basic operations 2 -...
TRANSCRIPT

2 Basic Operations
Accessing Functions .............................................................................. 2-2Using Toolbar...............................................................................................2-2Using Widgets (Japanese) .............................................................................2-2Using Main Menu.........................................................................................2-3Using Favorite Menu ....................................................................................2-4Built-in Stand ...............................................................................................2-4Using Shortcut Keys .....................................................................................2-4
Incoming Settings.................................................................................. 2-5Changing Volume ........................................................................................2-5Changing Ringtone ......................................................................................2-5Setting Vibration ..........................................................................................2-5
Standby Display Options ....................................................................... 2-6Wallpaper ....................................................................................................2-6Slide Show ...................................................................................................2-6
Widgets (Japanese) ............................................................................... 2-7Window Operations .....................................................................................2-7
Text Entry .............................................................................................. 2-8Text Entry Window .......................................................................................2-8Text Entry Flow ............................................................................................2-9Changing Entry Methods ..............................................................................2-9Changing Entry Mode...................................................................................2-9Kana/Kanji .................................................................................................2-10Katakana/Alphabet/Number .......................................................................2-11Symbol .......................................................................................................2-11Pictograms/Emoticons ................................................................................2-11Line Break ..................................................................................................2-12Entering Space ...........................................................................................2-12Hangul .......................................................................................................2-13Using Quick Address List ...........................................................................2-13Deleting/Editing .........................................................................................2-13
User's Dictionary (Japanese) ............................................................... 2-14Editing User's Dictionary .............................................................................2-14Saving to User's Dictionary .........................................................................2-14
Phone Book ......................................................................................... 2-15Phone Book Window ..................................................................................2-15Creating New Entries .................................................................................2-15Entry Search ...............................................................................................2-16Calling from Phone Book ............................................................................2-17Deleting Phone Book Entries.......................................................................2-17
Advanced Settings ............................................................................... 2-18Standby .....................................................................................................2-18Text Entry...................................................................................................2-18User's Dictionary ........................................................................................2-19Phone Book ...............................................................................................2-19

Basic Operations
2-2
2
Accessing Functions
Use these methods to access handset applications: ・Toolbar・Widgets・Main Menu・Favorites Menu・ShortcutKeys・Built-in stand
Using Toolbar
Tap Phone, Messaging, Yahoo! or Menu in Standby. Frequently used functions/settings (e.g., Select or Save) appear in Toolbar. Items and numbers vary by menu or function.Tap an item in Toolbar to execute it.
Toolbar
Using Widgets (Japanese)
Tap Widget Bar or Standby Widgets to select functions or use them in Standby.Choose from four styles for widget appearance; set different widget layouts for each.See "Adding to Standby Display" (fP.9-14) for details.
Standby Widgets (default)
Default: The following widgets appear in Standby.
Package/Widget Function
A Package
お父さんウィジェット (fP.9-12)
twinavi (fP.9-12)
Twitter ウィジェット (fP.9-12)
S! Quick News (fP.9-16)
B Package
TweetMe (fP.9-12)
ツイッターおまとめサイト (fP.9-12)
Facebook (fP.9-13)
YouTube (fP.8-8)
C Package
mixi (fP.9-12)
モバゲー TOWN (fP.9-13)
ニコニコウィジェット (fP.9-13)
マイスペース (fP.9-13)

Basic Operations
2-3
2
Package/Widget Function
D Package
pixiv (fP.9-12)
kikimimi (fP.9-12)
Ameba (fP.9-12)
美人時計 (fP.9-12)
Using Main Menu
a In Standby, tap Menu
Main Menu
b Tap an item
c Repeat b to select function
・ Press c to return to the previous operation step.・ Press y to exit menu. Handset returns to
Standby. If multiple functions are active, active window appears.・ Press y to cancel menu. Handset returns to
Standby or previous window. In some menus, a confirmationappears.・ If menu title is too long to view, hold menu to
show whole menu title. Change text scroll speed (fP.14-4).
Example: Selecting WallpapersSettings → Display settings → Wallpapers
Tap Settings Tap DisplaySettings
Tap Wallpapers Wallpaper MenuAppears

Basic Operations
2-4
2
Using Favorite Menu
Swipe screen upward to open Favorite Menu. In Favorite Menu screen, tap shortcut icons to activate functions.
・ For details, see "Using Favorites" (fP.3-5)/"Sending messages" (fP.3-5).
Adding Shortcut Icon
a In Standby, swipe screen upward
b Tap Add → Tap menu item → Check items → Tap Add
Removing Shortcut Icon
a In Standby, swipe screen upward
b Tap Remove → Check items → Tap Remove
Built-in Stand
Open Built-in stand to automatically access assigned functions (complete setup beforehand).
a Tap Menu → Settings → Phone settings → Auto activation settings
b Photo movie/Music player/Movie player/Sub camera/TV/TV player/Yahoo! Keitai/PC site browser/Off
knaBtfoS
Using Shortcut Keys
In Standby, use the following keys to access functions.
Key Menu/Function
t Open Call Log (outgoing)
t
(1 + seconds) Dial
c
(1 + seconds) Open Recordings list
l Activate/Cancel Key Lock
m Select Manner mode
m (1 + seconds) Toggle Manner mode On/Off
n / b Adjust Earpiece volume
n (2 + seconds) Activating Dummy Call (set by Side Key (down)
b (2 + seconds) Activate Wi-Fi
k
(2 + seconds) Activate Camera/Video Camera
Basic Operations
2-5
2
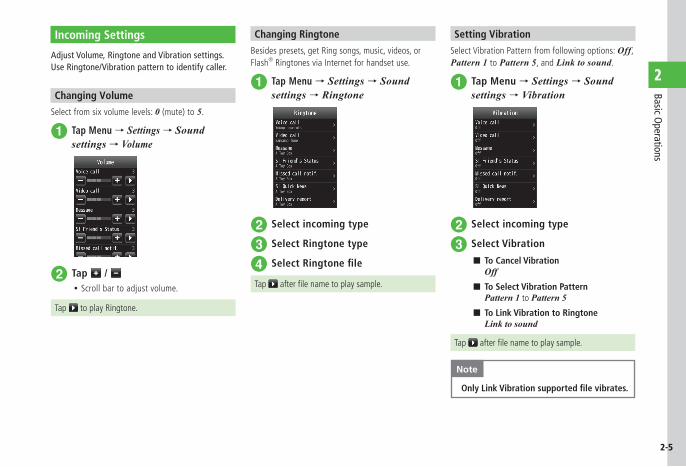
Incoming Settings
AdjustVolume,RingtoneandVibrationsettings.Use Ringtone/Vibration pattern to identify caller.
Changing Volume
Select from six volume levels: 0 (mute) to 5.
a Tap Menu → Settings → Sound settings → Volume
b Tap / ・ Scroll bar to adjust volume.
Tap to play Ringtone.
Changing Ringtone
Besides presets, get Ring songs, music, videos, or Flash® Ringtones via Internet for handset use.
a Tap Menu → Settings → Sound settings → Ringtone
b Select incoming type
c Select Ringtone type
d Select Ringtone file
Tap afterfilenametoplaysample.
Setting Vibration
Select Vibration Pattern from following options: Off, Pattern 1 to Pattern 5, and Link to sound.
a Tap Menu → Settings → Sound settings → Vibration
b Select incoming type
c Select Vibration
■ To Cancel VibrationOff
■ To Select Vibration PatternPattern 1 to Pattern 5
■ To Link Vibration to RingtoneLink to sound
Tap afterfilenametoplaysample.
Note
Only Link Vibration supported file vibrates.
Basic Operations
2-6
2
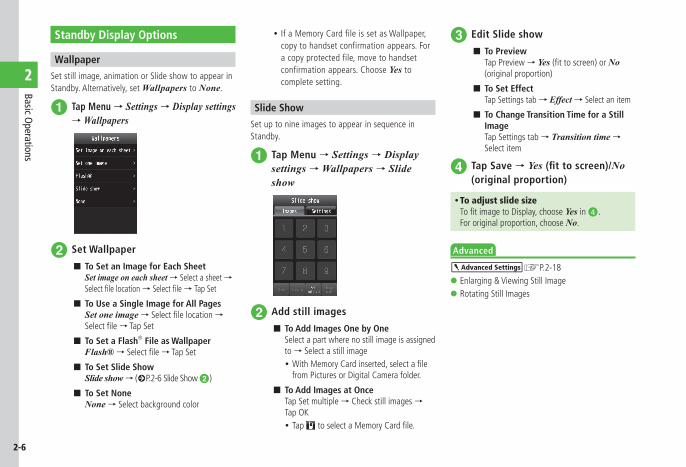
Standby Display Options
Wallpaper
Set still image, animation or Slide show to appear in Standby. Alternatively, set Wallpapers to None.
a Tap Menu → Settings → Display settings → Wallpapers
b Set Wallpaper
■ To Set an Image for Each SheetSet image on each sheet → Select a sheet → Selectfilelocation→ Selectfile→ Tap Set
■ To Use a Single Image for All PagesSet one image →Selectfilelocation→ Selectfile→ Tap Set
■ To Set a Flash® File as WallpaperFlash® →Selectfile→ Tap Set
■ To Set Slide ShowSlide show → (fP.2-6 Slide Show b)
■ To Set NoneNone → Select background color
・ If a Memory Card file is set as Wallpaper, copy to handset confirmation appears. For a copy protected file, move to handset confirmation appears. Choose Yes to complete setting.
Slide Show
Set up to nine images to appear in sequence in Standby.
a Tap Menu → Settings → Display settings → Wallpapers → Slide show
b Add still images
■ To Add Images One by OneSelect a part where no still image is assigned to → Select a still image・WithMemoryCardinserted,selectafile
from Pictures or Digital Camera folder.
■ To Add Images at OnceTap Set multiple → Check still images → Tap OK・Tap toselectaMemoryCardfile.
c Edit Slide show
■ To PreviewTap Preview → Yes(fittoscreen)orNo (original proportion)
■ To Set EffectTap Settings tab → Effect → Select an item
■ To Change Transition Time for a Still ImageTap Settings tab → Transition time → Select item
d Tap Save → Yes (fit to screen)/No (original proportion)
・ To adjust slide sizeTofitimagetoDisplay,chooseYes in d. For original proportion, choose No.
Advanced
brP.2-18 ● Enlarging & Viewing Still Image ● Rotating Still Images

Basic Operations
2-7
2
Widgets (Japanese)
Add various applications to Standby Display toaccess/activate information/functions quickly.
Preinstalled Widgets
・ Ameba・ HIS 世界一周旅行・ kikimimi・ mixi・ pixiv・ TweetMe・ twinavi・ Twitter ウィジェット・ お父さんウィジェット・ こえ部・ ウィジェットストア・ チケットぴあ・ ツイッターおまとめ
サイト・ 美人時計・ ニコニコウィジェット・ マイスペース・ モバゲー TOWN・ Analog clock
・ Digital clock・ Dual clock・ Calendar・ Task・ Alarm・ Memo (Yellow)・ Memo (Blue)・ Memo (Red)・ Countdown timer・ Light・ S! Information Channel・ S! Friend's Status・ S! Quick News・ Top3・ Mini player・ Wallpaper・ YouTube・ Facebook
・ Drag and drop widgets between Widget Bar and Standby Display.
Tap
Drag &Drop
Standby Widget Bar
Widget Appears inStandby
Window Operations
Widgets and Widget Menu appear in Widget Bar. Scroll Widget Bar for more widgets.Tap Widget list button to open Widget list.Tap Widget Menu to access following functions.
・ Widget Store (fP.9-13)
・ Widget list (fP.9-13)
・ Updating View (fP.9-13)
・ Yahoo! JAPAN log in (fP.9-22)
・ Settings (fP.14-21)
Widget Icon
Standby Widget
Widget Menu
Widget List Button
Widget Bar

Basic Operations
2-8
2
Text Entry
TaporwritetoenterKanji,Hiragana,Katakana(single-/double-byte),alphanumerics(single-/double-byte),symbols(single-/double-byte),pictograms,emoticonsorHangul.
Icon Entry Mode Icon Entry Mode
Kanji or Hiragana (fP.2-10)
Symbols (double-byte) (fP.2-11)
Hangul (fP.2-13) Symbols (single-byte) (fP.2-11)
Katakana (double-byte) (fP.2-11)
Pictograms (Common) (fP.2-11)
Katakana (single-byte) (fP.2-11)
Pictograms (All) (fP.2-11)
Alphanumerics (double-byte) (fP.2-11)
Emoticons (fP.2-11)
Alphanumerics (single-byte) (fP.2-11)
Alphanumerics (double-byte, lower case) (fP.2-11)
Number (double-byte) (fP.2-11)
Alphanumerics (single-byte, lower case) (fP.2-11)
Number (single-byte) (fP.2-11)
See "Changing Entry Mode" (fP.2-9) about toggling Entry mode.
Text Entry Window
Use Keypad or Handwriting to enter text.To toggle Entry mode, see "Changing Entry Methods" (fP.2-9).
Text Entry with Keypad
Tap Keypad.
Keypad
Function Keys
Current Entry Mode
Text Entry
Entered(bytes)/Available (bytes)
Text Entry with Handwriting
Enter characters directly into Handwriting window.
Function Keys
Handwriting Window
Text Entry
Suggestions Zoom In/Out
Suggestions
Handwriting
Entered (bytes)/Available (bytes)

Basic Operations
2-9
2
Suggestions
Text Entry Field
Suggestions*Japanese Kana ConversionAlternatives
*Suggestions do not appear in Katakana, Number, or Alphanumeric (double-byte) entry mode. If Prediction is set to Off in 漢かな input mode, suggestions appear when Convert or EngNumKana is tapped.
・ Only numbers can be entered in Date & Time or Alarm time. Number keys, appear.・ When Voice Call or Video Call arrives while
entering text, simply answer the call. When the call ends, text entry window returns. When Alarm is activated, end Alarm to return to text entry window.
Text Entry Flow
Select entry method → Select text entry mode → Enter text → Suggestion → Select suggestion.
Changing Entry Methods
Toggle Keypad/Handwriting. Status may limit entry method.
a In text entry window, tap More
b Settings
c Input mode
d Select text entry methods from Keypad or Handwriting・ Alternatively, hold → Keypad/
Handwriting.
Changing Entry Mode
Toggle text entry mode: Kanji, Hiragana, Katakana (single-/double-byte), Alphanumerics (single-/double-byte), Symbols (single-/double-byte), Pictograms, Emoticons or Hangul.
a In text entry window,
b Select entry mode
・ In text entry window, tap for / / / / . Tap / for Symbols, / for Pictograms, or for Emoticons.

Basic Operations
2-10
2
Kana/Kanji
Use predictive entry to convert and enter characters. Alternatively, directly convert entered hiragana. Katakana or pictograms may appear in Suggestions.Example: Enter 鈴木
Using Keypad
a Changing to Keypad (fP.2-9)
b → 漢かな
c Tap three times・ す is entered.
d ・ To enter same character continuously, tap
to move cursor to the right.
e Tap three times → ・ ず is entered.
f Tap twice
・ き is entered.
g Tap 鈴木
Using Handwriting
Enter text in Handwriting mode.
a Change to Handwriting (fP.2-9)
b → 漢かな
c In Handwriting field, enter す ,ず and き continuously
d Tap 鈴木
・ After entering hiragana, tap to add ゙or .゚・ After entering hiragana, tap to toggle case.・ Tap or press c to cancel a misentry.・ If you over-toggle character, press t / to
toggle in reverse.・TosetasHiragana,tapConfirm.・ If no suggestions appear, tap Convert → /
to change conversion range → Tap conversion alternatives → Repeat steps for other characters.・ If many suggestions appear, tap to expand
Suggestions. To restore default size, tap .
・ If conversion fails, try another reading. For multiple Kanji words, try converting characters separately.・ While suggestions appear, tap Convert for
conversion alternatives. While conversion alternatives appear, tap Predict to return to Suggestions.・ Kanji cannot be entered directly in Handwriting.・ In Handwriting mode, suggestions appear in Suggestionsfield.Ifacharacterismistakenlyconverted, select correction from Suggestions. Tap
to close Suggestions.・ In Handwriting mode, 漢かな entry, entering
anything other than Hiragana, yields most similar Hiragana.
Basic Operations
2-11
2
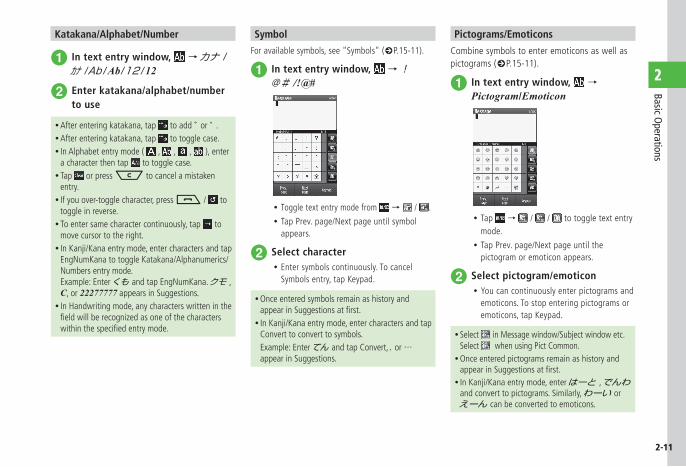
Katakana/Alphabet/Number
a In text entry window, → カナ /カナ /Ab/Ab/12/12
b Enter katakana/alphabet/number to use
・ After entering katakana, tap to add ゙or .゚・ After entering katakana, tap to toggle case.・ In Alphabet entry mode ( , , , ), enter
a character then tap to toggle case.・ Tap or press c to cancel a mistaken
entry.・ If you over-toggle character, press t / to
toggle in reverse.・ To enter same character continuously, tap to
move cursor to the right.・ In Kanji/Kana entry mode, enter characters and tap
EngNumKana to toggle Katakana/Alphanumerics/Numbers entry mode. Example: Enter くも and tap EngNumKana. クモ , C, or 22277777 appears in Suggestions.・ In Handwriting mode, any characters written in the fieldwillberecognizedasoneofthecharacterswithinthespecifiedentrymode.
Symbol
For available symbols, see "Symbols" (fP.15-11).
a In text entry window, → !@# /!@#
・ Toggle text entry mode from → / .
・ Tap Prev. page/Next page until symbol appears.
b Select character・ Enter symbols continuously. To cancel
Symbols entry, tap Keypad.
・ Once entered symbols remain as history and appearinSuggestionsatfirst.・ In Kanji/Kana entry mode, enter characters and tap
Convert to convert to symbols. Example: Enter てん and tap Convert, . or …
appear in Suggestions.
Pictograms/Emoticons
Combine symbols to enter emoticons as well as pictograms (fP.15-11).
a In text entry window, → Pictogram/Emoticon
・ Tap → / / to toggle text entry mode.
・ Tap Prev. page/Next page until the pictogram or emoticon appears.
b Select pictogram/emoticon・ You can continuously enter pictograms and
emoticons. To stop entering pictograms or emoticons, tap Keypad.
・ Select in Message window/Subject window etc. Select when using Pict Common.・ Once entered pictograms remain as history and appearinSuggestionsatfirst.・ In Kanji/Kana entry mode, enter はーと , でんわ
and convert to pictograms. Similarly, わーい or えーん can be converted to emoticons.

Basic Operations
2-12
2
Line Break
Use these steps to enter line break in any entry mode.
a In text entry window,
・ Line breaks cannot be inserted in some entry windows (e.g., Subject window in Messaging).
Entering Space
Entering space varies by Entry mode.
漢かな / カナ / カナ / Ab /Ab/ ハングル
D
a Tap ・ Tap Confirm to enter space.
Symbol (Full)/Symbol (Half)
aTap Prev. page/Next page and tap
・When Entry mode is Pictogram/Emoticon, toggle the above Entry mode and enter.・ When cursor is at the end of a sentence, entering
space with is also available.
・ Space cannot be inserted in some entry windows (e.g., Recipient window in Messaging).
Basic Operations
2-13
2
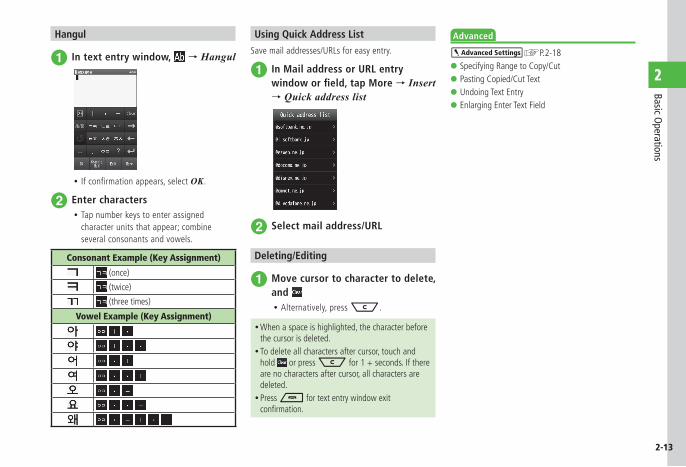
Hangul
a In text entry window, → Hangul
・ If confirmation appears, select OK.
b Enter characters・ Tap number keys to enter assigned
character units that appear; combine several consonants and vowels.
Consonant Example (Key Assignment)
(once)
(twice)
(three times)
Vowel Example (Key Assignment)
Using Quick Address List
Save mail addresses/URLs for easy entry.
a In Mail address or URL entry window or field, tap More → Insert → Quick address list
b Select mail address/URL
Deleting/Editing
a Move cursor to character to delete, and ・ Alternatively, press c.
・ When a space is highlighted, the character before the cursor is deleted.・ To delete all characters after cursor, touch and
hold or press c for 1 + seconds. If there are no characters after cursor, all characters are deleted.・ Press y for text entry window exit confirmation.
Advanced
brP.2-18 ● Specifying Range to Copy/Cut ● Pasting Copied/Cut Text ● Undoing Text Entry ● Enlarging Enter Text Field

Basic Operations
2-14
2
User's Dictionary (Japanese)
Save frequently used words/phrases of up to 40 characters; entries appear in Suggestions when Reading is entered.
Editing User's Dictionary
a Tap Menu → Settings → Phone settings → User's dictionary → Japanese dictionary/English dictionary → Tap Add new
b Tap Word field → Enter word or sentence
c Tap Reading field → Enter reading
d Tap Save
Saving to User's Dictionary
a In text entry window, tap More → Add to dictionary
b Tap the first character → Tap Start point
c Tap the last character → Tap End point
d Japanese dictionary/English dictionary
e Tap Reading field → Enter reading
f Tap Save
・ If selecting the range which includes a line break, character strings before the line break are saved.
Advanced
brP.2-19 ● Deleting Entries from User's Dictionary
s ● Edit User's Dictionary Entries (rP.14-3)

Basic Operations
2-15
2
Phone Book
Createupto1,000entries.Numberofsavableitemsper entry varies by USIM Card. Insert USIM Card into compatible SoftBank handsets to access USIM Card entries.
Note
・ Protect Important Information Phone Book entries may be lost/altered if
battery is removed or left uncharged for an extended period; accidents/malfunctions may also affect entries. Back up entries and store separately. SoftBank Mobile is not liable for damage from lost information.
Phone Book Window
Phone Book entries (fP.2-15) are divided into three tabs. Tap tabs to view desired information.
Each Phone Book tab contains items listed below:
Tab Item
Phone number 1
E-mail address 1
Group Homepage 1
Birthday Company
Blood type Job title
Address 1 Memo
Secret mode
Tone : Voice call
Tone : Video call
Tone : Message
Tone : S! Friend's Status
Vibe : Voice call
Vibe : Video call
Vibe : Message
Vibe : S! Friend's Status
Creating New Entries
Save new Phone Book entries to Phone or USIM Card.Default: Phone.Set save location to USIM Card as required (fP.14-8).Create new entry or save from Call Log record.
Saving Information as a New Entry
Create new entry; save name, reading, phone number, and mail address.
・ For other items, see "Adding Information to Phone Book Entry" (fP.2-19).
a Tap Phone → Phone book → Tap New entry・ If Save setting (fP.14-8) is set to Ask each
time, save location prompt appears. Select Phone or USIM.
New EntryItems
b Tap Name field
c Enter last name

Basic Operations
2-16
2
d Enter first name
e Confirm entry → Tap OK・ Edit readings as required.
f Tap Phone number field → Enter number → Tap Type field → Select phone type → Tap OK
g Tap E-mail address field → Enter mail address → Tap Type field → Select address type → Tap OK
h Tap Save
・ 0 through 9, #, *, -, P (pause), and + (International Code) can be registered for entering in the Phone numberfield.Tap to toggle *, - and P. Touch and hold to enter +.・IfaMemoryCardfileisselectedforincomingimageorRingtone,copyfiletohandsetconfirmationappears.Foracopyprotectedfile,movefiletohandsetfirstconfirmationappears.Choose Yes to complete setting.・ When using Samsung New PC Studio to
synchronize Phone Book entries with a PC, secret entries are not synchronized to PC. If an entry is changed to a secret entry, it can no longer be synchronized and is deleted from the PC. Samsung New PC Studio is available for download from SAMSUNG Website (http://jp.samsungmobile.com/pc/lineup/941download.html).
Saving Entries from Call Log Records
Save numbers in Call Log records to new or existing entries.
a t / Tap Phone and Call log
b Tap a record
c Tap Add to Phone Book・ If Save setting (fP.14-8) is set to Ask each
time, save location prompt appears. Select Phone or USIM.
d Select saving method
■ To Save as a New EntryNew → (fP.2-15 Creating New Entries b)
■ To Update Existing EntryUpdate → Search and select entry (fP.2-16) → Save a number to Phone Book (fP.2-15)
Entry Search
Use ABC/Group/Reading to search entries.
a Tap Phone → Phone book
Phone Book List
b Tap / / to switch to Search field (fP.2-21)
c Tap pulldown menu for search methods
Pulldown menu
d ABC/Group/Reading・ Selected search method is saved.
Basic Operations
2-17
2
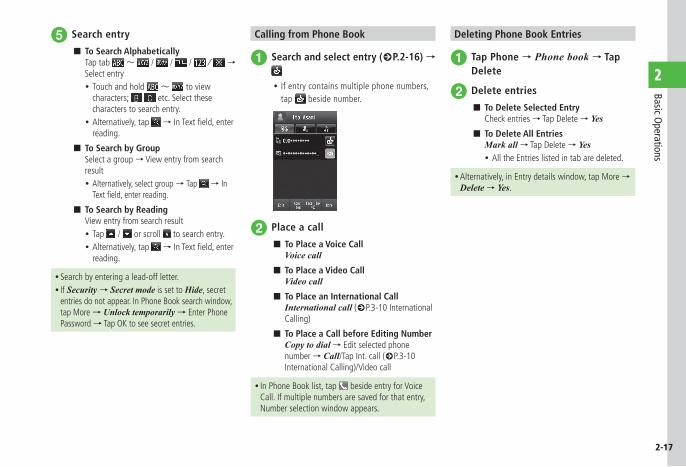
e Search entry
■ To Search AlphabeticallyTap tab ~ / / / / → Select entry・ Touch and hold ~ to view
characters; etc. Select these characters to search entry.
・ Alternatively, tap →InTextfield,enterreading.
■ To Search by GroupSelect a group → View entry from search result・ Alternatively, select group → Tap → In
Textfield,enterreading.
■ To Search by ReadingView entry from search result・ Tap / or scroll to search entry.・ Alternatively, tap →InTextfield,enter
reading.
・ Search by entering a lead-off letter.・ If Security → Secret mode is set to Hide, secret
entries do not appear. In Phone Book search window, tap More → Unlock temporarily → Enter Phone Password → Tap OK to see secret entries.
Calling from Phone Book
a Search and select entry (fP.2-16) →
・ If entry contains multiple phone numbers, tap beside number.
b Place a call
■ To Place a Voice CallVoice call
■ To Place a Video CallVideo call
■ To Place an International CallInternational call (fP.3-10 International Calling)
■ To Place a Call before Editing NumberCopy to dial → Edit selected phone number → Call/Tap Int. call (fP.3-10 International Calling)/Video call
・ In Phone Book list, tap beside entry for Voice Call. If multiple numbers are saved for that entry, Number selection window appears.
Deleting Phone Book Entries
a Tap Phone → Phone book → Tap Delete
b Delete entries
■ To Delete Selected EntryCheck entries → Tap Delete → Yes
■ To Delete All EntriesMark all → Tap Delete → Yes・ All the Entries listed in tab are deleted.
・ Alternatively, in Entry details window, tap More → Delete → Yes.
Basic Operations
2-18
2
Advanced
brP.2-19 ● Adding Information to Phone Book Entry ● Sending Phone Book Entry ● Specifying Saving Destination for Phone Book Entries
● Viewing USIM Card Service Number ● Temporarily Canceling Phone Book Secret Mode ● Editing Phone Book Entry ● Copying Item ● Saving Face Link to Phone Book Entry ● Adding Phone Book Entry to Favorites ● Adding S! Friend's Status Member from Phone Book ● Viewing S! Friend's Status ● Saving Entry to Data Folder ● Printing Phone Book Details via Bluetooth®
● Adding Groups ● Changing Group Settings
s ● Select Phone Book Save Location (rP.14-8) ● Change Phone Book Preference (Phone/USIM) (rP.14-8)
● Change Search Method (rP.14-8) ● Copy All Phone Book Entries & Save on Handset & USIM Card (rP.14-8)
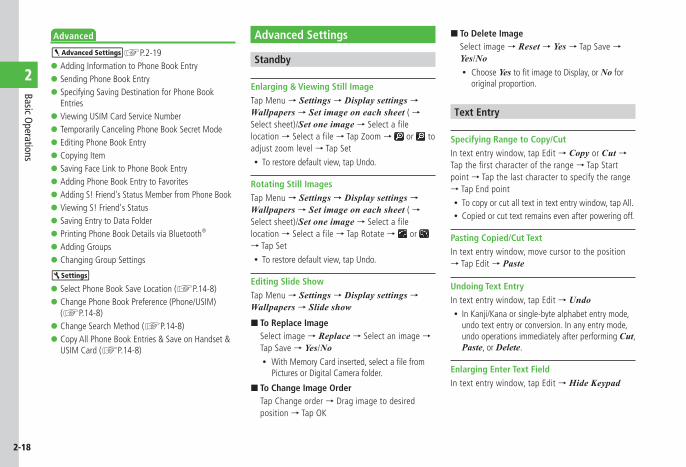
Advanced Settings
Standby
Enlarging & Viewing Still ImageTap Menu → Settings → Display settings → Wallpapers → Set image on each sheet ( → Select sheet)/Set one image → Select a file location → Select a file → Tap Zoom → or to adjust zoom level → Tap Set
・ To restore default view, tap Undo.
Rotating Still ImagesTap Menu → Settings → Display settings → Wallpapers → Set image on each sheet ( → Select sheet)/Set one image → Select a file location → Select a file → Tap Rotate → or → Tap Set
・ To restore default view, tap Undo.
Editing Slide ShowTap Menu → Settings → Display settings → Wallpapers → Slide show
■ To Replace ImageSelect image → Replace → Select an image → Tap Save → Yes/No・ WithMemoryCardinserted,selectafilefrom
Pictures or Digital Camera folder.
■ To Change Image OrderTap Change order → Drag image to desired position → Tap OK
■ To Delete ImageSelect image → Reset → Yes → Tap Save → Yes/No・ Choose YestofitimagetoDisplay,orNo for
original proportion.
Text Entry
Specifying Range to Copy/CutIn text entry window, tap Edit → Copy or Cut → Tap the first character of the range → Tap Start point → Tap the last character to specify the range → Tap End point
・ To copy or cut all text in text entry window, tap All.・ Copied or cut text remains even after powering off.
Pasting Copied/Cut TextIn text entry window, move cursor to the position → Tap Edit → Paste
Undoing Text EntryIn text entry window, tap Edit → Undo・ In Kanji/Kana or single-byte alphabet entry mode,
undo text entry or conversion. In any entry mode, undo operations immediately after performing Cut, Paste, or Delete.
Enlarging Enter Text FieldIn text entry window, tap Edit → Hide Keypad

Basic Operations
2-19
2
Setting Prediction, Learning, etc.In text entry window, tap More → Settings
■ To Activate/Cancel PredictionUnder Prediction, On or Off
■ To Activate/Cancel Learning FunctionUnder Learning, On or Off
■ To Activate/Cancel Auto CapitalizationAuto capitalization → On or Off
■ To Activate/Cancel Flexible SearchFlexible search → On or Off
■ To Reset Learning FunctionReset learning → Enter Phone Password → Tap OK → Yes
■ To Clear History for Pictograms/EmoticonsClear history → Yes
■ To Change Cursor SpeedAuto cursor → Off/Slow/Normal/Fast/Very fast
User's Dictionary
Deleting Entries from User's DictionaryTap Menu → Settings → Phone settings → User's dictionary → Japanese dictionary/English dictionary → Tap Delete → Check entries → Tap Delete → Yes・ If Mark all is selected, tap Delete → Enter Phone
Password → Tap OK → Yes.
Phone Book
Adding Information to Phone Book EntryTap Phone → Phone book → Tap New entry
■ To Save Group → Tap Group field → Select an item → Tap
Save
■ To Save Birthday → Tap Birthday field → Enter birthday
→ Tap Save
■ To Save Blood Type → Tap Blood type field → Select an item
→ Tap Save
■ To Save Address → Tap Address field → Tap Type field
→ Private/Business → Tap Zip code field → Enter zip code → Tap Country field → Enter country name → Tap Province field → Enter province name → Tap City field → Enter city name → Tap Street field → Enter street name → Tap Additional info field → Enter additional information → Tap OK → Tap Save
■ To Save URL → Tap Homepage field → Enter URL →
Tap Type field → Private/Business → Tap OK → Tap Save
■ To Save Company → Tap Company field → Enter company →
Tap Save
■ To Save Job Title → Tap Job title field → Enter job title →
Tap Save
■ To Save Memo → Tap Memo field → Enter text → Tap
Save
■ To Set Secret Mode → Under Secret mode, On or Off → Tap
Save
・ Items other than Group are unavailable in USIM Card Phone Book.

Basic Operations
2-20
2
Setting Incoming Image to Phone Book EntryTap Phone → Phone book → Tap New entry → Or Tap Phone → Phone book → Search entry (fP.2-16) → Tap Edit →
■ To Set from Saved Still ImagePictures → Select a file → Tap Save
・WithMemoryCardinserted,selectafilefromPictures or Digital Camera folder.
■ To Set CharacterCharacter icon → Select icon → Tap Save
■ To Set by Capturing Still ImageTake photo → Capture still image → Tap Save
■ To Cancel Set Incoming ImageOff → Tap Save
・ IfaMemoryCardfileissetasincomingimage,copyfiletohandsetfirstconfirmationappears.Iffileiscopyprotected,movefiletohandsetfirstconfirmationappears. Choose Yes to complete setting.
Setting Ringtone to Phone Book EntryTap Phone → Phone book → Tap New entry →
→ Tap Ringtone settings field Or Search entry (fP.2-16) → Tap Edit → → Tap Ringtone settings field
■ To Set Ringtone for Voice Call/Video CallTone: Voice call or Tone: Video call → Select a file location → Select a file → Tap Save
■ To Set Ringtone for Message/S! Friend's StatusTone: Message or Tone: S! Friend's Status → Ringtone → Select a file location → Select a file → Duration → Enter duration → Tap OK → Tap Save
・Whileselectingafile,tap toplaybackthefile.・ IfaMemoryCardfileissetasRingtone,copyfile
tohandsetfirstconfirmationappears.Iffileiscopyprotected,movefiletohandsetfirstconfirmationappears. Choose Yes to complete setting.
Setting Vibration to Phone Book EntryTap Phone → Phone book → Tap New entry →
→ Tap Vibration settings field Or Search entry (fP.2-16) → Tap Edit → → Tap Vibration settings field → Select Vibration pattern → Tap Save
・ While selecting a Vibration pattern, tap to check the pattern.
Creating Message from Phone Book EntryTap Phone → Phone book → Search and select entry (fP.2-16) → for recipient phone number or
for recipient address
■ Create message → S! Mail or SMS → (fP.4-4 S! Mail e, P.4-6 SMS e)
■ Create S! Mail message (fP.4-4 S! Mail e)
Opening Website from Phone Book EntryTap Phone → Phone book → Search and select entry with homepage saved (fP.2-16) → → beside homepage address to connect → Yes・ To browse website with PC Site Browser, tap PC
Site Browser.
Sending Phone Book EntryTap Phone → Phone book → Tap Send
■ To Send via MessageVia message → Check entries → Tap Send → (fP.4-4 S! Mail b)
■ To Send via Bluetooth®
Via Bluetooth → Check entries → Tap Send → (fP.13-7 Sending One Item at a Time b)
■ To Send via InfraredVia infrared → Check entries → Tap Send → (fP.13-5)
■ To Send via IC TransmissionVia IC transmission → Check entries → Tap Send → (fP.13-9)
・ In Entry details window, tap More → Send.
Copying Entries between Phone & USIMTap Phone → Phone book
■ To Copy Selected EntriesTap More → Copy to USIM or Copy to phone → Check entries → Tap Copy → Yes・ For both Phone and USIM Card entries, tap More
→ Copy each entry → Select entry → Yes.・ In Entry details window, tap More → Copy to
USIM or Copy to phone → Yes.

Basic Operations
2-21
2
・ If search method is Group, select group → Tap More → Copy to USIM or Copy to phone → Check entries → Tap Copy → Yes.
■ To Copy All Entries from Phone to USIM/USIM to PhoneTap More → Copy all → Phone to USIM/USIM to Phone → Yes
Specifying Saving Destination for Phone Book EntriesTap Phone → Phone book → Tap More → Save to → Phone/USIM/Ask each time
Viewing USIM Card Service NumberTap Phone → Phone book → Tap More → Service number・ The item Service number may not appear for
some USIM Cards.
Temporarily Canceling Phone Book Secret ModeTap Phone → Phone book → Tap More → Unlock temporarily → Enter Phone Password → Tap OK
・ If Security → Secret mode is set to Hide, numbers set as Secret mode - On appear temporarily in Phone Book.
Editing Phone Book EntryTap Phone → Phone book → Search and select entry (fP.2-16) → Tap Edit → (fP.2-15 Creating New Entries b)
・ To edit secret Phone Book entry, set Secret mode to Show.
Viewing S! Friend's StatusTap Phone → Phone book → Search and select entry (fP.2-16) → Tap More → View S! Friend's Status → Select a phone number
Saving Entry to Data FolderTap Phone → Phone book → Search and select entry (fP.2-16) → Tap More → Save to Data Folder → Phone/Memory card → Yes・ TosaveafiletoMemory card, insert Memory
Card.
Printing Phone Book Details via Bluetooth®
Tap Phone → Phone book → Search and select entry (fP.2-16) → Tap More → Print via Bluetooth → (fP.7-18 Printing via Bluetooth® e)
Toggling Phone Book View between USIM & PhoneTap Phone → Phone book → / / → Phone/USIM/Phone & USIM・ Change remains even if handset is powered off.
Entering & Saving Phone NumberTap Phone → Dial → Enter phone number → Add
■ To Save New EntryNew → (fP.2-15 Creating New Entries b)
■ To Update EntryUpdate → Search and select entry (fP.2-16) → Enter each item (fP.2-15)
・ Only name, reading, mail address, and group can be saved to USIM Card.
Copying ItemTap Phone → Phone book → Search and select entry (fP.2-16) → Tap Copy item → Select item
Saving Face Link to Phone Book EntryTap Phone → Phone book → Search and select entry (fP.2-16) → Tap Face link
■ To Save Face Link from a Saved Still ImageFace registration → Select from Image 1 to Image 5 → Pictures → Select file → Frame on Face
・ MemoryCardfilescannotbesetasFaceLink.■ To Save Face Link by Capturing a Still Image
Face registration → Select from Image 1 to Image 5 → Take photo → Capture still image
■ To Remove Face LinkThis person's photo → Tap Release → Check Face Link → Tap Release → Yes
Adding Phone Book Entry to FavoritesTap Phone → Phone book → Search and select entry (fP.2-16) → Tap More → Add to Favorites → Phone/Mail・ Alternatively, tap Phone → Favorites/In Standby,
swipe downward → Tap Add → Select entry.
Adding S! Friend's Status Member from Phone BookTap Phone → Phone book → Search and select entry (fP.2-16) → Tap More → Add to S! Friend's Status → Select a phone number → Yes
Basic Operations
2-22
2
Adding GroupsTap Phone → Phone book → Tap pulldown menu for search methods → Group → Tap Group setting → Add
■ To Set Incoming Image → Pictures/Character icon/Take photo/
Off → Set incoming image → Tap Save
・ With Memory Card inserted, Pictures/Digital camera is selectable.
・ If Character icon is selected, select icons.・ If Take photo is selected, capture a still image.・ If Off is selected, incoming image will not be
set.
■ To Set Group NamesTap Group name field → Enter group name → Tap Save
■ To Set Group IconTap Group icon field → Select icon → Tap Save
■ To Set Ringtone・ To set Ringtone for Voice Call or Video Call
Tone: Voice call/Tone: Video call → Select afilelocation→ Selectafile→ Tap Save
・ To set Ringtone for message or S! Friend's StatusTone: Message/Tone: S! Friends Status → Ringtone → Selectafilelocation→ Select a file→ Duration → Enter duration → Tap OK → Tap Save
■ To Set VibrationTap Vibe field → Select Vibration pattern → Tap Save
・ For USIM Card, only group name and group icon can be set.
・ Images and Ringtones set for individual entries take priority over Group setting.
Changing Group SettingsTap Phone → Phone book → Tap pulldown menu for search methods → Group → Tap Group setting → Edit → Select group → Edit each item the same way as items are added (fP.2-22).