basic plaster and splinting – upper limbs
TRANSCRIPT

Children’s Emergency Department, The Prince Charles Hospital
Basic Plaster and Splinting – Upper Limbs Resource Package

Basic Plaster and Splinting – Upper Limbs Printed versions are uncontrolled Page 1 of 21
Published by the State of Queensland (Metro North Hospital and Health Service), October 2017
This document is licensed under a Creative Commons Attribution 3.0 Australia licence. To view a copy of this licence, visit creativecommons.org/licenses/by/3.0/au
© State of Queensland (Metro North Hospital and Health Service) 2017
You are free to copy, communicate and adapt the work, as long as you attribute the State of Queensland (Metro North Hospital and Health Service).
For more information, contact:
Children’s Emergency Department, Metro North Hospital and Health Service, The Prince Charles Hospital, Rode Road, Chermside West QLD 4032, phone 07 3139 4000 for Children’s Emergency Department.
An electronic version of this document is available at https://sharepoint.health.qld.gov.au/mnhhs/tpch-ed/_layouts/15/start.aspx#/SitePages/Home.aspx
Disclaimer:
The content presented in this publication is distributed by the Queensland Government as an information source only. The State of Queensland makes no statements, representations or warranties about the accuracy, completeness or reliability of any information contained in this publication. The State of Queensland disclaims all responsibility and all liability (including without limitation for liability in negligence) for all expenses, losses, damages and costs you might incur as a result of the information being inaccurate or incomplete in any way, and for any reason reliance was placed on such information.
V 1.1 Effective: October 2017 Review: January 2018

Basic Plaster and Splinting – Upper Limbs Printed versions are uncontrolled Page 2 of 21
Contents
1. Introduction 3 2. Principles of fractures 4
2.1 Bones 4
2.2 Mechanism of injury 4
2.3 Fracture types 5
2.4 Fracture healing 7
3. Complications of plaster 9
3.1 Pressure ulcer and infection 9
3.2 Circulation and nerve impairment 9
3.3 Compartment syndrome 9
3.4 Thermal injury 10
3.5 Damage to cast 10
4. Forearm splints 11
4.1 Application instructions 11
5. Basic application of upper limb POP back slabs 13
5.1 Patient assessment 13
5.2 Radial / universal POP back slab 13
5.3 Scaphoid / thumb spica POP back slab 15
5.4 Above elbow POP back slab 17
6. Discharge education 19 7. Reference list 20

Basic Plaster and Splinting – Upper Limbs Printed versions are uncontrolled Page 3 of 21
1. Introduction Musculoskeletal injuries, e.g. fractures, requiring immobilisation by splints (e.g. forearm splint) or plaster (e.g. Plaster of Paris (POP) backslab) are a common cause of Children’s Emergency Department (CED) presentations. Fractured forearms (radius and/or ulna) account for approximately 1.9% of CED presentations.1 The American Academy of Orthopaedic Surgeons define a fracture as the disruption of the integrity of the bone.2 A well applied splint or POP backslab can provide safe and comfortable immobilisation of a fracture as part of the definitive management of an injury. The primary rationale for applying a splint or POP backslab is to stabilise the fracture, prevent further injury and to hold the limb in the normal anatomical position.3 It also assists in providing pain relief.3 A poorly or incorrectly applied splint or POP backslab can result in failure of immobilisation of injury resulting in ongoing pain and deformity, pressure injury of the skin, compartment syndrome, thermal injury or nerve palsy.4 The ability to properly apply a splint or POP back slab is a technical skill easily mastered with practice and an understanding of basic principles. During this learning package you will be learning the theoretical underpinnings required to safely apply the following splints and POP back slabs:
• Forearm splint • radial / universal POP backslab • scaphoid / thumb spica POP backslab • above elbow POP backslab.
Basic Plaster and Splinting – Upper Limbs Printed versions are uncontrolled Page 4 of 21
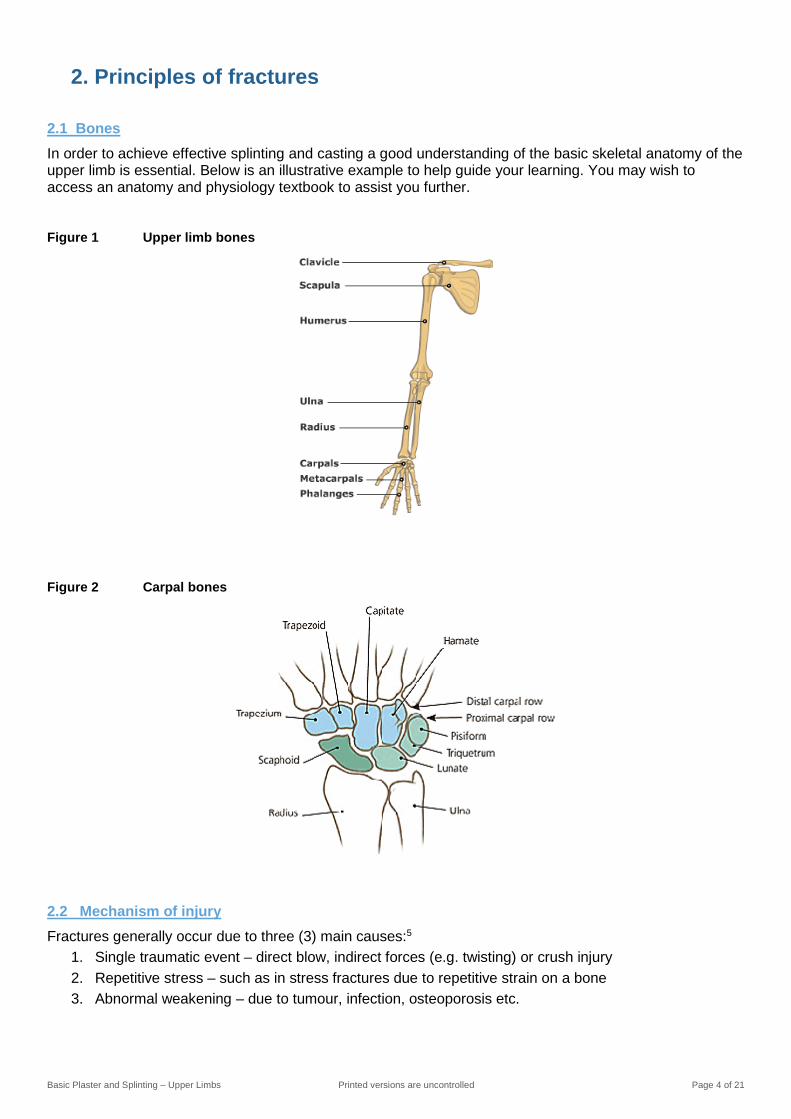
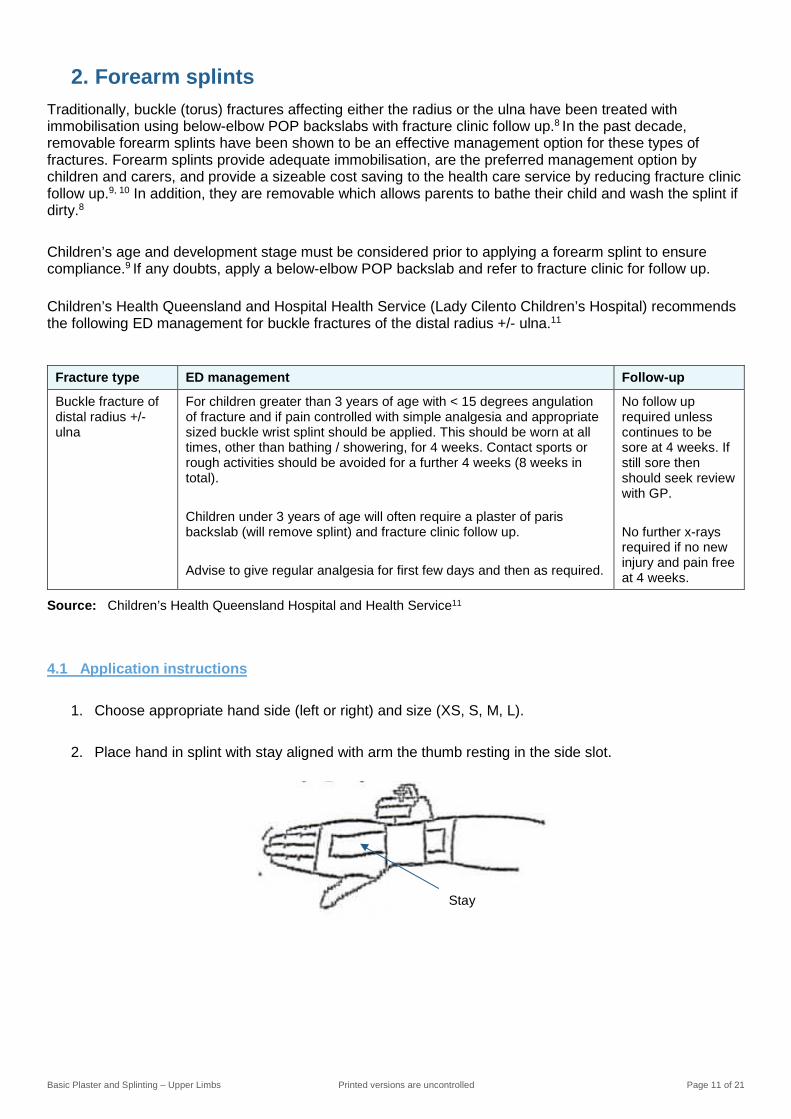
2. Principles of fractures 2.1 Bones In order to achieve effective splinting and casting a good understanding of the basic skeletal anatomy of the upper limb is essential. Below is an illustrative example to help guide your learning. You may wish to access an anatomy and physiology textbook to assist you further.
Figure 1 Upper limb bones
Figure 2 Carpal bones
2.2 Mechanism of injury Fractures generally occur due to three (3) main causes:5
1. Single traumatic event – direct blow, indirect forces (e.g. twisting) or crush injury 2. Repetitive stress – such as in stress fractures due to repetitive strain on a bone 3. Abnormal weakening – due to tumour, infection, osteoporosis etc.

Basic Plaster and Splinting – Upper Limbs Printed versions are uncontrolled Page 5 of 21
2.3 Fracture types
Avulsion A fracture that occurs
when a ligament or tendon pulls off a sliver of the bone.
Tearing / pulling force
Buckle (Torus) A paediatric fracture that
occurs at the diaphyseal-metaphyseal junction when the diaphyseal cortex is driven into the metaphysis.
Direct or indirect force
Comminuted Occurs when the bone is
fragmented into two or more pieces.
High emergency force
Compression / Crush An injury produced as a
result of continuous pressure applied to a part of the body, usually an extremity.
Compressive force —
Displaced A fracture that produces deformity of the limb.
—
Greenstick (incomplete fracture)
A fracture that disrupts only one side of the bone.
Any force
Impacted A fracture pattern in which
the fragments are pushed together, thus imparting some stability.
Compressive or direct force
Intra articular A fracture through the
joint. — —

Basic Plaster and Splinting – Upper Limbs Printed versions are uncontrolled Page 6 of 21
Oblique A fracture in which the fracture line crosses the bone diagonally.
Direct or indirect force
Pathological A fracture caused by a
normal load on abnormal bone, which is often weakened by tumour, infection, or metabolic bone disease.
Normal load —
Plastic Bowing without disruption of cortex
Direct or indirect force
Spiral A fracture caused by a
twisting force those results in a helical fracture line.
Twisting force
Salter Harris Classification system used
to categorise injuries to the growth plate (physis): • Type I – transverse
fracture through the physis without other injury.
• Type II – extends into the metaphysis.
• Type III – extends into the epiphysis.
• Type IV – involves the epiphysis, metaphysis and physis.
• Type V – compression of the epiphyseal plate.
— Refer to Figure 3
Transverse A fracture in which the fracture line is perpendicular to the shaft of the bone.
Direct or indirect force
Source: American Academy of Orthopaedic Surgeons2; Berkoff and Finnegan6; Royal Children’s Hospital, Melbourne7

Basic Plaster and Splinting – Upper Limbs Printed versions are uncontrolled Page 7 of 21
Figure 3 Salter Harris classification
2.4 Fracture healing
There are several phases of fracture healing that do not occur in isolation, rather each phase will overlap with another phase as progression of the healing process occurs. The normal phases of bone healing as well as the timeframes are outlined below.
Phase Description Length
Inflammatory phase
Broken bones result in torn blood vessels and the formation of a blood clot or haematoma. The inflammatory reaction results in the release of cytokines, growth factors and prostaglandins, all of which are important in healing. The fracture haematoma becomes organised and is then infiltrated by fibro vascular tissue, which forms a matrix for bone formation and primary callus.
hours to days
Reparative phase A thick mass of callus forms around the bone ends, from the fracture haematoma. Bone-forming cells are recruited from several sources to form new bone, which can be seen on radiographs within 7-10 days after injury. Soft callus is organised and remodelled into hard callus over several weeks. Soft callus is plastic and can easily deform or bend if the fracture is not adequately supported. Hard callus is weaker than normal bone but is better able to withstand external forces and equates to the stage of "clinical union", i.e. the fracture is not tender to palpation or with movement.
days to weeks
Remodelling phase This is the longest phase and may last for several years. During remodelling, the healed fracture and surrounding callus responds to activity, external forces, functional demands and growth. Bone (external callus) which is no longer needed is removed and the fracture site is smoothed and sculpted until it looks much more normal on an x-ray. The epiphyses gradually realign and residual angulation may be slowly corrected, in accordance with the rules of remodelling, outlined above.
months to years
Source: Royal Children’s Hospital, Melbourne7

Basic Plaster and Splinting – Upper Limbs Printed versions are uncontrolled Page 8 of 21
Further reading
1. Berkoff DJ, Finnegan BJ. Trauma: Principles of fracture management. In: Miller MD, Hart JA, MacKnigh JM. editors. Essential orthopaedics. Philadelphia: Elsevier; 2010. p. 58-62.
Reading 1

Basic Plaster and Splinting – Upper Limbs Printed versions are uncontrolled Page 9 of 21
3. Complications of plaster Patients may experience complications from wearing any cast (POP backslab, full cast). These have been outlined below.
3.1 Pressure ulcer and infection
Definition: Open wounds Signs and Symptoms: Fever; Localised pain; Burning sensation; Offensive smell.
Causes: Wounds or blisters not dressed appropriately; Uneven bandaging technique when applying the cast; Using fingers instead of palms when applying; Insufficient padding over bony areas; Cast being applied too tight or too loose; The edges of the cast not being finished correctly and pressing against the skin.
Treatment: Cut window in plaster to allow for inspection of area and dressings to be applied. Alternatively, the back slab or cast can be removed to allow for treatment of the ulcer or infection.
3.2 Circulation and nerve impairment
Definition: Inadequate blood flow and/or increased pressure on nerve. Signs and Symptoms: Pale/cyanosed skin; Cool/cold skin; Delayed capillary refill time; Report of pins
and needles, numbness or pain
Causes: Cast being applied too tightly; Uneven tension on the bandage when applied; Insufficient padding of the limb to allow for the expected swelling that will occur; Local pressure on an area which contains blood vessels and nerves close to the skin
Treatment: Elevation of limb.
3.3 Compartment syndrome
Definition: Increased pressure within a closed space that compromises blood flow and tissue perfusion and causes ischemia and potentially irreversible damage to the soft tissues within that space.4
Signs and Symptoms: Worsening pain, tingling, numbness, or any sign of vascular compromise such as severe swelling, delayed capillary refill, or dusky appearance of exposed extremities
Causes: Cast being applied too tightly; Bleeding or swelling from trauma. Treatment: Prompt removal of cast and fasciotomy.

Basic Plaster and Splinting – Upper Limbs Printed versions are uncontrolled Page 10 of 21
3.4 Thermal injury
Definition: Injury to skin caused by heat [generated when the POP is wet], with consideration to total body surface area involved and depth of burn.
Signs and Symptoms: Pain with complaint of plaster feeling hot; Erythema to epidermis; Blistered or raw skin.
Causes: Temperature of water used in application process. Cool water is advised. Treatment: Remove plaster; first aid for burns; manage burn as per local guideline.
3.5 Damage to cast
Definition: Cracking and denting to the plaster. Signs and Symptoms: As above. Causes: Uneven bandaging techniques; Insufficient padding; Incorrect sized cast;
Inappropriate care of cast by patient. Treatment: Consider reapplying.
Further reading
2. Bakody E. Orthopaedic plaster casting: nurse and patient education. Nurs Stand. 2009 Aug26-Sep 1; 23(51): 49-56.
Reading 2
Basic Plaster and Splinting – Upper Limbs Printed versions are uncontrolled Page 11 of 21
2. Forearm splints Traditionally, buckle (torus) fractures affecting either the radius or the ulna have been treated with immobilisation using below-elbow POP backslabs with fracture clinic follow up.8 In the past decade, removable forearm splints have been shown to be an effective management option for these types of fractures. Forearm splints provide adequate immobilisation, are the preferred management option by children and carers, and provide a sizeable cost saving to the health care service by reducing fracture clinic follow up.9, 10 In addition, they are removable which allows parents to bathe their child and wash the splint if dirty.8 Children’s age and development stage must be considered prior to applying a forearm splint to ensure compliance.9 If any doubts, apply a below-elbow POP backslab and refer to fracture clinic for follow up. Children’s Health Queensland and Hospital Health Service (Lady Cilento Children’s Hospital) recommends the following ED management for buckle fractures of the distal radius +/- ulna.11
Fracture type ED management Follow-up
Buckle fracture of distal radius +/- ulna
For children greater than 3 years of age with < 15 degrees angulation of fracture and if pain controlled with simple analgesia and appropriate sized buckle wrist splint should be applied. This should be worn at all times, other than bathing / showering, for 4 weeks. Contact sports or rough activities should be avoided for a further 4 weeks (8 weeks in total). Children under 3 years of age will often require a plaster of paris backslab (will remove splint) and fracture clinic follow up. Advise to give regular analgesia for first few days and then as required.
No follow up required unless continues to be sore at 4 weeks. If still sore then should seek review with GP. No further x-rays required if no new injury and pain free at 4 weeks.
Source: Children’s Health Queensland Hospital and Health Service11
4.1 Application instructions
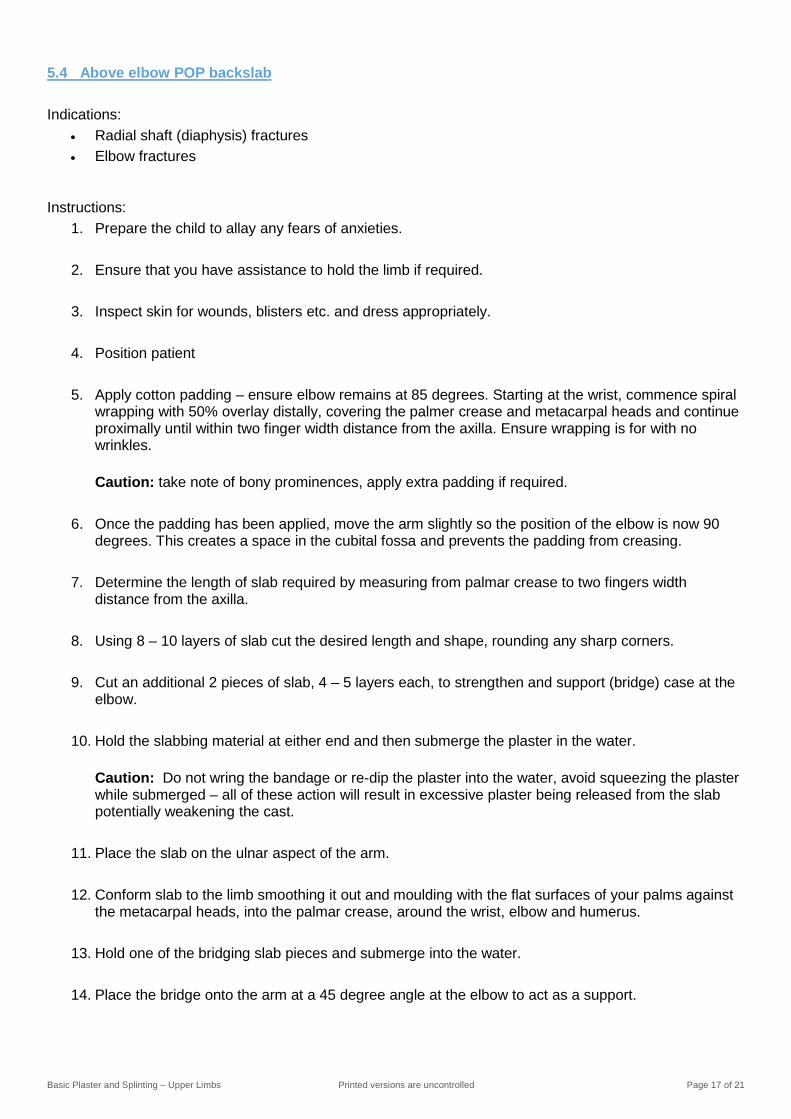
1. Choose appropriate hand side (left or right) and size (XS, S, M, L).
2. Place hand in splint with stay aligned with arm the thumb resting in the side slot.
Stay

Basic Plaster and Splinting – Upper Limbs Printed versions are uncontrolled Page 12 of 21
3. Attach straps while applying constant tension to elastic strap and wrist.
4. Cut excess strap.

Basic Plaster and Splinting – Upper Limbs Printed versions are uncontrolled Page 13 of 21
5. Basic application of upper limb plaster of paris backslab
5.1 Patient assessment Prior to applying a splint or POP backslab it is important to:6,12
• Assess pain which is essential for patient comfort and to aid in patient cooperation while applying the splint or POP backslab.
• Inspect skin integrity for the presence of pressure areas, wounds and blisters, dress appropriately.
• Assess vascular supply (peripheral pulses and neurovascular assessment) to the limb ensuring this is not compromised pre and post splint or POP backslab application.
If during the assessment the following are identified, the treating clinician must be notified immediately:
• Open wounds — injury to the skin around the fracture may appear innocuous, but if the base of the wound cannot be identified, the injury should be considered an open fracture until proven otherwise.12
• Neurovascular compromise.
5.2 Radial / Universal POP backslab Indications:
• Distal radius fracture • Distal radius / ulna styloid fracture • Carpal bone fractures • Proximal metacarpal fractures, excluding 1st metacarpal
Instructions:
1. Prepare the child to allay any fears of anxieties.
2. Ensure that you have assistance to hold the limb if required.
3. Inspect skin for wounds, blisters etc. and dress appropriately.
4. Position patient
5. Apply cotton padding – starting at the wrist, commence spiral wrapping with 50% overlay distally, covering the palmer crease and metacarpal heads and continue proximally until within two finger width distance of elbow crease. Ensure wrapping is for with no wrinkles. Caution: take note of bony prominences, apply extra padding if required.
6. Determine the length of slab required by measuring from the palmer crease to two digits width
distance from the elbow crease.
7. Using 8 – 10 layers of slab cut the desired length and shape including hole for thumb piece and round any sharp edges.

Basic Plaster and Splinting – Upper Limbs Printed versions are uncontrolled Page 14 of 21
8. Hold the slabbing material at either end and then submerge the plaster in the water. Caution: Do not wring the bandage or re-dip the plaster into the water, avoid squeezing the plaster while submerged – all of these action will result in excessive plaster being released from the slab potentially weakening the cast.
9. Place slab on the patient’s arm, exposing the thumb through the pre-cut hole, with ¾ of the slab on the dorsal aspect of the arm/wrist and the remaining ¼ on the volar side.
10. Conform slab to the limb by smoothing it out and moulding to the flat surfaces of your palms
ensuring there are no folds, finger marks or wrinkles in the material.
11. Turn back excess cotton padding.
12. Roll cotton padding over the slab whilst wet and secure this with a layer of bandage.
13. Assume “bikers handshake” position. Move wrist into functional position, 20-30 degree extension ensuring alignment of carpal and forearm bones.

Basic Plaster and Splinting – Upper Limbs Printed versions are uncontrolled Page 15 of 21
14. Check neurovascular observations and capillary refill after the backslab has dried to ensure there is no vascular compromise.
15. Ensure that clinical documentation is accurate and complete. 5.3 Scaphoid / thumb spica POP backslab Indications:
• Fractured scaphoid • Tendon repair thumb
Instructions:
1. Prepare the child to allay any fears of anxieties.
2. Ensure that you have assistance to hold the limb if required.
3. Inspect skin for wounds, blisters etc. and dress appropriately.
4. Position patient
5. Apply cotton padding – starting at the wrist, commence spiral wrapping with 50% overlay distally, covering the palmer crease and metacarpal heads and continue proximally until within two finger width distance of elbow crease. Ensure wrapping is for with no wrinkles. Caution: take note of bony prominences, apply extra padding if required.
6. Determine the length of slab required:
a. Scaphoid – measure from the interphalangeal joint of the thumb to two digits width distance from the elbow crease.
b. Thumb spica – measure from the base of the nail bed to two digits width distance from the elbow crease, restricting any movement of the interphalangeal joint.
7. Using 8 – 10 layers of slab cut the desired length and shape, rounding any sharp corners.

Basic Plaster and Splinting – Upper Limbs Printed versions are uncontrolled Page 16 of 21
8. Hold the slabbing material at either end and then submerge the plaster in the water. Caution: Do not wring the bandage or re-dip the plaster into the water, avoid squeezing the plaster while submerged – all of these action will result in excessive plaster being released from the slab potentially weakening the cast.
9. Place the slab on the medial (radial) aspect of the arm, ensuring that the distal phalanx is free.
10. Conform slab to the limb smoothing it out and moulding with the flat surfaces of your palms against
the metacarpals, the palmer surface and around the thumb.
11. Turn back excess cotton padding.
12. Roll cotton padding over the slab whilst wet and secure this with a layer of bandage.
13. Assume functional position of wrist as described previously and ask the patient to assume a “pinch grip” position
14. Check neurovascular observations and capillary refill after the backslab has dried to ensure there is no vascular compromise.
15. Ensure that clinical documentation is accurate and complete.
Basic Plaster and Splinting – Upper Limbs Printed versions are uncontrolled Page 17 of 21
5.4 Above elbow POP backslab Indications:
• Radial shaft (diaphysis) fractures • Elbow fractures
Instructions: 1. Prepare the child to allay any fears of anxieties.
2. Ensure that you have assistance to hold the limb if required.
3. Inspect skin for wounds, blisters etc. and dress appropriately.
4. Position patient
5. Apply cotton padding – ensure elbow remains at 85 degrees. Starting at the wrist, commence spiral wrapping with 50% overlay distally, covering the palmer crease and metacarpal heads and continue proximally until within two finger width distance from the axilla. Ensure wrapping is for with no wrinkles.
Caution: take note of bony prominences, apply extra padding if required.
6. Once the padding has been applied, move the arm slightly so the position of the elbow is now 90 degrees. This creates a space in the cubital fossa and prevents the padding from creasing.
7. Determine the length of slab required by measuring from palmar crease to two fingers width distance from the axilla.
8. Using 8 – 10 layers of slab cut the desired length and shape, rounding any sharp corners.
9. Cut an additional 2 pieces of slab, 4 – 5 layers each, to strengthen and support (bridge) case at the elbow.
10. Hold the slabbing material at either end and then submerge the plaster in the water.
Caution: Do not wring the bandage or re-dip the plaster into the water, avoid squeezing the plaster while submerged – all of these action will result in excessive plaster being released from the slab potentially weakening the cast.
11. Place the slab on the ulnar aspect of the arm.
12. Conform slab to the limb smoothing it out and moulding with the flat surfaces of your palms against
the metacarpal heads, into the palmar crease, around the wrist, elbow and humerus.
13. Hold one of the bridging slab pieces and submerge into the water.
14. Place the bridge onto the arm at a 45 degree angle at the elbow to act as a support.

Basic Plaster and Splinting – Upper Limbs Printed versions are uncontrolled Page 18 of 21
15. Repeat this step on the other side of the elbow.
16. Turn back excess cotton padding.
17. Roll cotton padding over the slab whilst wet and secure this with a layer of bandage.
18. Check neurovascular observations and capillary refill after the backslab has dried to ensure there is no vascular compromise.
19. Ensure that clinical documentation is accurate and complete.
Further reading
3. Beaman M, Beaman J. Plastering skill station. Brisbane (QLD): Queensland Rural Medical Support Agency; 2003. 80 p.
Reading 3
Source: Miles13
Basic Plaster and Splinting – Upper Limbs Printed versions are uncontrolled Page 19 of 21
6. Discharge education Educating patients about splint and POP backslab care is crucial. They should receive written and verbal information on the following:4,6
• elevation of the limb to decrease pain and swelling. • pain management. • monitoring for vascular compromise. • plaster or splint care. • use of sling and how to apply. • TPCH fracture clinic.
Time to follow-up and length of immobilisation varies depending on many things, including site, type and stability of the fracture and patient characteristics (e.g. age).4 For buckle fractures it is recommended the splint be worn for four weeks and GP follow up is only required is the arm remains sore after the splint is removed.14 Most POP backslabs require initial follow-up within one to two weeks after application, and most fracture guidelines estimate four to eight weeks for healing.4
Please familiarise yourself with the following patient handouts
4. TPCH CED handout – Information for carers of children with plasters and fractures
Reading 4
5. TPCH CED handout – Fracture clinic
Reading 5
6. Children’s Health Queensland handout – Buckle fractures
Reading 6

Basic Plaster and Splinting – Upper Limbs Printed versions are uncontrolled Page 20 of 21
7. Reference list 1. Acworth J, Babl F, Borland M, et al. Patterns of presentations to the Australian and New Zealand
Paediatric Emergency Research Network. Emerg Med Australas. 2009 Feb; 21(1): 59-66.
2. American Academy of Orthopaedic Surgeons. AAOS – Ortho info: Glossary [internet]. Place unknown: American Academy of Orthopaedic Surgeons; 2015 [cited 2017 Sep 19]. Available from: http://orthoinfo.aaos.org/glossary.cfm
3. Bakody E. Orthopaedic plaster casting: nurse and patient education. Nurs Stand. 2009 Aug26-Sep 1; 23(51): 49-56.
4. Boyd AS, Benjamin HJ, Asplund C. Principles of casting and splinting. Am Fam Physician. 2009 Jan 1; 79(1): 16-22.
5. Dandy DJ, Edwards DJ. Essential orthopaedics and trauma. 5th ed. Edinburgh: Elsevier; 2009. 99 p.
6. Berkoff DJ, Finnegan BJ. Trauma: Principles of fracture management. In: Miller MD, Hart JA, MacKnight JM. editors. Essential orthopaedics. Philadelphia: Elsevier; 2010. P. 58-62.
7. Royal Children’s Hospital, Melbourne. Fracture education [Internet]. Melbourne: Royal Children’s Hospital, Melbourne; 2017 [cited 29 September 2017]. Available from: https://www.rch.org.au/fracture-education/
8. Neal E. Comparison of splinting and casting in the management of torus fracture. Emerg Nurse. 2014 Feb; 21(9): 22-26.
9. Firman F, Crouch R. Splinting versus casting of “torus” fractures to the distal radius in the paediatric patient presenting at the emergency department (ED): A literature review. Int Emerg Nurs. 2009 July; 17(3): 173-178.
10. Jiang N, Cao Z, Ma Y, et al. Management of pediatric forearm torus fractures: A systematic review and meta-analysis. Pediatr Emerg Care. 2016 Nov; 32(11): 773-778.
11. Children’s Health Queensland Hospital and Health Service. Emergency management and discharge follow up for minor fractures [Internet]. Australia: Children’s Health Queensland Hospital and Health Service. 2017 [cited 2017 Oct 11]; CHQ-GDL-00721. Available from: http://qheps.health.qld.gov.au/childrenshealth/resources/guidelines/gdl-00721.pdf .
12. Simon RR, Sherman SC. Emergency orthopaedics. 6th ed. New York (NY): McGraw Hill; 2011. 600 p.
13. Miles S. Slabs for emergency applications – above elbow slabs. J Orthop Nurs. 2004 Nov; 8(4): 236-242.
14. Lady Cilento Children’s Hospital. Buckle fractures [brochure]. Brisbane (QLD): Children’s Health Queensland Hospital and Health Service; 2017 [cited 1 Oct 2017}. Available from: http://qheps.health.qld.gov.au/childrenshealth/docs/lcch/emergency/buckle%20fracture.pdf