basic surgical skills manual
DESCRIPTION
learning about surgeryTRANSCRIPT
BASIC SURGICAL SKILLS MANUAL
Principles and Applications
2nd Edition • Electronic Version
PHILIPPINE COLLEGE OF SURGEONS
• Committee on Surgical Training
Cenon R. Alfonso, MD - Committee Chairman
Miguel C. Mendoza, MD - Editor-in-Chief
Shirard L.C. Adiviso, MD, Jose Joey H. Bienvenida, MD,
and Renato Cirilo A. Ocampo, MD
Armando C. Crisostomo, MD - Regent-in-Charge.
PCS SCIENTIFIC PUBLICATION NO. 12

Foreword2nd Edition . . . Cenon R. Alfonso, MD, FPCS, Chairman
Committee on Surgical Training, Philippine College of Surgeons2003
Foreword1st Edition . . . Gabriel L. Martinez, MD, FPCS, Chairman,
Committee on Surgical Training, Philippine College of Surgeons1999
Message from the 2003 PCS PresidentFernando A. Lopez, MD, FPCS
Preface2nd Edition . . . Armando C. Crisostomo, MD, FPCS,
Regent-In-Charge (2003), Committee on Surgical Training,Philippine College of Surgeons
Preface1st Edition . . . Jose Y. Cueto, MD, FPCS, Regent-In-Charge
(1999), Committee on Surgical Training, Philippine College ofSurgeons
� Chapter ILearning & Assessing Psychomotor Skills inSurgeryJose Y. Cueto, Jr., MD, MHPEd, FPCS (1st edition)• Self-Assessment Questions
� Chapter IIThe Use of Simulation in Surgical TrainingShirard L.C. Adiviso, MD, MHPEd, FPCS• Self-assessment Questions
� Chapter IIISuture MaterialsJose Antonio M. Salud, MD, FPCS andJerome G. Baldonado, MD, FPCS (1st edition)Joey H. Bienvenida, MD, FPCS (2nd edition)• Self-assessment Questions
� Chapter IVSurgical NeedlesCenon R. Alfonso, MD, FPCS and
Nilo C. de los Santos, MD, FPCS (1st edition)
Renato A. Ocampo, MD, FPCS (2nd edition)
• Self-assessment Questions
Table of Contents
� Chapter V
Knot Tying
Jose Antonio M. Salud, MD, FPCS (1st edition)Miguel C. Mendoza, MD, FPCS (2nd edition)• Self-assessment Questions
� Chapter VISuturing Techniques
Cenon R. Alfonso, MD, FPCS,Shirard L.C. Adiviso, MD, MHPEd, FPCS,Jose Joey H. Bienvenida, MD, FPCS,Miguel C. Mendoza, MD, FPCS, andRenato Cirilo A. Ocampo, MD, FPCS (2nd edition)• Self-assessment Questions
� Chapter VIIClinical Applications
Cenon R. Alfonso, MD, FPCS,Jerome G. Baldonado, MD, FPCS,Alejandro C. Dizon, MD, FPCS,Rene C. Encarnacion, MD, FPCS,Eduardo S. Eseque, MD, FPCS,Gabriel L. Martinez, MD, FPCS,Paul Jesus S. Montemayor, MD, FPCS,Jose Antonio M. Salud, MD, FPCS, andJose A. Solomon, MD, FPCS.
• Plastic Closure of Skin Lacerations• Skin Closure with Skin Adhesives• Abdominal Wall Closure• Inguinal Herniorrhaphy/ Repair of the Inguinal
Floor• Appendectomy• Cholecystectomy & Surgery of the Bile Ducts• Liver Trauma• Bowel Anastomosis• Vascular Anastomosis & Repair• Application of Retention Sutures• Self-assessment Questions
Appendix A (Glossary of terms)
Appendix B (Answers to self-assessment questions)
2003 PCS Board of Regents
2003 Committee on Surgical Training
Acknowledgement
Even a full decade before the turn of the 21st
Century, the growing movement toward a paradigm
shift of surgical skills training has already begun. This
shift is from the operating-room-patient venue into the
surgical skills laboratory-simulation setting.
Because of this propensity, it will become unaccept-
able in the near future for young surgical trainees to be
allowed to “practice” and hone their basic surgical
techniques among patients in the operating room.
Furthermore, it may also come to a point that before
being allowed to do so, these trainees will be required
to pass a certification from a surgical skills laboratory.
This means that the essential principles of mastery in
psychomotor skills - repetition and feedback - have
been adequately satisfied. This likewise implies that the
trainee has progressed from being unconsciously
incompetent in surgical techniques as they started into
unconsciously competent as they ended (mastery) their
surgical skills training.
The hope is once the trainee is faced with an actual
Foreword• 2nd Edition
patient, basic surgical technique is almost second
nature.
The first step towards the above-mentioned goal is to
be able to experience an audiovisual simulation. This is
the importance of this CD version and Edition of the
Basic Surgical Skills Manual.
To all the members of the CST, Atong, Shirard, Joey,
and Ike, most specially to the Regent-in-Charge,
Armand, thank you and congratulations for all your
selfless efforts, contributions, and seemingly-endless
proddings.
An audiovisual simulation in basic surgical technique
Cenon R. Alfonso, MD, FPCS
Chairman,Committee on Surgical Training (2003)Philippine College of Surgeons

This manual was conceived in 1996 in answer to a
palpable need for a structured, problem-oriented
instructional tool for trainees and surgical practitioners.
In 1998, during the incumbency of Dr. Antonio B.
Sison, the Committee on Surgical Training (CST) through
its Chairman, Dr. Gabriel L. Martinez presented the
project proposal to the PCS Board of Regents. The
favorable action of the Board of Regents led to the
creation of the Sub-committee on Skills Improvement
under Dr. Jose Antonio M. Salud.
While diligently collecting and collating data from
the various makers of surgical needles and sutures for
inclusion in the Basic Surgical Skills manual, the CST
made representations with Johnson & Johnson Medical
Philippines through Mr. Bayani R. Santos, Jr. and Mr.
Erwin Tantoco who favorably endorsed the project.
In 1999, during the incumbency of Dr. Francisco Y.
Arcellana, the drafts of the Manual were presented to
the Board of Regents for comments and suggestions.
Once approval was obtained, the CST, and J & J
Foreword• 1st Edition
through its Franchise Manager, Ms. Ruth Nicolas,
engaged the services of Creative Powerhauz to publish
this manual.
As in any endeavor, there are unsung heroes whose
efforts were vital to the completion of this project: the
members of the 1998 and 1999 Committee on Surgical
Training, Regent-representative Dr. Jose Y. Cueto, Jr.,
contributors Drs. Nilo C. de los Santos and Paul Jesus S.
Montemayor. Special thanks to Dr. Elizabeth F.
Mabilangan-Salud and Ms. Olivia S.M. Manzano, CST
secretary.
Addressing need for problem-oriented instructional tool
Gabriel L. Martinez, MD, FPCS
Chairman,Committee on Surgical Training (1999)Philippine College of Surgeons

Clinical acumen, surgical knowledge and decision-
making, and the right attitude and motivation do not
make up a complete Surgeon.
These have to be adequately matched by a set of
fine psychomotor skills, i.e. mastery of technical compe-
tence. Training of young physicians into the Art and
Science of Surgery therefore requires not only intensive
education, but equally important, is the toning of every
muscle and discipline of each movement they create
during operations into a purposeful progress towards
the goal of every procedure they perform.
This aspect of surgical training essentially requires
two basic learning principles, namely: repetition and
feedback.
This feat of the Committee on Surgical Training is the
first step towards this end. A visual companion into the
world of Surgical Technique allows application of almost
all the senses in order to guide the young trainee in the
“HOW” of the procedures.
In the short term, the Board of Regents envisions this
project to serve as a guide to trainees. So that before a
Message from the 2003 PCS President
The backbone for all cutting specialties
certain technique is performed by simulation or in a
patient, the young trainee can view this first and then
play back for feedback.
In the long term however, this CD Edition of the
Basic Surgical Skills Manual will play as the backbone
of the National Surgical Skills Center (NSSC) that PCS
will establish for all cutting specialties.
In behalf of the Board of Regents, let me congratu-
late the Committee on Surgical Training for this project.
Allow me to extend a similar warm recognition to the
partner of PCS in this project, Johnson & Johnson
Medical Philippines.
Fernando L. Lopez, MDPresident 2003
Preface• 2nd Edition
Despite all the attention given to the development of
a strong basic theoretical foundation in surgery and the
enhancement of attitudinal competencies, the surgeons
of today continue to be judged mainly by the quality of
their technique in the performance of various surgical
procedures.
Major requirements for the accreditation of residency
training programs in surgery continue to highlight the
need for adequate operative experience in order to
ensure the competency of our trainees.
Despite the importance of the operative skill,
continuing education in this regard continues to be
wanting. Also, there is a need to standardize the
teaching of surgical technique to our students and
residents while appreciating some variation in individual
style.
With this in mind, the Surgical Training Committee of
the Philippine College of Surgeons has embarked on
this endeavor to further improve the initial landmark
publication of the Basic Surgical Skills Manual, this time
in electronic form.
Subsequently, we intend to pursue publication of the
Advanced Surgical Skills Manual, which highlights more
advanced techniques to include laparoscopic ap-
proaches.
Finally, we also plan to pursue the establishment of a
National Surgical Skills Center to be set up under the
auspices of the Philippine College of Surgeons.
All these efforts serve to demonstrate our sincere and
unwavering determination to attain our vision of being
the leading organization in uplifting the practice of
surgery in the country.
Uplifting the practice of surgery in the Philippines
Armando C. Crisostomo,
MD, MHPEd, FPCS
Regent-in-Charge (2003)Committee on Surgical TrainingPhilippine College of Surgeons
Preface• 1st Edition
As mandated by the Philippine College of Surgeons,
the PCS Committee on Surgical Training is primarily
concerned with the educational welfare of residents.
To fulfill this mandate, the project on the Surgical
Skills Improvement Program for residents was conceived.
In its original concept, there were two components:
1. Basic surgical skills (for junior residents)
• appropriate selection of needles and sutures
• suturing
• knot-tying
2. Advanced surgical skills (for senior residents)
• use of staplers and laparoscopy
• stapling techniques
• laparoscopic techniques
Why was this program envisioned? What resident
needs does it answer?
The training of young surgeons in these very basic
surgical skills started during their minor surgery sessions
in medical school. As students, they learned scrubbing,
preparation of the operative site, suturing and knot-tying.
In clinical clerkship and internship, they had opportu-
nities to perform in actual patient situations, suturing
different kinds of wounds, but many of them unsuper-
vised.
During residency, they assist numerous operations
and surgical procedures. Through constant exposure and
observation, residents get to absorb the practices, the
A foundation for learning basic surgical skills
habits and preferences of their senior residents and
consultants. As they progress to higher levels of training,
they indulge in their own series of trials and errors,
performing procedures in actual patients.
Conferences and audits have revealed the conse-
quences - leaks from repairs, blow-out of anastomoses,
disruption of abdominal closures and many others.
Undoubtedly, many of these complications are multifac-
torial, but a lot of them could be traced to deficiencies in
technical expertise.
This manual aims to provide a foundation for
learning the most basic surgical skills that all surgeons
need to master. These skills are very important compo-
nents of patient care. They are carried out regularly, in
the day-to-day activities of a surgeon. They must be
learned correctly and thoroughly because patient
outcomes are influenced by how well these skills are
performed.
Jose Y. Cueto, Jr., MD, MHPEd,
FPCSRegent-in-charge (1999)Committee on Surgical TrainingPhilippine College of Surgeons

I. Relevance and Importance
Surgeons who are involved in the training of residents are all
too familiar with complications that follow surgical procedures.
These are regularly presented in mortality-morbidity conferences
and include leaks from simple repairs, disruption of anasto-
moses, strictures and stenosis following tight suturing, partial and
complete dehiscence of abdominal wall closures and many
more.
These complications comprise the evidence of the importance
of psychomotor skills, specifically, operative skills. They constitute
a very critical part of day-to-day surgical patient care. While it is
true that most of them are multifactorial in origin, the most
important factor within the control of the surgeon is his technical
expertise. Patient outcomes are definitely influenced by how well
procedures are performed.
II. Theoretical Basis for Learning Skills
A. Fitt’s three-phase theory
Phase 1 Cognitive Phase
This phase involves the initial “intellectualization” process
necessary in learning a new task. Both the trainor and trainee try
to verbalize what needs to be learned. The trainee has to
understand the concepts and principles involved in the task
before any performance can be attempted. In surgery, the nature
of the technical skills, their indications, applications,
contraindications, complications or consequences are discussed.
In this phase, performances of trainees are prone to error.
There is, therefore, a need for the trainor to demonstrate how a
task should be accomplished.
Phase 2 Fixation or Associative Phase
This phase involves the development of correct pattern of
action and behavior. This is established thru practice with
regular feedback on the quality of performance. Incorrect
practices and steps are identified and rectified. There is gradual
elimination of error. This phase lasts a lot longer than the
cognitive phase.
Phase 3 Autonomous Phase
This phase is characterized by gradually improving speed and
accuracy of performance. The residents develop smoothness and
efficiency of movements, with minimal wasted moves, and
elimination of unnecessary steps.
During this phase, there is increasing resistance to stress and
Chapter I
Teaching and Assessing Psychomotor Skills in Surgery
Jose Y. Cueto, Jr., MD, MHPEd, FPCS
Objectives of this Chapter
After going through this chapter, the learner is expected to:
1. Understand the importance and relevance of learning and
assessing surgical skills
2. Discuss the theoretical bases for learning skills and their
educational implications
3. Formulate a system to evaluate skills

interference from other activities, and in fact, concurrent activities
may be performed.
These characteristics of performance are found in specialists
and experts, marked by a high level of proficiency.
III. Educational Implications
A. Need to recognize the phases of learning skills
To make the acquisition of psychomotor skills more effective,
the trainors should understand and apply the different phases of
learning. Each resident presents with his/her own level of
knowledge and competence with regard to a particular skill. The
trainor must be able to bring the residents through the different
phases of learning.
An educational activity that addresses the cognitive phase of
skills learning is the pre-operative conference. Residents go
through details in a procedure and verbalize the steps in a
particular operation and how complications are to be avoided.
Another very important activity is the operative assist. Operations
that residents assist in are actually considered “demonstrations”
by consultants and senior residents. Needless to say, the residents
must be exposed to the correct way of performing different
operations and techniques.
The skills that residents learn take years to refine, and are
finally incorporated into the autonomous phase of behavior.
Once habits become part of autonomous behavior, it becomes
very difficult to unlearn them.
B. Need for focus and clarity
In order that lower level residents know what needs to be
learned, complex tasks must be broken down into sub-tasks. The
residents focus first on learning the simpler sub-tasks before
graduating to complex tasks. Ideally, these skills should be
learned in the laboratory using simulations, using inexpensive
materials or animals. What needs to be learned, how they are to
be learned, and how they are to be assessed become clear to the
residents.
C. Need for structure
The old method of “see one, do one” has long been proven
to be inadequate and even dangerous. Repeatedly assisting
procedures and operations do not automatically mean that
trainees will absorb only the good practices of their seniors and
superiors. In order to obtain the required level of proficiency in
surgical skills, a structured method of teaching and assessment is
needed.
Supplementary workshops that include multi-station, hands-
on and interactive format will be of great help. The residents
rotate through different stations learning about needles, sutures
and how to select and use them depending on the clinical
situation. Group discussions then follow in order to recapitulate
and emphasize the important factors in selection, principles
governing their use, and the correct steps that should be fol-
lowed.
D. Need for guidance, supervision and feedback
It is during the fixation or associative phase where residents
develop their own pattern of action and behavior. They are
exposed to different consultants and senior residents who have
their own way of performing different techniques. The residents
should be able to determine and decide which steps and tech-
niques they should adopt, and which ones to reject and avoid.
When residents in lower years are allowed to acquire “bad
habits” and incorporate them into their practice, it becomes very
difficult for them to unlearn these habits when they reach their
senior years. There must, therefore, be adequate guidance and
supervision. In addition, timely feedback should be given
regarding what needs to be corrected and how they are to be
corrected. In this way, only the proper steps are incorporated
into the autonomous phase of skills acquisition.
E. Need for simulation and practice
Before residents are allowed to operate and perform proce-
dures on actual patients, they should be given opportunities for
simulations. This allows the trainor to make sure that the trainee
has mastered the steps in a certain procedure.
During simulation and practice, the deficiencies and errors of
the residents should already be determined and corrected. This is
to make surgical training safe, and avoid unnecessary complica-
tions that may arise from operations and procedures done
incorrectly.
IV. Assessing Psychomotor Skills
A. Direct observation with the use of checklists and rating
scales
This is the most valid method of assessing how trainees
perform. However, this is time-consuming because it requires the
presence of trainors all throughout the procedure. This method is
process-oriented and assumes that the resident follows the details
described in the cognitive phase. The consultant or supervisor
assesses how residents select needles and sutures, particularly in
the way they are handled.
B. Product evaluation
This is done by inspecting a finished product or a completed
task. For example, an anastomosis is inspected by the trainor
before the abdomen is closed. This can be reserved for higher
level trainees who have already demonstrated mastery of the
process.
C. Record review
For audit purposes, the record of procedures and operations
are meticulously examined. The materials used (needles and
sutures), the steps and their sequences and the over-all operative
management are assessed. These are all correlated with the
outcomes, such as the presence/absence of complications.
However, this method relies heavily on the accuracy and com-
pleteness of the operative records.
D. Objective Structured Clinical or Practical Exam (OSCE or OSPE)
This method utilizes a number of stations where skills are
tested. Skills such as suturing fascia, muscle, skin, intestine and
blood vessels are evaluated. Every station has a rater who
observes the trainee. With the use of objective checklists and
rating scales, the performance is determined to be satisfactory or
unsatisfactory. The results are then fed back to the trainees for
them to know where they need to improve on.
The use of structured clinical or practical exams ascertain that
all residents go through the same stations and the same tasks.
This is very difficult to attain in real clinical situations where cases
differ in degree of difficulty. Even similar cases of appendicitis
present with varying technical difficulties depending on patient
habitus, position of the appendix, etc.
REFERENCES
Abbatt F and McMahon R. Teaching Health Care Workers: A Practical Guide;Macmillan Education, London, 1988
Bouhuijs P, et al. The OSCE as a part of a Systematic Skills Training Approach,Medical Teacher, Vol. 9, No. 2, 1987
Crosby J. Learning in Small Groups, Medical Teacher, Vol. 18, No. 3, 1996
Harden RM, et al. Task-based learning: an educational strategy for undergraduate,postgraduate and continuing medical education, Part I, Medical Teacher, Vol. 18,
No. 1, 1996
Morgan M and Irby D. Evaluating Clinical Competence in the Health Profession;
C.V. Mosby, Co., St. Louis, 1978
Patrick J. Training: Research and Practice; Academic Press, San Diego, CA, 1992
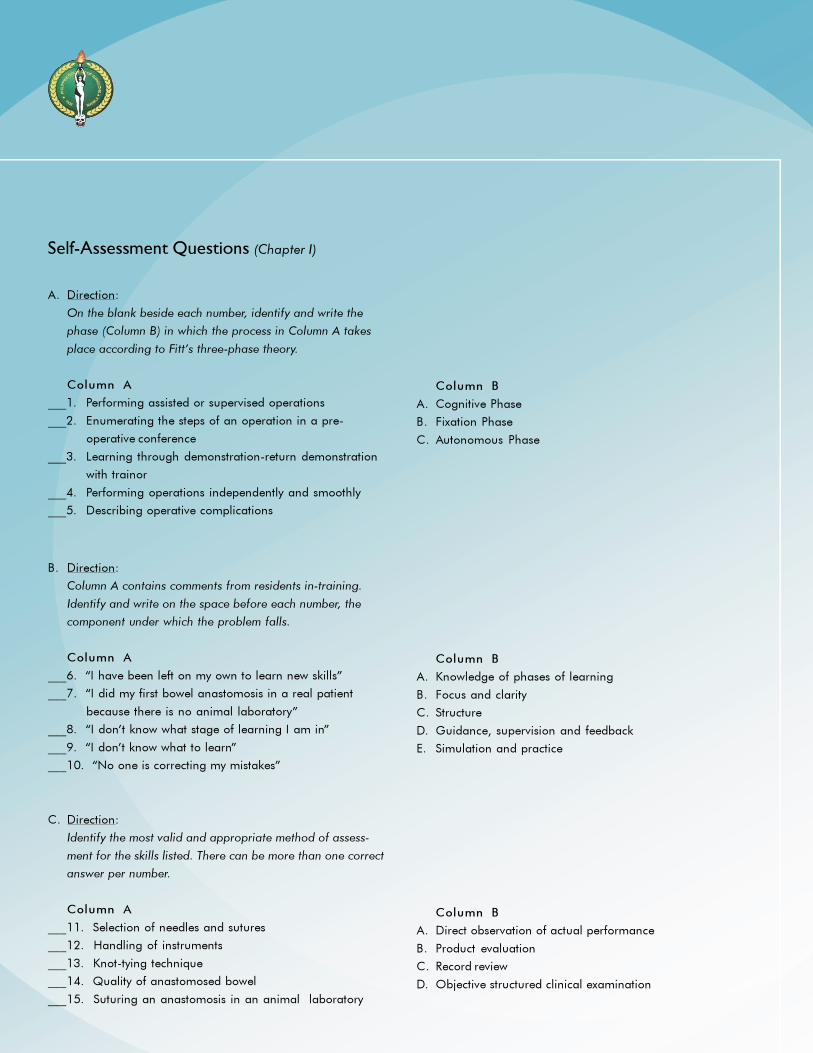
A. Direction:
On the blank beside each number, identify and write the
phase (Column B) in which the process in Column A takes
place according to Fitt’s three-phase theory.
Column A
___1. Performing assisted or supervised operations
___2. Enumerating the steps of an operation in a pre-
operative conference
___3. Learning through demonstration-return demonstration
with trainor
___4. Performing operations independently and smoothly
___5. Describing operative complications
Self-Assessment Questions (Chapter I)
Column B
A. Cognitive Phase
B. Fixation Phase
C. Autonomous Phase
B. Direction:
Column A contains comments from residents in-training.
Identify and write on the space before each number, the
component under which the problem falls.
Column A
___6. “I have been left on my own to learn new skills”
___7. “I did my first bowel anastomosis in a real patient
because there is no animal laboratory”
___8. “I don’t know what stage of learning I am in”
___9. “I don’t know what to learn”
___10. “No one is correcting my mistakes”
Column B
A. Knowledge of phases of learning
B. Focus and clarity
C. Structure
D. Guidance, supervision and feedback
E. Simulation and practice
C. Direction:
Identify the most valid and appropriate method of assess-
ment for the skills listed. There can be more than one correct
answer per number.
Column A
___11. Selection of needles and sutures
___12. Handling of instruments
___13. Knot-tying technique
___14. Quality of anastomosed bowel
___15. Suturing an anastomosis in an animal laboratory
Column B
A. Direct observation of actual performance
B. Product evaluation
C. Record review
D. Objective structured clinical examination
Chapter II
The Use of Simulation in Surgical Training
Shirard L.C. Adiviso, MD, MHPEd, FPCS
All surgical trainees need a core of basic surgical skills
regardless of their specialties. This requires continuous deliber-
ate practice to master it and should start early in their training.
The trainors have an important role in making this possible.
They should describe, demonstrate and arrange practice
sessions in teaching these skills.
During the last several years, medical education has swayed
away from traditional method of apprenticeship. Most of the
surgical skills were previously mastered initially with real patients
but is now transferred in “vitro” or simulated venue.
Professional and public concerns in surgical simulation has
been initiated by almost identical situation with the airline
industry with its desirable reputation for safety and its commit-
ment to lifelong training. Actual patient based learning is an
important part of advanced surgical training but acquiring
technical skills in a venue where patient safety is not at risk is
now inevitable.
Simulation (using physical models, computer program or
combination of two) provide the opportunity to achieve and
evaluate skills through repeated practice within a safe and
controlled environment.
Advantages of Simulation
1. The training design can be formulated based on the
needs of the learner and not the patient.
2. Since the venue is safe and controlled, learners are
allowed to fail and learn from such failures in a way that is
unacceptable in a true clinical scenario.
3. Simulators can offer objective evidence of performance
using their inherent tracking functions to map learner’s trajectory
in detail. Assessment forms are developed for both formative
and summative evaluations.
4. The capacity of the simulators to provide ready feedback
in digital form offers collaboration in learning.
Classification of Simulations
1. Model Based Simulation – a range of relatively inexpen-
sive models or animals are available. Basic procedural skills are
taught from simple intravenous insertion to wound suturing. The
benchtop models are limited in terms of feedback. This requires
comprehensive support from expert mentors.
Objectives of this chapter
After going through this chapter, the learner is expected to:
1. Understand the role of simulation in surgical training.
2. Conduct teaching and learning activities in basic and
advanced surgical skills using simulation.
A Simple Taxonomy of Simulators (Medical Education, 2003)
SKILL MANUAL REQUIREMENT EXAMPLES
Precision Placement Direct needle Intravenous needle insertion
Instrument to a point Lumbar puncture
Simple Manipulation Guide a catheter Angioplasty
Endoscope Colonoscopy
Ultrasound probe Bronchoscopy
Abdominal ultrasound
Complex Manipulation Perform single complex task Bowel/ vascular
anastomosis , MIST-VR,
Lap Sim
Integrated Procedure Perform multiple task of Laparoscopy procedure
entire procedure Anesthesia simulation
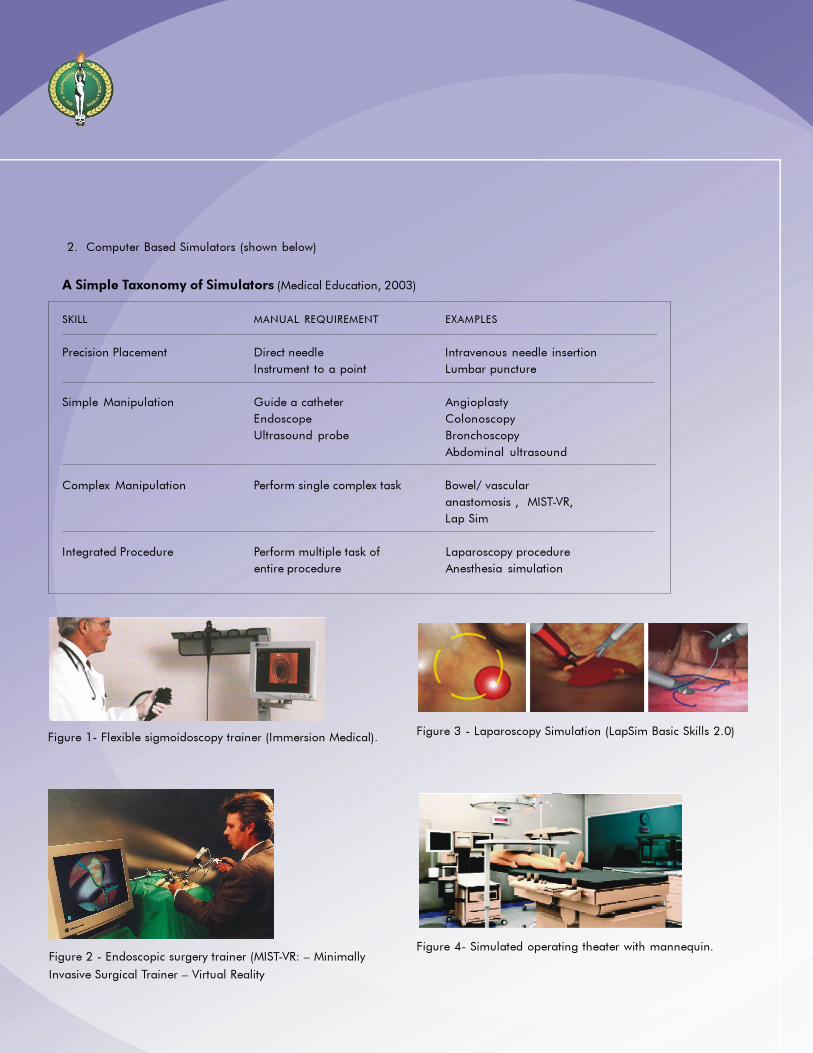
Figure 1- Flexible sigmoidoscopy trainer (Immersion Medical).
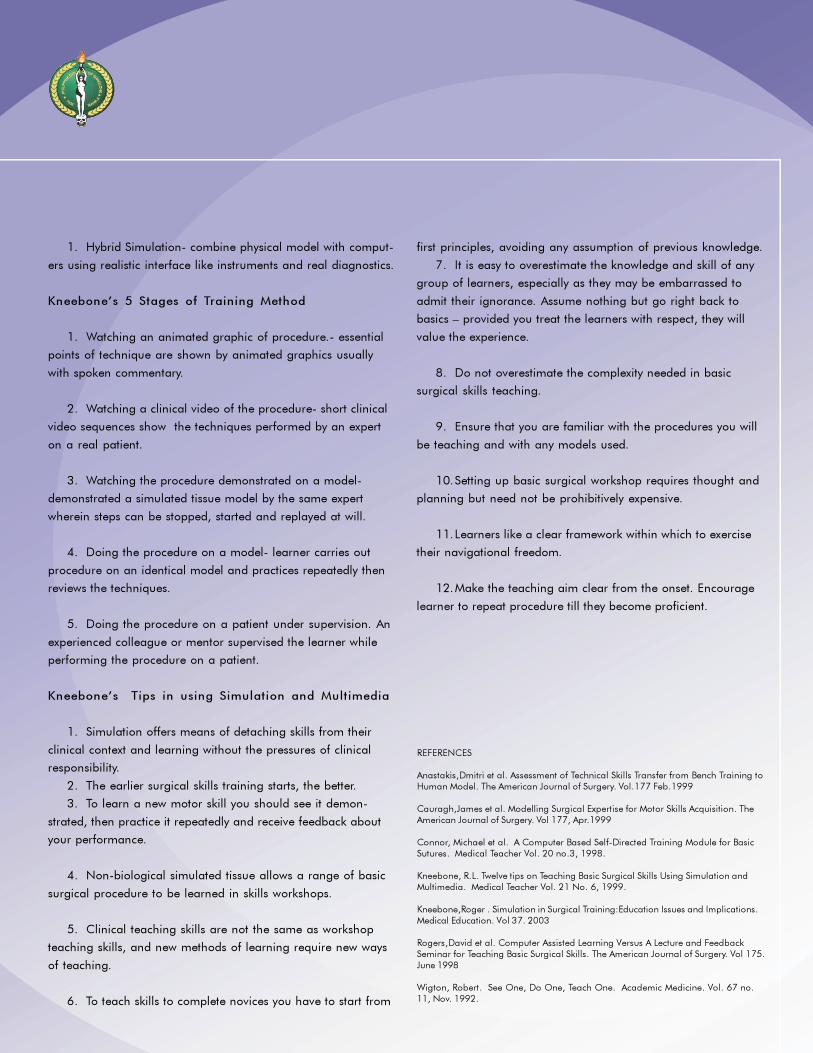
Figure 2 - Endoscopic surgery trainer (MIST-VR: – Minimally
Invasive Surgical Trainer – Virtual Reality
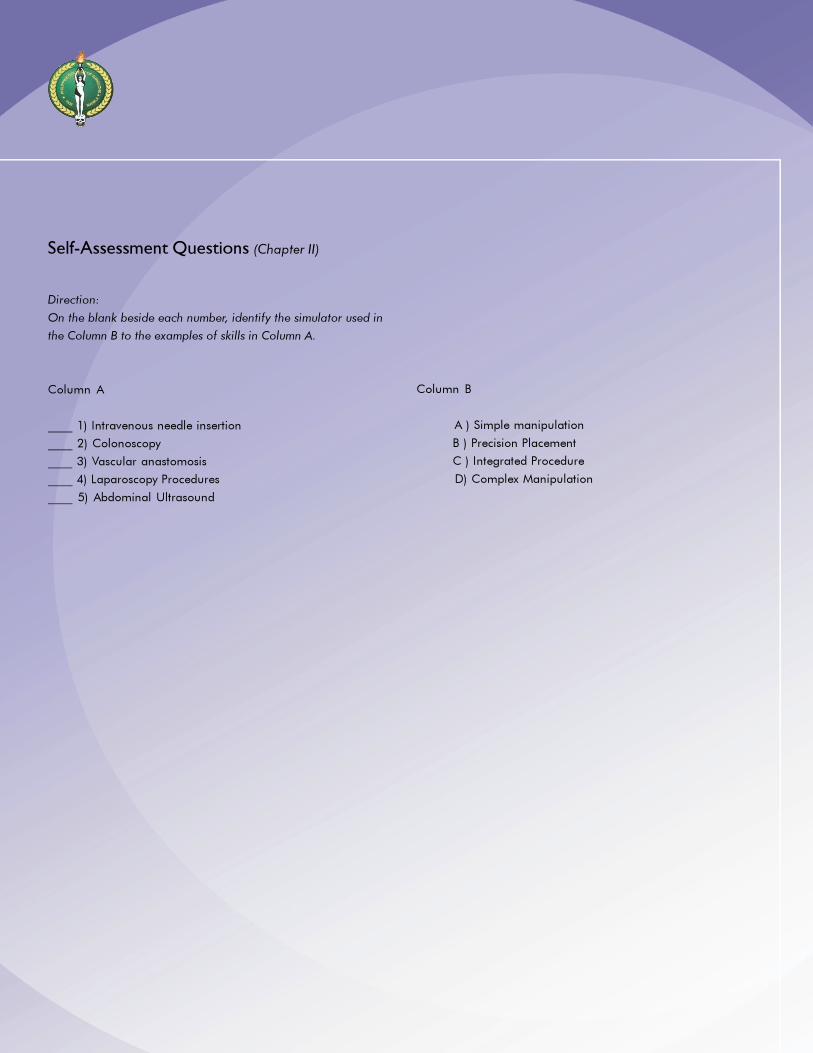
Figure 3 - Laparoscopy Simulation (LapSim Basic Skills 2.0)
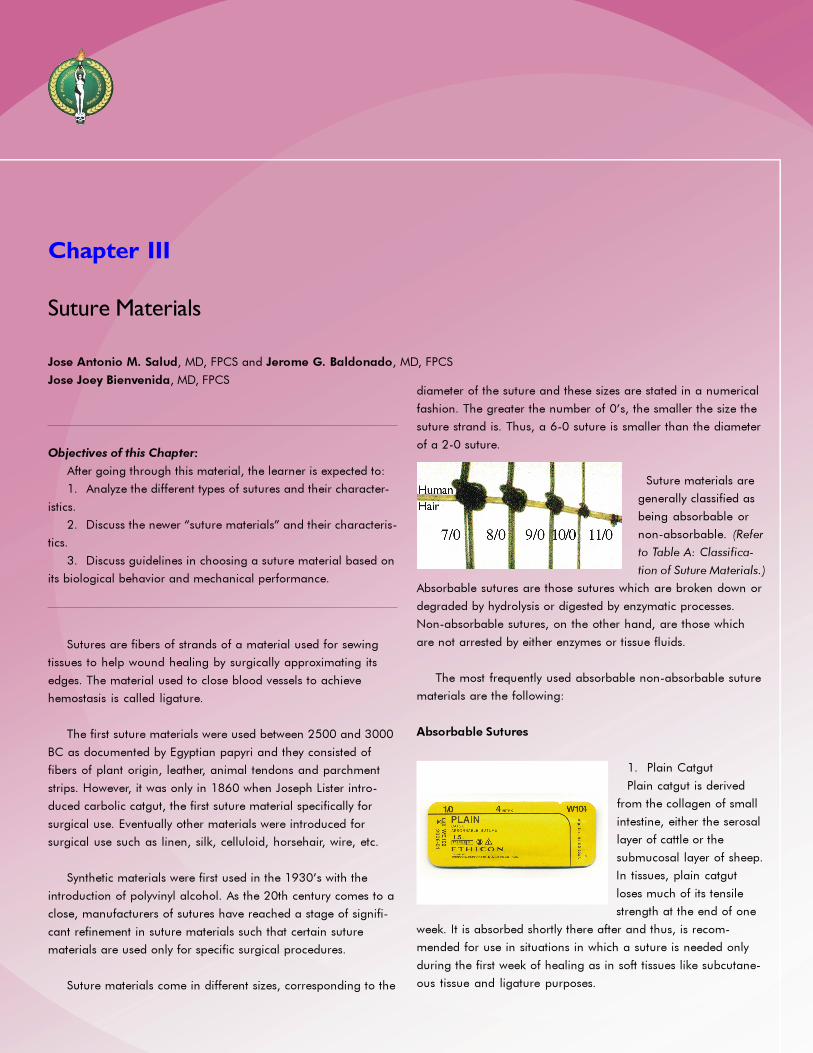
Figure 4- Simulated operating theater with mannequin.
2. Computer Based Simulators (shown below)
1. Hybrid Simulation- combine physical model with comput-
ers using realistic interface like instruments and real diagnostics.
Kneebone’s 5 Stages of Training Method
1. Watching an animated graphic of procedure.- essential
points of technique are shown by animated graphics usually
with spoken commentary.
2. Watching a clinical video of the procedure- short clinical
video sequences show the techniques performed by an expert
on a real patient.
3. Watching the procedure demonstrated on a model-
demonstrated a simulated tissue model by the same expert
wherein steps can be stopped, started and replayed at will.
4. Doing the procedure on a model- learner carries out
procedure on an identical model and practices repeatedly then
reviews the techniques.
5. Doing the procedure on a patient under supervision. An
experienced colleague or mentor supervised the learner while
performing the procedure on a patient.
Kneebone’s Tips in using Simulation and Multimedia
1. Simulation offers means of detaching skills from their
clinical context and learning without the pressures of clinical
responsibility.
2. The earlier surgical skills training starts, the better.
3. To learn a new motor skill you should see it demon-
strated, then practice it repeatedly and receive feedback about
your performance.
4. Non-biological simulated tissue allows a range of basic
surgical procedure to be learned in skills workshops.
5. Clinical teaching skills are not the same as workshop
teaching skills, and new methods of learning require new ways
of teaching.
6. To teach skills to complete novices you have to start from
first principles, avoiding any assumption of previous knowledge.
7. It is easy to overestimate the knowledge and skill of any
group of learners, especially as they may be embarrassed to
admit their ignorance. Assume nothing but go right back to
basics – provided you treat the learners with respect, they will
value the experience.
8. Do not overestimate the complexity needed in basic
surgical skills teaching.
9. Ensure that you are familiar with the procedures you will
be teaching and with any models used.
10.Setting up basic surgical workshop requires thought and
planning but need not be prohibitively expensive.
11.Learners like a clear framework within which to exercise
their navigational freedom.
12.Make the teaching aim clear from the onset. Encourage
learner to repeat procedure till they become proficient.
REFERENCES
Anastakis,Dmitri et al. Assessment of Technical Skills Transfer from Bench Training to
Human Model. The American Journal of Surgery. Vol.177 Feb.1999
Cauragh,James et al. Modelling Surgical Expertise for Motor Skills Acquisition. TheAmerican Journal of Surgery. Vol 177, Apr.1999
Connor, Michael et al. A Computer Based Self-Directed Training Module for BasicSutures. Medical Teacher Vol. 20 no.3, 1998.
Kneebone, R.L. Twelve tips on Teaching Basic Surgical Skills Using Simulation and
Multimedia. Medical Teacher Vol. 21 No. 6, 1999.
Kneebone,Roger . Simulation in Surgical Training:Education Issues and Implications.
Medical Education. Vol 37. 2003
Rogers,David et al. Computer Assisted Learning Versus A Lecture and Feedback
Seminar for Teaching Basic Surgical Skills. The American Journal of Surgery. Vol 175.
June 1998
Wigton, Robert. See One, Do One, Teach One. Academic Medicine. Vol. 67 no.11, Nov. 1992.
Direction:
On the blank beside each number, identify the simulator used in
the Column B to the examples of skills in Column A.
Column A
____ 1) Intravenous needle insertion
____ 2) Colonoscopy
____ 3) Vascular anastomosis
____ 4) Laparoscopy Procedures
____ 5) Abdominal Ultrasound
Column B
A ) Simple manipulation
B ) Precision Placement
C ) Integrated Procedure
D) Complex Manipulation
Self-Assessment Questions (Chapter II)
Sutures are fibers of strands of a material used for sewing
tissues to help wound healing by surgically approximating its
edges. The material used to close blood vessels to achieve
hemostasis is called ligature.
The first suture materials were used between 2500 and 3000
BC as documented by Egyptian papyri and they consisted of
fibers of plant origin, leather, animal tendons and parchment
strips. However, it was only in 1860 when Joseph Lister intro-
duced carbolic catgut, the first suture material specifically for
surgical use. Eventually other materials were introduced for
surgical use such as linen, silk, celluloid, horsehair, wire, etc.
Synthetic materials were first used in the 1930’s with the
introduction of polyvinyl alcohol. As the 20th century comes to a
close, manufacturers of sutures have reached a stage of signifi-
cant refinement in suture materials such that certain suture
materials are used only for specific surgical procedures.
Suture materials come in different sizes, corresponding to the
diameter of the suture and these sizes are stated in a numerical
fashion. The greater the number of 0’s, the smaller the size the
suture strand is. Thus, a 6-0 suture is smaller than the diameter
of a 2-0 suture.
Suture materials are
generally classified as
being absorbable or
non-absorbable. (Refer
to Table A: Classifica-
tion of Suture Materials.)
Absorbable sutures are those sutures which are broken down or
degraded by hydrolysis or digested by enzymatic processes.
Non-absorbable sutures, on the other hand, are those which
are not arrested by either enzymes or tissue fluids.
The most frequently used absorbable non-absorbable suture
materials are the following:
Absorbable Sutures
1. Plain Catgut
Plain catgut is derived
from the collagen of small
intestine, either the serosal
layer of cattle or the
submucosal layer of sheep.
In tissues, plain catgut
loses much of its tensile
strength at the end of one
week. It is absorbed shortly there after and thus, is recom-
mended for use in situations in which a suture is needed only
during the first week of healing as in soft tissues like subcutane-
ous tissue and ligature purposes.
Chapter III
Suture Materials
Jose Antonio M. Salud, MD, FPCS and Jerome G. Baldonado, MD, FPCS
Jose Joey Bienvenida, MD, FPCS
Objectives of this Chapter:
After going through this material, the learner is expected to:
1. Analyze the different types of sutures and their character-
istics.
2. Discuss the newer “suture materials” and their characteris-
tics.
3. Discuss guidelines in choosing a suture material based on
its biological behavior and mechanical performance.
Table A – Classification of Suture Materials
Based on Origin
Suture Material Origin
Natural
Animal
Catgut Submucosa of sheep intestine or serosa of beef intestine
Silk Raw silk spun by silkworm
Vegetable
Cotton Cotton Plant
Mineral
Steel Specially Formulated iron-chromium-nickel-molybdenum alloy
Silver Silver
Synthetic
Polyglactin 9101
Copolymer of glycolide and lactide with polyglactin 370 and calcium
stearate, if coated
Polyglycolic Acid Homopolymer of glycolid
Poliglecaprone 25 Copolymer of glycolide and epsilon-caprolactone
Polyglyconate Copolymer of glycolide and trimethylene carbonate
Polydioxanone Polyester of poly (p-dioxanone)
Poly (L-lactide/glycolide) Copolymer of lactide and glycode with caprolactone and glycolide
coating
Nylon Polyamide polymer
Polyester Fiber Polymer of polyethylene terephthalate (may be coated)
Polypropylene Polymer of propylene
Poly (hexafluoropropylene-VDF) Polymer blend of poly (vinylidene fluoride) and poly (vinylidene
fluoride-cohexafluoropropylene)
Based on BEHAVIOR
Absorbable Non-Absorbable
Catgut Cotton
Polyglactin 910 Steel
Silk
Polyglycolic Acid Silver
Poliglecaprone 25 Nylon
Polyglyconate Polyester Fiber
Polydioxanone Polypropylene
Poly (L-lactide/glycolide) Poly (hexafluoropropylene-VDF)
Based on STRUCTURE
Monofilament Multifilament (Braided)
2. Chromic Catgut
This suture material is
actually similar to plain
catgut except that it is
treated with chromate
compounds, which results
in a stronger and more
slowly absorbed suture.
Thus, the loss of tensile
strength takes a little longer, about double the time it takes for
plain sutures to lose their own. However, the absorption of
chromic is dependent on environmental factors in the tissues.
When used to suture the stomach, the presence of acid hastens
the absorption. This should not be used when extended approxi-
mation of tissues under stress is required, as in fascia. Both
plain and chromic catgut sutures may stimulate a considerable
inflammatory reaction during the absorptive phase and should,
thus not be used in areas such as the peritoneum.
3. Polyglactin
This is a synthetic
braided suture whose raw
material is a copolymer
of glycolide and lactide.
Most absorbable in
synthetic sutures,
polyglactin included, are
hydrolyzed during
absorption rather than being broken down enzymatically (as
with the natural absorbable sutures). In hydrolization, water
gradually penetrates the suture filaments causing the breakdown
of the suture’s polymer chain which results in lesser degree of
tissue reaction following tissue implantation. 75% of the strength
of this suture is retained at 14 days, and about 50% is retained
at 21 days. 100% loss in tensile strength is noted by the 32nd
day. Absorption is complete at about the 56th or the 70th day.
4. Polyglycolic Acid
This synthetic braided
suture is reduced by
the hydrolysis to
glycolic acid. Like most
synthetic sutures, the
inflammatory reaction
that results from its
breakdown is only
minimal. Its tensile strength is completely lost by the 30th day.
Complete absorption occurs about the 90th day.
5. Polydioxanone
This is a synthetic
monofilament absorb-
able suture composed of
the polyester of p-dioxa-
none. It takes longer for
its tensile strength to be
reduced as well as for its
absorption to be com-
pared with the two
previously mentioned suture materials. In vivo studies have
shown its tensile strength to be at about 70% at 14 days and
50% is retained at 28 days. Absorption starts close to the 90th
day and is complete at 6 months time.
6. Poliglecaprone
This is a mono-
filament suture whose
tensile strength in the first
week is high but rapidly
reduces soon after.
Studies have shown its
tensile strength to be
about 70% at the end of
the first week but is down to 30-40% by the end of the 2nd
week. It is thus recommended for use in situations wherein the
surgeon requires a high initial tensile strength as in subcuticular
wound closures. Absorption is complete in 90-120 days.
Non-absorbable sutures
1. Silk
By far, still the most
commonly used suture
material, silk is a
protein filament
produced by silk-
worms. As with most
braided sutures, silk
holds knots well.
However, silk loses its
tensile strength when exposed to moisture and should be used
dry. Silk loses much, if not all of its tensile strength within a year.
Although classified as a non-absorbable suture, silk can actually
be absorbed slowly but the absorption rate is variable.
2. Cotton
This is a commonly
used braided non-
absorbable suture much
like silk. It stimulates an
inflammatory reaction
greater than that of silk
and other sutures is that
this material is relatively
cheaper.
3. Nylon
This particular non-
absorbable suture comes
in a monofilament and
braided form. This suture
is characterized by its
high tensile strength and
extremely low tissue
reaction. The loss in
tensile strength is in the range of 15-20% per year by hydrolysis.
As with most monofilament sutures, nylon sutures require more
throws to securely hold the knots in place. The braided variety,
on the other hand is very similar in characteristic to silk but has
considerably less tissue reaction.
4. Polypropylene
Polypropylene is a
non-absorbable synthetic
monofilament suture.
This suture’s tensile
strength retention is
indefinite and is a suture
that is encapsulated by tissues when implanted
thus resisting tissue degradation. Because of these characteris-
tics, it is a suture that is widely used in virtually all specialties.
5. Polyester
This suture was the
first synthetic suture
material shown to last
indefinitely in tissues.
Like polypropylene,
poly-esters sutures are
encapsulated by
tissues and thus resist
tissue degradation.
6. Wire/Stainless
Steel/Titanium
A very strong suture
material that produces
little loss of tensile
strength, wire has
been used for many
years and is a popular
suture for a variety of
operations (thoraco-
cardiovascular, orthopedics, neurosurgery). Tissue reaction is
minimal. However, it is difficult to handle and may be easily
palpated by the patient.

Table B – Suture Materials and Characteristics
T A B L E O N S U T U R E C H A R A C T E R I S T I C S
Tissue Number of Absorbability Absorption Inflammatory Knot Securityof Origin strands Rate reaction (minimum #
of knots)
Plain Catgut Collagen of Monofilament Absorbed by Complete ++ 2small bowel of Enzymatic within 70 dayscattle & sheep Proteolysis
Chromic Catgut Collagen of Monofilament Absorbed by Over 90 days ++ 2small bowel of Enzymaticcattle & sheep Proteolysis
Polyglactin Copolymer of Multifilament & Absorbed by Complete in + 2/5lactide & Monofilament Hydrolysis 56-70 daysglycolide coated (size 10-0with polyglactin only)370 & calciumstearate
Polyglycolic acid Glycolic acid Multifilament Absorbed by Complete + 2polymer Hydrolysis in 90 days
Poliglecaprone Copolymer of Monofilament Absorbed by Complete -/+ 5glycolide and Hydrolysis in 91-119epsilon- dayscaprolactone
Polydioxanone Polyester Monofilament Absorbed by Complete -/+ 5polymer Hydrolysis in 180 days
Silk Silkworm Multifilament Non- N/A + 2absorbable
Cotton Cotton Plant Multifilament Non- N/A ++ 2absorbable
Nylon Long-chain Monofilament Non- N/A -/+ 2/5polymers of absorbablenylon
Polypropylene Crystalline Monofilament Non- N/A -/+ 5stereoisomer of absorbablepolypropylene
Polyester Polymer of Multifilament Non- N/A -/+ 2polyethylene absorbableterephthalate
Wire/Stainless 316L stainless Multi- & Non- N/A -/+Steel/Titanium steel Monofilament absorbable
MESH
Surgical mesh materials are more commonly used to repair
fascial defects. Its use in inguinal herniorrhaphies was even
made more popular in the advent of laparoscopic herniorrhaphy
techniques. Meshes may be non-absorbable or absorbable.
Non-absorbable Meshes
Most common types of materials used in non-absorbable
meshes are polypropylene, polyester (macroporous structures)
and polytetrafluroethylene (PTFE) (microporous structures).
Polypropylene may be monofilament or multifilament. Both
exhibit high burst strength. It is knitted in such fashion as to
interconnect each monofilament fiber and provide unidirectional
elasticity. This mesh is porous.
Absorbable Meshes
Polyglycolic acid and Polyglactin inert knit meshes are
stretchable. This mesh is mainly used to support the small
intestine and to set as a sling to protect the area from radiation
associated small bowel injury. It has 3 days tensible strength
retention and is absorbed within 60-90 days.
Surgical Staplers
Modern
surgical
stapling
devices and
techniques
were first
developed in
the Soviet
Union in the
1950’s
through the
work of the Scientific Research Institute for Experimental Surgical
Apparatus and Instruments in Moscow.
These instruments have wide application in various fields of
surgery facilitating ligation and division, resection, anastomosis
and skin and fascial closure. These staplers significantly reduce
operating time, time under anesthesia, blood loss, tissue
manipulation and trauma thus facilitating postoperative healing.
Edema and inflammation associated with manual suturing is
significantly reduced with the use of staplers and anastomoses
appear to function sooner as compared with manual suturing
techniques. The stainless steel staples that are used are virtually
inert producing minimal tissue inflammation and minimal tissue
compression. However, with the use for staplers for skin repairs,
the closure may be less meticulous. Another disadvantage of
staplers is that it may interfere with computed tomography and
magnetic resonance imaging.
Skin Adhesives
Designed to close skin wounds and lacerations, tissue
adhesives is a non-pigmented medical grade adhesive made of
n-butyl-cyanoacrylase. Applied to wound edges, to hold them
together and may provide wound healing similar to skin sutures.
The newest “suture material” available in the market today is
called topical skin adhesives, as exemplified by DERMABOND(r).
This is a non-absorbable sterile violet-colored liquid (2-
octylcyanoacrylate) that is used primarily for easy approximation
of skin edges.
Cyanoacrylate adhesives were first described in 1949 and
there first reported used as clinical adhesives was for 10 years
later. However, the use of these initial cyanoacrylates
(butylcyanocrylate) was limited due to certain physical properties.
Octylcyanoacrylate is a new-generation medical-grade
adhesive that has addressed these limitations. It is simply
applied over the apposed wound edges and allowed to set
within 45-90 seconds after application. An adhesive waterproof
film is then formed over the wound. It does not require applica-
tion of local anesthetics nor is there a need to use instruments
and sutures.
Octylcyanoacrylate tissue adhesive can replace skin sutures
on virtually all facial lacerations and properly selected extremity
and torso lacerations. It is not recommended for use on hands
and over joints since repetitive movements and washing the
adhesives may peel off with the top layer of epidermis in only a
few days, before complete healing has occurred. It is ideal for
use in children and in case where rapid skin closure essential.
After 5-10 days, the adhesive film sloughs off as the skin starts
to re-epithelialize. it has been deemed an effective and reliable
method of skin closure for many wounds, yielding similar
cosmetics results to closure with subcuticular sutures and is a
faster method of skin closure than suture.
Furthermore, cyanoacrylate adhesives also have antimicro-
bial properties against gram-positive organism and may
decrease wound
infections. However,
they have a lower
tensile strength than
sutures.
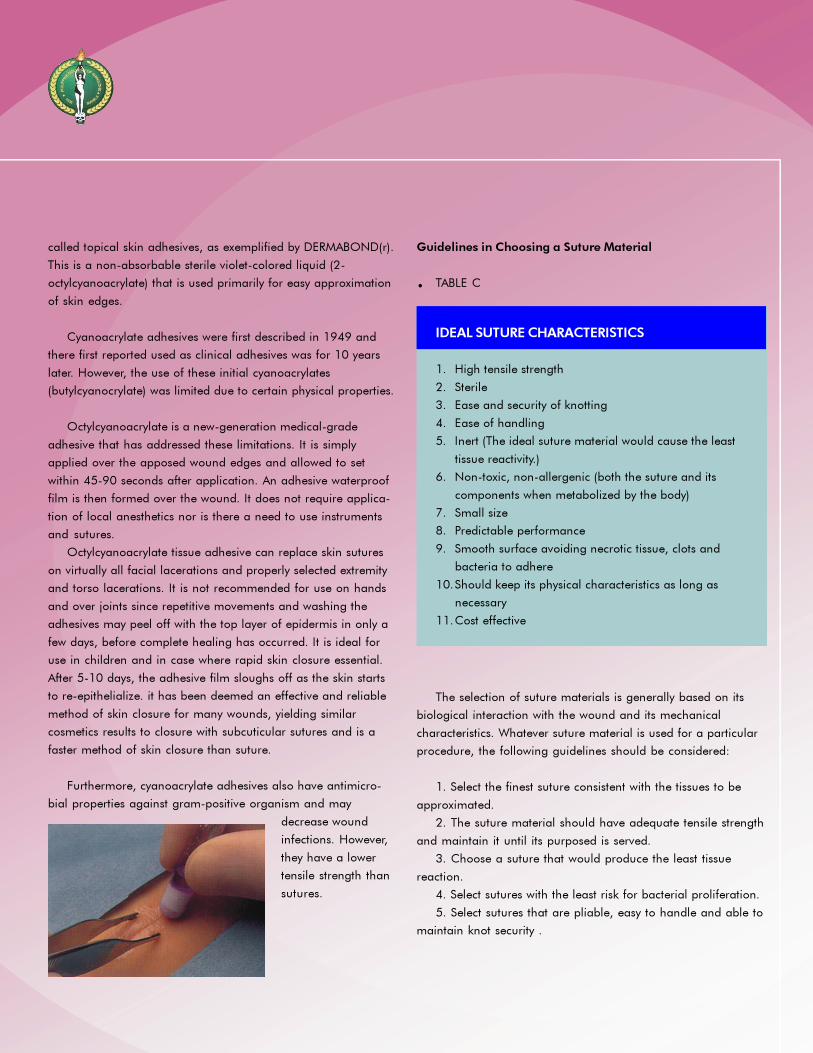
Guidelines in Choosing a Suture Material
• TABLE C
IDEAL SUTURE CHARACTERISTICS
1. High tensile strength
2. Sterile
3. Ease and security of knotting
4. Ease of handling
5. Inert (The ideal suture material would cause the least
tissue reactivity.)
6. Non-toxic, non-allergenic (both the suture and its
components when metabolized by the body)
7. Small size
8. Predictable performance
9. Smooth surface avoiding necrotic tissue, clots and
bacteria to adhere
10.Should keep its physical characteristics as long as
necessary
11.Cost effective
The selection of suture materials is generally based on its
biological interaction with the wound and its mechanical
characteristics. Whatever suture material is used for a particular
procedure, the following guidelines should be considered:
1. Select the finest suture consistent with the tissues to be
approximated.
2. The suture material should have adequate tensile strength
and maintain it until its purposed is served.
3. Choose a suture that would produce the least tissue
reaction.
4. Select sutures with the least risk for bacterial proliferation.
5. Select sutures that are pliable, easy to handle and able to
maintain knot security .
These principles are important to remember in the choice of
sutures based on their physical properties:
1. Sutures should be at least as strong as normal tissues
through which they are placed.
2. Suture strength must be maintained until the wound gains
maximum strength.
3. Tissue reaction to sutures should not prolong the healing
process.
To apply these principles, one must have information
regarding the normal strength of tissues, the rate at which
injured tissues regain strength, the strength of different sutures,
the rate at which sutures lose strength and the interaction
between sutures and tissues.
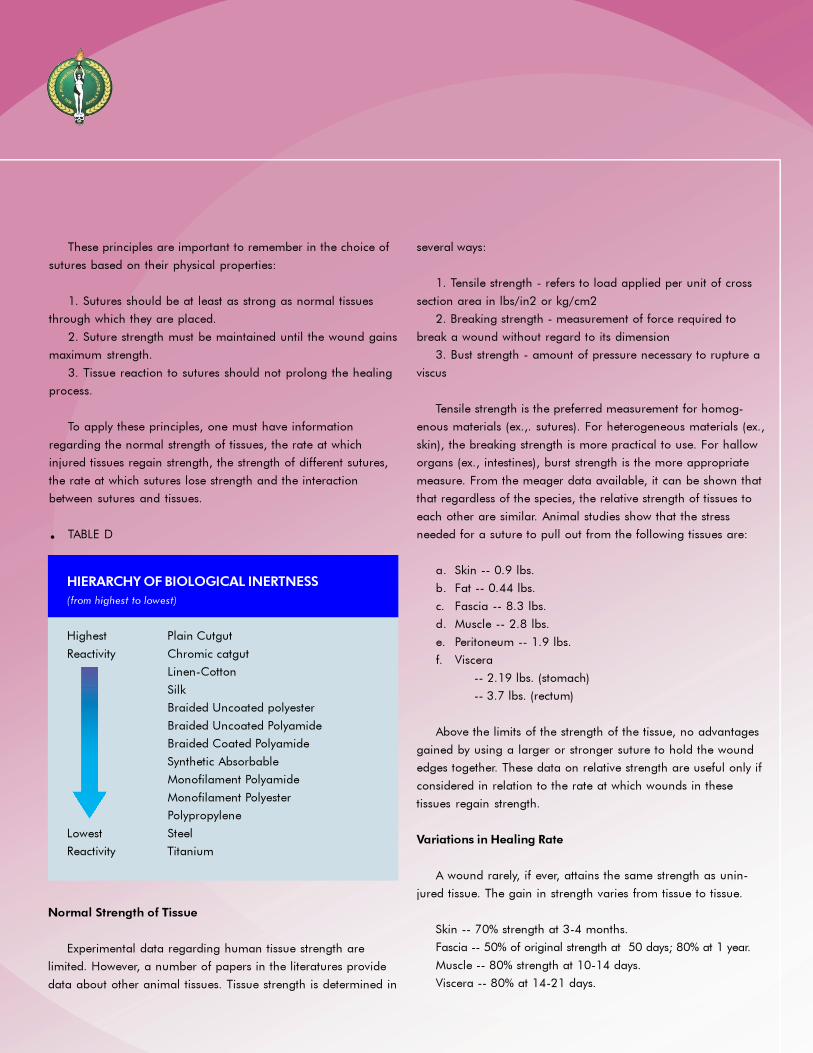
• TABLE D
HIERARCHY OF BIOLOGICAL INERTNESS
(from highest to lowest)
Highest Plain Cutgut
Reactivity Chromic catgut
Linen-Cotton
Silk
Braided Uncoated polyester
Braided Uncoated Polyamide
Braided Coated Polyamide
Synthetic Absorbable
Monofilament Polyamide
Monofilament Polyester
Polypropylene
Lowest Steel
Reactivity Titanium
Normal Strength of Tissue
Experimental data regarding human tissue strength are
limited. However, a number of papers in the literatures provide
data about other animal tissues. Tissue strength is determined in
several ways:
1. Tensile strength - refers to load applied per unit of cross
section area in lbs/in2 or kg/cm2
2. Breaking strength - measurement of force required to
break a wound without regard to its dimension
3. Bust strength - amount of pressure necessary to rupture a
viscus
Tensile strength is the preferred measurement for homog-
enous materials (ex.,. sutures). For heterogeneous materials (ex.,
skin), the breaking strength is more practical to use. For hallow
organs (ex., intestines), burst strength is the more appropriate
measure. From the meager data available, it can be shown that
that regardless of the species, the relative strength of tissues to
each other are similar. Animal studies show that the stress
needed for a suture to pull out from the following tissues are:
a. Skin -- 0.9 lbs.
b. Fat -- 0.44 lbs.
c. Fascia -- 8.3 lbs.
d. Muscle -- 2.8 lbs.
e. Peritoneum -- 1.9 lbs.
f. Viscera
-- 2.19 lbs. (stomach)
-- 3.7 lbs. (rectum)
Above the limits of the strength of the tissue, no advantages
gained by using a larger or stronger suture to hold the wound
edges together. These data on relative strength are useful only if
considered in relation to the rate at which wounds in these
tissues regain strength.
Variations in Healing Rate
A wound rarely, if ever, attains the same strength as unin-
jured tissue. The gain in strength varies from tissue to tissue.
Skin -- 70% strength at 3-4 months.
Fascia -- 50% of original strength at 50 days; 80% at 1 year.
Muscle -- 80% strength at 10-14 days.
Viscera -- 80% at 14-21 days.

REFERENCES
Edlich RF, Woods JA, Duke DB. Scientific Basis of Wound Closure Techniques.
Dannenmiller Memorial Educational Foundation, San Antonio, Texas.
Ethicon Wound Closure Manual, Ethicon, Inc., 1994
Maw JL, Quinn JV, Wells GA, Ducic Y, Odell PF, Lamothe A, Brownrigg PJ and
Suctliffe T. A Prospective Comparison Of Octylcyanoacrilate Tissue Adhesive &
Sutures for the Closure of Head and Neck Incisions; Journal of Otolaryngology, 1997,
Vol.26, 1;26-30
Quinn J, Wells G, Sutcliffe T, Jarmuske M, Maw J, Steill I and Johns P. A Randomized
Trial Comparing Octylcyanoacrylate Tissue Adhesive and Sutures in the Management
of Lacerations; JAMA, 1997, Vol. 277, 19:1527-1530
Sabiston DC, Jr. Textbook of Surgery, The Biological Basis of Modern Surgical
Practice, 15th ed., WB Saunders Co., 1997
Wound Closure In the Operating Theatre, B Braun Melsungen AG
Zinner MJ, Schwartz SI, Ellis H, Ashley SW & McFadden DW. Maingot’s Abdominal
Operations, 10th ed., 1997
1. Which of the following sutures are considered non-absorb-
able?
a. Polyester
b. Polydioxanone
c. Polyglactin
d. Polyglycolic acid
e. Poliglecaprone
2. Which of the following suture material has an indefinite
tensile strength?
a. Nylon
b. Silk
c. Polyester
d. Polypropylene
e. Polyglactin
3. Which of the following is a characteristic of skin adhesives?
a. Interferes with MR imaging
b. Consumes more time compared to sutures
c. Yields similar cosmetic results as with subcuticular sutures
d. Is used for joints lacerations
e. Produces pain on application
Self-Assessment Questions (Chapter III)
4. Which of the following sutures loses tensile strength the
longest?
a. Chromic catgut
b. Polyglactin
c. Polyglycolic acid
d. Polydioxanone
e. Poliglecaprone
5. Which suture material is most suitable in closing the fascia of
the abdominal wall?
a. Plain catgut
b. Chromic catgut
c. Polydioxanone
d. Poliglecaprone
e. Staplers
6. Which of the following suture materials exhibits the highest
inflammatory tissue reaction?
a. Polypropylene
b. Polyglactin
c. Chromic
d. Silk
e. Polyester
7. Based on their physical properties, what suture will be good
choice to approximate fascia after a contaminated operation?
a. Plain catgut
b. Polypropylene
c. Silk
d. Chromic catgut
e. Cotton
8. The following statements regarding the physical properties of
sutures and tissues are true EXCEPT?
a. Above the limits of normal tissue strength, there is no
advantage with the use of a larger or stronger suture
b. A suture should hold injured tissues in apposition until
the healing process to withstand stress without mechanical
support
c. Foreign bodies like sutures cane lead to the development
or persistence of local infection and therefore, should not stay
longer than their supported use
d. From the practical stand point, tensile strength is more
important than breaking strength
e. All of the above

Objectives of this Chapter
After going through this chapter, the learner should be able to:
1. Analyze the factors involved in needle selection.
2. Describe the characteristic of the surgical needle.
3. Identify the common types and code names of the locally
available needles.
Factors in the Selection of Needles
When considering the ideal surgical needle for a given
application, the type of tissues being approximated should be
considered: they should be altered as minimally as possible by
the needle. The only purpose of the needle is to introduce the
suture into the tissues. The needle should also be large enough
and of appropriate size, shape and design in order to provide
precise and efficient suturing. There are five basic requirements
that must be met in proper needle selection. The needle must
be:
1. Able to carry suture material through tissues with minimal
trauma.
2. Sharp to overcome tissue resistance.
3. Rigid to resist bending but flexible to prevent breaking .
4. Sterile and corrosion-resistant to prevent introduction of
microorganisms or foreign bodies into the surgical site, and
5. Of appropriate size, shape and design.
The surgical needle has evolved with the history of surgery
itself. The first needles were either closed-eyed or the so-called
French-eye needles requiring the scrub nurse to thread the
suture into the eye of the needle. The double strand of the
suture that results from threading and the increase in diameter
of the needle because of the presence of the eye, causes
additional trauma to tissues and in anastomotic procedures,
may lead to leakages.
Moreover, threading is time consuming and the needles are
difficult to prepare during surgery. A weak point is created near
the eye that could lead to needle breaks and even to rusting.
During operations in deep confined areas, eyed needles may
become unthreaded. Theoretically, it is more difficult to retrieve
them when accidentally dropped inside body cavities without the
suture. Because of these, there was a gradual reluctance both in
the use and manufacture of eyed surgical needles and favor
shifted towards swaged surgical needles.
Anatomy of the Surgical
Needle
Regardless of its intended
use, every surgical needle has
three basic components:
1. The point
2. The body
3. The attachment end
(swaged or eyed)
Chapter IV
Surgical Needles
Cenon R. Alfonso, MD, FPCS & Nilo C. de los Santos, MD, FPCS
Renato Cirilo A. Ocampo, MD, FPCS
A. Needle Point
The point extends from the extreme tip of the needle to the
maximum cross section of the body. Each specific point is
designed and produced to the required degree of sharpness to
smoothly penetrate the type of
tissue to be sutured.
1. Tapered
The body of the needle
tapers to a sharp point at the
tip. The taper point needle is
often preferred where the
smallest possible hole in the
tissue and minimal tissue trauma is desired. This is particularly
indicated in intestinal anastomosis. It is also ideal for approxi-
mation of the peritoneum, fascia and subcutaneous tissues.
Examples are needles code-
named CT-1 and SH.
2. Blunt
A rounded blunt point that
does not cut through tissues is
used for penetrating friable,
parenchymal and vascular
tissues like the liver, spleen or
kidneys. An example is the BP-
1 needle.
3. Reverse Cutting
These needles have a cutting
edge in the outer convex
curvature of the needle. This
cutting edge may extend from
the point of the needle down to
the swaged area. The cutting edge may also extend only down
to 1/3 of the distance to the swaged area. This type is most
useful in plastic surgical procedures. These types of needles are
coded PS- 2 and OS-8. The latter type is also indicated in the
closure of skin and various plastic surgery applications and
other orthopedic procedures.
4. Taper Cut (Trocar point)
This is a blend of the
combined features of the
reverse cutting and the taper
point needles. Three cutting
edges extend approximately 1/
32 inches back from the point.
All three edges of the point are sharpened to provide uniform
cutting action. It easily penetrates dense tough tissues. This type
is used for sclerotic or calcified tissues and for heavy fibrous
tissue such as the fascia. A typical example is V-40.
5. Conventional Cutting Edge
The cutting sharp edge is in
the concave curvature of the
needle. This is ordinarily used
in common plastic surgery
procedures and in closure of
superficial wounds and
incisions. An example is the
PC-5 needle.
B. Needle Body
The portion between the point and the swage of a needle is
called its body. This is the grasping area of the needle holder.
C. Attachment End
1. Swaged
This is the area in which the suture is
attached to the needle. It is of specific
importance to the needle-suture
relationship.The ideal swage area
diameter is a one-to-one suture-
needle ratio so that the more exact the
sizes correspond to each other, the
lesser the damage to the tissues. On
the other hand, the bigger the ratio,
the greater unnecessary tissue damage is produced. In cases of
bowel anastomosis, this ratio is most crucial in preventing
needle puncture leaks. Suture attachments to the needle are
most commonly done in two ways:
Channeled Needles
A channel is developed in the swage area and the suture is
placed or clipped in the channel. Pressure is applied to close the
channel around the suture in order to hold it tightly.
Drilled Needles
Mechanically drilled. A hole is drilled into the swage area of
the needle and the end of the suture is placed inside the hole.
The hole is then crimped a little in order to secure the suture
end.
Laser-drilled Needles
A feature provided where the swage area is laser-drilled to
achieve the closest one-to-one needle-suture ratio. Laser-drilled
needles are currently available among cardiovascular products.
It has the advantage of a tapered swage which in turn provides a
smoother transition from needle to suture. In addition, a laser-
drilled needle allows the so-called extended side flattening, a
design that adds strength and resistance to bending.
2. Closed Eye
Similar to a household sewing needle, the
shape of the closed eye may be round,
oblong or square.
3. French Eye
These needles have a slit from inside
the eye to the end of the needle with ridges
that catch and hold the suture in place.
4. Control Release Needle Suture
These needle sutures allows easy
detachment of the needle from the
suture when desired by the surgeon.
This allows rapid placement of
sutures in succession, reducing
operative time.
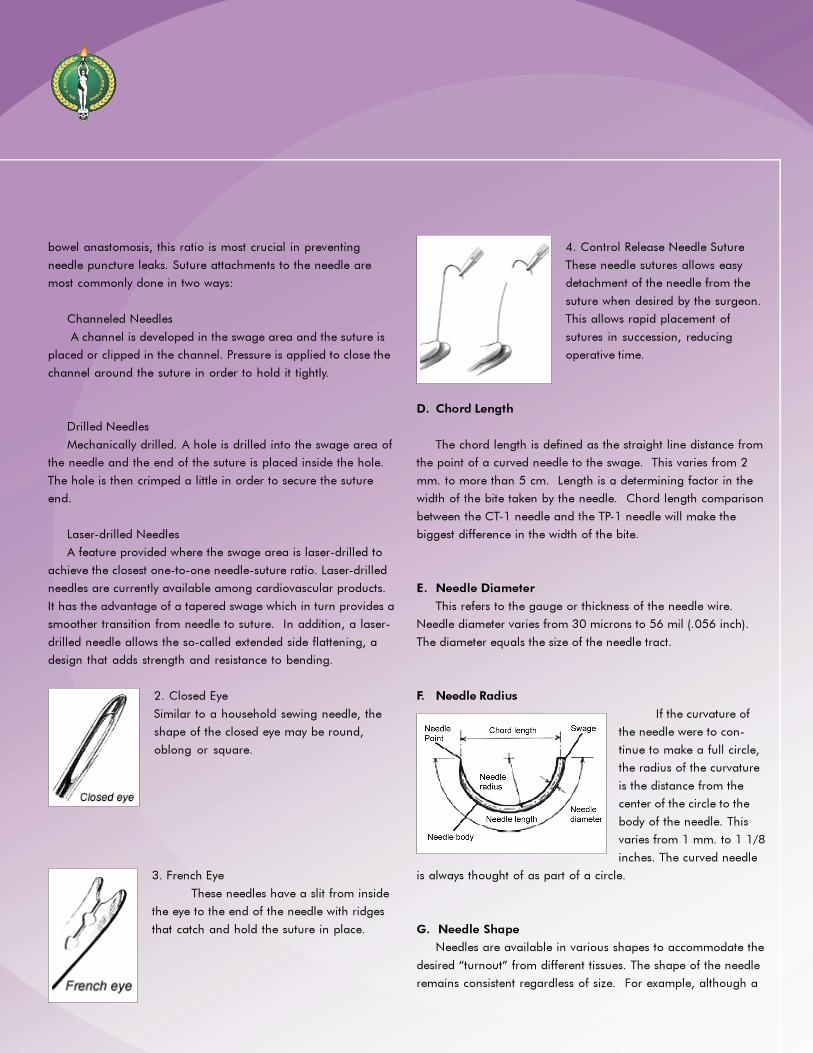
D. Chord Length
The chord length is defined as the straight line distance from
the point of a curved needle to the swage. This varies from 2
mm. to more than 5 cm. Length is a determining factor in the
width of the bite taken by the needle. Chord length comparison
between the CT-1 needle and the TP-1 needle will make the
biggest difference in the width of the bite.
E. Needle Diameter
This refers to the gauge or thickness of the needle wire.
Needle diameter varies from 30 microns to 56 mil (.056 inch).
The diameter equals the size of the needle tract.
F. Needle Radius
If the curvature of
the needle were to con-
tinue to make a full circle,
the radius of the curvature
is the distance from the
center of the circle to the
body of the needle. This
varies from 1 mm. to 1 1/8
inches. The curved needle
is always thought of as part of a circle.
G. Needle Shape
Needles are available in various shapes to accommodate the
desired “turnout” from different tissues. The shape of the needle
remains consistent regardless of size. For example, although a

TF needle is significantly smaller in size than an XLH, they are
both 1/2 circle needles. The following are the usual needle
shapes used:
1/4 circle (TG)
3/8 circle (P)
1/2 circle (CT)
5/8 circle (UR)
straight or Keith needle
TG Needle: Their use is often limited to ophthalmic and
microsurgical procedures. Size and depth of the area to be
sutured are small and shallow.
P Needle: This is the most commonly used curved needle.
It can be easily manipulated in relatively large and superfi-
cial wounds such as closure of the dermis with slight
pronation of the wrist. Because of a large arc of manipula-
tion required, 3/8 circle needles are awkward to use in
deep cavities such as the pelvis or in small, cramped areas
with difficult access.
CT Needle: it is relatively easy to use in confined areas and
difficult to reach locations though it requires more pronation
and supination movements of the wrist than a 3/8 circle needle.
UR Needle:
the tip of a 1/2
circle needle
such as the CT-
1 can become
obscured by
other tissue
deep in the
pelvic cavity.
When this
occurs, the
surgeon may
have difficulty locating the point of the needle in order to pull it
through the tissues. A 5/8 circle needle such as the UR-4 is most
advantageous in these situations.
H. Needle Length
This is the distance between the point and the swage
measured along the body of the needle.
Needle Arming
The needle should be grasped in the area about 1/4 to 1/2
the distance from the swaged area to the point. It should be held
on securely at the tip of the needle holder’s jaws. There are
various types of holders to accommodate different needles and
for different locations and tissues. The following factors must
influence the needle holder’s choice:
1. Security of the needle in the holder
2. appropriate size for specific needles
3. appropriate length for specific procedures
Single Versus Double Armed Suture
Commonly used sutures have one swaged-to-suture strand.
Situations do arise wherein there is a need to place a suture at a
midpoint and suturing must continue on both sides. The typical
examples are vascular anastomoses. In such situations, it is ideal
to use a double-armed suture. This is a suture strand with a
needle swaged at each end. If the strand is divided into halves,
this results into two single-armed sutures that can be used
individually. An example is the CT-1, CP-1 double armed needle
suture combination for episiotomy repair.
Characteristics of Surgical Needles and their Clinical Impor-
tance
Trauma to the tissue edges that are sutured together during
surgical procedures, among other factors, theoretically spells an
integral part of the outcome of wound healing. The relation-
ship is, in fact, indirectly proportional. The greater the trauma
induced, the poorer the outcome. If it were an intestinal anasto-
mosis, for example, excessively traumatized ends may result to a
poorer blood supply, affecting the integrity of the intestinal
layers, and complete apposition. Subsequent wound healing
processes therefore are compromised. It appears that the choice
of needle, suture material, as well as the technique of apposing
and handling tissues together are important factors in order to
achieve the best outcome with the least tissue damage. There-
fore, surgical needle design, characteristics and usage play
significant roles in the art and science of surgery.
Sharpness and Pointedness
Sharpness, in contrast to “pointedness,” refers to the condi-
tion of the blade of cutting surgical needles. This is obviously
not applicable among needles that are not flattened at the distal
body and point. (Needles that are round may either be pointed
or blunt at the opposite end of the swage). But cutting needles
can become blunted both at their point and at the flattened
body mainly due to repeated usage or friction against hard
tissue and foreign bodies. There are round needles that are
created with blunted points for the purpose of passing sutures
through solid organs like the liver and spleen. But it is desirable
to always use sharp cutting needles when indicated.
Sharp cutting needles create clean, minute lacerations
through tissues and cut muscle fibers. Pointed round needles,
however, just create puncture wounds and merely split muscle
fibers rather than cut them. Minute lacerated wounds created by
using cutting needles may completely tear at their corners when
subjected to tension. Literally, they tend to extend easily to a
rent. Punctured wounds by nature are not prone to renting and
are easily plugged. Thus, among hollow organs like viscus and
blood vessels, pointed round needles are favored.
On the other hand, tough tissues like the epidermis and the
subcuticular layers are difficult to traverse with pointed needles.
Thus, the cutting action of a flattened needle is desirable. These
tissues are not prone to lacerations or renting due to its fibrous
content.
Atraumatic Needles
This is a misnomer. All needles cause some form of trauma
to sutured tissues. So-called atraumatic needles cause the least
injury. This is so because of the following characteristics:
1. Small diameter,
2. The size of the swage is the same as the size of the body,
3. The suture material is of the same diameter as the
needle, and
4. There is no eye. With the smooth passage of the needle
and the suture through the tissue, the injury to the edges are
minimized.
Rigidity versus Flexibility
Rigidity of surgical needles is dependent on the diameter,
composition of the metal alloy used and the temperature by
which they were set (tempered). This is, therefore, affected by its
frequency of being subjected to autoclaving. Rigid needles are
necessary in suturing bones, cartilage and very tough fascia.
Hernia needles, sternal needles and needles used to wire bones
together are some examples. Rigid needles tend to break when
too much shearing pressure is applied unlike flexible needles.
Flexible needles, however, tend to withstand a greater shearing
force or even bending but generally not in acute angles.
Rust-free and Corrosion-free Needle Material
Stainless steel needles are generally rust- and corrosion-free.
Most surgical needles are no longer made of lesser quality. Their
flexibility, inertness and smoothness are other characteristics
that are most desirable in surgical needles for medical grade
usage. Other metal alloys are even better but their cost is
prohibitive.
Needle Weakpoints
Eyed needles break most frequently at the junction of the
swage and the body. This is so because of the tension created
by the angle of the needle against the suture. In the process of
passing a curved needle through tough tissues, the straight
portion of the eyed needle may be pulled by the surgeon at an
acute angle against the tissue. In other situations, the surgeon
may load the needle at this weak point and apply the drive force
through the tissue.
Another weak point, particularly among atraumatic round
needles, is the junction of the body and the point. The surgeon
may force the body of the curved needle through the tissues at

Self-Assessment Questions (Chapter IV)
1. Which of the following needles are most applicable when
suturing deep in the pelvic cavity?
a. 1/4 circle
b. 3/8 circle
c. 1/2 circle
d. 5/8 circle
e. straight needle
2. For suturing liver lacerations, the surgical needle to use is:
a. CT series
b. SH series
c. BP series
d. TP series
e. V-4 needles
3. The surgical needle for microsurgical procedures is:
a. UR-4 d. V-4
b. PS-1 e. CT-1
c. XLH
4. Surgical needles most commonly used for bowel anastomosis
is:
a. Reverse cutting
b. Circle tapered
c. Cutting tapered
d. Rounded blunt
e. Conventional cutting
5. The needle to use in the primary repair of a complete but
clean traumatic transection of the ureter is:
a. MO d. X-1
b. PS e. RB-1
the same angle as the point rather than smoothly glide the body
according to its curvature. By its structure, the tapered point and
the full diameter body creates a weak point at their junction
considering the tension these two areas will undergo at different
angles. Besides, the force exerted by the needle holder at the
body will exacerbate the above situation.
REFERENCEEthicon Wound Closure Manual, Ethicon, Inc., 1994

Objectives of this Chapter
Proper knot tying is one of the essentials in the performance
of a good surgical procedure. The art and science of surgery
requires that knots be tied not only with dexterity and speed, but
they should be placed with the right amount of tension for
proper approximation of tissues and ligation of blood vessels.
At the end of this chapter, the learner should be able to:
1. Discuss the general principles of knot tying
2. Describe the common techniques of knot tying which can
be applied to the different types of surgical procedures.
3. Perform the common techniques of knot tying which can
be applied to the different types of surgical procedures.
General Principles of Knot Tying
In knot tying, general principles to be adhered to are the
following:
1. When handling sutures, one must take care to avoid
damage to the suture material.
2. In tying any knot, friction between strands must be
avoided to prevent weakening of the integrity of the suture.
3. Sutures should be tied with appropriate tension to
prevent tissue strangulation or gaping of edges.
4. The completed knot must be secure.
5. For monofilament sutures, at least 5 throws are required
to securely hold the knots in place as less than this may result in
a tendency for the knots to loosen. Additional throws do not
add to the strength of a properly tied knot.
6. For braided sutures, two throws are required to securely
hold the knot.
7. Sutures must be cut to their proper length.
Chapter V
Knot Tying
Jose Antonio M. Salud, MD, FPCS
Miguel C. Mendoza, MD, FPCS
Knot Tying Techniques
Square Knot (Two-Hand Technique)
4. Purple strand crossed
over white and held
between thumb and index
finger of left hand.
3. Left hand turned
inward by pronation, and
thumb swung under white
strand to form the first
loop.
2. Purple strand held in
right hand brought
between left thumb and
index finger.
1. White strand placed
over extended index
finger of left hand acting
as brdige, and held in
palm of left hand. Purple
strand held in right hand.
12. The final tension on
the final throw should be
as nearly horizontal as
possible.
11. Horinzontal tension
applied with left hand
away from and right
hand toward the opera-
tor. This completes the
second half hitch.
10. Left hand rotated
inward by pronation with
thumb carrying purple
strand through loop of
white strand. Purple
strand is grasped
between right thumb and
index finger.
9. By further supinating
left hand, white strand
slides onto left index
finger to form a loop as
purple strand is grasped
between left index finger
and thumb.
7. Left index finger
released from white
strand and left hand
again supinated to loop
white strand over the left
thumb. Purple strand held
in right hand is angled
slightly to the left.
6. Purple strand released
by left hand and grasped
by right. Horizontal
tension is applied with
left hand toward and
right hand away from
operator. This completes
first half hitch.
5. Right hand releases
purple strand. Then left
hand supinated, with
thumb and index finger
still grasping purple
strand, to bring purple
strand through the white
loop. Regrasp purple
strand with right hand.
8. Purple strand brought
toward the operator with
the right hand and
placed between left
thumb and index finger.
Purple strand crosses over
white strand.
Knot Tying Techniques
Square Knot (Two-Hand Technique)
Click here for video on Square Knot (two-hand technique)
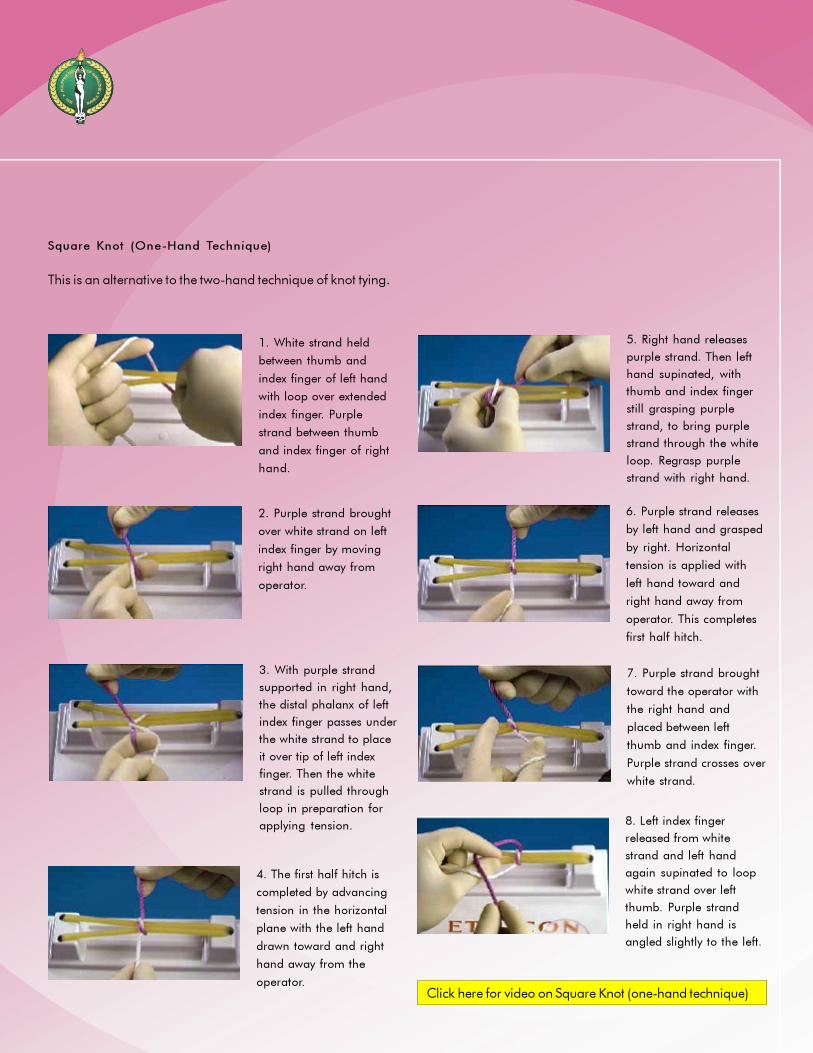
Square Knot (One-Hand Technique)
This is an alternative to the two-hand technique of knot tying.
4. The first half hitch is
completed by advancing
tension in the horizontal
plane with the left hand
drawn toward and right
hand away from the
operator.
5. Right hand releases
purple strand. Then left
hand supinated, with
thumb and index finger
still grasping purple
strand, to bring purple
strand through the white
loop. Regrasp purple
strand with right hand.
3. With purple strand
supported in right hand,
the distal phalanx of left
index finger passes under
the white strand to place
it over tip of left index
finger. Then the white
strand is pulled through
loop in preparation for
applying tension.
1. White strand held
between thumb and
index finger of left hand
with loop over extended
index finger. Purple
strand between thumb
and index finger of right
hand.
2. Purple strand brought
over white strand on left
index finger by moving
right hand away from
operator.
6. Purple strand releases
by left hand and grasped
by right. Horizontal
tension is applied with
left hand toward and
right hand away from
operator. This completes
first half hitch.
Click here for video on Square Knot (one-hand technique)
8. Left index finger
released from white
strand and left hand
again supinated to loop
white strand over left
thumb. Purple strand
held in right hand is
angled slightly to the left.
7. Purple strand brought
toward the operator with
the right hand and
placed between left
thumb and index finger.
Purple strand crosses over
white strand.
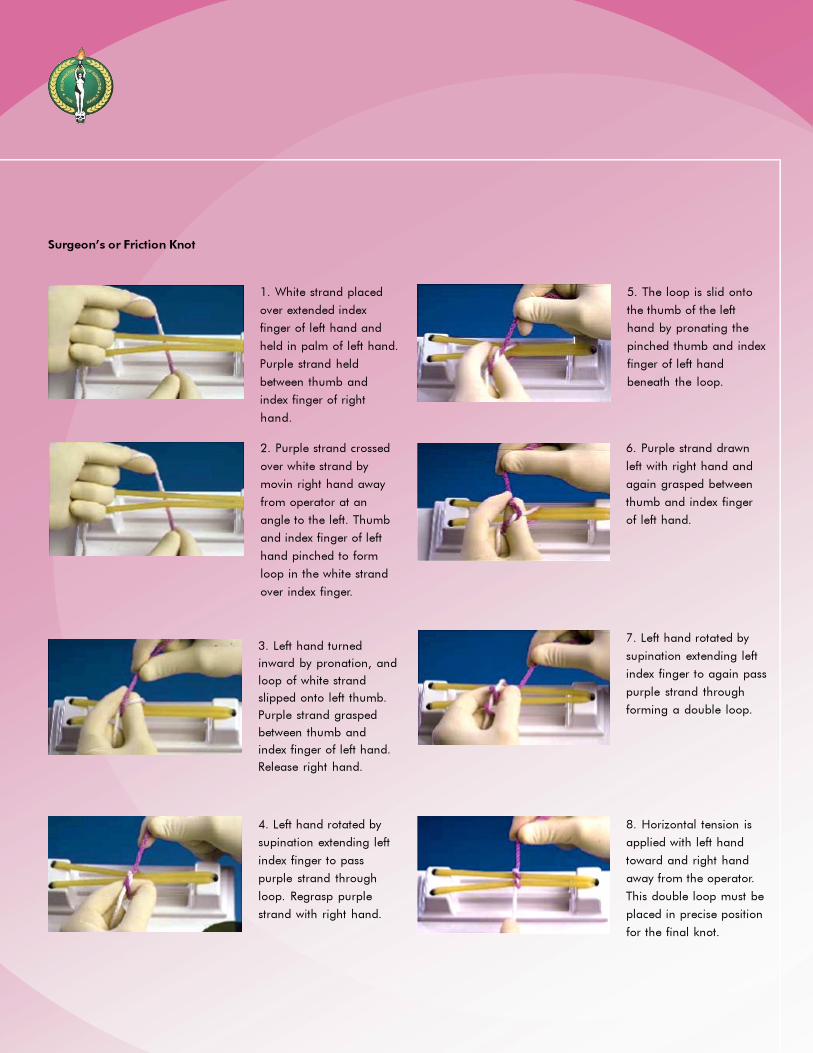
5. The loop is slid onto
the thumb of the left
hand by pronating the
pinched thumb and index
finger of left hand
beneath the loop.
6. Purple strand drawn
left with right hand and
again grasped between
thumb and index finger
of left hand.
7. Left hand rotated by
supination extending left
index finger to again pass
purple strand through
forming a double loop.
8. Horizontal tension is
applied with left hand
toward and right hand
away from the operator.
This double loop must be
placed in precise position
for the final knot.
Surgeon’s or Friction Knot
1. White strand placed
over extended index
finger of left hand and
held in palm of left hand.
Purple strand held
between thumb and
index finger of right
hand.
2. Purple strand crossed
over white strand by
movin right hand away
from operator at an
angle to the left. Thumb
and index finger of left
hand pinched to form
loop in the white strand
over index finger.
3. Left hand turned
inward by pronation, and
loop of white strand
slipped onto left thumb.
Purple strand grasped
between thumb and
index finger of left hand.
Release right hand.
4. Left hand rotated by
supination extending left
index finger to pass
purple strand through
loop. Regrasp purple
strand with right hand.

9. With thumb swung
under white strand,
purple strand is grasped
between thumb and index
finger of left hand and
held over white strand
with right hand.
10. Purple strand
released. Left hand
supinates to regrasp
purple strand with index
finger beneath the loop
of the white strand.
11. Purple strand rotated
beneath the white strand
by supinating pinched
thumb and index finger
of left hand to draw
purple strand through
the loop. Right hand
regrasps purple strand to
complete the second
throw square.
12. Hands continue to
apply horizontal tension
with left hand away from
and right hand toward the
operator. Final tension on
final throw should be as
nearly horizontal as
possible.
Click here for video on Surgeon’s or Friction Knot

5. Purple strand looped
over and under white
strand with right hand.
6. Purple strand looped
around white strand to
form second loop. This
throw is advanced into the
depths of the cavity.
7. Horizontal tension
applied to pushing down
on purple strand with
right index finger while
maintaining counter
tension on white strand
with left index finger.
Final tension should be
as nearly horizontal as
possible.
Deep Tie
In tying knots deep within a body cavity, this is the recommended technique of knot tying.
1. Strand looped around
hook in plastic cup on
Practice Board with index
finger of right hand which
holds purple strand in
palm of hand. White
strand held in left hand.
2. Purple strand held in
right hand brought
between left thumb and
index finger. Left hand
turned inward by prona-
tion, and thumb swung
under white strand to
form the first loop.
3. By placing index finger
of left hand on white
strand, advance the loop
into the cavity.
4. Horintal tension
applied by pusing down
on white strand with left
index finger while
maintaining counter-
tension with index finger
of right hand on purple
strand.
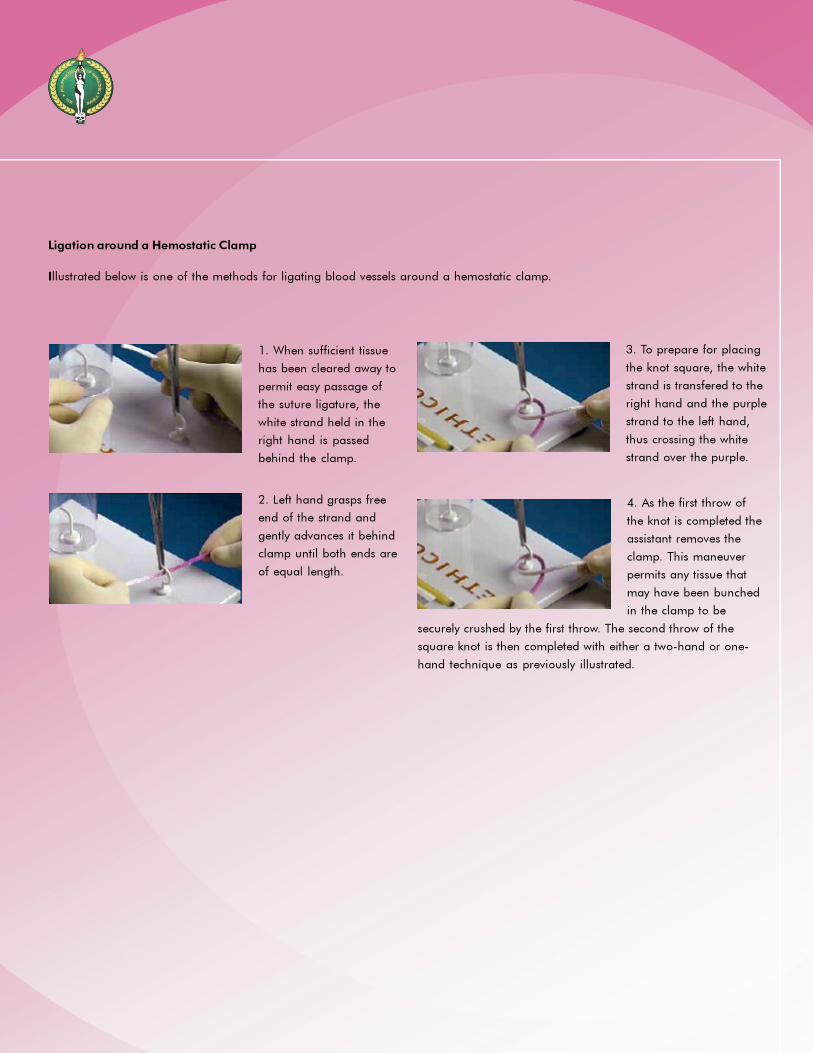
Ligation around a Hemostatic Clamp
Illustrated below is one of the methods for ligating blood vessels around a hemostatic clamp.
1. When sufficient tissue
has been cleared away to
permit easy passage of
the suture ligature, the
white strand held in the
right hand is passed
behind the clamp.
2. Left hand grasps free
end of the strand and
gently advances it behind
clamp until both ends are
of equal length.
3. To prepare for placing
the knot square, the white
strand is transfered to the
right hand and the purple
strand to the left hand,
thus crossing the white
strand over the purple.
4. As the first throw of
the knot is completed the
assistant removes the
clamp. This maneuver
permits any tissue that
may have been bunched
in the clamp to be
securely crushed by the first throw. The second throw of the
square knot is then completed with either a two-hand or one-
hand technique as previously illustrated.

6. Square knot com-
pleted by horizontal
tension applied with left
hand holding white
strand toward operator
and purple strand in
needleholder away from
operator. Final tension
should be as nearly
horizontal as possible.
5. With end of the strand
grasped by the
needleholder, pugple
strand is drawn through
loop in the white strand
away from the operator.
4. White strand is drawn
toward operator with left
hand and looped around
needleholder held in
right hand. Loop is
formed by placing
needleholder on side of
strand toward the
operator.
1. Short purple strand lies
freely. Long white end of
strand held between
thumb and index finger of
left hand. Loop formed by
placing needholder on
side of strand away from
the operator.
2. Needleholder in right
hand grasps short purple
end of strand.
3. First half hitch com-
pleted by pulling
needleholder toward
operator with right hand
and drawing white strand
away from operator.
Needleholder is released
from purple strand.
Instrument Tie
This is particularly useful when tying knots for suture materials where ends are short.
Click here for video on Instrument Tie technique (Square Knot)
Click here for video on Instrument Tie technique (Surgeon’s Knot)
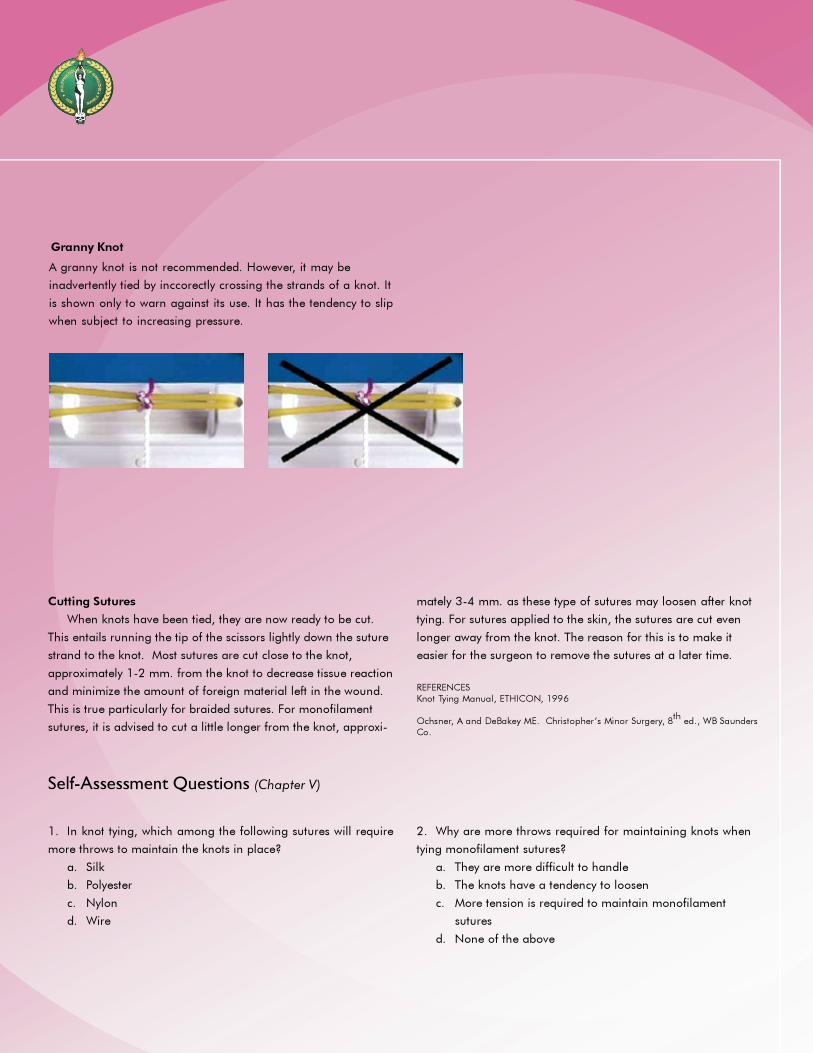
Cutting Sutures
When knots have been tied, they are now ready to be cut.
This entails running the tip of the scissors lightly down the suture
strand to the knot. Most sutures are cut close to the knot,
approximately 1-2 mm. from the knot to decrease tissue reaction
and minimize the amount of foreign material left in the wound.
This is true particularly for braided sutures. For monofilament
sutures, it is advised to cut a little longer from the knot, approxi-
mately 3-4 mm. as these type of sutures may loosen after knot
tying. For sutures applied to the skin, the sutures are cut even
longer away from the knot. The reason for this is to make it
easier for the surgeon to remove the sutures at a later time.
REFERENCES
Knot Tying Manual, ETHICON, 1996
Ochsner, A and DeBakey ME. Christopher’s Minor Surgery, 8th
ed., WB Saunders
Co.
Self-Assessment Questions (Chapter V)
1. In knot tying, which among the following sutures will require
more throws to maintain the knots in place?
a. Silk
b. Polyester
c. Nylon
d. Wire
2. Why are more throws required for maintaining knots when
tying monofilament sutures?
a. They are more difficult to handle
b. The knots have a tendency to loosen
c. More tension is required to maintain monofilament
sutures
d. None of the above
A granny knot is not recommended. However, it may be
inadvertently tied by inccorectly crossing the strands of a knot. It
is shown only to warn against its use. It has the tendency to slip
when subject to increasing pressure.
Granny Knot
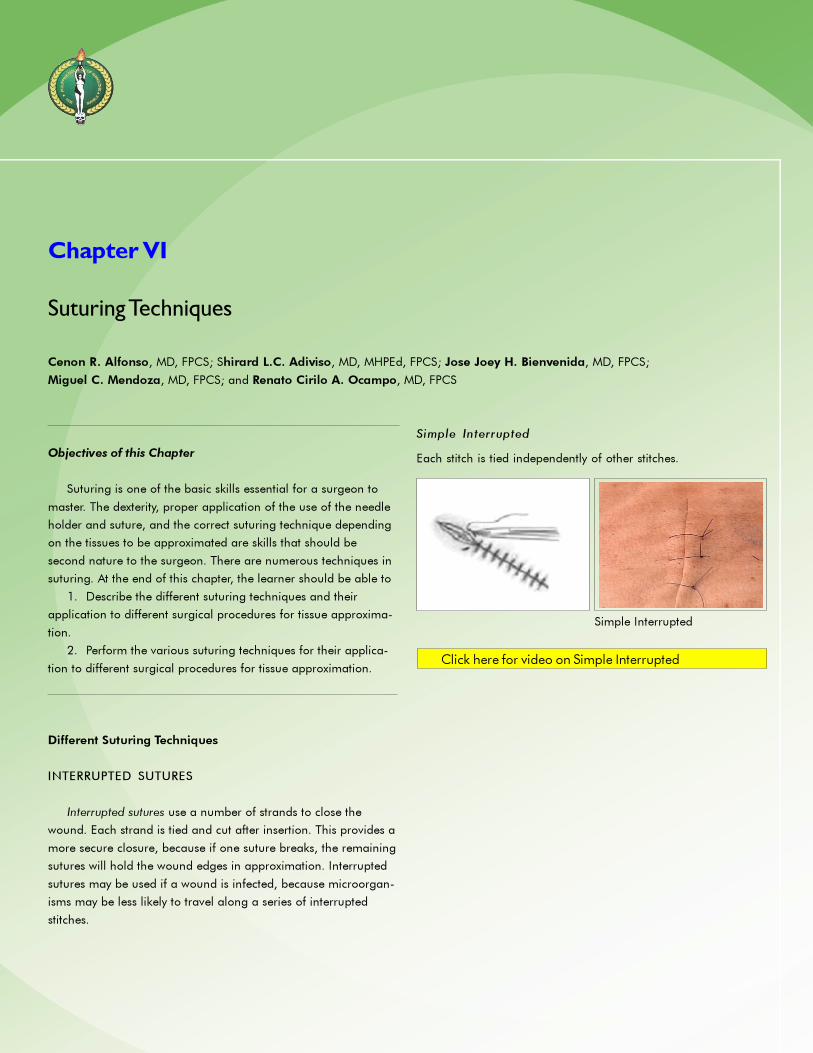
Chapter VI
Suturing Techniques
Cenon R. Alfonso, MD, FPCS; Shirard L.C. Adiviso, MD, MHPEd, FPCS; Jose Joey H. Bienvenida, MD, FPCS;
Miguel C. Mendoza, MD, FPCS; and Renato Cirilo A. Ocampo, MD, FPCS
Objectives of this Chapter
Suturing is one of the basic skills essential for a surgeon to
master. The dexterity, proper application of the use of the needle
holder and suture, and the correct suturing technique depending
on the tissues to be approximated are skills that should be
second nature to the surgeon. There are numerous techniques in
suturing. At the end of this chapter, the learner should be able to
1. Describe the different suturing techniques and their
application to different surgical procedures for tissue approxima-
tion.
2. Perform the various suturing techniques for their applica-
tion to different surgical procedures for tissue approximation.
Different Suturing Techniques
INTERRUPTED SUTURES
Interrupted sutures use a number of strands to close the
wound. Each strand is tied and cut after insertion. This provides a
more secure closure, because if one suture breaks, the remaining
sutures will hold the wound edges in approximation. Interrupted
sutures may be used if a wound is infected, because microorgan-
isms may be less likely to travel along a series of interrupted
stitches.
Simple Interrupted
Each stitch is tied independently of other stitches.
Simple Interrupted
Click here for video on Simple Interrupted

Horizontal Mattress Suture
A horizontal mattress suture starts some distance from the wound
edge, also passes under the wound to emerge on the opposite
side at the same distance from the edge. Then, coming from the
same side of the wound at some distance from where it emerged,
it passes back deeply under the wound to exit on the opposite side
at the same distance from the edge, where it is tied. The horizontal
mattress provides coaptation in an everted fashion. It is used for
closure of deeper tissues such as fascia.
Interrupted Vertical Mattress
Interrupted Horizontal Mattress
Click here for video of Vertical Mattress
Click here for video on Horizontal Mattress
Vertical Mattress
A vertical mattress suture starts some distance from the
wound edge, passes deeply under the wound and emerges on
the opposite side at the same distance from the edge. It then
returns taking a more superficial bite from each wound edge. It
is tied on one side of the wound and does not appear to cross
it. The vertical mattress suture gives a good approximation of
the skin edge and therefore results in a cosmetically acceptable
scar. It is frequently used for fine skin closure. The vertical
mattress consists of a “far-far, near-near” component. The
vertical mattress is also known as the Stewart suture.
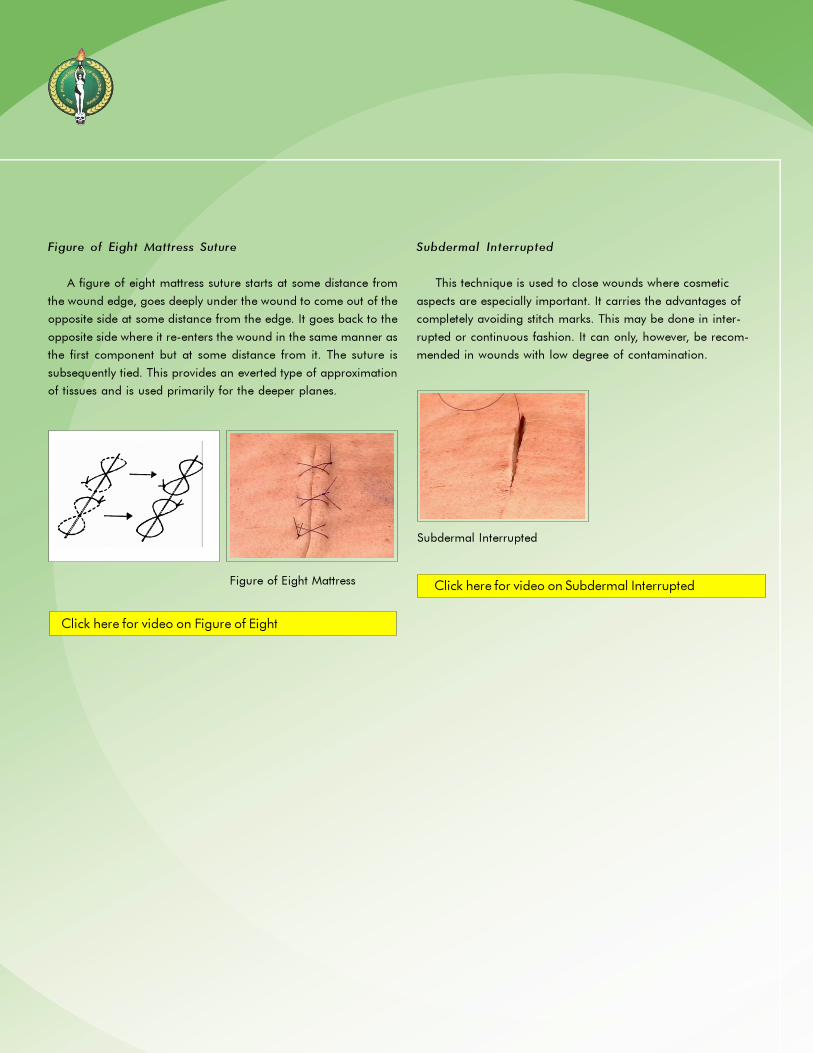
Subdermal Interrupted
This technique is used to close wounds where cosmetic
aspects are especially important. It carries the advantages of
completely avoiding stitch marks. This may be done in inter-
rupted or continuous fashion. It can only, however, be recom-
mended in wounds with low degree of contamination.
Figure of Eight Mattress Suture
A figure of eight mattress suture starts at some distance from
the wound edge, goes deeply under the wound to come out of the
opposite side at some distance from the edge. It goes back to the
opposite side where it re-enters the wound in the same manner as
the first component but at some distance from it. The suture is
subsequently tied. This provides an everted type of approximation
of tissues and is used primarily for the deeper planes.
Click here for video on Subdermal Interrupted
Click here for video on Figure of Eight
Figure of Eight Mattress
Subdermal Interrupted
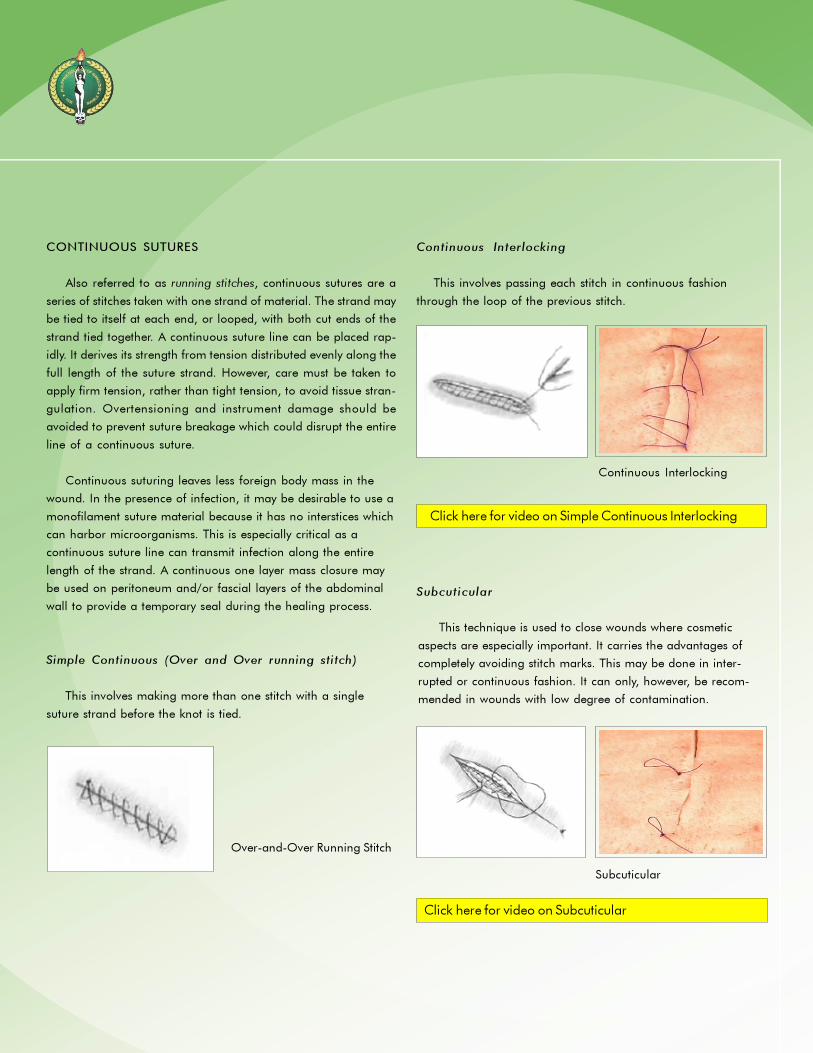
Continuous Interlocking
This involves passing each stitch in continuous fashion
through the loop of the previous stitch.
Subcuticular
Click here for video on Simple Continuous Interlocking
This technique is used to close wounds where cosmetic
aspects are especially important. It carries the advantages of
completely avoiding stitch marks. This may be done in inter-
rupted or continuous fashion. It can only, however, be recom-
mended in wounds with low degree of contamination.
Click here for video on Subcuticular
Continuous Interlocking
Subcuticular
CONTINUOUS SUTURES
Also referred to as running stitches, continuous sutures are a
series of stitches taken with one strand of material. The strand may
be tied to itself at each end, or looped, with both cut ends of the
strand tied together. A continuous suture line can be placed rap-
idly. It derives its strength from tension distributed evenly along the
full length of the suture strand. However, care must be taken to
apply firm tension, rather than tight tension, to avoid tissue stran-
gulation. Overtensioning and instrument damage should be
avoided to prevent suture breakage which could disrupt the entire
line of a continuous suture.
Continuous suturing leaves less foreign body mass in the
wound. In the presence of infection, it may be desirable to use a
monofilament suture material because it has no interstices which
can harbor microorganisms. This is especially critical as a
continuous suture line can transmit infection along the entire
length of the strand. A continuous one layer mass closure may
be used on peritoneum and/or fascial layers of the abdominal
wall to provide a temporary seal during the healing process.
Simple Continuous (Over and Over running stitch)
This involves making more than one stitch with a single
suture strand before the knot is tied.
Over-and-Over Running Stitch
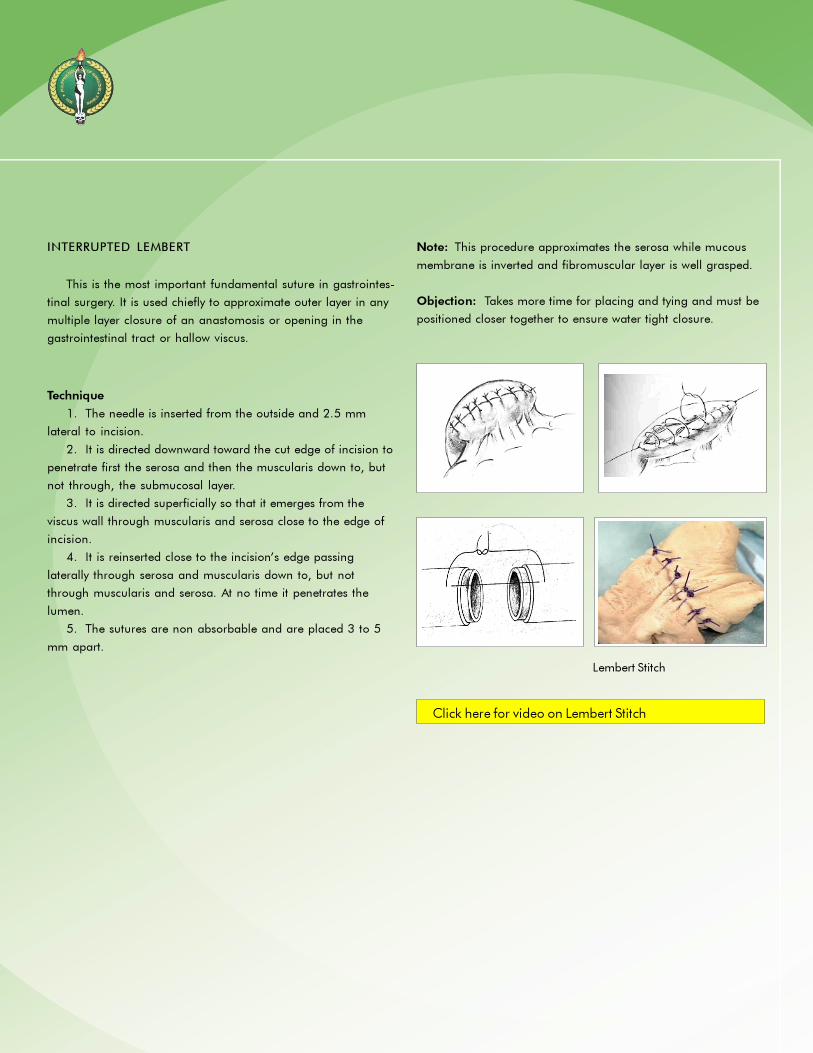
Technique
1. The needle is inserted from the outside and 2.5 mm
lateral to incision.
2. It is directed downward toward the cut edge of incision to
penetrate first the serosa and then the muscularis down to, but
not through, the submucosal layer.
3. It is directed superficially so that it emerges from the
viscus wall through muscularis and serosa close to the edge of
incision.
4. It is reinserted close to the incision’s edge passing
laterally through serosa and muscularis down to, but not
through muscularis and serosa. At no time it penetrates the
lumen.
5. The sutures are non absorbable and are placed 3 to 5
mm apart.
INTERRUPTED LEMBERT
This is the most important fundamental suture in gastrointes-
tinal surgery. It is used chiefly to approximate outer layer in any
multiple layer closure of an anastomosis or opening in the
gastrointestinal tract or hallow viscus.
Click here for video on Lembert Stitch
Lembert Stitch
Note: This procedure approximates the serosa while mucous
membrane is inverted and fibromuscular layer is well grasped.
Objection: Takes more time for placing and tying and must be
positioned closer together to ensure water tight closure.
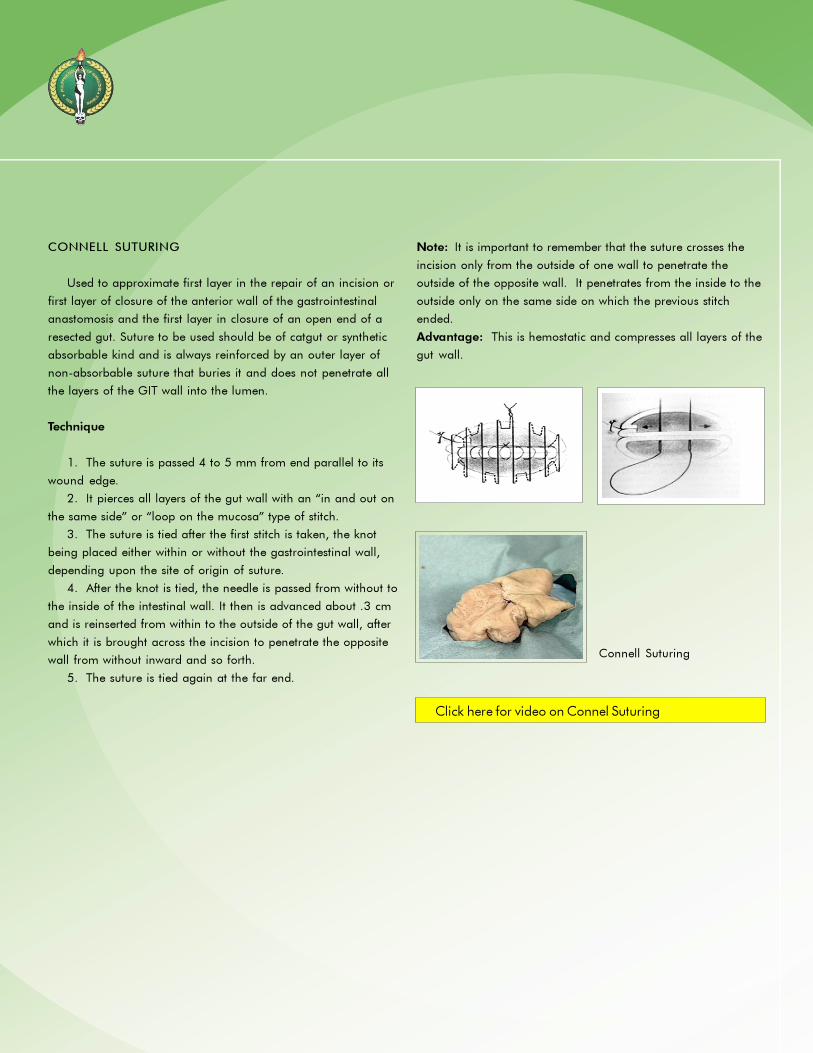
CONNELL SUTURING
Used to approximate first layer in the repair of an incision or
first layer of closure of the anterior wall of the gastrointestinal
anastomosis and the first layer in closure of an open end of a
resected gut. Suture to be used should be of catgut or synthetic
absorbable kind and is always reinforced by an outer layer of
non-absorbable suture that buries it and does not penetrate all
the layers of the GIT wall into the lumen.
Technique
1. The suture is passed 4 to 5 mm from end parallel to its
wound edge.
2. It pierces all layers of the gut wall with an “in and out on
the same side” or “loop on the mucosa” type of stitch.
3. The suture is tied after the first stitch is taken, the knot
being placed either within or without the gastrointestinal wall,
depending upon the site of origin of suture.
4. After the knot is tied, the needle is passed from without to
the inside of the intestinal wall. It then is advanced about .3 cm
and is reinserted from within to the outside of the gut wall, after
which it is brought across the incision to penetrate the opposite
wall from without inward and so forth.
5. The suture is tied again at the far end.
Click here for video on Connel Suturing
Connell Suturing
Note: It is important to remember that the suture crosses the
incision only from the outside of one wall to penetrate the
outside of the opposite wall. It penetrates from the inside to the
outside only on the same side on which the previous stitch
ended.
Advantage: This is hemostatic and compresses all layers of the
gut wall.
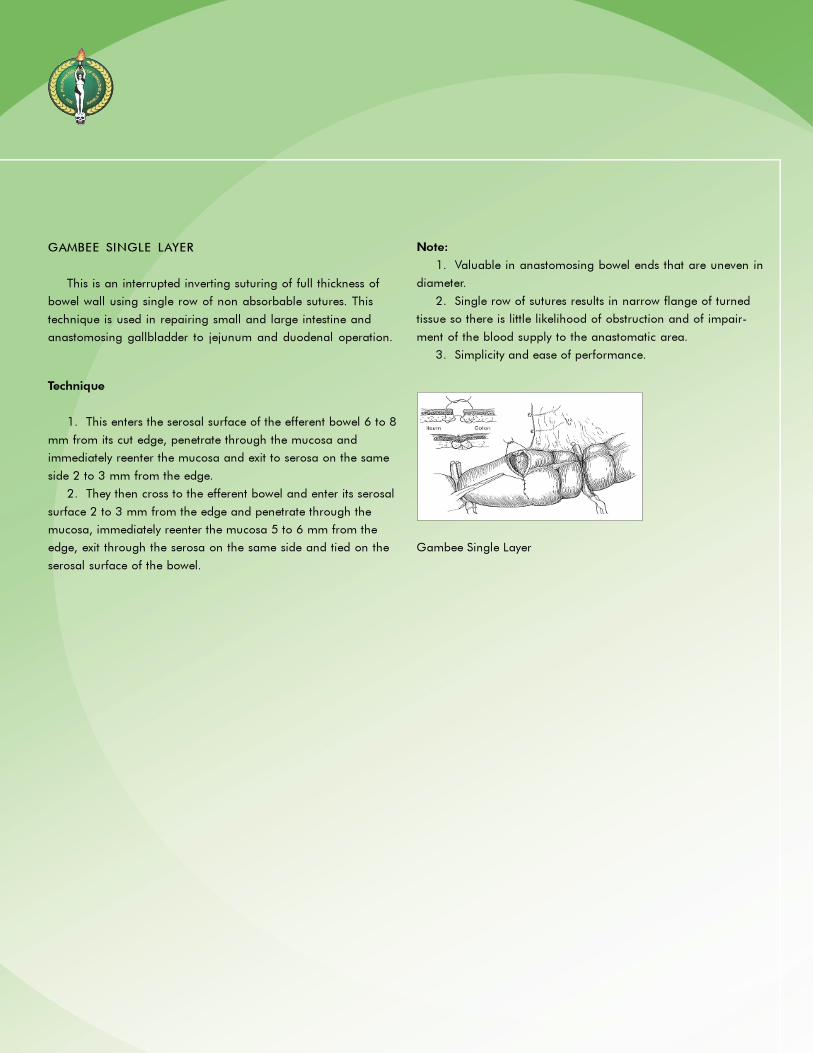
Technique
1. This enters the serosal surface of the efferent bowel 6 to 8
mm from its cut edge, penetrate through the mucosa and
immediately reenter the mucosa and exit to serosa on the same
side 2 to 3 mm from the edge.
2. They then cross to the efferent bowel and enter its serosal
surface 2 to 3 mm from the edge and penetrate through the
mucosa, immediately reenter the mucosa 5 to 6 mm from the
edge, exit through the serosa on the same side and tied on the
serosal surface of the bowel.
GAMBEE SINGLE LAYER
This is an interrupted inverting suturing of full thickness of
bowel wall using single row of non absorbable sutures. This
technique is used in repairing small and large intestine and
anastomosing gallbladder to jejunum and duodenal operation.
Gambee Single Layer
Note:
1. Valuable in anastomosing bowel ends that are uneven in
diameter.
2. Single row of sutures results in narrow flange of turned
tissue so there is little likelihood of obstruction and of impair-
ment of the blood supply to the anastomatic area.
3. Simplicity and ease of performance.
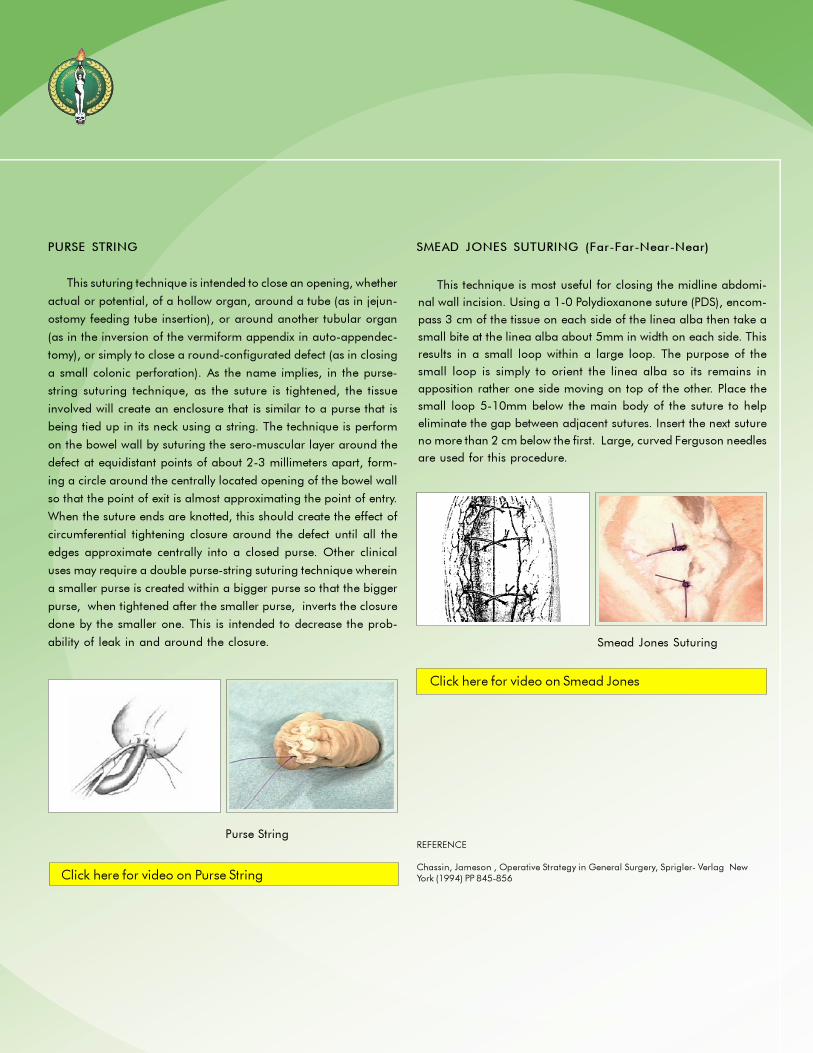
PURSE STRING
This suturing technique is intended to close an opening, whether
actual or potential, of a hollow organ, around a tube (as in jejun-
ostomy feeding tube insertion), or around another tubular organ
(as in the inversion of the vermiform appendix in auto-appendec-
tomy), or simply to close a round-configurated defect (as in closing
a small colonic perforation). As the name implies, in the purse-
string suturing technique, as the suture is tightened, the tissue
involved will create an enclosure that is similar to a purse that is
being tied up in its neck using a string. The technique is perform
on the bowel wall by suturing the sero-muscular layer around the
defect at equidistant points of about 2-3 millimeters apart, form-
ing a circle around the centrally located opening of the bowel wall
so that the point of exit is almost approximating the point of entry.
When the suture ends are knotted, this should create the effect of
circumferential tightening closure around the defect until all the
edges approximate centrally into a closed purse. Other clinical
uses may require a double purse-string suturing technique wherein
a smaller purse is created within a bigger purse so that the bigger
purse, when tightened after the smaller purse, inverts the closure
done by the smaller one. This is intended to decrease the prob-
ability of leak in and around the closure.
SMEAD JONES SUTURING (Far-Far-Near-Near)
REFERENCE
Chassin, Jameson , Operative Strategy in General Surgery, Sprigler- Verlag NewYork (1994) PP 845-856Click here for video on Purse String
Click here for video on Smead Jones
Purse String
Smead Jones Suturing
This technique is most useful for closing the midline abdomi-
nal wall incision. Using a 1-0 Polydioxanone suture (PDS), encom-
pass 3 cm of the tissue on each side of the linea alba then take a
small bite at the linea alba about 5mm in width on each side. This
results in a small loop within a large loop. The purpose of the
small loop is simply to orient the linea alba so its remains in
apposition rather one side moving on top of the other. Place the
small loop 5-10mm below the main body of the suture to help
eliminate the gap between adjacent sutures. Insert the next suture
no more than 2 cm below the first. Large, curved Ferguson needles
are used for this procedure.

Column A
___1. This suturing technique is intended to close an opening of
a hollow organ around a tube
___2. This suturing technique is used for fine skin closure
producing everted edges. It consists “far-far, near-near” compo-
nent.
___3. This technique is an interrupted inverting suturing of the full
thickness of bowel wall using only a single row of non absorb-
able sutures in bowel anastomosis.
___4. This suturing technique is used chiefly to approximate the
outer seromuscular layer in any multiple layer closure of an
anastomosis or opening in the gastrointestinal tract.
___5. This suturing technique is usually used to approximate first
layer of closure of the anterior wall of the gastrointestinal
anastomosis.
___6. This suturing technique avoids any stitch marks on the skin
and is usually is used to close wounds where cosmetic aspects
are especially important.
___7. This technique is usually used as an internal retention
suturing technique as an added strength to hold the abdominal
together and consists of a “far-far-near-near” component.
___8. This suturing technique involves passing each stitch in
continuous fashion through the loop of the previous stitch. It is
usually used for hemostatic purposes.
Column B
A. Vertical Mattress
B. Gambee
C. Continuous Interlocking
D. Purse String
E. Subcuticular
F. Smead Jones
G. Connel
H. Lembert
Self-Assessment Questions (Chapter VI)
Direction:
On the blank beside each number in Column A, identify and write the letter from column B that corresponds to column A.
Objectives of this Chapter
After going through this chapter, the learner is expected to:
1. Select the appropriate suture materials/needles to be used
in commonly performed general surgical procedures.
2. Apply the principles behind the rational use of these
suture materials/needles in the different surgical procedures.
3. Identify the alternative suture materials and techniques for
the said procedures.
Plastic Closure of Skin Lacerations
Listed below is the recommended manner of plastic repair for
lacerations in various locations:
When repairing skin lacerations, the skin edges must first be
freshened to achieve a sharp, smooth border. The thinner the
skin, the finer the sutures to be used, e.g., eyelid, use 6-0 or 7-
0 nylon, polypropylene or silk.The same sutures are recom-
mended for other facial lacerations without tension. Facial
lacerations with tension should be closed with 5-0.
For skin lacerations with subcutaneous tissue involvement
that is less than 0.5 cm. deep, subdermal stitches using 5-0 or
6-0 polyglactin, poliglecaprone or polydioxanone are recom-
mended. Thereafter, the skin should be closed as above.
For skin lacerations with subcutaneous tissue involvement
greater than 0.5 cm. deep, the subcutaneous tissue should first
be closed with absorbable sutures. In the absence of tension,
Chapter VII
Clinical Applications
Cenon R. Alfonso, MD, FPCS; Jerome G. Baldonado, MD, FPCS; Alejandro C. Dizon, MD, FPCS; Rene C. Encarnacion, MD,
FPCS; Eduardo S. Eseque, MD, FPCS; Gabriel L. Martinez, MD, FPCS; Paul Jesus S. Montemayor, MD, FPCS; Jose Antonio M.
Salud, MD, FPCS; and Jose A. Solomon, MD, FPCS.
use polyglactin, poliglecaprone or polydioxanone 5-0. Thereaf-
ter, the skin should be closed as mentioned above.
If the muscle is involved, repair the muscle using absorbable
sutures, 4-0 or 5-0 polyglactin, poliglecaprone or
polydioxanone after which the steps as mentioned earlier are
followed.
The preferred needles for the above procedures would either
be P-1, P-3, PC-5 or FS-2 needles.
Skin Closure with Skin Adhesives
(Octylcyanoacrylate/Strips)
Prior to repairing wounds that may be closed with skin
adhesives, it is first necessary to assess whether deep suturing or
debridement is necessary. Skin adhesives are used only for the
most superficial layer of the skin and so it is necessary to suture
deeper structures if they are involved. After this has been done,
the wound edges are manually approximated together with
fingers or forceps. If Octylcyanoacrylate is to be used, this is
applied on the wound using an applicator tip. The wound
edges are held together for about 30 to 45 seconds to allow for
complete polymerization. A film will be noted over the wound.
No dressings are necessary. The said adhesive film will slough
or fall off within 5-10 days as the skin re-epithelializes.

For skin strips, after deeper structures have been repaired,
the wound edges are approximated again with the fingers or
forceps and the strips are simply applied over the wound edges
to apposition. The strips may then be removed in 5-7 days.
Abdominal Wall Closure
In closing the abdominal wall, it is not necessary to close the
peritoneum as closure of this layer does not contribute to wound
strength. Still, some surgeons prefer to do so since this is
considered to aid in reducing the formation of adhesions.
However, the use of highly reactive sutures or sutures that are
applied too tightly may result in formation of significant adhe-
sions between the peritoneum and the underlying structures.
Furthermore, healing of the peritoneum is complete within seven
to fourteen days post-operatively. Thus, if the peritoneum is to be
closed, it is best to use sutures that result in minimal tissue
reaction while maintaining tensile strength for at least 14 days.
Polyglactin and polyglycolic acid sutures are thus recommended
using a 1/2 circle round needle.
The fascia is considered the most important layer in closing
an abdominal surgical wound. It is the major supportive
structure of the body and is the strongest tissue in the abdomi-
nal wall and thus, carries the brunt of the stress on the abdomi-
nal wound. Breakdown of this layer may result in the develop-
ment of incisional or ventral hernias especially in malnourished,
obese or immunocompromised patients.
The known critical healing period of fascia is somewhere
between the 14th and 21st post-operative days. A suture must
therefore maintain immediate and extended wound support to
prevent breakdown of this layer. In this regard, the best suture
materials would be those that maintain a long tensile strength
such as polypropylene, nylon, polyester, silk or cotton, 2-0 or 0
on a 1/2 circle needle. Since absorbable sutures like polyglactin
and polydioxanone can maintain tensile strength of about 40%-
50% at 3 weeks, they may also be used. However, in the
presence of infection or contamination, the sutures that elicit
minimal inflammation are best.
Inguinal Herniorrhaphy/Repair of the Inguinal Floor
Inguinal hernia repair is classified as a clean wound. The
incision is usually short and the precise anatomical repair is done
in a deep confined space. In repairing the inguinal floor, precise
tension on the fascial edges requires a technique where each
suture exists independent of the others. For this reason, the
majority of hernia repairs are performed using a simple
interrupted suture line. There are, however, some repair tech-
niques that utilize a continuous suture line. Since knot-tying is
extensive, and knot security is important in the interrupted
technique, a braided suture is used while monofilaments are
used for the continuous technique. The repair requires a strong
suture of adequate diameter to keep the tissues together without
breaking or cutting through. While the transversalis fascia is
relatively easy to penetrate, its analogues like the iliopubic tract
or Cooper’s ligament are tough tissues. In the face of tough
tissues in tight working areas, there is the tendency for a needle
to shift in the needle holder; worse, it can bend, perforate or
lacerate vital and vulnerable structures. For a precise anatomical
repair, the choice of the suture and the needle is vital.
The ideal suture is a non-absorbable braided (or monofila-
ment), 0 or 2-0 with permanent strength and low reactivity
(polyester or polypropylene) together with a very sharp tapered,
heavy-bodied atraumatic (channeled or drilled) needle, prefer-
ably 1/2 to 5/8 circle with a relatively short to medium chord
length.
The acceptable alternative is a silk suture threaded through a
sharp, tapered, heavy-bodied, eyed needle at 1/2 circle with a
relatively short to medium chord length.
Appendectomy
During an appendectomy, the mesoappendix is serially
clamped, cut down to the base and ligated using silk/cotton 2-0
or 3-0 sutures.
The base of the appendix is suture ligated using 2-0 silk/
cotton in a round 1/2 circle intestinal needle especially if the
Click here for video on Abdominal Wall Closure
Click here for video on Subcuticular Skin

base is wide. A free tie of 2-0 is often times used to reinforce
ligation of the base before the appendix is divided. It is always
safer to doubly ligate the base to reduce the possibility of stump
blowout. An alternative step is to apply purse-string sutures
using 2-0 or 3-0 silk/cotton in a 1/2 circle intestinal needle to
bury the appendiceal stump. However, no clear advantage has
been noted with the use of purse-string sutures.
Another alternative suture material is the braided absorbable
variety (polyglactin/polyglycolic) 2-0 or 3-0. Since it has a high
breaking force, maintains its tensile strength up to 14 days and is
only absorbed after 45 days, it can be used to ligate the appen-
diceal stump without the fear of stump blow-out. The wound
would have long healed before they are absorbed. One clear
disadvantage is the cost of the suture material.
Cholecystectomy and Surgery of the Bile Ducts
After identifying the cystic duct and artery during a cholecys-
tectomy, these structures are individually ligated with non-
absorbable 2-0 sutures (silk/cotton). Sometimes the cystic duct
can be ligated with a transfixing suture using 2-0 or 3-0 silk/
cotton utilizing a full curved round intestinal needle. Braided
suture materials are used in ligating vessels, the cystic duct and
bile ducts because they require minimal knots without easily
slipping as compared to monofilaments. Although tissue reaction
is greater, it is clinically insignificant if applied outside the wall of
a hollow structure or viscus. Hence, non-absorbable braided
suture materials are appropriate in this setting. It does not readily
slip and is cost-effective. Another alternative method of securing
the cystic duct stump is by using liga clips as in laparoscopic
surgery. Doubly ligating or clipping the cystic duct stump is
suggested to prevent unnecessary leaks.
When closing a choledochotomy, it is advisable to use a 3-0,
4-0 or 5-0 absorbable monofilament suture such as
poliglecaprone or polydioxanone, using a 1/2 curved tapered
needle. This is preferable over non-absorbable because they do
not act as a nidus to stone formation and they produce less
trauma to the bile duct wall since it smoothly slides inside the
needle tract during suturing. Its disadvantages are that it
requires more knots to secure the closure and are relatively more
expensive.
The best alternative suture material is the braided absorb-
able variety which requires less knots to secure the choledochos-
tomy (polyglactin or polyglycolic).
Liver Trauma
Simple suturing techniques of traumatic liver injuries are
applicable only to type I and II injuries. More complex liver
trauma management is beyond the scope of this manual. The
majority of simple liver injuries usually resolve spontaneously. If
bleeding fails to stop with other maneuvers (e.g., packing or
electro-cautery), the cut edges of the lacerated liver parenchyma
may need to be sutured.
Liver parenchyma is very vascular and friable. Tensile strength
is not a concern in this situation because what is required is just
to approximate the edges for hemostasis. Long tensile strength
retention and absorption time is likewise not a requirement.
For this reason, an appropriate and ideal suture for this
situation is chromic catgut suture. Chromic suture has a smooth
surface thereby inciting less trauma as it passes through liver
tissue. The suture is retained long enough for the purpose of
maintaining hemostasis. The suture is best swaged on a long,
blunt-tipped liver needle (BP-1) which is best when passed
through the vascular liver tissue.
Chromic 2-0 horizontal mattress sutures are applied on both
edges of the cut surface with or without interposition of a hemo-
static material or omental pedicle. The knots are tied gently with
Click here for video on Double Ligation of the Appendix
Click here for video on Ligation of the Cystic Duct
Click here for video on Suture of the CBD

a minimum of tension just to approximate the edges, taking
care in avoiding cutting through the friable liver tissue. Applica-
tions of deep suture bites are likewise avoided to prevent
necrosis of normal liver tissue.
The alternative suture would be an absorbable suture like
polyglactin.
Bowel Anastomosis
Leakage of intestinal contents or its frank breakdown after a
bowel anastomosis carries severe consequences. A critical factor
that determines anastomotic integrity is the application of proper
suturing technique and material. However, it must be empha-
sized that half of the procedure is accomplished before the
actual resection and anastomosis, i.e., during the preparation
of the segments that are to be resected and the bowel ends that
are to be joined together.
Another unique feature of the procedure is that of tissue
inversion. The repair is reinforced by the proper approximation
and healing of the seromuscular layer of each bowel end.
Inversion therefore provides a serosa-to-serosa apposition over a
mucosa-submucosal repair.
All the layers of the bowel wall are characteristically soft with
minimal to moderate dense fibrous support. As such it is easy to
penetrate. Using taper point or round point needles is appropri-
ate. Anything sharper than a taper or round needle may be more
traumatic or more risky than is desirable. Moreover, the depth of
the bite in bowel anastomosis need not be very deep and the
working space inside the abdominal cavity may be somewhat
confined. A 1/2 circle needle is standard for this repair. Bowels
are lumenous structures with fluid and gaseous contents and its
repair is ideally done without tension which seldom offers
resistance. Therefore, the diameter of the needle must be thin to
keep it water-tight but at the same time relatively strong and
stable given the necessary thin wire diameter. The average
thickness of bowel walls that are to be anastomosed only require
medium chord length. And in order to create the least puncture
injury to the bowel walls, atraumatic needles, i.e., those with a
swage attachment rather than eyed, are desirable.
Healing time is relatively fast with the anastomosis assuming
tensile strength in about 7-14 days. The serosal layer heals faster
than the submucosa but it is the latter, being the most fibrous
among the 4 layers that gives the anastomosis its required
strength. The submucosal repair therefore, is the most important
for the surgeon. Consequently, the suture material that is ideal
for bowel anastomosis must therefore retain tensile strength
beyond the healing time of the slowest healing tissue - the
submucosa. Absorbable suture materials are commonly used
but non-absorbables are also popular particularly among single
layer technique of repair.
It is not uncommon for the prolonged presence of a suture in
the mucosa to provoke significant foreign body reaction and
granuloma formation. This has great significance in the gastric
mucosa as it may lead to post-operative anastomotic ulcer
formation. Hence, for the inner layer in gastric or duodenal
anastomosis, short term absorbable suture materials are pre-
ferred. A popular compromise in single layer closure technique is
a longer term absorbable suture material such as polyglactin,
polyglycolic and polydioxanone.
In a double layer anastomosis, non-absorbables are com-
monly used in the seromuscular inverting stitch while virtually any
absorbable material like poliglecaprone is acceptable in the
mucosal and submucosal layers. The rationale here is the
required prolonged reinforcement of the seromuscular repair for
the slower healing submucosal layer and for the quickly ab-
sorbed inner suture.
There are, however, suturing techniques that accomplish
bowel anastomosis using single layer repair. These are mostly
applied in esophageal and rectal anastomoses where the
procedures are performed in very limited and confined spaces
and where the margins of resection are too short to adequately
permit an inversion technique. The anastomoses in such cases
may be commonly performed with a running stitch, although an
interrupted technique is also popular for facilitating a precise re-
approximation. Here, both braided and monofilament materials
are utilized depending on the technique, i.e., monofilament for
running, continuous stitch and braided for interrupted. Keep in

mind that a continuous non-absorbable suture would, in
essence, serve as a purse-string that would permanently limit the
size of the lumen as opposed to employing the interrupted
technique using absorbables.
In considering the size of the suture material, there has to be
a reasonable balance between the required tensile strength and
tissue reaction due to the foreign body. Suture material strength
is a function of the size. But bowel anastomosis is best done
without tension. The bowel walls are neither thick nor fibrous
where stress and strain to suture material is minimal. But if the
suture is too “fine,” there is always the possibility of “cutting
through” the tissues with the slightest strain. Therefore, 3-0 is the
standard while 2-0 is acceptable as well as 4-0.
Finally, a material that elicits the least amount of tissue
reaction is desirable in order to minimize incidence of adhesions
between the site of repair and other peritoneal surfaces as well
as to eliminate granuloma formation within and without the
bowel.
Vascular Anastomosis and Repair
Vascular suturing has specific demands different from other
suturing techniques. Suturing and repair of vessels demand
precision in the approximation of the cut edges to maintain
integrity of the lumen and prevent dehiscence/breakdown which
has more disastrous consequences. Tensile strength retention and
absorption rate are very critical in determining the choice of
suture. Blood vessels are subjected to a tremendous amount of
pressure per square millimeter and for this reason, sutures have
to be strong and absorbed/broken down only after a long time.
Given also the special situation of anastomosing blood vessels to
synthetic grafts, one must remember that only one side of the
repair will undergo biologic wound healing and repair. It has also
been noted that using absorbable sutures or sutures that are
easily broken down (including silk), leads to a higher incidence of
vascular anastomotic breakdown or pseudo-aneurysm formation.
The ideal suture for this situation is a suture that is inert, non-
traumatic, will retain its tensile strength for a long time and will
not easily be broken down or absorbed. Polypropylene has been
found to conform to most of these requirements. It is monofila-
ment, non- absorbable and incites very minimal inflammatory
reaction. This is best used with a 1/2 circle, tapered BV-1 or RB-
1 needle.
Vessels may be sutured in a running, continuous fashion,
for which a double-armed suture is best or in an interrupted
manner, especially for smaller vessels. Continuous suture
technique for very small vessels may have a purse-string effect
which may narrow the lumen further.
An alternate suture for use in vascular surgery is braided
polyester.
Application of Retention Sutures
These are utilized as reinforcing sutures to relieve pressure
on the suture line and to prevent postoperative wound disrup-
tion in abdominal wound closures in particularly vulner-
able patients, as in the elderly and immunocompromised
patients.
Retention sutures utilize strong and large suture materials, in
particular, non-absorbable sutures. Absorbable sutures need not
be used as these sutures will eventually be removed in a couple
of weeks. Sutures that may be used for this particular procedure
include nylon, polypropylene or silk 2, 1 or 0. Even stainless
steel or wire may be used. These same suture materials may be
used even in the presence of infection as they produce the least
inflammatory reaction. The best needle to use would be a large
cutting-edge needle, so as to penetrate the layers of the abdomi-
nal wall with ease. Retention sutures should be applied prior to
closing any layer of the abdominal wall and must be applied
under direct vision to prevent bowel injury. After all retention
sutures have been applied and after all the layers of the ab-
dominal wall have been closed, they are all individually tied. To
prevent tying the retention sutures too tightly, rubber bridges are
applied. These rubber bridges may be in the form of cut strips of
drainage tubes or catheters.

REFERENCES
Abrahamson J. Hernias. In: Zinner MJ, Schwartz SI, Ellis H, et al (eds), Maingot’sAbdominalOperations, 10th ed., Stamford, Conn.: Appleton & Lange, 1997
Brooks DC, Zinner, MJ. Surgery of the Small and Large Bowel. In: Zinner MJ,Schwartz SI, Ellis H, et al (eds), Maingot’s Abdominal Operations, 10th ed.,Stamford, Conn.: Appleton & Lange; 1997
Feliciano DV, Moore EE and Mattox KL. TRAUMA, 3rd ed., Stamford, Conn,:Appleton & Lange, 1996
Rout WR. Gastrointestinal Suturing. In: Zuidema GD, Ritchie WP, Jr. (eds),Shackelford’s Surgery of the Alimentary Tract, 4th ed., Philadelphia, PA: WBSaunders; 1996
Rout WR. Closure of Wound. In: Zuidema GD, Ritchie WP, Jr. (eds), Shackelford’sSurgery of the Alimentary Tract, 4th ed., Philadelphia, PA: WB Saunders; 1996
Rutherford RB. Atlas of Vascular Surgery: Basic Techniques and Exposures; WBSaunders Co., 1993
Singer AJ, Hollander JE and Quinn JV. Evaluation and Management of TraumaticLacerations; The New England Journal of Medicine, 1997, 337:1142-1148
Wilson RF and Walt AJ. Management of Trauma: Pitfalls and Practice, 2nd ed.,Williams & Wilkins, 1996
Zollinger RM, Jr., Zollinger RM. Atlas of Surgical Operations, 7th ed., New York:Macmillan, 1988

1. Which suture is best to ligate the cystic duct during a
cholecystectomy?
a. Nylon 3-0
b. Silk 2-0
c. Polyglactin 2-0
d. Cotton 4-0
e. Chromic 2-0
2. After insertion of a T-tube, repair of the CBD around the
tube
is best with which suture?
a. Silk 4-0 interrupted
b. Cotton 4-0 continuous
c. Polyglactin 4-0 simple, interrupted
d. Polypropylene 5-0 simple, interrupted
e. Polyglycolic acid 3-0 continuous
3. The use of absorbable sutures is advocated when applying
sutures in the biliary tree because?
a. It evokes less inflammation than non-absorbable sutures
does
b. Non-absorbable sutures become nidus for later stone
formation
c. Strictures are less common with the use of absorbable
sutures
d. Leaks are less likely to occur with absorbable sutures
e. Absorbable sutures are easier to handle
4. During a retrograde appendectomy, ligature of the base is
performed using which suture?
a. Silk 2-0
b. Polypropylene 2-0
c. Polyglactin 3-0
d. Chromic 2-0
e. Polyester 2-0
5. The following suture materials may be used in closing the
inner layer of a two-layer inverting bowel anastomosis, except:
a. Chromic catgut
b. Polyglycolic
Self-Assessment Questions (Chapter VII)
c. Plain catgut
d. Polyglactin
e. Polypropylene
6. The most frequently used suture material for single-layer
bowel anastomosis is:
a. Polypropylene
b. Braided silk
c. Cotton
d. Surgical gut
e. Polydioxanone
7. A 13-year old boy sustained a 2 cm. by 8 mm. deep
laceration on the left upper eyelid after being accidentally hit by
a baseball bat. The wound is clean with relatively smooth edges.
What would you do?
a. Close the wound with interrupted silk 6-0
b. Cut clean the edges and close with interrupted nylon 7-0
c. Cut clean the edges, suture the subcutaneous tissue with
6-0 polyglactin then close the skin with interrupted silk 6-0
d. Deep bite skin closure (together with subcutaneous tissue)
using 5-0 nylon
e. Debride and if available, use skin adhesives
8. During an inguinal herniorrhaphy, the suture of choice in
repairing the floor of the canal is?
a. Silk 2-0 interrupted
b. Chromic 0 interrupted
c. Nylon 0 continuous
d. Polyglactin 0 interrupted
e. Interrupted polypropylene 0
9. A completely transected axillary artery is best repaired end-to-
end using which double-armed suture?
a. Nylon 6-0 interrupted
b. Polypropylene 5-0 interrupted
c. Nylon 5-0 interrupted
d. Polypropylene 5-0 continuous
e. Polyester 5-0 continuous

Glossary of Terms
absorbable sutures
sutures which are broken down and absorbed by either hydrolysis
or digested by enzymatic processes
blunt point
a type of needle wherein the tip is rounded and will not cut through
tissues
braided
sutures with intertwining threads
breaking strength
measurement of force required to break a wound without regard
to its dimension
burst strength
amount of pressure neecessary to rupture a viscus
catgut
a type of absorbable suture derived from the bowel of either sheep
or cattle
chord length
the straight line distance from the point of a curved needle to the
swage
chromic
an absorbable suture treated with chromate compounds
continuous
a type of suture technique wherein sutures are placed into tissues
without interruption
conventional cutting edge
a type of needle with two cutting edges and in addition, have a
third cutting edge on the inside concave curvature of the needle
cotton
a non-absorbable braided suture
hydrolysis
a type of chemical process that results in suture breakdown of
synthetic absorbable sutures
in vivo tensile strength
amount of tension or pull which a suture can withstand before it
breaks, inside the tissue
knot tensile strength
the force which the suture strand can withstand before it breaks
during knot tying
knot tying
the process of securing sutures using instruments or done manually
ligature
any suture material used to tie vessels or structures
monofilament
synthetic sutures that are single and untwisted
needle body
the portion between the point and the swage of the needle
needle diameter
the gauge or thickness of the needle wire
needle length
the distance measured along the needle itself from point to end
needle radius
Appendix A
polyglyconate
a synthetic absorbable monofilament suture marketed as Maxon(r)
polypropylene
a non-absorbable synthetic monofilament suture marketed as
Prolene(r), Premilene(r), or Surgidac(r)
reverse cutting
like a conventional cutting needle except that its third cutting edge
is at the outer convex curvature of the needle
silk
the most commonly used non-absorbable braided suture; a protein
filament produced by silkworms
swage
the area in which the suture is attached to the needle resulting in
the needle and suture becoming a continuous unit
tapered needles
the type of needle wherein the body of the needle gradually tapers
to a sharp point at the tip
tensile strength
the load applied per unit of cross-section area measured in lbs/
in2 or kg/cm2
wire/steel
non-absorbable metal suture used primarily for fixing bony
structures
if the curvature of the needle were to make a full circle, this would
be the distance from the center of the circle to the body of the
needle
non-absorbable sutures
type of sutures that are not broken down by chemical processes in
tissues
nylon
a synthetic non-absorbable type of suture in monofilament and
braided forms marketed as Ethilon(r)or Nurolon*
plain catgut
simplest form of absorbable catgut suture
polydioxanone
a synthetic monofilament absorbable suture marketed as PDS(r)II
polyester
the first synthetic braided non-absorbable suture marketed as
Mersilene(r), Miralene(r), Ethibond(r), or Surgidac(r)
poliglecaprone
a synthetic monofilament absorbable suture marketed as Monocryl(r)
polyglactin
a synthetic braided absorbable suture marketed as Coated Vicryl(r)
polyglycolic
a synthetic braided absorbable suture marketed as Dexon(r)

CHAPTER I
1. B 9. B
2. A 10. D
3. B 11. A, D
4. C 12. A, D
5. A 13. A, D
6. C 14. B
7. E 15. A, D
8. A
CHAPTER II
1. B
2. A
3. D
4. C
5. A
CHAPTER III CHAPTER IV
1. A 1. D
2. D 2. C
3. C 3. D
4. D 4. B
5. C 5. E
6. C
7. B
8. D
Appendix B
Answers to Self-Assessment Questions
CHAPTER V
1. C
2. B
CHAPTER VI
1. D
2. A
3. B
4. H
5. G
6. E
7. F
8. C
CHAPTER VII
1. B
2. C
3. B
4. A
5. C
6. B
7. C
8. E
9. D
2003 Board of Regentsof the Philippine College of Surgeons
President: Fernando L. Lopez, MD
Vice-President: Edgardo R. Cortez, MD
Treasurer: Arturo S. de la Peña, MD
Secretary: Leonardo L. Cua, MD
Members: Josefina R. Almonte, MD Maximo B. Nadala, MD Armando C. Crisostomo, MD
Gerardo A. Directo, MD Rodolfo L. Nitollama, MD Rey Melchor F. Santos, MD
Maximo Dy-R. Elgar, MD Stephen S. Siguan, MD Jose C. Gonzales, MD
Maximo H. Simbulan, Jr., MD Vedasto B. Lim, MD

2003 Committeeon Surgical Training of thePhilippine College of Surgeons
Chairman: Cenon R. Alfonso, MD
Members: Shirard L.C. Adiviso, MD, MHPEd
Jose Joey H. Bienvenida, MD
Miguel C. Mendoza, MD
Renato Cirilo A. Ocampo, MD
Secretary: Annette G. Tolentino
Regent-in-charge:Armando C. Crisostomo, MD, MHPEd
Sitting (Left to right): Cenon R. Alfonso, MD,
Armando C. Crisostomo, MD, Annette G. Tolentino
Standing ( Left to Right): Miguel C. Mendoza, MD,
Renato A. Ocampo, MD, Shirard L.C. Adiviso, MD,
Joey H. Bienvenida, MD

Acknowledgement
The Committee on Surgical Training of the Philippine College of Surgeons would
like to express its sincerest gratitude to Ms. Annette G. Tolentino, Executive Secretary
of the Philippine College of Surgeons and to Ms.Ruth Nicolas, Franchise Manager,
Ethicon Division, of Johnson and Johnson Medical, Philippines, for their unwavering
and dedicated support to the completion of this 2003 Basic Surgical Skills, Electronic
Version. Also, the committee would like to acknowledge the expertise of Mr. Juanito
R. Gatus of Priority One Corporate and Marketing Communications, for the layout
and graphics; and Mr. Alain Espina, for the development of the CD.

2003 Board of Regentsof the Philippine College of Surgeons
President: Fernando L. Lopez, MD
Vice-President: Edgardo R. Cortez, MD
Treasurer: Arturo S. de la Peña, MD
Secretary: Leonardo L. Cua, MD
Members: Josefina R. Almonte, MD Maximo B. Nadala, MD Armando C. Crisostomo, MD
Gerardo A. Directo, MD Rodolfo L. Nitollama, MD Rey Melchor F. Santos, MD
Maximo Dy-R. Elgar, MD Stephen S. Siguan, MD Jose C. Gonzales, MD
Maximo H. Simbulan, Jr., MD Vedasto B. Lim, MD
2003 Committeeon Surgical Training of thePhilippine College of Surgeons
Chairman: Cenon R. Alfonso, MD
Members: Shirard L.C. Adiviso, MD, MHPEd
Jose Joey H. Bienvenida, MD
Miguel C. Mendoza, MD
Renato Cirilo A. Ocampo, MD
Secretary: Annette G. Tolentino
Regent-in-charge:Armando C. Crisostomo, MD, MHPEd
Sitting (Left to right): Cenon R. Alfonso, MD,
Armando C. Crisostomo, MD, Annette G. Tolentino
Standing ( Left to Right): Miguel C. Mendoza, MD,
Renato A. Ocampo, MD, Shirard L.C. Adiviso, MD,
Joey H. Bienvenida, MD

Acknowledgement
The Committee on Surgical Training of the Philippine College of Surgeons would
like to express its sincerest gratitude to Ms. Annette G. Tolentino, Executive Secretary
of the Philippine College of Surgeons and to Ms.Ruth Nicolas, Franchise Manager,
Ethicon Division, of Johnson and Johnson Medical, Philippines, for their unwavering
and dedicated support to the completion of this 2003 Basic Surgical Skills, Electronic
Version. Also, the committee would like to acknowledge the expertise of Mr. Juanito
R. Gatus of Priority One Corporate and Marketing Communications, for the layout
and graphics; and Mr. Alain Espina, for the development of the CD.