battery powered wheelbarrow carretilla propulsada a batería · 3 english 4. do not abuse the cord....
TRANSCRIPT

INSTRUCTION MANUALMANUAL DE INSTRUCCIONES
Battery Powered WheelbarrowCarretilla Propulsada a BateríaXUC01
IMPORTANT: Read Before Using.IMPORTANTE: Lea antes de usar.

2 ENGLISH
ENGLISH (Original instructions)
SPECIFICATIONSModel: XUC01
Dimensions (L x W x H)
When carrier is installed During operation: 1,560 mm x 1,060 mm x 900 mm (61-1/2″ x 41-3/4″ x 35-1/2″)
When stored: 1,110 mm x 670 mm x 820 mm (43-3/4″ x 26-3/8″ x 32-1/4″)
When bucket is installed During operation: 1,310 mm x 790 mm x 900 mm (51-1/2″ x 31-1/8″ x 35-1/2″)
When stored: 1,110 mm x 590 mm x 820 mm (43-3/4″ x 23-1/4″ x 32-1/4″)
Traveling speed Forward 1.5 or 3.5 km/h (0.9 or 2.2 mile/h)
Reverse 1.0 km/h (0.6 mile/h)
Minimum turning radius 1,075 mm (1.2 yard) (Outer diameter when turning with front wheel as axis)
Maximum climbing capacity 12°
Maximum load capacity 130 kg (287 lbs)
Brake Front wheel Disc brake with wire
Rear wheel Fixed with pedal
Tire Front wheel Tubeless tire
Rear wheel Self-sealing tire
Rated voltage D.C. 18 V
Standard battery cartridge BL1815N / BL1820B / BL1830 / BL1830B / BL1840B / BL1850B / BL1860B
Charger DC18RC / DC18RD / DC18SD / DC18SE / DC18SF
Net weight When carrier is installed 45 kg (99 lbs)
When bucket is installed 39 - 40 kg (86 - 88 lbs)
• Due to our continuing program of research and development, the specifications herein are subject to change without notice.
• Specifications and battery cartridge may differ from country to country.• The weight may differ depending on the attachment(s), including the battery cartridge. The lightest and heavi-
est combination, according to EPTA-Procedure 01/2014, are shown in the table.
SAFETY WARNINGSGeneral power tool safety warnings
WARNING: Read all safety warnings, instruc-tions, illustrations and specifications provided with this power tool. Failure to follow all instructions listed below may result in electric shock, fire and/or serious injury.
Save all warnings and instruc-tions for future reference.The term "power tool" in the warnings refers to your mains-operated (corded) power tool or BATTERY-operated (cordless) power tool.Work area safety1. Keep work area clean and well lit. Cluttered or
dark areas invite accidents.
2. Do not operate power tools in explosive atmo-spheres, such as in the presence of flammable liquids, gases or dust. Power tools create sparks which may ignite the dust or fumes.
3. Keep children and bystanders away while operating a power tool. Distractions can cause you to lose control.
Electrical Safety1. Power tool plugs must match the outlet. Never
modify the plug in any way. Do not use any adapter plugs with earthed (grounded) power tools. Unmodified plugs and matching outlets will reduce risk of electric shock.
2. Avoid body contact with earthed or grounded surfaces, such as pipes, radiators, ranges and refrigerators. There is an increased risk of elec-tric shock if your body is earthed or grounded.
3. Do not expose power tools to rain or wet con-ditions. Water entering a power tool will increase the risk of electric shock.

3 ENGLISH
4. Do not abuse the cord. Never use the cord for carrying, pulling or unplugging the power tool. Keep cord away from heat, oil, sharp edges or moving parts. Damaged or entangled cords increase the risk of electric shock.
5. When operating a power tool outdoors, use an extension cord suitable for outdoor use. Use of a cord suitable for outdoor use reduces the risk of electric shock.
6. If operating a power tool in a damp location is unavoidable, use a ground fault circuit inter-rupter (GFCI) protected supply. Use of a GFCI reduces the risk of electric shock.
7. Power tools can produce electromagnetic fields (EMF) that are not harmful to the user. However, users of pacemakers and other similar medical devices should contact the maker of their device and/or doctor for advice before operating this power tool.
Personal Safety1. Stay alert, watch what you are doing and use
common sense when operating a power tool. Do not use a power tool while you are tired or under the influence of drugs, alcohol or med-ication. A moment of inattention while operating power tools may result in serious personal injury.
2. Use personal protective equipment. Always wear eye protection. Protective equipment such as dust mask, non-skid safety shoes, hard hat, or hearing protection used for appropriate conditions will reduce personal injuries.
3. Prevent unintentional starting. Ensure the switch is in the off-position before connecting to power source and/or BATTERY pack, pick-ing up or carrying the tool. Carrying power tools with your finger on the switch or energising power tools that have the switch on invites accidents.
4. Remove any adjusting key or wrench before turning the power tool on. A wrench or a key left attached to a rotating part of the power tool may result in personal injury.
5. Do not overreach. Keep proper footing and balance at all times. This enables better control of the power tool in unexpected situations.
6. Dress properly. Do not wear loose clothing or jewellery. Keep your hair, clothing and gloves away from moving parts. Loose clothes, jewel-lery or long hair can be caught in moving parts.
7. If devices are provided for the connection of dust extraction and collection facilities, ensure these are connected and properly used. Use of dust collection can reduce dust-related hazards.
8. Do not let familiarity gained from frequent use of tools allow you to become complacent and ignore tool safety principles. A careless action can cause severe injury within a fraction of a second.
9. Always wear protective goggles to protect your eyes from injury when using power tools.The goggles must comply with ANSI Z87.1 in the USA.It is an employer's responsibility to enforce the use of appropriate safety protective equip-ments by the tool operators and by other per-sons in the immediate working area.
Power tool use and care1. Do not force the power tool. Use the correct
power tool for your application. The correct power tool will do the job better and safer at the rate for which it was designed.
2. Do not use the power tool if the switch does not turn it on and off. Any power tool that cannot be controlled with the switch is dangerous and must be repaired.
3. Disconnect the plug from the power source and/or remove the BATTERY pack, if detachable, from the power tool before making any adjust-ments, changing accessories, or storing power tools. Such preventive safety measures reduce the risk of starting the power tool accidentally.
4. Store idle power tools out of the reach of chil-dren and do not allow persons unfamiliar with the power tool or these instructions to operate the power tool. Power tools are dangerous in the hands of untrained users.
5. Maintain power tools and accessories. Check for misalignment or binding of moving parts, breakage of parts and any other condition that may affect the power tool’s operation. If dam-aged, have the power tool repaired before use. Many accidents are caused by poorly maintained power tools.
6. Keep cutting tools sharp and clean. Properly maintained cutting tools with sharp cutting edges are less likely to bind and are easier to control.
7. Use the power tool, accessories and tool bits etc. in accordance with these instructions, tak-ing into account the working conditions and the work to be performed. Use of the power tool for operations different from those intended could result in a hazardous situation.
8. Keep handles and grasping surfaces dry, clean and free from oil and grease. Slippery handles and grasping surfaces do not allow for safe handling and control of the tool in unexpected situations.
9. When using the tool, do not wear cloth work gloves which may be entangled. The entangle-ment of cloth work gloves in the moving parts may result in personal injury.
BATTERY tool use and care1. Recharge only with the charger specified by
the manufacturer. A charger that is suitable for one type of BATTERY pack may create a risk of fire when used with another BATTERY pack.
2. Use power tools only with specifically des-ignated BATTERY packs. Use of any other BATTERY packs may create a risk of injury and fire.
3. When BATTERY pack is not in use, keep it away from other metal objects, like paper clips, coins, keys, nails, screws or other small metal objects, that can make a connection from one terminal to another. Shorting the BATTERY termi-nals together may cause burns or a fire.
4. Under abusive conditions, liquid may be ejected from the BATTERY; avoid contact. If contact accidentally occurs, flush with water. If liquid contacts eyes, additionally seek med-ical help. Liquid ejected from the BATTERY may cause irritation or burns.

4 ENGLISH
5. Do not use a BATTERY pack or tool that is damaged or modified. Damaged or modified batteries may exhibit unpredictable behaviour resulting in fire, EXPLOSION or risk of injury.
6. Do not expose a BATTERY pack or tool to fire or excessive temperature. Exposure to fire or temperature above 130 °C may cause explosion.
7. Follow all charging instructions and do not charge the BATTERY pack or tool outside the temperature range specified in the instruc-tions. Charging improperly or at temperatures outside the specified range may damage the BATTERY and increase the risk of fire.
Service1. Have your power tool serviced by a qualified
repair person using only identical replacement parts. This will ensure that the safety of the power tool is maintained.
2. Never service damaged BATTERY packs. Service of BATTERY packs should only be per-formed by the manufacturer or authorized service providers.
3. Follow instruction for lubricating and chang-ing accessories.
Battery powered wheelbarrow safety warnings
1. This machine cannot be used on the public road.
2. While operating the machine, always wear non-slip and protective footwear. Non-skid, closed-toed safety boots and shoes will reduce the risk of injury.
3. Inspect pathway before hauling objects/mate-rials. Familiarizing yourself with the pathway and ensuring it is wide enough to safely navigate the machine under load will help reduce losing control of the machine.
4. Use extreme caution on slippery, loose and unstable terrain. Wet and slippery surfaces, such as wet grassy areas, snow or ice, and loose and unstable terrain, such as sand or gravel surfaces, may cause the machine to lose traction and may adversely affect steering, braking and stability.
5. Do not operate the machine on excessively steep slopes. This reduces the risk of loss of control, slipping and falling which may result in personal injury. Slopes greater than the maxi-mum recommended grade and side grades may increase the risk of instability and may adversely affect the ability to stop safely.
6. When working on slopes, always be sure of your footing, always work across the face of slopes, never up or down, and exercise extreme caution when changing direction. This reduces the risk of loss of control, slipping and falling which may result in personal injury.
7. Whenever possible, use level areas for stop-ping, loading and unloading and never leave machine unattended on a slope. The machine is more unstable when resting on a slope than when resting on a level surface.
8. When stopping on slopes, face the machine uphill or downhill and block unbraked wheels. The machine is less stable when facing across a slope. Unbraked wheels, especially those of the castor-type, can potentially turn and roll downhill even while the front wheel parking brake is set.
9. When leaving the machine unattended, set parking brake once the machine is located in a safe stopping area. The parking brake prevents unwanted movement of the front wheel and can improve stability.
10. Ensure that ramps are clean, strong and secure. In order to reduce the risk of injury, all ramps must be clear of loose debris and strong enough to withstand the weight of anticipated loads that will be moved over them. They must have adequate blocking underneath and to both sides to eliminate deflections and side-to-side movement under load. All ramps must be wide enough to have sure footing while hauling loads across them.
11. Avoid extending ramps without toe boards or railings over open spaces. Elevated open spaces and open trenches invite accidental falls and increase the potential for serious injury. Use toe boards or railings on ramps over open spaces to prevent driving the machine off the ramp.
12. Ensure all locking screws are tightly secure before using. Locking screws on the rear wheels and open-type carrier front and side walls must be secure to prevent unwanted movement of these adjustable parts of the machine.
13. Never operate the machine in an overloaded condition. Make sure the machine has the proper capacity rating for the objects or materials that have to be hauled. Excessive loads will make the machine more difficult to maneuver and stop, will increase stopping time and distance, and will increase the risk of instability.
14. Never operate your machine in an over stacked condition. Stacking material above the tray rim or over the sides of the tray can cause the machine to be uncontrollably out of balance and control.
15. Use containers and tie-downs to secure loads. Loose and/or insecure loads are more likely to shift which can result in loss of stability and control.
16. Always maintain a firm grip on handles. Loss of control can increase the risk of personal injury.
17. Remove safety key when not in use. The safety key prevents unwanted, powered use of the machine, such as by children or other untrained or unauthorized persons. Without the key, electric power cannot be turned “on”.
18. Use a sturdy plate with anti-slip and detach-ment prevention function when loading and/or unloading this machine for transportation, or moving this machine between different levels. Make sure the plate inclination does not exceed 12°, and operate the machine slowly and carefully. Unstable and quick operation may result in overturn and/or falling.
19. Do not disassemble, repair, or modify this machine.

5 ENGLISH
Operation1. When operating the machine, stand behind the
machine and hold the handles firmly.2. Do not operate the machine while riding on the
machine.3. Do not allow others to ride on the machine.4. When operating the machine in reverse and
walking backward, watch behind you and be careful not to slip or trip.
5. Do not use the machine when visibility is poor because there is a risk of striking obstacles.
6. When operating the machine on rough ground, decrease speed and exercise caution.
7. When using the machine, avoid soft ground to prevent overturn due to the shoulder of the road collapsing.
8. Do not operate the machine on upward slopes greater than 12°.
9. If you find an abnormality, stop the machine on flat ground. Before inspecting the machine, pull the brake lever and lock the brake, and then turn the power off.
10. Before operating the machine, make sure that the lock lever is fully pulled down and com-pletely locked. If the lock is incomplete, there is a risk of accident or injury as the carrier or bucket may be tilted and the objects fall when going downhill.
11. Be careful not to entangle the cords with the load or obstacles.
Operation on slopes1. Do not cross on slopes.2. Be sure to decrease speed and exercise caution.3. Exercise caution when starting or stopping the
machine on slopes.4. As the loads become less stable on slopes,
firmly secure the loads with ropes.5. As the machine becomes unstable depending
on the condition of the road, keep the load to a minimum.
6. As the view is obscured on slopes, keep the height of the load to a minimum.
7. Never park the machine on steep slopes. Park the machine on flat ground, pull the brake lever and lock the brake, and then turn the power off.
8. Do not change the direction or speed mode on steep slopes.
9. Do not release the switch trigger on upward slopes. The machine may go in reverse and cause an accident.
10. Make sure that the remaining battery capacity is enough before operating on slopes. If the remaining battery capacity is not enough, charge the battery or replace it with a charged one.
Loading objects1. Do not overload objects. When loading
objects, be sure to follow the instructions and load limits in the manual.
2. Firmly secure the objects with ropes.3. Load the objects within the carrier or bucket.
If the objects protrude from the carrier or bucket, there is a risk of accidents due to the objects falling or contact obstacles such as walls.
4. Be sure that loaded objects are below eye level. If the load is too high, it is dangerous because the view is obscured. Also, there is a risk of overturning and injury because the load is likely to be unbalanced.
5. Load the objects on the carrier or bucket evenly. If the objects are loaded unevenly, there is a risk of overturning and injury because the load is likely to be unbalanced.
6. Before loading the objects or operating the machine, make sure that the lock lever is fully pulled down and completely locked.
7. Be sure to load heavy objects first to keep balance.
8. Do not extend the front and side rails on steep slopes. Extend the side rails when lightweight objects are loaded.
9. When extending the front and side rails, do not extend them over the extension limit. Be sure to extend the side rails so that the right and left sides are the same length, and load objects evenly.
10. Load and unload objects on flat ground.11. When lifting and tilting the carrier or bucket,
hold the handles and frame firmly, and work in a stable posture.
Maintenance1. Always be sure to park the machine on flat
ground and lock the brake lever before stor-age or attempting to perform inspections or maintenance.
SAVE THESE INSTRUCTIONS.WARNING: DO NOT let comfort or familiarity
with product (gained from repeated use) replace strict adherence to safety rules for the subject product. MISUSE or failure to follow the safety rules stated in this instruction manual may cause serious personal injury.
SymbolsThe followings show the symbols used for tool.
volts
direct current
Important safety instructions for battery cartridge
1. Before using battery cartridge, read all instruc-tions and cautionary markings on (1) battery charger, (2) battery, and (3) product using battery.
2. Do not disassemble battery cartridge.3. If operating time has become excessively
shorter, stop operating immediately. It may result in a risk of overheating, possible burns and even an explosion.

6 ENGLISH
4. If electrolyte gets into your eyes, rinse them out with clear water and seek medical atten-tion right away. It may result in loss of your eyesight.
5. Do not short the battery cartridge:(1) Do not touch the terminals with any con-
ductive material.(2) Avoid storing battery cartridge in a con-
tainer with other metal objects such as nails, coins, etc.
(3) Do not expose battery cartridge to water or rain.
A battery short can cause a large current flow, overheating, possible burns and even a breakdown.
6. Do not store the tool and battery cartridge in locations where the temperature may reach or exceed 50 °C (122 °F).
7. Do not incinerate the battery cartridge even if it is severely damaged or is completely worn out. The battery cartridge can explode in a fire.
8. Be careful not to drop or strike battery.9. Do not use a damaged battery.10. The contained lithium-ion batteries are subject
to the Dangerous Goods Legislation require-ments. For commercial transports e.g. by third parties, forwarding agents, special requirement on pack-aging and labeling must be observed. For preparation of the item being shipped, consult-ing an expert for hazardous material is required. Please also observe possibly more detailed national regulations. Tape or mask off open contacts and pack up the battery in such a manner that it cannot move around in the packaging.
11. Follow your local regulations relating to dis-posal of battery.
SAVE THESE INSTRUCTIONS.CAUTION: Only use genuine Makita batteries.
Use of non-genuine Makita batteries, or batteries that have been altered, may result in the battery bursting causing fires, personal injury and damage. It will also void the Makita warranty for the Makita tool and charger.
Tips for maintaining maximum battery life1. Charge the battery cartridge before completely
discharged. Always stop tool operation and charge the battery cartridge when you notice less tool power.
2. Never recharge a fully charged battery car-tridge. Overcharging shortens the battery service life.
3. Charge the battery cartridge with room tem-perature at 10 °C - 40 °C (50 °F - 104 °F). Let a hot battery cartridge cool down before charging it.
4. Charge the battery cartridge if you do not use it for a long period (more than six months).
PARTS DESCRIPTIONParts description (when the carrier is installed)
10
9 8 6
7
6
5
4
3
2
1 2
1 Control panel 2 Handle
3 Switch trigger 4 Battery box
5 Brake lever for front wheel
6 Rear wheel
7 Brake pedal for rear wheel
8 Lamp
9 Front wheel 10 Carrier
Parts description (when the bucket is installed)
10
9 8 6
7
5
4
3
2
1 2
6
1 Control panel 2 Handle
3 Switch trigger 4 Battery box
5 Brake lever for front wheel
6 Rear wheel
7 Brake pedal for rear wheel
8 Lamp
9 Front wheel 10 Bucket

7 ENGLISH
ASSEMBLYCAUTION: Always be sure that the machine is
switched off and the battery cartridge is removed before carrying out any work on the machine.
Assembling main unit1. Take out the base unit and handles from the box.
NOTICE: Be sure to take out the base unit and handles together, so that excessive force is not applied to the cords.
2. Place the packing material under the rear side of the base unit.
1
► 1. Packing material
3. Insert the rear wheels into the frame.
1
► 1. Rear wheel
1
► 1. Rear wheel
NOTE: The support legs can be attached instead of the rear wheels.
4. Attach the spring washer and the washer to the short hexagonal bolt, and then tighten them using the wrench included in the package.
2 31
► 1. Short hexagonal bolt 2. Spring washer 3. Washer
NOTICE: Be sure to use the short hexagonal bolts to tighten the rear wheels.NOTICE: Fix the rear wheels at the same position on both sides.

8 ENGLISH
5. Raise the handles, and then insert them into the base unit.
A
NOTICE: Do not allow the cords inside area "A" in the figure. Long objects may be entangled with the cords and cause accidents.
NOTICE: Do not apply excessive force to the cords when raising and inserting the handles.NOTICE: Be sure to raise the handles with both hands.
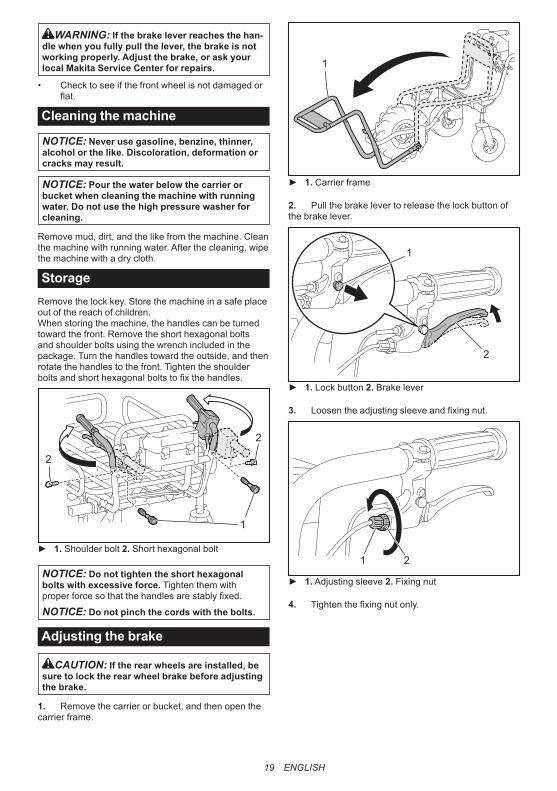
6. Open the carrier frame toward the front.
1
► 1. Carrier frame
7. Unfold the handles, then insert the long hexagonal bolts into the base unit, and then tighten the nuts with the wrench included in the package.
1
1
► 1. Long hexagonal bolt
8. Tighten the shoulder bolts from the rear using the wrench included in the package.
1
► 1. Shoulder bolt
9. Tighten the short hexagonal bolts from both sides using the wrench included in the package to fix the handles.
1
1
► 1. Short hexagonal bolt
NOTICE: Do not tighten the short hexagonal bolts with excessive force. Tighten them with proper force so that the handles are stably fixed.
NOTICE: Do not pinch the cords with the bolts.
10. Fix the cords with the clamps.

9 ENGLISH
1
1
► 1. Clamp
11. Fold the carrier frame.
1
► 1. Carrier frame
12. Press the lock button while pulling the brake lever to lock the brake.
1
2
► 1. Lock button 2. Brake lever
CAUTION: If the rear wheels are installed, press the brake pedal for the rear wheel to lock the rear wheel.
13. Hook the carrier lock, and then pull down the lock lever to lock the carrier.
1 2
► 1. Carrier lock 2. Lock lever
NOTICE: Make sure that the lock lever is locked securely.NOTICE: Do not pinch the cords with the lock lever.
NOTE: If you attach the support legs instead of the rear wheels, remove the rear wheels from the frames, and then attach the support legs to the frames.
1
2
► 1. Rear wheel 2. Support leg
10 ENGLISH
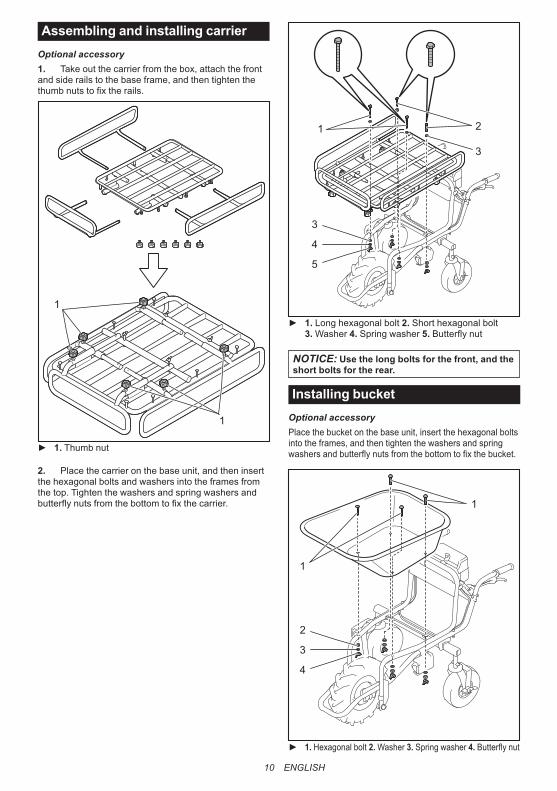
Assembling and installing carrierOptional accessory1. Take out the carrier from the box, attach the front and side rails to the base frame, and then tighten the thumb nuts to fix the rails.
1
1
► 1. Thumb nut
2. Place the carrier on the base unit, and then insert the hexagonal bolts and washers into the frames from the top. Tighten the washers and spring washers and butterfly nuts from the bottom to fix the carrier.
1 2
3
4
5
3
► 1. Long hexagonal bolt 2. Short hexagonal bolt 3. Washer 4. Spring washer 5. Butterfly nut
NOTICE: Use the long bolts for the front, and the short bolts for the rear.
Installing bucketOptional accessoryPlace the bucket on the base unit, insert the hexagonal bolts into the frames, and then tighten the washers and spring washers and butterfly nuts from the bottom to fix the bucket.
1
3
4
2
1
► 1. Hexagonal bolt 2. Washer 3. Spring washer 4. Butterfly nut

11 ENGLISH
FUNCTIONAL DESCRIPTIONInstalling or removing battery cartridge
CAUTION: Always switch off the machine before installing or removing of the battery cartridge.
CAUTION: Make sure that you lock the battery cover before use. Otherwise, mud, dirt, or water may cause damage to the product or the battery cartridge.
CAUTION: Always install the battery cartridge fully until the red indicator cannot be seen. If not, it may accidentally fall out of the machine, causing injury to you or someone around you.
CAUTION: Do not install the battery cartridge forcibly. If the cartridge does not slide in easily, it is not being inserted correctly.
CAUTION: Do not use the high-temperature battery cartridge. When the high-temperature bat-tery cartridge is used, the machine stops automati-cally before a short beep sound is emitted, and may cause an injury.
Installing the battery cartridge1. Rotate the lock lever, and then open the cover of the battery box.
1
2
► 1. Lock lever 2. Cover
2. Align the tongue on the battery cartridge with the slot on the battery box, and then slide the cartridge until it locks in place with a little click. If you can see the red indicator on the upper side of the button, battery car-tridge is not locked completely.
1
► 1. Battery cartridge
3. Insert the lock key in the place shown in the figure as far as it will go.
1
► 1. Lock key
NOTE: If the lock key is not inserted completely, the machine does not work.
4. Close the cover of the battery box, and then rotate the lock lever.
1
2
► 1. Lock lever 2. Cover

12 ENGLISH
Removing the battery cartridge1. Rotate the lock lever, and then open the cover of the battery box.2. Pull out the battery cartridge from the battery box while sliding the button on the front of the cartridge.
1
► 1. Button
3. Pull out the lock key.4. Close the cover of the battery box, and then rotate the lock lever.
Machine / battery protection systemThe machine is equipped with a machine/battery protection system. This system automatically cuts off power to the motor to extend machine and battery life.The machine will automatically stop during operation if the machine or battery cartridge is under one of the following conditions. A short beep sound is emitted before the machine stops automatically. The battery indicators and LED indicators blink while the beep sound is emitted.
Overload protectionWhen the machine is operated in a manner that causes it to draw an abnormally high current, the machine auto-matically stops without any indication. In this situation, turn the machine off and remove the cause of overload, and then turn the machine on to restart.
Overheat protectionWhen the machine is overheated, the machine stops automatically. Let the machine cool down before turning the machine on again. The overheat protection is likely to work under high temperature environment.
Overdischarge protectionWhen the battery capacity becomes low, the machine stops automatically. If the machine does not operate even when the switches are operated, remove the battery cartridge and charge it.
Switching the battery cartridge
1
► 1. Battery selection switch
Up to two battery cartridges can be installed in the battery box, although the machine uses one battery cartridge for operation. Before operating the machine, select the battery cartridge used for operation by press-ing the number on the battery selection switch.
NOTICE: If only one battery cartridge is installed in the battery box, be sure to select the battery box in which the battery cartridge is installed.
Indicating the remaining battery capacity on the battery box
CAUTION: Before checking the remaining battery capacities or switching the battery car-tridge, be sure to stop the machine.
1 1 2
► 1. Battery indicator 2. Check button

13 ENGLISH
Press the check button to indicate the remaining battery capacities. The battery indicators correspond to each battery.
Battery indicator statusRemaining battery
capacityOn Off
50% - 100%
20% - 50%
0% - 20%
Battery not installed
CAUTION: When the battery capacity becomes low, a short beep sound is emitted. If you continue to operate the machine at low battery capacity, a long beep sound is emitted and the machine automatically stops. When you hear the short beep sound, pull the brake lever and lock the brake, and then switch the battery cartridge to a charged one or charge the battery cartridge. When the remaining battery capacity runs out, the machine suddenly stops automatically and this may cause an injury.
NOTE: If you continue to pull the switch trigger even if you hear the short beep sound, the machine stops automatically. After the machine stops automatically, the beep sound continues and the support brake (electric brake) is enabled. To cancel the beep sound and release the support brake, pull the brake lever and release the switch trigger. Do not push the machine forcibly without releasing the support brake. After releasing the support brake, you can tell which battery protection system is working by checking the battery indicator status.
4
1 2 3
5
6
► 1. Lighting 2. Blinking 3. Turned off 4. Overheat protection 5. Overdischarge protection 6. Overload protection
CAUTION: If the beep sound is emitted while operating on slopes or the machine stops auto-matically on slopes, move the machine to a safe place, lock the brake, and then switch the battery cartridge to a charged one or charge the battery cartridge.If the load is large, and the beep sound is emit-ted while operating on slopes or the machine stops automatically on slopes, do not move the machine forcibly. Lock the brake, pay attention to safety and switch the battery cartridge to a charged one, and then move the machine to a safe place. Reduce the load before operating the machine again.
NOTE: You can check the remaining battery capacity even if the lock key is not inserted.
Indicating the remaining battery capacity
Only for battery cartridges with the indicator
1
2
► 1. Indicator lamps 2. Check button
Press the check button on the battery cartridge to indi-cate the remaining battery capacity. The indicator lamps light up for a few seconds.
14 ENGLISH
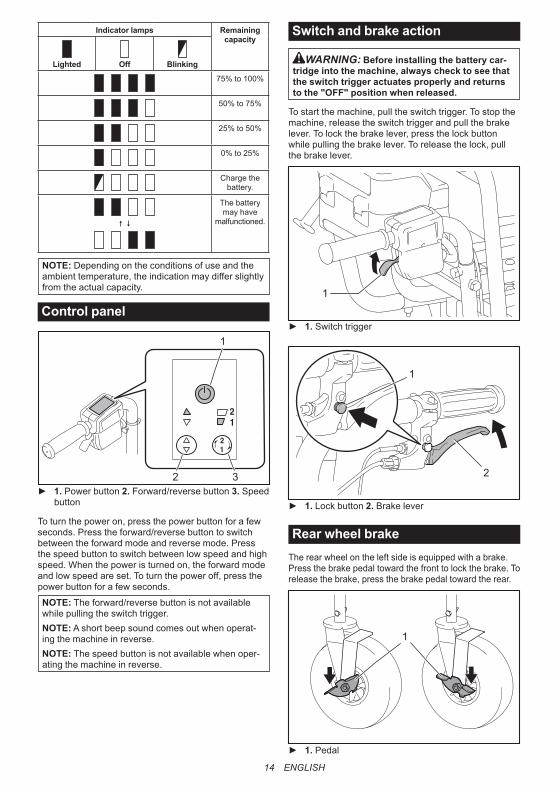
Indicator lamps Remaining capacity
Lighted Off Blinking
75% to 100%
50% to 75%
25% to 50%
0% to 25%
Charge the battery.
The battery may have
malfunctioned.
NOTE: Depending on the conditions of use and the ambient temperature, the indication may differ slightly from the actual capacity.
Control panel
1
2 3► 1. Power button 2. Forward/reverse button 3. Speed
button
To turn the power on, press the power button for a few seconds. Press the forward/reverse button to switch between the forward mode and reverse mode. Press the speed button to switch between low speed and high speed. When the power is turned on, the forward mode and low speed are set. To turn the power off, press the power button for a few seconds.
NOTE: The forward/reverse button is not available while pulling the switch trigger.NOTE: A short beep sound comes out when operat-ing the machine in reverse.NOTE: The speed button is not available when oper-ating the machine in reverse.
Switch and brake action
WARNING: Before installing the battery car-tridge into the machine, always check to see that the switch trigger actuates properly and returns to the "OFF" position when released.
To start the machine, pull the switch trigger. To stop the machine, release the switch trigger and pull the brake lever. To lock the brake lever, press the lock button while pulling the brake lever. To release the lock, pull the brake lever.
1
► 1. Switch trigger
1
2
► 1. Lock button 2. Brake lever
Rear wheel brakeThe rear wheel on the left side is equipped with a brake. Press the brake pedal toward the front to lock the brake. To release the brake, press the brake pedal toward the rear.
1
► 1. Pedal

15 ENGLISH
Lighting up the front lampsPress the lamp button on the battery box to light up the lamps. To turn off the lamps, press the lamp button again.
1
2
2► 1. Lamp button 2. Lamp
NOTE: The lamps go off if the machine is left unat-tended for approximately 10 minutes.NOTE: The lamps go off when the power is turned off.NOTE: You can light up the lamps even if the lock key is not inserted.
Adjusting the handle heightRemove the short hexagonal bolts and shoulder bolts using the wrench included in the package, and then adjust the handle height. The height can be adjusted to three levels. Tighten the shoulder bolts and short hex-agonal bolts to fix the handle.
2
1
► 1. Short hexagonal bolt 2. Shoulder bolt
NOTICE: Fix the left and right handles at the same height.NOTICE: Do not tighten the short hexagonal bolts with excessive force. Tighten them with proper force so that the handles are stably fixed.NOTICE: Do not pinch the cords with the bolts.
Adjusting the width of the rear wheels
Loosen the short hexagonal bolts using the wrench included in the package, and then slide the rear wheels.
1
► 1. Rear wheel
Tighten the short hexagonal bolts using the wrench included in the package to fix the wheels.
16 ENGLISH
1
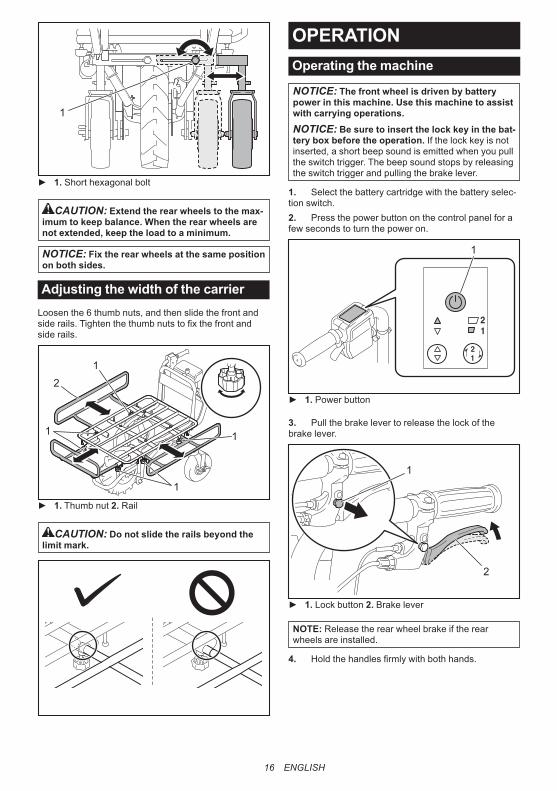
► 1. Short hexagonal bolt
CAUTION: Extend the rear wheels to the max-imum to keep balance. When the rear wheels are not extended, keep the load to a minimum.
NOTICE: Fix the rear wheels at the same position on both sides.
Adjusting the width of the carrierLoosen the 6 thumb nuts, and then slide the front and side rails. Tighten the thumb nuts to fix the front and side rails.
1
1
1
1
2
► 1. Thumb nut 2. Rail
CAUTION: Do not slide the rails beyond the limit mark.
OPERATIONOperating the machine
NOTICE: The front wheel is driven by battery power in this machine. Use this machine to assist with carrying operations.NOTICE: Be sure to insert the lock key in the bat-tery box before the operation. If the lock key is not inserted, a short beep sound is emitted when you pull the switch trigger. The beep sound stops by releasing the switch trigger and pulling the brake lever.
1. Select the battery cartridge with the battery selec-tion switch.2. Press the power button on the control panel for a few seconds to turn the power on.
1
► 1. Power button
3. Pull the brake lever to release the lock of the brake lever.
1
2
► 1. Lock button 2. Brake lever
NOTE: Release the rear wheel brake if the rear wheels are installed.
4. Hold the handles firmly with both hands.

17 ENGLISH
5. Pull the switch trigger.
1
► 1. Switch trigger
Loading objects
CAUTION: Before loading objects on the machine, make sure that the power is off and the brake lever is locked.
CAUTION: If the rear wheels are installed, make sure that the rear wheel brake is locked before loading objects on the machine.
CAUTION: Before loading objects on the machine, make sure that the carrier or bucket is locked.
CAUTION: Be sure to load objects within the carrier or bucket. If objects are sticking out of the carrier or bucket, they may fall or collapse if they touch obstacles.
CAUTION: Be sure to load objects so that they are below eye level. If the load is too high, it is dangerous because the view is obscured. Also, there is a risk of overturning and injury because the load is likely to be unbalanced.
When loading objects on the carrier, secure the objects with ropes and tie them down to the rope hooks.
18 ENGLISH
Dumping objects
CAUTION: Lift the carrier or bucket on flat and stable ground. Operation on unstable ground my cause an accident or injury.
You can dump the objects by lifting and tilting the carrier or bucket.1. Stop the machine, and then lock the brakes.
NOTICE: It is recommended to block the front wheel to stabilize the machine.
2. Release the lock lever.3. Stand at the side of the machine, hold the handle with one hand, and then lift and tilt the carrier or bucket by pushing up the carrier frame with the other hand.
CAUTION: Hold the handle and carrier frame firmly, and work in a stable posture.
CAUTION: Keep the load to a minimum. If the load is large, do not try to lift the carrier. Reduce the load, and then lift the carrier.
CAUTION: After dumping the objects, be sure to lock the carrier or bucket.
MAINTENANCECAUTION: Always be sure to park the
machine on flat ground and lock the brake lever before storage or attempting to perform inspec-tions or maintenance.
CAUTION: If the rear wheels are installed, make sure that the rear wheel brake is locked before storage, inspections, or maintenance.
CAUTION: Always be sure that the lock key and battery cartridge are removed from the machine before storage, inspections, or maintenance.
CAUTION: Always remove the lock key when the machine is not in use. Store the lock key in a safe place out of reach of children.
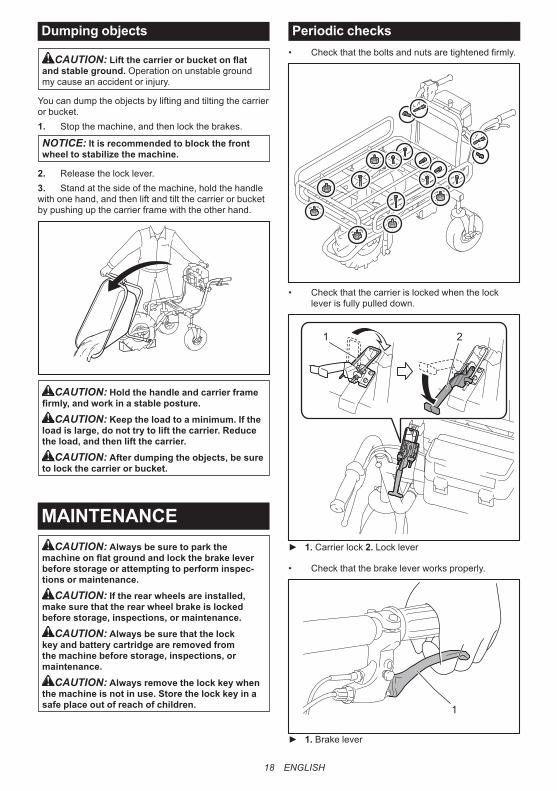
Periodic checks• Check that the bolts and nuts are tightened firmly.
• Check that the carrier is locked when the lock lever is fully pulled down.
1 2
► 1. Carrier lock 2. Lock lever
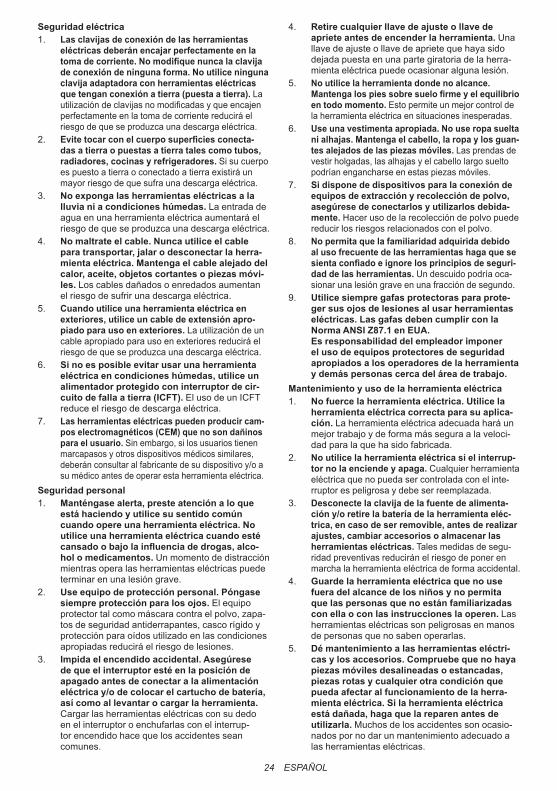
• Check that the brake lever works properly.
1
► 1. Brake lever
19 ENGLISH
WARNING: If the brake lever reaches the han-dle when you fully pull the lever, the brake is not working properly. Adjust the brake, or ask your local Makita Service Center for repairs.
• Check to see if the front wheel is not damaged or flat.
Cleaning the machine
NOTICE: Never use gasoline, benzine, thinner, alcohol or the like. Discoloration, deformation or cracks may result.
NOTICE: Pour the water below the carrier or bucket when cleaning the machine with running water. Do not use the high pressure washer for cleaning.
Remove mud, dirt, and the like from the machine. Clean the machine with running water. After the cleaning, wipe the machine with a dry cloth.
StorageRemove the lock key. Store the machine in a safe place out of the reach of children.When storing the machine, the handles can be turned toward the front. Remove the short hexagonal bolts and shoulder bolts using the wrench included in the package. Turn the handles toward the outside, and then rotate the handles to the front. Tighten the shoulder bolts and short hexagonal bolts to fix the handles.
1
2
2
► 1. Shoulder bolt 2. Short hexagonal bolt
NOTICE: Do not tighten the short hexagonal bolts with excessive force. Tighten them with proper force so that the handles are stably fixed.
NOTICE: Do not pinch the cords with the bolts.
Adjusting the brake
CAUTION: If the rear wheels are installed, be sure to lock the rear wheel brake before adjusting the brake.
1. Remove the carrier or bucket, and then open the carrier frame.
1
► 1. Carrier frame
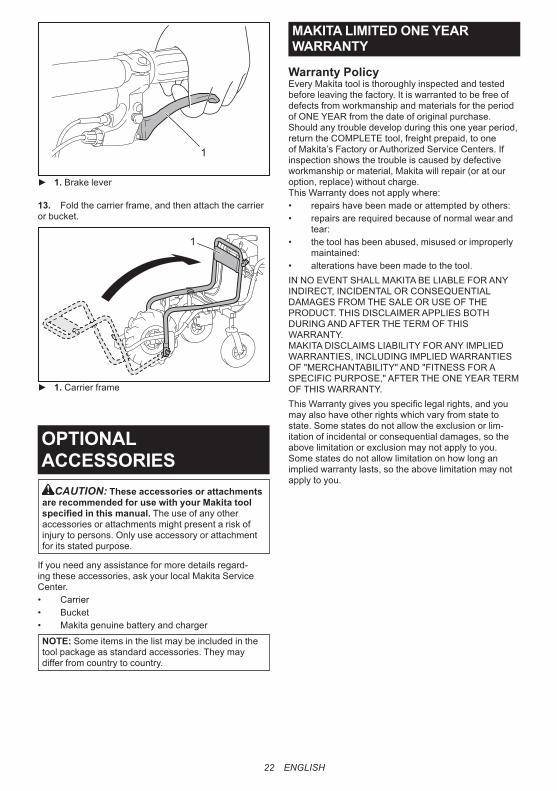
2. Pull the brake lever to release the lock button of the brake lever.
1
2
► 1. Lock button 2. Brake lever
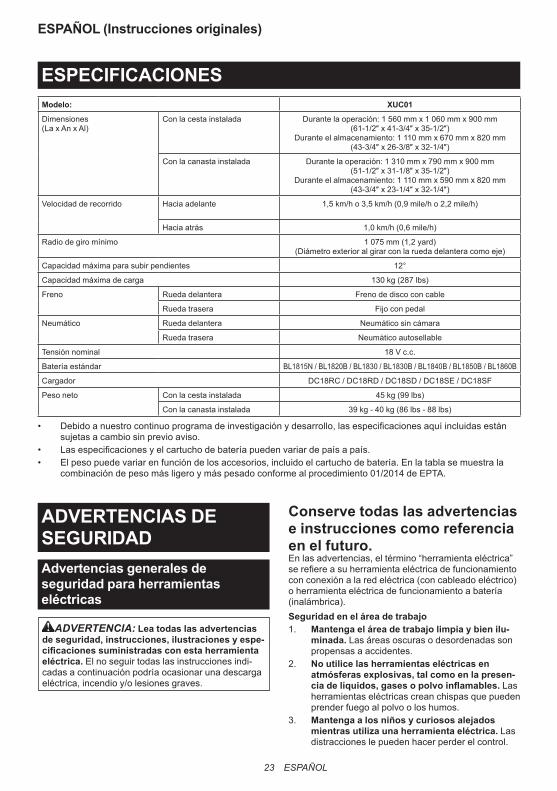
3. Loosen the adjusting sleeve and fixing nut.
1 2
► 1. Adjusting sleeve 2. Fixing nut
4. Tighten the fixing nut only.

20 ENGLISH
1
► 1. Fixing nut
5. Loosen the adjusting sleeve and fixing nut.
1 2
► 1. Adjusting sleeve 2. Fixing nut
6. Tighten the fixing nut only.
1
► 1. Fixing nut
7. Make sure that the brake lever is in the halfway position when it is fully pulled. If the brake lever is in the halfway position, go to step 13. If the brake lever is not in the halfway position, go to step 8.
1
► 1. Brake lever
8. Loosen the fixing nut only.

21 ENGLISH
1
► 1. Fixing nut
9. Tighten the fixing nut and adjusting sleeve together.
1 2
► 1. Adjusting sleeve 2. Fixing nut
10. Loosen the fixing nut only.
1
► 1. Fixing nut
11. Tighten the fixing nut and adjusting sleeve together.
1 2
► 1. Adjusting sleeve 2. Fixing nut
12. Make sure that the brake lever is in the halfway position when it is fully pulled.
22 ENGLISH
1
► 1. Brake lever
13. Fold the carrier frame, and then attach the carrier or bucket.
1
► 1. Carrier frame
OPTIONAL ACCESSORIES
CAUTION: These accessories or attachments are recommended for use with your Makita tool specified in this manual. The use of any other accessories or attachments might present a risk of injury to persons. Only use accessory or attachment for its stated purpose.
If you need any assistance for more details regard-ing these accessories, ask your local Makita Service Center.• Carrier• Bucket• Makita genuine battery and charger
NOTE: Some items in the list may be included in the tool package as standard accessories. They may differ from country to country.
MAKITA LIMITED ONE YEAR WARRANTY
Warranty PolicyEvery Makita tool is thoroughly inspected and tested before leaving the factory. It is warranted to be free of defects from workmanship and materials for the period of ONE YEAR from the date of original purchase. Should any trouble develop during this one year period, return the COMPLETE tool, freight prepaid, to one of Makita’s Factory or Authorized Service Centers. If inspection shows the trouble is caused by defective workmanship or material, Makita will repair (or at our option, replace) without charge.This Warranty does not apply where:• repairs have been made or attempted by others:• repairs are required because of normal wear and
tear:• the tool has been abused, misused or improperly
maintained:• alterations have been made to the tool.IN NO EVENT SHALL MAKITA BE LIABLE FOR ANY INDIRECT, INCIDENTAL OR CONSEQUENTIAL DAMAGES FROM THE SALE OR USE OF THE PRODUCT. THIS DISCLAIMER APPLIES BOTH DURING AND AFTER THE TERM OF THIS WARRANTY.MAKITA DISCLAIMS LIABILITY FOR ANY IMPLIED WARRANTIES, INCLUDING IMPLIED WARRANTIES OF "MERCHANTABILITY" AND "FITNESS FOR A SPECIFIC PURPOSE," AFTER THE ONE YEAR TERM OF THIS WARRANTY.This Warranty gives you specific legal rights, and you may also have other rights which vary from state to state. Some states do not allow the exclusion or lim-itation of incidental or consequential damages, so the above limitation or exclusion may not apply to you. Some states do not allow limitation on how long an implied warranty lasts, so the above limitation may not apply to you.
23 ESPAÑOL
ESPAÑOL (Instrucciones originales)
ESPECIFICACIONESModelo: XUC01
Dimensiones (La x An x Al)
Con la cesta instalada Durante la operación: 1 560 mm x 1 060 mm x 900 mm (61-1/2″ x 41-3/4″ x 35-1/2″)
Durante el almacenamiento: 1 110 mm x 670 mm x 820 mm (43-3/4″ x 26-3/8″ x 32-1/4″)
Con la canasta instalada Durante la operación: 1 310 mm x 790 mm x 900 mm (51-1/2″ x 31-1/8″ x 35-1/2″)
Durante el almacenamiento: 1 110 mm x 590 mm x 820 mm (43-3/4″ x 23-1/4″ x 32-1/4″)
Velocidad de recorrido Hacia adelante 1,5 km/h o 3,5 km/h (0,9 mile/h o 2,2 mile/h)
Hacia atrás 1,0 km/h (0,6 mile/h)
Radio de giro mínimo 1 075 mm (1,2 yard) (Diámetro exterior al girar con la rueda delantera como eje)
Capacidad máxima para subir pendientes 12°
Capacidad máxima de carga 130 kg (287 lbs)
Freno Rueda delantera Freno de disco con cable
Rueda trasera Fijo con pedal
Neumático Rueda delantera Neumático sin cámara
Rueda trasera Neumático autosellable
Tensión nominal 18 V c.c.
Batería estándar BL1815N / BL1820B / BL1830 / BL1830B / BL1840B / BL1850B / BL1860B
Cargador DC18RC / DC18RD / DC18SD / DC18SE / DC18SF
Peso neto Con la cesta instalada 45 kg (99 lbs)
Con la canasta instalada 39 kg - 40 kg (86 lbs - 88 lbs)
• Debido a nuestro continuo programa de investigación y desarrollo, las especificaciones aquí incluidas están sujetas a cambio sin previo aviso.
• Las especificaciones y el cartucho de batería pueden variar de país a país.• El peso puede variar en función de los accesorios, incluido el cartucho de batería. En la tabla se muestra la
combinación de peso más ligero y más pesado conforme al procedimiento 01/2014 de EPTA.
ADVERTENCIAS DE SEGURIDADAdvertencias generales de seguridad para herramientas eléctricas
ADVERTENCIA: Lea todas las advertencias de seguridad, instrucciones, ilustraciones y espe-cificaciones suministradas con esta herramienta eléctrica. El no seguir todas las instrucciones indi-cadas a continuación podría ocasionar una descarga eléctrica, incendio y/o lesiones graves.
Conserve todas las advertencias e instrucciones como referencia en el futuro.En las advertencias, el término “herramienta eléctrica” se refiere a su herramienta eléctrica de funcionamiento con conexión a la red eléctrica (con cableado eléctrico) o herramienta eléctrica de funcionamiento a batería (inalámbrica).Seguridad en el área de trabajo1. Mantenga el área de trabajo limpia y bien ilu-
minada. Las áreas oscuras o desordenadas son propensas a accidentes.
2. No utilice las herramientas eléctricas en atmósferas explosivas, tal como en la presen-cia de líquidos, gases o polvo inflamables. Las herramientas eléctricas crean chispas que pueden prender fuego al polvo o los humos.
3. Mantenga a los niños y curiosos alejados mientras utiliza una herramienta eléctrica. Las distracciones le pueden hacer perder el control.
24 ESPAÑOL
Seguridad eléctrica1. Las clavijas de conexión de las herramientas
eléctricas deberán encajar perfectamente en la toma de corriente. No modifique nunca la clavija de conexión de ninguna forma. No utilice ninguna clavija adaptadora con herramientas eléctricas que tengan conexión a tierra (puesta a tierra). La utilización de clavijas no modificadas y que encajen perfectamente en la toma de corriente reducirá el riesgo de que se produzca una descarga eléctrica.
2. Evite tocar con el cuerpo superficies conecta-das a tierra o puestas a tierra tales como tubos, radiadores, cocinas y refrigeradores. Si su cuerpo es puesto a tierra o conectado a tierra existirá un mayor riesgo de que sufra una descarga eléctrica.
3. No exponga las herramientas eléctricas a la lluvia ni a condiciones húmedas. La entrada de agua en una herramienta eléctrica aumentará el riesgo de que se produzca una descarga eléctrica.
4. No maltrate el cable. Nunca utilice el cable para transportar, jalar o desconectar la herra-mienta eléctrica. Mantenga el cable alejado del calor, aceite, objetos cortantes o piezas móvi-les. Los cables dañados o enredados aumentan el riesgo de sufrir una descarga eléctrica.
5. Cuando utilice una herramienta eléctrica en exteriores, utilice un cable de extensión apro-piado para uso en exteriores. La utilización de un cable apropiado para uso en exteriores reducirá el riesgo de que se produzca una descarga eléctrica.
6. Si no es posible evitar usar una herramienta eléctrica en condiciones húmedas, utilice un alimentador protegido con interruptor de cir-cuito de falla a tierra (ICFT). El uso de un ICFT reduce el riesgo de descarga eléctrica.
7. Las herramientas eléctricas pueden producir cam-pos electromagnéticos (CEM) que no son dañinos para el usuario. Sin embargo, si los usuarios tienen marcapasos y otros dispositivos médicos similares, deberán consultar al fabricante de su dispositivo y/o a su médico antes de operar esta herramienta eléctrica.
Seguridad personal1. Manténgase alerta, preste atención a lo que
está haciendo y utilice su sentido común cuando opere una herramienta eléctrica. No utilice una herramienta eléctrica cuando esté cansado o bajo la influencia de drogas, alco-hol o medicamentos. Un momento de distracción mientras opera las herramientas eléctricas puede terminar en una lesión grave.
2. Use equipo de protección personal. Póngase siempre protección para los ojos. El equipo protector tal como máscara contra el polvo, zapa-tos de seguridad antiderrapantes, casco rígido y protección para oídos utilizado en las condiciones apropiadas reducirá el riesgo de lesiones.
3. Impida el encendido accidental. Asegúrese de que el interruptor esté en la posición de apagado antes de conectar a la alimentación eléctrica y/o de colocar el cartucho de batería, así como al levantar o cargar la herramienta. Cargar las herramientas eléctricas con su dedo en el interruptor o enchufarlas con el interrup-tor encendido hace que los accidentes sean comunes.
4. Retire cualquier llave de ajuste o llave de apriete antes de encender la herramienta. Una llave de ajuste o llave de apriete que haya sido dejada puesta en una parte giratoria de la herra-mienta eléctrica puede ocasionar alguna lesión.
5. No utilice la herramienta donde no alcance. Mantenga los pies sobre suelo firme y el equilibrio en todo momento. Esto permite un mejor control de la herramienta eléctrica en situaciones inesperadas.
6. Use una vestimenta apropiada. No use ropa suelta ni alhajas. Mantenga el cabello, la ropa y los guan-tes alejados de las piezas móviles. Las prendas de vestir holgadas, las alhajas y el cabello largo suelto podrían engancharse en estas piezas móviles.
7. Si dispone de dispositivos para la conexión de equipos de extracción y recolección de polvo, asegúrese de conectarlos y utilizarlos debida-mente. Hacer uso de la recolección de polvo puede reducir los riesgos relacionados con el polvo.
8. No permita que la familiaridad adquirida debido al uso frecuente de las herramientas haga que se sienta confiado e ignore los principios de seguri-dad de las herramientas. Un descuido podría oca-sionar una lesión grave en una fracción de segundo.
9. Utilice siempre gafas protectoras para prote-ger sus ojos de lesiones al usar herramientas eléctricas. Las gafas deben cumplir con la Norma ANSI Z87.1 en EUA.Es responsabilidad del empleador imponer el uso de equipos protectores de seguridad apropiados a los operadores de la herramienta y demás personas cerca del área de trabajo.
Mantenimiento y uso de la herramienta eléctrica1. No fuerce la herramienta eléctrica. Utilice la
herramienta eléctrica correcta para su aplica-ción. La herramienta eléctrica adecuada hará un mejor trabajo y de forma más segura a la veloci-dad para la que ha sido fabricada.
2. No utilice la herramienta eléctrica si el interrup-tor no la enciende y apaga. Cualquier herramienta eléctrica que no pueda ser controlada con el inte-rruptor es peligrosa y debe ser reemplazada.
3. Desconecte la clavija de la fuente de alimenta-ción y/o retire la batería de la herramienta eléc-trica, en caso de ser removible, antes de realizar ajustes, cambiar accesorios o almacenar las herramientas eléctricas. Tales medidas de segu-ridad preventivas reducirán el riesgo de poner en marcha la herramienta eléctrica de forma accidental.
4. Guarde la herramienta eléctrica que no use fuera del alcance de los niños y no permita que las personas que no están familiarizadas con ella o con las instrucciones la operen. Las herramientas eléctricas son peligrosas en manos de personas que no saben operarlas.
5. Dé mantenimiento a las herramientas eléctri-cas y los accesorios. Compruebe que no haya piezas móviles desalineadas o estancadas, piezas rotas y cualquier otra condición que pueda afectar al funcionamiento de la herra-mienta eléctrica. Si la herramienta eléctrica está dañada, haga que la reparen antes de utilizarla. Muchos de los accidentes son ocasio-nados por no dar un mantenimiento adecuado a las herramientas eléctricas.

25 ESPAÑOL
6. Mantenga las herramientas de corte limpias y filosas. Si recibe un mantenimiento adecuado y tiene los bordes afilados, es probable que la herramienta se atasque menos y sea más fácil controlarla.
7. Utilice la herramienta eléctrica, los accesorios y las brocas de acuerdo con estas instruccio-nes, considerando las condiciones laborales y el trabajo a realizar. Si utiliza la herramienta eléctrica para realizar operaciones distintas de las indicadas, podrá presentarse una situación peligrosa.
8. Mantenga los mangos y superficies de asi-miento secos, limpios y libres de aceite o grasa. Los mangos y superficies de asimiento resbalosos no permiten una manipulación segura ni el control de la herramienta en situaciones inesperadas.
9. Cuando vaya a utilizar esta herramienta, evite usar guantes de trabajo de tela ya que éstos podrían atorarse. Si los guantes de trabajo de tela llegaran a atorarse en las piezas móviles, esto podría ocasionar lesiones personales.
Uso y cuidado de la herramienta a batería1. Recargue sólo con el cargador especificado
por el fabricante. Un cargador que es adecuado para un solo tipo de batería puede generar riesgo de incendio al ser utilizado con otra batería.
2. Utilice las herramientas eléctricas solamente con las baterías designadas específicamente para ellas. La utilización de cualquier otra batería puede crear un riesgo de lesiones o incendio.
3. Cuando no se esté usando la batería, mantén-gala alejada de otros objetos metálicos, como sujetapapeles (clips), monedas, llaves, clavos, tornillos u otros objetos pequeños de metal los cuales pueden actuar creando una cone-xión entre las terminales de la batería. Originar un cortocircuito en las terminales puede causar quemaduras o incendios.
4. En condiciones abusivas, podrá escapar líquido de la batería; evite tocarlo. Si lo toca accidentalmente, enjuague con agua. Si hay contacto del líquido con los ojos, busque asis-tencia médica. Puede que el líquido expulsado de la batería cause irritación o quemaduras.
5. No utilice una herramienta ni una batería que estén dañadas o hayan sido modificadas. Las baterías dañadas o modificadas podrían oca-sionar una situación inesperada provocando un incendio, explosión o riesgo de lesiones.
6. No exponga la herramienta ni la batería al fuego ni a una temperatura excesiva. La expo-sición al fuego o a una temperatura superior a los 130 °C podría causar una explosión.
7. Siga todas las instrucciones para la carga y evite cargar la herramienta o la batería fuera del rango de temperatura especificado en las instrucciones. Una carga inadecuada o a una temperatura fuera del rango especificado podría dañar la batería e incrementar el riesgo de incendio.
Servicio1. Haga que una persona calificada repare la
herramienta eléctrica utilizando sólo piezas de repuesto idénticas. Esto asegura que se man-tenga la seguridad de la herramienta eléctrica.
2. Nunca dé servicio a baterías que estén daña-das. El servicio a las baterías solamente deberá ser efectuado por el fabricante o un agente de servicio autorizado.
3. Siga las instrucciones para la lubricación y cambio de accesorios.
Advertencias de seguridad para la carretilla propulsada a batería
1. Esta máquina no puede ser usada en la vía pública.
2. Cuando opere la máquina use siempre calzado de protección con suela antiderrapante. Los zapatos y botas de seguridad cerrados con suela antideslizante reducen el riesgo de lesiones.
3. Inspeccione el camino antes de acarrear objetos o materiales. Familiarizarse con el camino y ase-gurarse de que éste sea lo suficientemente ancho para conducir la máquina bajo carga de forma segura ayudará a minimizar la pérdida de control.
4. Tenga extrema precaución en terrenos res-balosos, sueltos o inestables. Las superficies mojadas y resbalosas, tales como áreas pastosas húmedas, nieve o hielo, así como los terrenos sueltos e inestables como superficies con arena o grava podrían causar que la máquina perdiera tracción afectando adversamente la conducción, el frenado y la estabilidad.
5. No opere la máquina sobre pendientes excesi-vamente pronunciadas. Esto reducirá el riesgo de pérdida de control, resbalones y caídas que podrían causar lesiones personales. Las pen-dientes con una inclinación superior al máximo recomendado y los desniveles laterales podrían incrementar el riesgo de inestabilidad y afectar adversamente la capacidad para detener la máquina de forma segura.
6. Cuando trabaje en pendientes, asegúrese siempre de pisar firmemente y de frente a éstas, nunca arriba ni abajo, y de tener extrema precaución al cambiar de dirección. Esto reducirá el riesgo de pérdida de control, resbalones y caídas que podrían causar lesiones personales.
7. Cuando sea posible, use las áreas niveladas para detenerse, cargar y descargar, y nunca deje la máquina desatendida sobre una pen-diente. La máquina es más inestable cuando está sobre una pendiente que cuando está sobre una superficie nivelada.
8. Cuando se detenga sobre pendientes, colo-que la máquina orientada hacia arriba o hacia abajo y bloquee las ruedas que no tengan el freno. La máquina es menos estable cuando está orientada de frente a una pendiente. Las ruedas sin freno, en especial aquellas de tipo giratorio, pueden girar de repente y rodar hacia abajo incluso si el freno de estacionamiento de la rueda delantera está puesto.

26 ESPAÑOL
9. Cuando vaya a dejar la máquina desaten-dida, ponga el freno de estacionamiento una vez que la máquina se encuentre en un área segura para detenerse. El freno de estaciona-miento evita el movimiento no intencional de la rueda delantera y puede mejorar la estabilidad.
10. Asegúrese de que las rampas estén despejadas y que sean resistentes y seguras. A fin de reducir el riesgo de lesiones, todas las rampas deberán ser despejadas de residuos sueltos y lo suficientemente resistentes para soportar el peso de las cargas previs-tas que serán transportadas sobre éstas. Éstas debe-rán tener un bloqueo adecuado por debajo y a ambos lados para evitar las desviaciones y los movimientos laterales bajo la carga. Todas las rampas deberán ser lo suficientemente anchas para asegurar una pisada firme al acarrear las cargas a través de éstas.
11. Evite extender las rampas sin usar tablones de pie o cercos sobre espacios abiertos. Los espa-cios abiertos elevados y las zanjas son propensos a caídas por accidente e incrementan la probabili-dad de lesiones personales. Utilice tablones de pie o cercos sobre los espacios abiertos a fin de evitar que la máquina se desvíe fuera de la rampa.
12. Asegúrese de que todos los tornillos de bloqueo estén firmemente apretados antes del uso. Los tornillos de bloqueo en las ruedas traseras así como en la parte delantera y paredes laterales de la cesta de tipo abierta deberán ase-gurarse para evitar un movimiento no intencional de estas piezas ajustables de la máquina.
13. Nunca opere la máquina en condiciones de sobrecarga. Asegúrese de que la máquina tenga la medida de capacidad adecuada para los objetos o materiales que se van a acarrear. Las cargas excesi-vas harán que la máquina sea más difícil de manio-brar y detener, incrementarán el tiempo de parada y la distancia, y aumentarán el riesgo de inestabilidad.
14. Nunca opere la máquina en condiciones de apilamiento excesivo. Apilar material sobre el borde de la caja o los lados de la caja puede cau-sar que la máquina pierda el equilibrio y el control de forma incontrolable.
15. Utilice anclajes para sujetar las cargas. Las cargas sueltas y/o no aseguradas tienen mayor probabilidad de desplazarse y ocasionar la pér-dida de estabilidad y control.
16. Mantenga siempre una sujeción firme en los mangos. La pérdida de control puede incrementar el riesgo de lesiones personales.
17. Retire la llave de seguridad cuando no vaya a utilizar la máquina. La llave de seguridad evita el uso accionado de manera accidental de la máquina, por ejemplo por niños u otras personas no capacitadas ni autorizadas. Sin la llave, la alimentación eléctrica no podrá activarse.
18. Utilice una placa resistente que funcione para evitar un deslizamiento o desenganche al cargar y/o descargar esta máquina para trans-porte, o al moverla entre diferentes niveles. Asegúrese de que la inclinación de la placa no exceda de 12° y use la máquina lenta y cuida-dosamente. Una operación inestable y rápida podría ocasionar una volcadura y/o una caída.
19. No desarme, repare ni modifique esta máquina.
Operación1. Cuando opere la máquina, párese detrás de
ésta y sujete los mangos firmemente.2. No opere la máquina mientras esté montado
sobre ella.3. No permita que otras personas se monten
sobre la máquina.4. Cuando opere la máquina en reversa o camine
hacia atrás, vea detrás suyo y tenga cuidado de no resbalarse o tropezarse.
5. No utilice la máquina cuando no tenga buena visibilidad ya que existe riesgo de golpear contra obstáculos.
6. Cuando opere la máquina sobre un suelo irre-gular, reduzca la velocidad y tenga cuidado.
7. Evite usar la máquina sobre suelo blando para evi-tar una volcadura debido a un colapso del arcén.
8. No opere la máquina sobre pendientes eleva-das con una inclinación mayor a 12°.
9. En caso de observar alguna anormalidad, detenga la máquina sobre suelo plano. Antes de inspeccionar la máquina, jale la palanca del freno y bloquee el freno, luego apague la máquina.
10. Antes de operar la máquina, asegúrese de que la palanca de bloqueo haya sido jalada completamente hacia abajo y esté totalmente bloqueada. Si ésta no está totalmente bloqueada, puede haber riesgo de accidente o lesión debido a que la cesta o canasta podrían inclinarse y hacer que los objetos se caigan al ir cuesta abajo.
11. Tenga cuidado de que los cables no se enre-den con la carga o los obstáculos.
Operación en pendientes1. No cruce a través de pendientes.2. Asegúrese de reducir la velocidad y tener
cuidado.3. Tenga precaución al arrancar o detener la
máquina en pendientes.4. Asegure firmemente las cargas con cuerdas
ya que éstas pueden perder estabilidad en pendientes.
5. Procure que la carga siempre sea mínima ya que la máquina puede volverse inestable en función de la condición de la carga.
6. Procure que la carga tenga la altura mínima posible ya que ésta podría tapar la vista en pendientes.
7. Nunca estacione la máquina en pendientes pronunciadas. Estacione la máquina sobre suelo plano, jale la palanca del freno y bloquee el freno, luego apague la máquina.
8. No cambie el modo de dirección ni de veloci-dad en pendientes pronunciadas.
9. No suelte el gatillo interruptor en pendientes hacia arriba. La máquina podría irse en reversa y provocar un accidente.
10. Asegúrese de que la capacidad restante de la batería sea suficiente antes de operar la máquina en pendientes. Si la capacidad res-tante de la batería no es suficiente, cargue la batería o reemplácela con una que esté cargada.

27 ESPAÑOL
Carga de objetos1. Evite cargar la máquina con demasiados obje-
tos. Al cargar objetos, asegúrese de seguir las instrucciones y los límites de carga indicados en el manual.
2. Asegure firmemente los objetos con cuerdas.3. Cargue los objetos dentro de la cesta o
canasta. Si los objetos sobresalen de la cesta o canasta existe riesgo de accidentes debido a que los objetos pueden caerse o golpear contra obstá-culos tales como paredes.
4. Asegúrese de que los objetos cargados estén por debajo del nivel de los ojos. Si la carga es demasiado alta, la vista podría taparse y resultar peligroso. Asimismo, podría haber riesgo de vol-cadura y lesiones debido a la probabilidad de que la carga pierda el equilibrio.
5. Cargue los objetos dentro de la cesta o canasta de manera uniforme. Si los objetos no se cargan uniformemente, podría haber riesgo de volcadura y lesiones debido a la probabilidad de que la carga pierda el equilibrio.
6. Antes de cargar los objetos u operar la máquina, asegúrese de que la palanca de bloqueo haya sido jalada completamente hacia abajo y esté totalmente bloqueada.
7. Asegúrese de cargar los objetos pesados primero para mantener el equilibrio.
8. No extienda las barras delantera y laterales en pendientes pronunciadas. Extienda las barras laterales cuando cargue objetos ligeros.
9. Cuando extienda las barras delantera y laterales, no rebase el límite de extensión. Asegúrese de extender las barras laterales de manera que los lados derecho e izquierdo tengan la misma longitud y cargue los objetos uniformemente.
10. Cargue y descargue los objetos sobre suelo plano.
11. Cuando levante o incline la cesta o canasta, sujete los mangos y el bastidor firmemente y colóquese en una postura estable para trabajar.
Mantenimiento1. Asegúrese siempre de estacionar la máquina
sobre suelo plano y bloquee la palanca del freno antes de almacenar la máquina o intentar realizar una inspección o tarea de mantenimiento.
GUARDE ESTAS INSTRUCCIONES.
ADVERTENCIA: NO DEJE que la comodidad o familiaridad con el producto (a base de utilizarlo repetidamente) evite que siga estrictamente las normas de seguridad para dicho producto. El USO INCORRECTO o el no seguir las normas de seguridad indicadas en este manual de instruc-ciones puede ocasionar lesiones graves.
SímbolosA continuación se muestran los símbolos utilizados para la herramienta.
volts o voltios
corriente directa o continua
Instrucciones importantes de seguridad para el cartucho de batería
1. Antes de utilizar el cartucho de batería, lea todas las instrucciones e indicaciones de precaución en el (1) el cargador de batería, (2) la batería, y (3) el producto con el que se utiliza la batería.
2. No desarme el cartucho de batería.3. Si el tiempo de operación se ha acortado en
exceso, deje de operar de inmediato. Podría correrse el riesgo de sobrecalentamiento, posibles quemaduras e incluso explosión.
4. En caso de que ingresen electrolitos en sus ojos, enjuáguelos bien con agua limpia y con-sulte de inmediato a un médico. Esto podría ocasionar pérdida de visión.
5. Evite cortocircuitar el cartucho de batería:(1) No toque las terminales con ningún mate-
rial conductor.(2) Evite guardar el cartucho de batería en un
cajón junto con otros objetos metálicos, tales como clavos, monedas, etc.
(3) No exponga el cartucho de batería al agua o la lluvia.
Un cortocircuito en la batería puede causar un flujo grande de corriente, sobrecalentamiento, posibles quemaduras e incluso una descompostura.
6. No guarde la herramienta ni el cartucho de batería en lugares donde la temperatura pueda alcanzar o exceder los 50°C (122°F).
7. Nunca incinere el cartucho de batería incluso en el caso de que esté dañado seriamente o ya no sirva en absoluto. El cartucho de batería puede explotar si se tira al fuego.
8. Tenga cuidado de no dejar caer ni golpear la batería.9. No use una batería dañada.10. Las baterías de ión de litio están sujetas a los requisi-
tos reglamentarios en materia de bienes peligrosos. Para el trasporte comercial, por ej., mediante terceros o agentes de transporte, se deben tomar en cuenta los requisitos especiales relativos al empaque y el etiquetado. Para efectuar los preparativos del artículo que se va a enviar, se requiere consultar a un experto en materiales peligrosos. Si es posible, consulte ade-más otras regulaciones nacionales más detalladas. Pegue o cubra con cinta adhesiva los contactos abiertos y empaque la batería de manera que ésta no pueda moverse dentro del paquete.
11. Siga las regulaciones locales relacionadas al desecho de las baterías.
GUARDE ESTAS INSTRUCCIONES.

28 ESPAÑOL
PRECAUCIÓN: Utilice únicamente baterías originales de Makita. El uso de baterías no origina-les de Makita, o de baterías alteradas, puede ocasio-nar que las baterías exploten causando un incendio, lesiones personales y daños. Asimismo, esto inva-lidará la garantía de Makita para la herramienta y el cargador Makita.
Consejos para alargar al máximo la vida útil de la batería1. Cargue el cartucho de batería antes de que
se descargue completamente. Pare siem-pre la operación y cargue el cartucho de batería cuando note menos potencia en la herramienta.
2. No cargue nunca un cartucho de batería que esté completamente cargado. La sobrecarga acortará la vida de servicio de la batería.
3. Cargue el cartucho de batería a una tempera-tura ambiente de 10 °C - 40 °C (50 °F - 104 °F). Si un cartucho de batería está caliente, déjelo enfriar antes de cargarlo.
4. Cargue el cartucho de batería si no va a utili-zarlo durante un período prolongado (más de seis meses).
DESCRIPCIÓN DE LAS PIEZASDescripción de las piezas (con la cesta instalada)
10
9 8 6
7
6
5
4
3
2
1 2
1 Panel de control 2 Mango
3 Gatillo interruptor 4 Caja de batería
5 Palanca del freno para la rueda delantera
6 Rueda trasera
7 Pedal del freno para la rueda trasera
8 Lámpara
9 Rueda delantera 10 Cesta
Descripción de las piezas (con la canasta instalada)
10
9 8 6
7
5
4
3
2
1 2
6
1 Panel de control 2 Mango
3 Gatillo interruptor 4 Caja de batería
5 Palanca del freno para la rueda delantera
6 Rueda trasera
7 Pedal del freno para la rueda trasera
8 Lámpara
9 Rueda delantera 10 Canasta
MONTAJEPRECAUCIÓN: Asegúrese siempre de que
la máquina haya sido apagada y el cartucho de batería extraído antes de realizar cualquier tra-bajo en la máquina.
Ensamble de la unidad principal1. Saque la unidad de base y los mangos de la caja.
AVISO: Asegúrese de sacar la unidad de base y los mangos juntos, de manera que no se aplique una fuerza excesiva en los cables.
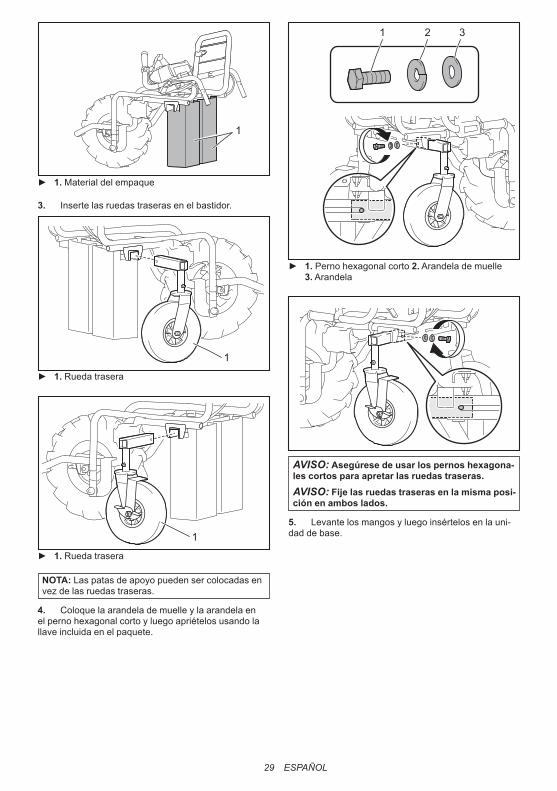
2. Coloque el material del empaque debajo de la parte posterior de la unidad de base.
29 ESPAÑOL
1
► 1. Material del empaque
3. Inserte las ruedas traseras en el bastidor.
1
► 1. Rueda trasera
1
► 1. Rueda trasera
NOTA: Las patas de apoyo pueden ser colocadas en vez de las ruedas traseras.
4. Coloque la arandela de muelle y la arandela en el perno hexagonal corto y luego apriételos usando la llave incluida en el paquete.
2 31
► 1. Perno hexagonal corto 2. Arandela de muelle 3. Arandela
AVISO: Asegúrese de usar los pernos hexagona-les cortos para apretar las ruedas traseras.AVISO: Fije las ruedas traseras en la misma posi-ción en ambos lados.
5. Levante los mangos y luego insértelos en la uni-dad de base.

30 ESPAÑOL
A
AVISO: No permita que los cables entren en el área “A” mostrada en la ilustración. Los objetos largos podrían enredarse con los cables y provocar accidentes.
AVISO: No aplique una fuerza excesiva en los cables al levantar e insertar los mangos.AVISO: Asegúrese de levantar los mangos con ambas manos.
6. Abra el bastidor de soporte hacia el frente.
1
► 1. Bastidor de soporte
7. Despliegue los mangos, luego inserte los pernos hexagonales largos en la unidad de base y después apriete las tuercas con la llave incluida en el paquete.
1
1
► 1. Perno hexagonal largo
8. Apriete los pernos de tope de la parte trasera usando la llave incluida en el paquete.
1
► 1. Perno de tope
9. Apriete los pernos hexagonales cortos de ambos lados usando la llave incluida en el paquete para fijar los mangos.
1
1
► 1. Perno hexagonal corto
AVISO: No apriete los pernos hexagonales cortos con demasiada fuerza. Apriételos con una fuerza adecuada de manera que los mangos queden fijados de manera estable.
AVISO: No pellizque los cables con los pernos.
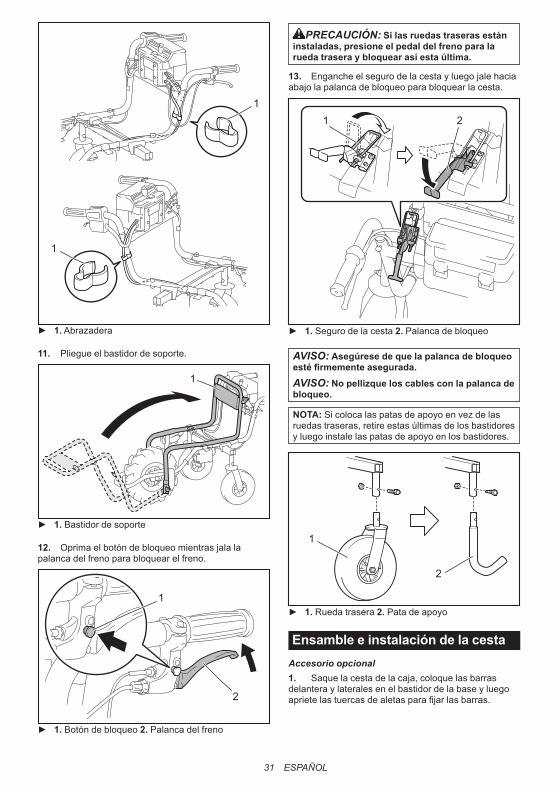
10. Fije los cables con las abrazaderas.
31 ESPAÑOL
1
1
► 1. Abrazadera
11. Pliegue el bastidor de soporte.
1
► 1. Bastidor de soporte
12. Oprima el botón de bloqueo mientras jala la palanca del freno para bloquear el freno.
1
2
► 1. Botón de bloqueo 2. Palanca del freno
PRECAUCIÓN: Si las ruedas traseras están instaladas, presione el pedal del freno para la rueda trasera y bloquear así esta última.
13. Enganche el seguro de la cesta y luego jale hacia abajo la palanca de bloqueo para bloquear la cesta.
1 2
► 1. Seguro de la cesta 2. Palanca de bloqueo
AVISO: Asegúrese de que la palanca de bloqueo esté firmemente asegurada.AVISO: No pellizque los cables con la palanca de bloqueo.
NOTA: Si coloca las patas de apoyo en vez de las ruedas traseras, retire estas últimas de los bastidores y luego instale las patas de apoyo en los bastidores.
1
2
► 1. Rueda trasera 2. Pata de apoyo
Ensamble e instalación de la cestaAccesorio opcional1. Saque la cesta de la caja, coloque las barras delantera y laterales en el bastidor de la base y luego apriete las tuercas de aletas para fijar las barras.

32 ESPAÑOL
1
1
► 1. Tuerca de aletas
2. Coloque la cesta en la unidad de base y luego inserte los pernos hexagonales y arandelas en los bastidores en la parte superior. Apriete las arandelas, las arandelas de muelle y las tuercas de mariposa en la parte inferior para fijar la cesta.
1 2
3
4
5
3
► 1. Perno hexagonal largo 2. Perno hexagonal corto 3. Arandela 4. Arandela de muelle 5. Tuerca de mariposa
AVISO: Utilice los pernos largos para la parte delantera y los cortos para la trasera.
Instalación de la canastaAccesorio opcionalColoque la canasta en la unidad de base, inserte los pernos hexagonales en los bastidores, y luego apriete las arandelas, las arandelas de muelle y las tuercas de mariposa en la parte inferior para fijar la canasta.
1
3
4
2
1
► 1. Perno hexagonal 2. Arandela 3. Arandela de muelle 4. Tuerca de mariposa
33 ESPAÑOL
DESCRIPCIÓN DEL FUNCIONAMIENTOInstalación o extracción del cartucho de batería
PRECAUCIÓN: Apague siempre la máquina antes de instalar o extraer el cartucho de batería.
PRECAUCIÓN: Asegúrese de haber asegu-rado la cubierta de la batería antes de utilizar el equipo. De lo contrario, el lodo, la tierra o el agua pueden causar daños al producto o al cartucho de batería.
PRECAUCIÓN: Instale siempre el cartucho de batería por completo hasta que el indicador rojo no pueda verse. Si no es así, éste podría caerse de la máquina ocasionándole una lesión a usted o a alguien más a su alrededor.
PRECAUCIÓN: No instale el cartucho de batería a la fuerza. Si el cartucho no se desliza hacia adentro fácilmente, esto se debe a que no ha sido insertado correctamente.
PRECAUCIÓN: No utilice el cartucho de batería de alta temperatura. Cuando se utiliza el cartucho de batería de alta temperatura, la máquina se detiene automáticamente antes de escucharse un pitido corto y esto podría ocasionar una lesión.
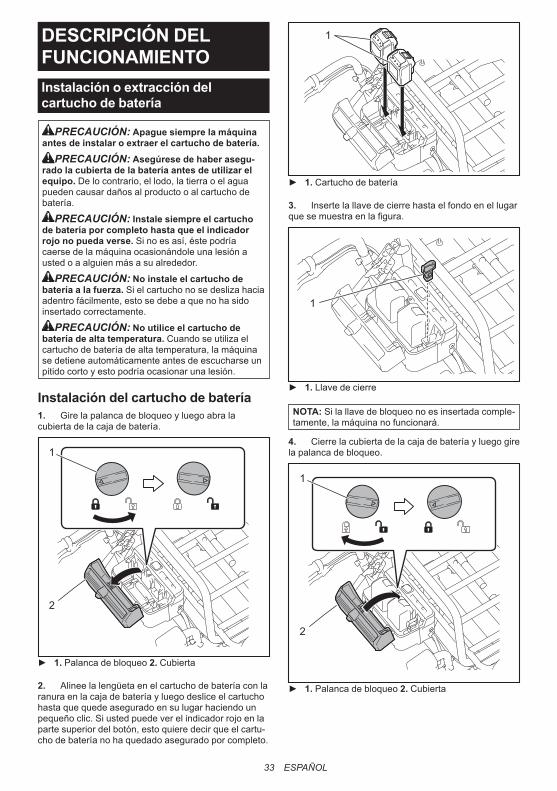
Instalación del cartucho de batería1. Gire la palanca de bloqueo y luego abra la cubierta de la caja de batería.
1
2
► 1. Palanca de bloqueo 2. Cubierta
2. Alinee la lengüeta en el cartucho de batería con la ranura en la caja de batería y luego deslice el cartucho hasta que quede asegurado en su lugar haciendo un pequeño clic. Si usted puede ver el indicador rojo en la parte superior del botón, esto quiere decir que el cartu-cho de batería no ha quedado asegurado por completo.
1
► 1. Cartucho de batería
3. Inserte la llave de cierre hasta el fondo en el lugar que se muestra en la figura.
1
► 1. Llave de cierre
NOTA: Si la llave de bloqueo no es insertada comple-tamente, la máquina no funcionará.
4. Cierre la cubierta de la caja de batería y luego gire la palanca de bloqueo.
1
2
► 1. Palanca de bloqueo 2. Cubierta

34 ESPAÑOL
Extracción del cartucho de batería1. Gire la palanca de bloqueo y luego abra la cubierta de la caja de batería.2. Saque el cartucho de batería de la caja de bate-ría mientras desliza el botón en la parte delantera del cartucho.
1
► 1. Botón
3. Saque la llave de cierre.4. Cierre la cubierta de la caja de batería y luego gire la palanca de bloqueo.
Sistema de protección de la máquina/batería
Esta máquina está equipada con un sistema de protec-ción de la máquina/batería. Este sistema corta auto-máticamente la alimentación al motor para prolongar la vida útil de la máquina y la batería.La máquina se detendrá automáticamente durante la operación si ésta o el cartucho de batería presenta alguna de las siguientes condiciones. Se escucha un pitido corto antes de que la máquina se detenga auto-máticamente. Los indicadores de la batería y los indica-dores LED parpadean mientras se escucha el pitido.
Protección contra sobrecargaCuando la máquina es operada de tal manera que causa que consuma una cantidad inusualmente alta de corriente, la máquina se detiene automáticamente sin ninguna indicación previa. En este caso, apague la máquina, corrija la causa de la sobrecarga y después encienda la máquina para reiniciarla.
Protección contra sobrecalentamientoCuando la máquina se sobrecalienta, ésta se detiene automáticamente. Deje que la máquina se enfríe antes de volverla a encender. La protección contra sobreca-lentamiento puede funcionar en un entorno con altas temperaturas.
Protección contra sobredescargaCuando la capacidad de la batería es baja, la máquina se detiene automáticamente. Si la máquina no opera aun habiendo activado los interruptores, retire el cartu-cho de batería y cárguelo.
Cambio del cartucho de batería
1
► 1. Interruptor de selección de baterías
En la caja de baterías se pueden instalar hasta dos cartuchos de batería, aunque la máquina utiliza solo un cartucho de batería para funcionar. Antes de operar la máquina, seleccione el cartucho de batería que va a utilizar durante la operación presionando el número en el interruptor de selección de baterías.
AVISO: Si solo un cartucho de batería es instalado en la caja de batería, asegúrese de seleccionar la caja de batería en la que el cartucho de batería está instalado.
Indicación de la capacidad restante de la batería en la caja de batería
PRECAUCIÓN: Antes de verificar las capa-cidades restantes de las baterías o de cambiar el cartucho de batería, asegúrese de detener la máquina.

35 ESPAÑOL
1 1 2
► 1. Indicador de batería 2. Botón de verificación
Oprima el botón de verificación para indicar las capa-cidades restantes de la batería. Los indicadores de batería corresponden a cada batería.
Estado del indicador de bateríaCapacidad res-
tante de la bateríaEncendido Apagado
50% - 100%
20% - 50%
0% - 20%
Batería no instalada
PRECAUCIÓN: Cuando la capacidad de la batería sea baja, se escuchará un pitido corto. Si usted continúa operando la máquina con una capacidad baja de la batería, se escuchará un pitido largo y la máquina se detendrá automá-ticamente. Cuando escuche el pitido corto, jale la palanca del freno y bloquee el freno, y luego cambie el cartucho de batería por uno cargado o cargue el cartucho de batería. Cuando la capacidad restante de la batería se agote, la máquina se deten-drá repentinamente de forma automática pudiendo ocasionar alguna lesión.
NOTA: Si usted continúa jalando el gatillo interruptor aun habiendo escuchado el pitido corto, la máquina se detendrá automáticamente. Una vez que la máquina se haya detenido de forma automática, el pitido continuará y el freno de apoyo (freno eléctrico) se activará. Para detener el pitido y liberar el freno de apoyo, jale la palanca del freno y suelte el gatillo interruptor. No presione la máquina forzadamente sin liberar el freno de apoyo. Después de liberar el freno de apoyo, usted podrá saber qué sistema de protección de la batería está funcionando verificando el estado del indicador de la batería.
4
1 2 3
5
6
► 1. Encendido 2. Parpadeando 3. Apagado 4. Protección contra sobrecalentamiento 5. Protección contra descarga excesiva 6. Protección contra sobrecarga
PRECAUCIÓN: Si el pitido es escuchado mientras opera la máquina en una pendiente o si ésta se detiene automáticamente estando en una pendiente, lleve la máquina a un lugar seguro, bloquee el freno y luego cambie el cartucho de batería por uno cargado o cargue el cartucho de batería.Si la carga es grande y el pitido es escuchado mientras opera la máquina en una pendiente o si ésta se detiene automáticamente estando en una pendiente, no mueva la máquina a la fuerza. Bloquee el freno, ponga atención a la seguridad y cambie el cartucho de batería a uno cargado, y des-pués lleve la máquina a un lugar seguro. Reduzca la carga antes de operar la máquina nuevamente.
NOTA: Usted puede verificar la capacidad restante de la batería incluso si la llave de bloqueo no ha sido insertada.

36 ESPAÑOL
Indicación de la capacidad restante de la batería
Únicamente para cartuchos de batería con el indicador
1
2
► 1. Luces indicadoras 2. Botón de verificación
Oprima el botón de verificación en el cartucho de la batería para que indique la capacidad restante de la batería. Las luces indicadoras se iluminarán por algu-nos segundos.
Luces indicadoras Capacidad restante
Iluminadas Apagadas Parpadeando
75% a 100%
50% a 75%
25% a 50%
0% a 25%
Cargar la batería.
La batería pudo haber funcionado
mal.
NOTA: Dependiendo de las condiciones de uso y la temperatura ambiente, la indicación podrá diferir ligeramente de la capacidad real.
Panel de control
1
2 3► 1. Botón de encendido/apagado 2. Botón de avan-
zar/reversa 3. Botón de velocidad
Para encender la máquina, oprima el botón de encen-dido/apagado durante unos segundos. Oprima el botón de avanzar/reversa para cambiar entre los modos avanzar y reversa. Oprima el botón de velocidad para cambiar entre velocidad baja y velocidad alta. Cuando la máquina es encendida, el modo avanzar y la velo-cidad baja están ajustados. Para apagar la máquina, oprima el botón de encendido/apagado durante unos segundos.
NOTA: El botón de avanzar/reversa no está disponi-ble cuando se jala el gatillo interruptor.NOTA: Cuando la máquina es operada en reversa se escucha un pitido corto.NOTA: El botón de velocidad no está disponible cuando la máquina es operada en reversa.
Accionamiento del interruptor y el freno
ADVERTENCIA: Antes de instalar el cartu-cho de batería en la máquina, verifique siempre que el gatillo interruptor se accione debidamente y que regrese a la posición de apagado al soltarlo.
Para arrancar la máquina, jale el gatillo interruptor. Para detener la máquina, suelte el gatillo interruptor y jale la palanca del freno. Para bloquear la palanca del freno, oprima el botón de bloqueo mientras jala la palanca del freno. Para liberar el seguro, jale la palanca del freno.
1
► 1. Gatillo interruptor

37 ESPAÑOL
1
2
► 1. Botón de bloqueo 2. Palanca del freno
Freno de la rueda traseraLa rueda trasera del lado izquierdo está equipada con un freno. Presione el pedal del freno hacia la parte delantera para bloquear el freno. Para liberar el freno, presione el pedal del freno hacia la parte trasera.
1
► 1. Pedal
Encendido de las lámparas delanteras
Oprima el botón de la lámpara en la caja de baterías para encender las lámparas. Para apagar las lámparas, presione el botón de la lámpara nuevamente.
1
2
2► 1. Botón de la lámpara 2. Lámpara
NOTA: Las lámparas se apagarán si la máquina se deja desatendida durante aproximadamente 10 minutos.NOTA: Las lámparas se apagarán al apagarse la máquina.NOTA: Usted podrá encender las lámparas incluso si la llave de bloqueo no ha sido insertada.
Ajuste de la altura de los mangosRetire los pernos hexagonales cortos y los pernos de tope usando la llave incluida en el paquete, y luego ajuste la altura de los mangos. La altura puede ser ajustada en tres niveles. Apriete los pernos de tope y los pernos hexagonales cortos para fijar los mangos.
2
1
► 1. Perno hexagonal corto 2. Perno de tope
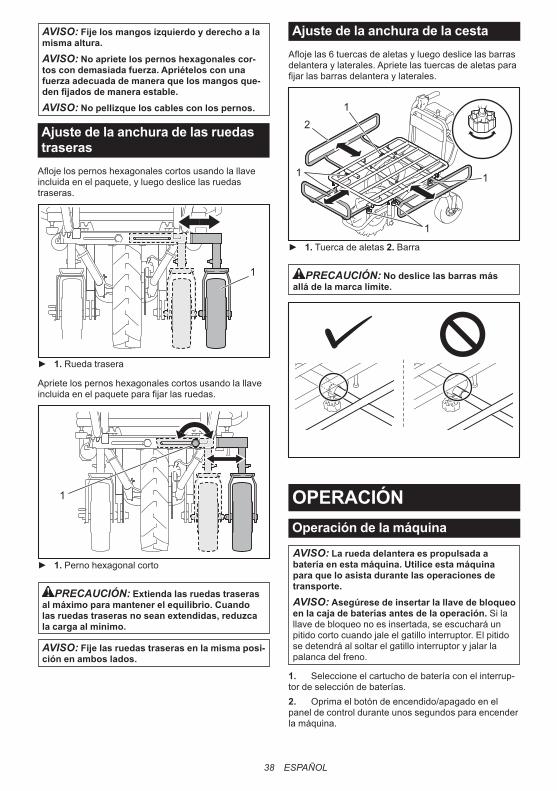
38 ESPAÑOL
AVISO: Fije los mangos izquierdo y derecho a la misma altura.AVISO: No apriete los pernos hexagonales cor-tos con demasiada fuerza. Apriételos con una fuerza adecuada de manera que los mangos que-den fijados de manera estable.AVISO: No pellizque los cables con los pernos.
Ajuste de la anchura de las ruedas traseras
Afloje los pernos hexagonales cortos usando la llave incluida en el paquete, y luego deslice las ruedas traseras.
1
► 1. Rueda trasera
Apriete los pernos hexagonales cortos usando la llave incluida en el paquete para fijar las ruedas.
1
► 1. Perno hexagonal corto
PRECAUCIÓN: Extienda las ruedas traseras al máximo para mantener el equilibrio. Cuando las ruedas traseras no sean extendidas, reduzca la carga al mínimo.
AVISO: Fije las ruedas traseras en la misma posi-ción en ambos lados.
Ajuste de la anchura de la cestaAfloje las 6 tuercas de aletas y luego deslice las barras delantera y laterales. Apriete las tuercas de aletas para fijar las barras delantera y laterales.
1
1
1
1
2
► 1. Tuerca de aletas 2. Barra
PRECAUCIÓN: No deslice las barras más allá de la marca límite.
OPERACIÓNOperación de la máquina
AVISO: La rueda delantera es propulsada a batería en esta máquina. Utilice esta máquina para que lo asista durante las operaciones de transporte.AVISO: Asegúrese de insertar la llave de bloqueo en la caja de baterías antes de la operación. Si la llave de bloqueo no es insertada, se escuchará un pitido corto cuando jale el gatillo interruptor. El pitido se detendrá al soltar el gatillo interruptor y jalar la palanca del freno.
1. Seleccione el cartucho de batería con el interrup-tor de selección de baterías.2. Oprima el botón de encendido/apagado en el panel de control durante unos segundos para encender la máquina.

39 ESPAÑOL
1
► 1. Botón de encendido/apagado
3. Jale la palanca del freno para liberar el seguro de ésta.
1
2
► 1. Botón de bloqueo 2. Palanca del freno
NOTA: Libere el freno de las ruedas traseras si éstas están instaladas.
4. Sujete los mangos firmemente con ambas manos.
5. Jale el gatillo interruptor.
1
► 1. Gatillo interruptor
Carga de objetos
PRECAUCIÓN: Antes de cargar objetos en la máquina, asegúrese de que ésta esté apagada y que la palanca del freno esté bloqueada.
PRECAUCIÓN: Si las ruedas traseras están instaladas, asegúrese de que el freno de las ruedas traseras esté bloqueado antes de cargar objetos en la máquina.
PRECAUCIÓN: Antes de cargar objetos en la máquina, asegúrese de que la cesta o canasta estén aseguradas.
PRECAUCIÓN: Asegúrese de cargar los objetos dentro de la cesta o canasta. Si los obje-tos sobresalen de la cesta o canasta, éstos podrían caerse o golpear contra obstáculos.
PRECAUCIÓN: Asegúrese de cargar los objetos de tal forma que queden por debajo del nivel de los ojos. Si la carga es demasiado alta, la vista podría taparse y resultar peligroso. Asimismo, podría haber riesgo de volcadura y lesiones debido a la probabilidad de que la carga pierda el equilibrio.

40 ESPAÑOL
Cuando cargue objetos en la cesta, asegúrelos con cuerdas atando éstas a los ganchos para cuerdas.
Vertido de objetos
PRECAUCIÓN: Levante la cesta o canasta sobre un suelo plano y estable. La operación sobre un suelo inestable podría provocar un accidente o lesión.
Usted puede verter los objetos levantando e inclinando la cesta o canasta.1. Detenga la máquina y luego bloquee los frenos.
AVISO: Es recomendable bloquear la rueda delantera para estabilizar la máquina.
2. Libere la palanca de bloqueo.3. Párese a un lado de la máquina, sujete el mango con una mano y luego levante e incline la cesta o canasta empujando hacia arriba el bastidor de soporte con la otra mano.
PRECAUCIÓN: Sujete firmemente el mango y el bastidor de soporte y colóquese en una pos-tura estable para trabajar.
PRECAUCIÓN: Reduzca la carga al mínimo. Si la carga es grande, no intente levantar la cesta. Reduzca la carga y luego levante la cesta.
PRECAUCIÓN: Después de verter los obje-tos, asegúrese de bloquear la cesta o canasta.
MANTENIMIENTOPRECAUCIÓN: Asegúrese siempre de esta-
cionar la máquina sobre suelo plano y bloquee la palanca del freno antes de almacenar la máquina o intentar realizar una inspección o tarea de mantenimiento.
PRECAUCIÓN: Si las ruedas traseras están instaladas, asegúrese de que el freno de éstas esté bloqueado antes del almacenamiento, ins-pecciones o tareas de mantenimiento.
PRECAUCIÓN: Asegúrese siempre de que la llave de bloqueo y el cartucho de batería hayan sido extraídos de la máquina antes del almacena-miento, inspecciones o tareas de mantenimiento.
PRECAUCIÓN: Retire siempre la llave de bloqueo cuando no vaya a utilizar la máquina. Guarde la llave de bloqueo en un lugar seguro y fuera del alcance de los niños.

41 ESPAÑOL
Inspecciones periódicas• Verifique que los pernos y tuercas estén firme-
mente apretados.
• Verifique que la cesta esté asegurada y que la palanca de bloqueo haya sido jalada hacia abajo completamente.
1 2
► 1. Seguro de la cesta 2. Palanca de bloqueo
• Verifique que la palanca del freno funcione correctamente.
1
► 1. Palanca del freno
ADVERTENCIA: Si la palanca del freno llega hasta el mango al jalarla por completo, quiere decir que el freno no está funcionando correcta-mente. Ajuste el freno o solicite la reparación al centro de servicio Makita de su localidad.
• Verifique que la rueda delantera no esté dañada o desinflada.
Limpieza de la máquina
AVISO: Nunca use gasolina, bencina, diluyente (tíner), alcohol o sustancias similares. Puede que esto ocasione grietas o descoloramiento.
AVISO: Vierta el agua por debajo de la cesta o canasta cuando limpie la máquina con agua de la llave. No utilice una lavadora de alta presión para la limpieza.
Elimine el lodo, tierra y suciedad de la máquina. Limpie la máquina con agua de la llave. Después de limpiarla, seque la máquina con un paño seco.
AlmacenamientoRetire la llave de bloqueo. Almacene la máquina en un lugar seguro y fuera del alcance de los niños.Para almacenar la máquina, los mangos pueden vol-tearse hacia el frente. Retire los pernos hexagonales cortos y los pernos de tope usando la llave incluida en el paquete. Doble los mangos hacia afuera y luego gírelos hacia el frente. Apriete los pernos de tope y los pernos hexagonales cortos para fijar los mangos.
1
2
2
► 1. Perno de tope 2. Perno hexagonal corto

42 ESPAÑOL
AVISO: No apriete los pernos hexagonales cortos con demasiada fuerza. Apriételos con una fuerza adecuada de manera que los mangos queden fijados de manera estable.
AVISO: No pellizque los cables con los pernos.
Ajuste del freno
PRECAUCIÓN: Si las ruedas traseras están instaladas, asegúrese de bloquear su freno antes de ajustar el freno.
1. Extraiga la cesta o canasta y luego abra el basti-dor de soporte.
1
► 1. Bastidor de soporte
2. Jale la palanca del freno para liberar botón de bloqueo de la palanca del freno.
1
2
► 1. Botón de bloqueo 2. Palanca del freno
3. Afloje el manguito de ajuste y la tuerca de sujeción.
1 2
► 1. Manguito de ajuste 2. Tuerca de sujeción
4. Apriete la tuerca de sujeción únicamente.
1
► 1. Tuerca de sujeción
5. Afloje el manguito de ajuste y la tuerca de sujeción.
1 2
► 1. Manguito de ajuste 2. Tuerca de sujeción
6. Apriete la tuerca de sujeción únicamente.

43 ESPAÑOL
1
► 1. Tuerca de sujeción
7. Asegúrese de que la palanca del freno esté en la posición media al ser jalada por completo. Si la palanca del freno está en la posición media, vaya al paso 13. Si la palanca del freno no está en la posición media, vaya al paso 8.
1
► 1. Palanca del freno
8. Afloje la tuerca de sujeción únicamente.
1
► 1. Tuerca de sujeción
9. Apriete la tuerca de sujeción y el manguito de ajuste juntos.
1 2
► 1. Manguito de ajuste 2. Tuerca de sujeción
10. Afloje la tuerca de sujeción únicamente.

44 ESPAÑOL
1
► 1. Tuerca de sujeción
11. Apriete la tuerca de sujeción y el manguito de ajuste juntos.
1 2
► 1. Manguito de ajuste 2. Tuerca de sujeción
12. Asegúrese de que la palanca del freno esté en la posición media al ser jalada por completo.
1
► 1. Palanca del freno
13. Pliegue el bastidor de soporte y luego instale la cesta o canasta.
1
► 1. Bastidor de soporte
ACCESORIOS OPCIONALES
PRECAUCIÓN: Estos accesorios o aditamen-tos están recomendados para utilizarse con su herramienta Makita especificada en este manual. El empleo de cualquier otro accesorio o aditamento puede conllevar el riesgo de lesiones personales. Utilice los accesorios o aditamentos solamente para su fin establecido.
Si necesita cualquier ayuda para más detalles en relación con estos accesorios, pregunte a su centro de servicio local Makita.• Cesta• Canasta• Batería y cargador originales de Makita
NOTA: Algunos de los artículos en la lista pueden incluirse en el paquete de la herramienta como acce-sorios estándar. Éstos pueden variar de país a país.

45 ESPAÑOL
GARANTÍA LIMITADA DE UN AÑO DE MAKITA
Ésta Garantía no aplica para MéxicoPolítica de garantíaCada herramienta Makita es inspeccionada y probada exhaustivamente antes de salir de la fábrica. Se garan-tiza que está libre de defectos de mano de obra y mate-riales por el período de UN AÑO a partir de la fecha ori-ginal de compra. Si durante este período de un año se desarrollara algún problema, devuelva la herramienta COMPLETA, con el envío prepagado, a un centro de servicio autorizado o de fábrica Makita. Si la inspección muestra que el problema ha sido a causa de un defecto de mano de obra o material, Makita hará la reparación (o a su discreción, el reemplazo) sin ningún cargo.Esta garantía no aplica cuando:• las reparaciones se hayan hecho o intentado
hacer por otros;• se requieran reparaciones debido al desgaste
normal;• la herramienta haya sido maltratada, recibido
un mal uso o haya recibido un mantenimiento inapropiado;
• se hayan hecho modificaciones a la herramienta.EN NINGÚN CASO MAKITA SE HARÁ RESPONSABLE DE NINGÚN DAÑO INDIRECTO, INCIDENTAL, O DERIVADO DE LA VENTA O USO DEL PRODUCTO. ESTE DESCARGO DE RESPONSABILIDAD APLICA DURANTE Y DESPUÉS DEL PLAZO DE ESTA GARANTÍA.MAKITA RENUNCIA A LA RESPONSABILIDAD POR CUALQUIER GARANTÍA IMPLÍCITA, INCLUYENDO GARANTÍAS DE “COMERCIABILIDAD” Y “ADECUACIÓN PARA UN PROPÓSITO ESPECÍFICO”, DESPUÉS DEL PLAZO DE UN AÑO DE ESTA GARANTÍA.Esta garantía le concede derechos legales específicos y usted podrá tener también otros derechos que varían de un estado a otro. Algunos estados no permiten la exclusión o limitación de daños incidentales o con-secuentes, por lo que la limitación o exclusión arriba mencionada podría no aplicar para usted. Algunos estados no permiten la limitación sobre la duración de una garantía implícita, por lo que la limitación arriba mencionada podría no aplicar para usted.

46

47

Some dust created by power sanding, sawing, grinding, drilling, and otherconstruction activities contains chemicals known to the State of Californiato cause cancer, birth defects or other reproductive harm. Some examplesof these chemicals are:• lead from lead-based paints,• crystalline silica from bricks and cement and other masonry products, and• arsenic and chromium from chemically-treated lumber.
Your risk from these exposures varies, depending on how often you do thistype of work. To reduce your exposure to these chemicals: work in a wellventilated area, and work with approved safety equipment, such as thosedust masks that are specially designed to filter out microscopic particles.
WARNING< USA only >
ADVERTENCIAAlgunos polvos creados por el lijado, aserrado, esmerilado, taladrado yotras actividades de la construcción contienen sustancias químicasreconocidas por el Estado de California como causantes de cáncer, defectosde nacimiento y otros peligros de reproducción. Algunos ejemplos de estosproductos químicos son:• plomo de pinturas a base de plomo,• sílice cristalino de ladrillos y cemento y otros productos de albañilería, y• arsénico y cromo de maderas tratadas químicamente.
El riesgo al que se expone varía, dependiendo de la frecuencia con la querealice este tipo de trabajo. Para reducir la exposición a estos productosquímicos: trabaje en un área bien ventilada y póngase el equipo de seguridadindicado, tal como las máscaras contra polvo que están especialmentediseñadas para filtrar partículas microscópicas.
< Sólo en los Estados Unidos >
Makita Corporation3-11-8, Sumiyoshi-cho,
Anjo, Aichi 446-8502 Japan
www.makita.com
885584-944XUC01-1EN, ESMX20170428