battery replacement installation instructions, (2711p ... · installation instructions original...
TRANSCRIPT
Installation Instructions
Original Instructions
Battery ReplacementCatalog Number 2711P-RY2032
Summary of ChangesThis publication contains new and updated information as indicated in the following table.
Topic Page
Summary of Changes 1
Important User Information 2
Precautions 3
About This Publication 4
Replace Battery in PanelView Plus Terminals 4
Replace Battery in PanelView Component Terminals 6
Replace Battery in PanelView plus 6 and PanelView Plus 6 Compact Terminals 7
400 and 600 Terminals 7
Replace Battery in PanelView Plus 6 Compact Terminals 8
1000 Terminals 8
Replace Battery in PanelView Plus 7 Standard Terminals 10
Replace Battery in PanelView Plus 7 Performance Terminals, PanelView 5500 Terminals, PanelView 5510 Terminals, and PanelView 5310 Terminals 11
Replace Battery in ArmorView Plus 7 Terminals 13
Replace Battery in PanelView 800 Terminals 15
Additional Resources 17
Topic Page
Added the ArmorView Plus 7 terminal to the list of terminals. 4
Added instructions on how to replace the battery in ArmorView Plus 7 terminals. 13
Updated the Additional Resources table with the installation instructions for the ArmorView Plus 7 terminals. 17
Battery Replacement
Important User InformationRead this document and the documents listed in the additional resources section about installation, configuration, and operation of this equipment before you install, configure, operate, or maintain this product. Users are required to familiarize themselves with installation and wiring instructions in addition to requirements of all applicable codes, laws, and standards.
Activities including installation, adjustments, putting into service, use, assembly, disassembly, and maintenance are required to be carried out by suitably trained personnel in accordance with applicable code of practice.
If this equipment is used in a manner not specified by the manufacturer, the protection provided by the equipment may be impaired.
In no event will Rockwell Automation, Inc. be responsible or liable for indirect or consequential damages resulting from the use or application of this equipment.
The examples and diagrams in this manual are included solely for illustrative purposes. Because of the many variables and requirements that are associated with any particular installation, Rockwell Automation, Inc. cannot assume responsibility or liability for actual use based on the examples and diagrams.
No patent liability is assumed by Rockwell Automation, Inc. with respect to use of information, circuits, equipment, or software described in this manual.
Reproduction of the contents of this manual, in whole or in part, without written permission of Rockwell Automation, Inc., is prohibited.
Throughout this manual, when necessary, we use notes to make you aware of safety considerations.
Labels may also be on or inside the equipment to provide specific precautions.
WARNING: Identifies information about practices or circumstances that can cause an explosion in a hazardous environment, which may lead to personal injury or death, property damage, or economic loss.
ATTENTION: Identifies information about practices or circumstances that can lead to personal injury or death, property damage, or economic loss. Attentions help you identify a hazard, avoid a hazard, and recognize the consequence.
IMPORTANT Identifies information that is critical for successful application and understanding of the product.
SHOCK HAZARD: Labels may be on or inside the equipment, for example, a drive or motor, to alert people that dangerous voltage may be present.
BURN HAZARD: Labels may be on or inside the equipment, for example, a drive or motor, to alert people that surfaces may reach dangerous temperatures.
ARC FLASH HAZARD: Labels may be on or inside the equipment, for example, a motor control center, to alert people to potential Arc Flash. Arc Flash will cause severe injury or death. Wear proper Personal Protective Equipment (PPE). Follow ALL Regulatory requirements for safe work practices and for Personal Protective Equipment (PPE).
2 Rockwell Automation Publication 2711P-IN009K-EN-P - March 2019
Battery Replacement
Precautions
Perchlorate material – special handling may apply. See www.dtsc.ca.gov/hazardouswaste/perchlorate.
This perchlorate warning only applies to primary Lithium Manganese Dioxide (LiMnO2) cells or batteries, and products that contain these cells or batteries, sold or distributed in California, USA.
These products contain a sealed lithium battery which may need to be replaced during the life of the product.
At the end of its life, the battery that is contained in this product should be collected separately from any unsorted municipal waste.
The collection and recycling of batteries helps protect the environment and contributes to the conservation of natural resources as valuable materials are recovered.
WARNING: There is a danger of explosion if the lithium battery or real-time clock module in this product is incorrectly placed. Replace the battery only with the indicated type. Do not replace the battery or real-time clock module unless power has been removed or the area is known to be nonhazardous.
Do not dispose of the lithium battery or real-time clock module in a fire or incinerator. Dispose of the battery in accordance with the local regulations. For safety information on the handling of lithium batteries. including handling and disposing of leaking batteries, see Guidelines for Handling Lithium Batteries, publication AG-5.4.
WARNING: The battery or real-time clock module in these products must only be changed in an area known to be nonhazardous.
ATTENTION: Work in a static-free environment and wear a properly grounded electrostatic discharge (ESD) wristband.
Be careful when touching any of the exposed electronic components to prevent damage from ESD.
Rockwell Automation Publication 2711P-IN009K-EN-P - March 2019 3
Battery Replacement
About This PublicationThis document provides information on how to replace the lithium battery, catalog number 2711P-RY2032, in these devices:
• 2711P PanelView™ Plus, 700 to 1500 terminals• 2711C PanelView Component, C400, C600, and C1000 terminals• 2711P PanelViewPlus 6, 400 and 600 terminals• 2711PC PanelView Plus 6, Compact 400, 600, and 1000 terminals• 2711P PanelView Plus 7, Standard terminals• 2711P PanelView Plus 7, Performance terminals• 2711P ArmorView™ Plus 7 terminals• 2711P PanelView 5500 terminals• 2715P PanelView 5510 terminals• 2713P PanelView 5310 terminals• 2711R PanelView 800 terminals
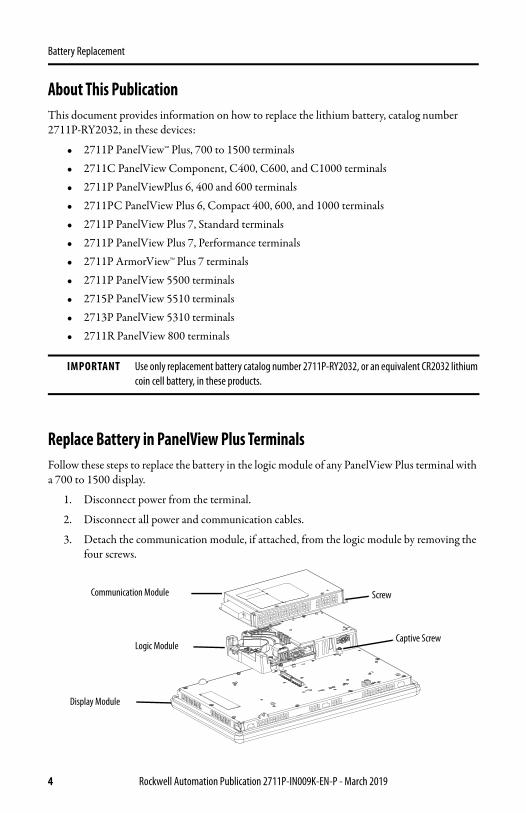
Replace Battery in PanelView Plus TerminalsFollow these steps to replace the battery in the logic module of any PanelView Plus terminal with a 700 to 1500 display.
1. Disconnect power from the terminal.
2. Disconnect all power and communication cables.
3. Detach the communication module, if attached, from the logic module by removing the four screws.
IMPORTANT Use only replacement battery catalog number 2711P-RY2032, or an equivalent CR2032 lithium coin cell battery, in these products.
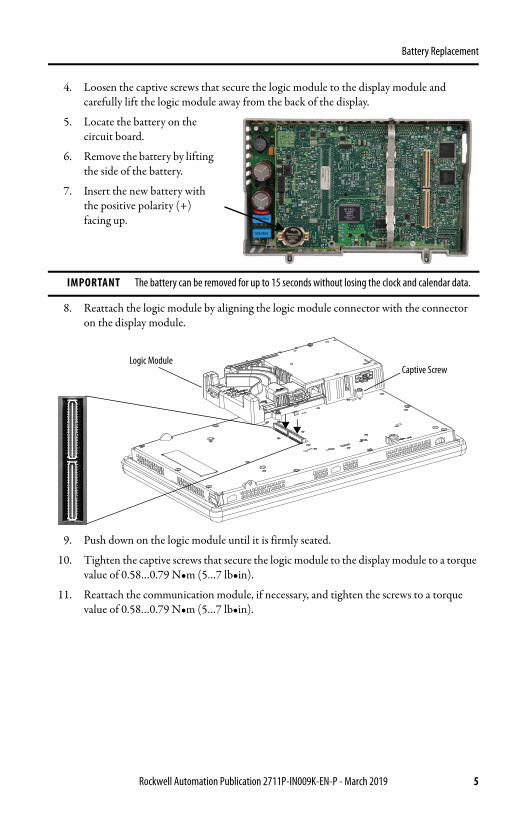
Logic Module
Communication Module Screw
Captive Screw
Display Module
4 Rockwell Automation Publication 2711P-IN009K-EN-P - March 2019
Battery Replacement
4. Loosen the captive screws that secure the logic module to the display module and carefully lift the logic module away from the back of the display.
5. Locate the battery on the circuit board.
6. Remove the battery by lifting the side of the battery.
7. Insert the new battery with the positive polarity (+) facing up.
8. Reattach the logic module by aligning the logic module connector with the connector on the display module.
9. Push down on the logic module until it is firmly seated.
10. Tighten the captive screws that secure the logic module to the display module to a torque value of 0.58…0.79 N•m (5…7 lb•in).
11. Reattach the communication module, if necessary, and tighten the screws to a torque value of 0.58…0.79 N•m (5…7 lb•in).
IMPORTANT The battery can be removed for up to 15 seconds without losing the clock and calendar data.
Captive ScrewLogic Module
Rockwell Automation Publication 2711P-IN009K-EN-P - March 2019 5
Battery Replacement
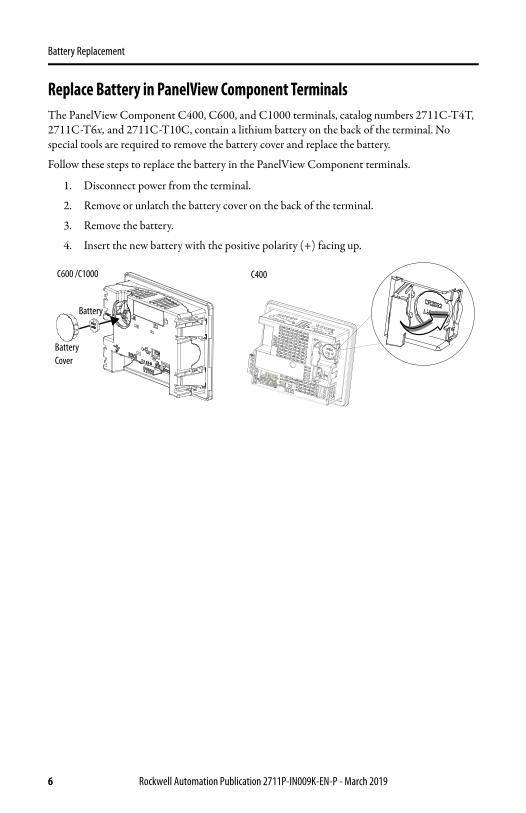
Replace Battery in PanelView Component TerminalsThe PanelView Component C400, C600, and C1000 terminals, catalog numbers 2711C-T4T, 2711C-T6x, and 2711C-T10C, contain a lithium battery on the back of the terminal. No special tools are required to remove the battery cover and replace the battery.
Follow these steps to replace the battery in the PanelView Component terminals.
1. Disconnect power from the terminal.
2. Remove or unlatch the battery cover on the back of the terminal.
3. Remove the battery.
4. Insert the new battery with the positive polarity (+) facing up.
Battery Cover
Battery
C600 /C1000 C400
6 Rockwell Automation Publication 2711P-IN009K-EN-P - March 2019
Battery Replacement
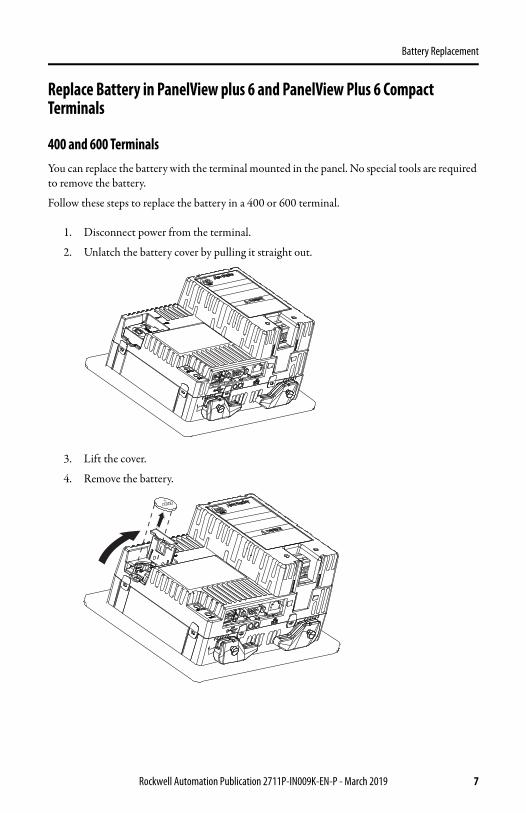
Replace Battery in PanelView plus 6 and PanelView Plus 6 Compact Terminals
400 and 600 TerminalsYou can replace the battery with the terminal mounted in the panel. No special tools are required to remove the battery.
Follow these steps to replace the battery in a 400 or 600 terminal.
1. Disconnect power from the terminal.
2. Unlatch the battery cover by pulling it straight out.
3. Lift the cover.
4. Remove the battery.
CR2032
Rockwell Automation Publication 2711P-IN009K-EN-P - March 2019 7
Battery Replacement
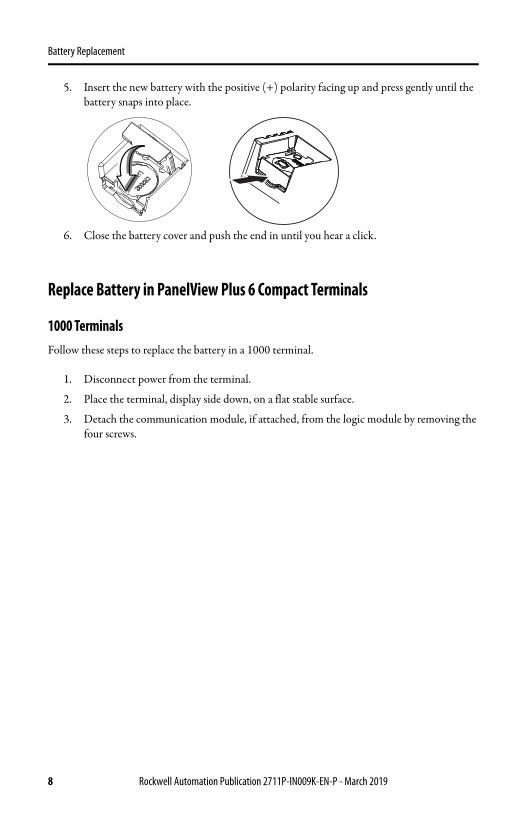
5. Insert the new battery with the positive (+) polarity facing up and press gently until the battery snaps into place.
6. Close the battery cover and push the end in until you hear a click.
Replace Battery in PanelView Plus 6 Compact Terminals
1000 TerminalsFollow these steps to replace the battery in a 1000 terminal.
1. Disconnect power from the terminal.
2. Place the terminal, display side down, on a flat stable surface.
3. Detach the communication module, if attached, from the logic module by removing the four screws.
8 Rockwell Automation Publication 2711P-IN009K-EN-P - March 2019
Battery Replacement
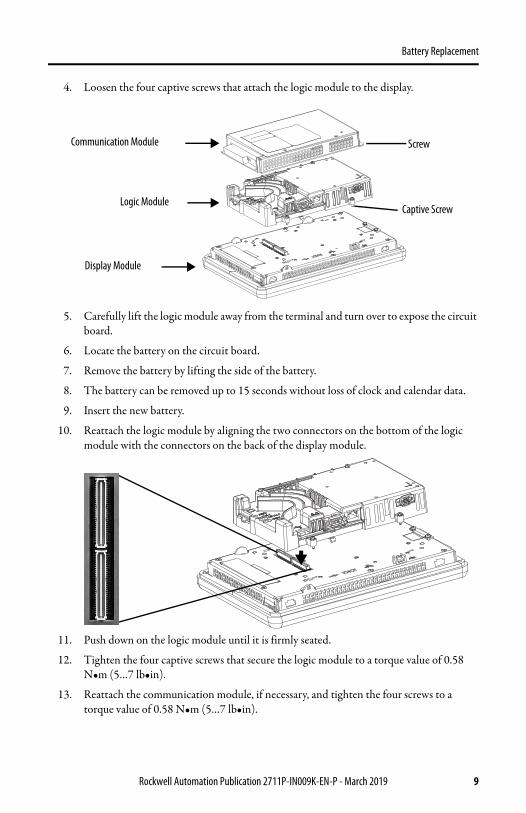
4. Loosen the four captive screws that attach the logic module to the display.
5. Carefully lift the logic module away from the terminal and turn over to expose the circuit board.
6. Locate the battery on the circuit board.
7. Remove the battery by lifting the side of the battery.
8. The battery can be removed up to 15 seconds without loss of clock and calendar data.
9. Insert the new battery.
10. Reattach the logic module by aligning the two connectors on the bottom of the logic module with the connectors on the back of the display module.
11. Push down on the logic module until it is firmly seated.
12. Tighten the four captive screws that secure the logic module to a torque value of 0.58 N•m (5…7 lb•in).
13. Reattach the communication module, if necessary, and tighten the four screws to a torque value of 0.58 N•m (5…7 lb•in).
Communication Module
Display Module
Captive Screw
Screw
Logic Module
Rockwell Automation Publication 2711P-IN009K-EN-P - March 2019 9
Battery Replacement
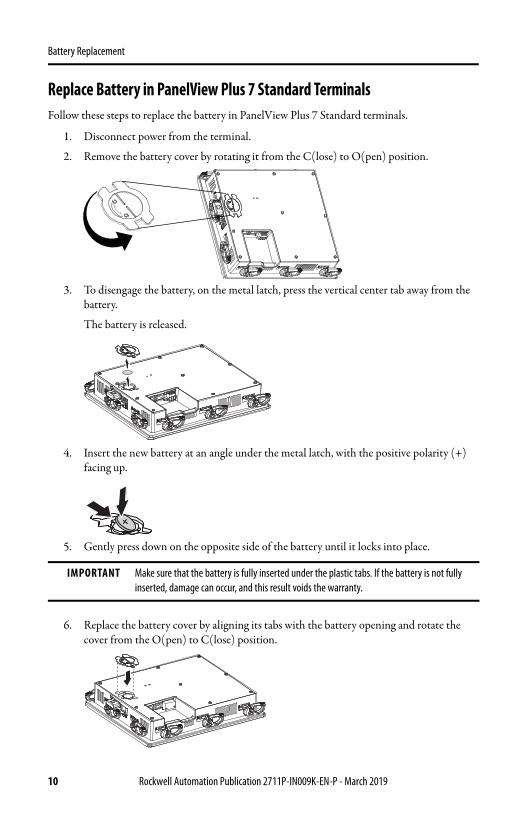
Replace Battery in PanelView Plus 7 Standard TerminalsFollow these steps to replace the battery in PanelView Plus 7 Standard terminals.
1. Disconnect power from the terminal.
2. Remove the battery cover by rotating it from the C(lose) to O(pen) position.
3. To disengage the battery, on the metal latch, press the vertical center tab away from the battery.
The battery is released.
4. Insert the new battery at an angle under the metal latch, with the positive polarity (+) facing up.
5. Gently press down on the opposite side of the battery until it locks into place.
6. Replace the battery cover by aligning its tabs with the battery opening and rotate the cover from the O(pen) to C(lose) position.
IMPORTANT Make sure that the battery is fully inserted under the plastic tabs. If the battery is not fully inserted, damage can occur, and this result voids the warranty.
10 Rockwell Automation Publication 2711P-IN009K-EN-P - March 2019
Battery Replacement
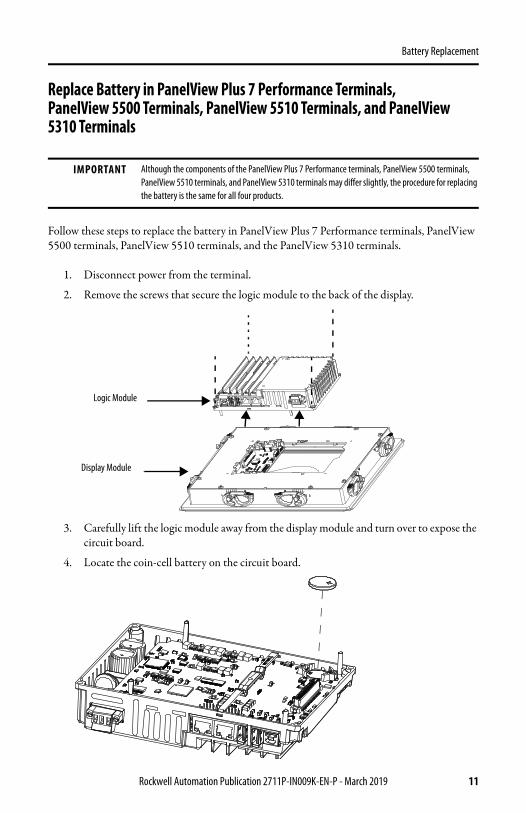
Replace Battery in PanelView Plus 7 Performance Terminals, PanelView 5500 Terminals, PanelView 5510 Terminals, and PanelView 5310 Terminals
Follow these steps to replace the battery in PanelView Plus 7 Performance terminals, PanelView 5500 terminals, PanelView 5510 terminals, and the PanelView 5310 terminals.
1. Disconnect power from the terminal.
2. Remove the screws that secure the logic module to the back of the display.
3. Carefully lift the logic module away from the display module and turn over to expose the circuit board.
4. Locate the coin-cell battery on the circuit board.
IMPORTANT Although the components of the PanelView Plus 7 Performance terminals, PanelView 5500 terminals, PanelView 5510 terminals, and PanelView 5310 terminals may differ slightly, the procedure for replacing the battery is the same for all four products.
Logic Module
Display Module
Rockwell Automation Publication 2711P-IN009K-EN-P - March 2019 11
Battery Replacement
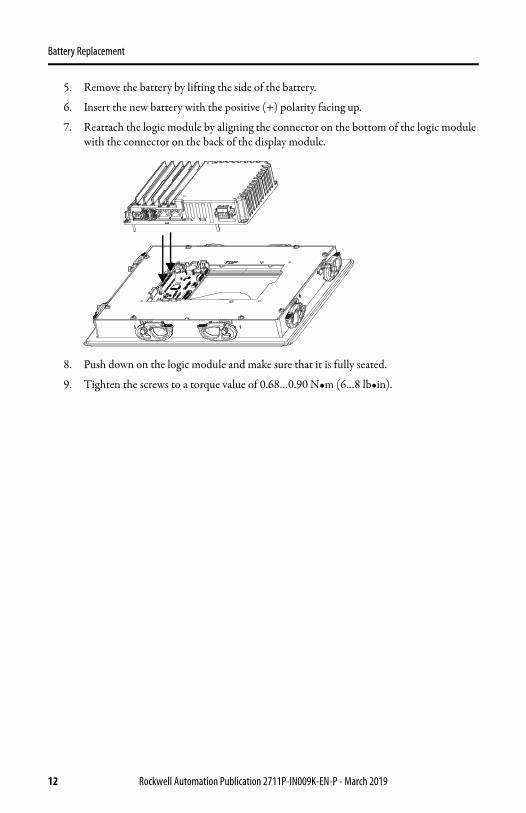
5. Remove the battery by lifting the side of the battery.
6. Insert the new battery with the positive (+) polarity facing up.
7. Reattach the logic module by aligning the connector on the bottom of the logic module with the connector on the back of the display module.
8. Push down on the logic module and make sure that it is fully seated.
9. Tighten the screws to a torque value of 0.68…0.90 N•m (6…8 lb•in).
12 Rockwell Automation Publication 2711P-IN009K-EN-P - March 2019
Battery Replacement
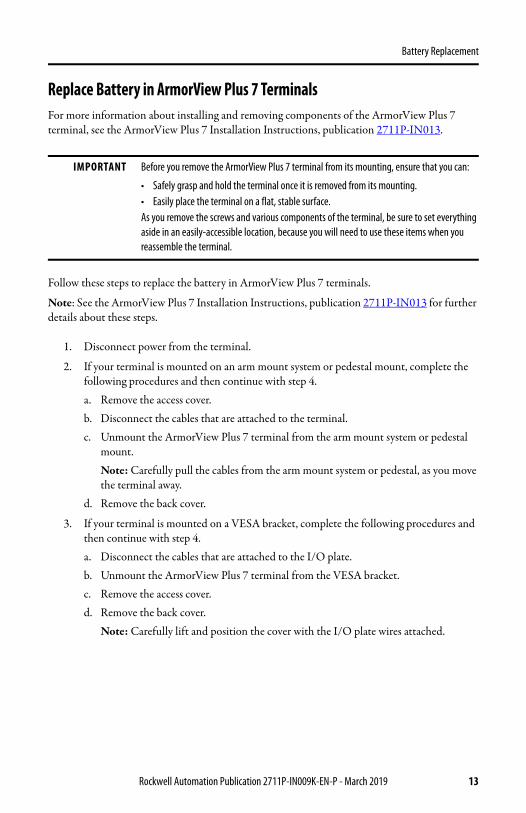
Replace Battery in ArmorView Plus 7 TerminalsFor more information about installing and removing components of the ArmorView Plus 7 terminal, see the ArmorView Plus 7 Installation Instructions, publication 2711P-IN013.
Follow these steps to replace the battery in ArmorView Plus 7 terminals.
Note: See the ArmorView Plus 7 Installation Instructions, publication 2711P-IN013 for further details about these steps.
1. Disconnect power from the terminal.
2. If your terminal is mounted on an arm mount system or pedestal mount, complete the following procedures and then continue with step 4.a. Remove the access cover.b. Disconnect the cables that are attached to the terminal.c. Unmount the ArmorView Plus 7 terminal from the arm mount system or pedestal
mount.Note: Carefully pull the cables from the arm mount system or pedestal, as you move the terminal away.
d. Remove the back cover.
3. If your terminal is mounted on a VESA bracket, complete the following procedures and then continue with step 4.a. Disconnect the cables that are attached to the I/O plate.b. Unmount the ArmorView Plus 7 terminal from the VESA bracket.c. Remove the access cover.d. Remove the back cover.
Note: Carefully lift and position the cover with the I/O plate wires attached.
IMPORTANT Before you remove the ArmorView Plus 7 terminal from its mounting, ensure that you can:
• Safely grasp and hold the terminal once it is removed from its mounting.• Easily place the terminal on a flat, stable surface.As you remove the screws and various components of the terminal, be sure to set everything aside in an easily-accessible location, because you will need to use these items when you reassemble the terminal.
Rockwell Automation Publication 2711P-IN009K-EN-P - March 2019 13
Battery Replacement
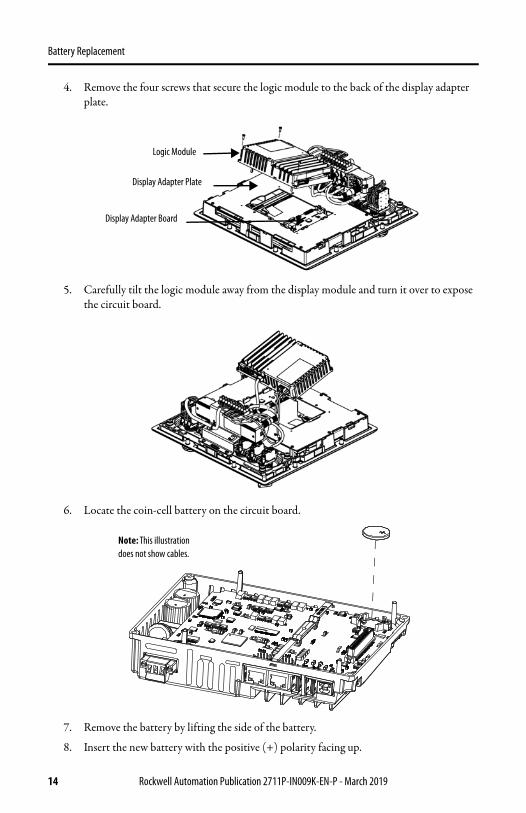
4. Remove the four screws that secure the logic module to the back of the display adapter plate.
5. Carefully tilt the logic module away from the display module and turn it over to expose the circuit board.
6. Locate the coin-cell battery on the circuit board.
7. Remove the battery by lifting the side of the battery.
8. Insert the new battery with the positive (+) polarity facing up.
Logic Module
Display Adapter Plate
Display Adapter Board
Note: This illustration does not show cables.
14 Rockwell Automation Publication 2711P-IN009K-EN-P - March 2019
Battery Replacement
9. Reattach the logic module by aligning the connector on the bottom of the logic module with the connector on the display adapter board.
10. Push down on the logic module and make sure that it is fully seated.
11. Insert the four screws and tighten them to a torque value of 0.68…0.90 N•m (6…8 lb•in).
12. If your terminal was mounted on an arm mount system or pedestal mount, complete the following procedures and then continue with step 14.a. Install the back cover.b. Mount the ArmorView Plus 7 terminal to an arm mount system or pedestal mount.
Note: Route the wires into the arm opening of the arm mount system as you mount the terminal on the arm.
c. Wire the ArmorView Plus 7 terminal.d. Install the access cover.
13. If your terminal was mounted on a VESA bracket, complete the following procedures and then continue with step 14.a. Install the back cover.b. Install the access cover.c. Mount the ArmorView Plus 7 terminal on a VESA bracket.d. Wire the ArmorView Plus 7 terminal.
14. Reconnect power to the terminal.
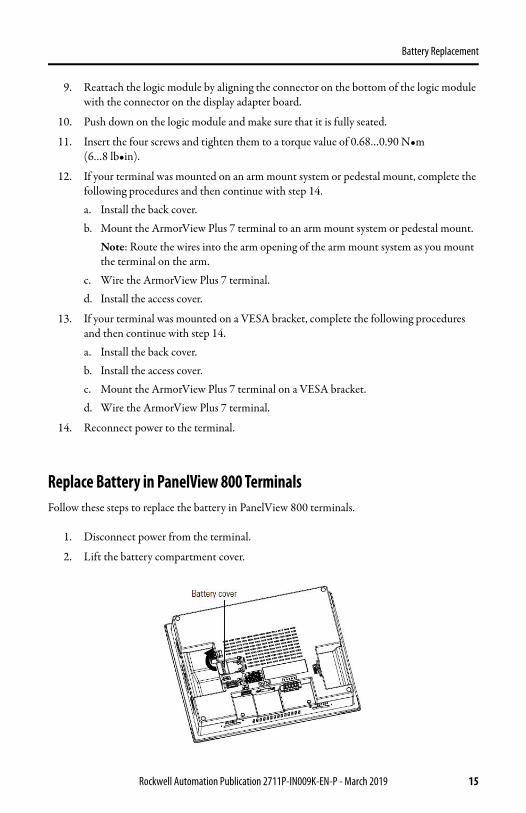
Replace Battery in PanelView 800 TerminalsFollow these steps to replace the battery in PanelView 800 terminals.
1. Disconnect power from the terminal.
2. Lift the battery compartment cover.
Rockwell Automation Publication 2711P-IN009K-EN-P - March 2019 15
Battery Replacement
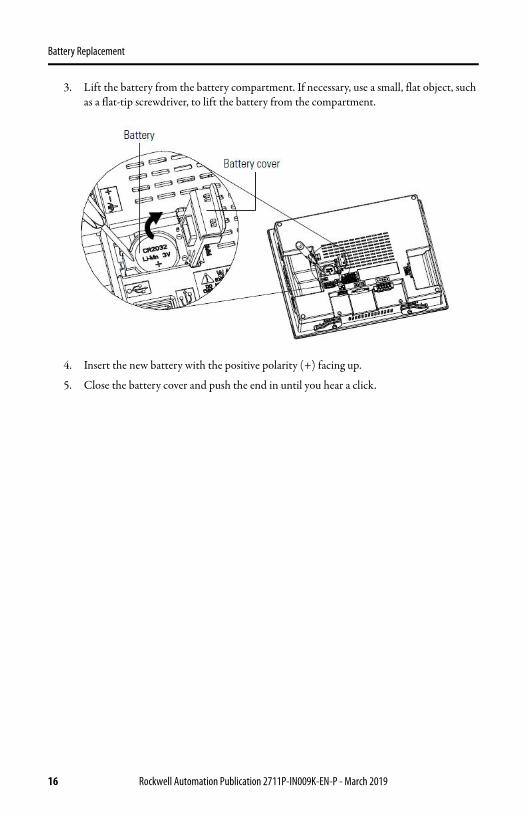
3. Lift the battery from the battery compartment. If necessary, use a small, flat object, such as a flat-tip screwdriver, to lift the battery from the compartment.
4. Insert the new battery with the positive polarity (+) facing up.
5. Close the battery cover and push the end in until you hear a click.
16 Rockwell Automation Publication 2711P-IN009K-EN-P - March 2019
Battery Replacement
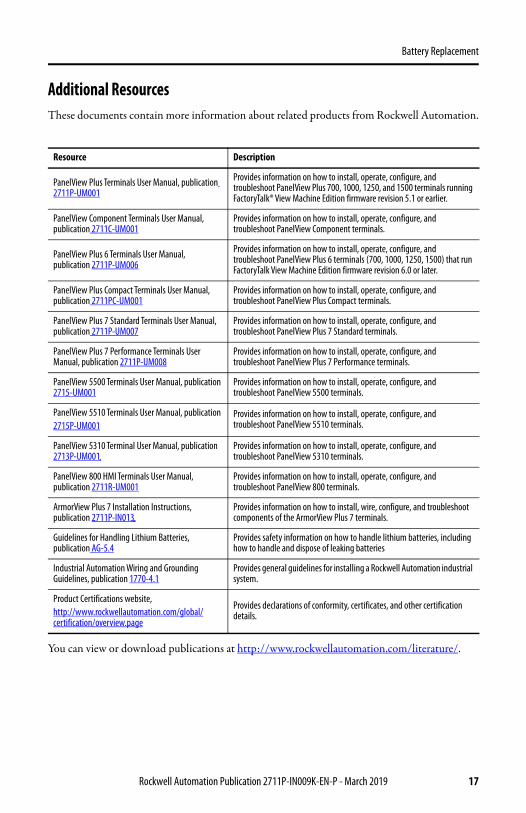
Additional ResourcesThese documents contain more information about related products from Rockwell Automation.
You can view or download publications at http://www.rockwellautomation.com/literature/.
Resource Description
PanelView Plus Terminals User Manual, publication 2711P-UM001
Provides information on how to install, operate, configure, and troubleshoot PanelView Plus 700, 1000, 1250, and 1500 terminals running FactoryTalk® View Machine Edition firmware revision 5.1 or earlier.
PanelView Component Terminals User Manual, publication 2711C-UM001
Provides information on how to install, operate, configure, and troubleshoot PanelView Component terminals.
PanelView Plus 6 Terminals User Manual, publication 2711P-UM006
Provides information on how to install, operate, configure, and troubleshoot PanelView Plus 6 terminals (700, 1000, 1250, 1500) that run FactoryTalk View Machine Edition firmware revision 6.0 or later.
PanelView Plus Compact Terminals User Manual, publication 2711PC-UM001
Provides information on how to install, operate, configure, and troubleshoot PanelView Plus Compact terminals.
PanelView Plus 7 Standard Terminals User Manual, publication 2711P-UM007
Provides information on how to install, operate, configure, and troubleshoot PanelView Plus 7 Standard terminals.
PanelView Plus 7 Performance Terminals User Manual, publication 2711P-UM008
Provides information on how to install, operate, configure, and troubleshoot PanelView Plus 7 Performance terminals.
PanelView 5500 Terminals User Manual, publication 2715-UM001
Provides information on how to install, operate, configure, and troubleshoot PanelView 5500 terminals.
PanelView 5510 Terminals User Manual, publication2715P-UM001
Provides information on how to install, operate, configure, and troubleshoot PanelView 5510 terminals.
PanelView 5310 Terminal User Manual, publication 2713P-UM001
Provides information on how to install, operate, configure, and troubleshoot PanelView 5310 terminals.
PanelView 800 HMI Terminals User Manual, publication 2711R-UM001
Provides information on how to install, operate, configure, and troubleshoot PanelView 800 terminals.
ArmorView Plus 7 Installation Instructions, publication 2711P-IN013
Provides information on how to install, wire, configure, and troubleshoot components of the ArmorView Plus 7 terminals.
Guidelines for Handling Lithium Batteries, publication AG-5.4
Provides safety information on how to handle lithium batteries, including how to handle and dispose of leaking batteries
Industrial Automation Wiring and Grounding Guidelines, publication 1770-4.1
Provides general guidelines for installing a Rockwell Automation industrial system.
Product Certifications website,http://www.rockwellautomation.com/global/certification/overview.page
Provides declarations of conformity, certificates, and other certification details.
Rockwell Automation Publication 2711P-IN009K-EN-P - March 2019 17
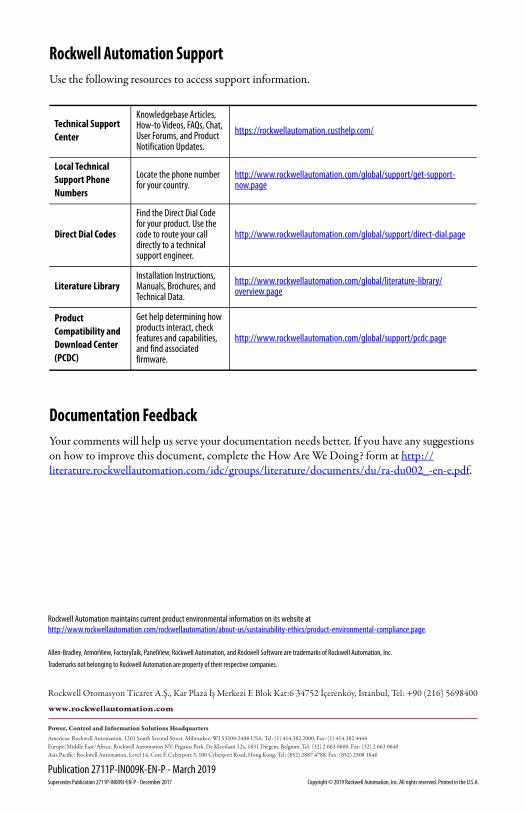
Rockwell Automation SupportUse the following resources to access support information.
Documentation FeedbackYour comments will help us serve your documentation needs better. If you have any suggestions on how to improve this document, complete the How Are We Doing? form at http://literature.rockwellautomation.com/idc/groups/literature/documents/du/ra-du002_-en-e.pdf.
Technical Support Center
Knowledgebase Articles, How-to Videos, FAQs, Chat, User Forums, and Product Notification Updates.
https://rockwellautomation.custhelp.com/
Local Technical Support Phone Numbers
Locate the phone number for your country.
http://www.rockwellautomation.com/global/support/get-support-now.page
Direct Dial Codes
Find the Direct Dial Code for your product. Use the code to route your call directly to a technical support engineer.
http://www.rockwellautomation.com/global/support/direct-dial.page
Literature LibraryInstallation Instructions, Manuals, Brochures, and Technical Data.
http://www.rockwellautomation.com/global/literature-library/overview.page
Product Compatibility and Download Center (PCDC)
Get help determining how products interact, check features and capabilities, and find associated firmware.
http://www.rockwellautomation.com/global/support/pcdc.page
Allen-Bradley, ArmorView, FactoryTalk, PanelView, Rockwell Automation, and Rockwell Software are trademarks of Rockwell Automation, Inc.
Trademarks not belonging to Rockwell Automation are property of their respective companies.
Rockwell Otomasyon Ticaret A.Ş., Kar Plaza İş Merkezi E Blok Kat:6 34752 İçerenköy, İstanbul, Tel: +90 (216) 5698400
Rockwell Automation maintains current product environmental information on its website athttp://www.rockwellautomation.com/rockwellautomation/about-us/sustainability-ethics/product-environmental-compliance.page.
Publication 2711P-IN009K-EN-P - March 2019Supersedes Publication 2711P-IN009J-EN-P - December 2017 Copyright © 2019 Rockwell Automation, Inc. All rights reserved. Printed in the U.S.A.