bear & the honey pot pumpkin - … · bear & the honey pot pumpkin by betty bowers....
TRANSCRIPT

EX
CLUSIVE
BEAR & THE HONEY POT PUMPKIN
by Betty Bowers

PALETTEDecoArt Americana AcrylicBittersweet Chocolate #13195Burnt Orange #13016Burnt Sienna #13063Camel #13191Cocoa #13253Deep Burgundy #13128Ice Blue*Lamp (Ebony) Black #13067Light Avocado #13106Moon Yellow #13007Plantation Pine #13113Snow White (Titanium White) #13001Spiced Pumpkin #13546Traditional Raw Sienna (TRS)**Discontinued by DecoArt
OTHER DECOART PRODUCTSDazzling Metallic Splendid Gold #14213DecoArt Multi Purpose Sealer #87392Acrylic Sealer Finisher Matte Spray #70836
SUGGESTED BRUSHESPapillon by The Artist’s ClubShader 6 Piece set #20135Shader 5 Piece set #20128Liner size 10/0 #20145Angular Shader size 1/4" #20109Angular Shader size 1/2" #20111Old fan brush1/4" and 1/2" from 4 Piece Highlighter set #201731/2" from 5 Piece Deerfoot set #20167
or use a stencil brush
SURFACEMedium Grooved Pumpkin #63000
MISC. SUPPLIESBasic Painting suppliesPaper TowelsGray Graphite Paper 18x36 #70141Pro Art Tracing Roll #83175Soft Grip Embossing & Stylus set of 3 #70125
WOOD PREPTrace on basic lines. Note: always use a brush to fi t the area being painted.
2 | artistsclub.com
Bear & The Honey Pot Pumpkinby Betty Bowers

artistsclub.com | 3
PAINTING INSTRUCTIONSBackgroundBasecoat the top area with a 1:1 mix of Spiced Pumpkin and Sealer. Let dry. Sand again for a smooth surface. Sometimes the paint will raise the wood grain. By sand-ing, it will give you a smooth surface to paint on. Base coat again with just paint. Let dry.
Use the 1/2" angular brush to shade around the edges of the wood surface and around the outline of the bear with Burnt Orange. Using the same brush, turn on the chisel edge and pull down some lines for wood grain in the background. Don’t forget to paint in the groves. Deepen the shading with Deep Burgundy.
Next, begin to highlight by dry brushing with the 3/4" highlighter brush and Moon Yellow. Do several light layers. Don’t clean or wet the brush, just pick up a little White and blend on palette. This will combine the two colors, lighten up the yellow more, dry brush to add lighter value of color.
Basecoat the stem of the wood surface with Burnt Sienna. Shade down the left side and in the top with Bittersweet Chocolate. Brush highlights on the right side with Moon Yellow, then White. Use your liner brush to pull details lines across the stem with Black.
Main DesignPOT• Basecoat pot with a mix of Lt. Avocado and Multi-
Purpose Sealer. Let dry. Lightly sand. Basecoat again with just paint. Let dry.
• Shade with Plantation Pine down the groves and across for boards.
• Dry brush highlights with the 1/2" highlighter brush and Ice Blue.
• Use your liner brush to pull down the grain lines with Plantation Pine. Repeat with White.
• Dot the nail heads with Black using the end of a large brush. Add highlight using White.
SPOON• Paint with Burnt Sienna. Shade with Bittersweet
Chocolate. • Dry brush with a little Camel. Pull down grain lines
with Black.HONEY• Paint honey on spoon and top of pot with Camel.
Shade with a little TRS. Begin to dry brush with the 1/2" highlighter brush with Moon Yellow. Do light
4 | artistsclub.com

artistsclub.com | 5
layers. Letting paint dry in between layers.• Lightly fl oat the honey and drips with White.• Lightly brush Splendid Gold on the drips. Reinforce
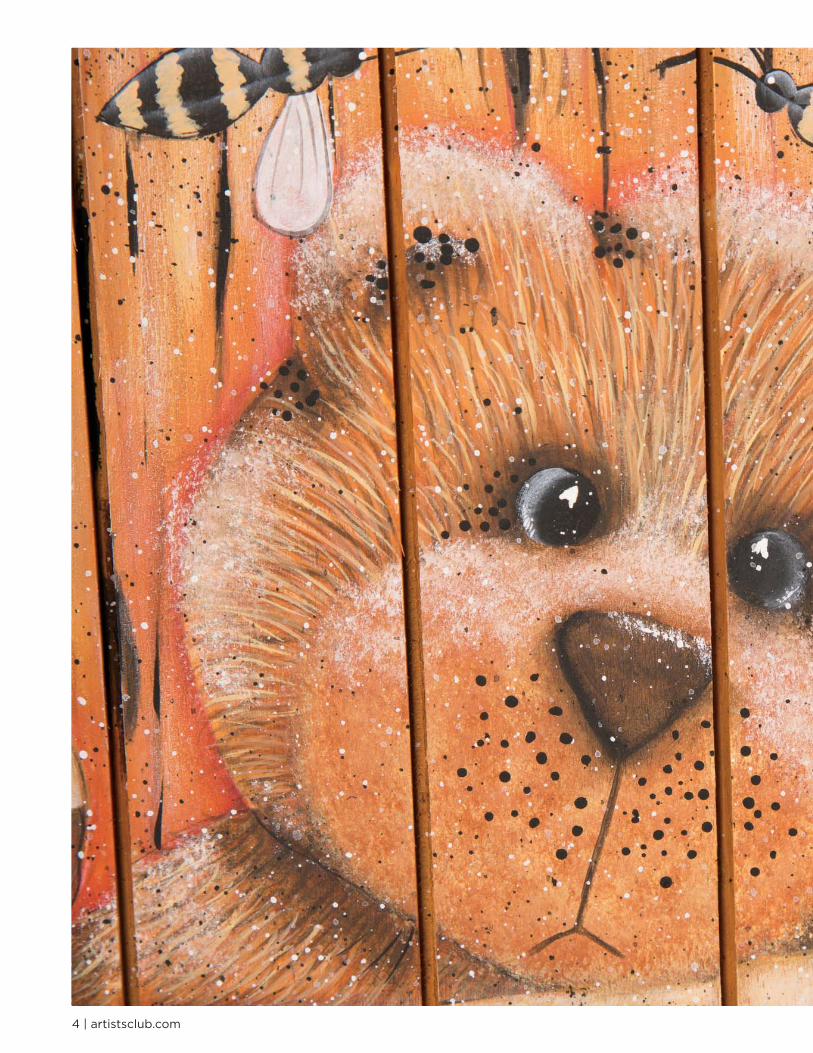
under the bottom of drips with TRS.BEAR• Basecoat with 1:1 mix of Cocoa and Sealer. Let dry
lightly sand. Paint again with just Cocoa.• Shade around muzzle, ears and inside ears, neck,
and paws with Burnt Sienna. Deepening shading with Bittersweet Chocolate.
• Using your liner brush, mix water with each color. Water will help paint to fl ow easy.
• Do colors in this order: Bittersweet Chocolate, Burnt Sienna, TRS, Camel, last Moon Yellow.
• Using your deerfoot stippler or a stencil brush, lightly stipple the muzzle area with Burnt Sienna.
• Using a clean brush, stipple the top part of muzzle, the top of head, each ear and the paws with just a little of White.
• You can reinforce the shading inside ears, on the outer edge of each ear, under the face and the paws with Bittersweet Chocolate.
• Paint the eyes and add dots in the ears, on the outer edge of ears, the eye sides, and muzzle with Black.
• Shade around the eyes with Bittersweet Chocolate.• Paint nose with Bittersweet Chocolate. Shade with
Black. White on the top of the nose for highlights.• Float inside the eyes with White. Dabble White in
each eye.BEES• Paint the bodies with Moon Yellow. Paint the head
and the stripes with Black. Float the wings with White.
• Outline and paint the antenna and details lines on the wings with White. dot eyes the a very small White dot.
FINISHINGUse the fan brush to dip into water, but don’t have too much water, mix with a little Black paint to inky con-sistence. Load the fan brush and tap over the trash to remove any blobs by lightly tapping on the handle of another paint brush. Now tap over the surface and repeat this process with Black. Let dry.
Protect your fi nished piece by spraying with sealer. I like to do several light coats.

6 | artistsclub.com
Pattern at 100%1" x 1"
To ensure yourpattern is at 100%,
this box should measure 1" x 1" when printed.

artistsclub.com | 7

Copyright 2018 by Betty Bowers and Crafts Americana Group, Inc.All Rights Reserved. #332326
No. *A332326*© Artist’s Club®. All rights reserved. For private, non-commercial use only.
Please see our web site for terms of use.