beaweblogic platform - oracle help center · iv creating weblogic configurations using the...
TRANSCRIPT

BEAWebLogic Platform™
Creating WebLogic Configurations Using the Configuration Wizard
Version 8.1 Service Pack 6Revised:June 2006

CopyrightCopyright © 2004-2006 BEA Systems, Inc. All Rights Reserved.
Restricted Rights LegendThis software and documentation is subject to and made available only pursuant to the terms of the BEA Systems License Agreement and may be used or copied only in accordance with the terms of that agreement. It is against the law to copy the software except as specifically allowed in the agreement. This document may not, in whole or in part, be copied, photocopied, reproduced, translated, or reduced to any electronic medium or machine readable form without prior consent, in writing, from BEA Systems, Inc.
Use, duplication or disclosure by the U.S. Government is subject to restrictions set forth in the BEA Systems License Agreement and in subparagraph (c)(1) of the Commercial Computer Software-Restricted Rights Clause at FAR 52.227-19; subparagraph (c)(1)(ii) of the Rights in Technical Data and Computer Software clause at DFARS 252.227-7013, subparagraph (d) of the Commercial Computer Software--Licensing clause at NASA FAR supplement 16-52.227-86; or their equivalent.
Information in this document is subject to change without notice and does not represent a commitment on the part of BEA Systems. THE SOFTWARE AND DOCUMENTATION ARE PROVIDED “AS IS” WITHOUT WARRANTY OF ANY KIND INCLUDING WITHOUT LIMITATION, ANY WARRANTY OF MERCHANTABILITY OR FITNESS FOR A PARTICULAR PURPOSE. FURTHER, BEA Systems DOES NOT WARRANT, GUARANTEE, OR MAKE ANY REPRESENTATIONS REGARDING THE USE, OR THE RESULTS OF THE USE, OF THE SOFTWARE OR WRITTEN MATERIAL IN TERMS OF CORRECTNESS, ACCURACY, RELIABILITY, OR OTHERWISE.
Trademarks or Service MarksBEA, BEA JRockit, BEA Liquid Data for WebLogic, BEA WebLogic Server, Built on BEA, Jolt, JoltBeans, SteelThread, Top End, Tuxedo, and WebLogic are registered trademarks of BEA Systems, Inc. BEA AquaLogic, BEA AquaLogic Data Services Platform, BEA AquaLogic Enterprise Security, BEA AquaLogic Service Bus, BEA AquaLogic Service Registry, BEA Builder, BEA Campaign Manager for WebLogic, BEA eLink, BEA Manager, BEA MessageQ, BEA WebLogic Commerce Server, BEA WebLogic Enterprise, BEA WebLogic Enterprise Platform, BEA WebLogic Enterprise Security, BEA WebLogic Express, BEA WebLogic Integration, BEA WebLogic Java Adapter for Mainframe, BEA WebLogic JDriver, BEA WebLogic JRockit, BEA WebLogic Log Central, BEA WebLogic Personalization Server, BEA WebLogic Platform, BEA WebLogic Portal, BEA WebLogic Server Process Edition, BEA WebLogic WorkGroup Edition, BEA WebLogic Workshop, and Liquid Computing are trademarks of BEA Systems, Inc. BEA Mission Critical Support is a service mark of BEA Systems, Inc. All other company and product names may be the subject of intellectual property rights reserved by third parties.
All other trademarks are the property of their respective companies.

Creating WebLogic Configurations Using the Configuration Wizard iii
Contents
1. Overview of the WebLogic Configuration Wizard and Configuration Template Builder
Overview . . . . . . . . . . . . . . . . . . . . . . . . . . . . . . . . . . . . . . . . . . . . . . . . . . . . . . . . . . . . . . 1-1
What Are Configuration and Extension Templates? . . . . . . . . . . . . . . . . . . . . . . . . . 1-2
Creating and Extending Domains Using the Configuration Wizard . . . . . . . . . . . . . . . . . 1-3
When to Choose Custom Configuration . . . . . . . . . . . . . . . . . . . . . . . . . . . . . . . . . . . 1-4
What the Configuration Wizard Creates. . . . . . . . . . . . . . . . . . . . . . . . . . . . . . . . . . . 1-4
Extending Domains. . . . . . . . . . . . . . . . . . . . . . . . . . . . . . . . . . . . . . . . . . . . . . . . . . . 1-5
Creating Custom Templates Using the Configuration Template Builder . . . . . . . . . . . . . 1-5
Creating Custom Configuration Templates . . . . . . . . . . . . . . . . . . . . . . . . . . . . . . . . 1-7
Creating Custom Extension Templates. . . . . . . . . . . . . . . . . . . . . . . . . . . . . . . . . . . . 1-7
Additional Tools for Extending and Managing Domains . . . . . . . . . . . . . . . . . . . . . . . . . 1-8
Brief Introduction to Domains . . . . . . . . . . . . . . . . . . . . . . . . . . . . . . . . . . . . . . . . . . . . . . 1-9
2. Starting the Configuration WizardStarting in Graphical Mode . . . . . . . . . . . . . . . . . . . . . . . . . . . . . . . . . . . . . . . . . . . . . . . . 2-1
Starting in Console Mode . . . . . . . . . . . . . . . . . . . . . . . . . . . . . . . . . . . . . . . . . . . . . . . . . 2-2
Starting in Silent Mode . . . . . . . . . . . . . . . . . . . . . . . . . . . . . . . . . . . . . . . . . . . . . . . . . . . 2-3
3. Starting the WebLogic Configuration Template BuilderStarting the Configuration Template Builder on Windows Platforms. . . . . . . . . . . . . . . . 3-1
Starting the Configuration Template Builder on UNIX Platforms . . . . . . . . . . . . . . . . . . 3-2
iv Creating WebLogic Configurations Using the Configuration Wizard
4. Creating a Script for Silent-Mode ConfigurationCreating a Script to Create a New Domain in Silent Mode . . . . . . . . . . . . . . . . . . . . . . . 4-2
Step 1: Select the Configuration Template. . . . . . . . . . . . . . . . . . . . . . . . . . . . . . . . . 4-2
Step 2: Edit the Configuration Information . . . . . . . . . . . . . . . . . . . . . . . . . . . . . . . . 4-2
Creating a Configuration Object. . . . . . . . . . . . . . . . . . . . . . . . . . . . . . . . . . . . . 4-4
Assigning an Existing Configuration Object to a Variable. . . . . . . . . . . . . . . . . 4-4
Assigning an Existing Child Element to a Variable . . . . . . . . . . . . . . . . . . . . . . 4-5
Setting Configuration Object Attributes . . . . . . . . . . . . . . . . . . . . . . . . . . . . . . . 4-6
Setting a Specific Attribute for a Child Element . . . . . . . . . . . . . . . . . . . . . . . . 4-7
Setting an Attribute for All Instances of a Child Element . . . . . . . . . . . . . . . . . 4-8
Setting Attributes for Unnamed Child Elements . . . . . . . . . . . . . . . . . . . . . . . . 4-8
Setting an HTTP Proxy Server for a Cluster . . . . . . . . . . . . . . . . . . . . . . . . . . . 4-9
Setting Configuration Options When Creating a New Domain . . . . . . . . . . . . 4-10
Assigning Servers to Clusters . . . . . . . . . . . . . . . . . . . . . . . . . . . . . . . . . . . . . . 4-11
Assigning All Applications and Services to Servers and Clusters . . . . . . . . . . 4-12
Assigning Individual Applications to Servers and Clusters . . . . . . . . . . . . . . . 4-14
Assigning Individual Services to Servers and Clusters . . . . . . . . . . . . . . . . . . 4-14
Creating Security Assignments. . . . . . . . . . . . . . . . . . . . . . . . . . . . . . . . . . . . . 4-16
Removing Assignments Using the Unassign Operation. . . . . . . . . . . . . . . . . . 4-16
Deleting a Configuration Object. . . . . . . . . . . . . . . . . . . . . . . . . . . . . . . . . . . . 4-17
Step 3: Create the Domain . . . . . . . . . . . . . . . . . . . . . . . . . . . . . . . . . . . . . . . . . . . . 4-17
Step 4: Close the Configuration Template . . . . . . . . . . . . . . . . . . . . . . . . . . . . . . . . 4-18
Creating a Script to Extend an Existing Domain in Silent Mode . . . . . . . . . . . . . . . . . . 4-18
Step 1: Select the Domain Directory . . . . . . . . . . . . . . . . . . . . . . . . . . . . . . . . . . . . 4-19
Step 2: Add the Extension Template to the Domain . . . . . . . . . . . . . . . . . . . . . . . . 4-19
Step 3: Edit the Existing Configuration Information (Optional) . . . . . . . . . . . . . . . 4-20
Setting Configuration Options When Extending a Domain . . . . . . . . . . . . . . . 4-20

Creating WebLogic Configurations Using the Configuration Wizard v
Step 4: Update the Domain. . . . . . . . . . . . . . . . . . . . . . . . . . . . . . . . . . . . . . . . . . . . 4-21
Step 5: Close the Domain . . . . . . . . . . . . . . . . . . . . . . . . . . . . . . . . . . . . . . . . . . . . . 4-21
Sample Configuration Scripts for Silent-Mode Configuration . . . . . . . . . . . . . . . . . . . . 4-22
Sample Scripts for Creating a New Domain from a Configuration Template . . . . . 4-22
Sample Script Based on the Basic WebLogic Server Domain Template . . . . . 4-22
Sample Script Based on the Avitek Medical Records Sample Domain Template . .4-26
Sample Script Based on the Basic WebLogic Portal Domain Template . . . . . . 4-29
Sample Script for Creating a New Domain and Updating It Using an Extension Template . . . . . . . . . . . . . . . . . . . . . . . . . . . . . . . . . . . . . . . . . . . . . . . . . . . . . . 4-31
5. Creating a New WebLogic DomainOverview of Creating a Domain Using the Configuration Wizard . . . . . . . . . . . . . . . . . . 5-1
Using the Express Option to Create a New Domain . . . . . . . . . . . . . . . . . . . . . . . . . 5-1
Using the Custom Option to Create a New Domain . . . . . . . . . . . . . . . . . . . . . . . . . 5-2
Creating or Extending a Configuration . . . . . . . . . . . . . . . . . . . . . . . . . . . . . . . . . . . . . . . 5-4
Selecting a Configuration Template . . . . . . . . . . . . . . . . . . . . . . . . . . . . . . . . . . . . . . . . . 5-5
Choosing Express or Custom Configuration . . . . . . . . . . . . . . . . . . . . . . . . . . . . . . . . . . . 5-6
Designating an Administration Server. . . . . . . . . . . . . . . . . . . . . . . . . . . . . . . . . . . . . . . . 5-7
Configuring the Administration Server . . . . . . . . . . . . . . . . . . . . . . . . . . . . . . . . . . . . . . . 5-7
Specifying Listen Addresses . . . . . . . . . . . . . . . . . . . . . . . . . . . . . . . . . . . . . . . . . . . 5-9
Specifying Listen Ports. . . . . . . . . . . . . . . . . . . . . . . . . . . . . . . . . . . . . . . . . . . . . . . 5-10
Configuring Managed Servers, Clusters, and Machines When Creating a New Domain 5-11
Configuring JDBC When Creating a New Domain . . . . . . . . . . . . . . . . . . . . . . . . . . . . 5-11
Configuring JMS When Creating a New Domain. . . . . . . . . . . . . . . . . . . . . . . . . . . . . . 5-12
Targeting Servers and Clusters When Creating a New Domain . . . . . . . . . . . . . . . . . . . 5-12
Configuring Security When Creating a New Domain. . . . . . . . . . . . . . . . . . . . . . . . . . . 5-13
Configuring Windows Options . . . . . . . . . . . . . . . . . . . . . . . . . . . . . . . . . . . . . . . . . . . . 5-13

vi Creating WebLogic Configurations Using the Configuration Wizard
Building Start Menu Entries . . . . . . . . . . . . . . . . . . . . . . . . . . . . . . . . . . . . . . . . . . . . . . 5-14
Specifying the Server Start Mode and Java SDK . . . . . . . . . . . . . . . . . . . . . . . . . . . . . . 5-15
Choosing the Startup Mode . . . . . . . . . . . . . . . . . . . . . . . . . . . . . . . . . . . . . . . . . . . 5-15
Selecting the SDK for the Domain . . . . . . . . . . . . . . . . . . . . . . . . . . . . . . . . . . . . . 5-16
Differences Between Configuration Startup Modes . . . . . . . . . . . . . . . . . . . . . . . . 5-18
Creating the WebLogic Configuration . . . . . . . . . . . . . . . . . . . . . . . . . . . . . . . . . . . . . . 5-19
Creating Configuration . . . . . . . . . . . . . . . . . . . . . . . . . . . . . . . . . . . . . . . . . . . . . . . . . . 5-20
6. Configuring Managed Servers, Clusters, and MachinesConfiguring Managed Servers . . . . . . . . . . . . . . . . . . . . . . . . . . . . . . . . . . . . . . . . . . . . . 6-3
Setting Up and Starting Managed Servers on a Remote Machine . . . . . . . . . . . . . . . 6-5
Configuring Clusters . . . . . . . . . . . . . . . . . . . . . . . . . . . . . . . . . . . . . . . . . . . . . . . . . . . . . 6-6
Assigning Managed Servers to Clusters . . . . . . . . . . . . . . . . . . . . . . . . . . . . . . . . . . . . . . 6-9
Creating HTTP Proxy Applications . . . . . . . . . . . . . . . . . . . . . . . . . . . . . . . . . . . . . . . . 6-10
Configuring Machines. . . . . . . . . . . . . . . . . . . . . . . . . . . . . . . . . . . . . . . . . . . . . . . . . . . 6-10
Assigning Servers to Machines . . . . . . . . . . . . . . . . . . . . . . . . . . . . . . . . . . . . . . . . . . . . 6-14
7. Configuring a Database ServiceConfiguring JDBC Connection Pools . . . . . . . . . . . . . . . . . . . . . . . . . . . . . . . . . . . . . . . . 7-3
Configuring JDBC MultiPools . . . . . . . . . . . . . . . . . . . . . . . . . . . . . . . . . . . . . . . . . . . . . 7-5
Assigning JDBC Connection Pools to MultiPools . . . . . . . . . . . . . . . . . . . . . . . . . . . . . . 7-7
Configuring JDBC Data Sources . . . . . . . . . . . . . . . . . . . . . . . . . . . . . . . . . . . . . . . . . . . 7-8
Testing JDBC Connection Pools and Setting Up a JDBC Database. . . . . . . . . . . . . . . . . 7-9
Setting Up the JDBC Database Content . . . . . . . . . . . . . . . . . . . . . . . . . . . . . . . . . 7-10
8. Configuring a Java Messaging ServiceConfiguring JMS Connection Factories . . . . . . . . . . . . . . . . . . . . . . . . . . . . . . . . . . . . . . 8-3
Configuring JMS Destination Keys . . . . . . . . . . . . . . . . . . . . . . . . . . . . . . . . . . . . . . . . . 8-5
Configuring JMS Templates . . . . . . . . . . . . . . . . . . . . . . . . . . . . . . . . . . . . . . . . . . . . . . . 8-7

Creating WebLogic Configurations Using the Configuration Wizard vii
Assigning JMS Destination Keys . . . . . . . . . . . . . . . . . . . . . . . . . . . . . . . . . . . . . . . . . . . 8-8
Configuring JMS File Stores . . . . . . . . . . . . . . . . . . . . . . . . . . . . . . . . . . . . . . . . . . . . . . . 8-9
Configuring JMS JDBC Stores . . . . . . . . . . . . . . . . . . . . . . . . . . . . . . . . . . . . . . . . . . . . 8-11
Configuring JMS Servers . . . . . . . . . . . . . . . . . . . . . . . . . . . . . . . . . . . . . . . . . . . . . . . . 8-13
Assigning JMS Servers to WebLogic Server Instances . . . . . . . . . . . . . . . . . . . . . . . . . 8-16
Configuring JMS Topics . . . . . . . . . . . . . . . . . . . . . . . . . . . . . . . . . . . . . . . . . . . . . . . . . 8-17
Configuring JMS Queues . . . . . . . . . . . . . . . . . . . . . . . . . . . . . . . . . . . . . . . . . . . . . . . . 8-19
Configuring JMS Distributed Topics. . . . . . . . . . . . . . . . . . . . . . . . . . . . . . . . . . . . . . . . 8-21
Configuring JMS Distributed Queues . . . . . . . . . . . . . . . . . . . . . . . . . . . . . . . . . . . . . . . 8-23
Assigning JMS Distributed Destinations. . . . . . . . . . . . . . . . . . . . . . . . . . . . . . . . . . . . . 8-24
Configuring JMS Distributed Topic Members . . . . . . . . . . . . . . . . . . . . . . . . . . . . . . . . 8-25
Configuring JMS Distributed Queue Members. . . . . . . . . . . . . . . . . . . . . . . . . . . . . . . . 8-27
9. Configuring TargetsTargeting Applications to Servers or Clusters. . . . . . . . . . . . . . . . . . . . . . . . . . . . . . . . . . 9-2
Targeting Services to Servers or Clusters . . . . . . . . . . . . . . . . . . . . . . . . . . . . . . . . . . . . . 9-2
Autoconfiguration of Applications and Services. . . . . . . . . . . . . . . . . . . . . . . . . . . . . . . . 9-4
10.Configuring SecurityConfiguring an Administrative Username and Password . . . . . . . . . . . . . . . . . . . . . . . . 10-2
Configuring Users and Groups . . . . . . . . . . . . . . . . . . . . . . . . . . . . . . . . . . . . . . . . . . . . 10-3
Configuring Users, Groups, and Global Roles . . . . . . . . . . . . . . . . . . . . . . . . . . . . . . . . 10-5
Assigning Users to Groups . . . . . . . . . . . . . . . . . . . . . . . . . . . . . . . . . . . . . . . . . . . . . . . 10-8
Assigning Groups to Groups . . . . . . . . . . . . . . . . . . . . . . . . . . . . . . . . . . . . . . . . . . . . . . 10-8
Assigning Users and Groups to Global Roles . . . . . . . . . . . . . . . . . . . . . . . . . . . . . . . . . 10-9
11.Extending DomainsOverview of Extending a Domain Using the Configuration Wizard . . . . . . . . . . . . . . . 11-1
Choosing a WebLogic Configuration Directory . . . . . . . . . . . . . . . . . . . . . . . . . . . . . . . 11-2

viii Creating WebLogic Configurations Using the Configuration Wizard
Selecting a Configuration Extension Template. . . . . . . . . . . . . . . . . . . . . . . . . . . . . . . . 11-3
Configuring JDBC When Extending a Domain . . . . . . . . . . . . . . . . . . . . . . . . . . . . . . . 11-3
Configuring JMS When Extending a Domain . . . . . . . . . . . . . . . . . . . . . . . . . . . . . . . . 11-4
Targeting Applications and Services to Servers and Clusters When Extending a Domain . . 11-4
Configuring Security Options When Extending a Domain. . . . . . . . . . . . . . . . . . . . . . . 11-5
Creating Your WebLogic Configuration. . . . . . . . . . . . . . . . . . . . . . . . . . . . . . . . . . . . . 11-6
12.Creating Configuration Templates Using the WebLogic Configuration Template Builder
Overview of Creating a Configuration Template Using the Configuration Template Builder12-2
Creating a New Template . . . . . . . . . . . . . . . . . . . . . . . . . . . . . . . . . . . . . . . . . . . . . . . . 12-3
Selecting a Template Configuration Source . . . . . . . . . . . . . . . . . . . . . . . . . . . . . . . . . . 12-4
Describing the Template . . . . . . . . . . . . . . . . . . . . . . . . . . . . . . . . . . . . . . . . . . . . . . . . . 12-5
Adding Applications to Your Configuration Template. . . . . . . . . . . . . . . . . . . . . . . . . . 12-7
Adding Files to Your Configuration Template . . . . . . . . . . . . . . . . . . . . . . . . . . . . . . . . 12-8
Adding SQL Scripts Into Your Configuration Template . . . . . . . . . . . . . . . . . . . . . . . . 12-9
Configuring the Administration Server. . . . . . . . . . . . . . . . . . . . . . . . . . . . . . . . . . . . . 12-10
Configuring Managed Servers, Clusters, and Machines When Creating Configuration Tem-plates . . . . . . . . . . . . . . . . . . . . . . . . . . . . . . . . . . . . . . . . . . . . . . . . . . . . . . . . . . . 12-10
Configuring JDBC When Creating Configuration Templates . . . . . . . . . . . . . . . . . . . 12-11
Configuring JMS When Creating Configuration Templates. . . . . . . . . . . . . . . . . . . . . 12-11
Targeting Servers and Clusters When Creating Configuration Templates . . . . . . . . . . 12-12
Configuring Security When Creating Configuration Templates. . . . . . . . . . . . . . . . . . 12-12
Building Start Menu Entries . . . . . . . . . . . . . . . . . . . . . . . . . . . . . . . . . . . . . . . . . . . . . 12-13
Preparing Scripts and Files With Replacement Variables . . . . . . . . . . . . . . . . . . . . . . 12-14
Replacement Variables. . . . . . . . . . . . . . . . . . . . . . . . . . . . . . . . . . . . . . . . . . . . . . 12-15

Creating WebLogic Configurations Using the Configuration Wizard ix
Creating Your Configuration Template. . . . . . . . . . . . . . . . . . . . . . . . . . . . . . . . . . . . . 12-16
13.Creating Extension Templates Using the WebLogic Configuration Template Builder
Overview of Creating an Extension Template Using the Configuration Template Builder . .13-1
Creating a Configuration or Extension Template . . . . . . . . . . . . . . . . . . . . . . . . . . . . . . 13-3
Selecting a Configuration Source for your Extension Template . . . . . . . . . . . . . . . . . . . 13-3
Choose a Domain Directory . . . . . . . . . . . . . . . . . . . . . . . . . . . . . . . . . . . . . . . . . . . 13-4
Describing Your Extension Template . . . . . . . . . . . . . . . . . . . . . . . . . . . . . . . . . . . . . . . 13-4
Adding Applications to Your Extension Template . . . . . . . . . . . . . . . . . . . . . . . . . . . . . 13-4
Adding Files to Your Extension Template . . . . . . . . . . . . . . . . . . . . . . . . . . . . . . . . . . . 13-5
Importing SQL Scripts Into Your Extension Template . . . . . . . . . . . . . . . . . . . . . . . . . . 13-5
Configuring JDBC for Extension Templates. . . . . . . . . . . . . . . . . . . . . . . . . . . . . . . . . . 13-5
Configuring JMS for Extension Templates . . . . . . . . . . . . . . . . . . . . . . . . . . . . . . . . . . . 13-6
Configuring Security Options in Your Extension Template . . . . . . . . . . . . . . . . . . . . . . 13-7
Preparing Text Files When Creating Extension Templates. . . . . . . . . . . . . . . . . . . . . . . 13-8
Creating Your Configuration Extension Template . . . . . . . . . . . . . . . . . . . . . . . . . . . . . 13-8
14.How Do I . . . ?Creating XA Domains Using Configuration Templates . . . . . . . . . . . . . . . . . . . . . . . . . 14-2
Guidelines for Changing to an XA Configuration . . . . . . . . . . . . . . . . . . . . . . . . . . 14-2
Summary of JDBC Settings for XA Configurations . . . . . . . . . . . . . . . . . . . . . . . . 14-2
JDBC Settings for WebLogic Workshop XA Configurations. . . . . . . . . . . . . . 14-3
JDBC Settings for WebLogic Integration XA Configurations . . . . . . . . . . . . . 14-5
JDBC Settings for WebLogic Portal XA Configurations . . . . . . . . . . . . . . . . . 14-8
JDBC Settings for WebLogic Platform XA Configurations . . . . . . . . . . . . . . 14-10
How Do I: Create a Domain Using a Different Database? . . . . . . . . . . . . . . . . . . . . . . 14-14
x Creating WebLogic Configurations Using the Configuration Wizard
How Do I: Create a Domain Using a Database with an XA Driver? . . . . . . . . . . . . . . 14-18
Step 1: Use the Configuration Wizard to Create a Domain . . . . . . . . . . . . . . . . . . 14-18
Step 2: Use the WebLogic Server Administration Console to verify the JDBC configuration for the domain . . . . . . . . . . . . . . . . . . . . . . . . . . . . . . . . . . . . . 14-19
How Do I: Create XA Domains with MultiPools and an Oracle RAC Database? . . . . 14-21
Updating Existing XA Domains to Use Oracle RAC . . . . . . . . . . . . . . . . . . . . . . 14-22
Creating XA Domains that Use Oracle RAC. . . . . . . . . . . . . . . . . . . . . . . . . . . . . 14-22
Task 1: Use the Configuration Wizard to Create a Domain . . . . . . . . . . . . . . 14-23
Task 2: Edit the config.xml File . . . . . . . . . . . . . . . . . . . . . . . . . . . . . . . . . . . 14-26
Sample config.xml Code. . . . . . . . . . . . . . . . . . . . . . . . . . . . . . . . . . . . . . . . . 14-30
15.Tutorials: Using the Configuration WizardTutorial: Creating Your First Domain. . . . . . . . . . . . . . . . . . . . . . . . . . . . . . . . . . . . . . . 15-2
Tutorial Goals. . . . . . . . . . . . . . . . . . . . . . . . . . . . . . . . . . . . . . . . . . . . . . . . . . . . . . 15-2
Tutorial Overview . . . . . . . . . . . . . . . . . . . . . . . . . . . . . . . . . . . . . . . . . . . . . . . . . . 15-2
Steps in This Tutorial . . . . . . . . . . . . . . . . . . . . . . . . . . . . . . . . . . . . . . . . . . . . . . . . 15-3
To Create Your First Domain . . . . . . . . . . . . . . . . . . . . . . . . . . . . . . . . . . . . . . . . . . 15-3
Step 1: Begin creating a new WebLogic configuration . . . . . . . . . . . . . . . . . . 15-4
Step 2: Select a configuration template and instruct the Configuration Wizard how to handle it . . . . . . . . . . . . . . . . . . . . . . . . . . . . . . . . . . . . . . . . . . . . . . . . . 15-5
Step 3: Set up the login for the administrative user . . . . . . . . . . . . . . . . . . . . . 15-6
Step 4: Configure the WebLogic environment . . . . . . . . . . . . . . . . . . . . . . . . . 15-7
Step 5: Create your new domain and administration server . . . . . . . . . . . . . . . 15-7
Step 6: Log in to the Administration Console and optionally review the configuration settings . . . . . . . . . . . . . . . . . . . . . . . . . . . . . . . . . . . . . . . . 15-9
Summary: Your First Domain. . . . . . . . . . . . . . . . . . . . . . . . . . . . . . . . . . . . . . 15-9
Tutorial: Creating a Custom Domain With Managed Servers, a Cluster, and Application Ser-vices . . . . . . . . . . . . . . . . . . . . . . . . . . . . . . . . . . . . . . . . . . . . . . . . . . . . . . . . . . . . 15-10
Creating WebLogic Configurations Using the Configuration Wizard xi
Tutorial Goals . . . . . . . . . . . . . . . . . . . . . . . . . . . . . . . . . . . . . . . . . . . . . . . . . . . . . 15-10
Tutorial Overview. . . . . . . . . . . . . . . . . . . . . . . . . . . . . . . . . . . . . . . . . . . . . . . . . . 15-11
Steps in This Tutorial . . . . . . . . . . . . . . . . . . . . . . . . . . . . . . . . . . . . . . . . . . . . . . . 15-12
To create a custom domain with Managed Servers, a cluster, and application services .15-13
Step 1: Begin creating a new WebLogic configuration. . . . . . . . . . . . . . . . . . 15-13
Step 2: Select a configuration template and instruct the Configuration Wizard how to handle it . . . . . . . . . . . . . . . . . . . . . . . . . . . . . . . . . . . . . . . . . . . . . . . . 15-15
Step 3: Configure the Administration Server . . . . . . . . . . . . . . . . . . . . . . . . . 15-16
Step 4: Configure the Managed Servers . . . . . . . . . . . . . . . . . . . . . . . . . . . . . 15-17
Step 5: Configure the Cluster . . . . . . . . . . . . . . . . . . . . . . . . . . . . . . . . . . . . . 15-18
Step 6: Configure the JDBC options . . . . . . . . . . . . . . . . . . . . . . . . . . . . . . . . 15-19
Step 7: Configure the JMS options . . . . . . . . . . . . . . . . . . . . . . . . . . . . . . . . . 15-22
Step 8: Set up the login for the administrative user . . . . . . . . . . . . . . . . . . . . 15-27
Step 9: Configure the WebLogic environment . . . . . . . . . . . . . . . . . . . . . . . . 15-28
Step 10: Create the new domain . . . . . . . . . . . . . . . . . . . . . . . . . . . . . . . . . . . 15-28
Step 11: Log in to the Administration Console and optionally review the configuration settings. . . . . . . . . . . . . . . . . . . . . . . . . . . . . . . . . . . . . . . . 15-30
Summary: Your First Custom Domain . . . . . . . . . . . . . . . . . . . . . . . . . . . . . . 15-31
Tutorial: Extending an Existing Domain. . . . . . . . . . . . . . . . . . . . . . . . . . . . . . . . . . . . 15-31
Tutorial Goals . . . . . . . . . . . . . . . . . . . . . . . . . . . . . . . . . . . . . . . . . . . . . . . . . . . . . 15-31
Tutorial Overview. . . . . . . . . . . . . . . . . . . . . . . . . . . . . . . . . . . . . . . . . . . . . . . . . . 15-32
Steps in This Tutorial . . . . . . . . . . . . . . . . . . . . . . . . . . . . . . . . . . . . . . . . . . . . . . . 15-32
To extend an existing domain by adding WebLogic Workshop functionality . . . . 15-33
Step 1: Begin extending an existing WebLogic configuration . . . . . . . . . . . . 15-33
Step 2: Select an existing configuration to extend with additional functionality . . .15-35

xii Creating WebLogic Configurations Using the Configuration Wizard
Step 3: Select the extension template and instruct the Configuration Wizard how to handle it . . . . . . . . . . . . . . . . . . . . . . . . . . . . . . . . . . . . . . . . . . . . . . . . . . 15-36
Step 4: Import resources and services into the existing configuration . . . . . . 15-37
Step 5: Start the Administration Server, Log in to the Administration Console and optionally review the configuration settings . . . . . . . . . . . . . . . . . . . . . . 15-39
Summary: Your First Extended Domain. . . . . . . . . . . . . . . . . . . . . . . . . . . . . 15-40
16.Template ReferenceDefining Configuration and Extension Templates . . . . . . . . . . . . . . . . . . . . . . . . . . . . . 16-1
Configuration Template Reference . . . . . . . . . . . . . . . . . . . . . . . . . . . . . . . . . . . . . . . . . 16-2
Location of Configuration Templates . . . . . . . . . . . . . . . . . . . . . . . . . . . . . . . . . . . 16-2
Configuration Template Summary. . . . . . . . . . . . . . . . . . . . . . . . . . . . . . . . . . . . . . 16-2
Avitek Medical Records Sample Domain . . . . . . . . . . . . . . . . . . . . . . . . . . . . . . . . 16-4
Basic WebLogic Integration Domain. . . . . . . . . . . . . . . . . . . . . . . . . . . . . . . . . . . . 16-6
Basic WebLogic Platform Domain . . . . . . . . . . . . . . . . . . . . . . . . . . . . . . . . . . . . 16-10
Basic WebLogic Portal Domain. . . . . . . . . . . . . . . . . . . . . . . . . . . . . . . . . . . . . . . 16-14
Basic WebLogic Server Domain . . . . . . . . . . . . . . . . . . . . . . . . . . . . . . . . . . . . . . 16-18
Basic WebLogic Workshop Domain . . . . . . . . . . . . . . . . . . . . . . . . . . . . . . . . . . . 16-20
WebLogic Server Examples Domain . . . . . . . . . . . . . . . . . . . . . . . . . . . . . . . . . . . 16-24
Extension Template Reference . . . . . . . . . . . . . . . . . . . . . . . . . . . . . . . . . . . . . . . . . . . 16-27
Location of Extension Templates. . . . . . . . . . . . . . . . . . . . . . . . . . . . . . . . . . . . . . 16-27
Extension Template Summary . . . . . . . . . . . . . . . . . . . . . . . . . . . . . . . . . . . . . . . . 16-27
Relationships Between Templates . . . . . . . . . . . . . . . . . . . . . . . . . . . . . . . . . . . . . 16-29
Relationships Between Templates . . . . . . . . . . . . . . . . . . . . . . . . . . . . . . . . . 16-30
WebLogic Workshop Resources as a Prerequisite . . . . . . . . . . . . . . . . . . . . . 16-31
Default WebApp Extension Template . . . . . . . . . . . . . . . . . . . . . . . . . . . . . . . . . . 16-31
WebLogic Integration Extension Template . . . . . . . . . . . . . . . . . . . . . . . . . . . . . . 16-32
WebLogic Portal Extension Template . . . . . . . . . . . . . . . . . . . . . . . . . . . . . . . . . . 16-35

Creating WebLogic Configurations Using the Configuration Wizard xiii
WebLogic Workshop Extension Template . . . . . . . . . . . . . . . . . . . . . . . . . . . . . . . 16-36

xiv Creating WebLogic Configurations Using the Configuration Wizard

Creating WebLogic Configurations Using the Configuration Wizard 1-1
C H A P T E R 1
Overview of the WebLogic Configuration Wizard and Configuration Template Builder
This section provides an overview of WebLogic Platform configuration using the Configuration Wizard and Configuration Template Builder.
Topics include:
Overview
Creating and Extending Domains Using the Configuration Wizard
Creating Custom Templates Using the Configuration Template Builder
Additional Tools for Extending and Managing Domains
Brief Introduction to Domains
OverviewBEA WebLogic Platform consists of WebLogic Server, WebLogic JRockit, and several other component products: WebLogic Workshop, WebLogic Portal, and WebLogic Integration. These components, as well as the WebLogic Platform applications that use them, are implemented as applications that run on WebLogic Server. To run applications on WebLogic Server you must define and create a domain. A domain is the basic administration unit for WebLogic Server. To run WebLogic Platform applications, you must create a domain that includes the appropriate WebLogic Platform components. Domains are described in more detail in “Brief Introduction to Domains” on page 1-9.
To simplify the configuration process, WebLogic Platform provides a suite of two tools, the Configuration Wizard and the Configuration Template Builder:

Overv iew o f the WebLog ic Conf igura t i on Wizard and Conf igurat i on Templa te Bui lde r
1-2 Creating WebLogic Configurations Using the Configuration Wizard
The Configuration Wizard guides you through the process of creating or extending a domain for your target environment. This process is accomplished using predefined configuration and extension templates containing the main attributes and files required for building or extending a particular domain.
The Configuration Template Builder guides you through the process of creating custom configuration and extension templates from existing templates or domains. These templates can be used later for creating and updating domains using the Configuration Wizard.
Used together, these tools allow you to define and propagate a standard domain across a development project, or to distribute a domain with an application that has been developed to run on it. You use the Configuration Wizard and Configuration Template Builder in off-line mode only (that is, when there is no server running).
What Are Configuration and Extension Templates?When using the Configuration Wizard, the term template refers to a Java Archive (JAR) file that contains the files and scripts required to create or update a domain. The types of templates that can be created by the Configuration Template Builder and used by the Configuration Wizard to create or update domains include:
Configuration template—defines the full set of resources within a domain, including infrastructure components, applications, services, security options, and general environment and operating system options. This type of template is used to create a domain.
Extension template—defines applications and services, such as JDBC or JMS components, and startup/shutdown classes, that can be used to extend an existing domain. This type of template is used to update a domain. The applications and services stored in the extension templates selected by the user are imported into the domain.
BEA delivers a set of predefined configuration and extension templates, as described in the “Template Reference” at the following URL:
http://e-docs.bea.com/platform/docs81/confgwiz/tempref.html
Included are configuration templates that enable you to configure domains with various combinations of WebLogic Platform components, and extension templates that allow you to add WebLogic Platform components to your existing domains.

Creating WebLogic Configurations Using the Configuration Wizard 1-3
Creating and Extending Domains Using the Configuration Wizard
Before you can develop and run a WebLogic Platform application, you must first create a WebLogic Server domain. You can create a domain quickly and easily by using a configuration template that provides domain configuration information as input to the Configuration Wizard. The Configuration Wizard, shown in the following figure, is a stand-alone Java application that can be run independently of WebLogic Server to simplify the creation of domains.
Figure 1-1 Configuration Wizard
To create a domain using the Configuration Wizard, select the configuration template that best meets your requirements and use it to build your domain.
The Configuration Wizard provides two options for creating domains:
Express configuration—This option allows you to create a domain quickly, using the default settings from the configuration template of your choice. Keep in mind that in this

Overv iew o f the WebLog ic Conf igura t i on Wizard and Conf igurat i on Templa te Bui lde r
1-4 Creating WebLogic Configurations Using the Configuration Wizard
mode you cannot modify template settings (for example, server port numbers) while you are creating your domain.
Custom configuration—This option allows you to modify configuration information as appropriate for your particular requirements. Once you decide to customize your domain, you have the option of specifying the following components and parameters:
– Infrastructure components, including Managed Servers, clusters, and physical host machines
– Database and messaging services—Java Database Connectivity (JDBC) and Java Message Service (JMS)
– Targets (servers and clusters)
– Security parameters
– General environment and operating system parameters
When to Choose Custom ConfigurationYou may want to choose the Custom configuration option in the following circumstances:
You want to create a multi-server or clustered application. (All the pre-defined configuration templates delivered with WebLogic Platform are single-server configurations.) For instructions on adding Managed Servers or clusters to your domain, see Chapter 6, “Configuring Managed Servers, Clusters, and Machines.”
The configuration template on which you are basing your domain uses a database other than the one required for your configuration. In this case, you need to customize the JDBC settings to point to the appropriate database. For instructions, see Chapter 7, “Configuring a Database Service.”
The configuration template on which you are basing your domain contains JMS configuration settings that differ from those required by your application. In this case, you need to customize the JMS settings to match your configuration. For instructions, see Chapter 8, “Configuring a Java Messaging Service.”
You received a configuration template from a developer to use as a test environment and you need to modify it to match your machine configuration. For instructions, see Chapter 9, “Configuring Targets.”
What the Configuration Wizard CreatesUsing your input, the Configuration Wizard creates a domain configuration that always includes:

Creating WebLogic Configurations Using the Configuration Wizard 1-5
A new configuration file, config.xml, that describes the infrastructure and basic network parameters of all server instances
Configuration of basic security features that allow for the initial booting of the domain
The domain may also include the following:
Server startup scripts (for example, startWebLogic.cmd or startWebLogic.sh) that are populated with the values that you enter using the Configuration Wizard
A directory containing the applications provided by the configuration template
Other files and directories to help you get started (for example, setEnv.cmd/setEnv.sh or setDomainEnv.cmd/setDomainEnv.sh)
After creating a domain using the Configuration Wizard, you can start a WebLogic Server instance to run in the domain for application development, testing, or production use.
Extending DomainsIn some cases, it may be desirable or necessary to add a predefined application, a WebLogic Platform component product, or a set of services, such as JDBC or JMS, to an existing domain. For example, if you have an existing WebLogic Server application running in a domain and you need to develop a WebLogic Workshop application to run in the same domain, you must extend the functionality of the WebLogic Server domain by adding WebLogic Workshop.
To extend a domain using the Configuration Wizard, select the directory of the domain that you want to extend and identify the extension template to use to include additional applications. You then have the option of configuring the database (JDBC) and messaging (JMS) services, and targeting servers or clusters to which you want the applications or services deployed. BEA delivers a set of predefined extension templates, as described in “Template Reference” at the following URL:
http://e-docs.bea.com/platform/docs81/confgwiz/tempref.html
The Configuration Wizard uses your input to update the config.xml file and all other generated components in the configuration directory, as required.
Creating Custom Templates Using the Configuration Template Builder
BEA provides a number of configuration and extension templates, as part of the WebLogic Platform product, aimed at developers seeking to create new applications. However, BEA also

Overv iew o f the WebLog ic Conf igura t i on Wizard and Conf igurat i on Templa te Bui lde r
1-6 Creating WebLogic Configurations Using the Configuration Wizard
provides the capability to create your own templates. The Configuration Template Builder, shown in the following figure, is a stand-alone Java application that allows you to create custom configuration and extension templates that can be used later for creating and updating domains using the Configuration Wizard.
Note: The Configuration Template Builder can be run in graphical mode only. Therefore, the console attached to the machine on which you are using the Configuration Template Builder must support a Java-based GUI. All consoles for Windows systems support Java-based GUIs; only a subset of UNIX-based consoles support Java-based GUIs.
Figure 1-2 Configuration Template Builder
Using an existing domain or template, the Configuration Template Builder guides you through the process of creating custom configuration and extension templates that can be used as input to the Configuration Wizard.

Creating WebLogic Configurations Using the Configuration Wizard 1-7
Creating Custom Configuration TemplatesTo create a custom configuration template using the Configuration Template Builder, select the domain or configuration template from which you want to create a new configuration template. You have the option of updating the following:
Basic template information
Application and domain directory contents
Infrastructure components, including Managed Servers, clusters, and physical host machines
Database and messaging services—Java Database Connectivity (JDBC) and Java Message Service (JMS)
Targets (servers and clusters)
Security options
General environment and operating system options
The Configuration Template Builder creates a configuration template (JAR file). The configuration template can be used by the Configuration Wizard to create a new domain.
Creating Custom Extension TemplatesTo create a custom extension template using the Configuration Template Builder, you select a domain or extension template to use as the basis for your extension template. You have the option of updating the following:
Basic template information
Application directory contents
Database and messaging services—Java Database Connectivity (JDBC) and Java Message Service (JMS)
Security Options
The Configuration Template Builder creates an extension template (JAR file). The extension template can be used by the Configuration Wizard to update an existing domain.

Overv iew o f the WebLog ic Conf igura t i on Wizard and Conf igurat i on Templa te Bui lde r
1-8 Creating WebLogic Configurations Using the Configuration Wizard
Additional Tools for Extending and Managing DomainsWebLogic Server provides a rich set of system administration tools that enable you to install, configure, monitor, and manage one or more domains. As described previously, you can use the Configuration Wizard to create and extend domains. It is designed to simplify and automate the process of initial domain configuration, and the addition of well-defined applications and services to existing domain configurations. The Configuration Wizard configures and extends domains by making a complete set of configuration changes in bulk (at one time), and in off-line mode (that is, when the WebLogic Server domain is not running), to obtain a valid configuration. It is not designed for sequential modification of individual configuration parameters, for use in online mode, or for use as a monitoring tool.
You can also use the tools defined in the following table to extend and manage the domain. Run-time configuration can also be accomplished using the consoles of the WebLogic Platform component products.
Table 1-1 Additional Tools for Extending and Managing Domains
To perform the following task . . . Use the following resources . . .
Add applications and services, or modify existing settings
• WebLogic Server Administration Console. For more information, see the WebLogic Server Administration Console Online Help, accessible by selecting the help icon from the Administration Console interface or at the following URL: http://e-docs.bea.com/wls/docs81/ConsoleHelp/index.html
• Other system administration tools, such as weblogic.Admin, JMX, and Ant. For more information, see Configuring and Managing WebLogic Server at the following URL: http://e-docs.bea.com/wls/docs81/ConsoleHelp/index.html
Add configuration information to the domain (not configurable by the Configuration Wizard)
WebLogic Server Administration Console. For more information, see the WebLogic Server Administration Console Online Help, accessible by selecting the help icon from the Administration Console interface or at the following URL: http://e-docs.bea.com/wls/docs81/ConsoleHelp/index.html
Manage and monitor the health and status of the domain

Creating WebLogic Configurations Using the Configuration Wizard 1-9
Brief Introduction to DomainsNote: This section provides a brief introduction to domains. You can skip this section if you are
already familiar with the primary features of a domain.
A domain is the basic administration unit for WebLogic Server. It consists of one or more WebLogic Server instances, and logically related resources and services that are managed, collectively, as one unit.
Figure 1-3 WebLogic Server Domain Structure
As shown in the previous figure, the basic domain infrastructure consists of one Administration Server and optional Managed Servers and clusters. These components are described in the following table.

Overv iew o f the WebLog ic Conf igura t i on Wizard and Conf igurat i on Templa te Bui lde r
1-10 Creating WebLogic Configurations Using the Configuration Wizard
Note: All Managed Servers in a domain must run the same version of the WebLogic Server software. The Administration Server may run either the same version as the Managed Servers in the domain, or a later service pack.
In addition to infrastructure components, a domain defines the basic network configuration for the server instances it contains. Specifically, a domain defines application deployments, supported application services (such as database and messaging services), security options, and physical host machines.
Domain configuration information is stored in a configuration file, config.xml, which is stored on the Administration Server along with other files, such as logs.
Table 1-2 Domain Infrastructure Components
Feature Description
Administration Server A domain always includes one WebLogic Server instance that is configured as an Administration Server. The Administration Server provides a central point for managing the domain and providing access to the WebLogic Server administration tools. These tools include, but are not limited to, the following:• WebLogic Server Administration Console—graphical user interface to the
Administration Server• WebLogic Server Node Manager—Java program enabling you to start, shut down,
restart, and monitor remote WebLogic Server instances
For more information about the WebLogic Server administration tools, see Configuring and Managing WebLogic Server at the following URL:
http://e-docs.bea.com/wls/docs81/adminguide/index.html
Managed Servers All other WebLogic Server instances in a domain are called Managed Servers. Managed Servers host application components and resources, which are also deployed and managed as part of the domain. In a domain with only a single WebLogic Server instance, that one server functions as both the Administration Server and Managed Server.
Clusters A domain may also include WebLogic Server clusters, which are groups of WebLogic Server instances that work together to provide scalability and high availability for applications. Clusters can improve performance and provide failover should a server instance become unavailable. The servers within a cluster can run on the same machine, or they can reside on different machines. To the client, a cluster appears as a single WebLogic Server instance.

Creating WebLogic Configurations Using the Configuration Wizard 1-11
You may find it useful to configure multiple domains based on specific criteria, such as system administrator responsibilities, the logical classification of applications, the geographical locations of servers, or size. The following table outlines the most common domain configurations.
Note: In production environments, BEA recommends that you deploy applications only on Managed Servers; the Administration Server should be reserved for management tasks.
For more detailed information about WebLogic Server domains, see "Overview of WebLogic Server Domains" in Configuring and Managing WebLogic Server at the following URL:
http://e-docs.bea.com/wls/docs81/adminguide/overview_domain.html
Table 1-3 Common Domain Configurations
Configuration Description
Domain with Managed Servers In typical production environments, several Managed Servers are deployed to host Web applications, and an Administration Server is deployed to perform management operations.
Domain with Managed Servers and Clusters
In production environments that require increased performance, throughput, or availability for a Web application, several Managed Servers might be grouped in a cluster. In such a case, the domain consists of one or more clusters with the applications they host, additional Managed Servers, if necessary, and an Administration Server to perform management operations.
Stand-alone Server Domain In development or test environments, a single application and server might be deployed independently from other Managed Servers. In such a case, you can deploy a domain consisting of a single Administration Server that also hosts the Web applications you want to test or develop. The WebLogic Server Examples Domain template is an example of a stand-alone server domain, as described in “Template Reference” at the following URL: http://e-docs.bea.com/platform/docs81/confgwiz/tempref.html

Overv iew o f the WebLog ic Conf igura t i on Wizard and Conf igurat i on Templa te Bui lde r
1-12 Creating WebLogic Configurations Using the Configuration Wizard

Creating WebLogic Configurations Using the Configuration Wizard 2-1
C H A P T E R 2
Starting the Configuration Wizard
This section describes how to invoke the Configuration Wizard in graphical, console (command-line), or silent interface modes. Topics include:
Starting in Graphical Mode
Starting in Console Mode
Starting in Silent Mode
Starting in Graphical ModeWhen run in graphical mode, the Configuration Wizard is executed in a graphics environment. The console for the machine on which you install WebLogic Platform must support a Java-based GUI. All Windows-based consoles support Java-based GUIs; only a subset of UNIX-based consoles support Java-based GUIs.
Note: If you attempt to start the Configuration Wizard in graphical mode on a system that cannot support a graphical display, the Configuration Wizard automatically starts in console mode.
To start the Configuration Wizard in graphical mode on a Windows platform, choose the Configuration Wizard option from the BEA program group in the Windows Start Menu:
Start→ Programs→ BEA WebLogic Platform 8.1→ Configuration Wizard
To start the Configuration Wizard in graphical mode from a Windows command prompt or on a UNIX platform:

Sta r t ing the Conf i gura t i on Wi za rd
2-2 Creating WebLogic Configurations Using the Configuration Wizard
1. Log in to the target system on which the product installation resides.
2. Open an MS-DOS command prompt window (on Windows) or a command shell (on UNIX).
3. Go to the \common\bin subdirectory of the product installation directory. For example:
cd c:\bea\weblogic81\common\bin
4. Invoke one of the following scripts to start the Configuration Wizard in graphical mode:
– Windows: config.cmd
– UNIX: sh config.sh
Note: You can also start the Configuration Wizard in graphical mode using the QuickStart application. QuickStart is presented, by default, following an installation of the product software. To launch the Configuration Wizard from QuickStart, select Create a new domain configuration, or extend an existing one.
Starting in Console ModeWhen run in console mode, the Configuration Wizard is executed in a text-based environment.
To start the Configuration Wizard in console mode:
1. Log in to the target system on which the product installation resides.
2. Open a command-line shell.
3. Go to the \common\bin subdirectory of the product installation directory. For example:
cd c:\bea\weblogic81\common\bin
4. Invoke one of the following scripts:
– Windows: config.cmd -mode=console
– UNIX: sh config.sh -mode=console
To finish creating your domain, respond to the prompts in each section by entering the number associated with your choice, pressing Enter, or typing next (or n) to accept the current selection. The arrow (→ ) indicates the value currently selected. To quit the Configuration Wizard, enter Exit in response to any prompt. To review or change your selection, enter Previous at the prompt.
Note: Instead of typing complete words when you want to enter [Exit], [Previous], and [Next], you can use the following one-letter shortcuts: x, p, and n, respectively.

Star t ing in S i l ent Mode
Creating WebLogic Configurations Using the Configuration Wizard 2-3
Starting in Silent ModeWhen run in silent mode, the Configuration Wizard is executed as a noninteractive process.
Silent-mode configuration enables you to define the configuration information for a domain once and then duplicate that domain on multiple machines. In silent mode, the Configuration Wizard reads configuration settings from a script that you manually create prior to execution.
Before you can run the Configuration Wizard in silent mode, you must first create a script in which you define the settings usually entered manually by a user during graphical mode or console mode configuration. When running in silent mode, the Configuration Wizard queries the specified configuration script to obtain the configuration settings it needs. It does not prompt you to provide information in real time. For more information, see “Creating a Script for Silent-Mode Configuration” on page 4-1.
To start the Configuration Wizard in silent mode on a Windows or UNIX system, follow these steps:
1. Log in to the target system on which the product installation resides.
2. Create a configuration script, as described in “Creating a Script for Silent-Mode Configuration” on page 4-1.
3. Open an MS-DOS command prompt window (on Windows) or a command shell (on UNIX).
4. Go to the \common\bin subdirectory of the product installation directory. For example:
cd c:\bea\weblogic81\common\bin
5. Start the silent-mode configuration process using one of the following commands:
– Windows: config.cmd -mode=silent [-silent_script=scriptfile1;scriptfile2;...]
[-log=logfile]
– UNIX: sh config.sh -mode=silent
[-silent_script=scriptfile1;scriptfile2;...] [-log=logfile]
In both command lines:
– scriptfile specifies the full or relative path of the configuration script. You can specify multiple scripts, separated by a comma (,), or a semi-colon (;). White space between filenames is not allowed. The -silent_script argument is optional. If you specify multiple scripts and one of them is not found, an error message indicating the

Sta r t ing the Conf i gura t i on Wi za rd
2-4 Creating WebLogic Configurations Using the Configuration Wizard
name of the script not found is generated. If no script file is specified, by default, the Configuration Wizard searches the common\lib subdirectory of the product installation directory for the file configscript.txt.
– logfile specifies the full or relative path of the log file. The -log argument is optional. If the argument is not specified, no log file is generated. If a pathname is not specified, the Configuration Wizard stores the log file within the common\lib subdirectory of the product installation directory.
Note: Incorrect entries in the configuration script can cause configuration failures. To help you determine the cause of a failure, you should generate a log file when you start the configuration.
The silent script is interpreted and executed at runtime. The domain is validated at various points during the execution.
Creating WebLogic Configurations Using the Configuration Wizard 3-1
C H A P T E R 3
Starting the WebLogic Configuration Template Builder
This section describes how to invoke the WebLogic Configuration Template Builder. The Configuration Template Builder can be invoked only in graphical mode. Therefore, the console attached to the machine on which you are running the Configuration Template Builder must support a Java-based GUI. All Windows-based consoles support Java-based GUIs; only a subset of UNIX-based consoles support Java-based GUIs.
Starting the Configuration Template Builder on Windows Platforms
To start the Configuration Template Builder on a Windows platform, do one of the following:
From the Start Menu, choose:
Start→ Programs→ BEA WebLogic Platform 8.1→ Other Development Tools→ Configuration Template Builder.
From a command prompt window:
a. Go to the \common\bin subdirectory of the product installation directory. For example:
cd c:\bea\weblogic81\common\bin
b. Enter the following command:
config_builder.cmd

Star t ing the WebLog ic Conf igura t i on Templa te Bu i lde r
3-2 Creating WebLogic Configurations Using the Configuration Wizard
Starting the Configuration Template Builder on UNIX Platforms1. Log in to the target system.
2. Open a command shell.
3. Go to the common/bin subdirectory of the product installation directory. For example:
BEA_HOME/weblogic81/common/bin
4. Invoke the following script:
sh config_builder.sh

Creating WebLogic Configurations Using the Configuration Wizard 4-1
C H A P T E R 4
Creating a Script for Silent-Mode Configuration
Before you can run the Configuration Wizard in silent mode to create or extend a domain, as described in “Starting in Silent Mode” on page 2-3, you must first create a script in which you define the configuration settings for the domain. A sample script, based on the Basic WebLogic Server Domain template, is provided with the WebLogic Platform software in the common\templates\silent_scripts directory of your product installation. This sample script and additional scripts, based on other domain templates, are provided and described in “Sample Configuration Scripts for Silent-Mode Configuration” on page 4-22.
To create a script, do one of the following:
Copy the contents of one of the sample scripts to a text file and edit it for your configuration (recommended)
Open a new file in a text editor and manually specify the domain configuration settings (for experienced users of sample scripts)
Refer to the following sections for instructions on creating scripts for creating and extending domains:
Creating a Script to Create a New Domain in Silent Mode
Creating a Script to Extend an Existing Domain in Silent Mode

Creat ing a Sc r ip t f or S i l en t -Mode Conf igura t i on
4-2 Creating WebLogic Configurations Using the Configuration Wizard
Creating a Script to Create a New Domain in Silent ModeWhen you create a script, you specify operations to be performed by the Configuration Wizard when the script is executed. The following sections describe the operations that must be defined in the script to create a new domain:
Step 1: Select the Configuration Template
Step 2: Edit the Configuration Information
Step 3: Create the Domain
Step 4: Close the Configuration Template
Note: The code for each operation described in this section must be terminated by a semicolon.
Step 1: Select the Configuration TemplateSelect a configuration template to use as the basis of the domain you will create and configure. To select a configuration template, use the read operation, as follows:
read template from "template_jar_name";
Table 4-1 describes the single read template operation parameter for which you must specify a value.
In the following example, the Basic WebLogic Server Domain configuration template is specified with the absolute pathname for the template:
read template from "C:\bea\weblogic81\common\templates\domains\wls.jar";
Step 2: Edit the Configuration InformationEdit the default configuration information to create new configuration objects, edit existing values for configuration object attributes, or delete configuration objects.
Table 4-1 Parameters for read template Operation
Parameter Description
template_jar_name Full pathname of the configuration template, including the name of the configuration template file. The pathname must be enclosed in quotation marks.

Creat ing a Sc r ip t t o Cr ea te a New Domain in S i l ent Mode
Creating WebLogic Configurations Using the Configuration Wizard 4-3
Note: You can obtain information about your existing domain configuration from the config.xml and security.xml files in the template JAR file, or from the config.xml in the domain itself, once it is created. For information about the config.xml file, see WebLogic Server Configuration Reference at: http://e-docs.bea.com/wls/docs81/config_xml/index.html.
You use silent mode to create and edit any valid configuration object and its child elements, except custom security objects. For more information about valid configuration objects, see WebLogic Server Configuration Reference at: http://e-docs.bea.com/wls/docs81/config_xml/index.html.
The following table summarizes the edit operations described in the following sections.
Table 4-2 Summary of Edit Operations for Creating a New Domain
To learn how to. . . See. . .
Create a configuration object
Creating a Configuration Object
Edit an existing configuration object
• Assigning an Existing Configuration Object to a Variable• Assigning an Existing Child Element to a Variable• Setting Configuration Object Attributes• Setting a Specific Attribute for a Child Element• Setting an Attribute for All Instances of a Child Element• Setting Attributes for Unnamed Child Elements• Setting an HTTP Proxy Server for a Cluster• Setting Configuration Options When Creating a New
Domain• Assigning Servers to Clusters• Assigning All Applications and Services to Servers and
Clusters• Assigning Individual Applications to Servers and Clusters• Assigning Individual Services to Servers and Clusters• Creating Security Assignments• Removing Assignments Using the Unassign Operation
Delete a configuration object
Deleting a Configuration Object
Creat ing a Sc r ip t f or S i l en t -Mode Conf igura t i on
4-4 Creating WebLogic Configurations Using the Configuration Wizard
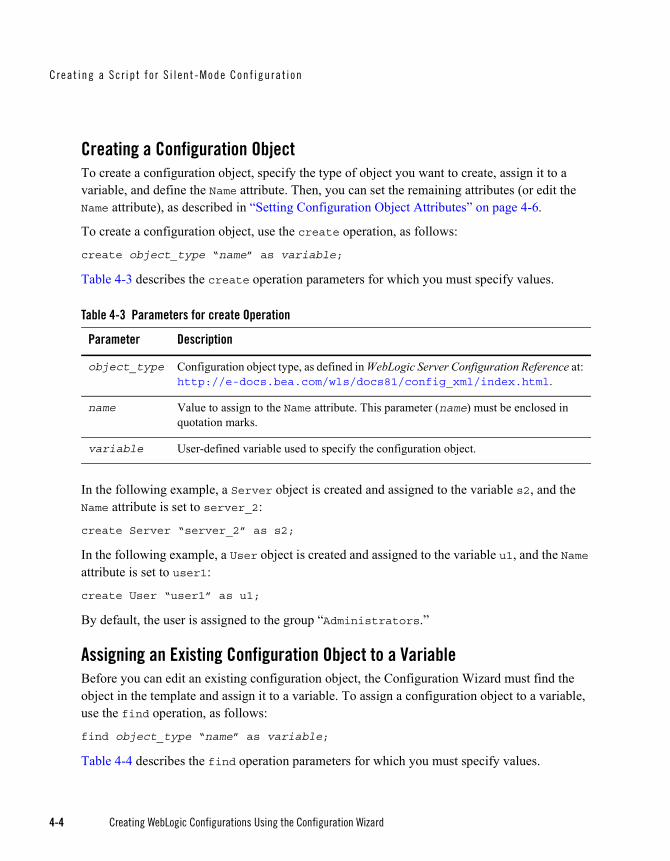
Creating a Configuration ObjectTo create a configuration object, specify the type of object you want to create, assign it to a variable, and define the Name attribute. Then, you can set the remaining attributes (or edit the Name attribute), as described in “Setting Configuration Object Attributes” on page 4-6.
To create a configuration object, use the create operation, as follows:
create object_type “name” as variable;
Table 4-3 describes the create operation parameters for which you must specify values.
In the following example, a Server object is created and assigned to the variable s2, and the Name attribute is set to server_2:
create Server “server_2” as s2;
In the following example, a User object is created and assigned to the variable u1, and the Name attribute is set to user1:
create User “user1” as u1;
By default, the user is assigned to the group “Administrators.”
Assigning an Existing Configuration Object to a VariableBefore you can edit an existing configuration object, the Configuration Wizard must find the object in the template and assign it to a variable. To assign a configuration object to a variable, use the find operation, as follows:
find object_type “name” as variable;
Table 4-4 describes the find operation parameters for which you must specify values.
Table 4-3 Parameters for create Operation
Parameter Description
object_type Configuration object type, as defined in WebLogic Server Configuration Reference at: http://e-docs.bea.com/wls/docs81/config_xml/index.html.
name Value to assign to the Name attribute. This parameter (name) must be enclosed in quotation marks.
variable User-defined variable used to specify the configuration object.

Creat ing a Sc r ip t t o Cr ea te a New Domain in S i l ent Mode
Creating WebLogic Configurations Using the Configuration Wizard 4-5
In the following example, a Server object named “myserver” is assigned to the variable s1:
find Server “myserver” as s1;
Assigning an Existing Child Element to a VariableSome configuration object types contain child elements. Before you can edit an existing child element, the Configuration Wizard must find the element in the template and assign it to a variable. To assign a child element to a variable, use the find operation, as follows:
find object_type.child_element “name.child_element_name” as variable;
Table 4-5 describes the find operation parameters for which you must specify values.
Note: Silent-mode configuration supports all child elements for the configuration object types. For a complete list of the child elements for the configuration objects, see WebLogic Server Configuration Reference at: http://e-docs.bea.com/wls/docs81/config_xml/index.html.
Table 4-4 Parameters for find Operation
Parameter Description
object_type Configuration object, as defined in WebLogic Server Configuration Reference at: http://e-docs.bea.com/wls/docs81/config_xml/index.html.
name Value of the Name attribute of the configuration object. This parameter (name) must be enclosed in quotation marks.
variable User-defined variable used to specify the configuration object.
Table 4-5 Parameters for find Operation for Child Elements
Parameter Description
object_type Configuration object, as defined in WebLogic Server Configuration Reference at: http://e-docs.bea.com/wls/docs81/config_xml/index.html.
child_element The child element of the configuration object. Silent-mode configuration supports all child elements for the configuration object types. For a complete list of the child elements for the configuration objects, see WebLogic Server Configuration Reference at: http://e-docs.bea.com/wls/docs81/config_xml/index.html.

Creat ing a Sc r ip t f or S i l en t -Mode Conf igura t i on
4-6 Creating WebLogic Configurations Using the Configuration Wizard
In the following example, a Server object named “myserver” with a WebServer child element named “mywebserver” is assigned to the variable ws1:
find Server.WebServer “myserver.mywebserver” as ws1;
Setting Configuration Object AttributesTo set a configuration attribute, specify the variable and attribute name for it, as follows:
set variable.attribute ”value”;
Table 4-6 describes the parameters for which you must specify values.
In the following example, the ListenAddress and ListenPort attributes for the Server configuration object referenced by s2 (that is, server_2) are set to localhost and 7001, respectively:
name Value of the Name attribute of the configuration object.
child_element_name
Value of the Name attribute of the child element.
variable User-defined variable used to specify the child element of the configuration object.
Table 4-6 Parameters for set Operation
Parameter Description
variable User-defined variable used to specify the configuration object.
For new configuration objects, you assign a configuration object to a variable during the creation process, as described in “Creating a Configuration Object” on page 4-4.
For existing configuration objects, you assign a configuration object to a variable using the find operation, as described in “Assigning an Existing Configuration Object to a Variable” on page 4-4.
attribute Configuration object attribute for which you want to specify a value.
value Value that you want to assign to the specified attribute. This parameter (value) must be enclosed in quotation marks.
Table 4-5 Parameters for find Operation for Child Elements
Parameter Description
Creat ing a Sc r ip t t o Cr ea te a New Domain in S i l ent Mode
Creating WebLogic Configurations Using the Configuration Wizard 4-7
set s2.ListenAdress ”localhost”;
set s2.ListenPort ”7001”;
Considerations for Setting the JDBC Connection Pool Properties AttributeThe JDBC Connection Pool Properties attribute specifies the list of properties passed to the JDBC Driver, and is used when creating physical database connections.
When specifying this attribute, ensure that you provide the complete list of the properties required by the JDBC Driver being used.
Because the values that you specify for the Properties attribute will override all values currently set, if you omit a value from the Properties list, that property will remain undefined, resulting in unexpected results.
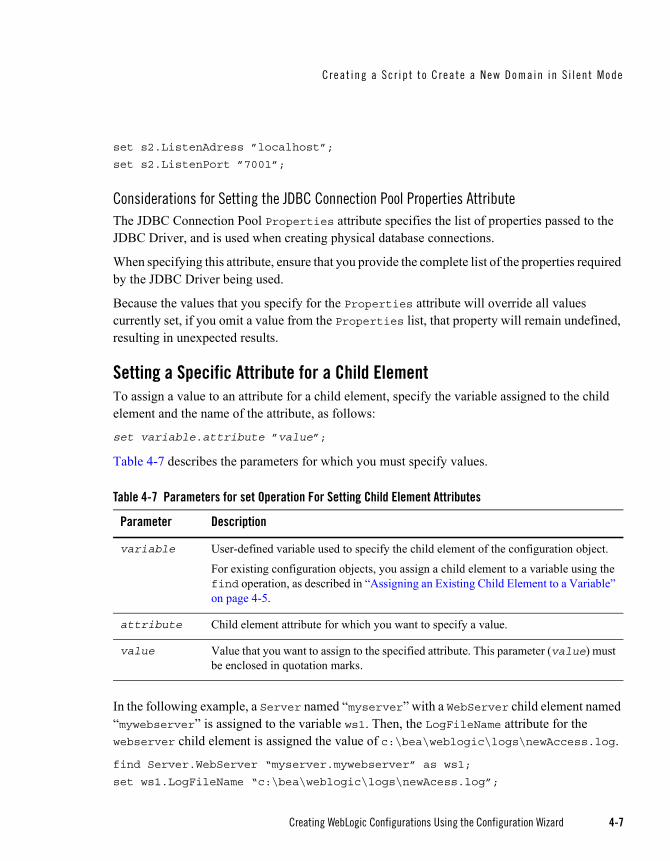
Setting a Specific Attribute for a Child ElementTo assign a value to an attribute for a child element, specify the variable assigned to the child element and the name of the attribute, as follows:
set variable.attribute ”value”;
Table 4-7 describes the parameters for which you must specify values.
In the following example, a Server named “myserver” with a WebServer child element named “mywebserver” is assigned to the variable ws1. Then, the LogFileName attribute for the webserver child element is assigned the value of c:\bea\weblogic\logs\newAccess.log.
find Server.WebServer “myserver.mywebserver” as ws1;
set ws1.LogFileName “c:\bea\weblogic\logs\newAcess.log”;
Table 4-7 Parameters for set Operation For Setting Child Element Attributes
Parameter Description
variable User-defined variable used to specify the child element of the configuration object.
For existing configuration objects, you assign a child element to a variable using the find operation, as described in “Assigning an Existing Child Element to a Variable” on page 4-5.
attribute Child element attribute for which you want to specify a value.
value Value that you want to assign to the specified attribute. This parameter (value) must be enclosed in quotation marks.

Creat ing a Sc r ip t f or S i l en t -Mode Conf igura t i on
4-8 Creating WebLogic Configurations Using the Configuration Wizard
Setting an Attribute for All Instances of a Child ElementTo assign a value to an attribute for all instances of a particular type of child element, use the following format:
set variable.child_element.attribute “value”;
Table 4-8 describes the parameters for which you must specify values.
In the following example, the server named “myserver” is assigned to the variable s1. Then, all ThreadCount attributes for the ExecuteQueue child element of the server referenced by s1 are set to 25:
find Server “myserver” as s1;
set s1.ExecuteQueue.ThreadCount "25";
Setting Attributes for Unnamed Child ElementsWhen the Name attribute of a child element instance is not defined, you cannot reference that child element individually. In this case, the only way you can assign a value to an attribute of an
Table 4-8 Parameters for set Operation for an Attribute of All Child Element Instances
Parameter Description
variable User-defined variable used to specify the configuration object.
For new configuration objects, you assign a configuration object to a variable during the creation process, as described in “Creating a Configuration Object” on page 4-4.
For existing configuration objects, you assign a configuration object to a variable using the find operation, as described in “Assigning an Existing Configuration Object to a Variable” on page 4-4.
child_element The child element of the configuration object. Silent-mode configuration supports all child elements for the configuration object types. For a complete list of the child elements for the configuration objects, see WebLogic Server Configuration Reference at: http://e-docs.bea.com/wls/docs81/config_xml/index.html.
attribute Child element attribute for which you want to specify a value.
value Value that you want to assign to the specified attribute. This parameter (value) must be enclosed in quotation marks.

Creat ing a Sc r ip t t o Cr ea te a New Domain in S i l ent Mode
Creating WebLogic Configurations Using the Configuration Wizard 4-9
unnamed child element is by setting all instances of the child element attribute, as described in “Setting an Attribute for All Instances of a Child Element” on page 4-8.
Setting an HTTP Proxy Server for a ClusterYou can also use the set operation to designate an HTTP proxy server for a cluster as follows:
set variable.ProxyServer “unclustered_managed_server“;
Note: Only an unclustered Managed Server can be used as a proxy server.
Table 4-9 describes the parameters for which you must specify values when setting an HTTP Proxy server.
In the following example, the cluster named myCluster is assigned to the variable mycluster. Then, the server AnUnClusteredServer is assigned to the attribute ProxyServer for the cluster referenced by mycluster.
create Cluster "myCluster" as mycluster;
set mycluster.ProxyServer "AnUnClusteredServer";
Table 4-9 Parameters for set Operation for HTTP Proxy Server
Parameter Description
variable User-defined variable used to specify the cluster configuration object.
For new configuration objects, you assign a configuration object to a variable during the creation process, as described in “Creating a Configuration Object” on page 4-4.
For existing configuration objects, you assign a configuration object to a variable using the find operation, as described in “Assigning an Existing Configuration Object to a Variable” on page 4-4.
ProxyServer Configuration object attribute that specifies the proxy server. Do not change this attribute.
unclustered_managed_server Name of the unclustered Managed Server that you want to assign as the ProxyServer for the cluster. This parameter (unclustered_managed_server) must be enclosed in quotation marks.

Creat ing a Sc r ip t f or S i l en t -Mode Conf igura t i on
4-10 Creating WebLogic Configurations Using the Configuration Wizard
Setting Configuration Options When Creating a New DomainYou can also use the set operation to specify configuration options for the domain, as follows:
set configuration_option value;
Table 4-10 describes the parameters for which you must specify values.
In the following example, a Windows Start Menu shortcut for the domain is not created.
set CreateStartMenu "false";
Table 4-11 describes the configuration options that you can specify using the set operation.
Table 4-10 Parameters for set Operation for Configuration Options
Parameter Description
configuration_option Name of the configuration option to be defined. The configuration options that you can specify when creating a new domain are listed in Table 4-11.
value Value that you want to assign to the configuration option. This parameter (value) must be enclosed in quotation marks.
Table 4-11 Configuration Options Specified Using the Set Operation When Creating a New Domain
For this Configuration Option . . .
Specify the following . . .
AllowCasualUpdate Whether you want to allow a domain to be updated without adding an extension template. The valid value for this option is always true, which allows you to update a domain with or without adding an extension template.
AppDir The full pathname to the application directory when a separate directory is required for applications, as indicated in the specified template. If a separate application directory is not required, this setting has no effect.
Note: This option can be used when you are creating a new domain and extending an existing domain.
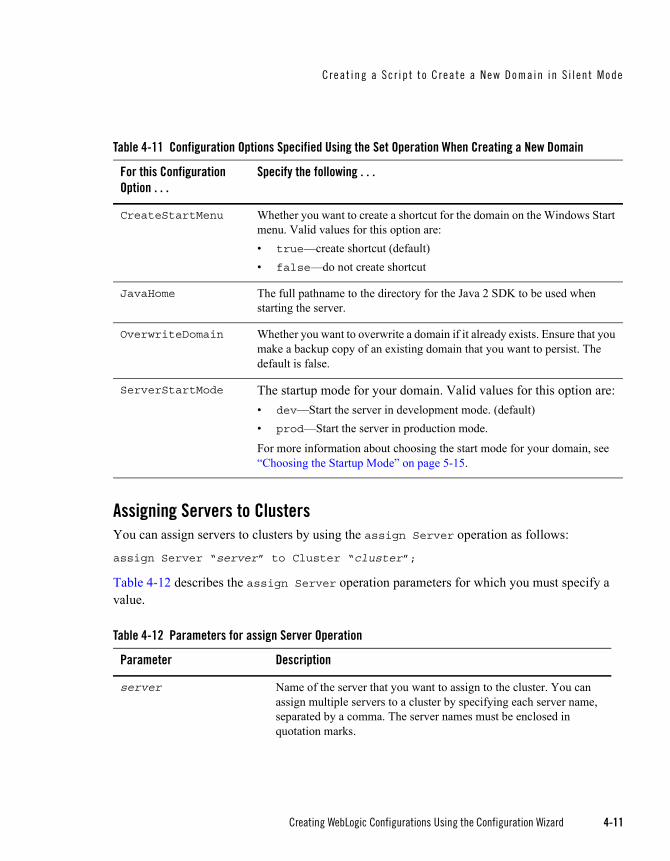
Creat ing a Sc r ip t t o Cr ea te a New Domain in S i l ent Mode
Creating WebLogic Configurations Using the Configuration Wizard 4-11
Assigning Servers to ClustersYou can assign servers to clusters by using the assign Server operation as follows:
assign Server “server” to Cluster “cluster”;
Table 4-12 describes the assign Server operation parameters for which you must specify a value.
CreateStartMenu Whether you want to create a shortcut for the domain on the Windows Start menu. Valid values for this option are:• true—create shortcut (default)• false—do not create shortcut
JavaHome The full pathname to the directory for the Java 2 SDK to be used when starting the server.
OverwriteDomain Whether you want to overwrite a domain if it already exists. Ensure that you make a backup copy of an existing domain that you want to persist. The default is false.
ServerStartMode The startup mode for your domain. Valid values for this option are:• dev—Start the server in development mode. (default)• prod—Start the server in production mode.
For more information about choosing the start mode for your domain, see “Choosing the Startup Mode” on page 5-15.
Table 4-12 Parameters for assign Server Operation
Parameter Description
server Name of the server that you want to assign to the cluster. You can assign multiple servers to a cluster by specifying each server name, separated by a comma. The server names must be enclosed in quotation marks.
Table 4-11 Configuration Options Specified Using the Set Operation When Creating a New Domain
For this Configuration Option . . .
Specify the following . . .

Creat ing a Sc r ip t f or S i l en t -Mode Conf igura t i on
4-12 Creating WebLogic Configurations Using the Configuration Wizard
In the following example, the servers named myServer1 and myServer2 are assigned to the cluster myCluster.
assign Server "myServer1,myServer2" to Cluster "myCluster";
Assigning All Applications and Services to Servers and ClustersYou can assign all the applications and services in a domain to servers and clusters by using the assign all operation as follows:
To assign all applications to a server or cluster, use the assign all Applications operation as follows:
assign all Applications to Target “server_or_clusters”
In the following example, all applications in the domain are assigned to the targets AdminServer and Cluster1:
assign all Applications to Target “adminServer,cluster1”;
To assign all services to a server or cluster, use the assign all Services operation as follows:
assign all Services to Target “server_or_clusters”;
In the following example, all services in the domain are assigned to the targets AdminServer and Cluster1:
assign all Services to Target “adminServer,cluster1”;
Table 4-13 describes the single assign all operation parameter for which you must specify a value.
cluster Cluster name to which you want the server or servers assigned. A server can only be assigned to one cluster. The cluster name must be enclosed in quotation marks.
Table 4-12 Parameters for assign Server Operation (Continued)
Parameter Description

Creat ing a Sc r ip t t o Cr ea te a New Domain in S i l ent Mode
Creating WebLogic Configurations Using the Configuration Wizard 4-13
If you use the assign all Services operation, any of the following services that are defined in the config.xml for the domain, or that you added in this script, are assigned to the target server or cluster:
MigratableRMIService
Shutdownclass
Startupclass
FileT3
RMCFactory
MailSession
MessagingBridge
JMSConnectionFactory
JDBCConnectionPool
JDBCMultipool
JDBCTxDataSource
JDBCDataSource
JDBCPoolComp
JoltConnectionPool
WLECConnectionPool
WTCServer
Table 4-13 Parameter for assign all Operation
Parameter Description
server_or_clusters Server or cluster name to which you want to target the applications or services. You can specify multiple server or cluster names, separated by a comma. The target server and cluster names must be enclosed in quotation marks.

Creat ing a Sc r ip t f or S i l en t -Mode Conf igura t i on
4-14 Creating WebLogic Configurations Using the Configuration Wizard
Assigning Individual Applications to Servers and ClustersYou can assign individual applications and application components (such as Web applications and EJB modules) to a server or cluster using the assign Application operation as follows:
assign Application “application_names” to Target “server_or_clusters”;
Table 4-14 describes the assign Application operation parameters for which you must specify a value.
In the following example, the applications named MedRecEAR and PhysicianEAR are assigned to the server myServer1.
assign Application "MedRecEAR, PhysicianEAR" to Target "myServer1";
In the following example, the application component SessionEJB for the application MedRecEAR is assigned to the server MedRecServer.
assign Application "MedRecEAR.SessionEJB" to Target "MedRecServer";
Assigning Individual Services to Servers and ClustersYou can assign an individual service to a server or cluster by name or category, as follows:
assign service_type “service_names” to Target “server_or_clusters”;
Table 4-14 Parameters for assign Application Operation
Parameter Description
application_names Name of the application or component that you want to assign to the server or cluster. You can specify multiple application names, separated by a comma. To specify an application component, use the following format:
application_name.component_name
Note: Because the . (period) is used as a separator to specify an application component, you cannot use periods in your application or component names.
server_or_clusters Server or cluster name to which you want to target the applications or services. You can specify multiple server or cluster names, separated by a comma. The target server and cluster names must be enclosed in quotation marks.

Creat ing a Sc r ip t t o Cr ea te a New Domain in S i l ent Mode
Creating WebLogic Configurations Using the Configuration Wizard 4-15
Table 4-15 describes the assign operation parameters for which you must specify a value when you are assigning individual services to servers or clusters.
In the following example, the service MedRecJMSServer is assigned to the server myServer1.
assign JMSServer "MedRecJMSServer" to Target "myServer1";
In the following example, all JMS Servers are assigned to myServer1.
assign JMSServer "*" to Target "myServer1";
Table 4-15 Parameters for assign Operation for Assigning Individual Services
Parameter Description
service_type Type of service to be assigned. In addition to the services listed in “Assigning All Applications and Services to Servers and Clusters” on page 4-12, you can also individually assign the following service categories:• JMSServer• JMSDistributedQueue• JMSDistributedTopic
service_names Name of the services that you want to assign to the server or cluster. You can specify multiple service names, separated by a comma. If you want to assign all services of the type specified using the service_type parameter, specify an asterisk for this parameter. The service_names parameter must be enclosed in quotation marks.
server_or_clusters Server or cluster name to which you want to target the services or services. You can specify multiple server or cluster names, separated by a comma. The target server and cluster names must be enclosed in quotation marks.

Creat ing a Sc r ip t f or S i l en t -Mode Conf igura t i on
4-16 Creating WebLogic Configurations Using the Configuration Wizard
Creating Security AssignmentsWhen you are creating a new domain, you can perform the following assignments:
Assign users to groups—You can designate individual users as members of a particular group. Groups allow you to manage multiple users simultaneously. This is generally more efficient than managing each user individually.
Note: When you create a user, it is assigned automatically to the Administrators group.
Assign groups to groups—You can designate one group a subgroup of another, to refine security management.
To assign users to groups, use the assign User operation as follows:
assign User “username” to Group “group”;
To assign groups to groups, use the assign Group operation as follows:
assign Group “group” to Group “group”;
Table 4-16 describes the assign operation parameters for which you must specify a value when you are assigning users and groups to groups.
In the following example, the user weblogic is assigned to the group Monitors and the group Deployers is assigned as a subgroup of the group Monitors.
assign User "weblogic" to Group "Monitors";
assign Group "Deployers" to Group "Administrators";
Removing Assignments Using the Unassign OperationYou can use the unassign operation to remove assignments using the same operations as the assign command. To do so, change assign to unassign and the to operator to from.
The following examples illustrate sample usage for the unassign operation:
Table 4-16 Parameters for assign Users and assign Groups Operations
Parameter Description
username Name of the user that you want to assign to a particular group. The username must be enclosed in quotation marks.
group Name of the group to which you want to assign a user or group, or that you want to assign to another group. The group name must be enclosed in quotation marks.

Creat ing a Sc r ip t t o Cr ea te a New Domain in S i l ent Mode
Creating WebLogic Configurations Using the Configuration Wizard 4-17
unassign Application "MedRecEAR, PhysicianEAR" from Target "myServer1";
unassign all Services from Target “adminServer,cluster1”;
unassign User "weblogic" from Group "Monitors";
Deleting a Configuration ObjectTo delete a configuration object, use the delete operation, as follows:
delete variable;
Table 4-17 describes the single delete operation parameter for which you must specify a value.
In the following example, the Server configuration object referenced by s2 (that is, server_2) is deleted:
delete s2;
Step 3: Create the DomainTo create the domain using the configuration settings that you have defined in step 2, use the write operation, as follows:
write domain to “domain_name”;
Table 4-18 describes the single write operation parameter for which you must specify a value.
Table 4-17 Parameters for delete Operation
Parameter Description
variable User-defined variable used to specify the configuration object.
For new configuration objects, you assign a configuration object to a variable during the creation process, as described in “Creating a Configuration Object” on page 4-4.
For existing configuration objects, you assign a configuration object to a variable using the find operation, as described in “Assigning an Existing Configuration Object to a Variable” on page 4-4.
Note: You can only modify the name or configuration for an administration server. The administration server cannot be deleted.

Creat ing a Sc r ip t f or S i l en t -Mode Conf igura t i on
4-18 Creating WebLogic Configurations Using the Configuration Wizard
In the following example, the domain is created in the C:\bea\user_projects\ directory and is named wlsDomain:
write domain to "C:\bea\user_projects\wlsDomain";
Step 4: Close the Configuration TemplateTo close the configuration template, use the close operation, as follows:
close template;
When you have finished defining the configuration, save the script. You can name the script as desired, and pass the relative or full pathname for it to the config command, as described in “Starting in Silent Mode” on page 2-3.
Creating a Script to Extend an Existing Domain in Silent ModeThe following sections describe the steps that you must perform in the script to create a new domain.
Step 1: Select the Domain Directory
Step 2: Add the Extension Template to the Domain
Step 3: Edit the Existing Configuration Information (Optional)
Step 4: Update the Domain
Step 5: Close the Domain
Note: Each operation described in this section must be terminated by a semicolon.
Table 4-18 Parameters for write Operation
Parameter Description
domain_name Full pathname to the directory in which you want to create the domain, including the name of the domain. The pathname must be enclosed in quotation marks.
Note: Do not create a domain named weblogic. This name is reserved for internal use by WebLogic Server.

Creat ing a Sc r ip t t o Ex tend an Ex is t ing Domain in S i l en t Mode
Creating WebLogic Configurations Using the Configuration Wizard 4-19
Step 1: Select the Domain Directory To select a domain directory that you want to update with additional applications and services, use the read operation, as follows:
read domain from “domain_directory_name”;
Table 4-19 describes the single read domain operation parameter for which you must specify a value.
In the following example, the absolute pathname to a domain named mydomain is specified:
read domain from "C:\bea\user_projects\domains\mydomain";
Step 2: Add the Extension Template to the DomainAn extension template defines applications and services, such as JDBC or JMS components, and startup/shutdown classes, that can be used to extend an existing domain. Use the add operation to add an extension template to the domain you specified using the read domain operation in step 1.
add template extension_template_jar_name;
Table 4-20 describes the single add template operation parameter for which you must specify a value.
In the following example, an extension template adding a basic Web application is specified, using the absolute pathname for the template:
Table 4-19 Parameters for read domain Operation
Parameter Description
domain_directory_name Full path name to an existing domain directory that you want to update. The pathname must be enclosed in quotation marks.
Table 4-20 Parameter for add template Operation
Parameter Description
extension_template_jar_name
Full pathname of the extension template, including the name of the extension template file.The pathname must be enclosed in quotation marks.

Creat ing a Sc r ip t f or S i l en t -Mode Conf igura t i on
4-20 Creating WebLogic Configurations Using the Configuration Wizard
add template
"C:\bea\weblogic81\common\templates\applications\DefaultWebApp.jar";
Step 3: Edit the Existing Configuration Information (Optional)You can edit the default configuration information to create new configuration objects, edit existing values for configuration object attributes, delete configuration objects, and assign applications and services to servers or clusters.The operations available for these tasks are the same for extending an domain and creating a new domain. For instructions about using these operations, see the following sections:
“Creating a Configuration Object” on page 4-4
“Assigning an Existing Configuration Object to a Variable” on page 4-4
“Setting Configuration Object Attributes” on page 4-6
“Deleting a Configuration Object” on page 4-17
“Assigning All Applications and Services to Servers and Clusters” on page 4-12
“Assigning Individual Applications to Servers and Clusters” on page 4-14
“Assigning Individual Services to Servers and Clusters” on page 4-14
You can also set configuration options when extending a domain, as described in “Setting Configuration Options When Extending a Domain” on page 4-20.
You can use silent mode to create and edit any valid configuration object and its child elements, except security objects. For more information about valid configuration objects, see WebLogic Server Configuration Reference at: http://e-docs.bea.com/wls/docs81/config_xml/index.html.
Setting Configuration Options When Extending a DomainWhen you are extending a domain, you can use the set operation to specify configuration options for the domain as follows:
set configuration_option value;
Table 4-21 describes the parameters for which you must specify values.

Creat ing a Sc r ip t t o Ex tend an Ex is t ing Domain in S i l en t Mode
Creating WebLogic Configurations Using the Configuration Wizard 4-21
Table 4-22 lists the configuration options that you can specify using the set operation when you are extending an existing domain.
Step 4: Update the DomainUpdate the domain opened in the read domain operation, use the update operation, as follows:
update domain;
Note: You must specify the add template operation before you can update the domain.
Step 5: Close the DomainTo close the domain, use the close operation, as follows:
Table 4-21 Parameters for set Operation for Configuration Options
Parameter Description
configuration_option Name of the configuration option to be defined. The configuration options that you can specify when you are extending an existing domain are listed in Table 4-22.
value Value that you want to assign to the configuration option. This parameter (value) must be enclosed in quotation marks.
Table 4-22 Configuration Options Specified Using the Set Operation When Extending a Domain
For this Configuration Option . . .
Specify the following . . .
AppDir The full pathname to the application directory when a separate directory is required for applications, as indicated in the specified template. If a separate application directory is not required, this setting has no effect.
Note: This option can be used when you are creating a new domain and extending an existing domain.
ReplaceDuplicates Whether you want to keep the original configuration in the domain or overwrite it with updated configuration from the extension template when there is a conflict between the two.

Creat ing a Sc r ip t f or S i l en t -Mode Conf igura t i on
4-22 Creating WebLogic Configurations Using the Configuration Wizard
close domain;
When you have finished defining the configuration, save the script. You can name the script as desired, and pass the relative or full pathname for it to the config command, as described in “Starting in Silent Mode” on page 2-3.
Sample Configuration Scripts for Silent-Mode ConfigurationThe following sample scripts are provided to demonstrate the basic concepts required to create and update domains using silent-mode configuration.
Sample Scripts for Creating a New Domain from a Configuration TemplateThe following sections provide samples scripts you can use to create a new domain from a configuration template. Topics include:
Sample Script Based on the Basic WebLogic Server Domain Template
Sample Script Based on the Avitek Medical Records Sample Domain Template
Sample Script Based on the Basic WebLogic Portal Domain Template
Sample Script Based on the Basic WebLogic Server Domain TemplateThe following sample script is based on the Basic WebLogic Server Domain template. This script is provided in the common\templates\silent_scripts directory of your product installation.
The numbers shown along the left-hand margin mark the beginning of each section of code that performs a major task within the script. For details about a particular task, see the description corresponding to the numeric callout in Table 4-23.
Listing 4-1 Sample Script for Creating a New Domain Based on the Basic WebLogic Server Domain
read template from "C:\bea\weblogic81/common/templates/domains/wls.jar";
//////////////////////////////////////////////////////////////////////////
//Find and configure the Admin Server.
/////////////////////////////////////////////////////////////////////////
find Server "myserver" as s1;
set s1.ListenAddress "";
set s1.ListenPort "7001";

Sample Conf igura t i on Scr ip ts fo r S i l en t-Mode Conf igura t i on
Creating WebLogic Configurations Using the Configuration Wizard 4-23
set s1.SSL.Enabled "true";
set s1.SSL.ListenPort "7002";
//////////////////////////////////////////////////////////////////////////
//Create a JMSQueue.
//////////////////////////////////////////////////////////////////////////
//A JMSServer has to be created first.
create JMSServer "myJMSServer" as jmsserver;
create JMSQueue "myJMSQueue" as myq;
//required attribute
set myq.JNDIName "jms/myjmsqueue";
//required attribute
set myq.JMSServer "myJMSServer";
//optional attribute
//set myq.StoreEnabled "false";
//target "myJMSServer" to server "myserver"
assign JMSServer "myJMSServer" to target "myserver";
//////////////////////////////////////////////////////////////////////////
//Create a JDBCConnectionPool.
//////////////////////////////////////////////////////////////////////////
create JDBCConnectionPool "demoPool" as mypool;
//required attribute
set mypool.DriverName "com.pointbase.jdbc.jdbcUniversalDriver";
//required attribute
set mypool.URL "jdbc:pointbase:server://localhost:9092/demo";
//required attribute
set mypool.Password "PBPUBLIC";
//optional attribute (but it's recommended you set the db user...)
set mypool.Properties "user=PBPUBLIC";
//target all JDBC connection pools to server "myserver"
assign JDBCConnectionPool "*" to target "myserver";
//////////////////////////////////////////////////////////////////////////
//target existing applications.
//////////////////////////////////////////////////////////////////////////
//target applications only when they exist in current domain template
//assign application "*" to target "myserver";
//////////////////////////////////////////////////////////////////////////
//Find the admin user and set the password, since it has not been set in the
// template.

Creat ing a Sc r ip t f or S i l en t -Mode Conf igura t i on
4-24 Creating WebLogic Configurations Using the Configuration Wizard
//////////////////////////////////////////////////////////////////////////
find User "weblogic" as u1;
set u1.password "weblogic";
//////////////////////////////////////////////////////////////////////////
//Write out the domain.
//////////////////////////////////////////////////////////////////////////
set OverwriteDomain "true";
write domain to "C:\bea/user_projects/domains/wls";
//////////////////////////////////////////////////////////////////////////
//Close domain template to indicate completion of work.
//////////////////////////////////////////////////////////////////////////
close template;
The sample script based on the WebLogic Server Domain template performs the tasks defined in the following table.
Table 4-23 Major Tasks Shown in Sample Script Based on WebLogic Server Domain Template
In this section of code...
The script...
Selects the Basic WebLogic Server Domain template. For more information, see “Step 1: Select the Configuration Template” on page 4-2.
Configures the Administration Server. For more information, see the following relevant sections in Step 2: Edit the Configuration Information:• “Assigning an Existing Configuration Object to a Variable” on page 4-4• “Setting Configuration Object Attributes” on page 4-6
Creates a JMS queue. For more information, see the following relevant sections in Step 2: Edit the Configuration Information:• “Creating a Configuration Object” on page 4-4• “Setting Configuration Object Attributes” on page 4-6• “Assigning Individual Services to Servers and Clusters” on page 4-14
Sample Conf igura t i on Scr ip ts fo r S i l en t-Mode Conf igura t i on
Creating WebLogic Configurations Using the Configuration Wizard 4-25
Creates a JDBC connection pool.
When specifying the JDBC connection pool Properties attribute, make sure you provide the complete list of properties required by the JDBC driver being used. For guidelines for setting the JDBC connection pool Properties attribute, see “Considerations for Setting the JDBC Connection Pool Properties Attribute” on page 4-7. In Listing 4-1, the following Properties specification is acceptable because the JDBC PointBase driver only requires definition of the user:set mypool.Properties "user=PBPUBLIC";
Alternatively, you can assign the properties separately. For example, to define the user name, you can also specify the following command:set mypool.UserName “myname”;
For more information, see the following relevant sections in Step 2: Edit the Configuration Information:• “Creating a Configuration Object” on page 4-4• “Setting Configuration Object Attributes” on page 4-6• “Assigning Individual Services to Servers and Clusters” on page 4-14
Optionally assigns applications that exist in the domain to myserver. By default, the Basic WebLogic Server Domain contains no applications. For more information, see “Assigning Individual Applications to Servers and Clusters” on page 4-14.
Updates the password for the user weblogic. For more information, see the following relevant sections in Step 2: Edit the Configuration Information:• “Assigning an Existing Configuration Object to a Variable” on page 4-4• “Creating Security Assignments” on page 4-16
Note: To review the predefined security information for a domain, view the security.xml file included in the domain template JAR file. If a user password is set to "????????" (indicating that it is not set), it must be defined in the silent script.
Sets the OverwriteDomain configuration option to "true" and stipulates that if the specified domain exists, it can be overwritten. For more information, see “Setting Configuration Options When Creating a New Domain” on page 4-10.
Table 4-23 Major Tasks Shown in Sample Script Based on WebLogic Server Domain Template (Continued)
In this section of code...
The script...

Creat ing a Sc r ip t f or S i l en t -Mode Conf igura t i on
4-26 Creating WebLogic Configurations Using the Configuration Wizard
Sample Script Based on the Avitek Medical Records Sample Domain TemplateThe following sample script is based on the Avitek Medical Records Sample Domain template. More detailed scripts are provided in the common\templates\silent_scripts directory of your product installation.
The numbers shown along the left-hand margin mark the beginning of each section of code that performs a major task within the script. For details about a particular task, see the description corresponding to the numeric callout in Table 4-24.
Listing 4-2 Sample Script for Creating a New Domain Based on the Avitek Medical Records Sample Domain
/* Create a new domain from a configuration template */
read template from "C:\bea\weblogic81\common\templates\domains\medrec.jar";
//medrec.jar already sets the password for the predefined user "weblogic".
//some templates do not have the password pre-set and you need to set it
create User "user1" as u1;
set u1.Password "password";
//by default "user1" is in "Administrators" group
unassign User "user1" from Group "Administrators";
assign User "user1" to Group "Deployers";
//creation of servers will trigger auto configuration
create Server "myServer1" as s1;
set s1.ListenPort "8001";
set s1.SSL.Enabled "true";
set s1.SSL.ListenPort "8002";
Creates the domain in C:\bea\user_projects\domains\wls. For more information, see “Step 3: Create the Domain” on page 4-17.
Closes the configuration template. For more information, see “Step 4: Close the Configuration Template” on page 4-18.
Table 4-23 Major Tasks Shown in Sample Script Based on WebLogic Server Domain Template (Continued)
In this section of code...
The script...

Sample Conf igura t i on Scr ip ts fo r S i l en t-Mode Conf igura t i on
Creating WebLogic Configurations Using the Configuration Wizard 4-27
//find a child element and set its attribute
find Server.ExecuteQueue "MedRecServer.default" as eq1;
set eq1.ThreadCount "25";
// if you do not have applications, do not do assignments for them
assign all Applications to Target "MedRecServer";
assign all Services to Target "MedRecServer, myServer1";
//JMSServer can't be assigned by "assign all Services".
assign JMSServer "*" to Target "myServer1";
set ServerStartMode "prod";
set JavaHome "C:\bea\jrockit81sp3_142_04";
set CreateStartMenu "false";
//no effect here since MedRec template does not specify app separation
set AppDir "C:\bea\user_projects\applications\myMedRec";
write domain to "C:\bea\user_projects\domains\myMedRec";
close template;
The sample script based on the Avitek Medical Records Sample Domain template performs the tasks defined in the following table.
Creat ing a Sc r ip t f or S i l en t -Mode Conf igura t i on
4-28 Creating WebLogic Configurations Using the Configuration Wizard
Table 4-24 Major Tasks Shown in Sample Script Based on Avitek Medical Records Sample Domain Template
In this section of code...
The script...
Selects the Avitek Medical Records Sample template. For more information, see “Step 1: Select the Configuration Template” on page 4-2.
Defines a user for the domain. For more information, see the following relevant sections in Step 2: Edit the Configuration Information:• “Creating a Configuration Object” on page 4-4• “Assigning an Existing Configuration Object to a Variable” on page 4-4• “Creating Security Assignments” on page 4-16• “Removing Assignments Using the Unassign Operation” on page 4-16
Note: To review the predefined security information for a domain, view the security.xml file included in the domain template JAR file. If a user password is set to "????????" (indicating that it is not set), it must be defined in the silent script.
Defines and configures the server myServer1. For more information, see the following relevant sections in Step 2: Edit the Configuration Information:• “Creating a Configuration Object” on page 4-4• “Setting Configuration Object Attributes” on page 4-6
Defines and configures the child element ExecuteQueue. For more information, see the following relevant sections in Step 2: Edit the Configuration Information:• “Assigning an Existing Configuration Object to a Variable” on page 4-4• “Setting Configuration Object Attributes” on page 4-6
Assigns all applications and services to MedRecServer and/or myServer1. For more information, see “Assigning All Applications and Services to Servers and Clusters” on page 4-12.
Assigns all JMS servers to myserver1. (JMS servers cannot be assigned using the assign all services method, as described in step 5.) For more information, see “Assigning Individual Services to Servers and Clusters” on page 4-14.
Sets several configuration options. For more information, see “Setting Configuration Options When Creating a New Domain” on page 4-10.
Sample Conf igura t i on Scr ip ts fo r S i l en t-Mode Conf igura t i on
Creating WebLogic Configurations Using the Configuration Wizard 4-29
Sample Script Based on the Basic WebLogic Portal Domain TemplateThe following sample script is based on the Basic WebLogic Portal Domain template.
The numbers shown along the left-hand margin mark the beginning of each section of code that performs a major task within the script. For details about a particular task, see the description corresponding to the numeric callout in Table 4-25.
Listing 4-3 Sample Script for Creating a New Domain Based on the Basic WebLogic Portal Domain
/* Create a new domain from a configuration template */
read template from "C:\bea\weblogic81\common\templates\domains\wlp.jar";
//some templates do not have the password pre-set and you need to set it
create User "system" as u1;
set u1.Password "password";
find User "weblogic" as u2;
set u2.Password "password";
//find server and set its attributes
find Server "portalServer" as s1;
set s1.Name "adminServer";
set s1.ListenPort "7001";
set s1.SSL.Enabled "true";
set s1.SSL.ListenPort "7002";
set ServerStartMode "dev";
set JavaHome "C:\bea\jrockit81sp3_142_04";
set CreateStartMenu "false";
Creates the domain in C:\bea\user_projects\domains\myMedRec. For more information, see “Step 3: Create the Domain” on page 4-17.
Closes the configuration template. For more information, see “Step 4: Close the Configuration Template” on page 4-18.
Table 4-24 Major Tasks Shown in Sample Script Based on Avitek Medical Records Sample Domain Template
In this section of code...
The script...

Creat ing a Sc r ip t f or S i l en t -Mode Conf igura t i on
4-30 Creating WebLogic Configurations Using the Configuration Wizard
// if you do not have applications, do not do assignments for them
assign all Applications to Target "adminServer";
assign all Services to Target "adminServer";
assign JMSConnectionFactory "*" to Target "adminServer";
//JMSServer can't be assigned by "assign all Services".
assign JMSServer "*" to Target "adminServer";
//If you switch to use a database with an XA driver, you must uncomment the
//following lines. The portalPool JDBC connection pool must have
//SuportsLocalTransaction set to “false”.
//find JDBCConnectionPool "portalPool" as portalcp;
//set portalcp.SupportsLocalTransaction "false";
write domain to "C:\bea\user_projects\domains\mywlp";
close template;
The sample script based on the Basic WebLogic Portal Domain template performs the tasks defined in the following table.
Table 4-25 Major Tasks Shown in Sample Script Based on the Basic WebLogic Portal Domain Template
In this section of code...
The script...
Selects the Basic WebLogic Portal Domain template. For more information, see “Step 1: Select the Configuration Template” on page 4-2.
Defines users for the domain. For more information, see the following relevant sections in Step 2: Edit the Configuration Information:• “Creating a Configuration Object” on page 4-4• “Assigning an Existing Configuration Object to a Variable” on page 4-4• “Creating Security Assignments” on page 4-16
Note: To review the predefined security information for a domain, view the security.xml file included in the domain template JAR file. If a user password is set to "????????" (indicating that it is not set), it must be defined in the silent script.
Sample Conf igura t i on Scr ip ts fo r S i l en t-Mode Conf igura t i on
Creating WebLogic Configurations Using the Configuration Wizard 4-31
Sample Script for Creating a New Domain and Updating It Using an Extension TemplateThe following sample script creates a new domain based on the Basic WebLogic Server Domain template and then updates it using the Default WebApp extension template.
The numbers shown along the left-hand margin mark the beginning of each section of code that performs a major task within the script. For details about a particular task, see the description corresponding to the numeric callout in Table 4-26.
Finds and configures the server portalServer. For more information, see the following relevant sections in Step 2: Edit the Configuration Information:• “Assigning an Existing Configuration Object to a Variable” on page 4-4• “Setting Configuration Object Attributes” on page 4-6
Sets several configuration options. For more information, see “Setting Configuration Options When Creating a New Domain” on page 4-10.
Assigns all applications and services to admin and desktop. For more information, see “Assigning All Applications and Services to Servers and Clusters” on page 4-12.
Assigns all JMS connection factories and servers to desktop. (JMS servers cannot be assigned using the assign all services method, as described in step 6.) For more information, see “Assigning Individual Services to Servers and Clusters” on page 4-14.
Finds the portalPool JDBC connection pool and sets the SupportsLocalTransaction option to “false”. If you switch to use a database with an XA driver, you must uncomment these code lines.
Creates the domain in C:\bea\user_projects\domains\mywlp. For more information, see “Step 3: Create the Domain” on page 4-17.
Closes the configuration template. For more information, see “Step 4: Close the Configuration Template” on page 4-18.
Table 4-25 Major Tasks Shown in Sample Script Based on the Basic WebLogic Portal Domain Template (Continued)
In this section of code...
The script...

Creat ing a Sc r ip t f or S i l en t -Mode Conf igura t i on
4-32 Creating WebLogic Configurations Using the Configuration Wizard
Listing 4-4 Sample Script for Creating a New Domain and Updating It Using an Extension Template
/*Create a domain from a configuration template and update it */
read template from "C:\bea\weblogic81\common\templates\domains\wls.jar";
find User "weblogic" as admin;
set admin.Password "newPassword";
create User "user1" as u1;
set u1.Password "password";
assign User "user1" to Group "Deployers";
set ServerStartMode "dev";
set JavaHome "C:\bea\jrockit81sp3_142_04";
set CreateStartMenu "false";
write domain to "C:\bea\user_projects\domains\wls";
close template;
/* update an existing domain */
read domain from "C:\bea\user_projects\domains\wls";
//keep originals if there are duplicates from added extension template
//We do not really need this here since wls template does not have
applications.
set ReplaceDuplicates "false";
//add an extension template
add template
"C:\bea\weblogic81\common\templates\applications\DefaultWebApp.jar";
assign Application "DefaultWebApp" to Target "myserver";
update domain;
close domain;
The sample script performs the tasks defined in the following table.

Sample Conf igura t i on Scr ip ts fo r S i l en t-Mode Conf igura t i on
Creating WebLogic Configurations Using the Configuration Wizard 4-33
Table 4-26 Major Tasks Shown in Sample Script For Creating a New Domain and Updating it Using an Extension Template
In this section of code...
The script...
Selects the Basic WebLogic Server Domain template. For more information, see “Step 1: Select the Configuration Template” on page 4-2.
Defines users for the domain. For more information, see the following relevant sections in Step 2: Edit the Configuration Information:• “Creating a Configuration Object” on page 4-4• “Assigning an Existing Configuration Object to a Variable” on page 4-4• “Creating Security Assignments” on page 4-16
Note: To review the predefined security information for a domain, view the security.xml file included in the domain template JAR file. If a user password is set to "????????" (indicating that it is not set), it must be defined in the silent script.
Sets several configuration options. For more information, see “Setting Configuration Options When Creating a New Domain” on page 4-10.
Creates the domain in C:\bea\user_projects\domains\wls. For more information, see “Step 3: Create the Domain” on page 4-17.
Closes the configuration template. For more information, see “Step 4: Close the Configuration Template” on page 4-18.
Selects the domain directory to be extended. For more information, see “Step 1: Select the Domain Directory” on page 4-19.
Sets the ReplaceDuplicate configuration option to "false" specifying that duplicate configuration options defined in the extension template should not be overwritten. For more information, see “Setting Configuration Options When Extending a Domain” on page 4-20.
Extends the domain to support a basic Web application by importing resources from the Default WebApp extension template. For more information, see “Step 2: Add the Extension Template to the Domain” on page 4-19.
Assigns the application to myserver. For more information, see “Assigning Individual Applications to Servers and Clusters” on page 4-14.

Creat ing a Sc r ip t f or S i l en t -Mode Conf igura t i on
4-34 Creating WebLogic Configurations Using the Configuration Wizard
Updates the domain. For more information, see “Step 4: Update the Domain” on page 4-21.
Closes the domain. For more information, see “Step 5: Close the Domain” on page 4-21.
Table 4-26 Major Tasks Shown in Sample Script For Creating a New Domain and Updating it Using an Extension Template (Continued)
In this section of code...
The script...

Creating WebLogic Configurations Using the Configuration Wizard 5-1
C H A P T E R 5
Creating a New WebLogic Domain
Before you can develop and run WebLogic Platform applications, you must first create a WebLogic Server domain. The Configuration Wizard guides you through the process of creating a new domain using configuration templates. A template is a Java Archive (JAR) file that contains the files and scripts required to create or update a domain.
A configuration template defines the full set of resources within a domain, including infrastructure components, applications, services, security options, and general environment and operating system options. BEA delivers a set of predefined configuration templates, which are described in the “Template Reference” at the following URL:
http://e-docs.bea.com/platform/docs81/confgwiz/tempref.html
Overview of Creating a Domain Using the Configuration WizardThe Configuration Wizard provides two options for creating new domains: express and custom. The express option allows you to create a domain quickly and easily by using the default settings defined in the configuration template you select. The custom option allows you to modify the settings in the configuration template to meet the requirements of your configuration.
Using the Express Option to Create a New DomainTable 5-1 summarizes the steps in the procedure for creating a new domain using the express option provided by the Configuration Wizard.

Creat ing a New WebLog ic Domain
5-2 Creating WebLogic Configurations Using the Configuration Wizard
Using the Custom Option to Create a New DomainThe custom option allows you to modify configuration information to accommodate your requirements. Table 5-2 summarizes the procedure for creating a domain using the custom configuration option.
Table 5-1 Steps for Creating a Domain Using the Express Option
In this step . . . You . . .
Creating or Extending a Configuration Choose whether to create a new WebLogic domain configuration or add to an existing domain configuration. To create a new domain, choose Create a new WebLogic configuration.
For details about adding to an existing domain configuration, see Chapter 11, “Extending Domains.”
Selecting a Configuration Template Choose the configuration template with which you want to create and configure your domain.
To determine whether the default settings for a configuration template meet your requirements, see “Template Reference” at the following URL: http://e-docs.bea.com/platform/docs81/confgwiz/tempref.html
If necessary, you can update the domain later, as described in Chapter 11, “Extending Domains.”
Choosing Express or Custom Configuration
Select the Express option to create a domain quickly, using the default template settings.
Configuring an Administrative Username and Password
Specify a username and password to be used for starting the Administration Server.
Specifying the Server Start Mode and Java SDK
Select the mode in which to launch your WebLogic domain configuration (development mode or production mode) and the Java Software Development Kit (SDK) that is enabled for the selected Startup mode.
Creating the WebLogic Configuration Review the domain details, specify the name and directory for the domain, and initiate the creation of the domain.

Creating WebLogic Configurations Using the Configuration Wizard 5-3
Table 5-2 Steps for Creating a Domain Using the Custom Option
In this step . . . You . . .
Creating or Extending a Configuration Choose whether to create a new WebLogic domain configuration or add to an existing domain configuration. To create a new domain, choose Create a new WebLogic configuration.
For details about adding to an existing domain configuration, see Chapter 11, “Extending Domains.”
Selecting a Configuration Template Choose the configuration template with which you want to create and configure your domain.
Choosing Express or Custom Configuration
Select the Custom option to create a domain with non-default template settings that meet the needs of your domain.
Designating an Administration Server Designate a server as the Administration Server. This window is displayed automatically only if the selected template includes multiple servers that are not assigned to clusters.
Configuring the Administration Server
Define parameters for the Administration Server, a designated server from which the domain is managed.
Configuring Managed Servers, Clusters, and Machines When Creating a New Domain
Optionally, define parameters for Managed Servers, clusters, and host machines.
Configuring JDBC When Creating a New Domain
Optionally, define parameters for Java Database Connectivity (JDBC).
Configuring JMS When Creating a New Domain
Optionally, define parameters for the Java Message Service (JMS).
Targeting Servers and Clusters When Creating a New Domain
Optionally, target the servers and clusters to which you want to deploy application components (such as Web applications and EJB modules), and application services (such as JDBC or JMS components, and startup/shutdown classes.)
Configuring Security When Creating a New Domain
Specify an administrative username and password. Optionally, you can also configure additional security features by defining users and groups and assigning them to global security roles.
Configuring Windows Options Optionally, define domain-specific parameters for the Windows operating system.

Creat ing a New WebLog ic Domain
5-4 Creating WebLogic Configurations Using the Configuration Wizard
Related Topics“Creating and Extending Domains Using the Configuration Wizard” on page 1-3
“Brief Introduction to Domains” on page 1-9
“Tutorial: Creating Your First Domain” on page 15-2
“Tutorial: Creating a Custom Domain With Managed Servers, a Cluster, and Application Services” on page 15-10
"Overview of WebLogic Server Domains" in Configuring and Managing WebLogic Server at http://e-docs.bea.com/wls/docs81/adminguide/overview_domain.html
Creating or Extending a ConfigurationThe Create or Extend a Configuration window prompts you to choose whether you want to create a new domain configuration or extend an existing one by adding applications and services.
Specifying the Server Start Mode and Java SDK
Select the mode in which to launch your WebLogic domain configuration (development mode or production mode) and the Java Software Development Kit (SDK) that is enabled for the selected Startup mode.
Creating the WebLogic Configuration Review the parameters defined for your domain configuration, specify its name and pathname, and initiate its creation.
Table 5-2 Steps for Creating a Domain (Continued)Using the Custom Option
In this step . . . You . . .
Choose this option . . . When you want to . . .
Create a new WebLogic configuration
Create a new domain that is configured to meet your requirements. Begin by selecting the configuration template as the basis for your domain. Then modify settings as required.
Extend an existing WebLogic configuration
Add applications and services to an existing domain configuration. Begin by selecting the directory of the domain that you want to update and identifying the extension template you want to use for adding applications. You then have the option of configuring the database (JDBC) and messaging (JMS) services, too. To learn more, see Chapter 11, “Extending Domains.”

Creating WebLogic Configurations Using the Configuration Wizard 5-5
Related Topics“Brief Introduction to Domains” on page 1-9
“Overview of Creating a Domain Using the Configuration Wizard” on page 5-1
Selecting a Configuration TemplateA template is a Java Archive (JAR) file that contains the files and scripts required to create or update a domain. A configuration template defines the full set of resources within a domain, including infrastructure components, applications, services, security features, and general environment and operating system settings.
The Select a Configuration Template window prompts you to choose the configuration template you will use to create and configure your domain. It is important to use the configuration template that best meets the requirements of your domain. A set of predefined configuration templates is provided with your product installation. These templates are described in the “Template Reference” at the following URL:
http://e-docs.bea.com/platform/docs81/confgwiz/tempref.html
Review the descriptions of these templates to determine if one of them meets your needs. You can also define your own custom configuration templates. For more information, see Chapter 12, “Creating Configuration Templates Using the WebLogic Configuration Template Builder.”
Note: Since the initial product release, there have been changes made to the Basic WebLogic Integration Domain, Basic WebLogic Platform Domain, and Basic WebLogic Portal Domain configuration templates. Because of these changes, when creating a domain using the Configuration Wizard, you should use a configuration template provided with your current installation or a custom template created from a domain or template in your current installation. You must upgrade the domains created using the configuration templates provided with an earlier service pack to the current service pack. For information about upgrading your domains, see the BEA WebLogic Platform Upgrade Planning Guide at http://e-docs.bea.com/platform/docs81/upgrade/index.html.
To select a configuration template:
1. Review the list of templates displayed in the Templates pane. The templates displayed for selection reside in the directory specified in the Locate Additional Templates field. If you need to select an alternate directory:
a. Click Browse to invoke a dialog box called Select a Template Directory.

Creat ing a New WebLog ic Domain
5-6 Creating WebLogic Configurations Using the Configuration Wizard
b. In the dialog box, navigate to the appropriate directory or manually enter its pathname in the Location field.
c. Click OK to return to the Select a Configuration Template window.
A list of the configuration templates available in the selected directory is displayed in the Templates pane. Templates are organized by category. For example, the predefined configuration templates provided with the product installation are listed together under the heading BEA.
2. Select the configuration template that contains the settings you want to use as the basis for your domain.
3. Click Next to proceed to the next configuration window.
Choosing Express or Custom ConfigurationThe Choose Express or Custom Configuration window prompts you to select between two types of configuration: express and custom.
Choose this option . . . When you want to . . .
Express Create a domain quickly, using the default settings from the configuration template that you selected. Keep in mind that in this mode you cannot modify template settings (for example, server port numbers).
If you select this option, see the following sections for information about creating a username and password, specifying the configuration environment, and subsequently creating the domain:• “Configuring an Administrative Username and Password” on
page 10-2• “Specifying the Server Start Mode and Java SDK” on page 5-15• “Creating the WebLogic Configuration” on page 5-19
Custom Create a domain that is customized for your target environment. In this mode you can modify the default settings of the selected configuration template as desired. An overview of the steps involved in creating a custom configuration are presented in “Overview of Creating a Domain Using the Configuration Wizard” on page 5-1.

Creating WebLogic Configurations Using the Configuration Wizard 5-7
Related Topics“Using the Express Option to Create a New Domain” on page 5-1
“Using the Custom Option to Create a New Domain” on page 5-2
“Tutorial: Creating Your First Domain” on page 15-2
Designating an Administration ServerThe Choose the Administration Server window prompts you to designate a server as the Administration Server. This window is displayed automatically only if the selected template includes multiple servers that are not assigned to clusters.
To choose the Administration Server:
1. From the list of Available Servers, select the server that you want to designate as the Administration Server. The Administration Server cannot be assigned to a cluster.
The Server Details area displays detailed information about the selected server. By default, the currently assigned Administration Server is selected.
2. Select Next to proceed to the next configuration window.
The Configure the Administration Server and Configure Managed Server(s) windows are updated to reflect your changes.
Configuring the Administration ServerIn every domain, one server must be designated the Administration server: the central point from which the whole domain is managed. The Configure the Administration Server window prompts you to define configuration information for the Administration Server. (For details, see “Brief Introduction to Domains” on page 1-9.) This information is used to access the server in the domain.
Servers can be reached using the following URL: protocol://listen-address:listen-port
In this URL, protocol can be any of the following:
t3
t3s
http

Creat ing a New WebLog ic Domain
5-8 Creating WebLogic Configurations Using the Configuration Wizard
https
listen-address and listen-port are defined in the Configure the Administration Server window.
To configure the Administration Server:
Review the values displayed in the window and modify them as necessary, using the guidelines provided in the following table. (Fields marked with an asterisk are required.) When you finish updating your settings, click Next.
In this field . . . Do the following . . .
Name* Enter a valid server name: a string of characters that can include spaces.
Each server instance in your WebLogic Platform environment must have a unique name, regardless of the domain or cluster in which it resides, or whether it is an Administration Server or a Managed Server. In addition, the name of the Administration Server must be unique among all configuration component names within the domain.
Note: This value is specified for identification purposes only; it is not used as part of the URL for applications that are deployed on the server. The server name is displayed in the WebLogic Server Administration Console. In addition, if you use WebLogic Server command-line utilities or APIs, you must specify this name to identify the server.
Listen address(Optional)
From the drop-down list, select a value for the listen address. Valid values for the listen address are as follows:• All Local Addresses (default)• IP address of the computer that hosts the server• DNS name that resolves to the host• localhost (valid only for requests that are issued from the computer on which
the server is running)
If you identify the listen address for a server instance as localhost, non-local processes cannot connect to the server instance. Only processes on the machine that hosts the server instance can connect to the server instance. If the server instance must be accessible as localhost (for example, if you create administrative scripts that connect to localhost), and it must also be accessible by remote processes, select All Local Addresses. The server instance determines the address of the machine and listens on it.
To learn more about Listen Addresses, see “Specifying Listen Addresses” on page 5-9.

Creating WebLogic Configurations Using the Configuration Wizard 5-9
Specifying Listen AddressesIf you want to limit the valid listen address for a server, use the guidelines for specifying listen addresses provided in the following table.
Listen port(Optional)
Enter a valid value for the listen port to be used for regular, non-secure requests (via protocols such as HTTP and T3). The default value is 7001. If you leave this field blank, the default value is used.
Any number between 1 and 65535 is a valid value.
For more information, see “Specifying Listen Ports” on page 5-10.
SSL listen port(Optional)
Enter a valid value to be used for secure requests (via protocols such as HTTPS and T3S). The default value is 7002. If you leave this field blank, the default value is used.
Any number between 1 and 65535 is a valid value.
Note: By default, a server instance uses demonstration certificates to authenticate requests from a secure port. In a production environment, you must configure SSL to use certificates from a certificate authority. For more information, see "Configuring SSL" in Managing WebLogic Security at http://e-docs.bea.com/wls/docs81/secmanage/ssl.html.
For more information, see “Specifying Listen Ports” on page 5-10.
SSL enabled(Optional)
Select the check box in this field to enable the SSL listen port. By default, the SSL is disabled for all new servers.
In this field . . . Do the following . . .

Creat ing a New WebLog ic Domain
5-10 Creating WebLogic Configurations Using the Configuration Wizard
Specifying Listen PortsRefer to the following guidelines when specifying listen ports and secure listen ports:
Although you can specify any valid port number, if you specify port 80, you can omit the port number from the HTTP request used to access resources over HTTP. For example, if you define port 80 as the listen port, you can use the URL http://hostname/myfile.html instead of http://hostname:portnumber/myfile.html.
If the listen address is set to . . .
Then the following is true . . .
All Local Addresses or DNS name
On multi-homed Windows machines, a server instance binds to all available IP addresses.
IP Address or DNS name • To connect to the server instance, processes can specify either the IP address or the corresponding DNS name.
• Processes that specify localhost fail to connect.• You must update existing processes that use localhost to connect
to the server instance.• For connections that specify the IP address for the listen address and a
secured port for the listen port, host name verification must be disabled.
Note: To resolve a DNS name to an IP address, WebLogic Server must be able to contact an appropriate DNS server or obtain the IP address mapping locally. Therefore, if you specify a DNS name for the listen address, you must either leave a port open long enough for the WebLogic Server instance to connect to a DNS server and cache its mapping or you must specify the IP address mapping in a local file. If you specify an IP address for the listen address and then a client request specifies a DNS name, WebLogic Server will attempt to resolve the DNS name, but if it cannot access DNS name mapping, the request will fail.
localhost • Processes must specify localhost to connect to the server instance.• Only processes that reside on the machine that hosts the server instance
(local processes) will be able to connect to the server instance.

Creating WebLogic Configurations Using the Configuration Wizard 5-11
On some operating systems, port 80 can be accessed only by processes run under a privileged user or group ID. In this case, you can assign the server instance to a UNIX machine on which a Post-Bind UID or GID is defined.
In a development environment, you might want to run multiple instances of WebLogic Server on a single computer. If you do so, each instance must use a unique listen port/listen address combination. On a multi-homed computer, you can use the same listen port but you must configure each server to use a unique IP address as its listen address. If your computer does not support multiple IP addresses, you must use a different listen port for each active instance.
Configuring Managed Servers, Clusters, and Machines When Creating a New Domain
The minimum requirement for your domain is a single Administration Server on a single machine. In addition, however, you have the option of configuring other resources to be managed by the Administration Server and distributing them across multiple machines. Specifically, you can:
Add, change, or delete Managed Servers
Add, change, or delete clusters
Group Managed Servers into clusters, or change current groupings
Assign servers to machines, or change current assignments
The Managed Servers, Clusters, and Machines Options window prompts you to specify whether you want to distribute your WebLogic configuration across Managed Servers, clusters, and physical machines. For more information, see Chapter 6, “Configuring Managed Servers, Clusters, and Machines.”
Configuring JDBC When Creating a New DomainWebLogic JDBC enables Java programmers to interact with common database management systems (DBMS), such as Oracle, Microsoft SQL Server, and Sybase. The Configuration Wizard gives you the option of configuring a database service for your domain by defining several WebLogic JDBC components:
Connection pools—Ready-to-use groups of connections to your DBMS
MultiPools—Groups of connection pools

Creat ing a New WebLog ic Domain
5-12 Creating WebLogic Configurations Using the Configuration Wizard
Data sources—Interfaces between applications and connection pools
Because WebLogic Server applications usually require some database access, most templates created for use with the Configuration Wizard contain JDBC configuration information. When using the Configuration Wizard, you can accept these settings, modify them, or add JDBC configuration information, as described in Chapter 7, “Configuring a Database Service.”
Configuring JMS When Creating a New DomainWebLogic JMS gives you access to enterprise messaging systems that enable applications to communicate with one another. To familiarize yourself with the features of WebLogic JMS, see Programming WebLogic JMS at the following URL:
http://e-docs.bea.com/wls/docs81/jms/index.html
The Configuration Wizard gives you the option of setting up JMS messaging services for a domain. To set up a messaging service, you define the following components:
Connection factory—Encapsulated connection configuration information that enables JMS applications to create a connection.
File and JDBC stores—Disk-based file stores and JDBC-accessible database stores, respectively; used to store persistent messages.
Destination Keys and JMS Templates—Keys to define the sort order for messages that arrive at a destination and templates to define multiple destinations with similar attribute settings.
JMS Servers—Servers that manage connections and message requests on behalf of clients.
Destinations—Queues (in point-to-point models) or topics (in publish/subscribe models) that serve as destinations and distributed destinations for a JMS server.
Because JMS is often required by WebLogic Server applications, the templates created for use with the Configuration Wizard typically contain JMS configuration information. You can accept these settings when using the Configuration Wizard, or you can modify or add JMS configuration information as described in Chapter 8, “Configuring a Java Messaging Service.”
Targeting Servers and Clusters When Creating a New DomainIf you have configured your domain to be distributed across servers or clusters, it is a good idea to target the servers and clusters onto which you want to deploy applications such as Web applications, or services such as JMS and JDBC component services. Typically, applications
Creating WebLogic Configurations Using the Configuration Wizard 5-13
provided in templates are targeted to the appropriate server(s). You can accept these settings when using the Configuration Wizard, or you can modify or add targeting information as described in Chapter 9, “Configuring Targets.”
Configuring Security When Creating a New DomainTo make sure that your domain is secure when you boot it for the first time, the Configuration Wizard provides basic security features. Whenever you create a domain, regardless of whether you do so using the express or custom option, you are prompted to define an administrative username and password. (See “Configuring an Administrative Username and Password” on page 10-2.)
If you are customizing a configuration, you can provide additional security by setting up two other security mechanisms:
Users and groups
Global security roles
For information about configuring basic security when creating a new domain, see Chapter 10, “Configuring Security.”
Configuring Windows OptionsThe Windows Options window prompts you to define operating system configuration information for Windows platforms. This window is displayed only if you are running on a Windows platform.
To configure Windows Options:
Specify your options as defined in the following table. Then click Next.

Creat ing a New WebLog ic Domain
5-14 Creating WebLogic Configurations Using the Configuration Wizard
Related Topics"Setting Up a WebLogic Server Instance as a Windows Service" in Configuring and Managing WebLogic Server at http://e-docs.bea.com/wls/docs81/adminguide/winservice.html
Building Start Menu EntriesThe Build Start Menu Entries window prompts you to build entries for the Windows Start Menu. This window is displayed in the Configuration Wizard only if you:
Are running on a Windows platform.
Set the Create Windows Start Menu option to Yes in the Configure Windows Options window.
To build the Start Menu entries:
Review the current list of Start Menu entries. Add, modify, or delete entries as required by your configuration, using the guidelines provided in the following table. To delete an entry, select the Start Menu entry tab and click Delete. When you finish updating your settings, click Next.
In this pane . . . Do the following . . .
Create Start Menu Specify whether you want to create a shortcut for the domain on the Windows Start menu. If you choose Yes (the default), you are prompted, in the next window, to define the Start menu entries.
Install Administrative Server as a Service
Specify whether you want the Administration server installed as a Windows service. When a server is installed as a Windows service, it starts automatically each time you boot your Windows system.You must have Administrator privileges to install the server as a Windows service.
If you are creating a domain with an Administration Server and Managed Servers, a Windows service is created only for the Administration Server. The wizard also creates a server-specific script that you can modify and use to install other servers as Windows services. The script is named domain-name\installService.cmd, where domain-name is the name of the domain that you created.

Creating WebLogic Configurations Using the Configuration Wizard 5-15
Specifying the Server Start Mode and Java SDKThe Configure Server Start Mode and Java SDK window prompts you to specify the:
Configuration startup mode for your domain
SDK to be used for the domain
Choosing the Startup ModeSpecify the startup mode for your domain as shown in the following table.
In this field . . . Do the following . . .
Shortcut link name Enter a name for the shortcut to be displayed in the Start menu. The name can be any string of characters, including spaces.
Program Specify the name of the program to be run when the shortcut is selected. Do one of the following:• Select a program from the drop-down list. By default, a list of the programs
defined by the configuration template is displayed in the drop-down list.• Click Browse to navigate through the local installation directory. Select the
desired program.
Argument Enter any parameter that you want to pass to the shortcut program.
Working directory Enter the pathname of the directory from which the shortcut is executed, or click Browse to navigate through the local installation directory so you can find and select the desired directory. The specified pathname must exist.
If, in the Program field, you select a program from the drop-down list that is defined by the configuration template, then this field is grayed out. In this case, the program script is executed in the root directory of the domain.
Description Enter a description for the shortcut.

Creat ing a New WebLog ic Domain
5-16 Creating WebLogic Configurations Using the Configuration Wizard
Notes: The PointBase Server included in the WebLogic Platform distribution is provided solely for evaluation purposes. Non-evaluation development or other use of the PointBase Server requires that a separate PointBase Server license be obtained by the end user directly from DataMirror. For more information about contacting DataMirror, see http://www.pointbase.com/. For more information about databases supported on your platform and any associated restrictions or limitations, see "Supported Database Configurations" in Supported Configurations for WebLogic Platform 8.1 at http://e-docs.bea.com/platform/suppconfigs/configs81/81_over/suppor
ted_db.html.
When you deploy applications automatically, the server automatically adds an entry for each application or module to the config.xml file for the domain. You do not need to edit the config.xml file manually.
To learn more about choosing between development and production modes, see “Differences Between Configuration Startup Modes” on page 5-18.
Selecting the SDK for the DomainThe Java SDK Selection pane prompts you to select the Java SDK for the startup mode you selected in the WebLogic Configuration Startup Mode pane. The Configuration Wizard presents a list of the SDKs supplied by BEA and installed with the product, including:
Sun SDK
Provided by Sun Microsystems.
BEA WebLogic JRockit SDK
First commercial server-side SDK developed uniquely for server-side applications and optimized for Intel architectures to ensure reliability, scalability, manageability, and flexibility for Java applications.
Choose this mode . . . When . . .
Development You are creating your applications. In this mode, the configuration of security is relatively relaxed, allowing you to auto-deploy applications.
Production Your application is running in its final form. In this mode, security is fully configured and advanced features, such as clusters, may be used.To auto-deploy applications in this mode, you must first put the exploded directory structure or archive file in the domain directory.

Creating WebLogic Configurations Using the Configuration Wizard 5-17
You can choose one of the SDKs provided by BEA or another SDK that you have installed on your system. The Configuration Wizard will create server startup scripts that invoke the Java SDK you select.
Select only those Java SDKs that are supported on the platform you are using. For a list of the Java SDKs that are supported for a specific platform, see WebLogic Platform 8.1 Supported Configurations. The default selection reflects the Java SDK that best meets the requirements of your environment, based on the platform on which you are installing the domain.
Note: If you plan to use the WebLogic JRockit SDK in production mode, BEA recommends that you develop and test your applications using WebLogic JRockit early in your project cycle. For information about migrating your application to WebLogic JRockit, see "Migrating to WebLogic JRockit" in Developing Applications at http://e-docs.bea.com/wljrockit/docs142/devapp/migrate.html.
To select the Java SDK:
1. Perform one of the following steps:
– To use a Java SDK supplied by BEA, select BEA Supplied SDKs and then select an SDK from the list.
– To use a Java SDK that is not installed with the product, select Other Java SDK, click Browse, and navigate to the appropriate directory.
Note: The Configuration Wizard does not configure the start scripts to use this type of SDK. You must change the start scripts manually.
2. Click Next to proceed to the next configuration window.
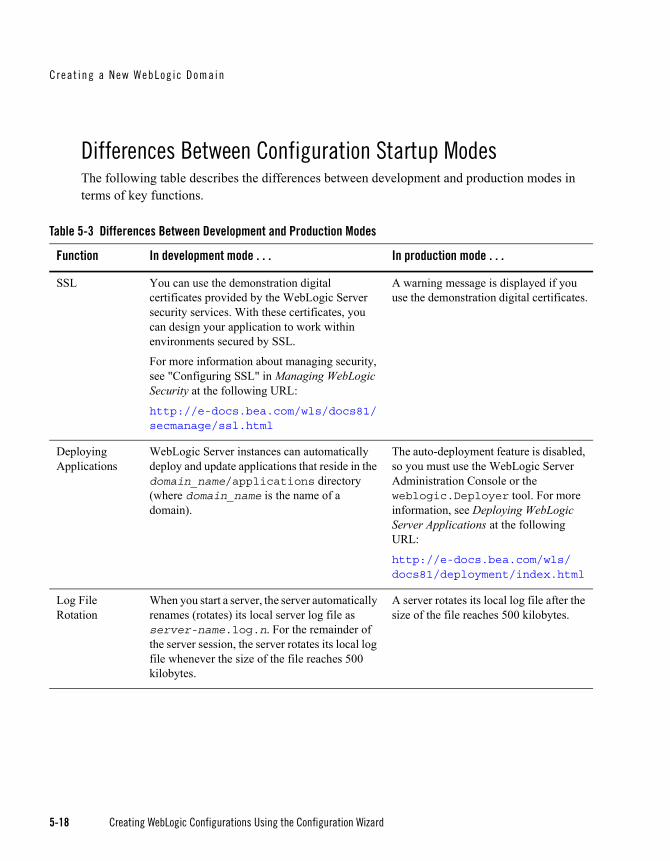
Creat ing a New WebLog ic Domain
5-18 Creating WebLogic Configurations Using the Configuration Wizard
Differences Between Configuration Startup ModesThe following table describes the differences between development and production modes in terms of key functions.
Table 5-3 Differences Between Development and Production Modes
Function In development mode . . . In production mode . . .
SSL You can use the demonstration digital certificates provided by the WebLogic Server security services. With these certificates, you can design your application to work within environments secured by SSL.
For more information about managing security, see "Configuring SSL" in Managing WebLogic Security at the following URL:
http://e-docs.bea.com/wls/docs81/secmanage/ssl.html
A warning message is displayed if you use the demonstration digital certificates.
Deploying Applications
WebLogic Server instances can automatically deploy and update applications that reside in the domain_name/applications directory (where domain_name is the name of a domain).
The auto-deployment feature is disabled, so you must use the WebLogic Server Administration Console or the weblogic.Deployer tool. For more information, see Deploying WebLogic Server Applications at the following URL:
http://e-docs.bea.com/wls/docs81/deployment/index.html
Log File Rotation
When you start a server, the server automatically renames (rotates) its local server log file as server-name.log.n. For the remainder of the server session, the server rotates its local log file whenever the size of the file reaches 500 kilobytes.
A server rotates its local log file after the size of the file reaches 500 kilobytes.

Creating WebLogic Configurations Using the Configuration Wizard 5-19
Related TopicsFor information on changing the run-time mode after you have created a domain, see "Changing the Runtime Mode" in the WebLogic Server Administration Console Online Help at http://e-docs.bea.com/wls/docs81/ConsoleHelp/servers.html#ChangingRuntimeM
ode
Creating the WebLogic ConfigurationThe Create WebLogic Configuration window prompts you to review the details for your configuration, specify the name and pathname for the domain, and initiate its creation.
To create the WebLogic configuration:
1. Review the details about the configuration in the Configuration Summary and Configuration Details areas. If you need to modify any information, select Previous to return to the desired configuration window.
2. Make sure that the Configuration Location and Domain Name field contains the name of the required configuration directory. If you need to change the value in this field:
a. Click Browse to invoke the Select a WebLogic Configuration Directory dialog box.
Execute Queues The default number of threads available to Execute Queues is 15.
The thread count determines the number of simultaneous operations that can be performed by applications that use the specified execute queue.
By default, all applications use the execute queue named default. You can create additional queues to exercise more control over the resources that your applications use.
The default number of threads available to Execute Queues is 25.
JDBC Connection Pool Capacity
The default capacity is 15 connections. The default capacity is 25 connections.
Table 5-3 Differences Between Development and Production Modes (Continued)
Function In development mode . . . In production mode . . .

Creat ing a New WebLog ic Domain
5-20 Creating WebLogic Configurations Using the Configuration Wizard
b. In the dialog box, navigate to the appropriate directory or manually enter its pathname in the Location field. Click OK.
The configuration directory can be located anywhere on your system. By default, it resides in BEA_HOME\user_projects\domains\domain, where BEA_HOME is the directory that contains the product installation, and domain is the name of the domain directory defined by the selected configuration template.
3. Make sure that the Configuration Name field contains the name of the required domain. If you need to change the value in the Configuration Name field, click within the field and modify the string displayed there.
Note: Do not create a domain named weblogic. This name is reserved for internal use by WebLogic Server.
4. After you verify the information displayed in the window, click Create.
The Creating Configuration window is opened to display status messages during the domain creation process.
The Configuration Wizard stores the config.xml file and all other generated components in the configuration directory that you specify.
Related Topics"Domain Restrictions" in Configuring and Managing WebLogic Server at http://e-docs.bea.com/wls/docs81/adminguide/overview_domain.html#DomainRes
trictions
Creating ConfigurationThe Creating Configuration window displays status messages during the domain creation process. When the process is complete, the new domain is ready for use.
On this platform . . . Perform the following task . . .
UNIX and Linux Click Done.
Windows Do one of the following:• If you want to start the server immediately, select the Start
Admin Server check box and click Done. • If you do not want to start the server at this time, click Done.

Creating WebLogic Configurations Using the Configuration Wizard 6-1
C H A P T E R 6
Configuring Managed Servers, Clusters, and Machines
WebLogic Platform gives you an opportunity to change the distribution of your domain across servers, clusters, and machines. The Managed Servers, Clusters, and Machines Options window prompts you to decide whether you want to define additional infrastructure components and distribute the domain across those components.
If you select No, the wizard uses the configuration settings exactly as defined in the configuration source that you selected earlier.
If you select Yes, you are prompted in subsequent windows to define the configuration you want, as described in the following table.

Conf i gur i ng Managed Ser ve rs , C lus te rs , and Mach ines
6-2 Creating WebLogic Configurations Using the Configuration Wizard
Related Topics“Tutorial: Creating a Custom Domain With Managed Servers, a Cluster, and Application Services” on page 15-10
Using WebLogic Server Clusters at http://e-docs.bea.com/wls/docs81/cluster/index.html
Task Description
Configuring Managed Servers Optionally, add Managed Servers or change the configuration of existing Managed Servers in your domain.
In addition to the Administration Server, production environments typically deploy one or more Managed Servers to host enterprise applications.
Grouping Managed Servers into Clusters
A cluster is a group of WebLogic Server instances that work together to provide scalability and high-availability for applications. Before you can start configuring a cluster, you must define at least one Managed Server.
To group Managed Servers into clusters, perform the following tasks:1. Define the configuration information for the clusters in the
domain, as described in “Configuring Clusters” on page 6-6.2. Assign the Managed Servers to a cluster in the domain, as
described in “Assigning Managed Servers to Clusters” on page 6-9.
3. Create an HTTP proxy for each cluster within the domain, as described in “Creating HTTP Proxy Applications” on page 6-10.
Mapping WebLogic Server Instances to Host Machines
In a domain, a machine is the computer hardware that hosts one or more WebLogic Server instances.
To define the machines in a domain, perform the following tasks:1. Specify values for the required parameters for the Windows and
UNIX machines that reside within the domain, as described in “Configuring Machines” on page 6-10.
2. Assign each instance of WebLogic Server to the machine on which it runs, as described in “Assigning Servers to Machines” on page 6-14.

Creating WebLogic Configurations Using the Configuration Wizard 6-3
Configuring Managed ServersThe Configure Managed Servers window prompts you to provide the configuration information for one or more Managed Servers. Production environments typically deploy one or more Managed Servers, in addition to the Administration Server, to host enterprise applications. (For details, see “Brief Introduction to Domains” on page 1-9.) This step is optional.
Notes: When creating a domain using the Basic WebLogic Integration Domain or Basic WebLogic Portal Domain template (or any other custom template that supports WebLogic Integration or WebLogic Portal), after configuring one or more Managed Servers, you must assign them to a cluster. For more information, see “Assigning Managed Servers to Clusters” on page 6-9.
If you plan to use a Managed Server as an HTTP proxy server acting as a frontend host, you should make note of the values you enter in this window for that Managed Server. You will need to enter these values in the Frontend fields of the Configure Clusters window. For more information, see “Configuring Clusters” on page 6-6.
When you configure Managed Servers, the Configuration Wizard creates a startManagedWebLogic_Readme.txt file in the domain directory. This file lists the name for each Managed Server and provides the admin_url for the domain. It also provides basic instructions for starting Managed Servers on remote machines. For more information, see “Setting Up and Starting Managed Servers on a Remote Machine” on page 6-5.
To Configure Managed Servers:
1. Review the current list of Managed Server configurations. Default values may vary, based on the configuration source you selected earlier.
Note: The wizard provides two views: a concise tabular view of all the Managed Servers or an individual view of each Managed Server, where each server is represented by a tab—you switch between servers by selecting the corresponding tab. To toggle the display mode between table and tab formats, click Switch Display.
2. Add or modify entries as required by your configuration, using the guidelines provided in the following table. (Fields marked with an asterisk are required.) To delete a Managed Server configuration, click in one of its fields and click Delete. When you finish updating your settings, click Next.

Conf i gur i ng Managed Ser ve rs , C lus te rs , and Mach ines
6-4 Creating WebLogic Configurations Using the Configuration Wizard
In this field . . . Do the following . . .
Name* Enter a valid server name: a string of characters that can include spaces.
Each server instance in your WebLogic environment must have a unique name, regardless of its function (Managed Server or Administration Server) and the domain or cluster in which it resides. In addition, the name of each Managed Server must be unique among all configuration component names within the domain.
The default value in this field is new_managedServer_n, where n specifies a numeric value used to differentiate among default Managed Server names; the value of n for the first Managed Server is 1. The value is incremented by 1 for each Managed Server that is added.
Note: This value is included for identification purposes only; it is not used as part of the URL for applications that are deployed on the server. The server name is displayed in the WebLogic Server Administration Console. In addition, if you use WebLogic Server command-line utilities or APIs, you must specify this name to identify the server.
Listen address(Optional)
Select a value for the listen address from the drop-down list. Valid values for the listen-address are as follows:• All Local Addresses (default)• IP address of the computer that hosts the server• DNS name that resolves to the host• localhost (valid only for requests that are issued from the computer on which
the server is running)
If you identify a server instance’s listen address as localhost, non-local processes cannot connect to the server instance. Only processes on the machine that hosts the server instance can connect to the server instance. If the server instance must be accessible as localhost (for example, if you create administrative scripts that connect to localhost), and it must also be accessible by remote processes, select All Local Addresses. The server instance determines the address of the machine and listens on it.
To learn more about listen addresses, see “Specifying Listen Addresses” on page 5-9.
Listen port(Optional)
Enter a valid value for the listen port to be used for regular, non-secure requests (via protocols such as HTTP and T3). The default value is 7001. If you leave this field blank, the default value is used.
Any number between 1 and 65535 is a valid value.
For more information, see “Specifying Listen Ports” on page 5-10.

Creating WebLogic Configurations Using the Configuration Wizard 6-5
Setting Up and Starting Managed Servers on a Remote MachineIn some configurations, you may want to run your Managed Servers on a machine that is remote from the Administration Server for the domain. To install and run Managed Servers on a remote machine, use the following procedure:
1. Install WebLogic Platform on each machine that you want to host a Managed Server for the domain.
Note: With the exception of the Administration Server, all WebLogic Server instances within a domain must run the same version of the WebLogic Server software. The Administration Server may run either the same version as the Managed Servers in the domain, or a later service pack. For more information about installing WebLogic Platform, see Installing BEA WebLogic Platform at the following URL:
http://e-docs.bea.com/platform/docs81/install/index.html
2. Using the Configuration Wizard, create a domain on each remote machine that you want to host a Managed Server. This ensures that you have all the required support files installed on the machine.
3. Establish a session with the remote machine that will host the Managed Server. You may use any valid method, such as telnet, to do so.
SSL listen port(Optional)
Enter a valid value to be used for secure requests (via protocols such as HTTPS and T3S). The default value is 7002. If you leave this field blank, the default value is used.
Any number between 1 and 65535 is a valid value.
Note: By default, a server instance uses demonstration certificates to authenticate requests from a secure port. In a production environment, you must configure SSL to use certificates from a certificate authority. For more information, see "Configuring SSL" in Managing WebLogic Security at http://e-docs.bea.com/wls/docs81/secmanage/ssl.html.
For more information, see “Specifying Listen Ports” on page 5-10.
SSL enabled(Optional)
Select the check box to enable the SSL Listen Port. The default is disabled.
In this field . . . Do the following . . .

Conf i gur i ng Managed Ser ve rs , C lus te rs , and Mach ines
6-6 Creating WebLogic Configurations Using the Configuration Wizard
4. Start the Administration Server for the domain as described in "Starting and Stopping Servers" in the WebLogic Server Administration Console Online Help at http://e-docs.bea.com/wls/docs81/ConsoleHelp/startstop.html.
5. On the remote machine, navigate to the directory for the domain that you created in Step 2.
6. Start the Managed Server on the remote machine by doing one of the following:
– On a Windows system, open an MS-DOS command prompt window and enter the following at the prompt: startManagedWebLogic.cmd my_managed_server admin-url
– On a UNIX system, enter the following at the prompt:startManagedWebLogic.sh my_managed_server admin-url
In these command lines, my_managed_server is the name of the Managed Server to be started and admin-url specifies the listen address (host name or IP address) and port number of the machine hosting the Administration Server. For your convenience, the startManagedWebLogic_Readme.txt file provides a list of all the Managed Servers and the admin-url for the domain.
Related Topics“Tutorial: Creating a Custom Domain With Managed Servers, a Cluster, and Application Services” on page 15-10
Configuring ClustersA cluster is a group of WebLogic Server instances that work together to provide scalability and high-availability for applications. Before you can start configuring a cluster, you must define at least one Managed Server.
Note: When creating a domain using the Basic WebLogic Integration Domain or Basic WebLogic Portal Domain template (or other custom template that supports WebLogic Integration or WebLogic Portal), after configuring one or more Managed Servers, you must assign them to a cluster.
The Configure Clusters window prompts you to administer the clusters in your domain. This step is optional.

Creating WebLogic Configurations Using the Configuration Wizard 6-7
To configure clusters:
1. Review the current list of cluster configurations. Default values may vary, based on the configuration source you selected earlier.
Note: The wizard provides two views: a concise tabular view of all the clusters or an individual view of each cluster, where each cluster is represented by a tab—you switch between clusters by selecting the corresponding tab. To toggle the display mode between table and tab formats, click Switch Display.
2. Add or modify entries as required by your configuration using the guidelines provided in the following table. (Fields marked with an asterisk are required.) To delete an entry, click in one of its fields and click Delete. When you finish updating your settings, click Next.
In this field . . . Enter a . . .
Name* Valid cluster name: a string of characters that can include spaces.
The name of the cluster must be unique among all configuration component names within the domain.
The default value in this field is new_cluster_n, where n specifies a numeric value that is used to differentiate among all default cluster names; the value of n for the first cluster is 1. The value is incremented by 1 for each cluster that is added
Multicast address(Optional)
Multicast address for the cluster. This address is used by cluster members to communicate with each other. The default value is 237.0.0.1.
Valid multicast addresses are any valid IP address of the form nnn.xx.xx.xxxx, where nnn is 237, 238, or 239.
Multicast port(Optional)
Multicast port for the cluster.The multicast port is used by cluster members to communicate with each other. The default value is 7777.
Any number between 1 and 65535 is a valid value.

Conf i gur i ng Managed Ser ve rs , C lus te rs , and Mach ines
6-8 Creating WebLogic Configurations Using the Configuration Wizard
Related Topics“Configuring Managed Servers” on page 6-3
Cluster address(Optional)
Cluster address that identifies the Managed Servers in the cluster.
A cluster address can be one of the following:• Comma-separated list of IP addresses or DNS names and ports, for example:
dns_name:port, dns_name:port• DNS name that maps to multiple IP addresses• localhost, DNS name, or IP address if all Managed Servers are listening on
the same address with unique port numbers
The cluster address is used in entity and stateless EJBs to construct the host name portion of URLs. If the cluster address is not set, EJB handles may not work properly.
Frontend host(Optional)
Name or listen address for the proxy server acting as a frontend host.
Frontend settings should be used to ensure proper handling of URLs when a proxy or firewall is employed. For more information, see "Cluster --> Protocols --> HTTP" in the WebLogic Server Administration Console Online Help at http://e-docs.bea.com/wls/docs81/ConsoleHelp/domain_cluster_protocols_http.html.
If you are using a Managed Server as a frontend HTTP proxy, you should enter the listen address that you specified for the Managed Server in the Configure Managed Servers window. For more information, see “Configuring Managed Servers” on page 6-3.
Frontend HTTP port (Optional)
The port number for the proxy server acting as a frontend host.
Frontend settings should be used to ensure proper handling of URLs when a proxy or firewall is employed. For more information, see "Cluster --> Protocols --> HTTP" in the WebLogic Server Administration Console Online Help at http://e-docs.bea.com/wls/docs81/ConsoleHelp/domain_cluster_protocols_http.html.
If you are using a Managed Server as a frontend HTTP proxy, you should enter the listen port that you specified for the Managed Server in the Configure Managed Servers window. For more information, see “Configuring Managed Servers” on page 6-3.
In this field . . . Enter a . . .

Creating WebLogic Configurations Using the Configuration Wizard 6-9
“Tutorial: Creating a Custom Domain With Managed Servers, a Cluster, and Application Services” on page 15-10
Assigning Managed Servers to ClustersThe Assign Servers to Clusters window prompts you to assign the available Managed Server(s) to a cluster within the domain. This window is displayed only if you have defined at least one cluster.
To assign Managed Servers to clusters:
1. In the Cluster pane, select the cluster to which you want to assign a Managed Server.
2. Assign the Managed Server to the designated cluster in one of the following ways:
– Double-click the name of the Managed Server in the Server pane.
– Select the Managed Server and click the right arrow.
The name of the Managed Server is removed from the Server pane and added, below the name of the target cluster, to the Cluster pane.
Note: Only Managed Servers are listed in the Server pane. The Administration Server is not listed because it cannot be assigned to a cluster.
If you are using a Managed Server as an HTTP proxy server, do not assign that Managed Server to the cluster. You can select the Managed Server to be used as the HTTP proxy server in the next configuration window.
3. Repeat steps 1 and 2 for each Managed Server that you want to assign to a cluster.
4. Review the cluster assignments.
If necessary, you can remove a Managed Server from a cluster in one of the following ways:
– Double-click the name of the Managed Server in the Cluster pane.
– Select the Managed Server and click the left arrow.
The name of the Managed Server is removed from the Cluster pane and restored to the Server pane.
5. Click Next to proceed to the next configuration window.

Conf i gur i ng Managed Ser ve rs , C lus te rs , and Mach ines
6-10 Creating WebLogic Configurations Using the Configuration Wizard
Creating HTTP Proxy ApplicationsThe Create HTTP Proxy Applications window prompts you to create an HTTP proxy application to proxy client requests to the cluster. An HTTP proxy application operates as an intermediary for HTTP requests.
This window is displayed if the following statements are true:
At least one Managed Server has been assigned to a cluster.
At least one Managed Server has not been assigned to a cluster.
To create HTTP proxy applications:
1. If you have multiple clusters, select the tab corresponding to the cluster for which you want to create HTTP proxy applications.
2. Click Create HTTP proxy for cluster clustername.
A list of the available servers is displayed in the Proxy Server drop-down list.
3. From the Proxy Server list, select a Managed Server onto which the proxy applications can be deployed.
Note: If you are using this proxy server as your frontend host, make sure that the values that you entered in the Frontend host and Frontend HTTP port fields in the Configure Clusters window match the values specified for this Managed Server in the Configure Managed Servers window.
A proxy application named BEA_Proxy_For_Cluster_clustername_on_servername is created and targeted to the Managed Server.
4. Repeat steps 1 through 3 for each cluster for which you want to create HTTP proxy applications.
5. Click Next to proceed to the next configuration window.
Configuring MachinesThe Configure Machines window prompts you to define the configuration information for the Windows and UNIX machines in the domain. This step is optional.
You may want to perform this step in circumstances such as (but not limited to) the following:
The Administration Server uses the machine definition, in conjunction with the Node Manager application, to start remote servers.

Creating WebLogic Configurations Using the Configuration Wizard 6-11
WebLogic Server uses configured machine names when determining which server in a cluster is best able to handle certain tasks, such as HTTP session replication. WebLogic Server then delegates those tasks to the identified server.
Note: In many production environments, Node Manager is run on a computer that does not host an Administration Server. In such an environment, you must create a machine configuration for each computer that runs a Node Manager process. The machine configuration must include values for the listen address and port number parameters. The Administration Server uses these values to connect with the Node Manager process running on that computer.
To configure Windows machines:
Select the machine tab and review the current list of configurations for Windows machines. Add or modify entries as required by your configuration using the guidelines provided in the following table. (Fields marked with an asterisk are required.) To delete an entry, click in one of its fields and click Delete. When you finish updating your settings, click Next.
Note: Default values may vary, based on the configuration source you selected earlier.

Conf i gur i ng Managed Ser ve rs , C lus te rs , and Mach ines
6-12 Creating WebLogic Configurations Using the Configuration Wizard
To configure UNIX machines:
Select the UNIX Machine tab and review the current list of UNIX machine configurations. Add or modify entries as required by your configuration, using the guidelines provided in the
In this field . . . Do the following . . .
Name* Enter a valid machine name: a string of characters that can include spaces.
The machine name:• Is used to identify the machine within the WebLogic Server domain; it is
not required to match the network name for the machine.• Must be unique among all configuration component names within the
domain.
The default value in this field is new_machine_n, where n specifies a numeric value that is used to differentiate among all default machine names; the value of n for the first machine is 1. The value is incremented by 1 for each machine that is added.
Node manager listen address (Optional)
Select a value from the drop-down list for the listen address used by the Node Manager. By default, the IP addresses defined for the local system and localhost are shown in the drop-down list. The default is localhost.
Valid values for the listen address are as follows:• IP address of the computer that hosts the server• DNS name that resolves to the host• localhost • All Local Addresses
If you specify an IP address for a machine that will host the Administration Server and you need to access the WebLogic Server Node Manager, you must disable host name verification. For details and instructions, see "Using Host Name Verification" in Managing WebLogic Security at the following URL:http://e-docs.bea.com/wls/docs81/secmanage/ssl.html#host_name_verifier
Node manager listen port (Optional)
Enter a valid value for the listen port used by the Node Manager.
Any number between 1 and 65535 is a valid value.
The default value is 5555.

Creating WebLogic Configurations Using the Configuration Wizard 6-13
following table. (Fields marked with an asterisk are required.) To delete an entry, click in one of its fields and click Delete. When you finish updating your settings, click Next.
Note: Default values may vary, based on the configuration source you selected earlier.
In this field . . . Do the following . . .
Name* Enter a valid machine name: a string of characters that can include spaces.
The machine name:• Is used to identify the machine within the WebLogic Server domain; it is
not required to match the network name for the machine.• Must be unique among all configuration component names within the
domain.
The default value in this field is new_unixMachine_n, where n specifies a numeric value that is used to differentiate among all default machine names; the value of n for the first machine name is 1. The value is incremented by 1 for each machine that is added.
Post bind GID enabled(Optional)
Select the check box to enable server process binding to the UNIX group ID (see Post bind GID (Optional)). The default is Disabled (unchecked).
Post bind GID(Optional)
Enter a valid UNIX group ID (GID) assigned (bound) to the process under which the WebLogic Server instance runs once the machine has carried out all privileged startup actions.
Post bind UID enabled(Optional)
Select the check box to enable server process binding to the UNIX user ID (see Post bind UID (Optional)). The default is Disabled (unchecked).
Post bind UID(Optional)
Enter a valid UNIX user ID (UID) assigned (bound) to the process under which the WebLogic Server instance runs after the machine finishes all privileged startup actions.
Conf i gur i ng Managed Ser ve rs , C lus te rs , and Mach ines
6-14 Creating WebLogic Configurations Using the Configuration Wizard
Related Topics"Overview of Node Manager" in Configuring and Managing WebLogic Server at http://e-docs.bea.com/wls/docs81/adminguide/nodemgr.html
Assigning Servers to MachinesThe Assign Servers to Machines window prompts you to assign Managed Server instances of WebLogic Server to the machines on which they run. This window is displayed only if you have defined at least one machine.
To assign WebLogic Server instances to machines:
1. In the Machine pane, select the Windows or UNIX machine to which you want to assign a WebLogic Server instance.
2. Assign the appropriate WebLogic Server instance to the designated machine in one of the following ways:
– Double-click the WebLogic Server instance in the Server pane.
Node manager listen address (Optional)
Select a value from the drop-down list for the listen address used by the Node Manager. By default, the IP addresses defined for the local system and localhost are shown in the drop-down list. The default is localhost.
Valid values for the listen address are as follows:• IP address of the computer that hosts the server• DNS name that resolves to the host• localhost • All Local Addresses
If you specify an IP address for a machine that will host the Administration Server and need to access the WebLogic Server Node Manager, you must disable host name verification. For details and instructions, see "Using Host Name Verification" in Managing WebLogic Security at the following URL:
http://e-docs.bea.com/wls/docs81/secmanage/ssl.html#host_name_verifier
Node manager listen port (Optional)
Enter a valid value for the listen port used by the Node Manager.
Any number between 1 and 65535 is a valid value.
The default value is 5555.
In this field . . . Do the following . . .

Creating WebLogic Configurations Using the Configuration Wizard 6-15
– Select the appropriate WebLogic Server instance in the Server pane and click the right arrow.
Note: Although the Administration Server is listed in the Server pane, there is no benefit to assigning it to a machine.
The name of the WebLogic Server instance is removed from the Server pane and added, below the name of the target machine, to the Machine pane.
3. Repeat steps 1 and 2 for each WebLogic Server instance that you want to assign to a machine.
4. Review the machine assignments.
If necessary, you can remove a WebLogic Server instance from a machine in one of the following ways:
– Double-click the name of the appropriate WebLogic Server instance in the Machine pane
– Select the appropriate WebLogic Server instance in the Machine pane and click the left arrow
The name of the WebLogic Server instance is removed from the Machine pane and restored to the Server pane.
5. Click Next to proceed to the next configuration window.

Conf i gur i ng Managed Ser ve rs , C lus te rs , and Mach ines
6-16 Creating WebLogic Configurations Using the Configuration Wizard

Creating WebLogic Configurations Using the Configuration Wizard 7-1
C H A P T E R 7
Configuring a Database Service
WebLogic JDBC enables Java programmers to interact with common database management systems (DBMS) such as Oracle, Microsoft SQL Server, Sybase. The wizard gives you the option of configuring a database service by defining several WebLogic JDBC components:
Connection pools—Ready-to-use group of connections to your DBMS
MultiPools—Groups of connection pools
Data sources—Interfaces between applications and connection pools
The Database (JDBC) Options window prompts you to decide whether you want to configure a database service.
If you select No, the wizard uses the configuration settings exactly as defined in the configuration source that you selected earlier.
If you select Yes, you are prompted in subsequent windows to define the configuration you want, as described in the following table.

Conf i gur i ng a Database Se rv i ce
7-2 Creating WebLogic Configurations Using the Configuration Wizard
Related TopicsProgramming WebLogic JDBC at http://e-docs.bea.com/wls/docs81/jdbc/index.html
“Tutorial: Creating a Custom Domain With Managed Servers, a Cluster, and Application Services” on page 15-10
For this task . . . Do the following . . .
Configuring JDBC Connection Pools(Optional)
Create ready-to-use pools of connections to your DBMS. This task is a prerequisite for configuring JDBC MultiPools.
Configuring JDBC MultiPools(Optional)
Set up a group of JDBC connection pools to accommodate either a high-availability algorithm or a load-balancing algorithm.
This window is displayed only if you have defined at least one JDBC connection pool.
Assigning JDBC Connection Pools to MultiPools(Optional)
Assign the JDBC connection pools to the defined JDBC MultiPools.
This window only is displayed only if you define one or more JDBC connection pools and JDBC MultiPools.
Configuring JDBC Data Sources(Optional)
Configure the data sources that are bound to the JNDI tree and assign a JDBC connection pool. A data source object enables JDBC applications to obtain a DBMS connection from a connection pool.
This window is displayed only if you have defined at least one JDBC connection pool.
Testing JDBC Connection Pools and Setting Up a JDBC Database(Optional)
Test your JDBC connection pool configurations on the local machine.
This window is displayed only if you have defined at least one JDBC connection pool.
Setting Up the JDBC Database Content(Optional)
Set up the database content used by the applications in your domain using pre-existing SQL or database loading files. A configuration template may contain a set of SQL files organized by database type.
This window is displayed only if the following statements are true:• You have defined at least one JDBC connection pool.• The configuration template contains one or more SQL files.

Creating WebLogic Configurations Using the Configuration Wizard 7-3
Configuring JDBC Connection PoolsConnection pools provide ready-to-use groups of connections to your DBMS. Client-side and server-side applications can utilize connections from a connection pool through a data source on the Java Naming and Directory Interface (JNDI) tree.
The Configure JDBC Connection Pools window prompts you to create a pool of JDBC connections. This step is optional. However, before you can define a MultiPool, you must first define its constituent connection pools.
Note: The configuration values that you specify for your database in this window must match the actual configuration of the database. For example, if you change the name of the PointBase database for a preconfigured domain in the DBMS name field in this window, you must also change the name of the actual PointBase database.
To configure JDBC connection pools:
1. Review the current list of JDBC connection pools. Default values may vary, based on the configuration source you selected earlier.
Note: The wizard provides two views: a concise tabular view of all the defined components, and an individual view, in which each component is represented by a tab, and you view a particular component by selecting the corresponding tab. To toggle the display mode between table and tab formats, click Switch Display.
2. Add or modify entries as required by your configuration, using the guidelines provided in the following table. (Fields marked with an asterisk are required.) To delete a JDBC connection pool configuration, click in one of its fields and click Delete. When you finish updating your settings, click Next.

Conf i gur i ng a Database Se rv i ce
7-4 Creating WebLogic Configurations Using the Configuration Wizard
In this field . . . Do the following . . .
Name* Enter a valid name for a JDBC connection pool: a string of characters that can include spaces.
The name of the JDBC connection pool must be unique among all configuration component names within the domain.
The default value in this field is new_JDBCConnectionPool_n, where n specifies a numeric value that is used to differentiate among the default names of connection pools; the value of n for the first connection pool is 1. The value is incremented by 1 for each connection pool that is added.
Vendor* From the drop-down list, select the DBMS of the database to which you want to connect. If your DBMS is not listed, select Other.
Driver* From the drop-down list, select the JDBC driver you want to use to connect to the database. The list includes common JDBC drivers for the selected DBMS. If you selected Other in the Vendor field, this field is not available.
Class name* If you selected a DBMS in the Vendor field, no action is required. If you selected Other in the Vendor field, enter the full package name of the class that implements the java.sql.Driver interface for your DBMS.
DBMS name* Enter the name of the database. If you selected Other in the Vendor field, this field is not available.
DBMS host* Enter the name of the server machine hosting the database. If you selected Other in the Vendor field, this field is not available.
DBMS port* Enter the port to be used to connect to the server. The default setting associated with the database selected is displayed. If you selected Other in the Vendor field, this field is not available.
JDBC URL* If you selected a DBMS in the Vendor field, no action is required. If the DriverName has been set and a default URL exists, that URL is used as the value of this field.
If you selected Other in the Vendor field, enter the URL for the database that is used to create the connections in the connection pool.
User name* Enter the account login name required for connecting to the database.
If you selected Other in the Vendor field, this field is not available.

Creating WebLogic Configurations Using the Configuration Wizard 7-5
Related Topics"Overview of Connection Pools" in Programming WebLogic JDBC at http://e-docs.bea.com/wls/docs81/jdbc/intro.html#intro018
“Tutorial: Creating a Custom Domain With Managed Servers, a Cluster, and Application Services” on page 15-10
Configuring JDBC MultiPoolsA JDBC MultiPool is a group of JDBC connection pools that you can set up to accommodate either a high-availability algorithm or a load-balancing algorithm. It is used the same way a connection pool is used.
The Configure JDBC MultiPools window prompts you to configure JDBC MultiPools. This window is displayed only if you have defined at least one JDBC connection pool. This step is optional.
User password* Enter a password that is valid for accessing the database. Valid values consist of a string of alphanumeric characters. The hyphen (-) and underscore ( _ ) characters are supported.
This password overrides the password entered as part of the JDBC Properties.
The value is encrypted.
Confirm user password*
Re-enter the user password.
Known properties
If you selected a DBMS in the Vendor field, no action is required. This field displays the properties list passed to the JDBC Driver for use in the creation of physical database connections.
If you selected Other in the Vendor field, this field is blank.
Additional properties
Enter any additional properties to be passed to the JDBC driver. Some JDBC drivers, such as DataDirect for DB2 or Informix, display specific properties in this field. For properties of the type, you must specify values. The properties shown in this field vary, based on which DBMS you select.
Supports Local Transaction
Select the check box to enable the support of local transactions. The default is disabled.
In this field . . . Do the following . . .

Conf i gur i ng a Database Se rv i ce
7-6 Creating WebLogic Configurations Using the Configuration Wizard
To configure JDBC MultiPools:
1. Review the current list of JDBC MultiPools. Default values may vary, based on the configuration source you selected earlier.
Note: The wizard provides two views: a concise tabular view of all the defined components, and an individual view, in which each component is represented by a tab, and you view a particular component by selecting the corresponding tab. To toggle the display mode between table and tab formats, click Switch Display.
2. Add or modify entries as required by your configuration using the guidelines provided in the following table. (Fields marked with an asterisk are required.) To delete a JDBC MultiPool configuration, click in one of its fields and click Delete. When you finish updating your settings, click Next.
In this field . . . Do the following . . .
Name* Enter a valid JDBC MultiPool name: a string of characters that can include spaces.
The name of the JDBC MultiPool must be unique among all configuration component names within the domain.
The default value in this field is new_JDBCMultiPool_n, where n specifies a numeric value that is used to differentiate among all default MultiPool names; the value of n for the first MultiPool is 1. The value is incremented by 1 for each MultiPool that is added.
Algorithm type From the drop-down list, select an algorithm type for the MultiPool. Available algorithm types include the following:• Load-Balancing—If this field is set to Load-Balancing, a MultiPool
distributes connection requests evenly to its member pools. This algorithm executes the same failover behavior executed by the High-Availability algorithm.
• High-Availability—If this field is set to High-Availability, connection pools are set up as an ordered list. When an application requests a connection, the MultiPool attempts to obtain a connection from the first connection pool in the list. If it cannot obtain a valid connection, it tries the next connection pool in the list. The process is repeated until a valid connection is obtained, or until the list is exhausted, at which time an exception is thrown. The MultiPool proceeds to the next connection pool in the list only when there is a problem with the pool, for example the database is down or the pool is disabled. If all connections are busy, the MultiPool behaves as a single pool and throws an exception. (default)
Creating WebLogic Configurations Using the Configuration Wizard 7-7
Related Topics"Overview of MultiPools" in Programming WebLogic JDBC at http://e-docs.bea.com/wls/docs81/jdbc/intro.html#intro021
“How Do I: Create XA domains with MultiPools and an Oracle RAC Database?” at http://e-docs.bea.com/platform/docs81/confgwiz/examples.html
Assigning JDBC Connection Pools to MultiPoolsThe Assign JDBC Connection Pools to MultiPools window prompts you to assign JDBC connection pools to the newly defined JDBC MultiPools. This window is displayed only if you define one or more JDBC connection pools and JDBC MultiPools.
To assign JDBC connection pools to the defined JDBC MultiPools:
1. In the JDBC MultiPool pane, select the JDBC MultiPool to which you want to assign JDBC connection pools.
The current assignments for the selected JDBC MultiPool are displayed in the left pane.
2. In the left pane, do one of the following:
– To assign a JDBC connection pool to the selected MultiPool, select the associated check box.
– To remove a JDBC connection pool from the selected MultiPool, clear the associated check box.
To select all connection pools in the list, choose Select All. To unselect all connection pools in the list, choose Unselect All.
The list of connection pools associated with each JDBC MultiPool is updated to reflect your changes.
3. Repeat steps 1 and 2 for each JDBC connection pool that you want to assign to a JDBC MultiPool. Keep in mind that you can assign a connection pool to more than one MultiPool.
4. Click Next to proceed to the next configuration window.

Conf i gur i ng a Database Se rv i ce
7-8 Creating WebLogic Configurations Using the Configuration Wizard
Configuring JDBC Data SourcesA data source object enables a JDBC application to obtain a DBMS connection from a connection pool. Each data source object binds to the JNDI tree and points to a connection pool or MultiPool. Applications look up the data source on the JNDI tree and then request a connection from the data source.
Data source objects can be defined with support for global transactions (Tx Data Source). Such support is required for any applications in which distributed transactions are used.
The Configure JDBC Data Sources window prompts you to configure the data sources that are bound to the JNDI tree and assign a JDBC connection pool. This window is displayed only if you have defined at least one JDBC connection pool. This step is optional.
To configure JDBC data sources:
1. Review the current list of JDBC data sources. Default values may vary, based on the configuration source you selected earlier.
Note: The wizard provides two views: a concise tabular view of all the defined components, and an individual view, in which each component is represented by a tab, and you view a particular component by selecting the corresponding tab. To toggle the display mode between table and tab formats, click Switch Display.
2. Add or modify entries as required by your configuration using the guidelines provided in the following table. (Fields marked with an asterisk are required.) To delete a JDBC data source, click in one of its fields and click Delete. When you finish updating your settings, click Next.
Creating WebLogic Configurations Using the Configuration Wizard 7-9
Related Topics"Overview of Data Sources" in Programming WebLogic JDBC at http://e-docs.bea.com/wls/docs81/jdbc/intro.html#datasources
“Tutorial: Creating a Custom Domain With Managed Servers, a Cluster, and Application Services” on page 15-10
Testing JDBC Connection Pools and Setting Up a JDBC DatabaseThe Test JDBC Connection Pools and Setup JDBC Database window prompts you to test the JDBC connection pool configurations on the local machine. You can test any database supported
In this field . . . Do the following . . .
Name* Enter a valid name for the JDBC data source: a string of characters that can include spaces.
The JDBC data source name is used in the configuration file (config.xml) and in the WebLogic Server Administration Console.
The default value in this field is new_JDBCDataSource_n or new_JDBCTxDataSource_n, where n specifies a numeric value that is used to differentiate among all default data sources; the value for the first data source is 1. The value is incremented by 1 for each data source that is added.
JNDI name* Enter a valid JNDI pathname to which this data source is bound.
When an application looks up a JNDI path, a javax.sql.DataSource instance corresponding to the data source is returned.
Pool name* From the drop-down list, select an existing JDBC connection pool or the JDBC MultiPool to be associated with the data source.
Applications get a connection from the underlying JDBC connection pool by looking up the data source on the JNDI tree and then requesting a connection from the data source.
Honor global transaction To disable support for global transactions, clear the check box. The default setting is enabled.
If global transactions are enabled, a Tx Data Source is created. If global transactions are disabled, a non-transactional data source is created.

Conf i gur i ng a Database Se rv i ce
7-10 Creating WebLogic Configurations Using the Configuration Wizard
by the JDBC drivers installed with WebLogic Platform, including: PointBase Universal Driver, Oracle Thin Driver, WebLogic jDriver for Microsoft SQL Server, and Sybase jConnect and jConnect2.
This step is optional.
Note: In most cases, when you are creating a domain that uses the PointBase database, you do not need to test the JDBC connection pools, or set up the JDBC database. For those cases when you do, such as for templates that use the WebLogic Server demo database (jdbc:pointbase:server://localhost:9092/demo), follow the steps described in this procedure. Examples of templates that use the WebLogic Server demo database are the WebLogic Server Examples Domain and the Avitek Medical Records Sample Domain.
To test a JDBC connection pool:
1. Select the connection pool from the list of Available JDBC Connection Pools.
2. If you want to capture test output in a log file, complete one of the following steps:
– Select Log File and manually enter the location of the log file.
– Click Browse, navigate to the name of the log file, and click Select log file.
By default, results are displayed in the Results area.
3. Click Test Connection to verify that the selected JDBC connection pool is working.
Note: Your database must be running to successfully test the JDBC connection.
4. If your template contains SQL files, go to “Setting Up the JDBC Database Content” on page 7-10 to set up the database content. Otherwise, click Next to proceed to the next configuration window.
Setting Up the JDBC Database ContentThe Available SQL Files and Database Loading Options pane in the Test JDBC Connection Pools and Setup JDBC Database window prompts you to set up the database content used by the applications in the domain using pre-existing SQL or database loading files. A configuration template may contain a set of SQL files organized by database type. This pane is displayed only if the configuration template contains one or more SQL files.
This step is optional.

Creating WebLogic Configurations Using the Configuration Wizard 7-11
To set up the database content:
1. From the Available SQL Files and Database Loading Options list, select the file to be loaded.
2. Click Load Database.
The database is loaded, using the selected file, and the results are displayed in the Results pane. If you prefer to capture test output in a log file, select the Log File check box and manually enter the location of the log file or click Browse to navigate to the name of the desired log file.
3. Click Next to proceed to the next configuration window.
Related Topics“Adding SQL Scripts Into Your Configuration Template” on page 12-9

Conf i gur i ng a Database Se rv i ce
7-12 Creating WebLogic Configurations Using the Configuration Wizard

Creating WebLogic Configurations Using the Configuration Wizard 8-1
C H A P T E R 8
Configuring a Java Messaging Service
WebLogic JMS gives you access to enterprise messaging systems that make it possible for applications to communicate with one another. To familiarize yourself with the features of WebLogic JMS, see Programming WebLogic JMS at the following URL:
http://e-docs.bea.com/wls/docs81/jms/index.html
The wizard gives you the option of configuring a JMS messaging service. To configure JMS, define the following components:
Connection factory—Encapsulated connection configuration information that enables JMS applications to create a connection.
File and JDBC stores—Disk-based file stores and JDBC-accessible database stores, respectively; used to store persistent messages.
Destination Keys and JMS Templates—Keys to define the sort order for messages that arrive at a destination and templates to define multiple destinations with similar attribute settings.
JMS servers—Servers that manage connections and message requests on behalf of clients.
Destinations—Queues (in point-to-point models) or topics (in publish/subscribe models) that serve as destinations and distributed destinations for a JMS server.
The Messaging (JMS) Options window prompts you to configure WebLogic Java Message Service (JMS). If you select No, the wizard uses settings for your JMS configuration exactly as defined in the configuration source that you selected earlier. If you select Yes, you are prompted, in subsequent windows, to define the configuration as described in the following table.

Conf i gur i ng a Java Messaging Ser v i ce
8-2 Creating WebLogic Configurations Using the Configuration Wizard
Note: If you are creating an extension template using the Configuration Template Builder and you select No, the next step in your procedure is to set up security for your application. See “Configuring Security Options in Your Extension Template” on page 13-7.
For this task . . . Do the following . . .
Configuring JMS Connection Factories
Configure connection factories, JMS objects that encapsulate connection configuration information, and enable JMS applications to create connections.
Configuring JMS Destination Keys
Configure JMS destination keys that are used to define the sort order for messages that arrive at a specific destination.
Configuring JMS Templates
Configure JMS templates which provide an efficient means of defining multiple destinations (queues and topics) with similar configuration settings.
Assigning JMS Destination Keys
Assign destination keys to templates.
Configuring JMS File Stores
Configure JMS file stores. A JMS file store is a disk-based file that is used to store persistent messages.
Configuring JMS JDBC Stores
Configure JMS JDBC stores, a JDBC-accessible database used to store persistent messages.
A JMS connection factory is required for creating a JMS JDBC store.
Configuring JMS Servers Configure JMS servers to manage connections and message requests on behalf of clients.
Assigning JMS Servers to WebLogic Server Instances
Assign the JMS servers to WebLogic Server instances.
This window is displayed only if you have defined one or more JMS servers.
Configuring JMS Topics Configure JMS topics. JMS topics support the publish/subscribe (Pub/sub) messaging model which enables an application to send a message to multiple applications. Pub/sub messaging applications send and receive messages by subscribing to a topic.
Configuring JMS Queues Configure JMS queues. JMS queues support the point-to-point (PTP) messaging model which enables one application to send a message to another application. PTP messaging applications send and receive messages using named queues.

Creating WebLogic Configurations Using the Configuration Wizard 8-3
Related Topics“Tutorial: Creating a Custom Domain With Managed Servers, a Cluster, and Application Services” on page 15-10
Configuring JMS Connection FactoriesA connection factory object encapsulates connection configuration information, and enables JMS applications to create connections.
The Configure JMS Connection Factories window prompts you to create JMS connection factories. This step is optional.
To configure JMS connection factories:
1. Review the current list of JMS connection factories. Default values may vary based on the configuration source you selected earlier.
Note: The wizard provides two display modes: a concise tabular view of all the defined components, and an individual view, in which each component is represented by a
Configuring JMS Distributed Topics
Configure JMS distributed topics, a set of physical topics that can support service continuity in the event of a WebLogic Server failure within a cluster.
This window is displayed only if you have configured a cluster.
Configuring JMS Distributed Queues
Configure JMS distributed queues, a set of physical queues that can support service continuity in the event of a WebLogic Server failure within a cluster.
This window is displayed only if you have configured a cluster.
Assigning JMS Distributed Destinations
Assign JMS distributed queues or topics to a WebLogic Server or cluster.
Configuring JMS Distributed Topic Members
Assign members to a particular JMS distributed topic.
This window is displayed only if you have configured a distributed topic.
Configuring JMS Distributed Queue Members
Assign members to the JMS distributed queue.
This window is displayed only if you have configured a distributed queue.
For this task . . . Do the following . . .
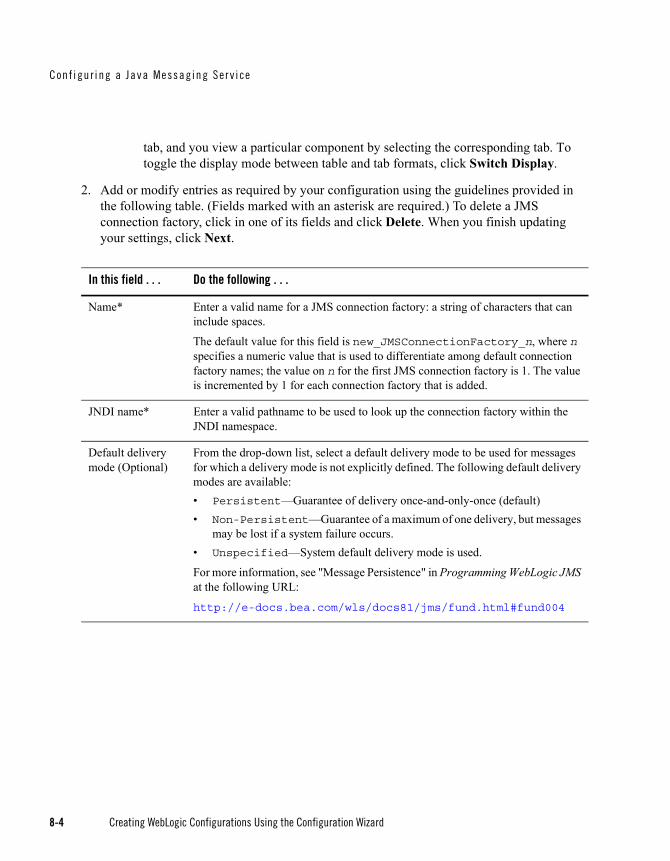
Conf i gur i ng a Java Messaging Ser v i ce
8-4 Creating WebLogic Configurations Using the Configuration Wizard
tab, and you view a particular component by selecting the corresponding tab. To toggle the display mode between table and tab formats, click Switch Display.
2. Add or modify entries as required by your configuration using the guidelines provided in the following table. (Fields marked with an asterisk are required.) To delete a JMS connection factory, click in one of its fields and click Delete. When you finish updating your settings, click Next.
In this field . . . Do the following . . .
Name* Enter a valid name for a JMS connection factory: a string of characters that can include spaces.
The default value for this field is new_JMSConnectionFactory_n, where n specifies a numeric value that is used to differentiate among default connection factory names; the value on n for the first JMS connection factory is 1. The value is incremented by 1 for each connection factory that is added.
JNDI name* Enter a valid pathname to be used to look up the connection factory within the JNDI namespace.
Default delivery mode (Optional)
From the drop-down list, select a default delivery mode to be used for messages for which a delivery mode is not explicitly defined. The following default delivery modes are available:• Persistent—Guarantee of delivery once-and-only-once (default)• Non-Persistent—Guarantee of a maximum of one delivery, but messages
may be lost if a system failure occurs.• Unspecified—System default delivery mode is used.
For more information, see "Message Persistence" in Programming WebLogic JMS at the following URL:
http://e-docs.bea.com/wls/docs81/jms/fund.html#fund004

Creating WebLogic Configurations Using the Configuration Wizard 8-5
Related Topics"Connection Factory Object" in Programming WebLogic JMS at http://e-docs.bea.com/wls/docs81/jms/fund.html#jms_connection_factory
“Tutorial: Creating a Custom Domain With Managed Servers, a Cluster, and Application Services” on page 15-10
Configuring JMS Destination KeysDestination keys are used to define the sort order for messages that arrive on a specific destination.
The Configure JMS Destination Key(s) window prompts you to configure JMS destination keys. In subsequent windows, you can create JMS templates and, if you like, assign these destination keys to JMS templates. This step is optional.
Default priority(Optional)
Enter a default priority to be used for messages for which a priority is not explicitly defined. Any numeric value between 0 and 9 is valid, with 0 specifying the lowest priority: • Levels 0-4 indicate gradations of normal priority• Levels 5-9 indicate gradations of expedited priority
The default value is 4.
Acknowledge policy (Optional)
From the drop-down list, specify an acknowledge policy to be used for non-transacted sessions run in CLIENT_ACKNOWLEDGE mode. Options include:• All specifies that when acknowledge is called on a message, all
unacknowledged messages received on the session are acknowledged (default)• Previous specifies that when acknowledge is called on a message, only
unacknowledged messages up to, and including, the given message are acknowledged
• Unspecified
For more information, see "Non-transacted Session" in Programming WebLogic JMS at http://e-docs.bea.com/wls/docs81/jms/fund.html#nontransacted
In this field . . . Do the following . . .

Conf i gur i ng a Java Messaging Ser v i ce
8-6 Creating WebLogic Configurations Using the Configuration Wizard
To configure JMS destination keys:
1. Review the current list of JMS destination keys. Default values may vary based on the configuration source you selected earlier.
Note: The wizard provides two display modes: a concise tabular view of all the defined components, and an individual view, in which each component is represented by a tab, and you view a particular component by selecting the corresponding tab. To toggle the display mode between table and tab formats, click Switch Display.
2. Add or modify entries as required by your configuration using the guidelines provided in the following table. (Fields marked with an asterisk are required.) To delete a JMS destination key, click in one of its fields and click Delete. When you finish updating your settings, click Next.
In this field . . . Do the following . . .
Name* Enter a valid name for the JMS destination key: a string of characters that can include spaces.
The default for this field is new_JMSDestinationKey_n, where n specifies a numeric value that is used to differentiate among default destination key names; the value of n for the first destination key is 1. The value is incremented by 1 for each connection factory that is added.
Property* From the drop-down list, select a message sort key or the name of a message header field on which to sort, or enter a value in the field. Message header field keys start with the letters JMS and ignore the key type setting.
The drop-down list offers the following values:• JMSCorrelationID
• JMSDeliveryTime
• JMSExpiration
• JMSMessageID
• JMSPriority
• JMSRedelivered
• JMSTimestamp • JMSType
Note: For better performance, use message header fields as sorting keys, rather than message sort keys.

Creating WebLogic Configurations Using the Configuration Wizard 8-7
Configuring JMS TemplatesA JMS template provides an efficient means of defining multiple destinations with similar attribute settings. When you use JMS templates, you can take advantage of the following benefits:
You do not need to re-enter every attribute setting each time you define a new destination; you can use the JMS template and override any setting to which you want to assign a new value.
You can modify shared attribute settings dynamically, simply by modifying the template.
The Configure JMS Template(s) window prompts you to configure JMS templates. This step is optional.
Note: Default values may vary, based on the configuration source you selected earlier. To toggle the display mode for the list of templates between table and tab formats, click Switch Display.
Key type(Optional)
From the drop-down list, select the expected property type for this destination key. This setting is ignored for message header field keys, which have an implied type.
Valid values for the key type are:• Boolean
• Byte
• Short
• Int
• Long
• Float
• Double
• String (default)• Unspecified
Direction(Optional)
From the drop-down list, select the direction in which the key will sort messages:• Ascending—uses a FIFO (first in, first out) sort order (default)• Descending—uses a LIFO (last in, first out) sort order• Unspecified
In this field . . . Do the following . . .

Conf i gur i ng a Java Messaging Ser v i ce
8-8 Creating WebLogic Configurations Using the Configuration Wizard
To configure JMS templates:
1. Review the current list of JMS templates and rename them if necessary for your configuration.
2. Perform the following steps as required for your configuration:
– To add a JMS template, click Add.
Enter a valid name for the JMS template: a string of characters that can include spaces.
The default for this field is new_JMSTemplate_n, where n specifies a numeric value that is used to differentiate among all default JMS template names; the value of n for the first JMS template is 1. The value is incremented by 1 for each template that is added.
– To delete a JMS template, select the template name and click Delete.
– To rename a template, select the template name and enter a new name.
3. When you finish updating the settings in the window, click Next.
Related TopicsConfiguring JMS Destination Keys
Assigning JMS Destination Keys
"JMS Template Tasks" in the WebLogic Server Administration Console Online Help at http://e-docs.bea.com/wls/docs81/ConsoleHelp/jms_config.html#jms_template_
create
Assigning JMS Destination KeysThe JMS Destination Key Assignment window prompts you to assign destination keys to a template. This window is displayed only if you have defined JMS destination keys and one or more JMS templates. This step is optional.
To assign destination keys to a JMS template:
1. In the JMS Template pane, select the JMS template to which you want to assign a JMS destination key.
The current assignments for the selected JMS template are displayed in the left pane.
2. In the left pane, do one of the following:

Creating WebLogic Configurations Using the Configuration Wizard 8-9
– To assign a JMS destination key to the selected JMS template, select the associated check box.
– To remove a JMS destination key from the selected JMS template, clear the associated check box.
To select all destination keys in the list and assign them to the selected template, choose Select All. To unselect all JMS destination keys in the list, choose Unselect All.
The list of JMS destination keys associated with each JMS template is updated to reflect your changes.
3. Repeat steps 1 and 2 for each JMS destination key that you want to assign to a JMS template. You can assign a destination key to more than one template.
4. Click Next to proceed to the next configuration window.
Related Topics“Configuring JMS Destination Keys” on page 8-5
“Configuring JMS Templates” on page 8-7
Configuring JMS File StoresA JMS file store is a disk-based file in which persistent messages can be saved.
The Configure JMS File Stores window prompts you to configure JMS file stores as required for your configuration. This step is optional.
To configure JMS file stores:
1. Review the current list of JMS file stores. Default values may vary based on the configuration source you selected earlier.
Note: The wizard provides two display modes: a concise tabular view of all the defined components, and an individual view, in which each component is represented by a tab, and you view a particular component by selecting the corresponding tab. To toggle the display mode between table and tab formats, click Switch Display.
2. Add or modify entries as required by your configuration using the guidelines provided in the following table. (Fields marked with an asterisk are required.) To delete a JMS file store, click in one of its fields and click Delete. When you finish updating your settings, click Next.
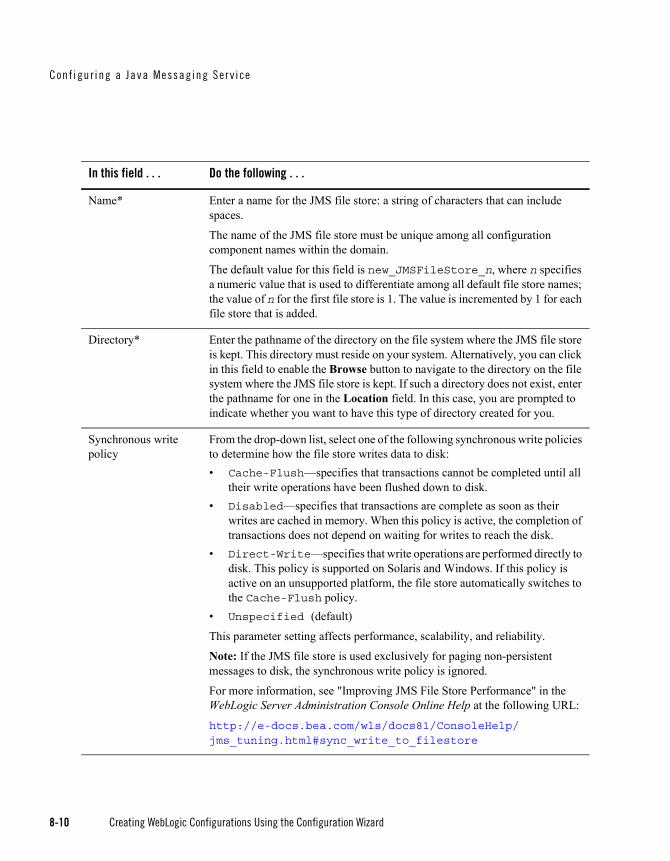
Conf i gur i ng a Java Messaging Ser v i ce
8-10 Creating WebLogic Configurations Using the Configuration Wizard
In this field . . . Do the following . . .
Name* Enter a name for the JMS file store: a string of characters that can include spaces.
The name of the JMS file store must be unique among all configuration component names within the domain.
The default value for this field is new_JMSFileStore_n, where n specifies a numeric value that is used to differentiate among all default file store names; the value of n for the first file store is 1. The value is incremented by 1 for each file store that is added.
Directory* Enter the pathname of the directory on the file system where the JMS file store is kept. This directory must reside on your system. Alternatively, you can click in this field to enable the Browse button to navigate to the directory on the file system where the JMS file store is kept. If such a directory does not exist, enter the pathname for one in the Location field. In this case, you are prompted to indicate whether you want to have this type of directory created for you.
Synchronous write policy
From the drop-down list, select one of the following synchronous write policies to determine how the file store writes data to disk: • Cache-Flush—specifies that transactions cannot be completed until all
their write operations have been flushed down to disk. • Disabled—specifies that transactions are complete as soon as their
writes are cached in memory. When this policy is active, the completion of transactions does not depend on waiting for writes to reach the disk.
• Direct-Write—specifies that write operations are performed directly to disk. This policy is supported on Solaris and Windows. If this policy is active on an unsupported platform, the file store automatically switches to the Cache-Flush policy.
• Unspecified (default)
This parameter setting affects performance, scalability, and reliability.
Note: If the JMS file store is used exclusively for paging non-persistent messages to disk, the synchronous write policy is ignored.
For more information, see "Improving JMS File Store Performance" in the WebLogic Server Administration Console Online Help at the following URL:
http://e-docs.bea.com/wls/docs81/ConsoleHelp/jms_tuning.html#sync_write_to_filestore

Creating WebLogic Configurations Using the Configuration Wizard 8-11
Configuring JMS JDBC StoresA JMS JDBC store is a JDBC-accessible database used to save persistent messages. A JMS connection factory is required for creating a JMS JDBC store.
The Configure JMS JDBC Store window prompts you to create JMS JDBC stores as required for your configuration. This step is optional.
To configure JMS JDBC stores:
1. Review the current list of JMS JDBC stores. Default values may vary based on the configuration source you selected earlier.
Note: The wizard provides two display modes: a concise tabular view of all the defined components, and an individual view, in which each component is represented by a tab, and you view a particular component by selecting the corresponding tab. To toggle the display mode between table and tab formats, click Switch Display.
2. Add or modify entries as required by your configuration, using the guidelines provided in the following table. (Fields marked with an asterisk are required.) To delete a JMS JDBC store, click in one of its fields and click Delete. When you finish updating your settings, click Next.

Conf i gur i ng a Java Messaging Ser v i ce
8-12 Creating WebLogic Configurations Using the Configuration Wizard
In this field . . . Do the following . . .
Name* Enter a valid name for the JMS JDBC store: a string of characters that can include spaces.
The name of the JMS JDBC store must be unique among all configuration component names within the domain.
The default value in this field is new_JMSJDBCStore_n, where n specifies a numeric value that is used to differentiate among default JDBC store names; the value of n for the first JDBC store is 1. The value is incremented by 1 for each JMS JDBC store that is added.
Note: If autoconfiguration has been applied in this configuration, the default value in this field may vary. For more information, see “Autoconfiguration of Applications and Services” on page 9-4.
Connection pool* From the drop-down list, select a valid JDBC connection pool for this persistent store.
Note: Only connection pools that use non-XA drivers are supported. If you are using a template that specifies a connection pool with a non-XA driver as a JMS JDBC store, and you change the driver to an XA driver, the JMS JDBC store is invalid and the connection pool is not available in the drop-down list.
Prefix name(Optional)
Enter a prefix name that uniquely identifies JMS tables in the backing store. Any continuous string of characters may be used as a valid name; spaces within names are not supported.
By specifying unique prefixes you can enable multiple stores to reside in the same database. Such prefixes are prepended to table names when:• The database management system (DBMS) requires fully qualified
names.• You must differentiate between JMS tables for two instances of
WebLogic Server in order to accommodate the storage of multiple tables on a single DBMS.
When prepended to a JMS table name, a prefix specified in the following format will result in a valid table name:[schema.[catalog.]]prefix

Creating WebLogic Configurations Using the Configuration Wizard 8-13
Related Topics“Tutorial: Creating a Custom Domain With Managed Servers, a Cluster, and Application Services” on page 15-10
Configuring JMS ServersA JMS server manages connections and message requests on behalf of clients.
The Configure JMS Servers window prompts you to create JMS servers as required for your configuration. This step is optional.
To configure JMS servers:
1. Review the current list of JMS servers. Default values may vary based on the configuration source you selected earlier.
Note: The wizard provides two display modes: a concise tabular view of all the defined components, and an individual view, in which each component is represented by a tab, and you view a particular component by selecting the corresponding tab. To toggle the display mode between table and tab formats, click Switch Display.
2. Add or modify entries as required by your configuration, using the guidelines provided in the following table. (Fields marked with an asterisk are required.) To delete a JMS server, click in one of its fields and click Delete. When you finish updating your settings, click Next.

Conf i gur i ng a Java Messaging Ser v i ce
8-14 Creating WebLogic Configurations Using the Configuration Wizard
In this field . . . Do the following . . .
Name* Enter a valid JMS server name: a string of characters that can include spaces.
The name of the JMS server must be unique among all configuration component names within the domain.
The default value in this field is new_JMSServer_n, where n specifies a numeric value that is used to differentiate among all default JMS server names; the value of n for the first JMS server is 1. The value is incremented by 1 for each JMS server that is added.
Note: If autoconfiguration has been applied in this configuration, the default value in this field may vary. For more information, see “Autoconfiguration of Applications and Services” on page 9-4.
Store From the drop-down list, select one of the following for the JMS server:• A valid JMS persistent store • A valid JMS JDBC store • Unspecified
A persistent store or JDBC store may be used by only one JMS server. A value of Unspecified means that persistent messaging is not supported.

Creating WebLogic Configurations Using the Configuration Wizard 8-15
Paging store From the drop-down list, select a valid JMS paging store for the JMS server or Unspecified.
Each JMS server must have its own paging store, which is used exclusively for paging out non-persistent messages for the JMS server and its destinations.
Before you can select a paging store, you must first configure a JMS file store to be used exclusively as a paging store. The selected paging store cannot be any of the following: a) the same as the selected non-paging store; b) the same store used by any other JMS server; or c) a JMS JDBC store.
Note: By default, message paging is disabled. However, a message paging store is created automatically when either bytes paging or messages paging is enabled on the JMS server or destinations of the JMS server and a message paging store is not already configured.
For more information, see "Paging Out Messages to Free Up Memory" in the WebLogic Server Administration Console Online Help.To access this document, select the help icon from the Administration Console interface or go to:
http://e-docs.bea.com/wls/docs81/ConsoleHelp/jms_tuning.html#using_message_paging
In this field . . . Do the following . . .

Conf i gur i ng a Java Messaging Ser v i ce
8-16 Creating WebLogic Configurations Using the Configuration Wizard
Related Topics“Tutorial: Creating a Custom Domain With Managed Servers, a Cluster, and Application Services” on page 15-10
Assigning JMS Servers to WebLogic Server InstancesThe Assign JMS Servers to WebLogic Servers window prompts you to assign the JMS servers to WebLogic Server instances. This window is displayed only if you have defined one or more JMS servers.
Temporary template
Note: This field refers to a JMS template, not a configuration or extension template.
From the drop-down list, select an existing JMS template to be used for the creation of temporary queues and topics for this JMS server. When a value is specified for this field, JMS applications can create temporary destinations.
The attribute values for a temporary destination are derived from this JMS template. If provided as part of the template, the Store attribute values are ignored because temporary destinations do not support persistent messaging.
If this attribute is set to none, attempts to create a temporary destination (queue or topic) fail.
Expiration scan interval Enter the amount of time, in seconds, that you want the JMS server to pause between its cycles of scanning its destinations for expired messages to process (according to the specified Expiration Policy for the destinations).
A value of 0 indicates that active scanning is disabled: expired messages are passively removed as they are discovered.
The default value in this field is 30.
For guidelines on setting this value, see the JMS server configuration information in the WebLogic Server Administration Console Online Help. To access this information, select the help icon from the Administration Console interface or go to:
http://e-docs.bea.com/wls/docs81/ConsoleHelp/domain_jmsserver_config_general.html#ExpirationScanInterval
In this field . . . Do the following . . .

Creating WebLogic Configurations Using the Configuration Wizard 8-17
To assign JMS servers to WebLogic Server instances:
1. In the Server pane, select the WebLogic Server instance to which you want to assign a JMS server.
2. Assign the JMS server to the designated WebLogic Server instance in one of the following ways:
– Double-click the name of the JMS server in the JMS Server pane.
– Select the name of the JMS server in the JMS Server pane and click the right arrow.
The name of the JMS server is removed from the JMS Server pane and added, below the name of the target WebLogic Server instance, in the Server pane.
3. Repeat steps 1 and 2 for each JMS server that you want to assign to a WebLogic Server instance.
4. Review the WebLogic Server instance assignments.
If necessary, you can remove a JMS server from a WebLogic Server instance in one of the following ways:
– Double-click the name of the JMS server in the Server pane.
– Select the name of the JMS server in the Server pane and click the left arrow.
The name of the JMS server is removed from the Server pane and restored to the JMS Server pane.
5. Click Next to proceed to the next configuration window.
Related Topics“Tutorial: Creating a Custom Domain With Managed Servers, a Cluster, and Application Services” on page 15-10
Configuring JMS TopicsJMS topics support the publish/subscribe (pub/sub) messaging model, which enables an application to send a message to multiple applications. Pub/sub messaging applications send and receive messages by subscribing to a topic.
The Configure JMS Topics window prompts you to configure JMS topics required for your configuration.This step is optional.
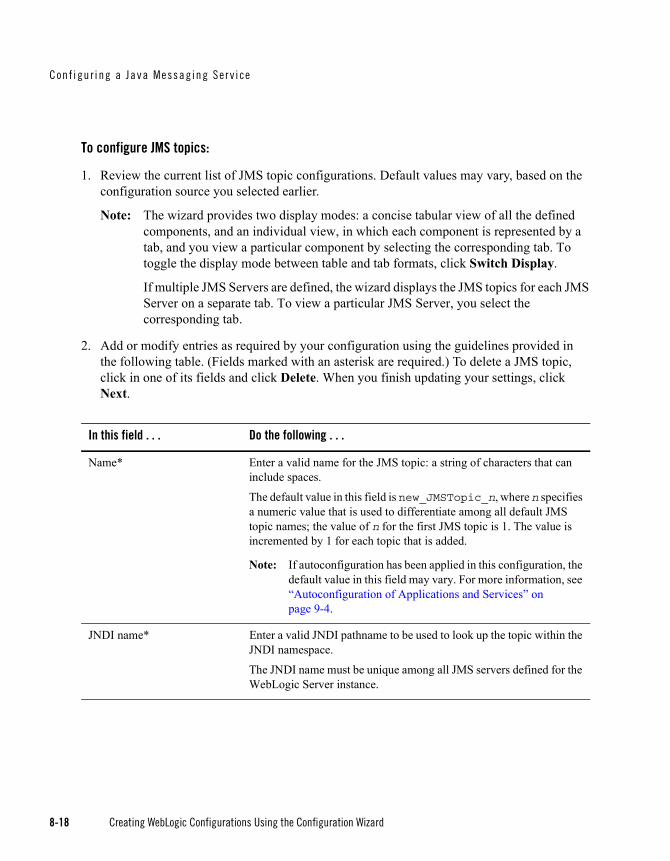
Conf i gur i ng a Java Messaging Ser v i ce
8-18 Creating WebLogic Configurations Using the Configuration Wizard
To configure JMS topics:
1. Review the current list of JMS topic configurations. Default values may vary, based on the configuration source you selected earlier.
Note: The wizard provides two display modes: a concise tabular view of all the defined components, and an individual view, in which each component is represented by a tab, and you view a particular component by selecting the corresponding tab. To toggle the display mode between table and tab formats, click Switch Display.
If multiple JMS Servers are defined, the wizard displays the JMS topics for each JMS Server on a separate tab. To view a particular JMS Server, you select the corresponding tab.
2. Add or modify entries as required by your configuration using the guidelines provided in the following table. (Fields marked with an asterisk are required.) To delete a JMS topic, click in one of its fields and click Delete. When you finish updating your settings, click Next.
In this field . . . Do the following . . .
Name* Enter a valid name for the JMS topic: a string of characters that can include spaces.
The default value in this field is new_JMSTopic_n, where n specifies a numeric value that is used to differentiate among all default JMS topic names; the value of n for the first JMS topic is 1. The value is incremented by 1 for each topic that is added.
Note: If autoconfiguration has been applied in this configuration, the default value in this field may vary. For more information, see “Autoconfiguration of Applications and Services” on page 9-4.
JNDI name* Enter a valid JNDI pathname to be used to look up the topic within the JNDI namespace.
The JNDI name must be unique among all JMS servers defined for the WebLogic Server instance.

Creating WebLogic Configurations Using the Configuration Wizard 8-19
Related Topics"Messaging Models" in Programming WebLogic JMS at http://e-docs.bea.com/wls/docs81/jms/fund.html#fund001
Configuring JMS QueuesJMS queues support the point-to-point (PTP) messaging model. This model enables one application to send a message to another. PTP messaging applications send and receive messages using named queues.
The Configure JMS Queues window prompts you to configure JMS queues required for your configuration. This step is optional.
Store enabled(Optional)
From the drop-down list, select a flag to specify whether or not the destination uses the persistent store specified by the JMS server.
If the true flag is selected, but no persistent store is defined for the JMS server, then the configuration fails and WebLogic JMS does not boot.
If the false flag is selected, then the destination does not support persistent messages.
If the default flag is selected, then the destination uses the persistent store, if one is defined for the JMS server, and supports persistent messaging.
If Unspecified is selected, no value is output to the config.xml file.
Template(Optional)
Note: This field refers to a JMS template, not a configuration or extension template.
From the drop-down list, select a valid JMS template from which the destination is to be derived.
If a template is not defined (Unspecified), then the attributes for the destination must be specified as part of the destination. The Template attribute setting for each destination is static. Template attributes, however, can be modified dynamically.
Attributes that are set to default values inherit their destination values from the JMS template at run time. If this attribute is not defined, then the attributes for the destination must be specified as part of the destination.
In this field . . . Do the following . . .

Conf i gur i ng a Java Messaging Ser v i ce
8-20 Creating WebLogic Configurations Using the Configuration Wizard
To configure JMS queues:
1. Review the current list of JMS queues. Default values may vary, based on the configuration source you selected earlier.
Note: The wizard provides two display modes: a concise tabular view of all the defined components, and an individual view, in which each component is represented by a tab, and you view a particular component by selecting the corresponding tab. To toggle the display mode between table and tab formats, click Switch Display.
If multiple JMS Servers are defined, the wizard displays the JMS topics for each JMS Server on a separate tab. To view a particular JMS Server, you select the corresponding tab.
2. Add or modify entries as required by your configuration using the guidelines provided in the following table. (Fields marked with an asterisk are required.) To delete a JMS queue, click in one of its fields and click Delete. When you finish updating your settings, click Next.
In this field . . . Do the following . . .
Name* Enter a name for the JMS queue: a string of characters that can include spaces.
The default value in this field is new_JMSQueue_n, where n specifies a numeric value that is used to differentiate among all default JMS queue names; the value of n for the first JMS queue is 1. The value is incremented by 1 for each JMS queue that is added.
Note: If autoconfiguration has been applied in this configuration, the default value in this field may vary. For more information, see “Autoconfiguration of Applications and Services” on page 9-4.
JNDI name* Enter a valid JNDI pathname to be used to look up the queue within the JNDI namespace.
The JNDI name must be unique among all JMS servers defined for the WebLogic Server instance.
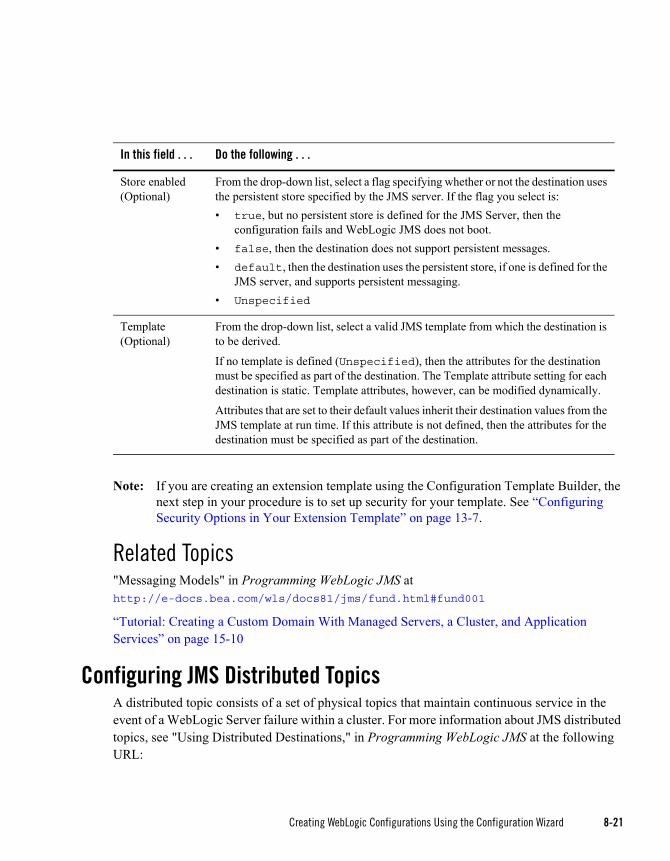
Creating WebLogic Configurations Using the Configuration Wizard 8-21
Note: If you are creating an extension template using the Configuration Template Builder, the next step in your procedure is to set up security for your template. See “Configuring Security Options in Your Extension Template” on page 13-7.
Related Topics"Messaging Models" in Programming WebLogic JMS at http://e-docs.bea.com/wls/docs81/jms/fund.html#fund001
“Tutorial: Creating a Custom Domain With Managed Servers, a Cluster, and Application Services” on page 15-10
Configuring JMS Distributed TopicsA distributed topic consists of a set of physical topics that maintain continuous service in the event of a WebLogic Server failure within a cluster. For more information about JMS distributed topics, see "Using Distributed Destinations," in Programming WebLogic JMS at the following URL:
Store enabled(Optional)
From the drop-down list, select a flag specifying whether or not the destination uses the persistent store specified by the JMS server. If the flag you select is:• true, but no persistent store is defined for the JMS Server, then the
configuration fails and WebLogic JMS does not boot.• false, then the destination does not support persistent messages.• default, then the destination uses the persistent store, if one is defined for the
JMS server, and supports persistent messaging.• Unspecified
Template(Optional)
From the drop-down list, select a valid JMS template from which the destination is to be derived.
If no template is defined (Unspecified), then the attributes for the destination must be specified as part of the destination. The Template attribute setting for each destination is static. Template attributes, however, can be modified dynamically.
Attributes that are set to their default values inherit their destination values from the JMS template at run time. If this attribute is not defined, then the attributes for the destination must be specified as part of the destination.
In this field . . . Do the following . . .

Conf i gur i ng a Java Messaging Ser v i ce
8-22 Creating WebLogic Configurations Using the Configuration Wizard
http://e-docs.bea.com/wls/docs81/jms/implement.html#using_distributed_dest
inations
The Configure JMS Distributed Topics window prompts you to configure JMS distributed topics required for your configuration. This window is displayed only if you have configured a cluster, as described in “Configuring Clusters” on page 6-6. This step is optional.
To configure JMS distributed topics:
1. Review the current list of JMS distributed topic configurations. Default values may vary based on the configuration source you selected earlier.
Note: The wizard provides two display modes: a concise tabular view of all the defined components, and an individual view, in which each component is represented by a tab, and you view a particular component by selecting the corresponding tab. To toggle the display mode between table and tab formats, click Switch Display.
2. Add or modify the entries as required by your configuration using the guidelines provided in the following table. (Fields marked with an asterisk are required.) To delete a JMS distributed topic, click in one of its fields and click Delete. When you finish updating your settings, click Next.
In this field . . . Do the following . . .
Name* Enter a valid name for the JMS distributed topic: a string of characters that can include spaces.
The default value in this field is new_JMSDistributedTopic_n, where n specifies a numeric value that is used to differentiate among all default JMS distributed topic names; the value of n for the first JMS distributed topic is 1. The value is incremented by 1 for each distributed topic that is added.
Note: If autoconfiguration has been applied in this configuration, the default value in this field may vary. For more information, see “Autoconfiguration of Applications and Services” on page 9-4.

Creating WebLogic Configurations Using the Configuration Wizard 8-23
Configuring JMS Distributed QueuesA distributed queue consists of a set of physical queues that maintain continuous service in the event of a WebLogic Server failure within a cluster. For more information about JMS distributed queues, see "Using Distributed Destinations," in Programming WebLogic JMS at the following URL:
http://e-docs.bea.com/wls/docs81/jms/implement.html#using_distributed_dest
inations
The Configure JMS Distributed Queues window prompts you to configure the JMS distributed queues required for your configuration. This window is displayed only if you have configured a cluster, as described in “Configuring Clusters” on page 6-6. This step is optional.
To configure JMS distributed queues:
1. Review the current list of JMS distributed queue configurations. Default values may vary based on the configuration source you selected earlier.
Note: The wizard provides two display modes: a concise tabular view of all the defined components, and an individual view, in which each component is represented by a tab, and you view a particular component by selecting the corresponding tab. To toggle the display mode between table and tab formats, click Switch Display.
2. Add or modify entries as required by your configuration using the guidelines provided in the following table. (Fields marked with an asterisk are required.) To delete a JMS distributed queue, click in one of its fields and click Delete. When you finish updating your settings, click Next.
JNDI name* Enter a valid JNDI pathname to be used to look up the distributed topic within the JNDI namespace.
Load balancing policy (Optional)
From the drop-down list, select a load-balancing policy that can be used by producers sending messages to this distributed queue in order to balance the message load across the members of a distributed destination. The following options are available:• Round-Robin
• RANDOM
• Unspecified
In this field . . . Do the following . . .

Conf i gur i ng a Java Messaging Ser v i ce
8-24 Creating WebLogic Configurations Using the Configuration Wizard
Assigning JMS Distributed Destinations The Assign JMS Distributed Destinations to Servers or Clusters window prompts you to assign JMS distributed queues or topics to a WebLogic Server instance or cluster. This window is displayed only if you have defined JMS distributed queues or topics. This step is optional.
To assign distributed queues or topics to a server or cluster:
1. Select, in the Target pane, the WebLogic Server or cluster to which you want to assign a JMS distributed queue or topic.
In this field . . . Do the following . . .
Name* Enter a valid name for the JMS distributed queue: a string of characters that can include spaces.
The default value in this field is new_JMSDistributedQueue_n, where n specifies a numeric value that is used to differentiate among all default JMS distributed queue names; the value of n for the first JMS distributed queue is 1. The value is incremented by 1 for each JMS distributed queue that is added.
Note: If autoconfiguration has been applied in this configuration, the default value in this field may vary. For more information, see “Autoconfiguration of Applications and Services” on page 9-4.
JNDI name* Enter a valid JNDI pathname to be used to look up the distributed queue within the JNDI namespace.
Load balancing policy (Optional)
From the drop-down list, select a load-balancing policy that can be used by producers sending messages to this distributed queue in order to balance the message load across the members of a distributed destination.
The following options are available:• Round-Robin
• RANDOM
• Unspecified
Forward Delay(Optional)
Enter the amount of time, in seconds, that a distributed queue member holding messages for which it has no consumers waits before forwarding the messages to other queue members that do have consumers.
A value of -1 indicates that no messages are forwarded to other queue members.
Creating WebLogic Configurations Using the Configuration Wizard 8-25
2. Assign the queue or topic to the designated WebLogic Server or cluster in one of the following ways:
– Double-click the name of the JMS distributed queue or topic in the JMS Distributed Destination pane.
– Select the JMS distributed queue or topic and click the right arrow.
The name of the JMS distributed queue or topic is removed from the JMS Distributed Destination pane and added, below the name of the target WebLogic Server or cluster, to the Target pane.
3. Repeat steps 1 and 2 for each distributed queue or topic that you want to assign to a WebLogic Server or cluster.
4. Review the WebLogic Server and cluster assignments.
If necessary, you can remove a JMS distributed queue or topic from a WebLogic Server or cluster in one of the following ways:
– Double-click the name of the JMS distributed queue or topic in the Target list.
– Select the name of the JMS distributed queue or topic and click the left arrow.
The name of the JMS distributed queue or topic is removed from the Target list and restored to the JMS Distributed Destination pane.
5. Click Next to proceed to the next configuration window.
Configuring JMS Distributed Topic MembersThe Configure JMS Distributed Topic Members window prompts you to assign members to the JMS distributed topic. This window is displayed only if you have configured a distributed topic, as described in “Configuring JMS Distributed Topics” on page 8-21. This step is optional.
To configure JMS distributed topic members:
1. Review the current list of JMS distributed topic member configurations. Default values may vary based on the configuration source you selected earlier.
Note: The wizard provides two display modes: a concise tabular view of all the defined components, and an individual view, in which each component is represented by a tab, and you view a particular component by selecting the corresponding tab. To toggle the display mode between table and tab formats, click Switch Display.
Conf i gur i ng a Java Messaging Ser v i ce
8-26 Creating WebLogic Configurations Using the Configuration Wizard
If multiple JMS Distributed Topics are defined, the wizard displays the distributed topic members for each JMS Distributed Topic on a separate tab. To view a particular component, you select the corresponding tab.
2. Add or modify the entries required by your configuration using the guidelines provided in the following table. (Fields marked with an asterisk are required.) To delete a JMS distributed topic member, click in one of its fields and click Delete. When you finish updating your settings, click Next.
In this field . . . Do the following . . .
Name* Enter a valid name for the JMS distributed topic member: a string of characters that can include spaces.
The default value in this field is new_JMSDistributedTopicMember_n, where n specifies a numeric value that is used to differentiate among all default JMS distributed topic member names; the value of n for the first JMS distributed topic member is 1. The value is incremented by 1 for each JMS distributed topic member that is added.
Note: If autoconfiguration has been applied in this configuration, the default value in this field may vary. For more information, see “Autoconfiguration of Applications and Services” on page 9-4.
JMS topic* From the drop-down list, select the associated JMS topic. If you are adding a JMS distributed topic member, this drop-down list is not populated until you select a JMS distributed topic from the JMS Distributed Topic field.
Only JMS topics with the same target as the associated JMS distributed topic are displayed in the drop-down list.
Weight(Optional)
Enter a numeric value to indicate the weight (that is, a measure of ability to handle message load) of the topic member with respect to other topic members in the distributed destination. The default value is 1.
For more information, see "Random Distribution" in Programming WebLogic JMS at the following URL:
http://e-docs.bea.com/wls/docs81/jms/implement.html#random_weight
JMS distributed topic* If you are adding a distributed topic member, select the JMS distributed topic to which this member is assigned from the drop-down list. For existing distributed topic members, no action is required; the JMS distributed topic associated with the distributed topic member is displayed in the field.

Creating WebLogic Configurations Using the Configuration Wizard 8-27
Configuring JMS Distributed Queue MembersThe Configure JMS Distributed Queue Members window prompts you to assign members to the JMS distributed queue. This window is displayed only if you have configured a distributed queue, as described in “Configuring JMS Distributed Topics” on page 8-21.
To configure JMS distributed queue members:
1. Review the current list of JMS distributed queue member configurations. Default values may vary based on the configuration source you selected earlier.
Note: The wizard provides two display modes: a concise tabular view of all the defined components, and an individual view, in which each component is represented by a tab, and you view a particular component by selecting the corresponding tab. To toggle the display mode between table and tab formats, click Switch Display.
If multiple JMS Distributed Queues are defined, the wizard displays the distributed topic members for each JMS Distributed Queue on a separate tab. To view a particular component, you select the corresponding tab.
2. Add or modify the entries required by your configuration, using the guidelines provided in the following table. (Fields marked with an asterisk are required.) To delete a JMS distributed queue member, click in one of its fields and click Delete. When you finish updating your settings, click Next.

Conf i gur i ng a Java Messaging Ser v i ce
8-28 Creating WebLogic Configurations Using the Configuration Wizard
In this field . . . Do the following . . .
Name* Enter a valid name for the JMS distributed queue member: a string of characters that can include spaces.
The default value in this field is new_JMSDistributedQueueMember_n, where n specifies a numeric value that is used to differentiate among all default JMS distributed queue member names; the value of n for the first JMS distributed queue member is 1. The value is incremented by 1 for each JMS distributed queue member that is added.
Note: If autoconfiguration has been applied in this configuration, the default value in this field may vary. For more information, see “Autoconfiguration of Applications and Services” on page 9-4.
JMS queue* From the drop-down list, select the associated JMS queue. If you are adding a JMS distributed queue member, this drop-down list is not populated until you select a JMS distributed queue from the JMS Distributed Queue field.
Only JMS queues with the same target as the associated JMS distributed queue are displayed in the drop-down list.
Weight (Optional) Enter a numeric value for the weight (that is, a measure of ability to handle message load) of the queue member with respect to other queue members in the distributed destination. The default value is 1.
For more information, see "Random Distribution" in Programming WebLogic JMS at the following URL:
http://e-docs.bea.com/wls/docs81/jms/implement.html#random_weight
JMS distributed queue*
If you are adding a distributed queue member, select the JMS distributed queue to which this member is assigned from the drop-down list. For existing distributed queue members, no action is required; the JMS distributed queue associated with the distributed queue member is displayed in the field.

Creating WebLogic Configurations Using the Configuration Wizard 9-1
C H A P T E R 9
Configuring Targets
Targeting of applications (such as Web applications) and services, such as JMS and JDBC component services, to servers or clusters is optional. However, if you have added services or configured your domain to be distributed across servers or clusters, BEA recommends that you target the servers and clusters onto which you want to deploy your applications or services.
The Applications and Services Targeting Options window prompts you to decide whether you want to target the servers and clusters onto which you want to deploy applications and services. If you select No, the wizard uses the targeting settings for your configuration exactly as defined in the configuration source that you selected earlier. If you select Yes, you are prompted, in subsequent windows, to configure targets as described in the following table.
Note: The Configuration Wizard automatically modifies your existing configurations to support applications and services running in a clustered or non-clustered multi-server environment. For more information, see “Autoconfiguration of Applications and Services” on page 9-4.
For this task . . . You . . .
Targeting Applications to Servers or Clusters
Specify the target servers and clusters onto which you want to deploy the application components, such as Web applications and EJB modules, that are included within your domain or imported extension templates.
Targeting Services to Servers or Clusters
Specify the target servers and clusters onto which you want to deploy the application services, such as JDBC or JMS components, or startup/shutdown classes.

Conf i gur i ng Ta rget s
9-2 Creating WebLogic Configurations Using the Configuration Wizard
Related Topics“Tutorial: Creating a Custom Domain With Managed Servers, a Cluster, and Application Services” on page 15-10
Targeting Applications to Servers or ClustersThe Target Applications to Servers or Clusters window prompts you to specify the target servers and clusters onto which you want to deploy the application components, such as Web applications and EJB modules, that are included in your domain or imported extension templates.
To deploy application components on servers or clusters:
1. In the Target pane, select the server or cluster to which you want to deploy an application component.
2. In the left pane, select each application component to which you want to assign to the selected server or cluster. To select all application components in the list, choose Select All. To unselect all application components in the list, choose Unselect All.
The Target list corresponding to each application component is updated to reflect the servers or clusters to which the components are assigned.
Note: If you target applications to members of a cluster, they are not automatically targeted to the cluster. If you want the applications targeted to the cluster, you must specifically do so.
3. Repeat steps 1 and 2 for each application component that you want to assign to a server or cluster.
4. Click Next to proceed to the next configuration window.
Related Topics“Tutorial: Creating a Custom Domain With Managed Servers, a Cluster, and Application Services” on page 15-10
Targeting Services to Servers or ClustersThe Target Services to Servers or Clusters window prompts you to specify the target servers and clusters onto which you want to deploy the application services, including JDBC or JMS components, or startup/shutdown classes.

Creating WebLogic Configurations Using the Configuration Wizard 9-3
Use the following guidelines for targeting JDBC components:
When you target JDBC data sources and connection pools, target the data source and its related pool to the same servers and clusters.
In a single-server configuration, assign each data source and the connection pool associated with it to the single server.
In a configuration with an Administration Server and Managed Servers, target the data source and the connection pool associated with it to the servers on which they will be used.
In a cluster, assign the data source and the connection pool associated with it to the cluster, rather than to individual servers in the cluster.
You can target data source/connection pool combinations to more than one server or cluster, as long as you target them in combination. For example, you cannot target a data source to Managed Server A if the connection pool associated with it is assigned only to Managed Server B.
To target a service to a server or cluster:
1. In the Target pane, select the server or cluster to which you want to deploy an application service.
2. In the left pane, select each service to which you want to assign to the selected server or cluster. To select all application services in the list, choose Select All. To unselect all application services in the list, choose Unselect All.
Note: When you select or deselect application services, the wizard checks for dependencies between the configuration elements and automatically modifies the list of selected components.
The Target list corresponding to each application service is updated to reflect the servers or clusters to which the components are assigned.
Note: If you target services to members of a cluster, they are not automatically targeted to the cluster. If you want the applications targeted to the cluster, you must specifically do so.
3. Repeat steps 1 and 2 for each application service that you want to assign to a server or cluster.
4. Click Next to proceed to the next configuration window.
Note: If you are extending an existing configuration, your next step is to update your configuration as described in “Creating Your WebLogic Configuration” on page 11-6.

Conf i gur i ng Ta rget s
9-4 Creating WebLogic Configurations Using the Configuration Wizard
Related Topics“Tutorial: Creating a Custom Domain With Managed Servers, a Cluster, and Application Services” on page 15-10
Autoconfiguration of Applications and ServicesWhenever you switch from a single-server domain to a multiserver domain (regardless of whether it is clustered or nonclustered), the Configuration Wizard automatically modifies your existing configurations to support the applications and services running in the new environment. This process is called autoconfiguration.
Note: The rules that the Configuration Wizard uses during the autoconfiguration process are defined to ensure that the reconfigured domain configuration functions properly. Only experienced users should attempt to modify these new settings. Changing these settings may negatively impact the operation of your domain.
As described in “Brief Introduction to Domains” on page 1-9, common types of domain configurations are as follows:
Stand-Alone Server Domain
Domain with Managed Servers
Domain with Managed Servers and Clusters
The Configuration Wizard performs autoconfiguration under the following circumstances:
You change the type of domain configuration while you are creating a domain. For example, if you select a template that contains a stand-alone server domain configuration and you add Managed Servers or clusters. In that case, the applications and services that were included in your original configuration are targeted, automatically, to the Managed Servers and clusters that you have just added.
You add an extension to an existing domain.
The Configuration Template Builder also performs autoconfiguration if you are creating a template from a stand-alone server domain and you add Managed Servers or clusters to the template.
The Configuration Wizard and Configuration Template Builder use the naming conventions listed in the following table when performing autoconfiguration.

Creating WebLogic Configurations Using the Configuration Wizard 9-5
Note: In the names of components created during autoconfiguration, n specifies a numeric value used to differentiate among the new component names; the value of n for the first component created is 1. The value is incremented by 1 for each component that is added.
For each autoconfigured component, an autoconfigured JNDI name is also created: JNDIname_auto_n.
Component Name created during autoconfiguration
JMS File Store JMSfilestorename_auto_n
JMS JDBC Store JMSJDBCStorename_auto_n
JMS Server JMSservername_auto_n(created when JMS servers are propagated to a cluster)
JMS Server JMSservername_pinned_n(created when JMS servers are pinned to a specific server)
JMS Topic JMStopicname_auto_n
JMS Queue JMSqueuename_auto_n
JMS Distributed Topic dist_JMStopicname_auto
JMS Distributed Topic Member
autoJMStopicname_OF_autoJMSservername
JMS Distributed Queue dist_JMSqueuename_auto
JMS Distributed Queue Member
autoJMSqueuename_OF_autoJMSservername

Conf i gur i ng Ta rget s
9-6 Creating WebLogic Configurations Using the Configuration Wizard

Creating WebLogic Configurations Using the Configuration Wizard 10-1
C H A P T E R 10
Configuring Security
To make sure that security is always provided for your configurations, even when they are booted for the first time, the Configuration Wizard and Configuration Template Builder provide basic security features. Whenever you create a new domain or configuration template, you are prompted to define an administrative username and password, as described in “Configuring an Administrative Username and Password” on page 10-2. In some cases, you can provide additional security for an application resource by using the following security features:
Users and groups—Classification of individuals and collections of individuals who may be granted a security role. Typically, a group is a collection of users who share a role or function within a company, such as working in the same department.
Global security roles—Dynamically computed privileges that are used to restrict access to WebLogic resources. These privileges are granted to or withheld from users according to which roles they are assigned.
For example, to leverage individual skills, many development teams divide system administration responsibilities into distinct roles. A team may then assign a different level of permission to each role. Each project might give only one or two team members permission to deploy components, but allow all team members to view the WebLogic Server configuration.
WebLogic Server supports such role-based development by providing four default global roles that determine access privileges for system administration operations: Admin, Deployer, Operator, and Monitor.
Warning: Do not make the default global security roles for Administrative and Server resources more restrictive. If you eliminate any existing security roles, you risk

Conf i gur i ng Secur i t y
10-2 Creating WebLogic Configurations Using the Configuration Wizard
degrading WebLogic Server operation. You can, however, make the default security roles more inclusive (for example, by adding new security roles).
The following table describes the actions you can take to provide basic security for the resources in your configuration.
Related TopicsSecuring WebLogic Resources at http://e-docs.bea.com/wls/docs81/secwlres/index.html
Configuring an Administrative Username and PasswordThe Configure Administrative Username and Password window prompts you to specify a username and password to be used for starting the Administration Server.
To configure an administrative username and password:
1. Enter a valid value in the User name field. This name is used to boot the Administration Server and connect to it.
Do not use commas or any other characters in this comma-separated list: \t, < >, #, |, &, ?, ( ), { }. User names are case sensitive.
For this task . . . You . . .
Configuring an Administrative Username and Password
Define the username and password to be used for starting the Administration Server.
Configuring Users and Groups Define users and groups for authentication purposes. (Configuration Wizard only)
Configuring Users, Groups, and Global Roles
Define users, groups, and global roles for authentication purposes.
Assigning Users to Groups Designate individuals as members of a particular group. Groups allow you to manage multiple users simultaneously. This is generally more efficient than managing each user individually.
Assigning Groups to Groups Designate one group a subgroup of another, to refine security management.
Assigning Users and Groups to Global Roles
Assign users and groups to predefined WebLogic Server global security roles.

Creating WebLogic Configurations Using the Configuration Wizard 10-3
2. Enter a valid value in the User password field: a string of at least 8 case-sensitive characters. Space characters are not supported. The password value is encrypted.
Note: Do not use the name/password combination weblogic/weblogic in a production environment.
3. Reenter the password in the Confirm user password field.
4. Optionally, enter a login description for this username.
5. If you are creating a configuration using the custom option, or a configuration template, you can configure additional security resources. If you want to configure additional users, groups, and global roles, select Yes. This option is not enabled in express mode.
6. Click Next to proceed to the next configuration window.
What Is the Next Step?
Configuring Users and GroupsThis window is displayed in the Configuration Wizard only.
A user is an entity that can be authenticated. It can be a person or a software entity, such as a Java client. Each user is given a unique identity within a security realm. A group is a collection of users who usually have something in common, such as working in the same department in a company.
The Configure Users and Groups window prompts you to define users and groups for authentication purposes. You must define at least one user. Depending on the configuration template selected, there may be one or more users and/or groups already defined. In addition, WebLogic Server defines a default set of groups. For a list of the default groups defined in
If you are creating a . . . Go to . . .
New domain, using the express option “Specifying the Server Start Mode and Java SDK” on page 5-15
New domain, using the custom option, and you want to configure additional security resources
“Configuring Users and Groups” on page 10-3
Configuration template and you want to configure additional resources
“Configuring Users, Groups, and Global Roles” on page 10-5
Conf i gur i ng Secur i t y
10-4 Creating WebLogic Configurations Using the Configuration Wizard
WebLogic Server, see "Default Groups" in "Users and Groups" in Securing WebLogic Resources at the following URL:http://e-docs.bea.com/wls/docs81/secwlres/usrs_grps.html
To configure users and groups:
1. Select the User tab and review the current list of user configurations. Add or modify the entries required by your configuration, using the guidelines provided in the following table. (Fields marked with an asterisk are required.) To delete a user, click in one of its fields and click Delete.
2. Select the Group tab and review the current list of group configurations. Add or modify the entries required by your configuration using the guidelines provided in the following table. To delete a group, click in one of its fields and click Delete. When you finish updating your settings, click Next.
In this field . . . Do the following . . .
User name* Enter a valid username. Do not use commas or any other characters in this comma-separated list: \t, < >, #, |, &, ?, ( ), { }. User names are case sensitive.
The default value in this field is new_user_n, where n specifies a numeric value that is used to differentiate among all default user names; the value of n for the first user is 1. The value is incremented by 1 for each user that is added.
User password* Enter a password for the user. A valid password is a string containing a minimum of 8 case-sensitive characters; space characters are not supported. The password value is encrypted.
Note: Do not use the name/password combination weblogic/weblogic in a production environment
Confirm user password*
Reenter the password to confirm the value entered.
Description(Optional)
Enter a description of the user that is used for informational purposes only; for example, full name of user.

Creating WebLogic Configurations Using the Configuration Wizard 10-5
Related Topics"Users and Groups," in Securing WebLogic Resources at http://e-docs.bea.com/wls/docs81/secwlres/usrs_grps.html
Configuring Users, Groups, and Global Roles The Configure Users, Groups and Global Roles window is displayed in the Configuration Template Builder and when you are extending a domain using the Configuration Wizard.
Users, groups, and global roles are defined as follows:
A user is an entity that can be authenticated. It can be a person or a software entity, such as a Java client. Each user is given a unique identity within a security realm.
A group is a collection of users who usually have something in common, such as working in the same department in a company.
A security role is a privilege granted to users or groups based on specific conditions. Like groups, security roles allow you to restrict access to WebLogic resources for multiple users simultaneously. A security role that applies to all WebLogic resources deployed within a security realm (and, thus, within the entire WebLogic Server domain) is called a global role.
The Configure Users, Groups and Global Roles window prompts you to define users, groups, and roles for authentication purposes. You must define at least one user.
Depending on the template or domain selected, one or more users, groups, and/or roles may be defined already. In addition, WebLogic Server defines a default set of groups and roles. For a description of the default groups and roles, see the following topics in Securing WebLogic Server:
In this field . . . Do the following . . .
Name* Enter a valid name for the group. Do not use commas or any other characters in this comma-separated list: \t, < >, #, |, &, ?, ( ), { }. Group names are case sensitive.
The default value in this field is new_group_n, where n specifies a numeric value that is used to differentiate among all default group names; the value of n for the first group is 1. The value is incremented by 1 for each group that is added.
Description(Optional)
Enter a description of the group that is used for informational purposes only.

Conf i gur i ng Secur i t y
10-6 Creating WebLogic Configurations Using the Configuration Wizard
"Default Groups" in "Users and Groups" at http://e-docs.bea.com/wls/docs81/secwlres/usrs_grps.html
"Default Global Roles" in "Security Roles" at http://e-docs.bea.com/wls/docs81/secwlres/secroles.html
To configure users, groups, and global roles:
1. Select the User tab and review the current list of user configurations. Add or modify entries as required by your configuration, using the guidelines provided in the following table. (Fields marked with an asterisk are required.) To delete a user, click in one of its fields and click Delete.
2. Select the Group tab and review the current list of group configurations. Add or modify the entries required by your configuration, using the guidelines provided in the following table. To delete a group, click in one of its fields and click Delete. When you finish updating your settings, click Next.
In this field . . . Do the following . . .
User name* Enter a valid username. Do not use commas or any other characters in this comma-separated list: \t, < >, #, |, &, ?, ( ), { }. User names are case sensitive.
The default value in this field is new_user_n, where n specifies a numeric value that is used to differentiate among all default user names; the value of n for the first user is 1. The value is incremented by 1 for each user that is added.
User password* Enter a password for the user. A valid password is a string containing a minimum of 8 case-sensitive characters; space characters are not supported. The password value is encrypted.
Note: Do not use the name/password combination weblogic/weblogic in a production environment
Confirm user password*
Reenter the password to confirm the value entered.
Description(Optional)
Enter a description of the user to be used for informational purposes only; for example, full name of user.

Creating WebLogic Configurations Using the Configuration Wizard 10-7
3. Select the Role tab and review the current list of role configurations. The predefined list of WebLogic Server global security roles is shown. Add or modify the entries required by your configuration using the guidelines provided in the following table. To delete a role, click in one of its fields and click Delete. When you finish updating your settings, click Next.
Warning: Do not make the default global security roles for Administrative and Server resources more restrictive. If you eliminate any existing security roles, you risk degrading WebLogic Server operation. You can, however, make the default security roles more inclusive (for example, by adding new security roles).
Related Topics"Users and Groups" in Securing WebLogic Resources at http://e-docs.bea.com/wls/docs81/secwlres/usrs_grps.html
"Security Roles" in Securing WebLogic Resources at http://e-docs.bea.com/wls/docs81/secwlres/secroles.html
In this field . . . Do the following . . .
Name* Enter a valid name for the group. Do not use commas or any other characters in this comma-separated list: \t, < >, #, |, &, ?, ( ), { }. Group names are case sensitive.
The default value in this field is new_group_n, where n specifies a numeric value that is used to differentiate among all default group names; the value of n for the first group is 1. The value is incremented by 1 for each group that is added.
Description(Optional)
Enter a description of the group to be used for informational purposes only.
In this field . . . Do the following . . .
Name* Enter a valid name for the role: a string of characters that are case sensitive. Space characters are not supported.
The default value in this field is new_role_n, where n specifies a numeric value that is used to differentiate among all default role names; the value of n for the first role is 1. The value is incremented by 1 for each role that is added.
Description(Optional)
Enter a description of the role to be used for informational purposes only.

Conf i gur i ng Secur i t y
10-8 Creating WebLogic Configurations Using the Configuration Wizard
Assigning Users to GroupsBEA recommends adding users to groups because groups allow you to manage multiple users simultaneously.
The Assign Users to Groups window prompts you to assign users to groups.
To assign users to groups:
1. In the Group pane, select the group to which you want to assign users.
The current assignments for the selected group are displayed in the left pane.
2. In the left pane, do one of the following:
– To assign a user to the selected group, select the check box for the user.
– To remove a user from the selected group, clear the check box for the user.
To select all users in the list, choose Select All. To unselect all users in the list, choose Unselect All.
The list of groups associated with each user is updated to reflect your changes.
3. Repeat steps 1 and 2 for each user that you want to assign to a group. You can assign a user to more than one group.
4. Click Next to proceed to the next configuration window.
Assigning Groups to GroupsThe Assign Groups to Groups window prompts you to designate one group as a subgroup of another group, as a means of refining the management of security for your domain.
Note: You should not assign groups recursively. For example, do not assign groupA as a subgroup of groupB and groupB as a subgroup of groupA. WebLogic Server does not support this type of recursion.
To assign groups to other groups:
1. In the Group pane, select the group to which you want to assign a subgroup.
The current assignments for the selected group are displayed in the left pane.
2. In the left pane, do one of the following:
– To assign a group, as a subgroup, to the selected group, select the check box for the group.
Creating WebLogic Configurations Using the Configuration Wizard 10-9
– To remove a subgroup from the selected group, clear the check box for the group.
To select all groups in the list, choose Select All. To unselect all groups in the list, choose Unselect All.
The list of subgroups associated with each group is updated to reflect your changes.
3. Repeat steps 1 and 2 for each group that you want to designate a subgroup. You can make a group a subgroup of more than one group.
4. Click Next to proceed to the next configuration window.
Assigning Users and Groups to Global RolesThe Assign Users and Groups to Global Roles window prompts you to assign users and groups to the global security roles defined by WebLogic Server. The following table shows the operations that may be performed by users assigned to each of these roles.
In this role . . . You can . . .
Admin • View and modify the server configuration.• Deploy applications, EJBs, startup and shutdown
classes, J2EE Connectors, and Web Service components.
• Edit deployment descriptors.
Deployer • View the server configuration. • Deploy applications, EJBs, startup and shutdown classes,
J2EE Connectors, and Web Service components. • Edit deployment descriptors.
Monitor • View the server configuration.
Operator • View the server configuration. • Start, resume, and stop servers by default.
Anonymous Default convenience role for all users (the group Everyone). This role can be specified in security deployment descriptors in weblogic.xml and weblogic-ejb-jar.xml files.

Conf i gur i ng Secur i t y
10-10 Creating WebLogic Configurations Using the Configuration Wizard
You must assign one or more users or groups (containing one or more users) to the Admin role to ensure that there is at least one user who can boot WebLogic Server.
To assign users and groups to global security roles:
1. In the Role pane, select the global role to which you want to assign users and groups.
The current assignments for the selected role are displayed in the left pane.
2. In the left pane, do one of the following:
– To assign a user or group to the selected role, select the associated check box.
– To remove a user or group from the selected role, clear the associated check box.
To select all users and groups in the list, choose Select All. To unselect all users and groups in the list, choose Unselect All.
The Role list corresponding to each user and group is updated to reflect the global roles to which the user and group are assigned.
3. Repeat steps 1 and 2 for each user or group that you want to assign to a global role. You can assign a user or group to more than one global role.
4. Click Next to proceed to the next configuration window.
Related Topics"Security Roles" in Securing WebLogic Resources at http://e-docs.bea.com/wls/docs81/secwlres/secroles.html

Creating WebLogic Configurations Using the Configuration Wizard 11-1
C H A P T E R 11
Extending Domains
In some situations, you may need to extend an existing domain with the addition of a predefined application, a WebLogic Platform component product, or a set of services such as JDBC or JMS. For example, if you need to develop a WebLogic Workshop application for a domain in which you are already running a WebLogic Server application, you must extend the functionality of the domain by adding WebLogic Workshop to it.
The Configuration Wizard simplifies the task of extending an existing domain by using extension templates. An extension template defines applications and services that can be added to an existing domain. BEA delivers a set of predefined extension templates, which are described in “Template Reference” at the following URL:
http://e-docs.bea.com/platform/docs81/confgwiz/tempref.html
Overview of Extending a Domain Using the Configuration WizardNote: Make sure that the domain is not active; you cannot update an active domain.
The following table summarizes the procedure for extending an existing domain using the Configuration Wizard.
Note: The following instructions are based on the assumption that you are running the Configuration Wizard in graphical mode. You can quit the Configuration Wizard at any time by clicking Exit.

Extendi ng Domains
11-2 Creating WebLogic Configurations Using the Configuration Wizard
Related Topics“Tutorial: Extending an Existing Domain” on page 15-31
Choosing a WebLogic Configuration DirectoryThe Choose a WebLogic Configuration Directory window prompts you to select an existing domain that you want to update with additional applications or services.
Table 11-1 Steps for Extending Domains
In this step . . . You . . .
Creating or Extending a Configuration Choose whether to create a new WebLogic domain configuration or add to an existing domain configuration. To extend an existing domain configuration, choose Extend an existing WebLogic configuration.
For details about creating a new WebLogic domain configuration, see Chapter 5, “Creating a New WebLogic Domain.”
Choosing a WebLogic Configuration Directory
Select the host directory for the domain you want to update.
Selecting a Configuration Extension Template
Specify an extension (or application) template that allows you to add applications and services to an existing domain.
Configuring JDBC When Extending a Domain
Optionally, define parameters for Java Database Connectivity. (JDBC).
Configuring JMS When Extending a Domain
Optionally, define parameters for Java Message Service (JMS).
Targeting Applications and Services to Servers and Clusters When Extending a Domain
Optionally, define parameters for the target servers and clusters onto which you want to deploy application components, such as Web applications and EJB modules, and application services, such as JDBC or JMS components, or startup and shutdown classes.
Configuring Security Options When Extending a Domain
Optionally, create users, groups, and roles, then assign them to groups and global roles.
Creating Your WebLogic Configuration
Review your current configuration settings and launch the process that updates the domain.

Creating WebLogic Configurations Using the Configuration Wizard 11-3
To choose a WebLogic configuration directory:
1. Use the navigation tree to select a valid domain directory: a directory that contains a config.xml file in the root directory of the domain and is indicated by the icon.
2. Click Next to proceed to the next configuration window.
Selecting a Configuration Extension TemplateThe Select a Configuration Extension Template window prompts you to specify one or more extension templates to be included when the domain is updated. You must select at least one extension template. A set of predefined configuration extension templates is provided with WebLogic Platform. (For a description of these extension templates, see “Template Reference” at the following URL: http://e-docs.bea.com/platform/docs81/confgwiz/tempref.html.)
To select a configuration extension template:
1. Make sure that the Template Locations field contains the name of the required extension template directory. The templates displayed for selection reside in the specified directory. To change the value in the Template Locations field:
a. Click Add Location to invoke the Select a Template Directory dialog box.
b. Navigate to the appropriate directory or manually enter the pathname for it in the Location field. Click OK.
A list of the extension templates available in the selected directory is displayed. Templates are organized by category. For example, the predefined extension templates provided with WebLogic Platform are grouped together under the heading BEA.
2. In the Configuration Extensions pane, select the check box for one or more extension templates that contain the applications or services that you want to import into your domain.
3. Click Next to proceed to the next configuration window.
Configuring JDBC When Extending a DomainWebLogic JDBC enables Java programmers to interact with common database management systems (DBMS), such as Oracle, Microsoft SQL Server, and Sybase. The Configuration Wizard gives you the option of configuring a database service for the domain by defining several WebLogic JDBC components:

Extendi ng Domains
11-4 Creating WebLogic Configurations Using the Configuration Wizard
Connection pools—Ready-to-use group of connections to your DBMS
MultiPools—Groups of connection pools
Data sources—Interfaces between applications and connection pools
The Database (JDBC) Options window prompts you to specify whether you want to configure a database service. For details about configuring JDBC, see Chapter 7, “Configuring a Database Service.”
Configuring JMS When Extending a DomainWebLogic JMS provides access to enterprise messaging systems that enable applications to communicate with one another. To familiarize yourself with the features of WebLogic JMS, see Programming WebLogic JMS at the following URL:
http://e-docs.bea.com/wls/docs81/jms/index.html
The Configuration Wizard gives you the option of configuring JMS for your domain. To set up JMS, you define the following components:
Connection factory—Encapsulated connection configuration information that enables JMS applications to create a connection.
File and JDBC stores—Disk-based file stores and JDBC-accessible database stores, respectively, used to store persistent messages.
Destination Keys and JMS Templates—Keys to define the sort order for messages that arrive at a destination and templates to define multiple destinations with similar attribute settings.
JMS Servers—Servers that manage connections and message requests on behalf of clients.
Destinations—Queues (in point-to-point models) or topics (in publish/subscribe models) that serve as destinations and distributed destinations for a JMS server.
The Messaging (JMS) Options window prompts you to configure the WebLogic Java Message Service (JMS). For details, see Chapter 8, “Configuring a Java Messaging Service.”
Targeting Applications and Services to Servers and Clusters When Extending a Domain
If you configure your domain for distribution across servers or clusters, it is a good idea to target the servers and clusters onto which you want to deploy applications, such as Web applications,

Creating WebLogic Configurations Using the Configuration Wizard 11-5
or services, such as JMS and JDBC component services. The Targeting Options window prompts you to specify the servers and clusters onto which you want to deploy applications and services. For details, see Chapter 9, “Configuring Targets.”
Note: The Configuration Wizard automatically modifies your existing configurations to support applications and services running in a clustered or non-clustered multi-server environment. For more information, see “Autoconfiguration of Applications and Services” on page 9-4.
Configuring Security Options When Extending a DomainOptionally, you can configure security parameters for your application—specifically, options to secure the application resources within the domain. You can provide security for an application resource using the following security features:
Users and groups—Classification of individuals and collections of individuals who may be granted a security role. Typically, a group is a collection of users who share a role or function within a company, such as working in the same department.
Global security roles—Dynamically computed privileges that are used to restrict access to WebLogic resources. These privileges are granted to or withheld from users according to which roles they are assigned.
For example, to leverage individual skills, many Web development teams divide system administration responsibilities into distinct roles. A team may then assign a different level of permission to each role. Each project might give only one or two team members permission to deploy components, but allow all team members to view the WebLogic Server configuration.
WebLogic Server supports such role-based development by providing four default global roles that determine access privileges for system administration operations: Admin, Deployer, Operator, and Monitor.
Warning: Do not make the default global security roles for Administrative and Server resources more restrictive. If you eliminate any existing security roles, you risk degrading WebLogic Server operation. You can, however, make the default security roles more inclusive (for example, by adding new security roles).
The Security Configuration Options window prompts you to set security options for your application. If you choose No, the security settings in the extended domain match those defined in the configuration source. If you choose Yes, you are prompted, in subsequent windows, to configure the security as described in the following table.

Extendi ng Domains
11-6 Creating WebLogic Configurations Using the Configuration Wizard
Creating Your WebLogic ConfigurationThe Create WebLogic Configuration window prompts you to review the details for your extension, and launch the process that updates the domain.
To create the extended domain:
1. Review details about the configuration in the Configuration Summary and Configuration Details areas. If you need to modify any information, click Previous to return to the desired configuration window.
You can limit the type of information displayed in this window by selecting a filter from the Summary View drop-down list.
2. Make sure that the Configuration Applications Location field contains the name of the required applications directory. If you need to change the value in this field:
a. Click Browse to invoke the Select the Applications Directory dialog box.
b. In the dialog box, navigate to the appropriate directory or manually enter its pathname in the Location field. Click OK.
3. After you verify the information displayed in the window, click Import to update the domain with the applications, services, and settings provided from the specified extension template.
The Creating Configuration window is opened to display status messages during the update process. The Configuration Wizard updates the config.xml file and other
Task Description
Configuring Users, Groups, and Global Roles
Define users, groups, and global roles for authentication purposes.
Assigning Users to Groups Assign users to groups. Groups allow you to manage a number of users at the same time. This is generally more efficient than managing each user individually.
Assigning Groups to Groups
Assign a group as a subgroup of another group, to add further granularity to security management
Assigning Users and Groups to Global Roles
Assign users and groups to the predefined WebLogic Server global security roles

Creating WebLogic Configurations Using the Configuration Wizard 11-7
application-specific components in the configuration directory, as defined by the configuration template.
When the process is complete, the updated domain is ready.
4. Click Done in the Creating Configuration window.

Extendi ng Domains
11-8 Creating WebLogic Configurations Using the Configuration Wizard

Creating WebLogic Configurations Using the Configuration Wizard 12-1
C H A P T E R 12
Creating Configuration Templates Using the WebLogic Configuration Template Builder
A configuration template defines the full set of resources within a domain, including infrastructure components, applications, services, security options, and general environment and operating system parameters. As part of the WebLogic Platform product, BEA provides several templates and template extensions for developers who want to create new applications. These templates are described in “Template Reference” at the following URL:
http://e-docs.bea.com/platform/docs81/confgwiz/tempref.html
The Configuration Template Builder makes it easy to create your own templates. It does this, for example, by enabling the:
Definition and propagation of a standard domain across a development project
Distribution of a domain along with an application that has been developed to run on that domain
Any template you create with the Configuration Template Builder is used as input to the Configuration Wizard. The Configuration Wizard uses it, in turn, as the basis for creating a domain that is customized for your target environment.
For information about creating a domain using the Configuration Wizard, see Chapter 5, “Creating a New WebLogic Domain.”

Creat ing Conf igura t i on Templa tes Us ing the WebLog ic Conf igura t i on Templ ate Bu i lde r
12-2 Creating WebLogic Configurations Using the Configuration Wizard
Overview of Creating a Configuration Template Using the Configuration Template Builder
The following table summarizes the procedure for creating a configuration template using the Configuration Template Builder.
You can quit the Configuration Template Builder at any time by clicking Exit.
Table 12-1 Steps for Creating a Configuration Template
Step Description
Creating a New Template Choose the type of template you want to create: configuration or extension. To create a configuration template, choose Create a Configuration Template.
For details about creating an extension template, see Chapter 13, “Creating Extension Templates Using the WebLogic Configuration Template Builder.”
Selecting a Template Configuration Source
Select the configuration template or the directory of the domain from which you want to create a new configuration template.
Describing the Template Specify a description of the template that will be displayed within the Select a Configuration Template window of the Configuration Wizard. (For more information about the Configuration Template window, see “Selecting a Configuration Template” on page 5-5.)
Adding Applications to Your Configuration Template
Review and modify, if desired, the list of applications to be included in the template.
Adding Files to Your Configuration Template
Review and modify, if desired, the files to be included in the template.
Adding SQL Scripts Into Your Configuration Template
Add SQL scripts for each database that you expect to be used with the domains created from this template and specify the order in which the scripts are executed.
Configuring the Administration Server
Define parameters for the Administration Server, a designated server from which the domain is managed.
Configuring Managed Servers, Clusters, and Machines When Creating Configuration Templates
Optionally, define parameters for the Managed Servers, clusters, and host machines in your domain.
Creating WebLogic Configurations Using the Configuration Wizard 12-3
Creating a New TemplateThe Create a New Template window prompts you to choose the type of template you want to create: a configuration template or an extension template.
Configuring JDBC When Creating Configuration Templates
Optionally, define parameters for Java Database Connectivity (JDBC).
Configuring JMS When Creating Configuration Templates
Optionally, define parameters for Java Message Service (JMS).
Targeting Servers and Clusters When Creating Configuration Templates
Optionally, define parameters for the target servers and clusters onto which you want to deploy application components (such as Web applications and EJB modules) and application services (such as JDBC or JMS components), or startup and shutdown classes.
Configuring Security When Creating Configuration Templates
Specify a user name and password to be used for starting the Administration Server and, if desired, configure additional security.
Building Start Menu Entries Optionally, define entries for the Windows Start Menu.
Preparing Scripts and Files With Replacement Variables
Replace specific paths, filenames, and other configuration environment settings with replacement variables in text files contained in the template. The Configuration Wizard later substitutes the variables with exact strings to set up a specific WebLogic configuration.
Creating Your Configuration Template
Review the configuration template details, specify the name and directory for the configuration template, and launch the process that creates it.
Table 12-1 Steps for Creating a Configuration Template (Continued)
Step Description

Creat ing Conf igura t i on Templa tes Us ing the WebLog ic Conf igura t i on Templ ate Bu i lde r
12-4 Creating WebLogic Configurations Using the Configuration Wizard
Selecting a Template Configuration SourceThe Select a Template Configuration Source window prompts you to choose the configuration template or domain from which you want to create a configuration template. You may need to create a configuration template for a variety of reasons. For example, you may want to:
Create a template from a domain to enable the definition and propagation of a standard domain across a development project
Enable the distribution of a domain, along with an application that has been developed to run on that domain.
To choose a domain configuration:
1. Select the Select a Configuration tab.
2. Navigate to the directory of the domain from which you want to create a configuration template. Valid domain directories are indicated by a icon.
3. Click Next to proceed to the next configuration window.
The Configuration Wizard verifies that the directory you selected contains a valid configuration. If it does not, an error message is displayed.
Choose this option . . . When you want to . . .
Create a Configuration Template
Create a template that defines the full set of resources within a domain, including infrastructure components, applications, services, security options, and general environment and operating system parameters. You can then use this template as input to the Configuration Wizard to create a new domain.
Create an Extension Template
Create a template that defines applications and services that can be used to extend an existing domain.The applications and services stored in the selected extension templates are imported into the domain. To learn more about creating an extension template, see Chapter 13, “Creating Extension Templates Using the WebLogic Configuration Template Builder.”

Creating WebLogic Configurations Using the Configuration Wizard 12-5
To choose a configuration template:
Note: WebLogic Platform is installed with a set of predefined configuration templates, which are described in “Template Reference” at the following URL:
http://e-docs.bea.com/platform/docs81/confgwiz/tempref.html
1. Select the Select a Template tab.
2. Review the list of templates displayed in the Templates pane. The templates displayed for selection reside in the directory specified in the Locate Additional Templates field. If you need to select an alternate directory:
a. Click Browse to invoke a dialog box called Select a Template Directory.
b. In the dialog box, navigate to the appropriate directory or manually enter its pathname in the Location field.
c. Click OK to return to the Select a Template Configuration Source window.
A list of the configuration templates available in the selected directory is displayed in the Templates pane. Templates are organized by category. For example, the predefined configuration templates provided with the product installation are listed together under the heading BEA.
3. Select a configuration template from the list.
4. Click Next to proceed to the next configuration window.
Describing the TemplateThe Describe the Template window prompts you to provide a description that will be displayed in the Select a Configuration Template or the Select a Configuration Extension Template window of the Configuration Wizard.
To enter template description information:
1. Do one of the following:
– If you selected a domain directory in the previous window, enter the information required for your configuration, as described in the following table, and click Next.
– If you selected a template in the previous window, the information from the selected template is displayed here. Review the information, and modify it, if necessary, to meet the requirements of your configuration, as described in the following table. Then click Next.

Creat ing Conf igura t i on Templa tes Us ing the WebLog ic Conf igura t i on Templ ate Bu i lde r
12-6 Creating WebLogic Configurations Using the Configuration Wizard
Note: Fields marked with an asterisk are required.
In this field . . . Do the following . . .
Name* Enter a valid name for the configuration template: a string of characters that can include spaces.
If you are creating a configuration template, the name that you enter identifies the configuration template within the WebLogic Configuration Templates area of the Select a Configuration Template window of the Configuration Wizard.
If you are creating an extension template, the name that you enter identifies the extension template within the Configuration Extensions area of the Select a Configuration Extension Template window of the Configuration Wizard.
Author(Optional)
Enter an author name to be displayed in the Author field of the Select a Configuration Template or Select a Configuration Extension Template window of the Configuration Wizard. Valid names consist of a string of characters that can include spaces.
For example, the name "BEA Systems, Inc." is displayed in the Author field of the default templates provided by BEA.
Category(Optional)
Enter the name of the category in which you want this template to be displayed. A valid name consists of a string of characters that can include spaces.
This information is used to group configuration templates in the following areas of the Configuration Wizard:• Within the WebLogic Configuration Templates area of the Select a Configuration
Template window• Within the Configuration Extensions area of the Select a Configuration Extension
Template window
For example, the default templates provided by BEA are grouped together in the category BEA.

Creating WebLogic Configurations Using the Configuration Wizard 12-7
Adding Applications to Your Configuration TemplateNote: The Add Applications window is displayed if applications are included in the
configuration template or domain selected in “Selecting a Template Configuration Source” on page 12-4.
The Add Applications window allows you to:
Review the list of applications that are currently defined
Review the pathnames of the current and imported applications
If necessary, change the relative directory into which applications are imported
If necessary, omit applications from the list of files to be imported
To add applications to the template:
1. In the Applications pane, review the list of applications to be included in your template. By default, all applications are checked, indicating that they will be included.
The applications displayed reside in the directory specified in the Current Application Path field. The applications are copied into your template from this location.
2. To change the relative path of the directory into which an application will be imported, do the following:
a. Select the application in the Applications pane.
Description(Optional)
Enter a description of the configuration template. A valid description consists of a string of characters that can include spaces.
For example, the description provided for the Basic WebLogic Server Domain template provided by BEA contains the following text:Create a basic WebLogic Server domain without installing sample applications.
If you are creating a configuration template, this information is displayed within the Description area of the Select a Configuration Template window of the Configuration Wizard.
If you are creating an extension template, this information is displayed within the Descriptions area of the Select a Configuration Extension Template window in the Configuration Wizard.
In this field . . . Do the following . . .

Creat ing Conf igura t i on Templa tes Us ing the WebLog ic Conf igura t i on Templ ate Bu i lde r
12-8 Creating WebLogic Configurations Using the Configuration Wizard
b. In the Imported Application Path field, enter the relative path you want to use after the application is imported into your template.
Note: Some of the applications listed in the Applications pane may be provided with your WebLogic Platform software. You cannot change the relative paths for these applications. When you select these applications in the Applications pane, the Imported Application Path field is replaced by an Internal Application Path. When you select these applications for inclusion in your template, this path will point to the application files contained in your WebLogic Platform installation directory. Because these files already exist on your system, they are not copied into the template.
3. Clear the check box for any application that you do not want to include in the template.
4. Click Next to proceed to the next configuration window.
Adding Files to Your Configuration TemplateBy default, the Configuration Template Builder includes files from the domain or template you specified as the source for the template you are creating. For example:
If you selected an existing template as the source for your new template, all files from the source template are automatically included.
If you selected a domain as the source for your new template, all files in the root of the domain, such as start scripts, are included.
You may also want to include other files from your system or network.
The Add Files window prompts you to review, add, or remove files in the template.
To add files into the template you are creating:
1. To view the current list of files in your template, expand the Domain Root Directory and Applications Root Directory in the Current Template View pane.
2. To add or remove files, perform the following steps:
– To add a file, navigate to the file within the File System View pane and select Add File. You can limit the files displayed in this pane by using the filters available in the Show File Types drop-down list. For example, to display only files with the .cmd extension, select *.cmd from the drop-down list.
– To remove a file, select the file that you want to delete from the Current Domain Directory area, and select Remove File.

Creating WebLogic Configurations Using the Configuration Wizard 12-9
3. Repeat steps 1 and 2 for each file that you want to add or remove.
4. Click Next to proceed to the next configuration window.
Adding SQL Scripts Into Your Configuration TemplateAdding SQL scripts to your template is optional. The Add SQL Scripts window prompts you to add SQL scripts for each database that you expect to be used with the domains created from this template. You can also specify the order in which the scripts are executed. When you create a domain using this template, the databases and associated SQL scripts that you include are displayed in the Test JDBC Connection Pools and Setup JDBC Database window of the Configuration Wizard.
To add SQL scripts to your template:
1. In the Database Type and Version pane, select a database from the Type drop-down list.
2. Select the database version from the Version drop-down list or enter a version number directly in the field.
3. Click Add SQL File.
The Add SQL File(s) dialog box is displayed.
4. In the Add SQL File(s) dialog box, navigate to the directory that contains the SQL scripts for the selected database.
5. Select the SQL files to be added.
6. Click Add SQL File(s).
The SQL files that you added are displayed in the Selected SQL Files list and the Selected Database Scripts pane of the Add SQL Scripts window. The Selected Database Scripts pane displays a tree-view of all the databases and associated SQL scripts included in the template.
7. To specify the order in which SQL files are executed, select a file from the Selected SQL Files list and use the up and down arrows to change the order of the files in the list.
The current sequence is reflected in the Selected Database Scripts pane. When you create a domain based on this template, this information is displayed in the Test JDBC Connection Pools and Setup JDBC Database window of the Configuration Wizard.
8. Repeat steps 1 through 7 for each database for which you want to include SQL files.
Creat ing Conf igura t i on Templa tes Us ing the WebLog ic Conf igura t i on Templ ate Bu i lde r
12-10 Creating WebLogic Configurations Using the Configuration Wizard
9. Click Next to proceed to the next configuration window.
What Is the Next Step?
Configuring the Administration ServerIn every domain, one server must be designated the Administration server: the central point from which the whole domain is managed. The Configure the Administration Server window prompts you to define configuration information for the Administration Server. (For details, see “Brief Introduction to Domains” on page 1-9.) This information is used to access the server in the domain.
Review the values displayed in the Configure the Administration Server window and modify them as necessary. For more information, see “Configuring the Administration Server” on page 5-7.
Configuring Managed Servers, Clusters, and Machines When Creating Configuration Templates
All machine configuration settings from the original domain or template are included in your new configuration template. If you want to customize the template further, you may do so by adding, modifying, or removing these Managed Servers, clusters, or machines.
The minimal requirement for your new WebLogic configuration is a single Administration Server on a single machine. In addition, however, you have the option of configuring other resources to be managed by the Administration Server and distributing them across multiple machines. You can:
Add, change, or delete Managed Servers
Add, change, or delete clusters
Group Managed Servers into clusters, or change current groupings
If you are . . . Go to . . .
Creating a new configuration template “Configuring the Administration Server” on page 5-7
Creating an extension template Chapter 7, “Configuring a Database Service”

Creating WebLogic Configurations Using the Configuration Wizard 12-11
Assign servers to machines, or change current assignments
The Managed Servers, Clusters, and Machines Options window prompts you to specify whether you want to distribute your WebLogic configuration across Managed Servers, clusters, and physical machines. For more information, see Chapter 6, “Configuring Managed Servers, Clusters, and Machines.”
Configuring JDBC When Creating Configuration TemplatesJDBC services and settings from the configuration or template you selected previously are replicated in your new template. If you want to customize the template further, you may do so by adding, modifying, or removing these services.
WebLogic JDBC enables Java programmers to interact with common database management systems (DBMS), such as Oracle, Microsoft SQL Server, and Sybase. The WebLogic Configuration Template Builder gives you the option of configuring a database service for your template by defining several WebLogic JDBC components:
Connection pools—Ready-to-use groups of connections to your DBMS
MultiPools—Groups of connection pools
Data sources—Interfaces between applications and connection pools
The Database (JDBC) Options window prompts you to specify whether you want to define a database service. For more information, see Chapter 7, “Configuring a Database Service.”
Configuring JMS When Creating Configuration TemplatesJMS services and settings from the configuration or template you selected earlier are replicated in your new template. If you want to customize the template further, you may do so by adding, modifying, or removing these services.
WebLogic JMS provides access to enterprise messaging systems that enable applications to communicate with one another. To familiarize yourself with the features of WebLogic JMS, see Programming WebLogic JMS at the following URL:
http://e-docs.bea.com/wls/docs81/jms/index.html
The wizard allows you to change JMS attributes, especially those affected by changes to the JDBC configuration. Specifically, you can:
Create and/or customize JMS connection factories

Creat ing Conf igura t i on Templa tes Us ing the WebLog ic Conf igura t i on Templ ate Bu i lde r
12-12 Creating WebLogic Configurations Using the Configuration Wizard
Create JMS templates
Create JMS destination keys and assign them to JMS templates
Designate destinations and persistent stores
Create and/or customize distributed destinations
Create and/or customize JMS servers and assign them to specific WebLogic Server instances
For more information about configuring WebLogic JMS, see Chapter 8, “Configuring a Java Messaging Service.”
Targeting Servers and Clusters When Creating Configuration Templates
All target settings from the original domain or template are included in your new configuration template. If you want to customize the template further, you may do so by modifying these settings. If you add services or configure your domain for distribution across servers or clusters, it is a good idea to target the servers and clusters onto which you want to deploy the applications or services.
The Applications and Services Targeting Options window prompts you to target the servers and clusters onto which you want to deploy applications and services. For more information, see Chapter 9, “Configuring Targets.”
Configuring Security When Creating Configuration TemplatesWhen you create a configuration template, the administrative username and password from the original domain or template are included in your new configuration template. If addition, you have the option to:
Modify this username and password as described in “Configuring an Administrative Username and Password” on page 10-2.
Provide extra security for application resource, using the following security features:
– Users and groups—Classification of individuals and collections of individuals who may be granted a security role. Typically, a group is a collection of users who share a role or function within a company, such as working in the same department.
Creating WebLogic Configurations Using the Configuration Wizard 12-13
– Global security roles—Dynamically computed privileges that are used to restrict access to WebLogic resources. These privileges are granted to or withheld from users according to which roles they are assigned.
For information about providing security for application resources when creating a configuration template, see Chapter 10, “Configuring Security.”
Building Start Menu EntriesThe Build Start Menu Entries window prompts you to create items to be added to the Windows Start Menu.
To build Start Menu entries:
Review the current list of Start Menu entries. Add, modify, or delete entries as required by your configuration, using the guidelines provided in the following table. To delete an entry, click the tab for the Start Menu entry and click Delete. When you finish updating your settings, click Next.
In this field . . . Do the following . . .
Shortcut Link Name Enter a valid name for the shortcut to be displayed in the Start menu: a string of characters that can include space characters.
Program Specify the program to be run when the shortcut is selected. Do one of the following:• Select a program from the drop-down list. A list of the programs defined by
the configuration template are shown in the drop-down list, by default.• Click Browse to navigate through the local installation directory so you can
find and select the desired program.
Argument Enter any parameter that you want to pass to the shortcut program.
Working Directory No action required. When generating templates, you cannot predict the final directory structure of the local system. This field is grayed out.

Creat ing Conf igura t i on Templa tes Us ing the WebLog ic Conf igura t i on Templ ate Bu i lde r
12-14 Creating WebLogic Configurations Using the Configuration Wizard
Preparing Scripts and Files With Replacement VariablesWhen you are creating a template, you want the scripts and files that you are packaging with your template to be free of local configuration environment settings and ready for use by the Configuration Wizard. The Configuration Template Builder automatically updates any standard scripts included in a template, such as start scripts, by replacing hard-coded values for various configuration environment settings with replacement variables. The Configuration Wizard can later replace these variables with new hard-coded values during the configuration of a new domain.
The Prepare Scripts and Files with Replacement Variables window allows you to replace hard-coded strings with replacement variables in files that have not been updated by the Configuration Template Builder.
Note: Files that were automatically updated by the Configuration Template Builder contain a check in the check box.
To insert replacement variables into your files:
1. Open the file in one of the following ways:
– Double-click the appropriate filename in the Select File list
– Select the appropriate filename in the list and click Edit
The Instructions pane is replaced by an Edit File pane, in which the contents of the file are displayed. An editing toolbar is provided at the top of the window.
2. To insert a replacement variable:
a. Select the string to be replaced.
b. Click the right mouse button; a list of replacement variables is displayed.
c. Select the desired variable.
The replacement variable replaces the selected string. The Configuration Wizard later substitutes the replacement variables with literal strings to set up a specific WebLogic configuration. For definitions of the available replacement variables, see “Replacement Variables” on page 12-15.
3. Repeat steps 1 and 2 for each string for which you want to substitute a variable.
4. Review your changes and click Save, to preserve your changes, or Revert to replace the current version of the file with the last version saved. If you have edited the file since the last time you saved it, you are prompted to confirm the revert operation.
Creating WebLogic Configurations Using the Configuration Wizard 12-15
Note: You can also click Reset within the Select File area to revert to the saved version of the file.
5. If you saved the edited file, select the check box next to the filename the Select File pane.
6. Repeat steps 1 through 5 for each file in which you want to insert replacement variables.
7. Click Next to proceed to the next configuration window.
Replacement VariablesThe following table defines the replacement variables available for use in your files.
Variable Definition
BEAHOME BEA Home directory containing the installation of WebLogic Platform associated with the domain. By default, the pathname for this directory is c:\bea.
WL_HOME Root directory of your WebLogic Platform installation. By default, the pathname for this directory is c:\bea\weblogic81.
JAVA_HOME Location of the JDK used to start WebLogic Server.
DOMAIN_NAME Name of the domain.
DOMAIN_USER Administration username required to start the server
SERVER_NAME Name of the server to be started.
SAMPLES_HOME Directory containing the samples provided with WebLogic Platform. By default, the pathname for this directory is c:\bea\weblogicxx\samples. In this pathname, xx is the version of the WebLogic Platform software.
USERDOMAIN_HOME Directory containing the user domains created with the Configuration Wizard. By default, the pathname for this directory is c:\bea\user_projects.
STARTMODE Mode in which the server is started: development or production.
PRODUCTION_MODE Mode in which the server starts. If set to true, the server starts in production mode. If set to false, the server starts in development mode.

Creat ing Conf igura t i on Templa tes Us ing the WebLog ic Conf igura t i on Templ ate Bu i lde r
12-16 Creating WebLogic Configurations Using the Configuration Wizard
Creating Your Configuration TemplateThe Create Template window prompts you to review details about the configuration template, specify the name and directory for the configuration template, and launch the process that creates it.
To create your configuration template:
1. Review details about the configuration in the Configuration Summary and Configuration Details areas. If you need to modify any information, select Previous to return to the desired configuration windows.
You can limit the type of information displayed in this window by selecting a filter from the Summary View drop-down list.
2. Make sure that the Configuration Template Location field contains the name of the directory in which you want the template to reside. If you need to change the value in this field:
a. Click Browse to invoke the Select the Template Creation Directory dialog box.
b. In the dialog box, navigate to the appropriate directory or manually enter the pathname for it in the Location field and click OK.
The template directory can be located anywhere on your system. By default, it resides in BEA_HOME\user_templates, where BEA_HOME is the directory that contains the product installation (by default, this directory is c:\bea on Windows).
3. Specify a name for the template in the Template Jar Name field by clicking within the field and modifying the string displayed there.
ADMIN_SERVER_URL URL specifying the listen address (host name or IP address) and port number of the Administration Server for the domain.
JAVA_VM Mode in which you want the JVM to run, such as -jrockit, -server, -hotspot.
JAVA_VENDOR Vendor of the JVM, for example, BEA, HP, IBM, and Sun.
DOCSWEBROOT The URL specifying the location of the WebLogic Platform documentation on the BEA Web site
Variable Definition

Creating WebLogic Configurations Using the Configuration Wizard 12-17
4. After you verify the information displayed in the window, click Create.
The Creating Configuration window is opened to display status messages during the template creation process. The Configuration Template Builder generates a JAR file that contains all the components required by the Configuration Wizard to generate a new domain, including the configuration settings that you provided.
5. Click Done in the Creating Configuration window.

Creat ing Conf igura t i on Templa tes Us ing the WebLog ic Conf igura t i on Templ ate Bu i lde r
12-18 Creating WebLogic Configurations Using the Configuration Wizard

Creating WebLogic Configurations Using the Configuration Wizard 13-1
C H A P T E R 13
Creating Extension Templates Using the WebLogic Configuration Template Builder
An extension template defines applications and services that can be used to extend an existing domain. This type of template is used when you are updating a domain. The applications and services stored in the selected extension templates are imported into the domain using the Configuration Wizard.
The Configuration Template Builder provides a simple means for creating extension templates which can be used as input to the Configuration Wizard. The process used to create an extension template is virtually the same as the process used to create a configuration template except that you are not prompted to define any infrastructure components.
(For information about updating a domain using the Configuration Wizard, see Chapter 11, “Extending Domains.”)
Overview of Creating an Extension Template Using the Configuration Template Builder
The following table summarizes the procedure for creating an extension template using the Configuration Template Builder.
You can quit the Configuration Template Builder at any time by clicking Exit.

Creat ing Ex tens ion Templa tes Using the WebLog ic Conf igura t i on Templa te Bu i lde r
13-2 Creating WebLogic Configurations Using the Configuration Wizard
Table 13-1 Steps for Creating Extension Templates
In this step . . . You . . .
Creating a Configuration or Extension Template
Choose the type of template you want to create: configuration or extension.To create an extension template, choose Create an Extension Template.
For details about creating a configuration template, see Chapter 12, “Creating Configuration Templates Using the WebLogic Configuration Template Builder.”
Selecting a Configuration Source for your Extension Template
Choose an extension template or a domain directory from which you want to create a configuration template.
Describing Your Extension Template Specify a description of the template that will be displayed within the Select a Configuration Extension Template window of the Configuration Wizard. (For more information about the configuration extension template window, see “Selecting a Configuration Extension Template” on page 11-3.)
Adding Applications to Your Extension Template
Review and modify, if desired, the list of applications to be included in your extension template.
Adding Files to Your Extension Template
Review and modify, if desired, the list of files to be included in your extension template.
Configuring JDBC for Extension Templates
Optionally, customize the Java Database Connectivity (JDBC) settings.
Configuring JMS for Extension Templates
Optionally, define parameters for Java Message Service (JMS).
Configuring Security Options in Your Extension Template
Optionally, create users, groups, and roles, then assign them to groups and global roles.
Preparing Text Files When Creating Extension Templates
Replace specific paths, filenames, and other environment-specific strings with replacement variables in text files contained in the template. Later, when a specific WebLogic configuration domain is being created, the Configuration Wizard replaces these variables with exact strings.
Creating Your Configuration Extension Template
Review the extension template, specify its name and directory for the extension template, and launch the process that creates it.

Creating WebLogic Configurations Using the Configuration Wizard 13-3
Creating a Configuration or Extension TemplateThe Create a Configuration or Extension Template window prompts you to choose the type of template you want to create: a configuration template or an extension template. To create an extension template, choose Create an Extension Template.
Selecting a Configuration Source for your Extension TemplateThe Select a Template Configuration Source window prompts you to choose the application template or domain directory from which you want to create an extension template.
To select an extension template:
1. Select the Select a Template tab.
2. Make sure that the Template Locations field contains the name of the required template extension directory. The templates displayed for selection reside in the specified directory. If you need to change the value in the Template Locations field:
a. Click Browse to invoke the Select a Template Directory dialog box.
b. In the dialog box, navigate to the appropriate directory or manually enter the pathname of the directory in the Location field.
A list of the extension templates available in the selected directory is displayed. Templates are organized by category. For example, the predefined extension templates provided with the product installation are listed together under the heading BEA.
3. Select an extension template from the list.
Choose this option . . . When you want to . . .
Create a Configuration Template
Create a template that defines the full set of resources within a domain, including infrastructure components, applications, services, security options, and general environment and operating system parameters. You can then use this template as input to the Configuration Wizard to create a new domain. To learn more about creating a configuration template, see Chapter 12, “Creating Configuration Templates Using the WebLogic Configuration Template Builder.”
Create an Extension Template
Create a template in which you define applications and services that can be used to extend an existing domain.

Creat ing Ex tens ion Templa tes Using the WebLog ic Conf igura t i on Templa te Bu i lde r
13-4 Creating WebLogic Configurations Using the Configuration Wizard
4. Click Next to proceed to the next configuration window.
Choose a Domain DirectoryTo choose the directory of the domain from which you want to create an extension template:
1. Select the Select a Domain Directory tab.
2. Navigate to the domain directory from which you want to create an extension template.
3. Click Next to proceed to the next configuration window.
Describing Your Extension TemplateThe Describe the Template window prompts you to provide a description that will be displayed in the Select a Configuration Extension Template window of the Configuration Wizard.
To enter template description information, do one of the following:
If you selected a template in the Select a Template Configuration Source window, the information from the selected template is displayed here. Review the information and, if necessary, modify it to meet the needs of your extension template, as described in “Describing the Template” on page 12-5. Then click Next.
If you selected a domain directory in the Select a Template Configuration Source window, enter the information required for your extension template, as described in “Describing the Template” on page 12-5. Then click Next.
Adding Applications to Your Extension TemplateThe Add Applications window prompts you to:
Review the list of applications that are currently defined
Review the pathnames of the current and imported applications
If necessary, change the relative directory into which applications are imported
If necessary, omit applications from the list of files to be imported
For more information, see “Adding Applications to Your Configuration Template” on page 12-7.

Creating WebLogic Configurations Using the Configuration Wizard 13-5
Adding Files to Your Extension TemplateExtension templates generated from the designated template or domain directory include files from that configuration source. You may also want to include other files from your system or network. The Add Files window prompts you to review, add, or remove files in the template.
To add files to the template you are creating:
1. To view a current list of files that currently reside in your template, expand the Domain Root Directory and Applications Root Directory in the Current Template View pane.
2. To add or remove files, perform the following steps:
– In the Current Template View, select the destination directory to which you want to add a file.
– To add a file, navigate to the file within the File System View area and select Add File. You can limit the files displayed in this view by selecting a filter from the Show File Types drop-down list. For example, to display only files with the .cmd extension, select *.cmd from the drop-down list.
– To remove a file, select the file that you want to delete from the Current Template View pane, and select Remove File.
3. Repeat steps 1 and 2 for each file that you want to add or remove.
4. Click Next to proceed to the next configuration window.
Importing SQL Scripts Into Your Extension TemplateThe Import SQL Scripts window prompts you to add SQL scripts for each database that you expect to be used with the domains created from this template. You can also specify the order in which the scripts should be executed. For more information, see “Adding SQL Scripts Into Your Configuration Template” on page 12-9.
Configuring JDBC for Extension TemplatesAll JDBC services included in the original domain or template are also included in the extension template you are creating. If you want to customize the extension template further, you may do so by adding, modifying, or removing these services.
WebLogic JDBC enables Java programmers to interact with common database management systems (DBMS) such as Oracle, Microsoft SQL Server, Sybase, and others. The WebLogic

Creat ing Ex tens ion Templa tes Using the WebLog ic Conf igura t i on Templa te Bu i lde r
13-6 Creating WebLogic Configurations Using the Configuration Wizard
Configuration Template Builder gives you the option of configuring a database service for the domain by defining several WebLogic JDBC components:
Connection pools—Ready-to-use groups of connections to your DBMS
MultiPools—Groups of connection pools
Data sources—Interfaces between applications and connection pools
The Database (JDBC) Options window prompts you to specify whether you want to define a database service. For more information, see Chapter 7, “Configuring a Database Service.”
Configuring JMS for Extension TemplatesAll JMS services included in the original domain or template are also included in the extension template you are creating. If you want to customize the extension template further, you may do so by adding, modifying, or removing these services.
WebLogic JMS provides access to enterprise messaging systems that enable applications to communicate with one another. To familiarize yourself with the features of WebLogic JMS, see Programming WebLogic JMS at the following URL:
http://e-docs.bea.com/wls/docs81/jms/index.html
The wizard allows you to change JMS attributes, especially those affected by changes to the JDBC configuration. Specifically, you can:
Create and/or customize JMS connection factories
Create JMS templates
Create JMS destination keys and assign them to JMS templates
Designate destinations and persistent stores
Create and/or customize distributed destinations
Create and/or customize JMS servers and assign them to specific WebLogic Server instances
For more information about configuring WebLogic JMS, see Chapter 8, “Configuring a Java Messaging Service.”

Creating WebLogic Configurations Using the Configuration Wizard 13-7
Configuring Security Options in Your Extension TemplateOptionally, you can configure security parameters for your application—specifically, options to secure the application resources within the domain. You can provide security for an application resource using the following security features:
Users and groups—Classification of individuals and collections of individuals who may be granted a security role. Typically, a group is a collection of users who share a role or function within a company, such as working in the same department.
Global security roles—Dynamically computed privileges that are used to restrict access to WebLogic resources. These privileges are granted to or withheld from users according to which roles they are assigned.
For example, to leverage individual skills, many Web development teams divide system administration responsibilities into distinct roles. A team may then assign a different level of permission to each role. Each project might give only one or two team members permission to deploy components, but allow all team members to view the WebLogic Server configuration.
WebLogic Server supports such role-based development by providing four default global roles that determine access privileges for system administration operations: Admin, Deployer, Operator, and Monitor.
Warning: Do not make the default global security roles for Administrative and Server resources more restrictive. If you eliminate any existing security roles, you risk degrading WebLogic Server operation. You can, however, make the default security roles more inclusive (for example, by adding new security roles).
The Security Configuration Options window prompts you to set security options for your application. If you choose No, the security settings in the extension template created that is created match those defined in the template or domain on which it is based. If you choose Yes, you are prompted, in subsequent windows, to configure the security as described in the following table.
Task Description
Configuring Users, Groups, and Global Roles
Define users, groups, and global roles for authentication purposes.
Assigning Users to Groups Assign users to groups. Groups allow you to manage a number of users at the same time. This is generally more efficient than managing each user individually.

Creat ing Ex tens ion Templa tes Using the WebLog ic Conf igura t i on Templa te Bu i lde r
13-8 Creating WebLogic Configurations Using the Configuration Wizard
Preparing Text Files When Creating Extension TemplatesThe Configuration Template Builder automatically updates any standard scripts included in a template, such as start scripts, by replacing hard-coded values for various configuration environment settings with variables. The Configuration Wizard can later replace these variables with new hard-coded values during the configuration of a new domain.
If you like, you can prepare additional files that are included with your template by manually inserting replacement variables. For more information, see “Preparing Scripts and Files With Replacement Variables” on page 12-14.
Creating Your Configuration Extension TemplateThe Create Template window prompts you to review details about the extension template, specify the name and directory for the extension template, and launch the process that creates it.
To create your extension template:
1. Review details about the configuration in the Configuration Summary and Configuration Details areas. If you need to modify any information, select Previous to return to the desired configuration windows.
You can limit the information displayed in this window by selecting a filter from the Summary View drop-down list.
2. Make sure that the Configuration Template Location field contains the name of the required configuration directory. If you need to change the value in this field:
a. Click Browse to invoke the Select the Template Creation Directory dialog box.
b. In the dialog box, navigate to the appropriate directory or manually enter the pathname of the directory in the Location field and click OK.
Assigning Groups to Groups
Assign a group as a subgroup of another group, to add further granularity to security management
Assigning Users and Groups to Global Roles
Assign users and groups to the predefined WebLogic Server global security roles
Task Description

Creating WebLogic Configurations Using the Configuration Wizard 13-9
The configuration directory can be located anywhere on your system. By default, it resides in BEA_HOME\user_templates\template.jar, where BEA_HOME is the directory that contains the product installation (by default, this directory is c:\bea on Windows), and template.jar is the name that you specified for the JAR file.
3. Specify a name for the template in the Template Jar Name field by clicking within the field and modifying the contents.
4. After you verify the information displayed in the window, click Create.
The Creating Configuration window is displayed, indicating the status of template creation process. The Configuration Template Builder generates a JAR file that consists of all components required by the Configuration Wizard to generate a new domain, including the configuration settings that you provided.
5. Click Done on the Creating Configuration window.

Creat ing Ex tens ion Templa tes Using the WebLog ic Conf igura t i on Templa te Bu i lde r
13-10 Creating WebLogic Configurations Using the Configuration Wizard

Creating WebLogic Configurations Using the Configuration Wizard 14-1
C H A P T E R 14
How Do I . . . ?
This section provides information and examples for some common domain configuration tasks:
For information about how to create XA domains using the configuration templates, see “Creating XA Domains Using Configuration Templates” on page 14-2. This section includes the following topics:
– “Guidelines for Changing to an XA Configuration” on page 14-2
– “Summary of JDBC Settings for XA Configurations” on page 14-2
For examples of creating domains using an Oracle database, see the following:
– “How Do I: Create a Domain Using a Different Database?” on page 14-14
– “How Do I: Create a Domain Using a Database with an XA Driver?” on page 14-18
For information about how to create XA domains with MultiPools and the Oracle RAC database, see “How Do I: Create XA Domains with MultiPools and an Oracle RAC Database?” on page 14-21.
Related TopicsFor details and recommendations on configuring your JDBC database resources, see Managing WebLogic Platform Database Resources at the following URL: http://e-docs.bea.com/platform/docs81/db_mgmt/db_resource_mgmt.html.
For information about how to create a single-server domain quickly and easily, see “Tutorial: Creating Your First Domain” on page 15-2.

How Do I . . . ?
14-2 Creating WebLogic Configurations Using the Configuration Wizard
For information about how to create a multiserver domain that includes Managed Servers, a cluster, and application services, see “Tutorial: Creating a Custom Domain With Managed Servers, a Cluster, and Application Services” on page 15-10.
Note: If you are using WebLogic Platform 8.1 SP2 or earlier, see “Configuring JDBC Domain Resources in SP2 or Earlier” in Important Usage Notes for Previous Releases of WebLogic Platform 8.1 at the following URL:http://e-docs.bea.com/platform/docs81/sp_notes/sp_notes.html#sp2_config
Creating XA Domains Using Configuration TemplatesBy default, the Configuration Wizard creates domains with non-XA configurations, based on the JDBC settings defined in the prepackaged configuration templates. If you want to create a domain in which JDBC resources are set up to participate in global transactions (XA), then you need to use an XA JDBC database driver and change some of the default JDBC settings.
This section provides the following topics:
“Guidelines for Changing to an XA Configuration” on page 14-2
“Summary of JDBC Settings for XA Configurations” on page 14-2
Guidelines for Changing to an XA ConfigurationTo change to an XA configuration:
1. Use the Configuration Wizard to create or extend a domain and configure the JDBC connection pools as XA resources, as required.
2. Use the WebLogic Server Administration Console to verify configuration option settings.
To learn about the JDBC settings required for an XA domain configuration using the Configuration Wizard and the configuration options that need to be set or verified using the WebLogic Server Administration Console, see “Summary of JDBC Settings for XA Configurations” on page 14-2.
Summary of JDBC Settings for XA ConfigurationsThe following sections summarize the JDBC settings required for an XA domain configuration using the Configuration Wizard and the prepackaged configuration templates, including:
“JDBC Settings for WebLogic Workshop XA Configurations” on page 14-3

Creat i ng XA Domains Us ing Conf igura t i on Templ ates
Creating WebLogic Configurations Using the Configuration Wizard 14-3
“JDBC Settings for WebLogic Integration XA Configurations” on page 14-5
“JDBC Settings for WebLogic Portal XA Configurations” on page 14-8
“JDBC Settings for WebLogic Platform XA Configurations” on page 14-10
Each section also provides a list of the configuration options that need to be set or verified using the WebLogic Server Administration Console.
Please note the following about creating WebLogic Server XA domain configurations:
The Basic WebLogic Server Domain template does not have preconfigured JDBC settings. You may use the Configuration Wizard to set up JDBC resources, as required for an XA domain. See instructions in “Creating a New WebLogic Domain” on page 5-1 and recommendations in Managing WebLogic Platform Database Resources at the following URL: http://e-docs.bea.com/platform/docs81/db_mgmt/db_resource_mgmt.html.
The Avitek Medical Records sample demonstrates best practices using WebLogic Server. For information about configuring an XA domain, we recommend that you review the “Using a Production Database Management System” tutorial in Medical Records Development Tutorials at the following URL: http://e-docs.bea.com/wls/docs81/medrec_tutorials/index.html
The WebLogic Server Examples domain may be configured to use databases other than PointBase. For instructions on using Oracle, see the WebLogic Server Examples Database Guide, which is installed on your system with the WebLogic Server examples.
JDBC Settings for WebLogic Workshop XA ConfigurationsTable 14-1 summarizes the JDBC settings to use with the Basic WebLogic Workshop Domain configuration template for an XA domain configuration. After using the Configuration Wizard to make the required additions and changes, remember to use the WebLogic Server Administration Console to complete the XA configuration setup.
Note: The scope of the JDBC configuration settings provided below is the JDBC settings in the prepackaged configuration templates only. If you are using a custom template or have already developed application resources in an existing domain, you may have additional JDBC resources to configure to complete the XA configuration.

How Do I . . . ?
14-4 Creating WebLogic Configurations Using the Configuration Wizard
Table 14-1 Changes to Workshop Template Settings for an XA Configuration
JDBC Resource Type
Resource Name XA Configuration Requirements
Database workshop Change the database being used to one that supports XA configurations, such as Oracle, Sybase, DB2, and MS SQL Server. For database support details, see “Supported Database Configurations” in Supported Configurations for WebLogic Platform 8.1.
Connection Pool
cgJMSPool-nonXA Maintain association with a non-XA JDBC driver.
Connection Pool
cgPool Change the type of driver being used to a Type 4/XA driver, such as the Oracle Thin XA driver, to connect to a supported database. For details about database driver support, see “Supported Database Configurations” in Supported Configurations for WebLogic Platform 8.1.
Use the WebLogic Server Administration Console to verify the following configuration options:• Supports Local Transaction option is enabled. (This is the
default setting for this connection pool; you should not change this setting.)
• Maximum Capacity option for the JDBC connection pool is greater than or equal to the value of the Thread Count option for the execute queue.
Tx Data Source
cgDataSource Keep bound to the cgPool connection pool.
Tx Data Source
cgDataSource-nonXA Keep bound to the cgJMSPool-nonXA connection pool.
Note: Although cgDataSource-nonXA is provided as a JDBC Tx Data Source, it cannot participate in global transactions. Therefore, you must always set it up with a connection pool configured with a non-XA JDBC driver, such as cgJMSPool-nonXA.
JMS Store cgJMSStore Keep bound to the cgJMSPool-nonXA connection pool.

Creat i ng XA Domains Us ing Conf igura t i on Templ ates
Creating WebLogic Configurations Using the Configuration Wizard 14-5
JDBC Settings for WebLogic Integration XA ConfigurationsTable 14-2 summarizes the JDBC settings to use with the Basic WebLogic Integration Domain configuration template for an XA domain configuration. After using the Configuration Wizard to make the required additions and changes, remember to use the WebLogic Server Administration Console to complete the XA configuration setup.
For an example of creating a WebLogic Integration XA configuration, see “How Do I: Create a Domain Using a Database with an XA Driver?” on page 14-18.
Note: The scope of the JDBC configuration settings provided below is the JDBC settings in the prepackaged configuration templates only. If you are using a custom template or have already developed application resources in an existing domain, you may have additional JDBC resources to configure to complete the XA configuration.

How Do I . . . ?
14-6 Creating WebLogic Configurations Using the Configuration Wizard
Table 14-2 Changes to Integration Configuration Template Settings for an XA Configuration
JDBC Resource Type
Resource Name XA Configuration Requirements
Database workshop Change the database being used to one that supports XA configurations, such as Oracle, Sybase, DB2, and MS SQL Server. For database support details, see “Supported Database Configurations” in Supported Configurations for WebLogic Platform 8.1.
Connection Pool
bpmArchPool Change the type of driver being used to a Type 4/XA driver, such as the Oracle Thin XA driver, to connect to a supported database. For details about database driver support, see “Supported Database Configurations” in Supported Configurations for WebLogic Platform 8.1.
Use the WebLogic Server Administration Console to verify the following configuration options:• Supports Local Transaction option is enabled. (This is the
default setting for this connection pool; you should not change this setting.)
• Maximum Capacity option for the JDBC connection pool is greater than or equal to the value of the Thread Count option for the execute queue.
• For Oracle databases only, the value of the Timeout Seconds option for JTA is less than or equal to the value of the XA Transaction Timeout option in the JDBC connection pool if the Enable XA Transaction Timeout option is enabled. It is recommended that you set the value of the XA Transaction Timeout option to 60 seconds, and the value of the Timeout Seconds option for JTA to 50 for normal size messages, and increase these values proportionately as the size of your message increases.
Connection Pool
cgJMSPool-nonXA Maintain association with a non-XA JDBC driver.

Creat i ng XA Domains Us ing Conf igura t i on Templ ates
Creating WebLogic Configurations Using the Configuration Wizard 14-7
Connection Pool
cgPool Change the type of driver being used to a Type 4/XA driver, such as the Oracle Thin XA driver, to connect to a supported database. For details about database driver support, see “Supported Database Configurations” in Supported Configurations for WebLogic Platform 8.1.
Use the WebLogic Server Administration Console to verify the following configuration options:• Supports Local Transaction option is enabled. (This is the
default setting for this connection pool; you should not change this setting.)
• Maximum Capacity option for the JDBC connection pool is greater than or equal to the value of the Thread Count option for the execute queue.
• For Oracle databases only, the value of the Timeout Seconds option for JTA is less than or equal to the value of the XA Transaction Timeout option in the JDBC connection pool if the Enable XA Transaction Timeout option is enabled. It is recommended that you set the value of the XA Transaction Timeout option to 60 seconds, and the value of the Timeout Seconds option for JTA to 50 for normal size messages, and increase these values proportionately as the size of your message increases.
Tx Data Source
bpmArchDataSource Keep bound to the bpmArchPool connection pool.
Tx Data Source
cgDataSource Keep bound to the cgPool connection pool.
Tx Data Source
cgDataSource-nonXA Keep bound to the cgJMSPool-nonXA connection pool.
Note: Although cgDataSource-nonXA is provided as a JDBC Tx Data Source, it cannot participate in global transactions. Therefore, you must always set it up with a connection pool configured with a non-XA JDBC driver, such as cgJMSPool-nonXA.
JMS Store cgJMSStore Keep bound to the cgJMSPool-nonXA connection pool.
Table 14-2 Changes to Integration Configuration Template Settings for an XA Configuration (Continued)
JDBC Resource Type
Resource Name XA Configuration Requirements
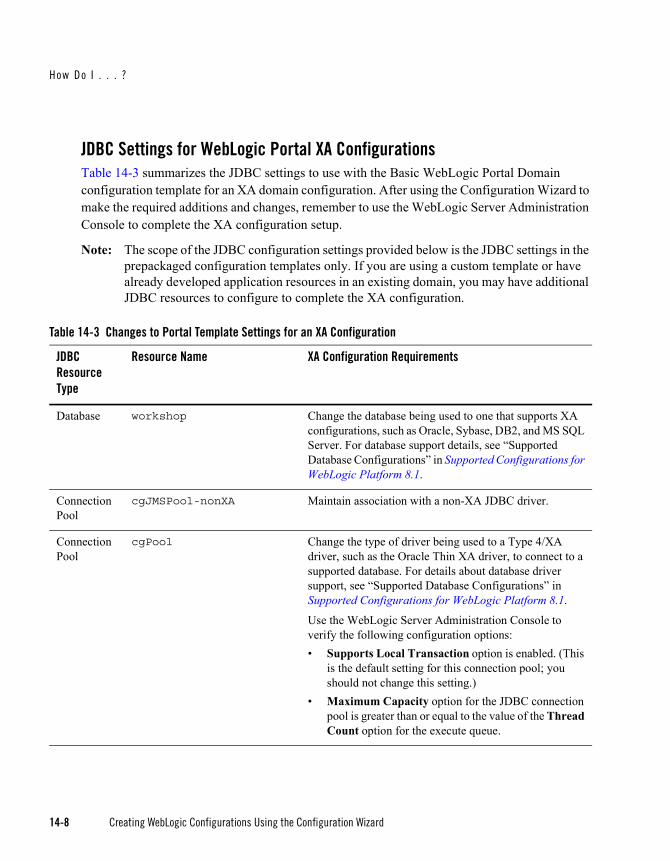
How Do I . . . ?
14-8 Creating WebLogic Configurations Using the Configuration Wizard
JDBC Settings for WebLogic Portal XA ConfigurationsTable 14-3 summarizes the JDBC settings to use with the Basic WebLogic Portal Domain configuration template for an XA domain configuration. After using the Configuration Wizard to make the required additions and changes, remember to use the WebLogic Server Administration Console to complete the XA configuration setup.
Note: The scope of the JDBC configuration settings provided below is the JDBC settings in the prepackaged configuration templates only. If you are using a custom template or have already developed application resources in an existing domain, you may have additional JDBC resources to configure to complete the XA configuration.
Table 14-3 Changes to Portal Template Settings for an XA Configuration
JDBC Resource Type
Resource Name XA Configuration Requirements
Database workshop Change the database being used to one that supports XA configurations, such as Oracle, Sybase, DB2, and MS SQL Server. For database support details, see “Supported Database Configurations” in Supported Configurations for WebLogic Platform 8.1.
Connection Pool
cgJMSPool-nonXA Maintain association with a non-XA JDBC driver.
Connection Pool
cgPool Change the type of driver being used to a Type 4/XA driver, such as the Oracle Thin XA driver, to connect to a supported database. For details about database driver support, see “Supported Database Configurations” in Supported Configurations for WebLogic Platform 8.1.
Use the WebLogic Server Administration Console to verify the following configuration options:• Supports Local Transaction option is enabled. (This
is the default setting for this connection pool; you should not change this setting.)
• Maximum Capacity option for the JDBC connection pool is greater than or equal to the value of the Thread Count option for the execute queue.

Creat i ng XA Domains Us ing Conf igura t i on Templ ates
Creating WebLogic Configurations Using the Configuration Wizard 14-9
Connection Pool
portalPool Change the type of driver being used to a Type 4/XA driver, such as the Oracle Thin XA driver, to connect to a supported database. For details about database driver support, see “Supported Database Configurations” in Supported Configurations for WebLogic Platform 8.1.
Use the WebLogic Server Administration Console to verify the following configuration options:• Supports Local Transaction option is disabled.• Maximum Capacity option for the JDBC connection
pool is greater than or equal to the value of the Thread Count option for the execute queue.
Data Source p13n_trackingDataSource Keep bound to the cgJMSPool-nonXA connection pool.
Data Source p13nDataSource Keep bound to the cgJMSPool-nonXA connection pool.
Tx Data Source
cgDataSource Keep bound to the cgPool connection pool.
Tx Data Source
cgDataSource-nonXA Keep bound to the cgJMSPool-nonXA connection pool.
Note: Although cgDataSource-nonXA is provided as a JDBC Tx Data Source, it cannot participate in global transactions. Therefore, you must always set it up with a connection pool configured with a non-XA JDBC driver, such as cgJMSPool-nonXA.
Use the WebLogic Server Administration Console to verify that the Enable Two-Phase Commit option is enabled.
Table 14-3 Changes to Portal Template Settings for an XA Configuration (Continued)
JDBC Resource Type
Resource Name XA Configuration Requirements

How Do I . . . ?
14-10 Creating WebLogic Configurations Using the Configuration Wizard
JDBC Settings for WebLogic Platform XA ConfigurationsTable 14-4 summarizes the XA domain configuration settings to use with the Basic WebLogic Platform Domain configuration template. After using the Configuration Wizard to make the required additions and changes, remember to use the WebLogic Server Administration Console to complete the XA configuration setup.
Note: The scope of the JDBC configuration settings provided below is the JDBC settings in the prepackaged configuration templates only. If you are using a custom template or have already developed application resources in an existing domain, you may have additional JDBC resources to configure to complete the XA configuration.
For an example of creating a domain with an XA configuration, see “How Do I: Create a Domain Using a Database with an XA Driver?” on page 14-18.
Note: The setup tasks in these examples also apply to creating a WebLogic Platform domain using Oracle with an XA driver because WebLogic Platform domains include WebLogic Integration and WebLogic Portal functionality.
Tx Data Source
portalFrameworkPool Keep bound to the portalPool connection pool.
Note: If you are using the optional commerce functionality in a Portal domain configured for XA, then you must move the weblogic.jdbc.jts.commercePool JNDI name from the portalFrameworkPool to the cgDataSource-nonXA JDBC Tx Data Source. For information about using commerce functionality, see “Adding Commerce Services to an Application” in the WebLogic Workshop Help at the following URL: http://e-docs.bea.com/workshop/docs81/doc/en/portal/buildportals/commerce.html
JMS Store cgJMSStore Keep bound to the cgJMSPool-nonXA connection pool.
Table 14-3 Changes to Portal Template Settings for an XA Configuration (Continued)
JDBC Resource Type
Resource Name XA Configuration Requirements

Creat i ng XA Domains Us ing Conf igura t i on Templ ates
Creating WebLogic Configurations Using the Configuration Wizard 14-11
Table 14-4 Changes to Platform Configuration Template Settings for an XA Configuration
JDBC Resource Type
Resource Name XA Configuration Requirements
Database workshop Change the database being used to one that supports XA configurations, such as Oracle, Sybase, DB2, and MS SQL Server. For database support details, see “Supported Database Configurations” in Supported Configurations for WebLogic Platform 8.1.
Connection Pool
bpmArchPool Change the type of driver being used to a Type 4/XA driver, such as the Oracle Thin XA driver, to connect to a supported database. For details about database driver support, see “Supported Database Configurations” in Supported Configurations for WebLogic Platform 8.1.
Use the WebLogic Server Administration Console to verify the following configuration options:• Supports Local Transaction option is enabled. (This is
the default setting for this connection pool; you should not change this setting.)
• Maximum Capacity option for the JDBC connection pool is greater than or equal to the value of the Thread Count option for the execute queue.
• For Oracle databases only, the value of the Timeout Seconds option for JTA is less than or equal to the value of the XA Transaction Timeout option in the JDBC connection pool if the Enable XA Transaction Timeout option is enabled. It is recommended that you set the value of the XA Transaction Timeout option to 60 seconds, and the value of the Timeout Seconds option for JTA to 50 for normal size messages, and increase these values proportionately as the size of your message increases.
Connection Pool
cgJMSPool-nonXA Maintain association with a non-XA JDBC driver.

How Do I . . . ?
14-12 Creating WebLogic Configurations Using the Configuration Wizard
Connection Pool
cgPool Change the type of driver being used to a Type 4/XA driver, such as the Oracle Thin XA driver, to connect to a supported database. For details about database driver support, see “Supported Database Configurations” in Supported Configurations for WebLogic Platform 8.1.
Use the WebLogic Server Administration Console to verify the following configuration options:• Supports Local Transaction option is enabled. (This is
the default setting for this connection pool; you should not change this setting.)
• Maximum Capacity option for the JDBC connection pool is greater than or equal to the value of the Thread Count option for the execute queue.
• For Oracle databases only, the value of the Timeout Seconds option for JTA is less than or equal to the value of the XA Transaction Timeout option in the JDBC connection pool if the Enable XA Transaction Timeout option is enabled. It is recommended that you set the value of the XA Transaction Timeout option to 60 seconds, and the value of the Timeout Seconds option for JTA to 50 for normal size messages, and increase these values proportionately as the size of your message increases.
Connection Pool
portalPool Change the type of driver being used to a Type 4/XA driver, such as the Oracle Thin XA driver, to connect to a supported database. For details about database driver support, see “Supported Database Configurations” in Supported Configurations for WebLogic Platform 8.1.
Use the WebLogic Server Administration Console to verify the following configuration options:• Supports Local Transaction option is disabled.• Maximum Capacity option for the JDBC connection
pool is greater than or equal to the value of the Thread Count option for the execute queue.
Table 14-4 Changes to Platform Configuration Template Settings for an XA Configuration (Continued)
JDBC Resource Type
Resource Name XA Configuration Requirements

Creat i ng XA Domains Us ing Conf igura t i on Templ ates
Creating WebLogic Configurations Using the Configuration Wizard 14-13
Data Source p13n_trackingDataSource Keep bound to the cgJMSPool-nonXA connection pool.
Data Source p13nDataSource Keep bound to the cgJMSPool-nonXA connection pool.
Tx Data Source
bpmArchDataSource Keep bound to the bpmArchPool connection pool.
Tx Data Source
cgDataSource Keep bound to the cgPool connection pool.
Tx Data Source
cgDataSource-nonXA Keep bound to the cgJMSPool-nonXA connection pool.
Note: Although cgDataSource-nonXA is provided as a JDBC Tx Data Source, it cannot participate in global transactions. Therefore, you must always set it up with a connection pool configured with a non-XA JDBC driver, such as cgJMSPool-nonXA.
Use the WebLogic Server Administration Console to verify that the Enable Two-Phase Commit option is enabled.
Tx Data Source
portalFrameworkPool Keep bound to the portalPool connection pool.
Note: If you are using the optional commerce functionality in a Portal domain configured for XA, then you must move the weblogic.jdbc.jts.commercePool JNDI name from the portalFrameworkPool to the cgDataSource-nonXA JDBC Tx Data Source. For information about using commerce functionality, see “Adding Commerce Services to an Application” in the WebLogic Workshop Help at the following URL: http://e-docs.bea.com/workshop/docs81/doc/en/portal/buildportals/commerce.html
JMS Store cgJMSStore Keep bound to the cgJMSPool-nonXA connection pool.
Table 14-4 Changes to Platform Configuration Template Settings for an XA Configuration (Continued)
JDBC Resource Type
Resource Name XA Configuration Requirements
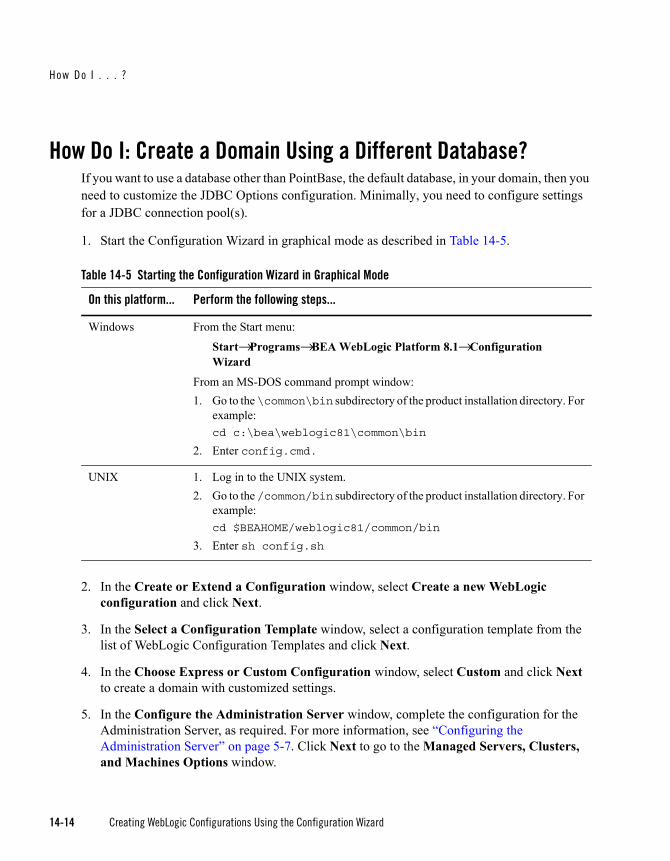
How Do I . . . ?
14-14 Creating WebLogic Configurations Using the Configuration Wizard
How Do I: Create a Domain Using a Different Database?If you want to use a database other than PointBase, the default database, in your domain, then you need to customize the JDBC Options configuration. Minimally, you need to configure settings for a JDBC connection pool(s).
1. Start the Configuration Wizard in graphical mode as described in Table 14-5.
2. In the Create or Extend a Configuration window, select Create a new WebLogic configuration and click Next.
3. In the Select a Configuration Template window, select a configuration template from the list of WebLogic Configuration Templates and click Next.
4. In the Choose Express or Custom Configuration window, select Custom and click Next to create a domain with customized settings.
5. In the Configure the Administration Server window, complete the configuration for the Administration Server, as required. For more information, see “Configuring the Administration Server” on page 5-7. Click Next to go to the Managed Servers, Clusters, and Machines Options window.
Table 14-5 Starting the Configuration Wizard in Graphical Mode
On this platform... Perform the following steps...
Windows From the Start menu:
Start→ Programs→ BEA WebLogic Platform 8.1→ Configuration Wizard
From an MS-DOS command prompt window:1. Go to the \common\bin subdirectory of the product installation directory. For
example:cd c:\bea\weblogic81\common\bin
2. Enter config.cmd.
UNIX 1. Log in to the UNIX system.2. Go to the /common/bin subdirectory of the product installation directory. For
example:cd $BEAHOME/weblogic81/common/bin
3. Enter sh config.sh

How Do I : Cr ea te a Domain Us ing a D i f fe rent Database?
Creating WebLogic Configurations Using the Configuration Wizard 14-15
6. In the Managed Servers, Clusters, and Machines Options window, do one of the following:
– Select Yes and click Next to go through the configuration setup of managed servers, clusters, and machines, as required. For more information, see “Configuring Managed Servers, Clusters, and Machines When Creating a New Domain” on page 5-11.
– Select No and click Next to keep the default template settings for managed servers, clusters, and machines and go to the Database (JDBC) Options window.
7. In the Database (JDBC) Options window, select Yes and click Next to go through the JDBC configuration setup.
8. In the Configure JDBC Connection Pools window, do one or both of the following:
– If your configuration template already has JDBC connection pools set up, select the tab for each connection pool to change the settings to use the new database configuration.
– If there are no JDBC connection pools set up, or if your application requires additional JDBC connection pools, select Add and set the JDBC settings, as required.
The following provides example settings for configuring an Oracle database:
– Name: myOraclePool
– Vendor: Oracle
– Driver: OracleDriver
– DBMS name: MyOracleDB
– DBMS host: MyOracleMachineName
– DBMS port: MyOraclePortNumber
– User name: MyUserName
– User password: MyUserPassword
– Confirm user password: MyUserPassword
where myOraclePool is the name you assign to the JDBC connection pool, OracleDriver is the JDBC driver you select to use with Oracle, MyOracleDB is the database name, MyOracleMachineName is the name of the machine on which your Oracle database resides, MyOraclePortNumber is the database port number (for example, 1521), and MyUserName and MyUserPassword are the appropriate values for your Oracle database setup.
Please note the following guideline when specifying the JDBC settings:

How Do I . . . ?
14-16 Creating WebLogic Configurations Using the Configuration Wizard
– When setting DBMS Name for DB2, SQL Server, and Sybase databases, specify the name of the database instance that has already been created by the database administrator.
Repeat this step to update any additional existing JDBC connection pools or to add additional new pools.
9. Click Next to save your changes and go to the Configure JDBC MultiPools window.
10. Click Next to skip configuring JDBC MultiPools and go to the Configure JDBC Data Sources window.
11. (Optional) If your application requires an additional JDBC data source, select Add and enter the following settings:
– Name: myDataSource
– JNDI name: myDataSource
– Pool name: myDBPool
– Honor global transaction: check the box to be transactional; otherwise, leave the box unchecked
Here myDBPool is the connection pool for the new data source, myDataSource.
12. Click Next to save your changes and go to the Test JDBC Connection Pools and Setup JDBC Database window.
13. Click Test Connection to test the connection to your Oracle database for each JDBC connection pool. Verify that “Test Successful!” is displayed in the Results pane.
Note: Make sure to first start your target database and ensure that the database is accessible; otherwise, the driver configuration test will fail.
14. If SQL files are available in the template, in the Available SQL Files and Database Loading Options pane, click Load Database to create database objects. Verify that “Database Load Successful!” is displayed in the Results pane before proceeding to the next step.
Note: Optionally, select the Log File option to write the results of your database load to the specified log file.
15. Click Next to save your changes and go to the Messaging (JMS) Options window.
16. In the Messaging (JMS) Options window, do one of the following:
How Do I : Cr ea te a Domain Us ing a D i f fe rent Database?
Creating WebLogic Configurations Using the Configuration Wizard 14-17
– Select Yes and click Next to go through the JMS configuration setup, as required. For more information, see “Configuring JMS When Creating a New Domain” on page 5-12.
– Select No and click Next to keep the default template settings for JMS and go to the Applications and Services Targeting Options window.
17. In the Applications and Services Targeting Options window, select Yes and click Next to configure targeting.
18. If applications are available in your template, the Target Applications to Servers or Clusters window is displayed. Make sure all applications are targeted. For more information, see “Targeting Servers and Clusters When Creating a New Domain” on page 5-12. Click Next to go to the Target Services to Servers and Clusters window.
19. If you added a JDBC connection pool and JDBC data source, in the left pane of the Target Services to Servers and Clusters window, make sure that myDBPool under the JDBC Connection Pool source listing and myDataSource under the JDBC Tx Data Source source listing are checked and target your server. If not, check them.
20. Click Next to save your changes and go to the Configure Administrative Username and Password window.
21. In the Configure Administrative Username and Password window, complete the configuration for the administrative user. For more information, see “Configuring Security When Creating a New Domain” on page 5-13. Click Next to save your changes and go to the Configure Windows Options window (Windows only).
22. Click Next in the following windows to accept the default settings (or change as required):
– Configure Windows Options (Windows only)
– Build Start Menu Entries (Windows only)
– Configure Server Start Mode and Java SDK
23. In the Create WebLogic Configuration window, review the summary and modify the configuration location and name, as required. For more information, see “Creating the WebLogic Configuration” on page 5-19. Click Create to create the domain.
24. In the Creating Configuration window, once the domain configuration has been created, click Done to close the Configuration Wizard.
How Do I . . . ?
14-18 Creating WebLogic Configurations Using the Configuration Wizard
How Do I: Create a Domain Using a Database with an XA Driver?When you create a domain with a default domain template using the Configuration Wizard, it creates a non-XA configuration. To create a new domain using a database with an XA driver, you must perform setup tasks in both the Configuration Wizard and the WebLogic Server Administration Console.
Step 1: Use the Configuration Wizard to Create a Domain
Step 2: Use the WebLogic Server Administration Console to verify the JDBC configuration for the domain
Before You StartBefore starting this procedure, we recommend that you review the following topics:
“Guidelines for Changing to an XA Configuration” on page 14-2
“Summary of JDBC Settings for XA Configurations” on page 14-2
Extending a DomainYou can also use the Configuration Wizard to extend an existing domain. While the JDBC changes in an XA configuration are the same, the steps to extend a domain are slightly different from creating a new domain.
For basic instructions on extending a domain, see “Overview of Extending a Domain Using the Configuration Wizard” on page 11-1.
For information about the resources and services available in the default extension templates, see “Extension Template Reference” on page 16-27.
For a summary of JDBC resource changes required for XA configurations, see “Summary of JDBC Settings for XA Configurations” on page 14-2.
Step 1: Use the Configuration Wizard to Create a DomainTo create a domain that uses a database with an XA driver, follow the procedure in “How Do I: Create a Domain Using a Different Database?” on page 14-14.
In step 8, when setting or changing values in the Configure JDBC Connection Pools window:
1. Set the Driver value to an XA driver.

How Do I : C reate a Domain Using a Database w i th an XA Dr ive r?
Creating WebLogic Configurations Using the Configuration Wizard 14-19
2. If you selected the Basic WebLogic Platform Domain or Basic WebLogic Portal Domain template, select the portalPool JDBC connection pool tab and deselect the Supports local transaction option. (This option is enabled by default.)
The following provides example settings for configuring an Oracle database with an XA driver:
Vendor: Oracle
Driver: Oracle’s Driver (Thin XA)
DBMS name: MyOracleDB
DBMS host: MyOracleMachineName
DBMS port: MyOraclePortNumber
User name: MyUserName
User password: MyUserPassword
Confirm user password: MyUserPassword
Here MyOracleDB, MyOracleMachineName, MyOraclePortNumber, MyUserName, and MyUserPassword are the appropriate values for your Oracle database setup.
Repeat step 8 to create or update any additional JDBC connection pools.
Note: JMS must use a JDBC connection pool that uses a non-XA resource driver (you cannot use an XA driver or a JTS driver). The cgJMSPool-nonXA JDBC connection pool is provided to support JMS resources.
Once the domain configuration has been created, in the Creating Configuration window, check Start Admin Server and click Done to start the Administration Server and close the Configuration Wizard.
Step 2: Use the WebLogic Server Administration Console to verify the JDBC configuration for the domainOnce the Administration Server is running, you log in to the domain’s Administration Console to verify the JDBC configuration for your domain.
1. Open a Web browser to the following URL:
http://hostname:port/console

How Do I . . . ?
14-20 Creating WebLogic Configurations Using the Configuration Wizard
Replace hostname with the DNS name or IP address of the Administration Server, and replace port with the address of the port on which the Administration Server is listening for requests (7001 by default). For example:
http://localhost:7001/console
2. When the login page is displayed, enter the username and password required to start the Administration Server. Then click Sign In.
3. For each connection pool using an XA driver, perform the following steps:
a. In the left pane of the Administration Console, navigate to Services→ JDBC→ Connection Pools.
b. Select the JDBC connection pool name on the list.
c. On the Connections tab in the Configuration section, click Show to show the Advanced Options section.
d. Verify that the Supports Local Transaction option is enabled (except for portalPool, if defined, which requires this option to be disabled).
e. Note the value of the Maximum Capacity option for the JDBC connection pool. Make sure that this value is greater than or equal to the value of the Thread Count option for the execute queue.
To display the execute queues, right-click the server name in the left pane and select View Execute Queues. Click an execute queue name on the list and view the Thread Count option value. (Note that the Thread Count option may also appear in the summary table on the Execute Queue page.)
4. For Oracle databases only, to configure JTA, perform the following steps:
Note: This step is not applicable to WebLogic Portal domains. If you are creating a WebLogic Portal domain or are not using an Oracle database, skip to step 5.
a. In the left pane, navigate to Services→ JTA.
b. Make sure that the value of the Timeout Seconds option for JTA is less than or equal to the value of the XA Transaction Timeout option in the JDBC connection pool if the Enable XA Transaction Timeout option is enabled.
To view the XA Transaction Timeout and Enable XA Transaction Timeout option settings, navigate to Services→ JDBC→ Connection Pools and select the JDBC Connection Pool. On the Connections tab in the Configuration section, click Show to show the Advanced Options section.

How Do I : C rea te XA Domains w i th Mu l t iPoo l s and an Orac le RAC Database?
Creating WebLogic Configurations Using the Configuration Wizard 14-21
For WebLogic Integration domains, it is recommended that you set the value of the XA Transaction Timeout option to 60 seconds, and the value of the Timeout Seconds option for JTA to 50 for normal size messages, and increase these values proportionately as the size of your message increases.
c. Click Apply.
5. For WebLogic Portal domains only, if you have configured the portalPool to use an XA driver and you are using the optional commerce functionality:
a. In the left pane of the Administration Console, navigate to Services→ JDBC→ Data Sources.
b. Select the portalFrameworkPool data source on the list.
c. Remove weblogic.jdbc.jts.commercePool from the list of JNDI names.
d. Click Apply.
e. Select the cgDataSource-nonXA data source on the list.
f. Add weblogic.jdbc.jts.commercePool to the list of JNDI names.
g. Click Apply.
For information about using commerce functionality, see “Adding Commerce Services to an Application” in the WebLogic Workshop Help at the following URL: http://e-docs.bea.com/workshop/docs81/doc/en/portal/buildportals/commerce.html
6. In the left pane of the Administration Console, navigate to Servers→ cgServer. On the Start/Stop tab in the Control section, select Force shutdown of this server to shut down the server and then restart it.
The domain is now set up to use a database with an XA Driver.
How Do I: Create XA Domains with MultiPools and an Oracle RAC Database?
WebLogic Platform 8.1 SP5 supports the use of JDBC MultiPools with an Oracle RAC database. A MultiPool is a group of connection pools, but to an application, the characteristics of a MultiPool appear identical to those of a single basic connection pool. Each connection pool in a MultiPool is assigned to a different instance of the same database. If an application cannot obtain a connection from a particular connection pool because database connectivity from the pool is
How Do I . . . ?
14-22 Creating WebLogic Configurations Using the Configuration Wizard
down, WebLogic Platform attempts to obtain a connection from the next connection pool in the MultiPool. Optionally, a MultiPool can be configured to provide load balancing, too.
Note: WebLogic Platform 8.1 SP5 is certified to support Multipools with XA only on Oracle RAC.
This section presents procedures for:
Updating Existing XA Domains to Use Oracle RAC
Creating XA Domains that Use Oracle RAC
Note: For complete information about creating an XA domain that uses Oracle RAC, see “Using WebLogic Platform with Oracle RAC” in Managing WebLogic Platform Database Resources.
Updating Existing XA Domains to Use Oracle RACIf you already have a domain that was created with the Basic WebLogic Platform Domain template, then you have a domain that is capable of using XA resources. (For more information, see “Guidelines for Changing to an XA Configuration” on page 14-2.) As a result, you have the option of reconfiguring your domain so it uses Oracle RAC. How do you perform such a reconfiguration? The Configuration Wizard GUI does not completely support the configuration of domains that include Oracle RAC, so you cannot use the GUI for this task.
Instead, this type of reconfiguration must be executed through a script produced with WebLogic Server Scripting Tool (WLST) Offline. WLST Offline is a command-line scripting interface for configuring a domain. For more information about using it to update a domain, specifically for the purpose of accommodating Oracle RAC, see “Updating an Existing XA Domain to Use Oracle RAC” in “Using WebLogic Platform with Oracle RAC” in Managing WebLogic Platform Database Resources.
For a sample script that you can use to update an existing Platform domain, see Appendix B, “WebLogic Scripting Tool (WLST) Offline Update File,” in Managing WebLogic Platform Database Resources.
Creating XA Domains that Use Oracle RACThe process of creating an XA domain that is set up for Oracle RAC to be used consists of two main tasks:
Task 1: Use the Configuration Wizard to Create a Domain

How Do I : C rea te XA Domains w i th Mu l t iPoo l s and an Orac le RAC Database?
Creating WebLogic Configurations Using the Configuration Wizard 14-23
Task 2: Edit the config.xml File
This section presents a procedure for each task, and then offers a sample config.xml file (see “Sample config.xml Code” on page 14-30) so you can understand how your file should look when you finish editing it.
Task 1: Use the Configuration Wizard to Create a DomainTo create a domain that uses an Oracle RAC database, see the procedure in “How Do I: Create a Domain Using a Different Database?” on page 14-14. Complete all the steps as specified in that procedure with the following exceptions:
In step 3 you are prompted to select a configuration template in the Select a Configuration Template window. When prompted, select Basic WebLogic Platform Domain and click Next.
If you are configuring connection pools, MultiPools, or JDBC Data Sources, do not perform steps 8 to 11. Instead, after step 7, perform the following steps 1 to 10:
1. In the Configure JDBC Connection Pools window, remove the following predefined connection pools by highlighting each pool name and clicking Delete:
– portalPool
– cgPool
– bpmArchPool
Note: Do not delete cgJMSPool-nonXA.
2. In the Configure JDBC Connection Pools window, create the following six connection pools:
– portalPool1
– portalPool2
– cgPool1
– cgPool2
– bpmArchPool1
– bpmArchPool2
To create a connection pool, click Add. Enter the values appropriate for your Oracle database setup. Table 14-6 shows some sample values. To make sure the values you specify for dbname1, dbname2, dbhost1, dbhost2, user_name, and user_password are

How Do I . . . ?
14-24 Creating WebLogic Configurations Using the Configuration Wizard
appropriate for your Oracle database setup, ask your database administrator to supply them. Here dbname1 and dbhost1 represent the name of instance 1 of the database and the name of its host machine, respectively. dbname2 and dbhost2 represent the name of instance 2 of the database and the name of its host machine.
3. Click Next to save your changes, and go to the Configure JDBC MultiPools window.
4. In the Configure JDBC MultiPools window, create the following JDBC MultiPools:
Table 14-6 Sample Values for Connection Pools
Name Vendor Driver Name DBMSName
DBMSHost
DBMSPort
User name
User password
portalPool1 Oracle Oracle’s Driver (Thin XA)
dbname1 dbhost1 1521 user_name
user_password
portalPool2 Oracle Oracle’s Driver (Thin XA)
dbname2 dbhost2 1521 user_name
user_password
cgPool1 Oracle Oracle’s Driver (Thin XA)
dbname1 dbhost1 1521 user_name
user_password
cgPool2 Oracle Oracle’s Driver (Thin XA)
dbname2 dbhost2 1521 user_name
user_password
bpmArchPool1 Oracle Oracle’s Driver (Thin XA)
dbname1 dbhost1 1521 user_name
user_password
bpmArchPool2 Oracle Oracle’s Driver (Thin XA)
dbname2 dbhost2 1521 user_name
user_password
cgJMSPool-nonXA
Oracle Oracle’s Driver (Thin) Versions: 9.0.1, 9.2.0, 10
dbname1 dbhost1 1521 user_name
user_password

How Do I : C rea te XA Domains w i th Mu l t iPoo l s and an Orac le RAC Database?
Creating WebLogic Configurations Using the Configuration Wizard 14-25
– cgMultiPool
– portalMultiPool
– bpmArchMultiPool
To create a MultiPool, click Add, and enter the appropriate MultiPool name.
5. Select an algorithm type:
– High-Availability
With the High-Availability option set, connection requests are served by the first available pool in the list. When a connection pool becomes defunct, connection requests are served by the next connection pool in the list.
– Load-Balancing
With the Load-Balancing option, connection requests are distributed among available connection pools.
6. Click Next to save your changes and go to the Assign JDBC Connection Pools to MultiPools window.
7. In the JDBC MultiPool pane, select the JDBC MultiPool to which you want to assign JDBC connection pools.
8. In the left pane, click the check box beside each JDBC connection pool that you want to assign to the selected multipool. Table 14-7 shows which connection pools to assign to each MultiPool.
Note: Do not assign the connection pool called cgJMSPool-nonXA to a MultiPool. WebLogic Platform does not support the use of MultiPools with JMS JDBC Stores. If your application makes use of JMS JDBC Stores, you must configure them to use Oracle RAC with connect-time failover. For instructions, see step 6 in “Task 2: Edit the config.xml File” on page 14-26.
Table 14-7 Assignments of Connection Pools to MultiPools
Connection Pools MultiPool
portalPool1, portalPool2 portalMultiPool
cgPool1, cgPool2 cgMultiPool
bpmArchPool1, bpmArchPool2 bpmArchMultiPool
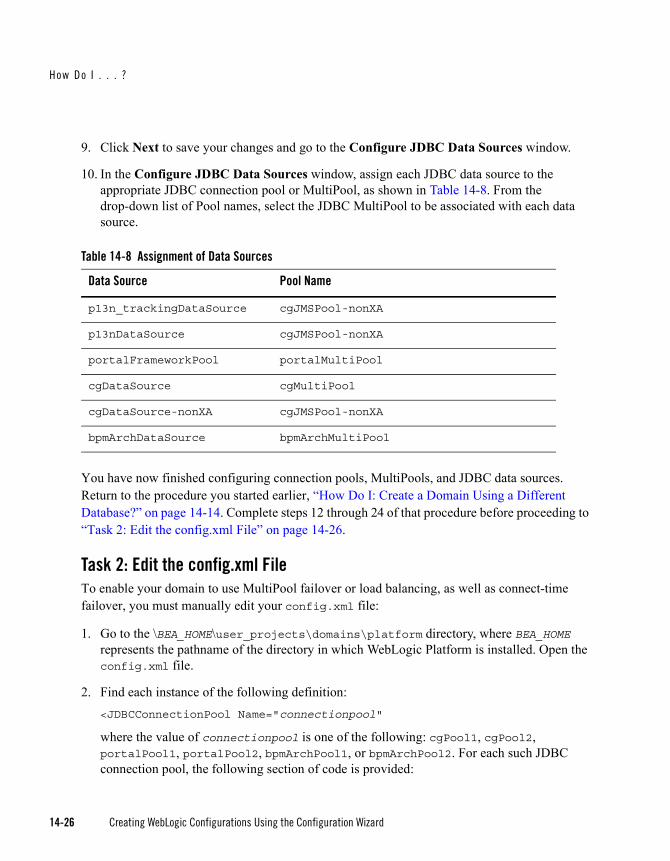
How Do I . . . ?
14-26 Creating WebLogic Configurations Using the Configuration Wizard
9. Click Next to save your changes and go to the Configure JDBC Data Sources window.
10. In the Configure JDBC Data Sources window, assign each JDBC data source to the appropriate JDBC connection pool or MultiPool, as shown in Table 14-8. From the drop-down list of Pool names, select the JDBC MultiPool to be associated with each data source.
You have now finished configuring connection pools, MultiPools, and JDBC data sources. Return to the procedure you started earlier, “How Do I: Create a Domain Using a Different Database?” on page 14-14. Complete steps 12 through 24 of that procedure before proceeding to “Task 2: Edit the config.xml File” on page 14-26.
Task 2: Edit the config.xml FileTo enable your domain to use MultiPool failover or load balancing, as well as connect-time failover, you must manually edit your config.xml file:
1. Go to the \BEA_HOME\user_projects\domains\platform directory, where BEA_HOME represents the pathname of the directory in which WebLogic Platform is installed. Open the config.xml file.
2. Find each instance of the following definition:<JDBCConnectionPool Name="connectionpool"
where the value of connectionpool is one of the following: cgPool1, cgPool2, portalPool1, portalPool2, bpmArchPool1, or bpmArchPool2. For each such JDBC connection pool, the following section of code is provided:
Table 14-8 Assignment of Data Sources
Data Source Pool Name
p13n_trackingDataSource cgJMSPool-nonXA
p13nDataSource cgJMSPool-nonXA
portalFrameworkPool portalMultiPool
cgDataSource cgMultiPool
cgDataSource-nonXA cgJMSPool-nonXA
bpmArchDataSource bpmArchMultiPool

How Do I : C rea te XA Domains w i th Mu l t iPoo l s and an Orac le RAC Database?
Creating WebLogic Configurations Using the Configuration Wizard 14-27
<JDBCConnectionPool Name="connectionpool"
DriverName="oracle.jdbc.xa.client.OracleXADataSource"Password="{3DES}q7oBrwmN89U=" Properties="user=user_name"TestConnectionsOnReserve="true"TestTableName="SQL SELECT 1 FROM DUAL" URL="jdbc:oracle:thin:@lcqlnxas10:1521:lnrac2"/>
3. Verify the following default attributes:
– TestConnectionsOnReserve="true"
The value should be set to "true".When this parameter is set to true, WebLogic Platform tests a connection before giving it to a client. The test adds a small delay in serving the client’s request for a connection from the pool, but it ensures that the client receives a working connection, as long as the DBMS is available and accessible.
– TestTableName="SQL SELECT 1 FROM DUAL"
Specifies the table used to test a physical database connection. For more details about this attribute, see TestTableName in “JDBCConnection Pool --> Configuration --> Connections” in the WebLogic Server Administration Console Online Help.
4. Add the following required attributes for XA to each connection pool (that is, cgPool1, cgPool2, portalPool1, portalPool2, bpmArchPool1, and bpmArchPool2):
– RefreshMinutes="1"
The interval, specified in minutes, between database connection tests. After every such interval, unused database connections are tested using TestTableName. Connections that fail are closed and reopened to re-establish a valid physical database connection. If TestTableName is not set, the test is not performed.
– CountOfTestFailuresTillFlush="1"
Specifies the number of test failures allowed before WebLogic Platform closes all connections in the connection pool to minimize the delay caused by further database testing. For more information about this attribute, see “JDBC Connection Pool Testing Enhancements” in “Configuring and Using WebLogic JDBC” in Programming WebLogic JDBC.
Minimizes the time allowed for failover when an Oracle RAC node fails.
– CountOfRefreshFailuresTillDisable="1"

How Do I . . . ?
14-28 Creating WebLogic Configurations Using the Configuration Wizard
Specifies the number of test failures allowed before the connection pool is disabled. By limiting the amount of time allowed for repeated tests, you can minimize the delay in handling the connection request after a database failure.
– InitialCapacity="5"
Specifies the number of physical database connections established when you create a connection pool.
– KeepXAConnTillTxComplete="true"
Forces the connection pool to reserve a physical connection to the database, and to maintain a connection to an application throughout the processing of each transaction, that is, until the distributed transaction is complete.
– MaxCapacity="100"
Specifies the maximum number of physical database connections that this connection pool can contain. Different JDBC Drivers and database servers may limit the number of possible physical connections.
– SupportsLocalTransaction="true"
When this attribute is set to true, the XA driver used to create physical database connections supports SQL without global transactions. This attribute applies to connection pools that use an XA driver only; it is ignored for connection pools that use non-XA drivers.
– XARetryDurationSeconds="300"
Specifies the amount of time that the WebLogic Platform transaction manager can retry XA recover, commit, and rollback calls.
– XASetTransactionTimeout="true"
When this attribute is set to true, the global transaction timeout, XATransactionTimeout, is enabled. This attribute applies to XA connection pools only; it is ignored for connection pools that use non-XA drivers.
– XATransactionTimeout="302"
Determines the number of seconds for a global transaction to time out. This attribute applies to XA connection pools only; it is ignored for connection pools that use non-XA drivers.
Note: Attributes must be set to the same values for each XA connection pool.
5. Add the following required attributes to each MultiPool (that is, cgMultiPool, portalMultiPool, and bpmArchMultiPool):

How Do I : C rea te XA Domains w i th Mu l t iPoo l s and an Orac le RAC Database?
Creating WebLogic Configurations Using the Configuration Wizard 14-29
– FailoverRequestIfBusy=”true”
For MultiPools configured for High Availability, this attribute enables failover when all connections in a connection pool are in use.
– HealthCheckFrequencySeconds=”300”
Controls how often WebLogic Platform checks automatically disabled connection pools in a MultiPool to determine whether connections can be recreated and whether the connection pool can be re-enabled. The default value is 300 seconds.
6. Configure your JMS JDBC Store to use connect-time failover. In the config.xml file, find the following section:
<JDBCConnectionPool
Name="cgJMSPool-nonXA" Targets="cgServer"CapacityIncrement="1" DriverName="oracle.jdbc.OracleDriver"InitialCapacity="5" MaxCapacity="20"Password="{3DES}q7oBrwmN89U=" Properties="user=user_name"RefreshMinutes="0" ShrinkPeriodMinutes="15"ShrinkingEnabled="true" SupportsLocalTransaction="true"TestConnectionsOnRelease="false"TestConnectionsOnReserve="false"TestTableName="SQL SELECT 1 FROM DUAL"URL="jdbc:oracle:thin:@lcqlnxas9:1521:lnrac1"/>
Note: Line breaks are included only for readability.
7. Make the following changes to the default attributes:
– RefreshMinutes="0"
Change the value to "1". This attribute defines the interval, specified in minutes, allowed between database connection tests. After every such interval, unused database connections are tested using TestTableName. Connections that fail are closed and reopened to re-establish a valid physical database connection.
– TestConnectionsOnReserve="false"
Change the value to "true". When the value of this attribute is set to true, WebLogic Platform tests a connection before giving it to a client. The test adds a small delay in serving the client’s request for a connection from the pool, but it ensures that

How Do I . . . ?
14-30 Creating WebLogic Configurations Using the Configuration Wizard
the client receives a working connection, as long as the DBMS is available and accessible.
8. Add the following attribute:
CountOfTestFailuresTillFlush="1"
Specifies the number of test failures allowed before WebLogic Platform closes all connections in the connection pool to minimize the delay caused by further database testing. For more information about this attribute, see “JDBC Connection Pool Testing Enhancements” in “Configuring and Using WebLogic JDBC” in Programming WebLogic JDBC.
Minimizes the time allowed for failover when an Oracle RAC node fails.
9. Replace the URL line with the following:
URL="jdbc:oracle:thin:@(DESCRIPTION=(ADDRESS_LIST=(ADDRESS=(PROTOCOL=TCP)(HOST=dbhost1)(PORT=1521))(ADDRESS=(PROTOCOL=TCP)(HOST=dbhost2)(PORT=1521))(FAILOVER=on)(LOAD_BALANCE=off))(CONNECT_DATA=(SERVER=DEDICATED)(SERVICE_NAME=dbservice)))"
Note: Line breaks are included only for readability.
Obtain the values for dbhost1, dbhost2, and dbservice from your database administrator.
Note: This URL is set to configure the JMS JDBC store for connect-time failover (that is, FAILOVER=on,LOAD_BALANCE=off). Do not set the configuration for load balancing (that is, FAILOVER=off,LOAD_BALANCE=on). Connect-time load balancing is not supported in Release 8.1 SP5.
Sample config.xml CodeThe following code provides an example of how connection pools, a WebLogic JDBC MultiPool, and an associated data source are configured [defined?] in the config.xml file. For more information on editing the config.xml file and using the WLST script to configure a domain completely, see “Using WebLogic Platform with Oracle RAC” in Managing WebLogic Platform Database Resources.
<JDBCConnectionPool
CapacityIncrement="1"
CountOfRefreshFailuresTillDisable= "1"
CountOfTestFailuresTillFlush="1"
DriverName="oracle.jdbc.xa.client.OracleXADataSource"

How Do I : C rea te XA Domains w i th Mu l t iPoo l s and an Orac le RAC Database?
Creating WebLogic Configurations Using the Configuration Wizard 14-31
InitialCapacity="5"
KeepXAConnTillTxComplete="true"
MaxCapacity="100"
Name="cgPool1"
PasswordEncrypted="{3DES}lBifoTsg8fc="
Properties="user=user_name"
RefreshMinutes="1"
SupportsLocalTransaction="true"
Targets="cgServer"
TestConnectionsOnReserve="true"
TestTableName="dual"
URL="jdbc:oracle:thin:@dbhost1:1521:dbname1"
XARetryDurationSeconds="300"
XASetTransactionTimeout="true"
XATransactionTimeout="302"/>
<JDBCConnectionPool
CapacityIncrement="1"
CountOfRefreshFailuresTillDisable= "1"
CountOfTestFailuresTillFlush="1"
DriverName="oracle.jdbc.xa.client.OracleXADataSource"
InitialCapacity="5"
KeepXAConnTillTxComplete="true"
MaxCapacity="100"
Name="cgPool2"
PasswordEncrypted="{3DES}lBifoTsg8fc="
Properties="user=user_name"
RefreshMinutes="1"
SupportsLocalTransaction="true"
Targets="cgServer"
TestConnectionsOnReserve="true"
TestTableName="dual"
URL="jdbc:oracle:thin:@dbhost2:1521:dbname2"
XARetryDurationSeconds="300"
XASetTransactionTimeout="true"
XATransactionTimeout="302"/>
<JDBCMultiPool
Name="cgMultiPool"

How Do I . . . ?
14-32 Creating WebLogic Configurations Using the Configuration Wizard
PoolList="cgPool1,cgPool2"
#The following attribute is valid only for high availability.
FailoverRequestIfBusy="true"
HealthCheckFrequencySeconds="300"
Targets="cgServer"/>
<JDBCTxDataSource
JNDIName="cgDataSource"
Name="cgDataSource"
EnableTwoPhaseCommit="true"
PoolName="cgMultiPool"
Targets="cgServer"/>
<JDBCConnectionPool Name="cgJMSPool-nonXA"
Targets="cgServer"
DriverName="oracle.jdbc.OracleDriver"
URL="jdbc:oracle:thin:@(DESCRIPTION=(ADDRESS_LIST=
(ADDRESS=(PROTOCOL=TCP)(HOST=dbhost1)(PORT=1521))
(ADDRESS=(PROTOCOL=TCP)(HOST=dbhost2)(PORT=1521))
(FAILOVER=on)(LOAD_BALANCE=off))(CONNECT_DATA=(SERVER=DEDICATED)
(SERVICE_NAME=dbservice)))"
InitialCapacity="5"
MaxCapacity="5"
CapacityIncrement="1"
PasswordEncrypted="{3DES}1rWxb2KuIbI="
RefreshMinutes="1"
ShrinkPeriodMinutes="15"
ShrinkingEnabled="true"
SupportsLocalTransaction="true"
Properties="user=user_name"
TestTableName="dual"
TestConnectionsOnReserve="true"
CountOfTestFailuresTillFlush="1" />
<JDBCDataSource Name="cgDataSource-nonXA"
Targets="cgServer"
JNDIName="cgDataSource-nonXA"
PoolName="cgJMSPool-nonXA" />
Note: Line breaks are included only for readability.
Creating WebLogic Configurations Using the Configuration Wizard 15-1
C H A P T E R 15
Tutorials: Using the Configuration Wizard
A domain, or WebLogic configuration, is the basic unit of administration used by WebLogic Server. It consists of one or more WebLogic Server instances, and logically related resources and services that are managed, collectively, as one unit. You must create a domain before you can deploy applications.
The Configuration Wizard simplifies the creation of domains and servers by having you work with configuration templates that already have many configured items set up. You start with templates instead of having to enter everything from scratch. The following tutorials show you how to use the Configuration Wizard to create and update a domain quickly and easily.
For more information about domains, see “Brief Introduction to Domains” on page 1-9.
Table 15-1 Tutorials for Using the Configuration Wizard
In this tutorial... You learn how to...
Tutorial: Creating Your First Domain
Create a single-server domain quickly and easily by using preconfigured settings.
Tutorial: Creating a Custom Domain With Managed Servers, a Cluster, and Application Services
Create a multiserver domain that includes Managed Servers, a cluster, and application services by customizing preconfigured settings.
Tutorial: Extending an Existing Domain
Extend the single-server domain that you created in Tutorial: Creating Your First Domain by adding WebLogic Workshop functionality.

Tuto r i a ls : Us ing the Conf igura t i on Wizard
15-2 Creating WebLogic Configurations Using the Configuration Wizard
Tutorial: Creating Your First DomainThis section includes the following topics:
Tutorial Goals—A summary of the concepts and tasks you can learn
Tutorial Overview—A description of the overall task and the features you are to use
Steps in This Tutorial—A summary of the high-level steps in the task
To Create Your First Domain—A detailed set of instructions for completing the tutorial
Tutorial GoalsIn this tutorial, you learn how to use the Configuration Wizard’s Express option to create a single domain and server that are based completely on settings provided in a prepackaged configuration template. The Express option is a quick and easy configuration method for novice and experienced users alike to set up a domain environment for running and deploying an application. The configuration of the resulting domain can be simple or extremely complex; it all depends on the default settings provided in the configuration template.
The goals of this tutorial are to help you learn how to:
Use the Configuration Wizard to set up a basic domain that contains a single Administration Server administered by a single administrative user
Locate and use prepackaged configuration templates
Use the Configuration Wizard’s Express option and a prepackaged configuration template to create a WebLogic domain configuration quickly and easily
If you are not familiar with the basic features and functionality of a domain, or WebLogic configuration, see “Brief Introduction to Domains” on page 1-9.
This tutorial takes about 5 minutes to complete.
Tutorial OverviewIn this tutorial, you use the Configuration Wizard’s Express option and the Basic WebLogic Server Domain configuration template to create a single domain and server. The Basic WebLogic Server Domain template provides all the basic settings to configure the minimal required components for a domain: an Administration Server and a single administrative user. Because you use the Express option, you keep the default configuration settings already provided in this

Creating WebLogic Configurations Using the Configuration Wizard 15-3
template and do not need to enter settings from scratch. The only setting you enter is the administrative user login setup.
Steps in This TutorialThis section provides a high-level summary of the steps that you follow to complete the tutorial.
Step 1: Begin creating a new WebLogic configurationStart the Configuration Wizard in graphical mode and begin the steps toward creating a new WebLogic configuration.
Step 2: Select a configuration template and instruct the Configuration Wizard how to handle it
Select the Basic WebLogic Server Domain configuration template and the Express option to create your domain quickly using template defaults.
Step 3: Set up the login for the administrative userEnter the user name and password used by the administrative user to log in to the Administration Server.
Step 4: Configure the WebLogic environmentSet up your server to start in development mode and select a Java Software Development Kit (SDK) to be used with your domain.
Step 5: Create your new domain and administration serverInstruct the Configuration Wizard to take your selections, create a new domain and server, and start the server.
Step 6: Log in to the Administration Console and optionally review the configuration settings
Log in to the server’s Administration Console and optionally review the configuration settings provided by the Basic WebLogic Server Domain configuration template for your domain.
Summary: Your First DomainReview the concepts and tasks covered in the tutorial.
To Create Your First DomainThis section provides the detailed set of instructions to follow to complete the tutorial.

Tuto r i a ls : Us ing the Conf igura t i on Wizard
15-4 Creating WebLogic Configurations Using the Configuration Wizard
Step 1: Begin creating a new WebLogic configuration1. Start the Configuration Wizard in graphical mode as described in the following table.
The Create or Extend a Configuration window is displayed.
Table 15-2 Starting the Configuration Wizard in Graphical Mode
On this platform... Perform the following steps...
Windows From the Start menu:
Start→ Programs→ BEA WebLogic Platform 8.1→ Configuration Wizard
From an MS-DOS command prompt window:1. Go to the \common\bin subdirectory of the product installation directory. For
example:cd c:\bea\weblogic81\common\bin
2. Enter config.cmd
UNIX 1. Log in to the UNIX system.2. Go to the /common/bin subdirectory of the product installation directory. For
example:cd $BEAHOME/weblogic81/common/bin
3. Enter sh config.sh
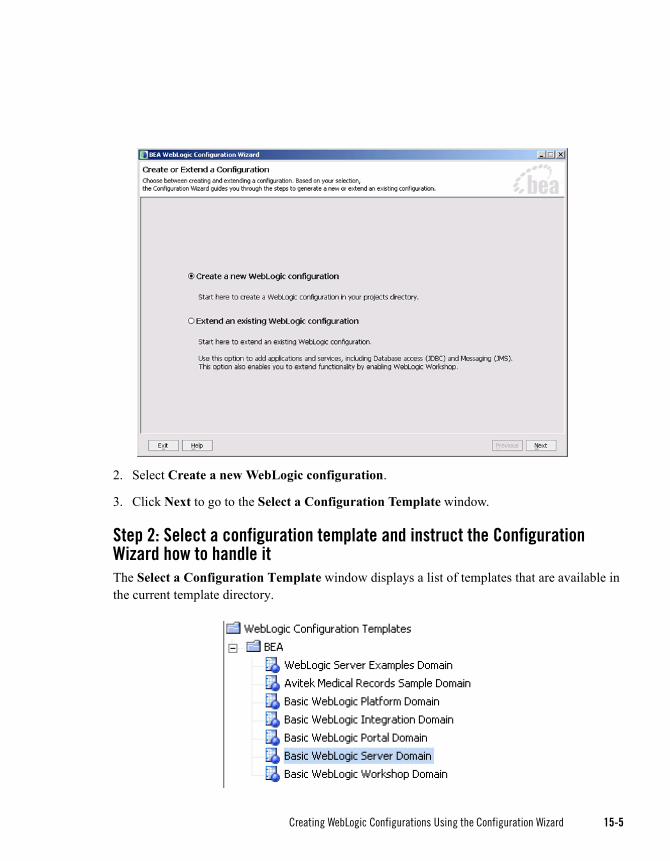
Creating WebLogic Configurations Using the Configuration Wizard 15-5
2. Select Create a new WebLogic configuration.
3. Click Next to go to the Select a Configuration Template window.
Step 2: Select a configuration template and instruct the Configuration Wizard how to handle itThe Select a Configuration Template window displays a list of templates that are available in the current template directory.

Tuto r i a ls : Us ing the Conf igura t i on Wizard
15-6 Creating WebLogic Configurations Using the Configuration Wizard
The configuration template directory can be located anywhere on your system. By default, it resides in WL_HOME\common\templates\domains, where WL_HOME is the directory that contains the product installation (by default, this directory is c:\bea\weblogic81 on Windows).
1. Select the Basic WebLogic Server Domain from the list of WebLogic Configuration Templates.
Note: For purposes of this tutorial, we instruct you to select the Basic WebLogic Server Domain configuration template because it contains the minimal settings needed to create a domain: an Administration Server and a single administrative user.
You could also select a template that contains default settings for a slightly more complex configuration. You might, for example, select the Avitek Medical Records Sample Domain template, which includes settings for an Administration Server, JMS queues, and multiple users, as well as the Medical Records application itself. Creating a more complex domain is no more difficult than creating a simple one when you use a template with the appropriate default settings. However, the goal of this tutorial is to create a simple domain, and the Basic WebLogic Server Domain configuration template is sufficient for this purpose.
2. Click Next to go to the Choose Express or Custom Configuration window.
This window provides the following modes for using the Configuration Wizard:
– Express—To create a domain by accepting the default template settings
– Custom—To create a domain by customizing the template settings to better meet the requirements of your domain environment
3. Select Express to create a domain quickly, using the default template settings.
Note: The Express option is a quick and easy configuration method for novice and experienced users alike to set up a domain environment. By relying on default template settings, you do not need to enter settings from scratch.
4. Click Next to go to the Configure Administrative Username and Password window.
Step 3: Set up the login for the administrative user1. In the Configure Administrative Username and Password window, enter weblogic for
both the user name and password. Notice that you must enter the password twice as a security precaution.
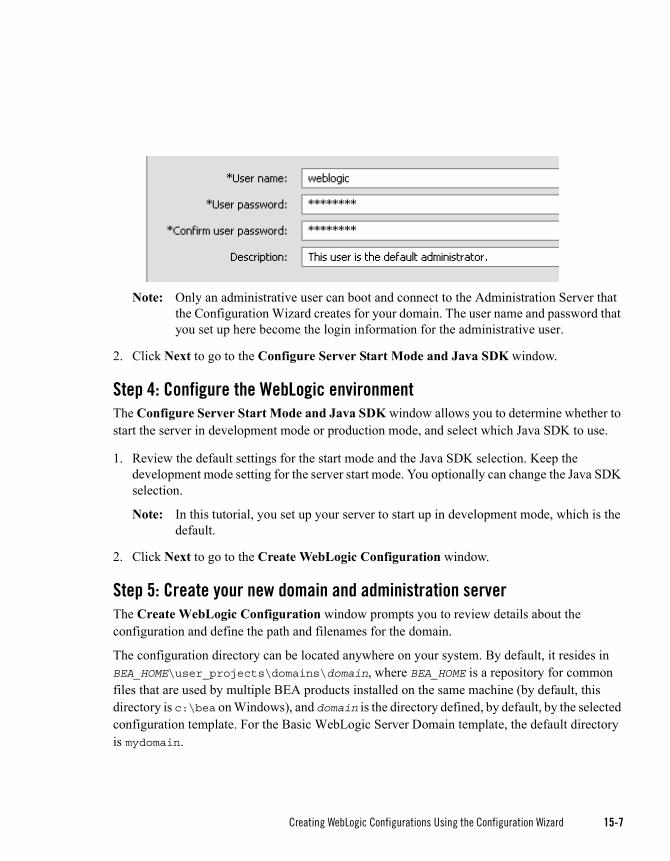
Creating WebLogic Configurations Using the Configuration Wizard 15-7
Note: Only an administrative user can boot and connect to the Administration Server that the Configuration Wizard creates for your domain. The user name and password that you set up here become the login information for the administrative user.
2. Click Next to go to the Configure Server Start Mode and Java SDK window.
Step 4: Configure the WebLogic environmentThe Configure Server Start Mode and Java SDK window allows you to determine whether to start the server in development mode or production mode, and select which Java SDK to use.
1. Review the default settings for the start mode and the Java SDK selection. Keep the development mode setting for the server start mode. You optionally can change the Java SDK selection.
Note: In this tutorial, you set up your server to start up in development mode, which is the default.
2. Click Next to go to the Create WebLogic Configuration window.
Step 5: Create your new domain and administration serverThe Create WebLogic Configuration window prompts you to review details about the configuration and define the path and filenames for the domain.
The configuration directory can be located anywhere on your system. By default, it resides in BEA_HOME\user_projects\domains\domain, where BEA_HOME is a repository for common files that are used by multiple BEA products installed on the same machine (by default, this directory is c:\bea on Windows), and domain is the directory defined, by default, by the selected configuration template. For the Basic WebLogic Server Domain template, the default directory is mydomain.

Tuto r i a ls : Us ing the Conf igura t i on Wizard
15-8 Creating WebLogic Configurations Using the Configuration Wizard
1. Keep the default settings for the path and filenames and click Create to create the domain.
The progress bar tracks the creation progress until the domain configuration is created.
The Configuration Wizard creates a domain that is based on the Basic WebLogic Server Domain template—a simple WebLogic Server domain with an Administration Server that can be administered by a single administrative user.
2. In the Creating Configuration window, perform the steps in the following table, as required by your platform, to close the Configuration Wizard and start the Administration Server.
Creating WebLogic Configurations Using the Configuration Wizard 15-9
Step 6: Log in to the Administration Console and optionally review the configuration settingsOnce the Administration Server is running, you can optionally log in to the domain’s Administration Console and review the configuration settings provided by the Basic WebLogic Server Domain configuration template for your domain.
1. Open a Web browser to the following URL:
http://hostname:port/console
Where you replace hostname with the DNS name or IP address of the Administration Server, and replace port with the address of the port on which the Administration Server is listening for requests (7001 by default). For example:
http://localhost:7001/console
2. On the Administration Console login page, enter weblogic as the username and password required to start the Administration Server. Then click Sign In.
3. In the left pane of the Administration Console, expand the Servers folder.
4. Click the name of the server, for example, myserver.
5. In the right pane, select the Configuration tab and review the information available in the Configuration area.
Summary: Your First DomainThis tutorial introduced you to the basics of using the Configuration Wizard to create a WebLogic domain configuration. The concepts and tasks you learned include the following:
On this platform . . . Perform the following task . . .
Windows Select Start Admin Server and click Done to close the Configuration Wizard and start the Administration Server.
UNIX and Linux Click Done. To start the Administration Server:1. Open a shell on the computer on which you created the
domain. 2. Navigate to the directory in which you created the domain. 3. Enter the following command:
startWebLogic.sh

Tuto r i a ls : Us ing the Conf igura t i on Wizard
15-10 Creating WebLogic Configurations Using the Configuration Wizard
The Configuration Wizard simplifies domain creation by working from a configuration template that contains preconfigured settings.
Your product installation includes prepackaged configuration templates that you can use immediately with the Configuration Wizard.
You can use the Configuration Wizard’s Express option and a prepackaged configuration template to create a WebLogic configuration quickly and easily.
Tutorial: Creating a Custom Domain With Managed Servers, a Cluster, and Application Services
This section includes the following topics:
Tutorial Goals—A summary of the concepts and tasks you can learn
Tutorial Overview—A description of the overall task and the features you are to use
Steps in This Tutorial—A summary of the high-level steps in the task
To create a custom domain with Managed Servers, a cluster, and application services—A detailed set of instructions for completing the tutorial
Tutorial GoalsIn this tutorial, you learn how to use the Configuration Wizard’s Custom option to create a clustered, multiserver domain by customizing the settings provided in a prepackaged configuration template. The Custom option is a configuration method where you start with a template’s default settings and then change those settings to match more precisely the requirements for the domain in which you want to deploy and run an application. Whether you want to change one setting or more, or want to create a simple domain or a more complex domain, the Configuration Wizard Custom option gives you the same ability to view, add, change, or delete any of the template settings.
The goals of this tutorial are the following:
Understand how you can use the Configuration Wizard to set up a clustered, multiserver domain provisioned with database and messaging application resources
Locate and use prepackaged configuration templates

Creating WebLogic Configurations Using the Configuration Wizard 15-11
Learn how you can use the Custom option to modify some of the default settings provided in a configuration template to create a custom domain that matches your application’s requirements more precisely
If you are not familiar with the basic features and functionality of a domain, or WebLogic configuration, see “Brief Introduction to Domains” on page 1-9.
This tutorial takes about 15 minutes to complete.
Tutorial OverviewIn this tutorial, you use the Configuration Wizard to create a domain that is based on the Basic WebLogic Server Domain configuration template, as you did in “Tutorial: Creating Your First Domain” on page 15-2. In this case, however, you customize your domain to include:
Three Managed Servers
A Managed Server hosts application components and resources, which are deployed and managed as part of the domain. The three Managed Servers are in addition to the single Administration Server that you also set up in this tutorial.
A single cluster
A cluster is a group of WebLogic Server instances that work together to provide scalability and high availability for applications. Clusters can improve performance and provide failover if a server instance becomes unavailable. The servers within a cluster can run on the same machine, or they can run on different machines. To the client, a cluster appears as a single WebLogic Server instance. In this tutorial, all the servers and the cluster created by the Configuration Wizard are to run on your local machine.
Database and messaging application services
Specifically, the WebLogic Java Database Connectivity (JDBC) and WebLogic Java Message Service (JMS) application services are set up.
This tutorial is loosely based on the Avitek Medical Records (MedRec) sample, which demonstrates WebLogic Server and J2EE features, as well as best practices. The Medical Records Clustering Tutorials, available at http://e-docs.bea.com/wls/docs81/medrec_cluster/index.html, guides you through the process of creating and configuring a new cluster using the Configuration Wizard to define the Managed Servers and cluster, and the Administration Console to define the application services.

Tuto r i a ls : Us ing the Conf igura t i on Wizard
15-12 Creating WebLogic Configurations Using the Configuration Wizard
This tutorial guides you through a similar scenario, using only the Configuration Wizard to define the infrastructure components and application services. For more information about the Medical Records sample, see WebLogic Server Application Examples and Tutorials at the following URL:
http://e-docs.bea.com/wls/docs81/samples.html
Steps in This TutorialThis section provides a high-level summary of the steps that you follow to complete the tutorial.
Step 1: Begin creating a new WebLogic configurationStart the Configuration Wizard in graphical mode and begin the steps toward creating a new WebLogic configuration.
Step 2: Select a configuration template and instruct the Configuration Wizard how to handle it
Select the Basic WebLogic Server Domain configuration template and the Custom option in order to customize the configuration to support Managed Servers, a cluster, and application services.
Step 3: Configure the Administration ServerConfigure the Administration Server for the domain by specifying a name, listen address, and listen ports.
Step 4: Configure the Managed ServersSet up three Managed Servers to host application components and resources.
Step 5: Configure the ClusterFor scalability and high availability, create a cluster and target the three Managed Servers to the cluster.
Step 6: Configure the JDBC optionsTo enable your application to interface with a database, set up resources, such as JDBC connection pools and a JDBC data source, and test your connection to the database.
Step 7: Configure the JMS optionsTo enable your application to handle messaging, set up resources, such as a JMS connection factory, a database store to persist messages, a JMS server to manage the connections and messages for clients, and destination queues.
Step 8: Set up the login for the administrative userEnter the user name and password used by the administrative user to log in to the Administration Server.

Creating WebLogic Configurations Using the Configuration Wizard 15-13
Step 9: Configure the WebLogic environmentEnable your domain to be used specifically in a Windows environment. Also, set up your server to start in development mode, and select a Java Software Development Kit (SDK) to be used with your domain.
Step 10: Create the new domainInstruct the Configuration Wizard to take your selections and modifications as input, create a new domain and server, and start the Administration Server.
Step 11: Log in to the Administration Console and optionally review the configuration settings
Log in to the server’s Administration Console and optionally review both the configuration settings provided by the Basic WebLogic Server Domain configuration template and those customized by you for your domain.
Summary: Your First Custom DomainReview the concepts and tasks covered in the tutorial.
To create a custom domain with Managed Servers, a cluster, and application servicesThis section provides the detailed set of instructions to follow to complete the tutorial.
Step 1: Begin creating a new WebLogic configuration1. Start the Configuration Wizard in graphical mode as described in the following table.

Tuto r i a ls : Us ing the Conf igura t i on Wizard
15-14 Creating WebLogic Configurations Using the Configuration Wizard
The Create or Extend a Configuration window is displayed.
Table 15-3 Starting the Configuration Wizard in Graphical Mode
On this platform... Perform the following steps...
Windows From the Start menu:
Start→ Programs→ BEA WebLogic Platform 8.1→ Configuration Wizard
From an MS-DOS command prompt window:1. Go to the \common\bin subdirectory of the product installation directory. For
example:cd c:\bea\weblogic81\common\bin
2. Enter config.cmd
UNIX 1. Log in to the UNIX system.2. Go to the /common/bin subdirectory of the product installation directory. For
example:cd $BEAHOME/weblogic81/common/bin
3. Enter sh config.sh

Creating WebLogic Configurations Using the Configuration Wizard 15-15
2. Select Create a new WebLogic configuration.
3. Click Next to go to the Select a Configuration Template window.
Step 2: Select a configuration template and instruct the Configuration Wizard how to handle it1. In the Select a Configuration Template window, select the Basic WebLogic Server
Domain from the list of WebLogic Configuration Templates.
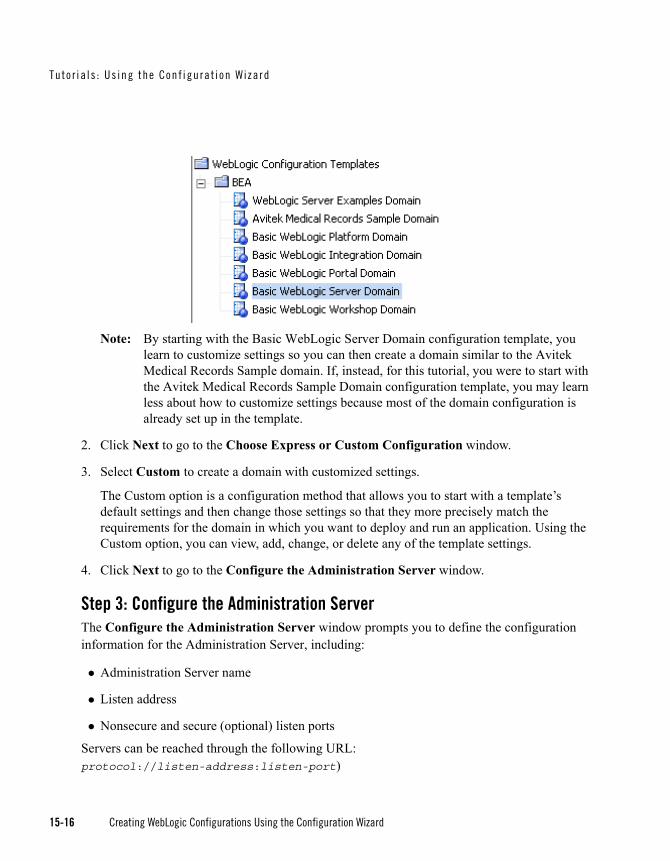
Tuto r i a ls : Us ing the Conf igura t i on Wizard
15-16 Creating WebLogic Configurations Using the Configuration Wizard
Note: By starting with the Basic WebLogic Server Domain configuration template, you learn to customize settings so you can then create a domain similar to the Avitek Medical Records Sample domain. If, instead, for this tutorial, you were to start with the Avitek Medical Records Sample Domain configuration template, you may learn less about how to customize settings because most of the domain configuration is already set up in the template.
2. Click Next to go to the Choose Express or Custom Configuration window.
3. Select Custom to create a domain with customized settings.
The Custom option is a configuration method that allows you to start with a template’s default settings and then change those settings so that they more precisely match the requirements for the domain in which you want to deploy and run an application. Using the Custom option, you can view, add, change, or delete any of the template settings.
4. Click Next to go to the Configure the Administration Server window.
Step 3: Configure the Administration ServerThe Configure the Administration Server window prompts you to define the configuration information for the Administration Server, including:
Administration Server name
Listen address
Nonsecure and secure (optional) listen ports
Servers can be reached through the following URL: protocol://listen-address:listen-port)

Creating WebLogic Configurations Using the Configuration Wizard 15-17
The Administration Server provides a central point for managing the domain and enabling access to the WebLogic Server administration tools. A domain always includes one WebLogic Server instance that is configured as an Administration Server.
1. Enter the values shown in the following illustration for your Administration Server.
2. Click Next to go to the Managed Servers, Clusters, and Machines Options window.
This window prompts you to define the additional infrastructure components that are needed to set up a distributed configuration, including Managed Servers, clusters, and host machines. In the following steps, you define three Managed Servers and one cluster for your domain.
3. Select Yes to step through the procedure for configuring Managed Servers, clusters, and machines.
4. Click Next to go to the Configure Managed Servers window.
Step 4: Configure the Managed ServersThe Configure Managed Servers window prompts you to define the configuration information for one or more Managed Servers, including:
Managed Server name
Listen address
Nonsecure and secure (optional) listen ports
Servers can be reached through the following URL: protocol://listen-address:listen-port.
In the following steps, you add three Managed Servers to the domain.
1. Click Add to add a Managed Server.

Tuto r i a ls : Us ing the Conf igura t i on Wizard
15-18 Creating WebLogic Configurations Using the Configuration Wizard
2. Enter the values shown in the following illustration for the Managed Server.
3. Repeat steps 1 and 2 to add two additional Managed Servers. Enter the values shown in the following illustration for the additional Managed Servers.
4. Click Next to go to the Configure Clusters window.
Step 5: Configure the ClusterThe Configure Clusters window prompts you to define the configuration information for one or more clusters, including:
Cluster name
Multicast address and port
Cluster address that identifies the Managed Servers in the cluster
Frontend host if you are using a proxy server or a firewall.
Frontend HTTP port if you are using a proxy server or a firewall.
In the following steps, you add a single cluster to the domain:
1. Click Add to add a cluster.
2. Enter the values in the following illustration for the cluster.
Note: Because all the Managed Servers listen at the same IP address (relying on unique port numbers to keep them separate), you should set the Cluster Address to the same IP address as the Managed Servers. You will not be using a proxy server or a firewall, so you do not need to enter values for Frontend host or FrontendHTTP port.
3. Click Next to go to the Assign Servers to Clusters window.

Creating WebLogic Configurations Using the Configuration Wizard 15-19
This window prompts you to assign the available Managed Servers to a cluster within the domain. By default, MedRecCluster, the only cluster that is defined, is already selected in the Cluster pane.
4. Shift-click the name of each Managed Server on the Server pane so that all Managed Servers are selected.
5. Click the right arrow to assign the Managed Servers to the cluster, MedRecCluster.
The names of the Managed Servers are removed from the Server pane and added, below the name of the target cluster, to the Cluster pane.
6. Click Next to go to the Configure Machines window.
This window prompts you to define the configuration information for the Windows and UNIX machines in the domain. This step is optional.
Note: In this tutorial, all the servers in the domain are to reside on your local machine, so it is unnecessary to set up additional machines and target resources to them. Therefore, you can skip the machine configuration steps.
7. Click Next to go to the Database (JDBC) Options window.
Step 6: Configure the JDBC optionsThe Database (JDBC) Options window prompts you to configure WebLogic Java Database Connectivity (JDBC). In the following steps, you define a JDBC connection pool and data source for the PointBase database management system. A JDBC connection pool is a ready-to-use pool of connections to your DBMS.
To configure the JDBC options:
1. Select Yes to step through the JDBC configuration setup.
2. Click Next to go to the Configure JDBC Connection Pools window.
This window prompts you to create a JDBC connection pool, including:
– Connection pool name

Tuto r i a ls : Us ing the Conf igura t i on Wizard
15-20 Creating WebLogic Configurations Using the Configuration Wizard
– Database vendor, driver, and class name used to create the physical connections between WebLogic Server and the DBMS for this connection pool
– Database name, host, and port number
– URL for the database used to create the connections in the connection pool
– User name and password used to create the physical database connections
– Properties list passed to the JDBC Driver for use when creating physical database connections
3. Click Add to add a JDBC connection pool.
4. Enter values shown in the following illustration for the Connection Pool.
Note: Enter MedRec as the password for the connection pool. Notice that you must enter the password twice as a security precaution.
Notes:
When you select a database vendor from the Vendor list, a number of fields are automatically populated for you, including the Driver, Class Name, Dbms Host, Dbms Port, and JDBC URL. The Class Name and JDBC URL values are read-only. All others can be modified, if required for your environment.
For this tutorial, you select a JDBC driver that does not support distributed transactions (nonXA driver).

Creating WebLogic Configurations Using the Configuration Wizard 15-21
5. Click Next to go to the Configure JDBC MultiPools window.
This window prompts you to configure JDBC MultiPools. A JDBC MultiPool is a group of JDBC connection pools that you can set up to accommodate either a high-availability algorithm or a load-balancing algorithm. It is used in the same way a connection pool is used.
Note: For this tutorial, you can skip the configuration of JDBC MultiPools because you do not need them in your domain.
6. Click Next to go to the Configure JDBC Data Sources window.
This window prompts you to configure the data sources that are bound to the JNDI tree, including:
– Data source name
– JNDI pathname to which this data source is bound
– Connection pool to which the data source is assigned
– Whether or not the data source supports global transactions
7. Click Add to add a JDBC data source.
8. Enter pb/MedRecTxDataSource for the JDBC data source and JNDI names, and set the remaining values as shown in the following illustration.
Note:
– You assign the JDBC data source to the JDBC Connection Pool defined previously.
– You set the Honor Global Transaction toggle switch to enable the support of global transactions.
– You use the Tx prefix in the JDBC data source and JNDI names to indicate that the data source supports global transactions.
9. Click Next to go to the Test JDBC Connection Pools and Setup JDBC Database window.
This window prompts you to test the JDBC connection pool configuration on the local machine.

Tuto r i a ls : Us ing the Conf igura t i on Wizard
15-22 Creating WebLogic Configurations Using the Configuration Wizard
Note: Because you are using PointBase in this tutorial, you do not need to test or set up any JDBC resources in this window. The Configuration Wizard configures the PointBase database for you during domain creation.
10. Click Next to go to the Messaging (JMS) Options window.
Step 7: Configure the JMS optionsThe Messaging (JMS) Options window prompts you to configure WebLogic Java Message Service (JMS).
In the following steps, you define:
Connection factory—Encapsulated connection configuration information that enables JMS applications to create a connection.
JDBC store—JDBC-accessible database store used to store persistent messages.
JMS Server—Server that manages connections and message requests on behalf of clients.
Destination—Queues (to support the point-to-point model) that serve as a destination for a JMS server.
To define the JMS options:
1. Select Yes to step through the JMS configuration setup.
2. Click Next to go to the Configure JMS Connection Factories window.
This window prompts you to define a JMS connection factory, including:
– Connection factory name
– JNDI pathname used to look up the connection factory within the JNDI namespace
– Default delivery mode used for messages for which a delivery mode is not explicitly defined
– Default priority used for messages for which a priority is not explicitly defined.
– Acknowledge policy for nontransacted sessions that use the CLIENT_ACKNOWLEDGE mode.
3. Click Add to add a JMS connection factory.
4. Enter jms/MedRecQueueConnectionFactory for the connection factory and JNDI names, and keep all other values set to their defaults as shown in the following illustration.

Creating WebLogic Configurations Using the Configuration Wizard 15-23
5. Click Next to go to the Configure JMS Destination Key(s) window.
This window prompts you to define the sort order for messages that arrive at a specific JMS destination.
Note: You can skip the configuration of JMS Destination Keys because the domain that you create in this tutorial does not require them.
6. Click Next to go to the Configure JMS Template(s) window.
This window prompts you to define templates that can be used to define multiple JMS destinations.
Note: You can skip the configuration of JMS Templates because the domain that you create in this tutorial does not require them.
7. Click Next to go to the Configure JMS File Stores window.
This window prompts you to define a JMS file store for storing persistent messages.
Note: You can skip the configuration of a JMS file store because the domain that you create in this tutorial does not require one. You set up a JMS JDBC store instead.
8. Click Next to go to the Configure JMS JDBC Store window.
This window prompts you to define a JMS JDBC store for storing persistent messages, including:
– JDBC store name
– JDBC connection pool for this persistent store
– Prefix name that uniquely identifies JMS tables in the backing store
9. Click Add to add a JMS JDBC store.
10. Enter the values shown in the following illustration for the JMS JDBC store.
11. Click Next to go to the Configure JMS Servers window.
This window prompts you to define a JMS server to manage connections and message requests on behalf of clients, including:

Tuto r i a ls : Us ing the Conf igura t i on Wizard
15-24 Creating WebLogic Configurations Using the Configuration Wizard
– Server name
– Persistent store for the JMS server
– Paging store for the JMS server, used exclusively for paging out nonpersistent messages for the JMS server and its destinations
– The name of an existing JMS template to use when creating all temporary queues and topics for this JMS server
– Amount of time, in seconds, that the JMS server pauses between its cycles of scanning its destinations for expired messages to process (according to the specified Expiration Policy on the destinations)
12. Click Add to add a JMS server.
13. Enter the values in the following illustration for the JMS server.
14. Click Next to go to the Assign JMS Servers to WebLogic Servers window.
This window prompts you to assign the JMS server to a WebLogic Server instance.
15. Select MedRec1 in the Server pane.
Notice that the MedRecJMSServer server, the only JMS server that is defined, is already selected in the JMS Server pane.
16. Click the right arrow to assign the MedRecJMSServer server to MedRec1.
The name of the JMS server is removed from the JMS Server pane and added, below the name of the target WebLogic Server instance, to the Server pane.
Note: Because you set up multiple Managed Servers and configured them in a cluster, it is a good idea to target the JMS Server to an independent, migratable server instance that can support the scalability and reliability of the server cluster. In this tutorial, you target the JMS Server to the MedRec1 Managed Server. This target choice is somewhat arbitrary as you could target the JMS Server to any other Managed Server

Creating WebLogic Configurations Using the Configuration Wizard 15-25
as well. Also, by targeting the JMS Server to a Managed Server, you keep the Administration Server available for management tasks.
17. Click Next to go to the Configure JMS Topics window.
This window prompts you to create a JMS topic. JMS topics support the publish/subscribe (Pub/sub) messaging model enabling an application to send a message to multiple applications. Pub/sub messaging applications send and receive messages by subscribing to a topic.
Note: For this tutorial, you set up JMS queues, so you can skip the configuration of JMS topics.
18. Click Next to go to the Configure JMS Queues window.
This window prompts you to create a JMS queue, including:
– Queue name
– JNDI pathname used to look up the queue within the JNDI namespace
– Flag specifying whether or not the destination uses the persistent store specified by the JMS server
– JMS template from which the destination is derived
– Associated JMS server
JMS queues support the point-to-point (PTP) messaging model enabling one application to send a message to another application. PTP messaging applications send and receive messages using named queues.
19. Click Add to add a JMS queue.
20. Enter jms/REGISTRATION_MDB_QUEUE for the queue and JNDI names, and set the remaining values, as shown:
21. Repeat steps 19 and 20 to add two additional queues, jms/MAIL_MDB_QUEUE and jms/XML_UPLOAD_MDB_QUEUE, as shown in the following illustration.
22. Click Next to go to the Configure JMS Distributed Topics window.
Tuto r i a ls : Us ing the Conf igura t i on Wizard
15-26 Creating WebLogic Configurations Using the Configuration Wizard
This window prompts you to create a JMS distributed topic. Distributed topics consist of a set of physical topics to support service continuity in the event of a WebLogic Server failure within a cluster.
Note: For this tutorial, you can skip the configuration of JMS distributed topics because you do not have JMS topics set up in your domain.
23. Click Next to go to the Configure JMS Distributed Queues window.
This window prompts you to create a JMS distributed queue. Distributed queues consist of a set of physical queues to support service continuity in the event of a WebLogic Server failure within a cluster.
Note: For this tutorial, you can skip the configuration of JMS distributed queues because you do not need them in your domain.
24. Click Next to go to the Applications and Services Targeting Options window.
This window prompts you to configure server and cluster targets onto which you want to deploy applications and services.
25. Select Yes to step through the targeting configuration setup.
26. Click Next to go to the Target Services to Servers or Clusters window.
This window prompts you to specify the target servers and clusters onto which you want to deploy the application components, such as Web applications and EJB modules, that are included in your domain or imported extension templates.
Target all application services to the MedRecCluster.
27. Select MedRecCluster on the Target list.
28. Click Select All.
All application services are targeted automatically to each of the Managed Servers within the MedRecCluster.

Creating WebLogic Configurations Using the Configuration Wizard 15-27
29. Click Next to go to the Configure Administrative Username and Password window.
Step 8: Set up the login for the administrative user1. On the Configure Administrative Username and Password window, enter weblogic for the
user name and password. Notice that you must enter the password twice as a security precaution.
Note: You do not need to configure additional users, groups, or global roles because you do not need to set up security for additional domain users. For this tutorial, you set up only one administrative user for your domain.
2. Click Next to go to the Configure Windows Options window (Windows platform only).

Tuto r i a ls : Us ing the Conf igura t i on Wizard
15-28 Creating WebLogic Configurations Using the Configuration Wizard
Step 9: Configure the WebLogic environmentThe Configure Windows Options window (Windows platform only) prompts you to decide whether to create a shortcut in the Windows Start Menu and set up the Administration Server as a Windows service.
Note: For this tutorial, keep the default template settings displayed in this window.
1. Click Next to go to the Build Start Menu Entries window (Windows platform only).
This window prompts you to build entries for the Windows Start Menu.
Note: For this tutorial, keep the default template settings displayed in this window.
2. Click Next to go to the Configure Server Start Mode and Java SDK window.
This window prompts you to select the server startup mode and the Java Software Development Kit (SDK) to be used with your domain.
Note: For this tutorial, keep the default template settings displayed in this window.
3. Click Next to go to the Create WebLogic Configuration window.
Step 10: Create the new domainThe Create WebLogic Configuration window is displayed.

Creating WebLogic Configurations Using the Configuration Wizard 15-29
Note: The Configuration Summary area shows the Deployment view by default. By selecting different options from the Summary View drop-down list, you can see different views of the configuration summary, for example, the Service and Cluster views.
1. Enter clusterdomain in the Configuration Name field.
Note: When you create a new domain, give it a new name that is different from mydomain, which you created in “Tutorial: Creating Your First Domain” on page 15-2. You do not want to overwrite an existing domain called mydomain. Overwriting an existing domain may result in intermittent problems with the domain, such as failure of the server to boot.
2. Click Create to create the domain.
The progress bar tracks the creation progress until the domain configuration is created.
3. In the Creating Configuration window, perform the steps in the following table, as required by your platform, to close the Configuration Wizard and start the Administration Server.

Tuto r i a ls : Us ing the Conf igura t i on Wizard
15-30 Creating WebLogic Configurations Using the Configuration Wizard
Step 11: Log in to the Administration Console and optionally review the configuration settingsOnce the Administration Server is running, you can optionally log in to the domain’s Administration Console and review both the configuration settings provided by the Basic WebLogic Server Domain configuration template and those customized by you for your domain.
1. Open a Web browser to the following URL:
http://hostname:port/console
Replace hostname with the DNS name or IP address of the Administration Server, and replace port with the address of the port on which the Administration Server is listening for requests (7001 by default). For example:
http://localhost:7001/console
2. When the login page is displayed, enter weblogic as the username and password required to start the Administration Server. Then click Sign In.
3. In the left pane of the Administration Console, expand the Servers folder.
4. Click the name of the server, for example, medrecadmin.
5. In the right pane, select the Configuration tab and review the information available in the Configuration area.
6. To review additional configuration information, expand the Clusters and Services folders in the left pane and then review the respective configuration information in the right pane.
On this platform . . . Perform the following task . . .
Windows Select Start Admin Server and click Done to close the Configuration Wizard and start the Administration Server.
UNIX and Linux Click Done. To start the Administration Server:1. Open a shell on the computer on which you created the
domain. 2. Navigate to the directory in which you created the domain. 3. Enter the following command:
startWebLogic.sh

Creating WebLogic Configurations Using the Configuration Wizard 15-31
Summary: Your First Custom DomainThis tutorial introduced you to the use of the Configuration Wizard for creating a custom WebLogic domain by modifying settings provided in a prepackaged configuration template. The concepts and tasks you learned include the following:
The Configuration Wizard simplifies domain creation by working from a configuration template that contains preconfigured settings.
Your product installation includes prepackaged configuration templates that you can use immediately with the Configuration Wizard.
Through the Configuration Wizard’s Custom option, you can view and access a rich set of configured items that are available for creating a new domain, such as for Managed Servers, clusters, JDBC, and JMS resources.
You can use the Custom option to modify one or all the settings provided in a configuration template to create a custom domain that matches your application’s requirements more precisely.
Tutorial: Extending an Existing DomainThis section includes the following topics:
Tutorial Goals—A summary of the concepts and tasks you can learn
Tutorial Overview—A description of the overall task and the features you are to use
Steps in This Tutorial—A summary of the high-level steps in the task
To extend an existing domain by adding WebLogic Workshop functionality—A detailed set of instructions for completing the tutorial
Tutorial GoalsIn this tutorial, you learn how to use the Configuration Wizard’s Extend an existing WebLogic configuration option to extend a basic domain with additional applications and resources that are provided in prepackaged extension templates. The ability to extend a configuration using the Configuration Wizard provides a quick and easy method for incrementally adding resources and applications to existing domains. The configuration of the resulting domain can be simple or extremely complex; it all depends on the functionality imported into the domain from the extension templates.
The goals of this tutorial are the following:

Tuto r i a ls : Us ing the Conf igura t i on Wizard
15-32 Creating WebLogic Configurations Using the Configuration Wizard
Use the Configuration Wizard to extend a basic domain
Locate and use prepackaged extension templates
Use the Configuration Wizard’s extension option and a prepackaged extension template to import resources into an existing domain
This tutorial takes about 5 minutes to complete.
Tutorial OverviewIn this tutorial, you use the Configuration Wizard’s Extend an existing WebLogic configuration option and a prepackaged extension template to extend an existing domain. You extend the basic WebLogic Server domain that you created in “Tutorial: Creating Your First Domain” on page 15-2 with resources provided from the WebLogic Workshop extension template.
Note: The availability of predefined extension templates depends on which WebLogic Platform components are installed. To use the WebLogic Workshop extension template, you must have installed the WebLogic Workshop component.
The basic WebLogic Server domain that you created contains a single Administration Server administered by a administrative user. Using the WebLogic Workshop extension template, you can extend the domain to support WebLogic Workshop runtime functionality, including Web applications, Web Services and custom controls. WebLogic Workshop resources are required before you can extend a domain to support WebLogic Integration, WebLogic Portal, or both (that is, a full Platform domain).
Steps in This TutorialThis section provides a high-level summary of the steps that you follow to complete the tutorial.
Note: Before you start this tutorial, you must have already created a WebLogic Server domain as described in “Tutorial: Creating Your First Domain” on page 15-2.
Step 1: Begin extending an existing WebLogic configurationStart the Configuration Wizard in graphical mode and select the Extend an existing WebLogic configuration option.
Step 2: Select an existing configuration to extend with additional functionalitySelect the mydomain configuration from the list of available configurations.

Creating WebLogic Configurations Using the Configuration Wizard 15-33
Step 3: Select the extension template and instruct the Configuration Wizard how to handle it
Select the WebLogic Workshop extension template and specify any additional configuration settings.
Step 4: Import resources and services into the existing configurationInstruct the Configuration Wizard to accept your selections and import the WebLogic Workshop resources and services into the mydomain configuration.
Step 5: Start the Administration Server, Log in to the Administration Console and optionally review the configuration settings
Start the server, log in to the server’s Administration Console, and optionally review both the configuration settings provided by the Basic WebLogic Server Domain configuration template and those added by the extension template.
Summary: Your First Extended DomainReview the concepts and tasks covered in the tutorial.
To extend an existing domain by adding WebLogic Workshop functionalityThis section provides the detailed set of instructions to follow to complete the tutorial.
Note: Before you start this tutorial, you must have already created a WebLogic Server domain as described in “Tutorial: Creating Your First Domain” on page 15-2.
Step 1: Begin extending an existing WebLogic configuration1. Start the Configuration Wizard in graphical mode as described in the following table.

Tuto r i a ls : Us ing the Conf igura t i on Wizard
15-34 Creating WebLogic Configurations Using the Configuration Wizard
The Create or Extend a Configuration window is displayed.
Table 15-4 Starting the Configuration Wizard in Graphical Mode
On this platform... Perform the following steps...
Windows From the Start menu:
Start→ Programs→ BEA WebLogic Platform 8.1→ Configuration Wizard
From an MS-DOS command prompt window:1. Go to the \common\bin subdirectory of the product installation directory. For
example:cd c:\bea\weblogic81\common\bin
2. Enter config.cmd
UNIX 1. Log in to the UNIX system.2. Go to the /common/bin subdirectory of the product installation directory. For
example:cd $BEAHOME/weblogic81/common/bin
3. Enter sh config.sh

Creating WebLogic Configurations Using the Configuration Wizard 15-35
2. Select Extend an existing WebLogic configuration.
3. Click Next to go to the Choose a WebLogic Configuration Directory window.
Step 2: Select an existing configuration to extend with additional functionalityThe Choose a WebLogic Configuration Directory window prompts you to select an existing domain that you want to update with additional applications or services.
1. In this window, select the mydomain configuration from the list of configurations.
Note: Make sure that the domain is not active; you cannot update an active domain.

Tuto r i a ls : Us ing the Conf igura t i on Wizard
15-36 Creating WebLogic Configurations Using the Configuration Wizard
Note: The configuration directory can be located anywhere on your system. By default, it resides in BEA_HOME\user_projects\domains\domain, where BEA_HOME is a repository for common files that are used by multiple BEA products installed on the same machine (by default, this directory is c:\bea on Windows), and domain is the directory defined, by default, by the selected configuration template. For the Basic WebLogic Server Domain we created in “Tutorial: Creating Your First Domain” on page 15-2, the default directory is mydomain.
2. Click Next to go to the Select a Configuration Extension Template window.
Step 3: Select the extension template and instruct the Configuration Wizard how to handle itThe Select a Configuration Extension Template window prompts you to specify one or more extension templates to be included when the domain is updated. You must select at least one extension template.
1. In the Select a Configuration Extension Template window, select the WebLogic Workshop Extension template.

Creating WebLogic Configurations Using the Configuration Wizard 15-37
The extension template directory can be located anywhere on your system. By default, it resides in WL_HOME\common\templates\applications, where WL_HOME is the directory that contains the product installation (by default, this directory is c:\bea\weblogic81 on Windows).
2. Click Next to go to the Database (JDBC) Options window.
The Database (JDBC) Options window prompts you to configure WebLogic Java Database Connectivity (JDBC). For this tutorial, keep the default configuration settings defined for mydomain.
3. Click Next to go to the Messaging (JMS) Options window.
This window prompts you to configure WebLogic Java Message Service (JMS). For this tutorial, keep the default configuration settings defined for mydomain.
4. Click Next to go to the Applications and Services Targeting Options window.
This window prompts you to configure server and cluster targets onto which you want to deploy applications and services. For this tutorial, keep the default configuration settings defined for mydomain.
5. Click Next to go to the Security Configuration Options window.
This window prompts you to configure additional security features by defining users and groups and assigning them to global security roles. You can skip additional security configuration.
Note: When you created the mydomain configuration, you specified weblogic for both the administrative user name and password. You will use this same user name/password combination to start the Administration Console in the extended domain.
6. Click Next to go to the Create WebLogic Configuration window.
Step 4: Import resources and services into the existing configurationThe Create WebLogic Configuration window prompts you to review the details for your extension, and launch the process that updates the domain.
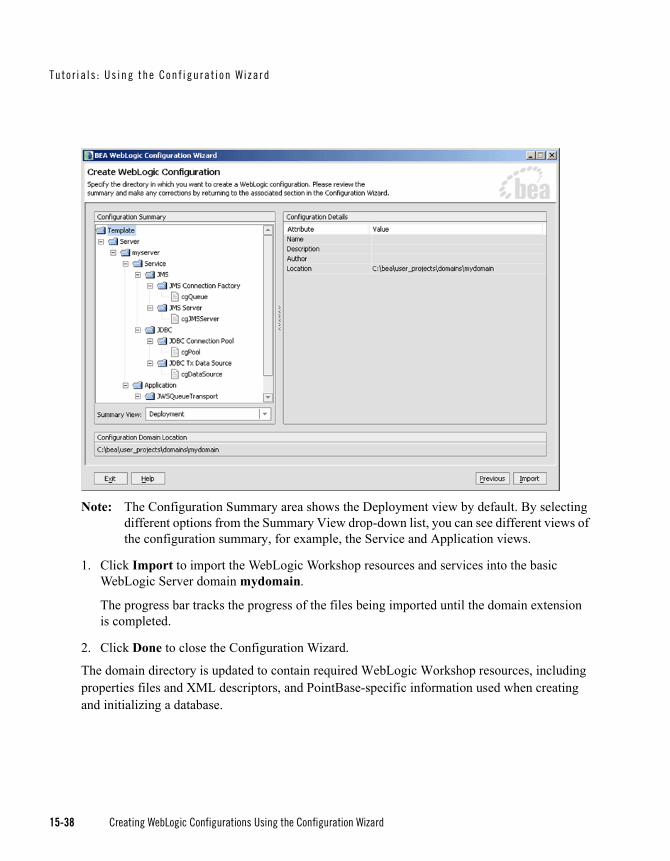
Tuto r i a ls : Us ing the Conf igura t i on Wizard
15-38 Creating WebLogic Configurations Using the Configuration Wizard
Note: The Configuration Summary area shows the Deployment view by default. By selecting different options from the Summary View drop-down list, you can see different views of the configuration summary, for example, the Service and Application views.
1. Click Import to import the WebLogic Workshop resources and services into the basic WebLogic Server domain mydomain.
The progress bar tracks the progress of the files being imported until the domain extension is completed.
2. Click Done to close the Configuration Wizard.
The domain directory is updated to contain required WebLogic Workshop resources, including properties files and XML descriptors, and PointBase-specific information used when creating and initializing a database.

Creating WebLogic Configurations Using the Configuration Wizard 15-39
Step 5: Start the Administration Server, Log in to the Administration Console and optionally review the configuration settings1. Start the server as follows:
a. Open a shell (command prompt) on the computer on which you created the domain.
b. Navigate to the directory in which you created the domain. In this tutorial, this directory is BEA_HOME\user_projects\domains\mydomain, where BEA_HOME is a repository for common files that are used by multiple BEA products installed on the same machine (by default, this directory is c:\bea on Windows).
c. Enter the command appropriate for your platform:
startWebLogic.cmd (Windows)
startWebLogic.sh (UNIX)
Once the Administration Server is running, you can optionally log in to the domain’s Administration Console and review both the configuration settings provided by the Basic WebLogic Server Domain configuration template and those added by the WebLogic Workshop extension template.
2. Open a Web browser to the following URL:
http://hostname:port/console
Replace hostname with the DNS name or IP address of the Administration Server, and replace port with the address of the port on which the Administration Server is listening for requests (7001 by default). For example:
http://localhost:7001/console
3. When the login page is displayed, enter weblogic as the username and password required to start the Administration Server. Then click Sign In.
4. In the left pane of the Administration Console, expand the Servers folder.
5. Select myserver.
6. In the right pane, you can view the resources and applications added with the WebLogic Workshop extension template by selecting the EJB Modules and Services tabs.
7. To review additional configuration information, expand the Deployments and Services folders in the left pane and then review the respective configuration information in the right pane.
Tuto r i a ls : Us ing the Conf igura t i on Wizard
15-40 Creating WebLogic Configurations Using the Configuration Wizard
Summary: Your First Extended DomainThis tutorial introduced you to the use of the Configuration Wizard for extending an existing WebLogic domain with WebLogic Workshop functionality. The concepts and tasks you learned include the following:
The Configuration Wizard simplifies the process for extending a domain using extension templates that contain preconfigured resources and services.
Your product installation includes prepackaged extension templates that you can use immediately with the Configuration Wizard.
You can easily extend an existing WebLogic domain by using the Configuration Wizard’s Extend an existing WebLogic configuration option and selecting one or more of the predefined extension templates.

Creating WebLogic Configurations Using the Configuration Wizard 16-1
C H A P T E R 16
Template Reference
The section includes the following topics:
Defining Configuration and Extension Templates
Configuration Template Reference
Extension Template Reference
Relationships Between Templates
Defining Configuration and Extension TemplatesA template is a Java Archive (JAR) file that contains the files and scripts required to create or update a domain. The Configuration Wizard uses two types of template:
Configuration template—defines the full set of resources within a domain, including infrastructure components, applications, services, security options, and general environment and operating system options. This type of template is used to create a domain. BEA delivers a set of predefined configuration templates, which are described in the following sections.
Extension template—defines applications and services, such as JDBC or JMS components, and startup/shutdown classes, that can be used to extend an existing domain. BEA delivers a set of predefined extension templates, which are described in the following sections.

Templa te Re fe rence
16-2 Creating WebLogic Configurations Using the Configuration Wizard
Configuration Template ReferenceWebLogic Platform provides predefined configuration templates that are installed with the product. You can easily create a WebLogic domain by running the Configuration Wizard in either Express mode or Custom mode, using one of the predefined configuration templates as your selection.
Note: Since the initial product release, there have been changes made to the Basic WebLogic Integration Domain, Basic WebLogic Platform Domain, and Basic WebLogic Portal Domain configuration templates. Because of these changes, when creating a domain using the Configuration Wizard, you should use a configuration template provided with your current installation or a custom template created from a domain or template in your current installation. You must upgrade the domains created using the configuration templates provided with an earlier service pack to the current service pack. For information about upgrading your domains, see the BEA WebLogic Platform Upgrade Planning Guide at http://e-docs.bea.com/platform/docs81/upgrade/index.html.
Location of Configuration TemplatesBy default, all the predefined configuration templates provided with your WebLogic Platform installation are located in the following directory:WL_HOME\common\templates\domains
Configuration Template SummaryThe configuration templates are summarized in the following table.
Note: The availability of predefined configuration templates depends on which WebLogic Platform components are installed; the WebLogic Platform components required for each template are identified in the following table.

Conf igura t i on Templ ate Re fe rence
Creating WebLogic Configurations Using the Configuration Wizard 16-3
Table 16-1 Configuration Template Summary
Template Required WebLogic Platform Component
Filename Description
Avitek Medical Records Sample Domain
WebLogic Server medrec.jar Creates the Avitek Medical Records domain outside the installed kit. This domain is a WebLogic Server sample application suite that concisely demonstrates all aspects of the J2EE platform.
Basic WebLogic Integration Domain
WebLogic Integration,
WebLogic Workshop,
WebLogic Server
wli.jar Creates a domain that supports the development of WebLogic Integration solutions.
Note: To create a domain that supports the development of WebLogic Server Process Edition solutions, use the Basic WebLogic Integration Domain template. If you have an existing WebLogic Server-based domain, you can extend it to include the resources required for WebLogic Server Process Edition by using the WebLogic Integration Extension Template.
Basic WebLogic Platform Domain
WebLogic Platform (all components must be installed)
platform.jar Creates a domain that supports the development of applications using all WebLogic Platform components.
Basic WebLogic Portal Domain
WebLogic Portal,
WebLogic Workshop,
WebLogic Server
wlp.jar Creates a domain that supports the development of WebLogic Portal solutions.
Basic WebLogic Server Domain
WebLogic Server wls.jar Creates a simple WebLogic Server domain without any sample applications.

Templa te Re fe rence
16-4 Creating WebLogic Configurations Using the Configuration Wizard
The following sections describe the default directory structure and files created by each configuration template.
Avitek Medical Records Sample DomainAvitek Medical Records is a WebLogic Server sample application suite that concisely demonstrates all aspects of the J2EE platform. The Avitek Medical Records Sample Domain configuration template allows you to create an Avitek Medical Records domain outside the installed kit. This configuration template is available when you install WebLogic Server.
By default, the following applications and resources are defined in an Avitek Medical Records Sample Domain:
Avitek Medical Records example application
Administration Server
JDBC connection pools and data source
JMS server, connection factory, queues, and data store
Multiple users with group and role assignments
Entry for the Windows Start menu
Startup and shutdown classes
The following table defines the default directory structure and files generated by the Avitek Medical Records Sample Domain configuration template. Unless otherwise specified, by default,
Basic WebLogic Workshop Domain
WebLogic Workshop,
WebLogic Server
wlw.jar Creates a domain that supports the development of WebLogic Workshop solutions.
WebLogic Server Examples Domain
WebLogic Server examples.jar Creates the WebLogic Server Examples domain outside the installed kit. This domain contains a collection of examples that illustrate best practices for coding individual J2EE APIs.
Table 16-1 Configuration Template Summary (Continued)
Template Required WebLogic Platform Component
Filename Description

Conf igura t i on Templ ate Re fe rence
Creating WebLogic Configurations Using the Configuration Wizard 16-5
the Configuration Wizard creates the domain in the BEA_HOME\user_projects\domains\medrec directory. If you modify the default configuration settings, the output directory structure may be different from the structure described here.
Table 16-2 Default Directory Structure for Avitek Medical Records Sample Domain
Directory or File Description
_cfgwiz_donotdelete\ Directory containing files used by the Configuration Wizard in support of creating and extending the domain.
applications\ Directory containing files for any custom applications that you create.
incoming\ Directory containing XML file to be used as input to the Avitek Medical Records example.
boot.properties File containing server startup properties, including the user name and password required to boot the server (in encrypted format). It is generated only when you select development startup mode.
This file enables you to bypass the prompt for user name and password during a server’s startup cycle. For more information, see “Providing Usernames and Passwords to Start and Stop a Server" in the WebLogic Server Administration Console Online Help at the following URL: http://e-docs.bea.com/wls/docs81/ConsoleHelp/startstop.html#Providing_Usernames_and_Passwords_to_Start_a_Server
config.xml File containing the configuration information used by the Administration Server. For more information, see the WebLogic Server Configuration Reference at the following URL:
http://e-docs.bea.com/wls/docs81/config_xml/index.html
DefaultAuthenticatorInit.ldift,
DefaultAuthorizerInit.ldift,DefaultRoleMapperInit.ldift
Files used for bootstrapping tasks, including authentication (user and group), authorization, and role mapping. These files contain LDAP-specific information.

Templa te Re fe rence
16-6 Creating WebLogic Configurations Using the Configuration Wizard
For more information about the Avitek Medical Records example, see WebLogic Server Application Examples and Tutorials at the following URL:
http://e-docs.bea.com/wls/docs81/samples.html
Basic WebLogic Integration DomainThe Basic WebLogic Integration Domain configuration template allows you to create a basic WebLogic Integration domain, without installing sample applications. Domains created from this template support the WebLogic Server, WebLogic Workshop, and WebLogic Integration run-time functionality, including support for J2EE applications, Web applications, Web Services, custom controls, and business processes. You use domains created from this configuration template as the foundations for development of WebLogic Integration applications. The Basic
fileRealm.properties File containing ACLs, users, and groups that can be used for the default security realm when Compatibility security is used.
log4j.properties File containing properties used by Log4j.
pointbase.ini File containing initialization information for a PointBase JDBC database.
SerializedSystemIni.dat File containing encrypted security information.
setMedRecEnv.cmd,setMedRecEnv.sh
Scripts that set up the Avitek Medical Records development environment on Windows and UNIX systems, respectively.
startManagedWebLogic.cmd,startManagedWebLogic.sh
Scripts used to start a Managed Server on Windows and UNIX systems, respectively.
startMedRecServer.cmd,startMedRecServer.sh
Scripts used to start the MedRec Administration Server on Windows and UNIX systems, respectively.
startMedRecServerQS.cmd,startMedRecServerQS.sh
Scripts used internally for the domain. These files can be ignored.
uninstallService.cmd Script used to uninstall Windows services.
Table 16-2 Default Directory Structure for Avitek Medical Records Sample Domain (Continued)
Directory or File Description

Conf igura t i on Templ ate Re fe rence
Creating WebLogic Configurations Using the Configuration Wizard 16-7
WebLogic Integration Domain configuration template is available when you install WebLogic Integration or when you install all the components of WebLogic Platform.
By default, when using the Basic WebLogic Integration Domain configuration template, you generate a domain that contains only the required components: an Administration Server and a single administrative user. Any required applications must be created and configured within the domain.
Note: To create a domain that supports the development of WebLogic Server Process Edition solutions, use the Basic WebLogic Integration Domain template. If you have an existing WebLogic Server-based domain, you can extend it to include the resources required for WebLogic Server Process Edition by using the WebLogic Integration Extension Template.
The following table defines the default directory structure and files generated by the Basic WebLogic Integration Domain configuration template. Unless otherwise specified, by default, the Configuration Wizard creates the domain in the BEA_HOME\user_projects\domains\integration directory. If you modify the default configuration settings, the output directory structure may be different from the structure described here.
Table 16-3 Default Directory Structure for Basic WebLogic Integration Domain
Directory or File Description
BEA_HOME\user_projects\applications\integration\
Directory containing the files for the B2BDefaultWebApp application and any custom application files that you create.
_cfgwiz_donotdelete\ Directory containing files used by the Configuration Wizard in support of creating and extending the domain.
logs\ Directory serving as a placeholder for log files.
rmfilestore\ Directory serving as a disk-based JMS file store to store persistent messages and durable subscribers.
script\ Directory containing a script that targets specified services and applications to the appropriate servers or clusters. This script supplements the Configuration Wizard’s auto-targeting of services and applications to a cluster.
wlai\ Directory serving as a placeholder for information used by the Application View control.

Templa te Re fe rence
16-8 Creating WebLogic Configurations Using the Configuration Wizard
wliconfig\ Directory containing the file used in support of application integration debugging.
boot.properties File containing server startup properties, including the user name and password required to boot the server (in encrypted format). It is generated only when you select development startup mode.
This file enables you to bypass the prompt for user name and password during a server’s startup cycle. For more information, see “Providing Usernames and Passwords to Start and Stop a Server” in the WebLogic Server Administration Console Online Help at the following URL: http://e-docs.bea.com/wls/docs81/ConsoleHelp/startstop.html#Providing_Usernames_and_Passwords_to_Start_a_Server
config.xml File containing the configuration information used by the Administration Server. For more information, see the WebLogic Server Configuration Reference at the following URL:
http://e-docs.bea.com/wls/docs81/config_xml/index.html
DefaultAuthenticatorInit.ldift,
DefaultAuthorizerInit.ldift,DefaultRoleMapperInit.ldift
Files used for bootstrapping tasks, including authentication (user and group), authorization, and role mapping. These files contain LDAP-specific information.
domain-info.xml File containing administrative information about the domain, including version, type, name, author, description, and icon name.
fileRealm.properties File containing ACLs, users, and groups that can be used for the default security realm when Compatibility security is used.
Table 16-3 Default Directory Structure for Basic WebLogic Integration Domain (Continued)
Directory or File Description

Conf igura t i on Templ ate Re fe rence
Creating WebLogic Configurations Using the Configuration Wizard 16-9
installService.cmd Script used to install Windows services. The script creates an entry for such services in the Windows Registry. As a result, the Windows system starts the specified service each time the system boots. This script can install the following services:• Administration Server (started each time the system is
booted)• PointBase (if there are PointBase connection pools in the
domain)• Debugger—if the script is modified to remove the
nodebug parameter from the following command line:%USERDOMAIN_HOME%\setDomainEnv.cmd production nodebug
jws-config.properties File containing WebLogic Workshop-related JMS information.
pointbase.ini File containing initialization information for a PointBase JDBC database.
SerializedSystemIni.dat File containing encrypted security information.
setDomainEnv.cmd,setDomainEnv.sh
Scripts used to set up all the environment variables and Java options required to run WebLogic Server, in the WebLogic Integration domain, on Windows and UNIX systems, respectively.
startManagedWebLogic.cmd,startManagedWebLogic.sh
Scripts used to start a Managed Server on Windows and UNIX systems, respectively.
startPointBaseConsole.cmd,startPointBaseConsole.sh
Scripts used to start the PointBase Console on Windows and UNIX systems, respectively.
startWebLogic.cmd,startWebLogic.sh
Scripts used to start the Administration Server on Windows and UNIX systems, respectively.
stopManagedWebLogic.cmd,stopManagedWebLogic.sh
Scripts used to stop a specified Managed Server on Windows and UNIX systems, respectively.
stopWebLogic.cmd,stopWebLogic.sh
Scripts used to stop the Administration Server on Windows and UNIX systems, respectively.
Table 16-3 Default Directory Structure for Basic WebLogic Integration Domain (Continued)
Directory or File Description

Templa te Re fe rence
16-10 Creating WebLogic Configurations Using the Configuration Wizard
Basic WebLogic Platform DomainThe Basic WebLogic Platform Domain configuration template allows you to create a domain that supports the development of applications using all WebLogic Platform components. This template is available when you install WebLogic Platform.
The following table defines the default directory structure and files generated by the Basic WebLogic Platform Domain configuration template. Unless otherwise specified, by default, the Configuration Wizard creates the domain in the BEA_HOME\user_projects\domains\platform directory. If you modify the default configuration settings, the output directory structure may be different from the structure described here.
uninstallService.cmd Script used to uninstall Windows services.
URLs.dat File containing the URL for the JDBC database.
webapp_build.xml File containing the project information used to build a Web application.
webappCompile.cmd,webappCompile.sh
Scripts used to compile a Web application into an EAR file on Windows and UNIX systems, respectively.
wli-config.properties File containing domain-specific parameters that are used by WebLogic Integration.
workshop$1.wal File containing domain-specific PointBase database information for the default database named workshop.
workshop.dbn File containing domain-specific PointBase database information for the default database named workshop.
workshop.properties File containing domain-specific parameters that are used by WebLogic Workshop.
Table 16-3 Default Directory Structure for Basic WebLogic Integration Domain (Continued)
Directory or File Description

Conf igura t i on Templ ate Re fe rence
Creating WebLogic Configurations Using the Configuration Wizard 16-11
Table 16-4 Default Directory Structure for Basic WebLogic Platform Domain
Directory or File Description
BEA_HOME\user_projects\applications\platform\
Directory containing the files for the B2BDefaultWebApp application and any custom application files that you create.
_cfgwiz_donotdelete\ Directory containing files used by the Configuration Wizard in support of creating and extending the domain.
logs\ Directory serving as a placeholder for log files.
rmfilestore\ Directory serving as a disk-based JMS file store to store persistent messages and durable subscribers.
script\ Directory containing a script that targets specified services and applications to the appropriate servers or clusters. This script supplements the Configuration Wizard’s auto-targeting of services and applications to a cluster.
wlai\ Directory containing information used by the Application View control.
wliconfig\ Directory containing the file used in support of application integration debugging.
boot.properties File containing server startup properties, including the user name and password required to boot the server (in encrypted format). It is generated only when you select development startup mode.
This file enables you to bypass the prompt for user name and password during a server’s startup cycle. For more information, see “Providing Usernames and Passwords to Start and Stop a Server” in the WebLogic Server Administration Console Online Help at the following URL: http://e-docs.bea.com/wls/docs81/ConsoleHelp/startstop.html#Providing_Usernames_and_Passwords_to_Start_a_Server

Templa te Re fe rence
16-12 Creating WebLogic Configurations Using the Configuration Wizard
config.xml File containing the configuration information used by the Administration Server. For more information, see the WebLogic Server Configuration Reference at the following URL:
http://e-docs.bea.com/wls/docs81/config_xml/index.html
create_db.cmd
create_db.sh
Scripts used to create database objects on Windows and UNIX systems, respectively. By default, create_db creates database objects for PointBase.The scripts are maintained independently from the Configuration Wizard and the Configuration Wizard’s Load Database functionality. The scripts provide an alternative method of creating and refreshing WebLogic Portal database objects.
db_settings.properties File containing two types of data used by create_db: (a) database properties, including driver, database, user name, and password, and (b) connection properties, and information needed for calling data files for the component-level tables. The file controls which SQL files to process from WL_HOME\portal\db, and is maintained independently from the Configuration Wizard.
DefaultAuthenticatorInit.ldift,
DefaultAuthorizerInit.ldift,DefaultRoleMapperInit.ldift
Files used for bootstrapping tasks, including authentication (user and group), authorization, and role mapping. These files contain LDAP-specific information.
domain-info.xml File containing administrative information about the domain, including version, type, name, author, description, and icon name.
fileRealm.properties File containing ACLs, users, and groups that can be used for the default security realm when Compatibility security is used.
Table 16-4 Default Directory Structure for Basic WebLogic Platform Domain (Continued)
Directory or File Description

Conf igura t i on Templ ate Re fe rence
Creating WebLogic Configurations Using the Configuration Wizard 16-13
installService.cmd Script used to install Windows services. The script creates an entry for such services in the Windows Registry. As a result, the Windows system starts the specified service each time the system boots. This script can install the following services:• Administration Server (started each time the system is
booted)• PointBase (if there are PointBase connection pools in the
domain)• Debugger—if the script is modified to remove the
nodebug parameter from the following command line:%USERDOMAIN_HOME%\setDomainEnv.cmd production nodebug
jws-config.properties File containing WebLogic Workshop-related JMS information.
pointbase.ini File containing initialization information for a PointBase JDBC database.
SerializedSystemIni.dat File containing encrypted security information.
set-dbenv.cmd,set-dbenv.sh
Scripts used by create_db.cmd and create_db.sh to set up the database environment on Windows and UNIX systems, respectively. The Configuration Wizard does not use or maintain these files.
setDomainEnv.cmd,setDomainEnv.sh
Scripts used to set up all the environment variables and Java options required to run WebLogic Server, in the WebLogic Platform domain, on Windows and UNIX systems, respectively.
startManagedWebLogic.cmd,startManagedWebLogic.sh
Scripts used to start a Managed Server on Windows and UNIX systems, respectively.
startPointBaseConsole.cmd,startPointBaseConsole.sh
Script used to start the console for the PointBase database.
startWebLogic.cmd,startWebLogic.sh
Scripts used to start the Administration Server on Windows and UNIX systems, respectively.
Table 16-4 Default Directory Structure for Basic WebLogic Platform Domain (Continued)
Directory or File Description

Templa te Re fe rence
16-14 Creating WebLogic Configurations Using the Configuration Wizard
Basic WebLogic Portal DomainThe Basic WebLogic Portal Domain configuration template allows you to create a basic WebLogic Portal domain, without installing sample applications. Domains created from this template support the WebLogic Server, WebLogic Workshop, and WebLogic Portal run-time functionality, including support for J2EE applications, Web applications, Web Services, custom controls, and portals. You use domains created from this configuration template as the foundations for development of WebLogic Portal applications. The Basic WebLogic Portal
stopManagedWebLogic.cmd,
stopManagedWebLogic.sh
Script used to stop a specified Managed Server on Windows and UNIX systems, respectively.
stopWebLogic.cmd,stopWebLogic.sh
Scripts used to stop the Administration Server on Windows and UNIX systems, respectively.
uninstallService.cmd Script used to uninstall Windows services.
URLs.dat File containing the URL for the JDBC database.
webapp_build.xml File containing the project information used to build a Web application.
webappCompile.cmd,webappCompile.sh
Scripts used to compile a Web application into an EAR file on Windows and UNIX systems, respectively.
wli-config.properties File containing domain-specific parameters that are used by WebLogic Integration.
workshop$1.wal File containing domain-specific PointBase database information for the default database named workshop.
workshop.dbn File containing domain-specific PointBase database information for the default database named workshop.
workshop.properties File containing domain-specific parameters that are used by WebLogic Workshop.
wsrpKeystore.jks Java keystore file.
Table 16-4 Default Directory Structure for Basic WebLogic Platform Domain (Continued)
Directory or File Description

Conf igura t i on Templ ate Re fe rence
Creating WebLogic Configurations Using the Configuration Wizard 16-15
Domain configuration template is available when you install WebLogic Portal or when you install all components of WebLogic Platform.
By default, when using the Basic WebLogic Portal Domain configuration template, you generate a domain that contains only the required components: an Administration Server and a single administrative user. Any required applications must be created and configured within the domain.
The following table defines the default directory structure and files generated by the Basic WebLogic Portal Domain configuration template. Unless otherwise specified, by default, the Configuration Wizard creates the domain in the BEA_HOME\user_projects\domains\portalDomain directory. If you modify the default configuration settings, the output directory structure may be different from the structure described here.
Table 16-5 Default Directory Structure for Basic WebLogic Portal Domain
Directory or File Description
_cfgwiz_donotdelete\ Directory containing files used by the Configuration Wizard in support of creating and extending the domain.
rmfilestore\ Directory serving as a disk-based JMS file store to store persistent messages and durable subscribers.
script\ Directory containing a script that targets specified services and applications to the appropriate servers or clusters. This script supplements the Configuration Wizard’s auto-targeting of services and applications to a cluster.
boot.properties File containing server startup properties, including the user name and password required to boot the server (in encrypted format). It is generated only when you select development startup mode.
This file enables you to bypass the prompt for user name and password during a server’s startup cycle. For more information, see “Providing Usernames and Passwords to Start and Stop a Server” in the WebLogic Server Administration Console Online Help at the following URL: http://e-docs.bea.com/wls/docs81/ConsoleHelp/startstop.html#Providing_Usernames_and_Passwords_to_Start_a_Server

Templa te Re fe rence
16-16 Creating WebLogic Configurations Using the Configuration Wizard
config.xml File containing the configuration information used by the Administration Server. For more information, see the WebLogic Server Configuration Reference at the following URL:
http://e-docs.bea.com/wls/docs81/config_xml/index.html
create_db.cmd,create_db.sh
Scripts used to create database objects on Windows and UNIX systems, respectively. By default, create_db creates database objects for PointBase.The scripts are independent of the Configuration Wizard and the Configuration Wizard’s Load Database functionality. The scripts provide an alternative method of creating and refreshing WebLogic Portal database objects.
db_settings.properties File containing two types of data used by create_db: (a) database properties, including driver, database, user name, and password, and (b) connection properties, and information needed for calling the data files for the component-level tables. The file controls which SQL files to process from WL_HOME\portal\db, and is maintained independently from the Configuration Wizard.
DefaultAuthenticatorInit.ldift,DefaultRoleMapperInit.ldift
Files used for bootstrapping including authentication (user and group) and role mapping. These files contain LDAP-specific information.
domain-info.xml File containing administrative information about the domain, including version, type, name, author, description, and icon name.
fileRealm.properties File containing ACLs, users, and groups that can be used for the default security realm when Compatibility security is used.
Table 16-5 Default Directory Structure for Basic WebLogic Portal Domain (Continued)
Directory or File Description

Conf igura t i on Templ ate Re fe rence
Creating WebLogic Configurations Using the Configuration Wizard 16-17
installService.cmd Script used to install Windows services. The script creates an entry for such services in the Windows Registry. As a result, the Windows system starts the specified service each time the system boots. This script can install the following services:• Administration Server (started each time the system is
booted)• PointBase (if there are PointBase connection pools in the
domain)• Debugger—if the script is modified to remove the
nodebug parameter from the following command line:%USERDOMAIN_HOME%\setDomainEnv.cmd production nodebug
jws-config.properties File containing WebLogic Workshop-related JMS information.
pointbase.ini File containing initialization information for a PointBase JDBC database.
SerializedSystemIni.dat File containing encrypted security information.
set-dbenv.cmd,set-dbenv.sh
Scripts used by create_db.cmd and create_db.sh to set up the database environment on Windows and UNIX systems, respectively. The Configuration Wizard does not use or maintain these files.
setDomainEnv.cmd,setDomainEnv.sh
Scripts used to set up all the environment variables and Java options required to run WebLogic Server, in the WebLogic Portal domain, on Windows and UNIX systems, respectively.
startManagedWebLogic.cmd,startManagedWebLogic.sh
Scripts used to start a Managed Server on Windows and UNIX systems, respectively.
startPointBaseConsole.cmd,startPointBaseConsole.sh
Scripts used to start the PointBase Console on Windows and UNIX systems, respectively.
startWebLogic.cmd,startWebLogic.sh
Scripts used to start the Administration Server on Windows and UNIX systems, respectively.
stopManagedWebLogic.cmd,stopManagedWebLogic.sh
Script used to stop a specified Managed Server on Windows and UNIX systems, respectively.
Table 16-5 Default Directory Structure for Basic WebLogic Portal Domain (Continued)
Directory or File Description

Templa te Re fe rence
16-18 Creating WebLogic Configurations Using the Configuration Wizard
Basic WebLogic Server DomainThe Basic WebLogic Server Domain configuration template allows you to create a simple WebLogic Server domain without installing any sample applications. This template is available when you install WebLogic Server.
By default, when using the Basic WebLogic Server Domain configuration template, you generate a domain that contains only the required components: an Administration Server and a single administrative user. Any required applications must be created and configured within the domain.
The following table defines the default directory structure and files generated by the Basic WebLogic Server Domain configuration template. Unless otherwise specified, by default, the Configuration Wizard creates the domain in the BEA_HOME\user_projects\domains\mydomain directory. If you modify the default configuration settings, the output directory structure may be different from the structure described here.
stopWebLogic.cmd,stopWebLogic.sh
Scripts used to stop the Administration Server on Windows and UNIX systems, respectively.
uninstallService.cmd Script used to uninstall Windows services.
URLs.dat File containing the URL for the JDBC database.
webappCompile.cmd,webappCompile.sh
Scripts used to compile a Web application into an EAR file on Windows and UNIX systems, respectively.
workshop$1.wal File containing domain-specific PointBase database information for the default database named workshop.
workshop.dbn File containing domain-specific PointBase database information for the default database named workshop.
workshop.properties File containing domain-specific parameters that are used by WebLogic Workshop.
wsrpKeystore.jks Java keystore file.
Table 16-5 Default Directory Structure for Basic WebLogic Portal Domain (Continued)
Directory or File Description
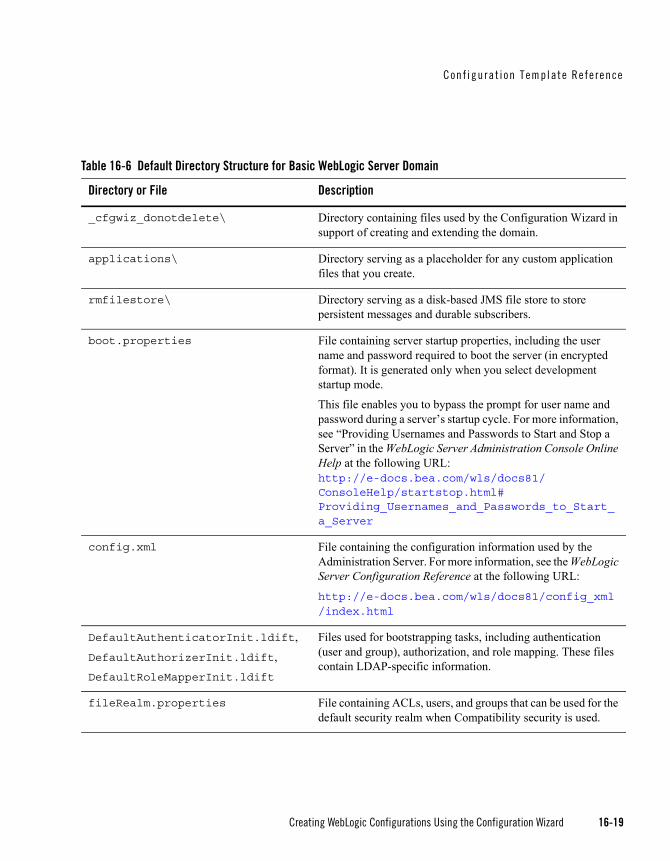
Conf igura t i on Templ ate Re fe rence
Creating WebLogic Configurations Using the Configuration Wizard 16-19
Table 16-6 Default Directory Structure for Basic WebLogic Server Domain
Directory or File Description
_cfgwiz_donotdelete\ Directory containing files used by the Configuration Wizard in support of creating and extending the domain.
applications\ Directory serving as a placeholder for any custom application files that you create.
rmfilestore\ Directory serving as a disk-based JMS file store to store persistent messages and durable subscribers.
boot.properties File containing server startup properties, including the user name and password required to boot the server (in encrypted format). It is generated only when you select development startup mode.
This file enables you to bypass the prompt for user name and password during a server’s startup cycle. For more information, see “Providing Usernames and Passwords to Start and Stop a Server” in the WebLogic Server Administration Console Online Help at the following URL: http://e-docs.bea.com/wls/docs81/ConsoleHelp/startstop.html#Providing_Usernames_and_Passwords_to_Start_a_Server
config.xml File containing the configuration information used by the Administration Server. For more information, see the WebLogic Server Configuration Reference at the following URL:
http://e-docs.bea.com/wls/docs81/config_xml/index.html
DefaultAuthenticatorInit.ldift,
DefaultAuthorizerInit.ldift,DefaultRoleMapperInit.ldift
Files used for bootstrapping tasks, including authentication (user and group), authorization, and role mapping. These files contain LDAP-specific information.
fileRealm.properties File containing ACLs, users, and groups that can be used for the default security realm when Compatibility security is used.

Templa te Re fe rence
16-20 Creating WebLogic Configurations Using the Configuration Wizard
Basic WebLogic Workshop DomainThe Basic WebLogic Workshop Domain configuration template allows you to create a basic WebLogic Workshop domain, without installing sample applications. Domains created from this template support the WebLogic Server and WebLogic Workshop run-time functionality, including support for J2EE applications, Web applications, Web Services, and custom controls. Use domains created from this template as the foundations for development of WebLogic Workshop applications. This template is available when you install WebLogic Server, WebLogic Integration, WebLogic Portal, and WebLogic Platform.
By default, when using the Basic WebLogic Workshop Domain configuration template, you generate a domain that contains only the required components: an Administration Server and a single administrative user. Any required applications must be created and configured within the domain.
installService.cmd Script used to install the Administration Server as a Windows service. The script creates an entry for the service in the Windows Registry. As a result, the Windows system starts the service each time the system boots.
SerializedSystemIni.dat File containing encrypted security information.
setEnv.cmd,setEnv.sh
Scripts that set up the development environment on Windows and UNIX systems, respectively.
startManagedWebLogic.cmd,startManagedWebLogic.sh
Scripts used to start a Managed Server on Windows and UNIX systems, respectively.
startWebLogic.cmd,startWebLogic.sh
Scripts used to start the Administration Server on Windows and UNIX systems, respectively.
stopWebLogic.cmd,stopWebLogic.sh
Scripts used to stop the Administration Server on Windows and UNIX systems, respectively.
uninstallService.cmd Script used to uninstall the Administration Server as a Windows service.
Table 16-6 Default Directory Structure for Basic WebLogic Server Domain (Continued)
Directory or File Description

Conf igura t i on Templ ate Re fe rence
Creating WebLogic Configurations Using the Configuration Wizard 16-21
By default, the following applications and resources are defined in a Basic WebLogic Workshop Domain:
Administration Server
JDBC connection pool and data source
JMS servers, connection factory, queues, and data stores
Administrative user
Entry for the Windows Start menu
Startup and shutdown classes
The following table defines the default directory structure and files generated by the Basic WebLogic Workshop Domain configuration template. Unless otherwise specified, by default, the Configuration Wizard creates the domain in the BEA_HOME\user_projects\domains\workshop directory. If you modify the default configuration settings, the output directory structure may be different from the structure described here.
Table 16-7 Default Directory Structure for Basic WebLogic Workshop Domain
Directory or File Description
_cfgwiz_donotdelete\ Directory containing files used by the Configuration Wizard in support of creating and extending the domain.
logs\ Directory serving as a placeholder for log files.
rmfilestore\ Directory serving as a disk-based JMS file store to store persistent messages and durable subscribers.
script\ Directory containing a script that targets specified services and applications to their appropriate servers or clusters. This script supplements the Configuration Wizard’s auto-targeting of services and applications to a cluster.

Templa te Re fe rence
16-22 Creating WebLogic Configurations Using the Configuration Wizard
boot.properties File containing server startup properties, including the user name and password required to boot the server (in encrypted format). It is generated only when you select development startup mode.
This file enables you to bypass the prompt for user name and password during a server’s startup cycle. For more information, see “Providing Usernames and Passwords to Start and Stop a Server” in the WebLogic Server Administration Console Online Help at the following URL: http://e-docs.bea.com/wls/docs81/ConsoleHelp/startstop.html#Providing_Usernames_and_Passwords_to_Start_a_Server
config.xml File containing the configuration information used by the Administration Server. For more information, see the WebLogic Server Configuration Reference at the following URL:
http://e-docs.bea.com/wls/docs81/config_xml/index.html
DefaultAuthenticatorInit.ldift,DefaultRoleMapperInit.ldift
Files used for bootstrapping including authentication (user and group) and role mapping. These files contain LDAP-specific information.
domain-info.xml File containing administrative information about the domain, including version, type, name, author, description, and icon name.
fileRealm.properties File containing ACLs, users, and groups that can be used for the default security realm when Compatibility security is used.
Table 16-7 Default Directory Structure for Basic WebLogic Workshop Domain (Continued)
Directory or File Description

Conf igura t i on Templ ate Re fe rence
Creating WebLogic Configurations Using the Configuration Wizard 16-23
installService.cmd Script used to install Windows services. The script creates an entry for such services in the Windows Registry. As a result, the Windows system starts the specified service each time the system boots. This script can install the following services:• Administration Server (started each time the system is
booted)• PointBase (if there are PointBase connection pools in the
domain)• Debugger—if the script is modified to remove the
nodebug parameter from the following command line:%USERDOMAIN_HOME%\setDomainEnv.cmd production nodebug
jws-config.properties File containing WebLogic Workshop-related JMS information.
pointbase.ini File containing initialization information for a PointBase JDBC database.
SerializedSystemIni.dat File containing encrypted security information.
setDomainEnv.cmd,setDomainEnv.sh
Scripts used to set up all the environment variables and Java options required to run WebLogic Server, in the WebLogic Workshop domain, on Windows and UNIX systems, respectively.
startManagedWebLogic.cmd,startManagedWebLogic.sh
Scripts used to start a Managed Server on Windows and UNIX systems, respectively.
startPointBaseConsole.cmd,startPointBaseConsole.sh
Scripts used to start the PointBase Console on Windows and UNIX systems, respectively.
startWebLogic.cmd,startWebLogic.sh
Script used to start the Administration Server on Windows and UNIX systems, respectively.
stopManagedWebLogic.cmd,
stopManagedWebLogic.sh
Script used to stop a specified Managed Server on Windows and UNIX systems, respectively.
stopWebLogic.cmd
stopWebLogic.sh
Scripts used to stop the Administration Server on Windows and UNIX systems, respectively.
Table 16-7 Default Directory Structure for Basic WebLogic Workshop Domain (Continued)
Directory or File Description

Templa te Re fe rence
16-24 Creating WebLogic Configurations Using the Configuration Wizard
For more information about WebLogic Workshop, see the following URL:
http://e-docs.bea.com/workshop/docs81/index.html
WebLogic Server Examples DomainThe WebLogic Server Examples Domain contains a collection of examples that illustrate best practices for coding individual J2EE APIs, and a set of scripts to run those examples. The WebLogic Server Examples Domain configuration template allows you to create the WebLogic Server Examples domain outside the installed kit. This template is available when you install WebLogic Server.
By default, the following applications and resources are defined in a WebLogic Server Examples Domain:
Two simple Web applications:
– The Main Web Application is the default Web application; it simply forwards requests to the Examples Web Application
– The Examples Web Application contains code samples for programming with various J2EE APIs
uninstallService.cmd Script used to uninstall Windows services.
URLs.dat File containing the URL for the JDBC database.
webapp_build.xml File containing the project information used to build a Web application.
webappCompile.cmd,webappCompile.sh
Scripts used to compile a Web application into an EAR file on Windows and UNIX systems, respectively.
workshop$1.wal File containing domain-specific PointBase database information for the default database named workshop.
workshop.dbn File containing domain-specific PointBase database information for the default database named workshop.
workshop.properties File containing domain-specific parameters that are used by WebLogic Workshop.
Table 16-7 Default Directory Structure for Basic WebLogic Workshop Domain (Continued)
Directory or File Description

Conf igura t i on Templ ate Re fe rence
Creating WebLogic Configurations Using the Configuration Wizard 16-25
Administration Server
JDBC connection pools and data sources
JMS server, connection factories, queues, topics, and data store
Administrative user with group and role assignments
Entry for the Windows Start menu
Startup and shutdown classes
After creating a domain with the template, you can start the server. When the server is started, the PointBase database server is also started.
The following table defines the default directory structure and files generated by the WebLogic Server Examples Domain configuration template. Unless otherwise specified, by default, the Configuration Wizard creates the domain in the BEA_HOME\user_projects\domains\examples directory. If you modify the default configuration settings, the output directory structure may be different from the structure described here.
Table 16-8 Default Directory Structure for WebLogic Server Examples Domain
Directory or File Description
_cfgwiz_donotdelete\ Directory containing files used by the Configuration Wizard in support of creating and extending the domain.
applications\ Directory serving as a placeholder for any custom application files that you create.
examplesWebApp\ Directory containing the files for an example Web application.
mainWebApp\ Directory containing the files for an example Web application.

Templa te Re fe rence
16-26 Creating WebLogic Configurations Using the Configuration Wizard
boot.properties File containing server startup properties, including the user name and password required to boot the server (in encrypted format). It is generated only when you select development startup mode.
This file enables you to bypass the prompt for user name and password during a server’s startup cycle. For more information, see “Providing Usernames and Passwords to Start and Stop a Server” in the WebLogic Server Administration Console Online Help at the following URL: http://e-docs.bea.com/wls/docs81/ConsoleHelp/startstop.html#Providing_Usernames_and_Passwords_to_Start_a_Server
config.xml File containing the configuration information used by the Administration Server. For more information, see the WebLogic Server Configuration Reference at the following URL:
http://e-docs.bea.com/wls/docs81/config_xml/index.html
DefaultAuthenticatorInit.ldift,
DefaultAuthorizerInit.ldift,DefaultCredentialMapper.ldift
DefaultRoleMapperInit.ldift
Files used for bootstrapping tasks, including authentication (user and group), authorization, credential mapping, and role mapping. These files contain LDAP-specific information.
fileRealm.properties File containing ACLs, users, and groups that can be used for the default security realm when Compatibility security is used.
pointbase.ini File containing initialization information for a PointBase JDBC database.
SerializedSystemIni.dat File containing encrypted security information.
setExamplesEnv.cmd,setExamplesEnv.sh
Scripts that set up the WebLogic Server Examples development environment on Windows and UNIX systems, respectively.
startExamplesServer.cmd,startExamplesServer.sh
Scripts used to start the Administration Server on Windows and UNIX systems, respectively.
Table 16-8 Default Directory Structure for WebLogic Server Examples Domain (Continued)
Directory or File Description

Extension Templ ate Re fe rence
Creating WebLogic Configurations Using the Configuration Wizard 16-27
For more information about the samples that are supported in the WebLogic Server Examples domain, see WebLogic Server Application Examples and Tutorial at the following URL:
http://e-docs.bea.com/wls/docs81/samples.html
Extension Template ReferenceWebLogic Platform provides predefined extension templates that are installed with the product. You can easily extend an existing WebLogic domain by using the Configuration Wizard’s Extend an existing WebLogic configuration option and selecting one or more of the predefined extension templates. For information about template dependencies, see “Relationships Between Templates” on page 16-29
Location of Extension TemplatesBy default, all the predefined extension templates provided with your WebLogic Platform installation are located in the following directory:
WL_HOME\common\templates\applications
Extension Template SummaryThe extension templates are summarized in the following table.
Note: The availability of predefined extension templates depends on which WebLogic Platform components are installed; the WebLogic Platform components required for each template are shown in the table.
startManagedWebLogic.cmd,startManagedWebLogic.sh
Scripts used to start a Managed Server on Windows and UNIX systems, respectively.
uninstallService.cmd Script used to uninstall Windows services.
Table 16-8 Default Directory Structure for WebLogic Server Examples Domain (Continued)
Directory or File Description

Templa te Re fe rence
16-28 Creating WebLogic Configurations Using the Configuration Wizard
Table 16-9 Extension Template Summary
Template Required WebLogic Platform Component
Filename Description
DefaultWebApp Any Platform component
DefaultWebApp.jar Imports the static resources for a basic Web application, including an HTML file, image files, and required XML descriptors. Use the Default Web Application as a launching point from which to develop your own Web applications.
WebLogic Integration Extension
• WebLogic Integration
• WebLogic Workshop
• WebLogic Server
wli.jar Imports the resources needed to support the development of WebLogic Integration applications.
Support for WebLogic Integration application development is already provided in the following configuration templates:• Basic WebLogic Integration
Domain• Basic WebLogic Platform Domain
Note: To create a domain that supports the development of WebLogic Server Process Edition solutions, use the Basic WebLogic Integration Domain template. If you have an existing WebLogic Server-based domain, you can extend it to include the resources required for WebLogic Server Process Edition by using the WebLogic Integration Extension template.

Extension Templ ate Re fe rence
Creating WebLogic Configurations Using the Configuration Wizard 16-29
Relationships Between TemplatesThis section provides the following topics:
Relationships between domains created with predefined configuration templates and domains extended with extension templates
WebLogic Workshop resources as prerequisites for extension templates
WebLogic Portal Extension
• WebLogic Portal
• WebLogic Workshop
• WebLogic Server
wlp.jar Imports the resources needed to support the development of WebLogic Portal applications.
Support for WebLogic Portal application development is already provided in the following configuration templates:• Basic WebLogic Portal Domain• Basic WebLogic Platform Domain
WebLogic Workshop Extension
• WebLogic Workshop
• WebLogic Server
wlw.jar Imports the resources needed to support the development of WebLogic Workshop applications.
Support for WebLogic Workshop application development is already provided in the following configuration templates:• Basic WebLogic Workshop
Domain• Basic WebLogic Integration
Domain• Basic WebLogic Portal Domain• Basic WebLogic Platform Domain
Table 16-9 Extension Template Summary (Continued)
Template Required WebLogic Platform Component
Filename Description

Templa te Re fe rence
16-30 Creating WebLogic Configurations Using the Configuration Wizard
Relationships Between TemplatesYou can create a basic WebLogic domain using the predefined configuration templates or you can create a basic WebLogic domain and extend it incrementally using the extension templates. The following table shows the relationship between the templates and the domains created.
Table 16-10 Relationships Between Templates
A domain created using this configuration template . . .
Is equivalent to a domain created using . . .
Basic WebLogic Workshop Domain Basic WebLogic Server Domain configuration template + WebLogic Workshop extension template
Basic WebLogic Integration Domain
• Basic WebLogic Server Domain configuration template + WebLogic Workshop extension template + WebLogic Integration extension template
• Basic WebLogic Workshop Domain configuration template + WebLogic Integration extension template
Basic WebLogic Portal Domain • Basic WebLogic Server Domain configuration template + WebLogic Workshop extension template + WebLogic Portal extension template
• Basic WebLogic Workshop Domain configuration template + WebLogic Portal extension template

Extension Templ ate Re fe rence
Creating WebLogic Configurations Using the Configuration Wizard 16-31
WebLogic Workshop Resources as a PrerequisiteWebLogic Workshop resources must already be set up in your domain before you can start importing resources from the WebLogic Integration or WebLogic Portal extension template. When you select an extension template, the Configuration Wizard checks to make sure the required resources are available for you. If desired, the Configuration Wizard allows you to import the WebLogic Workshop, WebLogic Integration, and WebLogic Portal extensions simultaneously. (Note that there are no prerequisites for using the DefaultWebApp extension template.)
Default WebApp Extension TemplateYou can extend your domain to support a basic Web application quickly and easily by using the Configuration Wizard to import resources from the Default WebApp extension template. For more information about developing Web applications, see Developing Web Applications for WebLogic Server at the following URL:
Basic WebLogic Platform Domain • Basic WebLogic Server Domain configuration template + WebLogic Workshop extension template + WebLogic Integration extension template + WebLogic Portal extension template
• Basic WebLogic Server Domain configuration template + WebLogic Workshop extension template + WebLogic Portal extension template + WebLogic Integration extension template
• Basic WebLogic Workshop Domain configuration template + WebLogic Integration extension template + WebLogic Portal extension template
• Basic WebLogic Workshop Domain configuration template + WebLogic Portal extension template + WebLogic Integration extension template
• Basic WebLogic Integration Domain configuration template + WebLogic Portal extension template
• Basic WebLogic Portal Domain configuration template + WebLogic Integration extension template
Table 16-10 Relationships Between Templates (Continued)
A domain created using this configuration template . . .
Is equivalent to a domain created using . . .

Templa te Re fe rence
16-32 Creating WebLogic Configurations Using the Configuration Wizard
http://e-docs.bea.com/wls/docs81/webapp/index.html
The following table shows the application resources and services, provided by the Default WebApp extension template, that can be imported into an existing WebLogic domain. The information is based on the assumption that the existing WebLogic domain was created using the Basic WebLogic Server Domain template.
WebLogic Integration Extension TemplateTo extend your domain to support WebLogic Integration, use the Configuration Wizard to import resources and services from the WebLogic Integration extension template.
Note: WebLogic Workshop resources must already be set up in your domain before you can start importing the WebLogic Integration extension template, unless you import the WebLogic Workshop and WebLogic Integration extensions at the same time.
To create a domain that supports the development of WebLogic Server Process Edition solutions, use the Basic WebLogic Integration Domain template. If you have an existing WebLogic Server-based domain, you can extend it to include the resources required for WebLogic Server Process Edition by using the WebLogic Integration Extension template.
The following table shows the application resources and services provided by the WebLogic Integration extension template that can be imported into an existing domain. The information is based on the assumption that the existing WebLogic domain was created using the Basic WebLogic Server Domain template.
Table 16-11 Default WebApp Extension Template Resources and Services
Resource Type Name Extension Result
JMS Services FileStore No change to the JMS JDBC Store provided by WebLogic Server
wsStoreForwardInternalJMSServer<myserver> No change to the JMS Server provided by WebLogic Server
Application Deployments
DefaultWebApp Adds the DefaultWebApp Web application

Extension Templ ate Re fe rence
Creating WebLogic Configurations Using the Configuration Wizard 16-33
Table 16-12 WebLogic Integration Extension Template Resources and Services
Resource Type Name Extension Result
Startup Classes WLI Startup Class Adds the startup class
WLI Post-Activation Startup Class
Adds the startup class
Shutdown Classes
WLI Shutdown Class Adds the shutdown class
JDBC Services bpmArchPool Adds the JDBC connection pool
cgPool Uses the JDBC connection pool provided by WebLogic Workshop to accommodate the additional data sources
bpmArchDataSource Adds the JDBC Tx Data Source that uses the bpmArchPool JDBC connection pool
cgDataSource Uses the JDBC Tx Data Source provided by WebLogic Workshop
JMS Services cgQueue Uses the JMS connection factory provided by WebLogic Workshop
WLI-B2B System Topic Factory Adds the JMS connection factory
cgJMSStore Uses the JMS JDBC Store provided by WebLogic Workshop
FileStore No change to the JMS JDBC Store provided by WebLogic Server
cgJMSServer Uses the JMS Server provided by WebLogic Workshop
wsStoreForwardInternalJMSServer<myserver>
No change to the JMS Server provided by WebLogic Server
cgJWSQueue Uses the JMS queue provided by WebLogic Workshop

Templa te Re fe rence
16-34 Creating WebLogic Configurations Using the Configuration Wizard
Application Deployments
JWSQueueTransport Uses the QueueTransportEJB EJB module provided by WebLogic Workshop
WLI-AI Design-time • Adds the WLI-AI Manager EJBs EJB module• Adds the wlai Web application
WLI System EJBs • Adds the following EJBs:WLI AdminWLI Admin HelperWLI Process TrackingWLI Calendar PersistenceWLI Worklist PersistenceWLI Worklist SelectionWLI Process Proxy DispatcherWLI AI Message ProcessorsWLI AI RAR UploadWLI RosettaNetWLI ebXMLWLI Message Tracking
• Adds the WLI-B2B HTTP Transport Web Application
WLI Console Adds the WLI Console Web application
WLI Worklist • Adds the following EJBs:.workshop/worklist/EJB/ProjectBeans
.workshop/worklist/EJB/GenericStateless EJBs
• Adds the Worklist Web application
B2BDefaultWebAppApplication Adds the B2BDefaultWebApp Web application module
BEA_WLS_DBMS_ADK • Adds the BEA_WLS_DBMS_ADK_Web Web application
• Adds the BEA_WLS_DBMS_ADK and BEA_WLS_DBMS_ADK_LOCALTX connector modules
Table 16-12 WebLogic Integration Extension Template Resources and Services (Continued)
Resource Type Name Extension Result

Extension Templ ate Re fe rence
Creating WebLogic Configurations Using the Configuration Wizard 16-35
WebLogic Portal Extension TemplateTo extend your domain to support WebLogic Portal, use the Configuration Wizard to import resources and services from the WebLogic Portal extension template.
Note: WebLogic Workshop resources must already be set up in your domain before you can start importing the WebLogic Portal extension template, unless you import the WebLogic Workshop and WebLogic Portal extensions at the same time.
The following table shows the application resources and services provided by the WebLogic Portal extension template that can be imported into an existing WebLogic domain. The information is based on the assumption that the existing WebLogic domain was created using the Basic WebLogic Server Domain template.
Table 16-13 WebLogic Portal Extension Template Resources and Services
Resource Type
Name Extension Result
JDBC Services
cgPool Uses the JDBC connection pool provided by WebLogic Workshop to accommodate the additional data sources
cgDataSource Uses the JDBC Tx Data Source provided by WebLogic Workshop
commercePool Adds the JDBC Tx Data Source
contentDataSource Adds the JDBC Tx Data Source
ebusinessPool Adds the JDBC Tx Data Source
portalFrameworkPool Adds the JDBC Tx Data Source
p13n_trackingDataSource Adds the JDBC data source
p13n_sequencerDataSource Adds the JDBC data source
p13n_dataSyncDataSource Adds the JDBC data source

Templa te Re fe rence
16-36 Creating WebLogic Configurations Using the Configuration Wizard
WebLogic Workshop Extension TemplateTo extend your domain to support WebLogic Workshop, use the Configuration Wizard to import resources and services from the WebLogic Workshop extension template. WebLogic Workshop resources are required before you can extend a domain to support WebLogic Integration, WebLogic Portal, or both (that is, a full Platform domain).
The following table shows the application resources and services provided by the WebLogic Workshop extension template that can be imported into an existing WebLogic domain. The information is based on the assumption that the existing WebLogic domain was created using the Basic WebLogic Server Domain template.
JMS Services cgQueue Uses the JMS Connection Factory provided by WebLogic Workshop
cgJMSServer Uses the JMS Server provided by WebLogic Workshop
FileStore No change to the JMS JDBC Store provided by WebLogic Server
cgJMSStore Uses the JMS JDBC Store provided by WebLogic Workshop
wsStoreForwardInternalJMSServer<myserver> No change to the JMS Server provided by WebLogic Server
cgJWSQueue Uses the JMS queue provided by WebLogic Workshop
Application Deployments
JWSQueueTransport Uses the QueueTransportEJB EJB module provided by WebLogic Workshop
paymentWSApp Adds the payment EJB and the payws Web service
taxWSApp Adds the tax EJB and taxws Web service
Table 16-13 WebLogic Portal Extension Template Resources and Services (Continued)
Resource Type
Name Extension Result

Extension Templ ate Re fe rence
Creating WebLogic Configurations Using the Configuration Wizard 16-37
Table 16-14 WebLogic Workshop Extension Template Resources and Services
Resource Type Name Extension Result
JDBC Services cgPool Adds the JDBC connection pool
cgDataSource Adds the JDBC Tx Data Source
JMS Services cgQueue Adds the JMS connection factory
cgJMSStore Adds the JMS JDBC Store
FileStore No change to the JMS JDBC Store provided by WebLogic Server
cgJMSServer Adds the JMS Server
wsStoreForwardInternalJMSServer<myserver> No change to the JMS Server provided by WebLogic Server
cgJWSQueue Adds the JMS queue
Application Deployments
JWSQueueTransport Adds the QueueTransportEJB EJB Module

Templa te Re fe rence
16-38 Creating WebLogic Configurations Using the Configuration Wizard