beckman coulter genomelab™ gexp genetic analysis system
TRANSCRIPT

Beckman Coulter GenomeLab™ GeXP Genetic Analysis System
Bergen County Technical Schools Stem Cell Lab
Room 213

Beckman Coulter GenomeLab™ GeXP Genetic Analysis System Information Sheet
The Beckman Coulter GenomeLab™ GeXP Genetic Analysis System is a fully
automated, versatile platform capable of a magnitude of genetic analysis applications
ranging from quantitative multiplexed gene expression to fragment analysis and
sequencing. The hardware is used to carry out the task of sample handling as well as
the tasks associated with the separation and detection phases of electrophoresis. The
software provides the user with an interface for manual or automatic control of the
system, and with data capture and basic data analysis capabilities.
The instrument incorporates two plate holders and can accept two 96 well plates
at one time, giving the user the ability to sequence the DNA of up to 192 samples at one
time. For sequencing purposes, the instrument is able to sequence the bases of DNA
strands ranging from less than 200 base pairs to over 700 base pairs. This DNA can
exist in the form of plasmids, raw PCR products, and purified PCR products. The
method used for sequencing is Capillary Electrophoresis using Dye Terminator Cycle
Sequencing.
After DNA has been sequenced, the software offers the user a wide range of
options, including the ability to analyze the raw sequence data as well as the edited and
corrected data, the ability to compare a sequence to a reference sequence, and the
ability to export the sequence data to formats such as .fasta and .tat (sequence text
files) and .scf (standard chromatograph file), which can then be used with third party
software for further analysis.
The goal of dye terminator cycle sequencing is to synthesize a set of DNA
fragments in which each base pair is represented by a fragment of a given length and
Dye Terminator Cycle Sequencing and Capillary Electrophoresis
labeled with a fluorescent dye. To do this, a polymerase chain reaction (PCR) is run on
the DNA strand, which contains primers for the creation of new fragments, and
Dideoxynucleotide Triphosphates (ddNTP) containing a fluorescent dye corresponding
to each of the four nucleic acids. During the PCR cycle, new strands of DNA are created
from existing template strands. When a ddNTP is inserted in a sequence, it stops the
elongation of that strand at that base. The insertion of ddNTP’s into the sequence is
random, and in theory should result in the creation of different length fragments of DNA
that contain a ddNTP in every possible position of the original DNA strand.
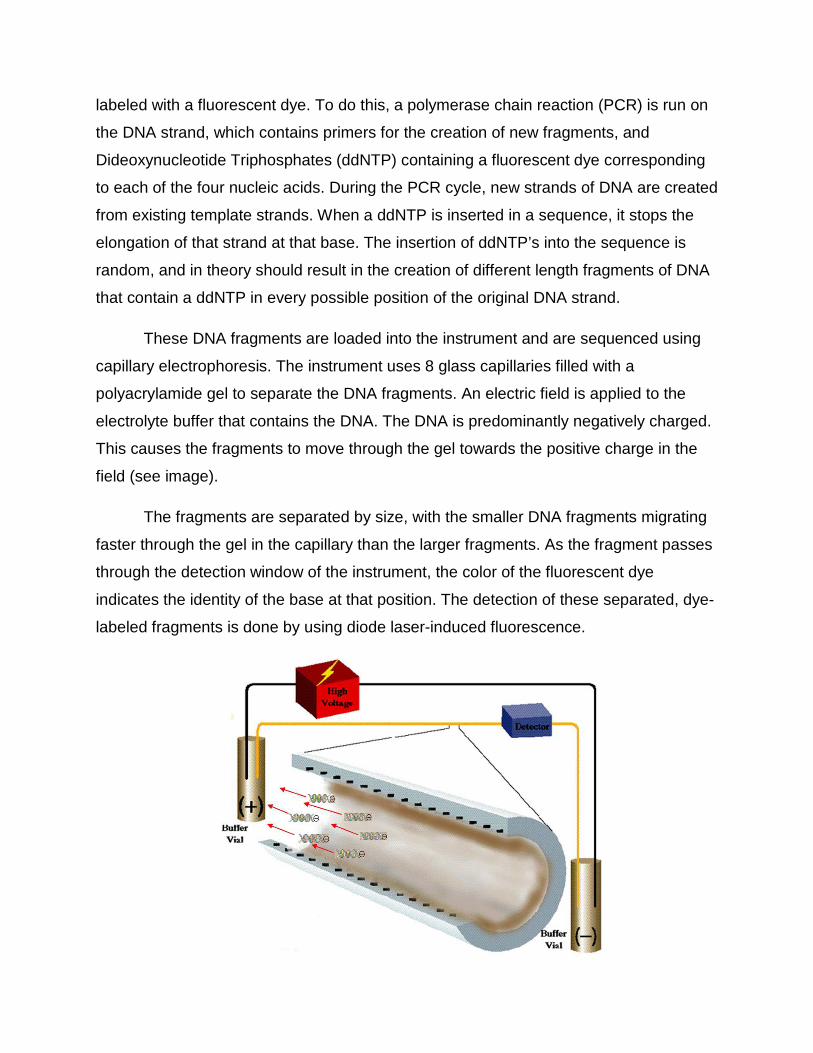
These DNA fragments are loaded into the instrument and are sequenced using
capillary electrophoresis. The instrument uses 8 glass capillaries filled with a
polyacrylamide gel to separate the DNA fragments. An electric field is applied to the
electrolyte buffer that contains the DNA. The DNA is predominantly negatively charged.
This causes the fragments to move through the gel towards the positive charge in the
field (see image).
The fragments are separated by size, with the smaller DNA fragments migrating
faster through the gel in the capillary than the larger fragments. As the fragment passes
through the detection window of the instrument, the color of the fluorescent dye
indicates the identity of the base at that position. The detection of these separated, dye-
labeled fragments is done by using diode laser-induced fluorescence.

Beckman Coulter GenomeLab™ GeXP Genetic Analysis System Quick Start Guide – Sequencing
1. Plasmid or PCR DNA samples can be run for sequencing. These samples
Preparing Samples for DNA Sequencing
Preparing the DNA Sequencing Reaction
Before any samples can be sequenced, they must be prepared for Dye Terminator
Cycle Sequencing using the Beckman Coulter Quick Start Kit. Until samples are fully
prepared and ready to be sequenced, the instrument does not need to be turned on.
should be prepared ahead of time, and should be run on a gel to determine
the concentration of DNA in the sample.
Note: The instrument contains 8 capillaries. Therefore, a minimum
of 8 samples must be run for every round of sequencing. If the
user has less than 8 samples, duplicates of samples can be run,
or a buffer can be added to blank wells prior to the run.
2. Take the Quick Start Kit from -20°C freezer and place the Master Mix Tube on
ice.
The following steps should be repeated in a tube for each of the samples being
prepared.
3. In a 0.2mL PCR tube, add 0.5 – 10.0µL of the sample template DNA (depending
on the concentration determined from the gel) and add distilled H2O to bring the
final volume in the tube to 10µL.
a. For ONLY Plasmid DNA samples, a preheat step is necessary. Place the
tube containing the sample in the thermal cycler and program the
instrument to preheat at 96°C for 2 minutes, followed by a 4°C hold. This
protocol is pre-programmed in the thermal cycler as 96C2min.

4. Add a total of 2.0µL of the user’s primers to the tube.
5. Add 8.0µL of DTCS Quick Start Master Mix to the tube. The final volume should
be 20µL per sample.
6. Mix the sample thoroughly and then quickly centrifuge the samples.
a. Place the rotor for the centrifuge in the -20°C freezer after this step.
Thermal Cycling Program
1. Place the tubes in the thermal cycler.
2. Set the thermal cycler to run the following program: 96°C for 20 Seconds, 50°C
for 20 seconds, and 60°C for 4 minutes. Repeat for 30 cycles, and follow the run
with a 4°C hold.
3. This cycle is pre-programmed in the thermal cycler as 30dtcs.
Ethanol Precipitation
1. Prepare a labeled, sterile microfuge tube for each sample (up to 8).
2. In a fresh tube, prepare the fresh Stop Solution / Glycogen mixture as follows:
20µL of 3M Sodium Acetate (pH 5.2), 20µL of 100mM Na2-EDTA (pH 8.0), and
10µL of 20mg/mL glycogen (from the Quick Start Kit).
3. To each of the labeled tubes, add 5µL of the Stop Solution / Glycogen mixture.
4. Transfer the 20µL from the thermal cycler to the appropriate tube containing the
stop solution. Mix thoroughly using a vortex.
5. Add 60µL of cold 95% ethanol from the -20°C freezer and mix thoroughly using
a vortex.
6. Immediately centrifuge at 14,000 RPM at 4°C for 15 minutes. The rotor can be
removed from the freezer to spin at 4°C. After completed, carefully remove and
discard the supernatant. DO NOT TOUCH THE PELLET.
7. Rinse the pellet 2 times with 200µL of cold 70% ethanol from the -20°C freezer.
8. Each time, centrifuge immediately without mixing at 14,000 RPM for 2 minutes
at 4°C. Carefully remove and discard the supernatant after each spin.
9. Open the tubes and vacuum dry for 10 minutes, or place inside a hood in the lab
until no ethanol remains in the tube (may take 20 – 30 minutes).
Note: At this point in the procedure, the instrument can be turned on and all protocol
information can be set up in the software, as explained in the following sections.
10. Centrifuge the tubes for 1 minute at 14,000 RPM to ensure all DNA in the tube is
at the bottom of the wells.
11. Resuspend the sample in 40µL of the Sample Loading Solution (SLS) (from
the kit). Mix thoroughly and allow to sit at room temperature for 10 minutes.
12. At this point, the instrument should be ready for sequencing. Transfer the 40µL of
each sample into the appropriate wells of the sample plate. (Add 40µL SLS buffer
to any empty wells in the row).
13. Add 1 drop of mineral oil to each well that contains a sample.
1. Press the Power Button located on the front of the instrument.
Turning on the Instrument and Software for Sequencing
2. There are two computers associated with the instrument. Start the computer on
the Right Side for sequencing.
3. Double Click the GenomeLab System Icon on the Desktop to start the
software.

Each user should set up their own folder in the database where all of their sequencing
data and protocols will be stored.
Setting up a User in the Database
1. On the Software Main Menu Screen, select the Database Icon.
a. A database for student research has already been created. It is labeled
Student Research Database.
2. Make sure that the database is Bold. If it is not, right click the database and
select Set as Working Database.
a. If you have already set up a project within
the database for the user, continue to the
next section.
3. Right click on the database and select
New Project. “New Project” will appear
under the database.
4. Select the new project, right click, and select Rename.
5. Enter a new name for the project and press Enter.
a. The new project should be named with the User’s name.
i. The individual runs that are stored in the project folders will contain
more detail about the type of run’s being performed.
6. Once the new project is named in the database, exit the Database
Manager by clicking the (X) at the top right of the screen.
1. On the Software Main Menu Screen, select the Setup Icon.
Setting Up a Sample Plate
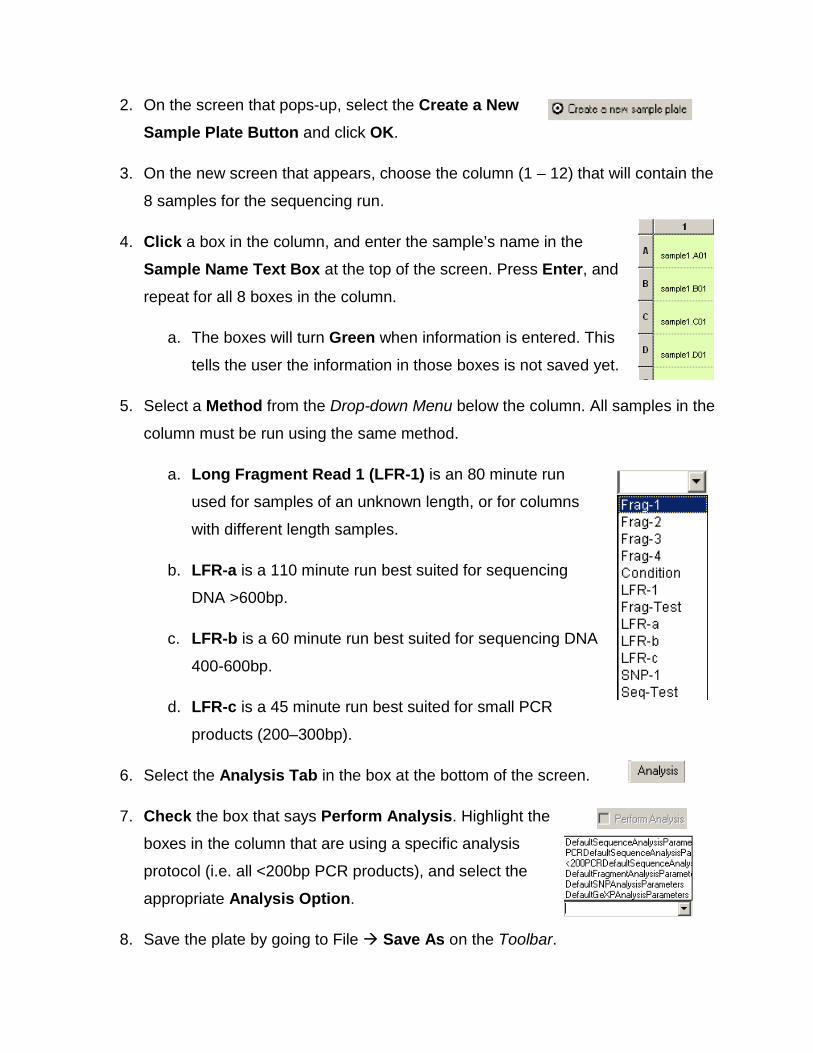
2. On the screen that pops-up, select the Create a New Sample Plate Button and click OK.
3. On the new screen that appears, choose the column (1 – 12) that will contain the
8 samples for the sequencing run.
4. Click a box in the column, and enter the sample’s name in the
Sample Name Text Box at the top of the screen. Press Enter, and
repeat for all 8 boxes in the column.
a. The boxes will turn Green when information is entered. This
tells the user the information in those boxes is not saved yet.
5. Select a Method from the Drop-down Menu below the column. All samples in the
column must be run using the same method.
a. Long Fragment Read 1 (LFR-1) is an 80 minute run
used for samples of an unknown length, or for columns
with different length samples.
b. LFR-a is a 110 minute run best suited for sequencing
DNA >600bp.
c. LFR-b is a 60 minute run best suited for sequencing DNA
400-600bp.
d. LFR-c is a 45 minute run best suited for small PCR
products (200–300bp).
6. Select the Analysis Tab in the box at the bottom of the screen.
7. Check the box that says Perform Analysis. Highlight the
boxes in the column that are using a specific analysis
protocol (i.e. all <200bp PCR products), and select the
appropriate Analysis Option.
8. Save the plate by going to File Save As on the Toolbar.

a. Enter a name for the plate. This should include the User’s name, project,
and date. Ex. UserX_ProjectY_mm-dd-yy.
b. Select the Project Name that was
previously created from the Project
Name Drop-down Menu at the bottom of the screen.
c. Click OK to save the plate.
d. All of the boxes on the screen should now turn Blue. This
means that they are saved.
9. Press the (X) Button at the top of the screen to exit the plate setup.
1. On the Software Main Menu Screen, select the Run Button.
Running a Sample Plate and Installing the Gel and Capillaries
2. On the screen that appears, select the Direct Control Tab. This
shows a cartoon view of the instrument and its parts. From here,
the gel and capillaries can be accessed.
Note: Students should NOT install the gel or capillaries. This should only be
performed by the instructor. Have an instructor install the gel and capillaries
at this point, and students can then proceed to the section Setting up the Run.

Setting up the Run
1. Click the Run Sample Plate Button located at the top of
the Run Screen.
2. In the Sample Plate Run Configuration Screen:
a. Determine if the samples will be loaded in the Left or Right Plate Carrier. Either is fine to use.
b. Enter the Operator’s Name.
c. Select the Project Name previously
setup in the Drop-down Menu.
d. Select the rows that contain sample by
clicking on the corresponding wells in the
picture.
i. Wells will turn yellow once selected.

3. Click the button at the bottom of the box that says Load Plates.
a. In the dialog box that appears, click
Start. Wait for the instrument to
say it is OK to load the plates. The
user will have 15 minutes to
complete all sample loading.
4. Lift the Sample Access Cover and load the samples that were prepared earlier
(40µL SLS and DNA with 1 drop of Mineral Oil in each of the 8 sample wells) into
either the left or right plate carriage (depending on which was selected).
5. Load 250 - 300µL of buffer into Buffer Plate wells that correspond to the
location of the samples in the sample plate. Place the Buffer Evaporation Cover back over the buffer plate.
6. Empty the Wetting Tray, and refill it ¾ with D.I. water. Place it
back into the instrument.
7. On the screen, select the buttons next to Plate Loaded
and Immerse Capillaires under the left or right plate
depending on which side the samples were loaded into.
8. Click the Load Button.
9. On the screen, click the Start Button to start the sequencing.

After the sequencing protocol has been run:
Analyzing the Results of the Sequencing
1. Click the Sequencing Button on the Software Main Menu
Screen.
2. In the Sequence Analysis Screen, click File Open.
a. Select the correct Project Name from
the Drop-down Menu at the bottom of
the dialog box.
b. Select the correct run data from the list
in the dialog box. Click OK.
3. In the screen that pops up, select the wells in the
plate that contained the samples that you would like
to view.
a. The wells that have sample data are filled in
Purple. When selected for viewing (by clicking
on each), the wells will turn Yellow.
4. Click Open.
5. A screen will open for each of the wells that were selected.
6. The user can look at multiple features in this screen by selecting the Icons on
the left side of the data, including:

a. the Analyzed Data as a Chromatograph,
b. the bases viewed as Text,
c. the Raw Data,
d. the Current and Voltage from throughout the run,
e. Comparing one sequence to another,
f. and the Call Scores for each base.
To Export Results:
Exporting Data
1. Select File Export.
2. Choose the type of file you would like to export the
data as (.txt, .seq, or .fasta for text, .scf for a
chromoatograph).
3. Choose the Sample Elements to be exported in the file.
This is located on the left side of the window.
4. Select where the exported data should be saved to.
5. Click Export.
6. These files can then be saved to a USB drive and analyzed on a different
computer.

1. Follow the procedure for Removing the Gel Cartridge and Capillary Array
listed above.
Shutting Down the Instrument
2. At the same time as the capillary array is being removed from the instrument,
also remove the sample plate.
3. Shut the instrument’s power off by pressing the Power Button located on the front of the instrument.
4. Close all of the software windows that are open by pressing the (X) Button in the top right corner of the screen.
5. On the Software Main Menu Screen, click the Exit Button.
6. Make sure the station is neat before leaving the instrument!

Beckman Coulter GenomeLab™ GeXP Genetic Analysis System Safety Sheet
1. Samples should be handled according to good laboratory procedures and methods in order to prevent accidents.
2. Normal operation of the instrument can involve the use of solvents and reagents that are toxic, flammable, or biologically harmful. Observe all precautionary information printed on the original solution containers.
3. Wear appropriate laboratory attire (safety glasses, gloves, lab coat) when working with potentially hazardous materials.
4. Dispose of all waste solutions according to waste disposal procedures.
5. The instrument uses a high voltage power supply:
a. Do not remove any panels or cords from the instrument to avoid electrical shock.
b. Do not perform any maintenance on the instrument while the power is on to avoid electrical shock.
6. The instrument has moving parts:
a. Do not attempt to remove or exchange sample trays, the gel cartridge, capillaries, or any other parts of the instrument while it is operating.
b. Be aware of clothing and body parts around any of the instruments moving parts.
c. Most of the instruments moving parts are controlled through the software. Use the software to make changes in the instrument. Never forcefully attempt to add or remove anything, such as the capillaries, to or from the instrument.
7. The instrument uses a “Class 3B” laser, which means that direct viewing of this type of laser is always hazardous. The laser is housed in a sealed container which makes the laser an overall “Class 1” laser, which means it is safe to users under normal operation conditions. Never attempt to remove the laser from the sealed container or open the outer casing.
8. Instruments used in the preparation of samples for sequencing, such as the Thermocycler, can reach temperatures near 100°C. Use caution when working near the instrument to avoid injury.
9. The capillaries are made of glass and are extremely fragile. Use caution when replacing the capillaries in the instrument.
10. Cleaning the workstation around the instrument is necessary. Never attempt to clean any internal spaces of the instrument.
11. Food and drinks should not be placed on or near the instrument.
12. Running unauthorized programs or changing preferences on the instrument’s computer is not allowed. Laptops are provided for personal use and internet access. Do not plug memory sticks in the instrument’s computer unless instructed to do so by the instructor.

Beckman Coulter GenomeLab™ GeXP Genetic Analysis System Instrument Information Sheet
GeXP Genetic Analysis System Overview:
1. Instrument Status Indicators (Power, Laser, and High Voltage)
2. Capillary Access Cover
3. Sample Access Cover
4. Power Button
5. Gel Pump / Gel Cartridge Access Cover
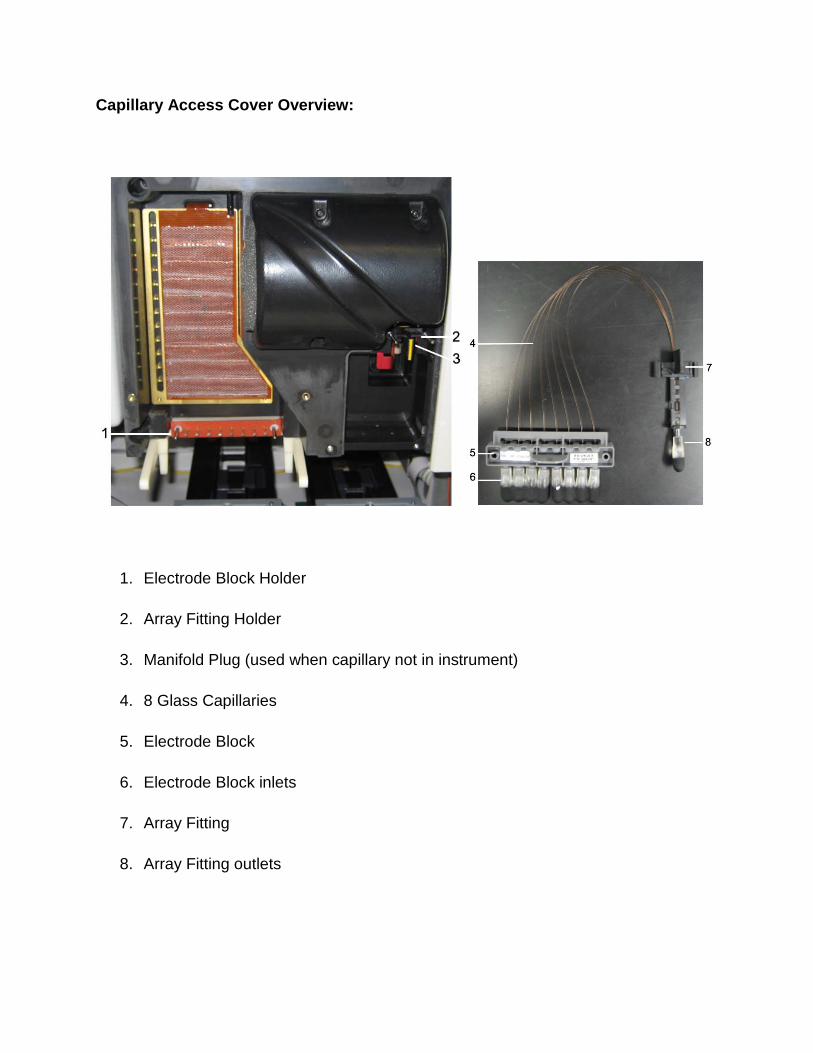
Capillary Access Cover Overview:
1. Electrode Block Holder
2. Array Fitting Holder
3. Manifold Plug (used when capillary not in instrument)
4. 8 Glass Capillaries
5. Electrode Block
6. Electrode Block inlets
7. Array Fitting
8. Array Fitting outlets
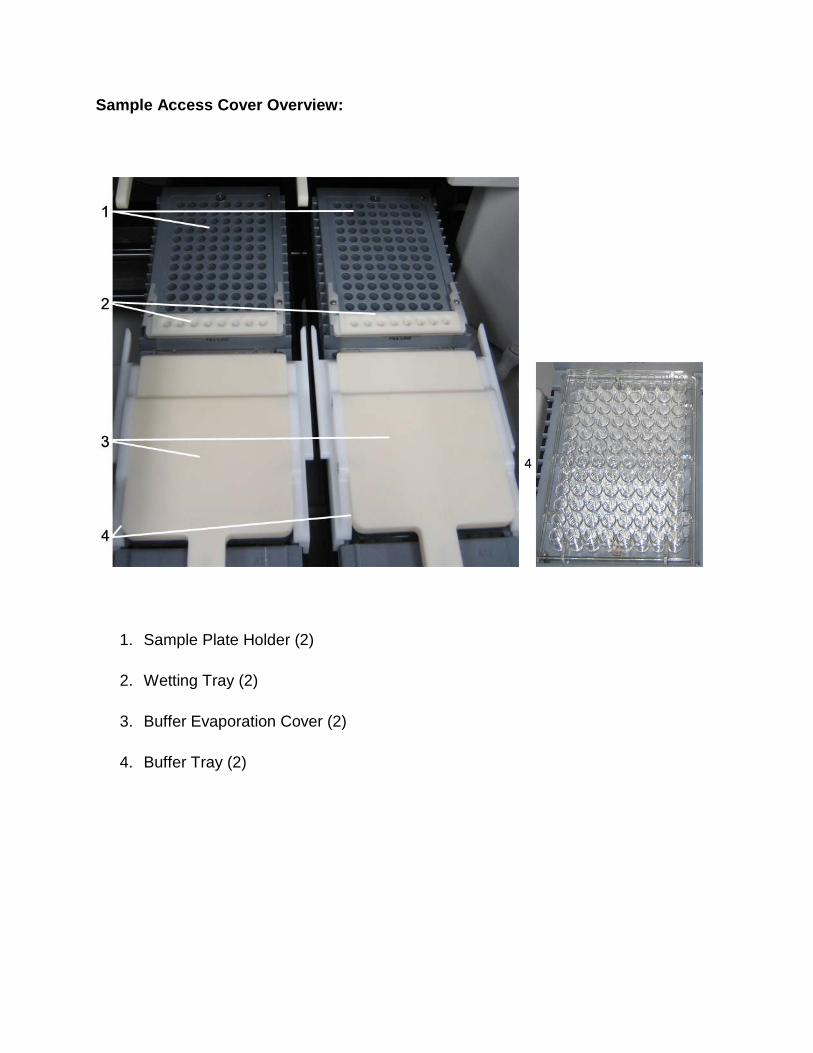
Sample Access Cover Overview:
1. Sample Plate Holder (2)
2. Wetting Tray (2)
3. Buffer Evaporation Cover (2)
4. Buffer Tray (2)
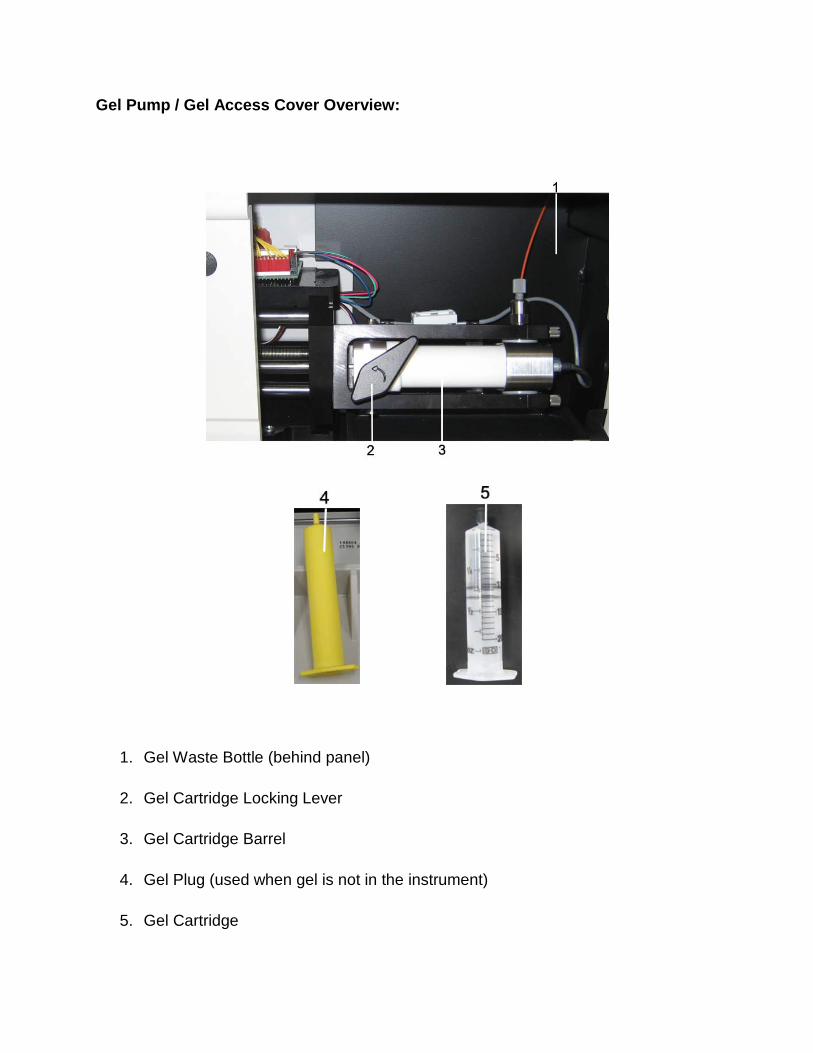
Gel Pump / Gel Access Cover Overview:
1. Gel Waste Bottle (behind panel)
2. Gel Cartridge Locking Lever
3. Gel Cartridge Barrel
4. Gel Plug (used when gel is not in the instrument)
5. Gel Cartridge

GeXP Software Main Screen Overview:
1. Setup – Used to setup sample locations in a plate and the run conditions.
2. Run – Used to set run parameters for a plate.
3. Database – Contains all files associated with runs, plates, protocols, etc.
4. Exit – Shuts down the program.
5. Sequencing – Used to visualize all run results when a sample is sequenced.
6. Investigator – Used to perform specific analysis techniques on samples.
7. Fragment – Used to visualize run results when fragment analysis is performed.
8. Help – Provides help options for a user.