beginning programming (pascal) overview of windows and
TRANSCRIPT

Beginning Programming (Pascal) Overview of Windows and Pascal CMSC 1513 Lecture 5 1. Signing on to a computer in MCS 126
1.1. Go to the laboratory in MCS 126. 1.2. If you are using a Dell computer on the left side of the room, follow the instructions below.
1.2.1. Turn on the computer if it is not already on by pressing the button in the middle of the vertical computer case to the right of the display.
1.2.2. Press Ctrl-Alt-Delete keys 1.2.3. In the Log On to Windows dialog box
1.2.3.1. User name edit box: enter cslab121 1.2.3.2. Password edit box: ignore, do not put anything in this box. 1.2.3.3. Log on to: drop-down list box: select UCOK.
1.3. If you are using a Gateway computer on the right side of the room, follow the instructions below. 1.3.1. Turn on the computer if it is not already on. Press the button on the right side of the
computer case under the display. 1.3.2. Ignore the Active Desktop Recovery notice on the Windows desktop
2. Starting Turbo Pascal 5.5 on Dell computers. 2.1. Press the button labeled Shortcut to Turbo Pascal that is enclosed in a white rectangle in figure 1.
Figure 1. Shortcut to Turbo Pascal.
2.2. Please note the gray icon labeled Shortcut to Turbo Pascal on the fifth row and third column of shortcut icons in figure 1.
1

Beginning Programming (Pascal) Overview of Windows and Pascal CMSC 1513 Lecture 5 3. Starting Turbo Pascal 5.5 on Gateway computers.
3.1. Start | All Programs | Turbo Pascal 5.5
Figure 2. Starting Turbo Pascal 5.5. 4. Turbo Pascal 5.5 Interactive Development Environment (IDE).
4.1. The display shown in figure 3 appears after Turbo Pascal 5.5 is invoked.
Figure 3. Turbo Pascal 5.5 IDE. 5. Exiting the Turbo Pascal 5.5 Interactive Development Environment (IDE).
5.1. Press the Alt-x keys. (Press the Alt key and x-key simultaneously.)
2

Beginning Programming (Pascal) Overview of Windows and Pascal CMSC 1513 Lecture 5 6. Getting Help in the Turbo Pascal IDE.
6.1. Press the F1-key.
Figure 4. Getting Help in the Turbo Pascal IDE.
6.2. The help offered is specific to the task being performed. The help offered at the entry to the IDE is general. Editing commands can be found by invoking the F1-key when a program is being edited.
7. Entering your first program. 7.1. Press the Alt-e keys. (Press the Alt-key and the e-key simultaneously.)
Figure 5. Editing file NONAME.PAS. 7.2. The cursor is placed on line 1, column 1 of the Edit portion of the IDE. 7.3. Enter program zogwarg as shown in figures 6 and 7.
Figure 6. Program zogwarg.
program zogwarg; begin
writeln(‘Give me liberty or give me death, Zogwarg Queen!) end.
3

Beginning Programming (Pascal) Overview of Windows and Pascal CMSC 1513 Lecture 5
Figure 7. Program zogwarg in the Turbo Pascal IDE. 8. Compiling your first program.
8.1. Press the Alt-c keys. (Press the Alt-key and the c-key simultaneously.)
Figure 8. Compiling program zogwarg. 8.2. Press the Enter-key to select the first option (Compile).
Figure 9. An error in program zogwarg. 8.3. Whoops! There is an error. Please note the error in figure 9. Error 8: String constant exceeds
line. We forgot to put the apostrophe at the end of the string on line 4 near the white arrow. 8.4. Insert an apostrophe between the exclamation mark (!) and the closing parenthesis ()).
4

Beginning Programming (Pascal) Overview of Windows and Pascal CMSC 1513 Lecture 5
8.5. Try to compile the program again. Press Alt-F9 keys. (Press the Alt-key and the F9-key simultaneously.)
Figure 10. Success! 8.6. You were successful. Your program is syntactically correct. Now we must determine if
program zogwarg has any errors that can be found by executing it. Testing or executing a program can discover many run-time errors and logic errors.
9. Executing your first program.
9.1. Press the Alt-r keys. (Press the Alt-key and the r-key simultaneously.)
Figure 11. Executing program zogwarg. 9.2. Press the Enter key.
Figure 12. What happened?
5

Beginning Programming (Pascal) Overview of Windows and Pascal CMSC 1513 Lecture 5
We should have seen a display showing ‘Give me liberty or give me death, Zogwarg Queen!’ However, we did not. Where is the text that was printed?
10. Finding your output.
10.1. Press the Alt-r keys and again and index down to the User screen. Use the down-arrow key (↓) to move to the selection labeled User screen. Now, press the Enter-key.
Figure 13. Invoking the User screen.
10.2. Note that your output Give me liberty or give me death, Zogwarg Queen! is on the display
Figure 14. The User screen. 10.3. Press the Enter-key to return to the IDE.
6

Beginning Programming (Pascal) Overview of Windows and Pascal CMSC 1513 Lecture 5 11. Saving your source file.
11.1. There are two files associated with your program. The first file is the source file. The source file contains the Pascal program you entered. Currently, the name of your source file is NONAME.PAS. We are going to change that name and save the source file under the new name. (In section 12 we will save the executable file. Translating or compiling a source file creates the executable file. An executable file is very difficult to read. Executable files are written in the language understood by the computer called machine language.)
11.2. Press the Alt-f keys. Index down to the Save F2 selection using the down-arrow key (↓).
Figure 15. Saving your program step 1. 11.3. Press the Enter key.
Figure 16. Saving your program step 2.
7

Beginning Programming (Pascal) Overview of Windows and Pascal CMSC 1513 Lecture 5
11.4. Note that the Rename NONAME dialog box appears. Change the name to something more
appropriate. Change the name to zogwarg.pas. Both the DOS operating system and the Pascal programming language are case insensitive. Lower case letters are not distinguished from upper case letters.
Figure 17. Saving program zogwarg.pas step 3.
11.5. Press the Enter-key to save program zogwarg.pas. Note that the name of the file being edited is now ZOGWARG.PAS as shown in figure 18.
Figure 18. File ZOGWARG.PAS and the Turbo Pascal IDE.
8

Beginning Programming (Pascal) Overview of Windows and Pascal CMSC 1513 Lecture 5 12. Saving your executable file.
12.1. In the previous section, we mentioned that there are two files associated with your program. One of the files is the source file. The other file is the executable file. Successfully compiling a program translates your source file into an executable file. Every time you make a change to your source file you must compile the program again to create a new executable file that contains the changes you made to your source file.
12.2. We want to change the destination where your executable file is stored. Press the Alt-c keys and index down to Destination Memory as shown in figure 19.
Figure 19. Changing the Destination of the executable file.
12.3. Now, press the Enter key and observe that the Destination is now the Disk.
Figure 20. Destination Disk.
9

Beginning Programming (Pascal) Overview of Windows and Pascal CMSC 1513 Lecture 5
12.4. Press the F9 key and observe that the IDE is Compiling to Disk as shown in figure 21.
Figure 21. Compiling to Disk.
10

Beginning Programming (Pascal) Overview of Windows and Pascal CMSC 1513 Lecture 5 13. Executable file name.
13.1. The executable file name is ZOGWARG.EXE. Executable file names are created by replacing the source file suffix .PAS with the executable file suffix .EXE.
14. Executing your program in the DOS environment – the Command Prompt.
After you have created an executable file and stored it on disk you can execute your program directly in the DOS environment. The advantage of executing your program in the DOS environment is that you can see the output of your program without switching to the User screen. 14.1. Using the mouse, select start | All Programs | Accessories | Command Prompt as shown in
Figure 22.
Figure 22. Starting the Command Prompt.
11

Beginning Programming (Pascal) Overview of Windows and Pascal CMSC 1513 Lecture 5
14.2. Move to the Turbo Pascal directory (folder). C:\Documents and Settings\cslab121> cd c:\temp\pascal The prompt “C:\Docments and Setting\cslab121>” reflects the current directory or folder. You must change the current directory to the directory containing your program. Your program resides in directory C:\TEMP\PASCAL. The command cd is an abbreviation for change directory. Be sure to put spaces between the command and the new directory. The prompt is issued by the DOS operating system.
Figure 23. The Command Prompt.
14.3. Execute your program. C:\TEMP\PASCAL> zogwarg
Figure 24. Before entering the command to execute program zogwarg.
12
Beginning Programming (Pascal) Overview of Windows and Pascal CMSC 1513 Lecture 5
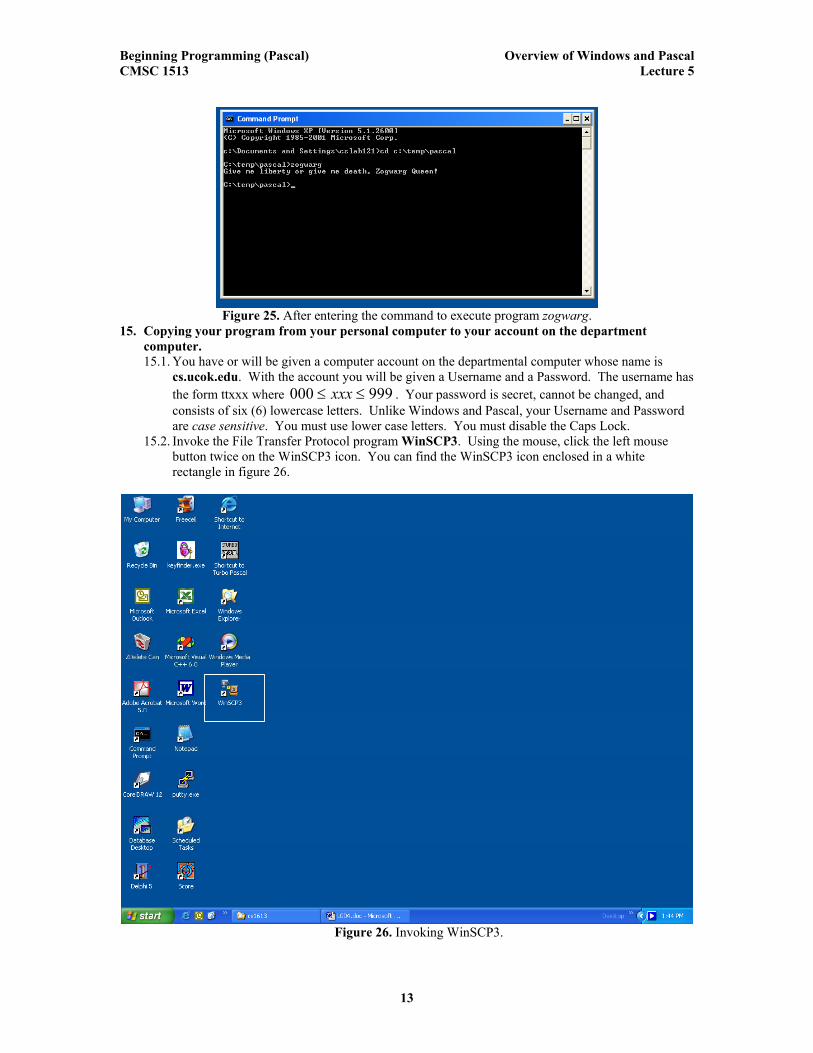
Figure 25. After entering the command to execute program zogwarg. 15. Copying your program from your personal computer to your account on the department
computer. 15.1. You have or will be given a computer account on the departmental computer whose name is
cs.ucok.edu. With the account you will be given a Username and a Password. The username has the form ttxxx where 000 999≤≤ xxx . Your password is secret, cannot be changed, and consists of six (6) lowercase letters. Unlike Windows and Pascal, your Username and Password are case sensitive. You must use lower case letters. You must disable the Caps Lock.
15.2. Invoke the File Transfer Protocol program WinSCP3. Using the mouse, click the left mouse button twice on the WinSCP3 icon. You can find the WinSCP3 icon enclosed in a white rectangle in figure 26.
Figure 26. Invoking WinSCP3.
13

Beginning Programming (Pascal) Overview of Windows and Pascal CMSC 1513 Lecture 5
15.3. Invoke the File Transfer Protocol program WinSCP3. Using the mouse, click the left mouse button twice on the WinSCP3 icon.
15.4. With the mouse, press the New button.
Figure 27. WinSCP Login Dialog.
15.5. Login into your account on the department computer. 15.5.1. Host name: Enter cs.ucok.edu. 15.5.2. User name: Enter your Username, ttxxx. 15.5.3. Password: Enter your Password. 15.5.4. Press the Login key.
Figure 28. WinSCP Login Dialog continued.
Figure 29. Completed WinSCP Login Dialog.
14

Beginning Programming (Pascal) Overview of Windows and Pascal CMSC 1513 Lecture 5
15.6. Find your program in the Windows ® file system. On the left side of the WinSCP display you will find files on your personal computer. On the right side of the display you will find files in your account on the department computer. Use the directory tools on the personal computer side to find directory c:\temp\pascal.
Figure 30. WinSCP Dual Computer File System View.
15.7. Copy your program to your account on the department computer. 15.7.1. With the mouse select the source file. In this case the source file is ZOGWARG.PAS. 15.7.2. Press the F5 key. 15.7.3. With the mouse, press the Copy button.
Figure 31. Preparing to copy file ZOGWARG.PAS.
15

Beginning Programming (Pascal) Overview of Windows and Pascal CMSC 1513 Lecture 5
16
15.8. Please note that file ZOGWARG.PAS now appears on the right side of the display. By using the copy command, your file ZOGWARG.PAS now resides in your account on the departmental computer.
Figure 32. File ZOGWARG.PAS stored in your account.
15.9. Closing WinSCP3. 15.9.1. It is very important to close WinSCP3. 15.9.2. With the mouse, press the white x enclosed in the red box in the upper right of the
WinSCP3 display (the “close” button). 15.9.3. Confirm session termination by pressing the OK button in the Confirm dialog box.
Figure 33. Closing WinSCP3.