belajar mailing
DESCRIPTION
mari belajar mailingTRANSCRIPT
Copyright © 2006 ASCPL 2/16/2009 2:40:34 PM/JS/KJ 1
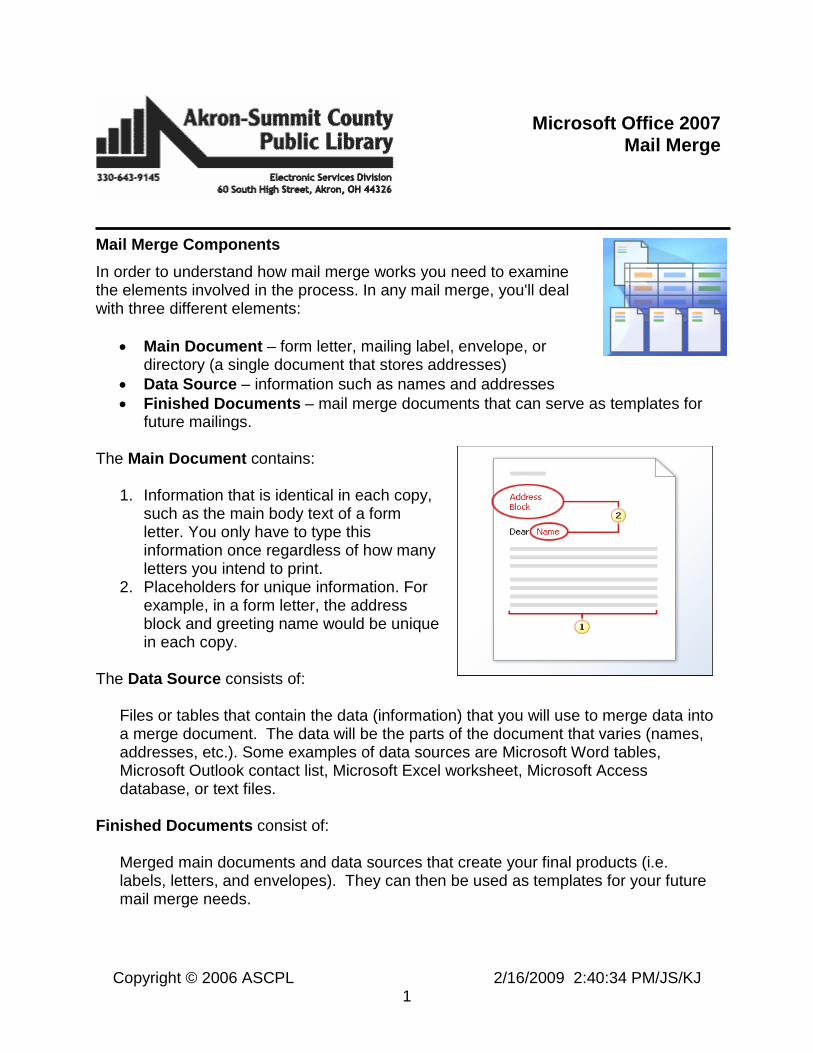
Mail Merge Components In order to understand how mail merge works you need to examine the elements involved in the process. In any mail merge, you'll deal with three different elements:
• Main Document – form letter, mailing label, envelope, or directory (a single document that stores addresses)
• Data Source – information such as names and addresses • Finished Documents – mail merge documents that can serve as templates for
future mailings.
The Main Document contains:
1. Information that is identical in each copy, such as the main body text of a form letter. You only have to type this information once regardless of how many letters you intend to print.
2. Placeholders for unique information. For example, in a form letter, the address block and greeting name would be unique in each copy.
The Data Source consists of:
Files or tables that contain the data (information) that you will use to merge data into a merge document. The data will be the parts of the document that varies (names, addresses, etc.). Some examples of data sources are Microsoft Word tables, Microsoft Outlook contact list, Microsoft Excel worksheet, Microsoft Access database, or text files.
Finished Documents consist of: Merged main documents and data sources that create your final products (i.e. labels, letters, and envelopes). They can then be used as templates for your future mail merge needs.
Microsoft Office 2007 Mail Merge

Copyright © 2006 ASCPL 2/16/2009 2:40:34 PM/JS/KJ 2
Mail Merge Wizard In Microsoft Office 2007, there are two different ways to complete the Mail Merge process. There is a wizard which can assist with the mail merge process, or you can use the buttons on the ribbon. First we will walk through the wizard. Then we will try it with the buttons. To get started:
• Click on the Mailings tab, then the Start Mail Merge button, and then Step by Step Mail Merge Wizard…
• The wizard will open in the task pane to the right. Select your document type.
• Click Next: Starting document from the bottom of
the task pane.
Letters To create letters:
• Select Letters from the previous task pane. You will then be prompted to select a starting document.
• Choose a document you currently have displayed in the main Word window, start from a template, or choose an existing document file. For class, click on the Office Button and then on Open. Select the mail merge letter.doc from the mail merge folder in the My Documents folder.
• Then click on Next: Select recipients from the bottom of the task pane. (Note: You can always go backwards by clicking on the Previous links.)

Copyright © 2006 ASCPL 2/16/2009 2:40:34 PM/JS/KJ 3
• You will then be prompted to select your mail merge recipients. You can choose an existing list, use your Outlook mail contacts*, or type a new list. (*Note: If your Outlook mail is not configured, then you will not be able to use this option.)
• Choose Use an existing list and click on Browse…
• The Select Data Source window will open. Choose your list from its location on your computer. You can use an Excel document, an Access table, or a list created in Word (which we will cover later). For class, click on the My Documents folder, open the mail merge folder, and select the mail merge address list.xls document. (If you would like to know how to create your own Excel address list at home, see Appendix A.)
• Because we opened an Excel document, the window that comes up will ask which worksheet tab the information is located on. Make sure Sheet1 is selected and click on OK.
• The Mail Merge Recipients
window will open, asking which people on your list you wish to include in this mailing. Uncheck anyone you want to exclude.
• Once you have chosen your data source you must click on the Next: Write you letter link at the bottom of the task pane.

Copyright © 2006 ASCPL 2/16/2009 2:40:34 PM/JS/KJ 4
• Now we are going to insert the address block and greeting line. Click on the empty spot of your document where you would like the recipient’s address to appear. Then click on Address Block from the task pane to the right.
• The Insert Address Block window will open and you can choose the format of the name and address.
• After you click OK, you will see a place holder on the page that says «Address Block». Once we get to the next step you will see actual names and addresses in that space.
• Click in an empty space a few lines down so that we can insert a greeting line.
• Click on Greeting line… from the task pane on the right. Select the format for the name and the greeting. If you don’t like the options they have given you, you can always type your own greeting in the box that says “Dear” and your own punctuation in the appropriate box. Then click OK.
• You will see a place holder that says «Greeting Line».

Copyright © 2006 ASCPL 2/16/2009 2:40:34 PM/JS/KJ 5
• The More Items field allows you to insert additional fields or match fields from an existing database or spreadsheet file.
• Once the appropriate fields have been added to your letter it will resemble the example below:
• Then click on the Next: Preview your letters link at the bottom of the task pane.

Copyright © 2006 ASCPL 2/16/2009 2:40:34 PM/JS/KJ 6
• Once the recipient fields have been set you can then preview your letter with the fields populated. You have the option to click back and forth from recipient to recipient and can even edit out selected recipients.
• Notice that the fields are populated with your recipients:
• Once you have finished previewing your letters you
must click on the Next: Complete the merge link at the bottom of the task pane.
• The last step allows you to either print your letters or edit individual letters as needed.

Copyright © 2006 ASCPL 2/16/2009 2:40:34 PM/JS/KJ 7
E-mail messages
This time, we are going to use the buttons in the ribbon to do the same things we would have done with the task pane.
To get started:
• Click on the Office button and then on New. Choose Blank Document and click on Create.
• Click on the Mailings tab. • Click on the Start Mail Merge button and select
E-Mail Messages.
• Click on the Select Recipients button and then on Select from Outlook Contacts… to choose an address list.
• If Outlook or Outlook Express is configured on your machine your list of Contacts will show up in the next window. Select the list to use (if you have more than one) and click OK.
• Your contacts list will open and
you need to choose which people to include in this mailing. When finished, click OK.

Copyright © 2006 ASCPL 2/16/2009 2:40:34 PM/JS/KJ 8
• Then type your message in the space below. Add a Greeting Line and other merge fields when appropriate by clicking on the links in the ribbon.
•
• Click on the Preview results button to see person #1.
• Use the buttons on the ribbon to scroll through your recipients.
• Click on the Finish & Merge button and then on Send E-mail Messages… to send the message.
• A window will open asking you to verify which field of your database has the email addresses. Give the email a subject, and then choose a format. When finished, click OK.
Copyright © 2006 ASCPL 2/16/2009 2:40:34 PM/JS/KJ 9
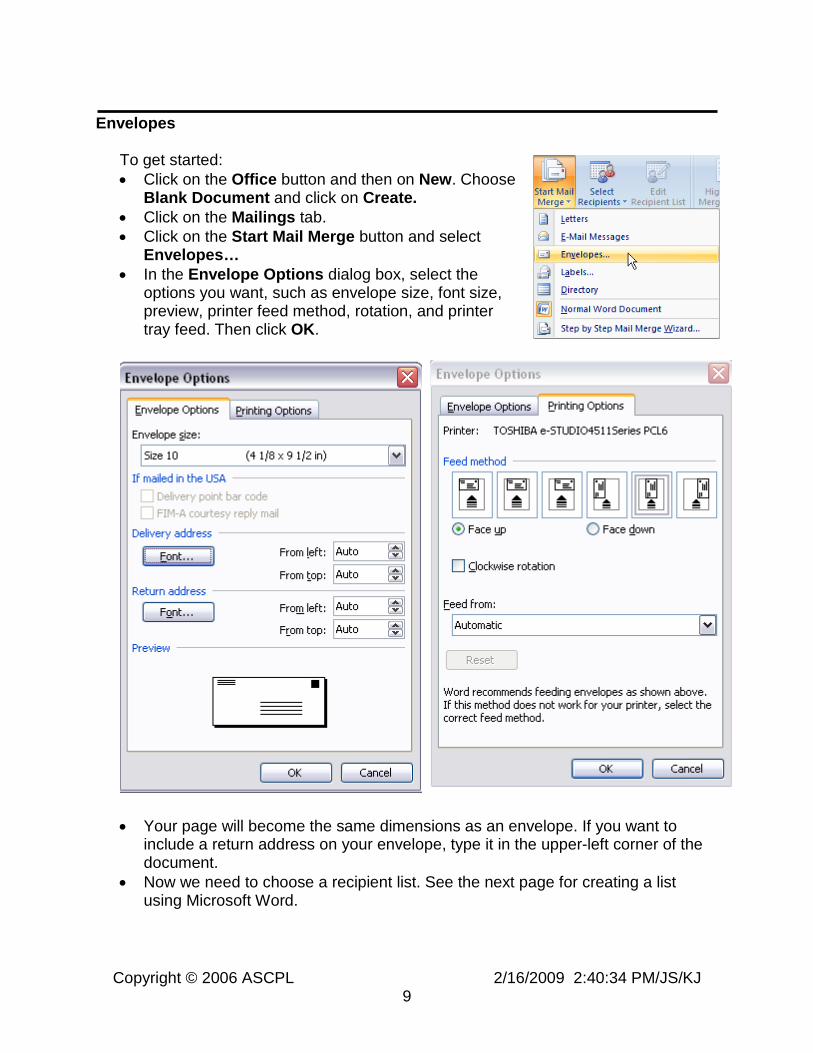
Envelopes
To get started: • Click on the Office button and then on New. Choose
Blank Document and click on Create. • Click on the Mailings tab. • Click on the Start Mail Merge button and select
Envelopes… • In the Envelope Options dialog box, select the
options you want, such as envelope size, font size, preview, printer feed method, rotation, and printer tray feed. Then click OK.
• Your page will become the same dimensions as an envelope. If you want to
include a return address on your envelope, type it in the upper-left corner of the document.
• Now we need to choose a recipient list. See the next page for creating a list using Microsoft Word.
Copyright © 2006 ASCPL 2/16/2009 2:40:34 PM/JS/KJ 10
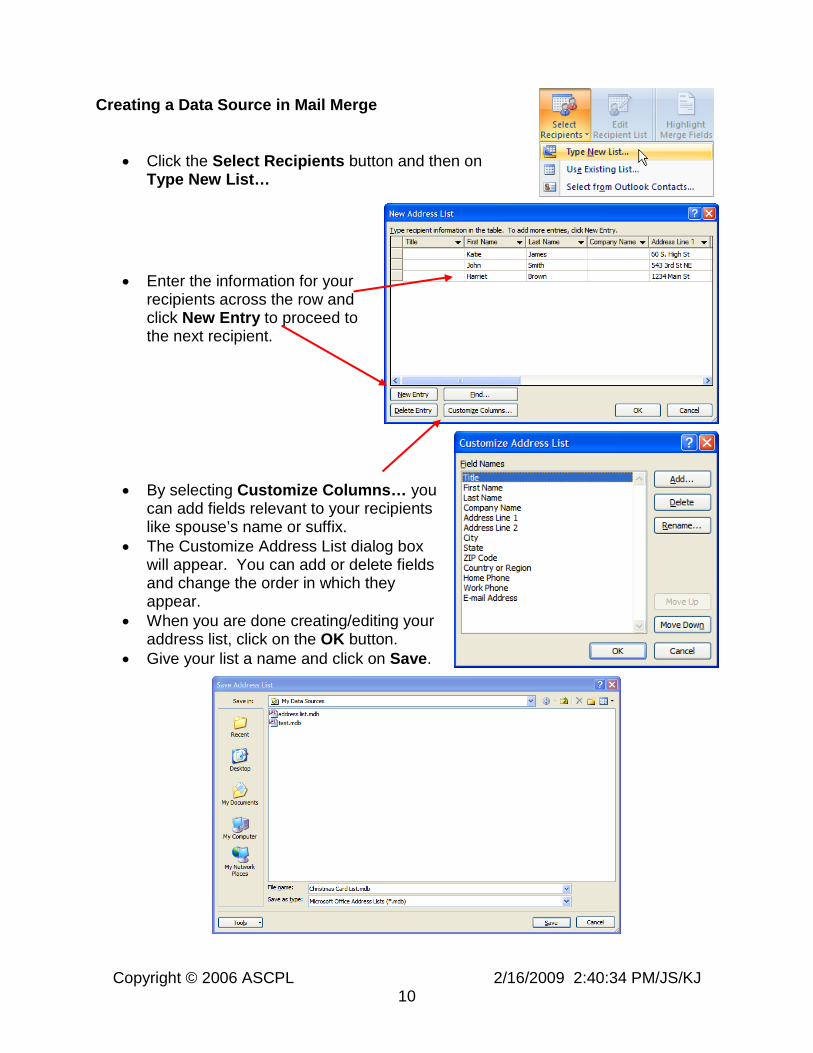
Creating a Data Source in Mail Merge
• Click the Select Recipients button and then on Type New List…
• Enter the information for your recipients across the row and click New Entry to proceed to the next recipient.
• By selecting Customize Columns… you can add fields relevant to your recipients like spouse’s name or suffix.
• The Customize Address List dialog box will appear. You can add or delete fields and change the order in which they appear.
• When you are done creating/editing your address list, click on the OK button.
• Give your list a name and click on Save.
Copyright © 2006 ASCPL 2/16/2009 2:40:34 PM/JS/KJ 11
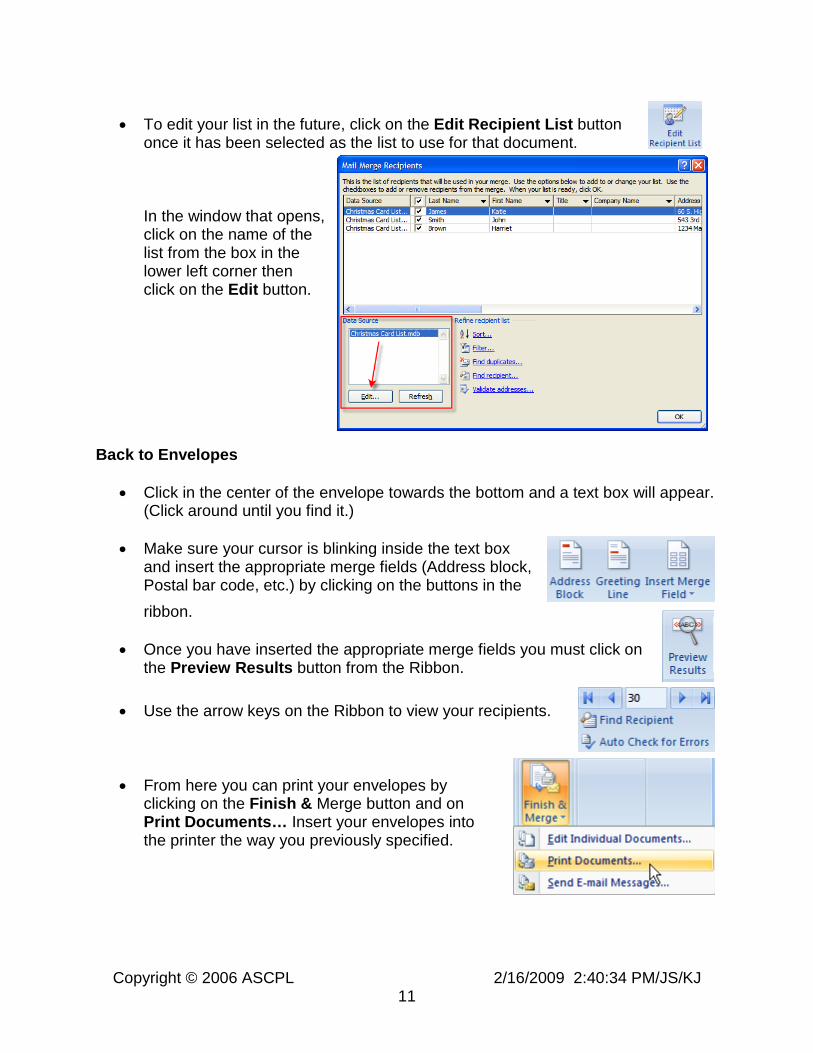
• To edit your list in the future, click on the Edit Recipient List button
once it has been selected as the list to use for that document. In the window that opens, click on the name of the list from the box in the lower left corner then click on the Edit button.
Back to Envelopes
• Click in the center of the envelope towards the bottom and a text box will appear. (Click around until you find it.)
• Make sure your cursor is blinking inside the text box
and insert the appropriate merge fields (Address block, Postal bar code, etc.) by clicking on the buttons in the ribbon.
• Once you have inserted the appropriate merge fields you must click on
the Preview Results button from the Ribbon.
• Use the arrow keys on the Ribbon to view your recipients.
• From here you can print your envelopes by clicking on the Finish & Merge button and on Print Documents… Insert your envelopes into the printer the way you previously specified.
Copyright © 2006 ASCPL 2/16/2009 2:40:34 PM/JS/KJ 12
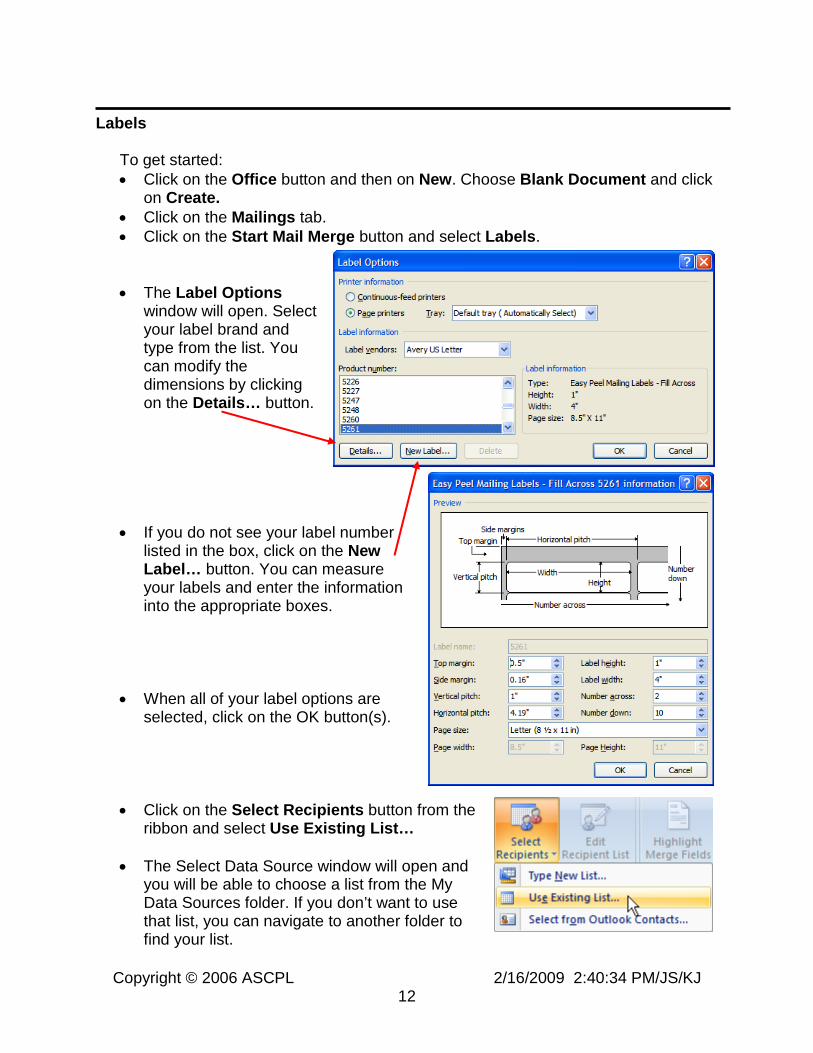
Labels
To get started: • Click on the Office button and then on New. Choose Blank Document and click
on Create. • Click on the Mailings tab. • Click on the Start Mail Merge button and select Labels.
• The Label Options window will open. Select your label brand and type from the list. You can modify the dimensions by clicking on the Details… button.
• If you do not see your label number listed in the box, click on the New Label… button. You can measure your labels and enter the information into the appropriate boxes.
• When all of your label options are selected, click on the OK button(s).
• Click on the Select Recipients button from the ribbon and select Use Existing List…
• The Select Data Source window will open and you will be able to choose a list from the My Data Sources folder. If you don’t want to use that list, you can navigate to another folder to find your list.

Copyright © 2006 ASCPL 2/16/2009 2:40:34 PM/JS/KJ 13
• The individual label spaces will be marked as «Next Record» (except the first one). Click on the empty, first label. Click on the Address Block button from the ribbon and choose your address style (like we did on page 4.)
• Select the Update Labels button to copy the formatting of your first label to all other labels. The records will be marked as «Next Record»«AddressBlock». DO NOT FORGET THIS STEP! IT IS VERY IMPORTANT!
• Click on the Preview Results button in the ribbon.
• Click on the Finish and Merge button in the ribbon and then on Print Documents… Remember to put your label paper in the printer, first!
Directory A directory is a single document containing a catalog or printed list of addresses.
To get started: • Click on the Office button and then on New. Choose Blank Document and click
on Create. • Click on the Mailings tab. • Click on the Start Mail Merge button and select Directory. • Click on the Select Recipients button and select Use Existing List… • The Select Data Source window will open. Click on My Documents and open
the Mail Merge folder. Select the mail merge directory example.xls document. Select Sheet 1 and click on OK.
• Place merge fields on the page as you would like them to appear in your directory. (In a directory, the fields normally appearing are Job Title, Address Block, and Phone Number.
• Make sure you place a line break or two below the last item on the page so your directory items will not be squished together.
• Once you have inserted the appropriate merge fields you must click on the Preview Results button from the ribbon.
Copyright © 2006 ASCPL 2/16/2009 2:40:34 PM/JS/KJ 14
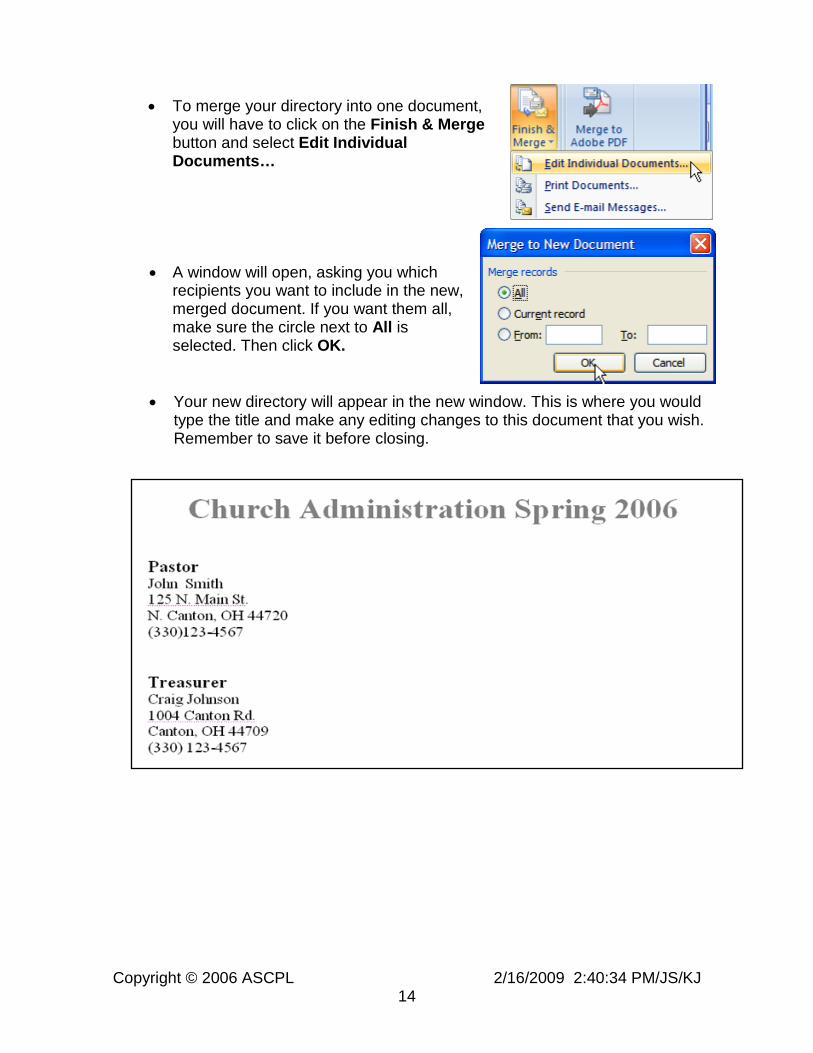
• To merge your directory into one document, you will have to click on the Finish & Merge button and select Edit Individual Documents…
• A window will open, asking you which
recipients you want to include in the new, merged document. If you want them all, make sure the circle next to All is selected. Then click OK.
• Your new directory will appear in the new window. This is where you would type the title and make any editing changes to this document that you wish. Remember to save it before closing.

Copyright © 2006 ASCPL 2/16/2009 2:40:34 PM/JS/KJ 15
Mail Merge Quick Tools Microsoft Word has several quick tools that will allow you to create envelopes and labels quickly. Envelopes
• To access the quick tool, click on the Mailings tab and then on the Envelopes button.
• Enter the delivery and return addresses into the appropriate boxes.
• To modify the font style of the addresses or select your printing options, click on the Options… button. Do you remember the envelope options from page 9? It’s the exact same thing.
• When finished selecting your envelope options, click on the Print button.

Copyright © 2006 ASCPL 2/16/2009 2:40:34 PM/JS/KJ 16
Labels
• To access the quick tool, click on the Mailings tab and then on the Labels button.
• Enter your
address into the text box.
• Choose whether you would like a full page of the same label or just one label. If you choose one label you will need to select which row and column to print it on.
• To select the correct label
type, click on the Options… button. The same Label Options window we saw on page 12 will appear. You still have the option to customize the measurements like before with the Details… button. Select your label type and click OK.
• When finished, click on
the Print button to print your label(s).
Copyright © 2006 ASCPL 2/16/2009 2:40:34 PM/JS/KJ 17
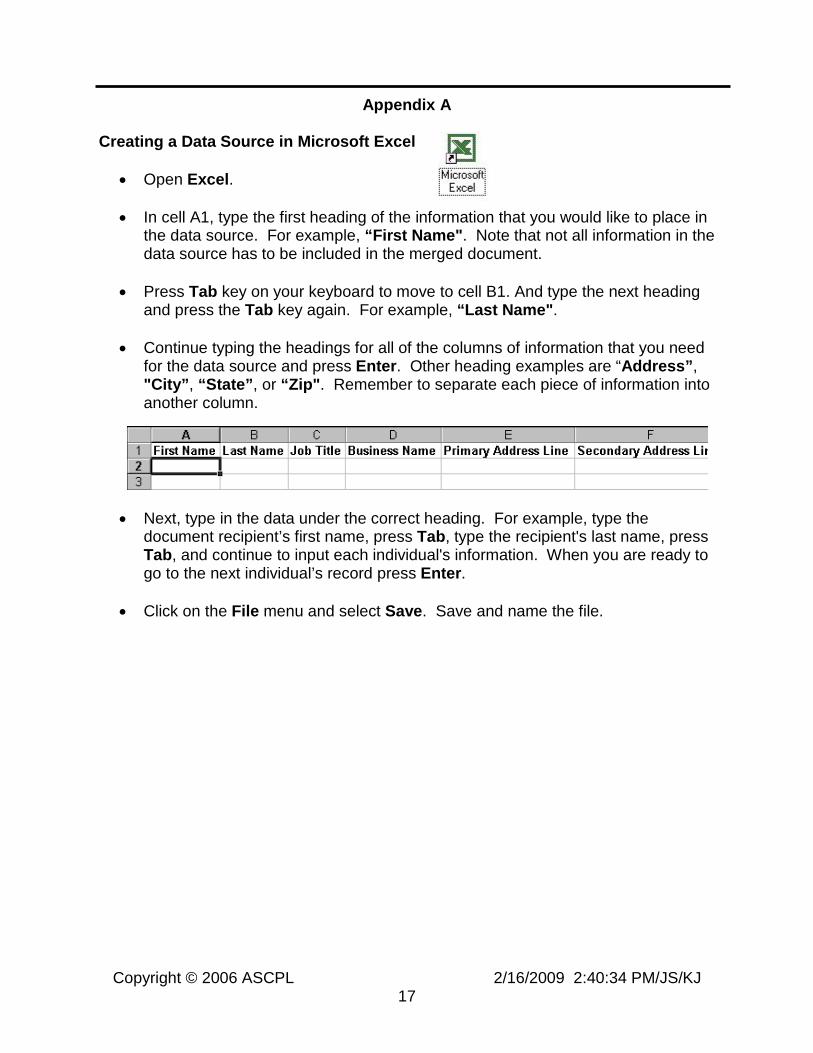
Appendix A Creating a Data Source in Microsoft Excel
• Open Excel. • In cell A1, type the first heading of the information that you would like to place in
the data source. For example, “First Name". Note that not all information in the data source has to be included in the merged document.
• Press Tab key on your keyboard to move to cell B1. And type the next heading
and press the Tab key again. For example, “Last Name". • Continue typing the headings for all of the columns of information that you need
for the data source and press Enter. Other heading examples are “Address”, "City”, “State”, or “Zip". Remember to separate each piece of information into another column.
• Next, type in the data under the correct heading. For example, type the document recipient’s first name, press Tab, type the recipient's last name, press Tab, and continue to input each individual's information. When you are ready to go to the next individual’s record press Enter.
• Click on the File menu and select Save. Save and name the file.