best practices for trialing the intronis cloud backup and...
TRANSCRIPT

White [email protected] | www.intronis.com | (800) 569-0155 | @intronisinc
© 2012 Intronis, Inc. All rights reserved. Intronis is a trademark of Intronis, Inc.
Page | 1
Best Practices for Trialing the Intronis Cloud Backup and Recovery Solution
Intronis Cloud Backup and Recovery is a file based backup application that allows users to back up their critical data
to the ultra-secure Intronis cloud. User data is always available and is stored in an encrypted format only accessible by
those who possess their security key and account password.
This white paper reviews some of the best practices that Intronis recommends for installing, configuring and trialing
Intronis Cloud Backup and Recovery. Intronis provides partners with a free 14 day trial to store as much or as little data
as they would like. This gives partners a feel for the software and some of its capabilities.
Trial users will start by downloading our software agent, which is just one part of the Intronis solution. Our excellent
sales staff is more than happy to demonstrate our solution’s additional capabilities, including the centralized manage-
ment portal, end-user web portal and brandable marketing materials. Please contact our sales staff at 1-800-569-0155
and select option 1 for additional information or if you have any questions about the Intronis software.
Downloading the Trial Software Agent
To download the trial software agent, simply visit the link below.
https://my.intronis.com/installers/3.0/0/eSureIT-TrialSetup.exe
Installing the Trial Software Agent
Once the software is downloaded, Intronis recommends installing the agent on the computer that you would plan to
trial the solution. We recommend choosing a non-production system that most closely resembles your customer base.
Most frequently, this system will include files, Microsoft Exchange and SQL data.
To begin, you will install the software by running the executable.
Please note: Prior to beginning the software installation, Intronis recommends disabling any anti-virus, anti-malware, software
firewall or any real-time scanning applications. At the conclusion of the installation, Intronis recommends adding exclusions to
any of these types of applications for our installation folder, temp folder and Local Vault locations.
White [email protected] | www.intronis.com | (800) 569-0155 | @intronisinc
© 2012 Intronis, Inc. All rights reserved. Intronis is a trademark of Intronis, Inc.
Page | 2
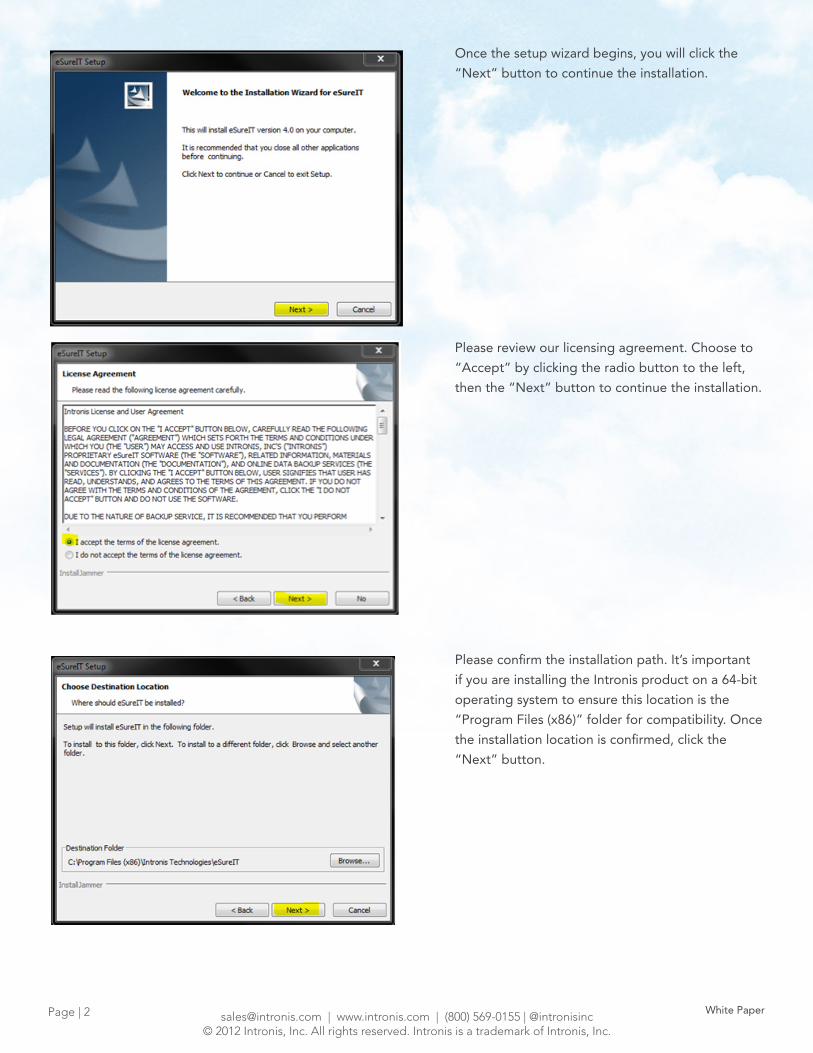
Please review our licensing agreement. Choose to
“Accept” by clicking the radio button to the left,
then the “Next” button to continue the installation.
Once the setup wizard begins, you will click the
“Next” button to continue the installation.
Please confirm the installation path. It’s important
if you are installing the Intronis product on a 64-bit
operating system to ensure this location is the
“Program Files (x86)” folder for compatibility. Once
the installation location is confirmed, click the
“Next” button.
White [email protected] | www.intronis.com | (800) 569-0155 | @intronisinc
© 2012 Intronis, Inc. All rights reserved. Intronis is a trademark of Intronis, Inc.
Page | 3
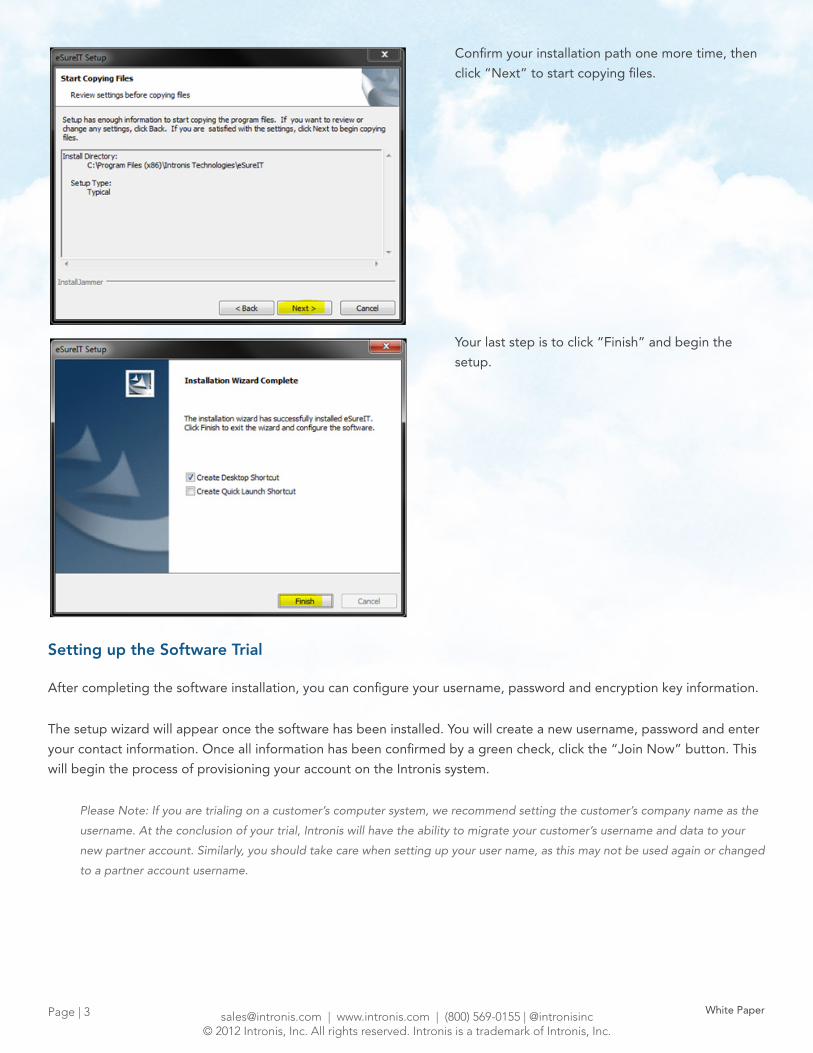
Confirm your installation path one more time, then
click “Next” to start copying files.
Your last step is to click “Finish” and begin the
setup.
Setting up the Software Trial
After completing the software installation, you can configure your username, password and encryption key information.
The setup wizard will appear once the software has been installed. You will create a new username, password and enter
your contact information. Once all information has been confirmed by a green check, click the “Join Now” button. This
will begin the process of provisioning your account on the Intronis system.
Please Note: If you are trialing on a customer’s computer system, we recommend setting the customer’s company name as the
username. At the conclusion of your trial, Intronis will have the ability to migrate your customer’s username and data to your
new partner account. Similarly, you should take care when setting up your user name, as this may not be used again or changed
to a partner account username.

White [email protected] | www.intronis.com | (800) 569-0155 | @intronisinc
© 2012 Intronis, Inc. All rights reserved. Intronis is a trademark of Intronis, Inc.
Page | 4
A Special Note: If you will be trialing the software on more than one customer, we recommend each customer or company
install should be setup with its own username. If you would like to install the solution on more than one computer under a
particular username, please contact our sales team or see the Knowledge Base article below. To add another computer, you
will need to first create the computer within our management portal, then use the option “I am an existing user” to install the
software against that additional computer ID.
How to create a new subaccount in the management portal.
https://my.intronis.com/support/?kbid=KBBASE860SINORTNI
Now that you have your account provisioned on the
Intronis system, you can choose the type of encryp-
tion key you would like to use. Intronis recommends
selecting the “Use a Managed Key” option, as this
allows partners to recover a software installation
without knowing the encryption key. This option
still provides all of the safety the “Create Your Own
Key” option, just without the need to remember
the encryption key.
Please Note: If you select “Create Your Own Key,” you will be required to keep a copy of your encryption key. If this key is lost,
damaged, or unavailable, you will not be able to recover your data. Intronis does not maintain a copy of this key and will not be
able to assist in data restoration without this key.
After generating a new encryption key, you can
run the software through a quick test to ensure
you are able to properly communicate with the
Intronis servers. Click the “Test” button to begin
the process.

White [email protected] | www.intronis.com | (800) 569-0155 | @intronisinc
© 2012 Intronis, Inc. All rights reserved. Intronis is a trademark of Intronis, Inc.
Page | 5
If you receive a status other than a green check,
Intronis recommends further investigating the issue or
contacting our technical support team. At the conclu-
sion of the test, click the “Next” button.
The last page of the setup wizard is where you can
adjust some default settings. For now, you can skip
the configuration of these preferences, since the guide
shows you how to further adjust these later.
Congratulations! You have installed the software!

White [email protected] | www.intronis.com | (800) 569-0155 | @intronisinc
© 2012 Intronis, Inc. All rights reserved. Intronis is a trademark of Intronis, Inc.
Page | 6
We recommend a few adjustments in the Prefer-
ences screen. The first recommended adjustment is
the “Temp Folder” location. This location is used to
process files temporarily while the backup process
is occurring. Once a backup set completes, informa-
tion for this folder is removed. Intronis recommends
at least 5 Gigabytes of free temporary storage space
during the backup process. By default, this location
will be “%WINDIR%\backupagent.” If there is not
enough free storage, we recommend adjusting this
to a location that does. If no drives are available with
enough free storage space, you may also connect a
portable USB hard drive and specify that location.
The next setting we will adjust is the “Local Vault” location. Local Vault provides users with a duplicate copy of data
backed up to the Intronis cloud. This allows partners to restore data quicker than over the internet. The feature allows
you to specify a location where this data will be maintained. You may specify either a local resource or remote resource
accessible via a UNC share. Note that remote resources such as NAS devices may cause backups to run slightly slower
than when specifying local resources. The feature has two options associated with it: “Backup directly to the local
vault first…” and “Sync local vault with the remote vault.” We recommend enabling both options for low bandwidth
customers (under 128kbps) and only enabling the “Sync local vault with the remote vault” for higher bandwidth
customers. This will ensure the Local Vault location will always maintain an up-to-date copy of the user’s data. The Local
Vault location is also utilized to store data when performing local-only backups as well.
Next, you should review some of the “File System
Settings.” These settings allow you to prune your
backups to ensure you are backing up only data
that you wish to protect. “Wildcard Excludes” is the
first option you should adjust within this section.
This allows partners to use pattern matching in
order to filter out specific extensions. This feature
is great for excluding unwanted file types such as
MP3, AVI, ACC, and others. Just enter “*.MP3” in
the text box provided and then click the plus sign
to the right to add to the exclusion list. Once you
have added all of the exclusions you would like,
click the “Apply” button.
Configuring Trial Software Agent Preferences
We recommend configuring your basic preferences and settings prior to creating any backup sets. This will help ensure
you experience more of our solution’s functionality. Some of these features include our Local Vault, bandwidth throttling
and file exclusion rules.
To access the preferences, simply click on the “Preferences” button at the top of the screen. This will bring you to the
main preferences screen.

White [email protected] | www.intronis.com | (800) 569-0155 | @intronisinc
© 2012 Intronis, Inc. All rights reserved. Intronis is a trademark of Intronis, Inc.
Page | 7
The last preference we recommend modifying,
titled “Bandwidth Throttling,” can be found in
“Network Settings.” This setting allows you to limit
the amount of internet usage during a particular
period of time, normally during business hours. We
recommend enabling bandwidth throttling an hour
prior to the first person arrives in the office and
an hour after the last person leaves the office. We
also recommend throttling to about 10-20% of the
customers total available upload. For example, if
the customer has a T1 connection with 1500Kbps,
you would enter 150 Kb/s. After configuring, click
“Apply.”
Once all preferences have been applied, we recommend restarting the BackupAgent service. This ensures all settings
are properly configured and any new updates are applied. To restart the BackupAgent service, close the software
monitor, then open the Windows Services Console and choose to restart the “BackupAgent” service. The Windows
Services Console can be opened by running the command “Services.msc” from the “Run” dialog Window.
Configuring Backup Sets in the Trial Software Agent
Backup sets may be configured in two different locations. The first is through the installed software agent, or the
monitor, the second is the web management portal. This guide will focus on creating backup sets through the software
monitor. For more information about creating backup sets through our management portal, please see our video
tutorials. (http://www.intronis.com/product/video-tutorials.php)
To create your first backup set, you will navigate back over to the “Backup Sets” section by clicking on the appropriate
button to display a list of available backup sets. The first type of backup set you will create is the most basic, called
“Choose Files and Folders By Location.”
To begin creating this backup set, select the appro-
priate backup set type. This will begin the backup
set creation wizard.
White [email protected] | www.intronis.com | (800) 569-0155 | @intronisinc
© 2012 Intronis, Inc. All rights reserved. Intronis is a trademark of Intronis, Inc.
Page | 8
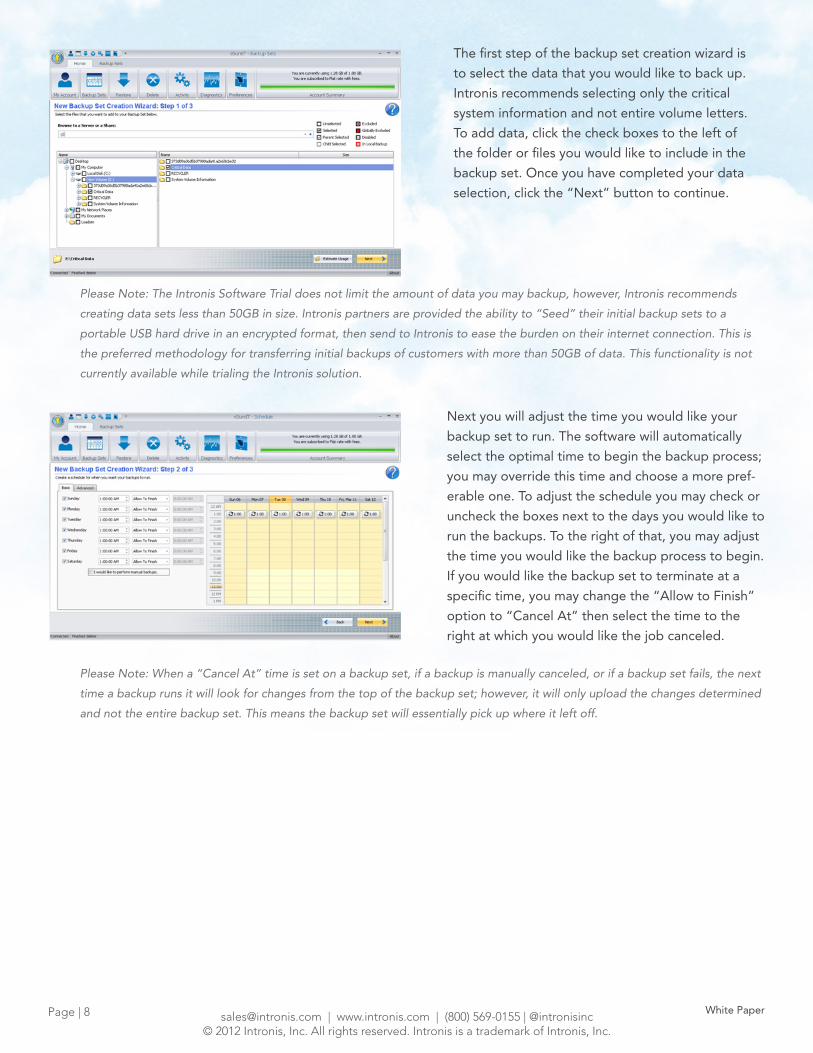
The first step of the backup set creation wizard is
to select the data that you would like to back up.
Intronis recommends selecting only the critical
system information and not entire volume letters.
To add data, click the check boxes to the left of
the folder or files you would like to include in the
backup set. Once you have completed your data
selection, click the “Next” button to continue.
Please Note: The Intronis Software Trial does not limit the amount of data you may backup, however, Intronis recommends
creating data sets less than 50GB in size. Intronis partners are provided the ability to “Seed” their initial backup sets to a
portable USB hard drive in an encrypted format, then send to Intronis to ease the burden on their internet connection. This is
the preferred methodology for transferring initial backups of customers with more than 50GB of data. This functionality is not
currently available while trialing the Intronis solution.
Next you will adjust the time you would like your
backup set to run. The software will automatically
select the optimal time to begin the backup process;
you may override this time and choose a more pref-
erable one. To adjust the schedule you may check or
uncheck the boxes next to the days you would like to
run the backups. To the right of that, you may adjust
the time you would like the backup process to begin.
If you would like the backup set to terminate at a
specific time, you may change the “Allow to Finish”
option to “Cancel At” then select the time to the
right at which you would like the job canceled.
Please Note: When a “Cancel At” time is set on a backup set, if a backup is manually canceled, or if a backup set fails, the next
time a backup runs it will look for changes from the top of the backup set; however, it will only upload the changes determined
and not the entire backup set. This means the backup set will essentially pick up where it left off.

White [email protected] | www.intronis.com | (800) 569-0155 | @intronisinc
© 2012 Intronis, Inc. All rights reserved. Intronis is a trademark of Intronis, Inc.
Page | 9
The last step of the backup set creation wizard is
to name your backup set. Once a name has been
entered, click the “Apply” button then “Finish”
button to commit the backup set. After the backup
set has been committed, you will be brought to the
“Backup Sets” screen and asked if you would like to
run the backup set now.
Since you will be creating a few more types of backup sets, you will click the “No” button and allow the backup set to
run at its next scheduled time.
Exchange Backup Set Creation
Now let’s move on to create an Exchange Information Store backup set. To create your new backup set, you will select
the “Create a new backup set” from the actions menu on the left hand side. This will return you to backup set selection
screen.
To create the Exchange backup set, you will select
the “Backup Full Exchange Information Stores.”
This option will allow you to back up a full copy of
the Information Store, which consists of databases
and logs. This is the preferred backup set type when
configuring Exchange backups for disaster recovery.
This will allow you to restore the entire Information
Store in the event of a disaster.
Please Note: The option to “Backup Full Exchange Information Stores” will only be available when installing on a machine
with Microsoft Exchange installed. Intronis also provides you with the ability to backup individual mailboxes and messages.
However, the setup is outside the scope of this document. For more information about how to setup this backup set, please
see the Knowledge Base articles listed below.
How to Configure Mailbox Level Backups for Exchange 2003 https://my.intronis.com/support/?kbid=KBBASE660SINORTNI
How to Configure Mailbox Level Backups for Exchange 2007 https://my.intronis.com/support/?kbid=KBBASE661SINORTNI
How to Configure Exchange Mailbox Level Backups for Exchange 2010 https://my.intronis.com/support/?kbid=KBBASE924SINORTNI
Also, please feel free to contact our technical support department for any additional assistance in setting up these backup sets.

White [email protected] | www.intronis.com | (800) 569-0155 | @intronisinc
© 2012 Intronis, Inc. All rights reserved. Intronis is a trademark of Intronis, Inc.
Page | 10
The first step of the backup set creation wizard is to
select the storage group you would like to backup.
Once your storage group is selected, click the
“Next” button to continue to the next step.
Please Note: Each storage group will require its
own backup set.
Next, you will confirm the time your backup set will
start. As with the files and folder backup set, the
software will automatically select the optimal time.
This time can be overridden and set to whenever
you would like. You may also select which days you
would like to run the backup sets and if these will
be Full or Incremental backups. Intronis requires you
select at least one day to be a Full backup. Once
the backup set time has been confirmed, click the
“Next” button to continue.
Please Note: The Intronis solution performs true Full (or Normal) and Incremental backups according to Microsoft’s best
practices. For more information about Exchange backup methods, please see the below Knowledge Base article.
Overview of Exchange Server Backup Methods http://technet.microsoft.com/en-us/library/aa996125(EXCHG.65).aspx
The last step of the backup set creation wizard is to
name your backup set. Once a name has been entered,
click the “Apply” button and then the “Finish” button to
commit the backup set. After the backup set has been
committed, you will be brought to the “Backup Sets”
screen and asked if you would like to run the backup set
now.

White [email protected] | www.intronis.com | (800) 569-0155 | @intronisinc
© 2012 Intronis, Inc. All rights reserved. Intronis is a trademark of Intronis, Inc.
Page | 11
As with the Files and Folders backup set, you will be creating another backup set. Click the “No” button and allow the
backup set to run at its next scheduled time.
SQL Backup Set Creation
To create a SQL Server backup set, you will select the “Create a new backup set” from the actions menu on the left
hand side. This will return you to backup set selection screen.
To create your Microsoft SQL backup set, you
will select the option “SQL Server.” This option
will allow you to back up a full copy of your SQL
databases and logs.
The first step of the SQL backup set creation
wizard is to discover your SQL server instance by
clicking on the “Discover” button. This will discover
any visible SQL server instances running on your
network. Once your instances have been discov-
ered, select the instance you would like to backup
from the drop down list. If your SQL instance
requires SQL Authentication, enter the credentials
in the space provided.
Otherwise, the Intronis solution will authenticate with the “Local System” account using Windows authentication.
From there, we can discover the available databases by clicking on the “Refresh List” button. This will display a list of
available databases based on the permissions provided underneath. Once your databases have been detected, they will
be automatically selected to be backed up. You may unselect any that you would not like to have backed up and then
click the “Next” button to continue.
Please Note: You will need to create a backup set for each SQL server instance you would like to backup, regardless if they are
local or remote.

White [email protected] | www.intronis.com | (800) 569-0155 | @intronisinc
© 2012 Intronis, Inc. All rights reserved. Intronis is a trademark of Intronis, Inc.
Page | 12
Next, you will confirm the time that your backup set
will start. As with the files and folder backup set, the
software will automatically select the optimal time.
This time can be overridden and set to whenever
you would like. You may also select which days you
would like to run the backup sets and if these will
be Full or Differential backups. Intronis requires you
select at least one day to be a Full backup. Once
the backup set time has been confirmed, click the
“Next” button to continue.
Please Note: The Intronis solution performs true Full (or Normal) and Differential backups according to Microsoft’s best
practices. For more information about SQL backup methods, please see the Knowledge Base article below.
SQL Server Backup and Restore http://technet.microsoft.com/en-us/library/cc966495.aspx
The last step of the backup set creation wizard is
to name your backup set. Once a name has been
entered, click the “Apply” button then “Finish”
button to commit the backup set. After the backup
set has been committed, you will be brought to the
“Backup Sets” screen and asked if you would like to
run the backup set now.
As with the Exchange backup set, you will be creating another backup set. Click the “No” button and allow the backup
set to run at its next scheduled time.
System State Backup Set Creation
This backup set will allow you to restore your Active Directory back in the event a failure occurs. To create your new
backup set, select the “Create a new backup set” from the actions menu on the left hand side. This will return you to
the backup set selection screen.

White [email protected] | www.intronis.com | (800) 569-0155 | @intronisinc
© 2012 Intronis, Inc. All rights reserved. Intronis is a trademark of Intronis, Inc.
Page | 13
To create your System State backup set, you will
select the “Backup the System State” option. This
option will allow you to back up your system state.
The Intronis product leverages Windows Backup
to generate a traditional System State backup file.
There is no need to configure any options here.
Click “Next” to continue.
Next, you will confirm the time your backup set will
start. As with the files and folder backup set, the
software will automatically select the optimal time.
This time can be overridden and set to whenever
you would like. You may also select additional days
you would like to run the backup. Once the backup
set time has been confirmed, click the “Next”
button to continue.
The last step of the backup set creation wizard is
to name your backup set. Once a name has been
entered, click the “Apply” button and then the
“Finish” button to commit the backup set. After
the backup set has been committed, you will be
brought to the “Backup Sets” screen and asked if
you would like to run the backup set now.

White [email protected] | www.intronis.com | (800) 569-0155 | @intronisinc
© 2012 Intronis, Inc. All rights reserved. Intronis is a trademark of Intronis, Inc.
Page | 14
The guide will be reviewing the steps to Restore data next, so click the “No” button and allow the backup set to run at
its next scheduled time.
Please Note: When attempting to create a System State on server 2008, ensure Windows Server Backup be installed. For more
information see our KB article about System State Backups (https://my.intronis.com/support/?kbid=KBBASE909SINORTNI).
Backing up Virtual Environments
Intronis provides partners with several options for backing up virtual environments. For additional information about
backing up virtual environments including Hyper-V and VMware, please contact our sales team.
Local Only Backup Sets
In addition to Online or Online and Local backup sets, Intronis provides partners the ability to backup data exclusively
to the “Local Vault” location. This functionality is disabled by default. If you would like to demonstrate this functionality,
please contact our sales team.
To create a “Local Only” backup set, ensure that you have contacted our sales team to enable the functionality and
have a valid “Local Vault” location specified. Next, start the standard backup set creation process. After selecting the
type of plugin that you would like to utilize, you will be prompted if this will be a local or online backup set, select
“Local Only.”
Please Note: The “Local Vault” does support drive rotation and must be a fixed device.

White [email protected] | www.intronis.com | (800) 569-0155 | @intronisinc
© 2012 Intronis, Inc. All rights reserved. Intronis is a trademark of Intronis, Inc.
Page | 15
Running Restores
During the trial process, Intronis recommends running a few test restores to help make you more familiar with the
software interface. When restoring files, you may restore files to the original or alternative location.
To start the restoration process, please click on the
“Restore” button to display your listing of files.
You will then drill down through you folder listings
to determine the folder, file or version of file you
would like to restore. After selecting your data,
click the “Restore” button to continue.
The next step to the restore wizard is to decide
to where you will be restoring your files. You may
select either the original location or an alternative
location. If you will be running file comparisons,
we recommend selecting an “Alternative Path”
and specifying a restoration location, otherwise,
select the “Original Path”, then click the “Restore”
button. This will bring you to the “Current Activity”
screen where you may view the progress of your
restore.
Deleting Information
During the trial you may delete any information you have backed up. However, it isn’t necessary, as your information will
automatically be purged and wiped at the conclusion of the trial.
To delete data from the Intronis system manually, you may click on the “Delete” button to display a listing of all data
and versions currently available.

White [email protected] | www.intronis.com | (800) 569-0155 | @intronisinc
© 2012 Intronis, Inc. All rights reserved. Intronis is a trademark of Intronis, Inc.
Page | 16
To delete data, select the items from the list you
would like to delete and then click the “Delete”
button.
Enter your password if it is requested and click the “Yes” button to continue. Next, you will be brought to the current
activity screen were you can watch the delete complete. Deletes can take just a few seconds to several hours depending
the size and count of data files.
Intronis Software Agent Trial Process Overview
When trialing the software, Intronis recommends installing, backing up and running test restores to help you become
more familiar with the software interface. If at any time during the software trial you have any questions, please feel
free to contact your sales representative or our award winning technical support department. Technical support may be
reached by calling 1-800-569-0155 option 2, by live chat from our website, or by emailing [email protected].
Special Considerations
When trialing the Intronis solution, we recommend disabling or uninstalling any other backup programs. In some cases,
conflicts can occur when attempting to backup duplicate information at the same time.
About Intronis
Intronis Cloud Backup and Recovery is a world class cloud backup solution for the IT Channel. Intronis provides the industry’s easiest
to use secure data solution for offsite and local backup, which generates a monthly recurring revenue stream to add to your business.
Intronis offers the most complete Exchange and SQL backup on the market and U.S.-based customer support. The solution has been
field tested by thousands of MSPs and the industry spoke by awarding Intronis the 2011 Vendor of the Year from ASCII.
www.intronis.com