bf-9700 user manuals3.image.ro.s3.amazonaws.com/download/bf-9700usermanual.pdfway as below: 1) put...
TRANSCRIPT


Please read the following safety information in order to offer you security and high efficiencyduring operation.* Please turn off the radio before entering an inflammable and explosive area.* Do not replace the battery or charging when you are in an inflammable and explosive area.* Please turn off the radio when you are close to the blast area or detonator zone.* Do not use any radio which has a damaged antenna. It may cause a minor burn when the damaged antenna touches your skins.* Do not attempt to dismantle the radio unless professional technical person.* To avoid the problems which caused by EMI and EMC, turn off your radios in any places where posted notices *Please turn off your - radios*. For example, the hospital or other health care places.* Turn off your radio before boarding an aircraft. Any use of the radio must be in accordance with airline regulations or flight crew*s instructions.* If the vehicles have carried with an air bag, do not put your radios within the air bag expand coverage.* Do not expose the radio to direct sunlight over a long time, nor place it close to the heating equipment.* Do not place the radio in any excessively dusty, humid or wet place, nor an unstable surface.* When the portable radio is transmitting, please hold the radio in a vertical position and speak to the Microphone.
1.-SAFETY INFORMATION:
WARNING: If you wear a radio on your body, ensure the radio and its antenna isat least 2.5 centimeters away from your body when transmitting.
* Commercial FM radio receiver (65 MHz ~ 108 MHz)* Incorporates 105 codes "DQT" and 50 privacy codes "QT" programmable* Function "VOX" (voice operated transmission)* Alarm function* Up to 16 memory channels* Broadband (Wide) / Narrowband (Narrow) selectable* High power / low selectable* Battery saving function "SAVE"* Timer transmission "TOT" programmable* Selecting the Scan Mode* Inspection, stun, kill and decoding* Distant urgency alarm, SOS function* Function Busy Channel Lock "BCL"* Programmable by PC* Level Threshold "Squelch" adjustable from 0 to 9* Cross band reception/transmission* Transmit 1750 Tone* Channel frequency-report
2.-FEATURES AND FUNCTIONS:
01 02

We suggest you to check the packing box first before using it. Please carefully unpackthe box and check if all the items which listed in following table are received. If you findany loss or damage, please contact your dealer immediately.
3.-UNPACKING AND CHECKING EQUIPMENTS:5.1.- INSTALLING THE ANTENNA:
5.- INSTALLATION OF ACCESSORIES:
03 04
Note:* Items included in the package, may differ from those listed in the table above dependingon the country of purchase. For more information, consult your dealer or vendor.
4.- OPTIONAL ACCESSORIES:
Note:* Consult the dealer or retailer for information about options available.
Install the antenna as shown in the figure below and turn it clockwise until it stops.Note:* When installing the antenna, don*t rotate itby its top, holding it by its base and turn.* If you use an external antenna, make surethe *SWR* is about 1.5:1 or less, to avoiddamage to the transceiver's final transistors.* Do not hold the antenna with your hand orwrap the outside of it to avoid bad operationof the transceiver.* Never transmit without an antenna.
5.2. - INSTALLING THE BELT CLIP:If necessary, install the belt clip at the rear ofthe battery compartment cover as shown inthe figure below.Note:* Do not use any kind of glue to fix the screwon the belt clip.* The solvents Glue may damage the batterycasing.
05 06
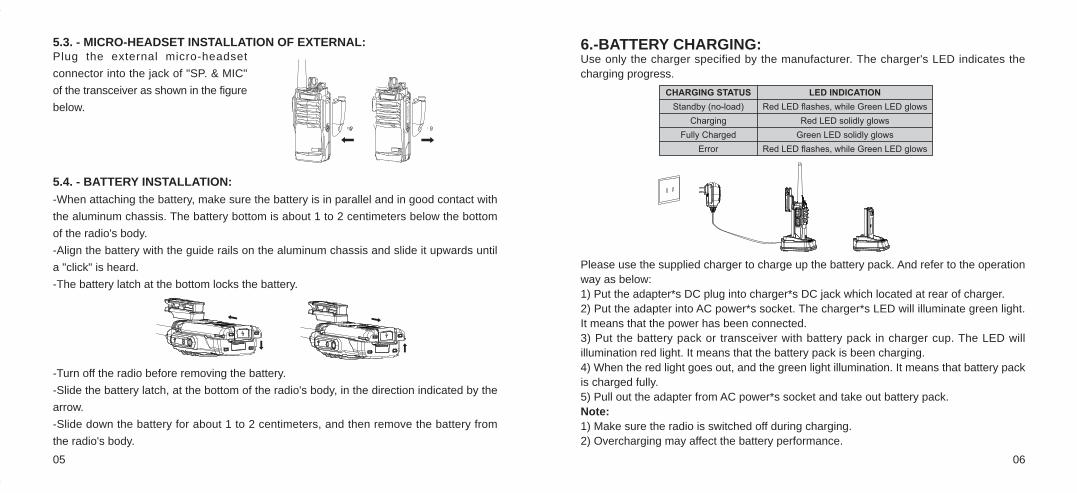
5.3. - MICRO-HEADSET INSTALLATION OF EXTERNAL:Plug the external micro-headsetconnector into the jack of "SP. & MIC"of the transceiver as shown in the figurebelow.
5.4. - BATTERY INSTALLATION:-When attaching the battery, make sure the battery is in parallel and in good contact withthe aluminum chassis. The battery bottom is about 1 to 2 centimeters below the bottomof the radio's body.-Align the battery with the guide rails on the aluminum chassis and slide it upwards untila "click" is heard.-The battery latch at the bottom locks the battery.
-Turn off the radio before removing the battery.-Slide the battery latch, at the bottom of the radio's body, in the direction indicated by thearrow.-Slide down the battery for about 1 to 2 centimeters, and then remove the battery fromthe radio's body.
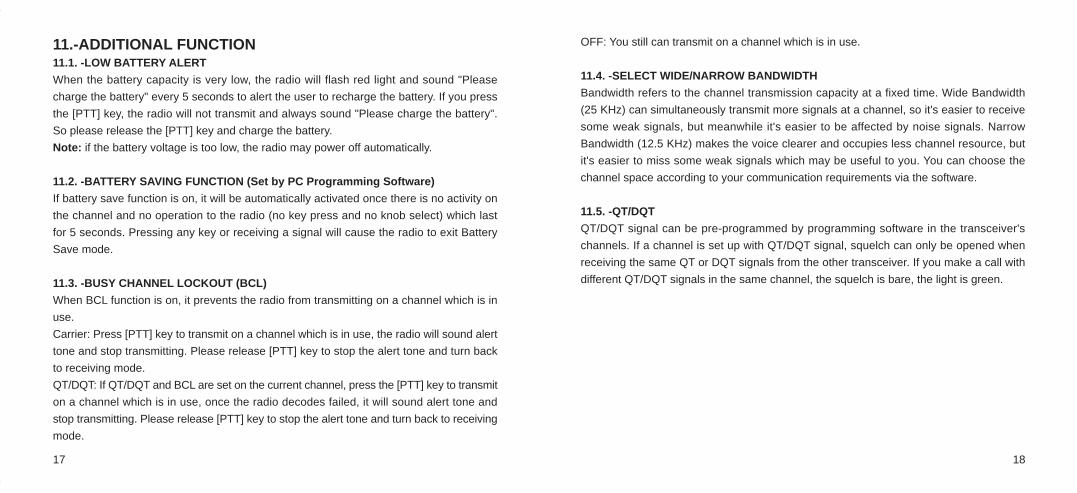
6.-BATTERY CHARGING:Use only the charger specified by the manufacturer. The charger's LED indicates thecharging progress.
Please use the supplied charger to charge up the battery pack. And refer to the operationway as below:1) Put the adapter*s DC plug into charger*s DC jack which located at rear of charger.2) Put the adapter into AC power*s socket. The charger*s LED will illuminate green light.It means that the power has been connected.3) Put the battery pack or transceiver with battery pack in charger cup. The LED willillumination red light. It means that the battery pack is been charging.4) When the red light goes out, and the green light illumination. It means that battery packis charged fully.5) Pull out the adapter from AC power*s socket and take out battery pack.Note:1) Make sure the radio is switched off during charging.2) Overcharging may affect the battery performance.

07 08
7.2. -APPLICABLE BATTERY PACKPlease only use the battery which specified by the manufacturer. Unauthorized batteriesmay cause the failure of Ex-protection or bodily injury and property damages.
7.-BATTERY INFORMATION:7.1.-INITIAL USENew batteries are not charged fully in the factory. Please charge it before using. In general,the battery should charge 12 hours at initial use. The maximum battery capacity andperformance is achieved after three times fully battery charge-discharge cycle. When thebattery power runs out, please recharge the battery or replace one.
7.3.-SAFETY INFORMATION1) Do not throw the battery into fire!2) Do not abandon the battery as the household garbage, it should be recycled and disposedcorrectly.3) Never attempt to disassemble the battery pack.Notices:1)When charging your battery, please keep the ambient temperature among 5*- 40*.2)Please turn off the radio when the battery is charging. Using the radio during chargingwill affect the battery pack to be charged normally.3)During charging, do not plug in/pull out the power supply or the battery frequently, itwould affect battery charging.4)Do not charge when the battery or radio is wet. Please dry it with a soft cloth beforecharging.5)The battery life is over when the operating time is obviously shorter than normal even ifit's fully and correctly charged. Please replace a new battery.
7.4.-PROLONG BATTERY LIFE1)Battery performance will degrade when the current temperature is below 0*. A sparebattery is necessary in cold weather. Please keep the cold batteries, these batteries maywork under room temperature.2)If the battery contact is dusty, it may influence its normal use or normal charge.
1)Fully charge a battery before you store it for a long time, to avoid battery damage causedby over-discharge.2)Recharge the battery after several months'storage (Li-Ion/Li-polymer battery: 6months,NiMH battery: 3 months), to avoid battery capacity reducing caused by over-discharge.3)When storing your battery, keep it in a cool and dry place under room temperature.
7.5.-BATTERY STORAGE:

09 10
8.-RADIO OVERVIEW: 8.2. - COMMAND/KEY DEFINITION:Power On:Rotate PWR/VOL Switch clockwise, you will hear a sound *Beep*, report the presentchannel, the transceiver is ready for working; meanwhile rotate PWR/VOL Switch to adjustthe volume
[SOS]Emergency Alarm:Long press to open the alarm function, at this moment, the green light, red light, and handlamp flashes shin at the same time. Press this button again to release the alarm.
[PTT]:-Press and hold [PTT] button, then talk to the microphone. Release [PTT] to receive.
SK-SIDE KEY1/ [F]: -Press the [F] button, to activate the FM Radio on; Press it again to deactivate the FMRadio.
SK-SIDE KEY2/ [MONI]:-Press the [MONI] button, to turn on the flashlight; Press it again to turn off. Press andhold on the [MONI] button, to monitor the signal.

11 12
9.-BASIC OPERATION9.1.- RADIO ON-OFF-Make sure the antenna and battery are installed correctly and the battery charged.-Rotate the knob clockwise to turn the radio on, and rotate the knob fully counter-clockwiseuntil a "click" is heard to turn the radio off.
9.2.-VOLUME CONTROLRotate the knob clockwise or counter-clockwise, to adjust the volume.
9.3.-TRANSMIT AND RECEIVEChoose the correct channel No. or enter the frequency which you need, then press andhold [PTT] button, the radio is transmitting now, and then talk to the microphone, yoursound will be transmitted. Release [PTT] to receive.
9.4.-High/ Low Power SwitchoverWith the state of FM radio inactivated, press [MONI]to make noise, then press [PTT] cantemporarily switch High/Low power of selected channel(selected by selector). Meanwhilereport the state of Dual Band Dual Watch Mode (TDR mode). If it is on, report "TDR ON",it is off, report "TDR OFF" .Voice prompt "Transmitting Power 1" is low power transmitting, "Transmitting Power 5" is high power transmitting.
9.5.-MONI CHANNELWith dual band state, keep holding [MONI] button to take turns to monitor the signal ofdesigned channel and selected channel. If the green LED keeps lighting, the signal is fromdesignated channel, if the green LED twinkles, the signal is from selected channel.
9.6. -SELECT A CHANNELTurn the Channel Selector Knob to select your desired channel. If the Voice announcementfunction is enable, your radio will automatically report the channel No. where the knoblocates.

13 14
10.-ADVANCED OPERATION10.1. -Voice Prompt* To turn on or turn off the voice prompt, please switch the channel knob to Channel 10,then press [PTT] and [F] to turn on the radio.* To change the Chinese and English setting, please switch the channel knob to channel15, then press [PTT] and [F] to turn on the radio.
10.2. -STUN, KILL FUNCTIONYou can program the working status to control the radios in the group.* Remote StunRemote Stun function allows the control center to temporarily turn off the radios whichare illegal occupying the channels.When the radio receive a DTMF signal with the matched Stun code, the radio will enterStun mode after it decoding succeed, which means the radio can't transmit but can stillreceive from other radios.Under Stun mode, the radio will exit Stun mode when it receiving a revive code from thecontrol center with decoding succeed or re-programmed via software.* Remote KillRemote Kill function allows the control center to disable the radios which are lost or stolen.It prevents from information leakage.When the radio receive a DTMF signal with the matched Remote Kill code, the radio willenter Kill mode after it decoding succeed, then the radio cannot transmit or receive.Under Kill mode, the radio will exit Kill mode when it receiving a revive code from the controlcenter with decoding succeed or re-programmed via software.
10.3. -1750Hz TONEThis function is used to awake the sleeping repeater station. Press the programmed "1750HzTone" key to activate the 1750Hz Tone, press this key again to exit it.When 1750Hz Tone is activated, press [PTT] key to transmit 1750Hz Tone first then transmitnormal signals. The receiver whom receives the 1750Hz Tone will sound Beep alert untilthe 1750Hz signal disappears.
10.4. -DIGITAL FM RADIO FUNCTIONIn the single reception state, press [F] switch on FM radio. After FM Radio starts, press[F] to search FM radio. Press [MONI] for FM band switch. If press [MONI], a sound "Beep"is heard, then FM works in 65-75.9 FM band range, at this time press [F] radio frequencysearch in the range of 65-75.9MHz. If press [MONI] ,a sound "Beep, Beep" is heard, FMworks in 76-108 FM band range, at this time press [F] radio frequency search in the rangeof 76-108 MHz Shutdown and restart or rotate the selector can permanently turn off theradio.
10.5. -VOX FunctionVOX means voice-operated-transmission. When VOX function is activated, the radio cantransmit without pressing [PTT] key.On channel 1-5, press and hold the MONI and [PTT], then switch on the transceiver, thusto activate the VOX functions ON/OFF.* When you turn on the VOX function on Channel 1, the VOX level will be 1 (most sensitive)* When you turn on the VOX function on Channel 5, the VOX level will be 5 (lest sensitive)* When you operate the VOX function, you must use an optional headset with microphone.

15 16
The transceiver automatically switches to Transmission Mode when the VOX circuitrysenses that you have begun speaking into the microphone.1. When operating the VOX function, be sure to set the VOX Gain level which allows thetransceiver to recognize the sound levels.2. If the microphone is too sensitive, the transceiver will begin transmitting when there isnoise in the background.3. If it is not sensitive enough, it will not pick up your voice when you begin speaking. Besure to adjust the VOX Gain level to an appropriate sensitivity to allow smooth transmission
10.6. -SCAN/FAST SWITCHING CHANNEL* Channel scanPress [MONI] key to start scanning from the current channel and the radio will scan thechannel numbers one by one on the list which we programmed before. Once a valid signalis detected, it will switch to this channel directly. You can press [PTT] key to transmit. PressScan key again to exit radio scanning.Note: The Scan status will not be memorized once the radio is powered off.* Resume scanning ModeTo configure the scanning mode as following:Carrier: Scanning stops on an active channel until there is no activity, it resumes scanningafter 5 seconds without activity on this channel.Timer: Scanning stops on an active channel only for 5 seconds before it resumes scanning.Seek: Scanning stops on an active channel and exit scanning mode at the same time.* Priority Channel ScanSometimes you may need to keep an eye on a prefer channel while you are scanning other
channels. You can set up any channels as the priority channel, which means the radiowill scan this priority channel and other normal channels alternately. Press the programmed* Priority Channel Scan key to activate this function and press this key again to exit. Forexample, there are 3 channels CH1, CH2, CH3 and 1 priority channel on the scan list.Then the priority scan will become:CH1*Pri*CH2*Pri*CH3*Pri*CH1*Pri**
10.7. -CHANNEL FREQUENCY-REPORTIf you want to know the frequencies of selected transmit and receive, also the QT we setteron transmitting and receiving, press [MONI] key and until has noise, then press the [F]key. Broadcast order: "transmit Storage ", transmit frequency, and transmit QT. "ReceivingStorage", receiving frequency, receiving QT. After reported frequency, If it did not reportthe DQT and QT that indicating that the channel is not set QT, or continue to broadcastDQT and QT , when broadcast frequency and QT, I "beep" sound that appears to indicate"point. "After reporting the DQT "beep" sound occurs, expressed as a positive DQT, a"beep, beep" twice, indicating that the reverse digital tone.
10.8. -EMERGENCY ALARMThe radio can be loud, penetrating strong alarm sound; it can make somebody drawattention to the roll call.* Alarm function: Press the [SOS] button to start alarm function, when the green lights, redlights, hand lamps blink at the same time.* Cancel alarm: In the alarm status, press [F] or [PTT] button or turn off the power to cancelthe alarm.
17 18
11.-ADDITIONAL FUNCTION11.1. -LOW BATTERY ALERTWhen the battery capacity is very low, the radio will flash red light and sound "Pleasecharge the battery" every 5 seconds to alert the user to recharge the battery. If you pressthe [PTT] key, the radio will not transmit and always sound "Please charge the battery".So please release the [PTT] key and charge the battery.Note: if the battery voltage is too low, the radio may power off automatically.
11.2. -BATTERY SAVING FUNCTION (Set by PC Programming Software)If battery save function is on, it will be automatically activated once there is no activity onthe channel and no operation to the radio (no key press and no knob select) which lastfor 5 seconds. Pressing any key or receiving a signal will cause the radio to exit BatterySave mode.
11.3. -BUSY CHANNEL LOCKOUT (BCL)When BCL function is on, it prevents the radio from transmitting on a channel which is inuse.Carrier: Press [PTT] key to transmit on a channel which is in use, the radio will sound alerttone and stop transmitting. Please release [PTT] key to stop the alert tone and turn backto receiving mode.QT/DQT: If QT/DQT and BCL are set on the current channel, press the [PTT] key to transmiton a channel which is in use, once the radio decodes failed, it will sound alert tone andstop transmitting. Please release [PTT] key to stop the alert tone and turn back to receivingmode.
OFF: You still can transmit on a channel which is in use.
11.4. -SELECT WIDE/NARROW BANDWIDTHBandwidth refers to the channel transmission capacity at a fixed time. Wide Bandwidth(25 KHz) can simultaneously transmit more signals at a channel, so it's easier to receivesome weak signals, but meanwhile it's easier to be affected by noise signals. NarrowBandwidth (12.5 KHz) makes the voice clearer and occupies less channel resource, butit's easier to miss some weak signals which may be useful to you. You can choose thechannel space according to your communication requirements via the software.
11.5. -QT/DQTQT/DQT signal can be pre-programmed by programming software in the transceiver'schannels. If a channel is set up with QT/DQT signal, squelch can only be opened whenreceiving the same QT or DQT signals from the other transceiver. If you make a call withdifferent QT/DQT signals in the same channel, the squelch is bare, the light is green.
19 20

21 22
12.-TECHNICAL SPECIFICATION:12.1-RECEIVER
12.2-GENERAL