bigi 250 installation manual - princeton power systems r0.5 bigi 250_installation... · esd...
TRANSCRIPT
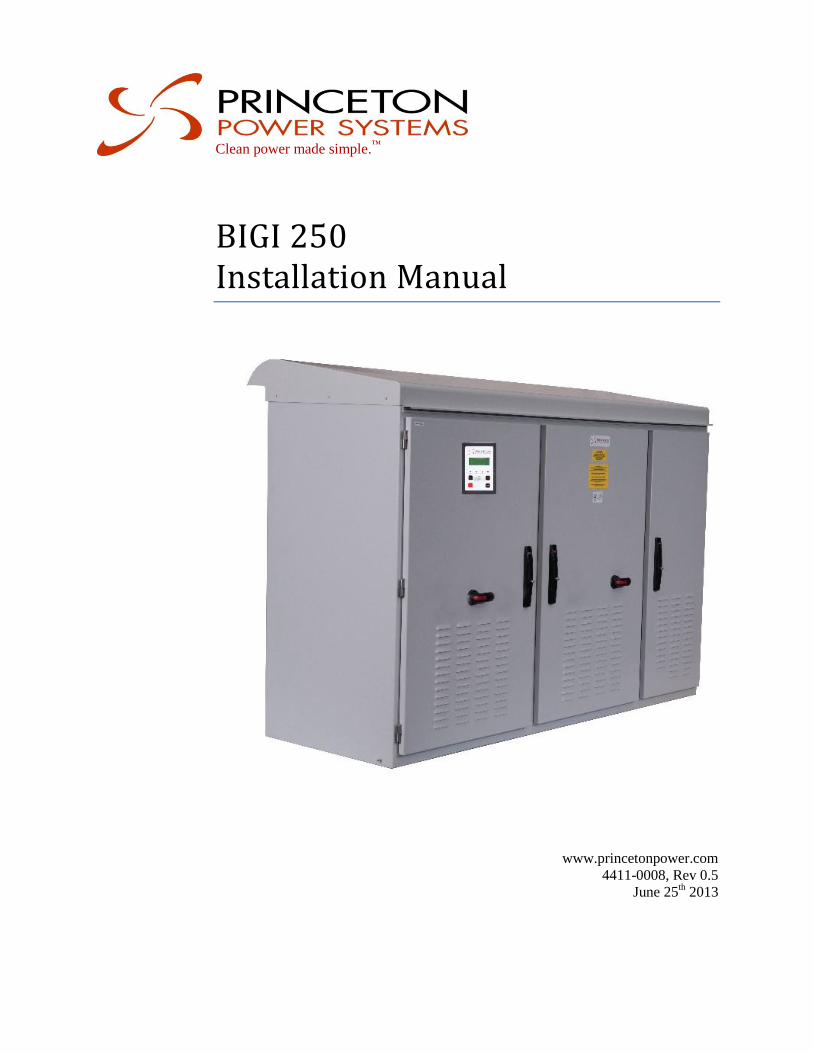
Clean power made simple.™
BIGI 250 Installation Manual
www.princetonpower.com
4411-0008, Rev 0.5
June 25th 2013

This page intentionally left blank.

About this Manual
4411-0008, Rev 0.5 iii
Copyright © Copyright 2013
Princeton Power Systems, Inc.
3175 Princeton Pike
Lawrenceville, NJ 08648
Tel: 609-955-5390
Fax: 609-751-9225
Email: [email protected]
Princeton Power Systems, Inc. and "Clean Power made simple" are registered trademarks
of Princeton Power Systems, Inc.
Specifications and descriptions in this document were in effect at the time of publication.
Princeton Power Systems, Inc. reserves the right to change specifications, product
appearance or to discontinue products at any time.
No patent infringement liability is assumed by Princeton Power Systems, Inc. with
regards to the use of information, circuits, equipment, or software described in this
manual.
The statements and information in this document must not be changed without special
notification from Princeton Power Systems, Inc. Furthermore, Princeton Power Systems,
Inc. does not commit to any further obligations with this document. Use and reproduction
is only permitted in accordance with the contractual agreements with Princeton Power
Systems, Inc. Under no circumstances may parts of this publication be copied,
reproduced, stored in a retrieval system or translated into another language, except with
written permission from Princeton Power Systems, Inc.

About this Manual
iv 4411-0008, Rev 0.5
About This Manual
Purpose The purpose of this Installation Manual is to provide explanations and procedures for
installing and troubleshooting the BIGI 250.
Scope The manual provides safety guidelines, detailed planning and setup information,
procedures for installing the inverter, as well as information about troubleshooting the
unit. It does not provide details about particular brands of batteries. You need to consult
individual battery manufacturers for this information.
Audience The manual is intended for anyone who needs to install the BIGI 250. Installers should be
certified technicians or electricians.

About this Manual
4411-0008, Rev 0.5 v
Organization This manual is organized into three chapters and three appendices.
Chapter 1, “System Overview” provides general information of the BIGI-250.
Chapter 2, “Installation” describes how to mount and install the BIGI-250.
Chapter 3, “Wiring Instructions” describes system configurations and how to perform
wiring and cabling procedures.
Appendix A, “BIGI-250 Specifications” provides the electrical and environmental
specifications of the BIGI-250.
Appendix B, "BIGI-250 Grounding” provides grounding method for various
configurations.
Appendix C, “BIGI-250 Default Trip Settings”
Abbreviations and Definitions The following table provides a glossary of terms used in this manual.
Abbreviations Definition
AC Alternating Current
BIGI Battery Integrated Grid Interactive
CEC California Energy Commission
DC Direct Current
DRI Demand Response Inverter
ESD Electro-Static Discharge
GFDI Ground Fault Detector and Interrupter
HMI Human/Machine Interface
IEEE Institute of Electrical and Electronics Engineers
MPPT Maximum Power Point Tracking
NEC National Electrical Code
PPS Princeton Power Systems, Inc.
PV Photovoltaic
THD Total Harmonic Distortion
UL Underwriters Laboratories

About this Manual
vi 4411-0008, Rev 0.5
Important Safety Instructions
SAVE THESE INSTRUCTIONS– This manual contains important
instructions for the BIGI-250 that shall be followed during installation and
maintenance of the inverter.
Symbols The following is a list of symbols used in this manual and on labels in the BIGI-250.
DC circuit
AC circuit
Phase indicator
Protective earth ground.
Other grounding conductor.
Warning Symbols Used in This Manual Attention: This symbol identifies information about circumstances or practices that
could lead to personal injury, death, internal component damage, reduced product life,
equipment damage, economic loss, or other adverse effects.
Electric Shock Hazard: This symbol identifies information about a condition or
procedure that could be potentially lethal or harmful to personnel or damaging to
components due to live voltages within the system, components holding stored energy, or
electrostatic discharge (ESD).

About this Manual
4411-0008, Rev 0.5 vii
Terms of Use Because of the wide variety of uses for power electronics equipment, this manual does
not describe every possible application or configuration. All technicians responsible for
installing, commissioning, and operating this equipment must satisfy themselves of the
suitability and proper implementation of the intended application of this power
conversion product.
In no event will PPS, its subsidiaries, partners, employees, or affiliates be responsible or
liable for any damages, indirect or direct, resulting from the misuse or incorrect
application of this equipment.
The examples and diagrams in this manual are for illustrative purposes only. Because of
the wide variety of uses, applications, peripheral equipment, and facility configurations
particular to each installation, PPS cannot assume responsibility or liability for actual use
based on the information provided herein.
General Precautions For Proper Circuit Isolation: Connect a minimum 250kVA rated isolating transformer
between the output of the inverter and the utility power line connections. The transformer
is to be an isolation type having separate primary and secondary windings.
Maintenance by Qualified Personnel: Only personnel familiar with the PPS BIGI-250
Inverter and associated machinery should attempt installation, commissioning, or
maintenance of the system. Untrained or unauthorized personnel run the risk of grave
personal injury, death, or equipment damage.
High Voltage Electric Shock Hazard: The PPS BIGI-250 Inverter contains electrical
components carrying potentially lethal voltages and currents. Extreme caution should be
exercised around the system, especially when the cabinet door is open. Before opening
the cabinet, all supply power should be disconnected using a standard physical lock-out
procedure and the service personnel should wait 5 minutes prior to opening the enclosure
door.
Installation to Code: The following instructions are merely a guide for proper
installation. The National Electrical Codes (NEC), local codes, and similar standards
outline detailed requirements for safe installation of electrical equipment. Installation
must comply with specifications for wire types, conductor sizes, electrical and thermal
insulation, branch circuit protection, grounding, and disconnect devices. PPS cannot
assume responsibility for compliance or noncompliance to any national or local code.
PPS cannot assume responsibility for personal injury and/or equipment damage exists if
codes are ignored or misapplied during installation.

About this Manual
viii 4411-0008, Rev 0.5
Improper Use: PPS cannot assume responsibility for personal injury and/or equipment
damage as a result of improper installation, use, maintenance, reconfiguration,
reprogramming, or other improper actions. An incorrectly serviced or operated Inverter
system can cause personal injury, component damage, or reduced product life.
Malfunction may result from wiring errors, an incorrect or inadequate DC supply or AC
grid connection, excessive ambient temperatures or obstructed ventilation, or incorrect
software configuration
Heat Hazard: The cabinet should not be mounted on a combustible surface nor should
combustible materials be placed on or against the cabinet. The system should not be
installed in a confined space that prevents proper ventilation or allows the build-up of
excessive heat. A minimum of 12 inches of spacing clearance must exist for proper
cooling airflow into and out of ventilation openings.
ESD Sensitive Components: The inverter contains Electrostatic Discharge (ESD)
sensitive components. Standard ESD control precautions must be followed when
installing, commissioning, testing, servicing, or repairing the system. Component
damage, component degradation, or an interruption in control system operation may
occur upon an electrostatic discharge event
Battery Information Battery Parameters Setting: The battery charge control function has adjustable battery
charging settings. The user must confirm that the charge control profile used in this
inverter is appropriate and safe for the type of battery used and that all battery charging
settings are set correctly for the battery voltage, current, and temperature ratings. Setting
these settings incorrectly may damage the battery and the inverter and may cause a
hazardous condition that puts personnel at risk of grave injury or death.

Contents
4411-0008, Rev 0.5 ix
Contents About This Manual ............................................................................................................................... iv
Purpose .............................................................................................................................................. iv Scope iv Audience ............................................................................................................................................ iv Organization ....................................................................................................................................... v Abbreviations and Definitions ............................................................................................................ v
Important Safety Instructions ................................................................................................................ vi Symbols ............................................................................................................................................. vi Warning Symbols Used in This Manual ............................................................................................ vi Terms of Use..................................................................................................................................... vii General Precautions .......................................................................................................................... vii Battery Information..........................................................................................................................viii
1
System Overview 1
1.1 BIGI-250 Overview ........................................................................................................................ 2 1.2 Grid-Tied Systems .......................................................................................................................... 2
2
Installation 4
2.1 Unpacking, Inspection, and Storage ............................................................................................... 5 2.2 Dimensions ..................................................................................................................................... 5 2.3 Location Considerations ................................................................................................................. 6 2.4 Mounting & Ventilation ................................................................................................................. 7 2.5 Conduit Installation Locations ........................................................................................................ 8
3
Wiring Instructions 10
3.1 Installation Tools and Materials Tools Required .......................................................................... 11 3.2 Safety ............................................................................................................................................ 11 3.3 Opening/Closing the Enclosure Doors ......................................................................................... 12 3.4 Wire Sizing and Ratings ............................................................................................................... 15
3.4.1 AC Grid Wire Sizing and Ratings .......................................................................................... 15 3.4.2 DC (PV and Battery) Wire Sizing and Ratings ...................................................................... 15 3.4.3 Control Wire Sizing and Ratings ........................................................................................... 16
3.5 Hookup Requirements .................................................................................................................. 16 3.5.1 Disconnects ............................................................................................................................ 16
3.6 Grounding ..................................................................................................................................... 17 3.6.1 Torque Specifications ............................................................................................................ 18 3.6.2 Ground Wire Sizing ............................................................................................................... 18 3.6.3 Ground Wiring Instructions ................................................................................................... 19
3.7 DC Connection ............................................................................................................................. 20 3.7.1 Torque Specifications ............................................................................................................ 20
Contents
x 4411-0008, Rev 0.5
3.7.2 Battery and PV Port Connection ............................................................................................ 20 3.8 AC Utility and Load Connections ................................................................................................ 21
3.8.1 Torque Specifications ............................................................................................................ 21 3.8.2 AC Installation ....................................................................................................................... 21
3.9 Isolation Transformer Connections .............................................................................................. 22 3.9.1 Torque Specifications ............................................................................................................ 22 3.9.2 Isolation Transformer Connections ........................................................................................ 22
3.10 Wire Routing .......................................................................................................................... 22 3.11 Input and Output Wire Connection ........................................................................................ 23
3.11.1 Digital Inputs ......................................................................................................................... 23 3.11.2 Digital Outputs ....................................................................................................................... 24 3.11.3 Analog Inputs ......................................................................................................................... 25 3.11.4 Analog Outputs ...................................................................................................................... 26
4
Commissioning Sequence 29
4.1 Basic Operation ............................................................................................................................ 30 4.1.1 Navigation .............................................................................................................................. 30 4.1.2 Inverter Status Screen/Home Screen ...................................................................................... 30 4.1.3 Main Menu ............................................................................................................................. 30
4.2 MODBUS Interface ...................................................................................................................... 32 4.2.1 Introduction ............................................................................................................................ 32 4.2.2 Setup ...................................................................................................................................... 33 4.2.3 RS-232 Hardware Configuration ........................................................................................... 33
4.3 Web Interface ............................................................................................................................... 40 4.3.1 Setup ...................................................................................................................................... 40
4.4 Password Protection ..................................................................................................................... 42 4.5 Commissioning Sequence ............................................................................................................. 42
4.5.1 Single Grid-Connected Systems............................................................................................. 42
A
BIGI-250 Specifications 46
A.1 BIGI-250 Specifications ............................................................................................................... 47
B
BIGI-250 Grounding 50
C
BIGI-250 Default Grid Trip Settings 53

Contents
4411-0008, Rev 0.5 xi
Figures
Figure 1-1: Configuration of BIGI-250 ........................................................................................................ 3 Figure 2-1: Side View of BIGI-250 .............................................................................................................. 5 Figure 2-2: Front View of BIGI-250 ............................................................................................................. 6 Figure 2-3: Airflow (with and without Roof) ............................................................................................... 6 Figure 2-4: Ventilation Clearances .............................................................................................................. 8 Figure 2-5: Optional Top Wire Access for Indoor Application Only. .......................................................... 8 Figure 2-6: Pad Mounting and Conduit Hole Locations, Access through bottom floor, Top View ............. 9 Figure 3-1: DC Battery and AC Disconnect Switch Shown in the On Position ......................................... 13 Figure 3-2: Locked Door ............................................................................................................................ 13 Figure 3-3: Power Electronics Hook ups, BIGI-250 ................................................................................... 14 Figure 3-4: DC Wiring Connections ........................................................................................................... 20 Figure 3-5: AC Wiring Connections, BIGI-250 ......................................................................................... 21 Figure 3-6: Isolation Transformer Wiring BIGI-250 .................................................................................. 22 Figure 3-7: Power and Control Wire Entrance ........................................................................................... 23 Figure 3-8– Digital input configuration – Terminals on I/O Board header J27 ......................................... 24 Figure 3-9: Digital Output I/O board J27 terminal configuration ............................................................... 24 Figure 3-10: Analog I/O Board mounted in the left side of the enclosure .................................................. 25 Figure 3-11: Analog Output Header J36 on I/O Board ............................................................................... 27 Figure 4-1: RS-232 Signal Pins .................................................................................................................. 33 Figure 4-2: RS-232 Dip Switch Settings..................................................................................................... 34 Figure 4-3: RS-485 Half Duplex Dip Switch Settings ................................................................................ 34 Figure 4-4: RS-485 Half Duplex with Bias Dip Switch Settings ................................................................ 35 Figure 4-5: RS-485 Half Duplex Signal Pins .............................................................................................. 35 Figure 4-6: RS-485 Half Duplex Dip Switch Settings w/ multiple slaves. ................................................. 35 Figure 4-7: RS-485 Full Duplex Wire Assignments ................................................................................... 36 Figure 4-8: RS-485 Pin Assignments.......................................................................................................... 36 Figure 4-9: RS-485 Dip Switch Settings Inverter as a Slave ...................................................................... 36 Figure 4-10: Modbus Functions Supported ................................................................................................ 37 Figure 4-11: Control Board and Interface I/O Board Location ................................................................... 41

Contents
xii 4411-0008, Rev 0.5
Tables
Table-1: AC Wire Specifications ................................................................................................................ 15 Table-2: DC (PV and Battery) Wire Specifications .................................................................................... 15 Table-3: Control Wire Specifications ......................................................................................................... 16 Table-4: Conductor Size of AC System Grounding ................................................................................... 18 Table -5: Conductor Size of Equipment Grounding ................................................................................... 19 Table-6: BIGI-250 Specifications ............................................................................................................... 47

1 System Overview

System Overview
2 4411-0008, Rev 0.5
1.1 BIGI-250 Overview
The Battery Interactive Grid Interactive (BIGI) Inverter is a multi-port power converter
that allows for the seamless combination of renewable power generation with energy
storage. The system is designed for utility interactive functionality.
The PPS Battery Integrated Grid Interactive – 250kW Inverter (BIGI-250) is a unique
and innovative three port power inverter that is poised to become an integral part of the
smart-grid supporting distributed power generation and demand response applications.
The BIGI-250 allows energy from multiple energy sources to be harvested, stored and
distributed.
Some of the changes and opportunities in the electricity market that are evolving now and
precipitating the transition to advanced systems requiring the Grid Interactive Inverter
technology include:
Solar Backup Power – With the Grid Interactive Inverter it is possible to integrate PV
arrays with battery storage, allowing the inverter to continue operating when the sun
goes down; saving fuel, money, and increasing positive perception of solar systems.
Energy Storage Integration – Integrating the Grid Integrated Inverter with the solar
array and energy storage provides a broad range of possibilities. When multiple
loads, storage, and generation sources are managed effectively through a Grid
Interactive Inverter, the value, reliability, and security of the energy system are
maximized. All available resources are being utilized to their maximum efficiency
and effectiveness, based on the price signals and environmental signals available.
Regulatory Services – Area frequency regulation, VAR support, and other services
are increasingly being monetized by grid regulators such as Pennsylvania, New
Jersey, and Maryland (PJM) Interconnection. Solar resources can provide their full
value as a capacity resource when combined with load control or energy storage
through the BIGI. Contact Princeton Power Systems for more information regarding
current available regulatory service capabilities.
1.2 Grid-Tied Systems The system is designed to provide grid support functionality for grid-connected
systems including on-command real power delivery for frequency regulation and
demand response as well as on-command reactive power delivery for voltage
regulation. The BIGI is compatible with advanced communications protocols
including the IEC 61850 communication protocol that includes a number of
important grid support capabilities.

System Overview
4411-0008, Rev 0.5 3
Figure 1-1: Configuration of BIGI-250
The GFDI on the PV and battery ports are configured to ground the PV negatively. The
PV is negatively grounded in the above configuration.

2 Installation

Installation
4411-0008, Rev 0.5 5
2.1 Unpacking, Inspection, and Storage Upon receiving the unit, inspect for signs of damage that may have been caused during
shipping. If damage is found, immediately contact PPS and the Shipping Company.
The inverter weighs approximately 3,500 lbs. Use a forklift to move the units. Do NOT
attempt to lift and/or move either the inverter or transformer by hand. They are extremely
heavy. Attempting to move the unit by hand may lead to serious injury.
2.2 Dimensions
Figure 2-1: Side View of BIGI-250

Installation
6 4411-0008, Rev 0.5
Figure 2-2: Front View of BIGI-250
2.3 Location Considerations
Figure 2-3: Airflow (with and without Roof)

Installation
4411-0008, Rev 0.5 7
To make the most of the benefits provided by the inverter, please comply with the
following requirements:
1. Unit is NEMA 3R rated configured to be installed INDOORS.
2. Install the inverter in an accessible location following NEC for enclosure and
door clearances and proximity to other equipment.
3. The maximum life of the inverter can be achieved by mounting the unit in a
clean, dry and cool location
4. For optimal inverter life and performance, do not mount the inverter in direct
sunlight, especially in hot climates. If the unit must be mounted in direct sunlight,
a metal sun-shield is recommended but not required.
5. The inverter is forced-air-cooled. Air is drawn in through vents at the lower part
of the front door and the bottom, exhaust air is emitted vertically from vents at
the rear of the roof, as shown. If the inverter has been installed without the roof,
the air will be exhausted out of the top of the unit. The air inlet and outlet must
not be blocked, and the installation location should be sufficiently ventilated to
prevent the inverter heat output from increasing the ambient temperature beyond
the inverter’s rating.
6. Under certain operating conditions, the inverter will emit audible noise; it is not
advisable to install in the immediate vicinity of living quarters.
7. The inverter should not be installed in an area that is excessively dusty, as this
may decrease the performance of the air cooling system.
8. The inverter must not be installed in areas in which dust containing conductive
particles (e.g. iron filings) may form.
2.4 Mounting & Ventilation
1. The inverter weighs about 3,500 lbs. Be sure to verify load capacity of floor, roof
or concrete pad mounting area (recommended).
2. Provisions should be made and/or procedures should be in place to ensure that
nothing is placed or stored on the enclosure roof where it could block the exhaust
vents.
3. Similar precautions should be taken regarding the air inlet vents on the front of
the unit
4. A minimum distance of 12 inches (300mm) must be clear above the inverter for
ventilation.
5. A minimum distance of 36 inches (900mm) must be clear in front of the inverter
to allow for opening of the main door.
6. The inverter must be mounted with at least a 4” open space behind it if the
inverter has the roof installed.

Installation
8 4411-0008, Rev 0.5
7. Correct mounting position for the inverter is vertical with the mounting feet on
the floor. The enclosure must be bolted to a concrete pad to prevent the
possibility of tipping. See Figure 2-6 for mounting locations and more access.
8. Environment and clearance of the installation shall also meet NEC and other
locale code requirements.
Figure 2-4: Ventilation Clearances
2.5 Conduit Installation Locations
Figure 2-5: Optional Top Wire Access for Indoor Application Only.

Installation
4411-0008, Rev 0.5 9
Figure 2-6: Pad Mounting and Conduit Hole Locations, Access through bottom floor, Top View
3 Wiring Instructions

Installation
4411-0008, Rev 0.5 11
3.1 Installation Tools and Materials Tools Required These tools will be required
1. Wire stripper
2. Assorted open-end wrenches or socket wrench set and fittings
3. Torque wrench
4. Electrical tape
5. Multi-meter (AC/DC Voltage, frequency)
6. Assorted Phillips screw drivers
7. Allen/Hex head driver set (through 1/2")
8. Slotted screw driver
9. Level
10. Pencil
11. Utility knife
12. Wire lugs
The following materials may be required for completing this installation:
1. Conduits (code compliant conduit is recommended), bushings, wire nuts,
appropriate fittings for wire run, and seals as necessary.
2. Electrical wire of appropriate size and length
3. Breaker panels (if used)
4. Additional circuit breakers (if required)
5. Ground busses, bars, and/or rods
3.2 Safety Shock Hazard: Ensure that no DC voltage is being supplied to the inverter and that no
AC voltage is present on the AC wiring. Failure to do so could cause serious injury or
death. A warning label is provided to inform all personnel that multiple sources of power
are available inside. This label is installed on the outside of the door and should remain
clearly visible. Ensure all sources are OFF or disconnected before servicing.
The PPS BIGI-250 Inverter contains electrical components carrying potentially lethal
voltages and currents. Extreme caution should be exercised around the system, especially
when the cabinet door is open once it's installed. Before opening the cabinet, all supply
power should be disconnected using a standard physical lock-out procedure and the
service personnel should wait 15 minutes prior to opening the enclosure door.

Installation
12 4411-0008, Rev 0.5
PV Voltage: Before connecting the solar panels, check that the voltage specified by the
manufacturer corresponds to the actual measured voltage. At an outside temperature of
-10°C, the open-circuit voltage for the solar panels should never rise above 600 V. When
the temperature is lower, the open-circuit voltage generated will be higher than normal.
The temperature coefficients for calculating the open-circuit voltage at -10°C can be
found in the data sheet for the solar panels. If the open-circuit voltage for the solar panels
rises above 600 V, this may result in damage to the inverter and all warranty rights shall
be declared null and void.
Battery Parameters: The battery charge control function has adjustable battery charging
settings. The user must confirm that the charge control profile used in this inverter is
appropriate and safe for the type of battery used and that all battery charging settings are
set correctly for the battery voltage, current, and temperature ratings. Setting these
settings incorrectly may damage the battery and the inverter and may cause a hazardous
condition that puts personnel at risk of grave injury or death.
Battery Temperature Compensation: Programming temperature compensation
parameters that are not suitable for the type of battery being used may damage the battery
and the inverter and may cause a hazardous condition that puts personnel at risk of grave
injury or death. The user must ensure that the battery temperature compensation
parameters are appropriate and safe for the type and voltage rating of the battery used.
Grounding: All input and output circuits are isolated from the enclosure. System
grounding, when required by Sections 690.41, 690.42, and 690.43 of NEC, ANSI/NFPA
70, is the responsibility of the installer.
3.3 Opening/Closing the Enclosure Doors
Disconnect Position: The AC disconnect has an interlock mechanism to prevent the door
from being opened if it is not in their OFF position. Turn the disconnect to OFF
(horizontal, shown in Figure 3-1: DC Battery and AC Disconnect Switch Shown in the
On Position) position before opening/closing the doors. Turning the disconnect clockwise
sets them to ON (vertical) position, while turning the disconnects counter clockwise sets
them to OFF (horizontal) position.
The disconnect for the battery port is equipped with an under-voltage trip module. When
tripped, the handle on the outside of the enclosure may still appear in its horizontal
position but the steel bar (Figure 3-4: DC Wiring Connections) behind it turns clockwise,
which cannot be disengaged from the handle. When this happened, turn the disconnect
counter clockwise to its OFF position before opening the door.

Installation
4411-0008, Rev 0.5 13
Figure 3-1: DC Battery and AC Disconnect Switch Shown in the On Position
The enclosure doors are to be unlocked only by a qualified electrician or technician who
is performing the installation or period maintenance. Each door latch is designed so the
door can be locked in the closed position, shown in Figure 3-2.
Figure 3-2: Locked Door
Rotating a handle in the wrong direction can break the handle; so before trying to open a
door, make sure you are rotating the direction the handles toward that door’s hinges.
AC Grid
Disconnect
Switch
DC Battery
Disconnect
Switch

Installation
14 4411-0008, Rev 0.5
Figure 3-3: Power Electronics Hook ups, BIGI-250
PV Port
Chassis
GND
AC Grid Port
Chassis
GND
DC Battery
Port

Installation
4411-0008, Rev 0.5 15
3.4 Wire Sizing and Ratings
3.4.1 AC Grid Wire Sizing and Ratings All AC power wiring should meet the following specifications:
Voltage Rating 600 Volts or greater per NEC
Temperature Class 75°C or greater per NEC
Gauge Copper: 500 MCM
Table-1: AC Wire Specifications
3.4.2 DC (PV and Battery) Wire Sizing and Ratings DC power wiring, including PV and battery, should meet the following specifications:
Voltage Rating 600 Volts or greater as per NEC
Temperature Class 75°C or greater per NEC
Gauge Copper: 2 x 400 MCM
Table-2: DC (PV and Battery) Wire Specifications

Installation
16 4411-0008, Rev 0.5
3.4.3 Control Wire Sizing and Ratings Circuit Class: Class 1 wiring methods must be used for wiring of class 2 circuits
(Control or sensor circuit).
Wire Insulation: All wiring installed in the system must be rated for 600VAC, including
control and signal wiring.
Here are the requirements for the control wires:
Voltage Rating 600 Volts
Temperature Class 75°C or greater
Gauge Copper Stranded: 22 - 18AWG or greater per NEC
Table-3: Control Wire Specifications
3.5 Hookup Requirements
3.5.1 Disconnects
3.5.1.1 DC Disconnects
The BIGI-250 includes an internal Battery DC Disconnect for user’s safety and
convenience. A dedicated DC disconnect must be installed for the PV port. The
disconnect needs to have the following characteristics:
1. The DC disconnect must open all ungrounded conductors of the circuit to
which it is connected,
2. Consist of a manually operated switch or a circuit breaker,
3. Employ an operating handle that is accessible or located behind a hinged
cover not requiring a tool for opening,
4. Be marked or otherwise clearly identified as the DC disconnect switch for
the inverter, and
5. Be rated for 600VDC and the lesser of
a. The maximum current of the connected DC source, or
b. 640ADC (the maximum DC ratings of the inverter)
3.5.1.2 AC Disconnects
The BIGI-250 includes an internal AC Disconnect for user’s safety and convenience.

Installation
4411-0008, Rev 0.5 17
3.6 Grounding
Grounding Requirements: All input and output circuits are isolated from the enclosure.
System grounding and equipment grounding, when required by the National Electrical
Code, ANSI/NFPA 70, is the responsibility of the installer. PPS takes no responsibility
for damage or injuries resulting from non NEC compliant grounding arrangements.
Installation
18 4411-0008, Rev 0.5
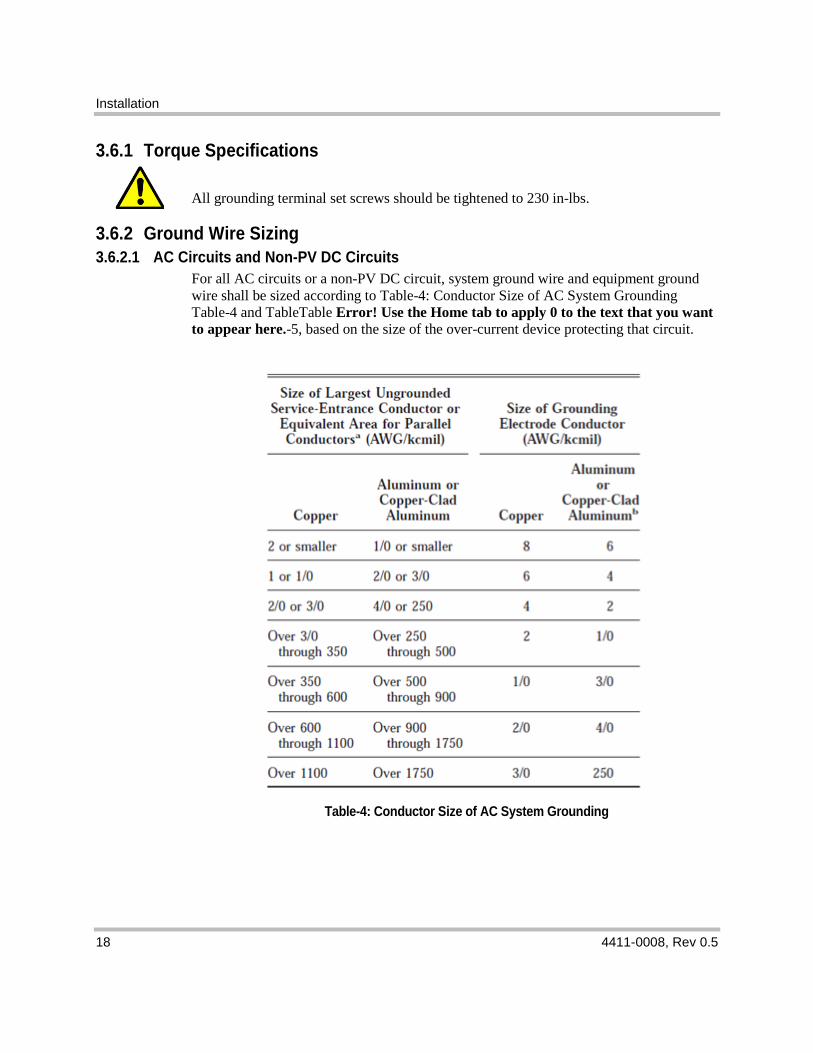
3.6.1 Torque Specifications
All grounding terminal set screws should be tightened to 230 in-lbs.
3.6.2 Ground Wire Sizing
3.6.2.1 AC Circuits and Non-PV DC Circuits
For all AC circuits or a non-PV DC circuit, system ground wire and equipment ground
wire shall be sized according to Table-4: Conductor Size of AC System Grounding
Table-4 and TableTable Error! Use the Home tab to apply 0 to the text that you want
to appear here.-5, based on the size of the over-current device protecting that circuit.
Table-4: Conductor Size of AC System Grounding
Installation
4411-0008, Rev 0.5 19
Table Error! Use the Home tab to apply 0 to the text that you want to appear here.-5: Conductor Size of Equipment Grounding
3.6.2.2 PV DC Input
For installations with PV arrays installed on the DC input port, a ground wire for the DC
circuit will be rated for at least 1.25 times the rated short-circuit current of the installed
PV array.
3.6.3 Ground Wiring Instructions
3.6.3.1 Equipment Ground Connection
The earth protective ground lug shown in Figure 3-7 can be used for equipment ground
connection. The ground supplied with the AC grid circuit typically can serve as this
ground connection. Verify local wiring and local codes before using the AC grid circuit
ground as the system earth ground.
3.6.3.2 Grid Circuit Ground Connection
This ground is associated with the AC circuit connected to the grid port. If the grid port
is used, connect the utility-supplied ground to the earth protective ground lug shown in
Figure 3-7.
3.6.3.3 DC Circuit Ground Connection
The negative terminals of two DC sources are connected together inside the BIGI-250. So
floating both PV and battery is not allowed according to NEC. When grounding one DC
source's terminal, the other must be left floating.
The DC circuit ground connection is done through the configuration of Ground Fault
Detector and Interrupter (GFDI). Only negative conductor of the DC circuit can be
grounded. There is no need to make any additional ground connection for the DC circuit,

Installation
20 4411-0008, Rev 0.5
except to ground the frame or rack of the DC source(s). Grounding conductors from the
frame or rack of the DC source(s) can be connected to the protective earth ground lug
shown in Figure 3-6.
Ground Fault Detector and Interrupter (GFDI): If the BIGI-250 is not equipped with
an integrated GFDI then it must be used with an external GFDI device as required by the
Article 690 of the National Electrical Code for the installation location.
3.7 DC Connection
3.7.1 Torque Specifications
All DC terminal block compression screws must be tightened with a torque of 230 in-lbs.
3.7.2 Battery and PV Port Connection Connection can be made at the terminals as shown in Figure 3-4.
Figure 3-4: DC Wiring Connections
Battery +/-
PV +/-
PV Chassis Gnd

Installation
4411-0008, Rev 0.5 21
3.8 AC Utility and Load Connections AC Grid Neutral: The BIGI-250 does not have a neutral on the AC grid port without an
isolation transformer. If a neutral point is required, it must be found on an external
optional grid isolation transformer. Connect a minimum 250kVA isolating transformer
between the output of the inverter and the utility power line connections. The transformer
is to be an isolation type having a separate primary and secondary winding. It shall be
configured as a Delta Y with neutral.
3.8.1 Torque Specifications
All AC terminal blocks in the BIGI-250 are the same size, and the compression screws
must be tightened with a torque of 230 in-lbs.
3.8.2 AC Installation Phase Rotation: AC Ports wiring must be installed with a positive phase rotation: 123 or
ABC. All AC power terminals are labeled by phase number; follow these labels when
installing AC power wiring.
Connection can be made at the bottom side of the disconnects as shown Figure 3-5.
Figure 3-5: AC Wiring Connections, BIGI-250

Installation
22 4411-0008, Rev 0.5
3.9 Isolation Transformer Connections
3.9.1 Torque Specifications
All transformer terminal set screws should be tightened to 230 in-lbs.
3.9.2 Isolation Transformer Connections The external Isolation Transformer should be hooked up to the BIGI-250 as per the diagram
in Figure 3-5.
Figure 3-6: Isolation Transformer Wiring BIGI-250
3.10 Wire Routing There are access plates in the bottom of the enclosure for cable and wire entrance shown
Figure 3-7. Drill proper size of holes in the access plates of the cable/wire entrances and
use grommets to cover the edge of the holes to protect the cables/wires.
Seal the Cable/Wire Entrance Properly: Seal the cable/wire entrances properly
after installing the cables/wires. Fail to do so could alter the airflow path and allow the
BIGI-250 to be damaged due to thermal failure.

Installation
4411-0008, Rev 0.5 23
Figure 3-7: Power and Control Wire Entrance (Std. Floor and Optional Indoor top access)
3.11 Input and Output Wire Connection There are number of inputs and outputs that can be configured and used by users. Refer to the user
manual sections 3.7.10 through 3.7.13 for set up information.
3.11.1 Digital Inputs
The inverter is equipped with 2 digital inputs for sending “high/low” signals to the inverter, all of which
can be mapped to a number of “digital” parameters within the system. Each digital input has a parameter
associated with it that contains the ID number for the parameter to which it is mapped.
For digital inputs, 24VDC signals are used to indicate “high” or “low”. When a digital input is mapped to
a parameter, then the parameter is set to 1 every time the input goes “high”, and is set to 0 every time the
input goes “low”. Whether 24V means “high” and 0V means “low” or vice-versa is configurable for each
channel.

Installation
24 4411-0008, Rev 0.5
Figure 3-8– Digital input configuration – Terminals on I/O Board header J27
24VDC is supplied on the user I/O terminal strip for use in setting up digital input signals. This power
supply can be used to convert a relay (contact-closure) input to a 0-24VDC signal, allowing the user to
provide input signals to the inverter using relays or other contact-closure systems. The figure at left
illustrates how to connect a digital input relay/switch using the on-board 24V power supply. Since the
users supply is isolated, a connection must be made between the corresponding digital input return and
the power supply return, as shown in Figure 3-8. This figure shows a configuration with user supplied
24VDC sources. A cable shield drain is also shown.
3.11.2 Digital Outputs
The inverter is equipped with 2 digital outputs for sending “high/low” signals from the inverter, all of
which can be mapped to a number of “digital” parameters within the system. Each digital output has a
parameter associated with it that contains the ID number for the parameter to which it is mapped.
The digital outputs consist of a set of 2 relays that are controlled by the “high/low” status of the digital
output signals. As with the digital inputs, the polarity of each digital output relative to its mapped
parameter can be configured individually. Each relay also has a “Normally Open” (NO) and a “Normally
Closed” (NC) set of contacts, for further flexibility. When the mapped value is logic (0), the NO
terminal will be open and the NC terminal will be closed. When the mapped value is logic (1), the NO
terminal will be closed and the NO terminal will be open.
Figure 3-9: Digital Output I/O board J27 terminal configuration

Installation
4411-0008, Rev 0.5 25
24VDC is supplied on the user I/O terminal strip for use in setting up digital output signals. As shown in
the figure above, this power supply can be used to turn the relay outputs into 0-24VDC digital voltage
signals to power lighted indicators or the inputs of a facility control system. An external power supply
could also be used if a different voltage or current limit is required.
Caution: Do not attach a load to the digital outputs that will exceed the 150 mA current rating.
Doing so could result in component damage on the I/O board.
3.11.3 Analog Inputs
The system has 3 analog inputs that can be used to send analog signals to the inverter. Each of the 3
signals can be configured either as a 0-10V voltage input, or a 0-20mA current input. Each of the inputs
can be mapped to a number of parameters in the system, and the range and scaling configuration for that
mapping is configurable for each input individually.
The analog input signals are connected to J36 on the BIGI interface I/O board as shown. The selection of
0-10V input or 0-20mA input is done using the set of 3 analog input selection switches, also on the BIGI
interface I/O board as shown by the yellow arrows. A switch in the “A” position configures the input as a
0-20mA channel. A switch in the “V” position configures the input as a 0-10V channel.
Figure 3-10: Analog I/O Board mounted in the left side of the enclosure
7-Return
6-Signal
5-Return
4-Signal
3-Return
2-Signal
AI0
AI1
AI2
J36

Installation
26 4411-0008, Rev 0.5
Caution: Configuring an analog input for 0-20mA operation and driving it instead with a voltage source
could cause component damage on the I/O board.
The use of shielded twisted pair wiring is recommended for all analog control signals. Shields should be
connected to the FRAME terminal, terminal 1 on J36.
The analog inputs can be driven from a potentiometer (such as a front panel rotary knob) powered by the
I/O board itself. A 10V voltage supply is available on terminal 8 of J36, its return is on terminal 9, for
facilitating such a circuit.
The analog input can also be driven from an external signal source. In this case, the signal wire is
connected to the “signal” terminal and the return wire is connected to the “return” terminal.
Each system parameter that can be mapped to an analog input has two parameters associated with it.
These parameters are in the same units as their parent parameter (the parameter to be mapped). These
define the range that the mapped parameter will traverse when it is mapped to an analog input.
Each analog input channel has two parameters associated with it as well, that define the part of the range
of the input signal that will correspond to the mapped parameter’s range. If an input signal goes above or
below this range, the parameter will be set to it’s high or low value respectively.
3.11.4 Analog Outputs
The system has 1 analog output that can be used to send analog signals from the inverter. The analog
output can be configured either as a 0-10V voltage output, or a 0-20mA current output. The analog
output can be mapped to a number of parameters in the system, and the range and scaling configuration
for that mapping is configurable for each output individually.
The analog output signal is connected to J36 on the GTI interface I/O board as shown. The selection of
0-10V input or 0-20mA output is done using the analog output selection switch, also on the BIGI
interface I/O board. The switch in the “A” position configures the output as a 0-20mA channel. The
switch in the “V” position configures the output as a 0-10V channel.

Installation
4411-0008, Rev 0.5 27
Figure 3-11: Analog Output Header J36 on I/O Board
Caution: Configuring an analog output to source 0-10V and connecting it to an external
current sensor could cause component damage to the external sensor.
Each system parameter that can be mapped to an analog output has two parameters associated with it.
These parameters are in the same units as their parent parameter (the parameter to be mapped). These
define the range of the mapped parameter that will be mapped to the analog output.
The analog output channel has two parameters associated with it as well, that define the part of the range
of the output signal that will correspond to the mapped parameter’s range. If a mapped parameter goes
above or below the range then the analog output will be set to its high or low value respectively.
11-Return
10-Signal
AO 0
J36

Installation
28 4411-0008, Rev 0.5
This page intentionally left blank.

Installation
4411-0008, Rev 0.5 29
4 Commissioning Sequence

Installation
30 4411-0008, Rev 0.5
4.1Basic Operation
4.1.1Navigation The front panel interface shown here is used to view and change
all system parameters. This interface can be used to configure
the inverter and to control the inverter while it is running. The
LCD screen displays either a list of menu options or a list of
parameters at all times. Menu options or parameters are selected
by scrolling to the desired item using the navigation knob and
then pressing the “Enter” button. Pressing the “Esc” button will
bring you back to the previous menu page or cancel the
parameter change.
The parameters are organized into groups in a way that mirrors
their organization in System Operation and Parameters Section
of the user manual. For example, if a particular parameter is
described in Sub-section 18 of that section, then that parameter
will be found under menu selection 18 under the View/Change
Params option on the front panel interface.
4.1.2 Inverter Status Screen/Home Screen When the inverter is first powered-on, the LCD screen will display the Home Screen. This screen
displays the present inverter status at the top, and the following three parameters:
[Battery Power]
[PV Power]
[Inverter AC Power Real]
The display will always return to this home screen after 5 minutes of inactivity on the Front Panel
Interface. The Home Screen can be accessed at any time by pressing “Esc” from the Main Menu.
4.1.3 Main Menu The Main Menu is accessed by pressing “Esc” from the Home Screen. The Main Menu can also be
accessed from any part of the menu structure by repeatedly pressing “Esc” until the Main Menu is
reached again. Reminder: Pressing “Esc” while viewing the Main Menu will take you to the Home
Screen and pressing “Esc” from the Home Screen will bring you back to the Main Menu.
The Main Menu contains a list of options. Scroll to the desired option using the navigation knob and
press “Enter”.

Installation
4411-0008, Rev 0.5 31
4.1.3.1 Editing Parameters
To edit any parameter, navigate to that parameter within the menu structure until the cursor arrow is next
to the parameter you want, and press “Enter”. If you have permission to edit that parameter at that time,
the parameter value will begin blinking. Use the navigation knob to scroll the value of the parameter up
or down to the desired value and then press “Enter” to save the new value. The message “Parameter
Downloaded” will appear briefly if the new value is saved successfully. You can press “Esc” at any
time while editing the value to abort the change, and the parameter will remain at its previous value.
You will not be allowed to edit certain parameters at certain times for a number of possible reasons:
1) The parameter is not allowed to be changed while the inverter is running
2) You have not entered a password appropriate for the level of access associated with that parameter
3) The parameter is read-only
4) The Front Panel Interface does not have “ownership” of the parameter
If you are not allowed to edit a parameter when you attempt to change it, a message will display briefly
explaining the reason, and no changes will be made.
Editing Binary Parameters
A small number of system parameters are binary parameters, meaning that they are displayed as a string
of 16 digits, each of which is a zero or a one. These parameters are edited one digit at a time. Select the
parameter using the navigation knob and press “Enter”. The first digit of the parameter that is changeable
will begin blinking. Use the navigation knob to scroll the value of that digit to one (up) or zero (down).
Then press “Enter” again to move to the next digit. Once you have reached the last digit, pressing
“Enter” will save the new parameter value, and the message Parameter Downloaded will appear
briefly if the new value is saved successfully. Pressing “Esc” at any point before this will abort the
changes made to all digits, and the parameter will remain unchanged.
4.1.3.2 Setup Wizard
The Setup wizard provides the user with a quick way to configure the most commonly used inverter
parameters. Most applications will not require further setup after the Setup Wizard is completed. The
Setup Wizard can be accessed from both the Front Panel and the Web Interface. The instructions below
apply to the Front Panel, though the procedure for the Web Interface is identical in most cases.
Operational Note: The inverter will not run until the Setup Wizard has been completed, unless it is
preconfigured at the factory.
4.1.3.3 Navigating the Wizard
Selecting Setup Wizard from the MAIN MENU will take you to the first page of the Setup Wizard.
At the bottom of each screen is a list of options. Read and follow the instructions on each screen, scrolling
up and down using the navigation knob, and choose one of the options at the bottom by pressing the

Installation
32 4411-0008, Rev 0.5
Enter key. Pressing the Esc key at any time will bring you back to the MAIN MENU. Changes up to
that point will be retained, so you will not have to redo them if you re-start the Setup Wizard. Scrolling
the cursor past the last displayed line on the screen will scroll the contents of the screen.
4.1.3.4 Runtime Data Page
Selecting Runtime Data View from the main menu will take you to the Runtime Data Page, which
displays a user-configurable list of system parameters at all times.
4.1.3.5 Memory Management
Selecting Memory Management from the Main Menu will allow you either to save the current
parameter settings or reset the parameters to their default settings. This feature is also available through
the Web Interface, with the additional ability to save and name individual parameter profiles. Parameter
settings will be automatically saved when the VSD starts running.
4.1.3.6 Password and User Access
Writeable parameters are grouped into three levels of access:
1) Open Access – Operational parameters modifiable by all users.
2) User Access – Parameters configurable by the facility manager.
3) Factory Access – Parameters for system commissioning and testing, accessible by Princeton
Power's installation and field service technicians.
To view the password options, choose Password from the Main Menu. To unlock access to user- or
factory-level parameters, choose Log In and enter in the appropriate password. Once user- or factory-
level access has been granted, the user can modify the password for that level of access by selecting
Modify Passwords. To revert back to Open Access, select Log Out.
4.2 MODBUS Interface
4.2.1 Introduction The Modbus RTU protocol is an industrial communications and distributed control system to integrate
PLCs, computers, terminals, and other monitoring, sensing, and control devices. Modbus is a Master-
Slave communications protocol. The Master controls all serial activity by selectively polling one or more
slave devices. The protocol provides for one master device and up to 247 slave devices on a common line.
Each device is assigned an address to distinguish it from all other connected devices. More information
on the protocol standard can be found here:
http://www.Modbus.org/docs/Modbus_Application_Protocol_V1_1a.pdf
http://www.Modbus.org/docs/Modbus_over_serial_line_V1.pdf
The inverter allows the user to view and configure all system parameters using the Modbus interface over
a serial hardware interface. The system supports three different hardware protocols: RS-232, the standard

Installation
4411-0008, Rev 0.5 33
RS-485 half-duplex multidrop, and the modified RS-485 full-duplex multidrop protocol. The user must
configure the communication parameters to match those of the Modbus master controller. The user must
also properly configure the hardware connection on the I/O board.
“All Modbus registers are 16-bit signed integers, however most of the parameters are floating point
numbers. To obtain the actual floating point value of a parameter, it’s Modbus register value needs to be
multiplied by the scale coefficient for that parameter. The scale coefficients of all parameters are provided
in the Section 7.29 (Parameter List) in the column “Scale”. For example, if a user reads a value of 5051
for Parameter 801 (Inverter AC Voltage) using Modbus, the actual value is 5051 x 0.1 = 505.1V.”
4.2.2 Setup
4.2.2.1 Parameter Configuration
Both RS-232 and RS-485 (full-duplex or half-duplex) standards are supported. In RS-232 and RS-485
full-duplex, the transmitter is on continuously. In RS-485 half-duplex, the transmitter is only powered
when the device being polled is transmitting. After setting the [RS-232/485 Select] to choose the
protocol being used, the protocols require that you specify four parameters: the [Baud Rate] of the
transmission, the number of [Data Bits] encoding a character, the sense of the optional [Parity], and the
number of [Stop Bits]. Each transmitted character is packaged in a character frame that consists of a
single start bit followed by the data bits, the optional parity bit, and the stop bit or bits.
4.2.3 RS-232 Hardware Configuration For RS-232, connect the following signals to J66 of the I/O interface board:
RS-232 Signal Name Pin #
TXD - Transmit 1
CTS - Clear to Send 2
RXD - Receive 3
RTS - Ready to Send 4
Signal Ground 5
Figure 4-1: RS-232 Signal Pins

Installation
34 4411-0008, Rev 0.5
For RS-232, configure the piano switches located on the I/O board as follows:
Switch Position Comments
1 Down (OFF)
2 Down (OFF)
3 Down (OFF) No termination resistor
4 Down (OFF)
5 Down (OFF) No termination resistor
6 Down (OFF)
7 Down (OFF)
8 Down (OFF)
Figure 4-2: RS-232 Dip Switch Settings
4.2.3.1 Half-Duplex RS-485 Hardware Configuration
RS-485 is a multidrop protocol, which means more than two systems can be connected. Devices are
connected in a daisy chain or “bus”, which means that devices in the middle of the chain will have a pair
of wires coming from the previous node and a pair of wires going to the next node. The devices at either
end of the bus will have only one incoming pair and need to have signal termination installed.
Termination
If the inverter is the only slave device on the Modbus
communication bus, or if it is physically located at either
end of the bus, the communication signals must be
terminated. There are two ways to accomplish this.
(1) Termination without bias: For basic termination using
on-board 120 , the user can configure the piano switches
on the I/O board as shown in the table below. The termination capacitor may be removed by setting
switch 4 in the Down (OFF) position.
Switch Position Comments
1 Up (ON) Shorts terminals 1 & 3
2 Up (ON) Shorts terminals 2 & 4
3 Up (ON) 120 ohm termination
4 Up (ON) Termination capacitor
5 Down (OFF)
6 Down (OFF)
7 Down (OFF)
8 Down (OFF)
Figure 4-3: RS-485 Half Duplex Dip Switch Settings
(2) Termination with bias: For more robust termination with voltage bias, the user can configure the piano
switches on the I/O board as shown in the table below. The termination capacitor may be removed by
setting switch 4 in the Down (OFF) position.

Installation
4411-0008, Rev 0.5 35
Switch Position Comments
1 Up (ON) Shorts terminals 1 & 3
2 Up (ON) Shorts terminals 2 & 4
3 Up (ON) 120 ohm termination
4 Up (ON) Termination capacitor
5 Down (OFF)
6 Down (OFF)
7 Up (ON) Voltage bias
8 Up (ON) Voltage bias
Figure 4-4: RS-485 Half Duplex with Bias Dip Switch Settings
Multidrop Connection
The figure below shows a half-duplex RS-485 connection for a device that is not located at either end of
the bus. One differential signal is used for both transmit and receive. This corresponds to two pairs of
wires, with each pair consisting of a (+) and (-) wire. One pair comes from the preceding node and one
pair goes to the next node in the bus. The following signal connections are required:
Half-Duplex RS-485
Signal Name
Pin #
Negative (-) 1
Positive (+) 2 Negative (-) 3
Positive (+) 4
Signal GND 5
Figure 4-5: RS-485 Half Duplex Signal Pins
If there are multiple slave devices on the Modbus communication bus and the inverter is not physically
located at either end of the bus, then set the switches as follows:
Switch Position Comments
1 Up (ON) Shorts terminals 1 & 3
2 Up (ON) Shorts terminals 2 & 4
3 Down (OFF) No termination resistor
4 Down (OFF) No termination capacitor
5 Down (OFF)
6 Down (OFF)
7 Down (OFF)
4.2.3.2 8 4.2.3.3 Down (OFF)
4.2.3.4
Figure 4-6: RS-485 Half Duplex Dip Switch Settings w/ multiple slaves.

Installation
36 4411-0008, Rev 0.5
4.2.3.5 Full-Duplex RS-485 Hardware Configuration
Full-duplex RS-485 uses two differential signals, transmit and receive. This corresponds to four wires
(TX+, TX-, RX+, RX-).
Figure 4-7: RS-485 Full Duplex Wire Assignments
The following signal connections are required:
Full-Duplex RS-485
Signal Name
Pin #
Transmit (-) 1
Transmit (+) 4
Receive (-) 3
Receive (+) 2 Signal Ground 5
Figure 4-8: RS-485 Pin Assignments
If the inverter is the only slave device on the Modbus communication bus, or if it is physically located at
either end of the bus, the communication signals must be terminated by setting the switches as follows:
Switch Position Comments
1 Down (OFF) Separates terminals 1 & 3
2 Down (OFF) Separates terminals 2 & 4
3 Up (ON) 120 ohm termination
4 Up (ON) Termination capacitor
5 Up (ON) 120 ohm termination
6 Up (ON) Termination capacitor
7 Down (OFF)
8 Down (OFF)
Figure 4-9: RS-485 Dip Switch Settings Inverter as a Slave
If the inverter is not physically located at either end of the bus, set all switches to Down (OFF) position.

Installation
4411-0008, Rev 0.5 37
4.2.3.6 Supported Functions
The following Modbus functions are supported and provide the functionality necessary to monitor and
control the inverter remotely.
Function
Code
Description
03 (0x03) Read Holding Registers
04 (0x04) Read Input Registers
06 (0x06) Write Single Register
16 (0x10) Write Multiple Registers
23 (0x17) Read/Write Multiple Registers
Figure 4-10: Modbus Functions Supported
4.2.3.7 Message Format
Address Function Code Data Error Check
The address field of a message frame contains 8 bits. Each slave device is assigned a unique address in
the range of 1 – 247. Master can communicate with any slave by inserting the appropriate address into
the address field. Also master can broadcast a message to all the slaves connected to the network by
placing 0 into the address field. When slave responds, it places its address into the address field of a
response message, to indicate which slave responded.
The function code field of a message frame contains eight bits. Valid codes are in the range of 1-255
decimal (0x00 to 0xFF hexadecimal). When a message is sent from a master to a slave device the function
code field tells the slave what kind of action to perform.
When the slave responds to the master, it uses the function code field to indicate either a normal (error-
free) response or that some kind of error occurred (called an exception response). For a normal response,
the slave simply echoes the original function code. For an exception response, the slave returns a code
that is equivalent to the original function code with its most significant bit set to a logic 1.
The data field is constructed using sets of two hexadecimal digits (one RTU character), in the range of 00
to FF hexadecimal. The data field of messages sent from a master to slave devices contains additional
information which the slave must use to take the action defined by the function code. This can include
items like discrete and register addresses, the quantity of items to be handled, and the count of actual data
bytes in the field.
In the inverter, Modbus Register addresses (which start at 0) match Parameter IDs (which start at 1), so
Register 0 corresponds to a Parameter ID of 1.
If no error occurs, the data field of a response from a slave to a master contains the data requested. If an
error occurs, the field contains an exception code that the master application can use to determine the next
action to be taken.
The message also contains a 16-bit checksum at the end of the packet for error checking.

Installation
38 4411-0008, Rev 0.5
4.2.3.8 Read Registers - 03 (0x03) & 04 (0x04)
These function codes are used to read the contents of one or more sequential registers. Because the
holding and input registers share the same memory space, they can be used interchangeably. The request
specifies the starting register address and the number of registers. The response contains the sequential
data read from the registers.
Request
Function Code 1 byte 0x03 or 0x04
Starting Address 2 bytes 0x0000 to 0xFFFF
Number of Registers to Read (N) 2 bytes 1 to 125 (0x0001 to 0x007D)
Response
Function Code 1 byte 0x03
Byte Count 1 byte 2 x N
Register Values N x 2 bytes [data]
Error
Error Code 1 byte 0x83 or 0x84
Exception Code 1 byte 01, 02, 03, or 04
4.2.3.9 Write Single Register - 06 (0x06)
This function code is used to write a single register. The request specifies the target register address.
The normal response is an echo of the request after the register contents have been written.
Request
Function Code 1 byte 0x06
Register Address 2 bytes 0x0000 to 0xFFFF
Register Data 2 bytes 0x0000 to 0xFFFF
Response
Function Code 1 byte 0x06
Register Address 2 bytes 0x0000 to 0xFFFF
Register Data 2 bytes 0x0000 to 0xFFFF
Error
Error Code 1 byte 0x86
Exception Code 1 byte 01, 02, 03, or 04
4.2.3.10 Write Multiple Registers - 16 (0x10)
This function code is used to write to one or more sequential registers, up to 120 registers.
The response contains the function code, starting address, and number of registers written.

Installation
4411-0008, Rev 0.5 39
Request
Function Code 1 byte 0x10
Starting Address 2 bytes 0x0000 to 0xFFFF
Number of Registers to Write (N) 2 bytes 1 to 120 (0x0001 to 0x00078)
Byte Count 1 byte 2 x N
Register Values N x 2 bytes [data]
Response
Function Code 1 byte 0x10
Starting Address 2 bytes 0x0000 to 0xFFFF
Number of Registers Written 2 bytes 1 to 120 (0x0001 to 0x00078)
Error
Error Code 1 byte 0x90
Exception Code 1 byte 01, 02, 03, or 04
4.2.3.11 Read/Write Multiple Registers - 23 (0x17)
This function code is used to write to one or more sequential registers and then, in the same function call,
read one or more sequential register values. This can be used to automatically confirm the register
settings after a write. The request specifies the read starting address, number of registers to be read, write
starting address, number of registers to be written, and the data to be written. The byte count specifies the
number of bytes in the write data field. The response contains the data from the group of registers that
were read. The byte count field specifies the number of bytes in the read data field.
Request
Function Code 1 byte 0x17
Read Starting Address 2 bytes 0x0000 to 0xFFFF
Number of Registers to Read 2 bytes 1 to 118 (0x0001 to 0x0076)
Write Starting Address 2 bytes 0x0000 to 0xFFFF
Number of Registers to Write (N) 2 bytes 1 to 118 (0x0001 to 0x0076)
Write Byte Count 1 byte 2 * N
Register Values N x 2 bytes [data]
N = Registers written
Response
Function Code 1 byte 0x10
Read Byte Count 2 bytes 1 to 236 (0x0001 to 0x00EC)
Read Register Values N x 2 bytes [data]
N = Registers read
Error
Error Code 1 byte 0x97
Exception Code 1 byte 01, 02, 03, or 04

Installation
40 4411-0008, Rev 0.5
RJ-45
port on
4.3 Web Interface
4.3.1 Setup Note: To use the Web Interface, the user must install Java Runtime Environment version
5.0 (or newer) on the computer workstation. This can be done by visiting
http://java.com/en/download/index.jsp, for instructions, and for downloading, and
installing the Java software.
An optional external RJ-45 Ethernet jack, with a weather-seal cap, is
located on top of the enclosure roof to allow for easy connection to a
Local Area Network (LAN). The internal connection of this Ethernet
port is routed to an RJ-45 jack on the BIGI-250 system Control Board
located on the inside of the enclosure door (described below).
Note: If a user is connecting directly between the RJ-45 jack of
a local computer and a BIGI-250 inverter RJ-45 jack, without
the use of a network connection, router, or switch (etc.), an Ethernet “Crossover” cable
may be required for proper communication.
The user should verify that an Ethernet cable is plugged into the inverter’s control board (Figure 4-11)
and into an active Ethernet jack. Open up a web browser (e.g. Internet Explorer) after the software has
been installed on the computer workstation. Type the inverter’s Host Name (the default is BIGI+Serial
Number, e.g. BIGI123) into the web browser’s address. If the browser first displays a security warning
before displaying the Web Interface page, grant security access. This is usually done by right-clicking the
security warning and selecting “Allow Blocked Content. . . ”.
It will take the Web Interface’s Java applet a few seconds to load before displaying a login page. The
default login username is user and default password is user. After logging in for the first time, the
user should change the username and password from the “Change Password” menu.
If multiple inverters are installed on the same network, the user must take care to not have two inverters
on the network with the same Host Name. Doing so will prevent Web Interface access on all inverters
with identical Host Names. Make sure to change the Host Name via the Inverter Configuration/WebUI
menu on the inverter before plugging additional units into the network.

Installation
4411-0008, Rev 0.5 41
Figure 4-11: Control Board and Interface I/O Board Location
4.3.1.1 Features
The Web Interface has the following features:
Step-by-step Setup Wizard for initial installation of the inverter, configuration of the analog &
digital inputs/outputs, and setup & auto-tuning of motor parameters.
Configuration and viewing of all system parameters via the Inverter Configuration menu.
Run/stop control and continuous real-time viewing of system status parameters via the Inverter
Status menu.
Continuous real-time graphical plotting of system status parameters via the Data Plot menu.
Back-up/Saving and reloading of parameter profiles via the Save/Load Profile menu.
Access to support and troubleshooting resources via the Support menu.
Ethernet Jack
Control Board
Interface I/O Board

Installation
42 4411-0008, Rev 0.5
4.4 Password Protection
Some of the system parameters are password protected, and cannot be edited unless a password with
sufficient access is entered. There are three levels of access:
1) Open Access – Operational parameters modifiable by all users.
2) User Access – Parameters configurable by the facility manager configuration.
3) Factory Access – Parameters used for system commissioning and testing, accessible by
authorized installation and field service technicians.
The default user-level password is 000. Note that this is different than the Web Interface password. For
security reasons, the customer should consider changing the [User Set Password] from the default value
after logging in for the first time. Until the user changes the user-level password to something other than
“000”, all user-level access parameters will be accessible by all users. Write down this new password
and store it in a safe place. Lost passwords will require reinitializing the inverter system, which can be
done only by a qualified service technician.
In general, once user-level access has been granted, the user can change the user-level password.
4.5 Commissioning Sequence Important: See Grid control settings Section in the User Manual for instructions relating to adjusting
UL-1741 anti-islanding parameters
4.5.1 Single Grid-Connected Systems
4.5.1.1 Wiring checklist
√ Item Info
℃ System ground (Grid port ground terminal or other ground terminal) Required
℃ AC Grid disconnect/circuit breaker Required
℃ AC Grid Port wiring (3 or 4-wire) (abc phase sequence required) Required
℃ DC circuit disconnect Required
℃ DC port wiring Required
℃ DC circuit equipment ground Required
℃ DC circuit protection Optional
℃ DC Pre-Charge circuit Optional
℃ Load Port wiring (3 or 4-wire) Required for backup loads
℃ Load circuit equipment ground Required for backup loads
℃ Transformer wiring (4-wire grid side, 3-wire inverter side) Required for Transformer
℃ Transformer enclosure ground Required for Transformer
℃ Analog/Digital I/O wiring Optional
℃ Modbus Communication wiring Optional

Installation
4411-0008, Rev 0.5 43
4.5.1.2 Commissioning Checklist
√ Item Info
All Systems
℃ Open AC Disconnect
℃ Open DC Disconnect
℃ Open Load Disconnect or Main Breaker (if
installed)
℃ Close AC Disconnect and/or circuit breaker,
applying AC power to the inverter.
The sounds of internal contactors closing may follow
seconds after applying power. This is normal.
℃ Verify proper LCD display confirms proper control system power-up
℃ Verify web user interface connectivity (if
used)
℃ Verify Modbus communication connectivity
(if used)
℃ Verify Analog input control signal
functionality (if used)
Verify that analog input voltages read properly in the
corresponding [AIx Signal Val] parameters. See
Section 0 for details.
℃ Verify AC grid voltage is within anti-
islanding parameters (See User Manual) by
viewing the grid voltage monitoring
parameters
℃ Close Load Disconnect and Main Breaker
(if load installed)
℃ Verify proper load operation (if load
installed)
℃ Close Pre-Charge DC Source Breaker/Relay
(if Pre-Charge Control circuit used) – Wait
a minimum of 20 seconds prior to applying
Main DC power to the inverter (next step)
The sounds of DC Pre-charge contactor operating may
follow momentarily after applying DC power to the
Pre-Charge Control Input
℃ Close DC Disconnect and/or circuit breaker,
applying DC power to the inverter.
The sounds of DC Pre-charge contactor operating may
follow momentarily after applying DC power (if Pre-
Charge circuit not used in previous step)
℃ Verify proper DC voltage by viewing the
DC voltage monitoring parameter (See User
Manual).
If voltage reads zero, the DC polarity may be reversed.
Battery Systems (For PV systems, skip to “PV Systems”)
℃ Use control method of choice to set [Power
Command] to 0.
This commands the system to charge the battery.
℃ Review battery charging settings in User
Manual carefully. Ensure that charging
voltages, charging current limits,
temperature settings and other settings are
safe for the battery in use.
℃ Start the inverter by pressing the “Start” Depending on the state of charge of the battery and the

Installation
44 4411-0008, Rev 0.5
button on the front panel interface or in the
web UI.
battery charging settings, the inverter will typically
start operating at this point, confirmed by an audible
sound. If the battery is fully charged, the inverter may
simply enter the Idle charge state, which will be
evidenced by the system status on the LCD display
changing to “Checking”. No sound will be heard.
℃ Confirm proper battery charging voltages
and currents through the monitoring
parameters.
℃ Confirm power export to grid by changing
[Power Command] to a positive number.
Inverter will stop charging the battery and begin
exporting power to the grid.
PV Systems (For battery systems, skip to “Backup Systems”
℃ Once DC power is applied to the inverter, it
will begin operating automatically.
If there is sufficient power to operate, the inverter will
export power to the grid. If not, the inverter will wait
for sufficient power to be available.
℃ Monitor DC voltage and current and verify
proper power export based on present
irradiance.

Installation
4411-0008, Rev 0.5 45
his page intentionally left blank.

A BIGI-250 Specifications

BIGI-250 Specifications
4411-0008, Rev 0.5 47
A.1 BIGI-250 Specifications
General Specifications
Inverter Technology High-frequency PWM
Size Inches 90.5 W x 41 D x 70 H
PV Port Input Specifications
DC Voltage 250-750 VDC (UL Certified to 600 VDC)
DC Maximum Power
Voltage
390-750 VDC (UL Certified to 600 VDC)
Max Current 640A
PV MPPT 280-580 VDC
PV Array Configuration With Isolation Transformer: Negative grounded
Battery Port Input Specifications
DC Voltage 250-750 VDC (UL Certified to 600 VDC)
DC Maximum Power
Voltage
390-750 VDC (UL Certified to 600 VDC)
Max Current
(Charge/discharge)
640A
Charging Profile 3-stage, programmable
BMS Compatible Modbus over RS485 or TCP/IP, CANbus, custom
DC Voltage Ripple < 1%
Grid Port Specifications
AC Line Voltage 480 VAC +10%, -12%, 3-phase
AC Line Frequency 60/50 Hz nominal
57-60.5/47-50.5 Hz range (field adjustable)
Continuous AC Current 325 A RMS
Continuous AC Power 250kVA
Power Factor 0 to 1 adjustable (leading and lagging)
Current Harmonics IEEE 1547 Compliant, ,<5% THD
Environmental Specifications
Temperature Operating 0° to 30°C
Storage -20° to 60°C
Humidity 5-95% (non-condensing)
Cooling Forced-air cooled
Rated Max Elevation 6,000 Feet
Enclosure NEMA 1R (Indoor)
(continued)
BIGI-250 Specifications
48 4411-0008, Rev 0.5
Safety Features
Faults Over/Under-Voltage, Over/Under-Frequency, Over
Current, Over-load, Over-Temperature
Standards Compliance IEEE 1547, CEC, UL 1741 *Pending
Safety Features Anti-islanding (grid fault detection, isolation & auto-
reconnect)
UL-compliant trip points (field adjustable)
User Interface Features
Front-Panel Interface 4x20 LCD, Keypad, Fault LED’s
Communication We offer a wide variety of communication options
Performance Monitoring Real-time & Historic, web-based performance data
Analog & Digital I/O Analog: (3) inputs, (1) output; 0-10V or 4-20mA
Digital: (2) inputs 0-24V, (2) output relays
Efficiency
Peak Efficiency 96.5%
CEC Efficiency 95.0%
Nighttime TARE Losses 175W
Energy-saving Features Automatic internal subsystems power-down,
Nighttime transformer auto-disconnect
Table-6: BIGI-250 Specifications

BIGI-250 Specifications
4411-0008, Rev 0.5 49
This page intentionally left blank

B BIGI-250 Grounding

BIGI-250 Grounding
4411-0008, Rev 0.5 51
Main AC Distribution
PanelBattery
PV Combiner
Box
PV(-)
GFDI
BAT(+)BAT(-)
PV(+)
PVgnd
BATgnd
U1U2U3Ugnd
Figure B-1: BIGI-250-Gnd Neg, Grid Interaction

BIGI-250 Grounding
52 4411-0008, Rev 0.5
This page intentionally left blank.

C BIGI-250 Default Grid Trip Settings
BIGI-250 Default Grid Trip Settings
54 4411-0008, Rev 0.5
Trip Setting Description Parameter Default
Setting Notes
Under frequency trip
(fast) threshold [AI Minimum Frequency] 57 Hz
Not user-settable
Over frequency trip (fast)
threshold [AI Maximum Frequency] 60.5 Hz
Not user-settable
Over/under frequency trip
(fast) time
[AI Outer Frequency Window
Time] 0.16 sec
Not user-settable
Under frequency trip
(slow) threshold [AI Sag Frequency] 59.3 Hz
User-settable
Under frequency trip
(slow) time [AI Frequency Sag Time] 0.16 sec
User-settable
Under voltage trip (fast)
threshold [AI Minimum Voltage] 50 %
Not user-settable
Over voltage trip (fast)
threshold [AI Maximum Voltage] 120 %
Not user-settable
Over/under voltage trip
(fast) time [AI Outer Voltage Window Time] 0.16 sec
Not user-settable
Under voltage trip (slow)
threshold [AI Sag Voltage] 88 %
User-settable
Over voltage trip (slow)
threshold [AI Surge Voltage] 110 %
User-settable
Under voltage trip (slow)
time [AI Voltage Sag Time] 1.9 sec
Not user-settable
Over voltage trip (slow)
time [AI Voltage Surge Time] 0.9 sec
Not user-settable