bike cart booklet
TRANSCRIPT

7/31/2019 Bike Cart Booklet
http://slidepdf.com/reader/full/bike-cart-booklet 1/22
44
april 8, 2005
1
a bicycle trailer with a 200 lb capacity that s̓ cheap
and easy to build with basic tools and materials
--for car independence and community--
$30 in parts, 8 to 15 hours to build

7/31/2019 Bike Cart Booklet
http://slidepdf.com/reader/full/bike-cart-booklet 2/22
Assembly Diagram
Contents
overview and fabrication breakdownparts and tool listusing the cartglossaryusing the tools
fabrication of the cartcutting and bending tubes and dropoutsmitering the tubes for brazing/weldingaligning the frame for brazing/weldingbrazing/welding frame togethercreating the dropout jigadding wheel wells and dropoutscreating the pulling armhitch creationfinishing the cart
some modifications “deep and long” (6 foot cart)bolt-together design (no welding)
more information (links, photos, buying a cart)
page
3571013
141920212425282931
3335
39
I design and build bicycle trailers because I want to create alternatives to au-tomobile use. I am critical of the current paradigm, and I see hope in localizingthe provision of technology. One way to increase the accessibility of using bi-cycles instead of cars for moving cargo is to provide a low cost means to movematerials around by bike. This cart is functional, relatively easy to build, andcheap. The parts cost about $30 if you can find bicycle wheels and plywood forfree, and it takes from 8 to 15 hours to build a finished trailer.
As a society, we use automobiles without questioning or evaluating their realenvironmental and social impacts and costs. The issues go farther than gaso-line cost and greenhouse gas emissions, to the the globalization and outsourc-
ing of manufacturing and the raw material, pollution, and energy costs of industrialism. Our political system perpetuates the militarization of petroleum-rich parts of the world by the countries that use the most oil.
This technology is driven by a desire for community-based social change.Read, build, ride.
2
About buying the cartI have been working on this design since the spring of 2004. I’m hoping peoplewill be excited about making carts for themselves, but I know some peoplewould rather buy them. If you need a cart and can’t build it, email me, and I’lltry to connect you with people making carts or build you one. They should costabout $150. Parts are $30, and fabrication takes about 8 hours.
One of the more time consuming parts of cart fabrication is finding wheels andtires and making the plywood bed. One way to spread these bike carts mightbe to sell just the cart body, and let the user find and mount wheels and ply-wood.
If you want to make a bike cart but can’t make a hitch, I will send you one forthe cost of parts, postage, and my time for making it (cost is $20 in 2005). Iwant to increase the accessibility of this project. For more information, contactme at [email protected]. These hitches are compatible with Bikes At Worktrailers.
I have made a few carts that are in use around where I live. I am thinkingabout making a few more and selling them for parts plus my time, probablyfor $150, in order to spread the design and increase visibility for the project. If you want make these carts to sell, go ahead, but please include a copy of thisbooklet. The goal is to increase car independence and empower people through
fabrication in their communities. Let me know if you sell these carts, and whatyou think about this project.
If you build a cart for yourself, let me know how it goes because I’m continu-ously working on the design and feedback is useful.
43
aaron and lisa working together on the bolt-together cart
http://bikecart.pedalpeople.compublic domain design. no copyright. please distribute freely.
Read first, build happily, and let me know how it goes for you.Contact info: [email protected]

7/31/2019 Bike Cart Booklet
http://slidepdf.com/reader/full/bike-cart-booklet 3/22
f r o m c
y c l e c i r c u s . o r g . .
. a n o t h e r d e s i g n f o r a w e l d l e s s b i k e t r a i l e r . t h e c h a i n i n
t h e h i t c h i s a f r e e v e r s i o n o f a u n i v e r s a l j o i n t , b u t i t a l l o w
s t h e c a r t t o t u g o n t h e
b i k e .
t h e d e s i g n c o u l d
b e s t r e n g t h e n e d c o n s i d e r a b l y w i t h
a l i t t l e b i t o f w e l d i n g .
42
Koolstop Wilderbeast
Radicaldesign Cyclone
Extracycle
3
Cancart by Bikecartage

7/31/2019 Bike Cart Booklet
http://slidepdf.com/reader/full/bike-cart-booklet 4/22
BicycleR Evolution Shopper
Bikes At Work
drumbent.com conduit trailer
Bob Yak
CycleTote
Koolstop Kool Mule
Burley Flatbed
Bykaboose
41
my first prototype
Burley Nomad
Get 5 pieces of 1/2” EMT conduit and cut and bend in the following manner:
Pipe #1: Full length. Mark and bend at 2”, 41”, 61”, and 100”. Overlap the last 2.”Pipe #2: Cut at 59”. bend 6 1/2” from each end to make a “u” (spine)
Cut at 38 1/2”. bend 5 3/4” from each end to make a “u” (rib 1)
Piece #3: Cut at 38 1/2”. bend 5 3/4” from each end to make a “u” (rib 2)Cut at 38 1/2”. bend at 3/4” from each end to make a “u” (wheel well 1)
Cut at 38 1/2”. bend at 3/4” from each end to make a “u” (wheel well 2)
Piece #4: Cut at 50”, and bend a 45 degree bend 10” from end (bottom pulling arm)Cut 51”, and bend a 45 degree bend 11” from end (top pulling arm)
Cut a 15” piece (arm brace)
Piece #5: Cut a 72” piece. Bend at 26” from each end to make a “u” (handle)
From flat stock: (1” by 3/16” thick). make (4) 1 1/2” long dropouts with a 3/8” slot.
*Miter the ends of the tubes with a file to fit as shown in the assembly diagram.
*Braze the main-frame, ribs, and spine together.
*Make a dropout jig. each set of dropouts is 4” apart, and space the sets at 22 1/2”.*Put the dropouts in the jig and support the jig level from the ground so that the wheel wells
rest on the outside dropouts, and the inside dropouts contact the center rib. Braze.*Braze the two pulling arm pieces together as shown in the assembly diagram.
*Braze the pulling arm to the front and center ribs. Add the arm-brace.
*Drill a hole in the pulling arm at the end, and attach a 2” long 3/8” bolt as shown.*Make a hitch out of 1” by 3/16” flat stock, 1/4” rod, and a 3/8” ID tube as shown.
*Make an extended wing nut, attach 2 front bicycle wheels to the cart, paint the joints.
*Add a plywood bed made that is 19” by 38” with notches cut for the ribs and spine.
Fabrication Breakdown (more detail on page 14)
bolted hitch
4

7/31/2019 Bike Cart Booklet
http://slidepdf.com/reader/full/bike-cart-booklet 5/22
540
I-bike trailer
Bikes at Work
Carryfreedomʼs Y-frame
Karstilo trailer
Roland
Photos
The images on these pages (40, 41, and 42) may be under copyright.

7/31/2019 Bike Cart Booklet
http://slidepdf.com/reader/full/bike-cart-booklet 6/22
7/31/2019 Bike Cart Booklet
http://slidepdf.com/reader/full/bike-cart-booklet 7/22
Using the cart
I became interested in bike carts after I saw two Bikes at Work trailers beingused for trash and recycling pickup in Northampton, Massachusetts, by PedalPeople. They are great trailers, but cost $400. This cart costs $30 in parts, isfun and educational, and is an opportunity to build community through boththe fabrication and use of the carts.
Community cart programs:I’m interested in supporting community bike cart programs. I’ve been involvedin a community bike program at Hampshire College, which has Yellowbikes all
around campus for anyone to use. We work on them once a week, which is anopportunity to learn bike maintenance skills, hang out with good people, anddo something beneficial for the community while having fun.
I would like to see community bike cart programs with user accountability.Imagine this: a group of people get together, obtain some funding from thetown for a community development project, and build a few bike carts. Theyadvertise the program in the town/neighborhood, and offer the use of thesecarts to anyone. For a small deposit of money, barter equivalent, trust, etc,you get a key that unlocks the bike carts from wherever they are. You havedesignated locations where they live, where you might expect to find a cart. Inthis way, many people can use a few carts. The carts could either have desig-nated bicycles, or you can attach the hitch to your bike when you get the cart.
Or, you can build a hitch for your bike and leave it on all the time if you usethe cart frequently.
Weight capacityShould I put a recommended load weight limit on the cart? I guess so. I’vesuccessfully carried 300 pounds of people in these carts. Once, with a 300pound load, one wheel potato-chipped while going on a sandy slope sideways.It was fine on flat ground. So if you carry 300 pounds, don’t take the cart ona sideways slope. The wheels are the weakest part of the cart. Maybe a 200pound load limit?
Fabrication time expectationsIt takes me about 8 hours to make a cart. It takes 1 hour to make the hitch.
2 hours is aligning and brazing the frame together. 1 hour is cutting, bend-ing, and mitering the tubes, and the other 4 hours are for dealing with wheels,painting the joints, making the plywood bed, and other small details. The firsttime you make a cart will take much longer…maybe 15 hours.
How to load, how to pullBalance the load just in front of the wheel axles, to keep a downward forceon the hitch, but not too much. Try putting a lot of weight in the back as anexperiment. It’s not fun for long. Secure the load with straps, especially onbumpy roads. When pulling, don’t go around corners too fast when the cart isempty, because it could flip over. Don’t go around corners too fast when it’sheavily loaded, because the sideways force on the wheels could cause them tobuckle. Try not to jack-knife the trailer when backing up or taking sharp rightturns because it could damage your bike or the hitch.
7
To attach dropouts to the wheel wells and rib (bolt-together cart)
1) Slide the dropouts onto the wheel wells and ribs with the flat side of the plate facingtowards where the wheels will be. The dropouts should be in front of the rib.
2) Line up the 4 dropouts using the same dropout jig from the brazed cart or with veryaccurate measuring.
3) Clamp the edge of one dropout with a C clamp and drill a 1/4” hole (first dent, then1/8”, then 1/4”) through the dropout and 1/2” EMT tube. This hole needs to be accurate
and close enough to the edge that another bolt will fit next to it. Once this hole isdrilled, the dropout canʼt be moved.
4) Slide a 1 1/2” 1/4”–20, bolt through the plate and tube, and tighten with a lock washerand a nut.
5) Remove the clamp and drill another hole in the other edge of the dropout plate.6) Tighten with another bolt/washer/nut combination.
7) Repeat 3-6 with the other 3 dropouts. The dropouts on the wheel wells will have slotsgoing down. The dropouts on the rib wil l have horizontal slots.
Making the pulling arm and attaching it to the frame (bolt-together cart)
1) From dowel or 2X4 lumber scraps, make six 2” long plugs of wood that just fit insidethe 1 1/4” EMT. These will be plugs to keep the tube from collapsing when bolts are
tightened through it.2) Create an arm in the shape shown from 1 1/4” EMT and a 1 1/2” elbow. One bend is
made with an elbow; the other is made by crimping the tube by hand in a vice. Wherethere is overlap, insert a wooden plug and drill through in 2 places. You will need one
section of 1 1/4” EMT 11” long, and another 49” long.
3) Drill a 3/8” hole (first dent, then 1/8”, then 3/8”) vertically through the arm for the hitchbolt. Drill through a wooden plug here too. The hole should be 5/8” from the end of thetube.
4) Slide a 3/8”-16 bolt, 2” long, down through the hole, and tighten a nut onto the otherside. Make this very tight. If the trailer arm is not parallel to the ground, remove this
bolt and slide it UP through the hole, so the arm hangs from the hitch. It is not as securegoing up, but it will work.
5) Put it all together, and place it on the cart so that when the bike is pulling the cart, thecart is centered on the bike and pulling straight. Mark where the pulling arm overlaps
the spine and rib (3 places) and carefully drill 1/4” holes straight through the spine, rib,and pulling arm. You can drill them separately or together, as long as the holes line up.
Before you bolt them together, slide wooden plugs into the tube and drill through. Thisis kind of tricky at the connection with the rib, and it is easier with two people working
on it together.6) Bolt through the spine and rib through the pulling arm with 3” bolts or bolts made from
nuts and threaded rod.
Making an easier pulling armAttach another rib positioned as far forward on the cart as possible. Use one 50” piece of 3/4”
EMT, bent with a conduit bender (different size bender; a 3/4” conduit bender has a bend radiusof 9”), to make a pulling arm like the arm for the brazed cart. Drill and bolt sideways through the
arm into the two ribs. Wrap it tightly with strips of bicycle inner tubes.
Finishing the bolt-together cartMake a hitch like the one in the cyclecircus illustration or for the brazed cart.If you were to take
the bolt-though hitch to a welder, it would only take 2 minutes to MIG weld i t together. Add aplywood bed.
38

7/31/2019 Bike Cart Booklet
http://slidepdf.com/reader/full/bike-cart-booklet 8/22
Don’t let these suggestions keep you from inventing crazy ways to use bikecarts.
Some possibilities…grocery shoppingmoving to a new homeparade floatcritical mass bike ridebike transportermobile renewable energypickup truck alternative
carrying manurespreading manuretrash/recycling pickupgrocery deliveryfurniture deliverypizza deliverynewspaper deliverybicycle rickshaw serviceice cream cartdumpster divingtransporting huge glass doorsfuneral procession hearsepicking up junked bikes
moving rocks out of a gardencarrying food to gatheringsfood pickups for survival centersambulance in citiesdelivering medical supplies at protestsmoving food/waste/tools on a farm
foraging...
Investing in an alternative to carsThere is a significant amount of embodied energy and chemicals involvedin the fabrication of these trailers. The steel industry has a long histroy of chemical pollution and labor exploitation. I don’t know what’s in brazing flux,or what the process of galvanization is like. Brazing conduit releases zincoxide and other chemicals. The paint used to protect the joints is dangerous,and paint cans have a disposal problem. Recognizing all this, bicycle cartscan replace a technology that is much more chemical, energy, and exploit-
ed-labor intensive: the automobile. The health benefits from transportingoneself by bike are signifigant. I encourage you to treat this project as aninvestment in an alternative to cars, and as such its usefulness will outweighits social, environmental, and financial costs.
tools for fabrication
Cutting and bending tubes and dropouts (bolt-together cart)
From the first piece of 1/2” EMT(main frame)
Mark and bend the main frame tube at 7”, 43 1/16”, 64 1/8”, and 100 3/16”. Mark but donʼt bend at114 1/4”. There is an overlap from 114 1/4” to 120”.
From the second piece of 1/2” EMT(two wheel wells)
Cut 2 pieces 41 5/8” long. Mark at 4” from each end. Mark and bend at 4 1/2” from each end.These are the wheel wells.
From the third piece of 1/2” EMT(rib and spine)
Cut a piece 42 3/8” long. Mark at 4” from each end, and mark and bend at 7 1/4” from each end.This is the rib.
Cut a piece 60” long. Mark at 4” from one end. From that end (back end), mark and bend at 6 1/2”,
43 1/16”, and 52 5/8”. This last bend at 52 5/8” is a bend away from the others, which makes ahandle attachment.
To make dropouts
1) Bend the square outlet box covers over a piece of 1/2” EMT in a vice, to make a shapelike a candy cane, so that the bend goes just over halfway around the EMT.
2) Cut the piece in half to make 2 short candy cane or “J” shapes when viewed from theend.
3) With a hacksaw, cut a slot in the middle of the flat section that is 3/8” wide and 3/4” long.
Bend the metal between the cuts over with pliers and cut it off with a hacksaw. File itsmooth.
4) Repeat 1-3 with the other outlet box cover. You will have 4 dropouts.
378

7/31/2019 Bike Cart Booklet
http://slidepdf.com/reader/full/bike-cart-booklet 9/22
Tools neededThe only tools which are not very common where I live are 1/2” conduit benders, half-round files, and oxy-acetylene torches. You’ll also have to buy brazing rod and gas forthe torch.
1/2” conduit bender $22hack saw common, or $12
tape measure common, or $4marker common
punch (or nail) common
hammer common
vice borrow, or $40 for a small vice
1/8” bit and 3/8” bit common, or $3 eachdrill common, or $80
half round file $10
oxy-acetylene torch borrow, or $300
plentiful brass brazing rod $5
brazing flux. goggles, and gloves borrow, or $10 for a lot of flux
bricks for holding frame common
framing square / “L” layout tool common
9
Materials (bolt-together cart):
Total cost: $37 for trailer body, and $7 to $10 for the hitch.
(3) pieces of 1/2” EMT ($3 each)(2) 4” square metal outlet box covers ($1.09 each)
(18) 1/4”-20 bolts, 1 1/4” long ($0.10 each)(14) 1/4”-20 bolts, 1 1/2” long ($0.11 each)
(4) 1/4”-20 bolts, 1 3/4” long ($0.14 each)(44) 1/4”-20 nuts ($0.05 each)
(41) 1/4”-20 lock washers ($0.05 each)
either some 1/4”-20 threaded rod, or 3” long 1/4”-20 bolts ($0.21 each)a piece of 1 1/4” EMT (enough for 2 carts) ($20 ,2 carts)90 degree bend of 1 1/2” EMT ($7.00 each)
(6) scrap dowel or wood, 1 1/4” diameter, 2” long (free)
To make a joint (bolt-together cart)
The following joint is used in all the connections between the wheel wells, ribs, spine, and mainframe.
1) Hammer the last 4” of the tube flat so that the flat part can wrap around the main frame
tube.2) Place a short piece of 1/2” EMT on the ground perpendicular to the flattened piece, and
wrap the flattened part over the other EMT. Hammer it into a tight fit.3) Clamp the end of the overlap with a C-clamp, with a loop created around a short piece of
conduit, and put it in a vice. Drill through the overlapping flattened piece into the tube onthe other side, so that a bolt through that hole could clamp the joint together. To start the
hole, tap the metal with a nail and hammer to make a dent. Drill first with a 1/8” bit, thenenlarge to 1/4”.
4) Slide a 1/4”-20, 1 1/4” long hex bolt through the hole. Slide a split-ring lock washer ontothe end, and thread and tighten down a 1/4”-20 nut.
5) Repeat step 3 farther down the overlapping material. Take out the bolt from step 4 untilthe joint is in its final location.
6) Take out the short piece of conduit from the joint and wrap around the main frame. Inserttwo bolt-washer-nut assemblies through the holes in the joint and tighten.
7) If the joint isnʼt tight from the bolts, clamp with a C-clamp on the edge of the loop of flattened conduit.
8) Where the flattened conduit wraps around the main frame, drill a hole with a 1/8” bit,leaving room for another 1/4” hex bolts.
9) Enlarge the hole to 1/4”.10) Slide a 1/4”-20, 1 1/2” long bolt through the hole. Tighten onto a lock washer with a nut.
11) Take off the clamp and repeat 8-10 for the other side.
Bolted Joint with 4 boltsand bent conduit
36
Tools:Drill (3/8” power drill)
1/8” bit1/4” bit
3/8” bittape measure
markerhammer
nail/starting punch
(2) 7/16” wrenchesflat file
vicehack saw
tube cutter (optional)pliers
C-camp
Safety glasses
summer, rebecca, dan, and lillian

7/31/2019 Bike Cart Booklet
http://slidepdf.com/reader/full/bike-cart-booklet 10/22
Glossary (organized by category)
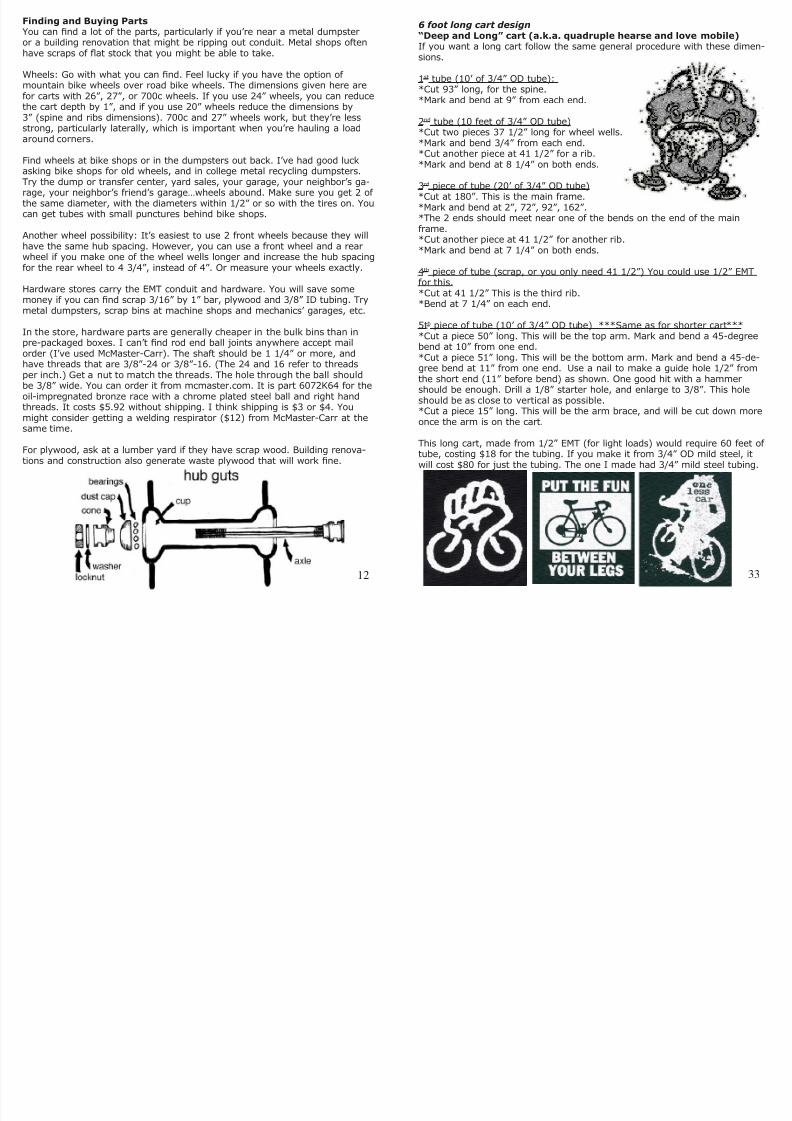
Materials and fabricationEMT ConduitThe kind of tubing used for the cart frame. It is used industrially to protectelectrical wires. EMT stands for “Electrical Metallic Tubing.” The nominaldimension is the inside dimension (ID). The outside dimension (OD) for 1/2” EMT is about 3/4”.
JigA device to align the dropouts and hold them at the correct spacing.
Mild steelA common carbon steel that is cheap and available from metal suppliers. Mildsteel tubing is not nearly as easy to find or as cheap as EMT. 3/4” mild steeltubing has about the same OD (outside dimension) as 1/2” EMT. 3/4” mildsteel with a 0.049” or 0.069” wall thickness costs $1.50 per foot and weighsconsiderably more than EMT. In a test that I did with a spring scale, 1/2” EMTresists bending to 68% the force of 0.049” wall mild steel tubing, and costs$0.30 per foot. The zinc oxide fumes it emits when heated are toxic, however.See the section on welding the frame.
MiterA fitted connection between two pieces of metal. In this case, it is a 3/4”
diameter half-circle cut out of the end of a tube.
Parts (see page 8 for pictures)
CouplingAn end-to-end connection for conduit. One is used on the main frame. Get acoupling that is steel, so it can be brazed. If you want to make a detachablepulling arm or pushing handle, you can use compression couplings.
DropoutThe slotted piece that holds the wheel axles.
HandleUsed for pushing the cart by hand. While it is not essential for the cart’s op-eration as a bike trailer, it adds versatility.
HitchThe connection between the bike and the pulling arm. There are 2 hitchstyles. The bolted hitch is a piece of flat metal with an arm that hooks aroundthe chainstay. There is a ball joint on the bottom of the hitch. The clamphitch consists of two bent pieces of rod that are clamped together around thechainstay and seatstay with two bolts. The bolted hitch is easier to make andcheaper, and the clamp hitch is stronger and better adapted to bikes withquick release axles.
Main FrameThe rectangular piece that creates the rim around the bed of the cart.
10
Bolt-together design
And now something else entirely. I spent a lot of time trying to make a design that could be built
without welding or brazing, because welding equipment i s less common than a drill. The designworks, but itʼs much harder to build because every connection must be drilled and bolted, instead
of brazed or welded quickly. The structure of the frame is the same, except for the towing bar,which is underneath the frame, and is the most expensive part of the whole cart. It causes this cart
to be not only more difficult to build than the brazed version, but to be more expensive as well.If you wanted a cheaper bolted version, you could do two things: replace the pulling arm with
something made from 3/4” EMT or 2 pieces of 1/2” EMT bolted together. This would be easy andcheap. You could also modify the frame to be deeper, and use a pulling arm similar to the one on
the welded frame. If I were to continue with this design, I would try to create a pulling arm under-neath the frame that is made from 2 or even 3 pieces of 1/2” EMT (3 pieces in a pyramid).
The weakest part of this design is the dropouts, which makes it overkill to have such a strong pull-
ing arm. Perhaps the dropouts could be strengthened with 2 overlapping plates, or just the dropoutscould be brazed, in a similar configuration to the welded trailer dropout design.
35
the wheel installed on
the bolted dropouts

7/31/2019 Bike Cart Booklet
http://slidepdf.com/reader/full/bike-cart-booklet 11/22
RibThe three pieces that run sideways across the cart. The center rib holds theinside dropouts. The front rib braces the pulling arm. The rear rib providesstructure for the bed and the handle.
Rod-end Ball JointA universal joint that spins freely around two axes and about 15 degrees inthe third. It is used on the hitch to allow the bike to lean, turn, and go overbumps independently of the cart.
Pulling arm
The arm created by two “L” shaped tubes (bottom arm and top arm). The pull-ing arm attaches to the front two ribs and spine, and connects to the hitch onthe bike.
SpineThe piece that runs from the front of the cart to the back, below the ribs.
Brazing and welding
BrazingThe process of heating metal and applying brass to join and fill in the gap be-tween the two pieces of metal.
FluxA paste that is used in brazing to help the filler metal flow into the joint. Get anon-toxic flux that can be cleaned up with water.
MIG welding “Metal Inert Gas” welding creates a spark between a wire and the material,which melts both. A wire feed throws the metal into the area being welded.It’s an easy form of welding to make a strong connection, but it’s not prettyuntil the welder is very good. Gas MIG welders are expensive and more dan-gerous. This cart can be welded with a MIG setup. Consider using mild steeltubing instead of galvanized conduit.
Oxy-Acetylene Welding/Cutting/Brazing torch
Uses an oxygen tank and an acetylene tank with regulators to supply gasto a torch. Use a brazing or welding tip. Cheap oxy-acetylene torches canbe bought on eBay for $80 or so without the tanks, which you can rent. Thecheapest setup with tanks is $300. There are a lot of oxy-acetylene torchesaround. Check with farmers, automobile and equipment repair people, neigh-bors… If you find an arc welder that you want to use instead, seriously con-sider buying mild steel tubing instead of galvanized EMT, because of the fumesgenerated. You can also use an air-acetylene torch, about which I know noth-ing. Mapp gas and oxygen, which you can buy in cylinders at hardware stores,might also be hot enough…
microcosm s̓ evolution design
1134
donna picking up hay bales in deep and long
7/31/2019 Bike Cart Booklet
http://slidepdf.com/reader/full/bike-cart-booklet 12/22
Finding and Buying PartsYou can find a lot of the parts, particularly if you’re near a metal dumpsteror a building renovation that might be ripping out conduit. Metal shops oftenhave scraps of flat stock that you might be able to take.
Wheels: Go with what you can find. Feel lucky if you have the option of mountain bike wheels over road bike wheels. The dimensions given here arefor carts with 26”, 27”, or 700c wheels. If you use 24” wheels, you can reducethe cart depth by 1”, and if you use 20” wheels reduce the dimensions by3” (spine and ribs dimensions). 700c and 27” wheels work, but they’re lessstrong, particularly laterally, which is important when you’re hauling a load
around corners.
Find wheels at bike shops or in the dumpsters out back. I’ve had good luckasking bike shops for old wheels, and in college metal recycling dumpsters.Try the dump or transfer center, yard sales, your garage, your neighbor’s ga-rage, your neighbor’s friend’s garage…wheels abound. Make sure you get 2 of the same diameter, with the diameters within 1/2” or so with the tires on. Youcan get tubes with small punctures behind bike shops.
Another wheel possibility: It’s easiest to use 2 front wheels because they willhave the same hub spacing. However, you can use a front wheel and a rearwheel if you make one of the wheel wells longer and increase the hub spacingfor the rear wheel to 4 3/4”, instead of 4”. Or measure your wheels exactly.
Hardware stores carry the EMT conduit and hardware. You will save somemoney if you can find scrap 3/16” by 1” bar, plywood and 3/8” ID tubing. Trymetal dumpsters, scrap bins at machine shops and mechanics’ garages, etc.
In the store, hardware parts are generally cheaper in the bulk bins than inpre-packaged boxes. I can’t find rod end ball joints anywhere accept mailorder (I’ve used McMaster-Carr). The shaft should be 1 1/4” or more, andhave threads that are 3/8”-24 or 3/8”-16. (The 24 and 16 refer to threadsper inch.) Get a nut to match the threads. The hole through the ball shouldbe 3/8” wide. You can order it from mcmaster.com. It is part 6072K64 for theoil-impregnated bronze race with a chrome plated steel ball and right handthreads. It costs $5.92 without shipping. I think shipping is $3 or $4. You
might consider getting a welding respirator ($12) from McMaster-Carr at thesame time.
For plywood, ask at a lumber yard if they have scrap wood. Building renova-tions and construction also generate waste plywood that will work fine.
12
6 foot long cart design“Deep and Long” cart (a.k.a. quadruple hearse and love mobile)If you want a long cart follow the same general procedure with these dimen-sions.
1st tube (10’ of 3/4” OD tube):*Cut 93” long, for the spine.*Mark and bend at 9” from each end.
2nd tube (10 feet of 3/4” OD tube)*Cut two pieces 37 1/2” long for wheel wells.
*Mark and bend 3/4” from each end.*Cut another piece at 41 1/2” for a rib.*Mark and bend at 8 1/4” on both ends.
3rd piece of tube (20’ of 3/4” OD tube)*Cut at 180”. This is the main frame.*Mark and bend at 2”, 72”, 92”, 162”.*The 2 ends should meet near one of the bends on the end of the mainframe.*Cut another piece at 41 1/2” for another rib.*Mark and bend at 7 1/4” on both ends.
4th piece of tube (scrap, or you only need 41 1/2”) You could use 1/2” EMTfor this.*Cut at 41 1/2” This is the third rib.*Bend at 7 1/4” on each end.
5th piece of tube (10’ of 3/4” OD tube) ***Same as for shorter cart****Cut a piece 50” long. This will be the top arm. Mark and bend a 45-degreebend at 10” from one end.*Cut a piece 51” long. This will be the bottom arm. Mark and bend a 45-de-gree bend at 11” from one end. Use a nail to make a guide hole 1/2” fromthe short end (11” before bend) as shown. One good hit with a hammershould be enough. Drill a 1/8” starter hole, and enlarge to 3/8”. This holeshould be as close to vertical as possible.
*Cut a piece 15” long. This will be the arm brace, and will be cut down moreonce the arm is on the cart.
This long cart, made from 1/2” EMT (for light loads) would require 60 feet of tube, costing $18 for the tubing. If you make it from 3/4” OD mild steel, itwill cost $80 for just the tubing. The one I made had 3/4” mild steel tubing.
33

7/31/2019 Bike Cart Booklet
http://slidepdf.com/reader/full/bike-cart-booklet 13/22
Using the tools
To use a conduit bender, line up your bend mark with the arrow on thebender. Step on the foot plate, while pushing down and pulling sideways onthe handle of the bender. Bend until the bubble level reads level with no forceon the handle.
Working with metal in this project is easy, but takes some practice. To cutwith a hacksaw, make sure the piece is clamped well and the cut is close tothe clamp. Use the full length of the blade, pushing down hard enough tocut but not hard enough to bind the blade. Use steady, even strokes pushing
forward. Don’t press down hard on the return stroke. Hold both the back andfront of the saw.
When using files, the cutting happens on the forward stroke. Pulling backwith downward pressure on the file will only dull the file. To cut with a tube cutter, align the mark with the cutting wheel and tightenthe screw just enough to score the metal all the way around the tube. Tight-en a little more and continue turning the tool, ensuring that the cut is in theoriginal groove. Continue around the tube. This tool is useful for the conduit,but a hacksaw is more reliable.
To braze with an oxy-acetylene torch, it’s a good idea to get a lesson from
someone who knows how. Always set the regulator carefully and keep thetanks well secured so they could not fall. Use gloves, #5 shade eye protec-tion, and work on non-combustible surfaces. Keep fire-extinguishing para-phernalia present. Work with good ventilation, especially with galvanizedconduit.
To drill into metal, make a starting dent with a nail, and drill a small hole athigh speed with a sharp metal bit. To enlarge it, use a lower speed and watchout for the bit catching as it breaks through the material. Always drill intomaterial secured in a vice or by clamps.
General safety: Wear gloves when things are hot, don’t wear gloves withspinning tools. Wear safety glasses when there are chips flying (drilling, cut-ting). Wear long non-synthetic, non-flammable clothes when working withthe torch. Wear closed-toe shoes or boots. Don’t breathe fumes from cutting,heating, or painting. Have fun and take care of yourself so you can ride yourbike and pull your bike cart and tell your friends how great it is to not use acar.
1332
The rest of the information in this booklet is references and information about different designs.

7/31/2019 Bike Cart Booklet
http://slidepdf.com/reader/full/bike-cart-booklet 14/22
Fabrication of the cart
Cutting and bending tubes and dropouts
Main frameFrom the first piece of 1/2” EMT (10’ long)*This piece will be the main frame. With all tubes, make all marks beforebending.
*Mark at all the following lengths from one end before bending. Make a smallstar symbol at the starting end to signify “start bending from this side.” Markat 2”, 41”, 61”, and 100”.
*Make a dotted line at 118”. This will be the mark to which the tube overlapswhen it is bent into a rectangle. Eventually, the last 2 inches will be cut off,but the tube is bent with the 2 inches to allow adjustment if the bends areuneven.
*Bend 4 bends to make rectangular shape. With each bend, make sure thatthe previous bend is in the same plane. Line it up by eye, and fix mistakes byhand.
*Holding the two ends of the tube in overlap of 2”, measure the width of theframe at the front and back, before the bends. It should be around 22” or22 1/2”. If the front and back are unequal distances, you can cut off more orless than 2” from the end of the tube. Cut approximately 2” off the end of thetube. Bend the frame by hand so that the two mating tubes are in line witheach other.
14
Fabrication breakdown
*Cut and Bend Tubes*Align and braze main frame and ribs*Mak e dropouts and attach to jig
*Align and braze dropouts and wheel wells*Make and attach pulling arm and handle*Make hitch parts and braze together*Add plywood bed, wheels, and paint the joints
31
Finishing the cart
*Drill a 1/8” starter hole 1/2” from the end of the pulling arm, and enlarge to3/8”. This hole should be as close to vertical as possible.
*Crush the end of the pulling arm slightly around the bolt hole so a 3/8” nut just slides inside. Slide a 2” long 3/8” bolt through the arm, from the top tothe bottom, threaded through the bolt inside the arm. Slip a 3/8” split-ringlock washer on, and then thread another 3/8” nut onto the end of the bolt andtighten it until the tube is crushed around the interior nut. Thread one more3/8” nut onto the bolt. Make it tight. Option: Braze the nuts and bolt together,
and to the arm.
*Take a 3/8” wing nut and braze a 2” long piece of scrap metal onto the twowings. Use some of the rod from the hitch, or whatever you find. This will bethe nut that attaches the cart to the bike, and the wing nut extension allowsremoval without tools. (Alternative: use a 3/8” nut with a wrench.)
*Attach the wheels to the cart. If there are quick release skewers, put thelevers on the outside of the cart.
*Paint the joints of the cart with an outdoor metal paint and/or primer. Youdon’t need spray paint. Any anti-rust brush-on paint works. Paint the hitchtoo, but not the inside of the nuts (clamp hitch). Remove the ball joint before
painting the hitch.
*Add a bed. Use 1/2” plywood that is 19” by 38”. Use any kind of clamp to at-tach the bed to the ribs. Plumbing or conduit clamps work. Sheet metal stripswith punched holes are cheaper but more work. You could try plumbers’ tape,screwing through the holes into the plywood. Cut slots in the plywood to fitthe tubes where they curve. This part can be any kind of creative expression.Metal, driftwood, plastic, canvas, plywood, rope, glass…some ideas are bettersuited to certain applications.
*Make tie-down straps out of old bicycle tubes, with the valve cut off. Usebowline knots to attach them to the main frame.
*A nice option: Add something unique and special to the cart. My personalfavorite is a pole with space for art and signs. “One less car” “Yes, I’m movingby bike” “One less car; make it two?”
7/31/2019 Bike Cart Booklet
http://slidepdf.com/reader/full/bike-cart-booklet 15/22
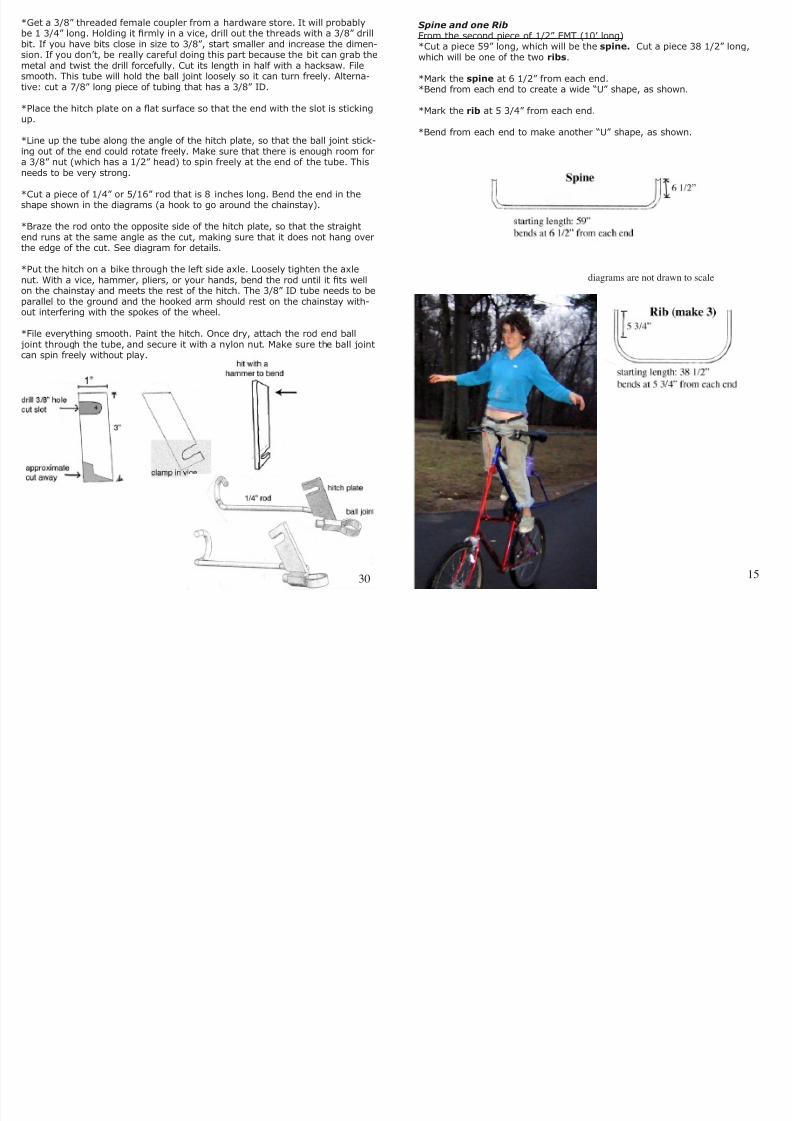
Spine and one RibFrom the second piece of 1/2” EMT (10’ long)*Cut a piece 59” long, which will be the spine. Cut a piece 38 1/2” long,which will be one of the two ribs.
*Mark the spine at 6 1/2” from each end.*Bend from each end to create a wide “U” shape, as shown.
*Mark the rib at 5 3/4” from each end.
*Bend from each end to make another “U” shape, as shown.
15
diagrams are not drawn to scale
30
*Get a 3/8” threaded female coupler from a hardware store. It will probablybe 1 3/4” long. Holding it firmly in a vice, drill out the threads with a 3/8” drillbit. If you have bits close in size to 3/8”, start smaller and increase the dimen-sion. If you don’t, be really careful doing this part because the bit can grab themetal and twist the drill forcefully. Cut its length in half with a hacksaw. Filesmooth. This tube will hold the ball joint loosely so it can turn freely. Alterna-tive: cut a 7/8” long piece of tubing that has a 3/8” ID.
*Place the hitch plate on a flat surface so that the end with the slot is stickingup.
*Line up the tube along the angle of the hitch plate, so that the ball joint stick-ing out of the end could rotate freely. Make sure that there is enough room fora 3/8” nut (which has a 1/2” head) to spin freely at the end of the tube. Thisneeds to be very strong.
*Cut a piece of 1/4” or 5/16” rod that is 8 inches long. Bend the end in theshape shown in the diagrams (a hook to go around the chainstay).
*Braze the rod onto the opposite side of the hitch plate, so that the straightend runs at the same angle as the cut, making sure that it does not hang overthe edge of the cut. See diagram for details. *Put the hitch on a bike through the left side axle. Loosely tighten the axle
nut. With a vice, hammer, pliers, or your hands, bend the rod until it fits wellon the chainstay and meets the rest of the hitch. The 3/8” ID tube needs to beparallel to the ground and the hooked arm should rest on the chainstay with-out interfering with the spokes of the wheel.
*File everything smooth. Paint the hitch. Once dry, attach the rod end ball joint through the tube, and secure it with a nylon nut. Make sure the ball jointcan spin freely without play.

7/31/2019 Bike Cart Booklet
http://slidepdf.com/reader/full/bike-cart-booklet 16/22
One rib and two wheel wellsFrom the third piece of 1/2” EMT (10’ long)*Cut another piece 38 1/2” long, which will be the second rib. Mark andbend this rib like the first.
*Cut two pieces 38 1/2” long, which will be the two wheel wells.***NOTE: If you are going to be using rear wheels for the cart, and don’twant to take out the spacers (with hub adjustment), you should add 1 inchto the length of the wheel wells, and cut at 39 1/2” If you don’t add length,but use the wider rear hubs, the wheel wells will have less of a slope down-
ward and will be a little weaker. (To visualize this, think about the wheelwells as a part of a structural triangle, from the back of the bike cart lookingforward.) You can use any combination of front and rear wheels as long asthe diameters are within 1/2”.
*Mark the wheel wells at 3/4” from each end. Bend into “U” shapes, asshown.***Note again. If you added an inch to the wheel wells above, mark thewheel wells 1 1/4” from each end.
16
Aaron pulling a
55 gallon barrel
Hitch creation
diagrams on following page
The hitch is made from flat stock, a short tube, a rod, a ball joint, and a nut.
It clamps onto the left side of the rear axle. There is a slot cut for the wheelʼs axle, a
tube or drilled-out female coupler to allow the ball joint to pivot, and a rod that is braced
against the chainstay to keep the hitch from twisting around the axle.
*Start with a piece of the 1” X 3/16” flat stock that you used for the dropout jigs. This will be the hitch plate.
*Cut a piece 3” long.
*Drill a 3/8” hole for the axle 1/2” from the end and 1/2” from each side.
*From one side of the hitch plate, cut towards the hole so that there are 2
parallel cuts 3/8” apart that meet the hole at the widest part.
*Cut the other end at a 30 degree angle. Make the cut so that the shortestside is the side that has the slot cut into it. Make two more cuts to create aplace for the ball joint nut to freely spin, as pictured.
*Clamp the slotted end of the piece in a vice at a 30 degree angle from verti-cal. Clamp it so that the slot is hidden in the vice by 1/2” and so that the endof the piece is parallel to the ground.
*Look at the hitch plate from the side so that the metal angles upward fromthe vice to the right. Hit the piece with a hammer away from your point of view to make a bend in the hitch plate away from the bike. The end of the
piece should be bent until it is about 1/2” away from vertical. The purpose of this bend is to get the ball joint far enough away from the wheel that there areno clearance issues. 29
3/8” rod end
ball joint
7/31/2019 Bike Cart Booklet
http://slidepdf.com/reader/full/bike-cart-booklet 17/22
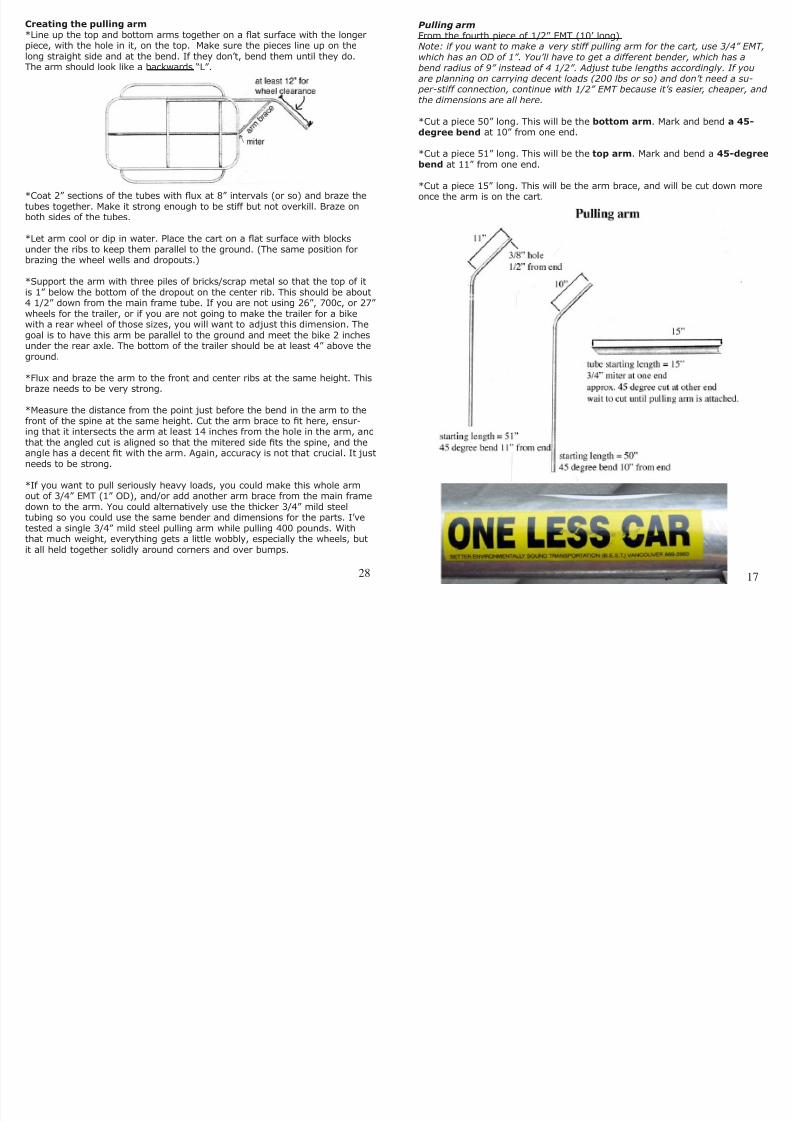
Pulling armFrom the fourth piece of 1/2” EMT (10’ long)Note: if you want to make a very stiff pulling arm for the cart, use 3/4” EMT,which has an OD of 1”. You’ll have to get a different bender, which has abend radius of 9” instead of 4 1/2”. Adjust tube lengths accordingly. If youare planning on carrying decent loads (200 lbs or so) and don’t need a su- per-stiff connection, continue with 1/2” EMT because it’s easier, cheaper, and the dimensions are all here.
*Cut a piece 50” long. This will be the bottom arm. Mark and bend a 45-degree bend at 10” from one end.
*Cut a piece 51” long. This will be the top arm. Mark and bend a 45-degreebend at 11” from one end.
*Cut a piece 15” long. This will be the arm brace, and will be cut down moreonce the arm is on the cart.
17
Creating the pulling arm
*Line up the top and bottom arms together on a flat surface with the longerpiece, with the hole in it, on the top. Make sure the pieces line up on thelong straight side and at the bend. If they don’t, bend them until they do.The arm should look like a backwards “L”.
*Coat 2” sections of the tubes with flux at 8” intervals (or so) and braze thetubes together. Make it strong enough to be stiff but not overkill. Braze onboth sides of the tubes.
*Let arm cool or dip in water. Place the cart on a flat surface with blocksunder the ribs to keep them parallel to the ground. (The same position forbrazing the wheel wells and dropouts.)
*Support the arm with three piles of bricks/scrap metal so that the top of itis 1” below the bottom of the dropout on the center rib. This should be about4 1/2” down from the main frame tube. If you are not using 26”, 700c, or 27” wheels for the trailer, or if you are not going to make the trailer for a bikewith a rear wheel of those sizes, you will want to adjust this dimension. Thegoal is to have this arm be parallel to the ground and meet the bike 2 inchesunder the rear axle. The bottom of the trailer should be at least 4” above theground.
*Flux and braze the arm to the front and center ribs at the same height. Thisbraze needs to be very strong.
*Measure the distance from the point just before the bend in the arm to thefront of the spine at the same height. Cut the arm brace to fit here, ensur-ing that it intersects the arm at least 14 inches from the hole in the arm, andthat the angled cut is aligned so that the mitered side fits the spine, and theangle has a decent fit with the arm. Again, accuracy is not that crucial. It justneeds to be strong.
*If you want to pull seriously heavy loads, you could make this whole armout of 3/4” EMT (1” OD), and/or add another arm brace from the main framedown to the arm. You could alternatively use the thicker 3/4” mild steeltubing so you could use the same bender and dimensions for the parts. I’vetested a single 3/4” mild steel pulling arm while pulling 400 pounds. Withthat much weight, everything gets a little wobbly, especially the wheels, butit all held together solidly around corners and over bumps.
28

7/31/2019 Bike Cart Booklet
http://slidepdf.com/reader/full/bike-cart-booklet 18/22
Handle and third rib
From an optional fifth piece of 1/2” EMT
If you don’t want a handle, you can save some time and money by skippingthe fifth piece which makes an optional third rib and the handle. The handleadds quite a bit of versatility and usability to the cart.
*Cut a third rib that is 38 1/2” long. This is a nice piece for easy attachmentof the bed, but is not necessary structurally. Bend at 5 3/4” from each end.Position it where it fits at the back of the cart, mitered where it connects tothe main frame and in contact with the spine.
*Cut a piece 72” long. This will be the handle. Mark and bend the handle26” from each end into a “U” shape. Make sure that the angles are 90 de-grees at each bend, or the cart will have a visibly crooked handle.
Wheel dropouts/mountsFrom the 3/16” X 1” flat stock*Cut four pieces 1 1/2” long.*With a nail or a punch and hammer, make a small dent in the middle of thematerial (3/4” and 1/2” from the edges). Put the piece in a vice, or clamp itreally well. Drill a 1/8” pilot hole, and then enlarge to 3/8”.*Using a hacksaw, cut in from the end to meet the hole. The slot should be
3/8” wide. Make sure your wheel axles fit in the slots. Finish the slot with afile.*File off the sharp edges.*Repeat, to make a total of 4 dropouts.
18 27
Dropout jig alignment
7/31/2019 Bike Cart Booklet
http://slidepdf.com/reader/full/bike-cart-booklet 19/22
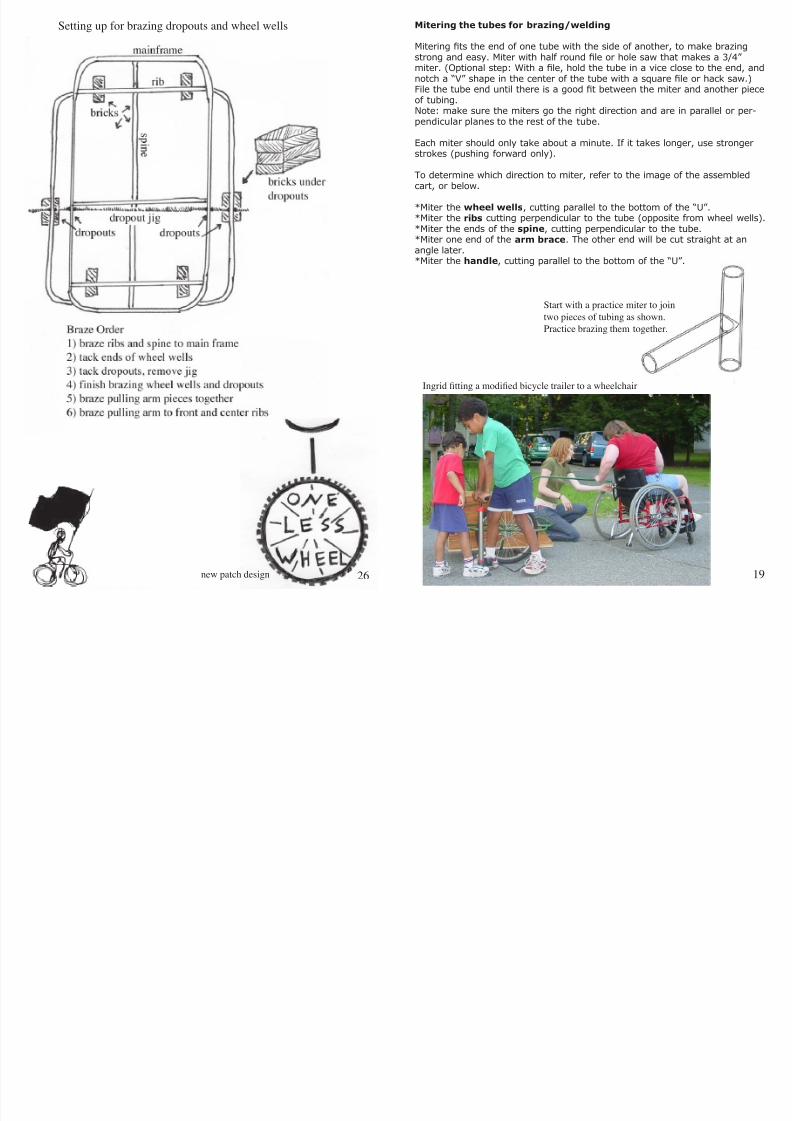
Mitering the tubes for brazing/welding
Mitering fits the end of one tube with the side of another, to make brazingstrong and easy. Miter with half round file or hole saw that makes a 3/4” miter. (Optional step: With a file, hold the tube in a vice close to the end, andnotch a “V” shape in the center of the tube with a square file or hack saw.)File the tube end until there is a good fit between the miter and another pieceof tubing.Note: make sure the miters go the right direction and are in parallel or per-pendicular planes to the rest of the tube.
Each miter should only take about a minute. If it takes longer, use strongerstrokes (pushing forward only).
To determine which direction to miter, refer to the image of the assembledcart, or below.
*Miter the wheel wells, cutting parallel to the bottom of the “U”.*Miter the ribs cutting perpendicular to the tube (opposite from wheel wells).*Miter the ends of the spine, cutting perpendicular to the tube.*Miter one end of the arm brace. The other end will be cut straight at anangle later.*Miter the handle, cutting parallel to the bottom of the “U”.
19
Ingrid fitting a modified bicycle trailer to a wheelchair
Start with a practice miter to join
two pieces of tubing as shown.
Practice brazing them together.
Setting up for brazing dropouts and wheel wells
new patch design 26
7/31/2019 Bike Cart Booklet
http://slidepdf.com/reader/full/bike-cart-booklet 20/22
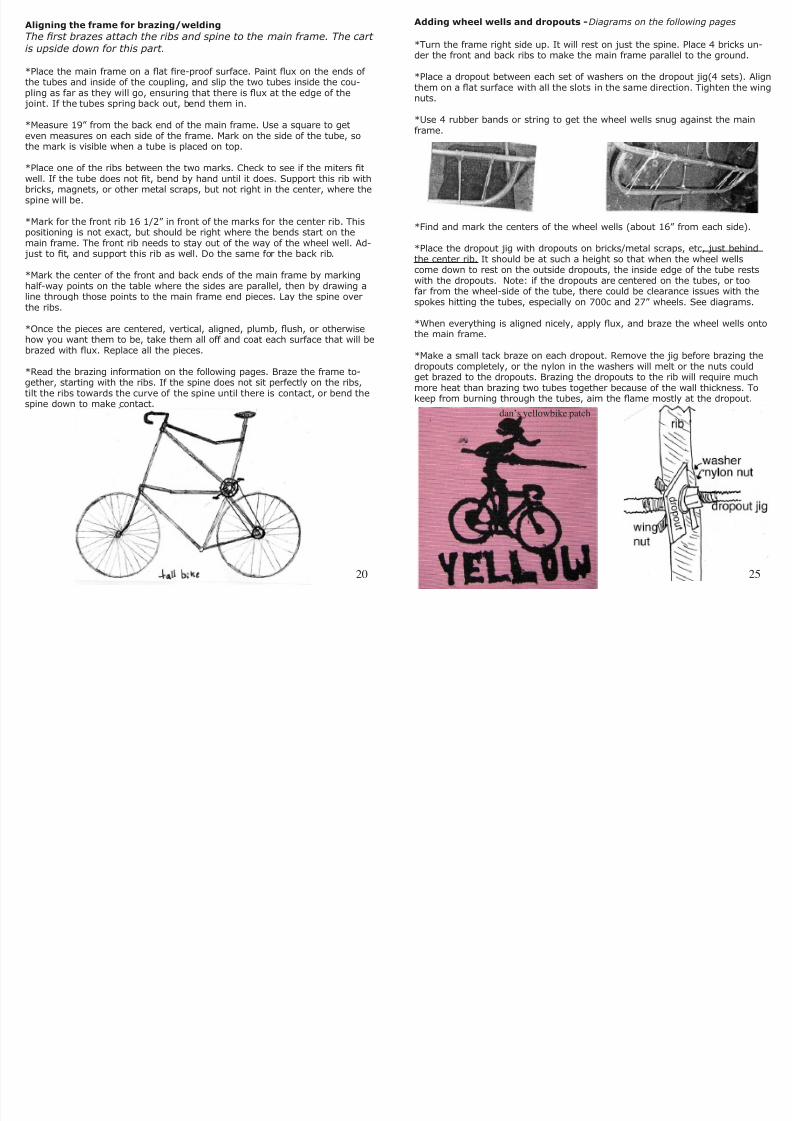
Aligning the frame for brazing/welding
The first brazes attach the ribs and spine to the main frame. The cart is upside down for this part.
*Place the main frame on a flat fire-proof surface. Paint flux on the ends of the tubes and inside of the coupling, and slip the two tubes inside the cou-pling as far as they will go, ensuring that there is flux at the edge of the joint. If the tubes spring back out, bend them in.
*Measure 19” from the back end of the main frame. Use a square to geteven measures on each side of the frame. Mark on the side of the tube, sothe mark is visible when a tube is placed on top.
*Place one of the ribs between the two marks. Check to see if the miters fitwell. If the tube does not fit, bend by hand until it does. Support this rib withbricks, magnets, or other metal scraps, but not right in the center, where thespine will be.
*Mark for the front rib 16 1/2” in front of the marks for the center rib. Thispositioning is not exact, but should be right where the bends start on themain frame. The front rib needs to stay out of the way of the wheel well. Ad- just to fit, and support this rib as well. Do the same for the back rib.
*Mark the center of the front and back ends of the main frame by markinghalf-way points on the table where the sides are parallel, then by drawing aline through those points to the main frame end pieces. Lay the spine overthe ribs.
*Once the pieces are centered, vertical, aligned, plumb, flush, or otherwisehow you want them to be, take them all off and coat each surface that will bebrazed with flux. Replace all the pieces.
*Read the brazing information on the following pages. Braze the frame to-gether, starting with the ribs. If the spine does not sit perfectly on the ribs,tilt the ribs towards the curve of the spine until there is contact, or bend thespine down to make contact.
20
Adding wheel wells and dropouts -Diagrams on the following pages
*Turn the frame right side up. It will rest on just the spine. Place 4 bricks un-der the front and back ribs to make the main frame parallel to the ground.
*Place a dropout between each set of washers on the dropout jig(4 sets). Alignthem on a flat surface with all the slots in the same direction. Tighten the wingnuts.
*Use 4 rubber bands or string to get the wheel wells snug against the mainframe.
*Find and mark the centers of the wheel wells (about 16” from each side).
*Place the dropout jig with dropouts on bricks/metal scraps, etc, just behindthe center rib. It should be at such a height so that when the wheel wellscome down to rest on the outside dropouts, the inside edge of the tube rests
with the dropouts. Note: if the dropouts are centered on the tubes, or toofar from the wheel-side of the tube, there could be clearance issues with thespokes hitting the tubes, especially on 700c and 27” wheels. See diagrams.
*When everything is aligned nicely, apply flux, and braze the wheel wells ontothe main frame.
*Make a small tack braze on each dropout. Remove the jig before brazing thedropouts completely, or the nylon in the washers will melt or the nuts couldget brazed to the dropouts. Brazing the dropouts to the rib will require muchmore heat than brazing two tubes together because of the wall thickness. Tokeep from burning through the tubes, aim the flame mostly at the dropout.
25
danʼs yellowbike patch

7/31/2019 Bike Cart Booklet
http://slidepdf.com/reader/full/bike-cart-booklet 21/22
Brazing/welding frame together
Safety Considerations:VentilationRespiratory protectionEye ProtectionHeat Protection
Danger of welding galvanized metal (from cutting, welding, and brazing)You are heating galvanized metal, which is coated in zinc. The zinc will burnoff and oxidize in the air, creating zinc oxide. Breathing zinc oxide can cause
Metal Fume Fever. According to the American Welding Society, Metal FumeFever causes flu-like symptoms including headache, fever, chills, muscleaches, thirst, nausea, vomiting, chest soreness, fatigue, gastrointestinalpain, weakness, and tiredness. Symptoms start several hours after exposureand last 6 to 24 hours. The American Welding Society claims that there areno known long-term affects from Metal Fume Fever.
Ventilation:*Braze outside. Portability is one nice thing about oxy-acetylene torches.*Keep air moving across the work, with a fan or align yourself with wind sothat the smoke blows sideways. (If your back is to the wind, your body willstop the airflow in front of your face.)*Don’t breathe the smoke plume.
*Keep your head back from and never above the area that you are brazing.*Watch the ends of tubes, because fumes will escape from them.
Respiratory Protection:If you cannot ensure adequate ventilation, wear an N95 (or higher) typerespirator. You can buy a N99 filter respirator from McMaster-Carr for $11.34(Part #53565T2). The instructions say it’s good for 8 hours of breathingthrough, or until it gets hard to breathe through. 2 replacement filters are$5.61. I don’t like buying from large mail-order corporations, but if the trad-eoff is getting sick or not building a bike cart, I will do it.
Eye protection:Use #5 shade eye protection. If you look at the flame for a second, you’renot going to lose your sight, but it’s bright and bad for your eyes, a bit worstthan looking at the sun. I’ve heard that you’re eyes are safe 10 feet backfrom the flame.
Heat Protection:Use gloves to touch the metal that you are working on. The brazing rod willget hot close to the end.
21
Creating the dropout jigNote: These measurements assume that you are using 2 front wheels frombikes, with 4” distance between the outside surfaces of the locknuts. If youare using rear hubs or hubs with a different spacing make an appropriate
adjustment in the jig.*If you are lucky enough to find 20” wheels, measure the axle width, adjust the dropout jig, make the wheel wells shorter by 6 inches or so, and takeoff 3 inches off of each side of the ribs and spine to keep the same clear-ance. (Axle height on a 26” wheel is 13”, and on a 20” wheel it’s 10”.) If your wheels are strong, the cart with 20” wheels should be more stable and stronger than a cart with larger wheels. Move the wheel wells and center ribback by 6 inches to stabilize the cart.
If you are going to be making several trailers, I suggest using nylon nutsfor this jig. If you are making just one trailer, you could make a cheaper jigfrom wood or metal rod. As an alternative to nylon nuts, use 2 regular nutstightened together.
*Measure the width of the center rib from the outside of the one mitered endto the outside of the other end. Center to center will be about 22”, and out-side to outside will be about 22 3/4”. Take your measurement, and subtract1/4” (to allow the dropouts to sit well against the tube). It will be about 221/2”.
*Thread on a wing nut on each side, with the flat side of the nut facing out.Slide on two 3/8” washers on each side.
*Thread 2 nylon nuts onto the threaded rod, one from each end. (The sidewithout the nylon has to go on first.) To hold the rod while threading, youcan thread two regular nuts onto the opposite end of the rod and tightenthem together. Hold this end in a vice or another wrench.
*Thread the first nylon nut 6” onto the end of the rod. Thread the other ny-lon nut on the other far enough so the distance from the outside of the twowashers is the same as the distance measured along the center rib, minus1/4” (see above, probably 22 1/2” or so).
*Thread another nylon nut onto each side, so that the distance betweenthe two nylon nuts and two of the washers is the same as the spacing foryour wheels. For 26” mountain bike wheels, this distance is 4”. For roadbike wheels, the distance may be less, down to 3 7/8”. If you’re using rearwheels, it might be 4 3/4” or more.
*Slide on two more washers on each side. Thread on one more wing nut oneach side, so that the flat sides of the nuts are facing the washers.
24

7/31/2019 Bike Cart Booklet
http://slidepdf.com/reader/full/bike-cart-booklet 22/22
23
Brazing basics
Definition: Brazing is the welding process of bonding surfaces by heat-ing them to a temperature above the melting point of the filler material,but below the melting point of the base material; the filler material isdrawn into the joint through capillary action.
To braze a joint, heat up both metal surfaces to a temperature hotenough to melt the filler material (usually brass). Brazing is used to join similar or dissimilar metals with a filler material that bonds to both
surfaces. Brazing is more effective than welding for galvanized steel be-cause it minimizes zinc fumes and burning of the zinc coating. Addition-ally, brazing rods are usually compatible with zinc, thereby facilitating agood joint.
How to braze:Put on gloves and number 5 shade goggles. There should be good ven-tilation. Consider using a particle respirator.
Turn on your oxy-acetylene torch setup. First close the torch valves andmake sure the regulators are disengaged (counter clockwise). Open thefuel (acetylene) tank valve 1 turn, while looking away. Usually, you willset the regulator to 10 psig. Open the oxygen valve all the way, and setthe regulator to 10 psig. Bleed the gasses out of the torch handle byopening and closing the acetylene, then the oxygen valves. Open thefuel valve on the torch handle, and light it with a flint striker. Adjust theflame so that it almost creates a gap (without a flame) right at the tipof the torch. It is too low if it produces a lot of smoke. Add oxygen untilthe two visible flame cones come close together. For fine work, you willwant the cones to merge. For general heating, keep them separate.
Coat the surface to be brazed with a brazing flux. Heat the two basematerials with the flame, just beyond the inner cone. When the metalstarts to shimmer a little, touch the brazing rod to the hot metal (don’tmelt it in the flame). The filler rod will flow into the joint. If the metalis too hot it will spark. If it is not hot enough the rod won’t melt. Go allthe way around the tube, creating a good fillet. The strength of the jointcomes from the surfaces joined in close contact with brass and from thefillet (smoothed-out corner) between the base materials.
DO NOT BREATHE THE FUMES FROM BRAZING GALVANIZED METAL(EMT conduit). Use good ventilation and a welding respirator.
Turn off the torch by first closing the fuel valve on the torch handle.Then close the oxygen valve on the torch handle. Close the valves onthe tanks, and open the torch valves to bleed the lines. Unscrew theregulators until they are loose. Close the valves on the torch handle.
22
Metal Fume Fever Information
According to the American Welding Society, Metal Fume Fever isan illness caused by exposure to zinc oxide, a chemical present infumes from welding and brazing galvanized metal. The symptomsof metal fume fever are flu-like, including headache, nausea, fever,fatigue, and chills. Symptoms start several hours after exposureand last 6 to 24 hours, although total recovery might not be for 48hours. High levels of exposure may cause metallic taste in mouth,dry and irritated throat, and coughing. Several hours after exposure,
you may have a fever (lower than 102 degrees F, then chills beforereturning to normal). The OSHA standard for zinc oxide exposureis 5 miligrams per cubic meter of air averaged over an 8 hour workshift. NIOSH uses the same 5 mg per m^3 (cubic meter), but sug-gests that it is permissible for 10 hours per day, or 40 hours perweek. They further permit a STEL (short term exposure limit) of 10mg/m^3 averaged over a 15 minute period. There is no publishedinformation about long term effects of zinc oxide exposure. (Ameri-can Welding Society. Safety and Health Fact Sheet No. 25)
Even though there are no known long term effects, it doesn’t makesense to expose yourself to zinc oxide and potentially suffer fromMetal Fume Fever, because it’s easy to prevent exposure. Brazing,
as opposed to welding, produces fewer fumes because of the lowertemperaures.
Protect yourself from exposure.*Keep your head back from the fumes.*Wear a particle respirator with a good face seal. There is a N99filter from McMaster-Carr for $12.*Use a mechanical ventilation system that keeps the fumes out of your breathing zone.*If you have an exhaust fan, position the duct intake next to yourwork to capture all the fumes.*If you have a fan to blow acorss your work, make sure the air flowssideways in front of you so that your body does not interfere with
the air flow.
In the process of designing and learning to build bike trailers withgalvanized conduit, I got metal fume fever twice, through careless-ness. You should be careful, and I think it is possible to braze EMTconduit safely. The sickness felt like the head and body ache thatare symptoms of influenza. I felt dehydrated and tired. I felt fine thenext morning.