bio-sand filtration filter casting instructions
TRANSCRIPT

United Kingdom The Shieling, Wreay Carlisle CA4 0RL Tel: +44 (0)1697 47 5369 Mobile: +44 (0) 7739 665 777 Email: [email protected]
Madagascar Libanona Americain PB 307 Fort Dauphin (614) Tel: +261 (0) 20 92 21405 Mobile: +261 (0) 3302 21405 Email: [email protected]
© Adriaan Mol, BioSandFilter.org
May 7, 2004
Bio-Sand Filtration
Filter Casting Instructions

Bio-sand filter construction guidelines Page 2 of 10
Introduction
On the following pages, you will find an illustrated construction guide that takes you step-by-step through the process of building your own bio-sand filter. Please note that you will first need a metal mould for the improved round design. The advantage of the round over the rectangular filter is that it is structurally stronger (less filters will crack). It also uses less cement and is therefore cheaper to build.
If you don’t have your own mould yet, you can easily build one using the illustrated mould construction guide that is available from www.biosandfilter.org.
Much of the information in this document was collected by the author during a project that was financed and implemented by Medair in Kenya, in 2000. Check www.medair.org for more information on the humanitarian programmes implemented by this organisation.
Copyright information: This document, in part or in its entirety, may be copied, reproduced or adapted to meet local needs without permission from the authors or publishers, provided credit is given to BioSandFilter.org and the author(s). These provisions apply only provided the parts reproduced are distributed free or at cost – not for profit. BioSandFilter.org would appreciate being sent a copy of any materials in which text or illustrations have been adapted. For reproduction on commercial basis, permission must be first obtained from BioSandFilter.org.
Disclaimer: BioSandFiler.org and the author(s) assume no responsibility for and make no warranty with respect to the results that may be obtained from the use of information in this document. Under ideal circumstances, the bio-sand filter can produce drinking water of excellent quality which is safe to drink without further treatment. However, this can not always be guaranteed. BioSandFiler.org and the author(s) shall not be liable to anyone whatsoever for any damage resulting from reliance on any information contained in this document. This also applies to the consumption of water produced by a bio-sand filter. It should be noted that a bio-sand filter can not be relied upon to remove chemical contamination. Ideally, water should be boiled before consumption.

Bio-sand filter construction guidelines Page 3 of 10
List of Required Materials
To build a filter using an improved round mould, the following materials are necessary:
Portland cement (10,5 kg);
River sand, dry without clay (30 kg);
Ballast (gravel), 8mm to 10mm (40 kg);
PVC 3pcs elbow ½ inch (optional);
PVC pipe (½ inch pipe, cut to 40mm length and a second piece of 560mm length);
Cooking fat;
2 pieces spanners # 17 (to open the bolts securing the mould parts).
Regarding cement, the quantities given here worked fine for us. However, reports from other users indicated that if the quality of gravel, sand or cement used is not optimal, a different mix should be used. It is recommended to experiment locally to find out what works best.
Bio-sand filter construction guidelines Page 4 of 10
Casting procedure
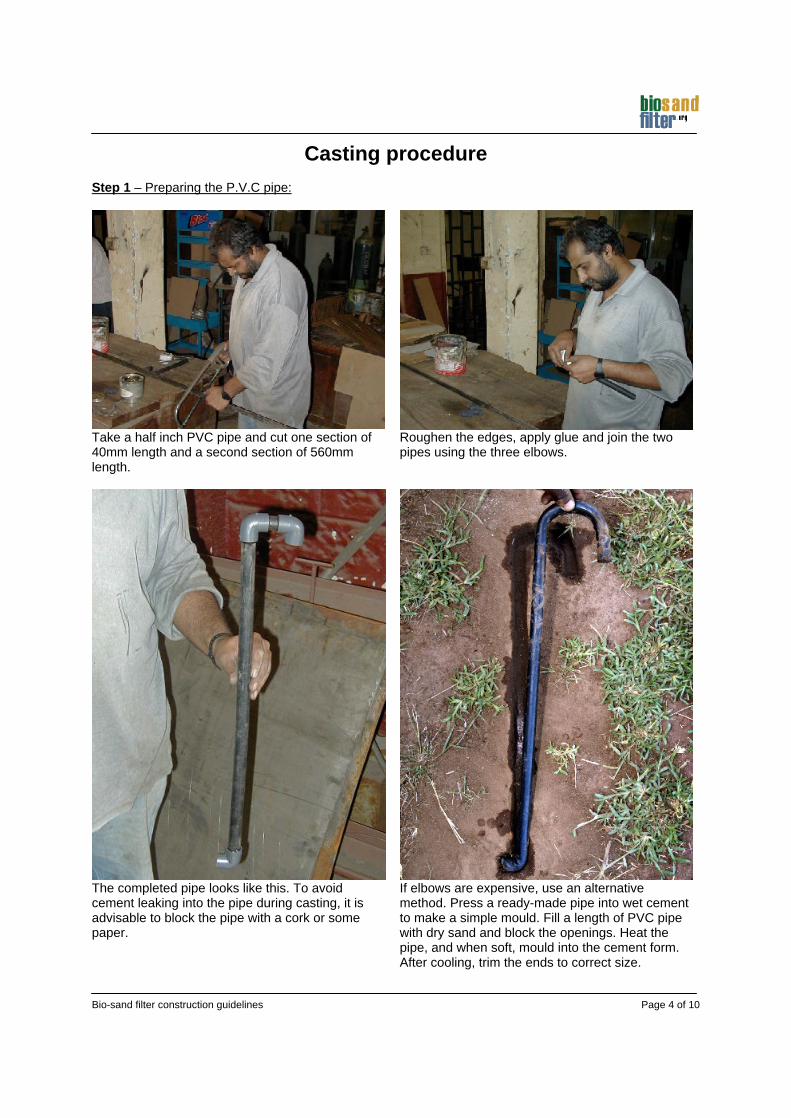
Step 1 – Preparing the P.V.C pipe:
Take a half inch PVC pipe and cut one section of 40mm length and a second section of 560mm length.
Roughen the edges, apply glue and join the two pipes using the three elbows.
The completed pipe looks like this. To avoid cement leaking into the pipe during casting, it is advisable to block the pipe with a cork or some paper.
If elbows are expensive, use an alternative method. Press a ready-made pipe into wet cement to make a simple mould. Fill a length of PVC pipe with dry sand and block the openings. Heat the pipe, and when soft, mould into the cement form. After cooling, trim the ends to correct size.

Bio-sand filter construction guidelines Page 5 of 10
Step 2 – Greasing and assembling the mould:
Apply cooking fat to all insides of the mould. Next, assemble the two outer halves.
Note: Do not apply used engine oil if cooking fat is not available. Rather use butter or any other edible grease to avoid harmful substances seeping into the concrete.
Grease the inner core, and then lower it carefully into the outer shell. Tighten the bolts securing the inner core to the outer shell.
Step 3– Inserting the PVC pipe:
Insert the nose plate and lock it into place using the bolt.
Insert the P.V.C pipe prepared earlier. Make sure the PVC pipe protrudes slightly through the hole in the nose plate. Secure the pipe in place by lightly tightening the bolt protruding from the front shell, located below the nose. This bolt presses the open elbow of the PVC pipe flush against the inner core.

Bio-sand filter construction guidelines Page 6 of 10
Step 4 – Mixing concrete:
Sieving gravel to remove impurities and stones with too large a diameter.
Weighing gravel, sand and cement to achieve correct mixture. Can also be done by volume.
Mix concrete to the following ratio: By part (weight): Cement 1 part; sand 3 parts; ballast 4 parts (1:3:4); For one filter the following amounts are needed: 10 kg cement, 30 kg sand and 40 kg of ballast (gravel). Water: approx. 6 - 8 litres.
It is best to mix concrete by weight rather than by volume as this method ensures that the amount of mixture produced is exactly sufficient for casting one filter. Thus left-overs and loss of materials is avoided. The use of different ratios is also possible. The following mix was found suitable during a programme in Madagascar: 10 litres of cement, 25 litres sand, 25 litres gravel.
Mix evenly, leave for about 30 minutes, and then remix ready for pouring (this allows the cement to absorb the water).

Bio-sand filter construction guidelines Page 7 of 10
Step 5 – Pouring the concrete:
Pour the concrete into the mould using small quantities at a time.
Continuously, poke the concrete in the mould with a rod or stick, and shake the mould from side to side to remove any air pockets in the mixture. Alternatively beat the mould with a rubber mallet.
When poking the cement, avoid hitting the PVC pipe. If you’re not careful with this, cement can leak into the pipe, blocking it.
Continue filling up to the top. Make a smooth, flat finish, since this will become the bottom of the filter. If not flat, the filter will not sit stable.
Note: As this is a light weight (thin walled) casting, allow for a setting time of 24 - 36 hours minimum before removing the filter from the mould.
Bio-sand filter construction guidelines Page 8 of 10
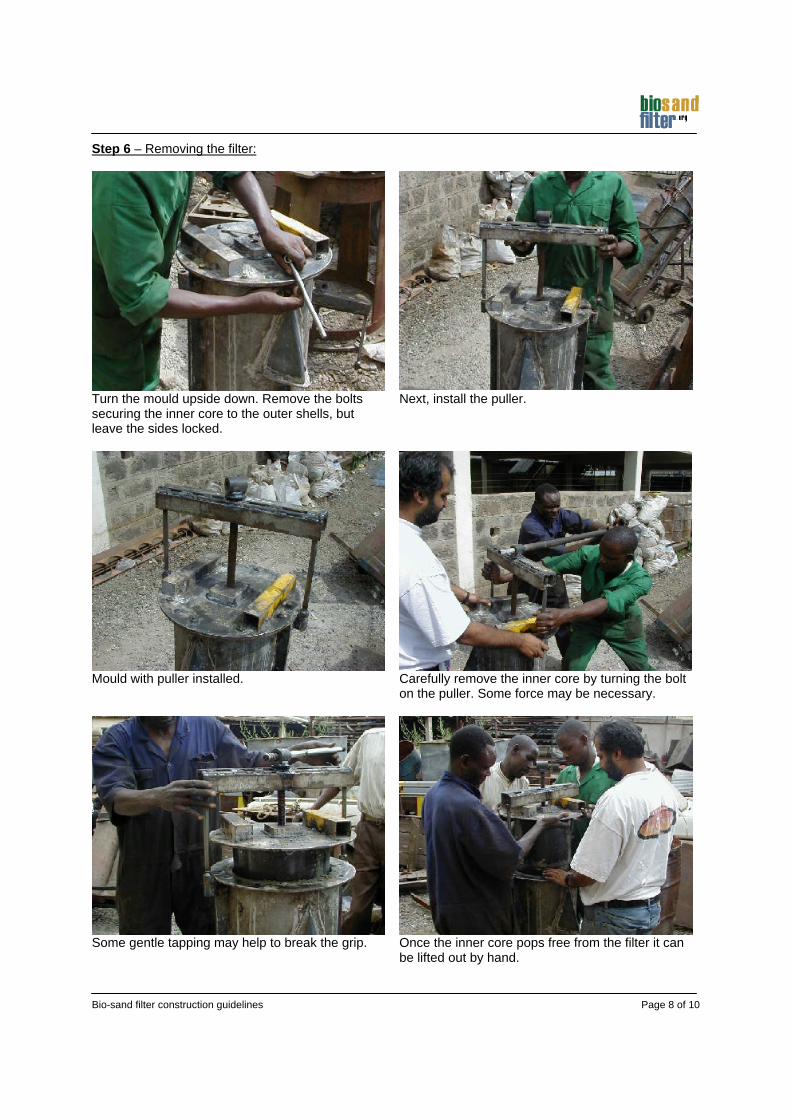
Step 6 – Removing the filter:
Turn the mould upside down. Remove the bolts securing the inner core to the outer shells, but leave the sides locked.
Next, install the puller.
Mould with puller installed. Carefully remove the inner core by turning the bolt on the puller. Some force may be necessary.
Some gentle tapping may help to break the grip. Once the inner core pops free from the filter it can be lifted out by hand.

Bio-sand filter construction guidelines Page 9 of 10
The inner core has been removed. Notice how poor poking or vibrating has left air trapped in the concrete. However, this can be easily repaired with cement.
With the inner core removed, unscrew the bolts from the sides. Also unscrew the bolt that secured the PVC pipe.
Carefully, pull the two halves apart. Do not forget to open the nose plate to avoid damaging the protruding PVC pipe.

Bio-sand filter construction guidelines Page 10 of 10
Here the outer shell with the nose section has been removed.
Using some cement, the air bubbles can be easily repaired. Do not forget to also fill the hole left by the bolt that originally secured the PVC pipe.
Important:
It is advisable to leave a newly produced filter fully with water for several days. This ensures that the concrete remains wet while it continues to cure. This also removes excess caustic soda from the filter walls. Leave the filter to harden for at least 7 days before transporting it (handle gently immediately after opening the mould).
The filter cast is now ready for use.
Note:
If the mould is to be used for intensive production then it is possible to use more outer shells with only one inner core. If handled carefully, the inner core can be removed after 8 - 12 hours.
Order information: This mould is also available ready-made. For more information, email [email protected].
Credits: This mould was designed by Jitu Jawahar Patani and Adriaan Mol in Nairobi, Kenya in 2000.