bishounentaurus - daz...
TRANSCRIPT
M
CreatorBISHOUNENTAURUS1
MANGA
STYLE
MMANGA STYLE
2
FAQQ: How do I keep it from replacing my textures?A: To keep the shader from replacing any textures you’re using (for example, the skin texture), hold CTRL while loading the texture. A window should pop up, the Material Preset Load Options window. Under the Options tag, set Images to Ignore. All of your textures will be kept in tact!
Q: My textures are coming out too dark. How do I make them brighter?A: If you’re having problems with textures (particularly skin textures) turning out darker than ex-pected, you can brighten the texture within Daz Studio by turning down the screentone strength. Please see the Screentone section for more information.
Q: My opacity maps are coming out weird. Why?A: Manga Style doesn’t handle opacity maps (a.k.a trans maps or alpha maps) in the usual way. To ensure that the opacity maps don’t break the style of the image, they’re fed through one of two processes; outline, or screentone.
When using opacity maps, you must use one of the two presets found underManga Style Shaders/Partial Presets/Opacity Presets, based on whether you want the opacity maps to appear outlined or screentoned in the final render. For more information, please see the Opacity section.
Q: My renders look very messy, and most of the screentone isn’t showing up.A: This tends to happen when using very small screentone patterns. By default, Daz doesn’t handle tiny patterns all too well, making renders appear muddy at the best of times, and really bad at the worst of times. Fortunately, this is an easy fix...
In your Render Settings, change the Shading Rate to a smaller number. The smaller the number, the more accurate (and slower) the final render is. A Shading Rate of either 0.2 or 0.1 works well if you don’t mind a bit of noise (sometimes this can help add to the traditional manga effect), while a Shading Rate of 0.01 (the smallest number possible) will give you the most accurate pattern possible. Alternatively, you can also increase the size of the image (the screentone will resize to match). This is especially useful if you’re doing renders for print.
Q: Highlights on hair don’t look right. There are highlights where there shouldn’t be highlights, like where it’s completely transparent.A: This can be fixed with the Specular Through Opacity setting. On surfaces which use an opacity map, like hair or cloth, you should set this to 0. See the Opacity section for more info.
Note: Gonna be honest with you here, I accidentally set up the Specular Through Opacity option to be backwards. 0 is on, and 1 is off, instead of the other way around. I’m very sorry about this. :(
Q: Can I share any presets I make with my friends?A: Of course, BUT...and this is a big but...you must encode the presets using RTEncoder. The way Shader Mixer works is that the shader is embedded into every preset; you share the preset, you also share the shader. By encoding your presets (e.g MyMangaPresets.zip) with RTEncoder using an original Manga Style file (e.g the official PC installer) as a “key file”, you can make sure that only people who own Manga Style can use your custom Manga Style presets.
To download RTEncoder (for both encoding and decoding), visit here: http://www.rtencoder.com/
M
CreatorBISHOUNENTAURUS
1
23
4
3
ParametersDiffuse
Diffuse - TintThis is your basic diffuse parameter. You can use this to tint the surface and to apply a texture to the surface.
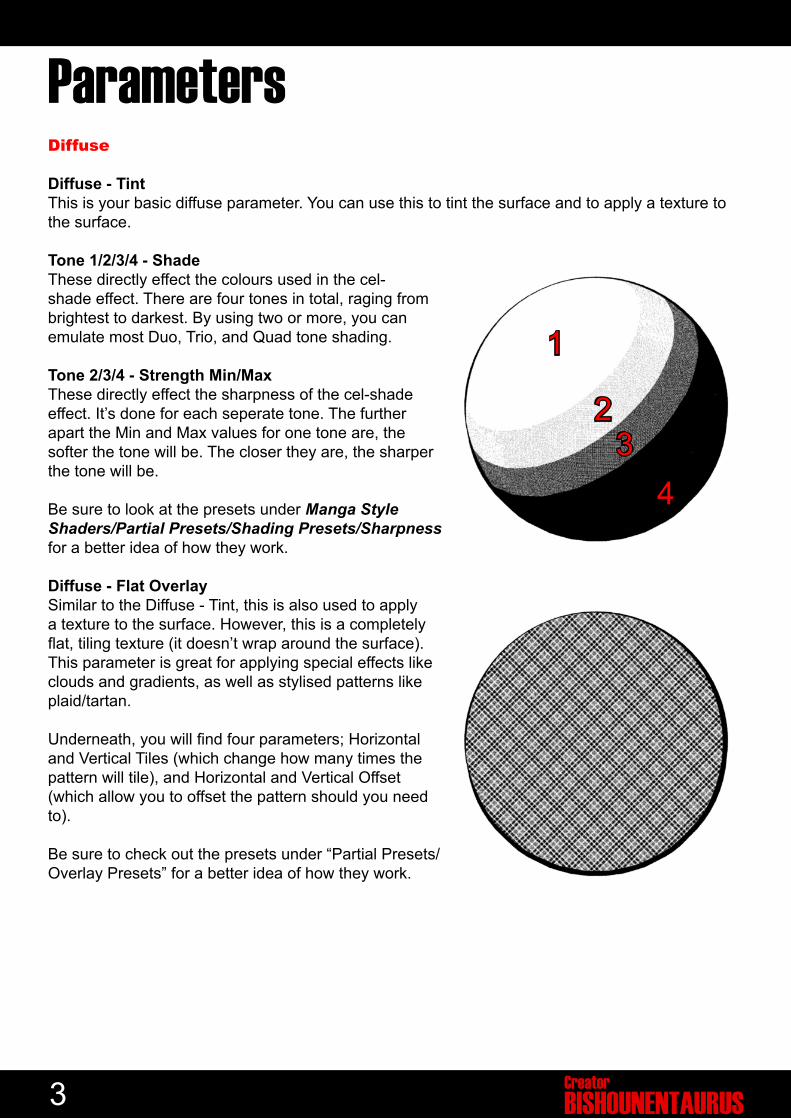
Tone 1/2/3/4 - ShadeThese directly effect the colours used in the cel-shade effect. There are four tones in total, raging from brightest to darkest. By using two or more, you can emulate most Duo, Trio, and Quad tone shading.
Tone 2/3/4 - Strength Min/MaxThese directly effect the sharpness of the cel-shade effect. It’s done for each seperate tone. The further apart the Min and Max values for one tone are, the softer the tone will be. The closer they are, the sharper the tone will be.
Be sure to look at the presets under Manga Style Shaders/Partial Presets/Shading Presets/Sharpness for a better idea of how they work.
Diffuse - Flat OverlaySimilar to the Diffuse - Tint, this is also used to apply a texture to the surface. However, this is a completely flat, tiling texture (it doesn’t wrap around the surface). This parameter is great for applying special effects like clouds and gradients, as well as stylised patterns like plaid/tartan.
Underneath, you will find four parameters; Horizontal and Vertical Tiles (which change how many times the pattern will tile), and Horizontal and Vertical Offset (which allow you to offset the pattern should you need to).
Be sure to check out the presets under “Partial Presets/Overlay Presets” for a better idea of how they work.

MMANGA STYLE
4
Specular
These are your basic specular controls. Here, you can change the colour, strength, glossiness, and sharpness of the specular highlight. For a quick and easy way to apply specular highlights to your surfaces, check the presets under Manga Style Presets/Partial Presets/Specular Presets.
Outline
Colour - OutlineHere, you can change the colour of the toon outline. Any colour can be used, which can be useful when doing pop art or golden age style comic renders. You could also set it to white on darker surfaces if need be.
Outline - Thickness (Light/Dark Areas)These two parameters effect how thick the outline is. You can choose different thicknesses depending on lighting of the surface. Setting them both to the same value will give you a more even outline.
Outline - Thickness (Opacity Map)When using Outlined Opacity (see the Opacity section), this will effect how thick the outline will be around transparent areas. Most of the time, any value above 0.5 won’t work too well, so it’s recommended to keep this value under that (0.3 is the typically the optimal value).
Opacity
Specular Through OpacityWhen set to 1, the specular will shine regardless of whether the surface in question is transparent or opaque. This is good for surfaces like glass or water.
When set to 0, the specular is multiplied by the opacity, causing the highlight to become weaker the more transparent the surface is. This is useful for any type of surface that uses an opacity map, such as hair.
Opacity - MapThis is used to control the opacity of the surface. 1 is fully opaque, and 0 is fully transparent. A texture (opacity map) can be used here to control the opacity.
Opacity - StyleFrom here, you can switch between the two different opacity styles. 0 is Outlined, 1 is Screentoned.
Outlined will take the opacity map, sharpen it, and then apply an outline around the edges. (Fig 1)
Screentoned will apply a screentone effect to the opacity. (Fig 2)
Opacity - Threshold (Outlined Only)When using Outlined Opacity, this will effect the threshold of the sharpen effect. It’s generally advised to keep this at 0.5, but it can be adjusted if need be.
M
CreatorBISHOUNENTAURUS5
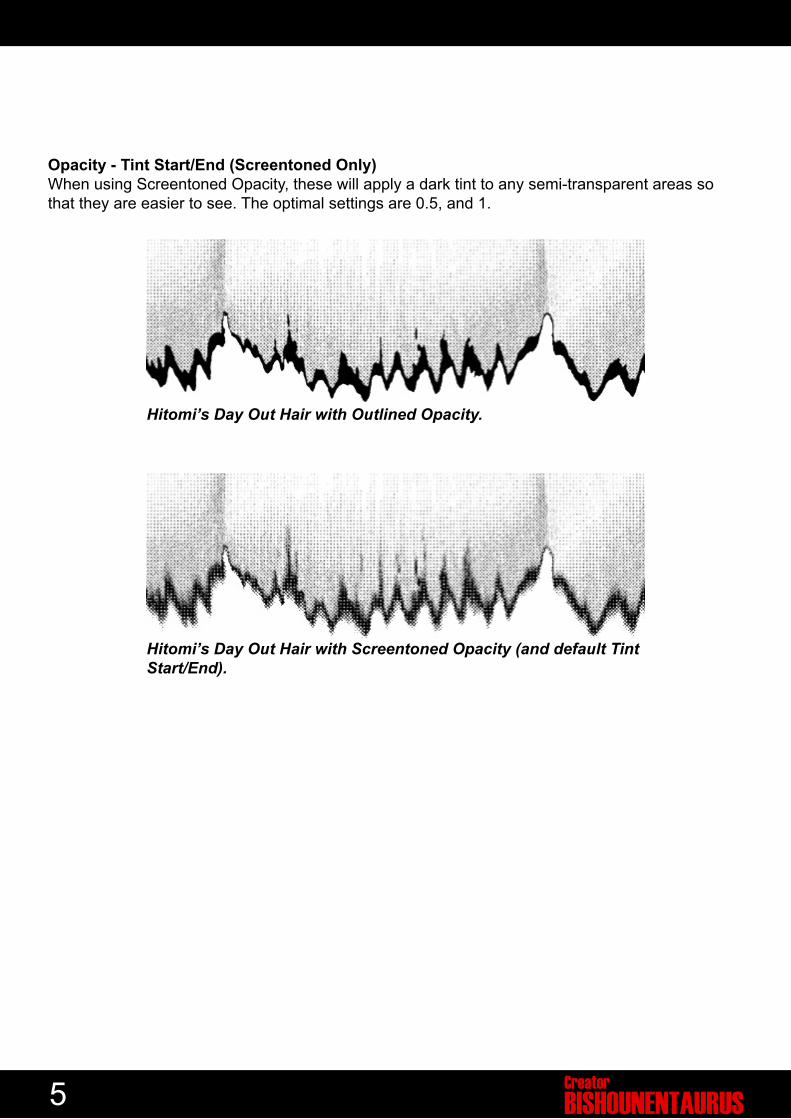
Opacity - Tint Start/End (Screentoned Only)When using Screentoned Opacity, these will apply a dark tint to any semi-transparent areas so that they are easier to see. The optimal settings are 0.5, and 1.
Hitomi’s Day Out Hair with Outlined Opacity.
Hitomi’s Day Out Hair with Screentoned Opacity (and default Tint Start/End).
MMANGA STYLE
12
3
4
}}
6
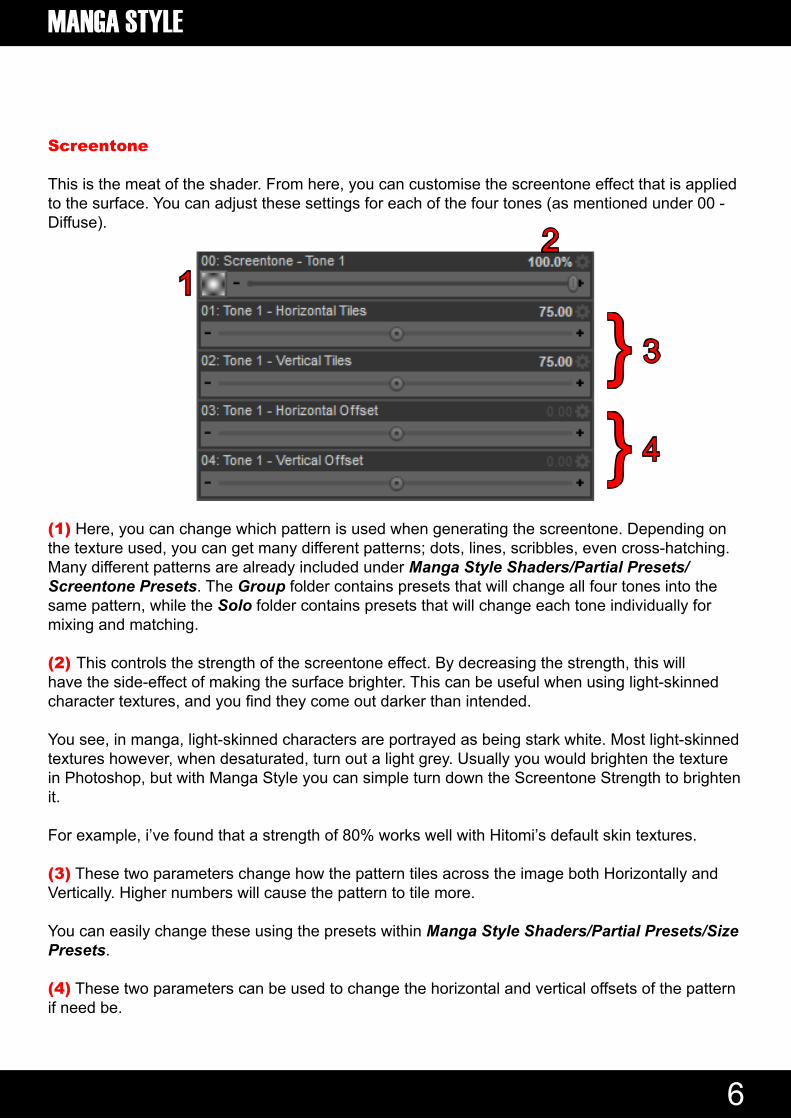
Screentone
This is the meat of the shader. From here, you can customise the screentone effect that is applied to the surface. You can adjust these settings for each of the four tones (as mentioned under 00 - Diffuse).
(1) Here, you can change which pattern is used when generating the screentone. Depending on the texture used, you can get many different patterns; dots, lines, scribbles, even cross-hatching. Many different patterns are already included under Manga Style Shaders/Partial Presets/Screentone Presets. The Group folder contains presets that will change all four tones into the same pattern, while the Solo folder contains presets that will change each tone individually for mixing and matching.
(2) This controls the strength of the screentone effect. By decreasing the strength, this will have the side-effect of making the surface brighter. This can be useful when using light-skinned character textures, and you find they come out darker than intended.
You see, in manga, light-skinned characters are portrayed as being stark white. Most light-skinned textures however, when desaturated, turn out a light grey. Usually you would brighten the texture in Photoshop, but with Manga Style you can simple turn down the Screentone Strength to brighten it.
For example, i’ve found that a strength of 80% works well with Hitomi’s default skin textures.
(3) These two parameters change how the pattern tiles across the image both Horizontally and Vertically. Higher numbers will cause the pattern to tile more.
You can easily change these using the presets within Manga Style Shaders/Partial Presets/Size Presets.
(4) These two parameters can be used to change the horizontal and vertical offsets of the pattern if need be.

M
CreatorBISHOUNENTAURUS7
Colour - Paper/Tone1/Tone2/Tone3/Tone4
These parameters will change the colour of the screentone effect. You can change the base colour (a.k.a the “paper”, white by default) as well as the colour of each tone (black by default). These also accept textures.

MMANGA STYLE
8
Included FilesIncluded with Manga Style is over one-hundred presets to help make using Manga Style as quick and simple as possible. A hundred presets is a lot to go through.
So to help ya out, here’s a quick runthrough of all the files that are included.
Blank
This is a completely blank preset, for creating new presets from scratch.
Geometry Shell Outline
This shader, when applied to a Geometry Shell, will make it look like a toon outline. You can use the shell’s usual settings to change the thickness of the shell (thereby changing the thickness of the outline), and to hide sections for any parts you don’t want to outline.
THERE’S J
UST
SO MANY!!

M
CreatorBISHOUNENTAURUS9
Partial PresetsThese are presets that only affect a small group of parameters while leaving everything else intact. You can use these to quickly alter existing Manga Style presets, or mix-n-match to make your own from scratch.
Opacity Presets
These are very important. These two presets contain the optimum settings for both Outlined and Screentoned opacity (see the Opacity section). These settings will work well with most opacity maps.
When using opacity maps, you MUST apply one of these presets (even if you’re using the Manga Hair preset mentioned later), or your opacity maps will look weird.
Outline Presets
These are presets that’ll effect the toon outline on the surface. As well as a “none” setting for turning it off completely, there are also heavy and light settings for both Lighting and Normal styles. The Lighting outline will change thickness depending on the lighting of the scene (brighter parts of the surface will have thinner outlines, darker sections will have thicker outlines). The Normal outline will be more even in thickness regardless of the lighting.
Overlay Presets
Here you can easily apply the included Overlays. The filenames will tell you which Ratio they are best suited for, and whether they are Tiled, Squared, or Stretched. Tile means that it will tile (in the case of the Clouds and Gradients, Horizontally), Square means that it’ll fit the width of an image by evenly scaling up, and Stretched means that it’ll fit the ratio of the render by stretching in one direction.
Currently the only Ratios supported are 1:1 (square renders) and 16:9 (wide renders, specifically 720p and 1080p).
For more information about Overlays, see the Diffuse section.
Screentone Presets
Here you can easily change the screentone pattern used on the surface. You can either use one of the Group settings to change all four Tones to the same pattern, or use the Solo settings to apply seperate patterns to seperate Tones (for more information on Tones, see the Diffuse section).
Shading Presets
These presets can be used to quickly change the shading that’s applied to the surface. There are Contrast presets, and Sharpness presets. The Contrast presets will apply either light and subtle or dark and strong tones. The Sharpness presets will make the cel-shading either soft or sharp, and comes in either Duo, Trio, or Quad flavours (again, see the Diffuse section for more information on Tones).

MMANGA STYLE
10
Size Presets
These presets will change the size of the screentone patterns you’re using. The higher the number, the smaller the patterns.
Specular Presets
You can use these to quickly and easily apply different types of specular highlights to the surface. There is also a “none” preset to turn it off.
M
CreatorBISHOUNENTAURUS11
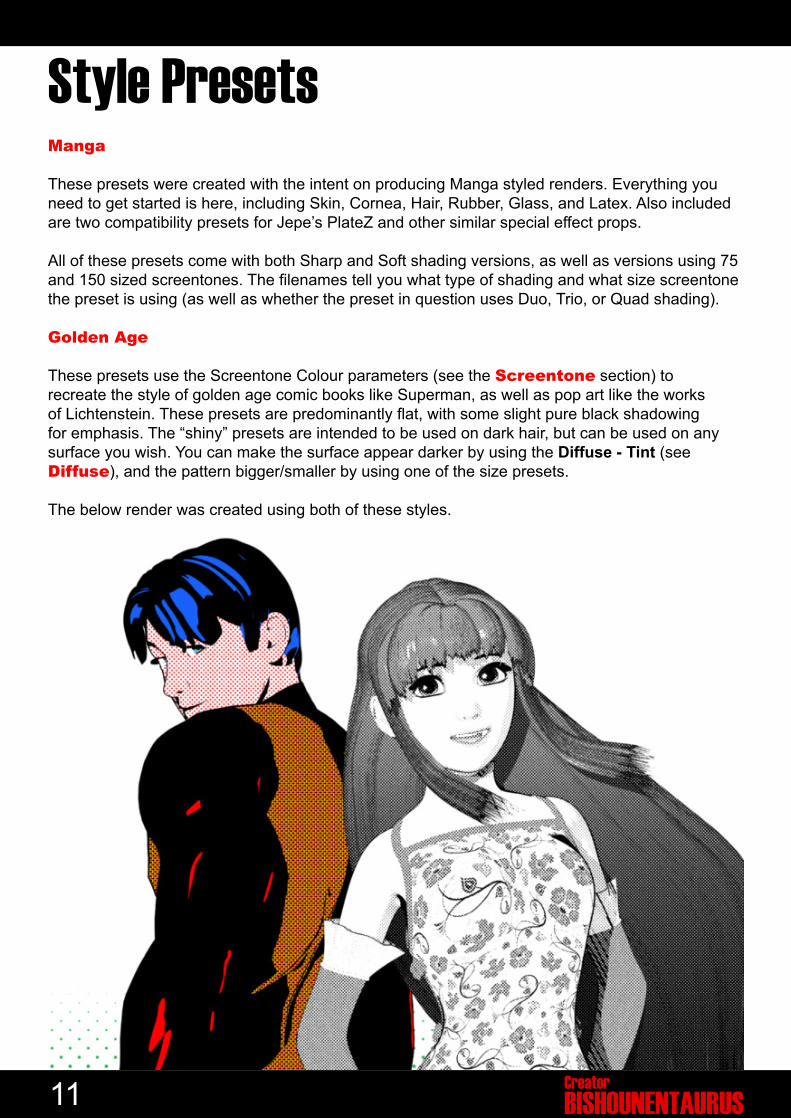
Style PresetsManga
These presets were created with the intent on producing Manga styled renders. Everything you need to get started is here, including Skin, Cornea, Hair, Rubber, Glass, and Latex. Also included are two compatibility presets for Jepe’s PlateZ and other similar special effect props.
All of these presets come with both Sharp and Soft shading versions, as well as versions using 75 and 150 sized screentones. The filenames tell you what type of shading and what size screentone the preset is using (as well as whether the preset in question uses Duo, Trio, or Quad shading).
Golden Age
These presets use the Screentone Colour parameters (see the Screentone section) to recreate the style of golden age comic books like Superman, as well as pop art like the works of Lichtenstein. These presets are predominantly flat, with some slight pure black shadowing for emphasis. The “shiny” presets are intended to be used on dark hair, but can be used on any surface you wish. You can make the surface appear darker by using the Diffuse - Tint (see Diffuse), and the pattern bigger/smaller by using one of the size presets.
The below render was created using both of these styles.

MMANGA STYLE
12
Hope this helped,HAVE FUN!