black titanium summit pen kit instructions
TRANSCRIPT

Review full manual instructions prior to use for important safety information. Always check Rockler.com to confirm that you are using the most recent manual version for your product.
Black Titanium Summit Pen Kit InstructionsEffective December 2018

2
GENERAL SAFETY WARNINGS
This product is designed only for specific applications as defined in the instructions and should not be modified or used for any manner not described in these instructions. Use only recommended accessories. Before using the Black Titanium Summit Pen Kit: READ, UNDERSTAND and FOLLOW ALL INSTRUCTIONS AND SAFETY WARNINGS. KEEP THESE INSTRUCTIONS READILY AVAILABLE FOR FUTURE REFERENCE.
> Always confirm that you are using the most recent version of the Instructions and safety warnings for your product (see the Instructions link on the product page at Rockler.com).
> Before using another tool with this product, always read, understand and follow the instructions and safety warnings in the owner’s manual for that tool. If you do not have the owner’s manual, obtain one from the tool’s manufacturer before using it with this product.
> Before using any chemical with this product, always read, understand and follow all safety warnings and guidelines in the manufacturer’s Safety Data Sheet (SDS; formerly called “MSDS”), especially regarding: • How to safely use the chemical, including potential hazards and recommended first aid measures; • Personal safety equipment required to safely use the chemical (e.g. gloves, eye protection, mask/respirator, etc.); • Proper and safe handling, storage and disposal of the chemical.
> Before using this product, review and verify that all tools to be used with it have safety equipment installed and are in proper working order as defined by the tool’s owner’s manual.
> Do not use this product until you have read and are confident you understand: • Blank Preparation (p. 3); • Turning the Blank (p. 3); • Assembly (p. 4).
> The user assumes all risk and responsibility for the proper and safe use of this product and for ensuring product suitability for the intended application.
> It is the sole responsibility of the purchaser of this product to ensure that any anyone you allow to use this product reads and complies with all instructions and safety precautions outlined in this manual prior to use.
> Follow all standard shop safety practices, including: • Keep children and bystanders away from the tool operating area; • Do NOT use power tools in explosive environments, or in the presence of flammable liquids, fumes or dust; • TURN OFF AND UNPLUG all power tools BEFORE making any adjustments or changing accessories; • Remain alert and use good judgment. Do not use this product if you are in any way impaired by medications, alcohol, drugs or fatigue; • Keep your work area well lit and clean; • Dress appropriately. Secure loose clothing, remove all jewelry and tie up long hair before using this product; • ALWAYS wear safety glasses, hearing protection and respiratory protection that complies with NIOSH/OSHA/ANSI safety standards; • Use dust collection tools and dust face masks to reduce exposure to dust; • Use safety equipment such as featherboards, push sticks and push blocks, etc., when appropriate; • Maintain proper footing at all times and do not overreach; • Do NOT force woodworking tools.
> These warnings and instructions do NOT represent the total of all information available regarding tool safety, use and technique. Always seek out opportunities to learn more and improve your skills and knowledge.
Drilling, sawing, sanding or machining wood products can expose you to wood dust, a substance known ot the State of California to cause cancer. Avoid inhaling wood dust or use a dust mask or other safeguards for personal protection. For more information go to www.P65Warnings.ca.gov/wood.
Danger indicates a hazardous situation that, if not avoided, will result in death or serious injury.
Warning indicates a hazardous situation that, if not avoided, could result in death or serious injury.Caution indicates a hazardous situation that, if not avoided, may result in minor or moderate injuryor property damage.Notice indicates important or helpful information and/or user tips.
BP0918

3
Blank Preparation1. Cut the blanks about 1/8" longer than the Brass Tubes to allow for blowout or hole elongation. Maintain grain orientation of the two blanks for turning by drawing a line lengthwise across the cut line.
2. Drill the blanks with a 7mm drill bit at a speed of 900 to 1,200 RPM.
3. Scuff the Brass Tubes with 220 grit sandpaper to remove oxidation and roughen the Tubes for better adhesion.
4. Prepare to glue with medium cyanoacrylate (CA) glue or two-part fast-drying epoxy.
5. Working on one at a time, apply the glue to the outside of the Brass Tubes, with a liberal amount around the ends that will be inserted first. Do not apply glue to the inside of the blank, as this will cause the glue to get inside the Brass Tubes and ruin the tube.
6. Insert each tube with a twisting motion into the blank until the tube is equidistant between both ends of the blank. Wipe off any excess glue. Allow the glue to cure.
7. Using a barrel trimmer or a disk or belt sander, trim the ends of the blanks until you can just see the bright brass ends of the tubes. The faces of the ends must be perpendicular to the Brass Tubes and parallel with each other. It is imperative that the length of the trimmed blanks match the original length of the Brass Tubes and that the insides of the Brass Tubes are clean and free of any glue.
8. Use a permanent marker to make marks inside the Brass Tubes that line up with the grain-alignment lines you drew on the outside of the blanks. This will help you maintain grain continuity after the blanks have been turned. Fig. 1.
Turning the Blank1. Assemble the blanks and bushings on the mandrel in the order shown in Mandrel Setup. Keep the grain orientation of the blanks in line when mounting. Note that the Stepped Bushing should be placed between the blanks and oriented as shown. The pen’s Center Band may be taped onto the Stepped Bushing and used to test the fit of the tenon you will turn on the blank containing the Upper Tube (Short). Just be sure not to contact the Center Band with cutters or sandpaper, or you might damage the finish.
2. Tighten the tailstock and then tighten the mandrel nut that holds the blanks. Do not overtighten the tailstock or mandrel nut as this may cause the mandrel to flex, causing the blanks to go out of round.
3. Mark and turn a 3/16” wide tenon on the end of the Upper Tube (Short) nearest the Stepped Bushing to match the inside diameter of the Center Band. Go slowly and make light cuts to avoid cutting the tenon too small. Stop the lathe occasionally to test the fit by trying to slide the Center Band onto the tenon. The fit should be snug. Make sure the Center Band has been resecured before turning the lathe back on. The portion of the Upper Blank nearest the tenon should be turned to the diameter of the Center Band (approximately 13mm).
4. Turn the blanks to the desired shape, making sure that the other surfaces next to the bushings are turned to the same diameter as the bushings.
5. After turning, sand the surfaces in progressive steps of 180, 240, 320, 400 and 600 grit. If a higher-gloss finish is desired, Micro-Mesh abrasives may be used.
6. Apply the finish of choice and polish.
7. Remove the blanks from the mandrel, taking care to maintain blank orientation and grain alignment.
Place a small piece of painter’s tape around the blanks toward the center onto which you can transfer the grain-alignment marks from inside the tubes.
Mandrel Setup
Fig. 1
Upper Tube (Short) Lower Tube (Long)NutMandrel
10.3mm 10.3mm 10.8mm 9.1mm
Stepped Bushing
Center Band
Summit Bushings
3/16" Tenon
4 Distributed by Rockler Companies, Inc. Medina, MN 55340
46345Rev 12/18
Check Rockler.com for updates. If you have further questions, pleasecontact our Technical Support Department at 1-800-260-9663 or [email protected]
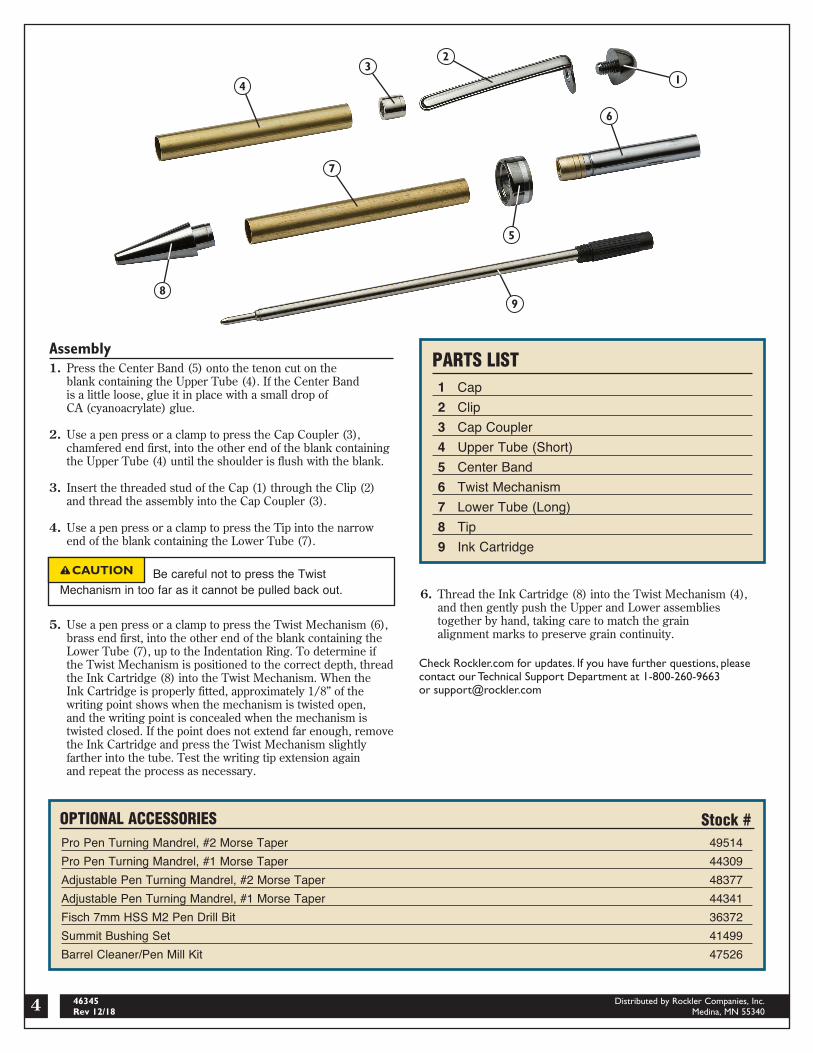
Assembly1. Press the Center Band (5) onto the tenon cut on the blank containing the Upper Tube (4). If the Center Band is a little loose, glue it in place with a small drop of CA (cyanoacrylate) glue.
2. Use a pen press or a clamp to press the Cap Coupler (3), chamfered end first, into the other end of the blank containing the Upper Tube (4) until the shoulder is flush with the blank.
3. Insert the threaded stud of the Cap (1) through the Clip (2) and thread the assembly into the Cap Coupler (3).
4. Use a pen press or a clamp to press the Tip into the narrow end of the blank containing the Lower Tube (7).
5. Use a pen press or a clamp to press the Twist Mechanism (6), brass end first, into the other end of the blank containing the Lower Tube (7), up to the Indentation Ring. To determine if the Twist Mechanism is positioned to the correct depth, thread the Ink Cartridge (8) into the Twist Mechanism. When the Ink Cartridge is properly fitted, approximately 1/8” of the writing point shows when the mechanism is twisted open, and the writing point is concealed when the mechanism is twisted closed. If the point does not extend far enough, remove the Ink Cartridge and press the Twist Mechanism slightly farther into the tube. Test the writing tip extension again and repeat the process as necessary.
6. Thread the Ink Cartridge (8) into the Twist Mechanism (4), and then gently push the Upper and Lower assemblies together by hand, taking care to match the grain alignment marks to preserve grain continuity.
Be careful not to press the Twist Mechanism in too far as it cannot be pulled back out.
Stock #Pro Pen Turning Mandrel, #2 Morse Taper 49514Pro Pen Turning Mandrel, #1 Morse Taper 44309Adjustable Pen Turning Mandrel, #2 Morse Taper 48377Adjustable Pen Turning Mandrel, #1 Morse Taper 44341Fisch 7mm HSS M2 Pen Drill Bit 36372Summit Bushing Set 41499Barrel Cleaner/Pen Mill Kit 47526
OPTIONAL ACCESSORIES
1 Cap 2 Clip 3 Cap Coupler 4 Upper Tube (Short) 5 Center Band 6 Twist Mechanism 7 Lower Tube (Long) 8 Tip 9 Ink Cartridge
PARTS LIST
1
23
4
7
5
9
6
8