blackboard collaborate accessibility guide v11
TRANSCRIPT
Version 11
Accessibility Guide for ParticipantsSeptember, 2011

Table of Contents
Page i
Preface 1
Conventions Used in this Guide 1
Operating System Differences 1
Notes 2
Typographical Conventions 3
Getting Help 3
Documentation and Training Materials 3
Technical Support 4
Chapter 1 Getting Started 5
System Requirements 5
Blackboard Collaborate Web Conferencing 5
Operating System 6
Java Web Start 6
Screen Readers 6
Getting Ready for a Blackboard Collaborate Session 7
Using this Guide 7
Chapter 2 The Blackboard Collaborate Web Conferencing Room 11
The Content Area Modes 13
Managing Panels and Windows 14
Working with Windows 14
Working with Panels 16
Managing Audio 18
Using the Audio Setup Wizard 18
Adjusting Microphone and Speaker Levels 20
Microphone Level 21
Speaker Level 21
Chapter 3 Navigation 23
Keyboard Navigation 24
Navigating Between Modules 24
Navigating Between Elements 24
Navigating Within a Toolbar of a Module Window 25
Navigating Within Drop-Down Menus 25
Navigating Between and Within Content Modes 26
Navigating within Whiteboard Content Mode 26
Navigating within Application Sharing Mode 27
Navigating within Web Tour Mode 27
Navigating Between and Reading Whiteboard Pages 28
Navigating Between Chat Conversation Tabs 29
Using Mnemonic and Keyboard Shortcuts 30
Mnemonics 30
Keyboard Shortcuts 31
Chapter 4 The Activity Window 41
Opening and Closing the Activity Window 42
Displaying Events 43
Filtering Events for Display 43
Resizing Activity Window Text 48
Showing/Hiding Time Stamps 48
Reading Events with a Screen Reader 49
Entering Commands 50
Live Session Commands 51
Recording Playback Command 52
Chapter 5 Closed-Captioning 53
Closed-Captioning Activity and Permission Indicators 54
ii Table of Contents
Entering Closed-Captioning Text 54
Viewing Closed-Captioning Text 55
Saving Closed-Captioning Text 56
Closing and Reopening the Closed Captioning Window 57
Chapter 6 Accessibility Options 59
Setting Notification Preferences 59
Audible Notifications 59
Visual Notifications 61
Application Sharing Options 63
Viewing a Shared Application 63
Scaling the Shared Content 63
Maximizing the Content Area 64
Emphasized Cursor 64
Hosting Options 64
Chat Options 66
Notes Options 67
Copyright 69
Trademarks 70
iiiTable of Contents

Preface
Page 1
This guide is written for Blackboard Collaborate Web Conferencing users with visual, auditory or motor disabilities. It describes the accessibility features in Blackboard Collaborate intended for these users.
Note: For a complete instructions on using Blackboard Collaborate, refer to the Participant's Guide available on the On-Demand Learning Center at http://www.blackboard.com/Platforms/Collaborate/Services/On-Demand-Learning-Center/Web-Conferencing.aspx.
See Getting Started on page 5 for a list of which sections in this guide are relevant to your par-ticular needs.
Conventions Used in this Guide
Operating System DifferencesThis guide is written for Blackboard Collaborate Web Conferencing users on all supported oper-ating systems: Windows, Mac OS X, and Linux.
Keystrokes and Mouse Clicks
The same keystrokes and mouse clicks are used on Windows and Linux platforms. Those used on Mac OS X are different. This guide gives instructions for users of all supported operating sys-tems. The Windows/Linux keystrokes or mouse clicks are given first, followed by those for Mac OS X (in parentheses):
Mouse Click Example
Select the object and then right-click (Control-Click on Mac) anywhere on the Whiteboard to dis-play the context menu.
Keystroke Example
Select the object(s) in the Whiteboard or in the Object Explorer and then enter Ctrl+X (Com-mand-X on Mac) to cut the object(s).
Screen Captures
Most screen captures shown in this guide were taken in a Windows environment. If you are run-ning Blackboard Collaborate Web Conferencing on a Mac OS X or Linux platform, the appear-ance of windows, dialog boxes, etc. will differ slightly from those shown in this guide.
Variables
There are a few places in Blackboard Collaborate Web Conferencing that are populated with data specific to the session. Because we do not know in advance what those data (e.g., words or names) will be, in this guide they are represented by variables enclosed in angle brackets. For example, the variable <Panel Name> is used in the discussion of Restoring Default Prefence Sett-tings to represent the name of the currently selected panel.
NotesSix types of notes are used in this guide to highlight information:
Note: Notes are used to highlight important information or to present asides relevant to the topic at hand.
Tip: Tips provide helpful information on how to most effectively use a particular feature of Blackboard Collaborate Web Conferencing.
Caution: Cautions alert you to potentially confusing terminology or difficulties that may occur when using Blackboard Collaborate Web Conferencing.
2 Preface
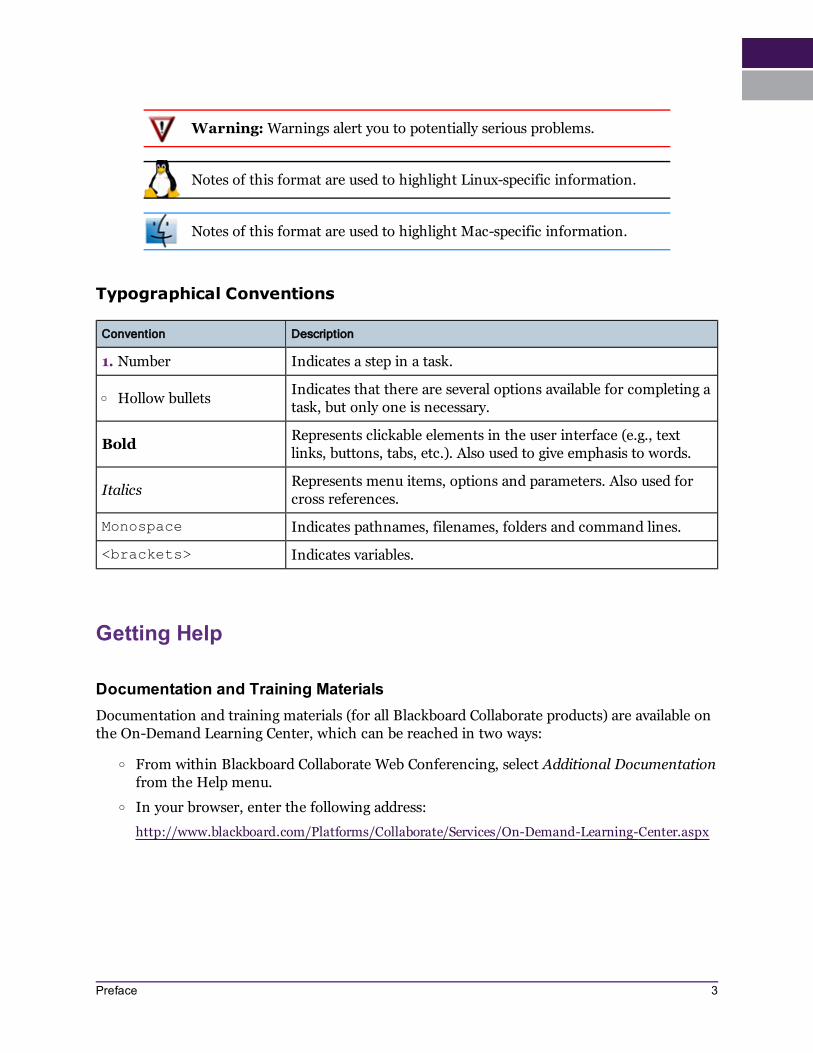
Warning: Warnings alert you to potentially serious problems.
Notes of this format are used to highlight Linux-specific information.
Notes of this format are used to highlight Mac-specific information.
Typographical Conventions
Convention Description
1. Number Indicates a step in a task.
o Hollow bullets Indicates that there are several options available for completing a task, but only one is necessary.
Bold Represents clickable elements in the user interface (e.g., text links, buttons, tabs, etc.). Also used to give emphasis to words.
Italics Represents menu items, options and parameters. Also used for cross references.
Monospace Indicates pathnames, filenames, folders and command lines.
<brackets> Indicates variables.
Getting Help
Documentation and Training MaterialsDocumentation and training materials (for all Blackboard Collaborate products) are available on the On-Demand Learning Center, which can be reached in two ways:
o From within Blackboard Collaborate Web Conferencing, select Additional Documentation from the Help menu.
o In your browser, enter the following address:
http://www.blackboard.com/Platforms/Collaborate/Services/On-Demand-Learning-Center.aspx
3Preface
You can directly open the following documents from within Blackboard Collaborate Web Con-ferencing by selecting them from the Help menu:
l Keyboard Shortcuts
l Accessibility Guide (Moderator's version)
l Blackboard Collaborate Essentials for Moderators
l Blackboard Collaborate Essentials for Participants
Technical SupportBlackboard Collaborate technical support and the support Knowledge Base are available through the Support Portal:
http://support.blackboardcollaborate.com
4 Preface
Chapter 1
Page 5
Getting StartedBefore you begin using the accessibility features of Blackboard Collaborate Web Conferencing, we recommend you do the following:
n ensure your system meets the necessary requirements (see System Requirements below);
n get Blackboard Collaborate ready to use accessibility features (see Getting Ready for a Blackboard Collaborate Session on page 7);
n see which parts of this guide are most relevant to you (see Using this Guide on page 7); and
n familiarize yourself with the Blackboard Collaborate user interface.
System RequirementsIn order to use the accessibility features in Blackboard Collaborate Web Conferencing, you must meet the following system requirements.
Blackboard Collaborate Web Conferencing The full set of accessibility features are available only in the English version of Blackboard Col-laborate version 11.
Operating SystemOnly Windows operating systems support all of the Blackboard Collaborate accessibility fea-tures:
n Windows XP (32 bit), Windows Vista (32 bit) or Windows 7 (32 bit)
n Pentium III 1 GHz processor
n 256 MB RAM
Linux (Ubuntu 9.10) and Mac (Mac OS X 10.5 or higher) support only some of the Blackboard Collaborate accessibility features.
Java Web StartJava version 1.5 or higher (32-bit only) is required to run Blackboard Collaborate and the Java Accessibility Bridge (see below). (A 64-bit version of Java is not compatible with the Java Acces-sibility Bridge, which only comes in a 32-bit version.)
To check to see if you have the correct version of Java, open the following web page:
http://support.blackboardcollaborate.com/ics/support/default.asp?deptID=8336&task=knowledge&questionID=1473
The “Step 1- Checking System Requirements” will tell you whether or not you have the required version of Java Web Start and, if not, provide a link to the Java download page.
Screen ReadersJAWS (version 9, 10 or 11) is the only supported screen reader for Blackboard Collaborate ver-sion 11.
For further details on JAWS and the Java Access Bridge, see the Knowledge Base Article What are the System Requirements for the Java Access Bridge and JAWS? at the following web page:
http://support.blackboardcollaborate.com/ics/support/default.asp?deptID=8336&task=knowledge&questionID=692
Java Access Bridge
The Java™ Access Bridge is a technology that allows assistive technologies (such as screen read-ers, magnifiers, etc.) to access Java applications and applets, including Blackboard Collaborate. In order to use Blackboard Collaborate with the JAWS screen reader, you must install Java Access Bridge version 2.0.1.
To download this tool, go to the following web page and then click on the Download the Java Access Bridge 2.0.1 link:
http://www.oracle.com/technetwork/java/javase/tech/jab-previous-releases-354403.html
6 Getting Started
Note: Whenever you install a new version of Java, you must re-install the Java Access Bridge. There is no need to download the installer again; after the first installation you can find it in the following location:C:\Program Files\Java Access Bridge\installer.exe
Getting Ready for a Blackboard Collaborate SessionIf you will be using JAWS to navigate through the Blackboard Collaborate Web Conferencing interface, be sure to do the following:
1. Start JAWS before you log in to the session.
2. Verify that the Java Access Bridge is working.
3. Configure JAWS to read all access keys so the mnemonic keys are spoken aloud; other-wise, you won’t be able to identify them. This setting is found under the basic settings of JAWS.
It is advisable to enter the room early (before the session starts) so you can configure your Black-board Collaborate interface to suit your particular needs. How early you can enter the room is set by the session creator. The default is 30 minutes but the session creator may change that.
1. For those using audio in your Blackboard Collaborate session, run the Audio Setup Wizard to ensure your microphone and speakers are set to suitable levels. For details, see Using the Audio Setup Wizard on page 18.
2. For all users, set which Audible and Visual Notifications you wish to receive in the session. For details, see Setting Notification Preferences on page 59.
Using this GuideBlackboard Collaborate Web Conferencing has been designed to meet the needs of users of var-ious abilities. Some of the accessibility features are helpful to those whose mobility make it dif-ficult for them to use a mouse, others are for users who are deaf or hard of hearing and others are for users with limited vision (including color blindness) or no vision.
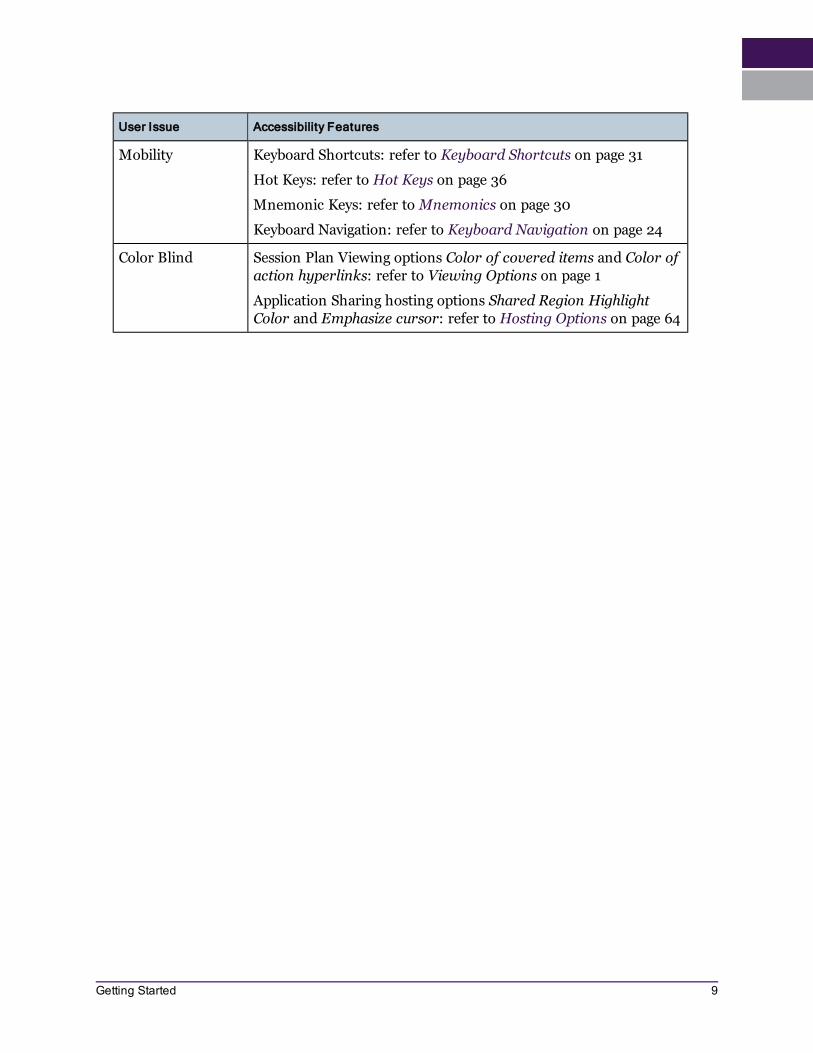
The following table lists the various target audiences and the accessibility features from which each would benefit, including a reference to the relevant section in this document.
7Getting Started

User Issue Accessibility Features
Low Vision Maximizing window and panel sizes: refer to Managing Panels and Windows on page 14
Activity Window: refer to The Activity Window on page 41
Audible Notifications: refer to Audible Notifications on page 59
Keyboard Shortcuts: refer to Keyboard Shortcuts on page 31
Hot Keys: refer to Hot Keys on page 36
Keyboard Navigation: refer to Keyboard Navigation on page 24
Chat text size options: refer to Chat Options on page 1
Notes text size options: refer to Notes Options on page 1
Session Plan Display Setting preferences: refer to Display Settings on page 1
Application Sharing hosting option Emphasize cursor: refer to Hosting Options on page 64
Application Sharing viewing features to scale the shared content and maximize the content area: refer to Viewing a Shared Appli-cation on page 63
Blind Activity Window: refer to The Activity Window on page 41
Audible Notifications: refer to Setting Notification Preferences on page 59
Keyboard Shortcuts: refer to Keyboard Shortcuts on page 31
Hot Keys: refer to Hot Keys on page 36
Keyboard Navigation: refer to Keyboard Navigation on page 24
Deaf or Hard of Hearing
Activity Window: refer to The Activity Window on page 41
Visual Notifications: refer to Setting Notification Preferences on page 59
Closed-Captioning: refer to Closed-Captioning on page 53
Audio volume controls: refer to Adjusting Microphone and Speaker Levels on page 20
Audio Setup Wizard: refer to Using the Audio Setup Wizard on page 18
8 Getting Started
User Issue Accessibility Features
Mobility Keyboard Shortcuts: refer to Keyboard Shortcuts on page 31
Hot Keys: refer to Hot Keys on page 36
Mnemonic Keys: refer to Mnemonics on page 30
Keyboard Navigation: refer to Keyboard Navigation on page 24
Color Blind Session Plan Viewing options Color of covered items and Color of action hyperlinks: refer to Viewing Options on page 1
Application Sharing hosting options Shared Region Highlight Color and Emphasize cursor: refer to Hosting Options on page 64
9Getting Started

Chapter 2
Page 11
The Blackboard Collaborate Web Conferencing Room
The Blackboard Collaborate Web Conferencing room consists of six main components: the menu bar at the top, three panels on the left (Audio & Video panel on top, the Participants panel in the middle and Chat panel on the bottom), the Collaboration toolbar at the top of the right side and the main content area on the right (for displaying Whiteboard, Application Sharing and Web Tour content).
n The Menu bar contains the File, Edit, View, Tools, Windows and Help menus.
n The Audio & Video panel enables you to participate in conversations either using a microphone and speakers (or headset) or via a teleconference. You also can transmit and receive Video during the session and preview your video before transmitting it.
n The Participants panel provides a list of all Participants and Moderators in the session and information about their current activities, such as talking (Audio), transmitting Video, sending a Chat message, using the Whiteboard drawing tools and conducting an Appli-cation Sharing session.
Above the Participants list is a small toolbar containing buttons for raising your hand and stepping away from the session and menus for selecting polling responses and feedback options.
n The Chat panel enables you to send Chat messages to everyone in the room or to Mod-erators only. By selecting names in the Participants list, you can send private Chat mes-sages to individuals. Messages can be printed and saved to track session communication.
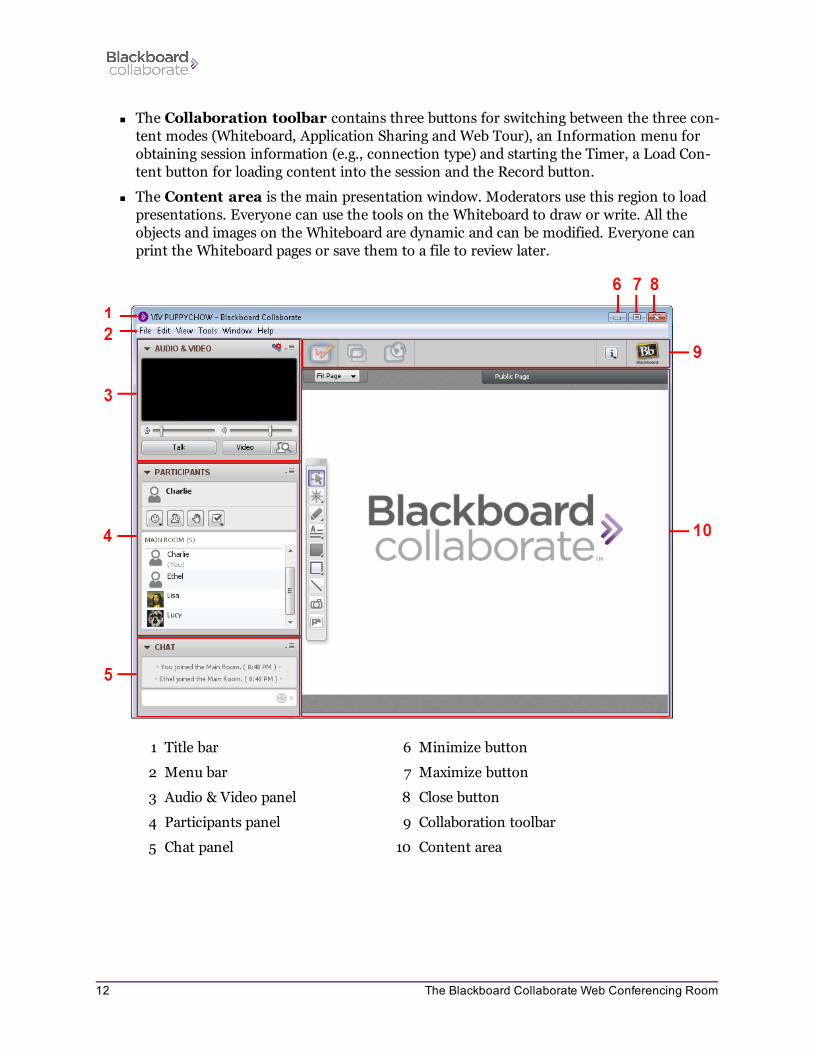
n The Collaboration toolbar contains three buttons for switching between the three con-tent modes (Whiteboard, Application Sharing and Web Tour), an Information menu for obtaining session information (e.g., connection type) and starting the Timer, a Load Con-tent button for loading content into the session and the Record button.
n The Content area is the main presentation window. Moderators use this region to load presentations. Everyone can use the tools on the Whiteboard to draw or write. All the objects and images on the Whiteboard are dynamic and can be modified. Everyone can print the Whiteboard pages or save them to a file to review later.
1 Title bar 6 Minimize button
2 Menu bar 7 Maximize button
3 Audio & Video panel 8 Close button
4 Participants panel 9 Collaboration toolbar
5 Chat panel 10 Content area
12 The Blackboard Collaborate Web Conferencing Room
The Content Area ModesThe Whiteboard, Application Sharing and Web Tour share space in the Blackboard Collaborate Web Conferencing interface – each represents a "mode" in the content area. Although White-board content, Application Sharing content and Web Tour content may all be loaded at the same time, you will be able to see the content of only one mode at a time.
Only certain users can switch between modes:
n Moderators with can switch between all modes.
n Participants with Application Sharing permission can switch to Application Sharing mode and back to Whiteboard mode.
n Participants with Web Tour permission can switch to Web Tour mode and back to White-board mode.
Participants with Whiteboard permission but not Application Sharing or Web Tour permission cannot switch to Whiteboard mode from either of the other two modes. This safeguards against Participants switching modes during someone else's Web Tour or Application Sharing pre-sentation.
When someone switches modes, everyone in the session will follow them to the new mode.
Be careful not to inadvertently switch modes on someone else who is presenting content. Everyone in the session will follow you to the new mode.
To switch modes, do one of the following:
o Click on the button in the Collaboration toolbar associated with the desired mode.
o Select the desired mode from the View menu.
o Use the keyboard shortcut associated with the desired mode:
Whiteboard mode: Ctrl+Alt+W (Command-Option-W on Mac)
Application Sharing mode: Ctrl+Alt+A (Command-Option-S on Mac)
Web Tour mode: Ctrl+Alt+U (Command-Option-U on Mac)
13The Blackboard Collaborate Web Conferencing Room
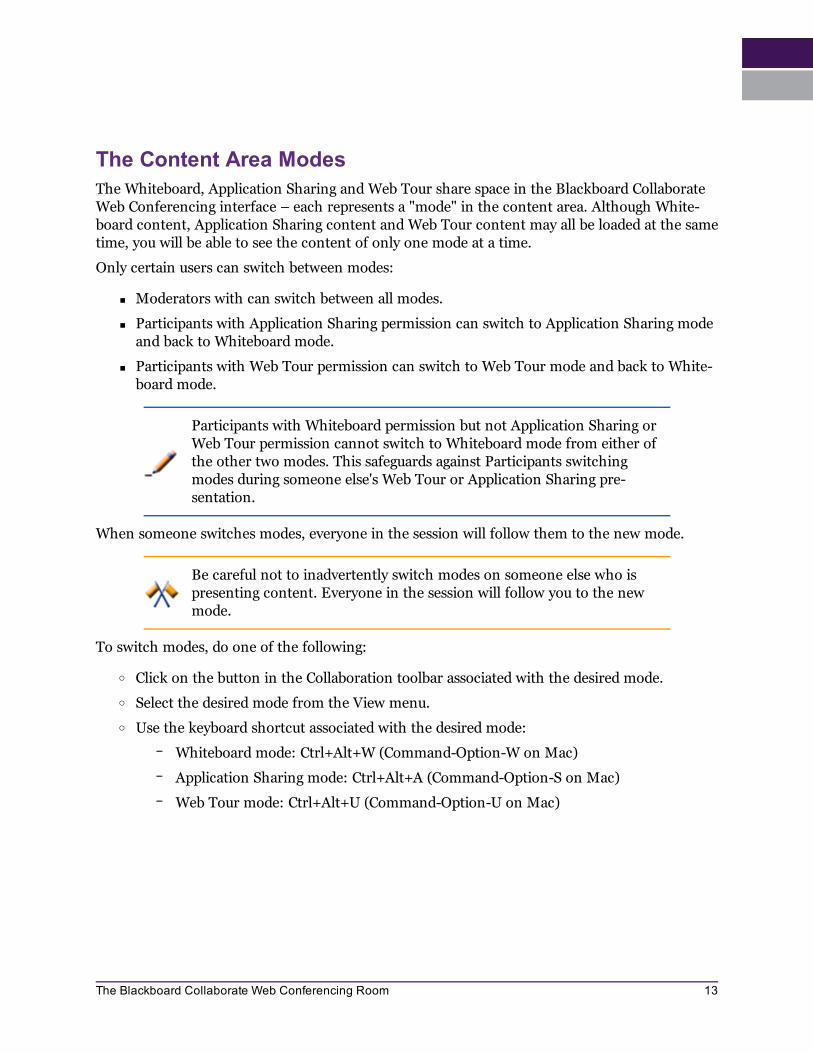
You can easily see which mode is selected by noting which button in the Collaboration toolbar is colored. In the Collaboration toolbar below, the current mode is Whiteboard mode.
Managing Panels and WindowsThe Blackboard Collaborate Web Conferencing interface consists of panels and windows. Panels can be collapsed, expanded, detached and reattached, resized and, in their detached state, can be moved. These side panels (Audio & Video, Participants and Chat) also can be hidden. For details, see Working with Panels on page 16.
The main application window can be minimized, maximized, moved, resized and closed. Other windows can be opened, moved, resized and closed. For details, see Working with Windows below.
Working with WindowsThere are a number of different kinds of windows in Blackboard Collaborate Web Conferencing: the main application window, module windows (such as the Notes window and the Multimedia Library), dialog boxes (such as the Preferences dialog and Create Breakout Rooms dialog) and utility windows (such as the Object Explorer and Page Explorer).
Below are the ways you can manage your windows:
n Open the main application window: To open the window you need to join the ses-sion by clicking on a link.
14 The Blackboard Collaborate Web Conferencing Room

n Open a main module window: To open the window of one of the main modules, select it from the Window menu or, if available, open it using its associated keyboard short-cut (see Keyboard Shortcuts on page 31.)
n Move a window: Grab the window by its title bar and, while holding down your mouse, drag it to the desired location and then drop it by releasing the mouse.
n To resize a window: Grab a window border and drag it. Hold your mouse over any side or a corner and, when the cursor changes to a two-headed arrow, click and drag the bor-der of the window to contract or expand it.
n Minimize or maximize the main application window: Use the standard con-ventions of your operating system for minimizing and maximizing windows. For example, on Windows, use the Minimize and Maximize buttons in the window's title bar:
n Un-obscure a window: If part of a window is obscured by another window or panel, click on the window itself to bring it to the front of the other window or panel.
Tip: If you can't find a window because it is hidden beneath other windows, an easy way to find it is to select Restore Default Layout from the View menu and then open your window again.
15The Blackboard Collaborate Web Conferencing Room

n Close a main module window: To close a main module window, do one of the fol-lowing:
o Click on the window’s Close button in the title bar of the window.
o Enter Ctrl+W (Command-W on Mac)
o Enter Alt+F4 (Windows and Linux only)
n Close the main application window: If you close the main application window you will leave the session. For details, see Closing the Application on page 1.
Working with PanelsThe default when you first join a Blackboard Collaborate Web Conferencing session is for the Participants and Chat panels to be expanded and attached and the Audio & Video panel to be col-lapsed and attached. Blackboard Collaborate will remember the state in which you left your pan-els (expanded or collapsed and attached or detached) from one session to the next (but only if you are logged in to the same computer).
Below are the ways you can manage your panels:
n Collapse and expand a panel: By default, the panels are expanded. If you want to make more room for one of the panels, you can collapse the others.
To collapse a panel, click on the Collapse button in the panel's title bar:
To expand the panel back to its former state, click on the Expand button in the panel's title bar:
n Move a panel: Grab the panel (either attached or detached) by its title bar and, while holding down your mouse, drag it to the desired location and then drop it by releasing the mouse.
16 The Blackboard Collaborate Web Conferencing Room
n Detach and reattach a panel: Panels can be detached so you can move them to a more convenient location.
To detach a panel, do one of the following:
o From the Options menu, select Detach Panel.
o Drag and drop the panel out of the main application window. (See Move a panel above.)
To reattach a panel, do one of the following:
o From the Options menu, select Attach Panel.
o Drag and drop the panel back into the main application window. (See Move a panel above.)
o From the View menu, select Restore Default Layout.
o Click on the panel's Close button:
n Reorder an attached panel: Drag and drop the panel up or down within the side bar area (left side) of the main application window. (See Move a panel above.)
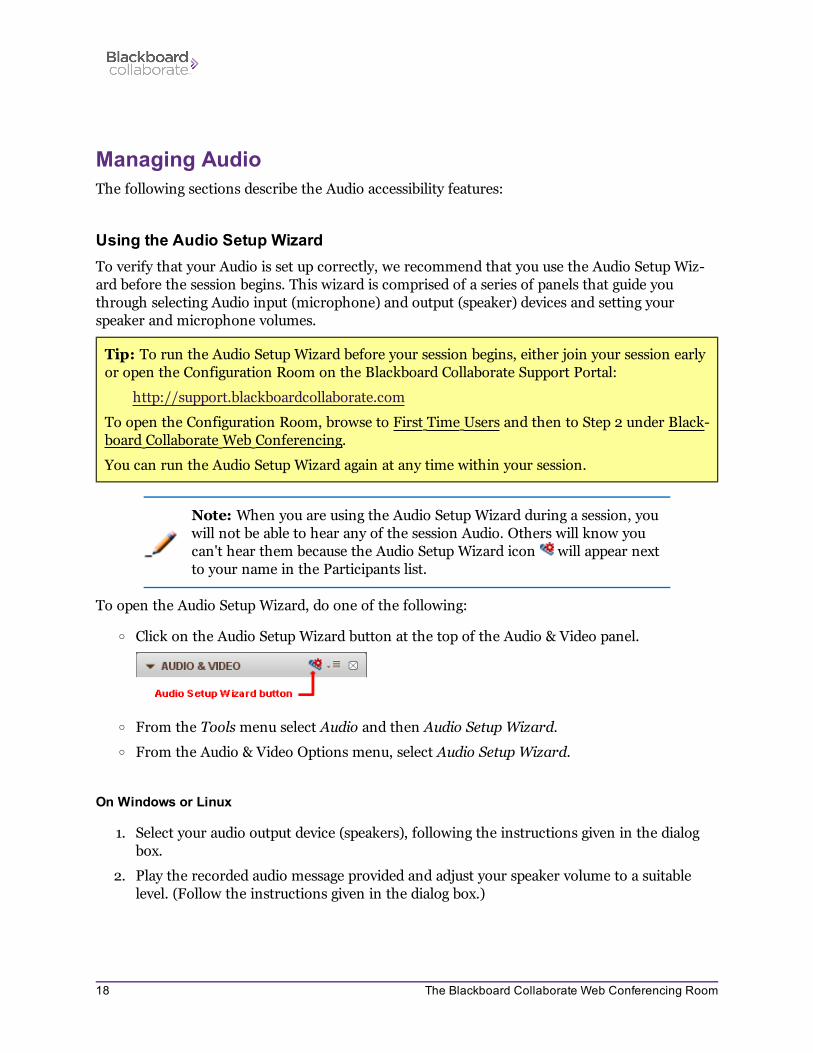
n Hide attached side panels: You can make the Content area larger by hiding the side bar area (left side) of the main application window. To do so, in the View menu, unselect (uncheck) Show Side Bar. To restrore the side bar, reselect it. Alternatively, you can grab the border of any one of the panels and drag it all the way to the left. To bring the side bar back, grab it again and move to the right.
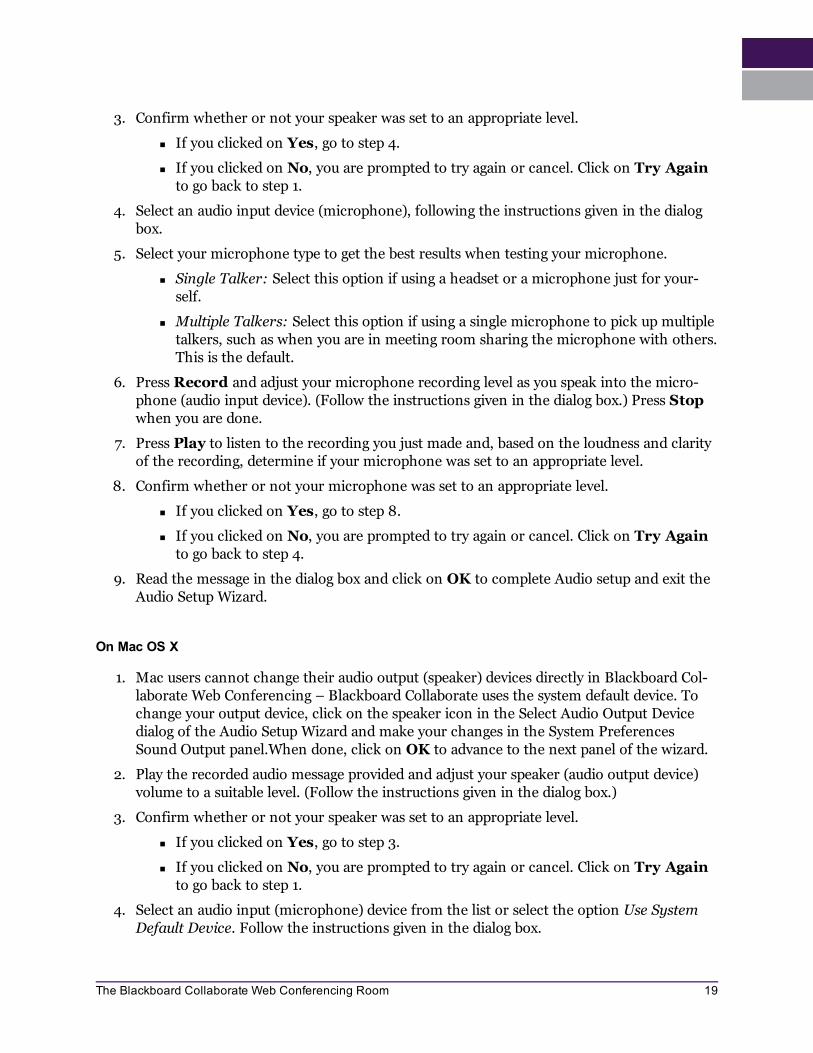
n Resize a panel: Grab a panel border and drag it. Hold your mouse over any side (either attached or detached) or a corner (detached only) and, when the cursor changes to a two-headed arrow, click and drag the border of the panel to contract or expand it.
n Un-obscure detached panels: If part of the panel is obscured by another panel or win-dow, click anywhere on the panel to bring it to the front of the other panel or window.
17The Blackboard Collaborate Web Conferencing Room
Managing AudioThe following sections describe the Audio accessibility features:
Using the Audio Setup WizardTo verify that your Audio is set up correctly, we recommend that you use the Audio Setup Wiz-ard before the session begins. This wizard is comprised of a series of panels that guide you through selecting Audio input (microphone) and output (speaker) devices and setting your speaker and microphone volumes.
Tip: To run the Audio Setup Wizard before your session begins, either join your session early or open the Configuration Room on the Blackboard Collaborate Support Portal:
http://support.blackboardcollaborate.com
To open the Configuration Room, browse to First Time Users and then to Step 2 under Black-board Collaborate Web Conferencing.
You can run the Audio Setup Wizard again at any time within your session.
Note: When you are using the Audio Setup Wizard during a session, you will not be able to hear any of the session Audio. Others will know you can't hear them because the Audio Setup Wizard icon will appear next to your name in the Participants list.
To open the Audio Setup Wizard, do one of the following:
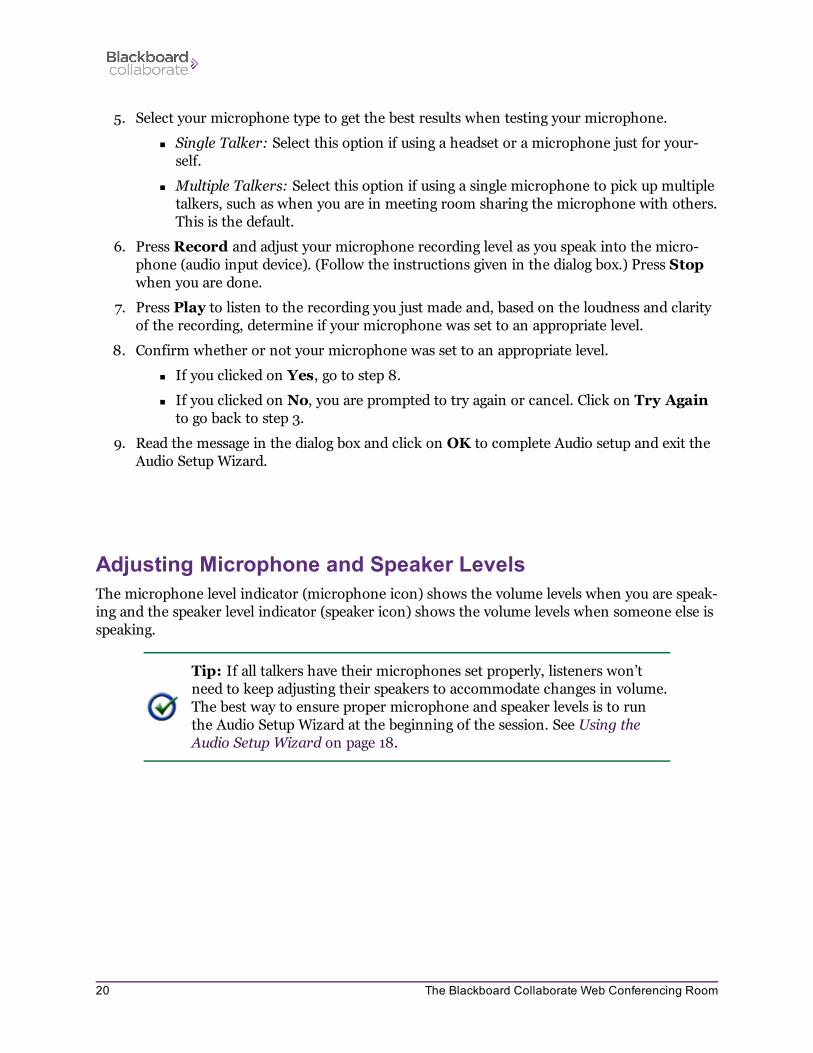
o Click on the Audio Setup Wizard button at the top of the Audio & Video panel.
o From the Tools menu select Audio and then Audio Setup Wizard.
o From the Audio & Video Options menu, select Audio Setup Wizard.
On Windows or Linux
1. Select your audio output device (speakers), following the instructions given in the dialog box.
2. Play the recorded audio message provided and adjust your speaker volume to a suitable level. (Follow the instructions given in the dialog box.)
18 The Blackboard Collaborate Web Conferencing Room
3. Confirm whether or not your speaker was set to an appropriate level.
n If you clicked on Yes, go to step 4.
n If you clicked on No, you are prompted to try again or cancel. Click on Try Again to go back to step 1.
4. Select an audio input device (microphone), following the instructions given in the dialog box.
5. Select your microphone type to get the best results when testing your microphone.
n Single Talker: Select this option if using a headset or a microphone just for your-self.
n Multiple Talkers: Select this option if using a single microphone to pick up multiple talkers, such as when you are in meeting room sharing the microphone with others. This is the default.
6. Press Record and adjust your microphone recording level as you speak into the micro-phone (audio input device). (Follow the instructions given in the dialog box.) Press Stop when you are done.
7. Press Play to listen to the recording you just made and, based on the loudness and clarity of the recording, determine if your microphone was set to an appropriate level.
8. Confirm whether or not your microphone was set to an appropriate level.
n If you clicked on Yes, go to step 8.
n If you clicked on No, you are prompted to try again or cancel. Click on Try Again to go back to step 4.
9. Read the message in the dialog box and click on OK to complete Audio setup and exit the Audio Setup Wizard.
On Mac OS X
1. Mac users cannot change their audio output (speaker) devices directly in Blackboard Col-laborate Web Conferencing – Blackboard Collaborate uses the system default device. To change your output device, click on the speaker icon in the Select Audio Output Device dialog of the Audio Setup Wizard and make your changes in the System Preferences Sound Output panel.When done, click on OK to advance to the next panel of the wizard.
2. Play the recorded audio message provided and adjust your speaker (audio output device) volume to a suitable level. (Follow the instructions given in the dialog box.)
3. Confirm whether or not your speaker was set to an appropriate level.
n If you clicked on Yes, go to step 3.
n If you clicked on No, you are prompted to try again or cancel. Click on Try Again to go back to step 1.
4. Select an audio input (microphone) device from the list or select the option Use System Default Device. Follow the instructions given in the dialog box.
19The Blackboard Collaborate Web Conferencing Room
5. Select your microphone type to get the best results when testing your microphone.
n Single Talker: Select this option if using a headset or a microphone just for your-self.
n Multiple Talkers: Select this option if using a single microphone to pick up multiple talkers, such as when you are in meeting room sharing the microphone with others. This is the default.
6. Press Record and adjust your microphone recording level as you speak into the micro-phone (audio input device). (Follow the instructions given in the dialog box.) Press Stop when you are done.
7. Press Play to listen to the recording you just made and, based on the loudness and clarity of the recording, determine if your microphone was set to an appropriate level.
8. Confirm whether or not your microphone was set to an appropriate level.
n If you clicked on Yes, go to step 8.
n If you clicked on No, you are prompted to try again or cancel. Click on Try Again to go back to step 3.
9. Read the message in the dialog box and click on OK to complete Audio setup and exit the Audio Setup Wizard.
Adjusting Microphone and Speaker LevelsThe microphone level indicator (microphone icon) shows the volume levels when you are speak-ing and the speaker level indicator (speaker icon) shows the volume levels when someone else is speaking.
Tip: If all talkers have their microphones set properly, listeners won’t need to keep adjusting their speakers to accommodate changes in volume. The best way to ensure proper microphone and speaker levels is to run the Audio Setup Wizard at the beginning of the session. See Using the Audio Setup Wizard on page 18.
20 The Blackboard Collaborate Web Conferencing Room
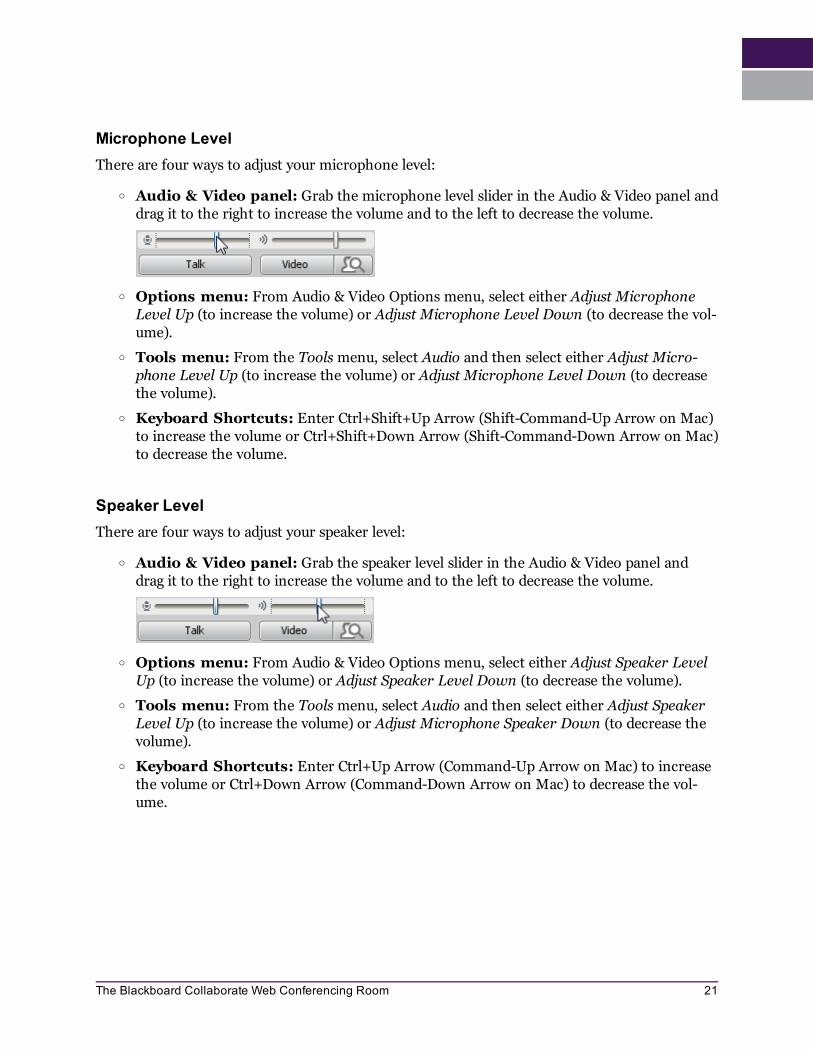
Microphone LevelThere are four ways to adjust your microphone level:
o Audio & Video panel: Grab the microphone level slider in the Audio & Video panel and drag it to the right to increase the volume and to the left to decrease the volume.
o Options menu: From Audio & Video Options menu, select either Adjust Microphone Level Up (to increase the volume) or Adjust Microphone Level Down (to decrease the vol-ume).
o Tools menu: From the Tools menu, select Audio and then select either Adjust Micro-phone Level Up (to increase the volume) or Adjust Microphone Level Down (to decrease the volume).
o Keyboard Shortcuts: Enter Ctrl+Shift+Up Arrow (Shift-Command-Up Arrow on Mac) to increase the volume or Ctrl+Shift+Down Arrow (Shift-Command-Down Arrow on Mac) to decrease the volume.
Speaker LevelThere are four ways to adjust your speaker level:
o Audio & Video panel: Grab the speaker level slider in the Audio & Video panel and drag it to the right to increase the volume and to the left to decrease the volume.
o Options menu: From Audio & Video Options menu, select either Adjust Speaker Level Up (to increase the volume) or Adjust Speaker Level Down (to decrease the volume).
o Tools menu: From the Tools menu, select Audio and then select either Adjust Speaker Level Up (to increase the volume) or Adjust Microphone Speaker Down (to decrease the volume).
o Keyboard Shortcuts: Enter Ctrl+Up Arrow (Command-Up Arrow on Mac) to increase the volume or Ctrl+Down Arrow (Command-Down Arrow on Mac) to decrease the vol-ume.
21The Blackboard Collaborate Web Conferencing Room

Chapter 3
Page 23
Navigation
Before using Blackboard Collaborate Web Conferencing, it may be useful to familiarize yourself with the user interface. See The Blackboard Collaborate Web Conferencing Room on page 11 for a description of the main user interface components.
There are three ways to navigate through the Blackboard Collaborate user interface without hav-ing to use a mouse:
n Keyboard navigation (see Keyboard Navigation on next page)
n Mnemonics (see Mnemonics on page 30)
n Shortcut keys (see Keyboard Shortcuts on page 31)
For information about navigating within some specific areas, refer to the following:
n Navigating Between and Within Content Modes on page 26
n Navigating Between and Reading Whiteboard Pages on page 28
n Navigating Between Chat Conversation Tabs on page 29

Keyboard NavigationThere are four general levels of keyboard navigation in Blackboard Collaborate Web Con-ferencing:
n between modules in the main application window
n between elements (both within and across modules)
n within toolbars of a secondary window
n within menus
Using the navigation methods described in the following sections, navigate to the desired func-tion to bring it into focus. When you wish to activate that function (execute the command), press Space.
Navigating Between ModulesWhen you join an Blackboard Collaborate session, the Participants panel is in focus. Press F6 (the same on the Mac) to cycle keyboard focus between the main Blackboard Collaborate mod-ules, in the order listed below:
n Participants panel: focus goes to the top name in the Participants list.
n Chat panel: focus goes to the Message text box.
n Collaboration toolbar: focus goes to the Whiteboard mode button.
n Action bar: focus goes to the New Page button.
n Audio & Video panel: focus goes to the Talk button.
If you change the order of the panels, the F6 navigation order will be dif-ferent. For information on reordering the panels, see Working with Pan-els on page 16.
Navigating Between ElementsYou can navigate through the Blackboard Collaborate user interface one element (e.g., button, field, option, etc.) at a time by tabbing. The Tab key moves you forward through the Blackboard Collaborate elements in the sequence described below. To move backwards in the sequence, enter Shift+Tab.
Within each panel or window, tabbing moves through its elements from left to right and top to bottom.
24 Navigation
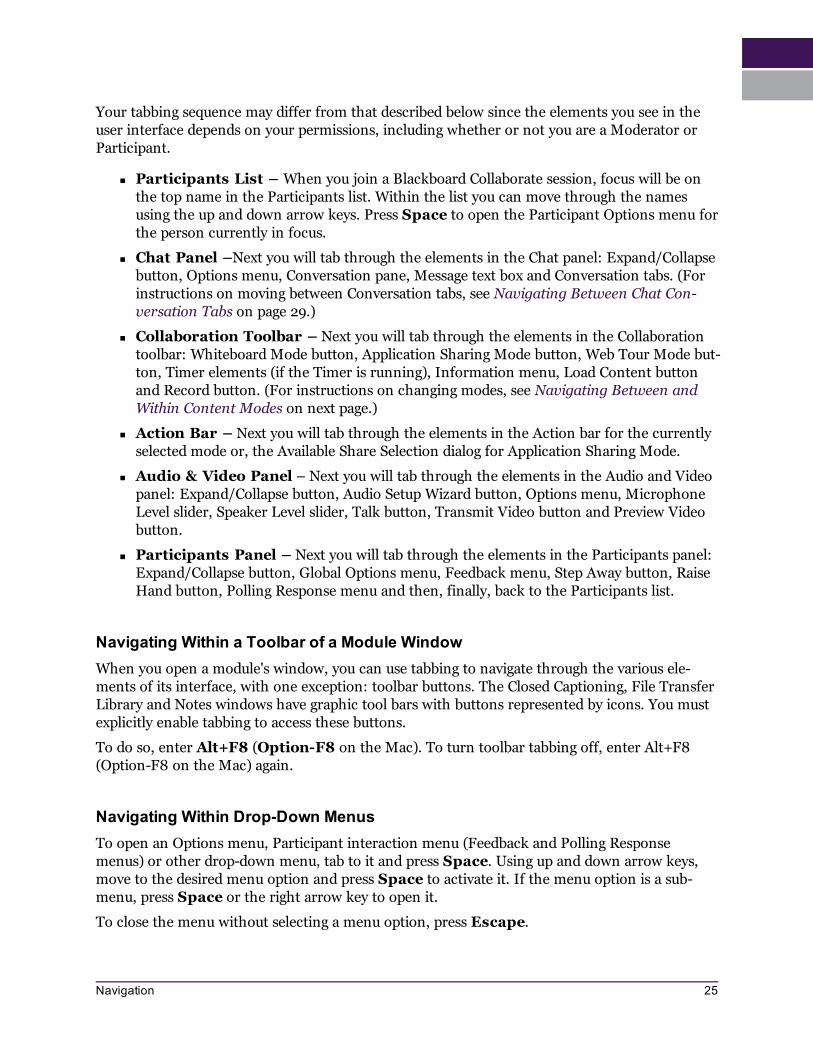
Your tabbing sequence may differ from that described below since the elements you see in the user interface depends on your permissions, including whether or not you are a Moderator or Participant.
n Participants List – When you join a Blackboard Collaborate session, focus will be on the top name in the Participants list. Within the list you can move through the names using the up and down arrow keys. Press Space to open the Participant Options menu for the person currently in focus.
n Chat Panel –Next you will tab through the elements in the Chat panel: Expand/Collapse button, Options menu, Conversation pane, Message text box and Conversation tabs. (For instructions on moving between Conversation tabs, see Navigating Between Chat Con-versation Tabs on page 29.)
n Collaboration Toolbar – Next you will tab through the elements in the Collaboration toolbar: Whiteboard Mode button, Application Sharing Mode button, Web Tour Mode but-ton, Timer elements (if the Timer is running), Information menu, Load Content button and Record button. (For instructions on changing modes, see Navigating Between and Within Content Modes on next page.)
n Action Bar – Next you will tab through the elements in the Action bar for the currently selected mode or, the Available Share Selection dialog for Application Sharing Mode.
n Audio & Video Panel – Next you will tab through the elements in the Audio and Video panel: Expand/Collapse button, Audio Setup Wizard button, Options menu, Microphone Level slider, Speaker Level slider, Talk button, Transmit Video button and Preview Video button.
n Participants Panel – Next you will tab through the elements in the Participants panel: Expand/Collapse button, Global Options menu, Feedback menu, Step Away button, Raise Hand button, Polling Response menu and then, finally, back to the Participants list.
Navigating Within a Toolbar of a Module WindowWhen you open a module's window, you can use tabbing to navigate through the various ele-ments of its interface, with one exception: toolbar buttons. The Closed Captioning, File Transfer Library and Notes windows have graphic tool bars with buttons represented by icons. You must explicitly enable tabbing to access these buttons.
To do so, enter Alt+F8 (Option-F8 on the Mac). To turn toolbar tabbing off, enter Alt+F8 (Option-F8 on the Mac) again.
Navigating Within Drop-Down MenusTo open an Options menu, Participant interaction menu (Feedback and Polling Response menus) or other drop-down menu, tab to it and press Space. Using up and down arrow keys, move to the desired menu option and press Space to activate it. If the menu option is a sub-menu, press Space or the right arrow key to open it.
To close the menu without selecting a menu option, press Escape.
25Navigation
To access the main menus (e.g., File, Edit, etc.) use mnemonic keys. (See Mnemonics on page 30.) You cannot use tabbing to open these menus; however, once a menu is open, you can use your arrow keys to navigate within it and Space to execute the menu item command.
Navigating Between and Within Content ModesWhen you open a new session, the Whiteboard is your default content mode. You can use key-board navigation or keyboard shortcuts to move between content modes and keyboard navi-gation to move within content modes.
Note: To switch to a content mode, you must be a Moderator or a Par-ticipant with permission to use that mode.
Navigation within each content mode is unique, as described below.
Navigating within Whiteboard Content ModeFollow the steps below to switch to Whiteboard mode and access the functions in the Action bar:
If you are a Participant or a Moderator without the Whiteboard per-mission, F6 navigation will place focus on the Scaling menu of the White-board Action bar.
1. To switch to Whiteboard mode, do one of the following:
o Keyboard ShortcutEnter Ctrl+Alt+W (Command-Option-W on Mac)
o Keyboard NavigationPress F6 (the same on the Mac) to cycle keyboard focus to the Collaboration tool-bar. By default, you will be in Whiteboard Mode.
2. Press F6 again to move to the Whiteboard Action bar.
3. Use Tab, Shift+Tab and the arrow keys to move between the elements in the Action bar and the adjacent Navigation bar.
4. Press Space to activate the selected function.
26 Navigation
Navigating within Application Sharing ModeFollow the steps below to switch to Application Sharing mode and start hosting an Application Sharing session:
If someone else is already hosting an Application Sharing session (you are already in Application Sharing mode), F6 navigation will place focus on the Scale to Fit option of the Application Sharing Action bar.
1. To switch to Application Sharing mode, do one of the following:
o Keyboard ShortcutEnter Ctrl+Alt+A (Command-Option-A on Mac)
o Keyboard Navigation
i. Press F6 (the same on the Mac) to cycle keyboard focus to the Collaboration toolbar. By default, you will be in Whiteboard Mode.
ii. Press Tab or Right Arrow once to move to the Application Sharing Mode button.
iii. Press Space to activate Application Sharing Mode. The Application Sharing Selections dialog will open.
2. Press Tab five times to move through the elements in the Collaboration toolbar to the Share Desktop (the first) field of the Application Sharing Selections dialog.
3. You have two options:
o Share your entire desktop: Press any of the arrow keys to select Share Desk-top, press Tab three times to move to the Share button and press Space to start sharing your desktop.
o Share a specific application only: Press Tab to move to the list of available applications and then, using the arrow keys, select the desired application from the list. Press Tab twice to move to the Share button and press Space to start sharing the selected application.
Navigating within Web Tour ModeFollow the steps below to switch to Web Tour mode and start hosting a Web Tour:
If someone else is already hosting a Web Tour session (you are already in Web Tour mode) and you don't have Web Tour permission, F6 navigation will place focus on the Back button of the Web Tour Action bar.
27Navigation
1. To switch to Web Tour mode, do one of the following:
o Keyboard ShortcutEnter Ctrl+Alt+U (Command-Option-U on Mac)
o Keyboard Navigation
i. Press F6 (the same on the Mac) to cycle keyboard focus to the Collaboration toolbar. By default, you will be in Whiteboard Mode.
ii. Press Tab or Right Arrow twice to move to the Web Tour Mode button.
iii. Press Space to activate Web Tour Mode. The Web Tour Action bar will open and focus will be in the Address text box.
2. Use Tab, Shift+Tab and the arrow keys to move between the elements in the Action bar.
3. Press Space to activate the selected function or, if in the Address text box, open the spec-ified web page.
Navigating Between and Reading Whiteboard PagesIf you are using a JAWS screen reader, you can read the text of presentations imported into the Whiteboard via the Activity Window. Navigate to the desired page (as instructed below) and open the Activity Window using Ctrl + / (Command- / on Mac) to read the textual content of that page. You will need to move focus to the bottom of the window. (For details on using the Activ-ity Window, see The Activity Window on page 41.)
Note: You can freely navigate between pages in breakout rooms but must be given permission by the Moderator to navigate between pages of the Main room. You will know you are free to move between Main room pages when you see a red border around your Whiteboard content area.
To move directly to a specific Whiteboard page, select it from the Go to Page menu in the White-board navigation bar. For instructions on keyboard navigation to that menu, see Navigating within Whiteboard Content Mode on page 26.
If using a screen reader, you’ll know you are in the Go to Page menu when you hear, “Go to the selected Whiteboard page.”
To move to the next page, use any of the following options:
o Keyboard ShortcutEnter Alt+Page Down (Option-Page Down on Mac).
o Mnemonic KeysUsing mnemonics keys, from the Tools menu select Whiteboard followed by Go to Next Page. (For instructions on using mnemonic keys, see Mnemonics on page 30.)
28 Navigation
o Keyboard NavigationNavigate to and activate the Next Page button in the Whiteboard Navigation bar.If focus is on the Go to Page menu of the Navigation bar, press the Down Arrow.(For instructions on keyboard navigation in Whiteboard Mode, Navigating within White-board Content Mode on page 26.)
To move to the previous page, use any of the following options:
o Keyboard ShortcutEnter Alt+Page Up (Option-Page Up on Mac).
o Mnemonic KeysUsing mnemonics keys, from the Tools menu select Whiteboard followed by Go to Pre-vious Page. (For instructions on using mnemonic keys, see Mnemonics on next page.)
o Keyboard NavigationNavigate to and activate the Previous Page button in the Whiteboard Navigation bar.If focus is on the Go to Page menu of the Navigation bar, press the Up Arrow.(For instructions on keyboard navigation in Whiteboard Mode, Navigating within White-board Content Mode on page 26.)
Navigating Between Chat Conversation TabsYou can use keyboard navigation to move between the private Chat conversation tabs in the Chat panel.
If you want to know when a new private Chat message has been received, enable the Audible Notification "Private Chat Message Received". For details, see Audible Notifications on page 59.
1. Press F6 (the same on the Mac) to cycle keyboard focus to the Chat panel.
2. Press Tab twice to move to the currently open conversation tab. (By default, this is the Room conversation.)
3. Use the arrow keys to move to the desired conversation tab.
4. Press Space to open the conversation.
If there are too many conversation tabs to fit in the Chat panel, they will be added to a drop-down menu to the right of the displayed conversation tabs. To open a conversation tab in the menu, do the following:
1. From your currently open conversation tab, press Tab. This will move focus to the con-versation drop-down menu.
29Navigation
Note: if there is no conversation drop-down menu, focus will move to the Collaboration toolbar.
2. Press Space to open the menu.
3. Use the arrow keys to move to the desired conversation.
4. Press Space to open the conversation.
Using Mnemonic and Keyboard ShortcutsInstead of using your mouse to select a menu option, you can use your keyboard. Using mne-monic or Keyboard Shortcuts saves time because you do not have to complete multiple steps (e.g., clicking on a menu and then clicking on an option), nor do you have to take your hand off the keyboard to issue the command.
Note: Mnemonic and standard Keyboard Shortcuts are enabled only when you have input focus on the Blackboard Collaborate Web Con-ferencing window. Focus is not required for Hot Keys.
MnemonicsA mnemonic is an underlined letter or number that appears in a menu title or menu option that, when pressed in conjunction with the ALT key, activates a command or navigates to an element in the user interface.
Keyboard mnemonics are not supported on the Mac.
Note: On Windows, depending upon your configuration, you may have to toggle ALT the key before the options in the menus will display the under-lined character or number.
To choose a menu option with mnemonics, do the following:
1. Press the ALT key, note which letter or number (mnemonic) is underlined in the desired menu name and enter it on your keyboard. The menu options for that main menu will appear. For example, if you press ALT+F, the File menu will appear.
2. Again, note the mnemonic for the desired option in the menu and enter it, with or with-out the ALT key.
To select a menu option from a sub-menu, repeat step 2.
30 Navigation

Keyboard ShortcutsYou can quickly accomplish tasks you perform frequently by using keyboard shortcuts (both standard keyboard shortcuts and hot keys), which are one or more keys you press in com-bination within Blackboard Collaborate Web Conferencing to perform a function. For example, instead of clicking the Raise Hand button in the Participants panel or selecting Raise Hand from the Interaction menu, you can press Ctrl+R (Command-R on Mac OS X) to raise your hand.
Hot keys differ from standard keyboard shortcuts in some important ways. For details, and a dis-cussion of hot keys, see Hot Keys on page 36.
Note: The keyboard shortcuts were defined with an extended (full) key-board layout in mind. If your keyboard does not have a key used in a key-board shortcut, you will need to use the menu item or toolbar button to perform the desired function.
Caution: If you are sharing an application that has a keyboard shortcut identical to one in Blackboard Collaborate, and focus is on Application Sharing, the shortcut will activate its associated command in the shared application, not in Blackboard Collaborate.
The following table lists the keyboard shortcuts (both standard and hot keys) present in Black-board Collaborate to quickly perform a number of common functions.The first column describes the function to be performed, the second column lists the Windows and Linux keyboard short-cuts and the third column gives the Mac keyboard shortcuts. Keys are grouped into sections based on the Blackboard Collaborate module being used.
Note: To access the list of keyboard shortcuts while in a session, select Keyboard Shortcuts from the Help menu.
31Navigation
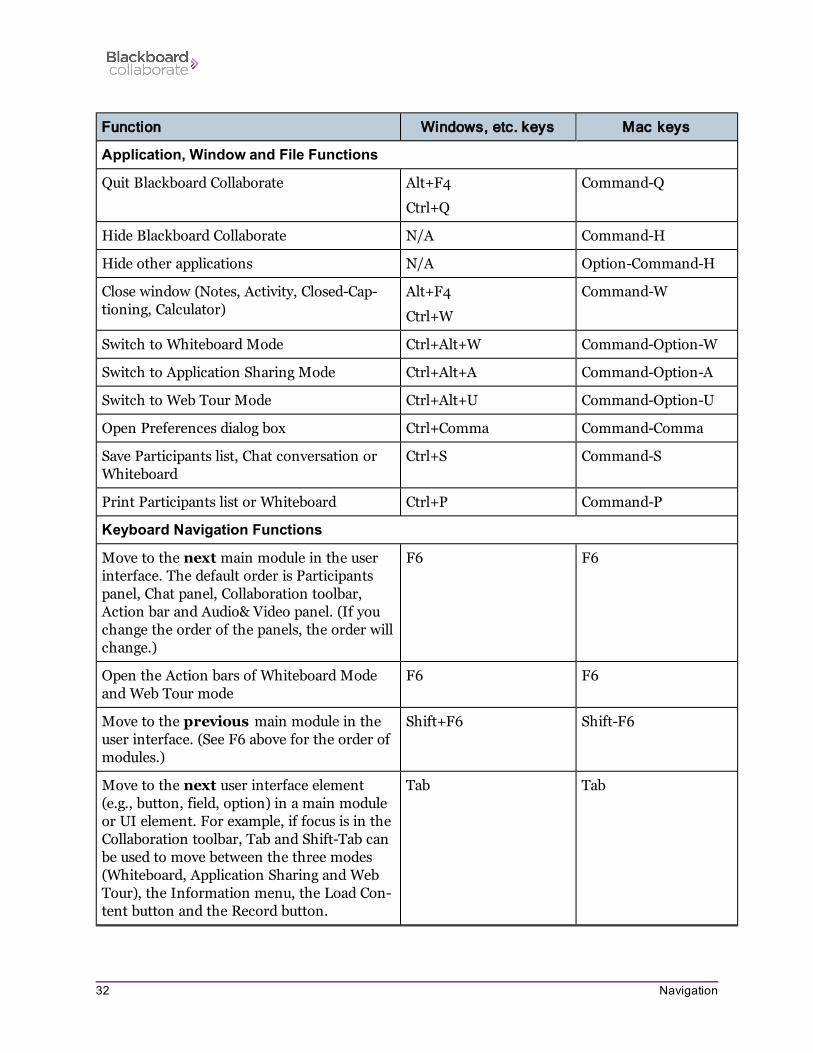
Function Windows, etc. keys Mac keys
Application, Window and File Functions
Quit Blackboard Collaborate Alt+F4
Ctrl+Q
Command-Q
Hide Blackboard Collaborate N/A Command-H
Hide other applications N/A Option-Command-H
Close window (Notes, Activity, Closed-Cap-tioning, Calculator)
Alt+F4
Ctrl+W
Command-W
Switch to Whiteboard Mode Ctrl+Alt+W Command-Option-W
Switch to Application Sharing Mode Ctrl+Alt+A Command-Option-A
Switch to Web Tour Mode Ctrl+Alt+U Command-Option-U
Open Preferences dialog box Ctrl+Comma Command-Comma
Save Participants list, Chat conversation or Whiteboard
Ctrl+S Command-S
Print Participants list or Whiteboard Ctrl+P Command-P
Keyboard Navigation Functions
Move to the next main module in the user interface. The default order is Participants panel, Chat panel, Collaboration toolbar, Action bar and Audio& Video panel. (If you change the order of the panels, the order will change.)
F6 F6
Open the Action bars of Whiteboard Mode and Web Tour mode
F6 F6
Move to the previous main module in the user interface. (See F6 above for the order of modules.)
Shift+F6 Shift-F6
Move to the next user interface element (e.g., button, field, option) in a main module or UI element. For example, if focus is in the Collaboration toolbar, Tab and Shift-Tab can be used to move between the three modes (Whiteboard, Application Sharing and Web Tour), the Information menu, the Load Con-tent button and the Record button.
Tab Tab
32 Navigation
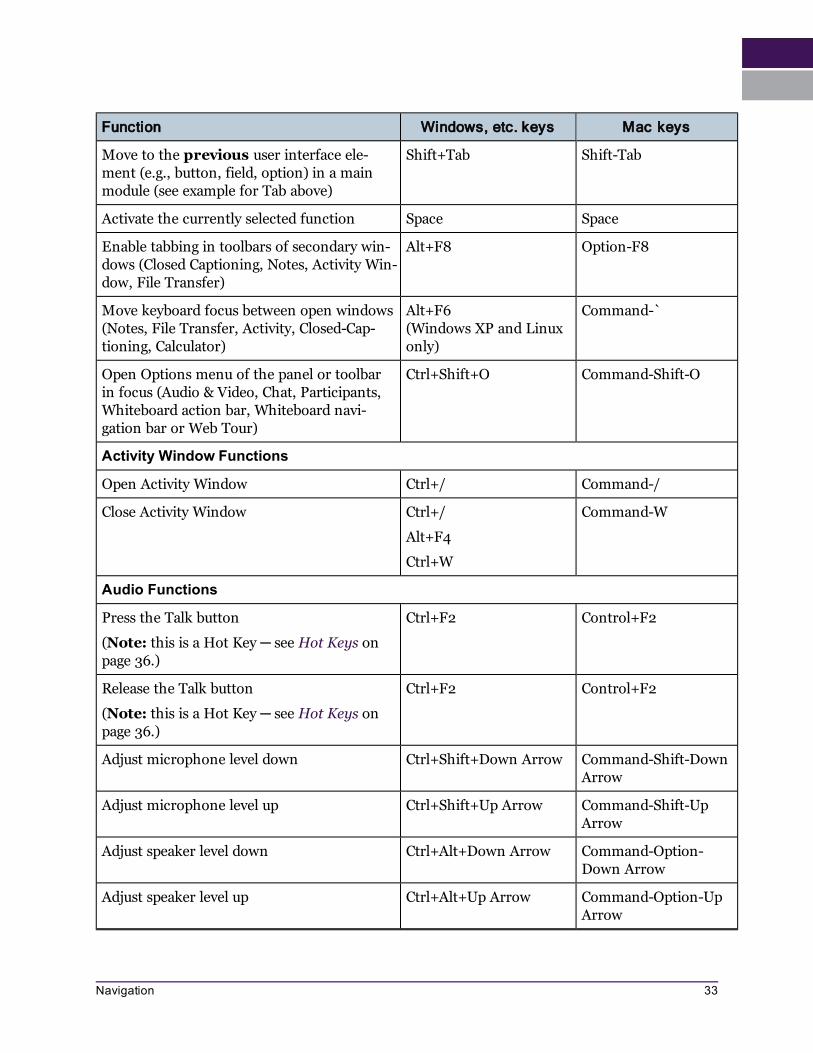
Function Windows, etc. keys Mac keys
Move to the previous user interface ele-ment (e.g., button, field, option) in a main module (see example for Tab above)
Shift+Tab Shift-Tab
Activate the currently selected function Space Space
Enable tabbing in toolbars of secondary win-dows (Closed Captioning, Notes, Activity Win-dow, File Transfer)
Alt+F8 Option-F8
Move keyboard focus between open windows (Notes, File Transfer, Activity, Closed-Cap-tioning, Calculator)
Alt+F6(Windows XP and Linux only)
Command-`
Open Options menu of the panel or toolbar in focus (Audio & Video, Chat, Participants, Whiteboard action bar, Whiteboard navi-gation bar or Web Tour)
Ctrl+Shift+O Command-Shift-O
Activity Window Functions
Open Activity Window Ctrl+/ Command-/
Close Activity Window Ctrl+/
Alt+F4
Ctrl+W
Command-W
Audio Functions
Press the Talk button
(Note: this is a Hot Key ─ see Hot Keys on page 36.)
Ctrl+F2 Control+F2
Release the Talk button
(Note: this is a Hot Key ─ see Hot Keys on page 36.)
Ctrl+F2 Control+F2
Adjust microphone level down Ctrl+Shift+Down Arrow Command-Shift-Down Arrow
Adjust microphone level up Ctrl+Shift+Up Arrow Command-Shift-Up Arrow
Adjust speaker level down Ctrl+Alt+Down Arrow Command-Option-Down Arrow
Adjust speaker level up Ctrl+Alt+Up Arrow Command-Option-Up Arrow
33Navigation
Function Windows, etc. keys Mac keys
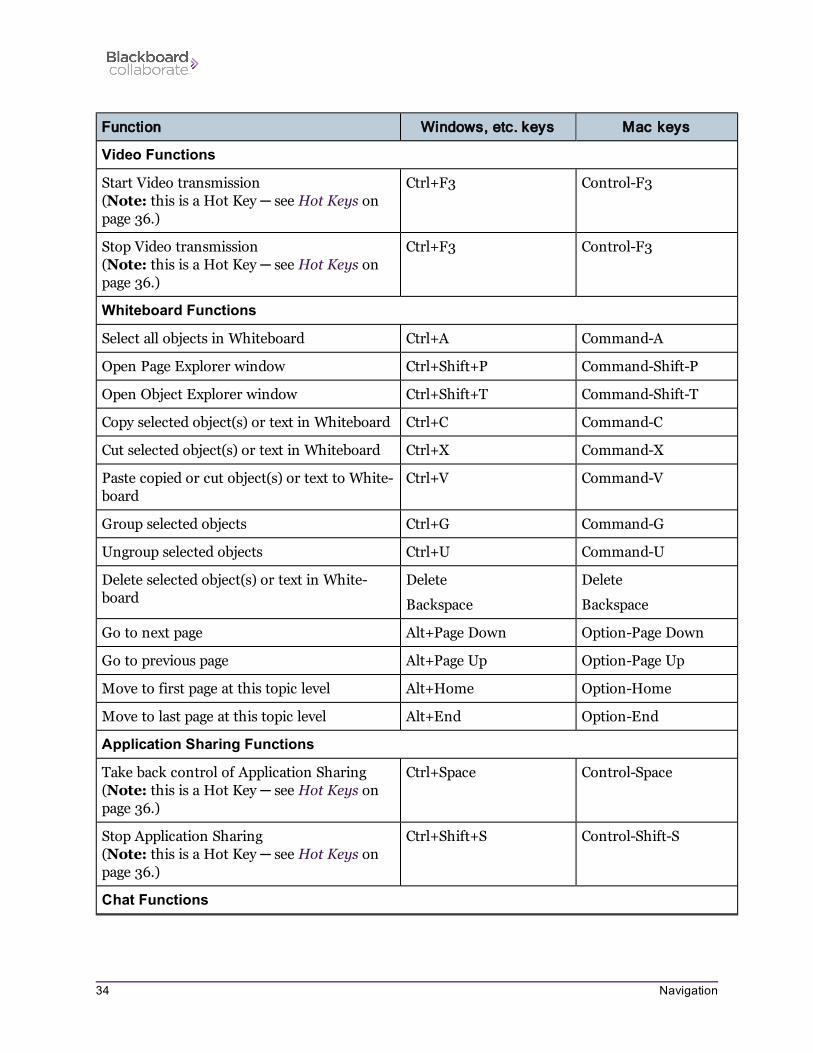
Video Functions
Start Video transmission(Note: this is a Hot Key ─ see Hot Keys on page 36.)
Ctrl+F3 Control-F3
Stop Video transmission(Note: this is a Hot Key ─ see Hot Keys on page 36.)
Ctrl+F3 Control-F3
Whiteboard Functions
Select all objects in Whiteboard Ctrl+A Command-A
Open Page Explorer window Ctrl+Shift+P Command-Shift-P
Open Object Explorer window Ctrl+Shift+T Command-Shift-T
Copy selected object(s) or text in Whiteboard Ctrl+C Command-C
Cut selected object(s) or text in Whiteboard Ctrl+X Command-X
Paste copied or cut object(s) or text to White-board
Ctrl+V Command-V
Group selected objects Ctrl+G Command-G
Ungroup selected objects Ctrl+U Command-U
Delete selected object(s) or text in White-board
Delete
Backspace
Delete
Backspace
Go to next page Alt+Page Down Option-Page Down
Go to previous page Alt+Page Up Option-Page Up
Move to first page at this topic level Alt+Home Option-Home
Move to last page at this topic level Alt+End Option-End
Application Sharing Functions
Take back control of Application Sharing(Note: this is a Hot Key ─ see Hot Keys on page 36.)
Ctrl+Space Control-Space
Stop Application Sharing (Note: this is a Hot Key ─ see Hot Keys on page 36.)
Ctrl+Shift+S Control-Shift-S
Chat Functions
34 Navigation
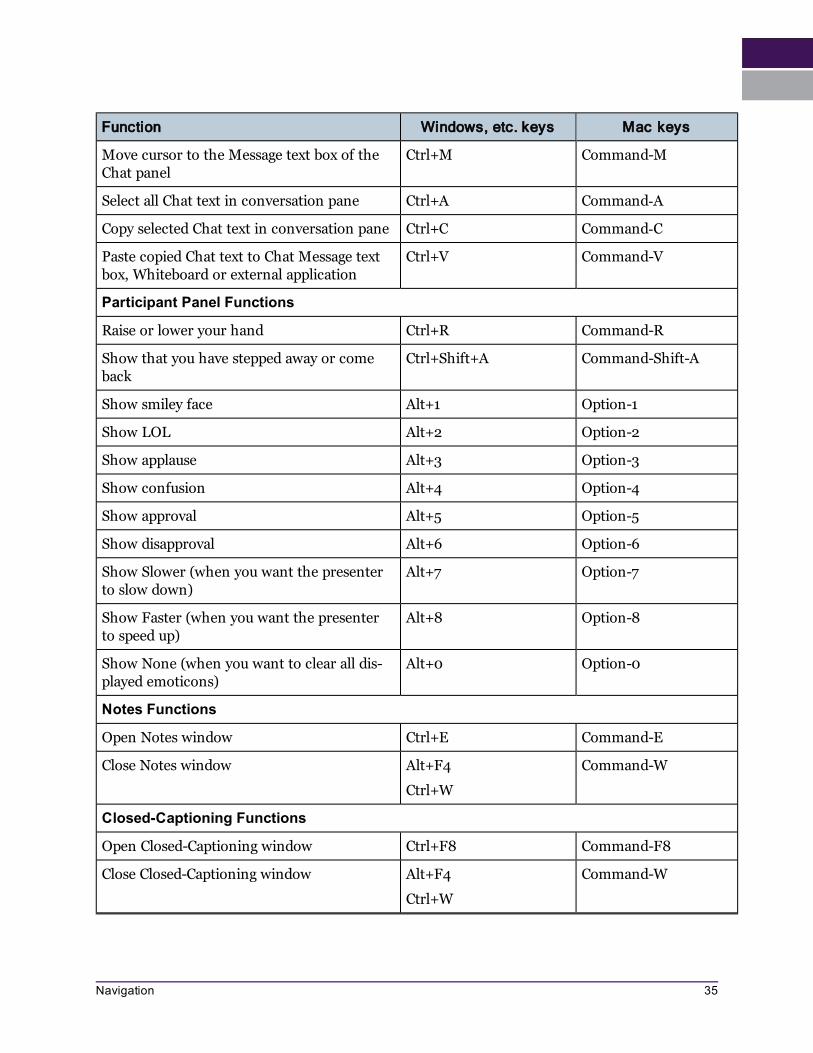
Function Windows, etc. keys Mac keys
Move cursor to the Message text box of the Chat panel
Ctrl+M Command-M
Select all Chat text in conversation pane Ctrl+A Command-A
Copy selected Chat text in conversation pane Ctrl+C Command-C
Paste copied Chat text to Chat Message text box, Whiteboard or external application
Ctrl+V Command-V
Participant Panel Functions
Raise or lower your hand Ctrl+R Command-R
Show that you have stepped away or come back
Ctrl+Shift+A Command-Shift-A
Show smiley face Alt+1 Option-1
Show LOL Alt+2 Option-2
Show applause Alt+3 Option-3
Show confusion Alt+4 Option-4
Show approval Alt+5 Option-5
Show disapproval Alt+6 Option-6
Show Slower (when you want the presenter to slow down)
Alt+7 Option-7
Show Faster (when you want the presenter to speed up)
Alt+8 Option-8
Show None (when you want to clear all dis-played emoticons)
Alt+0 Option-0
Notes Functions
Open Notes window Ctrl+E Command-E
Close Notes window Alt+F4
Ctrl+W
Command-W
Closed-Captioning Functions
Open Closed-Captioning window Ctrl+F8 Command-F8
Close Closed-Captioning window Alt+F4
Ctrl+W
Command-W
35Navigation
Function Windows, etc. keys Mac keys
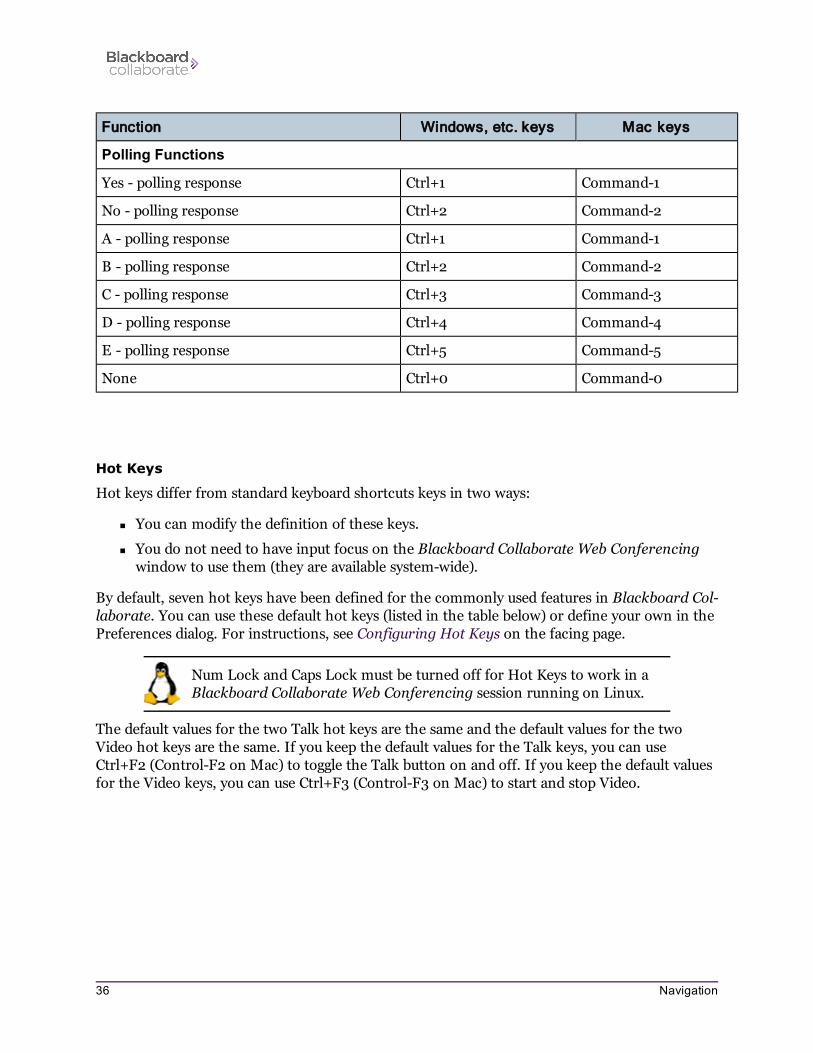
Polling Functions
Yes - polling response Ctrl+1 Command-1
No - polling response Ctrl+2 Command-2
A - polling response Ctrl+1 Command-1
B - polling response Ctrl+2 Command-2
C - polling response Ctrl+3 Command-3
D - polling response Ctrl+4 Command-4
E - polling response Ctrl+5 Command-5
None Ctrl+0 Command-0
Hot Keys
Hot keys differ from standard keyboard shortcuts keys in two ways:
n You can modify the definition of these keys.
n You do not need to have input focus on the Blackboard Collaborate Web Conferencing window to use them (they are available system-wide).
By default, seven hot keys have been defined for the commonly used features in Blackboard Col-laborate. You can use these default hot keys (listed in the table below) or define your own in the Preferences dialog. For instructions, see Configuring Hot Keys on the facing page.
Num Lock and Caps Lock must be turned off for Hot Keys to work in a Blackboard Collaborate Web Conferencing session running on Linux.
The default values for the two Talk hot keys are the same and the default values for the two Video hot keys are the same. If you keep the default values for the Talk keys, you can use Ctrl+F2 (Control-F2 on Mac) to toggle the Talk button on and off. If you keep the default values for the Video keys, you can use Ctrl+F3 (Control-F3 on Mac) to start and stop Video.
36 Navigation
Tip for Screen Reader users: With toggle commands, it is not always easy to remember which state you are currently in. You can always be sure that you are sending the desired command by redefining one of the hot keys in each toggle pair. For example, if you keep the default for pressing the Talk button Ctrl+F2 (Control-F2 on the Mac) and redefine the hot key for releasing the Talk button to something else, Ctrl+F2 (Control-F2 on the Mac) will always turn on the Talk button and your redefined hot key will always turn off the Talk button -- you will never have to know whether or the Talk button it is currently turned on or off.
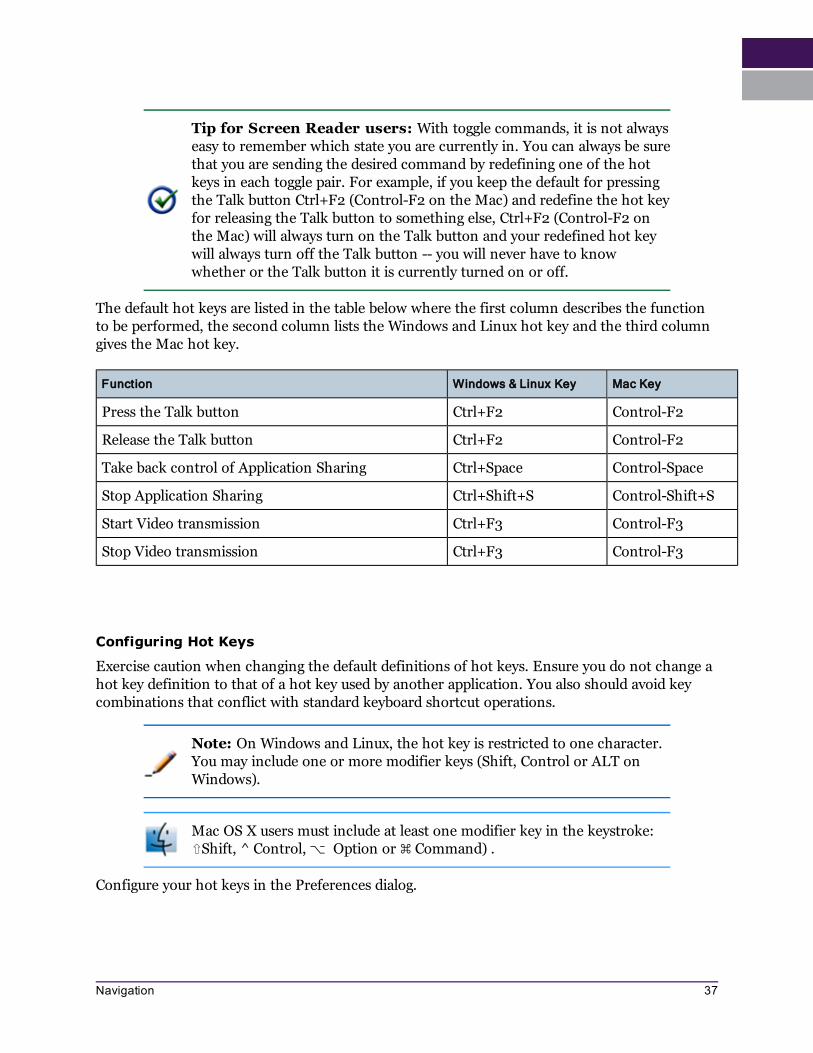
The default hot keys are listed in the table below where the first column describes the function to be performed, the second column lists the Windows and Linux hot key and the third column gives the Mac hot key.
Function Windows & Linux Key Mac Key
Press the Talk button Ctrl+F2 Control-F2
Release the Talk button Ctrl+F2 Control-F2
Take back control of Application Sharing Ctrl+Space Control-Space
Stop Application Sharing Ctrl+Shift+S Control-Shift+S
Start Video transmission Ctrl+F3 Control-F3
Stop Video transmission Ctrl+F3 Control-F3
Configuring Hot Keys
Exercise caution when changing the default definitions of hot keys. Ensure you do not change a hot key definition to that of a hot key used by another application. You also should avoid key combinations that conflict with standard keyboard shortcut operations.
Note: On Windows and Linux, the hot key is restricted to one character. You may include one or more modifier keys (Shift, Control or ALT on Windows).
Mac OS X users must include at least one modifier key in the keystroke: ⇧Shift, ^ Control, ⌥ Option or ⌘ Command) .
Configure your hot keys in the Preferences dialog.
37Navigation
1. Open the Preferences dialog in one of the following ways:
o From the Edit menu, select Preferences… (Windows & Linux)
From the Blackboard Collaborate Web Conferencing menu, select Preferences (Mac OS X)
o Enter Ctrl+Comma (Windows & Linux)
Enter Command-Comma (Mac OS X)
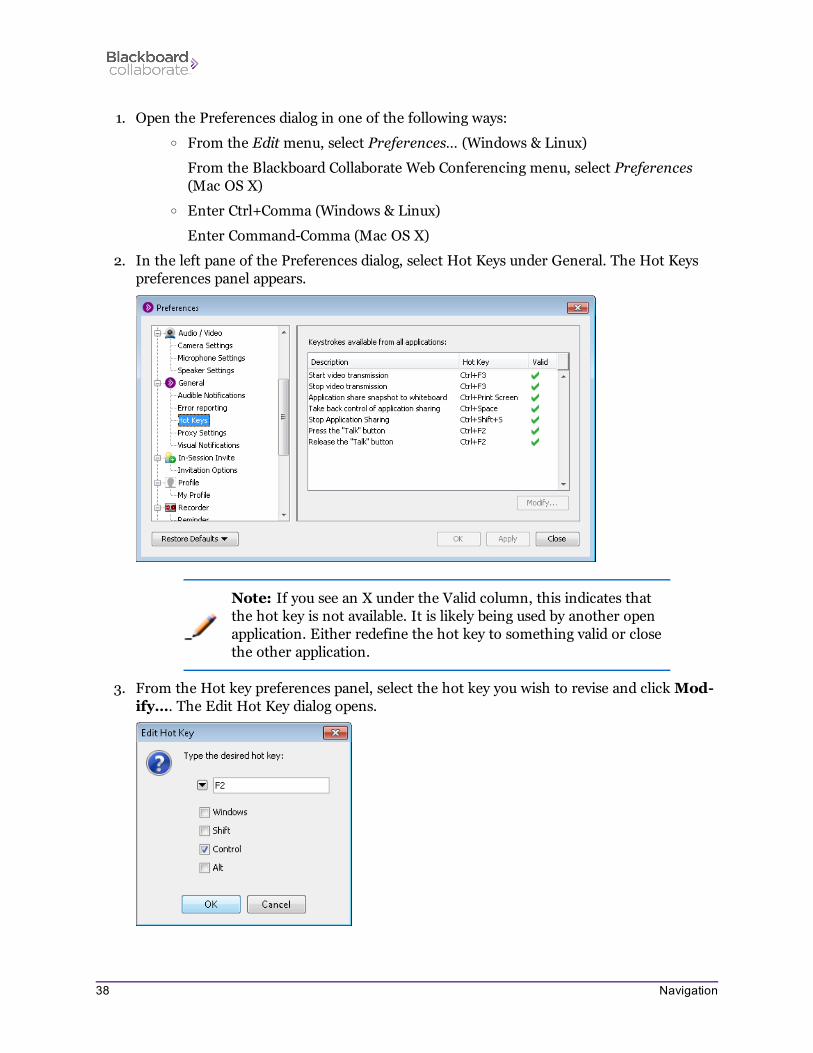
2. In the left pane of the Preferences dialog, select Hot Keys under General. The Hot Keys preferences panel appears.
Note: If you see an X under the Valid column, this indicates that the hot key is not available. It is likely being used by another open application. Either redefine the hot key to something valid or close the other application.
3. From the Hot key preferences panel, select the hot key you wish to revise and click Mod-ify…. The Edit Hot Key dialog opens.
38 Navigation
4. Assign the keystrokes. Click on the down arrow to select a key from the key option list and then select the desired modifier keys by clicking on their check boxes. For example, the keystroke in the screen capture above is Ctrl+F2.
5. Click on OK to save the hot key configuration and close the Edit Hot Key dialog, or Can-cel to close the Edit Hot Key dialog without saving your changes.
6. Click on OK to save your preferences and close the Preferences dialog, Apply to save your preferences and leave the Preferences dialog open or Cancel to close the Preference dialog without saving any of your changes.
When you configure preferences, Blackboard Collaborate Web Conferencing will remember the settings each time you join another session on the same computer.
39Navigation

Chapter 4
Page 41
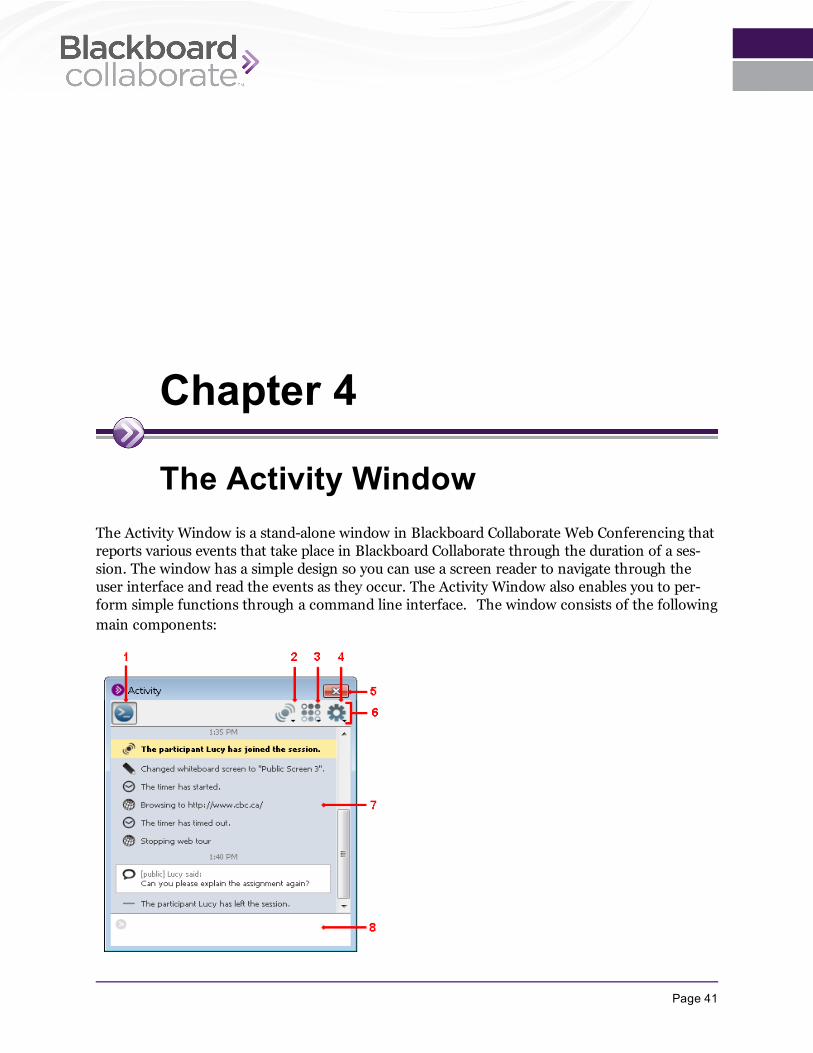
The Activity WindowThe Activity Window is a stand-alone window in Blackboard Collaborate Web Conferencing that reports various events that take place in Blackboard Collaborate through the duration of a ses-sion. The window has a simple design so you can use a screen reader to navigate through the user interface and read the events as they occur. The Activity Window also enables you to per-form simple functions through a command line interface. The window consists of the following main components:
1 Show/Hide Command Input field 5 Close button
2 Audible Notification Filter 6 Tool bar
3 Module Event Filter 7 Event panel
4 Importance Event Filter 8 Command Input field
n The Tool Bar, at the top of the window, contains the Show/Hide Command Input Field button, the Audible Notifications Filter, the Module Event Filter and the Impor-tance Event Filter. (These are described a little later.)
n The Event Panel, in the middle of the window, reports the events that have occurred in the session.
n The Command Input Field, at the bottom of the window, enables you to type com-mands to perform some basic tasks in Blackboard Collaborate.
Opening and Closing the Activity WindowOpening and closing the Activity Window is simple so you can access it without your attention being diverted from the session in progress. If you move to a different window in Blackboard Col-laborate Web Conferencing, you easily can bring the Activity Window back into focus (activate it).
You also can move, resize or close the Activity Window so it is not obtrusive.
Note: On Windows, Linux and Mac OS X platforms, the Activity Window always remains in front of the Blackboard Collaborate main window. On Solaris, if you click on the main Blackboard Collaborate window, the Activ-ity Window will move behind the main window.
To open or activate (bring into focus) the Activity Window, do one of the following:
o Enter the keyboard shortcut Ctrl+/ (Command- / on Mac)
o From the Window menu, select Show Activity (on Windows or Linux, you can use the mnemonic Alt+W+A to select it)
To close the Activity Window, do one of the following:
o Enter the keyboard shortcut Ctrl+W or Alt+F4 (Command-W on Mac)
o From the Window menu, select Show Activity (on Windows or Linux, you can use the mnemonic Alt+W+A to select it)
o Click on the Close button in the top-right corner of the window
42 The Activity Window

Displaying EventsNotable events that occur in an Blackboard Collaborate Web Conferencing session are displayed in the Event panel of the Activity Window. By default, events of all Blackboard Collaborate mod-ules are displayed and the approximate time each event occurred is noted. Moderators can see all events and Participants can see only a subset of events.
When a new event is reported, keyboard focus stays at the last place you had it (the last cursor position is maintained and the window will not scroll to the new message at the bottom). You need to manually move focus to the new event using your arrow keys or scroll bar so you can read the new text.
Note: The complete list of events is shown in the Event Filtering Pref-erences panel. (For details, refer to Event Filtering Preferences Panel on page 47.)
You can manage your display in three ways:
l filter which events are to be displayed in the event panel (see Filtering Events for Display below);
l change the text size in the event panel (see Resizing Activity Window Text on page 48); and
l show or hide the time stamps associated with events (see Showing/Hiding Time Stamps on page 48)
Filtering Events for DisplayYou can select which events you want displayed in your own Event panel through the Module Event Filter and the Importance Event Filter menus in the Activity Window or through the Event Filtering preferences panel.
Note: The events you hide or display will affect what is displayed in your own Event panel only – it will not affect what others see in their own Event panels.
You can select which events for which you want to be audibly notified through the Audible Noti-fications Filter in the Activity Window or through the Audible Notifications Preferences panel.
43The Activity Window
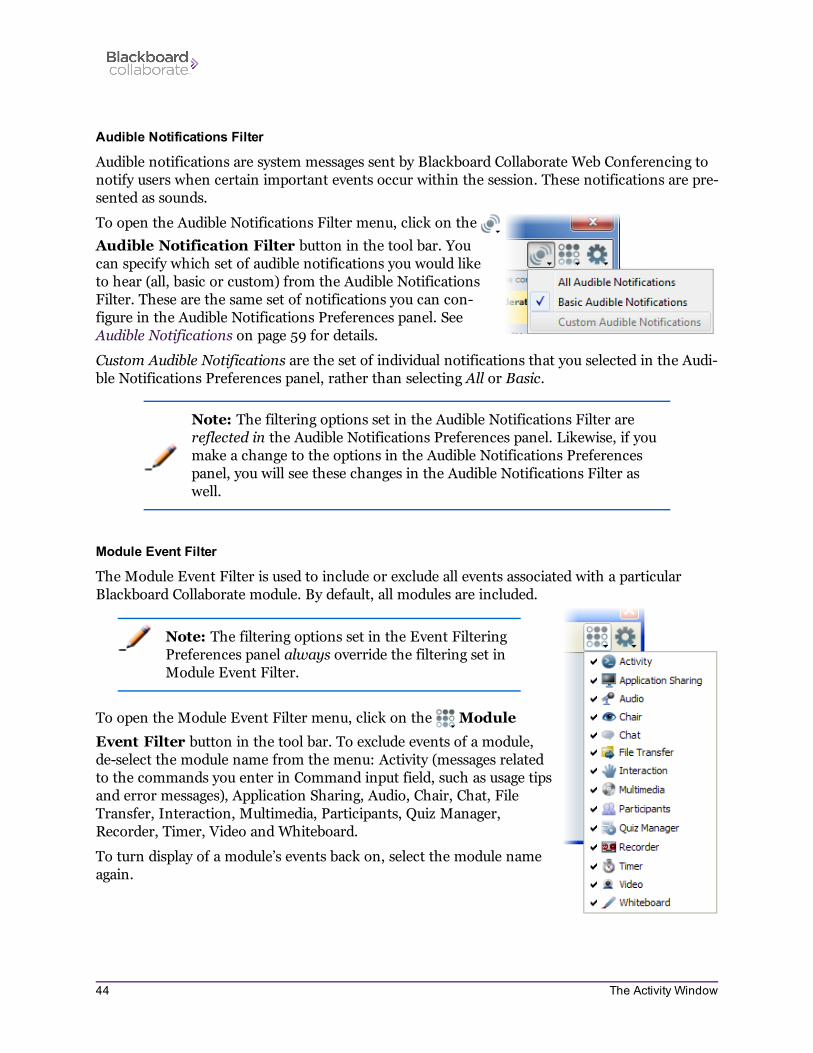
Audible Notifications Filter
Audible notifications are system messages sent by Blackboard Collaborate Web Conferencing to notify users when certain important events occur within the session. These notifications are pre-sented as sounds.
To open the Audible Notifications Filter menu, click on the
Audible Notification Filter button in the tool bar. You can specify which set of audible notifications you would like to hear (all, basic or custom) from the Audible Notifications Filter. These are the same set of notifications you can con-figure in the Audible Notifications Preferences panel. See Audible Notifications on page 59 for details.
Custom Audible Notifications are the set of individual notifications that you selected in the Audi-ble Notifications Preferences panel, rather than selecting All or Basic.
Note: The filtering options set in the Audible Notifications Filter are reflected in the Audible Notifications Preferences panel. Likewise, if you make a change to the options in the Audible Notifications Preferences panel, you will see these changes in the Audible Notifications Filter as well.
Module Event Filter
The Module Event Filter is used to include or exclude all events associated with a particular Blackboard Collaborate module. By default, all modules are included.
Note: The filtering options set in the Event Filtering Preferences panel always override the filtering set in Module Event Filter.
To open the Module Event Filter menu, click on the Module
Event Filter button in the tool bar. To exclude events of a module, de-select the module name from the menu: Activity (messages related to the commands you enter in Command input field, such as usage tips and error messages), Application Sharing, Audio, Chair, Chat, File Transfer, Interaction, Multimedia, Participants, Quiz Manager, Recorder, Timer, Video and Whiteboard.
To turn display of a module’s events back on, select the module name again.
44 The Activity Window
Note: To display some but not all events associated with a module, use the Event Filtering Preferences panel. For details, refer to Event Filtering Preferences Panel on page 47.
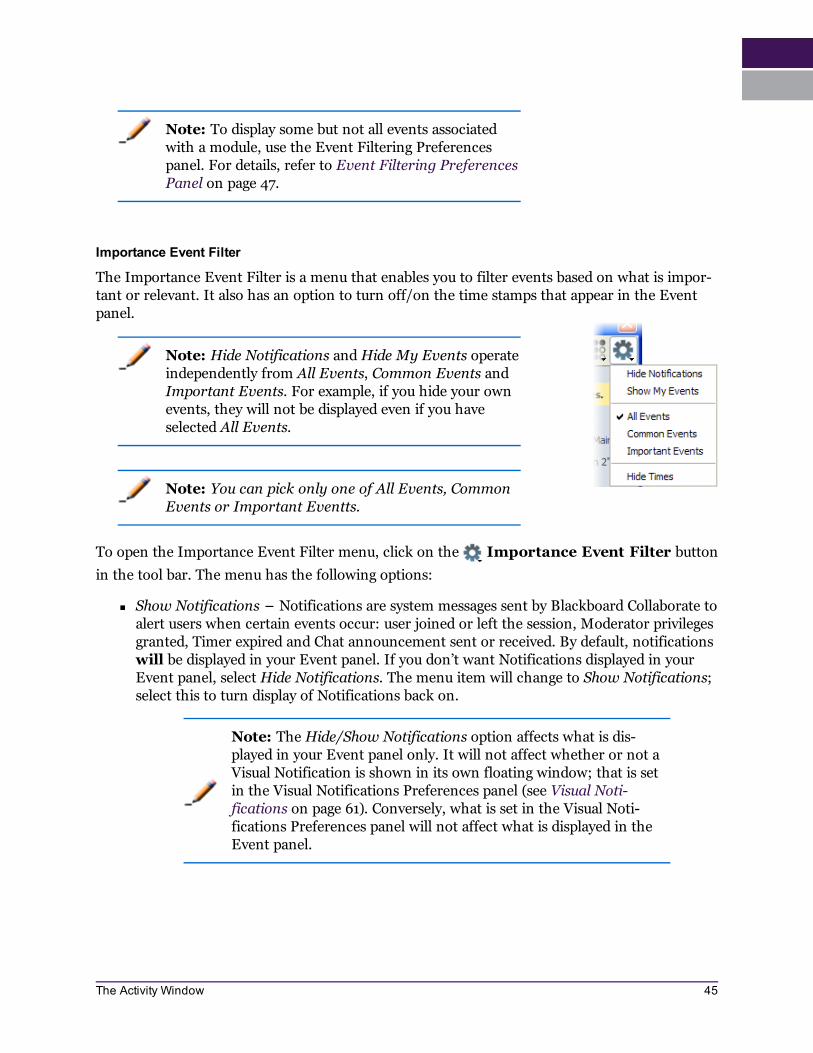
Importance Event Filter
The Importance Event Filter is a menu that enables you to filter events based on what is impor-tant or relevant. It also has an option to turn off/on the time stamps that appear in the Event panel.
Note: Hide Notifications and Hide My Events operate independently from All Events, Common Events and Important Events. For example, if you hide your own events, they will not be displayed even if you have selected All Events.
Note: You can pick only one of All Events, Common Events or Important Eventts.
To open the Importance Event Filter menu, click on the Importance Event Filter button
in the tool bar. The menu has the following options:
n Show Notifications − Notifications are system messages sent by Blackboard Collaborate to alert users when certain events occur: user joined or left the session, Moderator privileges granted, Timer expired and Chat announcement sent or received. By default, notifications will be displayed in your Event panel. If you don’t want Notifications displayed in your Event panel, select Hide Notifications. The menu item will change to Show Notifications; select this to turn display of Notifications back on.
Note: The Hide/Show Notifications option affects what is dis-played in your Event panel only. It will not affect whether or not a Visual Notification is shown in its own floating window; that is set in the Visual Notifications Preferences panel (see Visual Noti-fications on page 61). Conversely, what is set in the Visual Noti-fications Preferences panel will not affect what is displayed in the Event panel.
45The Activity Window

n Show My Events − By default, the events that you triggered (e.g., raise your hand or turn on your microphone) will not be displayed in your Event panel. (They may, however, be displayed in the event panel of others, depending on the event.) If you want to display these events in your own Event panel, select Show My Events. The menu item will change to Hide My Events; select this to turn display of your events back off.
n All Events − By default, events of all importance are displayed in the Event panel. If you don’t want to see all events, select either Common Events or Important Events.
n Common Events − Select this option to display all events except the interaction events: Raise Hand/Lower Hand, Stepped Away/Came Back buttons and the emoticons Laughter, Applause, Confusion and Disapproval.
n Important Events − Select this option to display only a small subset of events, such as when a user has joined a session, when you have been granted the Moderator privilege or when you have received a Chat message.
n Hide Times − Select this option to turn off/on the time stamps that appear in the Event panel. For further details, see Showing/Hiding Time Stamps on page 48
46 The Activity Window
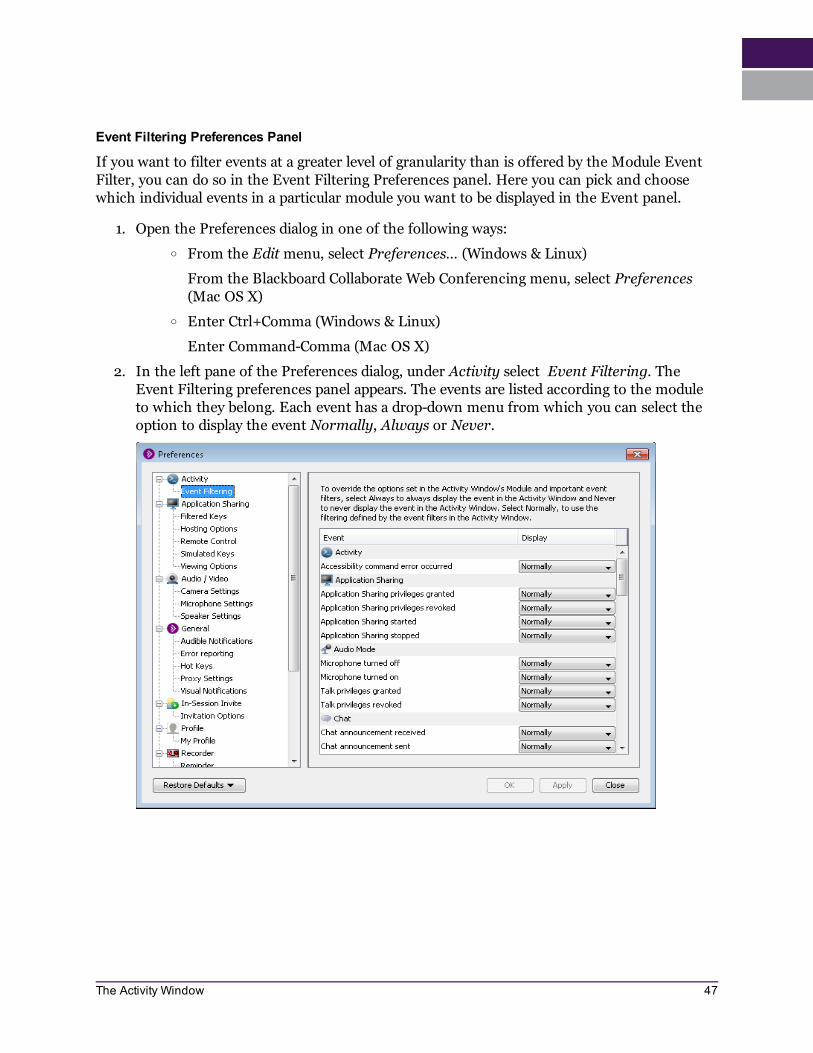
Event Filtering Preferences Panel
If you want to filter events at a greater level of granularity than is offered by the Module Event Filter, you can do so in the Event Filtering Preferences panel. Here you can pick and choose which individual events in a particular module you want to be displayed in the Event panel.
1. Open the Preferences dialog in one of the following ways:
o From the Edit menu, select Preferences… (Windows & Linux)
From the Blackboard Collaborate Web Conferencing menu, select Preferences (Mac OS X)
o Enter Ctrl+Comma (Windows & Linux)
Enter Command-Comma (Mac OS X)
2. In the left pane of the Preferences dialog, under Activity select Event Filtering. The Event Filtering preferences panel appears. The events are listed according to the module to which they belong. Each event has a drop-down menu from which you can select the option to display the event Normally, Always or Never.
47The Activity Window
3. Select the desired option for each of the events listed under the module names. Normally is the default option.
Note: The filtering set in the Event Filtering Preferences panel always overrides the filtering set in the Activity Window menus. For example, if you turn off the Audio module events in the Activity Window but have Microphone turned on set to display Always in the Preferences panel, whenever you turn on your microphone in the session, the event will be reported in the Events panel.
n Normally – Select this option if you would like to use the filtering defined by the Activity Window’s Module and Importance Event Filters.
n Always – Select this option if you would like to always display this event, even if it has been excluded from display by the Activity Window’s Module and Importance Event Filters.
n Never – Select this option if you would like to never display this event, even if it has been included for display by the Activity Window’s Module and Importance Event Filters.
4. Click on OK to save your preferences and close the Preferences dialog, Apply to save your preferences and leave the Preferences dialog open or Cancel to close the Preference dialog without saving any of your changes.
When you configure preferences, Blackboard Collaborate Web Conferencing will remember the settings each time you join another session on the same computer.
Resizing Activity Window TextBy default, the text in the Activity Window is determined by your operating system (typically 10 or 11 points).
n To make the text larger, right-click (Control-Click on Mac) anywhere in the Activity Window to open the context menu and select Make Text Bigger.
n To make the text smaller, right-click (Control-Click on Mac) anywhere in the Activity Window to open the context menu and select Make Text Smaller.
n To return the text to the default size, right-click (Control-Click on Mac) anywhere in the Activity Window to open the context menu and select Default Size.
Showing/Hiding Time StampsBy default, the Event panel displays a time stamp every 5 minutes. Any events that occur in the next five minute period will appear beneath that time stamp in the Event panel. For example, a time stamp will be reported at 1:00 PM and any events that occur between 1:00 PM and 1:05 PM will be listed beneath the 1:00 PM time stamp. If there is no activity in a 5 minute period, (for example, between 1:05 PM and 1:10 PM), no time stamp will be reported for that period (for
48 The Activity Window
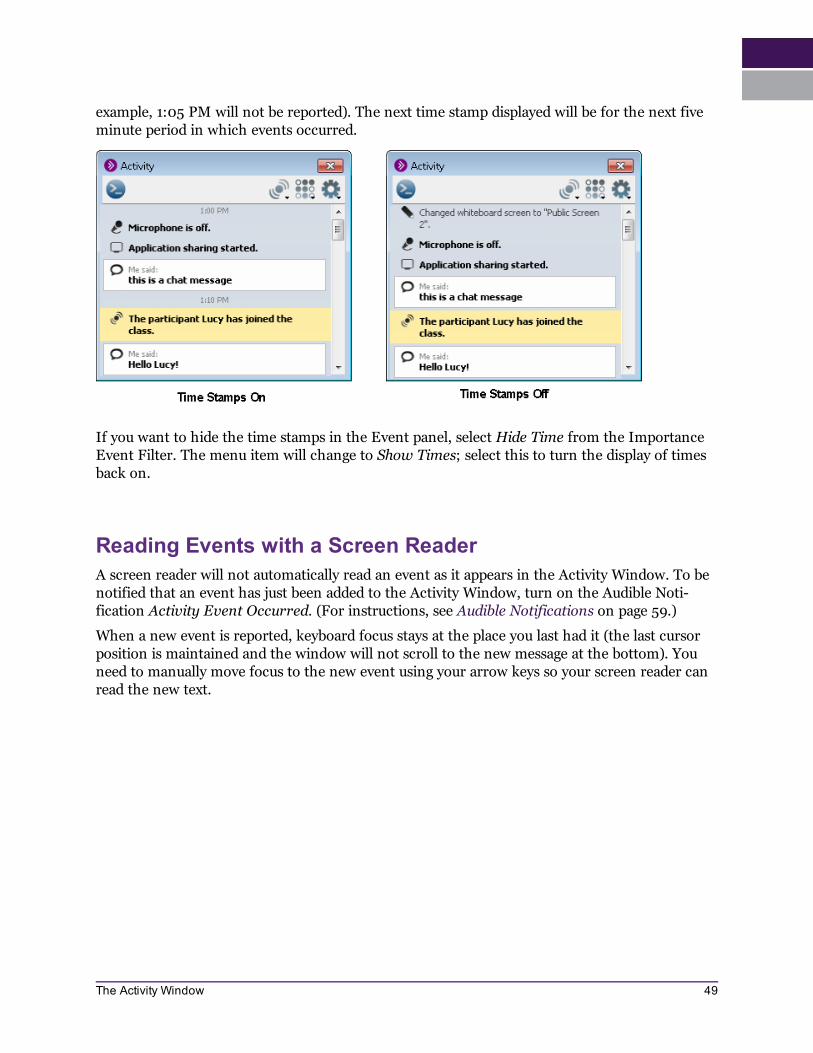
example, 1:05 PM will not be reported). The next time stamp displayed will be for the next five minute period in which events occurred.
If you want to hide the time stamps in the Event panel, select Hide Time from the Importance Event Filter. The menu item will change to Show Times; select this to turn the display of times back on.
Reading Events with a Screen ReaderA screen reader will not automatically read an event as it appears in the Activity Window. To be notified that an event has just been added to the Activity Window, turn on the Audible Noti-fication Activity Event Occurred. (For instructions, see Audible Notifications on page 59.)
When a new event is reported, keyboard focus stays at the place you last had it (the last cursor position is maintained and the window will not scroll to the new message at the bottom). You need to manually move focus to the new event using your arrow keys so your screen reader can read the new text.
49The Activity Window
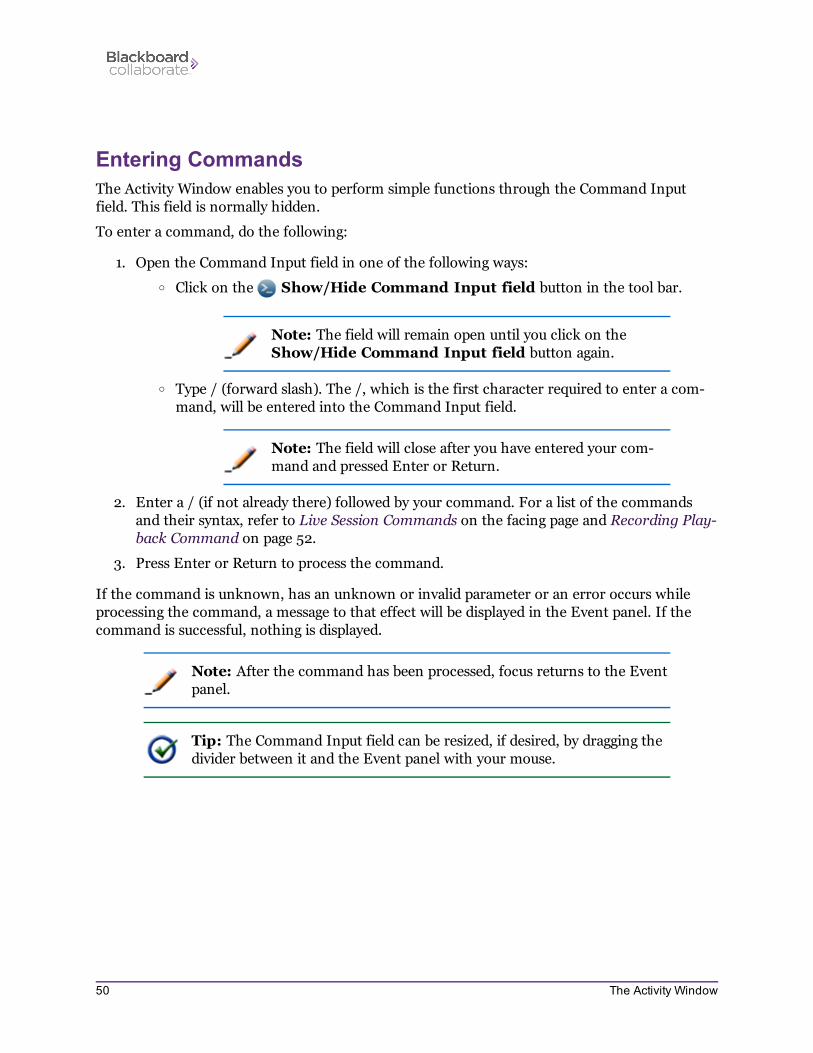
Entering CommandsThe Activity Window enables you to perform simple functions through the Command Input field. This field is normally hidden.
To enter a command, do the following:
1. Open the Command Input field in one of the following ways:
o Click on the Show/Hide Command Input field button in the tool bar.
Note: The field will remain open until you click on the Show/Hide Command Input field button again.
o Type / (forward slash). The /, which is the first character required to enter a com-mand, will be entered into the Command Input field.
Note: The field will close after you have entered your com-mand and pressed Enter or Return.
2. Enter a / (if not already there) followed by your command. For a list of the commands and their syntax, refer to Live Session Commands on the facing page and Recording Play-back Command on page 52.
3. Press Enter or Return to process the command.
If the command is unknown, has an unknown or invalid parameter or an error occurs while processing the command, a message to that effect will be displayed in the Event panel. If the command is successful, nothing is displayed.
Note: After the command has been processed, focus returns to the Event panel.
Tip: The Command Input field can be resized, if desired, by dragging the divider between it and the Event panel with your mouse.
50 The Activity Window
Live Session CommandsThese commands can be used only in a live session, not while listening to a recording.
Each command starts with a / (forward slash) and is followed by parameters. Where there is more than one available parameter, they are listed together and separated by a | (pipe). Enter only one parameter.
Raise or Lower Hand
Syntax: /hand up|down
Set Audio Mode
Syntax: /audio computer|phone
Talk or Stop Talking
Syntax: /talk on|off
Send Chat Message
Syntax:
/chat <message>
where
n <message> is the text of your message
Note: use this syntax to send a public message to only the room you are currently in.
or
/chat [@<recipient> | @all_rooms | @announcement | @moderators] <message>
where
n <recipient> sends a private message to the specified Moderator or Participant
n all_rooms sends a public chat to all rooms (Main room and breakout rooms)
n announcement sends a public message as an Announcement
n moderators sends a message to Moderators only (under the Moderators conversation tab)
These options are not case-sensitive.
51The Activity Window
Tip: Enclose <recipient> in quotation marks if it contains an ambiguous term. For example, let’s say there are two Participants, one named Mary and one named Mary Hansen. If you want to send Mary Hansen the message “Hello Mary”, enclose her name in quotation marks: /chat @“Mary Hansen” Hello Mary If you enter /chat @Mary Hansen Hello Mary you will send the other Mary the message “Hansen Hello Mary”.
<message> is the text of your message.
Display Video
Syntax: /video preview|on|off
React (show emotion)
Syntax: /react laughter|applause|confusion|disapproval|approval|faster|slower
Enter Polling Response
Syntax: /answer none|yes|no|a|b|c|d|e
Step Away or Come Back
Syntax: /status away|back
Recording Playback CommandThis command can be used only while listening to a recording. It starts with a / and is followed by one of three parameters, listed together and separated by a | (pipe). Enter only one param-eter.
Syntax: /playback start|pause|stop
52 The Activity Window
Chapter 5
Page 53
Closed-CaptioningThe Closed-Captioning feature enables a session attendee to transcribe audio information while a session is in progress. The transcribed text can be viewed by other session attendees in the live session and in a recording of the session. It can also be saved to a text file.
There are two types of Closed-Captioning windows: one for entering closed-captioning text and one for reading the text.
Note: Closed-Captioning windows always stay on top of other windows so they are easily accessed.
Anyone in the session can view the closed-captioning text, but a Moderator must give session attendees the permission to enter closed-captioning text. More than one person may be given the permission of entering closed-captioning text.
Closed-Captioning Activity and Permission IndicatorsYou can monitor the state of Closed-Captioning activity and permissions through indicators dis-played in the Participants list of the Participants panel.
The table below describes the icons displayed in the Participant list to indicate Moderator and Participant permissions and activity while using Closed-Captioning.
Activity Indicator
Meaning
User is currently entering Closed-Captioning text.
Moderator has granted Closed-Captioning permission to this user.
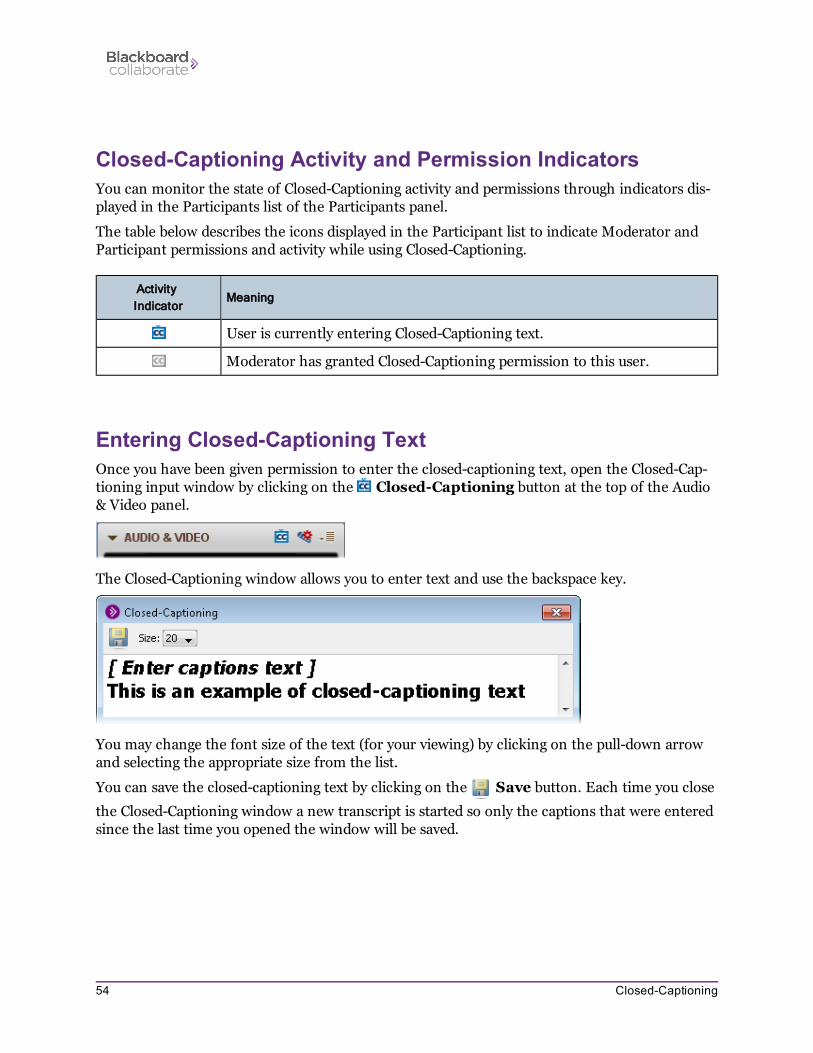
Entering Closed-Captioning TextOnce you have been given permission to enter the closed-captioning text, open the Closed-Cap-tioning input window by clicking on the Closed-Captioning button at the top of the Audio & Video panel.
The Closed-Captioning window allows you to enter text and use the backspace key.
You may change the font size of the text (for your viewing) by clicking on the pull-down arrow and selecting the appropriate size from the list.
You can save the closed-captioning text by clicking on the Save button. Each time you close
the Closed-Captioning window a new transcript is started so only the captions that were entered since the last time you opened the window will be saved.
54 Closed-Captioning

Viewing Closed-Captioning TextAll Moderators and Participants, upon joining a session have the permission to view the text in the Closed-Captioning window. To open the view-only Closed-Captioning window, do one of the following:
o Enter Ctrl+F8 (Command-F8 on Mac).
o From the Window menu, select Closed-Captioning.
If no one is currently entering closed-captioning text, the Closed-Captioning window will state [No caption source available].
If someone is entering closed-captioning text, the Closed-Captioning window will display who is entering the Closed-Captioning text in the Source field. In the example below, Lucy entered the text.
Note: Text that is entered in the Closed-Captioning window is real-time data. There is no historical data. When you open the view-only Closed-Cap-tioning window, you will see the text that is being entered starting from the time you opened the window.
55Closed-Captioning

In the Closed-Captioning window, you may change the font size of the text and select whose closed-captioning text you want to read.
n Save — To save the closed-captioning text, click on the Save button. Each time you
close the Closed-Captioning window a new transcript is started so only the captions that were entered since the last time you opened the window will be saved.
n Size — To change the font size, click on the pull-down arrow and select the appropriate font size. The default font size is set to 24.
n Source — This read-only field displays the name of the person who is entering the closed-captioning text that you are currently viewing. If the source is set to None, and you have the view-only Closed-Captioning window open, the first person that starts entering closed-captioning text will be the source.
n Preferred Source — If more than one person in the session is entering closed-captioning text at the same time during the session, all their names will appear in the Preferred Source pull-down menu. To change whose closed-captioning text you want to read, click on the pull-down arrow button and then select the appropriate person.
You also can tell who is currently entering Closed-Captioning text by the presence of the Closed-Captioning icon next to the captioners' names in the Participants list.
Note: If the person who was your preferred source is disconnected from your session, you will see the input from the next available source. When your preferred source returns to the session, you will again receive that person’s input. (Your preferred source remains in the list even though disconnected.)
Saving Closed-Captioning TextYou can save the closed-captioning text by clicking on the Save button in either of the
Closed-Captioning windows (input or view-only).
Each time you close the Closed-Captioning window a new transcript is started so only the cap-tions that were entered since the last time you opened the window will be saved.
56 Closed-Captioning
Closing and Reopening the Closed Captioning WindowIf you close either the input or view-only Closed Captioning window, it will be blank when you open it again. Only the captions that are entered after you reopen the window are displayed.
To close the window, do one of the following:
o Click on the window’s Close button in the title bar of the window.
o Enter Ctrl+W (Command-W on Mac)
o Enter Alt+F4 (Windows and Linux only)
To reopen the window, do one of the following:
o Enter Ctrl+F8 (Command-F8 on Mac).
o From the Window menu, select Closed-Captioning.
57Closed-Captioning

Chapter 6
Page 59
Accessibility OptionsSeveral options and preferences exist in Blackboard Collaborate Web Conferencing to improve accessibility. See the following sections for details:
n Setting Notification Preferences below
n Application Sharing Options on page 63
n Chat Options on page 1
n Notes Options on page 1
n Session Plan Options on page 1
Setting Notification Preferences
Audible NotificationsAudible notifications are system messages sent by Blackboard Collaborate Web Conferencing to notify users when certain important events occur within the session. These notifications are pre-sented as sounds.
In the Preference dialog, you can listen to what each notification sounds like as well as enable or disable the notifications. There are two built-in sets of notifications: Basic and All.
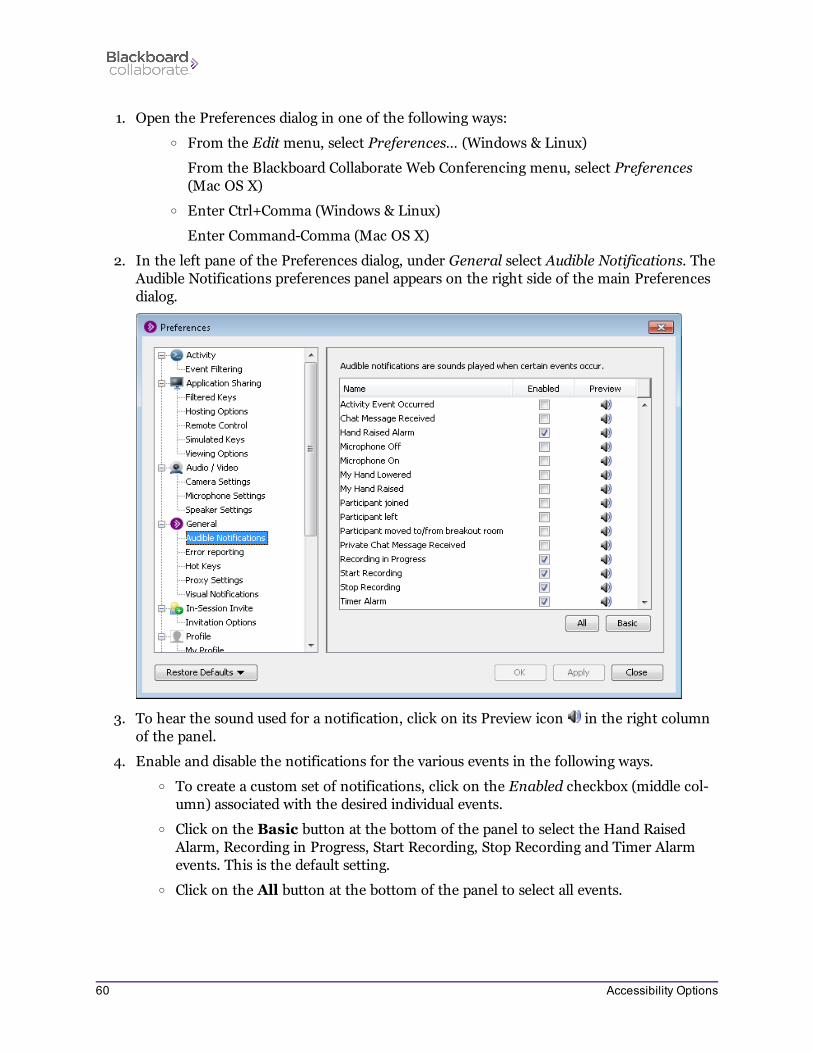
1. Open the Preferences dialog in one of the following ways:
o From the Edit menu, select Preferences… (Windows & Linux)
From the Blackboard Collaborate Web Conferencing menu, select Preferences (Mac OS X)
o Enter Ctrl+Comma (Windows & Linux)
Enter Command-Comma (Mac OS X)
2. In the left pane of the Preferences dialog, under General select Audible Notifications. The Audible Notifications preferences panel appears on the right side of the main Preferences dialog.
3. To hear the sound used for a notification, click on its Preview icon in the right column of the panel.
4. Enable and disable the notifications for the various events in the following ways.
o To create a custom set of notifications, click on the Enabled checkbox (middle col-umn) associated with the desired individual events.
o Click on the Basic button at the bottom of the panel to select the Hand Raised Alarm, Recording in Progress, Start Recording, Stop Recording and Timer Alarm events. This is the default setting.
o Click on the All button at the bottom of the panel to select all events.
60 Accessibility Options
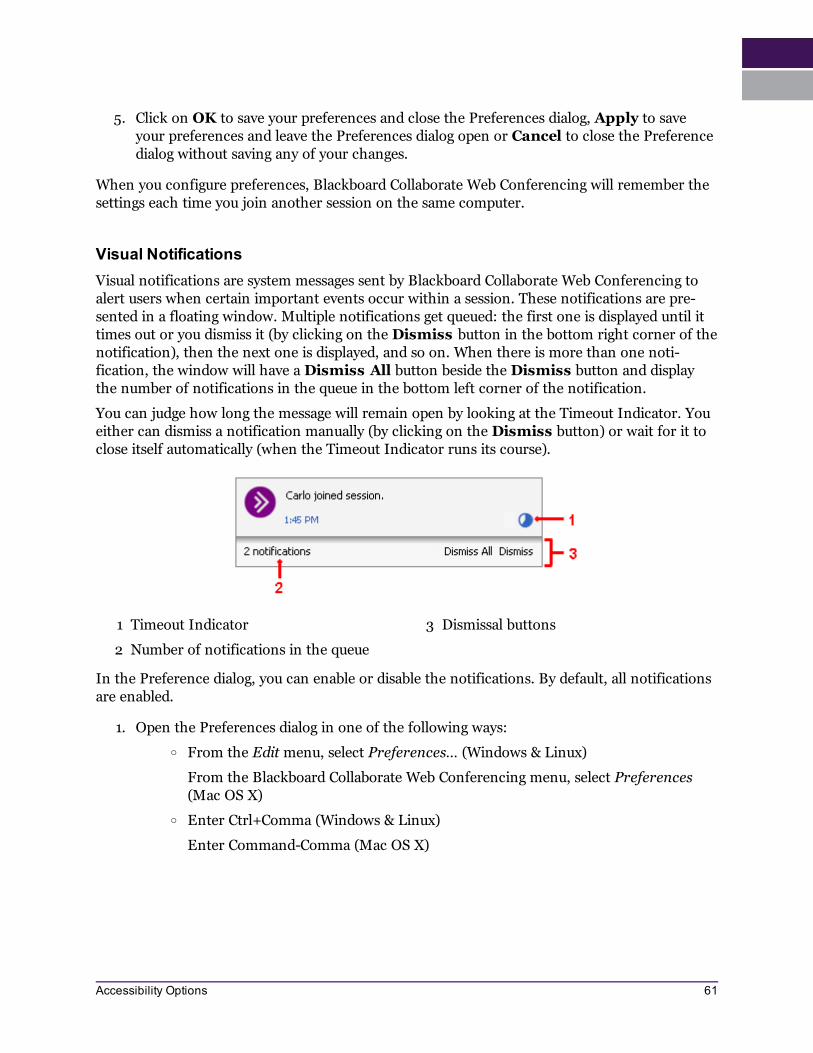
5. Click on OK to save your preferences and close the Preferences dialog, Apply to save your preferences and leave the Preferences dialog open or Cancel to close the Preference dialog without saving any of your changes.
When you configure preferences, Blackboard Collaborate Web Conferencing will remember the settings each time you join another session on the same computer.
Visual NotificationsVisual notifications are system messages sent by Blackboard Collaborate Web Conferencing to alert users when certain important events occur within a session. These notifications are pre-sented in a floating window. Multiple notifications get queued: the first one is displayed until it times out or you dismiss it (by clicking on the Dismiss button in the bottom right corner of the notification), then the next one is displayed, and so on. When there is more than one noti-fication, the window will have a Dismiss All button beside the Dismiss button and display the number of notifications in the queue in the bottom left corner of the notification.
You can judge how long the message will remain open by looking at the Timeout Indicator. You either can dismiss a notification manually (by clicking on the Dismiss button) or wait for it to close itself automatically (when the Timeout Indicator runs its course).
1 Timeout Indicator 3 Dismissal buttons
2 Number of notifications in the queue
In the Preference dialog, you can enable or disable the notifications. By default, all notifications are enabled.
1. Open the Preferences dialog in one of the following ways:
o From the Edit menu, select Preferences… (Windows & Linux)
From the Blackboard Collaborate Web Conferencing menu, select Preferences (Mac OS X)
o Enter Ctrl+Comma (Windows & Linux)
Enter Command-Comma (Mac OS X)
61Accessibility Options
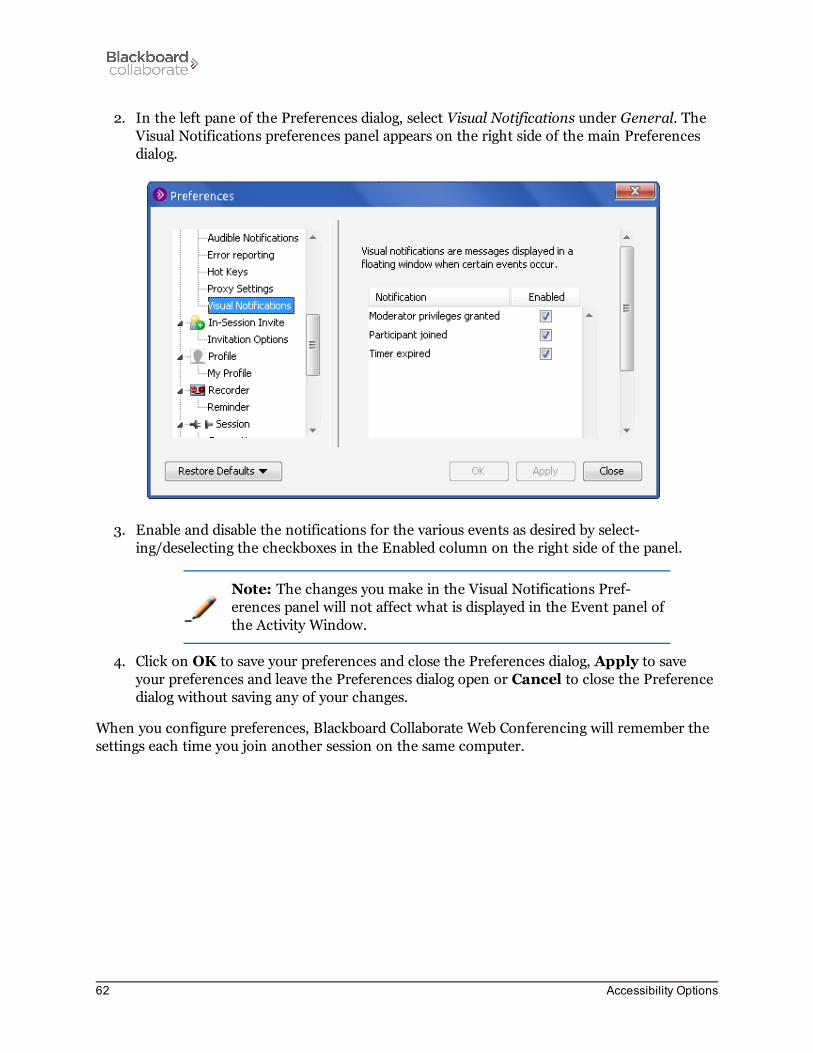
2. In the left pane of the Preferences dialog, select Visual Notifications under General. The Visual Notifications preferences panel appears on the right side of the main Preferences dialog.
3. Enable and disable the notifications for the various events as desired by select-ing/deselecting the checkboxes in the Enabled column on the right side of the panel.
Note: The changes you make in the Visual Notifications Pref-erences panel will not affect what is displayed in the Event panel of the Activity Window.
4. Click on OK to save your preferences and close the Preferences dialog, Apply to save your preferences and leave the Preferences dialog open or Cancel to close the Preference dialog without saving any of your changes.
When you configure preferences, Blackboard Collaborate Web Conferencing will remember the settings each time you join another session on the same computer.
62 Accessibility Options
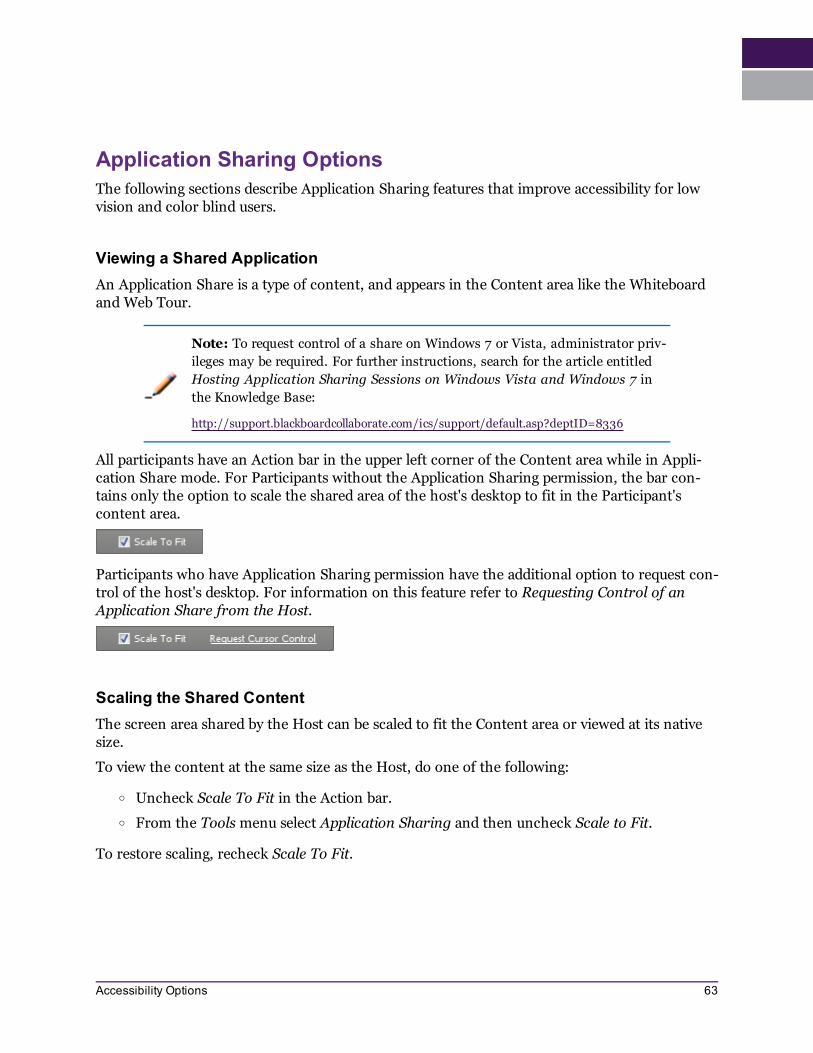
Application Sharing OptionsThe following sections describe Application Sharing features that improve accessibility for low vision and color blind users.
Viewing a Shared ApplicationAn Application Share is a type of content, and appears in the Content area like the Whiteboard and Web Tour.
Note: To request control of a share on Windows 7 or Vista, administrator priv-ileges may be required. For further instructions, search for the article entitled Hosting Application Sharing Sessions on Windows Vista and Windows 7 in the Knowledge Base:
http://support.blackboardcollaborate.com/ics/support/default.asp?deptID=8336
All participants have an Action bar in the upper left corner of the Content area while in Appli-cation Share mode. For Participants without the Application Sharing permission, the bar con-tains only the option to scale the shared area of the host's desktop to fit in the Participant's content area.
Participants who have Application Sharing permission have the additional option to request con-trol of the host's desktop. For information on this feature refer to Requesting Control of an Application Share from the Host.
Scaling the Shared ContentThe screen area shared by the Host can be scaled to fit the Content area or viewed at its native size.
To view the content at the same size as the Host, do one of the following:
o Uncheck Scale To Fit in the Action bar.
o From the Tools menu select Application Sharing and then uncheck Scale to Fit.
To restore scaling, recheck Scale To Fit.
63Accessibility Options
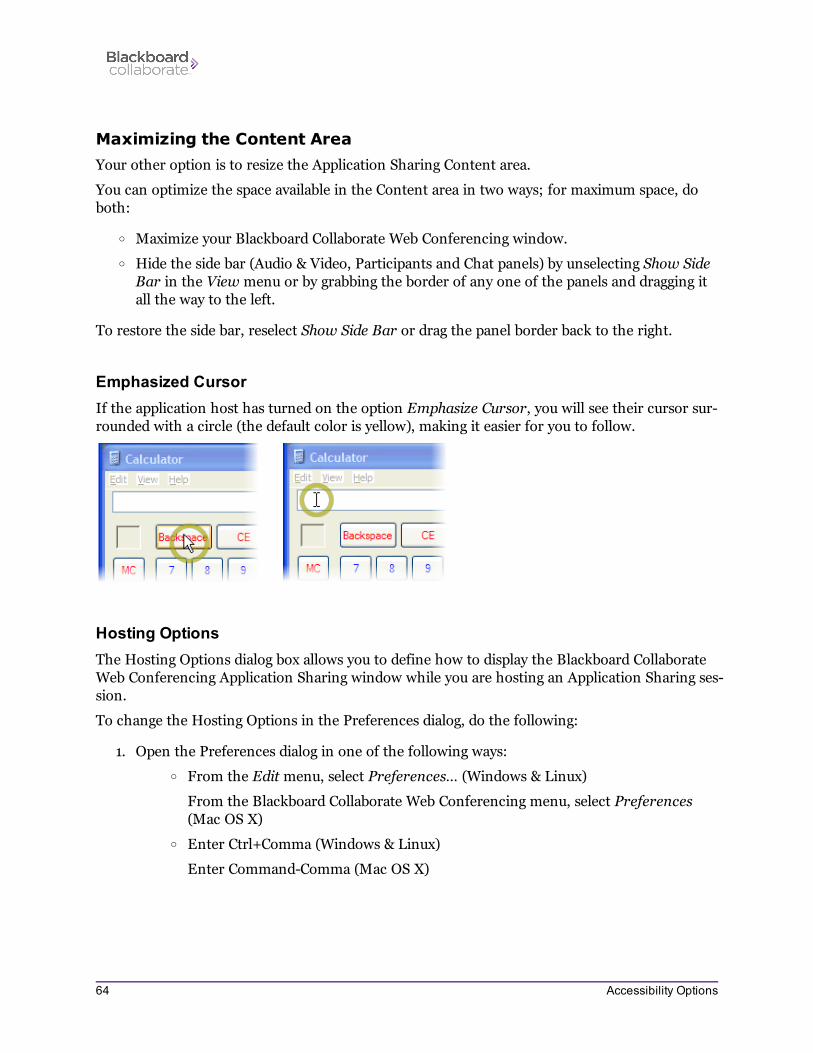
Maximizing the Content AreaYour other option is to resize the Application Sharing Content area.
You can optimize the space available in the Content area in two ways; for maximum space, do both:
o Maximize your Blackboard Collaborate Web Conferencing window.
o Hide the side bar (Audio & Video, Participants and Chat panels) by unselecting Show Side Bar in the View menu or by grabbing the border of any one of the panels and dragging it all the way to the left.
To restore the side bar, reselect Show Side Bar or drag the panel border back to the right.
Emphasized CursorIf the application host has turned on the option Emphasize Cursor, you will see their cursor sur-rounded with a circle (the default color is yellow), making it easier for you to follow.
Hosting OptionsThe Hosting Options dialog box allows you to define how to display the Blackboard Collaborate Web Conferencing Application Sharing window while you are hosting an Application Sharing ses-sion.
To change the Hosting Options in the Preferences dialog, do the following:
1. Open the Preferences dialog in one of the following ways:
o From the Edit menu, select Preferences… (Windows & Linux)
From the Blackboard Collaborate Web Conferencing menu, select Preferences (Mac OS X)
o Enter Ctrl+Comma (Windows & Linux)
Enter Command-Comma (Mac OS X)
64 Accessibility Options
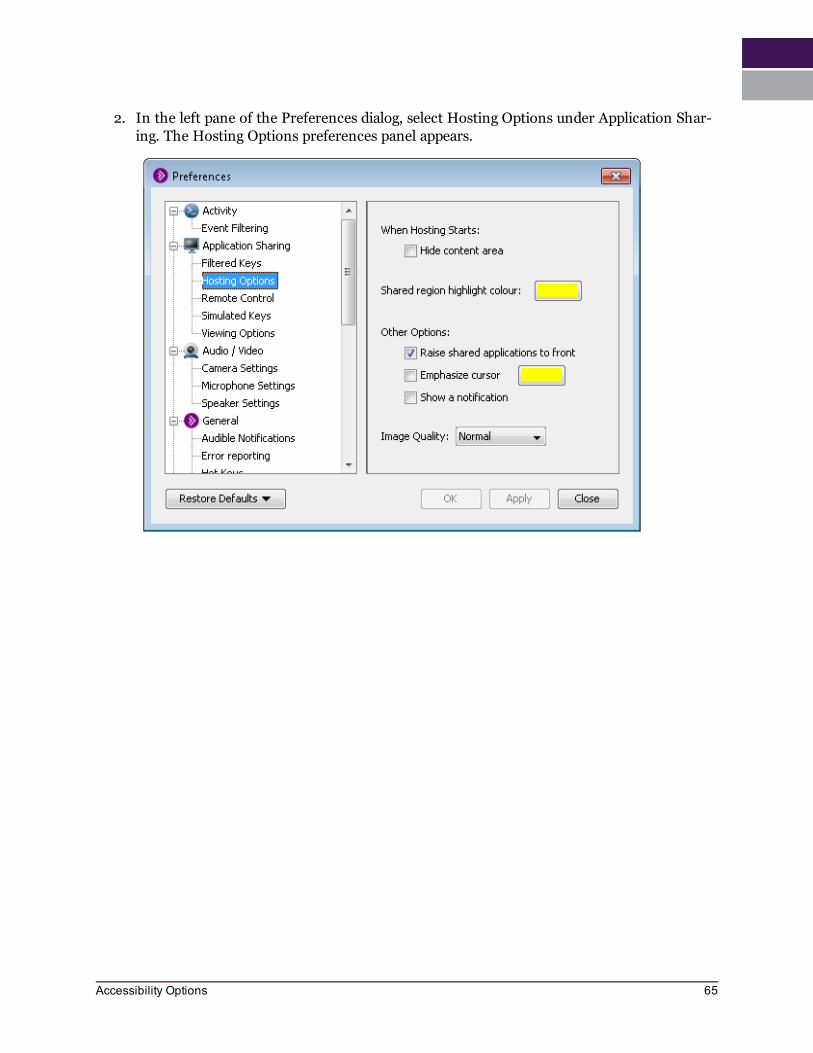
2. In the left pane of the Preferences dialog, select Hosting Options under Application Shar-ing. The Hosting Options preferences panel appears.
65Accessibility Options
3. Change any options:
Hide content area – Select this option to collapse the Content area of the Black-board Collaborate interface, leaving only the sidebar visible.
Shared region highlight color – Use this option to set the color of the border sur-rounding your shared application. The border identifies what is being shared so you will always know what the viewers of your application share are seeing
Raise shared applications to front – Select this option if you want the application that is being shared to be brought to the front of all other windows. If the option is not selected, the application may be hidden behind other windows on your monitor and the Application Sharing window will be black.
This option does not work on Linux using KDE or Gnome.
Emphasize cursor – Select this option if you would like the cursor in your shared application to stand out so it is easier for viewers of the shared application to follow its movements. If set, the viewer’s cursor will be surrounded by a colored circle. (As host, your view of the cursor is not emphasized.) Click the colored box to the right to change the highlighter color.
Show a notification – Select this option if you want a Notification window to appear on your monitor every time you start hosting an Application Sharing session. If you wish not to have this window appear, de-select this option.
4. Click on OK to save your preferences and close the Preferences dialog, Apply to save your preferences and leave the Preferences dialog open or Cancel to close the Preference dialog without saving any of your changes.
When you configure preferences, Blackboard Collaborate Web Conferencing will remember the settings each time you join another session on the same computer.
Chat OptionsYou can set the font size of the text in the conversation pane anywhere from 7 points to 109 points, in increments of 2 points. The default value is 13 points, which may be influenced by your system-wide font defaults.
To increase the font size, do one of the following
o From the Tools menu, select Chat and then Increase Font Size.
o From the Chat Options menu, select Increase Font Size.
To decrease the font size, do one of the following
o From the Tools menu, select Chat and then Decrease Font Size.
o From the Chat Options menu, select Decrease Font Size.
66 Accessibility Options
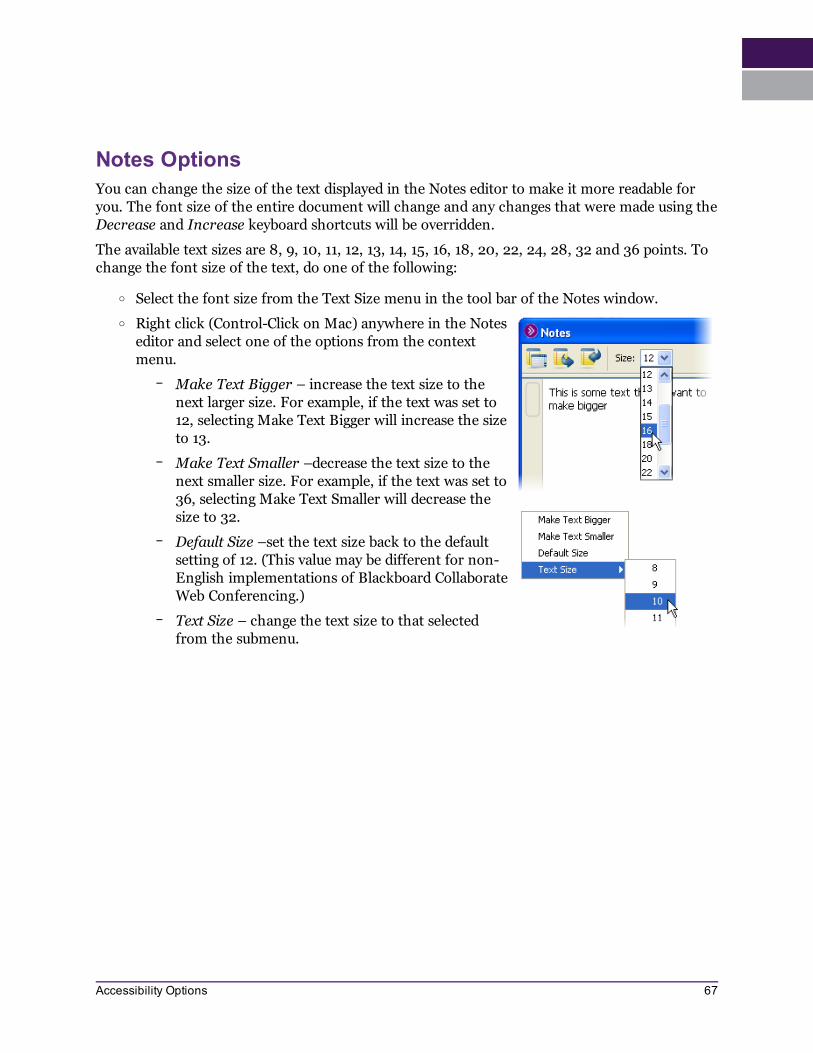
Notes OptionsYou can change the size of the text displayed in the Notes editor to make it more readable for you. The font size of the entire document will change and any changes that were made using the Decrease and Increase keyboard shortcuts will be overridden.
The available text sizes are 8, 9, 10, 11, 12, 13, 14, 15, 16, 18, 20, 22, 24, 28, 32 and 36 points. To change the font size of the text, do one of the following:
o Select the font size from the Text Size menu in the tool bar of the Notes window.
o Right click (Control-Click on Mac) anywhere in the Notes editor and select one of the options from the context menu.
Make Text Bigger – increase the text size to the next larger size. For example, if the text was set to 12, selecting Make Text Bigger will increase the size to 13.
Make Text Smaller –decrease the text size to the next smaller size. For example, if the text was set to 36, selecting Make Text Smaller will decrease the size to 32.
Default Size –set the text size back to the default setting of 12. (This value may be different for non-English implementations of Blackboard Collaborate Web Conferencing.)
Text Size – change the text size to that selected from the submenu.
67Accessibility Options

CopyrightThis document contains confidential proprietary information and is protected by law. This doc-ument and the information contained in it are intended for authorized users only and may be used only for the express purpose of legally accessing and using Blackboard Inc. products; any other use, without Blackboard Inc.’s prior written permission, is strictly prohibited.
© 2011 Blackboard Inc. All Rights Reserved.
69
TrademarksBlackboard Collaborate® and Blackboard Collaborate Web Conferencing® are registered trade-marks of Blackboard Inc. and its subsidiary companies, all rights reserved.
Elluminate Plan!TM is a trademark of Blackboard Inc. and its subsidiary companies. All rights reserved.
Elluminate Publish!TM, Elluminate Unplugged!TM, and Elluminate Unplugged! RecordingTM are trademarks of Blackboard Inc. and its subsidiary companies. All rights reserved.
All other brand or product names are trademarks or registered trademarks of their respective com-panies or organizations.
70