blacksmith - full compass systems
TRANSCRIPT

BLACKSMITH
USer’S MAnUAL


a
en
1 Read these instructions.2 Keep these instructions.3 Heed all warnings.4 Follow all instructions.5 Do not use this apparatus near water.6 Clean only with dry cloth.7 Do not block any ventilation openings. Install in accordance with the manufacturer’s
instructions.8 Do not install near heat sources such as radiators, heat registers, stoves, or other
apparatus (including amplifiers) that produce heat.9 Do not defeat the safety purpose of the polarized or grounding-type plug. A
polarized plug has two blades with one wider than the other. A grounding type plug has two blades and a third grounding prong. The wide blade or the third prong are provided for your safety. If the provided plug does not fit into your outlet, consult an electrician for replacement of the obsolete outlet.
10 Protect the power cord from being walked on or pinched particularly at plugs, convenience receptacles, and the point where they exit from the apparatus.
11 Only use attachments/accessories specified by the manufacturer.12 Use only with the cart, stand, tripod, bracket, or table specified by the
manufacturer, or sold with the apparatus. When a cart is used, use caution when moving the cart/apparatus combination to avoid injury from tip-over.
13 Unplug this apparatus during lightning storms or when unused for long periods of time.
14 Refer all servicing to qualified service personnel. Servicing is required when the apparatus has been damaged in any way, such as power supply cord or plug is damaged, liquid has been spilled or objects have fallen into the apparatus, the apparatus has been exposed to rain or moisture, does not operate normally, or has been dropped.
• Thisequipmentshouldbeinstallednearthesocketoutletanddisconnectionofthe device should be easily accessible.• TocompletelydisconnectfromACmains,disconnectthepowersupplycordfrom the AC receptacle.• Themainsplugofthepowersupplyshallremainreadilyoperable.• Donotinstallinaconfinedspace.• Donotopentheunit–riskofelectricshockinside.
Caution:You are cautioned that any change or modifications not expressly approved in this manual could void your authority to operate this equipment.
Service• Therearenouser-serviceablepartsinside.• Allservicemustbeperformedbyqualifiedpersonnel.
Important Safety InStructIonS
Voltage Line plug according to standard
110-125 V UL817 and CSA C22.2 no 42. 220-230V CEE 7 page VII, SR section 107-2-D1/IEC 83 page C4.
240V BS 1363 of 1984. Specification for 13A fused plugs and switched and unswitched socket outlets.
Warning!• Toreducetheriskoffireorelectricalshock,donotexposethisequipmentto
dripping or splashing and ensure that no objects filled with liquids, such as vases, are placed on the equipment.
• Thisapparatusmustbeearthed.• Useathreewiregroundingtypelinecordliketheonesuppliedwiththeproduct.• Beadvisedthatdifferentoperatingvoltagesrequiretheuseofdifferenttypesofline
cord and attachment plugs.• Checkthevoltageinyourareaandusethecorrecttype.Pleaserefertothe
following table:

b
EMC/EMIThis equipment has been tested and found to comply with the limits for a Class B Digital device, pursuant to part 15 of the FCC rules.These limits are designed to provide reasonable protection against harmful interference in residential installations. This equipment generates, uses and can radiate radio frequency energy and, if not installed and used in accordance with the instructions, may cause harmful interference to radio communications. However, there is no guarantee that interference will not occur in a particular installation. If this equipment does cause harmful interference to radio or television reception, which can be determined by turning the equipment off and on, the user is encouraged to try to correct the interference by one or more of the following measures:
• Reorientorrelocatethereceivingantenna.• Increasetheseparationbetweentheequipmentandreceiver.• Connecttheequipmentintoanoutletonacircuitdifferentfrom that to which the receiver is connected.• Consultthedealeroranexperiencedradio/TVtechnicianforhelp.
For Customers in Canada:This Class B digital apparatus complies with Canadian ICES-003.Cet appareil numérique de la classe B est conforme à la norme NMB-003 du Canada.
emc / emI & certIfIcate of conformIty

IntroductIonImportant Safety Instructions& Certificate of Conformity ...................................... a-b
Table of Contents ....................................................... 3Introduction ................................................................. 4Quick Setup Guide ..................................................... 5
operatIon Front panel ................................................................. 7RC-4 ......................................................................... 14Rear panel ................................................................ 15
appendIx General Protection mode ......................................... 19Heat Protection mode............................................... 19Signal Flow Diagram ................................................ 20Technical Specifications ........................................... 21
3
en
table of contentS
TC Electronic, Sindalsvej 34, DK-8240 Risskov – [email protected] Prod. No: 606150111English Version - Revision 1

IntroductIon
4
Congratulations on the purchase of your last bass-amp for big stage use. Blacksmith unites immense power and versatility, delivering a sound so massive that it is guaranteed to cover any demand imaginable. The raw power combined with nice features such as presets, compression and TubeTone known from other TC Electronic bass amplifiers will keep the smile on your face for a very long time. Bass amp 2.0 has just reached a high point. Blacksmith unites immense power and versatility, delivering a sound so massive that it’s guaranteed to pierce through any mix – with ease! Blacksmith - with Blacksmith behind you, power is not an issue. Large clubs, major venues or full-scale stadiums: No matter which stage youenter–you’recoveredalltheway.You’llbeincontrolofamassive1600watts,deliveringahugebasstonethatwillfollowyourslightest move while playing those hard-rocking bass lines and hammering riffs. Tone Shaping Overdose –Blacksmithdoesn’tjustgiveyouasetofroughtoolsforbasicsoundsculpting;itprovidesyouwithafullarsenal of tone-shaping tools, allowing you to tailor any sound imaginable. The primary tone-shaping tool is the 4-band EQ that gives you full control over Bass, Low-mid, High-mid and Treble for instant creation of your dream tones. In short, you can make crude tonal changes or fine-tune subtle nuances with surgical precision depending on the situation. On top of that, three extremely versatile tools allow you to gracefully enter the tonal corner of bass heaven: SpectraComp, TubeTone and TweeterTone. SpectraComp–offers‘per-string’multi-bandcompression.Inshort,yoursoundgetscompressedevenlyacrossallstringswithouthavingthe dynamics of your playing destroyed. This is the way bass compressors should always have been done. TubeTone–isallaboutthatspecial,vintagefeel.Turnitupjustabitforatouchofsubtletubewarmth,giveitanothernotchtoaddgenuine tube grind or crank it all the way up to get a roaring, in-your-face overdrive! With TubeTone, you get a painstaking recreation of boththetubepreampandpowerampsections.Puttingasingletubeinapreampwillnotdothejob–TubeTonewill! TweeterTone–isyourtoolofchoicewheneveryougoforamodern,crispsoundthatwilltakeyoursoundtonewheights–frequency-wise! Perfect for capturing that distinct and razor-sharp slap sound that instantly makes the crowd embrace the bass!
IntroductIon
5
en
Please note - We reserve the rights to change the contents of this manual at any time. The latest manual revision can always be downloaded from www.tcelectronic.com. If you need additional information and support, be sure to visit the TC Support Portal: www.tcelectronic.com/support
Built-in Tuner–Onceyouhavetriedthis,there’snoturningback.Theideaofhavinganinternalchromaticbasstunerisassimpleasitisbrilliant.Thetunerisalways‘on’,whichallowsyoutomonitoryourpitchstatusatalltimes–andtotuneupswiftlybetweentunesifneeded.Mostampscomewitha‘tunerout’,butwhyhavearacktunerclutterupyourrig?Whynotbuilditinrightfromthestart?Thereareliterallyno downsides, so it was really a no-brainer! User memories –Ifyou’veeveruseddifferentbassesorchangeplayingstyleduringshows,youknowthatafewamppresetswouldbewelcome. Blacksmith offers three on-board user memories, allowing you to switch easily between 4 and 5-string basses, Rickenbackers andFendersforthatmatter.Youcanalsocreatethreeentirelydifferenttonesforonebass–e.g.overdriveusingTubeTone,crispandcuttingslapsoundusingSpectraCompandTweeterToneandaclassic,old-schoolvintagetone.Inshort:Haveityourway–threetimes! POWER!!!–Powerisnotanissue–itisjustsomethingyouhavewithBlacksmith.1600wattsofraw,hard-punchingpowerwillkeepyouloudandstillleaveplentyofheadroomfor‘evenlouder’inanybandsettingonanystage! Also,Blacksmithiscapableofoperatingat8,4or2Ohms,so,ultimately,youcouldfireupfourRS410cabinets–that’s16x10”,or8.7square foot of speaker cones blasting air in your direction! You better put that foot on the monitor to keep standing!

6
QuIck Setup guIde
If you just can’t wait…Here are a few quick steps to get you playing within minutes.
Unpacking• UnpackyourBLACKSMITHamp.• Theboxshouldcontainthefollowingitems: – BLACKSMITHamplifier – PowerCable – Manual.• Inspectallitemsforsignsoftransitdamage.Intheunlikely
event of this having occurred, inform the carrier and supplier.• Keepallthepackagingifdamagehasoccurred,asthiswill
show evidence of excessive handling force.• Itisalsoagoodideatokeepthepackagingforfuture
transportation.
Setting up• ConnecttheSpeakerOutoftheamplifiertoyourcabinet
using a Speakon cable. TC Electronic RS cabinets come with a speaker cable included, so if you have bought a RS cabinet, you are all set to go.
• Blacksmithcanrunanycabinetcombinationwithaminimumload of 2 Ohm. To get the optimum performance from the amplifier, make sure to select the correct Load Impedance on the back plate before powering up the amplifier.
Notice that the amplifier will NOT be damaged if a wrong Load Impedance setting is selected, but a protection mode may be invoked. (please refer to page 19 for more information)
• Connectthepowercableandpowerup.• Connectyourbasstotheinputjackonthefrontpanel.• AdjusttheinputgainusingtheGAINknob.• AdjusttheoutputvolumeusingtheMASTERknob.• Play!
• RC-4isanoptionalpedalwithfourfootswitchesthatcanuse to switch between three memory locations and also to mute for tuning purposes. This pedal also shows tuner information.
Be sure to check www.tcelectronic.com for latest news about these and other TC products.

7
en
operatIon – front panel
1 – INPUTYoucanconnectanactiveorpassivebasstothis¼”inputjack.The BLACKSMITH input stage is designed to adapt to any type of pickup.
2+3 – GAIN & OVERLOAD LEDThe input gain should be set to the highest possible level without overloading the input stage. To find the correct setting, simply pluginyourbass,playandturnuptheGAINknobuntiltheOVERLOAD LED occasionally lights up. Then reduce the gain slightly. When set, simply turn up the MASTER volume knob to start playing.
4 – TONE ControlsBLACKSMITH has four tone controls: Bass, Lo-mid, Hi-mid and Treble. These controls have been tuned carefully to address four
relevant bass frequency areas, and should allow you to dial in your sound with ease.
As you know, each instrument has its own sound characteristics. If you feel that your BLACKSMITH’s tone controls don’t grab exactly the frequencies your particular instrument requires, you can change the center frequencies of the four EQ bands.
Changing Tone Control FrequencyYou can change the control frequencies of all four frequency bands.Thisissometimesreferredtoas“parametricbands”or“sweepable”.Normally, the BASS, LO-MID, HI-MID and TREBLE knobs are used to set the gain of each EQ band. To change the center frequency of an EQ band, press the SHIFT button once and then adjust a band’s center frequency by turning its knob.
Front Panel
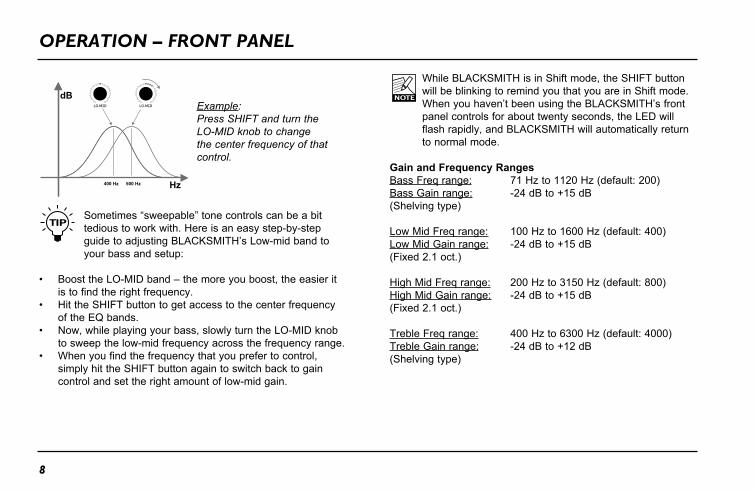
Example:Press SHIFT and turn the LO-MID knob to change the center frequency of that control.
Sometimes“sweepable”tonecontrolscanbeabittedious to work with. Here is an easy step-by-step guide to adjusting BLACKSMITH’s Low-mid band to your bass and setup:
• BoosttheLO-MIDband–themoreyouboost,theeasieritis to find the right frequency.
• HittheSHIFTbuttontogetaccesstothecenterfrequencyof the EQ bands.
• Now,whileplayingyourbass,slowlyturntheLO-MIDknobto sweep the low-mid frequency across the frequency range.
• Whenyoufindthefrequencythatyouprefertocontrol,simply hit the SHIFT button again to switch back to gain control and set the right amount of low-mid gain.
While BLACKSMITH is in Shift mode, the SHIFT button will be blinking to remind you that you are in Shift mode. When you haven’t been using the BLACKSMITH’s front panel controls for about twenty seconds, the LED will flash rapidly, and BLACKSMITH will automatically return to normal mode.
Gain and Frequency Ranges Bass Freq range: 71 Hz to 1120 Hz (default: 200)BassGainrange: -24 dB to +15 dB(Shelving type)
Low Mid Freq range: 100 Hz to 1600 Hz (default: 400)LowMidGainrange: -24 dB to +15 dB(Fixed 2.1 oct.)
High Mid Freq range: 200 Hz to 3150 Hz (default: 800)HighMidGainrange: -24 dB to +15 dB(Fixed 2.1 oct.)
Treble Freq range: 400 Hz to 6300 Hz (default: 4000)TrebleGainrange: -24 dB to +12 dB(Shelving type)
operatIon – front panel
8

operatIon – front panel
9
en
5 – SPECTRACOMP™Turn the knob to adjust the amount of SpectraComp compression.
SpectraComp™ uses a so-called spectral or multi-band approach to compression, allowing for individual compression of the low, mid and high frequency bands. Multiband compression allows a significantly smoother and more transparent compression without killing dynamics or tone.
SpectraComp™ is an advanced compressor, optimized to get the best from a bass signal. If you simply want to hear it just turn the knob while playing. If you want to know a bit more about what is going on behind the scenes, please read the following section.
SpectraComp In DepthGainReduction/CompressionMeterWhen using SpectraComp™, the light-ring around the SPECTRACOMP knob doubles as a compression meter, showing you how much compression is applied to the signal.
AutoMake-upGainAs compression by nature reduces the loudest parts and peaks of the signal, you may feel that many conventional compressors “eat”thelevelofyoursignal,resultinginaloweroutputvolume.SpectraComp™ automatically compensates for compression gain reduction, giving you an even output volume.
Spectral Compression vs. Full Band CompressionVirtually any compressor on the market for bass is based on a “fullband”principle,meaningthatthecompressorwillrespondand compress identically across the full (20 Hz to 20 kHz) frequency range.FromthelowE(orB)stringtotheGstring:Theelectricbass has a very wide dynamic range. When using standard compressors,thelowEstringwill–duetoitshigherenergy–control when and how the compressor responds to and shapes theentiresignal.ThetypicalresultisthateithertheGstringisnotcompressedatallorthat–justwhentheGstringstartstosoundright–,thelowEstringiscompressedtoostrongly.Inother words: You are constantly dealing with a tight and difficult compromise.
With Spectral Compression, the BLACKSMITH amplifier uses a different approach that allows for independent compression of the Low, Mid and High frequency areas. This way, the right amount of compression is added to the individual strings of your bass, resulting in a smoother and much more transparent compression.
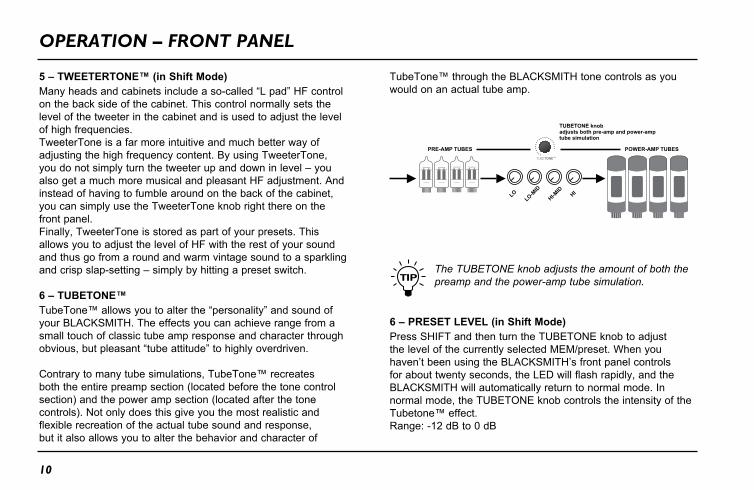
5 – TWEETERTONE™ (in Shift Mode)Manyheadsandcabinetsincludeaso-called“Lpad”HFcontrolon the back side of the cabinet. This control normally sets the level of the tweeter in the cabinet and is used to adjust the level of high frequencies. TweeterTone is a far more intuitive and much better way of adjusting the high frequency content. By using TweeterTone, youdonotsimplyturnthetweeterupanddowninlevel–youalso get a much more musical and pleasant HF adjustment. And instead of having to fumble around on the back of the cabinet, you can simply use the TweeterTone knob right there on the front panel. Finally, TweeterTone is stored as part of your presets. This allows you to adjust the level of HF with the rest of your sound and thus go from a round and warm vintage sound to a sparkling andcrispslap-setting–simplybyhittingapresetswitch.
6 – TUBETONE™TubeTone™allowsyoutoalterthe“personality”andsoundofyour BLACKSMITH. The effects you can achieve range from a small touch of classic tube amp response and character through obvious,butpleasant“tubeattitude”tohighlyoverdriven.
Contrary to many tube simulations, TubeTone™ recreates both the entire preamp section (located before the tone control section) and the power amp section (located after the tone controls). Not only does this give you the most realistic and flexible recreation of the actual tube sound and response, but it also allows you to alter the behavior and character of
TubeTone™ through the BLACKSMITH tone controls as you would on an actual tube amp.
The TUBETONE knob adjusts the amount of both the preamp and the power-amp tube simulation.
6 – PRESET LEVEL (in Shift Mode)Press SHIFT and then turn the TUBETONE knob to adjust the level of the currently selected MEM/preset. When you haven’t been using the BLACKSMITH’s front panel controls for about twenty seconds, the LED will flash rapidly, and the BLACKSMITH will automatically return to normal mode. In normal mode, the TUBETONE knob controls the intensity of the Tubetone™ effect.Range: -12 dB to 0 dB
operatIon – front panel
10
operatIon – front panel
11
en
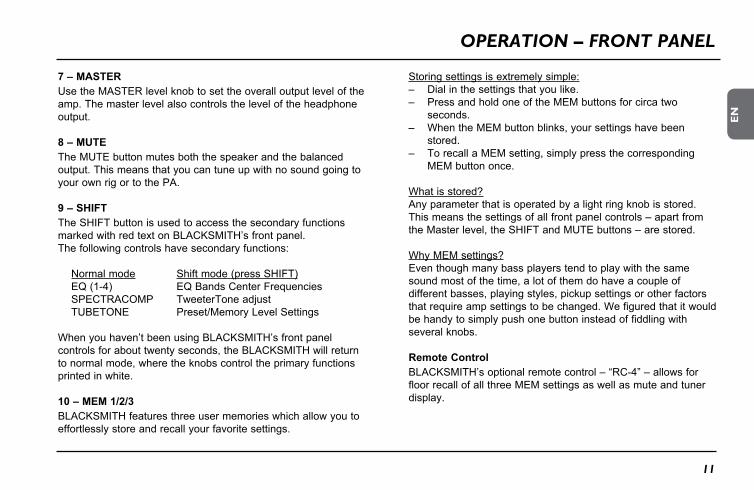
7 – MASTERUse the MASTER level knob to set the overall output level of the amp. The master level also controls the level of the headphone output.
8 – MUTEThe MUTE button mutes both the speaker and the balanced output. This means that you can tune up with no sound going to your own rig or to the PA.
9 – SHIFTThe SHIFT button is used to access the secondary functions marked with red text on BLACKSMITH’s front panel. The following controls have secondary functions:
Normal mode Shift mode (press SHIFT)EQ (1-4) EQ Bands Center FrequenciesSPECTRACOMP TweeterTone adjustTUBETONE Preset/Memory Level Settings
When you haven’t been using BLACKSMITH’s front panel controls for about twenty seconds, the BLACKSMITH will return to normal mode, where the knobs control the primary functions printed in white.
10 – MEM 1/2/3BLACKSMITH features three user memories which allow you to effortlessly store and recall your favorite settings.
Storing settings is extremely simple:– Dialinthesettingsthatyoulike.– PressandholdoneoftheMEMbuttonsforcircatwo
seconds.– WhentheMEMbuttonblinks,yoursettingshavebeen
stored.– TorecallaMEMsetting,simplypressthecorresponding
MEM button once.
Whatisstored?Any parameter that is operated by a light ring knob is stored.Thismeansthesettingsofallfrontpanelcontrols–apartfromtheMasterlevel,theSHIFTandMUTEbuttons–arestored.
WhyMEMsettings?Even though many bass players tend to play with the same sound most of the time, a lot of them do have a couple of different basses, playing styles, pickup settings or other factors that require amp settings to be changed. We figured that it would be handy to simply push one button instead of fiddling with several knobs.
Remote ControlBLACKSMITH’soptionalremotecontrol–“RC-4”–allowsforfloor recall of all three MEM settings as well as mute and tuner display.

11 – TUNERBLACKSMITH is equipped with a fully chromatic, high accuracy bass tuner. The tuner is always active, whether BLACKSMITH is in Mute mode or not. Here is how you read the display:The played note is shown on the left side of the display.
On the right side of the display,– acircle indicates that the note is in tune.– anarrow pointing right indicates that the note is too low and
should be tuned up.– anarrow pointing left indicates that the note is too high and
should be tuned down.
Too low – tune up Too high – tune down In tune Sharpnotes:C#,D#,F#,G#andA#areindicatedasfollows:
Example – A#
The tuner also offers a Mute mode with additional tuner information. To activate Mute mode, simply press the MUTE button. Now the BASS tone control turns into a high resolution pitch indicator supporting the Note and Arrow field of the tuner.
Too low – tune up Too high – tune down In tune
Tuner information is also displayed in the optional RC-4 footswitch. Yes, this is correct: If you have a RC-4 footswitch, you do no longer need a separate tuner. Please refer to the manualsection“RC-4”tolearnmoreaboutthisfootswitch.
operatIon – front panel
12
operatIon – front panel
13
en
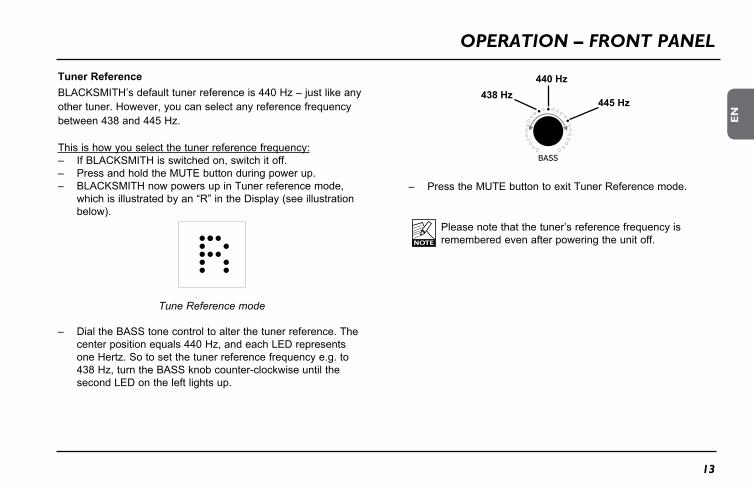
Tuner ReferenceBLACKSMITH’sdefaulttunerreferenceis440Hz–justlikeanyother tuner. However, you can select any reference frequency between 438 and 445 Hz.
This is how you select the tuner reference frequency:– IfBLACKSMITHisswitchedon,switchitoff.– PressandholdtheMUTEbuttonduringpowerup.– BLACKSMITHnowpowersupinTunerreferencemode,
whichisillustratedbyan“R”intheDisplay(seeillustrationbelow).
Tune Reference mode
– DialtheBASStonecontroltoalterthetunerreference.Thecenter position equals 440 Hz, and each LED represents one Hertz. So to set the tuner reference frequency e.g. to 438 Hz, turn the BASS knob counter-clockwise until the second LED on the left lights up.
– PresstheMUTEbuttontoexitTunerReferencemode.
Please note that the tuner’s reference frequency is remembered even after powering the unit off.

The optional RC-4 footswitch not only allows you to remotely access the BLACKSMITH’s three memory locations (MEM 1/2/3), but also to mute the signal for silent tuning and even view the tuner information. No power-supply is needed for the RC-4 as it receives its power from BLACKSMITH.
1 – Memory Switches 1, 2 and 3Press one of the three numbered buttons to recall the settings stored in the associated MEM location. A green light ring around the switch indicates that this MEM setting has been recalled (activated).– NotethatyoucanonlyrecallaMEMsettingifasettinghas
actually been stored in a memory location.– Alsonotethatassoonasyouchangeoneofthestored
settings on the BLACKSMITH front panel, the green light ring on the footswitch will be unlit. This indicates that the positions of the front panel knobs no longer correspond to the stored settings.
2 – MUTE buttonPress the M(ute) button to mute the BLACKSMITH’s outputs.
This is useful for tuning or e.g. unplugging/changing your bass.The MUTE button also mutes the BLACKSMITH’s balanced output, allowing you to tune silently, even when connected to the PA system.
3 – DISPLAYThe display always indicates tuner information in a couple of different ways. The detected note is shown on the left side. On the right side of the display, a circle indicates that the note is in tune, an arrow pointing to the right indicates that the note should be tuned up, and an arrow pointing to the left indicates that the note should be tuned down. In addition to these indications (that are also shown on the BLACKSMITH tuner display), a line of nine dots below the display indicates how far from the target pitch the currently played note is. When only the center dot is lit, the note is in tune.
Too low – tune up Too high – tune down In tune
rc-4
14

rear panel
15
en
DIGITAL OUT
EFFECTS LOOP
SEND
RETURN
LINE DRIVER OUTREMOTE IN
AES/EBU 96kHz(S/PDIF Compatible)
transformer balanced
PRE
PRE-AMPLIFIER
POST
4 OHM OR ABOVE
2 OHM
5V/100mA PRE/POST PREAMP
SEND / RETURN
SPEAKER OUT
CLASS 2 WIRING
Minimum Load: 2 Ohm
LOAD IMPEDANCE
UTILITY ZONE
MAINS GROUND MUST BE CONNECTED
WARNING
AVIS
TO REDUCE THE RISK OF FIRE OR ELECTRIC SHOCK DO NOTEXPOSE THIS EQUIPMENT TO RAIN OR MOISTURE.
RISQUE DE CHOC ELECTRIQUE-NE PAS OUVRIR
SPEAKER FREE OPERATION
CAUTIONRISK OF ELECTRIC SHOCK
DO NOT OPEN
R
C US
FILE# 186633
BLACKSMITH1600W BASS AMPLIFIER
MADE IN DENMARK
ALLOWED
MAINS IN
SERIAL NO.
rear Panel
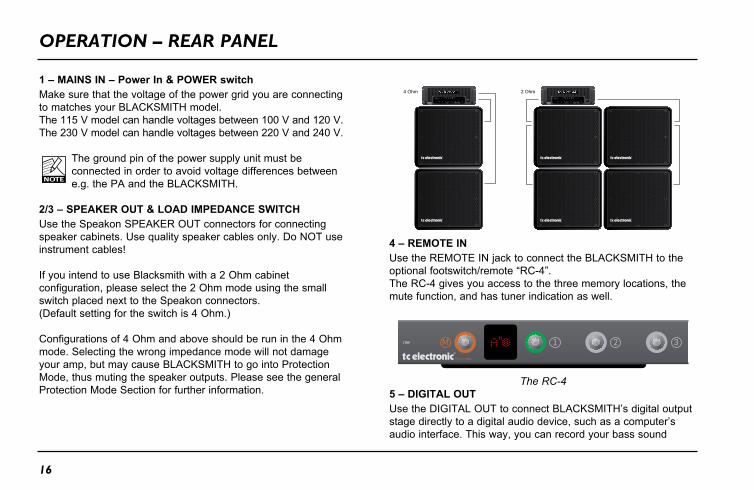
1 – MAINS IN – Power In & POWER switchMake sure that the voltage of the power grid you are connecting to matches your BLACKSMITH model. The 115 V model can handle voltages between 100 V and 120 V.The 230 V model can handle voltages between 220 V and 240 V.
The ground pin of the power supply unit must be connected in order to avoid voltage differences between e.g. the PA and the BLACKSMITH.
2/3 – SPEAKER OUT & LOAD IMPEDANCE SWITCHUse the Speakon SPEAKER OUT connectors for connecting speaker cabinets. Use quality speaker cables only. Do NOT use instrument cables!
If you intend to use Blacksmith with a 2 Ohm cabinet configuration, please select the 2 Ohm mode using the small switch placed next to the Speakon connectors.(Default setting for the switch is 4 Ohm.)
Configurations of 4 Ohm and above should be run in the 4 Ohm mode. Selecting the wrong impedance mode will not damage your amp, but may cause BLACKSMITH to go into Protection Mode, thus muting the speaker outputs. Please see the general Protection Mode Section for further information.
TM TM
GAIN
INPUT
BASS LO-MID HI-MID TREBLE SPECTRACOMP TUBETONE MASTER
MUTEMEM 3MEM 2MEM 1HOLD
TO STORE
ACTIVE / PASSIVE
PICK-UP
SHIFT
CENTER PRESET LEVELTWEETERTONE
O
I
BLACKSMITH 1 6 0 0 W C L A S S - D B A S S A M P L I F I E R
TM
HANDCRAFTED IN DENMARK
SERIAL NO. 0012
BLACKSMITH
TM TM
GAIN
INPUT
BASS LO-MID HI-MID TREBLE SPECTRACOMP TUBETONE MASTER
MUTEMEM 3MEM 2MEM 1HOLD
TO STORE
ACTIVE / PASSIVE
PICK-UP
SHIFT
CENTER PRESET LEVELTWEETERTONE
O
I
BLACKSMITH 1 6 0 0 W C L A S S - D B A S S A M P L I F I E R
TM
HANDCRAFTED IN DENMARK
SERIAL NO. 0012
BLACKSMITH
4 Ohm 2 Ohm
TM TM
GAIN
INPUT
BASS LO-MID HI-MID TREBLE SPECTRACOMP TUBETONE MASTER
MUTEMEM 3MEM 2MEM 1HOLD
TO STORE
ACTIVE / PASSIVE
PICK-UP
SHIFT
CENTER PRESET LEVELTWEETERTONE
O
I
BLACKSMITH 1 6 0 0 W C L A S S - D B A S S A M P L I F I E R
TM
HANDCRAFTED IN DENMARK
SERIAL NO. 0012
BLACKSMITH
4 Ohm
“LINK”
Send
Return TM TM
GAIN
INPUT
BASS LO-MID HI-MID TREBLE SPECTRACOMP TUBETONE MASTER
MUTEMEM 3MEM 2MEM 1HOLD
TO STORE
ACTIVE / PASSIVE
PICK-UP
SHIFT
CENTER PRESET LEVELTWEETERTONE
O
I
BLACKSMITH 1 6 0 0 W C L A S S - D B A S S A M P L I F I E R
TM
HANDCRAFTED IN DENMARK
SERIAL NO. 0012
BLACKSMITH
4 Ohm
4 – REMOTE INUse the REMOTE IN jack to connect the BLACKSMITH to the optionalfootswitch/remote“RC-4”.The RC-4 gives you access to the three memory locations, the mute function, and has tuner indication as well.
The RC-45 – DIGITAL OUTUsetheDIGITALOUTtoconnectBLACKSMITH’sdigitaloutputstage directly to a digital audio device, such as a computer’s audio interface. This way, you can record your bass sound
operatIon – rear panel
16

operatIon – rear panel
17
en
straight into Pro Tools, Logic or any other DAW application. The digital output signal is in 96 kHz/24 Bit AES/EBU format. This ensures the highest possible resolution and quality of your recorded bass signal. To determine where in the signal chain the signal for the digital output should be tapped, use the PRE/POST switch located right beside the LINE DRIVER OUT jack on the BLACKSMITH’s rear panel. Your bass signal is present on both Left and Right digital channel.
Setting up for recording:In order to record straight from BLACKSMITH’s digital output, follow these steps:– ConnectBLACKSMITH’sDIGITALOUTtoyourDAW.– SetyourDAWtosync/slaveto“externalclock”.– HittherecordbuttoninyourDAWandstartplaying. SPDIF CompatibilityWhile a simple XLR to RCA converter may suffice to allow recording through an SPDIF interface, please note that AES/ EBU and SPDIF have different level and impedance specifications, which in some cases can cause compatibility problems.
If you want to record with an analog signal instead, you may also use the BLACKSMITH’s balanced output signal from the LINE DRIVER OUT jack.
6 – INSERT PREAMP I/O – Effects Loop/Break pointThese jacks provide a break point between BLACKSMITH’s preamp section (which includes SpectraComp™, Tone controls and the TubeTone™ module) and the power amp section. This break point can be used as a regular serial effects loop for inserting e.g. modulation effects or other external devices.
Linking Two AmpsThe break point may also be used to link two BLACKSMITH units together to achieve even more power.– Useastandard¼”jackinstrumentcabletoconnect
the first BLACKSMITH SEND (the upper) to the second BLACKSMITH’s RETURN (the lower jack).
– PlugyourbassintotheINPUTjackonthefirstBLACKSMITH and adjust your sound using the controls on this BLACKSMITH.
– SetthevolumeusingtheMASTERvolumeknobsofbothamps.Younowhave–letussay“enough”amplificationpower at your fingertips!
DIGITAL OUT
EFFECTS LOOP
SEND
RETURN
LINE DRIVER OUTREMOTE IN
AES/EBU 96kHz(S/PDIF Compatible)
transformer balanced
PRE
PRE-AMPLIFIER
POST
4 OHM OR ABOVE
2 OHM
5V/100mA PRE/POST PREAMP
SEND / RETURN
SPEAKER OUT
CLASS 2 WIRING
Minimum Load: 2 Ohm
LOAD IMPEDANCE
UTILITY ZONE
MAINS GROUND MUST BE CONNECTED
WARNING
AVIS
TO REDUCE THE RISK OF FIRE OR ELECTRIC SHOCK DO NOTEXPOSE THIS EQUIPMENT TO RAIN OR MOISTURE.
RISQUE DE CHOC ELECTRIQUE-NE PAS OUVRIR
SPEAKER FREE OPERATION
CAUTIONRISK OF ELECTRIC SHOCK
DO NOT OPEN
R
C US
FILE# 186633
BLACKSMITH1600W BASS AMPLIFIER
MADE IN DENMARK
ALLOWED
MAINS IN
SERIAL NO.
Please see relevant setup example on the following page.

18
BLACKSMITH’s MUTE button mutes both the speaker and headphones outputs. This means that you can tune up with no sound going to your own rig or to the PA.
BLACKSMITH’s balanced output has been designed with the utmost care for the sound. This is achieved through a galvanic isolated transformer coupling. The active design by far outperforms most standard DI boxes around, and it is capable of driving long cable hauls. No phantom power is required.
VentilationBe sure not to cover the black cooling plate of the BLACKSMITH amplifier! Insufficient ventilation may cause the amplifier’s temperature to increase.
If your BLACKSMITH is insufficiently ventilated, it may go intoHeatProtectionmode,whichisindicatedbyan“H”on the front panel display. Please read more on the following page.
operatIon rear panel
TM TM
GAIN
INPUT
BASS LO-MID HI-MID TREBLE SPECTRACOMP TUBETONE MASTER
MUTEMEM 3MEM 2MEM 1HOLD
TO STORE
ACTIVE / PASSIVE
PICK-UP
SHIFT
CENTER PRESET LEVELTWEETERTONE
O
I
BLACKSMITH 1 6 0 0 W C L A S S - D B A S S A M P L I F I E R
TM
HANDCRAFTED IN DENMARK
SERIAL NO. 0012
BLACKSMITH
TM TM
GAIN
INPUT
BASS LO-MID HI-MID TREBLE SPECTRACOMP TUBETONE MASTER
MUTEMEM 3MEM 2MEM 1HOLD
TO STORE
ACTIVE / PASSIVE
PICK-UP
SHIFT
CENTER PRESET LEVELTWEETERTONE
O
I
BLACKSMITH 1 6 0 0 W C L A S S - D B A S S A M P L I F I E R
TM
HANDCRAFTED IN DENMARK
SERIAL NO. 0012
BLACKSMITH
4 Ohm 2 Ohm
TM TM
GAIN
INPUT
BASS LO-MID HI-MID TREBLE SPECTRACOMP TUBETONE MASTER
MUTEMEM 3MEM 2MEM 1HOLD
TO STORE
ACTIVE / PASSIVE
PICK-UP
SHIFT
CENTER PRESET LEVELTWEETERTONE
O
I
BLACKSMITH 1 6 0 0 W C L A S S - D B A S S A M P L I F I E R
TM
HANDCRAFTED IN DENMARK
SERIAL NO. 0012
BLACKSMITH
4 Ohm
“LINK”
Send
Return TM TM
GAIN
INPUT
BASS LO-MID HI-MID TREBLE SPECTRACOMP TUBETONE MASTER
MUTEMEM 3MEM 2MEM 1HOLD
TO STORE
ACTIVE / PASSIVE
PICK-UP
SHIFT
CENTER PRESET LEVELTWEETERTONE
O
I
BLACKSMITH 1 6 0 0 W C L A S S - D B A S S A M P L I F I E R
TM
HANDCRAFTED IN DENMARK
SERIAL NO. 0012
BLACKSMITH
4 Ohm
Example: 1600 W power per stack. The left head controls both stacks.
8 – LINE DRIVER OUT – Balanced Line OutUse the LINE DRIVER OUT jack to connect your BLACKSMITH to the PA when you play on stage or to connect it to a recording device when you are in the studio.To determine where in the signal chain the signal for the balanced output should be tapped, use the PRE/POST switch (7), located right next to the LINE DRIVER OUT jack.

19
en
appendIx – mIScellaneouS
Heat Protection ModeIfthedisplayindicatesan“H”,theampistoohot.Thisisrarely seen, but a few extreme situations can invoke this mode:
a) If the amplifier is used in an environment that is too hot, or if proper ventilation is not ensured.
b) The Load Impedance switch on the amplifier’s back plate must match the load of the connected cabinet configuration. If the Load Impedance switch is set to 4 Ohm and the amplifier is run at high levels over a long period of time with a 2 Ohm speaker configuration, the amplifier may enter Heat Protection mode.
In both situations, proceed as follows:– Turnofftheamplifier.– Solvetheissues.– Allowtheamplifiertocooloffforafewminutes.– Turnontheamplifieragain.
Notice that due to Blacksmiths protection features the amplifier will NOT be damaged if a wrong Load Impedance setting is selected.
Protection modeBLACKSMITH is equipped with an intelligent protection system, ensuring that the amp does not suffer or malfunction if operated wrongly or in extreme environments.
General Protection modeIftheBLACKSMITH’sdisplayindicates“P”,theampisinProtection mode. Protection mode is invoked if for some reason a short-circuit situation occurs. In Protection mode, the speaker outputs are shut off so that the speakers cannot be damaged by a shortcut. The balanced output, digital recording out and the effects loop, however, are still passing audio in Protection mode.
To remedy the problem, try turning off your BLACKSMITH for a minute and then turn it on again. If the display still indicates “P”,youwillhavetosendyourBLACKSMITHtoaqualifiedservice-center for inspection.

appendIx – SIgnal flow
20
INPUT GAIN MUTE
“LINK”
“LINK”
“LINK”
SPECTRA
COMP
TUBETONE
PRE
TONE
CONTROLS
DIGITAL
RECORDING
OUT
TUBETONE
POST
PRESET
LEVEL
ACTIVE
POWER
MANAGEMENT
POWER AMP
IN
GALVANIC ISOLATION
WITH DI DRIVER
DI
PREAMP
OUT
MASTER
VOLUME
POWER
AMP
TUNER
“LINK”
SEND
RETURN
JACK
TWEETER
TONE

21
en
Input SectionInput connectorInput impedanceGainrange
Tone controls Bass
Low Mid
High Mid
Treble
Tweeter Tone
Tube Tone
Spectra Comp
Preset Level
User Memories
Tuner Tuning range
Mute
Mains supply
Speaker out
1/4”jack1 MOhm / 100 pF-96 to 32 dB
Default Freq: 200 Hz (range: 71-1120 Hz, Gain:+15/-24dB)-Shelvingtype.Default Freq: 400 Hz (range: 100-1600 Hz, Gain:+15/-24dB)Default Freq: 800 Hz (range: 200-3150 Hz, Gain:+15/-24dB)Default Freq: 4000 Hz (range: 400-6300 Hz, Gain:+15/-24dB)-Shelvingtype.
-12 to 12, L-PAD Cabinet Recreation
0 to 12, Tube amp Recreation
3 band Spectral Compression
-12 dB to 0 gain attenuation
3 memory locations storing all front panel controls except Mute & Master Level
Chromatic, constant onA0 (27.50 Hz) to E5 (659.26 Hz)
Mutes Speaker out and Balanced out
100-120V~ or 220-240V~ 50/60 Hz (200 W @ 1/8 Power)
2x SpeakonTM
Power rating
2 Ohm / >4 Ohm setting
Balanced outputMax. Output
Optimal Load Impedance
Preamp out
Power amp in
Digital Recording out
Remote connection
Operating/Storage Temperature
Humidity
Dimensions
Weight
Finish
1600 W (4500 W Peak)
Recessed Toggle Switch
Transformer Balanced XLR, Pre/Post Pre-amp+0 dBu
600 Ohm
1/4”Jack,BalancedOutput,MaxOutputLevel=+8 dBu
1/4”Jack,balancedinput,impedance=10kOhm,MaxInputLevel=+8dBu
Balanced XLR, AES/EBU, (24 Bit)
5 pin DIN, Cable with shield
0° C to 50° C / -30° C to 70° C
Max. 90 % non-condensing
483x412x178mm/19”x16.2”x7”
12 kg / 26.5 pounds
Anodized aluminum frontPlated and painted steel chassis
appendIx – technIcal SpecIfIcatIonS
21
en
Due to continuous development, these specifications are subject to change without notice.
