blenders - webstaurantstore: restaurant supply ... · receiving the blender adjust its voltage...
TRANSCRIPT

BlendersModels LAR-15PMB, LAR-25PMB
Instruction Manual
Version 1
1-800-465-0234www.omcan.com
3115 Pepper Mill Court, Mississauga, ON, L5L 4X54450 Witmer Industrial Estates, Unit 4, Niagara Falls, NY, 14305

2
Page
-------------------------------------------------------------------------------- 3
--------------------------------------------------------------------------- 3 - 4
-------------------------------------------------------------------------- 5
--------------------------------------------------------------------------------------- 5 - 6
----------------------------------------------------------------------------------------- 6 - 7
------------------------------------------------------------------------------------- 7 - 9
-------------------------------------------------------------------------- 10 - 13
---------------------------------------------------------------------- 14 - 15
---------------------------------------------------------------------------- 17
Table of Contents
Section
General Information
Safety and Warranty
Technical Specifications
Installation
Operation
Maintenance
Parts Breakdowns
Electrical Schematics
Warranty Registration
Model LAR-15PMB / Model LAR-25PMB

3
General Information
Safety and Warranty
Omcan Manufacturing and Distributing Company Inc. and Food Machinery Of America, Inc. dba Omcan are not responsible for any harm or injury caused due to any person’s improper or negligent use of this equipment. The product shall only be operated by someone over the age of 18, of sound mind, and not under the influence of any drugs or alcohol, who has been trained in the correct operation of this machine, and is wearing authorized, proper safety clothing. Any modification to the machine voids any warranty, and may cause harm to individuals using the machine or in the vicinity of the machine while in operation.
The High Performance Tilting Blenders are simple to use and clean. However, for your safety read the following instructions in order to avoid accidents:1. Always unplug the machine when cleaning, servicing or when any other maintenance operation is needed.2. Never use tools that do not belong to the machine during operation.3. Never spray water on the machine.4. Do not operate the machine while wearing wet clothes or wet shoes.5. Before operating the machine, make sure it is properly grounded.6. When washing inside of the Cup Nº02 (Pic. 01) ensure power is off and unit is unplugged. Be careful with
the blade as it has sharp edges.
General Safety Practices
The following safety instructions are addressed to both the operator of the machine as well as the person in charge of maintenance. The user shall operate the machine only after being well acquainted with the safety procedures described in the present manual. READ THIS MANUAL THOROUGHLY.
Basic Operation Practices
Dangerous partsSome parts of the electric devices are connected to high voltage points. These parts when touched may cause severe electrical shocks or can even be FATAL. Never touch commands such as buttons, switches and knobs with wet hands, wet clothes and/or shoes. By not following these instructions, operators could be exposed to severe electrical shocks or even to a FATAL situation.

4
Safety and Warranty WarningsThe operator has to be well familiar with the position of ON/OFF Switch to make sure the Switch is easily accessible when necessary. Before any kind of maintenance, physically remove plug from the socket. Provide space for a comfortable operation thus avoiding accidents. Water or oil spilled on the floor will cause additional hazards. Make sure the floor is clean and dry. Before giving any manual command (switch, buttons, turn keys or lever) be sure the command is the correct one. Check this manual for further details if necessary. Never use a manual command (switch, buttons, lever) unadvisedly. If any work is to be made by two or more people, coordination signs will have to be given for each operation step. Every step of the operation shall be taken only if the sign has been made and responded.
AdvicesIn case of power shortage, immediately turn the machine OFF. Use recommended or equivalent lubricants, oils or greases. Avoid mechanical shocks as they may cause failures or malfunction. Avoid penetration of water, dirt or dust into mechanical or electrical components of the machine. DO NOT MODIFY original characteristics of the machine. DO NOT REMOVE, TEAR OFF or MACULATE ANY SAFETY or IDENTIFICATION LABELS stuck on the machine. If any label has been removed or is no longer legible, contact your nearest dealer for replacement.
Safety Procedures and Notes Before Switching Machine ON
IMPORTANT: Carefully read ALL INSTRUCTIONS of this manual before turning the machine ON. Be sure to be familiar with the instructions and that you have understood all information contained in this manual. If you have any questions contact your supervisor or your nearest Dealer.
DangerAn electric cable or electric wire with damaged jacket or bad insulation could cause electrical shocks as well as electrical leak. Before use, unplug and check conditions of all wires and cables.
AdvicesBe sure ALL INSTRUCTIONS in this manual have been thoroughly understood. Every function and operational procedure have to be very clear to the operator. Contact your nearest Dealer for further questions. Any manual command (switch, button or lever) shall be given only after being sure it is the correct one.
PrecautionsThe electric cable has to be compatible with the power required by the machine. Cables touching the floor or close to the machine need to be protected against short circuits.

5
Installation
01- Lid02- Cup03- On/Off Switch04- Voltage Selector Switch 110/220V05- Stand06- Motor07- Lock Pedal
The High Performance Tilting Blenders were developed to be used in both voltages: 110V or 220V. Upon receiving the Blender adjust its voltage according to the one of the power supply source using the Voltage Selector Switch Nº04 (Pic. 01) located at the bottom of the machine. Adjust it if necessary. Grounding is mandatory.
Technical Specifications
Picture 1
Main Components
All components are made with carefully selected materials, in accordance with Omcan experience and standard testing procedures.
Technical Data Units LAR-15PMB LAR-25PMBVoltage [V] 110/220 110/220Power Rating [Hz] 50 or 60 50 or 60Frequency [CV] 1,0 1,0 or 1.5Consuption [kW/h] 0,73 0,73 or 1,1Height [mm] 1060 1180Width [mm] 360 410Depth [mm] 525 525Net Weigth [kg] 19 20,5Gross Weigth [kg] 23 24Rotation [ rpm] 3500 3500
(*) Frequency will be only the one indicated on motor characteristics label.

6
Installation
Operation
01 - Motor 02 - Pedal Lock.
IMPORTANT: Before doing any maintenance to the machine switch it OFF and unplug it.
Starting
The Blender is activated by turning the On/Off Switch Nº03 (Pic.01) to ON position.
Operating Procedures
The High Performance Tilting Blender works at high speed (approximately 3.500 rpm, 50Hz). To feed it proceed as follows:1. Remove the Lid Nº01 (Pic.01).2. Put product inside the Cup Nº02 (Pic.01) with the machine switched OFF.3. Place the Lid Nº01 (Pic.01) back on top of the Cup and switch the machine ON.
NOTE: Due to turbulence generated when machine is ON do not turn it ON without the Lid Nº01 (Pic.01). The processing time depends on the kind of product.
IMPORTANT: NEVER SWITCH THE MACHINE ON WITHOUT PRODUCT IN IT BECAUSE IT WILL CAUSE IRREPARABLE DAMAGES.
IMPORTANT: It is not recommended to blend products without the addition of any liquid, otherwise it will overheat and damage the Cup seal.
Picture 2
Pre Operation
First of all check if the Blender is firm on its position. Check if Motor (Nº01) is perfectly fitted on the Lock Pedal (Nº02) as shown on Picture 2.

7
MaintenanceCleaning
The new Blenders cup has stamped ribs that facilitate cleaning. Wash the Lid Nº01 and the Cup Nº02 (Pic. 01) with water and neutral soap. Wipe up the other parts with a damp cloth.
IMPORTANT: Never do cleaning with machine plugged in. Always unplug machine before cleaning. When washing inside the Cup be careful with the blade.
Maintenance
DangerAny maintenance with the machine in working situation is dangerous. TURN IT OFF BY PULLING THE PLUG OFF THE SOCKET DURING MAINTENANCE.
IMPORTANT: Always unplug the machine when emergency cases arise.
AdviceElectrical or mechanical maintenance must be done by qualified personal for such operation. Person in charge has to be sure that the machine is under TOTAL SAFETY conditions when working.
Routine Inspection - Unplug Machine
AdviceWhen checking the tension of the belts or chains, DO NOT introduce your fingers between the belts and the pulleys and nor between the chain and the gears.
PrecautionsCheck if motors and sliding or turning parts of the machine produce abnormal noises. Check the tension of the belts and chains and replace the set when belt or chain show signs of being worn out. When checking tensions of belts or chain DO NOT introduce your fingers between belts and pulleys, nor between the chains and gears.Check protections and safety devices to make sure they are working properly.
OperationDischarging Procedures
To discharge processed product from Blender Models proceed as follows:1. Turn machine OFF.2. Remove Lid Nº01 (Pic. 01).3. Press Lock Pedal Nº07 (Pic. 01) down.4. Tilt Cup Nº02 (Pic. 01) holding its handle and discharge processed product as needed.

8
Operation
AdviceBe sure your hair is not loose in order to avoid getting caught by turning parts which could lead to a serious accident. Tie your hair up and/or cover your head with a scarf. The operation performed by untrained personnel shall be forbidden. Never touch turning parts with your hands or in any other way. NEVER operate machine without all original safety devices under perfect conditions.
Cautions with Stainless Steel:
The Stainless Steel may present rust signs, which ARE ALWAYS CAUSED BY EXTERNAL AGENTS, especially when the cleaning or sanitization is not constant and appropriate. The Stainless Steel resistance towards corrosion is mainly due to the presence of chrome, which in contact with oxygen allows the formation of a very thin protective coat. This protective coat is formed through the whole surface of the steel, blocking the action of external corrosive agents. When the protective coat is broken, the corrosion process begins, being possible to avoid it by means of constant and adequate cleaning. Cleaning must always be done immediately after using the equipment. For such end, use water, neutral soap or detergent, and clean the equipment with a soft cloth or a nylon sponge. Then rinse it with plain running water, and dry immediately with a soft cloth, this way avoiding humidity on surfaces and especially on gaps. The rinsing and drying processes are extremely important to prevent stains and corrosion from arising.
IMPORTANT: Acid solutions, salty solutions, disinfectants and some sterilizing solutions (hypochlorites, tetravalent ammonia salts, iodine compounds, nitric acid and others), must be AVOIDED, once it cannot remain for long in contact with the stainless steel.
These substances attack the stainless steel due to the CHLORINE on its composition, causing corrosion spots (pitting). Even detergents used in domestic cleaning must not remain in contact with the stainless steel longer than necessary, being mandatory to remove it with plain water and then dry the surface completely.
Use of abrasives:Sponges or steel wool and carbon steel brushes, besides scratching the surface and compromising the stainless steel protection, leave particles that rust and react contaminating the stainless steel. That is why such products must not be used for cleaning and sanitization. Scrapings made with sharp instruments or similar must also be avoided.
Main substances that cause stainless steel corrosion:Dust, grease, acid solutions such as vinegar, fruit juices, etc., saltern solutions (brine), blood, detergents (except for the neutral ones), common steel particles, residue of sponges or common steel wool, and also other abrasives.
Analysis and Problems Solving
Problems, causes and solutionsThe High Performance Tilting Blenders were designed to operate with the need of minimum maintenance but the natural wearing caused by long use of the equipment may occasionally cause some malfunctions. If such
Maintenance

9
Maintenanceproblem occurs with your Blender refer to Table below in which the most common situations are listed with recommended solutions.
Problems Causes SolutionsThe machine does not turn on. Lack of power. Check if machine is plugged in
and if there is power in the power supply source.
Problem in the electric circuit of the machine.
Call technical assistance.
Cup is leaking. Damaged seal. Call technical assistance.

10
Parts BreakdownModel LAR-15PMB 37969

11
Parts BreakdownModel LAR-15PMB 37969
Description Position Description Position Description PositionLOGO 120mm 00047.7 PCA M8 DIN 934 INOX 12445.1 PFS AUTO BROC.4, 2x13 ZB 29442.0ELAST.6x22 PIN DIN 1481 00212.7 ARR.L.A8, 4 DIN 125 INOX 12460.5 ETIQ.FIO TERRA E / F / I / P 32258.0
DOWEL WIRE MOLD 092 231 00218.6 Clamp K22-LM (T-80I) 12469.9 ETIQ.ATENCAO GROUND WIRE 32259.8
ELAST.6x50 PIN DIN 1481 00267.4 Connect WIRE GROUND WIRE 13737.5 PEDAL (ASH) 34320.0
PFS UNC3 FRI / 8 “x7 / 8” RTZB 00711.0 PFS M6x8 DIN 7985 ZB 14174.7 ETIQ.LIMPEZA /
MAINTENANCE 34686.1
TERM. PRE-ISOL.EF-4228 01213.0 SPACER 14644.7 EP RUBBER 34895.3
Capinha NYLON CN-4472 02031.1 CENTRAL WITH BEARING BUSHING 14650.1 PLATE PROTECTION 35057.5
PCA M8 DIN 934 ZB 02729.4 FRI LOW PCA M22x1, 5 14653.6 CS STAND (ASH) 35111.3ARR.L.A8, 4 DIN 125 ZB 02730.8 WASHER FIBRE 0.6X13X23 14654.4 MOTOR SUPPORT (ASH) 35112.1
PCA M6 DIN 934 ZB 03099.6 PCA ACAB.M10x1 25 RE INOX 14660.9 PROTECTION OF WIRES 280mm 35613.1
PCA M5 DIN 934 ZB 03145.3 ENGAGEMENT COMPL. - LB 15815.1 overcap MB 40753.4PFS M6x8 DIN 916 phosphite. 03188.7 FLANGE COUPLING-LB 15816.0 15 LID (FE006-111) 40774.7CB.3x2, 5mm2x1800mm A.P.V. 03656.0 The HAT LAR/LS-04 25 17456.4 CS HELICE TYPE MB 40830.1
PFS M3x6 DIN 7985 ZB 04208.0 TERM.POSITIV LOCK 1 A 2.5 17581.1 CS CUP LAR-15LMB 40857.3
SPRING ROCKER 04870.4 COVER P / FEMALE TERMINAL 17582.0 FULL CUP - LAR-15LMB 40866.2
COAT PIN FLANGE 05041.5 SELECTOR SWITCH C / TERMINAL 18250.8 BEARING COMPLETE 40867.0
ETIQ.ATENCAO 110/220/380V 05504.2 PFS M8x16 DIN 933 ZB 19059.4 AXIS CENTR.LAR/LB-
15/25MB 40868.9
PFS M8x40 DIN 933 ZB 09008.5 deflecting 19148.5 CS SUPPORT Dump. (ASH) 41009.8RING VED.MANCAL MD.112410 09167.7 ARR.L.A5, 3 DIN 125 INOX 20194.4 PE RECTANGULAR
(MOL.483753) 46767.7
ARR.L.A10, 5 DIN 125 ZB 09338.6 RING V’RING 16,5 x10, 5x5, 5 20378.5 ETIQ.LIMPEZA / MAINTENANCE 50665.6
ETIQ.IDENTIF.MOTOR / RESIST 09637.7 60Hz 1.5 HP MOTOR W 28733.4
12
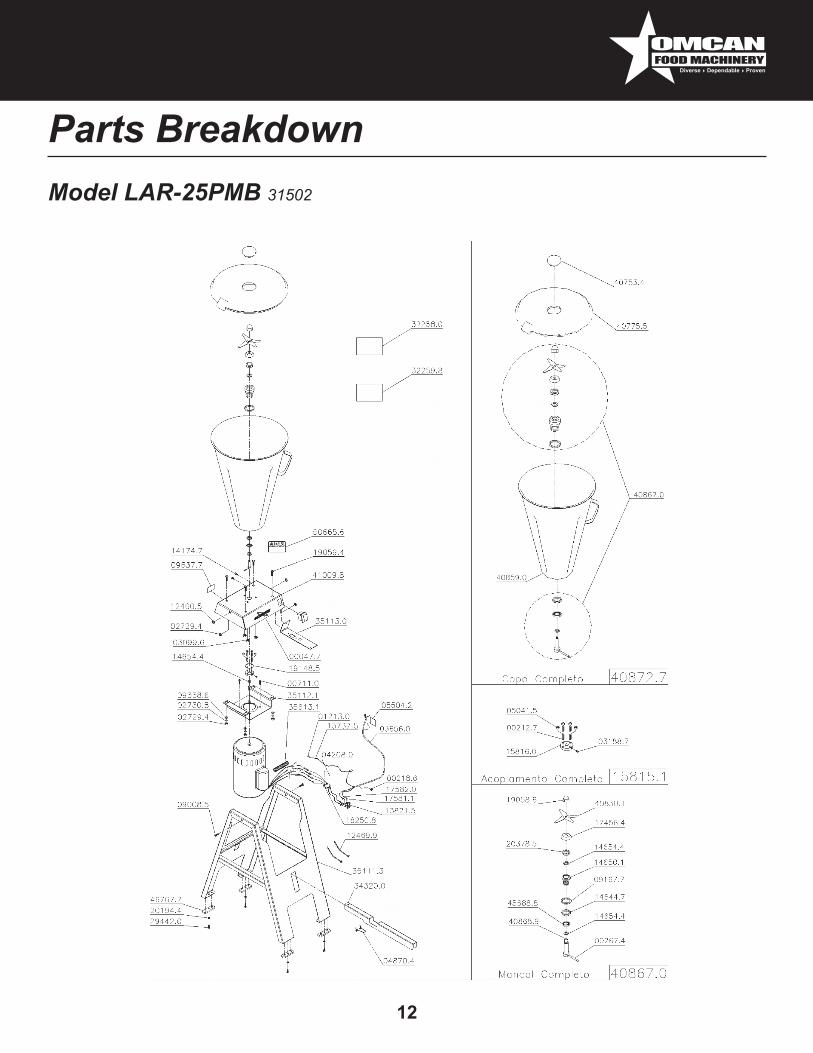
Parts BreakdownModel LAR-25PMB 31502

13
Parts BreakdownModel LAR-25PMB 31502
Description Position Description Position Description PositionLogo 120mm 00047.7 Clamp K22-LM (T-80I) 12469.9 ETIQ.FIO TERRA E / F / I / P 32258.0
Elast.6x22 Pin Din 1481 00212.7 FIO Connect GROUND WIRE 13737.5 ETIQ.ATENCAO GROUND WIRE 32259.8
Dowel Wire Mold 092 231 00218.6 CH.TEC.30223 M2FT2EE3G136 13821.5 PEDAL (ASH) 34320.0
Elast.6x50 Pin Din 1481 00267.4 PFS M6x8 DIN 7985 ZB 14174.7 ETIQ.LIMPEZA / MAINTENANCE 34686.1
PFS UNC3 FRI / 8 “x7 / 8” RTZB 00711.0 SPACER 14644.7 EP RUBBER 34895.3
Term. Pre-ISOL.EF-4228 01213.0 CENTRAL BEARING WITH BUSH 14650.1 CS STAND (ASH) 35111.3
PCA M8 DIN 934 ZB 02729.4 PCA FRI LOW M22x1, 5 14653.6 MOTOR SUPPORT (ASH) 35112.1ARR.L.A8, 4 DIN 125 ZB 02730.8 WASHER FIBER 0.6X13X23 14654.4 PROTECTION PLATE (ASH) 35113.0
PCA M6 DIN 934 ZB 03099.6 PCA ACAB.M10x1 25 RE INOX 14660.9 PROTECTION OF WIRES 280mm 35613.1
PCA M5 DIN 934 ZB 03145.3 ENGAGEMENT COMPL. - LB 15815.1 overcap MB 40753.4PFS M6x8 DIN 916 phosphite. 03188.7 FLANGE ENGAGEMENT-LB 15816.0 COVER 25 (FE006-112) 40775.5CB.3x2, 5mm2x1800mm A.P.V. 03656.0 The 25 CHAPEU LAR/LS-04 17456.4 CS HELICE TYPE MB 40830.1
PFS M3x6 DIN 7985 ZB 04208.0 TERM.POSITIV LOCK 1 A 2.5 17581.1 CS CUP LAR-25MB 40859.0
THE SPRING ROCKER 04870.4 COVER P / FEMALE TERMINAL 17582.0 BEARING COMPLETE 40867.0
COAT PIN FLANGE 05041.5 KEY SELECTOR C / TERMINAL 18250.8 AXIS CENTR.LAR/LB-
15/25MB 40868.9
ETIQ.ATENCAO 110/220/380V 05504.2 PFS M8x16 DIN 933 ZB 19059.4 FULL CUP - LAR-25LMB 40872.7
PFS M8x40 DIN 933 ZB 09008.5 deflecting 19148.5 CS SUPPORT Dump. (ASH) 41009.8RING VED.MANCAL MD.112410 09167.7 ARR.L.A5, 3 DIN 125 INOX 20194.4 PE RECTANGULAR
(MOL.483753) 46767.7
ARR.L.A10, 5 DIN 125 ZB 09338.6 RING V’RING 16,5 x10, 5x5, 5 20378.5 ETIQ.LIMPEZA / MAINTENANCE 50665.6
ETIQ.IDENTIF.MOTOR/RESIST 09637.7 MOTOR 60Hz 1.5 HP W 28733.4
ARR.L.A8, 4 DIN 125 INOX 12460.5 PFS AUTO BROC.4, 2x13 ZB 29442.0

14
Electrical SchematicsModel LAR-15PMB 37969

15
Electrical SchematicsModel LAR-25PMB 31502

16

17
Warranty Registration
Thank you for purchasing an Omcan product. To register your warranty for this product, complete the information below, tear off the card at the perforation and then send to the address specified below. You can also register online by visiting:
OMCAN INC.PRODUCT WARRANTY REGISTRATION
3115 Pepper Mill Court,Mississauga, Ontario
Canada, L5L 4X5
OMCANPRODUCT WARRANTY REGISTRATION
4450 Witmer Industrial Estates, Unit 4,Niagara Falls, New York
USA, 14305
www.omcan.com/warrantyregistration.html
Thank you for choosing Omcan
Purchaser’s Information
Name: Company Name:
Address:
Telephone:
City: Province or State: Postal or Zip: Email Address:
Country: Type of Company:
Restaurant Bakery Deli
Dealer from which Purchased: Butcher Supermarket Caterer
Dealer City: Dealer Province or State: Institution (specify):
Invoice: Other (specify):
Model Name: Model Number: Serial Number:
Machine Description:
Date of Purchase (MM/DD/YYYY): Date of Installation (MM/DD/YYYY):
For mailing in Canada For mailing in the US


Over the last 60 years, Omcan has grown to become a leading supplier to the food service industry in Canada and the USA. Our success over these many years is directly attributed to our established relationships with all of our valued customers and through providing them with Diverse, Dependable and Proven products. Omcan continues to help our customers remain competitive.
With associates in North America, Europe, Asia, and South America, our global footprint continues to expand as we hold to the principle that clients benefit from the accessibility and familiarity of our sales team. In 2013 as our geography and brand recognition continued to grow, we changed to one name Omcan Food Machinery.
In over 200,000 sq ft of warehouse space we stock over 2,500 quality food equipment and supplies for the food preparation market.