blmjz instruction(en) 2016.06 - quilt in a day · threading the machine 10 bobbin winding lower...
TRANSCRIPT


Never operate this sewing machine if it has a damaged cord or plug, if it is not working properly, if it has been dropped or damaged, dropped into water. Return this sewing machine to the nearest authorized Baby Lock retailer for examination, repair, electrical or mechanical adjustment.
This product is intended for household use.
-1-
The sewing machine's rating is 100V-120Vac
20.If one of the LED lamps is damaged or broken, it must be replaced by the manufacture or its service agent, in order to avoid a hazard.21.Never place anything on the foot controller.22.Use only the foot controller type YC-482 manufactured by Yamamoto Electric Co., Ltd.23.The supply cord connected with the foot controller cannot be replaced. If the cord is damaged the foot controller should be scrapped.

-2-

Keep the carton and packing materials. You may have to take or send the machine to be repaired. If you do not pack it properly, or do not use the right packing material, the machine could be damaged.
IMPORTANT
PLEASE READ THESE INSTRUCTIONS BEFORE YOU USE THE MACHINE.
This packing material is designed to prevent damage. Save this packing material if you need to take or send this machine to be repaired.
To use the machine safely1. Make sure you watch the needle carefully while you are sewing. Do not touch the handwheel, thread take-up lever, needle, or other moving parts.2. Turn off the main power and unplug the cord in the following circumstances : When you have stopped using the machine When you are replacing or removing the needle or any other part If there is a power failure while you are using the machine If you are checking or cleaning the machine Leaving the machine unattended3.Do not store anything on the foot controller.4.Plug the machine directly into the wall. Do not use extension cords.
To give your machine a longer life
1. Do not store this machine in direct sunlight or in high humidity conditions. Do not use or store the machine near a heater, iron, halogen lamp or other hot objects.2. Use only mild soaps or detergents to clean the case. Benzene, thinner, and scouring powders can damage the case and machine, and should never be used.3. Do not drop or hit the machine.4. Always consult this manual before you replace or attach presser feet, the needle, or any other parts to make sure you attach them correctly.
To repair or adjust the machine
If the machine breaks down or needs adjustment, first follow the troubleshooting table to inspect and adjust the machine yourself. If the problem is still there, consult your local authorized Baby Lock retailer.
-3-
INTRODUCTION
Thank you for purchasing this machine.
Before using this machine, carefully read the "IMPORTANT SAFETY INSTRUCTIONS",and then study this manual for the correct operation of the various functions.
In addition, after you have finished reading this manual, store it where it can quickly be accessed for future reference.
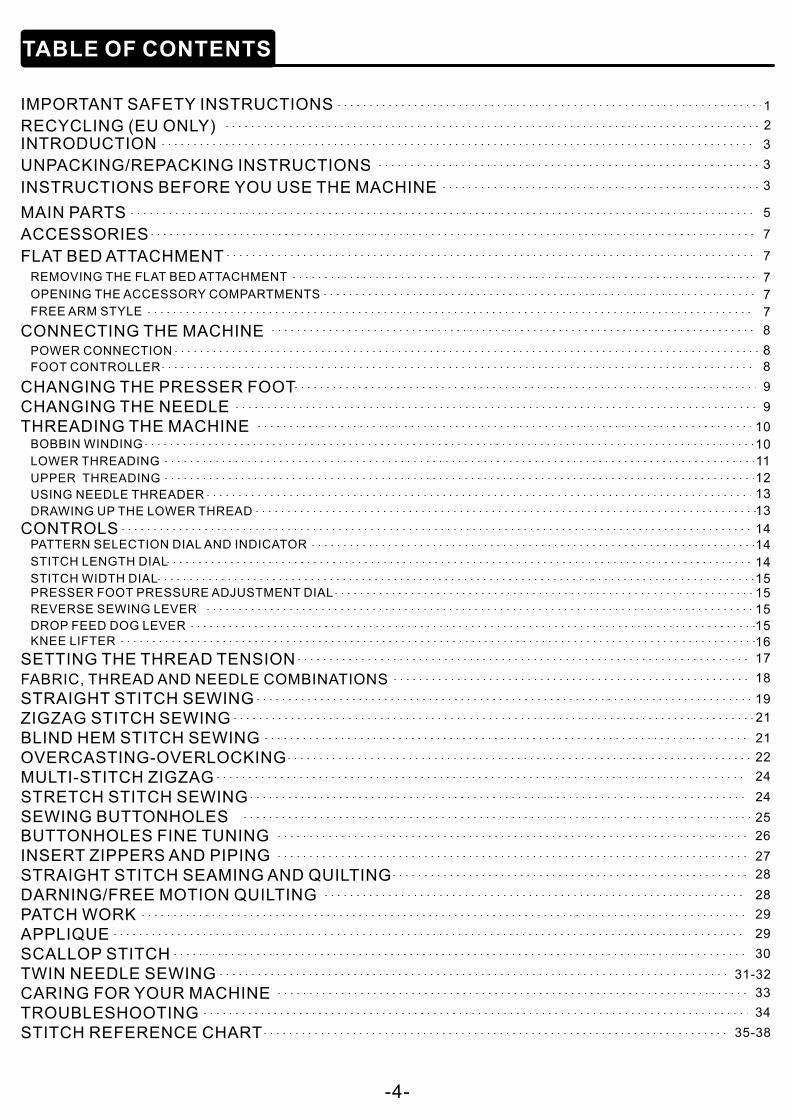
TABLE OF CONTENTS
-4-
FLAT BED ATTACHMENT
MAIN PARTS
ACCESSORIES
REMOVING THE FLAT BED ATTACHMENT
OPENING THE ACCESSORY COMPARTMENTS
FREE ARM STYLE
CONNECTING THE MACHINE 8
POWER CONNECTION 8
FOOT CONTROLLER 8
CHANGING THE PRESSER FOOTCHANGING THE NEEDLETHREADING THE MACHINE 10
BOBBIN WINDING
LOWER THREADING 11
UPPER THREADING 12
USING NEEDLE THREADER
DRAWING UP THE LOWER THREAD
CONTROLSPATTERN SELECTION DIAL AND INDICATOR
STITCH LENGTH DIAL
STITCH WIDTH DIAL
REVERSE SEWING LEVER
DROP FEED DOG LEVERKNEE LIFTER
SETTING THE THREAD TENSION FABRIC, THREAD AND NEEDLE COMBINATIONS
STRAIGHT STITCH SEWINGZIGZAG STITCH SEWINGBLIND HEM STITCH SEWINGOVERCASTING-OVERLOCKINGMULTI-STITCH ZIGZAGSTRETCH STITCH SEWINGSEWING BUTTONHOLES
INSERT ZIPPERS AND PIPINGSTRAIGHT STITCH SEAMING AND QUILTINGDARNING/FREE MOTION QUILTINGPATCH WORKAPPLIQUESCALLOP STITCH
CARING FOR YOUR MACHINETROUBLESHOOTING
INSTRUCTIONS BEFORE YOU USE THE MACHINE
INTRODUCTION
UNPACKING/REPACKING INSTRUCTIONS
IMPORTANT SAFETY INSTRUCTIONS
RECYCLING (EU ONLY)
1
2
3
3
3
PRESSER FOOT PRESSURE ADJUSTMENT DIAL
5
7
7
7
7
7
9
9
10
13
13
1414
14
1515
15
1516
17
18
19
21
21
22
24
24
25
26
27
28
28
29
29
31-32TWIN NEEDLE SEWING
30
33
STITCH REFERENCE CHART
34
BUTTONHOLES FINE TUNING
35-38

-5-
MAIN PARTS
1 Face Cover
2 Reverse Lever
3 Thread Cutter
4 Thread Take-Up Lever (inside)
5 Thread Tension Regulator
6 Thread Guide Plate
7 Spool Pin
8 Spool Cap
9 Bobbin Winder Pretension Disc
10 Bobbin Winder Shaft
22 Thumb Screw Holes
12 Knee Lifter Mounting Slot
13 Flat Bed Attachment With Accessory Compartments
14 Pattern Indicator
15 Stitch Length Dial
16 Stitch Width Dial
17 Presser Foot Pressure Adjustment Dial
18 Bobbin Winder Stop
19 Handwheel
20 Pattern Selection Dial
11
17
1
3
13
12
2
14
15
10169
756
4
8
18
19
20
21
21 Buttonhole Fine Tuning
22
11 Top Cover
MAIN PARTS
-6-
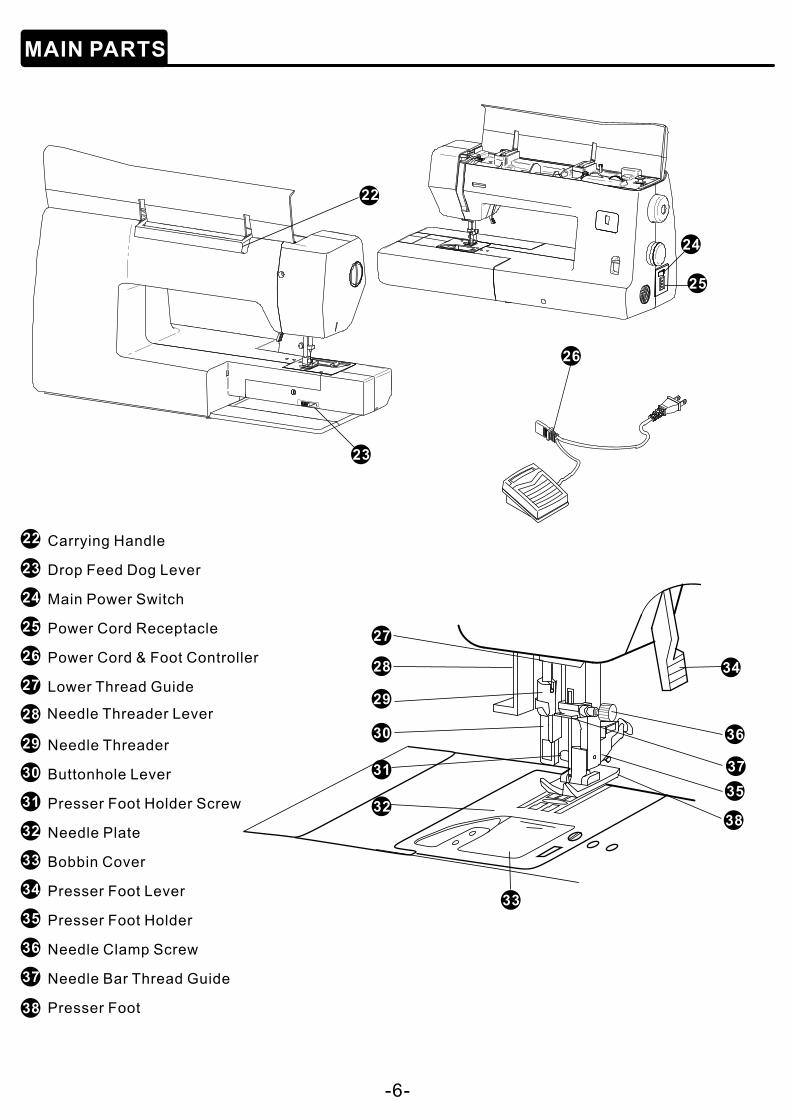
22 Carrying Handle
23 Drop Feed Dog Lever
24 Main Power Switch
25 Power Cord Receptacle
26 Power Cord & Foot Controller
27 Lower Thread Guide
28
Needle Threader29
Buttonhole Lever30
Presser Foot Holder Screw31
Needle Plate
26
32
Bobbin Cover33
Presser Foot Lever34
Presser Foot Holder35
Needle Clamp Screw36
Needle Bar Thread Guide37
Presser Foot
Needle Threader Lever
27
29
30
31
32
33
34
35
36
37
38
28
38
24
25
22
23
FLAT BED ATTACHMENT
Removing The Flat Bed Attachment
2
Free-Arm Style
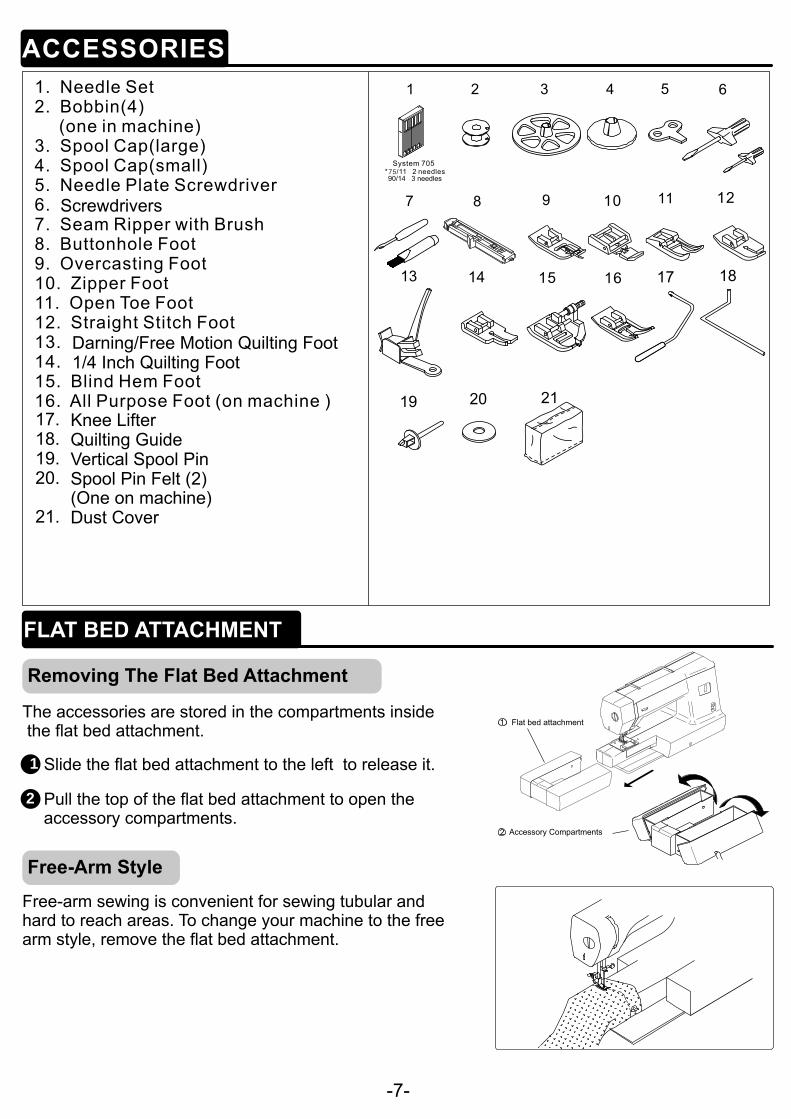
The accessories are stored in the compartments inside the flat bed attachment.
Pull the top of the flat bed attachment to open the accessory compartments.
Free-arm sewing is convenient for sewing tubular and hard to reach areas. To change your machine to the freearm style, remove the flat bed attachment.
1 Slide the flat bed attachment to the left to release it.
-7-
17
17. Knee Lifter
Screwdrivers
18. Quilting Guide
18
19 20
19. Vertical Spool Pin20. Spool Pin Felt (2)
Darning/Free Motion Quilting Foot1/4 Inch Quilting Foot
21. Dust Cover
21
Flat bed attachment11
Accessory Compartments12
90/14 3 needles
(One on machine)

:ON
:OFF
Main Power Switch
US ONLY
Power Connection
2
3
Connect the foot controller plug to the machine.
Connect the power supply plug to a wall outlet.
Use regular household electricity for power source. Usingother power sources may result in fire, electric shock, or damage to the machine.
Turn off the main power and remove the plug in the following circumstance:When you are away from the machineAfter using the machine When the power fails during useWhen the machine does not operate correctly due to a bad connection or a disconnectionDuring electrical storms
WARNING
This appliance has a polarized plug (one blade wider thanthe other). To reduce the risk of electrical shock, this plugis intended to fit in a polarized outlet only one way. If the plug does not fit fully into the outlet please reverse the plug. If it still does not fit, contact a qualified electrician to install the proper outlet. Do not modify the plug in any way.
Do not use extension cords or multi-plug adapters with many other appliances plugged in to them. Fire or electricshock may result.
CAUTION
Do not touch the plug with wet hands. Electric shock may result. When unplugging the machine, always turn off the main power first. Always grasp the plug to remove it from the outlet. Pulling on the cord may damage the cord, or lead to fire or electric shock. Do not allow the power cord to be cut , damaged, modified, forcefully bent, pulled, twisted, or bundled. Do not place heavy object on the cord. Do not subject the cord to heat. These behaviors may damage the cord and cause fire or electric shock. If the cord or plug is damaged, take the machine to your authorized Baby Lock retailer for repairs before continuing use.Unplug the power cord if the machine is not to be used for a long period of time, otherwise a fire may result.
Connect the foot control to the machine by inserting the 3 hole plug into the power cord receptacle located on the right side of sewing machine.
When you press the foot controller lightly, the machine will run at a low speed.
When you press harder, the speed of machine will increase. When you take your foot off the foot controller, the machine will stop. You should make sure that no items are placed on the foot controller when the machine is not in use.
CAUTION
Foot Controller
Do not allow pieces of cloth and dust to build up on the foot controller.Doing so could cause a fire or an electric shock.
1
2
Use only foot controller provided with this machine.Foot Controller: Model YC-482
-8-
1 Place machine on a sturdy table and make surethe main power switch is in the OFF position.

Always turn off the power before you change the presser foot.if you leave the power on and step on the controller, the machine will start and you may be injured.Always use the correct presser foot for the stitch pattern you have chosen. If you use the wrong presser foot, the needle may strike thepresser foot and bend or break, and may cause injury.Only use presser feet that have been designed to be used with this machine.Using any other presser foot may damage machine or cause personal injury.
CAUTION
-9-
Knee Lifter (see page 16)
OR
18
the notch in presser foot holder.
Presser foot holder notchTo re-attach, tighten the screw after aligning the presser footholder with lower left side of presser bar.

THREADING THE MACHINE
Bobbin Winding
1.Place a spool of thread onto the spool pin with thread winding off counterclockwise and slide the appropriate spool cap on spool pin until it’s against the spool of thread. 2.Pass thread through the thread guide as shown.3.Pass thread through the bobbin winder thread guide.4.Guide thread from bobbin winder thread guide through pretension disc as shown.5.Insert thread through hole in bobbin from inside-out.6.Place the bobbin on bobbin winder shaft and push to the right to engage bobbin winder.7.Hold the end of thread and start the machine.
WINDING THE BOBBIN
If the spool of thread is not correctly placed, the thread may tangle on the spool.
Make sure you follow the instructions carefully. If you do not cut the excess thread completely before winding the bobbin, when the bobbin thread runs low it may tangle around the bobbin and cause the needle to break.
CAUTION
-10-
8.After the bobbin winds a few turns, stop the machine and cut the thread as close to the hole as possible.9.Start the machine again by pressing foot control and wind bobbin at medium speed.10.The bobbin winding will stop when bobbin is full. 11.Push the bobbin and shaft to the left. Remove the bobbin from the shaft and cut the thread.
10 11
5 6 7
Pretension disc 8 9
Thread guide
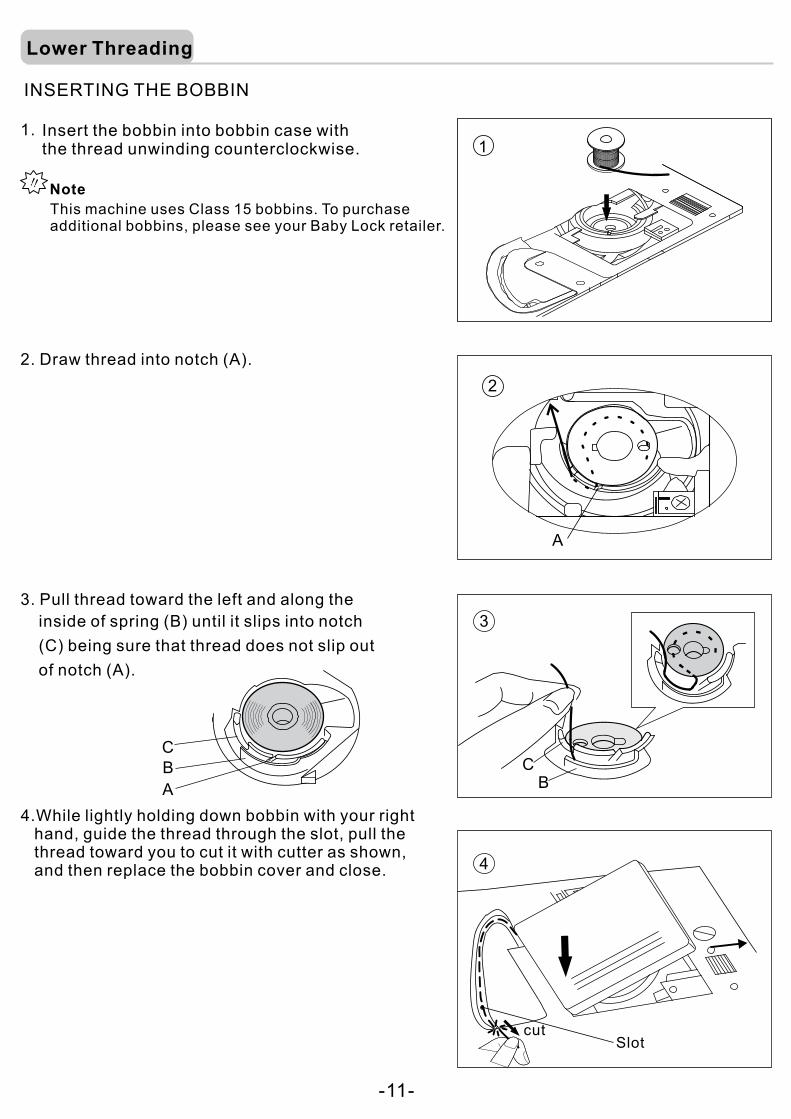
Lower Threading
-11-
1
4.While lightly holding down bobbin with your right hand, guide the thread through the slot, pull the thread toward you to cut it with cutter as shown, and then replace the bobbin cover and close.
cutSlot
This machine uses Class 15 bobbins. To purchase additional bobbins, please see your Baby Lock retailer.

Upper Threading
-12-
1 Raise presser foot lever.
2 Rotate the handwheel toward you to raise the take-up lever into the highest position.
3 Place a spool of thread onto the spool pin and secure with proper size spoolcap.
4 Pass the thread under thread guide and around pretension disc for upper threading.
5 Bring thread forward and down the right channel, then to the left and up the left channel.
6 Pull the thread through and into the take-up lever from right to left.
7 Pass the thread down the left channel and into the lower thread guide. Slidethe thread from right to left into the thread guide on the needle clamp.
8 Thread the needle from front to back or follow directions for using the needlethreader.(Please refer to page 13)
2 3
1
4
6
5
7
If necessary, horizontal spool pin may be raised so it can be used in a vertical position.
4
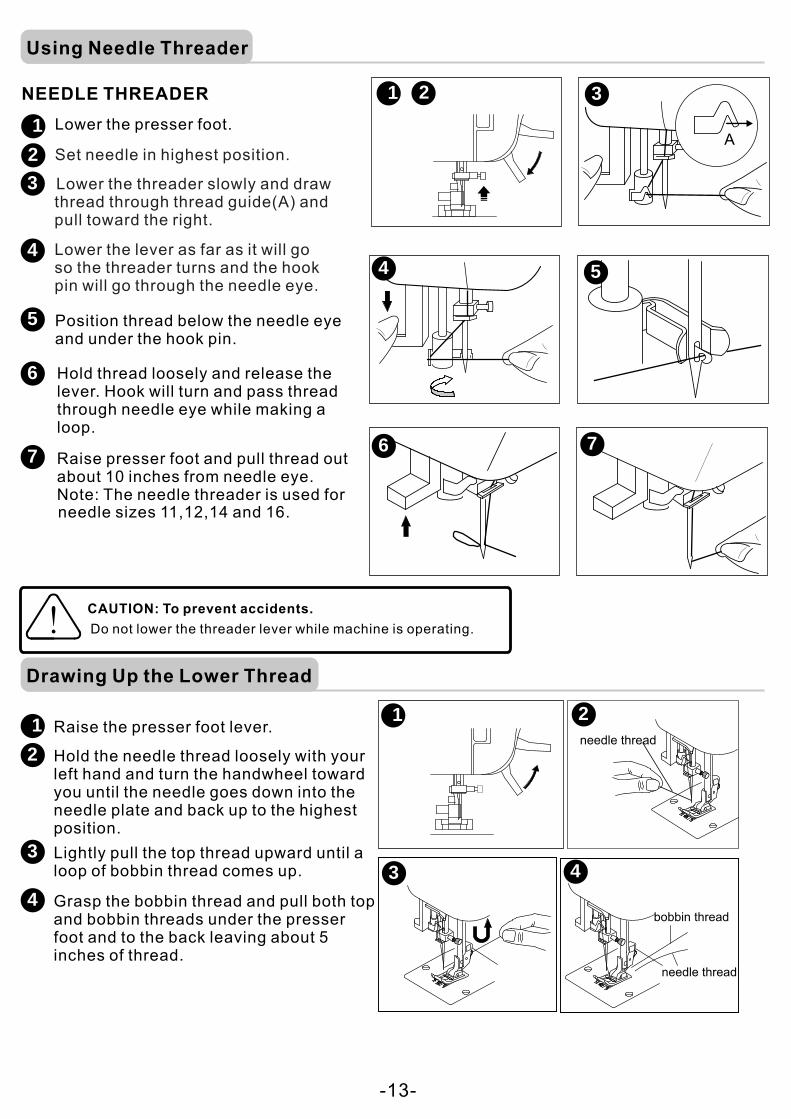
Using Needle Threader
Drawing Up the Lower Thread
-13-
1 Raise the presser foot lever.
2 Hold the needle thread loosely with your left hand and turn the handwheel toward you until the needle goes down into the needle plate and back up to the highest position.
3 Lightly pull the top thread upward until a loop of bobbin thread comes up.
4 Grasp the bobbin thread and pull both topand bobbin threads under the presser foot and to the back leaving about 5 inches of thread.
1 2
1
2
3
4
5
6
7
4
3
5
6 7
Set needle in highest position.
needle sizes 11,12,14 and 16.
1 2
3 4
CONTROLS
Pattern Selection Dial and Indicator
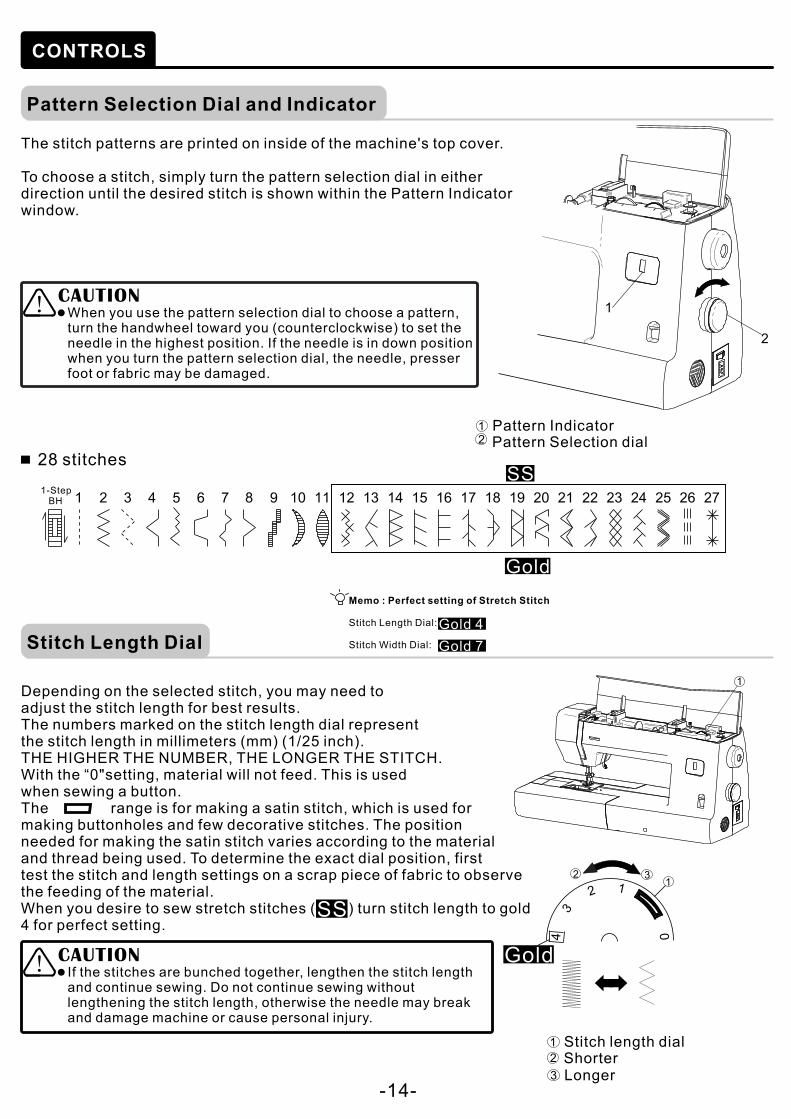
Pattern Indicator 1
Pattern Selection dial 2
The stitch patterns are printed on inside of the machine's top cover.
To choose a stitch, simply turn the pattern selection dial in either direction until the desired stitch is shown within the Pattern Indicatorwindow.
When you use the pattern selection dial to choose a pattern,turn the handwheel toward you (counterclockwise) to set the needle in the highest position. If the needle is in down positionwhen you turn the pattern selection dial, the needle, presser foot or fabric may be damaged.
CAUTION
28 stitches SS
Stitch Length Dial
Depending on the selected stitch, you may need to adjust the stitch length for best results.The numbers marked on the stitch length dial representthe stitch length in millimeters (mm) (1/25 inch).THE HIGHER THE NUMBER, THE LONGER THE STITCH.With the “0"setting, material will not feed. This is used when sewing a button.The range is for making a satin stitch, which is used for making buttonholes and few decorative stitches. The position needed for making the satin stitch varies according to the materialand thread being used. To determine the exact dial position, first test the stitch and length settings on a scrap piece of fabric to observe the feeding of the material. When you desire to sew stretch stitches ( ) turn stitch length to gold 4 for perfect setting.
1 2 3 0 4
12 3
Stitch length dial1
Shorter 2
Longer 3
If the stitches are bunched together, lengthen the stitch length and continue sewing. Do not continue sewing withoutlengthening the stitch length, otherwise the needle may break and damage machine or cause personal injury.
CAUTION
-14-
Gold
Gold
SS
Memo : Perfect setting of Stretch Stitch
Stitch Length Dial:
Stitch Width Dial:
Gold 4
Gold 7
1-Step BH
1

Stitch Width Dial
Reverse Sewing Lever
The numbers marked on the dial represent the stitch width. THE HIGHER THE NUMBER, THE WIDER THE STITCH.
0 1 2 3 4 2 5
6
When the Straight or Triple Stretch Stitch is selected,the needle position can be changed from right to left by adjusting the stitch width dial.
You can use reverse sewing for back tacking and reinforcing seams.
To sew in reverse, push the reverse sewing lever down as far as possible and hold it in that position while you lightly push the foot controller. To sewforward, release the reverse sewing lever. The machine will then sew forward.
Reverse Sewing Lever1
Drop Feed Dog Lever
The feed dog should be up for all general sewing. Lower the feed dog for free motion darning, embroidery, monogramming and stipple quilting.When the feed dog is lowered, you must move the fabric as you sew. To lower the feed dog, slide flat bed attachment toward left and then the lever to the left. To raise the feed dog, slide the lever to the right.
-15-
Presser Foot Pressure Adjustment Dial
You can adjust the presser foot pressure (the amount of pressure applied to the fabric with the presser foot)by adjusting the Presser Foot Pressure Adjustment Dial. The higher the number, the greater the pressure will be. Set the pressure at "2" for normal sewing.
1
2
Stitch Width Dial1
1
1
1 2
7
Note: Feed dog will raise once a stitch is completed or by turning handwheel toward you.
Knee Lifter
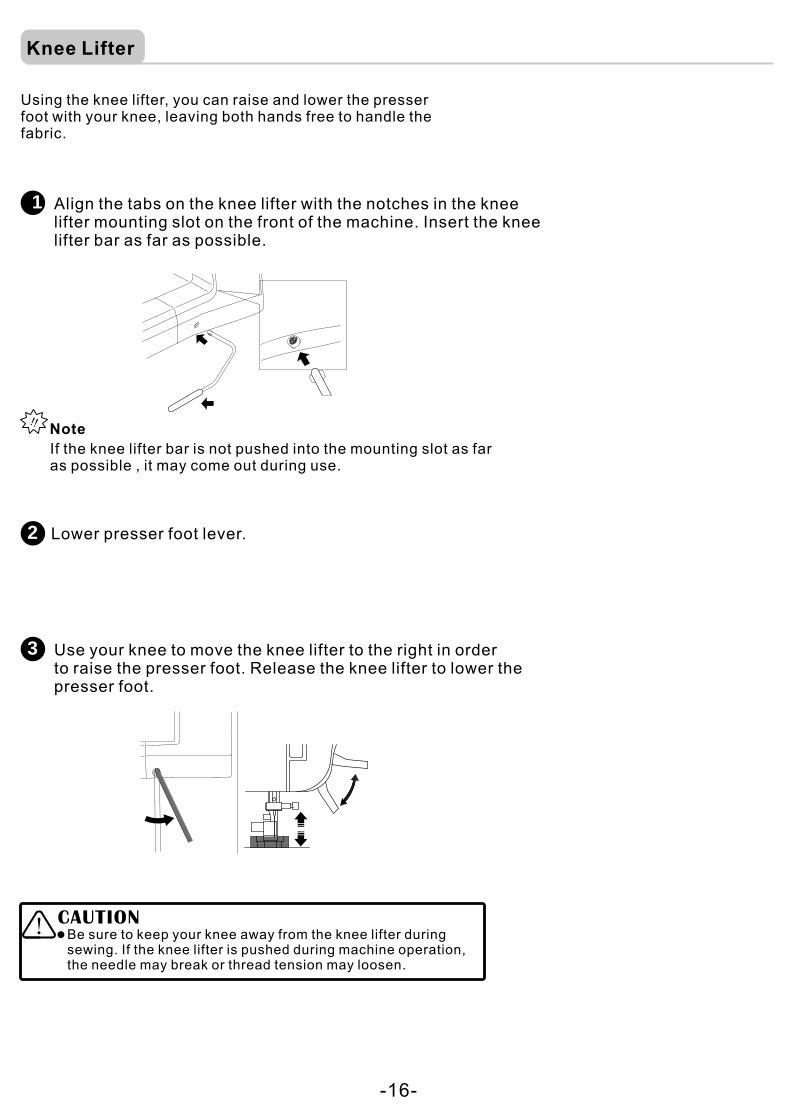
Using the knee lifter, you can raise and lower the presserfoot with your knee, leaving both hands free to handle the fabric.
1 Align the tabs on the knee lifter with the notches in the kneelifter mounting slot on the front of the machine. Insert the kneelifter bar as far as possible.
If the knee lifter bar is not pushed into the mounting slot as far as possible , it may come out during use.
3 Use your knee to move the knee lifter to the right in order to raise the presser foot. Release the knee lifter to lower the presser foot.
Be sure to keep your knee away from the knee lifter during sewing. If the knee lifter is pushed during machine operation,the needle may break or thread tension may loosen.
CAUTION
-16-
2 Lower presser foot lever.

SETTING THE THREAD TENSION
-17-
To sew zigzag stitches, the upper thread tension should be set to a slightly weaker tension than when sewing straight stitches.
Turn the tension dial to a lower number to decrease the upper thread tension.
Turn the tension dial to a higher number to increase the upper thread tension.
FABRIC, THREAD AND NEEDLE COMBINATIONS
-18-
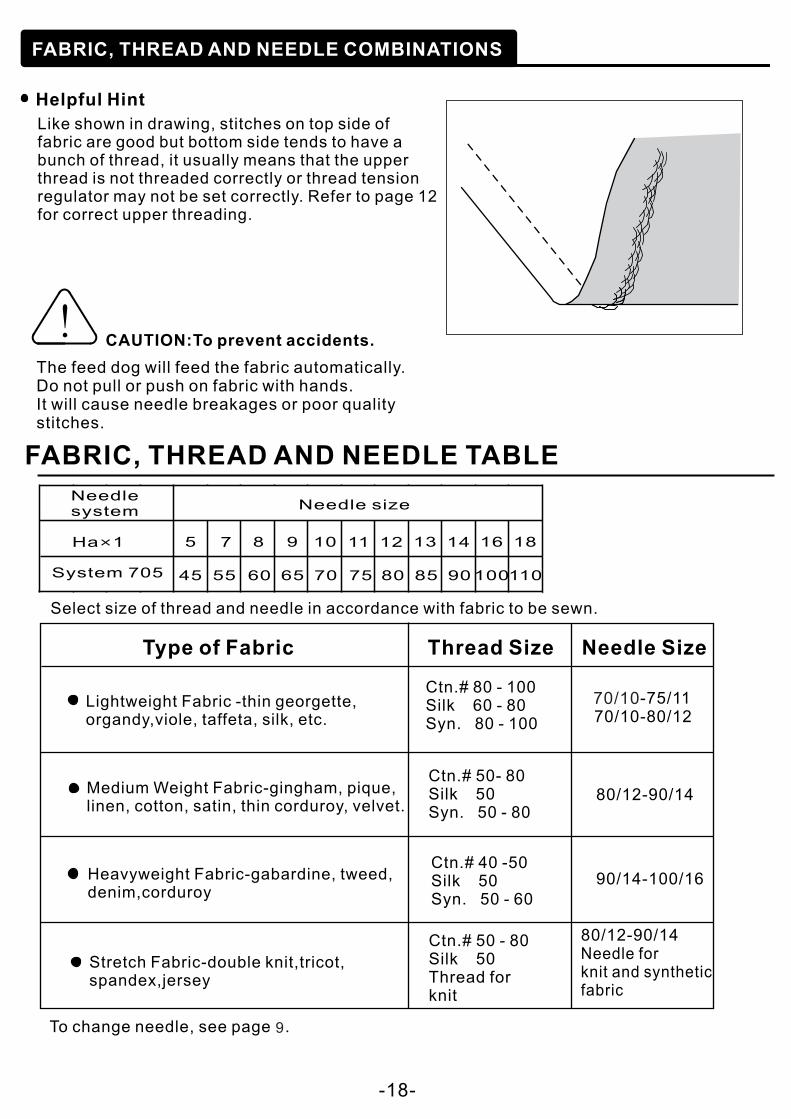
Like shown in drawing, stitches on top side of fabric are good but bottom side tends to have a bunch of thread, it usually means that the upper thread is not threaded correctly or thread tension regulator may not be set correctly. Refer to page 12 for correct upper threading.
Lightweight Fabric -thin georgette, organdy,viole, taffeta, silk, etc.
Medium Weight Fabric-gingham, pique,linen, cotton, satin, thin corduroy, velvet.
Heavyweight Fabric-gabardine, tweed,denim,corduroy
Stretch Fabric-double knit,tricot,spandex,jersey
70/10
9

STRAIGHT STITCH SEWING
Stitch Name PatternStitch Length
Dial[mm(inch)]
Stitch Width Dial[mm(inch)]
All Purpose Foot
Straight Stitch 0-4
(0-3/16) 0-7*
(0-1/4)
*The stitch width dial has multi-functions depending on stitch selected.Turn the stitch width dial to adjust the needle position.Setting the dial to 0 selects the right needle position; setting the dial to 7 selects the left needle position; setting dial between 0-7 determines width of zigzag type stitches.
Starting to sew
1 Set the pattern selection dial to the Straight Stitch pattern.Note: By turning the pattern selection dial you are able to choose your desired stitch pattern.
2
3
Raise the needle to its highest position and lift the presser foot lever.
4 Place the fabric under the presser foot and positionthe needle 1cm (3/8 inch) from the edge of the fabric.
Guide the upper and bobbin threads under the presser foot and toward the back of the machine.
5 Lower the presser foot.
6 To back tack, push down the reverse sewing lever as faras possible, and then press the foot controller to start reverse sewing. Release the foot controller to stop sewing.
6
7 Release the reverse sewing lever and start sewing in the forward direction by pressing the foot controller.
Make sure the needle does not hit a pin or any other object duringsewing. The thread could tangle or the needle could break, causing damage to machine or personal injury.
CAUTION
Changing Sewing Direction
1 Stop the machine at point where you want to change direction with the needle still in the fabric.
2 Raise the presser foot and turn the fabric to its new direction using the needle as a pivot.
3 Lower the presser foot and start sewing in the new direction.
-19-
Knee Lifter (see page 16)
5
3
66
1

Finishing Sewing
1 To lock stitches,stitch to the end of seam and stop.
2 Push down on the reverse sewing lever and stitch backwards for 1 cm (3/8 inch) from the fabric edge.
You can use stitches to lock the threads at the end of the seam.
62
Removing the Material from the Machine
1 Stop the machine. Raise the needle to its highest position and make sure that the thread take -up lever is also in its highest position.
2 Lift the presser foot and pull the fabric out gently to the left side of the machine.
3 Cut both threads with the thread cutter on the left hand side of the machine.
3
Sewing Heavy Fabric
When sewing heavy fabrics, the front of presser foot tends to lift up and sewing will hesitate at the point where the fabric is thicker, such as a cross seam. In this case, place a piece of cardboard or fabric of samethickness under the rear section of the presser foot to level presser foot.
The presser foot lever can be raised 1 step higherfor placing heavy materials under the presser foot easily.
Careful guide the fabric with your hand when sewing over thick fabric areas.
-20-
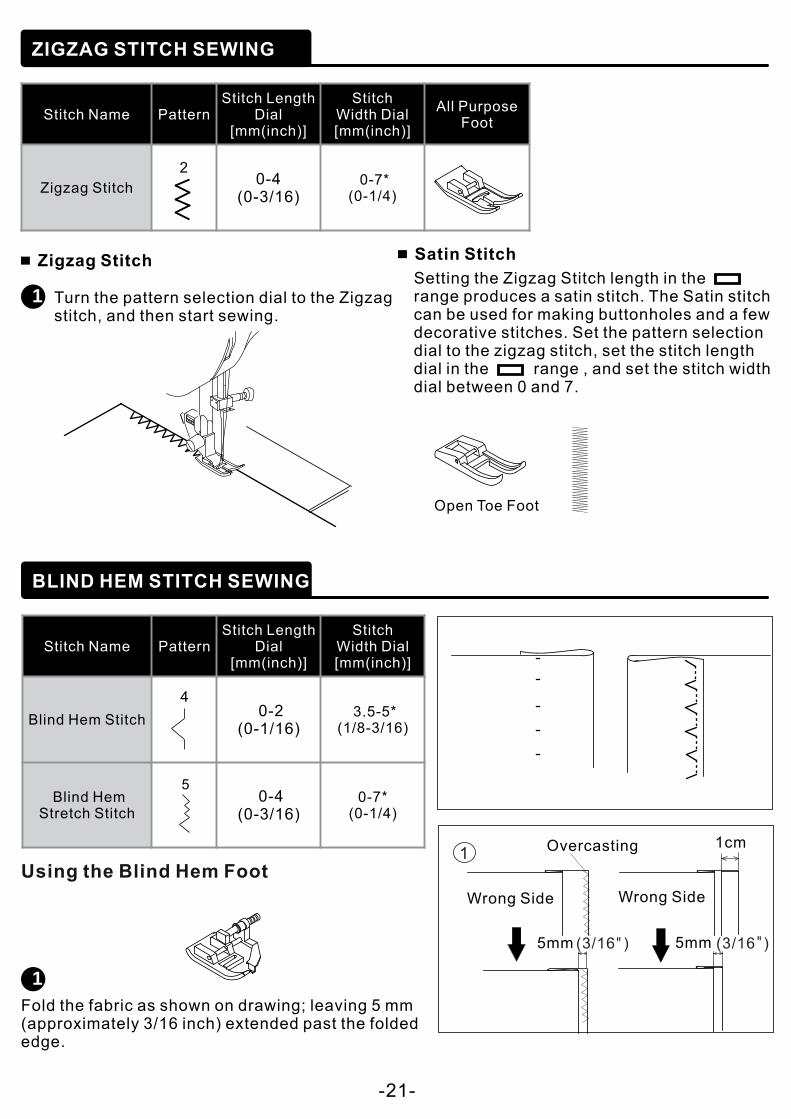
ZIGZAG STITCH SEWING
Stitch Name PatternStitch Length
Dial[mm(inch)]
Stitch Width Dial[mm(inch)]
All Purpose Foot
Zigzag Stitch 0-4
(0-3/16) 0-7*
(0-1/4)
Zigzag Stitch
1 Turn the pattern selection dial to the Zigzag stitch, and then start sewing.
Satin Stitch
Setting the Zigzag Stitch length in the range produces a satin stitch. The Satin stitchcan be used for making buttonholes and a few decorative stitches. Set the pattern selection dial to the zigzag stitch, set the stitch length dial in the range , and set the stitch width dial between 0 and 7.
BLIND HEM STITCH SEWING
Stitch Name PatternStitch Length
Dial[mm(inch)]
Stitch Width Dial[mm(inch)]
Blind Hem Stitch 0-2
(0-1/16) 3.5-5*
(1/8-3/16)
Blind Hem Stretch Stitch
0-4(0-3/16)
0-7*(0-1/4)
Fold the fabric as shown on drawing; leaving 5 mm(approximately 3/16 inch) extended past the folded edge.
1
Using the Blind Hem Foot
-21-
Open Toe Foot
2
4

2 The guide (A) on the blind hem foot ensures even feeding of the fabric when blind hem stitching. The guide (A) is adjusted by turning the adjusting screw (B).
3 Place fabric so that the straight stitches are on the extended hem edge and the zigzag stitches just catch one thread of the folded edge. Turn the screw so that the guide barely touches the foldededge of fabric.
4 Lower the presser foot and sew hem, guiding fabric evenly along the guide.
5 Turn the fabric over when you have completed sewing.
The Blind Hem Stitch is useful for stretch fabric.
If too much of the stitching shows on the right side of the fabric, change to a narrower stitch width ormove the guide on the foot to the right.If the zigzag does not meet the fold, widen the stitchwidth or move the guide on the foot to the left.
Stretch
OVERCASTING-OVERLOCKING
Stitch Name PatternStitch Length
Dial[mm(inch)]
Stitch Width Dial[mm(inch)]
Overlock Stitch 5-7*
(3/16-1/4)
Overcasting Stitch
5-7*(3/16-1/4)
Double-Overlock Stitch
5-7*(3/16-1/4)
Overcasting Stitch
0-2(0-1/16)
5-7*(3/16-1/4)
Elastic Zigzag Stitch
0-2(0-1/16)
5-7*(3/16-1/4)
SS
-22-
Gold 4
SS Gold 4
SS Gold 4
SS Gold 7
SS Gold 7
SS Gold 7
14
15
19
8
3

1 Some stitches can sew the seam and overcasting at the same time.Therefore, it is convenient for sewing easy to ravel and stretch fabrics.
Overcasting stitches (width 5.0-7.0) are used for preventing raveling of fabrics.
2
Overcasting foot should be used for sewing pattern 14,15,19 only and do not change the stitch width narrower than 5.0, it is possiblethat needle could hit the presser foot and break when sewing other patterns and stitch width.
CAUTION
Use a narrow zigzag width for lightweight fabrics.
Adjust the width and length for various weights of knit and stretch fabrics.(When using overcasting foot, do not change the width any narrower than 5.0mm.)
For allotted seam allowances, sew thentrim the excess fabric close to the stitching. Be careful not to cut thread when cutting the fabric edge.
1
2
3
When using the all purpose foot, place the fabric so that the needle will fall near the edgeof fabric.
Position the fabric against the guide plateof the overcasting foot so that the needle falls near the edge of the fabric.
-23-
1 2
1 2
3
3 8
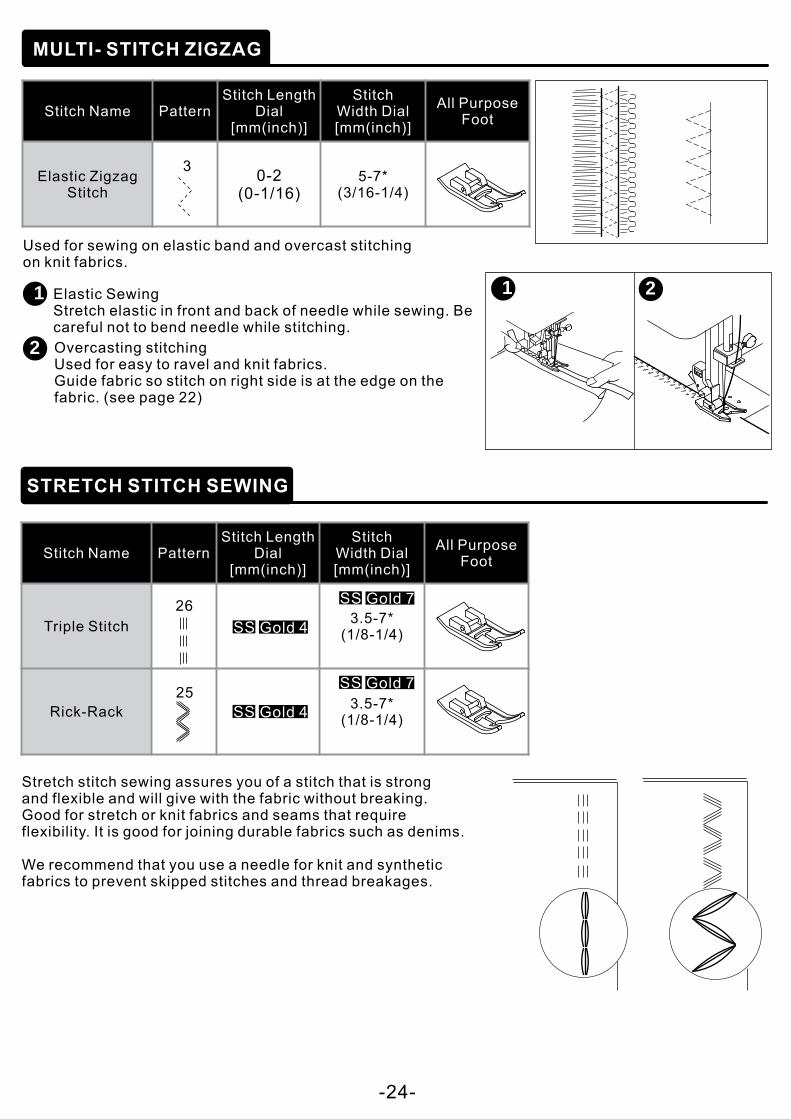
MULTI- STITCH ZIGZAG
Stitch Name PatternStitch Length
Dial[mm(inch)]
Stitch Width Dial[mm(inch)]
All Purpose Foot
Elastic Zigzag Stitch
0-2(0-1/16)
5-7*(3/16-1/4)
Used for sewing on elastic band and overcast stitching on knit fabrics.
1
2
Elastic Sewing Stretch elastic in front and back of needle while sewing. Becareful not to bend needle while stitching.
Overcasting stitchingUsed for easy to ravel and knit fabrics.Guide fabric so stitch on right side is at the edge on the fabric. (see page 22)
STRETCH STITCH SEWING
Stitch Name PatternStitch Length
Dial[mm(inch)]
Stitch Width Dial[mm(inch)]
All Purpose Foot
Triple Stitch 3.5-7*
(1/8-1/4)
Rick-Rack3.5-7*
(1/8-1/4)
Stretch stitch sewing assures you of a stitch that is strong and flexible and will give with the fabric without breaking.Good for stretch or knit fabrics and seams that require flexibility. It is good for joining durable fabrics such as denims.
We recommend that you use a needle for knit and syntheticfabrics to prevent skipped stitches and thread breakages.
-24-
SS Gold 4
SS Gold 7
SS Gold 4
SS Gold 7
1 2
3
26
25

SEWING BUTTONHOLES
Stitch Name PatternStitch Length
Dial[mm(inch)]
Stitch Width Dial[mm(inch)]
Buttonhole0-1
(0-1/16)
3.5-7*(1/8-1/4)
Using the Buttonhole Foot
1 Mark position and length of buttonhole on fabric.
2 Set button on the base and slide base forward to secure button.* If button does not fit on the base, adjust slide on base to diameterof button plus thickness of button.a =Length of button +thickness
3 Pass upper thread through the needle opening of buttonhole foot and attach buttonhole foot to machine. Bring upper and bobbin threads to the left under foot.
4 Position fabric under buttonhole foot so that the center line mark is in the center of the needle opening in the buttonhole foot.With the main part of the foot pushed to the back lower the presser foot lever.
5 Pull the buttonhole lever down as far as possible and then push the lever toward the back until it clicks.
6 Hold upper thread lightly and start the machine.Stop sewing when right side of buttonhole is completed.
Machine will not stitch properly if buttonhole lever is not lowered properly or buttonhole foot is not positioned correctly.
7 Raise the presser foot and cut threads.To sew same buttonhole, raise presser foot to return to buttonhole starting position.
8 With buttonhole cutter, cut center of buttonhole being careful not to cut stitches on either side. Use a pin as a stopper.
-25-
1
a b c d
2
1-Step BH
Push
3 4
5 6
7 8

BUTTONHOLE FINE TUNING
TOOL
BUTTONHOLE FINE TUNING ADJUSTMENTS
Large Screwdriver
Various types of fabric may have different stitching results when a buttonhole is sewn. The stitch density of the buttonhole's left or right side could be found to be unbalanced.The buttonhole fine tuning will allow you to make adjustments by slightly turning the screw with included large screwdriver.
If the stitch density on the buttonhole's right side is less than the left side, use the large screwdriver to turn the fine tuning screw slightly toward the right (clockwise). The increased density will appear on the right side of buttonhole (as shown).
If the stitch density on the buttonhole's left side is less than the right side, use the large screwdriver to turn the fine tuning screw slightly toward the left (counterclockwise). The increased density will appear on the left side of buttonhole (as shown).
1
2
1
2
-26-

INSERT ZIPPERS AND PIPING
Stitch Name PatternStitch
Length Dial[mm(inch)]
Stitch Width Dial[mm(inch)]
Straight Stitch 0-4
(0-3/16)
3.5(center)
(1/8)
You can use the zipper foot to sew different types of zippers,and can easily position it to the right or left side of the needle.
When sewing the right side of the zipper, attach the presser foot holder to the left pin of zipper foot. When sewing the left side of thezipper, attach the presser foot holder to the right pin of the zipper foot.
Zipper Foot1
Right pin for sewing the left side of the zipper2
Left pin for sewing the right side of the zipper3
1 2
3
1 Needle stitches to the left of foot.
2 Needle stitches to the right of foot.
Align the right side or the left side of the zipper footpin with the presser foot holder, lower the presser foot lever to attach the foot.
3 To insert zippers, consult the zipper package for instructions on how to prepare zipper placket and place zipper. To sew close to the zipper on the right side, snap the zipper foot ontothe presser foot holder on the left side so the needle passes through the opening on the left side of the foot.Snap the foot onto the presser foot holder on the other side of foot to sew close to the left side of the zipper.
To insert piping, purchase pre-made piping or cover cording with a bias strip of fabricusing the zipper foot snapped on to the right side of the presser foot holder. Place the piping between two layers of fabric. Stitch with the piping next to the foot, so the stitching is tight against the cord.
Turn the handwheel by hand to make sure the needle does not hit the zipper foot before you start sewing. Choosing a different stitch will cause the needle to hit the presser foot and break, which may damage machine or cause personal injury.
Make sure the needle does not hit the zipper during sewing.If the needle hits the zipper, the needle may break, which may damage machine or cause personal injury.
CAUTION
1 2
3
-27-
1

STRAIGHT STITCH SEAMING AND QUILTING
Stitch Name PatternStitch Length
Dial[mm(inch)]
Stitch Width Dial[mm(inch)]
Straight Stitch 0-4
(0-3/16)
3.5(center)
(1/8)
Using the 1/4 Inch Quilting Foot
1
2
Set the pattern selection dial to the Straight Stitch.Set the stitch length between 0 (0 inch) and 4 (3/16 inch).Set the stitch width at 3.5 (1/8 inch)(center needle position).
3
Attach the 1/4 Inch Quilting Foot.
Position the presser foot over the fabric and sew as shown in the right side of illustration.
Quickly Stitch together a Quilt
Achieving an accurate seam allowance
Darning/Free Motion Quilting
Stitch Name PatternStitch Length
Dial[mm(inch)]
Stitch Width Dial[mm(inch)]
Straight Stitch 0-4
(0-3/16)
3.5(center)
(1/8)
Using Darning/ Free Motion Quilting Foot
Select straight stitch. Set needle in the center needle position.Using drop feed lever lower feed dog.Remove the presser foot and presser foot holder. Screw the darning/free motion quilting foot onto the presser bar with the extended arm of the foot resting above the needle clamp screw.Holding the needle thread, take one stitch and pull up bobbinthread through the fabric.Lower presser foot lever and start sewing at a slow to medium speed, moving the fabric back and forth with a steady rhythm.Turn fabric and sew another layer of stitching across the first layer of stitching
When using on machine with zigzag stitches do not set the stitch width any wider than 4.0 . Otherwise needle may deflect and hit the darning/free motion quilting foot causing damage to machine or personal injury.
darning/free motion quilting footCAUTION
-28-
Align this side of foot with the edge of the fabricBeginning of stitching
End of stitchingAlign this side of foot with the edge of the fabric
Only use the Straight Stitch pattern when stitching with straight stitch foot or 1/4 inch quilting foot. Choosing a different stitch pattern will cause the needle to hit the presser foot and break, which may damage machine or cause personal injury.
CAUTION
1
1

Patch Work
Stitch Name PatternStitch
Length Dial[mm(inch)]
Stitch Width Dial[mm(inch)]
Feather Stitch 3.5-7*
(1/8-1/4)
Decorative Cross Stitch
3.5-7*(1/8-1/4)
Fagoting Stitch3.5-7*
(1/8-1/4)
1 Place two piece of fabric right sides togetherand sew a basting stitch.
2 Press the seam open.
3 Place fabric right side up and stitch with the seam line in the center of the foot.Stitches should fall on both sides of the seam line.
For additional decorative purposes, use a variety of different fabrics.
APPLIQUE
Stitch Name PatternStitch
Length Dial[mm(inch)]
Stitch Width Dial[mm(inch)]
Decorative Overcasting
3.5-7*(1/8-1/4)
Decorative Applique
3.5-7*(1/8-1/4)
Using Open Toe Foot
1 Position the applique on fabric with fabric glue, fusible iron on stabilizer or basting stitches.(When using fabric with frayed edges for the applique, press under 1/4 inch on all the edges)
2 Sew along the edge of the applique. Align the straight part of the stitch with the edge of the applique to give this project a hand-made appearance.
3 When pivoting corners, lower the needle in the right side of stitch. Raise the presser foot and use the needle to pivotand turn the fabric.
-29-
3
SS Gold 4
SS Gold 4
SS Gold 4
SS Gold 7
SS Gold 7
SS Gold 7
SS Gold 4
SS Gold 4
SS Gold 7
SS Gold 7
1 2 3
Using All Purpose Foot
17
23
24
15
16
1
2

SCALLOP STITCH
Stitch Name PatternStitch Length
Dial[mm(inch)]
Stitch Width Dial[mm(inch)]
Open Toe Foot
All Purpose Foot
Scallop Stitch0-1
(0-1/16) 3.5-7*
(1/8-1/4)
These stitches are used to sew a decorative edge on garmentsand table cloths using the Opening Toe Foot or the All Purpose Foot.
1 SCALLOP HEM(1) Fold the fabric with right sides together and sew near the edge.(2) Cut the fabric along the seam leaving an allowance of 3 mm (1/8") for seaming. Notch the allowance.(3) Turn fabric with right sides out and gently push out the curved seam then press. 2 DECORATIVE SCALLOP EDGE(1) Place the fabric with wrong sides together and stitch near the edge.(2) Trim along the outside edge of the stitching;being careful not to cut the stitching. (3) Use seam sealant or fabric glue to secure edges of the scallop stitching.
-30-
10

With the twin needle, you can sew parallel lines of the same stitch with two different colored threads. Both upper threads should have the same thickness and quality. Use the vertical spool pin and spool pin felt.(Refer to page 7)
Using Twin Needles
Installing Twin Needle & Threading
1. Remove the single needle and insert twin needle(A).(See page 9)2. Guide spool thread from horizontal spool pin using normal threading procedure (B). (See page 12) 3. Thread the left needle eye by hand from needle front to back (A).4. Insert vertical spool pin with spool pin felt and thread spool into the hole opening located behind the horizontal spool pin (C).5. Guide spool thread from vertical spool pin and thread machine same as Step 2 above. 6. For better sewing results, do not pass second thread through needle bar threading guide, thread right needle eye by hand from front to back (A).7. Refer to twin needle procedures as outlined in illustrations.
1
2
Needle threader cannot be used with twin needle, it may cause damage to machine. C
2
1
1
2
B
A
-31-

For detail on changing the presser foot, please refer to page 9.The stitch width must be adjusted at 3.5 mm only, for safety reason and the needle must be checked to make sure it safely clears the presser foot and needle plate before sewing by slowly turning handwheel manually.
All Purpose Presser Foot
Stitch Name PatternStitch Length
Dial[mm(inch)]
Stitch Width Dial[mm(inch)]
Needle TypeAll Purpose
Foot
Straight Stitch (ONLY)
1-4(1/16-3/16)
3.5(Center Needle Position ONLY)
2.0/903.0/904.0/905.0/90
When using twin needle, be sure to attach All Purpose foot and always check that the needles do not touch needle plate and presser foot, otherwise, the needle may break or damage the machine.
When using the twin needle be sure to select the STRAIGHT STITCH ONLY and Stitch WidthDial is set at 3.5 (center needle position), otherwise the needle may break or the machine may be damaged.
-32-
Start to sew
When changing the sewing direction raise the needles from the fabric by turning handwheel, and then raise the presser foot lever and turn direction of the fabric.Do not try turning the fabric while twin needle is still in the fabric, otherwise the needle may break or the machine may be damaged.
(Please refer to page 19 for details for Starting to sew)

CARING FOR YOUR MACHINE
To ensure the best possible operation of your machine, it is necessary to keep the essential parts clean at alltimes. Always disconnect the machine from power supplyby removing the plug from the electric outlet.
Please switch off the main power switch and then disconnect plug from electric outlet before you start cleaning.
CAUTION
1 Raise the needle to its highest position.
2 Remove the bobbin cover and bobbin (1).
3 Remove the needle plate (1).
4 Remove the bobbin case (2).
6 Replace the bobbin case with the projection (3)positioned against the spring (4).Replace the needle plate.
Put a drop of good quality sewing machine oil on the hook race as indicated by arrow A.
Never use a bobbin case that is scratched; otherwise the upper thread may become tangled, the needle may break, or sewing performance may suffer.
CAUTION
Make sure that you fit the bobbin case properly, otherwise the needle may break and damage machine or cause personal injury.
-33-
CLEANING THE FEED DOG AND HOOK AREA
5 Clean the feed dog and hook area with the lint brush.
Important Maintenance Message
Baby Lock recommends taking your machine to an authorized Baby Lock retailer for regular maintenance. Such steps will help to ensure you receive continued, uninterrupted hours of machine operation for the future.

TROUBLESHOOTING
If the machine stops working properly, check the following possible problems.If the problem is still there, contact your authorized Baby Lock retailer.
-34-
1211
1718
1110
32
18
18
1211
17
111217
12
32
1818
18
32
8
810
15
Needle is not raised to highest position.
Eye of needle too smallHook pin on threader bent
Insert needle size 11 or higherSee authorized Baby Lock retailer
Feed dog is lowered. .
1313
Select correct foot, pattern and needle position.
9Insert new needle.Needle is bent.
Main power switch is not turned on.shaft
mainshaft
9
25
25
presser:
9
99
9
99
9

Stitch Name Pattern ApplicationStitch Length Dial
[mm(inch)]
Stitch Width Dial[mm(inch)]
Straight Stitch General sewing, attaching zippers and creating gathersor pintucks, etc.
0-4(0-3/16)
0-7*(0-1/4)
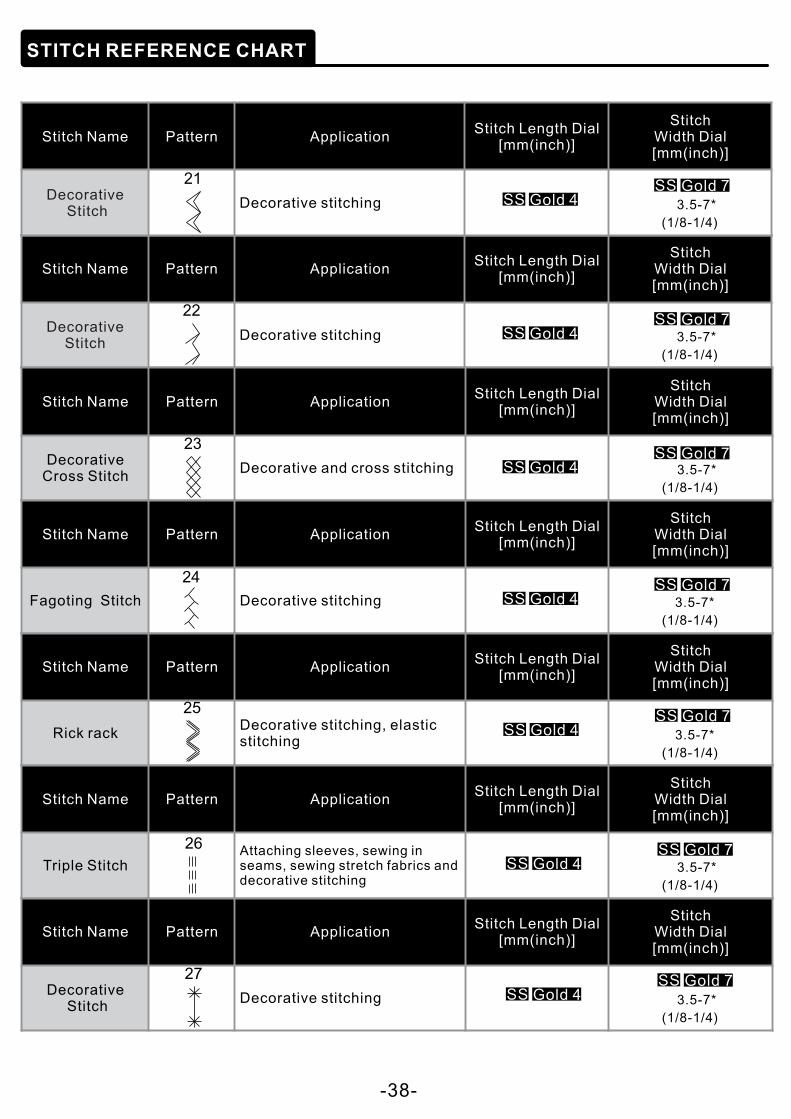
STITCH REFERENCE CHART
Stitch Name Pattern ApplicationStitch Length Dial
[mm(inch)]
Stitch Width Dial[mm(inch)]
Zigzag Stitch Quilting, overcasting and attaching applique, etc.
0-4(0-3/16)
0-7*(0-1/4)
Stitch Name Pattern ApplicationStitch Length Dial
[mm(inch)]
Stitch Width Dial[mm(inch)]
Elastic Zigzag Stitch
Overcasting on medium weight or stretch fabric, attaching elastic or darning etc.
1-4(1/16-3/16)
1-7*(1/16-1/4)
Stitch Name Pattern ApplicationStitch Length Dial
[mm(inch)]
Stitch Width Dial[mm(inch)]
Blind Hem StitchBlind hem stitching on medium weight, etc.
1-4(1/16-3/16)
1-7*(1/16-1/4)
Stitch Name Pattern ApplicationStitch Length Dial
[mm(inch)]
Stitch Width Dial[mm(inch)]
Blind Hem Stretch Stitch
Blind hem stitching on stretch fabric
0-4(0-3/16)
0-7*(0-1/4)
Stitch Name Pattern ApplicationStitch Length Dial
[mm(inch)]
Stitch Width Dial[mm(inch)]
Double Action Attaching elastic to stretch fabrics
0-4(0-3/16)
0-7*(0-1/4)
Stitch Name Pattern ApplicationStitch Length Dial
[mm(inch)]
Stitch Width Dial[mm(inch)]
Buttonhole Creating buttonholes0-1
(0-1/16)
(1/8-1/4)
3.5-7*
1-Step BH
-35-
*The Stitch Width Dial has multi-functions depending on stitch selection. Refer to page 19 for completedetails.

-36-
Stitch Name Pattern ApplicationStitch Length Dial
[mm(inch)]
Stitch Width Dial[mm(inch)]
Overcasting Stitch
Overcasting on thin or medium weight fabrics
1-4(1/16-3/16)
1-7*(1/16-1/4)
STITCH REFERENCE CHART
Stitch Name Pattern ApplicationStitch Length Dial
[mm(inch)]
Stitch Width Dial[mm(inch)]
Decorative Satin Stitch
Decorative and satin stitching 0-4
(0-3/16) 3.5-7*
(1/8-1/4)
Stitch Name Pattern ApplicationStitch Length Dial
[mm(inch)]
Stitch Width Dial[mm(inch)]
Decorative Satin Stitch
Decorative and satin scallop stitching
0-4(0-3/16)
3.5-7*(1/8-1/4)
Stitch Name Pattern ApplicationStitch Length Dial
[mm(inch)]
Stitch Width Dial[mm(inch)]
Decorative Satin Stitch
Decorative and satin stitching 0-4
(0-3/16) 3.5-7*
(1/8-1/4)
Stitch Name Pattern ApplicationStitch Length Dial
[mm(inch)]
Stitch Width Dial[mm(inch)]
Decorative Stitch
Decorative stitching 3.5-7*
(1/8-1/4)
Stitch Name Pattern ApplicationStitch Length Dial
[mm(inch)]
Stitch Width Dial[mm(inch)]
Decorative Stitch
Decorative stitching 3.5-7*
(1/8-1/4)
Stitch Name Pattern ApplicationStitch Length Dial
[mm(inch)]
Stitch Width Dial[mm(inch)]
Bridging Patchwork stitching and decorative stitching
1-4(1/16-3/16)
1-7*(1/16-1/4)
SS Gold 4SS Gold 7
SS Gold 4SS Gold 7

-37-
Stitch Name Pattern ApplicationStitch Length Dial
[mm(inch)]
Stitch Width Dial[mm(inch)]
Decorative Overcasting
Applique, decorative stitching 3.5-7*
(1/8-1/4)
STITCH REFERENCE CHART
Stitch Name Pattern ApplicationStitch Length Dial
[mm(inch)]
Stitch Width Dial[mm(inch)]
Decorative Applique Stitch
Applique, decorative stitching 3.5-7*
(1/8-1/4)
Stitch Name Pattern ApplicationStitch Length Dial
[mm(inch)]
Stitch Width Dial[mm(inch)]
Feather StitchDecorative stitching, patchwork 3.5-7*
(1/8-1/4)
Stitch Name Pattern ApplicationStitch Length Dial
[mm(inch)]
Stitch Width Dial[mm(inch)]
Decorative Stitch
Decorative stitching 3.5-7*
(1/8-1/4)
Stitch Name Pattern ApplicationStitch Length Dial
[mm(inch)]
Stitch Width Dial[mm(inch)]
Double Overlock Stitch
Decorative hemming on thin, medium weight and plain weave fabric, heirloom stitching etc.
3.5-7*
(1/8-1/4)
Stitch Name Pattern ApplicationStitch Length Dial
[mm(inch)]
Stitch Width Dial[mm(inch)]
Decorative Stitch
Decorative stitching 3.5-7*
(1/8-1/4)
Stitch Name Pattern ApplicationStitch Length Dial
[mm(inch)]
Stitch Width Dial[mm(inch)]
Overlock Overcasting on thin or medium weight fabricOvercasting on thick fabrics
(1/8-1/4)
3.5-7*
SS Gold 4SS Gold 7
SS Gold 4SS Gold 7
SS Gold 4SS Gold 7
SS Gold 4SS Gold 7
SS Gold 4SS Gold 7
SS Gold 4SS Gold 7
SS Gold 4SS Gold 7
-38-
Stitch Name Pattern ApplicationStitch Length Dial
[mm(inch)]
Stitch Width Dial[mm(inch)]
Decorative Stitch
Decorative stitching 3.5-7*
(1/8-1/4)
STITCH REFERENCE CHART
Stitch Name Pattern ApplicationStitch Length Dial
[mm(inch)]
Stitch Width Dial[mm(inch)]
Decorative Cross Stitch
Decorative and cross stitching 3.5-7*
(1/8-1/4)
Stitch Name Pattern ApplicationStitch Length Dial
[mm(inch)]
Stitch Width Dial[mm(inch)]
Fagoting Stitch Decorative stitching 3.5-7*
(1/8-1/4)
Stitch Name Pattern ApplicationStitch Length Dial
[mm(inch)]
Stitch Width Dial[mm(inch)]
Rick rack Decorative stitching, elastic stitching 3.5-7*
(1/8-1/4)
Stitch Name Pattern ApplicationStitch Length Dial
[mm(inch)]
Stitch Width Dial[mm(inch)]
Triple Stitch Attaching sleeves, sewing in seams, sewing stretch fabrics and decorative stitching
3.5-7*
(1/8-1/4)
Stitch Name Pattern ApplicationStitch Length Dial
[mm(inch)]
Stitch Width Dial[mm(inch)]
Decorative Stitch
Decorative stitching 3.5-7*
(1/8-1/4)
Stitch Name Pattern ApplicationStitch Length Dial
[mm(inch)]
Stitch Width Dial[mm(inch)]
Decorative Stitch
Decorative stitching 3.5-7*
(1/8-1/4)
SS Gold 4SS Gold 7
SS Gold 4SS Gold 7
SS Gold 4SS Gold 7
SS Gold 4SS Gold 7
SS Gold 4SS Gold 7
SS Gold 4SS Gold 7
SS Gold 4SS Gold 7


IBBLMJZEnglish
Printed in Taiwan