body on frame repair - amazon s3 the welded area (2) ... using a non-marring feeler gauge, measure...
TRANSCRIPT

Dan Black
Collision repair strategies
Global Service Lead- Body/Chassis/Paint
Body on Frame Repair
7/13/17- Guild 21
FCA vehicles equipped with full frames
Body on Frame Design Characteristics
Repair Methodology
Vehicle Specific Scenarios
Overview
7/13/2017 2
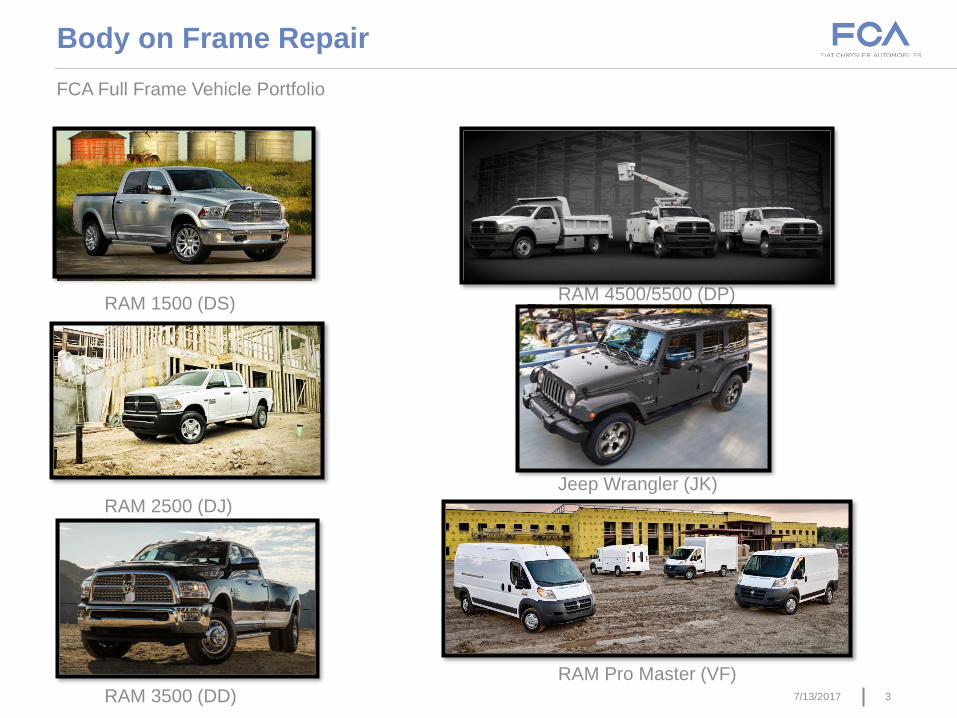
RAM 1500 (DS)
RAM 2500 (DJ)
RAM 3500 (DD)
FCA Full Frame Vehicle Portfolio
Body on Frame Repair
7/13/2017 3
RAM 4500/5500 (DP)
Jeep Wrangler (JK)
RAM Pro Master (VF)
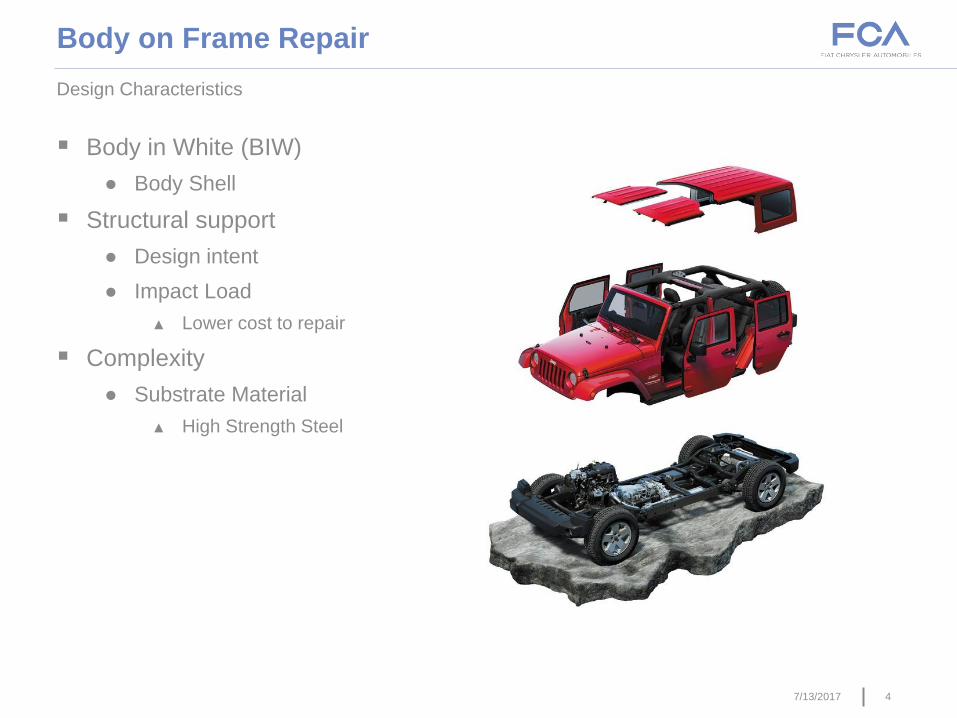
Body in White (BIW)
● Body Shell
Structural support
● Design intent
● Impact Load
▲ Lower cost to repair
Complexity
● Substrate Material
▲ High Strength Steel
Design Characteristics
Body on Frame Repair
7/13/2017 4

57/13/2017
Additional assembly plant processing information
Body on Frame Repair
Principal point location (PLP) should
be used by all collision repair shops
to confirm that the cab and/or pickup
box is dimensionally correct & will fit
on the frame.
● They are 2 way & 4 way locating
holes that assist with locating the
transfer pins to confirm dimensional
integrity throughout the assembly
process.
Body and pickup box when
applicable are mounted to the frame
using alignment pins at the assembly
plant.
Unibody dimensional
shape/foundation of the vehicle is
taken from the vehicle ladder of the
BIW.

Is the use of heat permitted when repairing FCA vehicles?
A) Yes
B) No
6

77/13/2017
Do not use heat during the collision repair
process unless the subsequent component
will be replaced after straightening.
● Refer to Collision Bulletin 31-001-11
Unless partial replacement procedures are
documented in a FCA US LLC publication,
structural panels must be installed in their
entirety - partial replacement or “sectioning”
of panels may compromise vehicle structure.
FCA US LLC does not support the use or re-
use of any structural component which has
been removed from a vehicle previously
damaged, flooded, burned, scrapped or
removed from use for any other reason--
commonly referred to as “salvage parts.”
Repair Methodology Disclosure
Body on Frame Repair

87/13/2017
While some salvage parts may “appear”
equivalent, there can be dramatic
differences in the design and functional
characteristics which cannot be determined
by a visual inspection and which could
have a negative effect on the vehicle
occupants in a future collision event.
Salvage components may have been
affected by crash impact loads, incorrect,
improper or inadequate disassembly and
removal procedures, weathering or
environmental exposure outside of that
expected during normal use.
Salvage components are not traceable
should a component recall be required in
the future.
Repair Methodology Disclosure Continued
Body on Frame Repair

97/13/2017
High Strength Steel
● GMAW
▲ Welder requirements
□ Electrode Type: AWS CLASS. ER70S-6
□ Electrode Size: 0.035
□ Wire Feed Speed in/min: 245-250 Vertical Down and 70-90 Flat & Horizontal
□ Voltage: 19-20
□ Polarity: DCEP
□ Electrical Stick out (in): 1/2 - 5/8
□ Type of ARC transfer: Short Circuit
▲ Gas Requirements
□ Gas Flow(cfh) 25-35
□ Gas Type: 75% Argon/ 25%Co2
Frame Rail Repair Equipment Requirements
Body on Frame Repair
• Sheet Metal Repairs• Reference the applicable Collision
Repair Manual at
MoparRepairConnection.com

107/13/2017
Remove all components from the vehicle that inhibit access to the structural
damage.
Evaluate frame damage on a frame machine and ensure the vehicle is level.
Begin measuring with a 3D measurement system to confirm severity.
● Note: MoparRepairConnection.com should be referenced to ensure
measurement specifications are accurate.
Anchor the vehicle in accordance with the frame equipment providers
recommendations.
When operating a frame machine be sure to follow the manufacturers safety
recommendations to avoid serious or fatal injury.
Begin cold pulling the frame to align within FCA measurement specifications.
If frame will not align to FCA specification from cold pulling, the use of heat
is permissible, but only on components that will be removed and replaced on
the frame after the straightening process is complete.
Frame Repair Methodology
Body on Frame Repair
117/13/2017
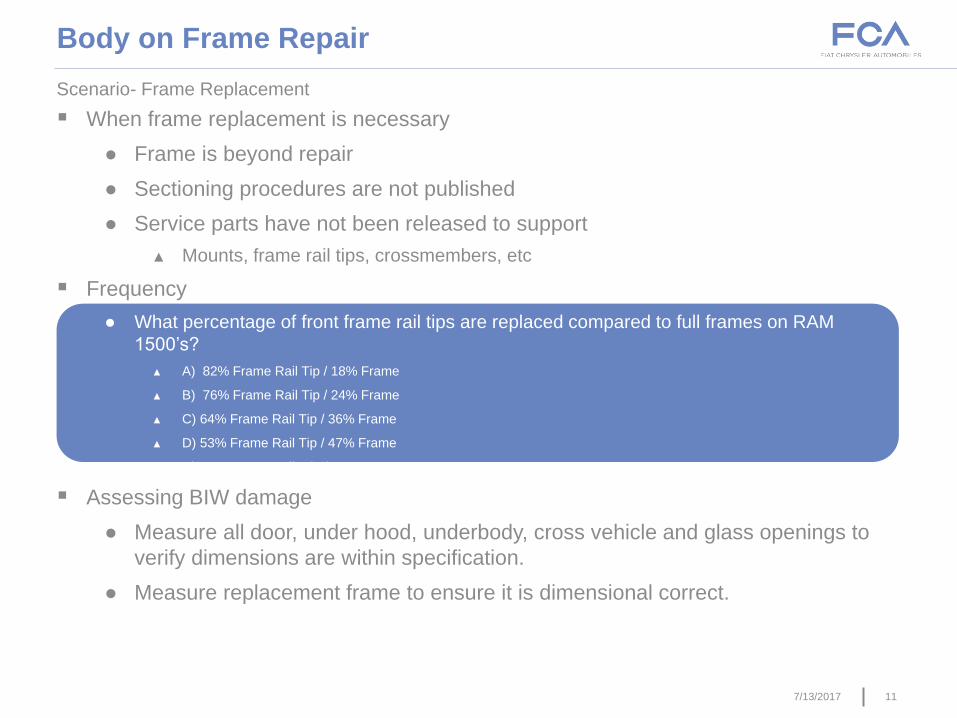
When frame replacement is necessary
● Frame is beyond repair
● Sectioning procedures are not published
● Service parts have not been released to support
▲ Mounts, frame rail tips, crossmembers, etc
Frequency
● What percentage of front frame rail tips are replaced compared to full frames on RAM
1500’s?
▲ A) 82% Frame Rail Tip / 18% Frame
▲ B) 76% Frame Rail Tip / 24% Frame
▲ C) 64% Frame Rail Tip / 36% Frame
▲ D) 53% Frame Rail Tip / 47% Frame
▲ D) 41% Frame Rail Tip /
Assessing BIW damage
● Measure all door, under hood, underbody, cross vehicle and glass openings to
verify dimensions are within specification.
● Measure replacement frame to ensure it is dimensional correct.
Scenario- Frame Replacement
Body on Frame Repair

127/13/2017
Remove all necessary components to access the frame rail sectioning location.
Remove the welds securing the front rail tips to the frame.
Do not use an oxy-acetylene cutting torch to remove the damaged frame rail tip.
Use a plasma cutter, reciprocating saw, or equivalent tool, carefully cut and remove the
damaged frame rail tip (1). Cut at the forward edge of the weld at the tip to frame joint (2),
do not cut the main frame rail.
Using a plasma cutter, or die grinder, remove the puddle weld (3) that attaches the frame
tip to the frame rail.
With the puddle weld removed, grind any remaining weld and remove the remaining piece
of the frame tip (1) from within the frame rail and discard.
Scenario: RAM Pickup Truck, Requires Front Frame Rail Tip Replacement
Body on Frame Repair- RAM Pickup Truck

On which FCA vehicles is it acceptable to apply weld-thru primer?
A.) RAM 1500 (DS) , Jeep Wrangler (JK), Chrysler 300 (LX)
B.) Jeep Renegade (BU), Jeep Compass (MP), Ram Promaster (VF), Alfa Romeo GIULIA
(GA), Alfa Romeo Stelvio (GU)
C.) Dodge Challenger (LA), Jeep Grand Cherokee (WK), Chrysler 200 (UF)
D.) None of the above
13

147/13/2017
Smooth and square the cut edges of the original frame
Note: Remove any burrs at the hole and frame edge
Caution: Shield the surrounding area and components from exposure
to the welding spatter and heat
Dry fit the new rail to verify alignment and make any adjustments
as necessary
Remove all internal and external OEM e-coat within 25 mm (1.0 in.)
of the weld joint on the replacement tip and the existing frame rail.
Using the appropriate measuring equipment, verify the front end
sheet metal bracket’s location and adjust if required. Refer to
specifications identified in the collision repair manual
When correctly aligned, tack weld the new rail tip into place.
Verify the rail tip is within measurement specifications
Apply MIG plug weld (3) into the MIG plug weld hole on the
replacement frame tip.
Start the MIG plug welds at location (1) and follow around the
circumference of the MIG plug weld hole and end weld overlapping
start point (2).
Scenario: RAM Pickup Truck, Requires Front Frame Rail Tip Replacement Continued
Body on Frame Repair- RAM Pickup Truck

157/13/2017
Then weld at the tip to frame joint (2) should be performed in a skip (stitch) type method
to minimize the heat buildup and frame distortion, utilizing the Weld Process
Specifications. The preferred method is GMAW (MIG).
Scenario: RAM Pickup Truck, Requires Front Frame Rail Tip Replacement Continued
Body on Frame Repair- RAM Pickup Truck
Weld the joint, one quadrant at a time, switching to the opposite side of the frame rail for
each quadrant.
Confirm alignment of the replacement tip.

167/13/2017
Dress the welded area (2) and apply corrosion resistant coatings inside and out.
● Apply epoxy primer to the inside of the frame rail repair area.
● Inside the rail, inject a creeping wax based rust inhibitor compound through the existing holes in
the frame ensuring 100% coverage including the space between the original frame rail and the
replacement rail tip (1) using Mopar Cavity wax kit (part # 68042969AA) / Undercoating kit (part #
68042967AA) or equivalent.
● Apply a durable top coat to the outside of the repair area (2).
Scenario: RAM Pickup Truck, Requires Front Frame Rail Tip Replacement Continued
Body on Frame Repair- RAM Pickup Truck
Complete other repairs and install removed parts.

177/13/2017
As with other frame replacement scenarios, measure all body dimensions to ensure they
are within specification.
Scenario: Jeep Wrangler, Frame Replacement
Body on Frame Repair- Jeep Wrangler
Adjust accordingly if the openings are out of dimension, if it is determined that the
damaged frame is resulting in the deviation, proceed with BIW removal.
Measure the dimensions of the replacement frame to ensure they align with specifications
in the collision repair manual.

187/13/2017
Unique features of the Jeep Wrangler body construction.
● Equipped with a soft top and/or removable freedom panel roof system
● Exterior hinges on closure panels
● Optional half doors
● Foldable windshield
● Sport Bar upper aperture support
The vehicle does not have a fixed roof system
● Generates panel alignment and dimensional
variables when replacing vehicle frame.
▲ Roof System Alignment
▲ Windshield Frame alignment
▲ Upper Door Fitment
Scenario: Jeep Wrangler, Frame Replacement
Body on Frame Repair- Jeep Wrangler
197/13/2017
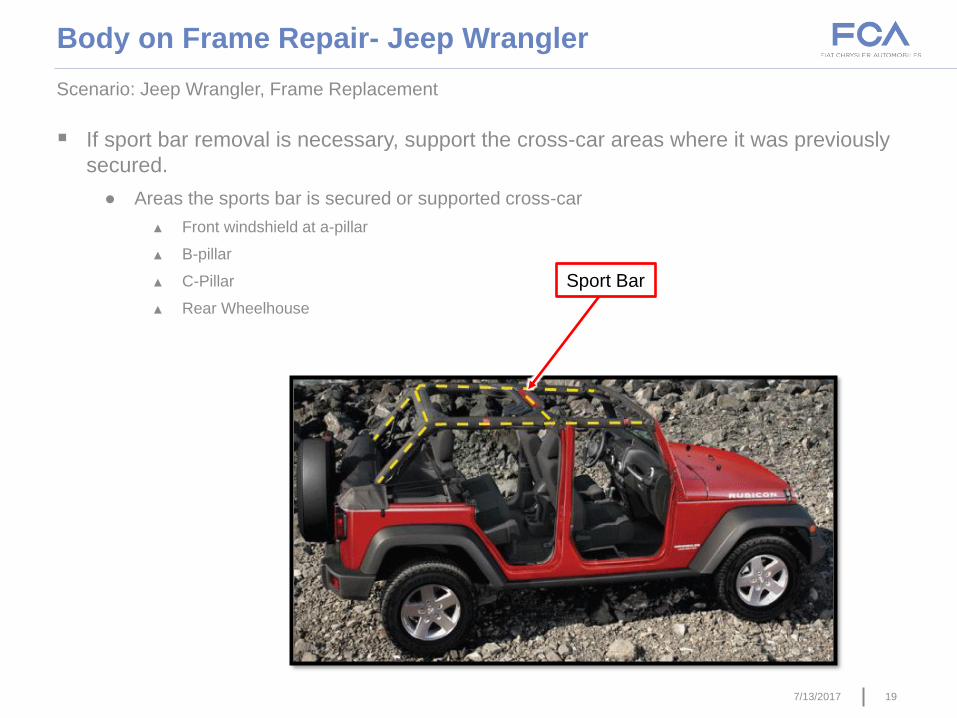
If sport bar removal is necessary, support the cross-car areas where it was previously
secured.
● Areas the sports bar is secured or supported cross-car
▲ Front windshield at a-pillar
▲ B-pillar
▲ C-Pillar
▲ Rear Wheelhouse
Scenario: Jeep Wrangler, Frame Replacement
Body on Frame Repair- Jeep Wrangler
Sport Bar
207/13/2017
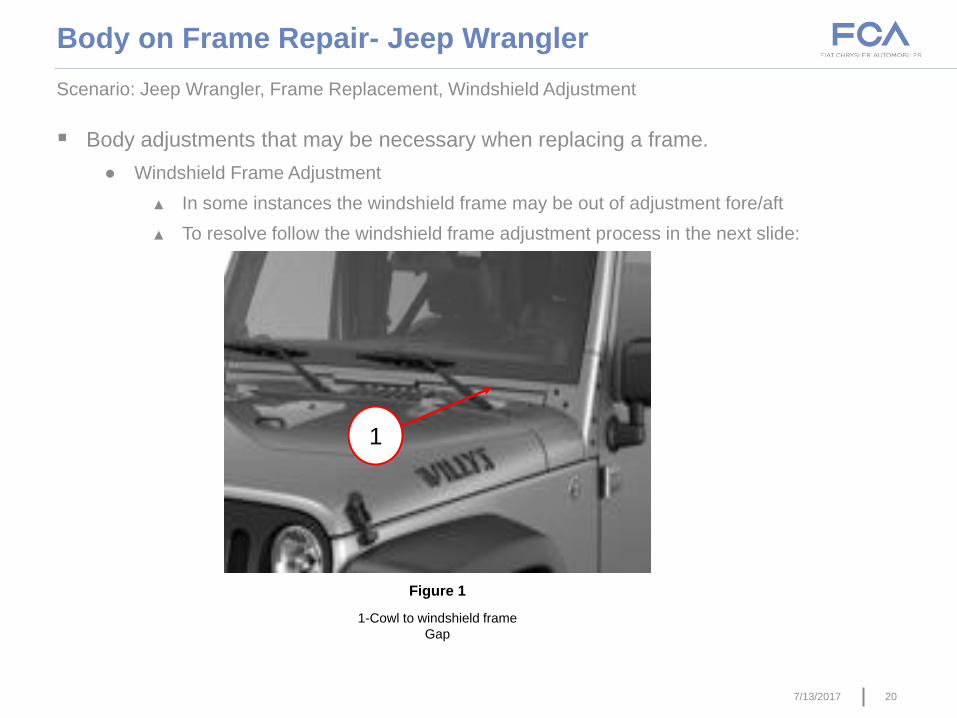
Body adjustments that may be necessary when replacing a frame.
● Windshield Frame Adjustment
▲ In some instances the windshield frame may be out of adjustment fore/aft
▲ To resolve follow the windshield frame adjustment process in the next slide:
Scenario: Jeep Wrangler, Frame Replacement, Windshield Adjustment
Body on Frame Repair- Jeep Wrangler
1
Figure 1
1-Cowl to windshield frame
Gap

217/13/2017
Scenario: Jeep Wrangler, Frame Replacement, Windshield Adjustment
Body on Frame Repair- Jeep Wrangler
Windshield Frame Inspection Criteria:
The windshield frame adjustment should only be performed
if the vehicle exhibits one of the following conditions:
• Gaps between the windshield frame and door exceeding
6.5 mm (.25
in.).
• Gaps between the windshield frame and top of cowl
exceeding 6 mm
(.23 in.) or less than 4 mm (.15 in.).
• Record measurements for reference.
Using a non-marring feeler gauge, measure the gap between
the door and windshield frame and the gap between the
windshield frame and top of cowl. Is the gap between the
windshield frame and door larger than 6.5 mm (.25 in.)? Is
the gap between the windshield frame and top of cowl larger
than 6 mm (.23 in.) or less than 4 mm (.15in.)(Fig.1)?
If yes, proceed with Windshield Frame Adjustment,
otherwise continue further diagnosis.
NOTE: It is important that the adjustments are
made on one side of the windshield frame at a
time. If both sides need to be adjusted, complete
the whole procedure on one side, then repeat the
procedure on the other side.
Loosen the side bars by pulling the cross bar
and side bar covers off to expose the end side
bar bolts.
Loosen but do not remove from the B-pillar
(Fig. 2).
Loosen but do not remove the bolt underneath
the cross bar (Fig. 2).
Windshield Frame Adjustment:
Remove the modular tops (Freedom Top) and
hard top. Refer to the detailed service procedures
available in DealerCONNECT> TechCONNECT
under: Service Info> 23 -Body/Removable Top,
Hard/Removal.
Figure 2
1- Cross Bar Bolt
2- B-Pillar Bolt

227/13/2017
Scenario: Jeep Wrangler, Frame Replacement, Windshield Adjustment
Body on Frame Repair- Jeep Wrangler
The gray foam has access holes and should
not be removed.
Loosen but do not remove the bolt on top of
the side bar (Fig. 3).
CAUTION: Do not remove the six gusset bolts.
Loosening the bolts minimizes the risk of
damaging the vehicles paint.
Using a T40 Torx bit, loosen the six gusset
bolts on one side of the windshield frame (Fig.
4).
Are the gaps between the door and windshield
frame larger than 6.5 mm (.25 in.)?
a. YES >>> Proceed to Repair
Procedure A: Door to Windshield
Frame Adjustment.
b. NO >>> The gaps between the
windshield frame and cowl top are
smaller than 4mm (.15 in.).
Proceed to Repair Procedure B:
Windshield Frame to Cowl Panel
Adjustment Gap less than 4mm
Figure 3
Figure 4
237/13/2017
Scenario: Jeep Wrangler, Frame Replacement, Windshield Adjustment
Body on Frame Repair- Jeep Wrangler
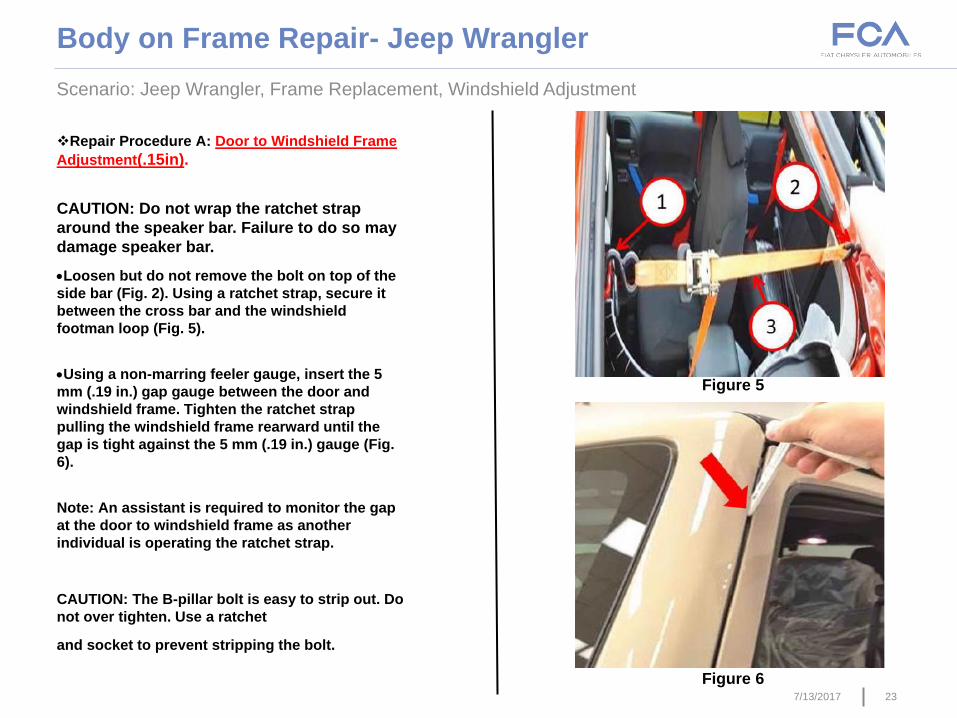
Repair Procedure A: Door to Windshield Frame
Adjustment(.15in).
CAUTION: Do not wrap the ratchet strap
around the speaker bar. Failure to do so may
damage speaker bar.
Loosen but do not remove the bolt on top of the
side bar (Fig. 2). Using a ratchet strap, secure it
between the cross bar and the windshield
footman loop (Fig. 5).
Using a non-marring feeler gauge, insert the 5
mm (.19 in.) gap gauge between the door and
windshield frame. Tighten the ratchet strap
pulling the windshield frame rearward until the
gap is tight against the 5 mm (.19 in.) gauge (Fig.
6).
Note: An assistant is required to monitor the gap
at the door to windshield frame as another
individual is operating the ratchet strap.
CAUTION: The B-pillar bolt is easy to strip out. Do
not over tighten. Use a ratchet
and socket to prevent stripping the bolt.
Figure 5
Figure 6
247/13/2017
Scenario: Jeep Wrangler, Frame Replacement, Windshield Adjustment
Body on Frame Repair- Jeep Wrangler
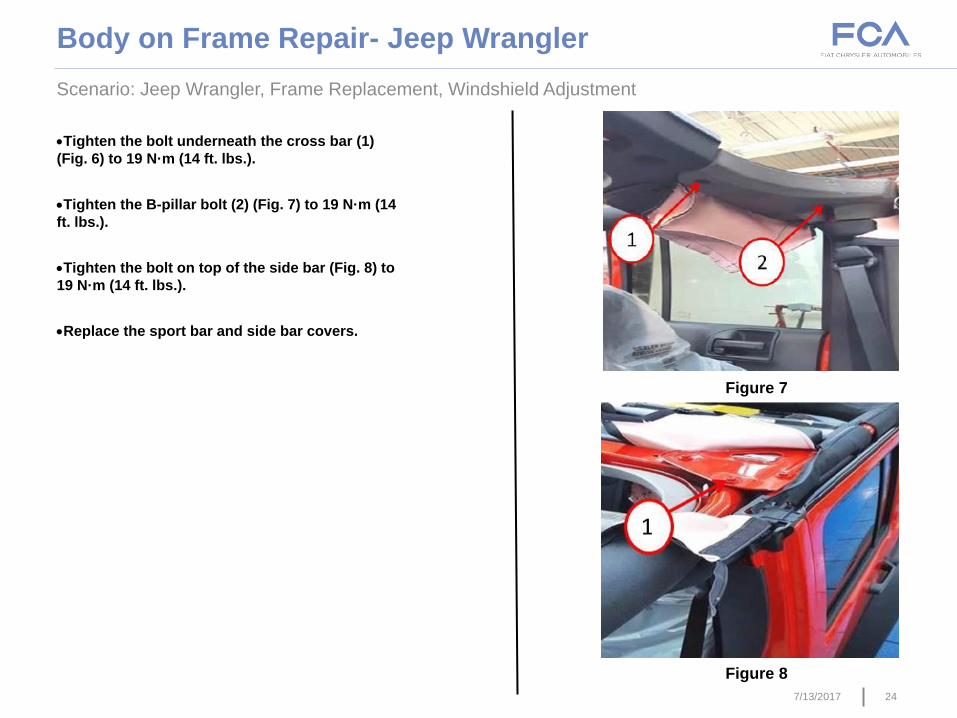
Tighten the bolt underneath the cross bar (1)
(Fig. 6) to 19 N·m (14 ft. lbs.).
Tighten the B-pillar bolt (2) (Fig. 7) to 19 N·m (14
ft. lbs.).
Tighten the bolt on top of the side bar (Fig. 8) to
19 N·m (14 ft. lbs.).
Replace the sport bar and side bar covers.
Figure 7
Figure 8

257/13/2017
Scenario: Jeep Wrangler, Frame Replacement, Windshield Adjustment
Body on Frame Repair- Jeep Wrangler
Using a non-marring feeler gauge, check the
gap between the windshield frame and top of
cowl. Place the feeler gauge in the location
shown on the left and right side of the
windshield frame and measure the gaps (Fig.
9).
Are the gaps between 4 mm (.15 in.) and 6 mm
(.24 in.) (Fig. 9)?
a)YES >>>
oTighten the bolt underneath the
cross bar (1) (Fig. 6) to 19 N·m
(14 ft. lbs.).
oTighten the B-pillar bolt (2) (Fig.
7) to 19 N·m (14 ft. lbs.).
oTighten the bolt on top of the side bar (Fig. 8)
to 19 N·m (14 ft. lbs.).
b)NO >>> Proceed to the next step.
Is the gap smaller than 4 mm (.15 in.) (Fig. 9)?
a. YES >>> Proceed to Repair Procedure B:
Windshield Frame to Cowl Panel Adjustment
Gap Less than 4mm (.15mm) p.19.
b. NO >>> The gap is larger then 6 mm (.24 in.)
(Fig. 8). Proceed to Repair Procedure C:
Windshield Frame to Cowl Panel Adjustment
Gap Greater than 6mm (.24in).
Repair Procedure C: Windshield Frame to
Cowl Panel Adjustment Gap Greater than 6mm
(.24in)
Using a ratchet strap, fasten strap around the
side bar (Fig. 10).
Figure 9
Figure 10
267/13/2017
Body on Frame Repair- Jeep Wrangler
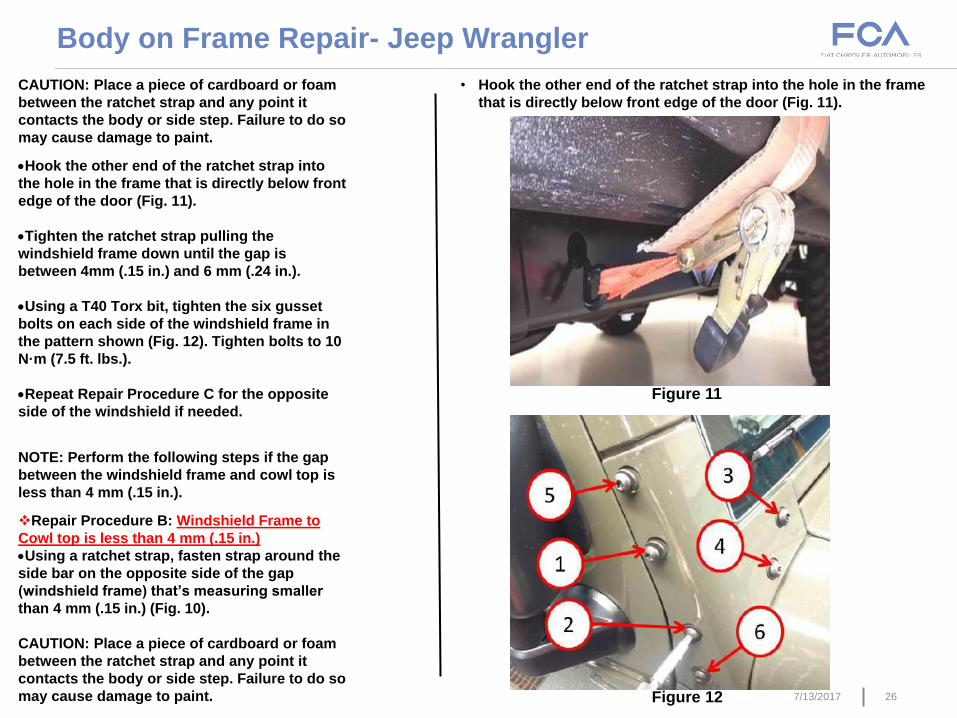
CAUTION: Place a piece of cardboard or foam
between the ratchet strap and any point it
contacts the body or side step. Failure to do so
may cause damage to paint.
Hook the other end of the ratchet strap into
the hole in the frame that is directly below front
edge of the door (Fig. 11).
Tighten the ratchet strap pulling the
windshield frame down until the gap is
between 4mm (.15 in.) and 6 mm (.24 in.).
Using a T40 Torx bit, tighten the six gusset
bolts on each side of the windshield frame in
the pattern shown (Fig. 12). Tighten bolts to 10
N·m (7.5 ft. lbs.).
Repeat Repair Procedure C for the opposite
side of the windshield if needed.
NOTE: Perform the following steps if the gap
between the windshield frame and cowl top is
less than 4 mm (.15 in.).
Repair Procedure B: Windshield Frame to
Cowl top is less than 4 mm (.15 in.)
Using a ratchet strap, fasten strap around the
side bar on the opposite side of the gap
(windshield frame) that’s measuring smaller
than 4 mm (.15 in.) (Fig. 10).
CAUTION: Place a piece of cardboard or foam
between the ratchet strap and any point it
contacts the body or side step. Failure to do so
may cause damage to paint.
• Hook the other end of the ratchet strap into the hole in the frame
that is directly below front edge of the door (Fig. 11).
Figure 11
Figure 12
277/13/2017
Scenario: Jeep Wrangler, Frame Replacement, Windshield Adjustment
Body on Frame Repair- Jeep Wrangler
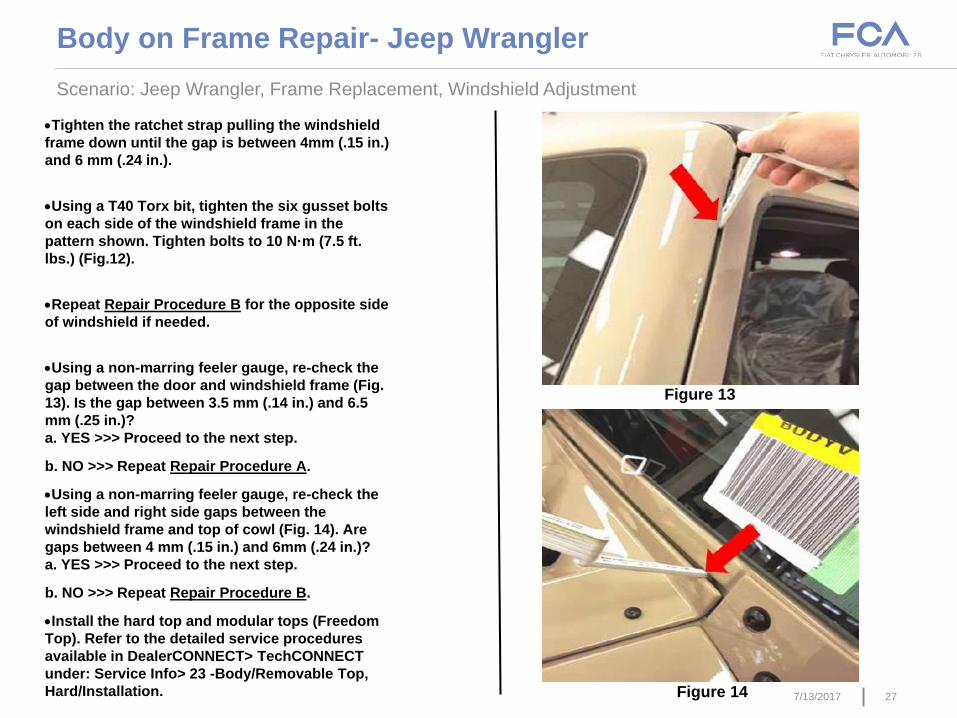
Tighten the ratchet strap pulling the windshield
frame down until the gap is between 4mm (.15 in.)
and 6 mm (.24 in.).
Using a T40 Torx bit, tighten the six gusset bolts
on each side of the windshield frame in the
pattern shown. Tighten bolts to 10 N·m (7.5 ft.
lbs.) (Fig.12).
Repeat Repair Procedure B for the opposite side
of windshield if needed.
Using a non-marring feeler gauge, re-check the
gap between the door and windshield frame (Fig.
13). Is the gap between 3.5 mm (.14 in.) and 6.5
mm (.25 in.)?
a. YES >>> Proceed to the next step.
b. NO >>> Repeat Repair Procedure A.
Using a non-marring feeler gauge, re-check the
left side and right side gaps between the
windshield frame and top of cowl (Fig. 14). Are
gaps between 4 mm (.15 in.) and 6mm (.24 in.)?
a. YES >>> Proceed to the next step.
b. NO >>> Repeat Repair Procedure B.
Install the hard top and modular tops (Freedom
Top). Refer to the detailed service procedures
available in DealerCONNECT> TechCONNECT
under: Service Info> 23 -Body/Removable Top,
Hard/Installation.
Figure 13
Figure 14

287/13/2017
Scenario: Jeep Wrangler, Frame Replacement, Freedom Panel Alignment
Body on Frame Repair- Jeep Wrangler
STEP 1: INSPECTION:
Measure the gap between the edge of
the freedom panel and the windshield
header sheet metal for the left and
right panel. Is the gap within 8-10mm
and (Fig.1)?
Yes>>> Although the panels are
misaligned the condition will not
generate a water leak, continue
further diagnosis.
No>>> Proceed to the repair
procedure.
STEP 2: REPAIR
PROCEDURE:
Determine the direction of the
stagger. Panels can either be
staggered with the left panel behind
the right panel or right panel behind
the left (Fig.2, Fig.3).
Figure 1
Figure 2
Figure 3

297/13/2017
Scenario: Jeep Wrangler, Frame Replacement, Freedom Panel Alignment
Body on Frame Repair- Jeep Wrangler
Remove both freedom panels from the
vehicle.
Remove the two Freedom Top Torx
fasteners located on the rear panel
(Fig.4).
For left panel behind right panel
condition apply pressure to the
hardtop above the left B-Pillar
towards the right side of the vehicle
(Fig.5).
For right panel behind left panel
condition apply pressure to the
hardtop above the right B-Pillar
towards the left side of the vehicle
(Fig.6).
Figure 4
Figure 5 Figure 6
307/13/2017
Scenario: Jeep Wrangler, Frame Replacement, Freedom Panel Alignment
Body on Frame Repair- Jeep Wrangler
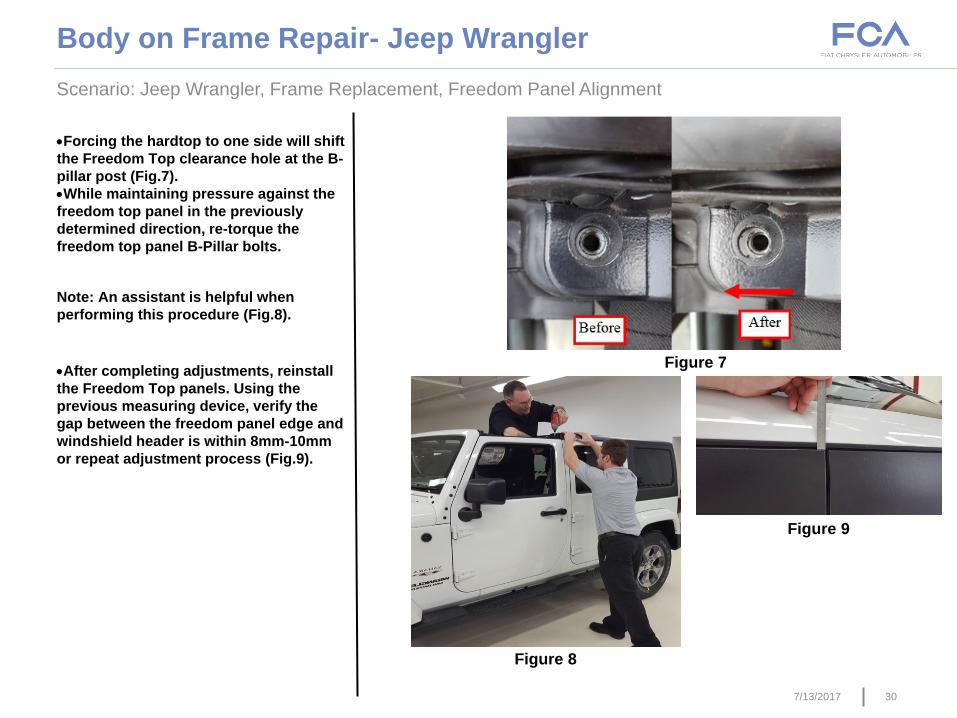
Forcing the hardtop to one side will shift
the Freedom Top clearance hole at the B-
pillar post (Fig.7).
While maintaining pressure against the
freedom top panel in the previously
determined direction, re-torque the
freedom top panel B-Pillar bolts.
Note: An assistant is helpful when
performing this procedure (Fig.8).
After completing adjustments, reinstall
the Freedom Top panels. Using the
previous measuring device, verify the
gap between the freedom panel edge and
windshield header is within 8mm-10mm
or repeat adjustment process (Fig.9).
Figure 7
Figure 8
Figure 9

7/13/17- Guild 21
Questions?
Dan Black
Global Service Lead- Body/Chassis/Paint