bonus block penny's patchwork pumpkin · penny's patchwork bonus block pumpkin 12"...
TRANSCRIPT
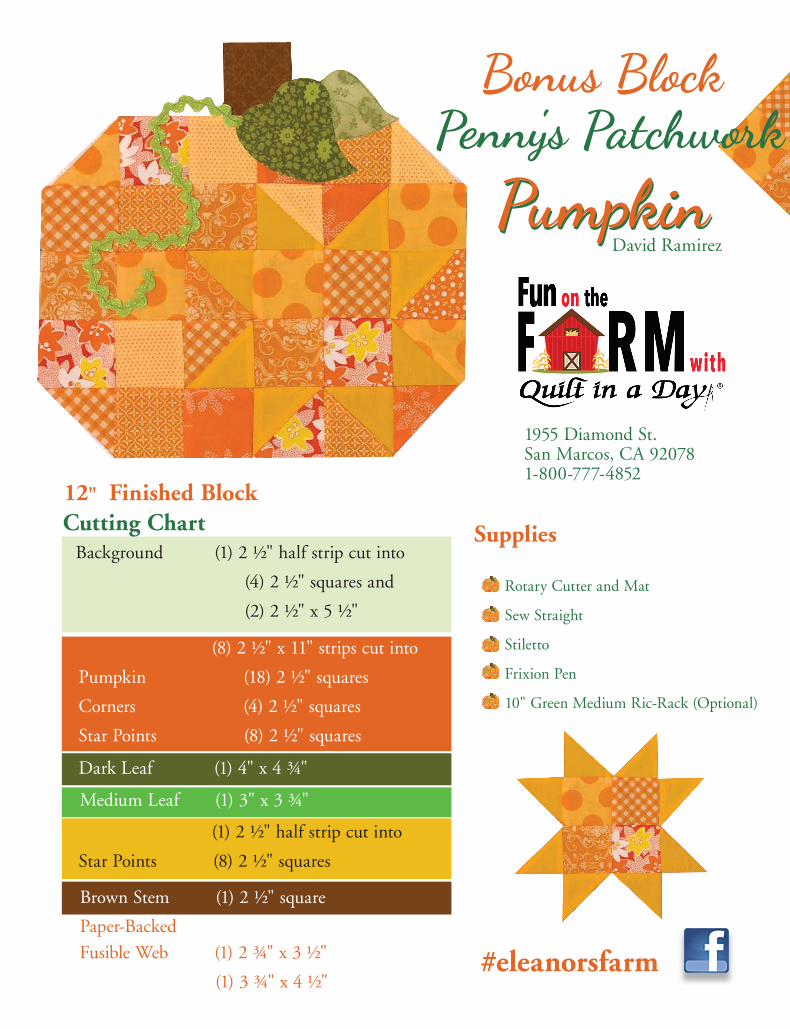
Pumpkin
Rotary Cutter and Mat
Sew Straight
Stiletto
Frixion Pen
10" Green Medium Ric-Rack (Optional)
David Ramirez
1955 Diamond St. San Marcos, CA 92078 1-800-777-4852
Supplies Cutting Chart
(1) 2 H" half strip cut into
Star Points (8) 2 H" squares
Fusible Web (1) 2 I" x 3 H"
(1) 3 I" x 4 H"
Paper-Backed
Medium Leaf (1) 3" x 3 I"
Dark Leaf (1) 4" x 4 I"
(8) 2 H" x 11" strips cut into
Pumpkin (18) 2 H" squares
Corners (4) 2 H" squares
Star Points (8) 2 H" squares
Brown Stem (1) 2 H" square
Background (1) 2 H" half strip cut into
(4) 2 H" squares and
(2) 2 H" x 5 H"
Penny's Patchwork Bonus Block
Pumpkin
12" Finished Block
#eleanorsfarm

Making 2 ½" Half Square Triangles from 2 ½" Squares
Make eight star points 8 Orange Squares 8 Star Squares
Make four pumpkin corners. 4 Orange Squares 4 Background Squares
1. Place two 2 ½" squares right sides
together.
2. Draw a diagonal line on each set.
3. Sew on diagonal line.
El’s Tip: Use Sew Straight and sew on unmarked diagonal line!
4. Trim ¼" to one side of diagonal line of stitches.
5. Press four pumpkin corners to pumpkin
square.
6. Press four star points to star triangle.
7. Press four star points away from star triangle.
Making Stem Row
1. Lay out 2 ½" stem square and two 2 ½" x 5 ½" background rectangles.
2. Sew 2 ½" x 5 ½" background rectangles
to either side of stem.
3. Press seams to stem.
Sewing Block Together
1. Count out 18 orange squares.
2. Layout block as shown. For locking seams check arrows indicating seam direction.
3. Assembly line sew each row.
4. From wrong side press row #2, #4 and #6 to the left; and press rows #3 and #5 to the right.
5. Locking all seams, sew rows together.
6. Press seams away from row #1
Finishing Block
1. On paper side of paper backed light weight fusible trace large and small pumpkin leaf.
2. Fuse interfacing to wrong side of 3½" x 4½" and 2½" x 3" green squares.
3. Cut out leaves and remove paper. 4. Fuse to block as desired.
5. Straight stitch around leaves.
6. (Optional) With water soluble glue stick, glue down ric-rack as desired. Stitch down center of ric-rack.
If you enjoyed working with 2 ½" strips, check out these fun patterns at quiltinaday.com.
Pumpkin kisses
and harvest wishes!
1
2
3
4
5
6
.
1.
toward
Press pumpkin corners toward dark.
6. Press four star points toward dark.
7. Press four star points toward light.
Making 2 ½" Half Square Triangles from 2 ½" Squares
Make eight star points 8 Orange Squares 8 Star Squares
Make four pumpkin corners. 4 Orange Squares 4 Background Squares
1. Place two 2 ½" squares right sides
together.
2. Draw a diagonal line on each set.
3. Sew on diagonal line.
El’s Tip: Use Sew Straight and sew on unmarked diagonal line!
4. Trim ¼" to one side of diagonal line of stitches.
5. Press four pumpkin corners to pumpkin
square.
6. Press four star points to star triangle.
7. Press four star points away from star triangle.
Making Stem Row
1. Lay out 2 ½" stem square and two 2 ½" x 5 ½" background rectangles.
2. Sew 2 ½" x 5 ½" background rectangles
to either side of stem.
3. Press seams to stem.
Sewing Block Together
1. Count out 18 orange squares.
2. Layout block as shown. For locking seams check arrows indicating seam direction.
Lay out 2H" stem square and two 2H" x 5H" background rectangles.
1.
Making 2 ½" Half Square Triangles from 2 ½" Squares
Make eight star points 8 Orange Squares 8 Star Squares
Make four pumpkin corners. 4 Orange Squares 4 Background Squares
1. Place two 2 ½" squares right sides
together.
2. Draw a diagonal line on each set.
3. Sew on diagonal line.
El’s Tip: Use Sew Straight and sew on unmarked diagonal line!
4. Trim ¼" to one side of diagonal line of stitches.
5. Press four pumpkin corners to pumpkin
square.
6. Press four star points to star triangle.
7. Press four star points away from star triangle.
Making Stem Row
1. Lay out 2 ½" stem square and two 2 ½" x 5 ½" background rectangles.
2. Sew 2 ½" x 5 ½" background rectangles
to either side of stem.
3. Press seams to stem.
Sewing Block Together
1. Count out 18 orange squares.
2. Layout block as shown. For locking seams check arrows indicating seam direction.
3. Assembly line sew each row.
4. From wrong side press row #2, #4 and #6 to the left; and press rows #3 and #5 to the right.
5. Locking all seams, sew rows together.
6. Press seams away from row #1
Finishing Block
1. On paper side of paper backed light weight fusible trace large and small pumpkin leaf.
2. Fuse interfacing to wrong side of 3½" x 4½" and 2½" x 3" green squares.
3. Cut out leaves and remove paper. 4. Fuse to block as desired.
5. Straight stitch around leaves.
6. (Optional) With water soluble glue stick, glue down ric-rack as desired. Stitch down center of ric-rack.
If you enjoyed working with 2 ½" strips, check out these fun patterns at quiltinaday.com.
Pumpkin kisses
and harvest wishes!
1
2
3
4
5
6
toward
1. Trace leaves on paper side of paper backed
2. Fuse interfacing to wrong sides of leaves.
3. Cut out leaves and remove paper.
4. Fuse to block as desired.
fusible web.
12 H"
3. Assembly line sew each row.
4. From wrong side press row #2, #4 and #6 to the left; and press rows #3 and #5 to the right.
5. Locking all seams, sew rows together.
6. Press seams away from row #1
Finishing Block
1. On paper side of paper backed light weight fusible trace large and small pumpkin leaf.
2. Fuse interfacing to wrong side of 3½" x 4½" and 2½" x 3" green squares.
3. Cut out leaves and remove paper. 4. Fuse to block as desired.
5. Straight stitch around leaves.
6. (Optional) With water soluble glue stick, glue down ric-rack as desired. Stitch down center of ric-rack.
If you enjoyed working with 2 ½" strips, check out these fun patterns at quiltinaday.com.
Pumpkin kisses
and harvest wishes!
Optional: Skip the stars & add a face to make a cute
Jack-o'-lantern. Have a safe and Happy Halloween
from Quilt in a Day!
Have Fun with Your Block!
5. Straight Stitch or Blanket Stitch around leaves.
Making 2 ½" Half Square Triangles from 2 ½" Squares
Make eight star points 8 Orange Squares 8 Star Squares
Make four pumpkin corners. 4 Orange Squares 4 Background Squares
1. Place two 2 ½" squares right sides
together.
2. Draw a diagonal line on each set.
3. Sew on diagonal line.
El’s Tip: Use Sew Straight and sew on unmarked diagonal line!
4. Trim ¼" to one side of diagonal line of stitches.
5. Press four pumpkin corners to pumpkin
square.
6. Press four star points to star triangle.
7. Press four star points away from star triangle.
Making Stem Row
1. Lay out 2 ½" stem square and two 2 ½" x 5 ½" background rectangles.
2. Sew 2 ½" x 5 ½" background rectangles
to either side of stem.
3. Press seams to stem.
Sewing Block Together
1. Count out 18 orange squares.
2. Layout block as shown. For locking seams check arrows indicating seam direction.
.
Making 2 ½" Half Square Triangles from 2 ½" Squares
Make eight star points 8 Orange Squares 8 Star Squares
Make four pumpkin corners. 4 Orange Squares 4 Background Squares
1. Place two 2 ½" squares right sides
together.
2. Draw a diagonal line on each set.
3. Sew on diagonal line.
El’s Tip: Use Sew Straight and sew on unmarked diagonal line!
4. Trim ¼" to one side of diagonal line of stitches.
5. Press four pumpkin corners to pumpkin
square.
6. Press four star points to star triangle.
7. Press four star points away from star triangle.
Making Stem Row
1. Lay out 2 ½" stem square and two 2 ½" x 5 ½" background rectangles.
2. Sew 2 ½" x 5 ½" background rectangles
to either side of stem.
3. Press seams to stem.
Sewing Block Together
1. Count out 18 orange squares.
2. Layout block as shown. For locking seams check arrows indicating seam direction.

Dark Leaf
Medium Leaf