border workshop guide - darkroom software
TRANSCRIPT
Copyright 1994-2007
Darkroom Software
All Rights Reserved.
“photography inspired solutions”
THE BORDER
WORKSHOP BOOK
3.23.2007 v5
A P P L I C A T I O N U S E R G U I D E
2
For General Technical Questions or Support:
Call 1-800-517-4522
Our normal business hours are Monday-Friday, 8 a.m. to 8 p.m., U.S. Central Time, excluding major
holidays. If all representatives are busy, please leave a message and one of our technical support
representatives will call you back as soon as possible, always within four hours (during normal business
hours). Emergency messages can be left after normal business hours and will be returned as soon as
possible the next business day.
For General Information and Updates:
Visit www.darkroomsoftware.com
A P P L I C A T I O N U S E R G U I D E
3
Table of Contents
TABLE OF CONTENTS ................................................................................................................................................................................. 3
INTRODUCTION ............................................................................................................................................................................................ 5
AN OVERVIEW ............................................................................................................................................................................................ 10
BORDER ORGANIZATION IN THE SETUP TAB ................................................................................................................................................ 11 Group Options Menu ................................................................................................................................................................................ 12 Border/Templates Options Menu.............................................................................................................................................................. 14
TOOL OVERVIEW IN THE BORDER WORKSHOP ............................................................................................................................................. 23 Border Properties ............................................................................................................................................................................ 23 Item Properties ............................................................................................................................................................................... 29 Test Form ....................................................................................................................................................................................... 29
Border Object Tool Menu......................................................................................................................................................................... 30 Add Photo ...................................................................................................................................................................................... 32 Add Multiple Photos ...................................................................................................................................................................... 55 Add Graphic ................................................................................................................................................................................... 83 Add Text ...................................................................................................................................................................................... 106 Attribute Options .......................................................................................................................................................................... 115 Movement Options ....................................................................................................................................................................... 115 Vertical Alignment Options .......................................................................................................................................................... 115 Character and line Spacing .......................................................................................................................................................... 115 Advanced Options ........................................................................................................................................................................ 115 Size and Position .......................................................................................................................................................................... 115
Object Format Tools .............................................................................................................................................................................. 116 Border Workshop Utilities ...................................................................................................................................................................... 116
BORDER WORKSHOP FUNCTION OVERVIEW ............................................................................................................................................... 117 PRE-BORDER WORK IN 3RD
PARTY SOFTWARE ........................................................................................................................................... 117 CREATE NEW BORDER ............................................................................................................................................................................... 119
Border Properties................................................................................................................................................................................... 119 Add Multiple Photos ............................................................................................................................................................................... 119 Add Graphic ........................................................................................................................................................................................... 119 Add Text ................................................................................................................................................................................................. 119 Add Effect ............................................................................................................................................................................................... 120
BORDER ITEM PROPERTIES AND TOOLS ...................................................................................................................................................... 120 BORDER TOOLS .......................................................................................................................................................................................... 120 PORTRAIT AND WEDDING BORDER CREATION ........................................................................................................................................... 121 SPORT AND EVENT BORDER CREATION ...................................................................................................................................................... 121 SCHOOL AND GROUP BORDER CREATION .................................................................................................................................................. 121 GREENSCREEN BORDER CREATION ............................................................................................................................................................ 121
BORDER WORKSHOP .............................................................................................................................................................................. 122
Border Workshop Menu ......................................................................................................................................................................... 122 Front & Back Tab ......................................................................................................................................................................... 122 Options ......................................................................................................................................................................................... 124
SETTING BORDER PROPERTIES ................................................................................................................................................................... 127 Adding an Effect ..................................................................................................................................................................................... 128
Transparency Options ................................................................................................................................................................... 129 Movement Options ....................................................................................................................................................................... 130 Advanced Options ........................................................................................................................................................................ 130 Other Options ............................................................................................................................................................................... 130 Size and Position .......................................................................................................................................................................... 130
Editing a Text Object’s Font .................................................................................................................................................................. 131 Adjusting the Page Layout ..................................................................................................................................................................... 131
Fill & Fit Tool .............................................................................................................................................................................. 131 Make Same Tool .......................................................................................................................................................................... 131 Center Tool................................................................................................................................................................................... 132 Align Tool .................................................................................................................................................................................... 132 Space Tool .................................................................................................................................................................................... 132 Order Tool .................................................................................................................................................................................... 132 Rotate Tool ................................................................................................................................................................................... 133

A P P L I C A T I O N U S E R G U I D E
4
Select ............................................................................................................................................................................................ 133 Pan ............................................................................................................................................................................................... 134 Zoom ............................................................................................................................................................................................ 134 Fit to Page .................................................................................................................................................................................... 134 Actual Size 100% ......................................................................................................................................................................... 134
TESTING VARIABLE TEXT FIELDS ............................................................................................................................................................... 135 Using the Photo and graphic Object Query ........................................................................................................................................... 135
Graphic Variables ......................................................................................................................................................................... 135 Query Variables............................................................................................................................................................................ 137
BORDER WORKSHOP SHORTCUT KEYS ....................................................................................................................................................... 138 EXPRESS COLOR CODE TABLE ................................................................................................................................................................... 139
C H A P T E R 1 0 – B O R D E R W O R K S H O P
5
Introduction
Since the digital camera’s debut to the professional market in the early 1990s, the technology has
reached every corner of the globe. Because of the cameras simplicity and power, consumers and
professionals alike buy the hardware. The onslaught of the digital age of cameras created a whole
new market for professional photographers and forever changed the industry.
Because digital images can be manipulated via the computer, innovators developed business
strategies and software systems to fill the market’s need for technology. This period of innovation
and growth brought about the creation of the graphical border template.
Within the Darkroom software there are two ways to refer to a graphical border template. This
feature can be called either a “border” or a “template.” These terms are used interchangeably in the
digital photography industry. All borders are stored within the software and can be applied to digital
images within the workflow software.
What is a border/template? Borders are graphical designs that can be applied to photos in the
Darkroom software. The graphical designs are made up of photo placeholders, backgrounds and text.
Borders can be built as a simple graphical overlay or it can be a more complex layout. Complex
layouts include montages, repeated pictures, overlapping images, layered graphics, moveable
graphics, and other custom arrangements.
Photographers should think of a border as several layers of objects stacked upon one another.
Building a border is like painting a picture on canvas. When you paint a picture you start the painting
by creating a background. From there you build up layers of paint to accentuate and clarify the
picture. This means that if you were painting a house you would leave the window or roof details
until the very last layer so it would be visible to the viewer. This is the same concept with a digital
border. You start with a background image or color and then build the border upwards depending on
what should be visible. For example, text boxes are normally added last because it will overlay a
photo, a graphical item or the background.
Photographers can also think of the graphical layers of a boarder as clear acetate sheets containing
graphics or text layered on top of one another. Each graphic, picture, and text are on a different layer.
The objects on each layer can overlap objects on other layers.
The layering methodology is the basic foundation of how Adobe Photoshop
works. Users can
navigate through the layers of an image by eliminating one layer at a time. Essentially this means that
as each layer is turned off, only one layer of graphical items is peeled off the image.
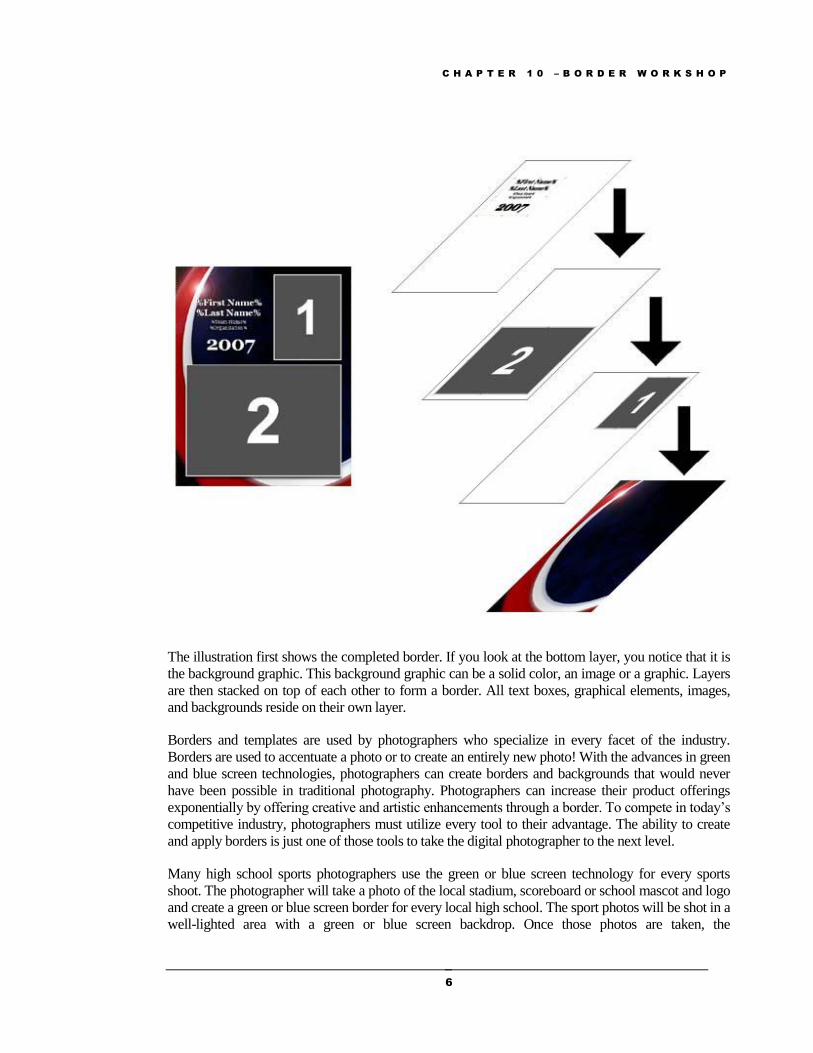
Included is a graphical illustration showing this layering process.
C H A P T E R 1 0 – B O R D E R W O R K S H O P
6
The illustration first shows the completed border. If you look at the bottom layer, you notice that it is
the background graphic. This background graphic can be a solid color, an image or a graphic. Layers
are then stacked on top of each other to form a border. All text boxes, graphical elements, images,
and backgrounds reside on their own layer.
Borders and templates are used by photographers who specialize in every facet of the industry.
Borders are used to accentuate a photo or to create an entirely new photo! With the advances in green
and blue screen technologies, photographers can create borders and backgrounds that would never
have been possible in traditional photography. Photographers can increase their product offerings
exponentially by offering creative and artistic enhancements through a border. To compete in today’s
competitive industry, photographers must utilize every tool to their advantage. The ability to create
and apply borders is just one of those tools to take the digital photographer to the next level.
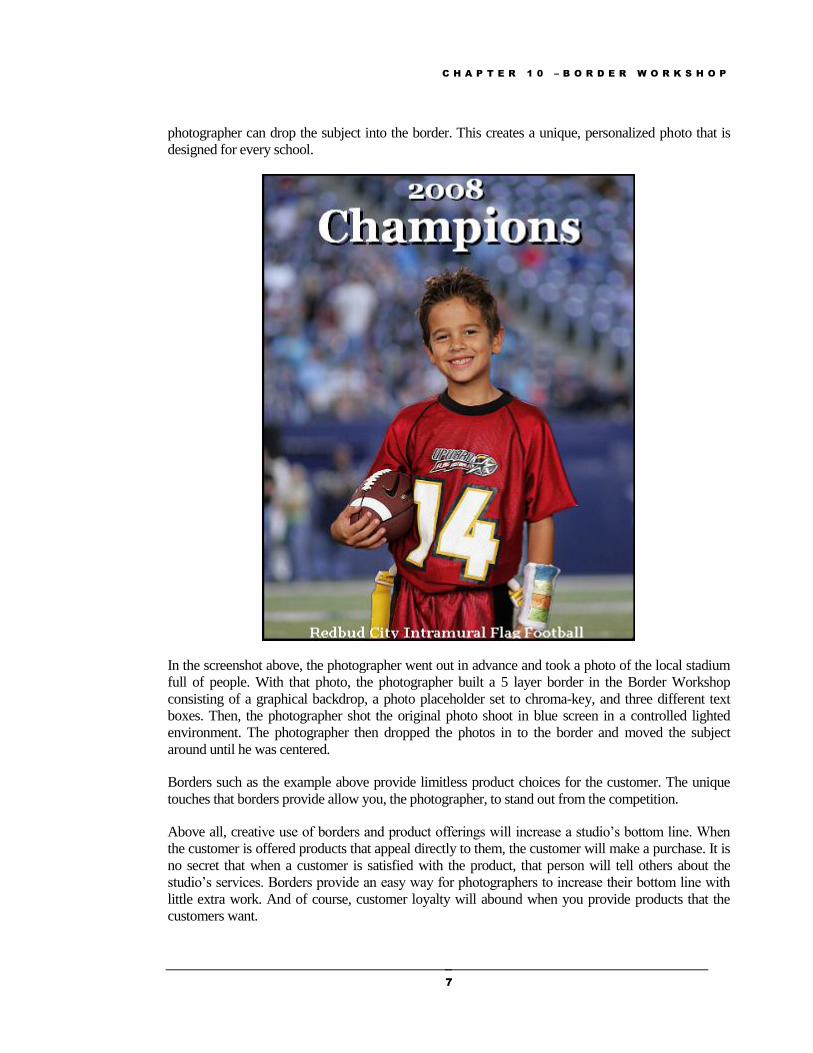
Many high school sports photographers use the green or blue screen technology for every sports
shoot. The photographer will take a photo of the local stadium, scoreboard or school mascot and logo
and create a green or blue screen border for every local high school. The sport photos will be shot in a
well-lighted area with a green or blue screen backdrop. Once those photos are taken, the
C H A P T E R 1 0 – B O R D E R W O R K S H O P
7
photographer can drop the subject into the border. This creates a unique, personalized photo that is
designed for every school.
In the screenshot above, the photographer went out in advance and took a photo of the local stadium
full of people. With that photo, the photographer built a 5 layer border in the Border Workshop
consisting of a graphical backdrop, a photo placeholder set to chroma-key, and three different text
boxes. Then, the photographer shot the original photo shoot in blue screen in a controlled lighted
environment. The photographer then dropped the photos in to the border and moved the subject
around until he was centered.
Borders such as the example above provide limitless product choices for the customer. The unique
touches that borders provide allow you, the photographer, to stand out from the competition.
Above all, creative use of borders and product offerings will increase a studio’s bottom line. When
the customer is offered products that appeal directly to them, the customer will make a purchase. It is
no secret that when a customer is satisfied with the product, that person will tell others about the
studio’s services. Borders provide an easy way for photographers to increase their bottom line with
little extra work. And of course, customer loyalty will abound when you provide products that the
customers want.
C H A P T E R 1 0 – B O R D E R W O R K S H O P
8
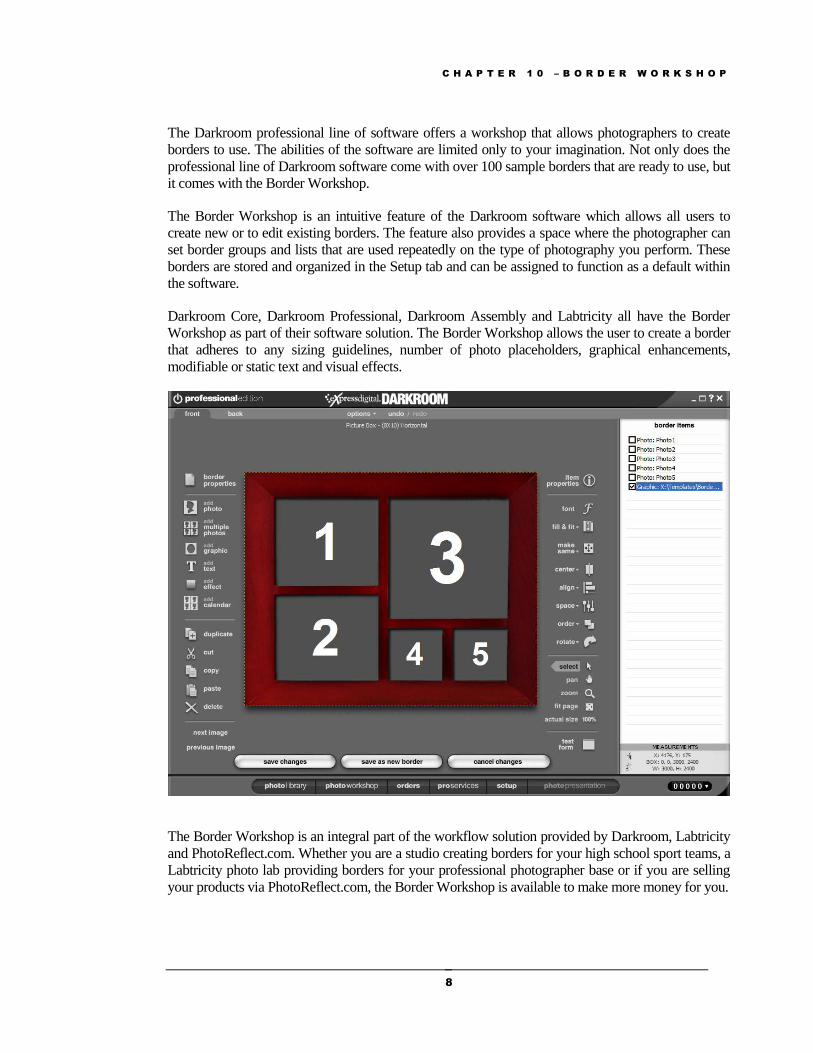
The Darkroom professional line of software offers a workshop that allows photographers to create
borders to use. The abilities of the software are limited only to your imagination. Not only does the
professional line of Darkroom software come with over 100 sample borders that are ready to use, but
it comes with the Border Workshop.
The Border Workshop is an intuitive feature of the Darkroom software which allows all users to
create new or to edit existing borders. The feature also provides a space where the photographer can
set border groups and lists that are used repeatedly on the type of photography you perform. These
borders are stored and organized in the Setup tab and can be assigned to function as a default within
the software.
Darkroom Core, Darkroom Professional, Darkroom Assembly and Labtricity all have the Border
Workshop as part of their software solution. The Border Workshop allows the user to create a border
that adheres to any sizing guidelines, number of photo placeholders, graphical enhancements,
modifiable or static text and visual effects.
The Border Workshop is an integral part of the workflow solution provided by Darkroom, Labtricity
and PhotoReflect.com. Whether you are a studio creating borders for your high school sport teams, a
Labtricity photo lab providing borders for your professional photographer base or if you are selling
your products via PhotoReflect.com, the Border Workshop is available to make more money for you.
C H A P T E R 1 0 – B O R D E R W O R K S H O P
9
The following chapters will delve into the features and functionality of the Border Workshop. You
will learn how the Border Workshop tools function, how to create borders using images and effects
from third party graphical design software and finally how to create borders while following along
with in-depth tutorials. Whether you are a sports, wedding, agriculture, or pleasure photographer, you
will understand the limitless opportunities the Border Workshop will afford you.
C H A P T E R 1 0 – B O R D E R W O R K S H O P
10
An Overview
The Darkroom Professional product line allows all photographers and photo labs to effectively use
the built-in border technology. In order to provide an easy method for software users to access the
borders, an innovative organization system was built to help photographers classify and list their
borders. This feature is part of the Setup function in all Darkroom software.
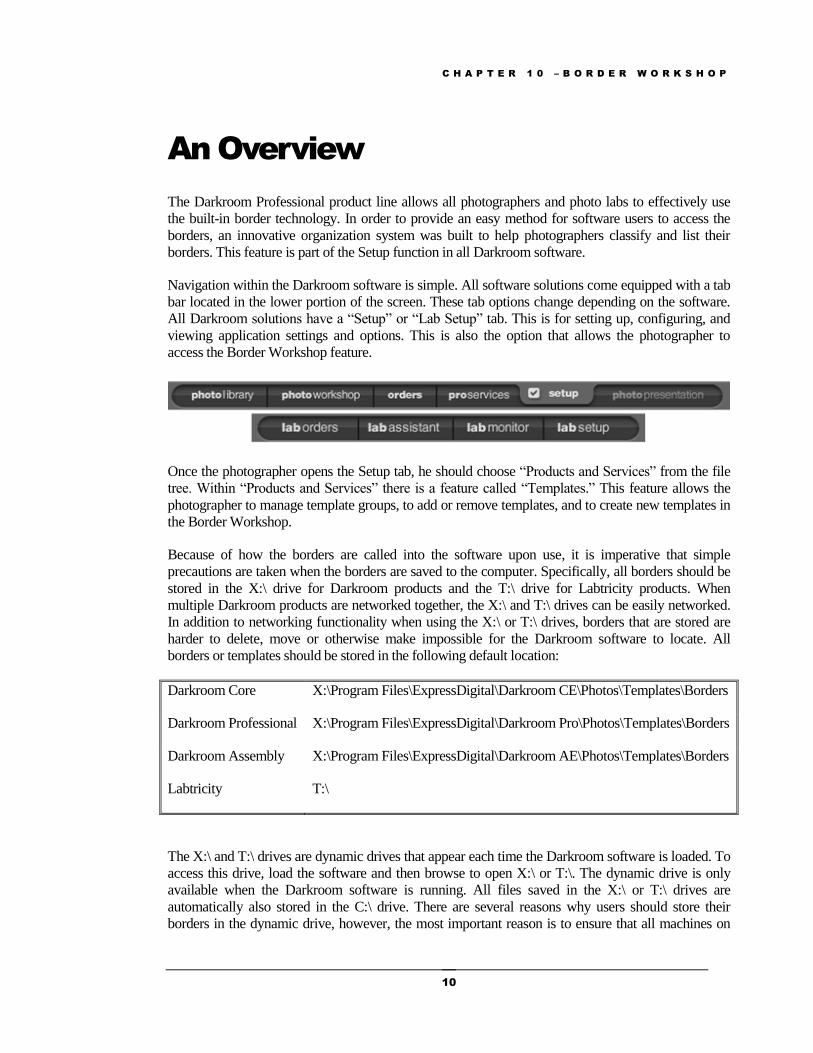
Navigation within the Darkroom software is simple. All software solutions come equipped with a tab
bar located in the lower portion of the screen. These tab options change depending on the software.
All Darkroom solutions have a “Setup” or “Lab Setup” tab. This is for setting up, configuring, and
viewing application settings and options. This is also the option that allows the photographer to
access the Border Workshop feature.
Once the photographer opens the Setup tab, he should choose “Products and Services” from the file
tree. Within “Products and Services” there is a feature called “Templates.” This feature allows the
photographer to manage template groups, to add or remove templates, and to create new templates in
the Border Workshop.
Because of how the borders are called into the software upon use, it is imperative that simple
precautions are taken when the borders are saved to the computer. Specifically, all borders should be
stored in the X:\ drive for Darkroom products and the T:\ drive for Labtricity products. When
multiple Darkroom products are networked together, the X:\ and T:\ drives can be easily networked.
In addition to networking functionality when using the X:\ or T:\ drives, borders that are stored are
harder to delete, move or otherwise make impossible for the Darkroom software to locate. All
borders or templates should be stored in the following default location:
Darkroom Core X:\Program Files\ExpressDigital\Darkroom CE\Photos\Templates\Borders
Darkroom Professional X:\Program Files\ExpressDigital\Darkroom Pro\Photos\Templates\Borders
Darkroom Assembly X:\Program Files\ExpressDigital\Darkroom AE\Photos\Templates\Borders
Labtricity T:\
The X:\ and T:\ drives are dynamic drives that appear each time the Darkroom software is loaded. To
access this drive, load the software and then browse to open X:\ or T:\. The dynamic drive is only
available when the Darkroom software is running. All files saved in the X:\ or T:\ drives are
automatically also stored in the C:\ drive. There are several reasons why users should store their
borders in the dynamic drive, however, the most important reason is to ensure that all machines on
C H A P T E R 1 0 – B O R D E R W O R K S H O P
11
the network have access to the borders and templates. If the border and templates are stored on the
C:\ drive and then imported into the Darkroom software, other computers on the network cannot
access those files.
B O R D E R O R G A N I Z A T I O N I N T H E S E T U P T A B
Darkroom outfitted the border setup feature to manage border groups, to add or remove borders, and
to create new borders in the Border Workshop. There are two different ways to access the border
features depending on what software is being used. If a Darkroom product is currently being
operated, the photographer should select “Setup” to access all of the program’s setup features. Then
the photographer should select “Products and Services” from the file tree and finally, “Templates.” If
a Labtricity product is currently operational, the photographer should select “Lab Setup” to access all
of the program’s setup features. Then the photographer should select “Products and Services” from
the file tree and finally, “Templates.”
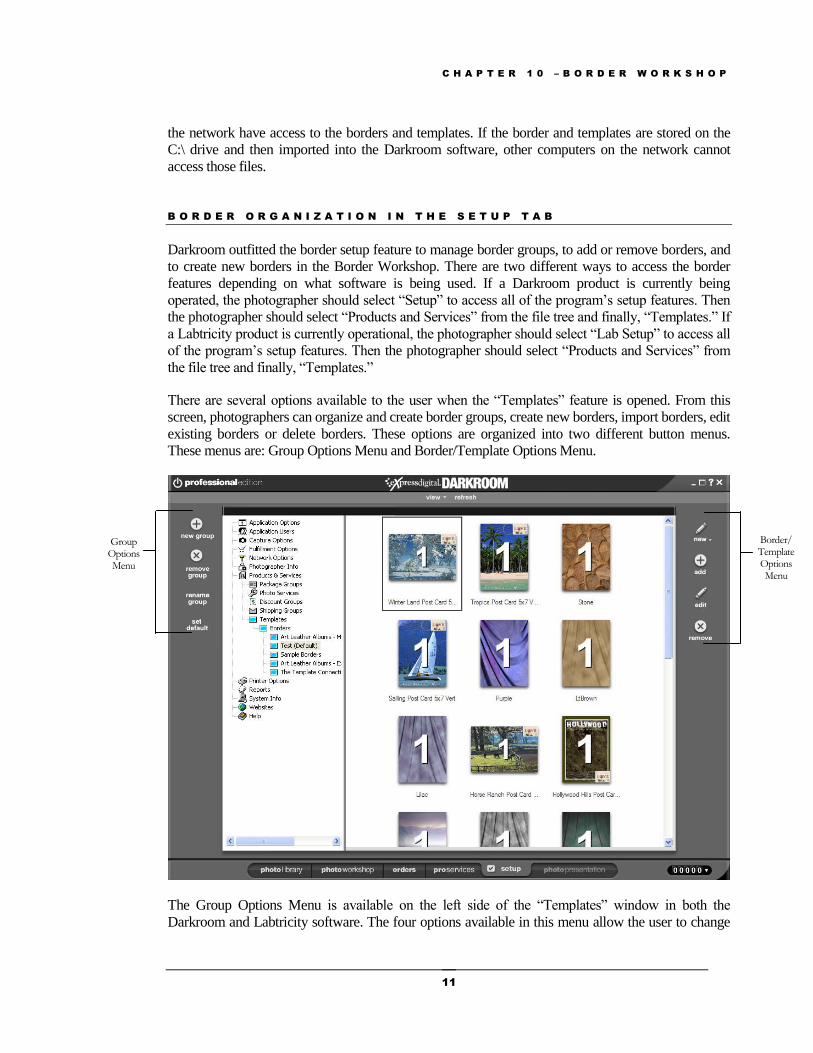
There are several options available to the user when the “Templates” feature is opened. From this
screen, photographers can organize and create border groups, create new borders, import borders, edit
existing borders or delete borders. These options are organized into two different button menus.
These menus are: Group Options Menu and Border/Template Options Menu.
The Group Options Menu is available on the left side of the “Templates” window in both the
Darkroom and Labtricity software. The four options available in this menu allow the user to change
Group Options Menu
Border/ Template Options Menu
C H A P T E R 1 0 – B O R D E R W O R K S H O P
12
the border group organization. This means that from this menu, photographers can add, rename and
set default groups. This menu also gives the user the ability to delete existing groups.
The Border/Templates Options Menu is located on the right side of the “Templates” window in both
the Labtricity and Darkroom software. The four options available in this menu allow the user to
create new templates and edit existing templates in the Border Workshop. There is also an option that
allows the photographer to delete existing borders. Finally, this section allows the user to import
borders into the software.
All borders must be organized into a file system with the software before they can be used. This
methodology provides a way for photographers to easily sort and classify borders by categories that
make sense to the user. For example, a sports photographer may cater to several sports. Within the
Darkroom software, that photographer can organize his borders within group headings such as
Baseball, Soccer, Basketball, Cheerleading, and Football. Each border group would hold only the
border associates with that sport. So the football memory mates would be stored in the Football
group. The borders pertaining to soccer would be stored in the Soccer group. If the photographer had
several borders for each sporting event, then this method of organization makes sense.
This organizational method can be created to each photographer’s specifications. If the photographer
is a wedding photographer, he can have four border groups pertaining to the seasons in addition to
groups holding different frames. Photographers can also create border groups based on price or
package options. If there is a limit on what borders are available for a particular price point, he can
sort the borders into Border Group “Silver,” “Gold,” and “Platinum.” Most photographers will use a
combination of sort methods.
G R O U P O P T I O N S M E N U
The Group Options Menu is available on the left side of the “Templates” window in both the
Darkroom and Labtricity software. The four options available in this menu allow the user to change
the border group organization. This means that from this menu, photographers can add, rename and
set default groups. This menu also gives the user the ability to delete existing groups.
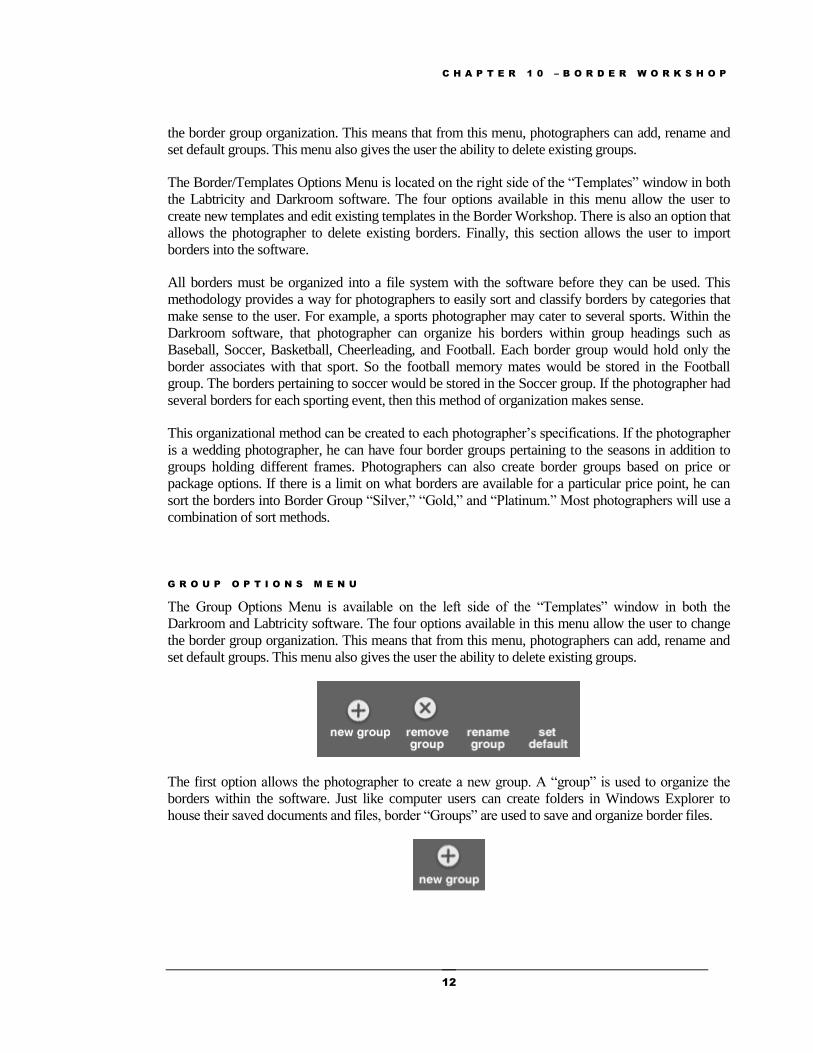
The first option allows the photographer to create a new group. A “group” is used to organize the
borders within the software. Just like computer users can create folders in Windows Explorer to
house their saved documents and files, border “Groups” are used to save and organize border files.
C H A P T E R 1 0 – B O R D E R W O R K S H O P
13
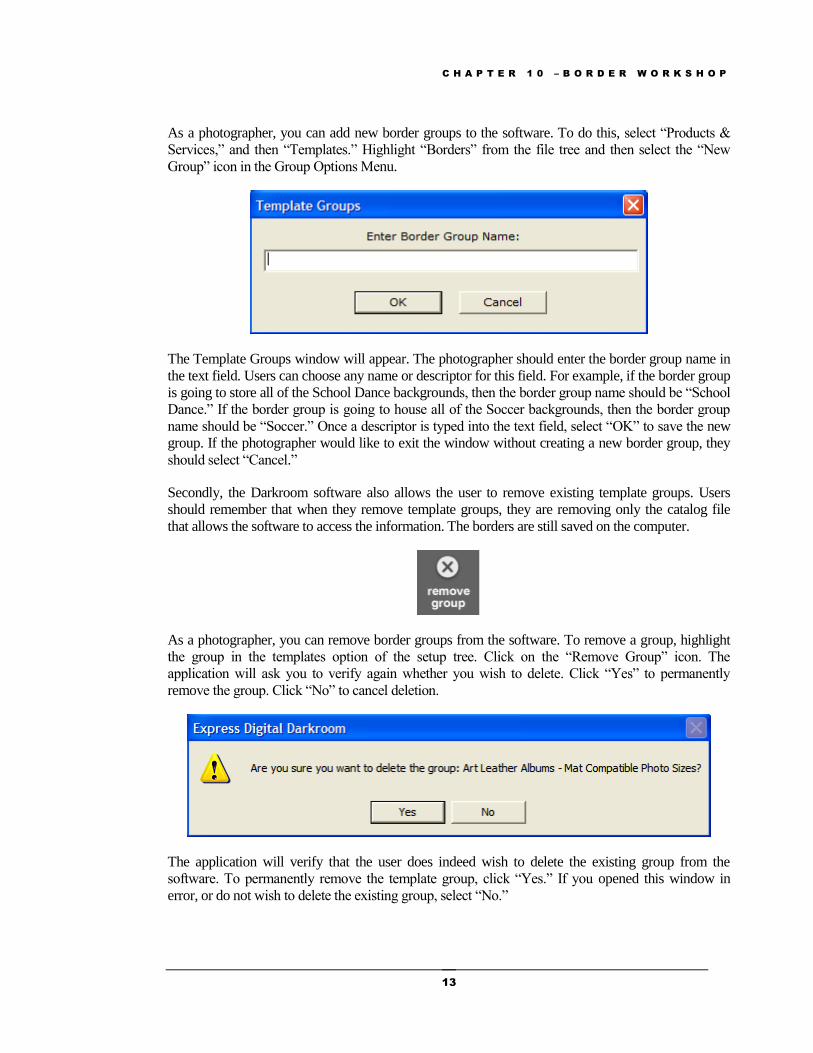
As a photographer, you can add new border groups to the software. To do this, select “Products &
Services,” and then “Templates.” Highlight “Borders” from the file tree and then select the “New
Group” icon in the Group Options Menu.
The Template Groups window will appear. The photographer should enter the border group name in
the text field. Users can choose any name or descriptor for this field. For example, if the border group
is going to store all of the School Dance backgrounds, then the border group name should be “School
Dance.” If the border group is going to house all of the Soccer backgrounds, then the border group
name should be “Soccer.” Once a descriptor is typed into the text field, select “OK” to save the new
group. If the photographer would like to exit the window without creating a new border group, they
should select “Cancel.”
Secondly, the Darkroom software also allows the user to remove existing template groups. Users
should remember that when they remove template groups, they are removing only the catalog file
that allows the software to access the information. The borders are still saved on the computer.
As a photographer, you can remove border groups from the software. To remove a group, highlight
the group in the templates option of the setup tree. Click on the “Remove Group” icon. The
application will ask you to verify again whether you wish to delete. Click “Yes” to permanently
remove the group. Click “No” to cancel deletion.
The application will verify that the user does indeed wish to delete the existing group from the
software. To permanently remove the template group, click “Yes.” If you opened this window in
error, or do not wish to delete the existing group, select “No.”
C H A P T E R 1 0 – B O R D E R W O R K S H O P
14
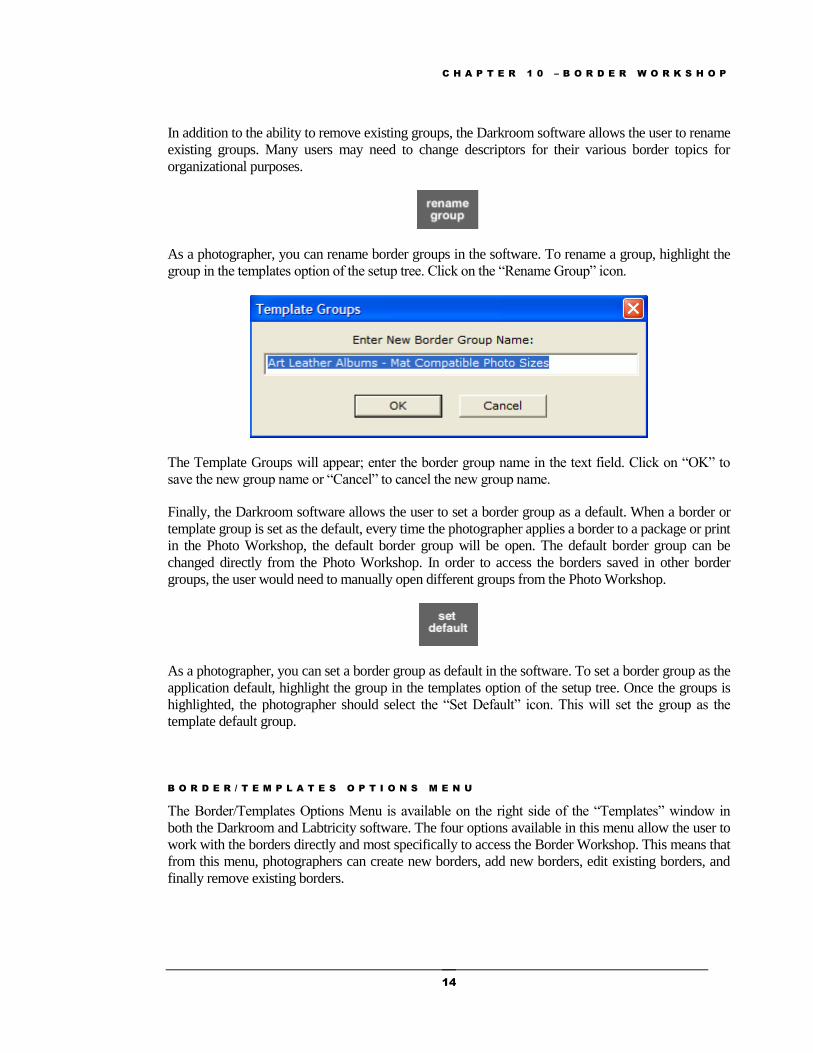
In addition to the ability to remove existing groups, the Darkroom software allows the user to rename
existing groups. Many users may need to change descriptors for their various border topics for
organizational purposes.
As a photographer, you can rename border groups in the software. To rename a group, highlight the
group in the templates option of the setup tree. Click on the “Rename Group” icon.
The Template Groups will appear; enter the border group name in the text field. Click on “OK” to
save the new group name or “Cancel” to cancel the new group name.
Finally, the Darkroom software allows the user to set a border group as a default. When a border or
template group is set as the default, every time the photographer applies a border to a package or print
in the Photo Workshop, the default border group will be open. The default border group can be
changed directly from the Photo Workshop. In order to access the borders saved in other border
groups, the user would need to manually open different groups from the Photo Workshop.
As a photographer, you can set a border group as default in the software. To set a border group as the
application default, highlight the group in the templates option of the setup tree. Once the groups is
highlighted, the photographer should select the “Set Default” icon. This will set the group as the
template default group.
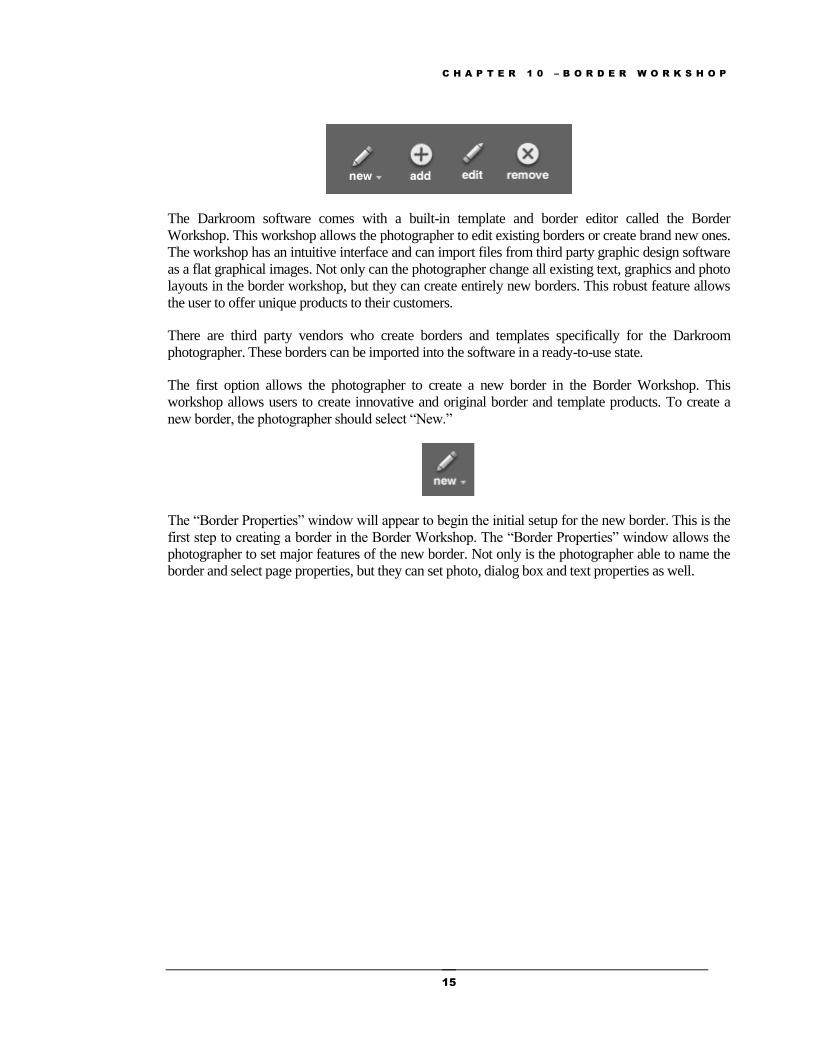
B O R D E R / T E M P L A T E S O P T I O N S M E N U
The Border/Templates Options Menu is available on the right side of the “Templates” window in
both the Darkroom and Labtricity software. The four options available in this menu allow the user to
work with the borders directly and most specifically to access the Border Workshop. This means that
from this menu, photographers can create new borders, add new borders, edit existing borders, and
finally remove existing borders.
C H A P T E R 1 0 – B O R D E R W O R K S H O P
15
The Darkroom software comes with a built-in template and border editor called the Border
Workshop. This workshop allows the photographer to edit existing borders or create brand new ones.
The workshop has an intuitive interface and can import files from third party graphic design software
as a flat graphical images. Not only can the photographer change all existing text, graphics and photo
layouts in the border workshop, but they can create entirely new borders. This robust feature allows
the user to offer unique products to their customers.
There are third party vendors who create borders and templates specifically for the Darkroom
photographer. These borders can be imported into the software in a ready-to-use state.
The first option allows the photographer to create a new border in the Border Workshop. This
workshop allows users to create innovative and original border and template products. To create a
new border, the photographer should select “New.”
The “Border Properties” window will appear to begin the initial setup for the new border. This is the
first step to creating a border in the Border Workshop. The “Border Properties” window allows the
photographer to set major features of the new border. Not only is the photographer able to name the
border and select page properties, but they can set photo, dialog box and text properties as well.
C H A P T E R 1 0 – B O R D E R W O R K S H O P
16
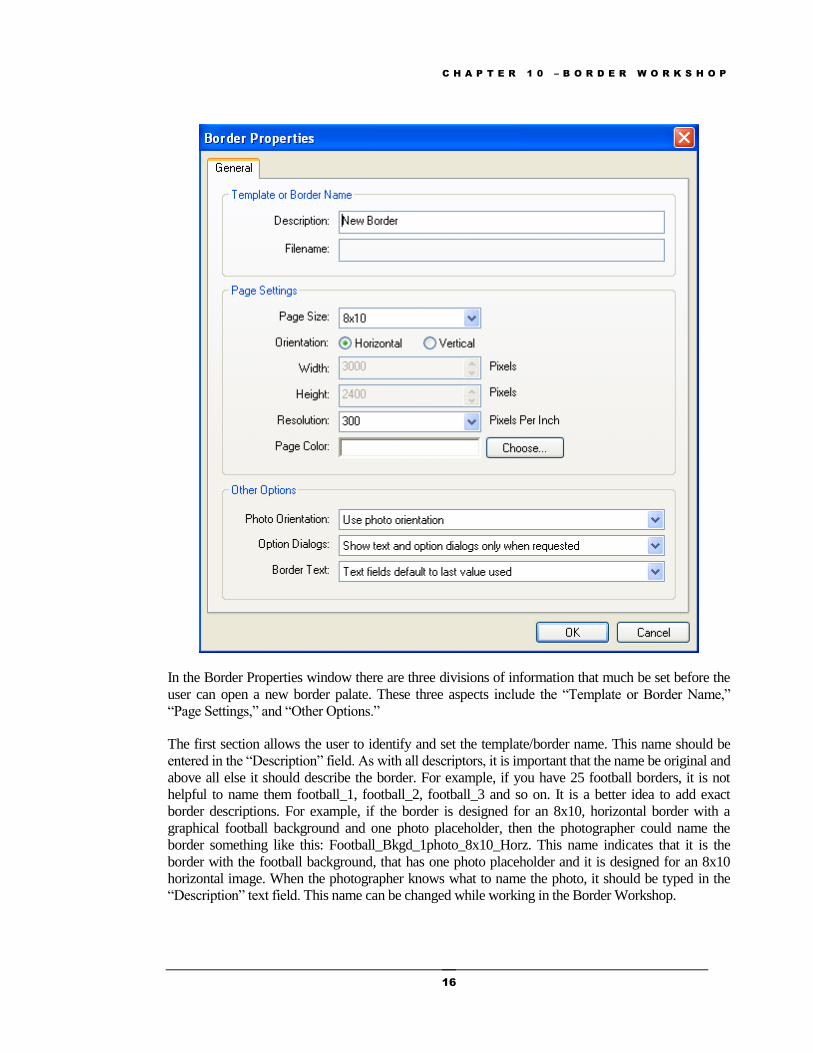
In the Border Properties window there are three divisions of information that much be set before the
user can open a new border palate. These three aspects include the “Template or Border Name,”
“Page Settings,” and “Other Options.”
The first section allows the user to identify and set the template/border name. This name should be
entered in the “Description” field. As with all descriptors, it is important that the name be original and
above all else it should describe the border. For example, if you have 25 football borders, it is not
helpful to name them football_1, football_2, football_3 and so on. It is a better idea to add exact
border descriptions. For example, if the border is designed for an 8x10, horizontal border with a
graphical football background and one photo placeholder, then the photographer could name the
border something like this: Football_Bkgd_1photo_8x10_Horz. This name indicates that it is the
border with the football background, that has one photo placeholder and it is designed for an 8x10
horizontal image. When the photographer knows what to name the photo, it should be typed in the
“Description” text field. This name can be changed while working in the Border Workshop.
C H A P T E R 1 0 – B O R D E R W O R K S H O P
17
The second section allows the user to assign the border page settings. The page settings describe the
properties of the page the border will be created on. The first option is the ability to set the page size.
To assign a page size, click on the drop down menu. The list contains all available page size ranging
from 2 ¾ x 4 to 40 x 60. Included in this drop down menu are also page sizes for book covers and
credit cards. The Darkroom software includes European print sizes in the drop down menu with
options like A0, A4, or B10. Photographers may also create a custom print size which can include
any size as long as there is paper large enough to print it.
After the user assigns the appropriate page size, they must choose the border orientation, resolution
and page color. Users are allowed to choose either horizontal or vertical for the orientation. Once the
orientation is set, the user should select the desired resolution. Resolution refers directly to the dots
per inch (dpi) for the border or template. The Border Workshop will default the resolution to be 300
dpi. This default is the industry standard for photo print quality. Resolution measurements below 150
are generally too blurry for printing and should be avoided.
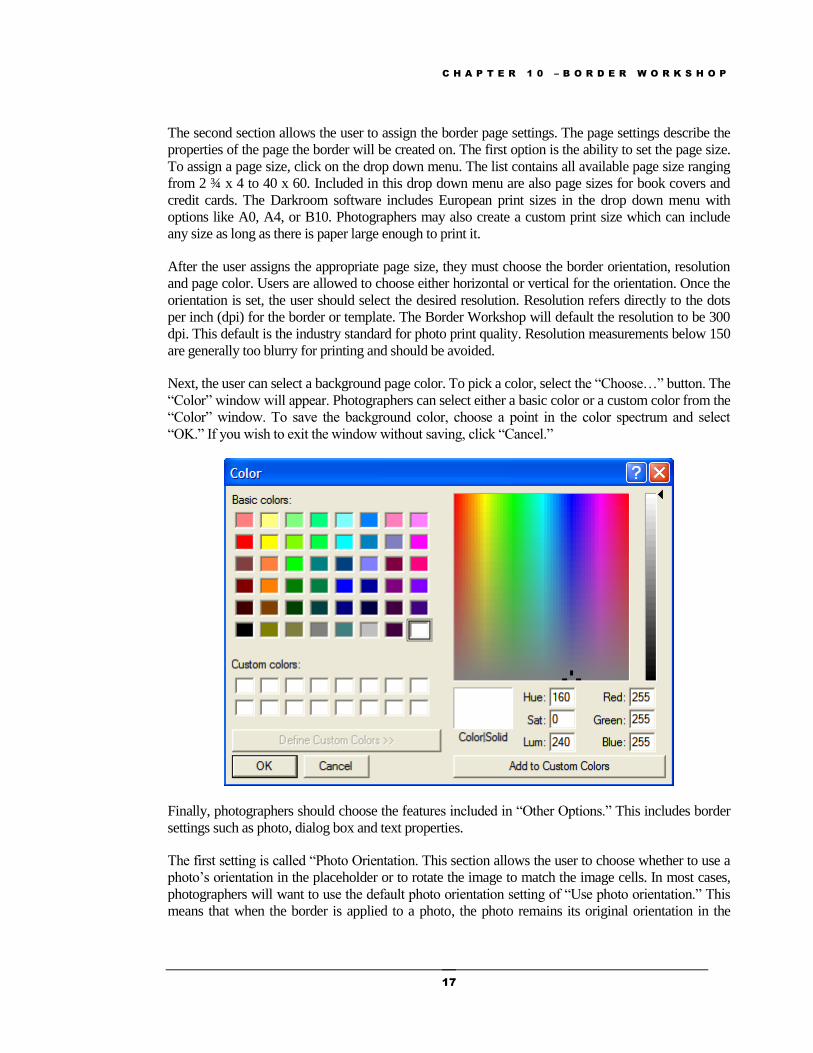
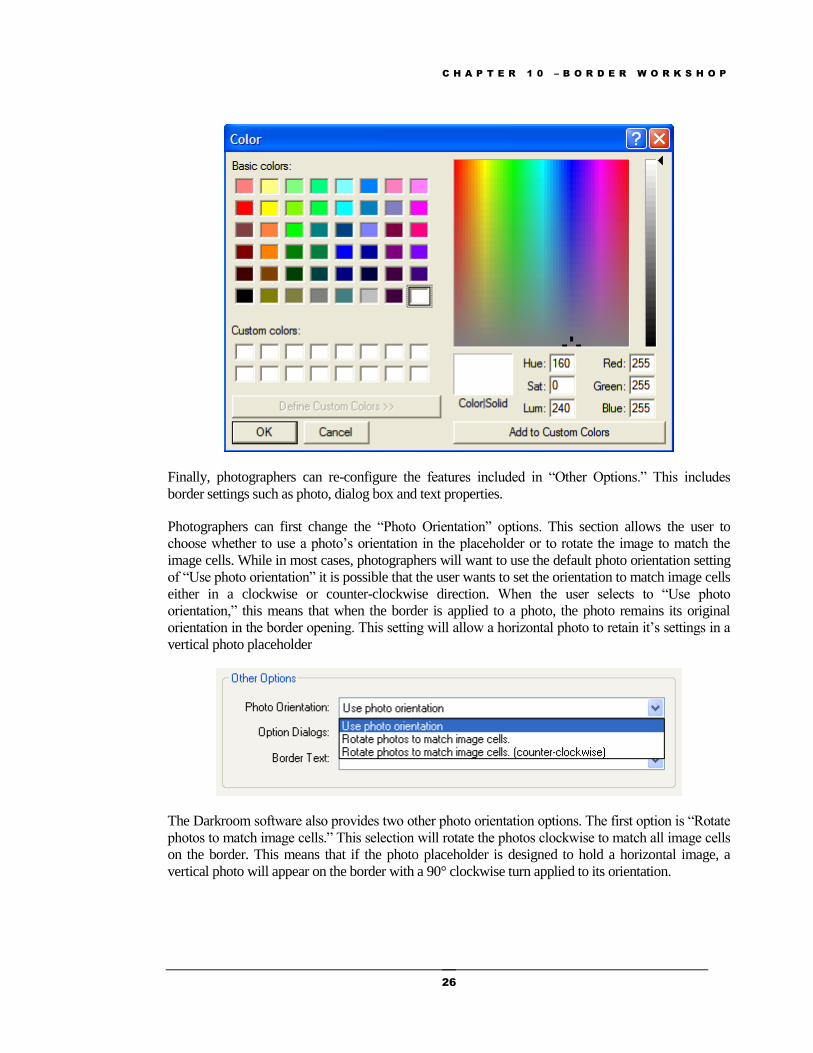
Next, the user can select a background page color. To pick a color, select the “Choose…” button. The
“Color” window will appear. Photographers can select either a basic color or a custom color from the
“Color” window. To save the background color, choose a point in the color spectrum and select
“OK.” If you wish to exit the window without saving, click “Cancel.”
Finally, photographers should choose the features included in “Other Options.” This includes border
settings such as photo, dialog box and text properties.
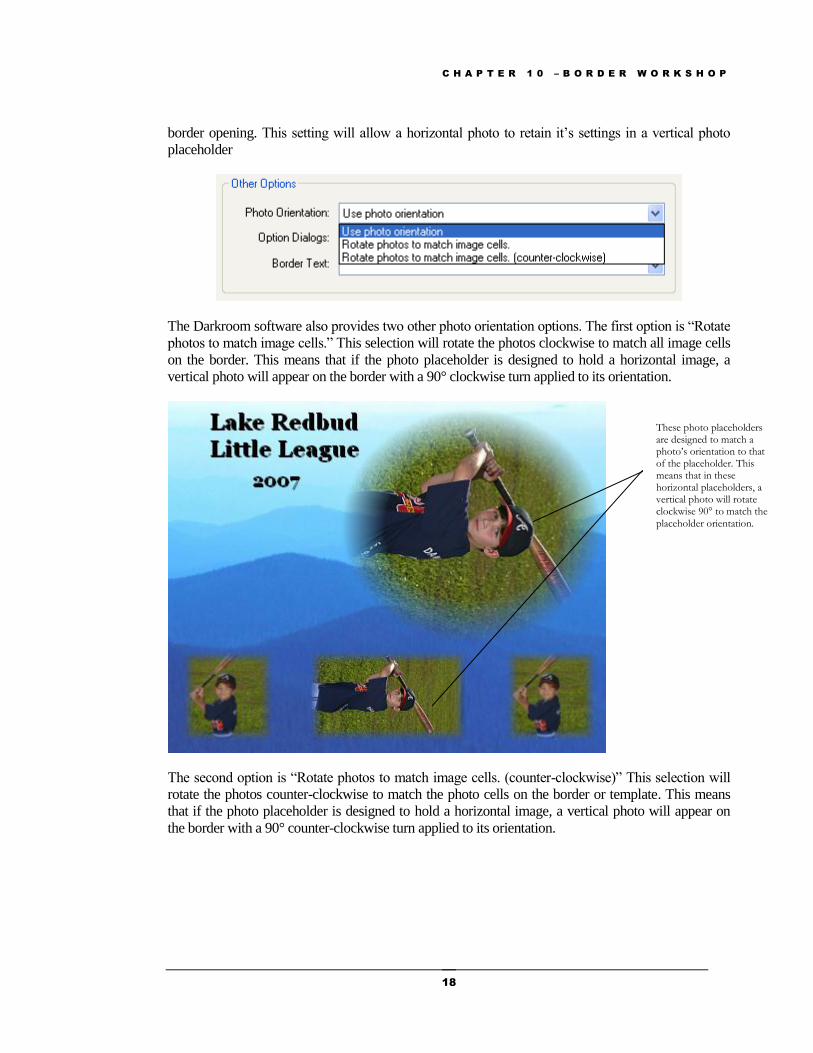
The first setting is called “Photo Orientation. This section allows the user to choose whether to use a
photo’s orientation in the placeholder or to rotate the image to match the image cells. In most cases,
photographers will want to use the default photo orientation setting of “Use photo orientation.” This
means that when the border is applied to a photo, the photo remains its original orientation in the
C H A P T E R 1 0 – B O R D E R W O R K S H O P
18
border opening. This setting will allow a horizontal photo to retain it’s settings in a vertical photo
placeholder
The Darkroom software also provides two other photo orientation options. The first option is “Rotate
photos to match image cells.” This selection will rotate the photos clockwise to match all image cells
on the border. This means that if the photo placeholder is designed to hold a horizontal image, a
vertical photo will appear on the border with a 90° clockwise turn applied to its orientation.
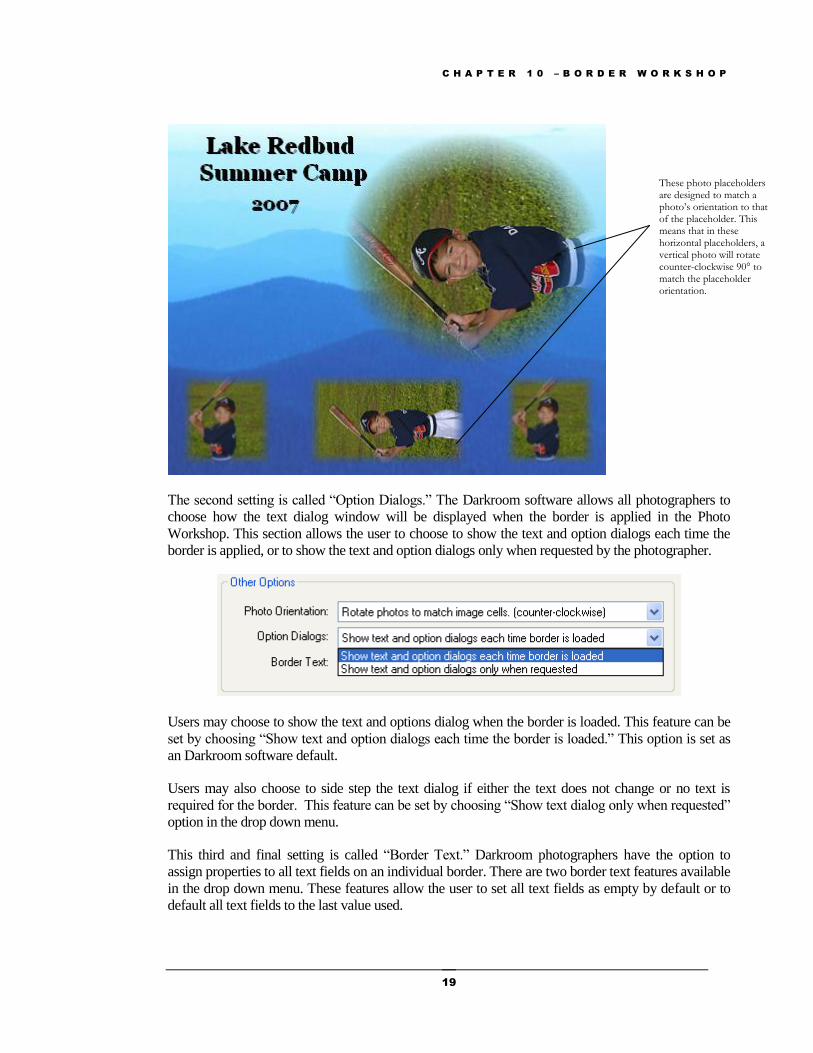
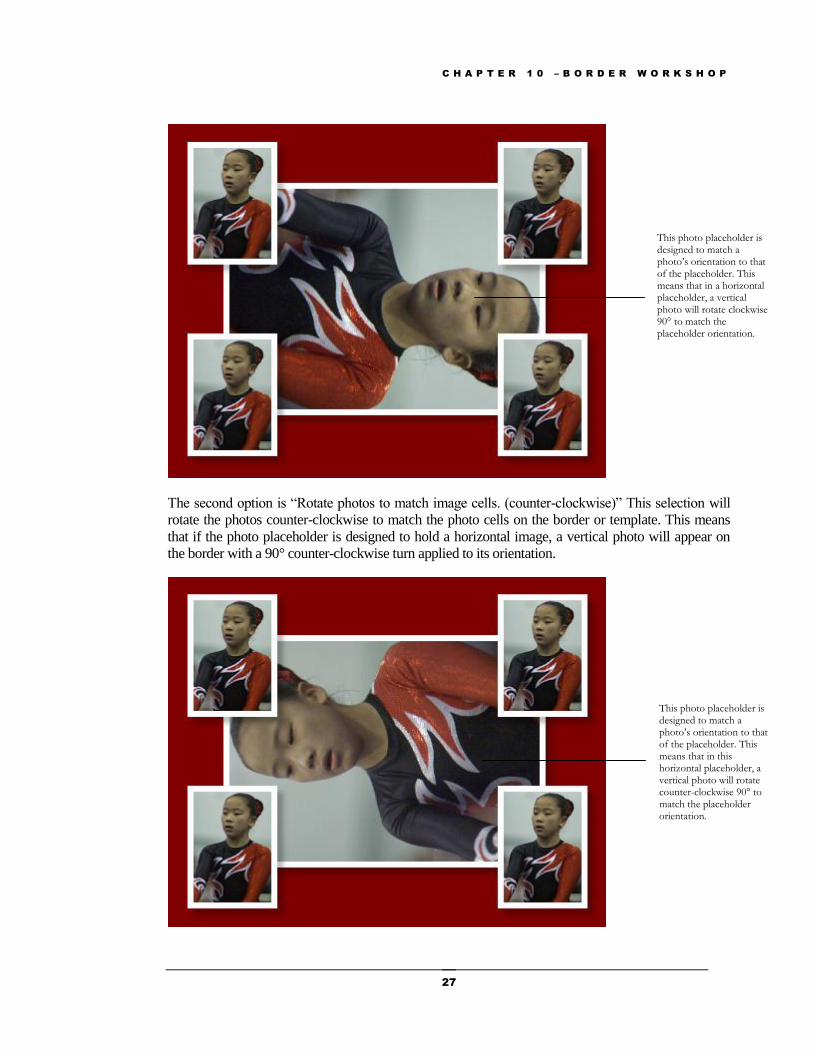
The second option is “Rotate photos to match image cells. (counter-clockwise)” This selection will
rotate the photos counter-clockwise to match the photo cells on the border or template. This means
that if the photo placeholder is designed to hold a horizontal image, a vertical photo will appear on
the border with a 90° counter-clockwise turn applied to its orientation.
These photo placeholders are designed to match a photo’s orientation to that of the placeholder. This means that in these horizontal placeholders, a vertical photo will rotate clockwise 90° to match the placeholder orientation.
C H A P T E R 1 0 – B O R D E R W O R K S H O P
19
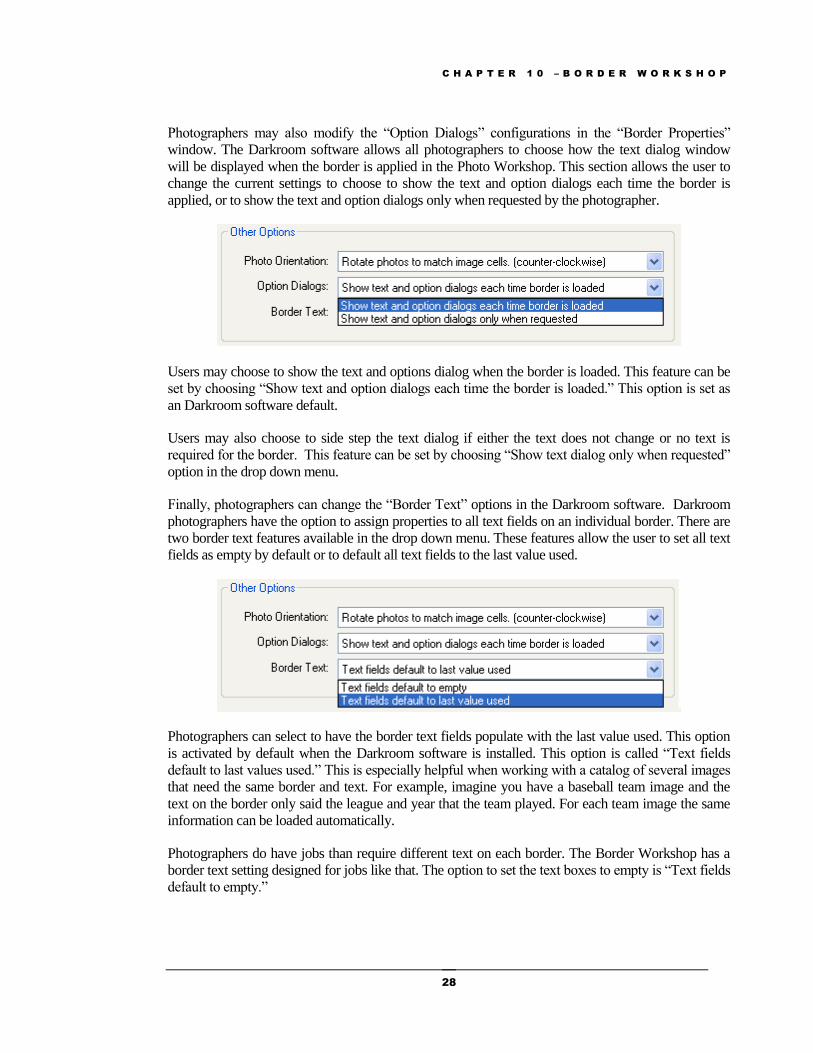
The second setting is called “Option Dialogs.” The Darkroom software allows all photographers to
choose how the text dialog window will be displayed when the border is applied in the Photo
Workshop. This section allows the user to choose to show the text and option dialogs each time the
border is applied, or to show the text and option dialogs only when requested by the photographer.
Users may choose to show the text and options dialog when the border is loaded. This feature can be
set by choosing “Show text and option dialogs each time the border is loaded.” This option is set as
an Darkroom software default.
Users may also choose to side step the text dialog if either the text does not change or no text is
required for the border. This feature can be set by choosing “Show text dialog only when requested”
option in the drop down menu.
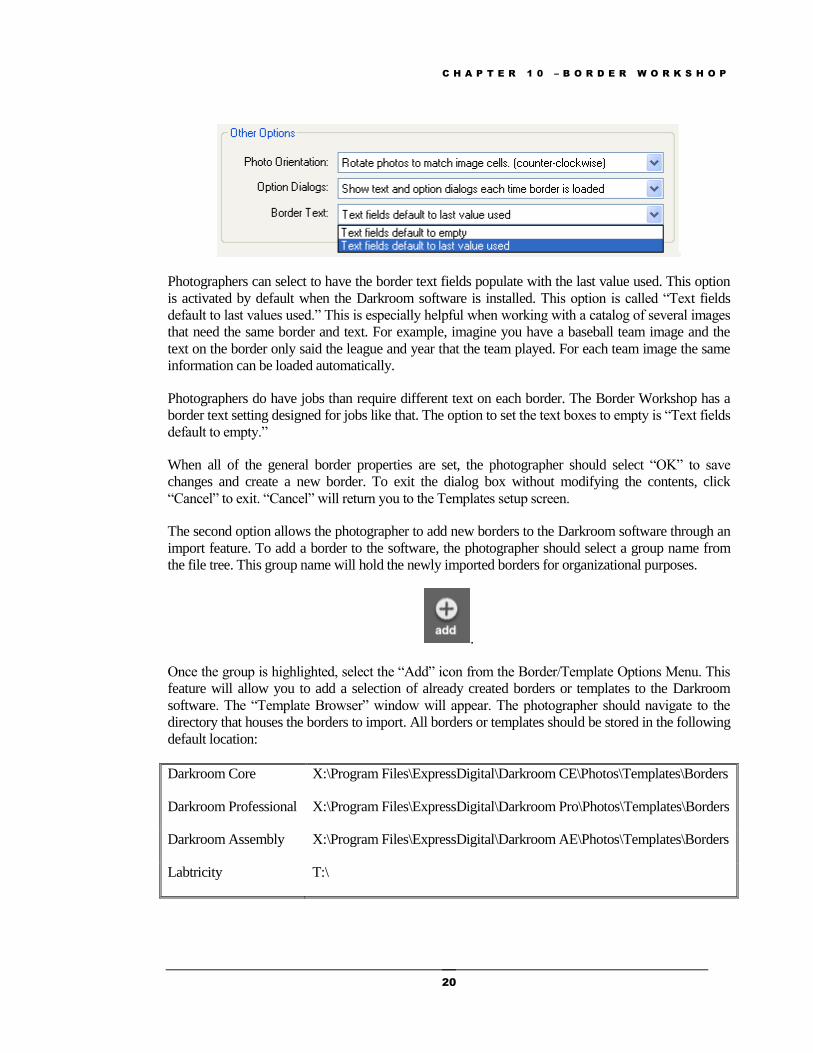
This third and final setting is called “Border Text.” Darkroom photographers have the option to
assign properties to all text fields on an individual border. There are two border text features available
in the drop down menu. These features allow the user to set all text fields as empty by default or to
default all text fields to the last value used.
These photo placeholders are designed to match a photo’s orientation to that of the placeholder. This means that in these horizontal placeholders, a vertical photo will rotate counter-clockwise 90° to match the placeholder orientation.
C H A P T E R 1 0 – B O R D E R W O R K S H O P
20
Photographers can select to have the border text fields populate with the last value used. This option
is activated by default when the Darkroom software is installed. This option is called “Text fields
default to last values used.” This is especially helpful when working with a catalog of several images
that need the same border and text. For example, imagine you have a baseball team image and the
text on the border only said the league and year that the team played. For each team image the same
information can be loaded automatically.
Photographers do have jobs than require different text on each border. The Border Workshop has a
border text setting designed for jobs like that. The option to set the text boxes to empty is “Text fields
default to empty.”
When all of the general border properties are set, the photographer should select “OK” to save
changes and create a new border. To exit the dialog box without modifying the contents, click
“Cancel” to exit. “Cancel” will return you to the Templates setup screen.
The second option allows the photographer to add new borders to the Darkroom software through an
import feature. To add a border to the software, the photographer should select a group name from
the file tree. This group name will hold the newly imported borders for organizational purposes.
.
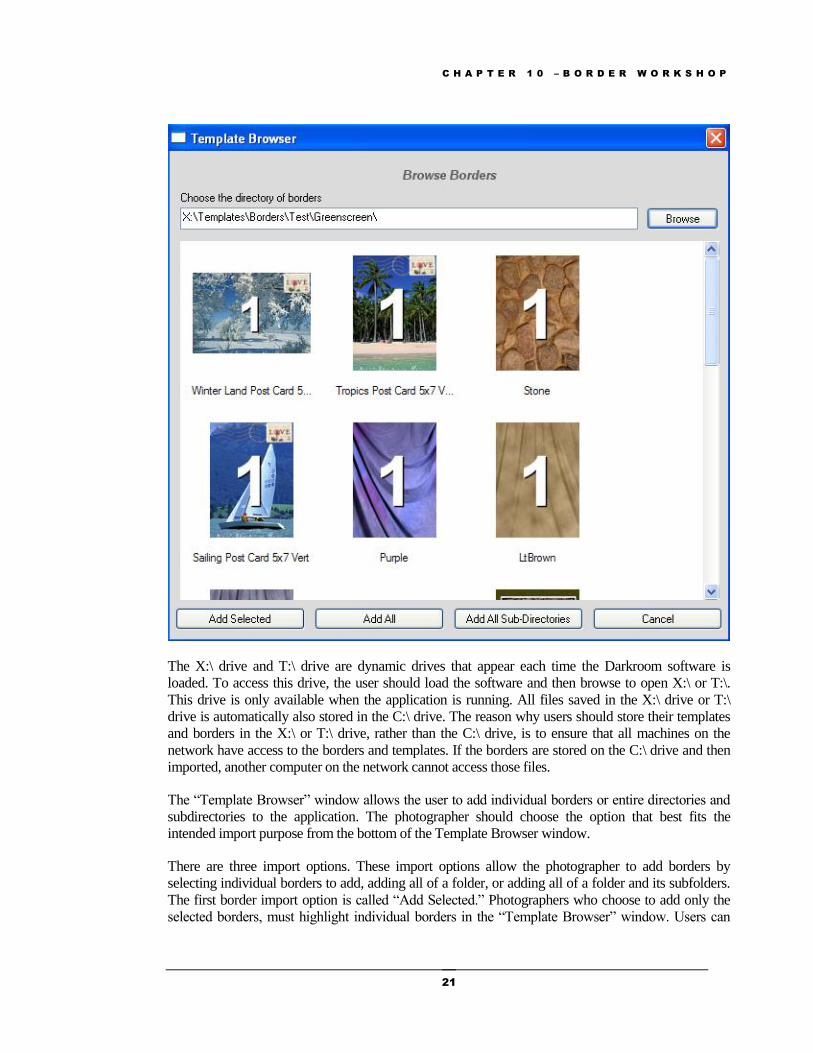
Once the group is highlighted, select the “Add” icon from the Border/Template Options Menu. This
feature will allow you to add a selection of already created borders or templates to the Darkroom
software. The “Template Browser” window will appear. The photographer should navigate to the
directory that houses the borders to import. All borders or templates should be stored in the following
default location:
Darkroom Core X:\Program Files\ExpressDigital\Darkroom CE\Photos\Templates\Borders
Darkroom Professional X:\Program Files\ExpressDigital\Darkroom Pro\Photos\Templates\Borders
Darkroom Assembly X:\Program Files\ExpressDigital\Darkroom AE\Photos\Templates\Borders
Labtricity T:\
C H A P T E R 1 0 – B O R D E R W O R K S H O P
21
The X:\ drive and T:\ drive are dynamic drives that appear each time the Darkroom software is
loaded. To access this drive, the user should load the software and then browse to open X:\ or T:\.
This drive is only available when the application is running. All files saved in the X:\ drive or T:\
drive is automatically also stored in the C:\ drive. The reason why users should store their templates
and borders in the X:\ or T:\ drive, rather than the C:\ drive, is to ensure that all machines on the
network have access to the borders and templates. If the borders are stored on the C:\ drive and then
imported, another computer on the network cannot access those files.
The “Template Browser” window allows the user to add individual borders or entire directories and
subdirectories to the application. The photographer should choose the option that best fits the
intended import purpose from the bottom of the Template Browser window.
There are three import options. These import options allow the photographer to add borders by
selecting individual borders to add, adding all of a folder, or adding all of a folder and its subfolders.
The first border import option is called “Add Selected.” Photographers who choose to add only the
selected borders, must highlight individual borders in the “Template Browser” window. Users can
C H A P T E R 1 0 – B O R D E R W O R K S H O P
22
add more than one border to the highlighted selection by holding down the ‘CTRL’ button on the
keyboard and then clicking on individual borders. Once all the borders are selected, the user should
click the "Add Selected" button to make the borders available in the Darkroom software.
The second import option is called “Add All.” Photographers who choose the import option that will
add all borders are only adding those borders from the specified folder. Specifically, this import
option will add all of the border content saved in the entire directory. This option will not import the
subfolders of that directory.
The last import option is called “Add All Subdirectories." It is sometimes necessary to import an
entire folder file path of borders into the Darkroom software. When this is necessary, the
photographer should use the import option that allows the user to import the directory and its
subfolders. Most specifically, this option will add all borders or templates stored in a specific file path
to the software.
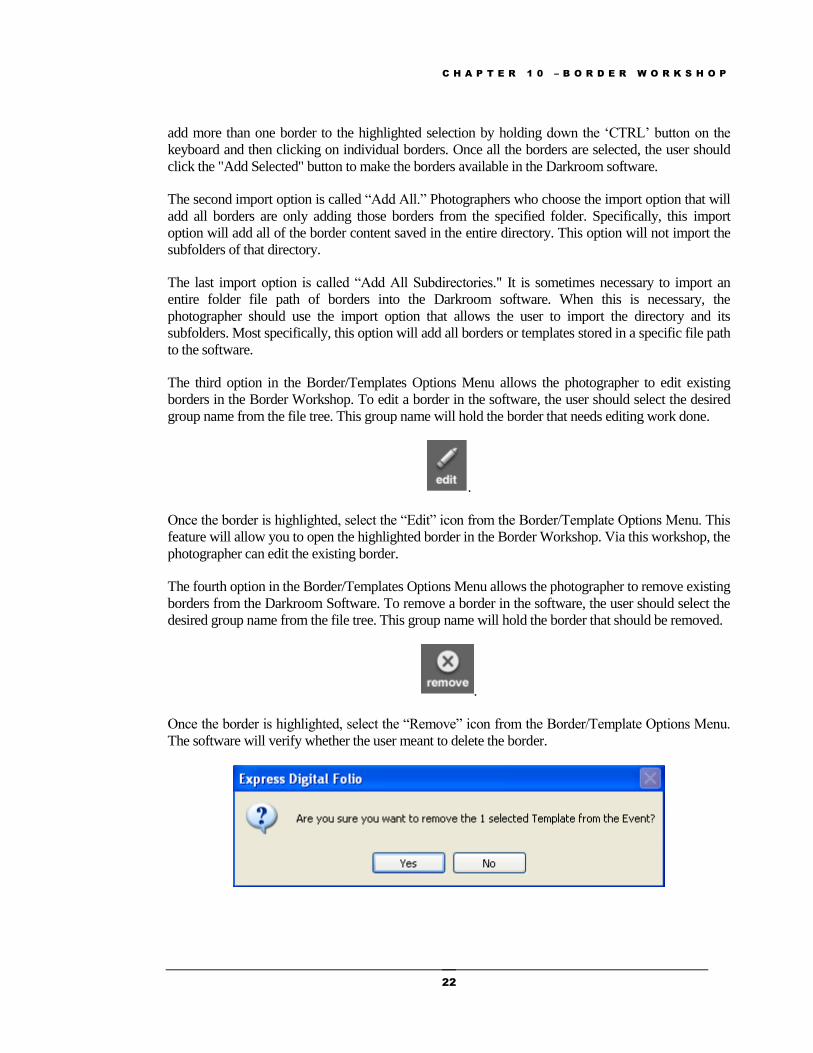
The third option in the Border/Templates Options Menu allows the photographer to edit existing
borders in the Border Workshop. To edit a border in the software, the user should select the desired
group name from the file tree. This group name will hold the border that needs editing work done.
.
Once the border is highlighted, select the “Edit” icon from the Border/Template Options Menu. This
feature will allow you to open the highlighted border in the Border Workshop. Via this workshop, the
photographer can edit the existing border.
The fourth option in the Border/Templates Options Menu allows the photographer to remove existing
borders from the Darkroom Software. To remove a border in the software, the user should select the
desired group name from the file tree. This group name will hold the border that should be removed.
.
Once the border is highlighted, select the “Remove” icon from the Border/Template Options Menu.
The software will verify whether the user meant to delete the border.
C H A P T E R 1 0 – B O R D E R W O R K S H O P
23
The photographer should select “Yes” in the verification window to remove the border from the
software. To exit the removal feature without changing the border, select “No.”
T O O L O V E R V I E W I N T H E B O R D E R W O R K S H O P
The Darkroom Border Workshop is designed for the photographer. Because photographers are
constantly on the go, the framework of the workshop was built to streamline and simplify the border
making process. The result is a powerful engine to build borders and templates without the ramp up
time of a costly third party graphical editor.
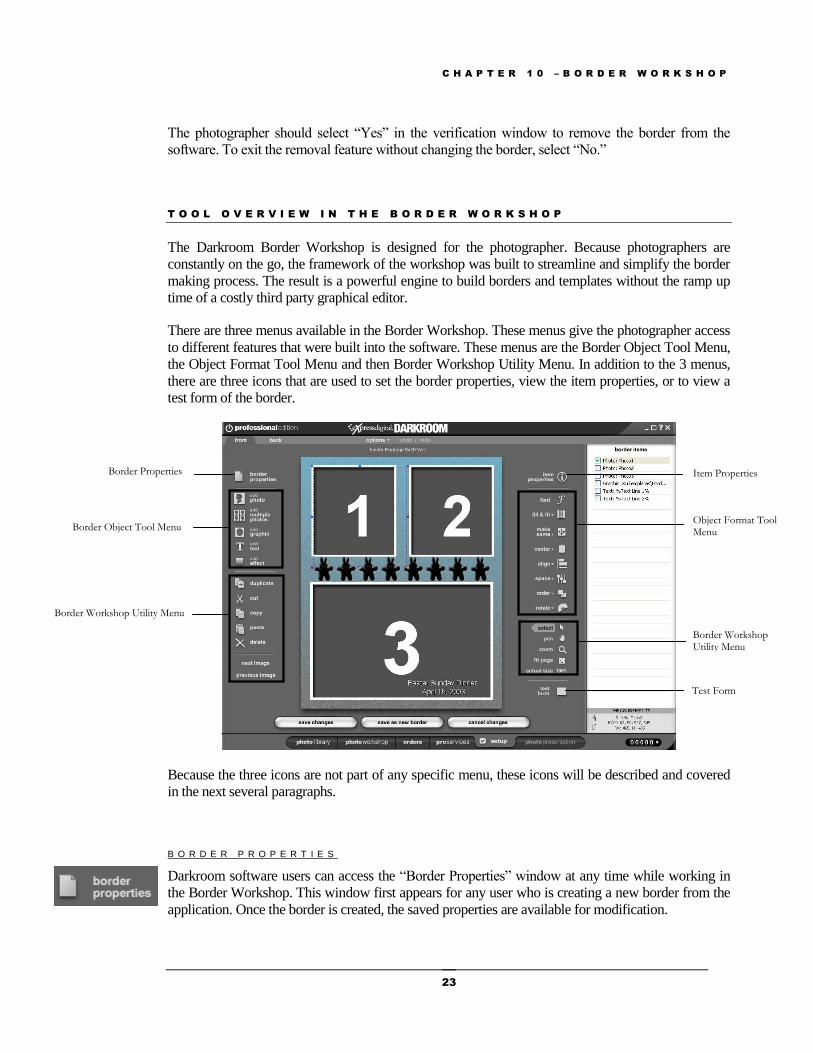
There are three menus available in the Border Workshop. These menus give the photographer access
to different features that were built into the software. These menus are the Border Object Tool Menu,
the Object Format Tool Menu and then Border Workshop Utility Menu. In addition to the 3 menus,
there are three icons that are used to set the border properties, view the item properties, or to view a
test form of the border.
Because the three icons are not part of any specific menu, these icons will be described and covered
in the next several paragraphs.
B O R D E R P R O P E R T I E S
Darkroom software users can access the “Border Properties” window at any time while working in
the Border Workshop. This window first appears for any user who is creating a new border from the
application. Once the border is created, the saved properties are available for modification.
Border Properties
Border Object Tool Menu
Border Workshop Utility Menu
Item Properties
Object Format Tool Menu
Border Workshop Utility Menu
Test Form
C H A P T E R 1 0 – B O R D E R W O R K S H O P
24
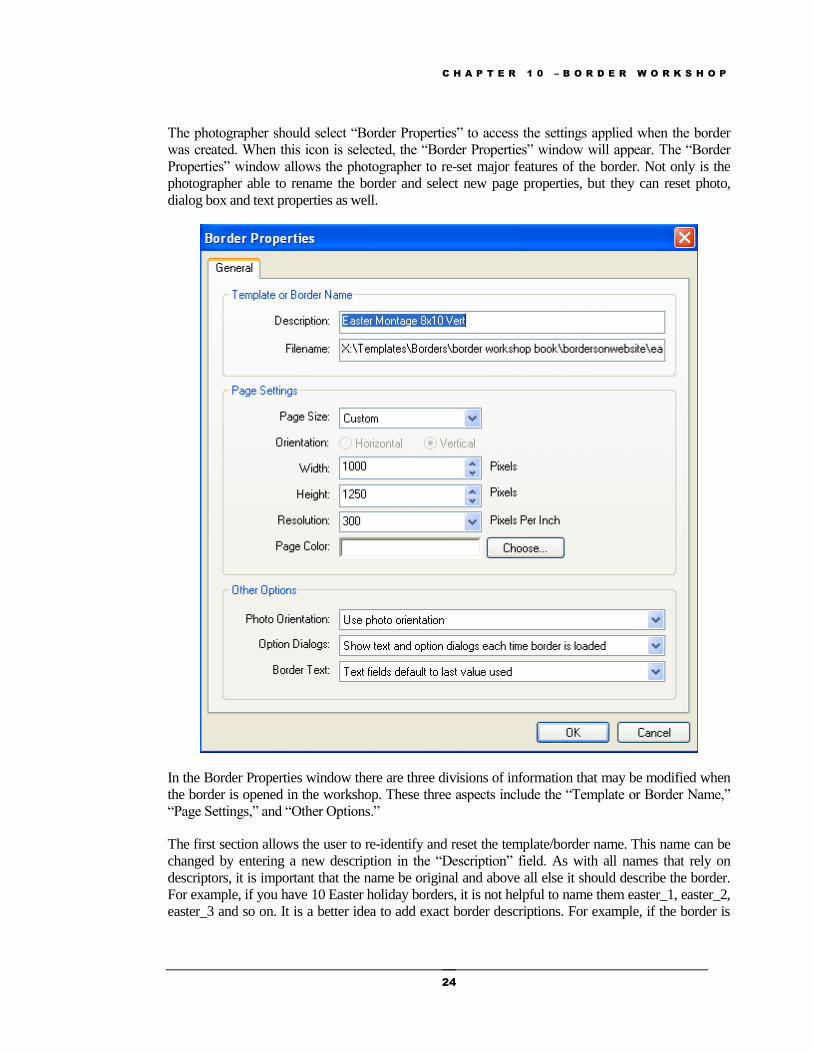
The photographer should select “Border Properties” to access the settings applied when the border
was created. When this icon is selected, the “Border Properties” window will appear. The “Border
Properties” window allows the photographer to re-set major features of the border. Not only is the
photographer able to rename the border and select new page properties, but they can reset photo,
dialog box and text properties as well.
In the Border Properties window there are three divisions of information that may be modified when
the border is opened in the workshop. These three aspects include the “Template or Border Name,”
“Page Settings,” and “Other Options.”
The first section allows the user to re-identify and reset the template/border name. This name can be
changed by entering a new description in the “Description” field. As with all names that rely on
descriptors, it is important that the name be original and above all else it should describe the border.
For example, if you have 10 Easter holiday borders, it is not helpful to name them easter_1, easter_2,
easter_3 and so on. It is a better idea to add exact border descriptions. For example, if the border is

C H A P T E R 1 0 – B O R D E R W O R K S H O P
25
designed for an 8x10, vertical border with a photo montage, then the photographer could name the
border something like this: Easter_Montage_8x10_Vert. This name indicates that it is the border with
the Easter background, is a photo montage and it is designed for an 8x10 vertical image. When the
photographer knows what to rename the photo, it should be typed in the “Description” text field.
There is no absolute number of times a name can be changed. It can be modified very time the border
is opened in the workshop.
The second section allows the user to re-assign the border page settings. The page settings describe
the border page properties. This is the digital canvas that will morph into a border as the
photographer works. The first option is the ability to reset the page size. The current page size is
viewable in the “Page Size” field. To re-assign a page size, click on the drop down menu. The list
contains all available page size ranging from 2 ¾ x 4 to 40 x 60. Included in this drop down menu are
also page sizes for book covers and credit cards. The Darkroom software includes European print
sizes in the drop down menu with options like A0, A4, or B10. Photographers may also create a
custom print size which can include any size as long as there is paper large enough to print it.
Photographers can also reset the border orientation, resolution and page color. Users may change the
photo from a vertical orientation to a horizontal orientation and back again. Users can also change the
desired resolution. Resolution refers directly to the dots per inch (dpi) for the border or template. The
Border Workshop will default the resolution to be 300 dpi. This default is the industry standard for
photo print quality. Resolution measurements below 150 are generally too blurry for printing and
should be avoided.
Photographer may also reset the background page color. The current border background color is
viewable as a color swatch. To choose another color, select the “Choose…” button. The “Color”
window will appear. Photographers can select either a basic color or a custom color from the “Color”
window. To save the background color, choose a point in the color spectrum and select “OK.” If you
wish to exit the window without saving, click “Cancel.”
C H A P T E R 1 0 – B O R D E R W O R K S H O P
26
Finally, photographers can re-configure the features included in “Other Options.” This includes
border settings such as photo, dialog box and text properties.
Photographers can first change the “Photo Orientation” options. This section allows the user to
choose whether to use a photo’s orientation in the placeholder or to rotate the image to match the
image cells. While in most cases, photographers will want to use the default photo orientation setting
of “Use photo orientation” it is possible that the user wants to set the orientation to match image cells
either in a clockwise or counter-clockwise direction. When the user selects to “Use photo
orientation,” this means that when the border is applied to a photo, the photo remains its original
orientation in the border opening. This setting will allow a horizontal photo to retain it’s settings in a
vertical photo placeholder
The Darkroom software also provides two other photo orientation options. The first option is “Rotate
photos to match image cells.” This selection will rotate the photos clockwise to match all image cells
on the border. This means that if the photo placeholder is designed to hold a horizontal image, a
vertical photo will appear on the border with a 90° clockwise turn applied to its orientation.
C H A P T E R 1 0 – B O R D E R W O R K S H O P
27
The second option is “Rotate photos to match image cells. (counter-clockwise)” This selection will
rotate the photos counter-clockwise to match the photo cells on the border or template. This means
that if the photo placeholder is designed to hold a horizontal image, a vertical photo will appear on
the border with a 90° counter-clockwise turn applied to its orientation.
This photo placeholder is designed to match a photo’s orientation to that of the placeholder. This means that in a horizontal placeholder, a vertical photo will rotate clockwise 90° to match the placeholder orientation.
This photo placeholder is designed to match a photo’s orientation to that of the placeholder. This means that in this horizontal placeholder, a vertical photo will rotate counter-clockwise 90° to match the placeholder orientation.
C H A P T E R 1 0 – B O R D E R W O R K S H O P
28
Photographers may also modify the “Option Dialogs” configurations in the “Border Properties”
window. The Darkroom software allows all photographers to choose how the text dialog window
will be displayed when the border is applied in the Photo Workshop. This section allows the user to
change the current settings to choose to show the text and option dialogs each time the border is
applied, or to show the text and option dialogs only when requested by the photographer.
Users may choose to show the text and options dialog when the border is loaded. This feature can be
set by choosing “Show text and option dialogs each time the border is loaded.” This option is set as
an Darkroom software default.
Users may also choose to side step the text dialog if either the text does not change or no text is
required for the border. This feature can be set by choosing “Show text dialog only when requested”
option in the drop down menu.
Finally, photographers can change the “Border Text” options in the Darkroom software. Darkroom
photographers have the option to assign properties to all text fields on an individual border. There are
two border text features available in the drop down menu. These features allow the user to set all text
fields as empty by default or to default all text fields to the last value used.
Photographers can select to have the border text fields populate with the last value used. This option
is activated by default when the Darkroom software is installed. This option is called “Text fields
default to last values used.” This is especially helpful when working with a catalog of several images
that need the same border and text. For example, imagine you have a baseball team image and the
text on the border only said the league and year that the team played. For each team image the same
information can be loaded automatically.
Photographers do have jobs than require different text on each border. The Border Workshop has a
border text setting designed for jobs like that. The option to set the text boxes to empty is “Text fields
default to empty.”
C H A P T E R 1 0 – B O R D E R W O R K S H O P
29
When the photographer finishes re-configuring the general border properties, the photographer
should select “OK” to save changes. To exit the dialog box without modifying the contents, click
“Cancel” to exit. “Cancel” will return you to the Border Workshop.
I T E M P R O P E R T I E S
Darkroom software users can access a specific item property at any time while working in the Border
Workshop. Each border item has a property window associated to it. Border items include photo
placeholders, multiple photo placeholders, graphics, text and effects. This window first appears for
any user who adds a border object to the canvas. Once the object is added to the border, the saved
properties are available for modification.
The photographer should select a border item either from the canvas or from the “Border Items’ list
to access the settings applied when the graphic, placeholder, text or effect was created. When this
icon is selected, the individual windows of the border items will appear. All border objects can be
accessed via the “Item Properties” button.
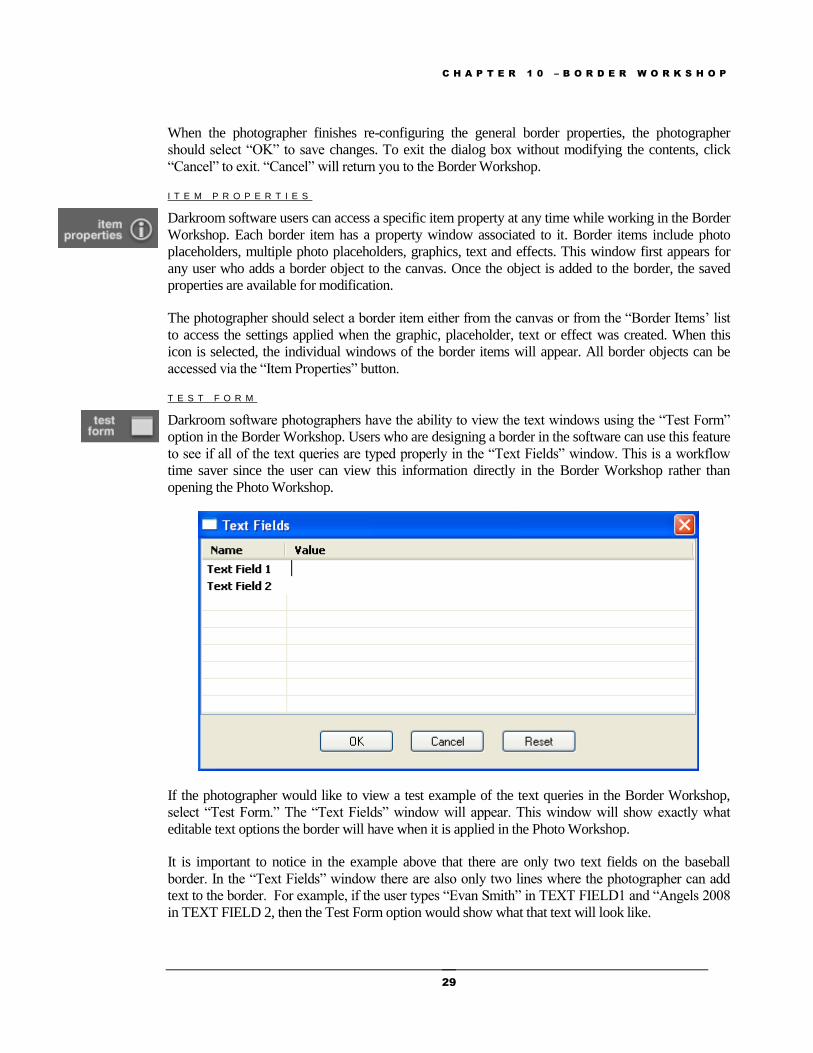
T E S T F O R M
Darkroom software photographers have the ability to view the text windows using the “Test Form”
option in the Border Workshop. Users who are designing a border in the software can use this feature
to see if all of the text queries are typed properly in the “Text Fields” window. This is a workflow
time saver since the user can view this information directly in the Border Workshop rather than
opening the Photo Workshop.
If the photographer would like to view a test example of the text queries in the Border Workshop,
select “Test Form.” The “Text Fields” window will appear. This window will show exactly what
editable text options the border will have when it is applied in the Photo Workshop.
It is important to notice in the example above that there are only two text fields on the baseball
border. In the “Text Fields” window there are also only two lines where the photographer can add
text to the border. For example, if the user types “Evan Smith” in TEXT FIELD1 and “Angels 2008
in TEXT FIELD 2, then the Test Form option would show what that text will look like.
C H A P T E R 1 0 – B O R D E R W O R K S H O P
30
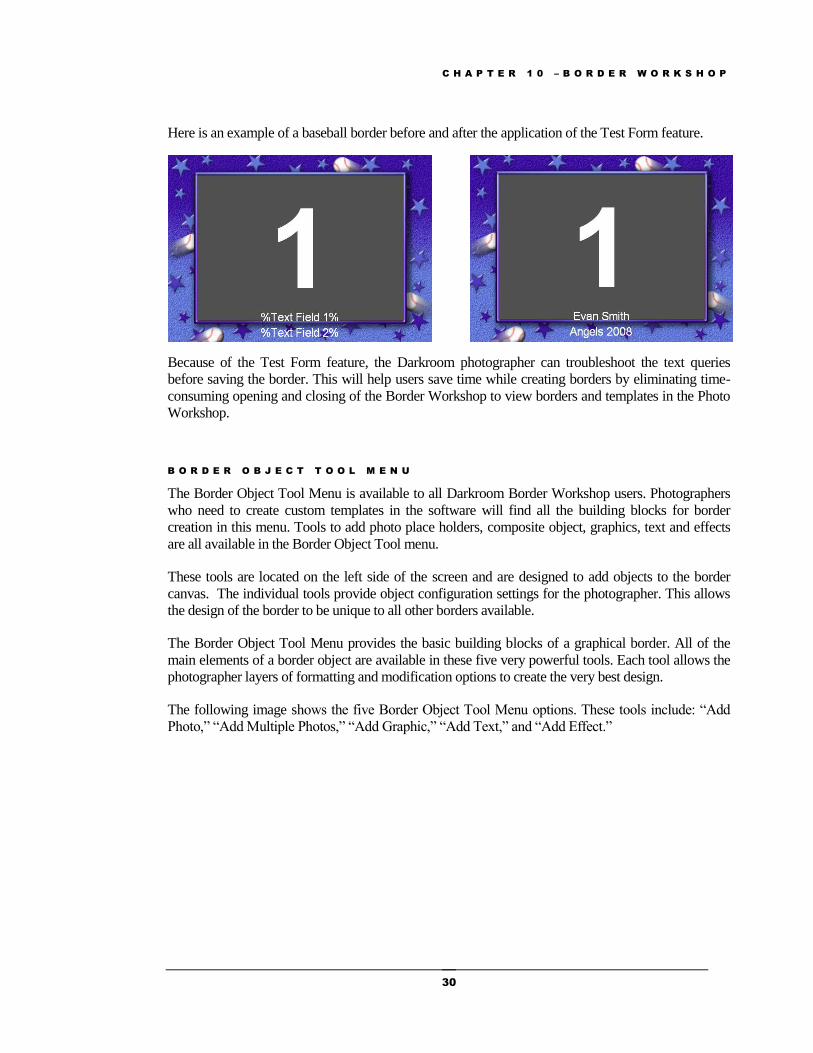
Here is an example of a baseball border before and after the application of the Test Form feature.
Because of the Test Form feature, the Darkroom photographer can troubleshoot the text queries
before saving the border. This will help users save time while creating borders by eliminating time-
consuming opening and closing of the Border Workshop to view borders and templates in the Photo
Workshop.
B O R D E R O B J E C T T O O L M E N U
The Border Object Tool Menu is available to all Darkroom Border Workshop users. Photographers
who need to create custom templates in the software will find all the building blocks for border
creation in this menu. Tools to add photo place holders, composite object, graphics, text and effects
are all available in the Border Object Tool menu.
These tools are located on the left side of the screen and are designed to add objects to the border
canvas. The individual tools provide object configuration settings for the photographer. This allows
the design of the border to be unique to all other borders available.
The Border Object Tool Menu provides the basic building blocks of a graphical border. All of the
main elements of a border object are available in these five very powerful tools. Each tool allows the
photographer layers of formatting and modification options to create the very best design.
The following image shows the five Border Object Tool Menu options. These tools include: “Add
Photo,” “Add Multiple Photos,” “Add Graphic,” “Add Text,” and “Add Effect.”
C H A P T E R 1 0 – B O R D E R W O R K S H O P
31
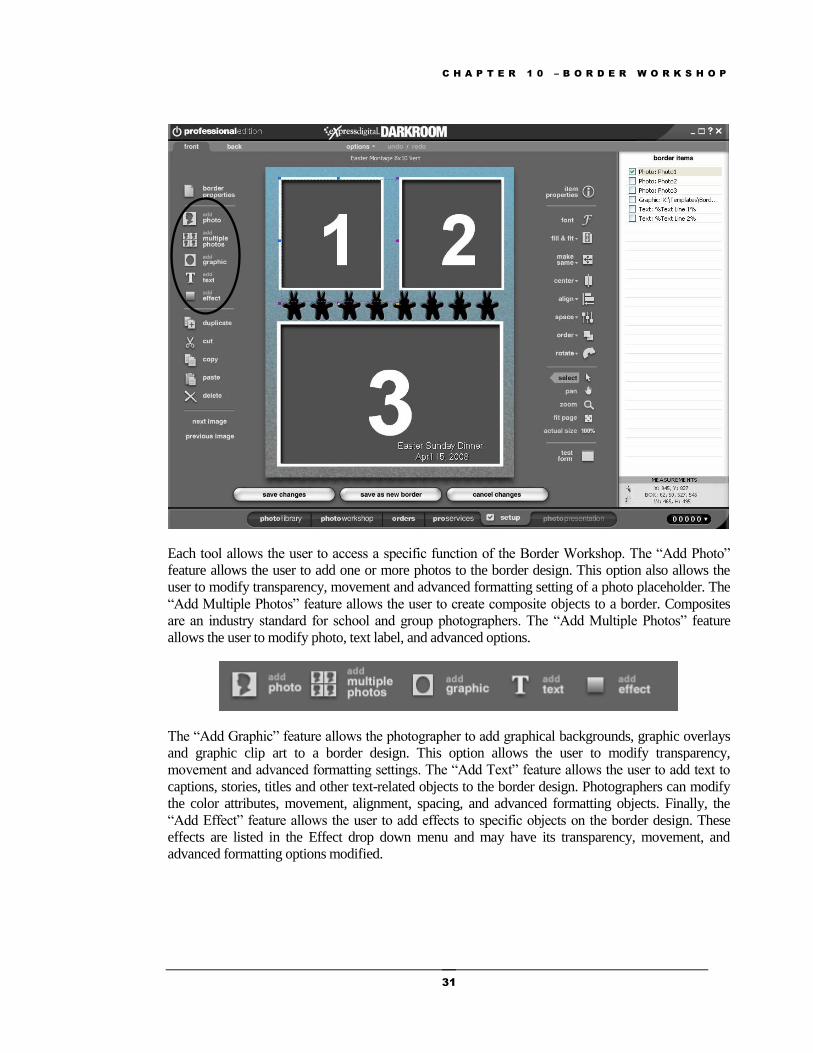
Each tool allows the user to access a specific function of the Border Workshop. The “Add Photo”
feature allows the user to add one or more photos to the border design. This option also allows the
user to modify transparency, movement and advanced formatting setting of a photo placeholder. The
“Add Multiple Photos” feature allows the user to create composite objects to a border. Composites
are an industry standard for school and group photographers. The “Add Multiple Photos” feature
allows the user to modify photo, text label, and advanced options.
The “Add Graphic” feature allows the photographer to add graphical backgrounds, graphic overlays
and graphic clip art to a border design. This option allows the user to modify transparency,
movement and advanced formatting settings. The “Add Text” feature allows the user to add text to
captions, stories, titles and other text-related objects to the border design. Photographers can modify
the color attributes, movement, alignment, spacing, and advanced formatting objects. Finally, the
“Add Effect” feature allows the user to add effects to specific objects on the border design. These
effects are listed in the Effect drop down menu and may have its transparency, movement, and
advanced formatting options modified.
C H A P T E R 1 0 – B O R D E R W O R K S H O P
32
A D D P H O T O
The Border Workshop provides users with the power to create a border containing photo
placeholders that are only limited by the size of a sheet of paper. All added photos on a border
template are designed to act as placeholders until the border is assigned to a print in the software.
Photo placeholders may be added to the template in any size and in any location on the border. The
Photo tools allow the user to configure the photo so that they are not simply “on the page” but a part
of a work of art. Users can set the transparency, assign custom masks, draw frames and drop shadows
and assign rotation. The user may modify the photos in countless ways.
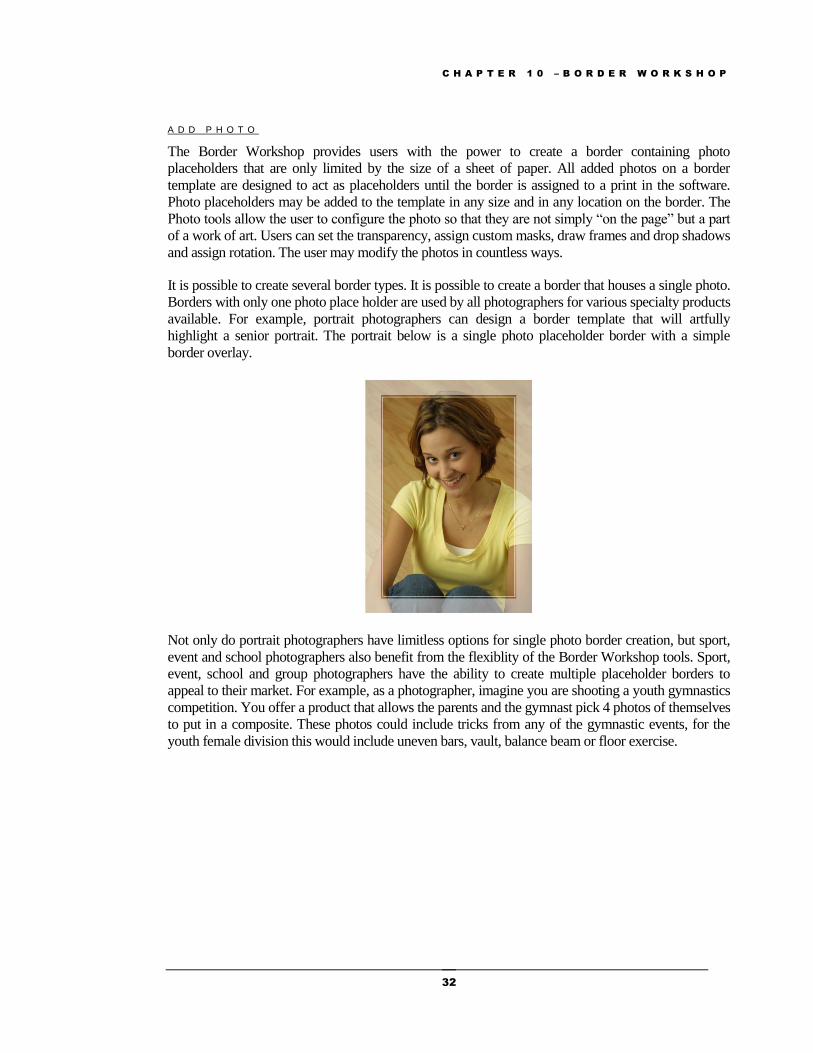
It is possible to create several border types. It is possible to create a border that houses a single photo.
Borders with only one photo place holder are used by all photographers for various specialty products
available. For example, portrait photographers can design a border template that will artfully
highlight a senior portrait. The portrait below is a single photo placeholder border with a simple
border overlay.
Not only do portrait photographers have limitless options for single photo border creation, but sport,
event and school photographers also benefit from the flexiblity of the Border Workshop tools. Sport,
event, school and group photographers have the ability to create multiple placeholder borders to
appeal to their market. For example, as a photographer, imagine you are shooting a youth gymnastics
competition. You offer a product that allows the parents and the gymnast pick 4 photos of themselves
to put in a composite. These photos could include tricks from any of the gymnastic events, for the
youth female division this would include uneven bars, vault, balance beam or floor exercise.
C H A P T E R 1 0 – B O R D E R W O R K S H O P
33
From these photos, customers can create a composite and print an 8x10 right on site at the event. For
example, the multiple photo border above has a full size image in black & white on the background.
Then the 3 square photos are lined up evenly on the left side of the border and are printed in color.
The gymnast and then gymnast’s parents chose four images from the floor routine to create a lasting
memory from the event.
Now that the two types of borders, single photo placeholder and multiple photo placeholder, have
been described, the photographer should learn how to add photos to a border. Photo placeholders that
are all different sizes should be added by selecting the “Add Photo” button located in the Border
Object Tool menu.
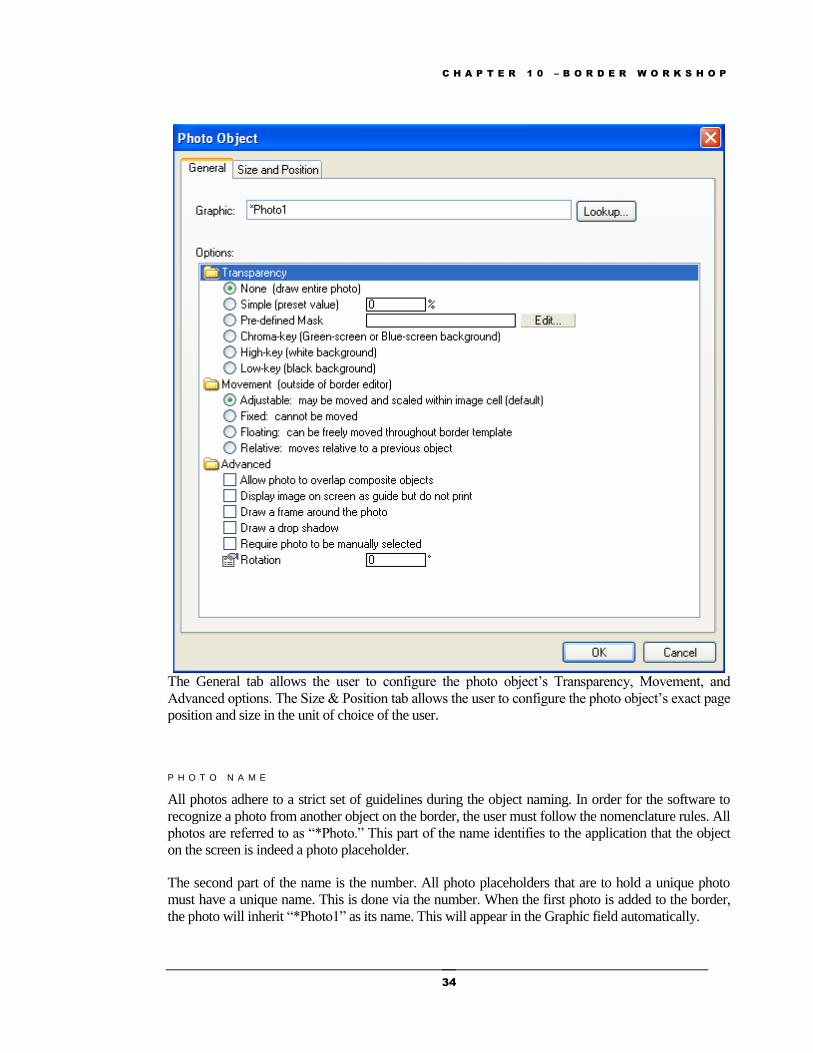
All photos are configured in the “Photo Object” window. This is available after the user selects the
“Add Photo” button. The “Photo Object” window allows the user to set the photo’s General and Size
& Position options on the border.
C H A P T E R 1 0 – B O R D E R W O R K S H O P
34
The General tab allows the user to configure the photo object’s Transparency, Movement, and
Advanced options. The Size & Position tab allows the user to configure the photo object’s exact page
position and size in the unit of choice of the user.
P H O T O N A M E
All photos adhere to a strict set of guidelines during the object naming. In order for the software to
recognize a photo from another object on the border, the user must follow the nomenclature rules. All
photos are referred to as “*Photo.” This part of the name identifies to the application that the object
on the screen is indeed a photo placeholder.
The second part of the name is the number. All photo placeholders that are to hold a unique photo
must have a unique name. This is done via the number. When the first photo is added to the border,
the photo will inherit “*Photo1” as its name. This will appear in the Graphic field automatically.
C H A P T E R 1 0 – B O R D E R W O R K S H O P
35
Darkroom users can create limitless photo placeholders to the border. Each time a new photo place
holder is added the names will change numbers. These place holder names are added in numerical
order so they appear as “*Photo1,” “*Photo2,” “*Photo3” and so on. It is possible to add multiple
photo placeholders. In the case where there are multiple photos of the same thing on the page, the
photo place holder should indicate the identical number for every copy of the same image. For
example, if there were three placeholders on a page and all three photos were the same picture, just
one was black and white, one had a transparency applied and one was in color, all the placeholders
should say “*Photo1.”
For more information on using the “Lookup” button, go to “Using the Photo and Graphic Object
Query” section available later in this chapter.
T R A N S P A R E N C Y
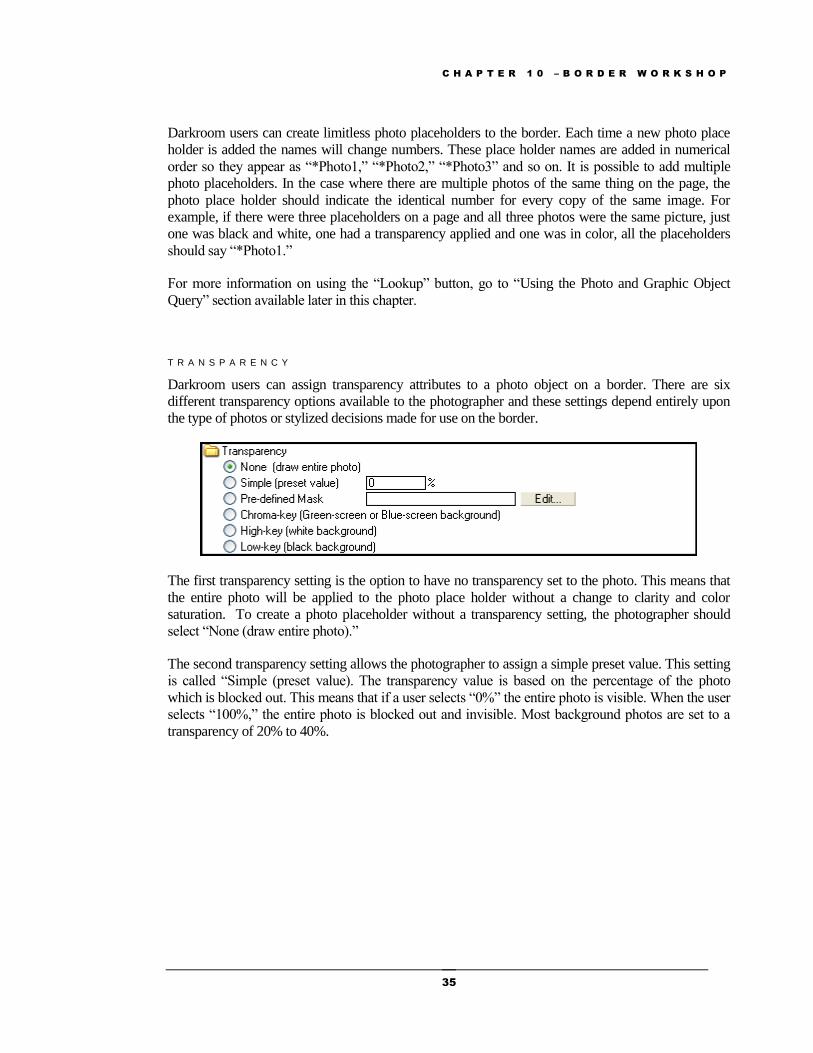
Darkroom users can assign transparency attributes to a photo object on a border. There are six
different transparency options available to the photographer and these settings depend entirely upon
the type of photos or stylized decisions made for use on the border.
The first transparency setting is the option to have no transparency set to the photo. This means that
the entire photo will be applied to the photo place holder without a change to clarity and color
saturation. To create a photo placeholder without a transparency setting, the photographer should
select “None (draw entire photo).”
The second transparency setting allows the photographer to assign a simple preset value. This setting
is called “Simple (preset value). The transparency value is based on the percentage of the photo
which is blocked out. This means that if a user selects “0%” the entire photo is visible. When the user
selects “100%,” the entire photo is blocked out and invisible. Most background photos are set to a
transparency of 20% to 40%.
C H A P T E R 1 0 – B O R D E R W O R K S H O P
36
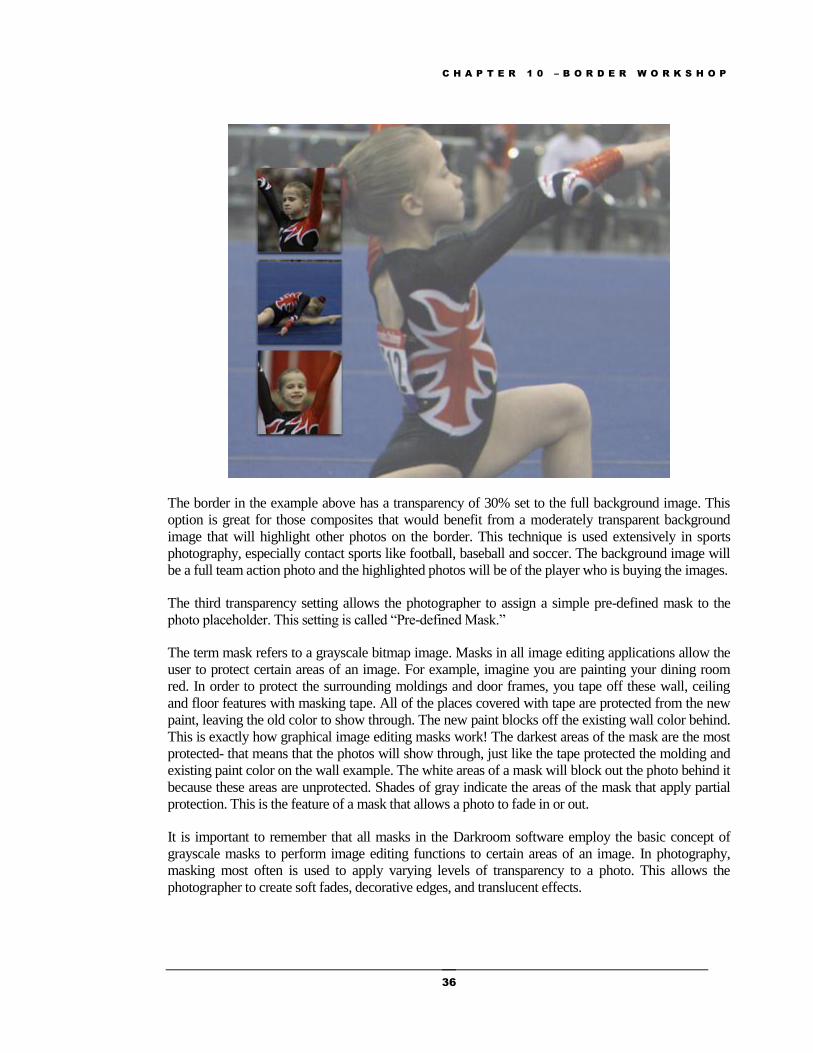
The border in the example above has a transparency of 30% set to the full background image. This
option is great for those composites that would benefit from a moderately transparent background
image that will highlight other photos on the border. This technique is used extensively in sports
photography, especially contact sports like football, baseball and soccer. The background image will
be a full team action photo and the highlighted photos will be of the player who is buying the images.
The third transparency setting allows the photographer to assign a simple pre-defined mask to the
photo placeholder. This setting is called “Pre-defined Mask.”
The term mask refers to a grayscale bitmap image. Masks in all image editing applications allow the
user to protect certain areas of an image. For example, imagine you are painting your dining room
red. In order to protect the surrounding moldings and door frames, you tape off these wall, ceiling
and floor features with masking tape. All of the places covered with tape are protected from the new
paint, leaving the old color to show through. The new paint blocks off the existing wall color behind.
This is exactly how graphical image editing masks work! The darkest areas of the mask are the most
protected- that means that the photos will show through, just like the tape protected the molding and
existing paint color on the wall example. The white areas of a mask will block out the photo behind it
because these areas are unprotected. Shades of gray indicate the areas of the mask that apply partial
protection. This is the feature of a mask that allows a photo to fade in or out.
It is important to remember that all masks in the Darkroom software employ the basic concept of
grayscale masks to perform image editing functions to certain areas of an image. In photography,
masking most often is used to apply varying levels of transparency to a photo. This allows the
photographer to create soft fades, decorative edges, and translucent effects.
C H A P T E R 1 0 – B O R D E R W O R K S H O P
37
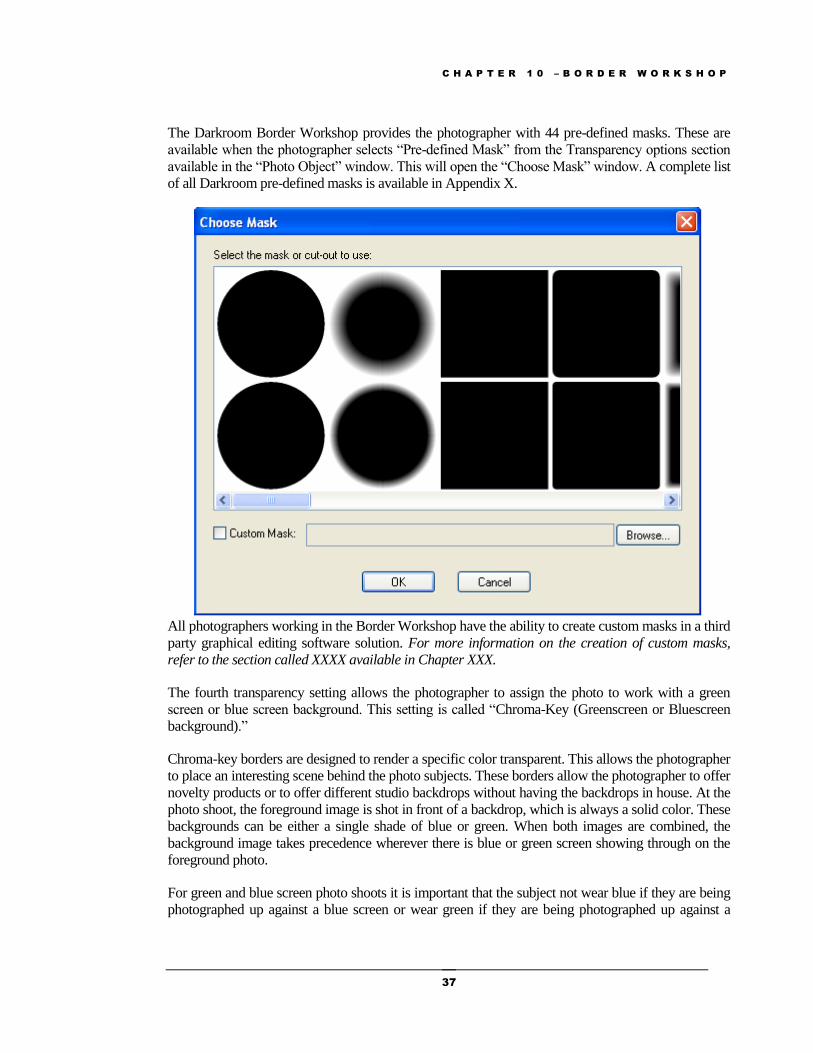
The Darkroom Border Workshop provides the photographer with 44 pre-defined masks. These are
available when the photographer selects “Pre-defined Mask” from the Transparency options section
available in the “Photo Object” window. This will open the “Choose Mask” window. A complete list
of all Darkroom pre-defined masks is available in Appendix X.
All photographers working in the Border Workshop have the ability to create custom masks in a third
party graphical editing software solution. For more information on the creation of custom masks,
refer to the section called XXXX available in Chapter XXX.
The fourth transparency setting allows the photographer to assign the photo to work with a green
screen or blue screen background. This setting is called “Chroma-Key (Greenscreen or Bluescreen
background).”
Chroma-key borders are designed to render a specific color transparent. This allows the photographer
to place an interesting scene behind the photo subjects. These borders allow the photographer to offer
novelty products or to offer different studio backdrops without having the backdrops in house. At the
photo shoot, the foreground image is shot in front of a backdrop, which is always a solid color. These
backgrounds can be either a single shade of blue or green. When both images are combined, the
background image takes precedence wherever there is blue or green screen showing through on the
foreground photo.
For green and blue screen photo shoots it is important that the subject not wear blue if they are being
photographed up against a blue screen or wear green if they are being photographed up against a
C H A P T E R 1 0 – B O R D E R W O R K S H O P
38
green screen. In these cases, parts of the subject can become 100% transparent and the background
will show or bleed through instead of the real clothing item. The background should consist of a
single blue or green color. These colors are used because they are considered to be the furthest away
from skin tone. Since chroma-key technology became available to digital photographers, green has
become the favored color. This is because digital cameras retain more detail in the green channel and
it requires less light than blue.
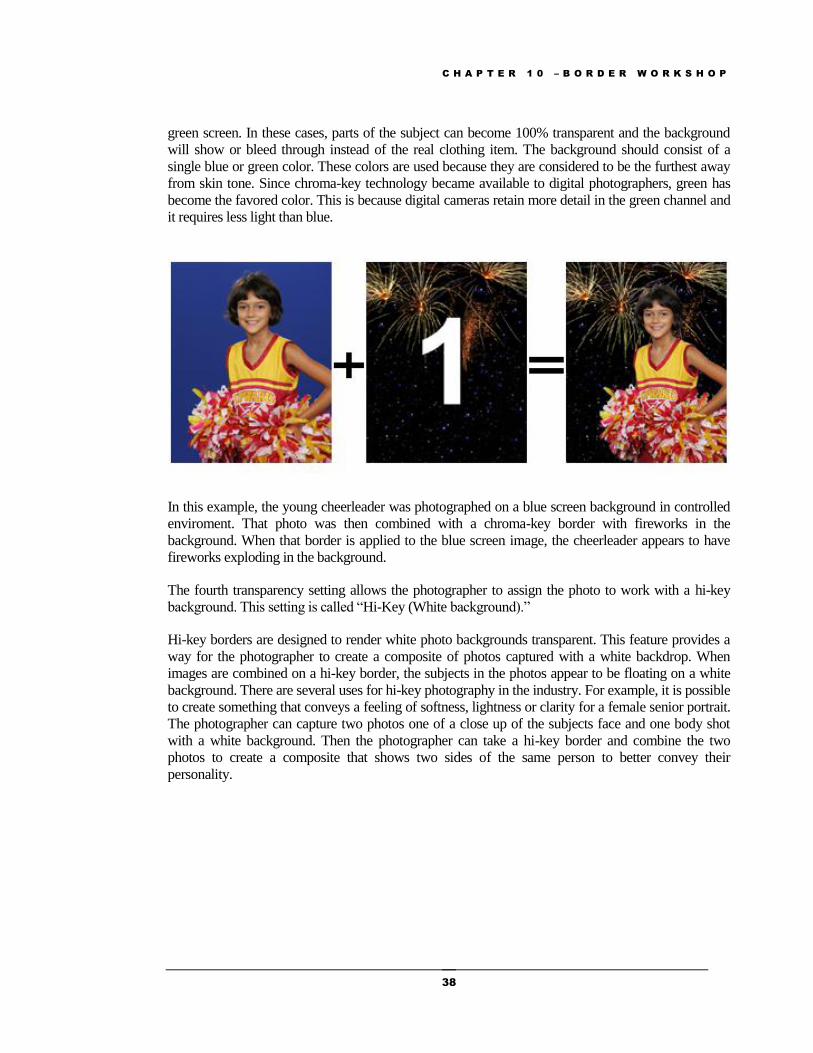
In this example, the young cheerleader was photographed on a blue screen background in controlled
enviroment. That photo was then combined with a chroma-key border with fireworks in the
background. When that border is applied to the blue screen image, the cheerleader appears to have
fireworks exploding in the background.
The fourth transparency setting allows the photographer to assign the photo to work with a hi-key
background. This setting is called “Hi-Key (White background).”
Hi-key borders are designed to render white photo backgrounds transparent. This feature provides a
way for the photographer to create a composite of photos captured with a white backdrop. When
images are combined on a hi-key border, the subjects in the photos appear to be floating on a white
background. There are several uses for hi-key photography in the industry. For example, it is possible
to create something that conveys a feeling of softness, lightness or clarity for a female senior portrait.
The photographer can capture two photos one of a close up of the subjects face and one body shot
with a white background. Then the photographer can take a hi-key border and combine the two
photos to create a composite that shows two sides of the same person to better convey their
personality.
C H A P T E R 1 0 – B O R D E R W O R K S H O P
39
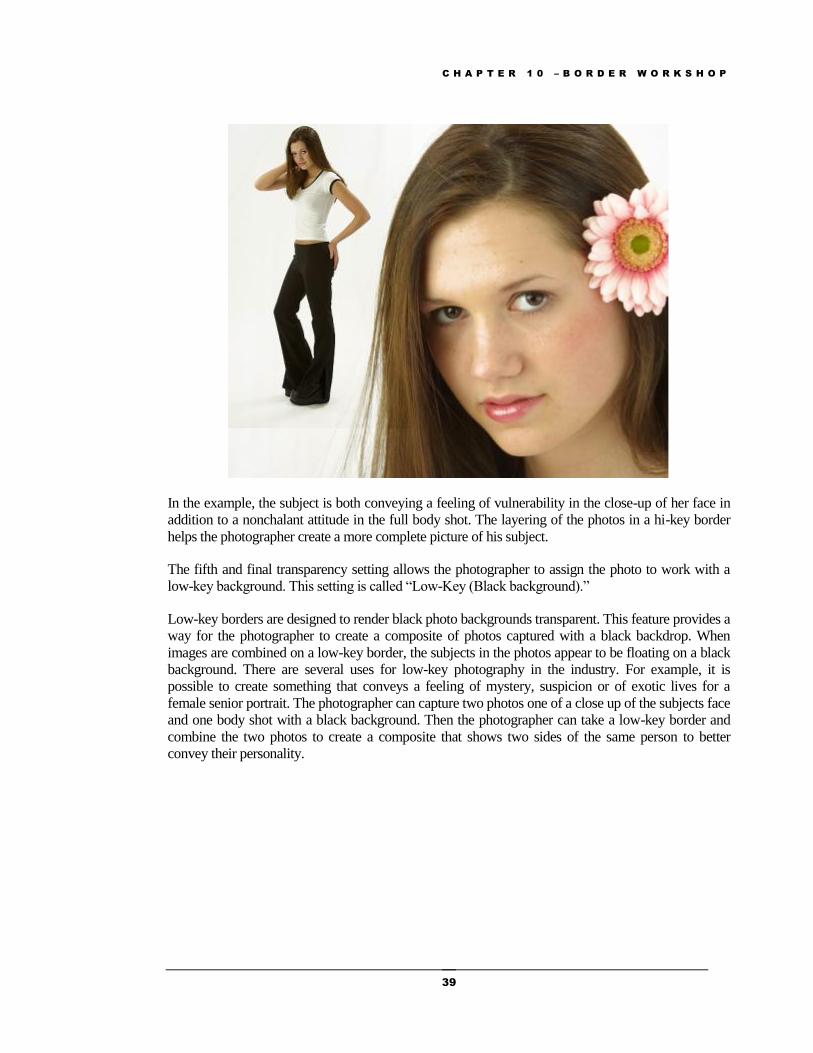
In the example, the subject is both conveying a feeling of vulnerability in the close-up of her face in
addition to a nonchalant attitude in the full body shot. The layering of the photos in a hi-key border
helps the photographer create a more complete picture of his subject.
The fifth and final transparency setting allows the photographer to assign the photo to work with a
low-key background. This setting is called “Low-Key (Black background).”
Low-key borders are designed to render black photo backgrounds transparent. This feature provides a
way for the photographer to create a composite of photos captured with a black backdrop. When
images are combined on a low-key border, the subjects in the photos appear to be floating on a black
background. There are several uses for low-key photography in the industry. For example, it is
possible to create something that conveys a feeling of mystery, suspicion or of exotic lives for a
female senior portrait. The photographer can capture two photos one of a close up of the subjects face
and one body shot with a black background. Then the photographer can take a low-key border and
combine the two photos to create a composite that shows two sides of the same person to better
convey their personality.
C H A P T E R 1 0 – B O R D E R W O R K S H O P
40
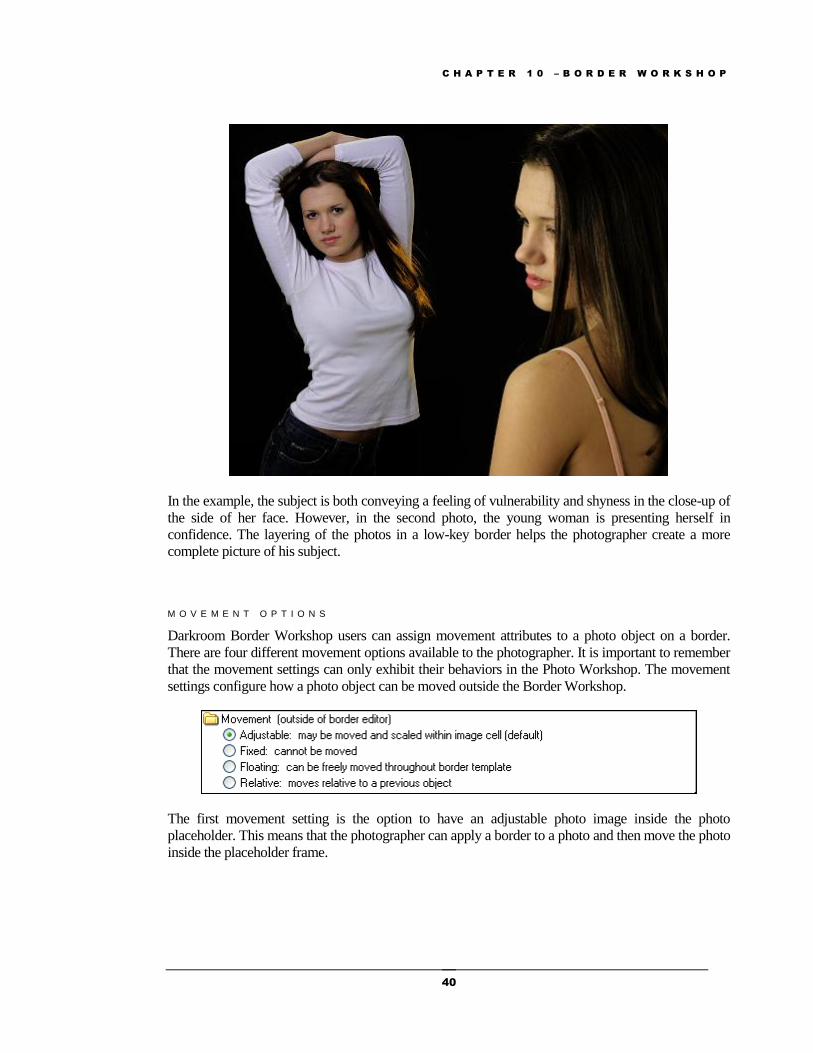
In the example, the subject is both conveying a feeling of vulnerability and shyness in the close-up of
the side of her face. However, in the second photo, the young woman is presenting herself in
confidence. The layering of the photos in a low-key border helps the photographer create a more
complete picture of his subject.
M O V E M E N T O P T I O N S
Darkroom Border Workshop users can assign movement attributes to a photo object on a border.
There are four different movement options available to the photographer. It is important to remember
that the movement settings can only exhibit their behaviors in the Photo Workshop. The movement
settings configure how a photo object can be moved outside the Border Workshop.
The first movement setting is the option to have an adjustable photo image inside the photo
placeholder. This means that the photographer can apply a border to a photo and then move the photo
inside the placeholder frame.
C H A P T E R 1 0 – B O R D E R W O R K S H O P
41
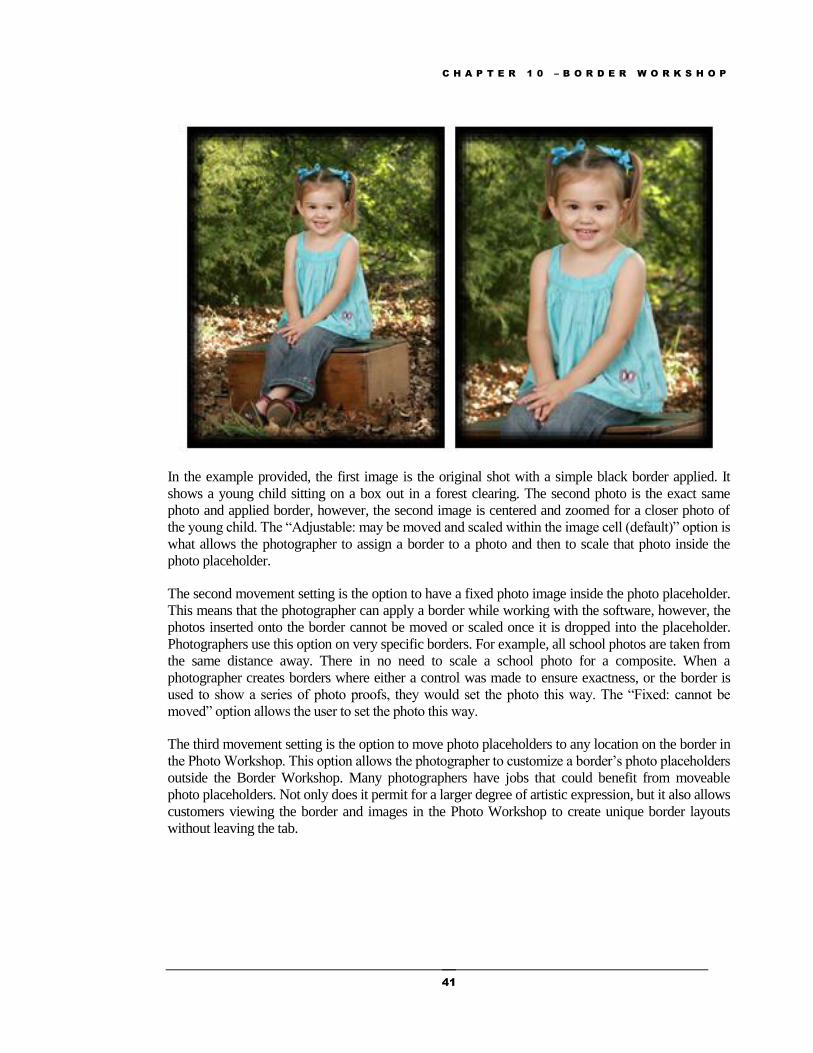
In the example provided, the first image is the original shot with a simple black border applied. It
shows a young child sitting on a box out in a forest clearing. The second photo is the exact same
photo and applied border, however, the second image is centered and zoomed for a closer photo of
the young child. The “Adjustable: may be moved and scaled within the image cell (default)” option is
what allows the photographer to assign a border to a photo and then to scale that photo inside the
photo placeholder.
The second movement setting is the option to have a fixed photo image inside the photo placeholder.
This means that the photographer can apply a border while working with the software, however, the
photos inserted onto the border cannot be moved or scaled once it is dropped into the placeholder.
Photographers use this option on very specific borders. For example, all school photos are taken from
the same distance away. There in no need to scale a school photo for a composite. When a
photographer creates borders where either a control was made to ensure exactness, or the border is
used to show a series of photo proofs, they would set the photo this way. The “Fixed: cannot be
moved” option allows the user to set the photo this way.
The third movement setting is the option to move photo placeholders to any location on the border in
the Photo Workshop. This option allows the photographer to customize a border’s photo placeholders
outside the Border Workshop. Many photographers have jobs that could benefit from moveable
photo placeholders. Not only does it permit for a larger degree of artistic expression, but it also allows
customers viewing the border and images in the Photo Workshop to create unique border layouts
without leaving the tab.

C H A P T E R 1 0 – B O R D E R W O R K S H O P
42
In the example provided, the first border shows two layered photo placeholders with a small white
outline around each photo. Both photos were set to “Floating: can be freely moved throughout border
template” in the Photo Object window. Within the Photo Workshop, photographers can click and
drag the photos around the background. In the second image the photos were dragged to the opposite
sides of the screen.
Finally, the fourth movement setting allows the photographer to set a photo place holder to move
around the border space relative to the border object applied previous to the photo object. What does
that mean? Basically it means that a photo object can be linked to the border object on the previous
layer. This is useful for photographers who need to move a group of objects around. For example,
imagine you are building a school composite. Every photo on the composite can be linked to the
name caption. The result of this is when a caption is moved, the photo will move with it.
It is important to remember that only two objects can be assigned to move relative to each other. It is
not possible to link three objects together and assign them as relative to one another. In situations
where the photographer needs to move several objects and maintain the same spacing a group
highlight and mouse drag will move those objects.
The following is a graphical example of a photo moving relative to a text object. Because this is used
most often in school composites, the example utilizes a commonly used composite that is part of the
sample borders available in the Darkroom Assembly software. This tool can be used between any
photo object and photo or other object in the Darkroom Border Workshop.

C H A P T E R 1 0 – B O R D E R W O R K S H O P
43
A D V A N C E D O P T I O N S
Darkroom Border Workshop users can assign advanced attributes to a photo object on a border.
There are six different advanced options available to the photographer. The advanced settings allow
the user to format the photo options to create a unique end product for the customer. The six photo
options allows the photographer to overlap composite objects with photos, to display a photo
Photographers should ensure that the Border Items window is in the correct order. To link a photo object to another object on the border for movement purposes, the user should list the photo object BELOW the object that it will link with. In the graphical example, Photo1 is to be connected to the Text Caption located below the photo on the border. In the first Border Items window, the objects are out of order. In the second window, the objects are correct.
The photographer should assign the photo object to “Relative.”
This is the original school composite border available in the Darkroom Assembly software. Notice how the circled Photo1 and Text Caption box are centered in relationship to each other.
When the caption text box is moved around the border canvas, Photo1 moves with the text object. When objects are linked relatively to one another, the objects maintain the same spacing.

C H A P T E R 1 0 – B O R D E R W O R K S H O P
44
onscreen but prohibit printing, to format frames and drop shadows on the photo object, to require
manual photo selection, and to rotate the photo.
The first advanced setting is an option to allow a photo object to overlap a composite object. Normal
photo objects will move a composite object when they are layered on top of each other. The
composite object photo placeholders will re-arrange around the moved photo object. It is possible to
create a composite object and allow other photos to layer on the composite photo placeholders.
In the example above, the border is comprised of one 4-photo composite object and then 4 individual
photo objects layered on top. Each of the outside photos are set to allow overlapping over a
composite object. To activate this option for a photo object, the photographer should select “Allow
The four inner photos are a multiple photo composite object.
The four outer photos are individual photo placeholders.
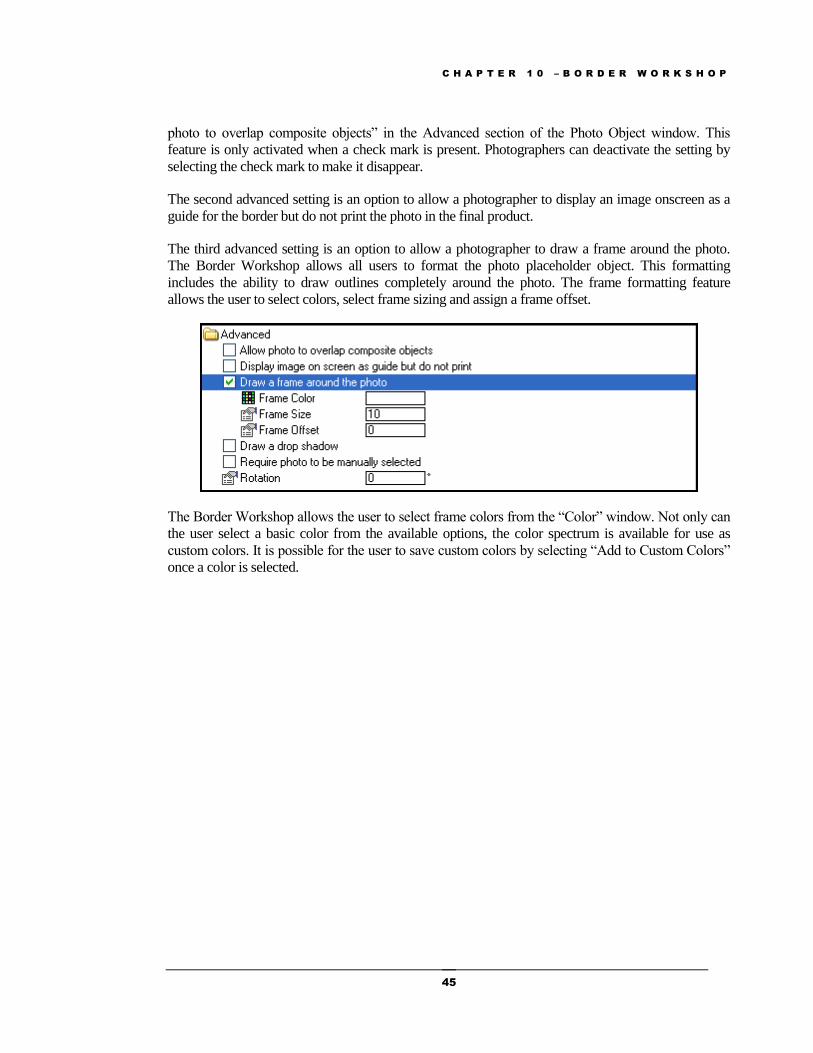
C H A P T E R 1 0 – B O R D E R W O R K S H O P
45
photo to overlap composite objects” in the Advanced section of the Photo Object window. This
feature is only activated when a check mark is present. Photographers can deactivate the setting by
selecting the check mark to make it disappear.
The second advanced setting is an option to allow a photographer to display an image onscreen as a
guide for the border but do not print the photo in the final product.
The third advanced setting is an option to allow a photographer to draw a frame around the photo.
The Border Workshop allows all users to format the photo placeholder object. This formatting
includes the ability to draw outlines completely around the photo. The frame formatting feature
allows the user to select colors, select frame sizing and assign a frame offset.
The Border Workshop allows the user to select frame colors from the “Color” window. Not only can
the user select a basic color from the available options, the color spectrum is available for use as
custom colors. It is possible for the user to save custom colors by selecting “Add to Custom Colors”
once a color is selected.
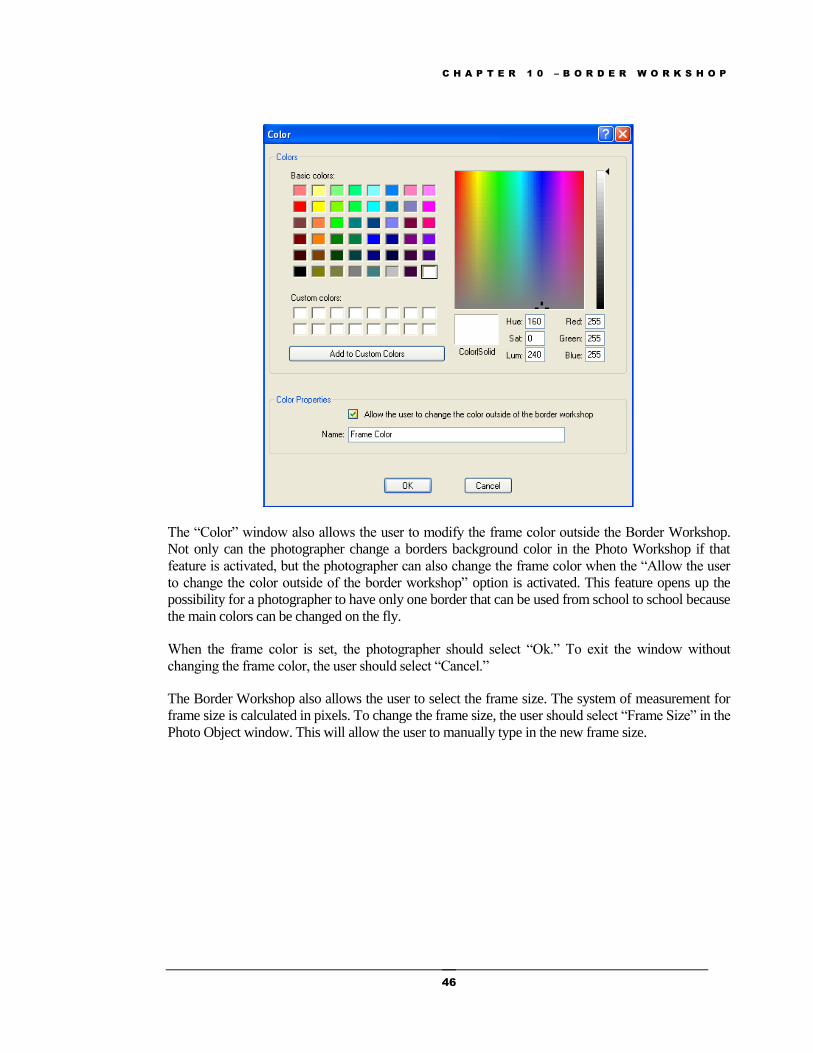
C H A P T E R 1 0 – B O R D E R W O R K S H O P
46
The “Color” window also allows the user to modify the frame color outside the Border Workshop.
Not only can the photographer change a borders background color in the Photo Workshop if that
feature is activated, but the photographer can also change the frame color when the “Allow the user
to change the color outside of the border workshop” option is activated. This feature opens up the
possibility for a photographer to have only one border that can be used from school to school because
the main colors can be changed on the fly.
When the frame color is set, the photographer should select “Ok.” To exit the window without
changing the frame color, the user should select “Cancel.”
The Border Workshop also allows the user to select the frame size. The system of measurement for
frame size is calculated in pixels. To change the frame size, the user should select “Frame Size” in the
Photo Object window. This will allow the user to manually type in the new frame size.
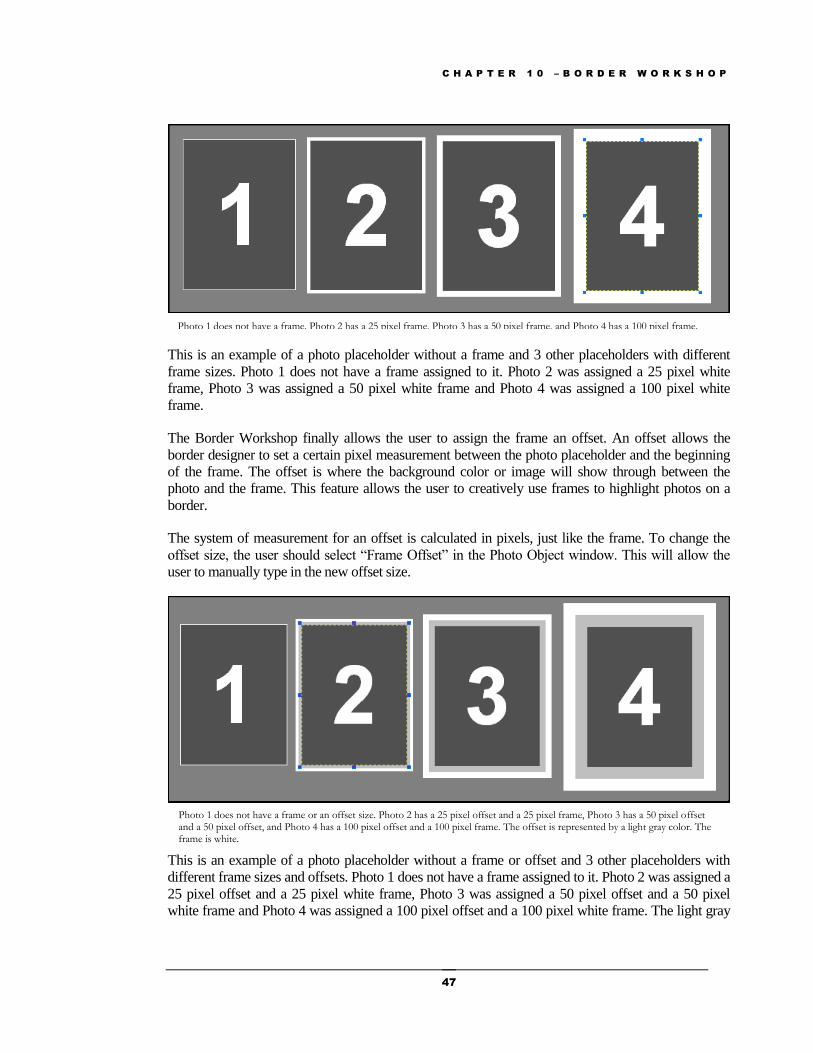
C H A P T E R 1 0 – B O R D E R W O R K S H O P
47
This is an example of a photo placeholder without a frame and 3 other placeholders with different
frame sizes. Photo 1 does not have a frame assigned to it. Photo 2 was assigned a 25 pixel white
frame, Photo 3 was assigned a 50 pixel white frame and Photo 4 was assigned a 100 pixel white
frame.
The Border Workshop finally allows the user to assign the frame an offset. An offset allows the
border designer to set a certain pixel measurement between the photo placeholder and the beginning
of the frame. The offset is where the background color or image will show through between the
photo and the frame. This feature allows the user to creatively use frames to highlight photos on a
border.
The system of measurement for an offset is calculated in pixels, just like the frame. To change the
offset size, the user should select “Frame Offset” in the Photo Object window. This will allow the
user to manually type in the new offset size.
This is an example of a photo placeholder without a frame or offset and 3 other placeholders with
different frame sizes and offsets. Photo 1 does not have a frame assigned to it. Photo 2 was assigned a
25 pixel offset and a 25 pixel white frame, Photo 3 was assigned a 50 pixel offset and a 50 pixel
white frame and Photo 4 was assigned a 100 pixel offset and a 100 pixel white frame. The light gray
Photo 1 does not have a frame. Photo 2 has a 25 pixel frame, Photo 3 has a 50 pixel frame, and Photo 4 has a 100 pixel frame.
Photo 1 does not have a frame or an offset size. Photo 2 has a 25 pixel offset and a 25 pixel frame, Photo 3 has a 50 pixel offset and a 50 pixel offset, and Photo 4 has a 100 pixel offset and a 100 pixel frame. The offset is represented by a light gray color. The frame is white.

C H A P T E R 1 0 – B O R D E R W O R K S H O P
48
represents the offset and it shows the light gray background sowing through. The white represents the
frame.
The fourth advanced setting allows the photographer to draw a drop shadow for the photo. When
working with the Darkroom Border Workshop, the term “drop shadow” refers to an effect where a
darkened image is repeated behind itself to create the illusion that the image is floating over its
background. This graphical effect allows the photographer to build a photo that appears three-
dimensional. There are several formatting features available with a drop shadow. These include
drawing a simple shadow behind the photo, drawing a shadow inside the image cell on top, applying
shadow offsets on both the X and Y axis and assigning the shadow radius.
The Border Workshop allows the user to draw a simple drop shadow behind a photo. To activate this
option the user should select “Draw a shadow beneath the photo.” Shadows that are applied behind
the photo are used to make the photo “pop out" of the border. The photo appears to be floating above
the background.
This photo placeholder has a drop shadow applied. Because all drop shadows depend on the X and Y offset values, the shadow is offset to the bottom and right side of the photo placeholder. The offset values for this drop shadow included: Shadow offset X = 200 and Shadow Offset Y = 200.
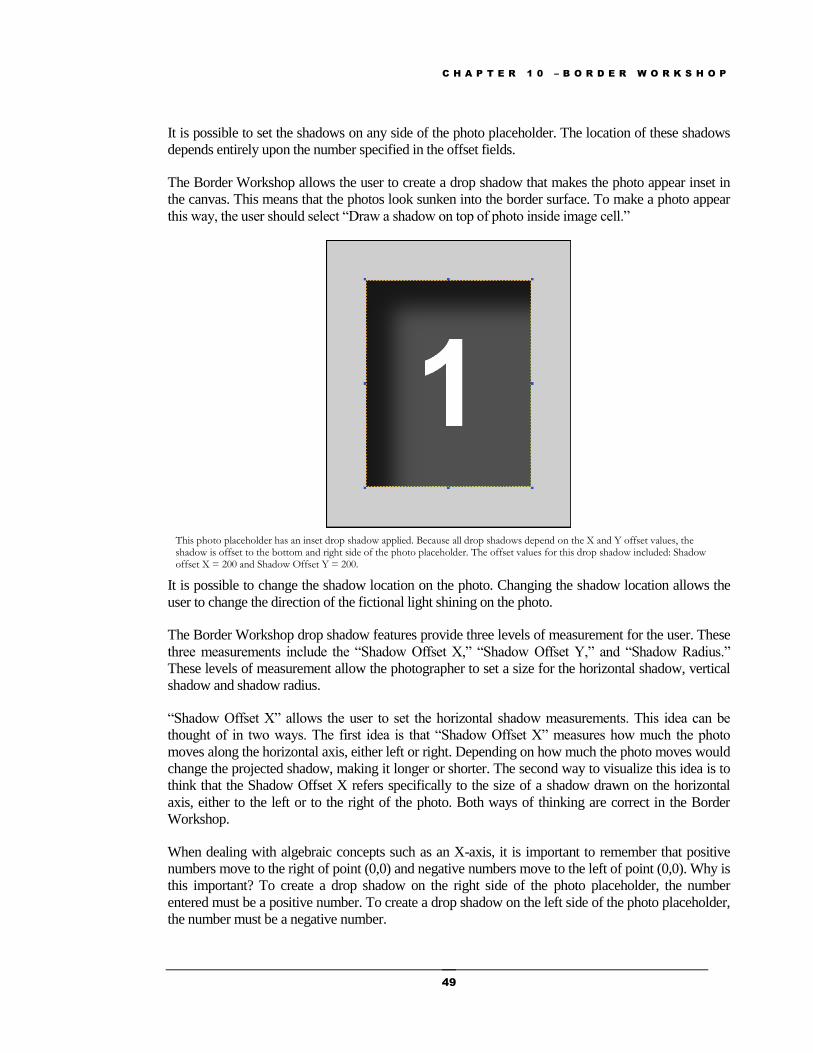
C H A P T E R 1 0 – B O R D E R W O R K S H O P
49
It is possible to set the shadows on any side of the photo placeholder. The location of these shadows
depends entirely upon the number specified in the offset fields.
The Border Workshop allows the user to create a drop shadow that makes the photo appear inset in
the canvas. This means that the photos look sunken into the border surface. To make a photo appear
this way, the user should select “Draw a shadow on top of photo inside image cell.”
It is possible to change the shadow location on the photo. Changing the shadow location allows the
user to change the direction of the fictional light shining on the photo.
The Border Workshop drop shadow features provide three levels of measurement for the user. These
three measurements include the “Shadow Offset X,” “Shadow Offset Y,” and “Shadow Radius.”
These levels of measurement allow the photographer to set a size for the horizontal shadow, vertical
shadow and shadow radius.
“Shadow Offset X” allows the user to set the horizontal shadow measurements. This idea can be
thought of in two ways. The first idea is that “Shadow Offset X” measures how much the photo
moves along the horizontal axis, either left or right. Depending on how much the photo moves would
change the projected shadow, making it longer or shorter. The second way to visualize this idea is to
think that the Shadow Offset X refers specifically to the size of a shadow drawn on the horizontal
axis, either to the left or to the right of the photo. Both ways of thinking are correct in the Border
Workshop.
When dealing with algebraic concepts such as an X-axis, it is important to remember that positive
numbers move to the right of point (0,0) and negative numbers move to the left of point (0,0). Why is
this important? To create a drop shadow on the right side of the photo placeholder, the number
entered must be a positive number. To create a drop shadow on the left side of the photo placeholder,
the number must be a negative number.
This photo placeholder has an inset drop shadow applied. Because all drop shadows depend on the X and Y offset values, the shadow is offset to the bottom and right side of the photo placeholder. The offset values for this drop shadow included: Shadow offset X = 200 and Shadow Offset Y = 200.

C H A P T E R 1 0 – B O R D E R W O R K S H O P
50
The same concept applies when the photographer sets “Shadow Offset Y.” Since the X measurement
refers to horizontal movement, the Y measurement refers to vertical movement. Again, there are two
ways to think about the action of this feature. The first idea is the “Shadow Offset Y” measures how
much the photo move along the vertical axis, either up or down. The length of the movement would
determine the length of the visible shadow making it longer or shorter. The second idea is that
Shadow Offset Y refers specifically to the size of a shadow drawn on the vertical axis, either above or
below the photo placeholder.
Photo 1 is assigned a Shadow Offset X of -100 while Photo 2 is assigned a Shadow Offset X of 100.

C H A P T E R 1 0 – B O R D E R W O R K S H O P
51
Just like the X-axis numbers, Y-axis numbers can move in a positive and negative direction. When
you move up from the point (0,0) the number is positive. When a user moves below the point (0,0)
the number is negative. This means that positive numbers create shadows above the photo and
negative numbers create shadows below the photo.
The best part about the drop shadow feature is the ability to move a shadow both on the X-axis and
the Y-axis. This means it is possible to build a shadow on two sides of a photo placeholder. The
previous figure displays all the available configurations of a standard and inset drop shadow. Both X
and Y settings are showing the measurements 100 or -100.
The final part of the drop shadow feature allows the user to change the shadow radius. Border
Workshop user can change the shadow radius when they want to change the blurring on the drop
shadow. As the number is increased, the blurring effect applied to the shadow becomes more
pronounced.
The diagram shows 5 photos with different shadow radius values. Photo1 has a radius value of 10. Photo2 has a radius value of 50. Photo3 has a radius value of 100. Photo4 has a radius value of 150. Photo5 has a radius value of 200.
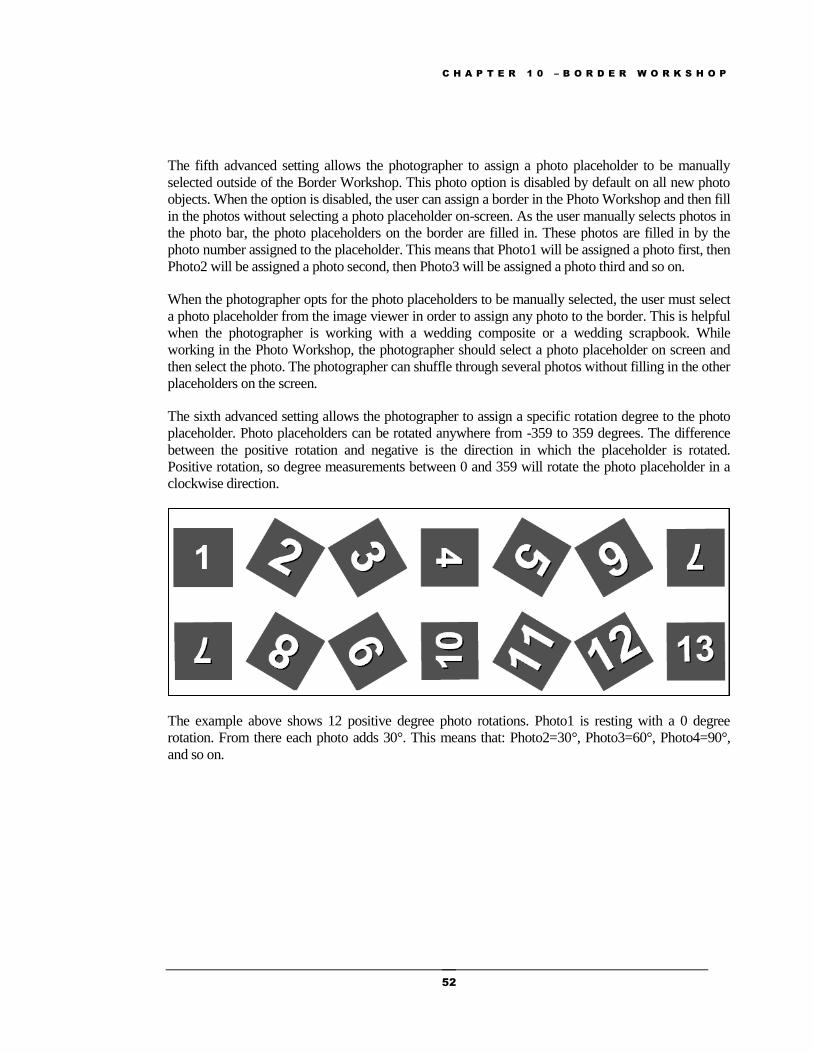
C H A P T E R 1 0 – B O R D E R W O R K S H O P
52
The fifth advanced setting allows the photographer to assign a photo placeholder to be manually
selected outside of the Border Workshop. This photo option is disabled by default on all new photo
objects. When the option is disabled, the user can assign a border in the Photo Workshop and then fill
in the photos without selecting a photo placeholder on-screen. As the user manually selects photos in
the photo bar, the photo placeholders on the border are filled in. These photos are filled in by the
photo number assigned to the placeholder. This means that Photo1 will be assigned a photo first, then
Photo2 will be assigned a photo second, then Photo3 will be assigned a photo third and so on.
When the photographer opts for the photo placeholders to be manually selected, the user must select
a photo placeholder from the image viewer in order to assign any photo to the border. This is helpful
when the photographer is working with a wedding composite or a wedding scrapbook. While
working in the Photo Workshop, the photographer should select a photo placeholder on screen and
then select the photo. The photographer can shuffle through several photos without filling in the other
placeholders on the screen.
The sixth advanced setting allows the photographer to assign a specific rotation degree to the photo
placeholder. Photo placeholders can be rotated anywhere from -359 to 359 degrees. The difference
between the positive rotation and negative is the direction in which the placeholder is rotated.
Positive rotation, so degree measurements between 0 and 359 will rotate the photo placeholder in a
clockwise direction.
The example above shows 12 positive degree photo rotations. Photo1 is resting with a 0 degree
rotation. From there each photo adds 30°. This means that: Photo2=30°, Photo3=60°, Photo4=90°,
and so on.
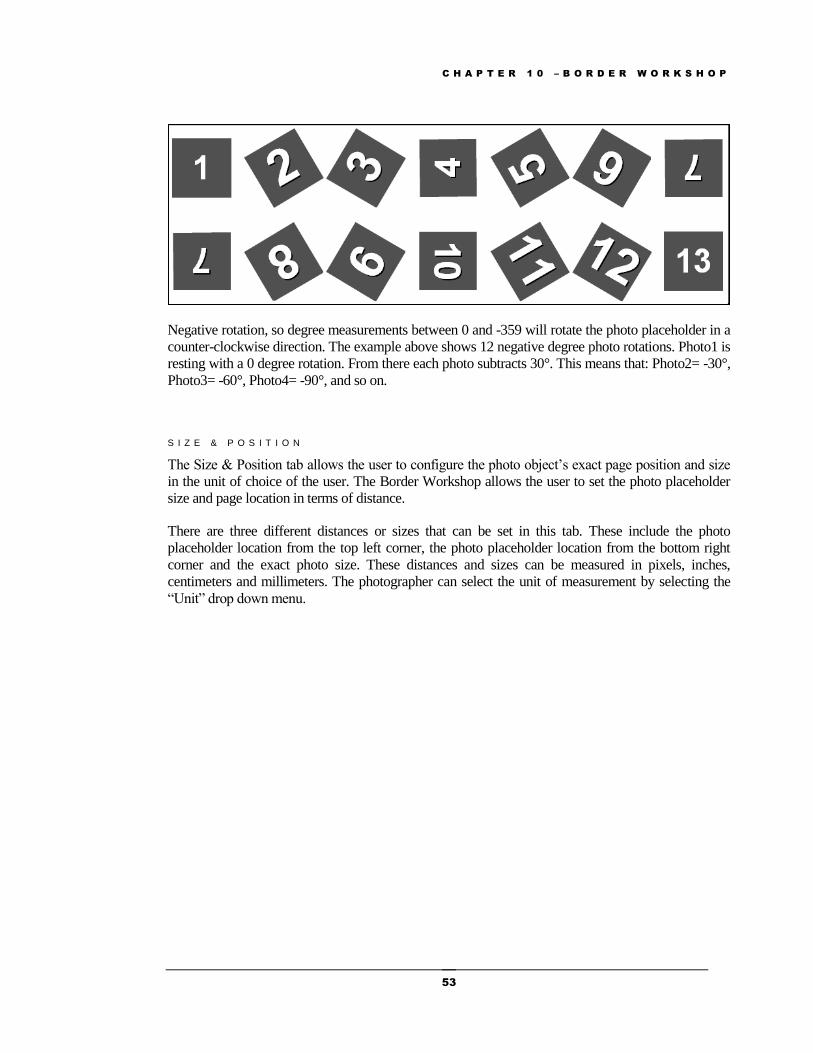
C H A P T E R 1 0 – B O R D E R W O R K S H O P
53
Negative rotation, so degree measurements between 0 and -359 will rotate the photo placeholder in a
counter-clockwise direction. The example above shows 12 negative degree photo rotations. Photo1 is
resting with a 0 degree rotation. From there each photo subtracts 30°. This means that: Photo2= -30°,
Photo3= -60°, Photo4= -90°, and so on.
S I Z E & P O S I T I O N
The Size & Position tab allows the user to configure the photo object’s exact page position and size
in the unit of choice of the user. The Border Workshop allows the user to set the photo placeholder
size and page location in terms of distance.
There are three different distances or sizes that can be set in this tab. These include the photo
placeholder location from the top left corner, the photo placeholder location from the bottom right
corner and the exact photo size. These distances and sizes can be measured in pixels, inches,
centimeters and millimeters. The photographer can select the unit of measurement by selecting the
“Unit” drop down menu.
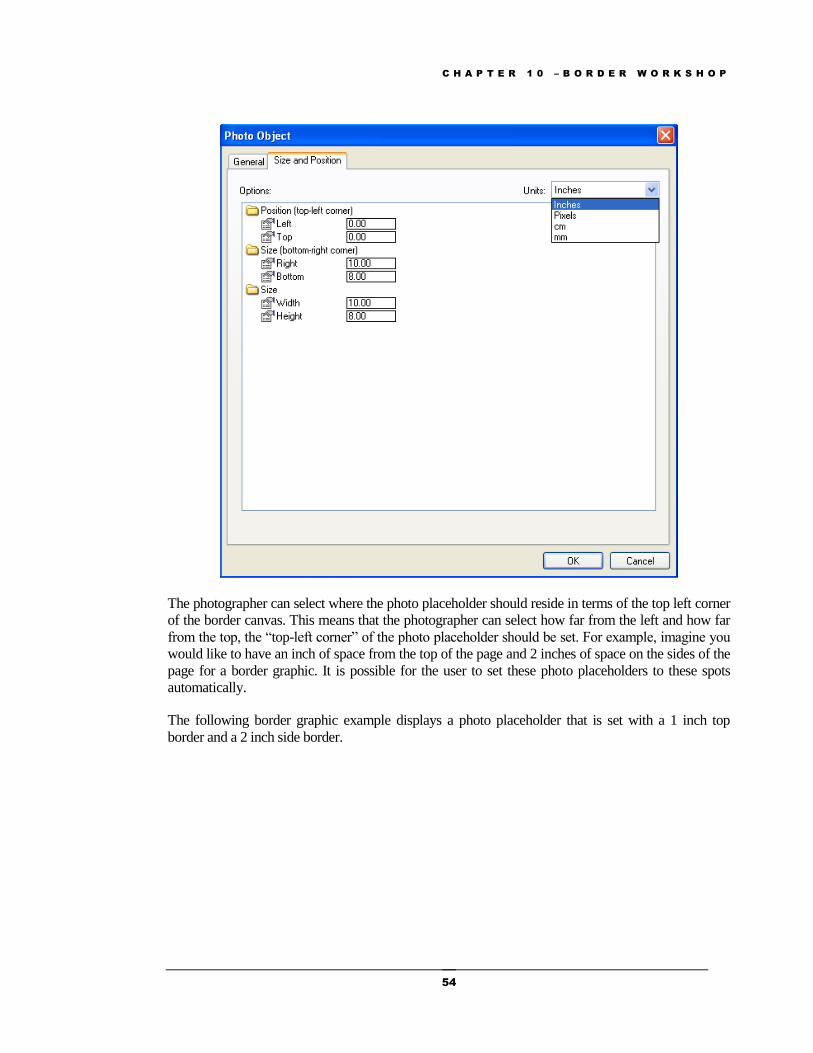
C H A P T E R 1 0 – B O R D E R W O R K S H O P
54
The photographer can select where the photo placeholder should reside in terms of the top left corner
of the border canvas. This means that the photographer can select how far from the left and how far
from the top, the “top-left corner” of the photo placeholder should be set. For example, imagine you
would like to have an inch of space from the top of the page and 2 inches of space on the sides of the
page for a border graphic. It is possible for the user to set these photo placeholders to these spots
automatically.
The following border graphic example displays a photo placeholder that is set with a 1 inch top
border and a 2 inch side border.
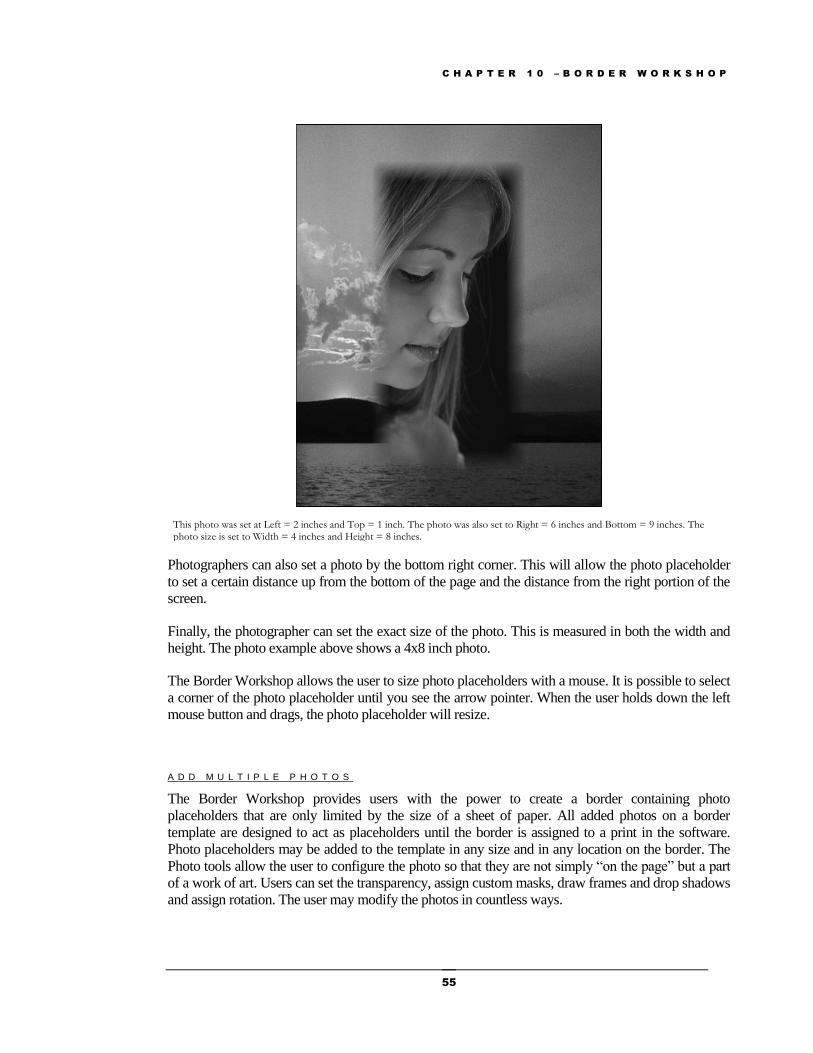
C H A P T E R 1 0 – B O R D E R W O R K S H O P
55
Photographers can also set a photo by the bottom right corner. This will allow the photo placeholder
to set a certain distance up from the bottom of the page and the distance from the right portion of the
screen.
Finally, the photographer can set the exact size of the photo. This is measured in both the width and
height. The photo example above shows a 4x8 inch photo.
The Border Workshop allows the user to size photo placeholders with a mouse. It is possible to select
a corner of the photo placeholder until you see the arrow pointer. When the user holds down the left
mouse button and drags, the photo placeholder will resize.
A D D M U L T I P L E P H O T O S
The Border Workshop provides users with the power to create a border containing photo
placeholders that are only limited by the size of a sheet of paper. All added photos on a border
template are designed to act as placeholders until the border is assigned to a print in the software.
Photo placeholders may be added to the template in any size and in any location on the border. The
Photo tools allow the user to configure the photo so that they are not simply “on the page” but a part
of a work of art. Users can set the transparency, assign custom masks, draw frames and drop shadows
and assign rotation. The user may modify the photos in countless ways.
This photo was set at Left = 2 inches and Top = 1 inch. The photo was also set to Right = 6 inches and Bottom = 9 inches. The photo size is set to Width = 4 inches and Height = 8 inches.
C H A P T E R 1 0 – B O R D E R W O R K S H O P
56
P H O T O S
Of all the borders used by professional photographers, there in no border more powerful in scope and
time-saving attributes than a photo composite. Composites are integral to any photographer’s
workflow that includes a large group. School photographers use composites to print classroom
individual pictures or class pictures. Churches use composites to identify each member. Businesses,
sororities, fraternities, sport teams, clubs, etc all use composites to create a professional lingering
composite photo to memorialize their group.
Photographers can create original photo composites in the Darkroom Border Workshop. The
composite options allow for the user to select the number of photo rows and columns, photo size,
orientation, spacing, and overlapping object settings. Users can also set the composite to work by
query.
Darkroom users should have a very good idea of the photo composite characteristics before sitting
down at the software and designing the template. Photographers should have a sense of composite
size. For example, photographers should ask themselves what kind of job is this composite going to
be for? Is the composite for an elementary school class with 20 students or the entire senior class of
600 students? These kinds of concerns change the design dramatically.
Photographers should select “Add Multiple Photos” while in the Border Workshop to begin creation
on a composite object. The “Photos” tab contains all composite configuration options. Photographers
can set the photo number, photo query, photo size, total composite size, photo arrangement, photo
orientation, photo spacing, photo overlapping options and photo distribution options.
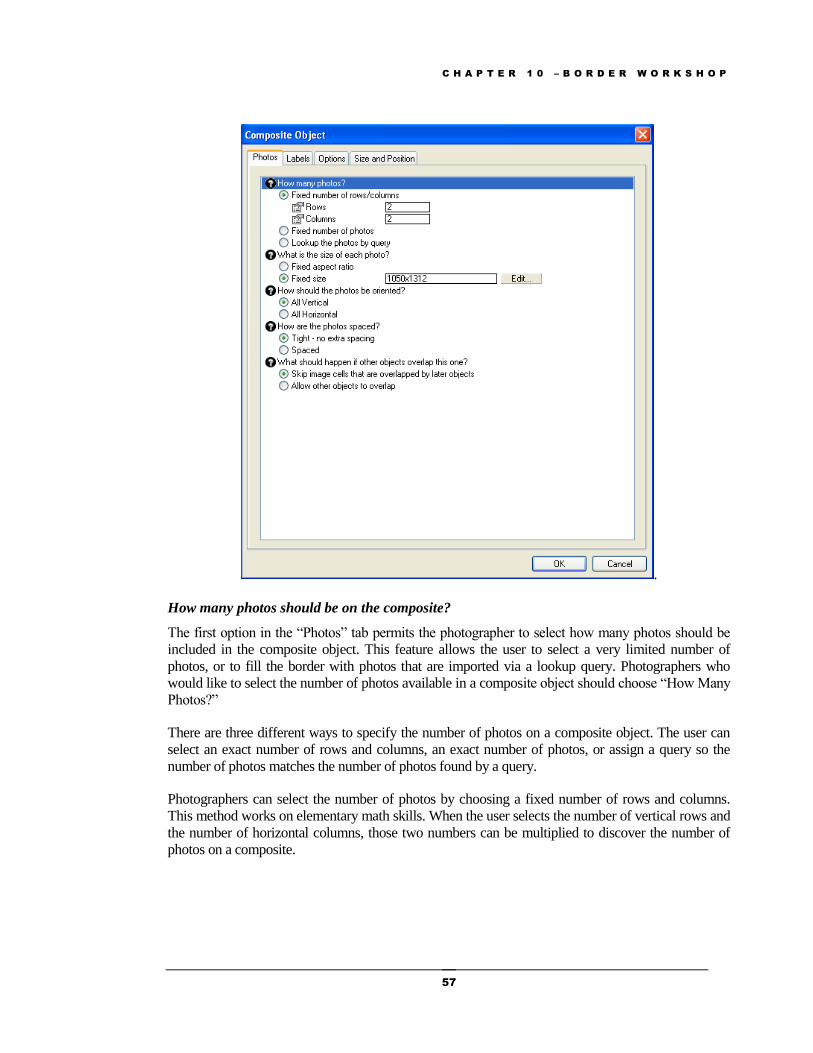
C H A P T E R 1 0 – B O R D E R W O R K S H O P
57
.
How many photos should be on the composite?
The first option in the “Photos” tab permits the photographer to select how many photos should be
included in the composite object. This feature allows the user to select a very limited number of
photos, or to fill the border with photos that are imported via a lookup query. Photographers who
would like to select the number of photos available in a composite object should choose “How Many
Photos?”
There are three different ways to specify the number of photos on a composite object. The user can
select an exact number of rows and columns, an exact number of photos, or assign a query so the
number of photos matches the number of photos found by a query.
Photographers can select the number of photos by choosing a fixed number of rows and columns.
This method works on elementary math skills. When the user selects the number of vertical rows and
the number of horizontal columns, those two numbers can be multiplied to discover the number of
photos on a composite.

C H A P T E R 1 0 – B O R D E R W O R K S H O P
58
For example, if the user selects to have 2 rows and 2 columns, there will be a total of 4 photos on the
screen in the composite object. This is because when 2 is multiplied by 2, the solution is 4. If the user
selects to have 15 rows and 20 columns, the photographer will have 300 photos on the composite.
Photographers can also select the exact number of photos that should appear on the composite object.
This is useful when the photographer knows exactly how many subjects will be included on
composite. There are groups that always have an exact number of participants.
For example, groups like sororities, fraternities, sport teams, and companies generally have the exact
number of photos that should be included in a composite. This number may not change from year to
year and because of that fact, the borders can be set to use a fixed number of photos without any
consequence.
Photographers may use a query to set the number of photos available in a composite object. Photo
Queries are used most often in ExpressDigital Darkroom Assembly. Because Darkroom Assembly is
a data driven workflow solution designed to handle large groups such as schools, sport teams and
church membership directories, all photos have a certain amount of data attached to them. This
allows the Darkroom software to set up queries. When a person asks a query in everyday life, that
person is posing a question. When referring to software, a person can ask a question of the software
and the software will return an answer. In the case of composite images, a photographer can ask a
question or query that will make the software return with photos as an answer.
For example, imagine you are a school day photographer and you need to create a printable
composite that can display all the photos of the entire senior class. Instead of attempting to design a
composite object on that scale, the Darkroom software allows the user to set up the software to pull
all the students from the senior class into a composite object without worrying about how many rows
or columns are being used.
Photographers who want to set up a query should select “Add Query” from the Composite Object
window.
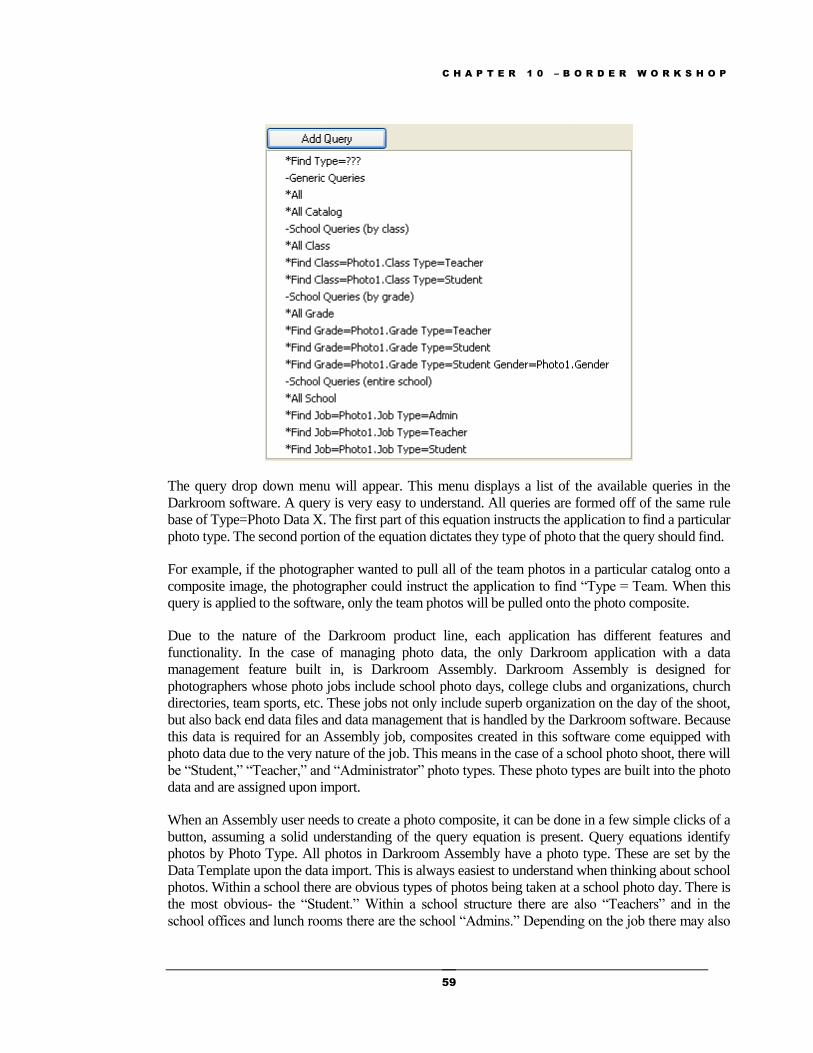
C H A P T E R 1 0 – B O R D E R W O R K S H O P
59
The query drop down menu will appear. This menu displays a list of the available queries in the
Darkroom software. A query is very easy to understand. All queries are formed off of the same rule
base of Type=Photo Data X. The first part of this equation instructs the application to find a particular
photo type. The second portion of the equation dictates they type of photo that the query should find.
For example, if the photographer wanted to pull all of the team photos in a particular catalog onto a
composite image, the photographer could instruct the application to find “Type = Team. When this
query is applied to the software, only the team photos will be pulled onto the photo composite.
Due to the nature of the Darkroom product line, each application has different features and
functionality. In the case of managing photo data, the only Darkroom application with a data
management feature built in, is Darkroom Assembly. Darkroom Assembly is designed for
photographers whose photo jobs include school photo days, college clubs and organizations, church
directories, team sports, etc. These jobs not only include superb organization on the day of the shoot,
but also back end data files and data management that is handled by the Darkroom software. Because
this data is required for an Assembly job, composites created in this software come equipped with
photo data due to the very nature of the job. This means in the case of a school photo shoot, there will
be “Student,” “Teacher,” and “Administrator” photo types. These photo types are built into the photo
data and are assigned upon import.
When an Assembly user needs to create a photo composite, it can be done in a few simple clicks of a
button, assuming a solid understanding of the query equation is present. Query equations identify
photos by Photo Type. All photos in Darkroom Assembly have a photo type. These are set by the
Data Template upon the data import. This is always easiest to understand when thinking about school
photos. Within a school there are obvious types of photos being taken at a school photo day. There is
the most obvious- the “Student.” Within a school structure there are also “Teachers” and in the
school offices and lunch rooms there are the school “Admins.” Depending on the job there may also
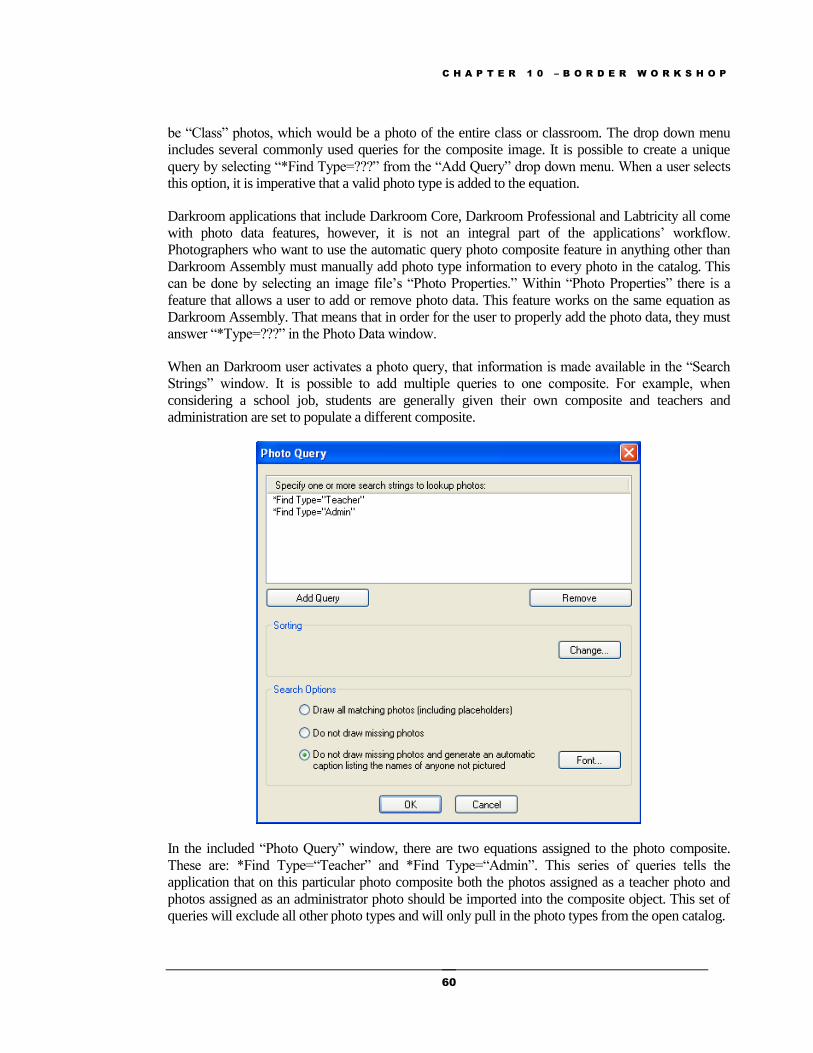
C H A P T E R 1 0 – B O R D E R W O R K S H O P
60
be “Class” photos, which would be a photo of the entire class or classroom. The drop down menu
includes several commonly used queries for the composite image. It is possible to create a unique
query by selecting “*Find Type=???” from the “Add Query” drop down menu. When a user selects
this option, it is imperative that a valid photo type is added to the equation.
Darkroom applications that include Darkroom Core, Darkroom Professional and Labtricity all come
with photo data features, however, it is not an integral part of the applications’ workflow.
Photographers who want to use the automatic query photo composite feature in anything other than
Darkroom Assembly must manually add photo type information to every photo in the catalog. This
can be done by selecting an image file’s “Photo Properties.” Within “Photo Properties” there is a
feature that allows a user to add or remove photo data. This feature works on the same equation as
Darkroom Assembly. That means that in order for the user to properly add the photo data, they must
answer “*Type=???” in the Photo Data window.
When an Darkroom user activates a photo query, that information is made available in the “Search
Strings” window. It is possible to add multiple queries to one composite. For example, when
considering a school job, students are generally given their own composite and teachers and
administration are set to populate a different composite.
In the included “Photo Query” window, there are two equations assigned to the photo composite.
These are: *Find Type=“Teacher” and *Find Type=“Admin”. This series of queries tells the
application that on this particular photo composite both the photos assigned as a teacher photo and
photos assigned as an administrator photo should be imported into the composite object. This set of
queries will exclude all other photo types and will only pull in the photo types from the open catalog.
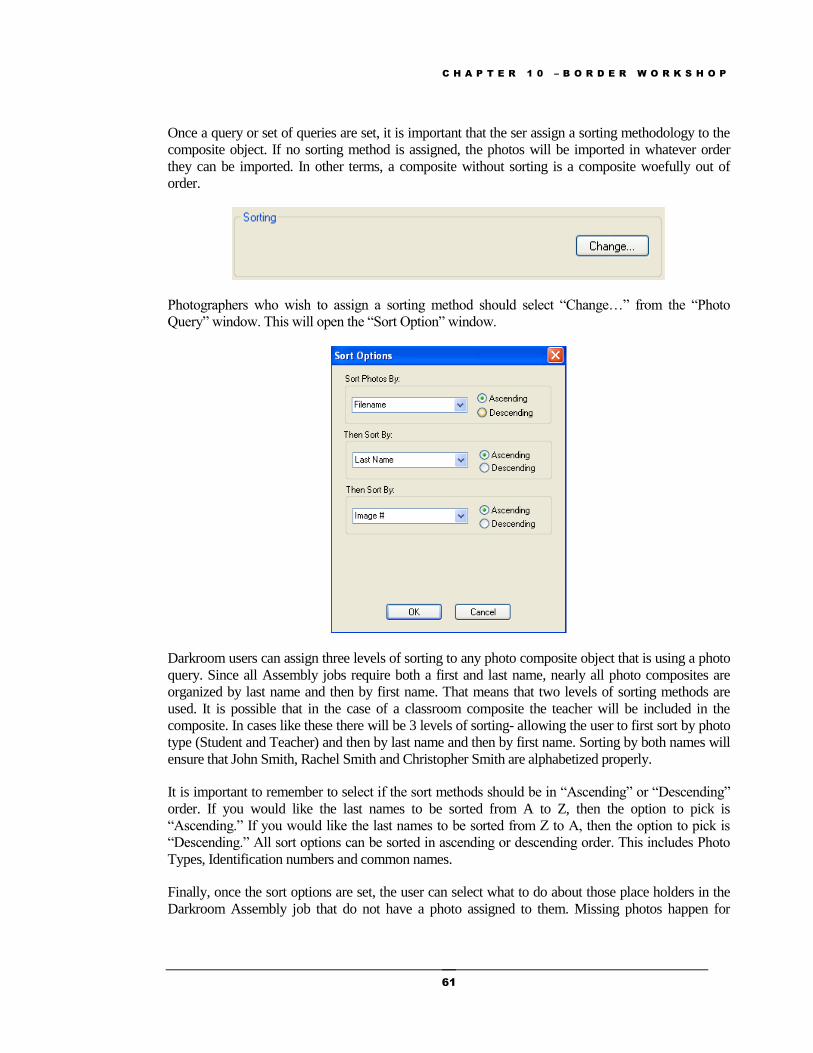
C H A P T E R 1 0 – B O R D E R W O R K S H O P
61
Once a query or set of queries are set, it is important that the ser assign a sorting methodology to the
composite object. If no sorting method is assigned, the photos will be imported in whatever order
they can be imported. In other terms, a composite without sorting is a composite woefully out of
order.
Photographers who wish to assign a sorting method should select “Change…” from the “Photo
Query” window. This will open the “Sort Option” window.
Darkroom users can assign three levels of sorting to any photo composite object that is using a photo
query. Since all Assembly jobs require both a first and last name, nearly all photo composites are
organized by last name and then by first name. That means that two levels of sorting methods are
used. It is possible that in the case of a classroom composite the teacher will be included in the
composite. In cases like these there will be 3 levels of sorting- allowing the user to first sort by photo
type (Student and Teacher) and then by last name and then by first name. Sorting by both names will
ensure that John Smith, Rachel Smith and Christopher Smith are alphabetized properly.
It is important to remember to select if the sort methods should be in “Ascending” or “Descending”
order. If you would like the last names to be sorted from A to Z, then the option to pick is
“Ascending.” If you would like the last names to be sorted from Z to A, then the option to pick is
“Descending.” All sort options can be sorted in ascending or descending order. This includes Photo
Types, Identification numbers and common names.
Finally, once the sort options are set, the user can select what to do about those place holders in the
Darkroom Assembly job that do not have a photo assigned to them. Missing photos happen for
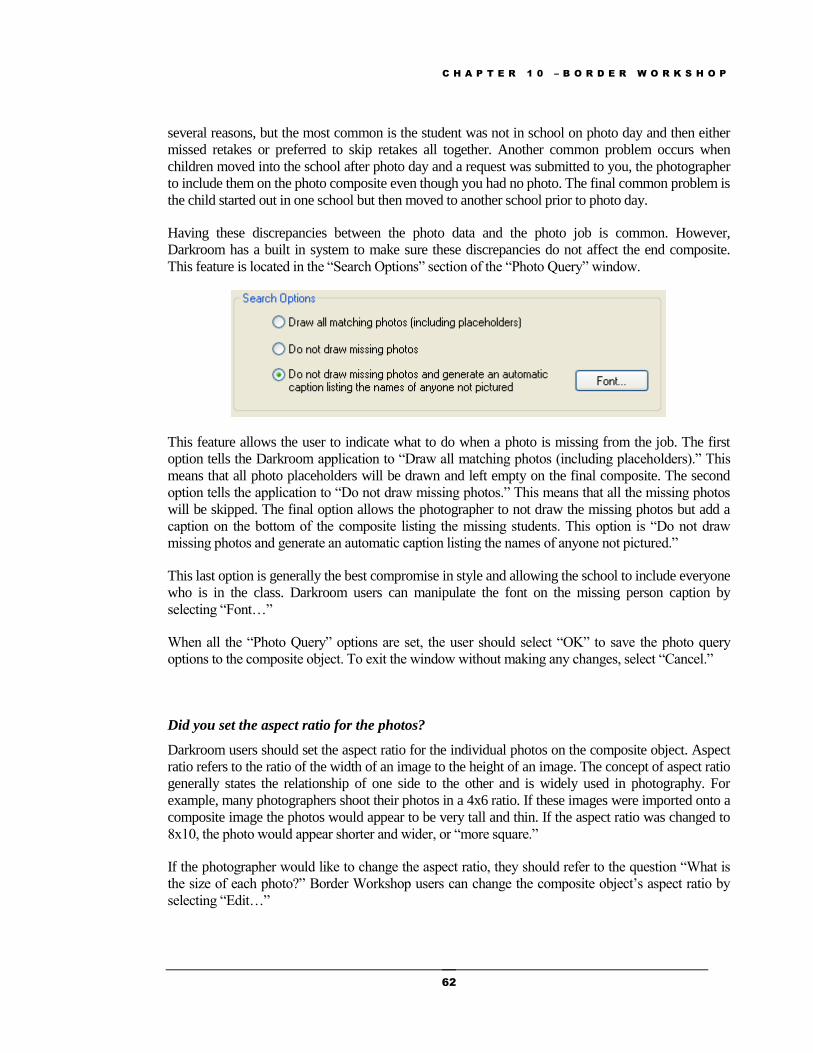
C H A P T E R 1 0 – B O R D E R W O R K S H O P
62
several reasons, but the most common is the student was not in school on photo day and then either
missed retakes or preferred to skip retakes all together. Another common problem occurs when
children moved into the school after photo day and a request was submitted to you, the photographer
to include them on the photo composite even though you had no photo. The final common problem is
the child started out in one school but then moved to another school prior to photo day.
Having these discrepancies between the photo data and the photo job is common. However,
Darkroom has a built in system to make sure these discrepancies do not affect the end composite.
This feature is located in the “Search Options” section of the “Photo Query” window.
This feature allows the user to indicate what to do when a photo is missing from the job. The first
option tells the Darkroom application to “Draw all matching photos (including placeholders).” This
means that all photo placeholders will be drawn and left empty on the final composite. The second
option tells the application to “Do not draw missing photos.” This means that all the missing photos
will be skipped. The final option allows the photographer to not draw the missing photos but add a
caption on the bottom of the composite listing the missing students. This option is “Do not draw
missing photos and generate an automatic caption listing the names of anyone not pictured.”
This last option is generally the best compromise in style and allowing the school to include everyone
who is in the class. Darkroom users can manipulate the font on the missing person caption by
selecting “Font…”
When all the “Photo Query” options are set, the user should select “OK” to save the photo query
options to the composite object. To exit the window without making any changes, select “Cancel.”
Did you set the aspect ratio for the photos?
Darkroom users should set the aspect ratio for the individual photos on the composite object. Aspect
ratio refers to the ratio of the width of an image to the height of an image. The concept of aspect ratio
generally states the relationship of one side to the other and is widely used in photography. For
example, many photographers shoot their photos in a 4x6 ratio. If these images were imported onto a
composite image the photos would appear to be very tall and thin. If the aspect ratio was changed to
8x10, the photo would appear shorter and wider, or “more square.”
If the photographer would like to change the aspect ratio, they should refer to the question “What is
the size of each photo?” Border Workshop users can change the composite object’s aspect ratio by
selecting “Edit…”
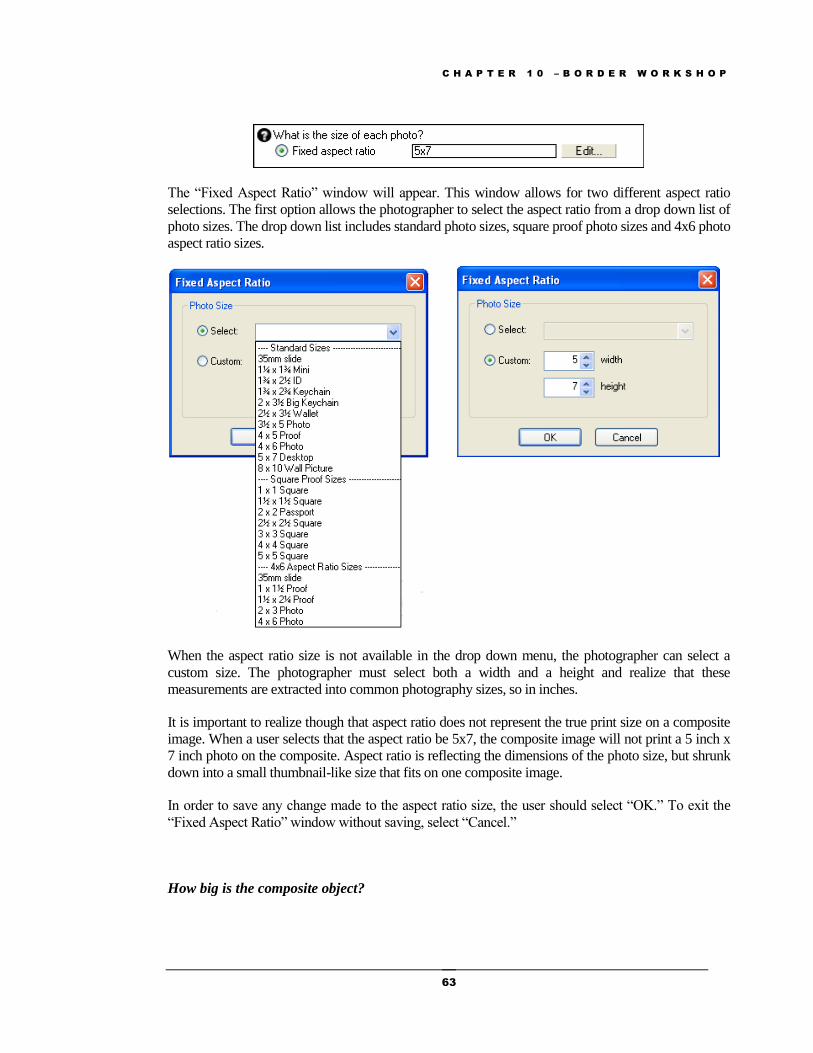
C H A P T E R 1 0 – B O R D E R W O R K S H O P
63
The “Fixed Aspect Ratio” window will appear. This window allows for two different aspect ratio
selections. The first option allows the photographer to select the aspect ratio from a drop down list of
photo sizes. The drop down list includes standard photo sizes, square proof photo sizes and 4x6 photo
aspect ratio sizes.
When the aspect ratio size is not available in the drop down menu, the photographer can select a
custom size. The photographer must select both a width and a height and realize that these
measurements are extracted into common photography sizes, so in inches.
It is important to realize though that aspect ratio does not represent the true print size on a composite
image. When a user selects that the aspect ratio be 5x7, the composite image will not print a 5 inch x
7 inch photo on the composite. Aspect ratio is reflecting the dimensions of the photo size, but shrunk
down into a small thumbnail-like size that fits on one composite image.
In order to save any change made to the aspect ratio size, the user should select “OK.” To exit the
“Fixed Aspect Ratio” window without saving, select “Cancel.”
How big is the composite object?

C H A P T E R 1 0 – B O R D E R W O R K S H O P
64
Darkroom users can assign the exact size of a composite object on a border canvas. Because the
composite object size is determined in pixels, Darkroom users should be able to convert inches into
pixel size.
All borders have a set number of pixels per inch. This size is determined in the “Border Properties”
window. If you are unsure of the number, open the “Border Properties” window to refresh your
memory. In most cases, the borders are set to 300 pixels per inch. This is a general industry standard
and a good place to start from. When you are working with 300 pixels per inch, you will always
multiply your inch size by that. For example, image you are creating a composite object that needs to
take up an 8x10 inch space. In order to determine the pixel size for those dimensions you multiply 8
by 300 and 10 by 300. The end result is 2400 x 3000. For quick math, it is possible to multiple 8 by
3, which equals 24. You can then add the zeroes on the end- so two zeroes because of the two zeroes
in 300. You end up with 24 with two zeroes on the end- so 2400.
Many users prefer that method since multiplying larger numbers without a calculator is daunting for
some. The simple method of adding zeroes allows a user to use their basic multiplication tables in a
rapid method, thus saving time in the end.
It is very easy to set the area constrictions after the pixel size has been determined. To change the
width and height measurements, the user should select the field and then type in the new
measurement. Once the measurement is modified, the composite object size will reflect that change
when the user exits the “Composite Object” window.
How should you arrange the photos on the border canvas?
Darkroom photographers have the ability to arrange the photos within the composite object in terms
of rows and columns. The Border Workshop allows the users who are creating a composite object
with either a fixed number s photos or by photo query the ability to set a number of rows and
columns. This feature gives control over the composite object layout to the composite designer.
With photo query layouts, the photographer should know the number of photos that will eventually
be included on the composite in order to manipulate the column and row formatting.
Because some tables can be confusing, the followings is a brief description of how rows and columns
are different. The first main point is that rows are always vertical constructs and columns are always
horizontal constructs. This is easy to remember when thinking about rows and columns outside an
excel document. When you consider a column on a house, that structure is generally load bearing and
starts at the ground and stands vertically toward the ceiling or roof. When considering a row, think of
a time you looked for your seat at a performance. You are seated in rows which are set up
horizontally across a flat surface. This is exactly how an excel table, or a composite table is set up.
The columns “go up and down” and the rows go “back and forth.”
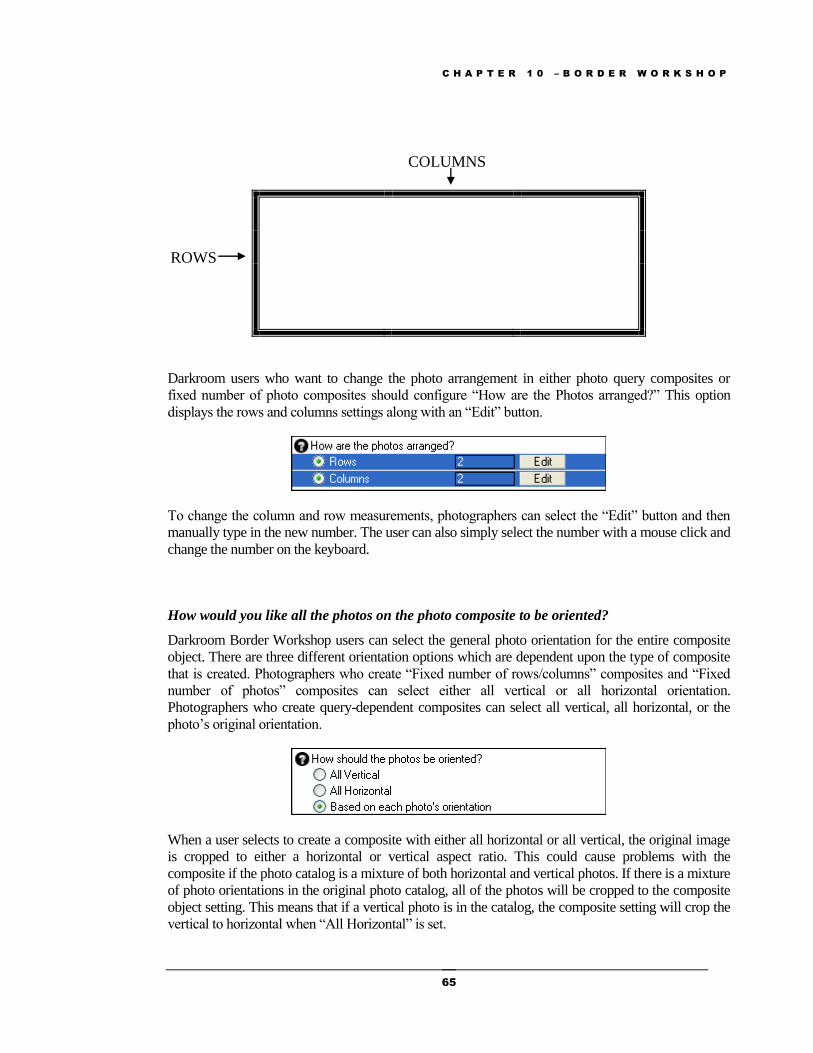
C H A P T E R 1 0 – B O R D E R W O R K S H O P
65
Darkroom users who want to change the photo arrangement in either photo query composites or
fixed number of photo composites should configure “How are the Photos arranged?” This option
displays the rows and columns settings along with an “Edit” button.
To change the column and row measurements, photographers can select the “Edit” button and then
manually type in the new number. The user can also simply select the number with a mouse click and
change the number on the keyboard.
How would you like all the photos on the photo composite to be oriented?
Darkroom Border Workshop users can select the general photo orientation for the entire composite
object. There are three different orientation options which are dependent upon the type of composite
that is created. Photographers who create “Fixed number of rows/columns” composites and “Fixed
number of photos” composites can select either all vertical or all horizontal orientation.
Photographers who create query-dependent composites can select all vertical, all horizontal, or the
photo’s original orientation.
When a user selects to create a composite with either all horizontal or all vertical, the original image
is cropped to either a horizontal or vertical aspect ratio. This could cause problems with the
composite if the photo catalog is a mixture of both horizontal and vertical photos. If there is a mixture
of photo orientations in the original photo catalog, all of the photos will be cropped to the composite
object setting. This means that if a vertical photo is in the catalog, the composite setting will crop the
vertical to horizontal when “All Horizontal” is set.
ROWS
COLUMNS
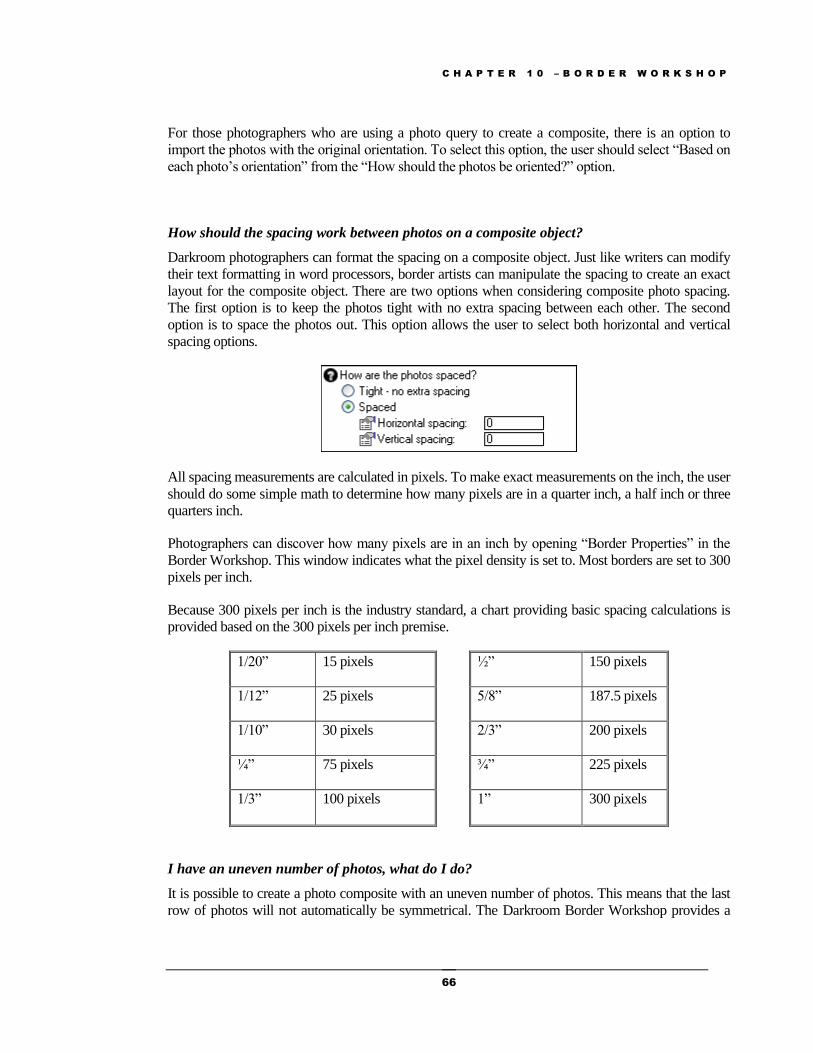
C H A P T E R 1 0 – B O R D E R W O R K S H O P
66
For those photographers who are using a photo query to create a composite, there is an option to
import the photos with the original orientation. To select this option, the user should select “Based on
each photo’s orientation” from the “How should the photos be oriented?” option.
How should the spacing work between photos on a composite object?
Darkroom photographers can format the spacing on a composite object. Just like writers can modify
their text formatting in word processors, border artists can manipulate the spacing to create an exact
layout for the composite object. There are two options when considering composite photo spacing.
The first option is to keep the photos tight with no extra spacing between each other. The second
option is to space the photos out. This option allows the user to select both horizontal and vertical
spacing options.
All spacing measurements are calculated in pixels. To make exact measurements on the inch, the user
should do some simple math to determine how many pixels are in a quarter inch, a half inch or three
quarters inch.
Photographers can discover how many pixels are in an inch by opening “Border Properties” in the
Border Workshop. This window indicates what the pixel density is set to. Most borders are set to 300
pixels per inch.
Because 300 pixels per inch is the industry standard, a chart providing basic spacing calculations is
provided based on the 300 pixels per inch premise.
1/20” 15 pixels ½” 150 pixels
1/12” 25 pixels 5/8” 187.5 pixels
1/10” 30 pixels 2/3” 200 pixels
¼” 75 pixels ¾” 225 pixels
1/3” 100 pixels 1” 300 pixels
I have an uneven number of photos, what do I do?
It is possible to create a photo composite with an uneven number of photos. This means that the last
row of photos will not automatically be symmetrical. The Darkroom Border Workshop provides a
C H A P T E R 1 0 – B O R D E R W O R K S H O P
67
feature where the application itself will make the row symmetrical with the rest of the photo
composite. Because this can only apply to borders created with fixed number of photos or borders
created by a photo query, the option is only visible when these two types of composites are being
configured.
There are four options for the user to select to fix the uneven number of photos in the last row
problem. These options include allowing the Darkroom application to distribute the photos to the left,
to the right, to the center or to the sides.
The following is a diagram showing what will happen to a photo composites last row depending on
the photo distribution selected.
Is it possible to allow other objects to overlap the composite object?
The Darkroom Border Workshop allows the composite designer to create a multiple photo object and
then overlap it with another object onscreen. When this occurs the photos will not reorganize
themselves around the graphical or text object, but will be covered by the object. Photographers
Here are the distribution settings from top left to bottom right: Left, Center, Right and then Sides.
C H A P T E R 1 0 – B O R D E R W O R K S H O P
68
generally use this feature when the border design includes the creation of graphical objects that need
to overlap all or part of a composite object photo.
There are two options when the user is asked “What should happen is other objects overlap this
one?” The first option allows the user to skip image cells that are overlapped by later objects. This
feature allows the user to add an object but it cannot overlap any photos on the composite object.
When a later object, such as a graphic is added, the application will reorganize the photos depending
on where the graphical object is set on the border canvas.
The second option allows the photographer to cover an existing photo in the composite image
without changing the entire composite image organization. To utilize this feature the designer should
select “Allow object to overlap.” There is one caveat to this feature that should be noted before use.
This feature “displaces” composite images. When those photos are hidden behind a graphical or text
object, they are not used for photos on the composite. For example, imagine you have 30 photos on a
composite border. You add a graphic which covers 4 of those photos. When you use that border in
the Photo Workshop, only 26 photos will appear on the composite image. The four photos behind the
graphic will not have a photo assigned to them.
What is the starting photo composite starting number?
All photo composites have the feature which allows Darkroom photographer to change the starting
number for the first photo in a composite object. Because using one or two photos on a composite
image that should be highlighted or emphasized has become a common occurrence, the Darkroom
Border Workshop allows all users to change the starting photo number. Making these special images
Photo1 or Photo2 permits the photographer to quickly add photos to this portion of the border
without accessing the composite object.
To change the starting number, the user should click the number field next to the “Starting Number.”
The photographer can select any number to fulfill that starting number requirement.
L A B E L S
The Labels tab allows the user to add photo labels to the composite object individual photos. In
Darkroom Assembly, these labels will pull from the group imported photo data and will match the
subject data with the subject photo. In the other Darkroom software, the labels will show the
information assigned to the special text.
C H A P T E R 1 0 – B O R D E R W O R K S H O P
69
Darkroom users must select “Show Labels” from the Labels tab in the Composite Object window to
view a photo label. Once the photo label is activated, the photographer can add special text codes to
the composite. Special text codes are available in an extensive menu that can be opened when the
user selects “Insert Special Text…” These codes are available in Appendix X, located at the
conclusion of the book. In addition to the visible codes in the menu, there are additional special text
codes listed in Appendix X.
The Border Workshop user is given the ability to format the composite photo labels. Not only can the
user select where on the page the label should go in relationship to the photo, but the user can also
format the text features itself.
In the position field the user can select one of four different options. These are “Above,” “Top,”
“Bottom,” and “Below.” When the label is set to appear “Above” a photo, the text box will not
overlap the photo at all. The photo label will appear directly above the individual photo. When the
label is set to appear on “Top” of the individual photo, the text box will be located in the top portion
of the photo. The text will be printed on the photo. The label can also be set to appear at the
“Bottom” of the individual photo. This means that the text label will be positioned on the photo in the
lower portion of the photo. Finally, the label can be positioned below the individual photo. This
allows the photographer to position the text label below the individual photo so no portion of the text
covers the photo.
C H A P T E R 1 0 – B O R D E R W O R K S H O P
70
Border Workshop users can also specify the text label justification. This means the text can be right-
justified, left-justified or center-justified. These options are available in the second Position drop
down menu.
The last label option allows the users to format the font features. It is important to remember that font
size should be set to the ideal size. The assigned text will be scaled down to fit in the size of the photo
for longer names. To access the font options, the user should select “Font.” Within this window, the
user can change the font, font style, color, size, effects and script.
O P T I O N S
The Options tab allows the user to configure a multiple photo object’s Transparency and Advanced
options. A multiple photo object refers specifically to composite objects. The Transparency options
allow the user to change the photo overall transparency, set a pre-defined or custom mask or makr a
composite object as chroma-key.
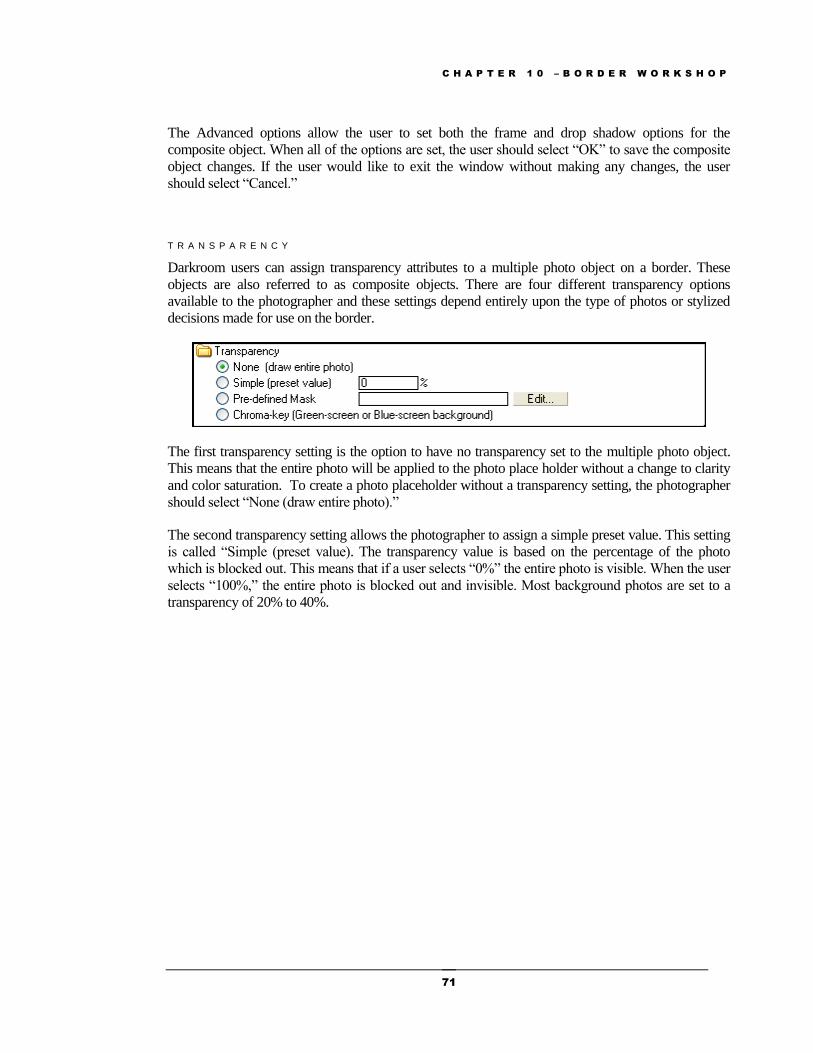
C H A P T E R 1 0 – B O R D E R W O R K S H O P
71
The Advanced options allow the user to set both the frame and drop shadow options for the
composite object. When all of the options are set, the user should select “OK” to save the composite
object changes. If the user would like to exit the window without making any changes, the user
should select “Cancel.”
T R A N S P A R E N C Y
Darkroom users can assign transparency attributes to a multiple photo object on a border. These
objects are also referred to as composite objects. There are four different transparency options
available to the photographer and these settings depend entirely upon the type of photos or stylized
decisions made for use on the border.
The first transparency setting is the option to have no transparency set to the multiple photo object.
This means that the entire photo will be applied to the photo place holder without a change to clarity
and color saturation. To create a photo placeholder without a transparency setting, the photographer
should select “None (draw entire photo).”
The second transparency setting allows the photographer to assign a simple preset value. This setting
is called “Simple (preset value). The transparency value is based on the percentage of the photo
which is blocked out. This means that if a user selects “0%” the entire photo is visible. When the user
selects “100%,” the entire photo is blocked out and invisible. Most background photos are set to a
transparency of 20% to 40%.
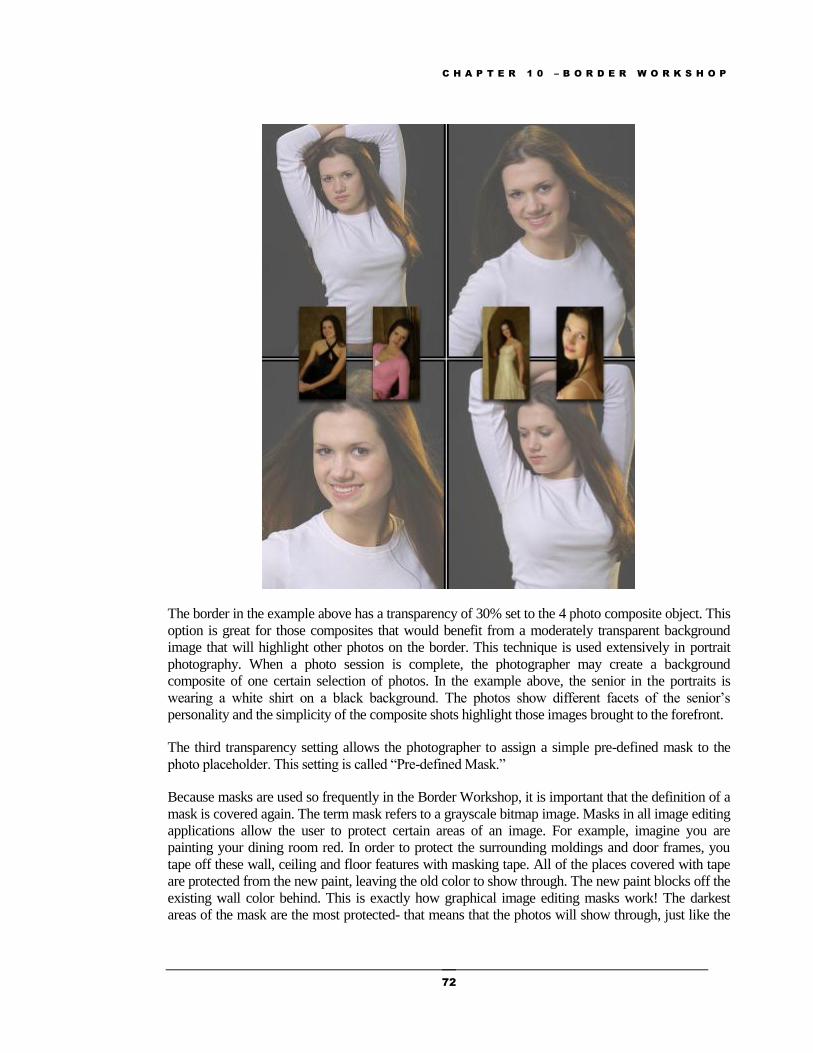
C H A P T E R 1 0 – B O R D E R W O R K S H O P
72
The border in the example above has a transparency of 30% set to the 4 photo composite object. This
option is great for those composites that would benefit from a moderately transparent background
image that will highlight other photos on the border. This technique is used extensively in portrait
photography. When a photo session is complete, the photographer may create a background
composite of one certain selection of photos. In the example above, the senior in the portraits is
wearing a white shirt on a black background. The photos show different facets of the senior’s
personality and the simplicity of the composite shots highlight those images brought to the forefront.
The third transparency setting allows the photographer to assign a simple pre-defined mask to the
photo placeholder. This setting is called “Pre-defined Mask.”
Because masks are used so frequently in the Border Workshop, it is important that the definition of a
mask is covered again. The term mask refers to a grayscale bitmap image. Masks in all image editing
applications allow the user to protect certain areas of an image. For example, imagine you are
painting your dining room red. In order to protect the surrounding moldings and door frames, you
tape off these wall, ceiling and floor features with masking tape. All of the places covered with tape
are protected from the new paint, leaving the old color to show through. The new paint blocks off the
existing wall color behind. This is exactly how graphical image editing masks work! The darkest
areas of the mask are the most protected- that means that the photos will show through, just like the
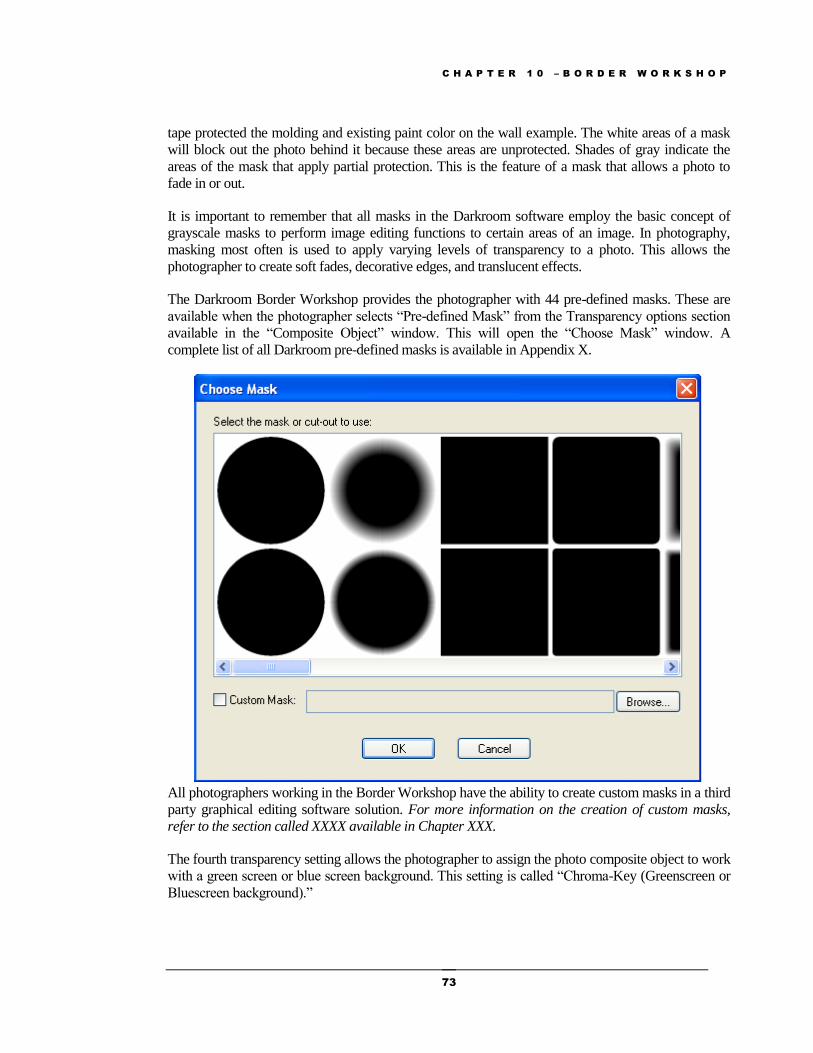
C H A P T E R 1 0 – B O R D E R W O R K S H O P
73
tape protected the molding and existing paint color on the wall example. The white areas of a mask
will block out the photo behind it because these areas are unprotected. Shades of gray indicate the
areas of the mask that apply partial protection. This is the feature of a mask that allows a photo to
fade in or out.
It is important to remember that all masks in the Darkroom software employ the basic concept of
grayscale masks to perform image editing functions to certain areas of an image. In photography,
masking most often is used to apply varying levels of transparency to a photo. This allows the
photographer to create soft fades, decorative edges, and translucent effects.
The Darkroom Border Workshop provides the photographer with 44 pre-defined masks. These are
available when the photographer selects “Pre-defined Mask” from the Transparency options section
available in the “Composite Object” window. This will open the “Choose Mask” window. A
complete list of all Darkroom pre-defined masks is available in Appendix X.
All photographers working in the Border Workshop have the ability to create custom masks in a third
party graphical editing software solution. For more information on the creation of custom masks,
refer to the section called XXXX available in Chapter XXX.
The fourth transparency setting allows the photographer to assign the photo composite object to work
with a green screen or blue screen background. This setting is called “Chroma-Key (Greenscreen or
Bluescreen background).”
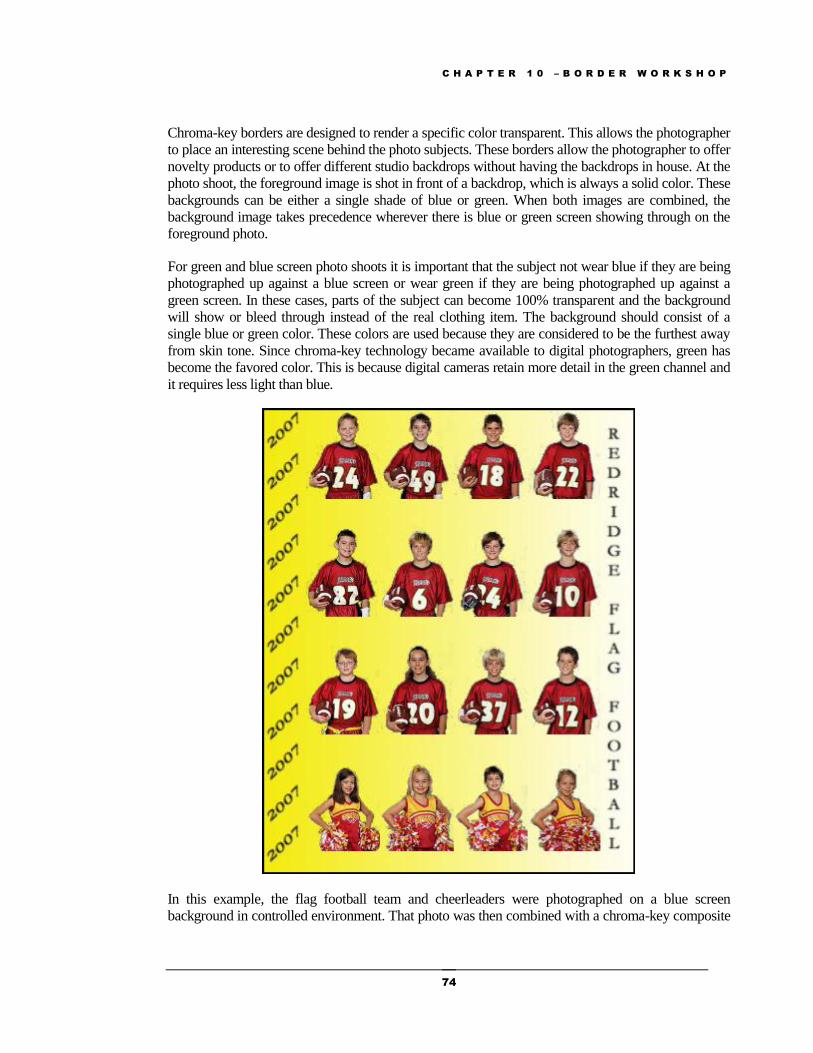
C H A P T E R 1 0 – B O R D E R W O R K S H O P
74
Chroma-key borders are designed to render a specific color transparent. This allows the photographer
to place an interesting scene behind the photo subjects. These borders allow the photographer to offer
novelty products or to offer different studio backdrops without having the backdrops in house. At the
photo shoot, the foreground image is shot in front of a backdrop, which is always a solid color. These
backgrounds can be either a single shade of blue or green. When both images are combined, the
background image takes precedence wherever there is blue or green screen showing through on the
foreground photo.
For green and blue screen photo shoots it is important that the subject not wear blue if they are being
photographed up against a blue screen or wear green if they are being photographed up against a
green screen. In these cases, parts of the subject can become 100% transparent and the background
will show or bleed through instead of the real clothing item. The background should consist of a
single blue or green color. These colors are used because they are considered to be the furthest away
from skin tone. Since chroma-key technology became available to digital photographers, green has
become the favored color. This is because digital cameras retain more detail in the green channel and
it requires less light than blue.
In this example, the flag football team and cheerleaders were photographed on a blue screen
background in controlled environment. That photo was then combined with a chroma-key composite
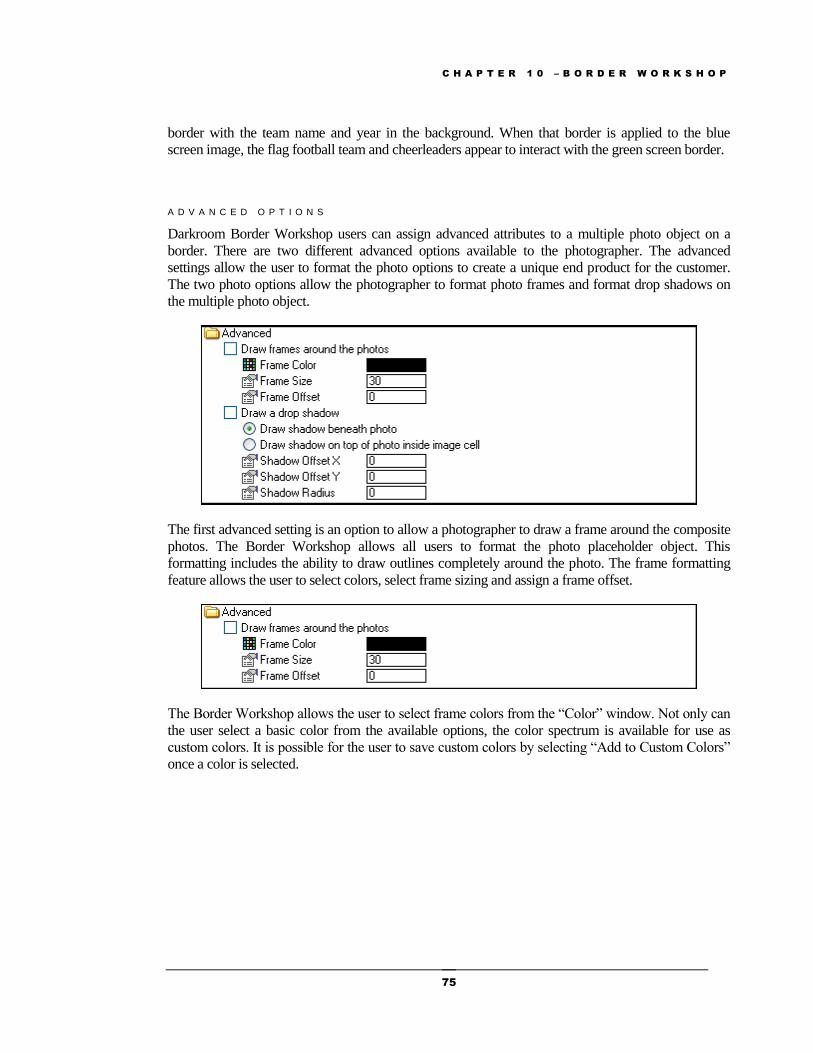
C H A P T E R 1 0 – B O R D E R W O R K S H O P
75
border with the team name and year in the background. When that border is applied to the blue
screen image, the flag football team and cheerleaders appear to interact with the green screen border.
A D V A N C E D O P T I O N S
Darkroom Border Workshop users can assign advanced attributes to a multiple photo object on a
border. There are two different advanced options available to the photographer. The advanced
settings allow the user to format the photo options to create a unique end product for the customer.
The two photo options allow the photographer to format photo frames and format drop shadows on
the multiple photo object.
The first advanced setting is an option to allow a photographer to draw a frame around the composite
photos. The Border Workshop allows all users to format the photo placeholder object. This
formatting includes the ability to draw outlines completely around the photo. The frame formatting
feature allows the user to select colors, select frame sizing and assign a frame offset.
The Border Workshop allows the user to select frame colors from the “Color” window. Not only can
the user select a basic color from the available options, the color spectrum is available for use as
custom colors. It is possible for the user to save custom colors by selecting “Add to Custom Colors”
once a color is selected.
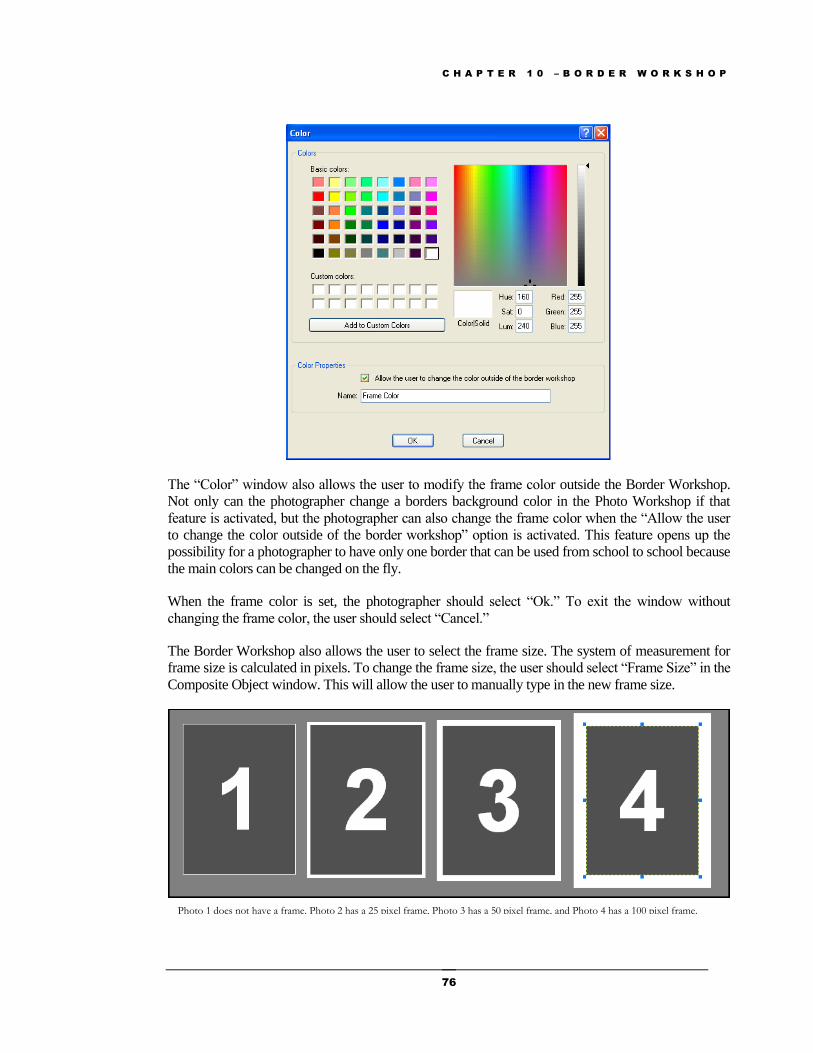
C H A P T E R 1 0 – B O R D E R W O R K S H O P
76
The “Color” window also allows the user to modify the frame color outside the Border Workshop.
Not only can the photographer change a borders background color in the Photo Workshop if that
feature is activated, but the photographer can also change the frame color when the “Allow the user
to change the color outside of the border workshop” option is activated. This feature opens up the
possibility for a photographer to have only one border that can be used from school to school because
the main colors can be changed on the fly.
When the frame color is set, the photographer should select “Ok.” To exit the window without
changing the frame color, the user should select “Cancel.”
The Border Workshop also allows the user to select the frame size. The system of measurement for
frame size is calculated in pixels. To change the frame size, the user should select “Frame Size” in the
Composite Object window. This will allow the user to manually type in the new frame size.
Photo 1 does not have a frame. Photo 2 has a 25 pixel frame, Photo 3 has a 50 pixel frame, and Photo 4 has a 100 pixel frame.
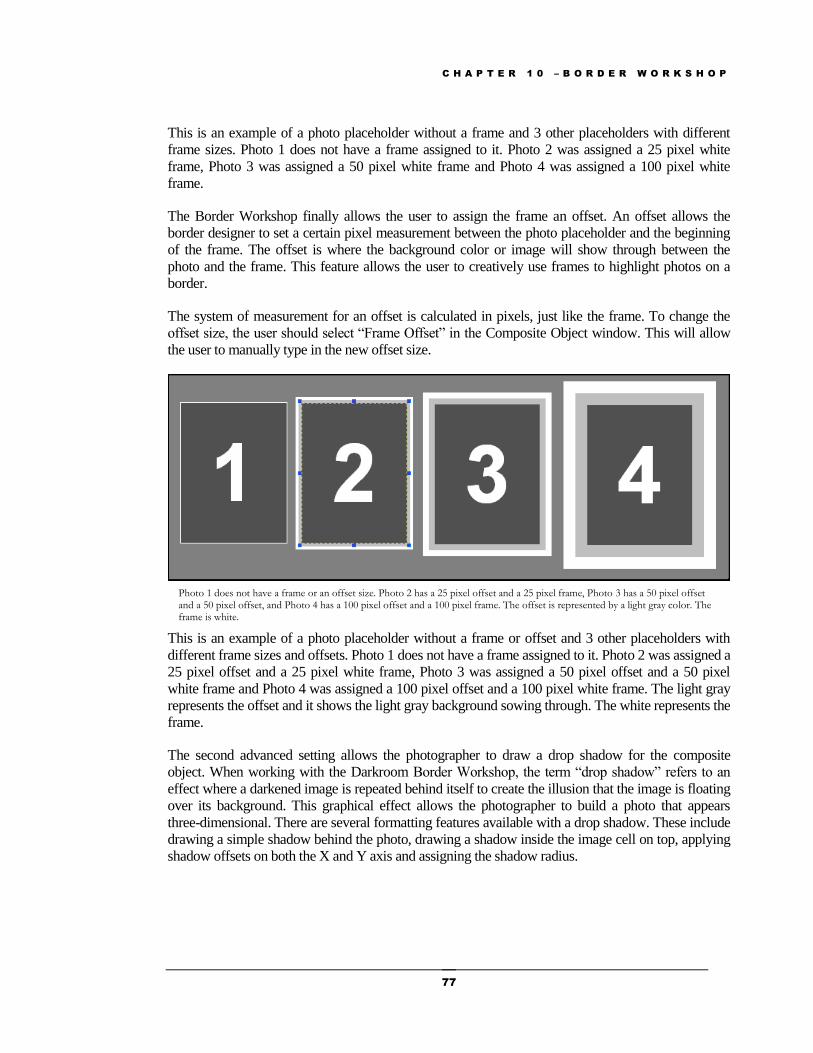
C H A P T E R 1 0 – B O R D E R W O R K S H O P
77
This is an example of a photo placeholder without a frame and 3 other placeholders with different
frame sizes. Photo 1 does not have a frame assigned to it. Photo 2 was assigned a 25 pixel white
frame, Photo 3 was assigned a 50 pixel white frame and Photo 4 was assigned a 100 pixel white
frame.
The Border Workshop finally allows the user to assign the frame an offset. An offset allows the
border designer to set a certain pixel measurement between the photo placeholder and the beginning
of the frame. The offset is where the background color or image will show through between the
photo and the frame. This feature allows the user to creatively use frames to highlight photos on a
border.
The system of measurement for an offset is calculated in pixels, just like the frame. To change the
offset size, the user should select “Frame Offset” in the Composite Object window. This will allow
the user to manually type in the new offset size.
This is an example of a photo placeholder without a frame or offset and 3 other placeholders with
different frame sizes and offsets. Photo 1 does not have a frame assigned to it. Photo 2 was assigned a
25 pixel offset and a 25 pixel white frame, Photo 3 was assigned a 50 pixel offset and a 50 pixel
white frame and Photo 4 was assigned a 100 pixel offset and a 100 pixel white frame. The light gray
represents the offset and it shows the light gray background sowing through. The white represents the
frame.
The second advanced setting allows the photographer to draw a drop shadow for the composite
object. When working with the Darkroom Border Workshop, the term “drop shadow” refers to an
effect where a darkened image is repeated behind itself to create the illusion that the image is floating
over its background. This graphical effect allows the photographer to build a photo that appears
three-dimensional. There are several formatting features available with a drop shadow. These include
drawing a simple shadow behind the photo, drawing a shadow inside the image cell on top, applying
shadow offsets on both the X and Y axis and assigning the shadow radius.
Photo 1 does not have a frame or an offset size. Photo 2 has a 25 pixel offset and a 25 pixel frame, Photo 3 has a 50 pixel offset and a 50 pixel offset, and Photo 4 has a 100 pixel offset and a 100 pixel frame. The offset is represented by a light gray color. The frame is white.
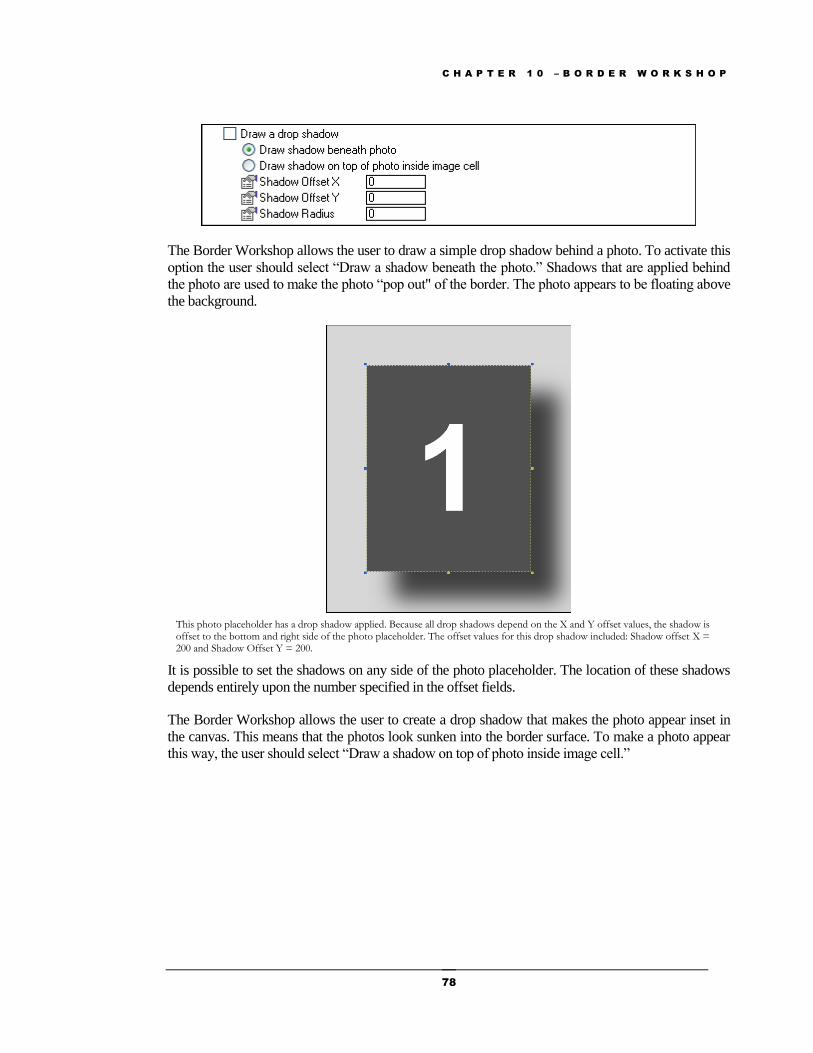
C H A P T E R 1 0 – B O R D E R W O R K S H O P
78
The Border Workshop allows the user to draw a simple drop shadow behind a photo. To activate this
option the user should select “Draw a shadow beneath the photo.” Shadows that are applied behind
the photo are used to make the photo “pop out" of the border. The photo appears to be floating above
the background.
It is possible to set the shadows on any side of the photo placeholder. The location of these shadows
depends entirely upon the number specified in the offset fields.
The Border Workshop allows the user to create a drop shadow that makes the photo appear inset in
the canvas. This means that the photos look sunken into the border surface. To make a photo appear
this way, the user should select “Draw a shadow on top of photo inside image cell.”
This photo placeholder has a drop shadow applied. Because all drop shadows depend on the X and Y offset values, the shadow is offset to the bottom and right side of the photo placeholder. The offset values for this drop shadow included: Shadow offset X = 200 and Shadow Offset Y = 200.
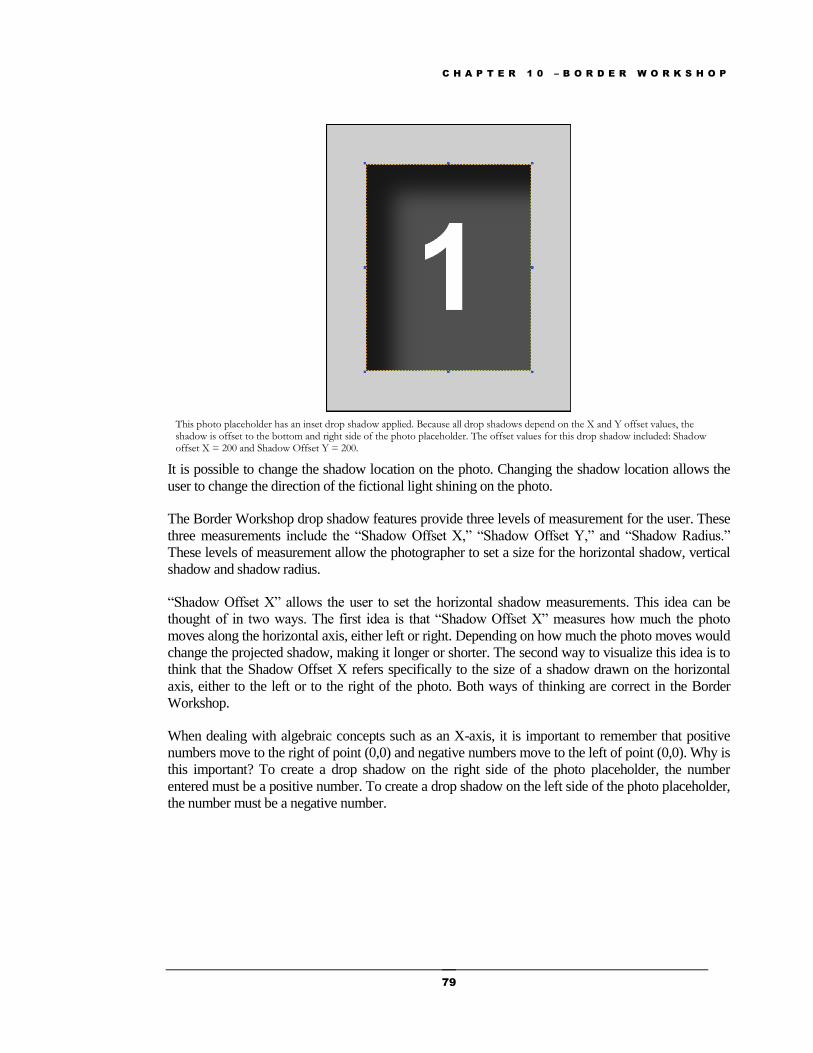
C H A P T E R 1 0 – B O R D E R W O R K S H O P
79
It is possible to change the shadow location on the photo. Changing the shadow location allows the
user to change the direction of the fictional light shining on the photo.
The Border Workshop drop shadow features provide three levels of measurement for the user. These
three measurements include the “Shadow Offset X,” “Shadow Offset Y,” and “Shadow Radius.”
These levels of measurement allow the photographer to set a size for the horizontal shadow, vertical
shadow and shadow radius.
“Shadow Offset X” allows the user to set the horizontal shadow measurements. This idea can be
thought of in two ways. The first idea is that “Shadow Offset X” measures how much the photo
moves along the horizontal axis, either left or right. Depending on how much the photo moves would
change the projected shadow, making it longer or shorter. The second way to visualize this idea is to
think that the Shadow Offset X refers specifically to the size of a shadow drawn on the horizontal
axis, either to the left or to the right of the photo. Both ways of thinking are correct in the Border
Workshop.
When dealing with algebraic concepts such as an X-axis, it is important to remember that positive
numbers move to the right of point (0,0) and negative numbers move to the left of point (0,0). Why is
this important? To create a drop shadow on the right side of the photo placeholder, the number
entered must be a positive number. To create a drop shadow on the left side of the photo placeholder,
the number must be a negative number.
This photo placeholder has an inset drop shadow applied. Because all drop shadows depend on the X and Y offset values, the shadow is offset to the bottom and right side of the photo placeholder. The offset values for this drop shadow included: Shadow offset X = 200 and Shadow Offset Y = 200.
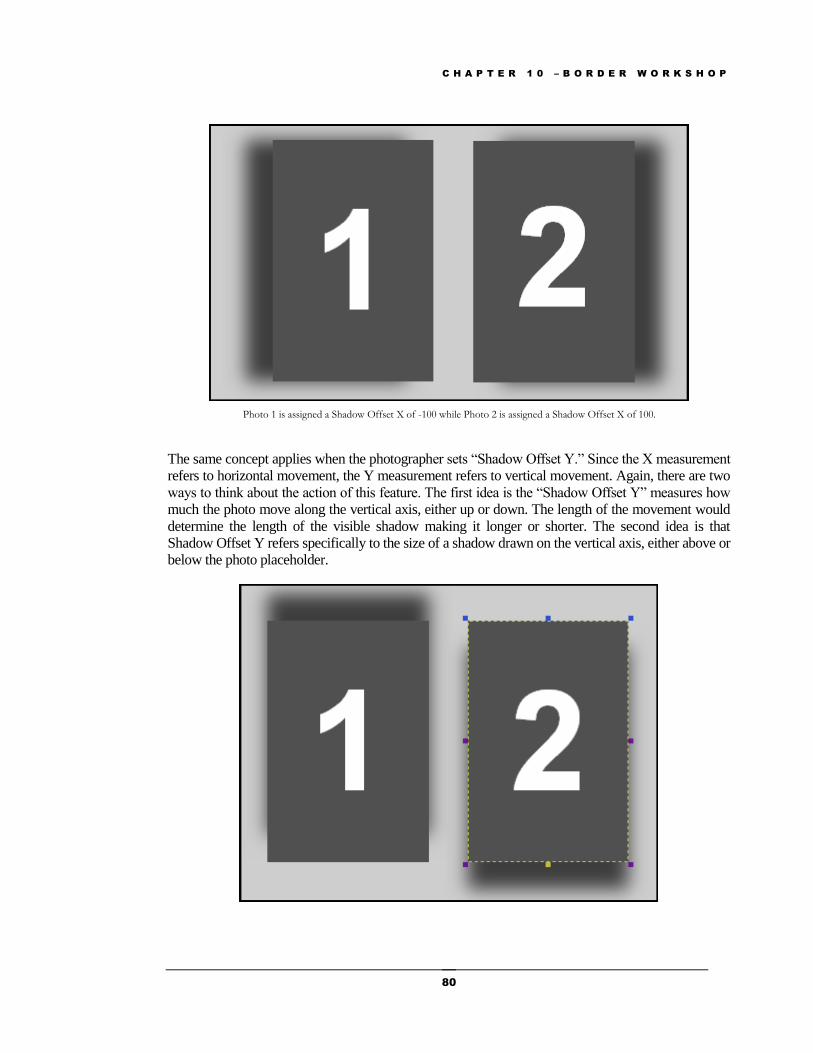
C H A P T E R 1 0 – B O R D E R W O R K S H O P
80
The same concept applies when the photographer sets “Shadow Offset Y.” Since the X measurement
refers to horizontal movement, the Y measurement refers to vertical movement. Again, there are two
ways to think about the action of this feature. The first idea is the “Shadow Offset Y” measures how
much the photo move along the vertical axis, either up or down. The length of the movement would
determine the length of the visible shadow making it longer or shorter. The second idea is that
Shadow Offset Y refers specifically to the size of a shadow drawn on the vertical axis, either above or
below the photo placeholder.
Photo 1 is assigned a Shadow Offset X of -100 while Photo 2 is assigned a Shadow Offset X of 100.
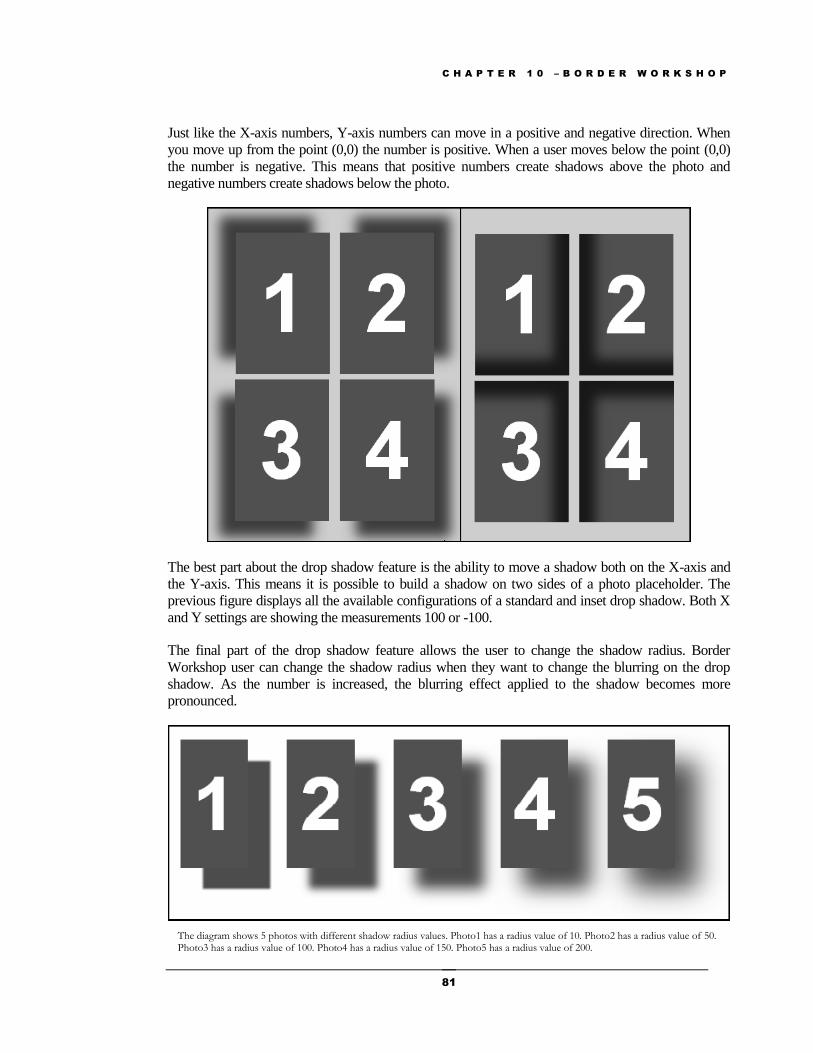
C H A P T E R 1 0 – B O R D E R W O R K S H O P
81
Just like the X-axis numbers, Y-axis numbers can move in a positive and negative direction. When
you move up from the point (0,0) the number is positive. When a user moves below the point (0,0)
the number is negative. This means that positive numbers create shadows above the photo and
negative numbers create shadows below the photo.
The best part about the drop shadow feature is the ability to move a shadow both on the X-axis and
the Y-axis. This means it is possible to build a shadow on two sides of a photo placeholder. The
previous figure displays all the available configurations of a standard and inset drop shadow. Both X
and Y settings are showing the measurements 100 or -100.
The final part of the drop shadow feature allows the user to change the shadow radius. Border
Workshop user can change the shadow radius when they want to change the blurring on the drop
shadow. As the number is increased, the blurring effect applied to the shadow becomes more
pronounced.
The diagram shows 5 photos with different shadow radius values. Photo1 has a radius value of 10. Photo2 has a radius value of 50. Photo3 has a radius value of 100. Photo4 has a radius value of 150. Photo5 has a radius value of 200.
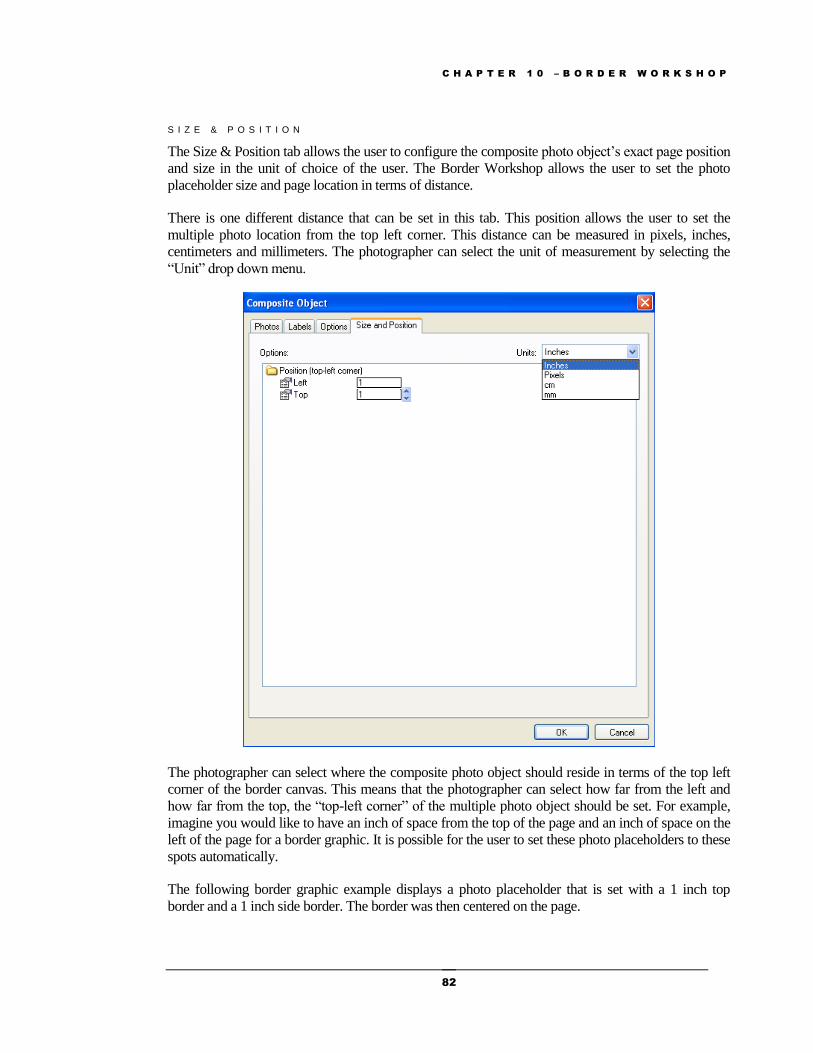
C H A P T E R 1 0 – B O R D E R W O R K S H O P
82
S I Z E & P O S I T I O N
The Size & Position tab allows the user to configure the composite photo object’s exact page position
and size in the unit of choice of the user. The Border Workshop allows the user to set the photo
placeholder size and page location in terms of distance.
There is one different distance that can be set in this tab. This position allows the user to set the
multiple photo location from the top left corner. This distance can be measured in pixels, inches,
centimeters and millimeters. The photographer can select the unit of measurement by selecting the
“Unit” drop down menu.
The photographer can select where the composite photo object should reside in terms of the top left
corner of the border canvas. This means that the photographer can select how far from the left and
how far from the top, the “top-left corner” of the multiple photo object should be set. For example,
imagine you would like to have an inch of space from the top of the page and an inch of space on the
left of the page for a border graphic. It is possible for the user to set these photo placeholders to these
spots automatically.
The following border graphic example displays a photo placeholder that is set with a 1 inch top
border and a 1 inch side border. The border was then centered on the page.
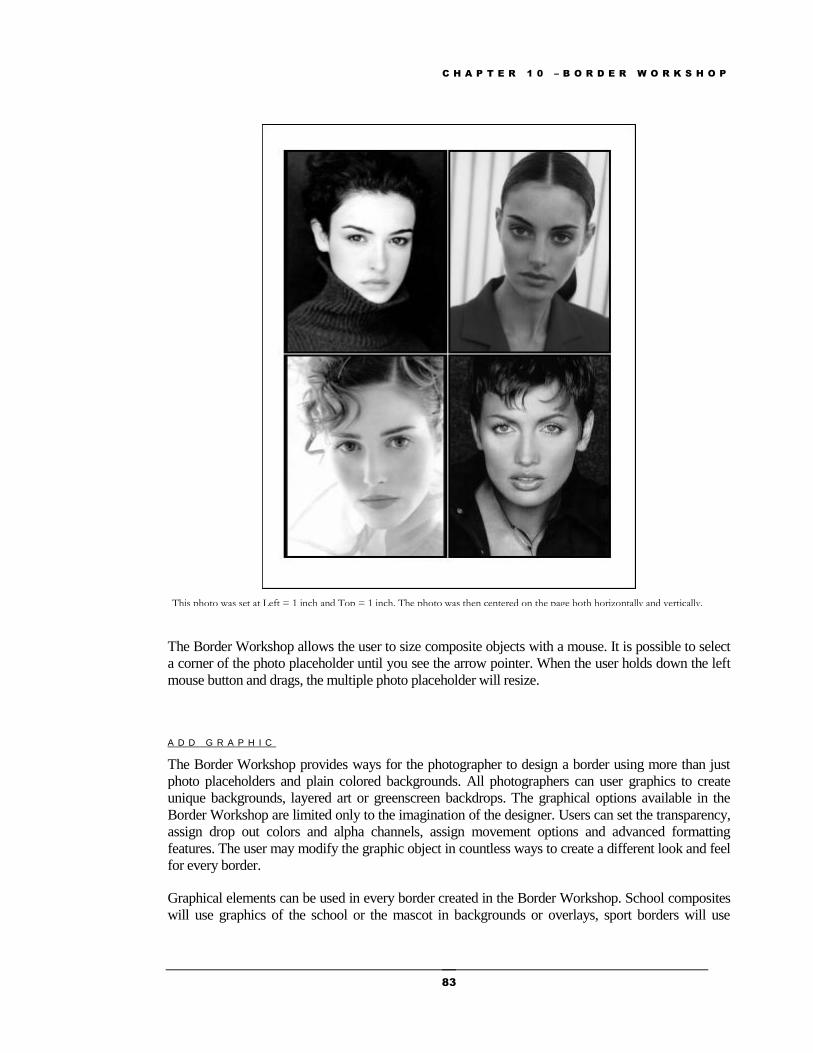
C H A P T E R 1 0 – B O R D E R W O R K S H O P
83
The Border Workshop allows the user to size composite objects with a mouse. It is possible to select
a corner of the photo placeholder until you see the arrow pointer. When the user holds down the left
mouse button and drags, the multiple photo placeholder will resize.
A D D G R A P H I C
The Border Workshop provides ways for the photographer to design a border using more than just
photo placeholders and plain colored backgrounds. All photographers can user graphics to create
unique backgrounds, layered art or greenscreen backdrops. The graphical options available in the
Border Workshop are limited only to the imagination of the designer. Users can set the transparency,
assign drop out colors and alpha channels, assign movement options and advanced formatting
features. The user may modify the graphic object in countless ways to create a different look and feel
for every border.
Graphical elements can be used in every border created in the Border Workshop. School composites
will use graphics of the school or the mascot in backgrounds or overlays, sport borders will use
This photo was set at Left = 1 inch and Top = 1 inch. The photo was then centered on the page both horizontally and vertically.
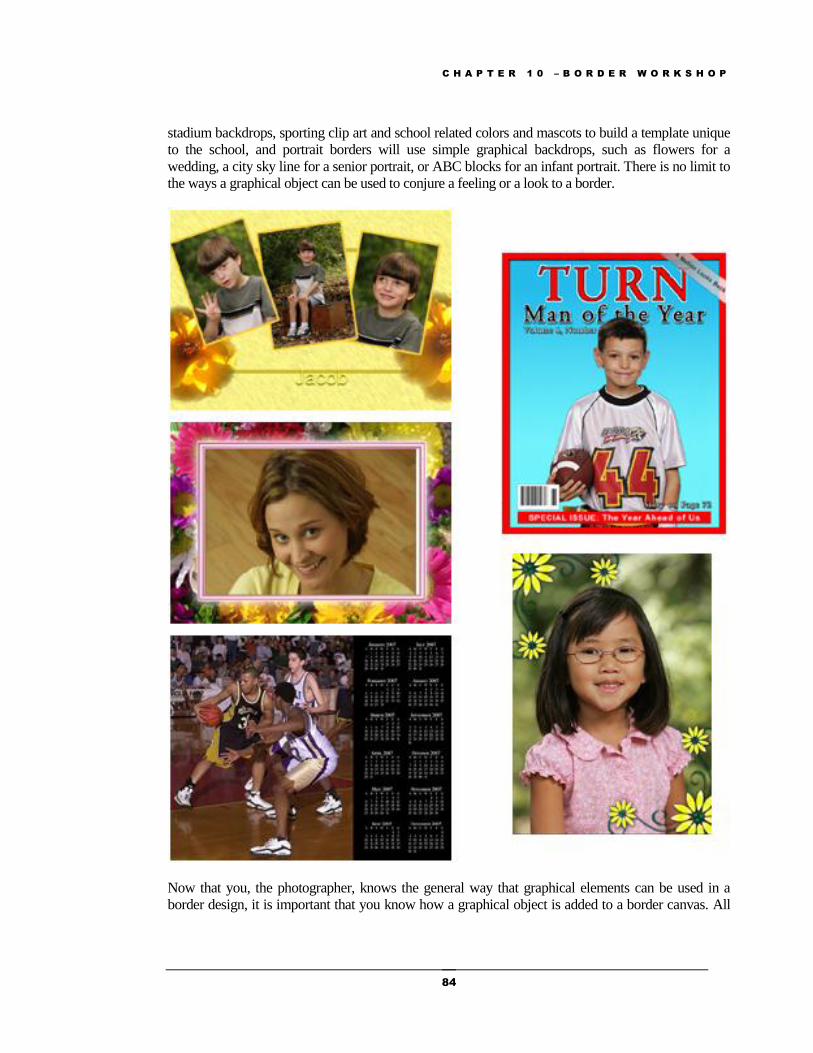
C H A P T E R 1 0 – B O R D E R W O R K S H O P
84
stadium backdrops, sporting clip art and school related colors and mascots to build a template unique
to the school, and portrait borders will use simple graphical backdrops, such as flowers for a
wedding, a city sky line for a senior portrait, or ABC blocks for an infant portrait. There is no limit to
the ways a graphical object can be used to conjure a feeling or a look to a border.
Now that you, the photographer, knows the general way that graphical elements can be used in a
border design, it is important that you know how a graphical object is added to a border canvas. All
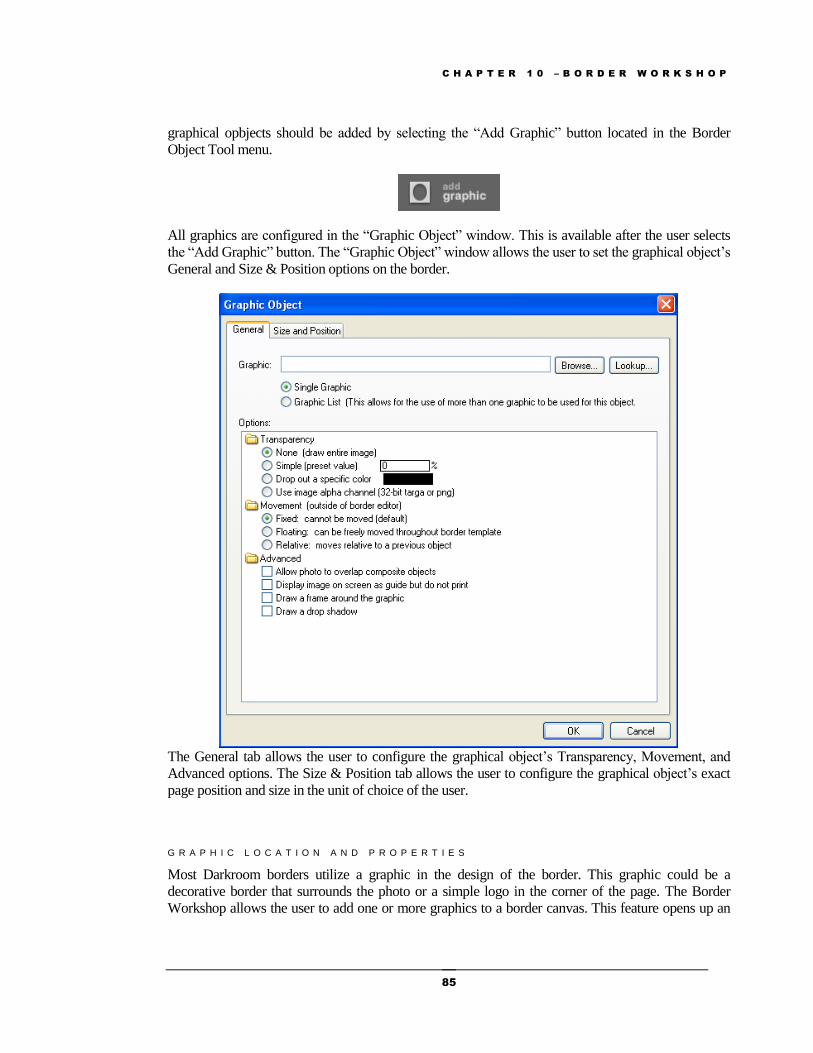
C H A P T E R 1 0 – B O R D E R W O R K S H O P
85
graphical opbjects should be added by selecting the “Add Graphic” button located in the Border
Object Tool menu.
All graphics are configured in the “Graphic Object” window. This is available after the user selects
the “Add Graphic” button. The “Graphic Object” window allows the user to set the graphical object’s
General and Size & Position options on the border.
The General tab allows the user to configure the graphical object’s Transparency, Movement, and
Advanced options. The Size & Position tab allows the user to configure the graphical object’s exact
page position and size in the unit of choice of the user.
G R A P H I C L O C A T I O N A N D P R O P E R T I E S
Most Darkroom borders utilize a graphic in the design of the border. This graphic could be a
decorative border that surrounds the photo or a simple logo in the corner of the page. The Border
Workshop allows the user to add one or more graphics to a border canvas. This feature opens up an

C H A P T E R 1 0 – B O R D E R W O R K S H O P
86
infinite number of options when creating the border. Photographers can pull in graphic images to
create a look and feel unique to the border.
The photographer should select “Browse” to select the graphic file that the user wants to appear on
page. Darkroom users should use either a targa (.TGA) or a Portable Network Graphic (.PNG)
graphics file. These two file formats allow for the use of transparencies and alpha channels set in
third party editing software. It is possible to use .JPG, .BMP, and .PSD graphic files, however, these
files will not save transparency and alpha channel file information.
Border Workshop users can also use queries to fill in a particular graphic. This is helpful when
working with schools that have different colors and logo needs.
Graphic objects can be assigned as either a single object or part of a graphic object list. When a
graphic is set as a single object, the image cannot be changed outside of the Border Workshop. For
example, if a user adds a flowered graphical background to a border and sets it as a single object, the
user cannot change the flowered background in the Photo Workshop.
The Border Workshop provides a way for photographers to create graphic lists associated with
individual borders. There are several reasons that photographers would want to do this. Probably the
easiest scenario to understand is shooting greenscreen at a school photo day. With a greenscreen
border, the photos taken at a school photo day can be modified to utilize any of the border options
prepared for the student packages.
Border Workshop users should create a Graphic List when creating a graphic object that should
change in the Photo Workshop. To create this list, the photographer should select “Graphic list (This
allows for the use of more than one graphic to be used for this object)” from the Graphic Object
window.
Once the user selects the Graphic List option, the photographer can select “Edit” to add or modify
items in the graphic list. This will open the “Graphic List” window. Remember that the graphics
added to a graphic list allow the user to set up multiple graphic objects, whether that is a background,
logo, clip art, etc, in a list that can be used when assigning photos to the border in the Photo
Workshop.
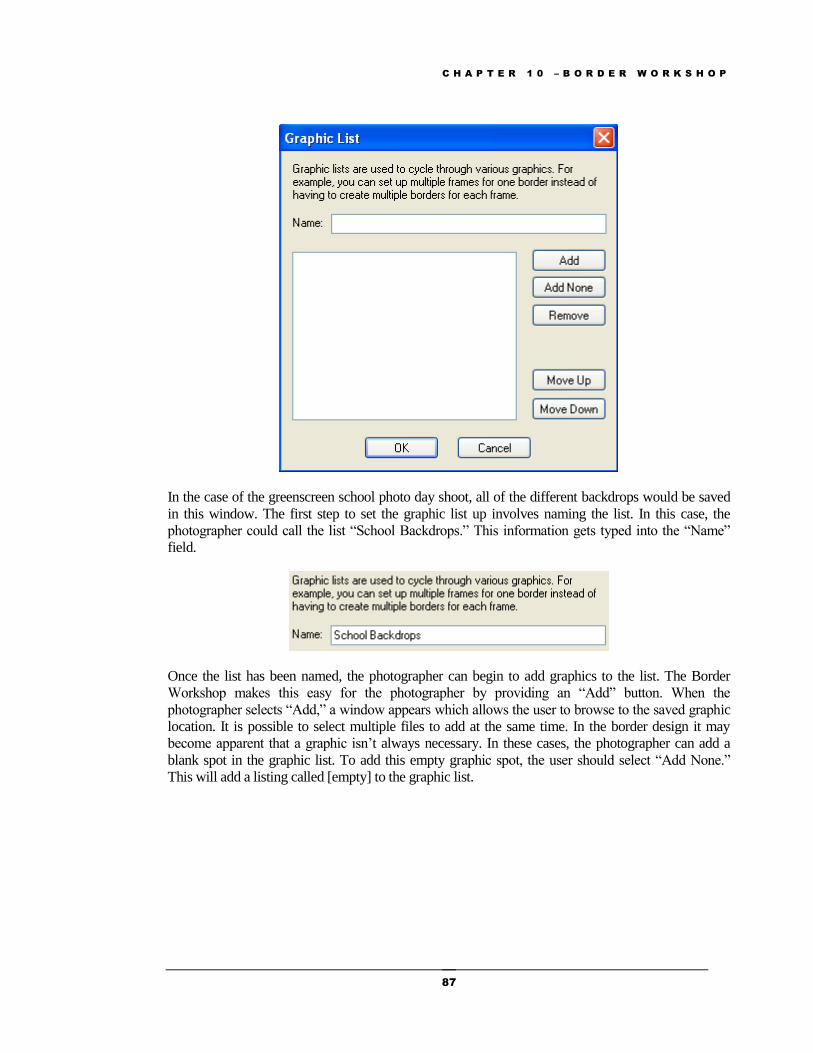
C H A P T E R 1 0 – B O R D E R W O R K S H O P
87
In the case of the greenscreen school photo day shoot, all of the different backdrops would be saved
in this window. The first step to set the graphic list up involves naming the list. In this case, the
photographer could call the list “School Backdrops.” This information gets typed into the “Name”
field.
Once the list has been named, the photographer can begin to add graphics to the list. The Border
Workshop makes this easy for the photographer by providing an “Add” button. When the
photographer selects “Add,” a window appears which allows the user to browse to the saved graphic
location. It is possible to select multiple files to add at the same time. In the border design it may
become apparent that a graphic isn’t always necessary. In these cases, the photographer can add a
blank spot in the graphic list. To add this empty graphic spot, the user should select “Add None.”
This will add a listing called [empty] to the graphic list.
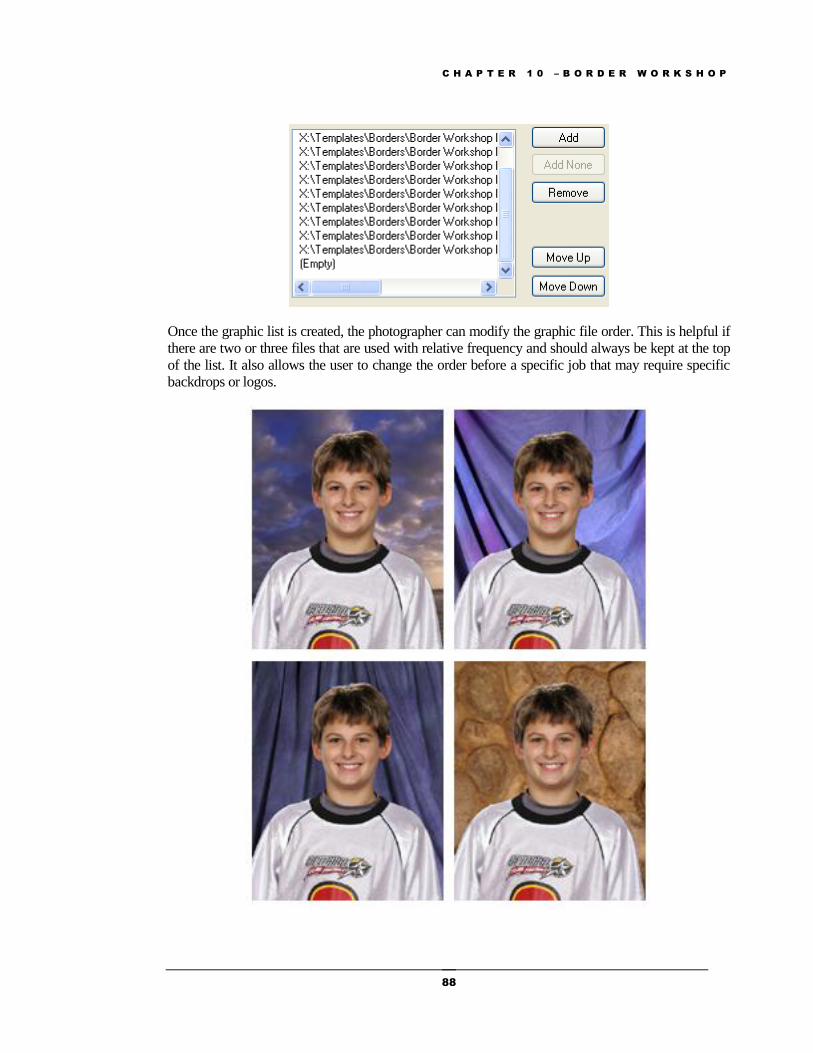
C H A P T E R 1 0 – B O R D E R W O R K S H O P
88
Once the graphic list is created, the photographer can modify the graphic file order. This is helpful if
there are two or three files that are used with relative frequency and should always be kept at the top
of the list. It also allows the user to change the order before a specific job that may require specific
backdrops or logos.
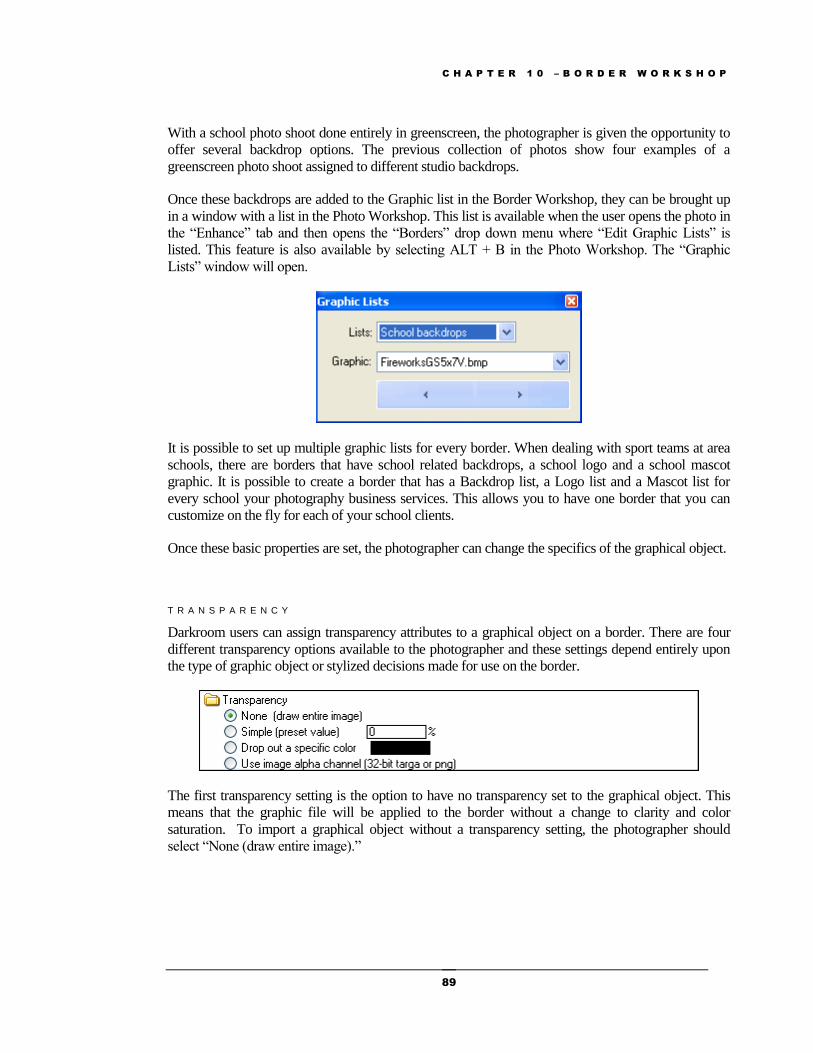
C H A P T E R 1 0 – B O R D E R W O R K S H O P
89
With a school photo shoot done entirely in greenscreen, the photographer is given the opportunity to
offer several backdrop options. The previous collection of photos show four examples of a
greenscreen photo shoot assigned to different studio backdrops.
Once these backdrops are added to the Graphic list in the Border Workshop, they can be brought up
in a window with a list in the Photo Workshop. This list is available when the user opens the photo in
the “Enhance” tab and then opens the “Borders” drop down menu where “Edit Graphic Lists” is
listed. This feature is also available by selecting ALT + B in the Photo Workshop. The “Graphic
Lists” window will open.
It is possible to set up multiple graphic lists for every border. When dealing with sport teams at area
schools, there are borders that have school related backdrops, a school logo and a school mascot
graphic. It is possible to create a border that has a Backdrop list, a Logo list and a Mascot list for
every school your photography business services. This allows you to have one border that you can
customize on the fly for each of your school clients.
Once these basic properties are set, the photographer can change the specifics of the graphical object.
T R A N S P A R E N C Y
Darkroom users can assign transparency attributes to a graphical object on a border. There are four
different transparency options available to the photographer and these settings depend entirely upon
the type of graphic object or stylized decisions made for use on the border.
The first transparency setting is the option to have no transparency set to the graphical object. This
means that the graphic file will be applied to the border without a change to clarity and color
saturation. To import a graphical object without a transparency setting, the photographer should
select “None (draw entire image).”
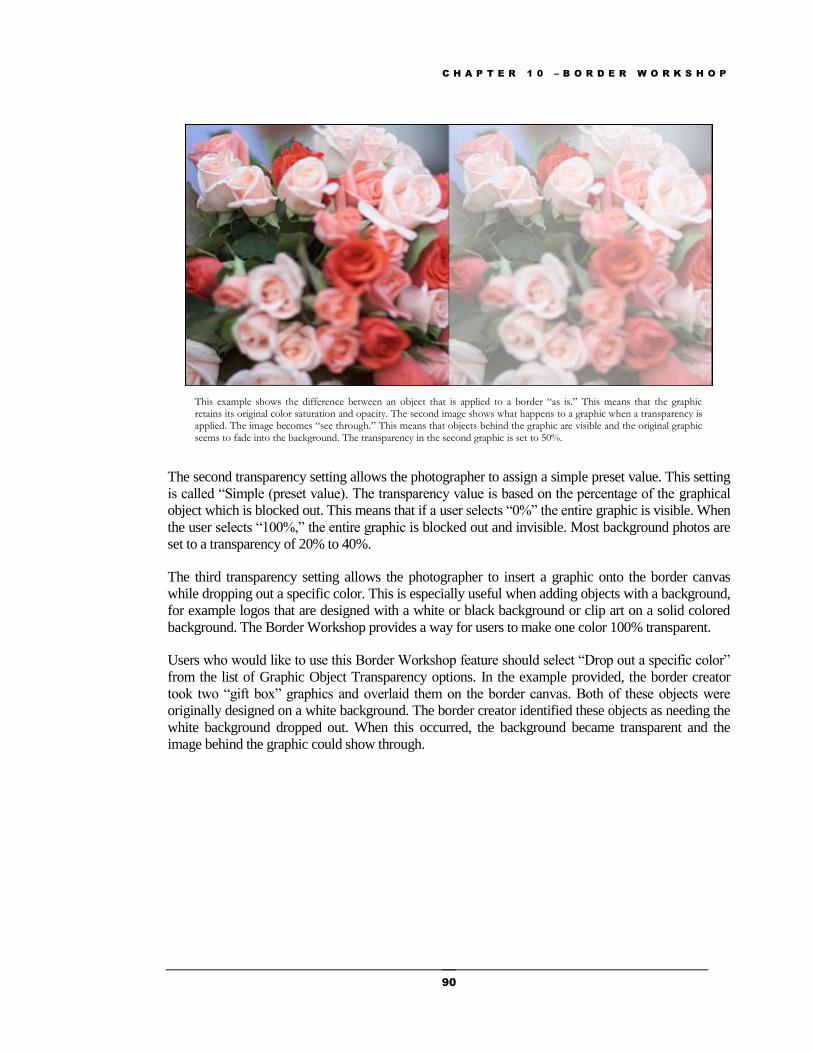
C H A P T E R 1 0 – B O R D E R W O R K S H O P
90
The second transparency setting allows the photographer to assign a simple preset value. This setting
is called “Simple (preset value). The transparency value is based on the percentage of the graphical
object which is blocked out. This means that if a user selects “0%” the entire graphic is visible. When
the user selects “100%,” the entire graphic is blocked out and invisible. Most background photos are
set to a transparency of 20% to 40%.
The third transparency setting allows the photographer to insert a graphic onto the border canvas
while dropping out a specific color. This is especially useful when adding objects with a background,
for example logos that are designed with a white or black background or clip art on a solid colored
background. The Border Workshop provides a way for users to make one color 100% transparent.
Users who would like to use this Border Workshop feature should select “Drop out a specific color”
from the list of Graphic Object Transparency options. In the example provided, the border creator
took two “gift box” graphics and overlaid them on the border canvas. Both of these objects were
originally designed on a white background. The border creator identified these objects as needing the
white background dropped out. When this occurred, the background became transparent and the
image behind the graphic could show through.
This example shows the difference between an object that is applied to a border “as is.” This means that the graphic retains its original color saturation and opacity. The second image shows what happens to a graphic when a transparency is applied. The image becomes “see through.” This means that objects behind the graphic are visible and the original graphic seems to fade into the background. The transparency in the second graphic is set to 50%.

C H A P T E R 1 0 – B O R D E R W O R K S H O P
91
The fourth transparency setting allows the user to import a graphical object that already has an alpha
channel assigned to it. Alpha channels are generally used to create picture windows in borders in a 3rd
party graphical editing program, such as Photoshop.
In graphic design programs there is a portion of the image space is reserved for transparency
information. An alpha channels are essentially masks which follow the same 8-bit channel rules as a
more traditional mask object. This means that the alpha channel has 256 levels of gray from 0, which
is completely black, to 255, which is completely white. Depending on the program, white can either
act as the selected are or the protected area. In the Darkroom software, it is easiest if the selected area
is black and the protected area is white.
The following is an example of the alpha channel designed in PhotoShop.
When a photographer creates a border and the foreground graphic needs to have certain colors dropped out and appear transparent, the end result appears like the example provided. This “gift box” graphic was created on a white background. When this graphic was imported into the Border Workshop, the white background was selected to drop out and become transparent in the “Graphic Object” window.
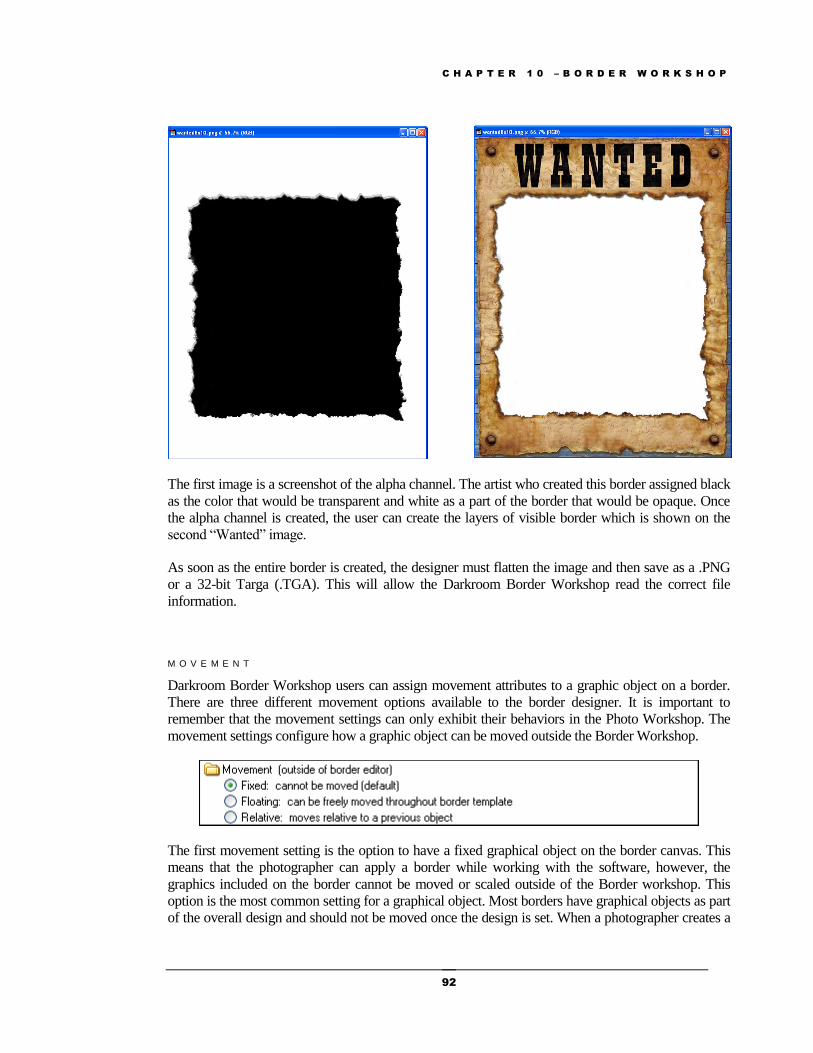
C H A P T E R 1 0 – B O R D E R W O R K S H O P
92
The first image is a screenshot of the alpha channel. The artist who created this border assigned black
as the color that would be transparent and white as a part of the border that would be opaque. Once
the alpha channel is created, the user can create the layers of visible border which is shown on the
second “Wanted” image.
As soon as the entire border is created, the designer must flatten the image and then save as a .PNG
or a 32-bit Targa (.TGA). This will allow the Darkroom Border Workshop read the correct file
information.
M O V E M E N T
Darkroom Border Workshop users can assign movement attributes to a graphic object on a border.
There are three different movement options available to the border designer. It is important to
remember that the movement settings can only exhibit their behaviors in the Photo Workshop. The
movement settings configure how a graphic object can be moved outside the Border Workshop.
The first movement setting is the option to have a fixed graphical object on the border canvas. This
means that the photographer can apply a border while working with the software, however, the
graphics included on the border cannot be moved or scaled outside of the Border workshop. This
option is the most common setting for a graphical object. Most borders have graphical objects as part
of the overall design and should not be moved once the design is set. When a photographer creates a
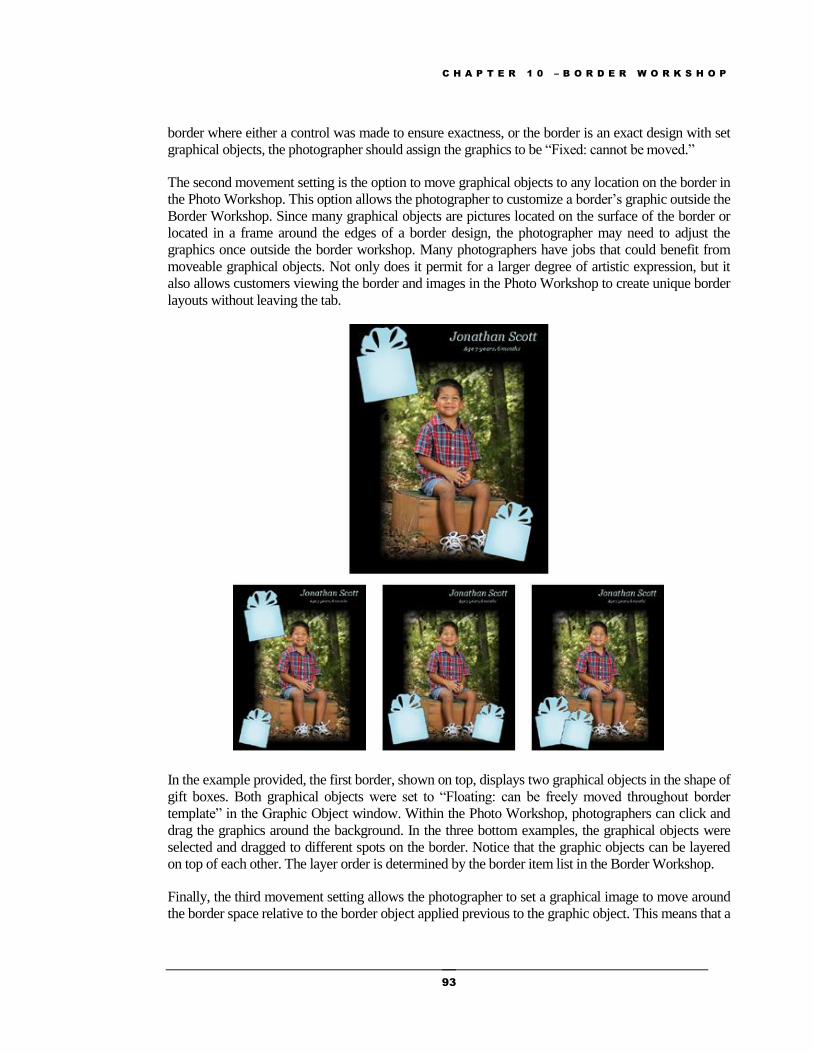
C H A P T E R 1 0 – B O R D E R W O R K S H O P
93
border where either a control was made to ensure exactness, or the border is an exact design with set
graphical objects, the photographer should assign the graphics to be “Fixed: cannot be moved.”
The second movement setting is the option to move graphical objects to any location on the border in
the Photo Workshop. This option allows the photographer to customize a border’s graphic outside the
Border Workshop. Since many graphical objects are pictures located on the surface of the border or
located in a frame around the edges of a border design, the photographer may need to adjust the
graphics once outside the border workshop. Many photographers have jobs that could benefit from
moveable graphical objects. Not only does it permit for a larger degree of artistic expression, but it
also allows customers viewing the border and images in the Photo Workshop to create unique border
layouts without leaving the tab.
In the example provided, the first border, shown on top, displays two graphical objects in the shape of
gift boxes. Both graphical objects were set to “Floating: can be freely moved throughout border
template” in the Graphic Object window. Within the Photo Workshop, photographers can click and
drag the graphics around the background. In the three bottom examples, the graphical objects were
selected and dragged to different spots on the border. Notice that the graphic objects can be layered
on top of each other. The layer order is determined by the border item list in the Border Workshop.
Finally, the third movement setting allows the photographer to set a graphical image to move around
the border space relative to the border object applied previous to the graphic object. This means that a

C H A P T E R 1 0 – B O R D E R W O R K S H O P
94
graphic object can be linked to any border object on the previous layer in the Border Items list. This
is useful for photographers who need to move a group of objects around while working in the
Darkroom Border Workshop. For example, imagine you are building a school sport day border. This
border will contain a photo place holder and one or more graphics, text fields and logos to create a
border that looks like a magazine cover. To maintain spacing, it is possible to link various objects
together. For example, imagine that you are building a border where the top logo must always be
properly spaced with a sub title. It is possible to take that first graphic logo and position it so that it
will always move relative to the text box sub-title.
In all “Relative” situations, the graphic object must be listed directly after the object that the border
must be relative to. So in the case of the logo and text sub-title, the Text Sub-title box will be listed
first in the Border Items list and the graphic object will be listed second. When this is set, the user can
move the text sub-title and the graphical logo will always move with it, maintaining all spacing.
It is important to remember that only two objects can be assigned to move relative to each other. It is
not possible to link three objects together and assign them as relative to one another. In situations
where the photographer needs to move several objects and maintain the same spacing a group
highlight and mouse drag will move those objects.
The following is a graphical example of a graphical object moving relative to a text object. Because
this is used most often on borders where a logo is used in addition to a border title, this example
utilizes a sports related magazine cover that is a part of the sample borders available in the Darkroom
software. This tool can be used between any graphic object and photo or other object in the
Darkroom Border Workshop.
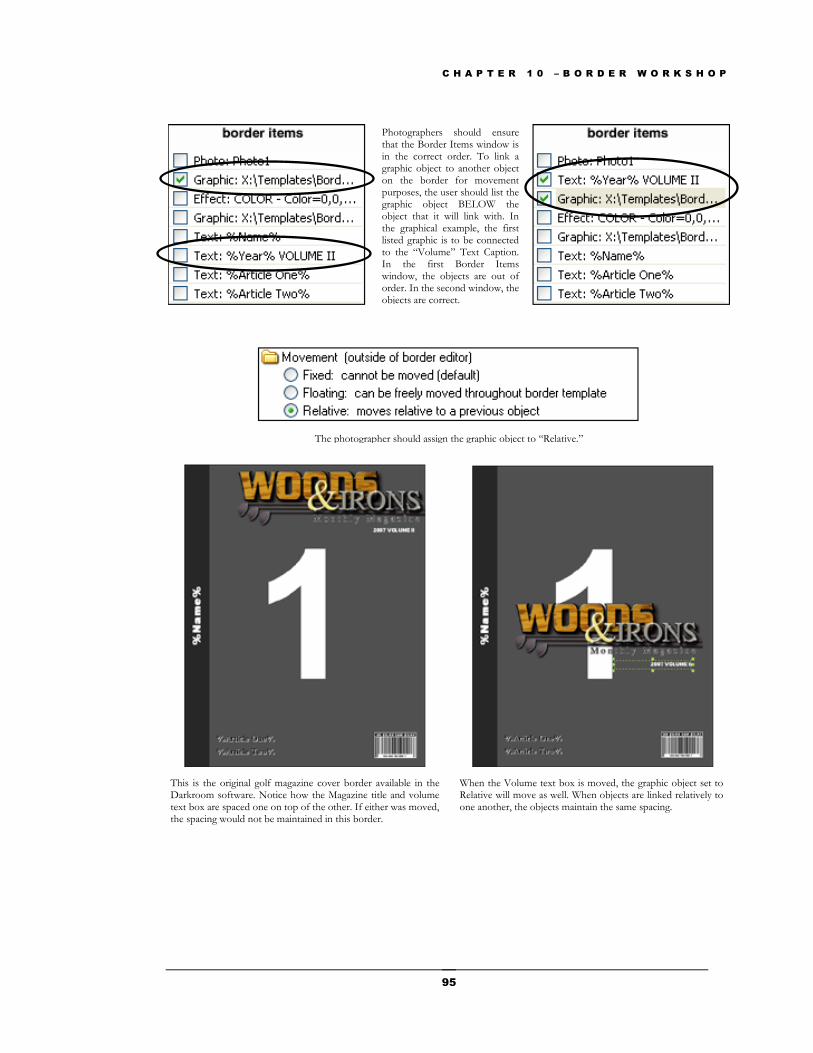
C H A P T E R 1 0 – B O R D E R W O R K S H O P
95
Photographers should ensure that the Border Items window is in the correct order. To link a graphic object to another object on the border for movement purposes, the user should list the graphic object BELOW the object that it will link with. In the graphical example, the first listed graphic is to be connected to the “Volume” Text Caption. In the first Border Items window, the objects are out of order. In the second window, the objects are correct.
The photographer should assign the graphic object to “Relative.”
This is the original golf magazine cover border available in the Darkroom software. Notice how the Magazine title and volume text box are spaced one on top of the other. If either was moved, the spacing would not be maintained in this border.
When the Volume text box is moved, the graphic object set to Relative will move as well. When objects are linked relatively to one another, the objects maintain the same spacing.
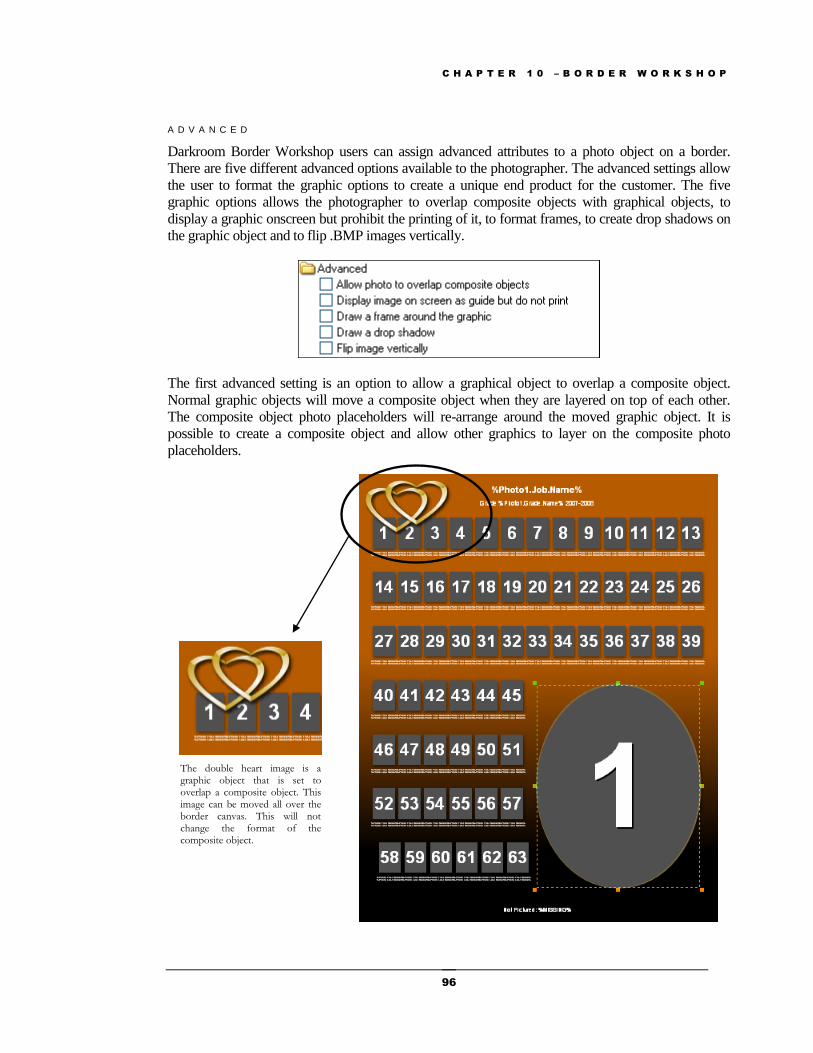
C H A P T E R 1 0 – B O R D E R W O R K S H O P
96
A D V A N C E D
Darkroom Border Workshop users can assign advanced attributes to a photo object on a border.
There are five different advanced options available to the photographer. The advanced settings allow
the user to format the graphic options to create a unique end product for the customer. The five
graphic options allows the photographer to overlap composite objects with graphical objects, to
display a graphic onscreen but prohibit the printing of it, to format frames, to create drop shadows on
the graphic object and to flip .BMP images vertically.
The first advanced setting is an option to allow a graphical object to overlap a composite object.
Normal graphic objects will move a composite object when they are layered on top of each other.
The composite object photo placeholders will re-arrange around the moved graphic object. It is
possible to create a composite object and allow other graphics to layer on the composite photo
placeholders.
The double heart image is a graphic object that is set to overlap a composite object. This image can be moved all over the border canvas. This will not change the format of the composite object.
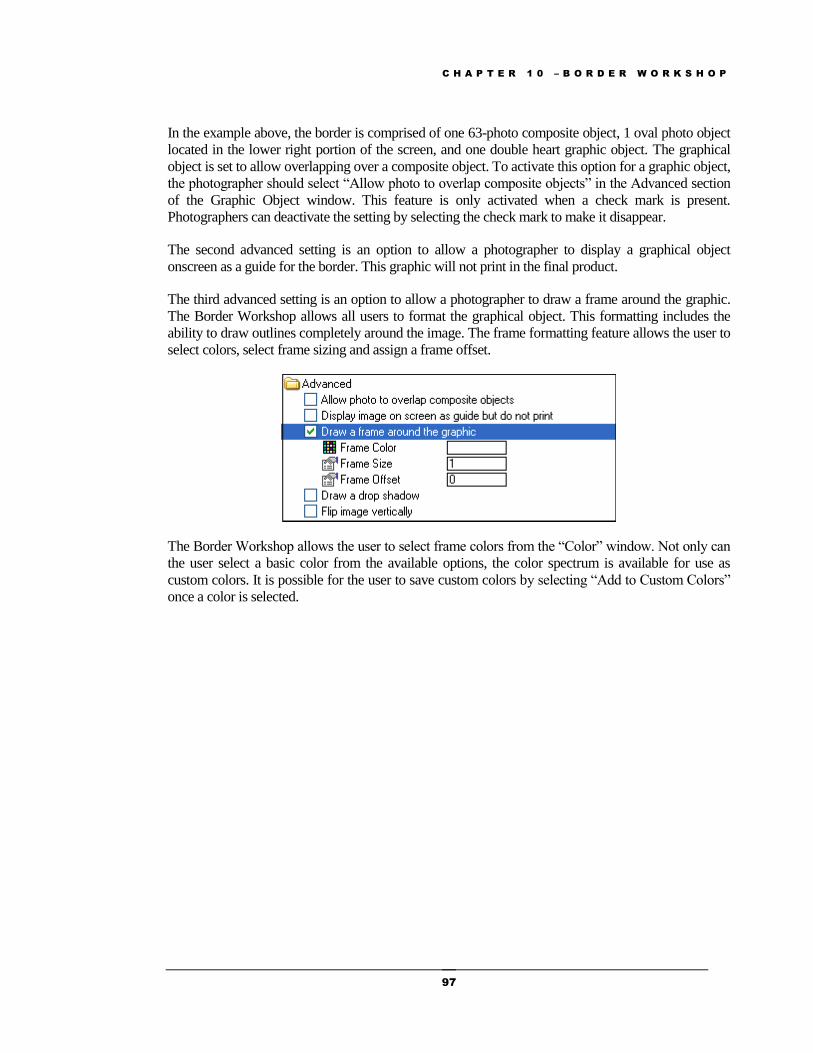
C H A P T E R 1 0 – B O R D E R W O R K S H O P
97
In the example above, the border is comprised of one 63-photo composite object, 1 oval photo object
located in the lower right portion of the screen, and one double heart graphic object. The graphical
object is set to allow overlapping over a composite object. To activate this option for a graphic object,
the photographer should select “Allow photo to overlap composite objects” in the Advanced section
of the Graphic Object window. This feature is only activated when a check mark is present.
Photographers can deactivate the setting by selecting the check mark to make it disappear.
The second advanced setting is an option to allow a photographer to display a graphical object
onscreen as a guide for the border. This graphic will not print in the final product.
The third advanced setting is an option to allow a photographer to draw a frame around the graphic.
The Border Workshop allows all users to format the graphical object. This formatting includes the
ability to draw outlines completely around the image. The frame formatting feature allows the user to
select colors, select frame sizing and assign a frame offset.
The Border Workshop allows the user to select frame colors from the “Color” window. Not only can
the user select a basic color from the available options, the color spectrum is available for use as
custom colors. It is possible for the user to save custom colors by selecting “Add to Custom Colors”
once a color is selected.
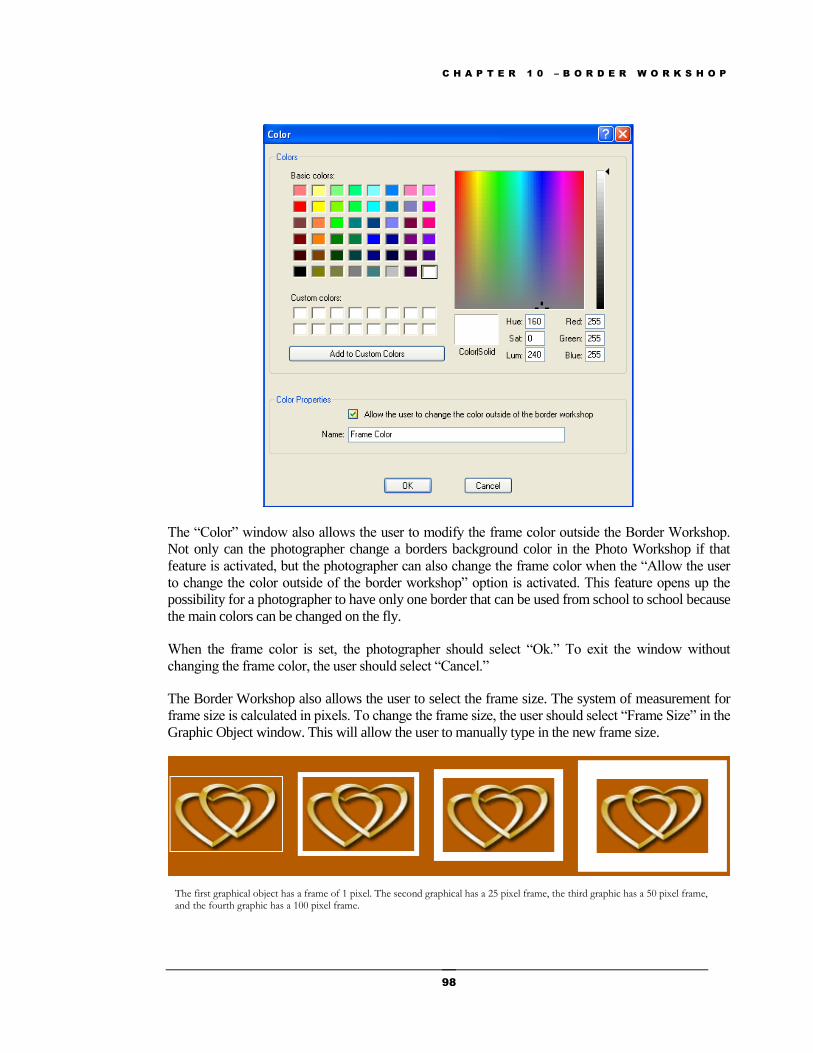
C H A P T E R 1 0 – B O R D E R W O R K S H O P
98
The “Color” window also allows the user to modify the frame color outside the Border Workshop.
Not only can the photographer change a borders background color in the Photo Workshop if that
feature is activated, but the photographer can also change the frame color when the “Allow the user
to change the color outside of the border workshop” option is activated. This feature opens up the
possibility for a photographer to have only one border that can be used from school to school because
the main colors can be changed on the fly.
When the frame color is set, the photographer should select “Ok.” To exit the window without
changing the frame color, the user should select “Cancel.”
The Border Workshop also allows the user to select the frame size. The system of measurement for
frame size is calculated in pixels. To change the frame size, the user should select “Frame Size” in the
Graphic Object window. This will allow the user to manually type in the new frame size.
The first graphical object has a frame of 1 pixel. The second graphical has a 25 pixel frame, the third graphic has a 50 pixel frame, and the fourth graphic has a 100 pixel frame.
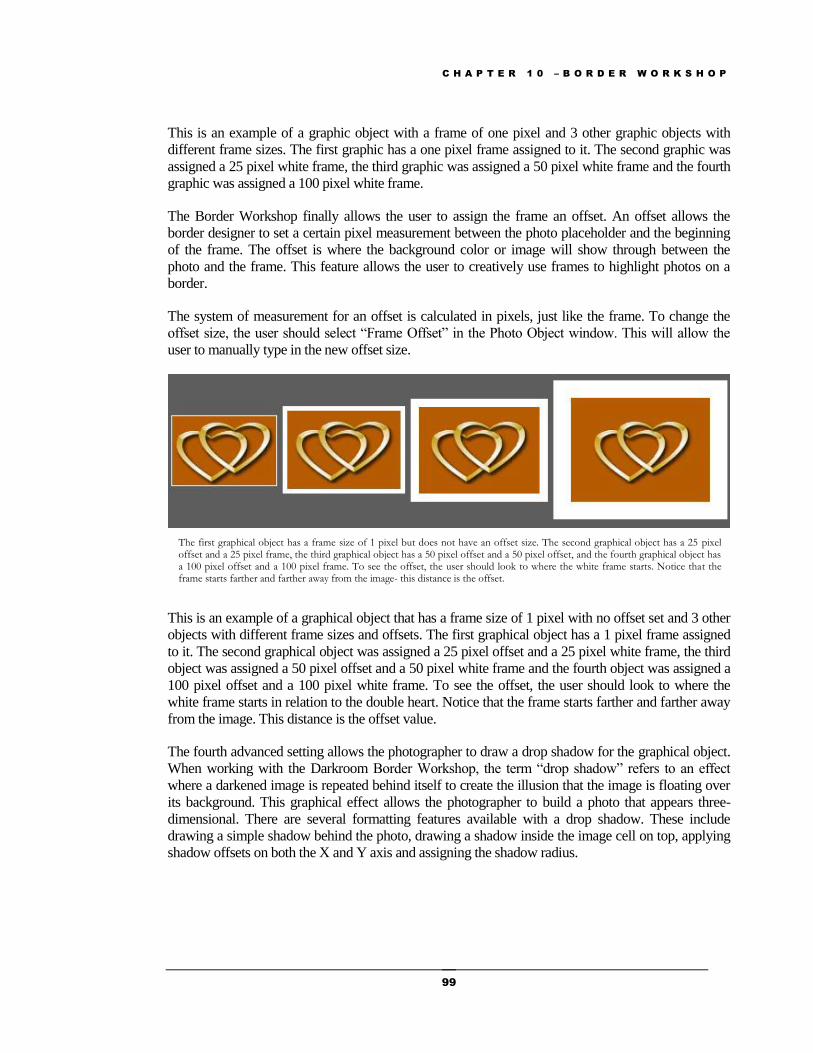
C H A P T E R 1 0 – B O R D E R W O R K S H O P
99
This is an example of a graphic object with a frame of one pixel and 3 other graphic objects with
different frame sizes. The first graphic has a one pixel frame assigned to it. The second graphic was
assigned a 25 pixel white frame, the third graphic was assigned a 50 pixel white frame and the fourth
graphic was assigned a 100 pixel white frame.
The Border Workshop finally allows the user to assign the frame an offset. An offset allows the
border designer to set a certain pixel measurement between the photo placeholder and the beginning
of the frame. The offset is where the background color or image will show through between the
photo and the frame. This feature allows the user to creatively use frames to highlight photos on a
border.
The system of measurement for an offset is calculated in pixels, just like the frame. To change the
offset size, the user should select “Frame Offset” in the Photo Object window. This will allow the
user to manually type in the new offset size.
This is an example of a graphical object that has a frame size of 1 pixel with no offset set and 3 other
objects with different frame sizes and offsets. The first graphical object has a 1 pixel frame assigned
to it. The second graphical object was assigned a 25 pixel offset and a 25 pixel white frame, the third
object was assigned a 50 pixel offset and a 50 pixel white frame and the fourth object was assigned a
100 pixel offset and a 100 pixel white frame. To see the offset, the user should look to where the
white frame starts in relation to the double heart. Notice that the frame starts farther and farther away
from the image. This distance is the offset value.
The fourth advanced setting allows the photographer to draw a drop shadow for the graphical object.
When working with the Darkroom Border Workshop, the term “drop shadow” refers to an effect
where a darkened image is repeated behind itself to create the illusion that the image is floating over
its background. This graphical effect allows the photographer to build a photo that appears three-
dimensional. There are several formatting features available with a drop shadow. These include
drawing a simple shadow behind the photo, drawing a shadow inside the image cell on top, applying
shadow offsets on both the X and Y axis and assigning the shadow radius.
The first graphical object has a frame size of 1 pixel but does not have an offset size. The second graphical object has a 25 pixel offset and a 25 pixel frame, the third graphical object has a 50 pixel offset and a 50 pixel offset, and the fourth graphical object has a 100 pixel offset and a 100 pixel frame. To see the offset, the user should look to where the white frame starts. Notice that the frame starts farther and farther away from the image- this distance is the offset.
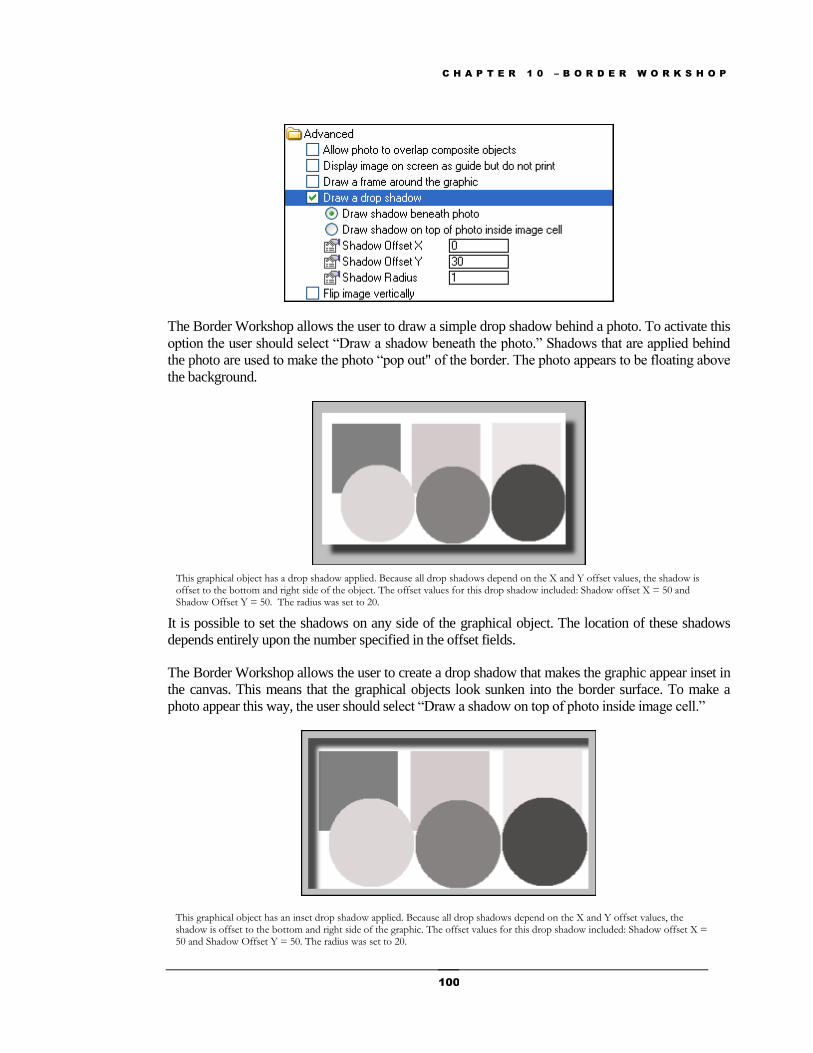
C H A P T E R 1 0 – B O R D E R W O R K S H O P
100
The Border Workshop allows the user to draw a simple drop shadow behind a photo. To activate this
option the user should select “Draw a shadow beneath the photo.” Shadows that are applied behind
the photo are used to make the photo “pop out" of the border. The photo appears to be floating above
the background.
It is possible to set the shadows on any side of the graphical object. The location of these shadows
depends entirely upon the number specified in the offset fields.
The Border Workshop allows the user to create a drop shadow that makes the graphic appear inset in
the canvas. This means that the graphical objects look sunken into the border surface. To make a
photo appear this way, the user should select “Draw a shadow on top of photo inside image cell.”
This graphical object has a drop shadow applied. Because all drop shadows depend on the X and Y offset values, the shadow is offset to the bottom and right side of the object. The offset values for this drop shadow included: Shadow offset X = 50 and Shadow Offset Y = 50. The radius was set to 20.
This graphical object has an inset drop shadow applied. Because all drop shadows depend on the X and Y offset values, the shadow is offset to the bottom and right side of the graphic. The offset values for this drop shadow included: Shadow offset X = 50 and Shadow Offset Y = 50. The radius was set to 20.
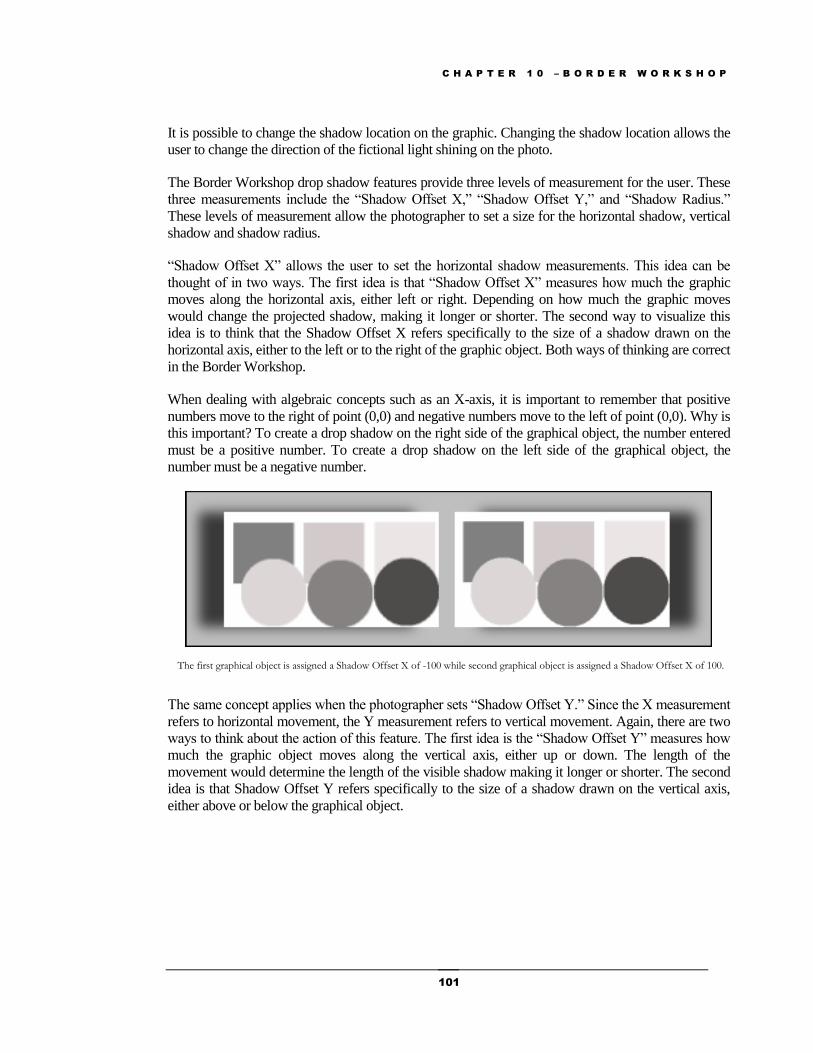
C H A P T E R 1 0 – B O R D E R W O R K S H O P
101
It is possible to change the shadow location on the graphic. Changing the shadow location allows the
user to change the direction of the fictional light shining on the photo.
The Border Workshop drop shadow features provide three levels of measurement for the user. These
three measurements include the “Shadow Offset X,” “Shadow Offset Y,” and “Shadow Radius.”
These levels of measurement allow the photographer to set a size for the horizontal shadow, vertical
shadow and shadow radius.
“Shadow Offset X” allows the user to set the horizontal shadow measurements. This idea can be
thought of in two ways. The first idea is that “Shadow Offset X” measures how much the graphic
moves along the horizontal axis, either left or right. Depending on how much the graphic moves
would change the projected shadow, making it longer or shorter. The second way to visualize this
idea is to think that the Shadow Offset X refers specifically to the size of a shadow drawn on the
horizontal axis, either to the left or to the right of the graphic object. Both ways of thinking are correct
in the Border Workshop.
When dealing with algebraic concepts such as an X-axis, it is important to remember that positive
numbers move to the right of point (0,0) and negative numbers move to the left of point (0,0). Why is
this important? To create a drop shadow on the right side of the graphical object, the number entered
must be a positive number. To create a drop shadow on the left side of the graphical object, the
number must be a negative number.
The same concept applies when the photographer sets “Shadow Offset Y.” Since the X measurement
refers to horizontal movement, the Y measurement refers to vertical movement. Again, there are two
ways to think about the action of this feature. The first idea is the “Shadow Offset Y” measures how
much the graphic object moves along the vertical axis, either up or down. The length of the
movement would determine the length of the visible shadow making it longer or shorter. The second
idea is that Shadow Offset Y refers specifically to the size of a shadow drawn on the vertical axis,
either above or below the graphical object.
The first graphical object is assigned a Shadow Offset X of -100 while second graphical object is assigned a Shadow Offset X of 100.
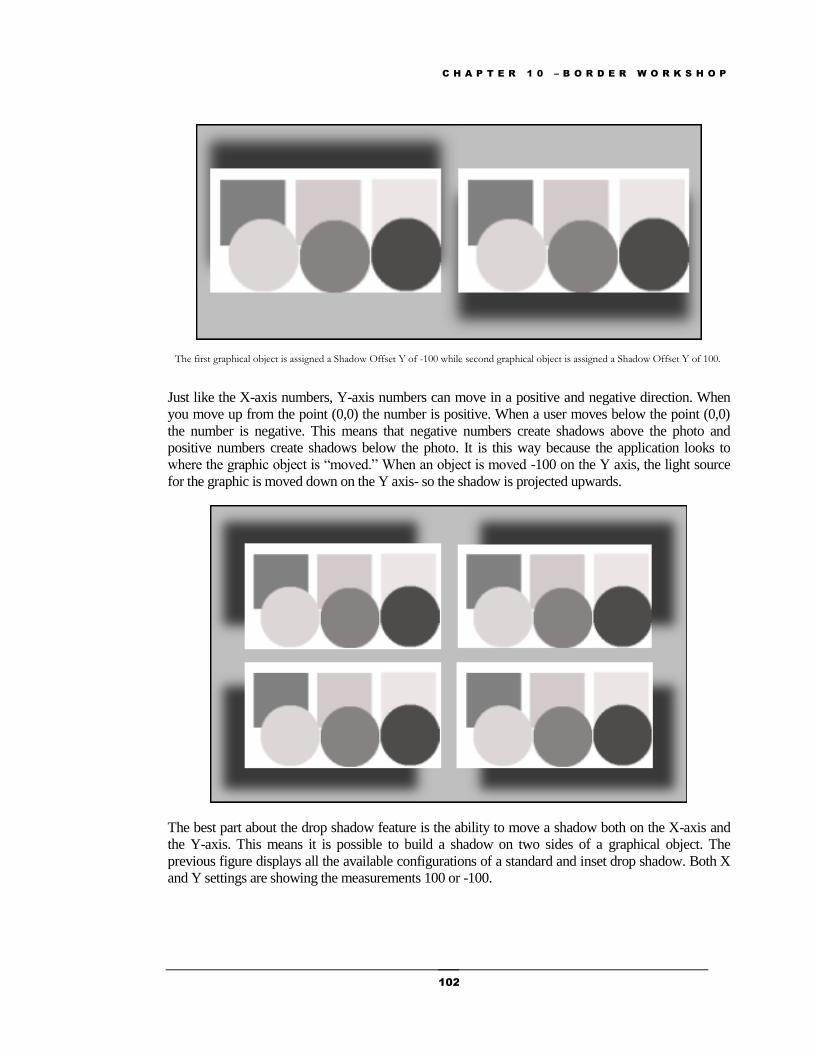
C H A P T E R 1 0 – B O R D E R W O R K S H O P
102
Just like the X-axis numbers, Y-axis numbers can move in a positive and negative direction. When
you move up from the point (0,0) the number is positive. When a user moves below the point (0,0)
the number is negative. This means that negative numbers create shadows above the photo and
positive numbers create shadows below the photo. It is this way because the application looks to
where the graphic object is “moved.” When an object is moved -100 on the Y axis, the light source
for the graphic is moved down on the Y axis- so the shadow is projected upwards.
The best part about the drop shadow feature is the ability to move a shadow both on the X-axis and
the Y-axis. This means it is possible to build a shadow on two sides of a graphical object. The
previous figure displays all the available configurations of a standard and inset drop shadow. Both X
and Y settings are showing the measurements 100 or -100.
The first graphical object is assigned a Shadow Offset Y of -100 while second graphical object is assigned a Shadow Offset Y of 100.
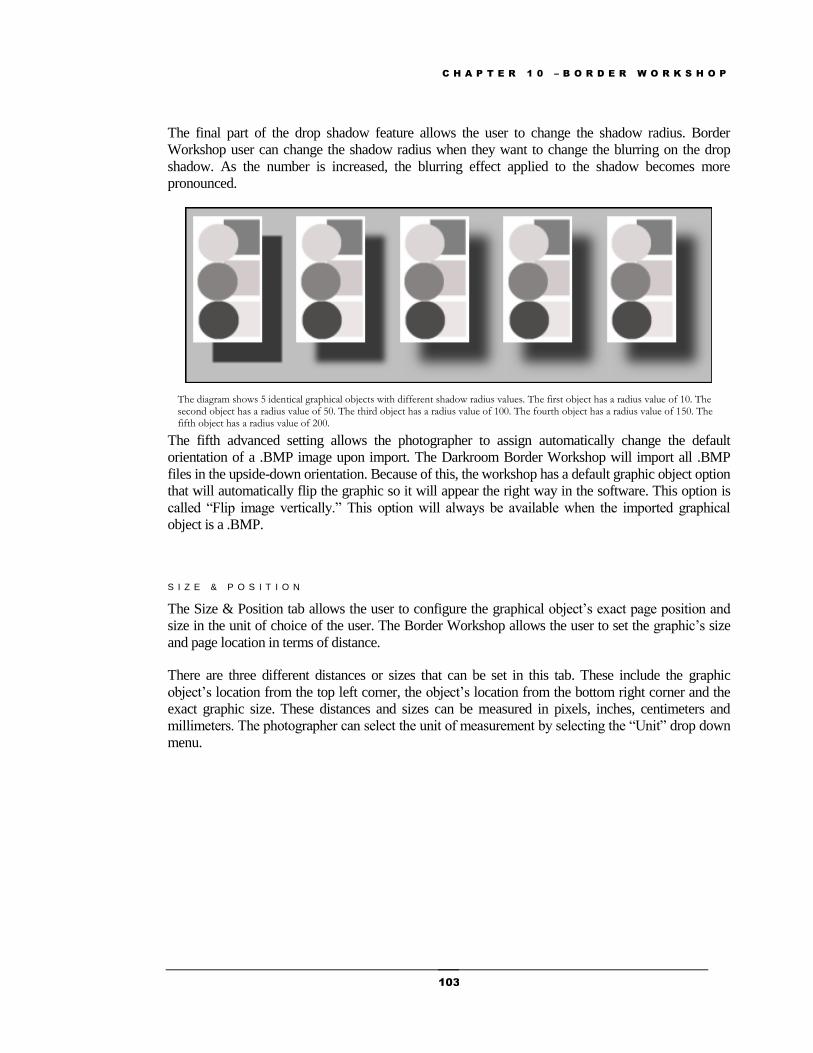
C H A P T E R 1 0 – B O R D E R W O R K S H O P
103
The final part of the drop shadow feature allows the user to change the shadow radius. Border
Workshop user can change the shadow radius when they want to change the blurring on the drop
shadow. As the number is increased, the blurring effect applied to the shadow becomes more
pronounced.
The fifth advanced setting allows the photographer to assign automatically change the default
orientation of a .BMP image upon import. The Darkroom Border Workshop will import all .BMP
files in the upside-down orientation. Because of this, the workshop has a default graphic object option
that will automatically flip the graphic so it will appear the right way in the software. This option is
called “Flip image vertically.” This option will always be available when the imported graphical
object is a .BMP.
S I Z E & P O S I T I O N
The Size & Position tab allows the user to configure the graphical object’s exact page position and
size in the unit of choice of the user. The Border Workshop allows the user to set the graphic’s size
and page location in terms of distance.
There are three different distances or sizes that can be set in this tab. These include the graphic
object’s location from the top left corner, the object’s location from the bottom right corner and the
exact graphic size. These distances and sizes can be measured in pixels, inches, centimeters and
millimeters. The photographer can select the unit of measurement by selecting the “Unit” drop down
menu.
The diagram shows 5 identical graphical objects with different shadow radius values. The first object has a radius value of 10. The second object has a radius value of 50. The third object has a radius value of 100. The fourth object has a radius value of 150. The fifth object has a radius value of 200.
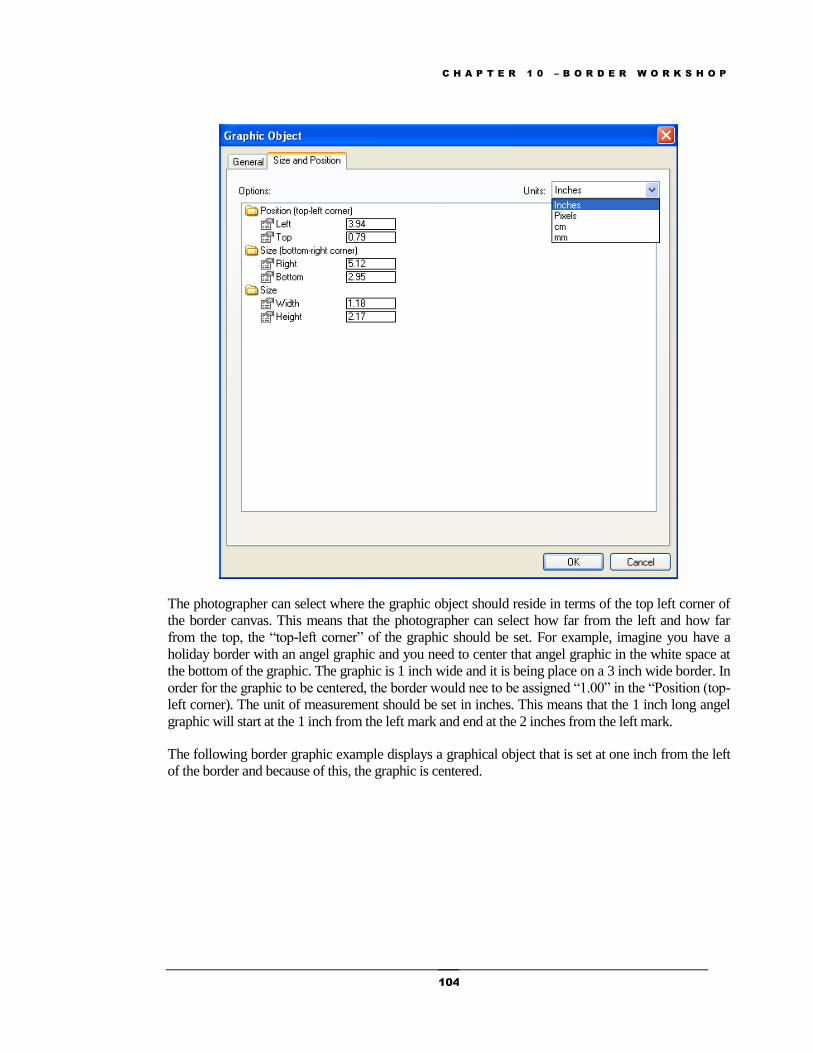
C H A P T E R 1 0 – B O R D E R W O R K S H O P
104
The photographer can select where the graphic object should reside in terms of the top left corner of
the border canvas. This means that the photographer can select how far from the left and how far
from the top, the “top-left corner” of the graphic should be set. For example, imagine you have a
holiday border with an angel graphic and you need to center that angel graphic in the white space at
the bottom of the graphic. The graphic is 1 inch wide and it is being place on a 3 inch wide border. In
order for the graphic to be centered, the border would nee to be assigned “1.00” in the “Position (top-
left corner). The unit of measurement should be set in inches. This means that the 1 inch long angel
graphic will start at the 1 inch from the left mark and end at the 2 inches from the left mark.
The following border graphic example displays a graphical object that is set at one inch from the left
of the border and because of this, the graphic is centered.
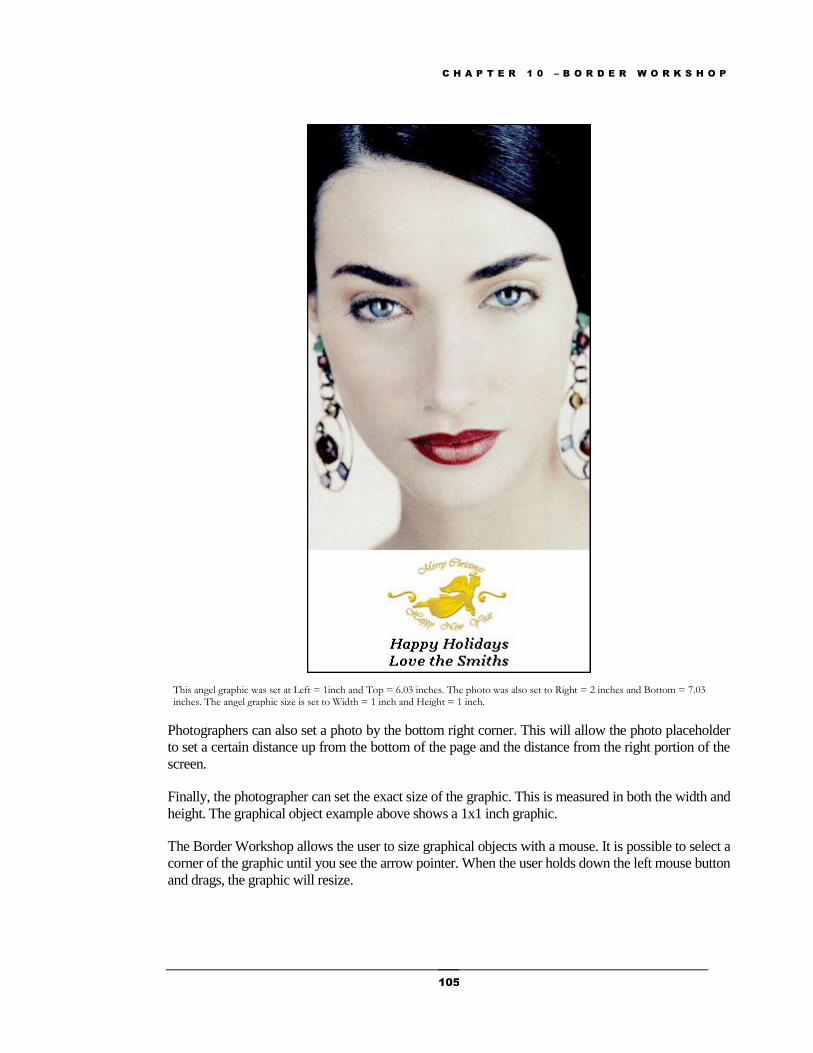
C H A P T E R 1 0 – B O R D E R W O R K S H O P
105
Photographers can also set a photo by the bottom right corner. This will allow the photo placeholder
to set a certain distance up from the bottom of the page and the distance from the right portion of the
screen.
Finally, the photographer can set the exact size of the graphic. This is measured in both the width and
height. The graphical object example above shows a 1x1 inch graphic.
The Border Workshop allows the user to size graphical objects with a mouse. It is possible to select a
corner of the graphic until you see the arrow pointer. When the user holds down the left mouse button
and drags, the graphic will resize.
This angel graphic was set at Left = 1inch and Top = 6.03 inches. The photo was also set to Right = 2 inches and Bottom = 7.03 inches. The angel graphic size is set to Width = 1 inch and Height = 1 inch.
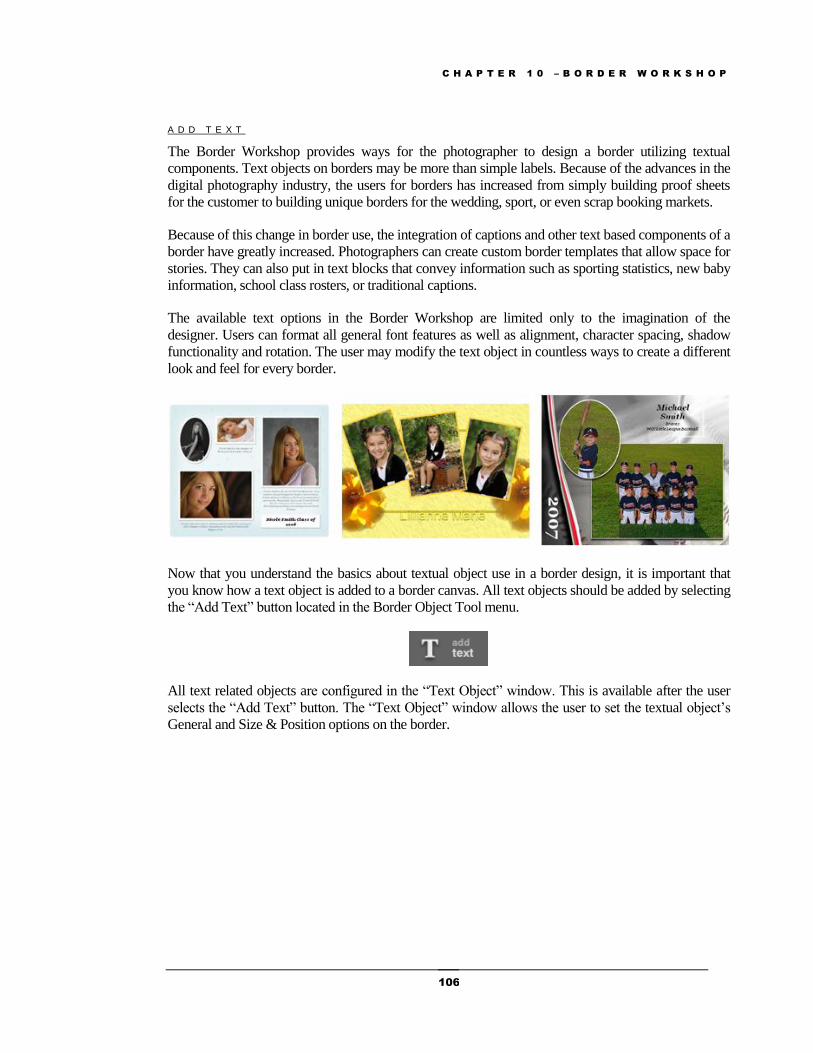
C H A P T E R 1 0 – B O R D E R W O R K S H O P
106
A D D T E X T
The Border Workshop provides ways for the photographer to design a border utilizing textual
components. Text objects on borders may be more than simple labels. Because of the advances in the
digital photography industry, the users for borders has increased from simply building proof sheets
for the customer to building unique borders for the wedding, sport, or even scrap booking markets.
Because of this change in border use, the integration of captions and other text based components of a
border have greatly increased. Photographers can create custom border templates that allow space for
stories. They can also put in text blocks that convey information such as sporting statistics, new baby
information, school class rosters, or traditional captions.
The available text options in the Border Workshop are limited only to the imagination of the
designer. Users can format all general font features as well as alignment, character spacing, shadow
functionality and rotation. The user may modify the text object in countless ways to create a different
look and feel for every border.
Now that you understand the basics about textual object use in a border design, it is important that
you know how a text object is added to a border canvas. All text objects should be added by selecting
the “Add Text” button located in the Border Object Tool menu.
All text related objects are configured in the “Text Object” window. This is available after the user
selects the “Add Text” button. The “Text Object” window allows the user to set the textual object’s
General and Size & Position options on the border.

C H A P T E R 1 0 – B O R D E R W O R K S H O P
107
The General tab allows the user to configure the text object’s Color Attributes, Movement,
Alignment, Spacing and Advanced options. The Size & Position tab allows the user to configure the
text object’s exact page position and size in the unit of choice of the user.
G E N E R A L F O R M A T T I N G
The Border Workshop user has the ability to modify general text formatting options assigned to the
text and text window. This option provides all of the basic computer text formatting options
including, font type, font size, bold options, italicize options, and justification. The Text Object
window also allows the photographer to add special text codes.

C H A P T E R 1 0 – B O R D E R W O R K S H O P
108
The user should select “Add Text” from the Border Object Tool Menu. This will open the “Text
Object” window. In order to create a textual object for the border, the user must assign text in this
window.
The Border Workshop can only work with downloaded Windows font types. These font types will
appear in the “Text Object” window each time the software opens. If new font types are added to the
software, the Darkroom application will refresh to add the new font types. All fonts are available in
the first drop down menu. When the photographer selects a font type, a preview of that font is
available in the text window.
In addition to the font type, the photographer can also select the font size. This particular example is
shown at size “20.” It is possible to select tiny caption text sizes and large title text sizes. Darkroom
users can select text sizes that are unavailable in the drop down menu by manually typing in the text
size from the drop down menu.
The next three formatting settings allow the user to assign bold text, italicized text and justification
settings. The first option allows the user to assign bold lettering to the text window. Bold lettering
allows the user to darken the text. For example, this sentence is written with “bold” text. This
option is always available by selecting “B.” The second option allows the user to assign italicized
lettering to the text window. Italicized lettering allows the user to slant the text to the right. For
example, this sentence is written with italicized text. This option is always available by selecting “I.”
The final settings allow the user to mark the text as right justified, center justified or left justified.
Here is an example of the three options:
Right Justified:
“Darkroom has a rounded product offering called Digital Everyday that includes Darkroom
software, PhotoReflect.com internet storefronts, Labtricity lab connectivity, and Enrichment business
services.”
Center Justified:
“Darkroom has a rounded product offering called Digital Everyday that includes Darkroom
software, PhotoReflect.com internet storefronts, Labtricity lab connectivity, and Enrichment business
services.”
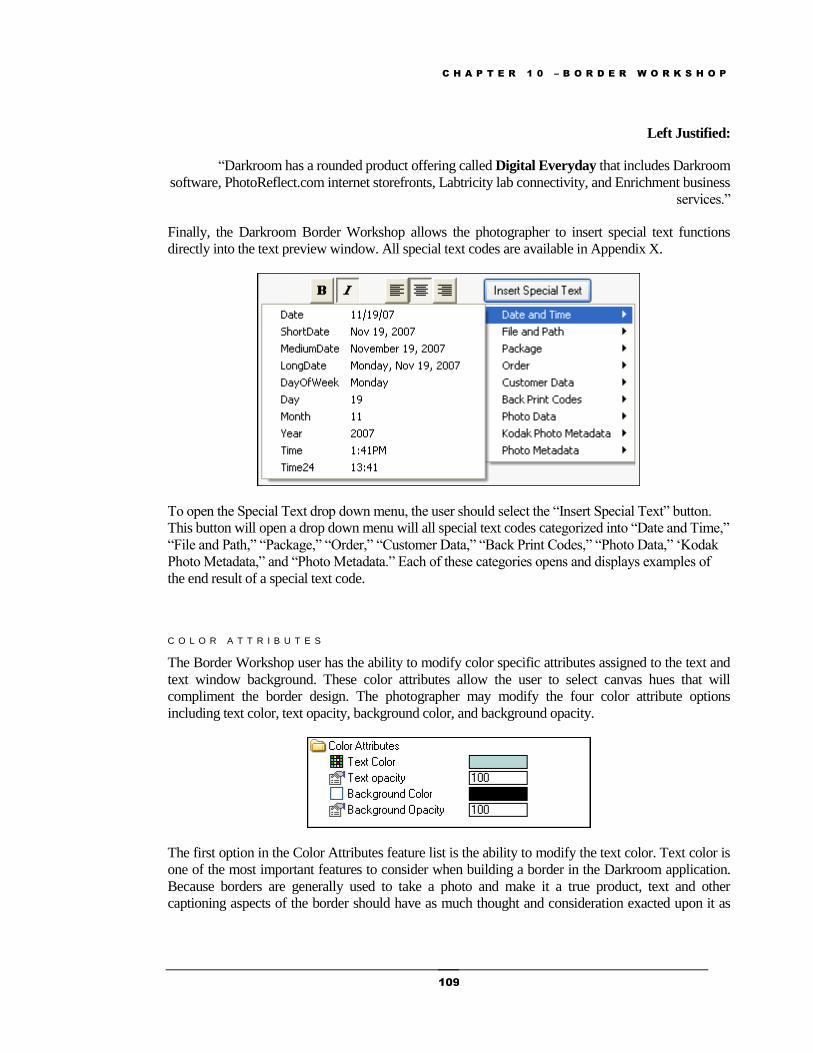
C H A P T E R 1 0 – B O R D E R W O R K S H O P
109
Left Justified:
“Darkroom has a rounded product offering called Digital Everyday that includes Darkroom
software, PhotoReflect.com internet storefronts, Labtricity lab connectivity, and Enrichment business
services.”
Finally, the Darkroom Border Workshop allows the photographer to insert special text functions
directly into the text preview window. All special text codes are available in Appendix X.
To open the Special Text drop down menu, the user should select the “Insert Special Text” button.
This button will open a drop down menu will all special text codes categorized into “Date and Time,”
“File and Path,” “Package,” “Order,” “Customer Data,” “Back Print Codes,” “Photo Data,” ‘Kodak
Photo Metadata,” and “Photo Metadata.” Each of these categories opens and displays examples of
the end result of a special text code.
C O L O R A T T R I B U T E S
The Border Workshop user has the ability to modify color specific attributes assigned to the text and
text window background. These color attributes allow the user to select canvas hues that will
compliment the border design. The photographer may modify the four color attribute options
including text color, text opacity, background color, and background opacity.
The first option in the Color Attributes feature list is the ability to modify the text color. Text color is
one of the most important features to consider when building a border in the Darkroom application.
Because borders are generally used to take a photo and make it a true product, text and other
captioning aspects of the border should have as much thought and consideration exacted upon it as
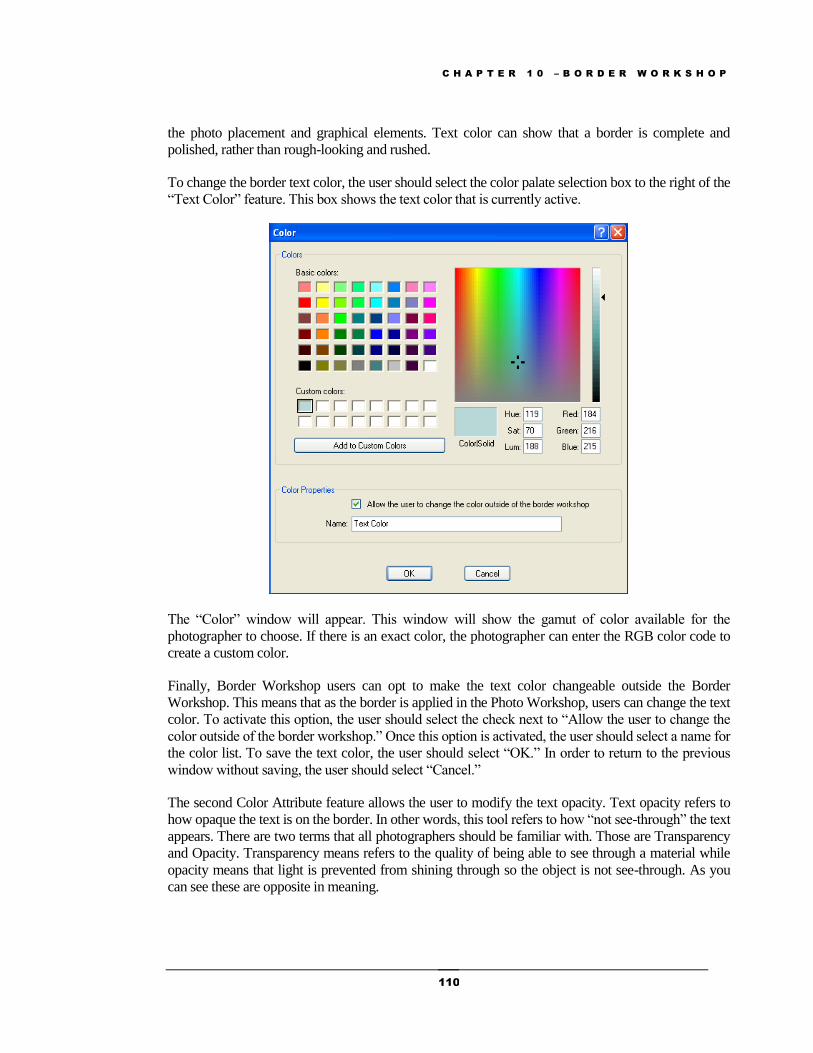
C H A P T E R 1 0 – B O R D E R W O R K S H O P
110
the photo placement and graphical elements. Text color can show that a border is complete and
polished, rather than rough-looking and rushed.
To change the border text color, the user should select the color palate selection box to the right of the
“Text Color” feature. This box shows the text color that is currently active.
The “Color” window will appear. This window will show the gamut of color available for the
photographer to choose. If there is an exact color, the photographer can enter the RGB color code to
create a custom color.
Finally, Border Workshop users can opt to make the text color changeable outside the Border
Workshop. This means that as the border is applied in the Photo Workshop, users can change the text
color. To activate this option, the user should select the check next to “Allow the user to change the
color outside of the border workshop.” Once this option is activated, the user should select a name for
the color list. To save the text color, the user should select “OK.” In order to return to the previous
window without saving, the user should select “Cancel.”
The second Color Attribute feature allows the user to modify the text opacity. Text opacity refers to
how opaque the text is on the border. In other words, this tool refers to how “not see-through” the text
appears. There are two terms that all photographers should be familiar with. Those are Transparency
and Opacity. Transparency means refers to the quality of being able to see through a material while
opacity means that light is prevented from shining through so the object is not see-through. As you
can see these are opposite in meaning.
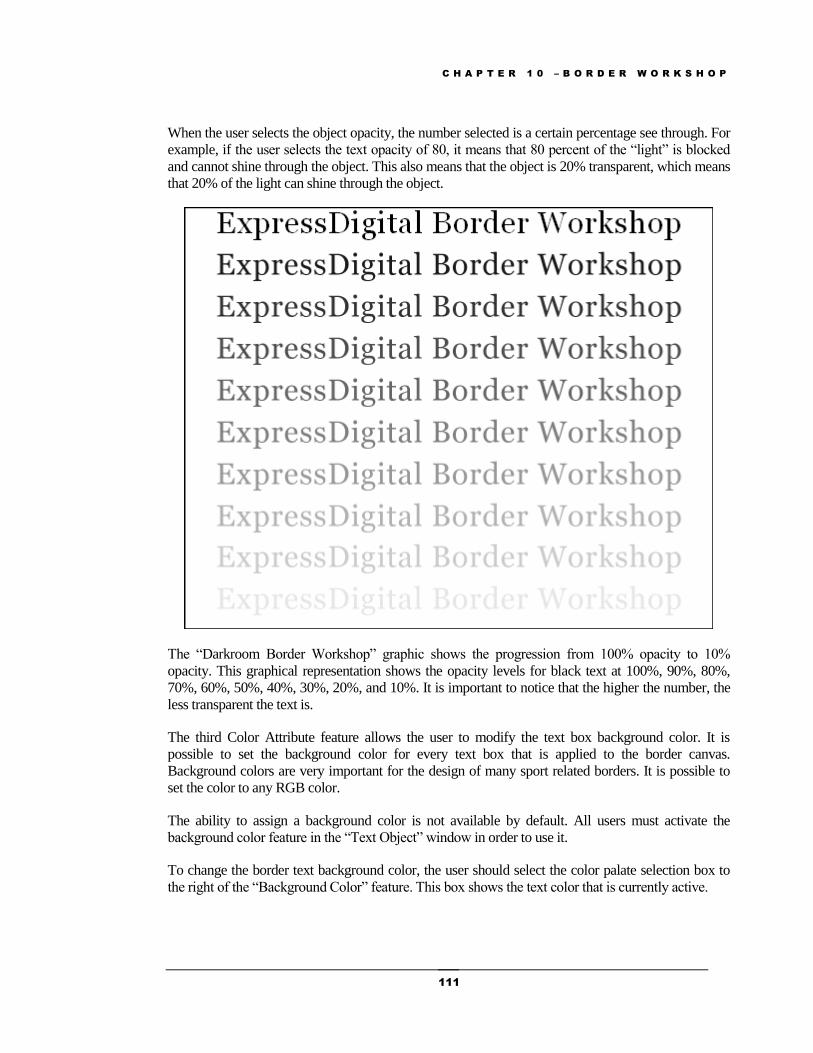
C H A P T E R 1 0 – B O R D E R W O R K S H O P
111
When the user selects the object opacity, the number selected is a certain percentage see through. For
example, if the user selects the text opacity of 80, it means that 80 percent of the “light” is blocked
and cannot shine through the object. This also means that the object is 20% transparent, which means
that 20% of the light can shine through the object.
The “Darkroom Border Workshop” graphic shows the progression from 100% opacity to 10%
opacity. This graphical representation shows the opacity levels for black text at 100%, 90%, 80%,
70%, 60%, 50%, 40%, 30%, 20%, and 10%. It is important to notice that the higher the number, the
less transparent the text is.
The third Color Attribute feature allows the user to modify the text box background color. It is
possible to set the background color for every text box that is applied to the border canvas.
Background colors are very important for the design of many sport related borders. It is possible to
set the color to any RGB color.
The ability to assign a background color is not available by default. All users must activate the
background color feature in the “Text Object” window in order to use it.
To change the border text background color, the user should select the color palate selection box to
the right of the “Background Color” feature. This box shows the text color that is currently active.
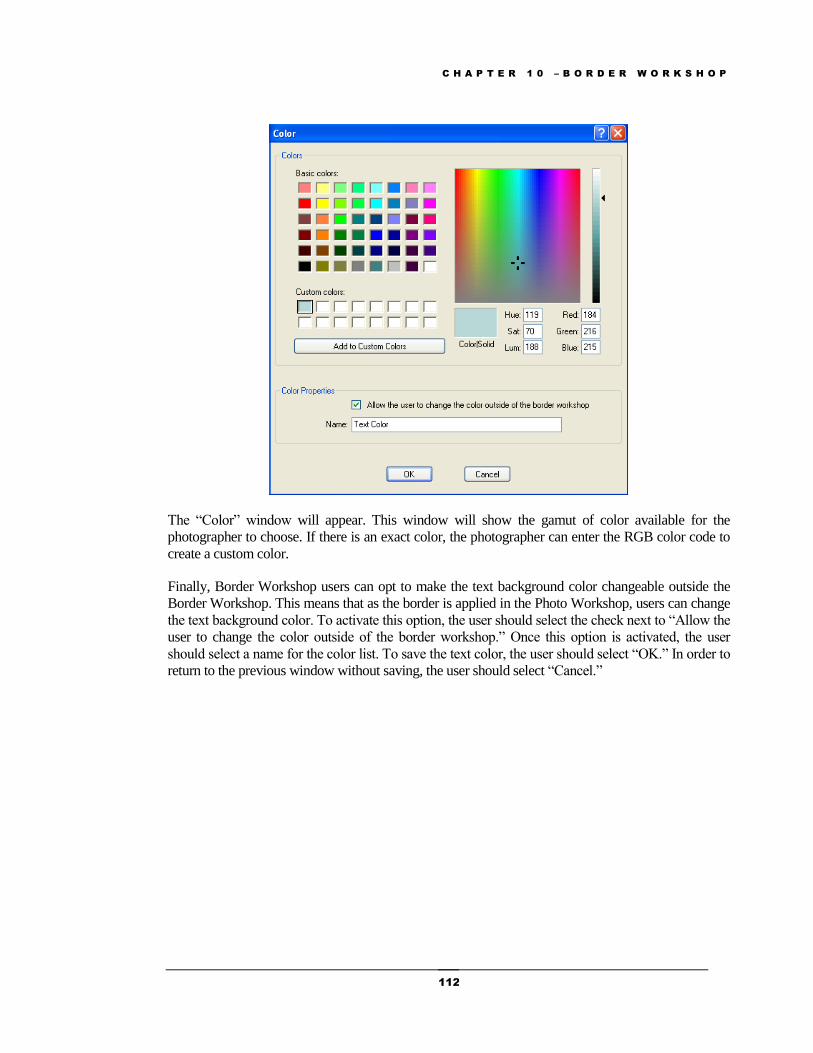
C H A P T E R 1 0 – B O R D E R W O R K S H O P
112
The “Color” window will appear. This window will show the gamut of color available for the
photographer to choose. If there is an exact color, the photographer can enter the RGB color code to
create a custom color.
Finally, Border Workshop users can opt to make the text background color changeable outside the
Border Workshop. This means that as the border is applied in the Photo Workshop, users can change
the text background color. To activate this option, the user should select the check next to “Allow the
user to change the color outside of the border workshop.” Once this option is activated, the user
should select a name for the color list. To save the text color, the user should select “OK.” In order to
return to the previous window without saving, the user should select “Cancel.”
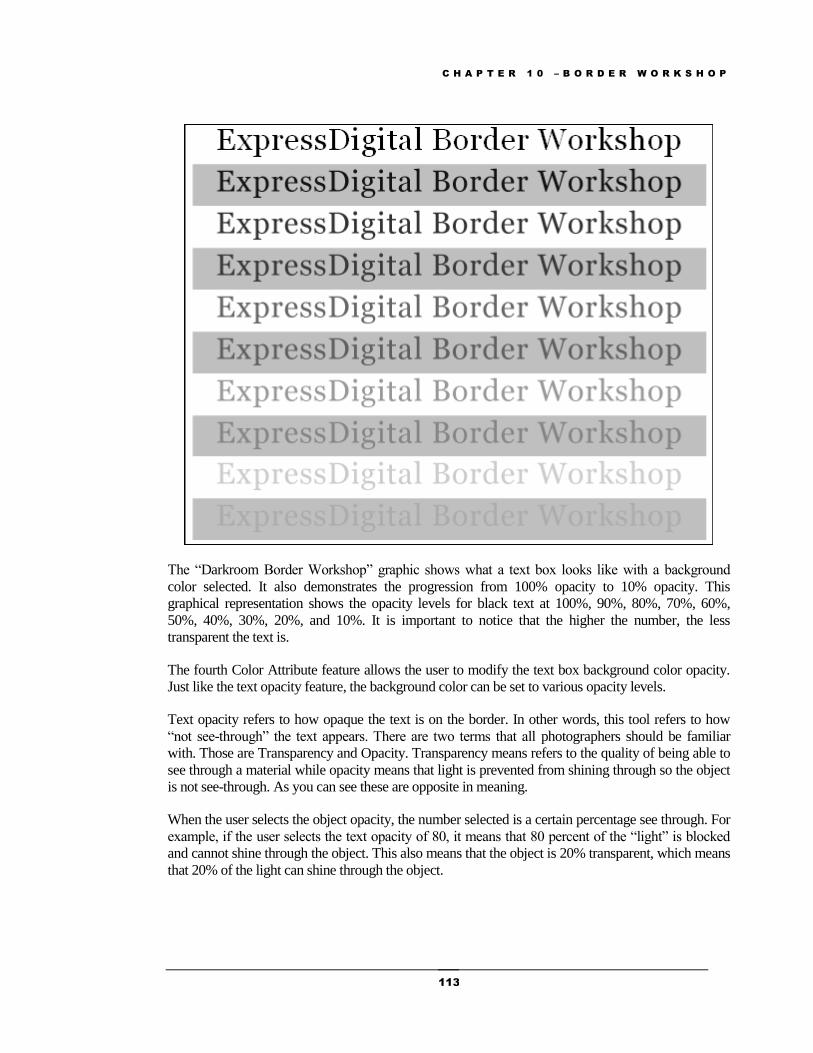
C H A P T E R 1 0 – B O R D E R W O R K S H O P
113
The “Darkroom Border Workshop” graphic shows what a text box looks like with a background
color selected. It also demonstrates the progression from 100% opacity to 10% opacity. This
graphical representation shows the opacity levels for black text at 100%, 90%, 80%, 70%, 60%,
50%, 40%, 30%, 20%, and 10%. It is important to notice that the higher the number, the less
transparent the text is.
The fourth Color Attribute feature allows the user to modify the text box background color opacity.
Just like the text opacity feature, the background color can be set to various opacity levels.
Text opacity refers to how opaque the text is on the border. In other words, this tool refers to how
“not see-through” the text appears. There are two terms that all photographers should be familiar
with. Those are Transparency and Opacity. Transparency means refers to the quality of being able to
see through a material while opacity means that light is prevented from shining through so the object
is not see-through. As you can see these are opposite in meaning.
When the user selects the object opacity, the number selected is a certain percentage see through. For
example, if the user selects the text opacity of 80, it means that 80 percent of the “light” is blocked
and cannot shine through the object. This also means that the object is 20% transparent, which means
that 20% of the light can shine through the object.
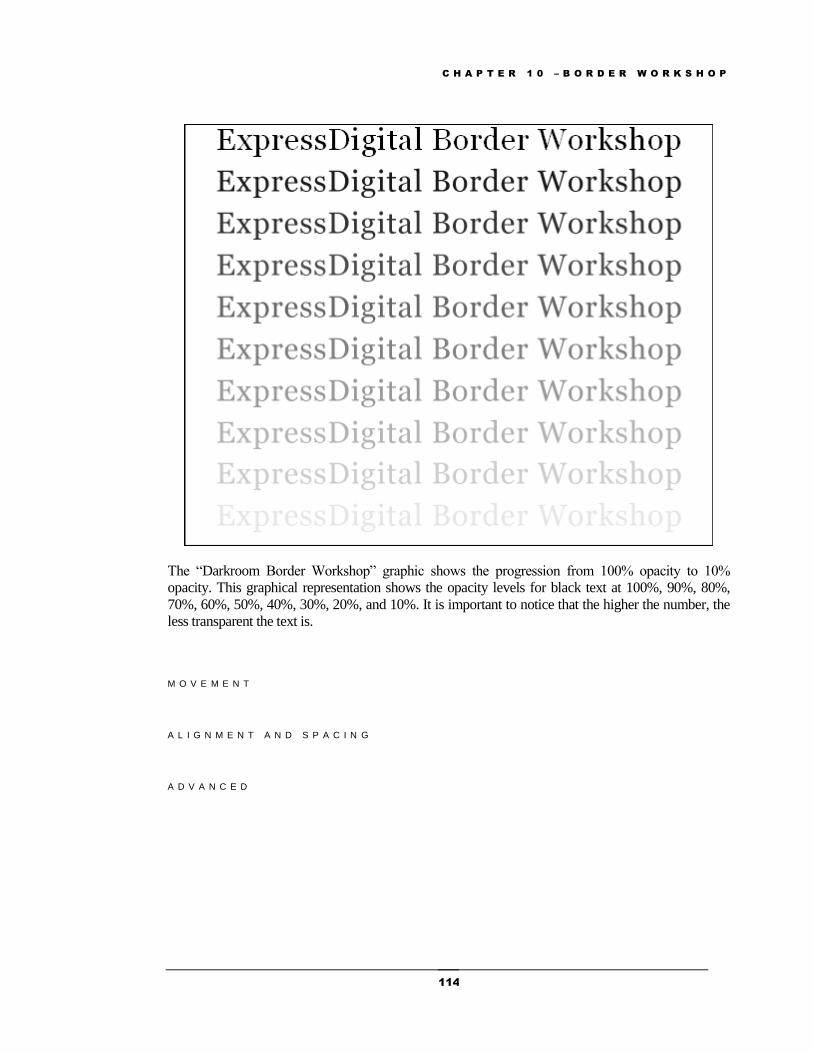
C H A P T E R 1 0 – B O R D E R W O R K S H O P
114
The “Darkroom Border Workshop” graphic shows the progression from 100% opacity to 10%
opacity. This graphical representation shows the opacity levels for black text at 100%, 90%, 80%,
70%, 60%, 50%, 40%, 30%, 20%, and 10%. It is important to notice that the higher the number, the
less transparent the text is.
M O V E M E N T
A L I G N M E N T A N D S P A C I N G
A D V A N C E D
C H A P T E R 1 0 – B O R D E R W O R K S H O P
115
To add text, click “add text” on the toolbar. The Text Object window appears. Enter the text you
want to appear on the page. If you want to enter a text variable, type a percent sign before and after
the variable name. For example, you enter the text “My name is %name%.” This example prints the
static text “My name is” and then prompts you for a name. You might also use variable text without
static text. For example, %title% prompts you for the person’s title and prints only the title. You can
insert predefined variables such as the date or copyright by clicking the Insert Auto Text button and
selecting a variable.
A T T R I B U T E O P T I O N S
M O V E M E N T O P T I O N S
The Movement setting determines if you can move the text when you apply the border in the Photo
Workshop. The Fixed setting does not let you move the text at all. The Floating setting gives you
freedom to move the text anywhere on the page. The Relative setting allows you to move the text, but
its position remains relative to the object on the previous layer. This is useful if you want to keep the
relationship between two text objects or a graphic and text. Using this option is like grouping objects.
V E R T I C A L A L I G N M E N T O P T I O N S
Choose the vertical alignment within the text box. When you add text, it is inside a text box that can
be sized. This setting aligns the text at either the top, middle, or bottom of the text box.
C H A R A C T E R A N D L I N E S P A C I N G
The Border Workshop allows user to set custom character spacing for the text on a border. The
workshop offers default, exact, and even options. The “Exact” option allows the photographer an
opportunity to set the exact spacing measured in pixels. The “Evenly Spaced Text Box” option
means that each character will be evenly spaced with every other character in the text box.
The Border Workshop also allows the user to set custom line spacing for the text on the border.
These options include single, multiplier and exact. The multiplier option takes the amount fixed for
single and multiplies that by the entered number. A photographer could choose 6 and the result
would be 6 single lines between each line of text. The exact option allows the user to select an exact
pixel width. If the user entered 20 in the “Exact” field, then the space between each line of text would
be 20 pixels wide.
A D V A N C E D O P T I O N S
The advanced section of the Text Object window includes seven features. These allow the user to
display text onscreen as a guide but the text is not printed. It allows the user to draw an outline around
the text in addition to a drop shadow or an inside shadow around the text. The advanced options
allow the user to enter a text rotation angle if you want rotated text. Users can also select whether or
not you want word-wrap enabled. When enabled, the text wraps within the text box. Finally, this
feature allows the user to make the border editable for future changes.
S I Z E A N D P O S I T I O N
It is possible to select the size and position for the text from the “Text Object” window. This is
available in the “Size and Position” tab. Photographers can change the position starting at the top left
C H A P T E R 1 0 – B O R D E R W O R K S H O P
116
corner. This positioning system can be measured in inches, pixels, centimeters (cm), or millimeters
(mm).
Finally photographers can select a size for the object. They can either select a size based on the
bottom-right corner or based on the width and height.
Add Text
Add Effect
O B J E C T F O R M A T T O O L S
Font
Fill & Fit
Make Same
Center
Align
Space
Order
Rotate
B O R D E R W O R K S H O P U T I L I T I E S
Duplicate
Cut
Copy
Paste
C H A P T E R 1 0 – B O R D E R W O R K S H O P
117
Delete
Select
Pan
Zoom
Fit Page
Actual Size
Next Image
Previous Image
B O R D E R W O R K S H O P F U N C T I O N O V E R V I E W
Border Workshop overview with Tool Diagrams
Basic Starter Knowledge
- Border Item list
- Measurements
- Save/Cancel Functions
P R E - B O R D E R W O R K I N 3 R D P A R T Y S O F T W A R E
Layer Concept
Masks
You can create your own masks if you want a transparent shape that is not available in the pre-
defined masks. For example, you might want to create a cut-out as in the example below.
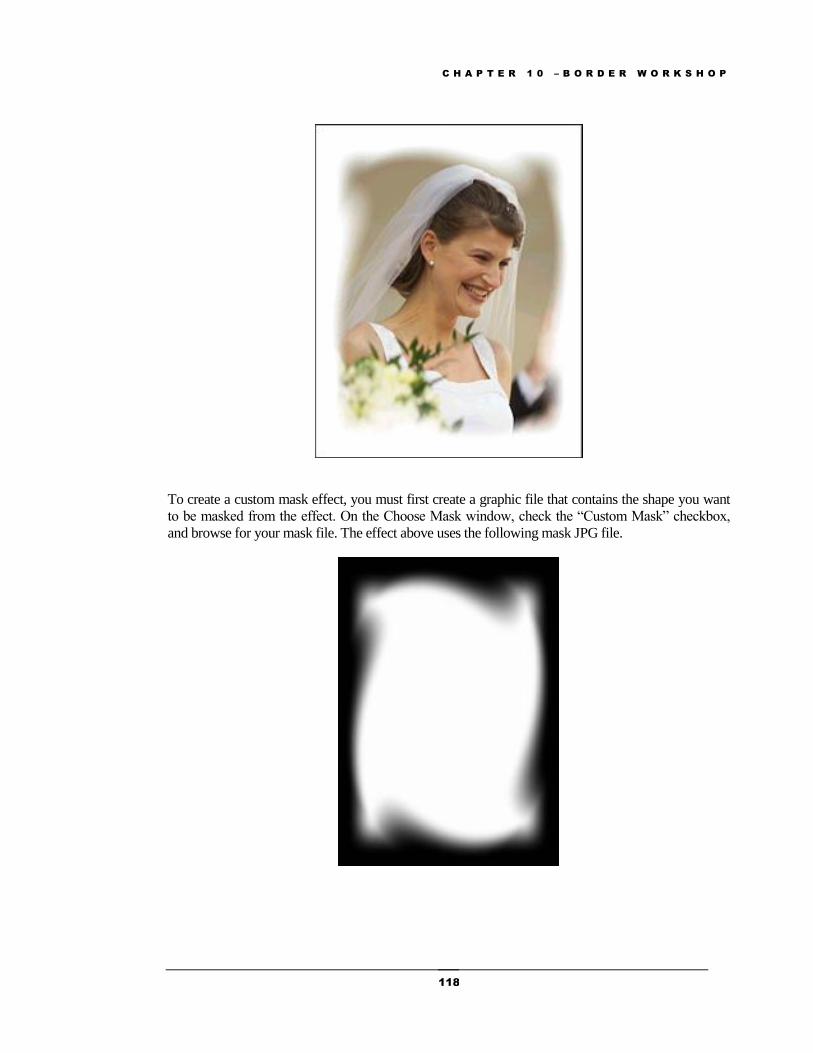
C H A P T E R 1 0 – B O R D E R W O R K S H O P
118
To create a custom mask effect, you must first create a graphic file that contains the shape you want
to be masked from the effect. On the Choose Mask window, check the “Custom Mask” checkbox,
and browse for your mask file. The effect above uses the following mask JPG file.
C H A P T E R 1 0 – B O R D E R W O R K S H O P
119
The inner shape is the masked area and is transparent. The default color around the masked area is
white. If you want the non-transparent area to be a color other than white, you can use the Color
effect. See the custom mask example in the Adding an Effect section.
Alpha Channels
.PNG, .JPG, What else?
Naming Files
C R E A T E N E W B O R D E R
B O R D E R P R O P E R T I E S
- Description & Filename
- Page Settings
- Other Options
A D D M U L T I P L E P H O T O S
o Photos
o Labels
o Options
Transparency
Advanced
o Size and Position
A D D G R A P H I C
o General
Transparency
Movement
Advanced
o Size & Position
A D D T E X T
o General
Color Attributes
Movement
Vertical Alignment
C H A P T E R 1 0 – B O R D E R W O R K S H O P
120
Character Spacing
Line Spacing
Advanced
o Size & Position
A D D E F F E C T
o General
Transparency
Movement
Advanced
o Size & Position
B O R D E R I T E M P R O P E R T I E S A N D T O O L S
Item Properties
Font
Fill & Fit
Make Same
Center
Align
Space
Order
Rotate
Options >Show Grid
Options> Grid Options
Auto Alignment.
B O R D E R T O O L S
Duplicate
Cut
Copy
Paste
Delete
Select
Pan
Zoom
Fit Page
Actual Size
C H A P T E R 1 0 – B O R D E R W O R K S H O P
121
P O R T R A I T A N D W E D D I N G B O R D E R C R E A T I O N
Proof Sheet
Artistic Composite
S P O R T A N D E V E N T B O R D E R C R E A T I O N
Team/Individual Composite
Trading Card
S C H O O L A N D G R O U P B O R D E R C R E A T I O N
Composite
ID Card
G R E E N S C R E E N B O R D E R C R E A T I O N
Border
Photo Workshop Tie in.
C H A P T E R 1 0 – B O R D E R W O R K S H O P
122
Border Workshop
B O R D E R W O R K S H O P M E N U
There are several options available in the Border Workshop that are only available via the Border
Workshop menu. This menu allows the user to access both the front and back view of a template via
tabs. This menu also provides the user with a way to turn on a grid system or activate an auto
alignment system, which is used in the creation process. Finally, users can access the undo and redo
options.
F R O N T & B A C K T A B
The Darkroom Border Workshop provides a way for users to access both the front side and backside
of a template. This feature is important to photographers who use borders and templates that have
backs. For example, sport and event photographers may offer photo trading card products or small
photo business cards. This unique Border Workshop feature allows professional users to access the
back of templates to create products that customers want.
The first option available on the border Workshop menu is the Front tab and Back tab. These options
are available in the upper left portion of the Border Workshop screen.
In order to visualize the purpose of this feature, imaging you are a sport photographer that is shooting
the local Little League baseball teams. One of the most popular product offerings is a small trading
card that the players can take out and trade with their friends, just like people do with professional
Major League baseball cards.
In order to make the cards more realistic, it is important that there is a front side of the card and a
backside to the card. The front side includes a photo of the player and a baseball related graphic. For
example, the following border is a front side of a baseball trading card.

C H A P T E R 1 0 – B O R D E R W O R K S H O P
123
The front side of the border contains important information such as the subject’s individual photo,
team name and the subject’s first and last name.
However, the information on the back of the card varies greatly. This graphic-centric template
includes statistical information. In the case of a Little League baseball player, the subject’s first and
last name, height, weight and field position are included. Information such as times at bat, batting
average, age, RBIs, and homeruns can also be included to individualize the players information.
Here is an example of the back of a trading card:
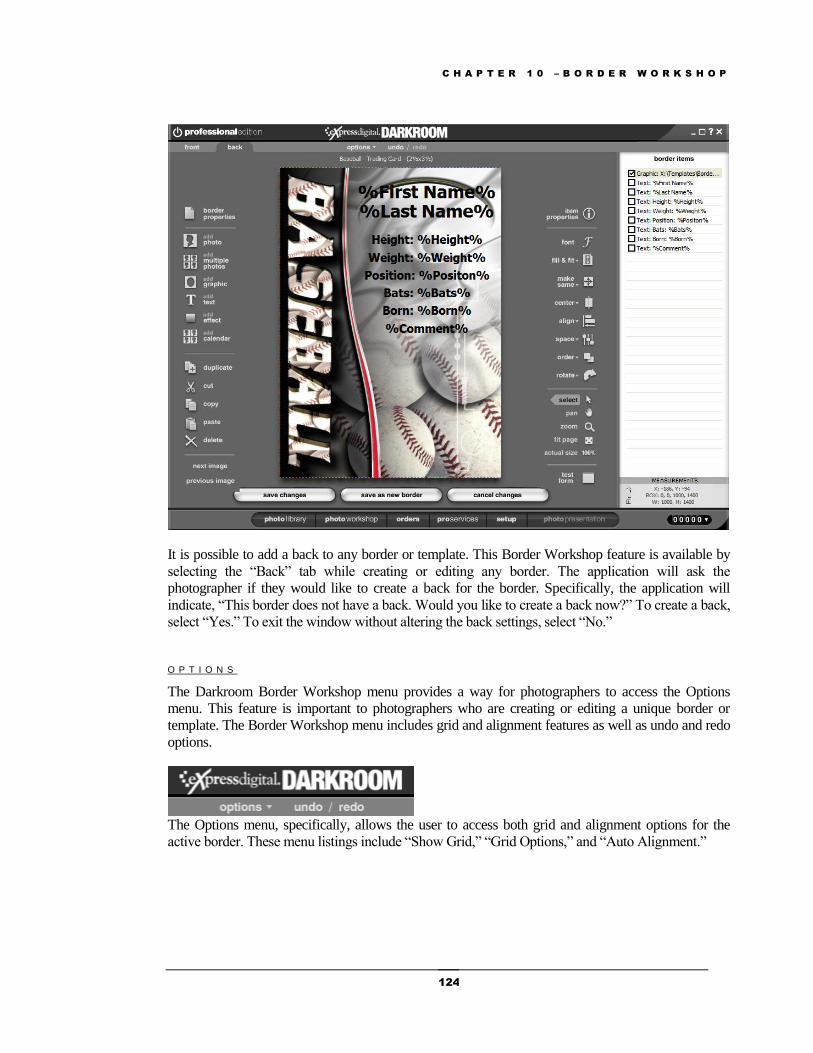
C H A P T E R 1 0 – B O R D E R W O R K S H O P
124
It is possible to add a back to any border or template. This Border Workshop feature is available by
selecting the “Back” tab while creating or editing any border. The application will ask the
photographer if they would like to create a back for the border. Specifically, the application will
indicate, “This border does not have a back. Would you like to create a back now?” To create a back,
select “Yes.” To exit the window without altering the back settings, select “No.”
O P T I O N S
The Darkroom Border Workshop menu provides a way for photographers to access the Options
menu. This feature is important to photographers who are creating or editing a unique border or
template. The Border Workshop menu includes grid and alignment features as well as undo and redo
options.
The Options menu, specifically, allows the user to access both grid and alignment options for the
active border. These menu listings include “Show Grid,” “Grid Options,” and “Auto Alignment.”
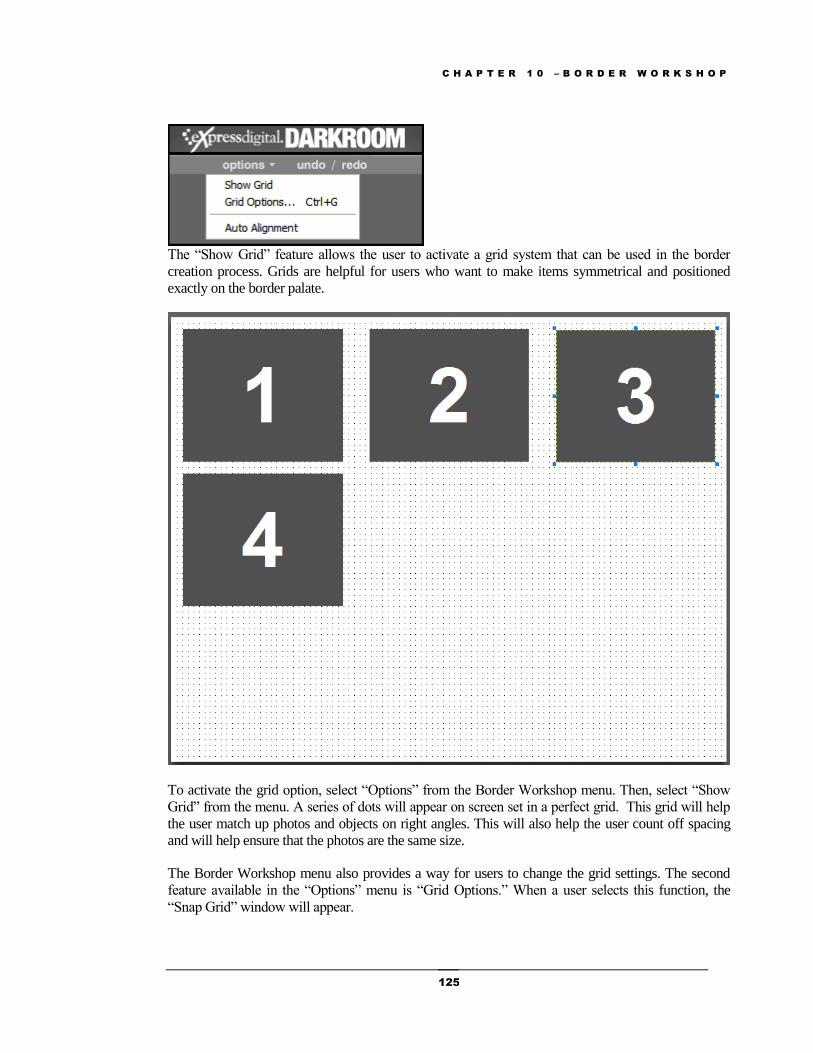
C H A P T E R 1 0 – B O R D E R W O R K S H O P
125
The “Show Grid” feature allows the user to activate a grid system that can be used in the border
creation process. Grids are helpful for users who want to make items symmetrical and positioned
exactly on the border palate.
To activate the grid option, select “Options” from the Border Workshop menu. Then, select “Show
Grid” from the menu. A series of dots will appear on screen set in a perfect grid. This grid will help
the user match up photos and objects on right angles. This will also help the user count off spacing
and will help ensure that the photos are the same size.
The Border Workshop menu also provides a way for users to change the grid settings. The second
feature available in the “Options” menu is “Grid Options.” When a user selects this function, the
“Snap Grid” window will appear.
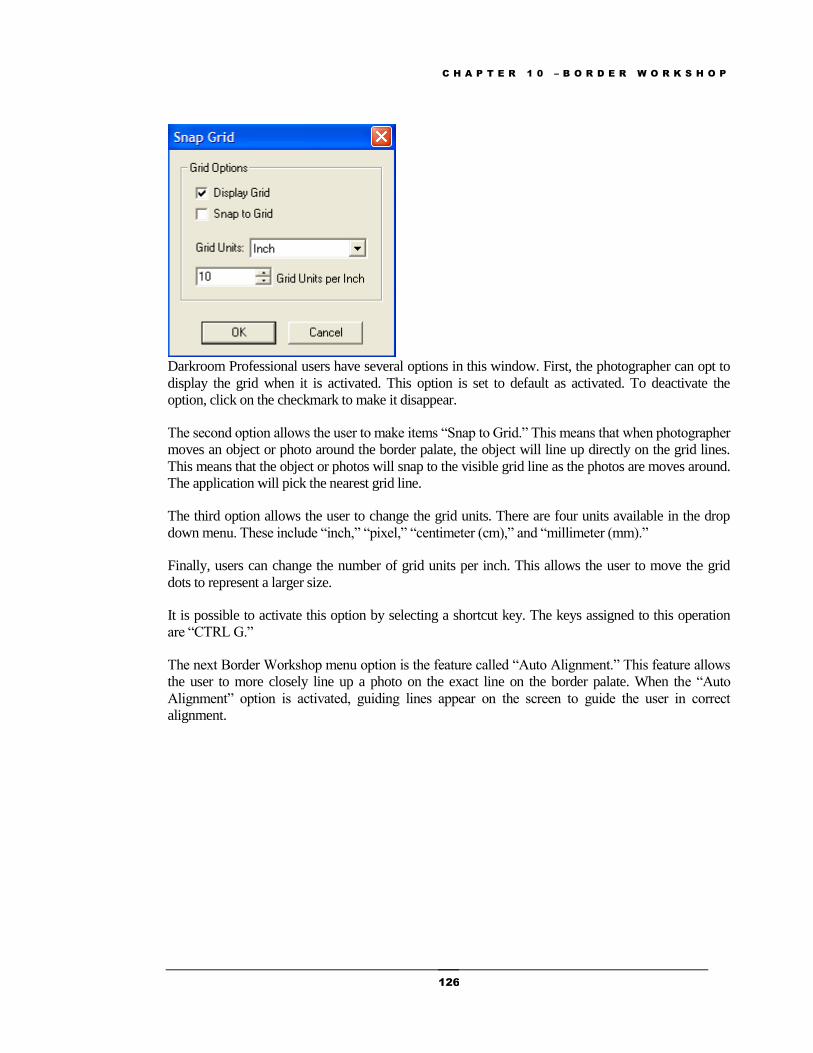
C H A P T E R 1 0 – B O R D E R W O R K S H O P
126
Darkroom Professional users have several options in this window. First, the photographer can opt to
display the grid when it is activated. This option is set to default as activated. To deactivate the
option, click on the checkmark to make it disappear.
The second option allows the user to make items “Snap to Grid.” This means that when photographer
moves an object or photo around the border palate, the object will line up directly on the grid lines.
This means that the object or photos will snap to the visible grid line as the photos are moves around.
The application will pick the nearest grid line.
The third option allows the user to change the grid units. There are four units available in the drop
down menu. These include “inch,” “pixel,” “centimeter (cm),” and “millimeter (mm).”
Finally, users can change the number of grid units per inch. This allows the user to move the grid
dots to represent a larger size.
It is possible to activate this option by selecting a shortcut key. The keys assigned to this operation
are “CTRL G.”
The next Border Workshop menu option is the feature called “Auto Alignment.” This feature allows
the user to more closely line up a photo on the exact line on the border palate. When the “Auto
Alignment” option is activated, guiding lines appear on the screen to guide the user in correct
alignment.
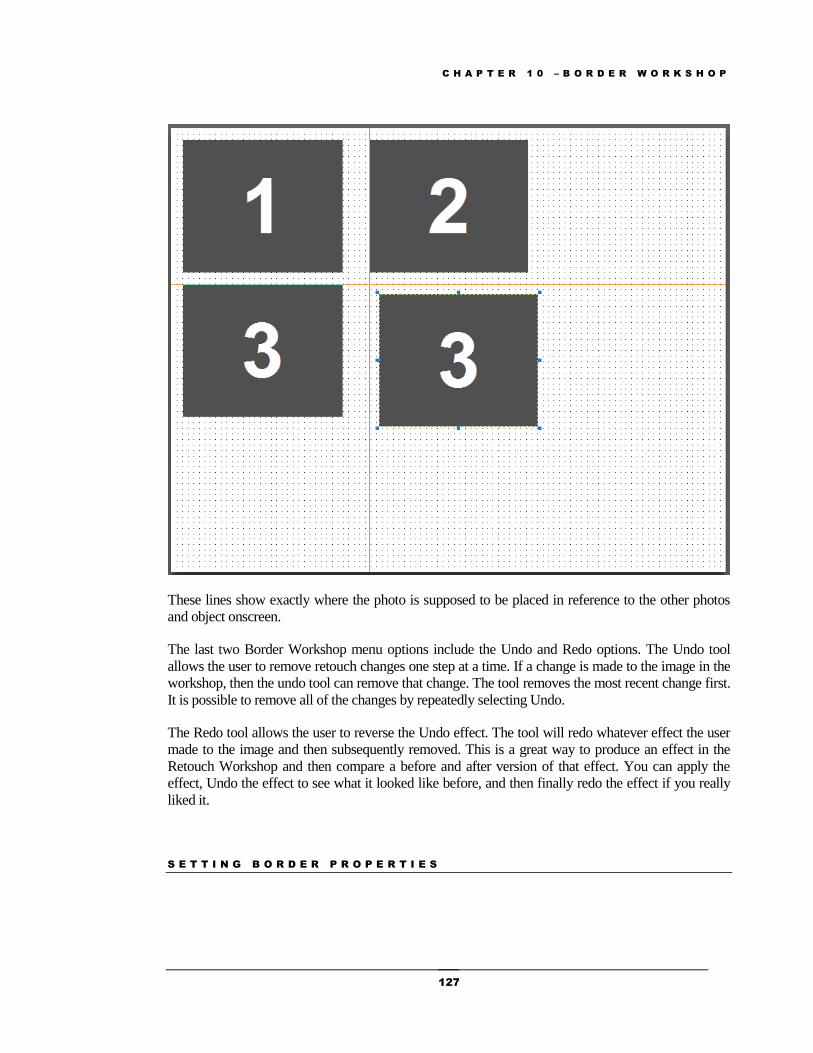
C H A P T E R 1 0 – B O R D E R W O R K S H O P
127
These lines show exactly where the photo is supposed to be placed in reference to the other photos
and object onscreen.
The last two Border Workshop menu options include the Undo and Redo options. The Undo tool
allows the user to remove retouch changes one step at a time. If a change is made to the image in the
workshop, then the undo tool can remove that change. The tool removes the most recent change first.
It is possible to remove all of the changes by repeatedly selecting Undo.
The Redo tool allows the user to reverse the Undo effect. The tool will redo whatever effect the user
made to the image and then subsequently removed. This is a great way to produce an effect in the
Retouch Workshop and then compare a before and after version of that effect. You can apply the
effect, Undo the effect to see what it looked like before, and then finally redo the effect if you really
liked it.
S E T T I N G B O R D E R P R O P E R T I E S
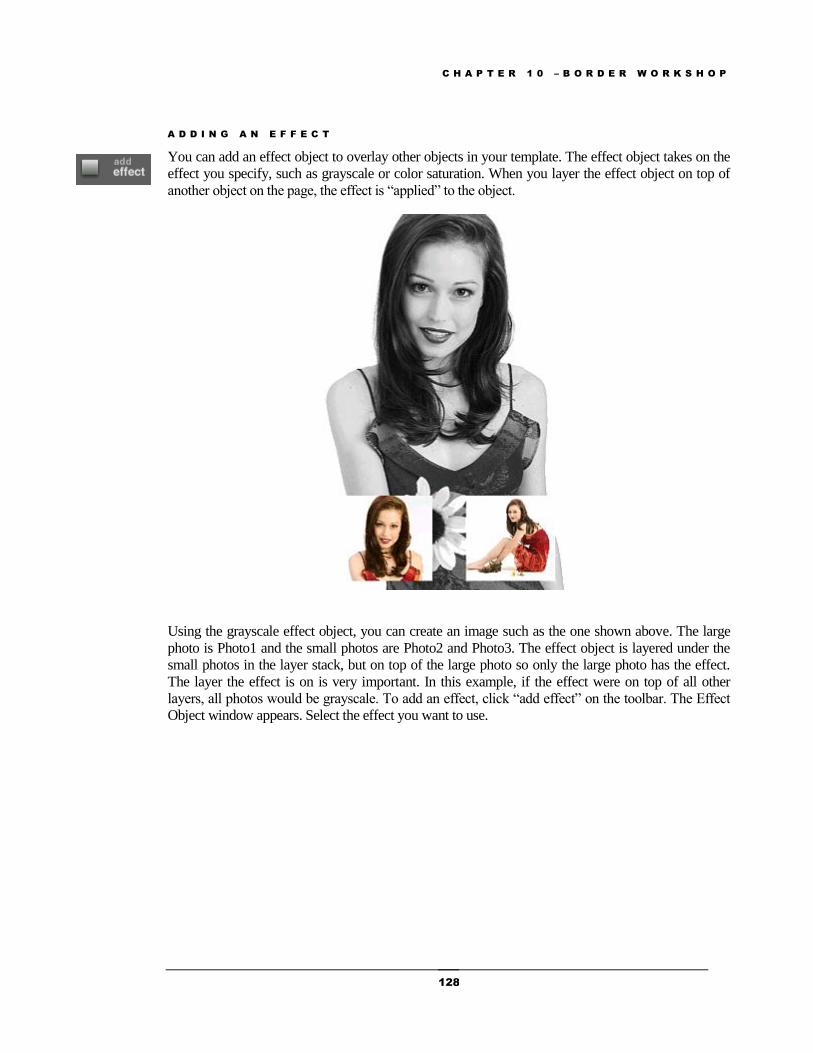
C H A P T E R 1 0 – B O R D E R W O R K S H O P
128
A D D I N G A N E F F E C T
You can add an effect object to overlay other objects in your template. The effect object takes on the
effect you specify, such as grayscale or color saturation. When you layer the effect object on top of
another object on the page, the effect is “applied” to the object.
Using the grayscale effect object, you can create an image such as the one shown above. The large
photo is Photo1 and the small photos are Photo2 and Photo3. The effect object is layered under the
small photos in the layer stack, but on top of the large photo so only the large photo has the effect.
The layer the effect is on is very important. In this example, if the effect were on top of all other
layers, all photos would be grayscale. To add an effect, click “add effect” on the toolbar. The Effect
Object window appears. Select the effect you want to use.
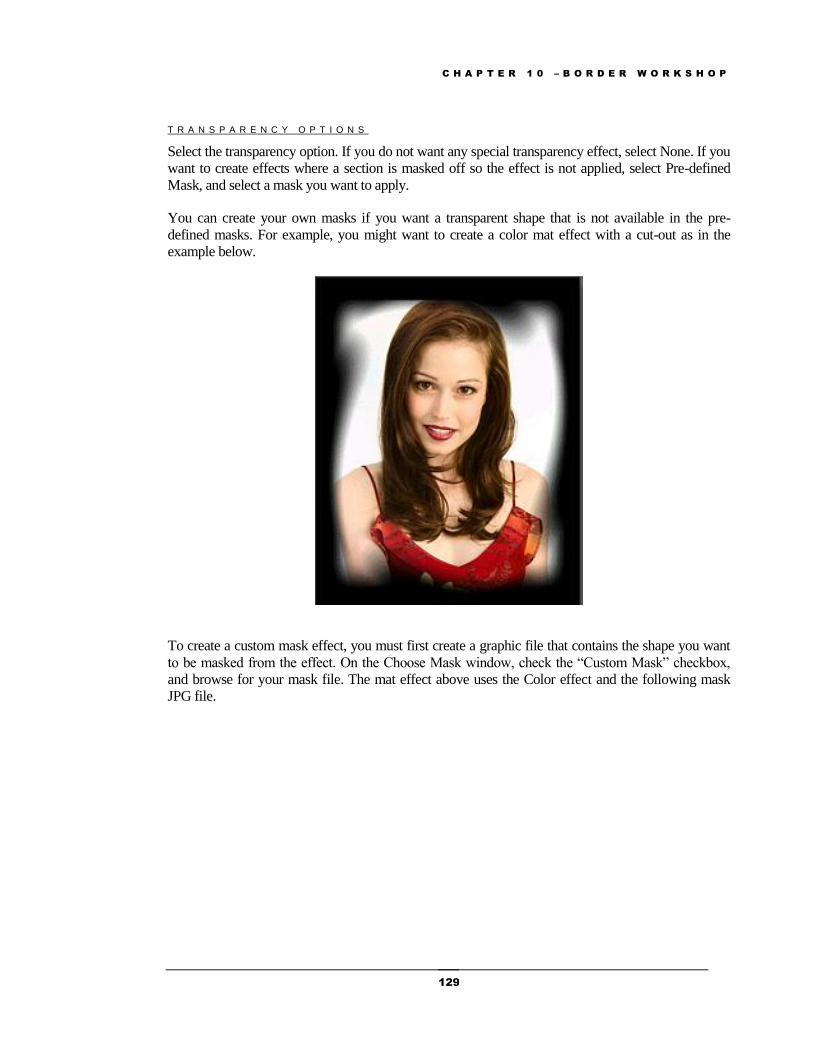
C H A P T E R 1 0 – B O R D E R W O R K S H O P
129
T R A N S P A R E N C Y O P T I O N S
Select the transparency option. If you do not want any special transparency effect, select None. If you
want to create effects where a section is masked off so the effect is not applied, select Pre-defined
Mask, and select a mask you want to apply.
You can create your own masks if you want a transparent shape that is not available in the pre-
defined masks. For example, you might want to create a color mat effect with a cut-out as in the
example below.
To create a custom mask effect, you must first create a graphic file that contains the shape you want
to be masked from the effect. On the Choose Mask window, check the “Custom Mask” checkbox,
and browse for your mask file. The mat effect above uses the Color effect and the following mask
JPG file.
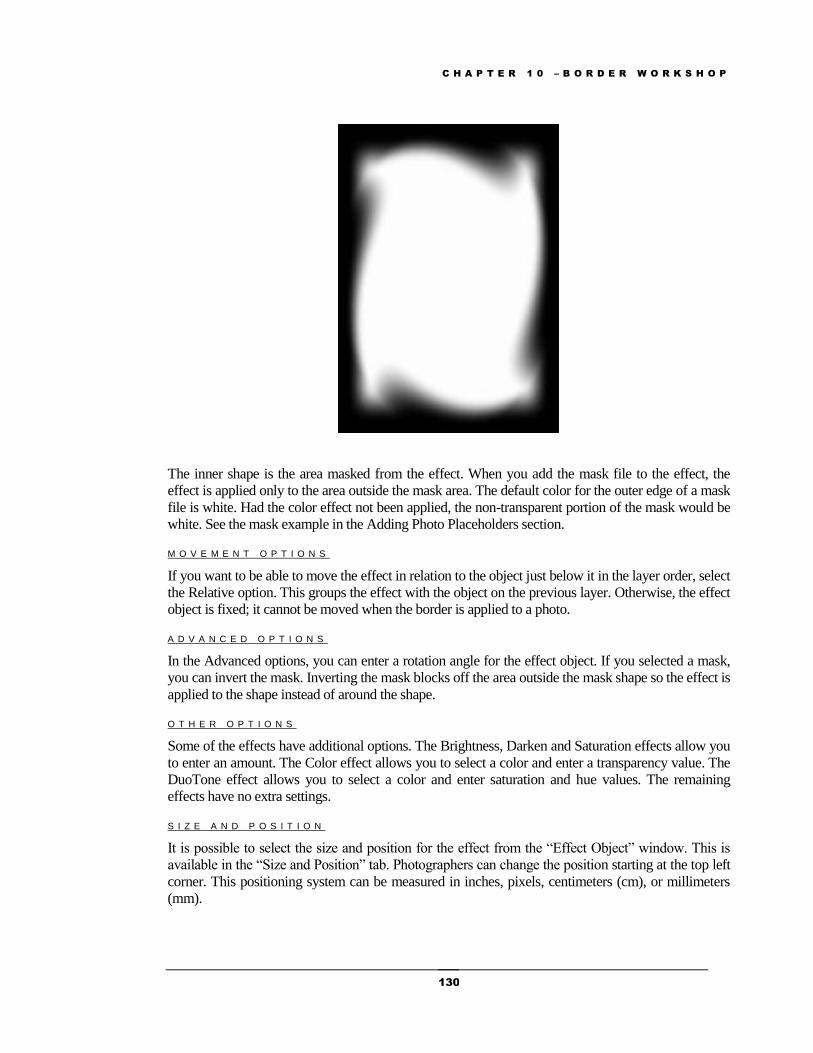
C H A P T E R 1 0 – B O R D E R W O R K S H O P
130
The inner shape is the area masked from the effect. When you add the mask file to the effect, the
effect is applied only to the area outside the mask area. The default color for the outer edge of a mask
file is white. Had the color effect not been applied, the non-transparent portion of the mask would be
white. See the mask example in the Adding Photo Placeholders section.
M O V E M E N T O P T I O N S
If you want to be able to move the effect in relation to the object just below it in the layer order, select
the Relative option. This groups the effect with the object on the previous layer. Otherwise, the effect
object is fixed; it cannot be moved when the border is applied to a photo.
A D V A N C E D O P T I O N S
In the Advanced options, you can enter a rotation angle for the effect object. If you selected a mask,
you can invert the mask. Inverting the mask blocks off the area outside the mask shape so the effect is
applied to the shape instead of around the shape.
O T H E R O P T I O N S
Some of the effects have additional options. The Brightness, Darken and Saturation effects allow you
to enter an amount. The Color effect allows you to select a color and enter a transparency value. The
DuoTone effect allows you to select a color and enter saturation and hue values. The remaining
effects have no extra settings.
S I Z E A N D P O S I T I O N
It is possible to select the size and position for the effect from the “Effect Object” window. This is
available in the “Size and Position” tab. Photographers can change the position starting at the top left
corner. This positioning system can be measured in inches, pixels, centimeters (cm), or millimeters
(mm).
C H A P T E R 1 0 – B O R D E R W O R K S H O P
131
Finally photographers can select a size for the object. They can either select a size based on the
bottom-right corner or based on the width and height.
E D I T I N G A T E X T O B J E C T ’ S F O N T
After adding a text object, you can change its font without opening the item properties. Select one or
more text objects, and click “font” on the toolbar. You can set font attributes for the text and view a
sample of your font selections before applying them.
A D J U S T I N G T H E P A G E L A Y O U T
After you add border objects, you might need to adjust how they are presented on the page. For
example, you might have three small photos you want to align and space evenly. Or, you might need
to change the layer order of overlapping objects to achieve the look you want. Use the following tools
to make these kinds of layout adjustments.
F I L L & F I T T O O L
Use this tool to size a selected object in relation to the page.
FILL ENTIRE PAGE Sizes the object to the exact size of the page
FILL WIDTH Sizes the object to the exact width of the page
FILL HEIGHT Sizes the object to the exact height of the page
FIT WITHIN PAGE Sizes the object proportionally until its boundaries reach the edge of
the page
M A K E S A M E T O O L
The Make Same tool gives one object the same attributes as another. The order in which you select
objects before using this tool is important. First, select the object from which you want to copy
attributes, and then select the objects you want to copy to. Click “make same” on the toolbar and
select the attributes you want to copy.
MAKE SAME SIZE Sizes the object to the exact size of the object you selected first
MAKE SAME SIZE & POSITION Sizes the object to the exact size and positions the object to the exact
position of the object you selected first
MAKE SAME WIDTH Sizes the object to the exact width of the object you selected first
MAKE SAME HEIGHT Sizes the object to the exact height of the object you selected first
MAKE SAME FONT Applies the same font attributes as the text object you selected first
C H A P T E R 1 0 – B O R D E R W O R K S H O P
132
C E N T E R T O O L
Use this tool to center selected items on the page. When you have multiple items selected, they are
centered as a single unit.
HORIZONTALLY Centers the object between the left and right of the page
VERTICALLY Centers the object between the top and bottom of the page
CENTER Centers both horizontally and vertically
A L I G N T O O L
This tool aligns two or more selected objects with each other. The first three align options are for the
horizontal alignment of objects stacked vertically. The last three are for the vertical alignment of
horizontal objects.
LEFT Aligns objects by their left edges
CENTER Aligns objects by their centers
RIGHT Aligns objects by their right edges
TOP Aligns objects by their top edge
MIDDLE Aligns objects by their middles
BOTTOM Aligns objects by their bottom edges
S P A C E T O O L
Use the Space tool to evenly space three or more selected objects. You can set spacing from the
object edges or from the object centers.
GAPS HORIZONTALLY Equally Spaces the gaps between objects lined horizontally on the
page
GAPS VERTICALLY Equally spaces the gaps between objects lined vertically on the page
CENTERS HORIZONTALLY Equally spaces objects from their centers. Use with objects lined
horizontally on the page.
CENTERS VERTICALLY Equally spaces objects from their centers. Use with objects lined
vertically on the page.
O R D E R T O O L
You can change the layer order of a selected object. As you add objects to the page, they are layered
one on top of another. The back, or bottom, layer is covered by new layers. The front, or top, layer
C H A P T E R 1 0 – B O R D E R W O R K S H O P
133
covers all previous layers. To achieve the look you want, you might need to rearrange the order in
which objects appear on the page. You can use the Order tool on only one selected object at a time.
SEND TO BACK Sends the selected object to the bottom of the layer stack. The object
becomes the first item in the Border Items list.
BRING TO FRONT Sends the selected object to the top of the layer stack. The object
becomes the last item in the Border Items list.
SEND BACKWARD Sends the selected object one layer toward the bottom of the layer
stack. The object moves closer to the first item in the Border Items
list.
BRING FORWARD Sends the selected object one layer toward the top of the layer stack.
The object moves closer to the last item in the Border Items list.
R O T A T E T O O L
Use this tool to rotate photo, text, and graphic objects. You can rotate 90 degrees, 180 degrees or an
angle you specify. When you rotate photo objects, the photo rotates within the image cell. For
example, if you have a portrait image cell and you rotate 90 degrees, the image cell remains portrait,
but the photo within the cell rotates 90 degrees.
RESET Resets the rotation to the original setting
90º CLOCKWISE Rotates the selected object 90 degrees to the right
90º COUNTERCLOCKWISE Rotates the selected object 90 degrees to the left
180º Rotates the selected object 180 degrees
ANGLE Allows you to set a specific degree angle of rotation
S E L E C T
The Darkroom Border Workshop provides more control for the border creator. The “Select” tool
provides the photographer with a simple way to click-select border objects. This tool provides a way
to click and drag objects around the template or to perform subtle changes in a zoomed in view.
To use the “Select” tool, highlight the icon. This will activate the feature. Click on items in the
Border Preview. All selected items will highlight by displaying an outline.
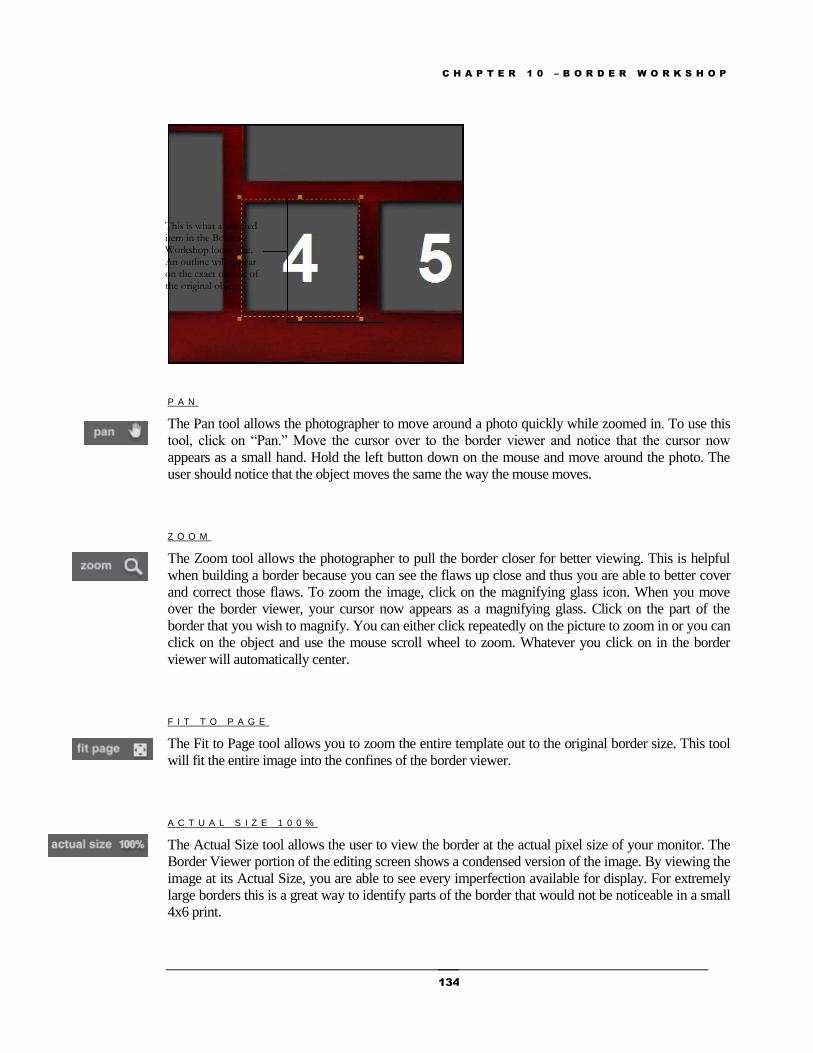
C H A P T E R 1 0 – B O R D E R W O R K S H O P
134
P A N
The Pan tool allows the photographer to move around a photo quickly while zoomed in. To use this
tool, click on “Pan.” Move the cursor over to the border viewer and notice that the cursor now
appears as a small hand. Hold the left button down on the mouse and move around the photo. The
user should notice that the object moves the same the way the mouse moves.
Z O O M
The Zoom tool allows the photographer to pull the border closer for better viewing. This is helpful
when building a border because you can see the flaws up close and thus you are able to better cover
and correct those flaws. To zoom the image, click on the magnifying glass icon. When you move
over the border viewer, your cursor now appears as a magnifying glass. Click on the part of the
border that you wish to magnify. You can either click repeatedly on the picture to zoom in or you can
click on the object and use the mouse scroll wheel to zoom. Whatever you click on in the border
viewer will automatically center.
F I T T O P A G E
The Fit to Page tool allows you to zoom the entire template out to the original border size. This tool
will fit the entire image into the confines of the border viewer.
A C T U A L S I Z E 1 0 0 %
The Actual Size tool allows the user to view the border at the actual pixel size of your monitor. The
Border Viewer portion of the editing screen shows a condensed version of the image. By viewing the
image at its Actual Size, you are able to see every imperfection available for display. For extremely
large borders this is a great way to identify parts of the border that would not be noticeable in a small
4x6 print.
This is what a selected item in the Border Workshop looks like. An outline will appear on the exact outline of the original object.
C H A P T E R 1 0 – B O R D E R W O R K S H O P
135
T E S T I N G V A R I A B L E T E X T F I E L D S
If you add variable text to your template, the application prompts you for values for those text fields
when you apply the border to a photo. You can test the variable input form from the Border
Workshop to make sure fields are correct and text appears correctly on the page. To test the form,
click “test form” on the toolbar. The Text Fields window displays your variable text fields. You can
enter values into the fields to check your layout.
U S I N G T H E P H O T O A N D G R A P H I C O B J E C T Q U E R Y
When you add photos and graphics to a border template, you can select a variable that instructs the
application to generate the border at the time it is applied based on images found in the catalog. The
simplest photo variable is *Photo# (e.g., *Photo1). This variable is entered automatically as you add
single photos to the template. This variable simply adds to the border the first, second, third, etc.
photo you select while editing a photo in the Photo Workshop. There are two other types of
predefined variables you can select—graphic and query variables.
G R A P H I C V A R I A B L E S
If have a graphic element you consistently want to add to your photos, you might add the graphic to
your catalog. Common graphic elements in a border are a background and a logo. Once added to the
catalog, the graphics are available to be used by graphic variables you specify in your border
template. For your border template to access these graphics, you must add photo data to the graphic
file so the border can find them. To add photo data, right-click the graphic in the Photo Library, and
select Properties. Click the Photo Data tab, and click the Add Data button. Using the background
example, enter a property of graphic and a value of background.
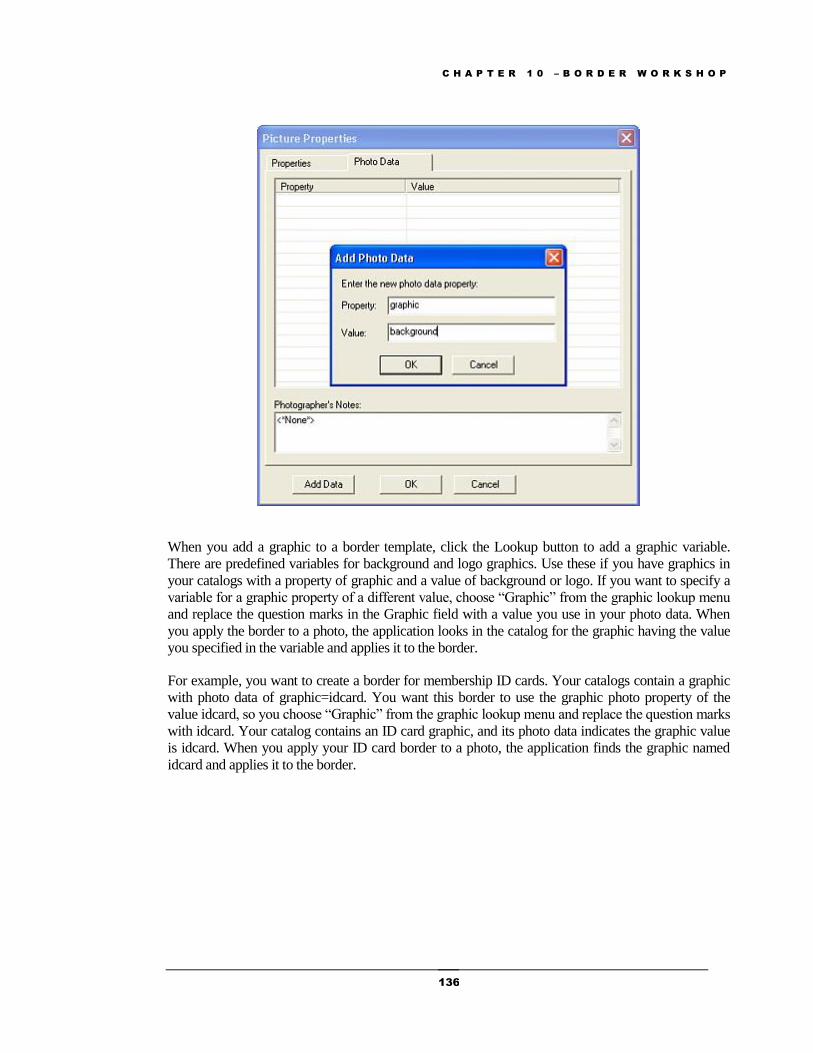
C H A P T E R 1 0 – B O R D E R W O R K S H O P
136
When you add a graphic to a border template, click the Lookup button to add a graphic variable.
There are predefined variables for background and logo graphics. Use these if you have graphics in
your catalogs with a property of graphic and a value of background or logo. If you want to specify a
variable for a graphic property of a different value, choose “Graphic” from the graphic lookup menu
and replace the question marks in the Graphic field with a value you use in your photo data. When
you apply the border to a photo, the application looks in the catalog for the graphic having the value
you specified in the variable and applies it to the border.
For example, you want to create a border for membership ID cards. Your catalogs contain a graphic
with photo data of graphic=idcard. You want this border to use the graphic photo property of the
value idcard, so you choose “Graphic” from the graphic lookup menu and replace the question marks
with idcard. Your catalog contains an ID card graphic, and its photo data indicates the graphic value
is idcard. When you apply your ID card border to a photo, the application finds the graphic named
idcard and applies it to the border.

C H A P T E R 1 0 – B O R D E R W O R K S H O P
137
Q U E R Y V A R I A B L E S
You might want to create a border that searches for a photo or graphic of a certain Type value. When
the search finds that photo or graphic in the current catalog, the application inserts the photo into the
border. For example, you might have a group photo, like a team photo, in your catalog and you want
it to always be applied to a special border, like a memory mate. If the photo’s data has a property of
type and a value of group, you can use a query in the border template that tells the application to find
the photo of type “group” when you open the border in the Photo Workshop. When the photo is
found, the application applies the photo to the border.
Note: If there is more than one photo in the catalog with the same type value, the application uses the
first one it finds. Therefore, this feature is best used when you only have one photo of the type
specified in the query.
The Queries lookup contains common queries. To use these, you must use the same type value in
your photo data as in the query you want to use. For example, if you use the query *Find
Type=league and you do not use the type value “league” in the photo data for any photos, the query
will return no photos.
Note: The query is not case sensitive.
If you want to specify a query for a photo type other than those predefined, choose “Find” from the
query lookup menu and replace the question marks with a type you use in your photo data. When you
apply the border to a photo, the application looks in the catalog for a photo of the type you specified
and adds it to the border.
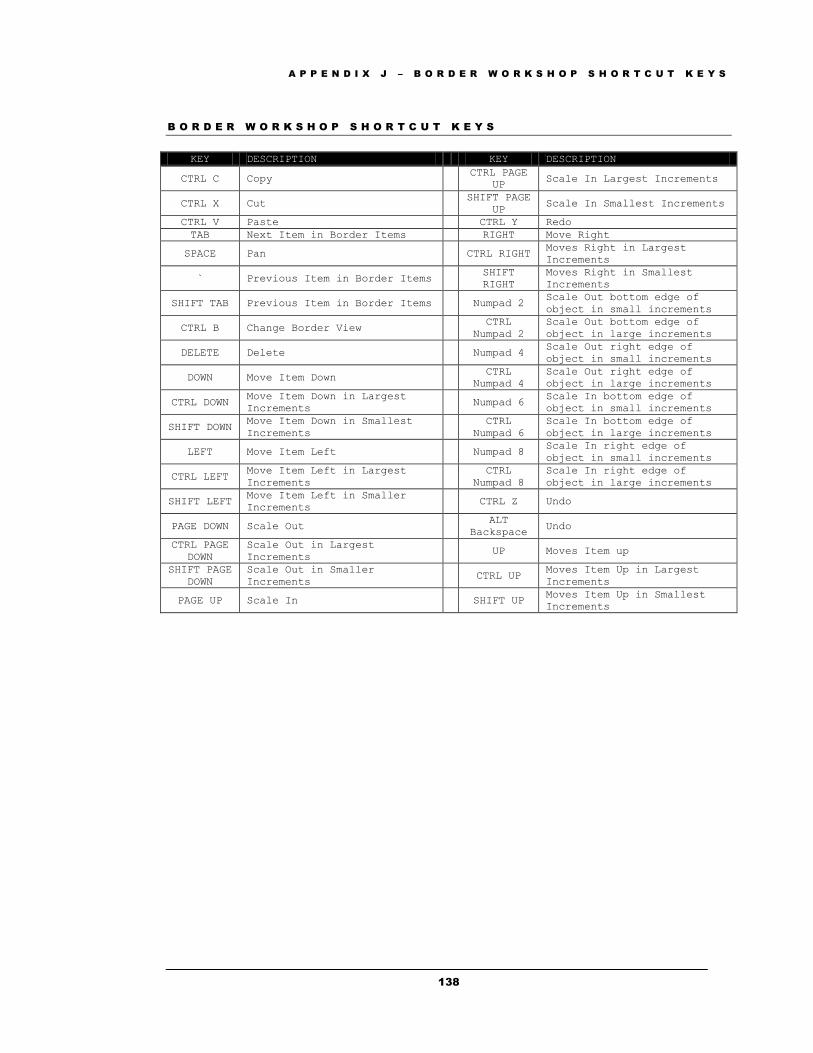
A P P E N D I X J – B O R D E R W O R K S H O P S H O R T C U T K E Y S
138
B O R D E R W O R K S H O P S H O R T C U T K E Y S
KEY DESCRIPTION KEY DESCRIPTION
CTRL C Copy CTRL PAGE
UP Scale In Largest Increments
CTRL X Cut SHIFT PAGE
UP Scale In Smallest Increments
CTRL V Paste CTRL Y Redo
TAB Next Item in Border Items RIGHT Move Right
SPACE Pan CTRL RIGHT Moves Right in Largest
Increments
` Previous Item in Border Items SHIFT
RIGHT
Moves Right in Smallest
Increments
SHIFT TAB Previous Item in Border Items Numpad 2 Scale Out bottom edge of
object in small increments
CTRL B Change Border View CTRL
Numpad 2
Scale Out bottom edge of
object in large increments
DELETE Delete Numpad 4 Scale Out right edge of
object in small increments
DOWN Move Item Down CTRL
Numpad 4
Scale Out right edge of
object in large increments
CTRL DOWN Move Item Down in Largest
Increments Numpad 6
Scale In bottom edge of
object in small increments
SHIFT DOWN Move Item Down in Smallest
Increments
CTRL
Numpad 6
Scale In bottom edge of
object in large increments
LEFT Move Item Left Numpad 8 Scale In right edge of
object in small increments
CTRL LEFT Move Item Left in Largest
Increments
CTRL
Numpad 8
Scale In right edge of
object in large increments
SHIFT LEFT Move Item Left in Smaller
Increments CTRL Z Undo
PAGE DOWN Scale Out ALT
Backspace Undo
CTRL PAGE
DOWN
Scale Out in Largest
Increments UP Moves Item up
SHIFT PAGE
DOWN
Scale Out in Smaller
Increments CTRL UP
Moves Item Up in Largest
Increments
PAGE UP Scale In SHIFT UP Moves Item Up in Smallest
Increments
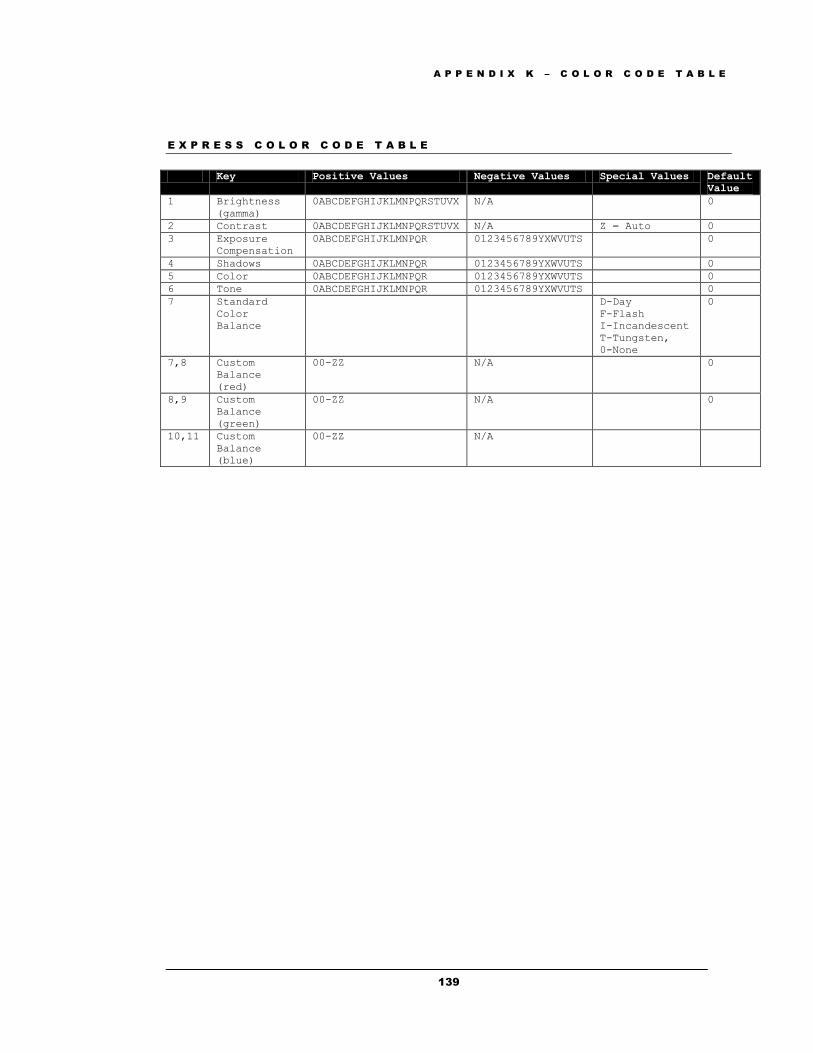
A P P E N D I X K – C O L O R C O D E T A B L E
139
E X P R E S S C O L O R C O D E T A B L E
Key Positive Values Negative Values Special Values Default
Value
1 Brightness
(gamma)
0ABCDEFGHIJKLMNPQRSTUVX N/A 0
2 Contrast 0ABCDEFGHIJKLMNPQRSTUVX N/A Z = Auto 0
3 Exposure
Compensation
0ABCDEFGHIJKLMNPQR 0123456789YXWVUTS 0
4 Shadows 0ABCDEFGHIJKLMNPQR 0123456789YXWVUTS 0
5 Color 0ABCDEFGHIJKLMNPQR 0123456789YXWVUTS 0
6 Tone 0ABCDEFGHIJKLMNPQR 0123456789YXWVUTS 0
7 Standard
Color
Balance
D-Day
F-Flash
I-Incandescent
T-Tungsten,
0-None
0
7,8 Custom
Balance
(red)
00-ZZ N/A 0
8,9 Custom
Balance
(green)
00-ZZ N/A 0
10,11 Custom
Balance
(blue)
00-ZZ N/A
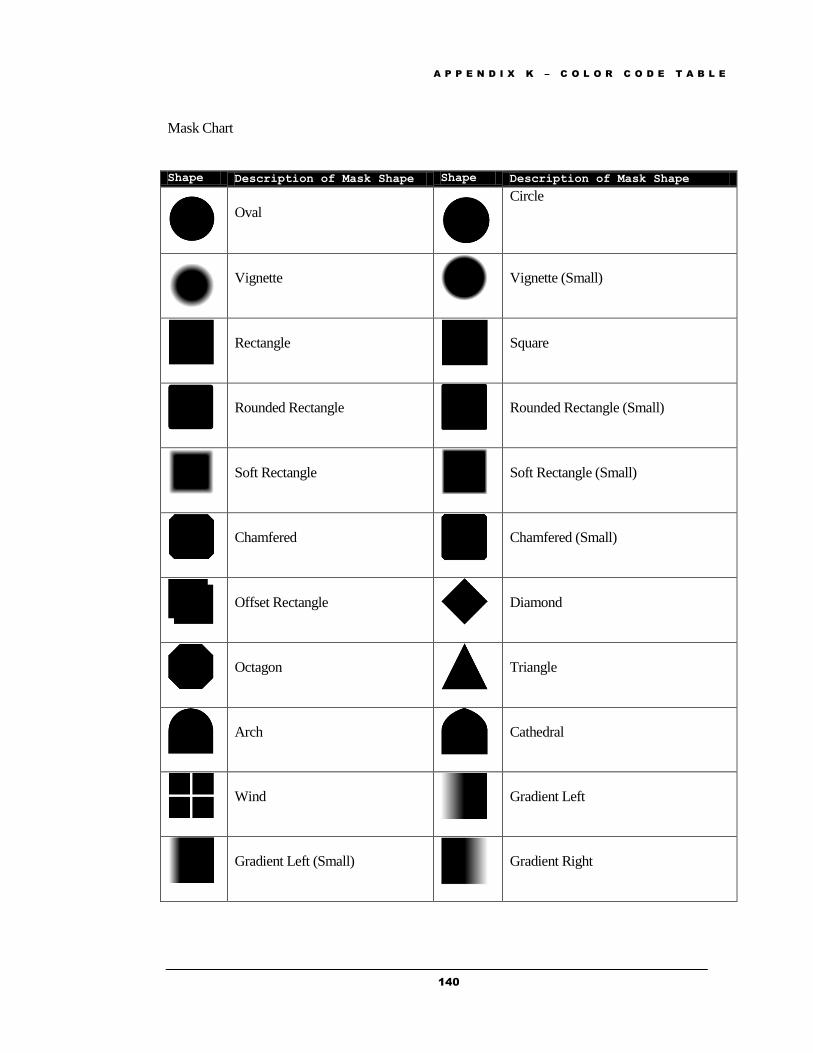
A P P E N D I X K – C O L O R C O D E T A B L E
140
Mask Chart
Shape Description of Mask Shape Shape Description of Mask Shape
Oval
Circle
Vignette
Vignette (Small)
Rectangle
Square
Rounded Rectangle
Rounded Rectangle (Small)
Soft Rectangle
Soft Rectangle (Small)
Chamfered
Chamfered (Small)
Offset Rectangle
Diamond
Octagon
Triangle
Arch
Cathedral
Wind
Gradient Left
Gradient Left (Small)
Gradient Right
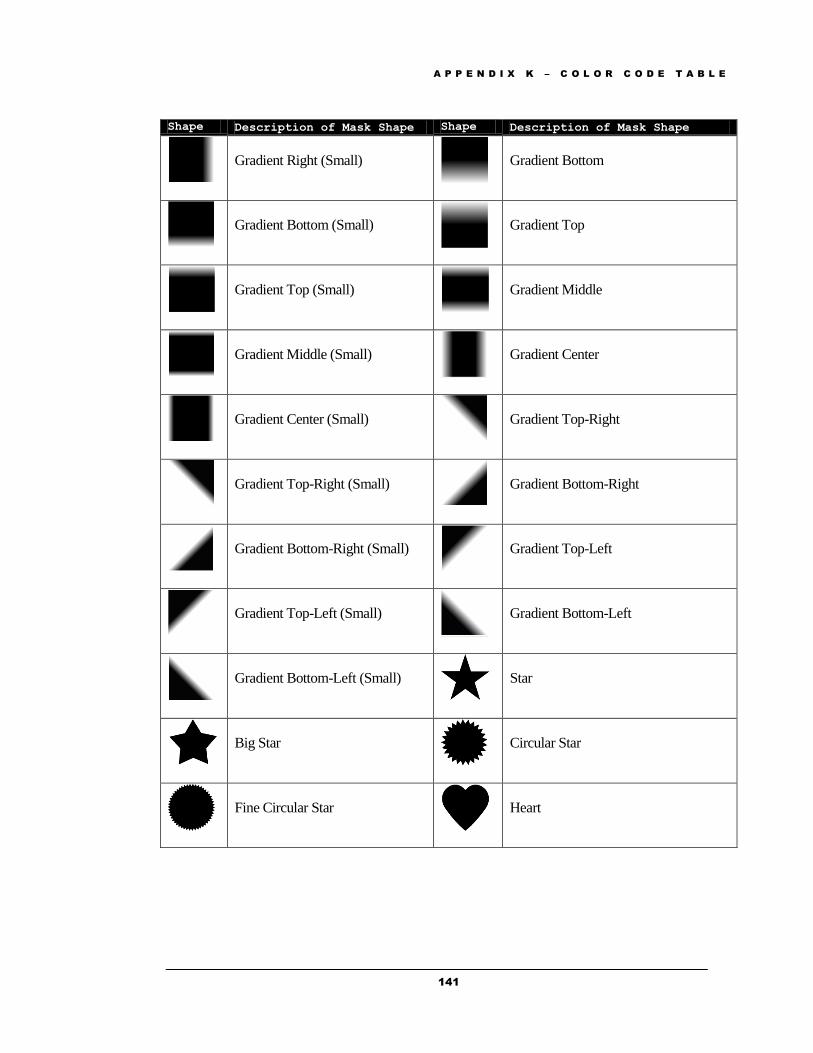
A P P E N D I X K – C O L O R C O D E T A B L E
141
Shape Description of Mask Shape Shape Description of Mask Shape
Gradient Right (Small)
Gradient Bottom
Gradient Bottom (Small)
Gradient Top
Gradient Top (Small)
Gradient Middle
Gradient Middle (Small)
Gradient Center
Gradient Center (Small)
Gradient Top-Right
Gradient Top-Right (Small)
Gradient Bottom-Right
Gradient Bottom-Right (Small)
Gradient Top-Left
Gradient Top-Left (Small)
Gradient Bottom-Left
Gradient Bottom-Left (Small)
Star
Big Star
Circular Star
Fine Circular Star
Heart
I N D E X
142
A
add effect tool · 24
add graphic tool · 22
add multiple photos tool · 18
add photo tool · 14
add text tool · 23
align tool · 29
arrays
in borders · 18
B
border items · 13
border workshop · 5
borders
aligning objects · 29
centering objects · 29
changing order of objects · 29
composites · 18
drop shadow on photos · 17, 21, 22
editing · 4
effects · 24
fitting objects to page · 28
graphics · 22
image cells · 13
making objects same · 28
masks · 15, 26
multiple photos · 18
photo array · 18
photo placeholders · 13
properties · 12
rotating objects · 30
spacing objects · 29
testing variable text fields · 32
text · 23
C
center tool · 29
composite borders
image cell settings · 21
labels · 21
photo frames · 21
photo queries · 19
transparency setting · 21
composites · 18
D
drop shadow · 17, 21, 22
E
effects
on borders · 24
F
fill & fit tool · 28
Fit to Page · 31
font tool · 28
G
graphic lookup · 32
graphics
on borders · 22
I
image cells · 13
L
labels
on composite borders · 21
lookup · 32
M
make same tool · 28
masks
on border effects · 15, 26
O
order tool · 29
I N D E X
143
P
Pan · 31
photo lookup · 32
photos
drop shadow · 17, 21, 22
properties
borders · 12
Q
queries
in composite borders · 19
lookup · 34
on border objects · 32
R
Redo
Retouch · 11
rotate tool · 30
S
space tool · 29
T
targa · 5
templates
borders · 4
test form tool · 32
text
fonts on borders · 28
on borders · 23
variable fields on borders · 32
U
Undo
Retouch · 11
Z
Zoom · 31