„born to fly… born to be in the sky“¡vod extasy - final en.pdf · user´s manual – extasy...
TRANSCRIPT

User´s manual – eXtasy - 1 -
paragliders and accessories for RC paragliding www.rcparasky.com
eXtasy
„Born to FLY…
born to be in the SKY“
User´s manual – eXtasy - 2 -
paragliders and accessories for RC paragliding www.rcparasky.com
Please read this manual carefully before using the product for the first time.
Thank you for choosing a product of our company. We believe that this manual will help you get started, operate safely and take care of the purchased product. Following this manual will allow you to take advantage of maximum performance and bring you pleasure from flying with RC paragliding models.
RC para SKY team
Safety warning:
By purchasing this model you become its user and you are responsible for its use and any risks associated with its operation. The manufacturer RC para SKY or the seller are not responsible for damages resulting from a possible accident. Read this operating manual carefully to minimize the risk of problems when operating RC paragliding models.
Radio-controlled models are a source of entertainment and sporting experiences. However, their inappropriate use may be a source of danger and damages. Prior to each flight, do a thorough preflight check. Make sure the fabric of the canopy and the lines are not damaged from any prior falls. Make sure the batteries are properly charged before flying. Before the first flight, check the range of the RC kit and always check that the electronics are properly fastened and work properly (e.g. servo control, motor control, etc.). Do not fly over the audience, cars, trees and buildings, also under the unfavorable weather conditions and poor visibility.
Aerobatic flights with RC paragliding models require sufficient piloting experience to ensure correct response and control input at the right moment. Do not attempt aerobatic manoeuvres without sufficient experience and knowledge – improper handling or response by the pilot can be dangerous and result in property damage or injury. Also, do not attempt aerobatic elements with models not designed for aerobatics.

User´s manual – eXtasy - 3 -
paragliders and accessories for RC paragliding www.rcparasky.com
Table of contents:
1. CANOPY CONSTRUCTION AND ITS PARTS ...................................................................................... 4
2. CANOPY ADJUSTMENT BEFORE FLIGHT ......................................................................................... 4
2.1. Attaching the canopy to the paramotor ............................................................................................. 4
2.2. Check the paramotor weight ............................................................................................................ 5
3. TAKEOFF, MULTIPLE FLIGHT MODES AND LANDING ....................................................................... 7
3.1. Canopy layout ................................................................................................................................ 7
3.2. Throwing the canopy over your head ................................................................................................ 8
3.3. Check the canopy adjustment ........................................................................................................ 11
3.4. The takeoff and flight phases ......................................................................................................... 12
3.5. Flight modes ................................................................................................................................ 12
3.6. Speed bar system......................................................................................................................... 13
3.7. Landing ....................................................................................................................................... 14
4. CANOPY CARE ............................................................................................................................... 15
5. REPAIRS......................................................................................................................................... 16
5.1. Fixing Tears in the Canopy ............................................................................................................ 16
5.2. Repairing Damaged Lines ............................................................................................................. 17
6. LINES OF CANOPY ......................................................................................................................... 18
7. TECHNICAL DATA ........................................................................................................................... 20
8. MANUFACTURER ........................................................................................................................... 20
User´s manual – eXtasy - 4 -
paragliders and accessories for RC paragliding www.rcparasky.com
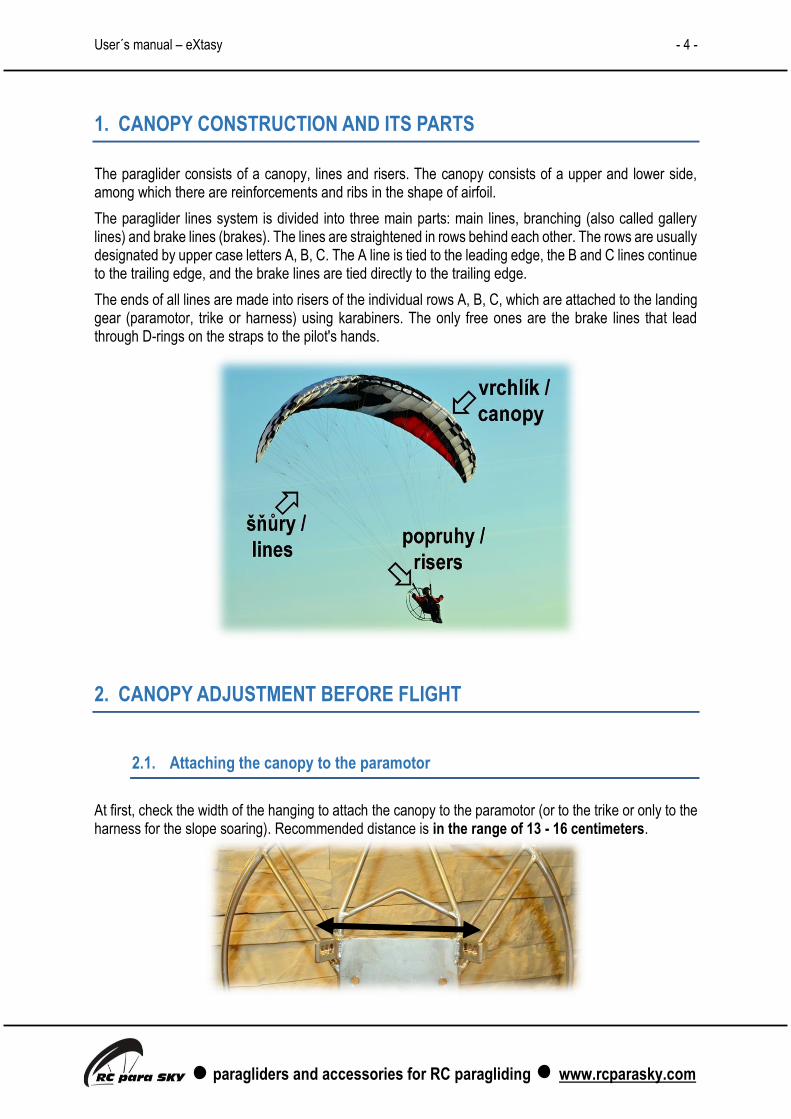
1. CANOPY CONSTRUCTION AND ITS PARTS
The paraglider consists of a canopy, lines and risers. The canopy consists of a upper and lower side, among which there are reinforcements and ribs in the shape of airfoil.
The paraglider lines system is divided into three main parts: main lines, branching (also called gallery lines) and brake lines (brakes). The lines are straightened in rows behind each other. The rows are usually designated by upper case letters A, B, C. The A line is tied to the leading edge, the B and C lines continue to the trailing edge, and the brake lines are tied directly to the trailing edge.
The ends of all lines are made into risers of the individual rows A, B, C, which are attached to the landing gear (paramotor, trike or harness) using karabiners. The only free ones are the brake lines that lead through D-rings on the straps to the pilot's hands.
2. CANOPY ADJUSTMENT BEFORE FLIGHT
2.1. Attaching the canopy to the paramotor
At first, check the width of the hanging to attach the canopy to the paramotor (or to the trike or only to the harness for the slope soaring). Recommended distance is in the range of 13 - 16 centimeters.

User´s manual – eXtasy - 5 -
paragliders and accessories for RC paragliding www.rcparasky.com
Attach the canopy to the paramotor using karabiners so that the "A" line faces forward in the direction of flight. Pass the brakes through the D-rings at the lower part of the riser, which is designed for the "C" line and then tie it to the pilot's hand.
The brakes length should be 69 cm from the last line branching to the top of the D-ring placed on the "C" line on riser.
This length is already marked on each brake with a black color. ATTENTION - as shown above, this is the length to the top of the D-ring, not the length to the pilot's hand!
2.2. Check the paramotor weight
Always weigh the paramotor (or trike/harness) before flying and try to balance the weight to the correct ratio of the chosen RC canopy according to the manufacturer's recommendations. The recommended load under the RC canopy is given in Chapter „Technical Data“.
The weight check of the paramotor is very important. If you choose the right weight, the RC canopy will be more responsive to controlling, will be more vivid and skillful. At a lower load, the canopy will be less stable.
User´s manual – eXtasy - 6 -
paragliders and accessories for RC paragliding www.rcparasky.com
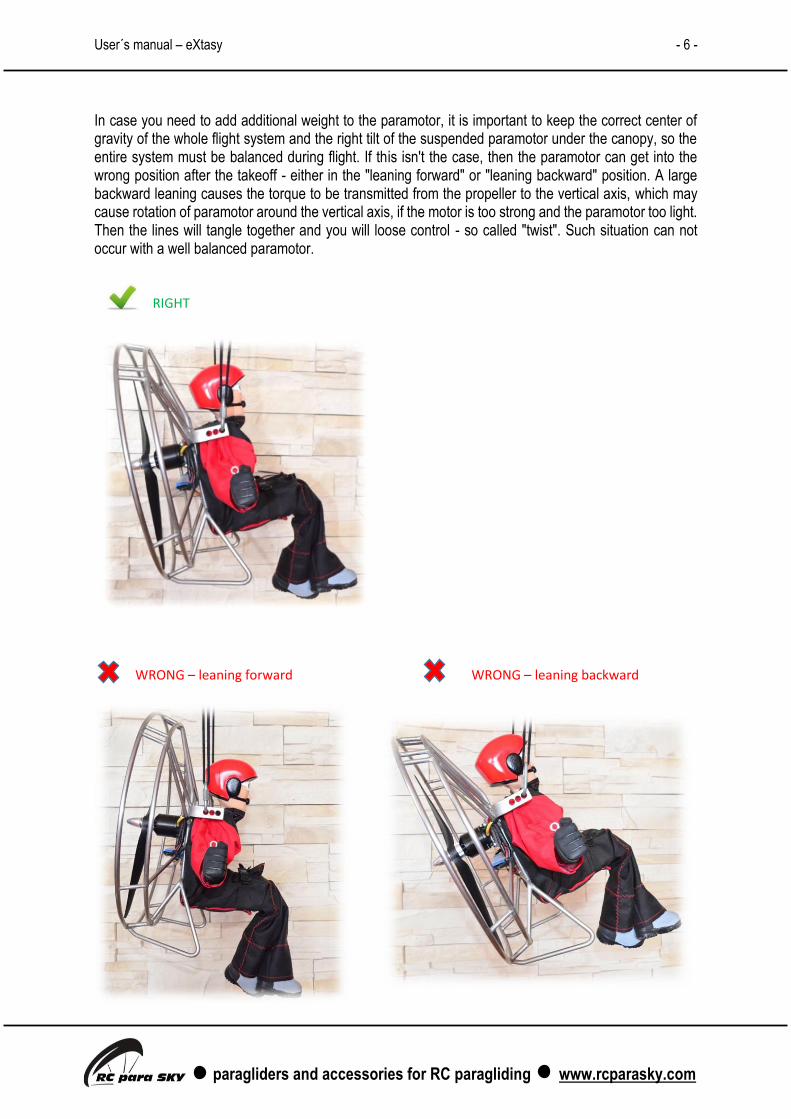
In case you need to add additional weight to the paramotor, it is important to keep the correct center of gravity of the whole flight system and the right tilt of the suspended paramotor under the canopy, so the entire system must be balanced during flight. If this isn't the case, then the paramotor can get into the wrong position after the takeoff - either in the "leaning forward" or "leaning backward" position. A large backward leaning causes the torque to be transmitted from the propeller to the vertical axis, which may cause rotation of paramotor around the vertical axis, if the motor is too strong and the paramotor too light. Then the lines will tangle together and you will loose control - so called "twist". Such situation can not occur with a well balanced paramotor.
RIGHT
WRONG – leaning forward WRONG – leaning backward

User´s manual – eXtasy - 7 -
paragliders and accessories for RC paragliding www.rcparasky.com
3. TAKEOFF, MULTIPLE FLIGHT MODES AND LANDING
3.1. Canopy layout
Place the wing on the ground in the shape that is shown in the picture so that the entrances to the canopy cells can be filled with air and thus create the wing profile.

User´s manual – eXtasy - 8 -
paragliders and accessories for RC paragliding www.rcparasky.com
3.2. Throwing the canopy over your head
The takeoff phase with throwing the canopy overhead can be the most difficult element for beginner pilots. That's why it's a good idea to learn this phase first and get the knack of it before the first flights. It's best to learn this in mild wind, when the canopy cells get easily filled with air and the wing keeps its shape well.
Throwing the canopy over your head is done by gently pulling on the pilot, making the canopy pressurized with the air and so getting it overhead. Every time you throw the wing, check with a glance that the gallery of lines is okay, for example, the lines aren't tangled or there is no grass in them, twig, etc.

User´s manual – eXtasy - 9 -
paragliders and accessories for RC paragliding www.rcparasky.com
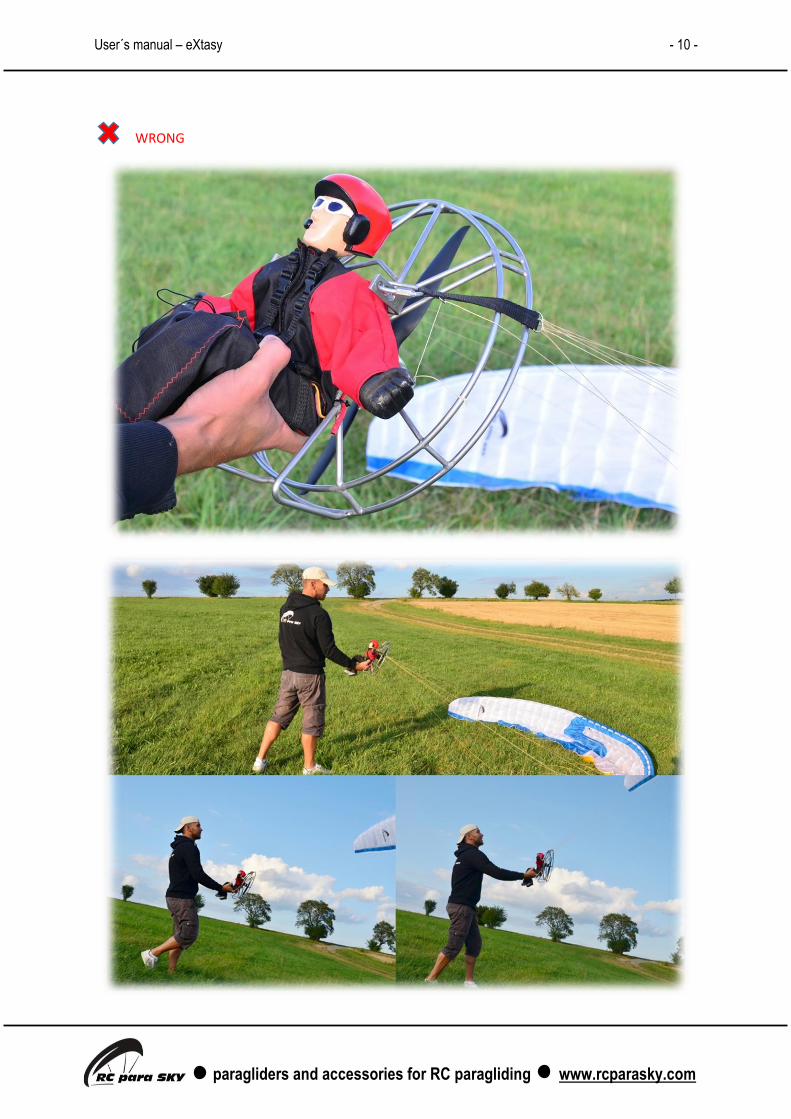
Also, when throwing the canopy overhead, make sure that the lines gallery isn't deformed because of the incorrect holding of the paramotor (trike) and that the paramotor is in the horizontal position (not sideways) all the time. It is necessary to keep the paramotor in the correct position throughout the throw.
RIGHT
User´s manual – eXtasy - 10 -
paragliders and accessories for RC paragliding www.rcparasky.com
WRONG

User´s manual – eXtasy - 11 -
paragliders and accessories for RC paragliding www.rcparasky.com
3.3. Check the canopy adjustment
After throwing the canopy overhead and before the first flight, it is important to check that the brake lines are properly adjusted. If you followed the recommended length of the brake lines when attaching the canopy to the paramotor (trike) as stated in chapter 2.1, the canopy should be adjusted correctly, but it is good to check it again when the canopy is thrown overhead.
You will know that the brakes are adjusted correctly when the canopy trailing edge is braked slightly with the pilot's hands in the neutral position. The trailing edge shouldn't be too braked or too loose in this neutral position.
RIGHT
WRONG – too brakes

User´s manual – eXtasy - 12 -
paragliders and accessories for RC paragliding www.rcparasky.com
WRONG – too loose
3.4. The takeoff and flight phases
If you manage to takeoff even with no wind, you can move on to the flight phase. Always fly in the open space and make sure that there are no obstacles in the flight direction.
Grab the pilot and lift the canopy overhead. If it's filled with air properly, you can slowly add gas on the paramotor or trike (never give it full throttle at this stage, there may be a situation when the pilot will "outrun" the canopy and fall) and send the pilot to the air into the flight phase. With a slight gas correction you will ensure a slight climb of the canopy. If you have adjusted the brakes on both hands correctly, the canopy continues in a straight flight.
Warning: Take extra care when handling the paramotor / trike! Always be careful that the propeller does not cut our hands or crash the paraglider´s lines due to improper handling when the engine is turned on.
3.5. Flight modes
The pilot controls the paraglider with brake lines - so-called brakes. The rear edge (trailing edge) of the paraglider is pulled down with brakes, which changes the forward resistance of the glider on the side on which the brake has been pulled. Paraglider control, change of the flight direction, is done with the brakes only in the horizontal plane, the glider can't climb by itself. Rising air currents are used to climb or a propulsion unit - a propeller motor - is used to obtain the height.
1. Direct flight is the most basic movement of a paraglider. When pulling the brake lines, the forward speed decreases and the fall increases. This can be done until its forward speed is greater than the minimum. When the minimum speed is reached, you mustn't brake anymore, otherwise the canopy will deform and the wing will go into a non-standard flight mode (spiral, etc.).
2. Slight turn is made by pulling the brake line on the side to which you want to turn. It's pulled only a little because of the slight turn. When the canopy makes the required turn, you will slowly release the brakes again.
User´s manual – eXtasy - 13 -
paragliders and accessories for RC paragliding www.rcparasky.com
3. Sharp turn "tightened" is done by a larger and faster pull of the brake line on the side to which you want to turn, while releasing the brake line on the other side. Thanks to a larger tilt, the forward speed will reduce more and the fall will be greater than with the slight turn. If you fly with the motor, you can help yourself by adding gas to it.
4. The spiral is a situation that you get into when intensively braking one side of the paraglider. Due to the specifics of this mode, the spiral ranks in paragliding among so-called non-standard modes.
Warning:
When controlling RC paragliding models, it's necessary to fly with a soft touch on the transmitter levers, because the canopy always responds to the breaking with a slight delay, compared to other RC models (aircraft) when the aircraft's response to the controlling is immediate.
At the moment, when you pull the transmitter lever while flying with the RC canopy, the pilot's hand will react immediately, but the canopy will react only afterwards. If you were to pull the transmitter lever even more at that moment, because you would have thought that the canopy didn't react, the paraglider will suddenly answer with a sharp turn and if you will get surprised with this situation and will immediately so-called "counter" on the other side, you will swing the canopy from side to side.
The solution is to stop trying to straighten the canopy by pulling the left and right lever alternately, rather put the canopy to rest by slightly pulling (braking) on both sides, and the canopy will straighten itself to a calm flight.
3.6. Speed bar system
The speed bar system (also "accelerator") is the type of control that is used to increase the canopy speed. When using a speed system, the wing´s angle of attack will change to the ground - lines A and B will be shortened. This increases the speed and also the sinking of the canopy, but also increases the possibility of collapsing the leading edge of the canopy. If the speed system is used, the canopy should not be braked (in the neutral position of the pilot´s hand), since there is a deformation of the wing profile, not the desired acceleration of the canopy.
The speed bar system is primarily used for slope soaring where wind currents can be more unstable (impact wind). We can also use it in powered flying to accelerate the flight, for example, when we need to fly out of a rising stream.
How to connect a speed system?
The use of the speed system in our canopies is not necessary, because all our canopies are already designed with the required acceleration. However, if you want to use the speed system, the risers of our canopies are ready for this speed system.
At the riser there is a D-ring on which we tie the line. We do the same for both risers. It is very important that the lines for the speed system are the same length on both sides!!!
We attach two servos to the pilot's feet (one on each side) including the servo lever. End of the line, tie into the servo lever.
When using a speed system, we pull down a maximum of 2 cm during the flight, otherwise the canopy may be collapsing.

User´s manual – eXtasy - 14 -
paragliders and accessories for RC paragliding www.rcparasky.com
D-ring is ready on the riser tie the line into D-ring
how to pull down the speed bar speed system is ready on both sides
3.7. Landing
Try to land with the canopy against the wind ideally and with the motor off (in case of landing in wind direction, the canopy will inadvertently accelerate and if the motor is on during the landing, the propeller can collide with the lines and break them). So you are flying against the wind and at a moment when the pilot is about 1 - 2 meters above the ground, fully release the breaks and turn off the engine, if you haven't done so earlier. By releasing the breaks, the canopy will speed up and the fall to the ground will increase. When the pilot is just before the landing (about 20 - 30 cm above the ground), fully pull both sides of the brakes at once to experience the softest landing. The canopy will swing up with this move and the pilot will land.

User´s manual – eXtasy - 15 -
paragliders and accessories for RC paragliding www.rcparasky.com
4. CANOPY CARE
The condition of your RC paraglider and its service life depend on the correct handling, storage and care that you give it. Therefore, please observe the following points: Use
- Pick a suitable starting point. Pay attention to protruding roots, sharp stones, bushes or branches that could damage the lines or the canopy.
- After landing, try to prevent the canopy from falling on the leading edge with pulling the brakes correctly. Failure to do so may result in tears in canopy or ribs.
- Don't step on the lines and the canopy when preparing for the takeoff. Try to avoid pulling the canopy and lines on the ground, if the ground is rocky or otherwise sharp or rough. Takeoff from asphalt or concrete causes damage to the lines and canopy.
- The RC glider shouldn't be exposed to sunlight for longer than absolutely necessary. Ultraviolet rays cause not only a loss of glider color intensity, but over time also degradation of porosity and strength of the fabric.
Folding
- Don't fold or roll the RC glider too tightly. - When folding the canopy, make sure that there are no insects or other foreign objects in its cells
that could be caught in it.
Cleaning - Lay the canopy on a flat, clean and dry surface. Don't use any solvents or abrasives. If necessary,
we recommend washing the dirty area with a mild soap and a soft sponge.
Storing - The loss of the fabric quality from which the glider is made, the change in the canopy behavior and
the change in the geometry of the lines, and thus lowering of the glider performance, are the result of packing a moist or wet canopy. Do not pack the canopy until it's completely dry. If you have no other option, at least try to dry the canopy in the shortest possible time, preferably on a shaded and well-ventilated place.
- Store the canopy in a dry place with controlled temperature.

User´s manual – eXtasy - 16 -
paragliders and accessories for RC paragliding www.rcparasky.com
5. REPAIRS
5.1. Fixing Tears in the Canopy
Self-adhesive material needed for repairing tears in the canopy is included in the repair kit you receive
when you purchase a glider. It is designed for repairing holes up to size of ca. 10 cm.
Cut two identical oval circles from the self-adhesive material so that they cover the entire tear in the fabric
(2). Flatten out the torn fabric of the canopy and make sure to avoid creating folds in the area while also
ensuring that the tear is not causing any deformation of the fabric (3). Paste one oval circle onto the hole
from the inside (4) and one from the outside of the canopy (5). Firmly press the self-adhesive material
onto the fabric and remove any air bubbles (6).

User´s manual – eXtasy - 17 -
paragliders and accessories for RC paragliding www.rcparasky.com
5.2. Repairing Damaged Lines
The repair kit also includes a spare line. Should a line become torn or damaged, you can replace it
provided you maintain the correct length for the specific line (down to a millimetre). The length of individual
lines is presented in the following chapter.
Create a loop on one end of the line as follows. Thread the end of the line through the eye of a needle (1)
and then pull the needle through the hollow in the line (2, 3, 4). Tuck the remaining end of the line back
in the hollow (5). That creates a loop at one end of the line. Paste the joint with cyanoacrylic glue (or
superglue). Measure out the distance from the loop to create a line of the appropriate length and mark
this point (6). This is where another loop must be made. Cut the line approximately 5 cm behind the
marked point. Thread the end of the line through the needle (7) and pass the needle through the hollow
ca. 1 cm before the marked point (8). After passing the needle through the hollow, again tuck the
remaining end of the line back into the hollow or cut it off (9). Glue the joint together.
User´s manual – eXtasy - 18 -
paragliders and accessories for RC paragliding www.rcparasky.com
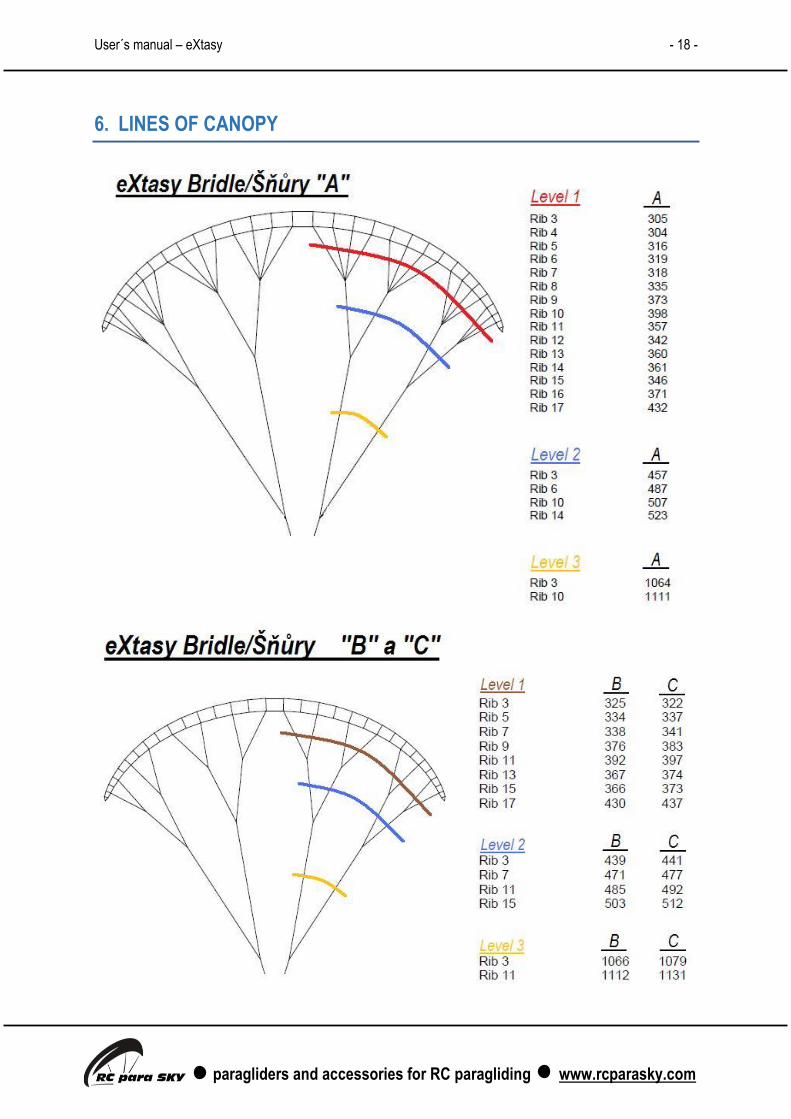
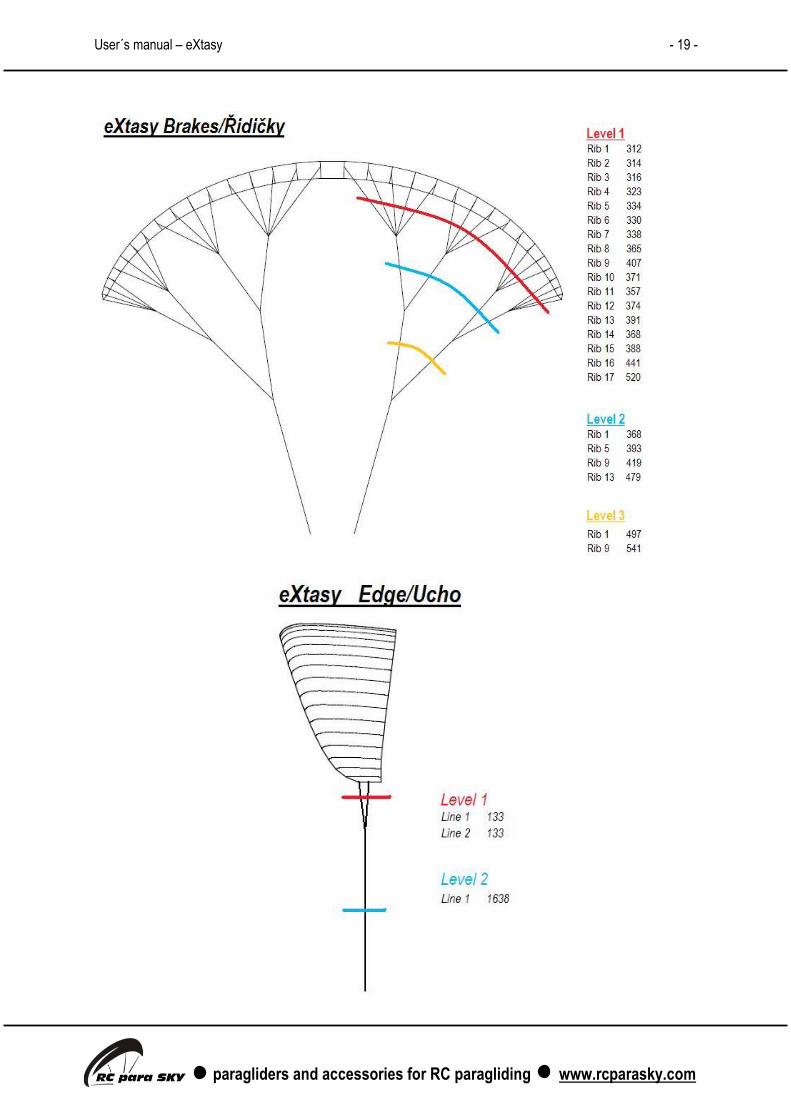
6. LINES OF CANOPY
User´s manual – eXtasy - 19 -
paragliders and accessories for RC paragliding www.rcparasky.com

User´s manual – eXtasy - 20 -
paragliders and accessories for RC paragliding www.rcparasky.com
7. TECHNICAL DATA
Wingspan: 3,3 m Flat area: 1,59 m2 Aspect ratio: 6,9 Number of cells: 33
Recommended load: 2,9 – 3,3 kg Materials Canopy: Dokdo N20 36g Ribs: Skytex 38 universal Leading edge: reinforced by strings and dacron Lines: Aramid Kevlar 0,4 mm Risers: 3-lines, strap 10 mm, D-ring 10 mm Carabiners: stell 4 mm
8. MANUFACTURER
RC para SKY Černíkovice 248
517 04 CZ – Czech republic
Company registration number: 88778045
[email protected] www.rcparasky.com