bowfront bed table
TRANSCRIPT

7/25/2019 Bowfront Bed Table
http://slidepdf.com/reader/full/bowfront-bed-table 1/9
• Step by Step construction
instruction.
• A complete bill of materials.
• Exploded view and elevation
drawings.
• How-to photos with instructive
captions.
• Tips to help you complete the
project and become a betterwoodworker.
To download these plans,you will need Adobe Reader
installed on your computer. If you want to geta free copy, you can get it at: Adobe Reader.
Having trouble downloading the plans?
• If you're using Microsoft Internet
Explorer, right click on the download link
and select "Save Target As" to downloadto your local drive.
• If you're using Netscape, right click on
the download link and select "Save Link
As" to download to your local drive.
WJ027
“America’s leading woodworking authority”™
Bowfront Bedside Table
Published in Woodworker’s Journal “The Complete WoodworTime-Tested Projects and Professional Techniques for Your S
and Home”
WOODWORKER'S JOURNAL
©2007 ALL RIGHTS RESERVED

7/25/2019 Bowfront Bed Table
http://slidepdf.com/reader/full/bowfront-bed-table 2/9
62 HOME PROJECTS
WOODWORKER'S JOURNAL ©2007 ALL RIGHTS RESERVED

7/25/2019 Bowfront Bed Table
http://slidepdf.com/reader/full/bowfront-bed-table 3/9
BOWFRONT BEDSIDE TABLE 63
Remember Saturday Night Live’s “guest columnist” Roseanne
Rosannadanna: “If it’s not one thing, Jane, it’s another …”?
Contributing editor Rick White’s bedroom set proves the phrase is
true. What started out as a simple headboard project in the February
2001 issue of Woodworker’s Journal turned into a matching dresser
project in August of that same year. Rick and his wife realized their
formerly nice looking dresser had taken on a rather shabby appear-
ance. So, it was back to the shop. This bedside table came next—
after all, if it’s not one thing, it’s another. But, thankfully this chain of
events provided readers with three great projects. See what happens
when you build a copy of Rick’s bedside table.
First Things First
Normally when you start a casework project, you build the case
first and then fit the drawers to the carcass. With this project, it’s
best to work back to front. Rather than building the curved drawer
fronts to match the carcass, Rick found it much easier to match key
carcass parts to the drawer’s gentle curve.
Start things off by creating a plywood bending form, using the
dimensions shown in the Drawing on page 65. The material of choice
for laminating the drawer faces and fronts (pieces 1 and 2), is 1/4"
bending ply. If you don’t have a wide roll-off table built around your
table saw, it may be best to have a buddy help you rip the bending
ply to slightly oversized pieces. Bendable plywood is so flexible that
ripping it by yourself is kind of like pushing a two-year-old’s arm into
Bowfront
Bedside Table
T here’s a “slippery slope” to some wood-
working projects. Contributing editor
Rick White found himself slipping down into a
three-project marathon here. First came the
headboard, then a matching dresser and finally
this bedside table. It’s a handsome, contemporary
design made of ash and walnut with a gentle
curved face.
WOODWORKER'S JOURNAL ©2007 ALL RIGHTS RESERVED

7/25/2019 Bowfront Bed Table
http://slidepdf.com/reader/full/bowfront-bed-table 4/9
Drawer Exploded View
64 HOME PROJECTS
Position the laid-up veneer on top of the stack (don’t forget glue here, too!), suck out the air and let the laminations cure.The veneer is held in position with a small
piece of tape.
Building Up Curved Drawers The best way to glue up the
panels which will become the drawer
faces and fronts is with a vacuum bagunit. You could do it with a curved top
clamping caul, but it would be much
more difficult. Rick separated the two
three-piece plywood “sandwiches”
with a piece of waxed paper.
Stacking the two laminations is
the easiest way to ensure that their
radii match exactly. The bending
form, right, is slightly oversized so
you can trim clean edges.
Glue up the bendable plywood panelswith regular yellow glue. Moving quickly,
stack them in the vacuum unit, separatingthe two laminations with waxed paper.
Using clear packing tape to lay up the veneer layer is a trick Rick learned from Woodworker’sJournal contributing editor Mike McGlynn. This material allows you to see the joint line whileworking and peels off easily when you’re done.
the sleeve of a winter jacket: you can
do it…but a helping hand is always
appreciated. Once you have the six
pieces of bending ply cut, you need to
lay up some ash and walnut veneer
(pieces 3 and 4) to create the decora-
tive grain on the drawer faces. Rick
borrowed a trick from contributing
editor Mike McGlynn and used clear
packing tape (see photo, above) to join
the 1/2"-wide walnut strips to the ash
veneer, rather than traditional veneer
tape. This material allows you to see
how the pieces fit together while you’re
working, and it peels off easily after the
panels are cured.
Rick used a large piece of ash
veneer and sliced it into three sections
to accept the walnut. This allowed the
grain to flow up and down through
both drawers and across the entire
front plane of the nightstand. Follow
the steps shown in the two photos at
right to create the two separate curved
panels that will become the drawer
faces and fronts. When you remove the
panels from the vacuum bag, peel off
the packing tape and slice the curved
panels into the drawer faces and fronts,
using the dimensions in the Material List
on the next page.
When you’ve got that sorted out,
move on and cut out the drawer sides,
backs and bottoms (pieces 5 through
9). Step over to the table saw and,
using a dado set, plow the grooves and
dadoes in the drawer sides and backs.
Grab your miter gauge and secure a
3/4" x 21 ⁄ 2" x 20" fence to it with screws.
Clamp a drawer front to the auxiliary
fence and form the tenons at each end.
As this is not your typical square corner,
this may take a bit of fiddling to get a
good joint. (See the Tenon Detail , right.)
Once the tenons are formed, move to the
router table and use a 1/4" slot cutter to
make the groove for the bottoms on the
inside of the drawer fronts.
WOODWORKER'S JOURNAL ©2007 ALL RIGHTS RESERVED

7/25/2019 Bowfront Bed Table
http://slidepdf.com/reader/full/bowfront-bed-table 5/9
5
7
1 / 4"3 / 8"
1 / 2"
1 / 4"
1 / 4"
1 / 4"
11 / 16"
21 / 2"
5
The curved bending form is slightly oversized.This is so you can trim the faces and fronts tofinal size after bending.
1/4" bending plywood
Waxed
paper
Laid-up veneer
Clear packing tape
41 / 2"
127 / 8"
2"
TenonDetail
Back Corner
(Top View)
Side
5
5
5
7
BOWFRONT BEDSIDE TABLE 65
MATERIAL LIST – Drawers
T x W x L
1 Drawer Faces* (3) 1/4" x 233 ⁄ 4" x 13"
2 Drawer Fronts* (3) 1/4" x 233 ⁄ 4" x 13"
3 Ash Veneer* (1) 1/16" x 233 ⁄ 4" x 13"
4 Walnut Veneer (2) 1/16" x 9/16" x 13"
5 Small Drawer Sides (2) 3/4" x 51 ⁄ 4" x 151 ⁄ 8"
6 Large Drawer Sides (2) 3/4" x 7" x 151 ⁄ 8"
7 Small Drawer Back (1) 3/4" x 51
⁄ 4" x 221
⁄ 4"8 Large Drawer Back (1) 3/4" x 7" x 221 ⁄ 4"
9 Drawer Bottoms* (2) 1/4" x 22" x 161 ⁄ 2"
10 Drawer Pulls (2) 1/2" x 43 ⁄ 4" x 23"
*Cut these pieces a little oversized until final machining
WOODWORKER'S JOURNAL ©2007 ALL RIGHTS RESERVED

7/25/2019 Bowfront Bed Table
http://slidepdf.com/reader/full/bowfront-bed-table 6/9
Curved Drawer Pulls
66 HOME PROJECTS
10
2"
21 / 2"
111
/ 2"
C L
The curved drawer handles are cut on the band saw.Cut just outside the lines and use a sander to completethe shape.
Use a core box bit to form the finger pull on the handles. Later, round over the top and bottom edges to achievethe shape shown in the drawing
at right.
Round-over
bit
Cove bit
Drawer PullCurve Detail(Top View)
It’s a bit of a trick to arrive at the
curved front edges of the drawer
bottoms. Dry-fit the drawer sides, back
and bottom together and hold them
in place with a clamp. Now slide the
drawer front down into its dadoes from
the top until it is sitting on the slightly
oversized bottom. Slide the bottom
forward exactly 1/2" and use the front
edge of the drawer front to help scribe
a line on the bottom with a pencil. (Do
this for each bottom.) Disassemble the
drawer, take the bottoms to the band
saw and make your cuts right on the
curved pencil lines. Again, test-fit the
drawer boxes, and when all is right,
glue and clamp them together. With
that done, go ahead and mount the
drawer faces with screws driven from
the inside. The last step on the drawers
is to make the ash pulls (pieces 10).
Lay out their curved shape on 1/2" ash
lumber (see the drawings, above) and
use your band saw to cut them out.
Sand carefully to the pencil lines and
then move over to your router table.
As shown in the photo, above right,
use a point fence and a core box bit to
relieve the finger pull into the handles,
then complete the shape by rounding
over their top and bottom edges. A bit
of sanding and you’re good to go on to
building the carcass. You’ll mount the
handles a bit later.
Moving onto the Carcass
Now you have a couple of draw-
ers, but no place to put them. To solve
that problem, begin the carcass by
making the front and back legs (piece
11 and 12) from ash lumber. The back
legs are simply sticked-up 3/4" stock,
but the front legs have a large rabbet
that runs their entire length. (See the
drawings on page 69.) Form the front
leg rabbet on your table saw, then take
a moment to make the front and back
leg spacers (pieces 13 and 14). Cut
the sides (pieces 15) from 3/4" ash
veneered plywood. There are a series
of dadoes and one rabbet to be plowed
into the sides. We recommend cutting
these dadoes into a single wide piece
of plywood from which you form the
two sides. Glue up the sides, legs and
leg spacers into matching left and right
subassemblies.
While the glue cures, there are
three dividers (pieces 16) to be made
next. Cut the dividers extra wide and
notch their front corners to fit around
the front legs, as shown in the Top and
Divider Detail drawing on page 69. Grab
the side subassemblies and dry-fit the
dividers into their respective dadoes
and gently clamp the test-fit together.
WOODWORKER'S JOURNAL ©2007 ALL RIGHTS RESERVED

7/25/2019 Bowfront Bed Table
http://slidepdf.com/reader/full/bowfront-bed-table 7/9
BOWFRONT BEDSIDE TABLE 67
This is the special point in the building
process when you’ll want to stop and
thank Rick for having you build thedrawers first. Measure back and mark
the point 1/8" from where the front of
the legs join the dividers. Now take the
dividers out of the test-fit, put one of
the drawers on top of the divider and
match the corners of the drawer up
to the marks you just made. Scribe a
pencil line from mark to mark, using
the drawer front to describe the curve.
(It’s a lot easier to make the dividers
match the drawers’ curve than the
other way around!)Step to the band saw and cut the
curve onto the dividers and sand the
edge smooth. Slice up some ash trim
(piece 17) and glue it onto the curve.
Clean up the edges with a scraper
and a bit of sandpaper.
Construct the back (piece 18)
and the drawer runners (pieces 19)
and you are ready to assemble the
carcass (minus the top). Rick used
the back (attached with glue and
brad nails) to help square up the
whole subassembly.
Making the Top Assembly
The top is a basic laminated
ash panel (piece 20) with a unique
walnut frame (pieces 21, 22 and 23)
attached to its bottom.
Glue up the top, square it up
and sand it smooth. Strike a curved
line to create the front edge (see the
elevation drawing on page 69.) Move
to your band saw to cut the top’s gentle
curve and sand it fair. Now make the
walnut frame pieces, taking special note
of the side frame’s (pieces 22) grain
orientation. You don’t want seasonal
movement blowing things apart, so plan
on edge-gluing a few pieces of walnut
together to make these pieces. Once
you’ve got the frame pieces made, glue
them to the underside of the top. Rick
cheated and used a few brad nails here
as his clamps—no one will be the wiser.On the curved front edge and
the sides, be sure the walnut extends
past the ash. Once the glue has cured,
chuck a bearing-guided flush-trimming
bit into your router and trim the walnut
frame flush to the ash top. Follow
right behind with a chamfering bit,
and the top assembly will be ready
for final sanding.
Rick attached the top using table-
top fasteners (they slip into the 3/32"
wide dadoes you milled into the sidesearlier). It’s a bit of a trick to drive in the
screws; the upper open compartment is
just big enough to allow this task. Slide
the drawers in place to be sure there
is no need to adjust their fit, and then
attach the drawer handles to the draw-ers. Use screws and cover the holes
with matching hardwood plugs.
Finishing Up
Bedside tables tend to get some
hard use. For that reason, protect your
new table with a polyurethane or lac-
quer topcoat. But to make the grain
really pop, first apply a coat of linseed
oil, followed by a clear shellac seal coat
(after the oil has cured completely). With
all that done, take a well-deserved restbefore you decide to redesign your bed
frame and dresser next. After all, if it’s
not one thing, Jane, it’s another...
Quick Tip
Small Stock Miter Gauge ClampTrying to hold small pieces of stock against a miter gauge can be
tricky, but the stout spring and wide jaws of a clipboard clip can help.
Attach the clip to a piece of scrap, and fasten the scrap to the miter
gauge. You can also rout grooves in the scrap and use wing nuts
to attach the clip: this lets you raise or lower the unit as needed.
The backup block reduces tearout.
Clipboard clip
Backup board
Wing nuts
3/8" slots
WOODWORKER'S JOURNAL ©2007 ALL RIGHTS RESERVED

7/25/2019 Bowfront Bed Table
http://slidepdf.com/reader/full/bowfront-bed-table 8/9
68 HOME PROJECTS
Bedside Table Exploded View
12
18
15
Exploded View
Back Rabbet Attach the back legs so they form a 1/4" rabbet to accept the cabinet’s back.
5
7
°
Take special note of the walnut frame’s grain orientation.
Frame and Top(End View)
WOODWORKER'S JOURNAL ©2007 ALL RIGHTS RESERVED
7/25/2019 Bowfront Bed Table
http://slidepdf.com/reader/full/bowfront-bed-table 9/9
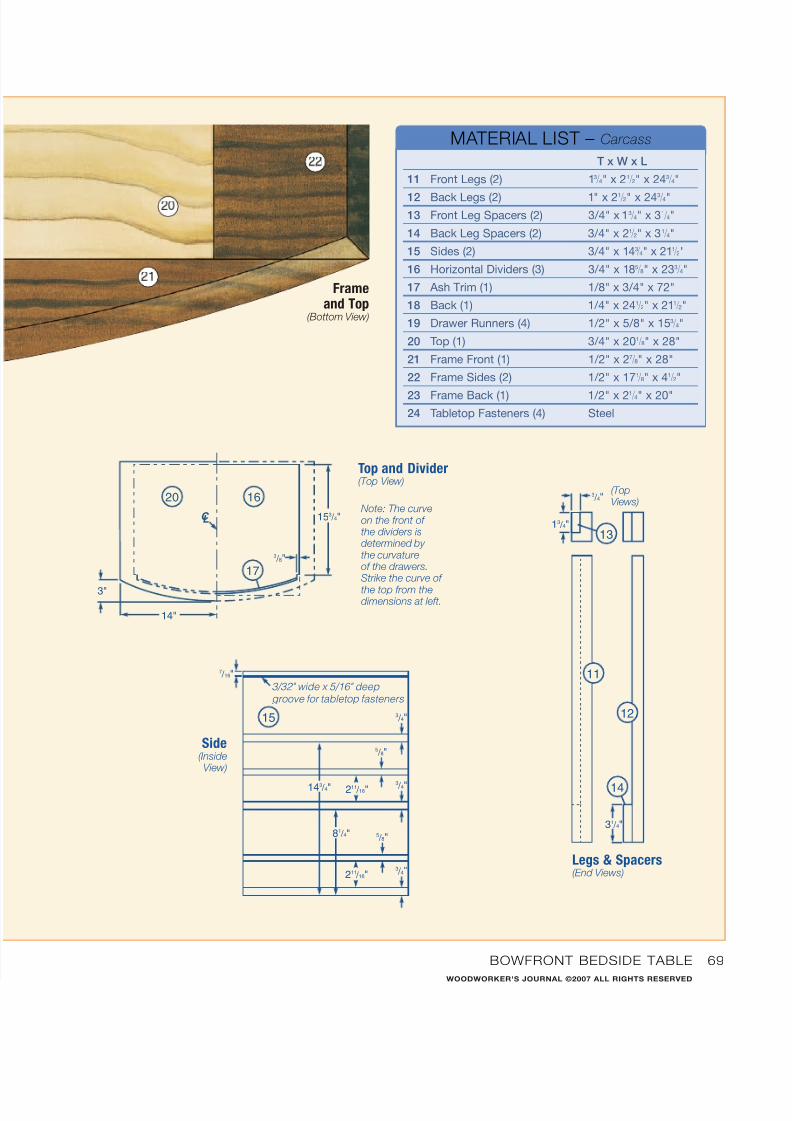
BOWFRONT BEDSIDE TABLE 69
20 16
17
153 / 4"
3 / 8"
14"
3"
C L
12
14
11
13
3 / 4"
13 / 4"
31 / 4"
Top and Divider(Top View)
(TopViews)
Legs & Spacers(End Views)
Note: The curveon the front ofthe dividers isdetermined bythe curvatureof the drawers.Strike the curve of
the top from thedimensions at left.
Frameand Top
(Bottom View)
MATERIAL LIST – Carcass
T x W x L
11 Front Legs (2) 13 ⁄ 4" x 21 ⁄ 2" x 243 ⁄ 4"
12 Back Legs (2) 1" x 21 ⁄ 2" x 243 ⁄ 4"
13 Front Leg Spacers (2) 3/4" x 13 ⁄ 4" x 31 ⁄ 4"
14 Back Leg Spacers (2) 3/4" x 21 ⁄ 2" x 31 ⁄ 4"
15 Sides (2) 3/4" x 143 ⁄ 4" x 211 ⁄ 2"
16 Horizontal Dividers (3) 3/4" x 185 ⁄ 8" x 233 ⁄ 4"
17 Ash Trim (1) 1/8" x 3/4" x 72"
18 Back (1) 1/4" x 241 ⁄ 2" x 211 ⁄ 2"
19 Drawer Runners (4) 1/2" x 5/8" x 153 ⁄ 4"
20 Top (1) 3/4" x 201 ⁄ 8" x 28"
21 Frame Front (1) 1/2" x 27 ⁄ 8" x 28"
22 Frame Sides (2) 1/2" x 171 ⁄ 8" x 41 ⁄ 2"
23 Frame Back (1) 1/2" x 21 ⁄ 4" x 20"
24 Tabletop Fasteners (4) Steel
15
3 / 4"211 / 16"
5 / 8"
211 / 16"143 / 4"
81 / 4"
3 / 4"
5 / 8"
3 / 4"
7 / 16"
3/32" wide x 5/16" deepgroove for tabletop fasteners
Side(InsideView)
WOODWORKER'S JOURNAL ©2007 ALL RIGHTS RESERVED