boxer 2k boxer 2k20 (bc3), boxer 2k25 (bc.4), boxer 2k30 (bc.5) … · 2016-07-20 · installation...
TRANSCRIPT
Instal lation and Setup Manual020-102265-01
Boxer 2KBoxer 2K20 (Bc3), Boxer 2K25
(Bc.4), Boxer 2K30 (Bc.5)

NOTICESCOPYRIGHT AND TRADEMARKS
Copyright © 2016 Christie Digital Systems USA Inc. All rights reserved.
All brand names and product names are trademarks, registered trademarks or trade names of their respective holders.
GENERAL
Every effort has been made to ensure accuracy, however in some cases changes in the products or availability could occur which may not be reflected in thisdocument. Christie reserves the right to make changes to specifications at any time without notice. Performance specifications are typical, but may varydepending on conditions beyond Christie's control such as maintenance of the product in proper working conditions. Performance specifications are based oninformation available at the time of printing. Christie makes no warranty of any kind with regard to this material, including, but not limited to, impliedwarranties of fitness for a particular purpose. Christie will not be liable for errors contained herein or for incidental or consequential damages in connectionwith the performance or use of this material. Canadian manufacturing facility is ISO 9001 and 14001 certified.
WARRANTY
Products are warranted under Christie’s standard limited warranty, the complete details of which are available by contacting your Christie dealer or Christie. Inaddition to the other limitations that may be specified in Christie’s standard limited warranty and, to the extent relevant or applicable to your product, thewarranty does not cover:
a. Problems or damage occurring during shipment, in either direction.
b. Projector lamps (See Christie’s separate lamp program policy).
c. Problems or damage caused by use of a projector lamp beyond the recommended lamp life, or use of a lamp other than a Christie lamp supplied byChristie or an authorized distributor of Christie lamps.
d. Problems or damage caused by combination of a product with non-Christie equipment, such as distribution systems, cameras, DVD players, etc., or useof a product with any non-Christie interface device.
e. Problems or damage caused by the use of any lamp, replacement part or component purchased or obtained from an unauthorized distributor of Christielamps, replacement parts or components including, without limitation, any distributor offering Christie lamps, replacement parts or components throughthe internet (confirmation of authorized distributors may be obtained from Christie).
f. Problems or damage caused by misuse, improper power source, accident, fire, flood, lightening, earthquake or other natural disaster.
g. Problems or damage caused by improper installation/alignment, or by equipment modification, if by other than Christie service personnel or a Christieauthorized repair service provider.
h. Problems or damage caused by use of a product on a motion platform or other movable device where such product has not been designed, modified orapproved by Christie for such use.
i. Problems or damage caused by use of a projector in the presence of an oil-based fog machine or laser-based lighting that is unrelated to the projector.
j. For LCD projectors, the warranty period specified in the warranty applies only where the LCD projector is in “normal use” which means the LCD projectoris not used more than 8 hours a day, 5 days a week.
k. Except where the product is designed for outdoor use, problems or damage caused by use of the product outdoors unless such product is protected fromprecipitation or other adverse weather or environmental conditions and the ambient temperature is within the recommended ambient temperature setforth in the specifications for such product.
l. Defects caused by normal wear and tear or otherwise due to normal aging of a product.
The warranty does not apply to any product where the serial number has been removed or obliterated. The warranty also does not apply to any product soldby a reseller to an end user outside of the country where the reseller is located unless (i) Christie has an office in the country where the end user is located or(ii) the required international warranty fee has been paid.
The warranty does not obligate Christie to provide any on site warranty service at the product site location.
PREVENTATIVE MAINTENANCE
Preventative maintenance is an important part of the continued and proper operation of your product. Please see the Maintenance section for specificmaintenance items as they relate to your product. Failure to perform maintenance as required, and in accordance with the maintenance schedule specified byChristie, will void the warranty.
REGULATORY
The product has been tested and found to comply with the limits for a Class A digital device, pursuant to Part 15 of the FCC Rules. These limits are designedto provide reasonable protection against harmful interference when the product is operated in a commercial environment. The product generates, uses, andcan radiate radio frequency energy and, if not installed and used in accordance with the instruction manual, may cause harmful interference to radiocommunications. Operation of the product in a residential area is likely to cause harmful interference in which case the user will be required to correct theinterference at the user’s own expense.
CAN ICES-3 (A) / NMB-3 (A)
이 기기는 업무용(A급)으로 전자파적합등록을 한 기기이오니 판매자 또는 사용자는 이점을 주의하시기 바라며, 가정 외의 지역에서 사용하는 것을 목적으로 합니다.
ENVIRONMENTAL
The product is designed and manufactured with high-quality materials and components that can be recycled and reused. This symbol means that electricaland electronic equipment, at their end-of-life, should be disposed of separately from regular waste. Please dispose of the product appropriately and accordingto local regulations. In the European Union, there are separate collection systems for used electrical and electronic products. Please help us to conserve theenvironment we live in!

Content
Introduction. . . . . . . . . . . . . . . . . . . . . . . . . . . . . . . . . . . . . . . . . . . . . . . . . 5Safety and warning guidelines. . . . . . . . . . . . . . . . . . . . . . . . . . . . . . . . . . . . . . 5
Installation safety and warning guidelines. . . . . . . . . . . . . . . . . . . . . . . . . . . . . 6
Light intensity hazard distance. . . . . . . . . . . . . . . . . . . . . . . . . . . . . . . . . . . . 6
Product labels. . . . . . . . . . . . . . . . . . . . . . . . . . . . . . . . . . . . . . . . . . . . . . 7
Projector overview. . . . . . . . . . . . . . . . . . . . . . . . . . . . . . . . . . . . . . . . . . . . . .9
Contact your dealer. . . . . . . . . . . . . . . . . . . . . . . . . . . . . . . . . . . . . . . . . . . . . 9
Key features. . . . . . . . . . . . . . . . . . . . . . . . . . . . . . . . . . . . . . . . . . . . . . . . .10
How the projector works. . . . . . . . . . . . . . . . . . . . . . . . . . . . . . . . . . . . . . . . . 10
List of components. . . . . . . . . . . . . . . . . . . . . . . . . . . . . . . . . . . . . . . . . . . . .10
Installation and setup. . . . . . . . . . . . . . . . . . . . . . . . . . . . . . . . . . . . . . . . . 11Site requirements. . . . . . . . . . . . . . . . . . . . . . . . . . . . . . . . . . . . . . . . . . . . . 11
Physical operating environment. . . . . . . . . . . . . . . . . . . . . . . . . . . . . . . . . . .11
Power connection. . . . . . . . . . . . . . . . . . . . . . . . . . . . . . . . . . . . . . . . . . . 11
Projector components. . . . . . . . . . . . . . . . . . . . . . . . . . . . . . . . . . . . . . . . . . . 12
IR remote keypad. . . . . . . . . . . . . . . . . . . . . . . . . . . . . . . . . . . . . . . . . . . . . 13
Display panel components. . . . . . . . . . . . . . . . . . . . . . . . . . . . . . . . . . . . . . . . 15
Positioning the projector. . . . . . . . . . . . . . . . . . . . . . . . . . . . . . . . . . . . . . . . . 15
Leveling the projector. . . . . . . . . . . . . . . . . . . . . . . . . . . . . . . . . . . . . . . . . . .16
Installing the projector lens. . . . . . . . . . . . . . . . . . . . . . . . . . . . . . . . . . . . . . . 16
Calibrating the lens motor. . . . . . . . . . . . . . . . . . . . . . . . . . . . . . . . . . . . . . . . 17
Removing the projection lens. . . . . . . . . . . . . . . . . . . . . . . . . . . . . . . . . . . . 18
Connecting to AC power. . . . . . . . . . . . . . . . . . . . . . . . . . . . . . . . . . . . . . . . . 18
Turning the projector on. . . . . . . . . . . . . . . . . . . . . . . . . . . . . . . . . . . . . . . . . 19
Projector LED status indicators. . . . . . . . . . . . . . . . . . . . . . . . . . . . . . . . . . . 19
Projector LED shutter indicators. . . . . . . . . . . . . . . . . . . . . . . . . . . . . . . . . . 20
Lamp states. . . . . . . . . . . . . . . . . . . . . . . . . . . . . . . . . . . . . . . . . . . . . . . 20
Turning the projector off. . . . . . . . . . . . . . . . . . . . . . . . . . . . . . . . . . . . . . . . . 21
Adjusting offset. . . . . . . . . . . . . . . . . . . . . . . . . . . . . . . . . . . . . . . . . . . . . . .21
Resetting the lens to home position. . . . . . . . . . . . . . . . . . . . . . . . . . . . . . . . 22
Adjusting boresight. . . . . . . . . . . . . . . . . . . . . . . . . . . . . . . . . . . . . . . . . . . . 22
Adjusting the fold mirror. . . . . . . . . . . . . . . . . . . . . . . . . . . . . . . . . . . . . . . . . 24
Optimizing the integrator zoom and focus. . . . . . . . . . . . . . . . . . . . . . . . . . . . . . 25
Boxer 2K Boxer 2K20 (Bc3), Boxer 2K25 (Bc.4), Boxer 2K30 (Bc.5) Installation and Setup Manual 3020-102265-01 Rev. 1 (06-2016)Copyright © 2016 Christie Digital Systems USA Inc. All rights reserved.
Adjusting DMD convergence. . . . . . . . . . . . . . . . . . . . . . . . . . . . . . . . . . . . . . . 26
Aligning the image with lens zoom and focus. . . . . . . . . . . . . . . . . . . . . . . . . . . . 27
Running Auto Setup to optimize display settings. . . . . . . . . . . . . . . . . . . . . . . . . . 27
Configuring Boxer 2K to work with Christie Link. . . . . . . . . . . . . . . . . . . . . . . . . . .27
Selecting a test pattern. . . . . . . . . . . . . . . . . . . . . . . . . . . . . . . . . . . . . . . . . .28
Connecting devices and establishing communication. . . . . . . . . . . . . . . . . 29IMXB ports. . . . . . . . . . . . . . . . . . . . . . . . . . . . . . . . . . . . . . . . . . . . . . . . . .29
Connecting a video source using HBMIC. . . . . . . . . . . . . . . . . . . . . . . . . . . . . . . 30
Connecting a video source using DisplayPort. . . . . . . . . . . . . . . . . . . . . . . . . . . . .30
Connecting a video source using 3G input card. . . . . . . . . . . . . . . . . . . . . . . . . . . 30
Connecting a video source using HDMI. . . . . . . . . . . . . . . . . . . . . . . . . . . . . . . . 31
Connecting a video source using DVI. . . . . . . . . . . . . . . . . . . . . . . . . . . . . . . . . 31
Connecting a video source using HDBaseT. . . . . . . . . . . . . . . . . . . . . . . . . . . . . . 31
Selecting a video source. . . . . . . . . . . . . . . . . . . . . . . . . . . . . . . . . . . . . . . . . 31
Connecting to a computer or server. . . . . . . . . . . . . . . . . . . . . . . . . . . . . . . . . . 32
Configuring the RS232 port. . . . . . . . . . . . . . . . . . . . . . . . . . . . . . . . . . . . . . . 32
Setting up the Ethernet. . . . . . . . . . . . . . . . . . . . . . . . . . . . . . . . . . . . . . . . . .32
Configuring how the video source is split. . . . . . . . . . . . . . . . . . . . . . . . . . . . . . . 33
Specifications. . . . . . . . . . . . . . . . . . . . . . . . . . . . . . . . . . . . . . . . . . . . . . . 34Display. . . . . . . . . . . . . . . . . . . . . . . . . . . . . . . . . . . . . . . . . . . . . . . . . . . . 34
Control signal compatibility. . . . . . . . . . . . . . . . . . . . . . . . . . . . . . . . . . . . . . . 34
Optional input cards. . . . . . . . . . . . . . . . . . . . . . . . . . . . . . . . . . . . . . . . . . . . 35
Temperature sensor thresholds. . . . . . . . . . . . . . . . . . . . . . . . . . . . . . . . . . . . . 35
Warning thresholds for fans. . . . . . . . . . . . . . . . . . . . . . . . . . . . . . . . . . . . . . . 36
Warning threshold for liquid cooling module. . . . . . . . . . . . . . . . . . . . . . . . . . . . . 37
Power requirements. . . . . . . . . . . . . . . . . . . . . . . . . . . . . . . . . . . . . . . . . . . . 37
Physical specifications. . . . . . . . . . . . . . . . . . . . . . . . . . . . . . . . . . . . . . . . . . .38
Accessories. . . . . . . . . . . . . . . . . . . . . . . . . . . . . . . . . . . . . . . . . . . . . . . . . 38
Regulatory. . . . . . . . . . . . . . . . . . . . . . . . . . . . . . . . . . . . . . . . . . . . . . . . . .39
Safety. . . . . . . . . . . . . . . . . . . . . . . . . . . . . . . . . . . . . . . . . . . . . . . . . . 39
Approvals. . . . . . . . . . . . . . . . . . . . . . . . . . . . . . . . . . . . . . . . . . . . . . . . 39
Electro-magnetic compatibility. . . . . . . . . . . . . . . . . . . . . . . . . . . . . . . . . . . 40
Environment. . . . . . . . . . . . . . . . . . . . . . . . . . . . . . . . . . . . . . . . . . . . . . . . 40
Content
Boxer 2K Boxer 2K20 (Bc3), Boxer 2K25 (Bc.4), Boxer 2K30 (Bc.5) Installation and Setup Manual 4020-102265-01 Rev. 1 (06-2016)Copyright © 2016 Christie Digital Systems USA Inc. All rights reserved.

Introduction
This manual is intended for professionally trained operators of Christie high-brightness projectionsystems.
Only Christie qualified technicians who are knowledgeable about the hazards associated with high-voltage, ultraviolet exposure, and the high temperatures generated by the projector are authorized toassemble, install, and service the projector.For complete Boxer 2K product documentation and technical support, go to www.christiedigital.com.
Safety and warning guidelinesRead all safety and warning guidelines before installing or operating the projector.
This projector must be operated in an environment that meets the operating range specification. Useonly the attachments and/or accessories recommended by Christie. Use of others may result in therisk of fire, shock, or personal injury.
Warning! Failure to comply with the following could result in death or serious injury.
• This product must be operated in an environment that meets the operating range as specified inthis manual.
• Do not look directly into the lens or at the lamp. The extremely high brightness can causepermanent eye damage.
• EXTREME BRIGHTNESS! When accessing a restricted access location for product service ormaintenance, avoid exposure to the product beam path by turning the product power off anddisconnecting the product from AC power, or by shuttering the lamp to avoid emissions from thefront aperture.
• FIRE HAZARD! Keep hands, clothes, and all combustible material away from the concentratedlight beam of the lamps.
• SHOCK HAZARD! Power supply uses double pole/neutral fusing. Disconnect all power sourcesbefore opening the product.
• FIRE HAZARD! Do not exceed 30 A for the breaker to power Input 1 on the projector.
• Install the product near an easily accessible AC receptacle.
• FIRE AND SHOCK HAZARD! Use only the attachments, accessories, tools, and replacement partsspecified by Christie.
Boxer 2K Boxer 2K20 (Bc3), Boxer 2K25 (Bc.4), Boxer 2K30 (Bc.5) Installation and Setup Manual 5020-102265-01 Rev. 1 (06-2016)Copyright © 2016 Christie Digital Systems USA Inc. All rights reserved.

Caution! Failure to comply with the following could result in minor or moderate injury.
• TRIP OR FIRE HAZARD! Position all cables where they cannot contact hot surfaces, be pulled, betripped over, or damaged by persons walking on or objects rolling over the cables.
• The American Conference of Governmental Industrial Hygienists (ACGIH) recommendsoccupational UV exposure for an 8-hour day to be less than 0.1 microwatts per squarecentimeters of effective UV radiation. A workplace evaluation is advised to assure employees arenot exposed to cumulative radiation levels exceeding the government guidelines for your area.Be aware that some medications are known to increase sensitivity to UV radiation.
Installation safety and warning guidelinesRead all safety and warning guidelines before installing the projector.
Warning! Failure to comply with the following could result in death or serious injury.
• Possibly hazardous optical radiation emitted from this product. (Risk group 3)
• High leakage current present when connected to IT power systems.
• Christie products must be installed and serviced by Christie qualified technicians.
• Do not operate the product without all of its covers in place.
• Always install safety straps when the frame and projector are installed overhead.
• Observe load ratings and applicable local safety codes.
• When installing the projector in portrait mode, the rigging device must have a sufficient loadrating, as identified in this manual.
• This product must be installed within a restricted access location not accessible by the generalpublic.
• Install the product so users and the audience cannot enter the restricted area at eye level.
• Only personnel who are trained on the precautions for the restricted access location can begranted entry to the area.
• Only Christie qualified technicians are permitted to open product enclosures.
Caution! Failure to comply with the following could result in minor or moderate injury.
• ELECTRICAL and BURN HAZARD! Use caution when accessing internal components.
• Only Christie qualified technicians are authorized to use the tools provided in the toolbox.
Light intensity hazard distanceThis projector has been classified as Risk Group 3 as per the IEC62471 standard due to possiblehazardous optical and thermal radiation being emitted.
Warning! Failure to comply with the following could result in serious injury.
• PERMANENT/TEMPORARY BLINDNESS HAZARD! No direct exposure to the beam must bepermitted.
• PERMANENT/TEMPORARY BLINDNESS HAZARD! Operators must control access to the beamwithin the hazard distance or install the product at the height (greater than or equal to 3.0 mfrom the floor to the beam) that prevents exposure of spectators' eyes within the hazarddistance.
• EXTREME BRIGHTNESS! Do not place reflective objects in the product light path.
Introduction
Boxer 2K Boxer 2K20 (Bc3), Boxer 2K25 (Bc.4), Boxer 2K30 (Bc.5) Installation and Setup Manual 6020-102265-01 Rev. 1 (06-2016)Copyright © 2016 Christie Digital Systems USA Inc. All rights reserved.
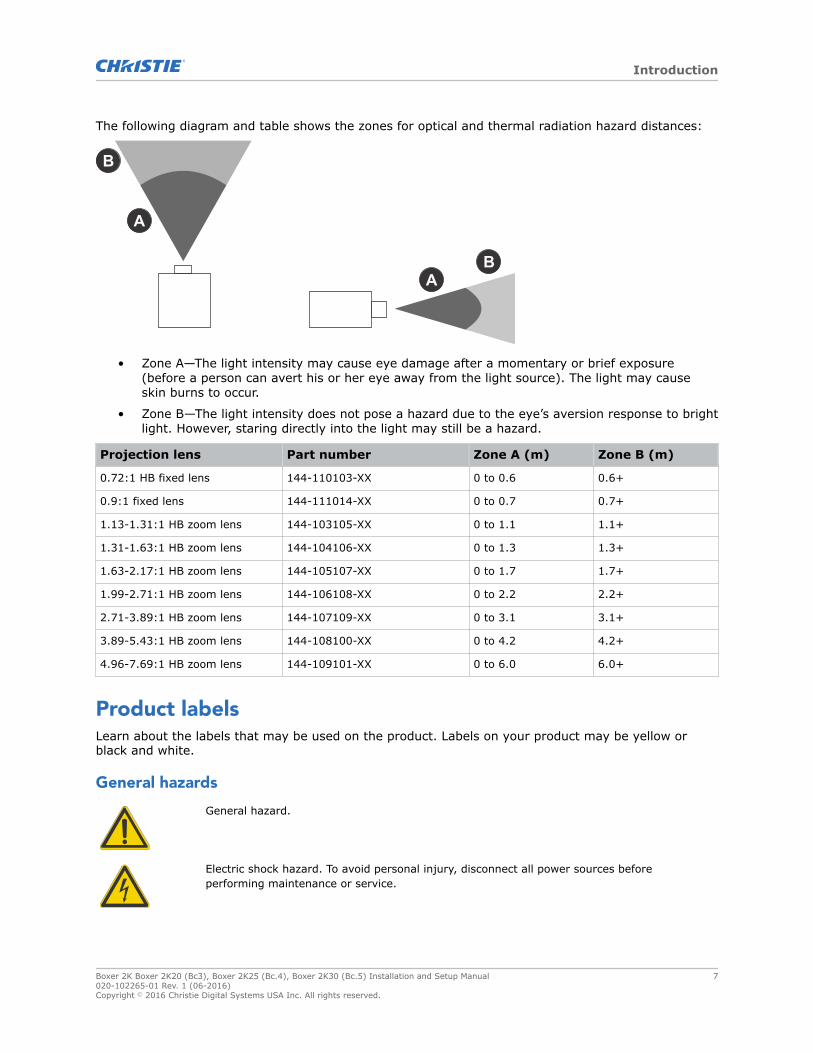
The following diagram and table shows the zones for optical and thermal radiation hazard distances:
AB
A
B
• Zone A—The light intensity may cause eye damage after a momentary or brief exposure(before a person can avert his or her eye away from the light source). The light may causeskin burns to occur.
• Zone B—The light intensity does not pose a hazard due to the eye’s aversion response to brightlight. However, staring directly into the light may still be a hazard.
Projection lens Part number Zone A (m) Zone B (m)
0.72:1 HB fixed lens 144-110103-XX 0 to 0.6 0.6+
0.9:1 fixed lens 144-111014-XX 0 to 0.7 0.7+
1.13-1.31:1 HB zoom lens 144-103105-XX 0 to 1.1 1.1+
1.31-1.63:1 HB zoom lens 144-104106-XX 0 to 1.3 1.3+
1.63-2.17:1 HB zoom lens 144-105107-XX 0 to 1.7 1.7+
1.99-2.71:1 HB zoom lens 144-106108-XX 0 to 2.2 2.2+
2.71-3.89:1 HB zoom lens 144-107109-XX 0 to 3.1 3.1+
3.89-5.43:1 HB zoom lens 144-108100-XX 0 to 4.2 4.2+
4.96-7.69:1 HB zoom lens 144-109101-XX 0 to 6.0 6.0+
Product labelsLearn about the labels that may be used on the product. Labels on your product may be yellow orblack and white.
General hazards
General hazard.
Electric shock hazard. To avoid personal injury, disconnect all power sources beforeperforming maintenance or service.
Introduction
Boxer 2K Boxer 2K20 (Bc3), Boxer 2K25 (Bc.4), Boxer 2K30 (Bc.5) Installation and Setup Manual 7020-102265-01 Rev. 1 (06-2016)Copyright © 2016 Christie Digital Systems USA Inc. All rights reserved.

Electrocution hazard. To avoid personal injury, always disconnect all power sources beforeperforming maintenance or service procedures.
Fire hazard. To avoid personal injury and property damage, follow the instructions provided inthis document.
Hot surface hazard. To avoid personal injury, allow the product to cool for the recommendedcool down time before performing maintenance or service.
Burn hazard. To avoid personal injury, allow the product to cool for the recommended cooldown time before performing maintenance or service.
Explosive material hazard. To avoid personal injury, disconnect all power sources beforeperforming maintenance or service, and wear Christie-approved protective clothing.
Bright light hazard. To avoid personal injury, never look directly at the light source.
Pinch hazard. To avoid personal injury, keep hands clear and loose clothing tied back.
Fan hazard. To avoid personal injury, keep hands clear and loose clothing tied back. Alwaysdisconnect all power sources before performing maintenance or service procedures.
Not for household use.
Mandatory action
Disconnect all power sources before performing maintenance or service procedures.
Consult the service manual.
Electrical labels
Indicates the presence of a protective earth ground.
Introduction
Boxer 2K Boxer 2K20 (Bc3), Boxer 2K25 (Bc.4), Boxer 2K30 (Bc.5) Installation and Setup Manual 8020-102265-01 Rev. 1 (06-2016)Copyright © 2016 Christie Digital Systems USA Inc. All rights reserved.

Indicates the presence of an earth ground.
Additional hazard labels
Risk Group 3 warning: Indicates a potential optical radiation hazard emitted fromthis product. Thermal radiation emitted from this product may cause burns.
Projector overviewLearn about the Boxer 2K projector.The Boxer 2K is a professional quality, easy-to-use projector using Digital Light Processing (DLPTM)technology from Texas Instruments. Integrating smoothly into traditional projection environments, theBoxer 2K interfaces with local networks throughout the world, for multimedia presentations from avariety of formats, to offer stunning wide screen images.
Contact your dealerRecord the information about your projector and keep this information with your records to assist withthe servicing of your projector. If you encounter a problem with your Christie projector, contact yourdealer.
Purchase record
Dealer:
Dealer or Christie Sales/Service contact phone number:
Projector serial number:
The serial number can be found on the license label located on the display panel
Purchase date:
Installation date:
Ethernet settings
Default gateway
Projector IP address
Subnet mask
Introduction
Boxer 2K Boxer 2K20 (Bc3), Boxer 2K25 (Bc.4), Boxer 2K30 (Bc.5) Installation and Setup Manual 9020-102265-01 Rev. 1 (06-2016)Copyright © 2016 Christie Digital Systems USA Inc. All rights reserved.

Key featuresUnderstand the important features of the projector.
• Built in warp and blend of projected images
• Near field communication
• Multi-lamp module with no lamp alignment required
• Improved lens mount with bayonet style insertion
• Single phase 200-240 V
• Side access to optical adjustments
• Omnidirectional operation
• TruLife electronics
• New LCD display to provide information at-a-glance
How the projector worksThe Boxer 2K accepts a variety of input signals for projection on front or rear projection screens,typical in commercial or other large screen applications.High-brightness light is generated by mercury vapor lamps, then modulated by three DigitalMicromirror Device (DMD) panels responding to incoming data streams of digitized red, green and bluecolor information. As these digital streams flow from the source, light from the responding “on” pixelsof each panel is reflected, converged and then projected to the screen through one or more projectionlenses, where all pixel reflections are superimposed in sharp full-color images.
List of componentsVerify all components were received with the projector.
• Power cord for full brightness, multi-lamp operation
• Power cord for limited power, single lamp operation
• IR remote keypad
Introduction
Boxer 2K Boxer 2K20 (Bc3), Boxer 2K25 (Bc.4), Boxer 2K30 (Bc.5) Installation and Setup Manual 10020-102265-01 Rev. 1 (06-2016)Copyright © 2016 Christie Digital Systems USA Inc. All rights reserved.

Installation and setup
Learn how to install, connect, and optimize the projector display.
Site requirementsTo safely install and operate the projector, the installation location must have restricted access forauthorized personnel only and meet these minimum requirements.
Physical operating environmentProvides specifications for the operating environment.
• Ambient temperature (operating) 5 to 40°C (41 to 104°F) up to 1500 ft
• Humidity (non-condensing) 10 to 80%
• Operating altitude: 10,000 ft maximum at 5 to 25 degrees Celsius ambient
Power connectionThe projector uses an innovative dual AC inlet power system that offers two power modes.To operate at full brightness (six lamps), power the projector using AC Input 1 if the appropriate highpower source is available. To operate in limited power mode (single lamp), power the projector usingstandard lower power sources using AC Input 2. A different power cord is provided for each powersource. A 30A rated wall breaker is required at the installation when using Input 1. A 15A rated wallbreaker is required at the installation when using Input 2.
Boxer 2K Boxer 2K20 (Bc3), Boxer 2K25 (Bc.4), Boxer 2K30 (Bc.5) Installation and Setup Manual 11020-102265-01 Rev. 1 (06-2016)Copyright © 2016 Christie Digital Systems USA Inc. All rights reserved.
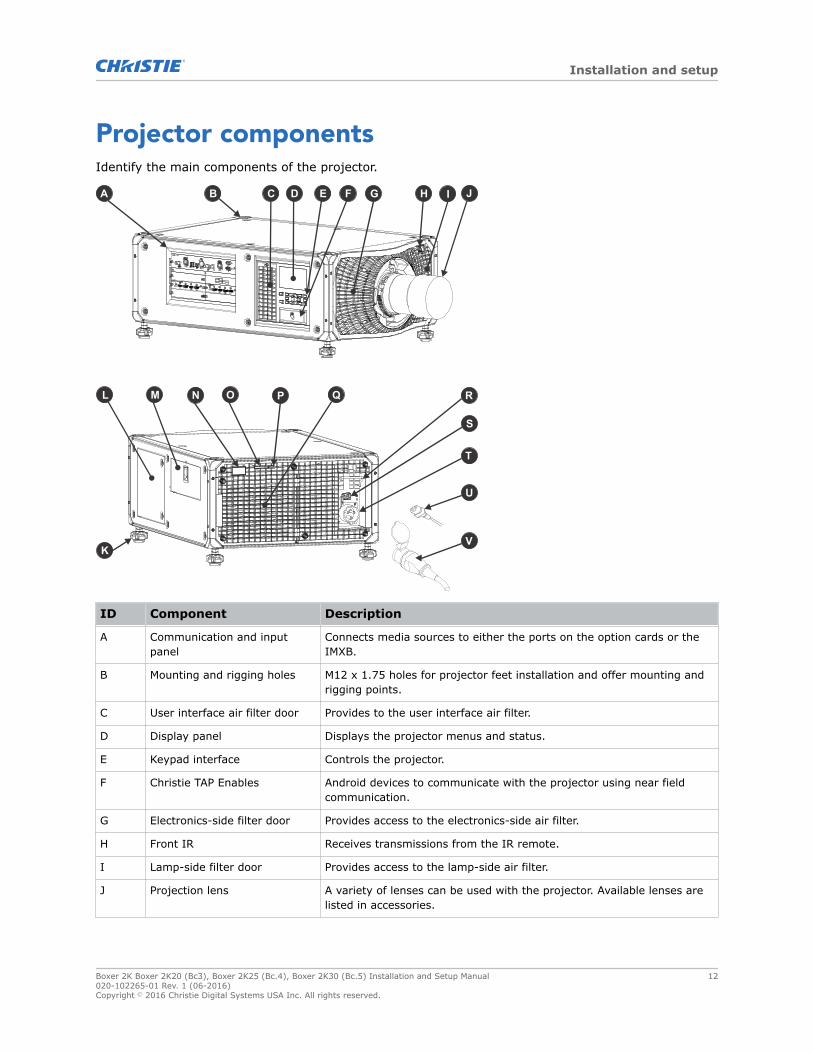
Projector componentsIdentify the main components of the projector.
A B C D E F
R
S
T
V
G
U
Q
H I J
K
L M N O P
ID Component Description
A Communication and inputpanel
Connects media sources to either the ports on the option cards or theIMXB.
B Mounting and rigging holes M12 x 1.75 holes for projector feet installation and offer mounting andrigging points.
C User interface air filter door Provides to the user interface air filter.
D Display panel Displays the projector menus and status.
E Keypad interface Controls the projector.
F Christie TAP Enables Android devices to communicate with the projector using near fieldcommunication.
G Electronics-side filter door Provides access to the electronics-side air filter.
H Front IR Receives transmissions from the IR remote.
I Lamp-side filter door Provides access to the lamp-side air filter.
J Projection lens A variety of lenses can be used with the projector. Available lenses arelisted in accessories.
Installation and setup
Boxer 2K Boxer 2K20 (Bc3), Boxer 2K25 (Bc.4), Boxer 2K30 (Bc.5) Installation and Setup Manual 12020-102265-01 Rev. 1 (06-2016)Copyright © 2016 Christie Digital Systems USA Inc. All rights reserved.
ID Component Description
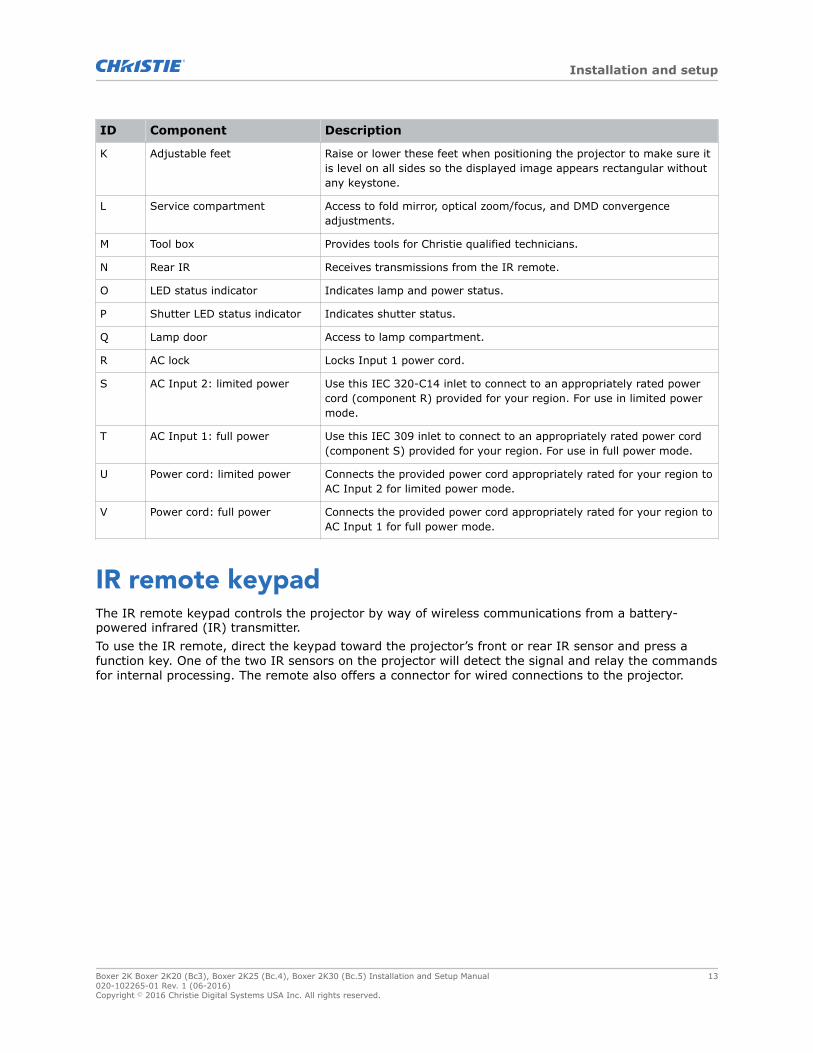
K Adjustable feet Raise or lower these feet when positioning the projector to make sure itis level on all sides so the displayed image appears rectangular withoutany keystone.
L Service compartment Access to fold mirror, optical zoom/focus, and DMD convergenceadjustments.
M Tool box Provides tools for Christie qualified technicians.
N Rear IR Receives transmissions from the IR remote.
O LED status indicator Indicates lamp and power status.
P Shutter LED status indicator Indicates shutter status.
Q Lamp door Access to lamp compartment.
R AC lock Locks Input 1 power cord.
S AC Input 2: limited power Use this IEC 320-C14 inlet to connect to an appropriately rated powercord (component R) provided for your region. For use in limited powermode.
T AC Input 1: full power Use this IEC 309 inlet to connect to an appropriately rated power cord(component S) provided for your region. For use in full power mode.
U Power cord: limited power Connects the provided power cord appropriately rated for your region toAC Input 2 for limited power mode.
V Power cord: full power Connects the provided power cord appropriately rated for your region toAC Input 1 for full power mode.
IR remote keypadThe IR remote keypad controls the projector by way of wireless communications from a battery-powered infrared (IR) transmitter.To use the IR remote, direct the keypad toward the projector’s front or rear IR sensor and press afunction key. One of the two IR sensors on the projector will detect the signal and relay the commandsfor internal processing. The remote also offers a connector for wired connections to the projector.
Installation and setup
Boxer 2K Boxer 2K20 (Bc3), Boxer 2K25 (Bc.4), Boxer 2K30 (Bc.5) Installation and Setup Manual 13020-102265-01 Rev. 1 (06-2016)Copyright © 2016 Christie Digital Systems USA Inc. All rights reserved.
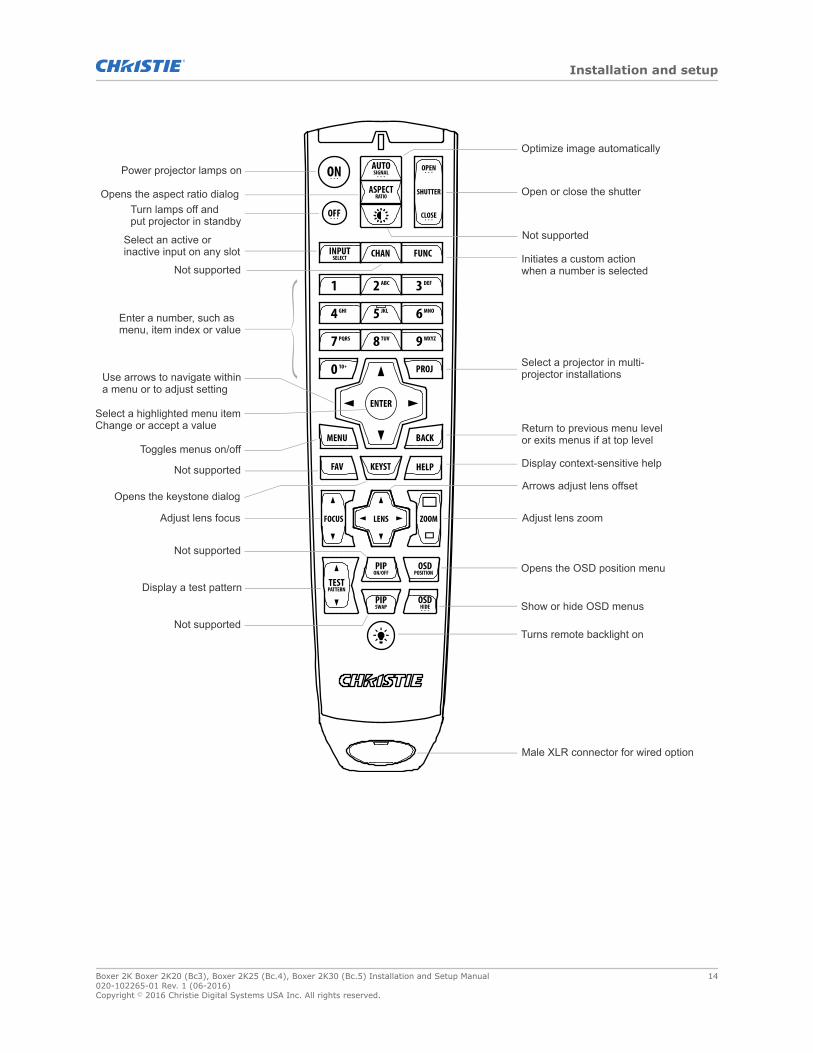
Power projector lamps on
Turn lamps off and put projector in standby
Open or close the shutter
Display a test pattern
Optimize image automatically
Initiates a custom actionwhen a number is selected
Not supportedSelect an active or inactive input on any slot
Not supported
Use arrows to navigate withina menu or to adjust setting
Select a highlighted menu itemChange or accept a value
Enter a number, such asmenu, item index or value
Select a projector in multi-projector installations
Toggles menus on/offDisplay context-sensitive help
Return to previous menu levelor exits menus if at top level
Adjust lens focus Adjust lens zoom
Arrows adjust lens offset
Show or hide OSD menus
Opens the OSD position menu
Male XLR connector for wired option
Opens the aspect ratio dialog
Opens the keystone dialog
Not supported
Not supported
Not supportedTurns remote backlight on
Installation and setup
Boxer 2K Boxer 2K20 (Bc3), Boxer 2K25 (Bc.4), Boxer 2K30 (Bc.5) Installation and Setup Manual 14020-102265-01 Rev. 1 (06-2016)Copyright © 2016 Christie Digital Systems USA Inc. All rights reserved.
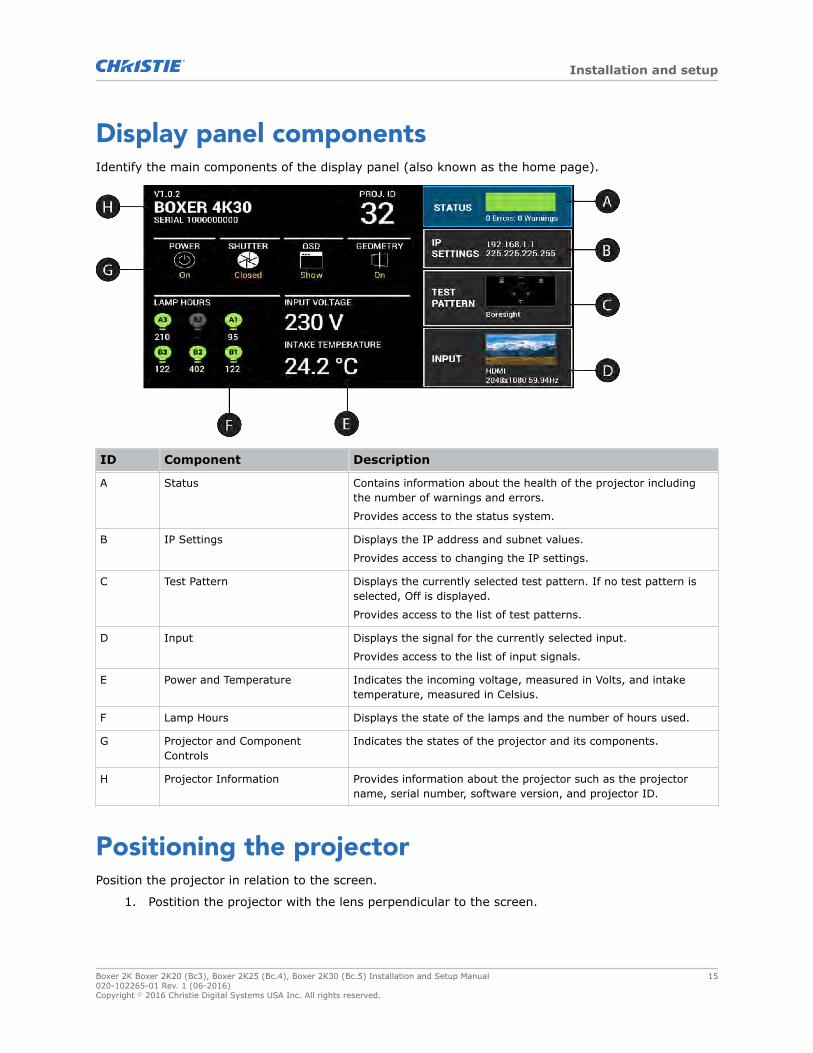
Display panel componentsIdentify the main components of the display panel (also known as the home page).
ID Component Description
A Status Contains information about the health of the projector includingthe number of warnings and errors.
Provides access to the status system.
B IP Settings Displays the IP address and subnet values.
Provides access to changing the IP settings.
C Test Pattern Displays the currently selected test pattern. If no test pattern isselected, Off is displayed.
Provides access to the list of test patterns.
D Input Displays the signal for the currently selected input.
Provides access to the list of input signals.
E Power and Temperature Indicates the incoming voltage, measured in Volts, and intaketemperature, measured in Celsius.
F Lamp Hours Displays the state of the lamps and the number of hours used.
G Projector and ComponentControls
Indicates the states of the projector and its components.
H Projector Information Provides information about the projector such as the projectorname, serial number, software version, and projector ID.
Positioning the projectorPosition the projector in relation to the screen.
1. Postition the projector with the lens perpendicular to the screen.
Installation and setup
Boxer 2K Boxer 2K20 (Bc3), Boxer 2K25 (Bc.4), Boxer 2K30 (Bc.5) Installation and Setup Manual 15020-102265-01 Rev. 1 (06-2016)Copyright © 2016 Christie Digital Systems USA Inc. All rights reserved.
Keep the projector lens as perpendicular to the screen as possible, even if significantly abovethe screen center. When a particularly short throw distance combines with a wide screen, youmay have to forfeit some aim and stay more perpendicular to the screen. In such cases,some lens offset can reduce the keystone distortion.
2. Center the projector with the screen.
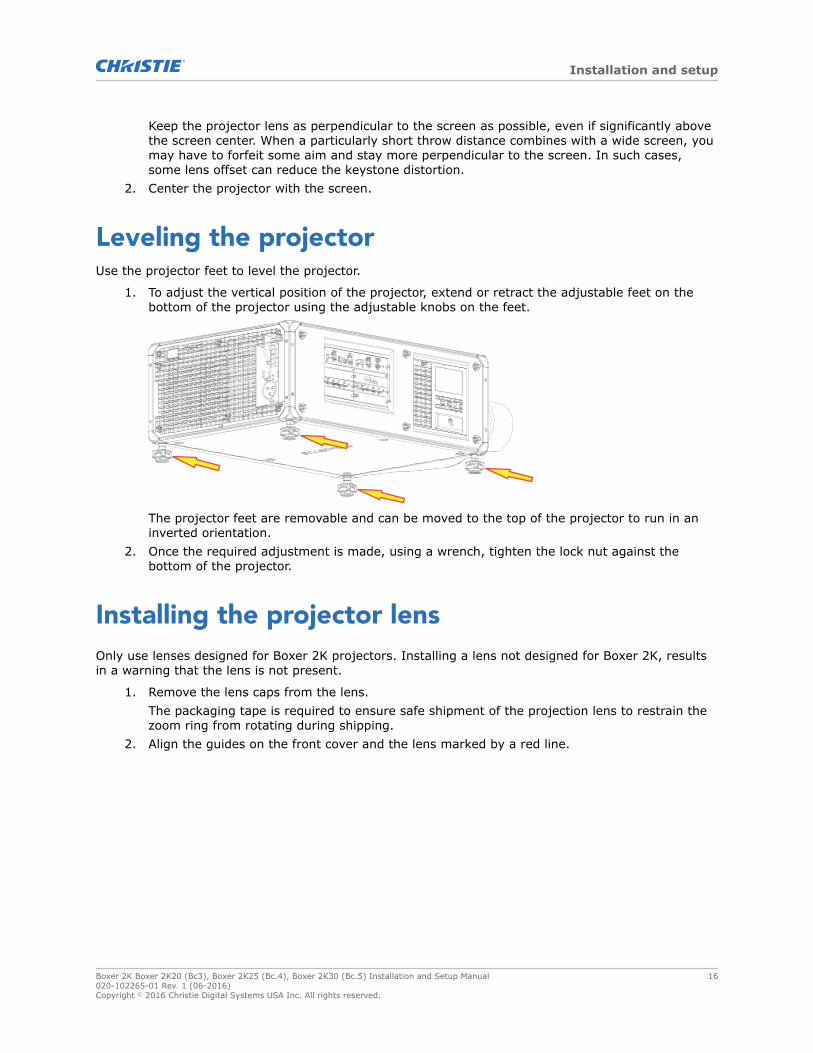
Leveling the projectorUse the projector feet to level the projector.
1. To adjust the vertical position of the projector, extend or retract the adjustable feet on thebottom of the projector using the adjustable knobs on the feet.
The projector feet are removable and can be moved to the top of the projector to run in aninverted orientation.
2. Once the required adjustment is made, using a wrench, tighten the lock nut against thebottom of the projector.
Installing the projector lensOnly use lenses designed for Boxer 2K projectors. Installing a lens not designed for Boxer 2K, resultsin a warning that the lens is not present.
1. Remove the lens caps from the lens.The packaging tape is required to ensure safe shipment of the projection lens to restrain thezoom ring from rotating during shipping.
2. Align the guides on the front cover and the lens marked by a red line.
Installation and setup
Boxer 2K Boxer 2K20 (Bc3), Boxer 2K25 (Bc.4), Boxer 2K30 (Bc.5) Installation and Setup Manual 16020-102265-01 Rev. 1 (06-2016)Copyright © 2016 Christie Digital Systems USA Inc. All rights reserved.
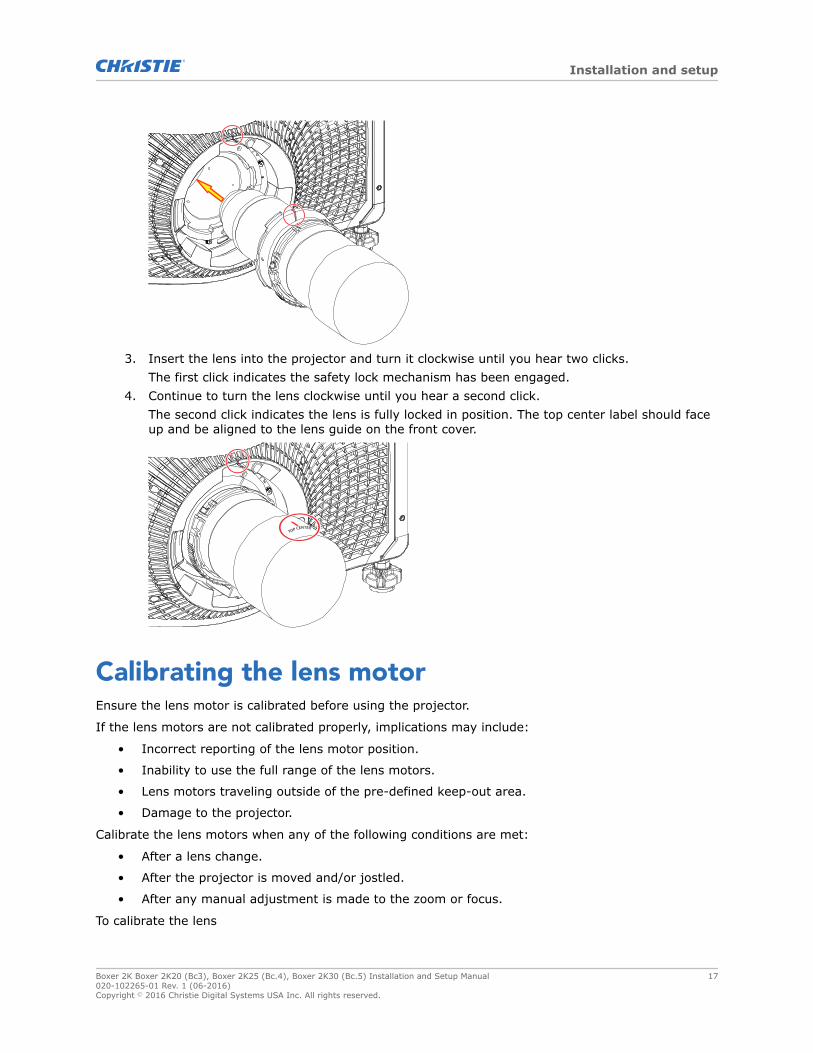
3. Insert the lens into the projector and turn it clockwise until you hear two clicks.The first click indicates the safety lock mechanism has been engaged.
4. Continue to turn the lens clockwise until you hear a second click.The second click indicates the lens is fully locked in position. The top center label should faceup and be aligned to the lens guide on the front cover.
Calibrating the lens motorEnsure the lens motor is calibrated before using the projector.
If the lens motors are not calibrated properly, implications may include:
• Incorrect reporting of the lens motor position.
• Inability to use the full range of the lens motors.
• Lens motors traveling outside of the pre-defined keep-out area.
• Damage to the projector.
Calibrate the lens motors when any of the following conditions are met:
• After a lens change.
• After the projector is moved and/or jostled.
• After any manual adjustment is made to the zoom or focus.
To calibrate the lens
Installation and setup
Boxer 2K Boxer 2K20 (Bc3), Boxer 2K25 (Bc.4), Boxer 2K30 (Bc.5) Installation and Setup Manual 17020-102265-01 Rev. 1 (06-2016)Copyright © 2016 Christie Digital Systems USA Inc. All rights reserved.
1. Select MENU > Configuration > Lens Settings > Lens Calibration.2. Select Enter.
Removing the projection lensUse the correct method of removing the lens.
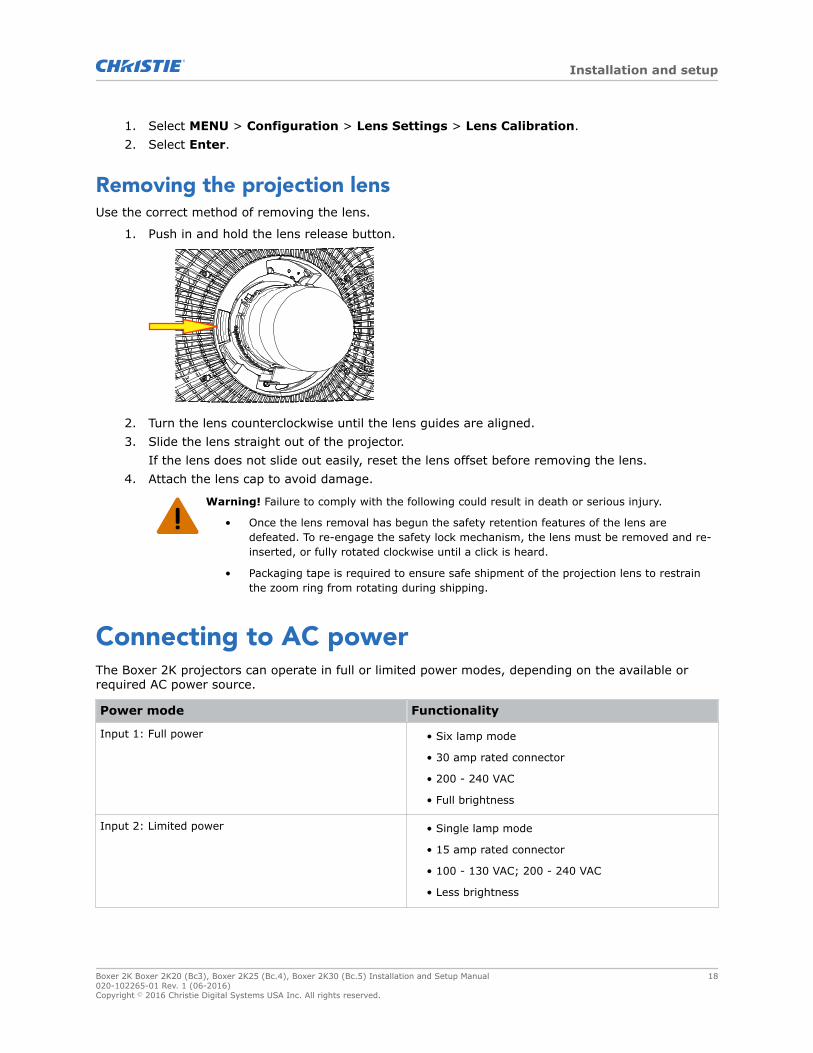
1. Push in and hold the lens release button.
2. Turn the lens counterclockwise until the lens guides are aligned.3. Slide the lens straight out of the projector.
If the lens does not slide out easily, reset the lens offset before removing the lens.4. Attach the lens cap to avoid damage.
Warning! Failure to comply with the following could result in death or serious injury.
• Once the lens removal has begun the safety retention features of the lens aredefeated. To re-engage the safety lock mechanism, the lens must be removed and re-inserted, or fully rotated clockwise until a click is heard.
• Packaging tape is required to ensure safe shipment of the projection lens to restrainthe zoom ring from rotating during shipping.
Connecting to AC powerThe Boxer 2K projectors can operate in full or limited power modes, depending on the available orrequired AC power source.
Power mode Functionality
Input 1: Full power • Six lamp mode
• 30 amp rated connector
• 200 - 240 VAC
• Full brightness
Input 2: Limited power • Single lamp mode
• 15 amp rated connector
• 100 - 130 VAC; 200 - 240 VAC
• Less brightness
Installation and setup
Boxer 2K Boxer 2K20 (Bc3), Boxer 2K25 (Bc.4), Boxer 2K30 (Bc.5) Installation and Setup Manual 18020-102265-01 Rev. 1 (06-2016)Copyright © 2016 Christie Digital Systems USA Inc. All rights reserved.
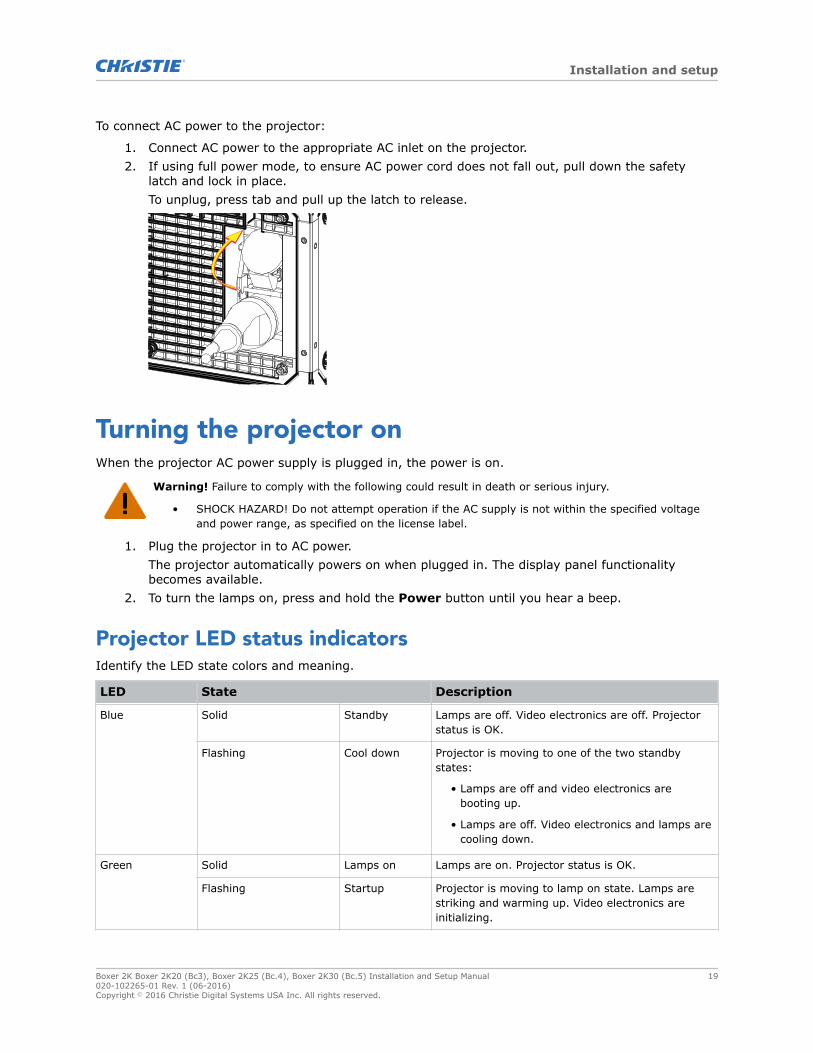
To connect AC power to the projector:
1. Connect AC power to the appropriate AC inlet on the projector.2. If using full power mode, to ensure AC power cord does not fall out, pull down the safety
latch and lock in place.To unplug, press tab and pull up the latch to release.
Turning the projector onWhen the projector AC power supply is plugged in, the power is on.
Warning! Failure to comply with the following could result in death or serious injury.
• SHOCK HAZARD! Do not attempt operation if the AC supply is not within the specified voltageand power range, as specified on the license label.
1. Plug the projector in to AC power.The projector automatically powers on when plugged in. The display panel functionalitybecomes available.
2. To turn the lamps on, press and hold the Power button until you hear a beep.
Projector LED status indicatorsIdentify the LED state colors and meaning.
LED State Description
Blue Solid Standby Lamps are off. Video electronics are off. Projectorstatus is OK.
Flashing Cool down Projector is moving to one of the two standbystates:
• Lamps are off and video electronics arebooting up.
• Lamps are off. Video electronics and lamps arecooling down.
Green Solid Lamps on Lamps are on. Projector status is OK.
Flashing Startup Projector is moving to lamp on state. Lamps arestriking and warming up. Video electronics areinitializing.
Installation and setup
Boxer 2K Boxer 2K20 (Bc3), Boxer 2K25 (Bc.4), Boxer 2K30 (Bc.5) Installation and Setup Manual 19020-102265-01 Rev. 1 (06-2016)Copyright © 2016 Christie Digital Systems USA Inc. All rights reserved.
LED State Description
Yellow Solid Warning instandby
Projector is in standby state. A problem exists withthe projector that does not prevent it fromoperating.
Flashing yellow/green Warning duringstartup
Projector is in a startup state. A problem existswith the projector that does not prevent it fromoperating.
Flashing Warning withlamps on
Lamps are on. A problem exists with the projectorthat will not cause it to shut down.
Flashing yellow/blue Warning duringcool down
Projector is in a cool down state. Lamps are off.Video electronics and lamps are cooling down. Aproblem exists with the projector that does notprevent it from operating.
Red Solid Error instandby
Projector is in standby. An error exists thatprevents the projector from starting up.
Flashing Error An error with the projector exists during startup,cool down, or when the lamps are off. Projector willproceed to shut down.
Off AC off The AC power is off.
Projector LED shutter indicatorsIdentify the shutter LED state colors and meaning.
LED State Description
Solid magenta Shutter closed The shutter is closed.
In standby, the shutter is always automatically closed andthe magenta light is muted.
Off Shutter open The shutter is open.
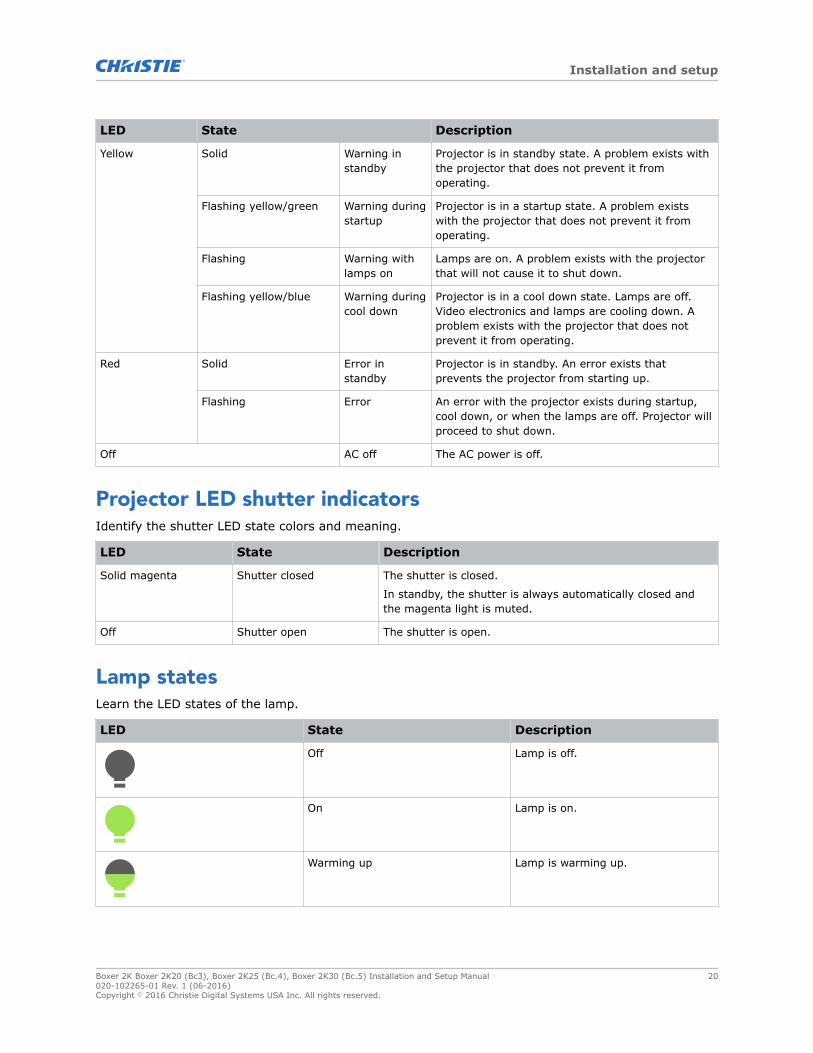
Lamp statesLearn the LED states of the lamp.
LED State Description
Off Lamp is off.
On Lamp is on.
Warming up Lamp is warming up.
Installation and setup
Boxer 2K Boxer 2K20 (Bc3), Boxer 2K25 (Bc.4), Boxer 2K30 (Bc.5) Installation and Setup Manual 20020-102265-01 Rev. 1 (06-2016)Copyright © 2016 Christie Digital Systems USA Inc. All rights reserved.
LED State Description
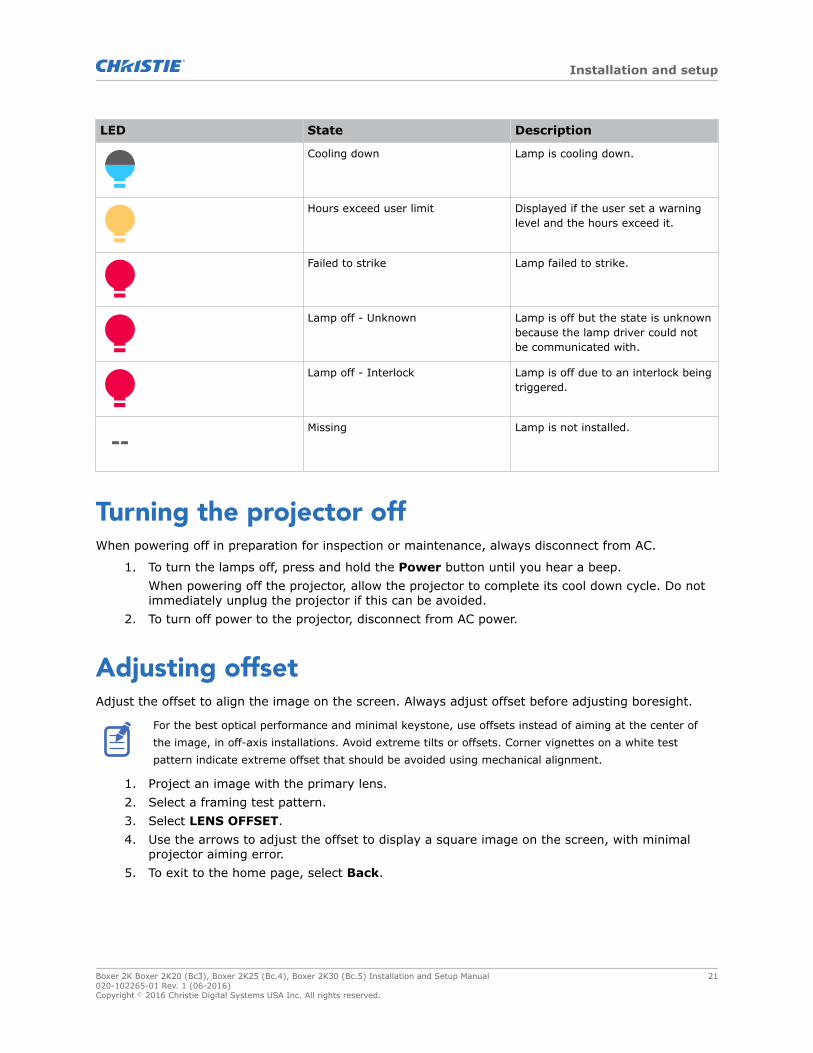
Cooling down Lamp is cooling down.
Hours exceed user limit Displayed if the user set a warninglevel and the hours exceed it.
Failed to strike Lamp failed to strike.
Lamp off - Unknown Lamp is off but the state is unknownbecause the lamp driver could notbe communicated with.
Lamp off - Interlock Lamp is off due to an interlock beingtriggered.
Missing Lamp is not installed.
Turning the projector offWhen powering off in preparation for inspection or maintenance, always disconnect from AC.
1. To turn the lamps off, press and hold the Power button until you hear a beep.When powering off the projector, allow the projector to complete its cool down cycle. Do notimmediately unplug the projector if this can be avoided.
2. To turn off power to the projector, disconnect from AC power.
Adjusting offsetAdjust the offset to align the image on the screen. Always adjust offset before adjusting boresight.
For the best optical performance and minimal keystone, use offsets instead of aiming at the center ofthe image, in off-axis installations. Avoid extreme tilts or offsets. Corner vignettes on a white testpattern indicate extreme offset that should be avoided using mechanical alignment.
1. Project an image with the primary lens.2. Select a framing test pattern.3. Select LENS OFFSET.4. Use the arrows to adjust the offset to display a square image on the screen, with minimal
projector aiming error.5. To exit to the home page, select Back.
Installation and setup
Boxer 2K Boxer 2K20 (Bc3), Boxer 2K25 (Bc.4), Boxer 2K30 (Bc.5) Installation and Setup Manual 21020-102265-01 Rev. 1 (06-2016)Copyright © 2016 Christie Digital Systems USA Inc. All rights reserved.
Resetting the lens to home positionRealign the lens to the home position after the lens has been offset and out of alignment.
1. Select LENS OFFSET.You can also select MENU > Configuration > Lens Settings > Lens Offset.
2. To reset the lens to the default home position, select Enter.3. To confirm the reset, select OK.
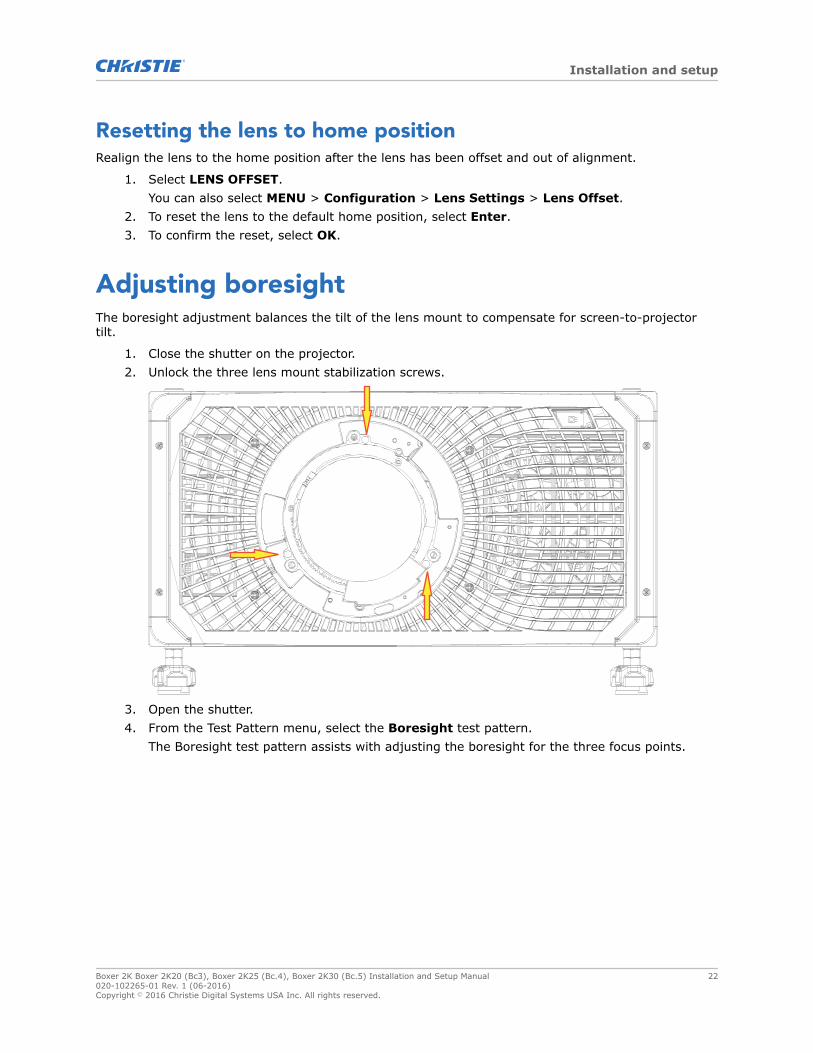
Adjusting boresightThe boresight adjustment balances the tilt of the lens mount to compensate for screen-to-projectortilt.
1. Close the shutter on the projector.2. Unlock the three lens mount stabilization screws.
3. Open the shutter.4. From the Test Pattern menu, select the Boresight test pattern.
The Boresight test pattern assists with adjusting the boresight for the three focus points.
Installation and setup
Boxer 2K Boxer 2K20 (Bc3), Boxer 2K25 (Bc.4), Boxer 2K30 (Bc.5) Installation and Setup Manual 22020-102265-01 Rev. 1 (06-2016)Copyright © 2016 Christie Digital Systems USA Inc. All rights reserved.
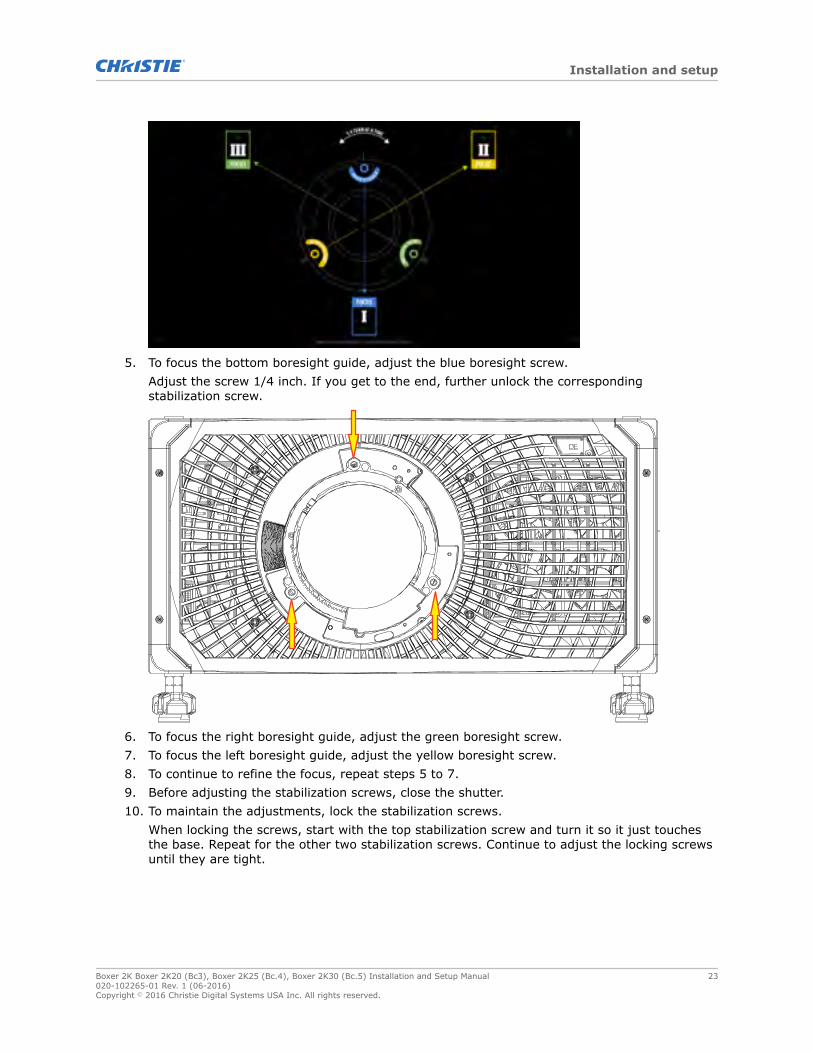
5. To focus the bottom boresight guide, adjust the blue boresight screw.Adjust the screw 1/4 inch. If you get to the end, further unlock the correspondingstabilization screw.
6. To focus the right boresight guide, adjust the green boresight screw.7. To focus the left boresight guide, adjust the yellow boresight screw.8. To continue to refine the focus, repeat steps 5 to 7.9. Before adjusting the stabilization screws, close the shutter.10. To maintain the adjustments, lock the stabilization screws.
When locking the screws, start with the top stabilization screw and turn it so it just touchesthe base. Repeat for the other two stabilization screws. Continue to adjust the locking screwsuntil they are tight.
Installation and setup
Boxer 2K Boxer 2K20 (Bc3), Boxer 2K25 (Bc.4), Boxer 2K30 (Bc.5) Installation and Setup Manual 23020-102265-01 Rev. 1 (06-2016)Copyright © 2016 Christie Digital Systems USA Inc. All rights reserved.
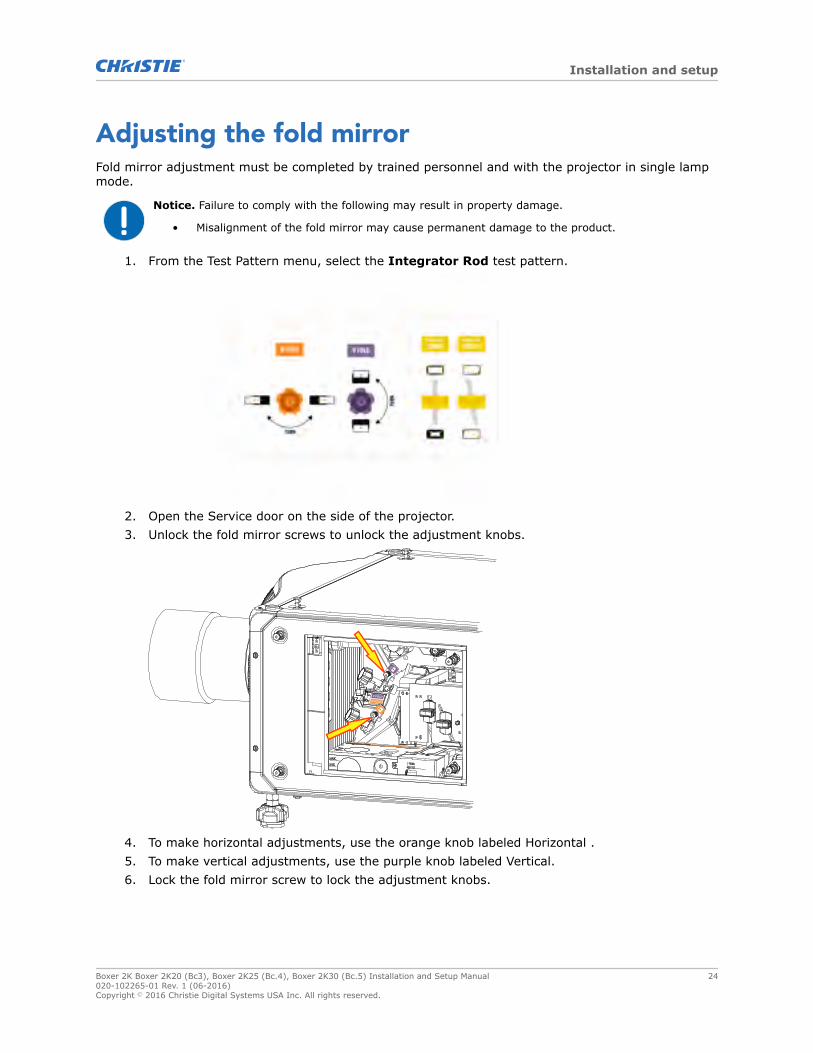
Adjusting the fold mirrorFold mirror adjustment must be completed by trained personnel and with the projector in single lampmode.
Notice. Failure to comply with the following may result in property damage.
• Misalignment of the fold mirror may cause permanent damage to the product.
1. From the Test Pattern menu, select the Integrator Rod test pattern.
2. Open the Service door on the side of the projector.3. Unlock the fold mirror screws to unlock the adjustment knobs.
4. To make horizontal adjustments, use the orange knob labeled Horizontal .5. To make vertical adjustments, use the purple knob labeled Vertical.6. Lock the fold mirror screw to lock the adjustment knobs.
Installation and setup
Boxer 2K Boxer 2K20 (Bc3), Boxer 2K25 (Bc.4), Boxer 2K30 (Bc.5) Installation and Setup Manual 24020-102265-01 Rev. 1 (06-2016)Copyright © 2016 Christie Digital Systems USA Inc. All rights reserved.
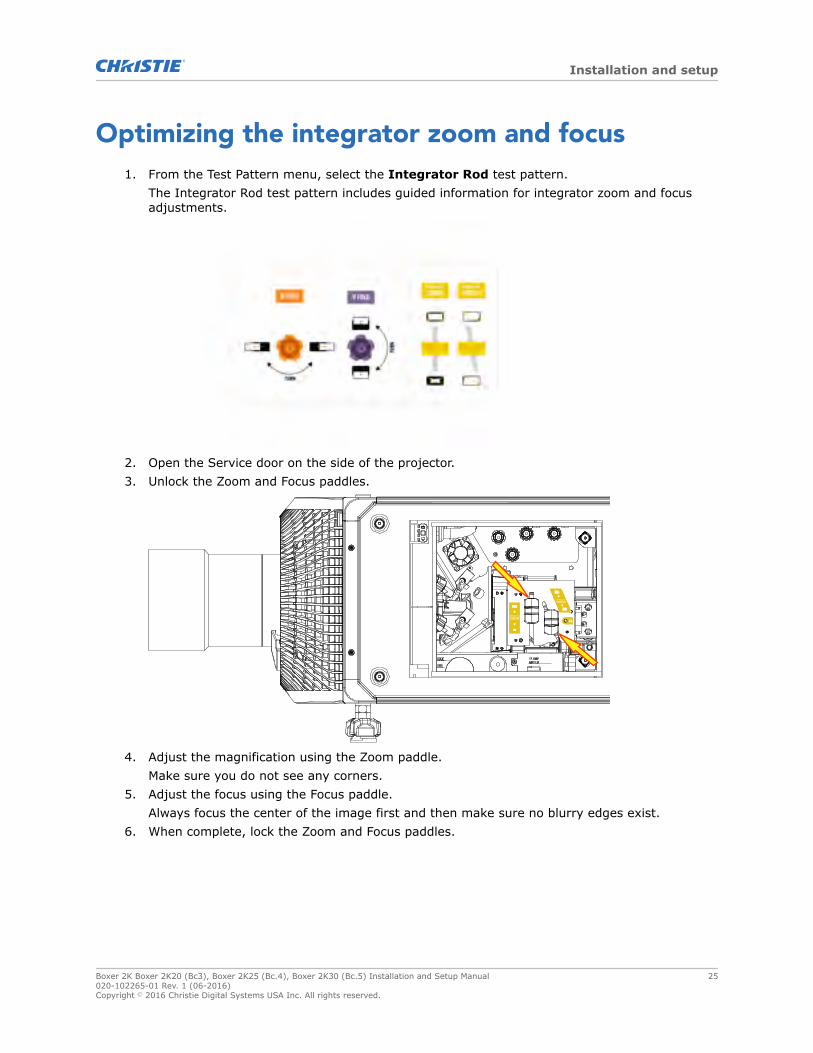
Optimizing the integrator zoom and focus1. From the Test Pattern menu, select the Integrator Rod test pattern.
The Integrator Rod test pattern includes guided information for integrator zoom and focusadjustments.
2. Open the Service door on the side of the projector.3. Unlock the Zoom and Focus paddles.
4. Adjust the magnification using the Zoom paddle.Make sure you do not see any corners.
5. Adjust the focus using the Focus paddle.Always focus the center of the image first and then make sure no blurry edges exist.
6. When complete, lock the Zoom and Focus paddles.
Installation and setup
Boxer 2K Boxer 2K20 (Bc3), Boxer 2K25 (Bc.4), Boxer 2K30 (Bc.5) Installation and Setup Manual 25020-102265-01 Rev. 1 (06-2016)Copyright © 2016 Christie Digital Systems USA Inc. All rights reserved.
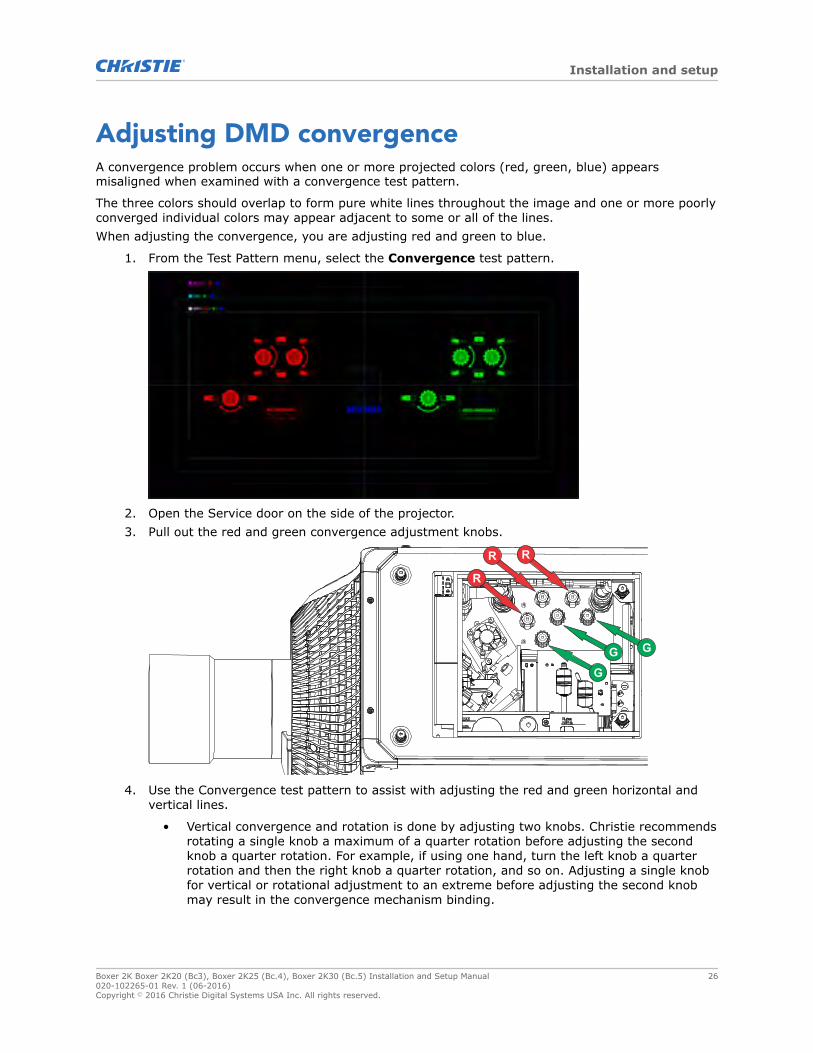
Adjusting DMD convergenceA convergence problem occurs when one or more projected colors (red, green, blue) appearsmisaligned when examined with a convergence test pattern.
The three colors should overlap to form pure white lines throughout the image and one or more poorlyconverged individual colors may appear adjacent to some or all of the lines.When adjusting the convergence, you are adjusting red and green to blue.
1. From the Test Pattern menu, select the Convergence test pattern.
2. Open the Service door on the side of the projector.3. Pull out the red and green convergence adjustment knobs.
GGG
RR
R
4. Use the Convergence test pattern to assist with adjusting the red and green horizontal andvertical lines.
• Vertical convergence and rotation is done by adjusting two knobs. Christie recommendsrotating a single knob a maximum of a quarter rotation before adjusting the secondknob a quarter rotation. For example, if using one hand, turn the left knob a quarterrotation and then the right knob a quarter rotation, and so on. Adjusting a single knobfor vertical or rotational adjustment to an extreme before adjusting the second knobmay result in the convergence mechanism binding.
Installation and setup
Boxer 2K Boxer 2K20 (Bc3), Boxer 2K25 (Bc.4), Boxer 2K30 (Bc.5) Installation and Setup Manual 26020-102265-01 Rev. 1 (06-2016)Copyright © 2016 Christie Digital Systems USA Inc. All rights reserved.
5. When complete, push in the red and green convergence adjustment knobs to disengage theknobs.
Aligning the image with lens zoom and focusEnsure the image reflected from the digital micromirror device (DMD) is parallel and centered with thelens and screen.
1. Display an image or test pattern that can be used to analyze image focus and geometry.2. Select ZOOM.3. Use the up and down arrows to zoom in or out of the image.4. To exit, select Back.5. Select FOCUS.6. Use the up and down arrows to adjust the focus of the image.7. To exit, select Back.8. To refine your adjusts, repeat steps 2 to 7.
Running Auto Setup to optimize display settingsAuto Setup initiates an automated process in which the projector optimizes video settings for theactive signal. Auto Setup helps to save time in perfecting a display and you can modify theadjustments as required.
1. Make sure of the following before running Auto Setup:
• Test patterns are turned off (on page 28).
• The active signal is valid.2. From the remote, select Auto Signal.
From the web UI, select Auto Setup.3. Select Run Auto Setup.4. Select the resolution for your projector.
The recommended option for your setup is selected by default.5. Select Apply.6. At the confirmation prompt, select Keep.
Configuring Boxer 2K to work with Christie LinkConfigure Boxer 2K to work with Christie Link, which provides a fully integrated fiber solution for longrange video transport.
1. Turn on Boxer 2K.2. From the side panel home page, verify the Boxer firmware is v1.3.0 or later.3. Verify the HBMIC has been installed in slot 0.4. To enable the Christie Link option for slot 1, select MENU > Configuration > Input
Settings > Enable Christie Link (Slot 1).5. To enable the Christie Link option for slot 2, select MENU > Configuration > Input
Settings > Enable Christie Link (Slot 2).
Installation and setup
Boxer 2K Boxer 2K20 (Bc3), Boxer 2K25 (Bc.4), Boxer 2K30 (Bc.5) Installation and Setup Manual 27020-102265-01 Rev. 1 (06-2016)Copyright © 2016 Christie Digital Systems USA Inc. All rights reserved.
6. Select Enter.7. Select the QSFP+ fiber option as the input setting in Four-Port mode.
a) From the side panel home page, select Input.
b) To access the port configuration dialog from the input screen, select the right arrow.You can also access the port configuration screen from MENU > Configuration >Input Settings > Input Port Configuration.
c) From the Port Configuration screen, navigate the list of port configurations until youfind the appropriate port configuration.
d) To return to the Input screen, select the left arrow.
e) On the Input selection page, select the appropriate input marked Fiber.More than one input source may be listed as Fiber, depending on how many signals arebeing sent from Christie Link. For example, 1-1, 2-1, and so on, where the first numberin the sequence is the slot number (slot 1 or slot 2).
Selecting a test pattern21 test patterns are available to assist with the configuration of the projector and to diagnose anyissues that may occur.
1. From the display panel, use the arrows to select Test Pattern.You can also select the test patterns from MENU > Test Pattern.
2. Scroll through the list of test patterns.3. Select the required test pattern.4. To confirm your selection, select Enter.
Installation and setup
Boxer 2K Boxer 2K20 (Bc3), Boxer 2K25 (Bc.4), Boxer 2K30 (Bc.5) Installation and Setup Manual 28020-102265-01 Rev. 1 (06-2016)Copyright © 2016 Christie Digital Systems USA Inc. All rights reserved.

Connecting devices andestablishingcommunication
Learn how to connect external devices to the projector.Communication and input ports are located on the projector side input panel (operator side). Theimage below shows the video option card slot numbers and the IMXB panel.Video sources can be connected to either the ports on the video option cards or the HDBaseT port onthe IMXB.
IMXBSLOT 0
IMXB portsThe IMXB has a variety of ports that can be used for control, 3D sync, upgrading, retrievinginterrogators, and connecting audio.
Port Description
Audio Out Not supported.
HDBaseT Accepts video signals, Ethernet, and IR.
Boxer 2K Boxer 2K20 (Bc3), Boxer 2K25 (Bc.4), Boxer 2K30 (Bc.5) Installation and Setup Manual 29020-102265-01 Rev. 1 (06-2016)Copyright © 2016 Christie Digital Systems USA Inc. All rights reserved.
Port Description
USB 1/USB 2 Connects a USB flash drive that has been formatted with a FAT32file system. Can be used for upgrades, backups, restores,a ndinterrogators.
USB 3 For manufacturing use only.
Wired Keypad Physically connects a remote control to the projector.
3D Sync In/3D Sync Out Supported for 3D-enabled projectors.
Ethernet Connects to the web user interface and can send Christie serialcommands.
RS232 Sends Christie serial commands using a standard RS232 serialcable.
GPIO Provides a method for controling the projector using electricalsignals. Not supported.
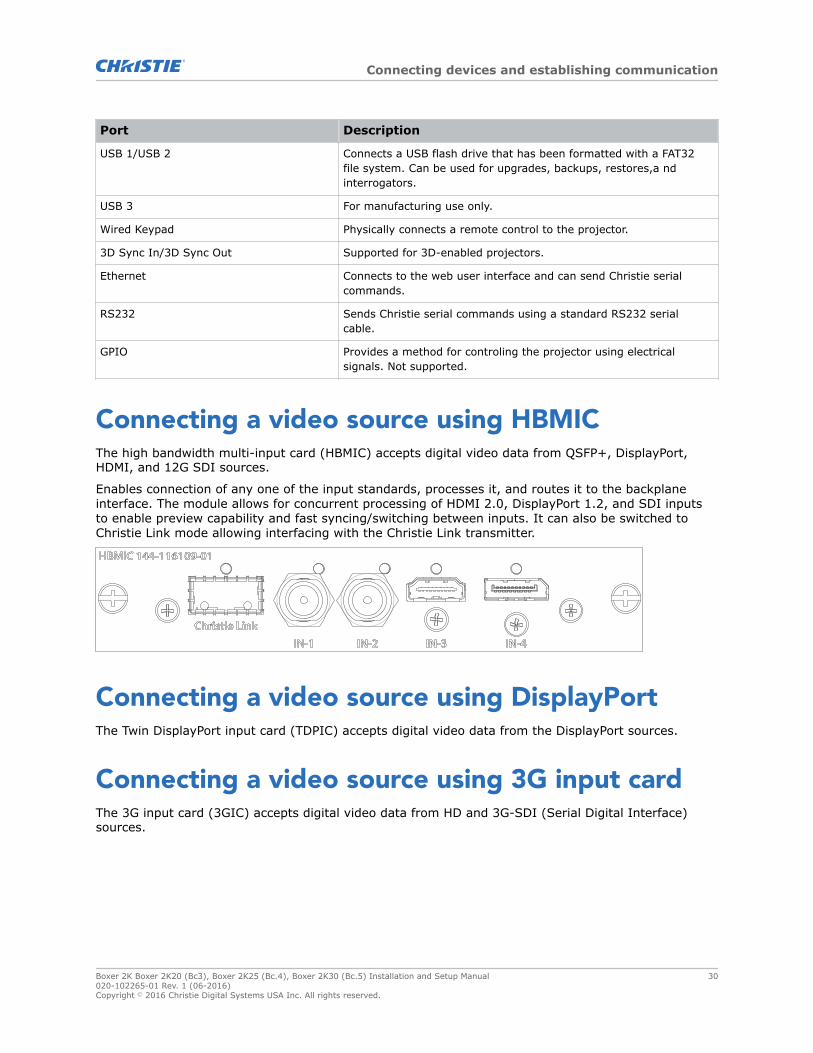
Connecting a video source using HBMICThe high bandwidth multi-input card (HBMIC) accepts digital video data from QSFP+, DisplayPort,HDMI, and 12G SDI sources.
Enables connection of any one of the input standards, processes it, and routes it to the backplaneinterface. The module allows for concurrent processing of HDMI 2.0, DisplayPort 1.2, and SDI inputsto enable preview capability and fast syncing/switching between inputs. It can also be switched toChristie Link mode allowing interfacing with the Christie Link transmitter.
Connecting a video source using DisplayPortThe Twin DisplayPort input card (TDPIC) accepts digital video data from the DisplayPort sources.
Connecting a video source using 3G input cardThe 3G input card (3GIC) accepts digital video data from HD and 3G-SDI (Serial Digital Interface)sources.
Connecting devices and establishing communication
Boxer 2K Boxer 2K20 (Bc3), Boxer 2K25 (Bc.4), Boxer 2K30 (Bc.5) Installation and Setup Manual 30020-102265-01 Rev. 1 (06-2016)Copyright © 2016 Christie Digital Systems USA Inc. All rights reserved.

Connecting a video source using HDMIThe Twin HMDI input card (THIC) accepts digital video data from HDMI sources.
Connecting a video source using DVIThe Dual Link DVI input card (DDIC) accepts digital video source from DVI sources. It does notsupport incoming analog signals.
Connecting a video source using HDBaseTThe HDBaseT port on the IMXB accepts digital video data from HDBaseT sources.
Selecting a video sourceAfter connecting a video source to the projector and making sure your port configuration is correct,you must select it.
1. From the display panel, select INPUT.2. Navigate the list of input selections until you find a selection that best matches your
configuration.3. To select the input, select Enter.
Connecting devices and establishing communication
Boxer 2K Boxer 2K20 (Bc3), Boxer 2K25 (Bc.4), Boxer 2K30 (Bc.5) Installation and Setup Manual 31020-102265-01 Rev. 1 (06-2016)Copyright © 2016 Christie Digital Systems USA Inc. All rights reserved.

Connecting to a computer or serverCommunicate with a remote computer, server, or an existing network using a RJ-45 cable.
The RS232 port located on the faceplate uses Christie-proprietary protocol and is intended for Christieaccessories or automation controllers only.For more information, on the serial commands, see the .
1. Use an RJ-45 cable to connect the Ethernet hub or switch to the Ethernet port, located on theprojector faceplate.
2. When using the Christie serial protocol over Ethernet, connect to port 3002.3. For applications or equipment using serial communications, use the Christie-proprietary serial
protocol to communicate with the RS232 port on the faceplate.
Configuring the RS232 portConfigure the RS232 port to send Christie serial commands using a standard RS232 serial cable.
1. Select Menu > Communications > Projector Communication.2. Use the down arrow to select Baud Rate.3. Select the appropriate baud rate and select Enter.4. Use the down arrow to select Network Routing.5. Select the type network routing appropriate for your projector and select Enter.
Setting up the EthernetEthernet is setup to obtain an IP address automatically if a DHCP server is on the network. To modifyIP settings, or manually enter an address.
Christie recommends using the Ethernet port on the IMXB as the HDBaseT port is limited to 100 Mb/s.
You cannot change the IP settings using the web interface.
1. From the display panel, use the arrow keys to select IP Settings.2. To set the type of network, select DHCP or Static.3. If you selected Static, manually enter the network information for the IP Address, Subnet,
and Gateway.4. Select Apply and select Enter.5. Select MENU > Communications > Ethernet.6. Select Device name.7. Use the up and down keys to enter the name of the projector.8. Select Enter.
Connecting devices and establishing communication
Boxer 2K Boxer 2K20 (Bc3), Boxer 2K25 (Bc.4), Boxer 2K30 (Bc.5) Installation and Setup Manual 32020-102265-01 Rev. 1 (06-2016)Copyright © 2016 Christie Digital Systems USA Inc. All rights reserved.

Configuring how the video source is splitInform the source device to split the 4K video raster into two or four columns instead of fourquadrants.
1. On the projector, select MENU > Configuration > Input Settings > EDID Window Mode.2. Select the adjustment most suited to the input signal:
• Auto Detect—Automatically detects how to split the video raster by matching the PortConfiguration setting. (Default)
• 4K - Quadrants 2x2—Splits the video raster into four quadrants.
• 4K - Columns 2x1—Splits the video raster into two columns.
• 4K - Columns 4x1—Splits the video raster into four columns.3. Select Enter.
Connecting devices and establishing communication
Boxer 2K Boxer 2K20 (Bc3), Boxer 2K25 (Bc.4), Boxer 2K30 (Bc.5) Installation and Setup Manual 33020-102265-01 Rev. 1 (06-2016)Copyright © 2016 Christie Digital Systems USA Inc. All rights reserved.
Specifications
Learn about the product specifications. Due to continuing research, specifications are subject tochange without notice.
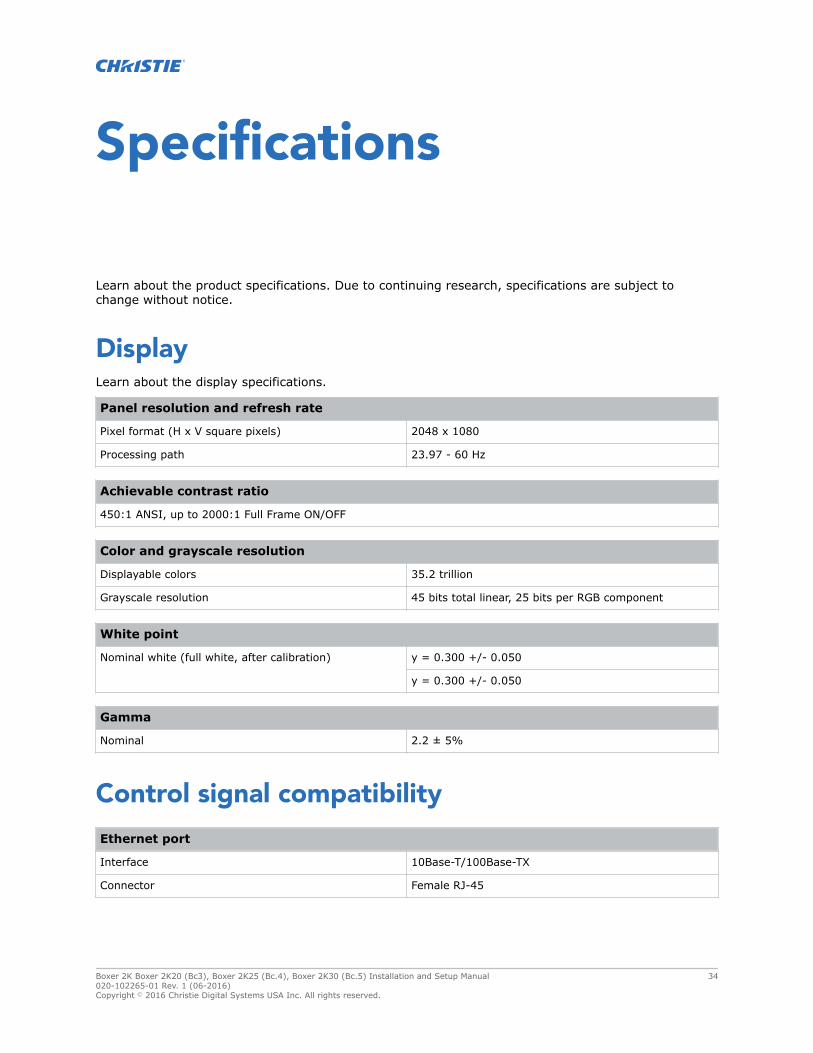
DisplayLearn about the display specifications.
Panel resolution and refresh rate
Pixel format (H x V square pixels) 2048 x 1080
Processing path 23.97 - 60 Hz
Achievable contrast ratio
450:1 ANSI, up to 2000:1 Full Frame ON/OFF
Color and grayscale resolution
Displayable colors 35.2 trillion
Grayscale resolution 45 bits total linear, 25 bits per RGB component
White point
Nominal white (full white, after calibration) y = 0.300 +/- 0.050
y = 0.300 +/- 0.050
Gamma
Nominal 2.2 ± 5%
Control signal compatibility
Ethernet port
Interface 10Base-T/100Base-TX
Connector Female RJ-45
Boxer 2K Boxer 2K20 (Bc3), Boxer 2K25 (Bc.4), Boxer 2K30 (Bc.5) Installation and Setup Manual 34020-102265-01 Rev. 1 (06-2016)Copyright © 2016 Christie Digital Systems USA Inc. All rights reserved.
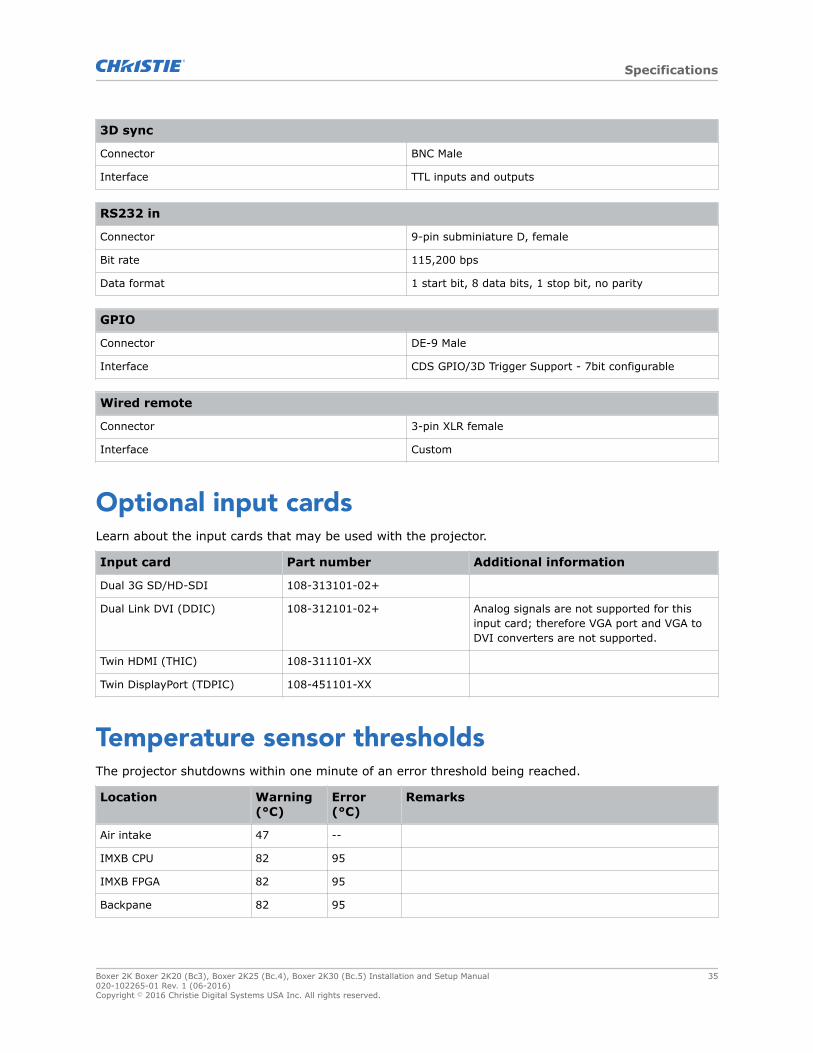
3D sync
Connector BNC Male
Interface TTL inputs and outputs
RS232 in
Connector 9-pin subminiature D, female
Bit rate 115,200 bps
Data format 1 start bit, 8 data bits, 1 stop bit, no parity
GPIO
Connector DE-9 Male
Interface CDS GPIO/3D Trigger Support - 7bit configurable
Wired remote
Connector 3-pin XLR female
Interface Custom
Optional input cardsLearn about the input cards that may be used with the projector.
Input card Part number Additional information
Dual 3G SD/HD-SDI 108-313101-02+
Dual Link DVI (DDIC) 108-312101-02+ Analog signals are not supported for thisinput card; therefore VGA port and VGA toDVI converters are not supported.
Twin HDMI (THIC) 108-311101-XX
Twin DisplayPort (TDPIC) 108-451101-XX
Temperature sensor thresholdsThe projector shutdowns within one minute of an error threshold being reached.
Location Warning(°C)
Error(°C)
Remarks
Air intake 47 --
IMXB CPU 82 95
IMXB FPGA 82 95
Backpane 82 95
Specifications
Boxer 2K Boxer 2K20 (Bc3), Boxer 2K25 (Bc.4), Boxer 2K30 (Bc.5) Installation and Setup Manual 35020-102265-01 Rev. 1 (06-2016)Copyright © 2016 Christie Digital Systems USA Inc. All rights reserved.
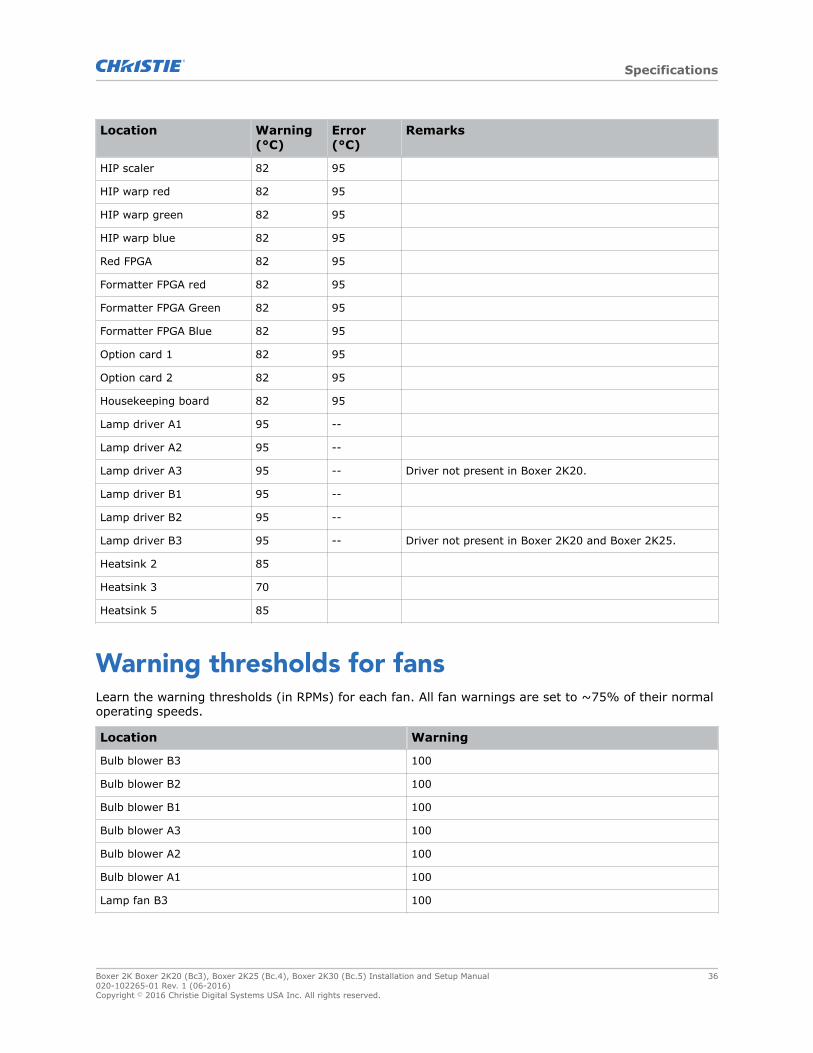
Location Warning(°C)
Error(°C)
Remarks
HIP scaler 82 95
HIP warp red 82 95
HIP warp green 82 95
HIP warp blue 82 95
Red FPGA 82 95
Formatter FPGA red 82 95
Formatter FPGA Green 82 95
Formatter FPGA Blue 82 95
Option card 1 82 95
Option card 2 82 95
Housekeeping board 82 95
Lamp driver A1 95 --
Lamp driver A2 95 --
Lamp driver A3 95 -- Driver not present in Boxer 2K20.
Lamp driver B1 95 --
Lamp driver B2 95 --
Lamp driver B3 95 -- Driver not present in Boxer 2K20 and Boxer 2K25.
Heatsink 2 85
Heatsink 3 70
Heatsink 5 85
Warning thresholds for fansLearn the warning thresholds (in RPMs) for each fan. All fan warnings are set to ~75% of their normaloperating speeds.
Location Warning
Bulb blower B3 100
Bulb blower B2 100
Bulb blower B1 100
Bulb blower A3 100
Bulb blower A2 100
Bulb blower A1 100
Lamp fan B3 100
Specifications
Boxer 2K Boxer 2K20 (Bc3), Boxer 2K25 (Bc.4), Boxer 2K30 (Bc.5) Installation and Setup Manual 36020-102265-01 Rev. 1 (06-2016)Copyright © 2016 Christie Digital Systems USA Inc. All rights reserved.

Location Warning
Lamp fan A3 100
Lamp fan B2 100
Lamp fan A2 100
Lamp fan B1 100
Lamp fan A1 100
Radiator fan A 800
Radiator fan B 800
Radiator fan C 800
Radiator fan D 800
Intake A 800
Intake B 800
Lamp driver intake 800
Lamp driver exhaust 800
Formatter-green 800
Formatter-red 800
Formatter-blue 800
LAD blower A 800
LAD blower B 800
Card cage exhaust 1600
Card cage intake 1600
Warning threshold for liquid cooling moduleLearn the warning thresholds (in RPMs) for the liquid cooling components.
Location Warning
Liquid cooling pump 180 RPM
Power requirementsLearn the power requirements for Boxer 2K.
Parameter Requirement
Rated voltage
Input 1 200 - 240 VAC
Input 2 100 - 130 VAC; 200- 240 VAC
Specifications
Boxer 2K Boxer 2K20 (Bc3), Boxer 2K25 (Bc.4), Boxer 2K30 (Bc.5) Installation and Setup Manual 37020-102265-01 Rev. 1 (06-2016)Copyright © 2016 Christie Digital Systems USA Inc. All rights reserved.
Parameter Requirement
Rated current
Input 1 19A maximum
Input 2 13.8 - 10.6 A; 9.3 - 7.7 A
Line frequency 50/60 Hz
AC input coupler
Input 1 IEC 309, 32 A/250 VAC
Input 2 IEC 320 - C14, 15 A/125 VAC, 10 A/250 VAC
Inrush current 40 A maximum
Maximum power consumption
Input 1 3800 W
Input 2 1380 W
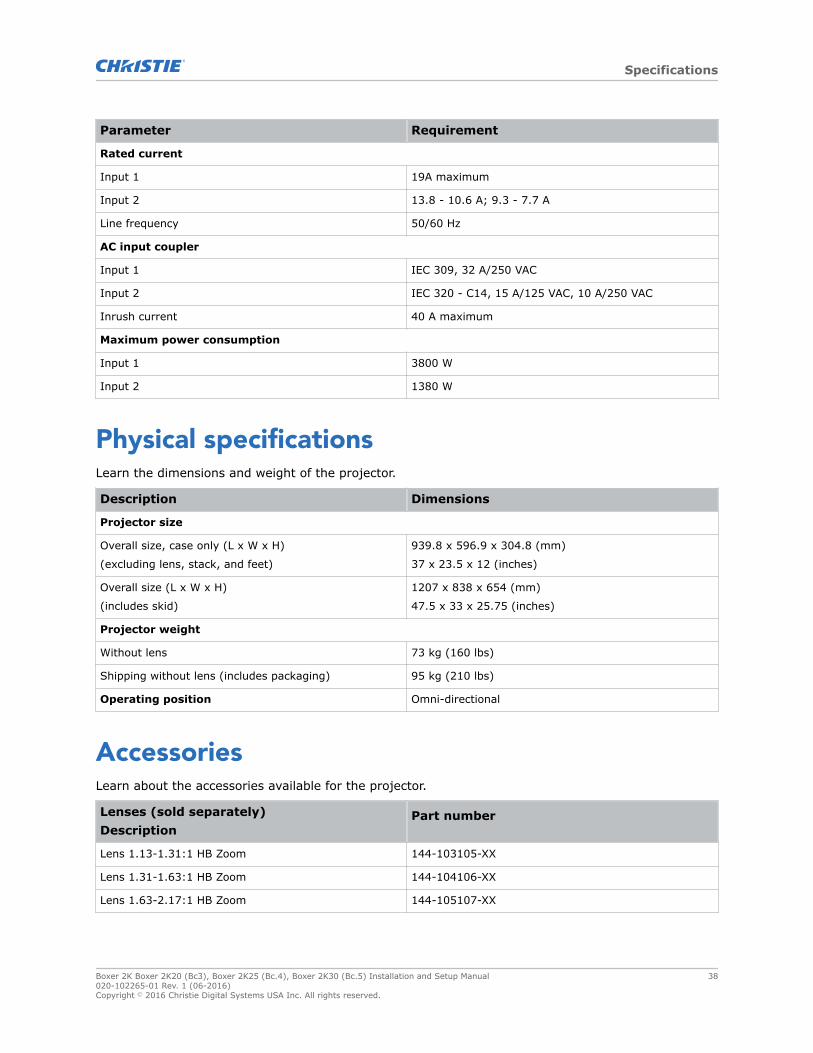
Physical specificationsLearn the dimensions and weight of the projector.
Description Dimensions
Projector size
Overall size, case only (L x W x H)
(excluding lens, stack, and feet)
939.8 x 596.9 x 304.8 (mm)
37 x 23.5 x 12 (inches)
Overall size (L x W x H)
(includes skid)
1207 x 838 x 654 (mm)
47.5 x 33 x 25.75 (inches)
Projector weight
Without lens 73 kg (160 lbs)
Shipping without lens (includes packaging) 95 kg (210 lbs)
Operating position Omni-directional
AccessoriesLearn about the accessories available for the projector.
Lenses (sold separately)Description
Part number
Lens 1.13-1.31:1 HB Zoom 144-103105-XX
Lens 1.31-1.63:1 HB Zoom 144-104106-XX
Lens 1.63-2.17:1 HB Zoom 144-105107-XX
Specifications
Boxer 2K Boxer 2K20 (Bc3), Boxer 2K25 (Bc.4), Boxer 2K30 (Bc.5) Installation and Setup Manual 38020-102265-01 Rev. 1 (06-2016)Copyright © 2016 Christie Digital Systems USA Inc. All rights reserved.

Lenses (sold separately)Description
Part number
Lens 1.99-2.71:1 HB Zoom 144-106108-XX
Lens 2.71-3.89:1 HB Zoom 144-107109-XX
Lens 3.89-5.43:1 HB Zoom 144-108100-XX
Lens 4.98-7.69:1 HB Zoom 144-109101-XX
Lens 0.72:1 HB Fixed 144-110103-XX
Lens 0.9:1 Fixed 144-111014-XX
Other accessories (sold separately)Description
Part number
IR remote 003-120918-xx
AutoSTACK 108-308101-XX
Rigging frames 144-112015-xx
Notice. Failure to comply with the following may result in property damage.
• Use appropriate packaging when shipping the product installed in the frame.
RegulatoryThis product conforms to the following regulations related to product safety, environmentalrequirements and electromagnetic compatibility (EMC).
Safety• CAN/CSA C22.2 No. 60950-1
• ANSI/UL 60950-1
• IEC 60950-1
• EN 60950-1
• IEC 62471-1
ApprovalsThis product is designed and built to comply with all relevant directives, standards, safety, health andenvironmental rules and regulations required for the product to be sold in: USA/Canada, EU,
Specifications
Boxer 2K Boxer 2K20 (Bc3), Boxer 2K25 (Bc.4), Boxer 2K30 (Bc.5) Installation and Setup Manual 39020-102265-01 Rev. 1 (06-2016)Copyright © 2016 Christie Digital Systems USA Inc. All rights reserved.

Australia/New Zealand, Kuwait, China, Korea, Japan, Mexico, Ukraine, Russia, India, Argentina, Brazil,Singapore, South Africa, and Saudi Arabia.
Electro-magnetic compatibility
EmissionsFCC CFR47, Part 15, Subpart B, Class ACAN ICES-3 (A) / NMB-3 (A)CISPR 22/EN 55022, Class A
• IEC 61000-3-2/EN61000-3-2
ImmunityCISPR 24/EN55024
• IEC 61000-3-3/EN61000-3-3
IEC/EN61000
• IEC 61000-4-2/EN61000-4-2
• IEC 61000-4-3/EN61000-4-3
• IEC 61000-4-4/EN61000-4-4
• IEC 61000-4-5/EN61000-4-5
• IEC 61000-4-6/EN61000-4-6
• IEC 61000-4-8/EN61000-4-8
• IEC 61000-4-11/EN61000-4-11
EnvironmentalEU Directive (2011/65/EU) on the restriction of the uses of certain hazardous substances (RoHS) inelectrical and electronic equipment and the applicable official amendment(s).EU Regulation (EC) No. 1907/2006 on the registration, evaluation, authorization and restriction ofchemicals (REACH) and the applicable official amendment(s).EU Directive (2012/19/EU) on waste and electrical and electronic equipment (WEEE) and theapplicable official amendment(s).China Ministry of Information Industry Order No.39 (02/2006) on the control of pollution caused byelectronic information products, hazardous substances concentration limits (SJ/T11363-2006), and theapplicable product marking requirements (SJ/T11364-2006).
EnvironmentLearn about the environment requirements for projector while operating and not operating.
Operating environment
Temperature 5 to 40°C (41 to 104°F)
Humidity (non-condensing) 10 to 80%
Altitude 3000 meters (10,000 feet) maximum
Specifications
Boxer 2K Boxer 2K20 (Bc3), Boxer 2K25 (Bc.4), Boxer 2K30 (Bc.5) Installation and Setup Manual 40020-102265-01 Rev. 1 (06-2016)Copyright © 2016 Christie Digital Systems USA Inc. All rights reserved.

Non-operating environment
Temperature -40 to 70°C (-40 to 158°F)
Specifications
Boxer 2K Boxer 2K20 (Bc3), Boxer 2K25 (Bc.4), Boxer 2K30 (Bc.5) Installation and Setup Manual 41020-102265-01 Rev. 1 (06-2016)Copyright © 2016 Christie Digital Systems USA Inc. All rights reserved.

For the most current technical documentation, please visit www.christiedigital.com
United Kingdomph: +44 (0) 118 977 8000
United Arab Emiratesph: +971 4 3206688
Spainph: +34 91 633 9990
Singaporeph: +65 6877-8737
Republic of South Africaph: +27 (0)11 510 0094
Korea (Seoul)ph: +82 2 702 1601
Japan (Tokyo)ph: 81 3 3599 7481
Indiaph: +91 (080) 6708 9999
Germanyph: +49 2161 664540
Franceph: +33 (0) 1 41 21 44 04
Eastern Europe andRussian Federationph: +36 (0) 1 47 48 100
China (Shanghai)ph: +86 21 6278 7708
China (Beijing)ph: +86 10 6561 0240
Brazilph: +55 (11) 2548 4753
Australiaph: +61 (0) 7 3624 4888
Worldwide offi ces
Italyph: +39 (0) 2 9902 1161
Consultant offi ces
Canada – Kitchenerph: 519-744-8005
USA – Cypressph: 714-236-8610
Corporate offi ces