bpc biosed srl - pera medikal · bpc biosed srl prime evolution - owner's manual rev. 0 -...
TRANSCRIPT

BPC BioSED srl
PRIME EVOLUTION - OWNER'S MANUAL Rev. 0 - 08/04 Page 1 of 41
IMPORTANT NOTE
In order to avoid any malfunctioning of the instrument, follow these specifications before normal operations: A. As Photometer is unpacked, let it functioning for about one hour before starting to work with it. B. Check Flow cell if is dirty, clogged or creates air bubbles and eliminate the trouble as indicated in maintenance section. C. Check peristaltic pump tubing if they are clogged or smashed or unshaped and if necessary replace them. D. Check peristaltic pump's aspiration (minimum 0.5 ml).
IMPORTANT NOTE
In Case of malfunctioning of the instrument or software’s lock up, it’s possible to restore the content of the EEPROM to the original factory settings. Note that restoring all the settings will also overwrite the modified methods, therefore is suggested to have a printout of your own methods settings to avoid to loose them. Follow these steps to restore factory settings on the EEPROM.
1. Switch off the instrument 2. Switch the unit on keeping pressed the ESC key 3. The LCD display will ask for confirmation to restore EEPROM data with
factory settings 4. Confirm the restore process 5. Switch off the unit as prompted on the screen 6. Switch it on again

BPC BioSED srl
PRIME EVOLUTION - OWNER'S MANUAL Rev. 0 - 08/04 Page 2 of 41
PRIME EVOLUTION SEMI AUTOMATIC ANALYZER
TABLE OF CONTENTS
IMPORTANT NOTE..................................................................................................................................................................1
SECTION 1. INTRODUCTION...........................................................................................................................................3 1.1 BASIC CHARACTERISTICS....................................................................................................................................... 3 1.2 TECHNICAL SPECIFICATIONS................................................................................................................................. 6 1.3 INSTALLATION............................................................................................................................................................ 7 1.4 LANGUAGES SELECTION AND INIZIALIZATION PROCEDURE..................................................................... 7 1.5 CONNECTION WITH THE DILUTER SAMPLER.................................................................................................... 8 1.6 STARTING OPERATIONS AND MAIN MENU ...................................................................................................... 9
SECTION 2. ROUTINE OPERATION............................................................................................................................10 2.1 AUTOZERO.................................................................................................................................................................. 10 2.2 START ANALYSIS..................................................................................................................................................... 12 2.3 CALIBRATION............................................................................................................................................................ 15 2.4 MULTI-STANDARD CALIBRATION..................................................................................................................... 16 2.5 SAMPLES ANALYSIS................................................................................................................................................ 17 2.6 PROFILE FUNCTION.................................................................................................................................................. 18 2.7 EXECUTING TESTS USING DISPOSABLE CUVETTES........................................................................................ 20 2.8 DIRECT ABSORBANCE READINGS....................................................................................................................... 22
SECTION 3. METHODS PROGRAMMING.....................................................................................................................22 3.1 METHODS PARAMETERS....................................................................................................................................... 23 3.2 CREATING AND MODIFYING METHODS............................................................................................................ 24 3.3 MULTI-STANDARD METHODS............................................................................................................................. 25 3.4 PRINTING METHODS STORED IN MEMORY...................................................................................................... 26
SECTION 4. MAINTENANCE AND TROUBLE-SHOOTING......................................................................................27 4.1 ADJUST PERISTALTIC PUMP STEPS.................................................................................................................... 27 4.2 SELECT PRINTER........................................................................................................................................................ 28 4.3 QUALITY CONTROL.................................................................................................................................................. 29 4.4 MENU' TEST ................................................................................................................................................................ 30 4.5 PERIODIC MAINTENANCE...................................................................................................................................... 31 4.6 TROUBLE-SHOOTING............................................................................................................................................... 32
SECTION 5. NON ROUTINE MAINTENANCE..............................................................................................................33 5.1 LAMP ASS'Y REPLACEMENT................................................................................................................................. 33 5.3 PERISTALTIC PUMP'S TUBES REPLACEMENT.................................................................................................. 34
PRIME EVOLUTION'S CALCULATION MODES ............................................................................................................35
ON LINE INTERFACING........................................................................................................................................................37
MATHEMATICAL MODELS FOR MULTI STANDARD CURVES ...............................................................................38
PRINTABLE ASCII CHARACTERS TABLE.....................................................................................................................39
ON SCREEN FLAG CODES LIST........................................................................................................................................41

BPC BioSED srl
PRIME EVOLUTION - OWNER'S MANUAL Rev. 0 - 08/04 Page 3 of 41
SECTION 1. INTRODUCTION
1.1 BASIC CHARACTERISTICS The PRIME EVOLUTION is an integrated semi-automatic photometer,all functions of the instrument, storage of tests parameters and calculation of calibration curves and end results are microprocessor controlled.The keyboard allows the operator to recall directly up to 22 methods commonly used in standard routines, as well is provided a key to recall tests by numerical keys, to perform and modify tests up to 150. Main parts of PRIME EVOLUTION are: • Photometer, composed of a light source placed at the center of a filterwheel,a 50 ml flow cell and
a solid state detecting system. The filterwheel contains an interference filter set.The light source is a low consumption, high intensity quartz-jodine lamp, and interference filters are narrow band type in the range of 340 nm to 620 nm.
• Aspiration system, based on an electronic controlled peristaltic pump that operates aspiration of
reaction mixture as well as washing solutions in the flow cell.Instrument asks confirmation to operator before doing any aspiration in the flow cell.
• User Interface, composed of an LCD Graphic Dot Matrix Display, to visualize all menus,
operative messages and all the graph, such as the Levy-Jennings graph and the multistandard curve for the immuno chemistry tests. A 24 keys, membrane type keypad is provided to access directly 22 tests , all operative levels and the instrument's functions. Furthermore a 40 columns High Speed thermal graphic printer is built in , to produce hard copies of test results and parameters.

BPC BioSED srl
PRIME EVOLUTION - OWNER'S MANUAL Rev. 0 - 08/04 Page 4 of 41
1- DISPLAY LCD 4- ASPIRATION PROBE 2- ASPIRATION SYSTEM 5- ASPIRATION LEVER 3- MEMBRANE TYPE KEYPAD 6- MAIN POWER SWITCH
1
2
4 3
5
6
7 8 9 10 11

BPC BioSED srl
PRIME EVOLUTION - OWNER'S MANUAL Rev. 0 - 08/04 Page 5 of 41
7- WASTE OUT 10- PRINTER PARALLEL PORT 8- AC POWER INPUT 11- SERIAL RS 232C PORT 9- FAN
1- THERMAL PRINTER 2- PRINTER RESET KEY 3- PAPER ADVANCE KEY 4- DISPLAY LCD 5- MULTIFUNCTIONS KEYBOARD 6- ASPIRATION LEVER 7- PHOTOMETER COMPARTMENT
1
2 3
4
5
7
6

BPC BioSED srl
PRIME EVOLUTION - OWNER'S MANUAL Rev. 0 - 08/04 Page 6 of 41
1.2 TECHNICAL SPECIFICATIONS PHOTOMETER • 6 Interference Filters 340,405,505,546,570,620 nm and 1 avalaible free position for an optional
filter, tolerance of +/- 2 nm max. • Quartz-Jodide Lamp 12V 10 W - Long Life 2000 hours • 50 µl micro flow cell • Temperature control in flow cell effectued by Peltier elements tolerance of ± 0.1° C - Selectable
temperatures: Off - 25°C - 30°C - 37°C DIGITAL PROCESSOR • 16 BIT Linear AD conversion • Based on 8088 ? P • Display LCD Graphic Dot Matrix • 24 keys membrane type keypad • 40 columns built-in Graphic thermal printer - parallel port for external printer • RS 232C serial port for on line data transfer PHYSICAL CHARACTERISTICS • Dimensions: 400(W) x 350(D) x 160(H) mm • Weight: 8 Kg • Power Supply: 220V 50Hz - Opzionale 110V 60Hz • Power Consumption: 80 W TYPES OF MEASUREMENTS • End Point • Kinetics Vs Factor • Kinetics Vs Standard • Bichromatics

BPC BioSED srl
PRIME EVOLUTION - OWNER'S MANUAL Rev. 0 - 08/04 Page 7 of 41
• Serum Blank • Immunoturbidimetrics • Multi-Standard • Initial Rate • Direct Absorbance
1.3 INSTALLATION After Unpacking check following : • Check the presence of power cord and waste discharge tubing. • Check if instrument's power supply matches with your country power outlet (USA-Japan 110V
60Hz-Europe 220V 50Hz-UK 240V 50Hz). • Check for the presence of ground line of good quality. • Check for the presence of clean power supply line, free from spikes and fluctuations. If necessary
use an AC stabilizer. • Avoid placing the instrument exposed to direct sun light. Connect waste tubing to waste bottle, position the bottle below the equipment, connect power cord to AC outlet and PRIME EVOLUTION is ready to work.
1.4 LANGUAGES SELECTION AND INIZIALIZATION PROCEDURE The PRIME EVOLUTION can be set to operate in different languages. At the moment only 3 languages are available: Italian, English and Chinese. To select the operating language for the instrument proceed as follows:
a. Switch on the instrument by keeping pressed the ESC key, on the LCD display will appear the following screen:

BPC BioSED srl
PRIME EVOLUTION - OWNER'S MANUAL Rev. 0 - 08/04 Page 8 of 41
Press the key corresponding to the language desired and therefore press Enter to confirm the selection. Note that for the Chinese language only it’s suggested to reboot the system to make changes effective.
After having selected the language and pressed the Enter key to confirm such a selection, the system will visualize the initialisation screen, which could be useful to restore the original instrument’s factory settings. This function can be used whenever the instrument shows some malfunctioning due to erroneous data writing on the internal EEPROM. The display LCD will show the following screen:
To restore the original factory settings and initialise the instrument press the 1 key and confirm with Enter.
IMPORTANT NOTE
Initializing the instrument the operator will loose all the user modified methods and the calibrations data.
1.5 CONNECTION WITH THE DILUTER SAMPLER In case you have purchased the optional Diluter/Sampler unit, refer to the following instructions to connect it to the PRIME EVOLUTION photometer: 1. Connect the flat cable provided with the Diluter/Sampler to the parallel port located on the rear
panel of the PRIME EVOLUTION and to the apposite connector located on the rear part of the Diluter/Sampler.
2. Switch on the PRIME EVOLUTION, then switch on the Diluter/Sampler and perform one priming cycle by pressing the “ SINGLE PRIME” lever on the top front of the Diluter.
3. Always keep the Diluter/Sampler switched on while working with the PRIME EVOLUTION connected to it, this in order to avoid any malfunctioning in operation of PRIME EVOLUTION.

BPC BioSED srl
PRIME EVOLUTION - OWNER'S MANUAL Rev. 0 - 08/04 Page 9 of 41
4. To access to the functions of the Diluter/Sampler, symply press the DIL key on PRIME EVOLUTION and select desired function for the Diluter.
On the LCD panel, once DIL key is pressed, will appear the following selection screen:
** REV 4.6/Profili Date: 24/08/04 **
SETTING ON DILUTER
At this prompt perform with the Diluter a “SINGLE PRIME” cycle and the display will show the following:
** REV 4.6/Profili Date: 24/08/04 **
DILUTER Diluter Sampler = 1 Dispenser = 2 [ ]
By entering 1 or 2 and pressing the ENTER key, it's possible to select the desired operation mode of the Diluter, as a Sampler in a SIP and DIP mode, or as a diluter with the pipette used only for picking up samples and reagent vial connected directly to the Diluter. Once the function is selected, the LCD goes back to the main menu, then select the test to be performed and the screen will demand you the operations required to be performed with the Diluter's pipette. Refer to the Diluter/Sampler Operation Manual for more detailed informations about the operative procedures to be performed.
1.6 STARTING OPERATIONS AND MAIN MENU Switch on the equipment using the main switch, located on the front of the instrument.At the moment the instrument is switched on, the DATE request appears on the LCD panel:
REV 4.6/Profili*
Date (ddmmyy) : ( )

BPC BioSED srl
PRIME EVOLUTION - OWNER'S MANUAL Rev. 0 - 08/04 Page 10 of 41
Once the DATE is entered by the numerical keys, the Main menu will be displayed :
** REV 4.6/Profili Date: 24/08/04 ** F1=Autozero F2=Methods F3=Maintenance F4=Start
By pressing the corresponding function key the sub-menues related to selected function, F1,F2,F3,F4 are accessed.
SECTION 2. ROUTINE OPERATION
2.1 AUTOZERO Option F1 on Main Menù offers the possibility to zero the instrument completely before the start of routine operation.This way the flow-through cell and the filters can be checked at the selected wavelenghts. Note: it's not suggested to start the routine with this, as every analysis will commence with an Autozero. It's important to switch on the instrument at least 30-40 minutes before operations, this in order to let the lamp and the electronics to stabilize and reach operative temperature . Before starting make sure the cuvet is filled with clean distilled water, the option asks operator to select one of the avalaible filters:
** REV 4.6/Profili Date: 24/08/04 **
AUTOZERO Filter 340 405 505 546 570 620 7 8 : [ ]
Note: Number 7 corresponds to a free position for an optional filter, and 8 corresponds to BLIND position (0% transmission). Selected filter is being checked and "Auto-zeroed".This means that the 0 Abs. (100% Transmission) is being stored. The electronic values (Voltages) of these settings are stored and applied during reading.If voltages found exceed factory set limits, a warning is displayed on LCD display for the filter in question. Once the desired filter is entered, press the Enter key, on the display will appears:

BPC BioSED srl
PRIME EVOLUTION - OWNER'S MANUAL Rev. 0 - 08/04 Page 11 of 41
** REV 4.6/Profili Date: 24/08/04 **
AUTOZERO
WASH
Then immediately:
** REV 4.6/Profili Date: 24/08/04 **
AUTOZERO ASPIRATION
Dip the aspirator probe in a test tube filled with clean distilled water and press the aspiration lever once: the water will be aspirated into the flow cell and the screen will display in sequence:
** REV 4.6/Profili Date: 24/08/04 **
AUTOZERO Wait for incubation
** REV 4.6/Profili Date: 24/08/04 **
AUTOZERO Wait for reading
** REV 4.6/Profili Date: 24/08/04 **
FILTER Temperature O.D. AUTOZERO 340 37 0.0000 (ENTER=OK)
At this point press the ENTER key,in case everything works fine on the screen will appear:
TEMPERATURE OK
Then press the Enter key to return to the Main Menu.

BPC BioSED srl
PRIME EVOLUTION - OWNER'S MANUAL Rev. 0 - 08/04 Page 12 of 41
In case there are problems with the aspiration or with the filter or with the lamp, the following error message will be displayed:
** REV 4.6/Profili Date: 24/08/04 **
FILTER Temperature O.D. AUTOZERO 340 37 OUT OF LIMIT (ENTER=OK)
Press Enter to return to the Main Menu and check for the fault ( aspiration or other cause ).
2.2 START ANALYSIS Selecting the option F4 of the main menù, the operation mode is entered, PRIME EVOLUTION asks for the the method to be done, it's possible to press one of the keys with indicated a chemistry, i.e. GOT, ALP etc., to recall directly the method to be performed:
** REV 4.6/Profili Date: 24/08/04 **
START OPERATION
TEST?_
or depress the key F4 / # TEST, in this case the screen will display:
** REV 4.6/Profili Date: 24/08/04 **
Test number ( 1 - xxx) : [ ]
Where the xxx means the last test available in the memory. After entering number of desired method , followed by ENTER, or after pressing the key related to the desired method, if printer is activated (see maintenance section) the date and the selected test will be printed and the instrument will jump to the Autozero function automatically:

BPC BioSED srl
PRIME EVOLUTION - OWNER'S MANUAL Rev. 0 - 08/04 Page 13 of 41
** REV 4.6/Profili Date: 24/08/04 **
AUTOZERO
WASH
** REV 4.6/Profili Date: 24/08/04 **
AUTOZERO ASPIRATION
Insert aspiration probe into a vessel filled with distilled water and push the aspiration lever,placed behind of the aspirating probe. Water is aspirated into the flow cell and the photometer is auto-zeroed. In case everithing is right, the display will visualize:
TEMPERATURE OK
Now press the Enter key to continue,the system asks to aspirate reagent blank (if programmed for the method), executes a reading and displays the measured value:
** REV 4.6/Profili Date: 24/08/04 ** 14 GOT/AST R1274 BLANK
WASH
** REV 4.6/Profili Date: 24/08/04 **
14 GOT/AST R1274 BLANK
ASPIRATION

BPC BioSED srl
PRIME EVOLUTION - OWNER'S MANUAL Rev. 0 - 08/04 Page 14 of 41
Dip the aspirator probe into a test tube containing blank reagent and press the aspirator lever, after the preincubation and the reading time. On the LCD panel will be displayed the O.D. of the reagent blank:
** REV 4.6/Profili Date: 24/08/04 ** 14 GOT/AST O.D. BLANK : 1.5220
after which operator may select out of: • ESC : goes back to main menù • ASP. REPEAT : repeats aspiration (before aspirating, empty flow cell by aspirating air) • O.D. REPEAT : repeats reading on the solution in the flow cell • ENTER : accepts the reading and steps to next display (Ex. GOT). At this point we can continue by testing a sample or we can calibrate, if in the method specified we have entered the standard concentration value:
** REV 4.6/Profili Date: 24/08/04 **
14 GOT/AST R1274 F1=CALIBRATE F2=NO STD. CONC.=46 FACTOR=1768
The STD. CONC. is the value programmed for the test in question.The factor may be the programmed factor OR the factor resulting from the last calibration. By selecting F1 a calibration of the method may be executed. F2 goes straight to the determination using the displayed factor.However if the method selected has not been calibrated before, bypassing with F2 will not be possible and the operator will be urged to calibrate first.

BPC BioSED srl
PRIME EVOLUTION - OWNER'S MANUAL Rev. 0 - 08/04 Page 15 of 41
2.3 CALIBRATION
** REV 4.6/Profili Date: 24/08/04 **
14 GOT/AST R1274 F1=CALIBRATE F2=NO STD. CONC.=46 FACTOR=1768
After pushing F1, the cursor jumps to the STD. CONC. item.In case a different standard is being used, it's value can be entered right away.By pressing ENTER key,the current value is accepted,
** REV 4.6/Profili Date: 24/08/04 **
WASH
The Flow cell is emptied
** REV 4.6/Profili Date: 24/08/04 **
ASPIRATE
The operator dips aspiration probe into the reaction mixture (Standard + Reagent) and pushes the ASPIRATION LEVER. The liquid is aspirated and sample is measured:
** REV 4.6/Profili Date: 24/08/04 **
14 GOT/AST R1274 CALIBRATION 1st O.D. STD.: 1.0056 FACTOR : 1782
After this,the operator has the option to: • ENTER : Confirms and accepts displayed value. Accepted values are printed. • O.D. REPEAT : Repeats the reading on the same liquid. • ASP. REPEAT : Aspirates again and repeats reading.

BPC BioSED srl
PRIME EVOLUTION - OWNER'S MANUAL Rev. 0 - 08/04 Page 16 of 41
2.4 MULTI-STANDARD CALIBRATION In case a Multi-Standard test has been selected for calibration, the operator will be prompted 6 times to aspirate each one of the calibrators:
** REV 4.6/Profili Date: 24/08/04 **
Aspirate Calibrator 1
** REV 4.6/Profili Date: 24/08/04 **
Aspirate Calibrator 2
** REV 4.6/Profili Date: 24/08/04 **
Aspirate Calibrator 3
** REV 4.6/Profili Date: 24/08/04 **
Aspirate Calibrator 4
** REV 4.6/Profili Date: 24/08/04 **
Aspirate Calibrator 5
** REV 4.6/Profili Date: 24/08/04 **
Aspirate Calibrator 6
After having aspirated the last calibrator,the Curve is calculated and the result is printed. On the LCD display will appear the curve calculated and by pressing the key ESC the operator will have access to the functions to accept or modify the curve of calibration obtained:

BPC BioSED srl
PRIME EVOLUTION - OWNER'S MANUAL Rev. 0 - 08/04 Page 17 of 41
** REV 4.6/Profili Date: 24/08/04 **
F1=Store F2=Change model F3=Eliminate point F4=Restore point
• F1=Store :Accepts the curve and stores it in non volatile memory. • F2=Change model :Change programmed mathematical model (see App. 6-C) and
recalculates curve. • F3=Eliminate :With this option 1 calibrator can be excluded from the curve, a new curve is calculated. • F4=Restore :This function restores a calibrator previously eliminated. A new curve is calculated each time In case of a bad Curve-FIT, the display visualizes the error message:
< Regress. error> By trying another model or eliminating one or more points a better curve may be found.
IMPORTANT NOTE
By pressing twice the ESC key when the LCD display shows the calibration curve, the program is exited and therefore the operator looses all the calibration data and the curve itself. Once the curve is recalculated and it results satisfactory to the operator, always store it before performing any operation.
2.5 SAMPLES ANALYSIS After calibration display prompts for the first patient:
** REV 4.6/Profili Date: 24/08/04 ** PAT. I.D. 1st O.D. FIT RES. GOT/AST 1 (F1=Input I.D. F2=not)

BPC BioSED srl
PRIME EVOLUTION - OWNER'S MANUAL Rev. 0 - 08/04 Page 18 of 41
F1 offers the possibility to enter a numeric patient ID, to be confirmed with ENTER. If no ID is wanted push F2. The instrument prompts the operator to aspirate the first sample.First sample will be read, the result printed, the cuvet emptied and the system continues to next patient:
** REV 4.6/Profili Date: 24/08/04 ** PAT. I.D. 1st O.D. FIT RES. GOT/AST 1 0.9856 1.00 35
By pressing the Enter key, the value is accepted and the display visualizes the next patient's request:
** REV 4.6/Profili Date: 24/08/04 ** PAT. I.D. 1st O.D. FIT RES. GOT/AST 2 (F1=Input I.D. F2=not)
and so on. Pushing ESC key, interrupts the sequence and operator is prompted to wash the flow cell:
** REV 4.6/Profili Date: 24/08/04 **
WASH
** REV 4.6/Profili Date: 24/08/04 **
ASPIRATE
Once water has been aspirated into the flow cell, the system returns to the main menu.
2.6 PROFILE FUNCTION

BPC BioSED srl
PRIME EVOLUTION - OWNER'S MANUAL Rev. 0 - 08/04 Page 19 of 41
With this software revision ( Rev. 4.6 ) it’s possible to have the printout of the results of all tests performed for a single patient on a sort of patient’s report. To proceed it’s necessary to enter the data at the beginning of the operations, and to enter the patient ID when required. At the moment that the LCD displays asks for the first sample for the first test to be aspirated, it shows :
** REV 4.6/Profili Date: 24/08/04 ** PAT. I.D. GLUCOSE
1 (F1=Input I.D. F2=not)
at this stage press the F1 key :
** REV 4.6/Profili Date: 24/08/04 **
PAT. I.D. GLUCOSE 1 ___
And type in the patient ID, note that only numerical ID can be used.
** REV 4.6/Profili Date: 24/08/04 **
PAT. I.D. GLUCOSE 1 02
then proceed as described. When operations are completed and all tests have been performed, press the F3 key to enter in Maintenance menu :
** REV 4.6/Profili Date: 24/08/04 ** F1=Adj. perist.pump F2=Select printer F3=QC / PROFILE F4=Test

BPC BioSED srl
PRIME EVOLUTION - OWNER'S MANUAL Rev. 0 - 08/04 Page 20 of 41
then select F3 to enter the QC / PROFILE :
** REV 4.6/Profili Date: 24/08/04 ** F1= QC F2=PROFILE
At this stage press the F2 key to enter the PROFILE MENU :
** REV 4.6/Profili Date: 24/08/04 ** Patient ID : _______
the system requires the ID of the patient, once this is entered, the report will be printed, collecting all tests’ results for that patient. Once the printing has been completed repeat the operations with anoth ID to get another Report. The use of the Profile function on the PRIME EVOLUTION reduces the number of methods which can be stored onto the instrument. With this software revision the number of methods which can be stored either for clinical chemistry or immunochemistry is 99 test. Profiles will remain stored into the memory until a new date is entered and however the max number of profiles which can be stored is 700 profiles. If either the date or the ID are not entered, the system will not work correctly. By performing the immediate repetition of a sample, the value which is stored for the profile function is the last one obtained.
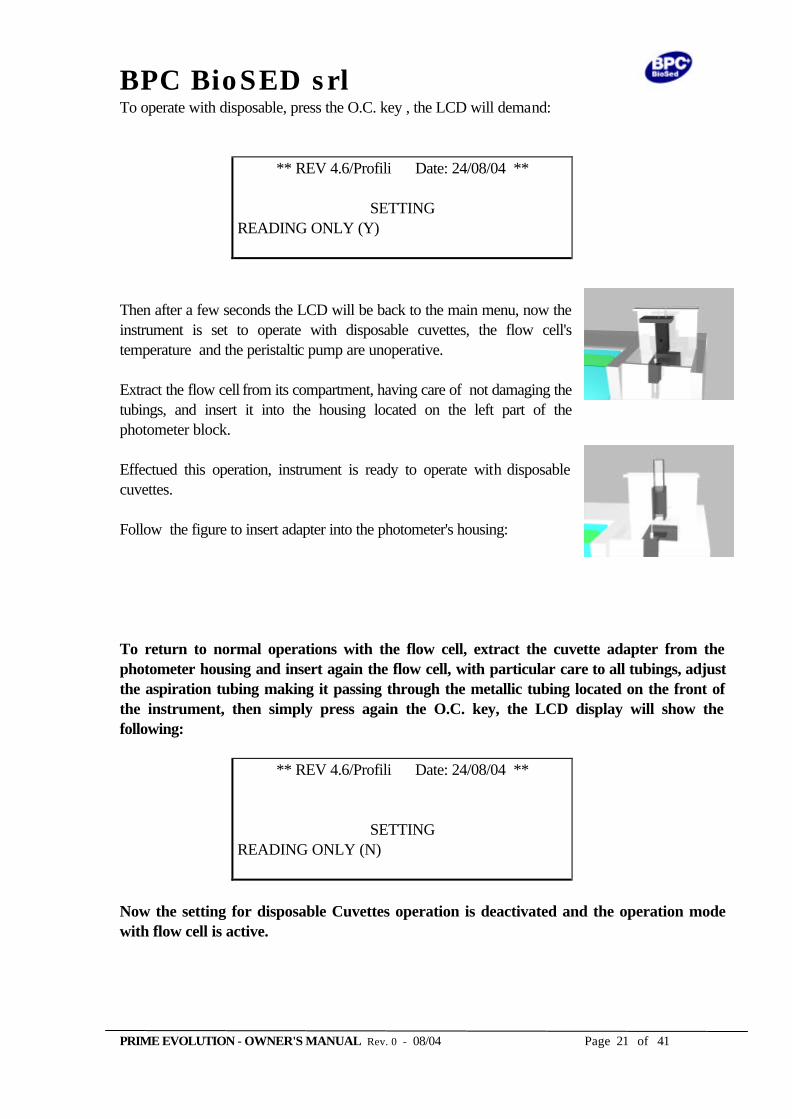
2.7 EXECUTING TESTS USING DISPOSABLE CUVETTES It's possible to use either flow cell and disposable cuvettes to execute readings with PRIME EVOLUTION photometer. The instrument is factory provided with a flow cell installed in the photometer compartment, but is supplied a metal adapter to be used with disposable cuvettes.
BPC BioSED srl
PRIME EVOLUTION - OWNER'S MANUAL Rev. 0 - 08/04 Page 21 of 41
To operate with disposable, press the O.C. key , the LCD will demand:
** REV 4.6/Profili Date: 24/08/04 **
SETTING READING ONLY (Y)
Then after a few seconds the LCD will be back to the main menu, now the instrument is set to operate with disposable cuvettes, the flow cell's temperature and the peristaltic pump are unoperative. Extract the flow cell from its compartment, having care of not damaging the tubings, and insert it into the housing located on the left part of the photometer block. Effectued this operation, instrument is ready to operate with disposable cuvettes. Follow the figure to insert adapter into the photometer's housing: To return to normal operations with the flow cell, extract the cuvette adapter from the photometer housing and insert again the flow cell, with particular care to all tubings, adjust the aspiration tubing making it passing through the metallic tubing located on the front of the instrument, then simply press again the O.C. key, the LCD display will show the following:
** REV 4.6/Profili Date: 24/08/04 **
SETTING READING ONLY (N)
Now the setting for disposable Cuvettes operation is deactivated and the operation mode with flow cell is active.

BPC BioSED srl
PRIME EVOLUTION - OWNER'S MANUAL Rev. 0 - 08/04 Page 22 of 41
2.8 DIRECT ABSORBANCE READINGS To perform with this instrument a direct absorbance reading, follow these simple steps: 1. Press the O.D. key to enter the Direct Absorbance Reading function, the screen will show you the
Autozero request:
** REV 4.6/Profili Date: 24/08/04 **
AUTOZERO Filter 340 405 505 546 570 620 7 8 [ ]
Enter a wavelenght and perform autozero,ref to section 2.1 , until the LCD will show :
** REV 4.6/Profili Date: 24/08/04 ** Filter O.D. READING ADC ( F1 = PRINT) 340 0.0002
2. Then press Asp. Repeat key to aspirate solution to be read, after preincubation time the LCD will
display the Absorbance of the sample. 3. Press F1 key to print absorbance read 4. To execute other solutions readings repeat items from 2. 5. Pressing O.D. Repeat key it's possible to read again the absorbance of solution in flow cell 6. Press ESC key to return in Main menù NOTE: The instrument always makes a first air aspiration in the flow cell, to wash any residuals of previous solutions. NOTE: When a wavelenght it's selected after another one, leave some time , about 5-6 minutes, to stabilize the lamp as the voltage of the lamp changes according to the filter selected, this to make longer the lamp's life.
SECTION 3. METHODS PROGRAMMING

BPC BioSED srl
PRIME EVOLUTION - OWNER'S MANUAL Rev. 0 - 08/04 Page 23 of 41
PRIME EVOLUTION is an " Open " instrument, as the operator can modify or create his own methods of clinical chemistry, or immunochemistry according to reagents used, operative conditions or specific needs.
3.1 METHODS PARAMETERS Heart of programming methods in PRIME EVOLUTION Photometer, are the parameters, items to be modified to create a new program either in immunochemistry or clinical chemistry.In PRIME EVOLUTION programming you have these end user modifyable parameters:
Type of Reaction (1-5) :
1= Endpoint 2= Kinetic-Enzymatic tests 3= Initial Rate 4= Bichromatic Endpoint 5= Serum Blank
Name of test (15 char.) : See Appendix D Lower limit (units) : Upper limit (units) :
Lower pathological limit Upper pathological limit
Temperature Cuvette : 0-25-30-37°C 0= Temp. Off Blank (Y=1/N=0) : Execute a reading of reagent blank
Reagent Blank subtraction : Correct samples for reagent blank Lower limit Reag. O.D. : Warning level Reagent O.D. Upper limit Reag. O.D. : Warning level Reagent O.D.
Linearity limit : Warning level for linearity Reagent Volume (µl) : These values will be read by the external Diluter Sample Volume (µl) : These values will be read by the external Diluter
Standard Concentration : Value of standard to be used
Factor : Factor for calculating end results; in case any standard is used, the calculated factor is stored
Incubation Time : Time liquid should stay in the flow cell before measurement. *
Duration of reading : Timespan during which reaction is monitored (typ. 20 sec.) **
Reaction Incr.(0)/Decr.(1) : Direction of reaction (e.g. CPK=0/GOT=1) O.D. level substrate Depl. : Warning for substrate depletion.
Save calibration factor : Factor can be saved (1) to avoid too many calibrations.
Number of controls (0-9) : Number of controls done at beginning of routine. Number of decimals(0-4) : No. of digit after floating Point
Filter 1 : Enter 340-405-505-546-570-620 or 7 (optional) Filter 2 : As above in case of bichromatic
(*) A minimum of 5 sec is reccomended to stabilize liquid in cuvet (**)Only in case of kinetic reactions and Initial Rate.

BPC BioSED srl
PRIME EVOLUTION - OWNER'S MANUAL Rev. 0 - 08/04 Page 24 of 41
3.2 CREATING AND MODIFYING METHODS Selecting option F2 (Methods) on Main menù, the LCD panel displays a sub-menù with 4 options:
** REV 4.6/Profili Date: 24/08/04 **
F1=Autozero F2=Methods F3=Maintenance F4=Start Operation
Press F2:
** REV 4.6/Profili Date: 24/08/04 ** F1=Modify Method F2=Immunochemistry F3=Print TEST F4=Print all TEST
Each sub-item can be selected by pressing the corresponding function key.With option F1, a test can be configurated by assigning parameters described in chapter 3.1.Up to 150 methods can be programmed and stored in the non-volatile RAM of the instrument. Internally tests are being numbered from 1 to 150, but 28 methods are preprogrammed on leaving the factory. The option starts with asking the operator the test number wanted, the default is the first free (non programmed method) number. However the operator can press a key with a chemistry code printed on it, i.e. GGT, to modify that method or can press the F4 key in order to enter the number of the test to be modified:
** REV 4.6/Profili Date: 24/08/04 **
Test number (1-xxx) : (_ )
where 'xxx' represents the highest test number + 1 programmed up to this moment.By hitting ENTER key,the next free number is selected for creation. Otherwise a pre-programmed method's number can be entered. If selected method's number already has been selected in another class (immunochemistry), the program warns the operator and ask for confirmation.

BPC BioSED srl
PRIME EVOLUTION - OWNER'S MANUAL Rev. 0 - 08/04 Page 25 of 41
Subsequently parameters described in chapter 3.1 can be entered by depressing enter key. NOTE* As PRIME EVOLUTION is provided only with numerical keypad, all alfabetical characters are entered by a 3 number ASCII code, described in Appendix-D.
3.3 MULTI-STANDARD METHODS With the sub-option F2, tests with multiple standards (Immunochemistry) may be configurated:
** REV 4.6/Profili Date: 24/08/04 ** F1=Modify Method F2=Immunochemistry F3=Print TEST F4=Print all TEST
Press F2:
** REV 4.6/Profili Date: 24/08/04 **
Test number (1-xxx) : (_ )
Then enter the desired or the last available test number, in case you want to create a completely new method, and press enter to confirm. Option asks for the same parameters as option F1, but in addition it asks for the following parameters:
Model (1-6) : One of 6 mathematical model (see Appendix 6-C)
Maximum Variance % : Max permitted deviation in % from calculated standard curve.
Lot. No. : Lot number of reagent used. CALIBRATOR 1 : Value of cal. 1 CALIBRATOR 2 : Value of cal. 2 CALIBRATOR 3 : Value of cal. 3 CALIBRATOR 4 : Value of cal. 4 CALIBRATOR 5 : Value of cal. 5 CALIBRATOR 6 : Value of cal. 6

BPC BioSED srl
PRIME EVOLUTION - OWNER'S MANUAL Rev. 0 - 08/04 Page 26 of 41
3.4 PRINTING METHODS STORED IN MEMORY With option F3 it's possible to have a printout of all parameters of individual method:
** REV 4.6/Profili Date: 24/08/04 ** F1=Modify Method F2=Immunochemistry F3=Print TEST F4=Print all TEST
Press F3:
** REV 4.6/Profili Date: 24/08/04 **
Test number (1-xxx) : (_ )
On entering a Test number, actual parameters of that test are being listed by the printer. With option F4 it's possible to obtain a printout of all parameters of all tests stored in the RAM of the instrument:
** REV 4.6/Profili Date: 24/08/04 ** F1=Modify Method F2=Immunochemistry F3=Print TEST F4=Print all TEST
Press F4:
** REV 4.6/Profili Date: 24/08/04 **
PRINT ALL TESTS F1=Only Full Name F2=With Parameters
Pressing F1 you can print only the names of tests associated with test numbers, pressing F2 it's possible to obtain tests printouts with all parameters associated.

BPC BioSED srl
PRIME EVOLUTION - OWNER'S MANUAL Rev. 0 - 08/04 Page 27 of 41
SECTION 4. MAINTENANCE AND TROUBLE-SHOOTING The option F3 of the Main menù offers 4 sub-options:
** REV 4.6/Profili Date: 24/08/04 ** F1=Autozero F2=Methods F3=Maintenance F4=Start Operation
Press F3:
** REV 4.6/Profili Date: 24/08/04 **
F1=Adj. perist.pump F2=Select printer F3=QC/Profile F4=Test
4.1 ADJUST PERISTALTIC PUMP STEPS Adjustment of peristaltic pump has 3 functions: • To switch off pump completely in case no flow cell is used (reading only of disposable cuvettes); • To adjust volume aspirated into the flow cell.The volume must be enough to rinse the flow cell
sufficiently, but not higher than the total reaction mixture; • To adjust volume aspirated during a Wash Cycle; If volume is too high, air will be sucked into the cell.If volume is too low, more liquid than normal stays behind in the reaction wells, and the cell may not be sufficiently cleaned. As the tubing of peristaltic pump gets older, it looses some of its elasticity and the volume may get lower too.

BPC BioSED srl
PRIME EVOLUTION - OWNER'S MANUAL Rev. 0 - 08/04 Page 28 of 41
** REV 4.6/Profili Date: 24/08/04 **
F1=Adj. perist.pump F2=Select printer F3=QC/Profile F4=Test
Press F1, LCD will visualize following message:
** REV 4.6/Profili Date: 24/08/04 **
No. of steps for Aspiration: xxx
Now it's possible to have the following choices: • The current number of steps is displayed • The number of steps can be increased or decreased by entering a new number between 100 and
999 and confirming with ENTER: • Current number is not to be modifyed so press simply ENTER for confirmation to jump to next
screen:
** REV 4.6/Profili Date: 24/08/04 **
No. of steps for wash: xxx
Repeat the choices above described and press ENTER again.Upon Enter the aspiration or wash cycle is being executed.
4.2 SELECT PRINTER Standard the PRIME EVOLUTION has got a standard thermal printer "on board".It's however possible to replace the on-board printer by a faster external printer.
** REV 4.6/Profili Date: 24/08/04 ** F1=Adj. perist.pump F2=Select printer F3=QC/Profile F4=Test

BPC BioSED srl
PRIME EVOLUTION - OWNER'S MANUAL Rev. 0 - 08/04 Page 29 of 41
Press F2:
** REV 4.6/Profili Date: 24/08/04 **
MAINTENANCE On Board=0 External=1 No=2
With this option of Maintenance programs, can be selected one of these three situations: 0. The On Board Printer is activated. 1. Results are printed by an external printer connected to parallel 25 pin (male) connector on the
rear of instrument. 2. No Printer, only to be used in exceptional cases. The PRIME EVOLUTION model is available with a graphic high speed thermal printer.
4.3 QUALITY CONTROL This option permits calculation of Mean, S.D. and C.V. of a series of results. When in the maintenance menu:
** REV 4.6/Profili Date: 24/08/04 ** F1=Adj. perist.pump F2=Select printer F3=QC/Profile F4=Test
Press F3:
** REV 4.6/Profili Date: 24/08/04 ** F1= QC F2=PROFILE
Then press F1:

BPC BioSED srl
PRIME EVOLUTION - OWNER'S MANUAL Rev. 0 - 08/04 Page 30 of 41
** REV 4.6/Profili Date: 24/08/04 **
QUALITY CONTROL Value:
Enter one value after another.After last value is entered, push ESC key and the results are calculated and printed.
By pressing then the F3 key corresponding to the option to visualize the graph, on the LCD will appear the Levy-Jennings graph related to the data entered:
The graph obtained can be also printed on the internal thermal printer by pressing the F3 key.
4.4 MENU' TEST This option permits to perform several mechanical and electronic functions:
** REV 4.6/Profili Date: 24/08/04 ** F1=Adj. Perist.pump F2=Select printer F3=QC/Profile F4=Test
Press F4:

BPC BioSED srl
PRIME EVOLUTION - OWNER'S MANUAL Rev. 0 - 08/04 Page 31 of 41
** REV 4.6/Profili Date: 24/08/04 ** F1=Wash perist.pump F2=Aspirating F3=Positioning filter F4=Temperature
F1: To aspirate water or cleaning solution into the flow cell. F2: This option is used to check aspirated volume, to check for air bubbles in the flow cell. F3:
** REV 4.6/Profili Date: 24/08/04 **
TEST Filter: 340-405-505-546-570-620-7-8 [ ]
This option offers the possibility to make a pure absorbance reading of a solution. Select a wavelenght and the filter will be positioned: a reading is made and the result printed. Note* Position 8 represents "Dark" (0% transmission). F4:
** REV 4.6/Profili Date: 24/08/04 **
TEST Temperature of cuvet: 0-25-30-37: [ ]
Selecting a temperature will change the temperature into the flow cell.Time to change temperature from (i.e.) 25 to 37°C is typically about 30 secs , but the thermal stabilization could require more time, typically 2 minutes.
4.5 PERIODIC MAINTENANCE Follow this scheduled maintenance periodically to have your PRIME EVOLUTION always at its best performance:

BPC BioSED srl
PRIME EVOLUTION - OWNER'S MANUAL Rev. 0 - 08/04 Page 32 of 41
DAILY MAINTENANCE
• Flow cell should be rinsed thoroughly with distilled water at the end of te routine.
• Before switching off instrument, flow cell and tubings are to be filled with distilled water.
• If the instrument is not going to be used for a long period of time, wash the flow cell with BPC washing solutions Extracleaning or Hypocleaning, then rinse with distilled water.
WEEKLY MAINTENANCE
• Wash the flow cell with BPC washing solution Hypocleaning, a deproteinizing solution,then rinse.It's possible to use BPC Extracleaning solution after the Hypocleaning and according to working time of the instrument
QUARTERLY MAINTENANCE
• Replace tubing of peristaltic pump once every three months, as referred in section 5.3.
4.6 TROUBLE-SHOOTING Before calling our Service Department, please check following items to find a faster solution of occurring troubles;
SYMPTOMS POSSIBLE CAUSES AND ACTIONS
Liquid not being aspirated
• Too tight or too loose rotor of peristaltic pump
• Silicon tubings of peristaltic pump damaged and to be replaced
• Leaky motor not functioning
Autozero of filterwheel gives 0V on all filters • Lamp of Photometer burned out • Connector of lamp ass'y disconnected or
failed • Filterwheel blocked or not in selected
position

BPC BioSED srl
PRIME EVOLUTION - OWNER'S MANUAL Rev. 0 - 08/04 Page 33 of 41
Erroneous Autozero
• Flow cell not properly filled with water • Flow cell dirty(to be cleaned) • Little air bubbles building up into the
cuvet(to be cleaned) • Tubing disconnected,leaky or clogged • Peristaltic pump malfunction • Not correct position of filterwheel
Erroneous non reproducible results
• Check for little air bubbles into the cuvet(to be cleaned)
• Check aspirating system • Check if the lamp flickers, try to replace
it.
SECTION 5. NON ROUTINE MAINTENANCE
5.1 LAMP ASS'Y REPLACEMENT Lamp ass'y consists in a lamp, complete of its fittings, wires and connector. The ass'y is fixed to photometer with two screws.To replace the lamp ass'y follow these steps:
1. Switch off the instrument 2. Remove the cover of the photometer 3. Remove the two screws 4. Pull connector from its fitting 5. Pull out burned lamp ass'y 6. Install the new one operating in reversed order

BPC BioSED srl
PRIME EVOLUTION - OWNER'S MANUAL Rev. 0 - 08/04 Page 34 of 41
WARNING: Always avoid to touch the bulb with your fingers, as the human skin excretions will be burned into the quartz and destroy the U.V. emission characteristics. A lamp accidentally touched by human skin may be carefully cleaned with a piece of soft cloth. After having installed a new lamp ass'y, the system has to be recalibrated in the following way: • Switch on instrument and let the system stabilize for at least 10 minutes • Aspirate clean distilled water into the flow cell, position the filterwheel at 340 nm and make a
reading(as indicated in section 4.4), the system makes a reading and prints the result:
** REV 4.6/Profili Date: 24/08/04 **
Filter 340 Volt x.xxxx D.O. y.yyyy
• Adjust Gain potentiometer on Photometer PCB to read Volt=4.2000 • Select filter 8 (Offset) and push enter The offset value is displayed and should be between 0.0020 and 0.0030.It can be adjusted with
potentiometer marked Offset, near the GAIN potentiometer. After it's adjusted, the reading can be repeated by pushing Enter again.
NOTE* Potentiometer GAIN is the screw next to cuvet NOTE**Care that Flow cell is clean and distilled water used is clean and not contaminated.
5.3 PERISTALTIC PUMP'S TUBES REPLACEMENT Tubing of peristaltic pump is pressed to the rotor of the pump by a semi circular leader.This leader is mounted on a plate, which in turn is kept in position by an hand tightened screw. To replace the tubing:
• Untighten the screw • Remove the old tubing • Put in the new tubes • Press the leader by hand against the tubing • Tighten the screw • Use the option Aspirate of the TEST program (4.4) to check the
functioning

BPC BioSED srl
PRIME EVOLUTION - OWNER'S MANUAL Rev. 0 - 08/04 Page 35 of 41
Step 2 After replacement of peristaltic pump tubing, it's necessary to perform the adjustment of the steps for aspirating and washing. To perform these adjustments refer to section 4.1 and proceed as follows:
** REV 4.6/Profili Date: 24/08/04 ** F1=Adj. perist.pump F2=Select printer F3=QC/Profile F4=Test
In this Maintenance menù press F1 key:
** REV 4.6/Profili Date: 24/08/04 **
No. of steps for Aspiration: xxx
Here you can enter by pressing numerical keys, the value necessary to meet the following specifications:
• Levels of liquid ingoing and outgoing to and from the
flow cell, must be almost equals • There should not be air bubbles into tubings connected
to flow cell Proceed in the same way in washing step adjustment option.
APPENDIX 6-A
PRIME EVOLUTION'S CALCULATION MODES All these calculation types can be used either with factor or with Standard. Calculation 1 ENDPOINT Conc. Standard Conc. Sample = Abs. Sample x Abs. Standard Conc. Standard

BPC BioSED srl
PRIME EVOLUTION - OWNER'S MANUAL Rev. 0 - 08/04 Page 36 of 41
The Calibration Factor can be stored as F. Abs. Standard In case the calculation is made using factor or stored calibration, the formula becomes: Conc. Sample = Abs. Sample X F Calculation 2 KINETIC During the reading interval programmed for the test, every 80 ms the absorbance is measured. At the end of time span, a straight line is calculated through the points of measurement, using the linear regression method. The coefficient of correlation (FIT) is used as a check on the linearity (must be > 0.98). The calculated slope, expressed in Abs./min. is used to calculate the activity: U/l = Abs./min. X F or: Conc. Standard Conc. = Abs./min. X Abs./min. (Standard) Results are FLAGGED: In case of increasing (+) reactions: • If the first reading > of start-Absorb. as programmed for method in question • If the first reading < (RB+SE) RB= Abs. Reagent Blank as measured at start of batch SE= O.D. for substrate Expletion as programmed for method In case of decreasing (-) reactions: • If the first reading < (RB-SE)
APPENDIX 6-A Continued Calculation 3 INITIAL RATE This corresponds to fixed time kinetics. Calculation is based on the Delta absorbance over the reading interval : one reading at the start (end of incubation time) and the second at the end.

BPC BioSED srl
PRIME EVOLUTION - OWNER'S MANUAL Rev. 0 - 08/04 Page 37 of 41
Conc. Sample = ∆ Abs. Sample X F Can be used also a standard insteadof F as in EndPoint calculation mode. Calculation 4 BICHROMATIC Calculation based on the Delta Absorbance between two wavelenghts.The formula is like in EndPoint. Conc. Sample = ∆ Abs. Sample X F Calculation 5 SERUM BLANK This type of calculation is based on the Delta abs. of a sample with reagent and a serum blank (Sample + Diluent). To this end, two reaction wells are being used for each sample. Calculation as for EndPoint.
APPENDIX 6-B
ON LINE INTERFACING INTERFACE

BPC BioSED srl
PRIME EVOLUTION - OWNER'S MANUAL Rev. 0 - 08/04 Page 38 of 41
Serial Interface used is of the type RS-232 C. The serial port for connection to a Lab Computer is the upper 25 pins, female, on the back of PRIME EVOLUTION. Connections are as follows: Pin 2 - TX (transmit) Pin 3 - RX (receive) Pin 7 - GND (signal ground) WORD FORMAT 1200 Baud 8 Data bit 1 Stop bit NO Parity
APPENDIX 6-C
MATHEMATICAL MODELS FOR MULTI STANDARD CURVES

BPC BioSED srl
PRIME EVOLUTION - OWNER'S MANUAL Rev. 0 - 08/04 Page 39 of 41
For the calculation of the non-linear standard curves the operator may choose out of 6 mathematical models. MODEL 1: 4 Parameters Log-Logit 1 R=Ro + Kc 1 + exp [-(a+b.lnC)] MODEL 2: 5 Parameters Log-Logit 1 R=Ro + Kc 1 + exp [-(a+b.lnC+c.C)] MODEL 3: 5 Parameters Exponential R= Ro + K exp [ a.lnC + b.(lnC)2 + c.(lnC)3] MODEL 4: 5 Parameters Polynomial (R-Ro) (R-Ro)2 (R-Ro)3 ln C = a + b + c + d 100 (100)2 (100)3 MODEL 5: 4 Parameters Logit 1 R= Ro + Kc 1+exp [-(a+b.C)] MODEL 6: Linear with offset C = a + b.R
APPENDIX 6-D
PRINTABLE ASCII CHARACTERS TABLE

BPC BioSED srl
PRIME EVOLUTION - OWNER'S MANUAL Rev. 0 - 08/04 Page 40 of 41
As indicated in the Methods programming section, PRIME EVOLUTION is not provided with an alfabetical keyboard, so to enter alfabetical characters it's necessary to enter them in numerical ASCII format. When PRIME EVOLUTION asks for an alfabetical entering, just press sequentially number keys corresponding to letter wanted, then when you've entered complete word, press enter key to confirm.
No. ASCII No. ASCII No. ASCII 032 Space 064 @ 096 ' 033 ! 065 A 097 a 034 " 066 B 098 b 035 # 067 C 099 c 036 $ 068 D 100 d 037 % 069 E 101 e 038 & 070 F 102 f 039 ' 071 G 103 g 040 ( 072 H 104 h 041 ) 073 I 105 i 042 * 074 J 106 j 043 + 075 K 107 k 044 , 076 L 108 l 045 - 077 M 109 m 046 . 078 N 110 n 047 / 079 O 111 o 048 0 080 P 112 p 049 1 081 Q 113 q 050 2 082 R 114 r 051 3 083 S 115 s 052 4 084 T 116 t 053 5 085 U 117 u 054 6 086 V 118 v 055 7 087 W 119 w 056 8 088 X 120 x 057 9 089 Y 121 y 058 : 090 Z 122 z 059 ; 091 [ 123 { 060 < 092 \ 124 | 061 = 093 ] 125 } 062 > 094 ̂ 126 ≈ 063 ? 095 _ 127
APPENDIX 6-E

BPC BioSED srl
PRIME EVOLUTION - OWNER'S MANUAL Rev. 0 - 08/04 Page 41 of 41
ON SCREEN FLAG CODES LIST L Beyond linearity limit fixed in methods Dilution is needed P Out of normal values range fixed in method ∗ If first O.D. (in kinetics reaction as GOT and GPT) is minor than blank reagent O.D. - Substrate
expl. limit O.D. as programmed in method. It means reagent not working properly or activity of sample is extremely high-try dilution-
FC In immunochemistry means the sample is out of calibration curve. CK Near reagent Blank O.D. it means O.D. out of range programmed in method. Check reagent. CK Near C1,C2,C3 it means control serum value is out of the range programmed in Control Sera Assay Valid only if control sera value are programmed(not=0) see 3.8 ERROR MESSAGES ON SCREEN WARNING RESET PROBLEM SWITCH OFF AND ON AGAIN Tells operator to switch instrument off, wait 10 seconds and then switch it on again to reset the CPU.In case there are still problems on reset, contact service. WARNING INCORRECT FILTERWHEEL RESET Problems of motor or photocoupler for home position, clean photocoupler or contact service. FILTER OUT OF RANGE - INCORRECT AUTOZERO Check if lamp is burned out, flow cells dirty or clogged, in case this message does not disappear, contact your dealer.