bravo2010-getting familiar with microsoft word 2007
TRANSCRIPT

Getting Familiar with Microsoft Word 2007 BRAVO Employee Institute 2010

Page 2 of 15
The Office Button
The Office Button is in the upper left corner of you Microsoft Word 2007 document.
This button opens up options, such as “New,” “Save” and “Print.”
The Title Bar
The Title Bar is where the name of you document and the name of the program is located. The following
title bar shows the name of the document as “Letter” and the name of the program as “Microsoft
Word.”

Page 3 of 15
Windows Controls
You also have on the upper right corner the Windows Controls, where you can
“Minimize,” “Restore Down,” or “Close” your Microsoft Word document.
The Ribbon
The “Ribbon” is a new and easier way to navigate Microsoft Word 2007. The “Ribbon” is composed of
Tabs, Groups, and Commands.
Tabs, Groups & Commands
Each Tab represents an activity area. Within each Tab there are several Groups that show related items
together. Within each Group there are different Commands. A Command is a button, a box to enter
information, or a menu.
Tab Group Commands
The Ruler
The Ruler helps you when you are lining up items or text in your document.

Page 4 of 15
Status Bar
The Status Bar has a variety of commands, such as the amount of
“Pages” you have, “Word Count,” “Spell Check,” and “Zoom.”
Quick Access Toolbar
The Quick Access Toolbar has the most frequently used commands. By default the Quick Access Toolbar
will have “Save,” “Undo” and “Repeat.”
You can add more features to the Quick Access Toolbar by clicking the downward arrow next to the
Quick Access Toolbar. You can then choose to place the Quick Access Toolbar below the ribbon by
clicking “Show Below the Ribbon.” By default the Quick Access Toolbar will be above the Ribbon.
Page 5 of 15
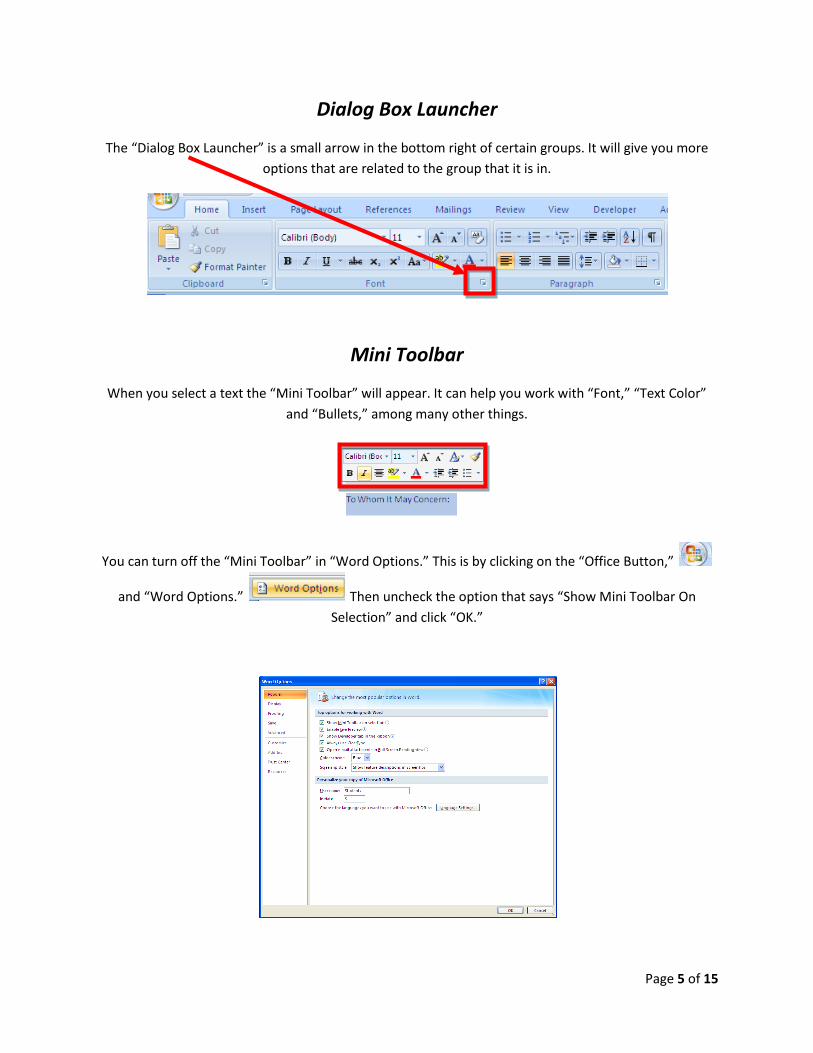
Dialog Box Launcher
The “Dialog Box Launcher” is a small arrow in the bottom right of certain groups. It will give you more
options that are related to the group that it is in.
Mini Toolbar
When you select a text the “Mini Toolbar” will appear. It can help you work with “Font,” “Text Color”
and “Bullets,” among many other things.
You can turn off the “Mini Toolbar” in “Word Options.” This is by clicking on the “Office Button,”
and “Word Options.” Then uncheck the option that says “Show Mini Toolbar On
Selection” and click “OK.”

Page 6 of 15
Recent Documents List
The “Recent Documents” list is a way to open a file in Microsoft Word. After you click on the “Office
Button” all the recent documents you have opened will appear in the “Recent Documents” list. You can
pin a file and click on the “Pin” icon so that the file will always remain in the “Recent Documents” list. To
“Unpin” a document click on the pin again.
The Font Options
In the “Font Group” you can change the “Font,” “Font Size,” and add “Effects” among many other things.
For more options, click on the Font group’s “Dialog Box Launcher.”
Font Font Size Effects
Page 7 of 15
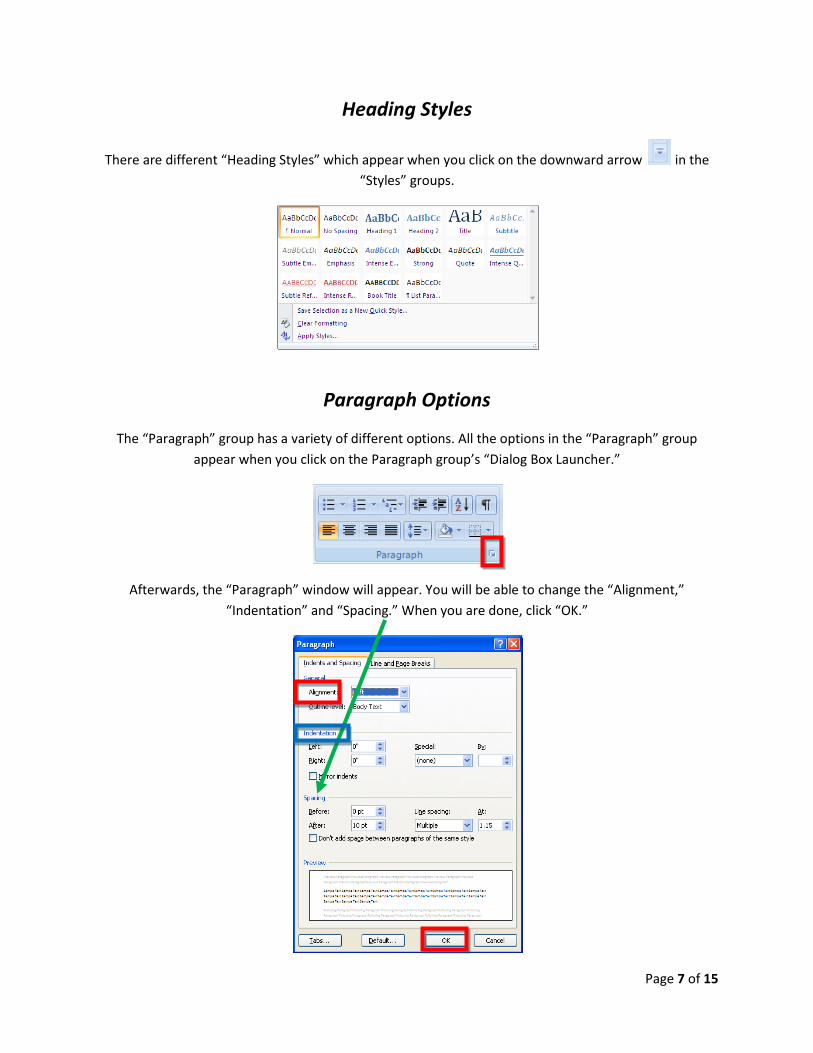
Heading Styles
There are different “Heading Styles” which appear when you click on the downward arrow in the
“Styles” groups.
Paragraph Options
The “Paragraph” group has a variety of different options. All the options in the “Paragraph” group
appear when you click on the Paragraph group’s “Dialog Box Launcher.”
Afterwards, the “Paragraph” window will appear. You will be able to change the “Alignment,”
“Indentation” and “Spacing.” When you are done, click “OK.”
Page 8 of 15
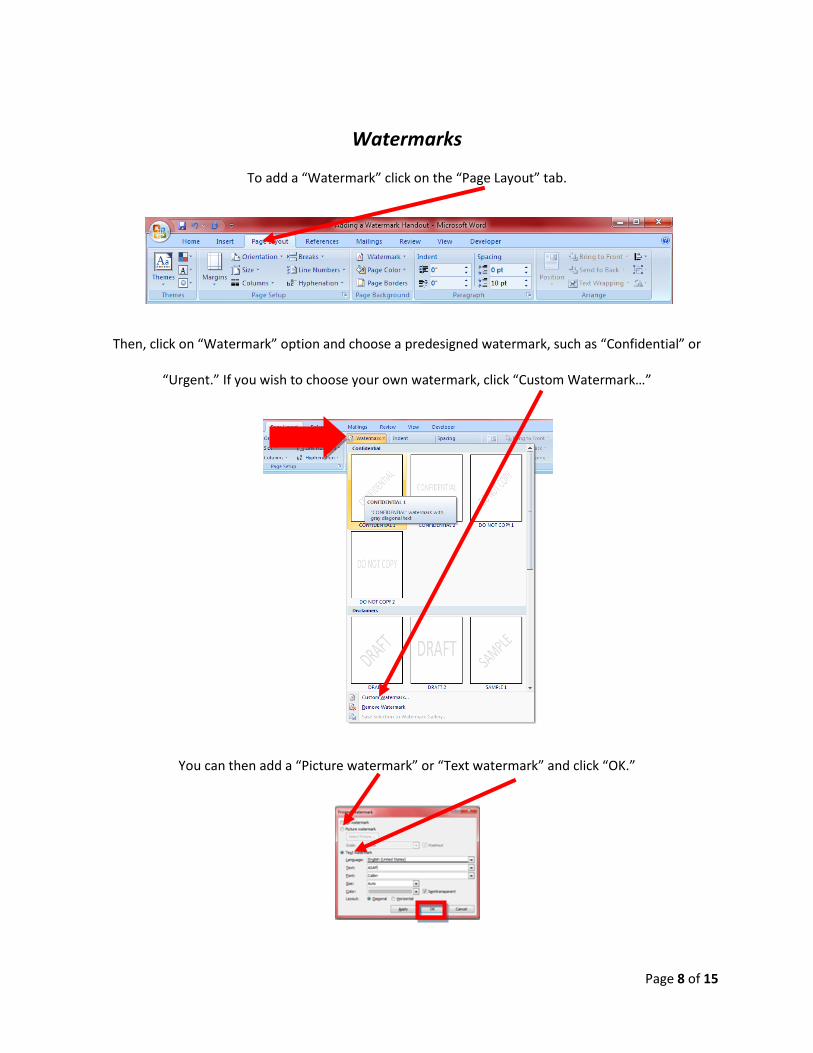
Watermarks
To add a “Watermark” click on the “Page Layout” tab.
Then, click on “Watermark” option and choose a predesigned watermark, such as “Confidential” or
“Urgent.” If you wish to choose your own watermark, click “Custom Watermark…”
You can then add a “Picture watermark” or “Text watermark” and click “OK.”
Page 9 of 15
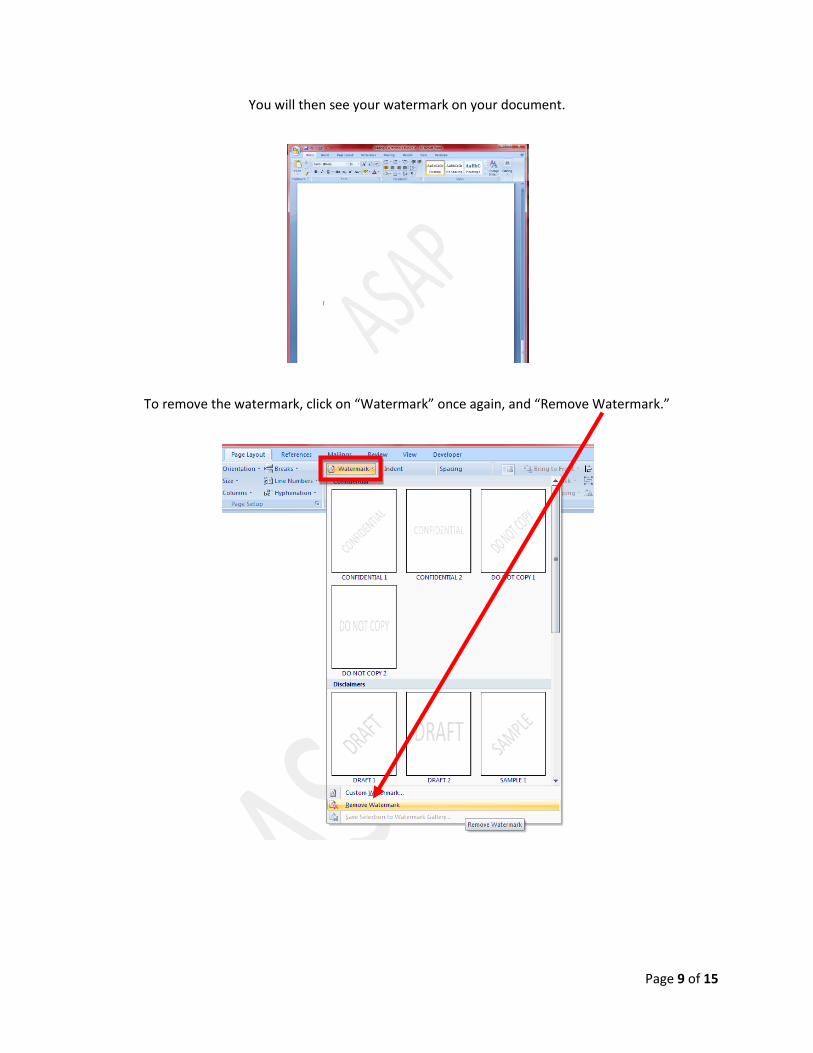
You will then see your watermark on your document.
To remove the watermark, click on “Watermark” once again, and “Remove Watermark.”

Page 10 of 15
Compatibility Mode
When you click on the “Office Button” and “Save As” you have a variety of ways to save your document.
The documents saved as a Microsoft Word 2003 document can open in the Microsoft Word 2007
version. But you cannot always open the 2007 document in the 2003 version. If you wish to open the file
in a 2003 version click on “Save As” and “Word 97-2003 Document” so you can open your document in
any previous version of Word.
Using Help Screen
If you need assistance with your Microsoft Word 2007 document click on the “Help Icon” on the
upper right corner of the screen. The “Word Help” window will appear. You can then type your question
in the search box and a list of links on the topic will appear.

Page 11 of 15
Keyboard Shortcuts
If you click on ALT you will see “Key Tips,” which allow you to access commands quickly.
Page Margins
If you click on the “Page Layout” tab and “Margins” you will be able to edit your document’s margins.
Page Borders
When you click on the “Page Layout” tab and “Page Borders” a new window will appear.

Page 12 of 15
The “Borders and Shading” window will appear and you will be able to add a border with different
“Styles” and “Color.” After you edit your border, click “OK.”
Page Color
You can change the color of your page by clicking on “Page Color” in the “Page Layout” tab.
You will then get a variety of “Theme Colors” to choose from.

Page 13 of 15
Page Orientation
To change the orientation of your page go to the “Page Layout” tab and click “Orientation.”
You will then be able to change the orientation of your page to “Portrait” or “Landscape.”
Protecting your Document
To protect your Microsoft Word 2007 document click on the “Review” tab on the Ribbon.
Then click “Protect Document.”

Page 14 of 15
Choose an option from the “Protect Document” drop-down list. Click “Restrict Formatting and
Editing.”
A new window will open on the side of your document. You will then be able to change the
“Editing restrictions” and add any “Exceptions” if you wish certain people to freely edit parts of
the document. Then click “Yes, Start Enforcing Protection.”

Page 15 of 15
Afterwards, you can add a “Password” to protect your document and click “OK.”
To unprotect the document click “Stop Protection,” type in the “Password:” and click “OK.”