bridge communication between cutting edge research laboratories and the educational community
DESCRIPTION
BioBridge’s missions and goals. Bridge communication between cutting edge research laboratories and the educational community. Develop theme based curricula that link biology, chemistry, and physics based on current research. Establish efficient networks for teacher training and support. - PowerPoint PPT PresentationTRANSCRIPT

1. Bridge communication between cutting edge research laboratories and the educational community.
2. Develop theme based curricula that link biology, chemistry, and physics based on current research.
3. Establish efficient networks for teacher training and support.
4. Establish self-sustaining, non-profit production facilities to produce science education materials at cost. Establish a regional facility to service the entire Southwest.
5. Encourage future careers in the biosciences
6. Increase science literacy in the community
BioBridge’s missions and goals

Teaching Strategies and PowerPoint
• The best use of PowerPoint for high school students is something interactive
• Look for something that will stimulate student interest• Look for something that ALL students can answer
without fear of getting the “wrong” answer• Look for things that will stimulate discussion

Describe what you see.What do you think causes the differences between these two dogs?

All dogs are descendants of wolves, in fact, dogs and wolves are almost indistinguishable genetically. But if that’s the case, how do we get dogs as
different as Chihuahuas and Great Danes?

Describe what you see (1)

Describe what you see (2)

• These two-day-old zebrafish (Danio rerio) embryos are expressing a gene for Green Fluorescent Protein (GFP) in cells lining their circulatory system. This causes the embryo's circulatory system to glow green when exposed to light of a certain wavelength.
• How would this be useful to scientists?
How are FP’s used by scientists?
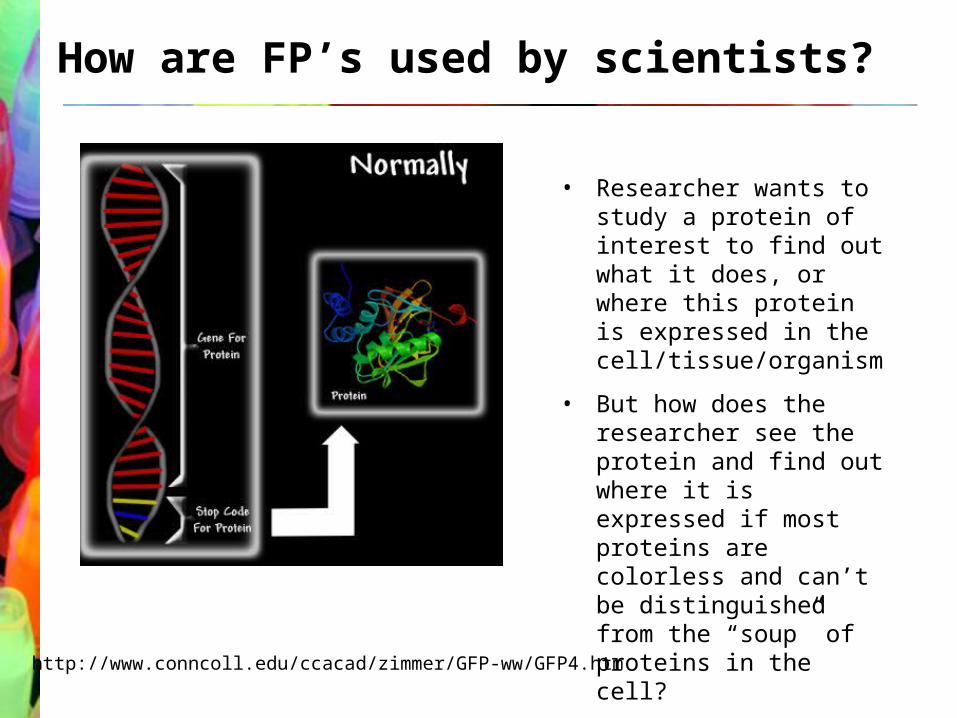
• Researcher wants to study a protein of interest to find out what it does, or where this protein is expressed in the cell/tissue/organism
• But how does the researcher see the protein and find out where it is expressed if most proteins are colorless and can’t be distinguished from the “soup” of proteins in the cell?
http://www.conncoll.edu/ccacad/zimmer/GFP-ww/GFP4.htm

How are FP’s used by scientists?
• The FP gene is inserted into the plasmid right after the gene for the protein, before the stop codon.
• The protein of interest AND the FP are translated at the ribosome together.
• The FP can be seen and measured, even though the protein of interest cannot be seen. Anytime the protein of interest is made in the cell, the FP will also be made.
http://www.conncoll.edu/ccacad/zimmer/GFP-ww/GFP4.htm

Human cell stained with two different fluorescent proteins to visulalize cytoskeletal components. Transfected with GFP-tubulin / mCherry actin (Ben Giepmans)
Cellular organelles targeted with FPs
C Elegans transfected with GFP tubulin construct (Susan Kline)

Advance preparation for transformation lab
• Prepare plates several days (3-30) in advance (1LB and 2 LB/Amp plates per group
• Streak starter plates from stab• Gather necessary materials (see instructions)• Decide on student grouping• Teach students how to use plastic pipettes (or
micropipettes if you are using those)• Decide whether or not you are doing the Protein
Purification lab that follows. This requires that you pour extra plates, and that you save the transformed plates from this lab

How to streak a plate from a stab
Touch a loop lightly to the stab and streak as shown:

Transcription / Translation
Campbell

What is Transformation?
Uptake of foreign DNA, often a circular plasmid
Bacterial chromosome
Bacterial chromosome
Plasmid
Bacteria now express cloned fluorescent protein (transcription of gene and translation of mRNA to protein at ribosomes).
Allow bacteria to grow for 1-3 days on plate with ampicillin.
Plasmid

What is a plasmid?
• A small circular piece of DNA that replicates separately from the main bacterial chromosome
• Originated in bacteria to allow survival in specific environmental conditions
• May express antibiotic resistance gene or be modified in the lab to express proteins of interest

How are plasmids engineered?
Host DNA fragments (i.e. coral or jellyfish FP coding DNA)
DNA Plasmid Vector
Cut plasmids open with restriction enzymes
Cut genomic DNA into fragments
+
Ligate (paste) fragments into cut DNA vector
End result: Plasmid containing FP gene

FP transformation procedure
1. Suspend bacterial colonies in CaCl2
2. Add plasmid DNA
3. Place tubes on ice for 10 min
4. Heat-shock at 42°C for 45 seconds & place on ice again for 2 min
5. Plate out bacteria
PLEASE READ AND FOLLOW LAB INSTRUCTIONS CAREFULLY!

Why calcium chloride?
Ca++
Ca++
OCH2
O
P O
O
OBase
CH2
O
P
O
O
O
Base
OH
Sugar
Sugar
OCa++
• Transformation solution = CaCl2
• Positive charge of Ca++ ions shields negative charge of DNA phosphates so the plasmid DNA can more easily move through the cell membrane

Why ice and heat?
• Incubate on ice slows fluid cell membrane
• Heat-shock increases permeability of membranes

Why Ampicillin?
• Ampicillin inhibits cell growth. Only cells that can inactivate the ampicillin around them will grow.
• Ampicillin resistance is tied to (expressed with) the fluorescent protein gene
• The ampicillin is the selection mechanism that allows only the transformed bacteria to grow on the plate

Materials Checklist
– 1 tube of CaCl2 on ice– 2 empty microtubes – 1 waterproof pen – 4 disposable transfer pipette (or you can use p20’s with yellow tips)– Innoculating loops– 2 cotton swabs or extra loops– tape for sealing plates after innoculation– 1 LB plate– 2 LB/AMP plates– Ice bucket (cup with ice and water) with tube holder (float)– One tube of plasmid labeled either PM1 or PM2 on ice.– Class or lab station waste containers– Class water bath– Lab instructions

• Teaching Strategies
• Transformation
• Central Dogma
• Mutations
• Ecology/Diversity
*** It is important for you to take the time to read through each curriculum piece so that you can decide which parts will work best for you and your students
BioBridge Curricula
• Protein Purification
• Bioinformatics
• Resources

Brief details of curricula
Transformation: Background information and wet lab used as beginning for Protein Purification Lab and Ecology Lab. The central idea for the other pieces.
Central Dogma: Review of concepts of transcription, translation and protein synthesis. Update to text information. Short student activity.
Mutations: Review of concepts of transcription, translation and protein synthesis. Several paper activities.
Ecology: Real world applications and origins of fluorescent proteins. LED lab activity. Good introduction to all other pieces if the lab is done without bacterial plates. (otherwise need plates from transformation lab
Protein Purification: Use products from transformation procedure to perform this activity. Levels of protein structure and wet lab demonstrating how proteins can be separated from a mixture.
Bioinformatics: Computers and biology come together to show 3D protein structure, and the relation between structure and function.

All of the BioBridge curriculum pieces follow the same basic format (with some modifications depending on activities and labs included)
Teacher’s Guide:1. Standards alignment
2. Purpose and objectives 3. Grouping suggestions 4. Class time needed 5. Additional equipment needed6. Things to think about
beforehand7. Lab preparation8. Answers to questions
Student Guide1. Student background reading2. Student lab instructions3. Pre-lab questions4. Results and discussion
questions5. Additional thought questions
• The only way you can understand the curriculum is to take the time to read through all the pieces!

Possible Curriculum Sequences
Transformation, Protein Purification, Mutation, Central Dogma, Ecology/Diversity, Bioinformatics
Mutation, Central Dogma, Transformation, Protein purification, Bioinformatics, Ecology/Diversity
Ecology/Diversity, Transformation, Mutation, Central Dogma, Protein Purification, Bioinformatics

Protein Purification
Purify a single recombinant protein of interest from over 4,000 naturally occurring E. coli gene products.

Why Purify Proteins?
• To get a pure sample of the protein for use in laboratory experiments
• This may take several different (successive) purification methods
• Without a pure sample you cannot be certain that results of an experiment are due solely to the protein being studied

Column Chromatography
• Examples of chromatography used for protein purification
- Size exclusion
- Hydrophobic interaction
- Affinity (HexaHistidine Tag used in this protocol)
•The his-tag is an added end piece of the fluorescent protein which attaches to the beads in the column.
•When imidazole is added, it takes the place of the his-tag because their structures are similar and the protein is washed off the beads

Materials Checklist
Agar (LB) amp plate from transformation lab
1 fresh LB/amp plate (optional)
150µl nickel beads (in microfuge tube labeled Ni) on ice or refrigerated
2 ml centrifuge tubes (3 for each group)
centrifuge
Plastic disposable pipettes (3)
pasteur pipet Cotton
TE buffer solution
Lysozyme tube (1 per class)
Wash (elution) buffer (in a microtube labeled “WB”)
Plastic plate spreader/scraper
INSTRUCTIONS FOR YOU TO FOLLOW. PLEASE READ
CAREFULLY!

Day 1
1. If you have many colonies of one color, skip this step.
2. If you have only a few colonies spread them over the entire plate by streaking them with a sterile loop.
3. Grow overnight at 37o C

Day 2
1. Resuspend bacteria (growing on plates) in the TE buffer solution
2. Gently scrape colonies from the plate (see protocol). Transfer to a clean tube.
3. Add the lysozyme and incubate for 5 min at room temperature, inverting occasionally
4. Freeze the cells overnight or with dry ice and ethanol (more freeze/thaw cycles may improve results)

How to Pour Agar Plates
1. Label plates2. Put 100 ml water in flask and add 4 g (pre-measured) agar
powder (or pre measured agar tablets)3. Swirl to mix4. Heat in microwave or on hotplate to boiling (don’t boil over)5. Swirl as needed to get clear solution6. Cool7. Stack plates8. Pour all LB plates9. Add ampicillin and swirl (be sure that agar is <45oC)10. Pour all LB plates11. Allow to sit for 1-2 days12. Store in refrigerator upside down.

Setting up the Column

Day 3
1. Defrost cells
2. Clear lysate by centrifuging for 5 minutes
3. Carefully suck up the liquid at the top of the tube (supernatant) with a clean pipette.
4. Add this liquid to the 150uL of nickel beads
5. Gently shake the microcentrifuge tubes back and forth for about 5 minutes to allow FPs with his-tag to bind to beads
6. Add the sample to the column

Running the Column (day 3)
1. Add the bead/protein solution into the column. Allow the liquid to flow through the column. Discard liquid.
2. Place clean tube under the column. Add wash (elution) buffer (imidazole) to the column to “disengage” the protein solution from the beads. Collect your FP.