bsd user guide
TRANSCRIPT
https://business.officedepot.com
business.officedepot.com
User Guide
Office Depot • business.officedepot.com User Guide
2 | User Guide https://business.officedepot.com
CONTACT INFORMATION
Contact
For Customer Service: Call 888.263.3423 (888.2.OFFICE) For Technical Support: Call 800.269.6888 or e-mail [email protected] Phone Hours of Operation:
Monday – Friday, 8:00 A.M. – 8:00 P.M. (Eastern Time) Live Chat:
For immediate support, chat in real time with an online representative Chat Hours of Operation:
Monday – Friday, 8:00 A.M. – 11:00 P.M. (Eastern Time)
SHIPPING AND DELIVERY SCHEDULE
Delivery schedule:
Monday – Friday. Order by 5:00 P.M. local time, and your order will be
delivered the next business day (between 8:30 A.M. and 5:00 P.M.) in our
local delivery areas. Some furniture, technology and special order items are
excluded. Deliveries outside our local delivery areas will be assessed a
delivery charge based on total order weight.
MY ACCOUNT
My Account Manager is: _________________________________________
My Account Manager’s Contact Information: _______________________
©Copyright 2015 by Office Depot, Inc. All rights reserved. Office Depot is a registered trademark of Office Depot, Inc.
Office Depot • business.officedepot.com User Guide
3 | User Guide https://business.officedepot.com
TABLE OF CONTENTS CHAPTER 1: TIMESAVING FEATURES ....................................................................................... 6
CHAPTER 2: GETTING STARTED............................................................................................... 7
LOGIN ......................................................................................................................................... 7
FORGOT YOUR LOGIN NAME/PASSWORD ........................................................................... 7
BULLETIN BOARD ..................................................................................................................... 8
EDITING THE BULLETIN BOARD ............................................................................................. 8
DASHBOARD.............................................................................................................................. 9
CHAPTER 3: ORDER ENTRY ..................................................................................................... 12
SEARCHING THE CATALOG .................................................................................................. 12
CATEGORY SEARCH .............................................................................................................. 12
KEYWORD SEARCH................................................................................................................ 13
ADVANCED SORTING ............................................................................................................. 13
ICON LEGEND.......................................................................................................................... 14
GREENER PURCHASE PROGRAM ....................................................................................... 15
ECO-FRIENDLY AND DIVERSE SUPPLIER FILTERS .......................................................... 16
SHOP OFFICE DEPOT BRAND .............................................................................................. 16
MY SHOPPING LISTS .............................................................................................................. 16
CREATE NEW LIST.................................................................................................................. 17
EMAIL SHOPPING LIST........................................................................................................... 17
PRODUCT COMPARISON....................................................................................................... 18
ORDER BY ITEM NUMBER ..................................................................................................... 19
INK & TONER ........................................................................................................................... 19
RECYCLING PROGRAM ......................................................................................................... 20
CUSTOM PRINTING ................................................................................................................ 21
LIMITED AVAILABILITY ........................................................................................................... 22
ORDERS FOR FUTURE DELIVERY ....................................................................................... 23
SUBSCRIPTION MANAGER .................................................................................................... 24
SETTING UP AN ITEM SUBSCRIPTION ................................................................................ 24
CHAPTER 4: CHECKOUT ........................................................................................................... 25
VIEW CART .............................................................................................................................. 25
GO GREENER .......................................................................................................................... 26
SHARE CART ........................................................................................................................... 27
CART TIME OUT ...................................................................................................................... 27
SAVE FOR LATER ................................................................................................................... 27
Office Depot • business.officedepot.com User Guide
4 | User Guide https://business.officedepot.com
MOVING SAVED ITEMS TO A SHOPPING LIST.................................................................... 29
CHECKOUT .............................................................................................................................. 29
CHECKOUT REQUIRED FIELDS ............................................................................................ 29
SUBMITTING YOUR ORDER .................................................................................................. 31
ORDER CONFIRMATION ........................................................................................................ 33
ORDER TRACKING.................................................................................................................. 34
QUICK RELEASE OF ORDERS .............................................................................................. 34
ORDER TRACKING SEARCH CRITERIA ............................................................................... 34
ORDER DETAIL ........................................................................................................................ 35
RELATED ORDERS ................................................................................................................. 35
ORDER RETURNS ................................................................................................................... 37
CHAPTER 5: MY PROFILE .......................................................................................................... 38
MY PROFILE OVERVIEW ........................................................................................................ 38
SELECT CONTACTS ............................................................................................................... 39
SELECT A SHIP TO LOCATION.............................................................................................. 40
SELECT PO, COST CENTER, RELEASE AND/OR DESKTOP ............................................. 40
USER INFO AND MARKETING SUBSCRIPTIONS ................................................................ 41
YOUR LOGIN ID AND PASSWORD ........................................................................................ 41
PAYMENT INFORMATION ...................................................................................................... 42
PROXY APPROVER INFO ....................................................................................................... 43
CHAPTER 6: OTHER FEATURES............................................................................................... 44
ONLINE REPORTING .............................................................................................................. 44
BUDGET TRACKING................................................................................................................ 45
CREATING A BUDGET ............................................................................................................ 45
BUDGET INDICATOR .............................................................................................................. 46
CREDIT CARD PERMISSIONS USER SETUP ....................................................................... 48
SINGLE CREDIT CARD ........................................................................................................... 48
MULTIPLE SELF-MANAGED CREDIT CARDS ...................................................................... 48
ASSIGNED CREDIT CARD GROUPS ..................................................................................... 48
PROCUREMENT CARD........................................................................................................... 49
PROCUREMENT CARD REGISTRATION .............................................................................. 49
STORE PURCHASE CARD ..................................................................................................... 50
STORE PURCHASE CARD APPLICATION ............................................................................ 50
CHAPTER 7: USER PROFILES (SUPER USERS ONLY) .......................................................... 51
ADD NEW USERS .................................................................................................................... 52
Office Depot • business.officedepot.com User Guide
5 | User Guide https://business.officedepot.com
LOGIN SETTINGS .................................................................................................................... 52
USER INFORMATION .............................................................................................................. 52
PAYMENT INFORMATION ...................................................................................................... 53
PERMISSIONS ......................................................................................................................... 53
WORKFLOWS/APPROVALS ................................................................................................... 54
EDITING USER PROFILES...................................................................................................... 55
SELECT A USER TO EDIT ...................................................................................................... 55
RESET PASSWORD ................................................................................................................ 55
ACTIVE/INACTIVE USERS ...................................................................................................... 56
DELETING USER PROFILES .................................................................................................. 56
TIERED APPROVALS .............................................................................................................. 56
CREATING A WORKFLOW ..................................................................................................... 57
WORKFLOW APPROVALS...................................................................................................... 58
CHAPTER 8: MANAGE ACCOUNT FOR SUPER USERS ......................................................... 59
MANAGE CONTACTS .............................................................................................................. 59
ADD CONTACTS ...................................................................................................................... 59
EDIT CONTACTS ..................................................................................................................... 59
MANAGE SHIP TO LOCATIONS ............................................................................................. 59
ADD A NEW SHIP TO ADDRESS............................................................................................ 60
EDIT A SHIP TO ADDRESS..................................................................................................... 60
MANAGE DESKTOPS, PO NUMBERS, RELEASES AND COST CENTERS ....................... 60
ADD A DESKTOP, PO NUMBER, RELEASE OR COST CENTER ........................................ 61
EDIT A DESKTOP, PO NUMBER, RELEASE OR COST CENTER ....................................... 61
CHAPTER 9: ASSISTANCE AND TRAINING ............................................................................. 62
DEMO HELP VIDEOS .............................................................................................................. 62
HELP DESK .............................................................................................................................. 62
CUSTOMER SERVICE ............................................................................................................. 62
LIVE CHAT ................................................................................................................................ 62
FREQUENTLY ASKED QUESTIONS (FAQ) ........................................................................... 62
CHAPTER 10: NOTES ................................................................................................................. 64
INDEX ........................................................................................................................................... 65

Office Depot • business.officedepot.com User Guide
6 | User Guide https://business.officedepot.com
CHAPTER 1: TIMESAVING FEATURES Office Depot’s Business Solutions Division has enhanced its website with more intuitive, time
saving features for your convenience. We added expandable menus to help you navigate the
site even faster and popular tools such as “Quick Order” and “Ink & Toner Finder,” are all
accessible on the homepage. You can also quickly manage your Shopping Lists and keep track of your orders, making your online purchasing experience better and more efficient than ever.
Search Tools Search for items by
keyword, Office Depot
Item Numbers, or
Manufacturer Numbers.
Quick Order With Quick Order you
can enter an item
number and quantity
and quickly add an
item directly to the
shopping cart.
Ink & Toner Provides a hassle-free
way of replenishing your
printing supplies, perfectly
matched to your machine
with just the right model
number.
My Account Click on My Account to view your
User Information, Login Information,
‘ShipTo’ Address, Security
Information, Profile Information, etc.
Click on any of these features to make
changes to your account in seconds.
Shopping Tools Find our most popular, timesaving shopping tools
located here for the ease of placing your order.
Just a click of your mouse will bring you the
features of Order Tracking, My Shopping Lists, and
Cart. You can also keep track of your item
selections and your order subtotal with our
Shopping Cart preview.
Office Depot • business.officedepot.com User Guide
7 | User Guide https://business.officedepot.com
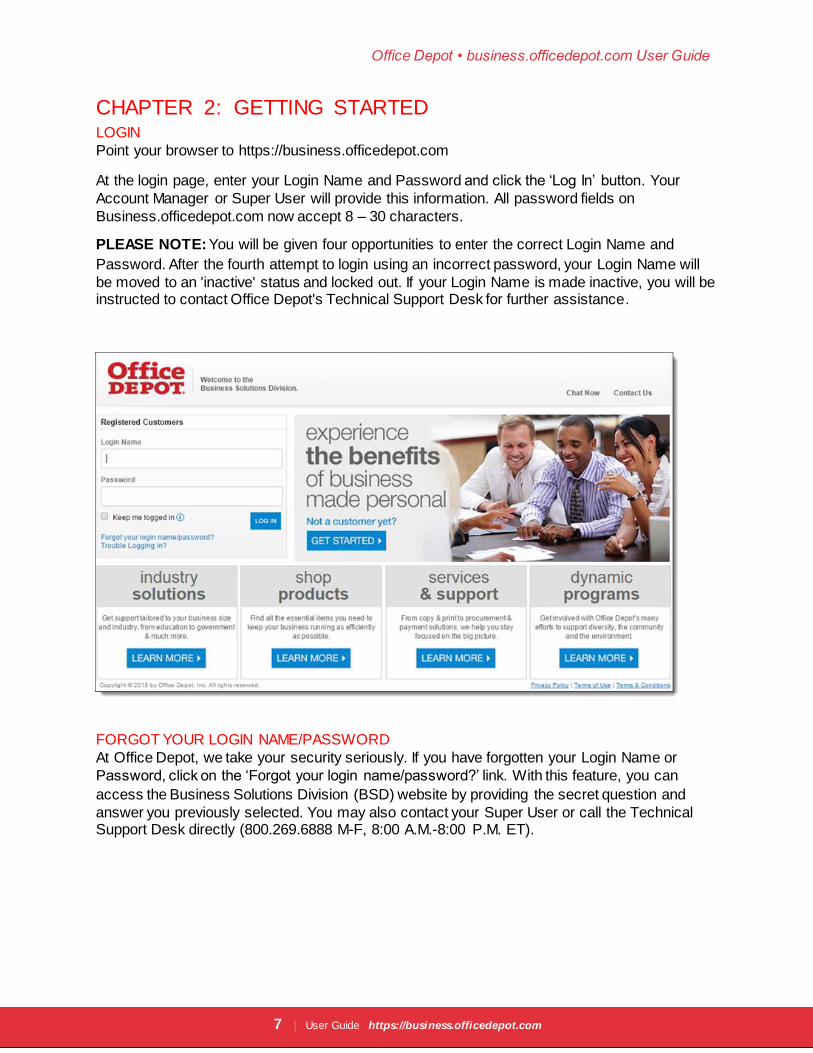
CHAPTER 2: GETTING STARTED LOGIN
Point your browser to https://business.officedepot.com
At the login page, enter your Login Name and Password and click the ‘Log In’ button. Your
Account Manager or Super User will provide this information. All password fields on
Business.officedepot.com now accept 8 – 30 characters.
PLEASE NOTE: You will be given four opportunities to enter the correct Login Name and
Password. After the fourth attempt to login using an incorrect password, your Login Name will
be moved to an 'inactive' status and locked out. If your Login Name is made inactive, you will be instructed to contact Office Depot's Technical Support Desk for further assistance.
FORGOT YOUR LOGIN NAME/PASSWORD
At Office Depot, we take your security seriously. If you have forgotten your Login Name or
Password, click on the ‘Forgot your login name/password?’ link. With this feature, you can
access the Business Solutions Division (BSD) website by providing the secret question and
answer you previously selected. You may also contact your Super User or call the Technical Support Desk directly (800.269.6888 M-F, 8:00 A.M.-8:00 P.M. ET).
Office Depot • business.officedepot.com User Guide
8 | User Guide https://business.officedepot.com
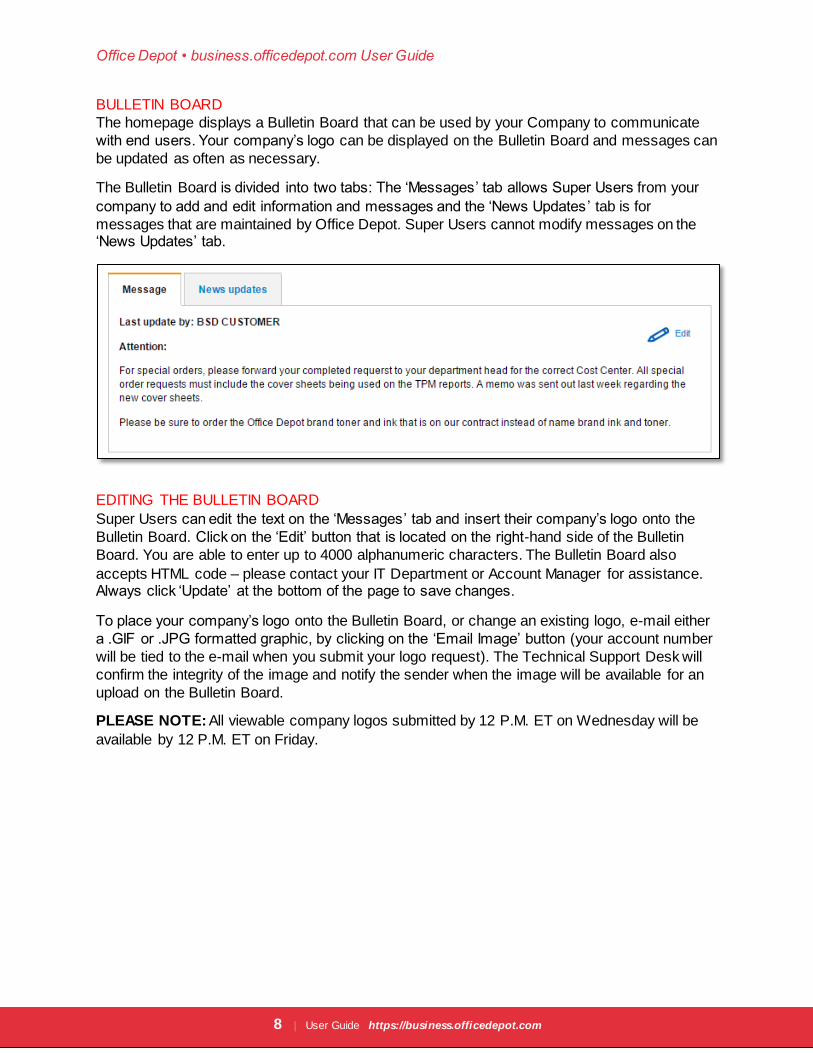
BULLETIN BOARD
The homepage displays a Bulletin Board that can be used by your Company to communicate
with end users. Your company’s logo can be displayed on the Bulletin Board and messages can
be updated as often as necessary.
The Bulletin Board is divided into two tabs: The ‘Messages’ tab allows Super Users from your
company to add and edit information and messages and the ‘News Updates’ tab is for
messages that are maintained by Office Depot. Super Users cannot modify messages on the ‘News Updates’ tab.
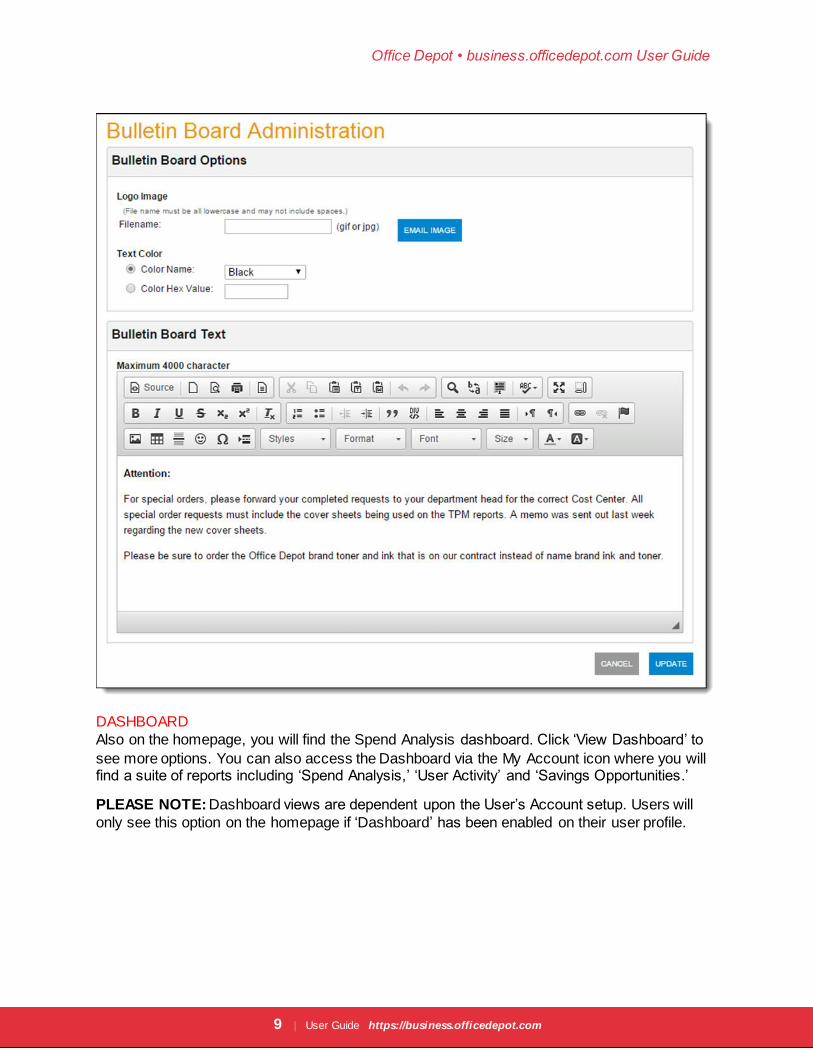
EDITING THE BULLETIN BOARD
Super Users can edit the text on the ‘Messages’ tab and insert their company’s logo onto the
Bulletin Board. Click on the ‘Edit’ button that is located on the right-hand side of the Bulletin
Board. You are able to enter up to 4000 alphanumeric characters. The Bulletin Board also
accepts HTML code – please contact your IT Department or Account Manager for assistance. Always click ‘Update’ at the bottom of the page to save changes.
To place your company’s logo onto the Bulletin Board, or change an existing logo, e-mail either
a .GIF or .JPG formatted graphic, by clicking on the ‘Email Image’ button (your account number
will be tied to the e-mail when you submit your logo request). The Technical Support Desk will
confirm the integrity of the image and notify the sender when the image will be available for an
upload on the Bulletin Board.
PLEASE NOTE: All viewable company logos submitted by 12 P.M. ET on Wednesday will be
available by 12 P.M. ET on Friday.
Office Depot • business.officedepot.com User Guide
9 | User Guide https://business.officedepot.com
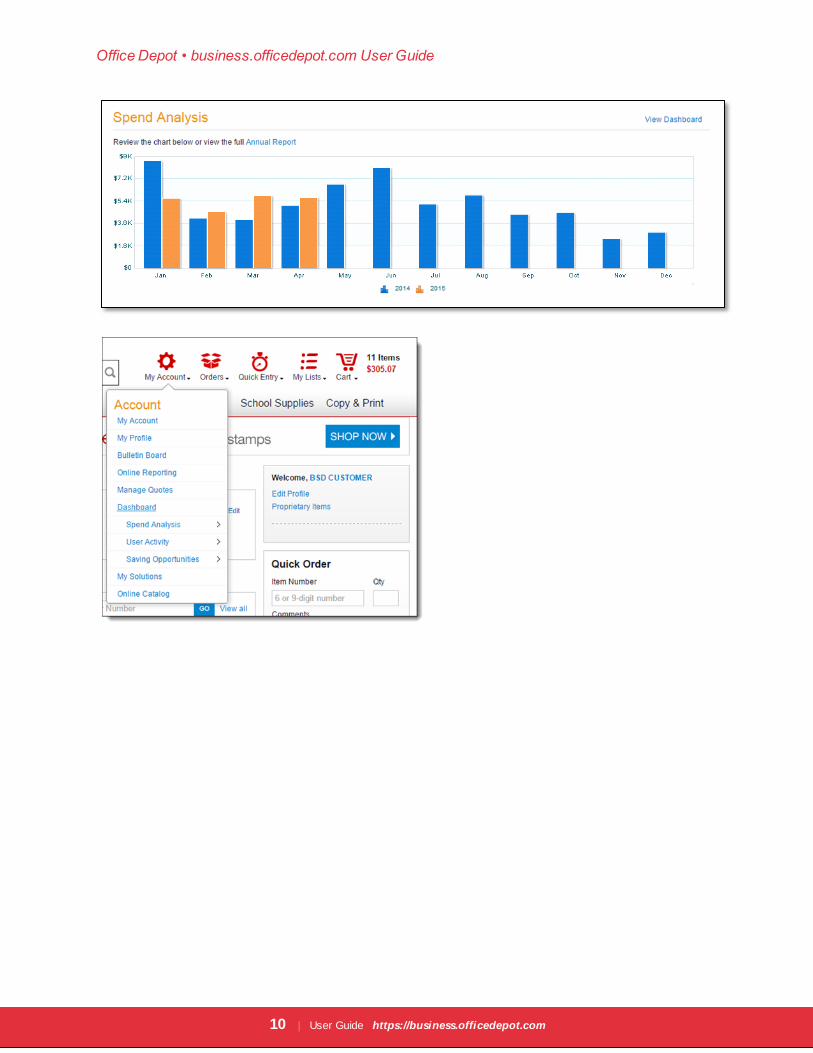
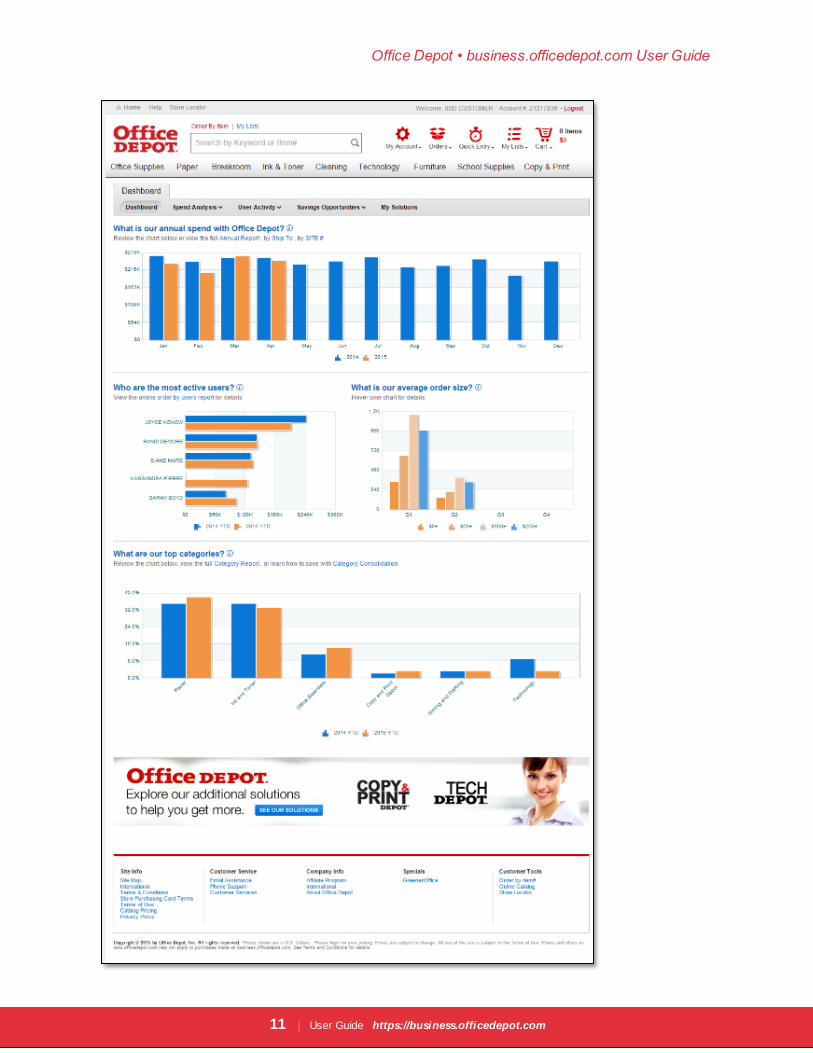
DASHBOARD
Also on the homepage, you will find the Spend Analysis dashboard. Click ‘View Dashboard’ to
see more options. You can also access the Dashboard via the My Account icon where you will find a suite of reports including ‘Spend Analysis,’ ‘User Activity’ and ‘Savings Opportunities.’
PLEASE NOTE: Dashboard views are dependent upon the User’s Account setup. Users will
only see this option on the homepage if ‘Dashboard’ has been enabled on their user profile.
Office Depot • business.officedepot.com User Guide
10 | User Guide https://business.officedepot.com
Office Depot • business.officedepot.com User Guide
11 | User Guide https://business.officedepot.com
Office Depot • business.officedepot.com User Guide
12 | User Guide https://business.officedepot.com
CHAPTER 3: ORDER ENTRY SEARCHING THE CATALOG
You can search for products by keyword, Office Depot Item Number, Manufacturer Number,
Customer Item Number, or Category. Searching by Item Number displays only one item while searching by keyword might yield a page or more of results.
For your shopping convenience, the Search feature appears on every page on the site.
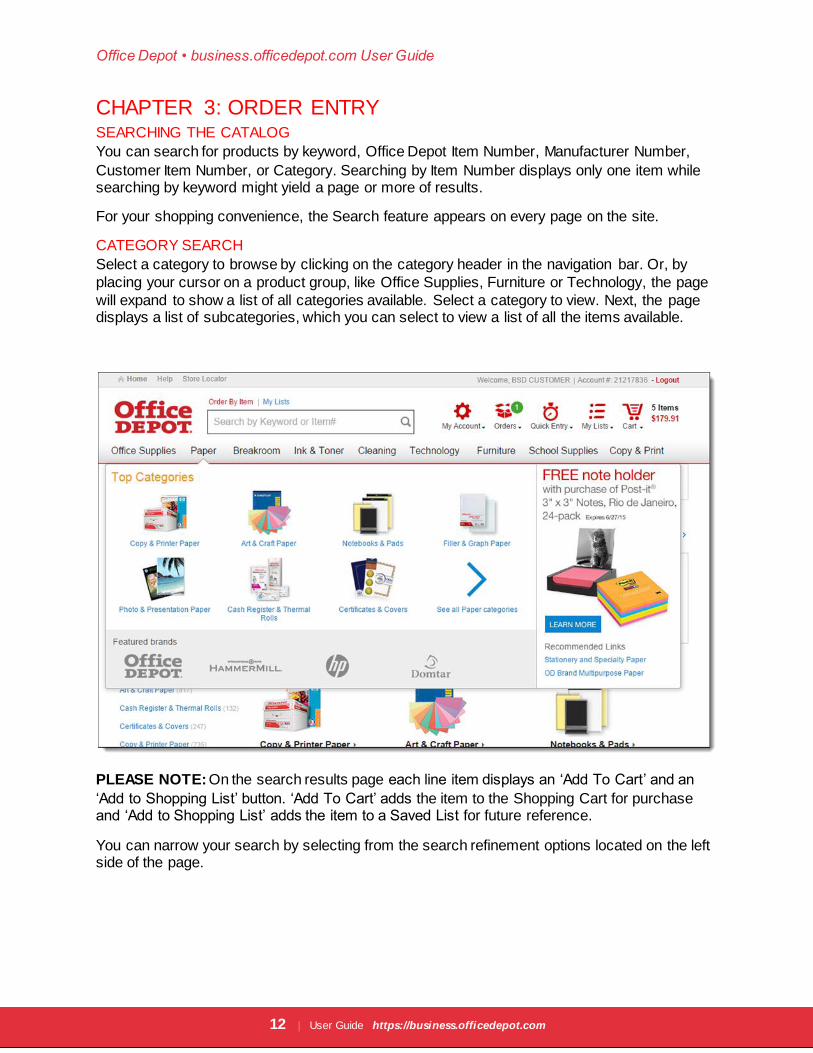
CATEGORY SEARCH
Select a category to browse by clicking on the category header in the navigation bar. Or, by
placing your cursor on a product group, like Office Supplies, Furniture or Technology, the page
will expand to show a list of all categories available. Select a category to view. Next, the page displays a list of subcategories, which you can select to view a list of all the items available.
PLEASE NOTE: On the search results page each line item displays an ‘Add To Cart’ and an
‘Add to Shopping List’ button. ‘Add To Cart’ adds the item to the Shopping Cart for purchase and ‘Add to Shopping List’ adds the item to a Saved List for future reference.
You can narrow your search by selecting from the search refinement options located on the left side of the page.
Office Depot • business.officedepot.com User Guide
13 | User Guide https://business.officedepot.com
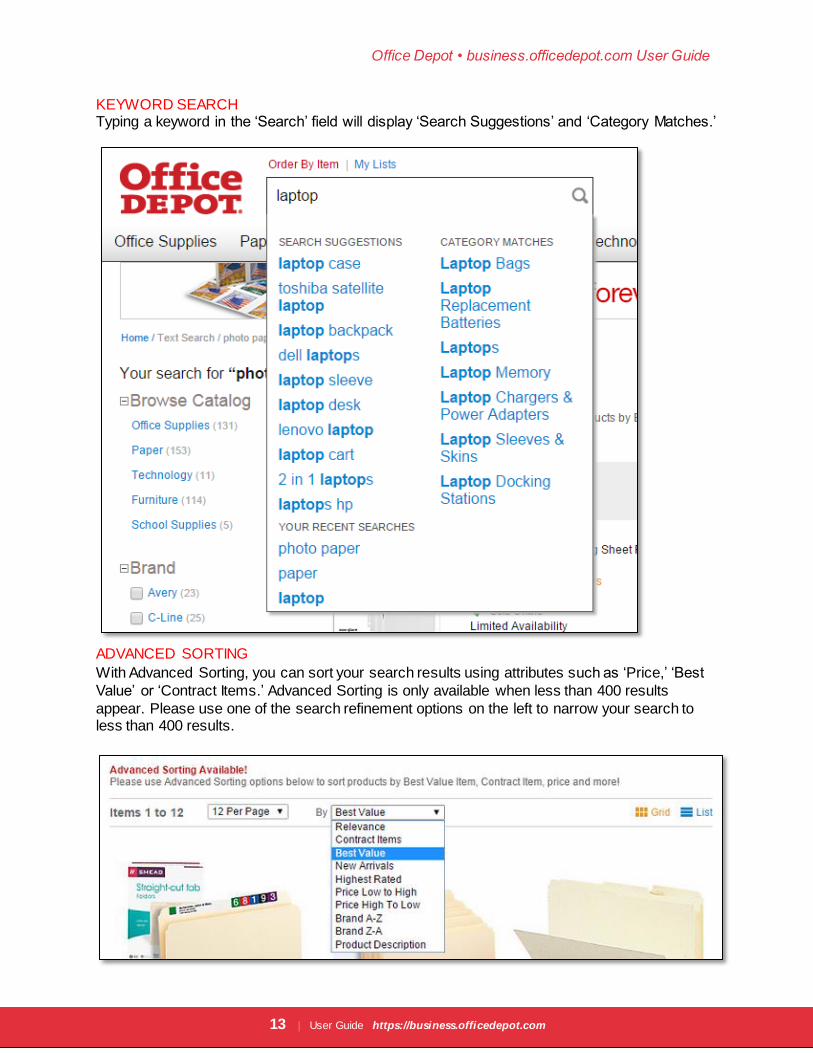
KEYWORD SEARCH Typing a keyword in the ‘Search’ field will display ‘Search Suggestions’ and ‘Category Matches.’
ADVANCED SORTING
With Advanced Sorting, you can sort your search results using attributes such as ‘Price,’ ‘Best
Value’ or ‘Contract Items.’ Advanced Sorting is only available when less than 400 results
appear. Please use one of the search refinement options on the left to narrow your search to less than 400 results.
Office Depot • business.officedepot.com User Guide
14 | User Guide https://business.officedepot.com
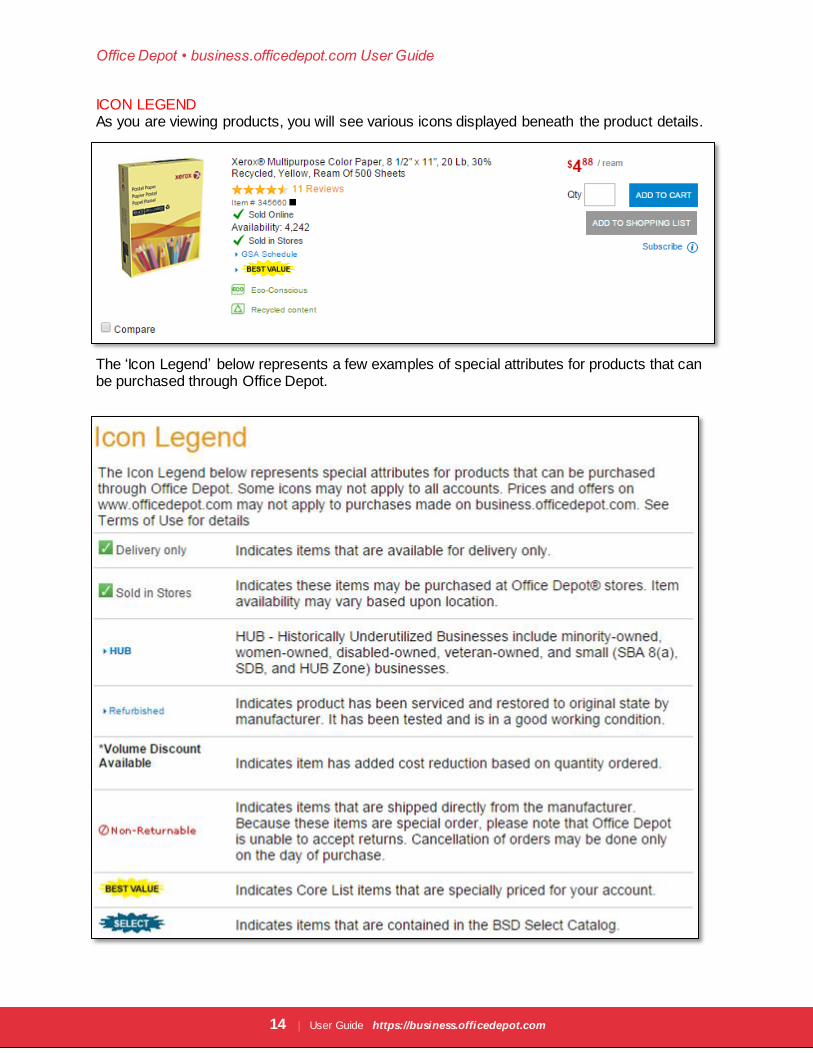
ICON LEGEND As you are viewing products, you will see various icons displayed beneath the product details.
The ‘Icon Legend’ below represents a few examples of special attributes for products that can be purchased through Office Depot.
Office Depot • business.officedepot.com User Guide
15 | User Guide https://business.officedepot.com
For the full list, please click on any of these icons in the product path, or click the following link: https://business.officedepot.com/catalog/iconlegend.do
PLEASE NOTE: Some icons may not apply to all accounts. Prices and offers on
www.officedepot.com may not apply to purchases made on business.officedepot.com. See Terms of Use for details.
GREENER PURCHASE PROGRAM
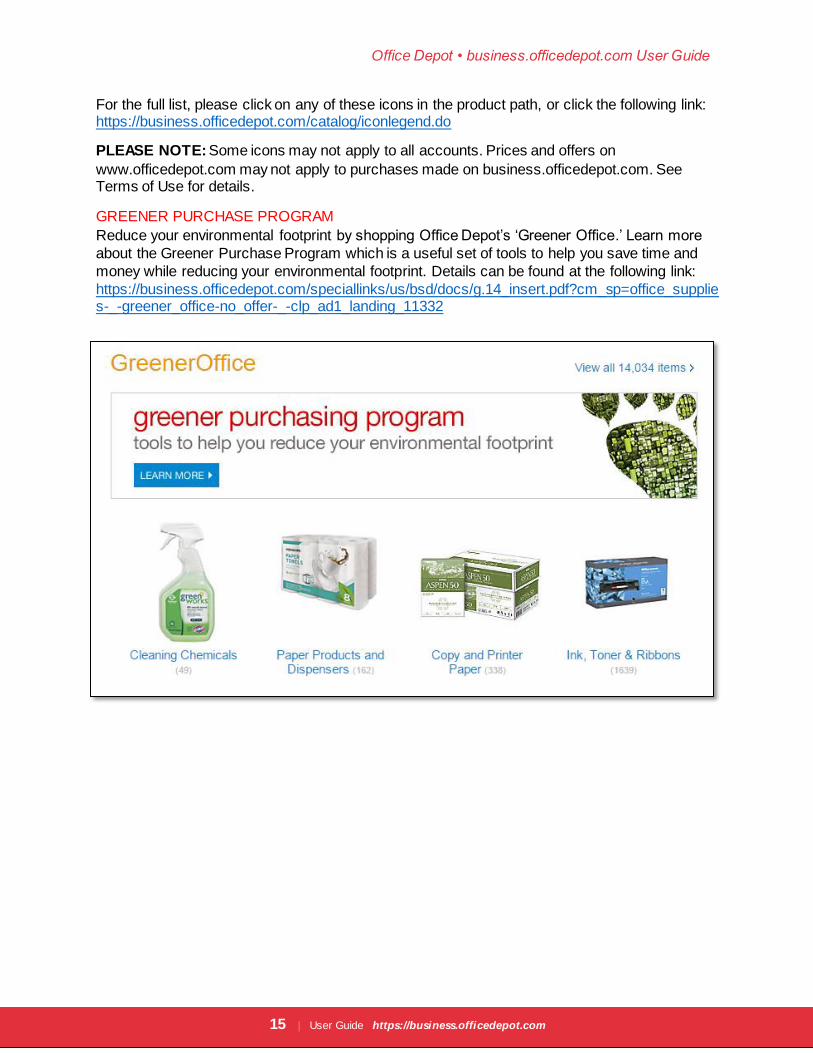
Reduce your environmental footprint by shopping Office Depot’s ‘Greener Office.’ Learn more
about the Greener Purchase Program which is a useful set of tools to help you save time and
money while reducing your environmental footprint. Details can be found at the following link:
https://business.officedepot.com/speciallinks/us/bsd/docs/g.14_insert.pdf?cm_sp=office_supplies-_-greener_office-no_offer-_-clp_ad1_landing_11332
Office Depot • business.officedepot.com User Guide
16 | User Guide https://business.officedepot.com
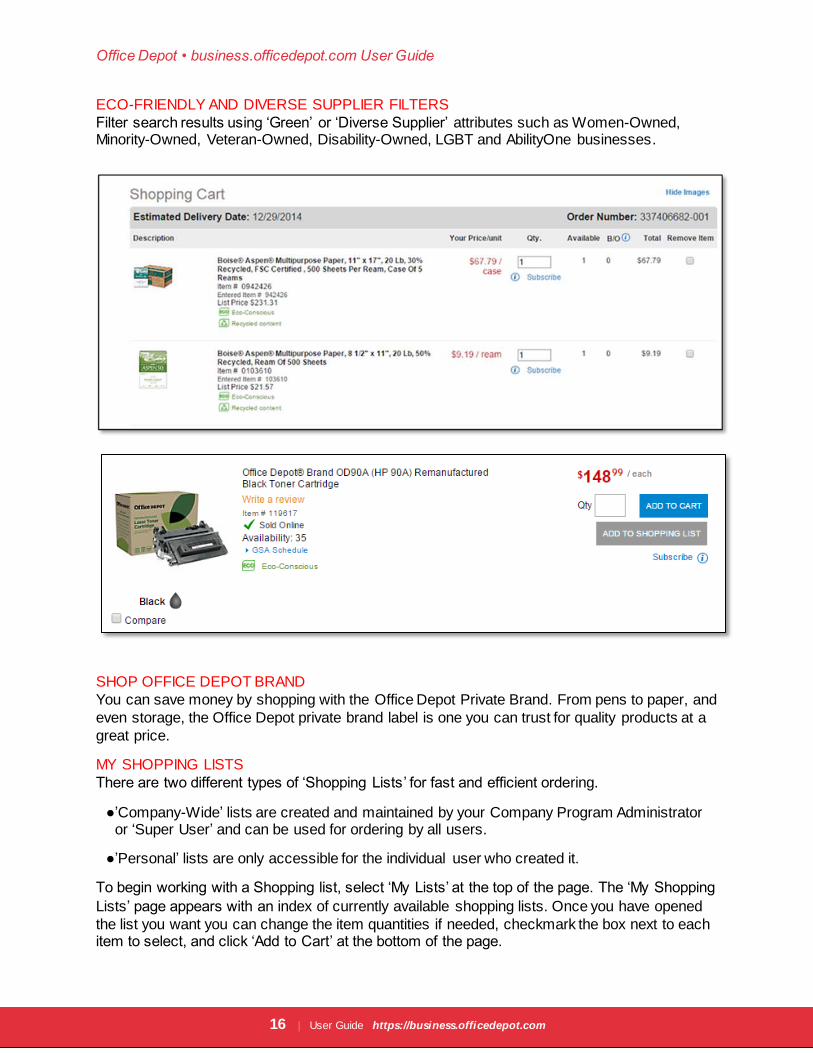
ECO-FRIENDLY AND DIVERSE SUPPLIER FILTERS
Filter search results using ‘Green’ or ‘Diverse Supplier’ attributes such as Women-Owned, Minority-Owned, Veteran-Owned, Disability-Owned, LGBT and AbilityOne businesses.
SHOP OFFICE DEPOT BRAND
You can save money by shopping with the Office Depot Private Brand. From pens to paper, and
even storage, the Office Depot private brand label is one you can trust for quality products at a
great price.
MY SHOPPING LISTS
There are two different types of ‘Shopping Lists’ for fast and efficient ordering.
●’Company-Wide’ lists are created and maintained by your Company Program Administrator or ‘Super User’ and can be used for ordering by all users.
●’Personal’ lists are only accessible for the individual user who created it.
To begin working with a Shopping list, select ‘My Lists’ at the top of the page. The ‘My Shopping
Lists’ page appears with an index of currently available shopping lists. Once you have opened
the list you want you can change the item quantities if needed, checkmark the box next to each item to select, and click ‘Add to Cart’ at the bottom of the page.
Office Depot • business.officedepot.com User Guide
17 | User Guide https://business.officedepot.com
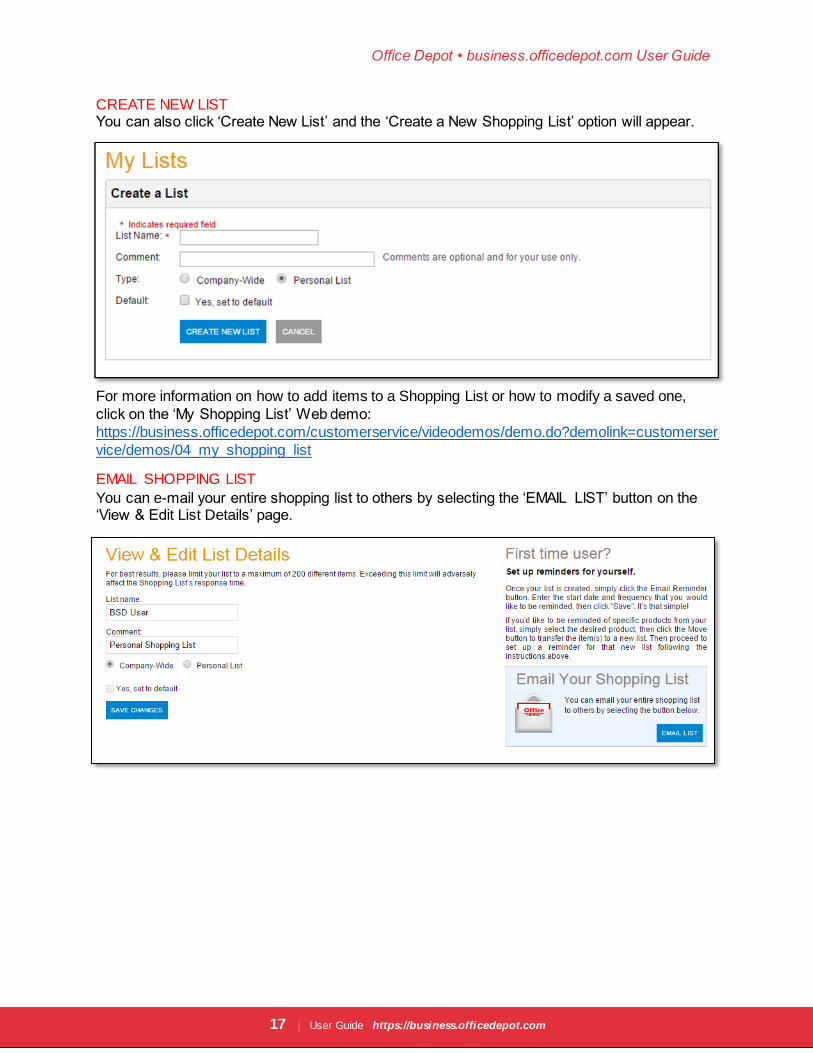
CREATE NEW LIST You can also click ‘Create New List’ and the ‘Create a New Shopping List’ option will appear.
For more information on how to add items to a Shopping List or how to modify a saved one,
click on the ‘My Shopping List’ Web demo:
https://business.officedepot.com/customerservice/videodemos/demo.do?demolink=customerser
vice/demos/04_my_shopping_list
EMAIL SHOPPING LIST
You can e-mail your entire shopping list to others by selecting the ‘EMAIL LIST’ button on the ‘View & Edit List Details’ page.
Office Depot • business.officedepot.com User Guide
18 | User Guide https://business.officedepot.com
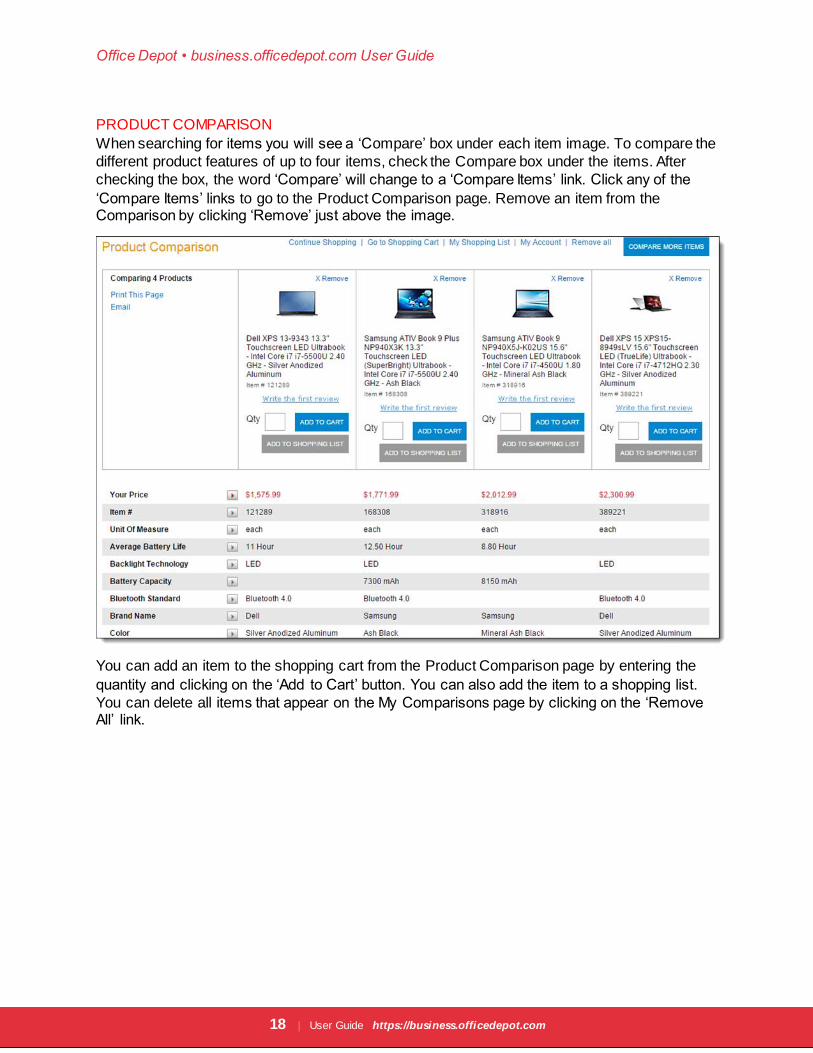
PRODUCT COMPARISON
When searching for items you will see a ‘Compare’ box under each item image. To compare the
different product features of up to four items, check the Compare box under the items. After
checking the box, the word ‘Compare’ will change to a ‘Compare Items’ link. Click any of the
‘Compare Items’ links to go to the Product Comparison page. Remove an item from the Comparison by clicking ‘Remove’ just above the image.
You can add an item to the shopping cart from the Product Comparison page by entering the
quantity and clicking on the ‘Add to Cart’ button. You can also add the item to a shopping list.
You can delete all items that appear on the My Comparisons page by clicking on the ‘Remove All’ link.
Office Depot • business.officedepot.com User Guide
19 | User Guide https://business.officedepot.com
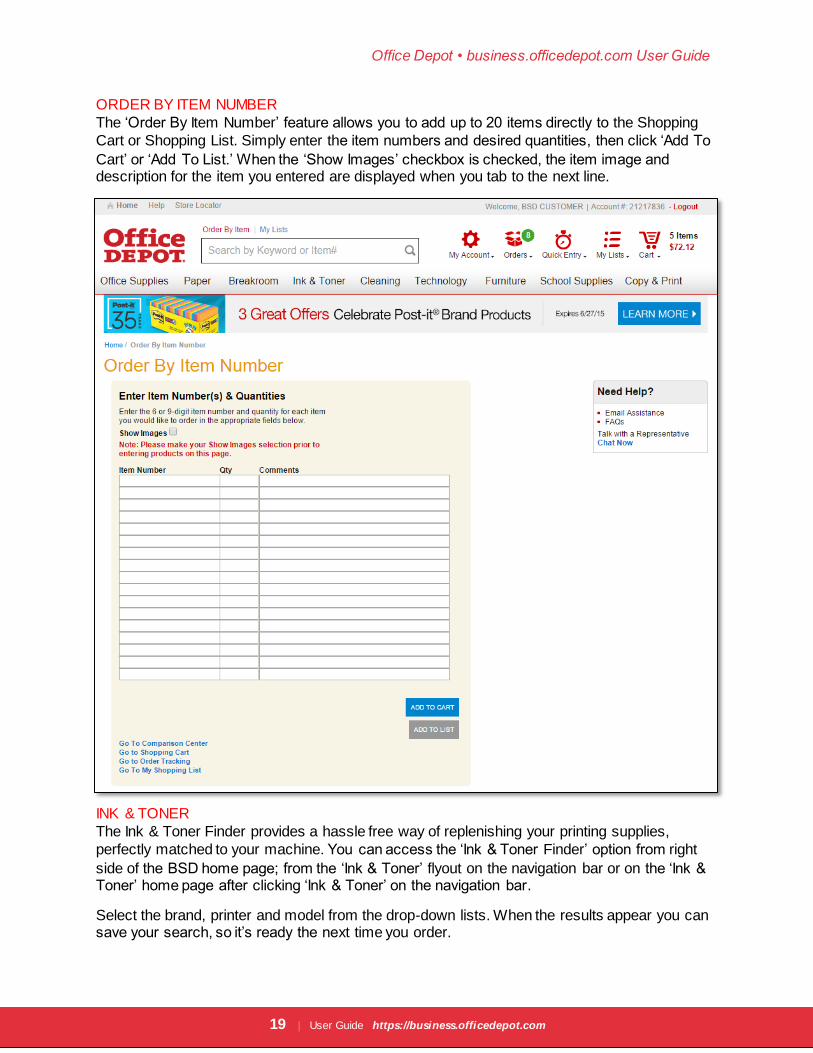
ORDER BY ITEM NUMBER
The ‘Order By Item Number’ feature allows you to add up to 20 items directly to the Shopping
Cart or Shopping List. Simply enter the item numbers and desired quantities, then click ‘Add To
Cart’ or ‘Add To List.’ When the ‘Show Images’ checkbox is checked, the item image and description for the item you entered are displayed when you tab to the next line.
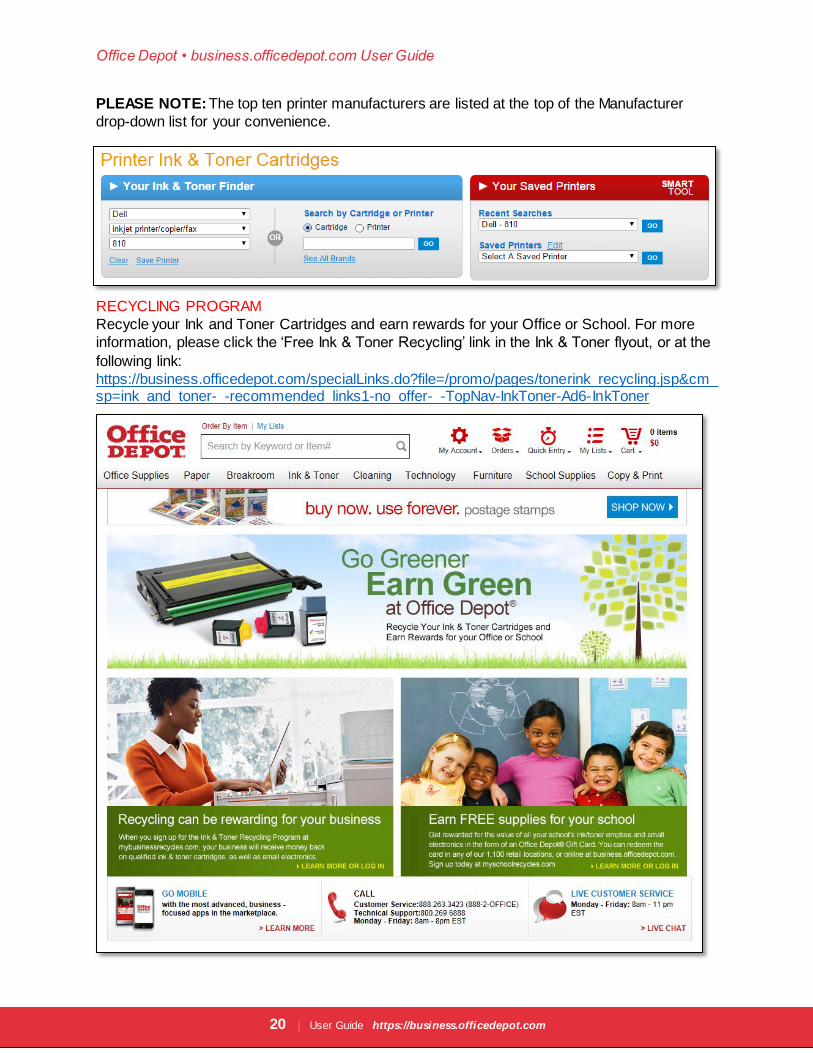
INK & TONER
The Ink & Toner Finder provides a hassle free way of replenishing your printing supplies,
perfectly matched to your machine. You can access the ‘Ink & Toner Finder’ option from right
side of the BSD home page; from the ‘Ink & Toner’ flyout on the navigation bar or on the ‘Ink & Toner’ home page after clicking ‘Ink & Toner’ on the navigation bar.
Select the brand, printer and model from the drop-down lists. When the results appear you can save your search, so it’s ready the next time you order.
Office Depot • business.officedepot.com User Guide
20 | User Guide https://business.officedepot.com
PLEASE NOTE: The top ten printer manufacturers are listed at the top of the Manufacturer
drop-down list for your convenience.
RECYCLING PROGRAM
Recycle your Ink and Toner Cartridges and earn rewards for your Office or School. For more
information, please click the ‘Free Ink & Toner Recycling’ link in the Ink & Toner flyout, or at the
following link:
https://business.officedepot.com/specialLinks.do?file=/promo/pages/tonerink_recycling.jsp&cm_sp=ink_and_toner-_-recommended_links1-no_offer-_-TopNav-InkToner-Ad6-InkToner
Office Depot • business.officedepot.com User Guide
21 | User Guide https://business.officedepot.com
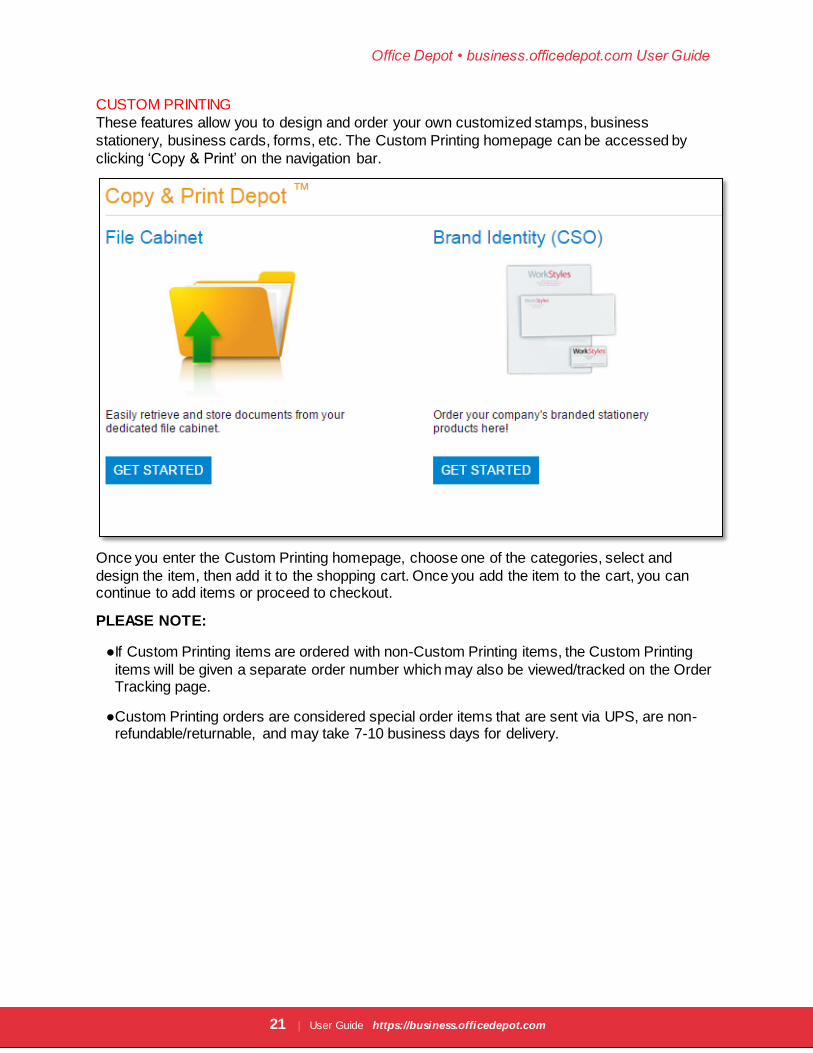
CUSTOM PRINTING
These features allow you to design and order your own customized stamps, business
stationery, business cards, forms, etc. The Custom Printing homepage can be accessed by
clicking ‘Copy & Print’ on the navigation bar.
Once you enter the Custom Printing homepage, choose one of the categories, select and
design the item, then add it to the shopping cart. Once you add the item to the cart, you can continue to add items or proceed to checkout.
PLEASE NOTE:
●If Custom Printing items are ordered with non-Custom Printing items, the Custom Printing
items will be given a separate order number which may also be viewed/tracked on the Order Tracking page.
●Custom Printing orders are considered special order items that are sent via UPS, are non-refundable/returnable, and may take 7-10 business days for delivery.
Office Depot • business.officedepot.com User Guide
22 | User Guide https://business.officedepot.com
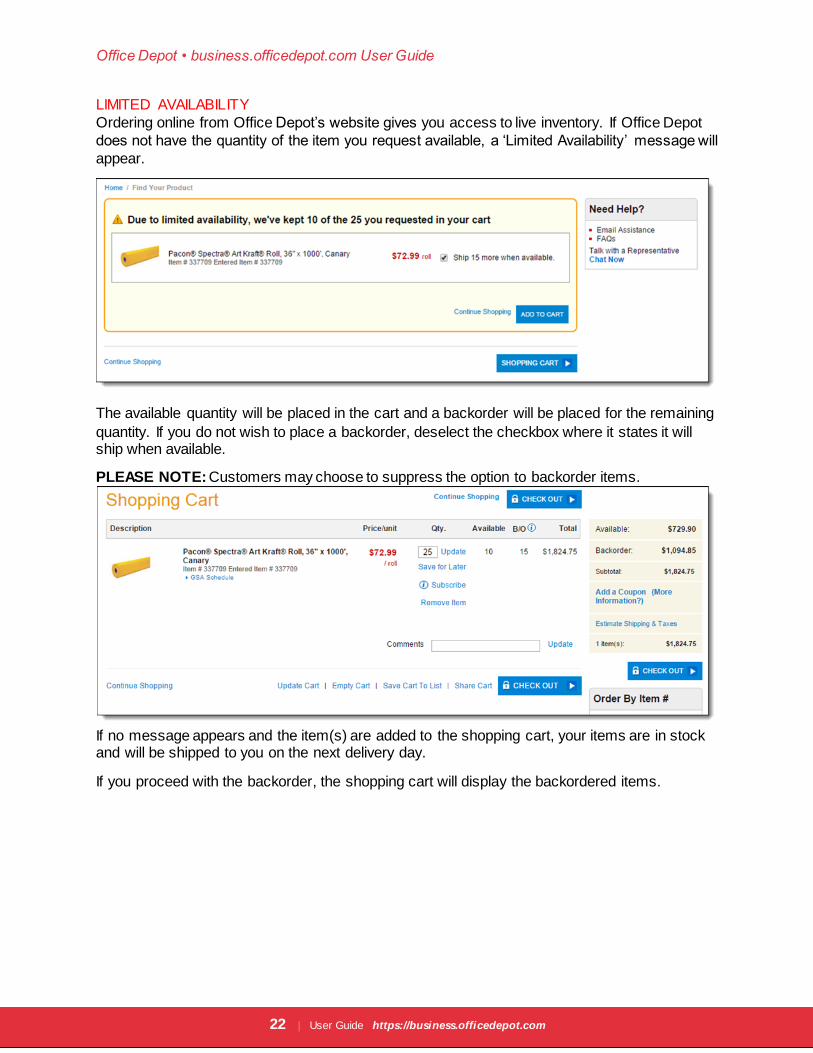
LIMITED AVAILABILITY
Ordering online from Office Depot’s website gives you access to live inventory. If Office Depot
does not have the quantity of the item you request available, a ‘Limited Availability’ message will
appear.
The available quantity will be placed in the cart and a backorder will be placed for the remaining
quantity. If you do not wish to place a backorder, deselect the checkbox where it states it will ship when available.
PLEASE NOTE: Customers may choose to suppress the option to backorder items.
If no message appears and the item(s) are added to the shopping cart, your items are in stock and will be shipped to you on the next delivery day.
If you proceed with the backorder, the shopping cart will display the backordered items.
Office Depot • business.officedepot.com User Guide
23 | User Guide https://business.officedepot.com
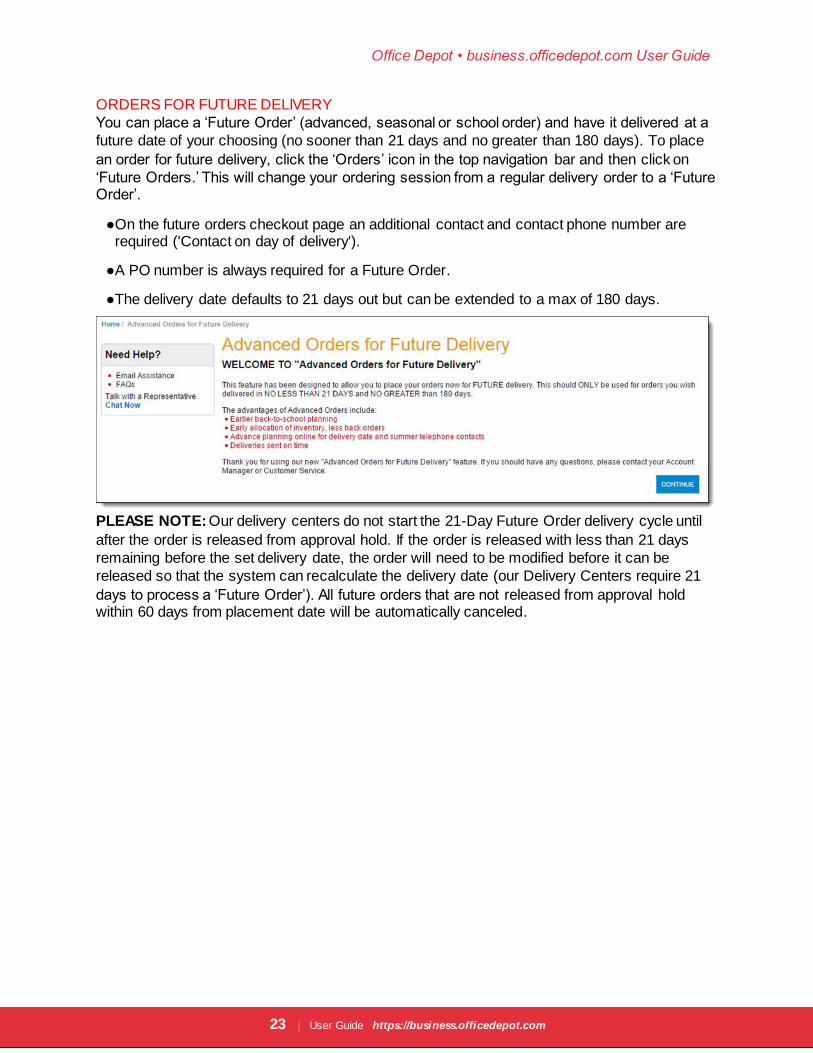
ORDERS FOR FUTURE DELIVERY
You can place a ‘Future Order’ (advanced, seasonal or school order) and have it delivered at a
future date of your choosing (no sooner than 21 days and no greater than 180 days). To place
an order for future delivery, click the ‘Orders’ icon in the top navigation bar and then click on
‘Future Orders.’ This will change your ordering session from a regular delivery order to a ‘Future Order’.
●On the future orders checkout page an additional contact and contact phone number are required ('Contact on day of delivery').
●A PO number is always required for a Future Order.
●The delivery date defaults to 21 days out but can be extended to a max of 180 days.
PLEASE NOTE: Our delivery centers do not start the 21-Day Future Order delivery cycle until
after the order is released from approval hold. If the order is released with less than 21 days
remaining before the set delivery date, the order will need to be modified before it can be
released so that the system can recalculate the delivery date (our Delivery Centers require 21
days to process a ‘Future Order’). All future orders that are not released from approval hold within 60 days from placement date will be automatically canceled.
Office Depot • business.officedepot.com User Guide
24 | User Guide https://business.officedepot.com
SUBSCRIPTION MANAGER
With Office Depot subscription ordering you can setup convenient automatic deliveries of your
favorite products. There are no commitments, no obligations, or fees; you can cancel a
subscription at any time.
If the price of the item increases or decreases, the amount you are charged on your subscription
may also increase or decrease. We'll notify you via email before your items are shipped and we don’t charge your method of payment until the items are shipped.
Access the Subscription Manager via the Orders icon on the navigation bar.
SETTING UP AN ITEM SUBSCRIPTION
You can start a subscription for an item by selecting ‘Subscription Delivery’ on the item detail page, or by clicking ‘Subscribe’ in the shopping cart.
Choose to have your first delivery sent immediately, or schedule your subscription to start on a future date by selecting ‘your first shipment date’ on the calendar provided.
PLEASE NOTE: The automatically recurring subscription orders will be created on Tuesdays of
each week to be delivered on schedule, on the next available business day. When creating a
new subscription, the customer is given five days “Buyer’s Remorse” to cancel. This delays the
first automatically recurring subscription order by five days if the subscription frequency is set to
‘Weekly’ and the first shipment date selected is the next day.
Office Depot • business.officedepot.com User Guide
25 | User Guide https://business.officedepot.com
CHAPTER 4: CHECKOUT After you have added the items you wish to purchase to the Shopping Cart, you are now ready
to proceed to ‘Checkout.’
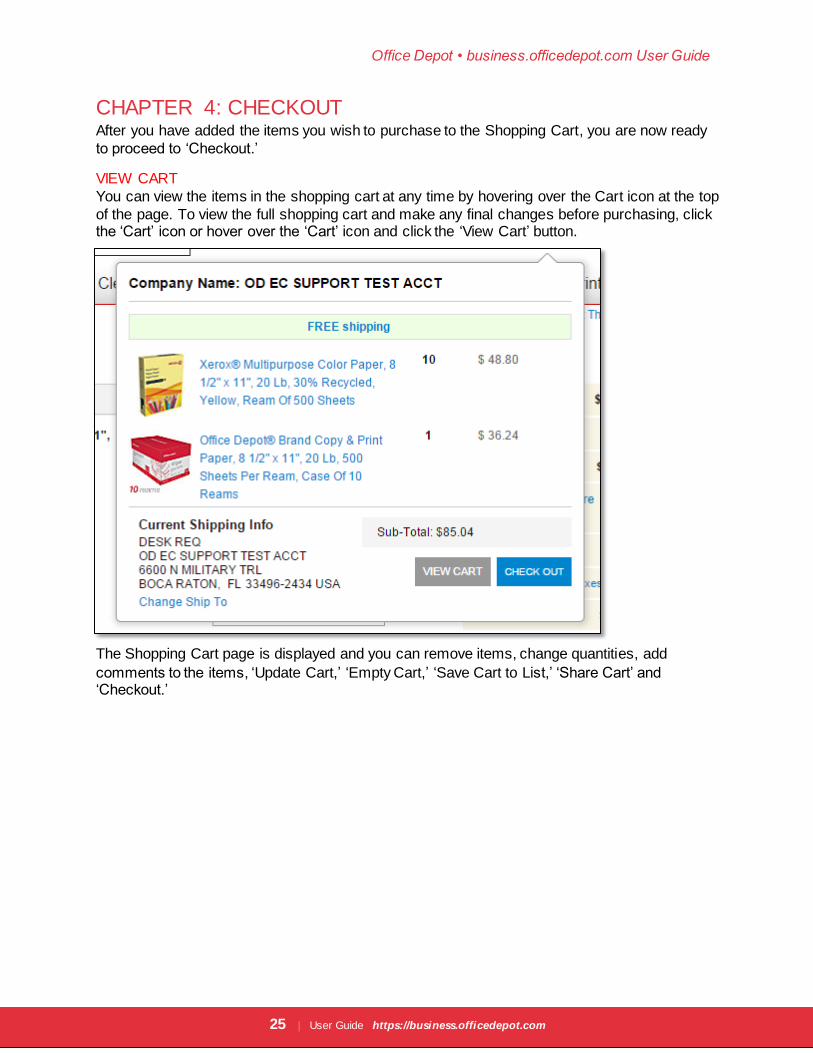
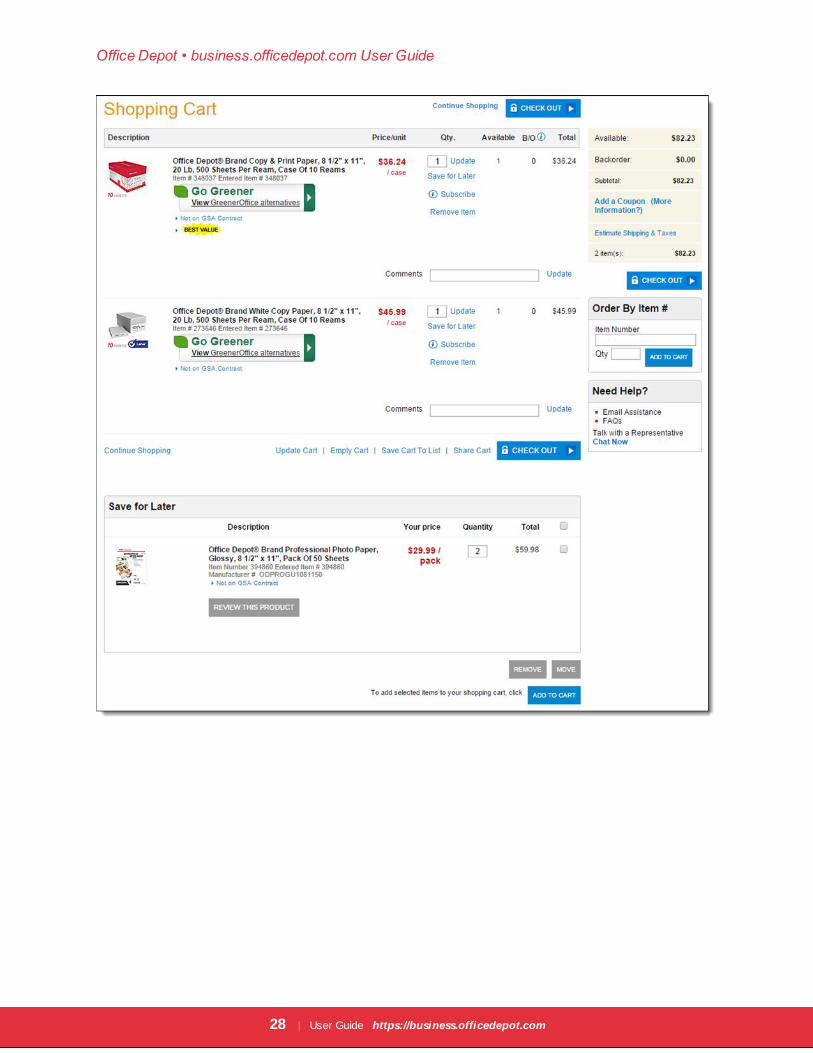
VIEW CART
You can view the items in the shopping cart at any time by hovering over the Cart icon at the top
of the page. To view the full shopping cart and make any final changes before purchasing, click the ‘Cart’ icon or hover over the ‘Cart’ icon and click the ‘View Cart’ button.
The Shopping Cart page is displayed and you can remove items, change quantities, add
comments to the items, ‘Update Cart,’ ‘Empty Cart,’ ‘Save Cart to List,’ ‘Share Cart’ and ‘Checkout.’

Office Depot • business.officedepot.com User Guide
26 | User Guide https://business.officedepot.com
GO GREENER
Depending on your account's settings and item availability, the option to purchase a greener
product may be displayed in the shopping cart. If you would like to proceed with the greener
Office Depot • business.officedepot.com User Guide
27 | User Guide https://business.officedepot.com
alternative, simply click ‘Choose this item’ on the ‘Greener Alternative’ item and click the ‘Replace Checked Items’ button.
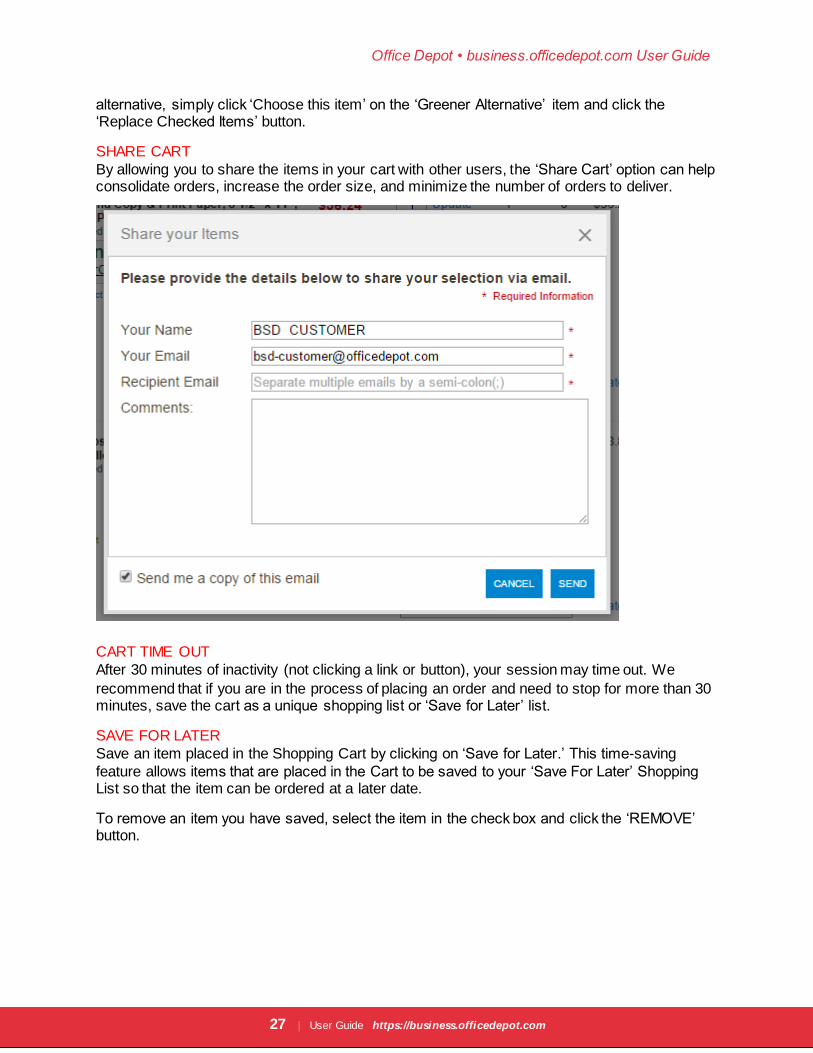
SHARE CART
By allowing you to share the items in your cart with other users, the ‘Share Cart’ option can help consolidate orders, increase the order size, and minimize the number of orders to deliver.
CART TIME OUT
After 30 minutes of inactivity (not clicking a link or button), your session may time out. We
recommend that if you are in the process of placing an order and need to stop for more than 30 minutes, save the cart as a unique shopping list or ‘Save for Later’ list.
SAVE FOR LATER
Save an item placed in the Shopping Cart by clicking on ‘Save for Later.’ This time-saving
feature allows items that are placed in the Cart to be saved to your ‘Save For Later’ Shopping List so that the item can be ordered at a later date.
To remove an item you have saved, select the item in the check box and click the ‘REMOVE’ button.
Office Depot • business.officedepot.com User Guide
28 | User Guide https://business.officedepot.com
Office Depot • business.officedepot.com User Guide
29 | User Guide https://business.officedepot.com
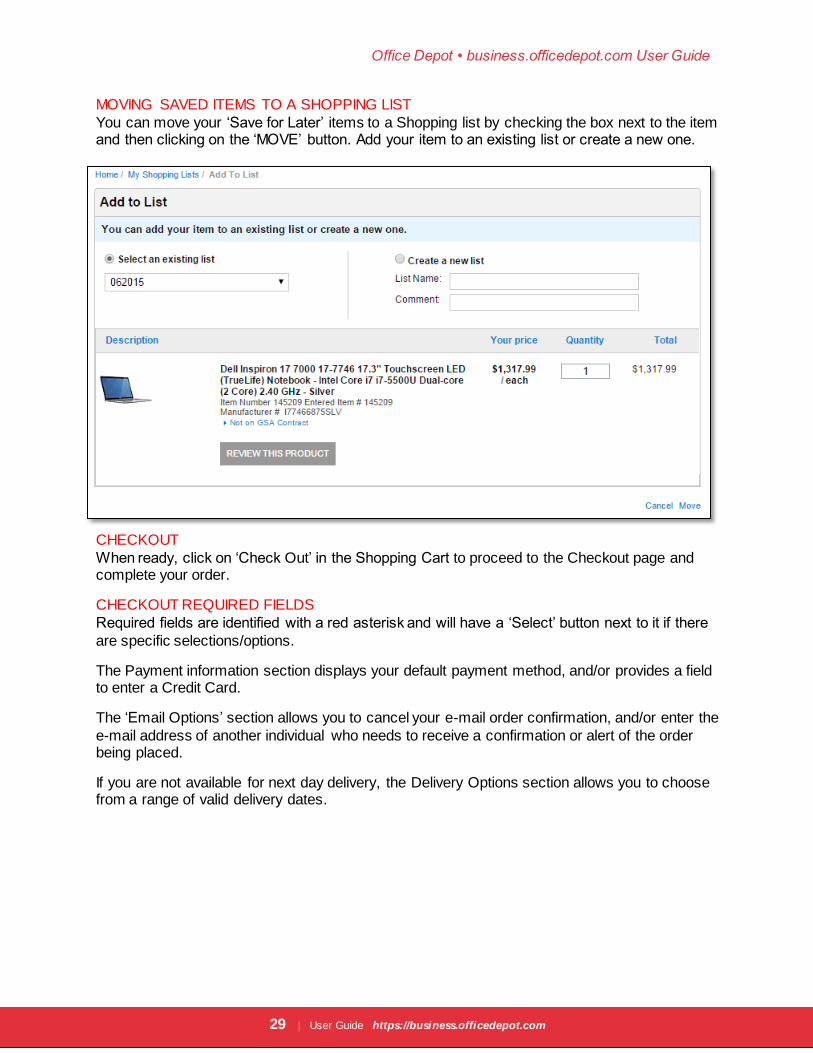
MOVING SAVED ITEMS TO A SHOPPING LIST
You can move your ‘Save for Later’ items to a Shopping list by checking the box next to the item and then clicking on the ‘MOVE’ button. Add your item to an existing list or create a new one.
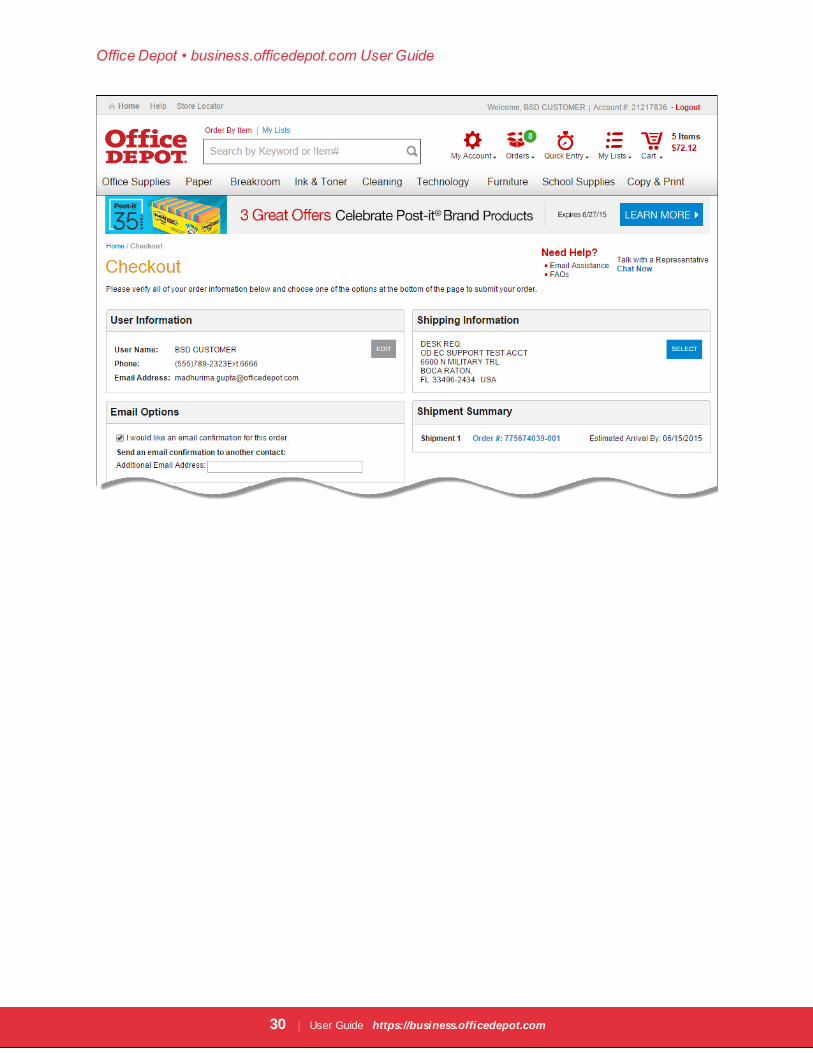
CHECKOUT
When ready, click on ‘Check Out’ in the Shopping Cart to proceed to the Checkout page and complete your order.
CHECKOUT REQUIRED FIELDS
Required fields are identified with a red asterisk and will have a ‘Select’ button next to it if there
are specific selections/options.
The Payment information section displays your default payment method, and/or provides a field to enter a Credit Card.
The ‘Email Options’ section allows you to cancel your e-mail order confirmation, and/or enter the
e-mail address of another individual who needs to receive a confirmation or alert of the order being placed.
If you are not available for next day delivery, the Delivery Options section allows you to choose from a range of valid delivery dates.
Office Depot • business.officedepot.com User Guide
30 | User Guide https://business.officedepot.com
Office Depot • business.officedepot.com User Guide
31 | User Guide https://business.officedepot.com
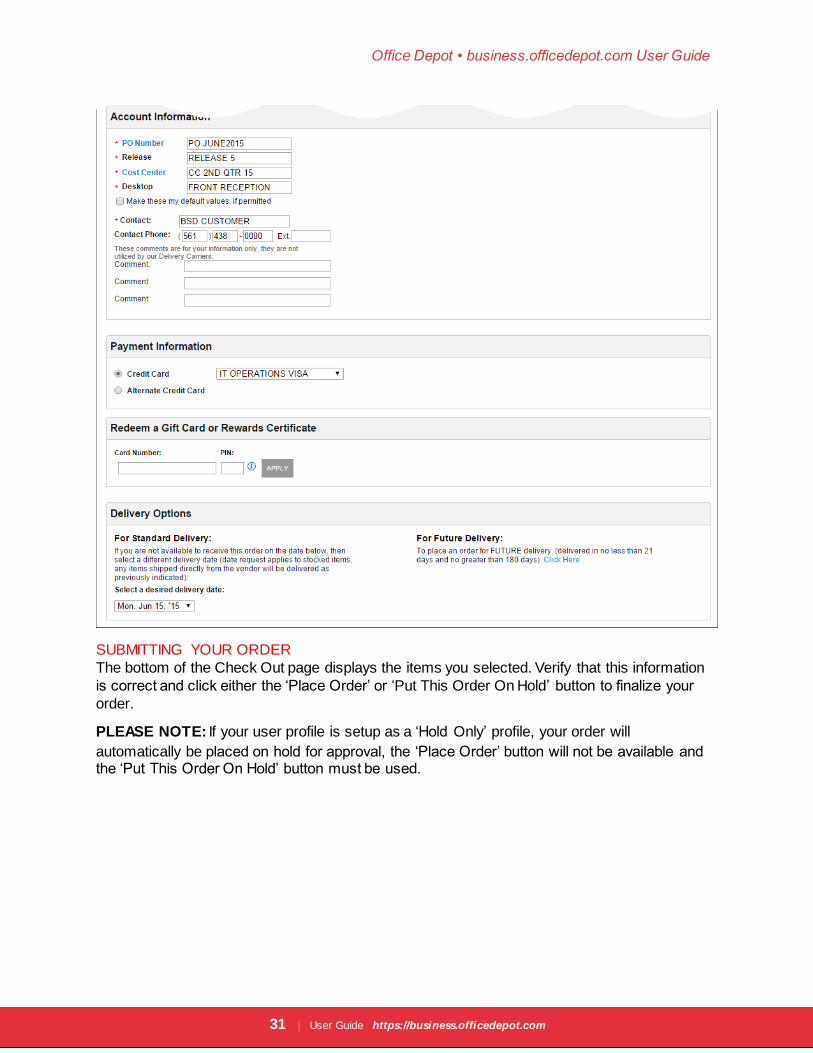
SUBMITTING YOUR ORDER
The bottom of the Check Out page displays the items you selected. Verify that this information
is correct and click either the ‘Place Order’ or ‘Put This Order On Hold’ button to finalize your
order.
PLEASE NOTE: If your user profile is setup as a ‘Hold Only’ profile, your order will
automatically be placed on hold for approval, the ‘Place Order’ button will not be available and the ‘Put This Order On Hold’ button must be used.
Office Depot • business.officedepot.com User Guide
32 | User Guide https://business.officedepot.com
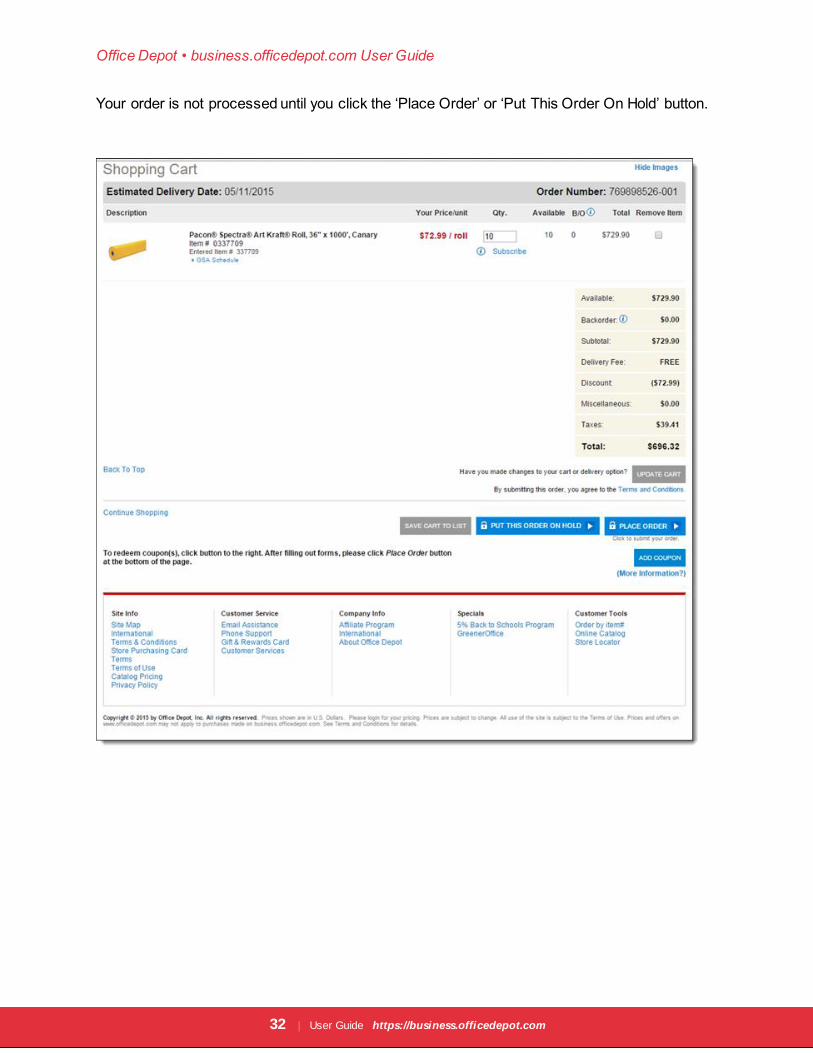
Your order is not processed until you click the ‘Place Order’ or ‘Put This Order On Hold’ button.
Office Depot • business.officedepot.com User Guide
33 | User Guide https://business.officedepot.com
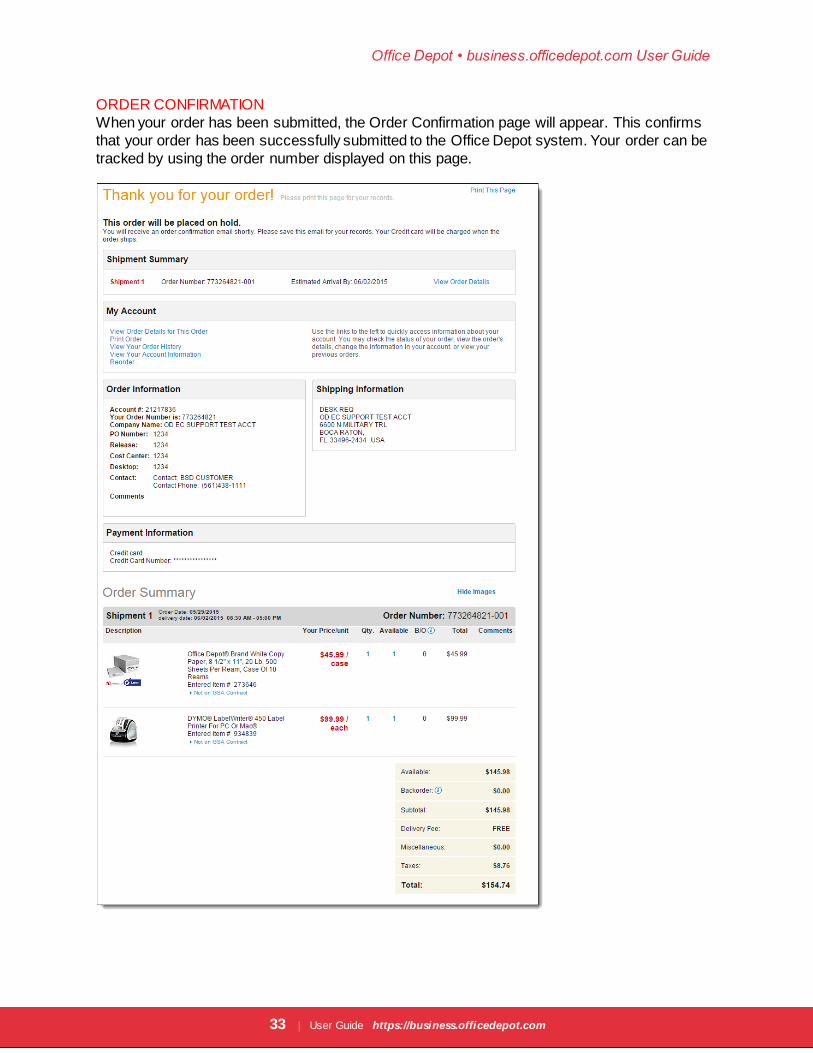
ORDER CONFIRMATION
When your order has been submitted, the Order Confirmation page will appear. This confirms
that your order has been successfully submitted to the Office Depot system. Your order can be
tracked by using the order number displayed on this page.
Office Depot • business.officedepot.com User Guide
34 | User Guide https://business.officedepot.com
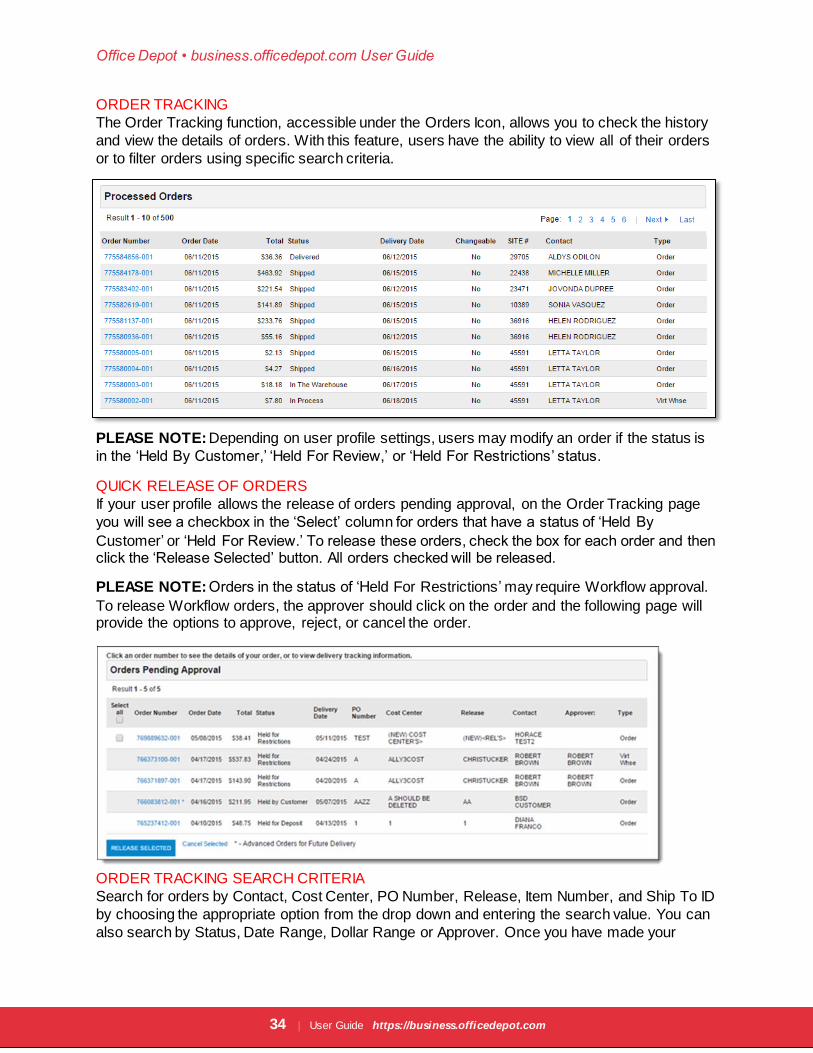
ORDER TRACKING
The Order Tracking function, accessible under the Orders Icon, allows you to check the history
and view the details of orders. With this feature, users have the ability to view all of their orders
or to filter orders using specific search criteria.
PLEASE NOTE: Depending on user profile settings, users may modify an order if the status is
in the ‘Held By Customer,’ ‘Held For Review,’ or ‘Held For Restrictions’ status.
QUICK RELEASE OF ORDERS
If your user profile allows the release of orders pending approval, on the Order Tracking page
you will see a checkbox in the ‘Select’ column for orders that have a status of ‘Held By
Customer’ or ‘Held For Review.’ To release these orders, check the box for each order and then click the ‘Release Selected’ button. All orders checked will be released.
PLEASE NOTE: Orders in the status of ‘Held For Restrictions’ may require Workflow approval.
To release Workflow orders, the approver should click on the order and the following page will provide the options to approve, reject, or cancel the order.
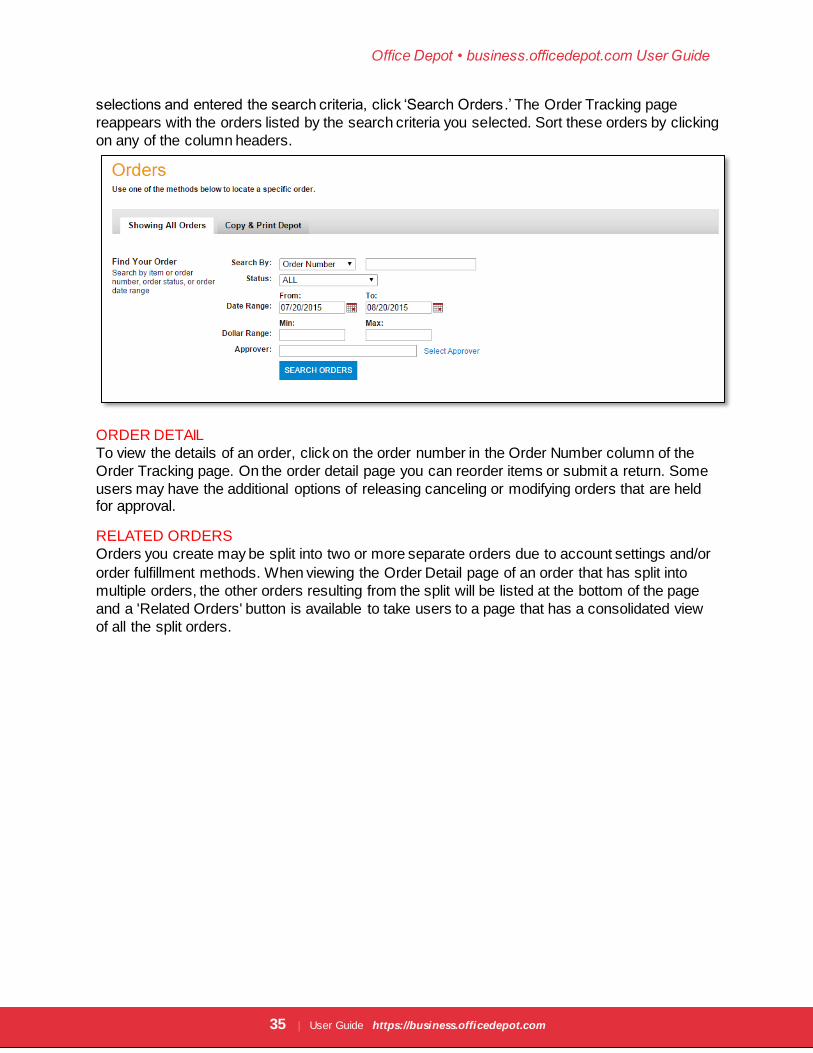
ORDER TRACKING SEARCH CRITERIA
Search for orders by Contact, Cost Center, PO Number, Release, Item Number, and Ship To ID
by choosing the appropriate option from the drop down and entering the search value. You can
also search by Status, Date Range, Dollar Range or Approver. Once you have made your
Office Depot • business.officedepot.com User Guide
35 | User Guide https://business.officedepot.com
selections and entered the search criteria, click ‘Search Orders .’ The Order Tracking page
reappears with the orders listed by the search criteria you selected. Sort these orders by clicking
on any of the column headers.
ORDER DETAIL
To view the details of an order, click on the order number in the Order Number column of the
Order Tracking page. On the order detail page you can reorder items or submit a return. Some
users may have the additional options of releasing canceling or modifying orders that are held for approval.
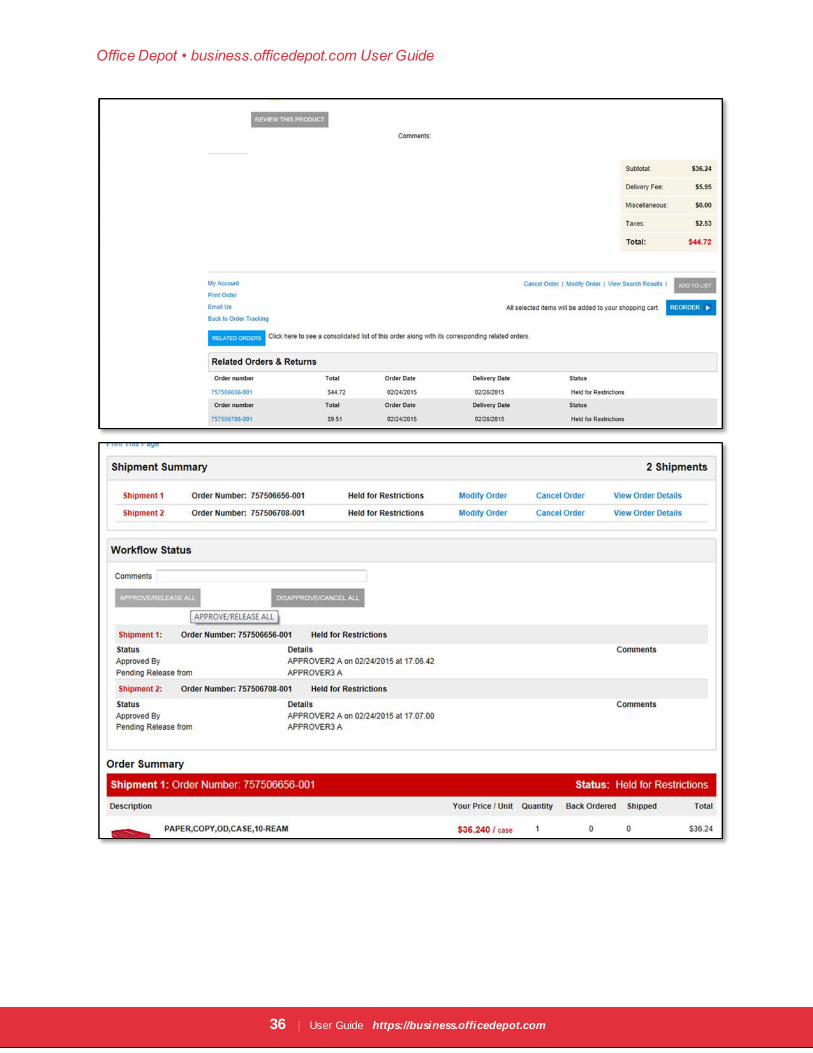
RELATED ORDERS
Orders you create may be split into two or more separate orders due to account settings and/or
order fulfillment methods. When viewing the Order Detail page of an order that has split into
multiple orders, the other orders resulting from the split will be listed at the bottom of the page
and a 'Related Orders' button is available to take users to a page that has a consolidated view
of all the split orders.
Office Depot • business.officedepot.com User Guide
36 | User Guide https://business.officedepot.com
Office Depot • business.officedepot.com User Guide
37 | User Guide https://business.officedepot.com
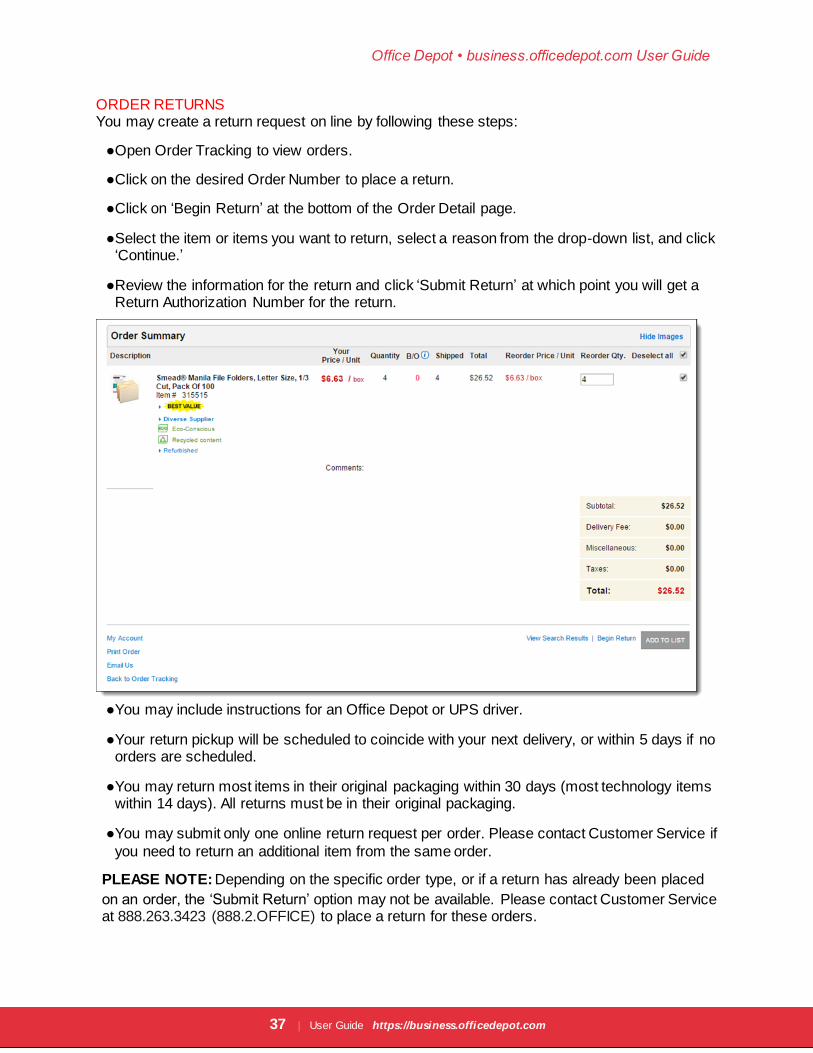
ORDER RETURNS You may create a return request on line by following these steps:
●Open Order Tracking to view orders.
●Click on the desired Order Number to place a return.
●Click on ‘Begin Return’ at the bottom of the Order Detail page.
●Select the item or items you want to return, select a reason from the drop-down list, and click ‘Continue.’
●Review the information for the return and click ‘Submit Return’ at which point you will get a Return Authorization Number for the return.
●You may include instructions for an Office Depot or UPS driver.
●Your return pickup will be scheduled to coincide with your next delivery, or within 5 days if no orders are scheduled.
●You may return most items in their original packaging within 30 days (most technology items within 14 days). All returns must be in their original packaging.
●You may submit only one online return request per order. Please contact Customer Service if
you need to return an additional item from the same order.
PLEASE NOTE: Depending on the specific order type, or if a return has already been placed
on an order, the ‘Submit Return’ option may not be available. Please contact Customer Service at 888.263.3423 (888.2.OFFICE) to place a return for these orders.
Office Depot • business.officedepot.com User Guide
38 | User Guide https://business.officedepot.com
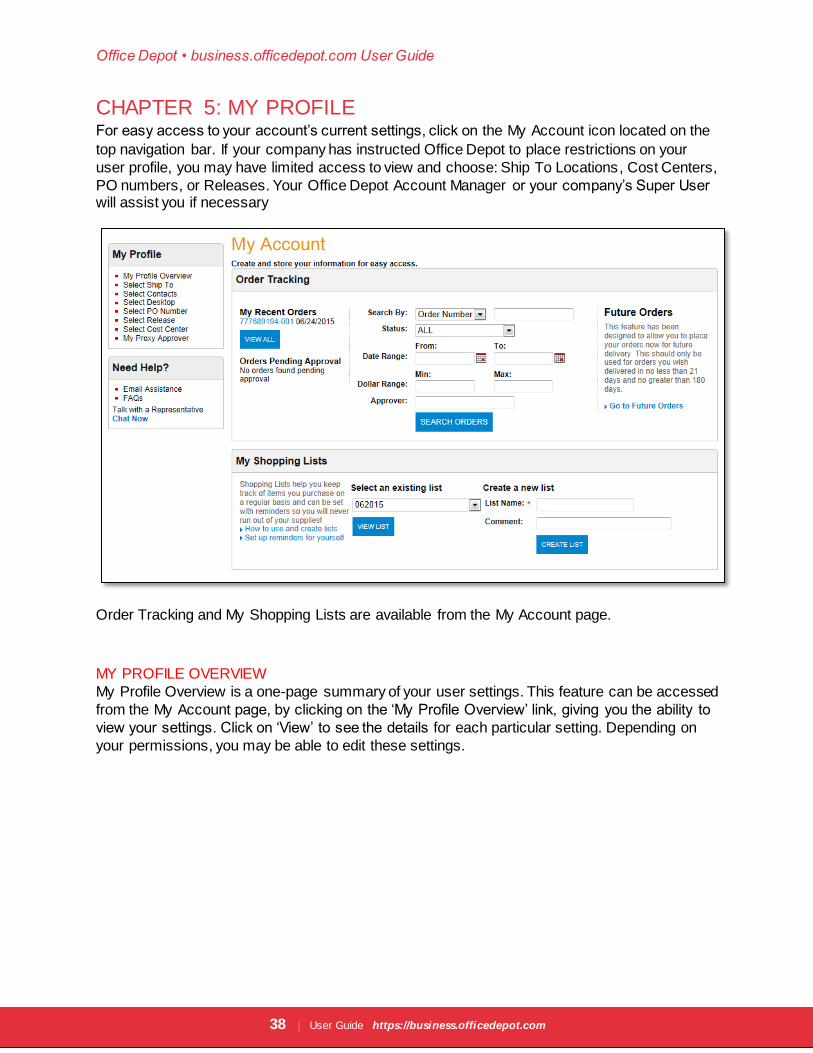
CHAPTER 5: MY PROFILE For easy access to your account’s current settings, click on the My Account icon located on the
top navigation bar. If your company has instructed Office Depot to place restrictions on your
user profile, you may have limited access to view and choose: Ship To Locations, Cost Centers,
PO numbers, or Releases. Your Office Depot Account Manager or your company’s Super User will assist you if necessary
Order Tracking and My Shopping Lists are available from the My Account page.
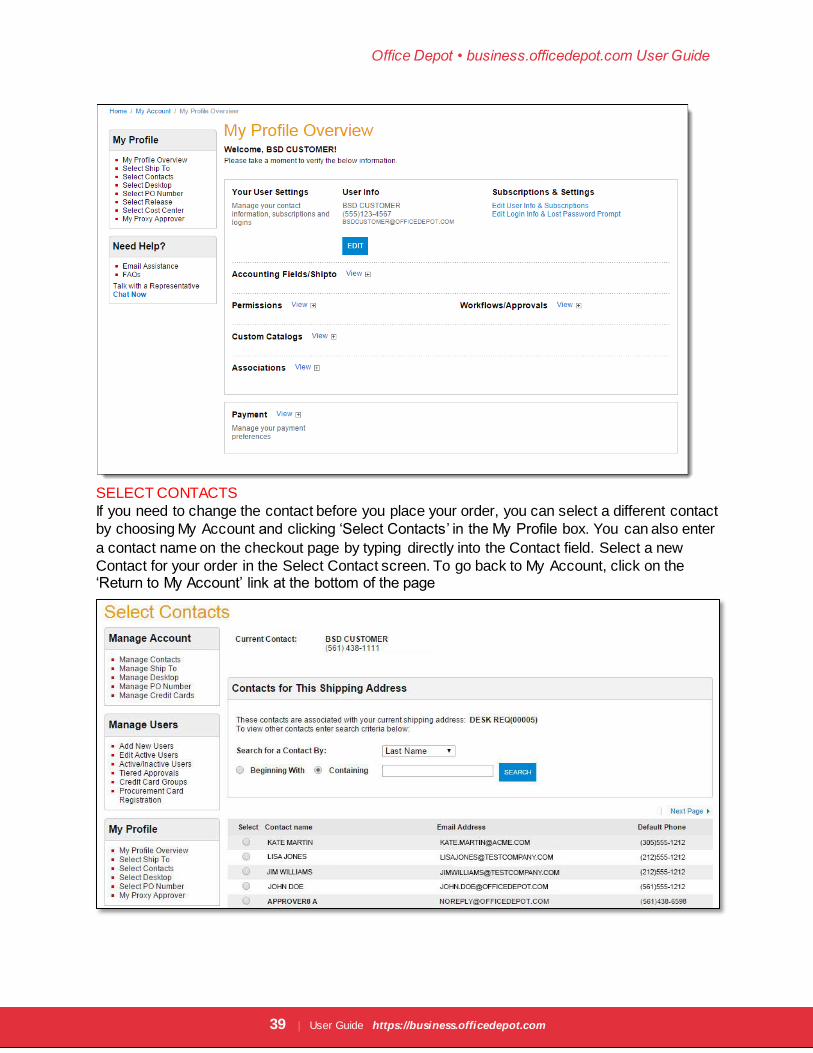
MY PROFILE OVERVIEW
My Profile Overview is a one-page summary of your user settings. This feature can be accessed
from the My Account page, by clicking on the ‘My Profile Overview’ link, giving you the ability to
view your settings. Click on ‘View’ to see the details for each particular setting. Depending on
your permissions, you may be able to edit these settings.
Office Depot • business.officedepot.com User Guide
39 | User Guide https://business.officedepot.com
SELECT CONTACTS
If you need to change the contact before you place your order, you can select a different contact
by choosing My Account and clicking ‘Select Contacts’ in the My Profile box. You can also enter
a contact name on the checkout page by typing directly into the Contact field. Select a new
Contact for your order in the Select Contact screen. To go back to My Account, click on the ‘Return to My Account’ link at the bottom of the page
Office Depot • business.officedepot.com User Guide
40 | User Guide https://business.officedepot.com
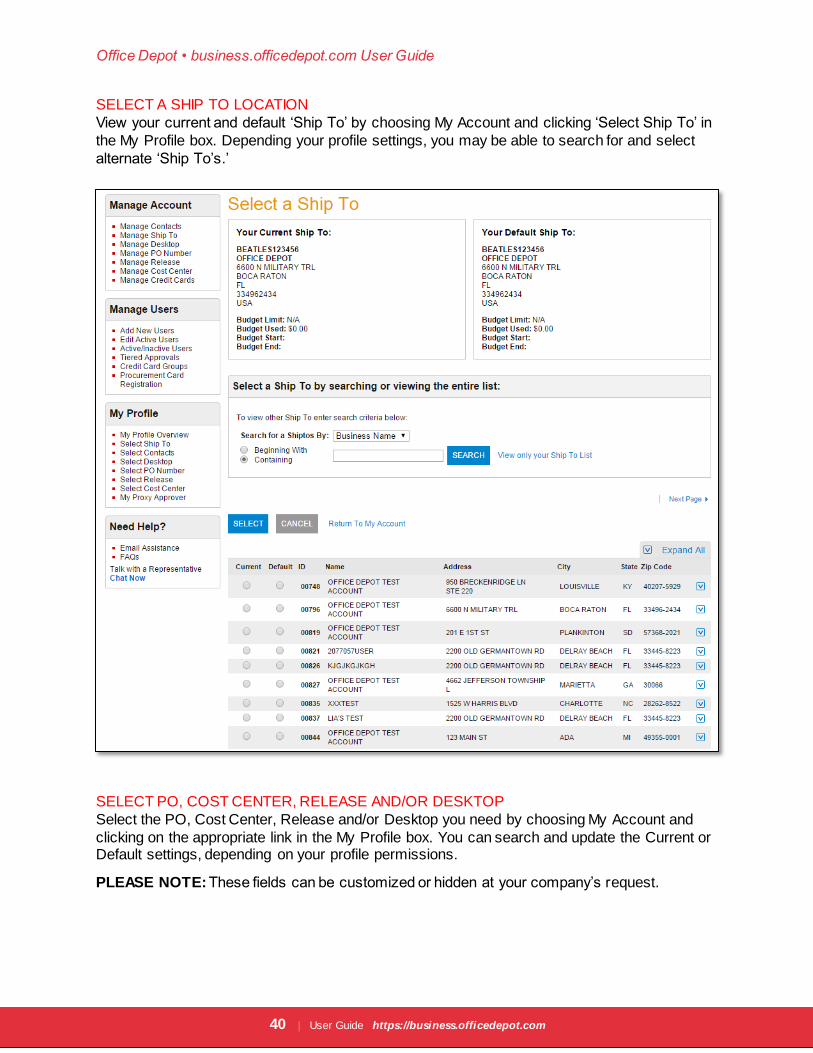
SELECT A SHIP TO LOCATION
View your current and default ‘Ship To’ by choosing My Account and clicking ‘Select Ship To’ in
the My Profile box. Depending your profile settings, you may be able to search for and select
alternate ‘Ship To’s.’
SELECT PO, COST CENTER, RELEASE AND/OR DESKTOP
Select the PO, Cost Center, Release and/or Desktop you need by choosing My Account and
clicking on the appropriate link in the My Profile box. You can search and update the Current or Default settings, depending on your profile permissions.
PLEASE NOTE: These fields can be customized or hidden at your company’s request.
Office Depot • business.officedepot.com User Guide
41 | User Guide https://business.officedepot.com
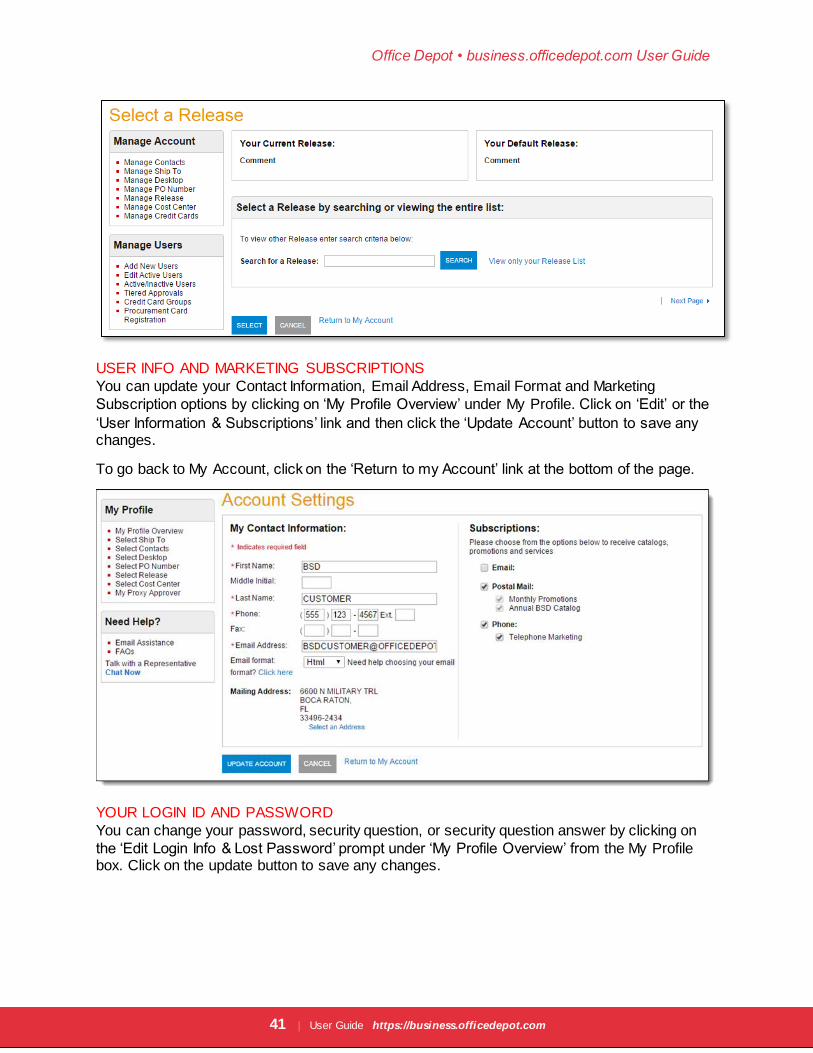
USER INFO AND MARKETING SUBSCRIPTIONS
You can update your Contact Information, Email Address, Email Format and Marketing
Subscription options by clicking on ‘My Profile Overview’ under My Profile. Click on ‘Edit’ or the
‘User Information & Subscriptions’ link and then click the ‘Update Account’ button to save any changes.
To go back to My Account, click on the ‘Return to my Account’ link at the bottom of the page.
YOUR LOGIN ID AND PASSWORD
You can change your password, security question, or security question answer by clicking on
the ‘Edit Login Info & Lost Password’ prompt under ‘My Profile Overview’ from the My Profile box. Click on the update button to save any changes.
Office Depot • business.officedepot.com User Guide
42 | User Guide https://business.officedepot.com
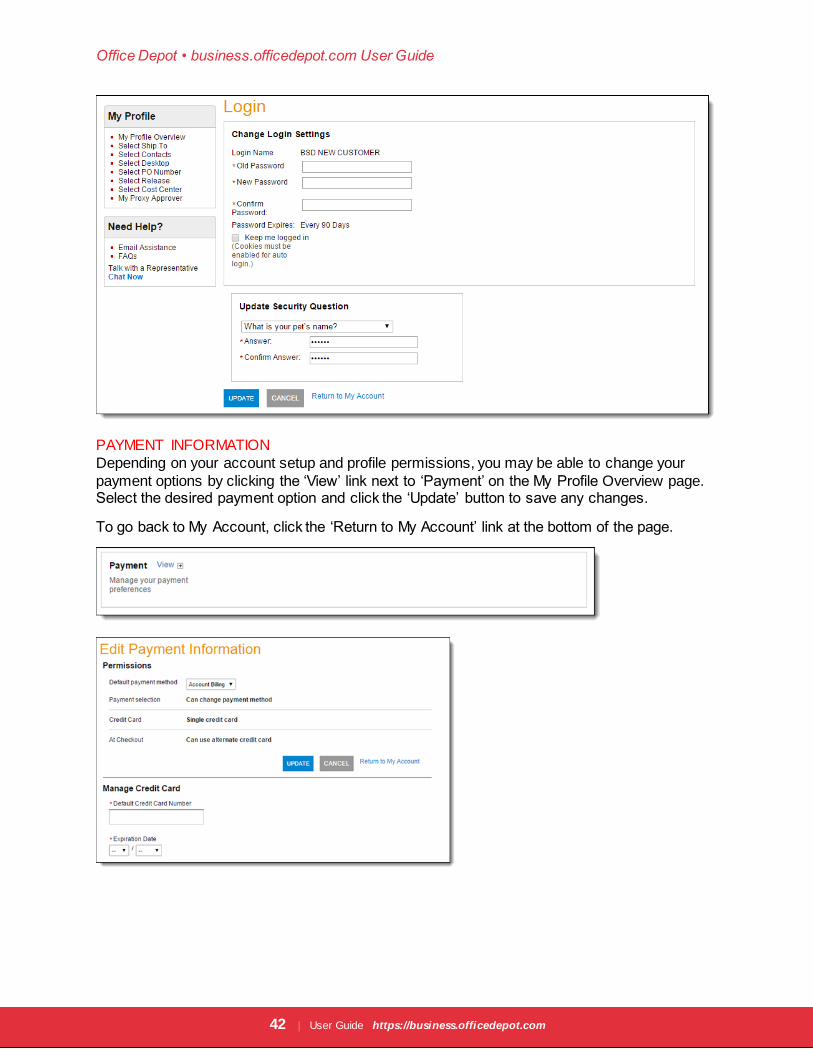
PAYMENT INFORMATION
Depending on your account setup and profile permissions, you may be able to change your
payment options by clicking the ‘View’ link next to ‘Payment’ on the My Profile Overview page. Select the desired payment option and click the ‘Update’ button to save any changes.
To go back to My Account, click the ‘Return to My Account’ link at the bottom of the page.
Office Depot • business.officedepot.com User Guide
43 | User Guide https://business.officedepot.com
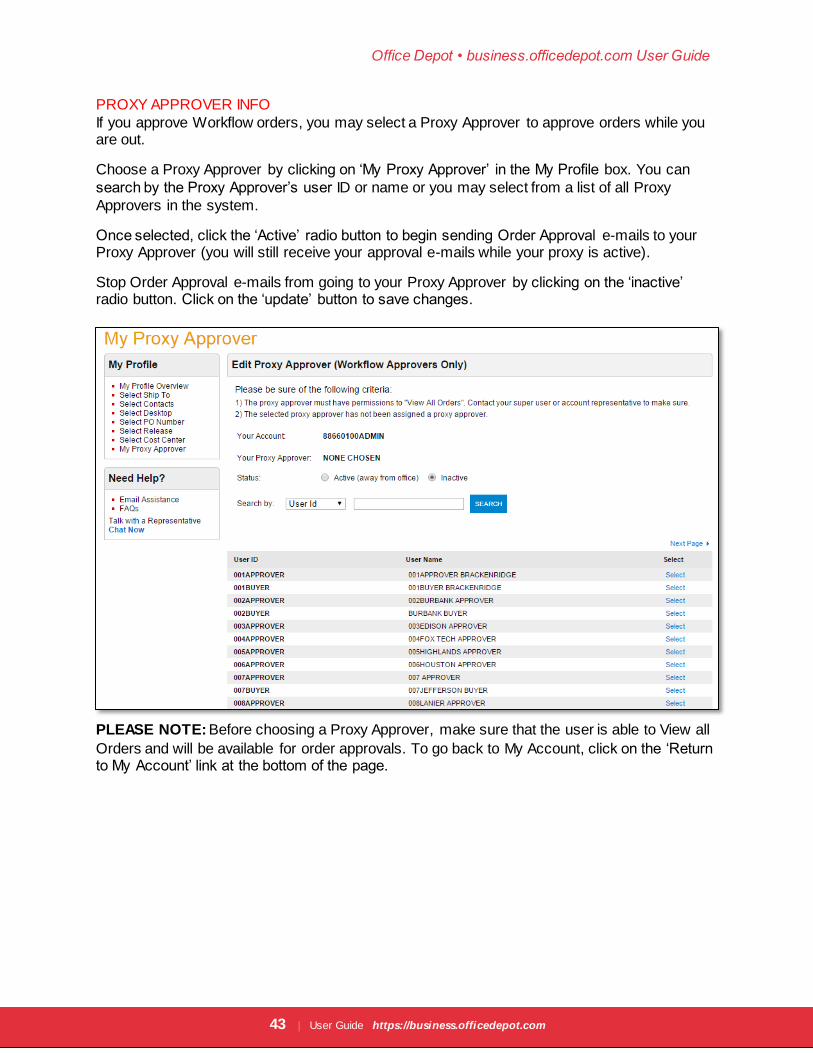
PROXY APPROVER INFO
If you approve Workflow orders, you may select a Proxy Approver to approve orders while you are out.
Choose a Proxy Approver by clicking on ‘My Proxy Approver’ in the My Profile box. You can
search by the Proxy Approver’s user ID or name or you may select from a list of all Proxy
Approvers in the system.
Once selected, click the ‘Active’ radio button to begin sending Order Approval e-mails to your Proxy Approver (you will still receive your approval e-mails while your proxy is active).
Stop Order Approval e-mails from going to your Proxy Approver by clicking on the ‘inactive’ radio button. Click on the ‘update’ button to save changes.
PLEASE NOTE: Before choosing a Proxy Approver, make sure that the user is able to View all
Orders and will be available for order approvals. To go back to My Account, click on the ‘Return to My Account’ link at the bottom of the page.
Office Depot • business.officedepot.com User Guide
44 | User Guide https://business.officedepot.com
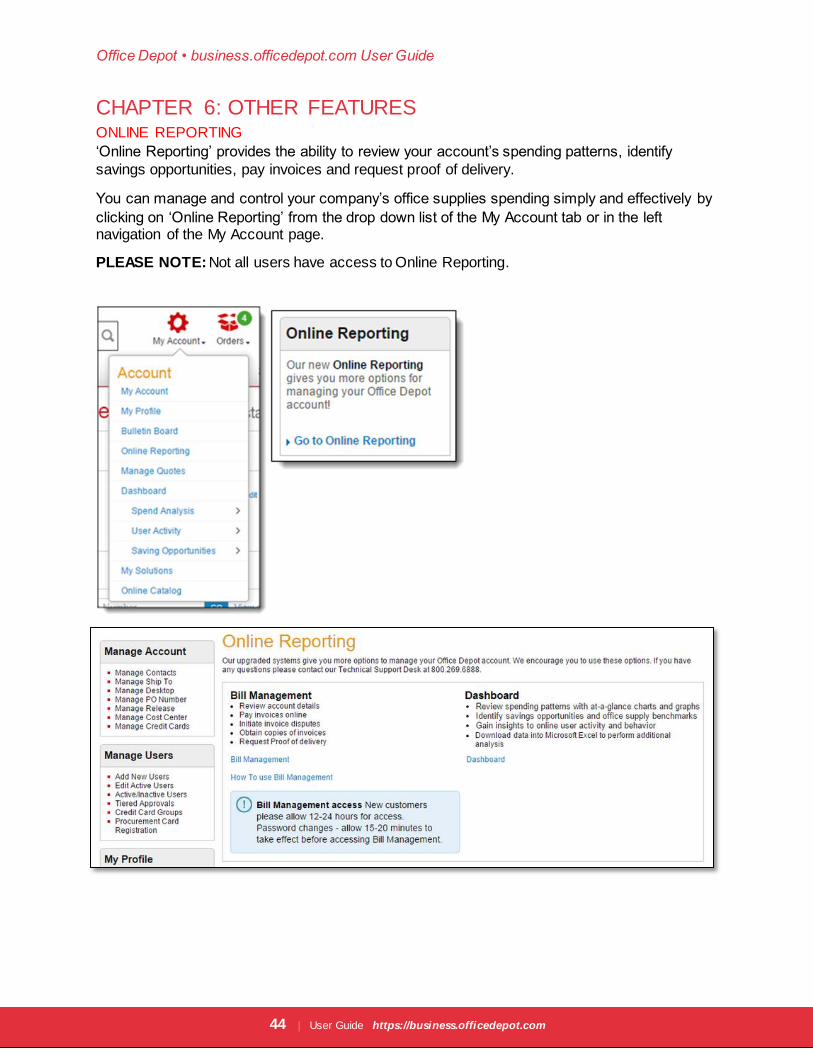
CHAPTER 6: OTHER FEATURES ONLINE REPORTING
‘Online Reporting’ provides the ability to review your account’s spending patterns, identify
savings opportunities, pay invoices and request proof of delivery.
You can manage and control your company’s office supplies spending simply and effectively by
clicking on ‘Online Reporting’ from the drop down list of the My Account tab or in the left navigation of the My Account page.
PLEASE NOTE: Not all users have access to Online Reporting.
Office Depot • business.officedepot.com User Guide
45 | User Guide https://business.officedepot.com
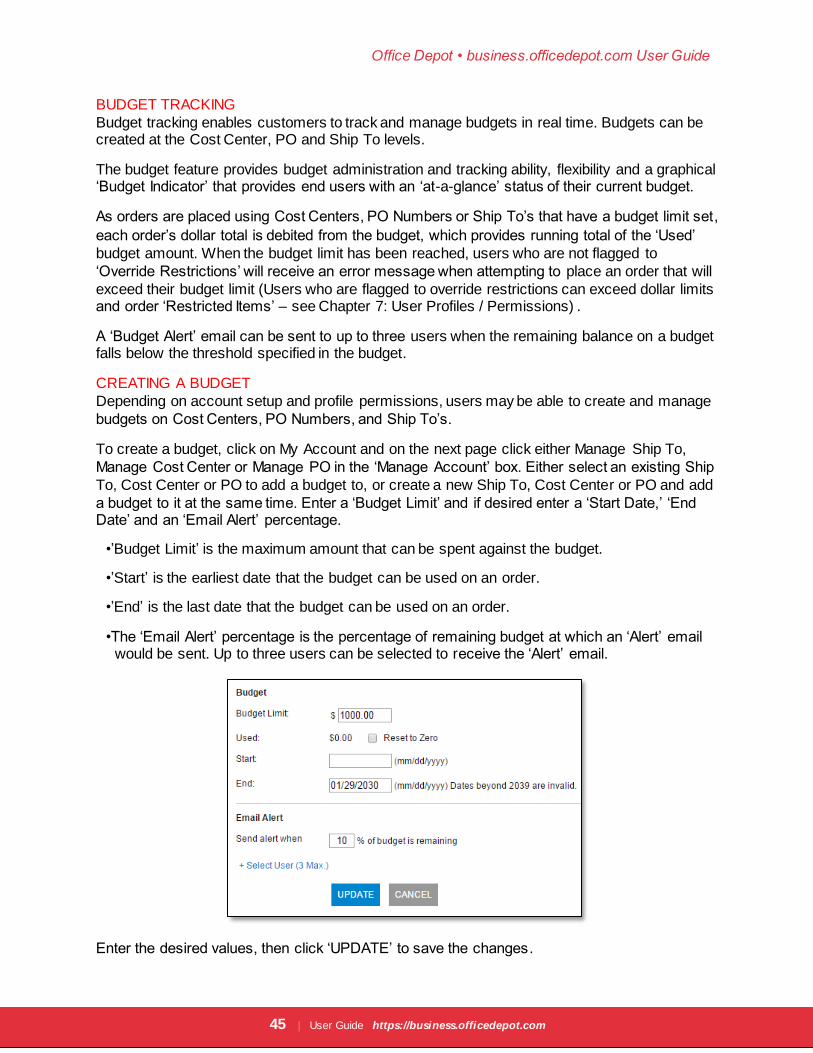
BUDGET TRACKING
Budget tracking enables customers to track and manage budgets in real time. Budgets can be created at the Cost Center, PO and Ship To levels.
The budget feature provides budget administration and tracking ability, flexibility and a graphical ‘Budget Indicator’ that provides end users with an ‘at-a-glance’ status of their current budget.
As orders are placed using Cost Centers, PO Numbers or Ship To’s that have a budget limit set,
each order’s dollar total is debited from the budget, which provides running total of the ‘Used’
budget amount. When the budget limit has been reached, users who are not flagged to
‘Override Restrictions’ will receive an error message when attempting to place an order that will
exceed their budget limit (Users who are flagged to override restrictions can exceed dollar limits and order ‘Restricted Items’ – see Chapter 7: User Profiles / Permissions) .
A ‘Budget Alert’ email can be sent to up to three users when the remaining balance on a budget falls below the threshold specified in the budget.
CREATING A BUDGET
Depending on account setup and profile permissions, users may be able to create and manage
budgets on Cost Centers, PO Numbers, and Ship To’s.
To create a budget, click on My Account and on the next page click either Manage Ship To,
Manage Cost Center or Manage PO in the ‘Manage Account’ box. Either select an existing Ship
To, Cost Center or PO to add a budget to, or create a new Ship To, Cost Center or PO and add
a budget to it at the same time. Enter a ‘Budget Limit’ and if desired enter a ‘Start Date,’ ‘End Date’ and an ‘Email Alert’ percentage.
•’Budget Limit’ is the maximum amount that can be spent against the budget.
•’Start’ is the earliest date that the budget can be used on an order.
•’End’ is the last date that the budget can be used on an order.
•The ‘Email Alert’ percentage is the percentage of remaining budget at which an ‘Alert’ email would be sent. Up to three users can be selected to receive the ‘Alert’ email.
Enter the desired values, then click ‘UPDATE’ to save the changes.
Office Depot • business.officedepot.com User Guide
46 | User Guide https://business.officedepot.com
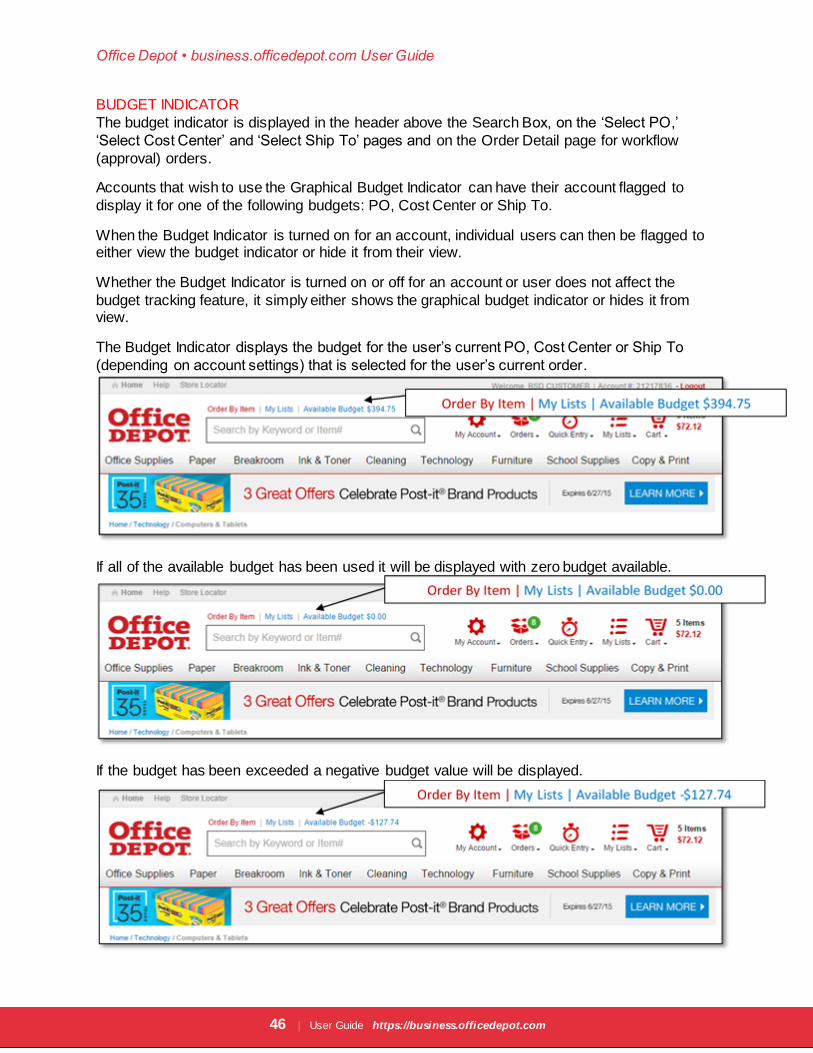
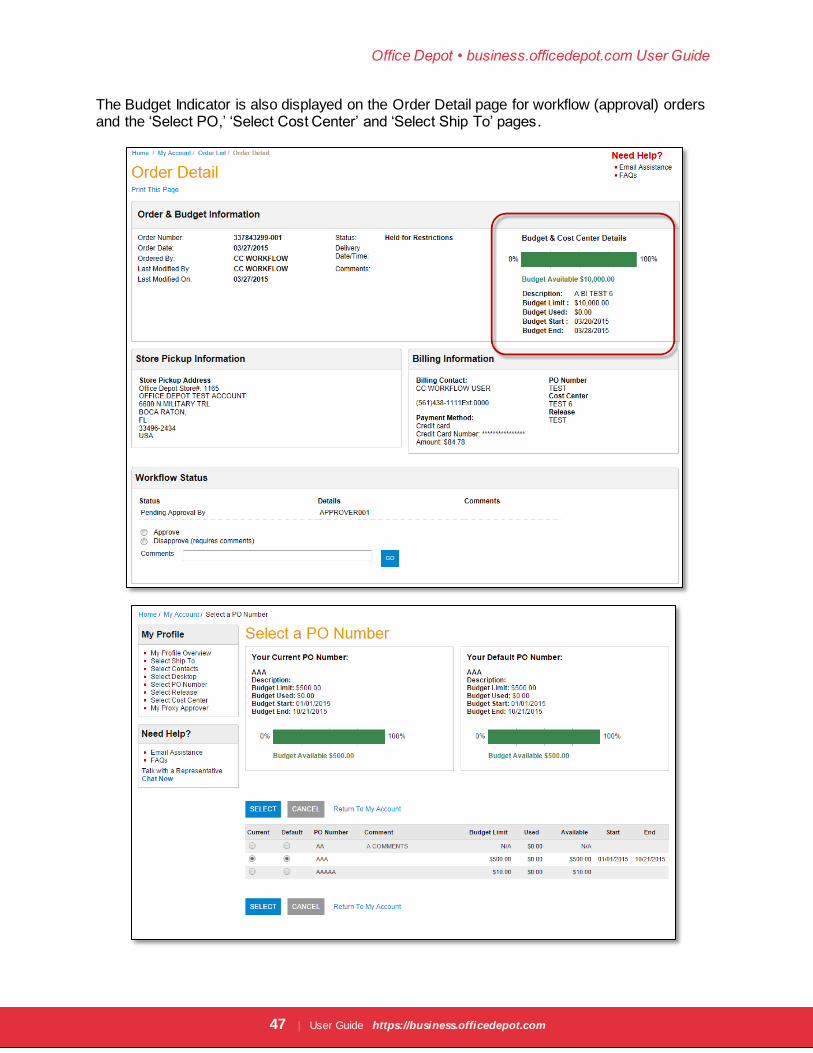
BUDGET INDICATOR
The budget indicator is displayed in the header above the Search Box, on the ‘Select PO,’
‘Select Cost Center’ and ‘Select Ship To’ pages and on the Order Detail page for workflow
(approval) orders.
Accounts that wish to use the Graphical Budget Indicator can have their account flagged to
display it for one of the following budgets: PO, Cost Center or Ship To.
When the Budget Indicator is turned on for an account, individual users can then be flagged to either view the budget indicator or hide it from their view.
Whether the Budget Indicator is turned on or off for an account or user does not affect the
budget tracking feature, it simply either shows the graphical budget indicator or hides it from view.
The Budget Indicator displays the budget for the user’s current PO, Cost Center or Ship To
(depending on account settings) that is selected for the user’s current order.
If all of the available budget has been used it will be displayed with zero budget available.
If the budget has been exceeded a negative budget value will be displayed.
Office Depot • business.officedepot.com User Guide
47 | User Guide https://business.officedepot.com
The Budget Indicator is also displayed on the Order Detail page for workflow (approval) orders and the ‘Select PO,’ ‘Select Cost Center’ and ‘Select Ship To’ pages.
Office Depot • business.officedepot.com User Guide
48 | User Guide https://business.officedepot.com
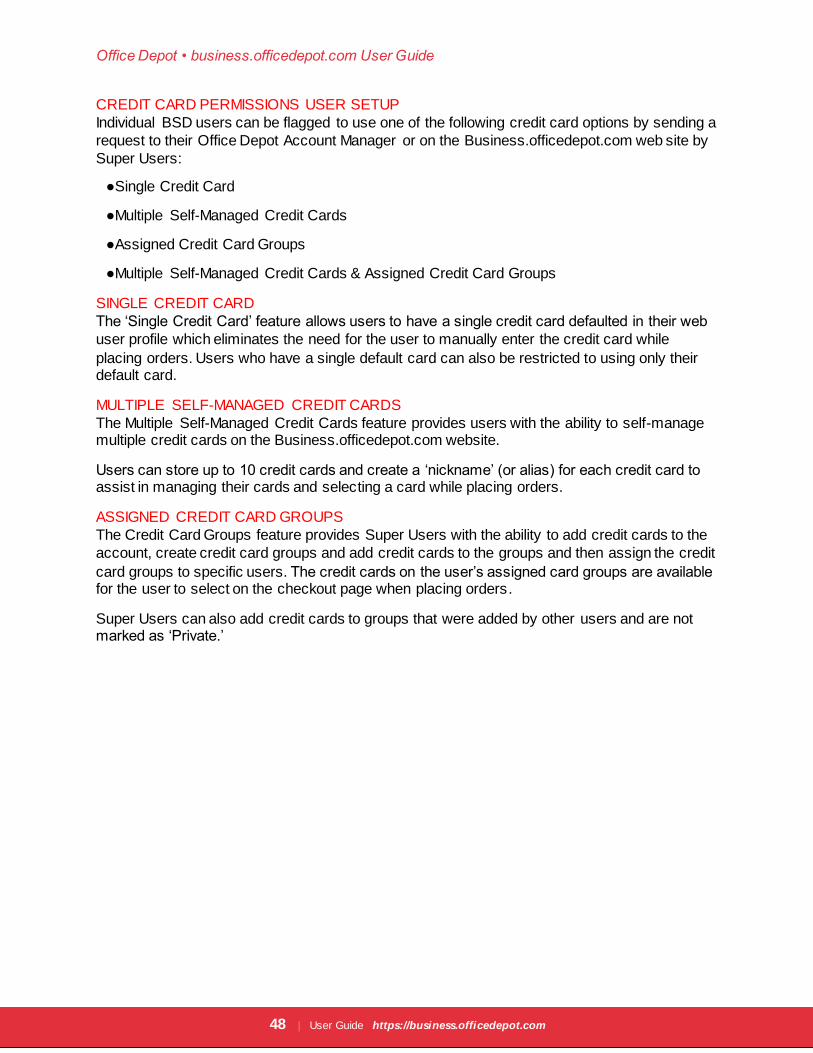
CREDIT CARD PERMISSIONS USER SETUP
Individual BSD users can be flagged to use one of the following credit card options by sending a
request to their Office Depot Account Manager or on the Business.officedepot.com web site by
Super Users:
●Single Credit Card
●Multiple Self-Managed Credit Cards
●Assigned Credit Card Groups
●Multiple Self-Managed Credit Cards & Assigned Credit Card Groups
SINGLE CREDIT CARD
The ‘Single Credit Card’ feature allows users to have a single credit card defaulted in their web
user profile which eliminates the need for the user to manually enter the credit card while
placing orders. Users who have a single default card can also be restricted to using only their default card.
MULTIPLE SELF-MANAGED CREDIT CARDS
The Multiple Self-Managed Credit Cards feature provides users with the ability to self-manage multiple credit cards on the Business.officedepot.com website.
Users can store up to 10 credit cards and create a ‘nickname’ (or alias) for each credit card to assist in managing their cards and selecting a card while placing orders.
ASSIGNED CREDIT CARD GROUPS
The Credit Card Groups feature provides Super Users with the ability to add credit cards to the
account, create credit card groups and add credit cards to the groups and then assign the credit
card groups to specific users. The credit cards on the user’s assigned card groups are available for the user to select on the checkout page when placing orders.
Super Users can also add credit cards to groups that were added by other users and are not marked as ‘Private.’
Office Depot • business.officedepot.com User Guide
49 | User Guide https://business.officedepot.com
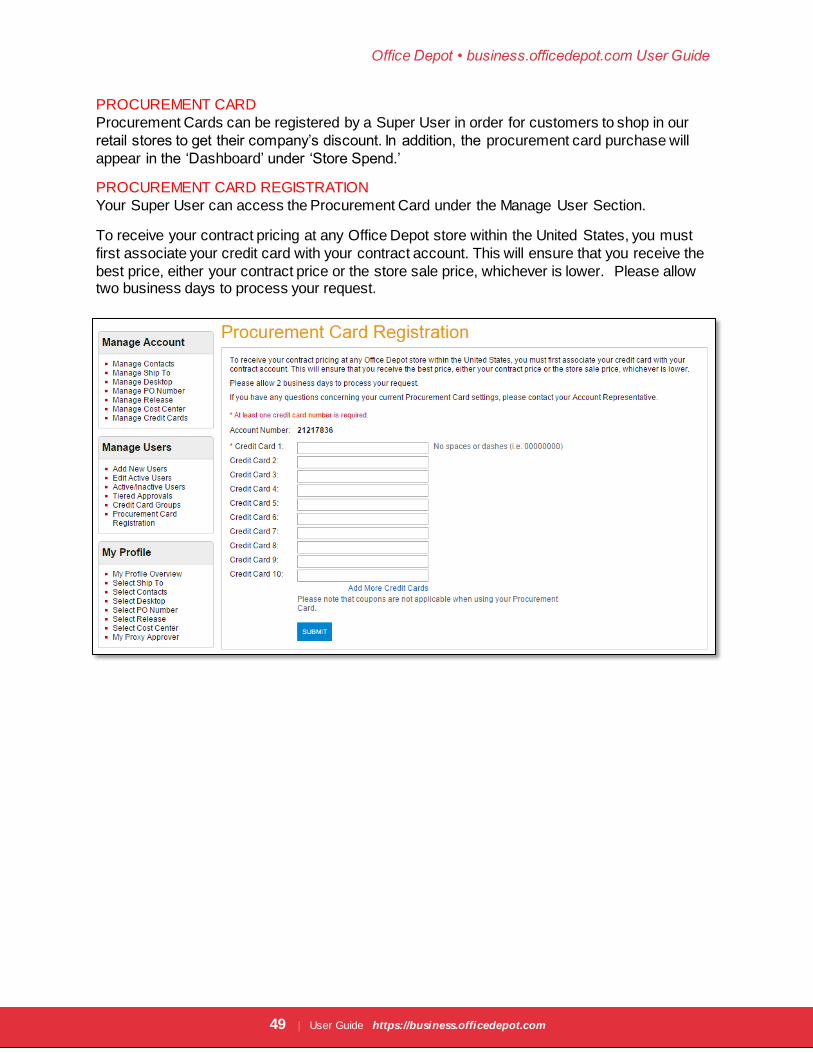
PROCUREMENT CARD
Procurement Cards can be registered by a Super User in order for customers to shop in our
retail stores to get their company’s discount. In addition, the procurement card purchase will
appear in the ‘Dashboard’ under ‘Store Spend.’
PROCUREMENT CARD REGISTRATION
Your Super User can access the Procurement Card under the Manage User Section.
To receive your contract pricing at any Office Depot store within the United States, you must
first associate your credit card with your contract account. This will ensure that you receive the
best price, either your contract price or the store sale price, whichever is lower. Please allow two business days to process your request.
Office Depot • business.officedepot.com User Guide
50 | User Guide https://business.officedepot.com
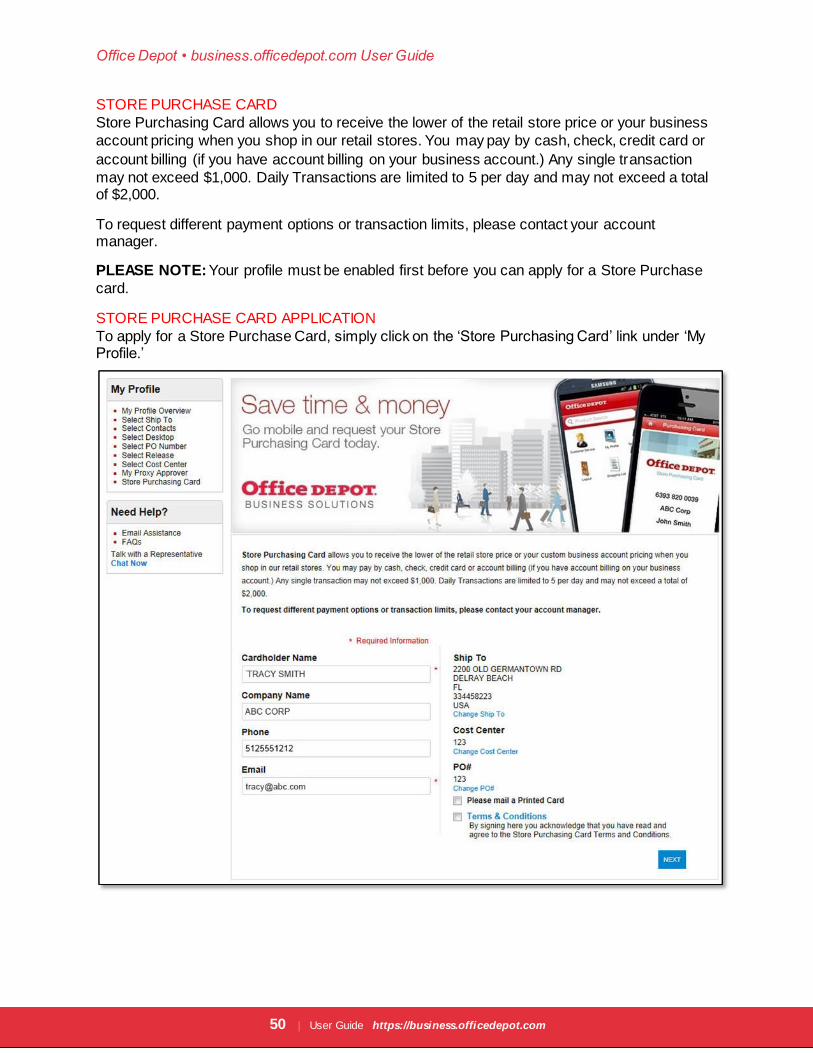
STORE PURCHASE CARD
Store Purchasing Card allows you to receive the lower of the retail store price or your business
account pricing when you shop in our retail stores. You may pay by cash, check, credit card or
account billing (if you have account billing on your business account.) Any single transaction
may not exceed $1,000. Daily Transactions are limited to 5 per day and may not exceed a total of $2,000.
To request different payment options or transaction limits, please contact your account manager.
PLEASE NOTE: Your profile must be enabled first before you can apply for a Store Purchase
card.
STORE PURCHASE CARD APPLICATION
To apply for a Store Purchase Card, simply click on the ‘Store Purchasing Card’ link under ‘My Profile.’
Office Depot • business.officedepot.com User Guide
51 | User Guide https://business.officedepot.com
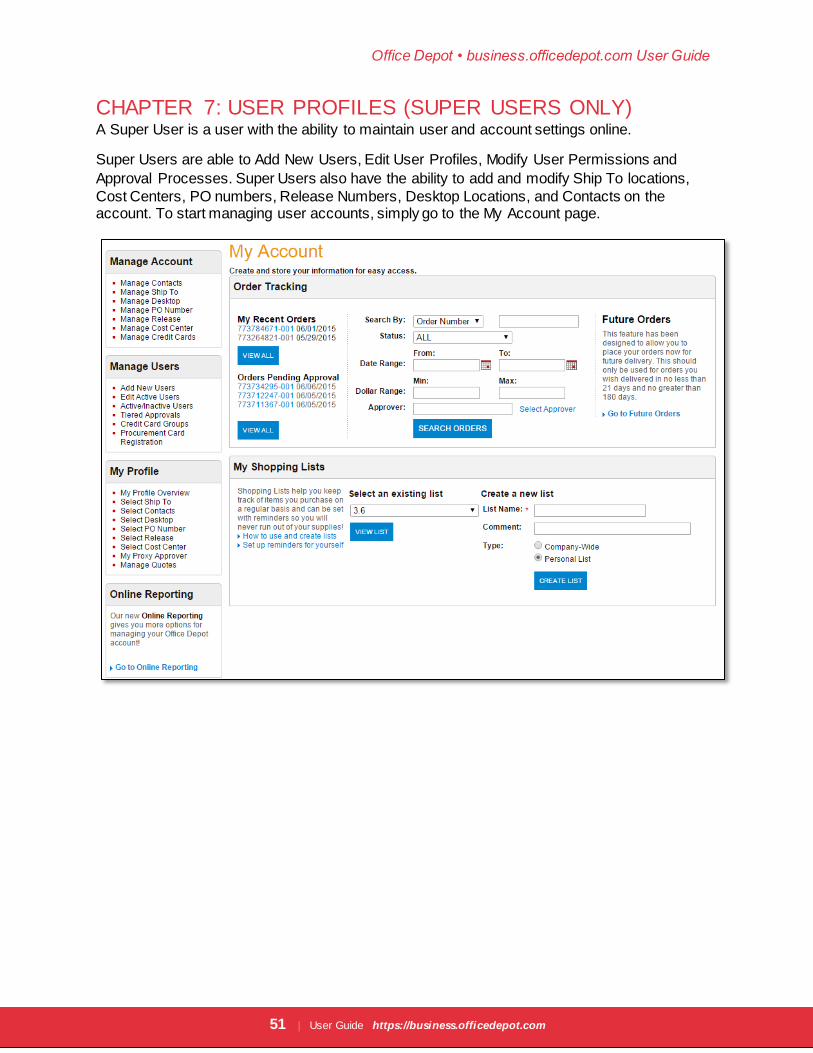
CHAPTER 7: USER PROFILES (SUPER USERS ONLY) A Super User is a user with the ability to maintain user and account settings online.
Super Users are able to Add New Users, Edit User Profiles, Modify User Permissions and
Approval Processes. Super Users also have the ability to add and modify Ship To locations,
Cost Centers, PO numbers, Release Numbers, Desktop Locations, and Contacts on the account. To start managing user accounts, simply go to the My Account page.
Office Depot • business.officedepot.com User Guide
52 | User Guide https://business.officedepot.com
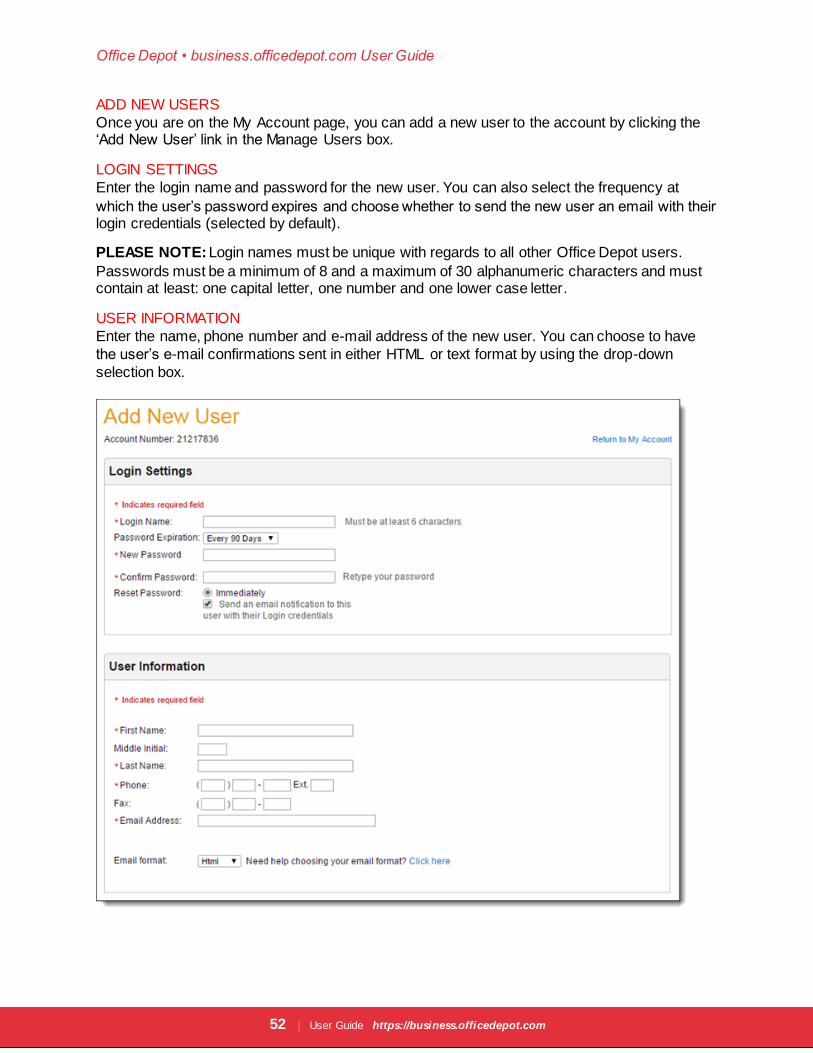
ADD NEW USERS
Once you are on the My Account page, you can add a new user to the account by clicking the ‘Add New User’ link in the Manage Users box.
LOGIN SETTINGS
Enter the login name and password for the new user. You can also select the frequency at
which the user’s password expires and choose whether to send the new user an email with their login credentials (selected by default).
PLEASE NOTE: Login names must be unique with regards to all other Office Depot users.
Passwords must be a minimum of 8 and a maximum of 30 alphanumeric characters and must contain at least: one capital letter, one number and one lower case letter.
USER INFORMATION
Enter the name, phone number and e-mail address of the new user. You can choose to have
the user’s e-mail confirmations sent in either HTML or text format by using the drop-down
selection box.

Office Depot • business.officedepot.com User Guide
53 | User Guide https://business.officedepot.com
PAYMENT INFORMATION
Select the preferred method of payment for the user. If you choose ‘Credit Card’ you can preset
the user’s credit card number or allow the user to use different cards (See CREDIT CARD
PERMISSIONS USER SETUP’). If Account Billing is used, selecting ‘Change Payment Type’
allows the user to use Account Billing and/or a credit card for any order. (Selecting ‘Account Billing’ in the Preset Type field, will result in Account Billing, but can be changed to credit card.)
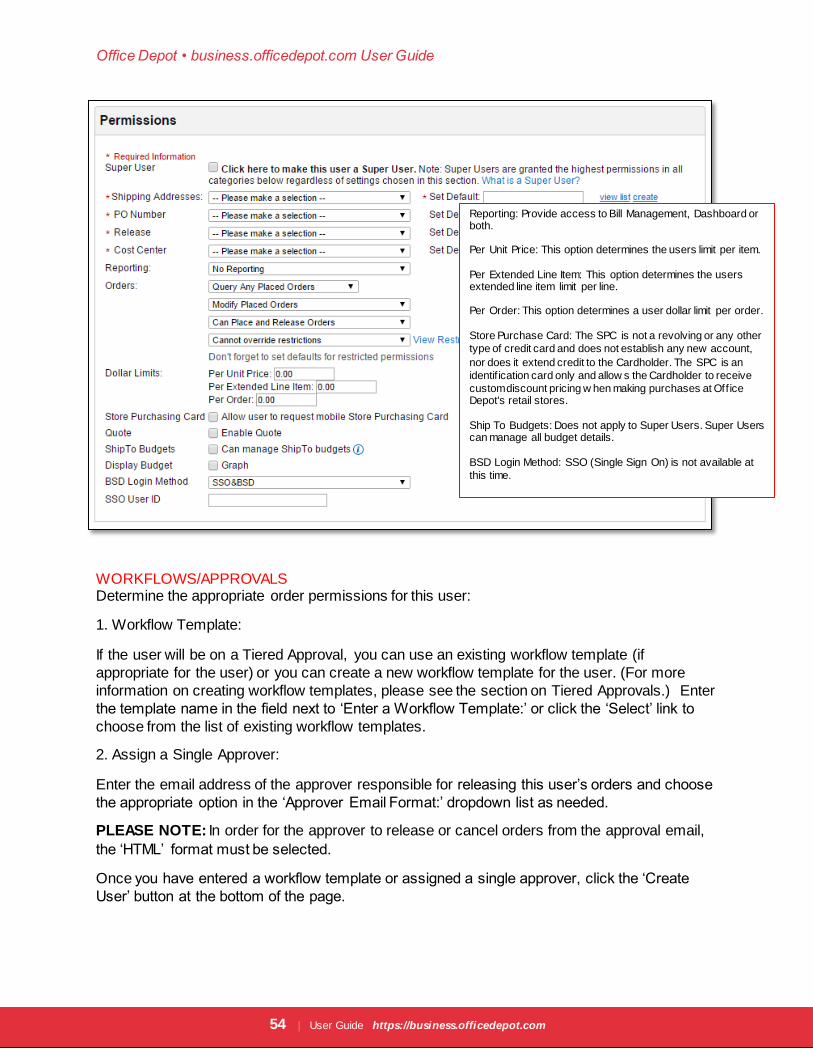
PERMISSIONS
You can set default values and permissions for a user by selecting the appropriate permissions
from the drop down menus and clicking on the ‘View List’ link next to the default fields to
populate a specific entry. Under the Order section you can determine if the user can Query
(view), or Modify orders. To give this new user the ability to add and edit users, Ship To’s, PO
Numbers, Cost Centers, etc., check the box that says ‘Click here to make this user a Super User.’
•Select whether the user can Place and release Orders or Place Orders on Hold Only (for
approval).
•Select whether the user can override dollar limits and order restricted items (items determined
by your company to be ‘restricted’ or non-orderable) by choosing from: Cannot Override
Restrictions, Can Override Restrictions with Approval, or Can Override All Restrictions. If
‘Can Override Restrictions with Approval,’ is selected, any orders the user places that
contain restricted items or exceed dollar limits will be placed on hold pending approval. An email will be sent to the Single Approver e-mail address (see WORKFLOWS/APPROVALS)
•Set spending limits for the user under Dollar Limits.
Once you have filled out all required fields, setup the user’s order approval flow in the
‘Workflows/Approvals’ section (if needed), or click on the ‘Create User’ button at the bottom of
the page.
Office Depot • business.officedepot.com User Guide
54 | User Guide https://business.officedepot.com
WORKFLOWS/APPROVALS Determine the appropriate order permissions for this user:
1. Workflow Template:
If the user will be on a Tiered Approval, you can use an existing workflow template (if
appropriate for the user) or you can create a new workflow template for the user. (For more
information on creating workflow templates, please see the section on Tiered Approvals.) Enter
the template name in the field next to ‘Enter a Workflow Template:’ or click the ‘Select’ link to
choose from the list of existing workflow templates.
2. Assign a Single Approver:
Enter the email address of the approver responsible for releasing this user’s orders and choose
the appropriate option in the ‘Approver Email Format:’ dropdown list as needed.
PLEASE NOTE: In order for the approver to release or cancel orders from the approval email,
the ‘HTML’ format must be selected.
Once you have entered a workflow template or assigned a single approver, click the ‘Create
User’ button at the bottom of the page.
Reporting: Provide access to Bill Management, Dashboard or both.
Per Unit Price: This option determines the users limit per item.
Per Extended Line Item: This option determines the users extended line item limit per line.
Per Order: This option determines a user dollar limit per order.
Store Purchase Card: The SPC is not a revolving or any other
type of credit card and does not establish any new account,
nor does it extend credit to the Cardholder. The SPC is an
identif ication card only and allow s the Cardholder to receive
custom discount pricing w hen making purchases at Office Depot's retail stores.
Ship To Budgets: Does not apply to Super Users. Super Users can manage all budget details.
BSD Login Method: SSO (Single Sign On) is not available at
this time.
Office Depot • business.officedepot.com User Guide
55 | User Guide https://business.officedepot.com
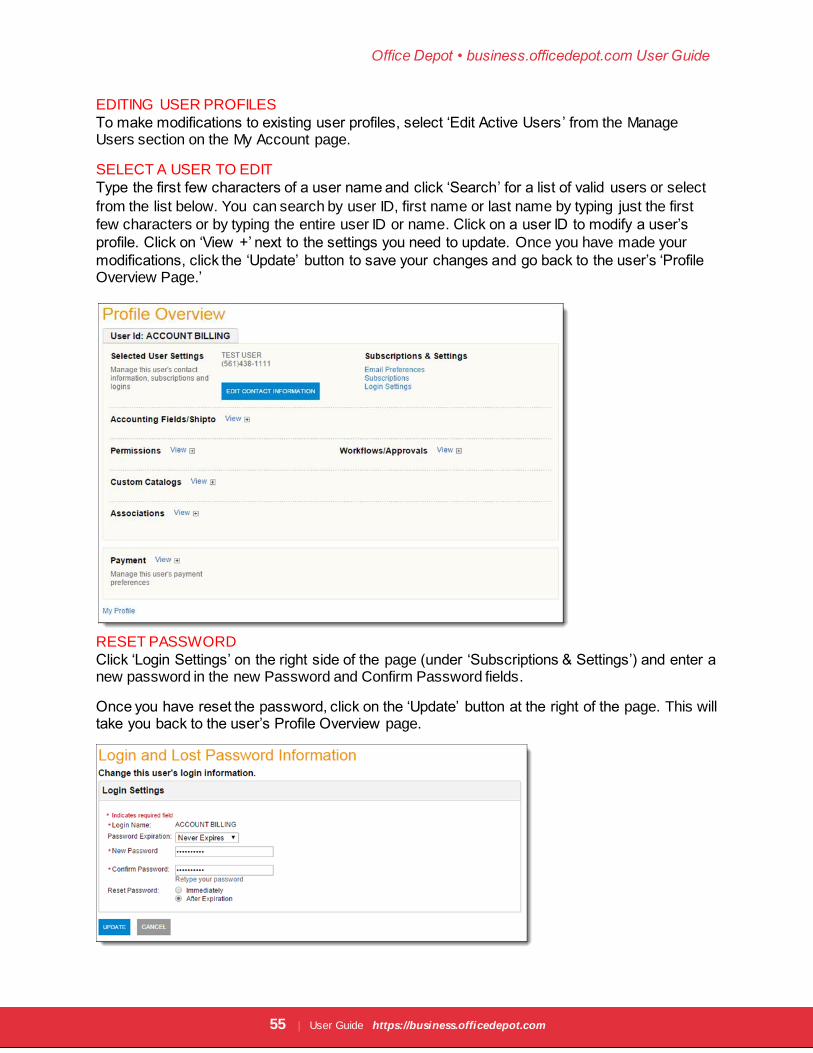
EDITING USER PROFILES
To make modifications to existing user profiles, select ‘Edit Active Users’ from the Manage Users section on the My Account page.
SELECT A USER TO EDIT
Type the first few characters of a user name and click ‘Search’ for a list of valid users or select
from the list below. You can search by user ID, first name or last name by typing just the first
few characters or by typing the entire user ID or name. Click on a user ID to modify a user’s
profile. Click on ‘View +’ next to the settings you need to update. Once you have made your
modifications, click the ‘Update’ button to save your changes and go back to the user’s ‘Profile Overview Page.’
RESET PASSWORD
Click ‘Login Settings’ on the right side of the page (under ‘Subscriptions & Settings’) and enter a new password in the new Password and Confirm Password fields.
Once you have reset the password, click on the ‘Update’ button at the right of the page. This will take you back to the user’s Profile Overview page.
Office Depot • business.officedepot.com User Guide
56 | User Guide https://business.officedepot.com
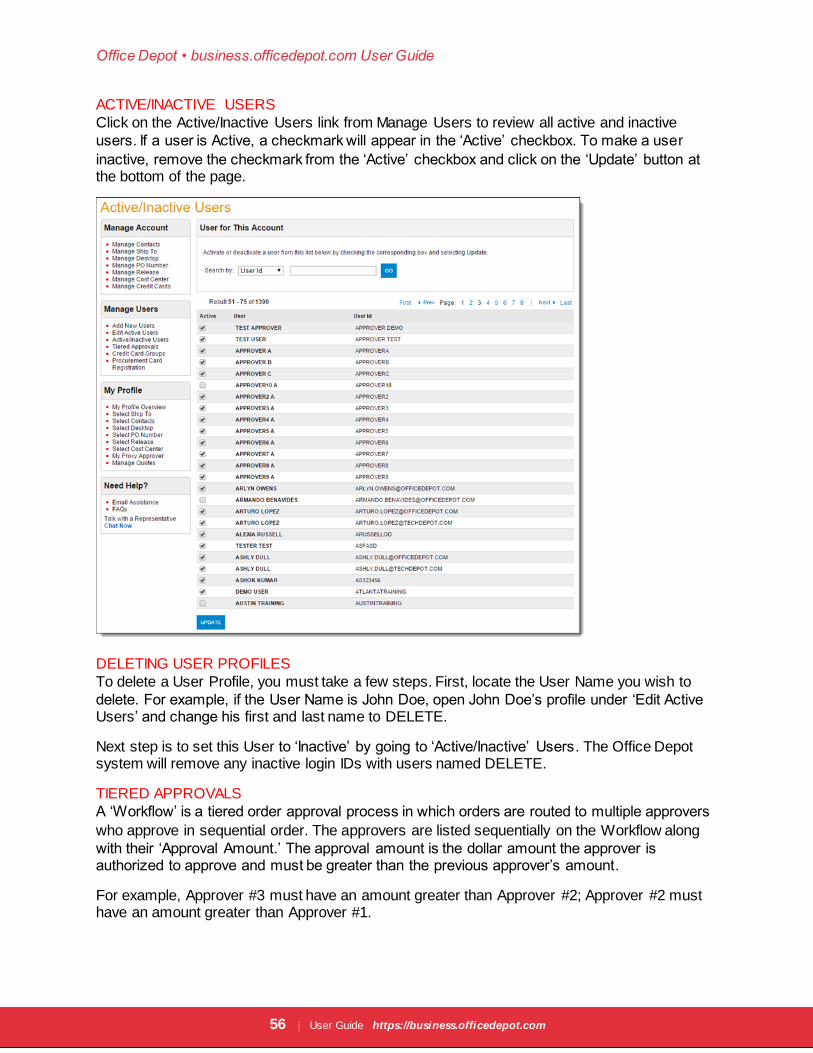
ACTIVE/INACTIVE USERS
Click on the Active/Inactive Users link from Manage Users to review all active and inactive
users. If a user is Active, a checkmark will appear in the ‘Active’ checkbox. To make a user
inactive, remove the checkmark from the ‘Active’ checkbox and click on the ‘Update’ button at the bottom of the page.
DELETING USER PROFILES
To delete a User Profile, you must take a few steps. First, locate the User Name you wish to
delete. For example, if the User Name is John Doe, open John Doe’s profile under ‘Edit Active Users’ and change his first and last name to DELETE.
Next step is to set this User to ‘Inactive’ by going to ‘Active/Inactive’ Users. The Office Depot system will remove any inactive login IDs with users named DELETE.
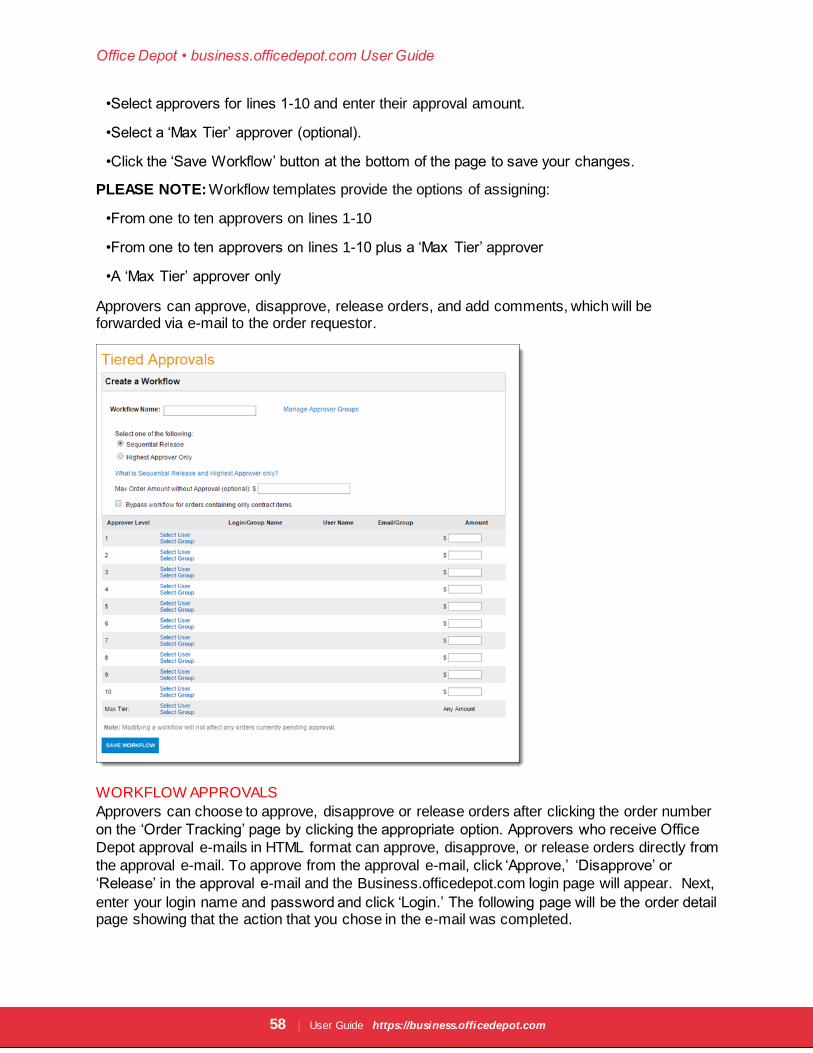
TIERED APPROVALS
A ‘Workflow’ is a tiered order approval process in which orders are routed to multiple approvers
who approve in sequential order. The approvers are listed sequentially on the Workflow along
with their ‘Approval Amount.’ The approval amount is the dollar amount the approver is authorized to approve and must be greater than the previous approver’s amount.
For example, Approver #3 must have an amount greater than Approver #2; Approver #2 must have an amount greater than Approver #1.

Office Depot • business.officedepot.com User Guide
57 | User Guide https://business.officedepot.com
If the order total exceeds the approver’s amount, the approver will have the option to ‘approve’
or ‘disapprove’ the order – approving the order routes it to the next approver and disapproving
cancels the order. When the order reaches the approver who’s approval amount is greater than
the order total, that approver will have the option to ‘Release’ the order (which sends the order to Office Depot to be processed), or cancel the order.
A ‘Max Tier’ approver can also be assigned to the workflow and will be able to release or cancel orders regardless of the order total.
When an order is routed through a Workflow, only the approvers listed on the workflow template
are able to approve, disapprove or release the order. The exceptions are: Super Users who can
approve any workflow order, and ‘Proxy Approvers’ who are selected by specific approvers to approve orders in their absence.
Create and edit Workflows by clicking on ‘Tiered Approvals’ under ‘Manage Users’
CREATING A WORKFLOW Click ‘Create A New Workflow’ and use the following steps to set up a workflow template.
•Enter a ‘Workflow Name’
•Select one of the following:
-Sequential release (Default): Starting with the first approver, the order is routed to each
approver until it reaches the approver whose dollar amount is high enough to release the order (must be greater than the order total).
-Highest Approver Only: The order is only routed to the approver whose dollar amount is high enough to release the order.
•To have smaller orders bypass the approval process, enter a dollar amount in the ‘Max Order
Amount without Approval’ field. Orders that are below the dollar amount entered will not be routed for approval.
•To have orders containing only contract items bypass the approval process, check the
‘Bypass workflow for orders containing only contract items’ box. Orders that contain only
contract items will not be routed for approval.
Office Depot • business.officedepot.com User Guide
58 | User Guide https://business.officedepot.com
•Select approvers for lines 1-10 and enter their approval amount.
•Select a ‘Max Tier’ approver (optional).
•Click the ‘Save Workflow’ button at the bottom of the page to save your changes.
PLEASE NOTE: Workflow templates provide the options of assigning:
•From one to ten approvers on lines 1-10
•From one to ten approvers on lines 1-10 plus a ‘Max Tier’ approver
•A ‘Max Tier’ approver only
Approvers can approve, disapprove, release orders, and add comments, which will be forwarded via e-mail to the order requestor.
WORKFLOW APPROVALS
Approvers can choose to approve, disapprove or release orders after clicking the order number
on the ‘Order Tracking’ page by clicking the appropriate option. Approvers who receive Office
Depot approval e-mails in HTML format can approve, disapprove, or release orders directly from
the approval e-mail. To approve from the approval e-mail, click ‘Approve,’ ‘Disapprove’ or
‘Release’ in the approval e-mail and the Business.officedepot.com login page will appear. Next,
enter your login name and password and click ‘Login.’ The following page will be the order detail page showing that the action that you chose in the e-mail was completed.
Office Depot • business.officedepot.com User Guide
59 | User Guide https://business.officedepot.com
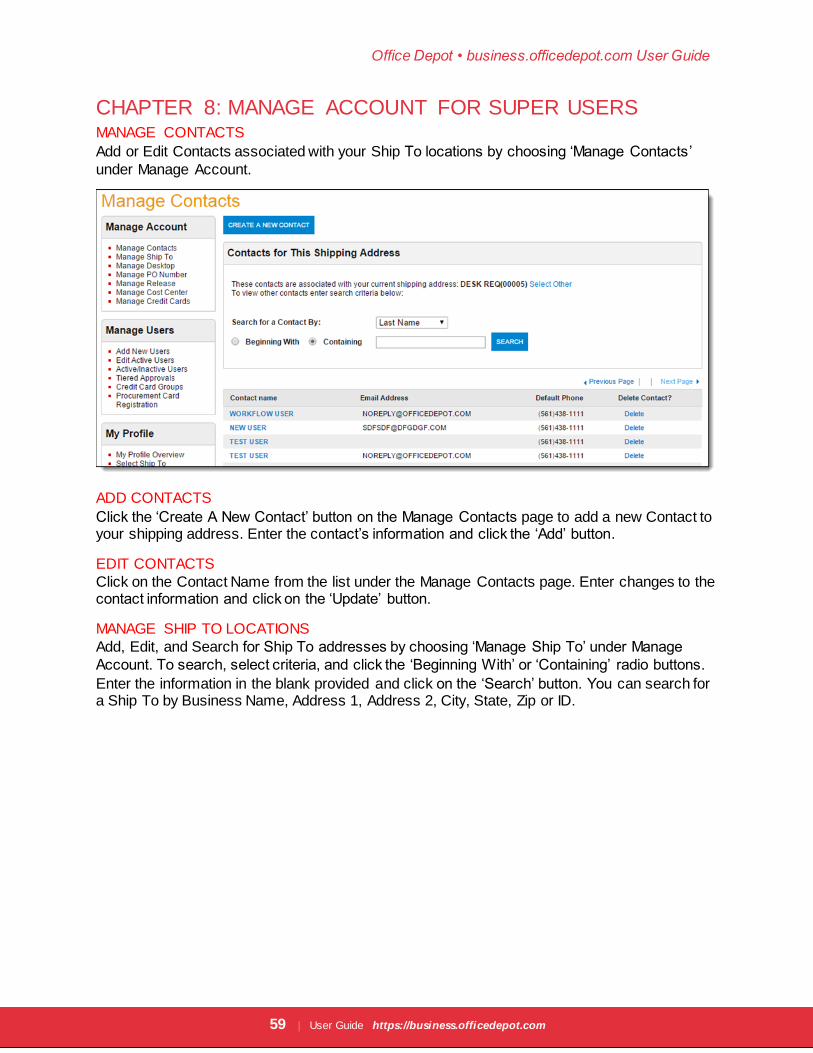
CHAPTER 8: MANAGE ACCOUNT FOR SUPER USERS MANAGE CONTACTS
Add or Edit Contacts associated with your Ship To locations by choosing ‘Manage Contacts’
under Manage Account.
ADD CONTACTS
Click the ‘Create A New Contact’ button on the Manage Contacts page to add a new Contact to your shipping address. Enter the contact’s information and click the ‘Add’ button.
EDIT CONTACTS
Click on the Contact Name from the list under the Manage Contacts page. Enter changes to the contact information and click on the ‘Update’ button.
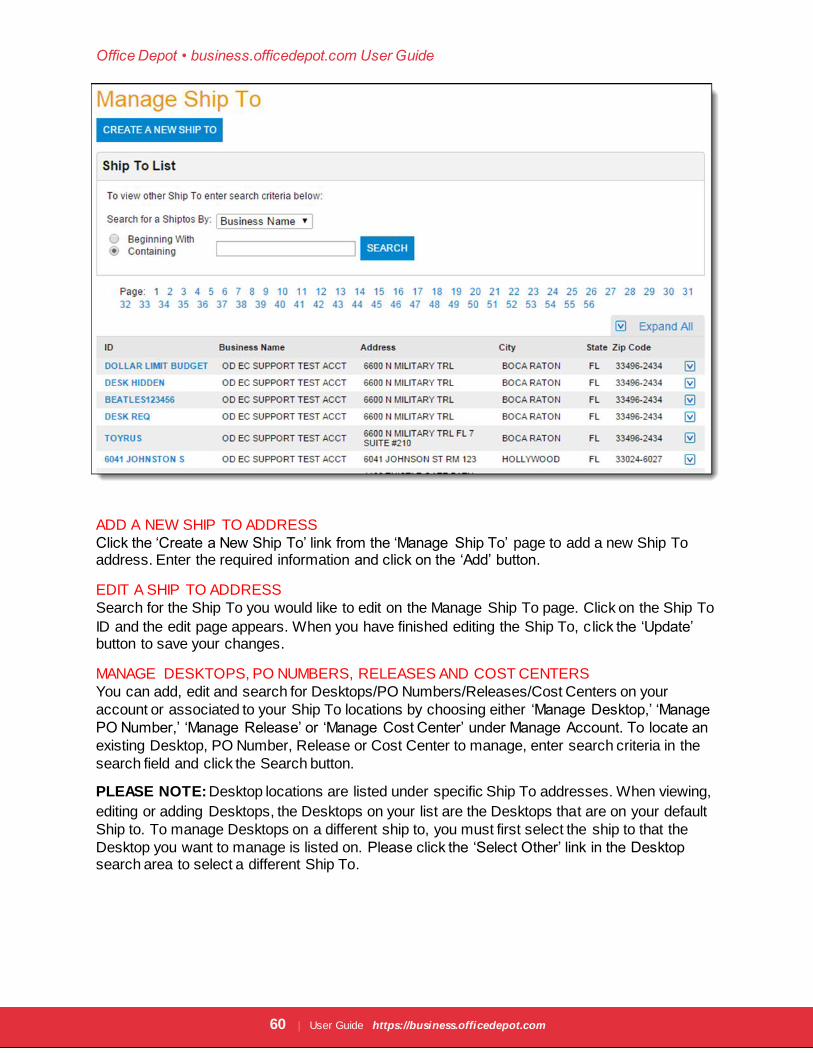
MANAGE SHIP TO LOCATIONS
Add, Edit, and Search for Ship To addresses by choosing ‘Manage Ship To’ under Manage
Account. To search, select criteria, and click the ‘Beginning With’ or ‘Containing’ radio buttons.
Enter the information in the blank provided and click on the ‘Search’ button. You can search for a Ship To by Business Name, Address 1, Address 2, City, State, Zip or ID.
Office Depot • business.officedepot.com User Guide
60 | User Guide https://business.officedepot.com
ADD A NEW SHIP TO ADDRESS
Click the ‘Create a New Ship To’ link from the ‘Manage Ship To’ page to add a new Ship To address. Enter the required information and click on the ‘Add’ button.
EDIT A SHIP TO ADDRESS
Search for the Ship To you would like to edit on the Manage Ship To page. Click on the Ship To
ID and the edit page appears. When you have finished editing the Ship To, c lick the ‘Update’ button to save your changes.
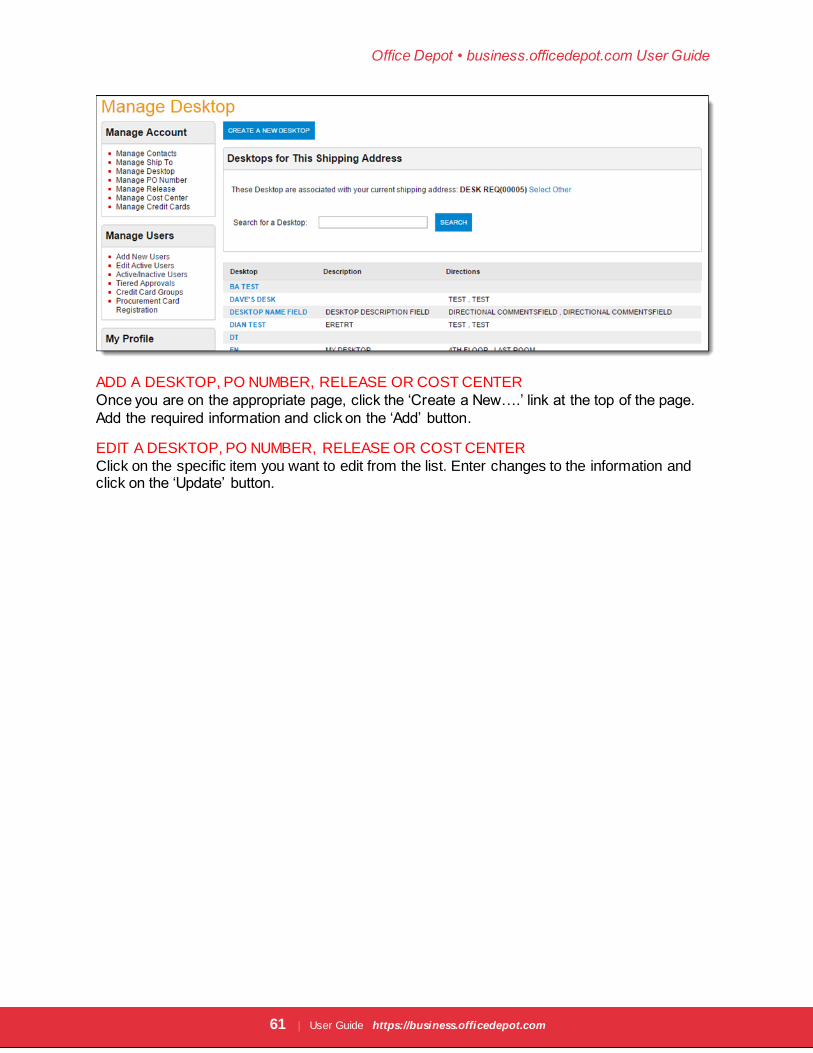
MANAGE DESKTOPS, PO NUMBERS, RELEASES AND COST CENTERS
You can add, edit and search for Desktops/PO Numbers/Releases/Cost Centers on your
account or associated to your Ship To locations by choosing either ‘Manage Desktop,’ ‘Manage
PO Number,’ ‘Manage Release’ or ‘Manage Cost Center’ under Manage Account. To locate an
existing Desktop, PO Number, Release or Cost Center to manage, enter search criteria in the
search field and click the Search button.
PLEASE NOTE: Desktop locations are listed under specific Ship To addresses. When viewing,
editing or adding Desktops, the Desktops on your list are the Desktops that are on your default
Ship to. To manage Desktops on a different ship to, you must first select the ship to that the
Desktop you want to manage is listed on. Please click the ‘Select Other’ link in the Desktop search area to select a different Ship To.
Office Depot • business.officedepot.com User Guide
61 | User Guide https://business.officedepot.com
ADD A DESKTOP, PO NUMBER, RELEASE OR COST CENTER
Once you are on the appropriate page, click the ‘Create a New….’ link at the top of the page.
Add the required information and click on the ‘Add’ button.
EDIT A DESKTOP, PO NUMBER, RELEASE OR COST CENTER
Click on the specific item you want to edit from the list. Enter changes to the information and click on the ‘Update’ button.
Office Depot • business.officedepot.com User Guide
62 | User Guide https://business.officedepot.com
CHAPTER 9: ASSISTANCE AND TRAINING DEMO HELP VIDEOS
https://business.officedepot.com includes Online Training Videos in the Customer Services
section of the navigation bar. Online Training provides training topics on a variety of subjects.
HELP DESK
Contact Office Depot’s Technical Support Desk at 800.269.6888 for technical assistance. The Technical Support Desk is open Monday through Friday, 8:00 A.M. – 8:00 P.M. (EST).
CUSTOMER SERVICE
Office Depot’s Customer Service Department is available to assist you with any questions you
may have concerning product, pricing, ordering, delivery, or support services. Get immediate
help with your online purchases by connecting instantly with a customer service representative,
Monday-Friday 8:00 A.M. to 8:00 P.M. (ET), using our Live Chat functionality or by calling us
toll-free at 888.263.3423.
LIVE CHAT Live Chat is available Monday-Friday 8:00 A.M. to 11:00 P.M. (ET)
FREQUENTLY ASKED QUESTIONS (FAQ) Q: When is the latest I can order to receive my delivery tomorrow?
A: Orders received by 5:00 P.M. local time are processed for next day.
Q: Why do I get a message about “Certificate Authority has expired”?
A: Your browser’s certificate for access to secure sites has expired. Please contact your
technical department to have the certificate deleted, or to have the browser upgraded.
Q: What is the difference between a cart and a list?
A: The Shopping Cart is used to make purchases right away. Use My Shopping List to create
lists of commonly ordered items for future reference.
Q: How do I search my Order Tracking by order number?
A: Click on ‘Orders’ and type the Order number in the ‘Search By’ field then click ‘Search Orders.’
Q: How do I obtain my login information?
A: Login information is provided by either your Account Manager, or by a designated “Super
User” within your company. To reset a password, the Technical Support Desk can provide
assistance in resetting the password and/or providing the login name (after the caller’s identity is
verified). You can reach Technical Support Monday through Friday 8:00 A.M. to 8:00 P.M. (ET) at: 800.269.6888. You may also contact your Super User for assistance.
Q: Why do I have to change my password?
A: For security reasons, Office Depot gives you the option of changing your password on a
regular basis (30, 60 or 90 days). Enter the password in the ‘New Password’ and ‘Confirm
Password’ fields when prompted to change your password. Contact your Office Depot Account Manager or Super User to have your password set to never expire.
Office Depot • business.officedepot.com User Guide
63 | User Guide https://business.officedepot.com
Q: I put the items in my shopping cart, why haven’t you filled my order yet?
A: Putting an item into your shopping cart is only the first step. Click View Cart to verify your items and click ‘Checkout’. Click the ‘Place Order’ button to submit your order.
Q: What is the difference between a Company-Wide Shopping list and a Personal Shopping list?
A: A ‘Company-Wide’ list allows all users on the account to view and select items for purchase. A ‘Personal’ List can only be viewed and modified under the login of which it was created.
Q: How do I place future orders?
A: To place an order for future delivery, click on the ‘Orders’ icon in the top navigation bar and
then click on ‘Future Orders’. This will take you to our Future Orders website where you can shop and then select your desired delivery date.
Q: How do I find the number for my Customer Service Center?
A: Click on ’Phone Support’ listed under ‘Customer Service’ at the bottom of every page. This
link provides all of Office Depot’s Customer Service numbers. You also can hover your mouse over ‘Help’ on the left side of the navigation bar and a list of contact numbers is displayed.
Q: How do I find an Office Depot store in my area?
A: Click on the ‘Store locator’ link on the left side of the navigation bar or in the footer section under ‘Customer Tools.’
Q: How do I compare items on the website?
A: When searching for items you will see a ‘Compare’ checkbox under each item. To compare
the different product features of up to four items, check the compare box under each item. After
the box is checked, the word ‘Compare’ changes to a ‘Compare Items’ link. Click the ‘Compare Items’ link on any of the items you checked to go to the Product Comparison page.
Q: How do I access my shopping lists?
A: All Shopping Lists are located at the top right corner in the navigation bar under the ‘My Lists’
icon. There also is a ‘My Lists’ link about the Search Box.
Q: How do I setup a Tiered Approval on my account?
A: Super Users can click on ‘Tiered Approvals’ under the Manage Users section in ‘My Account'.
Q: Where on the website can I find Toner for my copy machine?
A: Located in the navigation bar, click on ‘Ink & Toner’.

Office Depot • business.officedepot.com User Guide
64 | User Guide https://business.officedepot.com
CHAPTER 10: NOTES
Office Depot • business.officedepot.com User Guide
65 | User Guide https://business.officedepot.com
INDEX
A
Abi l ityOne · 18
Account Bi lling · 32, 47, 58
Account Manager · 2, 8, 11, 41, 52, 68, 69
Active/Inactive Users · 61
Add to Cart · 19, 21, See Order Entry
Add To Cart · 14, 22
Add to Shopping List · 14
Advanced Sorting · 15
ava ilable budget · 52, See Budget
B
backorder · 25
Budget Alert · 50, See Budget
Budget Indicator · 50, 51, See Budget
Budgets · 50
Bul letin Board · 8, 9, 10, 11
bus iness cards · 24
Bus iness Solutions Division · 7, 8
C
Cartridges · 23, See Ink & Toner
Category · 14, 15
Check Out · 28, 32, 34
Checkout · 28, 69 Company-Wide · 69, See Shopping Lists
Copy & Print · 24
Cost Centers · 41, 56, 66
Create New List · 20, See Shopping Lists
Credit Card · 32, 47, 52, 53, 58 Custom Printing · 24
Customer Service · 2, 39, 68, 69
D
Dashboard · 11
Desktop Locations · 56
Disability-Owned · 18
Diverse suppliers · 18, See Women-Owned; Minority-
Owned; Veteran-Owned; Disability-Owned; LGBT;
Abi l ityOne
E
Edit Active Users · 59, 61
Emai l · 11, 32, 46
Empty Cart · 28
environmental footprint · 18
F
fi l ters · 15
Future Order · 25, 26
Future Orders · 25, 69
G
greener alternative · 29
Greener Office · 18
Greener Purchase Program · 18
H
Held By Customer · 37
Held For Restrictions · 37 Held For Review · 37
I
Icon Legend · 17
Ink & Toner Finder · 7, 22
Item Number · 14, 38
K
keyword · 14, 15, 24
L
LGBT · 18
Limited Availability · 25
Live Chat · 2, 68
Login Name · 8, 57
logo · 8, 10, 11
Office Depot • business.officedepot.com User Guide
66 | User Guide https://business.officedepot.com
M
Manage Contacts · 65
Manage Users · 57, 59, 61, 62, 69 Max Tier · 62, 63, See Workflow
Messages · 9, 10
Minori ty-Owned · 18
My Account · 2, 11, 41, 42, 43, 45, 46, 47, 48, 49, 50, 56,
57, 59, 68, 69 My Profi le · 42, 43, 45, 46, 47, 48
N
navigation · 14, 25, 41, 49, 50, 68, 69
News Updates · 9
O
Office Depot Private Brand · 19
Onl ine Training Videos · 68
Order Approval · 48
Order Confi rmation · 36
Order Tracking · 24, 37, 38, 39, 42, 63, 68
Orders Icon · 37
P
Password · 8, 46, 57, 60, 69
Password Expiration · 57
Payment Information · 47
permissions · 42, 45, 58
Personal List · 19, 69, See Shopping Lists PO numbers · 41, 56
Procurement Card · 53
Procurement Cards · 53
Product Comparison · 20, 21, 69
Proxy Approver · 48
Q
Quick Order · 7
R
Recycle · 23
RELATED ORDERS · 40
Release Numbers · 56
Release Selected · 37
Releases · 41, 66
Reporting · 11, 49
Return Authorization Number · 39
S
Save Cart to List · 28
Save for Later · 30
Savings Opportunities · 11
Search · 14, 15, 18, 38, 45, 59, 60, 65, 66, 68 security · 8, 46, 69
Select Contacts · 43
Sel f-Managed Credit Cards · 52, 53
Share Cart · 28, 30
Ship To Locations · 41
Shopping Cart · 14, 22, 28, 30, 32, 68, See Checkout
Shopping Lists · 7, 19, 42, 69
Single Approver · 59
Spend Analysis · 11
s tationery · 24
Store locator · 69 Store Purchase Card · 55
Store Purchasing Card · 54, 55
Submit Return · 39
Subscription Delivery · 27
Subscription Manager · 26 Super User · 8, 19, 41, 56, 58, 68, 69
Super Users · 9, 10, 52, 53, 62, 69
T
Technical Support · 2, 8, 11, 68
Tier 1 · 53 Tiered Approval · 59, 69
U
Update Cart · 28
User Activity · 11
User Profile · 61
V
Veteran-Owned · 18
W
Women-Owned · 18
Workflow · 37, 48, 58, 59, 61, 62, 63


Office Depot • business.officedepot.com User Guide
68 | User Guide https://business.officedepot.com