bt education user manual v1.0 for j3.x
DESCRIPTION
Manual for template BT Education for JoomlaTRANSCRIPT

www.bowthemes.com
1
BT Education JOOMLA TEMPLATE
Total User Guide Version 1.0
Copyright © 2014 Bowthemes.com [email protected]
www.bowthemes.com
2
Tables of Contents
INTRODUCTION ................................................................................................................................. 3
Template Features ...................................................................................................................................................... 3
Compressed File Contents ........................................................................................................................................ 3
Accompanying Extensions ....................................................................................................................................... 3
HELP AND SUPPORT ......................................................................................................................... 4
We support ..................................................................................................................................................................... 4
We don’t support ......................................................................................................................................................... 4
Support channel ........................................................................................................................................................... 4
We recommend............................................................................................................................................................. 4
INSTALLING ........................................................................................................................................ 5
1. Installing Quickstart package ......................................................................................................................... 5
2. Partial installation ............................................................................................................................................... 9
3. Installing EasyBlog ............................................................................................................................................ 11
4. Installing Jomsocial: .......................................................................................................................................... 11
WORKING WITH TEMPLATE MODULE POSITIONS ................................................................13
1. BT Education – Content and sidebar .......................................................................................................... 15
2. How to configure BT Education modules ................................................................................................. 16 Header block ........................................................................................................................ 16 Position “background_slideshow” and “background_slideshow_content” ........................... 17 Position “position-1” ............................................................................................................ 18 Position “position-2” ............................................................................................................ 19 Position “top_mainbody” ..................................................................................................... 20 Position “position-5” ............................................................................................................ 20 Footer block ......................................................................................................................... 21 Position “sidebar-1” ............................................................................................................. 22 Contact page ........................................................................................................................ 23
HOW TO CUSTOMIZE CONTENT IN K2 COMPONENT .............................................................25
HOW TO CUSTOMIZE YOUR “CONTACT US” PAGE ..................................................................27
CUSTOMIZE THE LOOK OF YOUR TEMPLATE ..........................................................................29
1. Changing Logo, Main Menu, Favicon and website Title ...................................................................... 29
2. Change template color, template fonts ...................................................................................................... 30
HOW TO UPGRADE YOUR TEMPLATE .......................................................................................31
RECOMMENDATIONS .....................................................................................................................32
CONTACTING BOWTHEMES .........................................................................................................33
www.bowthemes.com
3
Introduction
BT Education is a responsive education template for Joomla 2.5 and 3.x websites. It is the perfect combination between innovative social
networks function and original website interface. It is integrated with JomSocial, Kunena and EasyBlog which provide wonderful functions
of social hub, forum and blog. Therefore, BT Education is one of the best solutions for not only education websites but also websites which
concentrate on interaction of social networks and communities.
Template Features
Running on T3 Framework Version 3
RESPONSIVE TEMPLATES
6 Colors themes support
Support for K2 component
Support for EasyBlog Component
Support for Jomsocial Component
Inbuilt Google Fonts configuration
Several module positions and various module class suffixes
Delivery with powerful BowThemes' extensions
Delivery with all Adobe Photoshop source files
Improved style of Joomla! Core system pages.
Multiples modules suffix's build-in template for module styling.
Inbuilt CSS and Javascript Compression
Template support for MooTools 1.2
Compatibility with Joomla 2.5, Joomla 3.0
Cross Browser Support: IE8+, Firefox 4+, Safari 4+, Chrome 8+, Opera 9+
Well-commented custom.css file for flexible customization
XHTML 1.0 Transitional Check it ?
CSS Validates Check it ?
All images for demo only.
Compressed File Contents
The BT Education Template zipped in file has following contents:
Extensions (components, modules and plug-ins)
Documentation
License
Photoshop files
Quickstart package
Screenshots
All the files are contained in a zip archived. You need to extract them by using Winrar, Stuffit or your archiving tools
Accompanying Extensions
This template comes with 5 powerful extensions:
BT Background SlideShow module
BT Google Maps module
BT Social Connect Free Version component
BT Content Showcase
BT Google Maps Pro
Note: You can only download version of extensions packed with template. To download upgraded version of extension, please make sure that your membership account is J!Extensions or J!Developers; or you have already bought this extension as a single product.
Template demo: http://demo.bowthemes.com/#bt-education
Template details: http://bowthemes.com/joomla-templates/bt- education.html
Support forum: http://bowthemes.com/forums/59-bt-education/
www.bowthemes.com
4
Help and Support
We support
Support service is a part of your purchase. So feel free to ask about Bowthemes product. We’d like to support following issues:
1. Issues in the products
2. Usage of our products
4. Non‐documented issues, tips and tricks regarding our software.
5. Minor changes to our products in order to work on the site.
6. If you purchase a single product, we do provide support only for ONE of your domain name. You can install Bowthemes
template for multiple sites, but support is for one domain only.
We don’t support
However, there are some unsupported issues such as:
1. Huge customizations.
2. Massively hacking the core files.
3. Third party extension’s conflict issues.
If you need customizations, please email us for a quote at [email protected].
Support channel
Our support is done via email system, ticket system for premium subscribers and forum support for both premium and non-premium subscribers. At the moment, we do not provide any support via telephone.
We recommend
*Follow us on Facebook, Twitter, Google+, LinkedIn
*Remind us about latency of support via Facebook messenger
*Encourage us by voting and leave reviews on Joomla Extension Directory
www.bowthemes.com
5
You are reading: How to install
BT Education
Installing
Installing Template file or Quickstart package is a common decision. If your website already has content and you just want to change its skin, we suggest you to install template file and choose extensions to add. If you are a Joomla newbie and your website has no or few data, in most cases, installing Quickstart package is the best choice.
1. Installing Quickstart package
* How a quickstart package works?
A Quickstart package is a whole Joomla website installation kit that installs the template and all of the components and plug-ins
onto your server at once. For each template, Bowthemes provides the Quickstart package to use easily and comfortably. It will
help you save much time on installing and configuring if you plan to start your site quickly. Installing the Quickstart package is
quite easy as you install Joomla generally!
In short, Quickstart = Joomla! + Template + Modules or/and Plugins + Images* + demo content included
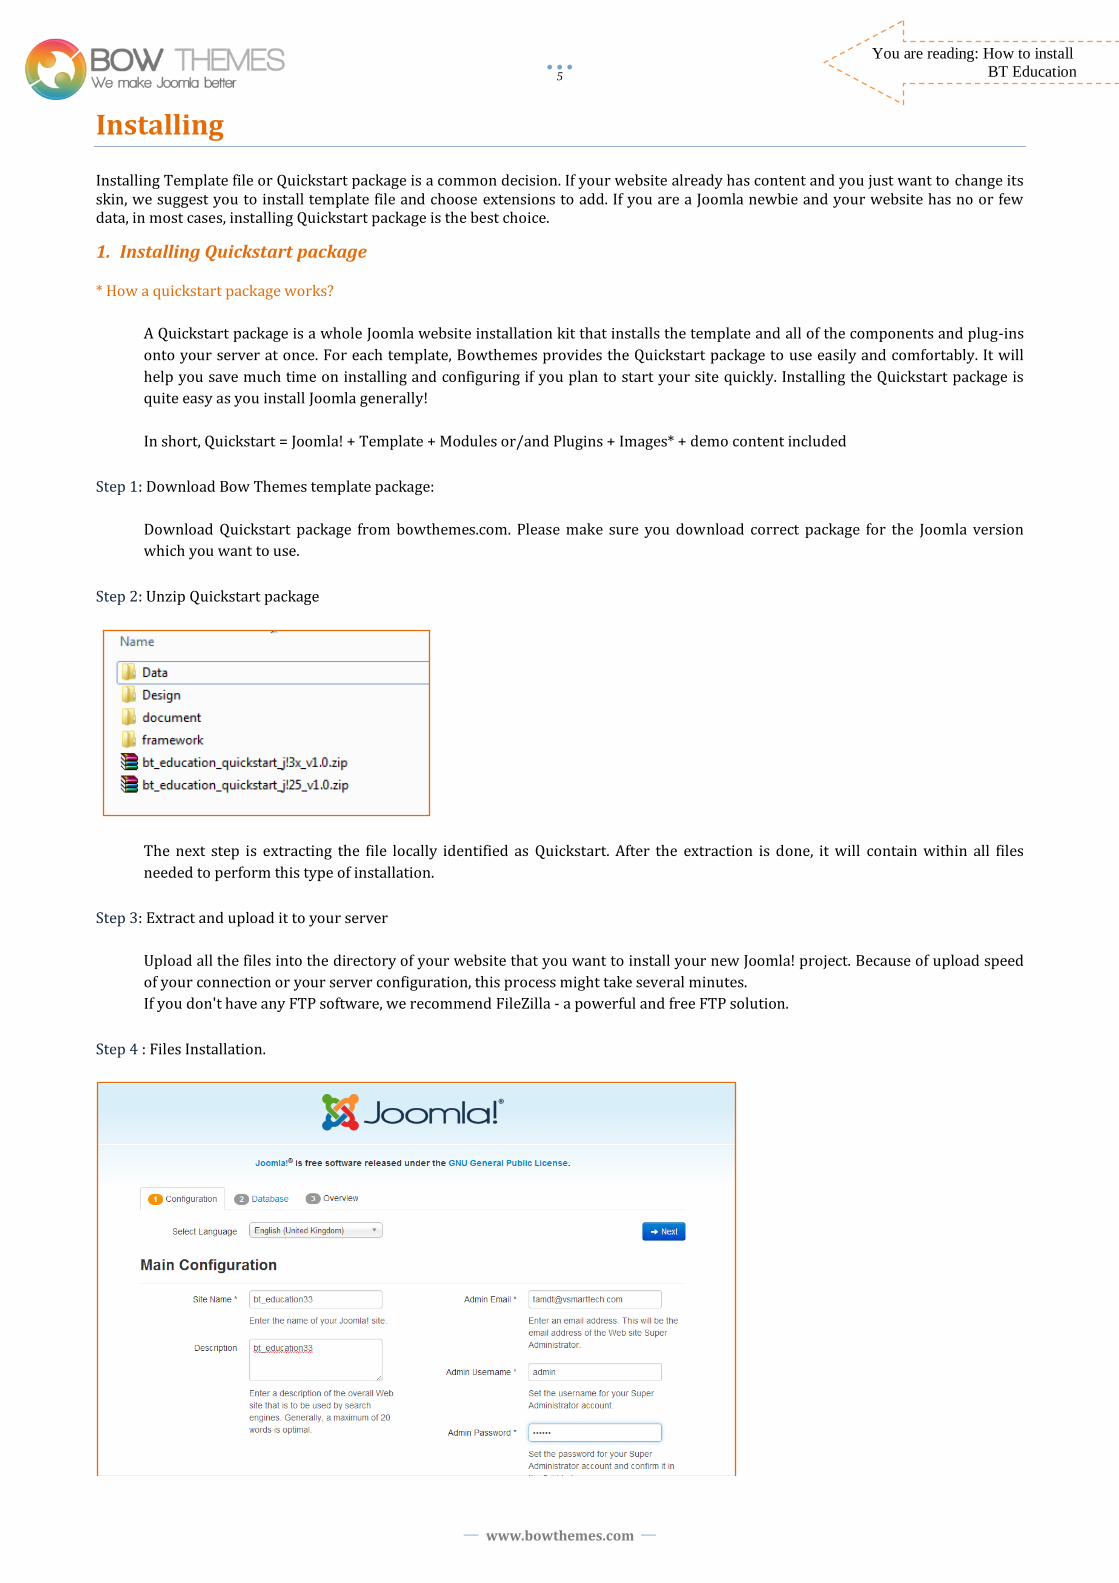
Step 1: Download Bow Themes template package:
Download Quickstart package from bowthemes.com. Please make sure you download correct package for the Joomla version
which you want to use.
Step 2: Unzip Quickstart package
The next step is extracting the file locally identified as Quickstart. After the extraction is done, it will contain within all files
needed to perform this type of installation.
Step 3: Extract and upload it to your server
Upload all the files into the directory of your website that you want to install your new Joomla! project. Because of upload speed
of your connection or your server configuration, this process might take several minutes.
If you don't have any FTP software, we recommend FileZilla - a powerful and free FTP solution.
Step 4 : Files Installation.

www.bowthemes.com
6
You are reading: How to install
BT Education
Install page 2 is the database page. The details you enter here are important as this is where the actual information for your Joomla
installation is going to be stored. In a nutshell you need to create a mysql database, a user for the database and then assign that user to
the database you created.This step requires a slight detour and we need to open up cpanel on our server.
Step 5 : Prepare your database
Open the cpanel account on your server. Most of the
time you find this by navigating to
http://www.mysite.com/cpanel. Once you have logged
in, navigate to the database area of the cpanel account.
Depending on the theme, it may look different on your
server. And this image shows how it looks like on one
of our servers.
You can use the database wizard to skip the process. But for those who have no the wizard on their cpanel installation, this is the
guide to create the database.
Click on the mysql database icon and write the name of the database you want to use for your site in the window provided. You
can use any name you want. Click on the Create database button and you should receive a success message telling you that the
database has been created.
Navigate back to the mysql database page and scroll down to the input boxes of
Create new mysql user.
The username and password you put in here are up to you. However, you should
use the random password generator to improve your Joomla site security.
After clicking Create New User, you will receive the success message and you are
abled to navigate back to the mysql page and scroll down the page again. Take a
note of the username and password - as we will need this later.
You now need to assign the user to the database. So where it says "Add user to
database" select the database and the user you have just created and make sure
they appear in the top and the bottom drop down boxes.
Once you have the new user and new database in the select boxes, you click add and
the following screen will appear.
Assign full or all privileges to the user and click "make changes" submit or add a
user or whichever submit button you have there. Then, you receive another
message telling that your user has been successfully added to the database. You
need to pay close attention to the names they use here as the database prefix and
user prefix need to be filled out in the next step. For example, while doing this
tutorial, the dummy database that is created called test and we can access it on our
server by using bowthemes_Education.
www.bowthemes.com
7
You are reading: How to install
BT Education
Step 6: Database Configuration
Select MySQL type of database from drop down list and enter the hostname of the database server Joomla! will be installed on
(normally it's "localhost").
This may not necessarily be the same as your Web server, so check with your hosting provider if you are not sure.
Enter the MySQL username, password and database name that you previously created on your host control panel.
when ready press next.
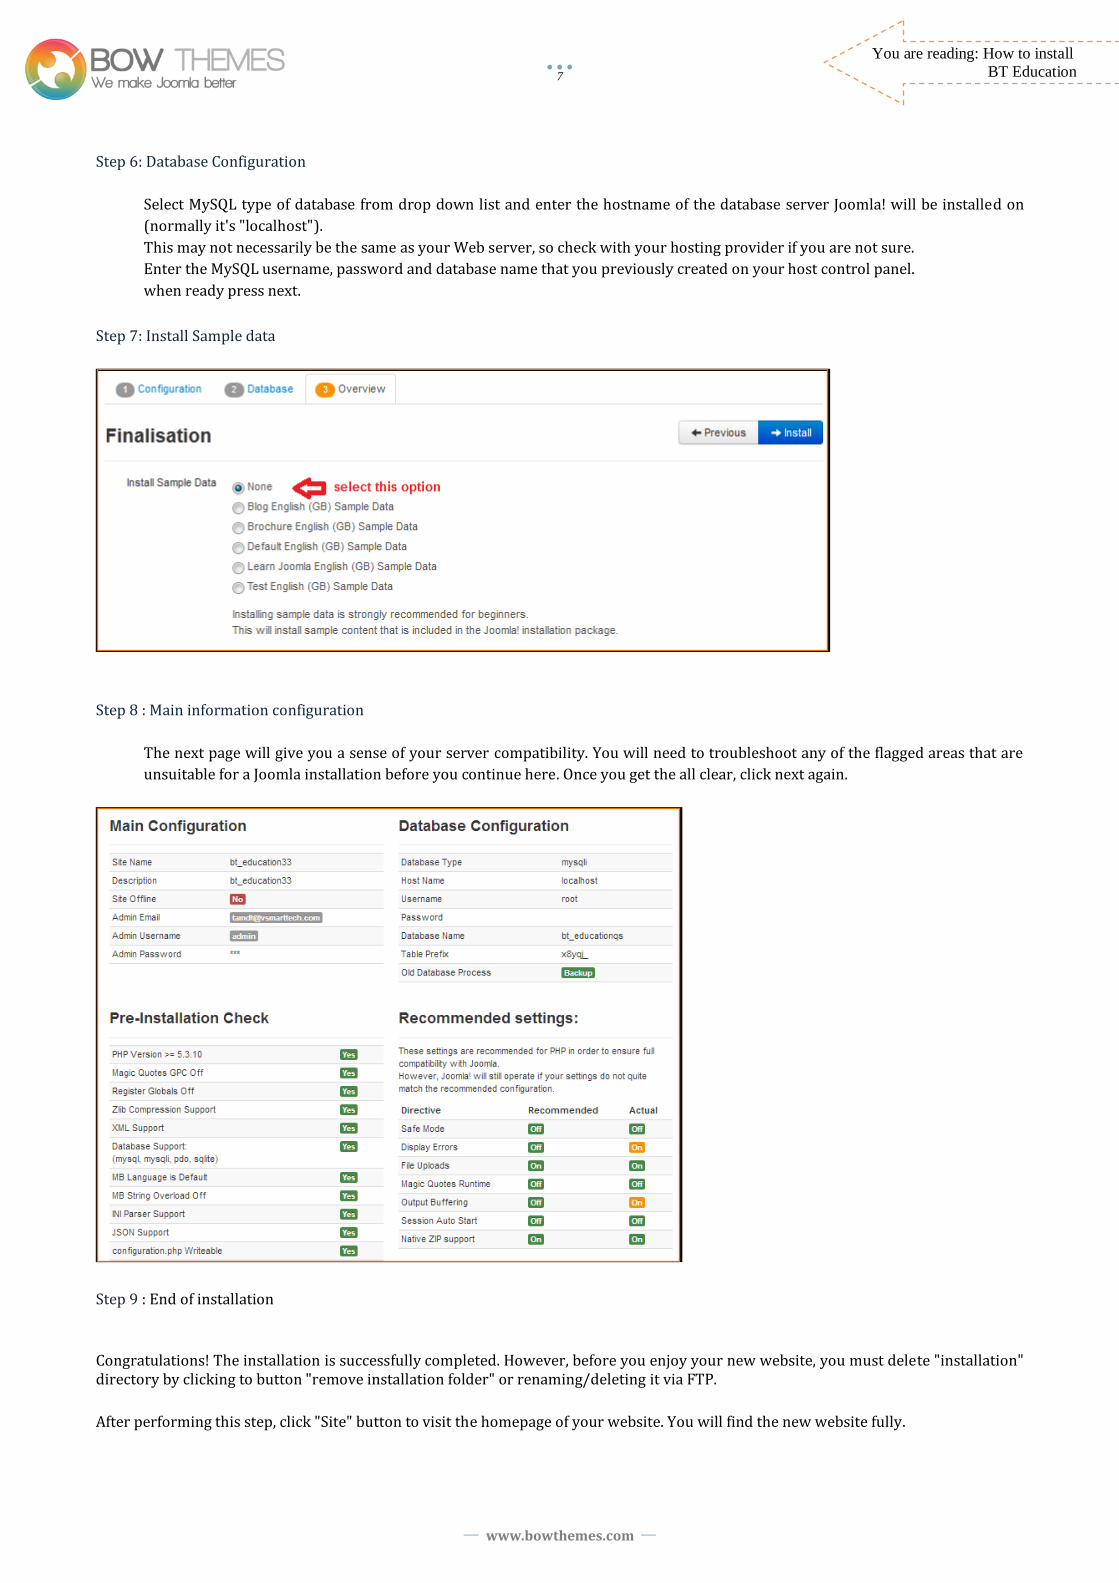
Step 7: Install Sample data
Step 8 : Main information configuration
The next page will give you a sense of your server compatibility. You will need to troubleshoot any of the flagged areas that are
unsuitable for a Joomla installation before you continue here. Once you get the all clear, click next again.
Step 9 : End of installation
Congratulations! The installation is successfully completed. However, before you enjoy your new website, you must delete "installation" directory by clicking to button "remove installation folder" or renaming/deleting it via FTP.
After performing this step, click "Site" button to visit the homepage of your website. You will find the new website fully.

www.bowthemes.com
8
You are reading: How to install
BT Education

www.bowthemes.com
9
You are reading: How to install
BT Education
2. Partial installation
If you decide to partially install BT Education template, we will guide you through following steps:
Check if you have the system requirement
A working installation of Joomla 2.5 or 3.x
*To install this template you must have a working version of Joomla already installed. For information regarding to installing the Joomla
platform, please refer to: http://docs.joomla.org/Beginners#Install_Joomla.21
Install T3 Framework plug-in
In order to use Bowthemes template, you have to make sure that the plugin JAT3 Framework is installed and enabled.
Installing T3 Framework: In the Joomla Administration panel, please follow these steps:
Step 1: Go to menu Extensions -> Extension Manager
Step 2: Choose “Upload Package File” tab. Browse the install package. Choose file plg_system_t3.v1.3.1.zip in related extensions
package
Step 3: Click “Upload & Install”
Enabling T3 Framework: In the Joomla Administration panel, please follow these steps:
www.bowthemes.com
10
You are reading: How to install
BT Education
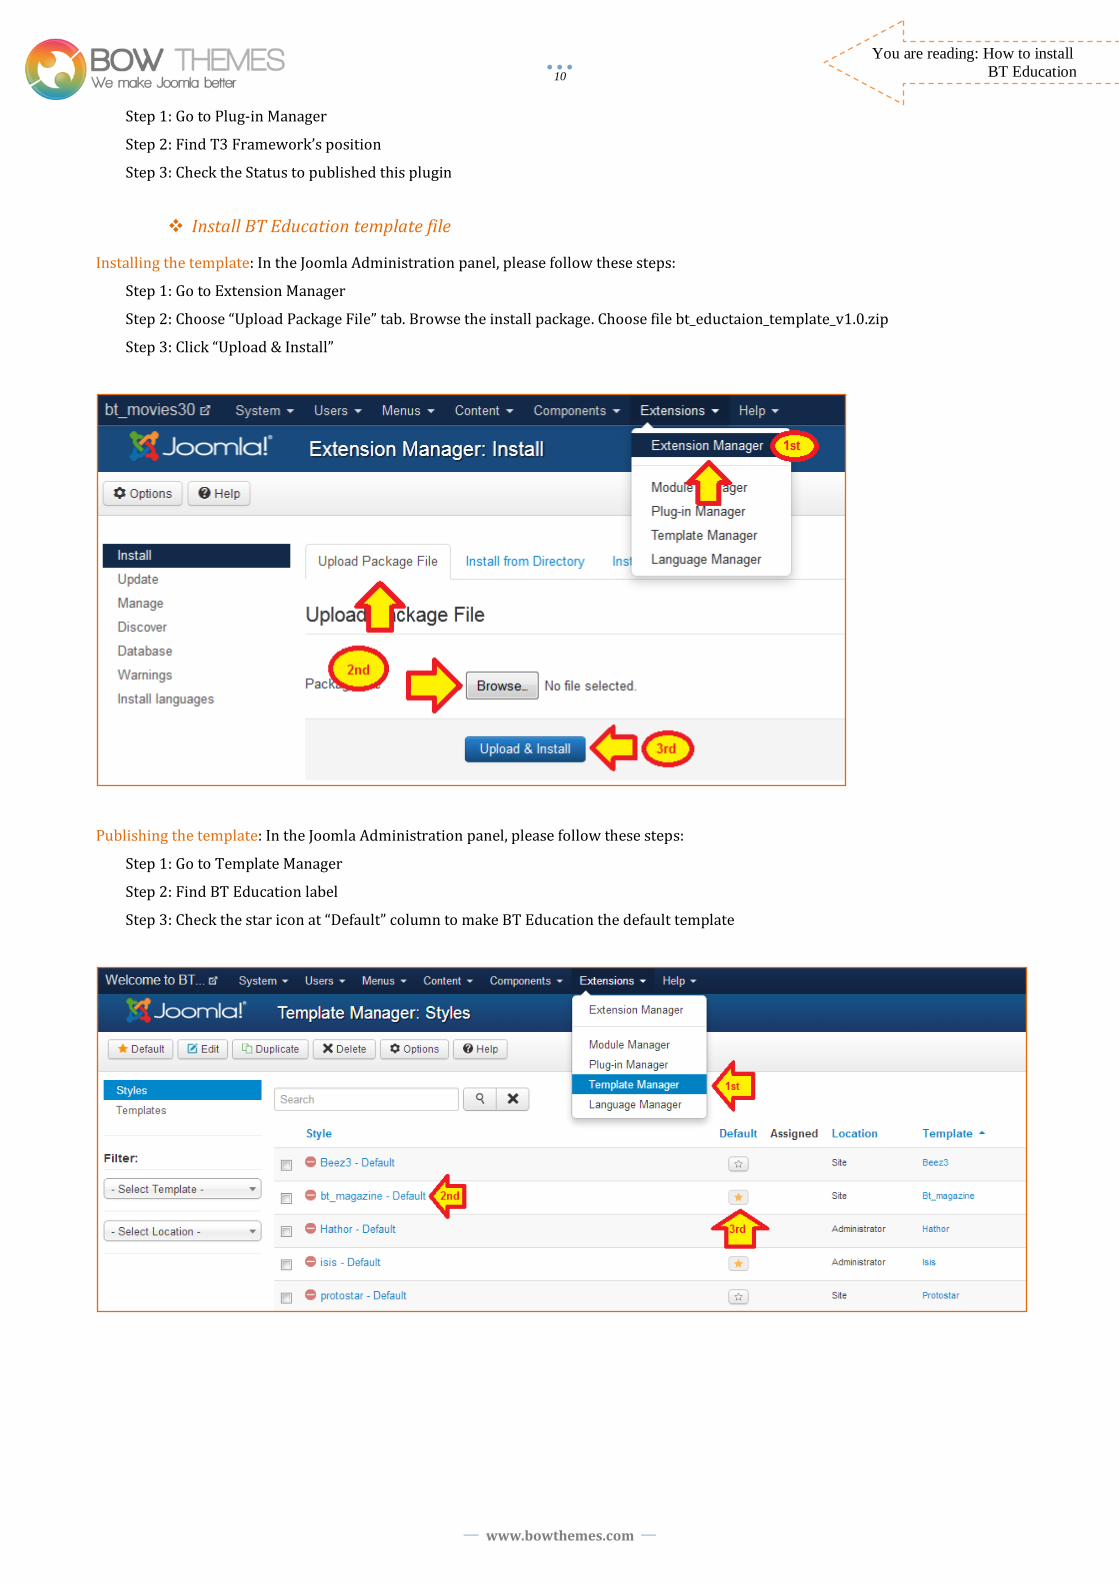
Step 1: Go to Plug-in Manager
Step 2: Find T3 Framework’s position
Step 3: Check the Status to published this plugin
Install BT Education template file
Installing the template: In the Joomla Administration panel, please follow these steps:
Step 1: Go to Extension Manager
Step 2: Choose “Upload Package File” tab. Browse the install package. Choose file bt_eductaion_template_v1.0.zip
Step 3: Click “Upload & Install”
Publishing the template: In the Joomla Administration panel, please follow these steps:
Step 1: Go to Template Manager
Step 2: Find BT Education label
Step 3: Check the star icon at “Default” column to make BT Education the default template

www.bowthemes.com
11
You are reading: How to install
BT Education
Install BT Education related extensions
Download the package related extensions, namely
BT_Education_all_Extensions_Unzip_first.zip and
extract it. In the Joomla Administration panel,
please follow these steps:
Step 1: Go to Extension Manager
Step 2: Browse the install extension (Choose the
extensions in the related extensions package that
you want)
Step 3: Click “Upload & Install”
3. Installing EasyBlog
Buy EasyBlog component
Set template default for EasyBlog component
Please follow our guide to set BT Education as default template of EasyBlog component. Firstly, you need to download related extensions package, copy file theme_bowthemes_for_easyblog.zip and paste into this folder: ../components/com_easyblog/themes Extract this file Next, go to Administration -> Components ->EasyBlog ->Themes.
Choose Bowthemes Theme (easyblog), this step is necessary to make sure that BT Education is the default template
EasyBlog configuration
EasyBlog makes the configuration working easier by giving their users a detailed documentation guide. To master this component,
please view this doc at EasyBlog official site:
http://stackideas.com/docs/easyblog
Here is the demo link if you want to see this component without Bowthemes template appearance.
http://demo.stackideas.com
4. Installing Jomsocial:
Buy Jomsocial component
Set template default for Jomsocial component

www.bowthemes.com
12
You are reading: How to install
BT Education
Please follow our guide to set BT Education as default template of Jomsocial component. Firstly, you need to download related extensions package, copy file theme_bowthemes_for_jomsocial.zip and paste into this folder: ../components/com_community/templates Extract this file Next, go to Administration -> Components ->Jomsocial ->Configuration->Templates
Choose Bowthemes Theme (Jomsocial), this step is necessary to make sure that BT Education is the default template
Jomsocial configuration
Jomsocial makes the configuration working easier by giving their users a detailed documentation guide. To master this component,
please view this doc at Jomsocial official site:
http://documentation.jomsocial.com/
Here is the demo link if you want to see this component without Bowthemes template appearance.
http://www.jomsocial.com/demo
If you need help, access here and post your requirement:
http://www.jomsocial.com/support-policy

www.bowthemes.com
13
You are reading: How to work with
Module positions
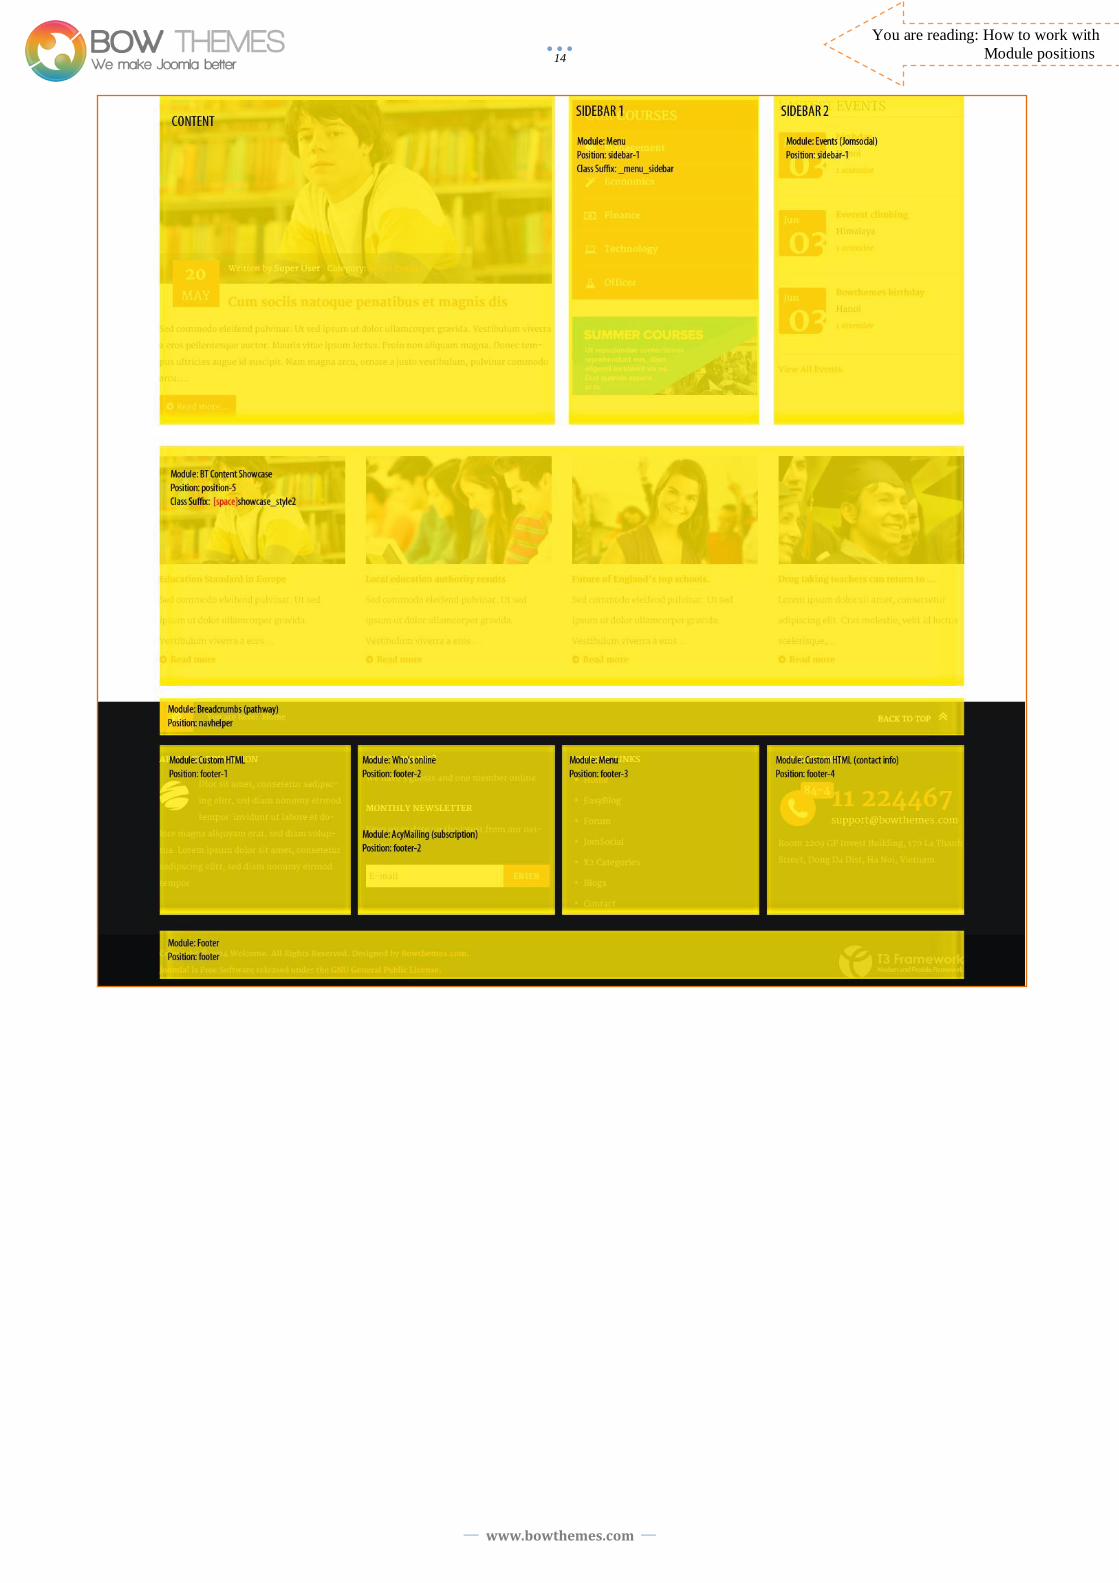
Working with Template Module positions
“Module” of a Joomla Website displays contents at front-end in the way you want. This section will give you an overview of how BT
Education template and its modules work together.
*Note: BT Education comes with 17 built-in module positions. The number of modules contained in each module position is unlimited.
For example: you can have 2 or 3 modules in the left or right module position.
BT Education – All module positions on homepage:
www.bowthemes.com
14
You are reading: How to work with
Module positions
www.bowthemes.com
15
You are reading: How to work with
Module positions
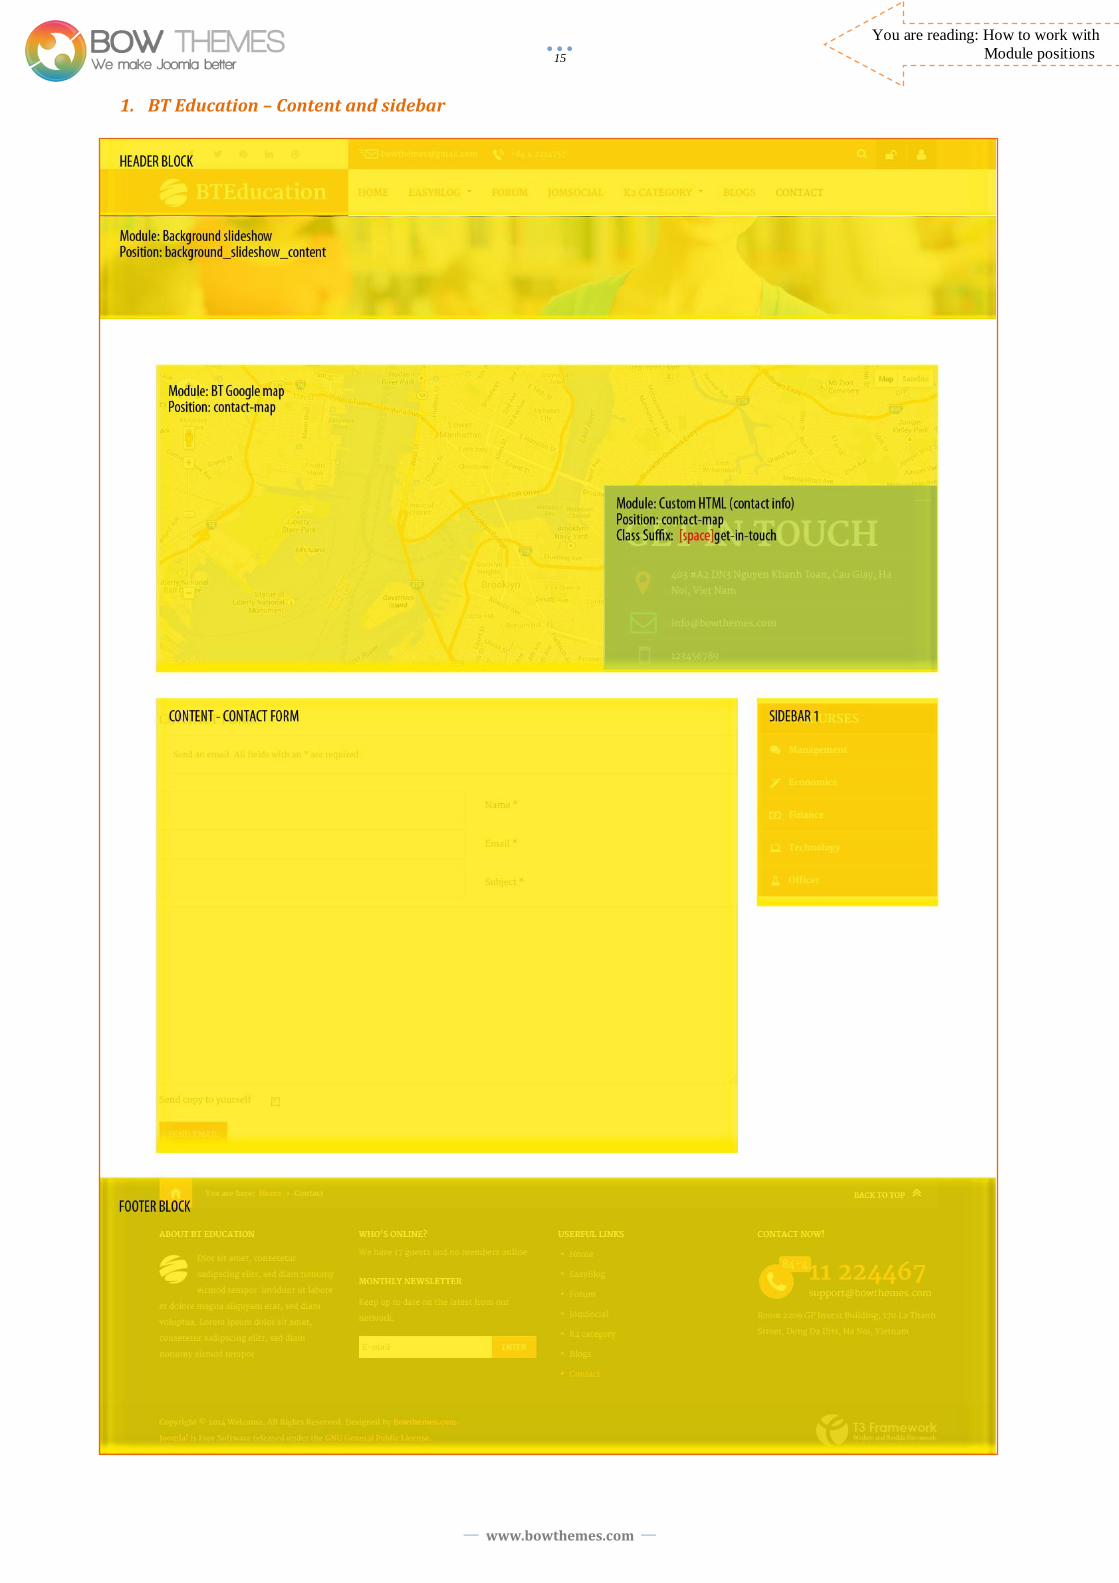
1. BT Education – Content and sidebar
www.bowthemes.com
16
You are reading: How to work with
Module positions
2. How to configure BT Education modules
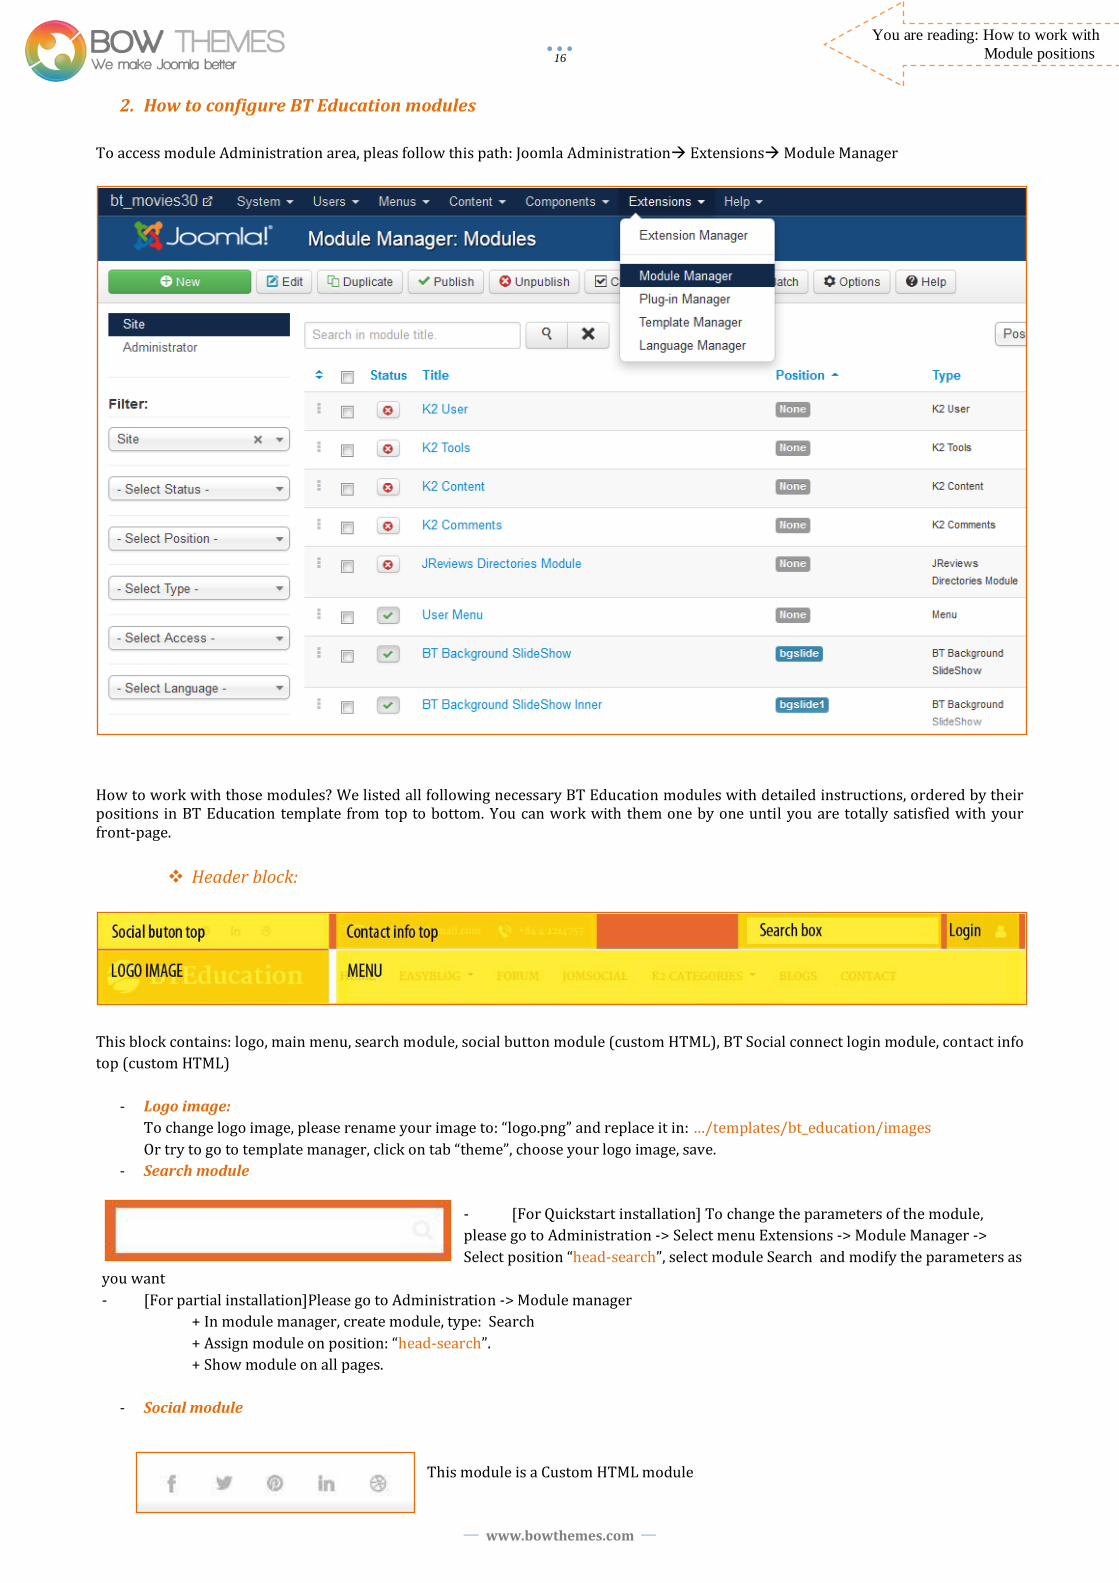
To access module Administration area, pleas follow this path: Joomla Administration Extensions Module Manager
How to work with those modules? We listed all following necessary BT Education modules with detailed instructions, ordered by their positions in BT Education template from top to bottom. You can work with them one by one until you are totally satisfied with your front-page.
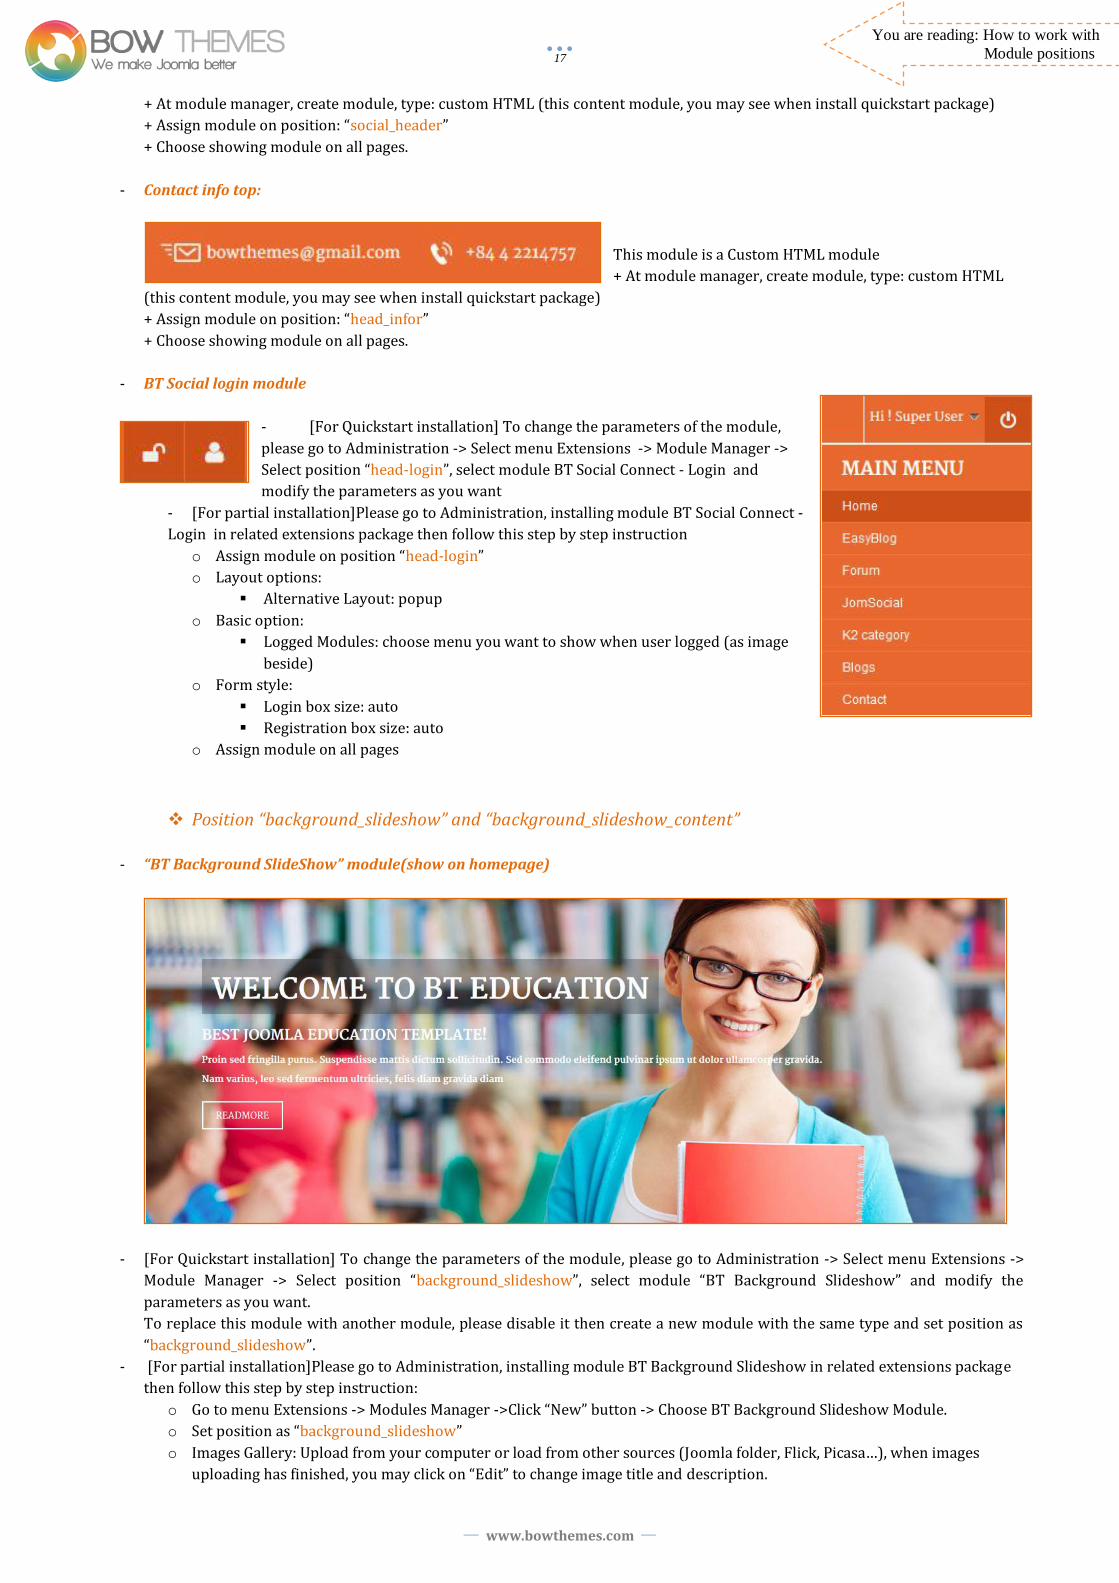
Header block:
This block contains: logo, main menu, search module, social button module (custom HTML), BT Social connect login module, contact info
top (custom HTML)
- Logo image:
To change logo image, please rename your image to: “logo.png” and replace it in: …/templates/bt_education/images
Or try to go to template manager, click on tab “theme”, choose your logo image, save.
- Search module
- [For Quickstart installation] To change the parameters of the module,
please go to Administration -> Select menu Extensions -> Module Manager ->
Select position “head-search”, select module Search and modify the parameters as
you want
- [For partial installation]Please go to Administration -> Module manager
+ In module manager, create module, type: Search
+ Assign module on position: “head-search”.
+ Show module on all pages.
- Social module
This module is a Custom HTML module
www.bowthemes.com
17
You are reading: How to work with
Module positions
+ At module manager, create module, type: custom HTML (this content module, you may see when install quickstart package)
+ Assign module on position: “social_header”
+ Choose showing module on all pages.
- Contact info top:
This module is a Custom HTML module
+ At module manager, create module, type: custom HTML
(this content module, you may see when install quickstart package)
+ Assign module on position: “head_infor”
+ Choose showing module on all pages.
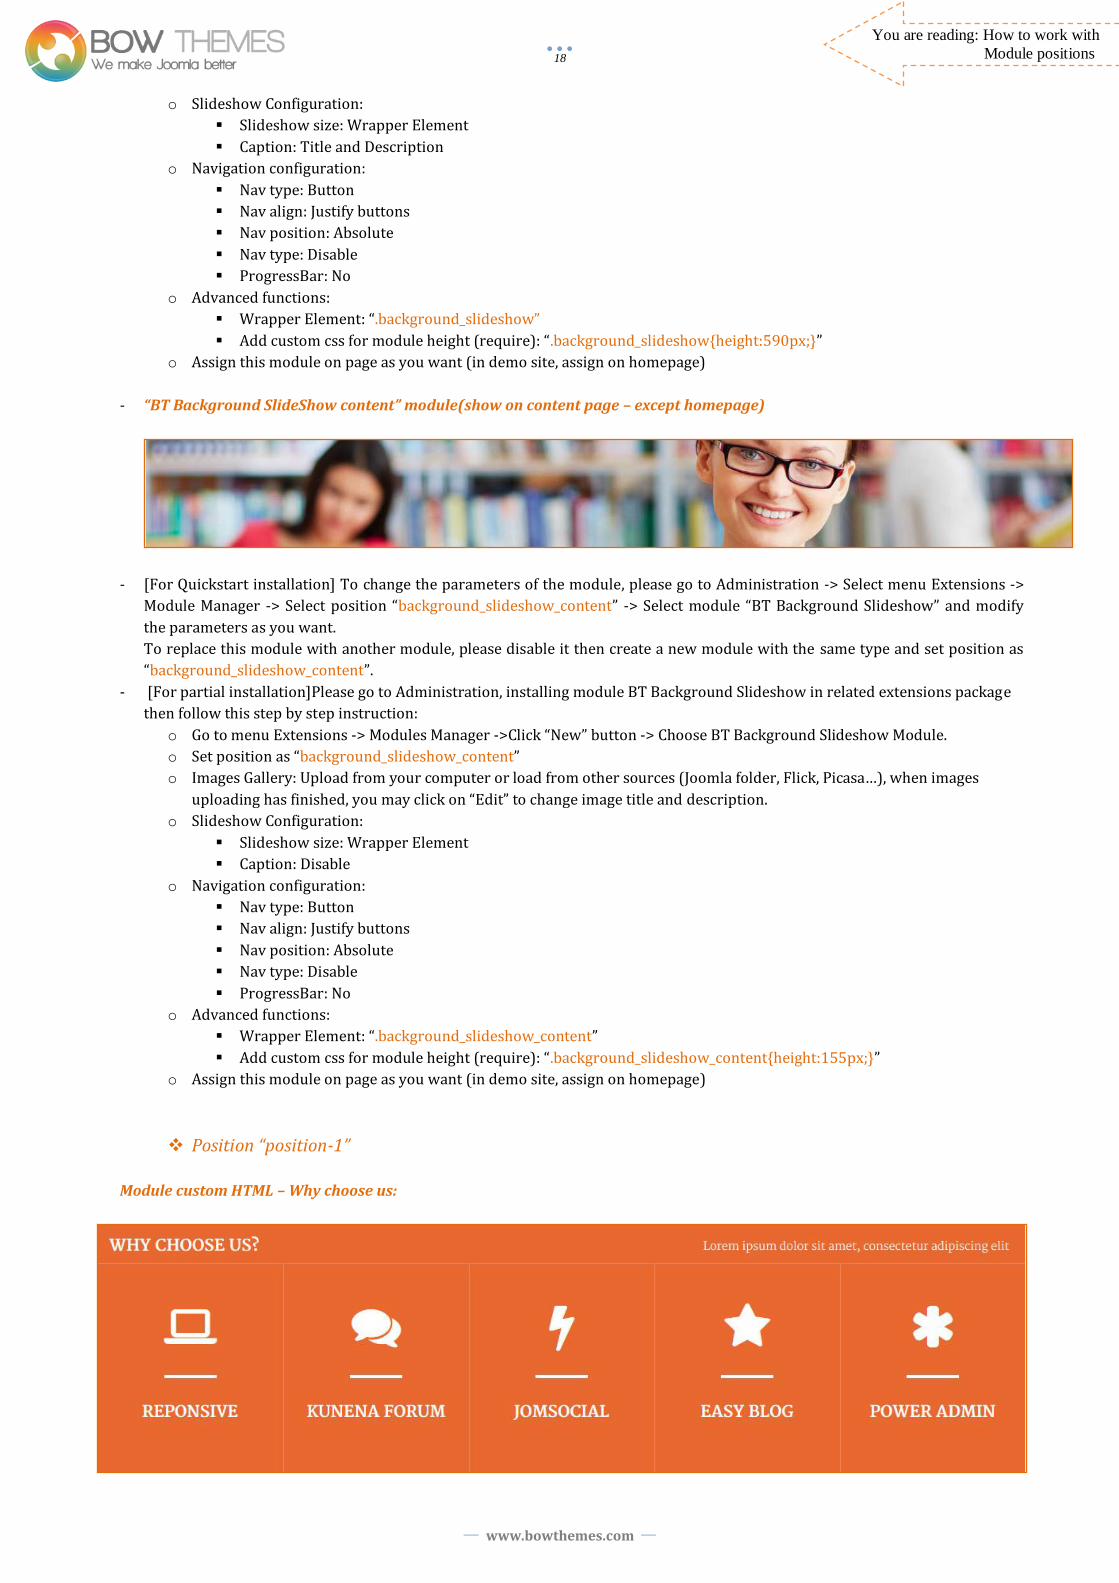
- BT Social login module
- [For Quickstart installation] To change the parameters of the module,
please go to Administration -> Select menu Extensions -> Module Manager ->
Select position “head-login”, select module BT Social Connect - Login and
modify the parameters as you want
- [For partial installation]Please go to Administration, installing module BT Social Connect -
Login in related extensions package then follow this step by step instruction
o Assign module on position “head-login”
o Layout options:
Alternative Layout: popup
o Basic option:
Logged Modules: choose menu you want to show when user logged (as image
beside)
o Form style:
Login box size: auto
Registration box size: auto
o Assign module on all pages
Position “background_slideshow” and “background_slideshow_content”
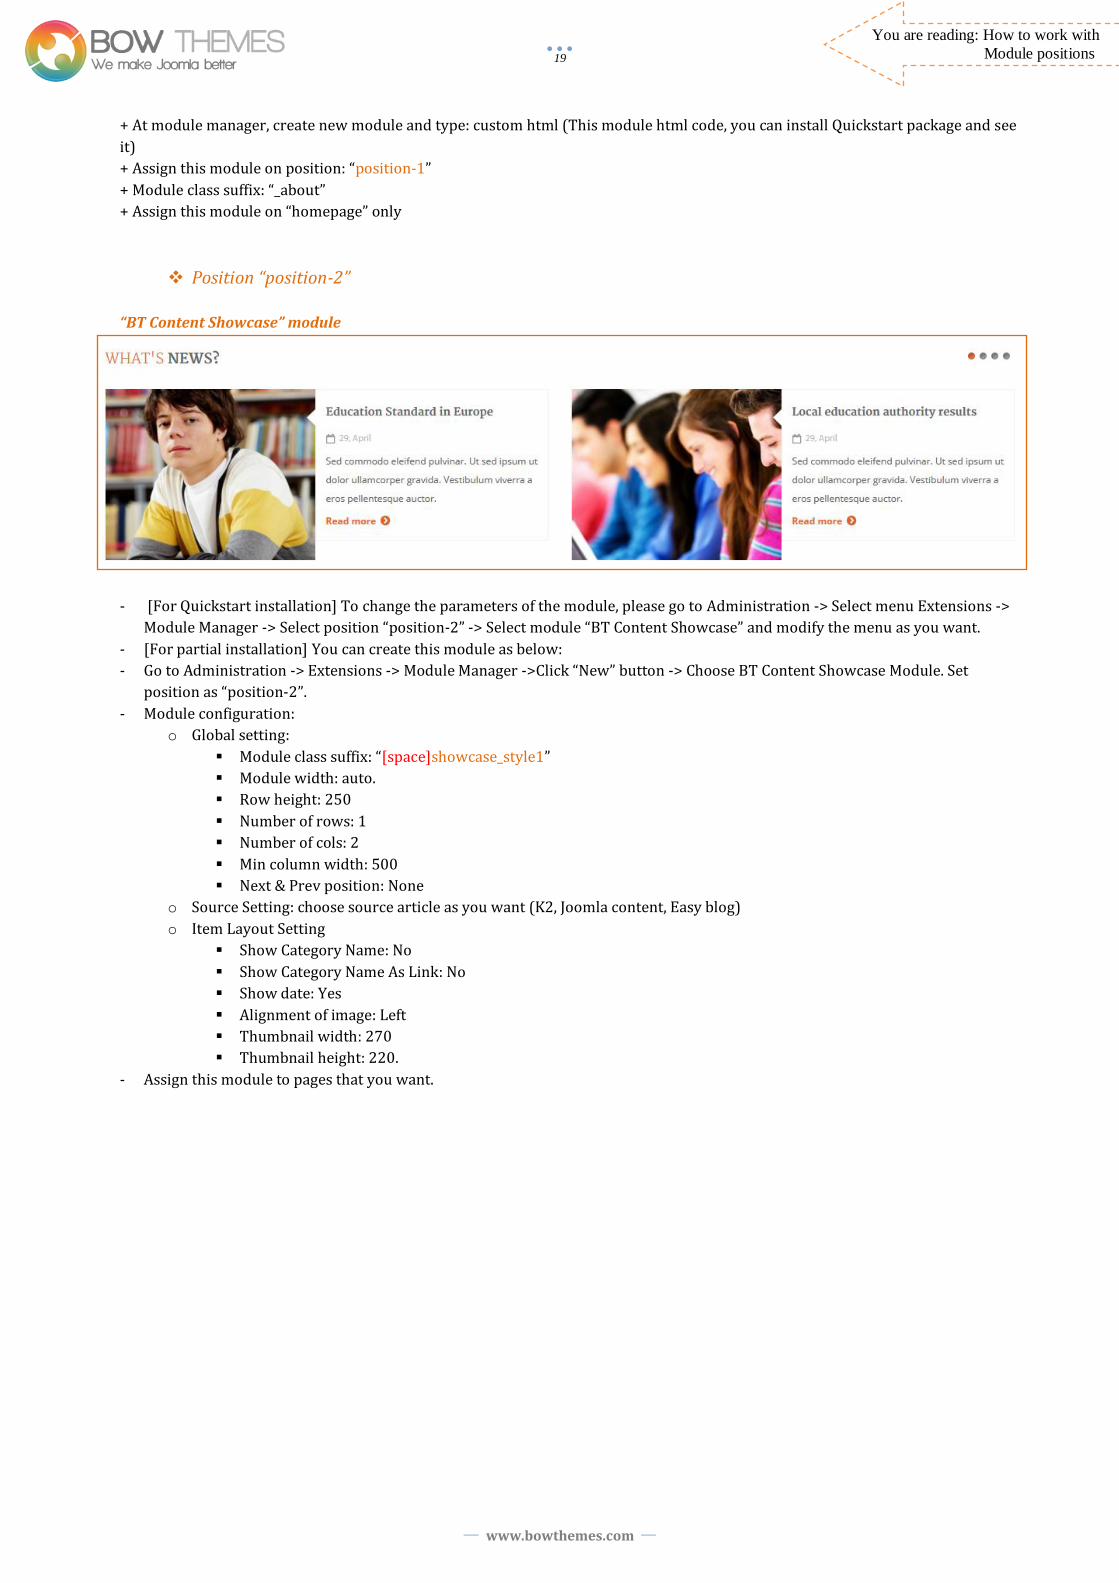
- “BT Background SlideShow” module(show on homepage)
- [For Quickstart installation] To change the parameters of the module, please go to Administration -> Select menu Extensions ->
Module Manager -> Select position “background_slideshow”, select module “BT Background Slideshow” and modify the
parameters as you want.
To replace this module with another module, please disable it then create a new module with the same type and set position as
“background_slideshow”.
- [For partial installation]Please go to Administration, installing module BT Background Slideshow in related extensions package
then follow this step by step instruction:
o Go to menu Extensions -> Modules Manager ->Click “New” button -> Choose BT Background Slideshow Module.
o Set position as “background_slideshow”
o Images Gallery: Upload from your computer or load from other sources (Joomla folder, Flick, Picasa…), when images
uploading has finished, you may click on “Edit” to change image title and description.
www.bowthemes.com
18
You are reading: How to work with
Module positions
o Slideshow Configuration:
Slideshow size: Wrapper Element
Caption: Title and Description
o Navigation configuration:
Nav type: Button
Nav align: Justify buttons
Nav position: Absolute
Nav type: Disable
ProgressBar: No
o Advanced functions:
Wrapper Element: “.background_slideshow”
Add custom css for module height (require): “.background_slideshow{height:590px;}”
o Assign this module on page as you want (in demo site, assign on homepage)
- “BT Background SlideShow content” module(show on content page – except homepage)
- [For Quickstart installation] To change the parameters of the module, please go to Administration -> Select menu Extensions ->
Module Manager -> Select position “background_slideshow_content” -> Select module “BT Background Slideshow” and modify
the parameters as you want.
To replace this module with another module, please disable it then create a new module with the same type and set position as
“background_slideshow_content”.
- [For partial installation]Please go to Administration, installing module BT Background Slideshow in related extensions package
then follow this step by step instruction:
o Go to menu Extensions -> Modules Manager ->Click “New” button -> Choose BT Background Slideshow Module.
o Set position as “background_slideshow_content”
o Images Gallery: Upload from your computer or load from other sources (Joomla folder, Flick, Picasa…), when images
uploading has finished, you may click on “Edit” to change image title and description.
o Slideshow Configuration:
Slideshow size: Wrapper Element
Caption: Disable
o Navigation configuration:
Nav type: Button
Nav align: Justify buttons
Nav position: Absolute
Nav type: Disable
ProgressBar: No
o Advanced functions:
Wrapper Element: “.background_slideshow_content”
Add custom css for module height (require): “.background_slideshow_content{height:155px;}”
o Assign this module on page as you want (in demo site, assign on homepage)
Position “position-1”
Module custom HTML – Why choose us:
www.bowthemes.com
19
You are reading: How to work with
Module positions
+ At module manager, create new module and type: custom html (This module html code, you can install Quickstart package and see
it)
+ Assign this module on position: “position-1”
+ Module class suffix: “_about”
+ Assign this module on “homepage” only
Position “position-2”
“BT Content Showcase” module
- [For Quickstart installation] To change the parameters of the module, please go to Administration -> Select menu Extensions ->
Module Manager -> Select position “position-2” -> Select module “BT Content Showcase” and modify the menu as you want.
- [For partial installation] You can create this module as below:
- Go to Administration -> Extensions -> Module Manager ->Click “New” button -> Choose BT Content Showcase Module. Set
position as “position-2”.
- Module configuration:
o Global setting:
Module class suffix: “[space]showcase_style1”
Module width: auto.
Row height: 250
Number of rows: 1
Number of cols: 2
Min column width: 500
Next & Prev position: None
o Source Setting: choose source article as you want (K2, Joomla content, Easy blog)
o Item Layout Setting
Show Category Name: No
Show Category Name As Link: No
Show date: Yes
Alignment of image: Left
Thumbnail width: 270
Thumbnail height: 220.
- Assign this module to pages that you want.

www.bowthemes.com
20
You are reading: How to work with
Module positions
Position “top_mainbody”:
“BT Background scrolling":
- This is a BT Background Scrolling Module. - [For Quickstart installation] To change the parameters of the module, please go to Administration -> Select menu Extensions ->
Module Manager -> Select position “top_mainbody” -> Select module “Background Scrolling” and modify the parameters as you
want.
- [For partial installation]You can create this module as below: o Click Extensions menu-> Module Manager ->Click “New” button-> Choose BT Background Scrolling.
o Set position as “top_mainbody”
o Basic options:
Height: 470
Background: select your background image
Text: enter your text here.
o Assign module on pages that you want.
Position “position-5”:
“BT Content Showcase” module (style 2)
- [For Quickstart installation] To change the parameters of the module, please go to Administration -> Select menu Extensions ->
Module Manager -> Select position “position-5” -> Select module BT Content Showcase and modify the menu as you want.
- [For partial installation] You can create this module as below:
- Go to Administration -> Extensions -> Module Manager ->Click “New” button -> Choose BT Content Showcase Module. Set
position as “position-5”.
- Module configuration:
o Global setting:
www.bowthemes.com
21
You are reading: How to work with
Module positions
Module class suffix: “[space]showcase_style2”
Module width: auto.
Row height: 320
Number of rows: 1
Number of cols: 4
Min column width: 250
Next & Prev position: None
Navigation Position: None
o Source Setting: choose source article as you want (K2, Joomla content, Easy blog)
o Item Layout Setting: show/hide option as you want (configuration in demo below)
Limit Title By: Character
Title Max Chars: 35
Show Category Name: No
Show Category Name As Link: No
Alignment of image: Center
Thumbnail width: 276
Thumbnail height: 160.
- Assign this module to pages that you want.
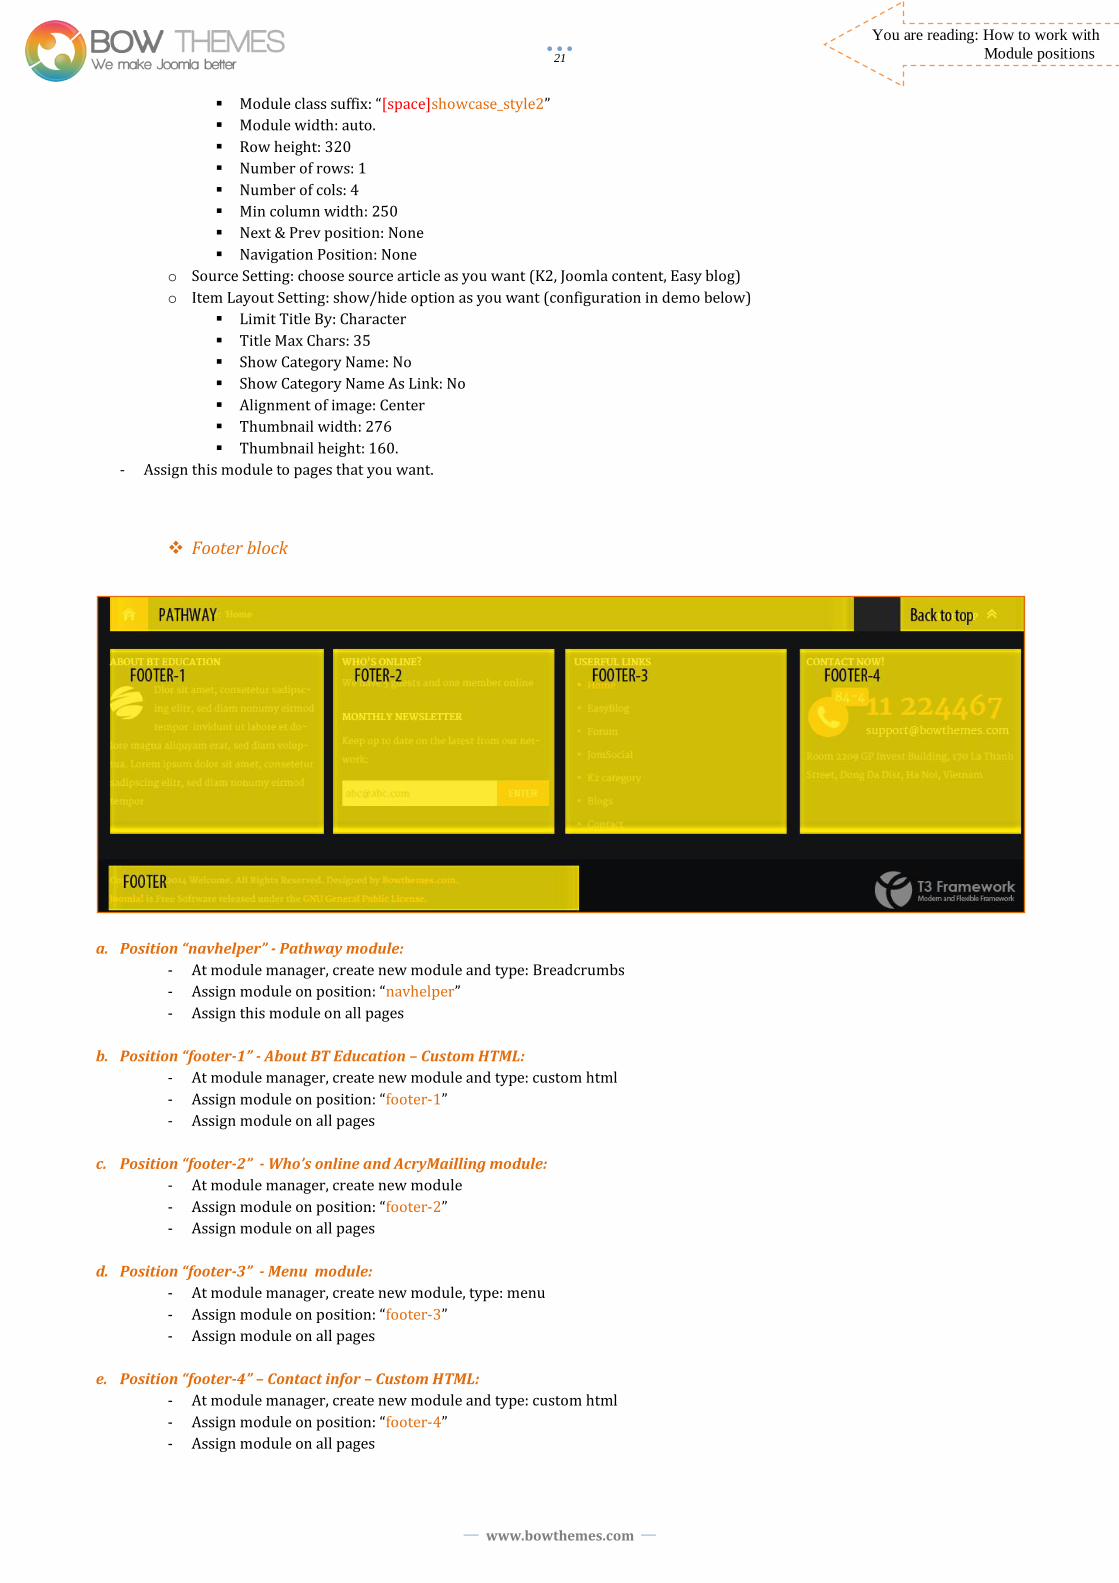
Footer block
a. Position “navhelper” - Pathway module:
- At module manager, create new module and type: Breadcrumbs
- Assign module on position: “navhelper”
- Assign this module on all pages
b. Position “footer-1” - About BT Education – Custom HTML:
- At module manager, create new module and type: custom html
- Assign module on position: “footer-1”
- Assign module on all pages
c. Position “footer-2” - Who’s online and AcryMailling module:
- At module manager, create new module
- Assign module on position: “footer-2”
- Assign module on all pages
d. Position “footer-3” - Menu module:
- At module manager, create new module, type: menu
- Assign module on position: “footer-3”
- Assign module on all pages
e. Position “footer-4” – Contact infor – Custom HTML:
- At module manager, create new module and type: custom html
- Assign module on position: “footer-4”
- Assign module on all pages

www.bowthemes.com
22
You are reading: How to work with
Module positions
f. Position “footer” – Footer module:
- At module manager, create new module and type: custom html
- Assign module on position: “footer”
- Assign module on all pages
Position “sidebar-1”:
a. “ Menu” module:
- [For Quickstart installation] To change the parameters of the module, please go to
Administration -> Select menu Extensions -> Module Manager -> Select position “sidebar-1”,
select module Menu and modify the menu as you want.
- [For partial installation] You can create this module as below:
- Go to Administration -> Extensions -> Module Manager ->Click “New” button -> Choose
Menu module.
- Set position as “sidebar-1”.
- Module configuration:
o Basic option:
Select menu: select menu as you want
o Advanced options:
Module class suffix: “_menu_sidebar”
b. “ K2 tags” module:
- [For Quickstart installation] To change the parameters of the module, please go
to Administration -> Select menu Extensions -> Module Manager -> Select position
“sidebar-1”, select module K2 Tools and modify the menu as you want.
- [For partial installation] You can create this module as below:
- Go to Administration -> Extensions -> Module Manager ->Click “New” button ->
Choose K2 Tools module.
- Set position as “sidebar-1”.
- Module configuration:
o Basic option:
Module class suffix: “[space]box-mod”
Select module functionality: Tag Cloud
o Assign module on pages that you want.
c. “ Login” module:
- [For Quickstart installation] To change the parameters of the module, please go to
Administration -> Select menu Extensions -> Module Manager -> Select position “sidebar-1”,
select module Login and modify the menu as you want.
- [For partial installation] You can create this module as below:
- Go to Administration -> Extensions -> Module Manager ->Click “New” button ->
Choose Login module.
- Set position as “sidebar-1”.
- Module configuration:
o Advanced options:
Module class suffix: “[space]box-mod”
o Assign module on pages that you want.
d. “ Login” module:
- [For Quickstart installation] To change the parameters of the module,
please go to Administration -> Select menu Extensions -> Module Manager ->
Select position “sidebar-1”, select module Login and modify the menu as you
want.
www.bowthemes.com
23
You are reading: How to work with
Module positions
- [For partial installation] You can create this module as below:
- Go to Administration -> Extensions -> Module Manager ->Click “New” button -> Choose Login module.
- Set position as “sidebar-1”.
- Module configuration:
o Basic options:
Module class suffix: “[space]box-mod[space]archive”
o Assign module on pages that you want.
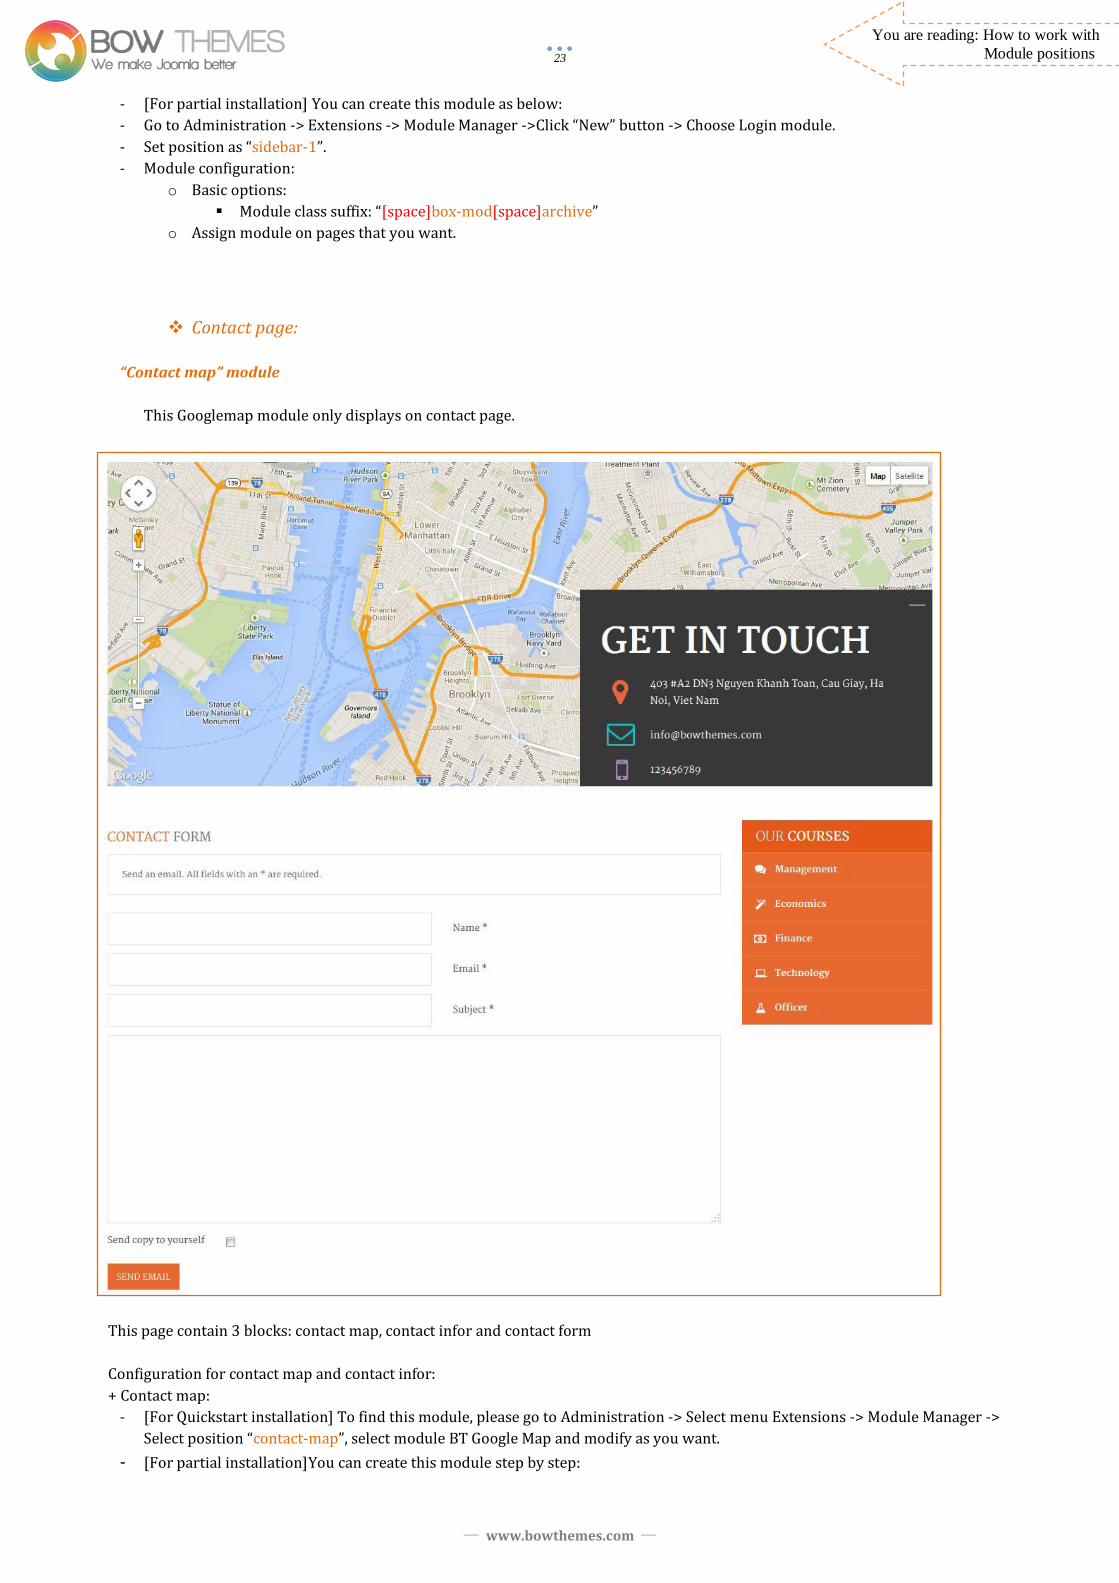
Contact page:
“Contact map” module
This Googlemap module only displays on contact page.
This page contain 3 blocks: contact map, contact infor and contact form
Configuration for contact map and contact infor:
+ Contact map:
- [For Quickstart installation] To find this module, please go to Administration -> Select menu Extensions -> Module Manager ->
Select position “contact-map”, select module BT Google Map and modify as you want.
- [For partial installation]You can create this module step by step:

www.bowthemes.com
24
You are reading: How to work with
Module positions
o If module BT Google Map not installed, please go to Administration, install this module.
o Go to menu Extensions -> Module Manager ->Click “New” button -> Choose BT Google Map.
o Set position as “contact-map”
o At tab Basic Options: Fill your address.
- Assign this module on all pages:
+ Contact infor (Get in touch):
- At module manager, create new module and type: custom html
- Assign module on position: “contact-map”
- Assign module on all pages

www.bowthemes.com
25
You are reading: How to create
your own contact page
How to customize content in K2 component
1. Configure images size in K2 component
Image size can be set up at “ Images” tab:
You may also set-up k2 images size in category:

www.bowthemes.com
26
You are reading: How to create
your own contact page
2. Configure Category page
a. Category layout configuration
b. Configuration of item in category listings

www.bowthemes.com
27
You are reading: How to create
your own contact page
How to customize your “Contact us” page
1. Creating a new contact Please go to Administration -> Components -> Contacts -> select “Contacts” tab ->Click “New” button and fill needed parameters as following image:
2. Configuration parameter on contact page Please go to Administration -> Components -> Contacts -> Click button Options and configuration as following image:
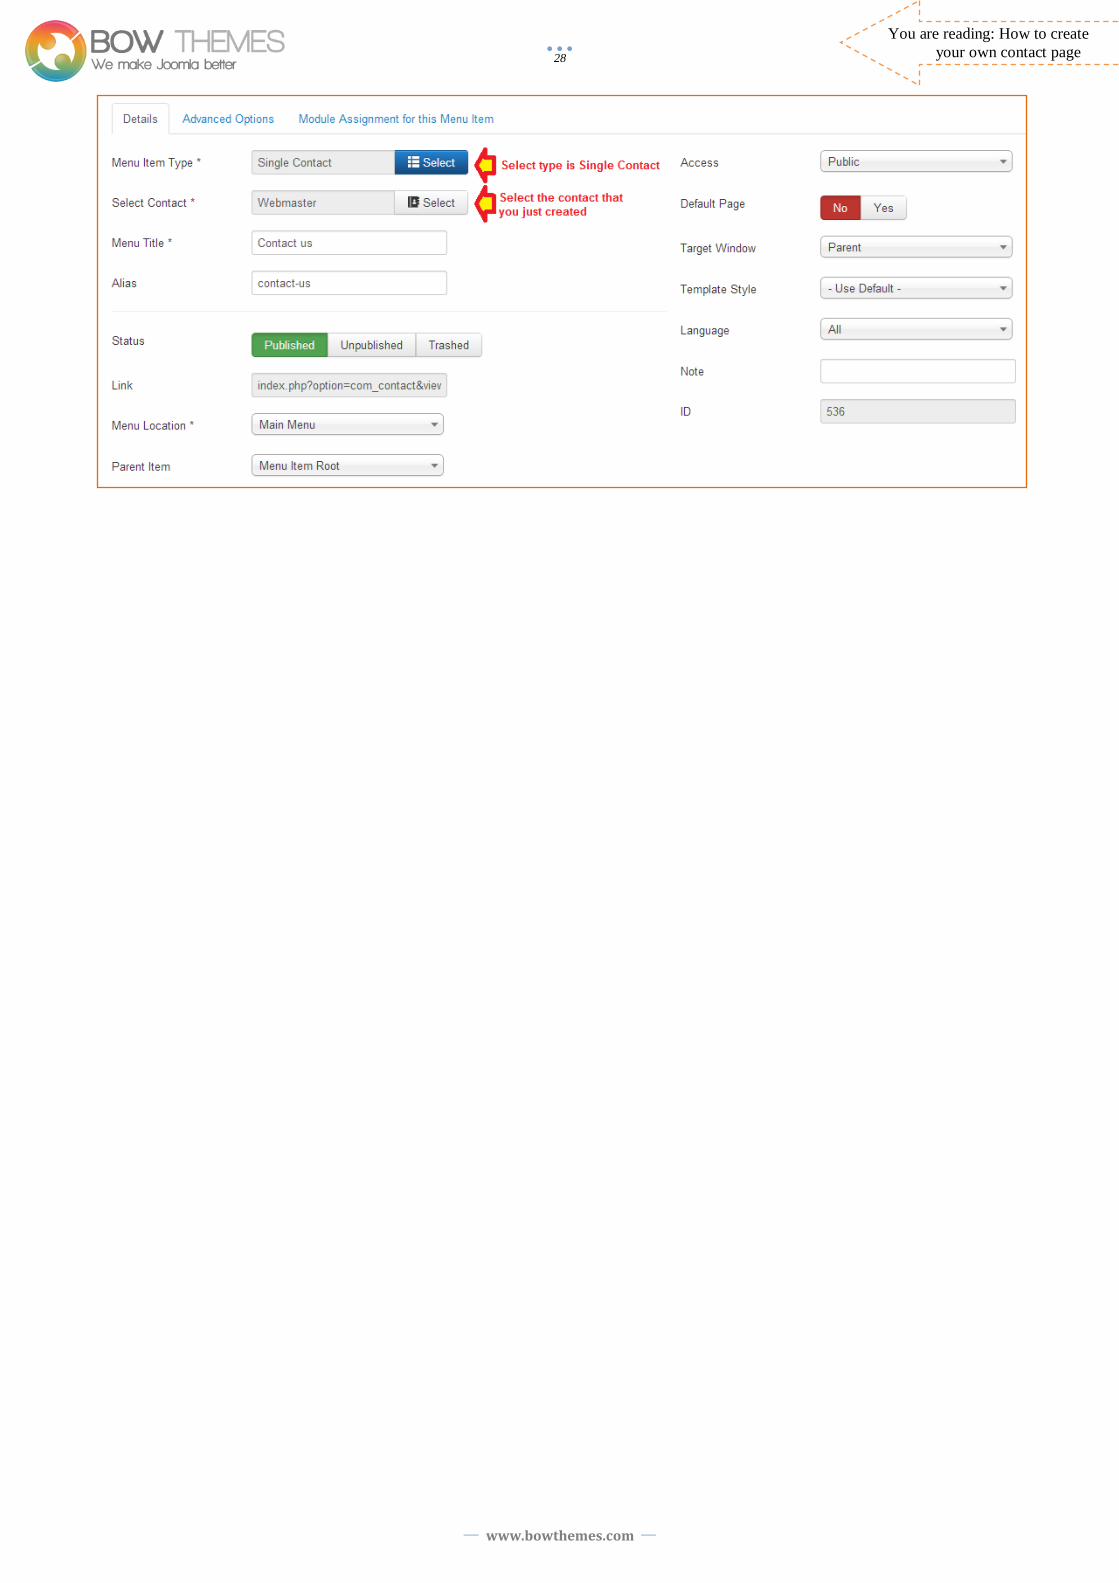
3. Create a link to page contact Please go to Administration -> Menus -> Main Menu -> Create a new menu item -> Set up and link this menu item to Single Contact
www.bowthemes.com
28
You are reading: How to create
your own contact page
www.bowthemes.com
29
You are reading: How to bring a
new look to your template
Customize the look of your template
Note: For more convenient work and prevention of your styled file loss, therefore, we suggest writing down your style in custom.css file. To overwrite old style, you may need to use !important css declaration for your style. For example: .logo-image a{ background: url("../images/your_logo.png")!important; }
1. Changing Logo, Main Menu, Favicon and website Title
a. Changing Logo
To change logo image located on top of the template, please replace the “logo.png” on your template folder with the one you want on the
top of your site (rename the image file in png first). The folder’s path is: ...\templates\bt_education\images
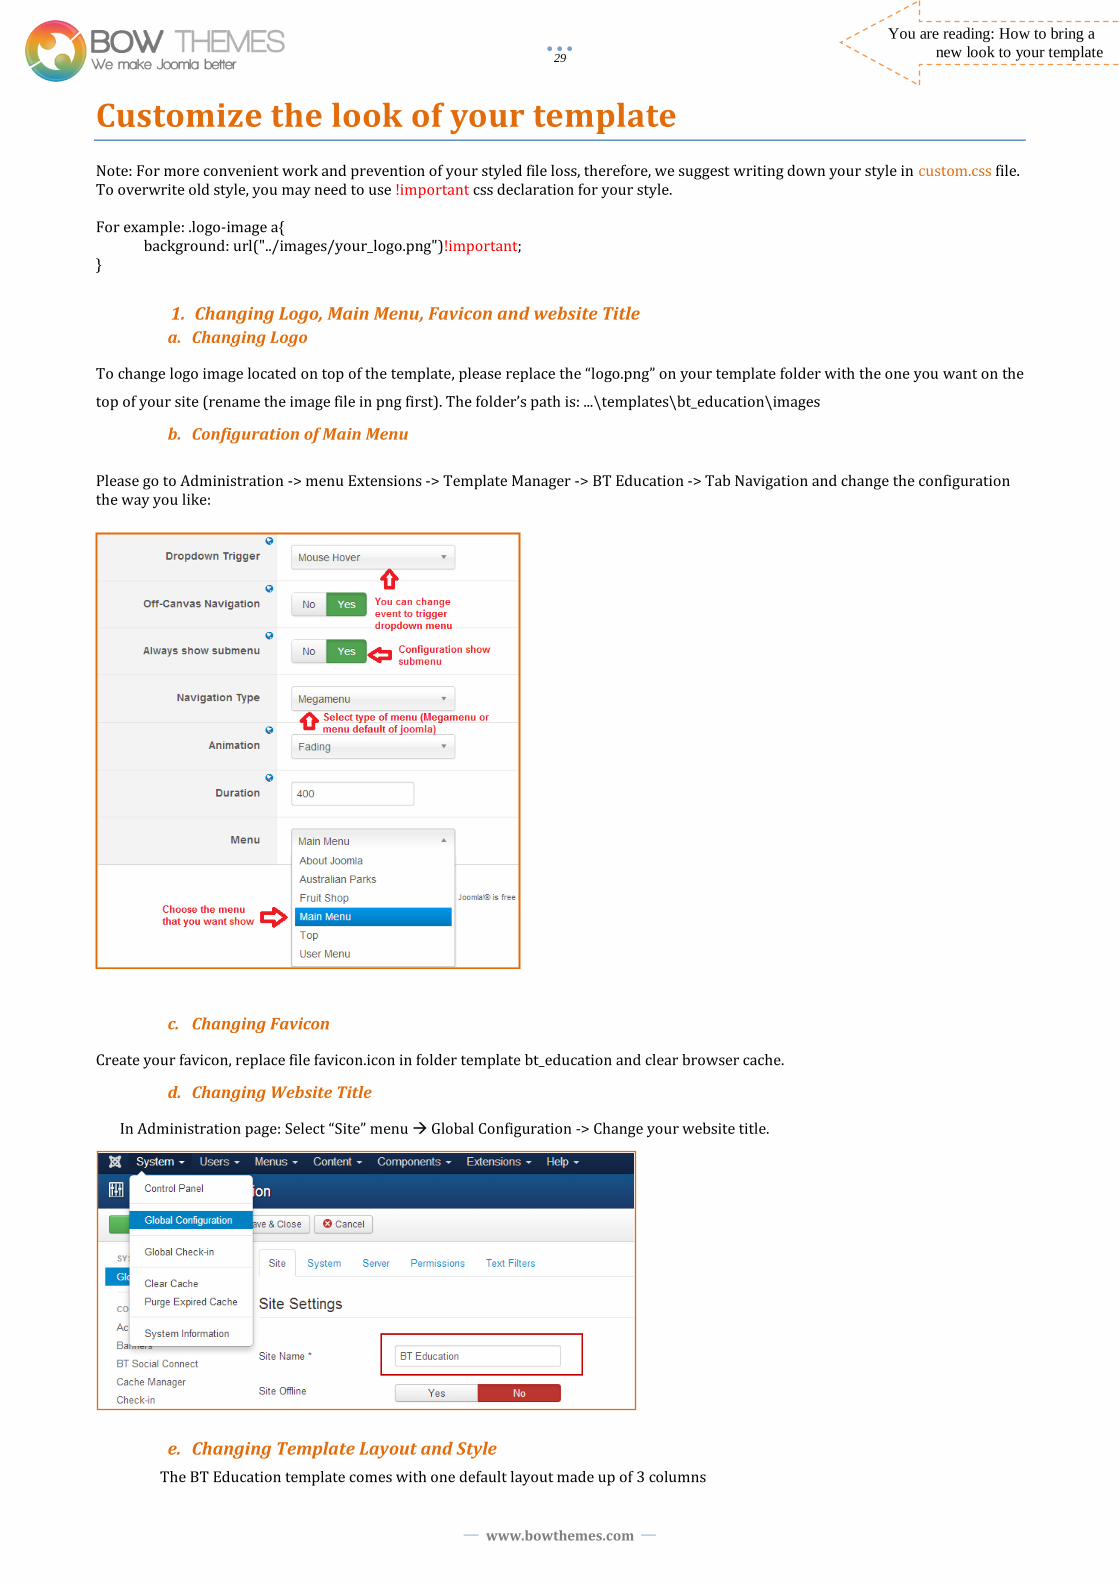
b. Configuration of Main Menu
Please go to Administration -> menu Extensions -> Template Manager -> BT Education -> Tab Navigation and change the configuration the way you like:
c. Changing Favicon
Create your favicon, replace file favicon.icon in folder template bt_education and clear browser cache.
d. Changing Website Title
In Administration page: Select “Site” menu Global Configuration -> Change your website title.
e. Changing Template Layout and Style
The BT Education template comes with one default layout made up of 3 columns

www.bowthemes.com
30
You are reading: How to bring a
new look to your template
Template layout is contained in: …/templates/bt_education/tpls
You can also customize the positions by simply moving the blocks around.
For an in-depth read on layout customization, please check out article about JA T3 Framework on the Wikipedia:
http://t3-framework.org
2. Change template color, template fonts:
a. Changing Template color
In back-end page: Select Extensions menu Template manager
BT_Education Theme -> Select a color theme.
b. Changing Font style
We used Google Font for module title and page header. To change font style, you may need to:
Search for another google font
Go to this file: ../templates/bt_education/tpls/blocks/head.php line 29, 30, 31
Change the link appeared here by the new google font.
Next, open the file: .../templates/bt_education/less/variables.less
@headingsFontFamily: "Merriweather"; (line 80)
@main_font : @headingsFontFamily; (line 400)
@second_font: "Open Sans"; (line 401)
@third_font: "Myriad Pro"; (line 402)
@headKCategoryFont: "Oswald"; (line 403)
Then go to Administration, menu Extenions -> Template Manager -> template BT Education -> click button Compile
Less to Css.
c. Changing Module Styles
If you just want to make little changes, please write your style on the file ../templates/bt_education/css/custom.css and use !important attribute to overwrite old style.

www.bowthemes.com
31
You are reading: How to upgrade
your template
How to upgrade your template
Bowthemes frequently upgrade our templates to catch up with new Joomla trends and prevent our customer from site-hackers. That’s
why template re-installation is must-have skill. Following guide shows how to do it:
Create a backup of your template.
Uninstall template. In the Joomla Administration panel:
Preparation step: Set another template (not BT Education) as default Site template.
Action steps: Go to Extension Manager Select Manage Select filter criteria in “Type” box is template Find “BT Education” label
click the checkbox. After all, hit “Uninstall” button
Reinstall template.
o Download the upgrade package of template and install it.
o Go to menu Extensions -> Template Manage -> Set “Default” for newly installed template.
Replace the code that you have changed
www.bowthemes.com
32
You are reading: Joomla Sources
and template support
Recommendations
Joomla
Joomla quickstart guide - http://help.joomla.org/ghop/feb2008/task048/joomla_15_quickstart.pdf
Joomla Getting Started - http://docs.joomla.org/Getting_Started_with_Joomla%21_1.5
T3 Framework Overview - http://t3-framework.org
Extensions
K2 - http://getk2.org/
BT Google Maps Pro - http://bowthemes.com/joomla-extensions/bt-google-maps-pro.html
BT Content Showcase - http://bowthemes.com/joomla-extensions/bt-content-showcase.html
BT Social Connect Free Version - http://bowthemes.com/joomla-extensions/bt-social-connect-free-version.html
BT Background Slideshow - http://bowthemes.com/joomla-extensions/bt-background-slideshow.html
BT Google Maps - http://bowthemes.com/joomla-extensions/bt-google-maps.html

www.bowthemes.com
33
You are reading: Joomla Sources
and template support
Contacting Bowthemes
All Bowthemes products include forum support, email support and ticket support. Please refer your membership package to
select the compatible kind of support, as we may be able to solve the problem without delay.
Website: http://bowthemes.com
Forum support: http://bowthemes.com/forums/59-bt-education/
Email support: [email protected]
Ticket support: http://bowthemes.com/submit-a-ticket
If you encounter any issues with Bowthemes extensions and templates, email us at [email protected] and we would like
to answer your questions.
This document is proprietary and confidential. No part of this document may be disclosed in any manner to a third party without the prior written consent of Bowthemes Team.