building a colormotions tree - …magicchristmasnews.org/building_a_colormotions_tree_sm.pdftopper...
TRANSCRIPT

Designed and Built by Walter and Jackie Monkhouse www.MagicChristmas.org
RGB Tree
Building A
Copyright 2012 © Walter and Jackie Monkhouse

General Description
Table of Contents
Components
Topper
Bottom Ring Bottom Ring Supports Ring Alignment
Base
Pole and Topper Assembly Simple Telescoping Pole Telescoping Pole Parts
Banding Strap and Pixel Strings Terminations on Strap Ends
Basket Weave
Topper Design Plate Thickness Topper Size
Bottom Ring Design Bending 1” EMT Conduit Hole Spacing on Bottom Ring
Topper / Bottom Ring Guide
Banding String Storage
Afterthoughts
Contact Information
3
4
5
8
13
14
17
25
26
29
35
36
37
33
2

http://www.youtube.com/watch?v=0pLdWhPGedc&list=PL772B6C1953CEA27A&index=2&feature=plcp
http://www.youtube.com/watch?v=HOG7XXFyXeM
General Description
The ColorMotions Tree is a mega tree that has RGB pixel strings attached to polyester banding material, which is tensioned between a topper and bottom ring. The tensioned banding provides support for the strings, keeps them straight and aligned, and rolls up for a small storage footprint. The tree can be built to any height and width however the tree seen in the video is approximately 14ʼ high including the star with a base diameter of 10ʼ. There are 54 RGB pixel strings with 42 nodes each for a total of 2,268 RGB pixels. No guy wires are required as each tension band is rated at 1400 lbs.
See Video -- Noel
See Video -- Let It Snow
3

Topper (Steel Plate)
Flange for Star
Flange to Connect Topper to Pipe
“J” Hooks to connect “Dʼ Rings to Topper and makefine adjustment.“D” Rings to
connectstrap to “J” hook
Banding Strapswith pixels
Scotch 88 ElectricalTape on each sideof pixels
EMT Conduit“Tʼs” with pipe nippleto attach to rebarRebar
Eye Bolts attached tostrap to install on conduit for final tensioning.
Basket Weave
Basket Weave
Pin pipe nippleto rebar
Outer Center Pole
Portable Hole II Base
Components
Inner Telescoping Pole
4

The Topper needs to be heavy duty as it will have to withstand a large amount of downward force on the outside edges due to the tensioning process. The ColorMotions tree topper is made from 1/4 “ steel plate and has an outside diameter of 20”. There are 64 1/4” holes around a diameter of 19” which is called the hole diameter (HD). The holes are spaced at .937” (15/16”) center to center.
Topper
5

“J” Hooks 1/4” X 4” long are installed in the holes. “D” Rings which are attached to the bands are placed on the “J” hooks.
A 2” floor flange is bolted to the plate bottom. A 2” X 1 1/2” bushing is screwed into the flange as a receiver for the Topper pole.
6
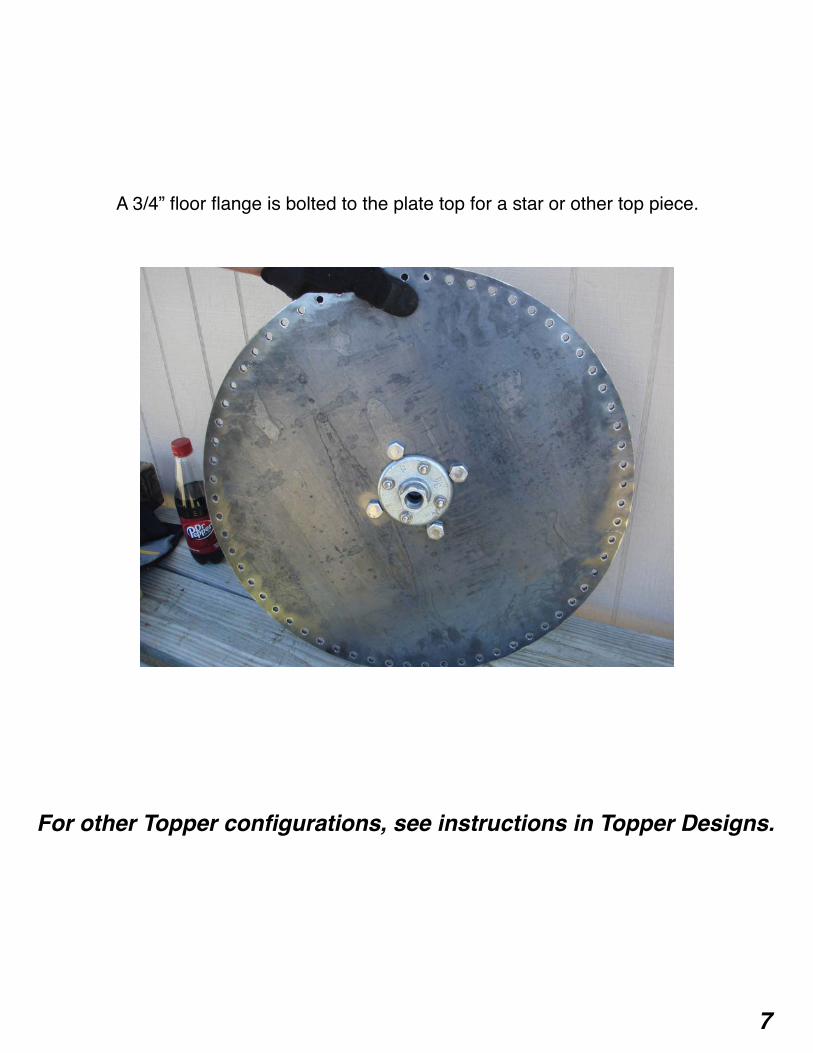
A 3/4” floor flange is bolted to the plate top for a star or other top piece.
For other Topper configurations, see instructions in Topper Designs.
7

Bottom Ring
The Ring is made from 1” EMT conduit. Steel conduit is preferred over PVC due to the heavy upper forces applied to the ring during the banding tensioning process.
Bottom Ring Supports
The Ring is held in place by inserting into 1” galvanized pipe “Tʼs” which have been trimmed. The trimming facilitates the insertion of the bent conduit. The pipe “Tʼs” have a 1” X 6” pipe nipple screwed into them. The pipe nipple fits over a 7/8” X 2 1/2ʼ rebar driven 2ʼ into the ground. A hole is drilled through the nipple and rebar and a pin inserted.
For instructions on a simple way to accurately bend EMT conduit see the section on “Bottom Ring Design”.
8

It is essential the ring is concentric to the base.
9

Front Hole
Front Hole
Ring Alignment
Choose a “Front” point for the tree on the bottom ring according to which direction you want the tree oriented. Two front hole marks with the correct hole spacing are made equal distance from the front point. Hole spacing for the ring is measured from the two front hole marks.
This procedure allows for a balanced tree in the case of a half or three quarter tree as well as a full tree.
After hole spacing is marked, space the rebar / T supports and conduit couplers so as not to interfere with the ring holes. A minimum distance of 1/2” from a “T” support or coupler is advised to allow the turning of the nut on the bottom of the eyebolt.
The Topper can be turned to come into alignment with the fixed ring hole spacing.
Front Point
Topper
Bottom Ring
Front HoleFront Hole
10
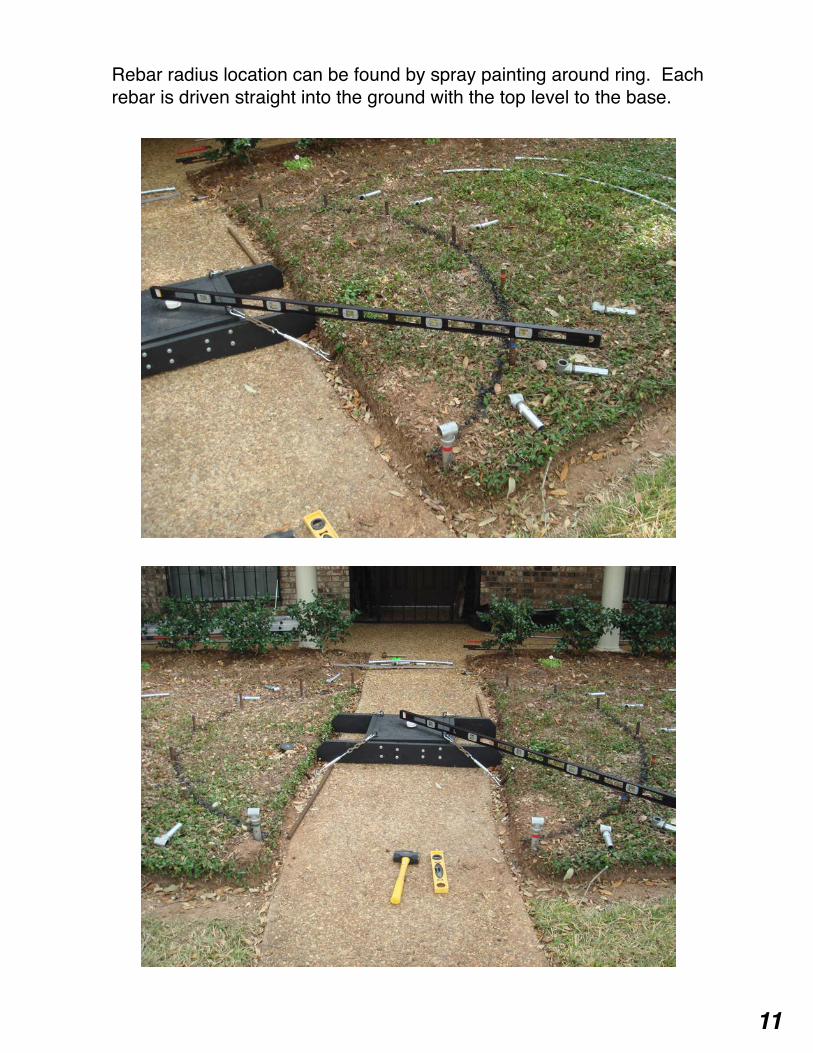
Rebar radius location can be found by spray painting around ring. Each rebar is driven straight into the ground with the top level to the base.
11

Ring Installed!
The number of rebar / “T” supports for the bottom ring needs to be sufficient to hold the bottom ring in place against an upward pull of about 20 lbs. per light string. The ColorMotions tree used 15 rebar / “T” supports for a ring diameter of 10 feet. The spacing of the rebar / “T” supports must be done so as to not to interfere with the string spacing.
A good time to drill the holes in the bottom ring is after the ring is installed. Tilt the drill and bit a little to approximate the cone shape of the tree. This will put the eye bolts in a direct line of pull with the bands.
12

Base
A substantial base is required to hold the pole in true vertical alignment. A leveled and tethered Portable Hole II was used for the ColorMotion tree. To build a Portable Hole II go to http://www.magicchristmasnews.org/portable%20hole%20ii.pdf .
13

Pole and Topper Assembly
A telescoping pole with the Topper installed is screwed into the base. A Single Stage JUMP works fine for a telescoping pole to pretension the bands. For more on the JUMP see www.MagicChristmas.org ---Building the JUMP.
An alternative to the telescoping pole could be a single pole of the correct height. However, tensioning of the bands would depend entirely upon the “take up” distance of the bottom ring eyebolts and may prove to be inadequate.
Other poles and configurations can be used if they are capable of supporting the high tensioning forces and loads applied to the banding.
A simple manually operated telescoping pole can be built using a 2” X 10ʼ rigid electrical conduit outer pole and a 1 1/2” inner pole. The outer pole has a 2” coupling on the top with a 2” X 1 1/2” Slip Bushing screwed into it. The inner pole which need not be more than 5ʼ long has a PVC centralizer screwed on the end.
14

Simple Telescoping Pole
A simple manually operated telescoping pole can be built using a 2” X 10ʼ rigid electric conduit outer pole. The outer pole has a 2” coupling on the top with a 2” X 1 1/2” Slip Bushing screwed into it. The inner pole which need not be more than 5ʼ long has a PVC centralizer screwed on the end.
The Inner Pole is lifted up to pretension the bands. It is marked and a hole drilled for a bolt to hold it in place.
Centralizer
Slip Bushing
2” Coupler
15

Telescoping Pole Parts
Made from 1 1/2” Female Adapter - grey PVC. Hack saw off back end. Use coarse file to remove outside material. The honed down piece should fit closely and slide smoothly in the 2” pipe.
Made from a 2” X 1 1/2” steel galvanized bushing. Remove the inside threads plus a little more until the 1 1/2” pipe slides smoothly inside of the bushing. Use a 3/4” X 1 1/4” Grinding Point available from Home Depot to remove the threads.
BeforeAfter
Before After
Centralizer for Bottom of 1 1/2” Inner Pole.
Slip Bushing for top of 2” Outer Pole.
16

Banding Straps and Pixel Strings
Banding material comes in numerous widths, thickness and strengths. The ColorMotion tree uses polyester banding which is 5/8” wide, .035” thick and has a strength of 1400 lbs. The banding material is available in different length rolls and available from supply stores such as Fastenal. Check the internet and eBay for “polyester strapping” to find the best current pricing and roll length.
17
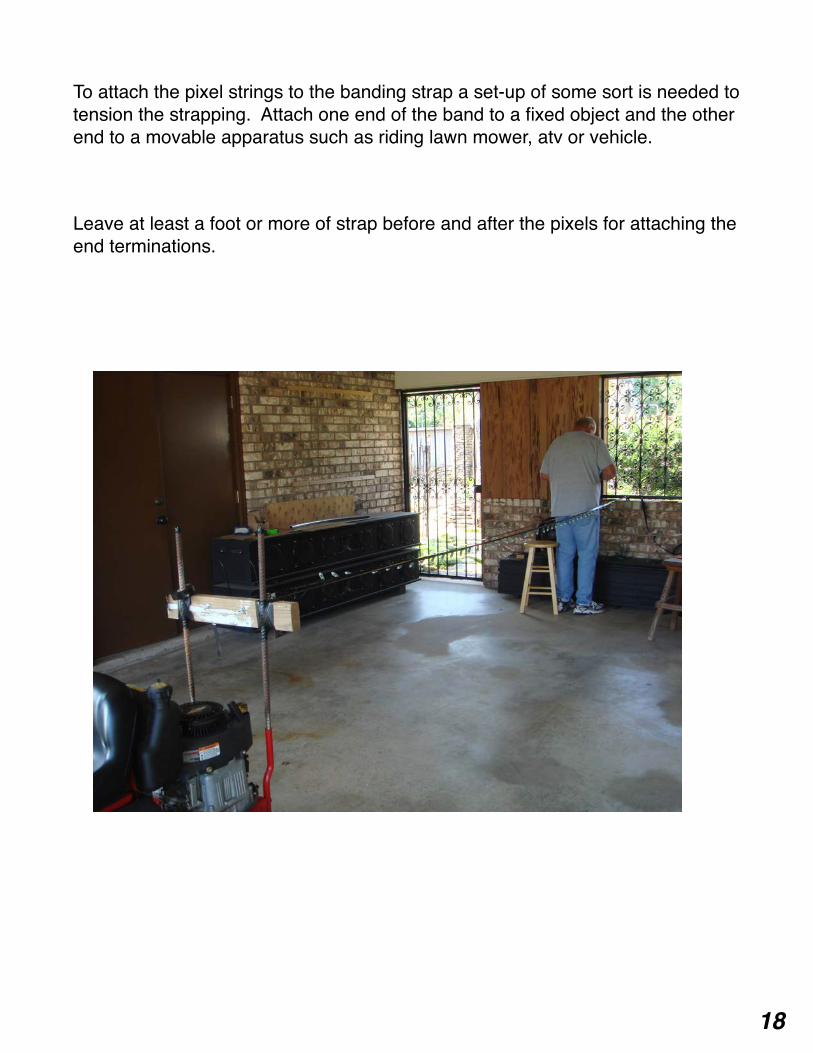
To attach the pixel strings to the banding strap a set-up of some sort is needed to tension the strapping. Attach one end of the band to a fixed object and the other end to a movable apparatus such as riding lawn mower, atv or vehicle.
Leave at least a foot or more of strap before and after the pixels for attaching the end terminations.
18

Build a Master String taking the time to space the pixels evenly along the strap. The ColorMotions tree pixels were spaced at an average of 3 1/2” apart measured center of pixel to center of pixel.
Using Scotch Super 88 electrical tape, tightly wrap several turns on both sides of each pixel. The pixels should stand up 90 degrees perpendicular to the strap. Duplicate the other strings by laying along side the Master String.
19

Evenly spaced pixels---
The pixels should be evenly spaced and the completed bands should be the same length. “J” hooks on the Topper allow for a small amount of fine tuning.
20

Terminations on Strap Ends
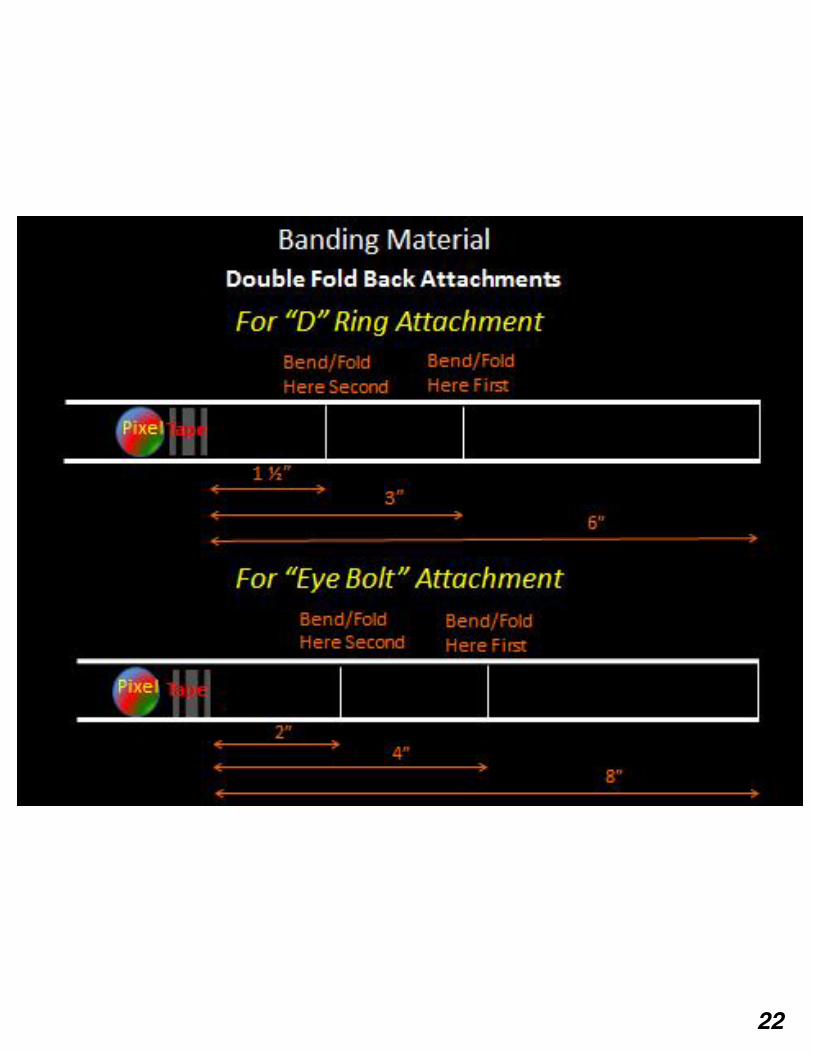
If a hole is drilled or burned into the polyester banding material the band will split longitudinally when tension is applied, therefore it is advisable to fold the banding and use cable ties.
The “double fold back” method of attaching “D” Rings and EyeBolts to the banding material has proven to be non-slip for the amount of tensioning required.
21
22

The top end of each strap has a “D” Ring installed which fits into the “J” hook of the Topper. The “D” Rings used were 5/8” nickel plated purchased fromSeattle Fabrics, Seattle,Washington (www.seattlefabrics.com) , style #411WST at a cost of approximately 35 cents each.
The outside dimension of the “D” Ring is 7/8”. Using a “D” Ring that is larger than 7/8” OD will change the hole spacing and diameter of the Topper.
Three cable ties are used to secure the banding to the “D” Ring.
Pixel
23

The bottom end of each strap has a 1/4” X 4” Eyebolt which fits into a hole in the bottom ring.
Pixel
Spread Eyebolt open enough to fit banding material.
Pixel
Four cable ties are used to secure the banding to the Eyebolt.
24

Basket Weave
Pixels on strings taped to banding material, which is tensioned to about 20 lbs., will stand upright and aligned over a vertical distance of about 6ʼ. Beyond that the pixels tend to lean over to one side or the other resulting in a slight horizontal mis-alignment. The pixels are re-aligned when a piece of banding is woven horizontally around the strings. A horizontal “basket weave” about every 6ʼ or less will suffice. An occasional taping of the basket weave to the band might be required.
Basket Weave
Basket Weave
25

Topper Design
A tree made from tensioned bands requires a heavy duty Topper made from steel or other material that can support large amounts of downward force. The 20” diameter ColorMotions Topper is made from 1/4” steel plate and supports over 1080 lbs. of downward force (54 strings X 20 lbs. of tension each = 1080 lbs.) .
Other Topper diameters that have fewer tensioned bands can be made out of less thick steel plate - 3/16” or 1/8” thick.
A Topper has an outside diameter (OD) and a hole diameter (HD). The HD is where the “J” bolt holes are spaced and drilled. The OD is 1” larger than the HD. Topper size is determined by the number of strings desired and the hole spacing. Hole spacing is set at 15/16” (.937”) center to center.
Recommended Plate Thickness: (Plate mounted on 2” Floor Flange)
Topper size up to 10” OD - 1/8” thick steel plate Topper size between 10” and 15” OD - 3/16” thick steel plate Topper size over 15” OD - 1/4” thick steel plate
26

7/8”7/8”
1/16”
15/16”
HoleSpacing
The hole spacing dimension is determined by the width of 2 - 5/8” “D” Rings hanging on “J” Hooks with about 1/16” separating them. The “D” Rings should be close but not touch each other.
If “D” Rings wider than 7/8” OD are used it will increase the hole spacing and Topper size.
5/8” “D” Ring
(.937”)
27

The Topper size can be determined by the formula:
# of holes X .937 ÷ 3.14 = HD
# of holes X .937 ÷ 3.14 + 1 = OD
(# of holes = desired number of strings for a full tree)
Example:
A full tree with 32 strings would need a Topper with an OD of 10.54” and an HD of 9.54”.
32 X .937 ÷ 3.14 + 1 = 10.54” OD32 X .937 ÷ 3.14 = 9.54” HD
On a full tree of 32 strings, if a half tree is desired the user would put 16 strings around the front of the topper and 2 blank stapes on the back for counterbalance.
Topper Size
28
Note:

Bottom Ring Design
Bending 1” EMT Conduit
The conduit comes in 10ʼ joints. It can be bent accurately to the desired radius with a hand bender using the following method:
On a flat surface draw out the desired radius using a piece of aluminum flat bar, pvc, etc. If the surface is concrete drill a 1/16” hole with a masonry bit. This will serve as the center for a circle.
29

Mark the EMT in two planes --- one straight line lengthwise (along the seam if you can find it) and another line perpendicular every four inches.
Mount hand bender upside down on a pole or tree. Insert the EMT into the bender and while keeping the lengthwise line in the center pull downward a small amount on each of the 4” marks.
30

Lay the bent conduit down on the drawn out pattern and make small adjustments to get the bend accurate. For adjustments it is always better to under bend than to over bend.
Saw off 2” - 3” of conduit on each end as it will not be a part of the bend. Connect the conduit pieces together with the conduit coupler shown.
31

Hole Spacing on Bottom Ring
For each hole on the Topper there is a corresponding hole on the Bottom Ring.
The hole spacing on the Bottom Ring is determined by the diameter of the Bottom Ring and the number of holes in the Topper.
Ring diameter X 3.14 ÷ number of Topper holes = Hole Spacing
Example:
A tree with 32 strings would have a Topper with 32 holes. If a diameter for the bottom of the tree was chosen as 6ʼ (72”) , the string spacing on the bottom ring would be 7.06”.
6ʼ (72”) X 3.14 ÷ 32 = 7.06
32

# of Strings
(Holes in Topper)
Topper HD
(Hole Diameter)
TopperOD
(OutsideDiameter)
Bottom Ring
Diameter
String Spacing
20 5.96 6.96
6ʼ (72”)
11.30
30 8.95 9.95
6ʼ (72”)
7.53
40 11.93 12.93
6ʼ (72”)
5.65
50 14.92 15.92
6ʼ (72”)
4.52
60 17.90 18.90 6ʼ (72”)
3.77
70 20.88 21.88
6ʼ (72”)
3.23
80 23.87 24.87
6ʼ (72”)
2.82
90 26.85 27.85
6ʼ (72”)
2.51
100 29.84 30.84
6ʼ (72”)
2.26
20 5.96 6.96
8ʼ(96”)
15.07
30 8.95 9.95
8ʼ(96”)
10.04
40 11.93 12.93
8ʼ(96”)
7.53
50 14.92 15.928ʼ
(96”)
6.03
60 17.90 18.908ʼ
(96”) 5.02
70 20.88 21.88
8ʼ(96”)
4.30
80 23.87 24.87
8ʼ(96”)
3.77
90 26.85 27.85
8ʼ(96”)
3.35
100 29.84 30.84
8ʼ(96”)
3.01
Topper / Bottom Ring Guide

# of Strings(Holes in Topper)
Topper HD
(Hole Diameter)
TopperOD
(OutsideDiameter)
Bottom Ring
Diameter
String Spacing
20 5.96 6.96
10ʼ(120”)
18.84
30 8.95 9.95
10ʼ(120”)
12.56
40 11.93 12.93
10ʼ(120”)
9.42
50 14.92 15.92
10ʼ(120”)
7.53
60 17.90 18.90 10ʼ(120”)
6.28
70 20.88 21.88
10ʼ(120”)
5.38
80 23.87 24.87
10ʼ(120”)
4.71
90 26.85 27.85
10ʼ(120”)
4.18
100 29.84 30.84
10ʼ(120”)
3.77
20 5.96 6.96
12ʼ(144”)
22.60
30 8.95 9.95
12ʼ(144”)
15.07
40 11.93 12.93
12ʼ(144”)
11.30
50 14.92 15.92
12ʼ(144”)
9.04
60 17.90 18.90
12ʼ(144”) 7.53
70 20.88 21.88
12ʼ(144”)
6.46
80 23.87 24.87
12ʼ(144”)
5.65
90 26.85 27.85
12ʼ(144”)
5.02
100 29.84 30.84
12ʼ(144”)
4.52
34

Banding String Storage
An advantage of pixel strings attached to banding is the small storage foot print. The strings can be rolled up and hung on supports. The area in which we store 54 strings is 1ʼ X 3ʼ X 3ʼ.
35

Afterthoughts
Banding material can be cut with heavy duty scissors. The best tool is a Craftsman HandiCut.
When purchasing Eyebolts and “J” Bolts be sure they are threaded on most of the shank.
When tensioning the Eyebolts, work around the ring tensioning evenly so that the pole remains in true vertical positioning.
If a half tree is made, two blank bands are needed on the back for counterbalance. The blank bands will need to be fastened at least a couple feet from the pole.
Instructions here show that the pixels strings are fastened to the banding before the end terminations. An alternative is to make a complete band and then attach the pixel strings.
The ColorMotion Tree used the Stellascape Green Pixel strings and Madrix software.
The thick steel plate for the Topper can be obtained at most scrap steel yards, however it can be a tedious job cutting and drilling the plate. Some machine shops will laser cut and drill the plate to specifications. If there is not a machine shop in your area that can do the job, contact Walter Monkhouse for a machine shop in the Alexandria, La. area that can make the plate to your specs.
36

For Questions Contact:
Walter Monkhouse
Email: [email protected] [email protected]
Phone: 318-487-0736
Website: www.MagicChristmas.org
37
