building a multi page image viewer with silverlight and...
TRANSCRIPT

© 2010 Accusoft Corporation 1 | P a g e
Building a Multi-Page Image Viewer with ImageGear for Silverlight and Azure As the desire to deliver rich web content and functionality has increased over the last decade, Rich Internet Application (RIA) technologies have become increasingly powerful. Unfortunately, a number of these technologies have been out of reach for many client application developers because of the non-trivial learning curve involved. With the number of RIA technologies available, where do you even begin? In many cases, there was not a “one size fits all” solution, so RIA development would involve a mix of HTML, JavaScript, Adobe Flash, and perhaps a little AJAX thrown in (just to name a few possibilities). Luckily, Microsoft has entered the world of RIA frameworks, and with Microsoft Silverlight, offers a platform, which leverages existing .NET developers’ talents.
Silverlight includes many of the same base services and types included in the .NET Framework. However, because it is a runtime built specifically for the web, where developers expect a robust platform in a small package, much of the functionality included in its desktop cousin is absent. For example, the image type in Silverlight, System.Windows.Media.Imaging.BitmapImage, only supports JPEG and PNG image file types, and does not include support for grayscale. This is where third-party tool vendors become part of the Silverlight ecosystem, providing extensions to the base platform as the market demands. For the imaging domain, Accusoft has continued its reputation as the leader in imaging software development kits (SDKs), by providing the most comprehensive imaging toolkit for Silverlight developers – ImageGear for Silverlight.
This article will provide a quick tour of the ImageGear for Silverlight toolkit while developing a multi-page image viewer, running completely on the client, via managed code. Once the viewer is built, it will be ready for deployment to the Windows Azure Cloud via an Azure Cloud Service project.
Building the Viewer
To get started, download the ImageGear for Silverlight SDK and sample code here. Open Visual Studio 2010, and bring up the New Project dialog. Under the Visual C# heading, select Silverlight as the project type, and then select Silverlight Application as the project template. Enter a name for your project (MultiPageImageViewer is used in the sample), and click OK (Figure 1).

© 2010 Accusoft Corporation 2 | P a g e
Figure 1: Defining the Silverlight Project
The next screen presented deserves a bit of explanation, particularly to those new to Silverlight development. The unit of deployment of a Silverlight application is a XAP package, and deploys within an HTML web page, or as part of an ASP.NET project. For many Silverlight applications, using an HTML web page as your host would be perfectly fine. However, ImageGear for Silverlight utilizes a web service to validate its SDK license, and the Silverlight application calling that web service must run from the domain name that hosts the service. As a result, it is best to avoid the HTML web page option, and instead create the ASP.NET project. The project wizards set everything up for you (Figure 2), so even the most inexperienced web developer can do it.

© 2010 Accusoft Corporation 3 | P a g e
Figure 2: Selecting the Silverlight Host
With a click of the OK button, a solution is created, containing two projects – the Silverlight application, where we will spend most of our time, and an ASP.NET host, set as the startup project. If you compile and run at this point, the application will execute; however, it will be pretty boring – just a blank page in IE. However, this page is not blank. There is a full-fledged Silverlight application running within it. We just need to build its layout to support our image viewer.
Defining the Layout
If you have utilized Windows Presentation Foundation (WPF) or Windows Workflow Foundation (WF), you have likely become familiar with XAML. While XAML is nothing more than a way to initialize a set of .NET types, it has become very popular in the next generation GUI stacks provided by Microsoft, and that carries through to Silverlight. To define the layout for our multi-page image viewer, we will modify the generated XAML to specify a user interface more suitable than the blank surface we get by default. A complete overview of XAML and the Silverlight GUI stack is beyond the scope of this article, but we will briefly explain what we are doing along the way.
To help us get our bearings, Figure 3 below shows the default view and XAML generated by Visual Studio. It defines a Silverlight UserControl, which contains an empty Grid.

© 2010 Accusoft Corporation 4 | P a g e
Figure 3: Generated Page.xaml
For our image viewer, we want to add a couple of controls to the UserControl – an instance of the ImageGear.Windows.Controls.PageView type for display of the image and several buttons to support opening a file and navigating between its pages. Before we modify the XAML, we have some references to add to the project to ensure calls to ImageGear for Silverlight resolve at compile time. ImageGear for Silverlight allows the developer to deploy only those assemblies required for their specific application. This allows the developer to keep the size of their deployment packages small, while enabling background loading of non-essential assemblies. A complete listing and description of the assemblies in ImageGear for Silverlight are in the toolkit’s documentation. For now, it is enough to make sure your references list looks like that in Figure 4. You will find the ImageGear for Silverlight assemblies in your \\Program Files\Accusoft\ImageGear for Silverlight v17\Bin directory.

© 2010 Accusoft Corporation 5 | P a g e
Figure 4: Required References
Listing 1 (below) shows the XAML for our image viewer’s layout. The XAML in Listing 1 adds two rows in the original grid, one to hold the image viewer and a second to hold the buttons. The ImageGear.Windows.Controls.PageView, is placed directly in the cell because it will simply fill its available space. The buttons, however, require some additional layout containers to ensure the desired layout is created. This is done with a second Grid containing two columns. The first will contain a Button we will use to invoke an Open File operation. The second column will contain two buttons – Previous Page and Next Page – so we will use a StackPanel container and place two buttons within it. A point of interest in our XAML is the use of a Style resource for each of our buttons. To make our XAML a bit cleaner and more efficient, the look for our buttons is defined once, as a Style. The Style is contained in the UserControl resources, and applied to each button. There are many excellent resources on the Silverlight GUI elements and XAML, and if you are not familiar with these technologies, I encourage you to look. You will never want to drag and drop user controls again!

© 2010 Accusoft Corporation 6 | P a g e
Listing 1: Multi-Page Image Viewer XAML
<UserControl x:Class="MultiPageImageViewer.MainPage"
xmlns="http://schemas.microsoft.com/winfx/2006/xaml/presentation"
xmlns:x="http://schemas.microsoft.com/winfx/2006/xaml"
xmlns:IGSilverlightUI=
"clr-namespace:ImageGear.Windows.Controls;assembly=ImageGear18.Windows.Controls"
MinWidth="640" MinHeight="480">
<UserControl.Resources>
<Style x:Key="ButtonStyle" TargetType="Button">
<Setter Property="Width" Value="100"/>
<Setter Property="Margin" Value="8,4,8,4"/>
</Style>
</UserControl.Resources>
<Grid x:Name="LayoutRoot" Background="White">
<Grid.RowDefinitions>
<RowDefinition Height="9*"/>
<RowDefinition Height="*"/>
</Grid.RowDefinitions>
<!-- Primary Image Viewer -->
<Grid Grid.Row="0" Background="Gray">
<IGSilverlightUI:PageView Margin="8"
x:Name="mPageView" Background="Gray"/>
</Grid>
<!-- Button Row -->
<Grid Grid.Row="1">
<Grid.ColumnDefinitions>
<ColumnDefinition Width="1*"/>
<ColumnDefinition Width="2*"/>
</Grid.ColumnDefinitions>
<Button x:Name="mOpenButton" Grid.Column="0" Style="{StaticResource ButtonStyle}"
Click="mOpenButton_Click" HorizontalAlignment="Left" IsEnabled="False">
<TextBlock Text="Open File"/>
</Button>
<StackPanel Grid.Column="1" Orientation="Horizontal" HorizontalAlignment="Right">
<Button x:Name="mPreviousButton" Style="{StaticResource ButtonStyle}"
Click="mPreviousButton_Click" IsEnabled="False">
<TextBlock Text="<< Previous"/>
</Button>
<Button x:Name="mNextButton" Style="{StaticResource ButtonStyle}"
Click="mNextButton_Click" IsEnabled="False">
<TextBlock Text="Next >>"/>
</Button>
</StackPanel>
</Grid>
</Grid>
</UserControl>
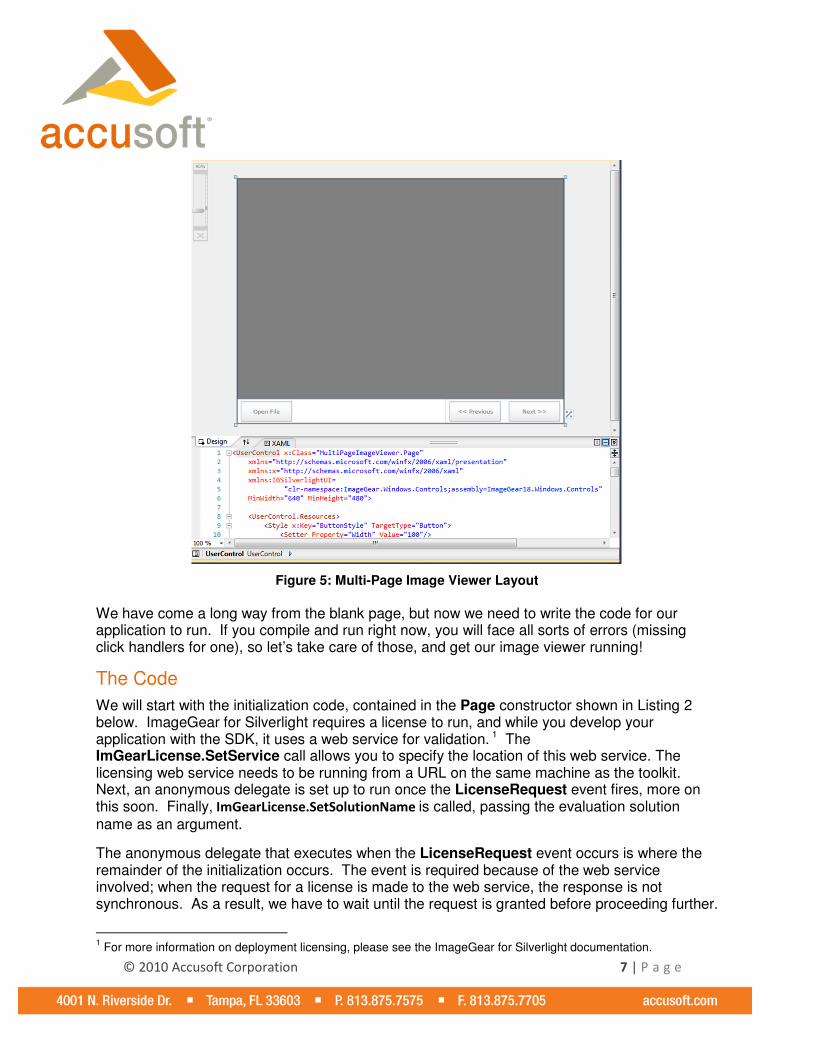
It is difficult to visualize our image viewer using the XAML definition only. Conveniently, Visual Studio supports a split view so you can see the result of your XAML as you go. Figure 5 below shows the layout generated by the XAML in Listing 1.
© 2010 Accusoft Corporation 7 | P a g e
Figure 5: Multi-Page Image Viewer Layout
We have come a long way from the blank page, but now we need to write the code for our application to run. If you compile and run right now, you will face all sorts of errors (missing click handlers for one), so let’s take care of those, and get our image viewer running!
The Code
We will start with the initialization code, contained in the Page constructor shown in Listing 2 below. ImageGear for Silverlight requires a license to run, and while you develop your application with the SDK, it uses a web service for validation. 1 The ImGearLicense.SetService call allows you to specify the location of this web service. The licensing web service needs to be running from a URL on the same machine as the toolkit. Next, an anonymous delegate is set up to run once the LicenseRequest event fires, more on this soon. Finally, ImGearLicense.SetSolutionName is called, passing the evaluation solution
name as an argument.
The anonymous delegate that executes when the LicenseRequest event occurs is where the remainder of the initialization occurs. The event is required because of the web service involved; when the request for a license is made to the web service, the response is not synchronous. As a result, we have to wait until the request is granted before proceeding further.
1 For more information on deployment licensing, please see the ImageGear for Silverlight documentation.

© 2010 Accusoft Corporation 8 | P a g e
Within the delegate body, initialization of the ImageGear.Formats.Common assembly (and its formats) is performed. While the toolkit requires the common formats to display images in the PageView, all others are optional. The developer gets to make the choice.
Listing 2: Page Constructor and ImageGear for Silverlight Initialization
using System;
using System.IO;
using System.Windows;
using System.Windows.Controls;
using ImageGear.Core;
using ImageGear.Display;
using ImageGear.Formats;
public Page()
{
InitializeComponent();
// Assuming evaluation mode...see the ImageGear for Silverlight
// documentation for an explanation of evaluation mode
ImageGear.Evaluation.EvaluationManager.Initialize();
Application.Current.RootVisual = this;
// ImageGear for Silverlight Development licensing. This licensing
// requires the sample to be run from a URL hosted on the same machine
// ImageGear for Silverlight was installed on.
string webServiceUrl = string.Format("http://{0}/{1}",
App.Current.Host.Source.DnsSafeHost,
"ImageGearSilverlight18_WebService/SilverlightWebService.svc");
ImGearLicense.SetService(webServiceUrl);
ImGearLicense.LicenseRequest =
new ImGearLicense.DelegateLicenseRequest(delegate(Exception error)
{
// Initialize format components
ImGearCommonFormats.Initialize();
// ImageGear Initialized and Licensed; Enable the Open Button
this.mOpenButton.IsEnabled = true;
});
ImGearLicense.SetSolutionName("AccuSoft 5-44-18");
}
Once the toolkit is initialized, we can write handlers for each of our buttons and get some images to display in the application. The mOpenButton handler (Listing 3) performs the bulk of the work. Most of the code is stock, and will be familiar to anyone who has utilized the OpenFileDialog type before. The Stream created is passed as an argument to ImGearFileFormats.LoadDocument to be loaded. If a codec corresponding to the file type is known to the toolkit (via initialization above), it will load; otherwise, an ImGearException is thrown.
With the document loaded into an instance of the ImGearDocument, an ImGearPageDisplay instance is created to specify the viewable page to the PageView. The easiest way to link the concepts is to think of the ImGearDocument as the in-memory representation of the file, and an ImGearPresentationPageDisplay as the logical representation of the page for display. In other words, the ImGearPresentationPageDisplay type contains the instructions for PageView to display the page properly. Examples might include resolution, clipping rectangles, or transforms. To get the page to display, an ImGearPresentationPageDisplay is assigned to the

© 2010 Accusoft Corporation 9 | P a g e
PageView.Display property, and a call to PageView.Update is made to force a redraw to occur.
Listing 3: Open Button Handler
private ImGearDocument mLoadedDocument = null;
private Int32 mCurrentPage = -1;
private ImGearPresentationPageDisplay mCurrentPageDisplay = null;
.
.
.
private void mOpenButton_Click(object sender, System.Windows.RoutedEventArgs e)
{
// Prompt the user to select an image file
OpenFileDialog ofd = new OpenFileDialog();
ofd.Filter =
"Image files (*.tif;*.jpg;*.png;*.bmp)|*.tif;*.jpg;*.png;*.bmp|All files (*.*)|*.*";
ofd.FilterIndex = 1;
bool? result = ofd.ShowDialog();
if (!result.GetValueOrDefault(false))
return;
try
{
using (Stream f = ofd.File.OpenRead())
{
// Open it with ImageGear, showing the first page by default
this.mLoadedDocument = ImGearFileFormats.LoadDocument(f, 0, -1);
this.mCurrentPage = 0;
if (null == this.mCurrentPageDisplay)
{
this.mCurrentPageDisplay =
new ImGearPresentationPageDisplay(this.mLoadedDocument.Pages[this.mCurrentPage]);
}
else
{
this.mCurrentPageDisplay.Page =
this.mLoadedDocument.Pages[this.mCurrentPage];
}
mPageView.Display = this.mCurrentPageDisplay;
mPageView.Update();
// Update the previous\next buttons depending on page count
this.UpdateButtonStates();
}
}
catch (ImGearException)
{
MessageBox.Show("The file selected is not supported by this sample.",
"MultiPageTiffViewer Control", System.Windows.MessageBoxButton.OK);
}
}
}
The remainder of the code manipulates the page displayed via the previous and next buttons, modifying the page displayed by the PageView type. The Pages collection within the ImGearDocument allows you to select the page loaded in the

© 2010 Accusoft Corporation 10 | P a g e
ImGearPresentationPageDisplay. Remember, when changing the page display always call ImGearSilverlightPageView.Update or a redraw will not occur.
Listing 3: Previous and Next Button Handlers, UpdateButtonStates Method
private void mPreviousButton_Click(object sender, System.Windows.RoutedEventArgs e)
{
if (this.mCurrentPage > 0)
{
this.mCurrentPageDisplay.Page = this.mLoadedDocument.Pages[--this.mCurrentPage];
this.mPageView.Update();
}
// Update the previous\next buttons depending on page count
this.UpdateButtonStates();
}
private void mNextButton_Click(object sender, System.Windows.RoutedEventArgs e)
{
if (this.mCurrentPage < this.mLoadedDocument.Pages.Count - 1)
{
this.mCurrentPageDisplay.Page = this.mLoadedDocument.Pages[++this.mCurrentPage];
this.mPageView.Update();
}
// Update the previous\next buttons depending on page count
this.UpdateButtonStates();
}
private void UpdateButtonStates()
{
this.mPreviousButton.IsEnabled =
(this.mCurrentPage > 0 && mLoadedDocument.Pages.Count > 1) ? true : false;
this.mNextButton.IsEnabled =
((this.mCurrentPage < (this.mLoadedDocument.Pages.Count - 1) &&
mLoadedDocument.Pages.Count > 1)) ? true : false;
}
With that, we have our multi-page image viewer for Silverlight! Figure 6 below shows the final product. With ImageGear for Silverlight, we have been able to extend the base platform to support loading of TIFF files, and we have a basic RIA suitable for document image display. Best of all, it was all done with current .NET technologies like XAML and
C#, using tools in the ecosystem. Of course, a full featured viewer would do much more, and ImageGear for Silverlight will help you get there.

© 2010 Accusoft Corporation 11 | P a g e
Figure 6: Multi-Page Image Viewer
Building an Azure Cloud Service for the Multi-Page Image Viewer
With the commercial introduction of Microsoft Windows Azure earlier this year, developers of Silverlight applications now have a scalable method of deployment. With the Windows Azure SDK, Microsoft has simplified the development of cloud services, including a rich simulation environment to enable development without the purchase of compute instances in the production cloud. To demonstrate the ease of getting started with the Cloud, we will create an Azure Cloud Service to host the Multi-Page Image Viewer and run it in the Azure simulation environment.
Open the MultiPageImageViewer solution created above in Visual Studio 2010 and bring up the Add New Project dialog. Under the Visual C# heading, select Cloud as the project type, and then select Windows Azure Cloud Service as the project template. If Windows Azure Cloud Service is not available, Visual Studio 2010 will prompt you to install. Once you have completed the installation, follow these instructions to create the service. Enter a name for your project, and click OK (Figure 7).

© 2010 Accusoft Corporation 12 | P a g e
Figure 7: Creating the Azure Cloud Service Project
The next screen presented (Figure 8) will prompt you to create a new Cloud service project. For now, simply click OK to dismiss the dialog. We will come back to this in a moment.
Figure 8: New Cloud Service Project Dialog
At this point, a shell Azure service is present in the solution, but the service does not do anything. In fact, if you build the solution, an error will result. This is because an Azure service must define one or more roles. Currently, there are two role types – a web role and a worker role. Each role encapsulates units of work that may be replicated across one or more computers to implement the functionality exposed by an Azure service. A complete description of roles and the Windows Azure Service Architecture is available on MSDN2.
The next step is to define a role for the service. In our case, a web role is needed because the functionality exposed by the service is to host a Silverlight application. We defined an ASP.NET project when we built the viewer, and we will reuse this project in the solution as the source for
2 Overview of Windows Azure Service Architecture http://msdn.microsoft.com/en-us/library/dd179341.aspx
© 2010 Accusoft Corporation 13 | P a g e
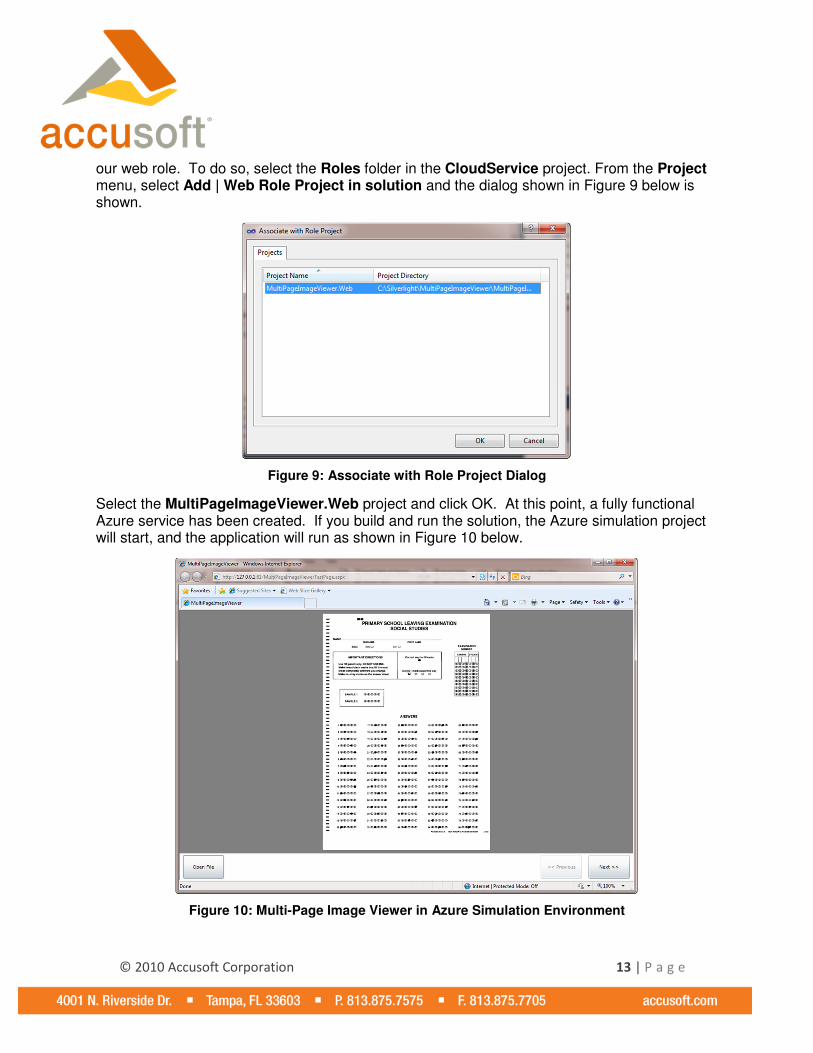
our web role. To do so, select the Roles folder in the CloudService project. From the Project menu, select Add | Web Role Project in solution and the dialog shown in Figure 9 below is shown.
Figure 9: Associate with Role Project Dialog
Select the MultiPageImageViewer.Web project and click OK. At this point, a fully functional Azure service has been created. If you build and run the solution, the Azure simulation project will start, and the application will run as shown in Figure 10 below.
Figure 10: Multi-Page Image Viewer in Azure Simulation Environment

© 2010 Accusoft Corporation 14 | P a g e
At first glance, this looks very similar to the viewer shown in Figure 6 above. However, there is one important difference. Examine the URL. The viewer in Figure 10 is running from http://127.0.0.1:81, the default address for the Azure simulation environment.
There is much more to Windows Azure, including service configuration, deployment, and storage, and hopefully, this simple example shows that with Azure, deployment of a Silverlight application is greatly simplified. Azure provides a scalable way to launch Silverlight applications to market, without the requirement of upfront infrastructure expense.
Download and Evaluate
Download the product or review a full list of ImageGear for Silverlight features, on our website www.accusoft.com/ig-silverlight.htm.
Please contact us at [email protected] or [email protected] more information.
About Accusoft Accusoft provides a full spectrum of document, content and imaging solutions. With its broad range of solutions, Accusoft is committed to deliver best-in-class, enterprise grade and fully-supported applications and a globally recognized suite of software development kits (SDKs). Accusoft products work reliably behind the scenes for capturing, processing, storing and viewing images, documents and more. Add barcode, compression, DICOM, image processing, OCR/ICR, forms processing, PDF, scanning, video, and image viewing to your applications. Products are delivered as applications and toolkits for multiple 32-bit/64-bit platforms and development environments, including iOS, Android, .NET, Silverlight, ASP.NET, ActiveX, Java, Linux, Solaris, Mac OSX, and IBM AIX. For more information, please visit www.accusoft.com.