building an arcbotics hexy - robotshop · 4 hip pieces 4 thigh pieces 3 calf pieces 1 rubber foot...
TRANSCRIPT

Building an ArcBotics HexyWritten By: Joseph Schlesinger
PARTS:
1 ArcBotics Hexy Kit (1)
SUMMARY
We're going to build a hexapod!
Building an ArcBotics Hexy
© Make Projects www.makeprojects.com Page 1 of 20
Step 1 — Building an ArcBotics Hexy
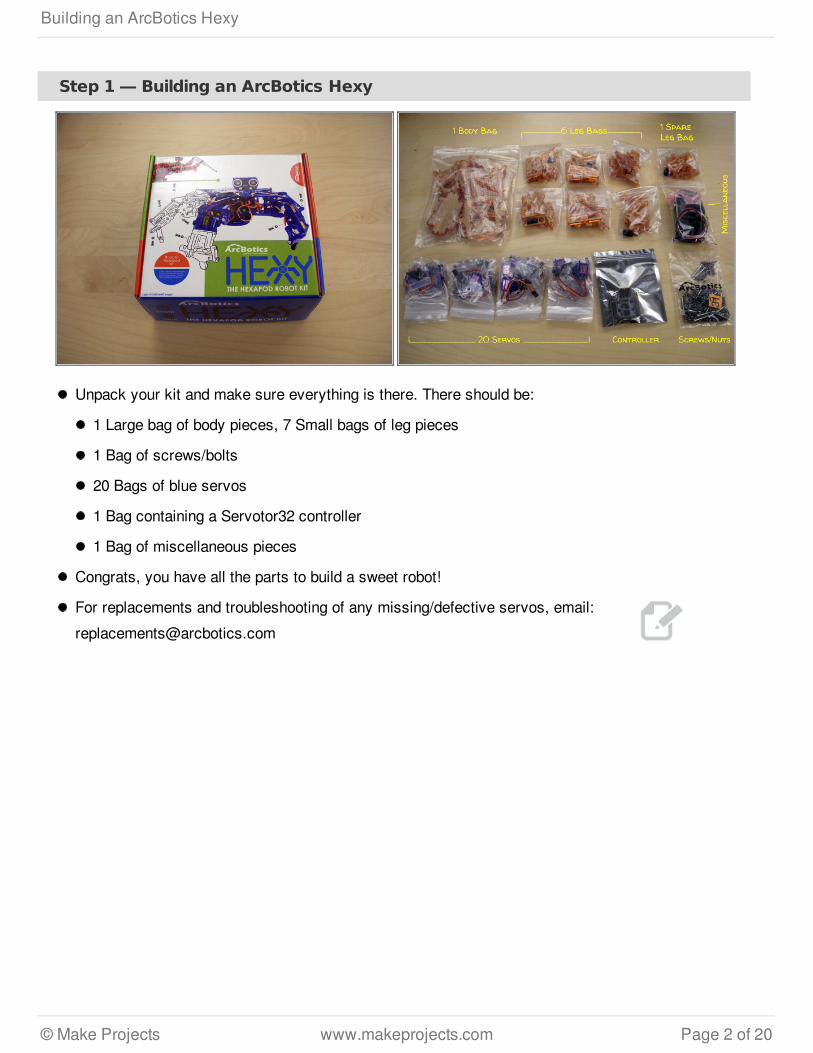
Unpack your kit and make sure everything is there. There should be:
1 Large bag of body pieces, 7 Small bags of leg pieces
1 Bag of screws/bolts
20 Bags of blue servos
1 Bag containing a Servotor32 controller
1 Bag of miscellaneous pieces
Congrats, you have all the parts to build a sweet robot!
For replacements and troubleshooting of any missing/defective servos, email:[email protected]
Building an ArcBotics Hexy
© Make Projects www.makeprojects.com Page 2 of 20

Step 2
In the Miscellaneous Bag, thereshould be:
1 4xAA battery holder, 1 5xAAbattery holder
1 ultrasonic distance sensor(robot’s eyes)
1 4pin cable for the ultrasonicdistance sensor
1 Bluetooth serial module
1 small #2 Phillips screwdriver
1 long 2.1mm to 9v clip
You will need to use the Phillipsscrewdriver shortly. Put everythingelse to the side for now.
Building an ArcBotics Hexy
© Make Projects www.makeprojects.com Page 3 of 20

Step 3
Time to build the first leg!
Check the bag of leg pieces to make sure all the parts are present. Please refer to theimage:
4 Hip pieces
4 Thigh pieces
3 Calf pieces
1 Rubber foot
Step 4
Each plastic piece comes with aprotective paper coating on it toprevent scratching during shipping.This protective coating should beremoved from all legs and bodyparts.
Catch a corner of the paper andpeel it off gently.
Make sure to get both sides!
Building an ArcBotics Hexy
© Make Projects www.makeprojects.com Page 4 of 20

Step 5
Place the servos in the left thigh piece as shown. Take note of the orientation of theservos, which have their axles and cables pointing outwards.
Place the two middle thigh pieces (shaped like ladders) in the slots between the servos.
Step 6
The middle thigh pieces should slipinto the slots of the remaining thighpiece.
Thread one 35mm screw (thelongest one) through the hole in thecenter of the outer thigh pieces.Attach the nut and tighten with thescrewdriver.
Building an ArcBotics Hexy
© Make Projects www.makeprojects.com Page 5 of 20

Step 7
We will now move on to assembling the lower leg.
Put the rubber foot onto the lower calf piece (airplane/T shaped).
Mount the left calf piece (wishbone/Y shaped) as shown, placing a nut and a 14mm screw(medium length) through the corresponding hole in the left calf. Tighten.
Building an ArcBotics Hexy
© Make Projects www.makeprojects.com Page 6 of 20
Step 8
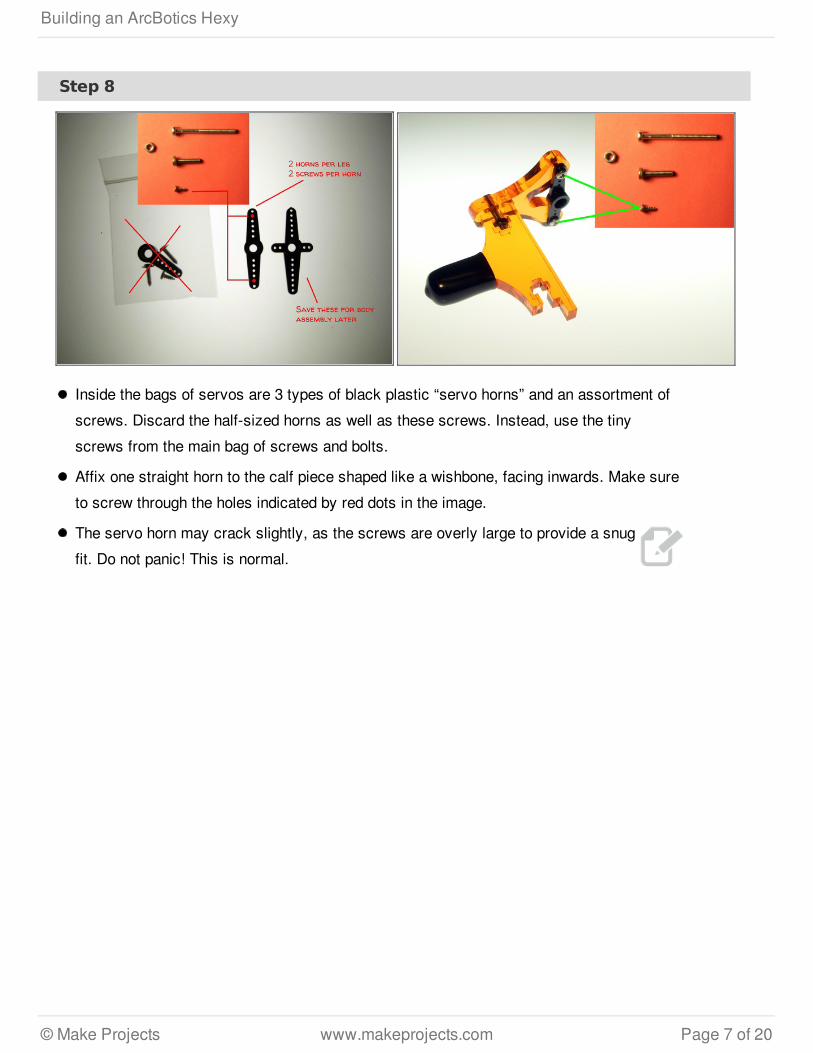
Inside the bags of servos are 3 types of black plastic “servo horns” and an assortment ofscrews. Discard the half-sized horns as well as these screws. Instead, use the tinyscrews from the main bag of screws and bolts.
Affix one straight horn to the calf piece shaped like a wishbone, facing inwards. Make sureto screw through the holes indicated by red dots in the image.
The servo horn may crack slightly, as the screws are overly large to provide a snugfit. Do not panic! This is normal.
Building an ArcBotics Hexy
© Make Projects www.makeprojects.com Page 7 of 20

Step 9
Using either the short or long clip, connect a battery holder to the servo plug on thecontroller. Use either 4xAA Alkalines or 5xAA NiMH. 4xAA NiMH is also okay. 5xAAalkalines can fry servos. The controller should display a steady green light. A smaller redlight should pulse dimly for a bit, flash brightly once, and then disappear.
Alkalines batteries don't work as well as NiMH, as they supply less current. Seehere for more info.
With batteries plugged into the servo plug on the controller, any servos plugged into ports0,1,2 or 3 should automatically center (you will hear some brief whirring). If they don't, thefirmware is probably out of date and may require an update. There is also one spare servoper kit.
Plug a thigh servo into slots 0,1,2 or 3 in the controller. Make sure the brown wire is in theprong closest to the controller's edge.
Align the calf and thigh sections to be as straight as possible. Push the thigh's servo axleinto the calf's servo horn. It will be a snug fit but do not force or twist them. Use a smallscrew to fasten the calf's servo horn into the thigh's servo. Doing this while the servo ispowered and centered will make sure the pieces are assembled centered.
Building an ArcBotics Hexy
© Make Projects www.makeprojects.com Page 8 of 20

Step 10
To finish securing the calf to the thigh, we will now attach the final calf piece (smallrounded rectangle).
Affix one medium screw and nut as shown in the image.
Align the final calf piece with the rest of the calf and thigh. The last screw you justattached should fit into the thigh, and the airplane-shaped piece should fit into its slot.Attach the final calf piece with another medium screw and nut.
The leg should pivot back and forth firmly but freely. Now onto the hip!
Step 11
Find the U-shaped piece. The engraved circle (see image) marks the inward direction ofthis piece.
With this engraving facing inwards, insert the clothespin shaped piece to the U-shape.Mount with a medium screw and nut.
Mount a straight servo horn onto the U-shape. This piece is mounted like the servo hornwas in Step 8. Note that the servo horn is also facing inwards, on the same side as theengraving, with the center hold of the servo horn facing inward.
Building an ArcBotics Hexy
© Make Projects www.makeprojects.com Page 9 of 20

Step 12
On the hip piece with a circle and rectangle in it, insert a servo. Notice how when mounted,the servo shaft is precisely in the middle of the piece. This is crucial, as it is how the leg isable to pivot on the chassis.
Insert this section into the U-shape as shown.
Step 13
With its engraving also facing inwards, the final hip piece should fit snugly with the rest ofthe hip. Mount a medium screw and nut along the top clothespin piece as shown in theimage.
Mount another medium screw and nut through the tip of the final piece you just attached tothe hip. For now, only attach the nut partially so that the screw protrudes from it slightly.
Building an ArcBotics Hexy
© Make Projects www.makeprojects.com Page 10 of 20

Step 14
As in Step 9, gently join the hip and thigh. Use one of the tiny screws to attach the hip'shorn to the thigh's servo axle. Do so with the the two sections as straight as possible andthe thigh servo powered and centered. This will make sure the pieces are assembledcentered.
Now you can tighten the screw that was protruding slightly in Step 13.
Step 15
Success! An assembled leg!
Thread the servo wires betweenthe hip servo and the U-shape for acleaner look.
Build five more legs and thenproceed to the next step.
Building an ArcBotics Hexy
© Make Projects www.makeprojects.com Page 11 of 20
Step 16
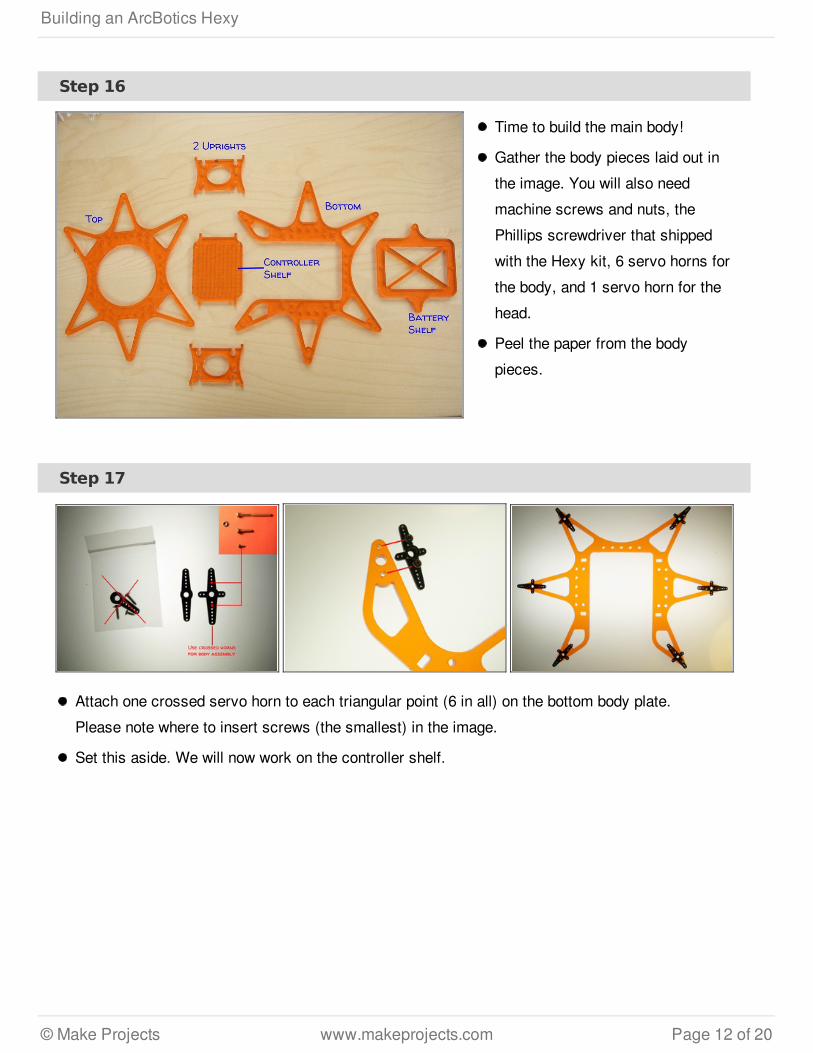
Time to build the main body!
Gather the body pieces laid out inthe image. You will also needmachine screws and nuts, thePhillips screwdriver that shippedwith the Hexy kit, 6 servo horns forthe body, and 1 servo horn for thehead.
Peel the paper from the bodypieces.
Step 17
Attach one crossed servo horn to each triangular point (6 in all) on the bottom body plate.Please note where to insert screws (the smallest) in the image.
Set this aside. We will now work on the controller shelf.
Building an ArcBotics Hexy
© Make Projects www.makeprojects.com Page 12 of 20

Step 18
Insert 4 medium screws into the controller shelf as indicated by the red dots in the image.
Insert the screws upwards through the shelf and controller corners. Make sure the nutsare attached from above so that they are on the side of the controller. Do not over-tightenthem as it may warp or damage the controller.
Set this aside and return to the bottom body plate from Step 17.
Step 19
Place an upright piece into therectangular slots on the bottombody panel. Take note that therectangular slots on the uprightpiece are off center. Make surethese slots are closer to the bottompanel.
Attach the upright piece with 2 setsof medium screws and nuts asshown.
Building an ArcBotics Hexy
© Make Projects www.makeprojects.com Page 13 of 20

Step 20
Insert the second upright piece into the bottom body panel. Make sure the off-center slotsare facing downwards as indicated in Step 19. However, do not screw the second uprightin just yet. You will need the wiggle room to insert the controller and shelf from Step 18.
Slide the controller and its shelf between the two uprights so that it fits into their slots.Make sure the USB connector of the controller is facing the back of the robot (open end ofthe bottom body plate).
You can now insert 2 sets of medium screws and nuts into the second upright to securethese pieces.
Building an ArcBotics Hexy
© Make Projects www.makeprojects.com Page 14 of 20

Step 21
The top body panel should fit snugly on top of what you've assembled thus far.
Attach with 4 sets of medium screws as indicated in the image.
On each of the triangular points of the top body panel, you will now insert a medium screw,facing downwards, and a partially tightened nut so that only the tip of the screw protrudesbeyond it. Refer to image.
Building an ArcBotics Hexy
© Make Projects www.makeprojects.com Page 15 of 20

Step 22
Now it is time to attach the legs to the body!
Just as you did to center the leg joints, power up the controller by plugging in the batterypack. Plug the hip servo into ports 0, 1, 2, or 3 on the controller. Make sure the brown wirefaces outwards towards the controller's edge. You should hear a light whirring as the servocenters.
With the hip servo powered and centered, make sure its axle is facing downwards to fitinto the servo horn on the bottom body plate. The partially tightened screw in the top bodyplate should be aligned with the hole in the center of the clothespin shape of the hip.Tighten this screw.
The leg should extend straight out from the body (see dotted lines in image). Pushthe servo axle into the servo horn. It will be a snug fit but do not force or twist it!
Flip everything over to secure the leg to the body with a small screw on the underside ofthe leg.
Unplug the servo from the controller for now.
Building an ArcBotics Hexy
© Make Projects www.makeprojects.com Page 16 of 20

Step 23
Almost done! Repeat Step 22 forthe rest of the legs.
Put aside to assemble the headnext.
Step 24
Time to build the head!
You will need 1 servo, 1 servohorn, the ultrasonic distancesensor (from the miscellaneousbag), and 4 pieces from the bodybag (refer to image) in order tocomplete the head.
Peel off the protective paper.
Building an ArcBotics Hexy
© Make Projects www.makeprojects.com Page 17 of 20

Step 25
Take the smallest piece and insert it into the slots of the semicircular piece, as shown inthe image. Fasten with a medium screw and nut.
Next, take the face piece and insert the ultrasonic distance sensor (eyes) with the pinspointing upwards.
Insert the semicircular piece into the face piece slots, from behind, such that the smallestpiece clamps the distance sensor in place. Fasten with two sets of screws and nuts.
Step 26
Take the servo and insert it into the C-shaped piece, from above. Make sure that the cablepoints outwards in the direction of the C-shape's opening, and the servo tabs should beresting on top of the C-shape.
Affix a small screw through the servo's inner tab into the C-shape below.
Building an ArcBotics Hexy
© Make Projects www.makeprojects.com Page 18 of 20
Step 27
Affix a straight servo horn to the underside of the semicircular piece through the holesindicated by the red dots in the image.
Power and center the head servo as you have been doing with the others. Gently push theservo's axle into the horn. Tighten with a small screw.
Step 28
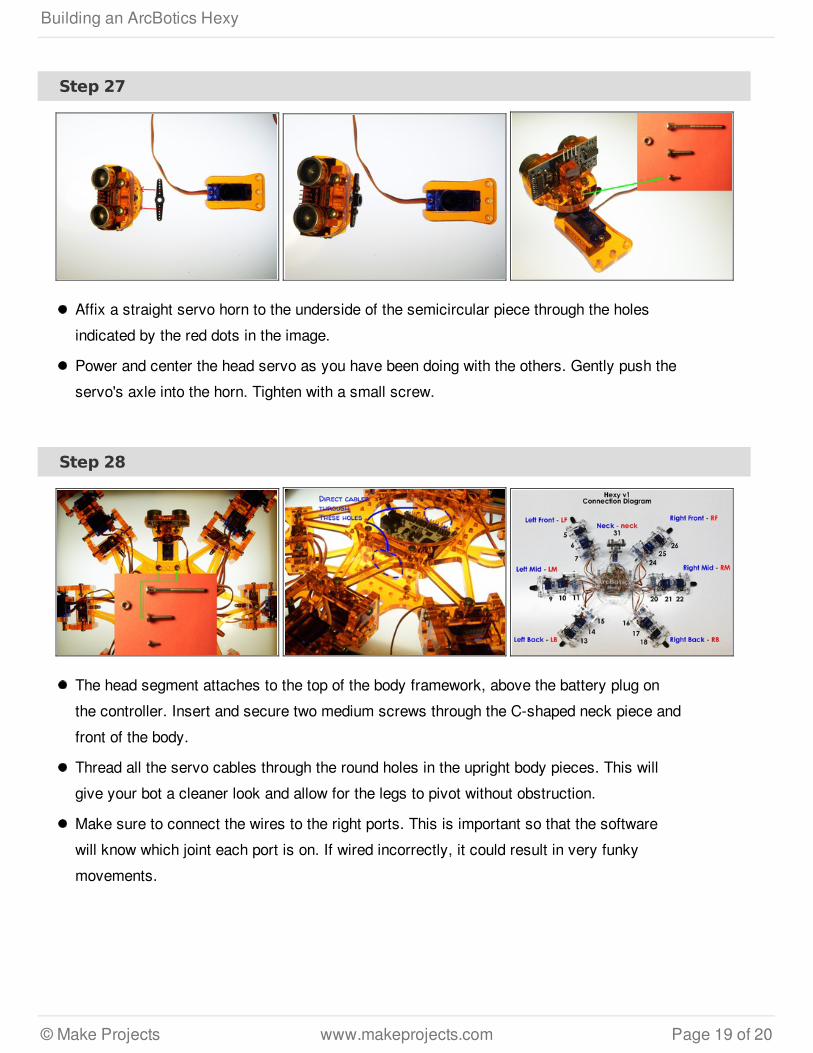
The head segment attaches to the top of the body framework, above the battery plug onthe controller. Insert and secure two medium screws through the C-shaped neck piece andfront of the body.
Thread all the servo cables through the round holes in the upright body pieces. This willgive your bot a cleaner look and allow for the legs to pivot without obstruction.
Make sure to connect the wires to the right ports. This is important so that the softwarewill know which joint each port is on. If wired incorrectly, it could result in very funkymovements.
Building an ArcBotics Hexy
© Make Projects www.makeprojects.com Page 19 of 20

This document was last generated on 2013-01-25 07:36:58 AM.
Step 29
Lastly, use 3 pairs of mediumscrews and nuts to secure thebattery shelf (X-shaped plate) tothe underside of your robot.
Step 30
That's it! You have a Hexy!
Get it connected and running byfollowing the setups here:http://arcbotics.com/products/hexy/start...
More information is available on thewiki:https://github.com/ArcBotics/Hexy/wiki
Support is available on the forums:http://forum.arcbotics.com/
For replacements andtroubleshooting of anymissing/defective servos, email:[email protected]
Building an ArcBotics Hexy
© Make Projects www.makeprojects.com Page 20 of 20