building the bi mobile hd application for enterprise deployment
DESCRIPTION
Unofficial GuideTRANSCRIPT

Building the BI Mobile HD Application for Enterprise Deployment August 1, 2013
1
Table of Contents Overview ..................................................................................................................................... 2 Overall Process ......................................................................................................................... 3
Build the Application with a Storyboard Project .......................................................... 4 Creating the Project .......................................................................................................................... 4 Add the BI Mobile HD Content to the New Project ................................................................. 5 Modify Project Properties .............................................................................................................. 6 Modify the Default Application Code ....................................................................................... 10 Run and Test the Project .............................................................................................................. 12
Build the Application without a Storyboard Project ................................................ 13 Creating the Project ....................................................................................................................... 13 Add the BI Mobile HD Content to the New Project .............................................................. 14 Modify Project Properties ........................................................................................................... 14 Modify the Default Application Code ....................................................................................... 14 Run and Test the Project .............................................................................................................. 16

Building the BI Mobile HD Application for Enterprise Deployment August 1, 2013
2
Overview These instructions are intended for an iOS mobile developer who is familiar with Apple’s signing and deployment process and is also familiar with the details of deploying an application with a selected MDM (Mobile Device Management) vendor. The Oracle Business Intelligence Mobile Security Toolkit provides the ability to generate a signed version of the Oracle BI Mobile HD application. The toolkit includes the instructions and necessary content to build this application making use of Apple’s Xcode and the iOS SDKs. Details for building an iOS application can be found at: http://developer.apple.com/library/ios/ -‐ referencelibrary/GettingStarted/RoadMapiOS/chapters/Introduction.html The BI Mobile Security Toolkit will be updated on a regular basis in order to synchronize with the Oracle BI Mobile HD application available on the Apple Application store. The Oracle Mobile Security Toolkit updates are delivered in alignment with the releases of the Oracle BI Mobile HD application. As these updates are provided on an on-‐going basis, the expectation will be that users will update their Oracle Mobile HD applications either through the Apple App Store or through the Oracle Mobile Security Toolkit. In both cases, the ability to provide incremental updates is not supported. For the application that is accessed through the Apple App Store, the application will be replaced with the latest version available. With the Oracle Mobile Security Toolkit, a complete new package of support files and libraries are provided. Issues have been noted with Apple iOS simulators when executed with only the project libraries replaced and the application rebuilt. The simulator does not always respect the updates to the libraries. In order to use simulators with library updates, perform a complete rebuild of the project or reset the content settings in the simulator. In order to avoid these simulator issues, it is recommended to replace all project and library files and build a complete new version of the application.
Building the BI Mobile HD Application for Enterprise Deployment August 1, 2013
3
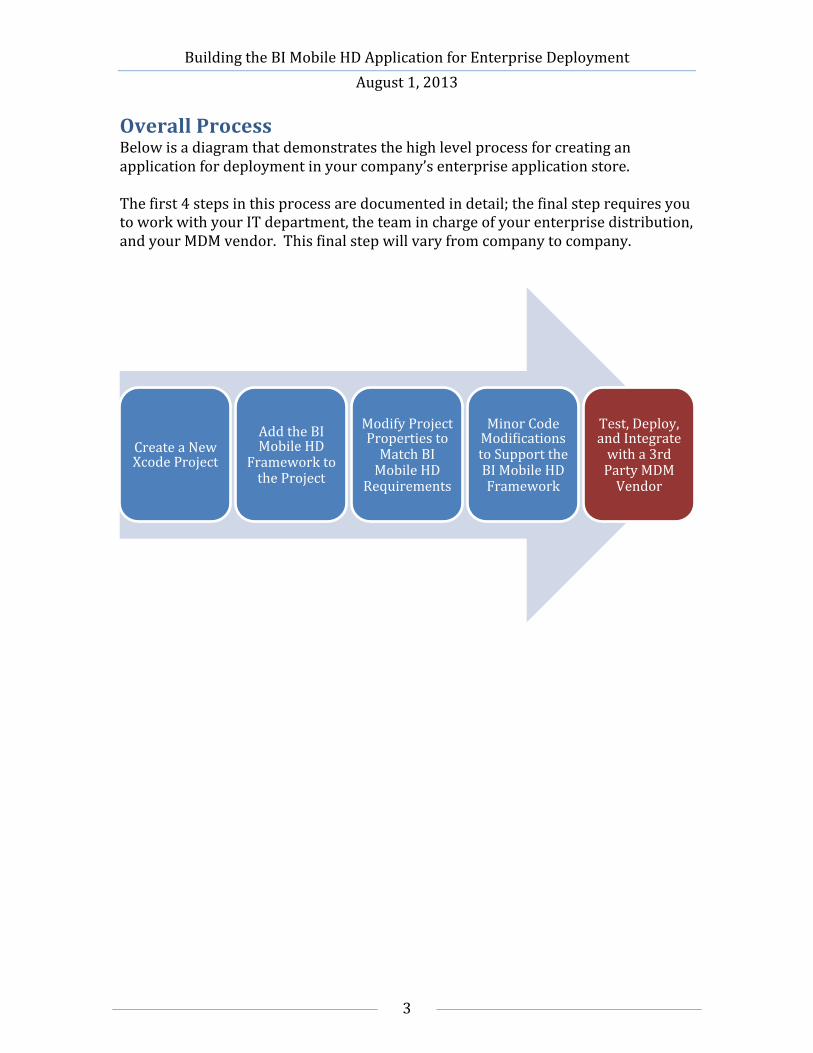
Overall Process Below is a diagram that demonstrates the high level process for creating an application for deployment in your company’s enterprise application store. The first 4 steps in this process are documented in detail; the final step requires you to work with your IT department, the team in charge of your enterprise distribution, and your MDM vendor. This final step will vary from company to company.
Create a New Xcode Project
Add the BI Mobile HD
Framework to the Project
Modify Project Properties to Match BI Mobile HD
Requirements
Minor Code Modi[ications to Support the BI Mobile HD Framework
Test, Deploy, and Integrate with a 3rd Party MDM Vendor
Building the BI Mobile HD Application for Enterprise Deployment August 1, 2013
4
Build the Application with a Storyboard Project Storyboards were added to Xcode to help developers visualize their application and the flow of the application. This choice is a personal preference and will not impact the BI Mobile HD application; instructions for a non-‐storyboard application are detailed below.
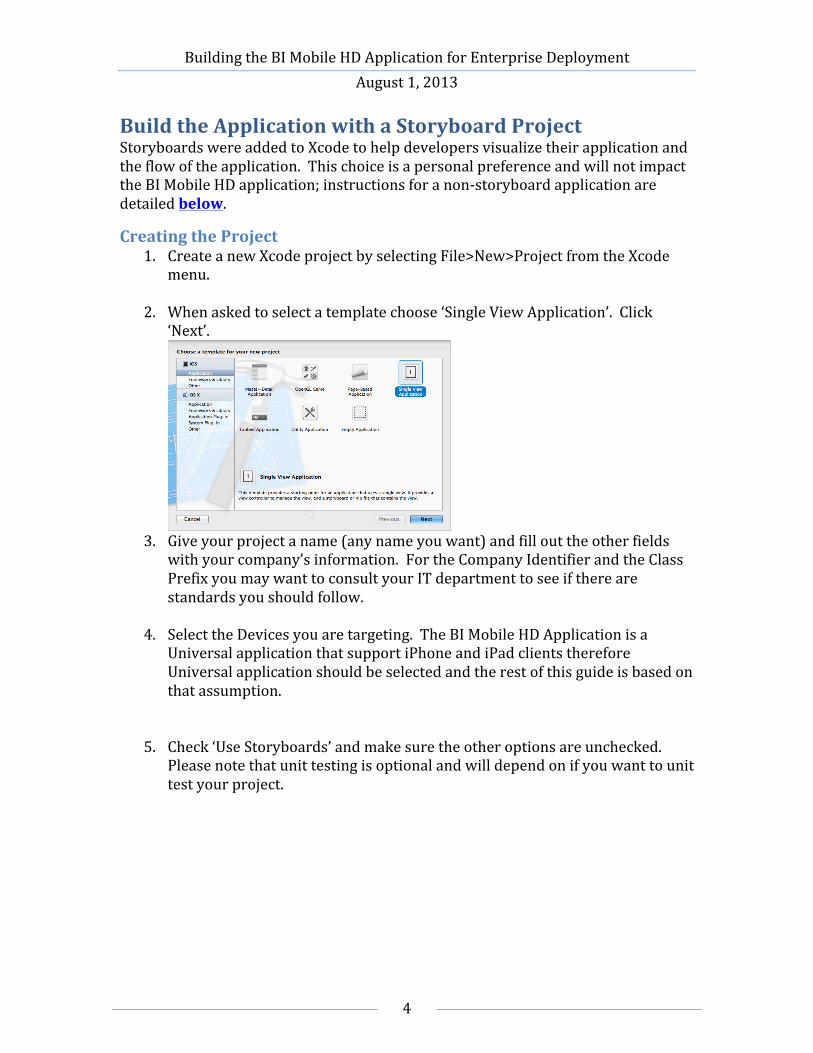
Creating the Project 1. Create a new Xcode project by selecting File>New>Project from the Xcode
menu. 2. When asked to select a template choose ‘Single View Application’. Click
‘Next’.
3. Give your project a name (any name you want) and fill out the other fields
with your company’s information. For the Company Identifier and the Class Prefix you may want to consult your IT department to see if there are standards you should follow.
4. Select the Devices you are targeting. The BI Mobile HD Application is a
Universal application that support iPhone and iPad clients therefore Universal application should be selected and the rest of this guide is based on that assumption.
5. Check ‘Use Storyboards’ and make sure the other options are unchecked.
Please note that unit testing is optional and will depend on if you want to unit test your project.

Building the BI Mobile HD Application for Enterprise Deployment August 1, 2013
5
6. Select a destination for your new project. Anywhere is fine just put it
somewhere safe and somewhere you will remember.
Add the BI Mobile HD Content to the New Project 1. Download the latest security toolkit files to the machine where you have
created this new Xcode project. The files can be found here: http://www.oracle.com/technetwork/middleware/bi-‐enterprise-‐edition/downloads/bi-‐mobile-‐security-‐toolkit-‐1872818.html?ssSourceSiteId=ocomen
2. Extract the files from the zip and drag the OBIMobile.framework,
Settings.bundle and OBIMobile.bundle files to the project. Be sure to drop them on the Project icon and not above the icon. (See Screenshot below)
3. Select ‘Create Groups for Any Added Folders’. Leave other options unchecked and click ‘Finish’

Building the BI Mobile HD Application for Enterprise Deployment August 1, 2013
6
Modify Project Properties 1. In the Summary section of new project add icons for the application. Be sure
to add them for both the iPhone and the iPad. You can do this by dragging and dropping icons to the areas they belong. See Below:
We supply icons for the iPad and the iPhone in the zip file you downloaded earlier, but you can use any icon you want as long as they comply with Apple
Building the BI Mobile HD Application for Enterprise Deployment August 1, 2013
7
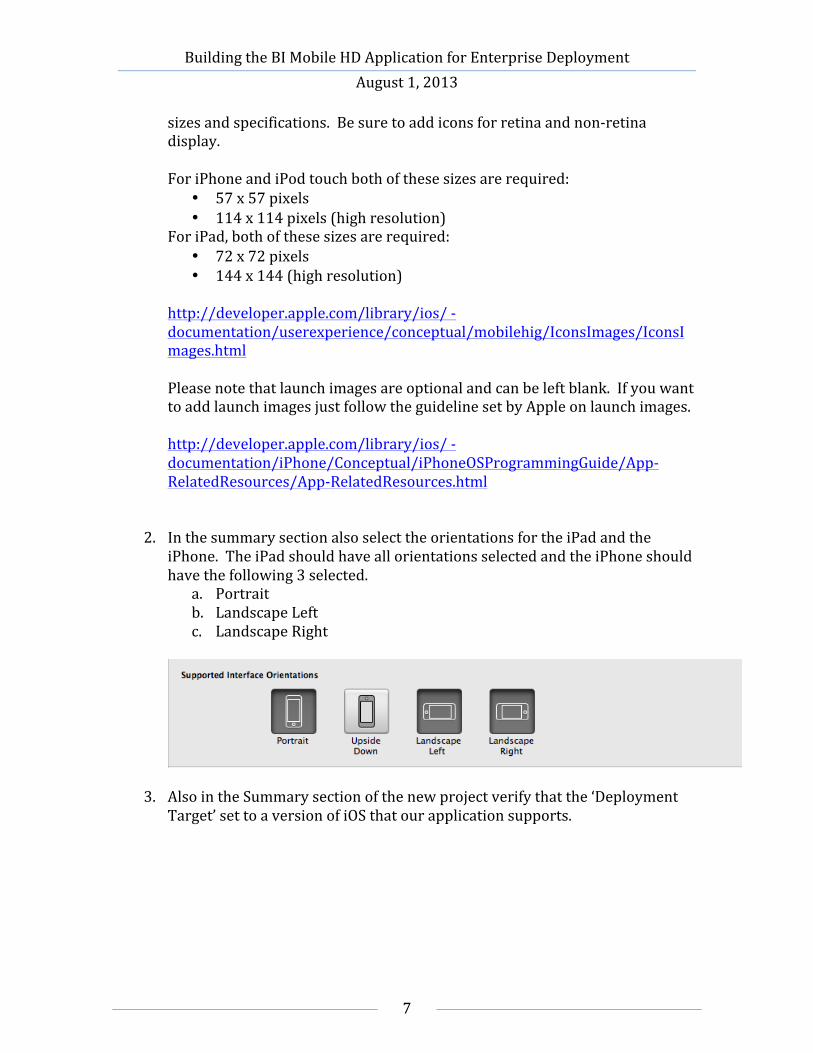
sizes and specifications. Be sure to add icons for retina and non-‐retina display. For iPhone and iPod touch both of these sizes are required:
• 57 x 57 pixels • 114 x 114 pixels (high resolution)
For iPad, both of these sizes are required: • 72 x 72 pixels • 144 x 144 (high resolution)
http://developer.apple.com/library/ios/ -‐ documentation/userexperience/conceptual/mobilehig/IconsImages/IconsImages.html
Please note that launch images are optional and can be left blank. If you want to add launch images just follow the guideline set by Apple on launch images. http://developer.apple.com/library/ios/ -‐ documentation/iPhone/Conceptual/iPhoneOSProgrammingGuide/App-‐RelatedResources/App-‐RelatedResources.html
2. In the summary section also select the orientations for the iPad and the iPhone. The iPad should have all orientations selected and the iPhone should have the following 3 selected.
a. Portrait b. Landscape Left c. Landscape Right
3. Also in the Summary section of the new project verify that the ‘Deployment Target’ set to a version of iOS that our application supports.

Building the BI Mobile HD Application for Enterprise Deployment August 1, 2013
8
Supported iOS version can be found by checking the ‘Requirements’ for our BI Mobile HD application on the Apple Application Store. https://itunes.apple.com/us/app/oracle-‐business-‐intelligence/id534035015?mt=8
4. In the Info section of new project expand the section labeled ‘URL Types’. Click the ‘+’ sign to add a new URL Type. Fill in the following fields with the corresponding values.
• Identifier: com.oracle.obimobile • URL Schemes: oraclebimobile
Leave the rest of the options for the new URL Type blank or as defaults.

Building the BI Mobile HD Application for Enterprise Deployment August 1, 2013
9
5. In the Build Settings section of new project search for "Other Linker Flags" and add the follow parameter:
-‐all_load -‐ObjC To add this parameter you will need to Double Click in the blank space next to the property and the dialog shown below will appear where you can add the new parameter.
When you are done you will see the following:
6. In the Build Phases section of new project in the section ‘Link Binary With
Libraries’, make sure the following frameworks are included and marked as ‘Required’:
• MessageUI.framework • Security.framework • QuartzCore.framework • CoreData.framework • UIKit.framework • Foundation.framework • CoreGraphics.framework

Building the BI Mobile HD Application for Enterprise Deployment August 1, 2013
10
• libsqllite3.dylib
Modify the Default Application Code 1. Select the file called <classprefix>AppDelegate.h in the project and add or
modify the following lines of code: a. Add #import <OBIMobile/OBIMobile.h> b. Make AppDelegate inherit from OBIApplicationDelegate
The modified <classprefix>AppDelegate.h should have the following lines of code with the changes shown in red:
#import <UIKit/UIKit.h> #import <OBIMobile/OBIMobile.h> @interface <classprefix>AppDelegate : OBIApplicationDelegate @property (strong, nonatomic) UIWindow *window; @end

Building the BI Mobile HD Application for Enterprise Deployment August 1, 2013
11
Please note the <classprefix> represents the name of the Class Prefix used in step 5 of the section “Creating the Project”. If you did not specify a class prefix the file will simply be called AppDelegate.h and any reference in the code will be AppDelegate.
2. Comment out the all the code in <classprefix>AppDelegate.m and replace it with the following code: #import "<classprefix>AppDelegate.h" @implementation <classprefix>AppDelegate @synthesize window = _window;
@end
/* CODE COMMENTED OUT*/
Please note the <classprefix> represents the name of the Class Prefix used in step 5 of the section “Creating the Project”. If you did not specify a class prefix the file will simply be called AppDelegate.m and any reference in the code will be AppDelegate.

Building the BI Mobile HD Application for Enterprise Deployment August 1, 2013
12
Run and Test the Project The project is now ready to run and test. From the Product menu in Xcode you can run and test the new project in the simulator or on an iOS device. We recommend that the application be thoroughly tested prior to deployment or integration with any MDM tool. Before you can distribute your app, you’ll need to certify and provision your application within the Enterprise Developer Program and sign and build your project in Xcode. This is process that is driven by Apple. For more details please visit the following link: http://www.apple.com/business/accelerator/deploy/ Please work with your IT department or the team in charge of your enterprise distribution for additional details.

Building the BI Mobile HD Application for Enterprise Deployment August 1, 2013
13
Build the Application without a Storyboard Project Storyboards were added to Xcode to help developers visualize their application and the flow of the application. This choice is a personal preference and will not impact the BI Mobile HD application; instructions for a storyboard application are detailed above.
Creating the Project 1. Create a new Xcode project by selecting File>New>Project from the Xcode
menu. 2. When asked to select a template choose ‘Single View Application’. Click
‘Next’.
3. Give your project a name (any name you want) and fill out the other fields with your company’s information. For the Company Identifier and the Class Prefix you may want to consult your IT department to see if there are standards you should follow.
4. Select the Devices you are targeting. The BI Mobile HD Application is a
Universal application that support iPhone and iPad clients therefore Universal application should be selected and the rest of this guide is based on that assumption.
5. Uncheck ‘Use Storyboards’ and make sure the other options are also
unchecked. Please note that unit testing is optional and will depend on if you want to unit test your project.

Building the BI Mobile HD Application for Enterprise Deployment August 1, 2013
14
6. Select a destination for your new project. Anywhere is fine just put it somewhere safe and somewhere you remember.
Add the BI Mobile HD Content to the New Project Follow the same instructions as above in the steps for a Storyboard based project.
Modify Project Properties Follow the same instructions as above in the steps for a Storyboard based project.
Modify the Default Application Code 1. Select the file called <classprefix>AppDelegate.h in the project and add or
modify the following lines of code: a. Add #import <OBIMobile/OBIMobile.h> b. Make AppDelegate inherit from OBIApplicationDelegate
The modified <classprefix>AppDelegate.h should have the following lines of code in with the changes shown in red:
#import <UIKit/UIKit.h> #import <OBIMobile/OBIMobile.h> @class <classprefix>ViewController; @interface <classprefix>AppDelegate : OBIApplicationDelegate @property (strong, nonatomic) UIWindow *window; @property (strong, nonatomic) <classprefix>ViewController *viewController; @end

Building the BI Mobile HD Application for Enterprise Deployment August 1, 2013
15
Please note the <classprefix> represents the name of the Class Prefix used in step 5 of the section “Creating the Project”. If you did not specify a class prefix the file will simply be called AppDelegate.h and any reference in the code will be AppDelegate.
2. Comment out the all the code in <classprefix>AppDelegate.m and replace it with the following code. The method didFinishLaunchingWithOptions is required but the code for that method is different and also shown below.
#import "<classprefix>AppDelegate.h"
#import "<classprefix>ViewController.h" @implementation <classprefix>AppDelegate @synthesize window = _window; @synthesize viewController = _viewController; /* CODE COMMENTED OUT*/
-‐ (BOOL)application:(UIApplication *)application didFinishLaunchingWithOptions:(NSDictionary *)launchOptions { self.window = [[[UIWindow alloc] initWithFrame:[[UIScreen mainScreen] bounds]] autorelease]; // Override point for customization after application launch. if ([[UIDevice currentDevice] userInterfaceIdiom] == UIUserInterfaceIdiomPhone) { self.viewController = [[[ViewController alloc] initWithNibName:@"ViewController_iPhone" bundle:nil] autorelease]; } else {

Building the BI Mobile HD Application for Enterprise Deployment August 1, 2013
16
self.viewController = [[[ViewController alloc] initWithNibName:@"ViewController_iPad" bundle:nil] autorelease]; } return [super application:application didFinishLaunchingWithOptions:launchOptions]; } /* CODE COMMENTED OUT*/
@end
Please note the <classprefix> represents the name of the Class Prefix used in step 5 of the section “Creating the Project”. If you did not specify a class prefix the file will simply be called AppDelegate.m and any reference in the code will be AppDelegate.
Run and Test the Project Follow the same instructions as above in the steps for a Storyboard based project.