building websites with opencms -...
TRANSCRIPT
BuildingWebsites withOpenCms
Matt Butcher
CHAPTER 3
“The OpenCms Workplace”

In this package you will find A biography of the author of Building Websites with OpenCms, Matt Butcher
A preview chapter from the book – Chapter 3, The OpenCms Workplace
The complete book’s Table of Contents
A synopsis of the book’s content
Information on where to buy this book
About the Author Matt Butcher is the Principal Consultant for Aleph-Null, Inc., a systems integrator located in Colorado, USA. Specializing in open-source software, Matt has worked on a wide variety of projects, including embedding Linux in set-top boxes and developing advanced search engines based on artificial intelligence and medical informatics technologies. Matt is involved in several Open Source communities, including OpenCms, Gentoo Linux, and RT (Request Tracker). In addition to his software development, Matt has worked as a freelance journalist covering areas of interest to the Open Source community. When Matt is not working, he enjoys exploring Colorado with his wife and his two daughters.
When I first started working with Open Source developers, I thought it was all about the software. After years of work with some fantastic people from many nations and walks of life, I realize that the software is an added benefit, but it is really all about the people and the community.
Thanks to Olli Arro, Joachim Arrasz, Paul D. Bain, Alex Epshteyn, Harald Gottlicher, Stephan Hartmann, Niranjan Jahagirdar, Douglas Paterson, and Ernesto De Santis, each of whom contributed (directly or indirectly) more to this book than I could describe here. Thanks also to Rene van't Veen for the SQL Server query.properties patch and Geoff Winkless for his SQL Server stored procedures.
I'd also like to thank the members of the OpenCms developers' list who have proved an invaluable resource in all of my OpenCms projects, and especially in writing this book.
And, of course, Alexander Kandzior and the OpenCms developers for building a great product around which an even greater community has formed.
Thanks to JP and Jonathan Marsden from Global Resources for Computing for initially allowing me to contribute the OpenCms Lucene module, and for providing me flexible work during the writing of this book.
Also, thanks to Dr. Wes Munsil and Janet Siebert for lending technical expertise as well as their encouragement.
Special thanks to Angie, Annabelle, and Claire for their encouragement.
Building Websites with OpenCms
FOR MORE ABOUT THIS BOOK VISIT http://www.packtpub.com/view_book/isbn/1904811043
3The OpenCms Workplace
The OpenCms Workplace is the primary interface for managing the contents of your OpenCms repository. It includes tools for editing, project management, workflow, publishing, and server administration. This chapter will start with a brief tour of the Workplace, and then will cover:
Managing projects Using modules Setting and using permissions Editing and publishing documents Creating new pages Customizing the Workplace Working with the standard modules
A Tour of the OpenCms Workplace The Workplace is the centre of OpenCms. Editors will use the Workplace to author their documents. Project managers will use it to create workflows, structure the site, and control publication of material. The vast majority of technical administration is done through the Workplace as well, and the system administrator will use the Workplace to manage the caches, check logs, and install new modules. All of these tasks are incorporated into one web-based interface.
The OpenCms developers have made a concerted effort to create an enterprise-class interface, and while it takes a while to get used to the Swiss-army-knife approach to interface design, experienced users appreciate its power and compactness. This tour is intended to help the new user understand the layout and navigation of the Workplace. While I will illustrate the components of the system, I'm leaving the details for the following sections.
To begin, point your browser to http://localhost:8080/opencms/opencms/, the OpenCms URL. This is the main OpenCms page. You should see the default index page:

Building Websites with OpenCms
FOR MORE ABOUT THIS BOOK VISIT http://www.packtpub.com/view_book/isbn/1904811043
The OpenCms Workplace
38
The link in the red box in the centre is the URL to the Workplace. If you click on it, a log-in window should pop up.
Building Websites with OpenCms
FOR MORE ABOUT THIS BOOK VISIT http://www.packtpub.com/view_book/isbn/1904811043
Chapter 3
393939
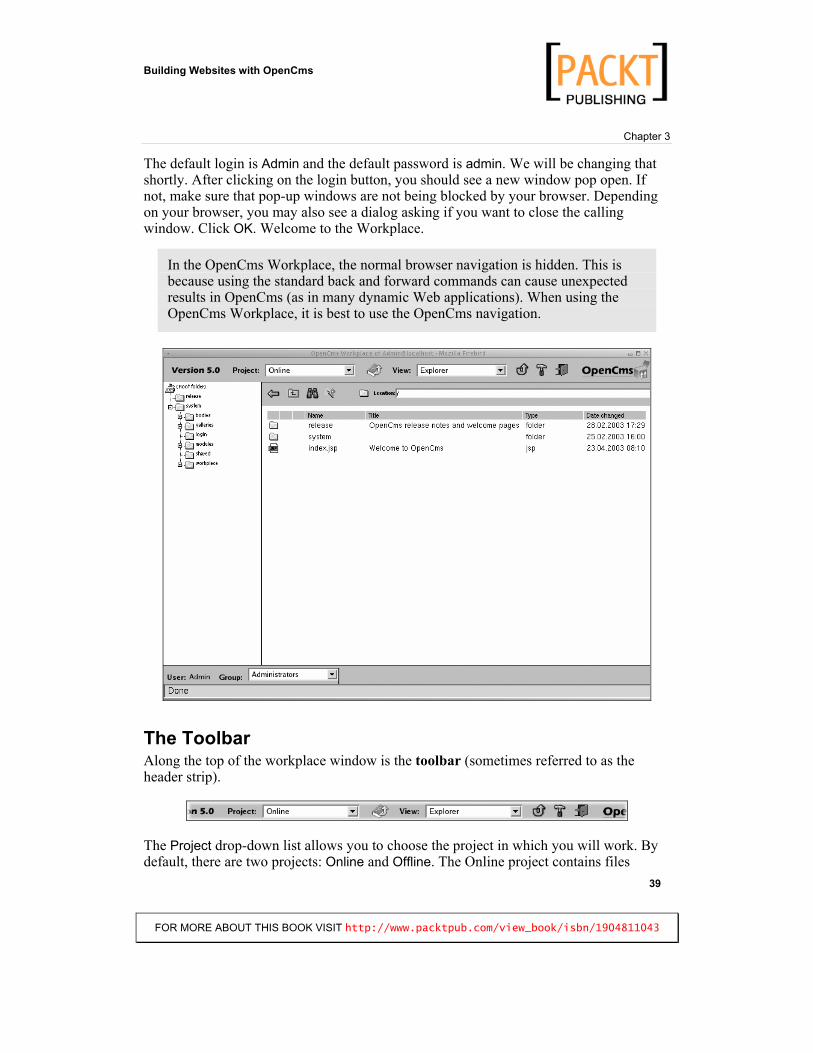
The default login is Admin and the default password is admin. We will be changing that shortly. After clicking on the login button, you should see a new window pop open. If not, make sure that pop-up windows are not being blocked by your browser. Depending on your browser, you may also see a dialog asking if you want to close the calling window. Click OK. Welcome to the Workplace.
In the OpenCms Workplace, the normal browser navigation is hidden. This is because using the standard back and forward commands can cause unexpected results in OpenCms (as in many dynamic Web applications). When using the OpenCms Workplace, it is best to use the OpenCms navigation.
The Toolbar Along the top of the workplace window is the toolbar (sometimes referred to as the header strip).
The Project drop-down list allows you to choose the project in which you will work. By default, there are two projects: Online and Offline. The Online project contains files

Building Websites with OpenCms
FOR MORE ABOUT THIS BOOK VISIT http://www.packtpub.com/view_book/isbn/1904811043
The OpenCms Workplace
40
currently published. No documents in the Online project can be edited. The Offline project contains all of the files in the repository. In a way, it is the master working copy of the repository. Other projects (we will create one in the following section) are essentially sub-projects of Offline. Later in this chapter, we will examine creating projects and assigning project managers to those projects.
The next button along the toolbar is the publish button. Clicking on this button will publish all of the resources in the given project. In the Offline project, this button publishes all of the documents in the repository. In the Online project, it is always marked inactive (gray), as in the image on the previous page, since the Online project is where things go when they are published. This may seem a bit confusing at the outset, but we will return to projects and publishing several more times during the course of this book.
The View drop-down list contains three items: Explorer, Administration, and Workflow.The explorer view is the current view. Most editorial work is done inside the explorer. The administration view provides access to all of the technical management tools, and is used mainly by the system administrator. Finally, the workflow view provides a project manager with a task-based interface for handling projects, rather than individual pieces of content. For the time being, we will focus on the explorer view, but will return to administration and workflow views during this tutorial.
Continuing along the toolbar, we come to the green arrow—the reload icon. As the name suggests, it reloads the page. In fact, it works identically to the reload button in your browser.
The hammer icon brings up the personal preferences dialogue. Password, user information, and individualized settings are all configurable in personal preferences. The final icon along the tool bar—the closing door—is the log out button (clicking on it will bring you back to the log in screen).
Without logging out, click on the personal preferences icon—let's personalize a little:
Building Websites with OpenCms
FOR MORE ABOUT THIS BOOK VISIT http://www.packtpub.com/view_book/isbn/1904811043
Chapter 3
414141
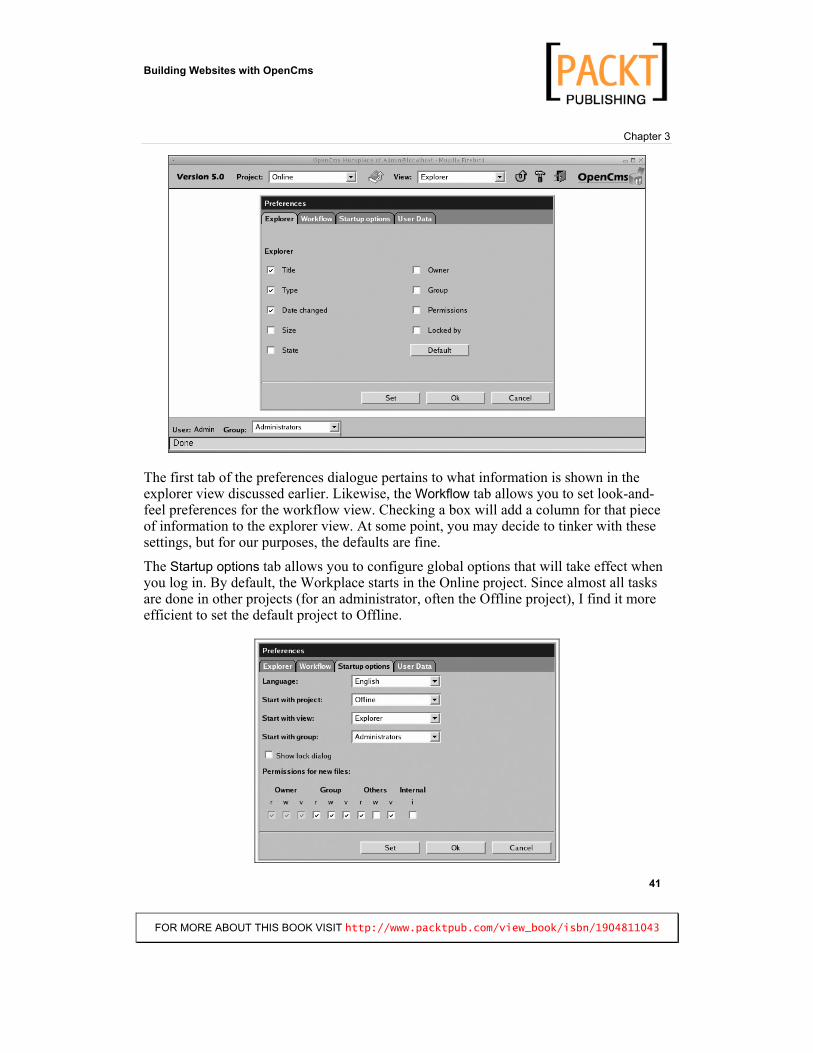
The first tab of the preferences dialogue pertains to what information is shown in the explorer view discussed earlier. Likewise, the Workflow tab allows you to set look-and-feel preferences for the workflow view. Checking a box will add a column for that piece of information to the explorer view. At some point, you may decide to tinker with these settings, but for our purposes, the defaults are fine.
The Startup options tab allows you to configure global options that will take effect when you log in. By default, the Workplace starts in the Online project. Since almost all tasks are done in other projects (for an administrator, often the Offline project), I find it more efficient to set the default project to Offline.
Building Websites with OpenCms
FOR MORE ABOUT THIS BOOK VISIT http://www.packtpub.com/view_book/isbn/1904811043
The OpenCms Workplace
42
You may also set the default language for the Workplace. While this converts the locale of all of the navigation in the Workplace itself, it does not change the language of the contents of the CMS. For instance, changing the language to Spanish will result in Spanish pop-up menu text, but files written in English will not be translated.
The User Data tab contains information about the user account. In OpenCms 5.0, only the password can be set from this screen. All other information must be set by an administrator from the administration view. Click the Change Password button and enter passwords as prompted. You will now need to log out and log back in again.
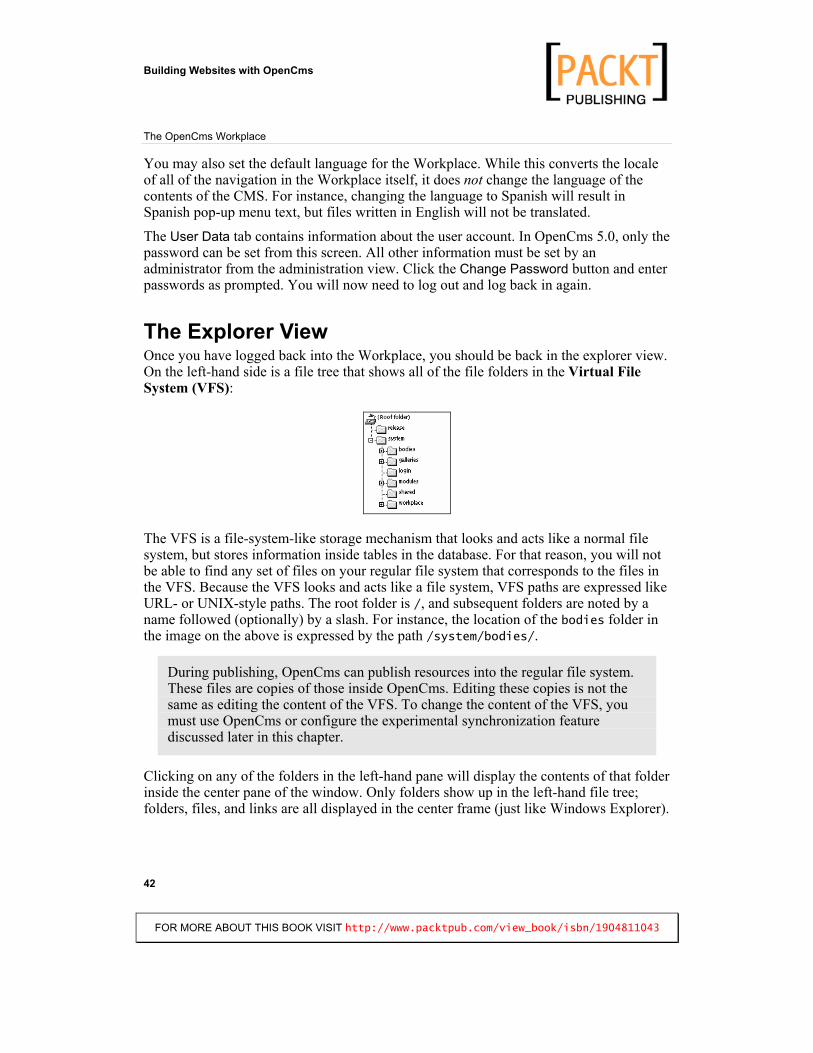
The Explorer View Once you have logged back into the Workplace, you should be back in the explorer view. On the left-hand side is a file tree that shows all of the file folders in the Virtual File System (VFS):
The VFS is a file-system-like storage mechanism that looks and acts like a normal file system, but stores information inside tables in the database. For that reason, you will not be able to find any set of files on your regular file system that corresponds to the files in the VFS. Because the VFS looks and acts like a file system, VFS paths are expressed like URL- or UNIX-style paths. The root folder is /, and subsequent folders are noted by a name followed (optionally) by a slash. For instance, the location of the bodies folder in the image on the above is expressed by the path /system/bodies/.
During publishing, OpenCms can publish resources into the regular file system. These files are copies of those inside OpenCms. Editing these copies is not the same as editing the content of the VFS. To change the content of the VFS, you must use OpenCms or configure the experimental synchronization feature discussed later in this chapter.
Clicking on any of the folders in the left-hand pane will display the contents of that folder inside the center pane of the window. Only folders show up in the left-hand file tree; folders, files, and links are all displayed in the center frame (just like Windows Explorer).

Building Websites with OpenCms
FOR MORE ABOUT THIS BOOK VISIT http://www.packtpub.com/view_book/isbn/1904811043
Chapter 3
434343
The root folder is the base of the document repository. When you publish the Offline project, for instance, you are publishing everything inside the root folder. Items directly in the root folder are published to the root of the OpenCms URL. For instance, a file named foo.jsp under the root folder would be published to http://localhost:8080/opencms/opencms/foo.jsp. The release folder contains OpenCms release notes. http://10.21.77.7:8080/opencms/opencms/release/ gives you access to the release notes.
The system folder has special significance. It contains items that are functionally important for OpenCms. Normal content is never placed inside the system folder, and each of the subfolders has a particular function.
The bodies subfolder contains the body files of XML Template Page objects, which we will discuss in detail later. While it can be useful for debugging, it is rarely used for day-to-day tasks, even by developers. Various OpenCms tools can leverage shared resources (such as images or commonly-used fragments of HTML). These are grouped together into galleries. Each of the galleries is stored as a subfolder inside the /system/galleries/ folder. While it is possible to maintain the galleries by working directly with these folders, there are tools in the Administrator view much better suited for the job. The login subdirectory contains all the files for managing user logins. The modules directory is the location in which new OpenCms modules are placed when installed. Modules are used to extend the basic function of OpenCms. Help text, for instance, is packaged in a module, as are functional add-ons such as calendar widgets, search engines, and guest books. Later in this chapter, we will dive into modules in more depth. The next subfolder, shared, contains a couple of templates that are shared by many resources. It is unlikely that you will ever have to work with the contents of this folder, and it may even go away in subsequent releases. Finally, the workplace folder contains all of the files—templates, images and content—that make up the very Workplace we are using. Developers can customize the Workplace itself (through the Workplace) by modifying these files. As you may have guessed, editing these files can be dangerous, and mistakes can lead to disaster. If, at some point, you decide to edit these files, do so on an installation that does not have important data on it.
The central pane of the explorer view displays a detailed look at the information in the VFS. At the top of the pane is the Explorer button bar (sometimes referred to as the button strip or the nav bar). It contains icons specifically related to exploring and editing content.
Building Websites with OpenCms
FOR MORE ABOUT THIS BOOK VISIT http://www.packtpub.com/view_book/isbn/1904811043
The OpenCms Workplace
44
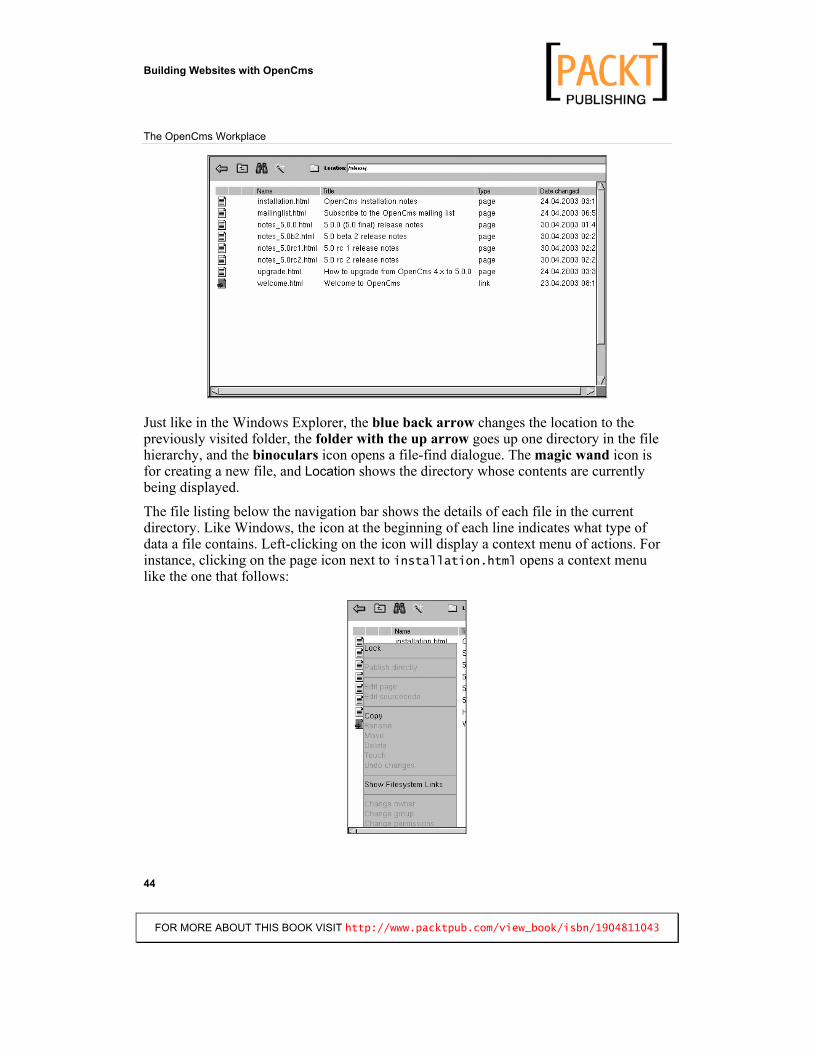
Just like in the Windows Explorer, the blue back arrow changes the location to the previously visited folder, the folder with the up arrow goes up one directory in the file hierarchy, and the binoculars icon opens a file-find dialogue. The magic wand icon is for creating a new file, and Location shows the directory whose contents are currently being displayed.
The file listing below the navigation bar shows the details of each file in the current directory. Like Windows, the icon at the beginning of each line indicates what type of data a file contains. Left-clicking on the icon will display a context menu of actions. For instance, clicking on the page icon next to installation.html opens a context menu like the one that follows:
Building Websites with OpenCms
FOR MORE ABOUT THIS BOOK VISIT http://www.packtpub.com/view_book/isbn/1904811043
Chapter 3
454545
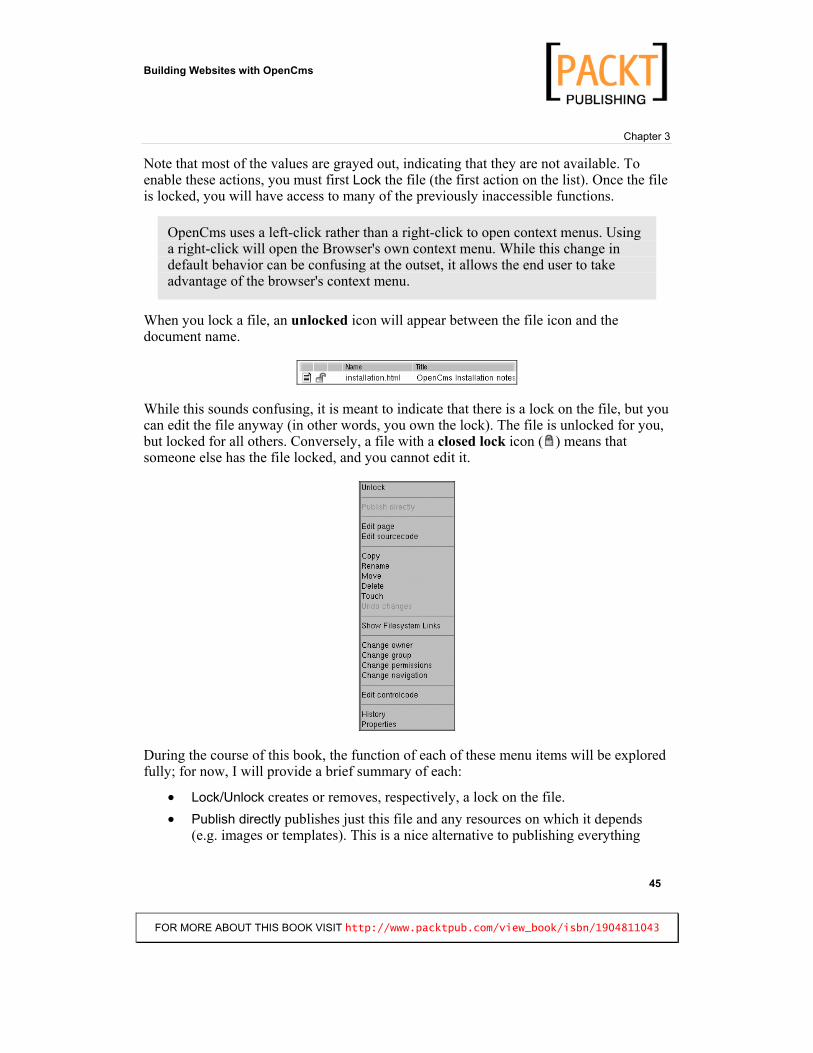
Note that most of the values are grayed out, indicating that they are not available. To enable these actions, you must first Lock the file (the first action on the list). Once the file is locked, you will have access to many of the previously inaccessible functions.
OpenCms uses a left-click rather than a right-click to open context menus. Using a right-click will open the Browser's own context menu. While this change in default behavior can be confusing at the outset, it allows the end user to take advantage of the browser's context menu.
When you lock a file, an unlocked icon will appear between the file icon and the document name.
While this sounds confusing, it is meant to indicate that there is a lock on the file, but you can edit the file anyway (in other words, you own the lock). The file is unlocked for you, but locked for all others. Conversely, a file with a closed lock icon ( ) means that someone else has the file locked, and you cannot edit it.
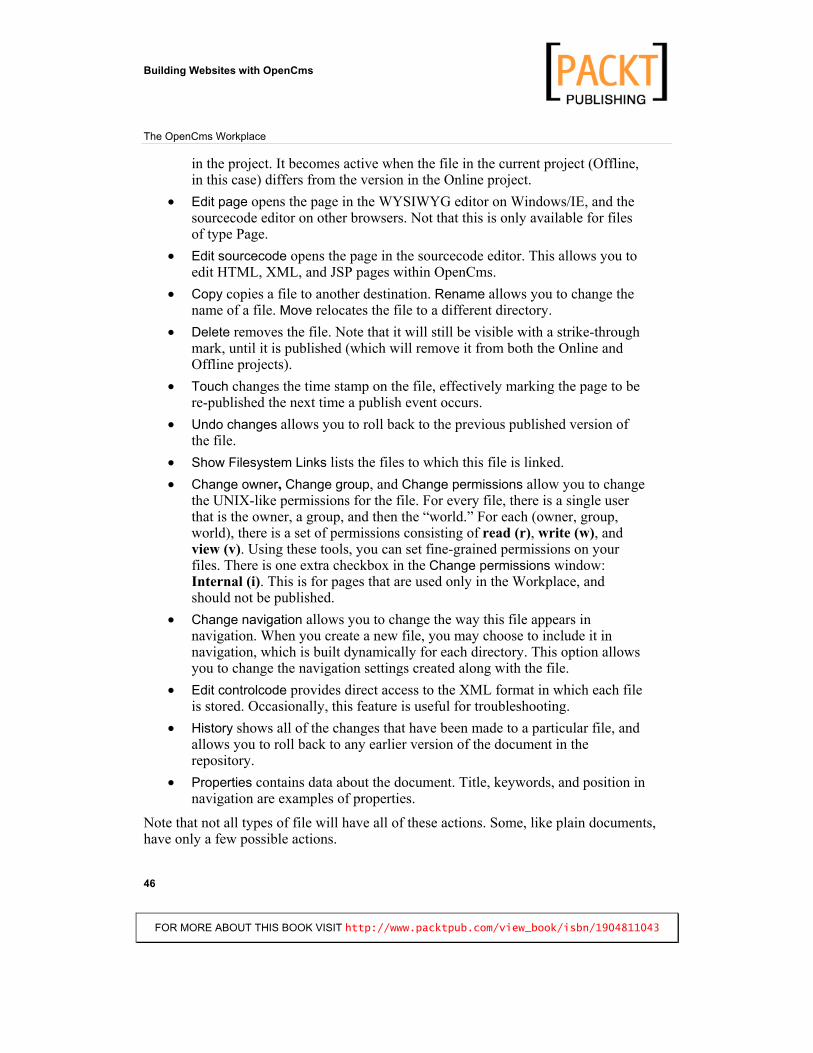
During the course of this book, the function of each of these menu items will be explored fully; for now, I will provide a brief summary of each:
Lock/Unlock creates or removes, respectively, a lock on the file. Publish directly publishes just this file and any resources on which it depends (e.g. images or templates). This is a nice alternative to publishing everything
Building Websites with OpenCms
FOR MORE ABOUT THIS BOOK VISIT http://www.packtpub.com/view_book/isbn/1904811043
The OpenCms Workplace
46
in the project. It becomes active when the file in the current project (Offline, in this case) differs from the version in the Online project.Edit page opens the page in the WYSIWYG editor on Windows/IE, and the sourcecode editor on other browsers. Not that this is only available for files of type Page. Edit sourcecode opens the page in the sourcecode editor. This allows you to edit HTML, XML, and JSP pages within OpenCms. Copy copies a file to another destination. Rename allows you to change the name of a file. Move relocates the file to a different directory. Delete removes the file. Note that it will still be visible with a strike-through mark, until it is published (which will remove it from both the Online and Offline projects). Touch changes the time stamp on the file, effectively marking the page to be re-published the next time a publish event occurs. Undo changes allows you to roll back to the previous published version of the file. Show Filesystem Links lists the files to which this file is linked. Change owner, Change group, and Change permissions allow you to change the UNIX-like permissions for the file. For every file, there is a single user that is the owner, a group, and then the “world.” For each (owner, group, world), there is a set of permissions consisting of read (r), write (w), and view (v). Using these tools, you can set fine-grained permissions on your files. There is one extra checkbox in the Change permissions window: Internal (i). This is for pages that are used only in the Workplace, and should not be published. Change navigation allows you to change the way this file appears in navigation. When you create a new file, you may choose to include it in navigation, which is built dynamically for each directory. This option allows you to change the navigation settings created along with the file. Edit controlcode provides direct access to the XML format in which each file is stored. Occasionally, this feature is useful for troubleshooting. History shows all of the changes that have been made to a particular file, and allows you to roll back to any earlier version of the document in the repository. Properties contains data about the document. Title, keywords, and position in navigation are examples of properties.
Note that not all types of file will have all of these actions. Some, like plain documents, have only a few possible actions.

Building Websites with OpenCms
FOR MORE ABOUT THIS BOOK VISIT http://www.packtpub.com/view_book/isbn/1904811043
Chapter 3
474747
Creating and Editing Content Thus far, we've examined how to navigate through the VFS using the explorer view. However, it is through the explorer view that we create and edit content, as well.
To start, let's create a working area in which we can store some test files. In the left-hand file-tree pane, click on the (Root folder) icon. This will take you to the document root. The central pane of the explorer should now show a couple of folders and the index.jspfile. Here, we will create a new folder.
Creating a Folder Click on the magic wand icon to open a file-creation dialogue:
The first step in creating a new file is to declare the file type. Folder will create a new directory. This is what we want. However, before moving on, let me briefly explain the other choices on this menu:
Page is an HTML document that can be edited in the WYSIWYG editor. We will create one of these soon. Link creates a pointer from this location to a document existing at another location. This is similar to a symbolic link in UNIX/Linux or a shortcut in Windows.Text (called Plain elsewhere in the Workplace) is a generic word for any piece of text-only content that should not be edited with the WYSIWYG editor. While it is usually used to store formatted text-only documents like README or installation texts, occasionally it may be used to store data for a program. XML Template and JSP files are both used to create dynamic content. XML Templates are an older technology developed for OpenCms. They are slowly being replaced by Java Server Pages. In later chapters of this book, we will cover development of dynamic content using these technologies.
Building Websites with OpenCms
FOR MORE ABOUT THIS BOOK VISIT http://www.packtpub.com/view_book/isbn/1904811043
The OpenCms Workplace
48
The last item on the list is Upload new file. This provides a method for taking an external source (including an image file) and loading it into the CMS, creating a new file in the VFS.
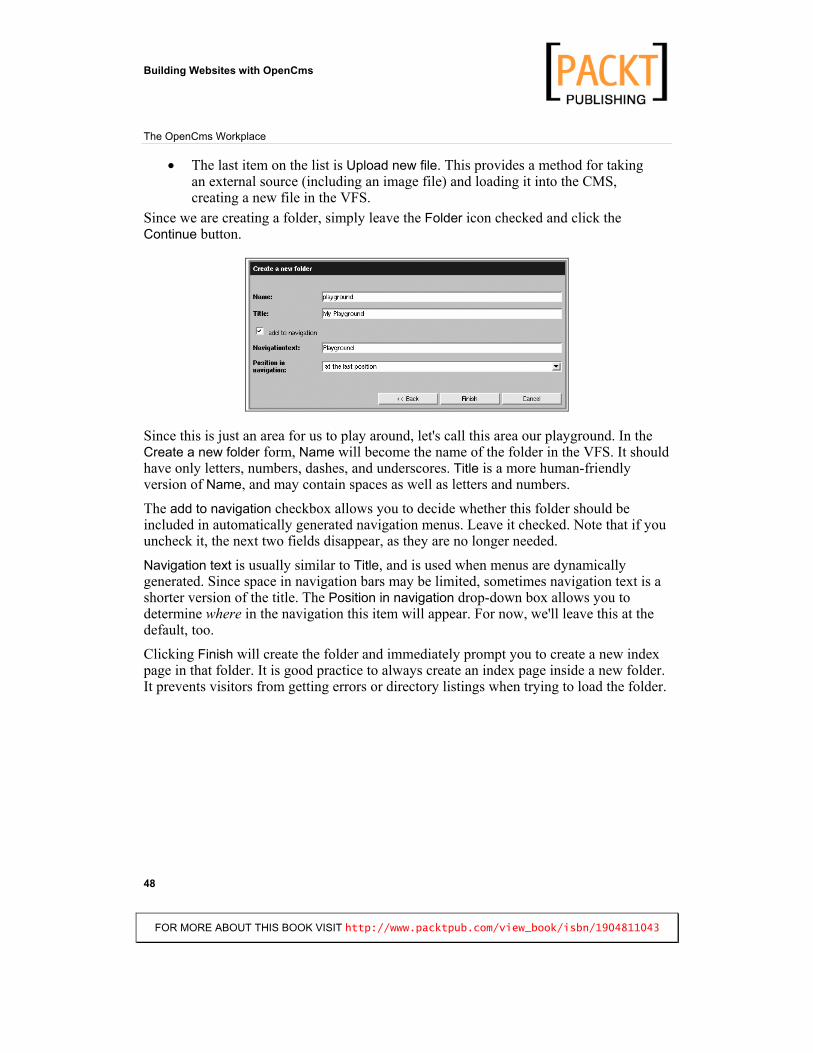
Since we are creating a folder, simply leave the Folder icon checked and click the Continue button.
Since this is just an area for us to play around, let's call this area our playground. In the Create a new folder form, Name will become the name of the folder in the VFS. It should have only letters, numbers, dashes, and underscores. Title is a more human-friendly version of Name, and may contain spaces as well as letters and numbers.
The add to navigation checkbox allows you to decide whether this folder should be included in automatically generated navigation menus. Leave it checked. Note that if you uncheck it, the next two fields disappear, as they are no longer needed.
Navigation text is usually similar to Title, and is used when menus are dynamically generated. Since space in navigation bars may be limited, sometimes navigation text is a shorter version of the title. The Position in navigation drop-down box allows you to determine where in the navigation this item will appear. For now, we'll leave this at the default, too.
Clicking Finish will create the folder and immediately prompt you to create a new index page in that folder. It is good practice to always create an index page inside a new folder. It prevents visitors from getting errors or directory listings when trying to load the folder.
Building Websites with OpenCms
FOR MORE ABOUT THIS BOOK VISIT http://www.packtpub.com/view_book/isbn/1904811043
Chapter 3
494949
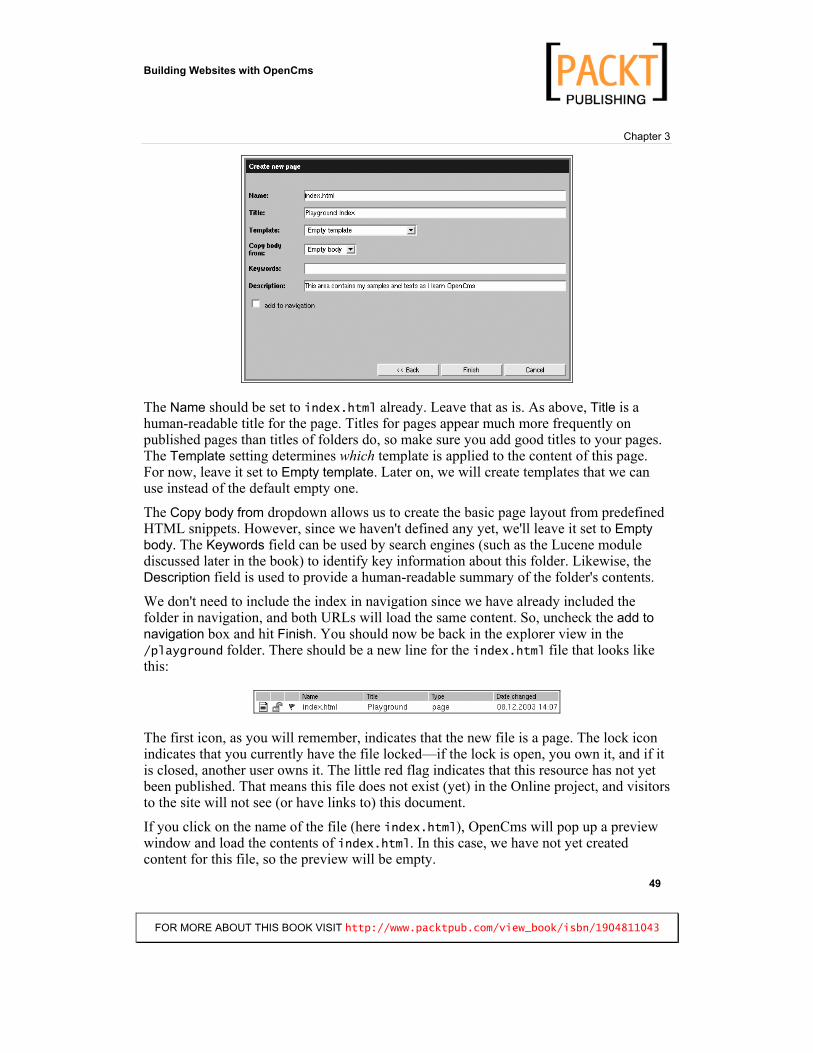
The Name should be set to index.html already. Leave that as is. As above, Title is a human-readable title for the page. Titles for pages appear much more frequently on published pages than titles of folders do, so make sure you add good titles to your pages. The Template setting determines which template is applied to the content of this page. For now, leave it set to Empty template. Later on, we will create templates that we can use instead of the default empty one.
The Copy body from dropdown allows us to create the basic page layout from predefined HTML snippets. However, since we haven't defined any yet, we'll leave it set to Emptybody. The Keywords field can be used by search engines (such as the Lucene module discussed later in the book) to identify key information about this folder. Likewise, the Description field is used to provide a human-readable summary of the folder's contents.
We don't need to include the index in navigation since we have already included the folder in navigation, and both URLs will load the same content. So, uncheck the add to navigation box and hit Finish. You should now be back in the explorer view in the /playground folder. There should be a new line for the index.html file that looks like this:
The first icon, as you will remember, indicates that the new file is a page. The lock icon indicates that you currently have the file locked—if the lock is open, you own it, and if it is closed, another user owns it. The little red flag indicates that this resource has not yet been published. That means this file does not exist (yet) in the Online project, and visitors to the site will not see (or have links to) this document.
If you click on the name of the file (here index.html), OpenCms will pop up a preview window and load the contents of index.html. In this case, we have not yet created content for this file, so the preview will be empty.
Building Websites with OpenCms
FOR MORE ABOUT THIS BOOK VISIT http://www.packtpub.com/view_book/isbn/1904811043
The OpenCms Workplace
50
To edit the file, left-click on the page icon and choose Edit page from the menu. In IE, this will open the WYSIWYG editor. In all other supported browsers, it will load the sourcecode editor.
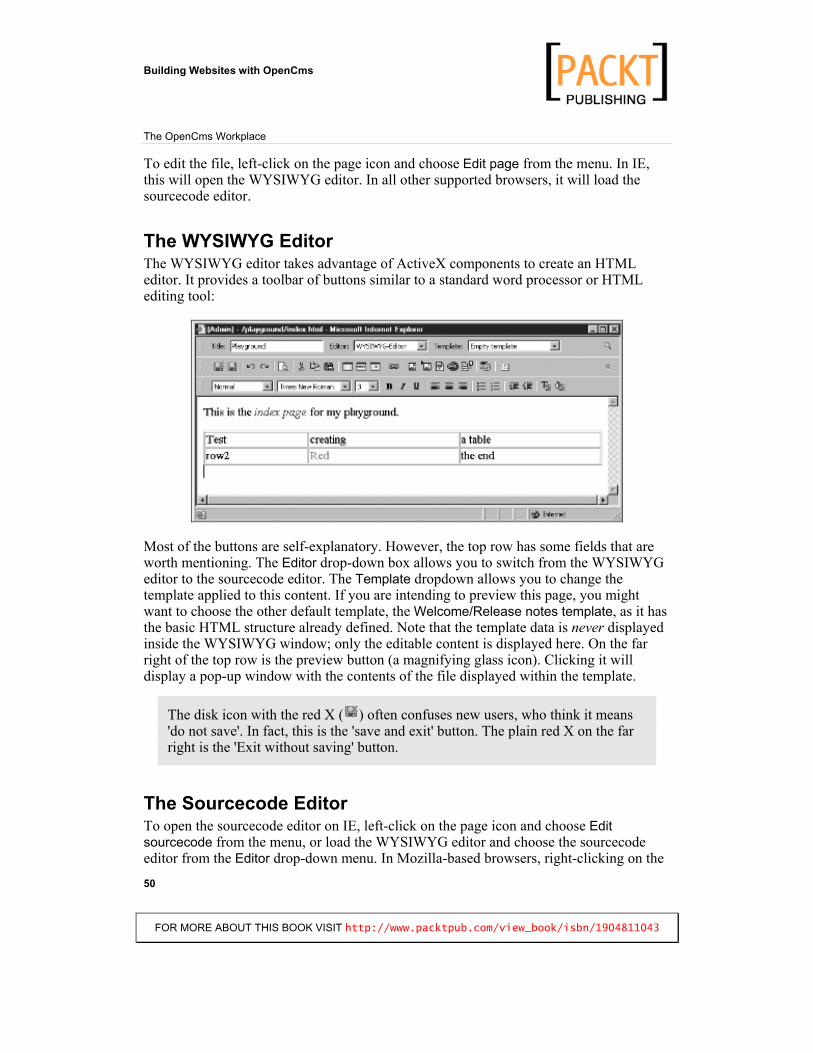
The WYSIWYG Editor The WYSIWYG editor takes advantage of ActiveX components to create an HTML editor. It provides a toolbar of buttons similar to a standard word processor or HTML editing tool:
Most of the buttons are self-explanatory. However, the top row has some fields that are worth mentioning. The Editor drop-down box allows you to switch from the WYSIWYG editor to the sourcecode editor. The Template dropdown allows you to change the template applied to this content. If you are intending to preview this page, you might want to choose the other default template, the Welcome/Release notes template, as it has the basic HTML structure already defined. Note that the template data is never displayed inside the WYSIWYG window; only the editable content is displayed here. On the far right of the top row is the preview button (a magnifying glass icon). Clicking it will display a pop-up window with the contents of the file displayed within the template.
The disk icon with the red X ( ) often confuses new users, who think it means 'do not save'. In fact, this is the 'save and exit' button. The plain red X on the far right is the 'Exit without saving' button.
The Sourcecode Editor To open the sourcecode editor on IE, left-click on the page icon and choose Editsourcecode from the menu, or load the WYSIWYG editor and choose the sourcecode editor from the Editor drop-down menu. In Mozilla-based browsers, right-clicking on the

Building Websites with OpenCms
FOR MORE ABOUT THIS BOOK VISIT http://www.packtpub.com/view_book/isbn/1904811043
Chapter 3
515151
page icon and selecting Edit page or Edit sourcecode will load the sourcecode editor, since no WYSIWYG editor exists for non-IE clients.
The sourcecode editor is a stripped-down no-frills editor. In fact, the main content area of the text editor is generated with the <textarea/> HTML tag. While this editor is basic, it contains all of the tools necessary for developing text resources (both content, which we cover here, and executable scripts, which we will see later).
For HTML editing, there are a few tricks to learn. First of all, you will notice that the only thing created by default is a CDATA section: <![CDATA[ ]]>. OpenCms stores all its content inside XML documents. Since HTML contains many characters that an XML parser will try to interpret, the HTML content must be enclosed within an XML CDATA section, which warns the XML parser that the content within should be left alone. So, make sure that the first line of the document begins with the <![CDATA[ demarcation, and that the document ends with the CDATA close demarcation: ]]>.
Also, the template will provide the main HTML layout code such as the header, the menu, and the footer. This leaves you to concentrate only on the content. Here's a bit of code created in the sourcecode editor:
<![CDATA[ <p>This is a sample paragraph written in the sourcecode editor. </p> <p>This is a second paragraph. It contains a <b>bold</b> word as well as a word in <i>italics</></p> <p>The end.</p> ]]>
Note that I've enclosed everything in a CDATA section and haven't defined the header or the body, but have simply created a few paragraph tags with some content. The rest of the structuring has been left to the template file. You can click the save-and-close icon (the disk with the red X) to exit the editor.
If you do not need to edit the resource again immediately, it is a good idea to unlock the resource. In fact, since we created the /playground/ directory, we have all its content locked. To unlock it, we go back to the root folder, left-click on the folder icon next to the playground item, and choose Unlock. The open blue lock should disappear. If you look inside the /playground/ folder, you will notice that the lock icon next to index.html has disappeared as well.
Publishing Your Changes There are two ways to publish the changes we've made. One is to publish the entire project (the Offline project, in this case). This will copy all of the changes in the current project to the Online project. To do this, simply press the Publish icon in the main toolbar. If any resources are locked, you will be prompted to allow OpenCms to release all locks. Choosing Ok will automatically remove all of the locks and then continue the publishing process:
Building Websites with OpenCms
FOR MORE ABOUT THIS BOOK VISIT http://www.packtpub.com/view_book/isbn/1904811043
The OpenCms Workplace
52
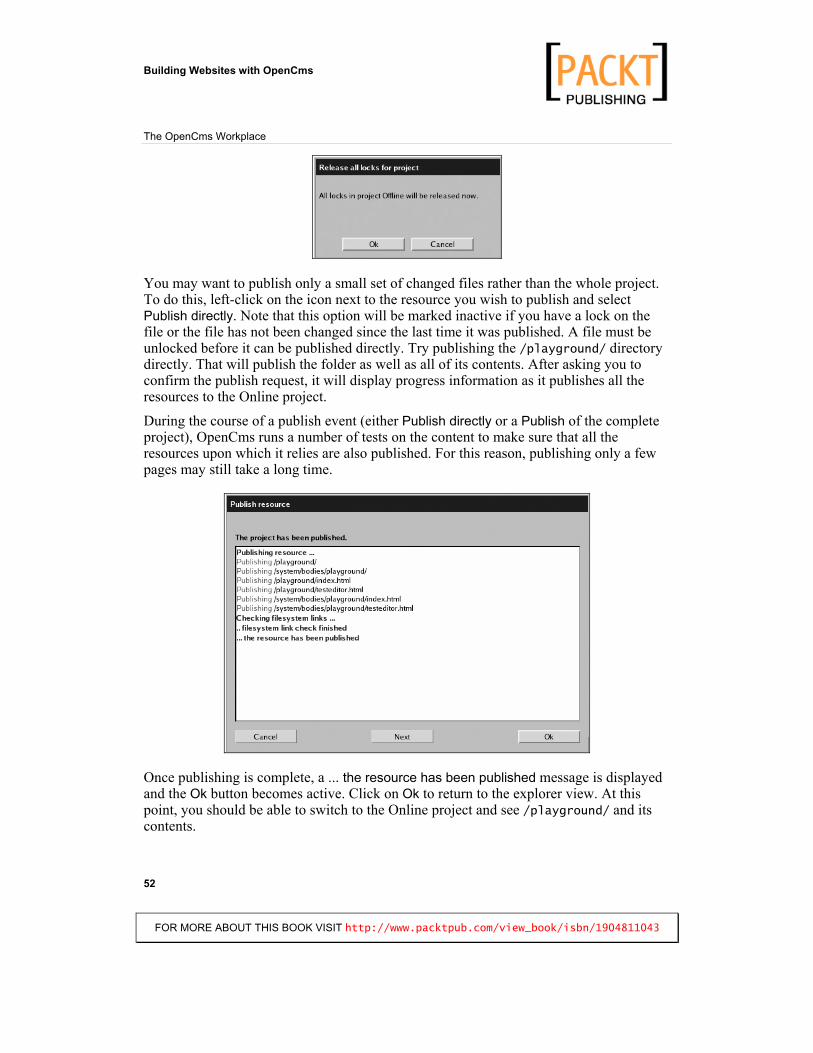
You may want to publish only a small set of changed files rather than the whole project. To do this, left-click on the icon next to the resource you wish to publish and select Publish directly. Note that this option will be marked inactive if you have a lock on the file or the file has not been changed since the last time it was published. A file must be unlocked before it can be published directly. Try publishing the /playground/ directory directly. That will publish the folder as well as all of its contents. After asking you to confirm the publish request, it will display progress information as it publishes all the resources to the Online project.
During the course of a publish event (either Publish directly or a Publish of the complete project), OpenCms runs a number of tests on the content to make sure that all the resources upon which it relies are also published. For this reason, publishing only a few pages may still take a long time.
Once publishing is complete, a ... the resource has been published message is displayed and the Ok button becomes active. Click on Ok to return to the explorer view. At this point, you should be able to switch to the Online project and see /playground/ and its contents.
Building Websites with OpenCms
FOR MORE ABOUT THIS BOOK VISIT http://www.packtpub.com/view_book/isbn/1904811043
Chapter 3
535353
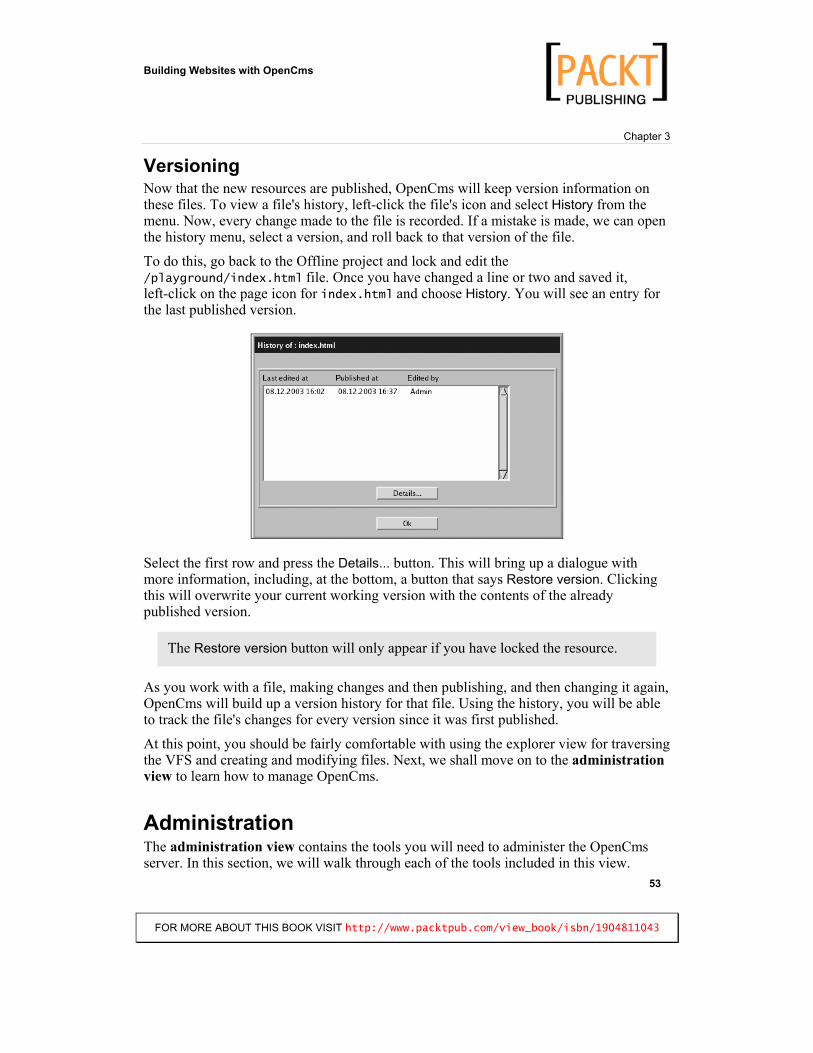
Versioning Now that the new resources are published, OpenCms will keep version information on these files. To view a file's history, left-click the file's icon and select History from the menu. Now, every change made to the file is recorded. If a mistake is made, we can open the history menu, select a version, and roll back to that version of the file.
To do this, go back to the Offline project and lock and edit the /playground/index.html file. Once you have changed a line or two and saved it, left-click on the page icon for index.html and choose History. You will see an entry for the last published version.
Select the first row and press the Details... button. This will bring up a dialogue with more information, including, at the bottom, a button that says Restore version. Clicking this will overwrite your current working version with the contents of the already published version.
The Restore version button will only appear if you have locked the resource.
As you work with a file, making changes and then publishing, and then changing it again, OpenCms will build up a version history for that file. Using the history, you will be able to track the file's changes for every version since it was first published.
At this point, you should be fairly comfortable with using the explorer view for traversing the VFS and creating and modifying files. Next, we shall move on to the administrationview to learn how to manage OpenCms.
AdministrationThe administration view contains the tools you will need to administer the OpenCms server. In this section, we will walk through each of the tools included in this view.
Building Websites with OpenCms
FOR MORE ABOUT THIS BOOK VISIT http://www.packtpub.com/view_book/isbn/1904811043
The OpenCms Workplace
54
In the administration view, menus are laid out with icons (like Windows 3.1). Clicking on an icon may load either an administration screen or another set of icons. To navigate back from a child menu to its parent, use the blue arrow ( ) in the navigation bar above the menu.
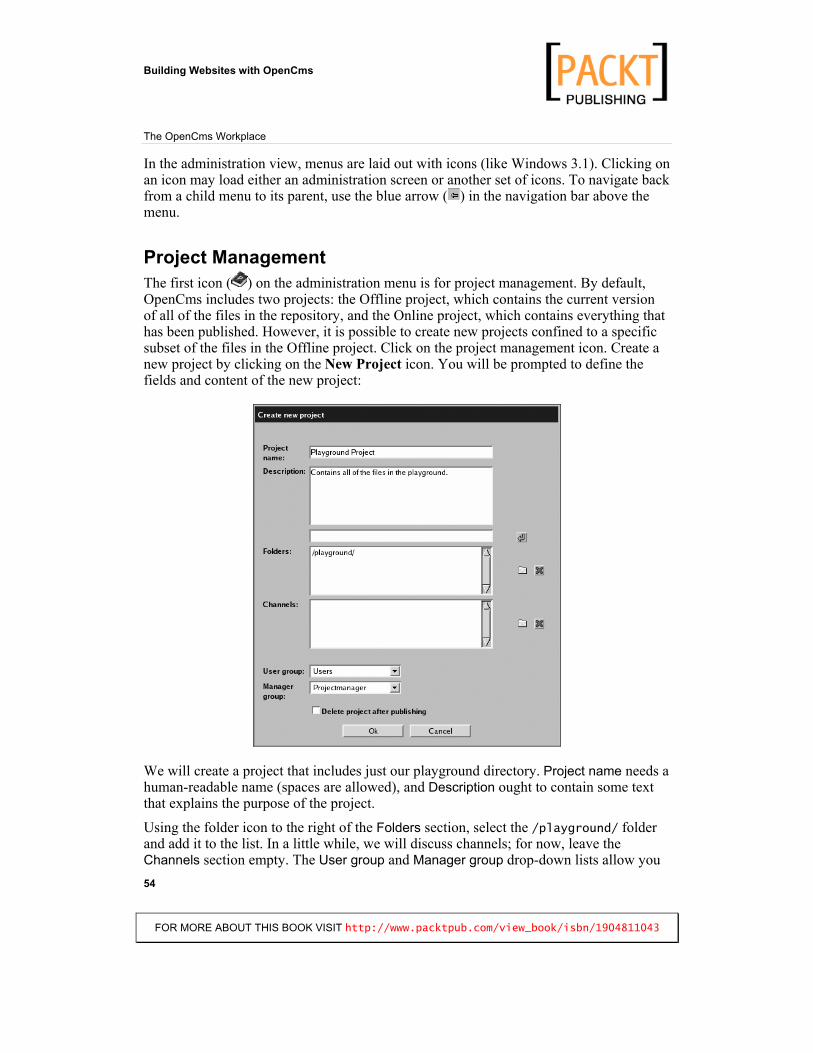
Project Management The first icon ( ) on the administration menu is for project management. By default, OpenCms includes two projects: the Offline project, which contains the current version of all of the files in the repository, and the Online project, which contains everything that has been published. However, it is possible to create new projects confined to a specific subset of the files in the Offline project. Click on the project management icon. Create a new project by clicking on the New Project icon. You will be prompted to define the fields and content of the new project:
We will create a project that includes just our playground directory. Project name needs a human-readable name (spaces are allowed), and Description ought to contain some text that explains the purpose of the project.
Using the folder icon to the right of the Folders section, select the /playground/ folder and add it to the list. In a little while, we will discuss channels; for now, leave the Channels section empty. The User group and Manager group drop-down lists allow you

Building Websites with OpenCms
FOR MORE ABOUT THIS BOOK VISIT http://www.packtpub.com/view_book/isbn/1904811043
Chapter 3
555555
to specify which groups should be able to create and edit content (users) and which group should control and publish the project (managers). Since we have not yet defined any other groups, these can be left on their default values.
Finally, there is an option to Delete project after publishing. This works well for projects that only need to exist until their content is published once (for instance, a promotional offer). Leave this unchecked for now, though. Click Ok to create the project.
Once the project is created, choose Playground Project from the Project drop-down list on the toolbar, and then go to the explorer view.
The Playground Project provides access to just the /playground/ directory. Note that the file tree shows that only the /playground/ directory is active in this project. Lock and edit the /playground/index.html file and save the changes. Doing this will give us something to track from project administration. Once you've done that, go back to the project management section in the administration view.
The Current projects screen shows a list of all of the projects along with their current status. If you modified the /playground/index.html file from the Playground Projectand left the file locked, you will notice that there is a lock icon on the left of the project name.
Clicking on the book icon brings up a context menu with only three items: Remove lockfor unlocking all of the resources in the project, Publish for publishing the entire project, and Delete for removing the project (but not the files in the project). Remove the lock and then publish the project to push your changes to the Online project. Essentially, this does the same thing as pressing the publish button in the explorer view. Once the publishing is done, use the blue back arrow to return to the project management menu.
Project history lists each project and its current status. While it provides some useful information, there are no functions to be performed from this menu. You may notice that there are some projects here that do not show up any place else. These are special system projects that you will never work with explicitly.
The Manage history properties screen is for setting the parameters that determine how much history is stored. Unless space is really limited, I recommend never checking

Building Websites with OpenCms
FOR MORE ABOUT THIS BOOK VISIT http://www.packtpub.com/view_book/isbn/1904811043
The OpenCms Workplace
56
Delete versions older than... and always checking Enable history. This will ensure that you have a good revision trail for your resources.
User Management Up until now, we've done all of our work with only two users: Guest (the unprivileged
user who can visit the published Online site) and Admin. Obviously, having only two accounts would be an inconvenience, to say the least, in a real-life situation. The usermanagement section provides tools for creating and managing users and groups.
The first icon under the user management menu is Edit users. Click on this to add and edit users. The Edit users menu displays all of the current user accounts. You may select a user account and click Edit to edit the user information, or you may click the Newbutton to create a new user.
Clicking the New button brings up a form for defining a new user:
Unfortunately, the first two field names on this form are a bit ambiguous. User is the login name (jsmith, in the example above). Name is the user's surname. Many of the fields are optional, but it is a good idea to give the user a good Description and an Emailaddress that the system can use to contact the user (we'll set this up in the next section).
Building Websites with OpenCms
FOR MORE ABOUT THIS BOOK VISIT http://www.packtpub.com/view_book/isbn/1904811043
Chapter 3
575757
Also, you will need to set a password for the new user by completing the Password and Confirm Password fields.
Since our user is an editor, he belongs in the Users group. Users have sufficient privileges to log in and edit content, but they cannot publish or administer the site. Groups can be arranged in a hierarchy, and the Users group happens to be a child group (with more privileges) to the group Guests. For that reason, adding users to the Usersgroup automatically adds them to the Guests group as well. Members of the Guestsgroup have permissions to view the published public site, but cannot login to the Workplace. To make sure that our new user can log in, we need to set the start with groupdropdown to Users. Click Ok to create the user.
If you belong to multiple groups, you may switch the currently active group at any time by choosing the desired group from the drop-down list at the bottom of the workplace window:
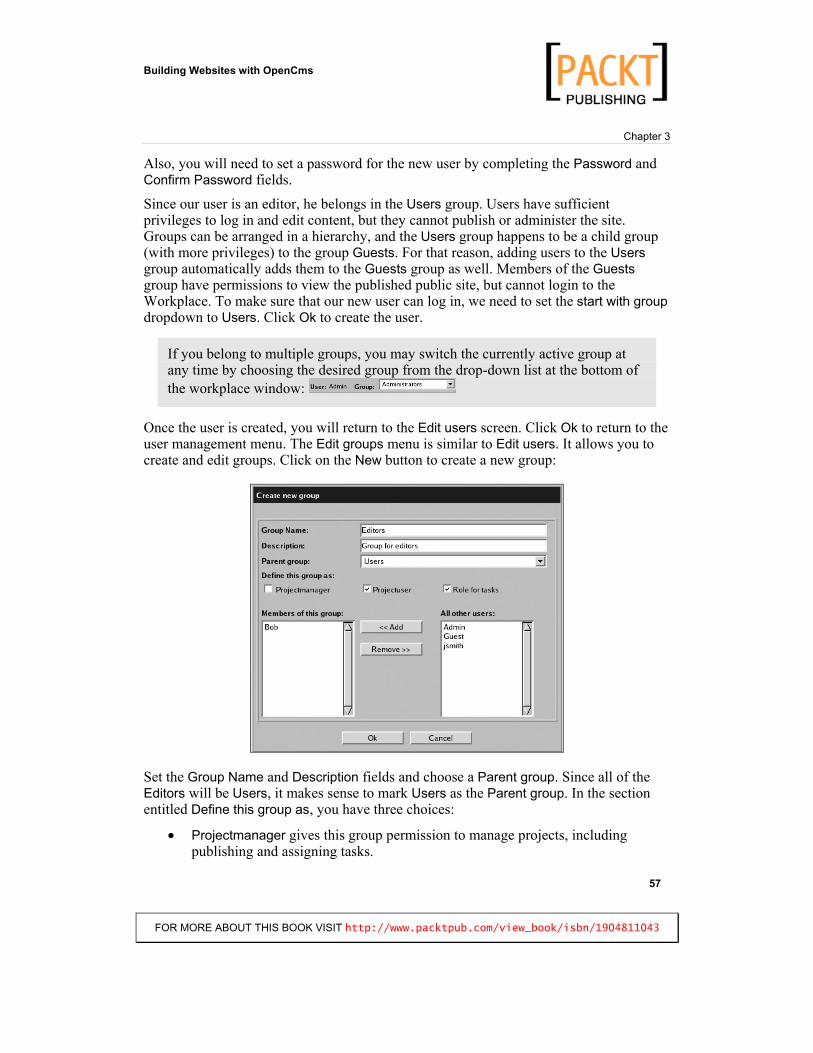
Once the user is created, you will return to the Edit users screen. Click Ok to return to the user management menu. The Edit groups menu is similar to Edit users. It allows you to create and edit groups. Click on the New button to create a new group:
Set the Group Name and Description fields and choose a Parent group. Since all of the Editors will be Users, it makes sense to mark Users as the Parent group. In the section entitled Define this group as, you have three choices:
Projectmanager gives this group permission to manage projects, including publishing and assigning tasks.
Building Websites with OpenCms
FOR MORE ABOUT THIS BOOK VISIT http://www.packtpub.com/view_book/isbn/1904811043
The OpenCms Workplace
58
Projectuser allows users in this group to log in to the Workplace and work on content.Role for tasks allows tasks to be assigned to this group as a whole. Since I may want to assign a task to all of my editors, I have checked that box.
Finally, the bottom frames allow you to select users to add immediately to the group. You may also add users to groups through the Edit users screens. Clicking Ok will create the group. Click Ok again to go back to the user management menu.
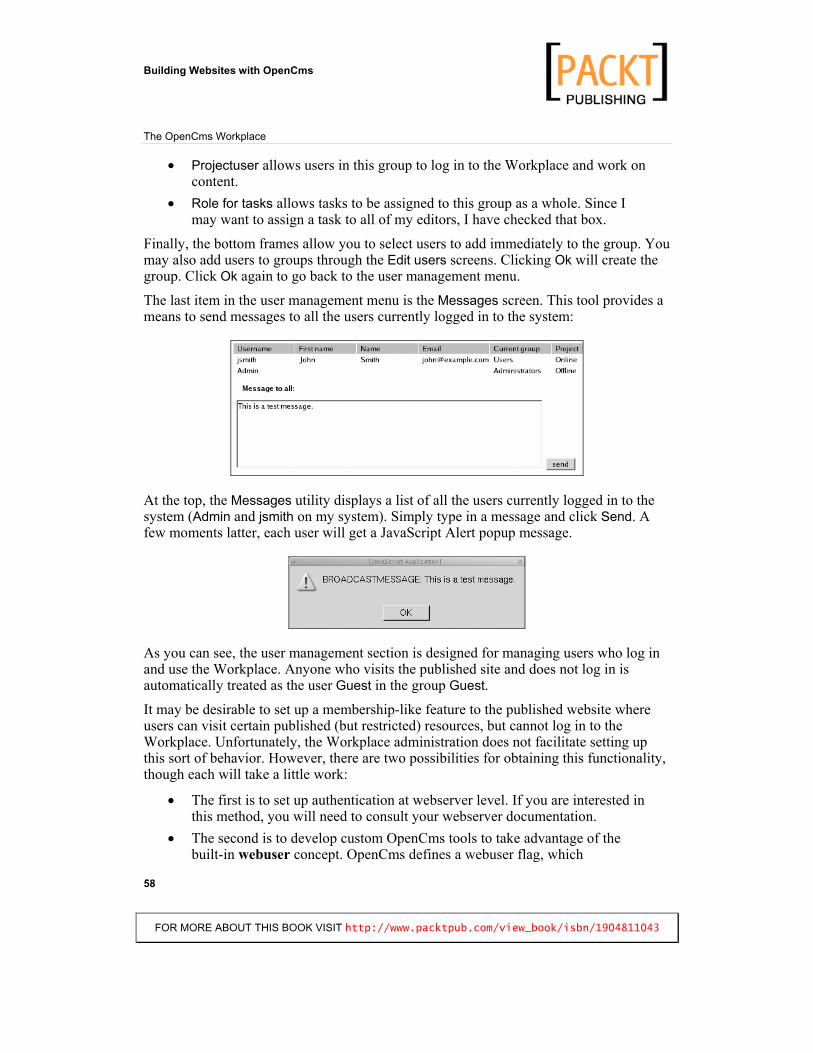
The last item in the user management menu is the Messages screen. This tool provides a means to send messages to all the users currently logged in to the system:
At the top, the Messages utility displays a list of all the users currently logged in to the system (Admin and jsmith on my system). Simply type in a message and click Send. A few moments latter, each user will get a JavaScript Alert popup message.
As you can see, the user management section is designed for managing users who log in and use the Workplace. Anyone who visits the published site and does not log in is automatically treated as the user Guest in the group Guest.
It may be desirable to set up a membership-like feature to the published website where users can visit certain published (but restricted) resources, but cannot log in to the Workplace. Unfortunately, the Workplace administration does not facilitate setting up this sort of behavior. However, there are two possibilities for obtaining this functionality, though each will take a little work:
The first is to set up authentication at webserver level. If you are interested in this method, you will need to consult your webserver documentation. The second is to develop custom OpenCms tools to take advantage of the built-in webuser concept. OpenCms defines a webuser flag, which
Building Websites with OpenCms
FOR MORE ABOUT THIS BOOK VISIT http://www.packtpub.com/view_book/isbn/1904811043
Chapter 3
595959
demarcates a user as one who cannot log in to the Workplace, but can log in to the published site.
These concepts are discussed in more detail in Chapter 8.
Database Management The database management tools facilitate exporting and importing the OpenCms
database. This is useful for making backups as well as transferring data from one server to another.
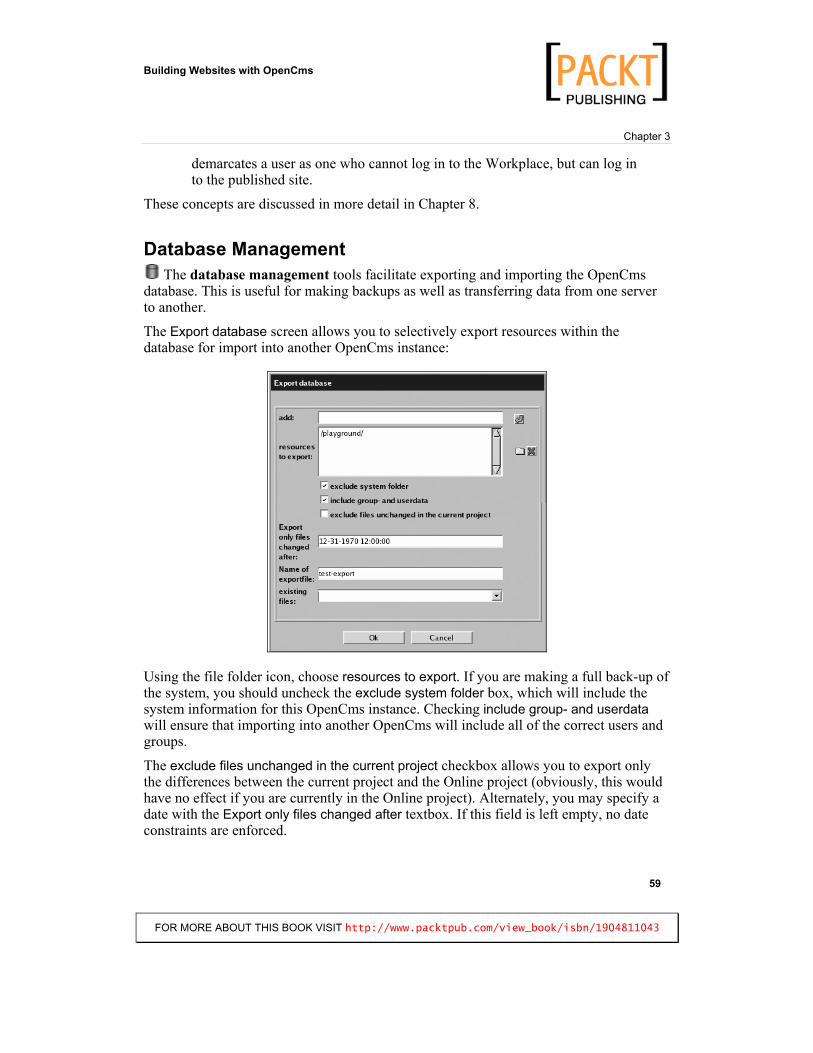
The Export database screen allows you to selectively export resources within the database for import into another OpenCms instance:
Using the file folder icon, choose resources to export. If you are making a full back-up of the system, you should uncheck the exclude system folder box, which will include the system information for this OpenCms instance. Checking include group- and userdatawill ensure that importing into another OpenCms will include all of the correct users and groups.
The exclude files unchanged in the current project checkbox allows you to export only the differences between the current project and the Online project (obviously, this would have no effect if you are currently in the Online project). Alternately, you may specify a date with the Export only files changed after textbox. If this field is left empty, no date constraints are enforced.
Building Websites with OpenCms
FOR MORE ABOUT THIS BOOK VISIT http://www.packtpub.com/view_book/isbn/1904811043
The OpenCms Workplace
60
In some versions of OpenCms (including 5.0.1), the date-checking JavaScript always generates errors on Mozilla browsers and fails to perform proper format checks on IE browsers. Consequently, using a date constraint can cause unexpected behavior. If you do not need a date constraint, leave the Export only files changed after field blank.
Give the file a name (the .zip extension will be automatically appended) and click Ok.After a few minutes of dumping the data, the file will be exported to the directory $CATALINA_HOME/webapps/opencms/WEB-INF/exports.
To import an exported file, choose Import from the database management menu. If the ZIP file that you want to import is on the machine you are using, choose the Localcomputer setting, otherwise, you may put the file in the $CATALINA_HOME/webapps/opencms/WEB-INF/exports directory and choose Server.Select the correct file and click Ok to import it.
OpenCms is very careful about what is imported, and will not create duplicate copies of existing users or groups. However, imported files will always overwrite existing files in the same location and will be marked as needing to be published.
The Export module data utility is for exporting specific modules. Since we have no modules, there is nothing to export from this screen. Modules are usually exported through the Module management utility anyway. Database exports and imports are discussed more thoroughly in Chapter 8.
Static Export The static export option is only available in the Online project. It will render all of
the pages in the Online folder (executing all necessary code and transforming the results to HTML) and write the contents to the file system of the underlying OS. Essentially, this turns the entire Online project into a static HTML site that can be served from another server. This process is discussed more completely in Chapter 8.
Clear Element Cache OpenCms uses a number of caches to optimize frequently accessed items. The URI
and element caches speed up the performance of XML templates by storing frequently rendered content in memory. To clear the items stored in the URI cache and the element cache, choose this item.

Building Websites with OpenCms
FOR MORE ABOUT THIS BOOK VISIT http://www.packtpub.com/view_book/isbn/1904811043
Chapter 3
616161
Resource Type Management There are a number of schemes for determining what sort of content a file contains,
for instance, Windows guesses at file type based on a three-letter extension and browsers use Multipart Internet Message Encoding (MIME) typing. OpenCms has several predefined file types, including Page (HTML in XML), Plain, JSP, Binary, Image, and XML template. Using file extensions, OpenCms maps all of its content into these file types.
The Resource type management screen provides a mechanism for explicitly associating an extension with a file type. Since OpenCms is missing a PNG (Portable Network Graphic) definition in the image type, we'll set one now:
Locate the Typ: image section, using the blue up and down arrows to scroll, and click on the magic wand icon.
Set the name to png and click Ok. It will add *.png under the Typ: image section. To delete an extension, simply click on the red X next to the extension entry.

Building Websites with OpenCms
FOR MORE ABOUT THIS BOOK VISIT http://www.packtpub.com/view_book/isbn/1904811043
The OpenCms Workplace
62
Properties Management Not all information about a file is stored inside the file. OpenCms stores certain
information, including the title, description, and navigation information, in a separate location in the database. This speeds retrieval of frequently accessed data and separates content itself from data about the content (usually called metadata). Every file type has a set of properties. By default, binary files only have three properties: Description,Keywords, and Title. Page files, which contain HTML content, have eight different properties, including content-encoding and NavPos (navigation position, used for building menus).
If you need to add a new property to a file type, you can use the properties managementtool to do so. Its operation is identical to that of the resource type management tool.
Gallery Management Tools The next four tools are all used for creating galleries, each management tool for a
different kind of content. Galleries provide a simple mechanism for sharing commonly used content, such as image files or HTML snippets, among users. Each gallery can be accessed from the WYSIWYG tool, where the content editor can click on an item in the gallery and insert it into the present document. The four gallery types are:
Image gallery: stores images Download gallery: stores files (such as binaries or archives) for download HTML gallery: stores snippets of commonly used HTML code External links gallery: stores a list of URLs for external sites
All of the gallery management tools work the same way; so to eliminate redundancy, I will only cover the Image gallery management tool in this section.
The first screen of the gallery management tool lists all the separate galleries. Since we have not yet created any, the list is empty. Create one by clicking on the magic wand icon.
Building Websites with OpenCms
FOR MORE ABOUT THIS BOOK VISIT http://www.packtpub.com/view_book/isbn/1904811043
Chapter 3
636363
This is not much different than creating a new folder. The Foldername cannot have whitespace, but the Title may. Set the Gallery owners group to the group that will manage the gallery. Under the Rights section, you may specify whether users not in the Galleryowners group may read or write to the gallery. Click Finish to create the gallery.
Now, under the gallery management screen, you should see the fun folder. Click on the name to enter the gallery. It is no surprise that there are no images in this gallery yet. Click on the arrow pointing up ( ) to upload a new image from the file system of your local computer.
Use the Browse button to navigate your local file system until you find the image you want to upload into the gallery and click Continue. Add the Title and Description, and click Finish to load the image into the gallery.
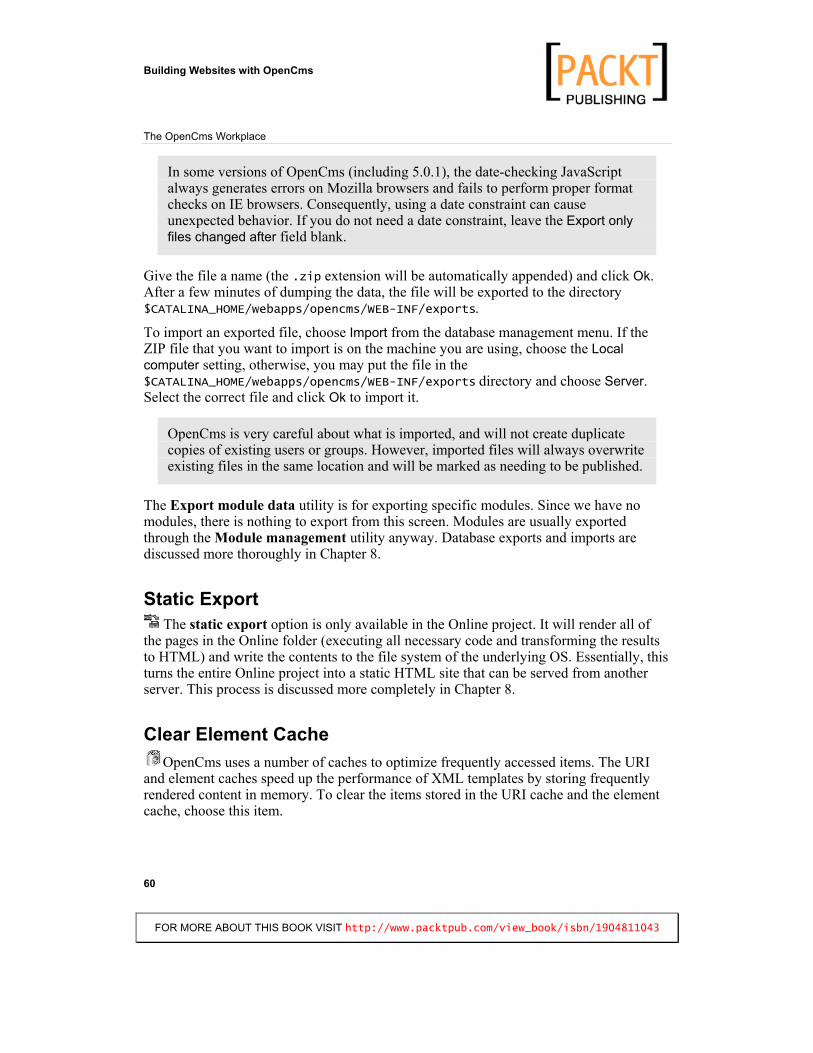
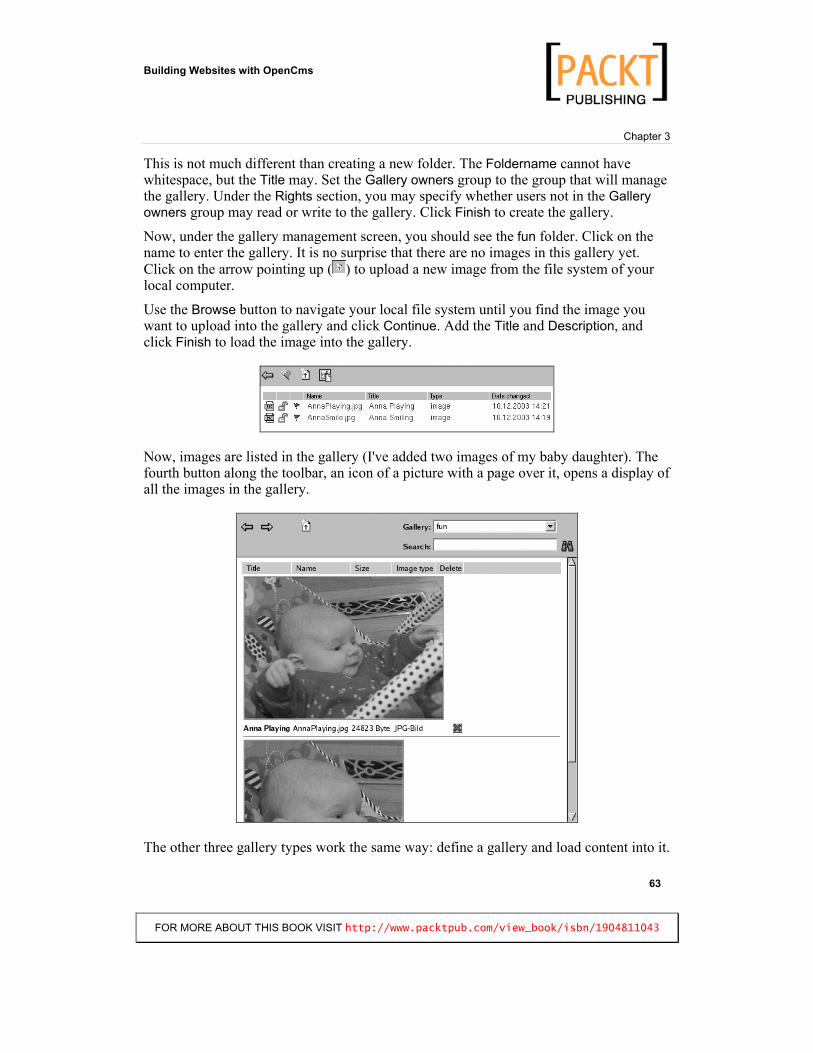
Now, images are listed in the gallery (I've added two images of my baby daughter). The fourth button along the toolbar, an icon of a picture with a page over it, opens a display of all the images in the gallery.
The other three gallery types work the same way: define a gallery and load content into it.
Building Websites with OpenCms
FOR MORE ABOUT THIS BOOK VISIT http://www.packtpub.com/view_book/isbn/1904811043
The OpenCms Workplace
64
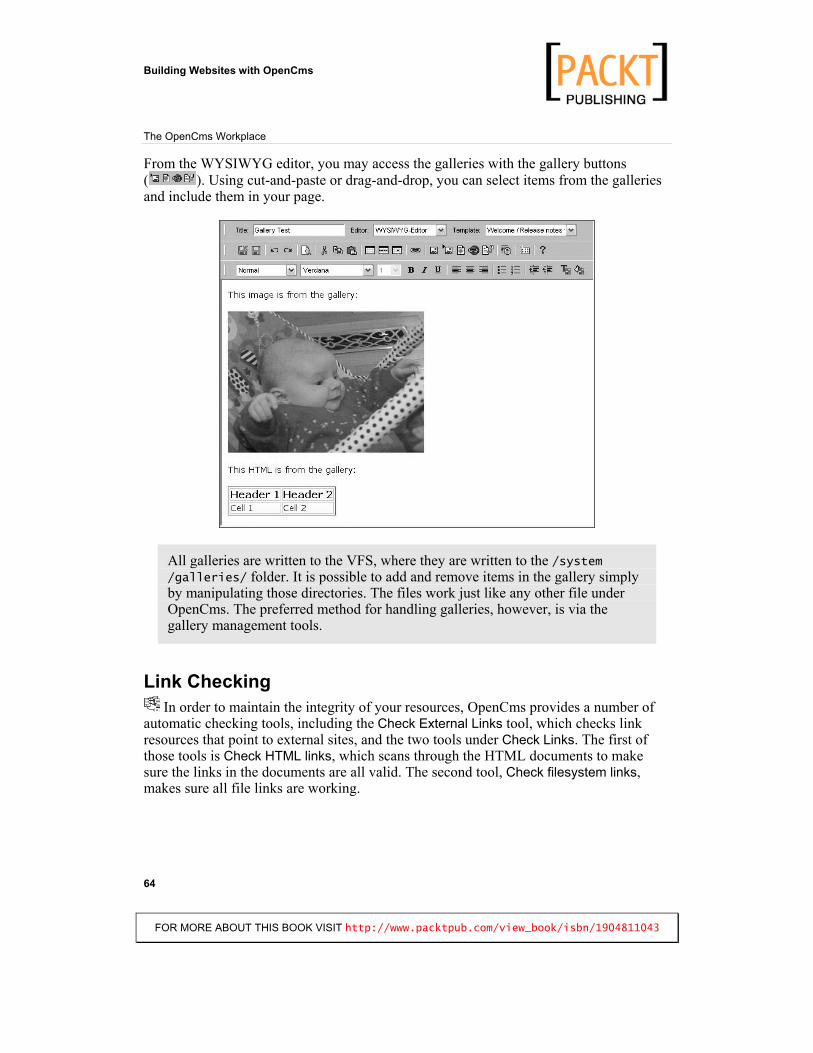
From the WYSIWYG editor, you may access the galleries with the gallery buttons ( ). Using cut-and-paste or drag-and-drop, you can select items from the galleries and include them in your page.
All galleries are written to the VFS, where they are written to the /system /galleries/ folder. It is possible to add and remove items in the gallery simply by manipulating those directories. The files work just like any other file under OpenCms. The preferred method for handling galleries, however, is via the gallery management tools.
Link Checking In order to maintain the integrity of your resources, OpenCms provides a number of
automatic checking tools, including the Check External Links tool, which checks link resources that point to external sites, and the two tools under Check Links. The first of those tools is Check HTML links, which scans through the HTML documents to make sure the links in the documents are all valid. The second tool, Check filesystem links,makes sure all file links are working.
Building Websites with OpenCms
FOR MORE ABOUT THIS BOOK VISIT http://www.packtpub.com/view_book/isbn/1904811043
Chapter 3
656565
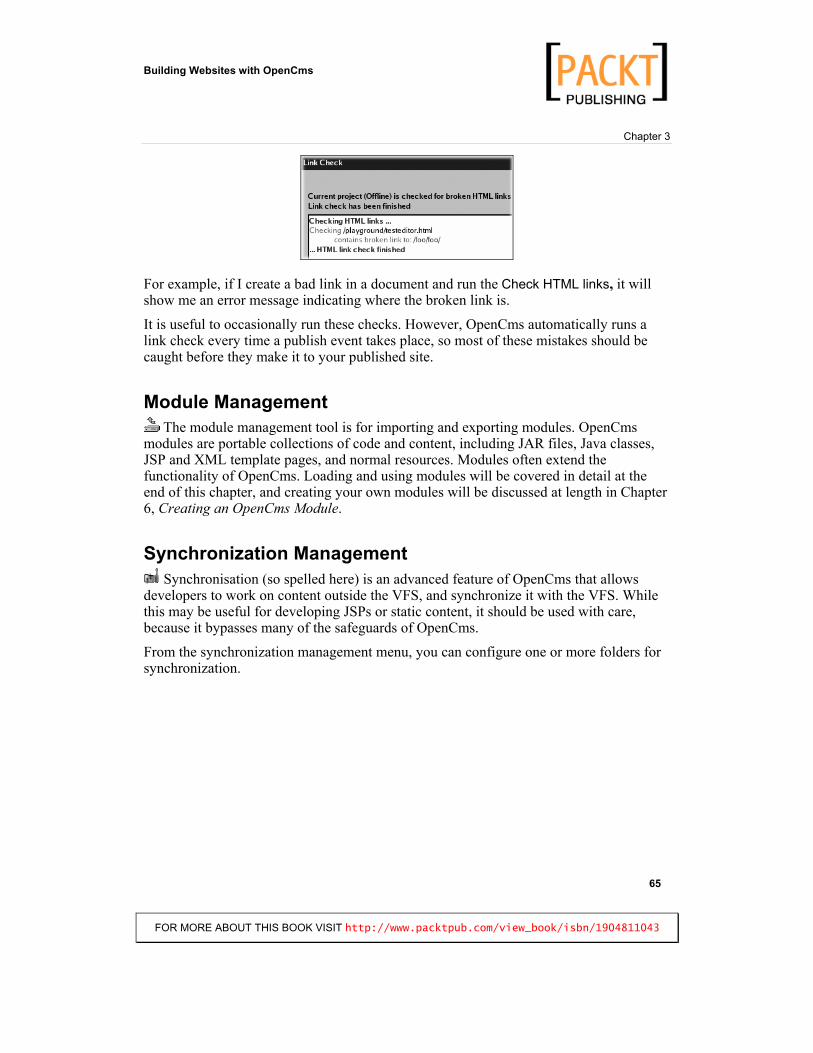
For example, if I create a bad link in a document and run the Check HTML links, it will show me an error message indicating where the broken link is.
It is useful to occasionally run these checks. However, OpenCms automatically runs a link check every time a publish event takes place, so most of these mistakes should be caught before they make it to your published site.
Module Management The module management tool is for importing and exporting modules. OpenCms
modules are portable collections of code and content, including JAR files, Java classes, JSP and XML template pages, and normal resources. Modules often extend the functionality of OpenCms. Loading and using modules will be covered in detail at the end of this chapter, and creating your own modules will be discussed at length in Chapter 6, Creating an OpenCms Module.
Synchronization Management Synchronisation (so spelled here) is an advanced feature of OpenCms that allows
developers to work on content outside the VFS, and synchronize it with the VFS. While this may be useful for developing JSPs or static content, it should be used with care, because it bypasses many of the safeguards of OpenCms.
From the synchronization management menu, you can configure one or more folders for synchronization.
Building Websites with OpenCms
FOR MORE ABOUT THIS BOOK VISIT http://www.packtpub.com/view_book/isbn/1904811043
The OpenCms Workplace
66
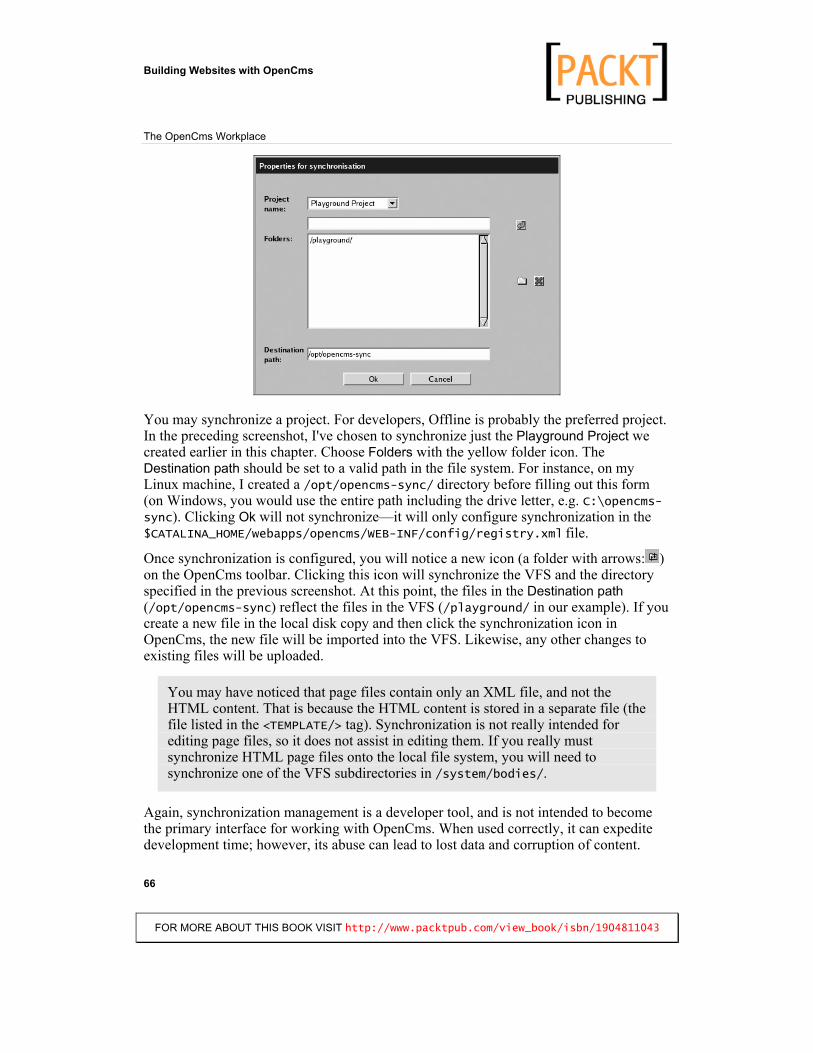
You may synchronize a project. For developers, Offline is probably the preferred project. In the preceding screenshot, I've chosen to synchronize just the Playground Project we created earlier in this chapter. Choose Folders with the yellow folder icon. The Destination path should be set to a valid path in the file system. For instance, on my Linux machine, I created a /opt/opencms-sync/ directory before filling out this form (on Windows, you would use the entire path including the drive letter, e.g. C:\opencms-sync). Clicking Ok will not synchronize—it will only configure synchronization in the $CATALINA_HOME/webapps/opencms/WEB-INF/config/registry.xml file.
Once synchronization is configured, you will notice a new icon (a folder with arrows: )on the OpenCms toolbar. Clicking this icon will synchronize the VFS and the directory specified in the previous screenshot. At this point, the files in the Destination path(/opt/opencms-sync) reflect the files in the VFS (/playground/ in our example). If you create a new file in the local disk copy and then click the synchronization icon in OpenCms, the new file will be imported into the VFS. Likewise, any other changes to existing files will be uploaded.
You may have noticed that page files contain only an XML file, and not the HTML content. That is because the HTML content is stored in a separate file (the file listed in the <TEMPLATE/> tag). Synchronization is not really intended for editing page files, so it does not assist in editing them. If you really must synchronize HTML page files onto the local file system, you will need to synchronize one of the VFS subdirectories in /system/bodies/.
Again, synchronization management is a developer tool, and is not intended to become the primary interface for working with OpenCms. When used correctly, it can expedite development time; however, its abuse can lead to lost data and corruption of content.

Building Websites with OpenCms
FOR MORE ABOUT THIS BOOK VISIT http://www.packtpub.com/view_book/isbn/1904811043
Chapter 3
676767
Scheduled Tasks Like Cron in UNIX/Linux or the Task Scheduler in Windows, OpenCms has a tool for
running programs at a given time. Unlike its Windows and UNIX/Linux counterparts, the OpenCms scheduled task tool requires that the task be a Java class that implements the I_CmsCronJob interface. Scheduling a task will be covered in detail in Chapter 6, Creating an OpenCms Module.
Log File Viewer OpenCms logs significant events to an opencms.log file located in
$CATALINA_HOME/webapps/opencms/WEB-INF/logs/. The Log File Viewer provides access to the log file through the Workplace.
Channels Channels can be used for categorizing content in a different way, e.g. topically. While
channels can be created and managed through the Channels administration menu, the rest of OpenCms makes scant use of them, and much custom development is required to make them truly useful.
One of the popular modules, the News module, uses the channels concept to organize content, but it uses its own interface for managing channels.
In future releases of OpenCms, the functionality surrounding the concept of channels is likely to be expanded. For now, though, there is not much to do with them.
Flex Cache Administration Earlier versions of OpenCms did not use JSP for page scripting, and relied entirely upon XML templates and custom Java classes for page rendering. In order to make JSPs work within the VFS, the OpenCms developers needed a way to efficiently store JSP pages on the file system where the JSP interpreter could find them. They developed the Flexpackage to accomplish this task. When a JSP is requested, Flex writes the VFS file into the real file system, storing it in $CATALINA_HOME/webapps/opencms/WEB-INF/jsp/online (or offline if the request is for a resource in one of the unpublished projects).
To expedite the process of rendering pages, the FlexCache stores the JSP and any elements included in the JSP, including plain text files and XML templates. Using a sophisticated algorithm, OpenCms manages the cache, keeping size down and providing JSP developers with a variety of cache control options. We'll cover practical use of the FlexCache in Chapter 4, Customizing the Site.

Building Websites with OpenCms
FOR MORE ABOUT THIS BOOK VISIT http://www.packtpub.com/view_book/isbn/1904811043
The OpenCms Workplace
68
The Flex Cache Administration page provides tools to manually manage the cache. The complexity of the cache is mirrored in the multitude of functions available in the cache management screen. Before examining the tasks, I will explain how items are stored. Each cached element has a key, which identifies what resources in the VFS are being cached. Data is stored in variations. Each key may have multiple variations, where a variation indicates that the particular resource was loaded by another resource. This can be the case when two different JSP files both include a common third file.
Clear variations only: Clears the data associated with each key, but leaves the keys in the cache. The key tells the location of the file in the VFS. The next time a resource is requested, OpenCms will reuse the key, assuming that the cache properties for that file have not changed. This gives you a slight performance boost as the cache is rebuilt. Most of the time, however, it is better to use the next option instead. Clear cache keys and variations completely: Clears everything from the cache. No information about resources in the VFS is saved. Purge JSP repository: Removes all cached JSP elements from $CATALINA_HOME/webapps/opencms/WEB-INF/jsp/ (both the online and offline directories). The next time a JSP is requested, it will be copied from the VFS into the real file system again. This option is useful during development when JSP files are frequently changing and cached copies quickly become outdated.
Building Websites with OpenCms
FOR MORE ABOUT THIS BOOK VISIT http://www.packtpub.com/view_book/isbn/1904811043
Chapter 3
696969
Show cached resources with keys and Show cached resources with keys and variations: Both display the items in the cache. If you click the latter button, it will list not only the keys, but also the variations of each cached object.
By default, resources in the Offline project are not cached by the FlexCache. During development, you may want to enable caching for Offline. To do so, edit the opencms.properties file under $CATALINA_HOME/webapps/opencms/ WEB-INF/config/, setting the flag flex.cache.offline=true. You will need to restart Tomcat after changing this file.
The Flex Cache Administration tool will now allow you to specify which cache (Online or Offline) you want to clear.
The caching system in OpenCms is complex, and while many of these concepts seem foreign now, they will become clearer as we work with caching directives in Chapter 4, Customizing the Site.
At this point, we have gone through all of the tools in the administration view. From here, we move on to the workflow view.
Workflow A fundamental aspect of good enterprise-level content management is the capability to handle workflow of resources as they make their way through the editorial process. The workflow view provides a task-based interface to the system. Already, we've created a project to manage a particular subset of our content. Through the workflow view, we will be able to assign editors tasks to complete within the project.
To enter the workflow view, select Workflow from the View drop-down box in the top toolbar.
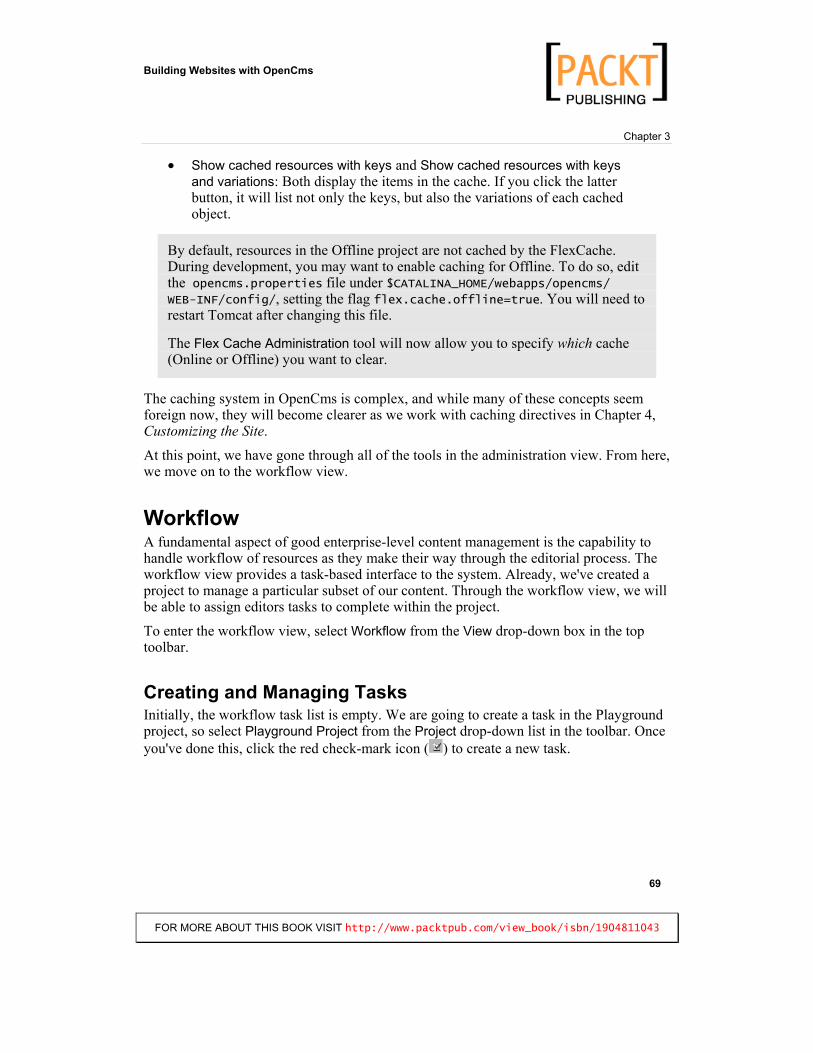
Creating and Managing Tasks Initially, the workflow task list is empty. We are going to create a task in the Playground project, so select Playground Project from the Project drop-down list in the toolbar. Once you've done this, click the red check-mark icon ( ) to create a new task.
Building Websites with OpenCms
FOR MORE ABOUT THIS BOOK VISIT http://www.packtpub.com/view_book/isbn/1904811043
The OpenCms Workplace
70
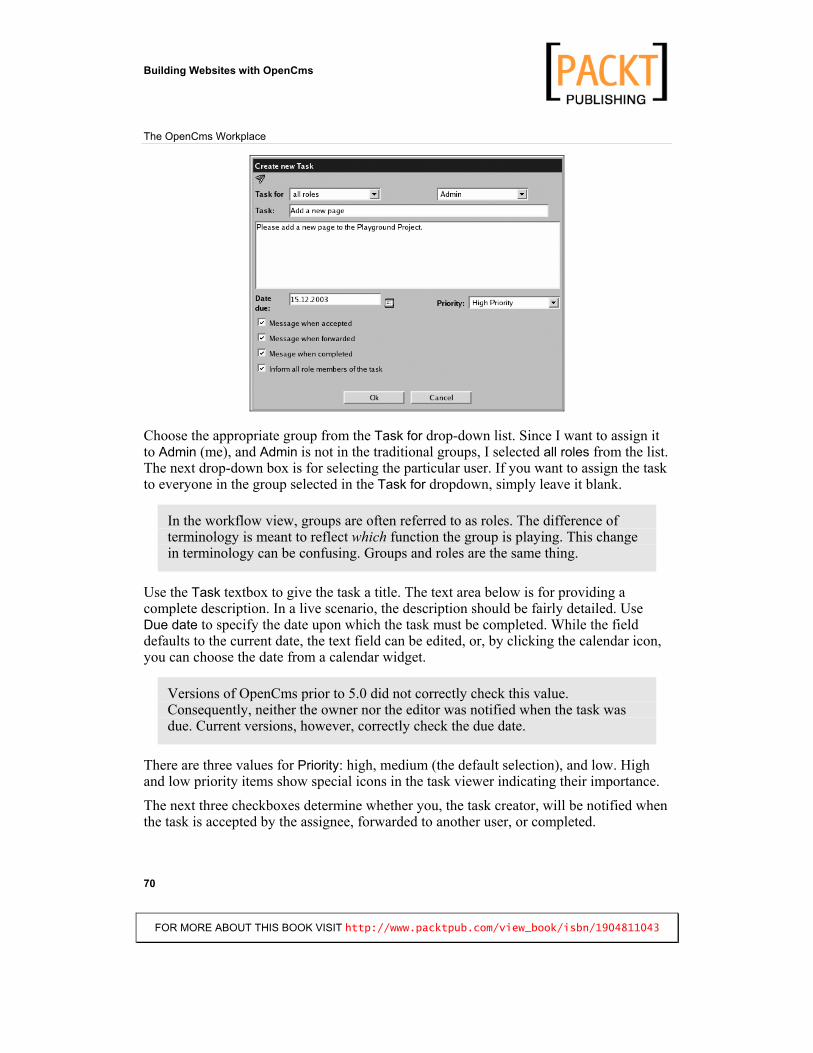
Choose the appropriate group from the Task for drop-down list. Since I want to assign it to Admin (me), and Admin is not in the traditional groups, I selected all roles from the list. The next drop-down box is for selecting the particular user. If you want to assign the task to everyone in the group selected in the Task for dropdown, simply leave it blank.
In the workflow view, groups are often referred to as roles. The difference of terminology is meant to reflect which function the group is playing. This change in terminology can be confusing. Groups and roles are the same thing.
Use the Task textbox to give the task a title. The text area below is for providing a complete description. In a live scenario, the description should be fairly detailed. Use Due date to specify the date upon which the task must be completed. While the field defaults to the current date, the text field can be edited, or, by clicking the calendar icon, you can choose the date from a calendar widget.
Versions of OpenCms prior to 5.0 did not correctly check this value. Consequently, neither the owner nor the editor was notified when the task was due. Current versions, however, correctly check the due date.
There are three values for Priority: high, medium (the default selection), and low. High and low priority items show special icons in the task viewer indicating their importance.
The next three checkboxes determine whether you, the task creator, will be notified when the task is accepted by the assignee, forwarded to another user, or completed.
Building Websites with OpenCms
FOR MORE ABOUT THIS BOOK VISIT http://www.packtpub.com/view_book/isbn/1904811043
Chapter 3
717171
The fourth item, Inform all role members of the task, determines whether the task will show up in the queue of other users in the same role as the assignee. Click Ok to create the task.
Once the task has been created, an e-mail will be sent to the assignee with some generic information about the new task. The following is an example message sent to the user Bob after I assigned him a new task:
From: [email protected] To: [email protected] Subject: OpenCms task management: new task for Bob Editor (Bob) / Editors
Automatic message from OpenCms task management: A new task was created for you or your role. Project: Playground Project Task: Write an article Task Initiatior: (Admin)
http://example.com:8080/opencms/opencms/system/login/index.html?startTaskId=34&startProjectId=13
The link at the bottom of the message takes the user directly to the new task (though the user must first log in if they have not already done so).
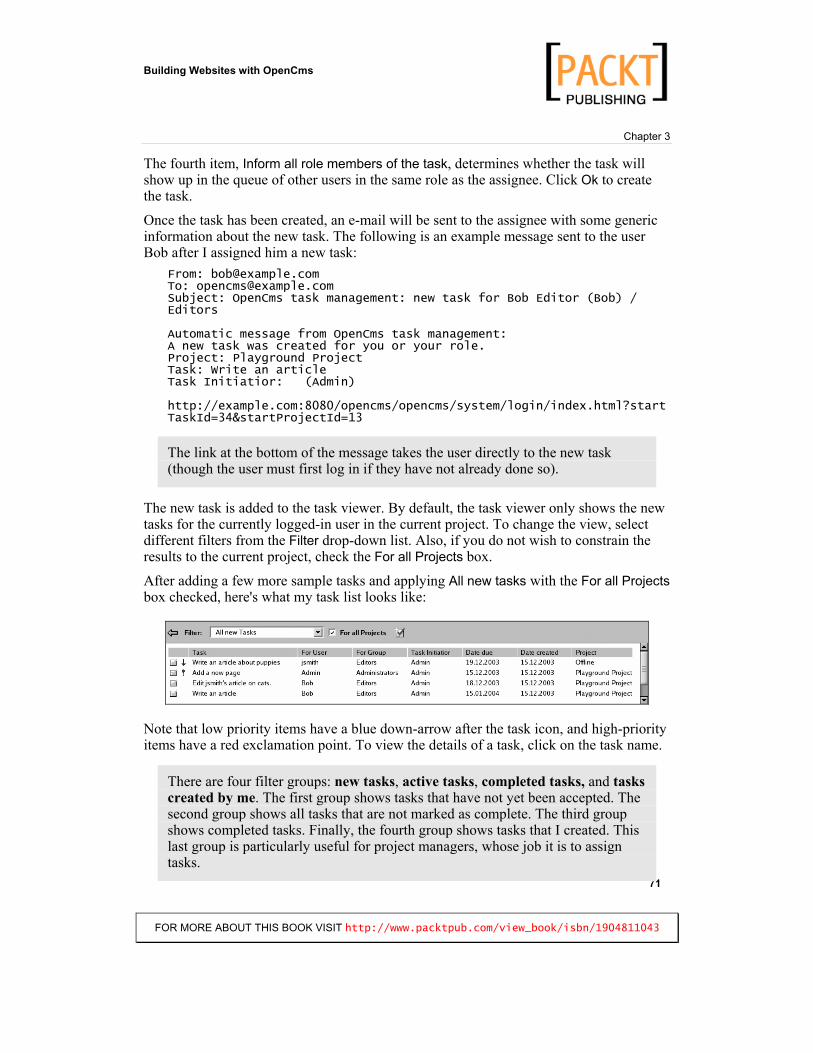
The new task is added to the task viewer. By default, the task viewer only shows the new tasks for the currently logged-in user in the current project. To change the view, select different filters from the Filter drop-down list. Also, if you do not wish to constrain the results to the current project, check the For all Projects box.
After adding a few more sample tasks and applying All new tasks with the For all Projectsbox checked, here's what my task list looks like:
Note that low priority items have a blue down-arrow after the task icon, and high-priority items have a red exclamation point. To view the details of a task, click on the task name.
There are four filter groups: new tasks, active tasks, completed tasks, and taskscreated by me. The first group shows tasks that have not yet been accepted. The second group shows all tasks that are not marked as complete. The third group shows completed tasks. Finally, the fourth group shows tasks that I created. This last group is particularly useful for project managers, whose job it is to assign tasks.

Building Websites with OpenCms
FOR MORE ABOUT THIS BOOK VISIT http://www.packtpub.com/view_book/isbn/1904811043
The OpenCms Workplace
72
For each group of tasks, you have the option of showing those assigned to you (the current user), your current role (group), or all tasks.
Clicking on the task name opens the task detail screen. The detail screen shows all of the important information about a task, with a summary at the top, and a documentation trail beneath.
At the end of the Project line, there is a button labeled Query (if you are the assignee:Task Agent) or Message (if you are the Task Initiator). Clicking this button will open a text editor screen that you can use to create a message. If you are the initiator, the message will go to the agent. If you are the agent, the message will go to the initiator. While the message recipient will be notified of the new message by e-mail, the user will have to log into the system to actually read it. The message appears in the documentation section, and look like this:
When assigned a new task, the agent must accept it before working on it. Click the Accept button to take the task. Once the task is accepted, this button will be replaced with a Forward button. Clicking this button will take you to a screen that allows you to assign the task to another role/user.
Building Websites with OpenCms
FOR MORE ABOUT THIS BOOK VISIT http://www.packtpub.com/view_book/isbn/1904811043
Chapter 3
737373
Other users who are marked as neither the agent nor the initiator will see a Takebutton instead of an Accept or Forward button. By clicking that button, a user may become the agent on that ticket.
A task initiator can also change the Date Due and Priority of a task. While the buttons for making the change appear on both the agent's and initiator's screens, they are deactivated on the agent's screen.
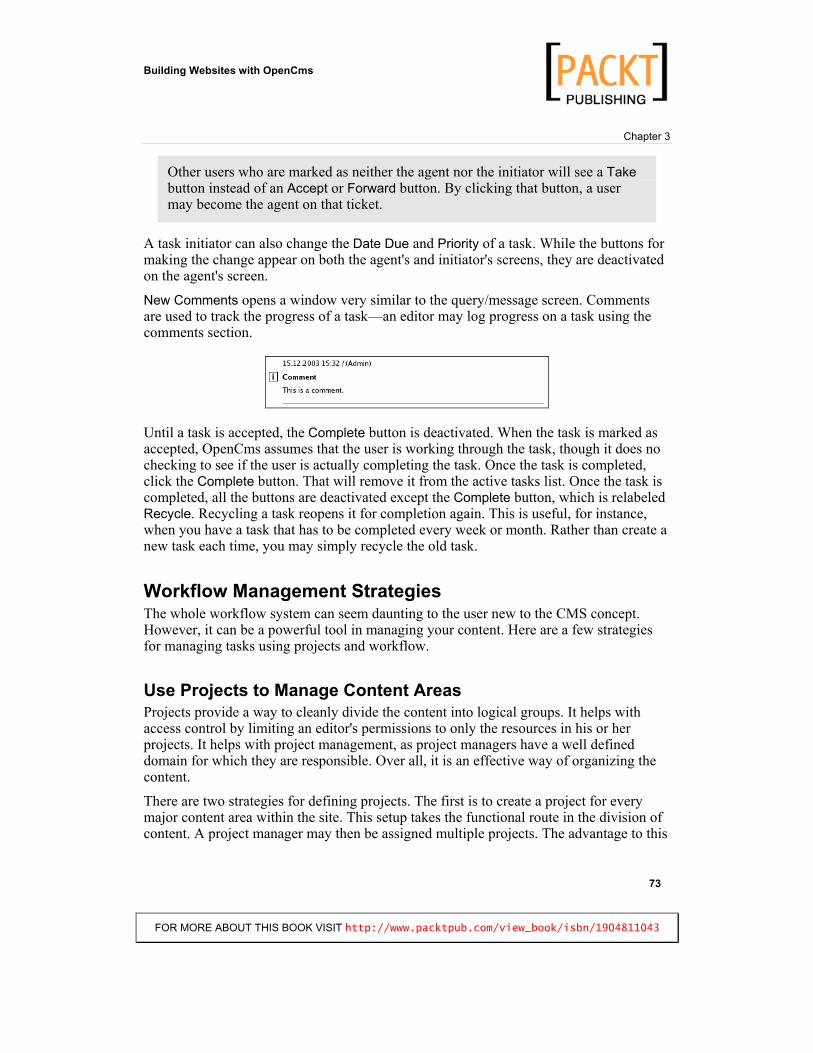
New Comments opens a window very similar to the query/message screen. Comments are used to track the progress of a task—an editor may log progress on a task using the comments section.
Until a task is accepted, the Complete button is deactivated. When the task is marked as accepted, OpenCms assumes that the user is working through the task, though it does no checking to see if the user is actually completing the task. Once the task is completed, click the Complete button. That will remove it from the active tasks list. Once the task is completed, all the buttons are deactivated except the Complete button, which is relabeled Recycle. Recycling a task reopens it for completion again. This is useful, for instance, when you have a task that has to be completed every week or month. Rather than create a new task each time, you may simply recycle the old task.
Workflow Management Strategies The whole workflow system can seem daunting to the user new to the CMS concept. However, it can be a powerful tool in managing your content. Here are a few strategies for managing tasks using projects and workflow.
Use Projects to Manage Content Areas Projects provide a way to cleanly divide the content into logical groups. It helps with access control by limiting an editor's permissions to only the resources in his or her projects. It helps with project management, as project managers have a well defined domain for which they are responsible. Over all, it is an effective way of organizing the content.
There are two strategies for defining projects. The first is to create a project for every major content area within the site. This setup takes the functional route in the division of content. A project manager may then be assigned multiple projects. The advantage to this

Building Websites with OpenCms
FOR MORE ABOUT THIS BOOK VISIT http://www.packtpub.com/view_book/isbn/1904811043
The OpenCms Workplace
74
system is that editors may be restricted to a small subset of the site. Also, projects may be moved from one project manager to another with a minimal amount of work.
The second method is to create one project per project manager, thereby reflecting organizational structure (as opposed to site structure). This structure makes the job of the project manager a little easier, as he or she must only keep track of one set of content and tasks. For editors that contribute to many different areas of content all under one project manager, this approach is easier. Like the project manager, they only have to track one project. There are two drawbacks to this configuration. If a content area is moved from one project manager to another, reconfiguring the projects is a little more tedious. Also, it is more difficult to restrict an editor's access to only one content area, as the project includes multiple content areas. This may be resolved with careful use of groups and file permissions, but that approach entails more maintenance.
Regardless of which route you choose, using projects will help manage content as your content repository grows.
Use Group Hierarchies for Inherited Permissions One common catch in the editing process is that resources (files and folders) can only belong to one user and one group. If multiple editors in different groups need to access the same resources, you will need to go through a little more effort to make sure that all of the right people can access shared resources.
Consider a technical news site that has two groups of editors—one that handles hardware news and one that handles software news. Most of the time, these editors are dealing with different content, but both groups have to update the headlines.html file. The headlines file can only have one owner and one group, but hardware editors are in a different group than software editors. Since other users on the system should not be able to edit this file, simply opening the file up for write access to all would not work.
The answer to this problem lies in the structuring of groups. Groups can be organized in a hierarchy, where a child group inherits the permissions of its parent. If both the groups have the same parent, then changing the file's group to the parent will allow members of both child groups access to the file. As an example, consider this group structure:

Building Websites with OpenCms
FOR MORE ABOUT THIS BOOK VISIT http://www.packtpub.com/view_book/isbn/1904811043
Chapter 3
757575
In this configuration, the parent group is Tech_Editors, with the Hardware and Softwaregroups its children. Consequently, any file with write permissions set for Tech_Editorswill be writable by members of either the Hardware or Software group.
Careful planning of group layouts can ease many of the access issues that arise in CMS management.
Track Work with Tasks The workflow tools are designed to provide a functional approach to managing your content. Workflow provides a clear and intuitive way to track the state of the content that is being generated, edited, and maintained. Using the workflow tool can help you maximize the efficiency of the editorial process. I recommend assigning tasks for every step of the editorial and publishing process. For example, consider a project (we'll call it 'Project X') with only one article and a corresponding JSP. Here is an example of the tasks I (as the project manager) would create:
Editor 1: Write the article in Project X. Developer 1: Create a JSP for Project X. Editor 2: Proof and edit the article. Editor 2: Proof the content on JSP. Project Manager: Approve article. Project Manager: Approve JSP. Project Manager: Publish Project.
I could trim down the number of tasks by requiring, for instance, Editor 1 to forward the article to Editor 2 once it was complete, and then have Editor 2 forward it to the Project Manager when it was ready for approval. Combining it thus reduces the number of tasks to track, but makes it a little harder to assess progress with just a glance at the tasks list.
One way to encourage users to use (and think in terms of) tasks is to set their default view to workflow instead of explorer.
Keeping a Trail Simply using the assign-accept-forward-complete tracking of tasks can be a sufficient means of operating. However, in cases where there are numerous editors or editors and project managers are not in the same physical location, communication can break down and information can slip through the cracks. E-mail can go unnoticed or accidentally be deleted. Conversations, whether verbal or in chat/instant-messaging are apt to be forgotten. And these methods do not keep all of the information in a central location.
To avoid these problems, you may find it expedient to track the status of a task using the Query, Message, and Comment tools provided with the workflow tools.

Building Websites with OpenCms
FOR MORE ABOUT THIS BOOK VISIT http://www.packtpub.com/view_book/isbn/1904811043
The OpenCms Workplace
76
If correspondence between the project manager and editor is handled through messages, and involved parties are diligent in making comments to record progress, then each task will have a self-contained paper trail. This can promote effective communication and prevent important information or requirements from slipping through.
We have toured each of the three views at length, and we are almost finished with our exploration of the Workplace. All that remains is a discussion of installing and configuring OpenCms modules.
ModulesNo single program fits the need of every user. Given the complex nature of content management, developers of CMS systems in particular cannot adopt the one-size-fits-all perspective. In order to provide their users with the ability to fit OpenCms into their own environment, the OpenCms developers implemented a module architecture that can be used to extend OpenCms with new functionality and content.
OpenCms modules consist of a well defined set of directories and files stored in a ZIP archive. A module may contain Java Archive (JAR) files, Java classes, JSP scripts, images, stylesheets, and any type of content that OpenCms supports. Using the module management tool in the administration view, you can upload and install new modules, as well as create, edit, and export your own modules. In this section, we will cover obtaining and installing some of the common modules, including the OpenCms help system. Later on, in Chapter 6, Creating an OpenCms Module, I will explain the process of creating a new module from scratch and developing and deploying it.
Obtaining Official OpenCms Modules The official OpenCms website hosts two repositories of modules. The first repository contains stable modules, primarily those released by Alkacon. For the most part, the material here is content (tutorials, reference), help text, and language localizations. Also, there is an official module sandbox. Modules in the sandbox are generally newer and undergo active development; however, they are usually stable enough for use. In addition, there is an unofficial module repository hosted on Alexander Langer's al-arenal.de site. To some extent, the modules here overlap with those in the sandbox. However, you will also find modules that, for one reason or another, were never submitted to the official site. Developers tend to post beta versions of their code to this site, so the versions in the unofficial repository may also be higher than their sandbox counterparts.
Stable Repository: http://www.opencms.org/opencms/en/download/modules/index.html
Sandbox: http://www.opencms.org/opencms/en/download/sandbox.html
Building Websites with OpenCms
FOR MORE ABOUT THIS BOOK VISIT http://www.packtpub.com/view_book/isbn/1904811043
Chapter 3
777777
Unofficial Module Repository: http://opencms.al-arenal.de/
The official Concurrent Versioning System (CVS) sourcecode repository has other Alkacon modules that are under development. In my experience, these tend to be the least stable of the publicly accessible modules, but developers may find them useful.
The Help System Modules You may have already noticed that there is no help system built into OpenCms. Actually, the help system is implemented as a series of add-on modules. There is a basic online help module that provides the core functionality, and then there are localizations for a number of languages.
The help system is virtually a necessity, so we will be installing it in the next section. From the stable repository on the OpenCms site, download the basic module and any localizations that you want to install. Save them on your local workstation—we will upload them to the server from the browser. I am installing the following help modules:
OpenCms 5.0 Workplace online help basic module OpenCms 5.0 Workplace online help English version
Importing OpenCms Modules In the OpenCms Workplace, go to the administration view. Click on the module-management icon ( ). You may already see a few modules that were installed by default. Click the upload icon (the blue arrow pointing up) to begin the module import process. Choose local computer and click Continue. Select the file named org.opencms.help_1.1.zip (this is the base module, not the language localization. If you try to install the localization first, you will get an error message).
Click Continue to upload the file to the server. You should see an import screen that looks similar to the publishing dialogue. OpenCms will unpack the module and copy the files into the correct locations within the VFS. Once the import is finished, it will say themodule has been imported and the Ok button will turn active. On clicking Ok, you should return to the module management tool, where the org.opencms.help module should now be listed in the modules list.
Click the upload icon again and repeat the same process for the org.opencms.help.en_1.1.zip module. Once you have finished that, you should also have the org.opencms.help.en module in your modules list. Unfortunately, there is no way to bulk import modules, so you will need to repeat the process for every language localization that you install.
Building Websites with OpenCms
FOR MORE ABOUT THIS BOOK VISIT http://www.packtpub.com/view_book/isbn/1904811043
The OpenCms Workplace
78
Modules are named by strict convention. A module name should always begin with the full Java package name for the module (e.g. org.opencms.help). The package name should be followed by an underscore, and then a version number of the form MAJOR.minor (_1.1). Finally, each module file must have the .zipextension.
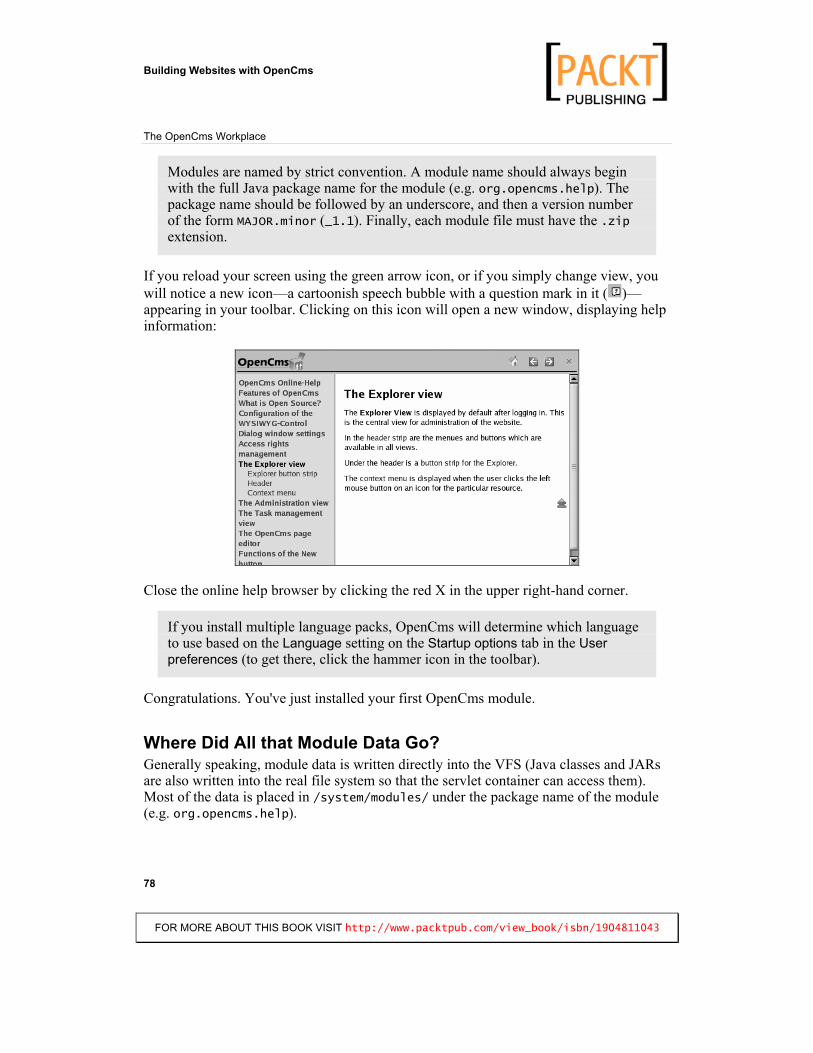
If you reload your screen using the green arrow icon, or if you simply change view, you will notice a new icon—a cartoonish speech bubble with a question mark in it ( )—appearing in your toolbar. Clicking on this icon will open a new window, displaying help information:
Close the online help browser by clicking the red X in the upper right-hand corner.
If you install multiple language packs, OpenCms will determine which language to use based on the Language setting on the Startup options tab in the User preferences (to get there, click the hammer icon in the toolbar).
Congratulations. You've just installed your first OpenCms module.
Where Did All that Module Data Go? Generally speaking, module data is written directly into the VFS (Java classes and JARs are also written into the real file system so that the servlet container can access them). Most of the data is placed in /system/modules/ under the package name of the module (e.g. org.opencms.help).

Building Websites with OpenCms
FOR MORE ABOUT THIS BOOK VISIT http://www.packtpub.com/view_book/isbn/1904811043
Chapter 3
797979
Occasionally (as with the documentation modules discussed below), files or links are written outside the /systems directory; however, that is considered bad practice for anything that is not strictly content. Some modules also add classes and templates to the Workplace. Like just about everything in OpenCms, files from modules are treated just like content. You may add, lock, modify, publish, and delete module contents. You also may export a new version of the module to the file system in order to install it on other instances of OpenCms. In Chapter 6, Creating an OpenCms Module, I will cover this in more detail.
Online Documentation Modules In addition to the help system, there are a few OpenCms documentation modules that come in handy. All of these are available from the stable repository on the official OpenCms website.
The Alkacon OpenCms 5.0 interactive documentation base module is required by all other Alkacon documentation. The Alkacon OpenCms 5.0 Howto: JSP template development module contains reference material for developing JSP templates. We will create JSP templates at the beginning of the next chapter. The Alkacon OpenCms 5.0 JSP basic documentation and Alkacon OpenCms 5.0 JSP scriptlet documentation modules provide references, tutorials, and implementation information about using Java Server Pages in OpenCms. The Alkacon OpenCms 5.0 JSP taglib documentation module describes using the JSP taglibs as an alternative to scriptlets. The Alkacon OpenCms 5.0 FlexCache documentation module describes the cache directives used by the FlexCache mechanism. The Alkacon OpenCms 5.0 Module mechanism documentation module outlines the process of creating a new module in OpenCms. Additionally, there are a couple of modules that contain code examples. For those interested in translation and localization, the Alkacon OpenCms 5.0 Howto: Translating the OpenCms Workplace module explains how to translate the Workplace and help into another language.
When these modules are installed, they appear in the main repository. When you are logged in, http://localhost:8080/opencms/opencms/, the default home page, will have links to the tutorials along the top of the page.
Note that all of these modules are placed in a publicly accessible directory. It is probably wise to not install these on a production machine, or, if you do, to make sure they are not published to the Online project.
Building Websites with OpenCms
FOR MORE ABOUT THIS BOOK VISIT http://www.packtpub.com/view_book/isbn/1904811043
The OpenCms Workplace
80
Other Modules There are a lot of modules to choose from. Here is a little information on the most popular modules. All modules listed here are open source. Additionally, there are a few companies that provide proprietary modules. Some companies, including Alkacon, do custom development and OpenCms consulting. A list of these companies can be found at http://www.opencms.org/opencms/en/support/solution_providers/index.html.
The News module, of which (by my count) there are currently six forks, provides news services to OpenCms. News implements its own version of channels, and includes additional tools in the administration view. The different forks each add different functionality, including scheduling, extra applets, and RSS support. The best place to locate information about the various versions of this module is the unofficial module site at http://opencms.al-arenal.de/.The OpenCms Lucene Search module, of which I am one of the maintainers, has also garnered a big following. It offers a search engine that operates within the VFS to intelligently index OpenCms resources. This module is managed as a SourceForge project, and its website is at http://opencmslucene.sourceforge.net/.The Article Management module provides a number of tools for managing articles in OpenCms, including article overviews and printer-friendly pages. It is available from http://www.rueth.info/articlemanagement-documentation/.
New modules are added all the time, though. Take a look at the various module repositories and find the ones that are right for you.
SummaryIn this chapter, we toured the entire OpenCms Workplace, examining the explorer view for managing content, the administration view for managing OpenCms, and the workflow view for managing tasks. We wrapped up by looking at the OpenCms module system.
At this time, you should have a good idea of how to use and manage OpenCms. From here, we will begin looking at developing templates and JSP pages, controlling the cache, and using custom data sources.
Table of Contents
Introduction 1
Chapter 1: Introduction to OpenCms 5What Is a Content Management System? 5
Three Essential Components 5
What Is OpenCms? 6Features 7
History 8
The OpenCms Community 8
The Purpose of This Book 9Technical Overview 9
The Web Server and Java Servlets 10
The Database 10
Pages, Templates, and Java Server Pages 10
Bringing it Together 11
Summary 11
Chapter 2: Installing OpenCms 13
Prerequisites 13Configuring the MySQL Database 14
MySQL on Linux 14 MySQL on Windows 15 Finishing the MySQL Setup 15
Configuring the Tomcat Servlet Engine 16Linux Configuration 17 Windows Configuration 18
Configuring Encoding 19
Tuning the JVM 20
Installing the OpenCms WAR File 20Configuring OpenCms to Use UTF-8 21
Running the Install Wizard 21Advanced Setup Screens 24

Table of Contents
ii
Basic Setup Screens 29
Manually Configuring Settings 32
Configuring the Client 33Mozilla-Based Browsers 33
Internet Explorer 34
Installation Troubleshooting 34Character-Set Issues 35
Temp File Project ID Error 35
Restarting Tomcat versus Reloading OpenCms 35
Importing Workplace Screen Freezes 36
MySQL User/Password Changes 36
Finding More Installation Help 36
Summary 36
Chapter 3: The OpenCms Workplace 37
A Tour of the OpenCms Workplace 37The Toolbar 39
The Explorer View 42Creating and Editing Content 47
Creating a Folder 47
The WYSIWYG Editor 50
The Sourcecode Editor 50
Publishing Your Changes 51Versioning 53
Administration 53Project Management 54
User Management 56
Database Management 59
Static Export 60
Clear Element Cache 60
Resource Type Management 61
Properties Management 62
Gallery Management Tools 62
Link Checking 64
Module Management 65
Synchronization Management 65
Table of Contents
iii
Scheduled Tasks 67
Log File Viewer 67
Channels 67
Flex Cache Administration 67
Workflow 69Creating and Managing Tasks 69
Workflow Management Strategies 73Use Projects to Manage Content Areas 73 Use Group Hierarchies for Inherited Permissions 74 Track Work with Tasks 75 Keeping a Trail 75
Modules 76Obtaining Official OpenCms Modules 76
The Help System Modules 77
Importing OpenCms Modules 77Where Did All that Module Data Go? 78
Online Documentation Modules 79
Other Modules 80
Summary 80
Chapter 4: Customizing the Site 81
Overview of Creating a Site 81Working with Templates and Tags 82
Creating a Site Module for Templates 82
Creating a New Template 84The JSP Template 87 Associating a Page with the New Template 90
JSP Tag Libraries and Scriptlets 91JSP Tag Libraries 92
The OpenCms Tag Library 93The JSP Template 93 Creating a JSP Document 95
JSP Scriptlets 98Basic Scriptlets 99The CmsJspActionElement Object 100 OpenCms Navigation 101 Getting the Contents of Other Files 104 Advanced Scriptlet Programming 107
A Few Things to Watch Out For 111
Table of Contents
iv
The File System 111 Redirecting and Forwarding 112 Java Synchronization 112 Dynamic Content and Publishing 113 Structuring Code and Content 113
The FlexCache 114Tuning the FlexCache 114
FlexCache JSP Directives 116Absolute Directives 117 User Directives 117 Time-Sensitive Directives 118 URL Directives 118
Controlling the Cache with URL Parameters 119
Using FlexCache 120
Internationalization 120Modules 120
Creating ResourceBundles 121 JSPs and ResourceBundles 122
Summary 124
Chapter 5: The OpenCms System Architecture 125
Resource Types 125Coding a New Resource Type 126
Building the Resource Type 128 Editing the Properties Files 130
Adding a Restype 130Menu Items 131Adding Properties for the Resource Type 133 Editing the OpenCms Registry 133
Using the New Resource Type 134
Content Definitions 135The Steps for Creating a Content Definition 135
Important Methods 136
The Virtual File System 138How Page Types Are Stored in the VFS 140
Resource Names and the VFS 142
Reading from and Writing to the VFS 143
Class Structure 147com.opencms.boot 148
com.opencms.core 148

Table of Contents
v
com.opencms.dbpool 148
com.opencms.defaults 148
com.opencms.defaults.master 149
com.opencms.file 149
com.opencms.file.<database> 149
com.opencms.file.utils 150
com.opencms.flex 150
com.opencms.flex.cache 150
com.opencms.flex.jsp 150
com.opencms.flex.util 150
com.opencms.htmlconverter 151
com.opencms.launcher 151
com.opencms.linkmanagement 151
com.opencms.report 151
com.opencms.template 151
com.opencms.template.cache 152
com.opencms.util 152
com.opencms.workplace 152
Summary 152
Chapter 6: Creating an OpenCms Module 153Using Modules 153
The Site Module 154
Creating a Module 154Navigating the New Module 158
Custom Classes and Libraries 160Adding Libraries 163
Adding Content 163Creating a Simple XML Document 164
A Place for XSLT Templates 164
JSP Elements 166
Adding a Scheduled Task 167The BatchTransformer Class 168
The CronBatchTransformer Class 170
Scheduling a Task 172How an I_CmsCronJob Is Executed 173
Table of Contents
vi
Managing the Module 174Administrate 175
The Dependency Screen 175 The Module Properties Screen 176
Properties 177
Accessing Module Parameters from JSP Pages 179
Exporting and Deploying the Module 180Summary 180
Chapter 7: Advanced Modules 183
Adding an Administration Point 183Creating Icons 184
Adding a Properties File 184
Creating Administration Point Folders 185Adding Additional Properties 186
Creating an Administration JSP 186The JSP Code 187
The Administration Point in Action 189
XML Templates 190How XML Templates Work 190
Editing XML Templates 191
The Structure of the Workplace XML Templates 192The action Folder 192 The administration Folder 192 The help and locales Folders 193 The resources Folder 193 The restypes Folder 193 The scripts Folder 193 The templates Folder 193 The /system/login Folder 193
Creating a Custom Launcher 194The Basic Idea 194
Implementing a Launcher 195
Editing the Registry 198
Testing the Launcher 199
Other Considerations 201Creating XML-Template-Based Launchers 201 Creating Resource Loaders 201

Table of Contents
vii
Master Modules 202Summary 203
Chapter 8: Deploying an OpenCms Solution 205
Serving Static versus Dynamic Content 205Published Resources 206
Static Serving 206
Dynamic Serving 207
The Export Property 207Changing Export Settings 208
Static Export 209Configuring for Static Export 209
Export Path Settings 209 Export URL Settings 210 Using Relative Links 210
Running a Static Export 210
Touching All Files in the VFS 211
Web User Authentication and Management 212How OpenCms Handles Authentication 213
The Guest User 213 CMS Users 213
Web Users 213
Creating Web Users 214The create_webuser.jsp Scriptlet 215
Authenticating Web Users 217Using the Authentication JSP 218 Restricting Access through a Template 219
Backup and Recovery 220Backing Up the Database 220
Backups from Within OpenCms 221Performing an OpenCms Database Export 222 Backing Up Large Sites 223 The Backup Files 223
Importing an Export Zip File 224Users and Groups 224 Resources 224
Performance Tuning 225Database Tuning 225
Table of Contents
viii
MySQL 225Oracle 226SQL Server 226
OpenCms Tuning 227FlexCache 227Page Streaming 227 Efficient Coding 228
Other Resources 228Summary 229
Appendix A: Building OpenCms from Source 231
What You Will Need 231Getting the OpenCms Source 232Checking Out the Source from CVS 232Building OpenCms with Ant 234Generating Javadocs 234Summary 235
Appendix B: Using the OpenCms Lucene Search Module 237
Searching Technologies and OpenCms 237About the OpenCms Lucene Module 238Obtaining and Installing the Module 239
Configuring the Registry 239Global Parameters 241 Document Factories 242 Content Definitions 244 Directories 246Finishing the Registry 246
Running the Index Manager 246
Searching with Lucene 249Hacking the OpenCms Lucene Module 251Summary 252
Index 253
Building Websites with OpenCms
OpenCms (available from www.opencms.org) is an open-source enterprise-grade content management system based on Java and XML technology, and is designed specifically for creating and maintaining websites. It provides a full set of tools for dealing with content creation, editorial workflow, publishing, and versioning.
In Building Websites with OpenCms from Packt Publishing, author Matt Butcher takes you through the process of constructing an OpenCms website, showing you how to work with OpenCms, customize and extend the system with Java libraries and classes, JSP pages, and XML templates, and how to administer and deploy your OpenCms solution.
Like many of the open-source content management systems, OpenCms is daunting on first use, but its power and flexibility reward the investment in learning to use it. This book exists to ease you into getting the most from OpenCms.
What The Book Covers Chapter 1 gives us an introduction to OpenCms, its features, and its history. Chapter 2walks us through the process of installing and configuring OpenCms. We look at installing OpenCms with its setup wizard, securing and troubleshooting the installation, and configuring the client.
Chapter 3 explores the OpenCms Workplace; this is the primary interface for managing the contents of your OpenCms repository, and includes tools for editing, project management, workflow, publishing, and server administration. In this chapter, we cover various aspects of working in the OpenCms Workplace, including managing projects, using modules, permissions, editing and publishing documents, creating new pages, and customizing the Workplace.
In Chapter 4 we turn our attention to customizing the site. We look at developing the look and feel of published content, adding dynamic elements, and controlling resources. This includes topics such as working with templates, using OpenCms JSP tag libraries, creating JSP scriptlets, and managing FlexCache directives.
Chapter 5 takes us into the heart of OpenCms, looking at the mechanisms that drive the content management system. We look at resource types, content definitions, the Virtual File System (VFS), and the class structure of OpenCms.
In Chapter 6 we look at OpenCms modules; these provide a mechanism for extending the functionality of OpenCms. Modules are designed to be easily distributed among OpenCms installations, and can provide functional elements ranging from portable content to sophisticated applications that interact with content in OpenCms. We take an in-depth look at developing modules, covering topics such as creating a module, adding templates, content, and JSP pages to the module, adding custom Java classes and libraries, and exporting and deploying your module.
Chapter 7 tackles some advanced features of the OpenCms module mechanism. We cover creating an administration point for a module, using JSPs to produce administration screens, and creating a custom launcher class.
In Chapter 8 we return to the administrative aspect of managing OpenCms, and examine the issues surrounding the deployment of an OpenCms solution. We cover static exports, user authentication and management, and other administrative tasks such as backup, recovery, and performance tuning.
There are two appendices that cover building OpenCms from its sourcecode, and installing, configuring, and using the OpenCms Lucene Module to improve the searching of your site.
Where to Buy this Book You can buy Building Websites with OpenCms direct from Packt Publishing at http://www.packtpub.com/view_book/isbn/1904811043/samplx, where you will find at least a 10% discount on the cover price and free shipping in the US and Europe. Alternatively, you can buy this book from Amazon, BN.com, Computer Manuals and most Internet booksellers.