buildroot-rpiv1.3.1.pdf
TRANSCRIPT

A custom Linux system on aA custom Linux system on aRaspeberry PIRaspeberry PI
Paulo Cardoso
Department of Industrial ElectronicsSchool of Engineering,
University of MinhoGuimarães, Portugal

Outline
•Glossary•Before start... our board•Custom Linux systems•Buildroot•Creating an emb. system using Buildroot •Boot loader•U-Boot•Booting with device tree

Glossary
•Application Binary Interface (ABI)•Defines a mapping between low-level hardware/OS concepts and high-level languages
•Includes things like:–How program startup/initialization works–How functions/system calls are called–Sizes, layout, and alignment of data types
•Adhering to ABIs is usually the job of the compiler–ABIs may not be officially standardized

Glossary
•Board Support Package (BSP)•Software code that access hardware-specific features
•Provides a standardized interface between hardware and the operating system
–Isolating hardware-specific functionally
•Each board has its own BSP
•Cross-development•The process of developing code on one machine (host) to run on another machine (target)
•Host is a desktop/laptop machine running Windows, OS X, Linux•Target is the embedded system, a single board computer

Glossary
•In-circuit emulator (ICE)•External hardware (board) to debug software in embedded systems
•Allows change the contents of registers, memory and I/O, breakpoint execution, ...
•JTAG interface•Is an access point to processor hardware circuity
•For debugging, diagnosis... •In system programming
– Programming a processor positioned inside the end system

Before start... our board
•Raspberry Pi•A board based on a SoC

Before start... our board
•Raspberry Pi•Uses an ARM processor
•ARM: From the architecture to the board –Low 0
Before start... our board
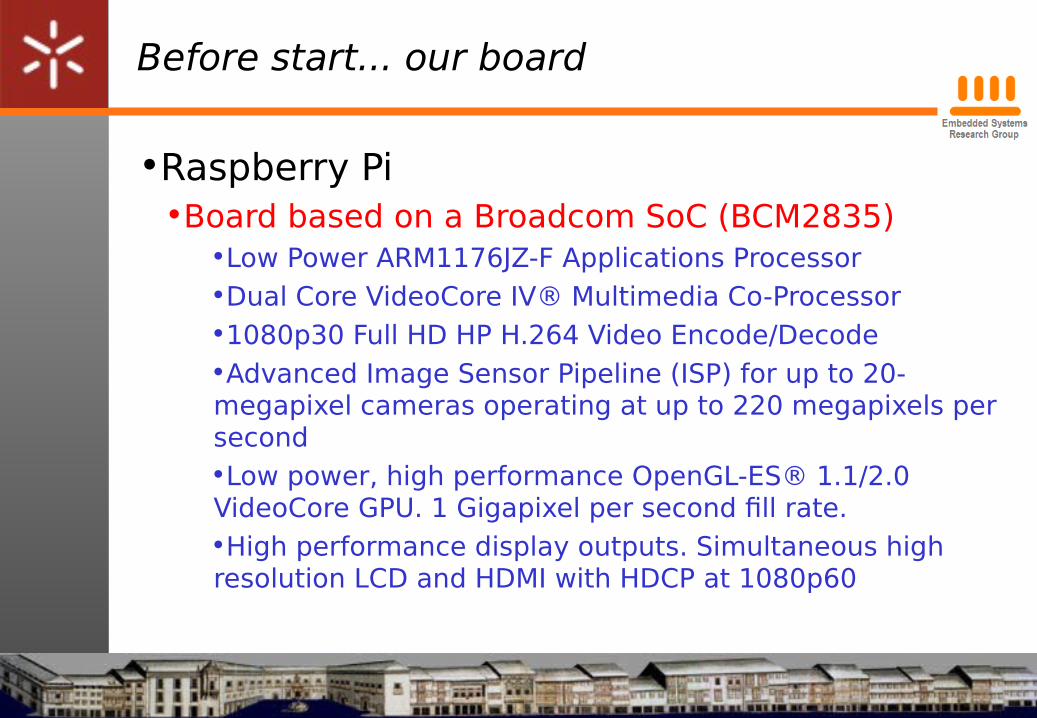
•Raspberry Pi•Board based on a Broadcom SoC (BCM2835)
•Low Power ARM1176JZ-F Applications Processor•Dual Core VideoCore IV® Multimedia Co-Processor•1080p30 Full HD HP H.264 Video Encode/Decode•Advanced Image Sensor Pipeline (ISP) for up to 20-megapixel cameras operating at up to 220 megapixels per second•Low power, high performance OpenGL-ES® 1.1/2.0 VideoCore GPU. 1 Gigapixel per second fill rate.•High performance display outputs. Simultaneous high resolution LCD and HDMI with HDCP at 1080p60
Before start... our board
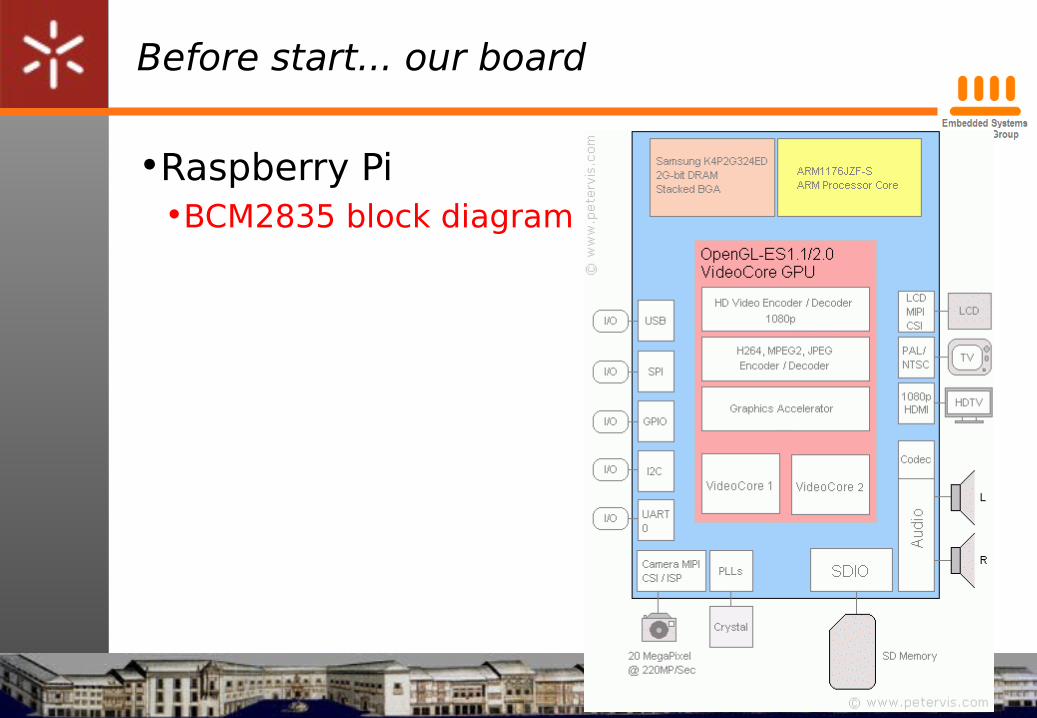
•Raspberry Pi•BCM2835 block diagram

Before start... our board
•Raspberry Pi•Layout diagram

Custom Linux systems
•How to create a Linux desktop system•Using a distribution
• Provide ready-to- use binary packages–E.g. Red Hat, Ubuntu, etc.
•Manually•E.g. http://www.linuxfromscratch.org

Custom Linux systems
•How to create an embedded Linux system•Using a distribution
•There are distros for Raspberry PI –http://elinux.org/RPi_Distributions
•Some distributions, such as Debian, are available for embedded architectures (ARM, MIPS, PowerPC)
•Pros–They make it relatively easy to get a working system
•Cons–Distribution choices don't necessarily match system's needs

Custom Linux systems
•How to create an embedded Linux system (cont.)
•Manually •Provides flexibility but painstaking, tedious and time consuming
–Dependencies between all the components must be known–Cross -compiling is usually a tedious process
»Sometimes requiring package source code changes
–There is no automated procedure to rebuild the system»Which might be needed to integrate a bug fix or a new feature

Custom Linux systems
•How to create an embedded Linux system (cont.)
•Automated build systems •Generate embedded Linux system from scratch•The build system manages package dependencies and cross-compiling issues are already solved•Automate the process of downloading, configuring, compiling and installing all software packages
–Easy to rebuilding system from scratch and to integrate patches, bug fixes or new upstream versions

Custom Linux systems
•Automated build systems•Takes a set of requirements
•The list of packages to include•Devices to be used•Kernel configuration
•Creates a self-contained root file system, including a kernel image
•Usually other tools take care of other needed components–Boot loader
–Firmware

Custom Linux systems
•Automated build systems for embedded systems
•YOKTO•Site of the project
–https://www.yoctoproject.org/
•Overview (among many others)–http://www.ibm.com/developerworks/linux/library/l-yocto-linux/l-yocto-linux-pdf.pdf
•Buildrooot•Site of the project
–http://www.buildroot.net/
•...

Custom Linux systems
•YOKTO vs Buildroot•YOKTO
•Very flexible build system•Can create a root filesystems, and also a complete distribution •Time consuming for minimalistic systems
• Buildroot•Best suited for small embedded systems

Buildroot
•A set of Makefiles that automates the process of building a cross- compiling toolchain and a root filesystem for an embedded system
•Has been initially developed by uClibc developers•Uses Kconfig configuration system and menuconfig- like interface
•Also known by those that configure Linux kernel in desktop systems

Creating an embedded system using Buildroot
•Before installing Buildroot•Other packages are required by Buildroot
•If they are not already installed–httpdf.pdf
– Minicom is not required by Buildroot but will be needed later
$ sudo apt-get install libncurses5-dev$ sudo apt-get install libcurl4-gnutls-dev libexpat1-dev gettext libz-dev libssl-dev$ sudo apt-get install git$ sudo apt-get install g++$ sudo apt-get install minicom
$ sudo apt-get install libncurses5-dev$ sudo apt-get install libcurl4-gnutls-dev libexpat1-dev gettext libz-dev libssl-dev$ sudo apt-get install git$ sudo apt-get install g++$ sudo apt-get install minicom

Creating an embedded system using Buildroot
•Open Terminal •Either searching in the Dash or typing CTRL+ALT+T
•Download Buildroot
•In these slides the host system is a 14.04 Ubuntu distribution, using kernel 3.13.0-30
•Other distributions/kernel versions can generate warnings/errors
$ mkdir -p $HOME/buildroot$ cd $HOME/buildroot$ wget http://buildroot.uclibc.org/downloads/buildroot-2014.05.tar.gz$ tar xvzf buildroot-2014.05.tar.gz$ cd buildroot-2014.05
Known as $TOPDIR in the configuration tool

Creating an embedded system using Buildroot
•Configuring Buildroot for the Raspberry Pi•Start the configuration tool
•The main menu of the configuration tool is displayed–Us
$ make menuconfig
Select Help to get information on the configuration option highlighted
Use vertical arrows to navigate among configuration sub-menus/options.
Press ENTER to enter a sub-menu.
Press SPACE to select an option
Use horizontal arrows to navigate among menu options.
Press ENTER to select
Select Exit to go back in a sub-nebu configuration

Creating an embedded system using Buildroot
•Configuring Buildroot for the Raspberry Pi•Select Target options
•Change the highlighted configurations–To the values in the image
Selects the target hardware
Creating an embedded system using Buildroot
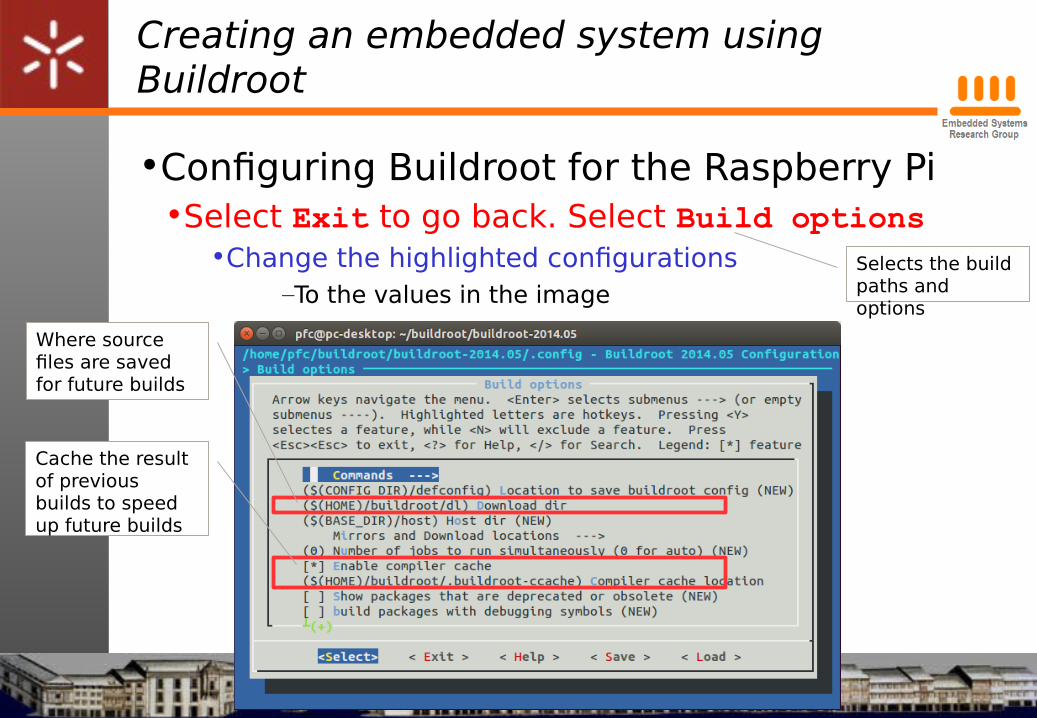
•Configuring Buildroot for the Raspberry Pi•Select Exit to go back. Select Build options
•Change the highlighted configurations–To the values in the image
Selects the build paths and options
Where source files are saved for future builds
Cache the result of previous builds to speed up future builds

Creating an embedded system using Buildroot
•Configuring Buildroot for the Raspberry Pi•Select Exit to go back. Select Toolchain
•Change the highlighted configurations–To the values in the image
Selects the compiling toolchain and options

Creating an embedded system using Buildroot
•Configuring Buildroot for the Raspberry Pi•Select Exit to go back. Select System configuration
•Change the highlighted configurations–To the values in the image
Configures compiled Linux system

Creating an embedded system using Buildroot
•Configuring Buildroot for the Raspberry Pi•Select Exit to go back. Select Kernel
•Change the highlighted configurations–To the values in the image
Selects kernel source
Creating an embedded system using Buildroot
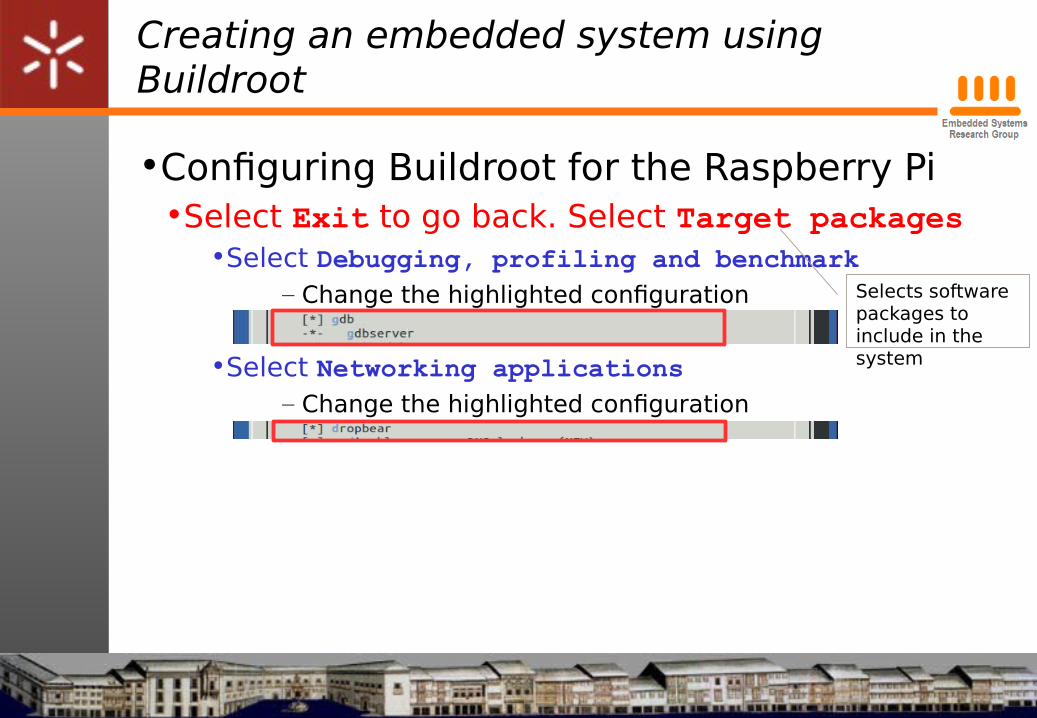
•Configuring Buildroot for the Raspberry Pi•Select Exit to go back. Select Target packages
•Select Debugging, profiling and benchmark– Change the highlighted configuration
•Select Networking applications – Change the highlighted configuration
Selects software packages to include in the system
Creating an embedded system using Buildroot
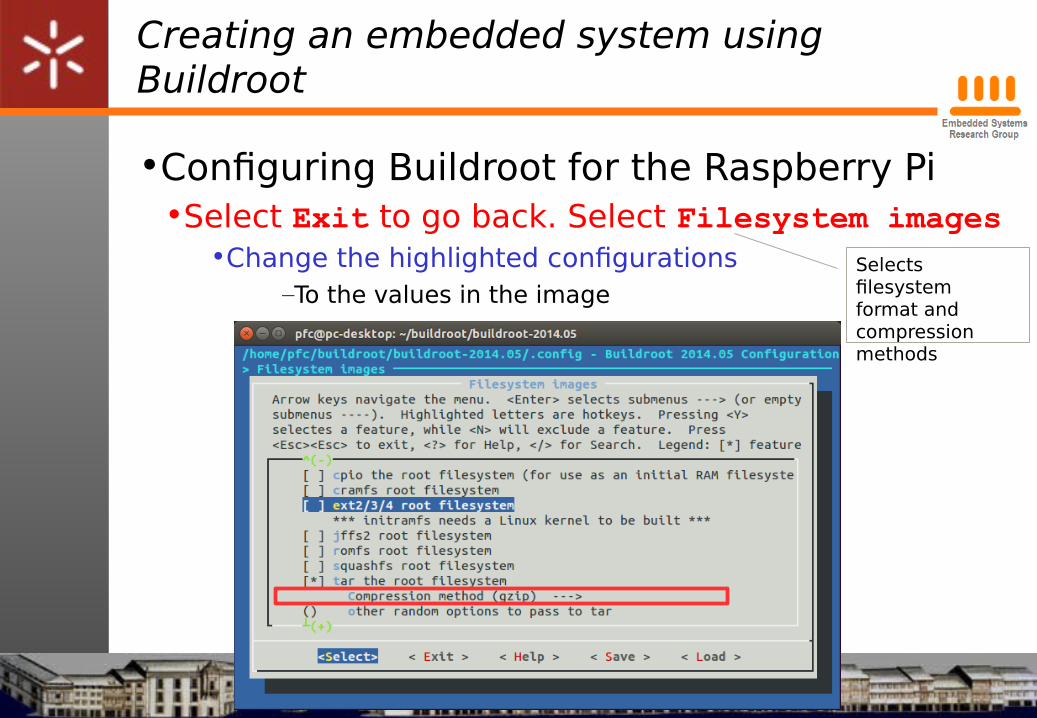
•Configuring Buildroot for the Raspberry Pi•Select Exit to go back. Select Filesystem images
•Change the highlighted configurations–To the values in the image
Selects filesystem format and compression methods

Creating an embedded system using Buildroot
•Configuring Buildroot for the Raspberry Pi•Instead of selecting configuration parameters
•It would be possible to use a default Raspberry config
– In this case using a different kernel version and other slightly different options
$ make raspberrypi_defconfig
Creating an embedded system using Buildroot
•System build•Creates toolchain, system library, kernel and filesystem
•This is a looooong step
$ make all

Creating an embedded system using Buildroot
•System build•Creates toolchain, system library, kernel and filesystem
•Buildroot will go through the following steps–Build a compiler toolchain (gcc, binutils, libtool, autoconf, automake, m4, cmake, pkg-config, etc.) for the host machine running Buildroot
» $TOPDIR/output/host
–Build a gcc which can cross-compile to the ARM architecture, together with an ARM µClibc
» $TOPDIR/output/toolchain
–Unpack, configure and build all selected packages using the compiler (and µClibc) built in previous step
» $TOPDIR/output/build/<package>-<version> (build dependencies also installed in $TOPDIR/output/staging )
In my case this is /home/pfc/buildroot/ buildroot-2014.05
Creating an embedded system using Buildroot
•System build•Creates toolchain, system library, kernel and filesystem
•Buildroot will go through the following steps (cont.)–Install packages
» $TOPDIR/output/target
–Create a root file system image» $TOPDIR/output/images/rootfs.tar.gz
–Install the kernel» $TOPDIR/output/images/zImage

Creating an embedded system using Buildroot
•System build•Compiles the kernel and creates filesystem
•This is a looooong step– make-all.log is a text file containing all output
•The next step will be to copy the filesystem to the SD card
$ make all 2>&1 | tee make-all.log

Aside...
•Shell •The “command line” when you use Terminal
•There are several. The most known is bash • That is the one you are using now
– Some of the commands you type are builtin, not external programs » For performance reasons or because a particular built-in needs direct
access to the shell internals
» E.g. cd, pwd, pushd, popd, dirs, export, echo, etc.
» Sometimes there are both implementations, e.g. echo and /bin/echo
• More on bash – http://tldp.org/HOWTO/Bash-Prog-Intro-HOWTO.html
•It also supports programming: shell scripts

Aside...
•Shell •Our embedded system will use Busybox
• It is a kind of super shell• It is a single binary, which is a conglomerate of many
applications–We can say that it's a shell with a lot if built-in commands– Busybox implements the ash shell

Aside...
•Shell •Redirecting output
• A shell has always three default files open• stdin (the keyboard) • stdout (the screen)• stderr (error messages output to the screen)
• This is like in a C program– Unix (from witch Linux is a flavor of) has its roots in C
• These, and any other open files, can be redirected– This simply means capturing output from a file, command,
program, script, or even code block within a script and sending it as input to another file, command, program, or script

Aside...
•Shell •Redirecting output
• Examples • ls -la > list.txt
– Redirects output of command ls to file list.txt – This the most used form of redirection
• ls -la >> list.txt – Redirects output, appending to list.txt
• : > empty.txt or > empty.txt (does't work with some shells) – Truncates file empty.txt to zero length – If file doesn't exist, creates it empty

Aside...
•Shell •Redirecting output
• Examples (cont.) • command 1> filename
– Redirect stdout to file filename
• command 1>> filename – Redirect and append stdout to file filename
• command 2> filename – Redirect stderr to file filename
• command 2>> filename – Redirect and append stderr to file filename
• command &> filename – Redirect both stdout and stderr to file filename

Aside...
•Shell •Redirecting output
• Examples (cont.)• command M>N
– File descriptor M (which defaults to 1) is redirect to N. If not explicitly set, N is a filename
• command M>&N – File descriptor M is redirect to file descriptor N
•Redirecting input• command < filename
– Accept input from a file. E.g. grep word < filename
•Pipe: | • The output of a program is the input of another

Creating an embedded system using Buildroot
•Create the system's SD card•SD card format
•Two partitions are needed–FAT32 partition
»Boot partition
–EXT4 partition»Linux filesystem partition
•Partitions' creation–Using fdisk utility

Creating an embedded system using Buildroot
•Back on track

Creating an embedded system using Buildroot
•Create the system's SD card•New partitions using fdisk
•After inserting the card use df to check the device name–In this case /dev/sdc1
•Unmount SD card

Creating an embedded system using Buildroot
•Create the system's SD card•New partitions using fdisk
•Call fdisk –In this case /dev/sdc1
•Check the existing partitions
Creating an embedded system using Buildroot
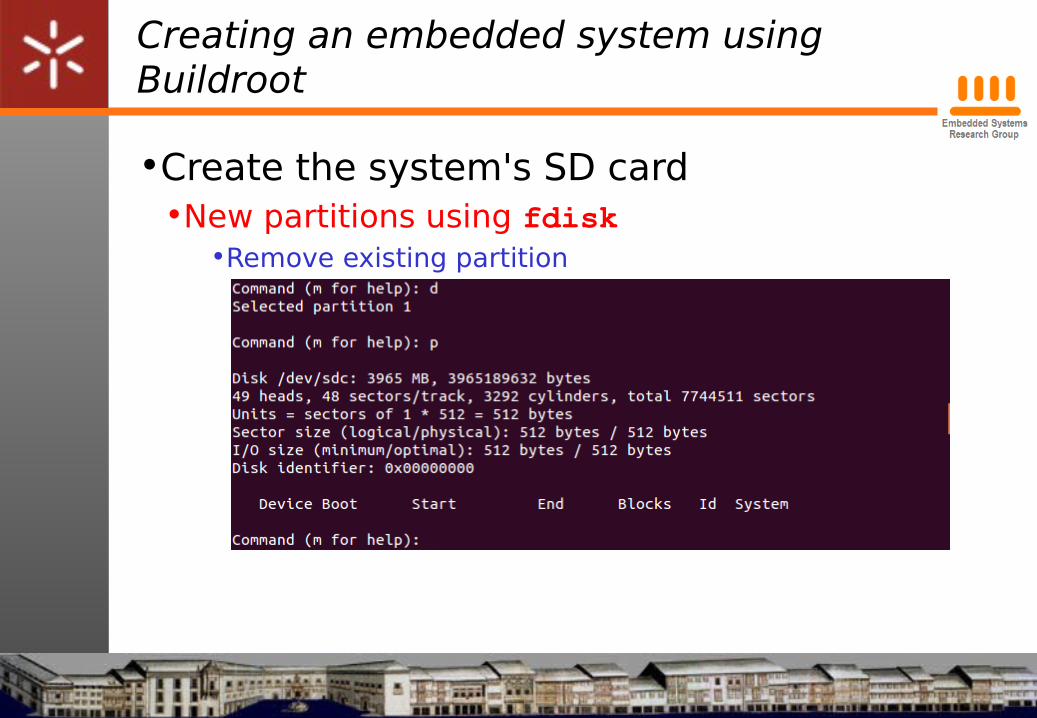
•Create the system's SD card•New partitions using fdisk
•Remove existing partition –In this case /dev/sdc1

Creating an embedded system using Buildroot
•Create the system's SD card•New partitions using fdisk
•Add new partition (34Mb) –32Mb in size

Creating an embedded system using Buildroot
•Create the system's SD card•New partitions using fdisk
•Change its type to FAT32 –32Mb in size

Creating an embedded system using Buildroot
•Create the system's SD card•New partitions using fdisk
•Add second partition (remaining space) –32Mb in size

Creating an embedded system using Buildroot
•Create the system's SD card•New partitions using fdisk
•Set bootable flag to first partition –32Mb in size

Creating an embedded system using Buildroot
•Create the system's SD card•New partitions using fdisk
•Write partition information (and exit)–Remaining space in size

Creating an embedded system using Buildroot
•Create the system's SD card•New partitions using fdisk
•Format partitions–First partition (/dev/sdc1) to FAT32
» boot is a name for the device

Creating an embedded system using Buildroot
•Create the system's SD card•New partitions using fdisk
•Format partitions–Second partition (/dev/sdc2) to ext4

Creating an embedded system using Buildroot
•Create the system's SD card•New partitions using fdisk
•Remove and insert card to automount•df to verify mounted partitions

Creating an embedded system using Buildroot
•Create the system's SD card•Transfer files to new file systems
•Download firmware and boot loader files
•Copy them to partition 1 (mounted on /media/pfc/boot/)
$ cd$ mkdir buildroot/dl/firmware$ cd buildroot/dl/firmware$ wget https://github.com/raspberrypi/firmware/raw/master/ boot/bootcode.bin $ wget https://github.com/raspberrypi/firmware/raw/master/ boot/start_cd.elf$ wget https://github.com/raspberrypi/firmware/raw/master/ boot/fixup_cd.dat
$ sudo cp * /media/pfc/boot$ cd ../..$ sudo cp buildroot-2014.05/output/images/zImage /media/pfc/ boot/kernel.img
Creating an embedded system using Buildroot
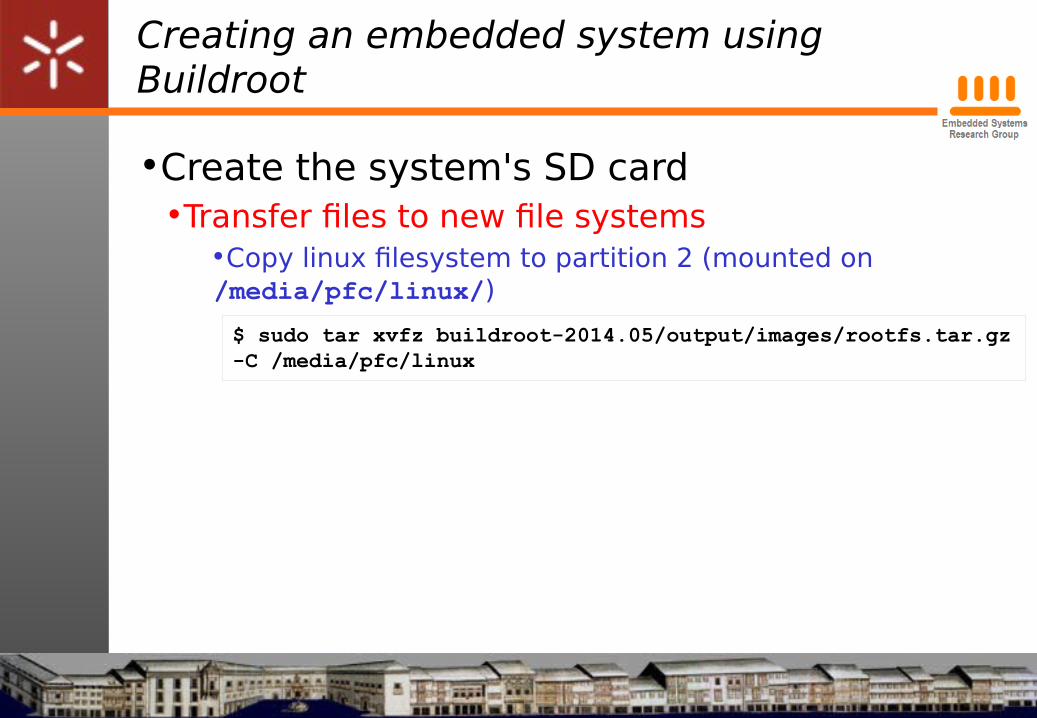
•Create the system's SD card•Transfer files to new file systems
•Copy linux filesystem to partition 2 (mounted on /media/pfc/linux/)
$ sudo tar xvfz buildroot-2014.05/output/images/rootfs.tar.gz -C /media/pfc/linux

Creating an embedded system using Buildroot
•Create the system's SD card•Some housekeeping on boot partition
•There are two boot configuration files– config.txt
» Contains system configuration parameters» This file is read by the GPU before ARM core initialization
– cmdline.txt » Contains arguments to the Linux kernel

Creating an embedded system using Buildroot
•Create the system's SD card•Some housekeeping on boot partition
•Create the file config.txt
•...and add the text
– Assign the least possible amount of memory to GPU» It's the best for general computing when you don't need 3D
graphics or hardware video acceleration» It has enough memory to handle 1920x1200x16bpp frame
buffer resolution
•For more information: http://www.elinux.org/RPi_config.txt
gpu_mem=16
$ cd /media/pfc/boot$ sudo nano config.txt

Creating an embedded system using Buildroot
•Create the system's SD card•Some housekeeping on boot partition
•Create the file cmdline.txt
•...and add the text (without ENTERs)
•For more information: http://www.elinux.org/RPi_cmdline.txt
dwc_otg.fiq_fix_enable=1 dwc_otg.lpm_enable=0 sdhci-bcm2708.sync_after_dma=0 console=ttyAMA0,115200 kgdboc=ttyAMA0,115200 console=ttys1 elevator=deadline rootwait root=/dev/mmcblk0p2 rootfstype=ext4
$ cd /media/pfc/boot$ sudo nano cmdline.txt

Creating an embedded system using Buildroot
•Create the system's SD card•Some housekeeping on Linux partition
•Set a password for default
–root password can also be set using this method
$ RPIPATHVAR=$(openssl passwd -1 -salt xyz esrg)$ sudo sed -i -e "s#^default:[^:]*:#default:$RPIPATHVAR:#" /media/pfc/linux/etc/shadow
Get an encrypted password
Write it to shadow file in the card (/media/pfc/linux)

Creating an embedded system using Buildroot
•Create the system's SD card•Some housekeeping on Linux partition
•Change definitions for console
–Make the changes according to the next figure
$ cd /media/pfc/linux$ sudo nano etc/inittab

Creating an embedded system using Buildroot
•Create the system's SD card•Some housekeeping on Linux partition
•Change mount definitions
– Insert the line /dev/mmcblk0p1 /boot vfat defaults 0 0
•Exit editor and check changes
$ cd /media/pfc/linux$ sudo nano etc/fstab

Creating an embedded system using Buildroot
•Create the system's SD card•Some housekeeping on Linux partition
•Setting RPi static IP address
–Add following information
$ cd /media/pfc/linux/etc/network$ sudo nano interfaces
auto eth0iface eth0 inet staticaddress 192.168.0.2netmask 255.255.255.0network 192.168.0.0broadcast 192.168.0.255gateway 192.168.0.1

Creating an embedded system using Buildroot
•Aside...•Setting a host's static IP address on wired interface
•Needed to connect to RPi–Add a new connection
» On the network icon on the black top bar of the desktop select: “Edit Connections”, and then “Add”
» Set IP address to 192.168.0.1

Creating an embedded system using Buildroot
•Boot RPi•Two connector will be used
• µUSB –To provide power
•TTL-USB –Serial connection to provide boot console– It could be used also to provide power
» 5V on pin2; 3,3V on pin1 » On next slide: red wire provides 5V. It could be connected to
pin2. In that case we SHOULDN'T use µUSB cable

Creating an embedded system using Buildroot
•Boot RPi •TTL-USB converter
•Based on the Prolific PL-2303HX IC • Connections ( Cable ↔ RPi)
– Ground (black) ↔ P1-06– Rx (white) ↔ P1-08 (Tx)– Tx (green) ↔ P1-10 (Rx)
» Other cables may have other colors
» The RX/TX pins are 3.3V level
•This cable can also power RPi• Instead of the µUSB cable
– 5V power (Red) ↔ P1-02» The power pin provides the
500mA direct from the USB port

Creating an embedded system using Buildroot
•Boot RPi•Connect µUSB and TTL-USB converter to Rpi

Creating an embedded system using Buildroot
•Boot RPi•Connect TTL-USB converter to host
•Find device to which it is connected
–Check device permissions

Creating an embedded system using Buildroot
•Boot RPi•Run your serial communication application
•minicom (in this example), GTKTerm, etc.–minicom -D /dev/ttyUSB0

Creating an embedded system using Buildroot
•Boot RPi•minicom
•By default communication settings are the same as Rpi–Speed: 115200–Data bits: 8–Parity: none–Stop bits: 1–No flow control
•You can check these settings on minicom typing
–CTRL A, → Z → O → "Serial port setup”» You should get the
same setting as here:

Creating an embedded system using Buildroot
•Boot RPi•Connect power USB cable to host (power on)
•Et voilà...

Creating an embedded system using Buildroot
•Boot RPi•Log in using default or root (dangerous!!!)
•By default comunication settings are the same as Rpi–Speed: 115200–Datarity: none–Stop bits: 1
•At the end of your session you should halt the system

Creating an embedded system using Buildroot
•Remote login (via network) from the host •Connect host and target by network cable•Insert host in the same network as RPi network
•On the network icon of the black top bar select the network previously added
•Open a terminal window and log on–Speed: 115200$ ssh [email protected]

Custom Linux systems
•Going back...•Generic boot sequence

Custom Linux systems
•Generic boot sequence
•Boot loader•A (or a set of) computer program executed after hardware reset
•Executes self-tests and timer calibration routines •Loads operating system
–As the bootloader runs before any piece of software on a device, it it is processor specific and every motherboard has it’s own

Raspberry Pi boot sequence
•When the Raspberry Pi powers up•The GPU (Graphical Processor Unit) takes control
•It loads a ROM bootloader• Containing the driver to SDCard
– That goes to the root directory of the first partition at the (FAT32 formatted) SDCard looking for bootcode.bin » It means that booting is hardcoded to happen from the SDCard, unlike
other embedded systems
» bootcode.bin is loaded into the L2 cache as SDRAM is disabled at this point
•bootcode.bin is loaded• Enables SDRAM • Knows about the .elf format and loads start.elf into RAM

Raspberry Pi boot sequence
•When the Raspberry Pi powers up•The GPU takes control (cont.)
•start.elf is loaded• It reads config.txt
– Contains hardware configuration parameters such as processor frequency
– Identifies which application to run
• It reads cmdline.txt – Contains parameters to be passed to the application (boot
parameters)
• It loads application to 0x00008000 – This application can be the Linux kernel, another boot loader (e.g.
Uboot), or even a standalone application– It also puts a few opcodes at 0x00000000 and application boot
parameters 0x00000100 and at last the ARM cpu is started.
• Passes control to ARP CPU
•The files are binary code provided by Broadcom
Raspberry Pi boot sequence
•When the Raspberry Pi powers up•The ARM CPU takes control
•It starts executing at 0x00000000• Where it will initialize r0, r1 and r2 • Jumps to 0x00008000 where application image starts

Raspberry Pi boot sequence
•When the Raspberry Pi powers up•Just out of curiosity
•Initial memory allocation• At 0x00000000 is the reset vector• From 0x0000100 to 0x00004000
– Used for application boot parameters (or device tree - bcm2835.dtb)» ATAGS (ARM tags) describing, amongst other things, the available
memory
» Data from cmdline.txt
• From 0x00004000 to 0x00008000– Used by Linux only for its initial mmu mapping page
• From 0x00008000– Used to load the appliction (Linux or whatever)
• More on this: http://www.simtec.co.uk/products/SWLINUX/files/booting_article.html

Raspberry Pi boot sequence
•Raspberry Pi boot sequence•These first three steps are “closed source”
•Provided by SoC manufacturer– On typical embedded systems only the first step exists
• The fourth step•Is when an “aplication” takes control over the processor
– Either it is the Linux kernel itself (as on the previous experiment)
– Or a boot loader (shortly we will discuss U-Boot)– Or even... a bare-metal application
» A program that executes directly over the hardware without the support of an operating system

Raspberry Pi boot sequence
•Booting Linux•Kernel image in memory takes control
•Setups hardware•Initializes page tables and enables memory paging

Raspberry Pi boot sequence
•Booting Linux•Kernel image in memory takes control (cont.)
•More initializations – Interrupts– Further memory configuration– Optionally load the initial RAM disk
» Allows the kernel to fully boot without having to mount any physical disks
» Allows you to create a small Linux kernel with drivers compiled as loadable modules
» These loadable modules give the kernel the means to access disks and the file systems on those disks, as well as drivers for other hardware assets
•The kernel starts the first user-space application: init

Raspberry Pi boot sequence
•Booting Linux•Kernel image in memory takes control (cont.)
•The kernel starts the first user-space application: init • Is responsible for starting the userspace services and programs
– E.g. web server, graphical applications, other network servers
•Several implementations (Buildroot support three of them)• Busybox init
– A basic init program, which is sufficient for most embedded systems» This is the default solution in Buildroot
» The BusyBox init program will read the /etc/inittab file at boot time
(It uses a slightly different syntax from traditional SystemV implementations)
» It mounts a few important filesystems
» Starts the /etc/init.d/rcS shell script (This starts other services)
» Start a getty program (which provides a login prompt)

Raspberry Pi boot sequence
•Booting Linux•Kernel image in memory takes control (cont.)
•Several implementations (cont.)• SystemV init
– This solution uses the old traditional sysvinit program» This was the solution used in most desktop Linux distributions, until
they switched to more recent alternatives such systemd
» sysvinit also works with an inittab file
• systemd – The new generation init system for Linux
» It does far more than traditional init programs: aggressive parallelization capabilities, uses socket and D-Bus activation for starting services, offers on-demand starting of daemons, keeps track of processes using Linux control groups, supports snapshotting and restoring of the system state, etc.
» It will be useful on relatively complex embedded systems, for example the ones requiring D-Bus and services communicating between each other

Custom Linux systems
•Boot loader (again)•A (or a set of) computer program executed after hardware reset
•Executes self-tests and timer calibration routines •Loads operating system
–As the bootloader runs before any piece of software on a device, it it is processor specific and every motherboard has it’s own
•Several bootloaders for embedded emb. systems•U-Boot•Barebox•Redboot•. . .

Boot loader
•U-Boot•A popular open source boot loader used in many
embedded devices •Executes self-tests and timer calibration routines •Loads operating system • As the bootloader runs before any piece of software on a
device, it it is processor specific and every motherboard has it’s own boot loader
•We will install U-Boo on RPi•As we saw it is not mandatory• Rpi boots without any other support
•An external boot loader (on top of the existing) • Provides flexibility on the booting process
U-Boot
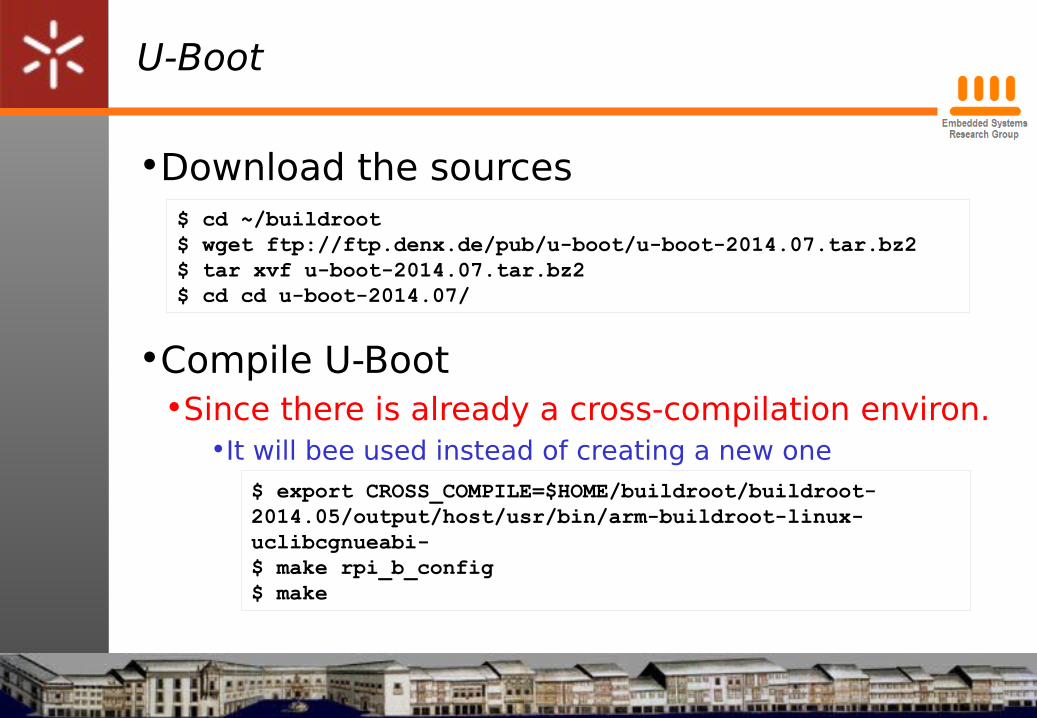
•Download the sources
•Compile U-Boot•Since there is already a cross-compilation environ.
•It will bee used instead of creating a new one
$ cd ~/buildroot$ wget ftp://ftp.denx.de/pub/u-boot/u-boot-2014.07.tar.bz2 $ tar xvf u-boot-2014.07.tar.bz2 $ cd cd u-boot-2014.07/
$ export CROSS_COMPILE=$HOME/buildroot/buildroot-2014.05/output/host/usr/bin/arm-buildroot-linux-uclibcgnueabi-$ make rpi_b_config$ make

U-Boot
•Copy boot loader to SD card•Insert the SD card on a PC
•Copy boot loader to SD card
•Edit config.txt on SD card
– And add the line
$ sudo cp ./u-boot.bin /media/pfc/boot
$ cd /media/pfc/boot$ sudo nano config.txt
kernel=u-boot.bin

U-Boot
•Copy boot loader to SD card•Insert the SD card on a PC (cont.)
•Create uEnv.txt on SD card
– And add the text (without ENTERs)
$ cd /media/pfc/boot$ sudo nano uEnv.txt
bootargs=dma.dmachans=0x7f35 bcm2708_fb.fbwidth=656 bcm2708_fb.fbheight=416 bcm2708.boardrev=0xf bcm2708.serial=0xe4fedb31 sdhci-bcm2708.emmc_clock_freq=250000000 vc_mem.mem_base=0x1ec00000 vc_mem.mem_size=0x20000000 dwc_otg.lpm_enable=0 console=ttyAMA0,115200n8 kgdboc=ttyAMA0,115200n8 console=tty elevator=deadline rootwait root=/dev/mmcblk0p2 rootfstype=ext4

U-Boot
•Boot•Unmount the card and insert it on RPi
•Power the board

U-Boot
•Boot•Type the commands to boot
•The system will boot as previously
•To automate boot •Insert the following line in uboot.scr
bootcmd=echo starting from MMC ; mmc dev 0; fatload mmc 0:1 ${kernel_addr_r} kernel.img; bootz ${kernel_addr_r}
U-boot> fatload mmc 0:1 ${kernel_addr_r} kernel.img U-Boot> bootz ${kernel_addr_r}

Booting with device tree
•Device tree •A file describing system hardware (OS agnostic)
•Needed to boot the system (When system configured this way) • Loaded by the boot loader • Parsed by the kernel at boot time
•Without device tree (Our approach in classes) •The kernel contains the entire description of the hardware• In platform-specific boot routines in the kernel’s sources
– Enabled by kernel configuration parameters
• The boot loader loads a single binary and executes it– The kernel image

Booting with device tree
•Device tree•Without device tree (cont.)
•The boot loader passes some additional information to kernel
–Memory size and location–Command line
•This was our approach!!!•This became difficult to manage with ARM architectures
–Each chip has its own addresses for the registers, and a slightly different configuration–Each board has its own set of external components
–Resulting in a lot of header files, patches and special configuration parameters in the kernel tree

Booting with device tree
•Device tree•Advantages
•Separation of architecture from operating system–The same compiled kernel can support different hardware configurations within a wider architecture family
» Instead of modifying/compiling kernel for each variant
• Other advantages–Easier to add support for newer platforms–Reduces amount of board specific code–Faster board ports

Booting with device tree
•Booting with device tree•The kernel no longer contains the description of the hardware
•It is located in a separate binary•Kernel configuration should be set accordingly
•The boot loader loads two binaries•The kernel image•DTB (device tree blob)
– Located in arch/arm/boot/dts» Inside /home/pfc/buildroot/buildroot-2014.05/output/build/
linux-b09a27249d61475e4423607f7632a5aa6e7b3a53
– The drivers are loaded by the kernel when the hardware is present (i.e. declared in the device tree)» DTB file should be recompiled when writing new device drivers

Booting with device tree
•DTB•Two source files
•bcm2835-rpi-b.dts– Board level definitions
•bcm2835.dtsi– SoC level definitions
•Device Tree Compiler•Compiles the source into a binary form
– Creating the Device Tree Blob (DTB)
•More on this subject•http://free-electrons.com/pub/conferences/2013/elce/ petazzoni-device-tree-dummies/•http://www.devicetree.org


The end