bullet pen tutorial.wps - family woodworkingfamilywoodworking.org/forums/oversize_attachments/bullet...
TRANSCRIPT

Rifle Cartridge Bullet Pen TutorialBy Les Elm
Making pens using rifle cartridges is nothing new. I have seen photos of cartridge pens and read tutorials onvarious pen making forums and decided to try making a Rifle Cartridge Pen using an actual Copper bulletfor the nib. The following instructions are what has worked for me. As you make your own pen you mayfind different ways to make this pen. These instructions can be used to make .270, .280, 30-06, 303 British ,7mm Magnum and other calibers.
For the Cartridge Pens I purchase new unprimed Brass Cartridges. New cartridges have no primers installedand I don’t have to deal with a spent primer when drilling out the primer hole. A spent primer will have anindentation in the end of the primer. With fired brass the neck has to be resized in order to seat the bullet orthe bullet can be glued in place.
It would be very dangerous to try and remove a live primer without the proper equipmentthat is used for reloading ammunition!
The bullets I use to make the nibs are either Full Metal Jacket with a lead core or Solid CopperBullets which I prefer due to environmental and health concerns with bullets containing Lead.
For the kit hardware I use either a Slimline or European style that uses 7mm tubes. I also use aSlimline finial and rifle clips and Euro Finial and rifle clips can be used.
I have made the cartridge pens with or without center bands. Some people prefer no center band andsome like the looks of a center band.
I use a Beall collet chuck and a ½ inch collet to hold the brass cartridges which will not mark thebrass. Ensure you have the collet tightened enough around the cartridge to keep it from spinning inthe collet while you are drilling the primer hole or you will mark the soft brass.
Set lathe at 800 RPM to do the drilling and cutting. When drilling either a bullet containing lead ora solid copper bullet, go slow and drill shallow using Rapid Tap Cutting Fluid, cleaning the drill bitsfrequently to avoid plugging the hole. If you go too fast the lead will get hot, melt and causeproblems.
To finish the brass cartridge and copper bullet to avoid tarnishing, first clean and polish the BrassCartridge and Copper Bullet with Liquid Brasso and wipe down with Lacquer Thinner. Apply 4coats of Sherwin - Williams Opex Clear Acrylic Metal Lacquer thinned with Lacquer Thinner to a40% Lacquer and 60% Lacquer Thinner mixture. I use the dipping method to accomplish this, firstby plugging the nib hole with Bee’s Wax, installing a piece of tight fitting dowel into the 7mmprimer hole and dip into a container of the thinned lacquer and hang vertically to dry.
I finish the Deer Antler by first sanding with 400 grit, fill any voids with Medium CA, then sandfrom 400 through to 1500 and polish with Brasso or Hut Ultra Gloss Plastic Polish.
Page 1.
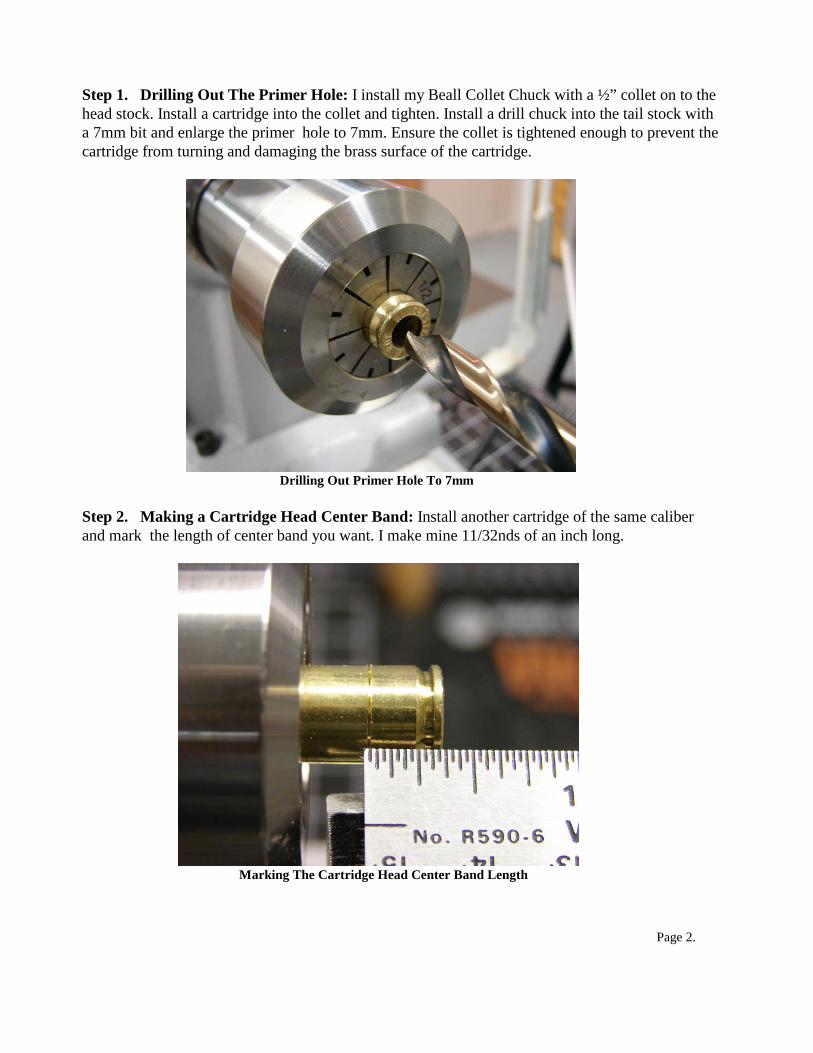
Step 1. Drilling Out The Primer Hole: I install my Beall Collet Chuck with a ½” collet on to thehead stock. Install a cartridge into the collet and tighten. Install a drill chuck into the tail stock witha 7mm bit and enlarge the primer hole to 7mm. Ensure the collet is tightened enough to prevent thecartridge from turning and damaging the brass surface of the cartridge.
Drilling Out Primer Hole To 7mm
Step 2. Making a Cartridge Head Center Band: Install another cartridge of the same caliberand mark the length of center band you want. I make mine 11/32nds of an inch long.
Marking The Cartridge Head Center Band Length
Page 2.

Step 2.1. Parting the Cartridge Head: To part the cartridge head off of the cartridge I use thepoint of an old HHS Skew placed on my tool rest.
Using Skew To Cut Base Off Of Cartridge Head
The Cartridge Head Cut Off Of The Cartridge
Page 3.
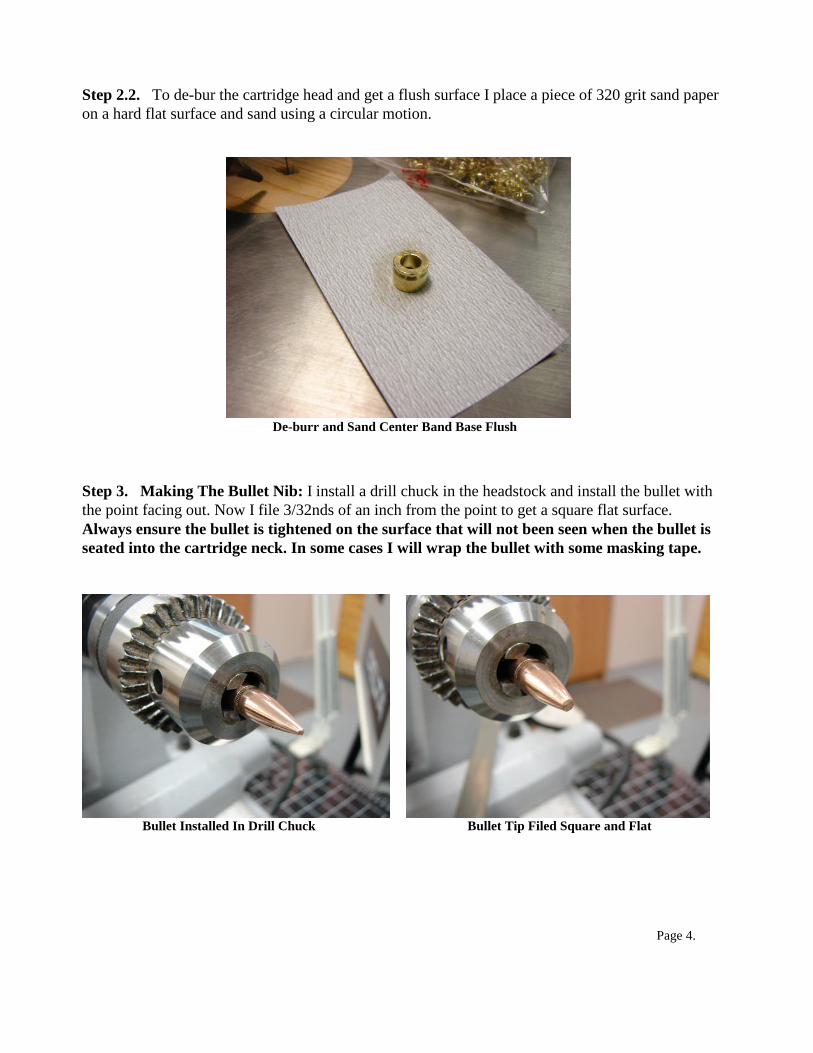
Step 2.2. To de-bur the cartridge head and get a flush surface I place a piece of 320 grit sand paperon a hard flat surface and sand using a circular motion.
De-burr and Sand Center Band Base Flush
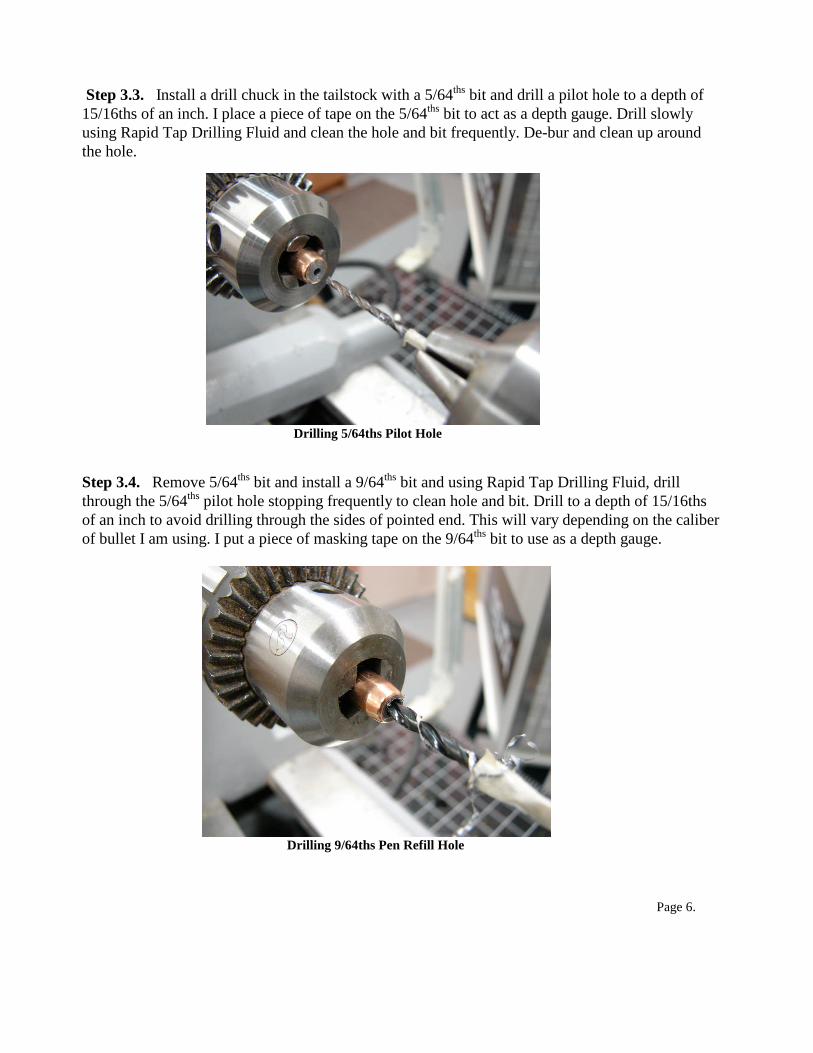
Step 3. Making The Bullet Nib: I install a drill chuck in the headstock and install the bullet withthe point facing out. Now I file 3/32nds of an inch from the point to get a square flat surface.Always ensure the bullet is tightened on the surface that will not been seen when the bullet isseated into the cartridge neck. In some cases I will wrap the bullet with some masking tape.
Bullet Installed In Drill Chuck Bullet Tip Filed Square and Flat
Page 4.

Step 3.1. Install a drill chuck in the tailstock and install a #55 drill bit to drill a pilot hole in thecenter of the flat bullet tip. Drill slowly using Rapid Tap Drilling Fluid and stop drilling once youhit lead. Remove the #55 bit and install a #46 bit and drill through the pilot hole using Rapid TapDrilling Fluid to a depth of ½ an inch. I place a piece of tape on the #46 bit to act as a depth gauge.
Drilling #55 Pilot Hole Drilling #46 Nib Hole
Step 3.2. Next I reverse the bullet in the drill chuck with the large end facing out. Install a livecenter into the tailstock and mark the center of the boat tail end of the bullet.
Marking The Center Of The Bullet Boat Tail
Page 5.
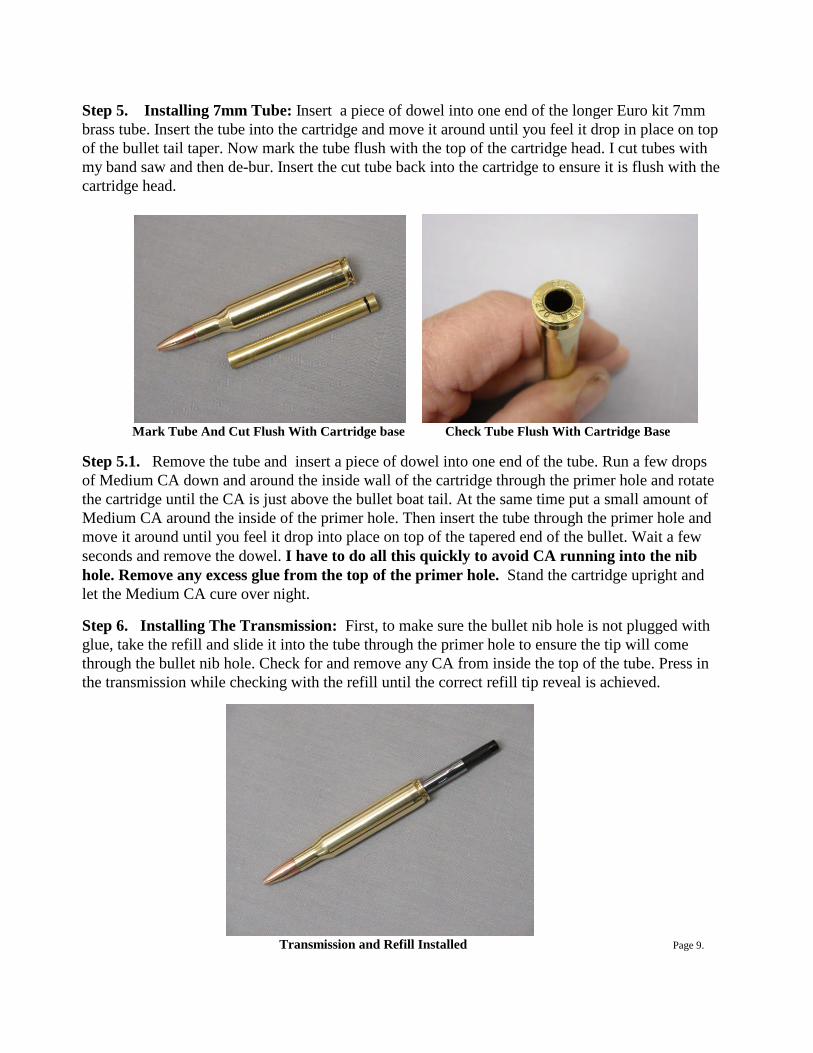
Step 3.3. Install a drill chuck in the tailstock with a 5/64ths bit and drill a pilot hole to a depth of15/16ths of an inch. I place a piece of tape on the 5/64ths bit to act as a depth gauge. Drill slowlyusing Rapid Tap Drilling Fluid and clean the hole and bit frequently. De-bur and clean up aroundthe hole.
Drilling 5/64ths Pilot Hole
Step 3.4. Remove 5/64ths bit and install a 9/64ths bit and using Rapid Tap Drilling Fluid, drillthrough the 5/64ths pilot hole stopping frequently to clean hole and bit. Drill to a depth of 15/16thsof an inch to avoid drilling through the sides of pointed end. This will vary depending on the caliberof bullet I am using. I put a piece of masking tape on the 9/64ths bit to use as a depth gauge.
Drilling 9/64ths Pen Refill Hole
Page 6.

Step 3.5 After drilling 9/64ths hole I use a file to taper the bullet enough to allow the 7mm brasstube to fit over the taper and then de-burr and clean up.
Bullet Tail Tapered For 7mm Brass Tube Checking Taper With 7mm Tube
Step 3.6. Now I reverse bullet in the chuck, de-burr and clean up the #46 nib hole.
Finished Bullet Nib Hole
Page 7.

Step 3.7. Next I check the #46 nib hole to ensure the refill slides in freely and that there is enough9/64ths hole depth to get the amount of refill tip reveal through the nib hole that I want.
Checking Nib Refill Hole For Reveal
Step 4. Seating The Bullet: Next I press the bullet nib into brass cartridge neck to the normalseating position that you would see on a loaded bullet. I use my drill press to do the seating.
Seating Bullet Into Cartridge Neck
Page 8.
Step 5. Installing 7mm Tube: Insert a piece of dowel into one end of the longer Euro kit 7mmbrass tube. Insert the tube into the cartridge and move it around until you feel it drop in place on topof the bullet tail taper. Now mark the tube flush with the top of the cartridge head. I cut tubes withmy band saw and then de-bur. Insert the cut tube back into the cartridge to ensure it is flush with thecartridge head.
Mark Tube And Cut Flush With Cartridge base Check Tube Flush With Cartridge Base
Step 5.1. Remove the tube and insert a piece of dowel into one end of the tube. Run a few dropsof Medium CA down and around the inside wall of the cartridge through the primer hole and rotatethe cartridge until the CA is just above the bullet boat tail. At the same time put a small amount ofMedium CA around the inside of the primer hole. Then insert the tube through the primer hole andmove it around until you feel it drop into place on top of the tapered end of the bullet. Wait a fewseconds and remove the dowel. I have to do all this quickly to avoid CA running into the nibhole. Remove any excess glue from the top of the primer hole. Stand the cartridge upright andlet the Medium CA cure over night.
Step 6. Installing The Transmission: First, to make sure the bullet nib hole is not plugged withglue, take the refill and slide it into the tube through the primer hole to ensure the tip will comethrough the bullet nib hole. Check for and remove any CA from inside the top of the tube. Press inthe transmission while checking with the refill until the correct refill tip reveal is achieved.
Transmission and Refill Installed Page 9.
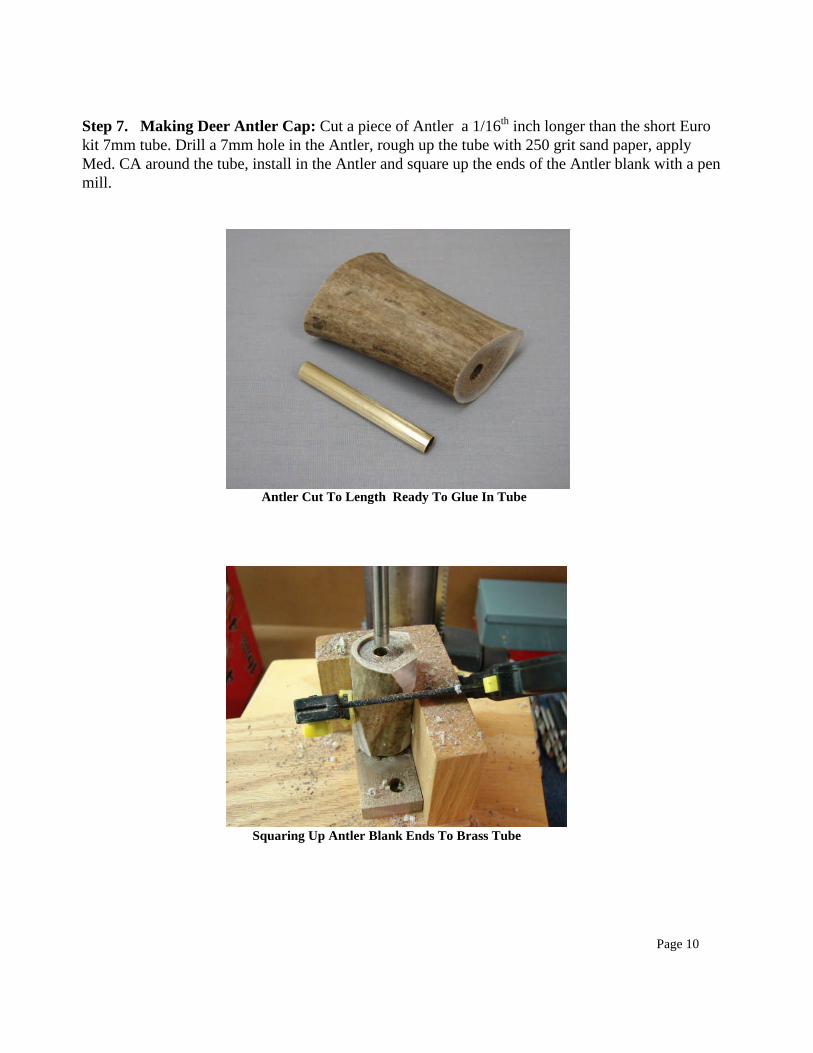
Step 7. Making Deer Antler Cap: Cut a piece of Antler a 1/16th inch longer than the short Eurokit 7mm tube. Drill a 7mm hole in the Antler, rough up the tube with 250 grit sand paper, applyMed. CA around the tube, install in the Antler and square up the ends of the Antler blank with a penmill.
Antler Cut To Length Ready To Glue In Tube
Squaring Up Antler Blank Ends To Brass Tube
Page 10

Step 7.1. Install the Antler blank on the mandrel and using appropriate pen kit bushings turn the blankdown to just proud of the Slimline Finial or the Finial of your choice. Mark the center band end with thecasing head cut to use as a center band.
Marking Tenon using Cartridge Head Center Band
Step 7.2. Cut a tenon down to the brass tube leaving enough Med CA on the brass tube to allow asnug fit for the cartridge head center band.
Tenon Cut for Cartridge Head Center Band
Page 11.

Step 7.2. Turn the Antler down just proud of the cartridge head center band. I use various calibercartridge heads I have cut to use as bushings.
Antler Turned Down Using Cartridge Head As A Bushing
Step 8. Turn and finish the Antler blank flush with the finial, cartridge head center band orcartridge head . To install the cartridge head center band apply some Med CA on the end of theAntler and press on over the brass tube. If you don’t want a center band then turn the barrel to matchthe outside diameter of the of the cartridge base. Install finial and clip of choice to complete pen.
.270 Bullet Pens with Cartridge Head Center Bands and Slimline Finials
Page 12.

Making a Rifle Cartridge Cap
I install my Beall Collet Chuck with a ½” collet on to the head stock. Install a cartridge into the collet andtighten. Install a drill chuck into the tail stock with a 7mm bit and enlarge the primer hole to 7mm. Ensurethe collet is tightened enough to prevent the cartridge from turning and damaging the brass surface of thecartridge.
Step 1. Drilling Out The Primer Hole: I install my Beall Collet Chuck with a ½” collet on to the headstock. Install a cartridge into the collet and tighten. Install a drill chuck into the tail stock with a 7mm bit andenlarge the primer hole to 7mm. Ensure the collet is tightened enough to prevent the cartridge from turningand damaging the brass surface of the cartridge.
Drilling Out Primer Hole To 7mm
Step 2. Next cut a 7mm brass tube 1/16” longer then the length of the cartridge being used for the cap.
7mm Brass tube cut 1/16” longer than Cartridge
Page 1.

Step 3. Wrap enough 1/2” Teflon Tape around on one end of the tube to fit inside the cartridge neck.Unwrap the Teflon Tape and place a small drop of Medium CA on the tube and rewrap the Teflon Tapearound the tube. Hold the Teflon end of the tube and insert the tube through the cartridge neck to check thefit. Remove the tube.
Teflon Tape Wrapped to Fit Cartridge Neck
Step 4. Insert a piece of ¼” dowel into the Teflon Tape end of the tube. Place a small drop of Medium CAaround the inside of the cartridge neck and cartridge primer hole. Place a drop of Medium CA on the TeflonTape and insert the tube ensuring the tube is flush with the bottom of the cartridge head.
Tube Inserted Into Cartridge Neck Tube Flush with Bottom Of Cartridge Head
Page 2.

Step 5. Square up the tube flush with the end of the cartridge neck by removing the 1/16” section of tubesticking above the cartridge. I use my blank squaring jig but a pen mill will also do the job
Squaring Up Brass Tube with Cartridge neck
Step 6. Press in a Rifle Clip with Slimline Finial into the Cartridge neck.
Press in Slimline Finial with Rifle Clip
Page 3.

Completed Brass 303 British Rifle cartridge Twist Ballpoint Pen
.303 British Brass with .303 British Cap with Gold Rifle Clip
.308 Nickel Plated with .308 Cap and Chrome Rifle ClipPage 4.