bv250 motorcycle owner’s manual - baja · pdf filealways wear a helmet; ... contained in...
TRANSCRIPT

BV250 Motorcycle Owner’s Manual
Always wear a helmet; It could save your Life!
This manual should be considered as a permanent part of the vehicle and should remain with the vehicle when resold or otherwise transferred to a new user or operator.
The manual contains important safety information and instructions which should be read carefully before operating the vehicle.
REVA073107
Minimum age requirement: 16

Introduction
Congratulations on your purchase of the Baja Motorsports BV250 Motorcycle.
Take time to understand how your motorcycle works before riding. Scheduled service is a must and it is important to follow the break-in guidelines and pre-ride instructions.
Make certain that you read the warranty coverage information provided and understand your responsibilities.
If you have any questions, comments or concerns contact Baja Motorsports at 888-863-2252.
All information, illustrations, photographs and specifications contained in this manual are based on the latest product information available at the time of publication. Due to improvements or other changes, there will be some discrepancies in this manual. We reserve the right to make product changes at any time, without notice and without incurring any obligation to make the same or similar changes to the vehicle previously built or sold.

Safety
The most important thing to remember is your safety and the safety of others. We have included procedures and labels to help you make safe informed decisions. This information is provided to make you aware of potential hazards that could hurt you and/or others. It is impossible to warn you of ALL potential hazardous so you must use your own best judgement. The following are different kinds of safety information you will find in this manual:
Safety Labels- On your motorcycleSafety Messages- Warning, Caution and Danger
The meaning of Warning, Caution and Danger Safety Messages:
WARNING!
! DANGER
! CAUTION
Death or serious injury CAN occur if proper instructions are not followed.
Death or serious injury WILL occur if proper instructions are not followed.
You CAN be hurt if proper instructions are not followed.
WARNING!
The engine exhaust from this product contains chemicals known to the State of California to cause cancer, birth defects or other reproductive harm. CALIFORNIA PROPOSITION 65

�
Contents
Warranty............................................................... Pg.6
Safety Information............................................... Pg.7 Safety Labels........................................... Pg.9
Component Locations........................................... Pg.10 Indicators................................................. Pg.12 Controls................................................... Pg.13
Before Riding...................................................... Pg.16 Pre-Ride Inspection................................. Pg.17 Loading guidelines and Load Limits....... Pg.18
Starting Procedures.............................................. Pg.19 Starting and Stopping Engine.................. Pg.19 Shifting Gears.......................................... Pg.21 Braking.................................................... Pg.23 Parking.................................................... Pg.24 Servicing your Motorcycle................................. Pg.25 Maintenance Safety................................. Pg.26 Maintenance Schedule........................... Pg.28 Servicing............................................................ Pg.32 Fuel........................................................ Pg.32 Fuel and Engine Oil............................... Pg.33 Air Cleaner............................................. Pg.37 Crankcase Breather and Throttle............ Pg.38 Clutch..................................................... Pg.39 Engine Idle Speed.................................. Pg.41 Spark Plug............................................. Pg.42

�
Contents
Brakes................................................... Pg.43 Tires...................................................... Pg.47 Drive Chain.......................................... Pg.51 Battery................................................... Pg.55Appearance Care.............................................. Pg.58Vehicle Identification....................................... Pg.59Specifications................................................... Pg.60Wire Diagram................................................... Pg.63Emission Control System Warranty............... Pg.64

�
Warranty
Congratulations on your purchase of the Baja Motorsports BV250 Motorcycle.
It is warranted to be free of manufacturing defects in the material of workmanship for a period of 90 days from the date of purchase. During the warranty period BAJA MOTORSPORTS, LLC will at its option, repair, provide replacement parts or replace your Baja Motorsports BV250 Motorcycle at no charge. This warranty does not cover normal wear items or damage caused by neglect or misuse of the product.
Engine Warranty – 90 daysFrame Warranty – 90 days
Warranty is void if:
Frame is bent or broken due to abuseWheels are bent or brokenFender bent or broken due to abuseAny sign of impact, accident, jumping, spin-outs or roll over.
BAJA MOTORSPORTS, LLC is not liable for any damage claim or liability claim person or otherwise resulting from the operation of this product in any way.
Should you experience a problem or need to return your Baja Motorsports BV250 Motorcycle for repair, please call the BAJA MOTORSPORTS customer service
department TOLL FREE at 1-888-863-BAJA (2252) between the hours of 7am and 5pm Monday thru Friday PST and Saturday 8am to 4pm PST. During DST hours
change to MT. You will be instructed how to proceed.
A COPY OF THE SALES RECEIPT IS REQUIRED.

�
Safety Information
This user’s manual contains important safety and maintenance information. Read it carefully before riding. Failing to follow the warnings contained in this manual could result in INJURY or DEATH.
ALWAYS WEAR A HELMETThe operator and passenger (if any) of this vehicle should always wear a helmet approved by agencies such as Department of Transportation (DOT), Safety Helmet Council of America (SHCA), or Snell Memorial Foundation (SNELL). Most motorcycle accident fatalities are due to head injuries. The operator should also wear face shields or goggles, boots or closed-toe shoes, gloves, and other appropriate protective clothing.
TAKE TIME TO LEARN AND PRACTICETake time to get to know this vehicle. The operator’s ability to operate this motorcycle safely is largely dependent upon the operator’s ability to exercise proper judgment. The operator must be of sufficient age, understanding, mental capacity, and physical capability to safely operate this vehicle. This vehicle should only be operated after sufficient practice in a decongested safe area. Safe operation includes responsibility for the safety of a passenger (if any). We recommend that any inexperienced driver should take a certified course approved by the Motorcycle Safety Foundation (MSF).
RIDE DEFENSIVELYA common accident happens when a car suddenly moves into your lane. Most motorcycle collisions happen when a car turns left in front of a motorcycle. Pay extra attention to other vehicles around you, never expect that they can see you.

�
Safety Information
MAKE YOURSELF VISIBLEMake yourself more visible by wearing bright reflective clothing. Use your horn when it will helps others see you and before turning use your turn signal.
RIDE WITHIN YOUR LIMITSYou should not ride beyond your abilities and never faster than the posted speed limit. NEVER OPERATE THIS VEHICLE WHILE UNDER THE INFLUENCE OF ALCOHOL, DRUGS, OR MEDICATION OF ANY KIND. SUCH OPERATION COULD BE DANGEROUS TO YOURSELF AND/OR OTHERS.
KEEP YOUR VEHICLE IN A SAFE CONDITIONProper maintenance will ensure a safe ride. Perform all recommended maintenance and inspect your vehicle before each ride. Never modify your vehicle in any way to make it unsafe.
NHTSA Safety NoticeIf you believe that your vehicle has a defect which could cause serious injury or death, you should immediately contact the National Highway Traffic Safety Administration (NHTSA) in addition to notifying Baja Motorsports.
If NHTSA receives similar complaints, it may open an investigation and if it finds that a safety defect exists in a group of vehicles, it may order a recall and remedy campaign.
However, NHTSA cannot become involved in any individual problems between you, your dealer or Baja Motorsports.
To contact NHTSA you may call the Auto Safety Hot line toll-free within the United States on 1-800-424-9393 or write to: NHTSA, 400 Seventh Street SW, Washington, DC 20590.

�
Safety Labels
The safety labels on your motorcycle provide you with important information do not remove them.
If a label becomes too difficult to read or comes off contact Baja Motorsports for replacement.
COLD TIRE PRESSURES:DRIVER AND PASSENGER:FRONT 29psi (199kpa) REAR 36psi (250kpa) DRIVER ONLY:FRONT 29psi (200kpa) REAR 33 psi (250kpa)TIRE SIZE: FRONT 110/90-16 REAR 130/90-15
• Study the owners manual carefully• Always wear a helmet, eye protection and protective riding gear.• Do not drive while drinking alcohol or while on medication.
WARNING!

10
Component Locations
Fuel valveAir cleaner
Shift LeverKickstand
Passenger footrest
BatteryMain fuse
Fuel tank cap Steering lock
Rear brake pedal
Oil filler cap/dipstick
Headlight
Taillight
Driver footrestBrake caliper
Carburetor
Cargo rack
Mirrors
Exhaust

11
Component Locations
SpeedometerIndicator lights
Brake fluid reservoirIgnition switchBrake brake lever
Horn
Turn signal switch
Headlight dimmer switch
Clutch lever
Fuel indicator
Fuel fill cap
Throttle gripEngine stop switch
Start button
Rearview mirror

12
Indicators
The indicators on your motorcycle help make you aware of possible issues, refer to them often.
Speedometer (1)-Shows the speed you are traveling in km.
Odometer (2)-Tracks the total miles driven.
Tripmeter (3)-Displays the number of miles you have traveled since last reset. To reset, turn tripmeter reset knob.
Rpm (4)- Shows engine’s rpm’s
Fuel indicator (5)- Shows fuel level.
High beam indicator (6)-Illuminates when headlight is on High beam.
Neutral indicator (7)-Illuminates when transmission is in neutral.
Turn signal indicator (8)-Flashes when left/right turn signal is on.
1
2
3
4
5
678

13
Controls
Fuel Valve
Fuel valve- Used to control the flow of gasoline from the fuel tank to the carburetor.
Choke Button- May be used when starting engine. See starting procedures using choke lever on page 19.
Choke Button
ON OFF
ON OFF RESERVE

1�
Controls
Ignition Switch OFF ONIgnition switch- Used for starting and stopping the engine. The key is used to lock the steering, preventing theft.
ON- All electrical components are ON.OFF- All electrical components are OFF.
Start button
Engine stop switch
Start button and Engine stop switch
Start button - Pushing the start button will start the engine. When button is pressed in the start motor will crank the engine, headlights will turn off but the taillight will stay on. See starting procedures page 19.
Engine stop switch- In case of an emergency and a quick stop is necessary turn switch to the “OFF” position. This switch must be in the “RUN” position in order to start the vehicle, and should remain in this position even while the engine is off. If you leave ignition switch on and engine stop switch off, the lights will stay on, causing the battery to lose life.
-RUN -OFF
1�
Controls
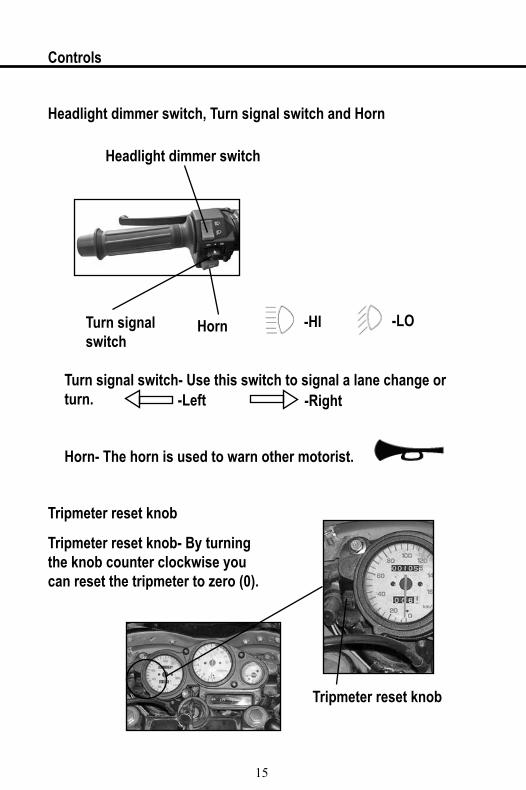
Headlight dimmer switch, Turn signal switch and Horn
Headlight dimmer switch
Turn signal switch
Horn -HI -LO
Turn signal switch- Use this switch to signal a lane change or turn.
Horn- The horn is used to warn other motorist.
-Left -Right
Tripmeter reset knob
Tripmeter reset knob
Tripmeter reset knob- By turning the knob counter clockwise you can reset the tripmeter to zero (0).

1�
Before Riding
Before your first ride on your new motorcycle we strongly recommended you:● Read the owner’s manual.● Understand all safety labels.● Know how to operate all controls.
Before you ride each time, make sure:● You are in good physical and mental health.● You are wearing protective gear (helmet, clothing, eyeprotection etc.) If you have a passenger be sure they also haveprotective gear on.● You do not have ANY alcohol or drugs in your system.
Protective ClothingFor your protection we urge you to ALWAYS wear protective clothing. The proper clothes can protect you from injury. Wear an approved motorcycle helmet, goggles, a good pair of gloves, strong boots that cover the ankle, long pants, and a long sleeve shirt every time you ride.
Helmets and Eye protection- A DOT approved motorcycle helmet is the most important part of your protective gear. A DOT approved motorcycle helmet can help prevent a serious head injury. Choose a helmet that fits snugly. Motorcycle dealers can help in selecting a good quality helmet which fits properly.
WARNING!
Not wearing a helmet greatly increases your chances of serious head injuries or death in the event of an accident.If you are riding with a passenger be sure they are also wearing a helmet and eye protection.

1�
Pre-ride Inspection
Before each ride check the condition of your motorcycle to make sure that it does not have mechanical problems. Your motorcycle should always be in good riding condition to ensure the safety of you, your passenger (if any) and others around you.
WARNING!
Improper maintenance of this motorcycle or failure to correct any problems can result in serious injury or death.ALWAYS perform a pre-ride inspection before every ride.
Be sure to check the following items before each ride:Brakes- Press on the brake pedal and hold in brake lever to ensure that the brakes are operating correctly.Throttle- Rotate the throttle handle to ensure it moves smoothly.Leaks and Loose ends- Check all hoses for leaks and cables that may be loose.Lights- Be sure that your Headlight, Brake light, Taillight and Turn signals are working properly.Chain- Check the condition. Adjust the slack (if any) and lubricate (if needed).Tires- Use an air pressure gauge to check the pressure. If needed add air. Look for excessive wear or damage.
If you are riding with a passenger or carrying cargo check:Load Limit- Do not exceed the load limit.Cargo- Secure all cargo.Rear suspension- Adjust the suspension according to the weight of the load you are carrying.
Make certain that you keep up with the Periodic maintenance (see periodic maintenance section).

1�
Loading guidelines and load limits
Your motorcycle has been designed to carry you and one passenger. When a passenger is riding with you there will be a difference in the acceleration and braking.
Load Limits
Maximum weight capacity (including rider, passenger, accessories and cargo): 330 lbs(150kg)
Maximum cargo weight: 11 lbs(5kg)
Loading guidelines
Improper loading of your motorcycle may affect your stability. With the motorcycle properly loaded always ride at a reduced speed.
If you have questions about carrying cargo contact Baja Motorsports for advice.
Check the following when carrying a passenger or cargo:● Both tires are properly inflated.● Rear suspension may need adjusting.● Secure all cargo● Balance cargo weight● Do not attach large or heavy items to the front of your motorcycle.
WARNING!
Improper loading or overloading can be hazardous and may cause and accident resulting in serious injury or death.Follow all load limits.

1�
Starting and Stopping the Engine
Always follow proper starting procedures.
Starting Procedure
● Insert key into ignition, turn to “ON” position.● Make sure the transmission is in the “NEUTRAL” position.● Turn the engine stop switch to “RUN”.● Turn fuel valve to ”ON”.
If you are restarting a warm engine, follow procedure for High Air Temperature.
Normal Air Temperature: 10˚-35˚C (50˚-95˚F)
Never start the engine in a closed place as the exhausted gas from the vehicle contains toxic carbon monoxide.
WARNING!
1) Turn choke ON (pull and hold button out)2) Start the engine, leaving throttle closed. Do not open throttle while choke is ON, this will make it difficult to start. 3) After engine has started, turn choke OFF (push button in). If idle is not stable, open the throttle a little.
ON
OFF

20
Starting and Stopping the Engine
High Air Temperature: 35˚C (95˚F) or aboveDO NOT TURN CHOKE ON1) Slightly open throttle.2) Start engine.
Low Air Temperature: 10˚C (50˚F) or below1) Follow Normal Air Temperature procedures 1-2.2) After RPM’s pick up, turn choke ON to keep fast idle.3) Keep warming the engine until it responds to the throttle when choke is OFF.
NOTICE:Extensive use of the choke can cause damage to the piston and cylinder wall.Fast idling for more than 5 minutes at Normal Air Temperature can cause exhaust pipe discoloration.
Flooded EngineThe engine may be flooded with extra gasoline, if it does not start after several attempts. Try the following to clear a flooded engine:1) Turn the engine stop switch to the “OFF” position.2) Close the choke OFF3) Open the throttle completely.4) Push and hold in the start button for 5 seconds.5) Wait 10 seconds and turn the engine stop switch to the “RUN” position.
Next, follow the High Air Temperature starting procedures.

21
Starting and Stopping the Engine, Shifting Gears
How to Stop the Engine
Normal Engine Stop● Shift into neutral and turn the ignition switch “OFF”.● Leave engine stop switch in the “RUN” position even when engine is “OFF”.DO NOT leave the ignition switch “ON” while the engine stop switch if “OFF”, this will allow the lights to stay “ON” causing the battery to loose life.
Emergency Engine StopIf an emergency stop is necessary, use the engine stop switch.Simply move the emergency stop switch to “OFF”.
Shifting Gears
Tips for learning how to shift for the inexperienced rider:
● Shift while moving a straight line.● Let loose on the throttle and pull in clutch lever completely before shifting (improper shifting may cause damage to the engine).● Recognize the engaging point when you release the clutch lever.
Your motorcycle is equipped with a cable-operated clutch. It has five forward gears, one down and four up.

22
Shifting Gears
● Reduce the throttle or shift to a higher gear before engine RPM’s get too high.● Shift to a lower gear before the engine RPM’s get too low.● When the engine RPM’s are too high do not downshift to slow your motorcycle, this could cause damage.● Do not coast or tow your motorcycle for a long period of time while the engine is off.● If your speed drops below 9mph (15km/h) pull in clutch lever and shift down to 1st gear or stalling can occur.

23
Braking
Your motorcycle is equipped with a hand operated front hydraulic disc brake and a foot operated rear drum brake. Your front brake provides 70% of your braking power. By using both front and rear brakes you will achieve faster, more stable and effective braking.
To slow down or stop your motorcycle apply front and rear brakes while downshifting. Slowly increase braking as you feel your speed reduce. In order to prevent stalling, pull in clutch lever before stop-ping completely.
If you apply your brakes too abruptly you may lock the wheels, slide and loose control of your motorcycle. If this should happen, release the brakes and steer straight until you have completely regained control.
Before making a turn reduce your speed. Try not to brake or close the throttle too quickly while turning or you may loose control of your motorcycle.
When traveling down a steep grade reduce your speed by downshifting rather than braking. Applying your brakes for a long period of time can reduce their effectiveness.
You should never ride with your foot resting on the brake pedal or your hand on the brake lever. This may cause your brakes to overheat and indicate false braking to other motorist’s.

2�
Parking
Try, when possible, to park on level ground. If you have no paved surface to park on, make sure the ground is firm. If it is necessary for you to park on a hill, position your rear wheel against the curb at an angle and leave the transmission in gear.
While parked, use the side stand for support.- Use your foot to guide the side stand down.- Put something solid under the side stand if you must park on a soft surface.
Always use the steering lock when your motorcycle is parked, this will lock the handlebars in place.- Turn the handler bars left- Insert ignition key into lock and turn clockwise 90˚, remove key.
Turn fuel valve “OFF”.
Theft-Prevention Tips● You should park your motorcycle in a garage if possible, otherwise make certain to park in a well lit area.● Never leave the ignition key with the motorcycle.● Always use the steering lock, even for a short period of time.● You should invest in a good quality anti-theft device that will secure your motorcycle to a stationary object.● Keep the owner’s manual, registration and insurance with the motorcycle to help authorities find you if it has been stolen and recovered.
Steering lock

2�
Servicing your Motorcycle
This section is provided to help you keep your motorcycle in good running condition.
The following table provides you with the three types of inspections recommended for you motorcycle.
*More often if you ride frequently
It is essential to your safety that you keep your motorcycle well maintained. A properly maintained motorcycle will help protect your investment, avoid break-downs and have maximum performance. The maintenance of your motorcycle is YOUR responsibility.
In the event of an accident have a Service Center inspect ALL parts even if they appear to be undamaged.
Type of Inspection/Service
Refer to page
When to perform Who performs?
Pre-ride Inspection 17 Before EVERY ride
You
Maintenance Schedule
29 Interval on Schedule
Service Center
Follow all maintenance and inspection recommendations.Improper maintenance can cause an accident resulting in injury or death.
WARNING!

2�
Maintenance Safety
This section will instruct you on how to perform some important routine maintenance. You can perform many of these tasks with the tools provided with the motorcycle. The more difficult tasks, such as wheel removal, should be performed by a professional technician. If you do not feel capable of performing any one task do not hesitate to contact your local Service Center for help.
Important Safety Precautions● Always turn the engine off before performing any maintenance or repairs. ● Let the engine cool before touching any related parts.● Do not touch any moving parts while engine is running.● Make sure you have the tools and skills required before performing any maintenance or repairs.● Use the side stand or maintenance stand to prevent themotorcycle from falling over.● Keep cigarettes, sparks, and flames away from all fuel-related parts. Use a non-flammable solvent when cleaning parts.
Keep in mind that your local Service Center is equipped with the proper tools and knowledge to help service your motorcycle. If necessary please contact them to ensure greater quality and reliability.
Failing to follow these maintenance instructions can result in serious injury or death.
WARNING!
2�
Maintenance Safety
Including the regular maintenance and pre-ride inspection, perform the periodic checks once a month and once a week if you ride frequently. Check the odometer and perform any scheduled maintenance necessary.
Tires- ● Check the air pressure and add air if needed. ● Check for any excessive wear on the tread. ● Check for any damage that may have occurred. ● Check the rims and spokes for any possible damage.
Fluids- ● Check the level of engine oil. ● Check the level of the brake fluid. ● Add the correct fluids if necessary.
Lights- ● Check the headlight, brake light, taillight and turn signals. Make certain they all work properly.
Free play- ● Check the clutch lever, rear brake pedal and throttle grip.
Drive Chain- ● Check the condition, adjust the slack and lubricate if necessary.
Fuses- ● Always have spare fuses.
Nuts&Bolts- ● Check all nuts and bolts and tighten if needed.

2�
Maintenance Schedule
This portion of the manual will tell you how often to perform maintenance. The Maintenance Schedule is based on average riding conditions. If you ride more frequently than usual and in dusty or wet weather be sure to maintain your motorcycle more often. We recommended that you have your local Service Center perform extensive maintenance and repairs unless you have advanced mechanical skills. If needed you can purchase a Service Manual from Baja Motorsports.
Every maintenance item requires some mechanical knowledge, some parts require more technical information and tools than others.* Unless you have the proper tools and service information,have your local Service Center perform these tasks.**For safety reasons, ONLY your local Service Center should perform these tasks.
NOTES:1- Repeat the frequency interval at higher odometer readings.2- Service more frequently if you are ridding in dusty or wet areas.3- Service more frequently if you are ridding at full throttle or in rain.4- Replace every 2 years, or at indicated odometer reading, which ever comes first.

2�
Maintenance ScheduleI-
insp
ect a
nd cl
ean,
adju
st, lu
brica
te, o
r rep
lace,
if ne
cess
ary
C- cl
ean
A- ad
just
L- l
ubric
ate
R- r
eplac
e
*Fu
el Li
neI
II
*Th
rottl
e Ope
ratio
nI
II
*Ca
rbur
etor
Cho
keI
II
Air C
leane
r2
RR
Cran
kcas
e Bre
athe
r3
CC
CC
CC
Spar
k plu
gI
RI
RI
R
*Va
lve C
leara
nce
II
II
II
I
Engi
ne O
ilR
RR
RR
RR
**En
gine
Oil s
train
er
scre
enC
CC
*En
gine
idle
spee
dI
II
II
II
*Ev
apor
ative
emiss
ion
cont
rol s
yste
m5
II
x1,
000m
i0.
��
�12
1�20
2�
x1,
000k
m1.
0�.
�12
.�1�
.22�
.�32
3�.�
Ref
erto
pa
ge
Freq
uenc
yIte
m
N
ote
Emission related items
O
dom
eter
read
ing
(Not
e 1)

30
Maintenance ScheduleI-
insp
ect a
nd cl
ean,
adju
st, lu
brica
te, o
r rep
lace,
if ne
cess
ary
C- cl
ean
A- ad
just
L- l
ubric
ate
R- r
eplac
e
Drive
Cha
in4
Brak
e Flu
idI
IR
II
R
Brak
e Sho
e/pad
wea
rI
II
II
I
Brak
e Sys
tem
II
II
*Br
ake l
ight
switc
hI
II
*He
adlig
ht ai
mI
II
Clut
ch S
yste
mI
II
II
II
Side
stan
dI
II
*Su
spen
sion
II
I
*Nu
t,Bol
ts,F
aste
ners
II
II
**W
heels
/Tire
sI
II
II
II
**St
eerin
g he
ad
bear
ings
II
II
x1,
000m
i0.
��
�12
1�20
2�
x1,
000k
m1.
0�.
�12
.�1�
.22�
.�32
3�.�
Ref
erto
pa
ge
Freq
uenc
yIte
m
N
ote
Non-Emission related items
O
dom
eter
read
ing
(Not
e 1)
1,L
Eve
ry�
00m
i(�0
0km
)

31
Maintenance Records
To ensure proper maintenance keep record. If the motorcycle is sold be sure to include the maintenance records. All scheduled maintenance is considered normal operator cost, if a Service Center performs these tasks you will be charged. Please use the tables below to keep track of all maintenance performed.
Miles (km) Odometer Date Performed By:
Notes
600(1,000)
4,000(6,400)
8,000(12,000)
12,000(19,200)
16,000(25,600)
20,000(32,000)
Miles (km) Odometer Date Performed By:
Notes
24,000(38,400)
28,000(44,800)
32,000(51,200)
36,000(57,600)
40,000(64,000)
44,000(70,400)
48,000(76,800)
52,000(83,200)
56,000(89,600)
60,000(96,000)

32
Fuel
Fuel Recommendation
Type- UnleadedOctane number- 86 (or higher)
Unleaded fuel produces fewer engine deposits and will extend the life of the exhaust system components. We suggest you use regular unleaded fuel. Be sure to only use an octane number of 86 or higher. Using a lower octane gasoline can cause severe damage to the engine. Never use stale or contaminated gasoline or an oil/gasoline mixture.
Fuel Capacity
Fuel tank capacity, including reserve- 3.07 US gal
After using the reserve tank you should refill the gas tank immediately. Then turn the fuel valve to the “ON” position so you do not run out of fuel in the reserve tank.

33
Fuel and Engine Oil
Refueling1) Pull tab up revealing key hole.2) Insert ignition key in the fuel fill cap and turn clockwise.3) Open cap4) Add fuel to the bottom of the filler neck. Do not overfill.
Gasoline is extremely flammable and explosive. You can be burned or seriously injured.
WARNING!
Filler neck
Fuel fill cap
4) After refueling, push cap into the filler neck until it snaps and locks.5) Turn the fuel valve back to the “ON” position (if it was in the “RESERVE” position).
By using, checking, adding, and changing the recommended engine oil you can prolong the life of your engine. Changing your engine oil helps get rid of dirt or debris that can damage the engine. Always be sure to keep the right amount of oil in the engine or serious damage can occur.
If you are driving in dusty areas you should change the oil more frequently.
Key hole

3�
Engine Oil
Recommended Oil
● Use the recommended oil, the oil does not need additives.● Do not use graphite oil or oil with molybdenum additives.● Do not use castor based racing oil, vegetable oil, or non-detergent oil.
Checking and Adding Oil
API classification SE or SG
Viscosity (weight) SAE 15W-40
0 20 �0 �0 �0 100˚F
-20 -10 0 10 20 30 40˚C
SAE20W-�0
SAE20W-�0
SAE10W-�0
SAE10W-30
Oil fill plug/dipstick
Lower level mark
Upper level mark →
→

3�
Engine Oil
Checking and Adding Oil
1) Park your motorcycle on level ground and use the side stand for support.2) Start the engine and let it run for 3-5 minutes.3) Turn the engine off and wait for at least 3 minutes.4) Remove the oil fill plug/dipstick and wipe clean.5) Hold the motorcycle in a upright position.6) Insert the dipstick in the oil fill until it rests on the metal, do not screw it in.7) Remove the dipstick and check the oil level.● If the oil is at or near the upper level mark there is no need to add oil.● If the oil is at or near the lower level mark, add the recommended oil until it reaches the upper level mark and do not overfill.8) Screw in the oil fill plug/dipstick9) Check for any leaks.
Changing Engine Oil
This procedure will require some mechanical skill and special tools such as a torque wrench. If you are not capable of performing this procedure contact your local service center.
Draining Engine Oil:1) Park your motorcycle on level ground and use the side stand for support.2) Start the engine and let it run for 3-5 minutes.3) Turn the engine off and wait for at least 3 minutes.

3�
Draining Engine Oil cont.:4) Remove the oil fill plug/dipstick, engine oil drain bolt and washer, to drain the oil into an oil pan.NOTICE:Improper disposal of oil can be hazardous to the environment.5) Dispose oil in an appropriate manner.6) Make sure the sealing washer is in good condition, if not replace. You should replace every other time you change the oil.
Adding Engine Oil7) Install the engine oil drain bolt and torque to: 18lbf·ft (25N· m, 2.5kgf· m).8) Fill crankcase with recommended oil: 1.12 US qt9) Reinstall the oil fill plug/dipstick.10) Start engine and let idle for 3-5 minutes.11) Turn engine off and let stand for 2-3 minutes.12) Hold the motorcycle in a upright position, and check the oil level.13) Make sure their are no leaks.
Engine Oil
Engine drain bolt

3�
Air Cleaner
Be sure to clean the air cleaner more frequently if you are riding in dusty or wet areas. Your local service center can help you determine the correct service interval for your riding conditions.
Use only the air cleaner specified for your motorcycle or one of equivalent quality.NOTICE:Using the correct air cleaner can prevent engine wear, damage, repairs, spark plug fouling and poor gas mileage. If you use the incorrect air cleaner you may cause severe engine damage. NOTICE:Improper air cleaner maintenance can cause early engine wear or poor performance.
Replacing Air Cleaner
1) Remove left side cover.2) Remove air cleaner cover.3) Remove foam air cleaner.4) Wash foam air cleaner.5) Replace foam air cleaner.6) Replace left side cover.
Wash the element as the following:1. Fill a washing pan large enough to hold the element with a nonflammable
cleaning solvent. Immerse the element in the solvent and wash it.2. Squeeze the element by pressing it between the palms of both hands to remove
excess solvent. Do not twist or wring the element or it will develop cracks.3. Immerse the element in another pan filled with Air filter oil. Squeeze the element
to remove excess oil. Make sure that the element remains damp with oil (but not soaked).
Left side cover
foam air cleaner

3�
Crankcase Breather and Throttle
Crankcase Breather
You should service the crankcase breather more often if you are ridding at full throttle or in rain. Be sure to service, if there are deposits in the transparent section of the drain tube.
Draining1) Place a drain/oil pan under the crankcase breather tube plug.2) Remove the plug so that the tube drains into the pan.3) Reinstall the crankcase breather tube plug.
ThrottleInspectionCheck the free play at the throttle grip. Free play: 1/16-1/4in (2-6mm) If needed adjust to specified free play.Adjustment1) Loosen lock nut.2) Turn the adjuster.3) After the adjustment has been made, check the full rotation of throttle grip from all steering positions.
Throttle Inspection
1) Make sure that all nuts and bolts are securely fastened and the throttle assembly is positioned correctly.2) Check the full rotation of throttle grip from all steering positions.
Lock nut
Adjuster

3�
The proper free play adjustment of the clutch allows for a gradual, smooth engagement when shifting gears.
Early wear can occur if you do not properly adjust the free play.
Clutch Free play
Left handlebar inspection1) Check free play, if needed adjust to specified adjustmentFree play: 3/8-13/16in. (10-20mm)
Upper AdjustmentAlways adjust using the upper clutch cable adjuster before using the lower adjustment.
1) Loosen upper lock nut.2) Rotate the upper clutch cable adjuster until the proper free play has been accomplished.3) Tighten the upper lock nut and check that the free play is correct.
Clutch System
↓
↓
Upper lock nut
Clutch cable adjuster

�0
Lower AdjustmentIf the upper clutch cable adjuster has reached it’s limit or you cannot obtain the correct free play, you may also use the lower clutch cable adjuster.
1) Loosen the upper lock nut and rotate the upper clutch cable ad-juster in to maximum free play.2) Tighten the upper lock nut.
3) Loosen lower lock nut.4) Rotate lower adjusting nut until the proper free play has been ac-complished.5) Tighten lower lock nut and check adjustment.6) Start engine, hold in clutch lever and shift into gear. Make sure the engine does not stall and the motorcycle does not move. Slowly re-lease the clutch lever and open the throttle, your motorcycle should accelerate gradually and move smoothly.
If you cannot accomplish the correct free play using both adjustments, contact you local Service Center.
Clutch System
Lower lock nut
Lower adjusting nut ↔IncreaseDecrease
Upper lock nut
Clutch cable adjuster

�1
Engine Idle Speed
For the best servicing you should visit your local Service Center.
Adjusting the Idle Speed will not cure all problems in the engine fuel delivery system.
Idle Speed Adjustment
1) If the engine is cold, start it and run for ten minutes of Stop and Go riding. Turn the engine off.2) Park the motorcycle on level surface using the side stand.3) Connect tachometer to the engine.4) Shift into neutral and start the engine.5) Adjust the idle speed with throttle stop screw.Idle speed (in neutral): 1500±50rpm.
Throttle stop screw
↔IncreaseDecrease

�2
Spark Plug
Spark Plug recommendationDo not use any spark plug other than the one recommended in the heat recommended.
NOTICE:If you use a spark plug in the improper heat range you can cause engine damage.
Spark Plug Replacement:1) Clean any/all dirt around the spark plug base.2) Disconnect the spark plug caps and make certain you do not damage the wires.3) Remove the spark plug using the spark plug wrench provided in the tool kit.4) Inspect the electrodes on the spark plug for corrosion and deposits, if it has great corrosion replace the plug.5) Using a wire-type feeler, check the gap on every new spark plug. If an adjustment is needed, bend the electrode carefully, the gap should be: 0.024-0.028in (0.60-0.70mm).6) Thread spark plug in by hand so there is no cross-threading.7) Tighten, old but still good, spark plug: 1/8-1/4 turn after it seats. Tighten new spark plug: 1/2 turn after it seats.8) Reinstall the spark plug caps.
NOTICE:Incorrect tightening of the spark plugcan cause severe damage to the engine.Too loose can damage piston, too tight can damage the threads.
Standard spark plug MEIYA-D8RTC/NGK-DR8EA/CHAMPION-RA8YC
↓
↓Spark plug gap ↓
Electrode↓
�3
Brakes
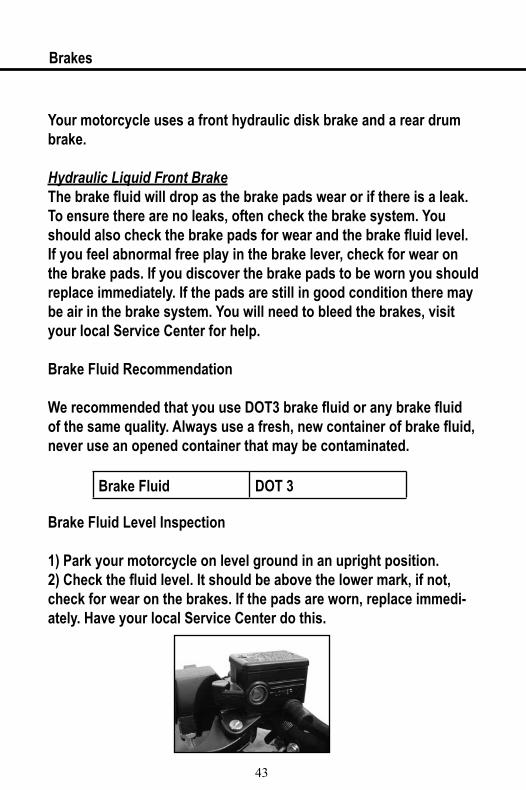
Your motorcycle uses a front hydraulic disk brake and a rear drum brake.
Hydraulic Liquid Front BrakeThe brake fluid will drop as the brake pads wear or if there is a leak. To ensure there are no leaks, often check the brake system. You should also check the brake pads for wear and the brake fluid level. If you feel abnormal free play in the brake lever, check for wear on the brake pads. If you discover the brake pads to be worn you should replace immediately. If the pads are still in good condition there may be air in the brake system. You will need to bleed the brakes, visit your local Service Center for help.
Brake Fluid Recommendation
We recommended that you use DOT3 brake fluid or any brake fluid of the same quality. Always use a fresh, new container of brake fluid, never use an opened container that may be contaminated.
Brake Fluid Level Inspection
1) Park your motorcycle on level ground in an upright position.2) Check the fluid level. It should be above the lower mark, if not, check for wear on the brakes. If the pads are worn, replace immedi-ately. Have your local Service Center do this.
Brake Fluid DOT 3

��
Brakes
Other Inspections● Make sure there no leaks in the fluid lines● Check for loose fittings or damage to the fluid lines.NOTICE:Brake fluid can damage painted surfaces and plastic, handle with care. Clean any spills immediately. In case of contact with skin, wash thoroughly. Contact with eyes, wash thoroughly and see a doctor immediately.
Brake Pad Wear
Brake pad wear depends on how much you use the brakes, the type of riding and road conditions. Normally brake pads tend to wear quicker on wet and dirty roads. Be sure to check the pads for wear during each maintenance interval.
You can inspect the wear on pad by using the wear indicator mark. If the pads are worn, replace immediately. Have your local Service Center do this.
��
Brakes
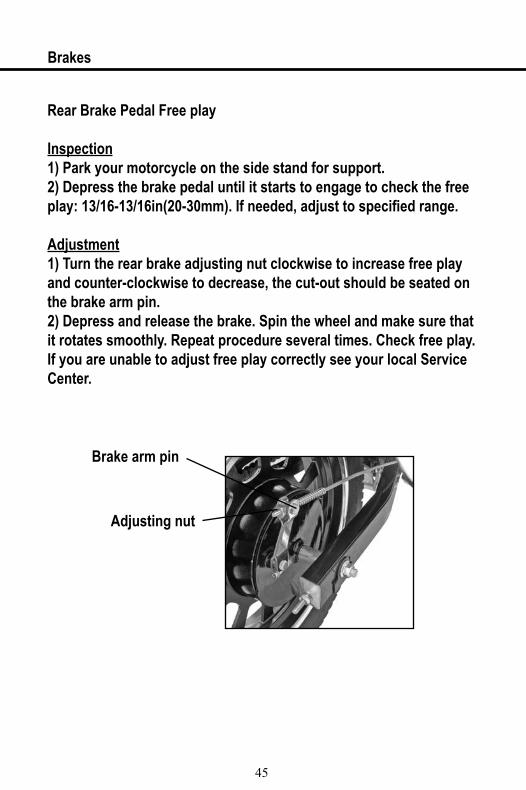
Rear Brake Pedal Free play
Inspection1) Park your motorcycle on the side stand for support.2) Depress the brake pedal until it starts to engage to check the free play: 13/16-13/16in(20-30mm). If needed, adjust to specified range.
Adjustment1) Turn the rear brake adjusting nut clockwise to increase free play and counter-clockwise to decrease, the cut-out should be seated on the brake arm pin.2) Depress and release the brake. Spin the wheel and make sure that it rotates smoothly. Repeat procedure several times. Check free play. If you are unable to adjust free play correctly see your local Service Center.
Adjusting nut
Brake arm pin

��
Brakes
Other Inspections
● Make sure the brake pedal is positioned properly and the securing bolts are tight.● Inspect the Brake rod, arm, spring and fasteners, make sure the are in good condition.
Brake Shoe Wear
You are able to check brake shoe wear without having to disassemble the rear end. There is an external brake wear indicator. By depressing the brake pedal, the brake arm arrow moves toward a reference mark on the brake panel.
1) Park your motorcycle and use the side stand for support.2) Depress the brake pedal and check the movement of the arrow on the brake arm. If the arrow aligns with the reference mark on the brake panel, have your local Service Center replace the brake shoes.
ArrowReference mark
Brake arm
Brake panel

��
Tires
The tires on your motorcycle should be the proper type and size. They should be in good condition and properly inflated for the load that you are carrying.
Air Pressure
Check the air pressure in both tires before riding. Improper air pressure would effect handling, steering response, traction, tire life and rider comfort. We suggest you visually check the tire pressure before each ride and check the pressure each month by using an air pressure gauge. Be sure that the tires are inflated to the pressures shown below. Tire pressure should only be measured or adjusted when the tires are cold.
WARNING!
Operating this motorcycle with improper tires, or even improper tire air pressure could be hazardous.If you use improper tires or improper tire air pressure, you may lose control of the motorcycle.Always use the size and type tires specified. Always maintain proper tire air pressure as described in this section.
Front tire pressure 29psi (200kpa)Rear tire pressure 36psi (250kpa)
��
Tires
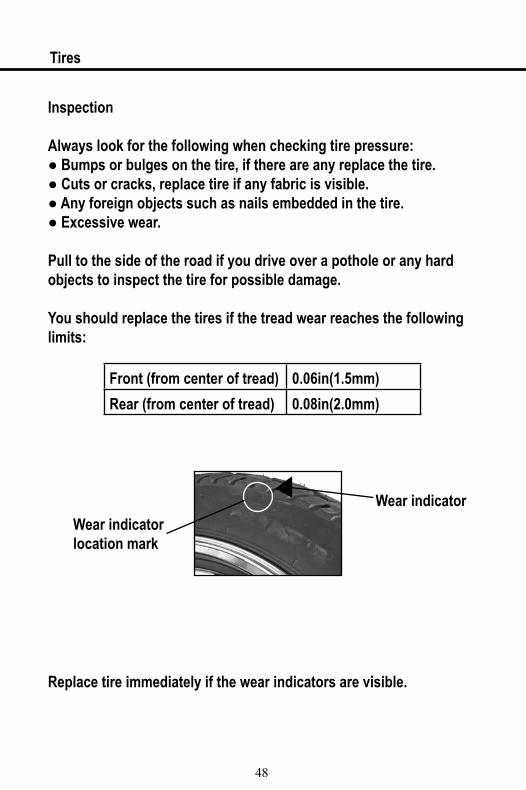
Inspection
Always look for the following when checking tire pressure:● Bumps or bulges on the tire, if there are any replace the tire.● Cuts or cracks, replace tire if any fabric is visible.● Any foreign objects such as nails embedded in the tire.● Excessive wear.
Pull to the side of the road if you drive over a pothole or any hard objects to inspect the tire for possible damage.
You should replace the tires if the tread wear reaches the following limits:
Replace tire immediately if the wear indicators are visible.
Front (from center of tread) 0.06in(1.5mm)Rear (from center of tread) 0.08in(2.0mm)
Wear indicator location mark
Wear indicator

��
Tires
Tire and Tube Repair
If your tire is punctured or damaged replace the tire, do not repair. A repaired tube may fail while riding, and is not as reliable as a new one. A temporary repair can be made in an emergency situation, but will not perform at it’s best. Ride at slow speeds and do not carry a passenger with a repaired tire. Have the tire and tube replace as soon as possible.
If you replace only the tube and not the tire do not exceed 50mph for the first 24hrs and 80mph anytime after.
Tire Replacement
When tire replacement is needed always replace them with the same size, load range and speed rating.
Recommended Tire Size:Front-110/90-16Rear-130/90-15
When replacing a tire:● Have the wheel balanced after installation.● If possible, have tire replaced by your local Service Center.● Replace the tube
WARNING!
Only use the tire size and type recommended.Using improper tires can affect stability and handling which may cause and accident resulting in injury or death.

�0
When replacing a tire:● Have the wheel balanced after installation.● If possible, have tire replaced by your local Service Center.● Replace the tube.
Safety Reminders● Do not replace tire with a Radial tire. Using a different type of tire may affect stability and handling.● Do not replace with Car tires. The tire may forcefully separate from the rim during installing causing serious injury or death.
Tires

�1
There is a riveted master link on the chain which connects the countershaft to the rear wheel sprockets. To keep out moisture and dirt the O-ring chain uses rubber rings between the side plates of the pin and roller links to seal in the lubricating grease. Proper lubrication and adjustment will help extend the life of the chain. You should always perform the pre-ride inspection to check the adjustment and lubrication before riding. If you are riding in dusty or muddy conditions remember to maintain and service the chain more often that usual.
Before any servicing to the chain occurs be sure the engine is off and in neutral.
You do not need to remove the chain to perform service in the Maintenance Schedule.
Inspection
1) Check the slack of the lower drive chain right between the two sprockets. Slack (allowing vertical movement by hand): 9/16in(15-30mm)2) The slack should remain consistent along the entire chain, if not, check to make sure their are no kinks or binds. You can sometimes eliminate kinks or binds by lubricating the chain.3) Inspect chain for:-Damaged rollers-kinks or binds-dry or rusty links-improper adjustment-excessive wear-damaged or missing o-rings
Drive Chain
Chain

�2
Drive Chain
The chain should be replaced if there is damage to the rollers, or if there are loose pins. Lubricate any kinks or binds to work them out. If the chain appears too dry or rusty, lubricate.
4) Check both the front and rear sprocket teeth for excessive wear or damage. If needed replace the sprocket.
NOTICE:The use of a new chain with a worn sprocket will cause quick wear to the chain.
Adjustment
Every 500 miles you should check and adjust (if needed) the slack of the drive chain. If you are riding at high speeds the chain may need adjusting for often.
Replace Replace
Good
Drive chain adjusting nut
Index mark
Axle nut

�3
Drive Chain
1) Place the motorcycle on level ground using the side stand. Make sure the transmission is in neutral and the ignition switch if in the “OFF” position.2) Loosen the axle nut.3) Turn both adjusting nuts the same amount of turns until you have reached the correct slack. To tighten the chain turn the adjusting nuts clockwise. To loosen the chain (provide slack) turn the adjusting nuts counter-clockwise. Adjust the slack in between the drive sprocket and the rear wheel sprocket. Move the motorcycle forward, stop and park it on the side stand. Recheck the slack, it should allow vertical movement by hand:0.375 inches~0.750 inches (10~20mm).4) You can check the rear axle alignment by making sure the index marks align with the rear edge of the adjusting slots. Both marks should at the same point. If they do not match up, turn the left or right adjusting nut until the marks correspond and recheck the chain slack.5) Torque the rear axle nut to: 65lbf•ft(88N•m, 9.0kgf•m). If you do not have a torque wrench available make sure to have our local Service Center perform this task.6) Lightly tighten the adjusting nuts and tighten the lock nuts while holding the adjusting nuts with wrench.
Lubrication
Lubricate the chain every 500 miles and more often if it appears to be dry. Only use SAE80 or 90 gear oil for lubrication, other chain lubricants may contain solvents that can damage the rubber o-rings.

��
Drive Chain
Removal, Cleaning and Replacement
Your motorcycle has a riveted master link and should only be removed or replaced by your local Service Center.
Do not use a Steam cleaner, high pressure washer or certain solvents. These products can damaged the o-rings.
1) Use a dry cloth to clean the side surface of the chain. Use a high flash point solvent- not gasoline. Do not use a solvent or brush to clean the o-rings.2) Check to make sure the chain is not damaged or worn. If needed replace the chain. Replacement chain: 520

��
Battery
Your motorcycle is equipped with a maintenance free battery. You do not have to check the electrolyte level or add distilled water.
NOTICE:If you remove the cap strip you can permanently damage the battery.
Any electrical accessory will use currents from the battery. If you have electrical accessories on your motorcycle and you do ride often, be sure to charge the battery frequently.
You should remove the battery or disconnect the battery cables if you do not plan to ride for two weeks or more.
Battery Storage
We recommended that you remove the battery from your motorcycle if you are planning to store it for a long period of time. In order to maintain the life of the battery while storing you should slow trickle charge the battery every 30 days. If you do not remove the battery you should disconnect the battery wires (negative first).
Immediately wash hands after handling battery.Battery and related components contain lead and lead compounds.
WARNING!

��
Battery
The battery can be found in the battery box under the right side cover below the driver seat.1) Remove the right side cover.2) Remove the rubber strap holding the battery in place.3) Disconnect the Negative terminal lead first, then the Positive terminal lead.4) Remove the battery from the battery box.5) Unless you have been riding on a regular basis, charge the battery.6) Store the battery in an easily accessible, neutral climate location (off of floor and out of reach of children).7) Clean battery box before storing.8) Use a slow trickle charger every 30 days to maintain the life of the battery.
● To avoid possibility of explosion, always connect battery cable in the order specified: Negative first; Positive last. An exploding battery can cause serious injury or death.
● Batteries contain sulfuric acid.● Always shield eyes with protective eyewear when working
around battery acid.● Battery acid is poisonous and can cause severe burns.● DO NOT smoke around batteries and keep away from
open flame.
WARNING!
Positive terminal lead
Negative terminal lead
Battery Rubber strap

��
Charging the Battery
Charging the battery incorrectly may cause damage. Always read the instructions that came with the battery charger and follow all directions on the battery.
For home charging we suggest you use a trickle charger. A trickle charger can be left connected for a long period of time without causing damage to the battery. Do not leave the battery connected to the charger longer than the recommended amount of time.
Do not use an automotive battery charger as this can cause permanent damage to your battery.
Battery
Trickle charger

��
Appearance Care
You should always clean and polish your motorcycle on a regular basis to keep it looking newer longer.
General Recommendations
• You may use the following to clean your motorcycle:- a mild, neutral detergent and water- a mild spray and cleaner/polisher- a mild cleaner/degreaser
• Do not use products that contain chemical solvents or harsh deter-gents• Before cleaning, make sure the engine is cool.• Wash your motorcycle in a shady area. Direct sunlight can cause water spots and fading.• Do not use a high pressure washer to clean, we suggest you use a garden hose.
NOTICE:High pressure washers can cause damage to certain parts of your motorcycle.
• When you are finished cleaning your motorcycle, always check for wear or leaks.
��
Vehicle Identification
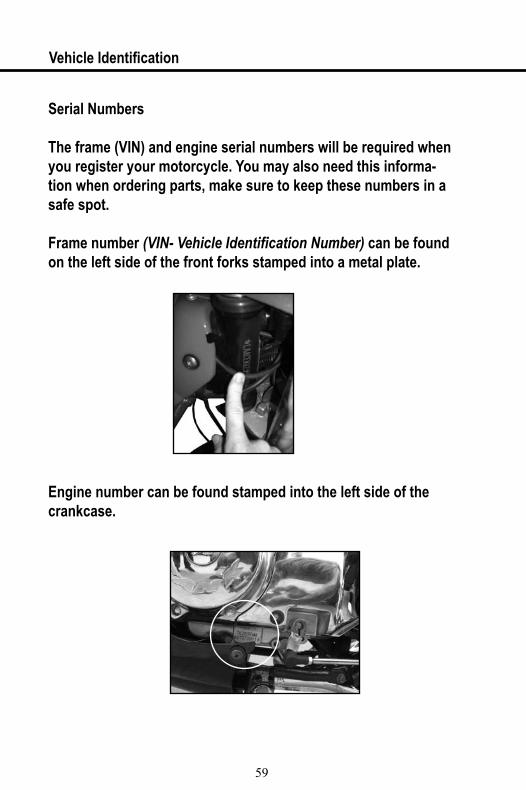
Serial Numbers
The frame (VIN) and engine serial numbers will be required when you register your motorcycle. You may also need this informa-tion when ordering parts, make sure to keep these numbers in a safe spot.
Frame number (VIN- Vehicle Identification Number) can be found on the left side of the front forks stamped into a metal plate.
Engine number can be found stamped into the left side of the crankcase.

�0
Specifications
Overall length 88.9 inches (2258mm)Overall width 29.7 inches (754.4mm)Overall height 45.67 inches (1160mm)Wheelbase 54 inches (1372mm)
Dimensions
Dry Weight 331lbs(150kg)
Fuel recommendation Unleaded, Octane 86 or higherFuel tank capacity 3.12US galFuel tank reserve capacity 0.47US galEngine oil recommendation API service classification SF
or SG. SAE 15W-40Engine oil capacity 1.5US qt (1.42L)Drive chain lubricant SAE 80 or 90 gear oil
Fuel and Lubrication
Passenger Operator and one passengerMaximum weight 331 US lbs(150kg)
Includes rider, passenger, cargo and accessories
Max cargo rack weight 11 US lbs (4.9kg)
Capacities

�1
Specifications
Displacement 14.2cu-in(233cm³)Bore and Stroke 2.09x2.09in(53.0x53.0mm)Compression ratio 9.4:1Spark plug (standard) MEIYA-D8RTC/NGK-DR8EA/
CHAMPION-RA8YCSpark plug gap 0.024-0.028in(0.60-0.70mm)Valve clearance 0.03x0.05mmIdle speed 1500±50
Engine Specification
Front Tire size 110/90-16Front Tire pressure COLD 29psi (200kpa)Rear Tire size 130/90-15Rear Tire pressure COLD 36psi (250kpa)
Tires
Primary transmission ratio 3.6311st gear ratio 2.842nd gear ratio 1.7773rd gear ratio 1.3334th gear ratio 1.0835th gear ratio 0.913Final drive chain 520
Transmission Power

�2
Battery 12V-9AH
Headlight 12V35W/35Brake/Taillight 12V20W/8Turn signal light 12V2WNeutral indicator 12V2W
Lights
Main 15AFuses
Specifications

�3
Hea
dlig
ht
swit
chSt
op
swit
chSt
art
swit
ch
Fro
nt
bra
kesw
itch
Mai
n
swit
ch
Bac
kb
rake
sw
itch
CD
IR
egu
lato
rFl
ash
rela
y
Rig
ht
rear
turn
sig
nal
lig
ht
12V
10W
Taill
igh
t12
V 2
0W 8
Left
rear
turn
sig
nal
lig
ht
12V
10W
Mag
net
o
Ign
itio
nco
il
Bat
tery
12V
9A
H
+-
M
Star
t re
lay
Ho
rnFu
el s
enso
r
Cau
tio
n s
wit
ch, H
igh
bea
m s
wit
ch,
Turn
sig
nal
sw
itch
, Ho
rn s
wit
ch
Left
fro
nt
turn
sig
nal
lig
ht
12V
10W
Rig
ht
smal
l lig
ht
12V
5W
Hea
dlig
ht
12V
35W
35
Neu
tral
pilo
t12
V 2
W
Turn
sig
nal
lig
ht
12V
2W
Hig
h b
eam
pilo
t12
V 2
W
Spee
d m
eter
pilo
t12
V 2
W
Fuel
met
er p
ilot
12V
2W
Rig
ht
fro
nt
turn
sig
nal
lig
ht
12V
10W
Y Y
Y
R/LG/WB/W
Y/B
N
R
GY
/R
L/B
GB
R/B
r
GY
/BR/
Br
BP
LD
gLb
BG
r
L P GG Br/
W O G
G L LbGLb BG G
G Lb G Br B
Y/B G
Br/
WB
BB
r Dg
B/W
G/Y
Y/W
B/W
GB
RG
/YB
G/W
Y/B
GB
/WB
/W
BG
R
YY
YB
Gr
G Lb G/Y G Br G O
Gr -
Gra
yLb
- Li
gh
t b
lue
O -
Ora
ng
eB
r - B
row
nB
- B
lack
Dg
- D
ark
gre
en
P - P
ink
L - B
lue
W -
Wh
ite
Y -
Yello
wG
- G
reen
BV25
0 Wire
Diag
ram

��
Emission Control System Warranty
BAJA MOTORSPORTS – EMISSION CONTROL SYSTEM WARRANTY
YOUR WARRANTY RIGHTS AND OBLIGATIONS
The emission control system warranty period for this vehicle begins on the date the vehicle is delivered to the first purchaser other than an authorized dealer, or the date it is first used as a demonstrator, lease, or company vehicle, whichever comes first and continues for 60 months after that date, or 18,000km, whichever comes first, provided there has been no abuse, neglect or improper maintenance of your vehicle. Where a warrantable condition exists, the Distributor will repair your vehicle at no cost to you, including diagnosis, parts and labor. If an emission-related part on your vehicle is defective, the part will be repaired or replaced by the Distributor. This is your emission control defects warranty.
OWNER’S WARRANTY RESPONSIBILITIES
As the vehicle owner, you are responsible for the performance of the required maintenance. You should maintain a record of all maintenance performed on your vehicle and retain all receipts covering maintenance on your vehicle. You may not be denied a warranty claim solely because of your failure to ensure the performance of all scheduled maintenance or lack of maintenance records or receipts. You are responsible for presenting your vehicle to an authorized dealer as soon as a problem exists. The warranty repairs should be completed in a reasonable amount of time, not to exceed 30 days.
As the vehicle owner, you should be aware that you may bedenied your warranty coverage if your vehicle or a part has failed due to abuse, neglect, improper maintenance, or unapproved modifications.
WARRANTY COVERAGE
The Distributor warrants that each new 2007 and later vehicle:• is designed, built, and equipped so as to conform at the time of initial retail purchase with all applicable regulations of the United States Environmental Protection Agency, and the California Air Resources Board; and• is free from defects in material and workmanship which cause such vehicle to fail to confirm with applicable regulations of the United States Environmental Protection Agency or the California Air Resources Board for the periods specified above.
Your emission control system warranty covers components whose failure would increase an engine’s emission, including electronic controls, fuel injection system, carburetor, the ignition system, catalytic converter, or any other system utilized in this vehicle to control emission if it is originally equipped. Also included may be hoses, connectors and other emission-related as-semblies. Replacing or repairing other components (including parts, labor, and other costs) not covered by this emission control system warranty or the standard warranty is the responsibility of the owner.

��
Coverage of repairs under this warranty applies only when repairs are completed at an authorized dealer or repair facility. The Distributor will not cover repairs performed outside of an authorized dealer or repair facility, except in an emergency situation. The use of replacement parts not equivalent to the original parts may impair the effectiveness of your vehicle’s emission control system. If such a replacement part is used and an authorized dealer determines it is defective or causes a failure of a warranted part, your claim for repair to bring your vehicle into compliance with applicable standards may be denied.
If an emergency situation exists when a warranted part or a dealer is not reasonably available to the owner, repairs may be performed at any available service establishment, or by the owner, using any replacement part. The Distributor shall reimburse the owner for the expenses, including diagnostic charges, not to exceed the Distributor’s suggested retail price for all war-ranted parts replaced and labor charges based on the Distributor’s recommend time allowance for the warranty repair and the geographically appropriate hourly labor rate. The owner may reasonably be required to keep receipts and failed parts in order to receive compensation.
This Emission Control System Warranty is in addition to the standard Limited Warranty.
EXCLUSIONS AND LIMITATIONS
This warranty does not cover the following:• Failures or malfunctions of the emission control systems caused by abuse, alteration, accident, misuse, the use of leaded gasoline.• Replacement of expendable maintenance items unless they are original equipment defective in material or workmanship under normal use, and the first required replace-ment interval for the item has not been reached. Expendable maintenance items include but not limited to spark plugs, filters, coolant, lubricants, gaskets, hoses, and belts.• Replacements of parts and other services and adjustments for required maintenance.• Any vehicle equipped with an odometer or hour meter where the reading is altered so that actual mileage cannot be readily determined.• Repairs or replacements as a result of:o Accidento Misuseo Use of replacement parts or accessories not conforming to the original specifications which adversely affect performance• Physical damage, corrosion, or defects caused by fire, explosions or similar causes beyond the control of the Distributor.• Failures not caused by a defect in material or workmanship.
Use of the vehicle in any type of competitive racing or related events immediately and completely voids this and all other warranties.
Emission Control System Warranty

��
Emission Control System WarrantyLIMITED LIABILITY
The liability of the Distributor under this Emission Control System Warranty is limited solely to the remedying of defects in material workmanship by an authorized dealer at its place of business during customary business hours. This warranty does not cover inconvenience or loss of use of the vehicle or transportation of the vehicle to/from the authorized dealer. The Distributor is not liable to any person for incidental, consequential or special damages of any description, whether arising out of express or implied warranty or any other contract, negligence or other tort or otherwise.
No express emission control system warranty is given by the Distributor except as specifically set forth herein. Any emission control system warranty implied by law, including any warranty of merchantability or fitness for a particular purpose is limited to the express emission control system warranty terms stated in this warranty. The foregoing statements of warranty are exclusive and in lieu of all other remedies. All express warranties not stated in this warranty are disclaimed. Some states do not allow limitations on how long an implied warranty lasts, so the above limitations may not apply if it is inconsistent with the controlling state law.
No dealer is authorized to modify this Emission Control System Warranty. If you have any questions regarding your warranty rights and responsibilities, you should contact BAJA MOTORSPORTS or the California Air Resources Board, 9528 Telstar Avenue, El Monte, CA 91731 (for California registered vehicles only).

Baja, INC.P.O. Box 61150
Phoenix, AZ. 85082Tel: 602-443-9180
Toll Free: 888-863-2252