by cliff martin - solent soundings · setting up the cruising dinghy by cliff martin sail areas the...
TRANSCRIPT

Setting up the cruising dinghy
by Cliff Martin

(i)
First published 22 May 2011
1
Setting up the cruising dinghy by Cliff Martin
Sail areas The power of the wind rises with the square of the wind speed. As the wind speed doubles the power available becomes four times as much. Most boats sail well in 10 knots of wind. 20 knots of wind will produce 4 times as much power and some means of reducing sail area will usually be needed. At 5 knots of wind speed only a quarter of the power is available. Boats vary but this is somewhere near the lower limit of what will get a boat moving properly. At low wind speeds the water is usually smooth and good progress is possible if enough sail can be set. If we take the 0 – 25 knot wind range as usable conditions we can start looking at how much sail to hoist. I needed a standard method of describing sail area. I drew a graph of sail area against beam and plotted over 50 different classes of boat on it. It became clear sail area and beam are closely related. It was possible to identify the fast and slow boats by their position on the graph. The only exceptions were unusually heavy boats. On a sloop where the jib overlaps the main, the slot effect is said to increase the power of the rig. I have found no evidence to support this theory. It might give a small gain but probably only close hauled or on a close reach. Racers generally accept a sloop will sail a little closer to the wind than a catboat. My intention was to form a set of guidelines which would work for most boats. It is rare anyone is very specific about sail areas. “Reefed down 30%” is a typical description but it leaves questions unanswered. How much sail was set in the first place? How does this area relate to the hull? My rule of thumb is a boat with a beam of 5’ 3” should carry 100sq feet of sail, adding or subtracting 8 sq feet for every 3” of beam. For the purposes of this document this can be considered 100% sail area and generally gives good performance in light conditions. Below is a table of what constitutes 100% sail area and can be used to compare different boats.
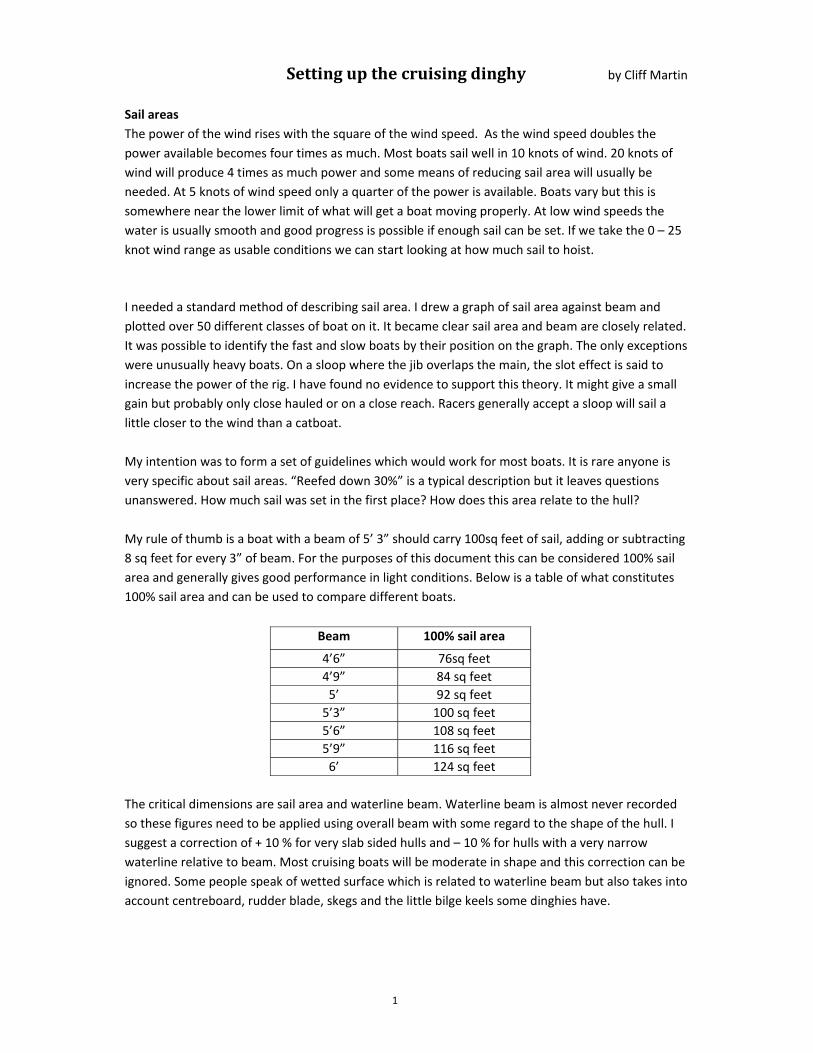
Beam 100% sail area
4’6” 76sq feet 4’9” 84 sq feet 5’ 92 sq feet 5’3” 100 sq feet 5’6” 108 sq feet 5’9” 116 sq feet 6’ 124 sq feet
The critical dimensions are sail area and waterline beam. Waterline beam is almost never recorded so these figures need to be applied using overall beam with some regard to the shape of the hull. I suggest a correction of + 10 % for very slab sided hulls and – 10 % for hulls with a very narrow waterline relative to beam. Most cruising boats will be moderate in shape and this correction can be ignored. Some people speak of wetted surface which is related to waterline beam but also takes into account centreboard, rudder blade, skegs and the little bilge keels some dinghies have.
2
Heavy boats The above figures assume an 11 foot boat’s hull weight is 112 lb (50 kg) rising with the cube of the length over deck. The weight rises sharply with only moderate increase in length. A 16 foot hull of similar proportions will weigh 345 lb (154 kg). If the weight of the boat is doubled due to extra heavy construction or ballast it will need to carry an extra 20% of sail.
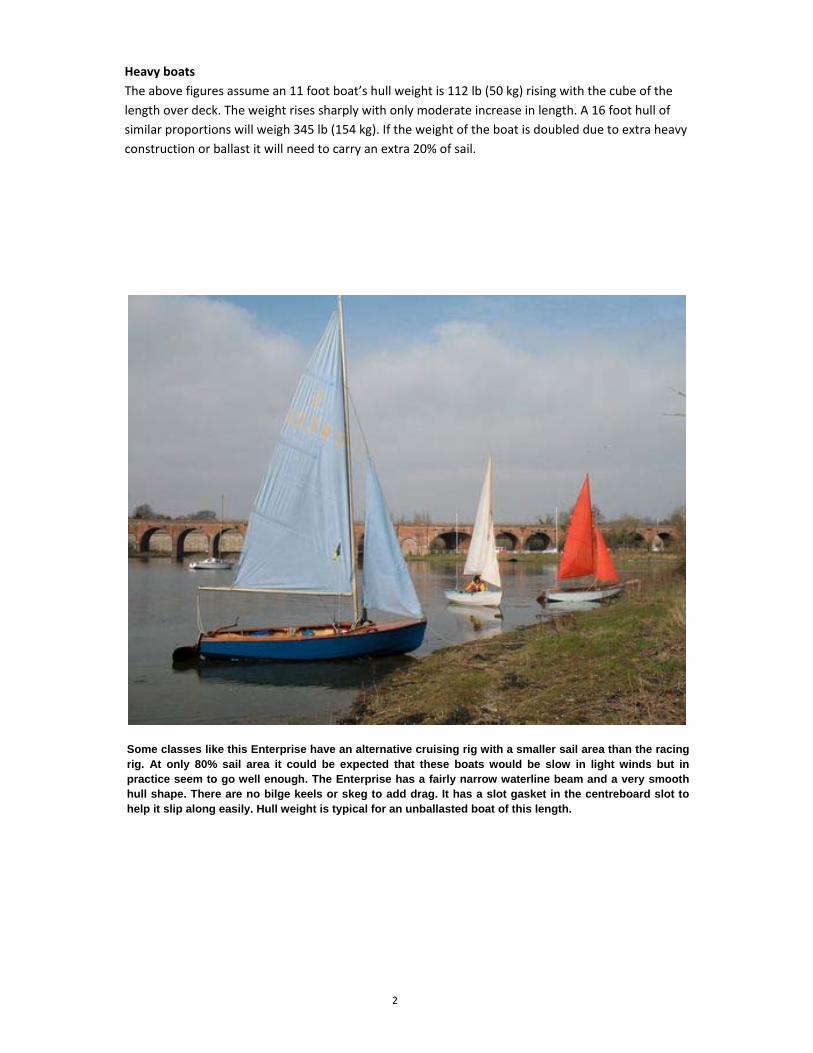
Some classes like this Enterprise have an alternative cruising rig with a smaller sail area than the racing rig. At only 80% sail area it could be expected that these boats would be slow in light winds but in practice seem to go well enough. The Enterprise has a fairly narrow waterline beam and a very smooth hull shape. There are no bilge keels or skeg to add drag. It has a slot gasket in the centreboard slot to help it slip along easily. Hull weight is typical for an unballasted boat of this length.

3
The Wayfarer as standard sets 138 sq feet of sail which is a 111% area. When setting our boat up we chose a smaller jib which we could see under. This gave the boat a sail area of 99%. It shows a hint more weather helm than I would like. Putting the first reef in the main puts the helm back in balance.
Wayfarer reefed down to 45%. This sail plan balances beautifully and gives the crew good control in up to 25 knots of wind. The double chined hull gives a narrow waterline beam and this sail area is probably equivalent to 50% on a firm bilged boat. Further reduction of sail is made by dropping the main and hoisting a 28 sq foot trysail with the storm jib to give 32%. Setting only a deep reefed main puts this boat out of balance. The long mast creates a lot of windage, a characteristic of this type of rig.

4
The Mirror as standard only carries a 91% sail area and is a little slow in light airs. With a single reef as shown here the sail is reduced to 71% and the boat starts to show lee helm. Changing to the storm jib takes it down to 58% and balances the helm again. Dropping the storm jib reduces sail to 42%
Tit Willow carries a 161% sail area. This boat is heavily ballasted weighing in at a ton and a quarter in cruising trim. She is 15 feet 6 inches long over the deck with a beam of 6 feet, a waterline beam of 5 feet 6 inches and draws 4 feet with the plate down. The mainsail has two reef bands and she carries 3 jibs, 80sq feet as shown here, a 40 sq feet working jib and a 10 sq feet storm jib. Double reefed with the storm jib she sets a 40% sail area. This is a good example of a home designed boat set up for coastal sailing.
5
Positioning reef bands Taking the above sail plans, the boat should have the facility to reduce sail area in 3 further stages: First reef about 75% Second reef about 50% Final reef about 35 to 40% On a catboat, 3 reef bands will be needed in one sail. This may be inconvenient and a compromise will have to be made. Worthwhile progress close‐hauled in strong conditions cannot be expected with much less than 50% sail area but down‐wind the boat may go dangerously fast in 30 knot gusts. There comes a wind speed where a boat will not make any progress to windward, probably around 30 or 35 knots, less in broken water. The final reef is somewhere near the area one would set in such conditions. This will vary with crew weight. Ballast Ballast widens the boat’s waterline beam by sinking the boat into the water. It will seem much stiffer to crew members. This is partly due to the widened waterline beam and partly because the weight of the crew is proportionately less of the overall weight of the boat. While it stiffens the boat it also reduces the angle of heel the boat can assume before the gunwale dips. More sail will be needed to propel the heavier boat with its broader waterline. All cruising gear stored inside the hull can be considered ballast. Bilge water does not work as ballast if it is free to move around. Overloading a boat can allow waves to break into the cockpit, making the boat heavier still. An 11 foot boat in rough conditions is unlikely to be able to carry any ballast in addition to one crew member and cruising gear. If the ballast is to be iron, lead or stone the hull buoyancy will need to be increased to carry this weight. Overall, ballast generally slows a boat but makes it more seaworthy provided it has the freeboard to carry the weight. Before loading the boat up with ballast it is worth looking up at the rig to see if changes here could bring a better solution to stability problems. Light weather performance This is linked to waterline beam and sail area. Other factors such as weight and keel profile are significant. The narrow waterline beam of double chined hulls seems to let them slip along better than single chined hulls. A very large sail area will prove its worth in light conditions, the long and typically fairly heavy spars it sets upon will reduce the boat’s sail carrying capacity in strong conditions. Even if a very light material is used for these spars they will still create a lot of windage when it blows hard. A lug rig which can be dropped and replaced by a trysail set direct from the mast may be a solution. Heavy weather performance It is very hard to be specific about how a boat will react to difficult conditions. Sailing a broad reach is rarely a problem so long as speeds are kept reasonable. Sailing on a run can produce an instability known to the racers as “death roll” or “windward roll”. This seems mainly to affect race boats. Reefing may eliminate it. Windward performance is paramount. This falls into 4 broad sections:

6
Ability to point close to the wind Bermudian is recognised as the best. Some other sail plans work perfectly well. It seems with a lug rig, the more vertical the yard, the better the performance is likely to be on the wind. Ability to resist leeway A generous depth of keel will go a long way towards this. Smaller boats often have poor draught. Ability to tack When trying to tack in a blow some boats head‐up, stop and fall back onto the same tack,or head‐up, get caught head to wind and start drifting backwards. It is fairly easy to predict the boats which will suffer from this. Sloops with one sail set are often more difficult to tack than a similar catboat. Light weight makes the boat less likely to carry way through the tack. A very blunt or transom bow will be stopped more quickly by the effects of the waves. A broad waterline will tend to generate more drag and stop sooner. Lots of hull windage near the bow will resist the boat in turning to windward. Lots of rig windage will stop the boat before it has had a chance to tack A long keel or skeg will resist the boat in turning to windward. A boat with a boom which cannot be sheeted in to the centreline will lose power earlier as it
heads‐up. A boat which doesn’t sail very close to the wind will have to turn further before it can fall onto
the new tack. The sloop’s ability to tack in heavy conditions is very good as the boat doesn’t have to point head‐to‐wind before the jib backs and takes the boat about. A yawl with the mizzen sheeted very flat will tend to kick the stern around and help the boat into the wind before it loses way. Spritsail barges went one better in this respect with a mizzen which was sheeted direct to the rudder. Ability to carry sail Weight and windage aloft will eat into the boat’s ability to carry sail. Windage aloft will slow the boat and encourage it to develop more leeway. A rig which is simple and uncluttered, with light, narrow spars will perform better than one used as a bracket for the attachment of accessories. Adding ballast will increase the boat’s ability to carry sail but will also increase the amount of sail needed to drive it. A boat which is moderate in all respects should give good upwind performance for most normal situations. Traditional pre‐war designs often perform quite well. Helm balance The boat sailed heeled a little to leeward should have light weather helm. It is unlikely a boat will carry this helm balance with all sail plans but is an ideal worth trying for. If the boat carries weather helm, the centreboard and rudder are working in the same direction, both limiting leeway. If lee helm is felt through the tiller, the centreboard and rudder are working in opposite directions and it is likely the boat will make more leeway. Excessive weather helm will slow the boat, is hard on the helmsman, the rudder and fittings. Raking the centreboard back may correct weather helm but reduces the effective keel area.

7
Reefing the jib Setting a jib too large for the conditions encourages the crew to sail the boat heeled too far to leeward and to carry too much sail. If caught aback when cleated it can take a boat over. Two jibs may be carried and swapped as the wind strength changes. A purpose made roller reefing system with a specially built jib or genoa can be used instead. A jib hanked to a forestay can sometimes be fitted with reef points. Storm jibs Sail area: 8‐10%. A high aspect sail will make the best storm jib. It should have little or no shape built into its seams so it can be pulled in and flattened before tacking to help the boat about. The storm jib should not be able to catch on the mast or spinnaker pole ring. This is so that the boat can be hove to by sheeting the jib to windward, pushing the tiller away and easing the main. There should be no need to tack into the hove to position. Storm jib sheets must not be stretchy. If constructing a storm jib, either from scratch or by cutting a sail down, use the same gauge sailcloth as the mainsail. Little jibs from very small dinghies can be used. The thin sailcloth they are often made from may not be strong enough to withstand strong winds and they may lose their shape or disintegrate. Thin luff wires may not be able to carry the rig tension so they might need to be hanked to the forestay. Cutting the top out of a bigger jib and re making the corners will usually yield a stronger and flatter sail. It is best that each jib has its own sheets. Storm mainsails Changing mainsails at sea needs careful planning. Stripping the working main off the boom and replacing it with another is difficult and slow. A simple boomless trysail a little larger than the working jib is a possibility. Hoisting a main in a force 6 is not going to be easy. There is every chance the boat will be sailing downwind, particularly if a jib is set. The sail must be able to be hoisted without it jamming in the standing rigging Cat rigs (only one sail) As sail area is reduced the centre of effort usually moves forward, increasing lee helm. It may be possible to adjust this out. Allowing the boat to heel more to leeward may balance the helm but heel should be kept moderate to keep the gunwales clear of the water. Roller reefing mainsails Generally despised by people who like slab reefing, roller reefing is infinitely variable and the unused portion of sailcloth is rolled up neatly creating less windage. In the right hands it works well but it is not possible to control the shape of the sail as well as with slab reefing. It is better to have roller reefing than inappropriately positioned reef bands. For a proper voyaging boat it is probably best to look beyond roller reefing and find another way of shortening sail. Roller reefing headsails These take a genoa (or jib) and roll it around a tube (a “foil” or “spar”) set immediately behind, around or sometimes instead of the forestay. A furling line allows the tube to be rotated and the genoa is rolled up around it reducing the area in use. Some beautifully engineered mechanisms are available. A proper roller reefing genoa will usually have a foam pad built into the sailcloth to flatten the remaining section of sail for strong winds. Benefits include convenience. Disadvantages are mainly going to be seen at high wind speeds. The low aspect sail is never going to be as good a shape as a storm jib, the fat furling foil wrapped up in sailcloth is going to create nearly as much windage as

8
the mast and if the furling line breaks the whole genoa will unroll. These systems can cost as much as a very usable second hand boat. Roller furling headsails Ordinary dinghy jibs with a luff wire can be set between a furling drum and a top swivel. This is a halfway stage between the roller reefing headsail and the traditional jib hanked to the forestay. The sail will either be fully furled or fully out, there is no half way between but it has the potential for a sail setting very well indeed. It’s a cheap system to set up and a convenient way of storing jibs when not in use. Changing sails is easy as the sail is rolled up prior to being changed. All the jibs must have identical luff wire lengths to match the gap between the top swivel and the furling drum. Quick release snap hooks can be used to join the sail on. They must be strong enough to handle the quite large loads involved. Capsize Anti capsize floats stop a boat inverting should it go over. They add weight and windage aloft, so slow a boat sailing close hauled and may contribute to a capsize. Whether to have them or not depends whether capsizes are to be expected and the probable difficulties in righting the boat. Some aluminium masts are lined with polystyrene which adds buoyancy aloft without increasing windage. Hollow wooden masts that are well sealed are very buoyant. Hull buoyancy is a significant factor. Light hulls with a wooden centreboard and plenty of side deck buoyancy can be expected to invert. A hull with a metal plate and buoyancy in the bow and stern is more likely to lie on its side and may self right but will most likely come up swamped. Racing classes tend to be designed to get knocked over and be easy to right, the worst problems I have seen have been day boats which were probably not designed with capsize recovery in mind. Rig tension Massive tension on the rigging will stress the hull and shorten its life. Tuning guides are around for the more common classes and will state a recommended rig tension. This is probably too tight if the hull is to be expected to last. Modern tuning guides seem to recommend more tension than they did 10 years ago. If the leeward shroud goes loose when beating, the mast is falling to leeward and tightening the rigging a little will stand it back upright without significantly altering the loads on the hull. If the forestay / luff wire goes slack downwind the rig tension is a bit loose or too much sail may be set. Sag in the luff wire of the jib upwind can be reduced by further tightening the rigging but needs to be done in a measured manner. Loose rigging could allow a clevis pin to drop out should its retaining ring be lost. In sloops, unless the jib is hanked to the forestay, the luff wire should take all or most of the tension. If roller furling gear and a separate forestay are used, the forestay must take some of the tension or it will become tangled as the sail is wound up. This is much more likely to happen when sailing downwind. Standing rigging Stainless steel with copper ferrules and stainless thimbles is by far and away the best. Fitting the ferrules is a precision operation and for most situations should only be done on a dedicated machine. Galvanised wire suffers from corrosion. Modern wire isn’t as heavily zinced as it used to be. Once it begins to rust it should be thrown away. Dyneema is a theoretically better material than stainless, a stay of equivalent stretch will be much lighter and not a lot thicker, but you can cut it with a knife. Chafe could bring a mast down.

9
Rigs Bermudian is the most common type and generally seen as the most efficient on the wind but relatively slow off the wind in light conditions. Lug rigs, gunter and occasionally gaff are also used. Boomless standing lug rigs have been proven to work well, the only rig I would not entertain is the dipping lug. Stayed and unstayed masts are both good systems provided they are built right. The same applies to both aluminium and wooden spars. Having a rig with more than one sail can have advantages. By choosing which sails to put where gives a chance to control helm balance as the sail area is reduced. The mainsail needs less reef bands to be fitted. If the boat is a sloop it gives the opportunity to heave‐to. A jib is a very useful tool in helping a boat about in strong conditions. The loading on the mainsheet will be less. A lot of lug rigs carry main and mizzen, most owners seem very satisfied with them. They have their own interpretation of heaving‐to which is to sheet the mizzen in flat and ease the main. The boat will tend to drift backwards downwind. Centreboards and daggerboards Centreboards are preferred as contact with the sea bed or obstructions is likely to do no damage. A metal centreplate is an extremely good way of carrying ballast. Typically the centreplate will be a third to half the thickness of an equivalent centreboard. Whilst an iron centreplate is considered an essential by some people, the differences are small at normal angles of heel. Once the boat is heeled so far over that the sail is in the water the weight of the iron plate will be a great help to stop inversion, but if the boat goes right over the plate can fall inside the boat making recovery even harder. Once the boat heels enough to dip a gunwale in a big way the boat will fill with water. A boat with an iron plate will need more buoyancy than a boat with a wooden centreboard. The hull will need to be protected at the point where the plate hits the hull when it is lowered. If changing from wood to iron these factors will need to be addressed. Centreboards and daggerboards, typical dimensions: 11 foot boat: 12 or 15 mm ply or up to 6 mm plate 16 foot boat: 19 or 25 mm ply or 6–10 mm plate
Area: 4% of sail area
Depth: 11 foot boats around 2’ below bottom of hull 16 foot boats around 3’ below bottom of hull A chord of around 14” where the board leaves the hull is very common One of the big differences is the waters these boats can be expected to sail in. Shallow draught works fine in smooth water but once the waves start to break the longer centreboard is needed to grip on undisturbed water deep down. Small dinghies which perform quite well in sheltered water can be slow to windward in broken water. Inadequate keel depth is common with a lot of the pocket cruisers.
10
If a long shallow keel is preferred it should be as deep as possible. These boats often make a lot of leeway. Rudder blade, typical dimensions: 1.5% of sail area. 10” chord is common 11 foot boat half inch ply 16 foot boat 19 or 22 mm ply If the rudder blade is deeper than the centreboard or keel(s), it is likely the keel hasn’t enough depth for broken water. Comfort Crew size will determine the shape of a comfortable boat interior. The following dimensions are based around my own frame which is 6 feet long, has an inside leg of 34 inches and a displacement of around 13 stone. A comfortable seating position needs to take several factors into account. A very wide side bench would seem to be the best but if the boat is to be sailed sometimes from the side bench and sometimes from the side deck/ gunwale, the bench will have to be fairly narrow. The side bench should be level or sloping back slightly. The angle of heel of the boat will be a factor in this angle. Larger boats tend to be sailed at higher angles of heel than small ones. The little boat will want a deeper foot well and flatter side benches than the bigger boat. When sailing using toe straps, the most comfortable position is with the legs straight. Seats and Cushions Wooden slats soon become uncomfortable. Flat plywood side decks are little better. A wooden gunwale is better as the weight is borne on the backs of the thighs which have some padding naturally. For long duration sailing a flat seat with a cushion is really a necessity. Polyethylene foam camping mat material is waterproof, soft and keeps the crew clear of water which runs down the side decks. Some gardeners kneelers work well. They should be at least an inch thick. There should be a cushion on both sides of the boat secured so it doesn’t fall into the bilges or get blown overboard. If the side decks are a little low, a thick cushion is a good way to correct this. Leg room Minimum side bench width: 10” Minimum vertical height of side bench above floor: 12”. This should be measured with a spirit level when the boat is heeled to a typical cruising angle. Horizontal distance, toe strap to gunwale: 28–30” Vertical distance, toe strap to gunwale: 6‐10” Mainsheets Hands can suffer badly after many hours at the tiller. The act of having to grip a rope throughout the day can leave the crew with painful hands. There are several options with the mainsheet. Amongst these are whether to use a traveller or sheet to the centreline, the diameter of the sheet, the mechanical advantage and the lead between the boat and the helmsman. The sheet will most commonly lead from the transom or centreboard case. An old design of mainsheet where the final fall runs from a block on the boom to the helmsman’s hand has some advantages: The sheet load will help to support the weight of the helmsman when he is sitting out and
reduce fatigue.

11
If the helmsman unfortunately misses the toe‐straps and begins to overbalance, the mainsheet may be enough to keep him in the boat.
Ultimate strength of rope is not a factor in selecting mainsheets, a 4mm rope will typically have a breaking strain of a quarter of a ton. For extended passages a thicker rope will be needed for comfort, certainly no less than 10 mm. A slightly stretchy rope will automatically ease the boom in gusts. The traveller Sheeting from the quarter greatly increases the downward pull on the sail when close hauled and prevents the boom from being pulled in fully to help the boat about. It may well be better to sheet to the centreline so the sail can twist for light airs although this is less important when the rig has no jib. If twist is not needed it can be controlled with a kicking strap. Some sailors who use lug or gaff rigs insist a kicking strap has no place on their boats. Boats with no kicking strap usually have low aspect rigs. Mechanical advantage 2 to 1 mainsheets are usual in little boats while 3 to 1 are more common on heavier boats. With a 2 to 1 on a short boom the sail angle can be adjusted greatly with one arms length of sheet. This can allow a little boat to be kept under control in gusts by sheeting and releasing the mainsail to keep the boat flat. A 3 to 1 on a long boom will have the opposite effect. The bigger boat may be able to pinch up into the wind to maintain control. The greater force the 3 to 1 is able to apply is necessary on bigger boats. A centre mainsheet which is connected to the boom halfway along its length will need twice the purchase power of one which is sheeted from the transom. Mainsheet cleats Close hauled these should be used with caution as release of the mainsheet may be needed to keep the boat flat in a gust. Off the wind, when the boom is out over the water there seems no reason not to cleat. With a conservative spread of sail and stable winds cleating may be appropriate on other points of sail. An experiment A pair of clam cleats were fitted to the thwart on my Mirror, one either side. The mainsheet tail was led from the transom and placed in the cleat on the leeward side. In stronger winds it was necessary to head up a little so the sails lift before reaching across the boat to put the sheet in the cleat. It was found very easy to release the sheet from the cleat with a gentle pull and upon doing so the boom was instantly let out about 20 degrees to depower the sail. It was easy to loosely coil the mainsheet tail up on the windward side deck to keep it instantly at hand. There is a danger it might fall into the bottom of the boat and become inaccessible. Verdict – Quite a good set up, to be used with care.

12
Tiller extension Racing tiller extensions are not very comfortable. They tend to be a bit thin and often are made of aluminium which feels cold. Traditional hand tools give an idea of what is comfortable to hold for prolonged periods. For sitting inside the boat a tiller extension is best gripped quite close to the tiller, around 2 feet inboard of the backrest of the side bench. It should be smooth, round, warm and somewhere near an inch in diameter. For sitting out it should reach the top of the helmsman’s thigh so he can steer if he needs to lean right back. A spade handle grip is good, again somewhere near an inch in diameter. A length of broom handle is a useful piece of wood to make the tiller extension from. All rough edges to be sanded smooth, finished with paint or varnish. No wind Sailors are often heard to say “There was no wind so I had to motor”. The cash strapped sailor may have little choice but to go without. In time he will learn the techniques to cruise under sail and will feel thankful to be free of the complications engines can bring. He will have to work hard at optimising the performance of his boat but once learned these skills become second nature. Making the most of very light conditions A boat with a reasonable spread of sail and a fairly narrow waterline will row more easily and sail better in light airs. Up‐wind: Very often the top of the sail is stalled. Holding the boom up so the sail sets to its proper shape can get the air sliding over it and make a difference. It is worth rigging a light line from somewhere up the mast for this. This line should be set on the windward side so it doesn’t interfere with the smooth shape of the sail. Heeling to leeward works on some boats. Down‐wind: A jib boomed out on a jib stick can correct weather helm and reduce rudder drag. Heeling the boat to windward also helps. Lifting the centreboard can reduce drag quite a lot. Oars of generous length are vital. Pad the thwart for comfort. Know the direction of the tide for every hour on the passage. Plan passages to work a fair tide and sleep during foul tides. Getting in and out of harbour can be slow and frustrating. Anchoring near the harbour mouth can massively speed getting out and underway. In sheltered waters a bigger dinghy can sometimes anchor‐off which eliminates having to get in or out. It’s good to get out into the channel an hour before the tide turns fair. Accept that progress of only 1‐2 knots may be possible, any help the tide will give is a big bonus. Some boats respond very well to being rowed in light winds with sail set. The advantages are: No messing about dropping and hoisting sails. Other water users will probably not notice the crew are rowing so leave them alone. It is sometimes possible to haul the boom up with a reef pendant to get it out of the way. Giving a good engine away is a very public declaration of choosing a different way to cruise.

13
Engines These days very few people make meaningful passages without an engine. Whilst it is true there are situations a boat equipped with an engine should not be allowed to get into, the engineless boat has a few more situations it should avoid. The engine brings convenience and allows tricky situations to be managed with minimal skill. This convenience doesn’t come for free: An engine which is fine looks much the same as one which is going to break down tomorrow.
A strategy to ensure its reliable operation needs to be in place. A new engine will cost more than a new mainsail or about three quarters of the cost of a new
trailer. An old one will cost more than an old mainsail and is harder to check. The engine needs fuel. This needs to be bought and must at all costs be kept from spilling into
the bilges. Expect no more than 20 miles from a gallon of fuel. The engine needs to be kept secure from theft. Along with its advantages and costs the engine can cause other situations to develop: Should the mainsheet become caught on the engine the boat could be taken over in a gust. The engine represents quite a lot of weight in a far from ideal place. This may compromise
the seaworthiness of the boat. Propellers and fuel can be dangerous. Developing the skills to do without is unlikely if its convenience is there at the pull of a cord. Oars Sailboats do not normally row very well, some much less well than others. A boat which is hard to propel but which tracks very straight may be better than a narrower and lighter craft which tends to spin around in circles. A skeg at the back of the hull can help and so can fitting the rudder and tying it off‐centred. When rowing into the wind, furled jibs are best dropped inside the boat to reduce windage. Crew should be encouraged to sit down inside the hull. For the sake of comfort and efficiency the side decks where the rowlocks are fitted need to be low. It should not be necessary for the oar handles to be above shoulder height while the oars are being pulled. Some adjustment is possible by sitting the crew on a thick cushion. Long oars will reach the water at a shallower angle than short oars. Distance between the oar handles is important. A gap of 2 ‐8 inches is comfortable. A very small gap may result in thumbs being pinched. Where the oar rests on the rowlock forms the pivot or fulcrum. The ratio of oar inboard to oar outboard of this pivot determines the mechanical advantage.

14
An experiment A pair of 7’10” oars from a boat of 4’6” beam were tried on a boat of 6’ beam. This showed the handles were too far apart to use comfortably and the boat was extremely hard to pull. Adding a second pair of oar collars closer to the oar blades made a world of difference. Boat of 6’ beam Oar tip to oar collar bearing point 64” Boat of 4’6” beam Oar tip to oar collar bearing point 71” Verdict: For both boats the 7’10” oars felt about right. With the 4’6” boat the oars were a bit blade heavy. Weights near the handles could have corrected this. Single oar sculling Propelling a boat using an oar over the transom is even slower than rowing it. It has advantages when coming alongside and sends a very definite message to other water users. A man sculling a sailboat is demonstrating a skill almost unknown these days, he clearly knows what he’s doing. He stands upright, looking where he’s going. He has one hand free for making gestures. He’s in charge. Tips It’s OK to use ordinary rowing oars of around 8’. Proper sculling oars are longer and often curved.
The sculling oar needs to fit as accurately as possible in the sculling notch. A standard iron rowlock is fine for this but most oars are too narrow where they will pass over it.
The oar will need protection from the notch. An oar collar is one answer, lining the notch with rubber is another.
A slightly bent oar is a great help. Draw a straight line between the handle and the centre of the blade, the part that bears on the notch should be 1” – 2” higher.
Offset the notch to starboard (if you are right handed).
A lanyard to hold the handle down will help with fatigue. This should be strung between the oar handle and the cockpit floor. The lanyard on our Wayfarer is fixed to the aft toe‐strap anchorage. As the sculling notch is offset to starboard, and the lanyard attachment on the centreline, the geometry is far from ideal. We found a rope lanyard ineffective due to this imperfect geometry so made one out of bungee cord which works very well.

15
The author sculling his Mirror with a standard 8 foot oar
Rowing and sculling If the boat carries a crew of two, one can row conventionally while the other sculls over the transom. It prevents one person from becoming bored and fretful. This is far more powerful than just one person rowing. The boat is steered by the sculler, the rower can concentrate on producing power. Other water users will admire the skill being demonstrated and keep a respectful distance. This technique needs lots of practice and regular crew.
Sarah and I rowing our Wayfarer. The sculling oar is 8’ 6” long with a blade 30” long and 4” wide. The blade meets the handle at an angle of 18 degrees.

16
Anchors A little anchor will hold the boat in most conditions for lunch. If the crew need to sleep at anchor or leave the boat something more substantial will be needed. At a meeting of sailors we talked about the anchors we used. Fisherman’s, Plough and Danforth were the most common types. 6‐10 lb for an 11 foot boat and 10‐15 lb for a 16 foot boat were typical. A short length of chain is often used between the anchor and line although some sailors claimed it is better to use a slightly heavier anchor and no chain. The folding grapnel anchor was universally condemned. Most people use anchor lines of 8 mm or 10 mm nylon or polyester. The thickness has more to do with its ability to absorb chafe and ease in handling than overall tensile strength. The usual scope of anchor line is five times the depth of water. For inshore sailing, five times the tidal range will probably be enough. For coastal work it may be necessary to anchor for a tide in very deep water. 300 feet or more of line may be needed. Navigation lights and night sailing Sadly we must sometimes sail when there is no light. Even if passages are planned to be completed during daylight, dusk will sometimes fall before a destination is reached. A short evening sail to position the boat near a harbour mouth can be essential to the next day’s passage. A torch meets the legal requirements but fitted lights offer the following benefits: Other craft will see you before you see them. There is no need to struggle holding a torch whilst sailing the boat. A 12 volt supply is as good a way as any of powering lights. This can be one 12 volt battery, two 6v batteries joined together or another system. Choosing where to site the lights needs some thought. Lights up the mast need wiring to run aloft. The weight and windage will slightly affect the boats ability to carry sail in strong conditions. Lights on the deck may shine on the jib and dazzle the crew. Using the storm jib may cure this and it saves having to mess about changing headsails in the dark. A light on the stem head could work well but is vulnerable to damage. Masthead lights double as anchor lights, they can be turned on or off without getting out of bed. Ordinary switches are not designed for salt water exposure. Terminating the wires with a pair of crocodile clips which go directly onto the battery is an alternative. It is not necessary to use coloured lights for port and starboard. White lights are cheaper and show up better. Any light is better than no light. If the boat has a yard or gaff peaked up above the masthead, the masthead light will need to be duplicated by another on the transom. Batteries will last much longer if LED type lights are used. If a lead acid battery is used the whole system will need a fuse to prevent the wiring burning‐out in the event of a short circuit. Wires can be joined with block connectors and covered with waterproof grease. It is better to solder if possible.

17
If marine grade LED lights are unavailable or too expensive, LED lights intended for commercial vehicles are an alternative. Most of these are well sealed against salt and water. Check they will work on a 12 volt supply as some lorries have 24 volt systems. Checking the chart is best done with a red head‐torch, as night vision isn’t affected by this. Charts may look a bit strange and hard to read in red light. It is good to have a torch to hand in case the running lights fail. Whilst putting in a reef in the dark should be possible, for most of us it is best to shorten sail before setting off. Sailing close hauled will have to be done by the feel of the boat or using the compass so progress to windward is likely to be poorer than in daylight. An illuminated compass is very useful and can be wired into the same circuit as the navigation lights.
Masthead light on Mirror. This was built from a truck light which shines into a 4 oz plastic food box. Part of the food box was lined with cooking foil to act as a reflector. The power cable runs down the shroud, along the gunwale and has a pair of crocodile clips where it ends by the transom. The light unit is a Rubbolite model 851. I have used these lights for years and have found them to be very good. Trailers, launching and recovery The crew must arrive equipped to launch and recover their boat without outside help. If the crew weight is less than the weight of the boat then problems with recovery need to be considered. Some individuals may manage to exceed this by up to 50%, otherwise some other means of dragging the boat out will be needed. Launching is less of a problem as gravity helps. It is sometimes wise to lower the boat gently down the slipway using a car. For haul out, if a slipway winch is available that is ideal but an ordinary car is a good substitute. For this to work the trolley (or trailer) will need at least 3 wheels. Docking arms which automatically line the boat up on the rubber pads are really a necessity for bigger boats. A simple lashing from trolley to stem head will hold the boat in place for haul out.

18
Attach the rope as low down on the trolley as possible, perhaps around the jockey wheel shaft. If a separate trolley and trailer are used there is no need to take the trailer off the car. Tie a rope between the trolley and trailer. Crew should be well clear of the boat as it is pulled out. It is important the boat doesn’t run anyone over. If the trolley or trailer catch on a rock, the tension in the tow line can become great enough to make some knots very tight. A round turn and two half hitches will normally come undone, as will a bowline. Lines can be joined with interlocking bowlines. Watch out for overhead cables. Combi trailers are preferred by many. Salt water affects the chassis and hub bearings of road trailers. As wheels rust they become progressively thinner until they collapse. For anything other than a very light boat a winch or tackle will be needed to haul the boat and trolley onto the trailer. Its capacity should be at least as much as the weight of boat, trolley and any gear inside the boat.
Recovering a heavier boat. Note docking arms on the trolley. These allowed me to get the boat on its trolley without getting my knees wet. The tow line is tied to the jockey wheel stem on the trolley and Sarah is tying it to the trailer. The car will then haul the boat out, the trailer will be backed up to the trolley and the boat and trolley winched on.

19
Photos and Credits Many thanks: To South Coast DCA members for allowing me to use their photos: Enterprise Steve Bradwell Wayfarer under full sail Steve Bradwell Wayfarer reefed Liz Baker Mirror under sail Chris Waite Tit Willow Chris Waite Mirror being sculled Sarah Sorensen Wayfarer being rowed Ian Hylton Masthead light Liz Baker Recovery of Wayfarer David Sumner To Chris Waite and Martin Corrick for sharing ideas. To Sarah Sorensen, for sailing with me while I fiddled with home made equipment which didn’t work properly. To Liz Baker for help with the lay‐out of this document and for sorting out my punctuation. Cliff Martin