by order of the air force manual 41-216 ...static.e-publishing.af.mil/production/1/af_sg/...chapter...
TRANSCRIPT

BY ORDER OF THE
SECRETARY OF THE AIR FORCE
AIR FORCE MANUAL 41-216
13 FEBRUARY 2013
Health Services
DEFENSE MEDICAL LOGISTICS
STANDARD SUPPORT (DMLSS) USERS
MANUAL
COMPLIANCE WITH THIS PUBLICATION IS MANDATORY
ACCESSIBILITY: Publications and forms are available on the e-Publishing website at
www.e-publishing.af.mil for downloading or ordering.
RELEASABILITY: There are no releasability restrictions on this publication.
OPR: AFMOA/SGAL
Supersedes: AFMAN 41-216, 31 August
2008
Certified by: AF/SG3
(Maj General Thomas W. Travis)
Pages: 600
This manual implements Air Force Policy Directive (AFPD) 41-2, Medical Support. It
prescribes a uniform system of property control under an automated information system and
applies to all medical logistics accounts supported by the DMLSS system. It establishes
requisition, purchase, receipt, storage, issue, shipment, disposition, stock control, and accounting
procedures for Air Force medical stock record accounts. It also establishes requirements for
equipment maintenance and management of facility operations. It applies to all Air Force
medical treatment facilities and all other operational users of the DMLSS system, including Air
National Guard and Air Force Reserve personnel. This publication may not be supplemented.
Send comments and suggested improvements on AF Form 847, Recommendation for Change of
Publication, through channels, to AFMOA/SGALD, 693 Neiman St, Fort Detrick, MD 21702-
5006. Ensure all records created as a result of processes prescribed in this publication are
maintained in accordance with AF Manual (AFMAN) 33-363, Management of Records, and
disposed of in accordance with the Air Force Records Disposition Schedule (RDS) located at
https://www.my.af.mil/afrims/afrims/afrims/rims.cfm. This instruction requires collecting
and maintaining information protected by the Privacy Act of 1974 authorized by 10 U.S.C. 55,
Medical and Dental Care; 10 U.S.C. 8013, Secretary of the Air Force; and E.O. 9397 (SSN).
The applicable Privacy Act System Notice, F044 AF SG E, Medical Record System (December
9, 2003, 68 FR 68609), is available online at:
http://www.defenselink.mil/privacy/notices/usaf. The use of the name or mark of any specific
manufacturer, commercial product, commodity, or service in this publication does not imply
endorsement by the Air Force.

2 AFMAN41-216 13 FEBRUARY 2013
SUMMARY OF CHANGES
This document is substantially revised and must be completely reviewed. It contains procedural
guidance for DMLSS users including version 3.1.2 system improvements, features and
functionality. Chapter 1 remains the same with minor changes. Chapter 2 includes new
information on Quality Control (paragraph 2.4.). Also, Section B was revised and Improving
Financial Management Effectiveness (paragraph 2.21.) was added. Chapter 3 is completely new
information based on new DMLSS hardware and version 3.1.2 functionality. Of particular
significance, system administrator (SA) tasks (table 3.1.) were added along with SA Tool
functions (paragraph 3.4.) including CAC/PKI (paragraph 3.5.1.4.) and tutorial databases set-up
instructions (paragraph 3.11.3.). Note: The JMLFDC has delayed release of the PKI/CAC
upgrade to DMLSS version 3.1.2.. Projected release is 2012. Chapter 4, SS, material was
updated to show new fields and divided for better organization. DMLSS MTF/ORG service and
logistics department detail information is now in Attachment 2. Chapter 5 now contains IM
procedures previously contained in Chapter 7. Moving IM forward creates a more natural
progression of materiel management functions and emphasizes the catalog record section.
Significant new material includes managing return authorizations (paragraph 5.16.2.3.5.1.),
prime vendor (PV) price verification (paragraph 5.16.2.3.6.), Wide Area Workflow interface
(paragraph 5.16.2.4.), reachback ordering (paragraph 5.28.), hub and spoke functionality
(paragraph 5.29.), DCAM customer support (paragraph 5.30.), and the master ordering facility
(paragraph 5.31.). AM information from Chapter 5 was moved to Chapter 8. Chapter 6 remains
CAIM with minor changes. Chapter 7 is now titled CS with information previously contained in
chapter 10. Chapter 8 now contains AM procedures with new information on delayed delivery
orders (paragraph 8.19.4.6.), primary and back-up PV‘s holding backorders (paragraph
8.19.4.7.), and deferred item order/ECAT contingency ordering (paragraph 8.19.5.). Chapter 9
remains EM and includes a new paragraph on equipment depreciation (paragraph 9.19.). MA
information changed slightly and was moved to Chapter 10. Chapter 11 remains Service
Contracts with minor changes. Chapter 12 remains FM with negligible change. Chapter 13,
Reports, is new material that covers DMLSS standard reports and their use. Information from
the previous chapter 13, Data Elements and Codes, can now be found in Attachment 10. Chapter
14, Inventory Control, is a new chapter that includes management procedures for controlling
warehouse and customer inventories. Attachment 1 remains the same with minor changes.
Attachment 2, DMLSS MTF/ORG – Service and Logistics Department Details contains new
material extracted from chapter 4. Attachment 3 is new information pertaining to DMLSS user
privileges. Attachment 4 contains new procedures relating to the new Distribution and
Transportation Module available in IM, AM, and EM. Attachment 5 is now IM Pending
Actions. Attachment 6 is now CAIM Pending Actions. Attachment 7 is now AM Pending
Actions. Attachment 8 is now EM Pending Actions. Attachment 9 is now MA Pending Actions.
Attachment 10, Data Elements and Codes, contains a portion of what was previously Chapter 13.
Also, a new quality control cross reference table (Table A10.3.) was added.
Chapter 1—GENERAL AND ADMINISTRATION 20
1.1. Purpose. ............................................................................................................. 20
1.2. Scope. ................................................................................................................ 20
1.3. Revisions. ........................................................................................................... 20

AFMAN41-216 13 FEBRUARY 2013 3
1.4. System Purpose. ................................................................................................. 20
1.5. Terms and Abbreviations. ................................................................................... 20
1.6. Sensitivity. ......................................................................................................... 20
1.7. System Security. ................................................................................................. 20
1.8. External Security. ............................................................................................... 21
1.9. Privacy Act Data. ............................................................................................... 21
1.10. Health Insurance Portability and Accountability Act (HIPAA). ........................... 21
1.11. DMLSS System Navigation. ............................................................................... 22
1.12. Module Menu Toolbars. ..................................................................................... 23
1.13. Shortcuts. ........................................................................................................... 23
1.14. Messages. ........................................................................................................... 24
1.15. Additional Screen Help. ...................................................................................... 24
Chapter 2—DOCUMENT CONTROL AND FINANCIAL PROCEDURES 25
Section 2A—Documentation and Reports 25
2.1. Document Number Construction. ........................................................................ 25
2.2. Computer Assigned Document Numbers. ........................................................... 25
2.3. Manually Assigned Document Numbers. ............................................................ 25
Figure 2.1. DMLSS Document Number Blocks. ................................................................... 26
2.4. Quality Control (QC). ......................................................................................... 26
Figure 2.2. Source Document Control Report. ...................................................................... 27
Figure 2.3. Specify Report Selection Criteria – Source Document Control Report. ................ 27
2.5. Preparing Supporting Documents for File. .......................................................... 27
2.6. Filing Supporting Documents. ............................................................................ 28
Section 2B—Finance Procedures 28
2.7. Financial Overview. ........................................................................................... 28
2.8. Organizational Structure. .................................................................................... 29
Figure 2.4. Organization Relationship. .................................................................................. 29
2.9. Financial Structure. ............................................................................................. 29
2.10. Establishing Organization and Fund Relationships. ............................................. 32
Table 2.1. Sample Funds Load and Project Center/Expense Center Revision Form. ............. 33
2.11. DMLSS Funds Management. .............................................................................. 34
2.12. The EOP Process. ............................................................................................... 35

4 AFMAN41-216 13 FEBRUARY 2013
2.13. Flow of the Financial Interface. .......................................................................... 37
Figure 2.5. DFAS Daily Process Flow. ................................................................................. 38
Figure 2.6. DFAS Monthly Process Flow. ............................................................................ 39
2.14. Funds Control System. ........................................................................................ 39
2.15. SMAS. ............................................................................................................... 39
2.16. IAPS. ................................................................................................................. 39
2.17. Enterprise Business System (EBS). ..................................................................... 40
2.18. Improving Financial Management Effectiveness. ................................................ 40
Chapter 3—SYSTEMS ADMINISTRATION (SA) 43
3.1. Scope. ................................................................................................................ 43
3.2. SA Responsibilities. ........................................................................................... 43
Table 3.1. System Backups and Maintenance Procedures. ................................................... 43
3.3. DMLSS Website (Intranet). ................................................................................ 45
3.4. SA Tool Overview. ............................................................................................. 45
Figure 3.1. DMLSS Start Page. ............................................................................................ 45
Figure 3.2. DMLSS System Administration Window. ........................................................... 46
Figure 3.3. System Administration Home Window. .............................................................. 47
3.5. Manage Users. .................................................................................................... 48
Figure 3.4. SA Manage Users Menu. .................................................................................... 48
Figure 3.5. Create DMLSS User Account page. .................................................................... 48
Figure 3.6. Assign User CAC information screen. ................................................................ 49
Figure 3.7. View And Update CAC Access Screen. .............................................................. 50
Figure 3.8. User Search Criteria Screen. ............................................................................... 50
Figure 3.9. Manage DMLSS User Accounts/Search Results Screen. ..................................... 51
Figure 3.10. Manage CAC Access Results Screen. ................................................................. 52
3.6. Manage Security. ................................................................................................ 53
Figure 3.11. Manage Security Menu. ...................................................................................... 53
Figure 3.12. Manage Web Access. ......................................................................................... 55
3.7. Manage User Messages. ..................................................................................... 55
Figure 3.13. Manage Users Messages Menu. .......................................................................... 56
Figure 3.14. Manage Users Messages Menu. .......................................................................... 56
Figure 3.15. Manage Users Messages, Deleting Messages. ..................................................... 56
3.8. Manage Server. .................................................................................................. 57

AFMAN41-216 13 FEBRUARY 2013 5
Figure 3.16. Manage Server Menu. ......................................................................................... 57
3.9. Manage Devices. ................................................................................................ 58
Figure 3.17. Manage Devices Menu. ...................................................................................... 59
Figure 3.18. Manage DCM Printers Window. ......................................................................... 59
3.10. Manage Services. ................................................................................................ 61
Figure 3.19. Manage Services Menu. ...................................................................................... 61
3.11. Manage Database Menu. ..................................................................................... 62
Figure 3.20. Manage Database Menu. ..................................................................................... 62
Figure 3.21. Manage Tutorial Database. ................................................................................. 63
3.12. Manage Medical Materiel Menu. ........................................................................ 63
Figure 3.22. Manage Medical Materiel Window. .................................................................... 64
Figure 3.23. Run Daily EOP Process Window. ....................................................................... 65
3.13. Facility Management Menu. ............................................................................... 67
Figure 3.24. Facility Management Menu Window. ................................................................. 68
3.14. Manage Backups Menu. ..................................................................................... 68
Figure 3.25. Manage Backups Menu Window. ....................................................................... 69
Figure 3.26. Backup DB/Server Window. ............................................................................... 70
3.15. Data Tapes. ........................................................................................................ 70
3.16. Cleaning Tape Drives. ........................................................................................ 71
3.17. Troubleshooting. ................................................................................................ 71
3.18. MHS Service Desk. ............................................................................................ 71
3.19. RF Networks. ..................................................................................................... 72
3.20. System Access Points Security. .......................................................................... 72
Chapter 4—SYSTEM SERVICES (SS) 73
4.1. Purpose. ............................................................................................................. 73
4.2. Organizational Structure. .................................................................................... 73
4.3. DMLSS Auditable Changes. ............................................................................... 73
4.4. Tree View. ......................................................................................................... 74
Figure 4.1. Tree View and Hierarchal Structure of ORG, DEPT, and SVC. ........................... 74
4.5. Search. ............................................................................................................... 74
4.6. MTF/Unit. .......................................................................................................... 75
4.7. Department. ........................................................................................................ 76
4.8. Service/Customers. ............................................................................................. 77

6 AFMAN41-216 13 FEBRUARY 2013
Figure 4.2. Service/Customer Detail – (New) – Basic Tab. ................................................... 78
Figure 4.3. Service/Customer Detail – (New) – Materiel Tab. ............................................... 79
Figure 4.4. Service/Customer Detail – (New) – Funding Tab. ............................................... 82
4.9. Funds. ................................................................................................................ 83
Figure 4.5. Log Fund Detail – Log – AF Working Capital Fund Window. ............................ 84
4.10. Project Center. .................................................................................................... 85
Figure 4.6. MM Project Center Detail Window. .................................................................... 86
4.11. Expense Center. .................................................................................................. 87
Figure 4.7. MM Expense Center Detail Window. ................................................................. 88
4.12. AM Funds. ......................................................................................................... 89
4.13. OP Funds. ........................................................................................................... 91
4.14. Project Center. .................................................................................................... 92
4.15. Expense Center. .................................................................................................. 92
4.16. POC. .................................................................................................................. 93
Figure 4.8. POC Detail Update – (New) Window. ................................................................ 93
4.17. User Privilege (UP) Assignment. ........................................................................ 94
Figure 4.9. User Priv – Assignment Window. ....................................................................... 95
4.18. User Privileges – Management. ........................................................................... 97
Figure 4.10. User Priv – Management Window. ..................................................................... 98
4.19. Table Maintenance Utility (TMU). ..................................................................... 99
4.20. DMLSS Communications Management (DCM). ................................................. 101
Figure 4.11. DCM Search Window. ........................................................................................ 102
Figure 4.12. DCM Configurations Window. ........................................................................... 104
4.21. EOP Process Management. ................................................................................. 106
Figure 4.13. EOP Process Management Window. ................................................................... 106
4.22. Record Management. .......................................................................................... 107
4.23. Change Expense Center. ..................................................................................... 109
4.24. Assign Customer to SOS. ................................................................................... 109
4.25. Assign Customers to User IDs. ........................................................................... 109
4.26. Assign Role to User IDs. .................................................................................... 109
4.27. Assign Assemblages to User IDs. ....................................................................... 109
4.28. Standard Reports. ............................................................................................... 109
Chapter 5—INVENTORY MANAGEMENT 110

AFMAN41-216 13 FEBRUARY 2013 7
5.1. Purpose. ............................................................................................................. 110
5.2. New MTF Catalog Records. ............................................................................... 110
Figure 5.1. Catalog Search, Scopes. ...................................................................................... 111
Figure 5.2. MTF Catalog Record, Basic Tab. ........................................................................ 111
Figure 5.3. MTF Catalog Record, Packaging (Tab) Window. ................................................ 119
Figure 5.4. MTF Catalog Record, Technical Tab. ................................................................. 120
Figure 5.5. MTF Catalog Record, Acceptable Equivalent Tab. .............................................. 120
Figure 5.6. MTF Catalog Record, Cust Cat Tab. ................................................................... 121
Figure 5.7. MTF Catalog Record, Log Cat Tab. .................................................................... 121
5.3. Catalog Search. .................................................................................................. 123
Figure 5.8. Catalog Search, Basic Search Tab. ...................................................................... 124
Figure 5.9. Catalog Search, Advanced Search Tab (Local Catalog Related Search Fields). .... 124
Figure 5.10. Catalog Search, Search Result Detail Tab. .......................................................... 125
5.4. Review MTF Catalog Changes. .......................................................................... 125
5.5. Mass MTF Catalog Changes. .............................................................................. 126
5.6. Source of Supply (SOS). ..................................................................................... 126
Figure 5.11. Vendor Data from DBPA Report. ....................................................................... 127
Figure 5.12. Source of Supply – (New), Basic Tab. ................................................................ 127
Figure 5.13. Source of Supply – (New), Submission Tab. ....................................................... 129
Figure 5.14. Source of Supply – (New), SOS Contract Tab (Current Contract). ...................... 130
Figure 5.15. Source of Supply – (New), Address Tab (Order/Remit to Addresses). ................. 131
Figure 5.16. Source of Supply – (New), POC Tab. ................................................................. 132
Figure 5.17. Source of Supply – (New), SOS Environment Tab. ............................................. 133
5.7. Purchase Card. .................................................................................................... 134
Figure 5.18. Purchase Card Register window. ......................................................................... 137
Figure 5.19. PC Reconciliation Codes. ................................................................................... 138
5.8. Physical Inventory. ............................................................................................. 144
Figure 5.20. Select Inventory Segment window. ..................................................................... 145
Figure 5.21. Generate Count Lists and Assign Teams Criteria Window. ................................. 147
Figure 5.22. Generate Count Lists and Assign Teams to IM Inventory Control Number
Window. ............................................................................................................. 147
Figure 5.23. Enter Counts for Physical Inventory Window. .................................................... 148
Figure 5.24. Research Inventory Gains and Losses for IM Inventory Window. ....................... 149

8 AFMAN41-216 13 FEBRUARY 2013
5.9. Destructions. ...................................................................................................... 151
5.10. Commercial Returns. .......................................................................................... 151
5.11. Item Gain/Loss. .................................................................................................. 156
Figure 5.25. Item Gains/Losses Window. ............................................................................... 157
Figure 5.26. IM RIC Lookup Screen. ...................................................................................... 160
Figure 5.27. Outshipment Form/Transportation Selection screen. ........................................... 160
5.12. Excess. ............................................................................................................... 162
Figure 5.28. Report Excess – IM Search Results. .................................................................... 163
Figure 5.29. Report Excess – Search Excess (Search Results in Background) Window. .......... 166
5.13. Print Barcodes. ................................................................................................... 167
Figure 5.30. Barcode Printing Window. .................................................................................. 168
5.14. Orders. ............................................................................................................... 168
Figure 5.31. Build Order - Order Summary Window. ............................................................. 170
Figure 5.32. Submit Progress for Exception Started Window. ................................................. 170
Figure 5.33. Cancel LOG Due-In Process. .............................................................................. 175
Figure 5.34. Cancel LOG Due-Out Process. ........................................................................... 175
5.15. Issues. ................................................................................................................ 176
Figure 5.35. LOG Fulfilled Customer Requirement (Issue Generated). ................................... 179
Figure 5.36. LOG unfulfilled Customer Requirement (Backorder generated). ......................... 180
5.16. Receipts. ............................................................................................................. 180
Figure 5.37. Return Authorization Modal Window. ................................................................ 185
Figure 5.38. Price Verification Status. .................................................................................... 186
Figure 5.39. IM Receipt Search Window. ............................................................................... 187
5.17. IM Summary Receipt Pending. ........................................................................... 187
5.18. Delivery List. ..................................................................................................... 187
5.19. Reprint Delivery List. ......................................................................................... 188
5.20. Transaction History. ........................................................................................... 188
5.21. QA. .................................................................................................................... 189
Figure 5.40. Create New Complaint. ...................................................................................... 190
Figure 5.41. QA Record Search. ............................................................................................. 193
Figure 5.42. QA Notification Class. ........................................................................................ 194
5.22. Transportation. ................................................................................................... 195
5.23. Return Item. ....................................................................................................... 195

AFMAN41-216 13 FEBRUARY 2013 9
5.24. Internal Transfer. ................................................................................................ 196
5.25. Status Edits. ........................................................................................................ 196
5.26. Standard Report. ................................................................................................. 197
5.27. Reprinting Asset Relocation Delivery List. ......................................................... 197
5.28. Reachback. ......................................................................................................... 197
Figure 5.43. Import External AOA Files Window. .................................................................. 198
5.29. Hub & Spoke. ..................................................................................................... 199
5.30. DCAM Customer Support. ................................................................................. 200
Figure 5.44. Service/Customer Detail – DCAM Test. ............................................................. 200
5.31. Master Ordering Facility (MOF). ........................................................................ 201
5.32. IM Utilities Menu. .............................................................................................. 202
Chapter 6—CUSTOMER AREA INVENTORY MANAGEMENT 205
6.1. Purpose. ............................................................................................................. 205
6.2. New Catalog Item. .............................................................................................. 205
6.3. Catalog Search. .................................................................................................. 207
6.4. SOS. ................................................................................................................... 207
6.5. Purchase Card. .................................................................................................... 207
6.6. Physical Inventory. ............................................................................................. 208
6.7. Destructions. ...................................................................................................... 212
6.8. Return Item. ....................................................................................................... 212
6.9. Customer Replenishment. ................................................................................... 212
6.10. Print Barcodes. ................................................................................................... 218
6.11. Orders. ............................................................................................................... 220
6.12. Issues. ................................................................................................................ 224
6.13. Receipts. ............................................................................................................. 224
6.14. Delivery List. ..................................................................................................... 225
6.15. Reprint Delivery List. ......................................................................................... 225
6.16. Customer Status Edits. ........................................................................................ 225
6.17. QA. .................................................................................................................... 225
6.18. Standard Reports. ............................................................................................... 225
6.19. Adhoc Reporting. ............................................................................................... 226
6.20. Transaction History. ........................................................................................... 226
6.21. Mass Updates. .................................................................................................... 226

10 AFMAN41-216 13 FEBRUARY 2013
6.22. Check Available Funds. ...................................................................................... 228
6.23. CAIM Utilities Menu. ......................................................................................... 228
Chapter 7—CUSTOMER SUPPORT (CS) 231
7.1. Purpose. ............................................................................................................. 231
7.2. Catalog Search. .................................................................................................. 231
Figure 7.1. Add Item to Order Request. ................................................................................ 232
7.3. New Item Request (NIR). ................................................................................... 232
Figure 7.2. New Item Request Window. ............................................................................... 233
7.4. New Item Request Status. ................................................................................... 238
7.5. Order Summary. ................................................................................................. 238
Figure 7.3. Order Summary Window. ................................................................................... 239
7.6. Manual Replenishment. ...................................................................................... 239
7.7. Work Request Status. ......................................................................................... 239
7.8. Customer Survey. ............................................................................................... 240
7.9. Work Request Draft. ........................................................................................... 240
7.10. Create Work Request. ......................................................................................... 240
7.11. Standard Reports. ............................................................................................... 240
7.12. Equipment Record. ............................................................................................. 240
7.13. Equipment Request. ............................................................................................ 240
Table 7.1. Request Reasons and Corresponding Request Types. .......................................... 241
7.14. New Equipment Work Order. ............................................................................. 245
7.15. Open Equipment Work Order. ............................................................................ 246
7.16. Equipment Sub-custodian. .................................................................................. 246
7.17. New Quality Complaint. ..................................................................................... 247
7.18. Search Quality Complaints. ................................................................................ 247
7.19. Check Available Funds. ...................................................................................... 247
7.20. Choose Customer. .............................................................................................. 247
7.21. Inbox. ................................................................................................................. 247
7.22. User Preference. ................................................................................................. 247
7.23. DecisionBase Pro. .............................................................................................. 248
Chapter 8—ASSEMBLAGE MANAGEMENT 249
8.1. Purpose. ............................................................................................................. 249
8.2. Assemblage Record Data. ................................................................................... 249

AFMAN41-216 13 FEBRUARY 2013 11
Figure 8.1. Assemblage Record Data Criteria Window. ........................................................ 250
Figure 8.2. Assemblage Record Data Window. ..................................................................... 251
Figure 8.3. Special Requirements and Stratification State. .................................................... 252
Figure 8.4. Assemblage Data (location) Records by Item. ..................................................... 252
Figure 8.5. Change Location for Strat State Window. ........................................................... 254
8.3. Assemblage Item Transfer. ................................................................................. 255
Figure 8.6. Assemblage Item Transfer Criteria Window. ...................................................... 255
8.4. Mass Update Assemblage Record. ...................................................................... 256
Figure 8.7. Mass Update Assemblage Record Criteria Window. ........................................... 257
Figure 8.8. Mass Update Assemblage Window. .................................................................... 258
8.5. Item Allowance Change. ..................................................................................... 260
Figure 8.9. Item Allowance Change Window. ...................................................................... 261
8.6. Non-Standard Assemblage Allowance Change. ................................................... 262
8.7. Item Code Change. ............................................................................................. 262
8.8. Equipment (AM). ............................................................................................... 264
8.9. Prime/Sub (P/S) Items. ....................................................................................... 265
Figure 8.10. Prime Sub Items Window. .................................................................................. 266
8.10. End/Support Items. ............................................................................................. 267
8.11. Weights/Cubes. .................................................................................................. 268
8.12. Item Gains/Losses. ............................................................................................. 268
Figure 8.11. Item Gains/Losses Criteria Window. ................................................................... 269
Figure 8.12. Item Gains/Losses (Search Results) Window. ..................................................... 270
Figure 8.13. Item Gains/Losses Outshipment Loss Screen. ..................................................... 271
Figure 8.14. Outshipment Form/Transportation Selection Screen. ........................................... 271
8.13. Destruction. ........................................................................................................ 272
Figure 8.15. Destruction Window. .......................................................................................... 272
Figure 8.16. Destruction (Detail) Window. ............................................................................. 273
8.14. Commercial Returns. .......................................................................................... 273
8.15. Returns. .............................................................................................................. 273
8.16. Issue Non-Routine. ............................................................................................. 274
Figure 8.17. Issue Non-Routine Window. ............................................................................... 275
8.17. Transfers. ........................................................................................................... 276
Figure 8.18. Recommended Assemblage Transfer File Management. ..................................... 276

12 AFMAN41-216 13 FEBRUARY 2013
Figure 8.19. Assemblage Gain Window. ................................................................................. 277
Figure 8.20. Assemblage Loss Window. ................................................................................. 280
Figure 8.21. Ship to Address Screen. ...................................................................................... 282
Figure 8.22. Assemblage Loss Browse for Folder. .................................................................. 282
Figure 8.23. AM Reconstitution Screen. ................................................................................. 287
8.18. Transportation. ................................................................................................... 290
8.19. Orders. ............................................................................................................... 290
Figure 8.24. Asset Review Window. ...................................................................................... 291
Figure 8.25. Internal Transfer Window. .................................................................................. 292
Figure 8.26. AM Replenishment Search Criteria Window. ...................................................... 293
Figure 8.27. AM Replenishment List Window. ....................................................................... 295
Figure 8.28. AM Order Window. ............................................................................................ 298
Figure 8.29. Supply/Equipment Offline Orders Window. ........................................................ 299
Figure 8.30. Deferred Replenishment Screen. ......................................................................... 303
8.20. Physical Inventory. ............................................................................................. 303
Figure 8.31. Physical Inventory – Select Assemblage Window. .............................................. 304
Figure 8.32. Generate Count Lists and Assign Teams Criteria Window. ................................. 306
Figure 8.33. Generate Count List and Assign Teams to AM Inventory Control Number
Window. ............................................................................................................. 306
Table 8.1. Enter Counts Rational Table. .............................................................................. 307
Figure 8.34. AM Enter Counts for Physical Inventory. ........................................................... 308
Figure 8.35. Research Discrepancies Window. ....................................................................... 309
8.21. Standard Assemblage Add. ................................................................................. 310
Figure 8.36. Standard Assemblage Add Window. ................................................................... 311
8.22. Standard Assemblage Update. ............................................................................. 312
Figure 8.37. Standard Assemblage Update Window. .............................................................. 313
8.23. Assemblage Allowance Update File. ................................................................... 313
Figure 8.38. Link to Allowance Standard Management System Link on Air Force Medical
Logistics Website, Application Tab. ................................................................... 314
Figure 8.39. Select File to Import Window. ............................................................................ 314
8.24. Load Non-Standard Assemblage. ........................................................................ 315
Figure 8.40. Non-Standard Assemblage Load Window. .......................................................... 315
8.25. Non-Standard Assemblage Add. ......................................................................... 316

AFMAN41-216 13 FEBRUARY 2013 13
Figure 8.41. Non-Standard Assemblage Add Window. ........................................................... 316
8.26. Assemblage Description Change. ........................................................................ 316
8.27. Duplicate Existing Assemblage. .......................................................................... 316
8.28. Build Default Locations. ..................................................................................... 317
8.29. Assemblage Build Control Number (BCN)/Unit Type Code (UTC) Change. ....... 317
8.30. QA. .................................................................................................................... 317
Figure 8.42. Quality Assurance Notification. .......................................................................... 318
Figure 8.43. Complaint Search Window. ................................................................................ 319
8.31. Status Edits. ........................................................................................................ 319
8.32. Reports. .............................................................................................................. 320
8.33. Reprinting Delivery Lists. ................................................................................... 320
8.34. Reprinting Asset Relocation Delivery Lists. ........................................................ 320
8.35. AM Utilities Menu. ............................................................................................ 320
Figure 8.44. Location/Sublocation Maintenance Window. ...................................................... 321
Chapter 9—EQUIPMENT MANAGEMENT (EM) 322
9.1. Purpose. ............................................................................................................. 322
9.2. EM Controlled Assets. ........................................................................................ 322
Figure 9.1. MTF Catalog Technical-Equipment Tab Window. .............................................. 323
9.3. New Catalog Item. .............................................................................................. 323
Figure 9.2. EOR Commodity Class Relationship. ................................................................. 324
9.4. Catalog Search. .................................................................................................. 325
9.5. SOS Search. ....................................................................................................... 325
9.6. Equipment Accountability. ................................................................................. 325
Figure 9.3. Equipment Gain Window. .................................................................................. 326
Figure 9.4. Equipment Search Criteria Screen. ...................................................................... 327
Figure 9.5. Equipment Search Criteria Screen. ...................................................................... 328
Figure 9.6. Equipment Detail Record Window. ..................................................................... 331
9.7. Equipment Balance. ............................................................................................ 333
Figure 9.7. EM Balances Window. ....................................................................................... 334
9.8. Equipment Classification. ................................................................................... 335
9.9. Equipment Loan. ................................................................................................ 335
9.10. Equipment Request. ............................................................................................ 336
Figure 9.8. DMLSS Equipment Request Routing Process. .................................................... 337

14 AFMAN41-216 13 FEBRUARY 2013
Figure 9.9. DMLSS Equipment Request Routing Process. .................................................... 337
Table 9.1. Equipment Request Responsibility. ..................................................................... 338
9.11. Equipment Software. .......................................................................................... 346
9.12. Custodian Management. ..................................................................................... 347
Figure 9.10. Custodian Detail Window, Custodian Tab Window. ........................................... 348
9.13. Equipment Inventory. ......................................................................................... 350
Figure 9.11. Equipment Inventory Listing Window. ............................................................... 351
Figure 9.12. Equipment Inventory Listing Window. ............................................................... 352
9.14. Equipment Excess. ............................................................................................. 356
Figure 9.13. EM Excess Window. .......................................................................................... 356
9.15. Contracts. ........................................................................................................... 357
9.16. Transportation. ................................................................................................... 358
Figure 9.14. EM Excess Window. .......................................................................................... 358
9.17. Equipment Reports. ............................................................................................ 358
9.18. Transaction History. ........................................................................................... 359
9.19. DMLSS Equipment Depreciation. ....................................................................... 359
9.20. EM Utilities ........................................................................................................ 360
Chapter 10—EQUIPMENT MAINTENANCE 362
10.1. Purpose. ............................................................................................................. 362
10.2. Repair Parts. ....................................................................................................... 362
10.3. Work Orders. ...................................................................................................... 364
Figure 10.1. Technician Workload Report. ............................................................................. 366
Figure 10.2. Request Scheduled Work Orders. ........................................................................ 370
Figure 10.3. Print Requested Work Orders. ............................................................................ 370
10.4. Contracts. ........................................................................................................... 370
10.5. Equipment Classification. ................................................................................... 371
10.6. Maintenance Plan. .............................................................................................. 374
10.7. Personnel Management. ...................................................................................... 376
10.8. Maintenance Procedures. .................................................................................... 380
10.9. Schedules. .......................................................................................................... 382
10.10. Equipment Transaction History. .......................................................................... 385
10.11. Equipment Accountability. ................................................................................. 385
10.12. Equipment Request. ............................................................................................ 386

AFMAN41-216 13 FEBRUARY 2013 15
10.13. Equipment Software. .......................................................................................... 386
10.14. New Catalog Item/Catalog Search. ..................................................................... 386
10.15. QA. .................................................................................................................... 386
10.16. SOS. ................................................................................................................... 386
10.17. Reports. .............................................................................................................. 386
10.18. MA Utilities Menu. ............................................................................................ 387
Figure 10.4. Work Order Search window. ............................................................................... 389
Figure 10.5. Export Selection Criteria window. ...................................................................... 390
10.19. Cross Functional Modules. ................................................................................. 391
Chapter 11—SERVICE CONTRACTS (SC) 392
11.1. Purpose. ............................................................................................................. 392
11.2. Contract Records. ............................................................................................... 392
Figure 11.1. Service Contract Record – New, Main Tab. ........................................................ 392
Figure 11.2. Loading Partial Service Hours. ........................................................................... 393
11.3. Contract Request. ............................................................................................... 394
Figure 11.3. Contract Request Window – Main Tab. .............................................................. 394
11.4. New Call. ........................................................................................................... 394
Figure 11.4. Call Detail. ......................................................................................................... 395
11.5. Call Register. ...................................................................................................... 395
11.6. Receipts. ............................................................................................................. 396
11.7. Transaction History. ........................................................................................... 396
11.8. Standard Reports. ............................................................................................... 396
11.9. Contract Renewal. .............................................................................................. 396
Chapter 12—FACILITY MANAGEMENT (FM) 398
12.1. Purpose. ............................................................................................................. 398
12.2. Budget Management. .......................................................................................... 398
12.3. Directory Module. .............................................................................................. 398
12.4. Documents Utility. ............................................................................................. 398
12.5. Drawing Management. ....................................................................................... 398
12.6. Facility Inventory. .............................................................................................. 398
12.7. Facility Systems Inventory (FSI). ........................................................................ 398
12.8. Maintenance Procedure. ...................................................................................... 399
12.9. MTF Information. ............................................................................................... 399

16 AFMAN41-216 13 FEBRUARY 2013
12.10. Preventive Maintenance. ..................................................................................... 399
12.11. Project Management. .......................................................................................... 399
12.12. Room Inventory. ................................................................................................. 399
12.13. Work Request. .................................................................................................... 399
12.14. Quality Control (QC) View. ................................................................................ 399
12.15. QA View. ........................................................................................................... 399
12.16. COR View. ......................................................................................................... 400
12.17. Requirement Detail. ............................................................................................ 400
12.18. Bundle Requirement. .......................................................................................... 400
12.19. Mass Update/Room Inventory. ........................................................................... 400
12.20. Mass Update/PM Schedule. ................................................................................ 400
12.21. RC Deficiency. ................................................................................................... 400
12.22. RC Procedures. ................................................................................................... 400
12.23. RC Requirements. .............................................................................................. 400
12.24. Business Objects. ............................................................................................... 400
12.25. DecisionBase Pro. .............................................................................................. 401
12.26. Drawbase. .......................................................................................................... 401
12.27. User Preferences. ................................................................................................ 401
12.28. Site Preferences. ................................................................................................. 401
12.29. Inbox. ................................................................................................................. 401
12.30. Override Process. ................................................................................................ 401
Chapter 13—DMLSS REPORTS 402
Section 13A—DMLSS 402
13.1. Purpose. ............................................................................................................. 402
13.2. DMLSS Report Types. ....................................................................................... 402
13.3. Access to Standard Reports and Inquiries. ........................................................... 402
Section 13B—Inventory Management (IM) Reports Module 402
13.4. IM Reports. ........................................................................................................ 402
Figure 13.1. Aged Duein – IM Report. ................................................................................... 404
Figure 13.2. Aged Due-in Summary Report. ........................................................................... 405
Figure 13.3. Best Medical Surgical Items By Dollar Savings Report. ...................................... 406
Figure 13.4. Delinquent Purchase Card Reconciliation Report. ............................................... 408

AFMAN41-216 13 FEBRUARY 2013 17
Figure 13.5. Hazardous Material Report. ................................................................................ 410
Figure 13.6. Inventory Adjustment Voucher. .......................................................................... 410
Figure 13.7. LOG Back Order Report. .................................................................................... 412
Figure 13.8. Return Document. .............................................................................................. 416
Figure 13.9. Stock Status Report (Detail View). ..................................................................... 417
Figure 13.10. Stock Status Report (Summary View). ................................................................ 417
Figure 13.11. Transaction Register. .......................................................................................... 418
Section 13C—Assemblage Management (AM) Reports Module. 419
13.5. AM Reports. ....................................................................................................... 419
Figure 13.12. Assemblage Funds Requirements Estimate. ........................................................ 420
Figure 13.13. Assemblage Funds Status Report. ....................................................................... 421
Figure 13.14. Assemblage Funds Status Report. ....................................................................... 421
Figure 13.15. Assemblage Status Report. ................................................................................. 422
Figure 13.16. Assemblage Status Summary. ............................................................................. 423
Figure 13.17. Dated Items Detailed Report. .............................................................................. 424
Figure 13.18. Incomplete Record Report. ................................................................................. 426
Figure 13.19. Prime/Sub Report. .............................................................................................. 428
Section 13D—Customer Area Inventory Management (CAIM) Reports Module. 429
13.6. CAIM Reports. ................................................................................................... 429
Figure 13.20. Active Dueouts Over 30 Days Report. ................................................................ 429
Figure 13.21. Consumption History Report. ............................................................................. 430
Figure 13.22. Customer Catalog. .............................................................................................. 431
Figure 13.23. High Total Expenditure Report. .......................................................................... 433
Figure 13.24. Project Center Fund Summary. ........................................................................... 435
Figure 13.25. Replenishment Inventory Exception Report. ....................................................... 436
Section 13E—Customer Support (CS) Reports Module. 438
13.7. CS Reports. ........................................................................................................ 438
Section 13F—Equipment Management (EM) Reports Module. 439
13.8. EM Reports. ....................................................................................................... 439
Figure 13.26. Equipment Inventory Adjustment Document. ...................................................... 440
Figure 13.27. Active Due-in/Due-out Report. ........................................................................... 441
Figure 13.28. Custodian Receipt/Location List. ........................................................................ 442

18 AFMAN41-216 13 FEBRUARY 2013
Figure 13.29. Custodians Without Equipment Report. .............................................................. 443
Figure 13.30. Document Register Report. ................................................................................. 443
Figure 13.31. Equipment Replacement Report. ......................................................................... 445
Figure 13.32. Potential Custodian Inventory List. ..................................................................... 446
Section 13G—Equipment Maintenance (MA) Reports Module. 447
13.9. MA Reports. ....................................................................................................... 447
Figure 13.33. Maintenance Management Report, Part I. ........................................................... 449
Figure 13.34. Maintenance Management Report, Part II. .......................................................... 449
Figure 13.35. Maintenance Management Report, Part III. ......................................................... 450
Figure 13.36. Unable to Locate Equipment Notification Report. ............................................... 452
Figure 13.37. Workload Report. ............................................................................................... 453
Section 13H—System Services (SS) Reports Module. 455
13.10. SS Reports. ......................................................................................................... 455
Figure 13.38. Inactive Users Report. ........................................................................................ 456
Figure 13.39. User Privilege Summary Report. ......................................................................... 457
Chapter 14—INVENTORY CONTROL 459
Section 14A—Managing Operating Inventory 459
14.1. Purpose. ............................................................................................................. 459
14.2. Establishing a Warehouse Stock Control Method. ............................................... 459
14.3. DMLSS warehouse level computation methods. ................................................. 460
Figure 14.1. MM Service Detail – Computation Tab. .............................................................. 460
14.4. Factors used to compute a Days of Stock SCL. ................................................... 461
Table 14.1. Daily Demand Rate (DDR). ................................................................................ 461
Table 14.2. Average Pipeline Time (PLT). ............................................................................ 461
Table 14.3. Dollar Value of Annual Sales. ............................................................................. 462
Table 14.4. Stock Control Level (SCL). ................................................................................ 463
Table 14.5. Reorder Point Percentage (ROP) and Reorder Point Quantity (ROQ). ................. 463
14.5. DMLSS automates EOQ computation and ordering. ........................................... 464
14.6. DMLSS Level Computation Environment Factors. ............................................. 464
Figure 14.2. TMU Environmental Table. ................................................................................ 464
Figure 14.3. Inventory Management (IM) SOS Environment Tab (example). .......................... 465
Figure 14.4. MTF Catalog, Log Cat Tab. ................................................................................ 466

AFMAN41-216 13 FEBRUARY 2013 19
14.7. IM recommended level changes. ......................................................................... 467
14.8. Improving Inventory Control Effectiveness. ........................................................ 467
Section 14B—Managing Customer Inventory - Leveling 468
14.9. Customer Inventory. ........................................................................................... 468
14.10. New Item Inventory Control. .............................................................................. 469
Figure 14.5. Item Location Detail Window. ............................................................................ 469
Table 14.6. Level Types. ....................................................................................................... 470
14.11. Replenishment Methods. .................................................................................... 470
Figure 14.6. CAIM Replenishment Inventory Module. ........................................................... 471
Table 14.7. CAIM Replenishment Inventory Method. ........................................................... 471
Figure 14.7. Service/Customer Detail, Materiel Tab Window. ................................................ 473
Attachment 1—GLOSSARY OF REFERENCES AND SUPPORTING INFORMATION 475
Attachment 2—DMLSS MTF/ORG–SERVICE AND LOGISTICS DEPARTMENT
DETAILS 485
Attachment 3—DMLSS USER PRIVILEGE ROLE MANAGEMENT 496
Attachment 4—DMLSS DISTRIBUTION AND TRANSPORTATION MODULE 508
Attachment 5—INVENTORY MANAGEMENT (IM) PENDING ACTIONS 514
Attachment 6—CUSTOMER AREA INVENTORY MANAGEMENT (CAIM) PENDING
ACTIONS 535
Attachment 7—ASSEMBLAGE MANAGEMENT (AM) PENDING ACTIONS 552
Attachment 8—EQUIPMENT MANAGEMENT (EM) PENDING ACTIONS 558
Attachment 9—MAINTENANCE ACTIVITY (MA) PENDING ACTIONS 565
Attachment 10—DATA CODES AND ELEMENTS 570

20 AFMAN41-216 13 FEBRUARY 2013
Chapter 1
GENERAL AND ADMINISTRATION
1.1. Purpose. The objective of the DMLSS User Manual is to provide medical logistics
personnel with the information necessary to use the system effectively, including operation of
computer hardware used in support of the system. This manual, in compliance with DoDD
8500.01E, Department of Defense Information Assurance (IA), and AFSSI 5024, Volume I, The
Certification and Accreditation (C&A) Process, also provides a high-level description of the
security procedures and mechanisms used to minimize security risks to the operational
environment of the DMLSS system.
1.2. Scope. The responsibilities for the medical logistics policy and operation are contained in
AFI 41-209, Medical Logistics Support. This manual documents DMLSS procedures used in
support of materiel, including War Reserve Materiel (WRM) in the Medical-Dental Division
(MDD) of the Air Force Working Capital Fund (AFWCF) and non-AFWCF materiel. The
procedures in this manual apply to all DMLSS activities. Deviation from these procedures can
only be authorized by Air Force Medical Operations Agency, Medical Logistics Division
(AFMOA/SGAL), Fort Detrick, MD.
1.3. Revisions. Revisions to this manual will be accomplished when processes or application
changes occur within DMLSS. When known or suspected errors exist in instructions,
procedures, text for preparation of input data, operation of computer hardware, audit procedures,
printed output products, or other related user products, notify the Office of Primary
Responsibility (OPR), AFMOA/SGALD, for assistance. Changes to this publication are not
official until validated, approved through official channels, and published as an official AF
publication.
1.4. System Purpose. DMLSS is used by logistics activities to maintain accountable records for
the AFWCF/MDD, in-use and stored equipment, WRM, facility infrastructure, and real property.
These records are updated by processing transactions based on medical materiel (MM) source
documents and are maintained IAW Air Force Records Information Management System (AFRIMS) T41-04, or internal computer program criteria.
1.5. Terms and Abbreviations. Attachment 1 contains an explanation of terms and
abbreviations used in this manual. Transaction code abbreviations are listed in Attachment 10,
Table A10.2.
1.6. Sensitivity. DMLSS is an inventory control and item accounting system that maintains data
related to the assets of medical logistics accounts. Although not classified, DMLSS processes or
handles unclassified and unclassified sensitive information that requires, as a minimum,
Controlled Access Protection (Class C2) compliant security mechanisms, procedures, and
documentation. The indiscriminate access to this data could provide an opportunity for theft, leading to the compromise of inventory accuracy, customer service, and readiness capability.
1.7. System Security.
1.7.1. Access to the Operating System. Access to the operating system is limited to Military
Health Systems (MHS) Service Desk personnel and DMLSS developers. All other access is denied unless coordination with the MHS Service Desk requires base level intervention.

AFMAN41-216 13 FEBRUARY 2013 21
1.7.2. Access to the DMLSS Application. An individual must have a unique username and
password or a Common Access Card (CAC) enabled account to gain access to DMLSS. The
DMLSS System Administrator (SA) is responsible for assigning a username and initial
password, or a username with CAC enabled access to each user. Users with passwords are
responsible for modifying their individual password during initial login. Access to DMLSS
is denied if an individual enters an invalid username and password. The username is disabled
after three consecutive unsuccessful login attempts. If this occurs, the DMLSS SA must log
into the DMLSS System Administration tool to reset the disabled user‘s password. Note: The
DMLSS user is required to log into the system at least once every 30 days, and change their password every 60 days.
1.7.3. Transaction Security. DMLSS provides the ability to limit the transactions a user is
authorized to perform. User privileges in System Services (SS) allows SAs and Application
Security Managers to assign existing roles by username or create specific roles by application for a username.
1.7.4. Transaction Security Audit Trail. The username of the individual performing actions
in DMLSS appears on the Source Document Control Report and within Transaction History.
These reports are maintained IAW AFRIMS T 41-04 R 09.00.
1.8. External Security. Establish procedures that limit access to information contained on
source documents, output products, and other data files to only those individuals having a valid need. Some recommended actions for ensuring system security are as follows:
1.8.1. Follow the password protocols for DMLSS and never disclose your password or CAC
pin to anyone.
1.8.2. Secure all medical logistics areas when unoccupied.
1.8.3. Limit access to input source documents and output products to those individuals having a need-to-know.
1.8.4. Secure all documentation pertaining to the accountability of controlled substances and precious metals and limit access to a need-to-know basis.
1.8.5. To prevent unauthorized access to the system, log off terminals when not in use.
Users that leave terminals logged on and unattended run the risk of having unauthorized transactions recorded against their username.
1.9. Privacy Act Data. As a standard business practice, DMLSS does not maintain any privacy
act data with the exception of information contained in the Equipment and Technology
Management (E&TM) Loan module. Health Insurance Portability and Accountability Act of 1996 guidelines will be used for securing this information.
1.10. Health Insurance Portability and Accountability Act (HIPAA).
1.10.1. AFI 41-217, Health Information Assurance For Military Treatment Facilities,
implements the national standards for electronic healthcare transactions and national
identifiers for providers, health plans, and employers for MTFs. It also addresses the security and privacy of health data.
1.10.2. DMLSS requires patient‘s names when using the equipment/consumable loan
program available in the E&TM module. The Administrative Simplification provisions of

22 AFMAN41-216 13 FEBRUARY 2013
HIPAA, which includes privacy requirements, apply to health plans, health care
clearinghouses, and health care providers that transmit individually identifiable health
information in electronic form. The privacy requirements limit the release of protected
health information without the individual‘s knowledge and consent beyond that required for
the individual‘s health care. The individual‘s personal information must be securely guarded
and carefully handled.
1.11. DMLSS System Navigation. The first window to appear after successfully logging on is
the DMLSS System - Navigation window. This window outlines all modules available in the DMLSS AIS.
1.11.1. Access to Modules. Access to a particular module or process must be granted by the
SA prior to accessing DMLSS. Users may have access to some or all modules based on their
work requirements. Users can access any module appearing in bold text. A single click on the module name will launch the module.
1.11.2. Navigation Window Menu Toolbar. In this window, the menu toolbar offers file,
view, and help dropdown menus. The ―File‖ menu offers a printer setup and the opportunity
to choose a default printer. The ―View‖ option allows users to customize the appearance of
the Navigation window. View options include the traditional navigation menu, a navigation
bar consisting of icons only, or visibility of both the traditional Navigation menu and Navigation bar.
1.11.3. Help Dropdown Menu. Help is available on the System Navigation window and all
module file menus. The ―Help‖ menu has options for [help by] Topic, Links, What‘s New,
and About.
1.11.3.1. Help Options. ―Topic‖ search provides quick help on the DMLSS module you
are currently accessing. The [help by] ―Contents‖ option is an additional tool available
only in the module help menus. These search windows contain module specific
information and are divided into three tabs, Contents, Index, and Search.
1.11.3.2. DMLSS Links.
1.11.3.2.1. DMLSS Program Management Office (PMO). By accessing the DMLSS
link, users are forwarded to the Defense Health Services Systems (DHSS) homepage on the www.health.mil website.
1.11.3.2.2. Electronic Catalog (ECAT). Select this link to access the ECAT portion
of the Defense Medical Materiel Online (DMMOnline/DLA Troop Support Medical
Supply Chain) website. This website can be used to research and order materiel offered via ECAT. Login and password are required for access.
1.11.3.2.3. Joint Medical Asset Repository (JMAR). Select this link to launch the
JMAR website. Access requires a separate login and password. JMAR is designed to
obtain, store, and present high-level medical materiel management data for various
DoD organizations. For example, a Medical Logistics Flight Chief would be granted
access to data pertaining to his/her specific site. MTF Field Support users are granted access to all medical logistics data assigned to his/her command.
1.11.3.2.4. Resource Center. Choose this option to access the Joint Medical
Logistics Functional Development Center‘s (JMLFDC) Resource Center website.

AFMAN41-216 13 FEBRUARY 2013 23
The Resource Center offers training information including step-by-step instructions, lesson plans, and e-learning tools.
1.11.3.2.5. MHS Service Desk. Select this link to access the Military Health System
Cyberinfrastructure Services‘ (MCiS) MHS Service Desk. The MCiS provides
support to various military health service automated systems to include DMLSS.
This website offers support and contact information. Once registered, users are able
to utilize this site to submit trouble tickets and request assistance with difficulties encountered while using DMLSS.
1.11.3.3. What‘s New. The What‘s New option explains new and updated functionality that has changed since the last major DMLSS release.
1.11.3.4. About. Under the menu bar, click ―Help‖ and select ―About‖ to view local
DMLSS system information. Current release, build number, host name, operating
platform, Internet Protocol (IP) address, and server name are listed in this menu. This
information is useful when establishing new remote user access or submitting a trouble
ticket to the MHS Service Desk.
1.12. Module Menu Toolbars. Module menu toolbars are similar to the toolbar in the DMLSS
System – Navigation Window, however they contain added dropdown menus with additional features. These toolbars include File, Navigate, Utilities, Window, and Help dropdown menus.
1.12.1. DMLSS Window Options. Each module within DMLSS contains a window
dropdown menu that offers user options for customizing desktop views.
1.12.1.1. Tile Horizontal. This option allows users to display open windows from top to bottom.
1.12.1.2. Tile Vertical. Select this option to view open windows from left to right.
1.12.1.3. Layer. Select ―Layer‖ to display only the active window, with others in the background. Layer is the default option.
1.12.1.4. Cascade. This option allows all open windows to be displayed in a cascade
view, partially overlaying each other.
1.12.2. Customize Toolbars. This option allows a user to customize the horizontal toolbar.
The settings are specific to the user‘s login and the computer being used at the time the
setting is applied. Only 16 toolbar items may be utilized at a time. Those using this
function will benefit by viewing frequently used icons versus only seeing the default icons.
1.13. Shortcuts.
1.13.1. Icons. Modules utilize shortcut icons similar to those found in other windows-based
programs. Icons are identified with a picture and are shortcuts placed on the horizontal and
vertical toolbars for frequently used processes. The horizontal toolbar shortcuts are used to
access specific processes within the module. The vertical toolbar shortcuts are used to access specific actions within a process window.
1.13.2. Buttons. Process buttons are available in many of the application windows. Buttons are identified with the name of the process function for which the button is used.

24 AFMAN41-216 13 FEBRUARY 2013
1.13.3. Hot Key. DMLSS modules utilize shortcuts called hot keys to access processes by
depressing a key or series of keystrokes to access a specific process. These types of shortcuts
are found in the Navigate menu following the process name or in the Help menu.
1.14. Messages. DMLSS will display messages to users for input, output, information, or
system errors. System error messages have a text field allowing the user to type specific details
that led to the error. Users can then print the error and text field circumstances. System error
messages should be reported to the DMLSS SA or to the MHS Service Desk when they occur.
1.15. Additional Screen Help. Each application within DMLSS contains a DMLSS Help icon
on the vertical toolbar. By selecting this icon, a Help window appears displaying instructional
information associated to the process or function currently open in DMLSS. For example, if the
Equipment Management (EM) Inbox screen is open and the help contents option is selected an
online help window with an overview of the EM Inbox is displayed. Essentially, DMLSS Help contains information similar to that covered in this manual.

AFMAN41-216 13 FEBRUARY 2013 25
Chapter 2
DOCUMENT CONTROL AND FINANCIAL PROCEDURES
Section 2A—Documentation and Reports
2.1. Document Number Construction.
2.1.1. Each document number consists of a 6-position DoD Activity Address Code/ Stock
Record Account Number (DODAAC/SRAN) or customer account number, a 4-position Julian date, and a 4-position serial number.
2.1.2. The DODAAC/SRAN assigned to Logistics (LOG) transactions is the same
DODAAC entered in the LOG detail record within SS. The customer account number assigned reflects the customer that generated the transaction.
2.1.3. The Julian date assigned to a document number is based on the DMLSS processing
date. For example, if you generate an action requiring a document number and the ―as of‖
date in DMLSS is 1 July 2011, the system will assign 1182 for the Julian date portion of the document number.
2.1.4. The serial number is assigned from one of the major serial number blocks found in
Figure 2.1. These serial number blocks relate to broad categories of transactions (due-ins,
issues, gains, losses, etc.). Each major block is further divided based on specific types of
transactions. This method uniquely identifies each transaction processed and allows for
sequential filing of all supporting documents for a specific type of transaction in Serial Block
Limitations. The number of transactions processed on a specific day cannot exceed the
numeric limitation for a serial number block in DMLSS. When all document serial numbers
for a specific document block have been used and additional document serial numbers are
needed for the same Julian calendar date, the system will begin assigning numbers from the beginning of the document block using the next Julian date.
2.2. Computer Assigned Document Numbers.
2.2.1. In most instances, DMLSS assigns document numbers to transactions as they process
through the system. The first transaction processed each day is assigned the first serial
number from the appropriate block and as more transactions of the same type are processed
during the day the serial number is incremented by one. For example, the first issue
processed each day is assigned a serial number of 3000; the next issue is assigned 3001.
Some transactions only use one serial number, even if multiple transactions are processed. They include:
2.2.1.1. Catalog Start. Catalog revision type transactions are assigned serial number 8997.
2.2.1.2. Internal Transfers. Assigned serial number is 8998.
2.2.1.3. Inventory Adjustments. All IAL/IAG actions are assigned serial number 8999.
2.3. Manually Assigned Document Numbers.
2.3.1. In some instances, DMLSS users manually assign a document number before
processing the transaction in DMLSS. For example, an item that is physically ordered before

26 AFMAN41-216 13 FEBRUARY 2013
the transaction is processed in DMLSS is manually assigned a document number using the 7000-7499 serial block.
2.3.2. Record manually assigned document numbers on an informal document register such
as an AF Form 36, Supply Document Register (Manual), an equivalent form, or an electronic spreadsheet. This action helps ensure document numbers are not duplicated.
2.3.3. The informal register may be destroyed upon quality control of the Source Document Control Report IAW AFRIMS T 41-04 R 04.00.
2.3.4. When manually assigning a document number to a requisition, the Julian date
assigned needs to be the date the requisition was forwarded to the procurement source.
Figure 2.1. DMLSS Document Number Blocks.
2.4. Quality Control (QC).
2.4.1. Supporting documents must be compared to the Source Document Control Report
(SDCR) and MEMO Document Register prior to filing in the permanent document file. See
Attachment 10, Table A10.3, for a consolidated table of IM and EM transaction codes cross-
referenced to their appropriate quality control document, supporting documentation, transaction type, and document number block.
2.4.1.1. SDCR. This report is produced upon request from the IM Reports module and
lists all transactions with a DMLSS assigned document number in the specified date range, with the exception of catalog change actions (Figure 2.2.).

AFMAN41-216 13 FEBRUARY 2013 27
Figure 2.2. Source Document Control Report.
2.4.1.1.1. To access this list, select Source Document Control Report from the
Reports option in the IM navigate dropdown menu or click the Reports button located
on the horizontal toolbar. Enter a date range and select a scope in the selection criteria window.
2.4.1.1.2. This report is available in four parts: Receipts/Cancellations, Orders,
Gains/Losses, and Funds. Use the Specify Report Selection Criteria window to print
individual or all parts as required (Figure 2.3.). Transactions appear on the report in
document number sequence within each section. Transaction totals are available on the last page of each section.
Figure 2.3. Specify Report Selection Criteria – Source Document Control Report.
2.4.1.2. MEMO Document Register. This report is used to quality control actions
affecting medical equipment. It lists transactions that have been assigned a document
number and have been processed in DMLSS. This report is available under the Standard Inquiry section of the EM Reports module.
2.4.2. Both the SDCR and MEMO Document Register should be requested immediately
prior to or just after the end-of-day (EOD) process, and once it is produced, this report becomes a source document that is used to perform QC.
2.4.3. QC is performed by verifying each source document against the SDCR or Document
Register. At a minimum, each document should be checked for validity and completeness.
If an error is found, annotate the corrective action required on the original source document
and process necessary changes in DMLSS. Use the next available SDCR or EM Document Register to verify the corrective action(s) processed correctly.
2.5. Preparing Supporting Documents for File. Before placing a source document in the
permanent file, you must:

28 AFMAN41-216 13 FEBRUARY 2013
2.5.1. Check for validity and completeness.
2.5.2. Compare it to the SDCR or EM Document Register for accuracy and verify the transaction is completed.
2.5.3. Ensure the document number is annotated on the supporting document.
2.5.4. Annotate the processing date on the document. This information is helpful while
accomplishing research and during audit procedures.
2.6. Filing Supporting Documents.
2.6.1. Filing Method. File supporting documents in serial number sequence by Julian date.
Maintain separate folders or filing areas for each block or sub block. For example, one folder for serial numbers 0001-2999 (receipts) and another for serial numbers 7500-7999 (excess).
2.6.2. Filing Supporting Computer Listings. Additional guidance for filing computer listings
is accessible from the AFRIMS website via the AF portal.
2.6.3. Temporary Listings. Some DMLSS system output is classified as temporary and the
distribution instructions for these items are designed to be flexible enough to satisfy local
procedures and conditions. Temporary listings can be found in the different reports modules
and DMLSS inboxes, i.e., the IM Status Edits Report, and each of these reports normally
require some sort of DMLSS corrective action. These ―working‖-type listings are
maintained in a temporary file until corrective actions have been completed and verified or
until a new list is received IAW AFRIMS T 41-04 R 02.00. This process provides managers
the option of retaining previous versions of the list containing items being worked or replacing them with a more current list.
2.6.4. Permanent Listings. The term ―permanent‖ is used to distinguish listings that must be
maintained for a designated period of time. Distribution instructions in this manual indicate
which listings need to be retained in a permanent file. Specific retention periods are
addressed in and maintained IAW AFRIMS T 41-04 R. For example, the SDCR is stored
within the DMLSS server for all current and previous year actions. AFRIMS reflects that
this document may be destroyed one year after closeout of the fiscal year (FY) to which they
pertain. DMLSS will automatically purge these documents when the specified time
requirements are met.
2.6.5. Retention of SDCRs and Document Registers. After all quality control actions are
completed and verified, printed control reports may be discarded; however, current and
previous year SDCRs and Document Registers must be available for review and audit
purposes. These reports are maintained within the DMLSS server and are retrievable anytime by accessing either the Reports modules in IM or EM.
Section 2B—Finance Procedures
2.7. Financial Overview. This section contains information and instructions on financial
processing and procedures. This includes:
2.7.1. An explanation of the DMLSS organization and financial structure
2.7.2. Procedures for loading funds in DMLSS

AFMAN41-216 13 FEBRUARY 2013 29
2.7.3. Procedures for DMLSS EOP management and the Finance interface process
2.7.4. An explanation of the Funds Control System and the Enterprise Business System
2.7.5. Procedures for financial reconciliation
2.8. Organizational Structure. In DMLSS, the organizational structure is built, and funds
management takes place within the SS module. There are three elements to the hierarchal ORG
relationship, as shown in Figure 2.4.
Figure 2.4. Organization Relationship.
2.8.1. MTF. A singular record, to which all other organization records are related. Within
DMLSS, the MTF is also considered an Organization or ―Org.‖ Every DMLSS activity has a
―host‖ ORG ID that relates to their host DODAAC described within paragraph 2.1.2. It is
also quite typically that DMLSS accounts establish multiple MTFs or Orgs in order to manage tenant organizations or remote facilities.
2.8.2. Department (DEPT). Subset of the MTF or ORG record. Within the hierarchy, the
MTF may have a relationship with multiple DEPTs; however, a DEPT can only be related to
one MTF/ORG.
2.8.3. SVC/CUST. Subset of the DEPT. DEPTs may have a relationship to multiple
SVC/CUSTs; however, a SVC/CUST can only be related to one DEPT and one ORG.
Additionally, SVC/CUSTs can be directly linked to the MTF with no DEPT relationship.
The exception is that SVC/CUSTs must be linked to a DEPT to be used in the Facility Management (FM) module.
2.8.4. Detachments. Detachments are considered separate units but can also be set up as
organizations (ORGs). Primary examples are Air National Guard (ANG) and AF Reserve
units.
2.8.5. Refer to Chapter 4, System Services, paragraph 4.2. for additional procedures relating to managing the DMLSS organizational structure.
2.9. Financial Structure. Medical Materiel utilizes the Air Force Working Capital Fund
(AFWCF)/Medical Dental Division (MDD) revolving fund as the line of accounting used to
purchase commodities from external Sources of Supply (SOSs). These funds are identified with

30 AFMAN41-216 13 FEBRUARY 2013
a 6B fund code and a cumulative balance is shown in DMLSS through the LOG fund. The MDD
reimbursement comes indirectly from the ordering organization‘s Operations and Maintenance
(O&M)(fund code 2X, 30, etc.) funds. These funds are loaded in DMLSS through the use of a
project center and associated Element of Resource (EORs) and managed with expense centers and their associated EORs.
2.9.1. LOG Fund.
2.9.1.1. The LOG fund displays the fund position of the LOG activity. The AF LOG
fund code should be 6B reflecting a cash source of the AFWCF/MDD. Exceptions to this
rule apply to ANG and AFCENT DMLSS units which have dedicated O&M funding
streams. Any other fund code for LOG must be coordinated with AFMOA/SGALD
before loading into DMLSS.
2.9.1.2. DMLSS also tracks financial balances within the LOG fund detail. The
available financial balance is computed using the following formula: Target –
(Obligations + Commitments + Credits) = Available Balance. However, because the
AFWCF is a revolving fund, AF policy does not require a target entry. If a LOG fund
target were entered, this amount cannot be exceeded when processing orders, price
changes, or receipts. Target amounts are cumulative for the current FY and reset to zero
during EOFY processing. Note: Active AFWCF/MDD accounts will not enter a LOG fund target. The LOG fund field in DMLSS is for information only.
2.9.1.3. The LOG fund defaults to element of resource code 600 – Default Logistics Fund.
2.9.1.4. Refer to Chapter 4, paragraph 4.9.3. for additional procedures relating to the
DMLSS LOG fund.
2.9.2. Project Center. The project center is used to manage customer funds within DMLSS
and should be considered equal to the Project Fund Management Record for DFAS
coordination. These funds are controlled at the Element of Resource (EOR) level within the
project center. Project centers can be related to a DEPT or to a SVS/CUST indirectly
through the expense center. Note: EOR is a DMLSS (and Army) term. Outside of DMLSS, the AF uses Element of Expense & Investment Code (EEIC).
2.9.2.1. Existing project center identification (ID) numbers are not changed in DMLSS;
however, some data such as the project center name, target, and EOR target can be revised.
2.9.2.2. New project centers can be created at anytime. To create a new MM project
center, select ―MM Project Center‖ from the Navigate menu in SS. Enter the new project
center, project center name, and project center target (if available). After saving, the
project center is added to the project center table and is available when creating new expense centers or re-associating an existing expense center to a different project center.
2.9.3. Expense Center. The expense center is the funding ―checkbook‖ for the SVC/CUST
and should be considered equal to the Responsibility Center/Cost Center for DFAS
coordination. The expense center hosts all EORs and provides a breakdown of expenditures
and fund balances for the associated SVC/CUSTs. Activities can associate multiple expense

AFMAN41-216 13 FEBRUARY 2013 31
centers to accommodate local business practices. While it is possible to load fund targets at the expense center tier, AF business requires funds targets be loaded at the project center tier.
2.9.3.1. Funds are updated by transactions at the EOR level and then rolled up to the
associated project center. SVC/CUSTs may have multiple expense centers, but can only
have one default expense center. It is recommended that only one expense center be
assigned per customer. An expense center can only be related to one project center at a
time. If a user changes the project center associated to the expense center, all values,
except the target value, are transferred to the new project center. This is not
recommended as it can cause problems for DFAS, and any change must be coordinated
between DFAS, RMO, and Medical Logistics in advance.
2.9.3.2. Expense Center Changes. To keep financial records straight, existing expense
center ID numbers are not changed; however, data such as the expense center name, and if applicable, target and EOR targets can be revised.
2.9.3.3. Changes Associated with EOFY. Select ―Expense Center ― from the Navigate
menu in SS. Enter the new expense center ID, expense center name, and associated
project center. After saving, the expense center is added to the expense center table. The
new expense center will be viewable in the nonassociate window when selecting expense
centers for a SVC/CUST.
2.9.3.3.1. After the EOFY processes, the new expense center can be set as the default
within the SVC/CUST detail. Open the SVC/CUST detail, select the new expense
center and associate it to the SVC/CUST. In the Default Expense Center field, select
the new expense center and click ―Save.‖ The expense center is now associated to the customer.
2.9.3.3.2. When a new expense center is associated to a service customer, the catalog
records must be updated to reflect the new expense center. The expense center
records can be updated in mass by selecting ―Change Expense Centers‖ from the
Navigate menu in SS. Enter the SVC/CUST ID that is being changed followed by the
old (from) and new (to) expense centers. Click the ―Process‖ icon to process the
changes. All customer catalog records will be changed to reflect the new expense center.
2.9.3.3.3. If the old expense center is no longer required, select the old expense
center and view the details. Mark the old expense center for deletion and return to the
SVC/CUST window. If there is no due-in/due-out information on file for the old
expense center the expense center may be unassociated. If there are active due-outs
still tied to the old Expense Center and DMLSS prohibits deletion, check the
―Retired‖ indicator within the Expense Center detail screen. Doing so prohibits DMLSS from using the Expense Center against any future customer objections.
2.9.3.4. Changes at Other Times. When changing expense centers during the fiscal year,
open the SVC/CUST detail and from the funding tab click the ―New‖ button located
between the associate and nonassociate expense center boxes. Enter the new expense
center ID, expense center name, and associated project center. After saving, the expense
center is added to the expense center table and will be automatically added to the
associate expense center box.

32 AFMAN41-216 13 FEBRUARY 2013
2.9.3.4.1. In the default expense center field, select the new expense center and click
―Save.‖ The expense center is now the new default expense center for the
SVS/CUST.
2.9.3.4.2. If the old expense center is no longer required, select the old expense
center and view the details. Mark the old expense center for deletion and return to the
SVC/CUST window. If there is no due-in/due-out information on file for the old
expense center, the expense center may be unassociated. If there are active due-outs
still tied to the old Expense Center and DMLSS prohibits deletion, check the
―Retired‖ indicator within the Expense Center detail screen. Doing so prohibits
DMLSS from using the Expense Center against any future customer objections.
2.9.3.4.3. When a new expense center is associated to a SVC/CUST, the catalog
records must be updated to reflect the new expense center. The expense center
records can be updated in mass by selecting ―Change Expense Centers‖ from the
Navigate menu in SS. Enter the SVC/CUST ID that is being changed followed by the
old (from) and new (to) expense centers. Click the ―Process‖ icon to process the
changes. All customer catalog records will be changed to reflect the new expense
center.
2.9.4. EOR. This element is used to manage and track funds at the EOR commodity class
level. All EORs are automatically related to all expense and project centers. The values in
project center EOR records equal the total value of the EOR of all the related expense
centers. Every MTF catalog record is linked to a specific EOR by assignment of a specific
commodity class when building and modifying catalog records. A translation table showing
what EOR is assigned to each commodity class is available in the Table Maintenance Utility
(TMU) within SS.
2.10. Establishing Organization and Fund Relationships.
2.10.1. Establishing and revising ORG and fund record relationships are accomplished in the
SS module. Changes to the ORG relationship occur when directed by the DFAS Field Site,
Accounting and Finance Office (AFO), or your Resource Management Office (RMO). These
changes must never be processed without supporting documentation and coordination. Use
these documents to QC the DMLSS transaction on the SDCR and retain the documents in file.
2.10.2. Medical Logistics personnel will coordinate with the appropriate DFAS Field Site
point of contact prior to establishing or revising expense centers. They will provide DFAS
with a project center number, the expense center number and the line of accounting. Proper
supporting documentation includes either the funding document or an email message
reflecting the project center, expense center and line of accounting. The expense center and line of accounting can be obtained from the MTF‘s RMO or RA.
2.10.3. Upon receipt of supporting documentation, DFAS will load the project center and the
new/revised expense center into the Standard Material Accounting System (SMAS) and the
General Accounting and Finance System (GAFS-BQ) within 4-8 business hours. DFAS will
notify the DMLSS user by email when they can load the expense center in DMLSS and start
ordering supplies and/or equipment. Ensuring these procedures are followed will reduce

AFMAN41-216 13 FEBRUARY 2013 33
and/or prevent transactions from rejecting in SMAS thereby improving the accuracy of your financial reports.
2.10.4. Once these elements are established in DMLSS, funds can be assigned in the form of
project center and expense center detail records.
2.10.5. The SVC/CUST ID manages the accounts detail records in DMLSS. This ID
number is not passed out of DMLSS for any financial processing. The SVC/CUST ID is a
unique identifier that can be any six-digit prefix the MTF assigns. Typically, it is the same as
the expense center; however, bases may elect to change this code to reflect any six-digit
prefix. Examples of this prefix would be MEPRS code prefixed with numeric fillers (AAXB01) or the customer‘s office symbol with numeric fillers if required (SGSNOB).
2.10.6. All customer catalog records, transaction history, and issue consumption are tied to
the SVC/CUST. It is for this reason that once the SVC/CUST is set, there is no need for
change. Creating a new SVC/CUST to replace an existing SVC/CUST would result in lost
historical records for the customer. Once a SVC/CUST is established, it must be tied to at
least one expense center.
2.10.7. Administrative targets may be activated at any level of the expense center.
Activation is case-by-case based on your local business practices or guidance found in AFI
41-209. Administrative targets within the expense center are the expense center target field
and the target amount for each EOR. This is strictly an administrative action. The funds are controlled by the target flag setting in the MTF ORG record.
2.10.8. Fund targets should be loaded at the project center level, representing the highest
level in the fund relationship. The project center window looks similar to the expense center
window; however, it collects all of the financial data from the associated expense centers.
Funds are increased and decreased from this window and can be stratified between the EORs.
These changes should not be accomplished without documentation and coordination with the
unit‘s RMO. Use the funds load sheet format shown in Table 2.1 or similar variation to serve
as a source and QC document for each fund load. Note: Fund transfers between EORs 604 and 615 do not require coordination.
Table 2.1. Sample Funds Load and Project Center/Expense Center Revision Form.
MEDICAL – PROJECT CENTER/EXPENSE CENTER (also known as PFMR and RCCC)
ESTABLISH/REVISE FORM
TRANS
CODE
PC
(PFMR)
EC
(RCCC)
EIC
(EOR) FC
BASO DOCUMENT
NUMBER
DOLLAR
AMOUNT
TARGET AMOUNT

34 AFMAN41-216 13 FEBRUARY 2013
REQUESTOR
(if prep‘d by cust)
(Name)
DATE
PREPARED:
APPROVED
AND
PROCESSED BY
FMA Budget Analyst FMA Sign
and Date:
FMA Accounting
Tech
FMA Sign
and Date:
MEDICAL
LOGISTICS
Med Log
QC:
DFAS-LI I
JAABC
DFAS-LI/
JAABC:
ABBREVIATIONS: TRANSACTION CODE:
PC – PROJECT CENTER
EC – EXPENSE CENTER
EEIC – ELEMENT OF EXPENSE &
INVESTMENT CODE FC – FUND CODE
ESP – ESTABLISH PFMR
ADP – ADJUST PFMR
RPM – REVISE PFMR
ECC – ESTABLISH RC/CC RCC – REVISE RC/CC
2.10.9. The project center target is sensitive to external SOS and can be exceeded for back
order releases resulting from receipts. The target flag is set in the MTF/Unit detail record
and should be set to ―PROJ EOR.‖ The targets must be entered for each project center and
EOR code at this level. If they are not, a zero default target is enabled and the SVC/CUST
will be unable to order.
2.11. DMLSS Funds Management.
2.11.1. Management of funds in DMLSS is critical to system operations. The funds module
in SS provides medical logistics and resource management the flexibility to manage most
aspects of the MTF‘s funding for medical supplies and medical equipment. DMLSS funds
management allows the ability to:
2.11.1.1. View and manage funds through expense centers, project centers, and the LOG fund.
2.11.1.2. Gather information on EORs and commodity classes.
2.11.1.3. View and manage details such as commitments, obligations, and target amounts.
2.11.1.4. View and manage both AM and OP funds.
2.11.1.5. Maintain documentation on expense/project center transactions including fund
loads (ESP, ADP, RPM, ECC, and RCC transactions). QC these documents to the funds portion of the SDCR and retain the documents in file (paragraph 2.4.).
2.11.2. AM Fund. Use the AM Funds module to maintain funds associated to ―Log Owned‖
(AFWCF) WRM assemblages. AM funds are appropriated in writing by AFMOA/SGAL for
the purpose of purchasing new materiel or replacing existing materiel for AFWCF WRM assemblages.

AFMAN41-216 13 FEBRUARY 2013 35
2.11.2.1. Each AM fund detail record reflects current fund balances for the assemblage(s) associated to that AM fund record.
2.11.2.2. Current AF policy dictates that only one assembly will be associated to each
AM fund record.
2.11.2.3. The available AM funds balance is computed using the following formula: Fund target – (commitments + obligations + receipts + returns) + R-sales.
2.11.3. OP Fund. OP funds are classified as funds used to purchase Capital Equipment
(CE); meaning, equipment with an acquisition cost greater than $249,999.99. An OP fund
record must be established before CE requisitions can be processed in DMLSS.
2.11.3.1. OP funds are rarely distributed to the bases but a ―pseudo‖ fund record must be
loaded in DMLSS to allow processing of orders. Because OP funds can span a period of
three FYs, DMLSS allows fund managers to establish and update OP fund targets for
three FYs (current year plus two previous years.). DMLSS maintains OP fund records for eight years; three active and five inactive.
2.11.3.2. The available OP balance is computed using the following formula: Program target – (committed + obligations).
2.12. The EOP Process.
2.12.1. Use the different EOP processes to close out one business period and begin another.
These processes are necessary to activate required processes, transmit files, produce necessary reports, back up records, and purge information no longer needed in the system.
2.12.2. Use the EOP processing instructions found in Chapter 3, System Administration
(paragraphs 3.12.3.-3.12.7.3.) and the End of Period Process Management window in SS
(paragraph 4.25.-4.25.4.) to manage the end-of-day (EOD), end-of-month (EOM), and end-of-fiscal year (EOFY or EOY) processing cycles in DMLSS.
2.12.3. EOD. The EOD process closes a business period and begins another. EOD is set to
process automatically Monday through Friday at a predetermined start time. The daily
process transmits requisition orders, posts incoming status to due-in records, performs
follow-up processes, purges aged data, generates management reports, and performs a
database backup. During EOD processing, DMLSS compiles financial data and sorts that
data into several different files that are interfaced with the DFAS system. These files reflect
transactions that have affected financial balances since the previous EOD process. The files
are separated by Obligations (both LOG and customer), Receipts, Sales, Inventory
Adjustments, and the Project Center balances.
2.12.3.1. DMLSS creates up to five finance files during the EOD. The files are listed
below and can be retrieved and viewed by accessing Materiel Management Reports within Business Objects (BOs) from the DMLSS main menu.
2.12.3.1.1. 821 – ObligationsInDFAS_AF.
2.12.3.1.2. 861 – ReceiptsInDFAS_AF.
2.12.3.1.3. 812 – SalesInDFAS_AF.
2.12.3.1.4. 846 – InventoryInDFAS_AF.

36 AFMAN41-216 13 FEBRUARY 2013
2.12.3.1.5. 814 – ProjectCenterDetail_AF.
2.12.3.2. During the EOD process, transactions are summarized by SOS type and DFAS
document number. Transactions are written to one of the EOD files listed in paragraph
2.12.3.1. and transmitted to DFAS. An EDI 527R transaction is transmitted for each PV
receipt, by call number, and processed in DMLSS during the EOD period. An EDI 527E is transmitted for each ECAT receipt by call number.
2.12.3.3. During the EOD, the DFAS process is activated and all transaction files are
read. These finance transaction files are created and sent to DFAS from the DMLSS
DCM module. The DCM keeps a record of all transmissions. DMLSS standard reports/BOs can be used to view financial reports for audit trails to line item level.
2.12.4. EOM. The EOM process closes a monthly business period and begins a new
monthly business period. The EOM is set to run automatically immediately following the
last EOD of the month. The monthly process includes, but is not limited to, automatic
leveling, purging of aged data, generation of management reports, and a backup of the
database.
2.12.4.1. During EOM processing, the finance file contains all the LOG due-in records
and all the customer due-out records in DMLSS. Finance uses the Due-In/Due-Out
Reconciliation file at the end of each EOM cycle to reconcile DFAS‘ data. Also during
the EOM, the equipment that meets depreciation requirements is reported to GAFS-R via
the Depreciation Report. This includes any gains, losses, and monthly depreciation amounts.
2.12.4.2. Two files specifically produced for the monthly EOP are listed below and can
be retrieved and viewed by accessing Materiel Management within BO from the DMLSS main menu.
2.12.4.2.1. 864 – Due-In/Due-Out Reconciliation file.
2.12.4.2.2. 821P – Depreciation file.
2.12.4.3. Additionally, the Balance Report by Accounting Requirement Code &
Stratification Report, Equipment Balance Report, and Due-In/Due-out Files are produced.
These files are sent to DFAS and/or AFMOA/SGAL from the DMLSS DCM module.
The DCM keeps a record of all transmissions. BOs can be used to view financial reports for audit trails to line item level.
2.12.5. EOFY. The EOFY automatically processes after the September EOM. During the
EOFY processing, all expense centers, project centers, and LOG fund records are reset to a
zero balance. The LOG fund then repopulates obligations and commitments with the current
active due-in dollar value for all external orders. The AM fund records are disassociated
from the current year fund records and the available balance is adjusted to zero. The following actions automatically occur as part of the EOFY process:
2.12.5.1. Financial records are reset. All customer/expense and project center fund targets and balances are reset to zero.
2.12.5.2. Inactive customers are deleted.

AFMAN41-216 13 FEBRUARY 2013 37
2.12.5.3. The EOFY Funds Report is generated detailing the position of the LOG fund and all project and expense centers.
2.12.5.4. The FY indicator is changed and new FY financial records are started.
2.12.5.5. A database backup is performed.
2.12.6. Additional EOFY Procedures. In conjunction with the DMLSS automated EOY
process, take the following into consideration:
2.12.6.1. Obtain and adhere to all instructions received from AFMOA/SGAL.
2.12.6.2. In IM, ensure all delivery lists are completed prior to processing the last
September EOD or the issue transactions will not pass to Finance, which will cause issues posting in the new FY.
2.12.6.3. In IM, process all AFWCF/MDD GPC receipts and issues. Each cardholder
should reconcile purchases in the GPC register and select the ―DFAS‖ (Money Bag)
button to ensure all Purchase Card Adjustments (PCAs) transactions are processed in the
current FY and passed to DFAS. Note: PCAs should only be generated as a result of
authorized transportation charges. Reference Chapter 7 for details.
2.12.6.4. Forward the Balance List by ARC and Stratification (Strat) Report to your
Finance POC as soon as possible. Note: Only send the FY ARC 1 & ARC 2. Line 11 of this report indicates medical logistics ending inventory for the reported period.
2.12.6.5. The Medical Materiel Management Report (MMMR) is produced by Finance.
Line 11 should be reconciled to Line 11 of the ARC Report. The ending balances on the
30 September MMMR (Pages 1 & 2) Line 11 must agree with Line 11 of the ARC
Report (ARC 1 & 2). It is absolutely necessary for you to coordinate closely with your
Finance POC to ensure differences are identified and corrected so the MMMR agrees with the ARC.
2.12.6.6. Validate that the new surcharge has been updated. This is typically
accomplished by a DMLSS datapatch. To manually update or validate the new
surcharge, open SS in DMLSS; select ―Search‖; click dropdown on Type; select
―Materiel Mgt‖ from dropdown menu; select ―Search‖ on the right-hand side menu and then, select ―Detail.‖ Update the Surcharge field accordingly.
2.12.6.7. Either RMO or LOG loads expense and project center targets upon receipt from
the resource manager. Customers cannot place orders until this is accomplished.
2.13. Flow of the Financial Interface. After the DMLSS financial processing is complete, the
DCM, viewable in SS, routes the financial files to the DLA Transaction Services (formerly
DAASC) where the Electronic Commerce/EDI files (EC/EDI) formats are translated into a
recognizable format and passed to the DFAS databases at Ogden. The depreciation file is then
routed to GAFS-R in the EC/EDI format. This internet protocol (IP) address and password for DLA Transaction Services are configured into the DCM Configuration module within SS.
2.13.1. DFAS Daily Process Flow. Orders, receipts, sales, inventory updates, cancellations,
target changes, etc. occur daily in DMLSS. The DMLSS DFAS process runs during the
EOD, reading the transaction history and collecting all transactions that affect a financial balance Figure 2.5.

38 AFMAN41-216 13 FEBRUARY 2013
2.13.1.1. The DCM converts the financial data into EC/EDI files and transmits them through DLA Transaction Services.
2.13.1.2. DLA Transaction Services converts each EC/EDI transaction set into a user
defined DFAS file (ABJFTF with a sequence number) and sends those files to the
appropriate DFAS system. Files that are unreadable by DLA Transaction Services are
returned to the sending base as a transmission error in DCM. Files that fail to transmit
will show up in the IM Inbox with a message of either Financial Failure or Transmission
Failure. The DCM monitor at the MTF will need to resend failed files. Format Failures and Financial Failures will need to be analyzed and corrected by JMLFDC.
2.13.1.3. After the DFAS system receives and verifies the data, SMAS processes the
ABJFTF file and performs the appropriate General Ledger Account (GLA) updates.
Figure 2.5. DFAS Daily Process Flow.
2.13.2. DFAS Monthly Process Flow. The DFAS process runs during the EOM process and
reads the due-in and due-out table. The monthly Due-In/Due-Out EC/EDI 864 reconciliation file is created and is maintained IAW AFRIMS T 41-04 R 04.00.
2.13.2.1. The file is queued in the DCM for transmission to DLA Transaction Services
who converts the EC/EDI transactions into a user-defined DFAS ABJDIF file and sends
it to the DFAS system.
2.13.2.2. SMAS processes the ABJDIF file, sends a copy to IAPS, and performs the due-
in and due-out reconciliation. This is to verify the due-in and due-out records exist in
SMAS and IAPS. Any due-in record differences between DMLSS and DFAS are
identified on a SMAS or IAPS Report and SMAS/IAPS personnel should take the
appropriate action to correct the difference with the assistance of Logistics personnel (if
required). The due-out values by expense center are totaled and compared to the Funds
Control function of SMAS. Any differences are posted as RDO transactions and passed onto GAFS-R for expense center due-out (obligation) updates Figure 2.6.

AFMAN41-216 13 FEBRUARY 2013 39
Figure 2.6. DFAS Monthly Process Flow.
2.14. Funds Control System. DMLSS finance files are first received and processed against the
DFAS‘ Funds Control portion of the SMAS. The Funds Control System performs the following functions:
2.14.1. Performs initial edit checks of the transactions. Note: DMLSS transaction codes are
translated by Funds Control into a Transaction Identification Code ―TRIC‖ which could be different then what shows in DMLSS.
2.14.2. Updates financial data based upon transactions sent from DMLSS.
2.14.3. Routes the transactions to either SMAS or the Integrated Accounts Payable System
(IAPS). Vendor Pay (local purchase) type of transactions are passed to IAPS. This includes
ESD, RRD, RND, and price changes for items ordered via Contracting, Blanket Purchase
Agreements (BPAs), and Decentralized BPAs (DPBAs). All other transactions are processed
by SMAS. SMAS updates the General Ledger Account (GLA) records and passes on
customer obligation and expense transactions to the General Accounting Finance System-Rehost (GAFS-R).
2.15. SMAS. The following categories of transactions are processed by SMAS:
2.15.1. Transactions related to inter-fund billing (billings between government agencies).
These transactions include ESD, PCZ, RRD, and DQC type transactions for all sources not
handled by IAPS. SMAS also processes the above transactions for purchase card buys and
maintains due-ins until receipt. Government Purchase Card (GPC) receipts delete the due-in
and post the receipt value to a suspense accounts payable general ledger account (GLA). The
payment of GPCs is accomplished through IAPS with the payment information passed to
SMAS to reduce the GPC suspense accounts payable account and update other appropriate general ledger accounts.
2.15.2. All transactions that affect financial inventory balances (general ledger account
codes (GLACs) and stratification of the AFWCF/MDD stock record account are processed
by SMAS. This includes inventory increases, decreases, and price changes as well as issues, receipts, and all adjustments.
2.16. IAPS. Due-in and receipt transactions related to local purchase through BPA/DBPA and
Contracting (SOS Type Code ―CON‖) are first routed to IAPS for processing and then to SMAS
for GLA updating. Transaction rejects in IAPS are not passed to SMAS for posting until the reject is corrected and processed.

40 AFMAN41-216 13 FEBRUARY 2013
2.17. Enterprise Business System (EBS). The Defense Logistics Agency (DLA) uses the
automated EBS to account for electronic orders, receipts, and invoices associated to materiel
purchased from a DLA source. DLA sources consist of Prime Vendor (PV), ECAT, and other
depot orders using SOS code ―SMS.‖ Electronic Data Interface (EDI) files are transmitted to EBS and vendor by DMLSS.
2.17.1. The following files are transmitted from DMLSS to EBS and/or vendors during each
End of Period (EOP) process: (The transfer status should be monitored daily using the SS DMLSS Communication Manager (DCM) feature referenced in Chapter 4, paragraph 4.20.)
2.17.1.1. EDI 850 – Requisition file (vendor and EBS). This occurs when the order is placed. Non-submit orders send only a pseudo 850 to EBS.
2.17.1.2. EDI 527R – PV receipt/cancellation file by call number (EBS only). This file
contains line item detail receipt records.
2.17.1.3. EDI 527E – ECAT receipt file (EBS only). This file contains line item detail receipt records.
2.17.1.4. EDI 860 – Cancellation request file (vendor and EBS).
2.17.2. The following files are transmitted to EBS and/or DMLSS from vendors: (These
files appear in DCM and must be monitored daily to ensure successful processing of
incoming status.)
2.17.2.1. EDI 855 – Order confirmation file (DMLSS and EBS).
2.17.2.2. EDI 856 – Shipping confirmation file (DMLSS and EBS).
2.17.2.3. EDI 865 – Cancellation confirmation file (sent to DMLSS and then DMLSS sends cancellation to EBS using the 527R file).
2.18. Improving Financial Management Effectiveness. DMLSS users have a responsibility
to protect both the AFWCF/MDD and the MTF O&M resources. Effective use of the following
DMLSS processes and management tools make this possible.
2.18.1. Catalog Records. Understand the relevance of building correct catalog records and
updating fields correctly before processing transactions in DMLSS. Pay particular attention to the following:
2.18.1.1. Refund Code. AFWCF/MDD customer‘s orders must be funded with only a
few exceptions (i.e. requested TRIMED excess). Thus, DMLSS default for customer
orders/issues are ―reimbursable/refundable‖ (refund code R). Logisticians must have
authorization to change the default from refund code ―R‖ to ―N‖ (non-refundable). Note:
When building catalog records in DMLSS, logisticians can select/check the ―free‖
indicator box. This action automatically defaults the refund code to ―N‖ for both
AFWCF/MDD receipts and customer orders/issues. Remember, refund code ―N‖ issue
transactions must be authorized.
2.18.1.2. SOS Type Code. A catalog record must be linked to a Source of Supply (SOS)
code in order to execute orders in DMLSS. Within the SOS code, logisticians must select
a SOS Type code. The SOS Type code determines what SOS code is passed to DFAS and
which DFAS system the transaction is routed to for updates (SMAS, IAPS, etc.), in turn, it directly effects obligations, billing, and reporting.

AFMAN41-216 13 FEBRUARY 2013 41
2.18.2. Status Updates. Review status carefully. It is very important to review, work, and
process ―status edits‖ because they communicate what is coming or actions that have taken
place. For example, logistics orders an item from GSA. DLA Transactions Services reviews
it to see if the request can be obtained in the DoD supply chain. If the DoD can supply the
item, the order is rerouted to that DoD agency and DLA Transaction Services sends status to
the ordering account of the ―reroute‖ so they can update their records (SOS). If logistics
doesn‘t update DMLSS with the ―new‖ source and DMLSS then sends a follow-up back to
the original source (GSA in this example), GSA will send ―BF‖ status which means ―no
record of your requisition.‖ A status of ―BF‖ cancels the due-in and logistics will likely reorder and eventually receive two orders instead of one. This creates ―excess.‖
2.18.3. Promptly communicate and resolve erroneous DMLSS transactions with Finance.
All DMLSS (AFWCF/MDD) transactions that affect balances, price changes, or inventory
stratifications pass to DFAS for financial updates. These DFAS ―financials‖ are the
AFWCF/MDD official records that are reported to AF, DoD, and Congress. For this reason,
knowing the correct transaction to process for a given action is very important. For example,
processing a combination price and unit of issue change transaction which requires ratios
can cause your account to increase (or decrease) inventory in the millions or billions of
dollars if accomplished incorrectly. Transactions were developed for a specific reason and
should be used for those purposes.
2.18.4. QC the Funds portion of the SDCR (paragraph 2.4.).
2.18.5. Monitor the DCM daily to verify financial files are transmitted to DFAS without error. (Chapter 4, paragraph 4.20).
2.18.6. Report discrepancies found when comparing the monthly BalanceInDFAS_AF Report to the Medical Materiel Management Report (MMMR).
2.18.7. Utilize DMLSS standard reports along with DMLSS DFAS BO reports will assist
with reconciling with DFAS. DFAS BO reports can be accessed from the DMLSS main
navigation window. Click ―BO‖ and select the Materiel Management subheading. The BO
program opens and displays the BO Standard Report viewer. You can select a report from
the viewer or close the viewer to create your own report. The following is a list of DFAS reports available in this view option:
2.18.7.1. Sales in DFAS. Identifies sales transactions transmitted for an entered date
range. Reports the transaction codes and the document numbers used to create the sales
transaction. DMLSS sales and issue transactions can and will be rolled together, when
predetermined information is identical, to create one interface sales transaction. This
report will show the interface transaction to SMAS as well as the DMLSS detail
transaction that make up the single sales transaction.
2.18.7.2. Obligations in DFAS. Identifies obligation transactions transmitted for an
entered date range. The obligation transactions include increases, decreases, and price
changes to LOG obligations and customer obligations. LOG obligations are orders to
outside sources. Customer obligations are orders to LOG. The report will reflect the
obligation transaction update sent to DFAS and the DMLSS transactions that make up the
obligation transaction. This report will reflect transactional information along with the
document numbers used to create the obligation transaction.

42 AFMAN41-216 13 FEBRUARY 2013
2.18.7.3. 527R Tailored Vendor Relationship (TVR) PV Receipts By Call. Lists PV
orders by call number. This report contains the call number, contract number, SOS code,
transmission indicator, and total price. Once PV receipts are processed in DMLSS, the
527R is generated after three EOD cycles. Receipts are not reversible once the 527R is generated.
2.18.7.4. DFAS Document Number. Enter the DFAS document number and receive a
listing of all transactions and their document numbers that make up that transaction.
2.18.7.5. Receipts in DFAS. Identifies receipt transactions transmitted for an entered
date range. Reports the transaction codes and the document numbers used to create the receipt transaction. These are LOG receipt actions and are normally one for one.
2.18.7.6. Inventory in DFAS. Identifies inventory transactions transmitted for an entered
date range. The report will show the transaction passed to SMAS and the DMLSS
transactions that are rolled together to make up the inventory transaction. For example,
instead of 100 PCZ transactions, DMLSS will pass a single net change transaction. The
old price or new price will be .01 and the opposite price will be the net change plus a
penny. This report will reflect transactional information along with the document numbers used to create the inventory transaction.
2.18.7.7. Balance List by Accountability Requirements Code (ARC) Stratification. The
Balance List by ARC Stratification reflects the DMLSS inventory balance position for
the selected month. The BO report name is BalanceInDFAS_AF. The report resembles the DFAS‘ MMMR and is maintained IAW AFRIMS T 41-04 R 31.00.
2.18.7.8. Project Funds Management Record (PFMRs). In DFAS, report will reflect the
project center‘s detail status that has been reported to DFAS.
2.18.7.9. Depreciation in DFAS Report. Depreciation in DFAS Report will reflect the
EM Module transactions used to make up the values reported to GAFS-R in the depreciation interface.
2.18.7.10. Expense Center Details and Project Center Detail Reports. The Expense
Center Details and Project Center Detail Reports will show the transactions for the date
range entered that affected the funds for that date range. If the beginning of the FY date
is used as a start date and the current date is used as an end date, the values should match
details in the Expense/Project Center Fund record displayed in SS.
2.18.7.11. AM Funds Detail Report. The AM Funds Detail Report will do the same
thing for AM funds that the expense center and project center reports do for customer funds.

AFMAN41-216 13 FEBRUARY 2013 43
Chapter 3
SYSTEMS ADMINISTRATION (SA)
3.1. Scope. This chapter contains instructions for site system administrators managing the
DMLSS automated information system (AIS). Also, specific information is provided to ensure
the secure operation of the DMLSS AIS by using system privileges and protective mechanisms.
These safeguards control access to administrative functions, help avoid security violations, and
minimize the opportunity for improper use of administrative functions that would compromise
the trusted computing base (TCB) and user security.
3.2. SA Responsibilities. The MLFC ensures a primary and alternate SA are assigned in the
DMLSS AIS. Site SAs have to complete various tasks in order to keep the server secure and the
database operating smoothly (see Table 3.1.). The following paragraphs include additional
responsibilities performed on a daily, weekly, and monthly basis.
Table 3.1. System Backups and Maintenance Procedures.
Daily DMLSS performs the daily EOP automatically. Ensure a backup tape is
inserted into the tape drive after each EOP cycle and retain 3 weeks‘ worth
of backup tapes. This equates to 15 tapes for those bases that process EOP
cycles Monday – Friday (paragraph 3.15). Note: Sites with the newer
Dell PowerEdge R710 server/LTO Ultrium 3/4 tape drive should refer to paragraph 3.15.
Weekly Clean once per week. Use each cleaning tape for 30 cleanings.
Monthly DMLSS performs the monthly EOP automatically. Note: Monthly EOP
data is written to the same tape as the final daily of the month. Additional tapes or storage requirements are not required.
Audit Backup – See below.
Audit Run on the 1st day of each month or more often (as directed in the SA
Tool) depending on the size of the facility. Store audit backups for one
year, and up to seven years, if possible. Approximately 12-20 are required
each year depending on the size of the facility. Note: Sites with the newer
Dell PowerEdge R710 server/LTO Ultrium 3/4 tape drive should refer to paragraph 3.14.2.1..
System recovery No system recovery tape is needed for OTR servers.
System reboot The server should be rebooted once each month and whenever directed to
do so by AFMOA/SGALD or JMLFDC (paragraph 3.8.8.1.).
3.2.1. Daily Responsibilities. In addition to the requirements in Table 3.1., SAs should
perform the following ongoing or daily activities:

44 AFMAN41-216 13 FEBRUARY 2013
3.2.1.1. User Management. This function includes adding new users, unlocking users,
and resetting passwords. Adding new users to the DMLSS environment will likely be
one of the most frequent tasks you will perform as an SA. (paragraph 3.5. and 3.7.).
3.2.1.2. Peripheral Device Management. This includes managing printers and other devices (paragraph 3.9.).
3.2.1.3. Monitor Services and Process Dates. A list of services and process dates appear
on the System Administration home window. Each of the services or processes listed has
a corresponding message and colored box to indicate its status. Together, the table
provides a complete overview of the server‘s resources and whether or not DMLSS processing is up-to-date (paragraph 3.4.2.3.).
3.2.1.4. Manage Backups. Backups are the first line of defense against the loss of
valuable information. The DMLSS server and database files are automatically backed up daily at 23:40 PM, Monday through Friday (paragraph 3.14.).
3.2.1.5. Manage Tutorial Databases: DMLSS tutorial databases are ―sanitized‖ copies of
your production database and may be used for practicing or testing of procedures without
affecting actual DMLSS conditions. Orders will not actually be transmitted as the IP
addresses for your trading partners have been removed. DMLSS SAs manage these tutorial databases (paragraph 3.11.3.).
3.2.1.6. Facility Management Responsibilities. SAs with a Facilities Management
Administrator role assigned in the SA Tool have additional responsibilities assigned in the SA Tool (paragraph 3.13.).
3.2.2. Weekly Responsibilities. The SA should clean the tape drive and monitor disk usage on a weekly basis (paragraphs 3.8. and 3.16.).
3.2.3. Monthly Responsibilities. Refer to Table 3.1. and paragraphs 3.14 and 3.15.
3.2.4. Additional Responsibilities.
3.2.4.1. Site SAs must provide initial and annual DMLSS specific training to users
emphasizing security, awareness, and training.
3.2.4.2. IAW AFI 41-209, paragraph 1.2.6.1.4., site SA‘s must ensure appropriate
management controls are in place to minimize occurrences of fraud, negligence, and
theft. Specifically, SAs should develop policy/procedures regarding DMLSS access, to
include the following:
3.2.4.2.1. Ensure DMLSS users (including Medical Logistics, custodians, clinicians,
etc.) do not have access to functions outside of their scope and span of control.
Review the organizational chart and compare it to the User Summary or equivalent
report. To the fullest extent possible, determine that single person(s) are not
responsible for all functions. Note: Organizations with limited resources to segregate
duties should have compensating controls, such as supervisory review of transactions
performed. For example, periodically run the ―Receipts and DueIns by Same User‖ BO report.
3.2.4.2.2. Review a system-generated list of inactive logon IDs, and determine why
access for these users has not been terminated. SA‘s can produce list of DMLSS

AFMAN41-216 13 FEBRUARY 2013 45
users (e.g. use the ―Status_of_DMLSS_Users‖ standard report located in the System
Services universe or the DMLSS Users Summary) to verify deletion of unwanted
accounts.
3.2.4.2.3. Verify that all unnecessary accounts are deleted. This includes terminated employees or users with emergency/temporary access to DMLSS.
3.2.4.3. As warranted, monitor the security of DMLSS using the Database Audit Report located in the SA Tool.
3.2.4.4. Verify EOP tapes are produced on a daily basis and a tape back-up system is in
place. This includes 3 weeks of backup tapes (15 tapes), at least 1 year of audit tapes (12
tapes), and an inventory record of backup tapes. A tape back-up system should consider
when and how files are rotated off site (e.g. advancing natural disaster, etc.), retention
periods, and security involved in transport.
3.3. DMLSS Website (Intranet). The DMLSS server at each site has a portion allocated as a
Web server area, referred to as the DMLSS website. This is the area where the SA Tool resides, as well as other important links.
3.4. SA Tool Overview. The SA Tool is the backbone of DMLSS that supports personnel as
they perform DMLSS tasks. It provides the ability to manage the server, its external devices,
backup the database, and manage DMLSS users. All of these responsibilities are maintained in a secure environment.
3.4.1. Access the DMLSS server webpage. In the Internet Explorer address line, enter
https:// and the server name or internet protocol (IP) address of your DMLSS server. Read the DoD notice and consent banner and select the ―Click Here to Continue‖ button.
3.4.1.1. DMLSS Start Page. The DMLSS Start Page (Figure 3.1.) displays when you
access the webpage for your DMLSS server. SAs use this page to install DMLSS
software, log on to the SA Tool, and access standard links. Note: Users do not have to
log-in to access the DMLSS Start Page. All users may access user documentation or use Assign User CAC information.
Figure 3.1. DMLSS Start Page.

46 AFMAN41-216 13 FEBRUARY 2013
3.4.1.2. All SA Tool screens contain a navigation pane on the left side containing Task
Areas, Quick Links, and DMLSS Links. Task Areas contain links to other menus, where
SA activities are performed. Options vary in this section depending on the links chosen.
3.4.2. Access the DMLSS SA Tool. In the Navigation pane, under the list of Quick Links,
click ―SA Tool.‖ The DMLSS System Administration window opens (Figure 3.2). Use this
page to log on to the SA Tool or change a password. SAs enter their username and password
in the indicated fields and then click the Log In button. The DMLSS SA Home window displays.
Figure 3.2. DMLSS System Administration Window.
3.4.2.1. The System Administration Home window (Figure 3.3) displays after logging
onto the SA Tool. Just like the DMLSS home page, the Navigation Pane includes a list
of Task Areas, Quick Links, and DMLSS Links; however, the Task Area in the SA Tool
has additional menus that are used to manage SA activities. Each page contains a title and
description in the header, along with path used to get to the current page. Whenever you
are within the SA Tool, you can click on the DMLSS logo to return to the SA Home
window. Note: If the SA Tool is not used for a few minutes, the session expires, and
users are prompted to log in again. Remember to log off. Navigating to another website
does not log you off automatically. To log off on any page in the SA Tool, simply click
―Exit‖ on the list of Quick Links located on the left side navigation pane.

AFMAN41-216 13 FEBRUARY 2013 47
Figure 3.3. System Administration Home Window.
3.4.2.2. SAs have full access to all the menus in the SA Tool, with the exception of the
FM menu. Only those with the FM Administrator role will also have access to the
Facility Management menu. Standard user cannot access the SA Tool, but a standard user with the FM Administrator role will have access to the FM menu.
3.4.2.3. Services and Process Dates. The list of Services and Process Dates are both
critical sections on the System Administration home window. As the name indicates,
―Services‖ shows the services available on the server, while ―Process Dates‖ displays the
most recent dates that particular processes have run on the server. Monitoring both of these areas is a key responsibility of the SA.
3.4.2.3.1. If Services/Process Dates are enabled, working, or up-to-date, a green box
is displayed. A yellow box indicates a warning. If resources are disabled, at a critical
stage, or processes have not run, a red box appears. For example, the Volume status
box reports available disk space. If one of the two drives falls below 20%, the
Volume status box will turn yellow. If the volume falls below 10%, the box turns red. In both instances, the message *Contact the MHS helpdesk* appears.
3.4.2.3.2. Any non-green status needs to be addressed immediately. Also, in some
cases, the precise value or entry is not significant, but variances from the routine
should be investigated or reported to the MHS Service Desk.
3.4.2.3.3. Clicking on the red box with a yellow star will display the page within the
SA Tool where the problem might be resolved or where more information might be available.
3.4.2.3.4. Scheduler Status reflects the number of DMLSS-related jobs currently
running in the scheduler (database). They are listed to the right of the Enabled/Green

48 AFMAN41-216 13 FEBRUARY 2013
status. If the number of jobs is greater than zero, the text is clickable and will display the new View Running Scheduler Jobs page when clicked.
3.4.2.3.5. Audit Backups. Periodically, a message under Process Dates indicates the
backup threshold has been reached with a status of ―Backup of Audit Required, Last
Status,‖ followed by the date the last backup was run and a red indicator. If this
occurs, the user should go to the Manage Backups menu and click the ―Backup Audit
Data‖ menu item (paragraph 3.14.2).
3.5. Manage Users. The first drop down menu in the SA Tool Task Area is Manage Users
(Figure 3.4.). It is used to manage the accounts of DMLSS users by including some of the most common tasks performed by SAs. The following options are available from this menu:
Figure 3.4. SA Manage Users Menu.
3.5.1. Create DMLSS User Account (Figure 3.5.). Use this function to set-up new DMLSS
user accounts. Each DMLSS user must have a unique account consisting of a username and
password, or a username with approved access via CAC, to use the system. As of 30
September 2010, DoD Policy JTF-GNO CTO 07-15 Rev 1 requires you to use a CAC to log
in. Exceptions are allowed only by arrangement with the local DMLSS SA. Note: The
JMLFDC has delayed release of the DMLSS version 3.1.2., PKI/CAC upgrade. Projected release is 2012.
Figure 3.5. Create DMLSS User Account page.
3.5.1.1. Username requirements. The assigned username must contain no more than
eight characters. The unique name may be all alphabetic characters, or a mix of
alphabetic and numeric characters provided the first digit is an alphabetic character.
Usernames cannot contain any special characters, hyphens, periods, or underscore.

AFMAN41-216 13 FEBRUARY 2013 49
3.5.1.2. Password requirements. SAs have the option of creating a password that is used
with the username to gain access to DMLSS. Passwords should be exactly 15 characters
in length since PDAs/HHTs do not allow for passwords longer than 15 characters.
Additionally, they must contain at least two numeric characters, at least two alphabetic
uppercase letters, at least two alphabetic lowercase letters, and have at least two printable
special characters (not the same). Additionally, a new password may not be any of the last 10 passwords used with the associated username.
3.5.1.3. Create a password enabled user. After entering a valid username and initial
password, select the correct user type−User or Admin. Then add any of the three user
roles that apply−Database Audit Reviewer, System Audit Reviewer, and/or Facilities
Management Administrator. After selecting the user type and user roles, click ―Create
User.‖ DMLSS provides a message screen informing the SA whether or not the account
was created or if any errors occurred. The most common reasons for failure are the new
password does not meet the password creation rules, a typing error may have occurred
when typing in the password twice, or the username already exists. Click ―OK‖ to
continue. Note: New users must change their temporary password at the next login.
3.5.1.4. Create a CAC-enabled user. SAs may choose to create a new user account with
access via the CAC by first establishing a username and then checking the Allow access
via CAC box. Select the correct user type−User or Admin, and then add any of the three
user roles that apply−Database Audit Reviewer, System Audit Reviewer, and/or Facilities
Management Administrator. After selecting the user type and user roles, click ―Create
User.‖ DMLSS provides a message screen informing the SA whether the account was
created or any errors that occurred. Click ―OK‖ to continue. Note: Once a user is CAC-enabled, they will not be able to log-in via a user ID and password.
3.5.1.4.1. After the DMLSS SA successfully creates a CAC-enabled user, the new
user accesses the DMLSS Start Page and selects the ―Assign User CAC information‖
link located under Common Activities. The Assign User CAC information screen
appears (Figure 3.6.) and the user enters their Username and clicks ―Submit.‖ After
the results message ―Success: Please close this window‖ appears, click the ―X‖ in the
upper right corner to close the window.
Figure 3.6. Assign User CAC information screen.
3.5.1.4.2. After a user assigns their CAC information, the SA returns to the Manage
Users menu and selects Manage CAC Access. From this screen, the SA performs a
search for the new user. Using the View and update CAC access screen (Figure 3.7.),

50 AFMAN41-216 13 FEBRUARY 2013
the SA selects the user(s) and then clicks the ―Approve selected user‖ link from the
list of update actions. Note: The CAC status must be ―Pending‖ before it can be
approved. On the approve message screen click ―Yes‖ or ―No.‖ On the Manage
CAC Access screen under the message, ―The following users have been approved for
CAC access,‖ click ―OK.‖ The Manage CAC Access screen will display with the
CAC status ―Approved.‖ The DMLSS SA can exit the SA Tool.
Figure 3.7. View And Update CAC Access Screen.
3.5.2. Manage DMLSS User Accounts. This option allows the administrator to perform a
variety of management functions, such as updating roles, resetting passwords, locking and
unlocking users, promoting, demoting or deleting users, and reactivating or expiring user
accounts.
3.5.2.1. The User Search screen (Figure 3.8.) is the first screen displayed and its purpose
is to allow the user an opportunity to narrow the search results to a more concise list
based upon the needs of the requestor. By entering a value in the Search Criteria entry
field and/or selecting the type of user desired from the drop down menu, a more narrow
answer field can be produced. The default for type of user is All Users. This allows an
SA to either view or print a list of all active and expired users associated to the DMLSS
database. Other types include: Active users, Locked Users, Expired Users, Locked and Expired Users, System Administrators, FM Administrators, or Audit Reviewers
Figure 3.8. User Search Criteria Screen.
3.5.2.2. After a query is executed, the search results are provided together with columns
of status that assist SAs with the management, security and integrity of the DMLSS
system (Figure 3.9.). A Print button is also available to launch a PDF version of the list
which can be viewed and printed.

AFMAN41-216 13 FEBRUARY 2013 51
Figure 3.9. Manage DMLSS User Accounts/Search Results Screen.
3.5.2.3. Once the list of users is displayed. all of the user actions also become available
for use. They are: set temporary password, lock users, promote users, reactivate users, update roles, delete users, unlock users, demote users, expire users, and unlock all users.
3.5.2.3.1. Set temporary password. Use this function to set a temporary password for
one or more selected usernames. This process forces a password change the next
time the user logs into DMLSS.
3.5.2.3.2. Delete users. This option allows the SA to delete selected user accounts
(for example, when a user is transferred to another assignment or location). All roles
and applications should be removed in the application prior to deleting the user on the
server or else the system will ―ghost‖ users on the application side. Database access
permissions are revoked when a user account is deleted, and users cannot log onto the
DMLSS server. If necessary, users can be recreated. To delete a user account, click
―Manage DMLSS User Accounts‖ and then display the user(s). Select the users and
click ―Delete Users.‖ Click ―Yes‖ on the prompt, ―Are you sure you want to delete
the following users?‖, and a confirmation message displays indicating the user was
deleted. You can also delete a user account through the Manage User Accounts in
DMLSS window. SAs cannot delete their own account; another SA-level user must perform this action.
3.5.2.3.3. Lock users. This function allows the SA to lock selected users. The user
receives the message, ―Your account is locked.‖ Locked users cannot log onto the
DMLSS system. To regain access, they must have the SA unlock their username.
SAs can perform a search to identify all ―Locked Users.‖ As a result, username status
and lock date fields will appear on the search results screen.
3.5.2.3.4. Unlock users. Use this function to unlock selected users.
3.5.2.3.5. Promote users. This option allows an existing user to be promoted to SA
status. If a user has been a logistics user, but is moving to a position with System Administrator responsibilities, use this function instead of creating a separate account.
3.5.2.3.6. Demote users. This function allows a SA to demote an existing SA to
logistics user level status. If a user has been a DMLSS SA, but is moving to a
position with no SA responsibilities, use this function rather than creating a separate
account. SAs may not demote themselves to a typical-user level; another SA-level
user must perform the action.
3.5.2.3.7. Reactivate users. Use this option to reactivate selected inactive DMLSS
users. An inactive user account is one in which the users password is expired. Note:
The DMLSS user is required to log into the system at least once every 30 days, and
change their password every 60 days.

52 AFMAN41-216 13 FEBRUARY 2013
3.5.2.3.8. Expire users. Use this option to expire passwords of selected DMLSS
users. An inactive user account is one in which the users password has expired. This
list also reflects the number of days since expiration. A SA would use this list to determine which accounts require reactivation and which accounts should be deleted.
3.5.2.3.9. Update roles. Use this option to update auditor roles for the selected
DMLSS users. The available roles for DMLSS users are Database Audit Reviewer,
System Audit Reviewer, and Facilities Management Administrator. Check the
appropriate box(es) on the Manage DMLSS User Accounts/Update roles–update screen and click the Update roles button.
3.5.2.3.10. Unlock all users. Use this option to unlock selected users.
3.5.3. List Connected Users. To view the List Connected Users, select the List Connected
Users option in the Manage User menu. SAs can view or print the Connected UsersID along with Program, Server, Start Time and Duration information.
3.5.4. Manage Dormant Users. To view the Manage Dormant Users select the Manage
Dormant Users link in the Manage User menu. The results screen offers the opportunity to
delete selected dormant users.
3.5.5. Manage Dormant User Period. This option allows the SA to define the number of
days a user account must be inactive to be displayed on the Manage Dormant Users page.
Type the new dormant days setting and click the ―Save Days Dormant Settings‖ button. The
default is set at 180 days.
3.5.6. Disconnect Users. Click the ―Disconnect all Users‖ bar to disconnect all users that are currently using the DMLSS Client application.
3.5.7. Manage CAC Access. This screen together with the Create a DMLSS user option
provides a full range of management options for controlling the CAC process. This window
is used to approve selected users, reject selected users, reset CAC information, enable CAC usage and disable CAC usage (Figure 3.10.).
Figure 3.10. Manage CAC Access Results Screen.
3.5.7.1. Create a new CAC-enabled user. (paragraphs 3.5.1.4.-3.5.1.4.2).
3.5.7.2. CAC-enable an existing user. To CAC-enable an existing user, the SA first
performs a search in the Manage CAC access. Using the results, the SA marks the
checkbox of the selected user(s) and clicks the enable CAC usage link located above the
search results. Two confirmation screens follow−click the ―Yes‖ or ―No‖ button on the
first screen; click ―OK‖ on the next.
3.5.7.2.1. Once the DMLSS SA completes this step, he/she notifies the new user(s).
The user then opens the browser with his/her CAC card in the reader and accesses the
DMLSS Start Page. Under the Common Activities section the user will click the
―Assign User CAC information.‖ The next screen, Assign User CAC information

AFMAN41-216 13 FEBRUARY 2013 53
screen, is used to associate a DMLSS username with his/her CAC. To do this, enter
the Username and click ―Submit.‖ If the process was successful, a screen appears
with a results message of ―Success: Please close the window.‖
3.5.7.2.2. After the User completes the Assign User CAC procedures, the DMLSS
SA accesses the Manage CAC access task area, selects the user(s) and clicks the
―Approve selected users‖ link. The CAC status must be ―Pending‖ to be approved.
Two confirmation screens follow–click ―Yes‖ or ―No‖ on the first screen; click ―OK‖
on the next. After this action, the Manage CAC screen displays with CAC status of Approved.
3.5.7.3. Reject selected users. The SA rejects CAC-username pairings if they are
invalid. If the recorded CAC certificate‘s distinguished name is not a match for the user,
the SA must reject it. It might also be necessary to reject the request if the SA cannot
validate the user as someone that should have access via CAC. Only users with status
―Pending‖ may be rejected. On the Users screen, select the user(s) and click the ―Reject
selected user‘s‖ option. Two confirmation screens follow – click ―Yes‖ or ―No‖ on the
first screen and ―OK‖ on the next. After this action, the Manage CAC screen displays
with CAC status of ―Rejected.‖
3.5.7.4. Reset CAC information. The DMLSS SA uses this option to reset the certificate
distinguished name information associated with an account. On the Users screen select
the user(s) and then click the ―Reset CAC information‖ option. Two confirmation
screens follow – click ―Yes‖ or ―No‖ on the first screen and ―OK‖ on the next. After this
action, the Manage CAC screen displays with CAC status of Enabled, not approved.
From this point, refer to and follow the instructions outlined in paragraphs 3.5.7.2.1. and
3.5.7.2.2.
3.5.7.5. Disable CAC usage. Use this function to disable selected user(s). On the Users
screen select the user(s) and then click the ―Disable CAC usage‖ option. Two
confirmation screens follow – click ―Yes‖ or ‖No‖ on the first screen and ―OK‖ on the
next. After this action, the Manage CAC screen displays with CAC status of ―Not enabled.‖
3.6. Manage Security. Using the Manage Security Menu (Figure 3.11.), SAs view and manage
the security settings for your DMLSS server, manage access to the DMLSS server, and audit
files. To access this window, click the ―Manage Security‖ link under the list of Task Areas in the SA Tool.
Figure 3.11. Manage Security Menu.

54 AFMAN41-216 13 FEBRUARY 2013
3.6.1. View Windows Hotfixes. To view notes pertaining to the DMLSS software HotFix,
click the ―Manage Security‖ link and select the ―View Windows Hotfixes‖ option. A frame
appears in your browser with a description of the current hotfixes and their IDs. Click ―Print‖ and a PDF file appears in your browser to view or print.
3.6.2. Changing Site Idle Timeout. When a user reaches the selected number of minutes of
idle time, an attempt to go to another page will return the user to the login page. To change
the idle timeout setting for your site, click the ―Manage Security‖ link and select the
―Changing Site Idle Timeout‖ option. In the Site Specific Settings window, enter any
number of minutes from 15 to 180 that a user‘s connection to the server can be idle before
timing out and disconnecting automatically. Type the new number of minutes in the Idle
TimeOut in Minutes field and click ―Update.‖ If the update was successful, the idle timeout label will reflect the new time.
3.6.3. View Open Ports. To view a list of open ports on the DMLSS server, click on the
―Manage Security‖ link and select the ―View Open Ports‖ option. A frame appears in your
browser with open ports identifying their protocol, local address, foreign address, and state.
Click ―Print‖ and a PDF file appears in your browser, listing the open port information on the
server.
3.6.4. View Security Login Denials. To view a list of failed secure login attempts, click on
the ―Manage Security‖ link and select the ―View Security Login Denials‖ option. A note
appears with the message: ―NOTE: This report may take several minutes to generate.‖ If you
wish to generate the report, click ―Generate Report.‖ A frame appears in your browser with
login denial information including user, date/time, source, category, event type, and message.
Click ―Print‖ and a PDF file appears in your browser, listing the open port information on the
server.
3.6.5. View Audit Reviewer Logs. To view the Audit Reviewers Logs, click on the
―Manage Security‖ link and select the ―View Audit Reviewers Logs‖ option. Enter the start
date and end date (format is YYYYMMMDD, for example, 2012Jan15) and click ― Refresh.‖
If there are any logs for the period selected, a frame will appear with the information from
the logs. You can view or print the list. Click ―Print‖ and a PDF file appears in your browser appears in your browser to view or print.
3.6.6. List Audit Reviewers. Audit reviewers are individuals who have been authorized to
view the Windows event logs. To access the list of audit reviewers, click on the ―Manage
Security‖ link and select the ―List Audit Reviewers‖ option. A frame appears in your
browser with the list of audit reviewers and associated information. Click ―Print‖ and a PDF
file appears in your browser to view or print.
3.6.7. Manage Web Access. This feature is used to allow DMLSS or a trading partner
(DCAM or EXT only) access from a particular IP node or segment/range of IP addresses. In
the Manage Web Access window, a menu with two options appears: Add web access, and
Deny web access to selected hosts (Figure 3.12.). Also there are radio buttons for Web
Server Access, DCAM, and EXT that are used to select the access file available for viewing or modifying.

AFMAN41-216 13 FEBRUARY 2013 55
Figure 3.12. Manage Web Access.
3.6.7.1. Click ―Add web access‖ and the Add Web Access window will be displayed.
Enter the IP address to be added and either an optional host name (for Web Server) or a
required comment (for DCAM or EXT). Click ―Grant Web Access‖ and a confirmation box will appear indicating if the addition was successful.
3.6.7.2. Click ―Deny web access to selected hosts‖ menu item and you will be prompted
to verify that you wish to remove the displayed entries from the access file. Click ―OK‖
to remove or cancel and return to the Manage Web Access window. If ―OK‖ is selected,
the application will attempt to remove the identified entries and will then display a
confirmation message that identifies which entries were removed and which entries were
unable to be removed, if any.
3.6.8. View Web Server Logs. To view the DMLSS web server logs, click on ―Manage
Security‖ link and select ―View Web Server Logs.‖ A frame appears with a dropdown text
box for selecting the appropriate log. Note: Some of these logs may be very large and could
take a minute or longer display. Click ―Print‖ and a PDF file appears in your browser, with the logs. You can view or print the list.
3.6.9. View Web Server Logs History. This option is used to view web server log entries
from the DMLSS server that have been archived. Click the ―Manage Security‖ link and
select ―View Web Server Logs‖ to reach the Web Server Logs History page. Set the criteria
for the search by selecting the appropriate log, entering any specific search criteria, and entering start/end dates.
3.6.10. Manage CAC/CRL. To enable or disable the CAC or CRL functionality, use the
Manage CAC/CRL link located in the Manage Security menu. If either option is currently
enabled, the respective Disable button is displayed. Likewise, if currently disabled, the
Enable button displays. Note: Clicking the Disable CAC causes CRL to be disabled as well
(the CRL state is changed to disabled and the Enable/Disable CRL button is disabled as
well). If one or both options are disabled, a reason must be entered in the Reason for the change field.
3.6.11. Manage Status Refresh Rate. To change the refresh interval on the main page or
disable it, click on the Manage Security link and select the Manage Status Refresh Rate link.
A valid range is number of minutes from 2 to 30, and a ―0‖ can be entered to disable the feature.
3.7. Manage User Messages. Using the Manage Users Messages Menu (Figure 3.13.), SAs can
send messages to DMLSS users, review or delete previously transmitted messages, and specify

56 AFMAN41-216 13 FEBRUARY 2013
IP addresses that should not receive messages. To access this window, click the User Messages link under the list of Task Areas.
Figure 3.13. Manage Users Messages Menu.
3.7.1. Send User Messages. This function is used to send a message to all DMLSS users,
even if they are not currently logged on to DMLSS. This is particularly useful if, for
example, you need to perform maintenance on the server. The message will reach the users
who are currently logged on, allowing them to log off before losing any data. The message
will also reach the users who are not currently logged on, warning them not to log on until
the maintenance is complete. To access this option, click the Send User Messages link
located in the Manage User Messages menu. In the Create/Send a Message to Users window
(Figure 3.14.), enter the message to be sent. Do not press Enter to add line returns between
parts of the message. Text entered after a line return will not appear in the message. Enter an
expiration date and time for the message. Click ―Create Message,‖ and ―OK‖ in response to
the confirmation message. The message will appear at any user‘s logon attempt until the specified date and time.
Figure 3.14. Manage Users Messages Menu.
3.7.2. Manage User Messages. Use this option to view or delete DMLSS user messages.
3.7.2.1. View Unexpired Messages. In the Manage User Messages window (Figure
3.15.), select Expired Type: Unexpired. Using the results of the search, SAs can view or
print the list.
Figure 3.15. Manage Users Messages, Deleting Messages.

AFMAN41-216 13 FEBRUARY 2013 57
3.7.2.2. Delete User Messages. To delete a message, use the dropdown list to narrow the
scope of the search between Unexpired or Expired messages. Then use the results of that
search to select the desired message(s) to delete. Click the Delete Selected Messages bar. A system message indicates if the messages were deleted.
3.7.3. Manage Host Blocking. SAs use this option to identify particular IP addresses that
should not receive messages, or unblock previously blocked users so they can view messages
again. To assess this feature, click Manage Host Blocking from the Manage User Messages
task menu. Use the Blocked Type dropdown window to narrow the scope of the search; i.e.
BlockedAndUnblocked, Blocked, Unblocked, or Unknown, and then use the results of the
search to identify the particular IP address(es) to block or unblock. Depending on the action
desired, click either the Block Selected Host or UnBlock Selected Host bar. A system message indicates whether the action was successful.
3.8. Manage Server. SAs can manage multiple server functions using the Manage Server Menu
in the SA Tool (Figure 3.16.).
Figure 3.16. Manage Server Menu.
3.8.1. View DMLSS Server Processes. This screen produces a list of current processes
running on the DMLSS server with their corresponding file sizes. The report grid can be
resorted by clicking on the desired column name and choosing the up arrow for ascending or the down arrow for descending. SAs can view or print the list in PDF format.
3.8.2. View Configuration Status. This screen displays the DMLSS server hostname, IP
address, MAC address and available databases. SAs can view or print the data in PDF
format.
3.8.3. View File System Status. This screen displays a brief summary of the DMLSS Server
file system by drive with corresponding status and any error messages. It is a good idea to
check the disk space every few days to verify no more than 90 percent of the space is being
used. The report grid can be resorted by clicking on the desired column name and choosing
the up arrow for ascending or the down arrow for descending. The size, free space, and
percent free column cells are shaded green, yellow, or red based on percentage of free space
available for the file. SAs can view or print the data in PDF format. Warning: If space
usage exceeds 90 percent, contact the MHS Service Desk for further instructions.
3.8.4. View OS Services and Devices. This screen displays a list of operating system
services and devices running on the DMLSS server. Use the dropdown list at the bottom of
the page to select between Services, Devices, or Services and Devices. The report grid
shows display name, service name, service type and status. The results can be resorted by
clicking on the desired column name and choosing the up arrow for ascending or the down arrow for descending. SAs can view or print the data in PDF format.

58 AFMAN41-216 13 FEBRUARY 2013
3.8.5. View Server Event Log. This screen shows a list of the current event log entries on
the DMLSS server. Using the Select Log dropdown list at the top of the page, the SA can
select the desired log (i.e., application, Internet Explorer, Microsoft-Windows-
Forwarding/Operational, Operations Manager, security, systems, and Windows PowerShell).
The report grid can be resorted by clicking on the desired column name and choosing the up
arrow for ascending or the down arrow for descending. SAs can view or print the data in PDF format.
3.8.6. View DMLSS Database Log. SAs use this page to view entries in the DMLSS
database log. Using the Select category dropdown list at the top of the page, SAs select the
desired log with a start date and end date. The report grid can be resorted by clicking on the
desired column name and choosing the up arrow for ascending or the down arrow for descending. SAs can view or print the data in PDF format.
3.8.7. View Running Scheduler Jobs: SAs use this page to view jobs currently being run by
the scheduler. The report grid can be resorted by clicking on the desired column name and
choosing the up arrow for ascending or the down arrow for descending. SAs can view or print the data in PDF format.
3.8.8. DMLSS Server Hardware. SAs use this page to view the DMLSS server hardware
report and manage hardware resources.
3.8.8.1. Server Reboot and Shutdown. Buttons for Shutdown Database Server, Reboot
Database Server and Cancel Shutdown or Reboot reside under the Database Server
Hardware heading. Note: The server should only be shutdown when directed to do so
by AFMOA/SGALD or JMLFDC.
3.8.8.2. CD Drive. Open CD Drive and Close CD Drive buttons are located under the Database Server Drives heading.
3.8.8.3. Click the Print Database Server Settings bar to produce a PDF version of the DMLSS Database Server Hardware Report.
3.8.9. Manage Common Log Levels. This page is used to manage the DMLSS Manage
Common Log Levels. On this screen the SA can change the level at which the system writes
logs using the combobox dropdown. Normally the default values are OK. If a problem exists
where more details are needed, then the minimum log levels can be set to a lower level,
meaning the logs will provide more details. Example: If you set the minimum log level at
―Debug‖ it will log all levels (Debug, Information, Warning, Error and Critical). If you set
the minimum log level at ―Critical‖ then the logs will only be written for critical items. If the
level is set at ―Do Not Log,‖ no items will be written to the logs.
3.9. Manage Devices. Using the Manage Devices menu (Figure 3.17.), SAs manage DMLSS
access points, barcode readers and printers. DMLSS users can print to a network printer hosted
on the DMLSS server or a printer on the site‘s local area network (LAN). To access this
window, click the Manage Devices link under the list of Task Areas.

AFMAN41-216 13 FEBRUARY 2013 59
Figure 3.17. Manage Devices Menu.
3.9.1. Create DMLSS Communication Manager (DCM) Printers.
3.9.1.1. In the SA Tool, the term ―printer‖ usually means ―DCM printer.‖ DCM printers
are used to print forms. Barcode printers are used to print barcode labels. Before adding
a printer, the printer‘s IP address should be configured. The IP address for DCM printers should be static and not change.
3.9.1.2. To create or add a DCM printer, click Create DCM Printers in the Manage
Devices menu. Enter the Printer Name and IP Address and click Create DCM printer. A
message appears indicating the printers were added successfully. You can set this as the
default DCM printer, if appropriate. Note: When adding a new printer for the first time,
ensure that the printer IP address has been included in the Ports & Protocols Survey
(PPS). The PPS is the primary document that enables network security personnel to
update local firewall settings.
3.9.2. Manage DCM Printers. From this page (Figure 3.18.), the SA has three options: update DCM printer, test printer connectivity, or delete selected printers.
Figure 3.18. Manage DCM Printers Window.
3.9.2.1. Updating a DCM Printer‘s IP Address. To update the IP Address for a DCM
Printer, select the checkbox of the printer to be updated and then click the ―Update DCM
Printer‖ link. Enter a new ―IP address‖ for the printer. Click ―Update DCM Printer‖ to
save the change. The system displays a message indicating whether the printer updated
successfully.
3.9.2.2. Testing printer connectivity. To test a printer‘s connectivity, select the checkbox
of the printer to be tested and click ―Test printer connectivity.‖ A message will appear
stating that the DCM printer was tested successfully, or an error occurred. Click ―OK‖ to
return to main screen

60 AFMAN41-216 13 FEBRUARY 2013
3.9.2.3. Removing a DCM Printer. Select the printer to be removed and the click the
―Delete selected printers‖ link. The system displays a message indicating whether the
printer was removed successfully.
3.9.3. Create Barcode Printers. To create or add a barcode printer, click ―Create Barcode
Printers‖ in the Manage Device task menu. Enter the printer name and IP address for the
printer. Select the label type (narrow or wide). Click ―Create Barcode Printer‖ and a message
displays indicating if the printer was added (Note: When adding a new printer for the first
time, ensure that the printer IP address has been included in the Ports & Protocols Survey
(PPS). The PPS is the primary document that enables network security personnel to update
local firewall settings.)
3.9.4. Manage Barcode Printers. From this page, the SA has three options: change barcode printer label type, test printer connectivity, or delete selected printers.
3.9.4.1. Changing the Label Type for a Barcode Printer. To change the label type for a
barcode printer (from narrow labels to wide labels, or vice versa), select the printer to be
updated and click the change barcode printer type link. Inside the update window,
choose the new label type and click on ―Change barcode printer label type.‖ A message appears to let you know if the printer was updated successfully.
3.9.4.2. Test Barcode Printer Connectivity. Select the checkbox of the printer to be
tested and click the ―Test printer connectivity‖ link. A message will appear stating that
the barcode printer was either tested successfully or an error has occurred. Click ―OK‖ to return to main screen.
3.9.4.3. Removing a Barcode Printer. To remove a barcode printer, select the checkbox
of the printer to be updated and the click the ―Delete selected printers‖ link. The system displays a message indicating whether the printer was removed successfully.
3.9.5. List All Printers. Click ―List All Printers‖ under the Manage Devices tool menu to
view a list of all DCM and barcode printers. The report grid can be resorted by clicking on
the desired column name and choosing the up arrow for ascending or the down arrow for descending. SAs can view or print the data in a PDF formatted report.
3.9.6. Set Default DCM Printer. Click ―Set Default DCM Printer‖ in the Manage Devices
menu to change the default printer for DCM. Select the printer to use as the default from the
dropdown list. If the desired printer is not available for selection, you may need to add it
using Create DCM Printer. Click ―Save DCM Settings‖ to save the default DCM printer. A
message will appear indicating whether the default printer changed successfully. You can
also test the new printer setting by printing a form from the dropdown menu provided. A message appears indicating the result of the test.
3.9.7. Start/Stop RF Link. The RF Link is used to manage wireless (RF) communication
between the DMLSS server and/or PDAs. To start or stop the RF link service, click
―Start/Stop RF Link‖ in the Manage Devices task area. The Start/Stop RF Link window
displays the current RF Link status as either running or not running. To initiate a change,
click ―Start/Stop RF Link‖ and a message displays indicating whether the RF Link was
started or stopped successfully.

AFMAN41-216 13 FEBRUARY 2013 61
3.9.8. Manage RF Link Configuration. To edit the RF Link configuration (which is usually
not necessary), click ―Manage RF Link Configuration‖ in the Manage Devices window and
enter a new value for any parameter listed. Click ―Update configuration‖ to save the
changes. RF Link must be stopped before the configuration can be edited and saved. Use
extreme caution when editing the RF Link configuration, because if it is edited incorrectly, it
could cause the RF connection to malfunction. SAs can view or print the data in a PDF formatted report.
3.9.9. Manage RF Link Users. When a PDA loses its connection to the RF network, and the
user tries to log in again, the RF Link ―thinks‖ that the user is already connected, and does
not allow the user to re-connect. This can happen when the user reboots a PDA or loses
battery power while connected. When this happens, an SA needs to disconnect the user by
clicking ―Manage RF Link Users‖ in the Manage Devices window, selecting the user(s) to be
disconnected, and clicking ―Disconnect RF User.‖
3.9.10. View RF Link Logs. To view the RF Link log, click ―View RF Link Logs‖ in the
Manage Devices task area. The log entries display in the window. Click ―Print‖ to display the entries in PDF format. SAs can view or print the data.
3.10. Manage Services. The Manage Services window is used to manage the communication
information for DCM, the automatic tool that transmits orders and financial data with minimal
assistance from the user (Figure 3.19.). Through the System Services (SS) application,
privileged users can monitor DCM transactions, and even re-submit them, if necessary. To
access this window, click ―Manage Services‖ under the list of Task Areas.
Figure 3.19. Manage Services Menu.
3.10.1. Manage Event Services. The first option in the Manage Services menu is the manage
event services window and it allows an SA to restart either the DMLSS Server Event Service
or the Web Server Event Service. From this window, users see status of both services that
confirms whether or not they are running.
3.10.2. Manage Web Server Service. This link is used to manage the Apache and XSP
services on the web server. Upon clicking this link, the Manage Event Services window
appears with the status of the web server status and a button to ―restart‖ the DMLSS Web
Server service.
3.10.3. Start/Stop FTP Service. File Transfer Protocol (FTP) is a standard network protocol
used to exchange files directly between servers, such as a Point of Use (POU) cabinet and
DMLSS. The Start/Stop FTP Service in the Manage Services menu contains both Start and
Stop buttons to enable FTP server control. If changes are made, a confirmation message
appears indicating if service was started or stopped successfully. Also, two tabs appear under the DMLSS FTP Properties title to define User List and IP filter properties.

62 AFMAN41-216 13 FEBRUARY 2013
3.10.4. Manage RFID Services. Radio frequency identification (RFID) uses electromagnetic
waves to exchange data between a terminal and an electronic tag attached to an object
(paragraph 3.30.). Use the Manage RFID Services link within the Manage Services Menu to
start, stop, or restart the iMotion Edge Runtime Service and iMotion Event Manager Service associated with this functionality.
3.10.5. Manage DCM Service. SAs use this window to set the number of retries that DCM
makes when attempting to send a transmission. Settings are available for both https: and FTP
retries. Also, an enable/disable button for DCM service is located on this page to engage or
suspend service. The DCM settings can be displayed in PDF format by clicking ―Print DCM
Settings.‖
3.10.6. View DCM Archives. Using this link, SAs use the report grid to select desired
serial(s). Results from the report grid can be resorted by clicking on the desired column
name and choosing the up arrow for ascending or the down arrow for descending. Click the
―Show archive details‖ bar and entries for that serial number are displayed below the report. SAs can view or print the data in PDF format by clicking ―Print.‖
3.11. Manage Database Menu. Using the Manage Database Menu (Figure 3.20.), SAs can
manage the DMLSS database and view database usage statistics. To access this window, click
―Manage Database‖ under the list of Task Areas.
Figure 3.20. Manage Database Menu.
3.11.1. Allow/Disallow Client Logins. The first option in the Manage Database menu is
used by the SA to either allow or disallow user access to the DMLSS client application. If
access is currently allowed, the ―Disallow‖ button displays. Likewise, if access is currently
disallowed, the ―Allowed‖ button displays. The system prompts you if the login was allowed or disallowed.
3.11.2. Viewing DMLSS Database Disk Usage. Use this window to view the DMLSS
database disk usage. Results from the report grid can be resorted by clicking on the desired
column name and choosing the up arrow for ascending or the down arrow for descending. SAs can view or print the data in PDF format by clicking ―Print.‖
3.11.3. Manage Tutorial Databases. DMLSS tutorial databases are copies of the accounts
production database that may be used for practicing or testing of procedures without
affecting actual operational data and balances. Orders are not placed in a tutorial database as
the IP addresses of your trading partners have been removed. Once you have created a
tutorial database, it will be available to every user of all DMLSS applications. DMLSS users
have the option of logging into the tutorial database when they first launch the DMLSS application.

AFMAN41-216 13 FEBRUARY 2013 63
3.11.3.1. Select ―Create Tutorial Database‖ to start the creation process. DMLSS can
support as many as seven tutorial databases. Keep in mind each database uses server
resources. When not being used, they should be stopped or dropped.
3.11.3.2. Tutorial databases are not upgraded when DMLSS is upgraded at your site. After each DMLSS upgrade, your tutorial database must be recreated.
3.11.3.3. After clicking ―Manage Tutorial Databases‖ in the Manage Database menu, a
frame appears with the available tutorial databases and their status (Figure 3.21.). Select
the appropriate tutorial database and then choose one of the action buttons located at the
bottom of the frame. The Demo Account Prefix is the prefix that will start all demo user
accounts in the tutorial database. The Demo Account Number should reflect the number
of demo user accounts to create in the tutorial database.
Figure 3.21. Manage Tutorial Database.
3.11.3.4. Users must click the tutorial checkbox when logging onto DMLSS. Upon a
successful login, TUTORIAL DATABASE will display in the title bar of every DMLSS
window. The tutorial database name displays in the bottom bar, and TUTORIAL
DATABASE displays in the lower right corner. In order to reconnect to a production
database, users will need to un-check the Tutorial checkbox at the login.
3.11.4. Manage Web Server Tnsnames. Tnsnames is an Oracle file that defines database
addresses for the purpose of connecting to them. SID is the name of the database. To
manage the Tnsnames or a file, go to this link in the Manage Database file. A frame appears
in your browser with the contents of the tnsnames.ora file in a scrollable text window. The
frame also contains a list of editable entries from the file. A menu across the top of the frame enables you to remove one or more entries, add a new entry or test one or more entries
3.11.5. View Database Version. This window shows the current version and patch level of
the DMLSS database.
3.12. Manage Medical Materiel Menu. From the Manage Medical Materiel Menu (Figure
3.22.), you can manage the settings for the DMLSS EOP process, import prime vendor orders or
export prime vendor requisition status, and manage the settings of for the UDR process. To
access this window, click ―Manage Medical Materiel‖ under the list of Task Areas.

64 AFMAN41-216 13 FEBRUARY 2013
Figure 3.22. Manage Medical Materiel Window.
3.12.1. Manage UDR. The UDR Medical Catalog is a DMLSS sponsored catalog product
that consolidates medical and pharmaceutical information from a variety of federal
government sources as well as commercial/industry sources. The first option in the Manage
Medical Materiel menu is the Manage UDR window. It allows the SA to view load status, perform a pre-process validation, and start a manual UDR load.
3.12.1.1. UDR Load Status. Click ―View UDR‖ in the Manage UDR screen to view the logs for the UDR processes.
3.12.1.2. UDR Pre-Process Validation. Click ―View Connected Users‖ to view the
connected users. This screen also contains an available message to send to users by
clicking ―Send Logout Message‖ located directly below the message. ―Refresh‖ and ―Back‖ buttons are also available at the bottom of the page.
3.12.1.3. Start UDR Load. In the event that the UDR Delta Process (paragraph 3.12.2.)
cannot be used, contact the MHS Service Desk to request that either a DMLSS Extract
CD-ROM be sent by overnight mail, or that the latest UDR table extract be laid on your
DMLSS server. If the table extract file is applied, instructions for processing will also be
furnished by either the MHS Service Desk or AFMOA/SGALD. Use the CD-ROM and
start a full UDR load by specifying the CD Drive to be used and clicking ―Start‖ to initiate the UDR process.
3.12.2. Manage Delta UDR. The UDR Delta Process is a web-based process that uploads
catalog updates to the DMLSS production servers. In this screen, status is provided to see
when the last UDR Delta Run processed with additional buttons to view UDR delta logs, set
the automatic indicator, enable/disable the delta process, view detailed properties, and start
the UDR load.
3.12.2.1. In general, the UDR Delta Process should be enabled and set to Auto.
However, in the Manage Delta UDR window, SAs can click ―Set to Auto‖ or ―Set to
Manual.‖ The UDR Delta Properties group will be updated to indicate whether UDR
Delta is set to run automatically.
3.12.2.2. If the process is set to run manually, run it from the Manage Delta UDR
window by clicking ―Start‖ under the Start UDR Load heading. A system message indicates if the process started.
3.12.3. DMLSS End of Period (EOP) Processes. DMLSS EOP processing automatically
provides the necessary reports, activates the required processes, backs up the required
records, and purges the information no longer needed in the system. Note: Use this

AFMAN41-216 13 FEBRUARY 2013 65
information in addition to the EOP processing instructions found in Chapter 2, Document
Control and Financial Procedures, (paragraph 2.12.) and the End of Period Process
Management window in SS (paragraph 4.25.-4.25.4.) to manage the end-of-day (EOD), end-of-month (EOM), and end-of-fiscal year (EOFY or EOY) processing cycles in DMLSS.
3.12.4. View Logs. Use this link to view or print logs for the EOP process. This window
shows a summary for each of the next scheduled EOP processes. It also provides EOP status
for the daily, monthly, and yearly runs with ―View History‖ and ―View Detail Log.‖ SAs
can view or print the detail log data in PDF format. FM has its own EOP processes that run independently of the general DMLSS EOP processes.
3.12.5. Run Daily EOP Process. End-of-Day (EOD) processing transmits unsent executed
orders, posts incoming status to due-in records, performs follow-up processes, produces the
receipt file and transmits it to legacy systems, purges aged data, generates management
reports, and performs a database backup. Normally, each of this process is run automatically
based on a schedule set up in SS. However, you can also start the processes manually from
the Run Daily EOP Process window (Figure 3.23). SAs may only process a manual EOD when first directed to do so by either the MHS Service Desk or AFMOA/SGALD.
Figure 3.23. Run Daily EOP Process Window.
3.12.5.1. Reset Lock. In general, the DMLSS EOP processes run automatically, and
when they are running, users are locked out of the DMLSS applications. This button
allows the SA to override the lockout process, so that users can still use DMLSS, even
though the EOP processes have been started. Contact the MHS Service Desk first, and
then click ―Reset Lock‖ to reset the EOP lock. If successful, the message ―EOP locks
have been reset‖ appears. If the Status of End-of-Period indicator is ‗Running‘ and
Status of End-of-Period Locked are ‗Locked‘ the message, ―Warning: EOP status
indicates that EOP is both running and locked. Clicking Override EOP Locks below will
reset both flags and may leave EOP data in an invalid state‖ appears with another set of buttons to confirm the override EOP locks or Cancel.
3.12.5.2. This window also allows the SA to enable or disable the EOD process. In
general, the DMLSS EOD process is run automatically, and should be enabled. To change this process, click the appropriate ―Enable EOD‖ or ―Disable EOD‖ button.
3.12.5.3. SAs can also use the Run Daily EOP Process screen to start the EOD process
manually by selecting ―Start‖ located below the Action [Process MM Daily] heading. A
user message is automatically sent out to other DMLSS users, to warn them that the EOD

66 AFMAN41-216 13 FEBRUARY 2013
process will begin in ten minutes. After ten minutes, the process begins, and users are
locked out of the DMLSS application suite until the EOD is complete. SAs may only
process a manual EOD when first directed to do so by either the MHS Service Desk or AFMOA/SGALD.
3.12.6. Run Monthly EOP Process. End-of-Month (EOM) processing includes automatic
leveling, purging of aged data, generation of management reports, and a backup of the
database. Normally, each of this process is run automatically based on a schedule set up in
SS. However, you can also use the SA Tool to start the processes manually. SAs may only
process a manual EOM when first directed to do so by either the MHS Service Desk or
AFMOA/SGALD.
3.12.6.1. Reset Lock. In general, the DMLSS EOP processes run automatically, and
when they are running, users are locked out of the DMLSS applications. This button
allows the SA to override the lockout process, so that users can still use DMLSS, even
though the EOP processes have been started. Contact the MHS Service Desk first and
then click ―Reset Lock‖ to reset the EOP lock. If successful, the message ―EOP locks
have been reset‖ appears. If the Status of End-of-Period indicator is ‗Running‘ and
Status of End-of-Period Locked are ‗Locked‘ the message, ―Warning: EOP status
indicates that EOP is both running and locked. Clicking Override EOP Locks below will
reset both flags and may leave EOP data in an invalid state‖ appears with another set of
buttons to confirm the override EOP locks or Cancel.
3.12.6.2. This window also allows the SA to enable or disable the EOM process. In
general, the DMLSS EOM process is run automatically, and should be enabled. To change this process, click the appropriate ―Enable EOM‖ or ―Disable EOM‖ button.
3.12.6.3. SAs can use the Run Monthly EOP Process screen to start the EOM process
manually by selecting ―Start‖ located below the Action [Process MM Monthly] heading.
A user message is automatically sent out to other DMLSS users, to warn them that the
EOM process will begin in ten minutes. After ten minutes, the process begins, and users
are locked out of the DMLSS application suite until the EOM is complete. Click on the
proper checkboxes at the bottom of the page to run the desired process(es). SAs may
only process a manual EOM when first directed to do so by either the MHS Service Desk
or AFMOA/SGALD.
3.12.7. Run Yearly EOP Process. End-of-Year (EOY) processing resets financial records,
starts new fiscal year financial records, database backup, generates a report detailing the
position of the log fund and all project centers and expense centers, cancels any orders that
have not been submitted for processing, cancels any IOUs that do not have any associated
due-in, and zeroes out targets for Operations and Maintenance (O&M) funded organizations.
Normally, this process is run automatically based on a schedule set up in SS. If the EOY
process has failed, contact the MHS Service Desk immediately. Under no circumstance
should you ever manually start the EOY cycle, unless directed to do so by either the MHS Service Desk or AFMOA/SGALD.
3.12.7.1. Reset Lock. In general, the DMLSS EOP processes run automatically, and
when they are running, users are locked out of the DMLSS applications. This button
allows the SA to override the lockout process, so that users can still use DMLSS, even
though the EOP processes have been started. Contact the MHS Service Desk first, and

AFMAN41-216 13 FEBRUARY 2013 67
then click ―Reset Lock‖ to reset the EOP lock. If successful, the message ―EOP locks
have been reset‖ appears. If the Status of End-of-Period indicator is ‗Running‘ and
Status of End-of-Period Locked are ‗Locked‘ the message, ―Warning: EOP status
indicates that EOP is both running and locked. Clicking Override EOP Locks below will
reset both flags and may leave EOP data in an invalid state‖ appears with another set of
buttons to confirm the override EOP locks or Cancel.
3.12.7.2. This window also allows the SA to enable or disable the EOY process. In
general, the DMLSS EOY process is run automatically, and should be enabled. To change this process, click the appropriate ―Enable EOY‖ or ―Disable EOY.‖ button.
3.12.7.3. SAs can use the Run Yearly EOP Process screen to start the EOY process
manually by selecting ―Start‖ located below the Action [Process MM Yearly] heading. A
user message is automatically sent out to other DMLSS users, to warn them that the EOY
process will begin in ten minutes. After ten minutes, the process begins, and users are
locked out of the DMLSS application suite until the EOY is complete. Click the proper
checkboxes at the bottom of the page to run the desired process(es). Under no
circumstance should you ever manually start the EOY cycle, unless directed to do so by
either the MHS Service Desk or AFMOA/SGALD.
3.12.8. Prime Vendor Interface (PVI) Import. Prime Vendor Requisition Status data can
either be imported from a removable storage device on the DMLSS Server, or from a file on
your workstation. Use this option to copy a file from a client machine or database server to
the DCM input table. Inside the import window, select the import source: ―Server‖ or ―My
Machine.‖ If importing from the server, select the removable storage device from the
dropdown list in the Source group. If importing from your local machine, click ―Browse‖ to
select the file to import. Click the >>Copy>> button to import the file.
3.12.9. PVI Export. Prime Vendor Requisition Status data can either be exported to a
removable storage device on the DMLSS Server, or to a file on your workstation. Use this
process to copy a file from the DCM table to the server or client machine. If you are
exporting to the server, connect or insert the storage media. Inside the export window, select
the export destination: ―Server‖ or ―My Machine,‖ and then select the files to copy from the
Source List. If exporting to the server, select the removable storage device from the drop
down list in the Destination group. If exporting to your local machine, then click the
>>Export>> to open a dialog box and specify the export location. Note: AF policy does not allow the use of removable storage devices.
3.12.10. View PVI Logs. To view the PVI logs, click ―View PVI Logs‖ in the Manage
Medical Materiel window. A PDF file displays in your browser, with the log information for PVI. You can view or print the log.
3.13. Facility Management Menu. The Facility Management menu allows users to perform
FM-specific management functions such as running manual end-of-period processes, exporting
FM data to the Joint Medical Asset Repository (JMAR), and managing users who have access to
upload/delete computer aided design (CAD) drawings in the DMLSS database (Figure 3.24). To
access the Facility Management menu you must be a DMLSS SA or have the ―Facilities
Management Administrator‖ role assigned to your user ID within the SA Tool. To access this window, click ―Facility Management‖ under the list of Task Areas.

68 AFMAN41-216 13 FEBRUARY 2013
Figure 3.24. Facility Management Menu Window.
3.13.1. Run Nightly End-of-Period. FM EOP processing runs independently of the general
DMLSS EOP processing. FM EOD processing is also called the nightly process. It normally
runs automatically at 1 minute after midnight every day, 365 days per year. If the FM Nightly
fails due to a power outage, server problem, etc., you may run it manually using this menu
option. Use this link to start the process manually by clicking ―Start‖ under the Action [Process FM Nightly] heading in the Run Nightly End-of-Period window.
3.13.2. Run Monthly End-of-Period. FM End-of-month (EOM) processing is also called the
monthly process. The EOM process performs two specific tasks. It creates the ―PM
Scheduled Work Pending‖ reminder message and the ―RC Scheduled Work Pending‖
reminder. The FM EOM process normally runs automatically at 00:01 AM. If the FM
Monthly fails due to a power outage, server problem, etc., you may run it manually using this
menu option. Use this link to start the process manually by clicking ―Start‖ under the Action [Process FM Monthly] heading in the Run Monthly End-of-Period window.
3.13.3. Export FM Data to JMAR. The Export FM Data to JMAR process performs the
single task of sending updated data on Facility Inventory, Real Property Installed Equipment
(RPIE) Inventory, Room Inventory, Projects, and Requirements to the DoD JMAR. The
―Export FM Data to JMAR‖ process normally runs automatically as part of the Medical
Materiel (MM) Monthly EOP process, which runs at the date/time established for each month
in the EOP module of System Services. However, if the MM Monthly process fails due to a
power outage, server problem etc., the SA may run the ―Export FM Data to JMAR‖ process
manually using this menu option. To export FM data to JMAR, select ―Export FM Data to JMAR‖ and then click ―Start‖ under the Action [Process JMAR Export] heading.
3.13.4. View or Purge End of Period Logs. SAs use this option to view the process logs,
identify any errors that may have occurred, and purge process logs. In this window, the FM
EOP status is displayed with three options for each process: view automatic process logs,
view manual process logs, and purge logs. Click the desired button and a PDF file displays in your browser, with the process logs. You can view or print the logs.
3.13.5. Manage FM CAD Administrators. This option is used to assign users to the FM
CAD Administrator group. Users who belong to this group and have the FM CAD
Administrator role (within the System Services UP Assign module) assigned to their user ID
will be able to perform specific tasks related to the management of the electronic CAD
drawings in the DMLSS-FM system.
3.13.6. Display FM Help Information. Use this link to display FM help information. A PDF file download window appears. You can view or print the information.
3.14. Manage Backups Menu. The DMLSS server and database files are automatically backed
up daily at 23:40 PM. If an automatic backup fails, or if you are preparing to upgrade the

AFMAN41-216 13 FEBRUARY 2013 69
DMLSS software, you can also run the backups manually. In the Manage Backups window
(Figure 3.25.), SAs can run backups and view the backup logs. To access this window, click
―Manage Backups‖ under the list of Task Areas.
Figure 3.25. Manage Backups Menu Window.
3.14.1. Manage Backup Settings. Use the Manage Backup Settings link to select the days of
the week that backups are scheduled to run. To change the Backup Process Settings, simply
mark the checkbox(es) of the day(s) of the week that backups should run. Users can
select/deselect individual days, or click on the ―Select all days‖ button to select all days, or
the ―Clear all days‖ button to deselect all days. After selections are complete, click ―Save
Settings.‖ Note: Backups should be scheduled Tuesday through Saturday, unless directed
otherwise by AFMOA/SGALD or JMLFDC.
3.14.2. Backup Audit Data. The Security Technical Implementation Guide (STIG) requires
that Oracle Database Audit records, Oracle Archive Logs, OS Event Logs, and Web Server
Logs be backed up and kept for a period of 1 year. DMLSS provides sites with the capability
of periodically backing up this Audit data to tape.
3.14.2.1. This audit data is stored on the file system under D:\STIG_AUDITS. Once this
directory reaches a threshold of 25 gigabytes (GB), a flag is set in the database. The next
time an SA uses the SATOOL, the ―Home Page‖ will display a red indicator box, beside
the text reading ―Last Audit Log backup.‖ This red box indicates that it is time to backup
the sites audit data. It is important to note that there is currently a five day grace period
that the SA has in order to complete this Audit backup. On the sixth day the audit data
will be purged from the file system in order to conserve space and the next cycle will
start. The SA could choose to backup the Audit Data before the 25 GB threshold is
reached by navigating to the ―Audit Backup Page‖ and running the backup as described
above. This is not recommended because more Audit tapes than necessary will be
required throughout the year. Note: Sites with the newer Dell PowerEdge R710
server/LTO Ultrium 3/4 tape drive should use the LTO Ultrium 3/4 Data Cartridge
backup tape and the LTO Ultrium cleaning tapes. One tape (1.6 terabyte capacity) can
hold 6 months of audit backups.
3.14.2.2. SAs initiate the backup by properly labeling a tape designated for the audit
backup, inserting the tape into the server, and clicking ―Backup Audit Log‖ on the Audit
Backup Page. It will take about 2.5 hours to backup 25 GB. The <Refresh Status> button
will keep the SA apprised of the elapsed time.
3.14.3. Backup DB/Server. The DMLSS server is configured to automatically back up the
file systems on a nightly basis. The Database Scheduler will archive and empty the Windows
Event Logs nightly, and there is no administration required at the site. Event logs are
automatically archived and cleared nightly.

70 AFMAN41-216 13 FEBRUARY 2013
3.14.3.1. SAs insert a tape in the tape drive each day to ensure the backup information is
available if required. Each activity should have a three week rotation of tapes at a
minimum.
3.14.3.2. To view a detailed log of the most recent backup of DMLSS server and
database files, click ―Backup DB/Server.‖ A frame appears in your browser with backup
details and log information for the last 2 database backup attempts (Figure 3.26.). Click
―Print‖ and a PDF file appears in your browser with the log. You can view or print the log.
Figure 3.26. Backup DB/Server Window.
3.14.3.3. When a backup processes successfully, the tape automatically ejects. When the
tape fails to eject, the common cause is that the backup failed. Verify whether or not the
automatic backup worked. If it failed, use the Backup DB/Server window to perform a
manual backup. Initiate the backup by properly labeling a tape designated for the
database/server backup, insert the tape into the server, select ―TAPE‖ from the Backup
Device dropdown menu and click ―Start Backup.‖
3.14.3.4. If you need to recover a file system, contact the MHS Service Desk. A systems
administrator at MHS who is responsible for recovering file systems can perform this task remotely in coordination with you. The SA Tool does not provide this capability.
3.15. Data Tapes.
3.15.1. Only DDS5, 4mm (72GB) Digital Audiotape (DAT) tapes should be used in the
DMLSS system, to ensure that the data fits on one data tape. Note: Sites with the newer
Dell PowerEdge R710 server/LTO Ultrium 3/4 tape drive should use the LTO Ultrium 3/4
Data Cartridge backup tape and the LTO Ultrium cleaning tapes. LT0 tapes are inserted into
the tape drive and stay there for one week storing 5 consecutive end-of-day backups onto the
1.6 terabyte LTO4 backup tape prior to ejecting.
3.15.2. Data tapes that are used frequently wear out and lose their recording ability. SAs
should track the life of these tapes and create a replacement schedule where all tapes are
replaced according to manufacturer specification. For example, if the manufacturer states
their tapes are tested to withstand a minimum of 100 full backups, and there is a three week
rotation, calculate an appropriate replacement schedule. Replacing them every year would
greatly underutilize each tape. In this scenario, replacing them at three years would be more
cost effective and still not extend them beyond their life expectancy.

AFMAN41-216 13 FEBRUARY 2013 71
3.15.3. Tape backups will fail if the tape is set to write-protect. Do not set backup tapes to
write-protect unless you are directed to do so by the Military Health Systems (MHS) service
desk or DMLSS program personnel. Make sure labels are stuck to the cartridge in the label
areas, and do not stick more than one label onto each label area. Extra labels can cause the cartridges to jam in the tape drive.
3.15.4. Backup tapes should be stored in a secure location away from the DMLSS server,
and safeguarded against fire, moisture, high electrical currents, and reuse. Label all used
tapes with the type and date of backup, DMLSS build number, and the name of the person performing the backup.
3.16. Cleaning Tape Drives.
3.16.1. The DAT tape drive(s) on the DMLSS server should be cleaned at least once a week
using a Dell compatible DAT72 cleaning tape (see note in paragraph 3.15.1). Specifically,
for the DAT tape drive, 4 Millimeter (mm) head cleaning tape or comparable is
recommended. To use this type of tape, simply insert the tape into the tape drive. The tape
runs automatically for 30-60 seconds, and then self-ejects. If it doesn‗t self-eject, eject it
manually. Note: Sites with the newer Dell PowerEdge R710 server/LTO Ultrium 3/4 tape
drive should use the LTO Ultrium 3/4 Data Cartridge backup tape and the LTO Ultrium
cleaning tapes.
3.16.2. The number of cleanings that any particular DAT72 (magnetic) cleaner provides
varies from brand to brand. When the cartridges are worn out, it is the responsibility of the site to order additional tape drive cleaning supplies.
3.17. Troubleshooting. If you have questions or problems with DMLSS, use the following
resources (in order) to find solutions:
3.17.1. For network-related problems, contact your local network administration support group.
3.17.2. For DMLSS-related problems, contact the regional DMLSS SA or MHS Service Desk.
3.17.3. For problems with equipment purchased under the Dell contract, the MHS Service
Desk can contact Dell for support.
3.17.4. For problems with equipment not purchased under the Dell contract, use the appropriate contract vehicle in place for that specific piece of equipment.
3.18. MHS Service Desk. The MHS Service Desk assists the DMLSS System Administrator in
resolving problems with the application software, and relays hardware and operating system
software-related problems to Dell. When calling the MHS Service Desk, you will be asked to provide the following information:
3.18.1. Application being used [for example, Inventory Management (IM), FM, Customer Support (CS) or PVI].
3.18.2. User‘s name.
3.18.3. User‘s location (that is, hospital name).
3.18.4. User‘s telephone number.

72 AFMAN41-216 13 FEBRUARY 2013
3.18.5. Description of problem.
3.18.6. Hardware failure (workstation or server).
3.18.7. Server serial number.
3.18.8. Software failure (workstation or server).
3.18.9. Detailed explanation of all error messages displayed.
3.18.10. The MHS Service Desk will assign a ticket number to the problem call. Please make a note of this ticket number for future reference.
3.19. RF Networks.
3.19.1. RF Networks manage communication between the DMLSS system and the RF
hardware, such as Hand Held Terminals using RF technology. Air Force sites use the 2.4
GHz PDAs and existing RF local area network (LAN) infrastructure. The range of the 2.4
GHz Access Point devices is quite limited (typically 200 to 300 feet) and resides within the
base perimeter.
3.19.2. Each Medical Treatment Facility (MTF) has a single RF network. An RF controller
attached to the MTF‘s LAN communicates to a series of base radio units, which can transmit and receive data to and from any PDA on the MTF site.
3.20. System Access Points Security. The DMLSS system must be configured properly to take
advantage of all security features. For optimal security, use the DMLSS-recommended settings on your Access Points and PDAs.

AFMAN41-216 13 FEBRUARY 2013 73
Chapter 4
SYSTEM SERVICES (SS)
4.1. Purpose.
4.1.1. SS encompasses many of the controls required for users to navigate throughout
DMLSS. On the server side, SS automatically supports several types of background
processing for all DMLSS applications. On the PC application side, SS does the following:
4.1.1.1. Supports security for the other applications (User Privileges). The DMLSS SA
provides the appropriate level of access to the system when medical logistics personnel
and supply or equipment custodians require access to DMLSS. Specific privileges are
assigned to users based on the information obtained from the DMLSS System User
Appointment Letter. The SA or Application Security Manager must be familiar with the
management of user privileges before attempting to assign user privileges. Instructions
for loading new users is explained in Chapter 3, paragraph 3.5. and Chapter 4, paragraph 4.17.
4.1.1.2. Controls the data accessed in the TMU application, archive management, and MTF/Organizational setup and management.
4.1.1.3. Allows SAs to monitor and interact with some processes generally managed on
the server; such as EOP processing and DCM.
4.1.2. Some thought and care should be given prior to assigning privileges for the SS
module. Most of the SS functions play a direct role in how the DMLSS organizational
structure, funds, document control, EOPs, and interfaces are managed. It is highly
recommended that only experienced logisticians with knowledge and training be afforded privileges to these functions.
4.2. Organizational Structure. Materiel and funds managers must be familiar with the
organizational structure in DMLSS. The three main components to this structure, MTF/Unit
(ORGs), DEPTs, and SVC/CUSTs, are based on a set of hierarchal rules and parent-child
relationships (The financial aspect of this design is covered in Chapter 2, Document Control and
Financial Procedures, paragraph 2.8.). Use the Tree View, Search, MTF/Unit, Department and
Service/Customer modules to understand, and review or make changes to your MTF's organization structure.
4.3. DMLSS Auditable Changes. Business rules require several processes of the MTF/Unit
module to be audited by DMLSS. Certain changes made in these audited areas are captured
along with the date, user ID, and other information viewable from the Transaction History window. Document numbers are also viewable when the transaction is saved.
4.3.1. ECC and RCC transaction codes are used for this requirement and are generated when
establishing and revising records within the logistics‘ department and service detail records,
plus MTF/Unit, Department, and SVC/CUST detail records.
4.3.2. The transaction codes are intended for user-initiated additions or changes that affect
the following data elements: Appropriation Fund type code, default expense centers, ORG IDs, ORG types, materiel ownership codes, and level algorithm changes.

74 AFMAN41-216 13 FEBRUARY 2013
4.4. Tree View. The Tree View Record Selection window displays a hierarchy view of all
MTF/Units and suborganizations that DMLSS manages for your site. Use TreeView to browse
your site‘s organizational structure, open an organizational record, print the TreeView display, or
move a SVC/CUST from one DEPT or MTF/Unit to another. TreeView icons represent the
associated customer level within the MTF. Figure 4.1, reflects the TreeView icons and proper
hierarchal structure using ORG, DEPT, and SVC/CUST.
Figure 4.1. Tree View and Hierarchal Structure of ORG, DEPT, and SVC.
4.4.1. ORG. MTF/Unit (Org) records are the highest level within the organizational
structure. The main MTF/Unit that supports the logistics DEPT is the log account −
identified by an ORG type code of ―LOG‖ and ―(LOG)‖ at the end of its name. The Log org
has the Stock Record Account (SRA) DODAAC assigned as the Organizational ID. Other
ORGs may be created to identify units supported by the SRA and/or MTF such as ANG and Reserve units. Within the Tree View, ORGs are identified by a full pie.
4.4.2. Department. Department is the next level within the hierarchal structure. One or
more departments can be assigned to a single ORG. This level of the structure further
identifies the local MTF‘s organizational assignment of its SVC/CUSTs. Within TreeView, Departments are identified with a half pie.
4.4.3. SVC/CUST. The SVC/CUST is the lowest level within the organizational structure.
The SVC/CUST directly identifies a customer being supported by LOG under the ―host‖ or
other ORG. The SVC/CUST must be associated to an ORG but it is highly recommended
that all SVC/CUSTs be associated to a department that is, in turn, associated to an ORG. Within TreeView, SVC/CUSTs are identified with a quarter pie.
4.5. Search. The SS Search function provides a method to search for MTF/Unit or
suborganization records to review, update, and/or print lists of organizational records. The
Organizational Search window appears by clicking the ―Search‖ icon located on the horizontal
toolbar or by selecting ―Search‖ from the SS Navigate menu. Search criteria available for use
includes: ID (SVC/CUST, ORG, or DEPT ID), Name, Type (Customer Type), Identifies for Ext
Cust, MOF Cust, Reachback, and Spoke, Medical Expense and Performance Reporting System
(MEPRS) Code, Office Symbol, Unit Identification Code (UIC) (assigned to Maintenance

AFMAN41-216 13 FEBRUARY 2013 75
Activities), and Cost Center. All records are displayed if search fields are left empty/blank and
the search icon located on the vertical toolbar is selected. Double click on a specific
organizational record or highlight the record and click on the ―Details‖ button located on the vertical toolbar to view and/or modify details of that record.
4.6. MTF/Unit. Multiple MTF/Unit (ORG) records can be created and maintained in a single
DMLSS database; however, only one can be assigned as the LOG (FMxxxx). The LOG DEPT is
also associated to all other logistics services, i.e. Medical Maintenance Activity (MA). Note:
See Attachment 2, DMLSS MTF/ORG – Service and Logistics Department Details for a
complete description of these details. The information and associations that you edit or create
here affect many things throughout the DMLSS system. As a user of MTF/Org, you have the
following qualifications. To ensure the integrity of the organizational structure, it is
recommended that only Medical Logistics Flight Commanders, Medical Logistics
Superintendents, and/or the Medical Logistics Non-Commissioned Officer in Charge (NCOIC)
be afforded the authority to create new and modify existing MTF/Unit records. Prior to creating
an MTF/Unit detail record, review the on-line help function to identify required information and
validate all data prior to creating the detail record.
4.6.1. Creating New MTF/Unit (ORG) Records. To create a new ORG record, select
―MTF/Unit‖ from the SS Navigate dropdown menu. The Basic tab of the MTF/Unit Detail –
(New) window appears. Follow recommendations explained in paragraph 4.6 to create a new
ORG record. Note: Existing ORG records can also be accessed from this window by using the Find button located on the vertical toolbar.
4.6.1.1. Basic Tab. At a minimum, complete all required fields. While the Target Flag
is not identified as a mandatory field, AF activities must set the Target Flag to ―Proj
EOR.‖ At the bottom of the basic tab, all new MTF/Unit (ORG) details must be
associated to the correct Primary Support Activities. Refer to Attachment 2, DMLSS
MTF/Org – Service and LOG Dept Details for a description of each service detail. Upon
saving data in the Basic tab, the remaining tabs become available.
4.6.1.2. Department Tab. In the DEPT tab, use the ―<‖ and ―>‖ buttons to associate
and/or disassociate DEPTs to/from the MTF/Unit. Click the ―Details‖ button between
the windows to view an existing DEPT‘s record. Click the ―New‖ button to create a new
DEPT. If both the associated and nonassociated boxes are empty, then no DEPTs were linked to the MTF/Unit when the new DEPT record was created.
4.6.1.3. SVC/CUST Tab. In the SVC/CUST tab, use the ―<‖ and ―>‖ buttons to
associate and/or disassociate SVC/CUSTs to/from the MTF/Unit. Click the ―Details‖
button between the windows to view an existing SVC/CUST‘s record. Click the ―New‖
button to create a new SVC/CUST. If both the associated and nonassociated boxes are
empty, then no SVC/CUST records were linked to the MTF/Unit and/or DEPT when the
new SVC/CUST record was created.
4.6.1.4. FM Installations Tab. In the FM Installations tab, use the ―<‖ and ―>‖ buttons to
associate and/or disassociate an FM installation to/from the MTF/Unit. An FM
installation should always be associated to the LOG DEPT but it is not necessary to be
associated to MTF/Unit records assigned as ORG types.

76 AFMAN41-216 13 FEBRUARY 2013
4.6.1.5. Assemblages Tab. The Assemblage tab provides a list of assemblages
associated to the MTF/Unit. If no assemblages are associated to the MTF/Unit then this
tab is not available.
4.6.2. Existing MTF/Unit Detail Records. Using the Search function, access existing
MTF/Unit (ORG) detail records by selecting ―ORG – Med Facility/MTF‖ in the Type field
and then clicking on the ―Search‖ icon. All ORG records are displayed in the Organizational
Search selection window. This list includes the LOG DEPT record. To access only the LOG
DEPT record using the Search function, select ―LOG – Logistics Dept‖ in the Type‖ field
and click ―Search.‖ Double click a record or highlight one and click on the ―Detail‖ button
to access the MTF/Unit Detail window for the specified ORG. Existing ORG records can be
modified and/or marked for deletion. To undelete an ORG record, click in the Mark For Deletion box to remove the check and the ORG record becomes usable.
4.7. Department. Departments are in the center of the organizational structure. Using the LOG
DEPT (MTF/Unit record) as an example, you could create a Department for each squadron
within the MTF (i.e. Aerospace Medical Squadron, Dental Squadron, Medical Operations Squadron, and Medical Support Squadron) that are associated to the LOG MTF/Unit.
4.7.1. Creating New Departments. To create a new Department record, select ―Department‖
from the SS Navigate dropdown menu. The Department Detail – New window appears.
Follow recommendations explained in paragraph 4.6. when creating new records. An
existing MTF/Unit or ORG record must be immediately associated to the new Department.
Upon associating to a MTF/Unit record, certain data fields in the Department record will
automatically populate and the remaining fields become available. After saving data in the
Basic tab, the SVC/Cust and Funding tabs become available. Note: Existing Department
records can also be accessed from this window by using the Find button located on the vertical toolbar.
4.7.1.1. Basic Tab. The DEPT ID, Name, and Military Service fields are the only
mandatory fields in the Basic tab; however, all fields should contain valid information if
possible. Theoretically, the DEPT ID should correlate to the DEPT Name (i.e. DEPT ID
―MDSS01‖ could be used to identify the DEPT Name ―Medical Support Squadron‖). Once data is saved to the Basic tab, the SVC/CUST and Funding tabs become available.
4.7.1.2. SVC/CUST Tab. Use the ―<‖ and ―>‖ buttons to associate and/or unassociate
existing SVC/CUST records to the DEPT. Select the ―Detail‖ button to view detailed
data for SVC/CUST records. Select the ―New‖ button to create a new SVC/CUST record.
4.7.1.3. Funding Tab. Use the ―<‖ and ―>‖ buttons to associate and/or unassociate
existing project center records to the DEPT. Select the ―Detail‖ button to view detailed
data for a project center record. Select the ―New‖ button to create a new project center
record. Refer to paragraphs 4.10. and 4.14. for an explanation on creating new project
centers.
4.7.2. Existing Departments. Using the SS Search function, select ―DEPT – Department‖ in
the Type field and click on the ―Search‖ button located on the vertical toolbar. All existing
DEPT records are displayed in the Query/List Record Selection window. A check in the
―DEL‖ column indicates that the DEPT record is marked for deletion and cannot be used. To

AFMAN41-216 13 FEBRUARY 2013 77
access a DEPT record, double click a record or highlight one and click on the ―Detail‖
button. In the DEPT Detail window, data fields can be modified and the DEPT can be
marked for deletion by checking the ―Mark for Deletion‖ box. To undelete a DEPT, click in the same box to remove the check and the DEPT becomes available for use.
4.8. Service/Customers. Service/Customers are at the bottom of the organizational structure.
These types of records should be associated to a Department. For example, Service/Customer
(SVC/CUST ID) accounts xx5245, xx5761, and xx5741 could be associated to the Medical
Support Squadron department and in turn, associated to the LOG MTF/Unit record.
Additionally, the Service/Customer is at the lowest end of the financial structure; meaning all
Service/Customer accounts must be associated to an expense center and that expense center must
be associated to a project center. These relationships are considered ―one-to-many‖ relationships
because multiple customers can be associated to a single expense center and multiple expense
centers can be associated to a single project center. Customer requests are not allowed if any of these links are broken.
4.8.1. Creating New Service/Customers. To create a new Service/Customer record, select
―Service/Customer‖ from the SS Navigate dropdown menu. DMLSS immediately prompts
you to assign the associated MTF/Unit and Department. While the department association is
not mandatory, it is highly recommended that one be associated at this time to maintain a
clear and concise organizational structure. Upon associating to a MTF/Unit and department,
the Service/Customer Detail (New) window appears (Figure 4.2.). Upon entering and saving
mandatory data in the Basic and Materiel tabs, the Funding tab becomes available. The
Submission tab becomes available if either the ―Reachback‖ or ―DCAM‖ indicators are
checked on the basic tab. If the Svc/Customer is associated to a customer owned
assemblage, the Assemblage tab becomes available listing all associated assemblages. Note:
Existing Service/Customer records can also be accessed from this window by using the Find
button located on the vertical toolbar.
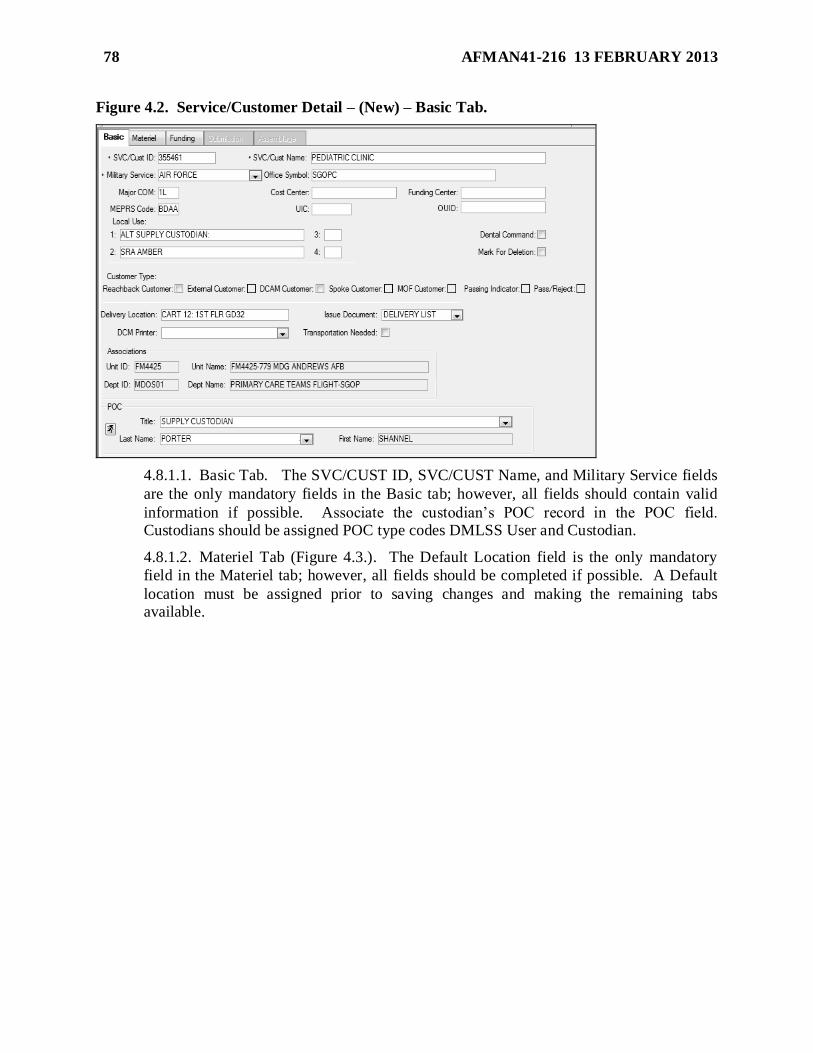
78 AFMAN41-216 13 FEBRUARY 2013
Figure 4.2. Service/Customer Detail – (New) – Basic Tab.
4.8.1.1. Basic Tab. The SVC/CUST ID, SVC/CUST Name, and Military Service fields
are the only mandatory fields in the Basic tab; however, all fields should contain valid
information if possible. Associate the custodian‘s POC record in the POC field. Custodians should be assigned POC type codes DMLSS User and Custodian.
4.8.1.2. Materiel Tab (Figure 4.3.). The Default Location field is the only mandatory
field in the Materiel tab; however, all fields should be completed if possible. A Default
location must be assigned prior to saving changes and making the remaining tabs available.

AFMAN41-216 13 FEBRUARY 2013 79
Figure 4.3. Service/Customer Detail – (New) – Materiel Tab.
4.8.1.2.1. Computation Method. Policy prescribes the computation option should
always be set to ―Days of Stock.‖
4.8.1.2.2. Days/Inv. Freq. The days and inventory defaults are set to 7 and 3 days
respectively. These numbers indicate how many days of stock the customer will
maintain and how many times within that period the customer will conduct an
inventory (produce an order). For example, if the defaults are maintained, the
customer will produce 3 orders within each 7 day period.
4.8.1.2.3. Inventory Method. In most instances, ―Order Quantity‖ is assigned for all
customers. Inventory Method ―Shelf Count‖ can be assigned when stricter inventory control is required.
4.8.1.2.4. Default Location. The ―Default Location‖ is a mandatory entry that should
identify the customer‘s main supply storage area. This should coincide with the
―Delivery Location‖ located in the Basic tab (identifies where logistics delivers supply requests).
4.8.1.2.5. Ship to Address. The shipping data is only relevant to CAIM SOS
accounts (Maintenance Activities) that are authorized to place orders to a SOS.
4.8.1.2.6. CAIM SOS. The CAIM SOS indicator identifies whether or not the
customer is authorized to sell materiel to other internal customers and can therefore
bypass LOG by placing supply orders directly to a SOS. The only authorized CAIM
SOS customer for AF logistics accounts is the MA. The Medical Logistics Flight
Chief is responsible for determining whether or not the MA is authorized to order
direct. If the MA is coded as a CAIM SOS, DMLSS prompts the user for a SOS
Code, Estimated Lead Days, and CAIM SOS Name. Upon saving, the SOS Code box in the Materiel tab is populated.

80 AFMAN41-216 13 FEBRUARY 2013
4.8.1.2.7. Advice Code. This code only affects CAIM SOS activities. The system
default Advice Code is ―2D‖ which stands for ―Furnish Exact Quantity.‖
AFMOA/SGALD recommends accepting the default unless otherwise directed by
MHS Service Desk personnel. A list of authorized advice codes is visible in TMU by selecting IM and then the Advice Code table.
4.8.1.2.8. Signal Code. This code only affects CAIM SOS activities. The system
default Signal Code is ―A,‖ which stands for ―Ship to Requisitioner; Bill to
Requisitioner.‖ AFMOA/SGALD recommends accepting the default unless
otherwise directed by MHS Service Desk personnel. A list of authorized signal codes
is visible in TMU under IM, then selecting the Signal Code (MILSTRIP) table.
4.8.1.2.9. Auto Due-out. This checkbox is available only if the CAIM SOS
checkbox is selected. Selecting this checkbox causes due-out quantities to be
increased to match the due-in quantities if the unit of sale (U/S) is not equal to the
unit of purchase (U/P). It only applies to catalog records assigned ―Core‖ or ―Static‖ level type and the location records are marked for ―Resale.‖
4.8.1.2.10. Verify Receipts. Current AF policy is to not check the verify receipts
checkbox. When this checkbox is not selected, DMLSS automatically updates
balance records with the quantities shown on the internal source's receipt. When
LOG processes receipts and generates the delivery list, DMLSS automatically
processes receipts for CAIM customers, changes the status of those receipts from
active to inactive, and updates the customer‘s estimated OH balance. Note: This is
mandatory for a CAIM SOS. If selected, this checkbox ensures that the user
receiving supplies verifies the receipt against what is actually received; therefore, the
CAIM receipt must be manually processed.
4.8.1.2.11. Verify Orders. When selected, this checkbox indicates that the customer
must manually verify individual orders within the CAIM Build/Process/Submit
module before submitting them to LOG. This option is not recommended because it
impedes a customer‘s normal ordering procedures. Note: ―Verify Orders‖ is mandatory for CAIM SOS activities.
4.8.1.2.12. Kill Prime Vendor Pharmaceutical (PVP) Due-outs. This function is used
only in conjunction with the PVP Direct option. When this box is checked, any time
a due-in from PVP is reduced or cancelled, a like amount of customer due-outs is reduced or cancelled.
4.8.1.2.13. PVP Direct. Select this checkbox if the customer is authorized to order
directly from the PVP. When this option is used, the customer‘s orders are rolled into
separate call numbers and are not commingled with other customer requirements. Coordinate with JMLFDC prior to selecting this option.
4.8.1.2.14. Prime Vendor Medical/Surgical (PVM) Direct. Select this checkbox if
the customer is authorized to order directly from the PVM. When this option is used,
the customer‘s orders are rolled into separate call numbers and are not commingled
with other customer requirements. Coordinate with JMLFDC prior to selecting this option.

AFMAN41-216 13 FEBRUARY 2013 81
4.8.1.2.15. Auto Source. The Auto Source code is used when the customer is coded
as a Reachback Customer (located in the Basic tab). If this checkbox is selected, and
an item does not have a catalog record for the Reachback PV (RPV), the item will automatically be sourced to LOG‘s default supplier.
4.8.1.2.16. Reachback Issue. The Reachback Issue checkbox is used when the
customer is coded as a Reachback Customer (located in the Basic tab). If this
checkbox is selected, local inventory is used to satisfy customer demands rather than forwarding those demands directly to a SOS.
4.8.1.2.17. Operating Room Management Application (ORMA) Customer. Select
this indicator to identify a customer as an ORMA customer. This option requires
specific interface configurations and should only be accomplished with direction from MHS Service Desk personnel.
4.8.1.2.18. Spoke Issue. Click to mark a service customer as a Spoke Customer.
4.8.1.2.19. Authorized Source of Supply. The Authorized SOS field is only used for
CAIM SOS customers or customers authorized PVP Direct and/or PVM Direct. MAs
are the only authorized CAIM SOS accounts for AF activities. Use the Edit button to
add the SOS codes in which the customer is authorized to purchase materiel without
going through LOG. The Medical Logistics Flight Commander is the responsible
approval authority.
4.8.1.2.20. MTF Restrictions. Use the MTF Restrictions tab to restrict the customer
from requesting certain types of materiel. If the customer is restricted against
ordering an item, the customer cannot create a CAIM catalog record for the item. For
example, to restrict the customer from creating catalog records and requesting
controlled substances, add the MTF restrictions for Code Q and R. These restrictions
directly relate the assigned Controlled Item Inventory Code (CIIC) within each
catalog record. Use the edit button to associate and unassociate restrictions.
4.8.1.2.21. Special Requirements. Use the Special Requirements tab to further
identify customer restrictions. For example, if the customer is not authorized to
request precious metals, add special requirement code M to this tab. These
restrictions directly relate the assigned CIIC within each catalog record. Use the edit button to associate and unassociate restrictions.
4.8.1.2.22. Controlled Item Inventory Restrictions. Use this tab to further identify
customer restrictions. For example, if the customer is not authorized to request
controlled pharmaceuticals, add codes ―Q‖ and ―R‖ to this tab. These restrictions
directly relate the assigned CIIC within each catalog record. Use the edit button to associate and unassociate these restrictions.
4.8.1.3. Funding Tab (Figure 4.4.). Use the ―<‖ and ―>‖ buttons to associate and/or
unassociate existing expense center records to the SVC/CUST. Select the ―Detail‖ button
to view detailed data for an expense center record. Select the ―New‖ button to create a
new expense center record. Refer to paragraph 4.13. for an explanation on creating new
expense centers. The ―Target Flag‖ should be set to ―Proj EOR‖ for all AF SVC/CUST records unless otherwise directed (may be locally directed).

82 AFMAN41-216 13 FEBRUARY 2013
Figure 4.4. Service/Customer Detail – (New) – Funding Tab.
4.8.1.3.1. Target Flag. The target flag instructs DMLSS to enforce a target amount at
the project center, expense center, or EOR level. The setting prevents orders at this
level and all subordinate levels from exceeding the established financial target
amounts. The target flag for all AF customers should be set at ―Proj EOR.‖
However, if the resource manager agrees to load and manage funds within DMLSS,
he/she may elect to set the target flag to ―Exp EOR.‖
4.8.1.3.1.1. Project EOR (PROJ EOR). DMLSS validates funds availability at
the project center and EOR level. For example, if a customer associated to project
center 001 (via the expense center relationship) is placing an order for $500 worth
of supplies; then project center 001 must have an available balance of at least $500 in EOR 604.
4.8.1.3.1.2. Project (PROJ). Do not use Proj unless otherwise directed by higher
authority. The target amounts set for each project center cannot be exceeded by
the project center‘s dependent SVC/CUSTs. DMLSS validates funds availability at the project center level regardless of which EOR the funds are available.
4.8.1.3.1.3. Expense EOR (EXP EOR). DMLSS validates funds availability at
the expense center and EOR level. For example, if a customer associated to
expense center 355610 is placing a pharmaceutical order for $5,000; then expense
center 355610 must have an available balance of at least $5,000 dollars in EOR 615.
4.8.1.3.1.4. Expense (EXP). Do not use Exp unless otherwise directed by higher
authority. The target amounts set for each expense center cannot be exceeded by
the expense center‘s dependent customers. DMLSS validates funds availability at the expense center level regardless of which EOR the funds are available.
4.8.1.3.1.5. NONE. The target flag should not be set to NONE unless otherwise
directed by higher authority. When the target flag is set to NONE, DMLSS does
AFMAN41-216 13 FEBRUARY 2013 83
not validate funds availability when obligations occur. In other words, the associated expense and project centers are allowed to go negative.
4.8.1.3.2. Detail Billing Required. Use this field to indicate whether or not detailed
billing is required for this customer. This indicator only affects CAIM SOS customers and generally is not used.
4.8.1.3.3. Maximum Order Limit. Use this field to restrict the price limit for any one item ordered by the customer.
4.8.1.3.4. Default Expense Center. Because SVC/CUST accounts can be
simultaneously associated to multiple expense centers, a default expense center must
be identified. The association identifies which expense and project center funds validation will occur when the customer obligates funds.
4.8.1.4. Submission Tab. This tab is only available if the SVC/CUST account is coded
as a Reachback, DCAM, External, or Spoke customer. All of the aforementioned
indicators reside in the Basic tab. Reachback, DCAM, and external customers are
considered ―external‖ to the local MTF and mission requirements dictate that orders be
filled by special procedures in the IM application. A Spoke customer is one who has an
operating DODAAC on another DMLSS server and procures materiel from the ―Hub‖
account. In order for the spoke customer to become active in DMLSS, the ―Hub‖
indicator must be set within the MM Service detail.
4.8.1.5. Assemblage Tab. The Assemblage tab is visible if the SVC/CUST account is
associated to customer owned assemblages in the AM module. Modifications are not allowed in this window.
4.9. Funds.
4.9.1. Management of funds in DMLSS is critical to system operations and can dramatically
impact the MTF and how medical logistics operates if not properly managed. The funds
module provides medical logistics and resource management the flexibility to manage most aspects of the MTF‘s funding. DMLSS funds management allows the ability to:
4.9.1.1. View and manage funds through expense centers, project centers, and the LOG
fund.
4.9.1.2. Gather information on EORs and commodity classes.
4.9.1.3. View and manage details such as commitments, obligations, and target amounts.
4.9.1.4. View and manage AM and OP funds.
4.9.2. Select ―Funds‖ from the SS navigate dropdown menu or click the ―Funds‖ icon
located on the horizontal toolbar to access the Funds-Search window. Fund managers can
search for records by Fund Center Number, Fund Center Name, or Fund Type (i.e. S-Log
Fund, P-Project Center, E-Expense Center). To retrieve all fund records, leave all search criteria fields blank and select the ―Search‖ icon located on the vertical toolbar.
4.9.3. LOG Fund.
4.9.3.1. The LOG fund detail window displays all funding for the Default Logistics Fund and is associated to EOR 600. Other criteria associated with the LOG fund are:

84 AFMAN41-216 13 FEBRUARY 2013
4.9.3.1.1. The target cannot be exceeded with orders, price changes, and/or receipts.
4.9.3.1.2. The default uses one Account Processing Code (APC) and EOR.
4.9.3.1.3. The target amount is cumulative for the FY.
4.9.3.1.4. The target is reset to zero during EOFY processing.
4.9.3.2. Log Fund Detail – Log – AF Working Capital Fund window (Figure 4.5.). The
upper portion of the window displays information from the LOG fund as well as funds
disbursements. The LOG Fund ID and Fund Code must be present.
Figure 4.5. Log Fund Detail – Log – AF Working Capital Fund Window.
4.9.3.3. The LOG fund target restricts the amount of funds a logistics account is allowed
to obligate during the FY and prevents negative balances based on the target and
available balance. Although the LOG Fund Target can be modified in the upper window,
AF activities have no need and are not required to set a fund target for the
AFWCF/MDD. The target flag indicator for the LOG fund is located in the
Appropriation tab of the MM Service Detail record. If it were used, the LOG fund is the
primary level target and the extended totals of all project centers could not exceed the
LOG fund targets. It is important to work closely with the MTF RMO to ensure that funding is set up and managed correctly.
4.9.3.4. The Direct Update field controls how funds will update in DMLSS. The AF has
adopted the policy that the Direct Update field will be checked for all MTFs. If the box
is checked, funds are updated at the time of transaction execution. If the box is
unchecked, the LOG fund account is reconciled either manually by tallying funds lower
window or during the next EOD process.
4.9.3.5. The middle window displays the EOR and all current funding information.
These fields may be updated as needed for financial book adjustments; however, it is
important not to change any information on this screen without the proper authorization
and documentation. Changes to these fields directly impact the funds availability for
your MTF and the AFWCF/MDD. When these fields are modified, the corresponding fields in the upper window are updated to reflect the new figures.

AFMAN41-216 13 FEBRUARY 2013 85
4.9.3.6. The lower window displays the cumulative figures for the LOG fund when the
Direct Update field is unchecked. Materiel Managers must manually update the LOG
fund accounting when this option is selected. To update the LOG fund, click the
―Reconcile‖ button located on the vertical toolbar. The figures in the lower window are then moved to the upper window and posted to the LOG Fund Detail.
4.9.3.7. For more information on the financial structure including the LOG fund, project
centers, and expense centers, refer to Chapter 2, Document Control and Financial Procedures, paragraph 2.9.
4.10. Project Center. Project center fund records provide visibility of fund management at the
project center level. They are associated to SVC/CUSTs indirectly through an expense center.
Project center transactions are internally audited by the system; meaning, DMLSS captures the
type of change along with the date, user ID, and other information. This data is recorded in the Transaction History using transaction code ESP.
4.10.1. Accessing an Existing Project Center. To access an existing project center, either
select ―Funds‖ from the SS Navigate menu or click the ―Funds‖ icon located on the
horizontal toolbar. The Funding-Search window appears. This window can be used to search all fund records. To retrieve a project center fund record, do one of the following:
4.10.1.1. Enter the project center ID into the Fund Center field and click ―Search.‖
4.10.1.2. Enter the project center name into the Fund Center Name field and click
―Search.‖
4.10.1.3. Select ―P-MM Project Center‖ in the Fund Type dropdown menu and click ―Search.‖ This option retrieves all project center records.
4.10.1.4. All fund records are retrieved by clicking the ―Search‖ icon when all three search criteria fields are empty.
4.10.2. The MM Project Center Detail window (Figure 4.6.) contains all financial
information unique to the selected project center. The financial manager can view current
totals for commitments, obligations, available balances, credits, sales, and surcharge figures
for the selected project center. Related expense centers are visible by selecting the ―Exp
Ctrs‖ box.

86 AFMAN41-216 13 FEBRUARY 2013
Figure 4.6. MM Project Center Detail Window.
4.10.2.1. Updates to project center name, project center target amounts, and target
amounts for individual EORs within the project are accomplished in this window. The
financial manager (assigned required privileges) can update fund targets or expenditures
by clicking the field to be updated and changing the totals. The screen does not ―auto
refresh‖ after the update. Changes will be visible after logging out and returning to the window.
4.10.2.2. Use the increase, decrease, and move buttons to modify project center fund
targets.
4.10.2.2.1. Increase – Use the increase button to load initial or add additional project
center fund targets. Load the total project center target being added in the Amount field and associate the target(s) to the applicable EOR(s).
4.10.2.2.2. Decrease – Use the decrease button to decrement the target amount.
Enter the total amount being removed in the Amount field and identify the EOR(s) in which that amount is being removed.
4.10.2.2.3. Move – Use the move button to move a target amount from one EOR to another.
4.10.2.3. Primarily, the project center target and EOR target amounts are the only fields
that should require updating. When a fund load is completed, the (Sum) EOR Target Amounts field should equal the Project Center Target field.
4.10.2.4. DMLSS automatically calculates the commitments, credits, expenses, obligations, R-sales, N-sales, and surcharges for each project center.
4.10.2.5. Check the Marked for Deletion checkbox to mark a project center fund record
for deletion. Usually, DFAS or your resource advisor will direct this action if/when the
project center is no longer required. A record that is marked for deletion still appears in
the system but does not support any further financial activity. The project center is
removed during EOFY processing as long as there are no financial ties. If there are still

AFMAN41-216 13 FEBRUARY 2013 87
financial obligations that were not cleared prior to EOFY, the project center will remain visible in DMLSS but will continue rejecting additional financial activity.
4.10.3. To view additional project centers, click the ―Find‖ button to open the Project Center
Search window. Enter a project center to view or click ―Search‖ to view a list of all project
centers. Select the project center and click the ―Details‖ button to view the project centers information.
4.10.4. For more information on the financial structure including the LOG fund, project
centers, and expense centers, refer to Chapter 2, Document Control and Financial Procedures, paragraph 2.9.. Refer to paragraph 4.14. when creating new project centers.
4.11. Expense Center. Expense centers capture funding data from associated SVC/CUST
records, which is rolled up to the associated project center. Expense centers can have program
targets the same as project centers. These targets represent the expense centers budget. Expense
center transactions are internally audited by the system; meaning, DMLSS captures the type of
change along with the date, user ID, and other information. This data is recorded in the
Transaction History using transaction code ESP.
4.11.1. Accessing an Existing Expense Center. To access an existing expense center, either
select ―Funds‖ from the SS Navigate menu or click the ―Funds‖ icon located on the
horizontal toolbar. The Funding-Search window appears. This window can be used to
search all fund records. To retrieve an expense center fund record, do one of the following:
4.11.1.1. Enter the expense center ID into the Fund Center field and click ―Search.‖
4.11.1.2. Enter the expense center name into the Fund Center Name field and click ―Search.‖
4.11.1.3. Select ―E-MM Expense Center‖ in the Fund Type dropdown menu and click ―Search.‖ This option retrieves all expense center records.
4.11.1.4. All fund records are retrieved by clicking the Search icon when all three search
criteria fields are empty.
4.11.2. The Expense Center Detail window (Figure 4.7.) is similar to the Project Center
Detail window. The financial manager can view current totals for commitments, obligations,
available balances, credits, sales, and surcharge figures for the selected expense center.
Select the ―SVC/CUST‖ box located in the Related Items window to see a list of SVC/CUSTs associated to the selected expense center.

88 AFMAN41-216 13 FEBRUARY 2013
Figure 4.7. MM Expense Center Detail Window.
4.11.2.1. Updates to expense center name, expense center target amounts, and target
amounts for individual EORs within the expense center are accomplished in this window.
While the military service and fund fields are editable, fund managers should not change
these settings without proper authorization and documentation. The financial manager
(assigned required privileges) can update fund targets or expenditures by clicking the
field to be updated and changing the totals. The screen does not ―auto refresh‖ after the update. Changes will be visible after logging out and returning to the window.
4.11.2.2. If necessary, fund managers can change an expense center from one project
center to another. When changing project centers, all financial data is moved to the new
project center. A message box warning of the change precedes the action. Changing an
expense center to a different project center should only be accomplished when approved
by your resource advisor and coordinated with DFAS. Documentation should be received and maintained for all changes.
4.11.2.3. DMLSS automatically calculates the commitments, credits, expenses, obligations, R-sales, N-sales, and surcharges for each expense center.
4.11.2.4. Use the increase, decrease, and move buttons to modify expense center fund
targets.
4.11.2.4.1. Increase – Use the increase button to load initial or add additional
expense center fund targets. Load the total expense center target being added in the ―Amount‖ field and associate the target(s) to the applicable EOR(s).
4.11.2.4.2. Decrease – Use the decrease button to decrement the target amount.
Enter the total amount being removed in the ―Amount‖ field and identify the EOR(s)
in which that amount is being removed.
4.11.2.4.3. Move – Use the move button to move a target amount from one EOR to another.

AFMAN41-216 13 FEBRUARY 2013 89
4.11.2.5. Normally, the expense center target and EOR target amounts are the only fields
that should require updating. When a fund load is completed, the ―(Sum) EOR Target
Amounts‖ field should equal the ―Expense Center Target‖ field.
4.11.2.6. Retired Indicator Checkbox. Use this checkbox to designate retired expense
centers. This indicator identifies a cost center that is no longer intended for use but
cannot be marked for deletion until due-outs and/or equipment data records have been
removed. When checked, the Expense Center is ineligible for selection in all ordering
processes such as IM Customer Requests, Offline Nonsubmit orders, Nonroutine issues, etc.
4.11.2.7. Marked for Deletion Checkbox. Check the Marked for Deletion checkbox to
mark an expense center fund record for deletion. Usually, DFAS or your resource
advisor will direct this action if/when the expense center is no longer required. A record
that is marked for deletion still appears in the system but does not support any further
financial activity. The expense center is removed during EOFY processing as long as
there are no financial ties. If there are still financial obligations not cleared prior to
EOFY, the expense center will remain visible in DMLSS but will continue rejecting
additional financial activity.
4.11.3. To view additional expense centers, click the ―Find‖ button to open the Expense
Center Search window. Enter an expense center to view or click ―Search‖ to view a list of all
expense centers. Select the expense center and click the Details button to view the expense
center‘s information.
4.11.4. For more information on the financial structure including the LOG fund, project
centers, and expense centers, refer to Chapter 2, paragraph 2.9. Refer to paragraph 4.15. when creating new expense centers.
4.12. AM Funds. Use the AM Funds module to maintain funds associated to WRM
assemblages. AM funds are appropriated in writing by AFMOA/SGAL for the purpose of purchasing new materiel or replacing existing materiel for WRM assemblages.
4.12.1. Creating a New AM Fund Record. In the AM Funds-Search window, click the ―New
Fund‖ icon located on the vertical toolbar. The AM Funding-New window appears and
allows the funds manager to create a new fund record for the current FY. The MTF/Unit,
Fund Number, Target, and Type Funding fields are the only mandatory fields; however, the appropriate data should be entered into all fields if possible. Use the fields as follows:
4.12.1.1. MTF/Unit – Select the DODAAC if the associated assemblage is LOG owned.
If the assemblage is owned by a detached unit, select the MTF/Unit assigned to that detachment.
4.12.1.2. Fiscal Year (FY) – Defaults to current FY.
4.12.1.3. Fund Number – Load fund number supplied in the funding authorization document and maintain IAW AFRIMS T 41-04 R 24.00.
4.12.1.4. Type Funding – Always assign ―Stock Fund‖ unless otherwise directed by
higher authority.
4.12.1.5. Target – Load the dollar amount referenced in the funding authorization letter.

90 AFMAN41-216 13 FEBRUARY 2013
4.12.1.6. Fund Source – Load ―AFMOA.‖
4.12.1.7. Description – Load the description provided on the funding authorization
document or one that corresponds to the assemblage in which the funds will be
associated.
4.12.1.8. Associate to Assemblage – The AM fund record must be associated to the
appropriate assemblage(s) before WRM personnel can process orders and/or
replenishments to obligate funds. Assemblages with no check mark in the ―Assoc‖ box
are eligible for association to the AM Fund record,
4.12.1.9. Save changes prior to exiting.
4.12.1.10. Once the new AM fund record is saved, search for and access the record to
modify the Build Control Number (BCN) field. Load the associated assemblage‘s
Maximum Repair Limit (MRL) Recnum into the BCN field. This data is provided on the
funding authorization document. If the assemblage has not been funded, the information is available on the Medical Resource Letter (MRL).
4.12.2. Accessing an Existing AM Fund Record. In the AM Fund-Search window, enter at
least the MTF/Unit and FY of the desired fund record. Additional search criteria can be
entered to narrow the search results. The search results window displays all AM fund records and assemblages associated to the defined search criteria.
4.12.2.1. Viewing the AM Funding-Search window:
4.12.2.1.1. A check is present in the Associated (Assoc) box if the fund record is associated to an assemblage and the assemblage is identified in the same row.
4.12.2.1.2. A check is not present in the Assoc box and the assemblage data fields
contain dashes if the fund record is not associated to an assemblage.
4.12.2.1.3. The AM fund data fields are blank for assemblages listed that are not associated to a fund record.
4.12.2.2. To view summary details of an AM fund record, highlight the desired record
and click on the ―View Assm‖ icon located on the vertical toolbar. The AM Funding-
Assemblage Detail window provides an up-to-date view of the assemblage‘s fund target,
available balance, commitments, obligations, receipts, surcharges, and R-sales. The
associated assemblage data is also listed at the bottom of the screen. This option is a
convenient way to provide quick funding status to supervisors, MAJCOM, or
AFMOA/SGAL. Even though the R-Sales field is editable, managers should never
manually update this field without proper authorization and documentation from
AFMOA/SGALO.
4.12.2.3. To edit an AM fund record, either double-click on the desired record or
highlight it and select ―Edit Fund‖ from the vertical toolbar. In the AM Funding-Revised
window, fund managers can view fund details as well as make modifications to the fund
record. In addition, the fund record can be associated to an assemblage. All assemblages
that are not associated to a fund record appear at the bottom of the window. To increase
or decrease funds, enter the dollar amount (with decimal point) in the Amount field and
click the ―Increase‖ or ―Decrease‖ buttons. The funds target adjusts accordingly. Enter
the fund source or who forwarded the money to your activity; AFMOA/SGAL or

AFMAN41-216 13 FEBRUARY 2013 91
MAJCOM. Enter the reason for the funding in the Description field (i.e. ―Cover
Assemblage Shortages‖ or ―Initial funds load for new project‖). Click ―Save‖ to accept
the edits. The window will reflect the new information after the save.
4.12.2.4. AM fund increases and decreases generate an ADP transaction that is written to
the Transaction History file. The ADP transaction captures the target adjustment
(whether positive or negative figure), assigns Fund Type of ―AM Funds,‖ assigns the
fund number to the ID field, and the owning ORG is listed in the name field. The
document is made up of the DODAAC, Julian date, and serial number beginning with F and 001, 002, 003, etc. The serial number resets after each EOP processing cycle.
4.12.2.5. To associate funds to assemblages, select the desired fund record in the AM—
Funding Search window and click the ―Edit‖ button. In the AM—Funding Revised
window, place a check in the Assoc checkbox to identify which assemblages are to be
associated to the fund record and click ―Save.‖ Upon refreshing the AM—Funding
Search window, the new association is displayed.
4.13. OP Funds.
4.13.1. OP funds are classified as funds used to purchase capital equipment; meaning,
equipment with an acquisition cost greater than $249,999.99. An OP fund record must be
established before capital equipment requisitions can be processed in DMLSS. Because OP
funds can span a period of three FYs, DMLSS allows fund managers to establish and update
OP fund targets for three FYs (current year plus two previous years.). OP funds are rarely
distributed to the bases but a ―pseudo‖ fund record must be loaded in DMLSS to allow
processing of orders. DMLSS maintains OP fund records for eight years; three active and five inactive.
4.13.2. Establishing a New OP Fund Record. In the OP Fund-Search window, select the
―New Fund‖ icon located on the vertical toolbar to establish a new OP fund record. In the
OP Funds Detail-New window, enter all required information as follows:
4.13.2.1. Fiscal Year (FY) – Funds can be loaded for current plus two previous FYs. Enter the applicable FY IAW the funding authorization letter.
4.13.2.2. MTF/Unit – Load the applicable organization.
4.13.2.3. Fund Code – Always enter ―2F‖ unless otherwise directed by higher authority.
4.13.2.4. BLIC - Not used.
4.13.2.5. Proj Code – Not used.
4.13.2.6. Appropriation (APPN) 1 – Enter the appropriation number IAW the funding authorization letter.
4.13.2.7. APPN 2 – Enter secondary appropriations number if funding is received from
multiple sources.
4.13.2.8. Target – Enter target amount indicated on the funding authorization letter.
4.13.2.9. Reference – Enter reference number from the funding authorization letter.

92 AFMAN41-216 13 FEBRUARY 2013
4.13.2.10. EOR Target Amount – Enter same value that was entered into the Target field.
Funds must be added to the EOR target amount in order to process equipment requests.
The EOR for capital equipment defaults to 144.
4.13.2.11. Save changes.
4.13.3. Accessing/Modifying an Existing OP Fund Record. Click ―OP Funds‖ from the SS
Navigate menu or click the ―OP Funds‖ button located on the vertical toolbar to access the
OP Funds-Search window. Search for OP funds by FY and fund code or leave these fields
blank and click ―Search‖ to view all OP Funds balances by FY. The search results window
displays the FY, fund code, commitments, obligations, and available balance for each fund
record. Either double-click on the desired fund record or highlight it and select the ―Detail‖
button located on the vertical toolbar to access a Fund Records Details. The OP-Funds-Detail window contains two tabs: Funds Ledger and Funds Status tabs.
4.13.3.1. Funds Ledger Tab. The Funds Ledger tab allows the fund manager to edit an
existing OP fund record (and create a new one). The OP Funds-Detail window includes
the same information as the OP Fund-New window, but also includes a Funding
Reference that is comparable to an electronic checkbook keeping track of all monetary
transactions associated to the fund record. Fund target increases and decreases are also
accomplished here.
4.13.3.1.1. Click the ―Increase‖ or ―Decrease‖ button to add or remove target
amounts to or from the OP fund record. Enter the adjustment amount referenced on
the funding authorization letter in the Amount field, the applicable reference, and
click ―Save.‖ Upon saving, the OP fund target field and the funding reference history
is updated with the transaction information for audit purposes. The EOR Target
Amount must be updated by entering the new total OP fund target amount. When
completed, verify the dollar value in the ―(Sum) EOR Target Amounts‖ field is equal to the OP fund ―Target‖ field.
4.13.3.1.2. When the fund updates occur, an ADP transaction is written to the
Transaction History file. The ADP transaction captures the target adjustment
(whether positive or negative figure), assigns Fund Type of ―OP Fund,‖ and assigns
Fund Code of ―2F.‖ The document is made up of the DODAAC, Julian date, and
serial number beginning with F and 001, 002, 003, etc. The serial number resets after
each EOP processing cycle.
4.13.3.2. Funds Status Tab. The Funds Status tab displays OP fund records details along
with equipment request data linked to the OP fund record. This tab is updated with all changes that occur to an OP purchase.
4.14. Project Center. To create a new project center, select ―Project Center‖ from the SS
Navigate dropdown menu. A project center ID and name must be entered in the MM Project Center Detail-New window. A fund target can be loaded at this time but it is not mandatory.
4.15. Expense Center. To create a new expense center, select ―Expense Center‖ from the SS
Navigate dropdown menu. An expense center ID, military service, fund code (defaults to 2X),
and expense center name must be entered in the MM Expense Center Detail-New window.
Additionally, the expense center must be associated to a project center at this time. An expense center target can be loaded at this time but it is not mandatory.

AFMAN41-216 13 FEBRUARY 2013 93
4.16. POC.
4.16.1. A POC is a point of contact in the organizational record. Keeping valid and current
POC information on all users is an important part of administering DMLSS. The POC
window allows authorized users to search, view, edit, add, and delete POC information as
necessary. The POC is usually responsible for managing the area that the organizational
record describes (i.e. a SVC/CUST account, a DEPT, or a MTF/Unit). POC information is
entered into the POC Detail Update – (New) Window (Figure 4.8.) and is available for association to the organizational records.
Figure 4.8. POC Detail Update – (New) Window.
4.16.2. Select ―POC‖ from the SS Navigate dropdown menus to access the POC Detail
window. The last name, first name, title, phone number, and email address are the only
mandatory data fields for new records; however, all data fields should be completed if
possible. If the POC‘s address is not already loaded in the DMLSS address table, click the
―Jump To‖ button to load the POC‘s address and associate it to his/her record. Note:
DMLSS 3.1.2 GENIV establishes an electronic interface between DMLSS and Wide Area
Work Flow (WAWF) that generates a Receipt Acceptance (EDI 861) to WAWF in addition
to sending the Receipt (EDI 527) to DLA Troop Support. The Receipt Acceptance contains
POC information to include the receiver‘s name, phone number, e-mail address, and user ID.
Users must enter accurate first/last names, phone numbers without parenthesis, spaces, or dashes, and a valid .mil email address.
4.16.3. Use the ―<‖ and ―>‖ buttons to associate and/or unassociate the types of services the
POC is assigned to perform. Most custodians and customers should be assigned Custodian
and DMLSS User POC types. User‘s may be assigned multiple POC types. Some of the common types are:
4.16.3.1. BPA Ordering Official – Assign this type to the logistics official authorized to
approve BPA orders. Use in conjunction with the POC listed in the MM service detail

94 AFMAN41-216 13 FEBRUARY 2013
record. When both are used, the POC‘s name will print on all DD Form 1155s for BPA purchases.
4.16.3.2. DBPA Approval Authority – Assign this type to the logistics official authorized
to approve DBPA orders. Use in conjunction with the POC listed in the MM service
detail record. When both are used, the POC‘s name is printed on all DD Form 1155s for DBPA purchases.
4.16.3.3. EM Service – Associate this POC type to the assigned MEMO officer.
4.16.3.4. Facility Management – Assign to the facility manager.
4.16.3.5. Maintenance Staff – Associate to all maintenance personnel.
4.16.3.6. Custodian – Associate this type to all assigned equipment and supply
custodians.
4.16.3.7. DMLSS User – Associate this POC type to routine DMLSS users.
4.16.4. The Associated ORG records fields are not updated in this window. If the POC is a
primary custodian for a SVC/CUST, DEPT, or ORG, then this field is updated by entering
the customer‘s POC information in the SVS/CUST, DEPT, or MTF/ORG window using the
SS search function as described in paragraph 4.5. For example, if the POC record added is
for the new custodian of 355662, associate POC types Custodian and DMLSS User. Then,
using the SS Search function, load the new POC information in the SVC/CUST detail record
for 355662. Then, when accessing the POC record, the associated SVC/CUST ID is displayed in the Associated Organization Records field.
4.16.5. System administrators should make corrections to the POC field when changes are
required for any SVC/CUST, DEPT, or ORG data to ensure the most current information is
available.
4.17. User Privilege (UP) Assignment.
4.17.1. A user‘s access to DMLSS is determined by the applications and roles privileges
assigned to their User ID. The roles assigned to users grant and/or restrict access to certain
modules and functions within the system and ultimately protect the database from
unauthorized access. In the UP Assign window, an authorized user can assign one or more
applications and/or roles to a another user. Only those with Security Manager roles are
authorized to access UP Assign and grant privileges to other users. Normally, this is
assigned to the designated SA. The SA should have a basic knowledge about what each role
performs before assigning a role to a user. See Attachment 3, DMLSS User Privilege Role
Management, for a complete table of standard roles, descriptions, and general application
rules.
4.17.2. Select ―User Priv-Assignment‖ from the Navigate menu or click the ―UP Assign‖
button on the horizontal toolbar to open the User Privilege—Assignment window (Figure 4.9.). The window is divided into the following sections:

AFMAN41-216 13 FEBRUARY 2013 95
Figure 4.9. User Priv – Assignment Window.
4.17.2.1. Username (top left). Select a name from a list of users stored in the DMLSS
server. This is the user ID of the person being assigned privileges.
4.17.2.2. Application Administrator (top right). This is the login name of the person who
was assigned with Application Security Manager rights for the selected module. This field cannot be changed.
4.17.2.3. Applications (middle left). These are the applications assigned to the selected
user.
4.17.2.4. Roles (middle). Roles are assigned for each application and identify which
tables and functions a user has access to within the application. A centrally managed set
of generic roles are available for use; however, locally managed roles can be developed
to meet more specific business practices.
4.17.2.5. Assemblages/SVC/CUST ID/Maintenance Activity (middle right). The
selected application determines what information is shown in this field. For all
applications except MA and AM, the SVC/CUST ID the user is assigned and has access
to is displayed in this box. For AM, assigned assemblages are displayed and in MA, the
primary maintenance activity is shown. Note: This area is blank for new users unless they are a SA.
4.17.3. To assign applications to a user, select a user name and click the ―Applications‖
button on the vertical toolbar. Associate applications to the user by selecting the
application(s) and clicking the ―<‖ button between the window boxes. To select all
applications click the ―<<‖ button. If an application needs to be disassociated, highlight the
application in the associated box and click the ―>‖ button. Changes must be saved to take effect.
4.17.4. Next, assign roles to a user by selecting an application and click the ―Roles‖ button.
Roles are selected by application. Associate role(s) to users by selecting the role(s) and
clicking the ―<‖ button between the window boxes. Click the ―<<‖ button to assign all

96 AFMAN41-216 13 FEBRUARY 2013
available roles. To disassociate a role(s), highlight the role in the associated box and click
the ―>‖ button. Use the ―>>‖ button to unassociate all roles. Changes must be saved to take
effect.
4.17.5. Associate SVC/CUST(s), Assemblage(s), EM, FM and MA activities. In addition to
assigned roles, users must also be privileged to access SVC/CUST(s) and Assemblage(s). If
a user is granted roles in the EM, FM, or MA, then they are required to be assigned to the
corresponding activity.
4.17.5.1. SVC/CUST(s) can only be assigned via the CAIM, Customer Service (CS), or
IM modules. To do so, click the SVC/CUST button on the vertical toolbar. Associate
SVC/CUST to the user by selecting the SVC/CUST(s) and clicking the ―<‖ button
between the window boxes. To assign all SVC/CUST(s) click the ―<<‖ button. Use the
―>‖ and ―>>‖ buttons to unassociate SVC/CUST(s) as needed. Changes must be saved
prior to being applied. Only authorized custodians may have access to their own
customer ID(s). Medical logistics personnel may have access to all customers IDs if determined in local business practices.
4.17.5.2. Assemblages can only be assigned within the AM application. To assign
assemblages to a new user, click ―Assemblage‖ located on the vertical toolbar. Select the
assemblages being assigned to the user and click the ―<‖ button between the window
boxes. To select all assemblages, click the ―<<‖ button. Use the ―>‖ or ―>>‖ button to
unassociate assemblage(s) when necessary. Changes must be saved prior to being
applied. Only medical logistics personnel should be granted access to LOG owned
assemblages. Some custodians will require access to customer owned assemblages
assigned to their SVC/CUST ID. Some users may be authorized viewing privileges if
determined in local business practices.
4.17.5.3. To associate an EM activity to a user, highlight ―Equipment Management‖ in
the Application window. Click on the ―EM‖ icon located on the vertical toolbar. Use the ―<‖ button to associate the appropriate EM activity and save changes.
4.17.5.4. To associate a FM activity to a user, highlight ―Facility Management‖ in the
Application window. Click on the ―FM‖ icon located on the vertical toolbar. Use the ―<‖ button to associate the appropriate FM activity and save changes.
4.17.5.5. To assign a MA to a user, highlight ―Maintenance Activity‖ in the Application
window. Click the ―MA‖ button located on the vertical toolbar. Use ―<‖ button to
associate the appropriate MA activity and save changes. A user can only be associated to one MA at a time.
4.17.6. Associated Pending Actions. In addition to assigning roles, you can associate
particular AM, CAIM, or IM pending action messages in the Pending Action window. This
way, for example, the user who is responsible for receipts can automatically get any receipts-
related pending action messages in their Inbox, while a user who has nothing to do with
receipts, never sees these pending actions. To manage pending actions, click the Pend
Action button on the vertical toolbar. Associate pending actions to users by selecting the
desired pending action and clicking the ―<‖ button between the window boxes. Click the
―<<‖ button to assign all available pending actions. To disassociate a pending action(s),

AFMAN41-216 13 FEBRUARY 2013 97
highlight the role in the associated box and click the ―>‖ button. Use the ―>>‖ button to unassociate all pending actions. Changes must be saved to take effect.
4.17.7. Changes to roles and privileges are updated upon exiting (clicking Close) the UP
Assign module. If users are logged on when the changes are made, they must exit DMLSS and log back into the application to gain access to new changes.
4.17.8. Overview. Within UP Assign, the Overview button located on the vertical toolbar
provides a way to preview or print a list of users granted privileges to specific applications,
roles within specific applications, associated SVC/CUST ID(s), assemblages, or Maintenance
Activities. The list is helpful when determining which users have what privileges when updates to roles and privileges are required.
4.17.9. User Information. By clicking the ―User Information‖ icon located on the vertical
toolbar, the SA can view the user information associated to the user ID identified in the Username box.
4.17.9.1. All fields of the user information box require input. Users should ensure they
complete all fields with accurate information. The address fields are not mandatory but
are provided for customers that may be geographically separated from the MTF. The
address information is helpful when delivering supplies and equipment or when mailing items or information is required.
4.17.9.2. Both the User and Address Information fields should reflect the most current
information. The SA should periodically review DMLSS users to validate their need to access the system and to verify their user information is accurate.
4.18. User Privileges – Management.
4.18.1. Roles within each DMLSS application can be created or deleted, and existing roles
may be modified by changing the attributes of the resources of that role. The User Priv –
Management function is used to view, add, modify, and/or delete roles by application. To do
so, a user must be designated as a SA or an application security manager role to gain access to the User Priv–Management window.
4.18.2. To access the User Privilege—Management window (Figure 4.10.), select ―User
Priv—Management‖ from the Navigate menu or click the ―UP Manage‖ button located on the horizontal toolbar. The window has three sections:

98 AFMAN41-216 13 FEBRUARY 2013
Figure 4.10. User Priv – Management Window.
4.18.2.1. Applications. These are the different applications associated with DMLSS.
Each application has assigned roles, which in-turn have resources assigned to them.
4.18.2.2. Roles. Roles are parts of an application that structure what a user may do
within a specific application.
4.18.2.3. Resource. The smallest piece of an application. Each resource defines how the
user can perform a specific task within a role. A resource includes four elements in its
make-up: read, update, create, and delete. Resources also contain the following
attributes/privileges:
4.18.2.3.1. Read. Read is the lowest level of the resource granted to users that only allows the ability to read the information associated to a specific resource.
4.18.2.3.2. Update. Update allows users to update, change, or modify information for selected records associated to the specific resource.
4.18.2.3.3. Create. Create allows users to create new record information associated
with a specific resource.
4.18.2.3.4. Delete. Delete is the highest level of resource privileges allowing users to delete selected records or information associated with a specific resource.
4.18.3. Modifying Roles. Modifications can be made to existing resource data if the data is
visible and not subdued. DMLSS or centrally managed roles (roles that appear ―grayed out‖)
cannot be modified or deleted. Select an application and role to view the associated resource
data. You can give or take away resource privileges to the read, update, create, or delete fields as necessary. The following rules apply when you assign resources to a role:
4.18.3.1. Delete is the highest level privilege, and read is the lowest. The order of
precedence is: delete, create, update, then read. When a privilege is selected for a
resource all the lower privileges are automatically selected. For example, if you select
update for a resource, read is automatically selected. The last column in the table ―Cust

AFMAN41-216 13 FEBRUARY 2013 99
Req‖ (Customer Required), is assigned Yes or No indicating whether or not SVC/CUSTs must be assigned in order to use that role.
4.18.4. Adding Roles. In some cases, the resources assigned to a role may not accommodate
local business practices. Therefore, an option is available to add roles and resources to different applications.
4.18.4.1. Add a role by clicking the ―Add Role‖ button located on the vertical toolbar
within the User Priv – Management window. The Add Role - {associated application
name} window opens. Enter the new role name and select the resource elements and privileges to be associated to the role.
4.18.4.2. Remember that privileges are a ―high-low‖ assigning process. If you want to
give a user delete privileges, the system will also assign create, update, and read
privileges to the resource. If you select update, the system will assign read privileges to the resource.
4.18.4.3. Click ―Save‖ to move the new role to the Roles box in the User Priv-Management window.
4.18.5. Deleting Roles. Roles that are no longer required can be deleted by selecting the role
and clicking the ―Delete Role‖ button located on the vertical toolbar. Centrally managed
roles cannot be deleted. In addition, locally developed roles must be disassociated from all users before being deleted.
4.18.6. Auditing. The Auditing function provides the ability to check which users were in
the system, when, how long, and/or problems associated with connecting. It can also be used
to track what application(s) a user accessed, when it was accessed, and for how long. Select
the ―Auditing‖ button located on the vertical toolbar to access the Application Auditing
window. Administrators can search by user name, application, activity, or hostname. When
the search completes, the user name, date/time, application, activity, description, and host name are displayed in the Application Auditing window.
4.19. Table Maintenance Utility (TMU).
4.19.1. TMU provides a centralized listing of all the values and codes used throughout
DMLSS applications. Use TMU to view, add, or delete data elements that appear in the
different applications. To view tables in TMU, users must have the appropriate TMU
resource(s) assigned to their user ID. These privileges are assigned using the ―UP Assign‖
function explained in paragraph 4.17.
4.19.2. At each MTF, one or more individuals should be assigned to manage these tables.
Before being assigned this task, the individual should have some basic knowledge of medical
logistics data elements and codes including DLA and military specific codes, such as advice
codes and device codes.
4.19.3. There are three types of tables viewable in this window:
4.19.3.1. DMLSS Wide (Centralized): These tables are not editable since the information must remain common across all MTFs.
4.19.3.2. DMLSS and Site Managed: Some of the data in these tables vary depending on
the site. The table contains common information (centralized) for all MTFs; however,

100 AFMAN41-216 13 FEBRUARY 2013
users can edit, add, and delete local (decentralized) information based on their common business practices and terminology.
4.19.3.3. Site Data: These decentralized tables contain data unique to the local MTF and
they are completely editable.
4.19.4. To view or modify a TMU table, first select an application from the Application
dropdown menu and then select a table from the list. The table type is displayed for each
table; DMLSS Wide, Site Data, or DMLSS & Site Managed. Table information that cannot
be modified is displayed with a gray background. Upon saving changes, the new data is included in the table and is visible in the application fields.
4.19.5. The following is a list of special rules that must be followed when updating certain tables within TMU.
4.19.5.1. The Currency Code table/SS application. Changes made on the currency code
table in TMU are audited by the system.
4.19.5.2. The Document Number Configuration table. The following guidelines apply to the CAIM‘s Document Number Configuration table in the TMU/SS application:
4.19.5.2.1. All data entered, with the exception of fund numbers, must consist of four
numeric digits. If the number entered has less than four digits, the system
automatically adds zeros to make a four-digit number. For example, 4 is changed to 0004 and 25 is changed to 0025.
4.19.5.2.2. The pattern of an End number must match the pattern of the Start number.
If one is totally numeric, the other must be also. If the Start or End number in a fund
range is alphanumeric (one letter and three numbers), the other must be as well.
4.19.5.2.3. The End number must always be larger than the Start number.
4.19.5.2.4. When the user enters a new Start number/End number range, the system
checks to see whether the new value range overlaps with an existing range. If so, a message to correct the new range is displayed.
4.19.5.2.5. When a number range has not yet been used by the system, the Last
Number Used and Date fields do not contain any data. These fields are protected by the system and cannot be changed by the user.
4.19.5.2.6. When the Start/End number range is changed for a grouping that contains
data in the Last number and Date fields, the system determines if the Last number and
the Date should be updated. If the current Last number does not fall within the new
Start/End range, the Last number is set equal to the new Start number and the Date is
incremented by one day. If the new range does encompass the current Last number,
the system makes no changes to the Last number or Date field.
4.19.5.3. The Registration Table in the TMU/SS application is a list of all the PCs at the
MTF site that have logged into DMLSS. Messages sent by the site SA from the System
Admin Tool are then received on all PCs listed in the table. Although this table is of the
Site Data (editable) type, you may not edit or add any entries, only delete an entry (which
will prevent that PC from receiving messages). Only DMLSS can make entries (when a
user first logs onto the system) or changes (updating the IP address, date updated, and

AFMAN41-216 13 FEBRUARY 2013 101
build number as users log on again). If you remove an entry and a user logs onto DMLSS
from that PC, it is again added to this table. The system automatically deletes any PC
that has not accessed DMLSS in 30 days.
4.19.5.4. The Real Property Installed Equipment (RPIE) Maintenance Procedure table
located in the TMU/FM application allows users to select a maintenance procedure from the dropdown field in order to view, add, or print the steps to that procedure.
4.19.5.5. The RPIE Nomenclature table found in the TMU/FM table allows users to add
a new nomenclature by clicking the ―Insert‖ button on the vertical toolbar.
4.20. DMLSS Communications Management (DCM). DCM is an automated tool within
DMLSS used to transmit data to external agencies. Information flowing from DMLSS includes
requisition files, financial data, and Prime Vendor Usage information. DCM is also the conduit
for receiving transmission of incoming status files, and it provides tools that allow SAs to
monitor progress of these files and to troubleshoot any errors. DMLSS retains transaction files
in DCM for the current and one previous month (or 62 days). Point-of-Use (POU) transaction
files are retained for seven days. Financial transaction files are retained in the system until archived, depending on the file this can range from 90 to 365 days.
4.20.1. DCM Search.
4.20.1.1. DMLSS' primary connection method is the DLA Transaction Services value
added network (VAN), using file transfer protocol (FTP) via secured ―https‖ mode. DLA
Transaction Services forwards these transactions to the DLA Troop Support for PV
payments, to the DFAS for non-PV payments, and to Point-of-Use (POU) systems. Use
the DCM Search function to view these transaction files and manage the interface of
DMLSS with these systems. Specifically, use this window to check the status of files and submit or resubmit files that failed to transmit.
4.20.1.2. Select ―DCM Search‖ from the SS Navigate dropdown menu or click on the
―DCM Search‖ icon located on the horizontal toolbar to access DCM Search. The DCM
Search window (Figure 4.11.) provides multiple search options. Enter specific and
detailed search criteria to narrow search results or minimize search criteria to receive a broad range of search results. The available search fields are as follows:

102 AFMAN41-216 13 FEBRUARY 2013
Figure 4.11. DCM Search Window.
4.20.1.2.1. Call/Sequence/Block Number. This dropdown provides a list of all call
numbers and financial sequence numbers that have processed through DCM.
4.20.1.2.2. Method. Identifies how the transaction files are processed (i.e. FTP or Print).
4.20.1.2.3. Form. Use the dropdown to select the file format used to transmit the file
(i.e. Military Standard Requisitioning & Issue Procedures (MILSTRIP), American
National Standard Institute (ANSI), EDI, etc.).
4.20.1.2.4. Contract Number. Use to search for transaction files associated to a
specific contract number. For example, enter ―FOA-REPORT‖ if you want the
system to locate and display report data transmitted to AFMOA/SGALD during a
particular EOP session.
4.20.1.2.5. Source of Supply. Use to search for transaction files associated to a SOS.
4.20.1.2.6. Status Code. Identifies the status of the file as it passed through DCM (i.e. Complete, Error, In-Progress, Transmitted).
4.20.1.2.7. Process Code. These are codes assigned to provide more information on the status of the orders as it passes through DCM.
4.20.1.2.8. User ID. Use to search for a specific user ID used to transmit a file.
Note: Financial files record user ID ―DFAS.‖
4.20.1.2.9. Begin Date. Identifies the begin date of the search. A blank begin date will include all dates.
4.20.1.2.10. End Date. Identifies the end date of the search. A blank end date defaults to the current date.
4.20.1.3. Determining Transmission Status. When searching transaction file history in
DCM Search, look for three separate lines indicating the entire life cycle of the file was
successful (applies to most file types). Using outbound transmissions as an example,
look for (1) Process code ―ARCORGFL;‖ description ―ARCHIVED ORIGINAL FILE;‖

AFMAN41-216 13 FEBRUARY 2013 103
(2) process code ―FMTGOOD;‖ description ―FILE WAS SUCCESSFULLY
FORMATTED;‖ and (3) process code ―TMTGOOD;‖ description ―TRANSMITION
SUCCESSFUL.‖ This sequence indicates the file was successfully archived, formatted,
and then transmitted. If for any reason you are unsure of what action to take, contact the MHS Service Desk for guidance.
4.20.1.3.1. Process Code Description (Desc). In the Search results window, highlight
a transaction file and select the ―Desc‖ icon on the vertical toolbar to view the
description of the process code associated to that transaction file. (i.e. For process code ―FMTGOOD‖ the description is ―File was successfully formatted.‖)
4.20.1.3.2. View File. Highlight a file and select the View option located on the
vertical toolbar to see the physical file as it is formatted and submitted to its intended source.
4.20.1.3.3. To identify formatting errors or failed transmissions, monitor the Status
code for ―ERROR‖ and the corresponding process code. The process code for that
item indicates in which stage the error occurred. In either case, the SA should
troubleshoot problems with the LAN, interface connectivity, or an incorrect IP
address, login, or password. All electronic communications activities are required to
periodically update passwords so you may need to contact the activity and verify
current passwords. The SA should track/monitor password update schedules to prevent transmission failures.
4.20.1.4. Resubmission Options. Review DCM search daily to ensure all transaction
files are successfully transmitted and received as a result of the previous day‘s business.
(i.e., requisition files to PV, DLA, financial files transferred to DFAS, and incoming
status files from an SOS.) In particular, verify financial files are transmitted to DFAS
daily without error. To accomplish this, enter the previous day's date in the Begin Date
Field and click ―Search.‖ Review the status and process codes to verify all transaction
files transmitted successfully. If transaction files did not successfully transmit, verify
with the systems office that the network is up and your ports and firewalls are open.
Upon verification, use the Submit or Resubmit options to retransmit the transaction files.
Users must be judicious on which file/s require retransmission. For example, if an
electronic Prime Vendor order fails to transmit, and the acquisitions manager elects to
cancel the order, and re-accomplish the order ―manually,‖ the EDI 850 should not be
retransmitted. This will result in a duplication of orders. When DCM is down
completely for an extended period of time, the logistics account should activate manual
supply operations as outlined in AFI 41-209. Manual orders to Prime Sources will result
in the creation of a ―pseudo‖ EDI 850 image which ultimately goes to DLA Troop
Support. When DCM connections are restored, these files will require retransmission.
DLA Troop Support requires this data in order to build their order profile between the MTF and the Prime Vendor.
4.20.1.4.1. Resubmit. In most instances, when a transaction file failed to transmit
due to network connectivity problems or another reason not related to the IP address,
login, or password, use the Resubmit function located on the vertical toolbar to retransmit that file during the next EOD process.

104 AFMAN41-216 13 FEBRUARY 2013
4.20.1.4.2. Financial Resubmit (Fin Resub). For financial files (contract number is
―FINANCIAL-xxx‖), if the transmission failure is due to an incorrect IP address,
login, and password, use the Fin Resub function on the vertical toolbar to rebuild the
transaction file and retransmit to DFAS. The Financial Resubmit is used in this case
because the IP address, login, and password are embedded into the financial file;
therefore, if any of this data changes, the file must be rebuilt. If a financial file
transfer fails for any other reason, use the Resubmit option to retransmit the existing file without rebuilding a new one.
4.20.2. Configure/Revise DCM Interfaces.
4.20.2.1. DCM must be configured before any DCM transactions can occur. These
parameters are already set in DMLSS, and modification to any DCM communication info
should be limited to the SA when instructed by systems support. Fields will be blank
unless the site receives instructions to update or load information. To set the
configuration parameters, select the ―Configure‖ icon located on the vertical toolbar in
the DCM Search window. The list of DCM Interface select criteria (transaction files
available for interfacing with external systems) is listed in the top left corner of the DCM
Configuration window. Use the DCM Configuration window (Figure 4.12.) to establish and/or edit electronic interfaces.
Figure 4.12. DCM Configurations Window.
4.20.2.2. DCM also assists accounts in monitoring DFAS document numbers, controls
the DCM outgoing transmissions, and activates the DFAS transaction process within DMLSS.
4.20.2.3. Select (highlight) the interface file name to be configured. The interface
settings vary depending on the file. Outlined below are some default settings for some of
the common interface settings and explanations on how these interfaces interact.

AFMAN41-216 13 FEBRUARY 2013 105
4.20.2.3.1. Set the Send option to ―Yes‖ if the transaction file is to be electronically
transmitted during the EOD process. The IP Address, Login ID, and Password are
mandatory data fields when the Send option is ―Yes.‖
4.20.2.3.2. Set the Send option to ―No‖ if the transaction file is not being
electronically transmitted. Check ―No‖ when a recipient has asked to temporarily
suspend transmissions, but make sure to return the send action to ―Yes‖ when
transmissions can resume.
4.20.2.3.3. When configuring the DFAS interface, set the Active and Send indicators
to ―Yes.‖ By doing so, DMLSS generates financial transaction files during each
EOD process. It does not create a transaction when there is no user activity recorded.
If you select ―No‖ for the Active indicator, financial data transactions are suspended. Setting the Send option to ―Yes‖ ensures financial data is transmitted to DFAS daily.
4.20.2.4. DFAS and FOA Excess interface options also have a Communications Routing
Identifier (COMMRI) list table that identifies the site exchanging information with DLA
Transaction Services (formerly DAASC). It is important to keep these COMMRIs up-to-
date to ensure electronic data transfers do not fail. The three COMMRI types that must be entered are:
4.20.2.4.1. AFMOA – The DLA Transaction Services assigned COMMRI for
AFMLO is RUQAAEC. DO NOT change this COMMRI unless instructed to do so by AFMOA/SGALD.
4.20.2.4.2. DAASC - RUSAZZA is the COMMRI assigned to DAASC. All
electronic transmission data sent from the MTF is routed through DLA Transaction
Services. They screen the data to determine if the transmission is clean and the data
conforms to the standard file setup. If there are problems with a transmission file, DLA Transaction Services will not forward the file to the intended recipient.
4.20.2.4.3. DMLSS – Each medical logistics activity generating electronic
communications is assigned a COMMRI. The COMMRI loaded in the DMLSS
COMMRI field uniquely identifies the site. DLA Transaction Services refers to this
COMMRI as the Data Pattern COMMRI. This COMMRI is different for each MTF
and is listed on the DLA Transaction Services website. A shortcut to their website is available from the AFML website via the supply tab/links tab.
4.20.2.5. The DFAS Interface contains a non-editable field for the finance sequence
number. This number is a sequence number assigned to all finance transmission header
records and cannot be duplicated. Finance uses these sequence numbers to keep track of
the MTF‘s financial transmissions that update the MTF‘s financial records. If DFAS
provides notification that a sequence number is missing, use the DCM Search as
explained in paragraph 4.19.1. to resubmit the applicable file.
4.20.3. DCM Monitor.
4.20.3.1. The DCM Monitor provides SAs a quick status view of the most current DCM
transaction. Select ―DCM Monitor‖ from the SS Navigate dropdown menu or click the ―Monitor‖ icon located on the horizontal toolbar to access the DCM Monitor.

106 AFMAN41-216 13 FEBRUARY 2013
4.20.3.2. The SA determines what files appear in DCM Monitor by specifying how many
days of transactions appear and how often updates are desired. The DCM Monitor lists
only those files meeting the set criteria. Use the DCM Search function to see additional files.
4.20.3.3. The Resubmit, View File, and Desc (description) functions work the same as
described in paragraph 4.24.1., DCM Search. The DCM Monitor should be checked
daily to minimize delays for services as well as financial and status updates.
4.21. EOP Process Management. Use the EOP Process Management window to view and
update the EOP process schedule (Figure 4.13.). To access, select ―End of Period Process
Management‖ from the SS navigate dropdown menu or click the ―EOP‖ button located on the
horizontal toolbar. Note: Use this information along with the EOP processing instructions
found in Chapter 2, Document Control and Financial Procedures, paragraph 2.12., and Chapter 3,
System Administration, paragraphs 3.12.3.-3.12.7.3. to further manage the end-of-day (EOD),
end-of-month (EOM), and end-of-fiscal year (EOFY or EOY) processing cycles in DMLSS.
Figure 4.13. EOP Process Management Window.
4.21.1. EOP Cycles.
4.21.1.1. EOD. The EOD automatically processes Monday through Friday at the
designated ―Start Time‖ and on Saturdays and Sundays when the EOP on Saturday
and/or Sunday indicators are selected.
4.21.1.2. EOM. The EOM process automatically begins once the last EOD process for that month completes successfully.
4.21.1.3. EOY. The EOY process corresponds to the EOFY, and runs automatically on
30 September after the EOD and EOM processes are complete. If the September EOM
process has not been completed, the EOY process completes the September EOM before beginning.

AFMAN41-216 13 FEBRUARY 2013 107
4.21.2. EOP Settings. The current FY, process start time, EOM process date, and last update
fields are displayed. Users assigned the MM Security Manager role are authorized to update
data fields with a white background.
4.21.2.1. FY – Always set to current FY. Not editable.
4.21.2.2. Start Time – Identifies the start time applied to all EOP cycles.
4.21.2.2.1. SAs have an option to change the start time so EOP processes begin at a
more convenient time. Do not change the EOP Start Time once that time has been
reached or during the EOP process. The system becomes corrupt and then requires
intervention from the MHS Service Desk to continue normal processing.
4.21.2.2.2. Refrain from changing the time if its within a 30-minute window of the
original start time in order to avoid potential system complications. For example, if
your EOP is scheduled to start at 16:05 hrs., do not attempt to alter the start time
moments before it is scheduled to begin, e.g., updating the EOP start time @ 16:04
hrs. Attempting to adjust the start time may result in a conflict between scheduled
Command Run On (CRON) cycles. In addition, avoid setting start times that start
precisely at the top of the hour (19:00, 20:00, 21:00, etc.) or on any 15 minute
increment after the top of the hour (20:15, 21:30, 22:45). DMLSS has imbedded
CRON cycles designed to automatically process incoming status, POU files, etc, and
encroaching on these CRON cycles leads to a potential threat of failure to launch the EOP. Adjust your start times accordingly (Example: 21:06, 22:09, etc.).
4.21.2.3. EOP on Saturday/Sunday – If checked, DMLSS automatically processes an
EOD on Saturday and/or Sunday at the assigned start time. As a general rule, EOPs are
not processed on Saturdays and Sundays. If necessary, notify DFAS prior to processing
EOPs on these days. In addition, coordinate with DLA Troop Support as PV orders and receipts could be transmitted to the BSM system over the weekend.
4.21.2.4. EOM Process Dates – The EOM process dates should always equal the last day
of each calendar month to include Saturdays and Sundays. Once an EOM has processed, that field is uneditable until the next FY.
4.21.2.5. Last Updated – These fields identify the user ID of the DMLSS user who last updated the EOP data and reflects the date and time the update was accomplished.
4.22. Record Management. The Record Management function is strictly used by FM
personnel for setting FM records to inactive in the FM database. In order to use this function,
users must be assigned the SS ―SS Expert‖ role or a customized role, usually titled one of the following: SS ―FM Related,‖ SS ―FM TMU Inactive,‖ or SS ―FM Inactive.‖
4.22.1. Assigning the inactive status to a record allows it to be separated from the active
records. The amount of data the application stores and the amount that the user must look
through needs to be up to date at all times. Thus, it is important to keep the system updated
and when it becomes necessary, records must be set to inactive so that the information is
maintained for historical purposes.
4.22.2. To access the Record Management window, click ―Record Management‖ from the
Navigate menu or click the ―Record Mgt‖ button on the toolbar. Select ―Set Inactive‖ or
―Set Active‖ from the Action window. Select the items that you want to activate/inactivate

108 AFMAN41-216 13 FEBRUARY 2013
from the Achievable Objects section in the window. On the right side of the window, select
the actual object(s) to be set active/inactive and click the ―Process Rqst‖ button on the
vertical toolbar. A message will be displayed to confirm that the action was processed. If
the message indicates there were problems, ensure that the process met the guidelines stated in the previous paragraphs.
4.22.3. Data must meet specific guidelines before being set to inactive. DMLSS displays a
message stating what must be done before the inactive command can be processed. The following object types and rules apply to the inactivating and activating of FM objects:
4.22.3.1. Facility. DMLSS checks for active work requests, projects, and FM
requirements that have a relationship with the specified facility. If a relationship exists
with any of these, the system displays a warning prompt identifying the type and number
of relationships that exist. Any active rooms and RPIE that a facility may have will automatically be set to inactive along with the facility.
4.22.3.2. Installation. All associated facilities must already be set inactive.
4.22.3.3. Maintenance Procedure. The linked Preventive Maintenance (PM) schedule (if
any) must have a valid end date; there must not be any scheduled work in the Work Projected table. When set inactive, all related schedules are deleted.
4.22.3.4. Organization. Organizations cannot be referenced in/on any active
installations, facilities, POCs, specialty shops, RPIs, PM schedules, work requests,
projects, Regulatory Compliance (RC) requirements, or FM requirements.
4.22.3.5. POC. POCs cannot be referenced in/on any active installations, facilities, specialty shops, RPIEs, work requests, projects, or FM requirements.
4.22.3.6. Project. All associated work requests will also be set inactive.
4.22.3.7. RC Procedure. Only those RC procedures, which are not being utilized, are allowed to be set inactive.
4.22.3.8. RC/Joint Commission on Accreditation of Healthcare Organizations (JCAHO)
Requirement. The RC requirement must have a valid end date and there must not be any scheduled work in the Work Projected table.
4.22.3.9. RPIE. The RPIE cannot be a parent to any child RPIE nor have active work requests or projects. If it is a parent RPIE, you must first set the child to inactive.
4.22.3.10. Requirement. A requirement must have the status of closed or cancelled in
order to be set inactive.
4.22.3.11. Room. All associated work requests, RPIE, and projects must already be set inactive and the room must not be linked to a drawing.
4.22.3.12. Work Request. A work request must have the status of closed or cancelled in
order to be set inactive. It cannot be associated with an active project. Work request(s)
that are associated to open projects will not appear in the list. Associated closed projects are not set inactive with the work requests.
4.22.4. When a record is set to inactive, it no longer appears in query results or other lists
within the FM application. Exceptions: Users can search inactive records in the Work

AFMAN41-216 13 FEBRUARY 2013 109
Request module, and inactive objects may be viewed using a BO query as long as they are
not excluded. Inactive records may also be set back to active so they can be accessed
through the FM application and updated if needed.
4.23. Change Expense Center. Within DMLSS, a customer‘s catalog records (item locations)
are associated to the expense center similarly to the way the catalog records are associated to the
SVC/CUST. Use the Change Expense Center function to process a mass update to expense
center record associations, rather than processing one at a time. The process is similar to associating/disassociating expense centers under the SVC/CUST Detail window.
4.24. Assign Customer to SOS. This window is used to associate an SOS with multiple
SVC/CUST accounts (in mass). Associating a SOS to a customer authorizes that customer to
bypass LOG and place orders directly to the SOS. Since MAs are the only authorized CAIM SOS for AF accounts, this option should not be used.
4.25. Assign Customers to User IDs. Use this option to associate or unassociate a SVC/CUST
to users in mass. This function is helpful when a new SVC/CUST is established and the SA
needs to simultaneously assign that new customer to multiple users.
4.26. Assign Role to User IDs. This mass update feature allows administrators to
simultaneously associate or unassociate a single role to or from multiple users. This function may be beneficial when new system roles are added to DMLSS as a result of a software upgrade.
4.27. Assign Assemblages to User IDs. Use this option to associate or unassociate AM
assemblages to users in mass. This option is useful when newly assigned assemblage(s) have been gained into DMLSS and multiple users require privileges to those assemblage(s).
4.28. Standard Reports. The SS application contains several ‗canned‘ reports available for
managing operating funds and AM funds as well as monitoring and managing system user
accounts. Refer to Chapter 13, DMLSS Reports, for an explanation of selected reports contained in the SS application.

110 AFMAN41-216 13 FEBRUARY 2013
Chapter 5
INVENTORY MANAGEMENT
5.1. Purpose. Inventory Management (IM) provides customers and materiel managers with a
seamless, automated capability to manage inventory from the time a customer starts the search
for a supply item to when the materiel is issued for consumption. It accommodates any required
redistribution or disposal actions. It also provides the functionality to establish formal
AFWCF/MDD and/or Operations and Maintenance (O&M) accounts with perpetual inventory
management.
5.1.1. IM Inbox. For privileged users, the IM Inbox automatically opens upon accessing the
IM application from the DMLSS System Navigation window. It can also be viewed by
selecting ―Inbox‖ from the Utilities menu (see paragraph 5.31.1.). Users must be assigned
the IM User Pending Action privilege and be associated to pending actions for the inbox to
appear. It contains many pending actions that are either advisory in nature or require user
action. DMLSS automatically removes some action items from the inbox upon processing,
while other advisory notices should be removed or deleted upon review and when no longer
needed. A detailed list of IM pending actions and their recommended use is available in
Attachment 5. At a minimum, all pending actions should be reviewed and worked daily to
ensure proper management of all assemblages.
5.1.2. The IM main window also appears once the IM application is launched from the
DMLSS System Navigation window. In this window, users can access the modules and
functionalities of IM mainly through the menu options. In some cases, you can also use the
buttons on the horizontal toolbar at the top of the window to open IM module windows.
While on any IM primary window, you have access to the same menu bar and horizontal
toolbar buttons. Each module window, however, displays a unique set of vertical toolbar
buttons on the right side of these windows.
5.1.3. The modules covered in the remainder of this chapter are in the same order as they appear in the Navigate and Utilities dropdown menus located on the menu toolbar.
5.2. New MTF Catalog Records. Building catalog records is very important to all aspects of
system use as well as AF and DoD standardization processes. Users benefit by loading all
available data into the catalog record upon creation. The New Catalog Item functionality is
accessible from the Navigate menu. Located within this function is the capability to add catalog
records to the MTF and customer catalogs. The preferred method to follow when adding a
catalog record to the MTF is to first search the UDR and DMLSS Master file for existing catalog
information (paragraph 5.3.). Change the ―Scope‖ to ―Contracted‖ Items‖ and enter pertinent
data to be used when conducting the search. The system displays all matches retrieved based on
the data entered. Create a new MTF catalog record when no matching records are retrieved.
5.2.1. Adding a MTF Catalog Record Using Catalog Search.
5.2.1.1. Items are added to the MTF Catalog using either the Cat Search icon on the
horizontal toolbar or selecting New Catalog Item and then MTF Catalog Item from the
Navigate menu. Search scopes (Figure 5.1.) must be set to Contracted items before
choosing Sourced/Unsourced items since this option presents the best possible monetary
savings over open market items. Carefully screen and exhaust the list of potential

AFMAN41-216 13 FEBRUARY 2013 111
contracted items before considering noncontracted sources. Note: The ECAT scope was removed. ECAT product and sourcing data now exist within the Medical Master Catalog.
Figure 5.1. Catalog Search, Scopes.
5.2.1.2. Record(s) matching the search criteria are displayed upon execution of the
search.
5.2.1.3. To create a new MTF catalog record, highlight the desired record and select
―Add MTF‖ from the vertical toolbar. Upon doing so, the new MTF Catalog record is displayed in the Basic tab view (Figure 5.2.).
Figure 5.2. MTF Catalog Record, Basic Tab.

112 AFMAN41-216 13 FEBRUARY 2013
5.2.1.4. Basic Tab.
5.2.1.4.1. Insert known data into the required (those with red dots) and optional
fields. The MTF Restrictions, Special Restrictions, and Destruction Method fields
require special attention and this data should be loaded if applicable. Save changes once all data is entered and the remaining tabs will become available.
5.2.1.4.2. Item Identification (ID). The Item ID field is used to assign an ID number
to an item. This field allows up to 32 positions; however, the assigned item ID should
directly correlate with the item. For example, a National Drug Code (NDC)
specifically identifies a pharmaceutical. Additionally, the local warehouse stocking
configuration should be considered because, in most cases, materiel is stocked in item
ID sequence.
5.2.1.4.2.1. To maintain standardization and database integrity, follow these rules when assigning an item ID:
5.2.1.4.2.1.1. Do not use item nomenclature.
5.2.1.4.2.1.2. Avoid special characters such as (, # $ @ ! % & *) and spaces. Using special characters makes database searches/matches impossible.
5.2.1.4.2.1.3. Avoid making multiple catalog records for the same item.
Search for an existing record before creating a new one.
5.2.1.4.2.1.4. Do not prefix the item ID with terms or acronyms like ―ISBN,‖ ―Cat Nr,‖ etc.
5.2.1.4.2.2. Utilize the following hierarchy/level of precedence when assigning item IDs:
5.2.1.4.2.2.1. National Stock Number (NSN).
5.2.1.4.2.2.2. If no NSN, use NDC.
5.2.1.4.2.2.3. If no NSN or NDC, then use Universal Product Number (UPN).
5.2.1.4.2.2.4. If no NSN, NDC, or UPN, then use the MFG‘s Part Number.
5.2.1.4.2.2.5. If none of the above, use the Vendor‘s Catalog Number (VCN).
5.2.1.4.2.2.6. As a last resort, assign a local (LOC) item ID.
5.2.1.4.2.2.7. Use the International Standard Book Number (ISBN) for all
books.
5.2.1.4.3. Commodity Class (CC). The CC identifies the item‘s commodity type. Use the following rules to assign the appropriate CC:
5.2.1.4.3.1. Pharmaceutical – Use for drugs/pharmaceuticals related to Federal
Stock Classes (FSC) 6505, 6508, or NDC‘s. Pharmaceuticals expend to EOR
615.
5.2.1.4.3.2. Repair Part Medical/Nonmedical – Medical/Nonmedical parts for equipment.
5.2.1.4.3.3. Supply WRM SG Managed – Assign this CC to WRM supply items

AFMAN41-216 13 FEBRUARY 2013 113
that are centrally managed by AFMOA/SGAL. This CC expends funds to EOR
604. All receipts and issues associated to this CC are respectively coded as
reimbursable and refundable.
5.2.1.4.3.4. Supply Durable Medical/Nonmedical – Use for medical/nonmedical
durable supply items. Medical examples include scissors and IV poles while nonmedical examples include calculators and pencil sharpeners.
5.2.1.4.3.5. Supply Expendable Medical/Nonmedical – Medical/nonmedical
items that are not durable. Items are usually expended, consumed, or used one
time then discarded. Examples of medical items are bandages and gauze. Examples of nonmedical items are paper and scotch tape.
5.2.1.4.3.6. Equipment Capital Medical/Nonmedical – Assign to
medical/nonmedical equipment with a purchase cost greater than $249,999.99.
Capital equipment is associated to OP funds centrally managed at AFMOA/SGAL.
5.2.1.4.3.7. Equipment Durable Medical/Nonmedical – Assign to
medical/nonmedical supplies when medical maintenance, warranty management,
or the accountability of highly pilferable items is required. Durable equipment
expends to EOR 604. Note: Any item, regardless of cost, that meets the criteria
for equipment as defined in AFI 41-209, paragraph 7.2.3.2., should be coded as Equipment Expense rather than Equipment Durable.
5.2.1.4.3.8. Equipment Durable WRM SG Managed – Use for WRM SG
Managed equipment durable items that are centrally managed and purchased by
AFMOA/SGAL. The CC for these items is associated to EOR 604, if and when
these WRM items are sold off. All associated receipts and issues are respectfully coded as reimbursable and refundable.
5.2.1.4.3.9. Equipment Expense Medical/Nonmedical – Use for
medical/nonmedical equipment with a unit cost less than $250,000 that meets the
criteria outlined in AFI 41-209, paragraph 7.2.3.2. The CC for these items is associated to EOR 624.
5.2.1.4.3.10. Equipment Expense WRM SG Managed - Use for WRM SG
Managed medical/nonmedical equipment with a unit cost less than $250,000 that
meets the criteria outlined in AFI 41-209, paragraph 7.2.3.2. This CC expends
funds to EOR 624, if and when these WRM items are sold off. All receipts and
issues associated to this CC are respectively coded as reimbursable and refundable.
5.2.1.4.4. National Stock Number (NSN). A NSN is a 13 digit numerical number
assigned centrally for global use and is recognized throughout the DoD. Load the
contiguous number into this field. Do not use dashes, spaces, prefixes, or suffixes.
Exception: The AF considers ―NCM‖ and ―UM‖ numbers valid NSNs (i.e. 6515NCM040423 and 6515011498842UM).

114 AFMAN41-216 13 FEBRUARY 2013
5.2.1.4.5. National Drug Code (NDC). The NDC should be entered into this field for
items coded with a Commodity Class of ―Pharmaceutical.‖ Load the 11 digit
contiguous number into this field. Do not use dashes, spaces, prefixes, or suffixes.
5.2.1.4.6. Short Item Description. Use the Short Item Description field to provide a
basic item description. This field allows for 40 alpha/numeric characters. Avoid
using special characters such as (, # $ @ ! % & *). Using special characters makes
database searches/matches impossible. Note: Short Item Descriptions are
―uneditable‖ to the DMLSS users if the catalog record is sourced to an SOS type of
DPV, DLA, or ECA. This field can only be modified via the daily UDR feed. The
following displays an example of a Short Item Description:
5.2.1.4.6.1. Main Noun – i.e. Forceps.
5.2.1.4.6.2. Descriptive data – what kind of forceps, i.e. Kelly Hemo Curved CRS.
5.2.1.4.6.3. Sizing data – i.e. 5IN.
5.2.1.4.6.4. Complete Short Item Description – ―FORCEPS KELLY HEMO CURVED CRS 5IN.‖
5.2.1.4.7. Long Item Description. The Long Item Description field is used to expand
on the Short Item Description. Use up to 254 alpha/numeric characters for the long
description. Using the example from 5.2.1.4.6.4., the description could be expanded
to ―FORCEPS KELLY HEMOSTATIC CURVED CHROME RESISTANT STEEL
5 INCHES LONG.‖ Note: Long Item Descriptions are ―uneditable‖ to the DMLSS
users if the catalog record is sourced to an SOS type of DPV, DLA, or ECA. This field can only be modified via the daily UDR feed.
5.2.1.4.8. Manufacturer‘s Name (Mfg Name). Use this field to identify the Mfg‘s
name. The Mfg name identifies who made the product; it is not the same as a vendor
or distributor name. A centralized Mfg‘s table is internally maintained in DMLSS.
All new Mfg names must be added to this table prior to use. Note: The
Manufacturer‘s name is ―uneditable‖ to the DMLSS users if the catalog record is
sourced to an SOS type of DPV, DLA, or ECA. This field can only be modified via the daily UDR feed.
5.2.1.4.9. Manufacturer‘s Catalog Number (Manufacturer Cat No). The item ID
number assigned by the MFG should be loaded in this field. This number is not the
same as the PV Order Number (PVON) or VCN. If the item is a pharmaceutical, the
MFG‘s catalog number is the same as the NDC. Note: The Manufacturer‘s Catalog
Number (Manufacturer Cat No.) is ―uneditable‖ to the DMLSS users if the catalog
record is sourced to an SOS type of DPV, DLA, or ECA. This field can only be modified via the daily UDR feed.
5.2.1.4.10. Hazardous Material. Use the dropdown options to identify each of these
management areas as Yes, No, or Unknown. Note: DMLSS 3.1.2. replaces the
hazardous material code with the hazardous material indicator. This element now consists of a simple Y (yes), N (no) or U (unknown).

AFMAN41-216 13 FEBRUARY 2013 115
5.2.1.4.11. Cold Chain, Green, and Latex Dropdown Menus. Use the dropdown options to identify each of these management areas as Yes, No, or Unknown.
5.2.1.4.12. Controlled Item Inventory Code (CIIC). The CIIC is used to assess
special storage and handling requirements. Assigning a CIIC limits the distribution
of the item to authorized customers. The two most notable codes are code R
(schedule I and II controlled substances and precious metals) and Q (schedule III, IV,
and V controlled substances).
5.2.1.4.13. MTF Restrictions. Within the Basic tab, select the ―MTF Restrictions‖
button to associate restrictions to an item. Assign MTF Restrictions to limit
distribution of an item to authorized customers and to identify special storage and
handling procedures. Available MTF Restriction codes and descriptions are available within the TMU table located in SS.
5.2.1.4.14. Special Requirements. Within the basic tab, select the ―Special
Requirements‖ button to associate special requirements unique to an item. Assign
special requirements to further specify an items distribution, storage, and handling
requirements. Available special requirement codes and descriptions are available within the TMU table located in SS.
5.2.1.4.15. Destruction Methods. Use the ―Destruction Methods‖ button to assign
the appropriate method of destruction. The assigned method will print on destruction
documents generated for that item ID. Destruction codes are visible within the TMU table located in SS.
5.2.1.4.16. Add Like. The Add Like functionality provides users an avenue to build
a new catalog record that is similar to an existing catalog record. First, locate and
open the MTF detail for the existing record, and then select the ―Add Like‖ icon from
the vertical toolbar. The system opens a new catalog record and replicates the basic
data except for the item ID. To complete the action, insert a new item ID, click ―Save‖ and then complete the remaining catalog record tabs.
5.2.1.4.17. WRM Prime Substitute Relationship. The WRM Prime/Sub (P/S) icon is
used to establish P/S relationships for specific WRM assemblages. In order to create a
new P/S or edit an existing P/S relationship, enter the substitute item ID at the bottom
of the screen. Next, either associate or unassociate an assemblage and apply or delete
ratios. Upon saving the information, DMLSS immediately updates the information in
the applicable AM assemblages.
5.2.1.4.18. Add Equivalent (Add Equ). The Add Equivalent function is used to view
system identified equivalent items. Potential equivalents are matched using the item
description and cataloging data such as NDC, MFG Cat Nbr, etc. Click on the ―Add
Equ‖ icon located on the vertical toolbar to view a list of potential equivalents.
Highlight the acceptable equivalent(s) and click ―OK.‖ Upon completion, the associated equivalent is listed in the Acceptable Equivalent tab.
5.2.1.4.19. Adding New SOS‘s. The SOS Catalog tab has been combined into the
Basic tab of the MTF Catalog. Use the ―ADD‖ button to establish a new SOS. At a
minimum, one SOS should be added when creating a new MTF catalog record. The
source‘s SOS Code must be associated to the item ID prior to establishing due-ins.

116 AFMAN41-216 13 FEBRUARY 2013
Note: The LOG SOS (local RIC) is always loaded so the customer can order from
LOG. Once completed, the default SOS field in the LOG Cat tab will automatically
update from UNK to the valid SOS. If multiple SOSs are added, DMLSS treats the
very first SOS created as the ―default‖ SOS for LOG. If additional SOS‘s are built,
the user will need to decide which SOS should be utilized as the default and make the
appropriate change in the LOG Cat tab.
5.2.1.4.20. Editing SOS Information. Upon associating to a SOS(s), additional
information becomes available in the lower section of the screen. Mandatory fields
are determined by the source and SOS type code. The U/P price, U/P, vendor item
type, and vendor item number are always required. This information is unique to the
selected SOS in the top window. Point to or highlight a SOS to view detailed data associated to that source.
5.2.1.4.20.1. Primary Source. If the assigned SOS is a contracting office (SOS
Type Code equals ―CON‖), then this is a mandatory field. The vendor‘s name,
POC information, and ordering address are mandatory. The data loaded into these
fields should identify the source which you recommend Contracting purchase the
item from.
5.2.1.4.20.2. FSC. The FSC is mandatory if the assigned SOS is a contracting
source, SOS Type Code ―CON.‖ A list of FSCs is available in the DLA Customer Assistance handbook or at DLA‘s website, http://www.dla.mil/.
5.2.1.4.21. Vendor Item Type. The Vendor Item Number field is used to dictate
what type of ―item qualifier‖ is sent to the vendor within the requisition set. If LOG
electronically interfaces with the vendor, this information is written to the requisition
file and submitted to the vendor upon placing orders. For example, when ordering a
pharmaceutical using the NDC number, the vendor item type would be ―NDC‖ and
the 11 digit, numeric NDC number would be loaded into the Vendor Item Number
field. Note: The Vendor item type is ―restricted‖ to the valid type on the contract
purchase agreement if the catalog record is sourced to an SOS type of DPV, DLA, or
ECA. This field can only be modified via the daily UDR feed. Available Type Vendor Item descriptions are:
5.2.1.4.21.1. HIBCC – Health Industry Business Community Council.
5.2.1.4.21.2. ISBN - International Standard Book Number.
5.2.1.4.21.3. MFG/PN - Manufacturer's Part Number.
5.2.1.4.21.4. NDC - National Drug Code.
5.2.1.4.21.5. NSN - National Stock Number.
5.2.1.4.21.6. UCC/EA – Uniform Code Council, similar to UPN or Universal
Product Code (UPC).
5.2.1.4.21.7. VCN - Vendors Catalog Number.
5.2.1.4.22. Pricing Agreement Number. The Pricing Agreement Number field is the
placeholder for Distribution and Pricing Agreement (DAPA) numbers. The DAPA is
the DoD National Contract number associated with that particular item. This is a

AFMAN41-216 13 FEBRUARY 2013 117
mandatory field for all items assigned a DRS delivery method. The DAPA number is
a primary vehicle for informing a Prime Vendor that these items should be
delivered/invoiced at the specified DAPA price provided the vendor honors that
manufacturer‘s DAPA. As mentioned previously, the system separates orders by
delivery method. The system further separates LOG orders by DAPA number when
the source‘s SOS type code is a Defense Logistics Agency Troop Support (DLA
Troop Support) PV (DPV) and the delivery method is DRS. Note: The Pricing
Agreement Number field is ―uneditable‖ to the DMLSS users if the catalog record is
sourced to an SOS type of ―DPV‖ and the delivery method is DRS. This field can only be modified via the daily UDR feed.
5.2.1.4.23. U/P. The U/P dropdown only displays codes loaded in the Packaging tab
with the U/P indicator checked. Note: The U/P is ―uneditable‖ to the DMLSS users
if the catalog record is sourced to an SOS type of DPV, DLA, or ECA. This field can only be modified via the daily UDR feed.
5.2.1.4.24. Unit of Purchase Price (U/P Price). Load the U/P price for the selected
source. Each associated SOS may sell the item at a different price. The U/P price
will default to $.01 if actual price is not loaded. When/if the U/P price is adjusted and
changes saved, the new data is written to the Packaging tab and DMLSS recalculates
all packaging and unit pricing ratios. Note: The U/P is ―uneditable‖ to the DMLSS
users if the catalog record is sourced to an SOS type of DPV, DLA, or ECA. This field can only be modified via the daily UDR feed.
5.2.1.4.25. Delivery Methods: Delivery methods are assigned to items being
purchased from a PV. The available codes will vary depending on the PV type,
whether it is pharmaceutical or medical/surgical. The delivery methods available for PVP and PVM are as follows:
5.2.1.4.25.1. PVP Delivery Methods.
5.2.1.4.25.1.1. JIT – Just-In-Time.
5.2.1.4.25.1.2. DRS – Drop Shipment.
5.2.1.4.25.2. PVM Delivery Methods.
5.2.1.4.25.2.1. USE – Usage Item.
5.2.1.4.25.2.2. NUS – Non-Usage Item.
5.2.1.4.25.2.3. DRS – Drop Shipment.
5.2.1.4.25.3. DMLSS automatically separates LOG orders according to the
assigned Delivery Method. For example, if LOG orders exist for PVM and that
order contains both USE and NUS items, the system will sort the USE items into
one order and the NUS items into another order. A separate call number is assigned to each order.
5.2.1.4.26. Estimated Monthly Usage. When usage must be reported to the vendor,
enter the estimated monthly usage quantity into this field. The estimated usage must
be at least one for items assigned a delivery method of JIT and USE because these are recognized as recurring purchases.

118 AFMAN41-216 13 FEBRUARY 2013
5.2.1.4.27. Report PV Usage. The Report PV Usage box is used to identify items
that require usage quantities to be reported to the vendor. Note: If the Send Usage
box in the SOS record is not checked, usage will not be reported to the vendor.
5.2.1.4.28. ECAT. The ECAT Supplier ID and Catalog ID become mandatory fields
for items associated to an ECAT type source. Note: The ECAT Supplier ID and
ECAT Catalog ID, are ―uneditable‖ to the DMLSS users if the catalog record is
sourced to an SOS type of ―ECA.‖ This field can only be modified via the daily UDR feed.
5.2.1.5. Locked Catalog Fields. In DMLSS 3.1.2./Gen IV, certain catalog fields will be
―LOCKED‖ when that record is associated to the Medical Master Catalog (MMC).
Every item ordered from a PV or ECAT must be associated to the MMC, and those items ordered from a PV must have a pricing agreement.
5.2.1.5.1. These include the short and long item descriptions, manufacturer name,
manufacturer catalog number, national drug code, and national stock number are
locked once they are associated to the Medical Master Catalog (MMC). Note: Item
descriptions can be edited by the user; however, when reported externally and in pre-built ad-hoc reports, the MMC descriptions shall be used.
5.2.1.5.2. Products sourced to a PV will have all fields locked with the exception of
unit of purchase, delivery method, and estimated monthly usage.
5.2.1.5.2.1. The delivery methods are restricted to NUS, USE, and DRS for PVM, USE is not available for a MOF contract.
5.2.1.5.2.2. PVP uses delivery methods of JIT and DRS.
5.2.1.5.3. Products sourced to ECAT and DLA will have all sourcing fields locked.
5.2.1.6. Packaging Tab/Pop-up Window. In DMLSS 3.1.2., the packaging tab moved to
a Jump To button that is located next to the U/P field in the SOS CAT detail. Only
packaging configurations available from the particular SOS chosen may be selected.
Within the Packaging tab (Figure 5.3.), users can add, delete, or ‗breakdown‘ U/Ps. This
data directly relates to the Ordering Information and Inventory Information located
within the LOG Cat tab. The Order Information identifies the U/P and U/P Quantity in
which the item is purchased from the default SOS. The Inventory Information (Unit of
Sale) identifies how the item inventory is maintained and the U/S and U/S Quantity.
Within this tab, users can add higher levels of packaging or break a package into smaller
units. However, all U/Ps must be equally divisible by the U/M Quantity identified in the
Inventory Information box in the LOG Cat tab. For example: The item ID is currently
purchased in Box (BX) of 100 from the vendor; however, another SOS sells the same
item in a larger U/P (Case of 500). By clicking on the "Add" button, the user can select
"CS." The new ratio quantity must be 5. The U/P checkbox/column identifies all units
that are available for purchase from the default SOS. The LOG Inventory Unit (Log U/S)
may or may not be marked as available for purchase for the SOS. Use the Ratio entry to
identify how many individual units equate to the LOG Inventory Unit. The U/M
Quantity is used to calculate the Unit Price (lowest measure) for the specified
(highlighted) unit. Additional packaging details such as the height, weight, length, unit
size, etc. can also be entered to further describe the package. Note: The U/P value for

AFMAN41-216 13 FEBRUARY 2013 119
―LOG‖ is ―uneditable‖ to DMLSS users if the catalog record is sourced to an SOS type of DPV, DLA, or ECA. This field can only be modified via the daily UDR feed.
Figure 5.3. MTF Catalog Record, Packaging (Tab) Window.
5.2.1.6.1. Unit of Purchase (U/P). The U/P identifies the unit in which the item is
purchased.
5.2.1.6.2. Unit of Measure Quantity (U/M Qty). The U/M Qty identifies the quantity
within the U/P. This data is used to compute the unit of measure (U/M) price in price
comparisons and catalog searches. With few exceptions, the U/M Qty should only
equal ―1‖ if the U/P is ―EA.‖ If purchasing a bottle of Aspirin containing 100 tablets,
the U/P is ―BT‖ and the U/M Qty is ―100.‖ If purchasing a 16 ounce bottle of
Isopropyl Alcohol, the U/P is ―BT‖ and the U/M Qty is ―16.‖ The U/M quantity field
is editable by adjusting the "ratio" associated to the U/P. Once saved, this updates
information displayed within the Packaging and LOG Cat tabs.
5.2.1.7. Technical Tab. Information contained in the Technical tab (Figure 5.4.) will
vary depending on the assigned CC. Equipment, pharmaceutical, repair parts, service,
and supply commodity types require unique technical information. The Technical tab
allows users to enter an item expiration type, shelf life code, and other important
information unique to the item. Three ―local‖ fields exist for site specific use. The first,
titled ―Local Field‖ is displayed in the Basic tab. The other two, ―Local Field 2‖ and
―Local Field 3,‖ are located in the Technical tab. It is recommended that the Materiel
Manager or Superintendent define a standardized use for these fields prior to use to eliminate confusion and inconsistency.

120 AFMAN41-216 13 FEBRUARY 2013
Figure 5.4. MTF Catalog Record, Technical Tab.
5.2.1.8. Acceptable Equivalent Tab (Figure 5.5.). Use this tab to identify VINs that are
acceptable equivalents to that particular item. Acceptable equivalents are
interchangeable exact equivalents that have been approved for automatic substitution and
contain the same intermediate package quantities as the primary item. Use the ―Add‖
radio button to associate additional equivalents. The barcode numbers for the item ID and acceptable equivalents are also stored in this tab and aid the receiving process.
Figure 5.5. MTF Catalog Record, Acceptable Equivalent Tab.
5.2.1.9. Customer Catalog Tab. The Customer Catalog tab (Figure 5.6.) identifies which
customers contain the item on their Customer Catalog. These are customers that are
currently or have previously requested the item from LOG. The U/P, U/S, and EOH, are
displayed in this screen. The item may be added or deleted from Customer Catalog(s) in this screen. Additionally, existing records can be edited.

AFMAN41-216 13 FEBRUARY 2013 121
Figure 5.6. MTF Catalog Record, Cust Cat Tab.
5.2.1.10. LOG Catalog Tab.
5.2.1.10.1. The LOG Catalog tab (Figure 5.7.) is used to identify information unique
to the logistics account. A default SOS other than UNK should always be associated
to MTF catalog records. Only SOS(s) added to the basic tab will appear for selection
in this field. When the system identifies a requirement for this item, it will appear in LOG Orders to be purchased from this default SOS code.
Figure 5.7. MTF Catalog Record, Log Cat Tab.

122 AFMAN41-216 13 FEBRUARY 2013
5.2.1.10.2. CAIM balances, CAIM WRM balances, LOG Owned WRM Balances,
Leveling, and Excess can be reviewed by selecting the appropriate radio button.
5.2.1.10.3. The Ordering Information U/P, U/P Quantity, and U/P Price reflect how
LOG purchases the item from the default SOS.
5.2.1.10.4. The Inventory Information identifies the package size in which the item
inventory is maintained as well as the U/S. The Unit (i.e. EA, PG, CS, etc.) must be
entered on the Packaging tab using the Break Unit function in order to be assigned as
the Inventory Unit (IU). DMLSS prompts the user to recalculate levels (realign up/down) and demands when the U/P or the IU is changed.
5.2.1.10.5. Inventory Unit/Adjusted U/S. The IU, formerly known as the U/S, is
located in the Inventory Information box of the LOG Catalog tab window. DMLSS
allows for purchasing an item using one U/P and stocking and selling it using another
U/S. Note: LOG sells materiel in the same U/M used for inventory purposes.
Materiel managers can adjust the packaging or ―breakdown‖ an item into smaller IU,
maximizing stock rotation and consumption. Adjusting the U/S also accommodates
customers with limited storage space. Items cannot be adjusted while due-ins and/or
due-outs exist. Also, an item with a U/P Quantity equal to ―1‖ cannot be adjusted.
An item is considered adjusted when the U/P, assigned in the SOS Catalog tab, and
the IU are different. Figure 5.1 reflects one possible scenario. Notice the U/P is BX of 100 and the IU is PG of 10.
5.2.1.10.6. Select the ―Leveling‖ option to view and/or update LOG operating level
type, level, and ROP.
5.2.1.10.6.1. Select a Level Type of Core, Static, or Stockless. While under
normal circumstances, it is desirable to allow the system to perform inventory
control, there are conditions that warrant local control of stock levels. Below are
some examples of situations that would warrant non-computer controlled levels.
5.2.1.10.6.1.1. New items that do not have consistent issue consumption or pipeline time data recorded.
5.2.1.10.6.1.2. Items with erratic issue consumption.
5.2.1.10.6.1.3. An item that is being phased out of inventory.
5.2.1.10.6.1.4. Special items that must be maintained at a specific level regardless of low or infrequent demands.
5.2.1.10.6.1.5. Mission changes that have an immediate impact on issue
consumption.
5.2.1.10.6.2. While it is adjustable, AF policy states the Computation Method for
all items should be set to ―Days of Stock.‖ The Estimated Monthly Usage field
for PV items can also be viewed here. In addition, the History Begin Date
(HBD), last six pipeline dates and days, and the last 24 months of consumption history are recorded in the Leveling window.
5.2.1.10.6.3. Refer to Chapter 14, Inventory Control, for additional information.
5.2.2. Creating a New MTF Catalog.

AFMAN41-216 13 FEBRUARY 2013 123
5.2.2.1. Items not listed on the UDR or DMLSS Extract and items that do not have
existing equivalent records require a new MTF Catalog item record. To add a new MTF
Catalog record, access the Navigate option from the menu bar or by using DMLSS
shortcut ―Ctrl+Shift+F2.‖ The requirements to build a new catalog record are the same as creating a catalog record using the search option. Refer to section 5.2.1. for details.
5.2.2.2. Personnel creating new catalog records should have thorough knowledge of the
item prior to building the record. As explained in paragraph 5.2., all required fields must
be completed properly so DMLSS will propagate all related tables and fields with reliable
data. Entering and saving additional data, such as the MFG‘s name, MFG‘s part number,
NDC, NSN, etc. are essential to a smooth acquisitions process. Basically, to be successful all essential data should be entered into the catalog record.
5.2.3. Customer Catalog Item. To access, select New Catalog Item from the Navigate menu
and then click ―Customer Catalog Item.‖ Enter the required information (fields with red
dots). Most of the fields populate with information from the MTF catalog record once the
item is added to the customer catalog. Validate existing conversion information, inventory
value, and issuing information. Once the customer‘s catalog record is saved, add the
customer‘s level if required and save the changes. Catalog records may also be added to a customer‘s catalog using the Cust Cat tab of the MTF detail record.
5.3. Catalog Search.
5.3.1. Select ―Catalog Search‖ from the Navigate menu or select the ―Cat Search‖ icon located on the horizontal toolbar to access this function.
5.3.2. The Catalog Search module is used for adding, retrieving, editing, and storing catalog
information. Use the Catalog Search module to conduct research on products currently used
by a MTF as well as on new items the facility is considering for use. The search provides
MTF personnel information such as item costs, available sources, and unique characteristics
associated with particular products. The DMLSS catalog search function combines a
multitude of catalogs into an easy-to-use automated tool that provides information on the
majority of products from both commercial and DoD sources to include items already
managed within the MTF.
5.3.2.1. The Catalog Search window contains multiple search tabs and allows individuals
to search the database for information using basic, advanced, or categorical search
criteria. The maximum number of records DMLSS will retrieve during each search is
500. The system defaults to the first 500 matches. Users can adjust the search limit
lower than 500 records but not greater than this limit. The limit is enforced to minimize
server demands and to maximize server performance. In order to search for "inactive"
(Deleted) catalog records, the user must check the "deleted" box.
5.3.2.2. Data may be entered into multiple fields to minimize search results. Some of the search fields may or may not be available for use depending on the selected scope.
5.3.3. Basic Search Tab.
5.3.3.1. In DMLSS 3.1.2, individual or multiple catalog records can be accessed with a
basic search. When using this option, the system displays all catalog records containing
the keyword or number requested. The Basic Search tab (Figure 5.8.) contains search

124 AFMAN41-216 13 FEBRUARY 2013
and filter options. Use the Search By box to enter keywords or numbers. Multiple
words are allowed in the description field, and the search will query both the short or
long item description. The Number field searches the Item ID, NDC, NSN, GTIN, PVON, manufacturer catalog number or Vendor Item Number, and ECAT Numbers.
Figure 5.8. Catalog Search, Basic Search Tab.
5.3.3.2. The Filter By box allows the user to filter by the pricing agreement or PV.
These dropdown menus show all pricing agreements or PVs actionable by that particular
site.
5.3.4. Advanced Search Tab. The advanced search tab (Figure 5.9.) offers searchable fields differ based on the selected scope.
Figure 5.9. Catalog Search, Advanced Search Tab (Local Catalog Related Search Fields).
5.3.4.1. A search can be conducted for either active or deleted records when the selected
scope is LOG Catalog, MTF Catalog, or Customer Catalog. DMLSS will search and
retrieve only active records if both the active and deleted boxes are unchecked. DMLSS
responds with the message ―NO RECORDS FOUND‖ if no matches are located. If
records are available, DMLSS totals the records and displays them under the Search System Results tab.
5.3.4.2. Customer Catalog Scope. A customer ID must be selected prior to searching for a catalog record within a specific Customer Catalog.
5.3.5. Categorical Search Tab.

AFMAN41-216 13 FEBRUARY 2013 125
5.3.5.1. A search can be processed for items classified as either Pharmaceutical or
Medical/Surgical. The Pharmaceutical categorical search uses the American Hospital
Formulary Service (AHFS) classification to provide groupings of items. The
Medical/Surgical search uses the Cardinal Healthcare (formerly Supplyline) classification system to provide groupings of items.
5.3.5.2. To conduct a search, select a category and sub-category from the list, then click
―Search‖ from the vertical toolbar. DMLSS responds with the message ―NO RECORDS
FOUND‖ if no matches are located. If matches are retrieved, DMLSS totals the records and displays them under the Search System Results tab.
5.3.6. Search Result Detail Tab. If records are available, DMLSS totals the records and
displays them under the Search Results Detail tab (Figure 5.10.). DMLSS responds with the
message ―NO RECORDS FOUND‖ if no matches are located. Modify the search criteria and retry if the expected results are not received.
Figure 5.10. Catalog Search, Search Result Detail Tab.
5.3.6.1. Drop Shipments Fee Indicator. With DMLSS 3.1.2/GEN IV, the catalog flags a
PVM item if it can be ordered only via a drop shipment and if there are additional fees
associated with it. Also, in the future under EBS, the vendors will be able to submit the drop shipment fees, if authorized, on the electronic Invoice (EDI 810).
5.4. Review MTF Catalog Changes.
5.4.1. MTF Catalog changes are a result of changes made automatically by UDR updates
and those accepted by users. Select ―Review MTF Catalog Changes‖ from the Navigate
menu to review affected catalog records. Select an ―As of Date‖ from the menu once the window is open.
5.4.2. MTF Catalog Changes. This option is used to search, view, and/or print catalog
update data that has already processed. The system displays all catalog data for each record
being displayed. However, the following data fields directly identify potential updates. Focusing on these data fields will allow technicians to efficiently complete this task.
5.4.2.1. Element Changed - Identifies catalog data field to be updated.
5.4.2.2. From - Displays existing data to be replaced.

126 AFMAN41-216 13 FEBRUARY 2013
5.4.2.3. To - Displays new data to be placed in the identified element field.
5.4.3. Recommended MTF Catalog Changes. Use this option to search, view, print, accept,
and/or reject potential MTF Catalog record updates. These are recommendations that the site
has not previously accepted, rejected, or suppressed. The information appears on either a critical or noncritical tab.
5.4.3.1. Critical tab examples include the expiration type code and shelf life code.
5.4.3.2. Non-critical tab examples include the device code and item descriptions.
5.4.4. Work potential catalog updates daily if possible, in order to maintain current data and
standardize records DoD-wide. However, users may choose to suppress a suggested change
for up to 12 months.
5.5. Mass MTF Catalog Changes.
5.5.1. The Mass MTF Catalog Changes function allows users to simultaneously apply the
same update to multiple catalog records. Select ―Mass MTF Catalog Changes‖ from the Navigate menu to access this function.
5.5.2. First, identify the catalog records requiring update. Enter the criteria for the desired
records and click ―Search.‖ In the lower section of the window, select the items to be changed. Click ―Select All‖ to select the entire list.
5.5.3. Next, in the top section of the window, identify the new data value(s) to be applied to the selected catalog records. The following data may be mass updated using this function.
5.5.3.1. Manufacturer (See the Note below in 5.5.3.5.).
5.5.3.2. Hazmat Code (See the Note below in 5.5.3.5.).
5.5.3.3. Location.
5.5.3.4. Standardized.
5.5.3.5. Note: The Manufacturer and Hazmat Code are uneditable to the DMLSS users
if the catalog record is sourced to an SOS type of DPV, DLA or ECA. This field can only be modified via the daily UDR feed.
5.5.4. Click ―Apply‖ to affect the changes, then ―Save‖ to process the changes. Select ―Print‖ from the vertical toolbar to obtain a printed report of catalog record updates.
5.6. Source of Supply (SOS).
5.6.1. New SOS. Utilize the New SOS option to create a new SOS. From the Navigate
menu, select ―SOS,‖ then click ―New SOS‖ or use the DMLSS shortcut ―Ctrl+Shift+F4‖ to
access this function. It can also be accessed by selecting the ―SOS‖ icon on the horizontal
toolbar, then click ―New.‖ A SOS record must be created for every vendor and associated to
the respective MTF/LOG catalog record(s) prior to processing orders through the system for
each vendor. Users should search for existing SOS catalog records prior to adding new
records. This will help minimize duplicate SOS records. Once the SOS catalog record is
established, each item being purchased from that vendor must be linked to the SOS. Refer to
section 5.2.1.4.19. for MTF Catalog record/SOS updates. If the new source is an official
DoD contracting office and the SOS Type Code is equal to ―CON,‖ then the contracting

AFMAN41-216 13 FEBRUARY 2013 127
office‘s DODAAC is required. A list of contracting office‘s DODAACs is located in the TMU in SS. It is titled ―CON DODAAC‖ and is located in the IM application.
5.6.1.1. Example. The vendor is Beck-Lee, Inc. and the vendor‘s data (Figure 5.11) was
obtained from the DBPA Report located on the AFML website.
Figure 5.11. Vendor Data from DBPA Report.
5.6.1.2. Basic Tab. Use the Basic Tab (Figure 5.12.) to identify the supplier‘s name,
SOS type code, SOS code, and additional purchase, delivery, and receipt information.
Mandatory data fields are marked with a red dot. All other available data should be loaded and saved in the Basic tab as it is important to the purchasing and billing process.
Figure 5.12. Source of Supply – (New), Basic Tab.
5.6.1.2.1. Applying the correct SOS type code is crucial. The SOS type code dictates
what data is required in the additional tabs. Once saved, this code cannot be changed.
If a mistake is made, click ―Close‖ to exit the window and do not save changes.
Open the New SOS function to start over. The following further identifies the
available SOS type codes:
5.6.1.2.1.1. BPA – Blanket Purchase Agreement (Local).
5.6.1.2.1.2. CON – A recognized government contacting office.
5.6.1.2.1.3. DBP – Decentralized Blanket Purchase Agreement.
5.6.1.2.1.4. DLA – Defense Logistics Agency.

128 AFMAN41-216 13 FEBRUARY 2013
5.6.1.2.1.5. DPV – DLATS Prime Vendor.
5.6.1.2.1.6. ECAT – Electronic Catalog.
5.6.1.2.1.7. EXT – External Logistics Agency.
5.6.1.2.1.8. GSA – General Services Administration.
5.6.1.2.1.9. NON – Non-Contracted (Only GPC orders).
5.6.1.2.1.10. RPV – Reachback DLATS Prime Vendor.
5.6.1.2.1.11. VPV – Veteran‘s Admin PV.
5.6.1.2.1.12. HUB - HUB source of Supply.
5.6.1.2.2. For SOS type code ―NON,‖ DMLSS offers an Auto Assign function that
can be used to auto populate the SOS code for non-contracted sources. This option
will assign the next sequential SOS code available based on criteria loaded in SS.
When this option is selected, all required fields populate with the exception of the
Supplier‘s Name. DMLSS interprets non-contracted sources as if all purchases will
be paid for using the GPC; therefore, the ―Accepts Purchase Card‖ box is checked.
The default payment method is the user‘s GPC and all orders are written to the users‘ Purchase Card Register upon submitting orders.
5.6.1.2.3. Enter the average delivery time from vendor into the Estimated Lead Days
field.
5.6.1.2.4. The Acknowledgement Hours field is defaulted to 2 hours. The data in this
field is only applicable when DMLSS electronically interfaces with the vendor.
Logistics personnel should modify this field when necessary. If an order is not
confirmed by the vendor within this time frame, the system will write the order
information to the Troubled Due-in Report that appears in the IM Inbox. For
example, the PV SOSs default to 2 hours based on contract terms. If a different
vendor confirms the order in 2 days, then the default should be set to 48 hours.
5.6.1.2.5. If the ―Accept Purchase Card‖ box is checked, all orders to that SOS will
default to GPC payment method and all purchases will write to the user‘s Purchase
Card Register. It is highly advised that the Accept Purchase Card indicator not be
checked for SOS type code ―DBP.‖ The rationale is that these vendors already have a
negotiated contract vehicle in place. Using a GPC to facilitate procurement only adds
additional work at the back end of the process (reconciliation). The user must have a
GPC and have GPC Holder privileges assigned in DMLSS prior to processing orders
to vendors that accept GPC payments. An override option exists in the orders module and should be utilized when processing non-GPC payment method orders.
5.6.1.2.6. Enter the vendor‘s assigned Dunn & Bradstreet Serial Number (DUNS)
number into the Vendor ID field. The financial interface process uses this number to identify vendors.
5.6.1.2.7. When the SOS Type code is equal to ―CON,‖ the DODAAC and Primary
Source fields become mandatory in the SOS Catalog tab of each item‘s catalog record
associated to a contracting SOS.

AFMAN41-216 13 FEBRUARY 2013 129
5.6.1.2.8. A Stockless indicator exists in the Basic Tab of all SOS records. When
activated/checked, all catalog records without a LOG level, and associated to that
SOS Code are considered Stockless unless otherwise modified. Item IDs containing a
level quantity > 0, are not affected. Newly established catalog records associated to a
stockless SOS will default to Level Type of Stockless. The level type for catalog
records associated to a stockless SOS can be manually changed to Core or Static.
When the Stockless option is inactivated/unchecked, all catalog records with a level
type of Stockless will be reassigned to level type of Static. Items with an existing
level will maintain their existing level type.
5.6.1.2.9. The BPN ID, DUNS Suffix code, and Trading Partner code are applicable
to the Army and used for within the General Fund Enterprise Business System (GFEBS).
5.6.1.3. Submission Tab.
5.6.1.3.1. Use the Submission tab (Figure 5.13.) to identify how orders are usually
submitted to the vendor. The available default submission methods will vary
depending on the assigned SOS type code. For example, an electronic submission
method FTP will be available for SOS type code DPV but not for NON. The
assigned Default Submission Method dictates which fields are mandatory within this
tab. However, it is highly suggested that all available data be loaded into the data
fields. This tab offers a great way to maintain vendor contact information such as
phone numbers, fax numbers, email addresses, etc. regardless of the submission method.
Figure 5.13. Source of Supply – (New), Submission Tab.
5.6.1.3.2. Login and password information must be obtained from the SOS. IAW
systems security measures, the passwords will not be visible to system users. Also,
current security protocols dictate that most passwords are changed every 90 days.
Keep this in mind when interface problems occur with the vendor.
5.6.1.4. Contract Tab.

130 AFMAN41-216 13 FEBRUARY 2013
5.6.1.4.1. The Contract tab (Figure 5.14) will only appear for contracted sources.
They are SOS type codes BPA, DBP, DPV, and VPV. Loading contract information
is essential. Be sure to enter the correct contract number when loading data in the
Contract Number field as this data is populated in EDI requisition files as well as
appearing on DD Form 1155s (i.e. use ―O‖s and ―zeroes‖ properly). When
processing orders, the system will automatically assign the next available call number
for that source when the Auto Generate Call Number box is checked. The user is
required to load the beginning and ending call numbers. Recommend using ―0001‖
through ―9999‖ unless otherwise designated. The Last Call Number Used field will update as orders are processed to the vendor.
Figure 5.14. Source of Supply – (New), SOS Contract Tab (Current Contract).
5.6.1.4.2. The contract start and end dates are always dictated by the negotiated
contract. However, the start and end dates loaded for the ―Current Contract‖ and the
―Next Contract‖ will vary depending on the source type. For example, if loading
contract data for a PV, the Start Date and End Date should coincide with the contract.
If the source has a DBPA, then the start and end dates should coincide with the FY
because at the beginning of each FY, the ―FY‖ portion of the contract number changes.
5.6.1.4.3. When a contract is within 60 days of expiration, a notification of the
impending contract termination appears in the IM Cannot Activate Next Contract
pending action. It is important to act promptly because if the end date passes without action, the SOS can no longer be used.
5.6.1.4.4. When exercising option years, access the SOS record and update the
contract ending date. This only refers to contracts that will maintain the exact same
contract number. If the contract number changes, use the Next Contract function (e.g. DBPAs).

AFMAN41-216 13 FEBRUARY 2013 131
5.6.1.4.5. Once the new contract is activated there is no way to reactivate or access
the old contract. Users may also manually activate the new contract by selecting the
―Activate Next Contract‖ button. The end date of the current contract and the start date of the new contract cannot overlap when manually activating the next contract.
5.6.1.4.6. Loading and Using the Secondary PV Contracts.
5.6.1.4.6.1. Activate and load the secondary PV contract by accessing the TMU
table in SS, then select the SS application. Open the Secondary PV Selection
table and change the secondary field to ―YES‖ for the appropriate secondary PV
contractor. Note: Only select the secondary PV assigned to your respective region. Save the updated data then open the SOS module in the IM application.
5.6.1.4.6.2. Create a new SOS record for the secondary PV. Use SOS Type
―DPV‖ and the SOS code ―PV_.‖ You can enter the next sequential number not
in use. For example, PV1 and PV2 are currently dedicated for Back-up
MEDSURG and Pharmaceutical vendors worldwide. If you currently have no
backup MEDSURG or Pharmaceutical Prime Vendor, assign the SOS codes of
PV1 and PV2 respectfully. If your server already has PV1 and PV2 established, then proceed assigning PV3 and so on.
5.6.1.4.6.3. In the basic tab of the primary PV, select the ―Backup PV SOS‖ for
the Secondary PV from the drop down menu.
5.6.1.4.6.4. The secondary PV is now active and available for use. A SOS record
must be loaded for the secondary PV in order to process orders to that vendor. The secondary PV may not be used as the default LOG SOS value.
5.6.1.5. Address Tab.
5.6.1.5.1. Three different addresses can be maintained in the Address tab (Figure
5.15). It is advisable to load the address data for both Ordering and Remit To
addresses even if they are the same. The Find radio button can be used to search the
database for existing addresses. If an existing address already exists, select the
address and the Address Tab fields will update with the existing address.
Figure 5.15. Source of Supply – (New), Address Tab (Order/Remit to Addresses).

132 AFMAN41-216 13 FEBRUARY 2013
5.6.1.5.2. Select the ―Shipping Address‖ box to load or edit the shipping address.
This address should be the site‘s ship to address or the address the materiel is to be
delivered.
5.6.1.6. POC Tab. The POC tab (Figure 5.16.) offers an automated means to document
all known contact information. It also provides a centralized storage area for that data. If
utilized properly, purchasing agents will have the necessary contact data available to
them when processing orders to that vendor. These data fields are not mandatory until data is entered into at least one field.
Figure 5.16. Source of Supply – (New), POC Tab.
5.6.1.7. Environment Tab.
5.6.1.7.1. The OPR and safety levels that correspond with annual sales for the
associated SOS are located in this tab. Figure 5.17. lists the default values for these
fields. If any of these fields are changed, a radio button titled ―Reset to Default‖ will appear. Click this button to reset the OPR and safety levels to system default values.

AFMAN41-216 13 FEBRUARY 2013 133
Figure 5.17. Source of Supply – (New), SOS Environment Tab.
5.6.1.7.2. The OPR and safety levels maintained in the Environment tab are utilized
to calculate item levels for item IDs associated to the SOS. Refer to Chapter 14 for level and calculation formulas.
5.6.2. Search SOS.
5.6.2.1. Access the SOS Search window from the Navigate menu or by clicking on the
―SOS‖ icon on the horizontal toolbar. Users should always search for existing SOS
records prior to adding a new SOS record to eliminate duplicate records. Use the Search
SOS option to view and edit vendor data as necessary. Remember, once the SOS Type
Code is saved it cannot be changed.
5.6.2.2. Conducting a search for an existing SOS record can be accomplished using a
few different methods. The first option is to search by SOS code. Another option is to
search by SOS type code. Users can also conduct a search using the supplier‘s name.
Finally, all SOS records can be viewed by clicking the ―Search‖ icon on the vertical toolbar.
5.6.2.3. The data maintained in the SOS record is directly relevant to the information
printed on the DD Form 1155. The following links some of the pertinent information to
the forms:
5.6.2.3.1. Block 1 – Contract/Purchase Order/Amendment Number:
5.6.2.3.1.1. If the SOS type code is not equal to BPA, DBP, DPV, or VPV then the SOS code from the Basic tab is displayed.
5.6.2.3.1.2. The contract number from the contract tab is displayed if the SOS type code is BPA, DBP, DPV, or VPV.
5.6.2.3.2. Block 6 – Issued By data is retrieved from the MM Service Ship to
Address located in SS.
5.6.2.3.3. Block 7 – Remit to Address is pulled from the Remit To address in the Address Tab.
134 AFMAN41-216 13 FEBRUARY 2013
5.6.2.3.4. Block 9 – Contractor information:
5.6.2.3.4.1. Supplier name is retrieved from the Basic tab.
5.6.2.3.4.2. The address reflected in block 9 is the Order Address loaded in the Address Tab.
5.6.2.3.4.3. The phone number is retrieved from the POC Tab.
5.6.2.3.4.4. The SOS Code is written to the ―Code‖ box in block 9.
5.6.2.3.5. Block 14 – Ship To data is retrieved from the MM Service ship to address
located in SS.
5.6.2.3.6. Block 15 - The payment address information in block 15 should reflect the
paying DFAS office‘s information. It is retrieved from the Bill To address located in
the MM Service detail record within SS. The ―Supplementary Addr/Bill to
DODAAC‖ located on the basic tab of the MM Service detail record is printed in the
―Code‖ field in block 15. The DODAAC is required so vendors can properly load billing information into the WAWF application.
5.7. Purchase Card. Use the Purchase Card module for adding, retrieving, editing, and storing
GPC information. This module also enables AOs and GPC holders to monitor purchase card use
and reconcile purchases against monthly bank statements. Privileges and roles required to access purchase card functions must be assigned in the SS module prior to use.
5.7.1. Purchase Card Status.
5.7.1.1. The Purchase Card Status inquiry provides a method for GPC holders and AOs
to manage the purchase card program. Users can view or print status for all GPC holders
or search for an individual GPC holder. Check the ―Include Deleted Cards‖ box to view GPC data marked for deletion.
5.7.1.2. The Purchase Card Status Summary screen displays GPC management data in
account number sequence and includes the following data:
5.7.1.2.1. PC Alias – Reflects either the last four digits of the purchase card number or a combination of the DMLSS user ID and sequence
5.7.1.2.2. Account Name – Reflects the card holder‘s name and should match the name printed on the actual purchase card (i.e. VISA).
5.7.1.2.3. Holder ID – Same as user ID.
5.7.1.2.4. Holder Name – Same as name loaded in user POC table.
5.7.1.2.5. Register Status – This field identifies the working status of the GPC
holder‘s register. Use this field to determine whether the cardholder is reconciling the register. The Register Status field will be either Working or Executed.
5.7.1.2.6. Current Statement Date – Reflects the bank statement date of the last reconciliation. Managers should review this date to verify reconciliations are current.
5.7.1.2.7. Primary GPC – Identifies whether or not the card is designated as the
primary GPC for the cardholder.
5.7.1.2.8. Ownership – Will always equal ―LOG.‖

AFMAN41-216 13 FEBRUARY 2013 135
5.7.1.2.9. Type – Will always equal ―Stock.‖ Purchase cards issued for commercial services are not loaded in DMLSS.
5.7.1.2.10. Deleted – Identifies whether or not a card is marked for deletion.
5.7.2. Deleted Purchase Cards. This module reflects all Purchase Cards, by PC Alias,
Account Name, and cardholder which have been retired/deleted.
5.7.3. New Purchase Card.
5.7.3.1. The data for all users assigned a GPC must be added to DMLSS prior to that
user processing GPC purchases. DMLSS automatically associates purchases to the user‘s
Purchase Card Register when placing orders to vendors that accept the purchase card
payment method, refer to paragraph 5.6.1.2.5. At this time, the DMLSS SA should assign purchase card privileges commensurate with the cardholder.
5.7.3.2. From the IM Navigate menu, select ―Purchase Card,‖ then ―New Purchase Card‖
to add new cardholder data. The Purchase Card-New window contains multiple panels.
The AO initially enters the following information and upon clicking ―Save‖ enters the cardholder‘s 16-digit account number.
5.7.3.2.1. In the Cardholder Information panel, select the GPC holder‘s DMLSS user
ID from the dropdown list. When the user ID is selected, the user‘s name, as it is
loaded in DMLSS, will be displayed in the adjacent Name field.
5.7.3.2.2. In the Purchase Card Information panel, enter the following information:
5.7.3.2.2.1. Card Name – Enter the applicable bank name in this field.
5.7.3.2.2.2. Expiration Date – Enter the expiration date as it appears on the front
of the user‘s credit card. However, DMLSS requires a four-digit year. If the expiration date is 07/12, then enter 07/2012.
5.7.3.2.2.3. Primary Indicator – In some instances a purchasing agent may be
assigned multiple GPCs. In this situation, check this indicator to identify the
user‘s primary card. All purchases will default to the user‘s primary card within
the IM Orders module. An Override option exists in the Order module so the
purchase agent can associate purchases to an alternate GPC when appropriate.
5.7.3.2.2.4. Delete Indicator – This option is not accessible unless a card is
already established. Mark a card for deletion using the Search Purchase Card option.
5.7.3.2.3. Purchase Card Information panel.
5.7.3.2.3.1. Enter the appropriate dollar limits in the Per Order and Per Month
fields. This information should correspond with limits approved by the Base Purchase Card administrator.
5.7.3.2.3.2. The Default Contract Number Field will auto populate with an "I"
and a four digit alphanumeric combination, i.e., UT01. The last four digits can be
changed to reflect the last four digits of the users GPC account number, i.e.,
I3456. This field is editable; however, it is highly recommended that users
maintain the system default. If the contract number is modified, be certain to

136 AFMAN41-216 13 FEBRUARY 2013
maintain an ―I‖ in the first position. The ―I‖ is an indicator recognized by Finance as a GPC purchase and all detail records will bypass IAPS and populate SMAS.
5.7.3.2.4. Funds Panel. The fund type within the Funds window will always be
associated to ―Stock Fund‖ for AF users. The Ownership Code in the Ownership window will always be associated to LOG for AF users.
5.7.3.2.5. Customers Panel. Data within the Customer window is not editable for AF
sites. The expense center defaults to LOG, the CC defaults to ―blank,‖ and the
customer ID is defaulted to the site‘s DODAAC.
5.7.3.2.6. In the Approving Official panel, select the AO‘s DMLSS user ID from the
dropdown box. When the user ID is selected the user‘s name, as it is loaded in DMLSS, will be displayed in the adjacent Name field.
5.7.3.3. Click ―Save‖ from the vertical toolbar once all data is entered into the Purchase
Card-New window. Upon saving, the window name will change to Purchase Card
(account number). In this window, the AO initially enters the 16-digit account number.
The cardholder is required to confirm the 16-digit account number when he/she first
accesses the account in DMLSS. Once confirmed, the card number is not legible and becomes encrypted.
5.7.4. Search Purchase Card. From the Navigate menu, select ―Purchase Card,‖ then
―Search Purchase Card‖ to access this function. Use the Search Purchase Card option to
access existing GPC records. Purchase card information can be viewed, edited, and printed
once retrieved. Use this option to mark a record for deletion or undelete a user‘s purchase
card. Detailed data associated to a deleted card remains visible until all actions associated to
the purchase card are complete and all transactions are reconciled.
5.7.5. Purchase Card Register.
5.7.5.1. The Purchase Card Register is accessible by selecting ―Navigate,‖ ―Purchase
Card,‖ then ―Purchase Card Register.‖ Cardholders use the Purchase Card Register to
manage their purchase and receipt transactions. It can also be used by AOs to monitor
each cardholder‘s actions.
5.7.5.2. A Purchase Card Register may be accessed by either searching for an
individual‘s user ID, PC Alias, or selecting ―Deleted.‖ Use the dropdown box in the
Account field to identify which Purchase Card Register is to be viewed. The statement
month defaults to the last month reconciled but can be changed when necessary. Two
Purchase Card Register modes are available: Reconcile and Read-Only. Use the
Reconcile mode to access GPC transactions that have not been reconciled and interfaced
with DFAS or ―Executed.‖ Use the Read-Only mode to access transactions that have
already been interfaced with DFAS or ―Executed.‖ When using this mode, the register
separates and saves transaction data according to the month and year the reconciliation
was completed. The registers for both modes reflect the same data.
5.7.5.3. The Purchase Card Register window (Figure 5.18.) is divided into three sections.
The upper section contains the GPC information, middle portion displays the actual Purchase Card Call Register, and the bottom section displays the other information.

AFMAN41-216 13 FEBRUARY 2013 137
Figure 5.18. Purchase Card Register window.
5.7.5.3.1. Purchase Card Information. The GPC information displayed in this section
directly correlates to the cardholder‘s GPC record.
5.7.5.3.1.1. The Current Statement is the date populated by the user in the Select the Purchase Card Account to Reconcile window.
5.7.5.3.1.2. Users may enter the bank statement total from the monthly credit
card statement into this field; however, this field is optional. If used, DMLSS will
compare the bank statement total to the DMLSS statement total and populate an
out of balance amount. A price value error exists if these values differ. In this
instance, the user must research each transaction to verify the DMLSS price
matches the price charged to the credit card.
5.7.5.3.1.3. Default Statement Amount box. The Order Total will populate in full
to the Current Statement Amount and Total Balance Paid fields when the Default Statement Amount box is checked.
5.7.5.3.1.4. The Register Status can be either Working or Executed. The status
defaults to ―Working‖ during the reconciliation process and changes to ―Executed‖ upon completing the reconciliation process.
5.7.5.3.2. Purchase Card Call Register. Use the Purchase Card Call Register to
reconcile purchases once the charges are applied to the cardholder‘s bank statement.
Cardholders are required to reconcile charges in DMLSS at least monthly, but they
can also reconcile multiple times during a statement period. The reconciliation
process is twofold, customers should reconcile with DMLSS and their applicable
banking agency. As a general rule, the DMLSS Purchase Card Register can be
reconciled upon receipt and the banking statement can be verified and approved upon billing.
5.7.5.3.2.1. All GPC orders processed by users assigned as GPC holders are
automatically written to the Purchase Card Call Register of the user who is logged
into DMLSS at the time. GPC orders are generated in either IM or AM. Detail
records cannot be manually added to the Purchase Card Register. Notable

138 AFMAN41-216 13 FEBRUARY 2013
Purchase Card Register fields are as follows:
5.7.5.3.2.1.1. Reconcile – Defaults to open/unchecked when added to the
register. This box is checked when the detail record is selected for
reconciliation.
5.7.5.3.2.1.2. Reconciliation Code – N = New; P = Partial; D = Disputed; and Y = Complete (Figure 5.19).
Figure 5.19. PC Reconciliation Codes.
5.7.5.3.2.1.3. Statement Date – Month and year of reconciliation.
5.7.5.3.2.1.4. Order Type – Materiel = commodities order; Service = order for services (Should always be Materiel for AF).
5.7.5.3.2.1.5. Order Total – Total order amount.
5.7.5.3.2.1.6. Order Status – Receipt Status; Open = not received, and Closed = received.
5.7.5.3.2.1.7. Current Statement Amount – Amount being reconciled; should
match bank statement.
5.7.5.3.2.1.8. Previous Balance Paid – Amount of previous reconciliation; associated to a previous partial reconciliation.
5.7.5.3.2.1.9. Total Balance Paid – Current and past amounts reconciled.
5.7.5.3.2.1.10. Order Adjustment – Purchase Card adjustment amount; should only be used for unknown shipping charges.
5.7.5.3.2.1.11. Order Date – Date order was processed in DMLSS.
5.7.5.3.2.1.12. Order Call Number – Auto generated upon procurement;
assigned per SOS.
5.7.5.3.2.1.13. SOS Code – SOS code.

AFMAN41-216 13 FEBRUARY 2013 139
5.7.5.3.2.1.14. Contract Number – Will either be the SOS code or contract
number. If SOS type code is NON the SOS code will populate this field. If
contracted SOS, the contract number will populate this field.
5.7.5.3.2.1.15. Supplier Name – Vendor name from SOS record.
5.7.5.3.2.1.16. Purchase Card Call Number – Auto assigned; assigned per cardholder.
5.7.5.3.2.1.17. Vendor Reference Number – Same as order confirmation number. Data must be documented during the procurement process to appear.
5.7.5.3.2.1.18. DFAS Document Number – Document number posted by
DFAS. Only populates after reconciliation process is complete and interface with Finance is completed.
5.7.5.3.2.1.19. DFAS Trans Date – Date DFAS document number is posted by Finance.
5.7.5.3.2.1.20. Order Strat Type – OPR = Operational; WRM = War Reserve
Materiel.
5.7.5.3.2.1.21. Customer of Origin ID – Identifies who purchased the product, normally will equal local DODAAC.
5.7.5.3.2.1.22. Customer of Origin Name – Further identifies who purchased the product, normally will be Medical Materiel.
5.7.5.3.2.2. Register Status – Either Working or Complete. Defaults to Working
during reconciliation process. Change to Complete after monthly reconciliation.
5.7.5.3.3. Order Information Tabs.
5.7.5.3.3.1. The Order Detail Tab provides an overview of a selected order detail
and is populated directly from the Purchase Card Register. The order
reconciliation action and statement amount are entered into this tab during the
reconciliation process. See Figure 5.19. for available Reconciliation Action codes.
5.7.5.3.3.2. The Statement History Tab reflects the history of reconciliation
actions against each purchase detail when actions are other than ―Y.‖ The Void
function is also available in this tab. This function allows cardholders to void
actions when changes need to be made against a specific call. When a call is
"voided" and there were previous PCA transactions linked to the call, the system
will generate new PCA transactions containing dollar amounts that result in a net overall PCA value of $0.00.
5.7.5.3.3.3. The PCA Information tab reflects purchase card adjustment
transactions that processed to either obligate additional funds or deobligate funds
in order to finalize the purchase and reconciliation process. PCAs are considered
pending and are applied to an expense center and SVC/CUST ID after the
DFAS/Execute icon from the vertical toolbar is selected. Users should generate
PCAs as a result of unknown shipping costs at the time of order. Correct detail price changes using the Price Correction function within Transaction History.

140 AFMAN41-216 13 FEBRUARY 2013
5.7.5.4. Reconciling PC Orders.
5.7.5.4.1. Select the account to reconcile by user ID or GPC Alias. Set the Register
Mode to ―Reconcile‖ to access the active Purchase Card Register. All active order
detail records are displayed in the Purchase Card Call Register.
5.7.5.4.2. Select a detail order record to reconcile by entering a check in the
Reconcile checkbox. Additional order information for the highlighted GPC detail
appears in the Order Detail tab. The order reconciliation information box becomes
active allowing updates to the Reconciliation Action and Statement Amount fields.
5.7.5.4.3. Select the Order Reconciliation Action code based on the status of the order. A detailed list of codes is available in figure 5.19.
5.7.5.4.4. Complete Order Reconciliation. Select one of the following action codes to finalize the reconciliation process.
5.7.5.4.4.1. Select action code ―Y‖ if no discrepancies exist and the order is
complete. The statement date field in the GPC detail record is updated with the statement date (month, yyyy).
5.7.5.4.4.2. Enter the statement amount.
5.7.5.4.4.3. If the statement amount equals the order total, the remaining balance will change to an order adjustment of $0.00.
5.7.5.4.4.4. If the statement amount does not match the order total, the PCA
window will open. PCA transactions were designed to assess unknown shipping
charges when the order was submitted. Use the price correction function in
Transaction History for all other price adjustments. The PCA is associated to the
SVC/CUST ID and expense center if only one is associated to the order. If
multiple accounts are associated to the order, the system requires the user to link
the PCA to one or more of the associated expense centers and SVC/CUST IDs. If
applying adjustments to multiple accounts, the user must also annotate the dollar
value being applied to each expense center and SVC/CUST ID. GPC adjustments
can only be applied to an expense center and SVC/CUST ID that was associated
to the order.
5.7.5.4.4.5. A positive PCA is generated if the statement total is greater than the order total. Funds are deducted from the expense center(s).
5.7.5.4.4.6. A negative PCA is generated if the statement total is less than the order total. Funds are credited to the expense center(s).
5.7.5.4.4.7. The current statement amount is updated to the statement price and
all adjustments are entered in the order adjustment field.
5.7.5.4.4.8. Click ―Save‖ to continue processing or ―Close‖ to exit the
Reconciliation Register. As explained in paragraph 5.7.5.3.3.3., PCAs are
considered pending at this point in the reconciliation process. Select the
―DFAS/Execute‖ icon from the vertical toolbar to process and apply PCAs to the
expense center and SVC/CUST ID. The PCA transaction commits, obligates, and
expenses funds, as well as interfaces with DFAS at this time. GPC holders are

AFMAN41-216 13 FEBRUARY 2013 141
encouraged to complete the DFAS Execute procedure in a timely manner. Failure
to complete will result in a posting of the call/s to the IM Delinquent Purchase
Card Reconciliation Report, Part 2. PCA transactions obligate from ―current‖
year funds. Failure to initiate the DFAS process could impact future year funds,
i.e, order reconciled in September; however, the DFAS button is not pushed until
November.
5.7.5.4.4.9. A detail record with an order status of ―Open‖ cannot be completed
with action code ―Y.‖ An order status of ―Open‖ indicates the item(s) on the order have not been received, therefore, cannot be reconciled as complete.
5.7.5.4.5. Partial Order Reconciliation. Select action code ―P‖ to process a partial
reconciliation. The statement date field is automatically updated.
5.7.5.4.5.1. Enter the bank statement amount.
5.7.5.4.5.2. The GPC details reconciliation code is updated to ―P-Partial‖ and the
current statement amount is changed to the entered amount. The remaining
balance in the Order Reconciliation is adjusted to reflect the remaining due-in
balance.
5.7.5.4.5.3. The Statement History tab is updated with the partial payment information upon saving updates.
5.7.5.4.5.4. To make changes to a partially reconciled order, the user must first
open the Statement History tab and void the original partial receipt. Voiding the
receipt resets the receipt to a reconciliation code of ―N-New‖ and allows for necessary adjustments. The void action is recorded in the Statement History tab.
5.7.5.4.5.5. Cardholders can process multiple partial reconciliations for a single
detail record. A reconciliation code of ―Y – Complete‖ is applied to the final
transaction.
5.7.5.4.5.6. Use the ―Notes‖ icon on the vertical toolbar to document all
information relevant to the order. Cardholders should document information such
as date contacted, POC‘s name, memorandum of discussion, follow-up actions,
etc. Once a note(s) is added, the Notes icon looks like an open notebook.
5.7.5.4.6. Disputed Order Reconciliation. Use reconciliation code ―D‖ to document a
disputed order. The statement date field in the GPC purchase detail is updated with the statement date (month, yyyy).
5.7.5.4.6.1. The reconciliation code is changed to ―D – Disputed.‖
5.7.5.4.6.2. Enter the statement amount. A natural tendency is to enter ―zero‖
because an item was either not received or it was damaged upon receipt. The
statement amount cannot be zero because the vendor billed the cardholder‘s
account. Enter the amount from the billing statement and contact the vendor and
GPC company to resolve the dispute.
5.7.5.4.6.3. The price entered will populate the statement amount field. The price entered should equal the billing statement and the amount Finance will pay.
5.7.5.4.6.4. Because the order is coded as Disputed, the system allows for fund

142 AFMAN41-216 13 FEBRUARY 2013
adjustments upon resolving the dispute. All actions are documented in the Statement History tab.
5.7.5.4.6.5. Use the Notes icon on the vertical toolbar to document all
information relevant to the order. Cardholders should document information such
as date contacted, POC‘s name, memorandum of discussion, follow-up actions, etc. Once a note(s) is added, the Notes icon looks like an open notebook.
5.7.5.4.7. Process Credit. Select reconciliation action code ―C – Credit‖ and enter
the statement amount to process credits. Credits are posted to the cardholder‘s
statement as disputes are resolved. When this happens, the appropriate Purchase Card Register Detail Record must be updated and completed.
5.7.5.4.7.1. A PCA transaction is generated and documented in the PCA
Information tab. As discussed in paragraph 5.7.5.3.3.3., PCAs are considered
pending at this point in the reconciliation process. Select the ―DFAS/Execute‖
icon from the vertical toolbar to process and apply PCAs to the expense center
and SVC/CUST ID. The PCA transaction commits, obligates, and expenses funds, as well as interfaces with DFAS at this time.
5.7.5.4.7.2. Select ―Save‖ to finalize the reconciliation. The process is complete when the funds data is passed to DFAS.
5.7.5.5. DFAS Icon. Users must select the DFAS icon from the vertical toolbar once the
monthly reconciliation is verified, correct, and complete. By clicking the DFAS icon, all
pending financial transactions are processed and detail records are interfaced with Finance.
5.7.5.5.1. Once selected, DMLSS will display the DFAS submissions window for the
statement month. The user ID, card number, and reconciliation totals are displayed.
The message ―This action is not reversible! Do you wish to continue?‖ appears. Choose one of the following actions:
5.7.5.5.2. Select ―Yes‖ to submit details to DFAS.
5.7.5.5.3. Select ―Cancel‖ to verify reconciliation totals.
5.7.5.6. Trans History Icon/Price Correction Tool. The PCA transaction was designed to
assess unknown shipping charges when the order was submitted. Use the price correction
tool in Transaction History to correct receipt prices. The PCA transaction commits,
obligates, and expenses current FY (CFY) customer and LOG funds only. Fund
obligations/deobligations are linked to the date the PCA is processed, not the date of the original order.
5.7.5.7. Find Calls Icon. The Find Calls function provides a method to search for
specific detail records by Order or GPC Reconciliation criteria. This function can be
helpful to cardholders who generate a large number of GPC purchases.
5.7.5.8. Edit Alias Icon. The Edit Alias function provides a method to document a
vendor‘s ―Alias.‖ In some instances, the vendor name that appears on the GPC statement is not the same as the Supplier‘s Name in the SOS record.

AFMAN41-216 13 FEBRUARY 2013 143
5.7.5.8.1. For example, the cardholder purchases materiel from ―Tazman Ind,‖ but
―Tazman Ind‖ does not appear on the monthly GPC statement. However, a company
named ―Aussi Subsidiaries‖ is charging the same dollar amount. After researching,
the cardholder finds that ―Aussi Subsidiaries‖ handles billing for ―Tazman Ind.‖ In
this instance, the cardholder should use the Edit Alias icon to document the alias
name, ―Aussi Subsidiaries.‖
5.7.5.8.2. All cardholders have visibility of alias names once they are saved.
5.7.5.9. Closed GPC records. Completed detail records are restratified to ―Closed‖
during the EOD process. To access these records, search the cardholder‘s Purchase Card Register using Register Mode ―Read Only.‖
5.7.6. Purchase Card Register Report.
5.7.6.1. The Purchase Card Register Report provides a method for cardholders and/or
AOs to retrieve GPC acquisition data based on selected search criteria. Because this data
is retrievable at any time, cardholders are not required to maintain a manual Purchase
Card Register. If a local requirement dictates a hardcopy of the register must be
maintained IAW AFRIMS T 41-04 R 31.00, then each cardholder can print a monthly report for permanent filing.
5.7.6.2. The date range can be specified for either order date or statement date. The date
range will return all order detail records meeting the date range criteria. A message
indicating there was no data for retrieval will be received if there were no orders for the date range.
5.7.6.3. The report can be sorted in either purchase card call or contract call sequence.
The GPC call number is assigned sequentially for each cardholder. The contract call
number is sequentially assigned for each SOS.
5.7.6.4. The report calculates a total extended price for all Order Detail Records retrieved.
5.7.7. Delinquent Purchase Card Reconciliation Report.
5.7.7.1. The Delinquent Purchase Card Reconciliation Report is used to identify closed
orders that are not reconciled (receipt has processed) and to identify reconciled orders
that have not been interfaced with Finance (DFAS button not selected). Cardholders and
AOs should use this report to verify GPC purchases are being reconciled in a timely manner and to minimize aged due-ins.
5.7.7.2. This report is separated into two parts:
5.7.7.2.1. Part I lists closed orders that have not been reconciled by the cardholder for
a specified period of time. The search criteria is defaulted to 60 days. Generally
speaking, if the materiel has been received, the cardholder should reconcile the order within 30 days.
5.7.7.2.2. Part II lists reconciled orders that have not been interfaced with Finance.
Items listed in part II have been reconciled, but the DFAS icon has not been selected.
As discussed in paragraph 5.7.5.5., the reconciliation process is not complete until the DFAS icon is selected.

144 AFMAN41-216 13 FEBRUARY 2013
5.7.8. Purchase Card Transfer.
5.7.8.1. The Purchase Card Transfer process allows a user, preferable an AO, to transfer
an order from one cardholder to another. This action will remove the detailed record
from the ―old‖ cardholder‘s Purchase Card Register and apply it to the ―new‖ cardholder‘s Purchase Card Register.
5.7.8.2. From the Navigate menu, select ―Purchase Card,‖ then ―Purchase Card
Transfer.‖ Enter required information and click ―Transfer‖ located on the vertical
toolbar. DMLSS locks both Purchase Card Registers until the transfer is complete.
5.7.8.3. The following rules must be met before the transfer will occur:
5.7.8.3.1. A transfer will not process if the order has been reconciled (Reconciliation Action Code equal to Y or C.).
5.7.8.3.2. Both purchase cards must be assigned the same fund type.
5.7.8.3.3. Both purchase cards must be assigned the same ownership code.
5.7.8.3.4. The ―To‖ purchase card must be privileged to process orders for that customer.
5.7.8.3.5. The transfer will not process if the ―To‖ purchase card has already been
reconciled for the date reconciled on the Order Detail Record.
5.7.8.3.6. Transfers will not occur if the order has been submitted to Finance but DFAS has not processed the transaction.
5.7.8.3.7. Transfers will not process if the order amount exceeds the ―To‖ GPC limit.
5.7.9. AO Purchase Card Transfer.
5.7.9.1. The AO Purchase Card Transfer function allows privileged users a quick and
easy method of reassigning cardholders from one AO to another. From the Navigate
menu, select ―Purchase Card,‖ then ―AO Purchase Card‖ to access this option. Transfers
will take affect once the EOD process is complete. The AO Purchase Card Transfer window is separated into two windows.
5.7.9.1.1. The left window displays a list of AOs and the cardholders currently
assigned to each AO. Also listed are cardholders that are not assigned to an AO.
5.7.9.1.2. The right window lists the AO‘s user ID, name, and status. Currently assigned cardholders are also listed in this window.
5.7.9.2. Highlight the ―From‖ AO so the assigned cardholders appear in the right window.
5.7.9.3. Simply ―drag and drop‖ the cardholder from the ―old‖ AO in the right window to
the ―new‖ AO‘s user ID in the left window. Click ―Save‖ when finished.
5.8. Physical Inventory.
5.8.1. Physical Inventory Process Overview. The Physical Inventory module enables users
to freeze assets for inventory, perform inventories, adjust balances, document inventories,
review inventory documents, and cancel inventories. Select ―Physical Inventories‖ from the
Navigate menu to access the Physical Inventories module. A typical inventory process

AFMAN41-216 13 FEBRUARY 2013 145
begins with selecting a set of items and locking them for inventory. The system produces
count lists that are assigned to teams for conducting inventory counts. After all required
counts are completed, potential overages and shortages are documented for research. The
inventory can be finalized after research has been completed. Some tasks related to physical inventories are:
5.8.1.1. Cancel Inventory.
5.8.1.2. Search Inventories for Specific Item.
5.8.1.3. View Count List Details.
5.8.1.4. View Statistics.
5.8.1.5. View Other Item Locations.
5.8.1.6. Add Item to Inventory.
5.8.1.7. Add Post-Inventory Action.
5.8.1.8. View Transaction History.
5.8.1.9. Print Inventory Research Report.
5.8.2. Select Inventory Segment.
5.8.2.1. Access the Select Inventory Segment window (Figure 5.20.) to select items to
lock for inventory. Locked items are assigned to inventory segments in item ID
sequence. The size of each segment depends on the number of items locked for
inventory. If the number of items locked is less than 1000, each segment is 50 items. If
the number of items locked is greater than 1000, each segment is 100 items. Items may be selected by:
Figure 5.20. Select Inventory Segment window.
5.8.2.1.1. IM Scope.
5.8.2.1.1.1. Stratification Type.

146 AFMAN41-216 13 FEBRUARY 2013
5.8.2.1.1.2. Stratification State.
5.8.2.1.1.3. Item ID.
5.8.2.1.1.4. Location.
5.8.2.1.1.5. Storage Area.
5.8.2.1.2. AM Scope.
5.8.2.1.2.1. Organization.
5.8.2.1.2.2. Assemblage Instance.
5.8.2.2. The Select Inventory Segment window contains the following tabs. These tabs
look slightly different, depending on the scope of your search (IM or AM), but the basic
functionality is the same.
5.8.2.2.1. Search Tab – Identifies the inventory scope.
5.8.2.2.2. Search Results Tab – View the selected records. To lock the selected
records for physical inventory, click ―Process Inv‖ on the vertical toolbar. On the
Process Successful message prompt, note the inventory control number (ICN) and
click ―OK.‖
5.8.3. Control Number Status.
5.8.3.1. The Control Number Status window displays the current processing status of all
inventories that are in progress and provides the capability to cancel an inventory. The processing status of a given inventory may be any of the following:
5.8.3.1.1. Counting – All counts are not complete.
5.8.3.1.2. Research – All counts completed, required research not completed.
5.8.3.1.3. Finalization – All required actions completed, ready to finalize.
5.8.3.2. While counting is in progress, the Count List Detail window is available by
double clicking an inventory control number or via the Detail icon on the vertical toolbar.
The Count List Detail window displays each count list and its current status. Physical Inventory tasks available from the Control Number Status window are:
5.8.3.2.1. Cancel Inventory.
5.8.3.2.2. Search Inventories for Specific Item (by Item ID or Item Desc).
5.8.3.2.3. View Count List Details.
5.8.4. Generate Count Lists. DMLSS assigns an ICN upon initiating a physical inventory.
Use the Generate Count Lists and Assign Teams Criteria (Figure 5.21.) and Generate Count
Lists and Assign Teams to IM Inventory Control Number (Figure 5.22.) screens to produce
inventory count lists, assign those lists to count teams, and view the distribution of items by
team or count list. DMLSS automatically creates one Count list and one Assigned team. You
can add count teams and the number of lists required for inventory segment. To add count
list(s) click ―Add Count List‖ and click ―Add Team‖ to add team(s). Up to 26 count teams
(Team A through Z) are available for an inventory. Assign a count list number and team to
each line item in the list. This can be done line item by line item or you can select multiple

AFMAN41-216 13 FEBRUARY 2013 147
rows. Highlight rows and select count list from dropdown. Click ―Apply‖ and when all rows
are assigned, click ―Save.‖ DMLSS does not track user IDs or names to a particular count
team. If required, document this information on a letter and file with other completed inventory documentation. The View Statistics task is available from this window.
Figure 5.21. Generate Count Lists and Assign Teams Criteria Window.
Figure 5.22. Generate Count Lists and Assign Teams to IM Inventory Control Number
Window.
5.8.4.1. On the Navigate menu select ―Physical Inventory,‖ select ―Reports‖ and then
―Inventory Count List‖ from the Reports. Select the ICN from the dropdown menu if
more than one control number. Select ―Count List‖ to print to select either individual
lists or all lists at once.
5.8.4.2. Complete the physical inventory. When all inventory is complete, you may enter inventory counts.
5.8.5. Enter Counts.
5.8.5.1. The Criteria for Entering Counts window and the Enter Counts Physical
Inventory (Figure 5.23) window allow users to select an assigned ICN and enter

148 AFMAN41-216 13 FEBRUARY 2013
inventory counts, add items to the current inventory, and view other item locations. The
typical process consists of selecting a Count List number and retrieving those items for
count entry. The search criteria is slightly different for AM and IM inventories, but the
basic functionality is the same for both. Items may be retrieved based on any
combination of available elements. Speed buttons at the bottom of the Enter Counts
window are provided to either remove all entered counts or perpetuate the last count
forward. Counts may be entered one at a time or the speed buttons can be used to
perpetuate the last counts forward. If using the speed buttons, rows can be updated by
exception. The count entry functions are slightly different for AM and IM inventories,
but the basic functionality is the same for both. For IM scope, enter the 1st, 2
nd, or 3
rd
item counts. For the AM Scope, enter the 1st, 2
nd, or 3
rd item counts and update QA data.
Click ―Save‖ on the vertical toolbar.
Figure 5.23. Enter Counts for Physical Inventory Window.
5.8.5.2. How DMLSS processes inventory counts.
5.8.5.2.1. Counts are processed once all item locations are counted. Alternate
location entries, not the primary, are identified with an asterisks (*) after the quantity.
5.8.5.2.2. Once all location quantities are entered into DMLSS, the sum of all counts is compared to the DMLSS inventory balance.
5.8.5.2.3. The item is unlocked and removed from inventory if they agree.
5.8.5.2.4. If the counts disagree with the inventory balance and the value of the
potential inventory adjustment is greater than the count criteria value, the system
forces another count. Up to three counts are required. The count criteria value is
accessible in SS, TMU, and IM Physical Inventory Adjustments. Items meeting these criteria are visible in the Research Discrepancies window.
5.8.5.2.5. No further counts are required if the counts disagree with the inventory
balance and the value of the potential inventory adjustment is below the count criteria

AFMAN41-216 13 FEBRUARY 2013 149
value. If the count criteria value is not met, DMLSS generates a pending gain or loss transaction. This condition could occur on the 1
st, 2
nd, or 3
rd count.
5.8.5.3. Tasks available from the Enter Counts window include:
5.8.5.3.1. View Other Item Locations.
5.8.5.3.2. Add Item to Inventory.
5.8.6. Research Discrepancies.
5.8.6.1. Use the Research Discrepancies window to view items requiring research or to
enter a final inventory count. Final counts are required when none of the previous counts
agree with the inventory balance. Research is required when the potential adjustment
amount is greater than the count criteria value. First, select the ICN or any combination
of elements from the dropdown list in the Criteria for Entering Research window. From
the list you can select one, some, or all items to process. Note: Use ―CTRL‖ or ―Shift‖ to
select multiple records for processing. Click ―Process‖ on the vertical toolbar. The
Research Inventory Gains and Losses for AM Inventory screen displays (Figure 5.24).
Figure 5.24. Research Inventory Gains and Losses for IM Inventory Window.
5.8.6.2. Potential inventory gains and losses are visible in the Research Inventory Gains
and Losses window. Users can preview potential gains and losses, enter final counts, add
an adjustment reason, document required post-inventory actions, review transaction
history, and print an Inventory Research Report. If the final count entered agrees with
the recorded balance, the item is unlocked and removed from inventory. An adjustment
reason is required for all items with CII Code of J, R, or Q, and when the potential
inventory adjustment value is greater than the count criteria value. The adjustment
reason will print on the Inventory Adjustment Voucher. A Post-Inventory Action feature
is available to document required post inventory actions.
5.8.6.2.1. The following are examples of inventory conditions that require research:
5.8.6.2.1.1. The inventory balance is 12 and previous count reflects 24 are on the
shelf. Researchers discover a receipt for 12 has not been processed. Enter a final

150 AFMAN41-216 13 FEBRUARY 2013
count of 12 and process the receipt after the inventory is closed.
5.8.6.2.1.2. The inventory balance is 12 and previous count reflect 27 are on the
shelf. Researchers discover an out-shipment loss for 12 was processed in the
system, but the materiel was not removed from the storage location and out-
shipped. In this case, enter a final count of 15 and a Post-Inventory Action as a
reminder to pull 12 from the storage location and ship them. DMLSS will
generate a potential inventory adjustment gain for remaining three.
5.8.6.3. Inventory tasks available from the Research Discrepancy window are:
5.8.6.3.1. Add Post-Inventory Action.
5.8.6.3.2. Review Transaction History.
5.8.6.3.3. Print Inventory Research Report.
5.8.7. Finalize Inventory. Use the Finalize Inventory window to preview the Inventory
Accuracy Analysis Report, finalize an inventory, and review completed inventory
documents. DMLSS processes pending inventory adjustment gains and losses. An inventory
cannot be finalized until:
5.8.7.1. All items are counted and counts entered into DMLSS.
5.8.7.2. All required research is completed.
5.8.7.3. On the Finalize Inventories; Post Transactions screen users can preview before
finalizing by clicking the Preview icon on the vertical toolbar. The IM-Preview Inventory Accuracy Analysis screen appears.
5.8.7.4. On the Finalize Inventories; Post Transactions screen click ―Finalize‖ on the
vertical toolbar. On the Inventory Management prompt message click ―Yes/No.‖ On the
Inventory Management Final Counts message prompt, click Yes/No. The inventory will
be removed from the IM- Finalize Inventories; Post Transactions screen. Click ―Close‖
on the vertical toolbar.
5.8.8. Reports. The following Physical Inventory Reports are available either during or after
the inventory is finalized. The inventory manager is advised to print these reports and file
them in a binder as part of the complete Physical Inventory Report. DMLSS stores inventory
reports for three years; however, the dates posted on the reports are updated to the date the report is requested and printed. Maintain these reports IAW AFRIMS T 41-04 R 13.00.
5.8.8.1. Inventory Accuracy Analysis - Identifies the gain/loss amount and the accuracy of each inventory segment.
5.8.8.2. Inventory Adjustment Voucher - Use this option to print or reprint the formal
Inventory Adjustment Voucher resulting from a finalized inventory.
5.8.8.3. Inventory Count List - Use to reprint Inventory Count List(s).
5.8.8.4. Inventory Research Report - Lists the items that required research.
5.8.8.5. Items with Location set to ―None‖ - Self explanatory.
5.8.8.6. Missed Locations Count List - Identifies items by count list that still require a physical count.

AFMAN41-216 13 FEBRUARY 2013 151
5.8.8.7. Post-Inventory Actions Report - Reflects required post-inventory actions.
5.8.8.8. Potential Inventory Discrepancy Report - Identifies the gain/loss transactions
that would result based on the current count information. This report is reviewable prior
to finalizing an inventory.
5.8.8.9. Preview Inventory Accuracy Analysis - Identifies the gain/loss amount and the
accuracy of each inventory segment that would result if an inventory were finalized with current counts.
5.9. Destructions.
5.9.1. Use the IM Destructions module to process all materiel destructions. Select
―Destructions‖ from the Navigate menu to access this module. The appropriate Destruction Method(s) must be associated to the MTF Catalog record prior to processing destructions.
5.9.2. Once the Destructions window is open, complete all required fields at a minimum. A
red dot identifies required fields. Save data upon completion. DMLSS will prompt users to
print the destruction document(s) when closing the Destruction window. Click ―Yes‖ to print
all destruction documents. If ―No‖ is selected, users can access the IM Reports module to
reprint the documents. Destruction documents are maintained IAW AFRIMS T 41-04 R
13.00.
5.9.3. Materiel may be destroyed in-house or as part of a contracted service. Both in-house
and contracted destructions require the same level of visibility. If a contractor performs the
destructions, signed documents transferring materiel to the vendor and destruction
certification after destruction occurs are still required. All destruction procedures must
comply with national, state, and local environmental protections laws. Consult the
Bioenvironmental Engineering (BEE) section to ensure these laws are adhered to, regardless
of who and where the destructions are performed.
5.10. Commercial Returns.
5.10.1. Process Overview.
5.10.1.1. The DMLSS Commercial Returns module is specifically designed to manage
the Reverse Distribution process through a third party vendor (i.e. E.Z. Returns, R.X.
Returns, etc.). Do not use the Commercial Returns module for direct vendor returns.
From the Navigate menu, select ―Commercial Returns‖ to access this module.
5.10.1.2. Use the Return Item(s) window to initiate materiel returns. The Manage Return
Item(s) window is utilized to assign call numbers upon pick-up, update and track item
return status, as well as pending credit and check value. The following Return Status
codes and descriptions are used to track materiel in the Commercial Returns module.
5.10.1.2.1. R – Ready for Pick-Up. Computer assigned from Return Item(s) when
item is selected for return. When a pickup date is arranged with the 3rd
party vendor,
the DMLSS user highlights all applicable rows for the items. The user then clicks
―Pickup‖ on the vertical toolbar, assigns a call number, associates all records, and
clicks ―Process.‖ The user has the option to print a Commercial Return Report.
Upon completion of this task, the status code is adjusted to reflect ―P – Disposition
Pending.‖

152 AFMAN41-216 13 FEBRUARY 2013
5.10.1.2.2. P – Disposition Pending. Computer assigned once an item is returned for credit determination.
5.10.1.2.3. X – Check Pending. User assigned when notification is received that a
check will be issued for the returned goods.
5.10.1.2.4. Y – Credit Pending. User assigned once notification is received that credit will be issued for the returned goods.
5.10.1.2.5. D – Complete Destroyed. User assigned if status is received from the vendor that the item was destroyed.
5.10.1.2.6. C – Complete Check. User assigned upon check receipt.
5.10.1.2.7. T – Complete Credit. User assigned upon receipt of credit. Also, use this
status code to record replacement stock that is issued from a non-PV source.
5.10.1.2.8. V – Complete PV Credit. User assigned once credit is posted to the PV credit account and verified.
5.10.2. Return Item(s). Selecting item(s) for reverse distribution is the first step in the
Commercial Returns process. From the Return Item(s) window use the ―>‖ button to return
individual items or the ―>>‖ button to return multiple items. A nonrefundable CRL is
generated for all items tagged for return and they are assigned Return Status code ―R-Ready
for Pick-Up.‖ Once an item is selected, use the Manage Return Item(s) module to track the
status and complete the process.
5.10.3. Managed Return Item(s).
5.10.3.1. The next step in the process is to identify the item(s) that are ready for pick-up
and assign a call number. In the Manage Return Item(s) window, search for detail
records by document number, item ID, return status code, or call number. Click ―ALL‖
radio button to view all items. DMLSS limits the search results window to 500 records so use the search criteria options to narrow the search when necessary.
5.10.3.2. The Search Results window displays all records that match the selected criteria.
Detailed management data is displayed in the upper part of the window when a record is
selected or highlighted.
5.10.3.3. Select all items being returned and click the ―Pickup‖ button on the vertical
toolbar (Refer to paragraph 5.10.3.5.1.). From the Manage Return Items—Pick-Up
window, enter the call number assigned to the return and associate all records to the call
number by clicking the ―>‖ button for a single item or the ―>>‖ button for all items.
Click ―Save‖ after all items are associated. The Return Status code is updated to P-Disposition Pending and the Commercial Return Report is printed.
5.10.3.4. The Commercial Return Report lists all items returned under the assigned call
number and provides total dollar value of the call. Detailed management data for each
line item is also included. For WRM items, the MFG, MFG date, lot number, expiration date, and catalog number are included.
5.10.3.5. The vertical toolbar offers multiple options once the Return Status code is
updated to P-Disposition Pending. These options allow users to manage the status of each return item and close a return record upon completion.

AFMAN41-216 13 FEBRUARY 2013 153
5.10.3.5.1. Pick-up Icon.
5.10.3.5.1.1. The Pick-Up Icon is only visible for items assigned a Return Status
code of R-Ready for Pick-Up and P-Disposition Pending. As discussed in
paragraph 5.10.3.3, select items ready for pick-up.
5.10.3.5.1.2. Click ―Pick-Up‖ and assign a call number for selected records. The system allows users to change a previously assigned call number, if necessary.
5.10.3.5.1.3. A Commercial Return Report is generated after the call number is
assigned. This report contains a detailed list of records assigned to the call
number. One call number is assigned per ―pick-up.‖
5.10.3.5.1.4. The system automatically updates the Return Status code to P-Disposition Pending.
5.10.3.5.2. Credit Icon.
5.10.3.5.2.1. Use the Credit icon to either enter credit pending or credit complete
estimates. Multiple records can be updated simultaneously if the assigned call
number and MFG‘s name match. Click the ―Credit‖ icon to open the Credit
Complete Update window. Select either ―Credit Pending‖ or ―Complete Credit‖ for the call number or items selected.
5.10.3.5.2.2. Update the Return Status code to Y-Credit Pending when materiel
has been returned to the third party vendor for credit. Assign this status code after
being notified of pending credit but credit has not been received. If known, a credit amount and reason can also be loaded.
5.10.3.5.2.3. Update the Return Status code to T-Complete Credit when credit is
received from the third party returns vendor. All data fields become mandatory
entries when assigning this status code. Enter the credit amount received and
reason, then click ―Save‖ to process updates. The Return Status is updated to
Complete Credit and the record can no longer be modified.
5.10.3.5.3. Check Icon.
5.10.3.5.3.1. Use the ―Check‖ icon to either enter check pending or check
complete estimates. Individual or multiple records can be updated
simultaneously. Click ―Check‖ to open the Check Complete Update window.
Select either ―Check Pending‖ or ―Complete Check‖ for the call number or items selected.
5.10.3.5.3.2. Update the Return Status code to X-Check Pending when materiel
has been returned to the third party vendor and a check is expected in return.
Assign this status code after being notified that a pending check is forthcoming. If known, a check amount and reason can also be loaded.
5.10.3.5.3.3. Update the Return Status code to C-Complete Check when the
check is received from the third party returns vendor. All data fields become
mandatory entries when this status code is assigned. Enter the check value and
reason, then click ―Save‖ to process updates. The Return Status code is updated to Complete Check and the record can no longer be modified.

154 AFMAN41-216 13 FEBRUARY 2013
5.10.3.5.3.4. During the Save process, DMLSS reverses the CRL transaction and
processes a TIL transaction type with a transaction reason of RVL. The system
generates a DD Form 1131, Cash Collection Voucher. Forward the voucher and
check to your supporting OPLOC Finance manager for processing, making sure it
is applied to the AFWCF/MDD. The 6B accounting classification is printed on
the form. Maintain a copy of the voucher and check for the permanent file after
quality control. Request Finance provide a screen print of the deposit to assure posting to the AFWCF/MDD and file with the DD Form 1131.
5.10.3.5.4. PV Credit Icon.
5.10.3.5.4.1. Use the PV Credit icon when items are returned directly to the PV
for credit. This option is not used to manage materiel returned to a third party
returns vendor. The system assigns Return Status code P-Disposition Pending to
these records. Use the ―PV Credit‖ icon to update status upon receipt of credit
notification.
5.10.3.5.4.2. In the Manage Return Item(s) window, select the items that have
been credited and click the ―PV Credit‖ icon. Multiple records cannot be updated
using this function. Enter the credit amount, reason, SOS, and credit account
number (if blank) for each record. If the credit account number is present in the SOS record, the credit account number will automatically populate.
5.10.3.5.4.3. Save changes to process the updates. DMLSS updates the Return Status code to V-Complete PV Credit and the record can no longer be modified.
5.10.3.5.5. Destroyed Icon.
5.10.3.5.5.1. Use the ―Destroy‖ icon to process destructions for items not
accepted for credit or return. Process the destructions after receipt of a disposal manifest or other official notification.
5.10.3.5.5.2. In the Manage Return Item(s) window, select ―Item Detail Records
From a Call‖ from the dropdown menu and click ―Destroyed.‖ Multiple items
can be selected and updated simultaneously. Enter a destruction reason and click
―Save‖ to process destructions. DMLSS updates the Return Status code to D-Complete Destroy and the record(s) are no longer editable.
5.10.3.5.6. Cost Call Icon. Use the ―Cost Call‖ icon to update and track the total
value of credits and checks received per call. Manually add the existing call amount
to new (additional) credit or check amounts and then use ―Cost Call‖ to update the
new call total. For example, the current value is $20.00 and a credit voucher is
received for $25.00. Use the ―Cost Call‖ icon to update the total credit value to $45.00.
5.10.4. Replacement Stock.
5.10.4.1. In some instances, MFGs will ship replacement stock instead of issuing credit.
When this happens, process a non-reimbursable receipt and (if warranted) a non-
refundable issue to the appropriate customer. If the returned stock did not come from the customer, do not issue the replacement stock as non-reimbursable.

AFMAN41-216 13 FEBRUARY 2013 155
5.10.4.2. Create a due-in detail record using ―IM Offline Orders‖ when notification is
received that replacement stock is being shipped and quantities are known. Check ―Non-
Submit‖ so an additional order is not submitted to the SOS. Also, assign Refund Code
―N‖ because there is no charge for the replacement materiel. Link the order to the
appropriate customer if warranted (see paragraph 5.10.4.1). Select local DODAAC from
the customer drop down menu if materiel is for LOG inventory. Upon receiving, process the receipt using the normal receipt process.
5.10.4.3. Process a RND when replacement materiel is received without prior
knowledge. The packing list or invoice should indicate the shipment is ―Replacement
Materiel.‖ Process the receipt using refund code ―N‖ and link to the appropriate
customer if warranted. Select local DODAAC from the customer drop down menu if materiel is for LOG inventory.
5.10.5. Manage PV Credits.
5.10.5.1. Use the Manage PV Credits function to monitor available credit account
balances. Ensure these balances are correct so logistics personnel and customers can
effectively use available credits. Funds must be available in a credit account prior to processing a PV Credit Order.
5.10.5.2. The Manage PV Credits window lists the SOS, total credit amount, add credit,
loss credit, reason, and credit account number. Enter a SOS or select one from the
dropdown menu to view available credit. The total credit amount field will populate with available credit funds.
5.10.5.3. Normally, each site will have four credit accounts but could have up to six if an
account is created for ―secondary‖ prime vendors. Both PVP and PVM SOS‘s will have
one for IM and one for AM. PV Credit Account managers should compare the vendor‘s
monthly PV Credit Report to the DMLSS PV Credit Account available balance for each
account. If a difference exists, use the Manage PV Credits function to modify the
DMLSS available balance to synchronize the two balances. Note: Verify the accuracy
of the PV Credit Report prior to updating DMLSS. Use the ―Add Credit‖ and ―Loss
Credit‖ icons to increase or decrease balances.
5.10.5.3.1. Use the ―Add Credit‖ icon to increase the DMLSS credit account
available balance. Enter the difference between the PV Credit Report and the
DMLSS available balance into the Add Credit field. Select ―Save‖ to process and
increase the available balance.
5.10.5.3.2. Use the ―Loss Credit‖ icon to decrease the DMLSS credit account
available balance. Enter the difference between the PV Credit Report and the
DMLSS available balance into the Loss Credit field. Select ―Save‖ to process and
decrease the available balance.
5.10.5.4. PV Credit account fund balances are updated automatically when orders are
placed within the ―Offline/Submit‖ module and the PV Credit indicator is checked. Balances can also be updated by completing item returns using Manage Return Item(s).
5.10.5.4.1. DMLSS automatically updates the PV credit account available balance
when Return Status T-Complete PV Credit is assigned to a detail record (see

156 AFMAN41-216 13 FEBRUARY 2013
paragraph 5.10.3.5.2.3.). When the PV Credit update action is saved, DMLSS appends the credit account‘s available balance by the credit amount.
5.10.5.4.2. As discussed in paragraph 5.10.5.2, credit account managers can
manually update an account‘s available balance in DMLSS. Use the Manage PV Credit function to update the available balances manually.
5.10.5.5. Use the IM Offline Orders function to process PV Credit Account orders.
Placing a check in the PV Credit checkbox in the Main tab sets the refund code for the
order to ―N‖ and deducts funds from the account‘s available balance. Sufficient funds
must be present in the credit account for the order to process. Link the order to the
appropriate customer if warranted. If the materiel is for LOG inventory, select the Host
DODAAC for the DMLSS account from the customer dropdown menu.
5.10.5.6. At the present time PV sources cannot accept electronic orders linked to the PV
Credit Account; therefore, check ―Non-Submit‖ prior to processing orders and manually
submit the order to the vendor. After the order is processed in DMLSS, the DD Form
1155 can be printed and faxed to the vendor. DMLSS will create a ―pseudo‖ EDI 850
requisition file which is transmitted to the DLA Troop Support. The pseudo 850 informs
DLA Troop Support that a credit order has been established between the DMLSS site and
the PV.
5.10.6. Reprint Cash Collection Voucher. This function allows users to reprint previously
processed DD Form 1131s. Utilize Reprint function if the original is misplaced or multiple copies are required.
5.11. Item Gain/Loss.
5.11.1. Gains.
5.11.1.1. To process an item gain click ―Gain/Loss‖ on the horizontal toolbar or select
―Item Gain/Loss‖ from the Navigate menu. Once the Item Gains/Losses window (Figure
5.25.) is open, check transaction type of Gain, and enter the quantity, external document
number if applicable, and other required information as necessary. Click ―Save‖ to
process the gain transaction.

AFMAN41-216 13 FEBRUARY 2013 157
Figure 5.25. Item Gains/Losses Window.
5.11.1.2. A MTF Catalog record must exist before the gain transaction is processed. Use
the Search button to locate the item ID or type into the Item ID field. The Jump To radio
button can be used to access the catalog record. Before creating a new MTF Catalog
record, search the database for an existing one. Keep in mind a catalog record may exist
for that item, but may be assigned a different item ID.
5.11.1.3. Assign the appropriate location code prior to processing. If a location code of
―Default‖ appears in the location field, use the dropdown menu to update. If the
appropriate location code does not appear in the dropdown menu, use the ―Jump To‖ icon
to access the MTF Catalog Record. Add the location code and save changes.
5.11.1.4. Gains Transaction Codes, Reason Types, and Uses.
5.11.1.4.1. Individual/Component Gain. DMLSS generates the ―MSG‖ transaction
with reason type ―IIG.‖ Use the IIG transaction reason type to gain individual or
component items when breaking down an end item or kit into individual items.
Normally, the IIG transactions are processed in combination with the End/Kit Item
Loss (EIL) transaction. For example, you want to disassemble a kit that contains 5
items. First, process an EIL to lose the end item or kit from record. Then gain the 5
individual items from the end item or kit by processing 5 separate IIGs. The total
dollar value of the individual/component gains should normally equal the unit price of
the end/kit item loss. As a rule, we rarely break down kits, so this is a seldom used
transaction. The MSG/IIG transaction updates line ―8I‖ of the Medical Materiel
Management Report (MMMR) produced by Finance, and line ―8H‖ of the BalanceInDFAS_AF (Arc/Strat) report within Business Objects.
5.11.1.4.2. Inshipment Gain. DMLSS generates the ―SHG‖ transaction with reason
type ―SFG.‖ Use the SFG transaction reason type to record the receipt of an item
shipped from another MDD account (FM****) and transfers of WRM assets between
ORG IDs. In addition to the gain, the inshipment decreases the division in-transit
account in finance. You should enter the shipper‘s document number into the gain

158 AFMAN41-216 13 FEBRUARY 2013
transaction for audit trail purposes. The SHG/SFG transaction updates line ―8A‖ of
the MMMR produced by Finance, and line ―8A‖ of the BalanceInDFAS_AF
(Arc/Strat) report within Business Objects.
5.11.1.4.3. Inventory Adjustment Gain. DMLSS generates the ―IAG‖ transaction
with no corresponding reason type. Use the IAG transaction reason type to increase
an on-hand balance in DMLSS when the actual on-hand quantity is more than the
quantity reflected in the accountable record. Before using the IAG, ensure the
overage isn't due to erroneous postings or failure to process another transaction. This
transaction is not reversable. To correct an erroneous IAG, an IAL transaction must
be processed. The IAG transaction updates line ―6A‖ of the MMMR produced by
Finance, and line ―6A‖ of the BalanceInDFAS_AF (Arc/Strat) report within Business Objects.
5.11.1.4.4. End/Kit Item Gain. DMLSS generates the ―MSG‖ transaction with
reason type ―EIG.‖ Use the EIG transaction reason type to build or assemble an end
item or kit from individual components. Normally, the EIG is processed in
combination with the Individual/Component Loss (IIL) transaction. For example,
you want to build or assemble an end item or kit that will consist of 5 individual
items. First, process the 5 separate IILs to record the loss of the 5 individual items
that will be part of the end item or kit. Then, process an EIG to gain the end item or
kit. The total dollar value of the end/kit item loss should normally equal the unit
price of the individual/component gains. As a rule, we rarely build kits, so this is a
seldom used transaction. The MSG/EIG transaction updates line ―8I‖ of the MMMR
produced by Finance, and line ―8H‖ of the BalanceInDFAS_AF (Arc/Strat) report within Business Objects.
5.11.1.4.5. Donated Item Gain. DMLSS generates the ―SHG‖ transaction with
reason type ―DPG.‖ Use the DPG transaction reason type to gain ARC 1 items that
are donated to the medical facility. For equipment items, use the DPG transaction in
the Equipment Management (EM) module. Donations require approval actions and
rarely occur; thus, this is a seldom used transaction. The SHG/DPG transaction
updates line ―8C‖ of the MMMR produced by Finance, and line ―8C‖ of the BalanceInDFAS_AF (Arc/Strat) report within Business Objects.
5.11.1.4.6. Receipt from DRMO. DMLSS generates the ―SHG‖ transaction with
reason type ―FZG.‖ Use the FZG transaction reason type to gain materiel withdrawn
from DRMO. The SHG/FZG transaction updates line ―8E‖ of the MMMR produced
by Finance, and line ―8D‖ of the BalanceInDFAS_AF (Arc/Strat) report within Business Objects.
5.11.1.4.7. Capitalization of SF Asset. DMLSS generates the ―MSG‖ transaction
with reason type ―MDG.‖ Use the MDG transaction reason type to gain an item
shipped in from other than a FM**** account. If coming from other than a FM
account, the item was probably purchased with other than MDD (6B) funds, thus we
capitalize it because the MDD is taking the management responsibility of the item
from another appropriation. The MSG/MDG transaction updates line ―8H‖ of the
MMMR produced by Finance, and line ―8G‖ of the BalanceInDFAS_AF (Arc/Strat)
report within Business Objects.

AFMAN41-216 13 FEBRUARY 2013 159
5.11.2. Losses.
5.11.2.1. To process an item loss click ―Gain/Loss‖ on the horizontal toolbar or select
―Item Gain/Loss‖ from the Navigate menu. Check transaction type of Loss, enter the
quantity, external document number if applicable, and other information as required. Select ―Save‖ to process the loss transaction.
5.11.2.2. Assign the appropriate location code prior to processing. If a location code of
―Default‖ appears in the location field, use the dropdown menu to update. If the
appropriate location code does not appear in the dropdown menu, use the ―Jump To‖ icon
to access the MTF Catalog record. Add the location code and save changes. The
location code will appear on the item loss document and is valuable to warehouse
personnel who will remove the item from inventory.
5.11.2.3. Loss Transactions, Reason Types, and Uses.
5.11.2.3.1. Individual/Component Loss. DMLSS generates the ―MSL‖ transaction
with reason type ―IIL.‖ Use the IIL transaction reason type to lose an individual or
component items that will be assembled into an end item or kit. This transaction is
also used to drop WRM repair parts purchased with WRM funds to repair WRM
equipment. Normally, the IIL transaction is processed in combination with the
End/Kit Item Gain (EIG) transaction. For example, you want to assemble a kit that
will contain 5 items. First, process the IILs on each of the 5 items that will be part of
the end item or kit. Then, process an EIG to pick up the complete end item or kit.
The total dollar value of the individual/component losses should normally equal the
unit price of the end/kit item gain. This transaction is seldom used. The MSL/IIL
transaction updates line ―9J‖ of the MMMR produced by Finance, and line ―9J‖ of the BalanceInDFAS_AF (Arc/Strat) report within Business Objects.
5.11.2.3.2. Outshipment Loss. DMLSS generates the ―SHL‖ transaction with reason
type ―SFL.‖ Use the SFL transaction reason type to outshipment an item to another
MDD account (FM****) and to transfer WRM assets between ORG IDs. Place the
document number assigned on the shipping document. When the SFL is processed it
not only records the loss but it also posts an increase to the division in-transit account.
The gaining activity must process an inshipment gain (SFG) to reduce the division in-
transit account. Note: Out Shipment Losses, within both the AM and IM
Applications, now generate a MSL/MDL transaction when AF activities ship materiel
to a non-AF activity. DMLSS continues to generate SHL/SFL transactions for shipments to AF activities.
5.11.2.3.2.1. In DMLSS 3.1.1, use the IM-Item Gains/Losses screen, select the
loss indicator, transaction reason and item ID and press enter. Populate/complete
all applicable fields and click ―Save‖ on the vertical toolbar. The IM RIC lookup screen (Figure 5.26.) appears. Verify the information and then click ―OK.‖

160 AFMAN41-216 13 FEBRUARY 2013
Figure 5.26. IM RIC Lookup Screen.
5.11.2.3.2.2. Click ―Yes/No‖ in response to the Gain/Loss Report message and
click ―OK‖ to respond to the Record update message. When the IM-Item
Gains/Losses window appears, click ―Close‖ on the vertical toolbar. The
Outshipment Form/Transportation Selection screen (Figure 5.27.) will appear. On
the Outshipment Form enter LOA (Line of Accounting)/Funds Cite, Transportation requirements and Tracking information, and then click ―OK.‖
Figure 5.27. Outshipment Form/Transportation Selection screen.
5.11.2.3.2.3. The SHL/SFL transaction updates line ―9A‖ of the MMMR
produced by Finance, and line ―9A‖ of the BalanceInDFAS_AF (Arc/Strat) report within Business Objects.
5.11.2.3.3. Return to Source of Supply. DMLSS generates the ―TIL‖ transaction
with reason type ―RTL.‖ Use the RTL transaction reason type to drop items returned
to the source for no credit, when credit is unknown, or if there is a pending
replacement. In addition, use the RTL when directed by DPSC, GSA,
AFMOA/SGALD, or other authority for actions other than excess returns. The
TIL/RTL transaction updates line ―9B‖ of the MMMR produced by Finance, and line
―9B‖ of the BalanceInDFAS_AF (Arc/Strat) report within Business Objects. See
paragraph 5.11.2.3.2.1. and 5.11.2.3.2.21. and figures 5.23. and 5.24. for similar steps
and D&TM screenshots.

AFMAN41-216 13 FEBRUARY 2013 161
5.11.2.3.4. Return Item for Trade In. DMLSS generates the ―TIL‖ transaction with
reason type ―TRL.‖ Use the TRL transaction reason type to drop an item shipped to a
commercial source as a trade-in. The TIL/TRL transaction updates line ―9K‖ of the
MMMR produced by Finance, and line ―9K‖ of the BalanceInDFAS_AF (Arc/Strat)
report within Business Objects. See paragraph 5.11.2.3.2.1. and 5.11.2.3.2.21. and
figures 5.23. and 5.24. for similar steps and D&TM screenshots.
5.11.2.3.5. Outshipment to DRMO. See paragraph 5.11.2.3.2.1. and 5.11.2.3.2.21.
and figures 5.23. and 5.24. for similar steps and D&TM screenshots. Note: If the
user selects ―Yes for Base Transportation,‖ the shipper will default to CMOS-Local
TMO; however, if the user selects ―NO for the Base Transportation,‖ they will then
be able to select the Shipper and Tracking Number. If the user selects ―Pending for the Base Transportation,‖ the shipper will default to Pending
5.11.2.3.6. Inventory Adjustment Loss. DMLSS generates the ―IAL‖ transaction
with no corresponding reason type. Use the IAL transaction reason type to decrease
an on-hand balance in DMLSS when the actual on-hand quantity is less than the
quantity reflected in the record. Before using the IAL, ensure that the shortage is not
due to erroneous posting or failure to process another transaction. This transaction is
not reversable. To correct an erroneous IAL, an IAG transaction must be processed.
The IAL transaction updates line ―6B‖ of the MMMR produced by Finance, and line
―6B‖ of the BalanceInDFAS_AF (Arc/Strat) report within Business Objects.
5.11.2.3.7. End/Kit Item Loss. DMLSS generates the ―MSL‖ transaction with reason
type ―EIL.‖ Use the EIL transaction reason type to disassemble an end item or kit.
The EIL transaction is processed in combination with the Individual/Component Gain
(IIG) transactions. For example, you want to disassemble an end item or kit that
contains 5 individual items. First, process an EIL to drop the end item or kit. Then
process the 5 individual IIGs to gain the individual items that were part of the end
item or kit. The total dollar value of the individual/component gains should normally
equal the unit price of the end/kit item loss. We rarely assembly kits, so this
transaction is seldom used. The MSL/EIL transaction updates line ―9J‖ of the
MMMR produced by Finance, and line ―9J‖ of the BalanceInDFAS_AF (Arc/Strat) report within Business Objects.
5.11.2.3.8. Decapitalization of SF Asset. DMLSS generates the ―MSL‖ transaction
with reason type ―MDL.‖ Use the MDL transaction reason type to lose an item that is
being shipped to other services or another division of the AFWCF (i.e. the Army or
Base Supply). The MSL/MDL transaction updates line ―9I‖ of the MMMR produced
by Finance, and line ―9I‖ of the BalanceInDFAS_AF (Arc/Strat) report within
Business Objects.
5.11.2.3.9. Natural Disaster Inventory Loss. DMLSS generates the ―IAL‖
transaction with reason type ―MIL.‖ Use the MIL transaction reason type to drop
items due to a major disaster such as a fire, flood, hurricane, tornado, warehouse
collapse, etc. Do not use this transaction for water damage from a rain storm,
refrigerator or freezer failure, etc. If in doubt whether to use this transaction, contact
AFMOA/SGALO. The IAL/MIL transaction updates line ―9K‖ of the MMMR

162 AFMAN41-216 13 FEBRUARY 2013
produced by Finance, and line ―9K‖ of the BalanceInDFAS_AF (Arc/Strat) report within Business Objects.
5.12. Excess.
5.12.1. General Information.
5.12.1.1. For the purpose of DMLSS inventory, materiel is considered local excess when
the materiel cannot be sold to a customer, utilized in WRM, or kept as economic
retention for future sale. General policy for reporting excess is contained in DoD
4140.26-M, Defense Integrated Materiel Management Manual for Consumables. Refer
to AFI 41-209, Chapter 3, for additional excess policy. Assets may also be deemed
excess because the customer can no longer use the materiel. The Asset Review function in DMLSS allows logistics to restratify excess assets between OPR and WRM.
5.12.1.2. The minimum total dollar value of each line item must be $3,000 to formally
report materiel as excess. If the total dollar value is greater than $3,000, credit
determination is based on stockage and redistribution requirements. DMLSS allows
materiel managers the ability to modify the ―Excess Dollar Value;‖ however, it should
not be changed unless higher headquarters dictates a change to the reportable excess
threshold. This value represents the threshold that DMLSS uses to determine whether or
not an item meets the excess criteria. Visibility of this threshold is most notable when an
item is coded as reportable or non-reportable in the excess module. The Excess Dollar Value field is in the MM Service detail record located in SS.
5.12.1.3. Refer to Attachment 5, IM Pending Actions, for a detailed explanation of
excess pending actions. A list of excess status codes is available in the TMU table
located in SS. To access, click on ―TMU‖ in SS, select ―IM‖ in the Application dropdown menu, and then open the Status Code (MRP) table.
5.12.1.4. Reporting Excess to the TRIMEDS. Excess medical materiel in serviceable
condition (condition codes A through C) is reported to TRIMEDS. Materiel reported
excess using TRIMEDS is available for 45 days. The materiel is available to AF
activities for the first 20 days. For the next 25 days, the materiel is available to all DoD
activities. TRIMEDS uses the AFML website, Procurement Services link, to offer
reported excess at no cost to DoD medical activities.
5.12.1.4.1. Criteria for Reporting Excess to TRIMEDS. The following categories of excess materiel are reported to TRIMEDS:
5.12.1.4.1.1. Total minimum line item value is $3,000.
5.12.1.4.1.2. Condition Codes A, B, and C are the only acceptable codes.
5.12.1.4.1.3. Shelf life dated items must have a minimum of 120 days until expiration.
5.12.1.4.2. Exceptions to TRIMEDS Reporting Criteria.
5.12.1.4.2.1. Do not report items with notes code ―G‖ or ―W.‖ (If a large dollar
value, call AFMOA/SGAL for disposition instructions.)
5.12.1.4.2.2. DMLSS does not track expiration dates for OPR materiel. In the
Report Excess screen, select ―Dated Item‖ to produce an Excess Dated Item

AFMAN41-216 13 FEBRUARY 2013 163
Worklist. Use this worklist to document the expiration dates for dated materiel that is considered potential excess.
5.12.1.5. DMLSS Procedures for Reporting Excess.
5.12.1.5.1. The first step in the process is to identify the potential excess materiel
using the Report Excess function. From the Navigate menu, select ―Excess‖ and then
―Report Excess.‖ The Report Excess window is broken into several sections. A search scope must be selected and then additional search criteria identified.
5.12.1.5.1.1. Scope. Enter IM for OPR stock, or AM for WRM.
5.12.1.5.1.2. Stratification State (Strat State). Place a check in one, some, or all
Strat States to further identify the search criteria.
5.12.1.5.1.3. Item ID. Select one or multiple item IDs. Use the ―Select All‖ box to search all item IDs.
5.12.1.5.2. Click ―Search‖ to retrieve and view records matching the search criteria.
5.12.1.5.3. The search results are displayed in the Report Excess Search Results
window. Potential excess items can be retained, reported, or restratified. Information
is slightly different for IM and AM items; however, the basic functionality is the same.
5.12.1.5.4. The Report Excess Search Results window (Figure 5.28.) contains item
details and other management data necessary to determine appropriate item
disposition. The item detail data is self explanatory but special attention should be
put on the CIIC and the refrigerate/freeze indicator. These items require special
handling and may play a role in making disposition decisions. The following
management data is displayed and should be used to make appropriate management decisions:
Figure 5.28. Report Excess – IM Search Results.
5.12.1.5.4.1. Strat State – Serviceable, Unserviceable, Repairable, Suspended,
FDA Test.
5.12.1.5.4.2. Level Qty – OPR or Assemblage level.
5.12.1.5.4.3. OH Qty – Total quantity OH.
5.12.1.5.4.4. Due-In – Total quantity due-in.

164 AFMAN41-216 13 FEBRUARY 2013
5.12.1.5.4.5. Due-Out – Total quantity due-out to customers.
5.12.1.5.4.6. Economic Retention Quantity (ERQ) – Authorized OPR retention
quantity if there is a reasonable probability that the materiel will be used in a
specified time period. Computer calculated based on Daily Demand Rate (DDR)
multiplied by the Economic Retention Days. The Economic Retention Days value is in the MM Service detail record located in SS.
5.12.1.5.4.7. Potential Excess – Computer calculated potential excess quantity.
5.12.1.5.4.8. $ Val Potential Excess – Line item value of potential excess.
Computer calculated based on potential excess quantity multiplied by the U/P price.
5.12.1.5.4.9. Reported Excess – Total quantity of line item already reported excess.
5.12.1.5.4.10. Asset Review – Identifies shortages in either OPR or WRM
assemblage(s). An ―X‖ will appear if a shortage exists. Use Asset Review to
transfer materiel to fill shortages vice reporting excess. Refer to paragraph 5.12.2.6 for more details.
5.12.1.5.4.11. Reportable – An ―X‖ appears in this box when the potential excess
meets reporting requirements.
5.12.1.5.4.12. CAIM Users – Identifies customers currently using the materiel.
5.12.1.5.4.13. Reason Non Reportable – A brief explanation is provided in this field if the materiel is not reportable.
5.12.1.5.5. Report an item excess. Only items containing an ―X‖ in the reportable
column can be reported as excess materiel. Only one record can be selected at a time.
To report an item excess, highlight the record and click ―Excess Report‖ located on
the vertical toolbar. The Excess Report Screen window opens. Validate excess
quantity and condition code and click ―Save.‖ The expiration date field is mandatory
for dated materiel. A message box with the assigned document number for the
reported excess is displayed. Click ―OK‖ to return to the Report Excess Search Results window.
5.12.1.5.6. The item is now considered reported excess and will not reappear in the
Report Excess Search Results window. During the next DMLSS End-of-Day
processing cycle, the system automatically produces and transmits excess report
images to the applicable agency (i.e., TRIMEDS). The system generates the
following transactions and writes them to Transaction History:
5.12.1.5.6.1. ITL for Strat State OPR – Internal Transfer Loss from operating.
5.12.1.5.6.2. ITG for Strat State EXS – Internal Transfer Gain to excess.
5.12.1.6. Asset Review.
5.12.1.6.1. Materiel managers should verify materiel is no longer needed prior to
reporting it excess. Within DMLSS, the Asset Review function is an automated tool

AFMAN41-216 13 FEBRUARY 2013 165
managers can use to locate stock shortages in OPR or LOG Owned WRM assemblage(s).
5.12.1.6.2. Potential excess items can be restratified between LOG owned WRM
assemblages and OPR. Use assets to fill shortages rather than reporting them excess.
An ―X‖ will appear in the Asset Review box when a materiel shortage exists in OPR or WRM.
5.12.1.6.3. When this condition exists, select ―Asset Review‖ located on the vertical
toolbar to open the Asset Review window. The Asset Review window contains item
details, potential excess details, and lists all assemblages containing an allowance for
the respective item. Be mindful that not all listed assemblages have existing
shortages. Some of the listed assemblages may actually have overages. Use
assemblage overages to fill assemblage shortages prior to transferring OPR stock to WRM.
5.12.1.6.4. To transfer assets, check ―SEL‖ in the WRM section of the Asset Review
window and select ―Transfer.‖ Multiple transfers can be accomplished simultaneously. Complete the transfer when the Internal Transfer window opens.
5.12.1.6.4.1. In the ―FROM‖ box, enter a location ID and a storage area.
5.12.1.6.4.2. In the ―TO‖ box, enter a location ID and a storage area.
5.12.1.6.4.3. Enter quantity in the Transfer Quantity field.
5.12.1.6.4.4. Enter the Transfer Qty in the Transfer To assemblage record at the bottom of the screen.
5.12.1.6.4.5. Click ―Save‖ to process item transfer and obtain delivery list. The
option not to print this list is available from the message box. If performing multiple transfers, a delivery list will print for each project.
5.12.1.6.5. The system generates the following transactions and writes them to Transaction History:
5.12.1.6.5.1. ITL, Strat Stat OPR - Internal Transfer Loss from OPR.
5.12.1.6.5.2. ITG, Strat Stat WMR - Internal Transfer Gain to WRM.
5.12.1.6.6. Report all remaining quantities excess once Asset Review and
redistribution has been accomplished. If no potential excess remains, the item will no longer appear in the Report Excess Search Results window.
5.12.1.7. A P/S relationship may exist for items appearing as potential excess. A check
mark in the P/S column identifies items coded as a substitute item. To view the prime
item identification data, select the ―P/S‖ icon from the vertical toolbar. Click ―WRM
P/S‖ to view prime item ID data for a WRM item. These icons are only available for substitute items.
5.12.2. Search Excess.
5.12.2.1. Use the Search Excess (Figure 5.29.) function to access reported excess detail
records. Users can search for reported excess using the document number, item ID,
Julian date reported to (DLA Troop Support or TRIMEDS), report status, or by

166 AFMAN41-216 13 FEBRUARY 2013
equipment nomenclature. If multiple shipments are directed for a single record, a suffix
code (A, B, C, etc.) is assigned to further identify detail records using the same document
number. Use the ―Scope‖ to target select records and minimize search results. Available
Scope options include ALL, IM, AM, or equipment. To further pinpoint desired results,
use the ―Active/Inactive‖ toggle button. Active records are those that have not received
disposition instructions. Inactive records have been shipped or disposed of accordingly.
The ―Scope‖ defaults to ALL/Active. If a search is performed and the fields are left blank, DMLSS retrieves all reported excess records up to the search limit.
Figure 5.29. Report Excess – Search Excess (Search Results in Background) Window.
5.12.2.2. Use this function to review detailed status, submit follow-ups, or submit
cancellation requests on reported excess. Click ―Detail‖ to review excess details and
status information. To submit a follow-up or cancellation request, select ―Status Request‖ located on the vertical toolbar.
5.12.2.3. Follow-ups on Reported Excess.
5.12.2.3.1. Computer Generated Follow-ups.
5.12.2.3.1.1. DMLSS generates a follow-up (document identifier FTF) if DLA
Troop Support or TRIMEDS does not respond to the FTE within 30 days. The
Excess Detail Record is updated to reflect submission of the FTF. If no response
to the first follow-up is received within 10 days, DMLSS generates a second
follow-up. If there is no response to the second follow-up, a ―000‖ image with
the message ―TWO CONS FOLLOW-UPS SENT – NO REPLY‖ is shown on the IM Excess Report in the Troubled tab.
5.12.2.3.1.2. DMLSS automatically generates follow-up requests after five days.
Manual follow-ups can be submitted at any time by using the ―Status Request‖
button and selecting ―Follow-up.‖ DMLSS writes status code EF and document
identifier code (DIC) FTF to the Excess file and it is transmitted to the SOS
during EOP processing. The follow-up details are displayed in the Status tab.
5.12.2.3.2. Manually Generated Follow-ups. Select ―Follow-Up‖ from the Status
Request window to submit a follow-up request. After clicking ―OK,‖ the system
generates the follow-up request and transmits the request during EOP processing.

AFMAN41-216 13 FEBRUARY 2013 167
The follow-up, DIC FTF and status code EF, is posted to the Status tab in the Excess Detail Record.
5.12.2.4. Responses to Follow-Up Requests.
5.12.2.4.1. DLA Troop Support.
5.12.2.4.1.1. If DLA Troop Support is processing the FTE, a FTD ―TR‖ is
transmitted. If an excess record is already established at DLA Troop Support and
a FTD or FTR has already been generated, a duplicate of the last status is transmitted.
5.12.2.4.1.2. If DLA Troop Support rejected the FTE, a FTR containing the same
status code as the original rejection is transmitted.
5.12.2.4.1.3. If no record of the FTE exists, DLA Troop Support processes the FTF as a FTE and responds with FTD or FTR status.
5.12.2.4.2. TRIMEDS.
5.12.2.4.2.1. If TRIMEDS is processing the FTE, a FTR ―FA‖ is transmitted.
5.12.2.4.2.2. If no record of the FTE exists, a FTR ―FN‖ is transmitted. The
image appears in the IM Inbox on the IM Excess Report in the Troubled tab.
Users must delete these records before any other action can take place.
5.12.3. Request Excess.
5.12.3.1. Excess materiel can be requested from other DoD activities via TRIMEDS to
fill OPR or WRM shortages and may also be requested to satisfy a specific customer
requirement. To generate a request select ―Excess,‖ then ―Request Excess‖ from the
Navigate menu.
5.12.3.2. The Request Type defaults to Customer but can be changed to OPR or WRM.
The item ID and quantity are always mandatory but the Request Type dictates additional
mandatory criteria. To further specify a request, insert the FOA Document Number and
condition code available in the TRIMEDS database via the AFML website by clicking the ―Supply‖ tab, then clicking ―Applications.‖
5.12.3.2.1. For a Customer request, the customer‘s ID is required and the maintenance activity is required if the item is classified as equipment.
5.12.3.2.2. For an OPR request, only the item ID and quantity is required.
5.12.3.2.3. If the request is to fill a WRM shortage, then the request must be linked to
an assemblage.
5.12.3.3. The requested excess information is written to an excess request file and transmitted to TRIMEDS during the next EOP processing cycle.
5.13. Print Barcodes.
5.13.1. The Barcode Printing module allows users to print barcode labels for new items or
replacement labels for existing items. Barcode labels are printed when the label of an
existing item is unreadable or if label-related information in the customer catalog has been
modified. Print barcodes can also be used in conjunction with Replenishment Inventory,

168 AFMAN41-216 13 FEBRUARY 2013
Physical Inventory, and the Issues processes via HHT. SBLs may be printed in the Barcode
Printing window. The SBL is principally used for inventorying customer areas, but is also
used for item and customer identification.
5.13.2. Before printing large quantities of labels, check the barcode printer to ensure that the
machine is on, operating properly, and there are plenty of labels for the print job. I f using
multiple printers, be sure to check them all. Print barcode labels frequently to ensure they
reflect current customer information. Reprint labels as they become worn or if they are
removed. DMLSS notifies users when unprinted labels require printing by posting the IM Unprinted Bar Code Labels with Changes pending action to the IM Inbox.
5.13.3. The Barcode Printing window (Figure 5.30.) can be accessed in a few different ways.
From the Navigate menu, click ―Print Barcodes‖ to access the Barcode Printing window or
click ―Barcode‖ located on the horizontal toolbar. Another option is to use the keyboard
shortcut ―Ctrl+Shift+F8.‖ This window is also accessible from the Customer Inbox when
unprinted barcode labels with changes are pending.
Figure 5.30. Barcode Printing Window.
5.13.4. Once the window is open, select the search criteria by utilizing any of the available
filters. Then click ―Search‖ to view a list of all barcodes matching the search criteria. The list shows item description, item ID, storage area, location, level, and U/S.
5.13.5. One, some, or all labels can be printed. Labels will print in the order they appear on
the screen. Change the print sequence by clicking the ―Sort‖ button on the toolbar. Sort
labels by description, item ID, storage area, or location. The Sort window also allows users
to add additional criteria or delete existing criteria. This is helpful when more detailed
printing is required. An example would be printing labels by location and inserting another sort criteria to print the location by item ID.
5.13.6. The last used sort criteria is saved. To print in item ID sequence only, click ―Sort,‖
highlight the field to delete, and click ―Delete.‖ Change the remaining field to item ID and
click ―OK.‖ This is the new print sequence. Click ―Print‖ from the toolbar and select a barcode printer.
5.14. Orders.
5.14.1. Customer Request.

AFMAN41-216 13 FEBRUARY 2013 169
5.14.1.1. A customer request can be generated from IM if necessary. From the Navigate
menu, select ―Orders‖ and then ―Customer Request‖ to access the Customer Request
window. Within the window, identify the requesting customer and required item using the dropdown lists. The window will populate with the stored catalog data.
5.14.1.2. Review all data fields and modify as necessary. Click ―SRIM Due-Out‖ on the
vertical toolbar to check for existing customer due-outs. If the item is due-out, contact
the customer to validate the additional requirement. If the requirement is valid, enter a document number (if required) and quantity. Click ―Save‖ to process the request.
5.14.1.3. Upon saving, the customer request generates an ESD and IOU. The customer
request is submitted to LOG when issues are processed. Refer to paragraph 5.15, Issues,
for completing the issue process.
5.14.2. LOG Orders.
5.14.2.1. Use IM LOG Orders to replenish OPR inventory and to purchase materiel
needed to fulfill customer requirements. DMLSS assembles all pending requirements
and populates LOG Orders during EOP processing, when IM issues are manually
processed or when a user selects the Orders/LOG Requirement Orders option. DMLSS
sorts all potential orders according to the SOS code and by ―Req Date.‖ The Req Date
identifies when the requirement was generated by the system based upon either an
unfulfilled IM Issue action or a level requirement for OPR/SER. For PVP and PVM,
DMLSS further sorts orders (call numbers) according to delivery method. In addition,
the system will segregate requirements if the potential order/s are linked to a customer/s
and marked as ―PV Direct.‖
5.14.2.2. While viewing the LOG Orders window, users may select all, some, or a single
SOS for processing. Once an SOS is selected, DMLSS locks the item, validates, and builds the order(s). An order summary is visible for each source.
5.14.2.3. The Order Summary window (Figure 5.31.) provides summary details for each
source to include total lines, total value, exceptions, controlled item class, call number,
auto call indicator, and delivery method. The summary also displays funds availability to
include commitments and new available balance information. Users have the ability to
modify specific requisition qualifiers with the order detail screen, such as, Media/Status
(M/S) code, Priority, Supplementary Address, and Vendor Item Number. The Vendor
Item Number (VIN) is the most critical component of the requisition process as it
signifies to the vendor exactly what you are attempting to procure. Adjust the VIM
accordingly if there is an acceptable equivalent loaded within the MTF Catalog on the item, and the primary item is not available from the vendor.

170 AFMAN41-216 13 FEBRUARY 2013
Figure 5.31. Build Order - Order Summary Window.
5.14.2.4. Exceptions must be resolved prior to executing an order. A check in the
exceptions box identifies line items requiring attention. The Exception Detail window
provides an explanation of why there is an exception on the order. Do one of the following to resolve exception data:
5.14.2.4.1. Alter potential due-in or due-out quantities.
5.14.2.4.2. Adjust the maximum/minimum order amounts.
5.14.2.4.3. Verify that the next contract information is properly loaded for SOS types-DPV, BPA, DBP, RPV, and VPV.
5.14.2.5. The exceptions box is unmarked once the exception is resolved. Execute the
order once all exceptions are resolved.
5.14.2.6. Using the ―Execute‖ button on the vertical toolbar allows DMLSS to process
the order as identified in the Submission tab of the SOS record (paragraph 5.6.1.3).
When the Submit Progress for Exception Started window (Figure 5.32.) appears, verify
the order was completed and submitted successfully then close the window. If the order
is destined to an ―external‖ agency, such as your Prime Vendor, DLA Troop Support,
ECAT, etc., utilize the ―DCM Search‖ or ―DCM Monitor‖ modules within System
Services to verify that the order was successfully transmitted.
Figure 5.32. Submit Progress for Exception Started Window.

AFMAN41-216 13 FEBRUARY 2013 171
5.14.2.7. PVMs Holding Backorders. DMLSS 3.1.2/Gen IV allows both the primary and
back-up Med/Surg PVs to hold a backorder; however, the PV must provide an estimated
ship date (ESD) on every line that is backordered with a status code of ―IB‖, and the
timeframe for delivery is based on the ESD. If the ESD exceeds the order date by 90
days, DMLSS will automatically generate a cancellation request. Additionally, if a
customer requires materiel before the ESD, they can initiate a request for cancellation immediately.
5.14.2.7.1. Any items not initially filled will be held on backorder with an ESD
provided in the order confirmation (EDI 855). If the customer determines they
require the product prior to the ESD, a request for cancellation must be made by
means of the EDI 860 (Purchase Order Change Request). The PV will respond with
an EDI 865 (Purchase Order Change Acknowledgement/Request) either accepting or
rejecting the cancellation.
5.14.2.7.2. If the primary PV accepts the cancellation, DMLSS generates a potential
order to the secondary PV. The user receives a Potential Orders to PV Backup
pending action and must decide between the following courses of action: resend the
order to the primary PV, create an order to the secondary PV or cancel the line
item(s) from the pending action. If the site chooses to send the order to the back-up
PV and it cannot fill the order immediately, they may place the item on backorder and
must provide the customer with an ESD in the order confirmation. If the customer
decides they require the item before the ESD, the customer can request cancellation in the same manner as stated above.
5.14.2.7.3. The user is notified two business days after the ESD if the receipt is not
posted and an EDI 856 is not received via a pending action – Delinquent Backorder from PV.
5.14.3. Offline Submit/Non-Submit.
5.14.3.1. Use Offline orders to process out-of-cycle or emergency purchases in DMLSS.
Additionally, use this process when recovering from manual supply operations,
submitting capital equipment orders, updating computer records when orders were placed while DMLSS was offline, or when directed by higher authority.
5.14.3.2. Offline Non-Submit is also used to process orders for CIIC R (schedule I and
II) items and Prime Vendor credit orders. The Offline Non-Submit order must be
processed in DMLSS prior to submitting the order to the vendor. When prompted, print
the DD Form 1155 and submit it to the vendor along with the DEA Form 222, U.S.
Official Order Forms – Schedules I and II Controlled. Note: follow the procedures for
your geographic location. Processing offline orders in DMLSS first provides required
prior notification of the order to DLA Troop Support and prevents the vendor‘s EDI 855
(order confirmation) and EDI 856 (shipping confirmation) status files from rejecting in
DMLSS and EBS.
5.14.3.3. The difference between ―Submit‖ and ―Non-Submit‖ is simply whether or not
the order will interface electronically with the source/vendor. For orders marked as
―Non-Submit,‖ the system does not generate an outgoing transaction file to the vendor.
For Prime Vendor requisitions, the system creates a ―pseudo‖ EDI 850 file that it

172 AFMAN41-216 13 FEBRUARY 2013
transmits to DLA Troop Support. This file is used to establish a billing/delivery order
profile by DLA Troop Support. Predetermined settings in the submission tab of the SOS
record dictates whether orders are printed or transmitted to vendor. An override option to
the default submission method is available in the SOS Details tab within the Offline Orders window.
5.14.3.4. Two tabs exist in the Supply/Equipment Offline Orders window. Use the Main
tab to identify order details. Use the SOS Details tab to view and edit the vendor‘s data as necessary.
5.14.3.5. In the Main tab, enter the item ID or select one from the dropdown list. The
remaining fields become available once the item ID is loaded. Use the ―Add Item‖ icon
located on the vertical toolbar if multiple items are being purchased on a single order.
Note: The ―Add Item‖ icon is only available after the order is associated to a customer
ID. Remaining catalog items associated to the particular SOS appear after the ―Add
Item‖ icon is selected. At this time, individual or multiple items may be added to the order by entering the order quantity. Click ―OK‖ when finished.
5.14.3.6. In the Customer window, click ―Add‖ to enter the customer, expense center,
and quantity. If the order is being processed to satisfy LOG OPR requirements, select the
local DODAAC from the customer dropdown list.
5.14.3.7. Complete additional required fields prior to executing the order. Modify the
Strat Type and Demand Code fields using the dropdown menu. The Offline Order
process defaults to ―Submit‖ and will electronically submit the order to the vendor. If the
order was manually submitted to the vendor, check the ―Non-Submit‖ box so DMLSS will NOT submit a duplicate order to the vendor.
5.14.3.8. The document number field is not a mandatory field. If this field is left blank,
the system will assign the next available document number even if the Non-Submit
function is used. If a manual document number was assigned to the order, enter the document number in this field.
5.14.3.9. Once the order is complete and all codes are properly set, select ―Execute‖ to
process the order. The LOG and CAIM due-ins and due-outs are generated and written to
the due-in/due-out module and Transaction History.
5.14.3.10. The user has visibility of the source‘s POC information, CAIM balances, and
CAIM due-outs while in the Supply/Equipment Offline Orders window. The POC
information provides a quick reference if the buyer needs to contact the source. CAIM
balances and due-outs can be used to verify the customer‘s requirement and to help prevent duplicating or pyramiding customer backorders.
5.14.3.11. Delayed Delivery Orders. A DMLSS PV order is considered a delayed
delivery order whenever the user enters a required delivery date (RDD) from the offline
orders screen. The RDD can be greater than the current date but not more than 180
calendar days from the current date. (See Chapter 8, paragraph 8.19.4.6. for more information on delayed delivery orders).
5.14.4. Equipment Requirement. Use the Equipment Requirement function to create an
offline equipment order. This function bypasses the Equipment Request process discussed in

AFMAN41-216 13 FEBRUARY 2013 173
Chapter 9, Equipment Management. The Equipment Requirement function obligates
customer funds and creates a LOG due-out (IOU) transaction. As a reminder, the equipment
order (LOG due-in) is not generated at this time. In order to link this new due-out to a LOG
due-in, you must utilize the IM Offline Submit/Nonsubmit module. The user will be notified
of the existing LOG due-out at this time and is provided the option to link the due-in and
due-out.
5.14.5. Due-in/Due-out Search.
5.14.5.1. Use the Due-in/Due-out Search module to search and view active or inactive
due-in/due-out records. An active record is one that has not been received or cancelled,
whereas, an inactive record has been received or cancelled. Additionally, the Due-
in/Due-out Search module is used to post and request status, request and process
cancellations, adjust due-in/due-out quantities, and update status prices. Searches may be conducted in three ways (scope):
5.14.5.1.1. MTF - Displays both LOG and customer due-ins/due-outs..
5.14.5.1.2. LOG - Displays only LOG due-ins/due-outs.
5.14.5.1.3. Customer - Displays only customer due-ins/due-outs.
5.14.5.1.4. Status updates from ―external‖ agencies such as Prime Vendor, ECAT,
DLA Troop Support, and WAWF will post automatically to respective due-in detail
records when passing select edit checks. For example, if the due-in detail record is
―active‖ and the status code provided does not require further action by the user on
the Status Edit Report Part II, then the system will post the status. Status from Prime
Vendors will generally include price updates, quantity revisions, and advance
shipping notifications. The information is provided by the vendor by contract and call
number. Status from ECAT generally includes ECAT contract/call updates, quantity
revisions, and advance shipment notifications. Status from DLA Troop Support
could include quantity revisions, contract information, pricing changes, SOS changes,
and advance shipment notifications. Status from WAWF will include advance shipment notifications.
5.14.5.2. Revise Due-In/Due-Out Quantity. Normally, when the supply source changes
the quantity ordered, either an AE1 image with status code ―BJ‖ (MILSTRIP) or EDI 855
with ―IQ‖ status code (PV) is provided. During processing of the AE1 or 855 statuses,
DMLSS adjusts the due-in quantity. Depending on the vendor type, electronic
confirmation may not be available and the status is received by some other means (i.e.
telephone, email, etc.). In this instance, manual quantity adjustments are accomplished using the LOG Due-in/Due-out module.
5.14.5.3. Adjusting Quantities Manually. Click ―Due-in/Due-out‖ on the horizontal
toolbar to access IM Due-In/Due-Outs. In the Due-in Search tab, enter a document
number or item ID to search for the due-in record. The Due-in Search Results tab
displays the retrieved records. Select ―LOG Due-in‖ and click ―Details.‖ To modify the existing due-in:
5.14.5.3.1. In the Detail screen, verify a previous partial receipt has not already
processed. If a partial receipt was previously processed, update the current due-in

174 AFMAN41-216 13 FEBRUARY 2013
quantity appropriately taking into consideration the partial receipt quantity and current due-in quantity. See the following examples:
5.14.5.3.1.1. Example 1 - Decrease to the Original Quantity Ordered: The
original due-in was for 15. A partial receipt has already processed for 5. The
current due-in quantity is 10. The supplier decreased the original order quantity
to 12. Since 5 of the 12 have already been received, enter 7 in the revised due-in
quantity field. DMLSS spawns a DQC transaction with status code ―CA.‖
5.14.5.3.1.2. Example 2 - Increase to the Original Quantity Ordered: The
original due-in was for 10. A partial receipt for 2 has already processed. The
current due-in quantity is 8. The supplier increased the original order to 12.
Since 2 of the 12 have already been received, enter 10 in the revised due-in
quantity field. DMLSS spawns a DQI transaction with status code ―BJ.‖ Note: DMLSS prohibits users from manually increasing due-in quantities on PV orders.
5.14.5.3.2. Enter the revised due-in quantity in the quantity field.
5.14.5.3.3. Use the standard unit of issue quantity.
5.14.5.3.4. Quantity increase adjustments to LOG due-ins require the LOG due-outs
to be increased. To increase the LOG due-out, open the Due-Out tab and perform a
search for the document number. The results of the search are displayed in the Due-
Out Results tab. Click ―Details‖ to view the due-out information. Coordinate with
the customer, and if acceptable, enter the revised due-out quantity and click ―Save.‖
Note: DMLSS will prohibit quantity increases from occurring if the LOG due-in is linked to a prior fiscal year LOG due-out.
5.14.5.4. DMLSS Processing Actions for Quantity Adjustments.
5.14.5.4.1. Due-in Increases. DMLSS increases the current and original due-in
quantity if the revised quantity is greater than the current due-in quantity. DMLSS
generates a DQI transaction. If the LOG due-out quantity is increased, the CAIM due-out is also increased (IOI transaction).
5.14.5.4.2. Quantity Decreases. DMLSS decreases the current and original due-in
quantity if the revised quantity is less than the current due-in quantity. DMLSS
generates a DQC transaction with status code ―CS.‖ If the due-in is for equipment
and it is linked to a prior FY (PFY) due-out, a message appears asking whether or not
the FY due-out should be cancelled. Generally, the answer should be ―NO.‖ If the
user answers ―YES,‖ then the PFY obligation is cancelled and the PFY customer funds are no longer retrievable.
5.14.5.5. Due-In/Due-Out Cancellations.
5.14.5.5.1. Understanding the Due-In/Due-Out cancellation process is of the utmost
importance. First, users must understand how LOG and CAIM due-ins and due-outs
are associated during the ordering process. Refer to paragraphs 5.15.4.5.2 and 5.15.4.5.3 and figures 5.33. and 5.34. for details.
5.14.5.5.2. Cancellation options vary depending on if the cancellations are for LOG
or CAIM. For example, a CAIM due-in cannot be cancelled if a LOG due-out exists

AFMAN41-216 13 FEBRUARY 2013 175
because the CAIM due-in is tied to the LOG due-out; they are assigned the same document number.
5.14.5.5.3. Customer requirements can be cancelled in CAIM prior to processing
BPS.
5.14.5.5.4. Figures 5.33. and 5.34. provide a snapshot of DMLSS actions generated during the cancellation process.
Figure 5.33. Cancel LOG Due-In Process.
Figure 5.34. Cancel LOG Due-Out Process.
5.14.6. External Customer Import.
5.14.6.1. External customers‘ files for requisitions are sent in A0x (electronic
requisition) in MILSTRIP format. MILSTRIP is a uniform procedure established by
DoD for use within DoD to govern requisition and issue of materiel within standardized
priorities. These MILSTRIP files can be imported and processed using the External Customer Import module, Import External A0x Files.

176 AFMAN41-216 13 FEBRUARY 2013
5.14.6.2. From the Navigate menu, point to Orders, and click ―External Customer
Import.‖ In the Import External A0A Files window, click ―Browse (…)‖next to the File
to Import field. This field may open automatically. In the Select File to Import window, browse for the file to be imported, select it, and click ―Open.‖
5.14.6.3. In the Import External A0A Files window, click ―Add‖ to move the file to the
lower section. Repeat the above steps for any other files that need to be imported. Click
―Process‖ to complete the process.
5.14.7. Reprint Contract/Call Documentation. Within the Reprint Contract/Call
Documentation window, enter the ORG/SVC ID or choose a dropdown menu option to
conduct a search. A list of orders associated to the ORG/SVC ID appears in the Call Register
box. Detailed due-in data for a specific call is visible in the Due-in Detail box. Select ―Print
DD1155‖ from the vertical toolbar to reprint the required call. The system displays the
message ―No orders found for customer!‖ when no matches are located for the ORG/SVC
ID.
5.14.8. Resubmit Orders/Follow-up Requests/Cancellations.
5.14.8.1. Periodically, LOG interface files do not print or electronically transmit to the
designated source. These files include but are not limited to the purchase request (EDI
850), the cancellation request (EDI 860), and the receipt files (EDI 861 and 527R).
Various system and network issues can cause this condition. This function allows users to either reprint or submit the orders.
5.14.8.2. Orders that did not transmit or print are displayed in the Resubmit orders
window. To retransmit orders, highlight a single order or multiple orders and select the
―Resubmit‖ button from the toolbar. To reprint orders, highlight a single order or
multiple orders and select the reprint button from the toolbar. The system removes these records from the list upon completion.
5.14.8.3. The original submission data and time, submission failure reason, order
information, and due-in details are available by highlighting an order and selecting the
―Detail‖ button located on the vertical toolbar. Select ―Close‖ to return to the Resubmit window.
5.14.9. Resend to Gentran. Gentran is a software package which is responsible for
formatting data prior to transmission to external agencies. Utilize GENTRAN to transmit
orders via FTP, HTTPS, etc. If there are no orders to send, the message ―No orders to
resend‖ is displayed. Select ―OK‖ to return to the previous screen. If order files exist,
highlight the file(s) being resubmitted and click ―Submit‖ located on the vertical toolbar.
5.15. Issues.
5.15.1. Overview. The LOG issue module is used as a response to customer generated
requirements. Reference Chapter 6 (CAIM), Paragraph, 6.9 and Chapter 7 (CS), Paragraphs
7.2.2.2 (Order Item) and 7.5 (Order Summary) for a detailed explanation on the customer
replenishment process. The LOG issues process generally includes the following steps:
5.15.1.1. LOG receives customer requirements.
5.15.1.2. Execute LOG issues.

AFMAN41-216 13 FEBRUARY 2013 177
5.15.1.3. Generate picklist(s).
5.15.1.4. Confirm picklist(s).
5.15.1.5. Process deliver list.
5.15.1.6. Fill deficiencies/backorders.
5.15.2. LOG Routine Issues.
5.15.2.1. Select ―Navigate,‖ then ―Issues‖ and ―LOG Routine Issues‖ or click the ―Issues‖ icon located on the horizontal toolbar to access the routine issues process.
5.15.2.2. Select a customer(s) from the dropdown menu and click ―Search.‖ To select all
customers, leave the customer entry blank and click ―Search.‖ DMLSS retrieves all pending customer(s) issues and displays them in the search results window.
5.15.2.3. Select an individual issue or all issues by using the ―Select All‖ button located
on the vertical toolbar. Click ―Gen Picklist‖ and then determine break and sort options
prior to processing.
5.15.2.4. The picklist ―break‖ function determines where the page breaks are set for a
given picklist. The primary break option is defaulted to the last criteria used and no
default is set for the secondary option. Available sort criteria for each is Storage Area,
Location ID, Customer ID, and IPG (Issue Priority Group).
5.15.2.5. The picklist ―sort‖ function determines the sort sequence for a given picklist.
The primary sort is defaulted to the last option used. The picklist can be further sorted
using Secondary, Tertiary, and Fourth sorts. These three options do not have defaults
assigned. The available sort criteria for each are Customer ID, Location ID, Item ID, and Item Description.
5.15.2.6. After selecting break and sort options, click ―OK‖ to view the Picklist-Break on Storage Area window. This window displays the issue requirements for the customer(s).
5.15.2.7. Select ―Process‖ from the vertical toolbar to print the picklist. The system
displays a ―Successfully Processed‖ message and assigns a picklist number. The Issues Search window is displayed after processing.
5.15.2.8. Use the picklist to pull stock from the LOG storage location. While pulling
stock for issue, annotate the actual quantity pulled in the space provided on the picklist.
After all stock is pulled, picklist actions must be confirmed (paragraph 5.15.4).
5.15.3. Non Routine Issues.
5.15.3.1. Use the Non Routine Issues function to record offline, and emergency issues. Record non-routine orders for the following reasons:
5.15.3.1.1. To maintain accurate inventory levels.
5.15.3.1.2. To record demand history.
5.15.3.1.3. To charge the issue to the customer.
5.15.3.2. From the Navigate menu point to Issues and click ―Non Routine Issues‖ to
open the Non Routine Issues window. Complete all required information (red dot) or

178 AFMAN41-216 13 FEBRUARY 2013
select information from the dropdown lists. The Delivery list option is the default for all non-routine issues. Click ―Save‖ and ―Close‖ from the vertical toolbar.
5.15.3.3. The message ―Delivery List has been processed. Do you want to print it?‖ is
displayed. Click ―Yes‖ to print the list. A message box appears indicating that the
delivery list was printed. Printing the delivery list reduces LOG balances and processes an INR to the customer.
5.15.3.4. When processing this type of issue, change the Delivery List default to
Unofficial Pick List. The purpose of this action is to verify LOG balances exist prior to
processing the issue. Therefore, the issue will process rather than create an additional
(invalid) customer requirement/backorder. Click ―Save‖ to view the Inventory
Management window using the Unofficial Pick List. Click ―Print‖ to generate and print the picklist. This will not reduce LOG balances.
5.15.3.5. Use the picklist to pull stock from the LOG storage location. While pulling
stock for issue, annotate the actual quantity pulled in the space provided on the picklist.
After all stock is pulled, picklist actions must be confirmed.
5.15.4. Confirm Picks.
5.15.4.1. Once issues are pulled from the storage area, use the Confirm Picks function to
update LOG inventory balances and generate a pending Deliver List (paragraph 5.18).
This step must be completed before funds are updated and the customer is charged for the
issues. From the IM Navigate menu, select ―Issues,‖ and then ―Confirm Picks.‖
5.15.4.2. Select the appropriate picklist and click ―Confirm Picks.‖ Click ―Select All‖ to
confirm all pending picklists. The picklist information is displayed with the Picked Qty field highlighted because it requires updates. Perform the following:
5.15.4.2.1. If the actual quantity issued (the ―picked quantity‖) is equal to the original
issue quantity leave the Picked Qty field empty.
5.15.4.2.2. If the actual quantity issued (the ―picked quantity‖) is different from the
original issue quantity, type the actual quantity in the Picked Qty field. This action generates an IM Issue Exception resulting in a pending action.
5.15.4.2.3. If the item is not in stock or only a partial quantity is available for issue, a
LOG requirement is generated to fill the customer backorder. These requirements will appear in LOG Orders.
5.15.4.3. After updating the Picked Qty field, click ―Complete‖ located on the vertical
toolbar. If the confirmed Picked Qty differs from the original picklist quantity, the
item(s) is locked for inventory. An inventory must be performed on the item(s) to clear the lock. See Physical Inventory (paragraph 5.8.) for processing procedures.
5.15.4.4. Upon confirming picklists, DMLSS generates LOG and Customer transactions
to record the issue action. The following information describes different scenarios and
the associated DMLSS transactions.
5.15.4.4.1. If the item is in stock, an ISS transaction is generated.
5.15.4.4.2. If the item is not in stock, an IOU transaction is generated and linked to the requesting customer. These requirements will appear in LOG Orders.

AFMAN41-216 13 FEBRUARY 2013 179
5.15.4.5. All LOG and Customer transactions appear in Transaction History and serve as an audit trail. Below are examples of how Transaction History will display transactions.
5.15.4.5.1. An item ordered for a customer will generate a CAIM (customer) ESD
and IOU. Because all customers order from LOG, DMLSS checks LOG inventory balances to fill the order.
5.15.4.5.2. If the request is filled, a LOG ISS transaction is generated. In this
instance, three transactions are written to Transaction History: the CAIM ESD and
IOU, as well as the LOG ISS. In this case, the customer requirement was filled by LOG and the transaction is complete (Figure 5.35).
Figure 5.35. LOG Fulfilled Customer Requirement (Issue Generated).
5.15.4.5.3. An IOU transaction is generated if LOG cannot fulfill the customer
requirement. In this case, three transactions are written to Transaction History: the
customer (CAIM) ESD and IOU, as well as the LOG IOU. This indicates the item
was ordered, but LOG could not fill the order internally. Item requests not fulfilled
by LOG appear in LOG orders indicating the item must be purchased from the
designated source. Once purchased, a LOG ESD (due-in) is written to Transaction
History (Figure 5.36.).

180 AFMAN41-216 13 FEBRUARY 2013
Figure 5.36. LOG unfulfilled Customer Requirement (Backorder generated).
5.15.5. Reprint Completed Picklists.
5.15.5.1. Occasionally, completed picklists are misplaced or additional copies are
needed. Use the Reprint Completed Picklists function to obtain additional copies of a
picklist. In the Reprint Completed Picklists window, identify the required picklist(s) and
click ―Reprint‖ on the vertical toolbar. The message ―Picklist(s) Printed‖ displays.
Select ―OK‖ to return to the Reprint Completed Picklist(s) window. The output product
is identified as a reprinted product.
5.15.5.2. DMLSS prevents multiple users from generating multiple picklists for the same
issue request. On the customer issue request, DMLSS defaults to the item ID, customer
and document number when a user generates a picklist. Once saved, picklists cannot be
cancelled.
5.16. Receipts.
5.16.1. The Receipts module enables users to process receipts, due-in adjustments, and
cancellation actions. Receipts are processed either manually or by using the RF HHT.
Pertinent item information is required prior to processing receipts in DMLSS. Obtain this
information from the item, receiving document, materiel packing list, and/or shipping
document. Using this data, receiving personnel can effectively process complete, partial, discrepant, and/or receipt not due-in transactions.
5.16.2. To access the Receipts module, select ―Navigate‖ and then ―Receipts‖ or use the
DMLSS shortcut ―Ctrl+Shift+Del.‖ The Receipts window is separated into two tabs: Search and Process Receipts tab.
5.16.2.1. Receipts Search Tab. Use this tab to search for active or inactive due-ins, to
obtain delivery lists, or to process receipts. Active due-ins are those in which the receipt
has not processed and Inactive due-ins are those in which the receipt has already
processed. Search for all due-ins by clicking ―Search‖ while all data fields are blank. To
narrow the search, enter at least three characters into any of the search fields. Adjust the
Record Limit between 1 and 500 to further minimize or maximize the search results.

AFMAN41-216 13 FEBRUARY 2013 181
Upon completing the search, the system displays the search results in the Process Receipt
Search Results tab. The Process Receipt Search Results tab is used to view due-in
details, process due-in status, adjust due-in quantities, process complete and partial receipts, and process cancellations.
5.16.2.2. Process Receipts.
5.16.2.2.1. The Process Receipt Search Results tab displays all due-ins matching the
pre-determined search criteria. As a rule, editable fields appear with a white
background. The receipt quantity, cancel quantity, status price, local contract, and substitute fields can be modified prior to processing a receipt.
5.16.2.2.1.1. Process Box – The system automatically ―checks‖ this box unless
(1) receipt exceptions exist as discussed below or (2) the due-in is from a "DPV"
type source of supply (Prime Vendor) and the vendor has not provided an advanced shipping notification (EDI 856).
5.16.2.2.1.1.1. Hazardous Materials – Receipts for hazardous material must
be processed manually. Place a checkmark in the ―Process‖ box to continue.
A message indicating that the item is hazardous is displayed. Select ―OK‖ to continue.
5.16.2.2.1.1.2. Local Contract Number – A contract number must be loaded
prior to processing the receipt. Click ―Detail‖ from the vertical toolbar and
enter the local contract number from the source document. Close the Details
window to update the contract information in the due-in detail. The receipt may now be processed.
5.16.2.2.1.1.3. QA Record – The message ―An existing QA message exists
for this Item ID‖ appears if a QA Record exists for the item. Receipts cannot
be processed using RF/HHT when linked to a QA Message. These receipts
must be processed using the DMLSS receipts module. The receipt cannot be
processed until the QA Message is reviewed. Select/Check the ―QA‖ box and
click the ―Jump To‖ icon to view the message. If the receipted material meets
the QA criteria, do not process the receipt. Contact the vendor and request
replacement materiel. If necessary, process a discrepant receipt and make
sure the material is not issued to the customer(s). If the material does not meet the QA criteria, process the receipt.
5.16.2.2.1.2. Pipeline Time (PLT) – A PLT checkbox is added to each record
when the delivery time varies by plus or minus 10 days. Check this box to record
this data as an actual PLT. Remember, PLTs are used to calculate ROPs for
stocked items. They are also a valid indicator of actual delivery time. The system
will not record the PLT if this box is unchecked.
5.16.2.2.1.3. Quantity – Receipt actual quantity received. A discrepant receipt or due-in adjustment may be necessary if different than current due-in quantity.
5.16.2.2.1.4. Price – Enter the billing price in this field.
5.16.2.2.2. Receipt Cancellations (DQC). Process complete or partial cancellations from the IM Process Receipt tab.

182 AFMAN41-216 13 FEBRUARY 2013
5.16.2.2.2.1. Update the quantity field to reflect the actual receipt quantity. If complete cancellation is processed, then enter zero.
5.16.2.2.2.2. Enter the cancellation quantity in the Cancel Quantity field. If
complete cancellation, this will equal the total due-in quantity.
5.16.2.2.2.3. Place a check in the Process box and click‖ Process Receipts‖ located on the vertical toolbar. Disregard the PLT field.
5.16.2.2.2.4. For complete cancellations, DMLSS generates a DQC transaction with status code BQ.
5.16.2.2.2.5. For partial cancellations, DMLSS generates a DQC transaction with
status code BJ.
5.16.2.2.3. Receipt Discrepancies.
5.16.2.2.3.1. Process discrepant receipts from the Process Receipts tab. DMLSS
uses the transaction quantity, receipt document quantity, current due-in quantity,
and total price to determine if the receipt is complete or partial and if the
discrepancy is a consequential or inconsequential overage or shortage. The DLA
Consequential Discrepancy dollar amount is documented in the Computations tab
of the MM Service detail record located within SS. This dollar value defaults to
$100 and should not be modified unless otherwise directed by higher headquarters.
5.16.2.2.3.2. Discrepancies cannot be processed against PV SOS type code DPV
or VPV items within DMLSS. The Prime Vendor Discrepancy process will be
managed within the DMMONLINE web portal application.
5.16.2.2.3.3. Consequential Overages. If the overage quantity meets the
consequential dollar value for the SOS, DMLSS generates a RND transaction for
the overage quantity. The RND records to Transaction History, appends the
inventory balance, and generates an additional receipt/claims record so DFAS will process payment to the vendor.
5.16.2.2.3.4. Consequential Shortages. If the shortage quantity meets the
consequential dollar value for the SOS, DMLSS generates a DQC for the shortage
quantity. The DQC records to Transaction History and notifies DFAS of the
shortage. DFAS will either short pay the bill or obtain credit if payment was already submitted.
5.16.2.2.3.5. For consequential discrepancies, DMLSS assigns Medical Materiel
Advice Code (MMAC) ―BH‖ for discrepancies attributable to the shipper or MMAC ―BJ‖ for discrepancies attributable to the carrier.
5.16.2.2.3.6. Inconsequential Overages. For inconsequential overages, DMLSS
generates a complete receipt and a SDG transaction. The SDG records to
Transaction History and appends inventory balance records. The gain transaction
is passed to Finance and updates inventory value data but it does not generate a claims payable record.
5.16.2.2.3.7. Inconsequential Shortages. If the shortage is inconsequential,

AFMAN41-216 13 FEBRUARY 2013 183
DMLSS generates a complete receipt and a SDL transaction. The SDL records to Transaction History and passes to Finance to update inventory values.
5.16.2.2.3.8. For inconsequential discrepancies, DMLSS assigns MMAC code
―BK‖ for a Notes code ―R‖ item and MMAC code ―BL‖ for all other items.
5.16.2.2.3.9. Linked Due-Outs. If the discrepancy involves a shortage for a due-
in that is linked to a current FY due-out, DMLSS generates a due-out cancellation
(IOC) transaction reversal for the DQC or SDL transaction quantity. If it is linked
to a PFY due-out, the link is broken and the PFY due-out is maintained.
5.16.2.2.4. Receipt of Substitutes.
5.16.2.2.4.1. Periodically, the vendor will ship a substitute item in place of the
requested (prime) item. When this happens, process the receipt using the
Substitute icon located on the vertical toolbar within the Process Receipts tab.
Note: A catalog record and P/S relationship must exist within DMLSS before a receipt of substitute can be processed.
5.16.2.2.4.2. To create a P/S relationship, click the ―Jump To‖ button next to the
Substitute field. Under the New tab, enter the substitute item ID and adjusted
ratio if required. After saving the record, return to the Receipts module and follow the procedures for processing a substitute.
5.16.2.2.4.3. Use the original document number to access the due-in detail record
for the requested item ID. Highlight the record that needs to be processed, and
then select ―Substitute.‖ The system displays all associated substitutes. This field will be blank if no substitutes exist.
5.16.2.2.4.4. Select the substitute item and click the checkbox in the Substitute
field. Enter the price of the substitute item into the price field, check the Process
box, and then click ―Process located on the vertical toolbar. A RRD is generated
using the prime item ID documented in the original due-in detail record. The
RRD is forwarded to Finance for processing. The substitute item ID is recorded
in Transaction History. If the price was changed, DMLSS generates a PDI
transaction prior to processing the RDD. The PDI is also recorded in Transaction History.
5.16.2.2.4.5. The substitute item ID is written to the Receipts Backorder Release
Report. The Delivery List from LOG to the customer identifies the backorder
release against the prime item ID, but reflects an issue against the substitute item ID.
5.16.2.2.5. Receipt Reversal. Receipts processed in error can be reversed in the IM
Transaction History module. To reverse a receipt, enter the document number and
click ―Search.‖ To narrow the search, select additional data to search (i.e. transaction
type, user ID, item ID, and to and from transaction dates). Select the appropriate
receipt transaction and click ―Reverse.‖ Enter the reversal quantity and click ―OK.‖
The system reverses all associated transactions (backorder release issues) and then
reverses the original receipt. Upon completion, the original due-in(s) and due-out(s)

184 AFMAN41-216 13 FEBRUARY 2013
are recreated. Reversal transactions are recorded in Transaction History and contain a red ―X‖ in the Reversal Transaction (Rev Txn) box.
5.16.2.2.6. Price Corrections. When receipts are processed at the wrong price use the
Price Correction function located in IM Transaction History to process price
corrections. Search for the receipt document number to access the record. To narrow
the search, select additional data to search (i.e. transaction type, user ID, Item ID, and
to and from transaction dates). Select the receipt and click the ―Correction‖ icon.
Enter the correct price in the price correction field and click ―OK.‖ DMLSS
generates a PDI transaction and increases or decreases the original receipt price. The
system also updates the price for all associated issues. Additionally, the price of the MTF Catalog record is updated to reflect the current price.
5.16.2.3. Prime Vendor Receipts.
5.16.2.3.1. Upon processing a PV receipt, an EDI 861, receipt confirmation, is
generated and passed to Finance for processing payment. This occurs for both stock
funded and credit orders and does reflect partial quantities. The receipt confirmation contains the line item document number and CLIN.
5.16.2.3.2. In addition to the 861, DMLSS will pass a Materiel Receipt
Acknowledgement (527R) to DLA. The 527R is not passed until the DMLSS receipt
and three EOD cycles have processed, allowing sufficient time for corrective actions.
When the receipt is complete (no partials pending) a 527R is submitted to DLA with a ‗final indicator.‘
5.16.2.3.3. The due-in status price for PV items cannot be changed once the EDI 855,
order confirmation, is processed in DMLSS. Bases should not utilize the vendor
―Packing slip‖ to obtain pricing as that information excludes the designated cost
recovery rate and distribution fees associated with the MTF and contract. To change
the price, obtain a Price Control Number (PCN) from DLA Troop Support and load that number into DMLSS. Once loaded, the due-in status price can be updated.
5.16.2.3.4. Quantity adjustments are allowed (receipt reversals and cancellations)
until the Materiel Receipt Acknowledgement (527R) is generated. Once the receipt
and three EODs have passed, no adjustments are allowed.
5.16.2.3.5. Manage Return Authorization. Utilize the ―Return Auth‖ modal window
(Figure 5.37.) to enter information regarding a discrepancy or request for return. For
example, the Prime Vendor‘s distribution center pulled the wrong item or NDC, and
you are attempting to secure an exchange for the materiel.

AFMAN41-216 13 FEBRUARY 2013 185
Figure 5.37. Return Authorization Modal Window.
5.16.2.3.5.1. DMLSS 3.1.2 provides users the ability to enter a Return
Authorization Number and a Materiel Disposition Description to document items
returned to the PV. The Return Authorization Number is provided by the PV and
used as a reference if there are short payments to the vendor that are disputed and
by the customer to keep track of material that has been returned due to discrepancies, overages, etc.
5.16.2.3.5.2. Upon processing the item receipt, DMLSS will generate an Manage
Return Authorization (MRA) transaction. Users can view the return authorization
number and materiel disposition in the transaction history.
5.16.2.3.6. Price Verification.
5.16.2.3.6.1. Real-time price verification is an automated process for all
medical/surgical (PVM) requisitions. This process occurs upon receipt of a PV
purchase order confirmation (EDI 855). After the EDI 855 is received, DMLSS
transmits an automatic transmission price challenge to DLA Troop Support via
the Price Lookup Web Service (PLWS). The results of the PLWS lookup are
recorded in the due-in detail and displayed in the status tab with a status code of
―PV‖ for Price Verified, or ―PF‖ for Price Verification Failed (Figure 5.38.).
Users cannot process price changes on a due-in after receipt of the EDI 855.

186 AFMAN41-216 13 FEBRUARY 2013
Figure 5.38. Price Verification Status.
5.16.2.3.6.2. Pharmaceutical (PVP) inquiries are currently handled manually via
email and phone communication.
5.16.2.4. Wide Area Workflow (WAWF) Interface – WAWF is a secure web-based
system used for electronic invoicing, receipt, and acceptance. It allows government
contractors and authorized DoD personnel to generate, capture and process receipt and
payment-related documentation. DMLSS 3.1.2. establishes an electronic interface with
WAWF that displays shipment information and allows the user to verify receipt of
materiel. The interface then uses PKI to electronically bind the digital signature and
provide proof that the user (electronically) signed the document with the contents. This
applies to SOS types: BPA, CON, DPV, ECA, RPV, and VPV.
5.16.2.4.1. Advance Shipping Notice. DMLSS receives an EDI 856 file from
WAWF containing information provided by the vendor. This file will provide
shipping status information to include inbound passive RFID and UID. The due-in
details will show the shipment status receipt and it will update the due-in status price
for all SOS types excluding DPV. The purchase order must be loaded in the due-in detail for CON orders so the EDI 856 will associate to the due-in detail record.
5.16.2.4.2. Receipt Process. DMLSS displays shipment information such as
shipment number and Item Unique Identification Data (IUID) to allow the user to
verify receipt of materiel. The user is required to select the Process box for
applicable Shipment ID received. DMLSS will display a modal window asking ―Are you acknowledging receipt and acceptance for the item(s) selected?‖ (Figure 5.39.).

AFMAN41-216 13 FEBRUARY 2013 187
Figure 5.39. IM Receipt Search Window.
5.16.2.4.3. Receipt Acceptance. Upon physical receipt/acceptance of the item,
DMLSS generates a Receipt Acceptance (EDI 861) to WAWF in addition to the
Receipt (EDI 527) to DLA Troop Support Medical for SOS types DPV, ECA, and
DLA. The Receipt Acceptance contains the user‘s POC information to include name,
phone number, e-mail address, and user ID in the receipt financial file. Note: It is
important this information is entered correctly into the User Information screen. This
file completes the receipt/acceptance steps in WAWF. WAWF then combines the
invoice with the receipt notification and sends them to DFAS for payment.
5.17. IM Summary Receipt Pending. The EDI 527R can be manually processed prior to the
third EOD cycle using the IM Summary Receipt Pending function; however, this action is not
recommended because DMLSS will populate a ―BSM transaction date‖ during the next EOD
cycle in all RRD or DQC transactions linked to the particular call. Once the BSM transaction
date populates, DMLSS prohibits users from reversing the transaction. Highlight the call
number and click the ―Process‖ button located on the vertical toolbar to generate the 527R. This
process marks the ―final indicator‖ in the record so the EOD DFAS process will read and send
the receipts and cancellations to EBS. As previously stated, once processed, reversals and cancellations are prohibited.
5.18. Delivery List.
5.18.1. Print Delivery List(s) after all issues are processed. DMLSS generates Delivery
List(s) for LOG backorder releases resulting from receipts and as a result confirmed picklists
(paragraph 5.15.4.). This list identifies item(s) that need to be pulled from LOG inventory and delivered to customers. Printing a Delivery List updates the customer‘s EOH quantities.
5.18.2. Select a customer and click ―Process‖ to print a Delivery List. When the message
―Would you like to print the selected Delivery Lists?‖ appears, click ―Yes‖ to access the
Print Selection window. The Delivery List is defaulted to print all issues. Select ―CIIC R
and Q‖ to obtain a separate Delivery List for controlled substances or select ―Other than CIIC

188 AFMAN41-216 13 FEBRUARY 2013
R and Q‖ to obtain a Delivery List for all items except controlled substances. Click ―OK‖ to return to the Print Delivery List window.
5.19. Reprint Delivery List. Occasionally, additional copies of a Delivery List are required or
the original was misplaced. Use the Reprint Delivery List function to obtain additional copies of
Delivery List(s). Once the window opens, identify the customer ID and either Delivery List
(routine) or Non-routine Delivery List. The system displays orders by delivery order number.
Select the Delivery List(s) to reprint and click ―Print‖ located on the vertical toolbar. Click ―Close‖ to exit window.
5.20. Transaction History.
5.20.1. DMLSS maintains 24 months of historical data within the Transaction History
module. Transaction History serves as an audit trail and is accessible at anytime and is
maintained IAW AFRIMS T 41-04 R 09.00. Corrective actions and transaction reversals are
also accomplished within Transaction History. To conduct a search, enter search criteria in
the Generic Search tab. The search scope defaults to ALL, but can be changed to IM, AM,
CAIM, or IM/AM combined. Enter as much search criteria as possible to minimize search
results and processing time. Broad searches take longer and result in maximum search
results. DMLSS limits search criteria to 2000 records; however, users may reduce the
number of search records as needed. A typical function of the Transaction History module
includes conducting a daily review of transactions. All of the processed transactions are
included in the Transaction History. However, the only reversible transactions are backorder
release issues, destructions, shipping discrepancy gains and losses, turn-in adjustment gains
and losses, inventory adjustment gains and losses, specific types of issues, and specific types of receipts.
5.20.2. Price Corrections.
5.20.2.1. Periodically, transactions are processed using an incorrect price. When this
happens, use the Price Correction option located on the vertical toolbar to correct the
transaction price. The icon is not available and ―grayed out‖ if the transaction price cannot be corrected.
5.20.2.2. To perform a price correction, search for the transaction using the document
number or other available data. The search results automatically display in the Search
Summary Results tab. Select the transaction to correct from the bottom half of the Search Summary Results tab and click ―Correction.‖
5.20.2.3. Enter the correct price in the Price Correction window and click ―OK.‖
DMLSS automatically processes reversals for this transaction and all spawned
transactions that were processed at the incorrect price; then processes the exact same transactions at the correct price using the same document numbers.
5.20.2.4. If the price entered into the Price Correction window is different than the
current MTF Catalog price, users will receive the following message: ―Price has been
corrected for this transaction and all related transactions. The new price is different than
the current catalog price. Do you want to change the catalog price? Yes/No.‖ If ―Yes‖
is selected, DMLSS changes the MTF Catalog price and recalculates the serviceable inventory value to reflect this change. All price corrections are passed to Finance.

AFMAN41-216 13 FEBRUARY 2013 189
5.20.3. Reversals.
5.20.3.1. Sometimes transactions are processed in error. When this happens, use the
Reversal function located in Transaction History to process corrective actions.
Reversible transactions include backorder release issues, destructions, shipping
discrepancy gains and losses, turn-in adjustment gains and losses, inventory adjustment gains and losses, specific types of issues, and specific types of receipts.
5.20.3.2. Enter search criteria into the Generic Search tab. The search results
automatically display on the Search Summary Results tab. In the bottom half of the
Search Summary Results tab, select the transaction to reverse. Click ―Reverse‖ located
on the vertical toolbar and the system displays the Transaction Reversal Quantity
window. Enter the reversal quantity in this field. The reversal quantity must be equal to
or less than the original quantity. If a previous reversal has been processed for a partial
quantity, the total of both reversals must be equal to or less than the original transaction
quantity. Click ―OK‖ to process the reversal and return to the Transaction Reversal Quantity window. Verify the correct quantity was reversed.
5.20.3.3. DMLSS identifies reversed transactions by placing a red ―X‖ in the Rev Txn
checkbox. For receipts and backorder releases, the reversed transactions and quantities
repopulate the Due-in/Due-out file using the original document number.
5.20.4. Archive Management. Use the Archive Management application to research
historical transactions that are more than 24 months old. Users must have the ―ARC
Transaction History‖ role assigned to their user ID to gain access to this function. The search
window in Archive Management is identical to IM Transaction History.
5.21. QA.
5.21.1. Procedures. Procedures for processing QA records are outlined in Chapter 9 of AFI
41-209. QA messages are automatically downloaded from the JMAR website via Medical
Materiel Quality Control (MMQC) to the DMLSS server. Notifications of new QA messages
are posted in the IM Inbox. These messages should be worked the day they arrive to ensure prompt actions to message resolution.
5.21.2. Submitting a New QA Complaint.
5.21.2.1. The New QA Complaint process is used by DMLSS customers to build new
complaint detail(s) and submit Product Quality Deficiency Reports (PQDR) when there is
a quality deficiency with a medical product. It is also the vehicle for submitting Safe
Medical Device (SMD) incidents. Examples of discrepancies, which should be reported on the PQDR, are:
5.21.2.1.1. Wrong or deficient labeling.
5.21.2.1.2. Foreign or particulate matter in liquids and solids.
5.21.2.1.3. Imperfectly manufactured items that are off-color, off-taste, and off-odor.
5.21.2.1.4. Suspected sub-potency or super-potency.
5.21.2.1.5. Defective devices.
5.21.2.1.6. Pinholes in tubing.

190 AFMAN41-216 13 FEBRUARY 2013
5.21.2.1.7. Faulty calibrations.
5.21.2.1.8. Systemic equipment failures.
5.21.2.1.9. Poor quality products.
5.21.2.2. PQDRs are submitted as either category I or II. FDA defines these categories. See AFI 41-209 for their descriptions and reporting procedures.
5.21.2.3. In DMLSS/IM Navigate menu, select ―QA‖ and then ―New QA Complaint‖ to
access the Create New Complaint window (Figure 5.40.). Select the appropriate
Complaint Type (I or II). If type I is selected, a message appears instructing the user to
contact DLA Troop Support immediately. In addition, the Type I Complaint Detail tab is
activated and requires additional patient reaction data. Note: Do not use ―Type III‖
complaint type in the New QA Complaint process. This category is not used in the PQDR process.
Figure 5.40. Create New Complaint.
5.21.2.4. Enter applicable data into the remaining mandatory data fields. If possible, the
optional data fields should also be completed. When the item ID is entered, the item
description and MFG‘s data automatically populates if the information is stored in
DMLSS.
5.21.2.5. To identify potential DoD Requisition Numbers, click the ―Search‖ button next
to the data field. Requisition data corresponding to the specified item ID is displayed in
the Select DoD Requisition Number window. Highlight the applicable requisition and
click ―OK‖ to populate the DoD Requisition Number field.
5.21.2.6. It is very important to identify OH quantities at this time. Serviceable LOG
inventory quantities must be suspended to prevent issue. Affected materiel stored in
customer areas must be retrieved. Utilize the Navigate\Return Item module to process a
Turn-In Gain for no credit to Strat State OPR/SUS for each customer possessing the
affected materiel. Enter the total quantity OH and total quantity suspended. These

AFMAN41-216 13 FEBRUARY 2013 191
quantities do not necessarily match because you may have OH quantities that do not meet the complaint criteria, i.e. different lot number.
5.21.2.7. Click ―Save‖ after entering the applicable data. Upon saving, the message
―Please submit the complaint on-line by selecting the QAC link button" is displayed. The
―QAC Link‖ button connects the user with the DMMONLINE web page for online
reporting instructions and submittal of the electronic Standard Form (SF) 368, Product
Quality Deficiency Report (PQDR). Note: Submit an online SF 368 via DMMONLINE
rather than using the obsolete SF380, Reporting And Processing Medical Materiel Complaints/Quality Improvement Report link available in DMLSS.
5.21.2.8. Customer OH balances are available by clicking ―CAIM Balance.‖ The
message ―No Balance Exists for Item ID xxx‖ is displayed when no customer balances exist.
5.21.2.9. All new QA complaints immediately appear in the IM QA Complaint Alert.
Complaint Exists for Items pending action. If not already accomplished, report the
complaint at this time. When the materiel complaint has been rectified, notify the Patient
Safety Officer and/or Risk Manager and enter a close reason and close date in the
Complaint Detail tab. Click ―Save,‖ then ―Close,‖ and the complaint is removed from
the pending action.
5.21.3. QA Complaint Search. Use the QA Complaint Search function to search and retrieve
existing complaint data. Click ―Search‖ to process an all inclusive search or enter search
criteria to limit the search results. QA complaints matching the search criteria will appear in
the Search Results window. A records detailed data can be viewed by either double clicking
on the record or by highlighting the record and selecting ―Detail‖ on the vertical toolbar.
Once the QA Complaint details are displayed, the close date and close reason can be
modified as well as the name of the person initiating the complaint.
5.21.4. New QA Record.
5.21.4.1. Use the New QA Record function to add/load a new record into DMLSS for
processing. The item description, QA reference number, class, and QA source are
mandatory fields and must be completed to add a new record. Additional information,
such as the item ID, should be completed, if known. Once added to DMLSS, the record
can be routed through the DMLSS notification process in the same manner as the automated QA notifications.
5.21.4.2. DMLSS provides two methods of QA notification and distribution of new
messages. These methods are automatic and manual. DMLSS is designed to download QA messages automatically from USAMMA and update the DMLSS system.
5.21.4.3. Automatic. When QA messages are downloaded to the DMLSS server,
DMLSS checks the MTF and Customer Catalog records to determine whether or not any
users have used the item associated with the QA message. New QA messages are posted
to the IM Inbox for LOG review. Any customers associated to the products are identified
in the QA Details tab. The customer receives notification of the QA message in the
CAIM Inbox.

192 AFMAN41-216 13 FEBRUARY 2013
5.21.4.4. Manual. In some cases, QA data may need to be loaded manually. Instances
might occur when a QA message is initiated in your facility or when items are not
updated in DMLSS from the automatic transfer.
5.21.4.5. From the Navigate menu, point to QA and click ―New QA Record.‖ The QA
Record (New) window appears with Supply as the default type of search. Select an item
ID from the dropdown list. When selected, the Item Description field is automatically
populated.
5.21.4.6. Complete all required fields (fields with red dots), or select data from the
dropdown list. Add or edit lot numbers, as desired. After all information is added click ―Save.‖
5.21.4.7. At the message prompt, click ―OK.‖ The reference information appears in the
bottom-half of the window. Note: You can double-click on the record(s) to view the details of the customer‘s quantities, and add the record(s) to additional customers.
5.21.5. QA Search.
5.21.5.1. QA Search allows users to search for all QA records in the DMLSS database.
When a supply or equipment item is identified as defective, the QA Record Search
window displays all of the QA message information. For supply items, DMLSS
identifies all internal or external customer accounts having consumption history and
WRM accounts that have an OH balance or due-in for the item. It also allows logistics
personnel to select any additional customer accounts or WRM accounts that should
receive pending action notifications for the item. For equipment items, DMLSS
identifies all equipment accounts and WRM accounts that have the item and allows
maintenance personnel to select any additional equipment accounts or WRM accounts
that should receive pending action notifications for the item. DMLSS associates all
system identified and selected customer accounts, WRM accounts, and equipment
accounts with the QA Notice in the QA Customer record so that subsequent actions may be tracked and recorded.
5.21.5.2. From the Navigate menu, point to QA and then click ―QA Search‖ to access
this module. Select the commodity type of supply or equipment, or leave blank to search
both types. Select search criteria from one of the available dropdown lists or enter the data manually. At least one field must be populated to conduct a search.
5.21.5.3. If the Reject Ind is ―Yes,‖ the search will only return DoD MMQC records that
do not match catalog records. If the ―Reject Ind‖ is ―No,‖ the search will only return
MMQC records that do match catalog records.
5.21.5.4. The QA Record Search window (Figure 5.41.) will display the search results in
the QA Record tab. Additional information from the original QA message along with associated customers and assemblages is available in the QA Details tab.

AFMAN41-216 13 FEBRUARY 2013 193
Figure 5.41. QA Record Search.
5.21.5.5. Adding a Customer to a QA Record.
5.21.5.5.1. As stated earlier, when DMLSS downloads the QA message, it compares
the item ID, NDC, MFG Cat number, etc. from the QA message to those in the MTF
and Customer Catalog records. Pending action notification is sent to all customers
with prior usage recorded. In some instances, the QA notification may need to be
forwarded to additional customers that were not identified during the electronic
review. Users can add additional customers to the QA message notification by
clicking the ―Add Customer‖ icon located on the vertical toolbar and then entering the required information.
5.21.5.5.2. Open the applicable QA message. The ―Add Customer‖ icon is located in
the QA Record Search module, QA Record tab. A pop-up window displays a list of
all customers loaded in DMLSS. Select customer ID(s) that are being added to the notification list.
5.21.5.5.3. Upon saving, the selected customer ID(s) are added to the QA Details tab. DMLSS forwards a pending action notification to each customer selected.
5.21.5.6. Adding/Deleting a Lot Number to a QA Record.
5.21.5.6.1. Within the QA Search window, locate the applicable MMQC message.
Click ―Add/Edit‖ under the Lot No. field box to view the Lot Number window and
then click ―Add.‖ Multiple lot numbers may be added by clicking ―Add‖ after each entry. Click ―Save‖ after entering valid lot numbers.
5.21.5.6.2. Lot Numbers can be removed from the MMQC message by selecting a
number and clicking ―Delete.‖ Save data upon completion.
5.21.5.6.3. When complete click ―Close.‖ The MMQC message reappears with the updated list of lot number(s).
5.21.5.7. Adding an Item to a QA Record. In the QA Search window, locate the
applicable MMQC message. In the QA message window, click ―Add Item‖ on the
vertical toolbar and select the item ID being added to the MMQC message. After the

194 AFMAN41-216 13 FEBRUARY 2013
new item ID is added, edit the Lot Number field to include the affected lot numbers. Add additional customers if necessary.
5.21.5.8. Internal Transfers from QA Search.
5.21.5.8.1. Items matching the MMQC message criteria for suspension can be
transferred from the QA Record Search window, QA Details tab. Click ―Transfer‖ to process an Internal Transfer.
5.21.5.8.2. From the Navigate menu, point to QA and select ―QA Search.‖ Select
search criteria from the dropdown list. At least one field must be populated. Click
―Search‖ to view the QA Records Search window.
5.21.5.8.3. Click the ―QA Details‖ tab and select ―QA Record‖ from the table to transfer. Click ―Transfer‖ to view the Internal Transfer window.
5.21.5.8.4. Using the dropdown list, select the transfer information for each required field. Save upon completion.
5.21.5.8.5. Click ―Yes‖ to print a Pick/Delivery list for the transferred item and then
click ―Close‖ to return to the QA Record Search window. Use the Pick/Delivery list to relocate the affected assets.
5.21.5.9. Completing QA Message Actions. QA messages should be closed out when all
associated actions are complete. This action must be coordinated with the MTF Patient
Safety Officer and/or Risk Manager. Within QA Search, locate the applicable MMQC
message. Click ―Apply Date‖ located next to the Completed Date Field. The Completed
Date Field is populated with the current date. Select ―Save‖ to apply the date to the
MMQC message and finalize the process.
5.21.6. QA Class Maintenance.
5.21.6.1. Editing the QA Notification Class window enables users to change the number
of days before issuing delinquency notice, or the number of days before a delinquency
notice must be posted to LOG. Figure 5.42. is an excerpt of the QA Notification Class
window and shows the fields that can be modified.
Figure 5.42. QA Notification Class.
5.21.6.2. To access the QA Notification Class window, select ―QA‖ from the Navigate
menu; and then ―QA Class Maintenance.‖

AFMAN41-216 13 FEBRUARY 2013 195
5.21.6.3. The ―Delinquency Notice (Days)‖ column identifies the time frame the system
will use to post a delinquent notice to the customer. The ―Delinquent Notice (LOG)
(Days)‖ column represents the time frame used to post a delinquent notice in the IM
Inbox (or LOG). The delinquent days must be updated to a maximum of 1, 5, and 5 days respectively for class I, II, and III.
5.21.6.4. Click ―Save‖ to exit the window and apply modified values.
5.22. Transportation. This option provides outshipment and inshipment search screens from
the Distribution and Transportation Module (D&TM) that allow users to track all or selected
shipments and send advance shipment notices to gaining bases. IM users can process
transactions requiring DRMO, Return to Source of Supply, Return Item for Trade-In, regular loss
transactions, process Issues, Reachback orders, and process Excess type shipments that will be
tracked within the D&TM module. See Attachment 4, DMLSS Distribution and Transportation Module, for additional instruction.
5.23. Return Item.
5.23.1. The Return Item window allows customers to return stock no longer required,
unserviceable, suspended, or overstocked from an item location to the LOG. CAIM does not
allow returns to external sources. Before processing, a determination must be made whether
to allow credit to the end user. Medical materiel personnel must also determine if the items
consumption history will be reduced and whether the Svc/Customer is considered an
―Internal‖ or an ―External‖ type customer. DMLSS does not allow a user to process a customer turn-in from a customer type of ―Spoke.‖
5.23.2. If credit will be given for the return item, check the ―Issue Credit‖ checkbox. Return
transactions are posted to the Transaction History module. A TIL transaction is generated for the customer area losing/returning and a TIG transaction is generated for LOG.
5.23.3. Acceptable equivalents are items associated with a P/S relationship. A checkmark in
this checkbox indicates that the item is the equivalent of an item currently existing in the
MTF catalog. If the P/S relationship is not established, go to the MTF catalog to establish
the P/S relationship. During processing, the item is added to the LOG inventory as the sub item but is identified to customers as the prime item.
5.23.4. Effect of Returns on Issue Consumption.
5.23.4.1. For supply items, the demand code determines if issue consumption should be
reduced. If the ―Reduce Demand‖ checkbox is checked, DMLSS generates a CHZ
transaction with demand code of ―R‖ to reduce current month issue consumption by the
quantity of the transaction. DMLSS reduces current month consumption to zero if it is
less than the transaction quantity. If the Reduce Demand checkbox is not checked,
DMLSS generates a CHZ (consumption history) transaction with demand code ―N.‖
Issue consumption is not reduced. Turn-in of equipment does not affect issue
consumption.
5.23.4.2. To process an item return, select the Navigate menu and click ―Return Item‖ to
view the Return Item window. Enter all required information in the From box in the
window. Entering the customer ID will automatically populate the expense center field.
Entering the item ID will populate the TO box and automatically populate required fields

196 AFMAN41-216 13 FEBRUARY 2013
with default data. Within the TO box, the Strat Type, Strat State, and Storage Area should be reviewed and modified as necessary.
5.23.4.3. Select a reason for the return from the dropdown box. More information can be
entered in the reason box after selecting a reason, if required. After information is entered click ―Save‖ to process. Users have the option of printing a return document.
5.24. Internal Transfer.
5.24.1. The Internal Transfer process allows users to restratify assets internally from one
stratification state to another. Examples include OPR/SER to OPR/SUS, or OPR/SER to
WRM/SER. DMLSS generates both an ITG and ITL when an internal transfer is processed. DMLSS simultaneously writes the ITG and ITL to Transaction History.
5.24.2. From the Navigate menu, select ―Internal Transfer‖ to access the Internal Transfer
window. Enter an item ID or select one from the dropdown list. Depending on the item ID
entered, various fields will be populated with default catalog data associated to the item ID.
5.24.3. In the From section, use the dropdown menus to select the stratification state the item
is being transferred from. In the ―To‖ section, use the dropdown menus to select the
stratification state the item is being transferred to. If there is no location ID associated with
the item being transferred, click the ―Jump To‖ button and add a location for the item.
5.24.4. Enter the transfer quantity and click ―Save.‖ The transfer quantity must be less than
or equal to the available quantity. After processing, users have the option to print a delivery
list. The delivery list can be used to relocate the assets from the old storage location to the
new location.
5.25. Status Edits. The Log Status Edits window displays requisition status messages received
from suppliers that electronically interface with DMLSS. From the Navigate menu, select
―Status Edits‖ to access these records. Status edits also appear in the IM pending action named
IM Status Edits Report and are maintained IAW AFRIMS T 41-04 R 02.00. These status messages are classified into the following three groups:
5.25.1. Part 1 – Errors Tab.
5.25.1.1. Unrecognized status codes/messages are displayed in Part 1, Errors tab. In the
bottom section of the window, highlight an item to review. Requisition data for the
highlighted item appears in the top section of the window.
5.25.1.2. When cancellation status is received from a DPV or VPV source, a list of
suitable substitutes is displayed in the PV Available Alternatives Report. Review this
with a pharmacy representative and determine whether a suitable substitute will satisfy
their requirement.
5.25.1.3. Status messages can be deleted once they have been reviewed and appropriate
action has been taken. Highlight the record(s) to be deleted, and click ―Delete‖ located on the vertical toolbar.
5.25.2. Part 2 – Awaiting Review Tab.
5.25.2.1. Records appear in the Part 2, Awaiting Review tab when requisition status is
received and requires manual intervention. In the bottom section of the window,

AFMAN41-216 13 FEBRUARY 2013 197
highlight an item to review. Requisition data for the highlighted item appears in the top section of the window to include the status description (reason for delay).
5.25.2.2. Review and process these messages to update the Due-in Detail record
accordingly. Once processed, the message is removed from this tab. The status
code/message dictates what information is required for processing. Upon entering the required data, click ―OK.‖
5.25.2.3. Status messages can be deleted once they have been reviewed and appropriate
action has been taken. Highlight the record(s) to be deleted, and click ―Delete‖ located on the vertical toolbar.
5.25.3. Part 3 – Processed Tab.
5.25.3.1. Requisition status that was received and automatically processed is displayed in
this tab for a total period of 7 days. In the bottom section of the window, highlight an
item to review. Requisition data for the highlighted item appears in the top section of the window to include the status description.
5.25.3.2. Delete status messages after review. Highlight the record(s) to be deleted and click ―Delete‖ located on the vertical toolbar.
5.26. Standard Report. A list of available IM standard reports can be accessed by selecting
―Standard Report‖ from the Navigate menu or by selecting the ―Reports‖ icon located on the
horizontal toolbar. Refer to Chapter 13, Reports, for a brief description of each report in DMLSS along with its content and use.
5.27. Reprinting Asset Relocation Delivery List.
5.27.1. Use the Reprint Asset Relocation Delivery List function to view and/or reprint any
delivery list produced because of asset restratification changes that were processed within the
past 30 days. To open the window, select ―Reprint Asset Relocation Delivery List‖ from the Navigate menu.
5.27.2. To search for a delivery list, enter the ORG ID and the ―From‖ and ―To‖ dates and
then click ―Search‖ located on the vertical toolbar. All delivery lists meeting the search
criteria are displayed in the Deliveries window. Double-click the delivery number to screen
a delivery list prior to printing. Details of the delivery list appear in the Delivery Detail
window. Click ―Print‖ on the vertical toolbar to print the report.
5.28. Reachback.
5.28.1. Reachback Scope. DMLSS functionality allows an organization to act in the
capacity of a Reachback host furnishing medical materiel to supported customers either
inside or outside of their geographic region. In order for DMLSS to act as the ―Host‖
Reachback organization, the ―Reachback Enabled‖ indicator in System Services/MM Service Detail must be checked.
5.28.2. Reachback Ordering. Svc/Customers requiring reachback support must be first
established as a reachback customer. The Reachback Customer indicator (SS\Svc Customer
Detail) has to be checked in order for the customer to qualify. Reachback customers have
two avenues for submitting requisitions. The first and most widely used option, is to load
their requirements into the TLAMM Reachback website accessible through the AFML

198 AFMAN41-216 13 FEBRUARY 2013
website by clicking the ―Readiness tab‖ and then clicking ―Applications.‖ Customers have
the ability to enter requirements on a shopping guide tailored to their specific mission needs.
Once quantities are entered, the host reachback site may import orders directly into DMLSS
from this website. The other option is to email requisitions (in MILSTRIP) format directly to the Reachback host.
5.28.3. Reachback Order Import Process. DMLSS users should save the reachback
customer order file into a location which is easily accessible by all users (i.e., shard drive).
The file should be renamed with a .txt extension (Example: FM6943FEB152011.txt.).
DMLSS is coded to only allow a single import of a specific file name and thus alleviates
duplication.
5.28.3.1. Once the file has been saved in the folder or drive, click on
―Navigate\Orders\External Customer Import.‖ The Import External AOA files screen
appears (Figure 5.43.). At the top of the screen, click on the small button containing
three dots (…). Next, select the drive and or folder where the reachback customer order
file resides. Once you have located the file, highlight it and click ―Open.‖ The path
populates at the top of the screen. Click the ―Add‖ button located on the vertical toolbar.
This moves your file from the top of the screen to the ―Selected Files for Import‖ section. Finally, click the ―Process‖ button on the vertical toolbar.
Figure 5.43. Import External AOA Files Window.
5.28.3.2. DMLSS displays a ―Customer Import Message was successful‖ if the file was
properly constructed. Close the module when complete. In order to confirm if the file
was successfully imported, launch the ―DCM Monitor‖ module within System Services.
The most recent DMLSS inbound files appear at the upper portion of the screen. Look
for any file(s) which contain a contract number heading of ―FROM-EXTERNAL.‖ If the
Process Code indicates ―FMTGOOD,‖ then DMLSS was able to decipher the requisition
data. If the Process Code indicates something else (i.e., ―FMTFAIL‖), then the file is probably not formatted properly. Contact the MHS Service Desk for assistance.
5.28.4. IM Reachback Pending Actions.
5.28.4.1. IM Reachback Customers Error/Review Processing. Review this pending
action to determine if the customers requisition(s) requires further action prior to
processing. For example, DMLSS will prohibit a user from completing the order process
if the customer has insufficient funds loaded. Other examples of rejections could include
a request for a particular item ID that is not loaded in the host MTF catalog. The NSN,
U/P, Qty Req, Docnum, Supp Addr, Fund Cd, Expense Ctr, Advice Cd, Dmd Cd, Signal
Cd, and Priority Cd are all editable fields. Once the data has been adjusted, highlight the respective row(s) and click ―Process‖ on the vertical toolbar.

AFMAN41-216 13 FEBRUARY 2013 199
5.28.4.2. IM Reachback Issues Exist for Processing. If the Reachback customer has the
Reachback Issue indicator selected in their Svc/Customer detail record, DMLSS will
attempt to fill the requirement first from OPR/SER stock. The DMLSS user filling the
customer request would process the requirement in the same fashion as regular IM Issues (paragraph 5.15).
5.28.4.3. IM Reachback Log Orders Exist for Processing. DMLSS creates this pending
action when reachback customers demands are not completely filled and result in a LOG
due-out. Launching the pending action reveals all SOS‘s which contain requirements. Work this pending action in the same fashion as normal LOG Orders.
5.28.4.4. IM Reachback Customers Delivery List. This pending action is produced when
the delivery list indicator is unchecked during the processing of a LOG receipt or IM
Issues to a reachback customer. Highlighting the particular delivery list number and processing the delivery list completes the process.
5.28.4.5. IM Reachback Issue Killed/Partial Order Cancelled. This pending action is
produced when LOG processes issues for the reachback customer and confirms a quantity
―less‖ than the prescribed amount on the Picklist. DMLSS immediately produces an inventory exception on the item ID(s) and cancels the partial quantity not filled.
5.29. Hub & Spoke.
5.29.1. Hub & Spoke Scope. The Hub & Spoke functionality enables a large MTF, within a
specific geographic region, to directly support a single or multiple ―Spoke‖ customers. The
spoke customer(s) may or may not also be co-located in the same region. The overarching
concept of Hub & Spoke, is that the Hub MTF acts a source of supply for the spoke
customer(s) and conduit for filling items which are not readily available through traditional
―E-Commerce‖ commercial vendors such as Pharm or Medsurg Prime Vendors, ECAT, etc.
Further, Hub & Spoke allows the Hub to order items for the Spoke customer(s) and have the
materiel delivered directly to the Spoke location.
5.29.2. Ordering Process (Spoke DMLSS Server). Spoke customers requiring support from
a Hub location must first build the new SOS on the spoke DMLSS server. The SOS type
must equal ―HUB.‖ In addition, the SOS code assigned must equal the RIC for the hub‘s
DODAAC (Example = EFN). MTF catalog records must be updated to reflect the new hub‘s
SOS value. DMLSS consolidates requirements for the hub SOS within the IM Log Orders
module and transmits them electronically through DLA Troop Support. DLA Troop Support
then passes the order files to gaining hub DMLSS server.
5.29.3. Ordering Process (Hub DMLSS Server). The ―Hub‖ indicator, located in SS \MM
Service Detail, must be checked in order for the hub to establish spoke customer accounts.
When establishing the new Spoke Svc/Customer account, check the ―Spoke‖ indicator on the
―Basic‖ tab. Check the ―Spoke Issue‖ indicator on the Materiel tab if you want to issue
items directly to the customer from operating inventory. Spoke customers do not require
funds. Both spoke and hub bases utilize the Air Force Working Capital Fund (AFWCF);
therefore, all sales from the hub to the spoke base are processed as outshipments and not sales.
5.29.4. IM Hub pending actions and Order Processing.

200 AFMAN41-216 13 FEBRUARY 2013
5.29.4.1. Spoke Customers Error/Review Processing. This pending action is produced
when a new spoke customer requisition is received and there are errors detected on the
order(s). Examine the error description closely. For example, if the error message
indicates ―NO RECORD FOUND‖ then the item ID furnished by the spoke customer
does not match anything within the hub‘s MTF Catalog. Contact the spoke customer and
attempt to adjust the NSN value manually and then process the request.
5.29.4.2. IM Spoke Orders. Orders that are successfully formatted (correct item ID, unit
of purchase, etc.) automatically generate a customer due-in (ESD) transaction. These
requirements are then forwarded to the IM Issues module where they can be processed
like any other internal customer demand. Requirements that are not filled with on-hand
balances are migrated to the IM Log Orders module where they are aligned to the Log
default SOS for processing. Items which are issued to the customer update IM
Transportation pending actions.
5.30. DCAM Customer Support.
5.30.1. DCAM Scope. DMLSS 3.1.1 supports a direct DCAM to DMLSS interface.
DMLSS allows DCAM customers, at remote locations, to download MTF cataloging
information each day and then place orders to DMLSS. During the DMLSS EOD cycle, the
system produces and transmits five separate cataloging files. They will appear within System
Services\DCM as ―TO-TCAM.‖ These files are placed into a directory which allows DCAM
users to import the data. DCAM requisitions follow a similar path as ―Reachback‖ orders, as
they both utilize the same IM Reachback pending action in-box notifications. DMLSS also
has the capability to pass requisition status to DCAM customers. During routine daily
processing of DCAM customer requests, DMLSS programmatically writes status based upon
the outcome of the customer order. These status images are imported into DCAM in the same fashion as the MTF cataloging data mentioned above.
5.30.2. DCAM Ordering. External svc/customers who require DCAM support must be first
established as a DCAM customer. Both the Reachback Customer and DCAM Customer
indicators in the System Services\Service Customer Detail need to be checked in order for
the customer to qualify (Figure 5.44.). DCAM customers transmit requisitions (in MILSTRIP format) directly to the host DMLSS server.
Figure 5.44. Service/Customer Detail – DCAM Test.

AFMAN41-216 13 FEBRUARY 2013 201
5.30.3. IM Reachback Customers Error/Review Processing. Review this pending action to
determine if the DCAM customer requisition(s) requires further action prior to processing.
For example, DMLSS will prohibit a user from completing the order process if the expense
center provided in the requisition does not match the DCAM customers ―default‖ expense
center loaded in the Svc/Customer detail record. Other examples of rejections could include
incorrect priority code or a request for a particular item ID that is not loaded in the host MTF
catalog. Once the data has been adjusted, highlight the respective row(s) and click ―Process‖ on the vertical toolbar.
5.30.4. IM Reachback Issues Exist for Processing. If the DCAM customer has the
Reachback Issue indicator selected in their Svc/Customer detail record, DMLSS attempts to
fill the requirement from OPR/SER stock first. The DMLSS user filling the customer request processes the requirement in the same fashion as regular IM Issues (paragraph 5.15.).
5.30.5. IM Reachback Log Orders Exist for Processing. DMLSS creates this pending action
when DCAM customers demands are not completely filled and result in a LOG due-out.
Launching the pending action reveals all SOS‘s which contain requirements. Work this pending action in the same fashion as normal LOG orders.
5.31. Master Ordering Facility (MOF). MOFs may be used to place an order for another site
at any time; however, their use is primarily designed to meet the demands of disaster relief (e.g.,
placing orders for another site due to a natural disaster), to facilitate placement of unusual orders
(e.g., equipment), readiness operations, or to manage sets, kits, and outfit builds. The AF has 10
designated MOFs that include three ANG Consolidated Shipment and Distribution Centers
(CSDCs). These sites are identified as alternate ordering sites for other bases within their region with the exception of AFMOA/SGALW – the only MOF not restricted by region.
5.31.1. The establishment of a MOF and its supported customers is determined by Trading
Partner Contract information stored in the Medical Master Catalog (MMC). This
information is received during the UDR Delta process and visible in the TMU. Additionally,
MOF indicators are visible in the MM service detail and customer organization records in
System Services (SS).
5.31.2. MOF customer orders are not filled from on-hand stock. They bypass the issue
process and are processed in LOG orders. An SOS code must be established for each MOF
PV contract. A MOF SOS code cannot be used as the default SOS code for LOG catalog
records.
5.31.3. MOF Customer Orders can be processed within the DMLSS IM application by using
existing electronic interfaces, external customer import, customer request, or offline order
processing. MOF sites can issue from on-hand balances using the IM non-routine issue
(NRI) to fill a MOF‘s customer‘s immediate requirement; however MOF PV contracts are in
place to meet the demands of the customer. Non-usage (NUS) and drop shipment (DRS) are the only delivery methods available for MOF orders.
5.31.4. With the implementation of the MOF order process, DMLSS the system will send
the order to the MOF customer‘s primary MOF PV. If the order is cancelled by the primary,
it is then sent to the MOF customer‘s backup MOF PV. If it is canceled again and the MOF
and MOF customer are in different regions, the order is sent to the MOF‘s primary MOF PV
and then to the MOF‘s back up MOF PV. Orders that cannot be filled by the primary(s) or

202 AFMAN41-216 13 FEBRUARY 2013
secondary(s) MOF PV contracts will be placed on the IM ―MOF Orders Exist For
Processing‖ pending action. If the order is cancelled from all available MOF PVs, the system
will write the MOF customer‘s request to the IM ―MOF Orders Exists for Processing‖ pending action.
5.31.5. The PVs are required by MOF contract to provide delivery to locations within the
Global Region the MOF Contract supports ONLY. For deliveries outside of the Global
Region the MOF must coordinate transportation arrangements with the PV.
5.32. IM Utilities Menu.
5.32.1. IM Utilities, Inbox. The IM Inbox automatically opens upon accessing the IM
module. It can also be viewed by selecting ―Inbox‖ from the Utilities menu. The IM Inbox
contains many pending actions that are either advisory in nature or require user action.
DMLSS will automatically remove some action items from pending actions upon processing
while other advisory notices should be removed or deleted upon review and when no longer
needed. A detailed list of IM pending actions and their recommended use is available in
Attachment 5.
5.32.2. IM Utilities, Maintain Address. DMLSS contains an address table that is linked to
other modules such as the SOS module. Use the Maintain Address function to add, modify,
and delete addresses. The ultimate goal is to load and maintain a single address only once.
Properly managing addresses will eliminate duplicate entries due to misspelling, different abbreviations, etc.
5.32.3. IM Utilities, Maintain Location. DMLSS contains an IM Location table that is
linked to the location/storage area in the LOG Catalog. The location is used in conjunction
with the storage area and identifies various locations where OPR inventory may be stored.
For example, refrigerated materiel may be stored in either the warehouse or the vault. One
location and storage area combination should be added for each; REFER/WAREHOUSE and
REFER/VAULT. Once added, both will appear in the location/storage area dropdown menu
located in the LOG catalog. New location\storage areas may also be added by using the ―Jump To‖ button within the LOG Catalog.
5.32.4. IM Utilities, Maintain POC. Use the Maintain POC function to manage POC data
entered into DMLSS. Data written to this table comes from different modules such as the
SOS POC tab, Equipment Custodian information, and the User Info tab located in SS. Use
this function to maintain a single POC record while eliminating duplicate entries due to
misspelling, different abbreviations, etc.
5.32.5. IM Utilities, Override Process. When one person is using a record, the record
becomes locked to all other users and all other processes. The override process allows that
record to be unlocked. First, attempt to contact the user who has locked it and ask them to
exit the record. If the user who has locked the record cannot be reached, users assigned the appropriate access rights can unlock the record using the override process.
5.32.6. IM Utilities, Override CAIM Process. When one person is using a record, the record
becomes locked to all other users and all other processes. The Override CAIM process
provides a method to unlock CAIM processes. As stated in the previous paragraph, attempt
to contact the person using the CAIM process prior to unlocking. When necessary, users

AFMAN41-216 13 FEBRUARY 2013 203
assigned the appropriate privileges can use this function to unlock CAIM processes. The CAIM Override Process is available in both IM and CAIM.
5.32.7. IM Utilities, Override Picklist. In the Override Picklist window, users assigned the
appropriate access rights can override the assignment of a particular user to a picklist. When
a user is assigned to a picklist, the items in the picklist are locked, until the picklist is completed. By overriding the user assignment, another user can complete the picklist.
5.32.8. IM Utilities, Override Physical Inventory. When a physical inventory is initiated,
DMLSS locks the included records. The ―Override Physical Inventory‖ option can be used
to unlock records that are locked for inventory. Use of this option should be limited because changes to these records may cause inaccurate inventory outcomes.
5.32.9. IM Utilities, HHT. The type of HHT being used must be identified within DMLSS.
To do so, access HHT from the Utilities menu and select ―Janus,‖ PDA, or Trakker. All sites should select ―PDA‖ unless otherwise instructed.
5.32.10. IM Utilities, PDA Order File. The PDA Order File window is used to create a file
of starter data used to generate PDA orders. The starter file must be created before the PDA
is used to submit orders to DMLSS and includes the items with which potential orders can be
created. Use IM to see all item IDs, AM for item IDs associated to a particular assemblage, and CAIM to see a specific customer catalog.
5.32.11. IM Utilities, Customer HAZMAT File. Use this option to create a hazardous
materials file that may be provided to the BEE staff or other official requesting activity. The
file is produced in text format and contains the item ID, item description, U/S, issue quantity,
customer ID, and customer description. This file provides a method of notifying the BEE
staff of all hazardous material sales.
5.32.12. IM Utilities, DCAM Local Catalog File. Use this option if your MTF supports an
external DCAM customer(s) that wish to build a local catalog within DMLSS and download that catalog into DCAM.
5.32.13. IM Utilities, DCAM File Download. During the DMLSS End-of-Day cycle, the
system creates four individual files (stklst.Z, qcalrt.Z, subs.Z, longnom.Z). These files are
used as the foundation for building catalog records within DCAM. Use the ―Select all Files‖
button on the vertical toolbar to mark all files for processing. Click ―Download‖ to
download the data.
5.32.14. IM Utilities, Review Usage.
5.32.14.1. PVP Usage Variance. The PVP Usage Variance process provides a method to
review current variances outside of the normal monthly review process. This report
contains historical data and recommends a new usage quantity based upon the last 90
days use. These calculations are based upon the previously reported usage, actual usage,
and the variance percentage set within the Contract tab of the PVP SOS record. This
provides a means to send and update usage quantities to the PV. During the review
process, take periodic or seasonal requirements into consideration. For example, if you
had an increased but temporary need for an item, the system would increase your usage
but you would decrease the number once the need passed. Note: During EOM
processing, the system generates a pending action to review PVP usage variances. The

204 AFMAN41-216 13 FEBRUARY 2013
PVP Usage Variance pending action will appear in the IM Inbox for users assigned this privilege.
5.32.14.2. PVM Usage Variance. The PVM Usage Variance process provides the same
functionality as the PVP process discussed in the previous paragraph. In this case, the
calculations are based upon the previously reported usage, actual usage, and the variance
percentage set within the Contract tab of the PVM SOS record. As previously stated,
DMLSS generates the PVM Usage Variance pending action monthly. The PVM Usage Variance pending action will appear in the IM Inbox for users assigned this privilege.
5.32.14.3. Recurring NUS/NUA. This process produces a report that shows PVM items
that were ordered three or more times in the previous 90 days. Based upon the recurring
orders, PVM monitors may wish to change the delivery method from NUS to USE (for DPV items) or from NUA to USA (for ACPOP items).
5.32.14.4. Send Current Usage. This option provides a method to transmit current usage
data to both pharmaceutical and MED/SURG PVs. When processed, DMLSS creates a
usage file and transmits that file during EOD processing.
5.32.15. IM Utilities, PV Reported Usage. Use the PV Reported Usage option to obtain a
printed usage report for PVM, PVP, or both. This report shows the reported usage quantity and the submission date.
5.32.16. IM Utilities, PV Websites. Use this option to access a vendor‘s website for PVP,
PVM, ECAT, EMALL, QA, and RIC websites. Highlight a vendor and click ―Go To Web‖ on the vertical toolbar to access the websites.
5.32.17. IM Utilities, Change Vendor Item Number. VINs can be updated for multiple
catalog items in the ―Change Vendor Item Number‖ window. This task is only performed by
LOG and is usually a onetime function, performed the night before changing PVs. The
following tasks are performed within this option: Change VINs, print VIN Conversion Reports, view VIN Conversion Reports, and change VIN for Gen III.
5.32.18. IM Utilities, Calculate Fill Rate. This option is no longer in use. Note: Under
GEN IV contracts, DLA Troop Support will use DMLSS-Wholesale (DMLSS-W)
applications to calculate and make contractual fill-rates available. During GEN IV-Phase 1,
DMLSS-Retail (DMLSS-R) will not display the fill rate to users; users will obtain the fill
rate directly from DMMonline.
5.32.19. IM Utilities, Dashboard. The IM Dashboard provides a high level view of the
logistics account to include inventory lines and value, stratification state, PV fill rate (see
note in paragraph 5.31.18.), inventory performance, and daily demands. Use this option to
view and print data in a variety of report formats. Charts and graphs are produced by left
clicking on underlined data headings. Furthermore, use the dropdown option to vary the
graphic presentation. Blue colored sections are derived from the most recent End-of-Day
(EOD) processing while Green colored sections are derived from the latest End-of- Month (EOM) cycle.

AFMAN41-216 13 FEBRUARY 2013 205
Chapter 6
CUSTOMER AREA INVENTORY MANAGEMENT
6.1. Purpose. CAIM is a user-friendly inventory management tool designed to enhance the
efficiency of DMLSS by allowing the materiel manager to establish and maintain local storage of
items in the customer area. Use the CAIM module to provide patient care and clinical support
through the use of modules that allow automated support for requesting materiel, physical
inventory, ordering, storage, receipt, and tracking of patient care related materiel all the way up
to its point of use.
6.1.1. CAIM is designed with the flexibility to support different customers in the manner
most appropriate for their size. It provides the capability to place orders internally with MTF
stockrooms and any other customer areas classified as a CAIM SOS, as well as placing
orders using purchase cards directly with external sources such as non-contracted BPAs and
DBPAs; however, AF policy directs that only medical maintenance activities are authorized
to be coded as a CAIM SOS. The local Medical Logistics Flight Commander determines
whether or not the maintenance activity is allowed to order directly to a SOS.
6.1.2. CAIM allows customers to store and order items by location. The item requests are
submitted to LOG (Host MTF). LOG either fills customer requirements by issuing materiel
from OPR stock or a backorder is generated and LOG must obtain the materiel from an
external source and issue the materiel to the customer upon receipt.
6.1.3. For privileged users, the CAIM Inbox automatically opens upon accessing the CAIM
application from the DMLSS System Navigation window. It contains many pending actions
that are either advisory in nature or require user action. DMLSS automatically removes
some action items from the inbox upon processing, while other advisory notices should be
removed or deleted upon review and when no longer needed. A detailed list of CAIM
pending actions and their recommended use is available in Attachment 6. At a minimum, all
pending actions should be reviewed and worked daily to ensure proper management of all assemblages.
6.1.4. The CAIM main window also appears once it is launched from the DMLSS System
Navigation window. In this window, users can access the modules and functionalities of
CAIM mainly through the menu options. In some cases, you can also use the buttons on the
horizontal toolbar at the top of the window to open IM module windows. While on any IM
primary window, you have access to the same menu bar and horizontal toolbar buttons. Each
module window, however, displays a unique set of vertical toolbar buttons on the right side of these windows.
6.1.5. The modules covered in the remainder of this chapter are in the same order as they appear in the Navigate dropdown menu located on the menu toolbar.
6.2. New Catalog Item.
6.2.1. MTF Catalog Item.
6.2.1.1. Items not listed on the UDR or DMLSS Extract require a new MTF Catalog item
record to be loaded. While a new MTF Catalog item can be created in CAIM, only basic
information can be loaded. Medical logistics should encourage that customers leverage

206 AFMAN41-216 13 FEBRUARY 2013
the use of the ―New Item Request‖ module with the CS application to maximum extent
based upon policy set forth in AFI 41-209, paragraph 4.4. in lieu of creating catalog
records. Additional management data such as MTF restrictions, special requirements, and
destruction methods must be updated in IM. For this reason, it is recommended that new
catalog records be created in IM by a logistician. User restrictions may apply to
accessing IM.
6.2.1.2. From the CAIM Navigate dropdown menu, select ―New Catalog Item‖ and then
―MTF Catalog Item‖ or click on the ―MTF Catalog‖ button located on the horizontal
toolbar to access this function. A shortcut option is also available by simultaneously
pressing ―Ctrl+Shift+F2‖ on the keyboard.
6.2.1.3. MTF Catalog records should be loaded and/or modified as explained in Chapter 5, paragraph 5.2.
6.2.2. Customer Catalog Item.
6.2.2.1. Use the Customer Catalog Detail window to add or update customer catalog
data, edit customer locations, add notes to the customer catalog item, and search for other
customer catalog items. If applicable, users can also identify items that will be stored in
the carousel and add a carousel location for a CAIM SOS to a Customer Catalog record.
From the CAIM Navigate menu, select ―New Catalog Item‖ and then ―Customer Catalog
Item‖ to access this function.
6.2.2.2. Enter the required information (fields with red dots). After the item ID is
entered, other data fields are automatically populated with information from the MTF
catalog record. Enter the customer ID and click ―Save.‖ The record is updated with
information contained in the MTF catalog record.
6.2.2.3. CAIM issues supplies based on location. The IM Delivery Lists automatically
default to the CAIM customer‘s delivery location that is identified in the SVC/CUST
Detail record in SS. Within the CAIM module, additional storage locations can be added
by accessing the customer‘s catalog record. In the Customer Catalog Detail record, click ―Add‖ in the location box to add another storage location.
6.2.2.4. The Combine Location button is available when multiple locations exist. Use the ―Combine‖ button to merge data from two locations into a single location record.
6.2.2.5. Use the ―Edit‖ button to access the Item Location Detail window and apply
management indicators specific to that item ID. The following data fields, indicators, and system features are available in this window.
6.2.2.5.1. Estimated Monthly Usage – This is not a mandatory field; however, the estimated monthly usage should be loaded if known.
6.2.2.5.2. Level – This is a mandatory field when the Level Type is either Core or
Static (see paragraph 6.2.2.5.7.). Enter the customer‘s desired level, that is, the
amount the customer maintains within their storage area. Note: It is possible for a Core or Static item to contain a level of zero.
6.2.2.5.3. Reorder Point (ROP) – This is a mandatory field when the Level Type is
either Core or Static. When mandatory, enter the customer‘s desired ROP. The ROP determines when the item should be replenished to avoid stock exhaustion.

AFMAN41-216 13 FEBRUARY 2013 207
6.2.2.5.4. Location – Use the dropdown menu to specify the item‘s storage location.
Use the ―Add‖ located next to the location field to add a new location and storage
area. The POU, Carousel, Ready Use, and Other indicators can also be selected in the Location (New) window.
6.2.2.5.5. Storage Area – The storage area coincides with a specified location and is added and/or modified by using the ―Add‖ button located next to the location field.
6.2.2.5.6. Expense Center – Use the dropdown menu to specify the expense center in
which this particular item ID is associated. Only the expense center associated to the customer in the SVC/CUST Detail record in SS appears in this dropdown menu.
6.2.2.5.7. Level Type.
6.2.2.5.7.1. Core – Indicates the level and ROP are computer controlled and based on the same calculations used for OPR inventory.
6.2.2.5.7.2. Static – Indicates the level and ROP are manually controlled by the
custodian or by logistics personnel.
6.2.2.5.7.3. Non-Stocked – Indicates this item is ―stockless‖ and the level and ROP fields are not available.
6.2.2.5.8. Auto Level – Use the ―Auto Level‖ button located on the vertical toolbar to
initiate a system calculation to compute the level and ROP. At least three months of
consumption data must be available prior to using this feature.
6.2.2.6. Save data prior to exiting the Customer Catalog Detail window. The data fields,
indicators, and features are unique to the specified item ID and customer ID; therefore, each customer catalog record must be coded separately.
6.3. Catalog Search.
6.3.1. The CAIM Catalog Search function works the same as the IM Catalog Search function
and is used to search for customer catalog records as well as for LOG, MTF, ECAT, and
other contracted item catalog records. Refer to Chapter 5, paragraph 5.3. for a detailed
explanation. The Generic Search window automatically defaults the search scope to
―Customer Catalog‖ and to the ―Cust ID‖ assigned to the customer conducting the search.
6.3.2. The Catalog Search function is used to retrieve and manage the customer catalog
records. Paragraph 6.2.2. contains detailed explanations of the data fields and indicators used
to manage customer catalog records. This function can also obtain information pertaining to
LOG and/or MTF catalog records and determine whether or not a LOG and/or MFT catalog
exists. While customers have the capability to create new LOG and/or MTF catalog records,
it is not recommended. Logistics personnel should create catalog records using the IM
function to ensure the catalog records are properly coded.
6.4. SOS. The CAIM SOS mimics the IM SOS functionality. Privileges to CAIM SOS should
not be afforded to CAIM customers. SOS records should be managed by logistics personnel using the IM SOS function explained in Chapter 5, paragraph 5.2.1.4.19.
6.5. Purchase Card. The CAIM Purchase Card function mimics the IM Purchase Card
function. CAIM Purchase Card privileges should not be given to customers. The IM Purchase

208 AFMAN41-216 13 FEBRUARY 2013
Card function should be used by logistics personnel to manage the GPC program. Refer to Chapter 5, paragraph 5.7. for a detailed explanation of DMLSS purchase card processes.
6.6. Physical Inventory.
6.6.1. The CAIM Physical Inventory function is used to validate actual OH quantities with
the DMLSS EOH quantity and to adjust inventory balances. The typical function of CAIM
Physical Inventory is to process issues or losses for quantity shortages, and to process gains
for quantity overages; therefore, adjusting the EOH quantities so they match the actual OH
quantities.
6.6.2. While a CAIM Physical Inventory can be coded as ―Official‖ or ―Unofficial,‖ AFI 41 -
209, Chapter 3, states all CAIM inventories are unofficial except for medical maintenance.
CAIM inventories are unofficial because the materiel is no longer LOG owned. The
difference between official and unofficial inventories is described as follows.
6.6.2.1. Unofficial Physical Inventory. The unofficial inventory provides a method to
informally adjust inventory balances. While an Inventory Adjustment Report-Unofficial
is generated, unofficial inventories do not require Certifying Official and Approving
Authority signature. The following transactions are produced as a result of processing an Unofficial Physical Inventory and are visible in both CAIM and IM Transaction History.
6.6.2.1.1. An ISU transaction is generated for each item ID identified with an
inventory shortage. This condition exists when the inventory count is less than the
EOH quantity. The ISU does not update or charge customer funds because the customer was already charged when the materiel was issued from LOG.
6.6.2.1.2. An IAG transaction is generated for each item ID identified with an
overage condition. This condition exists when the inventory count is greater than the
EOH quantity. The IAG does not affect customer funds nor does it affect LOG inventory balances or funds.
6.6.2.1.3. When no quantity adjustments occur, DMLSS unlocks the customer catalog records and they become available for normal operating business.
6.6.2.2. Official Physical Inventory. The CAIM Official Physical Inventory should not
be used, but is explained to provide an understanding of the differences between the
official and unofficial inventory processes. An Inventory Adjustment Report-Official is
produced as a result of an official inventory and must be signed by the Certifying Official
and Approving Authority. Official inventories reflect inventory loss and gain actions that
are subject to audits. The following transactions are produced as a result of processing an Official Physical Inventory and are visible in both CAIM and IM Transaction History.
6.6.2.2.1. An IAL transaction is generated for each item ID identified with an
inventory shortage. This condition exists when the inventory count is less than the
EOH quantity. The IAL does not affect customer funds nor does it affect LOG inventory balances or funds.
6.6.2.2.2. An IAG transaction is generated for each item ID identified with an
overage condition. This condition exists when the inventory count is greater than the
EOH quantity. The IAG does not affect customer funds nor does it affect LOG inventory balances or funds.

AFMAN41-216 13 FEBRUARY 2013 209
6.6.2.2.3. When no quantity adjustments occur, DMLSS unlocks the customer catalog records and they become available for normal operating business.
6.6.3. CAIM Physical Inventories may be accomplished manually or by using an HHT (in
CAIM only) in batch, RF, or store & forward mode to record the inventory results. A
physical inventory may be for an entire customer area, a storage area, selected locations, or selected item IDs.
6.6.4. Manual Inventory.
6.6.4.1. Select ―Physical Inventory‖ from the CAIM Navigate menu or click ―Phys.
Inven.‖ located on the horizontal toolbar to initiate a new or access a pending customer
inventory. In the Physical Inventory selection box, choose ―Unofficial‖ to begin a new
inventory, access an existing one, or choose ―Cancel‖ to exit the physical inventory
process. If a pending inventory already exists, the message, ―You already have a
physical inventory in progress for this customer. Only locked records will be displayed.‖ appears. Click ―OK‖ to continue.
6.6.4.2. In the search criteria window, enter the appropriate item ID, storage area,
location, and/or item type and then click ―Search‖ to retrieve the desired customer
records for inventory. The item type defaults to Stocked but can be changed to Static, Core, or All Core/Static.
6.6.4.3. Upon clicking ―Search,‖ DMLSS displays all matching customer records in the
bottom portion of the window, regardless of the EOH quantity. To process a manual
inventory, enter the count quantities in the ―Inv Qty‖ field for the corresponding item
ID(s). Inventory quantity fields left blank are automatically filled with a zero quantity.
Do not leave fields blank if an OH quantity exists. If necessary, use the Barcode search field to locate a particular record.
6.6.4.4. Process Inventory (Process Inv). Once all inventory quantities are entered, click
―Process Inv‖ located on the vertical toolbar to generate pending inventory actions.
Afterwards, the Inv Complete button appears on the vertical toolbar.
6.6.4.5. Inventory Complete (Inv Complete). After inventory counts are validated, click
‖Inv Complete‖ to complete the customer inventory and generate potential ISU and IAG
transactions as explained in paragraph 6.6.2.1. Select ―Yes‖ when prompted to print the
Inventory Adjustment Report-Unofficial.
6.6.4.6. Cancel Inventory (Cancel Inv). Click ―Cancel Inv‖ to terminate the inventory if
the search criteria or item(s) were selected in error, or when the inventory needs to be
terminated for official reasons. Cancelling the inventory unlocks all affected customer
catalog records and allows the customer to resume normal operations.
6.6.4.7. Close Inventory. Select ―Close‖ to exit the inventory process without
terminating the inventory. When Close is selected, a message opens informing the user
that all records remain locked for inventory. Upon reentering the Physical Inventory
function, users are notified that selected records are locked for inventory. These are the only records that are displayed until the inventory is completed or cancelled.
6.6.4.8. Invalid Records. Click ―Invalid Records‖ to access the Invalid Inventory
Report, which is produced as a result of a HHT inventory. This report identifies invalid

210 AFMAN41-216 13 FEBRUARY 2013
records that were transferred from a HHT to DMLSS as part of an inventory. These records are displayed in the CAIM Invalid Inventory pending action.
6.6.4.9. Revert. Click ―Revert‖ to cancel pending inventory actions and begin a fresh
inventory. All Inv Qty fields revert to blank fields and no transactions are generated.
6.6.4.10. Reset. Use the ―Reset‖ button to reset the item ID, location, storage area, and/or item type search criteria fields to blank.
6.6.5. Inventory Using the HHT Batch Option.
6.6.5.1. Using the HHT in batch mode allows multiple customer areas to be inventoried
and then uploaded to CAIM using the docking station. If duplicate records are found, the
last record uploaded will override the previous record.
6.6.5.2. The CAIM must be locked for physical inventory prior to the upload. To do so,
initiate a CAIM Physical Inventory from a PC and then select ―Close‖ as explained in paragraph 6.6.4.7.
6.6.5.3. To perform a physical inventory using batch HHT; type a valid user ID and hit
the Batch button on the Personal Data Assistant (PDA) to use the Batch password, or
manually type in the value of Batch in the password field. The default password is ―Batch.‖ When using HHT mode, you are not required to enter your ―client‖ password.
6.6.5.4. Select option #2 (Phy Inventory) from the CAIM HHT main menu and scan the
appropriate Customer Barcode Header Label (CBHL). If the label is not readable, press
―OK‖ and enter the customer barcode serial number. A customer inventory method of ‗P‘ (Physical Inventory) is displayed on the window.
6.6.5.5. Scan the Shelf Barcode Label (SBL), physically count the item, and enter the
inventory quantity. Repeat this step for all items being inventoried. If the barcode does
not read, press ―OK‖ and type in the item ID, location ID, and quantity at the prompts.
Once all items have been inventoried, click ―Cancel‖ on the Item Barcode and Customer
Barcode menus.
6.6.5.6. After the inventory is completed, verify active sync is initiated on the PC, return
the HHT to the docking station, select ―Send File (Batch)‖ on the HHT, and select ―Inventory.‖
6.6.5.7. From the PC, open the CAIM application and select the ―Batch HHT‖ button.
The system responds with the number of valid and invalid records. Close the window
and select the ―Phys Inven‖ button. A message appears stating that a customer inventory is already in progress, click ―OK‖ to continue.
6.6.5.8. Click the ―Process Inv‖ button and then the ―Inv Complete‖ button to process
the inventory and generate inventory adjustment transactions.
6.6.5.9. For unofficial inventories, DMLSS generates an ISU transaction for shortages
and an IAG for overages. For official inventories, DMLSS generates an IAL for
shortages and an IAG for overages. An Inventory Adjustment Report is produced for
both types of inventories. The customer‘s EOH is increased and/or decreased as a result of processing these transactions.

AFMAN41-216 13 FEBRUARY 2013 211
6.6.5.10. On the HHT, select ―File‖ from the bottom menu and then select ―Exit‖ to logout of the HHT.
6.6.6. Inventory Using the HHT RF Option.
6.6.6.1. Using the HHT in RF mode allows multiple customer areas to be inventoried
and then uploaded to CAIM using RF. The CAIM customer must be locked for Physical
Inventory on the client before using RF HHT to conduct an inventory. To do so, initiate
a CAIM Physical Inventory from a PC and then select ―Close‖ as explained in paragraph
6.6.4.7.
6.6.6.2. Select ―Physical Inv‖ from the CAIM HHT menu; type a valid DMLSS user ID and password. Do not use the ―Batch‖ password.
6.6.6.3. Scan the CBHL. If the label is not readable, press ―OK‖ and then enter the
customer barcode serial number. A customer inventory method of ―P‖ (Physical
Inventory) is displayed on the window.
6.6.6.4. Scan the SBL or manually enter the item ID, item location, and then enter the
inventory count. The count is updated to the server in real time when accepted. When
the inventory is complete, open the CAIM application from the PC and select ―Phys
Inven.‖ A message appears stating the customer inventory is already in progress, click ―OK‖ to continue.
6.6.6.5. If the CAIM Physical Inventory window was open while conducting the
inventory, click ―Revert.‖ All inventory counts are displayed in the Inv Qty field on the
Physical Inventory Entry window for review and acceptance.
6.6.6.6. Click ―Process Inv‖ and then ―Inv Complete‖ to process the inventory and generate adjustment transactions.
6.6.6.7. For unofficial inventories, DMLSS generates an ISU transaction for shortages
and an IAG for overages. For official inventories, DMLSS generates an IAL for
shortages and an IAG for overages. An Inventory Adjustment Report is produced for
both types of inventories. The customer‘s EOH is increased and/or decreased as a result of processing these transactions.
6.6.6.8. On the HHT, select ―File‖ from the bottom menu and then select ―Exit‖ to
logout of the HHT.
6.6.7. Inventory Using the HHT Store and Forward Option.
6.6.7.1. Typically, the Store & Forward HHT mode is used in locations outside the RF
coverage area. This mode is similar to the batch HHT, but it allows you to transmit
inventory records that were collected in batch to CAIM via RF rather than through the
docking station. Multiple customer areas can be inventoried and then uploaded to CAIM
using the RF. If duplicate records are found, the last record uploaded will override the previous record.
6.6.7.2. The customer(s) must be locked for Physical Inventory prior to the upload. To
do so, initiate a CAIM Physical Inventory from a PC and then select ―Close‖ as explained in paragraph 6.6.4.7.

212 AFMAN41-216 13 FEBRUARY 2013
6.6.7.3. Select ―Physical Inv‖ from the CAIM HHT menu, type a valid username, and enter ―Batch‖ as the password.
6.6.7.4. Scan the CBHL. If the label is not readable, press ―OK‖ and enter the customer
barcode serial number. A customer inventory method of ―P‖ (Physical Inventory) displays on the window.
6.6.7.5. Scan the SBL, physically count the item(s), and enter the inventory quantity.
Repeat this step for all items being inventoried. If the barcode does not read, press ―OK‖
and type in the item ID, location ID, and quantities when prompted. Once all items have been inventoried, click ―Cancel‖ on the Item Barcode and Customer Barcode menus.
6.6.7.6. After the inventory is completed, select ―Send File (RF)‖ on the HHT and enter a valid DMLSS user ID and password.
6.6.7.7. Open the CAIM application from the PC and select the ―Phys Inven‖ button. A
message appears stating that a customer physical inventory is already in progress, click
―OK‖ to continue. Select the ―Process Inv‖ and then ―Inv Complete‖ to process the inventory and generate adjustment transactions.
6.6.7.8. For unofficial inventories, DMLSS generates an ISU transaction for shortages
and an IAG for overages. For official inventories, DMLSS generates an IAL for
shortages and an IAG for overages. An Inventory Adjustment Report is produced for
both types of inventories. The customer‘s EOH is increased and/or decreased as a result
of processing these transactions.
6.6.7.9. On the HHT, select ―File‖ from the bottom menu and then select ―Exit‖ to logout of the HHT.
6.7. Destructions. Medical materiel destructions must be processed by logistics personnel using
the IM Destruction process explained in Chapter 5, paragraph 5.9. Customers should never
process destructions. Because the Destruction resource is tied to several roles within UP Assign,
it is difficult to prevent customers from receiving the privileges to use the CAIM Destruction process. Therefore, it is essential to enforce this policy at the site level.
6.8. Return Item. CAIM customers are not allowed to return items to LOG. Logistics
personnel must use the IM Return Item function explained in Chapter 5, paragraph 5.23. to process customer returns.
6.9. Customer Replenishment.
6.9.1. Use the Customer Replenishment function to submit automated supply requests to
LOG and replenish the customer area inventory. Logistics staff and/or customers can process
materiel requests using manual, automatic, or HHT replenishment methods. The HHT method may be conducted in batch, RF, or Store & Forward mode.
6.9.2. Initiating replenishment actions, regardless of method used, generates a CAIM due-
out (CAIM IOU transaction) and due-in (CAIM ESD transaction). The following LOG
transaction(s) are generated once the customer order is submitted to LOG and the IM Issues are processed:
6.9.2.1. If sufficient stock is OH, a LOG issue (ISS transaction) processes issuing the material to the customer.

AFMAN41-216 13 FEBRUARY 2013 213
6.9.2.2. If stock is not OH, a LOG due-out (IOU transaction) is generated.
6.9.2.3. If a partial quantity is OH, both an ISS and IOU could process.
6.9.3. If ―Verify Orders‖ is enabled in SS for the SVC/CUST, the customer must access the
Orders Build/Process/Submit (BPS) function explained in paragraph 6.11.1 to process the
order. Note: Customer funds are not obligated and committed until the BPS function is used to submit customer orders to LOG.
6.9.4. Typical replenishment actions include the following:
6.9.4.1. Using HHTs to determine replenishment quantities required to refill stock shortages.
6.9.4.2. Conducting a manual replenishment to replenish stock for specified items.
6.9.4.3. Using automatic replenishment, allowing DMLSS to calculate replenishment
quantities based on customer levels, EOH quantities, customer due-ins, and due-outs.
THIS OPTION IS NOT RECOMMENDED because automatic replenishment is based on EOH quantities and assumes that customer levels are valid.
6.9.5. Manual Replenishment.
6.9.5.1. From the CAIM Navigate menu, select ―Customer Replenishment‖ and then
―Manual Replenishment‖ or click ―Manu Repl‖ located on the horizontal toolbar to access the ―Manual Replenishment Inventory Entry‖ window.
6.9.5.2. Use one or more of the search criteria to retrieve customer catalog records for
potential replenishment. The available search criteria includes the item ID, item
description, storage area, location, barcode, and item type. Use the item type dropdown
menu to specify a stock level type code of stocked, non-stocked, core, or static. Enter
―All‖ into the item type field to retrieve records assigned all stock level type codes. Once
the search criterion is identified, click ―Search‖ to retrieve the matching customer catalog records for potential replenishment.
6.9.5.3. Enter a quantity in the Quantity field based on one of the available inventory
methods. The inventory method is linked to the customer‘s Inventory Method indicator
located in each SVC/CUST Detail record in SS. All AF activities defaults to ―Order Quantity‖ and should only be changed after thorough consideration.
6.9.5.3.1. Order Quantity - Enter the quantity required to replenish stock.
6.9.5.3.2. Shelf Count – Enter the actual quantity OH. DMLSS generates
replenishment based on the difference between the customer‘s level and the shelf
count.
6.9.5.3.3. Empty Shelf - DMLSS replenishes the level quantity because it assumes the OH quantity is zero.
6.9.5.4. Manual replenishments can be processed in many different ways. Assuming the
Order Quantity method is being used, the customer must ultimately know what quantity
to request whether using pen and paper or memory only. If necessary, the customer can
print the inventory list displayed in the Manual Replenishment Inventory Entry window
by selecting ―Print‖ from the File dropdown menu. This list can be used to inventory the

214 AFMAN41-216 13 FEBRUARY 2013
stock room and then the customer can use the printed list to enter the required replenishment quantity.
6.9.5.5. The Replenishment Qty and Replenishment Amount columns are updated for
each line item and totals are calculated as replenishment quantities are entered into the
Manual Replenishment Inventory Entry window. This feature may be valuable if insufficient funds are available for 100% replenishment.
6.9.5.6. Click ―Replenish‖ located on the vertical toolbar once all quantities are
annotated. DMLSS responds with a message confirming the number of items being
replenished. Click ―OK‖ in response to the confirmation message to return to the CAIM
main menu. If the Verify Orders option is not selected for the customer, the Generate
Order Progress window opens, followed by the ―Orders Have Been Successfully Built‖ message.
6.9.5.7. A message is displayed if there are replenishment exceptions. Exception items
are not ordered until the exception is resolved. You are also prompted to print a
Replenishment Exception Report at this point. All other items are transferred to the
Orders – BPS function and are considered ―pending‖ orders until submitted to LOG from the BPS window, explained in paragraph 6.11.1.
6.9.6. Automatic Replenishment.
6.9.6.1. As previously stated (see caution in paragraph 6.9.4.3.), the Automatic
Replenishment function is used to allow DMLSS to automatically calculate customer
replenishment quantities using the following calculation: Level – (O/H + D/I – D/O) =
Replenishment Qty. Before using this method, ensure valid customer levels are
established. Items with a level of zero and items marked for deletion are not considered for replenishment.
6.9.6.2. From the CAIM Navigate dropdown menu, select ―Customer Replenishment‖
and then ―Automatic Replenishment‖ or click on the ―Auto Repl‖ button to access the
Automatic Replenishment window. DMLSS calculates the customer‘s requirements and displays the results in a message box for customer validation.
6.9.6.3. Attempting to run Auto Replenish for a customer who has an unexecuted order
or unsent executed orders pending action will generate a message informing the customer
that pending actions related to orders exist. These pending actions must be deleted or submitted to LOG before automatic replenishment can be processed.
6.9.6.4. At the message prompt signifying completion of the replenishment process, click ―OK‖ to return to the previous window.
6.9.7. Replenishment Using Batch HHT.
6.9.7.1. With a HHT in batch mode, scan the SBLs to enter the inventory. The
information is stored in the HHT until the inventory process is complete. The unit is then
placed in the docking station and all the inventory data is downloaded to DMLSS at one time.
6.9.7.2. When using this method, the records processed in the text file determine the
replenishment quantity for each item location. The entries are processed according to the customer's inventory method.

AFMAN41-216 13 FEBRUARY 2013 215
6.9.7.3. To perform a replenishment inventory with a batch HHT: Select ―Replenish
Inv‖ from the CAIM HHT menu; type a valid username and enter ―Batch‖ for the
password; and scan the CBHL. If the label does not read, press ―OK‖ on the HHT to
reach the Manual Input window and manually enter the customer barcode serial number and inventory method at the prompt.
6.9.7.4. At the prompt, scan the SBL and enter the quantity required if using the Order
Quantity inventory method. If using the Shelf Count inventory method, enter the OH
quantity. Repeat this step for all items being inventoried. If the barcode does not read,
press ―OK‖ and type in the item ID, location ID, and quantity at the prompt. Once all
items have been inventoried, click ―Cancel‖ on the Item Barcode and Customer Barcode menus.
6.9.7.5. After the replenishment inventory is completed, select ―Send File (Batch)‖ on the HHT and return it to the docking station.
6.9.7.6. Log into CAIM using a DMLSS enabled PC. In the ―Select a Customer‖
window, select the customer that has been inventoried for replenishment using the HHT.
If you have multiple customer inventories, the Batch Transfer Process will update all of the customers regardless of which customer you log into first.
6.9.7.7. In the CAIM Main window, select the Batch HHT button located on the
horizontal toolbar. At the message prompt, click ―OK‖ to begin the replenishment inventory transfer. Only records without exceptions are replenished.
6.9.7.8. Records with exceptions are written to either the CAIM Invalid Inventory or the
CAIM Replenishment Exceptions Report pending action. The item exceptions must be
resolved prior to replenishment. Reference Attachment 6 for an explanation and suggested use of these pending actions.
6.9.8. Replenishment Using HHT RF Mode.
6.9.8.1. HHTs used in RF mode receive and transmit ‗real time‘ data to CAIM as the process is being performed just like your computer does over the LAN.
6.9.8.2. To replenish inventories using the RF HHT, select ―Replenish Inv‖ from the
CAIM HHT menu and enter a valid username and password. Do not use the ―Batch‖ password.
6.9.8.3. Scan the CBHL. If the label will not scan, manually enter the customer barcode serial number and inventory method at the prompt.
6.9.8.4. At the prompt, scan the SBL and enter the quantity required if using the Order
Quantity inventory method. If using the Shelf Count inventory method, enter the OH
quantity. Repeat this step for all items being inventoried. If the barcode does not read,
press ―OK‖ and type in the item ID, location ID, and quantity at the prompt. Once all
items have been inventoried, click ―Cancel‖ on the Item Barcode and Customer Barcode menus.
6.9.8.5. If the SBL is invalid due to damage or corrupt data. Press ―Enter‖ to access the
manual entry windows. The system will allow manually entering of the item ID,
customer ID, location ID, and quantity.

216 AFMAN41-216 13 FEBRUARY 2013
6.9.8.6. On the HHT, press ―Cancel‖ to complete the customer area replenishment
inventory process. DMLSS prompts for new customer information. Follow the steps
outlined above to continue the process in other areas.
6.9.8.7. Once all items and customers have been inventoried, click ―Cancel‖ on the Item Barcode and Customer Barcode menus.
6.9.9. Replenishment Using HHT Store & Forward Mode.
6.9.9.1. Store & Forward HHT is similar to Batch HHT. Multiple customer areas can be inventoried and then uploaded to CAIM using RF.
6.9.9.2. Using the HHT in Store & Forward mode allows you to scan the SBLs in batch
mode and then enter the inventory in RF mode. However, in Store & Forward mode, the
information is stored in the HHT until the inventory process is complete. The HHT then
uses RF mode to transmit the inventory data to CAIM at one time, without the use of a
docking station.
6.9.9.3. For a replenishment inventory on the HHT, the records processed in the text file
determine the replenishment quantity for each item location. The entries are processed
according to the customer‘s inventory method. Once the upload is complete, CAIM will
perform a validation process on the data and notify the user of records containing errors.
6.9.9.4. Use the following steps as a guide to process replenishments using the Store & Forward HHT method:
6.9.9.4.1. Select ―Replenish Inv‖ from the CAIM HHT menu, enter a valid username, and type ―Batch‖ for the password.
6.9.9.4.2. Scan the appropriate CBHL. If the label will not read, press ―OK‖ on the
HHT to reach the Manual Input window. Manually enter the customer barcode serial number and inventory method at the prompt.
6.9.9.4.3. At the prompt, scan the SBL and enter the quantity required if using the
Order Quantity inventory method. If using the Shelf Count inventory method, enter
the OH quantity. Repeat this step for all items being inventoried. If the barcode does
not read, press ―OK‖ and type in the item ID, location ID, and quantity at the prompt.
Once all items have been inventoried, click ―Cancel‖ on the Item Barcode and
Customer Barcode menus.
6.9.9.4.4. Repeat the process for each item being replenished.
6.9.9.4.5. On the HHT, press ―Cancel‖ to complete the customer area replenishment
inventory process. DMLSS prompts for new customer area information. Follow the steps outlined above (paragraph 6.9.9.4.) to continue the process in other areas.
6.9.9.4.6. Once all items and customers have been inventoried, click ―Cancel‖ on the
Item barcode and Customer Barcode menus.
6.9.9.4.7. After the inventory is completed, select ―Send File (RF)‖ on the HHT and enter a valid user ID and password.

AFMAN41-216 13 FEBRUARY 2013 217
6.9.9.4.8. Select the ―Issue‖ method and answer ―Yes‖ or ―No‖ to the prompt asking
if error messages should be displayed. The upload initiates at this point without the
need for the docking station.
6.9.9.4.9. Log into CAIM using a DMLSS enabled PC. In the Select a Customer
window, select the customer that has been inventoried for replenishment using the
HHT. If multiple customers were inventoried, the Batch Transfer Process updates all
of the customers regardless of which customer you log into first.
6.9.9.4.10. On the HHT, select ―File‖ from the bottom menu and then select ―Exit‖ to log out of the HHT.
6.9.9.5. Log onto CAIM and select the ―Batch HHT‖ button located on the horizontal
toolbar. At the message prompt, click ―OK‖ to begin the replenishment inventory
transfer.
6.9.9.6. Once the upload is complete, CAIM clears the HHT of all data and performs a
validation process. CAIM notifies the user of records containing errors by displaying a
Replenishment Exception pending action in the Customer Inbox. The user must
manually correct the errors listed.
6.9.9.7. If the customer has Verify Orders turned off, the orders are automatically
submitted to LOG. If Verify Orders is turned on, the user must access the Orders - BPS function to process the orders.
6.9.10. Point of Use (POU) and Carousel. POU and Carousel are not particular CAIM
Replenishment functions but operate like an automated replenishment function when the customer detail record is properly coded.
6.9.10.1. POU.
6.9.10.1.1. A POU cabinet is an automated supply tracking and replenishment system
used in various locations throughout a hospital. These POU cabinets store, dispense,
and automate the replenishment of materiel. With a POU cabinet, you do not need to perform manual replenishments or use HHTs for replenishment.
6.9.10.1.2. A POU interface was established to provide a means of communication
between the POU cabinet and DMLSS. This interface allows leveling and ordering
functionality to be handled by the POU system, and requirements received from the
POU system are then filled by DMLSS. The POU system acts as the conversion
manager and reorder calculator. DMLSS supplies any order quantities requested by
POU.
6.9.10.1.3. POU Set-up Procedures. If POU cabinets are used, the Verify Receipts
and Verify Orders indicators in SVC/CUST record in the SS application should NOT
be selected, they should be unchecked. To use the POU interface properly, perform
the following tasks:
6.9.10.1.3.1. Configure the POU interface in the SS application. Access DCM
Search and click the ―Configure‖ button located on the vertical toolbar. Select
―POUSRV‖ in the DCM Interface Selection window and click ―Yes‖ in the Send
field. Enter the POU‘s server IP address, login ID, and password. Save changes before existing.

218 AFMAN41-216 13 FEBRUARY 2013
6.9.10.1.3.2. Identify the POU locations in the customer catalog. Access CAIM
and perform a customer catalog search. Click the ―Add‖ button to add a location.
In the Location – New window, add a unique location and storage area and click
the POU indicator. A location cannot be marked as POU when the send indicator in DCM Configuration is turned off.
6.9.10.1.4. An item in the customer catalog can have a carousel location, a POU
cabinet location, and a ready use location. Remember that the combination of location ID and storage area must be unique.
6.9.10.1.5. Items, which reject as a result of the automated POU replenishment, are
displayed in the POU Replenishment Exception Report pending action. Access the
pending action and take necessary actions to resolve the exception and to process the replenishment.
6.9.10.2. Carousel.
6.9.10.2.1. A carousel is a type of stock and storage equipment usually located in a
medical pharmacy or medical supply warehouse. Manual or HHT replenishments are
not required when using a carousel. A carousel interface is available to accommodate the use of carousels by any of the following:
6.9.10.2.1.1. CAIM SOS customer (Only authorized CAIM SOS is the medical maintenance activity).
6.9.10.2.1.2. CAIM customer with ready use location.
6.9.10.2.1.3. Pharmacy that does not operate as a SOS.
6.9.10.2.2. These carousels may be a series of bins mounted to a track that retrieves
the required items for the operator. Currently, there are several carousel storage and
retrieval systems in operation within DoD MTFs. To use the carousel interface properly, perform the following tasks:
6.9.10.2.2.1. Configure the carousel interface in the SS application. Access
DCM Search and click ―Configure‖ located on the vertical toolbar. Select ―Carousel-1‖ or ―Carousel-2‖ in the DCM Interface selection window.
6.9.10.2.2.2. Identify the carousel locations in the customer catalog. Access
CAIM and perform a customer catalog search. Click ―Add‖ to add a location. In
the Location – New window, add a unique location and storage area and click the ―Carousel‖ indicator.
6.9.10.2.3. An item in the customer catalog can have a carousel location, a POU
cabinet location, and a ready use location. Remember that the combination of
location ID and storage area must be unique.
6.9.10.2.4. Use the CAIM Ready Use Location Replenishment pending action as explained in Attachment 6 when using Carousel and Ready Use replenishments.
6.10. Print Barcodes.
6.10.1. Use the CAIM Print Barcode function to print barcode labels for new items or
replacement labels for existing items. Barcode labels are printed when the label of an

AFMAN41-216 13 FEBRUARY 2013 219
existing item is unreadable or if label-related information in the customer catalog has been
modified. Print barcodes to be used in conjunction with Replenishment Inventory, Physical
Inventory, and Issues processes via HHT. SBLs may also be printed in the Barcode Printing
window. The SBL is principally used for inventorying customer areas, but is also used for item and customer ID.
6.10.2. Before printing large quantities of labels, check the barcode printer to ensure that the
machine is on, operating properly, and there are plenty of labels for the print job. Barcode
labels should be printed frequently to ensure the label information is accurate. Reprint labels
as they become worn or if they are removed. Customers should monitor the Unprinted
Barcode Labels with Changes and Unprinted Critical Barcode Labels pending actions and
produce new labels as necessary. Refer to Attachment 6 for a description and recommended use of these pending actions.
6.10.3. Select ―Print Barcodes‖ from the CAIM Navigate menu or click on the ―Barcode‖
button located on the Horizontal toolbar to access this function. Barcode labels can also be
printed from the Unprinted Barcode Labels with Changes and Unprinted Critical Barcode Labels pending actions.
6.10.4. In the Barcode Printing window, use the following search criteria to locate potential
barcode labels to print.
6.10.4.1. Print Customer Header Label Only - Check this indicator to print a customer identification label.
6.10.4.2. Item ID – Use to search for a specific item.
6.10.4.3. Location – Use the dropdown menu to retrieve records associated to a specific location.
6.10.4.4. Item Type – Use the dropdown menu to retrieve records associated to a specific
item level type. The available search criteria is: all records (ALL), Stocked, Non-stocked, Core, Static, and All Core/Static.
6.10.4.5. Barcode Type – Use the dropdown menu to identify a specific type of barcode
label to retrieve. The available barcode types are: All, All Changes, Critical, Noncritical,
and Obsolete.
6.10.4.6. Storage Location – Use the dropdown menu to identify records associated to a specific storage area.
6.10.5. Click the ―Search‖ button on the vertical toolbar once the search criteria is identified.
DMLSS displays the item description, item ID, storage area, location, level, and U/S of the
matching records in the ―Barcode Printing‖ window. Labels can be printed for one, some, or
all of the displayed records. Use the Shift and/or Control key function to highlight multiple records.
6.10.6. Reset. Click on the ―Reset‖ button to remove all previous search criteria so a new
search can be conducted.
6.10.7. Print. Select the ―Print‖ button to print a barcode report containing the displayed records.

220 AFMAN41-216 13 FEBRUARY 2013
6.10.8. Barcode Print. Click on the ―Barcode Print‖ button on the vertical toolbar to produce a barcode label for all selected (highlighted) records.
6.10.9. Delete. Click on the ―Delete‖ button to insert an ―N‖ in the Type column. This
provides another method to further sort the records. Clicking ―Delete‖ in this window does not mark the customer catalog for deletion.
6.10.10. Select All. Click ―Select All‖ to highlight all records for printing.
6.10.11. Sort. Use the ―Sort‖ button on the vertical toolbar to identify how the records are
sorted and displayed within the Barcode Printing window. Use the ―Insert,‖ ―Add,‖ and
―Remove‖ buttons as an advanced sort feature. Records can also be sorted in ascending
order by clicking once on any of the column headings or sorted in descending order by
clicking the column heading twice. Labels are printed in the order they appear on the screen.
The last Sort option is stored in CAIM for the next print session.
6.11. Orders.
6.11.1. BPS Orders.
6.11.1.1. Use the CAIM BPS function to submit and/or cancel pending customer orders
to LOG when the SVC/CUST has ―Verify Orders‖ turned on, when the order edits or
rejects (i.e. lack of funds), or when an order is submitted to an external agency other than
LOG. The BPS function is also used to resubmit orders that appear in the CAIM
Unexecuted Orders pending action. From the CAIM Navigate menu, select ―Orders‖ and
then ―Build/Process/Submit Orders‖ or click on the ―BPS Order‖ button located on the
horizontal toolbar to access this function.
6.11.1.2. Normally, the only SOS that appears in the ―SOS Selection‖ window is the RIC
assigned to LOG, i.e. EDT for Elmendorf, FM5000. Highlight the local LOG SOS and click ―OK‖ to access the Build Orders/Order Summary window.
6.11.1.3. The upper half of the window contains details of the customer‘s order to
include the SOS, project code, total number of line items on the order, total value of the
order, and an exceptions indicator. If an ―X‖ appears in the exceptions column, click
―Detail‖ to access the specific line item in question. The exception must be resolved
before that item can be ordered.
6.11.1.4. The customer‘s fund record details are displayed in the lower half of the
window. The project center fund code and associated EOR is visible along with the
dollar value of new commitments and surcharges, which are based on the order totals
listed in the upper half of the window. Additionally, the current available balance is
listed and the new available balance shows the customer what the available balance will be if all items are ordered.
6.11.1.5. The following flag (Flg) indicators are used throughout the order process: P –
process, H – Hold, and D – Delete. These indicators are used to determine whether or not an individual record or an entire order is processed upon clicking the ―Execute‖ button.
6.11.1.6. Execute. Click ―Execute‖ to process the order. Upon executing, the system generates an ESD IOU transaction. Both are written to Transaction History.

AFMAN41-216 13 FEBRUARY 2013 221
6.11.1.7. Detail. Click ―Detail‖ to access the Build Orders/Order Detail window.
Features available in the order detail window include the ability to add Notes, print a
detailed report, view SOS information, and check/compare PVM pricing. The due-in and due-out details are listed in separate tabs.
6.11.1.7.1. Due-In Tab. The due-in quantity, advice code, and U/P price can be
modified in the Due-In tab. The customer can also code the due-in as ―Hold.‖ To do
so, highlight the record to be held and click the ―Hold‖ button located at the bottom
of the window. The ―Flg‖ indicator changes from ―P‖ to ―H.‖ Records with a ―Flg‖ indicator of ―H‖ are not processed as part of the order upon executing.
6.11.1.7.2. Due-Out Tab. In the Due-Out tab, only the quantity can be modified.
Like the due-in, the due-out can also be coded as ―Hold.‖ In addition, the due-out can
be coded for deletion by highlighting the desired record and clicking ―Delete‖ located
at the bottom of the window. In this case, the ―Flg‖ indicator changes to ―D‖ and the
record is removed from the order.
6.11.1.8. Hold. Click ―Hold‖ to flag an entire order to be held. An order containing a
―Flg‖ indicator of ―H‖ is held and not processed upon executing the order. Orders that
are held reappear in the Build Orders/Order Summary window with a ―Flg‖ indicator of
―P‖ upon reaccessing BPS. Orders may need to be held for various reasons to include:
6.11.1.8.1. Reducing the maximum dollar amount allowed for an order.
6.11.1.8.2. Holding an order that is not ready to be submitted.
6.11.1.8.3. Loading additional funds for the order.
6.11.1.9. Exceptions. An exception indicator is visible in the Build Orders/Order
Summary window as well as in the Build Orders/Order Detail window. All exceptions
must be resolved before the item can be ordered. Once resolved, the ―X‖ is removed
from the exception indicator box. Highlight the order containing exceptions and click
―Exception‖ to access the Exception Detail window. Take one of the following actions to rectify the exception:
6.11.1.9.1. Alter potential due-in or due-out quantities. Edit the due-in or due-out
order information, click ―Save,‖ and then click ―Close.‖
6.11.1.9.2. Adjust fund targets. Navigate to the customer‘s fund record in SS and load funds in the appropriate EOR.
6.11.1.9.3. Adjust the maximum/minimum order amounts. Edit the due-in order
quantity to lower or raise the order dollar amount, click ―Save,‖ and then click
―Close.‖
6.11.1.9.4. The SOS may also require use of a purchase card.
6.11.1.10. Report. While in the Build Orders/Order Summary window, click the
―Report‖ button to print the BPS Order Summary Screen Report. While in the Build
Orders/Order Details window, click the ―Report‖ button to print the Order Detail Screen
Report. Each of these reports replicates the data contained within each window.

222 AFMAN41-216 13 FEBRUARY 2013
6.11.1.11. Refresh. Click ―Refresh‖ to refresh the data displayed within the Build
Orders/Order Summary window. This feature is beneficial because the user does not
have to exit and reaccess this window to update the information.
6.11.2. Offline Submit.
6.11.2.1. Use the CAIM Offline Submit function to place out-of-cycle or non-routine
orders to LOG. Normally, customer orders are submitted to LOG using one of the CAIM
replenishment options or by logistics personnel processing a customer request using the
IM Order function.
6.11.2.2. From the CAIM Navigate menu, select ―Orders‖ and then ―Offline Submit‖ to
access this function. Offline Submit function can also be accessed using the shortcut by simultaneously pressing the ―Ctrl+Shift+F10‖ keys.
6.11.2.3. In the Submit Offline Orders window, enter an item ID or select one from the
Drop Down Search & Select list. This list defaults to ascending sequence by item
description but it can also be sorted by item ID sequence. Upon entering the item ID,
corresponding information from the MTF catalog record automatically populates the
location, expense center, and SOS fields. The demand code always defaults to recurring and the priority code defaults to 13. Modify these fields as necessary.
6.11.2.4. Enter the required quantity in the Order Qty field. Use the Add Item feature
located on the vertical toolbar to add additional items and quantities to the order.
Continue selecting the Add Item feature until the last item is added.
6.11.2.5. After all requirements are added to the order, select ―BPS Order‖ to
immediately process the order or select ―Close‖ to process the order at another time. If
―BPS Order‖ is chosen, the order is immediately transmitted to LOG. If ―Close‖ is
chosen, the order is ‗staged‘ and accessible by accessing the CAIM BPS Order function explained in paragraph 6.11.1.
6.11.2.6. Upon processing the order to LOG, an ESD and IOU transaction are generated and written to Transaction History.
6.11.3. Offline Non-Submit.
6.11.3.1. Use the CAIM Offline Non-Submit function to document a manual order to
LOG without submitting an electronic request to LOG. This function is normally not
used because in almost all instances the customer order is already submitted. In normal
circumstances, customers use one of the CAIM replenishment functions or logistics
personnel process a customer request using the IM Orders function. The CAIM Offline
Submit function explained in paragraph 6.11.2 should be used prior to the Offline Non-
Submit option. Whichever method is used, the customer must understand the Offline
Non-Submit function documents the order in CAIM but does NOT submit an order to LOG.
6.11.3.2. From the CAIM Navigate menu, select ―Orders‖ and then ―Offline Non-
Submit‖ to access this function. Enter the desired item ID in the Non-Submit Offline
Orders window or select one from the Drop Down Search & Select list. This list defaults
to ascending sequence by item description but it can also be sorted by item ID sequence.
Upon entering the item ID, corresponding information from the MTF catalog record

AFMAN41-216 13 FEBRUARY 2013 223
automatically populates the Location, Expense Center, and SOS fields. The demand code
always defaults to recurring and the priority code defaults to 13. Modify these fields as
necessary.
6.11.3.3. Enter the required quantity in the Order Qty field. Use the Add Item feature
located on the vertical toolbar to add additional items and quantities to the order. Continue selecting the Add Item feature until the last item is added.
6.11.3.4. After all requirements are added to the order, select the ―Close‖ button to
process the order and generate a DD Form 1155, Order for Supplies or Services.
6.11.3.5. Select the ―New Order‖ button to generate another Offline Non-Submit order.
6.11.3.6. Upon processing the order, an ESD and IOU transaction are generated and written to transaction history.
6.11.4. Due-In/Due-Out Search.
6.11.4.1. Use the CAIM Due-in/Due-out Search module to retrieve and review
customer‘s active and inactive due-in/due-out records. An active record is one that has
not been received or cancelled; an inactive record has been received or cancelled.
Additionally, the CAIM Due-in/Due-out Search module is used to adjust a customer‘s
due-in/due-out quantities. Due-in/due-out searches may be for a particular customer or at
the MTF level (scope) as explained below:
6.11.4.1.1. Customer – Displays only due-ins and due-outs associated to the specified
customer. When a corresponding LOG due-out exists, the customer‘s due-in quantity and price cannot be updated.
6.11.4.1.2. MTF – Displays LOG and customer due-ins and due-outs. This option
provides customer‘s a method of seeing LOG‘s due-in and due-out status without
having to contact logistics. Quantity and price adjustments to LOG records are not allowed in CAIM.
6.11.4.2. The CAIM Due-in/Due-out search functions work the same as described for the
IM Due-in/Due-out search functions explained in Chapter 5, paragraph 5.14.5. A few exceptions for cancellations and revisions apply to customer due-ins and due-outs.
6.11.4.2.1. The CAIM due-in quantity cannot be revised if a corresponding LOG
due-out exists. Revisions must be accomplished to the LOG due-out first and then to
the CAIM due-in.
6.11.4.2.2. The CAIM due-out quantity cannot be revised if a corresponding CAIM
due-in exists. Revisions must be accomplished to the LOG due-out and CAIM due-in prior to adjusting the CAIM due-out.
6.11.4.2.3. Since the CAIM due-in and due-out are not linked, both must be revised
and/or cancelled. If the CAIM due-out is not modified, it will continue to appear in BPS as a customer requirement.
6.11.5. Reprint Contract/Call Documentation. The Reprint Contract/Call Documentation
function is generally used by logistics personnel as explained in Chapter 5, paragraph 5.14.7.
However, if customers desire, this function can be used to print a DD1155 or DD250,
Material Inspection and Receiving Report, reflecting the customer‘s order(s) to LOG. The

224 AFMAN41-216 13 FEBRUARY 2013
orders are divided by contract/call and appear in the Call Register box. Detailed due-in data
for a specific call is visible in the Due-in Detail box. Select the appropriate print function to
reprint the required call. When no matches are located for the specified customer, the system displays the message ―No orders found for customer!‖
6.11.6. Resubmit Orders/Follow-up Requests/Cancellations.
6.11.6.1. In most cases this function is not required for use by CAIM customers. This
function is primarily used by logistics personnel to resubmit orders directly to vendors.
However, if a condition exists, customers can use this function to resubmit orders to LOG that did not process or was not previously received.
6.11.6.2. Highlight the files being resubmitted and click the ―Submit‖ button located on
the vertical toolbar. If multiple records are present, use the ―Shift‖ or ―Control‖ key
functions to select multiple orders and then click on the ―Submit‖ button to resubmit the files.
6.11.6.3. Alternate submission methods can also be selected for orders being
resubmitted. In addition to resubmitting an order, customers can also edit the order for
resubmission or remove the order to prevent it from being resubmitted.
6.11.6.4. The message ―There are no failed orders to resubmit at this time‖ appears if all
orders transmitted successfully during the initial process. Click ―OK‖ to return to the CAIM main menu.
6.11.7. Resend to GENTRAN. This CAIM function should not be used by customers.
Logisticians are responsible for generating and/or resending files to GENTRAN as explained in Chapter 5, paragraph 5.14.9.
6.12. Issues. AF policy is that CAIM customers do not possess the authority to resell medical
materiel and therefore should never attempt to issue materiel to other customers. Only
authorized CAIM SOS activities (medical maintenance) that are granted the appropriate
privileges are allowed to process CAIM issues. If a customer attempts to process issues, the
message ―You must be a CAIM SOS to process Issues‖ appears and the customer is forced to
click ―OK‖ to continue.
6.13. Receipts.
6.13.1. Customers can use the CAIM Receipts function to search for and view materiel
receipts associated to their account; however, they should not be manually processing
receipts in CAIM. Per AF policy, only CAIM SOS accounts (medical maintenance
activities) are authorized to manually process receipts in CAIM. This function is directly
related to the Verify Receipts indicator located in the Materiel tab of each customer‘s
SVC/CUST Detail record in SS. The Verify Receipts indicator for all customers should be
unchecked.
6.13.2. Because the Verify Receipts indicator is unchecked, receipts for CAIM customers
automatically process after IM receipts are processed and the delivery list is generated in IM. Active CAIM due-ins becomes inactive as a result of that receipt process.
6.13.3. The automatic receipt action fails if an item is locked at anytime during the process.
As a result, the affected receipt records are displayed in the Auto Receipts Failed pending
action, which appears in both the IM and CAIM Inbox. Customers or logisticians must

AFMAN41-216 13 FEBRUARY 2013 225
access these records and process the receipts from the pending action. Receipt failures can be attributed to one of the following:
6.13.3.1. Item(s) Locked for Inventory. The inventory must be completed or cancelled
before the receipt can process.
6.13.3.2. Due-in/Due-out Out of Balance. Receipt fails if the due-out is less than the due-in quantity. Increase the due-out quantity to allow the receipt to process.
6.14. Delivery List. This function is only available to CAIM SOS customers; therefore, it is restricted to authorized medical maintenance activities.
6.15. Reprint Delivery List. This function is only available to CAIM SOS customers;
therefore, it is restricted to authorized medical maintenance activities.
6.16. Customer Status Edits. Customers can use the Customer Status Edits function to review
status received from LOG. Because LOG is the only SOS for AF customers, the status should only appear on the Part III, Processed tab.
6.17. QA.
6.17.1. New QA Complaint. The CAIM New QA Complaint process is the same as the IM
New QA Complaint process. Refer to Chapter 5, paragraph 5.21.2 for a detailed explanation.
To maintain an effective and efficient QA program, customers should discuss new QA
complaints and product quality deficiency reporting instructions with the MM Manager prior
to submitting an IM or CAIM New QA complaint.
6.17.2. QA Complaint Search. Use the CAIM QA Complaint Search function to retrieve QA complaint data associated to new QA complaints submitted by the specified customer.
6.17.3. QA Customer Responsibilities.
6.17.3.1. Each SVC/CUST account is responsible for assigning a QA monitor to initiate,
review, and respond to QA messages and/or complaints. The customer QA monitor is
responsible for reporting and submitting new QA complaints to the MM Manager as well
as reviewing and responding to pending actions generated as a result of the AF QA program.
6.17.3.2. The following pending actions are unique to CAIM and require customer
response to complete the QA process. Refer to Attachment 6, CAIM Pending Action, to
understand why these pending actions are generated and for an explanation of the
customer‘s required actions. The LOG QA monitor cannot complete the QA process
until required customer actions are completed.
6.17.3.2.1. ―QA Alert. Cust Equipment.‖
6.17.3.2.2. ―QA Alert. Item Qty Required Cust (Supply).‖
6.17.3.2.3. ―QA Delinquency Notice. Supply Item Qty Cust.‖
6.17.3.2.4. ―CAIM QA Complaint Alert. Complaint Exists for Item.‖
6.18. Standard Reports.
6.18.1. The CAIM Standard Reports module provides customers and logisticians numerous
standardized reports to use while managing the customer‘s account activity. Because these

226 AFMAN41-216 13 FEBRUARY 2013
reports are ‗Standardized,‘ they cannot be modified. Select ―Standard Reports‖ from the
CAIM Navigate menu or click on the ―Reports‖ button located on the horizontal toolbar to
access Standard Reports.
6.18.2. Refer to Chapter 13, Reports, for a brief description of each report in DMLSS along
with its content and use. Also, a description of all CAIM Standard Reports is available
within the online Help function. Once in the Reports window, click the ―Help‖ button
located on the vertical toolbar to access the CAIM Reports reference table.
6.18.3. Once processed, reports are displayed in the Report Viewer window. The following
features are available for most reports. Use the ―save to file‖ feature to save the report in
either text, Excel, .PSR, or clipboard formats. Available formats vary for different reports.
Some reports can only be saved as a .PSR file; therefore, the data cannot be manipulated in other Microsoft software programs (i.e. Excel, Word, etc.).
6.19. Adhoc Reporting. The Adhoc Reporting tool uses Business Objects, a commercial off-
the-shelf software package, to produce customized reports. Customers and logisticians can
utilize this tool to retrieve specific data and/or data formats that are not available using the
Standard Reports function. These reports are produced on demand and are only visible using BOs.
6.20. Transaction History.
6.20.1. The Transaction History module maintains 24 months of transaction history. Use the
CAIM Transaction History function to access up to 24 months of historical data for a
specified customer. This historical data can be reviewed for reporting purposes or to correct
errors. Use the Archive Management function to access historical data greater than 24
months old.
6.20.2. Select ―Transaction History‖ from the CAIM Navigate menu or click ―Trans
History‖ located on the horizontal toolbar to access this function. The Transaction Search window is divided into two tabs: Generic Search and Search Summary Results.
6.20.3. In the Generic Search tab, enter search criteria for existing transaction information.
There are several search options available depending on the nature of the search. Processing
time can be minimized and search results narrowed by entering as much search criteria as
possible. The broader the search the longer DMLSS needs to process the search. DMLSS
also limits search criteria to 500 records; however, the user may reduce the number of search records as needed. Search results are displayed in the Search Summary Results tab.
6.20.4. All historical transactions matching the search criteria are displayed in the Search
Summary Results tab. When possible, customers should use the Transaction History
function to conduct a daily review of transactions to verify accuracy. If necessary, corrective
actions should be accomplished. While all customer transactions are recorded in Transaction
History, only backorder release issues, destructions, shipping discrepancy gains and losses,
turn-in adjustment gains and losses, inventory adjustment gains and losses, specific types of
issues, and specific types of receipts can be reversed. Customers should not process
transaction reversals and other corrective actions without consent and instruction from
logistics personnel.
6.21. Mass Updates.

AFMAN41-216 13 FEBRUARY 2013 227
6.21.1. View Unchanged Expense Centers.
6.21.1.1. Within DMLSS, a customer‘s catalog records (item locations) are associated to
the expense center similarly to the way the catalog records are associated to the
SVC/CUST. If directed to change a customer‘s assigned expense center, use the Change Expense Center function explained in Chapter 4, paragraph 4.23.
6.21.1.2. The View Expense Centers function provides a method for customers and
logisticians to view and update the record(s), if any, that did not change expense centers
due to the catalog record being locked at the time the Change Expense Center was
processed. If this condition exists, the affected records are also displayed in the CAIM Unchanged Expense Center Due to Mass Update pending action.
6.21.1.3. Whether accessed from the View Unchanged Expense Center function or the
CAIM Unchanged Expense Center Due to Mass Update pending action, users can either
delete the record and leave them assigned to the originating expense center or access the customer detail record and change the assigned expense center to resolve the condition.
6.21.1.4. Click ―Delete‖ to remove the record and leave assigned to the original expense
center.
6.21.1.5. To update the expense center, click the ―Detail‖ button to access the customer‘s
catalog record. Then click the ―Edit‖ button located at the bottom of the window. Use the dropdown menu to reassign the expense center and click ―Save.‖
6.21.2. Copy Items.
6.21.2.1. Use the Mass Update Copy Items function to copy one or more catalog records
from one customer‘s catalog to another customer‘s catalog. This function is useful when creating or updating customer catalogs for new customers.
6.21.2.2. From the CAIM Navigate menu, select ―Mass Update‖ and then ―Copy Items‖ to access this function.
6.21.2.3. In the Mass Update/Copy Items window, use the dropdown menu in the Select
a Customer to copy items from the box to identify the originating customer‘s catalog
records. Once loaded, the originating customer‘s catalog item IDs and item descriptions are displayed in the upper portion of the window.
6.21.2.4. Next, use the dropdown menu located in the Select a customer to copy items to
the box to identify the gaining customer‘s account.
6.21.2.5. Use the ―Shift‖ and/or ―Control‖ key functions to highlight (select) the desired
records to copy. Once all records are highlighted, click ―Move Down‖ to copy the
catalog records to the gaining customer‘s catalog. Duplicate records are not copied to the
new customer.
6.21.2.6. Delete Feature. If a catalog record was moved to the gaining customer in error,
highlight the record and click ―Delete‖ on the toolbar. This action removes the catalog record from the gaining accounts catalog.
6.21.2.7. Item Location (Loc) Feature. On the vertical toolbar, click ―Item Locs‖ to view
the Mass Updates Create Customer Catalog Records window. Make necessary edits to
the item‘s location, level type, level, and ROP from this window. This step is important

228 AFMAN41-216 13 FEBRUARY 2013
because the new customer might not store an item in the same location or may require a
larger or smaller level for an item. Upon editing the gaining customer‘s catalog data,
click the ―Process‖ button to process the updates.
6.21.2.8. As a result of using this function, each record copied appears in the new
customer‘s Unprinted Critical Barcode Labels pending action. Barcode labels can be printed by accessing each record from the pending action.
6.21.3. Change SOS. The Change SOS function should not be used by customers as its
purpose is to specify different primary SOSs for items listed on the customer‘s catalog.
Because AF customers only order materiel from LOG, with potential exception to medical maintenance activities, this option is not beneficial.
6.22. Check Available Funds. The Check Available Funds function is available to customers
so they have direct visibility of their fund record. The fund record cannot be modified from
CAIM, but customers can see the fund record details to include their available balance. Select
―Check Available Funds‖ from the CAIM Navigate menu to access the customer‘s fund record.
Customers must be assigned the SS MTF Funding resource in order to access their detailed fund
record. This resource is embedded in the SS Expert and SS Read Only privileges. Since
customers should not load and/or modify fund records, it is highly recommended that the
DMLSS SA assign the SS Read Only privilege or create and assign a local privilege with read only rights to the SS MTF Funding resource.
6.23. CAIM Utilities Menu.
6.23.1. CAIM Utilities, Choose Customer. The Choose Customer function allows users to
specify the customer account in which they are working without having to exit the CAIM
module. A customer ID can also be designated by clicking on the Customer button located
on the horizontal toolbar. Once a customer ID is identified, all CAIM actions performed are associated to the specified customer‘s account.
6.23.2. CAIM Utilities, Inbox.
6.23.2.1. The inbox opens automatically upon accessing the CAIM Module and open
pending actions are present. Customers may also gain access to the inbox by selecting
―Inbox‖ from the Utilities dropdown menu. Customers must be assigned CAIM pending
actions in SS and UP Assign prior to having visibility in the CAIM module. Pending
actions are listed by the ―as of‖ dates. A description of CAIM pending actions and their recommended use are available in Attachment 6.
6.23.2.2. Review and work the pending actions daily to ensure proper management of the
customer‘s account. To initiate a process or report, click on the ―Jump To‖ icon located
at the bottom of the window. Make changes as required and save actions to complete the
process. Print any required reports as needed. When processes are complete, close the
window to return to the inbox. Delete pending actions once they are completed. The
inbox can be closed or left open while in the CAIM module.
6.23.3. CAIM Utilities, Adjust Periodic Automatic Resupply (PAR) Levels.
6.23.3.1. PAR levels in CAIM represent the customer‘s storeroom levels. Customer‘s
levels and ROPs are established upon creating a new customer catalog record. DMLSS generates recommended level changes as a result of processing recurring orders.

AFMAN41-216 13 FEBRUARY 2013 229
6.23.3.2. Access the Recommended Level Changes window by selecting ―Adjust PAR
Levels‖ from the CAIM Utilities menu. Customer records are also posted to the CAIM
Recommended Level Changes pending action after the item obtains 90 days of transaction history.
6.23.3.3. Ordering frequently and allowing the computer to adjust PAR levels results in
more efficient use of storage space and ensures stock availability when needed.
Maintaining accurate levels and ROPs allows logistics personnel to better manage storeroom stock.
6.23.3.4. All customer records containing recommended changes to the level, ROP,
and/or level type are displayed in the Recommended Level Change window. The current
and suggested level, ROP, and level type are displayed in this window along with other
catalog management data. Customers or logisticians can accept, modify, or reject the
recommended changes. When no recommendations exist, the message ―No
Recommended Level Changes‖ appears as a notification to the user.
6.23.3.4.1. Accept – Highlight the record(s) for the items you want to accept the new
level, ROP, and/or level type changes. Click ―Accept‖ to process the changes.
DMLSS will update the customer‘s catalog record data and remove the item from the
Recommended Level Change list.
6.23.3.4.2. Delete - If you want to reject the recommendations, highlight the item
record(s) and click ―Delete‖ to remove the record(s) from the Recommended Level
Change Report. The item record is removed until the next recommended levels are
updated and processed.
6.23.3.4.3. Modify - In some instances, you may want to reduce or increase an
inventory level but not to the extent of the DMLSS recommendations. To modify the
suggested level, ROP, and inventory type, select the item record and click ―Modify.‖
Enter your desired values in the level, ROP, and/or inventory type and click ―OK‖ to
update the customer‘s level, ROP, and level type. Click ―Accept‖ to process the modified changes.
6.23.4. CAIM Utilities, Batch Issues Update. Reserved.
6.23.5. CAIM Utilities, Batch Inventory Update. Reserved.
6.23.6. CAIM Utilities, Maintain Location.
6.23.6.1. Use the CAIM Maintain Location function to manage a customer‘s locations
and storage areas. Customers can establish new, update existing, and/or delete existing locations and storage areas.
6.23.6.2. Select ―Maintain Location‖ from the Utilities dropdown menu to access this
function. All locations and storage areas assigned to the specified customer are displayed
in the Add Location window.
6.23.6.3. To remove a location and storage area, highlight the desired record and click the ―Delete‖ button located at the bottom of the window.
6.23.6.4. To add a new or update an existing location and storage area, highlight an
existing record and click the ―Detail‖ button located on the vertical toolbar. In the

230 AFMAN41-216 13 FEBRUARY 2013
Location Detail window, make necessary modifications and click ―Save‖ to process
updates. To add a new location and storage area, type in the new location ID and storage
area, select the appropriate record type, and click ―Save‖ to add the new record.
6.23.6.5. POU, Carousel, and Ready Use locations are explained in paragraph 6.9.9.
6.23.7. CAIM Utilities, Maintain Pending Action Reports. In the Maintain Pending Action
Reports window, customers can select action notices to post in the inbox when an action is
pending. While pending actions are assigned to users in SS UP Assign, this function further
defines which actions are posted to the user‘s inbox. As a general rule, all pending actions
should be reviewed; therefore, it is highly recommended that customers elect to have all
pending actions post to the inbox. Click ―Yes‖ to post the pending action(s) to the inbox and
click ―No‖ to prevent the pending action from posting.
6.23.8. CAIM Utilities, Maintain Address. DMLSS contains an address table that is linked
to other modules such as the SOS module. The address table should be maintained by
medical logistics personnel using the IM Maintain Address function. However, if used in
CAIM, the customer‘s address is accessible and can be updated using this function. The customer‘s address data resides in the Basic tab of the SS SVC/CUST Detail record.
6.23.9. CAIM Utilities, Maintain POC. This function helps maintain a single POC record
while eliminating duplicate entries due to misspelling, different abbreviations, etc.; however,
the DMLSS POC table should be maintained by medical logistics personnel using the IM
Maintain POC function. If used in CAIM, the customer‘s POC record is accessible and can be updated using this function.
6.23.10. CAIM Utilities, Override Process. When a record or module is opened by a single
user, the record becomes locked to all other users and all other processes. If you need access
to a locked record or process, first contact the user who has it locked and request that he/she
exit or complete their updates. If you cannot locate that person, use the Override Process
function to gain control of a locked record or process.
6.23.11. CAIM Utilities, HHT Model Type. The HHT Model Type function identifies the
type of HHT being used by the LOG account. The default is set to Janus; however, the
standard HHT used at AF accounts is the PDA. The available HHT types are: Janus, PDA,
and Trakker. The HHT Model Type must be updated before batch orders can be processed if a different model is purchased and put into use. Click ―OK‖ to save the change.
6.23.12. CAIM Utilites, Prime Vendor Web Sites. This function provides a link to vendor‘s
websites. Despite its title, this function is not restricted to PV sources. Select ―Prime
Vendor Web Sites‖ from the CAIM Utilities menu to access PVP, PVM, ECAT, EMALL,
QA, and RIC websites. Highlight the desired source and click the ―Go to Web‖ button
located on the vertical toolbar. DMLSS uses the local internet carrier to access the vendor‘s
website.

AFMAN41-216 13 FEBRUARY 2013 231
Chapter 7
CUSTOMER SUPPORT (CS)
7.1. Purpose. The CS module encompasses supply, equipment, and facility management
functions into a single area. Within CS, supply custodians can submit new item requests and
monitor the status of existing requests. Equipment custodians can submit requests for new
equipment and monitor the status of requested equipment. Additionally, custodians can also
submit equipment work requests to the Biomedical Maintenance manager. Duty section
managers can request new FM work requests, request updated status, and monitor the status of
existing facility work requests. Finally, supply and equipment custodians can check the status of
funds in the CS module as well as process standardized reports designed to assist them in
managing their respective accounts. Many of the functions available in CS are also explained in
other chapters of this manual. In those situations, you may be referred to another chapter for a detailed explanation of the process.
7.2. Catalog Search.
7.2.1. The CS Catalog Search function works the same as the IM Catalog Search function
and is used to search for customer catalog records as well as searching for LOG, MTF,
ECAT, and other contracted item catalog records. Refer to Chapter 5, paragraph 5.3 for a
detailed explanation. New MTF and customer catalog records must be created using the
CAIM New Catalog Item function explained in Chapter 6, paragraph 6.2. As stated in
previous chapters, customers and logistics personnel should attempt to locate an existing
catalog record by conducting a search prior to creating a new catalog record. Search scopes
should be set to ―Contracted items‖ before choosing all items since they present the best possible monetary savings over open market items.
7.2.2. The Equivalent and Order Item features available in CS Catalog Search provide
customers with additional options while conducting searches and submitting requests. Use
these options as follows:
7.2.2.1. Equivalent. By clicking the ―Equivalent‖ button located on the vertical toolbar,
the search results are narrowed to show only those items that are equivalent to the originally selected item.
7.2.2.2. Order Item. The Order Item feature provides customers a method of
immediately submitting an order for an item found within catalog search. The Order Item button appears only for those items with an existing MTF catalog record.
7.2.2.2.1. In the Catalog Search Results window, highlight the desired item and click
―Order Item‖ located on the vertical toolbar. The Add Item to Order Request window
appears.
7.2.2.2.2. Within the Add Item to Order Request window, all fields are populated
with default data. However, the location ID, expense center, priority, quantity,
demand code, and advice code fields can be modified. The quantity field defaults to
one so this must be updated prior to clicking the Save button. Figure 7.1 depicts a default Add Item to Order Request window.

232 AFMAN41-216 13 FEBRUARY 2013
Figure 7.1. Add Item to Order Request.
7.2.2.2.3. Upon clicking ―Save,‖ the request appears in the Order Summary window,
explained in paragraph 7.5. Click ―Close‖ to return to Catalog Search and/or
continue adding items to the order. This window reappears each time the Order Item button is selected. The order can be executed or deleted at this time.
7.2.2.2.4. The order remains in a ―pending‖ state if it is not executed or deleted and
can be accessed anytime using the Order Summary function. Reference explanation provided in paragraph 7.5 for executing and/or deleting these orders.
7.3. New Item Request (NIR).
7.3.1. The NIR is used to submit a request for a supply item that does not have an existing
customer or LOG catalog record and/or the item has not previously been approved for
purchase.
7.3.2. Select ―New Item Request‖ from the CS Navigate menu or click on the ―NIR‖ button
located on the horizontal toolbar to open a NIR. The NIR (Figure 7.2.) contains required and
optional data fields. The customer must enter data into the required fields (identified with a
red dot) and should provide as much of the optional data as possible. All data provided is
used during the research phase of the NIR process and is important when searching for
existing catalog records. Note: User may also use Cat Search to find item to be submitted. If
found during the search, highlight the item and click the ―Add To NIR‖ icon on the vertical toolbar.

AFMAN41-216 13 FEBRUARY 2013 233
Figure 7.2. New Item Request Window.
7.3.3. NIR Data Fields. Use the NIR data fields as explained below:
7.3.3.1. Customer ID. Defaults to customer ID specified upon entering the CS module.
7.3.3.2. Expense Center. Defaults to the default expense center associated to the customer ID.
7.3.3.3. Item Description. Opens text field used by the customer to provide a detailed description of the requested item.
7.3.3.4. U/P. Use the dropdown menu to identify the U/P (i.e. if it is an individual item,
select ―EA,‖ if package of 10 select ―PG.‖)
7.3.3.5. U/P Price. Enter the purchasing price of the requested item.
7.3.3.6. Quantity. Enter the quantity being requested relative to the U/P.
7.3.3.7. Total Price. Equals the U/P price multiplied by the quantity requested.
7.3.3.8. Item ID Requirements. A minimum of one of the following item ID numbers
must be provided in order to purchase the requested item. More than one can be entered
if the information is available. For example, if both the NSN and MFG‘s catalog number
are known, enter both into the corresponding fields.
7.3.3.8.1. MFG‘s Catalog Number - The item ID number assigned by the MFG
should be loaded in this field. If the item is a pharmaceutical, the MFG‘s catalog
number is the same as the NDC. Note: This is not the same number as the PVON or
VCN.
7.3.3.8.2. NSN - An NSN is a 13-digit numerical number assigned centrally for
global use and is recognized throughout the DoD. Load the contiguous number into
this field. Do not use dashes, spaces, prefixes, or suffixes. The AF considers ―NCM‖
and ―UM‖ numbers valid NSNs (i.e. 6515NCM040423 and 6515011498842UM);
however, they are unique to WRM and should not be used in a peacetime OPR setting.

234 AFMAN41-216 13 FEBRUARY 2013
7.3.3.8.3. NDC - The NDC should be entered into this field for commodities
classified as a pharmaceutical. Load the 11-digit contiguous number into this field.
Do not use dashes, spaces, prefixes, or suffixes.
7.3.3.9. PVON. The PVON is assigned and only recognizable by the assigning vendor.
Different vendors most likely will have different PVONs for the same product. Note: The PVON is not the same as the NDC or MFG‘s Catalog Number.
7.3.3.10. Type VIN. This field will most likely be assigned by logistics personnel during
the review process. ―Type VIN‖ identifies the type of item ID that will be used to
purchase the requested item. Refer to Chapter 5, paragraph 5.2.1.4.23. for a detailed explanation for assigning the Type VIN.
7.3.3.11. Item ID. The item ID should be assigned by logistics personnel during the
review process. Reference Chapter 5, paragraph 5.2.1.4.2. for a detailed explanation for assigning item IDs.
7.3.3.12. Type Item ID. The Type Item ID should be assigned by logistics personnel
during the review process. The Type Item ID field identifies the assigned item ID and
must be in agreement with the number loaded into the Item ID field.
7.3.3.13. Document Number. No data is required during the request phase. The
customer‘s due-in document number (CAIM ESD) automatically populates this field when the Ordering Authority processes the customer requirement or an offline order.
7.3.3.14. Contract Number. The customer can load the contract number during the
request phase if known. If during the review process, a contract number is linked to the item being requested, logistics personnel should load the contract number into this field.
7.3.3.15. SOS. The SOS dropdown menu is linked to LOG‘s SOS table so this
information is usually assigned by logistics personnel. However, it can be assigned by
the customer upon submitting the NIR. Use the ―Jump To‖ button located next to the SOS field to search for existing SOS codes.
7.3.3.16. Recurring. Check this indicator if the requested item will be required on a
recurring basis. A recurring request is usually an item that will be purchased at least
monthly, however, the definition of recurring varies.
7.3.3.17. Estimated Usage/Month. If recurring, identify potential quantity that will be used on a monthly basis.
7.3.3.18. Required Delivery Date (RDD). Identify the date in which the item is required to be delivered to the customer.
7.3.3.19. Advice Code. The Advice Code should be assigned by the Ordering Authority
during the ordering phase.
7.3.3.20. Customer Catalog. Check this indicator to automatically add the new record to the customer‘s catalog upon approval.
7.3.3.21. Ozone Depleting Substance. Check this indicator if the item meets the definition of an ozone depleting substance.

AFMAN41-216 13 FEBRUARY 2013 235
7.3.3.22. Vendor Information. The requesting customer must load the vendor‘s
information so the Approval and Ordering Authorities know where to purchase the
requested item. If a SOS is chosen from the dropdown menu and the vendor‘s
information is already stored in the SOS table, these data fields will automatically populate with the stored data.
7.3.3.23. Justification. Open text field used by the customer to justify the NIR.
7.3.4. NIR Routing Process.
7.3.4.1. Originator.
7.3.4.1.1. The customer‘s user ID is automatically populated in the Originator field
and the NIR submission date is loaded into the Date field.
7.3.4.1.2. Upon completing the NIR request, the customer must use the dropdown menu to identify the Approval Authority.
7.3.4.1.3. Click ―Save‖ upon completion. The NIR is automatically forwarded to the Approval Authority‘s Inbox for review and approval/disapproval.
7.3.4.1.4. At this point, the requesting customer can use the NIR Status function to
monitor the request status.
7.3.4.2. Approval Authority.
7.3.4.2.1. The Approval Authority is someone within the customer‘s chain of
command privileged to approve and/or disapprove NIRs. For example, it may be the
department head, Officer in Charge (OIC), NCOIC, or the resource advisor.
Appointed personnel must be provided the CS Approval Authority privilege in SS to perform this function.
7.3.4.2.2. Upon accessing CS, the Approval Authority should access the New Item Request pending action and approve or disapprove the NIR.
7.3.4.2.3. If approved, the Approval Authority must use the dropdown menu to
assign a logistician to conduct catalog research. Upon saving, the NIR is forwarded
to the IM New Item Request pending action and appears in the Catalog Research Review tab.
7.3.4.2.4. If disapproved, the Approval Authority should click on the ―Note‖ button
and provide an explanation for disapproval. The NIR is closed and becomes inactive.
7.3.4.3. Catalog Research.
7.3.4.3.1. Catalog research should be accomplished by medical logistics personnel
using the IM New Item Request pending action. Appointed personnel must be assigned the CS NIR Catalog Research privilege in SS to accomplish this task.
7.3.4.3.2. Thorough research should be conducted to determine whether or not a
catalog record already exists. When using the IM Catalog Search function, be sure to
check the ―All Items‖ scope so DMLSS will search the DMLSS Master UDR file.
Locating and selecting existing catalog records ensures all pertinent catalog
information is present in the MTF, LOG, and customer catalogs. Additionally, it
helps to avoid creating and maintaining multiple catalog records for the same item

236 AFMAN41-216 13 FEBRUARY 2013
using multiple item IDs. Successfully finding an existing catalog record is highly
dependent upon the customer providing as much information as possible. Note:
Search scopes should be set to ―Contracted items‖ first and then ―ECAT‖ before
choosing all items since they present the best possible monetary savings over open market items.
7.3.4.3.3. Reference Chapter 5, paragraph 5.2. for a detailed explanation for creating
new catalog records and paragraph 5.3. for a thorough explanation on conducting catalog searches.
7.3.4.3.4. By clicking the ―Jump To‖ button located next to the Item ID field,
DMLSS conducts an automated catalog search based on the catalog criteria provided.
For example, if the NDC is provided, DMLSS will search for an existing catalog record using the NDC number.
7.3.4.3.5. When the automated catalog search does not produce a match, use all
available ID data to conduct manual research. To do so, use the IM Catalog Search
function. When the data is available, use the search criteria in the following
sequence: Item ID, NSN, NDC, MFG‘s catalog number, UPN, item description, and then search by MFG‘s name cross-referencing to item description.
7.3.4.3.6. Check the Existing Cat indicator if an existing catalog record is located
during research. When checked, the Item ID field becomes mandatory. If using the
―Jump To‖ button, the item ID will automatically populate once the catalog record is
selected. When a match is found, complete the NIR process using one of the
following options:
7.3.4.3.6.1. Disapprove the NIR and establish a customer catalog record for the
requesting customer. The customer can use the Manual Replenishment function to resubmit the item request to LOG.
7.3.4.3.6.2. Disapprove the NIR, and process an IM Offline Submit/Non-Submit
order or an IM Customer request and link to the requesting customer ID.
7.3.4.3.7. Check the No Existing Cat indicator if research does not produce a match
to an existing catalog record. At this point in the process, a new catalog record can be
created at any time. However, it is recommended that one be created once the LOG
Authority has approved the purchase. By doing so, you will prevent the addition of
catalog records for items that are not going to be purchased, thus preventing
unnecessary clutter. Once the catalog record is added, enter the item ID and other
pertinent data into the NIR.
7.3.4.3.8. Upon completing research, assign someone to conduct the Hazardous
Materiel Review and click ―Save‖ to update the NIR. The NIR status is updated and appears in the Haz Mat Review tab.
7.3.4.4. Hazardous Materiel Review.
7.3.4.4.1. The Haz Mat Review should be conducted by medical logistics personnel
using the IM NIR pending action. However, at least one individual from the BEE
office should be privileged to conduct the Haz Mat Review. If medical logistics
determines the item could potentially be hazardous, then he/she should notify the

AFMAN41-216 13 FEBRUARY 2013 237
BEE that a NIR requires their review. At this point, BEE should log into the NIR and annotate the appropriate hazardous identification.
7.3.4.4.2. Conduct research to determine whether or not the requested item is
considered hazardous and assign one of the following:
7.3.4.4.2.1. D – Hazardous; no Hazardous Materiel Information System (HMIS) information available.
7.3.4.4.2.2. N – Non-Hazardous.
7.3.4.4.2.3. P – may be Hazardous; no HMIS information available.
7.3.4.4.2.4. Y – Hazardous, Equivalent to ―Hazardous – HMIS information is available.‖
7.3.4.4.3. If the item is found to be hazardous, follow local reporting and storage
procedures. Also, the appropriate Haz Mat Code, MTF restrictions, special
requirements, and destruction methods should be loaded into the MTF catalog record at this time.
7.3.4.4.4. Upon completing the review, assign the LOG authority and click ―Save.‖
The NIR status is updated and now appears in the LOG Authority tab.
7.3.4.5. LOG Authority.
7.3.4.5.1. The LOG authority is usually assigned to the Medical Logistics Flight
Commander, Medical Logistics Flight Chief, NCOIC of Medical Logistics, or
someone within the MTF that is responsible for fiscal review. Personnel performing
this task must be assigned the CS LOG Authority privilege.
7.3.4.5.2. Click the ―Approve‖ indicator to approve the purchase of the requested
item. Once the Approve button is checked, assign the NIR to an authorized Ordering
Authority. Upon saving updates, the NIR status is updated and appears in the
Ordering Authority tab.
7.3.4.5.3. Click the ―Disapprove‖ indicator to disapprove the purchase of the
requested item. If disapproved, the LOG authority should use the ―Note‖ feature to
annotate a reason for disapproval. Disapproved requests are returned to the originator
and within CS NIR Status, disapproved NIRs appear in the customer‘s Disapproved
tab. In IM, the records are marked as inactive and appear in the NIR Administrator tab.
7.3.4.6. Ordering Authority.
7.3.4.6.1. The Ordering Authority is medical logistics personnel authorized to
purchase the requested item. If not already completed, the catalog record must be
established so the item can be purchased. The CS Ordering Authority privilege must be assigned to personnel authorized to purchase new item requests.
7.3.4.6.2. From the IM New Item Request - Ordering Authority tab, the purchasing
agent can process the order by creating a customer request or by placing an offline order.

238 AFMAN41-216 13 FEBRUARY 2013
7.3.4.6.3. Click the ―Cust Req‖ button to create a customer requirement for the
requested item. This action establishes a CAIM ESD transaction and generates a
CAIM IOU transaction. A requirement for this item will appear in LOG Orders and associated to the assigned SOS.
7.3.4.6.4. Click the ―Offline‖ button if the item is to be ordered immediately without
sending the requirement to LOG Orders. Refer to Chapter 5, paragraph 5.14.3. for a
detailed explanation on processing offline orders. Using this option generates a CAIM ESD and IOU as well as an IM ESD and IOU.
7.3.4.6.5. The customer‘s due-in document number (CAIM ESD) automatically
populates the Document Number field upon processing the customer requirement or
an offline order.
7.3.4.6.6. Within IM, the record is marked as inactive and appears in the NIR Administrator tab. Within CS NIR Status, the record appears in the Completed tab.
7.3.5. Additional NIR features.
7.3.5.1. Delete. If the NIR is disapproved and will not be resubmitted, it can be removed from the pending action by clicking ―Delete.‖
7.3.5.2. Clear Status. If the NIR has been disapproved by the approval or LOG
authority, they should have provided an explanation. Based on their reasoning, you may
decide to resubmit the request. Click the ―Clear Status‖ button to remove all approval
status from the NIR routing section. Make appropriate edits to address the original
rejection reason. Reassign to the approval authority and resubmit the request.
7.3.5.3. Print. Click ―Print NIR‖ to obtain a printed version of the NIR.
7.4. New Item Request Status. The CS NIR Status function provides customers a method of monitoring their NIR(s) status. The five stages of approval/disapproval are as follows.
7.4.1. Approval Required. In this stage, the NIR(s) is waiting for approval or action from the customer.
7.4.2. Being Processed. In this stage, the NIR(s) are waiting for approval or action from
LOG (IM personnel).
7.4.3. Completed. NIR(s) that have been completed, ordered, and/or received appear in the Completed tab.
7.4.4. Disapproved. NIR(s) that have been disapproved appear in this tab.
7.4.5. Inactive. The Inactive tab consists of NIR(s) that have been deleted or otherwise coded as inactive records.
7.5. Order Summary.
7.5.1. Pending orders that appear in the Order Summary window are a result of a customer
using the Order Item function explained in paragraph 7.2.2.2. Select ―Order Summary‖ from
the CS Navigate menu or click the ―Order Summ‖ button located on the horizontal toolbar to access the Order Summary window (Figure 7.3.).

AFMAN41-216 13 FEBRUARY 2013 239
Figure 7.3. Order Summary Window.
7.5.2. The Order Summary window is blank if no pending orders exist. Items are displayed
by line item if pending orders exist. The following features are available in the Order Summary window:
7.5.2.1. Print Order – Use to print the Order Summary Report.
7.5.2.2. Execute – Use to generate a CAIM ESD and IOU transaction. All line items displayed are forwarded to LOG for processing upon clicking the ―Execute‖ button.
7.5.2.3. Delete – Use the ―Delete‖ button to remove the highlighted item from the
pending order.
7.5.2.4. Detail – Click ―Detail‖ to reaccess the Add Item to Order Request window
explained in paragraph 7.2.2.2. Use this feature to modify the location ID, expense
center, priority code, quantity, demand code, and/or advice code prior to executing the
order.
7.5.2.5. Close – Use to exit the Order Summary window. The pending order can be reaccessed at any time.
7.5.3. A check in the Error (Err) box indicates an error or exception exists for the specified line item. The error must be resolved prior to executing the order.
7.5.4. Upon processing, the order is pushed to IM as a pending issue. Logistics personnel
complete the order/issue process using the IM Issue process explained in Chapter 5, paragraph 5.14.
7.6. Manual Replenishment. Use the Manual Replenishment function to resupply stock levels
for items listed in the customer‘s catalog. This CS Manual Replenishment function mimics the
CAIM Manual Replenishment function. Refer to Chapter 6, paragraph 6.9.5. for a detailed explanation of the Manual Replenishment function.
7.7. Work Request Status. Customers should use the Work Request Status function to monitor
the status of their submitted facility work requests. Within the work request status window, an

240 AFMAN41-216 13 FEBRUARY 2013
estimated start date, completion date, action date, action, and/or close out reason is visible once the facility manager takes action to satisfy the work request.
7.8. Customer Survey. The Customer Survey feature provides customer‘s an avenue to rate,
score, and/or provide comments in response to a completed facility work request. Once the
facility manager closes a work request, the Survey button located on the vertical toolbar becomes
available in the work request status record. Click the ―Survey‖ button to access the Customer
Survey window and click ―OK‖ to submit the survey to FM.
7.9. Work Request Draft. Customers can use this function to search for draft copies of
submitted FM work requests. Draft copies are only saved and accessible using this function
when the customer chooses to save the draft upon creating a new work request as explained in
paragraph 7.10. This function should be used sparingly as it can clutter the database.
7.10. Create Work Request.
7.10.1. Customers assigned the CS FM Work Request (a customized role) or CS Expert role
in SS, UP Assign/Manage can use the Create Work Request function to submit facility work
requests to FM. Select ―Create Work Request‖ from the CS navigate menu or click the
―Create new FM WR‖ button located on the horizontal toolbar to access the Draft Work Request – New window.
7.10.2. Within this window, the customer must input and/or verify the requester data and the
problem description prior to submitting the FM work request. Click ―Submit‖ once all data
is loaded and verified. The statement/question ―WR# CS0704241 (example) has been
submitted to Facility Management. Would you like to save the draft work request?‖ appears.
Select ―No‖ to continue without saving the draft copy. The request is automatically
forwarded to the FM Work Request module for FM review.
7.11. Standard Reports. Several standardized reports are available to assist
customers/custodians in managing their supply and equipment accounts. Access these reports by
selecting ―Standard Reports‖ from the Navigate menu or by selecting the ―Reports‖ icon located
on the Horizontal toolbar. Most of the available reports are directed toward helping customers
focus on high use, high demand, and high dollar items within their account(s). Focus in these
areas assists managers to maximize use of their resources. Refer to Chapter 13, for a brief
description of each report in DMLSS along with its content and use.
7.12. Equipment Record. The CS Equipment Record function allows equipment custodians
visibility of Equipment Detail records assigned to their equipment account. Custodians must be
assigned the CS Equipment Custodian role to gain access to this function. Select ―Equipment
Record‖ from the CS Navigate menu or click the ―Equipment‖ button located on the horizontal
toolbar to access this function. The Equipment Detail records are the same as explained in Chapter 9, paragraph 9.6.4. however, the custodian cannot modify the Equipment records.
7.13. Equipment Request.
7.13.1. The CS Equipment Request function is used by equipment custodians to submit
requests for new equipment and to monitor the status of existing Equipment Requests.
Custodians must be assigned the CS Equipment Custodian role to gain access to this
function. This function works the same in CS as is does in EM as explained in Chapter 9,
paragraph 9.10. Minor variances exist between the explanation provided in Chapter 9 and

AFMAN41-216 13 FEBRUARY 2013 241
the details listed below in that CS is based on the custodian‘s perspective; therefore, highlights the custodian‘s responsibilities.
7.13.2. Select ―Equipment Request‖ from the CS Navigate menu or click on the ―Equip
Reqst‖ button located on the horizontal toolbar to access the Equipment Request Search
window. In the Equipment Request Search window, click the ―New‖ button to open a new Equipment Request record.
7.13.3. New Equipment Request Record.
7.13.3.1. Main Tab. Initially, the Main tab is the only editable tab. Several data fields
are available for the custodian to add detailed information, but not all are mandatory fields. Complete the optional and mandatory fields as follows:
7.13.3.1.1. Short Item Description – Enter equipment description.
7.13.3.1.2. Required Delivery Date – Enter the date the equipment is required to be
delivered to the MTF. This is an optional field. While this is an optional field, the
Veteran‘s Administration (VA) and Base Contracting Office (BCO) require a RDD with all purchase requests.
7.13.3.1.3. Request Priority – Use this field to prioritize the custodian‘s equipment request. Prioritization procedures are based on local policy. This is an optional field.
7.13.3.1.4. Request Type – The Request Type field is used to identify why the
equipment is being requested. Use the dropdown menu to assign one of the following request types.
7.13.3.1.5. Accelerated Replacement – Replacing item prior to reaching its life expectancy.
7.13.3.1.6. Capital Lease – Leasing equipment valued greater than $249,999.99.
7.13.3.1.7. New Requirement – New request. Equivalent item not currently OH.
7.13.3.1.8. Normal Replacement – Replacing item upon reaching or surpassing its
life expectancy.
7.13.3.1.9. Operating Lease – Leasing equipment valued less than $250,000.00.
7.13.3.1.10. Upgrade – Existing item being upgraded.
7.13.3.1.11. Request Reason – The available request reasons vary depending on the
request type. Choose a request type and then use the Request Reason dropdown
menu to choose a corresponding reason. Table 7.4 lists the request reasons to their
corresponding request type.
Table 7.1. Request Reasons and Corresponding Request Types.

242 AFMAN41-216 13 FEBRUARY 2013
Accelerated Replacement Beyond Economical Repair
Enhanced Patient Care
Reached Life Expectancy
Reduced Operating Cost
Technological
Capital Lease Increased Workload
Initial Outfitting
New Capabilities
New Mission
Reduced Operating Cost
Technological
New Requirement Increased Workload
Initial Outfitting
New Capabilities
New Mission
Reduced Operating Cost
Technological
Normal Replacement Beyond Economical Repair
Reached Life Expectancy
Operating Lease Increased Workload
Initial Outfitting
New Capabilities
New Mission
Reduced Operating Cost
Technological

AFMAN41-216 13 FEBRUARY 2013 243
Upgrade Beyond Economical Repair
Enhanced Patient Care
Increased Workload
New Capabilities
New Mission
Reached Life Expectancy
Reduced Operating Cost
Technological
7.13.3.1.12. Requestor Name – Use this field to identify who is requesting the
equipment. This is not necessarily the equipment custodian, in many instances it is a doctor, nurse, technician, etc.
7.13.3.1.13. Phone – Enter the phone number of the requestor.
7.13.3.1.14. Quantity Requested – Enter the required quantity.
7.13.3.1.15. Base Price – Enter the base price of the requested equipment item. This
price should not include additional supplies, repair parts, installation, etc.
7.13.3.1.16. Fund Type – Expense equipment is equal to or less than $249.999.99 and Capital equipment is equal to or greater than $250,000.00.
7.13.3.1.17. Budget Year – Defaults to current year but is an editable field. This
field should only be modified by the Approval Authority when supporting
documentation is obtained from the funding source.
7.13.3.1.18. Asset Control Number (ACN) – Not required.
7.13.3.1.19. Acquisition Specialty – Use the dropdown menu to identify the medical specialty in which the equipment is used.
7.13.3.1.20. Attachments – The custodian should place a check into the available
attachment fields to indicate which ones apply to the equipment purchase. Upon
completing the equipment request, the custodian must hand deliver the indicated document(s) to the MEMO office.
7.13.3.1.21. Click ―Save‖ located on the vertical toolbar once all data is entered into
the Main tab. Upon saving, an equipment request number is assigned and the
remaining tabs become available. The custodian is responsible for adding additional
data into the Replacement ECN, Supplies, Training, and Suggested Sources tabs. If no additional information is available the request can be submitted at this time.
7.13.3.2. Replacement ECN(s) Tab. If the request type is Accelerated Replacement or
Normal Replace, use this tab to identify the ECN(s) of the existing equipment item(s)
being replaced. Replacement and/or upgrade comments can also be added for future
reference. MEMO and maintenance personnel use this information to verify turn-in of
replaced equipment upon issue of the new equipment.

244 AFMAN41-216 13 FEBRUARY 2013
7.13.3.3. Supplies Tab. Use the ―Add‖ button to specify supplies and/or replacement
parts to be purchased in conjunction with the equipment purchase. Use the ―Delete‖
button to remove supplies and/or replacement parts that were erroneously added.
7.13.3.4. Training Tab. If operator training is required, the custodian must check the
Training Required indicator and enter detailed training information. If necessary,
maintenance personnel will add their training needs into this tab during the review
process.
7.13.3.5. Suggested Sources Tab. Use this tab to identify at least three suggested sources
for the requested item. Place a ―check‖ in the Primary Source box to indicate which
source is the primary or preferred source of purchase. If the Sole Source indicator on the
Main tab is checked and a sole source letter is provided to MEMO, then only one suggested source is required.
7.13.4. While it is possible for the custodian to complete additional information, MEMO,
maintenance, and FM personnel usually complete the remaining tabs. Therefore, the
custodian may click the ―Submit‖ button at this time to process the equipment request. Note:
Once the equipment request is submitted, the custodian is limited to viewing the request and he/she cannot add or edit information.
7.13.5. Appointed MEMO personnel access the request from the EM Customer Equipment
Request Submitted pending action. MEMO personnel should refer to the explanation provided in Chapter 9, paragraph 9.10. to complete the process.
7.13.6. Equipment Request Search.
7.13.6.1. The Equipment Request Search function provides equipment custodians a
method of retrieving one or more Equipment Request records. Custodians use this
function to monitor the status of their Equipment requests.
7.13.6.2. In the Equipment Request Search window, the ORG and customer ID default to
the custodian‘s account information. Leave all search criteria fields empty and click ―Search‖ to retrieve all equipment request records.
7.13.6.3. Enter specific search criteria into one or more of the following search criteria
fields:
7.13.6.3.1. Item ID – Normally assigned by MEMO personnel upon approval so the item ID may not always be available.
7.13.6.3.2. Nomenclature – The dropdown menu provides defaults to the
standardized equipment device nomenclature table and does not reflect the short item
description provided in the Main tab.
7.13.6.3.3. Fund Type – Select either OP Fund (Capital) or Expense.
7.13.6.3.4. Request Number – Only request numbers assigned to the custodian‘s equipment requests appear in the dropdown menu.
7.13.6.3.5. Request Status – Available stages of a request are approved, awaiting
approval, cancelled, customer request, disapproved, filled by excess, and new request.
Upon initial submission, new request is assigned and then updated as the request flows through the approval process.

AFMAN41-216 13 FEBRUARY 2013 245
7.13.6.3.6. Fund Status – The Fund Status field is blank until the request is approved.
At that time, ―Unfunded‖ is assigned unless MEMO personnel modify the funding
information located in the Status tab. Depending upon available funds, the Fund Status may be updated to reflect Funded or Partial Funded.
7.13.6.3.7. Order Status – The Order Status remains blank until the funding
information is loaded into the Status tab. Initially, ―Not Ordered‖ is assigned until
MEMO personnel process an order for the requested item or the request is cancelled.
Depending on the state of the order, Cancelled, Ordered, or Partial Ordered is assigned.
7.13.6.3.8. Receipt Status – Once the order is submitted, the Receipt Status is
updated to Open Due-Outs. This status is updated to Partial Received or Received respectively, when a partial or complete receipt is processed in EM.
7.13.6.3.9. Request Type – This is directly related to the Request Type assigned by
the custodian upon completing the equipment request. Available types are listed in
paragraph 7.13.3.1.4.
7.14. New Equipment Work Order.
7.14.1. Equipment custodians can use the New Equipment Work Order function to submit
equipment work order requests to medical maintenance. This function provides an
automated method to communicate needs rather than the custodian leaving the duty section
to visit the maintenance shop. To access the New Work Order window, select ―New
Equipment Work Order‖ from the CS Navigate menu or click on the ―New Equipment Work Order‖ icon located on the horizontal toolbar.
7.14.2. Within the New Work Order window, only five data fields are available for edit, all
of which are mandatory. These data fields are used as follows:
7.14.2.1. ECN – Obtain the ECN from the equipment tag/label and enter into this field.
The equipment ID data, work order details, and custodian‘s information is automatically populated upon entering the ECN.
7.14.2.2. Location – Enter the equipment‘s current physical location so maintenance
personnel know where to locate the item.
7.14.2.3. POC – Identify a POC. POC should be someone with firsthand knowledge of the equipment malfunction, (i.e. doctor, nurse, technician, etc.).
7.14.2.4. POC Phone – Enter phone number of POC identified in the POC field.
7.14.2.5. Service Requested – Enter a detailed description of the equipment malfunction and/or the required service.
7.14.3. Click ―Submit‖ once the data fields are completed. The equipment work order
request is immediately forwarded to the MA Inbox and appears in the Customer Work Order
Pending pending action. Maintenance personnel will work this request IAW the explanation provided in Attachment 9.
7.14.4. Other available features include the following:

246 AFMAN41-216 13 FEBRUARY 2013
7.14.4.1. Revert – Click the ―Revert‖ button located on the vertical toolbar to reset all data fields to their original state, since the last save.
7.14.4.2. Print – Click ―Print‖ to print a copy of the request.
7.14.4.3. Cancel – Click ―Cancel‖ to withdraw the equipment work order request. The
request is automatically removed from the MA Customer Work Order pending action upon cancelling the request.
7.15. Open Equipment Work Order.
7.15.1. Custodians can use this function to monitor the work order status of their assigned
equipment. Multiple search criteria options exist to help locate specific records. Select
―Open Equipment Work Order‖ from the CS Navigate menu to access the Work Order Search window.
7.15.2. In the Work Order Search window, the Scope field defaults to search for open work
orders and the ORG and Customer fields default to the custodian‘s assigned ORG and
customer account. The remaining optional fields are blank at this time.
7.15.3. In the default window, click ―Search‖ to retrieve all open work orders. Use the remaining search criteria fields to narrow your search and minimize the search results.
7.15.3.1. Scope – Check the Open indicator to search for only open work orders. Check
the Completed indicator to search for only completed and cancelled work orders. Check
both indicators to search for all work orders.
7.15.3.2. ECN – Enter an ECN to search for a specific work order.
7.15.3.3. Work Order – Enter the ―From‖ and ―To‖ work order numbers to conduct a work order search for a series of work orders.
7.15.3.4. Request Date – Enter ―From‖ and ―To‖ dates to search for work orders that were requested within the specified time frame.
7.15.3.5. Class – Use the dropdown menu to specify the equipment device class assigned
to the equipment item(s). The dropdown options are linked to the device class table and cannot be modified.
7.15.3.6. Maintenance Activity – Use the dropdown menu to identify or conduct a search for work orders assigned to a specific MA.
7.15.3.7. MFG – Enter a MFG‘s name to conduct a search for work orders associated to
a specific MFG. The MFG‘s dropdown menu is linked to the DMLSS MFG table.
7.15.3.8. Category – Select either scheduled or unscheduled to minimize your search results.
7.15.3.9. MFG Serial Number – Enter the MFG‘s serial number to search for a specific equipment record.
7.15.4. Custodians can only request cancellation of work order requests that he/she
generated using the CS New Equipment Work Order request.
7.16. Equipment Sub-custodian.

AFMAN41-216 13 FEBRUARY 2013 247
7.16.1. The Equipment Sub-custodian function provides equipment custodians a method to
associate guardianship of specific equipment to an individual(s) within his/her area of
responsibility. For example, the appointed equipment custodian for the Dental Clinic is
accountable for all equipment owned by the Dental Clinic. However, each treatment room
usually contains similar equipment and each room is usually assigned to a specific dental
technician. The equipment custodian could use the sub-custodian function to associate a
specific treatment room‘s equipment, by ECN, to the technician assigned to that treatment
room. Likewise, a custodian could use this function when he/she is responsible for
equipment that is stored or used in different buildings.
7.16.2. Per AFI 41-209, Chapter 7, paragraph 7.3.6.2., the MTF Commander or designated
Squadron Commander appoints, in writing, property (equipment) custodians to support
medical logistics in the requisition, management, accountability, and maintenance of
equipment in the using activities. Therefore, using the sub-custodian function does not
constitute the transfer of responsibility. Using this function is simply a means to assist the equipment custodian in safe guarding the equipment within his/her area of responsibility.
7.17. New Quality Complaint. The CS New QA Complaint process is the same as the IM and
CAIM New QA Complaint process. Refer to Chapter 5, paragraph 5.21.2 for a detailed
explanation. To maintain an effective and efficient QA program, customers should discuss new
QA complaints and product quality deficiency reporting instructions with the MM Manager prior
to submitting a New QA Complaint.
7.18. Search Quality Complaints. The CS Search Quality Complaint function is the same as
the IM and CAIM QA Complaint Search functions. Refer to Chapter 5, paragraph 5.21.3 for a detailed explanation covering this function.
7.19. Check Available Funds. The CS Check Available Funds function mimics the CAIM
Check Available Funds function and provides customers with direct visibility of their fund
record. The fund record cannot be modified from CS, but customers can see the fund record
details to include their available balance. Select ―Check Available Funds‖ from the CS Navigate
menu to access the Customer Fund record.
7.20. Choose Customer. The CS Choose Customer function is the same as the CAIM Choose
Customer function and allows users to specify the customer account in which they are working
without having to exit the CS module. A customer ID can also be designated by clicking on the
―Customer‖ button located on the horizontal toolbar. Once a customer ID is identified, all CS actions performed are associated to the specified customer‘s account.
7.21. Inbox. CS Inbox messages or pending actions are generated as a result of customers
initiating a NIR or work request. Therefore, CS pending actions are not assigned in SS, UP
Assign. Customers must access the CAIM Inbox to review and take action on alert notices as
explained in Chapter 6, paragraph 6.23.2. A list of CAIM pending actions to include an explanation of use is available in Attachment 6.
7.22. User Preference. Customers should use the User Preference feature to specify whether or
not they want to receive a message in their inbox when a submitted work request has been
opened by the facility manager. To receive messages, place a check in the Opened Work
Request Notification indicator box and click ―OK.‖ Remove the check to terminate the
messages.

248 AFMAN41-216 13 FEBRUARY 2013
7.23. DecisionBase Pro. RESERVED.

AFMAN41-216 13 FEBRUARY 2013 249
Chapter 8
ASSEMBLAGE MANAGEMENT
8.1. Purpose. Assemblage Management (AM) is the DMLSS module used to manage your
WRM programs and Customer Owned (CO) programs such as Medical Counter-Chemical
Biological Radiological Nuclear (MC-CBRN) and Pandemic Flu items. Maintaining WRM
assemblages properly is critical to the overall effectiveness of the WRM and CO programs.
DMLSS streamlines the processes and allows for greater flexibility in asset management. This
section addresses procedures used to manage those programs.
8.1.1. For privileged users, the AM Inbox automatically opens upon accessing the AM
module from the DMLSS System Navigation window. It can also be viewed by selecting
―Inbox‖ from the Utilities menu. Users must be assigned the AM User Pending Action
privilege and be associated to pending actions for the inbox to appear. The AM Inbox
contains many pending actions that are either advisory in nature or require user action.
DMLSS will automatically remove some action items from the inbox upon processing, while
other advisory notices should be removed or deleted upon review and when no longer
needed. A detailed list of AM pending actions and their recommended use is available in
Attachment 7. AM pending actions should be reviewed and worked daily to ensure proper
management of all assemblages.
8.1.2. The AM main window also appears once AM is launched from the DMLSS System
Navigation window. In this window, users can access the modules and functionalities of AM
mainly through the menu options. In some cases, you can also use the buttons on the
horizontal toolbar at the top of the window to open AM module windows. While on any AM
primary window, you have access to the same menu bar and horizontal toolbar buttons. Each
module window, however, displays a unique set of vertical toolbar buttons on the right side
of these window.
8.1.3. The main modules covered in the remainder of this chapter in the same order as they appear in the Navigate dropdown menu located on the menu toolbar.
8.2. Assemblage Record Data. The first option on the AM Navigate dropdown menu is the
Assemblage Record Data window. It provides a single view for all assigned WRM assemblage
records maintained in DMLSS-AM. It can be used to view single line items within an
assemblage with or without multiple location records; and the user has the ability to move
throughout all the item records within an assemblage. Use the Assemblage Record Data window
to add, update, merge or split locations, process gains and losses, set and manage relationships
including prime/sub, manage critical, deferred and commingled codes, and utilize other
functions via the vertical toolbar without having to exit the assemblage data record. To access
this window, select this option from the navigate menu or click on the ―Assemblage‖ button located on the horizontal toolbar.
8.2.1. Assemblage Record Data Criteria. The Assemblage Record Data Criteria window
Figure 8.1. is the first window to appear after accessing the Assemblage Record Data option
and is used to select the applicable assemblage record data criteria . The following data search criteria and management options are available in this window:

250 AFMAN41-216 13 FEBRUARY 2013
Figure 8.1. Assemblage Record Data Criteria Window.
8.2.1.1. ORG – Select primary ORG (DODAAC) or a specific sub-ORG.
8.2.1.2. Assemblage – Assemblages are listed by ORG ID. Utilize the type assist for
expedited assemblage identification and then highlight the desired assemblage from the available list.
8.2.1.3. Item ID – Use the type assist feature or utilize the drop down to select the desired item ID.
8.2.1.4. Include Sub ORGs - If this field is checked, all ORGs and associated
assemblages will appear in the assemblage list.
8.2.1.5. Delete Location Field - The Delete Location Record When On-Hand Quantity Is
Zero field is a management tool that prompts DMLSS to automatically delete location
record(s) when the OH quantity is zero. This function works in conjunction with the AM
Location Delete Indicator located on the Basic tab of the MM Service Detail record in
SS. The default is set to ―No‖ if the AM Delete Location Indicator in SS is not set. If the
indicator is set, then the default in the Assemblage Record Data Criteria screen defaults
to ―Y.‖ The preferred method is to set (or check) the AM Delete Location Indicator in the MM Service Detail record (see Attachment 2).
8.2.1.6. Search/Close/Delete buttons – The ―Search‖ button opens the assemblage record
for the identified item. The ―Close‖ button closes the assemblage record data criteria
screen without taking any action. The ―Delete‖ button can delete an entire assemblage if
it was erroneously added to the ORG due to a Standard Assemblage Add (paragraph
8.21) with the condition that the assemblage/subassemblage does not contain on-hand
balances or have funds associated to it. If either of these conditions exist, the delete button will not appear.
8.2.1.6.1. On the Assemblage Record Data Criteria screen select the organization from the dropdown list. Select the assemblage to be deleted and click ―Delete.‖
8.2.1.6.2. At the message prompt. ―Do you want to delete selected assemblage?‖
click ―Yes.‖ The Assemblage Record Data Criteria screen will update with assemblage deleted. Click ―Close.‖

AFMAN41-216 13 FEBRUARY 2013 251
8.2.2. Navigating in the Assemblage Record Data Window. The Assemblage Record Data
window Figure 8.2 opens in the position of the selected Item ID. This window provides most
of the information a user needs to perform assemblage record updates.
Figure 8.2. Assemblage Record Data Window.
8.2.2.1. The top portion of the window allows you to scroll forward and/or backwards
through all of the assemblage‘s data records using the VCR buttons. Users also have the
option to search for specific item ID records.
8.2.2.2. The next window segment provides the corresponding assemblage information
based on the search criteria. The ORG ID, assemblage and sub-assemblage data,
assemblage description, unit training code (UTC) if loaded, build control number (BCN),
date of the last inventory, and as of date are displayed.
8.2.2.3. Following the assemblage information is the management information for each
line item found in the assemblage and the allowance standard quantities. This view
provides a quick overview of the line items position in the inventory and assemblage
without having to move between other windows. Users can view or make changes to the
MTF catalog record by clicking the ―Jump To‖ icon next to the Item ID field. Note:
Using the Jump To button produces a message warning that the record is locked. Click
―Yes‖ to see the lock details or click ―No‖ to view the MTF catalog record. Chances are
you are the one locking the record.
8.2.2.4. Below the management information view are special requirements and inventory
stratifications. The special requirements view is populated by the special requirements
tab from the MTF catalog record. Updates to the special requirements field must be
completed in the MTF catalog record.
8.2.2.5. The inventory stratification state is populated, by item ID, for all assemblage
data records maintained under the selected item ID Figure 8.3. When a stratification state
is changed, the change will be reflected in this field along with the quantities by
stratification state.

252 AFMAN41-216 13 FEBRUARY 2013
Figure 8.3. Special Requirements and Stratification State.
8.2.3. Updating Location Record Data.
8.2.3.1. The individual location records are displayed at the bottom of the Assemblage
Record Data window Figure 8.4. The list displays all location records associated to that
Item ID and can be sorted in any sequence by clicking a column header. Information
within the location records can be reviewed and modified within the Assemblage Record Data window without having to navigate to another window or AM function.
Figure 8.4. Assemblage Data (location) Records by Item.
8.2.3.2. Another function of this view is the ability to use ―COPY and PASTE‖ in the
data fields to update common information. Using the Manufacturer (MFG) field as an
example, Abbott Labs may be spelled multiple ways. A user can copy the correct
spelling, highlight the remaining rows, and paste the correct spelling in the specified data field.
8.2.3.3. The ―On-Hand Qty‖ field contains a calculator function to allow the user to
make quick calculations when modifying data. This function helps when processing
adjustments to the assemblage data record. Click the calculator when processing gains
and losses to the inventory. Enter the total quantity counted. DMLSS will calculate the
adjustment quantities based on input. Select the proper gain/loss reason and complete the transaction. Upon processing, the OH quantity is adjusted to reflect the new quantity.
8.2.3.4. Many changes to an assemblage data record can be made without saving the data
each time adjustments are made. Users can click ―Save‖ anytime or DMLSS will
compile the changes upon closing the window. There are two exceptions to this standard
− changes to OH quantity and changes to stratification state. New entries to either of
these positions locks the field and it cannot be modified until the new data is saved. Both
of these fields update the financial position of the inventory and must be controlled to ensure the correct financial data is posted to accountable financial records.
8.2.3.5. Use the location record data fields to manage assemblages as follows:
8.2.3.5.1. Location – Identifies storage location of the item.
8.2.3.5.2. Sub-Location – Further specifies the item‘s storage location.
8.2.3.5.3. OH Quantity – The actual OH quantity of that item, in that location and
sub-location, with identical QA data such as lot number, MFG‘s name, and date, etc.

AFMAN41-216 13 FEBRUARY 2013 253
If the item is stored in a single location but has different lot numbers, then two location records should be maintained; one for each lot number.
8.2.3.5.4. Stratification State – Identifies the item‘s inventory stratification state.
8.2.3.6. Maintain Location. DMLSS contains an AM Location table that is used to
manage location and sub-location codes. These codes have a ―parent/child‖ relationship
whereby the sub-location is directly linked to the location code. For example, if multiple
warehouses are used to store WRM assets and each warehouse contains a ―SHELF1‖
sub-location; then ―WAREHOUSE1‖ and ―WAREHOUSE2‖ must both be assigned a
sub-location of ―SHELF1.‖ Use the add, edit, and delete features to manage WRM location and sub-location codes.
8.2.4. Assemblage Record Data Screen Toolbar Icons.
8.2.4.1. Relationship Icon. Use the Relationship button to display a list of associated
substitute item IDs (paragraph 8.9) and End/Support item details (paragraph 8.10).
End/Support item associations are items identified as a component of an end item or an
end item associated to a component. This relationship is not restricted to equipment; it
can also be used to identify supply items that are required in order to use the end item.
For example, you might have specific IV tubing associated to a specific type of IV fluid.
These relationships should be periodically reviewed by a clinician to ensure proper
medical support is available during contingencies.
8.2.4.2. Set Codes Icon. This option is a shortcut to the Item Code Change window. Use
this function to apply and/or remove critical, deferred, and commingled codes for the specified line item. Refer to paragraph 8.7. for further explanation of these codes.
8.2.4.3. Add Location Icon (Gain Location). Use the Add Location function to gain OH
inventory into the Assemblage Record Data for the specified item ID. This function
should only be used when an identical location record does not already exist. If the
required location record including identical QA data already exists, then modify the
quantity within the existing location record rather than adding another location.
8.2.4.3.1. Enter the quantity you are gaining and any other applicable fields such as
sub location. Click ―Enter‖ on the keypad and then Select the Transaction Reason on the Gain Type Select screen. Click ―OK.‖
8.2.4.3.2. In the Assemblage Record Data window enter any additional information if
available. Click ―OK.‖
8.2.4.3.3. In the Assemblage Record Data window the Loc ID defaults to NONE and
the O/H Qty is updated to reflect the gained quantity. In the Loc ID field dropdown
list select the location. If the location of the item is not in the Loc ID field dropdown
list, the user must add the location. Edit other fields as necessary and click ―Save‖ on the vertical toolbar.
8.2.4.4. Split Location Icon. Use the Split Location function to separate a single location record into two location records.
8.2.4.4.1. This function should be used when the existing location record contains the
correct OH quantity, but the QA record data differs. For example, the correct
location quantity is ten; but six bottles are from manufacturer ―AAA‖ and four bottles

254 AFMAN41-216 13 FEBRUARY 2013
are from manufacturer ―BBB.‖ The benefit of using the Split Location is that this
function does not generate gain and loss transactions because the same OH quantity is
maintained.
8.2.4.4.2. Highlight the location record being split, and then click on the ―Split
Location‖ button located on the vertical toolbar. Enter the quantity being moved to
the new location record. DMLSS reduces the OH quantity in the existing location
record and creates a new location record placing the specified quantity in the OH
quantity field. The remaining data fields must be populated and updates saved prior to exiting the window.
8.2.4.5. Merge Location Icon. Use the Merge Location function to consolidate two
separate location records into a single location record. Use this function when the
existing location records are identical including location, sub-location, lot number, etc. It
should also be used when two or more locations are merging into one to save physical
storage space. The benefit of using the Merge Location is that this function does not generate gain and loss transactions because the total OH quantity remains unchanged.
8.2.4.5.1. Select the location record being merged (the record you are not keeping)
and click the ―Merge Loc‖ icon. In the Change Location for Strat State window
Figure 8.5., enter the transfer quantity into the location record where the materiel is
physically located. OH quantities can be merged into a single location record or multiple location records. Click ―OK‖ to merge the data.
Figure 8.5. Change Location for Strat State Window.
8.2.4.5.2. If only a partial amount was moved (or merged) into another location, the
location record will remain with the adjusted OH quantity. The old location record
may remain with a zero OH quantity if the ―AM Delete Location‖ indicator is not set.
Use the Delete Loc function (paragraph 8.2.4.6.) to remove location records with a remaining OH quantity of zero.
8.2.4.6. Delete Location Icon. Within the Assemblage Record Data window, use the
Delete Location function to remove a location record that is no longer required. This
option is only available for location records with an OH quantity of zero. Location records appear with a zero OH quantity when one of the following two conditions exist:
8.2.4.6.1. The AM Location Delete indicator in the MM Service Detail record (see
Attachment 2) is not checked and the Delete Location indicator for the assemblage is
set to ―No‖ in the Assemblage Record Data Criteria window.

AFMAN41-216 13 FEBRUARY 2013 255
8.2.4.6.2. Item(s) exist for review on the AM pending action AM Gains Incomplete Because of Price Factor.
8.2.4.6.3. To delete, select a location record with zero OH quantities in the
assemblage. Click ―Delete Loc‖ and the location record is removed from the assemblage.
8.2.4.7. WRM Prime/Sub Icon. Use the WRM Prime/Sub (P/S) function to establish or
modify a P/S relationship associated to an item ID in the assemblage data record. An
―Allow Qty (U/S)‖ must be present for the prime item before this option becomes available. Refer to paragraph 8.9. for detailed explanation on P/S relationships.
8.3. Assemblage Item Transfer.
8.3.1. Use the Assemblage Item Transfer function to transfer individual assemblage data
records between assemblages and/or sub-assemblages. Transfers can be processed within the
same ORG or between two different ORGs.
8.3.2. Individual item transfers can be accomplished between two customer owned assemblages, but only when the same customer owns the assemblages.
8.3.3. Select ―Assemblage Item Transfer‖ from the AM navigate dropdown menu to access
this function. In the Assemblage Item Transfer Criteria window Figure 8.6, use the available
search criteria to locate the desired record(s). The criteria window is separated into two parts: Source Assemblage and Destination Assemblage.
Figure 8.6. Assemblage Item Transfer Criteria Window.
8.3.4. Source Assemblage.
8.3.4.1. ORG. Identify the source ORG. All assemblages associated to the specified
ORG are displayed as available assemblages. Utilize the Include Sub Orgs checkbox to display assemblages from all subordinate organizations.
8.3.4.2. Item ID. Specify the item ID being transferred.
8.3.4.3. Stratification (Strat) State. Specify the Strat State of the assemblage data record.
If left blank, all Strat States meeting the search criteria are returned in the search results
window.

256 AFMAN41-216 13 FEBRUARY 2013
8.3.4.4. Location ID. If known, specify the location code of the source assemblage
location record. If left blank, all location records meeting the search criteria are
retrieved. Use the ―through‖ feature to search for records assigned a specific series of locations, i.e. ―SHELF1‖ through ―SHELF5.‖
8.3.4.5. Sub-Location. If known, enter the sub-location of the source assemblage
location record. If left blank, all location records meeting the search criteria are
retrieved. The sub-location works in conjunction with the location ID. Use the
―through‖ feature to search for records assigned a specific series of locations, i.e. ―BOX 1‖ through ―BOX 5.‖
8.3.5. Destination Assemblage. In the ―Organization‖ field, specify the ORG that owns the
assemblage in which the assets are being transferred. All assemblages owned by the specified ORG are displayed. Highlight the gaining assemblage.
8.3.6. Assemblage Item Transfer window. Upon clicking ―Search,‖ the location data records
meeting the specified search criteria are displayed in the Assemblage Item Transfer window.
Enter the ―Transfer Qty‖ for each location record being transferred and click ―Save.‖ Select
―Yes‖ when prompted to print a delivery list. Use the delivery list to relocate the transferred assets.
8.3.7. The transfer process generates an ITL transaction for all assets transferred from the
losing ORG/assemblage and an ITG transaction for all assets transferred to the gaining
ORG/assemblage. These transactions are written to Transaction History and all ITLs and
ITGs are assigned the same document number from document serial block 8000-8499, Gains
and Losses.
8.4. Mass Update Assemblage Record. This function provides a method for assemblage
managers to update multiple assemblage data records simultaneously. Utilize this screen as a timesaving tool by applying modifications to specific targeted information in mass.
8.4.1. Select ―Mass Update Assemblage Record‖ from the AM Navigate dropdown menu or
click on ―Mass Update‖ located on the horizontal toolbar to access this tool. In the Mass
Update Assemblage Record Criteria window Figure 8.7, identify the desired ORG and
assemblage(s). Narrow your search results by selecting the desired assemblage(s) and
entering a single search criteria field (i.e. Location) or multiple fields to further narrow
search results (i.e. Location and Sub-Location). Multiple assemblages can be viewed at the same time. Use search criteria fields as follows:

AFMAN41-216 13 FEBRUARY 2013 257
Figure 8.7. Mass Update Assemblage Record Criteria Window.
8.4.1.1. Select either the ―Supplies‖ or ―Equipment‖ radio button to limit the search to
the selected commodity.
8.4.1.2. Incomplete Flag - Limits search results to location records where the incomplete flag indicator is checked.
8.4.1.3. Record locking indicators.
8.4.1.3.1. No Lock. In the Mass Update screen, the default locking scheme is set to
―No Lock‖ which implies that multiple users can access the same Assemblage ID
records in Mass Update simultaneously. Record integrity applies with this option; the last ―Save‖ action updates the record.
8.4.1.3.2. Row-Locked. When Row-Lock is selected, all records become uneditable to other AM users when a check mark is entered in the ―SEL‖ indicator box.
8.4.1.3.3. Pre-Lock. When Pre-Locking is selected all records default with a check
mark in the ―SEL‖ indicator box; therefore, the records are uneditable to other AM users until the check mark is removed.
8.4.1.4. Item ID – Limits results to specified item ID within the specified assemblage(s).
8.4.1.5. Location ID – When a single location is entered, DMLSS limits search results in
the selected assemblage(s) to the specified location. When using the location ―through‖
criteria, DMLSS displays the identified locations and all locations between the beginning and ending locations.
8.4.1.6. Sub Location – When a single sub-location is entered, DMLSS limits search
results in the selected assemblage(s) to the specified sub-location. When using the sub-
location ―through‖ criteria, DMLSS displays the identified sub-locations and all those between the beginning and ending sub-locations.
8.4.1.7. Manufacturer Name - Returns location records in the selected assemblage(s) that
match the specified manufacture‘s name. The manufacturer name must be spelled the
same as it is listed in the location record to ensure a match.

258 AFMAN41-216 13 FEBRUARY 2013
8.4.1.8. Lot Number - Returns only those items in the selected assemblage(s) that match
the specified lot number. The lot number must be an identical match to the location
record to find a match.
8.4.1.9. Original Expiration Date – When a single expiration date is entered, DMLSS
limits the search results for the selected assemblage(s) to the specified expiration date.
When using the Original Expiration Date ―through‖ criteria, DMLSS retrieves the
location records with an original expiration date matching the specified dates and all expiration dates between the beginning and ending dates.
8.4.1.10. Revised Expiration Date - When a single expiration date is entered, DMLSS
limits the search results for the selected assemblage(s) to the specified expiration date.
When using the Revised Expiration Date ―through‖ criteria, DMLSS retrieves the
location records with a revised expiration date matching the specified dates and all expiration dates between the beginning and ending dates.
8.4.2. Mass Update Assemblage window Figure 8.8. After the search criteria is selected,
click ―Search‖. The search results are displayed in the Mass Update Assemblage window.
Within this window, individual records can be updated or multiple records can be updated simultaneously. Some of the key functions used in Mass Update are as follows:
Figure 8.8. Mass Update Assemblage Window.
8.4.2.1. Sort by Column – Left click on a column heading to sort the location records in
ascending order for the specified data; i.e. left click on the Location heading once to sort
records in ascending order by Location code. Click on the column heading a second time
to sort in descending order.
8.4.2.2. Advanced Sorting – Right click on any column heading to access an advanced
utilities menu and then select ―Advanced Sort.‖ Utilize the Sort window to establish the desired sorting criteria.
8.4.2.3. Saving Column Settings – Right click on any column heading to access the
advanced utilities menu; and then select ―Save Column Settings.‖ Using this function
saves the column settings for that user and that PC only. Each time the user accesses Mass Updates, the column settings will appear as they were when last saved.
8.4.2.4. Selecting Records for Update – To select an individual record, simply click on
the desired row. Use the Shift and Control keys same as other windows based programs

AFMAN41-216 13 FEBRUARY 2013 259
to select multiple rows for update. The Shift key is used to select a sequence or consecutive rows and the Control key is used to select random or non-sequential rows.
8.4.2.5. Select All – The Select All button is located in the upper right corner of the Mass
Update Assemblage window. If the ensuing update applies to all location records, click ―Select All‖ to select or highlight all records.
8.4.2.6. Set to Incomplete – Selecting this button inserts a check mark into the Incomplete Record indicator for all location records highlighted.
8.4.2.7. Set to Complete – Selecting this button removes the check mark from the
Incomplete Record indicator for all location records highlighted.
8.4.2.8. Apply Button – This button is used to apply the ―new‖ data to the selected location records.
8.4.3. To apply mass updates, load the data into the fields located in the top portion of the
Mass Update Assemblage window. If all records are affected, use the Select All button to
highlight all data records prior to applying changes. Then, use the Apply button to apply the
new data to selected records. For, example, if an entire Biological Warfare/Chemical
Warfare (BW/CW) assemblage was moved from ―Bldg 1‖ to ―Bldg 2,‖ first, you would
search for all records within the BW/CW assemblage; then, click the ―Select All‖ button to
highlight all location records within the assemblage; enter ―Bldg 2‖ into the Location data
field in the top portion of the window; click the ―Apply‖ button, and finally ―Save‖ the
changes. A single data field or multiple data fields may be updated at the same time. The following data fields are available for update:
8.4.3.1. Location – Enter the applicable location into this field and click ―Apply‖ to
update the location for selected records. Note: If the desired location does not already
exist, double-click in the Location field within one of the location records. Use the Add
Location function in the Location/Sub Location Maintenance window to establish the
new location. Refer to paragraph 8.35.2. for a detailed explanation on maintaining
locations.
8.4.3.2. Sub Location - Enter the applicable sub-location code into this field and click
―Apply‖ to update the sub-location for selected records. Note: If the desired sub-
location code does not already exist, double-click in the Location field within one of the
location records. Use the Add Sub-Location function in the Location/Sub Location
Maintenance window to establish the new sub-location code. Refer to paragraph 8.35.2. for a detailed explanation on maintaining location codes.
8.4.3.3. Manufacturer – Use this field to update the MFG data for selected location
records. Mass updating the MFG data field is useful when multiple spelling versions of
the same MFG exist within the specified assemblage(s). The mass update tool is an easy way to apply the same spelling version to all records simultaneously.
8.4.3.4. Lot Number – Use to update lot number data to correct inconsistencies with lot
number information or to enter common lot number information.
8.4.3.5. External Authority – This field is designed to be used in conjunction with the
Revised Expiration Date field. The most common example of an external authority is the

260 AFMAN41-216 13 FEBRUARY 2013
SLEP. In conjunction with applying a Revised Expiration Date, SLEP or an applicable reference number should be applied to the External Authority data field.
8.4.3.6. Original Expiration Date – The original expiration date is generally captured
during the receipt process. This date should only be modified if incorrectly captured
during the receipt process. If the item has been tested and the expiration date extended
by proper approval authority, use the Revised Expiration Date field to capture the
extended expiration date.
8.4.3.7. Revised Expiration Date – Load extended expiration dates into this field. For
example, if an item was submitted to SLEP and approved for a two year extended
expiration date and the original expiration date is 5/8/2011; then enter 5/8/2013 into the
Revised Expiration Date field. The appropriate reference for extension should also be entered into the External Authority field, paragraph 8.4.3.5.
8.4.3.8. Manufacture Date – Date of manufacture as documented on the materiel label.
8.4.3.9. Stratification State – Updates to the stratification state are only permitted when
using the Pre-Lock function and when the ―SEL‖ indicator is checked using the Row-
Lock function. In either case, the ―SEL‖ indicator must be checked.
8.4.4. If search results reflect a zero quantity in a location record for the specified
assemblage(s), some or all of the data fields may be grayed out and uneditable. Location
records with a zero quantity are a result of not selecting the AM Location Delete indicator,
which is used to remove location records when the OH quantity is zero. Use the Delete Location function to remove these records from the assemblage(s).
8.5. Item Allowance Change.
8.5.1. Use the Item Allowance Change function to manually add, modify, or remove an
assemblage allowance for an item, whether or not it is already part of a standard or non-
standard assemblage. Use the Non-standard Assemblage Allowance Change function
explained in paragraph 8.6 to apply mass allowance updates to non-standard assemblages.
Electronic allowance updates for standard assemblages are accomplished using the Standard
Assemblage Update function shown in paragraph 8.22.
8.5.2. Select ―Item Allowance Change‖ from the AM navigate dropdown menu or click on
the ―Allowance‖ icon located on the horizontal toolbar to access the Item Allowance Change
window. Once the window opens, enter the item ID and hit the enter key. If necessary, click
the ―Jump To‖ button located next to the item ID field to go to the MTF catalog search
screen and create a new record. Upon entering a valid item ID, two tabs are displayed in the
Item Allowance Change window ─ the Assemblages Containing Item, and Assemblages Not
Containing Item tabs Figure 8.9.

AFMAN41-216 13 FEBRUARY 2013 261
Figure 8.9. Item Allowance Change Window.
8.5.3. Assemblages Containing Item tab. All individual location records by assemblage
already containing an allowance for the specified item are displayed in this tab. Relevant
management data is also listed to include P/S relationships, OH quantity, due-in quantity,
current allowance quantity, and commingled, critical, and deferred codes and quantities.
Allowance updates and changes to the locally managed indicator may be applied to an
individual line item or applied to multiple line items in mass.
8.5.3.1. Allowance Updates. Allowance changes to individual line items can be
accomplished within the specified location record or by using the Apply function located
in the top portion of the window. The Apply function must be used to simultaneously
apply updates to multiple records. To do so, enter the new allowance in the New
Allowance Qty field. Select (highlight) the location records to which the ensuing update
applies. Click ―Apply.‖ Finally, verify updates are correct and save changes. To remove
the allowance, apply a new allowance quantity of zero.
8.5.3.2. Locally Managed Indicator. The Locally Managed Indicator setting determines whether or not electronic allowance updates process or edit.
8.5.3.2.1. If the setting is checked, electronic updates edit for review and the
assemblage manager determines whether or not to manually apply the update. If this
indicator is unchecked, electronic updates process and the allowance is updated accordingly.
8.5.3.2.2. Apply the Locally Managed Indicator to individual records by placing a
check mark in the Locally Managed checkbox within the location record or by using
the apply function. When using the apply function, both the new allowance quantity
and locally managed indicator are updated together for the specified records upon
selecting the ―Apply‖ button. This indicator defaults to ―No Change.‖ Click ―Add‖
to apply the indicator to selected records and use ―Remove‖ to uncheck the locally managed indicator.
8.5.3.3. If an item assigned to an assemblage is a sub item for an associated prime, verify your prime/sub ratio before updating the new allowance field.

262 AFMAN41-216 13 FEBRUARY 2013
8.5.3.4. Assemblages Not Containing Item tab. This tab lists all remaining assemblages
that do not contain an allowance for the specified item ID. Apply initial allowance
quantities and the Locally Managed indicator the same as shown in paragraph 8.5.
8.5.4. Use the ―Set Codes‖ button located on the vertical toolbar to access the Item Code
Changes window. Deferred, critical, and commingled codes and quantities may be applied as explained in paragraph 8.7.
8.6. Non-Standard Assemblage Allowance Change.
8.6.1. Use this function to add, modify, and remove allowance quantities associated to non-
standard assemblages. Prior to applying allowance updates, the non-standard assemblage
must be loaded into the database as explained in paragraph 8.24. Select ―Non-Standard
Assemblage Allowance Change‖ from the AM navigate dropdown menu to access this
function. In the criteria window, identify the ORG and assemblage to be updated.
8.6.2. All location records with existing allowances appear in the Non-Standard Assm
Allowance Change window. Allowance adjustments must be applied to individual line items one at a time.
8.6.3. Click on the ―Add Item‖ button located on the vertical toolbar to add a new allowance
for a new item ID. Type in the item ID and select the flashlight icon. Click ―OK" in the Item
ID pop-up window if the information is correct and the window disappears. Enter the allowance quantity and click ―Save‖ on the vertical toolbar.
8.6.4. Deferred, critical, and commingled codes and quantities may also be applied as
explained in paragraph 8.7. by selecting the ―Set Codes‖ button located on the vertical toolbar.
8.7. Item Code Change.
8.7.1. Use the Item Code Change function to manage deferred, critical, and commingled
codes and to apply or modify quantities or percentages to assemblage data records. Select
―Item Code Change‖ from the AM navigate dropdown menu or click on the ―Set Codes‖ icon available on various vertical toolbars to access this function.
8.7.1.1. Deferred Code. Deferred codes are used to identify assemblage materiel that
will be purchased using an existing deferred procurement (DP) plan prior to processing
the assemblage out-shipment. Refer to AFI 41-209, Chapter 13 for a detailed explanation of available DP programs.
8.7.1.1.1. Items assigned the following deferred codes are linked to the Deferred Item Order function explained in paragraph 8.19.5.
8.7.1.1.1.1. V - DoD Owned Stock (PV).
8.7.1.1.1.2. E - Service-Owned CEC.
8.7.1.1.1.3. R - Service-Owned VMI.
8.7.1.1.1.4. S - Service-Owned PVWRM.
8.7.1.1.2. Items coded as deferred are considered ―on-hand‖ assets and calculated
into the item stock percentages that appear on assemblage status reports.

AFMAN41-216 13 FEBRUARY 2013 263
8.7.1.2. Critical Code. The critical code is used to designate an item(s) within an
assemblage as a critical necessity for deployment. The critical code may be applied to all
or part of the allowance quantity using the percentage indicator or by manually entering
the critical quantity. Items assigned a critical item code are calculated into the critical item percentage on stock status reports.
8.7.1.3. Commingled Code. This code indicates that assemblage materiel for the item
number is commingled with operating stock. All or part of the OH quantity may be
coded as commingled using the percentage indicator or a specified quantity can be
manually loaded into the commingled quantity field. When processing a receipt or gain
against an item with a commingled code, the system annotates the assemblage data record(s) as incomplete.
8.7.1.3.1. The purpose of choosing to commingle WRM and operating stock is to
minimize loss due to stock expiration and deterioration. Sufficient operating stock
should be OH to effectively rotate with WRM stock.
8.7.1.3.2. QA data is not required in the assemblage data record for commingled
materiel. Before processing any AM out-shipments or sales, the assemblage manager
should remove the commingled code and update the assemblage record data with the
correct product management information.
8.7.1.3.3. Items coded as commingled are considered ―on-hand‖ assets and are calculated into the item stock percentage on assemblage status reports.
8.7.2. Item Code Change Criteria window. Use the Item Code Change Criteria window to
first select the ORG and assemblage(s) in which the updates apply. The following search
criteria can be used to further minimize search results.
8.7.2.1. Item ID - Entering an item ID reduces the search results to that item ID for the specified assemblage(s).
8.7.2.2. Deferred Code – Returns assemblage data records matching the deferred code
criteria. Use the dropdown menu to select the appropriate code. Locally assigned
deferred codes may be assigned to assemblage data records. If being used, they will
appear in this dropdown menu. Local deferred codes are established and managed within the TMU located in the SS module.
8.7.2.3. Critical Code - Returns assemblage data records matching the critical item code
criteria for the specified assemblage(s). Use the dropdown menu to select the appropriate
code. Locally assigned critical codes may be assigned to assemblage data records. If
being used, they will appear in this dropdown menu. Local critical codes are established
and managed within the TMU located in the SS module.
8.7.2.4. Commingled Code – Use the dropdown menu to select the appropriate
commingled code and only the assemblage data records matching that code criteria for the specified assemblage(s) are displayed.
8.7.3. Multiple search criteria can be used at the same time. For example, to search for
Atropine Injectors with a deferred code of ―D‖ within a BW/CW assemblage; first identify
the assemblage; enter ―6505009269083‖ in the Item ID field; choose Deferred Code ―D,‖ and

264 AFMAN41-216 13 FEBRUARY 2013
click ―Search.‖ The search results only display the assemblage data records matching all the criteria.
8.7.4. Item Code Change window. Within the Item Code Change window, users can apply
the deferred, critical, and commingled quantities by quantity or percentage. Use the ―Notes‖
field to provide a short explanation as to why the code(s) are assigned. A thorough reference
to applicable codes should be maintained in each corresponding assemblage‘s continuity
binder.
8.7.4.1. To add or update using a quantity, enter the quantity in the appropriate
row/column. In the corresponding code column, select a code from the dropdown list. Enter a short note in the Note column explaining why the code is assigned.
8.7.4.2. To modify a code based on percentages, select (highlight) the assemblage data
record(s) being updated. Then, in the top portion of the window, assign the applicable
deferred, critical or commingled code using the dropdown list. Enter a short note in the
Note column explaining why the code is assigned. Update the corresponding percentage
field to meet local requirements. The percentage defaults to 100% but can be adjusted to
as low as 1%. Percentages are applied using whole numbers only. Click ―Apply‖ to
update the specified assemblage data record(s). Verify updates are correct and click
―Save.‖
8.7.4.3. Use the ―Reset‖ button to remove deferred, critical, and/or commingled codes,
quantities, and percentages. To do so, highlight the applicable assemblage data records.
In the Reset box, choose ―deferred,‖ ―critical,‖ or ―commingled,‖ depending on which
code is being removed and click the ―Reset‖ button. Verify the specified code was removed from the assemblage data records and click ―Save.‖
8.7.4.4. DMLSS allows multiple item codes to be assigned to the same assemblage data
record; however, some rules apply. An item can be classified as both critical and
deferred, but the critical plus deferred quantity cannot exceed the allowance quantity. In addition, the commingled quantity cannot exceed the OH quantity.
8.8. Equipment (AM).
8.8.1. Use the AM equipment function to maintain equipment records and/or print barcode
labels for equipment associated to LOG and CO assemblages. Equipment detail records
associated to CO assemblages can only be viewed from AM; however, updates are only
permitted in the EM and MA modules. All AM equipment records are also accessible from the EM module and those requiring maintenance are accessible from the MA module.
8.8.2. Select ―Equipment‖ from the AM Navigate dropdown menu or click on the
―Equipment‖ icon located on the horizontal toolbar to access the Equipment Search Criteria
window. Numerous data fields are available for use in processing inquiries. Leave all data
fields empty and click ―Search‖ to retrieve all assigned equipment records. Otherwise,
multiple data fields can be used simultaneously to narrow search results when trying to locate
specific equipment records. The most direct route to a specific equipment record is by using the Equipment Control Number (ECN) as your search criteria.
8.8.3. The Equipment Search Results window displays all equipment records matching the
specified search criteria. To view an individual equipment record, highlight the desired

AFMAN41-216 13 FEBRUARY 2013 265
record and click on the ―Detail‖ button located on the vertical toolbar or double-click the
desired record. Multiple equipment records may be selected by highlighting the items using
the ―Shift‖ or ―Ctrl‖ key methods. Selected records are displayed in ECN sequence. When
multiple records are selected, a VCR button is available in the upper left corner of the window to allow users to scroll through the equipment records.
8.8.4. If necessary, use the Filter function in the Equipment Search Results window to filter
through the equipment records retrieved as a result of the initial search. One or more of
following criteria can be used to filter the records: item ID, nomenclature, manufacturer,
common model, contractor, ORG ID, customer name, custodian name, assemblage
description, and assemblage number. To apply the filter, enter the applicable filter data and
click the ―Filter‖ button located on the vertical toolbar. Click the ―Reset‖ button to remove filters.
8.8.5. Highlight an equipment record and click the ―Detail‖ button or double-click on the
equipment record to access the equipment detail record. Each equipment data record contains several tabs categorizing the individual equipment data fields.
8.8.6. CO Assemblage Equipment. Equipment designated for CO assemblages is accounted
for as operating inventory and the equipment data records are maintained using the EM
module. Each piece of equipment must be ―Associated‖ to the designated CO assemblage in
order to meet the allowance requirement and to be calculated into the available stock
percentages reported on assemblage status reports. To establish the association, the
equipment must be owned by the same customer that owns the CO assemblage; i.e. an ECN owned by 3H5888 can only be associated to a CO assemblage owned by 3H5888.
8.8.6.1. Associating Equipment to CO Assemblage. Access equipment detail record(s)
using the EM Equipment search function. Use the ―Associate‖ button located on the
vertical toolbar to access the Associate to Customer-Owned Assemblage window. The
ORG and customer fields default to the owning activity. Use the available dropdown
menus to associate the equipment to the appropriate assemblage. Once accomplished, the
assemblage data appears in the bottom portion of the Main tab.
8.8.6.2. Un-Associating Equipment from a CO Assemblage. Access equipment detail
record(s) using the EM Equipment search function. Use the ―Remove‖ button located on
the vertical toolbar to unassociate the equipment item from the CO assemblage. Click
―OK‖ to confirm removal of the association.
8.8.7. Refer to Chapters 9 and 10 for an in-depth explanation on maintaining equipment data records.
8.9. Prime/Sub (P/S) Items.
8.9.1. Use the P/S tool to establish a relationship between a sub item ID and a prime item ID.
While assemblage allowances are associated to specific item IDs, every site may not have
that specific item ID OH. In some cases, the exact same item and/or package size cannot be
obtained during replenishment action. In these cases, establish a prime/sub relationship allowing the sub item to fulfill the assemblage allowance requirements.
8.9.2. The following rules apply when establishing a P/S relationship:

266 AFMAN41-216 13 FEBRUARY 2013
8.9.2.1. The prime item must have an assemblage allowance. The sub item cannot have an assemblage allowance for the specified ORG and assemblage ID.
8.9.2.2. The sub item must have a quantity OH or due-in.
8.9.2.3. An item cannot be substituted for more than one prime item within the same
ORG and assemblage.
8.9.2.4. An item cannot be both a prime and a sub in the same ORG and assemblage.
8.9.3. Select ―Prime/Sub Items‖ from the AM navigate menu or click on the ―Prime/Sub
Item‖ button located on the horizontal toolbar to establish, revise, or delete P/S relationships.
P/S relationships are applied at the ORG and assembly ID level. Therefore, if the same
relationship exists for other assemblage(s) within the ORG, the P/S relationship must be applied to each assemblage.
8.9.4. In the criteria search window, select the ORG, assemblage, and item ID in which the
ensuing P/S relationship will apply. Click ―Search‖ to access the Prime/Sub Items window
Figure 8.10. The window is divided into 3 sections: top section, lower left, and lower right section.
Figure 8.10. Prime Sub Items Window.
8.9.5. Prime item ID management information is displayed in the top section. The lower left
section contains items without an allowance authorization; therefore, are considered
overage(s) and potential sub items. Existing sub items are displayed in the lower right section.
8.9.6. If the sub item is already part of the assemblage, enter the prime number in the search
criteria window and open the Prime Sub Items window. In the lower left section of the
window, select the sub‘s item ID and click the ―>‖ button to associate the sub item to the
prime. The P/S ratio always defaults to 1:1, so modify the P/S ratio as necessary. For
example, if the prime item‘s unit of sale (U/S) is 5s and the sub item‘s U/S is 1s, the
prime/sub ratio would be 1 (prime) to 5 (sub) respectively.

AFMAN41-216 13 FEBRUARY 2013 267
8.9.7. Use the ―Add Item‖ button located on the vertical toolbar to establish a P/S
relationship when the sub item is not already loaded in the assemblage. In the criteria search
window, select the ORG, assemblage, and prime item ID and access the Prime/Sub Items
window. Click the ―Add Item‖ button to open the Inventory Add Item-Location Data
window. Type in the item ID and press the enter key to populate the description, issue and
pricing fields. The QA data fields will also be displayed. You must enter, as a minimum, the
sub quantity to process the update. The sub item‘s QA should also be loaded at this time. If not loaded, leave the incomplete box checked. Click ―Save‖ to process the actions.
8.9.8. The Gain Type Select window appears upon clicking the ―Save‖ button. Select the
applicable type of gain and click ―OK.‖ Print the source document if required for QA.
8.9.9. Return to the Prime Sub Items window and associate the newly gained sub item from
the lower left section to the lower right section by clicking the ―>‖ button. Adjust the ratios as needed and save the information. Click ―Save‖ to complete the process.
8.10. End/Support Items. The End/Support items function was created to allow users to link
consumable supplies to the equipment item they support. These supplies are unique to the
capabilities to the equipment and generally do not work with other equipment items. Using this
function is advantageous when budgeting for replacement materiel in an assemblage. If an
equipment item changes, consumables that support the equipment can also be replaced at the same time.
8.10.1. Support Items.
8.10.1.1. From the AM navigate dropdown menu, select ―End/Support‖ and then
―Support‖ to access the Support Items window. In the criteria window, enter an ORG
from the dropdown list to view all associated assemblages. Select an assemblage from
the list and enter an item ID. The End/Support Item function can only be applied to one
assemblage at a time. Click ―Search‖ to open the Support Items window. Use the
Support Items window to associate end items to a support item.
8.10.1.2. Basic item information of the support item is listed in the top part of the
window including the allowance quantity, item code, and assemblage data contained in
the assemblage data records. Use the VCR buttons in the upper left corner to move
forward or back through the project without exiting or reopening the assemblage (this
changes the support item ID). The middle of the window is reserved for MFG name and
model ID for the support item. The lower left window contains a list of available items
within the project that may be associated as an end item. The lower right window is the association box for end items associated to the support items.
8.10.1.3. To associate end items to the support item, move the applicable item ID(s) from
the Available Items box to the End Items box. Highlight the item ID(s) and click on the
―>‖ button to move the item ID(s) to the End Items box. Use the ―>>‖ button to move all available item ID(s) to the End Items box. Click ―Save‖ to complete the process.
8.10.1.4. To remove an End Item association, select the item ID in the End Item box and
click ―<‖ button to disassociate and move it back to the Available box. Use the ―<<‖
button to disassociate all item IDs. Click ―Save‖ to complete the process.
8.10.2. End Items.

268 AFMAN41-216 13 FEBRUARY 2013
8.10.2.1. Use the End Items window to associate an end item to one or multiple support
items. From the Navigate menu, select ―End/Support Items‖ and click on ―End Items‖ to
view the End Items Criteria window. Enter an ORG from the dropdown list to view all
associated assemblages. Select an assemblage from the list and enter an item ID. Only one assemblage can be selected at a time. Click ―Search‖ to open the End Items window.
8.10.2.2. Basic item information of the end item is displayed in the top part of the
window, to include allowance quantity, item code, and assemblage data contained in the
assemblage data records. Use the VCR buttons located in the upper left corner of the
window to move forward and backward through the project without exiting or reopening
the assemblage (this changes the end item ID). The middle of the window is reserved for
MFG name and model ID for the end item. The lower left window contains a list of
available items within the assemblage that may be associated to an end item. The lower
right window is the association box for support items associated to an end item.
8.10.2.3. To associate supply items to an end item, move the applicable item ID from the
Available Items box to the Support Items box. Highlight the item ID(s) and click on the
―>‖ button to move the item ID(s) to the Support Items box. Use the ―>>‖ button to
move all available item ID(s) to the Support Items box. Click ―Save‖ to complete the process.
8.10.2.4. To remove a Support Item association, select the item ID from the Support
Items box and click the ―<‖ button to disassociate and move back to the Available box.
Use the ―<<‖ button to disassociate all item IDs. Click ―Save‖ to complete the process.
8.10.3. The Set Codes button is a shortcut that allows you to open the ―Item Code Change‖
window to update item codes for the new relationship without having to exit and open the window from the Navigate window.
8.10.4. After a relationship is created for either the end item or support items, use the ―Print‖
button to print a report showing the relationship information. The printed report will appear
similar to the respective windows and lists supported item ID(s) and/or end item ID(s), assemblage, allowance quantity, and item code information.
8.11. Weights/Cubes.
8.11.1. The Weights/Cubes function provides a method to document the weight and cube (in
cubic square feet) of assemblages. These figures are entered into DMLSS and displayed on
the packing list for each assemblage by location and sub-location. This data can also be retrieved when using BusinessObjects (BO) to develop localized reports.
8.11.2. Select ―Weights/Cubes‖ from the AM navigate dropdown menu to access this
function. In the criteria window, identify the applicable ORG, assemblage, location, and sub-
location (not mandatory). In the Location/Sub-location Weight and Cube List window, enter the weight and cube for each available location and sub-location.
8.11.3. Click the ―Open‖ button located on the vertical toolbar to return to the criteria
window and select other locations or assemblages. After all processes are complete, click
―Save‖ and ―Close.‖ Each time this data changes, a new packing list should be printed to reflect the changes.
8.12. Item Gains/Losses.

AFMAN41-216 13 FEBRUARY 2013 269
8.12.1. Whether building an assemblage from scratch or maintaining an existing one, the
need will eventually arise for assemblage managers to process gains to increase an item
quantity and/or a loss to reduce an item quantity. Use the Item Gains/Losses function to
increase or decrease an assemblage item‘s OH quantity. Select ―Item Gains/Losses‖ from the
AM navigate dropdown menu or click on the ―Gain/Loss‖ icon located on the horizontal
toolbar to open the Item Gains/Losses criteria window Figure 8.11. In the criteria window,
specify the applicable ORG and assemblage. Gains and losses can only be applied to one
assemblage at a time. Click ―Search‖ to view all items in an assemblage or enter one or more
of the following search criteria to minimize the results.
Figure 8.11. Item Gains/Losses Criteria Window.
8.12.1.1. Item ID - Enter the specific item ID that the ensuing gain or loss will apply.
8.12.1.2. Location ID – Select a location ID from the dropdown menu to minimize the search results to only those items with the specified location ID.
8.12.1.3. Sub-location – Use the sub-location dropdown in conjunction with the location
ID. Doing so narrows search results to those records assigned the specified location and sub-location.
8.12.2. In the criteria window, an option exists to delete the location record when OH
quantities equal zero. Select ―Yes‖ if you are processing a loss and the item will not be
replaced. If ―No‖ is selected, a location record with a zero OH quantity remains in the
assemblage. This function works in conjunction with the AM Location Delete Indicator
located in the Basic tab of the MM Service Detail record in SS (see Attachment 2). After
you have selected an assemblage and entered additional search criteria, click ―Search‖ to open the Item Gains/Losses window and to view the search results.
8.12.3. All assemblage data records matching the specified search results are displayed in
the Item Gains/Losses (search results) window Figure 8.12 to include allowance, due-in, and
OH quantities as well as record location and QA data. Initially, the only field available for
update is the Gains/Losses data field. Once a gain or loss is applied, the quantity field becomes mandatory.

270 AFMAN41-216 13 FEBRUARY 2013
Figure 8.12. Item Gains/Losses (Search Results) Window.
8.12.4. Gains and/or losses can be applied to a single line item or to multiple line items
simultaneously.
8.12.4.1. Individual. Choose a gain or loss transaction reason within the applicable
location record (row) to apply to individual items. Different transaction reasons and
quantities can be applied to different location records at the same time. Enter the quantity
and click ―Save‖ to update records.
8.12.4.2. Multiple. To apply the same transaction reason to multiple lines, use the
―Shift‖ and/or ―Control‖ key function to highlight the applicable location records, enter
the transaction reason at the top of the window, and click ―Apply.‖ This action applies
the gain or loss transaction type to all selected (highlighted) location records. Enter the gain or loss quantity and click ―Save‖ to update records.
8.12.4.3. All. Click ―Select All‖ to highlight all location records; enter the transaction
reason at the top of the window; and click on the ―Apply‖ button. This action applies the
gain or loss transaction type to all location records. Enter the appropriate gain or loss quantity once the transaction reason is applied.
8.12.4.4. Click ―Save‖ on the vertical toolbar to move to another gains/losses window
where the user can enter a desired priority, supply condition code, SOS RIC, Delivery
Date, (optional) Ext Doc Number and the Authority/Purpose. Click OK to complete the process and update the records.
8.12.5. Add Item function. Use the add item function if an item does not appear in an
assemblage; i.e., new assemblage allowance standard requirements or an addition of a
substitute item. To add the item to the assemblage, click the ―Add Item‖ button on the
vertical toolbar to open the Inventory Add Item-Location Data window. Enter the item ID
and press the ―Enter‖ key. If one does not exist, DMLSS prompts you to create a new MTF
catalog record. The item‘s descriptive data auto populates once the item ID is identified.
Enter the quantity being gained and load the corresponding QA data. QA data entry is not
mandated at this point but it is highly recommended that it be loaded at this time. Leave the
Incomplete check box checked if the QA data is not loaded at this time. Click ―Save‖ to
process the gain.
8.12.6. Create a P/S relationship if the item being gained is a substitute for a prime item that is assigned an allowance quantity.
8.12.7. Outshipment Loss Example. On the Item Gains/Losses window enter the pertinent
data for the loss in the dropdown boxes and click ―Save‖ on the vertical toolbar. The
Gains/Losses Outshipment Loss screen appears.

AFMAN41-216 13 FEBRUARY 2013 271
8.12.7.1. In the Item Gains/Losses outshipment loss screen (Figure 8.13.), enter the
required data (red dot fields are mandatory). Click ―OK.‖ Click ―OK‖ on the Item
Gains/Losses message that appears.
Figure 8.13. Item Gains/Losses Outshipment Loss Screen.
8.12.7.2. On the AM-Item Gains/Losses screen click the Close icon on the vertical
toolbar and the Outshipment Form/Transportation Selection screen appears Figure 8.14.
Select a form from the ―Print Form‖ dropdown list. Note: If the user selects ―None‖
then LOA/Fund Cite, Base Transportation and Shipper is grayed out. If the user selects
―DD Form 1348-1a,‖ then the Base Transportation and Shipper will have to be
completed. If the user selects the DD Form 1149, the LOA/Fund Cite, Base Transportation and Shipper must be completed.
Figure 8.14. Outshipment Form/Transportation Selection Screen.
8.12.7.3. Enter the LOA (Line of Accounting)/Fund Cite, Transportation requirements
and Tracking information. Click OK and the user then returns to the AM-In Box.
8.12.8. Outshipment to DRMO example. On the Item Gains/Losses window enter the
pertinent data for the loss in the dropdown boxes and click the Save icon on the vertical
toolbar. The Gains/Losses Outshipment to DRMO screen appears (similar to the
outshipment loss screen shown in Figure 8.13). Enter the required data (Red dot fields are mandatory) and click ―OK.‖

272 AFMAN41-216 13 FEBRUARY 2013
8.12.8.1. On the AM-Item Gains/Losses screen click the Close icon on the vertical
toolbar and the Outshipment Form/Transportation Selection screen appears (Figure
8.14.). Enter the LOA (Line of Accounting)/Fund Cite, Transportation requirements and Tracking information and click OK and the user then returns to the AM-In Box.
8.12.8.2. DOD 4000.25-1-M, MILSTRIP requires additional information for hazardous
items being turned into DRMO. Users must enter a signal code in the gain/loss screen
when they process a loss to DRMO for a hazardous item. The valid signal code choices
are A, B, C, and L (default is A). If the signal code is B, users must enter a ―Bill to
Activity‖ (DODAAC of the bill to office). The ―Bill to Activity‖ prints in block 27 of
DD Form 1348-1a, Issue Release/Receipt Document. The DRMO DODAAC also prints on the DD Form 1348-1a for all DRMO shipments.
8.12.9. All gain and loss transactions are written to the Transaction History file and to DFAS
to update financial records. Only Inventory Adjustment Gain/Loss transaction reasons
generate an Inventory Adjustment Voucher.
8.13. Destruction.
8.13.1. The item destruction process is another form of a loss transaction. Potential reasons
to destroy materiel are if it is expired or reached its life expectancy and the materiel is not
authorized for turn-in to commercial returns, DRMO, or excess. In addition, process a loss
(DDL transaction) to document the quantity when materiel is shipped to the FDA/DOD
SLEP for testing. The sample is not returned hence the quantity must be removed from AFWCF/MDD records.
8.13.2. Select ―Destruction‖ from the AM navigate dropdown menu to access this function.
The search criteria window for the destruction process is the same as for gains and losses
(paragraph 8.12) except these records default to a Gain/Loss transaction type of ―Destruction‖ Figure 8.15. The quantity field is the only field available for data entry.
Figure 8.15. Destruction Window.
8.13.3. In the Destruction window, select the item ID and enter the destruction quantity in
the quantity field. Click ―Save‖ to process the destruction. A window opens listing the item
ID, item description, the destruction code, and the destruction method Figure 8.16. Enter the
reason for destruction in the space provided. This reason is printed on the destruction
document. During processing, the OH quantity is reduced by the quantity being destroyed.
Click ―OK‖ to finalize the process and adjust the OH quantity. Use the ―Open‖ button
located on the vertical toolbar to process destructions from other assemblages if necessary.

AFMAN41-216 13 FEBRUARY 2013 273
Figure 8.16. Destruction (Detail) Window.
8.13.4. Before a destruction transaction is allowed, a destruction method must be associated
to the item‘s MTF catalog record. If a destruction method is not loaded, DMLSS displays a
message indicating that one is required. If necessary, click the ―Jump To‖ button located next to the item ID field to view the MTF catalog record.
8.13.5. Once the MTF catalog record appears, click on the ―Destruction Method‖ tab located
at the bottom of the Basic tab. Click on the ―Edit‖ button to load a destruction method if one
is not already present. DMLSS returns to the Destruction window upon saving changes and closing the MTF Catalog window. The destruction can now be processed.
8.13.6. After all destructions have been processed, click the ―Close‖ button located on the
vertical toolbar. The Destruction Report window appears providing the opportunity to print
either a Gains and Losses Report or a Destructions Report. Under Optional Report, select
―Destruction Document‖ and click ―OK‖ to print the corresponding destruction report in duplicate on a local printer. If applicable, print any pending Gain/Loss Reports.
8.13.7. If the Destruction Report is not printed at this time, it can be reproduced using the
Destruction Report in the AM Reports module. Destruction reports can be printed or
reprinted by ORG, assemblage ID, item ID, or by a specified period of time using the To and From date fields.
8.13.8. All item destructions are written to Transaction History and assigned a transaction
code of DDL and document serial block 8000-8499 is used to record the destruction.
8.14. Commercial Returns. The AM Commercial Returns function is set-up to accurately
process, track, and update WRM assets that are returned through reverse distribution for credit
consideration. The AM Commercial Returns module works the same as the IM Commercial
Returns module; however, AM commercial returns should be processed IAWAFI 41-209.
8.15. Returns.
8.15.1. Use the AM Returns function to process a TIG from a customer account to an
assemblage. This function should only be used when the item was initially issued from the
assemblage to the customer to satisfy a contingency operation or exercise and the materiel is
in serviceable condition at the time of turn-in. Inspect the item for serviceability and proper

274 AFMAN41-216 13 FEBRUARY 2013
packaging prior to processing the return. Credits are not authorized for returning WRM
except in the rare occasion that the materiel never left the logistics warehouse. In that case,
process an issue reversal versus a turn-in.
8.15.2. Select ―Returns‖ from the AM navigate dropdown menu to access this function. Use
the Search criteria window the same as explained in paragraph 8.12. Returns can only be
processed for one assemblage at a time. In the Returns window, enter the quantity being
returned for turn-in into the quantity field of the corresponding item ID. Click ―Save‖ to process the return.
8.15.3. A secondary Returns window opens displaying the item ID and description of the
item being returned. Identify the customer, location, storage area, and expense center of the
customer account that is returning the item. Upon selecting a customer, most of this data is
automatically populated. While the Reason field is optional, a reason for the return should be
annotated. It is also recommended that the original issue document number be included in
the reason field. The reason annotated in this field prints on the Return Report. Do not use
the Issue Credit for This Item box because credit cannot be given to the customer for returning the item. Click ―OK‖ to continue the returns process.
8.15.4. During the return process, DMLSS checks the customer‘s estimated on-hand (EOH)
balance. If the return quantity is greater than this EOH balance, a message appears asking
whether or not you want to continue. Verify the return quantity and select ―Yes‖ to continue.
In addition, DMLSS notifies you if multiple location records exist for the item being
returned. Each of those records contain the same allowance quantity, but reflect only the OH
quantity associated to each location record; meaning you should add the OH quantities together to make sure the quantity being returned will not be considered an overage.
8.15.5. Click the ―Open‖ button located on the vertical toolbar to process additional returns
to other assemblages as needed. After all processes are complete, click ―Close‖ to log out.
The Optional Report window appears providing the opportunity to print either a Gains and
Losses Report or a Return Item Report. Print the Returns Report by placing a check in the
check box nest to Returns and clicking ―OK.‖ The Returns Report is printed in duplicate to the local printer. If necessary, print the pending Gains and Losses Report.
8.15.6. If the Returns Report is not printed at this time, it can be reproduced using the
Returns Report in the AM Reports module. Returns Reports can be printed or reprinted by
ORG, assemblage ID, item ID, or by a specified period of time using the To and From date fields.
8.15.7. All item returns are written to Transaction History and assigned a transaction code of TIG and document serial block 8000-8499 is used to record the return.
8.16. Issue Non-Routine.
8.16.1. The Issue Non-Routine function in AM is used to issue WRM assets to a selected
customer with a valid requirement. Issues from WRM assemblages are authorized when
overages exist and a requirement can be filled within the MTF or in the event of emergency
to prevent death or undue suffering. All issues from WRM should be scrutinized. Verify
questionable issue requests with proper approval authority prior to processing.

AFMAN41-216 13 FEBRUARY 2013 275
8.16.2. Select ―Issues Non-Routine‖ from the AM Navigate dropdown menu or click on the
―Issues‖ icon located on the horizontal toolbar to access this function. In the Issues Non-
Routine Search criteria window, identify at a minimum the ORG and assemblage in which
the ensuing issue(s) will be processed. If known at this time, the search criteria can be minimized by entering the item ID, location, and/or sub-location of the item(s) being issued.
8.16.3. Utilize the ―Delete Location Record when Quantity is Zero?‖ function to determine
whether or not DMLSS should remove a location record when the OH quantity is reduced to
zero. If ―No‖ is selected, a ‗shell‘ record remains in DMLSS even though the OH quantity is
zero. If ―Yes‖ is selected, the location record is removed from the assemblage when the OH
quantity is zero.
8.16.4. Click the ―Search‖ button once all search criteria is identified. All assemblage data
records matching the search criteria are displayed in the Issues Non-Routine window. Only
two fields, Customer and Quantity, require data entry. The customer ID can be applied to a
single location record or to multiple location records using the Apply tool located at the top of the window.
8.16.5. To process a single issue, highlight the applicable location record, choose the
customer ID from the dropdown menu, enter the issue quantity, and click ―Save‖ to process
the issue Figure 8.17.
Figure 8.17. Issue Non-Routine Window.
8.16.6. Use the Shift and/or Control key functions to highlight multiple location records
when more than one but not all records are affected. Enter the customer number at the top
and click ―Apply‖ if the items are being issued to the same customer or select the customer
ID from the dropdown menu for each location record. Enter the issue quantity for each record and click ―Save‖ to process the issues.
8.16.7. Use the ―Select All‖ button to highlight all records if issues are being processed
against all location records. If all items are being issued to the same customer, enter the
customer‘s ID into the Customer field at the top of the window and click ―Apply.‖ This
action applies the customer ID to all highlighted records. Next, enter the quantity being
issued into the ―Qty‖ field for each location record. Click ―Save‖ to process the non-routine issues.
8.16.8. The issue quantity must be equal to or less than the available OH quantity, for each
location record, in order to process. Controlled items or other restricted items will not be
processed unless the customer is authorized to receive these types of supplies. If the
customer is authorized, they must be designated as such in SS, SVC/CUST function, Materiel tab.

276 AFMAN41-216 13 FEBRUARY 2013
8.16.9. If sufficient funds are not available and the target flag is other than ―NONE,‖
DMLSS produces a message displaying ―Insufficient Customer Funds, Do you want to
continue?‖ Choosing ―Yes‖ processes the issue as refund code ―R‖ while driving the project
and expense center available balance negative. If ―No‖ is chosen, contact the supply
custodian so he/she can take appropriate actions to have funds loaded in their project/expense
center. Note: When funds are not available at the time of deployment, AF policy allows the
expense and project center to go negative to ensure the deployment is not delayed. AM
notifies users with an ―insufficient fund‖ message, asking if you wish to continue the process.
A ―Yes‖ answer allows DMLSS to process the INR and update the approriate customer fund
record. If the customer has a target flag set (Project Center, Project Center/EOR, Expense, or
Expense/EOR), the available balance in the fund record will become a negative figure. The
customer will be billed by Finance in the next billing cycle.
8.16.10. Upon processing issues, DMLSS decreases the item‘s OH quantity according to the
corresponding issue quantity. After processing, click ―Open‖ to issue additional items from
another assemblage or click ―Close‖ to return to the main AM window. DMLSS prompts
you to print a delivery list upon closing the ―Issue Non-Routine‖ window. The Delivery List
is used to pull and deliver the assets to the receiving customer. Select the report and click ―OK‖ to send it to your local printer.
8.16.11. AM Issues. All assemblage issues are defaulted to non-recurring and refundable;
therefore, consumption history is not recorded and the customer is always charged for the
issue. The total price of each issue is written to the Reimbursable Sales (R-Sales) field of the AM Fund record
8.16.11.1. All AM non-routine issues generate an INR transaction from the assemblage
and a RNR transaction to the customer, and are assigned a document serial number from
the 8000-8499 block, Gains and Losses. These transactions are written to the Transaction History file.
8.17. Transfers. AM Transfers are used to process assemblage gains (in-shipments) and losses
(out-shipments), to reconstitute a previous assemblage sale, to change an assemblage ID, and to
merge two like assemblages into a single assemblage. Different rules apply to each type of
transfer as explained below. Because the gain, loss, reconstitution, and merge processes require
data files, it is highly recommended that a main folder and subfolders be maintained on a local
shared drive to manage these files. Within each subfolder (i.e. Assemblage Gain), create
additional subfolders that specifically identify the assemblage ID (i.e. 937 D 0; EMEDS
Resupply, Basic). An example is displayed in Figure 8.18.
Figure 8.18. Recommended Assemblage Transfer File Management.
8.17.1. Assemblage Gain.

AFMAN41-216 13 FEBRUARY 2013 277
8.17.1.1. Use the Assemblage Gain function to process an assemblage in-shipment. This
process is used regardless of how the incoming assemblage will be coded; LOG owned,
CO, or LOG Managed Expense Center Owned. Upon completing this process, the next available instance of the specified assemblage is gained into AM.
8.17.1.2. Prior to beginning the gain process, verify the 21 in-shipment files are saved to
a local hard drive or shared drive and are accessible. These 21 text files are a direct result
of the losing MTF‘s assemblage loss transaction. If all 21 files are not present, request the losing MTF resend the out-shipment files.
8.17.1.3. Also, verify the applicable ORG exists in DMLSS prior to processing the gain.
In most cases, the host ORG, or LOG, will be the owning ORG; however, in some cases
a new ORG may need to be created. If so, follow instructions provided in Chapter 4, SS, to create the new ORG.
8.17.1.4. From the AM navigate dropdown menu, select ―Transfers‖ and then
―Assemblage Gain‖ to access this function. In the Browse the Folder window, navigate
to the local folder in which the 21 in-shipment files are stored. These files must be
identified prior to processing the assemblage gain. Click ―OK‖ and the Assemblage Gain window appears.
8.17.1.5. The Assemblage Gain window Figure 8.19 contains data fields used to specify
the gain criteria and displays the assemblage(s) identified in the Browse to Folder
window used in the previous step. If multiple assemblage data files are located in the
identified folder, they will all appear in the assemblage description window at the bottom
of the window. Use the Assemblage Gain data fields and indicators as explained below.
Figure 8.19. Assemblage Gain Window.
8.17.1.5.1. ORG. The ORG defaults to the Host ORG or LOG, i.e. FM4486. Use
the dropdown menu to reassign to a different ORG, if necessary.
8.17.1.5.2. Scope. The scope identifies who owns, maintains, and funds the
assemblage being added. DMLSS defaults to LOG owned, modify as necessary.
8.17.1.5.2.1. LOG. AFWCF/MDD owned and funded assets.
8.17.1.5.2.2. Customer. Assets are CO and funded. The customer uses DMLSS
to manage the assets. When selected, the Customer and Expense Center fields

278 AFMAN41-216 13 FEBRUARY 2013
become mandatory. Upon selecting the Customer, the Fund Center field populates with the associated expense center ID.
8.17.1.5.2.3. LOG Managed Expense Center Owned. Assets are CO and funded.
However, logistics personnel are using DMLSS to manage assets. When selected, the Expense Center field becomes mandatory.
8.17.1.5.3. Transfer Directory (Dir) & Browse. Default mapping reflects the local
folder identified in the Browse to Folder window. Use the ―Browse‖ button to map to
another folder.
8.17.1.5.4. Validate DMLSS Master or AM Master Assm. Check this indicator to
validate the in-shipment catalog records against the DMLSS master UDR file. All
catalog records containing differences are written to an exceptions report. The
catalog exceptions must be rectified prior to using the catalog record in DMLSS. Leave this indicator unchecked to accept catalog records as is.
8.17.1.5.5. Update Allowance Quantities from DMLSS Master or AM Master Assm.
Check this indicator to update your local assemblage allowance quantities using the
DMLSS master UDR file. Leave this indicator unchecked to accept the allowances
contained within the incoming data files. Using this option is highly recommended
because the allowances contained on the incoming assemblage data files may not be
current.
8.17.1.5.6. To Assemblage. Use the dropdown menu to assign the incoming
assemblage (assemblage being gained) to a preexisting assemblage ID. For example,
915/H/1/0 was previously out-shipped. Sixty days later, the assemblage has returned.
Use the dropdown menu to select ―915/H/1/0‖ as the To Assemblage. The instance
number listed on the in-shipment file may differ from the instance number in this
field because multiple instances of that assemblage may already exist in your local
DMLSS database. Also, use the To Assemblage feature when performing an assemblage merge, explained in paragraph 8.17.5.
8.17.1.5.7. Customer. The Customer field only becomes available if the Scope is
equal to Customer. Use the dropdown menu to associate the assemblage to the
applicable customer ID.
8.17.1.5.8. Fund Center. The Fund Center field is used to identify the expense center
associated to the customer. Upon selecting a customer, this field auto populates with the customer‘s associated expense center.
8.17.1.5.9. Project Code. Not required for AF activities.
8.17.1.5.10. Ownership Code. Not required for AF activities.
8.17.1.5.11. Maint Activity. Assign a specific MA activity to the assemblage. This
is a mandatory entry.
8.17.1.5.12. Packing List. Check the Packing List indicator to obtain a printed copy
of the assemblage packing list. It is printed upon processing the gain. This option is
highly recommended. Assemblage managers should review the contents of the
assemblage prior to developing a management plan.

AFMAN41-216 13 FEBRUARY 2013 279
8.17.1.5.13. Freeze Shipment. Check the Freeze Shipment indicator to ―Freeze‖ the
assemblage for physical inventory. Once the gain is processed, the ―Freeze‖ is in
effect and a physical inventory should be conducted immediately, explained in paragraph 8.20.
8.17.1.5.14. Process All. Check this indicator if multiple assemblages appear in the
Assemblage Description box and a gain is to be processed for all of those
assemblages. All assemblage files are highlighted upon checking this box.
8.17.1.5.15. Assemblage Description Box. Displays assemblage in-shipment files
stored in the folder identified in the Browse to Folder window. This box could
contain one or more files. To select multiple files, but not all, use the Shift and/or
Control key function to specify which assemblage files are being gained.
8.17.1.6. DMLSS may produce an Exceptions Report when data such as supplier and
MFG on the incoming catalog records does not match local catalog records. For
example, the losing MTF may have been purchasing an item from PVP, while the gaining
MTF is purchasing that same item from CB6. All catalog exceptions must be corrected prior to using the catalog records in DMLSS.
8.17.1.7. A SHG transaction and a SFG transaction reason is written to Transaction
History for each individual item gained during this process. Each SHG/SFG transaction
is assigned the same document number from document serial block 8000-8499, Gains
and Losses. DMLSS prohibits reversals of erroneous SHG/SFG transactions. Balance
adjustments should be made within each assemblage data record or using the AM Gains
and Losses function.
8.17.1.8. As a result of the Assemblage Gain, all equipment items, regardless of the
maintenance requirement indicator, require an acceptance inspection. These work orders
are written to the MA Inbox under the Acceptance Work Order Inspection pending
action.
8.17.2. Assemblage Loss. Four different types of assemblage losses are processed using the
Assemblage Loss function: Ship Assemblage, Sell Assemblage, War Switch, and Internal Transfer.
8.17.2.1. The top portion of the assemblage loss window Figure 8.20 contains
assemblage loss criteria and various process codes and indicators. The following data fields appear for all of the loss processes.

280 AFMAN41-216 13 FEBRUARY 2013
Figure 8.20. Assemblage Loss Window.
8.17.2.1.1. ORG. The ORG defaults to the Host ORG or LOG, i.e. FM9133. Use
the dropdown menu to identify a different ORG if necessary. The assemblages owned by this ORG are displayed in the bottom portion of the window.
8.17.2.1.2. Include Sub Orgs. Check this indicator to include assemblages associated
to subordinate ORGs. This option is not available if the primary ORG is not in the ―Organization‖ field.
8.17.2.1.3. Select All. Check this indicator to highlight all assemblages, selecting all
of them for out-shipment. Theoretically, this option is rarely used because
assemblage shipments usually do not occur in mass quantities. To highlight multiple assemblages, but not all, use the Shift and/or Control key functions.
8.17.2.2. The bottom portion for each assemblage loss displays all assemblages owned by the identified ORG that are available for shipment.
8.17.2.3. Ship Assemblage (Assm).
8.17.2.3.1. Use Ship Assm to process a loss and ship the assemblage to another
facility. From the AM navigate dropdown menu, select ―Transfers‖ and then ―Assemblage Loss‖. In this window, select the ―Ship Assm‖ process.
8.17.2.3.2. Consider the following criteria prior to processing an assemblage shipment. Some of these actions must be completed in DMLSS prior to processing.
8.17.2.3.2.1. All catalog exceptions must be rectified.
8.17.2.3.2.2. Maintenance personnel must complete and close open work orders.
8.17.2.3.2.3. Finalize Physical Inventories. The assemblage shipment will not
process if the assemblage or any part of an assemblage is in an inventory freeze status.
8.17.2.3.2.4. Verify there are no commingled items in the project. DMLSS
produces a Commingled Item Pick List Report when a user attempts to out-ship
an assemblage.
8.17.2.3.2.5. Processing and/or closing all pending actions associated to the assemblage being out-shipped is highly recommended.

AFMAN41-216 13 FEBRUARY 2013 281
8.17.2.3.2.6. Printing and filing a copy of the following reports: Assemblage
Status, Packing List, Commingled Picklist, Incomplete Record, P/S, End/Support
Item, and the AM Funds Status.
8.17.2.3.2.7. Identify and track existing due-ins for the assemblage(s) being out-
shipped. Upon receipt of these items, process individual out-shipments and ship the materiel to the gaining facility.
8.17.2.3.3. In addition to the ―ORG,‖ ―Include Sub Orgs,‖ and ―Select all‖ fields
described in paragraph 8.17.2.1, the following process codes and data fields appear when Ship Assm is selected:
8.17.2.3.3.1. Remove from AM. This indicator should always be checked.
When checked, DMLSS removes the assemblage from the system once all actions
are processed.
8.17.2.3.3.2. Archive. The Archive indicator is checked by default. All assemblage sales files should be archived and accessible for future use.
8.17.2.3.3.3. Ship to RIC, DODAAC, and Priority. These data fields are
important to both the losing and gaining facilities. Enter the Ship to RIC , gaining
DODAAC, and shipment priority code to document the required shipment data. This information is printed on the DD Form 1348-1A.
8.17.2.3.4. Assemblages Available for Shipment. The assemblages associated to the
identified ORG are displayed in the bottom portion of the window and are available
for shipment. All work orders must be closed before Transfer can be completed. If
there are any assemblages with Open Work Orders the message box will appear. Click ―Yes‖ or ―No‖ (if you click Yes the Work Order screen appears).
8.17.2.3.5. Click the ―Save‖ button located on the vertical toolbar once all
assemblage shipment criteria and indicators are selected. The Ship to Address screen
(Figure 8.21.) will appear. If correct click ―OK.‖ Click ―OK‖ in the Assemblage Loss Verification window.

282 AFMAN41-216 13 FEBRUARY 2013
Figure 8.21. Ship to Address Screen.
8.17.2.3.6. In the Browse to Folder window Figure 8.22, identify the local folder in
which the 21 assemblage shipment files will be stored. These files should be stored
to a CD (usually D drive). Click ―OK‖ to save the data files. If the Archive indicator
was checked, save the files according to the explanation provided in paragraph 8.17.
and figure 8.18. In either case, make sure an additional copy of all 21 files is stored in a local or shared folder for later use, if necessary. Label all discs accordingly.
Figure 8.22. Assemblage Loss Browse for Folder.
8.17.2.3.7. A DD Form 1348-1A is printed as a result of the out-shipment to support
the transfer.
8.17.2.3.8. Due-ins and pending actions associated to the assemblage being out-
shipped are identified with a red ―X‖ in the delete column. This may appear in other modules such as IM.

AFMAN41-216 13 FEBRUARY 2013 283
8.17.2.3.9. The maintenance data and maintenance cost information associated to
equipment items being out-shipped are written to the out-shipment files and that data
is populated in the gaining facility‘s corresponding equipment records.
8.17.2.3.10. DMLSS records the transfer in Transaction History as transaction type
SHL and transaction reason SFL. The document serial block assigned is 8000-8499,
Gains and Losses. Erroneous SHL transactions can be reversed in IM Transaction
History.
8.17.2.4. Sell Assemblage (Assm).
8.17.2.4.1. The Sell Assemblage function is used to sell an entire assemblage to a
customer. Generally, this action is directed by higher headquarters and the receiving
customer ID and expense center are specified in the notification. If necessary, create
the new customer ID, expense, and project centers IAW instructions provided in Chapter 4.
8.17.2.4.2. Because the assemblage is being ―sold,‖ the customer must ―pay‖ for the
assets. This process issues all OH serviceable assets to the customer. DMLSS
generates a reimbursable INR transaction for the OH serviceable assets; charging the
customer to include applicable surcharges. This action obligates and expenses customer funds while increasing the R-Sales field in the AM fund record.
8.17.2.4.3. An issue is not generated for assets that are not serviceable. Therefore,
the Stratification (Strat) State is coded as Unserviceable, Suspended, Reparable, or
FDA Test. These assets are identified and printed on the Assemblage Sale Exceptions Report and must be worked separately.
8.17.2.4.4. Additionally, DMLSS decreases the assemblage allowance quantities
(levels) to zero. If assets do not issue due to Strat State code, the OH quantity is maintained and allowance quantity is set to zero.
8.17.2.4.5. From the AM Navigate dropdown menu, select ―Transfers‖ and then
―Assemblage Loss.‖ In the ―Assemblage Loss‖ window, select the ―Sell Assm‖
process.
8.17.2.4.6. In addition to the ―ORG,‖ ―Include Sub Orgs,‖ and ―Select all‖ fields
described in paragraph 8.17.2.1, the following process codes and data fields appear when Sell Assm is selected:
8.17.2.4.6.1. Check Funds. If checked, DMLSS enforces a funds edit to verify
customer funds are available to cover the sale amount. The assemblage sale will
not process if sufficient funds are not available. If not checked, DMLSS
processes the assemblage sale regardless of funds availability. This may cause
the customer‘s expense and project centers to go negative. See paragraph 8.16.9.
8.17.2.4.6.2. Archive. The Archive indicator is checked by default. All assemblage sales files should be archived and accessible for future use.
8.17.2.4.6.3. Sell to Customer. Enter the customer‘s ID in which the assemblage is being sold.
8.17.2.4.6.4. Ship to RIC, and Priority. These data fields are optional; however,

284 AFMAN41-216 13 FEBRUARY 2013
this data may be important if the customer is geographically separated. These
data fields provide an excellent opportunity to document this data. If entered, this
information is printed on the DD Form 1348-1A. Load the gaining activities RIC into the RIC field.
8.17.2.4.7. Assemblages Available for Sale. The assemblages associated to the
identified ORG are displayed in the bottom portion of the window and are available
for shipment.
8.17.2.4.8. All work orders must be closed before Transfer can be completed. If
there are any assemblages with Open Work Orders the message box will appear.
Click ―Yes‖ or ―No‖ (if you click Yes the Work Order screen appears). Click ―Print‖
to print Work Order page.
8.17.2.4.9. Click the ―Save‖ button located on the vertical toolbar once all
assemblage sales criteria and indicators are selected and applied to applicable
assemblages. A message appears prompting to either continue or discontinue the
sale. If you continue the sale, the following messages and/or prompts appear:
8.17.2.4.9.1. In the Browse for Folder window, identify a local folder as
explained in paragraph 8.17. and figure 8.18. to save the assemblage sale data files. These files should be provided to the customer and can be saved to a CD.
8.17.2.4.9.2. Next, identify the local folder as explained in paragraph 8.16. and
figure 8.18. to archive the assemblage sale data files. These files should be saved and accessible by the losing activity.
8.17.2.4.9.3. Click ―OK‖ in the Assemblage Sale was Successful window.
8.17.2.4.9.4. Click ―OK‖ in the Assemblage Exceptions are created for the AM
Sale window if it appears. As explained in 8.17.2.5., if assets did not issue due to
Strat State they are written to the AM Item(s) Could Not Be Sold Report pending action.
8.17.2.4.10. Assemblages for external customers and assemblages requiring
transportation will be shipped through base transportation (CMOS). Check the status
of the assemblage using the out-shipment tab in the Transportation module. The source document (DD 1348-1a) will automatically print.
8.17.2.4.11. If shipping the assemblage, forward the assemblage sales data files, a
copy of the Delivery List, Active Due-ins list, and a copy of the DD1348-1A to the
gaining customer. Print an Assemblage Status Report for all items not shipped due to
stratification state or existing due-ins. The Active Due-ins List identifies items that
are currently on order for the project. Assets received after 30 days are to be
absorbed into other WRM assemblages if needed and reported excess if no
requirement exists. The Assemblage Status Report will identify items that were not
shipped due to their stratification state or order status. All these reports provide the
gaining customer better oversight when determining initial requirements after receiving the assemblage.
8.17.2.5. War Switch.

AFMAN41-216 13 FEBRUARY 2013 285
8.17.2.5.1. The purpose of the War Switch is to transition a stored assemblage(s) to
an operational mode. This action is generally directed by higher headquarters. If
necessary, create new customer, expense, and project centers IAW instructions provided in Chapter 4, System Services.
8.17.2.5.2. The first step in processing the War Switch is to specify the Trans Org ID
in the Assemblage Description Change window, paragraph 8.26. Select ―Assemblage
Description Change‖ from the AM navigate dropdown menu and load the applicable
Host LOG account (DODAAC) or customer ID in the Trans Org ID field. Save
changes prior to exiting the window. Repeat this action for each assemblage and/or
sub-assemblage in which the War Switch is being applied.
8.17.2.5.3. From the AM Navigate menu, select ―Transfers‖ and then ―Assemblage
Loss.‖ In the Assemblage Loss window, click on the ―War Switch‖ indicator in the
Process box. The War Switch criteria and indicators are listed in the top portion of
the window and all assemblages associated to the specified ORG are listed in the bottom portion of the window.
8.17.2.5.4. In addition to the ―ORG,‖ ―Include Sub Orgs,‖ and ―Select all‖ fields
described in paragraph 8.17.2.1., the following process codes and data fields appear
when the War Switch is selected:
8.17.2.5.4.1. Delivery List. Check this indicator to produce and print a delivery
list as part of the process. The customer can use the delivery list to perform an initial inventory upon receipt of the assets.
8.17.2.5.4.2. Page Break. This option is only available when the Delivery List
indicator is checked. It defaults to ―None‖ but can be change to ―By Loc‖ or ―By Loc/Sub Loc‖ to satisfy local requirements.
8.17.2.5.4.3. Check Funds. If checked, DMLSS enforces a funds edit to verify
customer funds are available to cover the total dollar value of customer issues.
The War Switch only processes if sufficient funds are available. If not checked,
DMLSS processes the issues regardless of funds availability. This may cause the customer‘s expense and project centers to go negative. See paragraph 8.16.9.
8.17.2.5.5. Available Assemblages. The assemblages associated to the identified
ORG are displayed in the bottom portion of the window. Only the assemblages assigned an ―Activate Org‖ are available for the War Switch process.
8.17.2.5.6. The following information should be identified prior to processing the War Switch:
8.17.2.5.6.1. Identify whether or not the assets are for resupply. If for resupply,
the assets are gained into operating inventory if the host MM Service ORG ID,
i.e. FM4479, is associated to the particular assemblage or sub-assemblage in the
―Trans Org ID‖ field. If not for resupply, the assets are issued to a specified
customer.
8.17.2.5.6.2. If not for resupply, then identify the customer‘s ID in which the assets are to be issued.
8.17.2.5.6.3. Ensure an equipment custodian is assigned to all customer accounts

286 AFMAN41-216 13 FEBRUARY 2013
affected by the War Switch. This is accomplished in EM.
8.17.2.5.7. DMLSS generates the following transactions as a result of processing the War Switch and marking assets as resupply.
8.17.2.5.7.1. An ITL transaction is processed to document the loss from the
specified assemblage. An ITL is processed for each record containing OH serviceable assets. The assemblage‘s serviceable balances are reduced to zero.
8.17.2.5.7.2. An ITG transaction is processed to document the gain into operating
stock. An ITG is processed for each corresponding ITL and LOG‘s serviceable
balances are increased by the ITG quantity.
8.17.2.5.8. DMLSS generates the following transactions as a result of processing the War Switch and marking the assets for customer issue.
8.17.2.5.8.1. A reimbursable INR is processed to document the issue of
serviceable OH assets. The total dollar value of these issues is written to the R-
Sales field in the AM fund record.
8.17.2.5.8.2. A RNR is generated documenting the customer‘s receipt of the assets. A RNR is processed for each corresponding INR.
8.17.2.5.8.3. A SLR is generated adjusting the customer‘s stock level. The new
customer location level mirrors the old assemblage‘s cumulative level for the
affected item ID.
8.17.2.5.9. In addition to these transactions, DMLSS also creates customer catalog
records for the affected customer accounts if one did not already exist. The
customer‘s EOH balance is increased by the RNR quantity. The customer‘s level
type defaults to ―Static‖ and the reorder point of supply assets is set to two-thirds of the level.
8.17.2.5.10. OH assets assigned a Strat State of Unserviceable, Suspended,
Reparable, or FDA Test remain OH in the assemblage and are identified as an
exception in the AM Item(s) Could Not Be Sold pending action.
8.17.2.5.11. Equipment data records are updated accordingly. Maintenance ―Stored‖
cycles are converted to ―In-Use‖ cycles and work orders are generated, if applicable.
The equipment is reassigned to the new customer account and a Custody
Receipt/Location List is generated for the corresponding equipment custodian‘s signature.
8.17.2.6. Internal Transfer.
8.17.2.6.1. Use the Assemblage Loss – Internal Transfer function to transfer an
assemblage from one ORG to another ORG within the same DMLSS database. For
example, if an assemblage is currently associated to LOG but should be associated to the local ANG‘s ORG, you would use this function to reassign ownership.
8.17.2.6.2. From the AM Navigate dropdown menu, select ―Transfers and then
―Assemblage Loss.‖ In the Assemblage Loss window, select ―Internal Transfer‖ in
the Process box. Use the Internal Transfer criteria and indicators as follows.

AFMAN41-216 13 FEBRUARY 2013 287
8.17.2.6.3. In addition to the ―ORG,‖ ―Include Sub Orgs,‖ and ―Select all‖ fields
described in paragraph 8.17.2.1., the following process codes and data fields appear
when the Internal Transfer is selected:
8.17.2.6.3.1. Packing List. Check this indicator to produce and print a packing
list as part of the process. The gaining ORG can use the packing list to perform an initial inventory upon receipt of the assets.
8.17.2.6.3.2. Page Break. This option is only available when the Delivery List
indicator is checked. It defaults to ―None‖ but can be changed to ―By Loc‖ or ―By Loc/Sub Loc‖ to satisfy local requirements.
8.17.2.6.3.3. Transfer ORG. Use the dropdown menu to specify the gaining ORG. Click ―Apply‖ to apply the gaining ORG to all highlighted assemblages.
8.17.2.6.4. Available Assemblages. The assemblages associated to the identified
ORG are displayed in the bottom portion of the window.
8.17.2.6.5. Click ―Save‖ to process the transfer once all criteria and indicators are set
and the transfer ORG is applied to the applicable assemblage(s). The Internal
Transfer process generates an ITL transaction for all assets transferred from the losing
ORG and an ITG transaction for all assets transferred to the gaining ORG. These
transactions are written to Transaction History and all ITLs and ITGs are assigned the
same document number from document serial block 8000-8499, Gains and Losses.
Assembly fund targets are not transferred to the new ORG and must be reestablished if applicable.
8.17.3. AM Reconstitution.
8.17.3.1. Use the AM Reconstitution to recover returned assemblage assets that were
previously sold or transitioned to operating as a result of the War Switch process. First,
inventory the assemblage assets to determine what items will be gained back into the
MTF‘s WRM program. The archived data files from the original assemblage sale or War
Switch process must be accessible in order to process the reconstitution. Asset
reconstitution does not have to be performed in its entirety at the single session which
means the AM Reconstitution process can be accessed multiple times for the same assemblage until the Complete Reconstitution indicator is processed.
8.17.3.2. From the AM Navigate dropdown menu, select ―Transfer‖ and then ―AM
Reconstitution‖ to access this function Figure 8.23. Use the Reconstitution search criteria as follows.
Figure 8.23. AM Reconstitution Screen.

288 AFMAN41-216 13 FEBRUARY 2013
8.17.3.2.1. AM Sale. Select AM Sale if the original assemblage was lost due to an
Assemblage Loss – Sell Assm process. DMLSS automatically detects the
assemblages that were previously sold.
8.17.3.2.2. War Switch. Select War Switch if the original assemblage was lost due to
processing the War Switch. DMLSS automatically detects assemblages that were previously lost due to processing the War Switch.
8.17.3.2.3. Complete Reconstitution. Check this indicator after the restitution is
complete. The assemblage data files can be reaccessed as many times as necessary
until this indicator is processed, but once this box is checked the reconstitution
process is finalized and DMLSS will not allow further modifications to the
assemblage data files.
8.17.3.2.4. ORG. Specify the ORG that owned the original assemblage.
8.17.3.3. Click ―Search‖ once all search criteria is entered. The assemblage location
records are retrieved from the archived data files and displayed in the Reconstitution
window. Use the ―Check all Processes‖ button to select all records for reconstitution.
Use the ―Uncheck all Processes‖ button to remove the process indicator from all records.
8.17.3.4. The Gain Quantity and Process indicator are the only editable fields. The
original quantity, reversed quantity, loss document number, original location, sub-
location, and ECN are also displayed for reference. The Gain Quantity defaults to the
original loss quantity and must be modified as necessary.
8.17.3.5. The location records are displayed in item ID sequence. As counts are
performed and completed, enter the actual return quantity in the Gain Quantity field for
each applicable item ID. Check the Process indicator for records containing a Gain
Quantity. DMLSS generates the following actions upon clicking ―Save.‖
8.17.3.5.1. Processes an INR reversal transaction for each item containing a Gain
Quantity to offset the original INR generated as a result of the original sale or War Switch process. All reversals are written to Transaction History.
8.17.3.5.2. Updates the Reversed Quantity field to reflect the reconstituted quantities.
This field reflects the total reversed quantity if multiple reversals are processed for the same location record.
8.17.3.5.3. Customers do not receive credit for returned assets.
8.17.3.5.4. After saving, the ―Complete‖ button appears in the vertical toolbar. Click
this button to finalize the process if the reconstitution is completed for the
assemblage.
8.17.3.6. After the reconstitution process is completed, the assemblage allowance
standard (AS) must be reapplied. The AS can be processed using the DMLSS master
UDR or from the AS file download from the AFML website. Your local business
practice determines where this data is obtained. Once the AS data is updated, you will be able to view readiness percentages on the Assemblage Status Report.
8.17.4. Assemblage ID Change.

AFMAN41-216 13 FEBRUARY 2013 289
8.17.4.1. Use the Assemblage ID Change process to modify an assemblage‘s ID data, i.e.
Assm description, Assm ID, increment number, sub-assemblage, and/or instance. This
process should only be used if an existing assemblage was gained or created using the
incorrect ID data or if directed by higher headquarters. For example, an assemblage was
originally created for a Hospital Surgical Expansion Package using Assm ID: 885;
Increment: A; Instance: 1; and Sub-assemblage: 0. After further review, you found that
you should have built a Hospital Medical Expansion Package using Assm ID: 885; Increment: B; Instance: 1; and Sub-assemblage: 0.
8.17.4.2. For the AM navigate dropdown menu, select ―Transfer‖ and the ―Assemblage
ID Change‖ to access this process. In the top portion of the Assemblage ID Change
window, identify the owning ORG and the source assemblage. In the bottom portion of
the window, identify the new assemblage ID data. If the ensuing change is to the same
Assm ID (from 885 A to 885 A), only the instance number is updated (from 885 A 1 0 to 885 A 2 0).
8.17.4.3. This process generates an exception and an Allowance Change Report.
Assemblage managers should print these reports and take action as necessary to correct
catalog data and allowance standards. Upon completion, the old assemblage no longer exists and the new assemblage is available throughout AM.
8.17.5. Assemblage Merge.
8.17.5.1. Use the Assemblage Merge process to combine two like assemblages that are
partial or incomplete making one complete assemblage. The two partial assemblages
must be assigned the same assemblage ID, i.e. 903L and 903L. Assemblages assigned
different assemblage IDs cannot be merged. Assemblage Gain is used in conjunction with Assemblage Merge to complete this process.
8.17.5.2. Generally speaking, one portion of the assemblage would already be on record
in AM and the remaining portion was shipped to your site to satisfy remaining
requirements. For example, assemblage 903/L/1/0 is loaded against your host ORG.
AFMOA/SGALW notifies you that they shipped the remaining assets and you will be
receiving a second set of in-shipment files containing the data records for 903L. The second set will need to be merged with existing assemblage 903/L/1/0.
8.17.5.3. The files are sent to the gaining base by AFMOA/SGALW or the losing base
via email or CD. When these files are received they must be copied onto a local PC.
Recommend using storage procedures described in paragraph 8.17. and figure 8.18.
8.17.5.4. From the AM navigate dropdown menu, select ―Transfer‖ and then
―Assemblage Merge‖ to initiate the merge process after the in-shipment files have been saved to a local drive.
8.17.5.5. Use the dropdown menu to select the appropriate ORG. All assemblages
owned by the specified ORG are displayed. Highlight the assemblage in which the
ensuing merge will be applied. Upon clicking ―Save,‖ the out-shipment indicator is flagged with a red ―X.‖
8.17.5.6. Next, process an Assemblage Gain to complete the process. From the AM
Navigate dropdown menu, select ―Transfer‖ and then ―Assemblage Gain.‖ When

290 AFMAN41-216 13 FEBRUARY 2013
prompted, identify the folder in which the in-shipment data files were saved. In the
Assemblage Gain window, specify the ORG in which the merge assemblage is
associated. In the To Assemblage field, specify the assemblage in which the data files are being merged.
8.17.5.7. The following actions are generated as a result of the Assemblage Merge process.
8.17.5.7.1. SHG/SFG transactions are written to Transaction History for the gaining
assets; meaning those contained on the second in-shipment file. The existing assets
were gained during the original in-shipment. All SHG/SFL transactions are assigned a document serial number from the 8000-8499 block, Gains and Losses.
8.17.5.7.2. The AM Gains Incomplete because of Price Factor pending action is
generated for data records if the U/P and/or U/S ratios conflict with existing catalog records.
8.17.5.7.3. Records with incomplete catalog data are written to an exception report.
8.17.5.7.4. A P/S report is produced if P/S relationships are detected on the in-shipment file.
8.17.5.7.5. The out-shipment indicator is removed on the assemblage.
8.18. Transportation. This option provides outshipment and inshipment search screens from
the Distribution and Transportation Module (D&TM) that allow users to track all or selected
shipments. AM users can process transactions requiring DRMO, Return to Source of Supply,
Return Item for Trade-In, Sell Assemblage, Ship Assemblage, regular loss transactions,
Reachback orders, and ship Excess type transactions that will be tracked within the D&TM
module. See Attachment 4, DMLSS Distribution and Transportation Module, for additional instruction.
8.19. Orders.
8.19.1. Asset Review.
8.19.1.1. The Asset Review function is used to transfer assets between WRM
assemblages and/or between WRM and operating (OPR). After identifying search
criteria, this function displays asset records with potential overages and shortages so that
managers can transfer (restratify) assets to meet requirements while minimizing losses
due to deterioration and excess.
8.19.1.2. The order of transfers is important to the effectiveness of the process and
ensures proper stock usage. Restratify assets in the following order: Host ORG (LOG)
Assemblages, subordinate ORG Assemblages, OPR, Special Projects (SP), and then
Excess.
8.19.1.3. From the AM Navigate dropdown menu, select ―Orders‖ and then ―Asset
Review‖ to access the Asset Review search criteria window. The search criteria window contains the following data fields.
8.19.1.3.1. ORG. Use the dropdown menu to specify the ORG that owns the
assemblage(s) being reviewed. Once populated, all assemblages associated to that ORG are displayed.

AFMAN41-216 13 FEBRUARY 2013 291
8.19.1.3.2. Available Assemblages. Select or highlight one or more assemblages for
review. The Asset Review function identifies overages and shortages for all
highlighted assemblages.
8.19.1.3.3. Search Criteria. If WRM is selected, the Asset Review will only include
WRM assemblages. If WRM and Operating is selected, the OPR overages and shortages will also be identified.
8.19.1.4. The Asset Review window Figure 8.24 displays all records with the potential
for restratification in item ID sequence. It is divided into three portions: Item Details, Selected Assemblages, and the Potential Transfer to Location.
Figure 8.24. Asset Review Window.
8.19.1.4.1. Item Details. The item ID details appear in the upper portion of the
window. Use the VCR buttons located above the item ID to scroll to other records in
the selected assemblage(s) with overages and/or shortages. Click ―Jump To‖ next to
the item ID to review the MTF catalog record. If applicable, review consumption
history when considering transferring assets between WRM and OPR stocks. Also
consider when the WRM item could be physically moved to OPR and made available
for consumption. For example, do not process the transfer if the item will expire before it can be used.
8.19.1.4.2. Selected Assemblages. The item balances for each selected assemblage
are displayed in the middle portion of the window. An asset balance detail record
appears for all selected assemblages, even if the asset balances are zero. Review this list to locate the assemblage(s) that contain potential overages or shortages.
8.19.1.4.3. The bottom portion of the window (the ―Transfer to‖ portion) lists other
WRM assemblage(s) or LOG OPR details in which a corresponding shortage or overage also exists.
8.19.1.5. To begin the transfer process, highlight the source assemblage in the Selected
Assemblage portion of the window and mark the destination assemblage or OPR by
placing an ―X‖ in the ―SEL‖ box located in the Transfer To portion of the window. Once

292 AFMAN41-216 13 FEBRUARY 2013
the source and destination are identified, click on the ―Transfer‖ button located on the vertical toolbar and the Internal Transfer window appears.
8.19.1.6. The Internal Transfer window Figure 8.25 is separated into several boxes. The
Item ID details, Source (From), and Destination (To) data defaults according to the transfer criteria determined in the previous Asset Review window.
Figure 8.25. Internal Transfer Window.
8.19.1.6.1. Transfer Quantity. Determine the transfer quantity and enter that number
in the Transfer Quantity field.
8.19.1.6.2. Transfer From. If only one source location record is available this field is
uneditable. If multiple source location records exist, specify which will be used as
the source and identify the quantity being transferred from that location record. Transfers can be processed from multiple location records at the same time.
8.19.1.6.3. Transfer To. If only one destination location record is available this field
is uneditable. If multiple destination location records exist, specify which will be
used as the destination and identify the quantity being transferred to that location record. Transfers can be processed to multiple location records at the same time.
8.19.1.6.4. Existing Location. Check the Existing Location indicator if assets are
being transferred to an existing location. Uncheck this indicator if the assets are
being transferred to a new location.
8.19.1.7. Click ―Save‖ once the transfer quantity, source, and destination records have
been identified. Click ―Yes‖ when prompted to print the delivery list. Use this delivery
list to relocate the transferred assets. DMLSS returns to the Asset Review window once
the transfer is completed and the data records are updated to reflect the changes. Continue to process transfers or ―Close‖ the window to exit the Asset Review function.

AFMAN41-216 13 FEBRUARY 2013 293
8.19.1.8. As a result of the transfers, an ITL transaction is generated to document the loss
from the source location and an ITG transaction is generated to document the gain to the
destination location. These transactions are written to Transaction History and assigned a document serial number from the 8000-8499 series, Gains and Losses.
8.19.2. Replenishment List.
8.19.2.1. The Replenishment List function is used to review LOG owned assemblage
shortages and determine a replenishment method. Assemblage managers should research
excess materiel availability and process an in-house Asset Review (paragraph 8.19.1.) prior to using WRM funds to replenish stock.
8.19.2.2. DMLSS prioritizes item replenishments as follows:
8.19.2.2.1. If funds are available to replenish 100% of shortages, all requirements will appear in the Replenishment List window.
8.19.2.2.2. If funds are not available for 100% replenishment, then DMLSS
calculates replenishment quantities to meet a target dollar amount by sorting all
critical item shortages from lowest cost to highest, ordering one of each until the
dollar cost exceeds the remaining available amount. DMLSS proceeds to order
another of each item starting at the lowest and the cycle continues until there is
insufficient funds to order any remaining critical shortages or all critical shortages are
satisfied. If money remains, the process repeats with noncritical shortages until all
shortages are filled or the target dollar amount is exhausted.
8.19.2.3. From the AM Navigate menu, select ―Orders‖ and then ―Replenishment List‖
or click on the ―Replenish‖ button located on the horizontal toolbar to access the AM
Replenishment search criteria window Figure 8.26. Utilize the available search tools as
follows to access the desired replenishment lists.
Figure 8.26. AM Replenishment Search Criteria Window.
8.19.2.3.1. ORG. Use the dropdown menu to identify the ORG that owns the
assemblage(s) being replenished.

294 AFMAN41-216 13 FEBRUARY 2013
8.19.2.3.2. Available Assemblages. All assemblages owned by the specified ORG
are displayed and available for replenishment action. Only assemblages coded as
LOG owned are available. Multiple assemblages and/or sub-assemblages can be selected simultaneously as long as they are assigned to the same AM Fund record.
8.19.2.3.3. Rollup Requirements. Check this indicator to ―roll-up‖ multiple
requirements for the same item ID into a single replenishment requirement. The
―roll-up‖ action occurs at the assemblage ID level; therefore, sub-assemblages can be
rolled up, but different assemblages cannot be rolled together, i.e. 937G and 941A
cannot be rolled up. For example, an EMEDS Basic, 937A, contains multiple sub-
assemblages. Item ID 6510-00-201-2001, Bandage Cast Plaster 3‖ x 3 yards, is
assigned an allowance quantity of 1 PG in both sections A (Emergency Room) and K
(Logistics). Upon executing the order, DMLSS creates individual ESD transactions
for each item ID within each assemblage. Depending upon the SOS type linked to the
order, DMLSS either combines the total order amount into one single contract line
item number (CLIN) as is the case for DPV type sources or breaks each item out by
document number on the order file, i.e. DD1155, EDI 511R, etc. Receipts are still performed at the individual document number level.
8.19.2.3.4. Item ID. Enter an item ID if looking to replenish a single item.
8.19.2.3.5. Stock Target Criteria. The Stock Target Criteria feature provides a
method for assemblage managers to determine replenishment action based on a
percentage of critical and noncritical items or based on a specified dollar amount.
This feature could be used when funds are not available to replenish the entire assemblage and you need to maximize use of available funds.
8.19.2.3.5.1. Percentage. The critical stock percentage must be set to 100%
before a percentage can be entered into the noncritical percentage field. If critical is less than 100%, then the noncritical is set to zero.
8.19.2.3.5.2. Dollar Amount. A target dollar amount can be specified if a target
percentage is not used. While any target amount can be entered in the search
criteria window, the funds available balance cannot be exceeded during a replenishment action.
8.19.2.3.6. Select Allow Qty. This feature allows assemblage managers to produce a
replenishment list based on the current allowance quantities or the old allowance
quantities. Available AM funds should only be utilized to fulfill current allowance quantities.
8.19.2.3.7. LOG Order. If checked, the replenishment action will include LOG, i.e.
EFN, to see if stock is available to replenish WRM requirements. This indicator
should be unchecked except for an emergency deployment because funds are
allocated to WRM separately and you should not use OPR stocks to fill WRM shortages.
8.19.2.4. Click ―Search‖ once the applicable search criteria are identified. All item
shortages meeting the search criteria are displayed in the Replenishment List window
Figure 8.27. Some of the data in this window is for informational purposes while other
fields and indicators are editable and used to submit item orders. The list also provides

AFMAN41-216 13 FEBRUARY 2013 295
dollar figures that identify critical shortage dollars, total order critical shortage dollars,
total shortage dollars, and total order dollars. These figures could be helpful when
determining your WRM budget requirements or requesting additional funds from AFMLO.
Figure 8.27. AM Replenishment List Window.
8.19.2.5. Order quantities are defaulted to the shortage quantity and appear in the order
column. If the quantity is adjusted, the total order dollar field is increased or decreased
by the price difference. If the item is coded as critical, the total order critical shortage dollars are also adjusted.
8.19.2.6. The AM replenishment process identifies AM requirements for other
procurement (OP) items but does not allow them to be ordered from AM replenishment.
Use the Offline/Non-Submit order process, paragraph 8.19.4., to establish due-ins for
these items. AFMOA/SGALX will provide specific processing procedures for this type
of order.
8.19.2.7. The Advice Code does not appear in the Replenishment List window; however,
it defaults to ―2D‖ (furnish exact quantity requested) and can be modified in the Build
Orders details window. Note: Refer to SS Module TMU Table, Advice Codes for a list
of all advice codes.
8.19.2.8. Item IDs that appear in ―RED‖ indicate that the order quantity is less than the
total required quantity. This usually occurs when insufficient funds are available to
replenish the total required quantity. Review the list to ensure that you order the most critical requirements first.
8.19.2.9. Replenishment List Window. The following fields and features are available in
this window:

296 AFMAN41-216 13 FEBRUARY 2013
8.19.2.9.1. Target Stock Percentages. The Target Stock Percentage is equal to the
amount on hand and due-in versus the authorized amount. The Target Stock Dollar
Amount displays the available funds. This amount cannot be zero.
8.19.2.9.2. Priority Code. Use the dropdown menu to assign appropriate priority
code. If left blank, system assigns routine priority code, i.e. 13. Note: Priority code 03 should not be used to order in-garrison materiel.
8.19.2.9.3. Signal Code. Use the dropdown menu to assign appropriate code, ―A‖
(ship to requisitioner) should be assigned in almost all instances. Defaults to ―A‖ if left blank.
8.19.2.9.4. Project Code. Enter the project code if known. In most cases, project codes are no longer used.
8.19.2.9.5. Media & Status (M/S) Code. Use the dropdown menu to assign the
appropriate M&S code. If left blank, it defaults to ―S‖ (100% Supply and Shipment Status).
8.19.2.9.6. Supplementary Address (Supp Add). Enter a supplementary address if
materiel is to be shipped to a location other than the ordering facilities ship to address.
If used, the signal code should be changed to ―J‖ (Ship to Supplementary Address; Bill to Requisitioner).
8.19.2.9.7. Distribution (Dist) Code. Assign if applicable.
8.19.2.9.8. Required Delivery Date (Req Del Date). Enter date item is required to be delivered.
8.19.2.9.9. Select All. Click ―Select All‖ to highlight all records. Click a second
time to unselect all records.
8.19.2.9.10. Apply. Click ―Apply‖ to apply requisition codes to selected (highlighted) records.
8.19.2.9.11. Set Qty to Zero. Click this button to change the order quantity to zero
for highlighted records. To set all order quantities to zero, click ―Select All‖ and then
―Set Qty to Zero.‖
8.19.2.9.12. End/Support (E/S) Item Indicator. A check in the E/S box indicates that
this particular item ID supports other equipment/supplies. Do not deviate from this procurement source or product number when ordering this item.
8.19.2.9.13. P/S Indicator. A check in the P/S box indicates a P/S relationship exists
for the item. Review the P/S ratios to determine whether or not a requirement exists and what quantity is actually required.
8.19.2.9.14. Delete Indicator (Del). A checkmark in the Del column indicates the
item is coded for deletion. Research these items to determine if they are valid
allowance standard items and process accordingly. Remember to check P/S relationships.
8.19.2.9.15. Exceptions (Excp). A check in the Excp box indicates a replenishment
exception exists for the item. Use the ―Jump To‖ button located in the item ID

AFMAN41-216 13 FEBRUARY 2013 297
column heading to view the LOG/MTF Catalog to correct replenishment exceptions.
Exception items may not be ordered until the exception is remedied. Click on the
exception item to view the Exception Report window. The report provides exception data by item ID for the specified assemblage.
8.19.2.9.16. Fund. Identifies the associated AM Fund number.
8.19.2.9.17. Available Balance. Identifies the associated AM Fund records available balance.
8.19.2.9.18. Total Critical Shortage Dollars. Total dollar value of critical shortage
items.
8.19.2.9.19. Total Order Critical Shortage Dollars. Total dollar value of critical shortage items being replenished.
8.19.2.9.20. Total Shortage Dollars. Total dollar value of shortages.
8.19.2.9.21. Total Order Dollars. Total value of items being replenished.
8.19.2.9.22. Add Item. Click the ―Add Item‖ button located on the vertical toolbar to
access the Replenishment List – Enter Item ID window. Enter the applicable item ID
and assemblage in which the item is being added and click ―OK.‖ The
Replenishment List appears with the added item. Modify codes and quantities as necessary before executing the order.
8.19.2.9.23. Asset Review (A/R). A check in the A/R box indicates that a potential
overage for that item ID exists in another assemblage or in OPR inventory. Highlight
the applicable line item and click the ―Asset Review‖ button located on the vertical
toolbar. If possible, transfer assets as explained in paragraph 8.19.1. to satisfy stock
shortages.
8.19.2.9.24. Print. Click the ―Print‖ button located on the vertical toolbar to print a copy of the displayed Replenishment List.
8.19.2.9.25. Refresh. Click this button to refresh the replenishment requirements if all are not processed at the same time.
8.19.2.10. Click ―Save‖ to process the replenishments once all codes, indicators, and
quantities are applied. In the AM Order window Figure 8.28, select a single SOS or
multiple SOSs to process. Orders are separated by SOS and commodity type then
displayed in the Orders window. Enter a call number for the order if ―AUTO‖ assign call
number indicator is not checked for the SOS. You will not need to enter a call number if
―AUTO‖ assigned is checked for that SOS. The next sequential call number is pulled
from the SOS Catalog record, Contract tab. Select one or all orders to process and click
the ―Execute‖ button located on the vertical toolbar.

298 AFMAN41-216 13 FEBRUARY 2013
Figure 8.28. AM Order Window.
8.19.2.11. An ESD transaction is written to the Due-In file and Transaction History.
Each line item is assigned a 0001-2999 document serial number.
8.19.3. Customer Owned Assemblage Replenishment.
8.19.3.1. Use this function to process replenishment orders for CO Assemblage(s). This
function looks and works similar to AM replenishments, except LOG owned assemblages
are linked to an AM fund record and CO assemblages are associated to a customer ID,
expense center, and project center; same as CAIM customers. CO assemblage
allowances must be loaded and shortages must exist before this replenishment process can be utilized.
8.19.3.2. From the AM Navigate dropdown menu, select ―Orders‖ and the ―Customer
Owned Assemblage Replenishment‖ to access this function. In the criteria window,
select the customer and assemblage being replenished. Data fields and functions unique
to CO assemblage replenishment are explained below. Refer to paragraph 8.19.2. for
detailed explanation of the remaining fields as the LOG owned replenishment is very similar.
8.19.3.2.1. LOG Issue. The LOG Issue indicator determines whether or not LOG
OPR inventory will be considered during replenishment action. In most instances,
inventory managers do not want to deplete OPR stock in order to fill CO assemblage shortages.
8.19.3.2.1.1. Unchecked - DMLSS defaults this indicator to ―unchecked‖; which
means DMLSS bypasses LOG inventory, builds and passes the replenishment
orders to LOG orders, and the materiel is purchased from the supplier.
8.19.3.2.1.2. Checked - If the LOG Issue indicator is checked, LOG OPR
inventory is considered and if available will be issued to fill the requirements. If
not available, DMLSS builds and passes the replenishment requirements to LOG orders for purchase.
8.19.3.2.2. EOR Funds. The EOR Funds icon located on the vertical toolbar
provides a quick view of the customer‘s funds summary. Prior to processing the

AFMAN41-216 13 FEBRUARY 2013 299
replenishment action, the Total Order Dollar value in the replenishment screen should
be compared to the funds summary available balance to verify adequate funds are
available.
8.19.3.2.3. PVM Price. Use the PVM Price link to obtain a total delivered price for
items purchased from the Medical/Surgical (Med/Surg) PV. This view shows the
LOG PVM price, the raw price and the total cost calculation (Cost $ Calculation:
Raw Price * Cost Recovery Factor * Distribution Fee).
8.19.4. Offline Non-Submit.
8.19.4.1. Use the Offline Non-Submit function to manually create due-ins for one-time
orders, CP/OP item orders, and PV Credit orders. Despite its title, this function is used to
create offline orders that are either submitted or not submitted electronically. When
placing offline non-submit orders, the requisition file is not electronically transmitted to
the SOS so the orders must be manually placed using the telephone, email, or internet;
however, if the Non-Submit indicator is not checked, the order is electronically submitted
to the SOS.
8.19.4.2. From the AM Navigate menu, select ―Orders‖ and then ―Offline Non-Submit‖
to access the Supply/Equipment Offline Orders window. Identify the ORG and select an assemblage in the search criteria window and then click ―Search.‖
8.19.4.3. The Supply/Equipment Offline Orders window Figure 8.29 contains item and
assemblage information along with two tabs: Main and SOS Details. Use the data fields and indicators as explained below to process an Offline Non-Submit order.
Figure 8.29. Supply/Equipment Offline Orders Window.
8.19.4.3.1. Item ID. First, enter the item ID or click the Flashlight button to view a
list of item IDs. The Flashlight works in conjunction with the Assm Ind. The item
ID must be associated to an assemblage to process the offline request. Upon entering
an item ID, the price, maintenance activity, demand code, allowance quantity, priority, and non-submit fields are populated with default data.

300 AFMAN41-216 13 FEBRUARY 2013
8.19.4.3.2. Assemblage Indicator (Assm Ind). This indicator works in conjunction
with the Flashlight button. If checked, it limits the item ID search to those items
contained within the specified assemblage. If the indicator is removed, then all catalog records are displayed.
8.19.4.4. Main Tab.
8.19.4.4.1. Order Quantity. The Order Qty field appears once an item ID is entered. Insert the order quantity for the specified item ID.
8.19.4.4.2. Price. Enter the current order price of the specified item ID if different
from the MTF catalog price.
8.19.4.4.3. Non-Submit. Check this indicator if the order was placed manually using
the telephone, email, internet, or some other means. If checked, the order will not be
electronically transmitted to the SOS. Leave this indicator unchecked to
electronically transmit the order to the SOS.
8.19.4.4.4. PV Credit. Check this indicator if the order is being placed against either
the PVP or PVM WRM credit returns account. If for PV Credit, enter a manually
controlled call number in the SOS Details tab. DMLSS will assign a document
number for all PV Credit issues and establish an ESD transaction with Refund Code
―N‖ as a result of executing the order request. DMLSS also updates the Credit Fund
record by the credit dollar amount and posts a history of used credits. The order will
not process if funds are not available or the order exceeds the available credit amount.
8.19.4.4.5. Demand Code. Defaults to Recurring but can be changed to Non-Recurring if necessary.
8.19.4.4.6. Document Number. Enter a manually assigned document number if used. If left blank, DMLSS automatically assigns the next available document number.
8.19.4.4.7. Project Code. Enter the project code if the item is being purchased for a
specific deployment or contingency if known.
8.19.4.4.8. Refund Code. Defaults to ―R‖ unless the PV Credit indicator is checked or the order is associated to an OP item. Change to ―N‖ as necessary.
8.19.4.4.9. Required Delivery Date (Req Del Date). Enter the date materiel is
expected for delivery if applicable. See paragraph 8.19.4.6. for information on
delayed delivery orders.
8.19.4.4.10. Priority. Use the dropdown menu to assign the appropriate priority code. Defaults to routine if left blank, i.e. ―15.‖
8.19.4.4.11. Premium Transportation. Check this indicator if premium transportation charges were approved to pay for shipping costs.
8.19.4.4.12. Estimated Release Date (Est Rel Date). Enter the vendor‘s estimated
release date of the order if known.
8.19.4.4.13. Add Item. Click the ―Add Item‖ button located on the vertical toolbar to
add additional line items to the order. In the Add Items window, select and add order
quantities to one or multiple items to add them to the Offline order. Only items

AFMAN41-216 13 FEBRUARY 2013 301
assigned the same SOS as the original item ID appear in the ―Add Item‖ window.
The document number field will populate with the next sequential document number
based on the one entered in the original requirement. If 71287200 is assigned to the
original item ID, then 71287201 is assigned to the first item added to the order using
Add Item. The price and refund code can also be updated from this window. Select
―OK‖ to return to the Supply/Equipment Offline Orders window. Note: Once a submitted order is executed, additional line items cannot be added to that call number.
8.19.4.4.14. SOS Info. Click the SOS Info button located on the vertical toolbar to view detailed information about the SOS to include last call number used.
8.19.4.5. SOS Details Tab.
8.19.4.5.1. SOS. The default SOS Code assigned to the item ID specified in the
Main tab appears in this field. Use the dropdown menu to change the SOS as needed.
If the required SOS is not listed, associate the required SOS to the item ID by clicking
the ―Jump To‖ button and adding the SOS in the SOS Cat tab of the MTF Catalog
window.
8.19.4.5.2. Call Number. Enter a call number if necessary or allow DMLSS to auto
assign the next available call number. If the SOS is not set to automatically generate a call number, you will need to enter a call number.
8.19.4.5.3. Submission. Verify that the submission method and form are correct
prior to executing the order. Once all offline order criteria are specified, click the
―Execute‖ button located on the vertical toolbar to process the offline order. An ESD
transaction is written to the due-in file and to the Transaction History for the item(s)
on the order. A DD Form 1155 is available to be printed on the local printer.
8.19.4.6. Delayed Delivery Orders. Delayed delivery enables DMLSS users to order
material to support construction and maintenance of service assemblages, as well as
supporting other contingency operations that require future deliveries. Users can request
a PV delayed delivery for medical/surgical orders by entering a delayed delivery date
(DDD) from the offline orders screen. Required Delivery Date (RDD) toggles to DDD
when the item is sourced to PVM. The DDD must be greater than 3 calendar days and no
more than 180 calendar days from the current date. O&M funded sites cannot select a
DDD beyond the end of the current fiscal year. The PV must provide order
acknowledgement (EDI 855) to confirm the quantity and acceptance of the DDD within
three business days of the order placement and cannot use ―IB‖ status code for delayed
delivery orders. All delayed delivery orders are treated as non-recurring and delivery orders/call numbers are separated by DDD.
8.19.4.6.1. Delayed Delivery Price Changes. Delayed Delivery allows a onetime
price change per line item before material is delivered. Price updates are automated
with an EDI 865 notice. The Prime Vendor will provide a final delivered price no later than three business days prior to the DDD.
8.19.4.6.2. Delayed Delivery Shipment. The PV shall make deliveries no earlier than
one business day prior to the DDD; however, if receipt for the item is not processed
within two business days after the DDD (seven business days for OCONUS), the user
will be prompted for potential cancellation. DMLSS creates a pending action, and the

302 AFMAN41-216 13 FEBRUARY 2013
user receives the following notification: IM Overdue Delayed Delivery Shipment.
The system then allows the user to process a request for cancellation if an Advanced
Shipment Notice (EDI 856) has not been received.
8.19.4.7. PVMs Holding Backorders. Both the primary and back-up Med/Surg PVs can
hold a backorder; however, the PV must provide an estimated ship date (ESD) on every
line that is backordered, and the timeframe for delivery is based on the ESD. See Chapter
5, paragraph 5.14.2.7. for more information on PVM backorders.
8.19.5. Deferred Item Order / ECAT Contingency Ordering.
8.19.5.1. Use the Navigate option to select Orders and the Deferred Item Order function
to identify materiel and place orders for items that are coded as part of the WRM DP
program. These items should not be ordered until authorized by higher headquarters.
Reference AFI 41-209, Chapter 13 for directives concerning WRM DP processes. In
order to procure an item from an ECAT Contingency contract (SOS: ECC, ECD. ECP, or
ECR) the item IDs must have the applicable SOS established within the MTF catalog
detail record. Items meeting the prescribed criteria for ECAT Contingency contracts will
be administered by DLA Troop Support. These select items are populated within the
Medical Master Catalog (MMC) and pushed to each DMLSS activity via the daily UDR
Delta process. DMLSS users are prohibited from adding an ECAT Contingency SOS
record (ECC, ECD, ECP, or ECR) against any item ID unless it is already a component of the MMC data feed.
8.19.5.2. DP codes are assigned using the Set Code function explained in paragraph 8.7.
These codes are tied to specific SOSs (DMLSS – ECAT Readiness Automated Order Process for Contingency Contracts). The four specific codes are:
8.19.5.2.1. VMI (Code R) – Service Owned VMI. Defaults to SOS code ―ECD.‖
8.19.5.2.2. CEC (Code E) – Service Owned CEC. Defaults to SOS code ―ECC.‖
8.19.5.2.3. PV (Code V) – DOD Owned stock. Defaults to SOS code ―ECR.‖
8.19.5.2.4. PVWRM (Code S) – Service Owned PVWRM. Defaults to SOS code ―ECP.‖
8.19.5.3. From the AM Navigate menu, select ―Orders‖ and the ―Deferred Item Order‖
to access this function see Figure 8.30. Use the AM Replenishment Search criteria
window in the same way as for other AM replenishments. Highlight the appropriate
assemblage ID, select the desired item ID or leave the field vacant to retrieve all items
requiring deferred replenishment.

AFMAN41-216 13 FEBRUARY 2013 303
Figure 8.30. Deferred Replenishment Screen.
8.19.6. Resubmit Orders/Follow-up Requests/Cancellations.
8.19.6.1. Use this function to resubmit orders to the SOS if the file transmission or print
function failed. It is important to review this function daily to ensure supply orders and
deliveries are not delayed. From the AM Navigate menu, select ―Orders‖ and then ―Resubmit Orders/Follow-up Requests/Cancellations‖ to access this function.
8.19.6.2. All files that failed to transmit or print are displayed in the Resubmit Orders window. Use the following features to manage these files as appropriate:
8.19.6.2.1. Resubmit. Highlight the applicable file and click the ―Resubmit‖ button
located on the vertical toolbar to retransmit or reprint an order.
8.19.6.2.2. Detail. Click the ―Detail‖ button to view the contents of the failed order.
8.19.6.2.3. Refresh. Use the ―Refresh‖ button to update the Resubmit window if order files have been resubmitted or removed.
8.19.6.2.4. Remove. Highlight an order file and click the ―Remove‖ button to delete the order file. Once the file is removed, it can no longer be retransmitted or reprinted.
8.19.7. Resend to Gentran. Gentran, a product of DCM, is the transmission method used to
transmit interface files from DMLSS to its intended recipient. Files that cannot transmit out
of DMLSS due to LAN problems are stored in Gentran until the LAN problems are
corrected. Once the problems are corrected, use the Resend to Gentran process to resubmit
the files. The message ―No orders to resend‖ is displayed if there are no orders to send.
Select ―OK‖ to return to the previous screen. Gentran should be monitored daily to ensure successful interface and/or transmission of files.
8.20. Physical Inventory.
8.20.1. Purpose. Use the Physical Inventory module to assess and document the accuracy of
automated inventory balances. The Physical Inventory module includes adjusting recorded
balances to match actual inventory balances by processing losses and gains to items. Reports specific to the inventory process are also available.

304 AFMAN41-216 13 FEBRUARY 2013
8.20.2. Select Assemblage.
8.20.2.1. From the AM Navigate menu, select ―Physical Inventory‖ and then ―Select
Assemblage‖ to access the Physical Inventory – Select Assemblage window Figure 8.31.
Use the Physical Inventory features as follows:
Figure 8.31. Physical Inventory – Select Assemblage Window.
8.20.2.1.1. Scope. The scope defaults to AM but the inventory manager must check
either ―Annual‖ or ―Other‖ depending on the type of inventory being conducted.
8.20.2.1.2. ORG. Use the dropdown menu to identify the ORG that owns the assemblage(s) being inventoried.
8.20.2.1.3. Include Sub ORGs. Check this indicator to include assemblages owned
by sub-ORGs. This feature only works if the host ORG is loaded in the ORG field.
8.20.2.1.4. Select Assemblages. Highlight the applicable assemblages and click the
Select Assemblages indicator to place a check in the Select indicator for multiple assemblages simultaneously.
8.20.2.1.5. Select All. Click this indicator to select all assemblages for Physical Inventory.
8.20.2.1.6. Select field. Check this indicator to select assemblages for inventory one
at a time.
8.20.2.2. The Date of Last Inventory column reflects the date of the last automated
inventory. If blank, an automated inventory has never been completed. This date is also
displayed on the Physical Inventory Date Report and should be used to schedule future
annual inventories.
8.20.2.3. Click ―Search‖ once the applicable assemblages are selected for inventory. The
selected assemblages and components are listed in the Select Inventory Segment, Search
Results window. Preview this window to ensure that no other processes have locked any
of the assemblage‘s components and that there are no SOS type codes of unknown
(UNK) loaded in the project. If these conditions exist for all or some of the components, the inventory cannot be processed.

AFMAN41-216 13 FEBRUARY 2013 305
8.20.2.4. If the SOS type code is ―UNK,‖ access the MTF catalog record and load a valid
SOS against the item. Once all ―UNK‖ SOS codes are corrected, the inventory can be
processed.
8.20.2.5. If a component of the assemblage is locked by another process, determine who
has the item locked and why. The other processes must be closed prior to processing the inventory.
8.20.2.6. Once all exceptions and locks are cleared, click the ―Process Inv‖ button
located on the vertical toolbar. DMLSS locks the records and assigns an inventory control number. The control number is tied to the inventory segment you created.
8.20.2.7. The Generate Count Lists and Assign Teams Criteria window appears upon
clicking ―Save.‖ It is recommended that you generate count lists and assign teams at this
time. If cancelled at this time, count lists can be generated later using the Generate Count Lists function explained in paragraph 8.20.5.
8.20.3. Control Number Status.
8.20.3.1. Use the Control Number Status function to view and/or print the current status
of an active inventory. When in AM, only control numbers associated with AM
inventories are displayed. All active control numbers, current status or process, and the
number of records associated with an inventory appear in the Inventory Control Number (ICN) Status window.
8.20.3.2. Highlight a record and click the ―Detail‖ button or double-click on an ICN to
view count list summary information.
8.20.3.3. Highlight an ICN and click the ―Cancel‖ button located on the vertical toolbar
to cancel an inventory that was erroneously processed. Click ―Yes‖ in the status box to
verify your intent to cancel the inventory. If an inventory is cancelled, any updates made
during counting will be lost and the date of last inventory field is not updated.
8.20.4. Generate Count Lists.
8.20.4.1. In the criteria window (Figure 8.32), select the desired Default Count List
Breaks and set the Count List sort criteria. Click ―OK‖ once desired settings are complete.

306 AFMAN41-216 13 FEBRUARY 2013
Figure 8.32. Generate Count Lists and Assign Teams Criteria Window.
8.20.4.2. The Generate Count List and Assign Teams to AM Inventory Control Number
Figure 8.33 appears once the count list criteria are completed. Use the Add Count List
and Add Team buttons to increase the number or count lists and teams required for the
specified inventory. For example, you have four count teams assigned. However, you
want eight count lists to minimize the number of items on each count list. By default,
DMLSS automatically creates one count list and one assigned team. You would click the
―Add Count List‖ button to add seven more count lists. You would then click the ―Add
Team‖ button to add the additional three count teams. The inventory teams are assigned to a specific count list. Teams can be used more than once but count lists cannot.
Figure 8.33. Generate Count List and Assign Teams to AM Inventory Control Number
Window.
8.20.4.3. Next, assign a team to each count list. This can be accomplished line item by
line item in the bottom portion of the window or simply use the Assign Team dropdown
menus to associate a team to a count list. When using the dropdown menu, each
individual row in the bottom portion of the window is updated to reflect the assigned
team (Team column). Another option is to use the Select All, Apply and Change

AFMAN41-216 13 FEBRUARY 2013 307
Highlighted Rows to Count List functions to apply count list assignments to individual rows en masse.
8.20.4.4. Count lists are printed using the Physical Inventory Reports function explained
in paragraph 8.20.8. Enter the ICN and print the required count lists.
8.20.4.5. Click the ―Regen List‖ button located on the vertical toolbar to reaccess the criteria window and regenerate count lists based on new or different count list criteria.
8.20.4.6. Click on the ―Statistics‖ button located on the vertical toolbar to view the total
number of item locations and percentages counted by count team or by count list. This
feature provides a snapshot of the inventory progress at a given point between the start and finalization of an inventory.
8.20.5. Enter Counts.
8.20.5.1. The inventory manager or a member of the inventory posting team uses the
Enter Counts function to record actual inventory counts when count lists are completed.
Counts are entered by ICN.
8.20.5.2. The Enter Counts window and printed count lists are in item ID/detail sequence
to simplify the entry process. Click ―Save‖ after all counts are posted. If the first count
matches the DMLSS balance quantity, a second count is not required. If an out of
balance exists and the same quantities are counted twice, the matching quantities will be considered verified and the record will be moved to Research Discrepancies.
8.20.5.3. Table 8.1 reflects the rational used to determine inventory recounts. The key is
that two counts must match to consider the count process valid. There is no reason to
recount if the first count matches the OH balance. After first counts, two other counts
must match to consider the inventory line valid. Any out of balance conditions after third counts will require research.
Table 8.1. Enter Counts Rational Table.
Enter Inventory Counts Rational
AM Balance 1st Count 2
nd Count 3
rd Count Rational
O/H = 24 24 No recount required,
1st count equals O/H.
O/H = 13 12 13 13 1ST
count was recounted, 2nd
count matches O/H, 3rd
count
matches O/H, no recount required
O/H = 48 50 48 49 All three counts are different.
This item ID requires research after all counts are processed.

308 AFMAN41-216 13 FEBRUARY 2013
O/H = 20 18 18 Two matching counts.
Requires research because of the out-of-balance condition.
8.20.5.4. Information pertinent to individual assemblage data location records can be
updated within the Enter Counts window in addition to recording inventory counts. Part
of the AM inventory process is validating item QA data. Update the MFG‘s name,
manufacture date, expiration dates, revised expiration dates, and lot numbers of each line
item when necessary. This is a good opportunity to clean up data within the database.
8.20.5.5. Figure 8.34 reflects an excerpt from an open inventory. Notice that there are
two different spellings for Bayer. Under MFG name, you can update all instances of
Bayer to read either ―Bayer‖ or ―Bayer Corporation‖ by typing each or using ―cut and
paste‖ in each occurrence. The same can be done in any field. Standardizing data is another method to clean up the QA data.
Figure 8.34. AM Enter Counts for Physical Inventory.
8.20.5.6. After first counts are complete, generate the second and third count lists using
the Generate Count List function explained in paragraph 8.20.5. The maximum number
of counts allowed is three. After the third count, all out of balance conditions require
research during the research discrepancies part of the inventory.
8.20.5.7. Click the ―Item Detail‖ button located on the vertical toolbar to view and/or
print detailed management data for the selected item ID. The Item Detail window
displays OH quantities by location code along with other detailed data. The window also
displays current count information.
8.20.5.8. Use the ―Add Item‖ button located on the vertical toolbar to add items to the
automated inventory that are not included in the automated inventory count lists. Adding
an item to the inventory automatically generates a recount. This item will also require
research during the Research Discrepancies portion of the inventory process because
there was not a beginning count. The proper gain transaction will be processed for items kept in the inventory.
8.20.6. Research Discrepancies.

AFMAN41-216 13 FEBRUARY 2013 309
8.20.6.1. Use the Research Discrepancies function to view and resolve inventory count
discrepancies found during the inventory. All final adjustments are processed using this
function.
8.20.6.2. Select the ICN from the list to view all items that require research. From the
list you can select one, some, or all items to process. After making your selection, click the ―Process‖ icon to initiate research.
8.20.6.3. The first record is displayed from your selection. If multiple records were
selected, VCR buttons will appear at the top of the window. These buttons will allow you to scroll through the remainder of your list.
8.20.6.4. The AM physical inventory deals with the entire count total for a line item.
One line item may have several detail records associated for different locations or
manufacturers. The total of all these detail records must match the OH balance records Figure 8.35.
Figure 8.35. Research Discrepancies Window.
8.20.6.5. After research, enter a final quantity and adjustment reason. Enter the actual
quantity found if research reveals that a count was incorrect. DMLSS generates the
applicable inventory adjustment if the final count is different from the quantity OH.
DMLSS does not generate an adjustment transaction if the final count matches the
quantity OH.
8.20.6.6. The Adjustment Reason prints on the Inventory Adjustment Voucher so it
needs to be clear and reflect actual actions performed. Note: An adjustment reason is
required for all items with CII Code of J, R, or Q, and will be printed on the Inventory
Adjustment Voucher. Adjustment reasons are also required if the potential inventory
adjustment value is greater than the allowable amount set for Physical Inventory Adjustments in System Services (TMU module).
8.20.6.7. The Discrepancy List will be blank once all actions are processed.
8.20.6.8. Click on the ―Post-Inventory Actions‖ button to record additional notes
concerning the inventory. These notes could include identifying problems associated
with day-to-day business to target additional training, inventory after action notes, or

310 AFMAN41-216 13 FEBRUARY 2013
recommendations for upcoming inventories. All Post-Inventory Action notes are
compiled as part of the inventory finalization process. A Post-Inventory Actions Report,
by ICN, is available from the AM Physical Inventory Reports function explained in paragraph 8.20.8.
8.20.7. Finalize Inventory. Once all inventory actions are completed, use the Finalize
Inventory function to process the inventory adjustments and unlock records that were frozen
for inventory. From the AM Navigate menu, select ―Physical Inventory‖ and then ―Finalize
Inventory‖ to access this function. Identify the applicable ICN and click the ―Finalize‖
button located on the vertical toolbar. After verifying that you want to finalize the inventory,
print an Inventory Adjustment Voucher produced as a result of processing inventory gains and losses.
8.20.8. Reports.
8.20.8.1. Use the Physical Inventory Reports function to view and/or print reports and
lists associated to an inventory. Inventory documents are maintained IAWAFRIMS T
41-04 R 13.00.
8.20.8.2. Inventory Accuracy Analysis - Lists the inventory segment, physical and OH counts, adjustments, and accuracy for the inventory by ICN.
8.20.8.3. Inventory Adjustment Voucher - The Inventory Adjustment Voucher reflects
item management data, adjustment in dollars, and adjustment reason for all inventory
gains and losses produced during an inventory. It can be produced using the Finalize
Inventory function or by accessing the reports function. This report requires the
certifying and approving officials‘ (AO) signature and must be maintained in the
permanent file.
8.20.8.4. Post-Inventory Actions - Lists the quantity, transaction code, and further
description of what caused the discrepancy. This lists can help with an after inventory analysis in determining training requirements for normal operations.
8.20.8.5. Missed Location Count List - This report lists any locations that were not
counted during a specific inventory. This report should be reviewed before finalizing an inventory to verify all locations were counted.
8.20.8.6. Potential Inventory Discrepancy Report - This report reflects potential
inventory discrepancies based off count quantities that result in a stock overage or
shortage condition. Check this list to view your potential discrepancies prior to finalizing the inventory.
8.20.8.7. Preview Inventory Accuracy Analysis - Lists the inventory segment by ICN.
Use this report to preview the inventory accuracy prior to completing the physical
inventory process.
8.20.8.8. Inventory Count Lists - Use the Inventory Count Lists to perform manual counts of the inventory.
8.21. Standard Assemblage Add.
8.21.1. Use the Standard Assemblage Add function to load (or add) an assemblage instance
to your database. Information pertaining to standardized assemblages is contained on the

AFMAN41-216 13 FEBRUARY 2013 311
DMLSS Master file that is updated monthly during the UDR Delta process. If the UDR
Delta process is inactive, the DMLSS Master file is updated each time the UDR is manually
processed via systems administration. The most current assemblage information can also be
downloaded from the AFML website. Select ―Standard Assemblage Add‖ from the AM navigate dropdown menu to access this window Figure 8.36.
Figure 8.36. Standard Assemblage Add Window.
8.21.2. Most of the data fields in the Standard Assemblage Add (UDR) window are
mandatory data fields. Valid data should be entered into the remaining optional fields if known. To add a standard assemblage, enter data into the fields as follows:
8.21.2.1. ORG/Sub ORG ID – Enter the owning ORG‘s ID number.
8.21.2.2. Branch of Service – Select Air Force.
8.21.2.3. Assm ID – Upon clicking the dropdown box, the ―Select Assemblage‖ window
appears. Select the assemblage ID being loaded, i.e. select ―937‖ if loading an EMEDS
Basic.
8.21.2.4. Assm. Incr. – The assemblage increment automatically populates upon selecting the assemblage ID.
8.21.2.5. Sub Assm – The sub-assemblage automatically populates upon selecting the
assemblage ID. If applicable, all sub-assemblages are loaded as part of this process. If
no sub-assemblages are associated to the assemblage, a zero populates this field.
8.21.2.6. Assm Description – The assemblage description populates upon selecting the assemblage ID.
8.21.2.7. Assm UIC – Army use. Identifies the assemblage UIC.
8.21.2.8. Operational Status – Defaults to ―Mobility‖. The other option is ―Stored‖, but
assign ―Mobility‖ unless otherwise directed. The operational status greatly affects the
maintenance cycles for all equipment associated to the assemblage. Status of ―Stored‖ extends the maintenance cycles.

312 AFMAN41-216 13 FEBRUARY 2013
8.21.2.9. Build Control Number – Use this field to capture the MRL Recnum or Fund
Number to ensure funds are available for redistribution within the AF Medical Service
(AFMS) by providing a link between the fund record and assemblages.
8.21.2.10. Equipment Readiness Code (ERC) – Not used by Air Force sites.
8.21.2.11. Number Required – Identifies how many instances of the assemblage you wish to add to the ORG. In most cases, this should remain at ―1.‖
8.21.2.12. Scope – The scope identifies who owns, maintains, and funds the assemblage being added.
8.21.2.12.1. LOG Owned – AFWCF/MDD owned and funded WRM assets.
8.21.2.12.2. CO – Assets are CO and funded and are not WRM. Customer is using
DMLSS to manage the assets. When selected, the Customer and Expense Center
fields become mandatory. Upon selecting the customer, the expense center populates with the associated expense center ID.
8.21.2.12.3. LOG Managed Expense Center Owned – Assets are CO and funded.
However, logistics personnel are using DMLSS to manage assets. When selected, the Expense Center field becomes mandatory.
8.21.2.13. The Project Code, Ownership Code and Trans Org ID are not needed or required for use by AF activities.
8.21.2.14. Report to JMAR – Will be checked systematically.
8.21.2.15. Warehouse Location – Identifies storage location of assemblage.
8.21.3. Upon saving, a message appears if an item is not in the MTF catalog. Click ―OK‖ in
the message box to automatically add the item. An Exception Report is generated,
identifying data requirements for each catalog record meeting exception criteria. These data
inconsistencies must be corrected before the catalog record can be used. DMLSS provides
an option to print the Exceptions Report. After the Exception Report is printed, select ―OK‖
to confirm the assemblage was created. These exceptions are also written to the AM Catalog Exception Processing pending action.
8.21.4. Every assemblage added to DMLSS is assigned an Instance number. While not
visible during the add process, it is visible throughout AM once the assemblage is added.
The assemblage instance is an internally assigned number that provides a means for DMLSS
to post transactions and maintain transaction history for that specific instance. It is not and
should not be used as a sequential number defining the number of assemblages assigned to that ORG. The sequential number assigned can be found in the Medical Resource Letter.
8.22. Standard Assemblage Update.
8.22.1. Use the Standard Assemblage Update function to update existing assemblage
allowance quantities. This process pulls the allowances from the DMLSS Master (UDR) file
and updates the specified assemblage allowances in AM. Select ―Standard Assemblage Update‖ from the AM Navigate menu to access this function.
8.22.2. In the Standard Assemblage Update window Figure 8.37, select the owning ORG for
the assemblage being updated. All assemblages associated to that ORG are displayed in the

AFMAN41-216 13 FEBRUARY 2013 313
bottom portion of the window. Highlight the assemblage(s) being updated and select the
appropriate updated option in the Process box. Multiple update options are available and
described as follows.
Figure 8.37. Standard Assemblage Update Window.
8.22.2.1. Maintain Old and New Allowance Quantities - Updates current allowance
quantities and moves existing quantities to old allowance quantity fields.
8.22.2.2. Update Current Allowance Quantity - Replaces current allowance quantities only.
8.22.2.3. Delete Old Allowance Quantity – Deletes old allowance quantities and enters a
zero in the old allowance quantity field.
8.22.2.4. Delete Current Allowance Quantity - Deletes current allowance quantities and enters a zero in the current allowance quantity field.
8.22.3. Click the ―Save‖ button on the toolbar to save your actions. The Standard
Assemblage Update message window opens and displays the current assemblage
information, updates were successful, and the option to print the Allowance Change Report. It is recommended that you print the report for your WRM continuity files.
8.23. Assemblage Allowance Update File.
8.23.1. Use the Assemblage Allowance Update File function to update the DMLSS Master
(UDR) file located on the DMLSS server with the most current allowance standards
published on the AFML website, Readiness page.
8.23.2. Use the Application tab located on the home page of the AFML website to select the
Allowance Standard Management System Figure 8.38 Locate a specific AS by typing its
number into the search or scrolling through the list of all assemblages. After the appropriate
AS is selected, click the download tab and select ―DMLS Output.‖ Click on the download
hyperlink and save to a folder on the PC or CD-ROM. Files from the website are
downloaded or sent in the .ZIP format and identified as ―AM[SRAN].ZIP‖ (example
AM4427.ZIP). This file must be unzipped or extracted prior to uploading the new/revised
file(s) data. An approved zip/unzip program must reside on your PC to perform this
function. Contact your local Information Systems office for the approved program, if
required.

314 AFMAN41-216 13 FEBRUARY 2013
Figure 8.38. Link to Allowance Standard Management System Link on Air Force Medical
Logistics Website, Application Tab.
8.23.3. Unzip or extract the files from the .ZIP file to your local PC hard drive in a folder
you have already identified. There will be a minimum of two files with the .DEL extension created for each assemblage. Below is an example of what the .ZIP file contains:
8.23.3.1. AM4427111956.DEL.
8.23.3.2. AMI4427111956.DEL.
8.23.4. The AM[SRAN]xxxxxx.DEL file is the main file used by the system and contains all
the file structure. The AMI[SRAN]xxxxxx.DEL file is the index file that contains all the
allowance standard information. Both files are required for the upload to process correctly.
8.23.5. To process the allowance standard update, select ―Assemblage Allowance Update
File‖ on the AM Navigate menu. The AM Assemblage Allowance Update File window
opens and prompts you to navigate to the folder in which the import file(s) reside. Only one
.DEL file may be processed at a time. Go to the folder where the files reside and select the
―AM[SRAN]xxxxxx.DEL‖ file. Click ―Open.‖ Do not select the AM file with the letter ―I‖
in the third position. If the wrong file is selected the system returns an information box
indicating the file does not exist. If this happens, click ―OK‖ and select the correct file.
8.23.6. The assemblage information is listed in the Assemblages to Import box Figure 8.39
Select the assemblage(s) to import or check the Select All box and click ―Process.‖ An
information box is displayed with the assemblage information and the options to continue or
cancel the process. Click ―OK‖ to update the DMLSS Master (UDR) file. Once completed,
a successfully updated message appears. If Cancel is chosen, DMLSS returns to the Assemblage Allowance Update File window.
Figure 8.39. Select File to Import Window.
8.23.7. Once this process is complete, use the Standard Assemblage Update function
explained in paragraph 8.22. to apply the new allowances to the assemblage(s).

AFMAN41-216 13 FEBRUARY 2013 315
8.24. Load Non-Standard Assemblage.
8.24.1. Non-standard assemblages may be built for a specific purpose or mission in
situations where a standard assemblage does not contain required materiel. Some examples
of a non-standard assemblage are BW/CW programs, Hospital Expansion projects, and pilot
units for new/modified assemblages. This non-standard assemblage may include some items
from existing standard assemblages or items not found in any of the standard assemblages.
Because the items that belong to a non-standard assemblage are not predefined, item-level information must be manually loaded.
8.24.2. The Load Non-Standard Assemblage function is part one of a two part process to
create an instance of a Non-Standard Assemblage in AM. Once this part is completed,
accomplish the Non-Standard Assemblage Add function explained in paragraph 8.25. Both steps must be completed before the non-standard assemblage appears in AM.
8.24.3. Select Load Non-Standard Assemblage from the AM Navigate menu to access the
Non-standard Assemblage Load window Figure 8.40. Most of the fields require data entry
and should be used as follows:
Figure 8.40. Non-Standard Assemblage Load Window.
8.24.3.1. Assm ID – Four digit alpha-numeric number that identifies the assemblage (i.e.
BWCW identifies Biological/Chemical Warfare). Must be unique and cannot duplicate an assemblage ID already in the UDR.
8.24.3.2. Assm Incr. – If the assemblage contains modular units, enter the unit number
identifier in the Assm Incr field. If multiple increments exist, enter the exact number.
DMLSS will assign the next sequential increment number. If not, enter a zero in this
field to indicate none. If you enter a number already assigned to an assemblage, the
system prompts you to enter a new ID. Note: In most cases, the Assm Incr for non-
standard assemblages should be zero.
8.24.3.3. Sub Assm – In most instances, non-standard assemblages do not contain
multiple sub-assemblages. If no sub-assemblages exist, enter a zero to indicate none. If
multiple sub-assemblages do exist, the Load Non-standard Assemblage function must be
used for each instance (i.e. once for sub-assm ―A,‖ once for sub-assm ―B,‖ etc.)
8.24.3.4. Assm Description - Use to enter an abbreviated or colloquial description of the assemblage.

316 AFMAN41-216 13 FEBRUARY 2013
8.24.3.5. Build Control Number – If known, use this field to capture the MRL Recnum
or Fund Number to ensure funds are available for redistribution within the AFMS by
providing a link between the fund record and assemblages. Otherwise, leave this field blank.
8.24.3.6. Assemblage Item ID – No data is required for this field.
8.24.4. Click ―Save‖ to load the non-standard assemblage. Once loaded, use the Non-
Standard Assemblage Add function described in paragraph 8.25. to complete the process of
creating a non-standard assemblage.
8.25. Non-Standard Assemblage Add.
8.25.1. The Non-standard Assemblage Add is the second part of the two-part process to
create non-standard assemblages in AM. Once the non-standard assemblage is loaded
(paragraph 8.24.), use the Non-standard Assemblage Add function to complete the process of
creating the initial instance of the assemblage. This option is also used to create additional instances of the assemblage using the same assemblage ID.
8.25.2. Select ―Non-standard Assemblage Add‖ from the AM Navigate menu to access the
Non-standard Assemblage Add window Figure 8.41. Data required in this window is the
same data required when adding a standard assemblage. Follow the instructions provided in paragraph 8.21. to complete the process of creating a non-standard assemblage.
Figure 8.41. Non-Standard Assemblage Add Window.
8.26. Assemblage Description Change. Use this option to change the assemblage‘s descriptive
information after the initial assemblage load. While descriptive data may be modified, the scope
cannot be changed. For example, the assemblage cannot be changed from LOG owned to CO or
vice versa. Reference paragraph 8.21. for an explanation of the data fields available for
modification. The Trans ORG ID field is used in conjunction with the Assemblage Loss-War Switch process explained in paragraph 8.17.2.5.
8.27. Duplicate Existing Assemblage. Use this function to replicate an existing assemblage.
The new assemblage instance may be placed in the same ORG or different ORG. The entire

AFMAN41-216 13 FEBRUARY 2013 317
assemblage is duplicated to include allowances as well as P/S relationships and E/S items if chosen. The OH balances do not carry forward to the new assemblage instance.
8.28. Build Default Locations. Use the Build Default Locations function to create an
assemblage data location record for each line item, within the specified assemblage(s), that do
not have an existing location, balance OH, or due-ins. This action assigns a default location of
'NONE,' contains a ―zero‖ quantity, and the Incomplete indicator is checked. Essentially, this
action prevents you from having to click on the Add Item button to add a location record for every individual item.
8.29. Assemblage Build Control Number (BCN)/Unit Type Code (UTC) Change. Click
either the ―UTC‖ or ―BCN‖ button and use the dropdowns to enter the assemblage ID and
increment number. Enter the Unit Type Code or Build Control Number and click ―Save.‖
8.30. QA.
8.30.1. Use the AM QA process in conjunction with the IM QA process to review QA
messages and drug recalls associated to WRM assets. WRM assets identified as suspect
should be transferred to Stratification State of Suspended, Unserviceable, or as directed IAW
the QA message so the items are not issued or deployed as serviceable materiel.
8.30.2. During processing of receipts or gain transactions, DMLSS compares the item ID to
the QA Record file and places a checkmark in the QA field in the Receipts window to
identify that a QA record exists for that item. This form of notification allows you to ensure
the quality of the asset being received or gained.
8.30.3. QA is primarily managed in the IM module with suspended item records maintained
by item ID. When an item is identified in the QA process as suspended and the item is
associated to an assemblage, a pending action report is posted to the AM Inbox. There are
three QA pending actions that will post to the AM Inbox throughout the life cycle of a QA message.
8.30.3.1. QA Alert. WRM Supply Item. Serves as initial notice.
8.30.3.2. QA Delinquency Notice. Supply Item Qty WRM. Appears when the initial QA
Alert WRM Supply Item notice is not completed within the specified period, as identified
in the IM QA Notification Class window.
8.30.3.3. QA Review Only. No action required (WRM). Appears when notifications are
received for review only. If applicable, a New QA Complaint should be opened and processed to document actions taken.
8.30.4. When a QA message is processed in IM for an item with an allowance standard,
DMLSS forwards the QA message to the QA Alert. WRM Supply Item pending action.
Only users assigned these pending actions and assigned the applicable assemblages will see
these messages. To open the report, select the report from the inbox and click the ―Jump To‖
button at the bottom of the window. The QA Record Search window opens and defaults to
the QA Details tab. The tab consists of the QA Record data from the QA message and a list of all assemblages that maintain an allowance standard for the item.
8.30.5. Check all assemblages listed in the QA Record Search window to validate stock
against the QA alert message. Click the ―Lot Number‖ button to view a list of lot numbers
from the QA alert message against lot numbers maintained in the assemblage data records.

318 AFMAN41-216 13 FEBRUARY 2013
The assemblage lot numbers will change as you view the different assemblages. In the
Notify Quantity Column, enter the total number of items matching the QA message data. If
the quantity found was ―0,‖ you must enter a ―0‖ in the field to record the action was
accomplished. The example below Figure 8.42 represents an entry of the number of items that matched QA alert message data.
Figure 8.42. Quality Assurance Notification.
8.30.6. After quantities are entered in the search window, click the ―Save‖ button located on
the vertical toolbar to process your findings. All records with data entered are removed from
the pending action. The pending action notification will remain in the inbox until all findings
are processed.
8.30.7. Use the ―Transfer‖ button to process internal transfers of assets between assemblages, stratification types, and states.
8.30.8. Use the ―Print‖ button located on the vertical toolbar to print a list of all QA records.
8.30.9. New QA Complaint. Use the AM New QA Complaint function same as the IM New QA Complaint function explained in Chapter 5, paragraph 7.21.2.
8.30.10. QA Complaint Search.
8.30.10.1. Use the QA Complaint Search function Figure 8.43 to search for all QA
records within the DMLSS database. When supply or equipment items are identified as
defective, the QA Complaint search function presents all of the required information from the QA message.

AFMAN41-216 13 FEBRUARY 2013 319
Figure 8.43. Complaint Search Window.
8.30.10.2. For supply items, DMLSS identifies all internal and external customer
accounts having consumption history, and WRM assemblages that have an OH balance
or due-in for the item. This function also enables QA monitors to select any additional
customer accounts or WRM assemblages that should receive the QA notification pending actions.
8.30.10.3. For equipment items, DMLSS identifies all equipment accounts and WRM
assemblages that have the item and enables maintenance personnel to select any
additional equipment accounts or WRM assemblages that should receive the QA notification pending actions.
8.30.10.4. DMLSS associates all system identified and selected customer accounts,
WRM assemblages, and equipment accounts with the QA notification pending actions so
subsequent actions may be tracked and recorded.
8.30.10.5. The QA Complaint Search function also provides a method to view SF 380s,
Reporting and Processing Medical Materiel Complaints Quality Improvement Report, CAIM balances and links to QA complaints.
8.31. Status Edits.
8.31.1. Use the AM Status Edits function to view, delete, and process status edits that are
received as a result of submitting AM orders. The AM Status Edits function directly links to
the IM Status Edits Report pending action, except it defaults to the AM scope and cannot be
changed to IM or IM/AM. Local policy will dictate whether AM or IM personnel are
responsible for reviewing and processing AM status edits.
8.31.2. Select ―Status Edits‖ from the AM Navigate menu to access the Status Edits Report. This report contains three tabs.

320 AFMAN41-216 13 FEBRUARY 2013
8.31.2.1. Part 1 – Errors tab. Contains status for transactions not recognized in DMLSS. Review status and process or delete as necessary.
8.31.2.2. Part II – Awaiting Review tab. Contains status for transactions that are
recognized but are being held pending review and processing. Review and process status as appropriate.
8.31.2.3. Part III – Processed tab. Contains status for transactions that are recognized and the status has already processed. Upon review, these can be deleted.
8.32. Reports. Use the AM Reports function to view and/or print a multitude of available
reports designed to assist in the overall management of assigned assemblages. Select ―Reports‖
from the AM Navigate menu or click on the ―Reports‖ button located on the horizontal toolbar.
Refer to Chapter 13, DMLSS Reports, for a brief description of each report in DMLSS along
with its content and use.
8.33. Reprinting Delivery Lists.
8.33.1. The Reprint Delivery List window allows you to view or reprint any AM delivery list
that was processed within the past seven days. Select ―Reprint Delivery List‖ from the AM Navigate menu to access this function.
8.33.2. Select a customer ID and click ―Search‖ to view a list of delivery numbers and
date/times the list was generated. Select the delivery list you wish to reprint and click the ―Print‖ button located on the vertical toolbar. The delivery list is sent to the local printer.
8.34. Reprinting Asset Relocation Delivery Lists.
8.34.1. This function provides a method to view and reprint AM delivery lists produced as a
result of asset stratification changes that were processed within the last 30 days. Select
―Reprinting Asset Relocation Delivery Lists‖ from the AM Navigate menu to access this function.
8.34.2. The Reprinting Asset Relocation Delivery List window is separated into two boxes:
the Deliveries box and the Assemblage Detail box. Specify the ORG and the ―From‖ and
―To‖ dates and click ―Search.‖ All delivery lists meeting the specified search criteria appear
in the Deliveries box. To view the delivery list details, either double-click on the delivery list
or highlight the row and click the ―Search‖ button. Upon doing so, the delivery list details
appear in the Assemblage Detail box.
8.34.3. To reprint an Asset Relocation Delivery List, highlight the applicable delivery list and click on the ―Print‖ button located on the vertical toolbar.
8.35. AM Utilities Menu.
8.35.1. AM Utilities menu, In Box. The AM Inbox automatically opens upon accessing the
AM module. It can also be viewed by selecting Inbox from the Utilities menu. The AM
Inbox contains many pending actions that are either advisory in nature or require user action.
DMLSS will automatically remove some action items from pending actions upon processing
while other advisory notices should be removed or deleted upon review and when no longer
needed. A detailed list of AM pending actions and their recommended use is available in Attachment 7.

AFMAN41-216 13 FEBRUARY 2013 321
8.35.2. AM Utilities menu, Maintain Location. In the Location/Sublocation Maintenance
window Figure 8.44 users can view and maintain the list of locations and sublocations within
a location where assemblages are stored. Use this window to add, edit, or delete a location.
Figure 8.44. Location/Sublocation Maintenance Window.
8.35.2.1. Users may type up to 13 characters for a location name and up to 9 characters
for a sublocation name.
8.35.2.2. When a location is deleted the sublocations within that location are also deleted.
8.35.3. AM Utilities menu, AWRDS. Not used at AF sites.
8.35.4. AM Utilities menu, Override Process. When one person is using a record, the record
becomes locked to all other users and all other processes. The override process allows that
record to be unlocked. First, attempt to contact the user who has locked it and ask them to
exit the record. If the user who has locked the record cannot be reached, users assigned the
appropriate privileges can unlock the record using the override process.
8.35.5. AM Utilities menu, Override Physical Inventory. When a physical inventory is
initiated, DMLSS locks the applicable records. The Override Physical Inventory option can
be used to unlock records that are locked for inventory. Use of this option should be limited
because changes to these records may cause inaccurate inventory outcomes.
8.35.6. AM Utilities menu, HHT. The type of HHT being used must be identified within
DMLSS. To do so, access HHT from the Utilities menu and select ―Janus,‖ PDA, or Trakker. All sites should select PDA unless otherwise instructed.

322 AFMAN41-216 13 FEBRUARY 2013
Chapter 9
EQUIPMENT MANAGEMENT (EM)
9.1. Purpose. The EM module of DMLSS AIS provides an automated EM system for the MHS.
It is designed from a life cycle management concept that supports all related processes including
equipment request, authorization, replacement budgeting, and disposition. The integrated
logistics approach minimizes administrative workload and duplication of data. The goal is to
develop and implement a standard integrated information management system that supports
customers, functional users, and managers at all levels in the processes associated with life cycle management of equipment.
9.1.1. For privileged users, the EM Inbox automatically opens upon accessing the EM
application from the DMLSS System Navigation window. It can also be viewed by selecting
―Inbox‖ from the Utilities menu (review paragraph 9.19.1.). A detailed list of EM pending actions and their recommended use is available in Attachment 8.
9.1.2. The EM main window also appears once the EM application is launched from the
DMLSS System Navigation window. In this window, users can access the modules and
functionalities of EM mainly through the (navigation) menu options. In some cases, you can
also use the buttons on the horizontal toolbar at the top of the window to open EM module windows.
9.1.3. The equipment management modules covered in this chapter in the same order as they
appear in the Navigate and Utilities dropdown menus located on the menu toolbar.
9.2. EM Controlled Assets.
9.2.1. Accountability for all EM-managed equipment, including on-loan equipment, is managed by expense center/customer ID.
9.2.2. Additional Local Control. Any item, regardless of unit cost, may be maintained on
record at the discretion of the Medical Logistics Flight Commander. These items are
assigned an equipment commodity class (CC), maintained on EM accountable records, and processed in DMLSS.
9.2.3. Items with the Maint Req Ind box checked on the MTF Catalog – Technical Equipment tab (Figure 9.1.) are assigned an ECN for maintenance control purposes

AFMAN41-216 13 FEBRUARY 2013 323
Figure 9.1. MTF Catalog Technical-Equipment Tab Window.
9.2.3.1. Maintenance data for these items is stored in the equipment data records and
updated as maintenance is performed by the maintenance activity/Biomedical Equipment
Repair (BMER) office.
9.2.3.2. Items with the Acct Equip Code marked ―Y‖ on the MTF Catalog – Technical
Equipment tab (Figure 9.1.) appear on the Custodian Receipt/Location Listing Report.
This report lists accountable equipment records for a customer account and account and
includes a signature block for the custodian.
9.3. New Catalog Item.
9.3.1. Coordinate with the local BMER shop before processing new equipment catalog items
to ensure accurate information is entered in the equipment record. How equipment items are
loaded is critical to the maintenance activity to ensure proper maintenance schedules and
equipment classification.
9.3.2. From the Navigate menu, select ―New Catalog Item‖ and click on ―MTF Catalog
Items‖ to view the MTF Catalog Equipment-New window. As a minimum, enter all required
information in the Basic tab. The CC is important because it determines the accountability,
funding, and procurement of the item. See Figure 9.2 for a list of available CCs.

324 AFMAN41-216 13 FEBRUARY 2013
Figure 9.2. EOR Commodity Class Relationship.
9.3.3. Load any MTF restrictions, special requirements, and destruction methods as required.
After the Basic tab is complete, go to the Technical-Equipment tab (Figure 9.1.). The
Equipment Type is defaulted to ―Individual.‖ If the equipment item is a component of a
system that is being purchased, change the equipment type to ―Component.‖ If the equipment item is a system, select ―System.‖
9.3.4. The equipment nomenclature is an important element in the Technical Equipment tab
because it generates the device class, device code, and life expectancy. The makeup of the
device code is tied to maintenance procedures that are required by the BMET. Changes can be made to information in this screen but only to increase maintenance requirements.
9.3.4.1. The maintenance required indicator cannot be unchecked for an equipment item
with a device code that requires maintenance.
9.3.4.2. The accountable equipment code cannot be ―N‖ for an equipment item with a
device code that requires accountability. Device codes whose accountability is listed as local require a choice between ―Y‖ or ―N‖ that is at the discretion of the MLFC.
9.3.5. Other areas that may require updating are the Electrical Requirements fields. The
defaults for these fields are Voltage-110, Hertz-60, and Phase-Single. If OCONUS or if there are different electrical requirements, change the information.

AFMAN41-216 13 FEBRUARY 2013 325
9.3.6. After both the Basic and Technical-Equipment tabs are updated, click the ―Save‖ icon
on the toolbar. The basic catalog record is built and saved. Additional information may be
loaded in the remaining tabs.
9.3.7. If there are acceptable equivalents for the equipment item, enter the MFG name, item
number, and vendor item type in the Acceptable Equivalent tab. Multiple equivalents may be
loaded in this tab. The equipment barcode number may be included in this tab for the
primary item and all equivalents if known.
9.3.8. The SOS Cat tab is where procurement information is entered. The default SOS will
be loaded to the host MTF. Click the ―Add‖ button and load the SOS information for the item. Multiple SOSs may be loaded against the equipment item.
9.3.9. The LOG Cat tab allows selection of the primary SOS for the equipment item if
multiple SOSs are listed in the SOS Cat tab. If only one SOS is added in the SOS Cat tab for an item, that SOS will be the default in the LOG Cat tab.
9.3.10. If loading multiple items against the same equipment nomenclature, click the Add
Like icon on the toolbar. This leaves the basic equipment information intact. Enter a new
item ID, CC, MFG cat number, electrical requirements, and SOS information.
9.3.11. If loading multiple equipment items that are different, click the ―Add‖ icon on the toolbar. This will refresh the window to allow entry of data for the new item.
9.3.12. The Find icon allows a search for item records in the MTF Catalog by item ID, short
item description, NDC, NSN, UPN, or MFG catalog number. Enter at least 3 characters in
any field to search the MTF catalog. The more information entered the narrower the search
results will be. If a search doesn‘t return any results, change the search criteria and retry. If
multiple items are listed after the search, view an item ID by clicking the ―Detail‖ button on
the window side. The Print option, also available from this search window, will print the items returned from the search.
9.4. Catalog Search. The EM Catalog Search functions the same as used in IM. Reference Chapter 5, Paragraph 5.3. for details.
9.5. SOS Search. The EM SOS Search functions the same as used in IM. Reference Chapter 5,
Paragraph 5.6.2. for details.
9.6. Equipment Accountability. The Equipment Accountability application allows users to
process any actions that affect the accountability of the ORG‘s equipment. Accountability consists of gain, loss, transfer, and assembly/disassembly.
9.6.1. Equipment Gain. Equipment gain is used to create records for equipment not acquired
through the normal order/receipt process; for example, gifts, donations, or inventory adjustments.
9.6.1.1. When gaining an accountable item, DMLSS automatically creates an audit trail,
increases the in-use equipment quantity, updates the customer account, generates updates
to accounting records, and provides the option to print a Custodian Action List.
9.6.1.2. When gaining an item with a maintenance requirement, DMLSS creates a work order for an acceptance inspection.

326 AFMAN41-216 13 FEBRUARY 2013
9.6.1.3. To access the Equipment Gain window (Figure 9.3.), from the Navigate menu,
point to Equipment Accountability and click on ―Gain‖ or click the ―Gain‖ icon on the
toolbar. In the Gain Information section, enter the ORG where the equipment is being
gained and select a transaction reason. The selected reason may require additional fields to be completed before adding the item ID.
Figure 9.3. Equipment Gain Window.
9.6.1.4. Click the ―Add‖ button and enter the item ID of the gaining item. If the item ID
is unavailable, use the ―Jump To‖ icon to search for a similar item in the MTF Catalog or
create a new item ID. After the item ID is entered, enter the quantity to be gained in the
quantity field.
9.6.1.5. In the ECN List box, complete all mandatory fields. If the MFG or common
models are not listed in the dropdown menu, use the ―Jump To‖ icon to load the new
data. The nameplate model data should be the official model designation found on the
equipment data plate or tag. The acquisition cost should be actual cost of the equipment
when new. DMLSS uses this dollar total to calculate maximum repair allowance (MRA) figures in MA records.
9.6.1.6. Multiple items may be gained to an ORG by clicking the ―Add‖ button after all
data is entered for the first item. Complete all information for the second item and continue adding items, if required.
9.6.1.7. When all data is entered, click the ―Gain‖ icon on the toolbar. The user will be
prompted to print a Custodian Actions List and barcodes during processing which is
maintained IAW AFRIMS T 41-04 R 11.00. If multiple records are generated, a
Custodian Actions List and barcodes for each customer entered is printed. After the
record is updated, the Equipment Gain window will display the assigned ECN along with
the processed record data. An IGE transaction is written to the equipment Transaction History File to record the gain.

AFMAN41-216 13 FEBRUARY 2013 327
9.6.1.8. If there is a requirement to add additional information to the Equipment Detail
record, click the ―Detail‖ icon on the vertical toolbar. This will launch the Equipment
Detail record for the new ECN. If multiple items were entered, VCR buttons are
viewable in the upper corner of the ECN List box to move between records. Update equipment information as required.
9.6.1.9. To process other gain transactions, click the ―New‖ icon to reset the Equipment
Gain window.
9.6.2. Equipment Loss or Transfer.
9.6.2.1. Loss. An equipment loss is processed any time the accountability of the
organizational equipment inventory is decreased or when a maintenance record is no
longer needed, for example, when equipment is transferred to another MTF or turned in
to DRMO. Before processing any loss for equipment, coordinate with the maintenance activity office to ensure there are no outstanding work orders.
9.6.2.1.1. To process a loss or transfer an equipment item, from the Navigate menu,
point to Equipment Accountability and click on ―Loss‖ or ―Transfer.‖ The
Equipment Search Criteria window opens. The user has the option to search by one
or many Equipment Classification fields, Owner/Custodian fields, Service
Information fields, Defense Information Technology Management System (DITMS)
fields, or Assemblage fields. Enter the required search information and click the ―Search‖ icon on the toolbar.
9.6.2.1.2. The Equipment Search Results window (Figure 9.4.) displays the results.
Select the ECNs of the items to be lost and click the ―Details‖ icon on the toolbar to
view the Equipment Detail record. Click the ―Loss‖ icon on the toolbar to open the
Equipment Loss window. Enter the transaction reason for the loss and the form to
print for supporting documentation. If the items are being shipped to another MTF or
a vendor, the user needs to select the RIC and DODAAC/ORG Name. This
information is used to record the receiver and prints on the source document. Click
OK and the Ship to Address window (Figure 9.5.) is displayed. Make any
appropriate corrections, if required and click OK to return to the Equipment Loss screen.
Figure 9.4. Equipment Search Criteria Screen.

328 AFMAN41-216 13 FEBRUARY 2013
Figure 9.5. Equipment Search Criteria Screen.
9.6.2.1.3. After all information is entered, click ―OK‖ to process the loss. The user is
prompted to print a copy of the Custodian Actions List for signature and it is
maintained IAW AFRIMS T 41-04 R 11.00. An ILE transaction is written to the
equipment Transaction History file. Note: Do not use the transaction reason
―Financial Liability Investigation‖ to record the loss of equipment due to inventory.
Although it produces a Custodian Action List and documents an ILE transaction (with
a transaction reason code of FLL), it does not generate the required Inventory Adjustment Document.
9.6.2.2. Transfer.
9.6.2.2.1. Equipment transfer is used to ensure that equipment appears on the primary
user‘s customer account. At the request of a customer or during an equipment
inventory, the user may find it necessary to change accountability for equipment
items from one DEPT or work section to another. Users can also transfer equipment between ORGs supported by the same equipment manager.
9.6.2.2.2. To process a transfer of equipment items, from the Navigate menu, point to
Equipment Accountability and click on ―Loss‖ or ―Transfer.‖ The Equipment Search
Criteria window opens. The user has the option to search by one or many Equipment
Classification fields, Owner/Custodian fields, Service Information fields, DITMS
fields, or Assemblage fields. Enter the required search information and click the ―Search‖ icon on the toolbar.
9.6.2.2.3. The Equipment Search Results window displays the results. Select the
ECNs that are being transferred and click the ―Details‖ icon on the toolbar to view the
Equipment Detail record. Click the ―Transfer‖ icon on the toolbar to open the Equipment Transfer window.
9.6.2.2.4. Select the ORG and customer the item is being transferred to and click
―OK.‖ DMLSS generates the CTE transaction to record the transfer and creates a
Custodian Action List to reflect the changes to each custodian account.

AFMAN41-216 13 FEBRUARY 2013 329
9.6.2.2.5. Equipment items determined to be excess to the needs of the ORG and sub-
ORGs may be transferred to the equipment excess account from the Equipment
Transfers window. The equipment excess account is a SVC/CUST established in SS
under customer ID xx5245. The account is identified as the excess account for the MTF in the Equipment Service Detail record.
9.6.2.2.6. If the equipment item is considered excess, click the checkbox for Excess
while in the Equipment Transfer window. The ORG and customer fields default to
the host ORG and equipment excess account. Click ―OK‖ to process the transfer
action. DMLSS generates the CTE transaction to record the transfer and creates a
Custodian Action List to reflect the changes to each custodian account.
9.6.3. Assembly/Disassembly. The Assembly/Disassembly function is designed to perform
two different functions: to assemble or disassemble equipment records. The Assembly
function is used to consolidate multiple pieces of equipment (ECNs) into a single ECN. The
Disassembly function is used to separate a single ECN into multiple equipment records
(ECNs). Equipment managers may need to use these functions to properly account for assets
and maintenance personnel may need these functions for proper work order management.
Assembly/Disassembly can be accessed by selecting ―Equipment Accountability‖ from the
Navigate menu, then ―Assembly/Disassembly.‖ The Equipment Search Criteria window opens. Search for the desired equipment records by using the available criteria.
9.6.3.1. Assembly.
9.6.3.1.1. As previously stated, the Assembly function is used to consolidate ECNs.
Therefore, DMLSS anticipates multiple ECNs to be selected when performing an
assembly action. In the Equipment Search Results window, select the equipment
records to be assembled and then click on the ―Asbly/Dsbly‖ icon located on the
vertical toolbar. Each piece of equipment must be associated to the same customer in order to complete the assembly action.
9.6.3.1.2. The highlighted equipment records appear in the Loss Information
window. Add an item ID to the Gain Information window (item ID used to identify
the Assembled Equipment record). If necessary, use the ―Jump To‖ icon to create a
new catalog record and assign a new item ID. Note: For an assembly action, the
gain quantity defaults to one and is not editable. When processing an assembly
action the new ECN quantity will never be more than one.
9.6.3.1.3. To complete the process, fill in all mandatory fields and optional fields if
possible. Every attempt should be made to load the actual acquisition cost and ―2X‖
should be loaded into the Acquisition Fund Code field. Once all data is entered, click
the ―Gain‖ icon located on the vertical toolbar to process the assembly action.
9.6.3.1.4. The assembly action produces an EAD transaction code using transaction
reason Assembly Loss, Equipment for each ECN listed in the Loss Information
window. Additionally, an EAD transaction with transaction reason Assembly Gain,
Equipment is generated for the item ID listed in the Gain Information window and a new ECN is assigned.
9.6.3.2. Disassembly.

330 AFMAN41-216 13 FEBRUARY 2013
9.6.3.2.1. As stated previously, the Disassembly function is used to separate a single
ECN into multiple ECNs or equipment records. In this instance, DMLSS anticipates
a single equipment record in the Loss Information window. Use the search function as explained in paragraph 9.6.3 to locate the ECN being disassembled.
9.6.3.2.2. The highlighted record will appear in the Loss Information window. In the
Gain Information window, add an item ID for each new equipment record. If
necessary, use the ―Jump To‖ icon to create a new catalog record and assign a new
item ID. Note: For disassembly action, a quantity must be loaded for each record added to the Gain Information window (multiple units of the same item may exist).
9.6.3.2.3. To complete the process, fill in all mandatory fields and all optional fields,
if possible. Every attempt should be made to load the actual acquisition cost and the
acquisition fund code should be annotated. Once all data is entered, click the ―Gain‖ icon located on the vertical toolbar to process the disassembly action.
9.6.3.2.4. The disassembly action produces an EAD transaction code using
transaction reason Disassembly Loss, Equipment for the ECN listed in the Loss
Information window. Additionally, an EAD transaction with transaction reason
Disassembly Gain, Equipment is generated for each item ID listed in the Gain
Information window and new ECNs are assigned.
9.6.3.3. Whether assembling or disassembling equipment records, DMLSS allows
equipment mangers the option to print a Custodial Actions List and the option to generate
new barcode labels upon saving changes. The dollar value of assembly action gains is
reflected on line 8H and the value of disassembly action losses is reflected on line 9J of the Balance List by ARC and Strat (Balance In DFAS) Report.
9.6.4. Equipment Record.
9.6.4.1. EM uses equipment records to maintain physical accountability, custodial
responsibility, and fiscal accountability of all assigned ORG assets. For this reason, a
customer must be assigned to all custodian accounts. The equipment manager also uses
equipment records to record loans, conduct inventories, and create equipment
replacement schedules to support the budget process. Equipment records are also core
components of the QA and Risk Management programs.
9.6.4.2. Equipment records are created through the receipt/issue process in IM or the
equipment gain process. Once the equipment records are established and identification
data has been entered, in-use equipment is assigned to the equipment custodian for the
customer account.
9.6.4.3. Equipment records may be linked together to create an association of a system
and the individual components that make up the system. Equipment records are used for
identification of assets in an assemblage. Equipment records in assemblages are not used
for assignment of custodial responsibility.
9.6.4.4. Maintenance activities jointly utilize the accountable and assemblage equipment
records for maintenance purposes and may create additional equipment records for
maintenance purposes that are non-accountable. After the records are created, the
maintenance activity responsible for maintenance of the equipment is entered in the

AFMAN41-216 13 FEBRUARY 2013 331
record along with data used for scheduling maintenance services. The scheduling
information is used to create scheduled work orders. The equipment records are also
used when an unscheduled work order is created. Data related to the cost of maintenance
services that is entered on the work orders is accumulated in the equipment record and used to identify maintenance problems and support the equipment replacement process.
9.6.4.5. Equipment Record Detail.
9.6.4.5.1. The Equipment Detail Record (Figure 9.6.) provides current information
along with the life cycle for an equipment item. The user has the ability to view
currently active records that are maintained within the MTF or view records that are
inactive and are no longer maintained as accountable records. This view option is
available in the Equipment Search Criteria window. Accomplishing an equipment search will open up the Equipment Detail Record window.
Figure 9.6. Equipment Detail Record Window.
9.6.4.5.2. The Equipment Detail Record window is divided into several tab
categories. Users are encouraged to update all fill fields and keep data current to
ensure the most accurate data is maintained. When changes are made to a tab, the
user must click the ―Save‖ icon to record the change data before moving to a new tab.
Clicking the ―Revert‖ icon reverts to the last saved state for the record. The information below outlines the use and data required for each tab.
9.6.4.5.3. Main Tab. This tab contains the general information about an item,
equipment owners, condition code, and equipment type. Many of the fields are
populated from other equipment database records and cannot be updated in this

332 AFMAN41-216 13 FEBRUARY 2013
window. The MFG, nameplate model, and MFG serial number fields are mandatory fields.
9.6.4.5.4. Location & Inventory Tab. This tab identifies the location of the selected
equipment item to include room location, temporary location, loan data, last inventory
date, and reason. When the last inventory date is within 90 days of the annual
inventory anniversary date, a message is posted to the EM Inbox notifying the user of
the required inventory.
9.6.4.5.5. Approval/Acquisition Tab. Allows the user the ability to view and update
approval, purchase, warranty, and acquisition information. This tab provides some historical reference on the procurement process and installation of the item.
9.6.4.5.6. Maintenance Data Tab. This tab identifies the MA and team, other
government agency, or contractor who is responsible for providing maintenance for
the item. It further breaks down required maintenance cycles based on the procedure
number assigned, operational status, risk levels, readiness code, and MEL and MRLC
totals for repair determination.
9.6.4.5.7. Maintenance Cost Tab. Provides a historical look at repair and labor time
and cost on a piece of equipment. The tab displays downtime and number of
unscheduled work orders and is divided into organizational and contract repairs and
provides values for parts costs, unscheduled time and labor, and scheduled time and
labor. The user can view a collective of all time and cost estimates by history or view by FY for up to ten years.
9.6.4.5.8. Components Tab. The Components tab is enabled when an equipment
type system detail record that contains components is selected. The tab lists all
components of the system by ECN and item ID. When in this window, the user can
select a component and double click to open the equipment detail record for the
component.
9.6.4.5.9. Software Tab. Displays information for equipment related software. The
user can add software from this window or load software from Equipment Software
in the Navigate menu. The user can also view information on existing software
information loaded in the window.
9.6.4.5.10. Notes Tab. Allows the user to add, edit, or delete notes for a specific equipment item.
9.6.4.5.11. DITMS Tab. Information Technology (IT) equipment records identified
in the MTF Catalog as DITMS require additional information procurement and
product information. If the DITMS tab is accessible, update the information as required.
9.6.4.6. Equipment Detail vertical toolbar. The Equipment Detail vertical toolbar allows the user to perform additional tasks when working in this window (Figure 9.6.).
9.6.4.6.1. The Acquisition Cost icon allows the user the ability to factor in various
elements that would affect the end acquisition cost of an equipment item. The actual
cost of the equipment is important for the budgeting process when life expectancy is
nearing an end or when determining repair versus replacement. After receipt or gain

AFMAN41-216 13 FEBRUARY 2013 333
of an equipment item, this window allows the user to enter applied discounts, trade-in
values, transportation costs, installation costs, upgrades, and any other cost associated
with the value of the equipment. The new acquisition cost will be applied to the detail record.
9.6.4.6.2. The Barcode icon allows the user to print a new barcode label for the selected equipment record. The barcode will print to the selected printer.
9.6.4.6.3. The Contract icon is accessible if an item is associated with an existing
contract. When a contract is initially loaded in DMLSS, the user should enter the
associated ECNs that apply to the contract. Clicking the icon allows the user to view the contract information loaded in the Service Contracts module.
9.6.4.6.4. The Item ID icon allows the user to perform an item ID change when there
are like or similar items on the Equipment Detail records. Select the item ID that
requires changing and open the Equipment Detail record. Click the ―Item ID‖ icon
and enter the new item ID. The CC, equipment type, accountable equipment
indicator, and maintenance required fields must match to process the item ID change.
Changes to these fields may be performed in the MTF Catalog record. Click the
―Assign‖ button to process the item ID change. DMLSS processes a SNZ transaction
and prints a Custodian Action List which is maintained IAW AFRIMS T 41-04 R 09.00.
9.6.4.6.5. The Print icon allows printing of a Historical Maintenance Report (HMR) or an Equipment Detail Report. The reports print to the user‘s local printer.
9.7. Equipment Balance.
9.7.1. The Equipment Balance module provides the Equipment Manager the capability to
manage authorizations and view equipment balances. Equipment authorizations may be
created, edited, and deleted. When an equipment balance search is performed, the system
displays the authorizations as well as the OH balances for accountable in-use equipment
items that meet the search criteria.
9.7.2. To access the Balances window, from the Navigate menu, click ―Equipment Balance‖
or the user can click the ―Balance‖ button on the toolbar. The Equipment Balance search
window opens and requires input to continue. The user must enter a device class, item ID,
nomenclature, or Line Item Number (LIN).
9.7.3. The Balances window (Figure 9.7.) displays the requested results by authorizations
and balance information. Additional filter criteria can be entered in this window to further narrow the search parameters.

334 AFMAN41-216 13 FEBRUARY 2013
Figure 9.7. EM Balances Window.
9.7.4. When equipment balances exceed authorizations, managers should conduct research
and add or edit authorizations to equal balances. At times, authorizations will exceed
balances, i.e. an approved/unfunded equipment request may exist. Equipment managers
could adjust authorizations upon approval of the AF Form 601, Equipment Action Request, thus reflecting the approved/unfunded requirement.
9.7.5. The Balance Information box displays totals for equipment authorizations, in use, due-
in, on-loan, leased, and excess by item ID. The authorizations should match the collective
totals of the remaining fields (i.e. Authorization=In-Use+Due-In+On-Loan+Leased+Excess).
Note: Valid conditions may exist causing the authorizations and balances not to equal, i.e. approved/unfunded requirements.
9.7.6. Click the ―Add‖ button to create a new authorization detail for an item ID with a
balance record and no authorization. In the Authorization Detail window, enter the item ID,
ORG, authorization quantity, and authorization reference and click ―OK.‖ The increased
item authorization quantity will be added to the Authorizations List box and the Balance
Information box.
9.7.7. DMLSS generates an IAE transaction for the equipment increase.
9.7.8. Click the ―Edit‖ button to modify an existing authorization quantity. In the
Authorization Detail window, enter the modified authorization quantity and click ―OK.‖ The
quantity fields in both the Authorizations and Balances boxes reflect the increase or decrease
in authorization quantities. If the quantity entered is zero, the authorization will no longer appear in the Authorization box after processing.
9.7.9. DMLSS generates a DAE transaction for an equipment decrease and an IAE transaction for the equipment increase.

AFMAN41-216 13 FEBRUARY 2013 335
9.8. Equipment Classification. Local business practices will determine whether EM or MA
personnel will establish and maintain Equipment Classification records. Procedures for creating
and updating devices, device classes, MFG, and common model data are contained in Chapter 10 of this manual.
9.8.1. The Equipment Classification function supports both EM and MA requirements. It
supports the requirement to manage medical equipment based on a medical-legal risk
assessment and involves establishment of centralized tables. See paragraph 10.5. for more information.
9.9. Equipment Loan.
9.9.1. New Loan.
9.9.1.1. The Equipment Loan function is used to track equipment that is lent to patients
and internal or external ORGs when authorized by the ORG‘s approval authority. The
EM can establish, modify, or delete loan accounts as required. Unique loan account IDs
are generated by DMLSS and cannot be duplicated within the ORG. Once a loan account
has been created, information on equipment and/or durable items can be entered and
associated with the loan account. The user can print the Loan Receipt/Location Lists and the Loan Action Lists for signatures and documentation of the loan.
9.9.1.2. DMLSS sends messages to the EM Inbox to alert the user when loaned
equipment and/or durable items are nearing, or have reached the end of the loan period.
If a loan period requires an extension, click the ―Renew‖ icon on the Loan Information toolbar and enter the additional days required.
9.9.1.3. To access the Loan Information window, from the Navigate menu, click
―Equipment Loan‖ or click the ―Loan‖ icon on the toolbar. This brings up the Loan
Search window. Click ―Search‖ to view current loans. Select a loan then click ―Detail.‖ Click ―New‖ to start a new loan.
9.9.1.4. This is divided into three tabs: Borrower Info, Items, and Notes.
9.9.1.4.1. Borrower Info Tab. This tab identifies the type of loan, loan-to
information, and loan-from information. Enter the last name to access the remaining
fields. Complete all accessible fields within the tab. Accurate data is important in the
event the item is returned due to drug/equipment recall, equipment calibration, or loan times have exceeded time allowances.
9.9.1.4.2. Items Tab. The Items tab is where durable items and equipment are
assigned to the borrower.
9.9.1.4.2.1. Click the ―Loan‖ button under Durable Items and enter the item ID,
description, U/S price, quantity, and loan days. Click ―OK‖ to add the item to the
Durable Items List. If multiple items are being loaned, click ―Loan‖ and enter the
new information.
9.9.1.4.2.2. Click the ―Loan‖ button under Equipment Items and enter ECN and
loan days. Click ―OK‖ to add the item to the Equipment Items List. If multiple items are being loaned, click ―Loan‖ and enter the new information.

336 AFMAN41-216 13 FEBRUARY 2013
9.9.1.4.3. Notes Tab. Use the Notes tab to enter information about the loan. Click
the ―Add‖ button to load a note. Notes could include training/use of the loan items,
communications between the borrower and the loan office, or extension requests.
9.9.1.5. DMLSS will prompt for a Loan Action List or Loan Receipt Location List to be printed.
9.9.1.6. The borrower may have multiple loan items against a single loan account. As
items are returned to the activity, the user can go into the Items tab and select the item
being returned. Medical Maintenance inspects equipment items before they are returned
to inventory. Check durable items for serviceability. Annotate the notes tab with the condition of the return.
9.9.1.7. When all items are returned, click the ―Delete‖ icon on the toolbar to mark the
account for deletion. The account will not be deleted until after two EOFYs, after all actions are completed against any equipment records.
9.9.1.8. Records marked for deletion may be undeleted if the loan account still exists for
the borrower. Click the ―Undelete‖ icon on the toolbar to undelete the loan account.
Complete the tabs for the new loan items.
9.9.2. Open Loan. Use the Open Loan function to search for, view, and update existing
equipment loan records. Once an existing record is retrieved, it may be modified using same system functionality as loading a new loan record.
9.9.3. Loan Reminder. In the ―Loaned Items Expiring. Check Loan Reminder List.‖
pending action, equipment managers can view a list of loaned equipment items that are near
or past their return dates. Use the Loan Reminder List as a tool to contact the patient. When
the patient reminder letter is sent, the user can enter the Patient Letter Sent Date in this area.
In the Loan Reminder List window, the user can also print one or more loan reminder records.
9.10. Equipment Request. The Equipment Request module in DMLSS is used for tracking an
equipment request through the process of requesting, approving, funding, ordering, and receipt of
equipment. The Equipment Request Process window is divided into multiple tabs that identify
the equipment item, replacement equipment items, customer, SOS, total funds required,
maintenance requirements, facility requirements, training requirements, and coordination. Note:
The Integrated Global Equipment Request System (TIGERS) allows the AFMS to capture MTF
expense equipment unfunded requirements prior to funding availability so those requirements
can potentially be added to e-commerce sources of procurement (ECAT and PV). TIGERS
utilizes an online equipment request form via the AFML website.
9.10.1. New Request.
9.10.1.1. While new equipment requests can be initiated from EM, it is recommended
that customers initiate new equipment requests as explained in Chapter 7 Customer
Support (CS), paragraph 7.13. Once the custodian has submitted the new request,
MEMO personnel receive an EM Customer Equipment Request Submitted pending action inbox notice.
9.10.1.2. The DMLSS equipment request process is designed to be an electronic process.
However, if the custodian identifies attachments in the Main tab, he/she must hand

AFMAN41-216 13 FEBRUARY 2013 337
deliver the documents to MEMO. MEMO personnel must retain these documents in the Equipment Request file.
9.10.1.3. Each equipment request follows a standard routing process within DMLSS.
Once a new request is submitted, it electronically flows to MEMO and then to the MA.
MA receives an inbox pending action notifying them of the new request. The systems
office should be included in the review process even though they do not receive
electronic notification. Figure 9.8. reflects a typical Equipment Request routing process.
Figure 9.8. DMLSS Equipment Request Routing Process.
9.10.1.4. Each equipment request contains 14 tabs (Figure 9.9.) requiring a specific
category of information. Each tab contains mandatory and/or optional data fields used by
the offices and personnel involved in the request process to explain and define the exact
details of the equipment request. In most cases, a specific office or individual is
responsible for a tab; however, in some instances, tabs may require input from multiple offices. Table 9.10. reflects the primary responsibility of each tab and/or data field.
Figure 9.9. DMLSS Equipment Request Routing Process.
9.10.1.5. Custodial Responsibilities. As previously stated, the equipment custodian is
responsible for submitting new requests using the CS Equipment Request process. Refer to Chapter 7, Paragraph 7.13 for an explanation of custodial responsibilities.

338 AFMAN41-216 13 FEBRUARY 2013
9.10.1.6. MEMO Responsibilities.
9.10.1.6.1. MEMO has primary responsibility for the overall success of the
equipment request process. In addition to the responsibilities identified in Table 9.1,
MEMO is responsible for the accuracy of all information entered into each request prior to submitting it to the local approval authority.
Table 9.1. Equipment Request Responsibility.
Equip Request Tab Data Fields
Custodian Main All
(see custodial
responsibilities,
paragraph 9.10.1.5.)
Replacement ECN All
Suggested Sources All
Supplies Operating Supplies
Training Required Operator Training
MEMO Main Verify Data
(see MEMO
responsibilities,
paragraph 9.10.1.6.)
Equipment Information Item ID
FSC
Nomenclature
Manufacturer
Model
Manufacturer Division
Submit Order To
External Procurement
Replacement ECN Verify Data
Supplies Verify Data
Training Verify Data
Suggested Sources Verify Data
Status All
Coordination All

AFMAN41-216 13 FEBRUARY 2013 339
Summary Costs All
Maintenance
(see MA
responsibilities,
paragraph 9.10.1.7.)
Equipment Information Requires use/interface with existing
system
Performance Criteria
Notes
Options All
Components/Accessories All
Supplies Repair Parts
Installation All
Training Required BMET Training
Support All
Coordination Reviewer Comments
Facilities
(see FM
responsibilities,
paragraph 9.10.1.8.)
Facilities Electrical
Water
Drain
Steam
Gas
HVAC
Structural
Lighting
Hazardous Materiel
Radiation
Radioactive Materiel
Facility Modification Required
Include Cost In Request
Work Request
Facility Modification Total Cost
Coordination Reviewer Comments

340 AFMAN41-216 13 FEBRUARY 2013
Systems
(see Info Sys
responsibilities,
paragraph 9.10.1.9.)
Facility
LAN
Communication
Coordination Reviewer Comments
9.10.1.6.2. Main Tab. Verify data submitted by the equipment custodian.
9.10.1.6.3. Equipment Information Tab.
9.10.1.6.3.1. Item ID – If a catalog record already exists for the requested item,
enter the item ID at this time. Otherwise, the item ID field is not mandatory at
this time. Local procedures determine whether a new catalog record is created at
this point or after the purchase is approved. It is recommended that catalog
records be created after the request is approved to prevent the creation of
unnecessary catalog records. The item ID must be assigned prior to processing
the equipment order.
9.10.1.6.3.2. FSC – The FSC is automatically assigned in conjunction with the item ID. The FSC is linked to the device nomenclature.
9.10.1.6.3.3. Nomenclature (Device Nomenclature) – The nomenclature is populated upon assigning the item ID.
9.10.1.6.3.4. MFG – Use the ―Jump To‖ button to assign the appropriate MFG
from the internal MFG‘s table.
9.10.1.6.3.5. Model – Enter the MFG‘s model number.
9.10.1.6.3.6. MFG Division – This field is directly linked to each MFG within the
MFG‘s table. If a division is assigned to a MFG, it will appear in the dropdown menu.
9.10.1.6.3.7. Submit Order To – Auto populates upon assigning the item ID.
This information is directly linked to the default SOS assigned in the MTF catalog record.
9.10.1.6.3.8. External Procurement – Not required.
9.10.1.6.4. Replacement ECN Tab. Verify the custodian entered the correct ECN(s)
in this tab. Make corrections as necessary. Replacement ECN(s) are mandatory if the
request type is Normal or Accelerated Replacement. The Replacement Item
Received. Turn-in Replaced Item pending action appears in the EM Inbox upon
issuing the new equipment to the customer. MEMO is responsible for ensuring the
replaced equipment is turned-in and removed from custodial responsibility.
9.10.1.6.5. Supplies Tab. Review and verify all supplies and repair parts, required as
part of the initial purchase, are loaded into the Supplies tab. The need for the repair parts must be reviewed and verified by the MA prior to returning to MEMO.

AFMAN41-216 13 FEBRUARY 2013 341
9.10.1.6.6. Training Tab. Ensure all training requirements are documented in this
tab. Required training could be OPR and/or equipment maintenance training.
Generally, maintenance personnel will add maintenance training requirements during their review.
9.10.1.6.7. Suggested Sources Tab. Verify the custodian has provided at least three
possible SOSs. The Primary Source indicator should be checked for one SOS
indicating the preferred source. If the Sole Source indicator in the Main tab is
checked and the custodian provides a sole source letter, then only one suggested source is required. Assist the custodian with this tab as necessary.
9.10.1.6.8. Status Tab. Once the local approval authority (i.e. ERAA) has approved
or disapproved the request, update the Status tab appropriately. The Request Status
field in the Main tab updates accordingly. Once funded, update the applicable
funding information. The Funding Status field in the Main tab updates accordingly.
Also, add status notes as necessary.
9.10.1.6.9. Coordination Tab. Upon initial review, MEMO is responsible for adding
required reviewers to the Coordination tab. At a minimum, add MEMO,
maintenance, facilities and system‘s POCs. However, it is highly recommended that
MEMO add all individuals participating in the review process, including the approval
authority. If local policy requires a printed copy to be presented during the ERAA
meeting, the Coordination tab provides a signature block for all reviewers. MEMO
should ensure the data fields in this tab should be updated even if a printed copy is used during the ERAA meeting.
9.10.1.6.10. Summary Costs Tab. The Summary Cost tab provides the approval
authority a picture of the total cost involved with purchasing the requested equipment.
The price and cost fields are automatically calculated using the costs entered into
related tabs and data fields. MEMO must identify the transportation requirements. In
almost all instance, Free on Board (FOB) Destination applies. Obtain prior approval
from the local contacting authority if FOB Origin applies. Enter additional
transportation costs if FOB Origin is used. Additionally, check the Premium Trans indicator and enter the premium transportation fund cite if applicable.
9.10.1.7. MA Responsibilities. The MA is responsible for entering data and identifying
indicators related to the maintenance and upkeep of the requested item. The MA should focus on the following data fields as defined in Table 9.10.:
9.10.1.7.1. Equipment Information Tab. In addition to the data requirements listed
below, the MA should validate the MFG and model number. Once the item ID is
assigned, the MA must also verify the correct nomenclature is assigned to ensure proper maintenance cycles are applied to the requested item.
9.10.1.7.1.1. Requires use/interface with existing system – Check this indicator
and enter an explanation of requirements if the requested item will be used with
an existing asset.
9.10.1.7.1.2. Performance Criteria – Check this indicator and enter a detailed explanation if specific performance criteria are required.

342 AFMAN41-216 13 FEBRUARY 2013
9.10.1.7.1.3. Note – Add and/or remove notes as necessary.
9.10.1.7.2. Options Tab. The MA is responsible for identifying the equipment
characteristics and additional options required as part of the initial purchase of the
requested item.
9.10.1.7.3. Components/Accessories Tab. The MA is responsible for identifying
additional components and accessories required as part of the initial purchase of the requested item.
9.10.1.7.4. Supplies Tab. The MA must use the Add button to identify repair parts
required as part of the initial purchase of the requested item.
9.10.1.7.5. Installation Tab. The MA is responsible for identifying installation requirements. Use the data fields as explained below.
9.10.1.7.5.1. Installation Required – Check this indicator if the requested item requires installation.
9.10.1.7.5.2. Installation – Use the dropdown menu to specify who is responsible
for installing the requested item.
9.10.1.7.5.3. Installation Requirements – Use the Add button to specify
maintenance and/or facility requirements that must be in place prior to installing the requested item (i.e. electrical requirements).
9.10.1.7.5.4. Installation Notes – Use the Add button to specify additional notes
pertaining to the installation of the requested item.
9.10.1.7.6. Training Tab. The MA should use the Add button(s) to specify training
required for maintenance personnel in order to maintain the requested item and to enter additional notes.
9.10.1.7.7. Support Tab. The MA is responsible for identifying all support criteria.
9.10.1.7.7.1. Acceptance Inspection Required – Check this indicator if the
requested equipment requires an acceptance inspection.
9.10.1.7.7.2. Maintenance Activity – Use the dropdown menu to identify the activity responsible for providing maintenance support.
9.10.1.7.7.3. Do You See Problems with Providing Maintenance Support? – Check Yes or No. If yes, an explanation is required.
9.10.1.7.7.4. Maintenance Will be Provided – Place a check next to one of the
following:
9.10.1.7.7.4.1. Organizational – Check if a local MA is responsible for providing maintenance support (i.e. an MA assigned to the MTF).
9.10.1.7.7.4.2. Service Contract – Check if maintenance support will be outsourced.
9.10.1.7.7.4.3. Other Government Agency – Check if a government agency
not located within the MTF is responsible for providing maintenance support,
i.e. supporting Medical Equipment Repair Center (MERC) or Precision

AFMAN41-216 13 FEBRUARY 2013 343
Measurement Equipment Laboratory (PMEL).
9.10.1.7.7.5. Estimated Annual Service Cost – Enter the estimated annual cost of maintaining the requested item.
9.10.1.7.7.6. Literature Requirements – Use the Add button to identify required
manuals and other documents (i.e. Service Manuals).
9.10.1.7.8. Coordination Tab. Add reviewer comments as necessary.
9.10.1.8. FM Responsibilities.
9.10.1.8.1. Facilities Tab.
9.10.1.8.1.1. FM personnel are responsible for determining what utilities are
required, if environment concerns are associated to the new equipment, and
whether or not facility modifications are required. The Facilities tab contains
indicators FM personnel should use to make these determinations.
9.10.1.8.1.2. Use the following indicators to identify what, if any, utilities are
required. If not required, check the ―N/A‖ (not applicable) indicator. Check the
―Required‖ and ―Available‖ indicators as necessary. Usually, if both the
―Required‖ and ―Available‖ indicators are checked a facility modification is not
required. If the ―Required‖ indicator is checked but the ―Available‖ indicator is not, then a facility modification is required.
9.10.1.8.1.2.1. Electrical.
9.10.1.8.1.2.2. Water.
9.10.1.8.1.2.3. Drain.
9.10.1.8.1.2.4. Steam.
9.10.1.8.1.2.5. Gas.
9.10.1.8.1.2.6. Heating, Ventilation and Air Conditioning (HVAC).
9.10.1.8.1.2.7. Structural.
9.10.1.8.1.2.8. Lighting.
9.10.1.8.1.3. Use the following three indicators to indicate whether
environmental compliance concerns accompany the purchase of the requested item. Check the ―N/A,‖ ―Generates,‖ and/or ―Uses‖ indicator as necessary.
9.10.1.8.1.3.1. Hazardous Materials.
9.10.1.8.1.3.2. Radiation.
9.10.1.8.1.3.3. Radioactive Materials.
9.10.1.8.1.4. Check the ―Facility Mod. Required‖ indicator if a facility
modification is required to meet utility and/or environmental compliances. If
checked, enter the work request number and the cost of modification(s). The
facility modification costs display in the Facility Modification Cost field in the Summary Costs tab when the Include Cost in Request indicator is checked.

344 AFMAN41-216 13 FEBRUARY 2013
9.10.1.8.2. Coordination Tab. Add reviewer comments as necessary.
9.10.1.9. Information Systems Responsibilities.
9.10.1.9.1. Facilities Tab. Systems personnel are responsible for determining
whether LAN and/or communication requirements are required to support the
requested item. If not required, check the ―N/A‖ indicator. Check the ―Required‖
and/or ―Available‖ indicator(s) if they apply. Coordinate with FM personnel when a work request is required in conjunction with these requirements.
9.10.1.9.2. Coordination Tab. Add reviewer comments as necessary.
9.10.1.10. ERAA/Approval Authority Review. Upon completion, the ERAA or other
local approval authority reviews and approves or disapproves each request. Local policy
dictates whether the approval process is electronic or if a printed copy of the equipment
request is required. If necessary, click the ―Print‖ button located on the vertical toolbar to
obtain a printed copy of the entire equipment request. Required reviewers and the
approval authority may sign the printed coordination tab as explained in paragraph
9.10.3.9. If attachments apply, combine the printed request with custodian provided
attachments as explained in paragraph 9.10.1.2.
9.10.1.11. Approval.
9.10.1.11.1. If total request quantity is approved for purchase, MEMO accesses the
equipment request, enters the approved quantity and date in the Status tab, and then
clicks the ―Approve‖ button located on the vertical toolbar. Upon doing so, the
Request Status field updates to Approved and the Funding Status updates to Unfunded.
9.10.1.11.2. If a partial quantity is approved for purchase, enter the approved
quantity into the Approved Qty field in the Status tab and DMLSS automatically
populates the Disapproved Qty with the difference between the requested and
approved quantities. The Request Status field updates to Approved; however, the Status Notes within the Status tab reflect the approved and disapproved quantities.
9.10.1.12. Disapproval.
9.10.1.12.1. If the total request quantity is disapproved, MEMO accesses the
equipment request and enters a quantity of zero into the Approved Qty field in the
Status tab. The Disapproved Qty field is immediately populated with the request
quantity. At this time, use the dropdown menu to assign a Disapproved Reason, click
―Save,‖ and then click ―Yes‖ in the message box to acknowledge disapproval. If disapproved, the process terminates.
9.10.1.12.2. A partial disapproval equates to a partial approval explained in paragraph 9.10.8.2.
9.10.1.13. Cancel. If at any time the custodian chooses to withdraw the equipment
request, select the ―Cancel‖ button located on the vertical toolbar. Click ―Yes‖ to
confirm cancellation when the message ―You have marked this record Cancelled by
Customer and will not be able to change the record after the action is saved. Do you wish
to continue?‖ appears. The Request Status changes to Cancelled. Do not use the cancellation function as a substitute for the disapproval function.

AFMAN41-216 13 FEBRUARY 2013 345
9.10.1.14. DMLSS procedures for equipment requests via TIGERS. RESERVED.
9.10.1.15. Funding.
9.10.1.15.1. As previously stated, when a request is approved, the Funding Status
updates to and remains Unfunded until MEMO updates the funding information in the
Status tab. Before changing the funding status, the equipment nomenclature, MFG,
and item ID (Equipment Info tab) are required. If locally funded, apply the applicable
expense center. If centrally funded by AFMOA/SGAL, associate the request to the
appropriate OP fund record.
9.10.1.15.2. If the total request quantity is funded, the Funding Status updates to
Funded once the funding information is applied to the request. The Order Status tab updates to Not Ordered.
9.10.1.15.3. If a partial quantity is funded, the Funding Status updates to Partially
Funded and the Order Status updates to Not Ordered. Note: The remaining unfunded quantity cannot be funded until the originally funded quantity is ordered.
9.10.1.15.4. Once the total request quantity is funded, the Funding Status field updates to Funded.
9.10.1.15.5. A Status Note is added reflecting the funded quantity each time funding
is applied to the request.
9.10.1.16. Ordering Equipment.
9.10.1.16.1. MEMO places orders on approved and funded equipment. By clicking
the ―Order‖ button, the IM Offline Order window appears. Data entered into the
equipment request automatically populates the data fields within the Offline Orders
window. After validating the data, MEMO executes the order. DMLSS creates IM
due-in and due-out records and updates the equipment request with the document
number of the order. The Order Status field updates to Ordered and the Receipt
Status updates to Open Due-Outs.
9.10.1.16.2. If a partial quantity was funded and ordered, the Order Status field updates to Partial Ordered and the Receipt Status updates to Open Due-Outs.
9.10.1.16.3. Once the total request quantity is ordered, the Order Status field updates to Ordered and the Receipt Status remains at Open Due-Outs.
9.10.1.16.4. A Status Note is added to the Status tab when the equipment order(s) are
processed.
9.10.1.17. Receiving Equipment.
9.10.1.17.1. Once receipt(s) process for the total request quantity, the Receipt Status updates to Received.
9.10.1.17.2. If a partial quantity is received, the Receipt Status updates to Partial Received.
9.10.1.17.3. A Status Note is added to the Status tab when the equipment receipt(s)
are processed.

346 AFMAN41-216 13 FEBRUARY 2013
9.10.1.18. Add Like Icon. Once a new request is completed, the Add Like function takes
the information from that request and transfers the majority of the Main Tab information
to a new Equipment Request Detail. The ORG, customer, requestor‘s name, and quantity
requested are required in the Main tab. The user can also modify other fields that are not disabled if changes are required.
9.10.1.19. Excess Icon. Equipment requests being filled by excess received from another
MTF/DoD component or from local equipment excesses can be applied against an
existing requirement by clicking the ―Excess‖ icon on the vertical toolbar. Enter the
quantity and click ―OK‖ to apply the excess quantities to the requirement. The available
purchase quantities are reduced by the entered excess quantity and the reason ―Filled by Excess‖ is applied to the Request Status field in the Main tab.
9.10.2. Open Request. From the Navigate menu, click ―Equipment Request.‖ Then select
―Open Request,‖ which will open the Equipment Request Search window. By clicking the
―Request‖ icon on the toolbar it will access the Equipment Request Search window. Click
the ―Search‖ button and all equipment requests will show in the results panel. Searches may
be performed with any of the criteria in the drop-down boxes. The Equipment Request
Search function allows users to search for existing requests using the following criterion:
ORG, customer, item ID, nomenclature, or request number by status and type. The main use
of this function is to follow a request through the approval and funding process. It is
essentially a tracking tool for both logisticians and customers. All notes and detailed information added during the review process are visible as the data is inputted and saved.
9.11. Equipment Software. The Equipment Software Management module provides the
capability to manage software records for installed, embedded in equipment, or stored software
for later distribution. Users can create the software records and link them to individual
equipment items. These records can help identify the type and version of software with
problems or requiring updates. The tracking of available software and installed software
provides immediate visibility of assets and puts the facility in a better position to handle available upgrades from various vendors.
9.11.1. New Software. To access the Software window, from the Navigate menu, click
―Equipment Software.‖ Select ―New Software,‖ which will open a blank Equipment
Software detail window or click ―Open Software‖ which will open the Equipment Software
Search window. Click the ―Search‖ button and all software records will show in the results panel. Searches may be performed with any of the criteria in the drop-down boxes.
9.11.1.1. Equipment Software Detail. The window is divided into three tabs: Software
Info, License Info, and Notes.
9.11.1.1.1. Software Info Tab. Enter the software specifics and equipment
nomenclature in this tab. If a company or nomenclature is not available, click the
―Add‖ button to add the respective information. The software version number and
type are also important elements of this tab. Other optional fill fields are Operating System and Literature Reference.
9.11.1.1.2. License Info Tab. Enter the software medium, licensing information,
quantities, acquisition and expiration date, and cost in this tab. The lower half of the
tab allows the user to associate key values to equipment items. DMLSS will keep

AFMAN41-216 13 FEBRUARY 2013 347
track of available licenses. The user will not be able to associate more equipment items than available licenses.
9.11.1.1.3. Notes Tab. Use the Notes tab to enter information about the software.
Click the ―Add‖ button to load a note. Notes could include training/use of the
software, communications between the MAs and vendors or customers, or extension requests.
9.11.1.2. Multiple software licenses can be loaded by clicking the ―Add License‖ button.
This option is used when there are multiple software licenses from the same company.
When software is no longer required for a piece of equipment and there is a requirement
to return the software to the company or send the equipment to another installation or
DRMO, the user will need to delete the software record. Click the ―Delete License‖
button to remove the software license record. This will also remove the associated equipment.
9.11.1.3. When all software from a particular company is no longer used, click the
―Delete‖ icon on the toolbar to mark the company for deletion. Once all actions are
completed against an equipment record, the account will be deleted after two EOFYs . If
software and equipment are still linked to the company, the user will be prompted with a
message that records exist and will be deleted if the user continues any further.
9.11.1.4. Records marked for deletion may be undeleted if the company still exists.
Click the ―Undelete‖ icon on the toolbar to undelete the company. Add the new license info as required.
9.11.2. Open Software. To access the Software window, from the Navigate menu, click
―Equipment Software.‖ Select ―Open Software‖ which will open the Equipment Software
Search window. Click the ―Search‖ button and all software records will show in the results
panel. Searches may be performed with any of the criteria in the drop-down boxes. Users
should search for existing software records prior to adding new records. Searches can be
conducting by ORG, company, nomenclature, version, and type. The main purpose of this
function is to view and modify existing equipment software records and to minimize
duplication of records.
9.12. Custodian Management.
9.12.1. Custodian Management provides the capability for the equipment manager to
manage data on equipment custodians. The equipment manager establishes new POC
records, assigns custodians to customer accounts from new or existing POC records, modifies
custodian records, changes custodial responsibilities, and removes custodians when no OH equipment or equipment due-ins exist for the customer account.
9.12.2. The account custodian may be granted systems rights to establish, modify, or delete
sub custodians. These sub custodians are responsible for small sections of the account. As
an example, an eight dental treatment room (DTR) Dental Clinic has a primary property
custodian assigned. The primary custodian may want to assign equipment accountability to
the technician responsible for each DTR. The primary property custodian can appoint each
technician as a sub custodian for each DTR. The sub custodians‘ name is associated to the
customer account and once these records are established the application facilitates the
assignment of equipment to sub custodians for custodial responsibility. Custodial

348 AFMAN41-216 13 FEBRUARY 2013
responsibility of sub custodians may be removed by disassociating the equipment from the sub custodian record provided an inventory is accomplished prior to this action.
9.12.3. To access the Customer/Custodian List from the Navigate menu, click ―Custodian
Management.‖ The window default scope view is set to Customers with Custodians. All
customers with custodians assigned appear in the Custodians box within the window.
Change the scope to ―All Customers‖ to view all customer accounts by ORG. The window
also allows the user to minimize search criteria by setting filters. The user has the option to
minimize the search by ORG, customer name, customer ID, and/or custodian name. The results are displayed in the Custodians box.
9.12.4. To view custodian and inventory information, select a customer and click the
―Details‖ icon on the toolbar. Within the Custodian Detail window, Custodian tab Figure 9.10, the user can view and update the custodians information to include:
Figure 9.10. Custodian Detail Window, Custodian Tab Window.
9.12.4.1. Office Code - Customer‘s office symbol.
9.12.4.2. Building Number - The building number where the customer is located.
9.12.4.3. Room Number - The room where the customer‘s office is located.
9.12.4.4. Work Area - The customer‘s work area (i.e. Radiology, Dental Lab).
9.12.4.5. Rank/Grade - The rank/grade of custodian.
9.12.4.6. Phone - There are two spaces provided for the customer‘s primary and alternate phone numbers.
9.12.4.7. Fax - Used if the customer has a locally accessible fax machine.
9.12.4.8. Email - The electronic mailing address of the customer. Should be the local .mil address.
9.12.4.9. Start Date - This is the date the custodian was assigned the responsibility for
the customer account.

AFMAN41-216 13 FEBRUARY 2013 349
9.12.4.10. Orientation Date - The date that training was provided to the custodian on their responsibilities.
9.12.4.11. Departure Date - The date the individual is due to depart or has departed the
MTF.
9.12.5. The Custodian tab also allows the user to update the next scheduled inventory under
Inventory Information. The inventory date entered cannot exceed 365 days. This date is
used to send notice to the EM Inbox and to the customer 30 days prior to the official
inventory date for the selected section. This allows for both the EM and customer to prepare for the inventory.
9.12.6. Sub Custodian Tab. To add sub custodians to the account, click the ―Sub Custodian‖
tab in the Custodian Detail window. Enter the sub custodian‘s basic information in the
window. The information is similar to building a primary custodian. Click the ―Save‖ icon on the toolbar before assigning equipment.
9.12.6.1. To assign equipment to the user, click on the ―Assign/Unassign Equipment‖
button. Select the equipment the sub custodian will be responsible for from the
Unassigned Equipment box and use the associate single/all buttons, ―<‖ or ―<<‖ to assign
the equipment. Click ―Save‖ when all equipment is assigned. The assigned equipment will be displayed in the Customer‘s Equipment, Assigned Equipment box.
9.12.6.2. If there is a need to assign multiple sub custodians, click the ―Add Sub
Custodian‖ button and enter the next sub custodian‘s information and assign the
accountable equipment they will be responsible for. When multiple sub custodians exist
for a customer ID, the VCR buttons and number of sub custodians are displayed at the
top of the window. This allows the user to move freely through the records.
9.12.6.3. There is a Print option available to the EM and primary account custodian that
allows the printing of a Sub Custodian Receipt/Location List for each sub custodian.
When this product is requested it will print to the requestor‘s local printer. The primary
property custodian should maintain the current Sub Custodian Receipt/Location List in their accountable property records folder.
9.12.6.4. Use the Change Sub Custodian button when the primary property custodian
wants to make changes to sub custodian‘s basic information. Select the sub custodian
that is being replaced and click the ―Change Sub Custodian‖ button. Complete the new
record screen with the new custodian‘s information. When the user clicks the ―Save‖
icon on the tool bar, the new record replaces the selected custodian‘s information and all
equipment transfers to the new sub custodian. The primary custodian should ensure that
the new sub custodian has validated the inventory records prior to accepting the account from the replaced sub custodian.
9.12.6.5. Before a sub custodian can be deleted as an accountable property custodian, all
assigned equipment must be reassigned to the primary property custodian. The primary
property custodian may reassign the equipment to an existing sub custodian after the
equipment is returned to the primary account. Click the ―Assign/Unassign Equipment‖
button to disassociate assigned equipment. Select all equipment items using shift + click
method and click the disassociate button‖>>‖ to move all records back to the unassigned
equipment box. Click ―Save‖ to return to the Custodian Details window. The assigned

350 AFMAN41-216 13 FEBRUARY 2013
equipment box should be empty. Click the ―Delete Sub Custodian‖ button to remove the sub custodian.
9.12.6.6. The sub custodian is responsible for all items assigned to them; however, the
primary property custodian is still responsible for all equipment assigned to their account.
Discrepancies should be identified immediately to ensure quick resolution. AFI 41-209 contains guidance for Reports of Surveys (ROSs).
9.12.7. Notes Tab. The Notes tab allows the EM to enter small information bits (up to 256
characters) concerning a custodian or the status of a custodian‘s account. This feature allows
for tracking status of open issues, ROS actions, training conducted, or anything else relevant
to the property account. An option to delete comments is also available when data becomes
irrelevant or no longer needed.
9.12.7.1. To access a note, double click in the Note field. The message box will open to
allow notes to be entered at that time. When all notes are entered or updated, click the ―Save‖ icon on the toolbar.
9.12.8. Change Custodian Icon. Custodial responsibility may be removed provided an
inventory is accomplished prior to this action. Changing an existing primary property
custodian is done by clicking the ―Change Custodian‖ icon in the Customer/Custodian List
window. This opens the Custodian Detail window for which the customer ID custodian is
responsible. Enter the new custodian‘s information in the Custodian tab and click ―Save.‖ If
sub custodians exist for the account a message will display prompting the user to determine if
the existing sub custodians will be retained. If ―Yes‖ is selected, all information is
transferred under the new custodian. If ―No‖ is selected, all sub custodians are deleted and
all equipment associated to the sub custodians is disassociated and returned to the new primary property custodian. The new custodian may reassign sub custodians as needed.
9.12.9. Remove Icon. The Remove icon in the Customer/Custodian List window allows the
EM to remove a custodian when no longer required. A custodian cannot be removed if
accountable equipment records are OH or due-in or if the primary custodian has sub
custodians assigned. These items must be located and transferred to other property
custodians, EM hold account, or reported excess before the account is removed. When the
user clicks the ―Remove‖ icon, all customer and custodian information is deleted from the Customer/Custodian List in DMLSS.
9.12.10. Refresh Icon. The Refresh icon resets the window to what is current in the
database. In some cases, changes that are made will not be reflected in the window until this icon is pushed or the user exits and reenters the window.
9.12.11. Print Icon. The Print icon prints the results of the search in the Customer/Custodian
List window. The printed report lists the customer ID, customer name, custodian name,
custodian phone, last inventory date, and next inventory date. The user can sort the results before printing by clicking the column heading of the criteria to be sorted by.
9.13. Equipment Inventory.
9.13.1. The Equipment Inventory module allows the user to create, conduct, reconcile, and
resolve equipment inventories. The user can enter criteria for the inventory and DMLSS

AFMAN41-216 13 FEBRUARY 2013 351
generates an inventory file for the selected parameters and assigns an ICN. Equipment inventories, regardless of method used, must be accomplished IAW AFI 41-209, Chapter 7.
9.13.2. The equipment inventory method may be manual, HHT-Batch Mode or HHT-RF
Mode. In the manual inventory mode, the user prints the equipment inventory list and uses it
to perform the physical inventory. Once the physical part of the inventory is complete, the
user returns to DMLSS and updates the inventory records. The HHT allows the user to
perform the inventory by scanning bar code labels on the equipment instead of visually
reading the labels. The HHT is also an alternative input device for updating the inventory
file with the information from the physical inventory. The HHT can be used in a Batch
Mode or an interactive RF mode.
9.13.3. Once the inventory records have been input for update to the inventory file, the user
can reconcile and complete the inventory. DMLSS displays the overage/shortage list when
discrepancies exist for a customer account. The shortage list includes those equipment items
that were not updated (not found). The overage list includes those equipment items that were
manually added by the user or found during the HHT inventory process. The user can perform corrective actions for selected records on the overage/shortage screen.
9.13.4. To access the inventory module from the Navigate menu, select ―Inventory‖ and
click on ―New Inventory‖ or click the ―Inventory‖ icon on the toolbar. Search for existing
inventories by entering search criteria or click the ―New‖ button to establish an inventory for an ORG, customer, or custodian.
9.13.5. New Inventory.
9.13.5.1. Create Equipment Inventory Window Figure 9.11. New inventories require
entry of inventory method, reason, ORG, and scope at a minimum.
Figure 9.11. Equipment Inventory Listing Window.
9.13.5.2. Inventory methods determine how the inventory will be performed. Choose
between Manual, HHT-Batch, or HHT-RF.
9.13.5.3. Inventory reasons identify why the inventory is being performed. Command
directed, custodian change, equipment manager change, routine, and special are the

352 AFMAN41-216 13 FEBRUARY 2013
reasons for inventory. Command directed and special inventories allows inventory of
specific device classes and nomenclatures. An example of a special inventory could be
conducting an inventory of all defibrillators in the MTF.
9.13.5.4. ORG name identifies the organizational assets or the ORG of the customer‘s assets that will be inventoried.
9.13.5.5. Scope identifies the equipment that will be inventoried. The scope can define
all organizational equipment to be inventoried or specify specific customer‘s or
custodian‘s equipment.
9.13.5.6. Click ―OK‖ to process the inventory requirement and view the Equipment
Inventory Listing window for selected scope criteria. During processing, DMLSS
assigns an ICN to requirements. The purpose of the ICN is to keep track of inventories
that are not complete.
9.13.5.7. The Equipment Inventory Listing window Figure 9.12 lists all equipment items
identified by the search criteria by customer ID, ECN, item ID, nomenclature, equipment
type (Eq Ty), system ECN, permanent location, temporary location, and on loan status.
As the inventory is updated, the inventoried, date inventoried, and inventory performed by fields are populated.
Figure 9.12. Equipment Inventory Listing Window.
9.13.5.8. If performing a manual inventory, you may want a copy of the inventory listing
to use for documentation. Click the ―Print‖ icon on the toolbar to print a selected
inventory or all inventories pending completion. The product will be sent to the local printer.

AFMAN41-216 13 FEBRUARY 2013 353
9.13.5.9. To manually update an inventory, select an equipment record and click the
―Update‖ icon on the toolbar. Verify date of inventory and enter the person‘s name that
performed the inventory (if different) and click ―OK‖. The Inventory field displays a
―Y‖ and the date inventoried and inventory performed by fields populate with entered
information. This information will be saved and remain as part of the inventory record
during the inventory cycle.
9.13.6. HHT-RF.
9.13.6.1. HHT-RF inventories update DMLSS as the inventory process is being
performed. Before performing an HHT inventory, the inventory should have been
created in EM. Once the inventory is established, select E&TM from the HHTs
application menu and press enter. If the HHT is in the login screen, press the F5 function key to access the application menu.
9.13.6.2. Login to the E&TM Menu, select ―Inventory‖ or the corresponding number to
access the Inventory RF menu. In the Inventory RF menu, enter the ICN assigned by
DMLSS.
9.13.6.3. Scan barcode or type the customer ID for the inventory being performed. Scan or type the location barcode name.
9.13.6.4. Scan barcode or enter the ECN followed by the ORG ID. Repeat this step for
each item in the customer‘s inventory. When at a stopping point in the inventory, press
―Escape‖ until the E&TM Menu screen appears. Press ―Escape‖ back to the Login screen to exit the inventory processes.
9.13.6.5. To review the inventory, from the E&TM menu screen, press ―Review
Inventory‖ or the corresponding number. The review process will display all items
remaining on the inventory beginning with next item to be inventoried. When the item is
found, enter the customer ID to record the item in the inventory. To continue, enter or
scan the location and ECN for each remaining item to be inventoried. If the item is not
found, press function key ―F1‖ to skip to the next record.
9.13.7. HHT-Batch.
9.13.7.1. HHT-Batch inventories work the same way as RF inventories, except that the
inventory file must be downloaded from DMLSS to the HHT before the inventory can me
performed. As with RF inventories, an EM inventory must be created. Once the
inventory is established, select ―E&TM‖ from the HHTs application menu and press
―Enter.‖ If the HHT is in the login screen, press the ―F5‖ function key to access the application menu.
9.13.7.2. To download the inventory to the HHT, from the E&TM Login screen, enter
user ID and press function key ―F2‖ to enter Batch mode.
9.13.7.3. In DMLSS, open the ICN associated to the inventory desired for download to
the HHT and click the ―PC to HHT‖ icon on the toolbar. DMLSS prompts you to select
customers. Download all selected customers or select specific customers to download.
Click ―OK‖ to continue.
9.13.7.4. On the HHT, in the E&TM menu, select ―Batch Recv File‖ or the
corresponding number and press enter. Place the HHT in the docking station and press

354 AFMAN41-216 13 FEBRUARY 2013
any key to proceed. After pressing any key, wait 10 seconds and from DMLSS click ―OK‖ at the window prompt. The inventory is now loaded on the HHT.
9.13.7.5. After downloading the inventory file to the HHT, in the E&TM menu select
―Inventory‖ or the corresponding number and press ―Enter.‖ In the Inventory-Batch window type the ICN and press ―Enter.‖
9.13.7.6. Scan barcode or type the customer ID for the inventory being performed, the
location barcode name, and the ECN followed by the ORG ID. After the inventory is
completed, press the ―Escape‖ key to return to the E&TM login screen and upload the updated inventory from the HHT to DMLSS.
9.13.7.7. Review the inventory prior to uploading. From the E&TM menu, select
―Review Inventory‖ or corresponding number and press ―Enter.‖ In the Inventory-Batch
window, items that were not inventoried are displayed on the HHT screen. As with RF
inventories, when the item is found, enter the customer ID to record the item in the
inventory. To continue, enter or scan the location and ECN for each remaining item to be
inventoried. If the item is not found, press function key ―F1‖ to skip to the next record.
9.13.7.8. To upload the completed inventory to DMLSS, open the ICN inventory in
DMLSS and click the ―HHT to PC‖ icon on the toolbar. Wait before clicking the message and go to the HHT.
9.13.7.9. From the HHT, in the E&TM menu, select ―Batch Send File‖ or corresponding
number and press ―Enter.‖ Place the HHT in the docking station and press any key to
proceed. After pressing any key on the HHT, wait 10 seconds and go back to DMLSS and click ―OK‖ at the window prompt.
9.13.7.10. The associated inventory fields in the DMLSS EM Inventory window are
updated with the inventory results.
9.13.7.11. Any items found during inventory not on the custodian‘s equipment property
records should be added to the inventory for validation. Click the ―Add‖ button at the
bottom of the inventory list to view the Add ECN to Inventory window and enter the
ECN and Inventory location. Ensure the name of the individual who found the item is in
the Performed By field. The item is added to the immediate inventory list. Scanned
inventory items are added to the inventory during batch upload or in real time if
inventory was performed in RF mode.
9.13.7.12. Do not update equipment records for items that were not found during inventory. These records will be handled as part of inventory reconciliation.
9.13.7.13. View the Equipment Items Detail record anytime during the inventory by
clicking the ―Details‖ icon on the toolbar. The Equipment Details window provides
information on items to aid in the inventory process.
9.13.7.14. When the inventory is completed, click the ―Reconcile‖ icon on the toolbar to
view the Equipment Shortage/Overage window. The window lists all shortages and
overages identified during the inventory. This list must be validated before an inventory
can be completed.
9.13.8. Reconcile Shortages.

AFMAN41-216 13 FEBRUARY 2013 355
9.13.8.1. When shortages are discovered during the inventory, a letter requesting ROS
action is completed prior to processing the loss transaction and finalizing the inventory.
Click the ―Loss‖ icon on the toolbar to process the loss. In most cases, select ―Manual‖
for form number. If research is found that the item was sent to another MTF or DRMO,
select either DD Form 1149, Requisition and Invoice/Shipping Document or DD Form
1348-1A. There is the option to print a copy of the Custodian Actions List as a result of processing. DMLSS generates an ILE transaction to record the loss.
9.13.8.2. The Match icon compares the items listed in shortages and overages and lines up items listed in both window views.
9.13.9. Reconcile Overages.
9.13.9.1. Research overages to determine the reason an overage exists. Equipment might
have been changed between customers without coordination with the EM, excess
equipment may have been received and not coordinated with EM, or documentation may
have been submitted to turn an item in but the equipment was never given to maintenance
or the Equipment Manager. The overage field provides ownership customer ID and where the overage was found.
9.13.9.2. If the item is in this section as a result of transfer, click the ―Transfer‖ icon on
the toolbar. DMLSS processes the CTE transaction to record the transfer action. The
Custodian Actions List as a result of processing can be printed, if necessary. This item is considered reconciled for inventory purposes.
9.13.9.3. If the item belongs to the custodian listed in the ownership field, click the
―Return‖ icon on the toolbar. The item is cleared from the inventory list and returned to
the proper owner. The item is considered reconciled for inventory purposes.
9.13.9.4. If the item is required in the inventoried location and it is not currently listed on
a customer account, click the ―Gain‖ icon to add the item to the inventory. DMLSS
prompts completion of the equipment gain. If a MTF Catalog Record doesn‘t exist,
create one by using the ―Jump To‖ icon while in the Equipment Gain window.
9.13.9.5. DMLSS processes the IGE transaction to record the gain action. The option to
print the Custodian Actions List as a result of processing is available. This item is considered reconciled for inventory purposes.
9.13.10. Complete Reconciliation.
9.13.10.1. When corrective actions on all shortages and overages are complete, click the
―Reconcile‖ button on the toolbar to complete the inventory. The option exists to
complete single user inventories or multiple inventories. Reconciling the inventory
updates the equipment and custodian records and sets the next required inventory date in
the equipment detail records.
9.13.10.2. To print a copy of the Custodian Receipt/Location List, click the ―Reports‖
icon on the horizontal toolbar, select ―Standard Inquiry,‖ and click ―Custodian
Receipt/Location List‖ from the report name list. The printed copy will be sent to the
user‘s local printer. There is an option to save the file as a .TXT file for instances when electronic copies are required.

356 AFMAN41-216 13 FEBRUARY 2013
9.13.11. Open Inventory. To open an existing inventory that is not complete, click the
―Inventory‖ icon on the toolbar and select the ―ICN.‖ The inventory will open. Perform any
updates as required.
9.14. Equipment Excess.
9.14.1. EM Excess allows you to view, report, follow-up, and transfer potential excess items.
Equipment items classified as excess are transferred to the EM Excess SVC/CUST 2X5245
(SVC/CUST code changes based on finance guidance) identified in the EM Services Detail
record. Serviceable items listed in this SVC/CUST are considered potential excess and are displayed in the EM Excess window.
9.14.2. Access the EM Excess window Figure 9.13 from the Navigate menu by selecting
―Excess‖ or by clicking the ―Excess‖ icon on the toolbar. The EM Excess window displays
ECNs for potential excess and reported excess. Basic item details are viewable for each equipment item as selected.
Figure 9.13. EM Excess Window.
9.14.3. You have the ability to search for specific equipment items by limiting searches
using the Filter icon. The filter option allows you to narrow the equipment search by ECN,
item ID, or document number. The search will display the results by the equipment‘s current
excess state: Potential Excess or Excess Reported.
9.14.4. If an item currently in excess can be utilized within the main ORG or a sub ORG,
transfer the item to the gaining custodian using the Remove icon on the toolbar. The
Remove option performs an equipment transfer of the item from potential equipment excess
records to the gaining custodian. A CTE transaction is processed and written to the

AFMAN41-216 13 FEBRUARY 2013 357
equipment Transaction History file. DMLSS also generates a Custodian Actions List to document the loss from the equipment account and the custodian gain.
9.14.5. The Search icon is enabled when you are reviewing reported excess. Search allows
you to search all excess records.
9.14.6. Reporting Excess.
9.14.6.1. Select an ECN from potential excess and click the ―Report‖ icon on the toolbar.
The equipment is assigned a document number from the 7500-7999 serial block with
status code ―ES‖ and moved to the Excess Report within the EM Excess window. The
outgoing requirements are sent during EOP processing. To view the detail status of the
Excess Report, click the ―Detail‖ icon on the toolbar. The detail window provides excess detail information and status for each reported item.
9.14.6.2. Detail Status Processing. From the Excess Report Detail window, you can
process follow-up or cancellation status against reported excess requirements. To process
status against an equipment excess item, click the ―Status Request‖ icon on the toolbar.
Excess status processing is completed from the IM module and updated equipment
records.
9.14.6.3. Generate follow-up status when you haven‘t received status from TRIMEDS
within five days of the initial requirement being sent. Follow-up status generates status code ―EF‖ and posts the status to the Status tab within the window.
9.14.6.4. Cancellation of an equipment item generates status code ―EC‖ and posts the
status to the Status tab within the window.
9.14.6.5. If you are not familiar with a status code listed in the Status tab, you can click the ―Description‖ icon on the toolbar to view the status codes description.
9.15. Contracts.
9.15.1. The Contracts icon is linked to the Service Contracts module of DMLSS and
provides a method for recording information on service contracts. The service contract
records can be linked to equipment records to track equipment leases. When equipment is
entered on service contract records, the equipment record reflects the service contract
information. Once a service contract record has been created, users can record calls placed
against that contract and record the receipt of the services.
9.15.2. New Call.
9.15.2.1. The New Call icon opens the Call detail window and allows you to enter call
information associated with a contract for services required to be performed. Complete
all required information and enter any applicable notes associated with the call. Multiple
CLINs can be entered for a call by clicking the ―Add‖ button. Information for each CLIN, in most cases, is required for cost estimating.
9.15.2.2. If the call is being performed against an equipment item with a work order, enter the work order number and ECN.
9.15.2.3. Saving the call detail information adds the new call number to the Call Register
file.

358 AFMAN41-216 13 FEBRUARY 2013
9.15.3. Call Register.
9.15.3.1. Click the ―Call Register‖ icon to view all call numbers associated to a selected
contract. CLIN detail information is provided for each call selected within the window.
Click the ―Call Detail‖ icon to perform updates to open contract calls. Entering the document number will close the call for services performed.
9.15.3.2. When calls are complete, click the ―Receipts‖ icon to generate the DD250
required by Finance. You will be required to enter the actual quantity (services
performed based on CLIN information) received and the date performed. Click ―Save‖ to
update the call register and generate the DD250. You can select the number of copies that are required during printing.
9.16. Transportation. This option provides outshipment and inshipment search screens from
the Distribution and Transportation Module (D&TM) that allow users to track all or selected
shipments and send advance shipment notices to gaining bases. EM users can process
transactions to another Military Treatment Facility (MTF) and DRMO. While processing
transactions to another MTF or DRMO shipments requiring transportation, it is imperative that
users check the block ―Transportation Required‖ to the right of the ―Use Form Number‖
dropdown on the Equipment Loss screen as this allows the request to be tracked within D&TM
Figure 9.14. See Attachment 4, DMLSS Distribution and Transportation Module, for additional instruction.
Figure 9.14. EM Excess Window.
9.17. Equipment Reports. DMLSS provides a variety of standard reports and inquiries to help
managers. Access the EM Reports module to view the available reports. The difference between a report and an inquiry is defined below.

AFMAN41-216 13 FEBRUARY 2013 359
9.17.1. Report: A report is a collection of data presented automatically on a periodic or
event driven basis. Reports represent the status at that point in time and/or present data of a
historical nature. The data is presented in a standardized format and cannot be manipulated. Reports are not available if the Report Date field is not populated.
9.17.2. Standard Inquiry: An inquiry is similar to a report in that the inquiry presents data in
a standard preprogrammed format. Inquiries are not produced automatically on a periodic
schedule. Instead, inquiries are produced only when users request the information.
9.17.3. View Inquiry: Select an inquiry and click the ―View‖ icon on the toolbar to review
an inquiry. Most inquiries require criteria to be entered before the report is viewable. While in the inquiry preview window you have the option of printing or saving the inquiry to file.
9.17.4. Refer to Chapter 13, Reports, for a brief description of each report in EM along with
its content and use.
9.18. Transaction History.
9.18.1. Transaction History provides an auditable record of transactions, such as gains,
losses, or custodian changes that affect the accountable equipment inventory. DMLSS
assigns a document number and creates a Transaction History record every time a transaction
affects the quantity or dollar value of assets in inventory, the ID of assets in inventory, or the custodial responsibility of assets in inventory.
9.18.2. Transaction History is used to verify that equipment transactions have been
processed properly and to determine the necessary corrective actions when an error has been
identified. Equipment gain and loss transactions can be reversed from EM Transaction
History when it is determined erroneous processing occurred. Reversing a transaction processes all required actions in reverse order of how they were originally processed.
9.18.3. To access the Equipment Transaction History Search window, click on the
―Navigate‖ menu, then select ―Transaction History.‖ In the Equipment Transaction History
Search window, type or select the required search criteria and then click ―Search.‖ The Equipment Transaction History Details window will display the search results.
9.18.4. A multitude of search criteria is available for conducting searches. It is
recommended that you search for specific information to narrow the search results. This also minimizes the impact on server speed and processing.
9.19. DMLSS Equipment Depreciation.
9.19.1. Depreciation is the gradual reduction of an asset‘s value and is tied to the life of the
asset. DMLSS calculates depreciation on all equipment with acquisition cost of $100K or
more and reports these values to DFAS. See the Annual Capital Equipment Depreciation report (paragraph 13.8.2.).
9.19.2. Depreciation in DMLSS is calculated during the End-Of-Month (EOM) process.
9.19.2.1. DMLLS calculates the current months depreciation as the acquisition price
divided by 60 when the current month depreciation plus accumulated depreciation is less
than or equal to the acquisition price of the equipment. If the calculated depreciation plus
accumulated depreciation exceeds the acquisition price then the current month depreciation is calculated as the acquisition price minus the accumulated depreciation.

360 AFMAN41-216 13 FEBRUARY 2013
9.19.2.2. The exception to this is during the first month the depreciation is calculated.
When the accumulated depreciation is equal to zero and the acquisition date is prior to
the current month the depreciation is calculated as the acquisition cost divided by 60 times the age of the equipment in months.
9.19.3. The following fields in the EM application affect the depreciation calculation:
9.19.3.1. A blank acquisition date. When the acquisition date is blank, DMLSS
generates a pending action message ―Blank Acquisition date in Capital Equipment
record‖ in the EM inbox. The user must enter an acquisition date for the item. Once this date is entered, DMLSS calculates the deprecation correctly.
9.19.3.2. Changes to the acquisition date. Changes to the acquisition date do not adjust
any previous DMLSS calculations that were reported; however, it does change future
calculations. Caution: Depreciation starts form the original date that depreciation was
first calculated. Changes to an acquisition date may give the appearance that DMLSS
took longer than 60 months to report the depreciation of the item even though all items
should be fully depreciated in 60 months from the original acquisition date
9.19.3.3. Changes to the acquisition price. DMLSS continues to calculate depreciation
normally; however, the change alter the time it takes for this item to become fully
depreciated. When the acquisition price changes, DMLSS calculates the current month‘s
deprecation based off of the new acquisition price. If the new acquisition price is less
than the accumulated depreciation, DMLSS no longer reports deprecation for that item.
If the new acquisition price is greater than the accumulated depreciation, DMLSS does
calculate deprecation.
9.19.3.3.1. Example 1: The current deprecation for ECN 041213 is $376,034.29.
The original acquisition cost of $528,108.70 would have been fully depreciated in 60
months; however, the acquisition cost was changed to $454,802.52. Due to this
change and when it took place the item will now fully depreciate in 58 months.
9.19.3.3.2. Example 2: The current depreciation for ECN 048439 is $25,900.50.
The original acquisition cost $310,806.00 would have been fully depreciated in 60
months; however, the acquisition cost was changed to $362,000.00. Due to this
change and when it took place the item will now fully depreciate in 64 months.
9.20. EM Utilities
9.20.1. EM Utilities, Inbox. The inbox related to Equipment and Technology modules is
slightly different than the inbox in other DMLSS modules; however, it serves the same
purpose. When EM is accessed, the inbox opens automatically when pending actions or
advisory notices exist. The inbox can also be accessed by selecting ―Utilities‖ from the menu bar and clicking on ―Inbox.‖
9.20.1.1. Users must review and take action on items in the inbox daily to ensure proper
management of all equipment related issues. Users can access processes or reports by
clicking the action or advisory item and double clicking the report under the product
heading. Make changes as required and save actions to complete the process and print
any required reports as needed. When processes are complete, close the window to return
to the inbox. The inbox can be closed or left open while in the EM module.

AFMAN41-216 13 FEBRUARY 2013 361
9.20.1.2. The Advisory panel displays pending action messages that do not require any
action by the user. These may be deleted after review. However, some pending actions
will come back every day until resolved (for example, EM Excess Troubled Ship.). These must be deleted manually.
9.20.1.3. The Action Required panel displays pending action messages that require some
action by the user. This section does not have a Delete button. Once required action is
completed, the record will no longer appear.
9.20.2. EM Utilities, Hand Held Terminal (HHT). Where available, PDAs may be used to
perform inventories. With a HHT, users may scan bar code labels on the equipment, store the
inventory, and systematically reconcile the inventory. The HHT may be used in Batch mode
or in the interactive Radio Frequency (RF) mode, and users can switch between modes
during inventory. In Batch mode, you download or upload information between the HHT and a personal computer (PC) using a docking port.
9.20.2.1. Transfer to HHT. Use this option to download a batch inventory from the PC
(personal computer) to the HHT (hand held terminal).
9.20.2.2. Transfer from HHT. Use this option to download a batch inventory from the
HHT to the PC. The HHT must be attached to the computer, a functioning ActiveSync, and the HHT must be in its cradle (because the file transfer is not using wireless mode).
9.20.2.3. HHT Model Type. The type of HHT being used must be identified within
DMLSS. To do so, access HHT from the Utilities menu and select ―Janus,‖ PDA, or Trakker. All sites should select PDA unless otherwise instructed.

362 AFMAN41-216 13 FEBRUARY 2013
Chapter 10
EQUIPMENT MAINTENANCE
10.1. Purpose. The Equipment Maintenance (MA) application provides users with a systematic
approach to equipment maintenance. It allows customers with appropriate privileges the ability
to request maintenance services and obtain status on work requested. The work order system
provides scheduled maintenance procedures and facilitates historical maintenance data
collection. The parts module interfaces to the supporting supply activity and the work order
system. The historical maintenance data is used to support the EM and budgeting processes.
10.1.1. For privileged users the MA Inbox automatically opens upon accessing the MA
application from the DMLSS System Navigation window. It can also be viewed by selecting
―Inbox‖ from the Utilities menu (review paragraph 10.18.1.). A detailed list of MA pending
actions and their recommended use is available in Attachment 9.
10.1.2. The MA main window also appears once the MA application is launched from the
DMLSS System Navigation window. In this window users can access the modules and
functionalities of MA mainly through the (navigation) menu options. In some cases you can
also use the buttons on the horizontal toolbar at the top of the window to open MA module windows.
10.1.3. The equipment maintenance modules covered in this chapter in the same order as they appear in the Navigate and Utilities dropdown menus located on the menu toolbar.
10.2. Repair Parts.
10.2.1. Managing repair parts relates to the acquisition, receipt, storage, and issue of repair
parts used in equipment maintenance. It also involves updating repair part inventory, equipment records, and work order records with parts used in the maintenance processes.
10.2.2. A Repair Part Inventory record is actually a combination of the MTF Catalog record,
the Customer Catalog record, and the Item Location record. An SOS record and SOS
Catalog record must exist before a complete Repair Part Inventory record can be created.
These records are built within the CAIM application. A CAIM icon is located on the Repair
Part Search Results screen and the Repair Part Detail screen to accommodate transition to the
CAIM application.
10.2.3. Once the Repair Part Inventory records have been established, the process for
ordering repair parts is included in the CAIM process for BPS Replenishment Orders. The
replenishment inventory process triggers the requirement to build and process orders. In the
Repair Parts Inventory system, requirements are identified during the issue of parts to work
orders and during the establishment of new inventory records. Use the offline replenishment
process to generate an emergency order for repair parts. In this process the user can
manually input the requirement and initiate the order process.
10.2.4. The Repair Part Issue screen provides the capability to issue repair parts to a work
order or to a customer account and to record a part requirement against a work order. This
screen will be displayed when the user selects the ―Issue‖ icon on the Repair Part Detail
screen or when the user selects ―Repair Part Issue‖ from the Navigation menu.

AFMAN41-216 13 FEBRUARY 2013 363
10.2.5. The Repair Parts module consists of three functions: Open Part, Part Requirement
List, and Part Issue. These three functions are accessed from the Navigate menu Repair Parts
option. The Open Parts function can also be accessed by clicking the ―Parts‖ icon on the horizontal toolbar.
10.2.6. Open Part.
10.2.6.1. Accessing the Repair Parts module initially opens the Search window. The
scope default is set to search for active records. Change the scope to search for deleted
items by clicking the ―Deleted‖ radio button. The following search options are available to the user:
10.2.6.1.1. Parts Criteria, which are Part Number, Description, MFR, Item ID, and/or Location.
10.2.6.1.2. Equipment Criteria, which are ECN, MFR, and/or Common Model.
10.2.6.1.3. The search results are displayed in the window. The user must then
highlight the record that is to be reviewed and then press the Detail button to review
the Record Detail. The Record Details are automatically displayed if only one record is found.
10.2.6.1.4. The Repair Part Detail window is divided into four tabs: Part Info,
Pipeline Consumption, Equipment Info, and Note.
10.2.6.2. Part Info Tab.
10.2.6.2.1. The Part Info tab allows the user to view Repair Part Details and add or
edit the record as required. Items that can be modified in this window include the
customer item description, conversion information, issuing information, location,
level, ROP (Reorder Point), expense center (if multiple expense centers are on file), SOS, and level type.
10.2.6.2.2. Entering a quantity in the ROP field will dictate when the system
generates a new requirement for that item. Frequently used parts should have a ROP
assigned.
10.2.6.3. Pipeline Consumption Tab. The Pipeline Consumption tab provides historical
consumption data for 24 months on a selected item. This tab also records pipeline times
and dates. This data is useful when determining whether an item should be stocked, not
stocked, or deleted.
10.2.6.4. Equipment Info Tab. From the Equipment Info tab, users can add or delete an
equipment association to a repair part. Click the ―Add‖ button and enter a MFR,
common model, and the nomenclature to establish the association. Click the ―Delete‖
button to delete an association. Establishing these relationships is highly recommended
during the parts ordering process. The link between parts and equipment helps managers identify and manage on-hand inventory.
10.2.6.5. Notes Tab. The Notes tab allows users to enter unique information about the
part or any issue associated with the part. This information serves as historical
background for future requirements. Use the ―Delete‖ button to remove outdated or obsolete notes.

364 AFMAN41-216 13 FEBRUARY 2013
10.2.7. The module (vertical) toolbar contains icons that allow users to perform multiple
tasks within the Repair Parts Detail module. Standard icons include Find, Save, Revert,
Delete, Close, and Help topics. The remaining icons link to other modules or applications to perform specific functions.
10.2.7.1. Issue Icon. The Issue icon is a shortcut to the Part Issue module and allows
users to process an issue or reserve spare parts against an open work order. Parts
information will display OH quantities and available quantities. Reserved quantities are deducted from the quantity available and applied against the respective work order.
10.2.7.2. Inventory Adjustment Icon.
10.2.7.2.1. The Inventory Adjustment Icon is a shortcut to the Inventory Adjustment
module and allows a user to process a gain or loss against the Repair Parts Detail
record. The OH and available quantity will be either increased or decreased depending on what type of inventory adjustment is processed.
10.2.7.2.2. Processing of an inventory adjustment generates a RPG or RPL
transaction. Both transactions are written to Transaction History found in the IM
application.
10.2.7.3. CAIM Icon. The CAIM icon is a shortcut to the CAIM application and will
automatically open the Maintenance Activity CAIM Customer Inbox. The shortcut is
designed to allow the maintenance activity access to ordering capabilities for spare part
replacement without having to open and close other modules and applications.
10.2.8. Parts Requirement List.
10.2.8.1. From the Navigate menu, select ―Repair Parts‖ and click on ―Parts
Requirement List.‖ The Parts Requirements List window displays all parts requirements
in Item ID sequence. Note: Parts may be issued when there is an OH quantity in bench
stock and the required quantity does not exceed the OH balance. The Issue icon is not available when the OH quantity is zero.
10.2.8.2. Details of the repair part may be accessed by selecting a part and clicking on
the ―Detail‖ icon. A spare part can be reserved and a requirement can be established,
increased, or decreased within this window.
10.2.8.3. The Parts Ordering function can also be accessed by selecting the CAIM icon
within the Parts Detail record. The Maintenance Activity Service Center is opened when this option is selected. Follow CAIM ordering procedures to order spare parts.
10.2.9. Part Issue. This function can be accessed via the Navigate menu, Repair Parts, then
Part Issue. Use this function to issue or request parts directly to a customer. First, enter the
item ID of the required part. The Search results window will display work orders awaiting
the part. Enter the reserve quantity and issue information if a part is needed to satisfy a work
order requirement. Enter an issue quantity if the part is available for issue. Enter the required quantity in the Quantity Requirement field if the part is not available for issue.
10.3. Work Orders.
10.3.1. The Work Order Management function plays a vital role in the overall success of the
maintenance mission. The Work Order Management function allows the user to generate,

AFMAN41-216 13 FEBRUARY 2013 365
create, update, track, and complete work orders and are maintained IAW AFRIMS T 41-04 R
29.00. Multiple MAs can be created for a single MTF. However, users can be linked to only
one MA; therefore, users can only access work orders linked to the assigned MA.
10.3.2. This section includes a general overview of the Work Order Management function and discusses the following topics in detail:
10.3.2.1. Locating Work Orders.
10.3.2.2. Work Order Registers.
10.3.2.3. Work Order Detail Records.
10.3.2.4. Printing Work Orders.
10.3.3. Once created, scheduled and unscheduled work orders follow the same chain of events that are listed below:
10.3.3.1. Maintenance manager or team leader assigns the work order to a technician.
Note: Assigning work orders to a technician is important to the data collection process used in other MA modules and reports.
10.3.3.2. Technician or contractor updates work order.
10.3.3.3. Technician completes work order upon completion of service or repair.
10.3.3.4. Maintenance manager or team leader reviews work order for accuracy.
10.3.3.5. Work order is retained for historical purposes.
10.3.4. New Work Order.
10.3.4.1. During the EOM processing, DMLSS generates scheduled work orders for all
equipment items that have scheduled maintenance service due dates the next month.
Scheduled work orders can be manually initiated, suspended, or reactivated before EOM
processing. The suspend process disables generation of scheduled work orders on
equipment that is lost or in mobilization status. Scheduled maintenance can be
reactivated once the equipment is located or upon return from mobilization.
10.3.4.2. Unscheduled work orders can be created as necessary using either the ECN or for non-ECN controlled items, ORG, nomenclature, and customer name can be used.
10.3.4.3. DMLSS assigns a unique sequential number to all work orders, whether
scheduled or unscheduled. This work order number is formatted as follows:
YYYYMMDDxxxx; where YYYYMMDD is the creation date and xxxx is a serial number that is reset to 0001 each day.
10.3.4.4. Assign Work Orders. Work orders may be assigned to teams and/or to
individual technicians. Work orders can be assigned from the open work order register or
within the work order detail screen. The assignment process depends on the size of the
maintenance staff and the requirements at the MTF. Note: Before assigning work orders
to a technician, the maintenance manager has the ability to review the technician‘s
workload. The maintenance manager can then reassign work orders based upon the
number of work orders already assigned and estimated hours to complete assigned work. Reference Figure 10.1.

366 AFMAN41-216 13 FEBRUARY 2013
Figure 10.1. Technician Workload Report.
10.3.5. Open Work Order Module.
10.3.5.1. A work order may be updated or completed only after it is assigned to a
technician. Anyone with access and privileges to the work order file can update the
record. The purpose of the update process is to ensure that work in progress will not be
lost. The work order record provides an avenue for documenting work accomplished by
in-house maintenance technicians, contractors, and other agencies. Completion dates are also recorded.
10.3.5.2. Cancel Work Orders. The Cancel Work Order process provides a means to cancel work order records from the database.
10.3.5.3. Work Order Search.
10.3.5.3.1. From the Navigation menu, select the ―Open Work Module‖ option to
search for open work orders. Another option is to select the ―Find‖ icon within the
Work Order module. Either option accesses the search screen. The search scope
includes Open, Completed, or Inactive work orders. Within each scope a search can
be initiated using the ECN, work order number (or a range of work order numbers),
completion date (or a range of completion dates), class (device class name),
equipment nomenclature, equipment MFR, ORG name, customer name, technician
name, service type, work order category, work order priority, work order status text,
team name, contractor name, other government agency, assemblage ORG, assemblage description, assemblage number, or work location.
10.3.5.3.2. Once the search criteria are set, select ―Search‖ to find potential matching
work orders. The search criteria can be modified by selecting ―Reset‖ or can be
cancelled by selecting ―Cancel.‖ The Work Order Detail record is displayed if only
one match is located. If multiple records are retrieved, they are displayed in the Work
Order Register. Open work orders are displayed in the Open Work Order Register
while completed and inactive work orders are displayed in the Completed Work

AFMAN41-216 13 FEBRUARY 2013 367
Order Register. The search results will include work orders for associated
components when matched to an ECN, which has ―System‖ identified in the
Equipment Type field of the Equipment Detail main tab.
10.3.5.4. View Work Order Register.
10.3.5.4.1. The Work Order Register is a list of work orders. The Open Work Order
Register includes the following information for each incomplete work order: work
order number, ECN, equipment nomenclature, work order category, service type,
work order priority, work order status, technician name, work location, equipment
readiness code, ORG, customer name, equipment MFR, common model, team name,
contractor name, other government agency, and assemblage information if applicable.
The Completed Work Order Register includes the work order umber, ECN,
equipment nomenclature, date work order completed, work order category, service
type, work order status, total hours (for technician and contractor), parts cost, contract
cost, down time, technician name, ORG name, customer name, team name, contractor name, and other government agency.
10.3.5.4.2. The list can be filtered by one or more of the following when the register
is too large: ECN, work order number (or a range of work order numbers),
equipment nomenclature, ORG name, work order category, work order priority text,
service type, work order status, technician name, customer name, team name, contractor name, and/or other government agency.
10.3.5.4.3. The original Work Order Register list can be retrieved by selecting the
―Refresh‖ button. Selecting the ―Reset‖ option will also clear previously set filter criteria.
10.3.5.4.4. The Work Order Register is initially sorted by work order number in
descending order. The user can apply other simple or complex sorts to the Work
Order Register. A simple one-level sort is applied by clicking the column by which
the register will be sorted. The user can apply a complex sort by selecting ―Sort‖ on
the vertical toolbar or by right-clicking on the register and choosing Advanced Sort.
Then, in the Sort window the user can specify the different sort levels.
10.3.5.5. View Work Order Detail Records.
10.3.5.5.1. The Work Order Detail record is displayed when only one record is
located. If multiple records are displayed, the Work Order Register will list all
matches when multiple records are located. The detailed work order records can be
accessed by selecting one or more records and clicking the ―Detail‖ icon or by
double-clicking a single record. The Work Order Detail record consists of the
following screens: Work Order Main, Work by Technician, Work by Other, Parts,
Estimate, Required Materials, and Status Summary.
10.3.5.5.2. The work order number, ECN, nomenclature, ORG name, and customer name are also identified within each detail record.
10.3.5.6. Work Order Main.
10.3.5.6.1. The Main Screen of the work order is designed to provide information on
the item requiring maintenance, the type of service required, who is to do the service,

368 AFMAN41-216 13 FEBRUARY 2013
and the current status. The Work Order Main screen contains the following
information: work order category, service type, work order priority, work order
status, equipment readiness code, technician name, down status indicator, equipment
location, work location, equipment location, equipment MFR, system ECN, common
model, MFR serial number, MRL, team name, contractor name, other government
agency, person requesting, time work order requested, POC phone number, service
requested, contract indicator, warranty indicator, and equipment replacement
indicator. The service type, work order priority text, work order status text, person
requesting, request time, and service requested are marked as mandatory entries.
10.3.5.6.2. The Contract and Warranty Indicators are enabled when the equipment is
under contract or warranty, respectively. When the work order contains an ECN, the
Work Order Main screen contains icons for the user to access the corresponding
equipment record, maintenance procedure, or task checklist. When the work order
contains a contractor name, the Work Order Main screen also contains icons for the user to access the Contract Services module.
10.3.5.7. Work by Technician. The Work by Technician screen provides a place for the
technicians assigned to the maintenance activity to record their work and update
information in the work order. The data in this screen is also used for the MA‘s
management and productivity reports. The Work by Technician screen contains the
following information for each technician who performs service on the work order:
technician name, work order category, service type, service action, service item, service
result, date serviced, service time, labor rate, and labor cost. DMLSS calculates labor
cost using the service times entered on the work order and the labor rate entered in the
MA Detail record. DMLSS also calculates and displays total hours, technician, and total
labor cost from the data entered. This screen also contains the failure reason (if
applicable), maintenance assessment, supply condition code, accumulated down time,
actual response time, work order status, and work order notes. The technician name, service type, and service time are mandatory entries.
10.3.5.8. Work by Other. The Work by Other screen provides a means to record work
performed by contractors or other government agencies. The Work by Other screen
contains the following information: service provider, contract number, vendor site ID,
phone number, contract type, work order category, service type, service action, service
item, service result, date serviced, service time, labor rate, labor cost, total hours, total
labor cost, part cost contractor, cost total contractor, and contract response time actual. The service type, date serviced, and service time are mandatory entries.
10.3.5.9. Parts.
10.3.5.9.1. The Parts screen provides a means to record parts required to complete a
work order and to record parts used on a work order. The screen is divided into two
sections: parts that are included in the MA‘s catalog and parts not included in the
inventory. The Cataloged Parts section contains the following information for each
part needed to complete the work order: MFR name, MFR catalog number, short
item description, exchange item indicator, part quantity required, part quantity
reserved, part quantity used, U/S price, and part cost extended. The cataloged parts

AFMAN41-216 13 FEBRUARY 2013 369
section uses data from Repair Part Inventory records and is integrated with the Repair Part Inventory module.
10.3.5.9.2. The Parts screen also contains the following information for each non-
cataloged part that is used to complete the work order: non-catalog part description,
provided by, part quantity used, part cost, and part cost extended. The non-cataloged
parts section allows the user to record information about parts used that are not on
inventory records and parts provided by other maintenance activities. DMLSS calculates and displays the total parts cost for all cataloged and non-cataloged parts.
10.3.5.10. Estimate. The Estimate screen provides a place to record a cost estimate for
repairing a piece of equipment. The data fields in this window will be updated once all
estimates are entered and saved. Maintenance personnel should review these details and
determine whether or not it is economically feasible to have the equipment repaired. The
Estimate screen contains the following information: estimated labor hours, estimated
labor cost, estimated parts cost, estimated total repair cost, maximum repair limit
cumulative, maximum expenditure limit, total expenditures, acquisition date, acquisition
cost, life expectancy, equipment replacement number, condition code, maintenance
assessment, and supply and work order estimate notes. This screen also contains the non-
catalogued parts that are required to complete the work order, including description, cost, quantity, and extended cost.
10.3.5.11. Required Materials. The Required Materials screen identifies the items
required to complete a work order by providing information from the equipment record
and the Procedure module. The intent is for the technician to save time by gathering all
the items prior to starting the work. The Required Materials screen contains the
following information: literature title, literature location, precautions, catalogued parts, generic parts, test equipment/special tools, and miscellaneous supplies.
10.3.5.12. The Assemblage tab provides information to locate stored WRM equipment.
10.3.5.13. Status Summary. The Status Summary screen provides a brief management
summary on the history of the work order. The Status Summary screen contains the
following information: work order status, work order transaction date, DMLSS user
name, and assigned technician. Updates to the work order status are recorded and the
work order transaction date defaults to the system date and time. The user name is
defaulted to the user ID of the technician editing the work order or to system for system initiated changes.
10.3.6. Request Scheduled Work Orders.
10.3.6.1. The Request Scheduled Work Orders menu allows the user to create the next
month‘s scheduled work orders. This function allows for retrieval of work orders prior to
the scheduled EOM process. Reference Figure 10.2.

370 AFMAN41-216 13 FEBRUARY 2013
Figure 10.2. Request Scheduled Work Orders.
10.3.6.1.1. To retrieve scheduled work orders, select the ―Navigate‖ menu, ―Work
Orders,‖ then ―Request Scheduled Work Orders.‖
10.3.6.1.2. Scheduled work orders can be retrieved immediately by selecting the
―Process On-Line‖ option. Selecting the ―Process In Batch‖ option will generate the
scheduled work orders during the EOD process. The appropriate selection criteria
must be entered to retrieve desired work orders. The process is completed by clicking
on ―Create Work Orders‖ and selecting ―OK‖ in response to the confirmation message.
10.3.6.2. Print Work Orders. Individual or multiple records may be printed from the
Work Order Register (Figure 10.3.). If necessary, multiple copies of a work order may
also be printed. Additionally, one or more copies of a Work Order Detail record can be printed from the Work Order Detail window.
Figure 10.3. Print Requested Work Orders.
10.4. Contracts. Use the Contract Search window to search for service contracts. To access
this menu, click on the ―Navigate‖ menu and then ―Contracts‖ to open the ―Contract Record
Search‖ screen. All service contracts will be retrieved if no search criterion is entered. The

AFMAN41-216 13 FEBRUARY 2013 371
search criteria may be utilized to narrow the results and locate the desired record. Highlight a
record and click the ―Detail‖ icon to view details of a service contract. Details may be printed by
selecting the ―Print‖ option.
10.5. Equipment Classification.
10.5.1. The Equipment Classification function supports both EM and MA requirements. It
supports the requirement to manage medical equipment based on a medical-legal risk
assessment. It involves establishment of centralized tables containing the following
information:
10.5.1.1. An equipment classification and nomenclature system.
10.5.1.2. Standardized management guidance by type of equipment.
10.5.1.3. Default data by type of equipment.
10.5.2. Centrally managed classification tables were created as a tri-service project. The
centrally managed records cannot be edited at the local MTF; however, classification records may be added to meet local requirements.
10.5.3. The Equipment Classification and Nomenclature System includes:
10.5.3.1. Standard Equipment Nomenclature (Device) and Device Code for Each
Specific Type of Device. The standard classification system is based on ECRI‘s
(formerly the Emergency Care Research Institute) Universal Medical Device Code (UMDC) number and Universal Medical Device Nomenclature System (UMDNS).
10.5.3.2. Device Class Name and Device Class Code for Each Device. The device
classes associate the individual devices into groups that perform similar functions. For
example, there are several types of infusion devices: Ambulatory Infusion Pump, General
Purpose Infusion Pump, Warming/High Flow, Micro Infusion Pump, Multichannel
Infusion Pump, and Syringe Infusion Pump. Each of these has a separate device code
and equipment nomenclature, but all of them will be associated with the device class of
―Infusion Pumps.‖ This is used primarily to facilitate queries of equipment records for
the purpose of easily retrieving multiple like items. This functionality helps the user address command level requests and aids in recall or hazard alert management.
10.5.3.3. MFR. The name and contact information of the MFR for a certain equipment item.
10.5.3.4. MFR/Common Model. The name of the MFR of an equipment item and the
name by which the equipment is commonly referred to.
10.5.4. The Equipment Management Data for each item includes:
10.5.4.1. Risk level. This is centrally managed and is used as the basis for establishing
equipment management requirements and maintenance intervals. Risk levels are provided to the local equipment management and MAs for informational purposes.
10.5.4.2. Federal Supply Class. Identifies the supply class in which the asset is
classified.
10.5.4.3. Life Expectancy. This is used to calculate depreciation and equipment replacement planning.

372 AFMAN41-216 13 FEBRUARY 2013
10.5.4.4. Specialty. The specialty code is used to associate the type of device to a major medical specialty or section of the MTF where the equipment is primarily used.
10.5.4.5. Maintenance Required Indicator. Identifies devices that require periodic
maintenance and/or are considered to have significant risks that justify keeping an
individual historical service record. ECN‘s created by maintenance using the
Maintenance Record commodity classes should have a maintenance required indicator of
―Y‖ and an accountable equipment indicator of ―N.‖ Note: This determines if a record is searchable in the MA module.
10.5.4.6. Accountable Equipment Code. Indicates whether or not the item is to be
included on accountable records. Note: This determines if a record is searchable in the
EM module.
10.5.4.7. Device. Advances in the Medical community and in technology challenges the
ability to keep the centrally provided list of devices current. Rather than have customers wait until a review can occur, the DMLSS system allows users to create a local device.
10.5.5. New Device.
10.5.5.1. To establish a new device, from the Navigate menu select ―Equipment
Classification‖ and then select ―New Device.‖ This function can also be accessed by
selecting the ―Device‖ icon on the horizontal toolbar and selecting the ―New‖ button
from the criteria window. Note: Ensure ECRI or centrally managed devices are not
available. Coordinate with AFMOA/SGALE.
10.5.5.2. The Device Detail window is divided into three tabs: Device, MFR, and MTF
Catalog Items. The Device tab is the only viewable tab until the device code is
established. Enter all required data associated with the new device code in the Device tab
and click the ―Save‖ icon. DMLSS will generate the new device code number and
remaining tabs become accessible. Note: Local device codes should be based on information available in ECRI‘s Sourcebase whenever possible.
10.5.5.3. The MFR and MTF catalog can be associated using the manufacturer/common
model record and the equipment record respectively. This association is not allowed from the Device Detail window.
10.5.5.4. See paragraph 10.5.3.2. for details regarding Device Class.
10.5.6. New Device Class. To establish a new device class, select the ―Navigate‖ menu,
then select ―Equipment Classification,‖ and click ―New Device Class.‖ Enter the device
class name and click the ―Save‖ icon. Upon saving, DMLSS creates a unique Device Class Code and defaults the date to the current date.
10.5.7. MFR. See paragraph 10.5.3.3.
10.5.8. New MFR.
10.5.8.1. To establish a new MFR, from the Navigate menu select ―Equipment
Classification‖ and click ―New Manufacturer.‖ The New Manufacturer window opens
and is divided into four tabs: MFR, Sales POC, Parts POC, and Service POC. Note: This field is not related to the SOS or MFR field in the catalog record.

AFMAN41-216 13 FEBRUARY 2013 373
10.5.8.2. The MFR tab is similar to an address book allowing the user the opportunity to
enter a MFR name, address, phone numbers, email address, fax, ECRI, and Commercial
and Government Entity Code (CAGE) codes. A previously known MFR‘s and/or
division‘s name may also be documented in this tab. This is helpful when vendors
change company names, are bought out by a larger corporation, or when a new division is
established within a company.
10.5.8.3. The remaining tabs become accessible once information is loaded and saved in
the MFR tab. It is highly recommended to enter and save as much POC information as possible. Documenting this information reduces future research time.
10.5.8.4. Common Model (A MFR-assigned model that is normally referred to in
discussion) Note: The DMLSS system does not provide any Centrally Managed Common Model information. All Common Model data is created at the local MTF.
10.5.9. New Common Model.
10.5.9.1. To establish a new Common Model, from the Navigate menu select
―Equipment Classification‖ and click ―New Common Model.‖ From the New Common
Model window, enter the MFR, nomenclature and common model. Dropdown menus are available for MFR and nomenclature information.
10.5.9.2. Product literature information may be included in the Common Model Detail
record. Product literature is entered by title, storage location, and medium type (CD-
ROM, Paper, or website).
10.5.10. Open Device. To view an existing device, from the Navigate menu select
―Equipment Classification‖ and click ―Open Device.‖ Another option is to select the
―Device‖ icon on the horizontal toolbar to view the Device Search criteria window. The
Device Search window allows users to perform searches using one or more of the following:
device code, equipment nomenclature, device class, FSC, and specialty. The Device Detail
record will be displayed if only one match is retrieved. DMLSS will display a list of
matching records if multiple devices are retrieved.
10.5.11. Open Device Class. To view an existing device class, from the Navigate menu
select ―Equipment Classification‖ and click ―Open Device Class.‖ The Device Class search
window allows users to perform searches using one or more of the following: device class
code, device class name, and date. The Device Class detail record will be displayed if only
one matching record is retrieved. The system will display a list of matching records if
multiple device classes are retrieved. Detail information can be accessed by selecting the
appropriate device class detail.
10.5.12. Open MFR.
10.5.12.1. To view an existing MFR, from the Navigate menu select ―Equipment
Classification‖ and click ―Open Manufacturer.‖ Within the Manufacturer Search
window, users can search by MFR‘s name or a list of MFRs can be displayed by
selecting ―Search‖ from the vertical toolbar. Select the ―Detail‖ button to view the
MFR‘s detail information. Within the detail window, a MFR is either coded as centrally
or locally managed. Centrally managed MFR records cannot be modified; however, local
POC information can be added to centrally managed MFR records.

374 AFMAN41-216 13 FEBRUARY 2013
10.5.12.2. An existing locally created MFR may be marked for deletion when the MFR
is no longer in business or has changed names. Select the ―Locally Created MFR
Details‖ from the search window then select the ―Delete‖ icon from the vertical toolbar. Upon saving, the MFR is coded for deletion and is no longer accessible.
10.5.12.3. MFRs will occasionally change names. Utilize the ―Previously Known As…‖ field within the MFR tab to associate the old and new names.
10.5.12.4. An existing delete indicator can be removed from a MFR‘s record. This is
accomplished by accessing the MFR‘s Detail record and selecting the ―Undelete‖ button
from the vertical toolbar. Upon saving, the delete indicator is removed and the MFR
Detail record becomes accessible. It is highly recommended to validate the MFR‘s detail
and POC information at this time.
10.5.13. Open Common Model.
10.5.13.1. To view an existing common model, from the Navigate menu select
―Equipment Classification‖ and click ―Open Common Model.‖ From the search window,
the user must select a MFR, at a minimum, to search. After a MFR is selected, the search
can be narrowed to nomenclature and common model. Select a MFR to begin the search
process. The search criteria can be narrowed to nomenclature and common model upon
selecting a MFR. The Common Model Item Detail record will appear if only one
matching record is retrieved. DMLSS will display a list of matching records if multiple
common model records are retrieved. Utilize the ―Detail‖ button to view desired detail information.
10.5.13.2. Product literature can be added or deleted anytime changes are required.
Select the item to be deleted and click the ―Delete‖ button.
10.5.13.3. Common Model Detail records can be marked for deletion. Access the
Common Model Detail window and click the ―Delete‖ icon on the vertical toolbar to
mark a record for deletion. If a record is already marked for deletion, an Undelete icon
will be visible in the Common Model Detail record. Select the ―Undelete‖ button to
remove the delete indicator from a detail record. Note: When a Common Model record
is deleted, it is only marked for delete. The record remains in the system and continues to
support any records associated with it. However, it will not be available for use in any new records.
10.6. Maintenance Plan.
10.6.1. The Maintenance Plan module provides a method to establish guidance on the type
of scheduled maintenance services and the scheduled maintenance intervals for each type of
device that has a maintenance requirement. Maintenance plans may be established centrally or locally at three different levels:
10.6.1.1. Equipment nomenclature.
10.6.1.2. Equipment nomenclature, MFR, and common model.
10.6.1.3. Equipment control number.

AFMAN41-216 13 FEBRUARY 2013 375
10.6.2. Equipment records meeting the criteria of an established maintenance plan should be
associated to that plan. Once the association is accomplished, the system applies the
appropriate maintenance intervals to the equipment.
10.6.3. Maintenance plans are used to identify maintenance responsibility and the agency or
level of maintenance support required for each device (for example, depot maintenance,
organizational, or calibration laboratory). A maintenance plan can be associated with a
procedure number in order to identify the default maintenance procedure used while completing work orders.
10.6.4. The maintenance intervals within each maintenance plan identify the number of
months between scheduled maintenance. Each device that has a Maintenance Requirement
Indicator of ―Y‖ should be associated to a maintenance plan so the system will generate scheduled work orders. The four different types of scheduled work orders are:
10.6.4.1. Inspection (INSP).
10.6.4.2. Preventive Maintenance (PM).
10.6.4.3. Calibration (CAL).
10.6.4.4. Scheduled Parts Replacement (SPR).
10.6.5. Different maintenance intervals are established for the different operational statuses in which the device can be used:
10.6.5.1. In-Use.
10.6.5.2. Mobility (assets subject to short-term deployment).
10.6.5.3. Stored.
10.6.6. New Plan.
10.6.6.1. To create a new equipment maintenance plan in DMLSS, from the Navigate
menu, select ―Maintenance Plan‖ and click on ―New Plan.‖ Another option is to select
the ―Maintenance Plan‖ icon from the horizontal toolbar and click the ―New‖ button in
the Search window. The Maintenance Plan Detail window opens. Complete all required
information and click ―Save.‖ Note: New maintenance plans require management
decisions to determine whether a central plan is non-existent, too lenient or too stringent,
and may require prior approval with AFMOA/SGALE. Caution should be used when
applying local procedures to items with a central maintenance plan since those procedures will also be tied to other items using the same nomenclature.
10.6.6.2. Select the equipment nomenclature from the dropdown menu. Utilize the
―Jump To‖ button to create a new nomenclature if necessary. The equipment
nomenclature establishes the associated device code, device class name, device class code, risk level, life expectancy, and specialty.
10.6.6.3. Enter the maintenance responsibility. This field identifies the agency or organizational level responsible for performing maintenance.
10.6.6.4. Enter the MFR‘s recommendation for maintenance intervals, as required, for
the following scheduled maintenance types: inspection, PM, CAL, and SPR. These
intervals may be modified based on the equipment‘s intended purpose; meaning, the

376 AFMAN41-216 13 FEBRUARY 2013
operational status (in-use, mobility, stored) may dictate different intervals.
AFMOA/SGALD can provide additional assistance with determining scheduled
maintenance intervals if necessary.
10.6.6.5. The MFR‘s name, common model, and procedure number may also be updated
in this window. The level of scheduled maintenance may dictate whether or not theses fields need to be used.
10.6.7. Open Plan.
10.6.7.1. To open an existing maintenance plan, from the Navigate menu select
―Maintenance Plan‖ and click ―Open Plan‖ or click the ―Maintenance Plan‖ icon from
the horizontal toolbar. A search can be conducted using the following criteria: device
class name, equipment nomenclature, MFR name, common model, ECN, or any
combination of fields. Leave all search fields blank and click the ―Search‖ button to view all maintenance plans.
10.6.7.2. Highlight a record and click the ―Detail‖ button to view and/or revise a
maintenance plan. Locally managed maintenance plans can be updated but centrally
managed maintenance plans are not editable.
10.6.8. View Plan.
10.6.8.1. The View Plan - Central option allows users to view a report of all centrally
managed maintenance plans by equipment nomenclature. The information contained on
this list is similar to information contained in the on-screen maintenance plan view. In
addition to equipment nomenclature, the following data is also displayed: risk levels,
maintenance responsibility, maintenance requirement indicator, procedure number, and
maintenance intervals for in-use, mobility, and stored assets. Select the ―Print‖ icon on
the vertical toolbar to print the entire list or individual pages as required.
10.6.8.2. The View Plan – Consolidated option displays records by maintenance
intervals and equipment nomenclature sequence. The information contained on this list is
similar to information contained in the on-screen maintenance plan view. In addition to
the equipment nomenclature, the MFR‘s name, common model, ECN, and procedure
number are displayed. The centrally managed indicator is also visible. Separate
Navigate options are available to access the consolidated maintenance plan list for in-use,
mobility, and stored assets.
10.7. Personnel Management.
10.7.1. The Personnel Management module is used to:
10.7.1.1. Establish records for all maintenance personnel.
10.7.1.2. Assign maintenance personnel to maintenance teams.
10.7.1.3. Document the training experiences and professional certifications of personnel.
10.7.1.4. Record the time that personnel are available for work each month.
10.7.1.5. Provide a gross breakout of how the time was spent.

AFMAN41-216 13 FEBRUARY 2013 377
10.7.2. Staff records are established when individuals arrive for duty at a MA. The staff
record should be inactivated upon departure. Maintenance personnel can be assigned to work
orders once the staff record is established and a DMLSS login has been established.
10.7.3. Certification and training records can be added for each individual in the MA. This
information is used to document the professional certifications and training of the personnel
and aids the supervisor in making work assignments as well as determining if the individual
requires additional training. Master certification and training records are maintained so they
can be linked to additional staff members without duplicating the information in each
individual staff record. This DMLSS function is not intended to replace or supersede any
official training records or documentation.
10.7.4. The staff member‘s timesheet information should be entered at the end of each
month. DMLSS uses this data to process performance information about individual staff
members. DMLSS also combines data from multiple staff members to process information
about teams and the overall MA.
10.7.5. The monthly timesheet provides a method to record the time each person was
available for work during the month. The timesheet provides a gross breakout of how time
was spent and provides a basis for productivity analysis reports. The MEPRS data is derived
from the hours entered into completed work orders and is summed for each customer account.
10.7.6. New Staff. To add a new staff member, from the Navigate menu, select ―Personnel
Management‖ and click ―New Staff.‖ This will open the Staff Detail window. The window
is further divided into four tabs: General, Certification, Training and Notes. Complete all
required information in the General Tab and any additional information for the staff member to supplement the staff members‘ profile.
10.7.6.1. General Tab. Use this tab to load general information about the new staff
member. Mandatory fields are name, rank, job class, and date of arrival. Optional fields
should be completed if possible to provide a thorough description of the staff member
and his/her capabilities. The staff member can also be assigned to a maintenance team at
this time.
10.7.6.2. Certification Tab. All awarded certifications should be documented in this tab.
10.7.6.3. Training Tab. Use the Training tab to document training maintenance
personnel have received for particular equipment. Information is entered by device class
name, nomenclature, MFR, and model number. Note: The equipment trained data
associated to a training course is contained in a Null Data table and does not mean these equipment items are in the MTF inventory.
10.7.6.4. Notes Tab. Load notes of interest pertaining to a staff member in this tab.
10.7.7. Master Training. This function allows maintenance managers to load specific
requirements for approved courses; such as, military training courses, MFR and contractor
courses, and MTF and/or local training courses. The master training function is designed to
eliminate duplication of effort. One master training record can be assigned to multiple staff
members versus adding the training information to each individual staff members training

378 AFMAN41-216 13 FEBRUARY 2013
record. This information is used to document training of personnel assigned, aids the supervisor in assigning work, and helps to determine if any additional training is required.
10.7.7.1. To load a course in the Master Training window, from the Navigate menu,
select ―Personnel Management‖ and click ―Master Training.‖ Under Training Records,
click the ―Add Course‖ button and complete all required fields. Click the ―Add Course‖ button to load additional courses.
10.7.7.2. To remove obsolete courses, select the course from the training records list and
click the ―Delete Course‖ button. This action removes the course from the Master
Training record and all staff members‘ records. It also disassociates all related equipment.
10.7.7.3. Equipment records can be associated to a specific training course by selecting
the course from the list of training records and selecting the ―Add Equipment‖ button.
The association is completed by loading the device class and equipment nomenclature.
Multiple device classes and equipment nomenclatures can be loaded by clicking the ―Add
Equipment‖ button. Enter the MFR and model number if the training was focused on a specific make and model.
10.7.7.4. To remove equipment from a course, select the device class and click the
―Delete Equipment‖ button. The equipment identification will be removed from the
Master Training Record and all members‘ records that had this training in the past.
10.7.7.5. Information to populate these fields is loaded in the Master Training Record module by an individual that is assigned the applicable roles and privileges.
10.7.8. Master Certification. DMLSS allows certification records to be added for each
individual in the MA. This information is used to document the professional certifications of
assigned personnel, aids the supervisor in assigning work, and in determining if any additional training is needed for an individual.
10.7.8.1. To add a certification record, from the Navigate menu, select ―Personnel
Management‖ and click ―Master Certification.‖ Click the ―Add Certification‖ button and
enter the certification description and issuing agency in the open fields. Click the ―Add Certification‖ button to load additional professional certifications.
10.7.8.2. To remove obsolete certification records, select the obsolete record and click
the ―Delete Certification‖ button. The certification will be removed from the Master
Certification List and from all members‘ records that had the certification.
10.7.9. Team/Staff. To access a list of all current staff, from the Navigate menu select
―Personnel Management‖ and click ―Team/Staff.‖ A list of all assigned maintenance
personnel is displayed. The MA can load new teams and assign personnel as local business
practices dictate.
10.7.9.1. Maintenance Teams. To establish a maintenance team, select the ―Create
Team‖ button under the Teams view. Enter the name of the team that is to be
established. Upon saving, the team becomes visible and accessible within the Team/Staff
window.
10.7.9.1.1. To add members to a team, select the name from the Staff List and click
the ―Assign‖ icon from the vertical toolbar. Select the team from the dropdown list

AFMAN41-216 13 FEBRUARY 2013 379
and click ―OK.‖ A staff member can also be assigned to a team by selecting the staff member name, then dragging and dropping it over the team name.
10.7.9.1.2. To remove a member from a team, select the name from the staff list and
click the ―Unassign‖ icon located on the vertical toolbar. The staff member will be
moved to the Unassigned team. Upon saving, unassigned staff members can be
assigned to another existing team. A staff member can also be unassigned by
selecting the staff member name, then dragging and dropping it over the Unassigned team.
10.7.9.1.3. A team leader can be assigned to each team. To accomplish this, display
the team members by selecting a team name. Select the person to be assigned as the
team leader and click the ―Assign Team Leader‖ button. Upon saving, a checkmark
will identify the team leader. Repeat these actions to assign a new team leader. The staff member must be assigned to a team in order to be designated as the team leader.
10.7.9.1.4. To delete a team, highlight the team name and click the ―Delete Team‖
button located on the vertical toolbar. All staff members assigned to that team will be
moved to the Unassigned team and become available for reassignment. The team to
be deleted cannot be in the equipment detail of any record or in an open work order
for this function to be successful.
10.7.9.1.5. Staff members that are no longer assigned to the MA must be removed
from the active staff roster. To remove a staff member, open the Staff Detail record
for the staff member and click the ―Inactive‖ icon from the toolbar. The staff member
information will be archived and may be viewed by selecting the ―View Inactive Staff‖ radio button in the Team/Staff window.
10.7.9.1.6. If a staff member returns to the MA, click the ―View Inactive Staff‖ radio
button and select the staff member from the list. Click the ―Staff Details‖ button to
view the staff member‘s detail record and click the ―Active‖ icon from the toolbar.
The staff member will be restored to the Unassigned team. It is advisable to revalidate the staff member‘s credentials and training upon reactivation.
10.7.9.2. A Staff Roster can be printed for all assigned staff members or for a selected
team. This roster reflects rank, name, duty phone, home phone, beeper number, team, and date assigned.
10.7.10. Monthly Timesheets. The monthly timesheet provides a method to record the time
each person was available for work during the month. The timesheet provides a gross
breakout of how the time was spent and provides a basis for Productivity Analysis Reports.
10.7.10.1. Timesheet information should be entered at the end of each month. DMLSS
uses this data to process performance information about individual staff members.
DMLSS also combines data from multiple staff members to process information about
teams and the overall Maintenance Activity.
10.7.10.2. Each staff member should provide the following values of time, rounded to the nearest tenth of an hour:
10.7.10.2.1. Regular hours.
10.7.10.2.2. Overtime hours.

380 AFMAN41-216 13 FEBRUARY 2013
10.7.10.2.3. Non-duty hours.
10.7.10.2.4. Duty absence.
10.7.10.2.5. Administrative support hours.
10.7.10.2.6. Technician training hours.
10.7.10.2.7. Supervisory hours.
10.7.10.2.8. Travel hours.
10.7.10.3. The following values are automatically calculated based on input:
10.7.10.3.1. Total hours = Regular hours + Overtime hours.
10.7.10.3.2. Hours available for work = Total hours - (Non-duty absence + Duty absence).
10.7.10.3.3. Hours available for maintenance = Hours available for work -
(Administrative support hours + Technical training hours + Supervisory hours + Travel hours).
10.7.10.3.4. DMLSS also calculates all column totals.
10.7.10.4. Timesheets are available by selecting ―Timesheets from Personnel
Management‖ under the Navigate menu or by selecting the ―Timesheet‖ icon while in the
Team/Staff window.
10.7.10.5. Monthly timesheets can be printed by using the ―Print‖ icon. The printed report mimics the on-screen display.
10.8. Maintenance Procedures. The Procedures module provides a means to develop and
distribute procedural guidance on scheduled maintenance services. Each procedure includes a
list of tasks performed on a routine basis. It also includes appropriate safety precautions, test
equipment, special tools, repair parts, miscellaneous supplies needed to perform the service, and descriptive text on how to perform the tasks.
10.8.1. Centrally managed maintenance procedures are provided as part of the DMLSS
system. The Add Like function in the Procedures module provides a means for a user at a
local MTF to use a centrally developed procedure to create a customized procedure. The
Add Like function copies most parts of the selected procedure and uses it as a starting point
to establish a new procedure. A maintenance procedure contains detailed steps and guidance
for maintenance services. A procedure can be general enough to apply to several devices or
specific enough to apply to a single ECN. When a work order is created for equipment that
has an associated maintenance procedure, data from the procedure is entered on the Required Materials tab of the work order and a checklist is associated with the work order.
10.8.2. New Procedure. To load a new procedure, from the Navigate menu, select
―Procedures‖ and click ―New Procedure‖ or click the ―Procedure‘ icon on the toolbar and
click the ―New‖ button in the search criteria window. The following three tabs are available
for updating when the procedure editor window opens: General Info, Applicable Devices,
and Required Materials. The author of the new procedure will default to the first name and
last name from the POC record associated with the user‘s login ID.
AFMAN41-216 13 FEBRUARY 2013 381
10.8.2.1. Enter a procedure title in the Procedure Editor window. The procedure title is
tied to the equipment nomenclature and sub–nomenclature. It is also based on the MFR‘s
maintenance recommendations and procedures.
10.8.2.2. Enter the estimated required hours to complete inspections, PM, CALs, and SPR.
10.8.2.3. Enter the scope of work to be performed. The scope provides a description of
work to be performed, identifies all applicable devices, and defines the parameters of the
procedures.
10.8.2.4. Enter the precautions associated to the procedure. The precautions identify hazards and/or special precautions associated with performing the required maintenance.
10.8.2.5. Enter any special training required by the servicing technician.
10.8.2.6. The procedure and version numbers are included in the General Info tab if the procedure is being modified from an existing procedure.
10.8.2.7. Update all maintenance plans associated with the new procedure in the
Applicable Devices tab.
10.8.2.8. Use the Required Materials tab to identify all spare parts requirements. They
are categorized by cataloged or generic, test equipment and special tools required, and any miscellaneous supplies required for completion of necessary maintenance.
10.8.2.9. The remaining tabs become accessible upon saving the information loaded to
the General Info, Applicable Devices, and Required Materials tabs. Utilize the
inspection, PM, CAL, SPR, and acceptance to add task statements that include acceptable
values and test points if required. Use task text to completely explain a requirement. A
special text field is also available for unique characters required to explain a value or tolerance. The Acceptance tab lists acceptance criteria for inspection and CAL items.
10.8.2.10. All new procedures are considered ―draft‖ procedures until the user selects the ―Final‖ icon on the vertical toolbar.
10.8.2.11. Locally established procedures can be marked for deletion by opening the
procedure and selecting the ―Delete‖ icon on the toolbar. The procedure will be removed
from the database if it has never been associated to a work order. Centrally managed
procedures cannot be marked for deletion at the local level. Once marked for deletion,
the indicator cannot be removed. The user must create a new version of the procedure.
10.8.2.12. These tabs represent the maintenance procedures to follow while working on
an equipment item. To print a specific checklist or acceptance, click the ―Checklist‖ icon
on the toolbar. The tab view changes and will only display the general info, inspection,
PM, CAL, SPR, and Acceptance tabs. Select the ―Print‖ icon on the toolbar to obtain a hardcopy of these procedures.
10.8.2.13. Use the Add Like icon to establish a new procedure. Selecting Add Like
displays the original information contained in the General Info and Required Materials
tab with the exception of Inspection, PM, CAL, and SPR hours. The procedure and
version number of this new procedure is modeled after the existing information displayed in the General Info tab. Edit fields as required to complete the new procedure.

382 AFMAN41-216 13 FEBRUARY 2013
10.8.2.14. Within the Applicable Devices tab, associate related maintenance plans to the
new procedure. Include spare and generic parts requirements, misc. supplies, and update
the test equipment/special tools fields under Required Materials. Click the ―Save‖ icon to view the remaining procedure tabs.
10.8.2.15. The Inspection, PM, CAL, SPR, and Acceptance tabs populate with the
original procedure requirements. Use the Add, Edit, Delete, or Copy buttons to modify
specifications. Select the ―Final‖ icon on the vertical toolbar to save changes and complete the process.
10.8.3. Open Procedure. To open an existing procedure, click the ―Procedures‖ icon from
the toolbar or select ―Navigate‖ from the menu bar, then ―Procedures‖ and click ―Open
Procedures.‖ A procedures search can be performed using the equipment nomenclature,
equipment MFR, common model, ECN, procedure number, and/or procedure title. There is also an option to view only active records or all records on file.
10.8.3.1. If a single record is retrieved, the Procedures Detail window will automatically
appear. A list of matches will be displayed if multiple records are retrieved. Highlight
the appropriate procedure number and click the ―Detail‖ button to view the procedure contents.
10.8.3.2. Use the Filter Button to further narrow the search option. The Filter option
allows users to enter additional search criteria. Multiple results are displayed in the search window.
10.8.4. View Procedure. The Procedures View option available from the Navigate menu
allows users to view and/or print the Scheduled Maintenance Procedure Library by Index,
Test Equipment/Special Tools table, Miscellaneous Supplies table, or the Special Character
table. These tables provide useful information on procedures and the available data to aid in creating locally developed procedures.
10.9. Schedules.
10.9.1. The Workload Forecasting module is an effective tool for the maintenance manager
to identify potential scheduling problems and to identify adjustments to the maintenance
schedule. The program will aid the manager in establishing and maintaining an effective
maintenance schedule. It will facilitate management of the scheduled workload by ORG,
customer, type of equipment, and whether the work is to be accomplished by various teams within the MA or by outside agencies such as contractors.
10.9.2. Throughout the course of a year, the system generates a predictable quantity of
scheduled maintenance work orders. The maintenance manager establishes a pattern of how
this work will be scheduled. Many managers base the schedule on the ORG, customer,
location of the equipment, and/or type of device. Once a methodology is established, new items are added to the schedule as they are received.
10.9.3. Establishing and maintaining a scheduling methodology is necessary for efficient use
of personnel. The manager needs to review the schedule periodically to ensure the workload
is distributed throughout the year and that the workload is balanced among the various teams
within the MA. In addition, the maintenance manager needs to ensure the individual items of
equipment are still scheduled appropriately. This involves summarizing and displaying the

AFMAN41-216 13 FEBRUARY 2013 383
estimated times required for each scheduled maintenance service. The workload forecasting program provides this capability.
10.9.4. The Workload Forecasting Reports can be used to evaluate the workload for each
month and the distribution of work for the entire year. It allows the manager to identify
potential scheduling problems and make the necessary adjustments to the maintenance
schedule. The manager will be able to access the information needed to redistribute the
workload in order to achieve a balance that coincides with the staff availability or mission
requirements. Workload Forecasting Reports will also provide an indication of the overall
structure of the scheduling logic and shows the major customer areas that are scheduled each
month. This is helpful in establishing a maintenance schedule for new equipment.
10.9.5. Detailed Scheduled Workload Forecasting. The system allows maintenance
managers to generate Detailed Workload Reports related to equipment items scheduled for
periodic maintenance. The Detailed Report shows the individual equipment that is scheduled
for service during each month of the following year. The summary workload reports provide
the summary information necessary to identify workload distribution problems. The Detailed
Workload Report provides the details and the methods to correct workload distribution
problems.
10.9.5.1. To display the Detail Workload Request screen, select ―Navigate,‖
―Schedules,‖ and then ―Detailed Workload Forecasting.‖ The Detail Workload Request
screen allows the user to enter search criteria used to produce a desired report. The user
also dictates how the data is to be grouped and displayed. Available search criteria are:
ORG name, DEPT name, customer name, device class name, equipment nomenclature,
MFR name, common model, building number, floor number, room number, equipment
location, team name, other government agency, contractor name, ERC, assemblage
description, assemblage number/assemblage instance description, and scheduling factor.
The report data can be grouped and displayed by: ORG, customer nomenclature, MFR,
MFR and common model, team, other government agency, contractor, building number, equipment location, risk level, and ERC.
10.9.5.2. When the user enters the search criteria and selects ―Search,‖ the system
retrieves the records, prepares the report, and displays the Detail Scheduled Workload
Report screen. The Detailed Scheduled Workload Report screen displays a truncated
Equipment Nomenclature and Scheduling Factor and the services scheduled for the
equipment during each of the next twelve months. The annual estimated hours for
servicing the equipment are also displayed. The equipment is grouped according to the
input criteria, and the number of hours required for each group is calculated and displayed.
10.9.5.3. The user may reschedule the equipment services by moving them to another
month on the display. When this is done, the system recalculates and displays the hours
for the affected months. The user may also change the schedules by selecting an item of
equipment and the Detail icon. The system will then display the Maintenance Data tab of
the equipment record. In the Maintenance Data tab, the user can change the date due for
each of the service types, change the scheduling factor, and change the team name. The
user can also access the maintenance plan for the equipment to see the service type and
intervals associated with the equipment.

384 AFMAN41-216 13 FEBRUARY 2013
10.9.5.4. The system will display the ECN and equipment nomenclature in the Micro-
help area (Lower left corner) of the screen when the user allows the mouse pointer to
remain over an individual equipment item in the Detail Workload Request screen.
10.9.6. Summary Scheduled Workload Forecasting. DMLSS allows users to generate
Summary Workload Reports related to equipment items scheduled for periodic maintenance.
The Summary Workload Report is used to evaluate the distribution of the scheduled
maintenance workload with summarized data. By selecting the report using various criteria,
the maintenance manager should be able to identify major workload distribution problems
and determine appropriate solutions. The Detailed Workload Report provides the
functionality to identify details related to the maintenance schedule and the means to balance the workload.
10.9.6.1. To display the Summary Workload Request screen, select ―Navigate,‖ then
―Schedules‘, then ―Summary Workload Forecasting.‖ The Summary Workload Request
screen provides a display that allows the user to enter search criteria used to produce a
report. The user also dictates how the data is grouped and displayed in the report.
Available search criteria include: ORG name, customer name, building number, team
name, other government agency, and contractor name. Criteria used to group and display
report data include: ORG, customer, building number, team, contractor name, other government agency, and service type.
10.9.6.2. When the user enters the selection criteria and selects ―Search,‖ the system
retrieves the records, prepares the report, and displays the Summary Scheduled Workload
Report screen. The program uses the scheduling data, date due, and intervals to
determine what maintenance services are due during the next 12 months. The program
will then obtain the estimated service time and accumulate the amount of time currently
scheduled for each time period. The program will then display the accumulated data on
the Summary Scheduled Workload Report. The Summary Scheduled Workload Report
has three tabs: Estimated Hours, Number of Work Orders, and Graphs.
10.9.6.3. The Estimated Hours tab provides the number of estimated hours required for
scheduled maintenance per month for the next twelve months. This data is grouped and summarized according to the selected criteria.
10.9.6.4. The Number of Work Orders tab provides the number of work orders, which
equals the number of equipment items, scheduled for servicing per month for the next
twelve months. The data on this tab is also grouped and summarized according to the selected criteria.
10.9.6.5. The Graphs tab provides the capability to graph the data included in the
Summary Scheduled Workload Report. The user has the option to use the estimated
hour‘s data or the number of work orders. The user may also select the type of graph, the
months, and whether or not to use group or total data on the graph. The system will
display the graph on the screen once the selections are made.
10.9.6.6. The user may print the Summary Scheduled Workload Report and/or the graph.
If the user selects the ―Print‖ icon while in the Estimated Hours tab, the system will
produce the report displaying the estimated hours data. If the user selects the ―Print‖ icon
while in the Number of Work Orders tab, the system will produce the report displaying

AFMAN41-216 13 FEBRUARY 2013 385
the number of work orders data. The system will print the graph being displayed when the Print icon is selected.
10.9.6.7. The Summary Scheduled Workload Report allows the maintenance manager to
view the overall scheduled maintenance workload from several perspectives. The
summary reports allow the manager to identify possible scheduling problems. By using
the system in an iterative manner, the manager can investigate the possible problems in
more detail and the impact of potential changes. The manager has two options for
reducing the scope of identifying the scheduling problem and identifying possible
solutions: Request an additional summary report with reduced selection criteria that is
focused on the possible problem and request a Detailed Workload Report. If the user
selects the Detailed Scheduled Workload Report, it will provide a means for the manager
to view the individual equipment records and maintenance schedules that the summarized
data represents.
10.10. Equipment Transaction History. Transaction History provides an auditable record of
transactions; such as, gains, losses, or custodian changes that affect the accountable equipment
inventory. DMLSS assigns a document number and creates a Transaction History record every
time a transaction affects the quantity or dollar value of assets in inventory, the identification of assets in inventory, or the custodial responsibility of assets in inventory.
10.10.1. Transaction History is used to verify that equipment transactions have been
processed properly and to determine potential corrective actions when an error has been
identified. Equipment gain and loss transactions can be reversed from Equipment
Transaction History when it is determined erroneous processing occurred. Reversing a
transaction processes all required actions in reverse order of how they were originally
processed.
10.10.2. Users have the option of searching for specific item criteria when performing
searches in the Equipment Transaction History Details window. Maximizing search criteria
will narrow the search results for specific information. This also minimizes the impact on
server performance.
10.10.2.1. In the Equipment Transaction History Search window, the user can search for
transactions, such as gains or custodian changes that affect the accountable equipment inventory.
10.10.2.2. To access the Equipment Transaction History Search window, click on the
―Navigate‖ menu, then select ―Transaction History.‖ In the Equipment Transaction
History Search window, type or select the required search criteria and then click
―Search.‖ The Equipment Transaction History Details window will display the search
results.
10.11. Equipment Accountability.
10.11.1. Gain. See Chapter 9, paragraph 9.6.1 for equipment gain procedures. Note:
ECN‘s can only be assigned in the MA application when the commodity class of the item is
set to Maintenance Record. The transaction reason is always set to Maintenance Equipment
Gain – No Accountability when performing an equipment gain within the MA module.

386 AFMAN41-216 13 FEBRUARY 2013
10.11.2. Loss. See Chapter 9, paragraph 9.6.2 for equipment loss procedures. Note: Users
processing losses within the MA module can only process losses on maintenance record
items only.
10.11.3. Equipment Record. See Chapter 9, paragraph 9.6.4 for equipment record search procedures.
10.12. Equipment Request. The MA Equipment Request functionality is the same process used in EM. Refer to Chapter 9, paragraph 9.10 for details.
10.13. Equipment Software. The MA Equipment Software functionality is the same process
used in EM. Detailed instructions are available in Chapter 9, paragraph 9.11.
10.14. New Catalog Item/Catalog Search. Catalog search procedures are described in Chapter 5, paragraph 5.2. and 5.3.
10.15. QA. MA QA procedures are the same as discussed in Chapter 5, paragraph 5.21.
10.16. SOS. Refer to Chapter 5, paragraph 5.2.1.4.19. for SOS procedures.
10.17. Reports. The Equipment and Technology Management module contains reports that can
be used to manage MAs, as well as provide data required for higher headquarters. The user will
access the Reports module via the Navigation menu or Navigation toolbar. At that point , the
user can select ―Standard Inquiry‖ or ―Standard Reports.‖ Note: Users must possess the proper privileges, assigned in SS, to access these reports.
10.17.1. The user will be able to view standard reports that have been generated during EOP
processing. The system will maintain these standard reports throughout the specified
retention period. This allows users to view standard reports generated during previous EOP
processing sessions. When viewing standard inquiries, the system will require the user to
select a report and enter the input parameters. The user can view the reports and then elect to
print the reports. Reports within the Standard Inquiry option are not accumulative and are
over-written when a new report is produced. The user has the option to save these reports as
.PSR files on the local PC. Saving these reports will allow for future reference.
10.17.2. The following definitions describe what are normally considered reports:
10.17.2.1. Report: A report is a collection of data presented automatically on a periodic
or event driven basis. Reports represent the status at that point in time and/or present
data of a historical nature. The data is presented in a standardized format and cannot be
manipulated. Standard reports essential for the effective management of the activity are
prepared automatically and are reviewed and analyzed locally as well as at the higher headquarters level.
10.17.2.2. Standard Inquiry: An inquiry is similar to a report in that the inquiry will
present data in a standard preprogrammed format. Inquiries are not produced
automatically on a periodic schedule. Instead, inquiries are produced only when a user requests the information.
10.17.2.3. On-line Data: Most, if not all, maintenance data is available and retrievable
during on-line sessions. The desired information is obtained by processing the appropriate report.

AFMAN41-216 13 FEBRUARY 2013 387
10.17.2.4. Ad Hoc Inquiry: The system uses BOs as a standard Ad Hoc retrieval program used to retrieve customized information from the database.
10.17.2.5. Refer to Chapter 13, Reports, for a brief description of each report in MA
along with its content and use.
10.18. MA Utilities Menu.
10.18.1. MA Utilities, Inbox.
10.18.1.1. The Equipment Maintenance Inbox provides important information about
actions requiring follow-up (pending actions). The inbox provides the ability to
immediately view and resolve issues, thus preventing the possibility of problems
developing and expanding. The inbox should be accessed daily, so issues can be
addressed in a timely manner. When the Equipment Maintenance application is
launched, the Inbox window appears if there are pending actions for a MA or individual.
The user can also access the inbox from the Utilities menu.
10.18.1.2. The Equipment Maintenance Inbox has three sections:
10.18.1.2.1. MA Inbox - Displays pending action messages that pertain to the ORG ID of the MA.
10.18.1.2.2. Individual Inbox - Displays pending action messages for a specific user ID.
10.18.1.2.3. Details Section - Displays additional details about a selected pending
action message in the MA or Individual Inbox, if they are available.
10.18.1.3. The MA and Individual Inbox sections work the same way. Some pending
actions are advisory messages and do not require user action. These pending actions are
marked by a ―No‖ in the Action Required field. Other pending actions require an action
on the user‘s part, and are marked by a ―Yes‖ in the Action Required field. If the user
has the MA roles, privileges, and associated resources for pending actions, the user can use the ―Jump To‖ icon to access the relevant records.
10.18.1.4. If the Action Required field for a pending action equals ―No,‖ the user can
delete the pending action. If the Action Required field equals ―Yes,‖ the message will
remain in the inbox until the user performs the action required. The user can click the ―Refresh‖ icon to refresh the window display.
10.18.2. MA Utilities, Install Mobile Work Order Applications.
10.18.2.1. Mobile Work Order Application.
10.18.2.1.1. Mobile Visual Environment Overview. The mobile work order process
allows greater flexibility to the maintenance technician. Because the Mobile Media
window is smaller in nature there will be some visual differences to how information
is accessed in the mobile environment. Information will be the same but may be
distributed between multiple tabs verses a single window view.
10.18.2.1.2. Mobile work order allows the maintenance technician the ability to
download work orders from the DMLSS computer system to a mobile device such as
a PDA, tablet/notebook PC, or Laptop. Once disconnected from the network, these

388 AFMAN41-216 13 FEBRUARY 2013
devices become mobile and can be used anywhere maintenance is required. Once all
updates are complete in the field, the mobile device is reconnected so the completed
data can be uploaded into DMLSS. The Work Order module is updated to reflect the
completed work. To use this option, the Mobile Work Order application must first be activated in DMLSS.
10.18.2.1.3. Activities will also be required to install active sync software that is
provided with the PDA on the PC located in the maintenance shop. Active sync allows the data to pass from the PC to the PDA and back.
10.18.2.1.4. Laptop and table or notebook PC‘s are required to act as the DMLSS
client in order to utilize the mobile work order function. Client in this case means the
maintenance technician uses the laptop as his or her everyday LAN based PC
applications. It is also the PC that runs DMLSS. This allows the user to disconnect
the LAN and travel with the PC when work orders are exported. The data is staged in
a DMLSS folder on the laptop hard drive until it is imported back to DMLSS.
10.18.2.2. Roles and Resources.
10.18.2.2.1. The privileges required to operate mobile work orders are assigned in
SS. All maintenance technicians should be assigned the resources required to use
mobile work order processing. The exception is if the AA or SA creates a local role
and excludes this resource.
10.18.2.2.2. Unlock Work Orders. This role is required to unlock work orders that
are locked by other users. The role must be assigned through SS by the AA or SA. It
is recommended that the use of this role be limited to the superintendent, NCOIC,
and/or team leader.
10.18.2.3. Install Procedure.
10.18.2.3.1. Mobile work order supports two types of electronic devices: PDA and
Laptop. Notebook and tablet PC‘s fall into the laptop category. The device(s) being
used will determine which utility to install. Both devices will need to be loaded if
both devices are used.
10.18.2.3.2. To install a device, from the Utilities menu select ―Install Mobile Work Order Applications.‖ Select the mobile device type: PDA or Laptop.
10.18.2.3.3. If the device is connected, the serial number, system name, and owner name will be updated in the window.
10.18.2.3.4. An information message will be displayed if the device is not loaded.
Check the connections and try again.
10.18.3. MA Utilities, Unlock Exported Work Orders.
10.18.3.1. Unlocking work orders that are already exported have grave consequences to
work order management. The ability to import any work that has been performed and
documented on a mobile device will be lost as a result of the unlocking process.
Coordination must be accomplished before this process is executed.
10.18.3.2. In some cases it might be prudent to unlock an exported work order. A piece
of equipment might be brought to the maintenance shop by the property custodian for

AFMAN41-216 13 FEBRUARY 2013 389
maintenance before the maintenance technician has a chance to perform scheduled
maintenance. A review of open work orders identifies that the equipment as requiring
scheduled maintenance. The maintenance shop technician may ask the superintendent to
unlock the work order so the scheduled maintenance work order may be updated with the maintenance performed.
10.18.3.3. The Filter button in the Unlock Work Orders window allows users to narrow
search options when there are multiple exported work orders. Enter the search criteria in
the fields located at the top of the window and click the ―Filter‖ button. Only the items matching that search will be displayed.
10.18.4. MA Utilities, Export Work Orders.
10.18.4.1. Exporting work orders is the process of downloading the work orders from
DMLSS to a mobile device. Data can be exported to a mobile device by using either the
Utilities menu or the Work Order menu. Either method will work provided the mobile device is installed.
10.18.4.2. To download work orders from the Utilities menu, select ―Export Work
Orders.‖ Within the Work Order Search window, select a scope and enter the applicable search criteria. Reference Figure 10.4.. Click the ―Search‖ button to process.
Figure 10.4. Work Order Search window.
10.18.4.3. The system will display all records matching the search criteria. Work orders
that have already been exported are identified with an ―E‖ in the exported field.
10.18.4.4. One, multiple, or all work orders can be selected for downloading. Highlight
the desired records and click the ―Export‖ icon to download the work orders to the
mobile device. When the prompt appears, select the type of device and the work orders
being downloaded (Figure 10.5.). Click the ―Export‖ button to complete the transfer.

390 AFMAN41-216 13 FEBRUARY 2013
Figure 10.5. Export Selection Criteria window.
10.18.4.5. After the data is downloaded:
10.18.4.5.1. Uncradle the PDA to begin mobile maintenance.
10.18.4.5.2. Disconnect the LAN cable from the laptop to begin mobile maintenance.
10.18.5. MA Utilities, Import Work Orders.
10.18.5.1. Completed work order data contained on the mobile device should be
transferred to the work order record in DMLSS. First, cradle the PDA or reconnect the
laptop to a LAN connection before proceeding.
10.18.5.2. Open DMLSS MA and from the Utilities menu, click ―Import Work Orders.‖
Select the mobile device being used and click the ―Import‖ button. All data will be
transferred to DMLSS, updating all affected maintenance work orders. If a record was
unlocked within DMLSS, the data being transferred will NOT update the Maintenance Work Order record.
10.18.6. MA Utilities, Hand Held Terminal (HHT). Where available, PDAs may be used to
perform inventories. With a HHT, users may scan bar code labels on the equipment, store the
inventory, and systematically reconcile the inventory. The HHT may be used in Batch mode
or in the interactive Radio Frequency (RF) mode, and users can switch between modes
during inventory. In Batch mode, you download or upload information between the HHT and
a personal computer (PC) using a docking port.
10.18.6.1. Transfer to HHT. Use this option to download a batch inventory from the PC (personal computer) to the HHT (hand held terminal).
10.18.6.2. Transfer from HHT. Use this option to download a batch inventory from the
HHT to the PC. The HHT must be attached to the computer, a functioning ActiveSync,
and the HHT must be in its cradle (because the file transfer is not using wireless mode).
10.18.6.3. HHT Model Type. The type of HHT being used must be identified within
DMLSS. To do so, access HHT from the Utilities menu and select ―Janus,‖ PDA, or Trakker. All sites should select PDA unless otherwise instructed.

AFMAN41-216 13 FEBRUARY 2013 391
10.19. Cross Functional Modules.
10.20.1. The following applications/modules are available, if provided the correct roles and permissions in SS. The DMLSS SA can assign these privileges, if required.
10.20.2. Equipment Accountability, Equipment Request, and Equipment Software
procedures are available in the EM module.
10.20.3. QA is available in the IM module.
10.20.4. Maintenance technicians assigned to order parts require ordering privileges within the CAIM module.
10.20.5. Contract procedures are available in the Service Contracts module.

392 AFMAN41-216 13 FEBRUARY 2013
Chapter 11
SERVICE CONTRACTS (SC)
11.1. Purpose. The SC application provides a method for recording SC information and
associating work orders. Contracts can also be linked to a particular equipment item. System
transactions generated in the SC module do not interface outside of the DMLSS environment.
11.2. Contract Records.
11.2.1. The SC record in DMLSS reflects the contract information from a specific contract
managed by the MTF. The window is divided into several tabs that contain specific information concerning different elements of the contract.
11.2.2. New Record.
11.2.2.1. Main Tab. In the Service Contract Record – Main tab (Figure 11.1.) users can
add or edit a service contract record and view contract record details. This tab provides
general information about a contract like the contract period, contractor, issuing
contracting office, and customer. The information on this tab is usually obtained from
first page of an issued contract.
Figure 11.1. Service Contract Record – New, Main Tab.
11.2.2.2. COR/COTR Tab. Use this tab to add or edit contract record details about the
primary Contracting Officer‘s Representative (COR) or the Contracting Officer‘s
Technical Representative (COTR). Also, identify if this individual has Quality
Assurance Evaluator (QAE) responsibility from this tab. Complete all required fields and
update as changes are identified.
11.2.2.3. Contract Provisions Tab. Contract provisions are identified within the
Statement of Work (SOW) and identify specific requirements about the contract. Place
of performance, duty hours, overtime hours/days, labor rates, renewal options, and
materiel cost basis are some of the areas that should be updated when loading contract information. Click the ―N/A‖ checkbox for items that do not apply to the contract.

AFMAN41-216 13 FEBRUARY 2013 393
11.2.2.4. Services Tab. This tab identifies CLINs referenced in the main contract and
identifies the service requirements. Click the ―Add‖ button within the Services tab and
enter the CLIN information from the contract. DMLSS currently does not allow for
recording ―partial‖ hours when generating a call. A suggestion to allow partial hours
billing is to set up a ―sub-CLIN‖ with a description referencing the partial hour and using
a unit price of partial hour. Figure 11.2. reflects an example of loading CLINs for partial hours.
Figure 11.2. Loading Partial Service Hours.
11.2.2.4.1. You can also view all associated equipment and components that a
contract was written for by clicking the ―Associated Equipment‖ button. The
information is populated from the Equipment tab. This information is linked to the
equipment data record and updates contract repair/service costs associated to the ECN in maintenance history when receiving a call.
11.2.2.4.2. The Provisions/Exclusion field is used to specify services and supplies
materiel that are provided for in the contract. Complete if required.
11.2.2.4.3. The Standard of Performance field identifies criteria that must be met for
acceptance of services. These could be QAE responsibilities or state that the unit must be working IAW MFG specification upon completion.
11.2.2.5. Equipment Tab. This tab associates equipment and components to the SC
record and is available only for service types of Equipment-Maintenance or Equipment-
Lease. From the window you can Add and/or Delete equipment information or view an equipment record‘s detailed information.
11.2.2.6. Administration Tab. Contains financial and call number information regarding
the contract. You can set call number blocks to mirror local policy and set call number to
auto-generate if required. You can also enter the total contract award amount to track
expenses associated with the contract. Payment terms are found on the first page of the
awarded contract.
11.2.2.7. Notes Tab. It is important to document conversations, funds increase requests,
training, and problems associated with any contract. Use the Notes tab to keep track of
information regarding the contract. Some examples include, funds increase requests,
vendor performance, and training received (QAE, COR).

394 AFMAN41-216 13 FEBRUARY 2013
11.2.3. Search Records. Use this Contract Record Search window to search for contract records or create a service contract record.
11.3. Contract Request.
11.3.1. New Contract Request. In the Contract Request window, you can request a new
contract for services, or edit an existing request. The Contract Request window is also used to record a purchase card buy.
11.3.1.1. Contract Request – Main tab. In the Contract Request window - Main tab
(Figure 11.3.), you can request a new contract for services, or edit an existing request.
The Contract Request window is also used to record a purchase card buy.
Figure 11.3. Contract Request Window – Main Tab.
11.3.1.2. Contract Request – Services tab. Use this tab to describe the individual
services (contract line item numbers, or CLINs) to be included in a contract.
11.3.1.3. Contract Request – Equipment tab. In the Equipment tab, you can edit the list
of equipment items associated with a contract request. Note: The Equipment tab is available only for service types of Equipment-Maintenance or Equipment-Lease
11.3.2. Search Request. Use the Contract Request Search window to search for service
contract requests. You can also print the search results, or create a new service contract
request.
11.4. New Call.
11.4.1. Use the New Call feature to document contract services once the contract is entered
into DMLSS. Click the ―New Call‖ button located on the vertical toolbar to access the Call Detail window (Figure 11.4.) when a service is used against the contract.

AFMAN41-216 13 FEBRUARY 2013 395
Figure 11.4. Call Detail.
11.4.2. Complete all required information and enter any applicable notes associated with the
call. Multiple CLINs can be entered for a call by clicking the ―Add‖ button. Information for
each CLIN, in most cases, is required for cost estimating. If the estimate contains partial hours, enter the corresponding sub-CLIN that applies to the estimate (if established).
11.4.3. Enter the work order number and ECN if the call is being performed against an
equipment item with an open work order.
11.4.4. Saving the call detail information adds the new call number to the call register file.
11.5. Call Register. The call register is available for only two types of contracts: BPA without
a call number in the main screen, and DBPAs. Locate the Service Contract Record window of
the desired record and click the ―Call Register‖ icon located on the vertical toolbar to view all call numbers associated to a selected contract.
11.5.1. CLIN detail information is provided for each selected call. Click the ―Call Detail‖
button to perform updates to open contract calls. Call Details provides all call information,
call notes, CLIN detail information, payment, and document numbers assigned to a selected
call under an associated contract Entering the document number will close the call for
services performed.
11.5.2. Open Call. Click the ―Open Call‖ button located on the horizontal toolbar to search
for open call numbers for a specified contract(s). Open calls can be viewed and/or modified
and call receipts can be processed using the Open Call feature. Note: Clicking Open Call on
the horizontal toolbar returns the register of all calls for all contracts. If you know the
contract you are working with, it is easier to go directly to the call register for that contract, by using the button on the vertical toolbar
11.5.3. Open Call Register. Use the Open Call Register option located on the Navigate
menu to view the register of open calls.
11.5.4. Completed Call. the ―Comp Call‖ button located on the horizontal toolbar to search
for completed calls. Use this feature to view all completed call numbers for a specified

396 AFMAN41-216 13 FEBRUARY 2013
contract(s). Review and/or modify call details in order to process additional expenditures not
previously identified. When the call is modified, the requirement reverts to open call status
and receipt actions will be required. Changes are reflected in the CLIN Details window in the Completed Call window.
11.5.5. Completed Call Register. Use the Completed Call Register option located on the Navigate menu to view the register of open calls.
11.6. Receipts. When calls are complete, click on Receipts in the navigation menu or use the
―Receipts‖ button on the horizontal toolbar to generate the DD250 required by Finance. The
actual quantity (services performed based on CLIN information) received and the date performed
must be entered. Click ―Save‖ to update the call register and generate the DD250. You can
select the number of copies that are required during printing. A CSR transaction is generated when a receipt is processed for a service contract.
11.7. Transaction History. In the Transaction History window, you can view details of
contract-related transactions, and can reverse certain transactions. The SC transaction history
provides an auditable record of transactions, such as receipts or purchase card buys, that affect
funds or due-ins. Use this module to verify that contract transactions have been processed
properly, and to determine the necessary corrective actions when an error has been identified.
Users cannot see SC transactions in CAIM or IM transaction history, nor can they see CAIM/IM
transactions in SC transaction history. Note: Only due-in quantity decrease (CSC) and receipt (CSR) transactions can be reversed in SC.
11.8. Standard Reports. Standard Reports include: Contract Expiration, Purchase Card
Register, and Transaction History.
11.8.1. Contract Expiration report. This report is a list of recurring service contracts that are
set to expire by a specified date. When you generate the report, you are prompted to specify the date. Use this report to determine which contracts need to be renewed.
11.8.2. Purchase Card Register Report. This report is a summary of purchase card activity
for a particular purchase card. This report shows all purchase card buy information at the
purchase card call level, and includes all line items in the call. This report mirrors the information contained in the IM Purchase Card Register.
11.8.3. The Transaction History Report allows you to use various search criteria and sort
preferences to view all Service Contracts transactions. This report is similar to the
Transaction History module; however, the results of this report can be saved to file as a spreadsheet.
11.9. Contract Renewal.
11.9.1. Contracts that are written for multiple years are renewed annually provided services
are still required. To reflect a contract renewal against an existing contract, the renewal
option must be established in the Contract Provisions tab in the SC record. If the renewal
indicator ―N/A‖ is checked, a renewal cannot be established. Click the ―Renewal‖ button on
the toolbar to open the Contract Renewal/Extension window. Select the ―Renewal‖ radio
button and enter the renewal information of the contract and add notes if required. Click ―Save‖ to update the contract record.

AFMAN41-216 13 FEBRUARY 2013 397
11.9.2. The Renewal option is also used to record contract extensions. When an extension is
authorized, Select the ―Extension‖ radio button and enter the extension information and any
related notes as required. Use the funding document to update financial information in the SC Record, Contract Provisions, and Administration tabs.
11.9.3. When a contract is complete or cancelled anytime during the contract period, enter a
note referencing the reasons for contract termination and click the ―Delete‖ button on the
toolbar. The Contract record will be marked for deletion and no actions will be processed
from that point forward. If a contract was deleted by mistake, click the ―Undelete‖ button
from the toolbar to reactivate the contract and make a note entry of the mistake in the Notes
tab.
11.9.4. Deleted contracts are archived in DMLSS to allow retrieval of information as required.

398 AFMAN41-216 13 FEBRUARY 2013
Chapter 12
FACILITY MANAGEMENT (FM)
12.1. Purpose. The FM application encompasses the inventories of installation, facility, room,
and RPIE as well as modules to capture maintenance procedures and PM schedules for the RPIE,
as well as, administrative/RC items (i.e. fire drills, safety training, etc). One of the main daily
functions of the FM application is tracking unscheduled work requests. Any work performed in
your MTF should be captured within DMLSS. FM also has the capability of capturing
requirements (unfunded work requests or projects) and projects (work that typically exceeds $2500).
12.2. Budget Management. To access the Budget Management module, click ―Navigate,‖
―Budget Management‖ or the ―Budget Mgt‖ button on the horizontal toolbar. The Budget
Management module is utilized to see where funds for a particular expense center have been
spent (i.e. work requests and projects). The Budget Management module is a read-only module.
You cannot add data to this module. If you want to update fund targets against a particular
project center or expense center, this will need to be accomplished within the SS application (Funds Module).
12.3. Directory Module. To access the Directory module, click ―Navigate‖ and then
―Directory.‖ The Directory module is utilized to capture the different ORGs and POCs that are
used throughout DMLSS FM.
12.4. Documents Utility. To access the Documents Utility module, click ―Navigate,‖
―Documents Utility‖ or use the ―Documents‖ button on the horizontal toolbar. The Documents
Utility module is utilized to create forms and reports from templates already stored in DMLSS
and populate them with data from within the FM application.
12.5. Drawing Management. To access the Drawing Management module, click ―Navigate,‖
―Drawing Management,‖ or the‖Draw Mgt‖ button on the horizontal toolbar. The Drawing
Management module is utilized to load and link drawings to the Room Inventory module. This
module also displays which active facilities have linked electronic Drawbase drawings. From
within the Drawing Management module, click on the plus sign (+) next to a facility number to
display the drawing(s) linked. Highlight a drawing name and click ―View‖ on the vertical
toolbar. This will open the drawing for viewing purposes.
12.6. Facility Inventory. To access the Facility Inventory module, click ―Navigate,‖ ―Facility
Inventory‖ or use the ―Fac Inv‖ button on the horizontal toolbar. The Facility Inventory module is utilized to track all of the buildings that the Medical Group is responsible for managing.
12.7. Facility Systems Inventory (FSI). To access the FSI module, click ―Navigate,‖ ―Facility
Systems Inventory (FSI-RPIE)‖ or use the ―Fac Sys Inv‖ button on the horizontal toolbar. The
FSI module is utilized to track all RPIE. DMLSS allows them to be grouped, so when PM schedules are created against them later, each RPIE doesn‘t have to have its own schedule.
12.7.1. The Cost and History Tabs. The Cost tab tracks the cost that has been spent
maintaining that piece of equipment over the years. The History tab tracks the scheduled and unscheduled maintenance/work requests pertaining to this piece of equipment.

AFMAN41-216 13 FEBRUARY 2013 399
12.8. Maintenance Procedure. To access the Maintenance Procedure module, click
―Navigate,‖ ―Maintenance Procedure‖ or the ―Maint Proc‖ button on the horizontal toolbar. The
Maintenance Procedure module is utilized to capture a maintenance procedure (specific tasks
performed during maintenance) for each of the RPIE in which you plan to schedule. The
hierarchy (system, subsystem, assembly category, and nomenclature) of a maintenance
procedure must be identical to that of a RPIE in order to schedule it for maintenance.
12.9. MTF Information. To access the MTF Information module, click ―Navigate‖ and then
―MTF Information.‖ The MTF Information module is where you initially loaded your
installation and where you update your information against your installation (e.g. MAJCOM,
DoD region, installation code, etc). This is also where a user may update a Facility Manager for a specific MTF/Installation.
12.10. Preventive Maintenance. To access the PM Schedule module, click ―Navigate,‖
―Preventive Maintenance (PM) Schedule‖ or the ―PM Sched‖ button on the horizontal toolbar.
The PM Schedule module is utilized to schedule RPIE for recurring maintenance. Once you
have the RPIE loaded in the FSI module and the maintenance procedures loaded in the
Maintenance Procedure module, you then combine those two to create a PM schedule. Any
given piece of equipment can have multiple PM schedules against it. You can have a
combination of any of the following frequencies: annual, bi-monthly, bi-weekly, daily, every 2
years, every 3 years, every 4 months, every 4 years, every 5 years, every 6 years, every 7 years,
monthly, quarterly, semi-annual, and/or weekly.
12.10.1. Assignment Tab. On the lower half of this tab you will find the Next Scheduled Date. This area will display the work projected dates for the next six scheduled PMs.
12.11. Project Management. To access the Project Management module, click ―Navigate,‖
―Project Management,‖ or the ―Proj Mgmt‖ button on the horizontal toolbar. The Project
Management module is utilized to capture all projects (work that typically exceeds $2500).
12.12. Room Inventory. To access the Room Inventory module, click ―Navigate,‖ ―Room
Inventory,‖ or the ―Room Inv‖ button on the horizontal toolbar. The Room Inventory module is utilized to capture all room records within the MTF.
12.13. Work Request. To access the Work Request module, click ―Navigate,‖ ―Work
Request,‖ or the ―Wrk Reqst‖ button on the horizontal toolbar. The Work Request module is
utilized to capture day to day unscheduled work (typically work doesn‘t exceed $2500 or it
becomes a project). Any work accomplished within your MTF should be captured in DMLSS.
This module also captures recurring work (generated from the PM schedule and RC modules).
12.14. Quality Control (QC) View. To access the QC View module, click ―Navigate,‖
―QA/QC‖ and then ―QC View.‖ The QC View module is utilized to track QC (which is
performed by your maintenance contractors). This module is part of the Work Request module.
The DMLSS user must have the role of FM ―QC Manager‖ assigned within SS (UP Assign) in order to access this module.
12.15. QA View. To access the QA View module, click ―Navigate,‖ ―QA/QC,‖ and then ―QA
View.‖ The QA View module is utilized to track QA (which is performed by a government
representative, typically the FM or QAE, Quality Assurance Evaluator). This module is part of
the Work Request module. The DMLSS user must have the role of FM ―QA Manager‖ assigned within SS (UP Assign) in order to access this module.

400 AFMAN41-216 13 FEBRUARY 2013
12.16. COR View. To access the COR View module, click ―Navigate‖ and then ―COR View.‖
The COR View module is used to perform final review actions on work requests prior to being
accepted by the COR (FM). Once accepted by the COR, the work requests status updates to closed. This module is a component of the Work Request module.
12.17. Requirement Detail. To access the Requirement Detail module, click ―Navigate,‖
―Requirements,‖ ―Requirement Detail‖ or the ―Rqmt Detail‖ button on the horizontal toolbar.
The Requirement Detail module is utilized to capture all unfunded work prior to being turned into a work request or a project.
12.18. Bundle Requirement. To access the Bundle Requirement module, click ―Navigate,‖
―Requirements,‖ ―Create Bundle‖ or the ―Bundle Rqmt‖ button on the horizontal toolbar. The
Bundle Requirement module is utilized to group (or bundle) multiple requirements together and eventually turn them into one work request or project.
12.19. Mass Update/Room Inventory. To access the Mass Update, Room Inventory module,
click ―Navigate,‖ ―Mass Update,‖ ―Room Inventory.‖ The Mass Update, Room Inventory
module is utilized to view/edit up to 1000 room records (all within the same facility) at once.
12.20. Mass Update/PM Schedule. To access the Mass Update, PM Schedule module, click
―Navigate,‖ ―Mass Update,‖ ―PM Schedule.‖ The Mass Update, PM Schedule module is utilized
to view/edit multiple PM schedules at once. However, these schedules do not all have to be
located within the same facility.
12.21. RC Deficiency. To access the Regulatory Compliance (RC) Deficiency module, click
―Navigate,‖ ―RC/JCAHO Deficiency‖ or the ―RC Defic‖ button on the horizontal toolbar. The
RC Deficiency module is utilized to track RC deficiency type work requests. Users may enter
new deficiencies within module; however, updates may only be performed by using the Work Request module. You may also enter RC deficiencies directly into the Work Request module.
12.22. RC Procedures. To access the RC Procedure module, click ―Navigate,‖ ―RC/JCAHO
Procedures,‖ or the ―RC Proc‖ button on the horizontal toolbar. The RC Procedures module is
utilized to capture a maintenance procedure (specific tasks performed during maintenance) for each of the RC items in which you plan to schedule.
12.23. RC Requirements. To access the RC Requirements module, click ―Navigate,‖
―RCJCAHO Requirements‖ or the ―RC Rqmts‖ button on the horizontal toolbar. The RC
Requirements module is utilized to schedule RC items for recurring maintenance. Since there
are no RC items similar to RPIE items, you just have a RC maintenance procedure and the RC requirement (or schedule).
12.23.1. Remarks Tab. On the right side of this tab you will find a column that shows the
Schedule Date. This column will display work projected dates for the remainder of this FY
plus the next FY. As one date is generated into a work request, another date (the next scheduled date) populates in its place.
12.23.2. History Tab. This tab identifies the particular work requests and the costs that were
associated with each of the work requests.
12.24. Business Objects. To access Business Objects, click the ―Bus Obj‖ button on the horizontal toolbar. BO is used as the primary Adhoc Reports writing program within DMLSS.

AFMAN41-216 13 FEBRUARY 2013 401
12.25. DecisionBase Pro. To access the DecisionBase Pro module, click ―Navigate/
DecisionBase Pro.‖ The DecisionBase Pro module is utilized to access drawings and achieve
limited functions such as zoom, pan, etc. DMLSS users have the ability to view limited drawing
data within DecisionBase Pro. The Drawbase module offers a wider range of access to drawings.
12.26. Drawbase. Drawbase is a Commerical off the Shelf (COTS) program incorporated
within the DMLSS system. This module is utilized to link rooms on the drawing to rooms in the
DMLSS-FM database; to run and reconcile space discrepancy reports; to create a room inventory
from a Drawbase drawing; to execute queries in DMLSS and have the results displayed
graphically in a drawing; to execute a reverse query from within a drawing to view a room,
RPIE, work request, and project records in DMLSS; and how to color code rooms based on
various attributes such as department, service, room type, cleaning requirement, local use fields,
etc. To access Drawbase, click ―Navigate,‖ ―Drawing Management,‖ click the plus sign next to
your Installation, click the plus sign next to the facility which you want to select the drawing for, select the floor which you want to view and hit ―View‖ on the vertical tool bar.
12.27. User Preferences. To access the User Preferences module, click ―Utilities,‖ ―User
Preferences.‖ The User Preferences module is utilized to set up your individual user preferences
for a specific installation and facility. This way, each time you go to a search screen or click the new button, your installation and facility number will default to your user preferences.
12.28. Site Preferences. To access the Site Preferences module, click ―Utilities,‖ ―Site
Preferences.‖ The Site Preferences module is utilized to set up preferences for various fields for your entire site, not just an individual user.
12.29. Inbox. To access the FM Inbox, click ―Utilities,‖ ―Inbox.‖ The inbox is utilized to
display user and system prompted reminders from the various modules. The inbox displays
information which is shared and accessed by all FM users. A user will only see information for which they are privileged for.
12.30. Override Process. To access the Override Process module, click ―Utilities,‖ ―Override
Process.‖ The Override Process module is utilized when a record is locked (possibly by system
error) and you wish to unlock the record.

402 AFMAN41-216 13 FEBRUARY 2013
Chapter 13
DMLSS REPORTS
Section 13A—DMLSS
13.1. Purpose. This chapter provides information on standard DMLSS reports and inquiries
contained in the IM, AM, CAIM, CS, EM, MA, and SS applications. Use this chapter to view a brief description of each report including its purpose, content, and use.
13.2. DMLSS Report Types. DMLSS provides standard reports or inquiries contained in each
application, as well as ad-hoc type reporting via Business Objects.
13.1.1.1. Standard Report. A standard report is a collection of data presented
automatically on a periodic or event driven basis. Reports represent the status at that
point in time and/or present data of a historical nature. The data is presented in a
standardized format, and cannot be manipulated. Standard reports essential for the
effective management of the activity are prepared automatically. Standard reports are
produced for local MTF management, and to meet the requirements of higher
headquarters reporting.
13.1.1.2. Standard Inquiries. Standard inquiries are similar to reports in that the inquiry
presents data in a standard pre-programmed format. Inquiries are not produced
automatically on a periodic schedule. Instead, inquiries are produced only when the user
requests the information.
13.1.1.3. Ad-Hoc Reports. In addition to standard reports and inquiries, DMLSS
supports adhoc reporting via a commercial-off-the-shelf (COTS) application, currently
Business Objects, that allows users to build queries from which they can generate reports
and perform analysis using their own business terms. Several standard/―canned‖ reports
exist in Business Objects to assist local management and other higher headquarters reporting.
13.3. Access to Standard Reports and Inquiries. Standard reports are run in DMLSS with
criteria that are already set. Click Reports on the horizontal toolbar or select Reports on the
Navigation toolbar to run a standard report in each module. In the Report List window, you can view, print, and save a listing of all standard reports.
Section 13B—Inventory Management (IM) Reports Module
13.4. IM Reports.
13.4.1. AHFS Classification Detail. This report provides details on American Hospital Formulary Service (AHFS) pharmaceutical receipts processed in the specified date range.
13.4.1.1. Content. Use the selection screen to identify IM, customer, or all external
purchases, as well as inclusive dates and the specific AHFS codes for the search. This
report displays by AHFS code the items purchased, total cost, total units, and total for the AHFS class.

AFMAN41-216 13 FEBRUARY 2013 403
13.4.1.2. Use. Inventory managers may use this list to research receipts by AHFS code and provide this management data to the Pharmacy.
13.4.2. AHFS Classification Summary. The AHFS Classification Summary report provides
summary information on American Hospital Formulary Service (AHFS) pharmaceutical receipts processed in the specified date range.
13.4.2.1. Content. On the criteria selection screen select IM, customer, or all external
purchases. Specific AHFS codes may also be selected to be included within the search.
This report displays the total cost for each AHFS code during the specified date range.
13.4.2.2. Use. Inventory managers may use this list to research receipts by AHFS code and provide this management data to the Pharmacy.
13.4.3. Adjusted Unit of Issue Report. The Adjusted Unit of Issue Report identifies all catalog records that have been configured with an adjusted unit of issue.
13.4.3.1. Content. This report displays item ID, short item description, price factor, U/P,
U/P quantity, U/S and U/S quantity.
13.4.3.2. Use. This report gives the manager visibility of catalog records with an
adjusted unit of sale in order to fit the needs of the customer, maximize stock rotation, and consumption.
13.4.4. Aged Due-in – AM. The AM Aged Due-in report provides detailed information on
requisitions for assemblages that are overdue according to the procurement lead time for a given item.
13.4.4.1. Content. There are a many options available on the report selection criteria
screen to select. These options include organization, assemblage, delinquent days,
project code, SOS type, SOS, priority, status code, and critical code. This report is
separated by organization and assemblage and includes requisition information for each item also including the days delinquent, date ordered, and average pipeline time.
13.4.4.2. Use. This list shows management and status information from each due-in
selected. Use this report to determine delinquent orders that require immediate follow-up action.
13.4.5. Aged Duein – IM. The IM Aged Duein report (Figure 13.1.) provides detailed
information on requisitions for IM that are overdue according to the procurement lead time
for a given item.

404 AFMAN41-216 13 FEBRUARY 2013
Figure 13.1. Aged Duein – IM Report.
13.4.5.1. Content. The report selection criteria screen options include stratification
type(s), SOS Type, SOS, days delinquent, status, and priority code. This report displays
each due-in with its requisition information to include days delinquent, date ordered,
contract, and call number. Due-ins are separated by SOS.
13.4.5.2. Use. This list shows management and status information from each due-in
selected. This report can be used by acquisitions personnel to view IM requisitions that have become delinquent and require immediate follow-up action.
13.4.6. Aged Due-in Summary. The Aged Due-in Summary report (Figure 13.2.) provides
summary information on active due-ins and categorizes them based on the age of the due-in.

AFMAN41-216 13 FEBRUARY 2013 405
Figure 13.2. Aged Due-in Summary Report.
13.4.6.1. Content. The report selection criteria screen prompts the user to select AM,
IM, or All Orders. The report results list each SOS with an active due-in along with days
old, average age, and order/ship time. The Days Old column is divided into 5 categories.
1-15, 16-30, 31-60, 61-90, and over 90 days. The total number of due-ins for each
category is listed at the bottom of the report. Detailed information for each due-in can be viewed by conducting a due-in search.
13.4.6.2. Use. This report provides Acquisition managers with an overview of the total
number of due-ins by SOS along with the age category. Analyze each SOS for possible over age trends and perform follow-up action(s) where applicable.
13.4.7. Aged Due-Out Summary. The Aged Due-Out Summary report provides summary information on active due-outs.
13.4.7.1. Content. This report contents include totals for active due-outs 1-15, 16-30,
31-60, 61-90, and over 90 days old by EOR by customer. The total and average age is also listed for each customer.
13.4.7.2. Use. This report provides Acquisition managers with an overview of the total
number of due-outs by customer along with the age category. Analyze each customer‘s
due-outs for possible trends. Note: Aged due-outs often have a direct connection to aged due-ins.

406 AFMAN41-216 13 FEBRUARY 2013
13.4.8. Aged Sales Summary. The Aged Sales Summary report displays how quickly
customer demands are being satisfied. The criteria selection screen defaults to a date range
of the previous month, but this can be adjusted.
13.4.8.1. Content. This report lists totals for sales 1-15, 16-30, 31-60, 61-90, and over
90 days old by EOR by customer. The total and average age is also listed for each
customer. Every ISS (issue sale), INR (issue non-routine), and BRS (backorder release
issue sales) transaction that happened during the selected time period is counted.
13.4.8.2. Use. This report can be used to view how well customer demands were met
during a specified time period. Analyze each customer‘s demand/issue history for possible trends.
13.4.9. Best Medical Surgical Items By Dollar Savings. The Best Medical Surgical Items
By Dollar Savings report (Figure 13.3.) calculates estimated savings that would occur by switching to a suggested alternative medical surgical item.
Figure 13.3. Best Medical Surgical Items By Dollar Savings Report.
13.4.9.1. Content. This report displays and compares the item currently in use to a
suggested alternative. The report displays the annual quantity ordered, suggested
manufacturer, MFG category number, PV order number, U/P, price, and estimated annual savings.
13.4.9.2. Use. Acquisition managers should use this report to aid their research of
potentially less expensive Med Surg alternatives. Verify the alternative item‘s catalog
information is correct and the item meets the needs of the customer prior to adjusting the respective MTF catalog record.
13.4.10. Best Pharmaceutical Items By Dollar Savings. This report provides suggested
alternatives for stocked pharmaceutical items that potentially result in cost savings.
13.4.10.1. Content. This report displays and compares the item currently in use to a
suggested alternative. The report displays the annual quantity ordered, suggested manufacturer and NDC, suggested U/P, and estimated annual savings.
13.4.10.2. Use. Acquisition managers should use this report to aid their research of
potentially less expensive pharmaceutical alternatives. Verify the alternative item‘s
catalog information is correct and the item meets the needs of the Pharmacy prior to adjusting the respective MTF catalog record.
13.4.11. Catalog Discrepancy. This report displays the sites reported catalog discrepancies.
It lists active and/or closed discrepancies for up to 12 months past final resolution.

AFMAN41-216 13 FEBRUARY 2013 407
13.4.11.1. Content. Use the report search criteria window to select the desired results.
Each result shows the item ID, tracking ID, sequence ID name, date, submitter,
disposition, along with the current and proposed change(s).
13.4.11.2. Use. Acquisition managers use this report to view the status of reported catalog discrepancies.
13.4.12. Commercial Returns Call Status. The Commercial Returns Call Status report displays the current status for each commercial returns call number.
13.4.12.1. Content. Use the search selection criteria screen to select the desired call
number(s). The scope may be set to either IM or AM and the report type may be set as
either detail or summary. The detailed summary report is broken down by call number.
Each call number has a column for current status, number of items, value, and credit.
The summary report displays a list of selected call numbers with number of items, value,
credit, and cost information. The last page of the report displays the total for all selected call numbers.
13.4.12.2. Use. Acquisition manager‘s can use this report to review status and check for
incomplete calls. Process commercial returns IAW AFI 41-209, paragraph 3.56 and AFMAN 41-216, paragraph 5.10.
13.4.13. Contract Call Register. The Contract Call Register report displays all of the call numbers used against current or expired contracts.
13.4.13.1. Content. This report displays each call number, by SOS, with the number of
line items, total dollars, organization, user ID, and date of order.
13.4.13.2. Use. This report can be used to validate contract call information and account for total line items and dollars spent per SOS and call number.
13.4.14. Contracted Items Comparison Report. This report displays items with usage that are being purchased by the facility but available on contract with a potential cost savings.
13.4.14.1. Content. Use the search selection criteria screen to select the item type,
contract type, and from and to dates. The report displays item ID, product ID,
description, U/P and U/S, contract, quantity purchased, sum of purchases and potential
savings. Note: When a user selects Uniform Formulary Contracts (UFC), the system
compares items with demand during the specified period being purchased from other
sources or other contract vehicles not equal to the contract type code UFC. The system
returns acceptable equivalent items with a contract type code of UFC so you can change
to the UFC item.
13.4.14.2. Use. Acquisition managers can use this report to research potential savings by contract. Use this listing with other resources to optimize acquisition costs.
13.4.15. Customer Hazardous Material. The Customer Hazardous Material report displays hazardous items that have been issued to customers.
13.4.15.1. Content. Use the criteria selection screen to enter the desired date range. The
report displays by customer the hazardous materials item ID, short item description, quantity, and UOS.

408 AFMAN41-216 13 FEBRUARY 2013
13.4.15.2. Use. Inventory managers use this report to manage on-hand hazardous
material. Verify availability of proper MSDS‘s. It can also be used to notify
Bioenvironmental Engineering Services of all hazardous material sales. Note: The
Customer Hazmat File in IM Utilities creates a similar hazardous materials file that may be provided to the BEE staff or other official requesting activity.
13.4.16. Customer Organization. The Customer Organization report identifies all customers
within the MTF. This report provides a listing of contact and expense/project center(s) information for all service/customers.
13.4.16.1. Content. This report includes point of contact, phone number, fax number, e-
mail address, mailing address, and expense/project center information for each customer
ID.
13.4.16.2. Use. This report can be used to view a list of all customer point of contact information recorded in DMLSS.
13.4.17. DAPA Number/Contract Type Code Changes. The DAPA Number/Contract Type
Code Changes report displays catalog items when a DAPA number or contract type code
change has occurred.
13.4.17.1. Content. Use the criteria selection screen to enter item ID, SOS, user ID, and
a date range. The selection criteria include item ID, SOS, user ID, from, and to dates.
The report contents display the item that was changed, which element was changed,
previous information, new information, and the user who processed the changes.
13.4.17.2. Use. DAPA number/contract type code changes occur either by user action,
EOP processing, or UDR/delta update. In addition to the pending action, this report may
be used to review and validate any DAPA number/contract type code changes for usage
items within the catalog.
13.4.18. Delinquent Purchase Card Reconciliation Report. The Delinquent Purchase Card
Reconciliation Report (Figure 13.4.) displays a list of delinquent PC reconciliations based
upon two categories: Part I – Closed orders that have not been reconciled by the cardholder
for a specified period of time, and Part II – Reconciled orders that have not interfaced with Finance.
Figure 13.4. Delinquent Purchase Card Reconciliation Report.
13.4.18.1. Content. The search criteria selection screen defaults to search for closed
orders not reconciled more than 60 days ago and 30 days ago for reconciled orders not
sent to DFAS. The option to search by card holder or approving official is available. The

AFMAN41-216 13 FEBRUARY 2013 409
report contains the account number, contract call number, order close date, SOS, and purchase card AO.
13.4.18.2. Use. AO‘s and cardholders must use this report to view PC requisitions that
have closed and require reconciliation or have been reconciled but not sent to DFAS. Refer to paragraph 5.7.7. for additional information on this report.
13.4.19. Destruction. The Destruction report allows the retrieval of destruction records for viewing or reprinting.
13.4.19.1. Content. Destruction documents may be searched by item ID, document
number, and date range. This report includes date and signature lines for environmental health certification, the destruction officer, and two witnesses.
13.4.19.2. Use. This report is produced as a result of a user processing a destruction
against an item. DMLSS prompts users to print destruction document(s) when closing
the Destruction window. If ―No‖ is selected, users can access this report to reprint the
documents. Process destructions IAW AFI 41-209, Chapter 3. DMLSS procedures can
be found in paragraph 5.9. Destruction documents are maintained IAW AFRIMS T 41-
04 R 13.00.
13.4.20. Expense Center EOM Fund Balance. The Expense Center EOM Fund Balance
report displays a specified Expense Center‘s EOM closing balances. This report is produced during monthly EOP processing.
13.4.20.1. Content. Use the report selection criteria screen to select the Expense
Center(s) and Month and Year. This report resembles the Expense Center detail screen in
System Services. The total balances for the Expense Center are shown along with a break for each EOR.
13.4.20.2. Use. This report can be used to ensure the availability of funds and validate
available balances.
13.4.21. Failed MTF Catalog Changes. This list identifies failed MTF catalog changes.
13.4.21.1. Content. Use the report selection criteria to specify the As Of Date. This report displays the item ID and description, U/P CD, U/P price and error message.
13.4.21.2. Use. This report should be used to determine if additional catalog change updates are required.
13.4.22. Fill Rate. The Fill Rate report provides quantity and percentage of fills as specified
for supplier, customer, or as a summary.
13.4.22.1. Content. Use the report selection criteria to choose the scope of either
supplier, customer, or summary. Also select the From and To dates and suppliers. This
report displays filled and unfilled quantities/demands, fill rate quantity/demand
percentages.
13.4.22.2. Use. Managers use fill rate data as a management indicator. The fill rate
indicates the amount of filled issue requests expressed as a percentage. These figures are
based upon the amount of line items requested for issue divided into the number of line
items issued as a partial or complete issue for records with a stock control level.

410 AFMAN41-216 13 FEBRUARY 2013
13.4.23. Hazardous Material. The Hazardous Material report (Figure 13.5.) identifies items that have on-hand balances that are coded as hazardous.
Figure 13.5. Hazardous Material Report.
13.4.23.1. Content. The report scope may be set to view hazardous material by IM, AM,
or CAIM and the report contents include item ID, U/P, hazmat code, quantity, stratification type, and code.
13.4.23.2. Use. Inventory managers use this report to manage on-hand hazardous
material. IAW 41-209, Chapter 6, provide Bioenvironmental Engineering Services and
the Base HAZMAT Pharmacy with a copy of the monthly Hazardous Materiel Report.
Validate the items on this list with those on the ESOHMIS Hazardous Material Authorization List.
13.4.24. Inventory Adjustment Voucher. The Inventory Adjustment Voucher (Figure 13.6.)
is report allows inventory adjustment vouchers to be printed from transaction history.
Figure 13.6. Inventory Adjustment Voucher.
13.4.24.1. Content. Use the report options to select an item ID and/or date range to be
entered. This report displays items that were adjusted along with the type of adjustment
i.e. IAL or IAG. The prices, quantity, document number, inventory type, date and user
ID is also displayed. Located at the bottom of the report are signature blocks for the
certifying official and approving official.
13.4.24.2. Use. Use this option to print or reprint the formal Inventory Adjustment
Voucher resulting from a finalized inventory. Process inventory adjustments IAW AFI

AFMAN41-216 13 FEBRUARY 2013 411
41-209, Chapters 1, 3, 7, 13, and/or 14. DMLSS inventory adjustment procedures that
can be found in Chapter 5, paragraph 5.8. Verify each line item on the document. Obtain
the signature of the certifying and approving officer on the last page of the document. Keep on file and maintain IAW AFRIMS T 41-04 R 13.00.
13.4.25. Inventory Management. This report contains management indicators for static levels, operating stock, and economic retention.
13.4.25.1. Content. The Inventory Management Report is divided into five different
―Dollar of Annual Sales‖ categories. Each line contains level quantities with respective dollar values and percentages for static levels, operating stock, and economic retention.
13.4.25.2. Use. Use this report as a management tool to review the quality of inventory management practices.
13.4.26. Inventory Shipment Gain/Loss 1348-1a. This report provides the capability to print
DD Form 1348-1a documents from processed gains and losses in transaction history.
13.4.26.1. Content. Use the report criteria selection screen to select a search by either
gain or loss transaction. These options include item ID, document number, and date range. A minimum of one selection criteria is required.
13.4.26.2. Use. Use this option to print or reprint a DD Form 1348-1a as a result of a
shipment gain or loss.
13.4.27. Issue/Turn-in Summary. The Issue/Turn-in Summary lists detailed item and cost
information for LOG issue and turn-in transactions, turn-in reversals, issue reversals, and purchase card adjustments for selected customer(s) for a prescribed period of time.
13.4.27.1. Content. Use the report options to select customer(s) and date range. The
report is divided into sections to include issues, issue reversal, turn-ins,
13.4.27.1.1. Section A – Issue. Displays all issued to the customer.
13.4.27.1.2. Section B - Issue Reversal. Displays all issues that were reversed.
13.4.27.1.3. Section C - Turn – In. Displays all items that were turned in.
13.4.27.1.4. Section D - Turn - In Reversal. Displays all turn ins that were reversed.
13.4.27.1.5. Section E – Purchase Card Adjustments. Displays all purchase card
adjustments for items issued. Note: PCAs are not generated by your customers.
PCAs are generated by GPC holders to account for unknown shipping costs at the
time of order. They should not be used as a price correction tool.
13.4.27.2. Use. This report can be used to review all issue and turn-in transactions for
selected customer(s) based on specified criteria. Custodians can use this document to
review and validate their backorders. Logistics managers can review this report to see
what customers are buying, i.e. poor ordering practices, nonmedical customers should only purchase medical items, etc .
13.4.28. Item Gains/Losses. This report provides the capability to print all gain/loss transactions processed within a specified date range.

412 AFMAN41-216 13 FEBRUARY 2013
13.4.28.1. Content. Use the report options to enter item ID and date range. The report
contains item ID and transaction type i.e. DDL, CRL, IAG, TIG or TZL along with price,
quantity, document number, inventory type, date and user ID.
13.4.28.2. Use. Inventory managers can use this report to review gain and losses, check for trends and required documentation.
13.4.29. Items with Location of NONE. This report identifies items that do not have an assigned inventory location.
13.4.29.1. Content. The report contents include item ID, item description, level, and
quantities on-hand. On-hand quantities are broken down by stratification type and state.
13.4.29.2. Use. Use this list to reconcile items without an assigned location. Working this list will help minimize warehouse refusals.
13.4.30. LOG Back Order. The LOG Back Order report (Figure 13.7.) lists detailed item and cost information for current LOG due-outs for selected customer(s).
Figure 13.7. LOG Back Order Report.
13.4.30.1. Content. Use the report options the select the customer(s). Report contents
include item ID, item description, refund code, B/O quantity, U/P, price, document number, and status.
13.4.30.2. Use. Acquisitions managers and customers should use this report to review aged due-outs and validate customer requirements.
13.4.31. Log Inventory Balance Report. This report lists current inventory balances by
selected stratification (strat) state(s) and for selected item(s).
13.4.31.1. Content. Use the report selection criteria window to select desired strat
state(s) and item ID(s). This list displays item ID and description, U/S and price, storage
area and location, level and total OH. OH balances are divided into separate balances by
strat state.
13.4.31.2. Use. Use this report as a management tool to view strat states of a selected
item(s) or the overall quality of the inventory and management practices. NCOIC‘s

AFMAN41-216 13 FEBRUARY 2013 413
should use this report to determine if potential excess or excessive ordering practices exist. Users should review potential excess balances with customers.
13.4.32. Missing MMQC Messages. This report lists MMQC messages that have not been
received.
13.4.32.1. Content. This report displays the file name of missing MMQC messages.
13.4.32.2. Use. This list identifies missing messages by breaks in the number sequence
of file names. DMLSS also sends an automatic message to the Joint Medical Asset
Repository (JMAR) team when an MMQC message is missing. Typically the MMQC
message is received into the DMLSS inbox. Medical logisticians must perform research
of catalog records to determine whether the item has been received in the MTF, and
notify any potential end user of the item(s). Whether the item has come through the MTF
or not, the PSO must be notified. If the item is in use, logistics must obtain the item from
the customer and take any action(s) directed by the MMQC message. The Patient Safety
Officer will be made aware of the action taken, and will approve (or disapprove if
appropriate) closure of the pending action. If a MMQC message does not require action,
the PSO must still approve closure. Logistics will document the action field of the
MMQC message within DMLSS. Although this is not a required field in DMLSS, AFI
41-209 directs that it must be annotated for every message received.
13.4.33. Monthly Duein/Dueout Report . The Monthly Duein/Dueout Report identifies the due-ins and due-outs that were sent to finance during the last end-of-month processing cycle.
13.4.33.1. Content. Use the report selection criteria screen to retrieve due-ins, due-outs,
or both. This report displays due-ins by SOS type code. The monthly due-out report is
shown by project center. Total dollar figures are shown by EOR/expense center for current, prior, 2
nd prior, and older FY due-outs.
13.4.33.2. Use. Logistics managers use this report for managerial oversight of their due-ins and due-outs.
13.4.34. Operating Business Data Report. This report displays data using the values
stored in the Balance In DFAS tables.
13.4.34.1. Content. The report reflects both current fiscal year data along with prior
fiscal year data and contains management data such as daily and monthly sales, cost of
goods sold, days of stock on-hand, inventory turnover rate, receipts vs sales and sales vs
cost. Use this report to display values as line graphs representation of the data.
13.4.34.2. Use. This report, coupled with the BalanceInDFAS report provides a
snapshot view as of the end of the month for the prior and current FYs. The data should be utilized to identify positive or negative trends and can be easily graphed.
13.4.35. Pending Issue by Customer. The Pending Issue by Customer report identifies sales
that have been deducted from inventory, but have not yet been received by a customer.
13.4.35.1. Content. This report displays pending issues by customer. The item ID, document number, quantity picked, unit and extended prices are shown.
13.4.35.2. Use. Inventory managers produce this report as needed to identify pending
issues by customer. If the customer has verified receipts turned off, then one of two cases

414 AFMAN41-216 13 FEBRUARY 2013
apply: 1) IM has not processed a delivery list yet or 2) Autoreceipts failed for the
customer. may be used to validate the entry on Line 16 of the Inventory in DFAS
Business Objects report
13.4.36. Prime Vendor Backorder Report. This report identifies backordered item from the PV.
13.4.36.1. Content. The Prime Vendor Backorder Report displays management data
including item ID and description, quantity ordered and backordered, document number,
PVON, and estimated ship date.
13.4.36.2. Use. Acquisition managers use this report to view all PVM backorders. Perform follow-up action(s) where applicable.
13.4.37. Prime Vendor Credit Account Activity. This report lists the current credit account balance and changes posted for a selected prime vendor during the selected time period.
13.4.37.1. Content. Use the report selection criteria screen to select AM or IM, the
desired SOS, and From and To dates. This report shows amounts, adjustment reasons, call numbers, dates and user IDs for any activity within the requested dates.
13.4.37.2. Use. Use this list to verify and document PV credit activity. Work
commercial returns/PV credit returns IAW AFI 41-209, paragraph 3.56 and AFMAN 41-
216, paragraph 5.10.
13.4.38. Prime Vendor Usage Report. The PV Usage Report shows monthly usage for each item requested from the PV.
13.4.38.1. Content. Use the report selection criteria screen to select the desired SOS and
item ID(s). The VIN, type item ID, item ID, monthly usage, delivery method, user ID
and date sent are displayed. Monthly usage is a total of the primary and secondary vendor‘s usage.
13.4.38.2. Use. Acquisition managers may use this report to validate PV usage. Also, it
can be given to the PV Pharmacy representative and used to assist PV in establishing
stockage levels in the local distribution center.
13.4.39. Prime Vendor Usage Summary Report. This report provides monthly usage by VIN and corresponding item ID.
13.4.39.1. Content. This summary displays VIN, type item ID, item ID, monthly usage and date sent.
13.4.39.2. Use. This report can be given to the PV Pharmacy representative and used to
assist PV in establishing stockage levels in the local distribution center.
13.4.40. Prime Vendor/ECAT Research. This report lists pharmaceutical and supply items purchased during the selected time period from CON, NON, DBP, or BPA suppliers.
13.4.40.1. Content. Use the report selection criteria screen to select the scope, From and
To dates and other report options. The management data displayed includes item ID and
description, vending number and SOS, quantity and number of times received, and the last received date field.

AFMAN41-216 13 FEBRUARY 2013 415
13.4.40.2. Use. IM personnel can use this report to help identify items that may be more efficiently purchased from Prime Vendor or ECAT sources.
13.4.41. Prime/Sub. The Prime/Sub Report lists items that have an operating prime/sub
relationship established.
13.4.41.1. Content. Use the report selection criteria screen to select operating type and
the selected item(s). The prime and substitute items are displayed along with operating type and prime/sub ratios.
13.4.41.2. Use. Acquisition managers can use this report to identify and manage those
items that have a prime/sub relationship.
13.4.42. Project Center EOM Fund Balance. The Project Center EOM Fund Balance report
displays a specified project center‘s EOM closing balances. It is produced during monthly EOP processing.
13.4.42.1. Content. Use the report selection criteria screen to select the project center(s)
and Month Year. The report resembles the project center detail screen in System Services. The total balances for the project center are shown as well as each EOR.
13.4.42.2. Use. This report can be used to verify project center balances. Upon request, this report can be sent to RMO or given to a cost center manager.
13.4.43. RIA Variance Report. The RIA Variance Report displays items purchased on
contract that were all or partially cancelled with an IQ, R1 or AR status and then purchased off contract with an extra cost incurred.
13.4.43.1. Content. Use the report selection criteria to identify item, delivery type order
date and contract type. The report displays management data to include item ID and
description, contract type and call number, and order cost variance price.
13.4.43.2. Use. Use this report to determine if items are available on alternate DAPA contracts. Make MTF catalog adjustments accordingly.
13.4.44. Receipt Discrepancy. This report shows shipment discrepancy information for the selected supplier and/or document number.
13.4.44.1. Content. Use the report selection criteria screen to select the SOS, Begin and
End Dates, or specify a document number. This report shows all the management data
needed to manage the discrepancy including item, document number, invoice and contract information plus the quantities ordered , shipped, and received.
13.4.44.2. Use. Inventory managers can use this information to track receipt
discrepancies individually or by SOS.
13.4.45. Receipt by Supplier Type. This report summarizes data based on receipts processed during the selected time period.
13.4.45.1. Content. This report shows how many items, how many orders, the dollar
value, and how many suppliers were associated with receipts in two views. The first view
is by supplier type. The second view is by payment type. In this view, EFT payment type
is defined as any purchase from CON, NON, DBP, or BPA vendors that did not use a purchase card (Invoice will be sent to DFAS for payment.).

416 AFMAN41-216 13 FEBRUARY 2013
13.4.45.2. Use. This report serves as an excellent tool to gauge whether or not ―e-commerce‖ sources are being used to their fullest extent.
13.4.46. Returns. The Returns Document (Figure 13.8.) provides a record of returns used to
track quality problems, justify stock level changes, and support fund levels. A reversed return creates a separate Returns Report.
Figure 13.8. Return Document.
13.4.46.1. Content. A Return Document records the turn-in by displaying the org, strat
type and state, the returning customer, document number and item information along with
the return quantity, total price and credit. A reversal is indicated just under the heading
by the label Reversal.
13.4.46.2. Use. Use this document to print or reprint a returns document. Process returns IAW AFI 41-209, paragraph 3.47. and AFMAN 41-216, paragraph 5.23.
13.4.47. Source Document Control Report (SDCR). This report is used to compare source
documents to processed transactions to validate data entry accuracy and to validate that all
required source documents are available to support processed transactions (see Chapter 2,
paragraph 2.4.1.1.). It lists all transactions that processed for the selected scope and time period.
13.4.47.1. Content. The SDCR can be produced in the reports section of IM at any time.
On the report selection criteria screen specify the date range and select the scope type.
The scope selections are receipts/cancellations, orders, gains/losses, funds or all can be selected. All transactions that have processed through DMLSS are shown on this report.
13.4.47.2. Use. This report must be used to perform Quality Control daily on all
transactions against source documents to validate data entry accuracy and that all
required source documents are available to support processed transactions. If an error is
found during quality control, the corrective action required should be annotated on the
report. The document register produced from the next EOD cycle should be checked to
make sure the corrective action has processed. For missing documents contact the user
who performed the transaction(s) and have them provide the documents needed. File in
permanent document file after all quality control actions are completed.

AFMAN41-216 13 FEBRUARY 2013 417
13.4.48. Stock Status. The Stock Status report shows item irregularities, as indicated by the management notice(s) that are found during computer processing.
13.4.48.1. Content. This report is available as a detail (Figure 13.9.) or summary report
(Figure 13.10.). The summary provides an overall view of inventory stratification dollar
values. It contains information regarding operating, special projects, and excess balances and levels, as well as pertinent due-in and due-out information.
Figure 13.9. Stock Status Report (Detail View).
Figure 13.10. Stock Status Report (Summary View).
13.4.48.2. Use. The detail report identifies items that require manager attention. Using
the management notice(s), process the necessary action to correct any irregularities on the item.
13.4.49. Supplier Performance Report. This report identifies by supplier the estimated lead
days, actual lead days, number of receipts, number of items cataloged, dollar value on hand,
total value of sales, and turnover rate for the selected time period.
13.4.49.1. Content. Use the report selection criteria to designate the desired supplier and
inclusive dates. This report displays supplier, average lead times, sourced items, number of receipts and total value.

418 AFMAN41-216 13 FEBRUARY 2013
13.4.49.2. Use. Acquisition managers use this report as a tool for sourcing items to new SOSs if current pipeline times are inadequate.
13.4.50. Transaction Register. The Transaction Register (Figure 13.11.) shows catalog,
balance and transaction for selected MTF record(s).
Figure 13.11. Transaction Register.
13.4.50.1. Content. Use the transaction register criteria screen to select the scope of IM,
AM, or both, the report type, organization, item ID, and From and To dates for the report.
This report then calculates the inventory balances that existed for each selected item on
the beginning date, then lists those balances, all transactions that changed them, and the
resulting ending balances. A Grand Total closing balance is available for each item ID on
the IM Transaction Register for both the AM and IM/AM Scopes for both Report Types.
13.4.50.2. Use. The transaction register (TR) to used to validate balances and
transaction of selected MTF records. This report is also used to inventory controlled
items by comparing the inventory accounts to the TR report type ―Controlled Items as
outlined in AFI 41-209, Chapter 5. This shows information on controlled medical items
in the same manner as the other report type. Upon completion of the inventory, the
inventory officer will date, print their name and rank, and sign the annotated copy of the
TR. Hard copies of the monthly TR, report type ―Controlled Items with issue/turn-in
and receipt signatures are maintained in the controlled item storage area for a period of two years.
13.4.51. Troubled Dueins. This report identifies due-ins that have the "TD" as the last
reported status
13.4.51.1. Content. The Troubled Duein report displays the item, due-in, due-out, and
on-hand totals, as well as the document number, SOS, last status, and estimated ship date for the due-in.
13.4.51.2. Use. Items with "Troubled Duein" status require aggressive management
action due to the lack of updated status resulting from two successive (computer
generated) follow-ups from DMLSS. Delinquent shipments also appear on this list.
These items have not been received within the normal pipeline time after receiving ship
status. Troubled due-ins are also sent to the IM inbox and actions should be taken to
resolve these on a daily basis. Review the status of these due-ins to ensure the item is
received in time to satisfy your customer's needs or to prevent the the item‘s on-hand
balance from falling below the determined safety level (paragraph 14.3.2.2.). If your
review indicates the item will not be received on time, a priority requisition may need to be submitted.

AFMAN41-216 13 FEBRUARY 2013 419
13.4.52. Zero Balance Stocked Items. This report lists every stocked item that is currently at zero balance, grouped by supplier.
13.4.52.1. Content. This report displays supplier, item ID and description, location due-
in and due-out quantities, level and level type.
13.4.52.2. Use. Inventory managers can use this report to monitor stock outages on items with levels. Aggressive action should be taken to resolve these stock outages.
Section 13C—Assemblage Management (AM) Reports Module.
13.5. AM Reports.
13.5.1. 1348-1a. The 1348-1a report provides the capability to reprint DD Form 1348-1a
documents.
13.5.1.1. Content. On the report criteria screen users may search by gain or loss transaction, Organization, Assemblage(s), item ID, document number, and date range.
13.5.1.2. Use. This report may be used by WRM personnel to review and print DD Form 1348-1a documents from processed gains and losses in Transaction History.
13.5.2. AM Equipment Requiring Data For UII Report. The AM Equipment Requiring Data
For UII Report lists equipment items that require data in order for a UII (Unique Item Identifier) to be assigned.
13.5.2.1. Content. Use the report selection criteria to identify Organization, Assemblage,
and Data Required. The report displays the equipment item(s) along with what
information is required for UII and the date identified. Also, the totals for the selected criteria and totals for AM are included.
13.5.2.2. Use. This report can be used as a snapshot to view all AM equipment items requiring data for a UII.
13.5.3. AM Equipment With A UII Assigned. The AM Equipment With A UII Assigned
report lists active equipment records that have a UID or UII assigned.
13.5.3.1. Content. The report displays equipment by item ID and lists the ECN,
customer, U/I, ORG ID, manufacture. The report summarizes totals for the selected criteria and for AM.
13.5.3.2. Use. WRM managers can this report to view AM equipment items that have all
the required information entered and a UII is assigned.
13.5.4. Allowance Standard Publication Date Report. The Allowance Standard Publication
Date Report displays all assemblages within a selected ORG(s) with their associated allowance standard publication date.
13.5.4.1. Content. The report displays org ID, assemblage, build control number,
assemblage description and the allowance standard date.
13.5.4.2. Use. This optional management report can be used by WRM personnel to
validate current allowance standard publication dates for each assemblage within a selected ORG.

420 AFMAN41-216 13 FEBRUARY 2013
13.5.5. Assemblage Allowance Change. The Assemblage Allowance Change report
identifies assemblage items by the old and current allowance quantities when allowance
changes occurred within the selected time period.
13.5.5.1. Content. Use the search criteria screen to select an organization ID,
assemblage, and date range. The results of the report display all items in the assemblage
with allowance changes. Current and Old columns are listed for the changes. Both
columns display From and To changes.
13.5.5.2. Use. WRM personnel may use this report to review any item allowance changes made to an assemblage.
13.5.6. Assemblage Funds Requirements Estimate. The Assemblage Funds Requirements
Estimate report (Figure 13.12.) identifies total funds needed to bring selected assemblage(s)
up to a specified readiness percentage.
Figure 13.12. Assemblage Funds Requirements Estimate.
13.5.6.1. Content. The user may select the stock target percentage for Noncritical and
Critical (default will be 100%) on the search criteria screen. The report separates each
requirement by assemblage and displays the total dollar requirement for all selected
assemblages at the bottom of the report.
13.5.6.2. Use. This report can be used by the WRM project officer or appointed WRM
Crew Chief to project the total dollar amount of critical and non critical items needed to
make an assemblage 100% (Note: This report does not take into effect expired items or
items that will be expiring in the near future.).
13.5.7. Assemblage Funds Status Report. The Assemblage Funds Status Report (Figure 13.13.) displays the current fiscal years fund status for each Org ID.

AFMAN41-216 13 FEBRUARY 2013 421
Figure 13.13. Assemblage Funds Status Report.
13.5.7.1. Content. This report displays the fund number, assemblage, target amount
available balance, committed and obligated amounts, receipt amount R-Sales, and return amount for each assemblage.
13.5.7.2. Use. The WRM project officer or appointed WRM Crew Chief may use this
report to view real time funds status on all assemblages managed in DMLSS.
13.5.8. Assemblage LIMFAC Consideration Report. This report identifies potential deployment limiting factors for assemblages.
13.5.8.1. Content. Use the search criteria selection screen to select the organization and
assemblage(s). This report shows serviceable items that have expired or expire within the
next 6 months and equipment that is inoperable or requires maintenance within the next 6 months are displayed in this report.
13.5.8.2. Use. The WRM project officer or appointed Crew Chief use this report to
review limiting factors that may prevent assemblages from deploying as serviceable.
IAW with AFI 41-209, Chapter 13 a continuity file for limiting factors must be maintained.
13.5.9. Assemblage Physical Inventory Date Report. The Assemblage Physical Inventory
Date Report (Figure 13.14.) displays the last inventory date recorded in DMLSS for all
assemblages.
Figure 13.14. Assemblage Funds Status Report.
13.5.9.1. Content. Use the report selection criteria screen to select your organization.
The option to select a date to ―Include Only Assemblages Not Inventoried Since‖ is also

422 AFMAN41-216 13 FEBRUARY 2013
available. This report displays by ORG each assemblage along with the last inventory
date. If an assemblage has an inventory date of ―Not on Record,‖ an inventory has never
been accomplished.
13.5.9.2. Use. WRM managers can use this report to plan future inventories and develop an inventory schedule.
13.5.10. Assemblage Status. The Assemblage Status report (Figure 13.15.) displays selected assemblage(s) status based upon user selected criteria.
Figure 13.15. Assemblage Status Report.
13.5.10.1. Content. Use the report selection criteria screen to select the desired
organization and assemblage(s). There are many options that may be selected to
customize the search. The contents of the report include item ID, item description,
critical quantity, U/S, U/S price, balances, dollar value, over/short value, and stock
percentage. Summary information by commodity class and overall material availability
percentages is also provided.
13.5.10.2. Use. This report provides the WRM project manager or WRM Crew Chief
with a way to view specified status information for all assemblages. It can help identify
shortages within an assemblage. IAW with AFI 41-209, Chapter 13, the ―Gross‖ MAP
from this report may be used for SORTS reporting.
13.5.11. Assemblage Status Rollup. This report is similar to the Assemblage Status Report, but it enables multiple assemblages to be selected and viewed as one combined assemblage.
13.5.11.1. Content. Balances from all selected assemblages are listed for each item ID
matching the selection criteria. Critical and non-critical items totals, as well as gross
percentages are located at the end of the report.
13.5.11.2. Use. This report allows the WRM project manager or Crew Chief to view
status information from multiple assemblages and sub-assemblages that have been
combined. IAW with AFI 41-209, Chapter 13, the ―Gross‖ MAP from this report may be
used for SORTS reporting.

AFMAN41-216 13 FEBRUARY 2013 423
13.5.12. Assemblage Status Summary. The Assemblage Status Summary report (Figure
13.16.) is essentially a summary of dollar values and on-hand percentages taken from the last
page of the Assemblage Status report.
Figure 13.16. Assemblage Status Summary.
13.5.12.1. Content. This report lists the summary information by commodity class and
overall material availability percentages for assemblages.
13.5.12.2. Use. This report provides the WRM project manager or Crew Chief with
general summary information on shortages and/or overages within an assemblage. IAW
with AFI 41-209, Chapter 13, the ―Gross‖ MAP from this report may be used for SORTS
reporting.
13.5.13. Assemblages Managed. The Assemblages Managed report identifies all assemblages managed within DMLSS.
13.5.13.1. Content. The report displays by ORG each assemblage along with its
assemblage increment, assemblage description, and quantity. A total number of
assemblages is provided for each ORG and a total for all ORG‘s is provided at the end of the report.
13.5.13.2. Use. This report provides WRM managers with an overall view of assemblages managed separated by ORG.
13.5.14. Commercial Returns Call Status. The Commercial Returns Call Status report
displays the current status for each commercial returns call number.
13.5.14.1. Content. Use the search selection criteria screen to select the desired call
number(s). The scope may be set to either IM or AM, and the report type may be set as

424 AFMAN41-216 13 FEBRUARY 2013
either detail or summary. The detailed summary report is broken down by call number.
Each call number has a column for current status, number of items, value, and credit.
The summary report displays a list of selected call numbers with number of items, value,
credit, and cost information. The total for all selected call numbers is displayed at the end of the report.
13.5.14.2. Use. This report may be used to view the current status of commercial returns
call. Per AFI 41-209 the only component of the Commercial Returns module that is mandated for use is the Manage PV Credits function.
13.5.15. Commingled Picklist. The Commingled Picklist report displays items in the selected assemblage(s) that have commingled quantities.
13.5.15.1. Content. The report displays by assemblage item ID, description, AM/IM
location information, commingled quantity, U/S, U/S price, and pick quantity.
13.5.15.2. Use. WRM managers use this report to manage commingled quantities. It
can be used in conjunction with the assemblage transfer process. A transfer will not
process if commingled quantities exist in the assemblage. Once commingled items have
been placed with the assemblage, use Item Code Change to remove the commingled codes and quantities from the assemblage.
13.5.16. Dated Items Detailed. The Dated Items Detailed report (Figure 13.17.) displays item(s) in an assemblage that have expired or will expire within the selected time period.
Figure 13.17. Dated Items Detailed Report.
13.5.16.1. Content. Use the report selection criteria screen to select an organization and
assemblage(s). ―From‖ and ―To‖ dates may be entered as well as an ―Expire by date.‖
The report results are shown by assemblage. Each item that meets the selected expiration criteria is listed along with its expiration date and QA data.
13.5.16.2. Use. Use this report to help manage dated items. It allows a WRM manager
or Crew Chief to view expired or expiring items and project shortages that can be added
to a WRM spend plan.
13.5.17. Dated Items Summary. The Dated Items Summary report displays the dollar value of items that have expired or expiring in an assemblage within the specified time period.

AFMAN41-216 13 FEBRUARY 2013 425
13.5.17.1. Content. Use the report criteria selection screen to select your organization
and date range with an added option to select an expired by date. The report contents
include assemblage, stratification type, and dollar value of expiring items. The bottom of
the report displays the total dollar value of expiring items also the totals for each stratification types.
13.5.17.2. Use. Use this report to help manage dated items. It allows a WRM manager
or Crew Chief to view expired or expiring items and project shortages that can be added to a WRM spend plan.
13.5.18. Destruction. The Destruction report allows WRM personnel to retrieve destruction documents for viewing or reprinting.
13.5.18.1. Content. This report displays the item ID, document number, quantity, and
price of the destroyed item. Also destruction authority, date, method, and reason for
destruction are included along with signature and date lines for environmental health certification, the destruction officer, and two separate witnesses.
13.5.18.2. Use. Documentation for all destructions performed will be retained for a
period of two years IAW AFRIMS Table and Rule T 41-14 R 04.00.
13.5.19. Detail Stock Items. The Detail Stock Items report displays QA data and O/H balances of items in selected assemblage(s).
13.5.19.1. Content. Use the selection criteria screen to select an organization and
assemblage. The report is set by default to search for All Items, but there are many
options available to narrow the search. The report contents are essentially the same as an
Assemblage Status Report, but there are added details including location, sub location, and stratification state.
13.5.19.2. Use. This report can be used to view detailed information of items within an
assemblage.
13.5.20. Disassociated Assemblage Transaction Report. The Disassociated Assemblage
Transaction Report assists users in reviewing current fiscal year transactions that have been processed against assemblages that do not have associated AM fund records.
13.5.20.1. Content. Upon selecting an organization, assemblage(s), and date range, this
report will display the item ID, transaction date, transaction, document number, quantity, total price, refund code, and U/P codes.
13.5.20.2. Use. This report allows WRM managers to view transactions processing
against assemblages without an assigned AM Fund Record that may be causing financial
obligations. An automated report (D07) is generated and sent to AFMLO at the end of each month providing similar information.
13.5.21. End-item/Support Item Relationship Report. The End-item/Support Item Relationship Report allows users to search for end/support items belonging to an assemblage.
13.5.21.1. Content. The report displays the item ID, description, U/S price, critical code,
allowance, O/H, and due-in quantities of items with assemblage end item/support details.
13.5.21.2. Use. WRM personnel may use this report as a tool to review and manage all end-item/support item relationships.

426 AFMAN41-216 13 FEBRUARY 2013
13.5.22. Exceptions - Standard Assemblage Add. The Exceptions – Standard Assemblage
Add report displays any exceptions created during a standard assemblage add or assemblage
inshipment.
13.5.22.1. Content. Use the report criteria selection screen to select the desired
organization and assemblage and click Search. This report displays the assemblage data description, project and ownership code.
13.5.22.2. Use. WRM personnel can use this report to view existing exceptions for
selected assemblages that require attention. These exceptions must be corrected before
the catalog record can be used. Once the exception is corrected it will clear from the report.
13.5.23. Gain/Loss. The Gain/Loss report displays gain and loss transactions processed
against selected assemblage(s) within a specified date range.
13.5.23.1. Content. Use the criteria selection screen to select an organization,
assemblage(s), and date range. The report will list each item processed as a gain or loss
by assemblage along with transaction history details such as item ID, document number,
price, quantity, transaction type, and user ID.
13.5.23.2. Use. This report can be used by WRM personnel to review and verify gains and losses processed against selected assemblages.
13.5.24. Incomplete Record. The Incomplete Record report (Figure 13.18.) identifies all
assemblage record data items that are marked as incomplete. This report allows WRM
personnel to view which assemblage items are marked as incomplete.
Figure 13.18. Incomplete Record Report.
13.5.24.1. Content. Each incomplete record is listed by assemblage and includes the
Item ID, Description, Locations, Manufacturer, Expiration Date, and other QA data.
13.5.24.2. Use. This report is used to view assemblage records that are marked as
incomplete and require additional data entry. Upon entry of the required data, the complete flag may be cleared through mass update or assemblage record data.
13.5.25. Inventory Adjustment Voucher. The Inventory Adjustment Voucher (IAV) report
allows inventory adjustment gain/loss transactions to be viewed or reprinted.
13.5.25.1. Content. Use the selection criteria screen to select the organization,
assemblage(s), and date range. The report display‘s each inventory adjustment gain or
loss along with its transaction information to include item ID, assemblage, price,

AFMAN41-216 13 FEBRUARY 2013 427
document number, etc. The bottom of the report contains signature blocks for the certifying official and approval authority.
13.5.25.2. Use. Use this report to print or reprint an inventory adjustment voucher
within 14 days of the transaction. Properly certify and approve IAVs using the appropriate official.
13.5.26. Item Balance. The Item Balance report displays balances for a specified item in the selected assemblages that have an allowance standard for that item.
13.5.26.1. Content. This report displays each assemblage with the specified item ID
along with assemblage location, sub location, U/S, U/S price, balances, and dollar value.
The Balance‘s column includes on-hand, deferred, due-in, and allowance quantities. The
Dollar Value column includes on-hand, due-in, and over (short) values. Grand totals for
the Balances and Dollar Value columns are provided at the end of the report.
13.5.26.2. Use. WRM personnel may use this report as a management tool to identify assemblages that have overages or shortages for the specified item.
13.5.27. Organization Status. The Organization Status report displays a status summary of all assemblages within a specified organization based upon specified criteria.
13.5.27.1. Content. The contents of this report include assemblage balances, dollar
value, and stock percentage. The Balances column includes number of line items, and
due-ins. The Dollar Value column includes allowance, on-hand, due-in, overages, and shortages. The Stock Percentage column includes detail and gross.
13.5.27.2. Use. This report provides WRM managers with a snapshot of the current
status of all assemblages within an organization.
13.5.28. Packing List. The Packing List report allows an assemblage packing list to be viewed or printed.
13.5.28.1. Content. This report displays the packing/inventory list for the selected
assemblage‘s that includes item ID and O/H quantity along with its QA data such as
locations, expiration dates, manufacturer dates, lot number, serial number, and ECN.
13.5.28.2. Use. This report provides a list of items that are on-hand and ready for
deployment within an assemblage. IAW AFI 41-209, paragraph 15.3.1.11.2, prior to
deploying an assemblage attach packing lists to the outside of each pallet in a
waterproof/windproof container.
13.5.29. Prime Vendor Backorder Report. This report identifies backordered item from the PV.
13.5.29.1. Content. The Prime Vendor Backorder Report displays management data
including item ID and description, quantity ordered and backordered, document number,
PVON, and estimated ship date.
13.5.29.2. Use. WRM managers use this report to view all PVM backorders. Perform follow-up action(s) where applicable.
13.5.30. Prime Vendor Credit Account Activity. The Prime Vendor Credit Account Activity report displays the current credit balance.

428 AFMAN41-216 13 FEBRUARY 2013
13.5.30.1. Content. The contents of this report include the current balance and all
adjustments with the amount, adjustment reason, call number, date, and user ID. The
total dollar amount of the adjustments is displayed at the end of the report.
13.5.30.2. Use. This report can be used to view the current credit balance and any changes that may be posted for a selected prime vendor during a selected time period.
13.5.31. Prime/Sub. The Prime/Sub report (Figure 13.19.) identifies each prime primary item and its associated substitute and ratio.
Figure 13.19. Prime/Sub Report.
13.5.31.1. Content. The report displays each prime item ID and description along with
its sub item and their prime and sub ratios for the selected assemblages.
13.5.31.2. Use. This report can be used to review and manage all prime/sub relationships within an assemblage.
13.5.32. Returns. The Returns report allows WRM personnel to view and print return
documents.
13.5.32.1. Content. Use the criteria screen to select an organization, assemblage(s), and
date range. Options to include an Item ID and Document Number are available. The
report header contains Organization and Assemblage details. The report displays the
returning customer details along with transaction history details to include document number, item ID, U/S, U/S Price, and return quantity.
13.5.32.2. Use. WRM personnel can use this report to view and print return documents.
13.5.33. Unit Status. The Unit Status Report lists summaries of dollar values and gross dollar amounts.
13.5.33.1. Content. Use the criteria screen to select an organization, assemblage(s), and
readiness percent. Also select allowance quantity or old allowance quantity. This report
shows assemblage description, assemblage ID, project ownership, balances, dollar values, readiness percents for critical, non-critical, and total items.
13.5.33.2. Use. WRM managers may use this report to gather dollar values and gross
dollar amounts of assemblages by selected readiness criteria.
13.5.34. Unit Status – Non-Reportable Items. See paragraph 13.5.33. In the Unit Status
Report - Non Reportable Items Criteria window, you can select and search for the data to be

AFMAN41-216 13 FEBRUARY 2013 429
included in the report. You can customize the report by using the criteria that are available in this window.
13.5.34.1. Content. Use the criteria screen to select an organization, assemblage(s),
and readiness percent. Also select allowance quantity or old allowance quantity. This
report shows assemblage description, assemblage ID, project ownership, balances, dollar values, readiness percents for critical, non-critical, and total items.
13.5.34.2. Use. WRM managers may use this report to gather dollar values and gross
dollar amounts of assemblages by selected readiness criteria.
Section 13D—Customer Area Inventory Management (CAIM) Reports Module.
13.6. CAIM Reports.
13.6.1. Active Due-ins. The Active Due-ins Report provides detailed information on current requisitions.
13.6.1.1. Content. The contents of the report include document number, item ID, item
description, DFAS document number, SOS, due-in quantity, and due-in dollar value. Total due-in dollar value is indicated at the top of the report.
13.6.1.2. Use. This report lists all of the customer‘s active CAIM due-ins.
13.6.2. Active Dueouts over 30 days. The Active Dueouts over 30 days Report (Figure
13.20.) provides summary information on all active due-outs over 30 days old. This report is
produced upon request.
Figure 13.20. Active Dueouts Over 30 Days Report.
13.6.2.1. Content. Use the search criteria to select a search by Customer(s) or MTF.
The contents of the report include item ID, document number, UOP, quantity, UOP price,
amount, and date created.
13.6.2.2. Use. Customers can use this report to view their due-outs and initiate follow-up with Medical Logistics, as required.
13.6.3. Best Medical Surgical Items by Dollar Savings. See paragraph 13.4.9.
13.6.4. Best Pharmaceutical Items by Dollar Savings. See paragraph 13.4.10.
13.6.5. Bulk Purchase Card by Month and Year. Not used by AF.
13.6.6. Consumption History Graph. The Consumption History Graph report provides a
graphical view of an item‘s consumption history for a 12-month cycle. This report is
produced during monthly EOP processing.

430 AFMAN41-216 13 FEBRUARY 2013
13.6.6.1. Content. The report selection criteria allow the user to set the scope to
Customer or MTF. If customer is selected, users may select multiple customers. Enter
the item ID(s) or select from the drop down menu. AHFS descriptions and codes may
also be selected. The report displays a graph that represents 12 months of consumption
history. Also displayed are customer, item ID, customer item description, UOS,
commodity class name, UOS price, AHFS code and description.
13.6.6.2. Use. This report can be used to educate the Customer on monthly issue history, daily demand rate, and erratic ordering patterns.
13.6.7. Consumption History Report. The Consumption History Report (Figure 13.21.)
displays the detailed consumption history for an item. The report is produced during
monthly EOP processing.
Figure 13.21. Consumption History Report.
13.6.7.1. Content. The report selection criteria allow the scope to be set to either
Customer or MTF. If customer is selected you have the option to select multiple
customers. You may enter the item ID(s) or select from the drop down menu. AHFS
descriptions and codes may also be selected. The report displays the consumption history
for the current FY and previous 24 months. Each FY displays the total consumption history by month.
13.6.7.2. Use. This report can be used to educate the customer on monthly issue history, daily demand rate, and erratic ordering patterns.
13.6.8. Contract Call Register. The Contract Call Register report list current contracts. This
report is only applicable for a CAIM SOS. The only authorized Air Force CAIM SOS is medical maintenance.
13.6.8.1. Content. This report displays each call number, by SOS, with the number of line items, total dollars, organization, user ID, and date of order.
13.6.8.2. Use. This report can be used to validate contract call information and account
for total line items and dollars spent per SOS and call number.
13.6.9. Contract Termination. The Contract Termination report displays SOS contracts that
have expired, about to expire or have been marked for deletion. This report is only

AFMAN41-216 13 FEBRUARY 2013 431
applicable for a CAIM SOS. The only authorized Air Force CAIM SOS is medical maintenance.
13.6.9.1. Content. This report displays the contract expiration date, contract number,
SOS and Supplier name.
13.6.9.2. Use. Use this report as a tool to effectively manage contracts.
13.6.10. Critical Due-in. The Critical Due-in report lists items that are due-in and also marked as critical.
13.6.10.1. Content. The report displays by customer account number the item ID along
with other information such as document number, number of days old, status date, and
status code.
13.6.10.2. Use. The customer can use this report to view their critically coded items that are due-in and view any available status.
13.6.11. Customer Catalog. The Customer Catalog (Figure 13.22.) displays a selected customer‘s catalog information.
Figure 13.22. Customer Catalog.
13.6.11.1. Content. The search criteria screen allows the customer ID(s) to be selected.
Records are sorted by active or deleted (or both) and by item ID or customer item
description. The report contents for each record include customer item description, price,
and packaging information. Location, storage, critical item indicator, and level information are also provided.
13.6.11.2. Use. This report can be used by customers to view a detailed list of items in their customer catalog.
13.6.12. Customer Catalog Records with Invalid SOS. The Customer Catalog Records with
Invalid SOS report displays a customer catalog item associated with an SOS that has been
marked as deleted. This report is only applicable for a CAIM SOS. The only authorized Air Force CAIM SOS is medical maintenance activities.
13.6.13. Customer Organization. See paragraph 13.4.16.
13.6.14. Customer Restrictions. The Customer Restrictions report displays any customer
item restrictions.

432 AFMAN41-216 13 FEBRUARY 2013
13.6.14.1. Content. The report contents include item ID, item description, restriction type (i.e. CIIC), restriction code (i.e. Q,R), and restriction description.
13.6.14.2. Use. This report can be used by customers to view a list of items in the
customer catalog that have restrictions.
13.6.15. DAPA Number/Contract Type Code Changes. See paragraph 13.4.17.
13.6.16. Delinquent Purchase Card Reconciliation Report. The Delinquent Purchase Card Reconciliation Report should only be accessed through the IM module for AF users.
13.6.17. Destruction. Destructions must be processed by logistics personnel using the IM
Destruction process explained in AFI 41-216, Chapter 5, paragraph 5.9. Customers should
never process destructions.
13.6.18. Document Register. The Document Register displays all transactions processed
against a customer‘s account. The Document Register report is produced during daily EOP processing.
13.6.18.1. Content. The contents of the report include document number, item ID,
customer item description, U/S, price, quantity, transaction type, user ID, date/time,
reversal indicator, demand, and refund code. This report is produced in three parts. Part
one displays all receipts, due-ins, and cancellations. Part two displays all issues. Part
three displays all other transactions, i.e., turn-ins, location change, etc.
13.6.18.2. Use. This report can be used by customers to view all transactions processed against their account on a specified date.
13.6.19. End-of-Year Funds. The End-of-Year Funds report provides customers with a
snapshot of their account funds status at the end of the previous fiscal year. This report is
produced during yearly EOP processing.
13.6.19.1. Content. Use the search criteria to select log, project center, expense center,
or all. The contents of the report reflect target amount, available balance, commits, obligations, credits, surcharges, expenses, reimbursable, and non-reimbursable sales.
13.6.19.2. Use. This report can be used by customers as a tool to help determine budget
needs for the fiscal year.
13.6.20. Expenditures by SOS. The Expenditures by SOS report displays total expenses for
a customer by SOS. This report is only applicable for a CAIM SOS. The only authorized Air Force CAIM SOS is medical maintenance activities.
13.6.21. Expense Center EOM Fund Balance. See paragraph 13.4.20.
13.6.22. Expense Center Expenses by EOR. The Expense Center Expenses by EOR report
allows the customer to view their expenditures of each EOR by months in the current fiscal year.
13.6.22.1. Content. There are two fields to select from on the report selection criteria
screen, Report Type and Expense Center. Select either Report Listing or Graph for the
report type. The Report Listing type displays each EOR and the total spent for each
month. There is also an EOR total column for each EOR. The Graph report type displays month and expenses. Each EOR is represented by a different color on the graph.

AFMAN41-216 13 FEBRUARY 2013 433
13.6.22.2. Use. Customers can use this report as a tool to help manage their expenditures.
13.6.23. Expense Center Fund Summary. The Expense Center Fund Summary report allows
the Customer to view their current funds status.
13.6.23.1. Content. On the report selection criteria screen enter the Expense Center(s) or
choose from the drop down menu. The report resembles the Expense Center detail screen in System Services. It shows total balances for the Expense Center by EOR.
13.6.23.2. Use. Customers can use this report to view their current fund balance.
13.6.24. Failed MTF Catalog Changes. See paragraph 13.4.21.
13.6.24.1. Content. Reserved.
13.6.24.2. Use. Reserved.
13.6.25. High Total Expenditure. The High Total Expenditure report (Figure 13.23.)
provides the total expenditure of items for the MTF or by customer.
Figure 13.23. High Total Expenditure Report.
13.6.25.1. Content. The criteria search selection includes fiscal year and scope.
Minimum dollar is also available. The report will be separated by customer and will display item ID, description, SOS, UOP, price, total usage, and total expenditure.
13.6.25.2. Use. The High Total Expenditure report allows the customer to view their highest expenditures in descending order.
13.6.26. Inventory Adjustments. The Inventory Adjustment‘s report is generated at the end
of a CAIM physical inventory.
13.6.26.1. Content. The search criteria for this report include customer ID and date
range. The report displays the items that were adjusted along with the type of adjustment
i.e. IAL or IAG. The prices, quantity, document number, inventory type, date and user id
is also displayed. Located at the bottom of the report are signature blocks for the certifying official and approving official.
13.6.26.2. Use. This report can be used by customers to view all gains and losses
processed as a result of the inventory. Note: AF policy only allows customers to
perform unofficial inventories.

434 AFMAN41-216 13 FEBRUARY 2013
13.6.27. Inventory Status. The Inventory Status report provides the customer with comprehensive detail on inventory throughout their area.
13.6.27.1. Content. On the report selection criteria screen select your customer ID(s)
and sorting preference. Sort by options include item ID, item description, level, location,
and value on hand. The report contents list by customer ID, due-out balance ($ value),
estimated on-hand quantity, excess quantity, item description, item ID, level, location,
total excess on-hand $ value, total on-hand $ value, unit of purchase/unit of sale, and unit of purchase price/unit of sale price.
13.6.27.2. Use. This report can help the customer identify trends and problems that may need attention.
13.6.28. MTF Catalog Changes. The MTF Catalog Changes report displays any changes
made to records in the MTF catalog, such as price or unit of purchase, and includes the date the changes were made. This report is produced during EOD.
13.6.28.1. Content. The MTF Catalog Changes report displays changes to the MTF
catalog by item ID as a result of a catalog change or update process. This report has two
parts. Part 1 displays processed catalog changes. Part 2 displays pending catalog
changes. Part 2 changes will need to be processed using IM pending action Unprocessed
MTF Catalog Changes. Both parts display the catalog data element that was changed, the
old and new data element values for the catalog data element that was changed, item ID, short item description, source of change, and date.
13.6.28.2. Use. Use this option to print a report showing MTF catalog changes that took place on a given date.
13.6.29. Pharmaceutical and Medical Supply. This report compares items currently being
purchased to their PFY usage.
13.6.29.1. Content. The report contents include item ID, item description, commodity class, UOS, demand year, current UOS price, total usage, and total cost.
13.6.29.2. Use. The Pharmaceutical and Medical supply report provides customers with pharmaceutical and supply budget information.
13.6.30. Prime Vendor Backorder Report. This report identifies backordered item from the
PV.
13.6.30.1. Content. The Prime Vendor Backorder Report displays management data
including item ID and description, quantity ordered and backordered, document number, PVON, and estimated ship date.
13.6.30.2. Use. Custodians use this report to view all PVM backorders. Perform follow-
up action(s) where applicable.
13.6.31. Prime Vendor Usage Report. See paragraph 14.4.38.
13.6.32. Prime Vendor Usage Summary Report. See paragraph 14.4.39.
13.6.33. Project Center Commits and Obs by Expense Center. This report displays the
dollar value of commitments and obligations of each expense center of the selected project center.

AFMAN41-216 13 FEBRUARY 2013 435
13.6.33.1. Content. This report displays financial management data including EOR, EOR nomenclature, commitments, obligations, credits, and reimbursable sales.
13.6.33.2. Use. Custodians can use this report to view dollar values of commitments,
obligations, credits, and reimbursable sales by EOR for the selected expense center.
13.6.34. Project Center EOM Fund Balance. See paragraph 14.4.42.
13.6.35. Project Center Expenses by Expense Center. The Project Center Expenses by EOR
report allows the customer to view their expenditures of each EOR by months in the current fiscal year.
13.6.35.1. Content. There are two fields to select from on the report selection criteria
screen, Report Type and project center. Select either Report Listing or Graph for the
report type. The Report Listing type displays each EOR and the total spent for each
month. There is also an EOR total column for each EOR. The Graph report type
displays month and expenses. Each EOR is represented by a different color on the graph.
13.6.35.2. Use. Customers can use this report as a tool to validate and manage their Project/Expense Center expenses.
13.6.36. Project Center Fund Summary. The Project Center Fund Summary report (Figure 13.24.) allows the customer to view their current funds status.
Figure 13.24. Project Center Fund Summary.
13.6.36.1. Content. Use the report selection criteria screen to enter the project center(s)
or choose from the drop down menu. The report resembles the project center detail
screen in system services. The total balances for the project center is shown and it is also
broken down for each EOR.
13.6.36.2. Use. Customers use this report to view their current funds status.
13.6.37. Projected Expenditure. The Projected Expenditure report displays projected
expenditures by customer ID and also the year-to-date amount. This report is produced upon request.

436 AFMAN41-216 13 FEBRUARY 2013
13.6.37.1. Content. In the report selection criteria screen a minimum YTD amount may
be entered. The contents of the report include item ID, item description, UOP, UOP
price, PFY cost, YTD cost, estimated current FY cost, and percent change.
13.6.37.2. Use. This report allows the customer to view their previous years cost of an item, what they have spent this year and also see a projected cost for the year.
13.6.38. Purchase Card Register. The Purchase Card Register report allows purchase card
holders and AO‘s to produce a hardcopy call register based on entered search criteria. This
report is only applicable for a CAIM SOS. The only authorized Air Force CAIM SOS is medical maintenance activities.
13.6.39. Purchase Cards by Bulk Document Number. Not used by AF sites.
13.6.40. Purchase Cards Not Reconciled by Month. Not used by AF sites.
13.6.41. Receipt. Receipt report allows customers to view their receipts based on entered
search criteria. Note: Receipt discrepancies cannot be created in CAIM for an SOS type of
LOG.
13.6.42. Receipt Discrepancy. The Receipt Discrepancy report allows customers to view
receipt discrepancy information for a specified SOS, contract, call, or document number. Note: Receipt discrepancies cannot be created in CAIM for an SOS type of LOG.
13.6.43. Replenishment Inventory Exception. The Replenishment Inventory Exception
report (Figure 13.25.) allows customers to view any replenishment exceptions that have occurred along with an explanation of the cause.
Figure 13.25. Replenishment Inventory Exception Report.
13.6.43.1. Content. This report displays the item ID, item description, U/P, quantity,
date, and a reason for the exception.
13.6.43.2. Use. This is the same report as the one that appears in the inbox. Exceptions may require modification in BPS order to process to the LOG side.
13.6.44. Returns. The Returns report provides customers with a record of items returned to
Logistics. Note: A separate returns report is created for reversed items.
13.6.44.1. Content. The report selection criteria screen options include item ID, location,
and date range and a customer ID must be selected. The report displays the document
number, item ID, item description, unit pack, unit price, demand code, return quantity,
total price, refund code, credit, and reason for return.
13.6.44.2. Use. Customers may use this report as a tool to assist with managing their returns to Logistics.

AFMAN41-216 13 FEBRUARY 2013 437
13.6.45. Sales. Air Force restricts the use of CAIM SOS activities to only the Maintenance activity. Maintenance activities do not sell to other internal customers.
13.6.46. Shelf Life. The Shelf Life report allows customers to view a list of their items with
shelf-life dates.
13.6.46.1. Content. Use the report selection criteria screen to set the scope to MTF or
customer. The report content includes the item ID, item description, commodity class,
shelf life (months), expiration type, level type, UOS, level, UOS price, and estimated on
hand balance.
13.6.46.2. Use. This report can be used as a tool for customers to identify and mange any items that may expire.
13.6.47. Transaction History. The Transaction History report allows customers to access up to 24 months of their accounts historical data.
13.6.47.1. Content. Use the selection criteria screen to specify customer ID, document
number, item ID, transaction code, user ID, expense center, call number, contract number
and a date range. The option to break the report on customer ID/item ID or item ID only
is available. Also the report detail may be sorted by date or transaction type. The report
displays the item ID, transaction type, document number, quantity, price, unit, SOS
contract/call number, user ID, and date and time. A maximum of 500 records can be retrieved.
13.6.47.2. Use. This historical data can be reviewed for reporting purposes or to correct
errors.
13.6.48. Troubled Duein. The Troubled Duein report allows customers to view their
requisition(s) that DMLSS has identified as a potential problem. Certain criteria exist for an
order to be considered a troubled due-in. (1) due-in‘s that have not received an
acknowledgment after the second and subsequent request for acknowledgment, (2) due-ins
that have not received a reply on second and subsequent follow-up for improved status, (3)
due-ins with ship status recorded and average pipeline time has passed. If no pipeline times
are recorded in the customer catalog record, the system uses the estimated lead days in the
SOS table to determine if the average pipeline time has passed, and (4) due-ins with an estimated release date that exceeds the average pipeline time for the item.
13.6.48.1. Content. The report provides status summary of an item ordered to include
days old, priority code, last status code and date code received, and estimated ship date.
13.6.48.2. Use. Logistics personnel may need to contact the SOS to ascertain the status of the order.
13.6.49. Usage Cost by Therapeutic Class. The Usage Cost by Therapeutic Class report summarizes an account‘s usage by therapeutic class.
13.6.49.1. Content. Use the report selection criteria to enter the customer ID(s) and the
applicable AHFS code(s). The report is sorted by AHFS codes and displays item ID,
item description, U/S, U/S price, hospital formulary indicator, SOS code, history begin date, PFY usage and PFY usage cost.

438 AFMAN41-216 13 FEBRUARY 2013
13.6.49.2. Use. The Pharmacy may use this report as a tool to determine prior costs and project future expenditures.
13.6.50. Year to Date Funds Position Report. The Year to Date Funds Position displays the
financial positions of the DMLSS Log Fund and project centers within the organization with a balance greater than $0.00.
13.6.50.1. Content. Use the Report Selection Criteria screen to specify the desired date
posted. The report displays target amounts, available balance, commitments, obligations,
credits, reimbursable sales, nonreimbursable sales, surcharges, and expenses. Both project center and expense center EORs are displayed.
13.6.50.2. Use. This report may be used as a financial tool to validate the year to date funds positions
13.6.51. Zero/Negative Funds Summary. During daily EOP processing the Zero/Negative
Funds Summary report is produced when the target flag is set and the target amount is greater
than zero and the available balance is zero or negative; or, the target amount is zero and the available balance is negative.
13.6.51.1. Content. The report is produced in Svc/Customer ID sequence and provides
funding details for each customer at the Project Center Level. Current available funding
balances are given at each Element of Resource (EOR) within the Project Center along
with year to date commitments, obligations, credits, sales, surcharges, and expenses. A
Zero/Negative Funds Summary pending action notification will also be posted in customer‘s inbox‘s.
13.6.51.2. Use. Users should review the report and take action, if necessary, to augment their existing fund balances within the Project Center.
Section 13E—Customer Support (CS) Reports Module.
13.7. CS Reports.
13.7.1. Best Medical Surgical Items By Dollar Savings. See paragraph 13.4.9.
13.7.2. Best Pharmaceutical Items By Dollar Savings. See paragraph 13.4.10.
13.7.3. High Total Expenditure. See paragraph 13.6.25.
13.7.4. Highest Demanded Items (Med/Surg). This report is used to display the highest annual demanded medical/surgical items.
13.7.4.1. Content. Once ran the report will show the item ID, description, UOP, average UOP price, estimated cost Fiscal Year-to-date, and SOS(s).
13.7.4.2. Use. This report provides the customer with a tool to manage their stock by
understanding the annual demand for each item, overall expenditures, and a comparison of the unit of purchase costs by SOS for each of the items.
13.7.5. Highest Demanded Items (Pharm). This report is used to display the highest annual demanded pharmaceutical items.
13.7.5.1. Content. This report shows the item ID, description, UOP, average UOP price,
estimated cost Fiscal Year-to-date, and SOS(s).

AFMAN41-216 13 FEBRUARY 2013 439
13.7.5.2. Use. This report provides Pharmacy with a tool to manage their stock by
understanding the annual demand for each item, overall expenditures, and a comparison
of the unit of purchase costs by SOS for each of the items.
13.7.6. Highest Dollar Valued Items In Sales (Med/Surg). This report is used to display the highest annual dollar valued item in medical/surgical sales.
13.7.6.1. Content. This report shows the item ID, description, UOP, average UOP price, quantity, estimated cost Fiscal Year-to-date, and SOS(s) will be displayed.
13.7.6.2. Use. This report helps customers manage their stock by understanding the unit
of purchase costs (by SOS) for each item, as well as overall expenditures.
13.7.7. Highest Dollar Valued Items In Sales (Pharm). This report is used to display the highest annual dollar valued item in pharmaceutical sales.
13.7.7.1. Content. This report displays the item ID, description, UOP, average UOP price, quantity, estimated cost Fiscal Year-to-date, and SOS(s).
13.7.7.2. Use. This report helps Pharmacy manage their stock by understanding the unit
of purchase costs (by SOS) for each item, as well as overall expenditures.
13.7.8. Issue/Turn-in Summary Report. See paragraph 13.4.27.
Section 13F—Equipment Management (EM) Reports Module.
13.8. EM Reports.
13.8.1. Annual Capital Asset Balance Report (Standard Report). This report provides the
MEMO with a summary view of all equipment that meets the equipment capitalization
threshold.
13.8.1.1. Content. This report displays the acquisition cost, accumulated depreciation, and net value categorized by each Asset Type.
13.8.1.2. Use. MEMO managers use this report to support financial reporting and budgeting requests from AFMOA/SGALE.
13.8.2. Annual Capital Equipment Depreciation Report (Standard Report). The Annual
Capital Equipment Depreciation Report provides the MEMO with a list of all equipment that
meets the equipment capitalization threshold and has accumulated depreciation during the fiscal year.
13.8.2.1. Content. The equipments acquisition cost, current fiscal year depreciation, and
accumulated depreciation are displayed on this report.
13.8.2.2. Use. MEMO managers use this report to support replacement requests, financial reporting, and budgeting requests from AFMOA/SGALO.
13.8.3. Annual Capital Equipment Gain and Loss Report (Standard Report). The Annual
Capital Equipment Gain and Loss Report provides the MEMO with a list of all capital
equipment assets processed as an Inventory Gain or Inventory Loss during the current Fiscal Year.

440 AFMAN41-216 13 FEBRUARY 2013
13.8.3.1. Content. This report displays the agency the equipment was transferred to/from, net acquisition cost, and depreciation gain.
13.8.3.2. Use. MEMO managers use this report to support financial reporting and
budgeting requests from AFMOA/SGALO.
13.8.4. Capital Asset Balance Report (Standard Report). The Capital Asset Balance Report
provides the MEMO with a summary view of all equipment that meets the equipment capitalization threshold. This report is produced monthly.
13.8.4.1. Content. The report lists the acquisition cost, accumulated depreciation, and
net value categorized by each Asset Type.
13.8.4.2. Use. MEMO managers use this report to support financial reporting and budgeting requests from AFMOA/SGALO.
13.8.5. Controlled Items Inventory List (Standard Report). Not used by AF sites.
13.8.6. Daily Document Transaction Register (Standard Report). The Daily Document
Transaction Register allows the MEMO to verify the type and accuracy of transactions
processed in the system. This report is produced when equipment transactions are written.
13.8.6.1. Content. The transaction register displays the document number, customer ID,
item ID, ECN, nomenclature, transaction code, transaction reason, user ID, and reverse remarks indicator.
13.8.6.2. Use this report to verify the type and accuracy of daily transactions processed
in the system.
13.8.7. Equipment Inventory Adjustment Document (Standard Report). The Equipment
Inventory Adjustment Document (Figure 13.26.) provides the MEMO a method to verify
inventory adjustments. This report is produced daily when an equipment inventory
adjustment is processed.
Figure 13.26. Equipment Inventory Adjustment Document.
13.8.7.1. Content. The report displays what type of adjustment occurred, the total
inventory overage/shortage value, and net inventory change. There is also a section for
the Equipment Manager and Approval Authority to verify the adjustment(s) by signature.

AFMAN41-216 13 FEBRUARY 2013 441
13.8.7.2. Use. This report provides MEMO managers with a document to verify
inventory adjustments for equipment. Verify each line on the document, and prepare any
necessary documents IAW paragraphs 9.13.8.-9.13.9. and AFI 41-209, paragraph 7.19.
Obtain the signature of the certifying and approving officer on the last page of the document.
13.8.8. High Priority Report (Standard Report). Not used by AF sites.
13.8.9. Monthly Capital Asset Balance Report (Standard Report). Not used by AF sites.
13.8.10. Monthly Capital Equipment Depreciation Report (Standard Report). The Monthly
Capital Equipment Depreciation Report provides a list of all equipment that meets the capital equipment threshold and has had depreciation calculated during the month of the report.
13.8.10.1. Content. This report is sorted by Org ID and customer and displays the ECN,
item ID, nomenclature, serial number, acquisition date and cost, current and accumulated
depreciation for each item on the report.
13.8.10.2. Use. This report provides the Equipment Manager information about depreciation transactions that were passed to finance.
13.8.11. Monthly Capital Equipment Gain and Loss Report (Standard Report). This report
provides the MEMO with a summary of all capital equipment gains and losses for the month.
This report is produced monthly.
13.8.11.1. Content. The report includes the type of inventory adjustment that processed,
reversal indicator, net acquisition cost, depreciation gain, and accumulated depreciation. The net adjustments are also totaled.
13.8.11.2. Use. This report provides the Equipment Manager a summary of all capital
equipment gains and losses for the month.
13.8.12. Property Record Administrative Adjustment Report (Standard Report). Not used by AF sites.
13.8.13. Active Due-in/Due-out Report (Standard Inquiry). The Active Due-In/Due-Out
report (Figure 13.27.) provides the MEMO a summary of all equipment due-outs with linked
due-ins. This report is produced upon request.
Figure 13.27. Active Due-in/Due-out Report.
13.8.13.1. Content. Use the report selection criteria to select a sort preference by Due-in
Document Number or Item ID. Included in the report are the status codes, status date,

442 AFMAN41-216 13 FEBRUARY 2013
customer ID, due-in/due-out document numbers, item ID, nomenclature, required quantity, due-out quantity, received quantity, and due-in unit price.
13.8.13.2. Use. This report provides MEMO managers a tool for managing equipment
due-ins and due-outs.
13.8.14. Authorization Reference Report (Standard Inquiry). Not used by AF sites.
13.8.15. Custodian Action List (Standard Inquiry). The Custodian Action List report
provides a list of equipment records that have written to the equipment transaction history for a Customer account. This report can be produced upon request.
13.8.15.1. Content. The selection criteria for this report include search by Report Date
or transactions processed today that have not been printed.
13.8.15.2. Use. This list is produced if there is a change in the accountable records for a
using activity. The report provides the MEMO and customer with a list of accountable
transactions that have occurred for the Customer's account in a given business day. This
list essentially updates the Custody Receipt/Location List by showing all changes, such
as gains and losses, that occurred during the processing cycle. File one copy of all
certified listings in the MEMO property custodian file and retain until a new Custody
Receipt/Location List reflecting all the changes has been certified and signed by the property custodian.
13.8.16. Custodian Receipt/Location List (Standard Inquiry). The Custodian
Receipt/Location List (Figure 13.28.) provides a list of accountable equipment records for a
customer account and includes a signature block for the custodian. This report is produced upon request.
Figure 13.28. Custodian Receipt/Location List.
13.8.16.1. Content. Upon specifying the customer and sort by criteria, the report
displays item ID, nameplate model, serial number, equipment nomenclature, short item
description, ECN, common model, equipment type i.e. individual (ind), component
(cmp), and system (sys).

AFMAN41-216 13 FEBRUARY 2013 443
13.8.16.2. Use. This list may be requested on an as-required basis when an inventory of
MEMO controlled property is required, i.e. there is a change in property custodian, or
there are extensive changes in the records for an account. Property custodians sign and
return a certified copy to the MEMO. This copy is maintained in the MEMO property custodian file.
13.8.17. Custodians Without Equipment Report (Standard Inquiry). The Custodians
Without Equipment Report (Figure 13.29.) is produced upon request to provide MEMO with
a list of all custodians associated to the organization that do not have equipment records, requests, or due-ins that are active on their account.
Figure 13.29. Custodians Without Equipment Report.
13.8.17.1. Content. This report displays the customer ID, customer name, custodian
name, custodian phone, last inventory date, next inventory date, and custodian departure
date.
13.8.17.2. Use. This report provides MEMO managers a tool for managing equipment
custodians and custodial accounts within the organization. If no equipment is assigned to a custodian, the custodian should be considered for deletion.
13.8.18. Document Register Report (Standard Inquiry). The Document Register Report
(Figure 13.30.) enables the MEMO to verify the type and accuracy of transactions processed in the system. This report is produced upon request.
Figure 13.30. Document Register Report.
13.8.18.1. Content. The search criteria allow for specific start and end dates to be
selected. The report displays the document number, customer ID, item ID, ECN, nomenclature, transaction code/reason, user ID, reversal indicator, and any remarks.
13.8.18.2. Use. The document register is used to ensure that the transaction processed
correctly in DMLSS with the information contained on the source documents. If an error
is found on the document, take corrective action. Quality control of the document
register must be performed when MEMO transactions have been processed for a given
day.

444 AFMAN41-216 13 FEBRUARY 2013
13.8.19. EM Equipment Requiring Data For UII Report (Standard Inquiry). The EM
Equipment Requiring Data For UII Report displays equipment that requires data in order for
a Unique Item Identifier (UII) to be assigned. This report is produced upon request.
13.8.19.1. Content. The report selection criteria include Organization, Customer, and
Data Required. Included in the report are the ECN, customer, nomenclature, location,
manufacturer, information required for UII, date identified, serial, and model number.
The totals for selection criteria and EM service are also included and divided into four
sections. The sections include number of accountable equipment records, equipment
records with UII assigned, equipment records requiring a UII, and equipment records
requiring user update.
13.8.19.2. Use. This report can be used to view equipment items requiring data for a
UII. It is mainly for future use in identifying equipment that must be marked with a new 2d matrix barcode.
13.8.20. EM Equipment With A UII Assigned (Standard Inquiry). The EM Equipment With
A UII Assigned report list all active equipment records that a Unique Identifier (UID) or UII assigned.
13.8.20.1. Content. This report displays the equipment separated by item ID listing the ECN, customer, U/I, ORG ID, manufacturer,
13.8.20.2. Use. The report is mainly for future use in identifying equipment that must be
marked with a new 2d matrix barcode.
13.8.21. Equipment Account Report (Standard Inquiry). The Equipment Account Report
gives MEMO a list of all equipment on record for each organization. This report is produced upon request.
13.8.21.1. Content. This report shows the equipment record(s) assigned to each
customer, balance type information, and MTF Catalog information for each equipment item.
13.8.21.2. Use. This report gives MEMO a detailed list of all equipment on record for each organization
13.8.22. Equipment Account Summary Report (Standard Inquiry). The Equipment Account
Summary Report is a summary of all items on the Equipment Management account.
13.8.22.1. Content. This report is divided by four price categories. Each price category
displays total dollar value, number of item ID‘s, and number of equipment records. Each
indicates the total percentage of equipment it accounts for. A statement of responsibility
for the Equipment Manager is also available to sign.
13.8.22.2. Use. This report summarizes the value of the organization‘s equipment
account and provides an accountable document for MEMO managers to sign for and assume responsibility for the organization‘s overall equipment account.
13.8.23. Equipment Balance Report (Standard Inquiry). Not used by AF sites.
13.8.24. Equipment Gain And Loss Report (Standard Inquiry). This inquiry lists all
accountable records that have been gained or lost to the Equipment Management Account.

AFMAN41-216 13 FEBRUARY 2013 445
13.8.24.1. Content. The search criteria include search by Org. ID allowing for the
specification of beginning and end dates. The contents of the report include document
number, transaction date, customer ID, item ID, ECN, nomenclature, serial no., reversal indicator, and transaction code, and reason.
13.8.24.2. Use. This report provides the MEMO a tool for researching and managing equipment gains and losses.
13.8.25. Equipment Line Item Number Report (Standard Inquiry). Not used by AF sites.
13.8.26. Equipment Out of Balance Report (Standard Inquiry). Not used by AF sites.
13.8.27. Equipment Prime/Sub Report (Standard Inquiry). Not used by AF sites.
13.8.28. Equipment Records for Device Class Report (Standard Inquiry). This inquiry
provides the Equipment Manager a list of equipment records for the specified Device Class.
13.8.28.1. Content. Upon specifying the Device Class in the search criteria, this report
displays device code, item ID, nomenclature, ECN, Cust ID, manufacturer, nameplate model, serial number, and acquisition cost.
13.8.28.2. Use. This report provides the MEMO a tool for managing a particular type of
equipment.
13.8.29. Equipment Replacement Report (Standard Inquiry). The Equipment Replacement
Report (Figure 13.31.) is produced upon request and provides the MEMO and equipment custodians with a list of equipment that is eligible or becoming eligible for replacement.
Figure 13.31. Equipment Replacement Report.
13.8.29.1. Content. The search criteria include type of equipment expense or capital,
number of years one thru five, organization, and customer.
13.8.29.2. Use. Use this report and MEMO-approved/unfunded files as the basis for
budget inputs. MEMO provides equipment custodians copies of this report to use in
preparing their expense equipment budgets (AFI 41-209, paragraph 7.5.).
13.8.30. Equipment Transfers Report (Standard Inquiry). This report is produced upon
request and provides a list of accountable equipment records that have been transferred to or from a customer account.
13.8.30.1. Content. The selection criteria for this inquiry allows for the date range,
applicable customer, and sort option by document number or equipment control number.

446 AFMAN41-216 13 FEBRUARY 2013
The report displays the document number, transaction date, item ID, ECN, nomenclature, serial number and transaction reason.
13.8.30.2. Use. This report provides the MEMO a tool for researching equipment
transfers.
13.8.31. Excess Equipment Reconciliation Report (Standard Inquiry). This inquiry is
produced upon request and provides a list of reportable and non-reportable excess items on the MEMO excess account.
13.8.31.1. Content. This report is separated between potential reportable excess and
potential non-reportable excess
13.8.31.2. Use. MEMO personnel can use this report to manage excess equipment.
13.8.32. Inactive Due-in/Due-out Report (Standard Inquiry). The Inactive Due-in/Due-out
Report inquiry is produced upon request and provides the MEMO a list of equipment due-outs with associated due-ins that are complete.
13.8.32.1. Content. The specific report selection criteria include search by date range
and sort by due-in document number or by item ID.
13.8.32.2. Use. MEMO personnel can use this list to research inactive due-ins/due-outs.
13.8.33. Potential Custodian Inventory List (Standard Inquiry). The Potential Custodian
Inventory List (Figure 13.32.) is produced upon request and provides the MEMO with a list of inventories that are due within the next ninety days.
Figure 13.32. Potential Custodian Inventory List.
13.8.33.1. Content. This report displays the customer‘s last and next scheduled
inventory dates.
13.8.33.2. Use. This report provides the MEMO officer a tool to schedule and prepare for upcoming MEMO inventories.
13.8.34. Reported Excess Equipment Report (Standard Inquiry). This report is produced
upon request and provides a list of equipment items that have been reported as excess that are
still awaiting disposition or pending action. The report displays all status codes the item has received while in excess. This report can be produced upon request.
13.8.34.1. Content. The report displays all status codes the item has received while in excess.
13.8.34.2. Use. Use this report to manage equipment that is reported excess.

AFMAN41-216 13 FEBRUARY 2013 447
13.8.35. Systems and Components Report (Standard Inquiry). This report is produced upon
request and provides the MEMO a list of system equipment records with the associated
component equipment records.
13.8.35.1. Content. This report displays the total system acquisition cost along with
ECN‘s, item ID, equipment nomenclature, manufacturer, nameplate model, serial number, and acquisition cost.
13.8.35.2. Use. This report provides the MEMO officer a tool for managing system
equipment records and the associated components.
Section 13G—Equipment Maintenance (MA) Reports Module.
13.9. MA Reports.
13.9.1. Average Annual Maintenance Cost Report (Standard Report). This report lists all
manufacturer/common models of equipment that were in the MTF during the past fiscal year.
This report is only produced during end-of-fiscal year processing and only if you have created Common Model Records.
13.9.1.1. Content. This report is listed alphabetically by Equipment Nomenclature.
Dollar values are averages for manufacturer/common model, accomplished by summing
all costs for each category and dividing by quantity of equipment items for that manufacturer/common model.
13.9.1.2. Use. This report provides high-level cost data for each manufacturer/common model of equipment. Retention: 12 Months.
13.9.2. Consolidated Customer Maintenance Report (Standard Report). The consolidated
Customer Maintenance Report summarizes work order information from individual Customer Maintenance Reports and displays it in a single report.
13.9.2.1. Content. The Consolidated Customer Maintenance Report is broken down into
sections by Organization Name. Each section contains a row for each supported
Customer Name within that organization. The Grand Total line gives the sum total for all supported organizations.
13.9.2.2. Use. This report provides the maintenance manager with a summary view of
work order counts, service hours, and potential problem areas for each supported
customer. It is useful for determining which departments are utilizing Medical
Maintenance and as a possible indicator of the need for operator training. It can also help identify facility modification needs. Retention: 12 Months.
13.9.3. Contract Expiration Report (Standard Report). This report provides a list of
contracts with contract end dates that occur within the next 6 months. The Standard Report
version is created in the March, June, September and December end-of-month processing for
each Maintenance Activity; however, it is not produced if there is no contract data in the
Contract Management module.
13.9.3.1. Content. It is generated in a list format in both Contractor sequence and End Date sequence.

448 AFMAN41-216 13 FEBRUARY 2013
13.9.3.2. Use. This report alerts maintenance managers of equipment with an expiring
contract in order to prepare for organizational or additional contractual maintenance
support. The report can also be used to identify possible deficiencies that can be
corrected before the contract period expires. Review to avoid lapses in contract coverage. Retention: 3 Months – Inquiry must be saved manually
13.9.4. Customer Maintenance Report (Standard Report). The Customer Maintenance
Report provides information on scheduled and unscheduled services performed by the
Maintenance Activity and Contractors and the status of all work orders not completed prior to the end-of-month processing.
13.9.4.1. Content. The report is created for each customer supported by the
Maintenance Activity. The list portion is in Work Order Number sequence. It is
separated by Work Order Category; Part I contains Unscheduled Work Orders, and Part
II contains Scheduled Work Orders. Part III of the report contains the work order number
and identification data of any equipment items where the Work Order Status is Unable to Locate.
13.9.4.2. Use. The Customer Maintenance Report provides the Maintenance Activity and
each Customer, information on the maintenance services and support provided for the
Customer. Retention: 1 Month
13.9.5. Customer Scheduled Services Listing (Standard Report). The report provides a list of equipment that is due for scheduled services within a Customer‘s area.
13.9.5.1. Content. A separate listing in Equipment Control Number (ECN) sequence is provided for each Customer ID for which scheduled work orders are created.
13.9.5.2. Use. The report is to advise the customers of equipment items that are due for
scheduled services, and to aid in coordinating these services. Retention: 1 Month.
13.9.6. Maintenance Management Report (Standard Report). The Maintenance Management
Report provides summarized management data on the type of work performed and time expended during the report month.
13.9.6.1. Content. This is a three-part report to include Unscheduled Services,
Scheduled Services, and Maintenance Service Time Accounting. Part I, Unscheduled
Services (Figure 13.33.), shows the number of unscheduled services and the time
recorded to perform these services. It also provides columns for in-house technicians
and others. The second section provides statistics about the number of unscheduled work
orders. The third section shows the ending balance of work orders by status and by the
number of days they have been open. Part II Scheduled Services (Figure 13.34.) shows
the number of scheduled services that were required for the month and then captures the
number completed. It displays the number of hours logged for the completed services and
totals the number of services not performed. The completion numbers are then displayed
as a percent of services completed. The second section provides statistics about the
number of scheduled work orders, and the third section shows the ending balance of work
orders by status and by the number of days they have been open. Part III Maintenance
Service Time Accounting (Figure 13.35.) displays the number of authorized versus
assigned military and civilians. The second section summarizes time for all active
technicians as recorded on the maintenance personnel time sheet. The third section

AFMAN41-216 13 FEBRUARY 2013 449
provides statistics about the number of hours available versus the number of hours recorded in work orders.
Figure 13.33. Maintenance Management Report, Part I.
Figure 13.34. Maintenance Management Report, Part II.

450 AFMAN41-216 13 FEBRUARY 2013
Figure 13.35. Maintenance Management Report, Part III.
13.9.6.2. Use. Supervisors use this report to evaluate the equipment maintenance
program. This report should facilitate the identification of trends. Give special attention
to open work orders, critical and life-support equipment service, equipment calibration,
etc.
13.9.7. MEPRS Report (Standard Report). The MEPRS Report provides the man-hours expended for each customer.
13.9.7.1. Content. The Medical Expense and Performance Report is produced alphabetically in column format by MEPRS Code sequence by organization.
13.9.7.2. Use. It allows the resource manager to distribute maintenance costs to the
various expense centers (customers). The report is also useful for the maintenance
manager to see how the maintenance time and cost is distributed among the customers being supported. Retention: 12 Months.
13.9.8. Productivity Report/Maintenance Activity (Standard Report). The Maintenance
Activity Productivity Report contains a comparison of the time available for the Maintenance Activity to accomplish work and how that time was used to support the maintenance mission.
13.9.8.1. Content. A listing in Service Type sequence is provided for each Service Type
that has had time recorded in a work order. The data on time available for work is from
data input on the Monthly Timesheet. The data related to type of service and hours
charged is from data input on work orders. The report is delineated by type of work and
hours charged. The report also shows the concentration of the total time spent in

AFMAN41-216 13 FEBRUARY 2013 451
performing that type of work, by both the current month and a trend of the last twelve months.
13.9.8.2. Use. The Productivity Report is used by the Maintenance Manager to monitor
and evaluate the work accomplished during the month by Maintenance Activity. Retention: 12 Months.
13.9.9. Productivity Report/Team (Standard Report). The Team Productivity Report
contains a comparison of the time available for the team to accomplish work and how that
time was used to support the maintenance mission.
13.9.9.1. Content. A listing in Service Type sequence is provided for each Service Type
that has had time recorded in a work order. The data on time available for work is from
data input on the Monthly Timesheet. The data related to type of service and hours
charged is from data input on work orders. The report is delineated by type of work and
hours charged. The report also shows the concentration of the total time spent in
performing that type of work, by both the current month and a trend of the last 12
months.
13.9.9.2. Use. The Productivity Report is used by the Maintenance Team Leader to
monitor and evaluate the work accomplished during the month by both Team and Technician.
13.9.10. Productivity Report/Technician (Standard Report). The Maintenance Technician
Productivity Report is created for each Technician assigned to the Maintenance Activity.
13.9.10.1. Content. A listing in Service Type sequence is provided for each Service
Type that has had time recorded in a work order. The report contains a comparison of the
time available for the technician to accomplish work and how that time was used to
support the maintenance mission. The data on time available for work is from data input
on the Monthly Timesheet. The data related to type of service and hours charged is from
data input on work orders. The report is delineated by type of work and hours charged.
The report also shows the concentration of the total time spent in performing that type of work, by both the current month and a trend of the last 12 months.
13.9.10.2. Use. The Maintenance Technician Productivity Report is used by the
Maintenance Manager/Foreman/Team Leader to monitor and evaluate the work
accomplished during the month by the Technician. Retention: 12 Months.
13.9.11. Unable to Locate Equipment Notification (Standard Report). The Unable to Locate
Equipment Notification report (Figure 13.36.) lists equipment that has an Accountable
Equipment Code of "Y" and has not been located during maintenance visits by a
Maintenance Activity.

452 AFMAN41-216 13 FEBRUARY 2013
Figure 13.36. Unable to Locate Equipment Notification Report.
13.9.11.1. Content. This report is listed sequentially by ECN with a page break for
Customer.
13.9.11.2. Use. Equipment managers use this report to identify any equipment items that cannot be found for servicing. Retention: 1 Month.
13.9.12. Warranty Expiration Report (Standard Report). The Warranty Expiration Report
provides a list of equipment with warranty expiration dates that will occur within 6 months.
The Standard Report version is produced in the March, June, September and December end-
of-month processing for each Maintenance Activity; however it is not produced if there are no equipment records with warranty expiration dates within 6 months.
13.9.12.1. Content. It is generated in a list format in both Labor End Date sequence and
Parts End Date sequence.
13.9.12.2. Use. This report alerts the maintenance manager of equipment with a warranty
that is expiring in order to prepare for organizational or contractual maintenance support
and to identify possible deficiencies that can be corrected before the warranty period
expires. Review quarterly to prevent loss of equipment maintenance coverage.
13.9.13. Work Order Management Summary – MA (Standard Report). The Work Order
Management Summary (12 Month Trend) provides summary data of all work orders that
have been created by the Maintenance Activity. It displays the totals completed and the
status of any work orders remaining open.
13.9.13.1. Content. The Work Order Management Summary is provided in a column and row format by Months.
13.9.13.2. Use. The Work Order Management Summary provides a view of the work
order production and performance of the Maintenance Activity in a 12-month trend to the
Maintenance Manager. Retention: 12 Months.
13.9.14. Work Order Management Summary – Team (Standard Report). The Work Order
Management Summary (Maintenance Activity by Team) provides summary data of all work
orders that are assigned to a Maintenance Team and displays the totals completed and the
status of any work orders remaining open.
13.9.14.1. Content. The Work Order Management Summary, Maintenance Activity by Team Report, is provided in a column and row format by Teams.

AFMAN41-216 13 FEBRUARY 2013 453
13.9.14.2. Use. The Work Order Management Summary provides a view of the work
order production and performance of the Maintenance Activity by Teams to the
Maintenance Manager. Retention: 12 Months.
13.9.15. Work Order Management Summary – Technician (Standard Report). The Work
Order Management Summary (Team by Technician) provides summary data of all work
orders that have are assigned to each Maintenance Technician and displays the totals
completed and the status of any work orders remaining open.
13.9.15.1. Content. The Work Order Management Summary is in a column and row format by Technicians.
13.9.15.2. Use. The Work Order Management Summary provides a view of the work
order production and performance of the Maintenance Activity by Technicians to the
Maintenance Manager. Retention: 12 Months.
13.9.16. Workload Report (Standard Report). The Workload Report (Figure 13.37) shows
the number and status of open unscheduled work orders, the number of open scheduled work
orders, and the estimated hours required to complete the scheduled work orders. The
Standard Report captures this data for each Maintenance Activity at the start of the month.
Figure 13.37. Workload Report.
13.9.16.1. Content. The Workload Report displays open work orders in rows by Work
Order Category and Work Order Status. Scheduled work orders are displayed by
Unassigned, Assigned, and Unable to Locate. In addition, the program shows the periods
of time the work orders have been open.
13.9.16.2. Use. The Workload Report is used by the maintenance manager to manage the maintenance workload during the month. Retention: 1 Month.

454 AFMAN41-216 13 FEBRUARY 2013
13.9.17. Contract Expiration Report (Standard Inquiry). Content and use are the same as
Contract Expiration (Standard) Report (paragraph 13.9.3.). This inquiry is only produced
only when the user requests the information and allows the user to enter beginning and ending dates to customize the results.
13.9.18. Customer Scheduled Services Listing (Standard Inquiry). Content and use are
similar to the standard report version (paragraph 13.9.5.). When generated as a standard
inquiry, DMLSS provides a list of equipment that will be due during the month after which the inquiry was requested.
13.9.19. Equipment Without A Maintenance Activity Report (Standard Inquiry). The
Equipment Without A Maintenance Activity Report is user generated as a standard inquiry
report and shows active equipment records that have a maintenance requirement, but have no associated Maintenance Activity.
13.9.19.1. Content. The Equipment Without A Maintenance Activity Report displays equipment data in column format.
13.9.19.2. Use. This report is used by the Maintenance Manager/Foreman/Team Leader
to monitor and correct equipment records that have a maintenance requirement and no associated Maintenance Activity.
13.9.20. Equipment Without A Maintenance Plan Report (Standard Inquiry). The
Equipment Without A Maintenance Plan Report is user generated as a standard inquiry report
and shows active equipment records that have a maintenance requirement, but have no
Maintenance Plan associated with either the Equipment Nomenclature, Manufacturer/Common Model or Equipment Control Number (ECN).
13.9.20.1. Content. The Equipment Without A Maintenance Plan Report displays
equipment data in column format.
13.9.20.2. Use. This report is used by the Maintenance Manager/Foreman/Team Leader
to monitor and correct equipment records that have a maintenance requirement and no associated Maintenance Plan.
13.9.21. Maintenance Interval Without A Date Due (Standard Inquiry). The Maintenance
Interval Without A Date Due Report is user generated as a standard inquiry report and shows
active equipment records that have a maintenance interval associated with a Maintenance Type, but have no Date Due.
13.9.21.1. Content. The Maintenance Interval Without A Date Due Report displays
equipment data in column format.
13.9.21.2. Use. The Maintenance Interval Without A Date Due Report is used by the
Maintenance Manager/Foreman/Team Leader to monitor and correct equipment records
that have a maintenance interval associated with a Maintenance Type, but have no Date
Due.
13.9.22. Performance Analysis Report (Standard Inquiry). Report is listed but not available in DMLSS at this time.
13.9.23. Suspended Scheduled Work Orders Report (Standard Inquiry). The Suspended
Scheduled Work Orders Report is user generated as a standard inquiry report and lists all

AFMAN41-216 13 FEBRUARY 2013 455
items of equipment that have a scheduled maintenance requirement and whose suspend scheduled work orders indicator is active.
13.9.23.1. Content. This report displays equipment data in column format.
13.9.23.2. Use. This list is used by the Maintenance Manager/Foreman/Team Leader to
monitor and, if necessary, correct equipment records that have had their scheduled work orders suspended
13.9.24. Warranty Expiration Report (Standard Inquiry). Content and use are the same as
standard report version (paragraph 13.9.12.). This inquiry is only produced only when the
user requests the information and allows the user to enter beginning and ending dates to customize the results.
13.9.25. Workload Report (Standard Inquiry). The content and use are the same as the
standard report version (paragraph 13.9.16.). The Standard Inquiry can be run at any time
and displays the data for that point in time. The Standard Inquiry allows the manager to get a feel for how the work is progressing during the month.
Section 13H—System Services (SS) Reports Module.
13.10. SS Reports.
13.10.1. Assemblage Funds Status Report. See paragraph 13.5.7.
13.10.2. End-of-Year Funds. After selecting the desired criteria of Log, Project Center,
Expense Center or All, the End-of-Year Funds Report displays the appropriate fund data.
13.10.2.1. Content. This report displays target amount, available balance, committed,
obligated, credits, reimbursable sales, non-reimbursable sales, surcharges and expenses by EOR for the selected criteria.
13.10.2.2. Use. This report can be used to ensure the availability of funds and validate
available balances.
13.10.3. Expenditures by SOS. Not designed for AF use. This report displays expenditures
by customer ID is most applicable for a CAIM SOS. The only authorized Air Force CAIM SOS is medical maintenance.
13.10.4. Expense Center EOM Fund Balance. See paragraph 13.4.20.
13.10.5. Expense Center Expenses by EOR. See paragraph 13.6.22.
13.10.6. Expense Center Fund Summary. See paragraph 13.6.23.
13.10.7. FM Installations by MTF/Unit. This report displays the MTF/Unit and its
associated FM installations.
13.10.7.1. Content. This report displays the MTF/Unit along with its associated FM installation.
13.10.7.2. Use. Use this option to list the MTF/Units with their associated FM installations.
13.10.8. High Total Expenditure. See paragraph 13.6.25.

456 AFMAN41-216 13 FEBRUARY 2013
13.10.9. Inactive Users. The Inactive Users Report (Figure 13.38) displays users that have not used the system for 180 days or longer.
Figure 13.38. Inactive Users Report.
13.10.9.1. Content. This report displays all inactive users along with the number of days
their account has been expired, user signature, and last logon.
13.10.9.2. Use. SAs can use this report to display the users with expired DMLSS accounts. Determine whether the account is still required and take appropriate action.
13.10.10. Monthly Due-in/Due-out Report. This report list due-ins and dollar value of due-
outs for current and previous fiscal years. Users may select due-ins only, due-outs only, or
both in the selection criteria window.
13.10.10.1. Content. The due-in portion of this report is sorted by SOS type code and
displays document number, item ID, PO number, call number, refund code, SOS, UOP,
original quantity, cancelled quantity, current quantity, UOP price and total price. The
due-out part is sorted by project center and shows current FY refundable, current non-
refundable, prior FY refundable, 2nd
prior FY refundable, and older FY refundable values EOR and Expense center.
13.10.10.2. Use. Managers can use this report to reference individual due-ins and
validate the dollar value of refundable due-outs for each project center.
13.10.11. OP Funds Distribution History Report. Not used at AF sites.
13.10.12. OP Funds Report. Not used at AF sites.
13.10.13. Project Center EOM Fund Balance. See paragraph 13.4.42.
13.10.14. Project Center Expenses by Expense Center. See paragraph 13.6.35.
13.10.15. Project Center Fund Summary. See paragraph 13.6.36.
13.10.16. Projected Expenditure. See paragraph 13.6.37.
13.10.17. Role Detail Report. This report displays each role created within the SS, UP Manage module.
13.10.17.1. Content. This report displays the resources, and the privileges assigned (read, update, create, delete) for each role. All applications are available.
13.10.17.2. Use. SAs may use this report to understand the roles, resources, and
privileges that are available within DMLSS prior to assigning user roles in the User Priv – Assign window in SS.

AFMAN41-216 13 FEBRUARY 2013 457
13.10.18. Role Detail Report by Application. This report is similar to the Role Detail report (paragraph 13.10.5.); however users can only select one application at a time.
13.10.19. Sales. Not designed for AF use. This report displays expenditures by customer ID
is most applicable for a CAIM SOS. The only authorized Air Force CAIM SOS is medical maintenance.
13.10.20. User Privilege Summary Report. The User Privilege Summary report (Figure
13.39.) identifies individuals that have roles the match the resource requested on the search
criteria screen.
Figure 13.39. User Privilege Summary Report.
13.10.20.1. Content. Use the report search criteria screen to specify the desired
application and resource. In return, this report displays the name, user ID, role, resource
and privilege for any user meeting the criteria.
13.10.20.2. Use. SAs and Logistics managers may use this report to determine if certain
roles, resources, and privileges have been assigned. This report is similar to the User
Summary Report except it allows the administrator to further narrow the search results to
a specific application and resource element. Use this report to identify users assigned specific resource privileges.
13.10.21. User Report - All Users. This report displays all DMLSS users along with a list of their applications and assigned roles.
13.10.21.1. Content. The report displays all users in alphabetical order followed by the
applications they have access to and their associated roles.
13.10.21.2. Use. SAs and Logistics managers use this report to monitor DMLSS access and manage assigned roles.
13.10.22. User Report by User. This report provides the same information as the User
Report – All Users (see paragraph 13.10.8.); however, only one user ID must be chosen per
report. Use this report to inquire a particular user‘s access in DMLSS.
13.10.23. User Report by User Name and User ID. This report provides a list of all DMLSS users.
13.10.23.1. Content. This report displays last name, first name, and user ID.
13.10.23.2. Use. SAs and Logistics managers use this report to monitor DMLSS access.
13.10.24. User Summary Report. The User Summary Report provides a detailed view of all DMLSS users and their access to applications via assigned roles, resources and privileges.

458 AFMAN41-216 13 FEBRUARY 2013
13.10.24.1. Content. This report displays all users in alphabetical order followed by the applications they have access to and their associated roles, resources and privileges.
13.10.24.2. Use. SAs and Logistics managers use this report to monitor each user‘s
access to DMLSS, and it can be used to verify users are not afforded privileges they do not require.
13.10.25. User Summary Report by Application. Similar to User Privilege Summary Report
(see paragragh 13.10.7.); however, user‘s select only the desired application. Use this report
to narrow search results to a specific application, i.e. IM.
13.10.26. Zero/Negative Funds Summary. See paragraph 13.6.51.
13.10.27. Printed versions of DMLSS user reports should be appropriately safeguarded and only shared with those having a valid need to know.

AFMAN41-216 13 FEBRUARY 2013 459
Chapter 14
INVENTORY CONTROL
Section 14A—Managing Operating Inventory
14.1. Purpose. How you manage your inventory has an impact on the Air Force Working
Capital Fund (AFWCF) as well as the operation and maintenance (O&M) fund. The objective is
to provide logistical support with an economical investment in inventory. Section A of this
chapter covers inventory control procedures associated with establishing warehouse levels and
stock management of the operating inventory. Section B specifically covers customer area stock management including set-up, inventory, and leveling procedures.
14.2. Establishing a Warehouse Stock Control Method. Medical logistics warehouse
inventory control policies require that we maintain sufficient stocks on-hand to provide recurring use materiel upon demand.
14.2.1. Inventory control concepts. The MLFC establishes the inventory control policy.
The two main methods of inventory control are economic order quantity (EOQ) and
stockless. These are not mutually exclusive and election to adopt a completely stockless
warehouse methodology requires significant analysis of item characteristics and reliability of the source of supply.
14.2.2. EOQ. The EOQ inventory control method uses a minimum-maximum system to
control operating inventory. Unlike the stockless method, the EOQ method maintains
warehouse inventories for regularly used items. It is best suited for items with long (greater
than one week) pipeline times. Two critical stock positions identified in this method are the
Stock Control Level (SCL) and Safety level.
14.2.2.1. SCL. Under EOQ the planned maximum of an item (referred to as the stock
control level) should consist of the on-hand and on-order minus due-outs at any one time for operating purposes.
14.2.2.2. Safety Level. The planned minimum stock position under EOQ is the safety
level. The safety level is the least amount of supplies you should have on hand (planned
minimum) to support projected needs. This reserve can be used if receipts are delayed or if there are nonprojected increases in issues.
14.2.2.3. The goal is to maintain stock between these two positions. While the on-hand
quantity should not exceed the stock control level, requisitioning should occur in time to
ensure receipt before stock on hand reaches the safety level. This will ensure seamless
materiel availability. Using this method, inventory control is applied to assets centrally
managed in the warehouse.
14.2.3. Stockless. The stockless inventory method eliminates warehouse inventory and the
associated overhead costs of managing warehouse inventory. Conversely, it increases
procurement, receiving, and customer workload due to repetitive processing of smaller more
frequent orders. Electing to use the stockless inventory method requires extremely reliable suppliers (90%> fill rate) and short delivery timeframes (24-48 hours ).

460 AFMAN41-216 13 FEBRUARY 2013
14.2.3.1. Using this method, inventory control is applied to stock owned by and in the
using activity. There is no stock level maintained and no materiel stored in the
warehouse. Instead, all stock is issued to, delivered to, and stored by the using activity.
The stock is inventoried based upon predetermined schedules, and requirements are identified depending on the replenishment method used.
14.2.3.2. There are risks since no safety stocks are available for demand fluctuations, bad
weather, etc. Consequently, this can also lead to excessive customer ordering/hoarding.
Prior to implementing any form of stockless inventory policy, the MLFC should consider the reliability and availability requirements outlined in AFI 41-209, Chapter 3.
14.3. DMLSS warehouse level computation methods.
14.3.1. For operating warehouse inventory, DMLSS has three methods available for the
stock level computation method:
14.3.1.1. Standard (STD) Leveling Algorithm.
14.3.1.2. Days of Stock.
14.3.1.3. Wilson EOQ.
14.3.2. Air Force policy dictates that this option is set to ―Days of Stock.‖ The MLFC and
materiel manager are responsible for monitoring information used for level computations so do not edit these settings without their approval or guidance.
14.3.3. Level computation methods are located in the system services application on the
Computations tab of the materiel management (MM) Service Detail (Figure 14.1.).
Figure 14.1. MM Service Detail – Computation Tab.

AFMAN41-216 13 FEBRUARY 2013 461
14.4. Factors used to compute a Days of Stock SCL. DMLSS uses a multitude of data from
each individual SOS record in order to compute SCLs for each item ID containing a level and
assigned level type code of ―Core.‖ Items coded for deletion are not calculated. DMLSS computes a stock level based on the following factors:
14.4.1. Daily Demand Rate (DDR) – All system computations related to the SCL rely on the
DDR. This is the amount of stock consumed daily Table 14.2. If there are 12 months of
history recorded, the system computes the DDR by dividing the total quantity issued during
the 12 months by 365. If there is less than 12 months of history, DMLSS multiplies the
number of available months by 30, then divides the resulting figure into the total quantity
issued (For example, if there were 480 issues in three months, divide 480 by 90 to find the DDR).
Table 14.1. Daily Demand Rate (DDR).
COMPUTATION
- When 12 months of consumption is recorded – Total issues during the
consumption period divided by 365 (see Example 1).
- When less than 12 months of consumption is recorded – Total issues during
consumption period divided by the number of months then multiplied by 30 (see
Example 2).
EXAMPLE 1: EXAMPLE 2:
1280 issues in 12 months 480 issues in 3 months
1280/365 480/90 DDR = 3.50 DDR = 5.33
14.4.2. Pipeline Time (PLT) – PLT time is the number of calendar days between the date a
requisition is made and the date the materiel is received by medical materiel personnel.
DMLSS computes PLT based on the document number date minus the transaction date the
item is processed in DMLSS as being received.
14.4.2.1. Average Pipeline Time (aPLT) – aPLT is the average number of days it takes
for a specific item to be delivered. The aPLT for routine requisitions is computed and
recorded as a result of processing receipts with a demand code of Recurring. DMLSS
computes aPLT by totaling the pipeline days and dividing by the number of pipeline
factors recorded Table 14. If sufficient factors are not recorded, the system uses the
default average pipeline time factors of 31 days for the continental United States
(CONUS), 70 days for overseas.
Table 14.2. Average Pipeline Time (PLT).
COMPUTATION
Sum of pipeline times divided by the number of pipeline times. NOTE: The number
of pipeline times used is based on the dollar value of annual sales.
EXAMPLE 1:

462 AFMAN41-216 13 FEBRUARY 2013
If item annual sales is less than $99.99 with pipeline times of 49 and 51 days.
49 + 51 = 100/2
PLT = 50 days
EXAMPLE 2:
If item annual sales is greater than $2,500.00 with pipeline times of 17, 15, 12, 17,
11 and 18 days.
17 + 15 + 12 + 17 + 11 + 18 = 90/6
PLT = 15 days
14.4.2.2. Pipeline time can be distorted if we fail to process receipts immediately or
delay processing due-ins in DMLSS. See Chapter 5, paragraph 5.16.2.2.1.2. Overseas
accounts must be especially cautious to avoid using abnormal pipeline times from unusual methods of shipment.
14.4.3. Operating Level (Days) – Identifies the desired days of stock that should be
maintained for normal daily operations. When the Operating (OPR) Level Days is multiplied
by the daily demand rate it produces the EOQ. EOQ is the amount of stock deemed
economically prudent to requisition, based on consumption history and item cost. The EOQ
does not include Safety Level Days. Default operating level days are based on annual sales
and the number of months of issue history. The information used to compute levels for items from a specific SOS can be found in the SOS Environment tab (see paragraph 14.6.2.).
14.4.4. Safety Level Days – Identifies the desired days of stock that should be maintained if
OPR stock is exhausted. The safety level for an item is determined by multiplying the daily
demand rate times the safety level factor. To arrive at a quantity, multiply the safety level
days times the DDR. The Safety Level Quantity is the number of days of stock that we want
to keep in operating inventory to allow for fluctuations in demand and pipeline time. Default
safety level days are based on annual sales and the number of months of issue history (see paragraph 14.6.2.).
14.4.5. History Begin Date (HBD) – The HBD occurs when the first recurring issue of an
item is recorded. Since other factors used to compute a stock control level are based on the
months of history accumulated, an accurate HBD is important. DMLSS records up to 24 months of issue history.
14.4.6. Dollar Value of Annual Sales ($VS). Annual sales are used to compute the operating
and safety level days. See Table 14.3.
Table 14.3. Dollar Value of Annual Sales.
COMPUTATION
DDR X 365 days X unit price
EXAMPLE 1:
An item has 480 issues in 3 months and the unit price is $0.60.
(480/90) X 365 X $0.60
$VS = $1167.27 (Annual sales category $1,000 - $2,499.99.

AFMAN41-216 13 FEBRUARY 2013 463
EXAMPLE 2:
Same as the preceding example, except the unit price is $0.06.
(480/90) X 365 X $0.06
$VS = $116.73 (Annual sales category $100.00 - $499.99.
14.4.7. Stock Control Level (SCL). The following stock control level computation Table
14.4 is based on assignment of Days of Stock level computation method (AF policy) (see
sample computations in Tables 14.2.and 14.3.). These examples also use the system defaults
as outlined in the Environment Table in Figure 14.2. Each SOS contains an Environment Tab; therefore the OPR and Safety levels assigned are unique to each SOS.
Table 14.4. Stock Control Level (SCL).
COMPUTATION
(operating level days + safety level days + PLT days) X DDR
EXAMPLE 1:
An item with a DDR of 2 based on 12 months issue consumption, an average
pipeline time of 28 days, and annual sales greater than $2,500.00.
(14 + 10 + 28) X 2
SCL = 104
EXAMPLE 2:
Same as the preceding example, except 6 months issue consumption and a dollar
value less than $99.99.
(42 + 7 + 28) X 2
SCL = 154
14.4.8. Reorder Point - While not part of the stock control level, the system computes a
reorder point and uses it to determine when requisitioning action should occur. Generally,
the reorder point is the pipeline time and safety level total Table 14.5.
Table 14.5. Reorder Point Percentage (ROP) and Reorder Point Quantity (ROQ).
COMPUTATION
EXAMPLE 1:
An item has an average pipeline time of 32 days, 9 months issue consumption, and
annual sales less than $99.99.

464 AFMAN41-216 13 FEBRUARY 2013
(32 + 7) / (32 + 42 + 7) = (39 / 81) X 100
ROP = 48.14 % = 48% (rounded)
EXAMPLE 2:
The system uses the reorder point percentage and stock control level to compute the
ROQ.
Stock Control Level = 57; 48% of 57 = 27 ROQ (rounded)
14.4.8.1. Re-Order Point (ROP) Percentage – A percentage point, based on the stock level, in which an item should be replenished to avoid stock exhaustion.
14.4.8.2. Reorder Point Quantity (ROQ) – A quantity point, based on the stock level, in which an item should be replenished to avoid stock exhaustion.
14.5. DMLSS automates EOQ computation and ordering. Reliable supply sources should
allow the safety level and EOQ factors to be lowered from the initial defaults for a specific
supply source. Modifying and reviewing the inventory control method used is an ongoing
process. Regardless of inventory objectives and published goals, the MLFC will ensure the
medical mission is not compromised by an overly aggressive inventory control policy.
Variations in stock control levels may be necessary for certain items and under the conditions outlined in AFI 41-209, Chapter 3.
14.6. DMLSS Level Computation Environment Factors. Users can establish and/or edit the
default level computation environment factors from the following modules. Manipulation of these factors affects the SCL outcome.
14.6.1. TMU Environment Table (Figure 14.2). This table holds the (default) leveling
values that are used to initially fill each SOS Environment Tab. Specifically, it displays
seven requirement codes based on annual sales. Nonmedical and repair parts are assigned
their own category. The table also shows the operating (normal operating level or quantity
on hand) and safety levels (minimum quantity of the item that should be kept on hand for
necessities) for each different category by quantity issue history as follows:
Figure 14.2. TMU Environmental Table.
14.6.1.1. Less than 3 months—short history
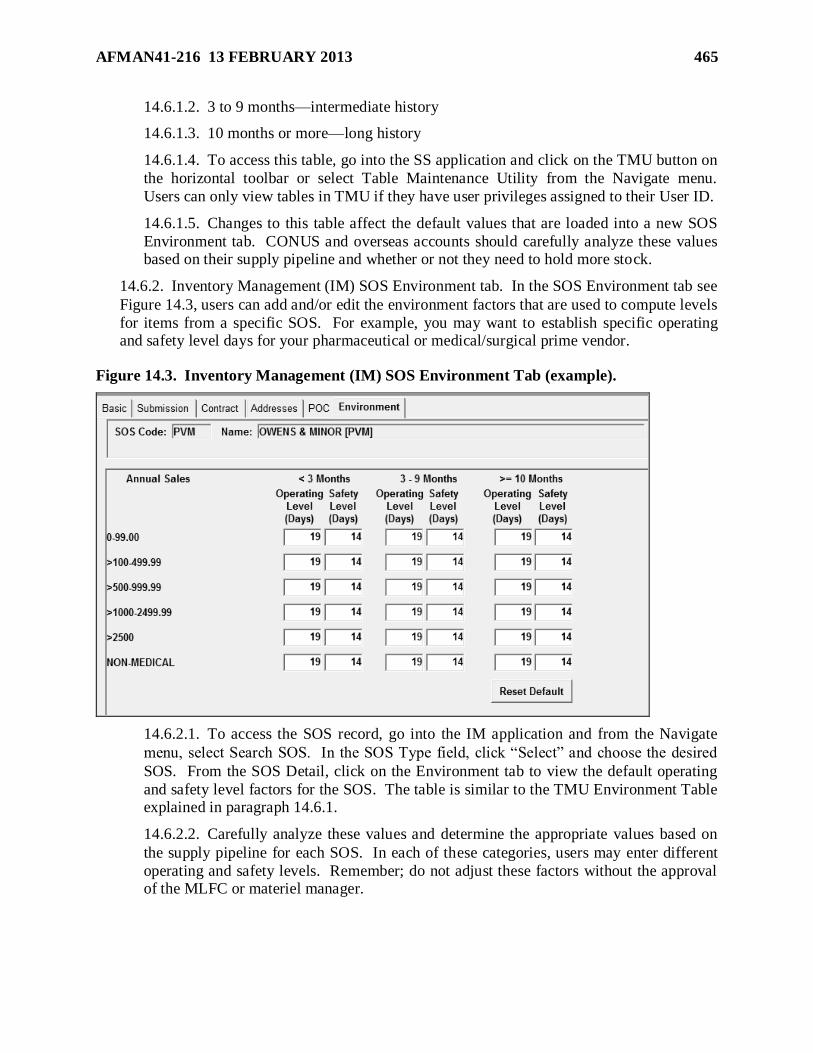
AFMAN41-216 13 FEBRUARY 2013 465
14.6.1.2. 3 to 9 months—intermediate history
14.6.1.3. 10 months or more—long history
14.6.1.4. To access this table, go into the SS application and click on the TMU button on
the horizontal toolbar or select Table Maintenance Utility from the Navigate menu.
Users can only view tables in TMU if they have user privileges assigned to their User ID.
14.6.1.5. Changes to this table affect the default values that are loaded into a new SOS
Environment tab. CONUS and overseas accounts should carefully analyze these values based on their supply pipeline and whether or not they need to hold more stock.
14.6.2. Inventory Management (IM) SOS Environment tab. In the SOS Environment tab see
Figure 14.3, users can add and/or edit the environment factors that are used to compute levels
for items from a specific SOS. For example, you may want to establish specific operating and safety level days for your pharmaceutical or medical/surgical prime vendor.
Figure 14.3. Inventory Management (IM) SOS Environment Tab (example).
14.6.2.1. To access the SOS record, go into the IM application and from the Navigate
menu, select Search SOS. In the SOS Type field, click ―Select‖ and choose the desired
SOS. From the SOS Detail, click on the Environment tab to view the default operating
and safety level factors for the SOS. The table is similar to the TMU Environment Table explained in paragraph 14.6.1.
14.6.2.2. Carefully analyze these values and determine the appropriate values based on
the supply pipeline for each SOS. In each of these categories, users may enter different
operating and safety levels. Remember; do not adjust these factors without the approval of the MLFC or materiel manager.

466 AFMAN41-216 13 FEBRUARY 2013
14.6.3. IM MTF Catalog, Log Cat tab Figure 14.4. In the IM application, users can change
the computation method for an individual item. If you‘ll recall, in DMLSS, you can choose
between three types of levels:
Figure 14.4. MTF Catalog, Log Cat Tab.
14.6.3.1. Static—the user maintains the level. This option is set on new items. After 90
days of consumption, the system will provide recommended level changes. Also,
managers my use this level type to compensate for seasonal or other operational
fluctuations.
14.6.3.2. Core—computer controlled. This level type should constitute the majority of inventory records.
14.6.3.3. Stockless—items with a recurring demand that are managed at the using activity location.
14.6.3.4. To edit the computation method for an item, conduct a search for the catalog
item you want to edit. In the Navigate menu, select Catalog Search. In the Catalog
Search window, select the MTF Catalog scope and conduct a Generic Search. DMLSS
will display the results of the search in the Search Summary Result tab. Select the
catalog record and click the Detail button on the vertical toolbar. In the MTF Catalog –
Supply window, click the Log Cat tab and then click on the Leveling button at the lower right hand side of the screen. This will display the IM Log – Leveling window.
14.6.3.5. In this window, select and/or edit the level computation factors such as
estimated monthly usage, level type, computation method, pipeline days and monthly

AFMAN41-216 13 FEBRUARY 2013 467
demand quantities for the current fiscal year. There must be at least three months of data
to calculate the level and reorder point (ROP) if you change the computation method.
Remember; do not adjust these factors without the approval of the MLFC or materiel manager.
14.7. IM recommended level changes.
14.7.1. DMLSS conducts automatic leveling during the end-of-month (EOM) processing and
makes recommendations for level changes based on consumption history. The
recommendations are posted as an ―IM Recommended Level Changes‖ pending action
message in the Inbox. DMLSS groups and displays recommended level changes into the following three categories and sequence:
14.7.1.1. Core items with a recommended level of zero. Validate demand and delete
level if indicated.
14.7.1.2. Nonstocked items with a recommended level. Validate 90 days of consistent demand, activity storage capacity and number of users and create level if indicated.
14.7.1.3. Static items with a recommended level change. Review after 6 months.
Validate the items usage. If the consumption merits a change of the level type, establish
a level and change to core.
14.7.2. To access this report, double-click on the pending action in the Inbox or click the
―Jump To‖ button at the bottom of the window. DMLSS will then display the IM
Recommended Level Changes window. In this window, users can perform the following
tasks:
14.7.2.1. Accept a recommended level change: Select the recommended level change(s)
that you want to accept. Caution: Avoid clicking ―Select All‖ followed by the ―Accept‖
button. It most likely will create an erroneous management decision to accept all of the
recommended level changes at the same time. The Select All option is non-reversible,
immediately applies all suggested levels, and potentially produces a drastic affect on the number of log orders.
14.7.2.2. Edit a recommended level change: Select the recommended level change(s) that
you want to edit and click ―Edit.‖ In the Edit window, enter the new suggested ROP, Level, and/or Type and click OK.
14.7.2.3. Include/exclude stockless item(s) in the list of recommended level changes:
Click the Incl Stock or Excl Stock from the vertical toolbar. Only one of these buttons is
available at any time. For example, if the list already includes stockless items, the Excl
Stock button is available. If a user clicks it to exclude stockless items, the button becomes the Incl Stock button.
14.7.2.4. Reject a recommended level change: Select the recommended level change(s)
that you want to reject or click ―Select All‖ and click ―Delete.‖Click ―Yes‖ in response to
the confirmation message. Warning: Do not remove the message until all actions are complete. If a user deletes this pending action, it is deleted for all users.
14.8. Improving Inventory Control Effectiveness.
468 AFMAN41-216 13 FEBRUARY 2013
14.8.1. Preliminary Work. Before any stock leveling takes place, managers should ensure
daily pending actions and reports are worked. This helps prevent potential problems and sets
up a sound foundation for managing stock. Specific pending actions are:
14.8.1.1. IM Status Edits Report. Launch this pending action to correct errors, identify transactions held for further processing, and transactions that were processed in DMLSS.
14.8.1.2. IM Troubled Due-In Report. Use this list to follow-up on potential problem requirements.
14.8.2. Measure and analyze current data. Use a variety of standard reports, adhoc (Business
Objects) reporting, and historical data to evaluate and gauge stock variances. Two examples of IM standard reports are:
14.8.2.1. Zero Balance Stocked Items. This report lists every stocked item that is
currently at zero balance, grouped by supplier. Aggressive action should be taken to
resolve these stock outages.
14.8.2.2. Supplier Performance Report. This report identifies by supplier the estimated
lead days, actual lead days, number of receipts, number of items cataloged, dollar value on hand, total value of sales, and turnover rate for the selected time period.
14.8.2.3. Use a variety of standard and BO reports to record and evaluate various
inventory measurements such as: excess, dead inventory, levels with no consumption,
static levels, zero balances with a level, aPLT, average customer wait time (aCWT), sell through rate, inventory turns, etc.
14.8.3. Set Goals and Develop a Plan. In addition to an overall goal of balancing customer
needs with a judicious use of resources, managers can set specific goals such as reducing out-
of-stocks, workload, or minimizing inventory costs. Before making changes to SOS
environment settings managers should understand how the stock control level works and test
planned changes using BusinessObjects or a tutorial database so the outcome will not be a
surprise. Example: If a SOS is changed on an item, the level may also be adjusted based on the environment settings of the new SOS.
14.8.4. Make Incremental Changes. Use caution when editing the level computation
environment factors. Drastic changes can bring unwanted surprises. Use the aPLT from
DMLSS as a gauge for setting operating level (EOQ) days and safety level/safety factor (SF)
days. A higher aPLT dictates higher EOQ/SF numbers, and a larger gap between EOQ and
SF results in fewer orders.
14.8.5. Measure effectiveness. Validate the changes by continuing to record and evaluate
the various inventory measurements mentioned in paragraph 14.8.2.3. If the changes
increase stock, review demand consistency, warehouse space and dated item management,
excess and dead stock.
Section 14B—Managing Customer Inventory - Leveling
14.9. Customer Inventory. Medical Logistics seeks to provide complete support to MTF
customers by developing a proactive logistics function responsive to each of their needs. This
support should include the management of inventory within the customer area. Managing the
customer‘s inventory includes: set-up of their storage area, selecting the best replenishment

AFMAN41-216 13 FEBRUARY 2013 469
method, managing customer levels, and of course—processing stock replenishment, receiving
and delivering their supplies. This entire process allows for the rapid identification of
requirement for assets stored in each using activity.
14.9.1. Service/Customer Inventory Control.
14.9.1.1. Each medical using activity is authorized the minimum stocks of recurring
demand consumable and durable supplies needed for continuity of operations until
replacement items can be obtained. The actual stock level of each item is based upon its
average usage and resupply frequency.
14.9.1.2. Like warehouse operating stock, the computation method should always be set
to Days of Stock for each customer. This method calculates customer levels based on
the number of days of desired stock and the frequency of stocking. Both of these values
are required in the Service/Customer Detail, Materiel tab when the days of stock option is
selected. Chapter 4, paragraph 4.8.1.2.1. explains these entries; however, these numbers
should be adjusted depending on the size / function of your MTF and delivery timeframes
(i.e. day clinics, 24-hr clinics, etc). The days and inventory defaults are set to 7 and 3 days respectively.
14.9.2. The CAIM application provides the capability to manage customer area stock items by establishing stock levels.
14.10. New Item Inventory Control. AFI 41-209, Chapter 3, states inventory policy regarding
new items.
14.10.1. Adding an Item to the Customer Catalog. CAIM customer catalogs are the
foundation of the order life cycle; therefore, the accuracy of each record is crucial when it comes to order placement.
14.10.1.1. Once the MTF catalog search is performed, select the desired item and click
the ―Add Cust‖ icon on the vertical toolbar. Make changes on the Customer Catalog Detail – (New) screen and click the Save button.
14.10.1.2. A location frame appears at the bottom of the detail window. The Add/ Edit
buttons located at the bottom of the window are used to access the Item Location Detail
window Figure 14.5. This window is also used to update the Estimated Monthly Usage field, location, and the level type.
Figure 14.5. Item Location Detail Window.

470 AFMAN41-216 13 FEBRUARY 2013
14.10.2. Location Field. The location field is used to identify where the item is stored in the
customers section. This is necessary because the customer may stock the item in several
locations.
14.10.3. Estimated Monthly Usage. When the item is new, there is no consumption data
available and that is when the estimated monthly usage is used. The estimated monthly
usage field is used to set the level and reorder point (ROP) when there is less than 3 month of
issue consumption. The customer‘s level and ROP does not affect the Medical Logistics
warehouse level and ROP for operating inventory. AFI 41-209, Chapter 3, describes how new item leveling is determined, as follows.
14.10.3.1. The static level of new items should not normally exceed what is required to
cover pipeline time plus one month‗s projected usage. The initial quantity backordered to
the requesting activity should be no more than the projected customer catalog level. In
the short term, closely control the initial issue of the new item to ensure accurate
consumption history.
14.10.3.2. Once a new item has consumption recorded in two separate months and three
months have elapsed since the initial issue, DMLSS will suggest the static level in the
stock control level be removed. Prior to removing the static level code, view the recorded
consumption history to determine if realistic issue history has been recorded. If it appears
that unrealistic issue history has been recorded, make appropriate adjustments and/or leave the static level code intact.
14.10.4. Level Type. The Level Type is used to determine how the level is maintained.
Table 14.6. explains what each of the different level types are and how they are used.
Table 14.6. Level Types.
Level
Type
Description
Core When using the core level type, the level is automatically adjusted monthly
by CAIM using demand history (3+ months). Initially, managers can set their
own levels with the core level type. An easy way to do this is to enter the
estimated monthly usage. As a result, the level and ROP (reorder point) is
calculated for you.
Static The level is not adjusted automatically and is independent of demand history.
The user must set the level with this option.
Non-
Stocked
The level is 0. The customer orders the item as needed. No estimated on-hand balance is maintained.
14.11. Replenishment Methods. The Replenishment Inventory module in the CAIM
application Figure 14.6 provides methods to reduce inventory time and increase inventory
accuracy. Chapter 6, paragraph 6.9. provides an explanation of this module. In addition, Medical
Logistics uses the following Personal Data Assistant (PDA) and CAIM replenishment procedures for use in a forward logistics location.

AFMAN41-216 13 FEBRUARY 2013 471
Figure 14.6. CAIM Replenishment Inventory Module.
14.11.1. PDA Replenishment. The PDA replenishment method may be conducted in
Batch, Radio Frequency (RF) mode, or Store & Forward Mode. In order to conduct PDA
inventories and replenishments; the customer needs to have all the items they wish to stock
on their shelves in their Customer Catalog. PDA replenishment methods rely on two types of labels, the Shelf Bar Code Label (SBCL) and the Header Bar Code Label (HBL).
14.11.1.1. PDA Batch Mode. Batch mode allows information to be transferred between
the PDA and PC using a docking port. Users dock the PDA and transfer the scanned data
via ActiveSync (Windows XP) or Window Mobile Device Center (Window
Vista/Windows 7) to their PC. Each Hand Held Terminal (HHT) contains the DMLSS
RFID application in its list of programs. Access to DMLSS RFID requires a username
and password. The password that is used in batch mode is ―batch.‖ Select the Batch button on the DMLSS RFID login screen.
14.11.1.2. PDA Radio Frequency (RF) mode. PDA‘s used in the RF mode, receive and
transmit data in real time to the DMLSS CAIM application once replenishment is
performed. A smart card reader is used to allow Public Key Infrastructure
(PKI)/Common Access Card (CAC) interface with the PDA/HHT. Presently, a DMLSS
RFID password is required when using the PDA in the RF Mode and must be only 15
characters in length. Longer passwords are truncated through the encryption process.
14.11.1.3. Store and Forward Mode. This process is uses a combination of batch and RF
modes. It allows the user to scan multiple customer areas without having to place the
PDA in a docking station and download each order individually. In Store and Forward
mode, the user may scan shelf bar code labels in batch mode, and then send the file in RF mode.
14.11.1.4. Inventory Methods. When a customer is established in DMLSS, an
inventory method is also assigned. An inventory method tells DMLSS how to perform
the inventory. There are three methods used to inventory the customer‘s shelves: Order Quantity, Empty Shelf, and Shelf count Table 14.7.
Table 14.7. CAIM Replenishment Inventory Method.

472 AFMAN41-216 13 FEBRUARY 2013
Inventory
Method Description
Order
quantity
When an order quantity customer performs replenishment, the customer
enters the quantity that he or she wants into the personal data assistant
(PDA). No calculations are performed; the system orders exactly what the
customer has entered.
Empty
shelf
Very few CAIM customers select the empty shelf method. When the
customer performs empty shelf replenishment, he or she does not enter a
quantity into the PDA. The system assumes zero balance in the location and
orders up to the location level.
Shelf count When the customer performs shelf count replenishment, he or she must
count the items on the shelf, enter the quantity into the PDA, and the system
orders the difference between the on-hand balance minus the authorized
level minus the due-in and due-out quantities.
14.11.1.4.1. Order Quantity is the default for all new customers that are created in the DMLSS system.
14.11.1.4.2. The inventory method used for each customer is identified on the HBCL
and is set in the System Services application of DMLSS using the Service Customer
Detail Record-Materiel tab Figure 14.7. You will print HBL‘s and SBCL‘s for each
customer to place on their shelves. The HBL is placed close to the storage area where
it can be identified and accessed easily. Each SBCL is placed on the shelf, so the
supply item you are scanning is identified. Once the labels are in place, one of the
various PDA replenishment methods can be used. Note: Failure to print and properly
post bar code changes may result in user orders rejecting prior to being passed to medical logistics.

AFMAN41-216 13 FEBRUARY 2013 473
Figure 14.7. Service/Customer Detail, Materiel Tab Window.
14.11.1.5. Once the upload is complete, the PDA clears the data and performs a
validation process. A Replenishment Exception pending action is sent to the customer‘s
inbox to inform them of records that contained errors. Note: It is important to have the
necessary user roles, resources, and pending actions assigned to manage the entire replenishment process.
14.11.2. Manual Replenishment Process. If neither the Batch nor RF PDA replenishment
process‘s are available, a manual replenishment is performed. Manual replenishments may be
placed by customers who have access to the CAIM application and enter their order into
DMLSS. Users can enter a single item ID, storage area or bar code number to replenish one
item or select an item type and location to replenish a specific location. Customers have the
following item types to choose from; non-stocked, stocked, all, core, and static. To view all
items in the customer catalog select ALL. After entering the search information, click
SEARCH on the vertical toolbar. Customers may want to print a Customer Catalog of active
records prior to data entry into CAIM. See Chapter 6, paragraph 6.9.5 for additional manual replenishment procedures.
14.11.3. CAIM Recommended Level Changes Pending Action. DMLSS performs a
releveling process for all customer areas during the monthly EOP cycle. The system
calculates a recommended level for non-stocked and static items. If the system determines
that a core item‘s level should change, the system automatically adjusts the level. See Attachment 6, CAIM Pending Actions.
14.11.4. CAIM Utilities, Adjust Periodic Automatic Resupply (PAR) Levels. PAR levels in
CAIM represent the customer‘s storeroom levels. DMLSS generates recommended level
changes as a result of processing recurring orders. Access the Recommended Level
Changes window by selecting ―Adjust PAR Levels‖ from the CAIM Utilities menu.
Customer records are also posted to the CAIM Recommended Level Changes pending action

474 AFMAN41-216 13 FEBRUARY 2013
after the item obtains 90 days of transaction history. See Chapter 6, paragraph 6.23.3 for
additional procedures on adjusting PAR levels. Note: Users should have access to pending
actions within CAIM in order to effectively manage these levels.
THOMAS W. TRAVIS, Lieutenant General,
USAF, MC, CFS Surgeon General

AFMAN41-216 13 FEBRUARY 2013 475
Attachment 1
GLOSSARY OF REFERENCES AND SUPPORTING INFORMATION
References
DoDD 8500.01E, Department of Defense Information Assurance (IA), 24 Oct 2002
AFMAN 33-363, Management of Records, 1 Mar 2008
AFSSI 5024, Volume I, The Certification and Accreditation (C&A) Process Comprehensive Drug Abuse, Prevention and Control Act of 1970
AFPD 41-2, Medical Support , 16 Aug 1993
AFI 41-209, Medical Logistics Support, 30 June 2006
DoD 4000.25-1-M, MILSTRIP, 28 Apr 2004
DoD 4140.1-R, DoD Supply Chain Materiel Management Regulation, 23 May 2003
DoD 4140.26-M, Defense Integrated Materiel Management Manual for Consumables, 24 Sep
2010
Adopted Forms
AF Form 36, Supply Document Register (Manual)
AF Form 601, Equipment Action Request
AF Form 847, Recommendation for Change of Publication
DD Form 250, Material Inspection and Receiving Report
DD Form 1131, Cash Collection Voucher
DD Form 1149, Requisition and Invoice/Shipping Document
DD Form 1155, Order for Supplies or Service
DD Form 1348-1A, Issue Release/Receipt Document
DEA Form-222, U.S. Official Order Forms—Schedules I & II Controlled
Standard Form 368, Product Quality Deficiency Report (PQDR)
SF Form 380, Reporting and Processing Medical Materiel Complaints Quality Improvement Report
Abbreviations and Acronyms
AA—Application Administrator
AAC—Acquisition Advice Code
ACN—Asset Control Number
AFML—Air Force Medical Logistics
AFMLO—Air Force Medical Logistics Office
AFMOA/SGAL—Air Force Medical Operations Agency, Medical Logistics Division

476 AFMAN41-216 13 FEBRUARY 2013
AFMOA/SGALD—Air Force Medical Operations Agency, Medical Logistics Division, Logistics Systems Support
AFMS—Air Force Medical Service
AFO—Accounting and Finance Office
AFRIMS—Air Force Records Information Management System
AFWCF—Air Force Working Capital Fund
AHFS—American Hospital Formulary Standard
AIS—Automated Information System
AM—Assemblage Management Module
ANG—Air National Guard
ANSI—American National Standards Institute
AO—Approving Official
APC—Account Processing Code
APPN—Appropriation
APR—Agency Purchase Request
A/R—Asset Review
ARC—Accountability Requirements Code
AS—Allowance Standard
ASIOE—Associated Items of Equipment
BCN—Build Control Number
BCO—Base Contracting Office
BEE—Bioenvironmetal Engineering
BMER—Biomedical Equipment Repair
BMET—Biomedical Equipment Technician
BOA—Basic Ordering Agreement
BO—Business Objects
BPA—Blanket Purchase Agreement
BPS—Build/Process/Submit
BSM—Business Systems Modernization
BW/CW—Biological Warfare/Chemical Warfare
CAC—Common Access Card
CAGE—Commercial and Government Entity Code
CAIM—Customer Area Inventory Management

AFMAN41-216 13 FEBRUARY 2013 477
CAL—Calibration
CALL—Call Order
CBHL—Customer Barcode Header Label
CC—Commodity Class
CD—Compact Disk
CEC—Corporate Exigency Contract
CFY—Current Fiscal Year
CIIC—Controlled Inventory Item Code
CLIN—Contract Line Item Number
CO—Customer Owned
COG—Cognizance Code (MILSTRIP code used within USN)
COMMRI—Communications Routing Identifier
CONUS—Continental United States
COR—Contracting Officer‘s Representative
COTR—Contracting Officer‘s Technical Representative
COTS—Commercial Off the Shelf
CP—Centrally Procured
CPU—Central Processing Unit
CRON—Command Run On
CS—Customer Support note: Listed as Customer Service
CS—Customer Service Module
DAASC—(See DLATS)
DAPA—Distribution and Pricing Agreement
DBMS—Database Management System
DBPA—Decentralized Blanket Purchase Agreement
DCAM—Defense Medical Logistics Customer Assistance Module
DCM—DMLSS Communication Manager
DDR—Daily Demand Rate
DEPT—Department
DFAS—Defense Finance and Accounting System
DITMS—Defense Information Technology Management System
DLA—Defense Logistics Agency

478 AFMAN41-216 13 FEBRUARY 2013
DLA Troop Support—Defense Logistics Agency Troop Support (Formerly DSCP)
DLATS—Defense Logistics Agency Transaction Services (Formerly DAASC)
DLIS—Defense Logistics Information Systems
DMLSS—Defense Medical Logistics Standard Support
DMMOnline—(Defense Medical Materiel Online)
DMSB—Defense Medical Standardization Board
DNS—Domain Naming Service
DODAAC—Department of Defense Activity Address Code
DoD—Department of Defense
DP—Deferred Procurement
DPV—DSCP Prime Vendor
DRA—ACPOP Drop Shipment
DRS—Drop Shipment
DRMO—Defense Reutilization and Marketing Office
DSCP—Defense Supply Center Philadelphia
DSN—Defense Switching Network
DTR—Dental Treatment Room
DUNS—Dunn & Bradstreet Serial Number
E&TM—Equipment and Technology Management
EBS—Enterprise Business System
EC—Electronic Commerce
ECAT—Electronic Catalog
ECN—Equipment Control Number
ECRI—Emergency Care Research Institute
EDI—Electronic Data Interchange
EM—Equipment Management Module
EOD—End-of-Day
EOFY—End-of-Fiscal Year
EOH—Estimated On Hand
EOM—End-of-Month
EOP—End of Period
EOR—Element of Resource

AFMAN41-216 13 FEBRUARY 2013 479
EOW—End-of-Week
EOY—End-of-Year
ERAA—Equipment Review & Authorization
ERC—Equipment Readiness Code
ERQ—Economic Retention Quantity
E/S—End Support
ET&M—Equipment Technology & Management
FAD—Force Activity Designator
FAX—Facsimile
FDA—Food and Drug Administration
FM—Facility Management
FOA—Field Operating Agency
FOB—Free On Board
FSC—Federal Stock Class
FSI—Facility Systems Inventory
FSS—Federal Supply Schedule
FTP—File Transfer Protocol
FY—Fiscal Year
GAFS—R—General Accounting Finance System-R
GLA—General Ledger Account
GPC—Government Purchase Card
GSA—General Services Administration
HBD—History Begin Date
HHT—Hand Held Terminal
HIBCC—Health Industry Business Communication Council
HIPAA—Health Insurance Portability and Accountability Act
HMIS—Hazardous Materiel Information System
HMR—Historical Maintenance Report
HVAC—Heating, Ventilation and Air Conditioning
IAPS—Integrated Accounts Payable System
IAW—In Accordance With
ICN—Inventory Control Number

480 AFMAN41-216 13 FEBRUARY 2013
ID—Identification
IM—Inventory Management
IM—Inventory Manager
INSP—Inspection
IP—Internet Protocol
IPG—Issue Priority Group
ISBN—International Standard Book Number
IT—Information Technology
IU—Inventory Unit
IUID—Item Unique Identification Data
JCAHO—Joint Commission on Accreditation of Healthcare Organizations
JIT—Just-in-Time Delivery
JMAR—Joint Medical Asset Repository
JMLFDC—Joint Medical Logistics Functional Development Center
LAN—Local Area Network
LIN—Line Item Number
LOG—Logistics (as in ―LOG-Owned‖)
LU—Logistics User
MAJCOM—Major Command
MA—Maintenance Activity/Equipment Maintenance Module
MC—CBRN—Medical Counter-Chemical, Biological, Radiological and Nuclear
MDD—Medical Dental Division
MDG—Medical Group
MED/SURG—Medical/Surgical
MEMO—Medical Equipment Management Office
MEPRS—Medical Expense and Performance Reporting System
MERC—Medical Equipment Repair Center
MFG—Manufacturer
MHS—Military Health Service
MILSTRIP—Military Standard Requisitioning & Issue Procedures
MMAC—Medical Materiel Advice Code
MM—Medical Materiel

AFMAN41-216 13 FEBRUARY 2013 481
MMMR—Medical Materiel Management Report
MMQC—Medical Materiel Quality Control
MRA—Maximum Repair Allowance
MRL—Maximum Repair Limit
MRQ—Maximum Re-Order Quantity
MTF—Medical Treatment Facility
NCOIC—Noncommissioned Officer In-Charge
NDC—National Drug Code
NIR—New Item Request
NSN—National Stock Number
NUA—ACPOP Non-Usage
NUS—Non-Usage Item
O&M—Operations and Maintenance
OCONUS—Outside the Continental United States
OH—On Hand
OIC—Officer in Charge
OPLOC—Operating Location
OP—Other Procurement
OPR—Operating
ORG—Organization
ORMA—Operating Room Management Application
OS—Operating Systems
PAR—Periodic Automatic Re-supply
PCN—Price Control Number
PC—Personal Computer
PCA—Purchase Card Adjustments
PDA—Personal Data Assistant
PFMR—Project Funds Management Record
PFY—Prior Fiscal Year
PLT—Pipeline Time
PMEL—Precision Measurement Equipment Laboratory
PMI—Patient Movement Items

482 AFMAN41-216 13 FEBRUARY 2013
PMO—Program Management Office
PM—Preventive Maintenance
P/N—Part Number
POC—Point of Contact
POU—Point of Use
POUSVR—Point of Use Servers
PQDR—Product Quality Deficiency Report
P/S—Prime/Substitute
PVI—Prime Vendor Interface
PVM—Prime Vendor Medical/Surgical
PVON—Prime Vendor Order Number
PVP—Prime Vendor Pharmaceutical
PV—Prime Vendor
QAE—Quality Assurance Evaluator
QA—Quality Assurance
QC—Quality Control
RC/CC—Responsibility Code/Cost Center
RC—Regulatory Compliance
RDD—Required Delivery Date
RDS—Records Disposition Schedule
RF—Radio Frequency
RIC—Routing Identifier Code
RMO—Resource Management Office
ROP—Re-Order Point
ROQ—Re-Order Quantity
ROS—Report of Survey
RPIE—Real Property Installed Equipment
RPV—Reachback Prime Vendor
R-Sales—Reimbursable Sales
SAR—System Activity Report
SA—Systems Administration/Systems Administrator
SBL—Shelf Barcode Label

AFMAN41-216 13 FEBRUARY 2013 483
SCL—Stock Control Level
SC—Service Contracts
SG—Surgeon General
SLEP—Shelf Life Extension Program
SMAS—Standard Materiel Accounting System
SMD—Safe Medical Device
SOS—Source of Supply
SOW—Statement of Work
SP—Special Project
SPR—Scheduled Parts Replacement
SRA—Stock Record Account
SRAN—Stock Record Account Number
SRG—Surge
SS—System Services
SVC/CUST—Service Customer
TCAM—Theater Army Medical Materiel and Information System Customer Assistance Module
TCB—Trusted Computing Base
TCN/GBL—Transportation Control Number/Government Bill of Lading
TMU—Table Maintenance Utility
TRIC—Transaction Identification Code
TRIMEDS—Tri-Service Medical Excess System
TVR—Tailored Vendor Relationship
U/M—Unit of Measure
U/P—Unit of Purchase
U/S—Unit of Sale
UCC—Uniform Code Council
UDR—Universal Data Repository
UIC—Unit Identification Code
UID—Unique Identification
UMDC—Universal Medical Device Code
UMDNS—Universal Medical Device Nomenclature System
UND—Urgency of Need Designator

484 AFMAN41-216 13 FEBRUARY 2013
UNK—Unknown
UP Assign—User Privilege Assignment
UPC—Universal Product Code
UPN—Universal Product Number
USA—ACPOP Usage
USAMMA—United States Army Medical Materiel Agency
USAMMA_MRE—USAMMA-Medcase Requirements Execution
USE—Usage Item
UTC—Unit Type Code
VA—Veteran‘s Administration
VCN—Vendor Catalog Number
VCR—Video Cassette Recorder
VIN—Vendor Item Number
VMI—Vendor Managed Inventory
VO—Verify Orders
VPV—Veteran‘s Admin Prime Vendor
WAWF—Wide Area Work Flow
WRM—War Reserve Materiel

AFMAN41-216 13 FEBRUARY 2013 485
Attachment 2
DMLSS MTF/ORG–SERVICE AND LOGISTICS DEPARTMENT DETAILS
A2.1. Service Detail Records. Your existing organization and service detail records were
converted from the Military Service legacy system during the DMLSS installation. Use
TreeView or Search to view or edit information specific to the MM, EM, MA, and FM Service
Detail records. To ensure the integrity of the organizational structure, privileges (create, update,
and delete) should be tightly controlled. However, read only access is encouraged for all logistics
users to facilitate better understanding of the organizational structure modules.
A2.1.1. Primary Support Activities. Service detail records (MM, EM, MA and FM) provide
the necessary background data that equates to the primary support activities that must be
selected when a new Org is created in the MTF/Unit (ORG) Detail (New) window (Figure
A2.1).
Figure A2.1. MTF/Unit (ORG) Detail (New) – Basic Tab Window.
A2.2. MM Service Detail. Only one MM Service is authorized per DMLSS application. It was
established on the DMLSS system during implementation at your site and may not be deleted.
The MM Service identifies the MM Management Service and is always associated to the LOG
MTF/Unit. This window is audited by the system. Settings on this record, especially the
Appropriation Data tab (described below), critically impact the way the Log Department and Log Fund manage orders and allocate funds.
A2.2.1. In the MM Service Detail window, you can open and edit MM (Materiel) service
information. To access the MM Service detail record using the search function, select ―MM –
Materiel Mgt‖ in the ―type‖ field and click the Search button. Once retrieved, either double-
click the MM Service record or highlight the record and click on the Detail button. A link to
the MM Service is also available in the Basic tab of the LOG detail record. The MM Service
detail record is segmented into the Basic, Appropriation Data, and Computation tabs. Each tab contains some mandatory data fields, but not all fields require data input.

486 AFMAN41-216 13 FEBRUARY 2013
A2.2.2. MM Service Basic Tab (Figure A2.2). These data fields are present in the basic tab and should be utilized as described:
Figure A2.2. MM Service Detail – Basic Tab Window.
A2.2.2.1. MM SVC ID – This is a mandatory field and it should always equal the LOG
DEPT DODAAC. Do not change this field without proper authorization and
documentation.
A2.2.2.2. Name – Mandatory field should always equal ―Medical Materiel Management.‖
A2.2.2.3. Military Service – Defaults to ―Air Force.‖
A2.2.2.4. Major COM – Although identified as an optional field; materiel managers
should load their corresponding Major Command (MAJCOM) code. (i.e. MAJCOM
code ―1L‖ identifies AMC bases)
A2.2.2.5. Hub – Hub and spoke is an AF capability allowing one stock fund account to
place orders for another stock fund account. When checked, this box MM indicates the MM Service is Spoke enabled.
A2.2.2.6. MOF – Master Ordering Facility. This functionality is under development to
allow selected accounts the ability to order from multiple PVs/SOSs.
A2.2.2.7. Office Symbol – Optional field used to document the MM Service office symbol.
A2.2.2.8. Marked for Deletion – This box indicates whether the record has been marked for deletion.
A2.2.2.9. Local Use –The local use fields allow you to enter data which can later be
accessed using BusinessObjects software.

AFMAN41-216 13 FEBRUARY 2013 487
A2.2.2.10. Related items – This button opens the Related MTF/Units List window where you can view or print the list of MTF/units associated with the service.
A2.2.2.11. Supplementary Address/Bill to DODAAC – Load your support DFAS
DODAAC into this field. When loaded, this DODAAC prints to all DD Form 1155s,
Order for Supplies or Services, in the block 15 code field. This data is required for entry into Wide Area Work Flow (WAWF).
A2.2.2.12. Location Indicator – This checkbox identifies whether or not the MM Service
Default location is used.
A2.2.2.13. Reachback Enabled – This indicator identifies whether or not the logistics
account provides Reachback services. It should only be checked if officially tasked by AFMOA/SGAL.
A2.2.2.14. IM Location Cleanup – Should always be checked. Indicates that locations
codes will be deleted during the next EOD process when balances are zero.
A2.2.2.15. Summary Receipt By-Pass – Not used.
A2.2.2.16. Auto Generate Delivery List – Should always be checked. When checked,
DMLSS automatically generates a delivery list as part of processing a receipt or confirming a picklist.
A2.2.2.17. AM Location Delete Indicator – Should always be checked. When checked,
this indicates that AM locations are deleted when the on-hand (OH) quantity drops to zero. This action does not affect allowances.
A2.2.2.18. Max Follow-Up Days – Identifies the maximum number of days before follow-up transactions are sent to a supplier.
A2.2.2.19. Default Location – Identifies the default storage location within the MM
Service. (i.e. the Warehouse)
A2.2.2.20. Passing Action DODAAC – For Army use only.
A2.2.2.21. Surcharge – Identifies the current FY surcharge rate. The surcharge rate
could change annually and is provided to all sites via AFMOA/SGAL prior to each EOFY.
A2.2.2.22. Discount – The discount field is essentially a ―negative surcharge‖ rate,
allowing the billed price to be less than the advertised U/P price.
A2.2.2.23. PV Region – Defaults to local DODAAC.
A2.2.2.24. Routing Identifier Code (RIC) – RICs are assigned for processing inter/intra
service/agency transactions. This is a mandatory field that identifies the RIC assigned to
the MM Service (logistics DEPT). Do not change the RIC without proper authorization
and documentation.
A2.2.2.25. Force Activity Designator (FAD) – This is a mandatory field that identifies
the FAD being used by the MM Service. The FAD is associated to the Urgency of Need
Designator (UND); which, determine what priority codes are available to apply to
requisitions. The FAD/UND table is available in the TMU.

488 AFMAN41-216 13 FEBRUARY 2013
A2.2.2.26. Signal Code – All requisitions contain a signal code to designate the intended
consignee (ship to) and the activity to receive and effect payment of bills. Always assign
―A‖ meaning ship to and bill to requisitioner. Signal codes are listed in the TMU.
A2.2.2.27. SPS Site Code – Not editable. Unique only to the Army.
A2.2.2.28. Defense Reutilization and Marketing Office (DRMO) RIC – Mandatory field
identifies your local DRMO RIC. This RIC and the corresponding DRMO address are printed to all documents generated by DRMO turn-in actions.
A2.2.2.29. Excess Field Operating Agency (FOA) RIC – Should always be F04 (F; zero;
4).
A2.2.2.30. Addresses – Bill to Address (Bill to) – Identifies your supporting DFAS
address. This information is printed to requisition documents, such as the DD Form 1155.
A2.2.2.31. Addresses – Opens the Address window for creating or editing data for the
Ship To address. If you are at a Hub Location, enter the Ship To information for the Spoke Customer.
A2.2.2.32. Addresses – DRMO Address – Identifies the local DRMO shipping address.
This address is used in conjunction with the DRMO RIC and is printed to all documents
generated by DRMO turn-in actions.
A2.2.2.33. DRMO DODAAC – Self explanatory.
A2.2.2.34. Go Live Dt – Identifies the date of initial DMLSS implementation
A2.2.2.35. Point of Contact (POC) – Identifies the primary POC for the MM Service.
Usually, the assigned POC is the Medical Logistics Flight Commander. When used in
conjunction with POC type assignments, the POC‘s name will print to the approval
official block on requisition documents such as the DD Form 1155.
A2.2.2.36. Distribution and Transportation Module (DTM) - For DTM to be successful,
the supplied data must be accurate. It is imperative you verify that the DRMO RIC,
DRMO DODAAC, and DRMO Address are your locally assigned DRMO facility
supporting the local area or base and not the Headquarters Battle Creek Michigan RIC S9D.
A2.2.3. MM Service Appropriation Data Tab. In the MM Service Detail window -
Appropriation tab (Figure A2.3.), you can enter more specific information for a customer
area, including appropriation segments. Most data fields in this tab are linked to the LOG detail record and are not editable. The few fields that are editable are explained below.

AFMAN41-216 13 FEBRUARY 2013 489
Figure A2.3. MM Service Detail – Appropriation Tab Window.
A2.2.3.1. Appropriation Fund Type – Should always be ―Stock Fund.‖ Deployed sites
are the only exception to this rule.
A2.2.3.2. Logistics Appropriation/Appropriation Segment 1 – Identifies the
AFWCF/MDD appropriation fund site. This should only be modified at the direction of AFMOA/SGAL.
A2.2.3.3. Premium Transportation/Appropriation Segment 1 – Identifies your local
premium transportation fund site. This changes each FY and should be obtained from
your resource advisor.
A2.2.3.4. LOG Fund Target Flag – Do not use unless otherwise directed by AFMOA/SGAL.
A2.2.3.5. Use the ―Jump To‖ button to view/edit the Log Fund record.
A2.2.4. MM Service Computations Tab. In the MM Service Detail window - Computations
tab (Figure A2.4.), you can monitor excess computation factors. The Major Receipt Price
Change field is the only field that requires data entry. Although other fields are optional they should not be changed.

490 AFMAN41-216 13 FEBRUARY 2013
Figure A2.4. MM Service Detail – Computations Tab Window.
A2.2.4.1. Major Receipt Price Change – System defaults to 25%. Use this field to
specify what percentage represents a "significant" difference between an order price and
receipt price for an item. When an IM user processes a receipt and the receipt price is
significantly different (i.e. 25% change) than the order price, a message is written to the IM Receipt Major Price Change pending action for review.
A2.2.4.2. Level Computation Method – Should always be ―Days of Stock.‖
A2.2.4.3. Per AF policy, do not change the following fields unless otherwise directed:
A2.2.4.4. Consequential Discrepancy Values.
A2.2.4.5. GSA Dollar Value.
A2.2.4.6. Excess Computation Factors.
A2.2.4.7. Do not change the following system defaults unless otherwise directed:
A2.2.4.8. Stocking Level Algorithm Defaults.
A2.2.4.9. Maximum Reorder Quantity (MRQ) Factors – Not recommended for AF use.
A2.3. EM Service Detail. Only one EM Service is authorized per DMLSS application. It was
established on the DMLSS system during implementation at your site and may not be deleted.
The EM Service identifies the Medical Equipment Management Office (MEMO) and is always associated to the LOG MTF/Unit. This window is audited by the system.
A2.3.1. To access the EM Service Detail record (Figure A2.5.) using the search function,
select ―EM –Equipment Mgt‖ in the Type field and click the ―Search‖ button. Once
retrieved, either double-click the EM Service record or highlight the record and click on the
―Detail‖ button. A link to the EM Service is also available in the Basic tab of the LOG detail
record.

AFMAN41-216 13 FEBRUARY 2013 491
Figure A2.5. EM Service Detail Window.
A2.3.2. The EM Service Detail record contains several data fields; most of which should
never be changed unless directed by higher authority. A few of these fields are explained below.
A2.3.2.1. EM SVC ID – Should always equal the LOG DODAAC. Do not change unless directed to do so by a higher authority.
A2.3.2.2. Name – Should always be ―Medical Equipment Management Office.‖
A2.3.2.3. Major COM - Optional field; however, materiel managers should load their
corresponding MAJCOM code. (i.e. MAJCOM code ―1L‖ identifies AMC bases)
A2.3.2.4. Office Symbol - Optional field used to document the EM Service office symbol.
A2.3.2.5. Mark for Delete – Do not mark the EM Service for deletion unless it is being
replaced with a new EM Service record. This action will be directed by a higher
authority.
A2.3.2.6. SVC/CUST Associations: Reference Chapter 9 for further explanation of these accounts.
A2.3.2.7. Excess – You can use the Excess field in this window to specify the customer
that serves as the Excess account. Then, in EM, you can process excess records by
transferring items to this Excess customer. The EM Service must be associated to a
SVC/CUST record identified as the MEMO Excess account before equipment items can be transferred and reported excess.
A2.3.2.8. Loaner - The EM Service must be associated to a SVC/CUST record identified
as the MEMO Loan account before equipment items can be coded as on-loan.
A2.3.2.9. Hold - The EM Service must be associated to a SVC/CUST record identified as the MEMO Hold account prior to transferring equipment items to ‗hold‘ status.

492 AFMAN41-216 13 FEBRUARY 2013
A2.3.2.10. POC – Associate the POC record for the MEMO. Within the POC detail
record, this user should be associated to the POC type of ―EM Service‖ (reference
paragraph 4.16.).
A2.3.2.11. Related Items: Unit button. This button opens the Related MTF/Units List window where you can view or print the list of MTF/units associated with the service.
A2.4. MA Service Detail. A Maintenance Activity (MA) provides maintenance services for
equipment owned by organizations and customers and can be both a provider and a user of
services in the DMLSS organization. As a service provider, it uses the following DMLSS
modules: equipment, work orders, manufacturer, and procedures. It also requires the use of the
Customer Area Inventory Management (CAIM) module to maintain and inventory of repair
parts. In this role, it becomes a CAIM user and a customer of the Medical Materiel (MM) service.
A2.4.1. The default MA service was established on the DMLSS system during
implementation at your site and may not be deleted, but multiple MAs can be loaded within a
single application. MAs may exist in the host MTF, as well as supported organizations, so
they may or may not belong to the Logistics Activity. In addition, there may be one or more maintenance activities in each organization.
A2.4.2. The MA Service(s), (usually xx5761), identifies the MEMO(s) responsible for the
supporting ORG(s) such as LOG. Note: Within User Privilege Assignment (UP Assign),
DMLSS users can be assigned to only one MA at a time; meaning, maintenance personnel can only access maintenance records for the MA associated to their user ID.
A2.4.3. Accessing an Existing MA Service record. To access the MA Service Detail record
using the search function, select ―MA –―Maintenance Act‖ in the Type field and click the
―Search‖ button. Once retrieved, either double-click the MA Service record or highlight the
record and click on the ―Detail‖ button. A link to the MA Service is also available in the
Basic tab of the LOG detail record. The MA Detail Record contains three tabs: Basic, Materiel, and Funding tabs. These windows are audited by the system.
A2.4.3.1. Basic Tab (Figure A2.6.). Most of the information in this tab will never require an update, but a few are explained below.

AFMAN41-216 13 FEBRUARY 2013 493
Figure A2.6. MA Service/Customer Detail Window – Basic Tab.
A2.4.3.1.1. MA SVC ID – Identifies the maintenance activity‘s SVC/CUST account
number. This field should not be modified unless directed to do so by a higher authority. Most AF MAs are associated to xx5761.
A2.4.3.1.2. Name – The name should be ―Medical Equipment Repair Center.‖
A2.4.3.1.3. Military Service – Defaults to ―Air Force‖, never change this data.
A2.4.3.1.4. Major COM – Although this is an optional field; materiel managers
should load their corresponding MAJCOM code. (i.e. MAJCOM code ―1L‖
identifies AMC bases).
A2.4.3.1.5. Office Symbol - Optional field used to document the MA Service office symbol.
A2.4.3.1.6. MEPRS Code – Optional field. This code is assigned by the local resource advisor and is used to track expenses associated to the MA.
A2.4.3.1.7. Mark for Deletion - Do not mark the MA Service for deletion unless it is
being replaced with a new MA Service record. This action will be directed by a higher authority.
A2.4.3.1.8. Labor Rate – Mandatory field. The labor rate is determined by
AFMOA/SGAL and is used to calculate labor costs associated to maintaining
equipment. The labor rate is recalculated annually and published prior to the beginning of each new FY.
A2.4.3.1.9. Delivery Location – Identifies the MA delivery location for equipment items.
A2.4.3.1.10. Issue Document – Should always be ―Pick List.‖
A2.4.3.1.11. DCM Printer – Identifies the primary DCM printer for MA forms and issue documents.

494 AFMAN41-216 13 FEBRUARY 2013
A2.4.3.1.12. POC - Associate the POC record for the Medical Maintenance
Management Officer. Within the POC detail record, this user should be associated to
the POC type of ―Maintenance Staff‖ (reference paragraph 4.16.).
A2.4.3.2. Materiel Tab. The MA Service/Customer Detail window - Materiel tab is used
to manage critical ordering information. The default data in the Materiel tab should be
accepted with the exception of the default location. In the default location field, identi fy
the MA‘s building and/or room location. Do not check the Verify Receipts indicator. If
checked, maintenance personnel will have to manually verify and process customer receipts in CAIM.
A2.4.3.3. Funding Tab. The MA contains a Funding tab because it doubles as a
SVC/CUST record for the maintenance account. This tab allows the SA to create or
change the expense center target and set the maximum order limit, as well manage
expense center associations. The MA must be associated to an expense and project center
before maintenance personnel can order supplies and repair parts. Use the data fields as described below.
A2.4.3.3.1. Target Flag – Should always be ―Proj EOR.‖
A2.4.3.3.2. Detailed Billing Req‘d – For use with authorized CAIM SOS accounts; however, it is not recommended for use.
A2.4.3.3.3. Maximum Order Limit - For use with authorized CAIM SOS accounts;
however, it is not recommended for use.
A2.4.3.3.4. Associate Expense Centers – Refer to paragraph 4.11.
A2.4.3.3.5. Default Expense Center – Refer to paragraph 4.11.
A2.4.4. Creating a New MA Service.
A2.4.4.1. The New MA function is located in the LOG MTF/ORG detail record. Using
the Search function, select ―ORG – Med Facility/MTF‖ in the Type field and click the
―Search‖ button. Once results are retrieved, either double-click the LOG record or
highlight the record and click on the ―Detail‖ button. Next, click on the ―New MA‖
button located on the vertical toolbar. The MA detail record contains three tabs: Basic, Materiel, and Funding tabs.
A2.4.4.2. A window appears requiring the new MA to be associated to a DEPT. Once
associated, complete the Basic, Materiel, and Funding tabs as explained above.
A2.4.4.3. DMLSS users can only be assigned to one MA at a time. Therefore,
maintenance personnel can only access maintenance records for the MA associated to
their user ID. Maintenance managers are only able to see maintenance reports for the
MA assigned to their user ID and will not have a complete view of work throughout all MA activities. These limitations should be considered prior to using multiple MAs.
A2.5. FM Service Detail.
A2.5.1. In the FM Service Detail window, you can open and edit FM service information.
The FM service was established on the DMLSS system during implementation at your site
and may not be deleted; however, multiple FMs can be loaded within a single application.

AFMAN41-216 13 FEBRUARY 2013 495
The FM Service(s) identifies the FM Office(s) responsible for supporting the ORG(s) such as LOG.
A2.5.2. New FM service records are created in the FM module and should be accomplished
by the facility manager or Medical Logistics Flight Commander. Select ―MTF Information‖
from the FM Navigate dropdown menu and the click the ―New‖ button located on the
vertical toolbar in the MTF Information window. Complete the mandatory data fields and as
many optional data fields as possible. Click ―Save‖ before exiting. This window is audited by the system.
A2.5.3. Unlike MA service accounts, DMLSS users may be associated to multiple FM
activities at the same time. Therefore, FM personnel can access records for all FM service
accounts associated to their user ID.
A2.6. LOG DEPT. Only one LOG DEPT is permitted for each DMLSS application. The sole
LOG DEPT was established during implementation at your site and may not be deleted. The
data contained in the Logistics Department Detail (Figure A2.7.) is critical for ordering and
contains informative data such as the LOG ID, name, and office symbol; materiel and services
currency types; conversion factors; LOGs associated FOA; the LOG POC and associated LOG service accounts.
Figure A2.7. Logistics Department Detail Window.
A2.6.1. While most of the LOG DEPT data fields are editable, they should not be changed
without proper approval and documentation. Do not mark the LOG DEPT for deletion
unless being replaced by a new LOG DEPT. This window is one of those audited by the system.

496 AFMAN41-216 13 FEBRUARY 2013
Attachment 3
DMLSS USER PRIVILEGE ROLE MANAGEMENT
Table A3.1. DMLSS User Role Management.
In the User Privilege module (UP Assign and UP Manage), an authorized user can assign
one or more roles to a user ID, modify a role, or create a new role. Roles are assigned to
every user ID on the DMLSS system to protect the database from changes that the user is
not authorized to make. Note: The User Privilege buttons only appear on the System
Services Main window if you have the security manager role.
SS Security Manager It is very important to note the elevated privilege of the SS
security manager, and that there should only be one SS
security manager per site. This user can give virtually any
rights in the system to him/herself or others. Only the SS
security manager has the unique ability to assign the
security manager attribute for other applications; every
other security manager is limited to the associated
application. For example, the FM security manager is only
able to assign FM security manager to another user,
whereas the SS security manager can assign security
manager for ARC, EM, MA, IM, AM, SS, FM, CS, MM,
PVI, and SC to any user ID, including his own. A user need
not have application access (have one or more application-
user roles) to be a security manager for that application.
Security Manager
Roles
The following security
manager roles are
available in DMLSS:
The security manager role for each application is designed so
that only a limited number of users can assign user privileges
to other users. A user may be assigned the security manager
role for more than one application (for example, a user can be
both an FM AA and a CS AA). However, it is strongly
recommended that there be only one security manager for
each application per site. Only a limited amount of users
should be given access to UP to assign powerful capabilities
in areas such as Org and Funding.
AM Security
Manager
Allows the user to manage user privileges for the
Assemblage Management (AM) application.
ARC Security
Manager
Allows the user to manage user privileges for the Archive
Management application.
CS Security
Manager
Allows the user to manage user privileges for the Customer
Support (CS) application.
EM Security
Manager
Allows the user to manage user privileges for the
Equipment Management (EM) application.
FM Security Allows the user to manage user privileges for the Facility

AFMAN41-216 13 FEBRUARY 2013 497
Manager Management (FM) application.
IM Security
Manager
Allows the user to manage user privileges for the Inventory
Management (IM) application.
MA Security
Manager
Allows the user to manage user privileges for the
Equipment Maintenance (MA) application.
MM Security
Manager
Allows the user to manage user privileges for the Customer
Area Inventory Management (CAIM) application. Gives the
user access to the EOP Process Management and UDR
Delta Process Management functions.
SC Security
Manager
Allows the user to manage user privileges for the Service
Contract (SC) application.
General Rules for
Application Roles:
Each DMLSS application has standard roles that cannot be
edited. You can also create new, customized roles in
DMLSS, based on the centrally managed resources. A user
with the security manager role can then assign roles to other
users, thereby giving those users access to particular
processes, windows, and data.
The following rules apply when you associate roles with
users:
- You can only add or remove a security manager role from
a User ID if you have the same security manager role.
- You cannot remove a security manager role from your
own User ID.
- In general, it is not necessary to assign more than one
application role per user ID.
- Before you can edit a user's privileges, the user must exist
in the system. A new user is created through the DMLSS
System Admin tool
- If a user is logged in when you change the user's
privileges, the user needs to exit DMLSS and log in again,
before the change will take effect.
- With any other application highlighted (CAIM, FM, PVI,
or SS), assigning a service/customer to a user ID
establishes the service/customer that the user supports.
DMLSS uses the service/customer assignments to
automatically populate certain data areas in CAIM and
CS.
AM Application Roles
Certain roles in AM can only be assigned to users with one or
more assemblages. If you attempt to assign one of these roles
to a user ID that has no assemblages, the system notifies you
that the operation cannot be performed.
AM COMMON
NAME
Allows the user to update the common name in a catalog
record. This resource is also available as a role in the
following applications: AM, CAIM, EM, and MA.

498 AFMAN41-216 13 FEBRUARY 2013
AM EXPERT Only a limited number of users should be given an expert role
due to the nearly unlimited access and capability it provides
within the application.
AM OVERRIDE Allows the user to remove (unlock) AM processes that have
locked up the system.
AM READ ONLY Allows the user read-only access to assemblage record data,
AM end support items, AM equipment records, AM MTF
catalog, AM Quality Assurance, AM Reports and AM Source
of Supply
AM TECHNICIAN This role allows full privileges to users with limited resources.
AM TRANSFERS Allows the user to process inventory transfers of assemblage
items.
AM UPDATE This role only allows read and update privileges within the
AM Equipment Record resource.
AM USER
PENDING ACTION
This role allows full privileges to the user to manage AM
User Pending Actions.
UP Manage–Add
Role.
These individual AM
resources are
available to build
custom roles with
Read, Update,
Create, and Delete
privileges.
AM Assemblage Gain, Assemblage Loss, Assemblage Record
Data, AM Build/Modify Assm, AM Complaints SF380, AM
End/Support Items, AM Equipment Record, AM Inventory,
AM Inventory Adjustments, AM Inventory Transfers, AM
Item Allowance Change, AM Item Code Change, AM Item
Gains/Losses, AM JMAR/AWRDS, AM Mass Update
Assemblage, AM Modify Due-Ins, AM MTF Catalog, AM
Override, AM Physical Inventory, AM Quality Assurance,
AM Replenishment, AM Reports, AM Sales, AM Source of
Supply, AM TMU, AM Transfers, AM War Switch, AM
Weights/Cubes, IM Common Name, PV Backup/Backorder
Processing
ARC Application Roles
ARC Transaction
History
Allows the user to view (read-only) archived MM
transactions.
ARC - SC
Transaction History
Allows the user to view (read-only) archived SC transactions.
UP Manage – Add
Role.
These individual
ARC resources are
available to build
custom roles with
Read, Update,
Create, and Delete
privileges.
ARC Transaction History, ARC-SC Transaction History
CAIM Application
Roles
For CAIM, certain roles can be assigned only to a user ID that
has one or more MM service/customers. If you attempt to

AFMAN41-216 13 FEBRUARY 2013 499
assign one of these roles to a user ID that has no MM
service/customers, the system notifies you that the operation
cannot be performed.
With the CAIM application highlighted, the Non-Associated
window contains only CAIM service/customers. With any
other application highlighted, all service/customers in the
system not currently associated to that user appear.
For CAIM, you cannot remove the last CAIM
service/customer from a user ID that has a role requiring at
least one MM service/customer. If you try to remove the last
service/customer, the System displays a message with the
reason the action cannot be accepted. If you try to remove all
CAIM service/customers at one time, the System removes all
of those selected except the last one, and informs you that the
last one has not been removed.
For CAIM and CS, certain resources must be set with either
all privileges (read, update, create, and delete) or no
privileges. If you select one, all are automatically selected; if you deselect one, all are automatically deselected.
CAIM COMMON
NAME
Allows the user to update the common name in a catalog
record. This resource is also available as a role in the
following applications: AM, CAIM, EM, and MA.
CAIM CREDIT
RETURNS
This role allows full privileges within the CAIM Credit
Returns resource only.
CAIM EXPERT Only a limited number of users should be given an expert role
due to the nearly unlimited access and capability it provides
within the application.
CAIM MTF CAT
PACKAGING
This role allows full privileges within the CAIM MTF Cat
Packaging resource only.
CAIM MTF
FUNDING
Allows the user read-only access to the MTF funding
resource.
CAIM OVERRIDE Allows the user to remove (unlock) CAIM processes that have
locked up the system.
CAIM PURCH
CARD APPROVAL
This role allows the user to full privileges to the CAIM
purchase card approval, CAIM purchase card register, and
CAIM purchase card search resources.
CAIM PURCH
CARD ADMIN
Allows the same roles/privileges as CAIM purchase card
approval with added full CAIM purchase card administrator
privileges.
CAIM PURCH
CARD HOLDER
Allows full privileges to the CAIM purchase card register and
read-only privilege to the CAIM purchase card search.
CAIM READ ONLY Assigns read-only rights to address, customer catalog,

500 AFMAN41-216 13 FEBRUARY 2013
location, MM reports, modify due-ins, modify due-outs, MTF
catalog, POC, print barcodes, receipts, SOS, and trans history
resources
CAIM USER
PENING ACTION
Allows the user full access to manage CAIM user pending
actions only.
CAIM AREA
MANAGER
Allows the CAIM Area Manager access to most areas with the
exception of automatic replenishment, issues, MM reports
(read-only), non routine orders, return orders and deleting
transaction history.
CAIM AREA SOS
MANAGER
Allows the CAIM Area SOS Manager access to most areas
with the exception of MM reports (read-only) and deleting
transaction history.
CUSTOMER AREA
USER
Allows the CAIM Area User access to many areas with
several exceptions including address (read-only), auto
replenishment, issues, MM reports (read-only), MTF catalog
(read-only), non routine issues, POC (read-only), return item,
SOS (read only), and trans history (read-only).
DIRECTOR OF
MED LOGISTICS
Allows the DML read-only access to required resources.
MASS UPDATES Allows the user to access the Mass Updates module, to update
multiple MTF catalog records simultaneously.
MATERIEL
MANAGER
Allows the Materiel Manager access to nearly all areas with
the exception CAIM security manager, MM Reports (read-
only) and deleting transaction history.
PARTS CLERK Allows required resources for a parts clerk with many
exceptions.
PROVIDER This resource allows selected read-only resources for
providers.
UP Manage – Add
Role.
These individual
CAIM resources are
available to build
custom roles with
Read, Update,
Create, and Delete
privileges.
Address, Adjust PAR Levels, Automatic Replenishment,
Batch HHT, Build Orders, CAIM Complaints SF 380,
Contract Award Management, Customer Catalog, Destruction,
FTP Login Management, IM Common Name, Issues,
Location, Mass Updates, MM Reports, Modify Due-ins,
Modify Due-outs, MTF Catalog, MTF Funding, Non Routine
Issues, Physical Inventory, POC, Print Barcodes, PV
Backup/Backorder Processing, Quality Assurance, Receipts,
Replenishment, Return Item, Source of Supply, Transaction
History
CS Application Roles With the CS application highlighted, assigning a
service/customer to a user ID equates to assigning
membership to that service/customer group.
For CS, you cannot remove the last service/customer from a
user ID that has a role requiring at least one service/customer.
If you try to remove the last service/customer, the System
displays a message with the reason the action cannot be

AFMAN41-216 13 FEBRUARY 2013 501
accepted.
For CAIM and CS, certain resources must be set with either
all privileges (read, update, create, and delete) or no
privileges. If you select one, all are automatically selected; if
you deselect one, all are automatically deselected.
CS APPROVAL
AUTHORITY
Allows the CS Approval Authority full privileges to this
resource only.
CS EQUIPMENT
CUSTODIAN
This role permits use of the CS equipment record (read-only),
CS equipment request, CS equipment subcustodian, and CS
equipment work order resources.
CS EXPERT Only a limited number of users should be given an expert role
due to the nearly unlimited access and capability it provides
within the application.
CS LOG
AUTHORITY
This role has full privileges in both CS Log Authority and CS
NIR administrator resources
CS MTF FUNDING Allows the user to jump from CS to funding windows in SS.
CS NIR CATALOG
RESEARCH
The resource is for running the Catalog Search option in CS.
The system applies this uneditable resource to every new role
the CS AA creates.
CS NIR HAZMAT
REVIEW
Allows the user to review an NIR and, if necessary, code the
item as hazardous.
CS ORDERING
AUTHORITY
Allows the user to process manual replenishment (CS and
CSW), buy the cart (CSW only), and execute orders from the
order summary window (CS only).
CS READ ONLY Allows read-only access to CS NIR, CS order, CS pending
action, CSW ordering, and FM work request resources.
CS USER Permits the CS user full access to CS catalog research, CS
NIR, CS order, and CS replenishment resources.
UP Manage – Add
Role.
These individual CS
resources are
available to build
custom roles with
Read, Update,
Create, and Delete
privileges.
CS Catalog Research, CS Complaints SF 380, CS Equipment
Record, CS Equipment Request, CS Equipment Subcustodian,
CS Equipment Work Order, CS NIR, CS NIR Administrator,
CS NIR Catalog Research, CS NIR Hazmat Review, CS
Order, CS Pending Action, CS Quality Assurance, CS
Replenishment, CSW Ordering, FM Work Request, MTF
Funding
EM Application Roles
DOCUMENT
REGISTER CLERK
Allows multiple resources for the EM document register clerk
with several exceptions.
EM COMMON
NAME
Allows the user to update the common name in a catalog
record. This resource is also available as a role in the
following applications: AM, CAIM, EM, and MA.

502 AFMAN41-216 13 FEBRUARY 2013
EM EQUIPMENT
MANAGER
Permits EM Equipment Manager access to nearly all areas
with the exception of EM security manager, EM contract svc
record (read-only), IM transaction history (read-only) and
deleting quality assurance.
EQUIP MGT
WAREHOUSEMAN
Allows multiple resources for the equip mgt warehouseman
with several exceptions.
EQUIPMENT MGT
TECHNICIAN
Allows most resources for technicians with few exceptions.
REQUIREMENTS
MANAGER
Allows multiple resources for the requirements manager with
many exceptions.
UP Manage – Add
Role.
These individual EM
resources are
available to build
custom roles with
Read, Update,
Create, and Delete
privileges.
EM Acquisition, EM Balances/Auth, EM Barcodes, EM
Batch HHT, EM Budgeting, EM Catalog, EM Common
Model, EM Complaints SF380, EM Contract SVC Record,
EM Custodian, EM Device, EM DITMS, EM Equipment
Record, EM Equipment Req Status, EM Equipment Request,
EM Excess, EM Gain, EM IM Transaction History, EM
Inventory, EM Loan, EM Loss, EM Manufacturer, EM
Pending Action, EM Quality Assurance, EM Reports, EM
Requirements, EM Software, EM Source of Supply, EM
Transaction History, EM Transfer, IM Common Name
FM Application Roles
BO FULL ACCESS Allows full privileges to this resource only.
COR Allows the COR full privileges within this resource only
FACILITY
MANAGER
Allows the Facility Manager access to nearly all areas with
few exceptions.
FM CAD
ADMINISTRATOR
Allows the CAD administrator full privileges within this
resource only.
FM OVERRIDE Allows the user to remove (unlock) FM processes that have
locked up the system.
FM READ ONLY Allows read-only access to most FM resources.
FSI MASS UPDATE Allows full privileges to this resource only.
PM SCHED MASS
UPDATE
Allows the user to perform mass updates in PM Schedules.
QA MANAGER This role allows full privileges in the QA manager, site
preferences, and work request resources
QC MANAGER Allows full privileges to this resource only.
RE-OPEN CLOSED
WR
Allows full privileges to this resource only.
REAL PROPERTY
MAINTAINER
Permits limited privileges to the real property maintainer in
multiple resources.
REQUIREMENT
MANAGER
Allows the user to create and modify FM requirements.
REQUIREMENT Allows the user to create/edit requirements, and to associate

AFMAN41-216 13 FEBRUARY 2013 503
PROJ MANAGER requirements with projects.
REQUIREMENT
WR MANAGER
Allows the user to create/edit requirements, and to associate
requirements with work requests.
REQUIREMENTS
READ ONLY
Permits read-only access within the FM requirement manager
resource.
ROOM INV MASS
UPDATE
Allows full privileges to this resource only.
SAFETY
MANAGER
Allows limited access and privileges to the safety manager.
SEND WR TO
ENGINEERS
Allows full privileges to this resource only.
UP Manage – Add
Role.
These individual FM
resources are
available to build
custom roles with
Read, Update,
Create, and Delete
privileges.
BO Full Access, Budget Management, WR-Closeout, Budget
Management-Contracts, RC/JCAHO Deficiencies, Directory,
Draw Mgmt-Space Discrepancy, Facility Inventory, FM
Barcode, FM Catalog, FM Gain, FM Loss, FM Purchase
Card, FM Quality Assurance, FM Repair Parts, FM
Requirement Manager, FM Source of Supply, Facility System
Inventory, FSI Mass Update, MTF Information, PM Sched
Mass Update, Maintenance Procedures, Project Management,
Requirement Proj Manager, Requirement WR Manager,
RC/JCAHO Requirements, Room Inventory, RC/JCAHO
Procedures, PM Schedule, Site Preferences, Drawing
Management, Work Request
IM Application Roles
DFAS
DISBURSEMENTS
Allows the user to process DFAS disbursements in the IM In
Box.
IM COMMON
NAME
Allows the user to update the common name in a catalog
record. This resource is also available as a role in the
following applications: AM, CAIM, EM, and MA.
IM EQUIPMENT
MANAGER
This roles allows full access in the IM build orders, IM issues,
IM modify due-ins, IM modify due-outs, IM non routine
issues, IM Receipts and read-only access to the IM transaction
history.
IM EXPERT Only a limited number of users should be given an expert role
due to the nearly unlimited access and capability it provides
within the application.
IM MTF CAT
PACKAGING
Allows the user to access the Packaging tab of the MTF
catalog.
IM NIR
ADMINISTRATOR
Allows the user to view all new item requests (NIRs), and
take approval/disapproval action on those requests. In
addition, this resource has supreme dominion over all other
NIR resources.
IM NIR
PROCESSING
Allows the user to create an offline issue of an item in the
Nonroutine Issues window. The user can use this window to
create:
- Post Post Issues the customer has already received the

504 AFMAN41-216 13 FEBRUARY 2013
item and the user is accounting for the issue after the fact.
- Walkthrough/Emergency Issues the customer has not
already received the item, but needs the item picked and
delivered immediately.
Equipment Issues an external customer issues equipment
items with Log balances.
IM OVERRIDE Allows the user to remove (unlock) IM processes that have
locked up the system.
IM PURCHASE
CARD ADMIN
Permits full access to the approving official, IM purchase card
admin, IM purchase card register, and IM purchase card
search resources.
IM PURCHASE
CARD APPROVAL
Permits full access to the approving official, IM purchase card
register, and IM purchase card search resources.
IM PURCHASE
CARD HOLDER
Permits full access to the IM purchase card register resource,
and read-only in the IM purchase card search resource.
IM READ ONLY Allows read-only access to IM address, IM location, IM MTF
catalog, IM POC, IM quality assurance, IM reports, IM SOS,
and IM trans history resources.
IM STANDING
ORDERS
This role allows full access to the IM build orders, IM modify
due-ins, IM modify due-outs, and IM standing orders
resources.
IM TECHNICIAN This role permits full access to the IM technician in most
resources with no exceptions.
IM USER PENDING
ACTION
Allows the user full access to manage IM user pending actions
only.
UP Manage – Add
Role.
These individual IM
resources are
available to build
custom roles with
Read, Update,
Create, and Delete
privileges.
Contract Award Management, DFAS Disbursements, FTP
Login Management, IM Address, IM Adjust Levels, IM Batch
HHT, IM Build Orders, IM CAIM Receipts, IM Common
Name, IM Complaints SF380, IM Destruction, IM Excess, IM
Ext Customer Orders, IM Gains/Losses, IM Inventory
Adjustments, IM Inventory Transfers, IM Issues, IM
Location, IM Modify Due-ins, IM Modify Due-outs, IM MTF
Catalog, IM MIR Administrator, IM NIR Order Authority, IM
Non Routing Issues IM Offline Submit, IM Override, IM
Physical Inventory, IM POC, IM Print Barcodes, IM Quality
Assurance, IM Reachback Cust Orders, IM Receipts, IM
Reports, IM Return Item, IM Source of Supply, IM Summary
Receipt, IM TMU, IM Transaction History, PV
Backup/Backorder Processing
MA Application Roles For MA, certain roles can be assigned only to a user ID that
has one or more maintenance activities. If you attempt to
assign one of these roles to a user ID that has no maintenance
activities, the system notifies you that the operation cannot be
performed.
MA COMMON
NAME
Allows the user to update the common name in a catalog
record. This resource is also available as a role in the

AFMAN41-216 13 FEBRUARY 2013 505
following applications: AM, CAIM, EM, and MA.
MA MTF CAT
PACKAGING
Allows the user full privileges to this resource only.
MA PARTS CLERK Allows required resources for a parts clerk with many
exceptions.
MAINTENANCE
MANAGER
This role permits full access to the maintenance manager to
most resources with few exceptions.
MAINTENANCE
TECHNICIAN
This role permits access to most resources with several
limitations to privileges. .
WORK ORDER
CLERK
Allows the user to view the equipment maintenance history.
UP Manage – Add
Role.
These individual MA
resources are
available to build
custom roles with
Read, Update,
Create, and Delete
privileges.
IM Common Name, MA Barcodes, MA Catalog, MA
Common Model, MA Complaints SF380, MA Contract SVC
Record, MA Device, MA DITMS, MA Equip Identification,
MA Equip Transaction Hist, MA Equipment Record, MA
Equipment Request, MA Finalize Procedure, MA Forecasting
Workload, MA Gain, MA Loss, MA Maintenance Plan, MA
Maintenance Scheduling, MA Manufacturer, MA Pending
Action, MA Procedures, MA Purchase Card, MA Quality
Assurance, MA Repair Parts, MA Reports, MA Schedule
Work Orders, MA Software, MA Source of Supply, MA
Staff, MA Timesheet, MA Transfer, MA Unlock Work
Orders, MA WO Transaction History, MA Work Order
Management
SC Application Roles In the SVC/Cust Management window, you can give or
take away a service/customer from a user's privileges. This
window shows a list of all the service/customers currently
associated with a user, and a list of all possible
service/customers that can be added to the user's privileges.
Only a security manager can access this window. There are
special guidelines for service/customer management.
SC COTR This role provides the multiple resources with various
privileges for the SC COTR
SC EXPERT Only a limited number of users should be given an expert role
due to the nearly unlimited access and capability it provides
within the application.
SC OVERRIDE Allows the user to unlock receipts, contract records, or open
call register records.
SC PC HOLDER Allows full privileges to SC receipt and SC SOS resources
with read-only access to SC reports.
SC READ ONLY Permits read-only access to the BO supervisor, SC call
register, SC receipt, SC record, SC reports, SC SOS and SC
trans history.
UP Manage – Add SC Call Register, SC Override, SC Receipt, SC Record, SC
Reports, SC Source of Supply, SC Trans History

506 AFMAN41-216 13 FEBRUARY 2013
Role.
These individual SC
resources are
available to build
custom roles with
Read, Update,
Create, and Delete
privileges.
SS Application Roles If the update privilege for MTF Logistics is selected, the
update privilege for MTF Funding is automatically added to
the same role. You cannot deselect the update privilege on
the MTF Logistics resource if update is selected for MTF
Funding.
If the read privilege for DCM Configuration is selected, the
read privilege for Comm Management is automatically added
to the same role. You cannot deselect the read privilege on
the Comm Management resource if read is selected for DCM Configuration.
Application Security
Manager Roles
AM, ARC, CS, EM, FM, IM, MA MM, PVI, SC, and SS
Security Manager roles covered at the beginning of this
attachment are assigned in the SS application.
ENGINEERING
JON CROSSWALK
AF sites do not use this functionality.
FOA AM FUND
MANAGER
This role gives full privileges to the AM funding and FOA
AM fund manger roles
MASS UPDATES Allows the user to access the Mass Updates module, to update
multiple MTF catalog records simultaneously.
RESOURCE
MANAGEMENT
This role provides full privileges to the contract award
management and read/update/create privileges in the SS
appropriation management.
SS EXPERT Only a limited number of users should be given an expert role
due to the nearly unlimited access and capability it provides
within the application.
SS READ ONLY Allows read-only access to all (application‘s) TMU‘s, AM
funding, comm management, DCM config, FM archive, MTF
department, MTF funding, MTF logistics, MTF organization,
MTF POC, MTF service, OP funding, and SS reports.
UP Manage – Add
Role.
These individual SS
resources are
AM Funding, AM TMU, Appropriation Association, Comm
Management, Contract Award Management, DCM
Configuration, EM TMU, Engineering JON Crosswalk, FM
Archive, FM TMU, FTP Login Management, IM TMU, MA
TMU, Mass Updates, MM TMU, MTF Department, MTF

AFMAN41-216 13 FEBRUARY 2013 507
available to build
custom roles with
Read, Update,
Create, and Delete
privileges.
Funding, MTF Information, MTF Logistics, MTF
Organization, MTF POC, MTF Service, OP Funding, SC
TMU, SS Appropriation Management, SS Reports, SS TMU

508 AFMAN41-216 13 FEBRUARY 2013
Attachment 4
DMLSS DISTRIBUTION AND TRANSPORTATION MODULE
A4.1. Purpose. The Distribution and Transportation Module (D&TM) is a shared module
accessible through IM, AM, and EM modules. Its purpose is to enable users to track out-
shipment losses that require transportation and in-bound shipments sent from another DMLSS system. Specifically:
A4.1.1. IM users can process transactions requiring DRMO, Return to Source of Supply,
Return Item for Trade-In, regular loss transactions, process Issues, Reachback orders, and
process Excess type shipments that will be tracked within the D&TM module.
A4.1.2. AM users can process transactions requiring DRMO, Return to Source of Supply,
Return Item for Trade-In, Sell Assemblage, Ship Assemblage, regular loss transactions,
Reachback orders, and ship Excess type transactions that will be tracked within the D&TM
module.
A4.1.3. EM users can process transactions to another Military Treatment Facility (MTF) and
DRMO. While processing transactions to another MTF or DRMO shipments requiring
transportation, it is imperative that you make sure to check the block "Transportation
Required" to the right of the "Use Form Number" as this allows the request to be tracked within the D&TM module.
A4.2. D&TM Related Data Elements. For D&TM to be successful, the supplied data must be accurate.
A4.2.1. It is imperative for all users to make sure that in System Services, under MM
Service Detail screen that the DRMO RIC, DRMO DODAAC, and DRMO Address are your
locally assigned DRMO facility supporting the local area or base. DMLSS will
automatically generate an electronic EDI 856 transaction for all DRMO shipments value
greater than $800 and CIIC Code of J to Headquarters Battle Creek, Michigan (RIC S9D) informing them that the items will be delivered to the local DRMO office.
A4.2.2. The user must make sure the Ship to Address in the TMU is correct and
accurate. The RIC and DODAAC of the receiving unit must be valid so the electronic
transaction works as designed. If not, the EDI transaction will not be translated by DAASC,
resulting in reversing the transaction, cancelling the shipment and possibly requiring a data
patch to fix the transaction. Additionally, while processing an out-shipment requiring
transportation (paragraph A4.3.) make sure the Delivery Address on the pop up screen is
accurate; if you are unsure of the information use the RIC/DODAAC lookup search provided on the screen as this will help prevent cancellations or data patches from occurring.
A4.2.3. When creating a new catalog item, the users must make sure they complete the
information required and the information is accurate, especially when selecting the Type
Vendor Item and Type Item ID. If the item is not an NSN, don‘t use "NSN", as this will cause the system to put the wrong data elements on the DD 1348-1a and DD 1149.
A4.2.4. Transportation Appropriation. The Transportation Appropriation is loaded from the
TMU (IM) in System Services. Select IM and then Transportation Appropriation DD1149 to enter the correct line of appropriation.

AFMAN41-216 13 FEBRUARY 2013 509
A4.2.5. Transportation Shipper. Users can add or delete carrier information on the
Transportation Shipper screen. This information is loaded from the TMU in System
Services. Select IM from the Application dropdown menu and then click on Transportation Shipper. Use the appropriate icon on the vertical toolbar to add or delete.
A4.3. Processing Loss Transactions. During the final step of processing a loss transaction, a
new Transportation print grid appears (Figure A4.1.). The grid is set up to select the source
document (DD 1348-1A or DD 1149), including the line of accounting when using a DD 1149 as
the source document, and requires the user to select "Yes" or "No" for that shipment being processed through the local transportation office.
Figure A4.1. Outshipment Form/Transportation Selection screen.
A4.3.1. If you do not know the type of transportation, you can select "Pending" to place the
shipment into a future pending action. If the shipment is not being processed through the
local transportation office, select "No" and select the type of shipper (i.e. Federal Express,
UPS, local delivery, or no transportation required) for that shipment.
A4.3.2. Lastly, users can add the commercial tracking number into the system while
processing the loss, which will be added to the electronic advance shipping notice being sent
to the receiving DMLSS site. When the print grid is completed, a DD 1348-1A or DD 1149
will be printed with a 2D barcode and a new entry will be added to the D&TM.
A4.4. Supply Requisitions. Supply requisitions requiring transportation using DD 1149 require
you to update the Transportation Appropriation (DD 1149) in System Services under TMU for
IM. The new module and enhancements made to the source documents will eliminate the use of
WEBFORMS and transportation personnel from manually processing medical supply shipment requests.
A4.5. Processing Issues. Additionally, this module provides a new way to process issues. The
new process gives you the ability to process issues throughout the day for a final consolidation
for all material going to the same RIC at a later time. If the issues require transportation it is
"important" to check the block "Transportation" on the screen, this will provide you the ability to
print the source document and track the shipment in D&TM. Once the user is ready to complete
the final process for the Issues pending, they need to open up the inbox of the module and look for the pending action called "Transportation Issues Pending."

510 AFMAN41-216 13 FEBRUARY 2013
A4.5.1. In the IM In Box select IM Transportation Issues Pending and double click or click
the jump ahead icon. In the Transportation Issues window (Figure A4.2.), highlight the line
item and insert the projected delivery date from the dropdown that the receiving customer
requires the shipment and click the Process icon on the vertical toolbar. Verify the Customer ship to address (Figure A4.3.), and click ―OK.‖
Figure A4.2. Transportation Issues Window.
Figure A4.3. Customer Address Window.
A4.5.2. In the Outshipment Form/Transportation Selection screen (Figure A4.1.) the user
can modify/change the print form and the base transportation information. When complete, click ―OK.‖ On the Pending issue successful prompt click ―OK.‖
A4.6. Cargo Movement Operations System (CMOS). CMOS is a standard ―DoD
transportation system‖ designed to bridge the gap between supply and base transportation by
eliminating manual processing of supply shipments requiring transportation, and improving in-
transit visibility by creating electronic transactions between the two systems with line item detail.
It also allows the gaining DMLSS user to receive tracking numbers in real-time within DMLSS.
A4.6.1. Specifically, this interface provides DMLSS with the capability to pre-lodge line
item details into CMOS by sending electronic transactions for all single item shipments and
multipacks. Assemblages will pre-load information at the assemblage level not at the
individual line item level.
A4.6.2. CMOS Processing. While processing a shipment that requires transportation within AM, EM, or IM modules, the user must:

AFMAN41-216 13 FEBRUARY 2013 511
A4.6.2.1. Select DD1348-1a as the source document. If the user selects None from the
Print Form dropdown, the source document won‘t be available for reprinting at a later
date.
A4.6.2.2. Select Yes for transportation needed which automatically defaults the shipper to Local TMO. This will allow TMO to see the pre-loaded supply data in CMOS.
A4.6.2.3. Selecting Local TMO and clicking OK will trigger the electronic transaction
process with CMOS. TMO will book the shipments through Fed Ex, UPS, or through the
DoD transportation pipeline. Once the shipment is booked, CMOS will send in-check, in-transit status with the tracking number to DMLSS.
A4.6.3. When using the Transportation module in DMLSS and selecting Base
Transportation as your Shipping Method, an EDI 940 request is sent to CMOS with the
shipment details and CMOS will eventually reply with an EDI 945 response that will
ultimately include the Transportation Control Number(s). When the shipment is going to
another MTF, an electronic Advance Shipping Notice (856) at line item detail is sent to the
gaining DMLSS user and once the gaining unit has completed receipt of the in-bound
material the user needs to complete the final process by selecting the Notify Shipper in the
In-Shipment Results screen. This action will generate an electronic Receipt
Acknowledgement (861) to ensure DMLSS maintains complete in-transit visibility of the shipment.
A4.7. Transportation Module Searches. The D&TM module includes Outshipment and
Inshipment search screen for each application (IM, AM, and EM), allowing users to track all or
selected shipments (Figure A4.4.). The search results include the current status of the shipment,
the lead document number and some additional functionality, such as the ability to get the
shipment line item details, to reprint the source document, to cancel the shipment, etc.
Additionally, when the TCN or commercial tracking number is available, it provides a hyperlink to check real-time statuses through the use of GTN, Federal Express, and UPS.
Figure A4.4. IM Outshipment Search Window.
A4.8. Pending Actions. See Tables A4.1. for a list of D&TM pending actions.
Table A4.1. D&TM Pending Actions.
Message Description Action(s)

512 AFMAN41-216 13 FEBRUARY 2013
Message Description Action(s)
IM Transportation
Issues Pending
The shipment needs a
projected delivery
date and possibly other information.
Click the pending action item to insert
needed information in the
Transportation Issues and related screens.
Transportation
Pending.
In the Outshipment
Results screen the
status of Request is
displayed to indicate
that the EDI 940R
has been sent to
CMOS.
Click the pending action to review the
Ship History screen/status history or change the status of the item.
Inshipment
Notification
Shipping notification
was received into the
system during the EOD process.
After confirming inship status and
processing the receipt of this item
select the Ship History icon on the
vertical toolbar. This displays both
the receipt acknowledgment and
complete status of the inshipment
and sends the EDI 861 back to the
issuing MTF.
Tracking Number
Needed
This pending action is
produced for all
outshipment items
lacking a tracking
number.
Open the pending actions list by
clicking the Jump-To button. The
DTM/Outshipment Results screen
appears. Enter the TCN/Tracking
Number.
Inshipment Past RDD This pending action is
produced for all AM
inshipments past their
required delivery date (RDD).
Highlight the item and determine if
the shipment is overdue or has
receipt been processed.
Unable To Send
Transportation Request
To CMOS
This pending action is
generated when the
electronic file
(EDI940) that sends
advance supply data
to CMOS did not transmit properly.
Take appropriate action. In some
cases, users may need to go to DCM
and resubmit the file.
Unable To Send This pending action is Take appropriate action. In some

AFMAN41-216 13 FEBRUARY 2013 513
Message Description Action(s)
Transportation File generated to inform
the user that the
electronic file EDI
856 or EDI 861 did
not transmit properly
between DMLSS
servers. (856S) is the
Advance Shipping
Notice and 861
Receipt
Acknowledgement.
cases, users may need to go to DCM
and resubmit the file.

514 AFMAN41-216 13 FEBRUARY 2013
Attachment 5
INVENTORY MANAGEMENT (IM) PENDING ACTIONS
A5.1. When Inventory Management is first opened, a message or a list of messages may appear
describing actions that were not completed or need to be completed. These are called Pending
Action Messages. The following chart lists each message, describes when or why the message is produced, and suggests the action or actions to best remedy the problem.
Table A5.1. Inventory Management (IM) Pending Actions.
Message When/Why DMLSS
Produces This Message
Action(s) to Resolve
This Message
Auto Receipts Failed DMLSS generates an Auto
Receipt Failed Pending
Action when auto
(automatic) receipt fails. An
auto receipt failure message
will occur when the IM
customer has either the item
id and or location locked for
an inventory.
When launching the auto
receipts failure pending
action, the user will be able
to view the item id/s,
document number/s and
quantities which require
receipt. During the next
EOP cycle, the system will
attempt to automatically
process all receipts which
previously failed. If the
inventory locks were
removed prior to the start of
the EOP cycle, the system
will process the receipts and
update the SVC/Customer EOH balances.
Appropriation/WBS
Error
The Appropriation Fund
ID(AFI) was not specified.
Not used by AF sites.
Bad Financial File A financial file is corrupt. Possible Transmission of
DFAS file unsuccessful.
Check System Services
DCM Search, Then select
DCM Configure button.
Ensure the DFAS settings for
FTP, user ID, and password
are correct. If they are not
make corrections and save.
Then go into Financial

AFMAN41-216 13 FEBRUARY 2013 515
Message When/Why DMLSS
Produces This Message
Action(s) to Resolve
This Message
resubmit and resubmit all
FAILED DFAS files. If the
DFAS settings are correct
just resubmit the files from
DCM search window. If this
doesn‘t work, contact the
System Administrator or the MHS Service Desk.
Delinquent Backorder
From PV
This pending action is
created during the EOD
process on the 10th
day after
an item has been
backordered to the prime
vendor and has not yet been received.
Users must coordinate with
the prime vendor. Take
action to either update the
estimated release date for
items being shipped, already
shipped or to send a
cancellation request to the
prime vendor for the selected
order(s).
Potential Orders To
PV Backup
This pending action is
created when the primary
prime vendor sends back of
the following statuses: IQ,
AA, AR, R1, or R6. Note:
Site has to have selected the
Back Up Prime Vendor
option and have chosen a
Secondary Prime Vendor for this pending action to appear.
The user has three choices:
Resend the order to the
primary prime vendor, create
order to back up prime
vendor, or cancel the line
item from the pending action.
Unprocessed MTF
Catalog Changes Report
This pending action is
produced when the UDR is
processed and MTF catalog changes exist.
If an MTF Catalog record
does not contain a CII Code,
the system shall recommend
a CIIC update on Part II of
the Unprocessed MTF
Catalog Change Report
during the UDR Update
process. If the user elects
not to process the exception
report, DMLSS adds it to the
pending actions and the
affected items shall remain
locked. After the exceptions

516 AFMAN41-216 13 FEBRUARY 2013
Message When/Why DMLSS
Produces This Message
Action(s) to Resolve
This Message
have been processed, the
system shall unlock the affected items.
Cannot Activate Next
Contract
This pending action message
indicates that contract(s)
have expired and/or
information is missing from
the Contracts tab in the
Source of Supply module
and the system is unable to activate a new contract.
Orders cannot be placed with
vendors that have expired
contracts or missing
pertinent information in
Contract. Users must
activate next contract by
updating contract date and
other pertinent contract information.
Disassociated Catalog
Records
Products sourced to a Prime
Vendor or ECAT cannot be
ordered unless they are
associated to the Master
catalog. If they become
disassociated, this pending action notifies the user.
Determine if the suggested
source is acceptable. If so,
click the Accept button and
the system will auto-build
the SOS record and make it LOGs default SOS.
DAPA
Number/Contract Type Code Changes
This pending action displays
catalog items when a DAPA
number or contract type code change has occurred.
Review and validate any
DAPA number/contract type
code changes for usage items within the catalog.
DFAS Failure The DMLSS system will
post a "DFAS Failure"
message in the customers
Inbox when step 1 (DFAS)
of the DMLSS End-of-Day
(EOD) Cycle fails to complete successfully.
This message is for
information purposes only.
The DFAS process is a
critical step in the EOD
cycle. It is imperative that
the user work with their
DMLSS System
Administrator in identifying
the cause of the failure (SQL
or ISAM error message) as
well as initiating a Military
Health Services (MHS)
trouble ticket if the problem
goes unresolved.

AFMAN41-216 13 FEBRUARY 2013 517
Message When/Why DMLSS
Produces This Message
Action(s) to Resolve
This Message
DLA Sourced NSN-
Commercial Sourcing Available
Items appearing in this
pending action are currently
sourced to a DLA source of
supply. The system has
found a commercial source for the item.
The user must determine if
the suggested source is
acceptable. If so, click the
Update button and the
system will auto-build the
SOS record and make it LOGs default SOS.
Did Not Receive
Status For All Items In The Call
This pending action is
produced as a result of
processing an incomplete
Prime Vendor ANSI.X.12
855 status file from the
Prime Vendor. Incomplete,
implies that a specific CLIN
(contract line item number)
were skipped on the status file.
Information Pending Action
only. Launch the pending
action to view a list of items
that did not receive status.
Click the ―Jump To‖ icon to
view the due-in/due-out file
for the item. The detail
records may be deleted by
clicking the Delete icon on
the toolbar. The pending
action will be removed when
all records are removed from the action list.
Pending
Disbursements
The pending action is created
when a disbursement file is
received from a FASTDATA server.
FASTDATA is not an AF program.
A privileged user will be
able to select and process
disbursement transactions,
review the data, or delete
unmatched disbursement
records.
Expired DEA
Registration Number(s)
This pending action appears
when the Drug Enforcement
Agency (DEA) number
assigned to the medical
facility has expired. The
actual certificate is
maintained in the medical
facilities vault. Users cannot
process electronic narcotic
orders assigned with the
CIIC Code of "R."
Users must submit the
necessary paperwork to the
DEA to register and obtain a
new expiration date. Once
the new registration form is
obtained, users will have to
enter the new dates in
System Services for the LOG
ORG or a customer. Once
this is accomplished, the
pending action no longer appears in the In Box.

518 AFMAN41-216 13 FEBRUARY 2013
Message When/Why DMLSS
Produces This Message
Action(s) to Resolve
This Message
Expiring DEA
Registration Number(s)
The DEA Registration is
going to expire within 60
days. This pending action
appears each day until the
new dates are input into the
system, which is located in
System Services. If the
certificate for ordering
narcotics is not renewed
within the 60 days, the user
is unable to order narcotics
with the CIIS of "R." The
user will receive another
Pending Action, "EXPIRED
DEA REGISTRATION NUMBER(S)."
Renew the certificate
through the DEA using the
correct procedures for
Electronic Orders for
Controlled Substances, using
Drug Enforcement
Administration, 21 CFR
Parts 1305, 1311 or reference the following URL:
http://www.deaecom.gov
and any military guidelines
provided by each of the
military services.
External Customers
Error/Review Processing
DMLSS allows the Log
Account to pass external
customer requirements to
other sources of supply when
processing External
Customer Orders from the
Review Tab. The Error Tab
identifies DR_ transaction
received from an External
Customer with no matching
due-in record. When the
external customer‘s available
balance is not sufficient for
the ESD, ―non-sufficient
funds‖ is written to the
pending action. The external
customer's due-in status is
coded as an exception.
When an authorized user
accepts a "Passed D/I
Shipment Status" IM
External Customer Orders
Inbox - Review Tab pending
action, the system shall
create the necessary SRIM
RRD and BRS transactions,
create and post the resulting
external customer RRD
transaction and create, post,
and send a DRA transaction
based on the quantity accepted.
Catalog Exception
Processing
This pending action is
produced after the UDR is
processed or assemblages are
gained to the MTF and new
catalog records are missing
data or information cannot be
Users launch this report from
the inbox. The Exceptions
icon will display a list of
exception data. Some of the
common exception
descriptions are: No SOS

AFMAN41-216 13 FEBRUARY 2013 519
Message When/Why DMLSS
Produces This Message
Action(s) to Resolve
This Message
validated. A pending action
shall be posted to the IM
Inbox informing the IM User
that an incomplete new
catalog record has been
added by an AM, IM or MA
user.
Exists for item in DMLSS
Master, New Item, U/P Price
is not in DMLSS Master.
These exceptions must be
worked to clear from the
report. VCR buttons are
displayed for multiple
records and provide a total
record count for exceptions.
When all exceptions are
updated and cleared this
report will be removed from
the inbox.
External Customers
Invalid Data Processing
This pending action is
created when improperly
formatted requests from
external customers are received.
The user can correct them if
they know what the problems
are and how to correct them
or delete them and re-enter
through Enter Customer Requests.
Failed MTF Catalog
Changes Report
This pending action message
is displayed when MTF
catalog changes were
requested, but failed to occur.
Identify reason for failure
and rectify the problem by
loading the appropriate
catalog information.
Failed Financial
Transactions
This pending action notifies
you with an information
window that problems
occurred with your financial
files. When you click ok you will be returned to the inbox.
Possible Transmission of
DFAS file unsuccessful.
Check System Services
DCM Search, Then select
DCM Configure button.
Ensure the DFAS settings for
FTP, Userid, and password
are correct. If they are not
make corrections and save.
Then go into Financial
resubmit and resubmit all
FAILED DFAS files. If the
DFAS settings are correct
just resubmit the files from DCM search window.

520 AFMAN41-216 13 FEBRUARY 2013
Message When/Why DMLSS
Produces This Message
Action(s) to Resolve
This Message
IM Failed Orders When submitting orders to
an SOS and the primary
submission method fails, the
DMLSS system
automatically attempts to
submit the order four more
times. When submission
fails after five tries, DMLSS
notifies the user via a "Failed
Orders" pending action
message.
This Pending action message
allows the user to select an
alternate submission method
for the order and, if required,
an alternate submission form
or the user may hold the
order for submission at a
later time. The pending
action message also allows a
user to retransmit the order
again using the original
transmission method, i.e., ftp
protocol. User should take
note of any disturbing trends.
For example, if orders
consistently fail to reach the
intended supply source, there
may be a local firewall in
place blocking a
transmission port. There
could also be a firewall
problem on the receiving
end. Any delay in
transmitting orders has a
negative impact on stock
availability and could impair
the customer area mission.
IM Failed Status This pending action opens
the Re Submit External
Customer Status window and
displays all unsuccessful
transmissions. Data in this
window may be refreshed at
any time by clicking Refresh List.
Launch this pending action
to re submit or remove
external customer status
information. The file type,
date and time are provided
for quick reference of status
received. A details icon is
provided to view the status detail records.
New MTF Catalog
Record
This pending action is
displayed to allow DMLSS
users to view a list of newly created catalog records.
The New MTF Catalog
Record Pending Action is
displayed in two (2) parts:
Part I 'NO ACTION

AFMAN41-216 13 FEBRUARY 2013 521
Message When/Why DMLSS
Produces This Message
Action(s) to Resolve
This Message
REQUIRED' lists new MTF
Catalog records where no
action is required. Part II
'Unknown SOS Records' lists
new MTF Catalog records
where LOGs SOS is equal to
UNK. An authorized user
may select one, many or all
records displayed on either
part of the New MTF
Catalog Record pending action screen to delete.
IM Troubled Due-In
Report
This pending action lists all
troubled due-ins for IM, AM
or both IM/AM. The report
is displayed in
Organization/Item ID
sequence. Each item ID lists
all troubled document
numbers and the total number of days "old".
This list may be printed or
saved to file. Use this list to
follow-up on potential
problem requirements. A
delete button is displayed for
this pending action when
selected. The Delete button
removes the pending action
from the inbox. The list will
reappear following EOP
processing when troubled due-ins exist.
IM Issue Exception If the user elects not to
process the exception report,
DMLSS adds it to the
pending actions and the
affected item's are locked.
After the exceptions have
been processed, the system unlocks the affected items.
Users launch this report from
the inbox. The Exceptions
icon will display a list of
exception data. Some of the
common exception
descriptions are: No SOS
Exists for item in DMLSS
Master, New Item, U/P Price
is not in DMLSS Master.
These exceptions must be
corrected before the master record can be used.
IM Incomplete Picklist This Pending Action
notification is posted in the
IM customer Inbox as a
result of an End-of-Day
Launching the Pending
Action opens up a modal
window that identifies the
Svc/Customer/s that have

522 AFMAN41-216 13 FEBRUARY 2013
Message When/Why DMLSS
Produces This Message
Action(s) to Resolve
This Message
processing cycle. The
purpose of this notification is
to alert the IM SOS
Svc/Customer that supported
Svc/Customers have
requested materiel and the
associated Picklist(s) have not been completed.
pending issues. Issues
should be performed on a
routine basis. Failing to
complete the issue process
can impair the mission of the supported Svc/Customer.
Catalog Items With
Invalid SOS
DMLSS will generate a
"Catalog Item with Invalid
SOS" pending action
message when the following
conditions have been met:
IM user has a customer
catalog record for the item,
and the SOS has been
marked as "deleted".
This is an "information only"
type of message. Users may
delete it without taking
further action. The purpose
of the listing is to alert the
user that a Source of Supply
(SOS) has been coded for
deletion. If the item is still
required to support patient
care needs, the user will need
to seek an alternate source of
supply and adjust their catalog record/s accordingly.
IM Status Edits Report The IM Status Edits Report
identifies LOG status edits in
3 tabs 1) Errors, 2) Awaiting
Review, and 3) Processed.
Launch this pending action
to correct errors and review.
Tab 1 identifies transactions
that are not recognized in
DMLSS. Tab 2 identifies
transactions that are
recognized, but held pending
further processing. Tab 3
identifies transactions
processed in DMLSS.
IM External Customer
Status Response Exception
This pending action is
generated when an external
customer, not loaded as an
account, has sent you an order.
Delete this action and contact
the external customer to resolve the order situation.

AFMAN41-216 13 FEBRUARY 2013 523
Message When/Why DMLSS
Produces This Message
Action(s) to Resolve
This Message
Log Unprocessed
Delivery List
DMLSS generates this
pending action message
during the End-of-Day cycle.
The system produces this
message if an IM SOS has
completed a "pick List" but
does not complete the
associated "Delivery List".
Upon launching the Pending
Action, the user has the
option to choose which
Delivery list they wish to
complete.
Expiring Logins And
Passwords
This pending action is
generated when inbound
login IDs and passwords are
nearing their 60-day expiration date.
Reset the account passwords
and IDs from System Services.
IM Material
Obligation Validation
(MOV)
This pending action is
generated as a result of MOV
actions received from DSCP
through DAASC. The
purpose of the MOV is to
validate and reconcile DI/DO records.
Review the pending action.
Status code BS allows users
to submit an on-line request
for reinstatement of canceled
requisitions for a period not
to exceed 60 days. Off line
reinstatement requests will
not be honored. Quantity
reinstated may equal to or
less than the quantity cancelled only.
New Item Request In the New Item Request
Pending Action window, you
can view a list of new item
requests that have been submitted by users.
No action is required on the
pending action.
Cancellation
Generated – ESD over 90 Days
This pending action is
created when the Primary
Prime Vendor provides
backorder status (IB) with an
Estimated Ship Date, which
exceeds the order placement date, by 90 days.
Information only.

524 AFMAN41-216 13 FEBRUARY 2013
Message When/Why DMLSS
Produces This Message
Action(s) to Resolve
This Message
IM Equipment Order
Pending
This pending action is for
ARMY customers. It
notifies IM that equipment
requirements identified as
approved and funded for
purchase card are ready for IM to procure.
The pending action is
removed when IM procures the equipment.
IM MOF Orders Exist
for Processing
When an item on a MOF
Order was cancelled by both
the MOFs Primary and
Secondary Prime Vendors,
the requirement will appear
on the "IM MOF Orders
Exist For Processing"
pending action.
The system requires users
have the IM "Build Orders"
resource in System Services
to access and process items
on this pending action.
An authorized user will be
able to initiate an order. If
the user initiates an order for
an item on this pending
action and the selected
source has previously
cancelled a request for the
item, the system will notify
the user of the prior
cancellation but allow the user to continue.
When the user initiates a new
order for an item on this
pending action, the system
adds the requirement to the
IM LOG Orders for processing.
IM Overdue Delayed
Delivery Shipment
This pending action is
generated when the Delayed
Delivery Shipment is
overdue (Past the Required
Delivery Date). It will be
generated 2 days past the
RDD for Conus and 7 days
OConus.
Take appropriate action. In
some cases, users may need
to go to DCM and resubmit the file.

AFMAN41-216 13 FEBRUARY 2013 525
Message When/Why DMLSS
Produces This Message
Action(s) to Resolve
This Message
IM Overdue Prime
Vendor Shipment
The Overdue Prime Vendor
Shipment Pending Action
window allows you to view a
list of prime vendor
shipments that are overdue.
You can print/process/review
overdue prime vendor
shipments from this pending action.
QA MMQC Info
Bulletin
In the QA MMQC Info
Bulletin window, you can
view a list of QA MMQC
bulletins that you have
received. (Clicking MMQC
icon launches the web
browser, and goes to the USAMMA MMQC site).
Information pending action
only. View this pending
action to determine if all QA
MMQC messages have been received in your system.
QA Delinquency
Notice Item Qty
This notice is generated
when QA messages
quantities are not updated by
the times established in the QA Maintenance Table.
Follow-up to close the
pending action ASAP. Once
all data is received and
entered into the delinquent
record, the pending action
will be removed.
IM QA Complaint
Alert. Complaint Exists for Item
This pending action message
is generated when a QA
Complaint message is
created and the on hand
balance quantity is greater than 0.
QA manager or user must
verify stock against
complaint details and ensure
all items meeting the criteria
specified in complaint are
segregated. The QA
manager or user must also
transfer material from
Operating/Serviceable to
applicable stratification state
which would prohibit the
stock from being issued to a
customer thus eliminating
any risk of injury to patient.
QA FTP Import Failed DMLSS failed to import the
quality alert (QA) file.
When the QA FTP import
fails, DMLSS automatically
sends a message to the help
desk. QA messages should

526 AFMAN41-216 13 FEBRUARY 2013
Message When/Why DMLSS
Produces This Message
Action(s) to Resolve
This Message
be manually retrieved whenever necessary.
QA Delinquency
Notice Immediate Recall
This pending action is
produced as a result of a non-
response to Customer/AM
pending action messages.
Call the custodian and have
them check their stock and
verify that they do/don't have
the affected stock. Close
scrutiny should be given to
lot number, expiration date,
serial number, and MFG
date. Enter the quantity
identified. If you found none,
enter zero. If found, ensure
corresponding turn-in of
materiel is coordinated with
customer so disposition action can be completed.
QA Alert Missing Or
No MTF Item ID
Match
This pending action message
displays a list of QA
messages in the QA Record
Search window-QA Rejected
Records tab, that were
rejected because there was
no corresponding item in the MTF catalog.
Rejected records list should
be reviewed to ensure no
corresponding items exist.
Once verified, record and
date the list was reviewed
(the completion date) to
remove Rejected records from the list.
QA Alert Item Qty
Required LOG (Supply)
This pending action message
is generated when a QA
message exists for a catalog
record loaded in MTF
catalog. DMLSS accepts
MMQC messages in
QCA/QCB format and
perform a search against the
MTF Catalog specifically for
Item ID, NSN, NDC, HIBCC
MFG/PN and UPN matches
and subsequently post a
pending action (QA Alert) in
the Customer and IM Inbox.
QA manager or DMLSS user
must update Notify Qty field
in the QA Details tab.
Complete message by
verifying stock against QA
message details and entering
quantity of affected material
in the Notify Qty field.
Affected materiel should be
transferred from
operating/serviceable to
applicable stratification state
which would prohibit the
stock from being issued to a

AFMAN41-216 13 FEBRUARY 2013 527
Message When/Why DMLSS
Produces This Message
Action(s) to Resolve
This Message
customer thus eliminating
any risk of injury to patient If
no material is affected, enter
0 as the notify quantity.
QA Missing MMQC
Message
This pending action lists all
missing QA messages.
Information pending action
only. Go to the Website
www.usamma.army.mil to
retrieve missing messages.
QA Alert Item Qty
On-Hand
This pending action notifies
the MTF QA manager of
which customers or STRAT
states have on-hand balances
associated with a particular DOD MMQC message.
QA manager or user can
review QA Details window,
data cannot be edited.
Internal transfers can be
processed to change Strat
Type if applicable, Items
can be deleted from list if no
corresponding data exists in QA Detail.
IM QA Import Failed An MMQC file (quality
alert) failed to import correctly to DMLSS.
DMLSS automatically sends
a message to USAMMA (the
lead agent for MMQC
messages) when there is a
QA import failure.
IM Reachback Issue
Killed/Partial Order Canceled.
The pending action lists all
reachback issues that were
either completely or partially
cancelled. All reachback
pending actions notifications
default in red and appear at
the top of the pending actions
list.
This pending action provides
change information to
reachback orders. The
sustaining base can use this
list to determine if additional
requirements must be
ordered to support the
reachback process.
Information can be deleted
from this window by
selecting the detail record and clicking the Delete icon.

528 AFMAN41-216 13 FEBRUARY 2013
Message When/Why DMLSS
Produces This Message
Action(s) to Resolve
This Message
IM Reachback Issues
Exist for Processing
This pending action is
produced and displayed at
the top of the inbox when
reachback issues exist in the
issues module. The pending
action message is displayed
in RED to distinguish the
action from other pending action messages.
DMLSS creates a pending
action notifying the user that
reachback issues exist when
valid reachback orders have
been received from a
customer and the reachback
issues indicator is checked in
the customer record.
Replenishment
Exception
The Replenishment
Exception pending action
message lists the items that
caused exceptions (errors)
during the replenishment
process.
Users can print list, process
orders for replenishment
exceptions, and delete items from the list.
IM Reachback Log
Orders Exist for Processing
This pending action is
produced as a result of
processing requirements for a
reachback customer and
stock is not available to
cover requirements. All
reachback pending actions
notifications default in red
and appear at the top of the pending actions list.
Launching this pending
action opens the Build
Orders window and allows
the user to select and execute all reachback orders on file.
IM Reachback
Customers Delivery List
This pending action is
produced as a result of
processing requirements for a
reachback customer. All
reachback pending actions
notifications default in red
and appear at the top of the
pending actions list.
When launching this list, the
user is able to view the Print
Reachback Customer
Delivery List window. The
user processes the delivery
list and pulls the items listed
on the delivery list. These
items then need to be made
ready for shipment to the supported unit.

AFMAN41-216 13 FEBRUARY 2013 529
Message When/Why DMLSS
Produces This Message
Action(s) to Resolve
This Message
IM Recommended
Level Changes
DMLSS groups and displays
recommended level changes
into the following three
categories and sequence: (1)
critical core items with a
recommended level of zero;
(2) non-stocked items with a
recommended level; and (3)
static items with a recommended level change.
DMLSS recalculates the
MRQ value in the LOG SOS
Cat record when the LOG
level changes. The MRQ
value is deleted from the
MOQ field when the LOG level is set to zero.
IM Receipt Major
Price Change
This pending action is
displayed when receipts are
processed that exceed the
percentage established in the
computations tab of the
Medical Materiel
Management Service Detail
in Systems Services.
Review the pending action to
determine if the price change
was valid. Users have the
option of reviewing the MTF
catalog from the window. If
changes are not valid, notify QC to make corrections.
IM Reachback
Customers
Error/Review
Processing
This DMLSS pending action
message is displayed when
an order from a reachback
customer caused an error.
Process the order, pass it on
to an external vendor, or delete it.
IM Summary Receipt
Pending
This pending action enables
you to view and process
prime vendor call summary
receipts that are not
processed within 24 hours of
processing a complete receipt for SOS Type DPV
Before processing the
summary receipt, ensure that
the call has been completely
received. Once the call is
processed, it cannot be
reversed. Summary receipts
are not available from this
view when there are active due-ins.
Spoke Customers
Error/Review
Processing
This pending action is
produced when a new spoke
customer requisition is
received and there are errors
detected on the order(s).
Examine the error
description closely. For
Contact the spoke customer
and attempt to adjust the
NSN value manually and then process the request.

530 AFMAN41-216 13 FEBRUARY 2013
Message When/Why DMLSS
Produces This Message
Action(s) to Resolve
This Message
example, if the error message
indicates ―NO RECORD
FOUND‖ then the item ID
furnished by the spoke
customer does not match
anything within the hub‘s
MTF Catalog.
New SOS Update The system creates a new
SOS Code for Back-Up PVs
when required due to GEN
III PVM Option changes.
The system will build all
necessary contract data with
an SOS code that must be changed.
Update the SOS code to a
valid non-used SOS code.
IM Transportation
Pending
This pending action indicates
an item is ready and waiting
on shipping. In the
Outshipment Results screen
the status of Request is
displayed to indicate that the
EDI 940R has been sent to CMOS.
Click the pending action to
review the Ship History
screen/status history or change the status of the item.
IM In-Shipment
Notification
Shipping notification was
received into the system
during the EOD process.
After confirming inship
status and processing the
receipt of this item select the
Ship History icon on the
vertical toolbar. This
displays both the receipt
acknowledgment and
complete status of the
inshipment and sends the
EDI 861 back to the issuing MTF.
IM Tracking Number
Needed
This pending action is
produced for all outshipment
items lacking a tracking number.
Open the pending actions list
by clicking the Jump-To
button. The
DTM/Outshipment Results
screen appears. Enter the

AFMAN41-216 13 FEBRUARY 2013 531
Message When/Why DMLSS
Produces This Message
Action(s) to Resolve
This Message
TCN/Tracking Number.
IM In-Shipment Past
RDD
This pending action is
produced for all AM
inshipments past their
required delivery date (RDD).
Highlight the item and
determine if the shipment is
overdue or has receipt been
processed.
IM Troubled Ship
Status
The pending action identifies
Due-ins with posted ship
status that have exceeded the normal pipeline time.
Follow up with the company
to determine if it has have
actually shipped it. Verify
shipping address, check the
warehouse, check with the
customer, and request Proof of Delivery etc.
Unable to Send
Transportation
Request to CMOS
This pending action is
generated when the
electronic file (EDI940) that
sends advance supply data to
CMOS did not transmit
properly.
Take appropriate action. In
some cases, users may need
to go to DCM and resubmit the file.
Unable to Send
Transportation File
This pending action is
generated to inform the user
that the electronic file EDI
856 or EDI 861 did not
transmit properly between
DMLSS servers. (856S) is
the Advance Shipping Notice
and 861 Receipt Acknowledgement.
Take appropriate action. In
some cases, users may need
to go to DCM and resubmit
the file.
IM Transportation
Issues Pending
The shipment needs a
projected delivery date and possibly other information.
Click the pending action item
to insert needed information
in the Transportation Issues and related screens.

532 AFMAN41-216 13 FEBRUARY 2013
Message When/Why DMLSS
Produces This Message
Action(s) to Resolve
This Message
IM Unprinted Barcode
Labels With Changes
DMLSS generates this
pending action message as a
result of creating a new
Svc/Cust catalog record, or
processing receipts with
status price increases/
decreases. If the user
changes item information,
excluding item ID, and the
user chooses not to print
changed bar code labels at
that time, the system shall
display a message on the
Pending Action Report
indicating that labels for changes need to be printed.
Upon launching the Pending
Action, the user has the
option to choose which
barcode labels they wish to
reprint.
Prime Vendor has
discontinued stocking some items.
This pending action
identifies any records that the
Prime Vendor has deleted
which were carried in the
LOG catalog. This is based
on the incoming EDI 832
file, the Price/Sales Catalog
file. If the item was also
present in a customer‘s
catalog, then a pending
action is also posted to
CAIM.
Resend the order to the
primary prime vendor, create
order to back up prime
vendor, or cancel the line
item from the pending action.
PVM Usage Variance
exist for processing
At the end-of-month
processing, the system
generates a pending action to
review PVP/PVM status.
This data includes
calculations of what should
be ordered for items based upon the last 90 days usage.
Users should check this list
monthly and make
appropriate changes. The
calculations are based upon
the report usage, actual
usage, and the variance
percentage set on the
contract tab of the PV SOS
record. This provides the
sites the means to send and
update their usage to the PV,
which is used in calculating

AFMAN41-216 13 FEBRUARY 2013 533
Message When/Why DMLSS
Produces This Message
Action(s) to Resolve
This Message
the fill rate.
PVP Usage Variance
exist for processing
At the end-of-month
processing, the system
generates a pending action to
review PVP/PVM status.
This data includes
calculations of what should
be ordered for items based upon the last 90 days usage.
Users should check this list
monthly and make
appropriate changes. The
calculations are based upon
the report usage, actual
usage, and the variance
percentage set on the
contract tab of the PV SOS
record. This provides the
sites the means to send and
update their usage to the PV,
which is used in calculating
the fill rate.
IM Excess In the Excess Pending
Actions window, you can see
the information
corresponding to excess-
related pending action
messages. This window can
have several tabs, but only
those tabs with current
information appear at any
given time.
This pending action serves
notice that items exist in the
excess program that require
attention. See IM Excess for
explanation on actions to
take in the excess module.
Once all items are cleared,
the pending action will be removed from the inbox.
Zero/Negative Funds
Summary Report
This Pending Action
notification is posted in the
IM customer Inbox as a
result of an End-of-Day
processing cycle. To access
the report, the user would
simply click on the ―Jump
To‖ button. The report is
produced in Svc/Customer
ID sequence and provides
funding details for each
customer at the Project
Center level. Current
This report was designed as a
management tool for the
Svc/Customer. It
automatically posts to the
Svc/Customer Inbox if a zero
or negative funding
condition exists. Users
should review the report and
take action, if necessary, to
augment their existing fund
balances within the Project Center.

534 AFMAN41-216 13 FEBRUARY 2013
Message When/Why DMLSS
Produces This Message
Action(s) to Resolve
This Message
available funding balances
are given at each Element of
Resource (EOR) within the
Project Center along with
year to date commitments,
obligations, credits, sales,
surcharges, and expenses.

AFMAN41-216 13 FEBRUARY 2013 535
Attachment 6
CUSTOMER AREA INVENTORY MANAGEMENT (CAIM) PENDING ACTIONS
A6.1. When CAIM is first opened, a message or a list of messages may appear in the In-Box
describing actions that were not completed or need to be completed. These are called Pending
Action Messages. The following chart lists each message, describes the meaning of the message, and suggest the action or actions to best remedy the problem.
Table A6.1. Area Inventory Management (CAIM) Pending Actions.
Message Description Action(s)
Auto Receipts Failed DMLSS generates an Auto
Receipt Failed Pending Action
when auto (automatic) receipt
fails. An auto receipt failure
message will occur when the
CAIM customer has either the
item id and or location locked
for an inventory.
When launching the auto
receipts failure pending
action, the user will be
able to view the item id/s,
document number/s and
quantities which require
receipt. During the next
EOP cycle, the system
will attempt to
automatically process all
receipts which previously
failed. If the inventory
locks were removed prior
to the start of the EOP
cycle, the system will
process the receipts and
update the SVC/Customer EOH balances.
Zero/Negative Funds
Summary Report
This Pending Action
notification is posted in the
CAIM customer Inbox as a
result of an End-of-Day
processing cycle. To access the
report, the user would simply
click on the ―Jump To‖ button.
The report is produced in
Svc/Customer ID sequence and
provides funding details for
each customer at the Project
Center level. Current available
funding balances are given at
each Element of Resource
This report was designed
as a management tool for
the Svc/Customer. It
automatically posts to the
Svc/Customer Inbox if a
zero or negative funding
condition exists. Users
should review the report
and take action, if
necessary, to augment
their existing fund
balances within the Project Center

536 AFMAN41-216 13 FEBRUARY 2013
Message Description Action(s)
(EOR) within the Project
Center along with year to date
commitments, obligations,
credits, sales, surcharges, and expenses
Delinquent Backorder
From PV
This pending action is created
during the EOD process on the
9th day after an item has been
backordered to the prime
vendor and has not yet been
received.
Users must coordinate
with the prime vendor to
cancel a backordered item.
No automatic request for
cancellation exists in this
build.
Potential Orders To
PV Backup.
This pending action is created
when the primary prime vendor
sends back one of the following
statuses: IQ, AA, AE, R1, or
R6. Note: Site has to have
selected the Back Up Prime
Vendor option and have chosen
a Secondary Prime Vendor for
this pending action to appear in
their inbox.
The user has three
choices: resend the order
to the primary prime
vendor, create order to
back up prime vendor, or
cancel the line item from
the pending action.
Unprocessed MTF
Catalog Changes Report
A DMLSS systems change
request has been initiated to
remove this Pending Action
notification from CAIM. Any
"Failed MTF Catalog changes"
will be handled in IM and not CAIM.
A DMLSS systems
change request has been
initiated to remove this
Pending Action
notification from CAIM.
Any "Failed MTF Catalog
changes" will be handled in IM and not CAIM.
Invalid Inventory This pending action is produced
when a customer inventory
exception is encountered. The
exception report can be printed
after the HHT download or the
exceptions can be worked from
the Invalid Inventory pending action.
Review the exception and
take appropriate action to
resolve the identified
catalog exception. If the
customer ID is invalid,
reprint the barcode and
header label. If the item
location delete indicator is
checked, search for the
inactive catalog record by
customer ID and undelete

AFMAN41-216 13 FEBRUARY 2013 537
Message Description Action(s)
the catalog record.
Unprinted Critical
Barcode Labels
DMLSS will post a message an
"Unprinted Critical Barcode
Labels" message to the CAIM
Svc/Customer Inbox when a
"critical" change(s) occurs to
the catalog record. Critical
changes include changes to
customer id, inventory method,
item ID, level, or location. The
message indicating that labels
for critical changes need to be
printed shall be displayed on the
report until the user prints the
changed bar code labels and
deletes the message from pending actions.
If the user changes item
ID, level, or location for
an item and the user
chooses not to print
changed bar code levels at
that time, DMLSS
displays a message on the
Pending Action Report
indicating that labels for
critical changes need to be
printed.
Customer
Restrictions
This pending action is created if
a customer attempts to order an
item that currently exists in a
customer catalog, but they are not authorized to order.
Users cannot order an
item they are not authorized to obtain.
Expired Contracts
Report
The Contract Termination
Report shows SOS records with
a contract number that expired
without having been replaced
and/or those that will expire
within 90 days. The report
displays the contract expiration
date, contract number, SOS, and SOS name.
This report is produced for
information purposes
only. CAIM users may be
required to take the
following action/s based
upon information
contained within this
report (1) attempt to
renew contract with
current vendor (2) attempt
to seek alternative source
of supply (3) attempt to
procure new item under
existing SOS. This
pending action should not
be assigned to customers.
Logistics personnel should
oversee contract

538 AFMAN41-216 13 FEBRUARY 2013
Message Description Action(s)
management within IM.
DAPA
Number/Contract Type Code Changes
This pending action displays
catalog items when a DAPA
number or contract type code change has occurred.
Review and validate any
DAPA number/contract
type code changes for
usage items within the
catalog.
DFAS Failure This pending action appears in
CAIM for use by CAIM SOS
customers. The only approved
Air Force CAIM SOS account
is the Medical Maintenance
Activity.
Customers do not require
privileges to this pending
action. The IM DFAS
Failure pending action
should be reviewed and
worked by logistics personnel.
Unprocessed
Delivery List
This pending action appears in
CAIM for use by CAIM SOS
customers. The only approved
Air Force CAIM SOS account
is the Medical Maintenance Activity.
Customers do not require
privileges to this pending
action. The IM
Unprocessed Delivery List
pending action should be
reviewed and worked by logistics personnel.
Document Register The DMLSS system generates
and posts a "Document
Register" pending action
message to the users Inbox
when the Svc/Customer has
performed specific actions
which result in transactions
since the previous end of period cycle.
The Document Register is
designed as a management
tool for the customer.
Transactions identified
within the report are
grouped according to EOP
cycle which they were
processed in, and data can
be retrieved up to the
previous 24 months. The
criteria option allows the
user to sort, view, and
print information
according to their liking.
The Document Register
reflects such actions as
receipts, establishing due-ins, and issues.

AFMAN41-216 13 FEBRUARY 2013 539
Message Description Action(s)
Did Not Receive
Status For All Items In The Call
This pending action appears in
CAIM for use by CAIM SOS
customers. The only approved
Air Force CAIM SOS account
is the Medical Maintenance Activity.
Customers do not require
privileges to this pending
action. The IM Did Not
Receive Status For All
Items In The Call pending
action should be reviewed
and worked by logistics personnel.
Expired/Expiring
Contracts Report
A contract number in an SOS
record has expired without
having been replaced, and/or will expire within 90 days.
Options include, attempt
to:
Renew a contract with
current vendor
Seek an alternative
source of supply
Procure a new item
under an existing SOS
End-Of-Year Funds DMLSS produces the "End of
Year Funds Report" as a result
of processing the EOFY cycle.
The report displays both Project
Center and Expense Center
EOR closing balances. Project
center EOR balances on the End
of Year Funds Report reflect
target amount, available
balance, commits, obligations,
credits, reimbursable sales, non-
reimbursable sales, surcharges,
and expenses. Expense center
EOR balances on the End of
Year Funds Report reflect target
amount, available balance,
commits, obligations, credits,
reimbursable sales, non-
reimbursable sales, surcharges, and expenses.
This report is produced for
information purposes
only. It captures and
portrays a myriad of
financial information for
the Svc/Customer area.
Failed Orders This pending action appears in
CAIM for use by CAIM SOS
Customers do not require
privileges to this pending

540 AFMAN41-216 13 FEBRUARY 2013
Message Description Action(s)
customers. The only approved
Air Force CAIM SOS account
is the Medical Maintenance Activity.
action. The IM Failed
Orders pending action
should be reviewed and
worked by logistics personnel.
Item Has Been
Marked For
Deletion Check
W/Supply
DMLSS produces this pending
action notification when an item
has been marked for deletion at
the MTF/LOG catalog level,
and the item is also carried
within customer catalog
records.
This pending action
message identifies the
item id and description for
the item being deleted as
well as the application
where the deletion
originated from. Users
should use this
information to research
and seek an alternate item,
if applicable, to replace the item being deleted.
Catalog Items With
Invalid SOS
DMLSS will generate a
"Catalog Item with Invalid
SOS" pending action message
when the following condition
have been met: CAIM user has
a customer catalog record for
the item, and the SOS has been marked as "deleted."
This is an "information
only" type of message.
Users may delete it
without taking further
action. The purpose of the
listing is to alert the user
that a Source of Supply
(SOS) has been coded for
deletion. If the item is
still required to support
patient care needs, the
user will need to seek an
alternate source of supply
and adjust their catalog record/s accordingly.
Recommended Level
Changes
The DMLSS system
automatically performs a
releveling process for all
customer areas during the
monthly EOP cycle, but allows
the user to initiate the process
for a particular item and a
location within a customer area
at any time. The system
During the leveling
process, whether user
initiated or system
initiated, the system
groups and displays
recommended changes
into three categories and
in the following sequence:
(1) critical core items with

AFMAN41-216 13 FEBRUARY 2013 541
Message Description Action(s)
calculates a recommended level
for non-stocked and static
items. If the level is greater than
zero, the system refers the
recommended level to a user for
action. CAIM recommends
levels or level changes for only
those items with a history begin
date older than three months. If
the system determines that a
Static item should be a Core
item, it is referred to a user for
review/action. If the system
determines that a core item‘s
level should change, the system
automatically adjusts the level.
If the system determines that a
critical core item should have a
level of zero, the system refers
the item to a user for review/action.
a recommended level of
zero, (2) non-stocked
items with a
recommended level, and
(3) static items with a
recommended level
change greater than zero.
CAIM allows the user to
accept, edit, or delete the
recommended level
changes. Once the user
views/works
recommended changes
generated during the
releveling process, the
system allows the user to
hold the file in order to
work/complete at a later
time or edit/accept/delete
changes and then purge
the file. During the
monthly process, the
system automatically
replaces any unprocessed
files with the new file of
recommended changes generated.
Unchanged Expense
Center Due To Mass
Updates
DMLSS generates and posts
this pending action in the
CAIM Customer Inbox when
the following conditions are
met: (1) Svc/Customer is
marked as "internal" (2)
Svc/Customer has catalog
records assigned (3) The default
expense center value for the
Svc/Customer has been
changed in System Services
using the Mass Updates - Change Expense Center Option.
This pending action
displays the item id, item
description, location, old
fund, and new fund for
each customer catalog
record being affected by
the expense center change.
The pending action
affords the user an option
to keep the existing
expense center by
highlighting and deleting
the detail, or accepting the
change. To accept the
change, the user highlights
the item id, clicks on the

542 AFMAN41-216 13 FEBRUARY 2013
Message Description Action(s)
"customer detail" button
on the vertical toolbar, and
changes the default
expense center value by
clicking on the "edit"
button in the customer
catalog detail screen.
Changing the expense
updates the pending action
screen.
Obsolete Barcode
Labels To Print
The system creates a report with
an image of each obsolete
barcode label (the customer
catalog record or location is marked for deletion).
Print the report as a
reference when removing
obsolete labels from their
area(s).
ORMA Input File
Processing Errors
At specific DMLSS locations,
the DMLSS system will
interface with the Operating
Room Management Application
(ORMA) system. DMLSS
creates a pending action
notification to the CAIM
customer Inbox if the ORMA interface file fails to process.
This pending action
message is applicable only
to CAIM customers
designed as "ORMA"
users. When the ORMA
interface pending action
notification is received for
failed processing, the
system creates a dialog
box allowing user to
choose to continue/not
continue processing. If
the Yes (continue), is
selected then the system
continues to process the
unprocessed data from the
table. If No (not
continue), is selected then
the system will not
continue to process and
retain data table for next process cycle.
Receipt Price Differs
From Original Price > 25%
This pending action is produced
as a result of processing a
receipt in CAIM from an
This pending action was
designed to alert the user
if they are paying too

AFMAN41-216 13 FEBRUARY 2013 543
Message Description Action(s)
external supply source with a
significant price variance. The
price variance table (Major
Receipt Price Change) is
maintained within System
Services in the MM Service detail.
much for a particular item
id. The system will
identify items received
that had a receipt price
variance less than / greater
than the amount
established in the MM
Service Detail. The modal
window will identify the
item id/s, original price,
receipt price, and
percentage of difference in
price. Users should use
this information to
potentially seek out
alternate sources of supply
that may furnish the item/s at a better price.
Unprocessed Picklists This pending action appears in
CAIM for use by CAIM SOS
customers. The only approved
Air Force CAIM SOS account
is the Medical Maintenance Activity
Customers do not require
privileges to this pending
action. The IM
Incomplete Picklist and
LOG Unprocessed
Delivery List pending
actions should be
reviewed and worked by logistics personnel.
Pending Orders
(Unprocessed Issues)
DMLSS posts this pending
action to the CAIM SOS
Svc/Customer as a result of
performing step 20 in the DMLSS End-of Day cycle
This message is designed
to alert the CAIM
customer that an
unprocessed issues
situation exists.
Supported CAIM
customers have completed
the Build Process Submit
(BPS) process which
generated orders to the
CAIM SOS; however, the
picklist function was
never initiated by the CAIM SOS.

544 AFMAN41-216 13 FEBRUARY 2013
Message Description Action(s)
POU Replenishment
Exception Report
Point of Use (POU) cabinets are
used at several military
treatment facilities. DMLSS
has established an interface to
communicate with the POU
cabinets. DMLSS produces a
POU replenishment exception
report for items that are not
replenished during the POU
automatic replenishment
process. This report includes
the item id, location, item
location serial number (Barcode number) and quantity requested.
The report is for
information purposes
only. The user should
evaluate the remarks field
on the report and take the
appropriate action, if
applicable. In some
circumstances, the system
will not replenish because
of an existing due-in/out
that covers the POU
shortfall.
QA Delinquency
Notice, Supply Item
Qty Cust
This pending action is produced
as a result of a non-response to
a "QA Alert. Item QTY
Required Cust (Supply)"
pending action message. This
pending action is based upon
time parameters established in
the IM Quality Assurance Class
Maintenance Table.
The CAIM user should
scan their shelves/storage
locations to determine if
they maintain the subject
item id. Close scrutiny
should be given to Lot
number, expiration date,
serial number, MFG date,
etc… To complete the
pending action message,
the user must enter the
appropriate quantity found
on their shelves, if
applicable. If no
quantities are maintained,
user must enter a zero (0)
and hit the save button on
the vertical toolbar. This
in turn will remove the
pending action message
and update the record
detail maintained in
Inventory Management
(IM).
QA Alert. Cust
Equipment
DMLSS will identify all
Equipment Custodians and War
Reserve Materiel (WRM)
The CAIM user should
scan their immediate
section/patient care areas

AFMAN41-216 13 FEBRUARY 2013 545
Message Description Action(s)
Accounts that have a record for
any equipment item that is the
subject of a quality alert, MTF
Complaint, or manufacturer's
recall. DMLSS allows logistics
maintenance personnel to select
additional customers that should
receive a pending action
notification on quality alerts,
manufacturer recalls, and MTF
complaints for equipment items.
An MTF QA customer record
will then be built and associated
with the quality alert for the
selected customers. The system
them notifies all system
identified and selected
Equipment Custodians and
medical maintenance personnel
via a pending action to their
DMLSS Inbox (for WRM
equipment also). The system
deletes pending actions when
the QA Customer record is closed.
to determine if they
maintain the subject item
id, and / ECN (equipment
control number). To
complete the pending
action message, the user
must enter the appropriate
quantity found in their
area, based upon ECN,
and or MFG model
number and serial number,
if applicable. If no
quantities are maintained,
user must enter a zero (0)
and hit the save button on
the vertical toolbar. This
in turn will remove the
pending action message
and update the record
detail maintained in
Inventory Management (IM).
CAIM QA Complaint
Alert. Complaint
Exists for Item
DMLSS will generate a ―CAIM
QA Alert. Complaint Exists For
Item‖ when a QA complaint
message is created and the LOG
O/H balance qty is > 0.
Launching the pending action,
DMLSS will identify the item
ID date created, Org ID, and
Org Name involved. The view
button allows the user to view
the entire complaint, as well as,
the SF 380 and LOG owned
CAIM balances linked to the item ID
It is the QA Managers
responsibility to take
action so that all suspect
items meeting the criteria
within the complaint are
segregated. The QA
manager should also take
action to laterally transfer
the materiel from
Operating/serviceable to
another strat state which
would prohibit the stock
from being issued to a
customer. This eliminates
any risk of injury to the patient
QA Alert. Item Qty This pending action is produced The CAIM user should

546 AFMAN41-216 13 FEBRUARY 2013
Message Description Action(s)
Required Cust
(Supply)
as a result of receiving a
Medical Materiel Quality
Control (MMQC) Quality
Assurance file during the
DMLSS EOP cycle. The
Pending action will post to the
CAIM user Inbox under the
following conditions (1) Item id
is loaded in the Svc/Cust
catalog (2) Item Id is loaded in
the Svc/Cust catalog and
marked as deleted and there has
been issue consumption within
the past 24 months (3) Item id is
not loaded in the Svc/Cust
catalog; however, IM user has
determined that CAIM
Svc/Customer should be alerted
of the recall/complaint on the
record.
scan their shelves/storage
locations to determine if
they maintain the subject
item id. Close scrutiny
should be given to lot
number, expiration date,
serial number, MFG date,
etc… To complete the
pending action message,
the user must enter the
appropriate quantity found
on their shelves, if
applicable. If no
quantities are maintained,
user must enter a zero (0)
and hit the save button on
the vertical toolbar. This
in turn will remove the
pending action message
and update the record
detail maintained in
Inventory Management
(IM).
Replenishment
Exception
DMLSS generates this
exception report and posts it to
the CAIM users Inbox as a
result of processing a
replenishment inventory in
either batch or "RF" Hand Held Terminal (HHT) mode.
This message is for
information purposes
only. The system will
provide a message in the
remarks field indicating
why an item id/s failed
during the replenishment
process. Too often the
problem relates back to an
invalid bar code label
being scanned. For
example, a user enters a
replenishment quantity in
the bar code label field by
mistake instead of the
actual barcode number.
The system will reflect the
incorrect label number on
the pending action and
will indicate an invalid

AFMAN41-216 13 FEBRUARY 2013 547
Message Description Action(s)
item id situation. Another
cause could be from
outdated labels. For
example, the customer
fails to print out a label
due to a critical barcode change.
RF HHT Inventory
Exception Report
DMLSS generates this
exception report and posts it to
the CAIM users Inbox as a
result of processing a
replenishment inventory in the
"RF" HHT mode.
Upon launching the
pending action, the system
opens up the
Replenishment Inventory
Exception Report from the
CAIM Reports module.
The report reflects the
item id, item description,
U/P, EOH, Inv Qty, Level,
Potential Due-out, Storage
Area, Location ID, Reason
for the exception, and
Date. An example of an
exception would be as
follows: CAIM
Svc/Customer uses "Shelf
Count" inventory logic.
The user scans an item for
replenishment and enters a
quantity greater than the
existing EOH value. The
Replenishment Inventory
Exception Report would
identify the reason as
"INVENTORY QTY >
EOH QTY". This pending
action can be deleted
when no longer useful, or
exception actions are
completed. This pending
action can be deleted
when no longer useful, or
exception actions are completed.
Ready Use Location This pending action only By completing this

548 AFMAN41-216 13 FEBRUARY 2013
Message Description Action(s)
Replenishment applies to Svc/Customers who
issue materiel from a Carousel
location to a "Ready Use" location in CAIM.
pending action, the system
decrements the Carousel
Estimated On Hand
(EOH) balance for the
item id(s) and satisfies the
Ready Use location requirement.
Sales Conversion
Ratio Changed
This Pending Action
notification is posted in the
CAIM customer Inbox as a
result of a change to MTF/LOG
catalog record unit of purchase
quantity. The unit of purchase
(UOP) purchase quantity can be
located on the "Basic" tab of the
MTF catalog detail
This message is produced
during the DMLSS EOP
cycle and is for
information purposes
only. Changing the UOP
quantity is a result of
either acceptance to a
UDR revision or an IM
user change as a result of
vendor repackaging. The
message will post to the
CAIM Svc/Cust if (1) the
user has the Pending
Action message associated
to their user id and (2) A
Svc/Customer catalog
record is present for the
item id/s affected.
Customers should be
cognizant of the UOP
quantity adjustments since
it will impact storage
space, inventory
replenishment, and potential cost of the item.
Status Edit Report -
Customer
DMLSS produces a Customer
Status Edit report during an on-
line session based upon receipt
of incoming status files from
the Prime Vendor, DLA or GSA
agencies, or other sources. This
report is subdivided into three
parts; Part 1 (errors), Part 2
(Awaiting Review), and Part 3
Customers should take
every opportunity to
review and work the
CAIM Customer Status
Edit report when
applicable to their
Svc/Customer area.
Images appearing on Part
1 of the report did not
update any due-in details

AFMAN41-216 13 FEBRUARY 2013 549
Message Description Action(s)
(Processed). because of an error in file
format. These details
should be reviewed and
then deleted when no
longer pertinent. Part 2 of
the report reflects status
images that require user
action. The images in Part
2 can either be accepted or
deleted. Accepting
changes will result in
immediate adjustments to
the applicable Due-in
detail. Part 3 lists all
status images that were
correctly formatted and
processed
Troubled Due-In
Report
DMLSS creates and posts a
Troubled Due-in Report to the
CAIM Svc/Customer Inbox
when the following conditions
are met: (1) Due-ins that have
not received an
acknowledgment after the
second and subsequent request
for acknowledgment, (2) due-
ins that have not received a
reply on second and subsequent
follow-up for improved status,
(3) due-ins with ship status
recorded and average pipeline
time has passed. If no pipeline
times are recorded in the
customer catalog record, the
system uses the estimated lead
days in the SOS table to
determine if the average
pipeline time has passed, and
(4) due-ins with an estimated
release date that exceeds the
average pipeline time for the
item. DMLSS continues follow-
up action on a due-in until the
This pending action was
designed to alert the user
that there is a potential
problem with their
requisition/s. The user
may need to take
alternative measures for
procuring the item/s. In
addition, the user may
need to contact the supply
source directly in order to
(1) ascertain the existing
status of the order (2)
cancel the order if not
obtainable in specific
timeframes, or (3) elevate
the priority level on the order.

550 AFMAN41-216 13 FEBRUARY 2013
Message Description Action(s)
maximum number of
consecutive follow-ups, defined
in the MTF Organization Record, has been reached.
Unsent Unexecuted
Orders
This pending action is produced
as a result of the EOP process.
During the End-of Day cycle,
DMLSS attempts to retransmit
any orders which previously
failed to reach their intended
destination. This pending
action identifies the SOS, Call
number, and method of transmission
Users should be extremely
wary of unexecuted
orders. This pending
action message allows the
user to select an alternate
submission method for the
order and, if required, an
alternate submission form
or the user may hold the
order for submission at a
later time. The pending
action message also
allows a user to retransmit
the order again using the
original transmission
method, i.e., ftp protocol.
User should take note of
any disturbing trends. For
example, if orders
consistently fail to reach
the intended supply
source, there may be a
local firewall in place
blocking a transmission
port. This could also be a
firewall problem on the
receiving end. Any delay
in transmitting orders has
a negative impact on stock
availability and could
impair the customer area mission
Unprocessed Issue
Exceptions
DMLSS generates this pending
action message during an on-
line session when a CAIM SOS
processes issues, an exception
situation occurs during
completion of the picklist
Upon launching the
Pending Action, the user
has the option to complete
the issue exception by
entering an inventory
quantity or closing out and

AFMAN41-216 13 FEBRUARY 2013 551
Message Description Action(s)
(quantity picked < qty
requested), and the CAIM SOS
declines to complete issue exceptions.
completing the action at a
later time.
Unexecuted Orders DMLSS generates an
"Unexecuted Orders" pending
action message during the EOP
processing cycle when a CAIM
customer performs a
replenishment action but does
not complete the Build Process
Submit (BPS) process
(SVC/Cust w/verify orders =
on) or (SVC/Cust w/verify
order = off and order is to LOG
w/exception)
Upon launching the
Pending Action, the user
can complete the BPS
process and or correct the
exception situation which
caused the order to fail in
execution. To clear the
exception, the user may
have to make adjustments
in the MTF catalog detail,
Source of Supply (SOS)
module, Expense Center
funds detail, or other appropriate modules
Unprinted Bar Code
Labels With Changes
DMLSS generates this pending
action message as a result of
creating a new Svc/Cust catalog
record, or processing receipts
with status price
increases/decreases. If the user
changes item information,
excluding item ID, and the user
chooses not to print changed
bar code labels at that time, the
system shall display a message
on the Pending Action Report
indicating that labels for changes need to be printed.
Upon launching the
Pending Action, the user
has the option to choose
which barcode labels they wish to reprint.

552 AFMAN41-216 13 FEBRUARY 2013
Attachment 7
ASSEMBLAGE MANAGEMENT (AM) PENDING ACTIONS
A7.1. When Assemblage Management is first opened, a message or a list of messages may
appear in the In-Box describing actions that were not completed or need to be completed. These
are called Pending Action Messages. The following chart lists each message, describes the meaning of the message, and suggest the action or actions to best remedy the problem.
Table A7.1. Assemblage Management (AM) Pending Actions.
Message Description Action(s)
AM Item Cancelled
Without Target Funds.
This pending action
indicates an AM item
was cancelled while
no target funds were
assigned.
Informational only. No action is
required.
AM Expired Item
Pending Action
This pending action
is generated during
EOD processing
when there is
serviceable WRM on hand that expired.
Update the stratification state from
serviceable to unserviceable,
suspended or FDA test. Or if
expiration date(s) has/have been
extended or are incorrect, correct
the respective expiration date(s).If
extended, enter new expiration date
in the Revised Exp Date field.
When all action is complete the
pending action is removed from the inbox.
AM Gains Incomplete
Because Of Price Factor
This pending action
is produced as a
result of an
assemblage
inshipment where the
adjusted
pricing/ratios do not
match. (i.e. old ratio
12-1 new ratio 10-1.).
Double clicking the pending action
will bring up the detailed gains that
were not processed with the U/S
and U/P information. Verify the
correct quantity received in the
current U/S and click save. This
will generate the gain transaction.
Delete any invalid gains that were
not received.
The gaining MTF must review old
ratios to current ratios to determine
corrective action. Verify adjusted
items received against local records
and enter the correct ratios for the

AFMAN41-216 13 FEBRUARY 2013 553
Message Description Action(s)
pending action item. The list is
removed when all pending actions
are complete.
AM Item(S) Could
Not Be Sold
When items in an
assemblage are sold
or the war switch is
used, these are
unserviceable items
that are not
sold/issued during
processing. Or, the
DMLSS UDR
Extract updated
WRM detail records
and data is missing or cannot be validated.
Launch this pending action to view
a list of all unserviceable items
associated to the assemblage(s). If
the items are found to be
serviceable, change the strat state
and sell or issue the item. If items
are unserviceable, remove from
inventory and destroy.
Delinquent Backorder
From PV
This pending action
is created during the
EOD process on the
9th day after an item
has been backordered
to the prime vendor
and has not yet been
received.
Informational only. Follow-up
with the PV and determine whether
or not to maintain the backorder or
cancel and procure from another
source. No action required if the backorder is kept.
Potential Orders To
PV Backup
This pending action
is created when the
primary prime vendor
rejects, completely
cancels or partially
cancels an item
request. Note: Site
has to have selected
the Back Up Prime
Vendor option and
have chosen a
Secondary Prime
Vendor for this
pending action to appear in their inbox.
The user has three choices: resend
the order to the primary prime
vendor, create order to back up
prime vendor, or cancel the line item from the pending action.

554 AFMAN41-216 13 FEBRUARY 2013
Message Description Action(s)
DAPA Numbering
Contract Type Code Changes
This pending action
is generated for
changes to the DAPA
Number, Contract
Expiration Date or
Contract Type
Code made by either
a user action, the
End-Of-Day Process,
or a UDR/delta
update.
Users can print, delete, or access
the catalog record if they have the
correct roles and resources for this
pending action.
Expired/Expiring
Contracts Report
A contract number in
an SOS record has
expired without
having been replaced,
and/or will expire within 90 days.
Options include, attempt to:
Renew a contract with current
vendor
Seek an alternative source of
supply
Procure a new item under an
existing SOS
Catalog Exception
Processing
This pending action
is produced as a
result of an
assemblage
inshipment or when
the DMLSS UDR
Extract updates
WRM detail records
and data is missing or
cannot be validated.
Open the pending actions list by
clicking the Jump-To button. The
first MTF Catalog opens. When
multiple MTF records are present,
the VCR buttons are present on
screen. Select the record and click
the Exception button to view the
exception reason. When all
exceptions are corrected, the
pending action is removed from the inbox.
AM Failed Orders AM orders were
submitted but not
transmitted during
EOP processing or
when on-line
processing.
Users must review the detail record
to determine the reason for failure.
Once processes are validated users
can select one or all failed orders
and resubmit. The pending action is
removed when all actions are processed or removed.

AFMAN41-216 13 FEBRUARY 2013 555
Message Description Action(s)
AM Item ID Change This action occurs
when an item ID
change occurs and a
corresponding record
exists in an AM Assemblage.
Informational only. No action is
required.
Cancellation Generated – ESD over 90 Days
This pending action
is created when the
Primary Prime
Vendor provides
backorder status (IB)
with an Estimated
Ship Date, which
exceeds the order
placement date, by 90 days.
Information only.
QA Alert. WRM
Supply Item. Qty
Required.
This pending action
is produced when
items are identified in
the quality assurance
program and the
possibility exists that
your MTF might have these items.
Verify WRM stock and complete
the WRM pending action by
entering quantities in the Notify
Quantity field, even when the
quantity is zero. The pending
action report is removed from the
inbox when all actions are complete.
QA Delinquency
Notice. Supply Item Qty WRM.
This pending action is
produced when items
identified in a QA
Alert were not
processed in a timely
manner.
Verify WRM Stock against QA
Message details and complete the
WRM pending action by entering
O/H quantities of affected materiel
in the Notify Quantity field even
when the quantity is zero. The
pending action is removed from the
inbox when all actions are complete.
AM QA Complaint
Alert. Complaint
Exists For Items.
This action indicates
a complaint has been
issued by a customer.
You must deal with such
complaints individually on a case-
by-case basis.
QA Review Only.
No Action Required
This pending action
is produced for all
This list does not require action.
The pending action serves as a

556 AFMAN41-216 13 FEBRUARY 2013
Message Description Action(s)
(WRM). QA Detail equipment
records pending
closure.
reminder/quick link to the QA Details record.
New SOS Update The system created a
new SOS Code for Back-Up.
The system will build all necessary
contract data with an SOS code that
must be changed. Users can update
the SOS code to a valid non-used SOS code.
AM Transportation
Pending.
In the outshipment
Results screen the
status of Request is
displayed to indicate
that the EDI 940R
has been sent to
CMOS.
Review the Ship History screen.
AM Inshipment
Notification
Shipping notification
was received into the
system during the
EOD process.
After confirming inship status and
processing the receipt of this item
select the Ship History icon on the
vertical toolbar. This displays both
the receipt acknowledgment and
complete status of the inshipment
and sends the EDI 861 back to the issuing MTF.
AM Tracking Number
Needed
This pending action
is produced for all
outshipment items
lacking a tracking number.
Open the pending actions list by
clicking the Jump-To button. The
DTM/outshipment Results screen
appears. Enter the TCN/Tracking Number.
AM Inshipment Past
RDD
This pending action
is produced for all
AM inshipments past
their required
delivery date (RDD).
Highlight the item and determine if
the shipment is overdue or has receipt been processed.
Unable To Send
Transportation Request
This pending action
is generated to
Take appropriate action. In some
cases, users may need to go to

AFMAN41-216 13 FEBRUARY 2013 557
Message Description Action(s)
To CMOS inform the user that
the electronic file
EDI 856 or EDI 861
did not transmit
properly between
DMLSS servers.
(856S) is the
Advance Shipping
Notice and 861
Receipt Acknowledgement.
DCM and resubmit the file.
Unable To Send
Transportation File
This pending action
is generated to
inform the user that
the electronic file
EDI 856 or EDI 861
did not transmit
properly between
DMLSS servers.
(856S) is the
Advance Shipping
Notice and 861
Receipt Acknowledgement.
Take appropriate action. In some
cases, users may need to go to
DCM and resubmit the file.

558 AFMAN41-216 13 FEBRUARY 2013
Attachment 8
EQUIPMENT MANAGEMENT (EM) PENDING ACTIONS
A8.1. When EM is first opened, a message or a list of messages may appear in the In-Box
describing actions that advisory, were not completed, or need to be completed. These are called
Pending Action Messages. The following chart lists each message, describes the meaning of the message, and suggest the action or actions to best remedy the problem.
A8.2. The Inbox is in tree view format. That is, if there are multiple pending actions of the same
type, the message appears only once, and you can click the + sign next to it, to see the individual
messages underneath. When you select an individual item under a pending action, the item details appear in the Details section, in the lower portion of the window.
A8.3. The EM Inbox has sections for two different types of pending actions: Advisory Notices
and Action Required. Note: An Advisory Notice pending action message can be deleted, but
before deleting it, you should do some research. When you select a pending action message, and click the Process button, the system jumps to the related record
Table A8.1. Equipment Management (EM) Pending Actions.
Message Description Action(s)
Accountable Equipment
Code Has Changed To Y
Produced when the
accountable equipment
code for an equipment item
was changed from ―N‖ to ―Y‖.
Search Transaction History
by Item ID to find out which
customers have the item.
Verify the item(s) and label with ECN.
An Equipment Order
Has Been Cancelled
Appears when an
equipment order cancellation has processed.
Decide whether or not to
resubmit the order.
Commodity Class
Change Alert (Supply to
Equipment)
Produced when the
commodity class for the
specified item ID was
changed from ―Supply‖ to ―Equipment‖.
Search Transaction History
by Item ID to find out which
customers have the item.
Verify the item(s) and label with ECN.
Custodian Does Not
Have Equipment
Generated during EOM
process when an assigned
custodian account no longer has equipment assigned.
Remove the custodian from
the customer account and the
pending action will be removed.
Customer Equipment Appears when an Review request for

AFMAN41-216 13 FEBRUARY 2013 559
Message Description Action(s)
Request Submitted Equipment Custodian
submits a new equipment request.
completeness, obtain
additional paperwork from
custodian as necessary (i.e.
quotes, literature, sole source
letters, etc), and add required
personnel/sections to the
―Coordination‖ tab (i.e.
Maintenance, Facilities, etc.)
and route for review and approval/disapproval.
Replacement Item
Received. Turn-In
Replaced Item
Appears when a new piece
of equipment is issued to a
customer as a result of an
Equipment Request
assigned a Request Type of
Normal Replacement or Accelerated Replacement.
Custodian must turn
equipment in to MEMO and
the equipment must be
removed from the
custodian‘s accountable
records.
EM Excess Report
Rejection
Generated during EOD
process and provides notice
that a reported excess item
has been rejected.
Cancel reported excess and
take appropriate actions to
re-report as excess or turn-in
to local DRMO.
EM Excess Troubled
Ship
Generated during EOD
process and produced when
follow-up notification is
received to previously
received ship status.
Process a Ship Notification
in the Excess Follow-up
window in IM. Ship
equipment if not already
done.
Equipment
Acceptance Pending
Appears when a receipt or
gain is processed for an
equipment item.
From the Inbox, enter
Equipment Manufacturer,
Nameplate Model, and
Manufacturer Serial Number
in the associated equipment
record(s). Data can also be
entered while working the IN work order.
Equipment Issue
Reversed
Appears when an issue
reversal is processed for
equipment item.
Validate reversal. of
Equipment item resulted in
being issued to appropriate
customer, reported excess,
turned in to DRMO or

560 AFMAN41-216 13 FEBRUARY 2013
Message Description Action(s)
transferred to MEMO Hold
account. Equipment items
should not be maintained as operating inventory.
Equipment Request
Review Is Overdue
Appears when an
equipment request review
date is exceeded.
From the Inbox, extend the
length of review by
increasing the Days To
Review data field or select a
Date Review Complete on
the Coordination tab of the Equipment Request window.
LOA Expires Within
10 Days
Generated during EOD
process when the Letter of
Authority (LOA) date will
expire within 10 days.
Select a new date from the
drop-down calendar for the
LOA Expiration Date that is
greater than the System date
or selects a date from the
drop-down calendar for the
LOA Return Date in the
LOA section on the Status
tab of the Equipment Request
window.
Custodian Departure
Within Forty-Five Days
Generated during EOD
process when the departure
date in the custodian record is within forty five days.
Conduct inventory and delete
record from inbox. If
custodian departure has
changed, update the
custodian‘s record.
Potential Custodian
Inventory List
Generated
Generated during EOM
process when the inventory
due date in the custodian
record is due within the
next 90 days, there is no
active inventory records for
the customer, and the
customer has active
equipment records.
Conduct the inventory if
needed; otherwise, delete
record from the inbox.
Unable to Locate
Accountable Equipment
Generated during EOD
process and appears when
maintenance personnel
identify an equipment item
Research the last known
location, initiate a financial
liability investigation if
necessary, or take other

AFMAN41-216 13 FEBRUARY 2013 561
Message Description Action(s)
as missing or ―unable to
locate‖.
appropriate measures.
Update LOA Return
Date
Generated during the EOD
process when the LOA return date is exceeded.
Select a date for the LOA
Return Date in the LOA
section on the Status tab of
the Equipment Request
window.
EM Inshipment
Notification
Shipping notification was
received into the system during the EOD process.
After confirming inship
status and processing the
receipt of this item select the
Ship History icon on the
vertical toolbar. This displays
both the receipt
acknowledgment and
complete status of the
inshipment and sends the
EDI 861 back to the issuing
MTF
EM Inshipment Past
RDD
This pending action is
produced for all
inshipments past their
required delivery date
(RDD)
Highlight the item and
determine if the shipment is
overdue or has receipt been processed.
Equipment Acceptance Pending
This is a notification of an
Acceptance Inspection
work order.
This message will be deleted
when the maintenance
technician enters the
equipment manufacturer,
nameplate model, and
manufacturer serial number
in the associated equipment record(s).
Note: The following table lists the EM Action Required pending action messages that
can appear in the Inbox, a brief description and the action required to resolve each
pending action.
Table A8.2. EM Action Required Pending Action messages.

562 AFMAN41-216 13 FEBRUARY 2013
Message Description Action(s)
Blank Acquisition Date
In Capital Equipment
Record
Generated during EOM
process and produced when
a blank acquisition date is
detected for a capital equipment item.
Enter an acquisition date in
the Approval and Acquisition
tab of the Equipment Record
Detail window. The
depreciation value for capital
equipment is reported to
DFAS and the acquisition
date plays a key role in
calculating that value.
EM Excess Destroy
Materiel
Generated during EOD
process and appears when
destruction status is
received for reported excess equipment.
Process a loss, and ship the
excess item(s) to DRMO for destruction.
EM Excess Ship
Materiel
Generated during EOD
process and produced upon
receiving ship status for equipment reported excess.
Process a loss, and ship the
excess item(s) to the MTF
indicated in the disposition
instruction received from the excess distribution system.
EM Excess Turn-In
to DRMO
Generated during EOD
process and produced upon
receiving turn-in status for equipment reported excess.
Process a loss, and ship the
excess item(s) to DRMO.
EM Excess Turn-In
To Installation Supply
Generated during EOD
process and produced upon
receiving turn-in status for equipment reported excess.
Process a loss, and ship the
excess item(s) to Installation Supply.
Equipment Issue
Pending
Appears when an
equipment issue is pending
awaiting completion of required data.
Enter the Equipment
Manufacturer, Nameplate
Model, and Manufacturer
Serial Number in the
associated equipment record(s).
Inventory Due Within
Thirty Days
Produced when the Next
Inventory Date in the
custodian record is within 30 days.
Create an inventory for the
customer account or change
the Next Inventory Date in
the custodian record to more

AFMAN41-216 13 FEBRUARY 2013 563
Message Description Action(s)
than 30 days beyond the current System Date.
Inventory Lists
Generated
Generated during EOM
process this is a notification of existing inventory list(s).
Reconcile the inventory
list(s) generated in the batch cycle.
LOA Has Expired Generated during EOD
process and is a notification
that LOA Expiration Date has been reached.
Select a date from the drop-
down calendar for the LOA
Return Date in the LOA
section on the Status tab of
the Equipment Request
window or select a new date
from the drop-down calendar
for the LOA Expiration Date
that is greater than the System date.
Loan Has Exceeded
Loan Return Date by
30 Days
Generated during EOD
process and produced when
an Equipment Loan has
exceeded the return date by 30 or more days.
Increase the Length of
Loan/Durable Length of
Loan or return the item to the
loaning account using the
Items tab of the Loan
Information window.
Loaned Items
Expiring. Check Loan Reminder List
Generated during EOD
process and produced as a
reminder that the loan
status of an equipment item is about to expire.
Update the associated Patient
Letter Sent Date in the Loan
Reminder List window,
increase the Length of
Loan/Durable Length of
Loan, or return the item(s) to
the loaning account using the
Items tab of the Loan Information window.
EM Tracking
Number Needed
This pending action is
produced for all
outshipment items lacking a tracking number.
Open the pending actions list
by clicking the Jump-To
button. The
DTM/Outshipment Results
screen appears. Enter the TCN/Tracking Number.
EM Transportation DTM Outshipment. Review the Ship History

564 AFMAN41-216 13 FEBRUARY 2013
Message Description Action(s)
Pending screen. In the Outshipment
Results screen the status of
Request is displayed to
indicate that the EDI 940R has been sent to CMOS.

AFMAN41-216 13 FEBRUARY 2013 565
Attachment 9
MAINTENANCE ACTIVITY (MA) PENDING ACTIONS
A9.1. When MA is first opened, a message or a list of messages may appear in the In-Box
describing advisory actions that must be reviewed/completed. These are called Pending Action
Messages. The following chart lists each message, describes the meaning of the message, and suggest the action or actions to best remedy the problem.
A9.2. The Inbox is in tree view format. That is, if there are multiple pending actions of the same
type, the message appears only once, and you can click the + sign next to it, to see the individual
messages underneath. When you select an individual item under a pending action, the item details appear in the Details section, in the lower portion of the window.
A9.3. The MA Inbox has sections for two different types of pending actions: Maintenance
Activity Inbox and Individual Inbox. Note: The Maintenance Activity Inbox displays pending
action messages that contain the MA Organization ID.
Table A9.1. The Maintenance Activity Inbox.
Message Description Action(s)
Acceptance Work Order
Pending
Appears whenever a new
equipment item is added to
the inventory.
BMET completes acceptance
inspection work order and
updates required data in equipment record.
Commodity Class
Change Alert (Supply to
Equipment)
Appears whenever the
commodity class of an item
is changed from ―supply ―to ―equipment‖.
Maintenance personnel need to
be aware that this action
produces an acceptance
inspection work order. Process
acceptance inspection work
order as required.
Equipment
Assembly/Disassembly Occurred
Appears whenever an
Assembly/ Disassembly transaction has occurred.
Maintenance personnel should
make appropriate corrections to the equipment item ECNs.
Equipment Item Loss Appears whenever an
equipment loss transaction is processed.
No action required.
Informational only; however,
the EDF should be removed
and if this is the last item of a
specific type in the facility the
technician should ensure the
technical literature and
associated parts from

566 AFMAN41-216 13 FEBRUARY 2013
Message Description Action(s)
benchstock are removed.
Equipment Record
Deleted by Gain
Reversal
Appears when a gain
reversal transaction has
occurred.
No action required.
Informational only. Note: This
may leave an open acceptance
work order that needs to be either cancelled or completed.
Equipment Record
Reinstated by Loss
Reversal
Appears when a loss
reversal transaction has
occurred.
This usually occurs after UL or
ROS items are found and
reinstated. It‘s possible this
item may have scheduled
maintenance due if it‘s
inspection cycle lapsed significantly.
Equipment
Transferred to New
Customer
Appears whenever an
equipment item is
transferred from one customer to another.
Ensure equipment location
fields in equipment detail are
updated accordingly to the new
location / room numbers.
Scheduled maintenance due
dates may need to be updated to
align with section maintenance schedule, if applicable.
MA-Equipment Issue
Reversed
Appears whenever
equipment being issued to
the maintenance activity is reversed.
No action required.
Informational only. Note: This
may leave an open acceptance
work order that needs to be
either cancelled or completed.
Maint. QA Alert.
Equipment QTY Required
Appears whenever a QA
Alert has potentially
matched an equipment item
within the MTF.
Enter a quantity in the Quality
Assurance Detail window.
Maintenance
Requirement Changed
Appears whenever the
maintenance requirement
indicator of an item is
changed.
Maintenance personnel should
schedule maintenance for item based on maintenance intervals.
Items adjusted to Maintenance
Required require a local
maintenance plan and each
ECN‘s maintenance record will

AFMAN41-216 13 FEBRUARY 2013 567
Message Description Action(s)
need due dates inserted.
Items adjusted to No
Mainteance Required will
require due dates to be removed.
Monthly Timesheets
are Due
This is produced every
month to inform
maintenance personnel to
complete time sheets.
Maintenance personnel should
provide updates to timesheets before EOM.
QA Alert. Item QTY
Required Cust (Supply)
Appears whenever a QA
Alert has potentially
matched a supply item
within the MTF.
Enter a quantity in the Quality
Assurance Detail window.
QA Delinquency
Notice. Equipment QTY
Appears when a QA
delinquency notice is
generated based on the
established intervals in the QA Class table.
Enter a quantity in the Quality
Assurance Detail window.
QA Delinquency
Notice. Supply item
QTY Cust
Appears when a QA
delinquency notice is
generated based on the
established intervals in the QA Class table.
Enter a quantity in the Quality
Assurance Detail window.
Receipt reversal
processed for ECN
Generated when a receipt
reversal is processed for a given equipment item.
No action required.
Informational only. Note: This
may leave an open acceptance
work order that needs to be
either cancelled or completed.
Repair Part Changed
to Supply Item
Appears whenever a repair
part is changed to a supply commodity class.
Maintenance personnel must
ensure that the change was
indeed appropriate for the item.
Repair parts are items that can
only be ordered by the maintenance activity.
Repair Parts Appears when there is an
on-hand balance > 0 for a
Issue the repair part to the

568 AFMAN41-216 13 FEBRUARY 2013
Message Description Action(s)
Available For Issue requested repair part. designated work order.
Supply Item Changed
to Repair Part
Appears whenever a supply
is changed to a repair part
commodity class.
Maintenance personnel must
ensure that the change was
indeed appropriate for the item.
Repair parts are items that can
only be ordered by the
maintenance activity.
Table A9.2. The MA Pending Action Messages.
Message Description Action(s)
Departure Date
Exceeded
Notification that Departure
Date in the Staff Detail
record, General tab has been exceeded.
Extend the Departure Date past
the current date or select the
Inactive icon in the affected staff record.
ERC Work Order Appears whenever the ERC
designation is identified
within an equipment record.
No action required.
Informational only.
Monthly Timesheets
Are Due
This is produced every
month to inform
maintenance personnel to complete time sheets.
No action required.
Priority Work Order Is generated whenever a
equipment work order
status is designated as an emergency work order.
Complete work order as
required.
Overdue Work Order Generated whenever a
work order has not been
completed during its schedule monthly cycle.
Complete work order a
required.
Note: The following table lists the MA pending action messages that can appear in the
Individual Inbox, along with the action required, if necessary, to resolve each pending

AFMAN41-216 13 FEBRUARY 2013 569
Message Description Action(s)
action.

570 AFMAN41-216 13 FEBRUARY 2013
Attachment 10
DATA CODES AND ELEMENTS
A10.1. Purpose. This chapter provides a practical, ready reference to data codes and elements
used in the DMLSS system that apply to the accounting, reporting, and requisitioning operations
within medical logistics.
A10.2. Scope. These data codes and elements are standardized across the DoD and apply to all AF medical activities within the limitations provided in each section.
A10.3. Contract Type Codes. The contract type code is used to identify the type of contract or
agreement for clarity of its origin since Pharmaceutical and MED/SURG contracting officers are
accepting contracts and agreements other than DAPAs. The three-position codes include:
A10.3.1. ACP – ACPOP DAPA
A10.3.2. CAT – Vendor‘s catalog price.
A10.3.3. D01 - VA Federal Supply Schedule (VA FSS).
A10.3.4. D03 - DAPA.
A10.3.5. DBP – Decentralized Blanket Purchase
A10.3.6. DNC - DoD National Contracts (DoD Natl).
A10.3.7. DPR – Discount Price.
A10.3.8. RIA – Regional Incentive Agreement
A10.3.9. UFC – DoD Uniform Formulary Contract.
A10.3.10. VBO - VA Basic Ordering Agreement (VA BOA).
A10.3.11. VBP - VA BPA.
A10.3.12. VNC - VA National Contracts (VA Natl).
A10.4. Due-In and MILSTRIP Status Codes. Table A10.1. contains a list of Due-In and MILSTRIP status codes. These codes are also visible in the TMU located in SS.
Table A10.1. Due-In and MILSTRIP Status Codes, Descriptions and Handling.
DI
Status
Code
Description DMLSS Handling
AA Item Rejected. Quantity
exceeds Usage Level.
The status is posted to Status Edits Part III, the
due-in status and due-in quantity is updated, and
a DQI or DQC transaction is generated.

AFMAN41-216 13 FEBRUARY 2013 571
DI
Status
Code
Description DMLSS Handling
AB ECAT Local Control Number
and Call Number Updated.
The due-in status is updated, along with the
procurement instrument identification number,
call number, and estimated shipment date.
AC Item Accepted and Shipped. The due-in status is updated.
AF Second or Subsequent Follow-
Up.
This status is applied when the user creates a
second or subsequent follow-up.
AK Follow up to cancellation
request.
This status is applied when the user creates a
follow-up to cancellation request.
AM Requisition modifier. This status is applied when the user creates a
request to modify any of the following: Advice
code; Priority; Required delivery date;
Supplementary address; Fund code; Project
code; Distribution code; Signal code
AR Item Rejected. Quantity
exceeds manufacturer‘s
allocation.
The status is posted to Status Edits Part III, the
due-in status and due-in quantity is updated, and
a DQI or DQC transaction is generated.
AT Follow-Up. This status is applied when the user creates a
follow-up.
BA Item being processed for
release and shipment.
The due-in status is updated, along with the
estimated release date.
BB Item is back ordered against a
due-in to stock.
The due-in status is updated, along with the
estimated release date.
BC Item is back ordered, and a
long delay is anticipated. A
possible substitute may be
furnished with this status; if
desired, submit a cancellation
for the original requisition
and submit a new requisition
for the offered substitute.
The due-in status is updated, along with the
estimated release date.

572 AFMAN41-216 13 FEBRUARY 2013
DI
Status
Code
Description DMLSS Handling
BD Requisition is delayed to
verify requirements. Upon
completion of review,
additional status will be
provided to indicate action
taken.
The due-in status is updated.
BE Depot/Storage Activity has
record of MRO but no
supporting transaction/ record
of action taken.
The status is posted to Status Edits Part II. Upon
user approval, the due-in record is updated.
BF No record of original
requisition.
This status is associated with a
request for cancellation or
follow-up.
The status is posted to Status Edits Part II. Upon
user approval, the due-in status is updated, the
due-in quantity is set to zero (0), and a DQC
transaction is generated.
BG One or more of the following
fields have been changed:
Stock number; Unit of issue;
Part number.
The status is posted to Status Edits Part II. Upon
user approval, the due-in status is updated,
along with the due-in item ID, U/P, and U/P
price.
BH Substitute will be supplied.
Examine unit of issue,
quantity, and unit price fields
for possible changes. Revise
appropriate records
accordingly. Additional status
will be provided.
The status is posted to Status Edits Part II.
When the user approves, the due-in status is
updated, along with the due-in sub item ID,
U/P, U/P price, and U/P quantity. A local
prime/sub relationship is built, and if the ratio
is 1 to 1, an IM acceptable equivalent is built.
If the user rejects the substitute, an AC1
transaction is sent to the source requesting
cancellation of the order.
BJ Quantity changed to conform
to unit pack or because of
allowable direct delivery
contract variance; adjust the
due-in records accordingly.
Unit of issue is not changed.
The status is posted to Status Edits Part III, the
due-in status and due-in quantity is updated, and
a DQI or DQC transaction is generated.

AFMAN41-216 13 FEBRUARY 2013 573
DI
Status
Code
Description DMLSS Handling
BK Requisition data elements have
been modified as requested.
The due-in status is updated, along with the due-
in priority and the estimated shipping date (if
provided by the SOS).
BL NOA was forwarded to the CR
or FF on date entered in record
position 70-73.
The due-in status is updated, and an ESD
transaction is generated.
BM Requisition passed to activity
in record position 67-69.
The status is posted to Status Edits Part II. Upon
user approval, the due-in status is updated.
BN Requisition being processed as
free issue.
The status is posted to Status Edits Part II. Upon
user approval, the due-in status is updated,
along with the due-in signal code and fund code.
The refund code is set to "N". The LOG fund
obligation and commitment values are reduced
by the total line item value of the order.
BP Requisition has been deferred
per customer instructions.
The due-in status is automatically updated.
BQ Canceled. Result of
cancellation request. Also
applies to cancellations
resulting from deletion of an
activity from the DODAAD.
Deobligate funds, if
applicable.
The status is posted to Status Edits Part III. The
due-in status and quantity updated, the due-in
quantity is set to zero (0), and a DQC
transaction is generated. If the order was
funded by a previous FY O&M fund, the status
is posted to Status Edits Part II, and the other
updates are only made if the user approves.
BR Canceled in response to
materiel obligation validation
(MOV) request.
The status is posted to Status Edits Part III. The
due-in status is updated, the due-in quantity is
set to zero (0), and a DQC transaction is
generated. If the order was funded by a
previous FY O&M fund, the status is posted to
Status Edits Part II, and the other updates are
only made if the user approves.
BS Canceled, failure to respond to
MOV request.
The status is posted to Status Edits Part II. Upon
user approval, the due-in status is updated, the
due-in quantity is set to zero (0), and a DQC
transaction is generated.

574 AFMAN41-216 13 FEBRUARY 2013
DI
Status
Code
Description DMLSS Handling
BT Requisition received. Will be
processed for attempted
release and shipment to meet
RDD. Further status will be
provided based on asset
availability at the time of
release processing. (Applies to
Subsistence only.)
The due-in status is automatically updated.
BU Item being supplied against
your FMS Case Designator or
your Grant Aid Prgm and
RCN.
The status is posted to Status Edits Part I.
BV Item procured and on contract
for direct shipment to
consignee. Cancellation, if
requested, may result in billing
for contract termination and/or
transportation costs, if
applicable.
The due-in status is updated, along with the
estimated release date, if applicable.
BW FMS/Grant Aid requisition
containing this document
number has been received by
the ILCO and submitted to the
supply system. A current ESD
(estimated ship date) is not
presently available but will be
provided by subsequent status
transactions.
The due-in status is updated.
BY Depot/storage has previously
denied the MRO by DI A6_.
The status is posted to Status Edits Part II.
BZ Requisition is being processed
for direct delivery
procurement. Additional
status will be provided to
indicate action taken.
The due-in status is updated.

AFMAN41-216 13 FEBRUARY 2013 575
DI
Status
Code
Description DMLSS Handling
B1 Assets not currently available.
Requisition will be retained by
DRMS for 60 days from date
of receipt awaiting possible
arrival of assets. (DRMS use
only.)
The status is posted to Status Edits Part I.
B2 Requested modification
denied; precluded by status of
supply or procurement action.
The status is posted to Status Edits Part III, and
the due-in status is updated.
B3 Required delivery date (RDD)
in the original requisition is
unrealistic.
The due-in status is updated.
B4 Cancellation request approved.
Do not deobligate funds.
Billing for materiel or contract
termination charges will be
made.
The status is posted to Status Edits Part III. The
due-in status is updated, the due-in quantity is
set to zero (0), and a DQC transaction is
generated. If the order was funded by a
previous FY O&M fund, the status is posted to
Status Edits Part II, and the other updates are
only made if the user approves.
B5 Action to determine current
status and/or improve ESD is
being attempted. Further status
will be furnished.
The status is posted to Status Edits Part III and
the due-in status is updated.
B6 Materiel applicable to the
requisition requested for
cancellation has been diverted
to alternate consignee.
The status is posted to Status Edits Part III. The
due-in status is updated, the due-in quantity is
set to zero (0), and a DQC transaction is
generated. If the order was funded by a
previous FY O&M fund, the status is posted to
Status Edits Part II, and the other updates are
only made if the user approves.
B7 Unit price change. The status is posted to Status Edits Part III. The
due-in status is updated, along with the U/P
price.
B8 Quantity requested for
cancellation not accomplished.
The due-in status is updated.

576 AFMAN41-216 13 FEBRUARY 2013
DI
Status
Code
Description DMLSS Handling
B9 Attempting to cancel per your
request. Do not deobligate
funds or delete due-in. Advice
of final action will be
furnished in subsequent status
transactions.
The due-in status is updated.
CA Rejected. The status is posted to Status Edits Part III. The
due-in status is updated, the due-in quantity is
reduced by the quantity canceled, and a DQC
transaction is generated. If the order was
funded by a previous FY O&M fund, the status
is posted to Status Edits Part II, and the other
updates are only made if the user approves.
CB Rejected. Quantity not
available by RDD.
The status is posted to Status Edits Part III. The
due-in status is updated, the due-in quantity is
set to zero (0), and a DQC transaction is
generated. If the order was funded by a
previous FY O&M fund, the status is posted to
Status Edits Part II, and the other updates are
only made if the user approves.
CC Rejected. Non-consumable
item. Your Service is not a
registered user. Submit your
requisition to your service ICP
for registration action.
The status is posted to Status Edits Part III. The
due-in status is updated, the due-in quantity is
set to zero (0), and a DQC transaction is
generated. If the order was funded by a
previous FY O&M fund, the status is posted to
Status Edits Part II, and the other updates are
only made if the user approves.
CD Rejected because of errors in
the quantity, date, or serial
number field.
The status is posted to Status Edits Part III. The
due-in status is updated, the due-in quantity is
set to zero (0), and a DQC transaction is
generated. If the order was funded by a
previous FY O&M fund, the status is posted to
Status Edits Part II, and the other updates are
only made if the user approves.

AFMAN41-216 13 FEBRUARY 2013 577
DI
Status
Code
Description DMLSS Handling
CE Rejected. Unit of issue (UI)
cannot be converted.
The status is posted to Status Edits Part III. The
due-in status is updated, the due-in quantity is
set to zero (0), and a DQC transaction is
generated. If the order was funded by a
previous FY O&M fund, the status is posted to
Status Edits Part II, and the other updates are
only made if the user approves.
CG Rejected. Unable to identify
requested item.
The status is posted to Status Edits Part III. The
due-in status is updated, the due-in quantity is
set to zero (0), and a DQC transaction is
generated. If the order was funded by a
previous FY O&M fund, the status is posted to
Status Edits Part II, and the other updates are
only made if the user approves.
CH Rejected. Requisition
submitted to incorrect IM
module. Research for the
correct source, and submit a
new requisition.
The status is posted to Status Edits Part III. The
due-in status is updated, the due-in quantity is
set to zero (0), and a DQC transaction is
generated. If the order was funded by a
previous FY O&M fund, the status is posted to
Status Edits Part II, and the other updates are
only made if the user approves.
CJ Rejected, item coded obsolete
or inactivated. A possible
substitute may be furnished
with this status; if desired,
submit a cancellation for the
original requisition and submit
a new requisition for the
offered substitute.
The status is posted to Status Edits Part III. The
due-in status is updated, the due-in quantity is
set to zero (0), and a DQC transaction is
generated. If the order was funded by a
previous FY O&M fund, the status is posted to
Status Edits Part II, and the other updates are
only made if the user approves.
CK Rejected. Unable to procure. The status is posted to Status Edits Part III. The
due-in status is updated, the due-in quantity is
set to zero (0), and a DQC transaction is
generated. If the order was funded by a
previous FY O&M fund, the status is posted to
Status Edits Part II, and the other updates are
only made if the user approves.

578 AFMAN41-216 13 FEBRUARY 2013
DI
Status
Code
Description DMLSS Handling
CL Rejected. Contractors
requisition or related
transaction is to be processed
initially by an MCA.
The status is posted to Status Edits Part III. The
due-in status is updated, the due-in quantity is
set to zero (0), and a DQC transaction is
generated. If the order was funded by a
previous FY O&M fund, the status is posted to
Status Edits Part II, and the other updates are
only made if the user approves.
CM Rejected. Item is not or is no
longer free issue. Submit a
new funded requisition with
signal code other than D or M.
The status is posted to Status Edits Part III. The
due-in status is updated, the due-in quantity is
set to zero (0), and a DQC transaction is
generated. If the order was funded by a
previous FY O&M fund, the status is posted to
Status Edits Part II, and the other updates are
only made if the user approves.
CN Non-consumable item. Your
service does not receive
requisition support on this
item, or your requirement is a
non-recurring demand that
cannot be satisfied. Support
will be provided upon
submission of an MIPR by
your service ICP.
The status is posted to Status Edits Part III. The
due-in status is updated, the due-in quantity is
set to zero (0), and a DQC transaction is
generated. If the order was funded by a
previous FY O&M fund, the status is posted to
Status Edits Part II, and the other updates are
only made if the user approves.
CP Rejected. SOS is local
manufacture, fabrication, or
local procurement.
The status is posted to Status Edits Part III. The
due-in status is updated, the due-in quantity is
set to zero (0), and a DQC transaction is
generated. If the order was funded by a
previous FY O&M fund, the status is posted to
Status Edits Part II, and the other updates are
only made if the user approves.
CQ Rejected. Item requested is
service controlled.
The status is posted to Status Edits Part III. The
due-in status is updated, the due-in quantity is
set to zero (0), and a DQC transaction is
generated. If the order was funded by a
previous FY O&M fund, the status is posted to
Status Edits Part II, and the other updates are
only made if the user approves.

AFMAN41-216 13 FEBRUARY 2013 579
DI
Status
Code
Description DMLSS Handling
CR Rejected. Invalid DI for a
GFM transaction.
The status is posted to Status Edits Part I.
CS Rejected. Quantity
requisitioned is excessive.
Partial quantity being supplied.
The status is posted to Status Edits Part III. The
due-in status is updated, the due-in quantity is
reduced, and a DQC transaction is generated. If
the order was funded by a previous FY O&M
fund, the status is posted to Status Edits Part II,
and the other updates are only made if the user
approves.
CT Rejected. Review records and
resubmit with a new document
number.
The status is posted to Status Edits Part I.
CU Rejected. Unable to procure
item requested. A possible
substitute may be furnished
with this status; if desired,
submit a new requisition for
the offered substitute.
The status is posted to Status Edits Part III. The
due-in status is updated, the due-in quantity is
set to zero (0), and a DQC transaction is
generated. If the order was funded by a
previous FY O&M fund, the status is posted to
Status Edits Part II, and the other updates are
only made if the user approves.
CV Rejected. Item prematurely
requisitioned.
The status is posted to Status Edits Part III. The
due-in status is updated, the due-in quantity is
set to zero (0), and a DQC transaction is
generated. If the order was funded by a
previous FY O&M fund, the status is posted to
Status Edits Part II, and the other updates are
only made if the user approves.
CW Rejected. Item is not available,
local procurement authorized.
The status is posted to Status Edits Part III. The
due-in status is updated, the due-in quantity is
set to zero (0), and a DQC transaction is
generated. If the order was funded by a
previous FY O&M fund, the status is posted to
Status Edits Part II, and the other updates are
only made if the user approves.

580 AFMAN41-216 13 FEBRUARY 2013
DI
Status
Code
Description DMLSS Handling
CX Rejected. Unable to identify
ship-to address, or signal code
is invalid.
The status is posted to Status Edits Part III. The
due-in status is updated, the due-in quantity is
set to zero (0), and a DQC transaction is
generated. If the order was funded by a
previous FY O&M fund, the status is posted to
Status Edits Part II, and the other updates are
only made if the user approves.
CY Rejected. Unable to procure
item requested. Requisition
substitute item if possible.
The status is posted to Status Edits Part III. The
due-in status is updated, the due-in quantity is
set to zero (0), and a DQC transaction is
generated. If the order was funded by a
previous FY O&M fund, the status is posted to
Status Edits Part II, and the other updates are
only made if the user approves.
CZ Rejected. Subsistence item not
available for resale. Reserved
for troop issue only.
The status is posted to Status Edits Part III. The
due-in status is updated, the due-in quantity is
set to zero (0), and a DQC transaction is
generated. If the order was funded by a
previous FY O&M fund, the status is posted to
Status Edits Part II, and the other updates are
only made if the user approves.
C1 Rejected. For subsistence only.
Requested item is not available
nationally.
The status is posted to Status Edits Part I.
C2 Rejected. ILP funds are not
available to process
requisition.
The status is posted to Status Edits Part I.
C3 Rejected. Applies to
subsistence only. Vendor
cannot make delivery during
shipping period.
The status is posted to Status Edits Part I.
C4 Rejected. Applies to
subsistence. Item is seasonal
and not available for delivery
during current shipping period.
The status is posted to Status Edits Part I.
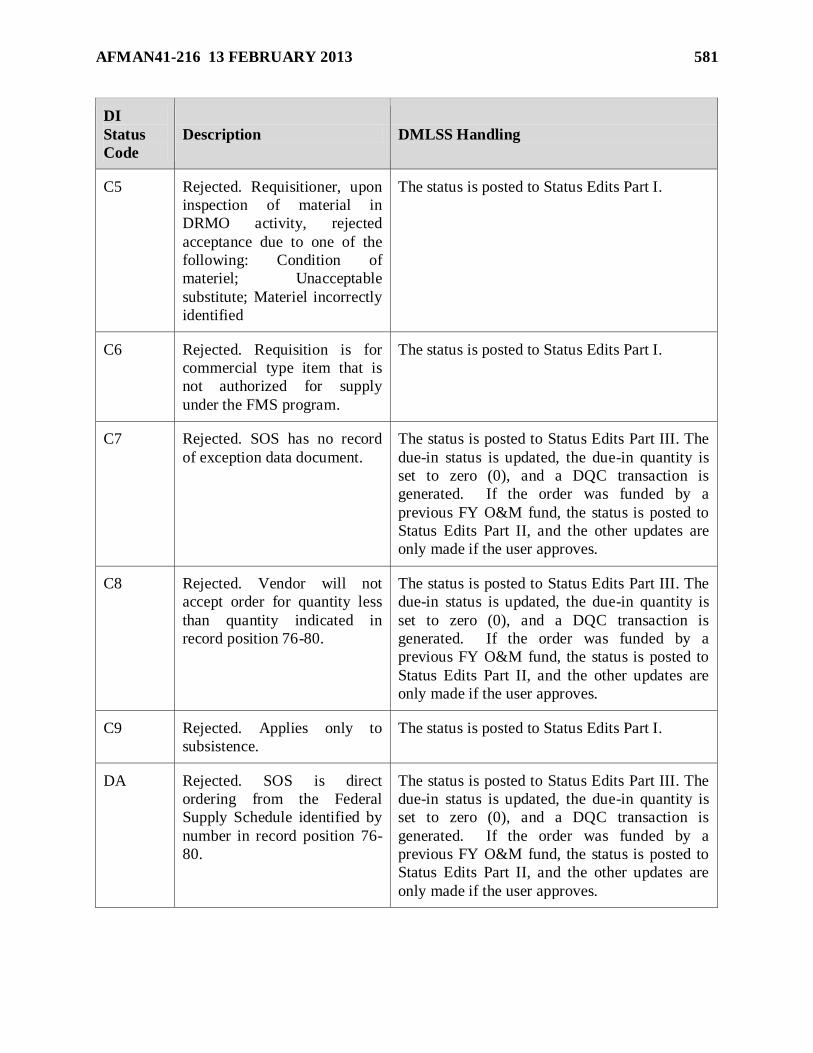
AFMAN41-216 13 FEBRUARY 2013 581
DI
Status
Code
Description DMLSS Handling
C5 Rejected. Requisitioner, upon
inspection of material in
DRMO activity, rejected
acceptance due to one of the
following: Condition of
materiel; Unacceptable
substitute; Materiel incorrectly
identified
The status is posted to Status Edits Part I.
C6 Rejected. Requisition is for
commercial type item that is
not authorized for supply
under the FMS program.
The status is posted to Status Edits Part I.
C7 Rejected. SOS has no record
of exception data document.
The status is posted to Status Edits Part III. The
due-in status is updated, the due-in quantity is
set to zero (0), and a DQC transaction is
generated. If the order was funded by a
previous FY O&M fund, the status is posted to
Status Edits Part II, and the other updates are
only made if the user approves.
C8 Rejected. Vendor will not
accept order for quantity less
than quantity indicated in
record position 76-80.
The status is posted to Status Edits Part III. The
due-in status is updated, the due-in quantity is
set to zero (0), and a DQC transaction is
generated. If the order was funded by a
previous FY O&M fund, the status is posted to
Status Edits Part II, and the other updates are
only made if the user approves.
C9 Rejected. Applies only to
subsistence.
The status is posted to Status Edits Part I.
DA Rejected. SOS is direct
ordering from the Federal
Supply Schedule identified by
number in record position 76-
80.
The status is posted to Status Edits Part III. The
due-in status is updated, the due-in quantity is
set to zero (0), and a DQC transaction is
generated. If the order was funded by a
previous FY O&M fund, the status is posted to
Status Edits Part II, and the other updates are
only made if the user approves.

582 AFMAN41-216 13 FEBRUARY 2013
DI
Status
Code
Description DMLSS Handling
DB Rejected. No valid contract
registered at MCA.
The status is posted to Status Edits Part I.
DC Processing of your CLSSA
termination/ drawdown
requisition has resulted in a
quantity being absorbed by the
ICP/IMM. Credit action for
this quantity is in progress.
The status is posted to Status Edits Part I.
DD Processing of your CLSSA
termination/ drawdown
requisition has resulted in a
quantity not being absorbed by
the ICP/IMM. This quantity
will not be delivered. Billing
action for this quantity is in
process.
The status is posted to Status Edits Part I.
DE Canceled. Although shipment
status was sent, no shipment
was made.
The status is posted to Status Edits Part I.
DF Terminate intransit control
processing. Property cannot be
located. Further research is
being conducted.
The status is posted to Status Edits Part I.
DG Shipment confirmed. DRMS
action required to resolve
apparent discrepancy.
The status is posted to Status Edits Part I.
DH Terminate intransit control
processing. Further research
on the quantity discrepancy is
being conducted.
The status is posted to Status Edits Part I.

AFMAN41-216 13 FEBRUARY 2013 583
DI
Status
Code
Description DMLSS Handling
DJ Rejected. GFM quantity
requisitioned exceeds the
contract-authorized quantity.
The quantity that exceeds the
authorized quantity will not be
supplied.
The status is posted to Status Edits Part I.
DK Rejected. Your agency
procurement request (APR)
transaction requesting
reinstatement was received
over 60 days after BS status
was sent.
The status is posted to Status Edits Part III. The
due-in status is updated, the due-in quantity is
set to zero (0), and a DQC transaction is
generated. If the order was funded by a
previous FY O&M fund, the status is posted to
Status Edits Part II, and the other updates are
only made if the user approves.
DL Rejected. Your APR
transaction requesting
reinstatement has been
received. No record of
AE1/BS.
The status is posted to Status Edits Part III. The
due-in status is updated, the due-in quantity is
set to zero (0), and a DQC transaction is
generated. If the order was funded by a
previous FY O&M fund, the status is posted to
Status Edits Part II, and the other updates are
only made if the user approves.
DM Rejected. Your APR
transaction requesting
reinstatement has been
received. Quantity in APR
greater than quantity in
AE1/BS.
The status is posted to Status Edits Part III. The
due-in status is updated, the due-in quantity is
set to zero (0), and a DQC transaction is
generated. If the order was funded by a
previous FY O&M fund, the status is posted to
Status Edits Part II, and the other updates are
only made if the user approves.
DN Rejected. A valid contract is
recorded at the MCA;
however, the requisitioned
item is not authorized GFM
under the contract.
The status is posted to Status Edits Part I.
DP Rejected. Unable to identify
the ship-to and/or mail-to
MAPAC to a valid address in
the MAPAD.
The status is posted to Status Edits Part I.

584 AFMAN41-216 13 FEBRUARY 2013
DI
Status
Code
Description DMLSS Handling
DQ Rejected. GFM quantity
requisitioned totally exceeds
the contract-authorized
quantity. The total quantity is
rejected.
The status is posted to Status Edits Part I.
DR Rejected. The MCA, for the
contract indicated, failed to
respond or provide a valid
response to an ICP GFM
validation request.
The status is posted to Status Edits Part I.
DS Requisition received for which
your Service is not a registered
user. Issue action is being
processed.
The status is posted to Status Edits Part III and
the due-in status is updated.
DY Rejected. Materiel shipped by
non-traceable means or
supplied by DVD from a
contractor without an assigned
DODAAC or there is no
record of the transaction for
which the follow up was
submitted.
The status is posted to Status Edits Part III. The
due-in status is updated, the due-in quantity is
set to zero (0), and a DQC transaction is
generated. If the order was funded by a
previous FY O&M fund, the status is posted to
Status Edits Part II, and the other updates are
only made if the user approves.
D1 Canceled. Requisition was
retained for 60 days.
Requested asset did not
become available.
The status is posted to Status Edits Part I.
D2 Rejected. Item requested is
Brand Name Resale and is in
short supply.
The status is posted to Status Edits Part III. The
due-in status is updated, the due-in quantity is
set to zero (0), and a DQC transaction is
generated. If the order was funded by a
previous FY O&M fund, the status is posted to
Status Edits Part II, and the other updates are
only made if the user approves.

AFMAN41-216 13 FEBRUARY 2013 585
DI
Status
Code
Description DMLSS Handling
D3 Rejected. Activity did not
respond to SOS request for
additional information.
The status is posted to Status Edits Part III. The
due-in status is updated, the due-in quantity is
set to zero (0), and a DQC transaction is
generated. If the order was funded by a
previous FY O&M fund, the status is posted to
Status Edits Part II, and the other updates are
only made if the user approves.
D4 Canceled. Applies only to
subsistence items. Your
requisition quantity does not
meet the contractors minimum
order quantity.
The status is posted to Status Edits Part I.
D5 Rejected. Item authorized for
issue only to nuclear reactor
plant activities or support
facilities.
The status is posted to Status Edits Part III. The
due-in status is updated, the due-in quantity is
set to zero (0), and a DQC transaction is
generated. If the order was funded by a
previous FY O&M fund, the status is posted to
Status Edits Part II, and the other updates are
only made if the user approves.
D6 Rejected. Manually prepared
requisition contains
unauthorized exception data.
The status is posted to Status Edits Part III. The
due-in status is updated, the due-in quantity is
set to zero (0), and a DQC transaction is
generated. If the order was funded by a
previous FY O&M fund, the status is posted to
Status Edits Part II, and the other updates are
only made if the user approves.
D7 Requisition modifier rejected
because of errors in one or
more data elements.
The status is posted to Status Edits Part III and
the due-in status is updated.
D8 Rejected. Requisition is for
controlled substance, and
requisitioner and/or ship-to
address is not an authorized
recipient.
The status is posted to Status Edits Part III. The
due-in status is updated, the due-in quantity is
set to zero (0), and a DQC transaction is
generated. If the order was funded by a
previous FY O&M fund, the status is posted to
Status Edits Part II, and the other updates are
only made if the user approves.

586 AFMAN41-216 13 FEBRUARY 2013
DI
Status
Code
Description DMLSS Handling
ED Item canceled via PV JIT but
is available via PV extended
delivery.
The status is posted to Status Edits Part III.
EX Item is available for shipment
or request for cancellation
received but not processed.
The due-in status is updated.
FC Request for improved status. This status is applied when the user creates a
request for improved estimated shipment date.
IA Item accepted. The due-in status is updated.
IB Item backordered. The due-in status is updated.
ID Item deleted. The status is posted to Status Edits Part I.
IP Item accepted, price changed. The status is posted to Status Edits Part III.
IQ Item accepted, quantity
changed.
The status is posted to Status Edits Part III.
IR Item rejected. The status is posted to Status Edits Part III. The
due-in status is updated, the due-in quantity is
set to zero (0), and a DQC transaction is
generated.
IS Item accepted, substitution
made.
The status is posted to Status Edits Part II.
MC Material obligation validation
confirmed.
The due-in status is updated.
MP Material obligation validation
reinstatement request (APR)
sent.
The due-in status is updated.
MR Material obligation validation
no longer required.
The due-in status is updated.
QD Quantity decreased. Backorder
item cancellation.
The status is posted to Status Edits Part III, the
due-in status and due-in quantity is updated, and
a DQI or DQC transaction is generated.

AFMAN41-216 13 FEBRUARY 2013 587
DI
Status
Code
Description DMLSS Handling
RA Receipt acknowledgement. The due-in status is updated and:
If the DR_ transaction was from an external
customer, and there is NO matching due-in, an
"External Customers Error/Review
Processing" pending action message is posted
to the IM In Box.
If the DR_ transaction was from an external
customer, and there IS a matching due-in, an
RRD transaction is generated from the IM due-
in, a BRS transaction is generated for the IM
due-out, and an RRD transaction is generated
for the external customer‘s due-in.
If the DR_ transaction was from a DLA source,
and there IS a matching due-in, a "Passed-
Active Ship Status" pending action message is
posted to the IM In Box.
RB Receipt acknowledgement
response.
The due-in status is updated and:
If the DR_ transaction was from an external
customer, and there is NO matching due-in, an
"External Customers Error/Review
Processing" pending action message is posted
to the IM In Box.
If the DR_ transaction was from an external
customer, and there IS a matching due-in, an
RRD transaction is generated from the IM due-
in, a BRS transaction is generated for the IM
due-out, and an RRD transaction is generated
for the external customer‘s due-in.
If the DR_ transaction was from a DLA source,
and there IS a matching due-in, a "Passed-
Active Ship Status" pending action message is
posted to the IM In Box.
RC Request cancellation. The due-in status is updated.

588 AFMAN41-216 13 FEBRUARY 2013
DI
Status
Code
Description DMLSS Handling
RF Follow-up request for receipt
acknowledgement.
The due-in status is updated and:
If the DR_ transaction was from an external
customer, and there is NO matching due-in, an
"External Customers Error/Review
Processing" pending action message is posted
to the IM In Box.
If the DR_ transaction was from an external
customer, and there IS a matching due-in, an
RRD transaction is generated from the IM due-
in, a BRS transaction is generated for the IM
due-out, and an RRD transaction is generated
for the external customers due-in.
If the DR_ transaction was from a DLA source,
and there IS a matching due-in, a "Passed-
Active Ship Status" pending action message is
posted to the IM In Box.
R1 Item rejected, not a contract
item.
The status is posted to Status Edits Part III. The
due-in status is updated, the due-in quantity is
set to zero (0), and a DQC transaction is
generated.
R2 Item rejected invalid item
product number.
The status is posted to Status Edits Part III. The
due-in status is updated, the due-in quantity is
set to zero (0), and a DQC transaction is
generated.
R3 Item rejected, invalid unit of
issue.
The status is posted to Status Edits Part III. The
due-in status is updated, the due-in quantity is
set to zero (0), and a DQC transaction is
generated.
R4 Item rejected, item is on
manufacturer or national
backorder.
The status is posted to Status Edits Part III. The
due-in status is updated, the due-in quantity is
set to zero (0), and a DQC transaction is
generated.
R5 Item rejected, reorder item as a
Just In Time (JIT) order.
The status is posted to Status Edits Part III. The
due-in status is updated, the due-in quantity is
set to zero (0), and a DQC transaction is
generated.

AFMAN41-216 13 FEBRUARY 2013 589
DI
Status
Code
Description DMLSS Handling
R6 Item rejected, item is not on
the customer‘s usage list.
The status is posted to Status Edits Part III. The
due-in status is updated, the due-in quantity is
set to zero (0), and a DQC transaction is
generated.
R7 Item rejected, reorder item as a
drop shipment order.
The status is posted to Status Edits Part III. The
due-in status is updated, the due-in quantity is
set to zero (0), and a DQC transaction is
generated.
R8 Item rejected, reorder item as a
surge order.
The status is posted to Status Edits Part III. The
due-in status is updated, the due-in quantity is
set to zero (0), and a DQC transaction is
generated.
SS Shipment status. When an AS1/AU1 shipment status is received,
the following information is updated in the due-
in detail record: Unit of issue; Quantity shipped;
Shipment hold code; Suffix code; Date shipped;
TCN/GBL; Mode of shipment; Status code;
Status date.
TD Troubled due-in. The due-in status is updated.
U1 User entered ship date via due-
in detail window.
The due-in status is updated.
U2 User entered estimated release
date via due-in detail window.
The due-in status is updated.
U3 Receipt or cancellation
reversal processed.
The due-in status is updated.
ZA Cancellation of a WASHPOST
item for any reason.
The due-in status is updated.
ZE Insufficient data received. The due-in status is updated.
ZF Cancelled prior to purchase
per request of customer.
The due-in status is updated.
ZG Item permanently not available
from local purchase sources.
The due-in status is updated.

590 AFMAN41-216 13 FEBRUARY 2013
DI
Status
Code
Description DMLSS Handling
ZH Item temporarily not available. The due-in status is updated.
ZJ Contract terminated by mutual
agreement between vendor and
government per customer
request.
The due-in status is updated.
ZK Contract unilaterally
terminated.
The due-in status is updated.
ZM Vendor refuses to accept the
terms/conditions of the order.
The due-in status is updated.
ZN Vendor shipping item free of
charge.
The due-in status is updated.
ZR Requirements exceed the max
limitation of the GSA
schedule.
The due-in status is updated.
ZY Commodity assigned item
cancellation.
The due-in status is updated.
A10.5. MMACs. MMACs are assigned to certain transactions in Transaction History. You
might see the following MMACs associated with a transaction.
A10.5.1. BH – assigned to RRD and RND transactions if the overage is consequential and the discrepancy is attributable to the shipper.
A10.5.2. BJ – assigned to RRD and DQC transactions if the shortage is consequential and the discrepancy is attributable to the carrier.
A10.5.3. BK – assigned to RRD and SDL transactions if the shortage is inconsequential.
A10.5.4. BL – assigned to RRD and SDG transactions if the overage is inconsequential.
A10.5.5. LD – assigned to RRD and SDG transactions if the over shipment criteria is
reached or exceeded for a source of supply (SOS) of type.
A10.5.6. CON – Contracting.
A10.5.7. NON – Non contract.
A10.5.8. BPA – Blanket Purchase Agreement.
A10.5.9. DBP – Decentralized Blanket Purchase Agreement.

AFMAN41-216 13 FEBRUARY 2013 591
A10.6. Transaction Codes and Corresponding Reasons. Table A10.2. contains a consolidated table of IM and EM transaction codes and reasons.
Table A10.2. Transaction Codes, Descriptions and Transaction Reasons.
Trans
Code Description Corresponding Transaction Reason(s)
ACC Acquisition Cost Change Acquisition Cost Change
ACG Item Changed to Accountable Item Changed to Accountable
ACL Item Changed to Not
Accountable
Item Changed to Not Accountable
Item Changed to No-Maintenance Required
ADP Adjust Funds N/A
AS1 Shipment Status N/A
BRI Backorder Release Issue N/A
BRS Backorder Release Issue (Sales) N/A
CCZ Commodity Class Change N/A
CHZ Consumption History N/A
CNA Contract Number Add N/A
CTE Custodian Equipment Transfer Custodian Equipment Transfer
CRL Commercial Returns Loss N/A
DAE Decrease Equipment
Authorization
Decrease Equipment Authorization
DDL Destruction N/A
DQC Due-in Increase Due to
Cancellation
N/A
DQI Due-in Quantity Increase N/A
DRT DFAS Disbursement N/A
EAD Equipment
Assembly/Disassembly
Assembly Gain, Equipment
Assembly Loss, Equipment
Disassembly Gain, Equipment
Disassembly Loss, Equipment
ECC Establish Customer
Organization
N/A
EDP Equipment Depreciation N/A
EGI Equipment Issue Gain Assemblage Issue
Equipment Issue Gain

592 AFMAN41-216 13 FEBRUARY 2013
Trans
Code Description Corresponding Transaction Reason(s)
EIZ Equipment Item Identification
Change
Equipment Identification Data Changed
Equipment Nomenclature Change
Manufacturer Changed
Nameplate Model Changed
Serial Number Changed
EOC Equipment Ownership Change Equipment Ownership Change
ESD Establish Due-in N/A
ESP Establish Funds N/A
FTZ IMM Materiel Receipt Status N/A
IAE Increase Equipment
Authorization
Increased Equipment Authorization
IAG Inventory Adjustment Gain N/A
IAL Inventory Adjustment Loss IAL – Inventory Adjustment Loss
MIL – Natural Disaster Inventory Loss
IGE Equipment Inventory Gain Accountability Changed to Required
Borrowed Equipment, Government
Borrowed Equipment, Non-government
Capital Leased Equipment
Component Gain
Cost Per Test
Customer Assemblage Gain
Donated Property
Equipment Inventory Adjustment Gain
Found on Installation
Gain From Another MTF
Gain From DRMO
Gain From Non-DOD Organization
Maintenance Equipment Gain – No Accountability
Operating Leased Equipment
Research/Grant Equipment
User Test

AFMAN41-216 13 FEBRUARY 2013 593
Trans
Code Description Corresponding Transaction Reason(s)
ILE Equipment Inventory Loss Component Loss
Customer Assemblage Loss
Equipment Inventory Adjustment Loss
Financial Liability Investigation
Item Changed to Not Accountable
Loss to Deployment
Loss to Natural Disaster
Maintenance Equipment Loss – No Accountability
Returned Borrowed Equipment, Government
Returned Borrowed Equipment, Non-Government
Returned Leased Equipment
Returned Research/Grant Equipment
Returned User Test
Shipped to Another MTF
Statement of Charges/Cash Collection Voucher
Trade-In Equipment
Transferred to Non-DOD Organization
Turn-In to DRMO
Turn-In to Installation Supply
Turn-In to Medical Supply
INR Issue Non-Routine N/A
IOC Due-out Cancellation N/A
IOI Due-out Increase N/A
IOU Due-out (Backorder) N/A
ISS Issue Sale N/A
ISU Issue Used N/A
ITG Inventory Transfer Gain N/A
ITL Inventory Transfer Loss N/A
LCG Location Change Gain N/A
LCL Location Change Loss N/A
MRP Manual Replenishment N/A
MSG Miscellaneous Gain EIG - End/Kit Item Gain
IIG - Individual/Component Gain
MDG - Capitalization Of SF Asset
MSL Miscellaneous Loss EIL – End/Kit Item Loss
IIL – Individual/Component Loss
MDL – Decapitalization of SF Asset
MTZ Equipment Catalog Change EXZ - Accountable Code Changed
MRZ – Maintenance Req Ind Changed

594 AFMAN41-216 13 FEBRUARY 2013
Trans
Code Description Corresponding Transaction Reason(s)
OLE Outgoing Loan Equipment External Organization Loaned Equipment
Internal Organization Loaned Equipment
Patient Loaned Equipment
Renewed External Loaned Equipment
Renewed Internal Loaned Equipment
Renewed Patient Loaned Equipment
PCA Purchase Card Adjustment N/A
PCR Purchase Card Receipt N/A
PCT Purchase Card Transfers N/A
PCZ Price Change N/A
PDI Due-in Price Change N/A
PDO Due-out Price Change N/A
RCC Revise Customer ID N/A
RGZ Restratification Gain N/A
RIX Customer Changed to External N/A
RLE Return Loan Equipment External Organization Returned Equipment
Internal Organization Returned Equipment
Patient Returned Equipment
RLZ Restratification Loss N/A
RND Receipt Not Due-in N/A
RNR Receipt Non-Routine N/A
RPG Repair Part Gain N/A
RPI Repair Part Issue N/A
RPL Repair Part Loss N/A
RRD Receipt N/A
RXI Customer Changed to Internal N/A
SDG Shipment Discrepancy Gain N/A
SDL Shipment Discrepancy Loss N/A
SHG Shipment Gain DPG - Donated Item Gain
FZG - Receipt From DRMO
SFG - Inshipment Gain
SHL Shipment Loss RXL - Return Excess to DLA Defense Logistics Agency
SFL – Outshipment Loss
TZL – Outshipment to DRMO
SLR Stock Level Revision N/A
SNZ Equipment ID Change Equipment Item ID Change in MTF Catalog
Equipment Item ID Changed in Equipment
SPZ Item ID Change N/A

AFMAN41-216 13 FEBRUARY 2013 595
Trans
Code Description Corresponding Transaction Reason(s)
TIG Turn-in Adjustment Gain FBG - Found on Installation
TIG - Turn-in Gain
TIL Turn-in Adjustment Loss RTL - Return to Source of Supply
RVL - Return Item For Credit
TRL - Return Item For Trade In
UIZ Unit of Issue Change N/A
VRN Vendor Reference Number N/A
A10.7. Quality Control – Cross Reference. Table A10.3. contains a consolidated table of IM
and EM transaction codes that appear on the Source Document Control Register or MEMO
Document Register. Each is cross-referenced to its corresponding quality control document, supporting documentation, transaction type, and document number block.
Table A10.3. Quality Control – Cross Reference Chart.
QUALITY CONTROL - CROSS REFERENCE CHART
IM - SOURCE DOCUMENT CONTROL REGISTER
RECIEPTS & CANCELLATIONS
Tran
s
Code
Description Reaso
n Code
Corresponding
Transaction
Reason(s)
Supporting
Document
Transaction Type/
Document Number
Block
DQC Due-in
Cancellation
N/A N/A Local Form Receipts 0001-
2999
RND Receipt Not
Due-in
N/A N/A DD Form 1155/
DD Form 250/
DD Form 1348-1
Receipts 0001-
2999
RRD Receipt N/A N/A DD Form 1155/
DD Form 250/
DD Form 1348-1
Receipts 0001-
2999
ORDERS
ESD Establish Due-
in
N/A N/A Receipts 0001-
2999
GAINS & LOSSES
CRL Commercial Returns Loss
CRL N/A DMLSS CRL Document
Gain/Losses 8000-8499
DDL Destruction DDL N/A DMLSS
Destruction
Document
Gain/Losses 8000-8499
IAG Inventory
Adjustment
Gain
IAG N/A Inventory
Adjustment
Document
Gain/Losses 8000-8499
IAL Inventory
Adjustment
Loss
IAL Inventory
Adjustment Loss
Inventory
Adjustment
Document
Gain/Losses 8000-8499

596 AFMAN41-216 13 FEBRUARY 2013
MIL Natural Disaster
Inventory Loss
Inventory
Adjustment
Document
Gain/Losses 8000-8499
MSG Miscellaneous
Gain
EIG End/Kit Item
Gain
Gain/Loss Report Gain/Losses 8000-8499
IIG Individual/
Component Gain
Gain/Loss Report Gain/Losses 8000-8499
MDG Capitalization Of SF Asset
Gain/Loss Report Gain/Losses 8000-8499
MSL Miscellaneous
Loss
EIL End/Kit Item
Loss
Gain/Loss Report Gain/Losses 8000-8499
IIL Individual/
Component Loss
Gain/Loss Report Gain/Losses 8000-8499
MDL Decapitalization of SF Asset
Gain/Loss Report Gain/Losses 8000-8499
SDG Shipment
Discrepancy
Gain
SDG N/A DD Form 1348-1 Gain/Losses 8000-8499
SDL Shipment
Discrepancy
Loss
SDL N/A DD Form 1348-1 Gain/Losses 8000-
8499
SHG Shipment
Gain
DPG Donated Item
Gain
DD Form 1348-1 Gain/Losses 8000-8499
FZG Receipt From
DRMO SFG -
Inshipment Gain
DD Form 1348-1 Gain/Losses 8000-8499
SHL Shipment
Loss
RXL Return Excess
to DLA
Defense
Logistics
Agency
DD Form 1348-1 Gain/Losses 8000-
8499
SFL Outshipment
Loss
DD Form 1348-1 Gain/Losses 8000-8499
TZL Outshipment to
DRMO
DD Form 1348-1 Gain/Losses 8000-8499
TIG Turn-in
Adjustment
Gain
FGB Found on
Installation
DD Form 1348-1 Gain/Losses 8000-8499
TIL Turn-in
Adjustment
Loss
RTL Return to Source
of Supply
DD Form 1348-1 Gain/Losses 8000-8499
RVL Return Item For
Credit
DD Form 1348-1 Gain/Losses 8000-8499
TRL Return Item For
Trade In
DD Form 1348-1 Gain/Losses 8000-
8499
FUNDS
ADP Adjust Funds N/A N/A Local Form FUNDS F001-
F999
RCC Revise
Customer ID
N/A N/A Local Form FUNDS F001-
F999
ESP Establish
Funds
N/A N/A Local Form FUNDS F001-
F999

AFMAN41-216 13 FEBRUARY 2013 597
ECC Establish
Customer
Organization
N/A N/A Local Form FUNDS F001-
F999
EM - MEMO DOCUMENT REGISTER
ACG Item Changed
to
Accountable
ACG Item Changed to
Accountable
Local Form Equipment
Gain/Losses
9500-
9574
ACL Item Changed
to Not
Accountable
ACL Item Changed to
Not
Accountable,
No-Maintenance
Required
AF Form 601 Equipment
Gain/Losses
9500-
9574
Item Changed
to Not Accountable
MTL Item Changed to
Not Accountable
AF Form 601 Equipment
Gain/Losses
9500-
9574
CTE Custodian
Equipment
Transfer
CTE Custodian
Equipment
Transfer
AF Form 601,
Custodian Action
List (CAL)
Equipment
Transfers 9200-9499
EAD Equipment Assembly
ASG Assembly Gain, Equipment
AF Form 601, CAL
Equipment Gain/Losses
9500-9574
Equipment
Assembly
ASL Assembly Loss,
Equipment
AF Form 601,
CAL
Equipment
Gain/Losses
9500-
9574
Equipment
Disassembly
DSG Disassembly
Gain, Equipment
AF Form 601,
CAL
Equipment
Gain/Losses
9500-
9574
Equipment
Disassembly
DSL Disassembly
Loss, Equipment
AF Form 601,
CAL
Equipment
Gain/Losses
9500-
9574
EGI Equipment
Issue Gain
AIG Assemblage
Issue
DD Form 1155,
AF Form 250,
DD Form 1149, DD Form 1348-1A
Receipts 0001-
2999
EGI Equipment Issue
Gain
DD Form 1155,
AF Form 250,
DD Form 1149,
DD Form 1348-1A
Receipts 0001-
2999
EIZ Equipment
Item
Identification
Change
EIE Equipment
Identification
Data Changed
Local Form Equipment
Changes 9100-9199
ENZ Equipment
Nomenclature
Change
Local Form Equipment
Changes 9100-9199
SNE Manufacturer
Changed
Nameplate
Model Changed
Serial Number
Changed
Local Form Equipment
Changes 9100-
9199
EOC Equipment
Ownership
Change
EOC Equipment
Ownership
Change
Local Form
IGE Equipment
Inventory
Gain
ARG Accountability
Changed to
Required
CAL Equipment
Gain/Losses
9500-
9574

598 AFMAN41-216 13 FEBRUARY 2013
BEN Borrowed
Equipment,
Government
Borrowed
Equipment, Non-
government
Capital Leased
Equipment
CAL Equipment
Gain/Losses
9500-
9574
COG Component Gain CAL Equipment
Gain/Losses
9500-
9574
CPT Cost Per Test CAL Equipment
Gain/Losses
9500-
9574
AGE Customer
Assemblage
Gain
CAL/
AF Form 601
Equipment
Gain/Losses
9500-
9574
DEG Donated
Property
CAL Equipment
Gain/Losses
9500-
9574
IGE Equipment
Inventory
Adjustment Gain
Inventory
Adjustment
Document/ CAL
Equipment
Gain/Losses
9500-
9574
FIG Gain From
Another MTF
DD Form 1348-1A,
CAL
Equipment
Gain/Losses
9500-
9574
FIG Gain From
DRMO
AF Form 601,
DD Form 1348-1A,
CAL
Equipment
Gain/Losses
9500-
9574
FIG Found on
Installation
CAL Equipment
Gain/Losses
9500-
9574
GND Gain From Non-
DOD
Organization
CAL Equipment
Gain/Losses
9500-
9574
MRG Maintenance
Equipment Gain
– No
Accountability
CAL Equipment
Gain/Losses
9500-
9574
LEG Operating
Leased
Equipment
Research/Grant
Equipment User
Test
CAL Equipment
Gain/Losses
9500-
9574
ILE Equipment
Inventory
Loss
COL Component Loss CAL Equipment
Gain/Losses
9500-
9574
ALE Customer
Assemblage Loss
CAL Equipment
Gain/Losses
9500-
9574
ILE Equipment
Inventory
Adjustment Loss
Inventory
Adjustment
Document/ CAL
Equipment
Gain/Losses
9500-
9574
FLL Financial
Liability
Investigation
Item Changed to
Not Accountable
Loss to
Deployment
CAL Equipment
Gain/Losses
9500-
9574

AFMAN41-216 13 FEBRUARY 2013 599
NDL Loss to Natural
Disaster
DD Form 1348-1A,
CAL
Equipment
Gain/Losses
9500-
9574
NML Maintenance
Equipment Loss
– No
Accountability
Returned
Borrowed
Equipment,
Government
Returned
Borrowed
Equipment, Non-
Government
Returned Leased
Equipment
CAL Equipment
Gain/Losses
9500-
9574
RRL Returned
Research/Grant
Equipment
CAL Equipment
Gain/Losses
9500-
9574
RUL Returned User
Test
CAL Equipment
Gain/Losses
9500-
9574
SML Shipped to
Another MTF
DD Form 1348-1A,
CAL
Equipment
Gain/Losses
9500-
9574
CVL Statement of
Charges/Cash Collection
Voucher
CAL Equipment
Gain/Losses
9500-
9574
TEL Trade-In
Equipment
CAL Equipment
Gain/Losses
9500-
9574
TNL Transferred to
Non-DOD
Organization
CAL Equipment
Gain/Losses
9500-
9574
TDL Turn-In to
DRMO
DD Form 1348-1A,
CAL
Equipment
Gain/Losses
9500-
9574
TBL Turn-In to Installation
Supply
CAL Equipment Gain/Losses
9500-9574
TML Turn-In to
Medical Supply
CAL/AF Form 601 Equipment
Gain/Losses
9500-
9574
OLE Outgoing
Loan
Equipment
ECL External
Organization
Loaned
Equipment
Loan Action List/
Loan Receipt
Location
Equipment
Loans
9575-
9599
ICL Internal
Organization
Loaned
Equipment
Loan Action List/
Loan Reciept
Location
Equipment
Loans
9575-
9599
PLL Patient Loaned
Equipment
Loan Action List/
Loan Reciept
Location
Equipment
Loans
9575-
9599
NXL Renewed External Loaned
Equipment
Renewed
Internal Loaned
Loan Action List/ Loan Reciept
Location
Equipment Loans
9575-9599

600 AFMAN41-216 13 FEBRUARY 2013
Equipment
Renewed Patient
Loaned
Equipment
RLE Return Loan
Equipment
ECG External
Organization
Returned
Equipment
Loan Action List Equipment
Loans
9575-
9599
ICG Internal
Organization
Returned
Equipment
Loan Action List Equipment
Loans
9575-
9599
PRG Patient Returned
Equipment
Loan Action List Equipment
Loans
9575-
9599
SNZ Equipment ID
Change
IDZ Equipment Item
ID Change in
MTF Catalog
Item ID Change
Report
SNZ Equipment Item
ID Changed in
Equipment
Item ID Change
Report