c320 device manual en
TRANSCRIPT

8/3/2019 C320 Device Manual En
http://slidepdf.com/reader/full/c320-device-manual-en 1/54
User’s Manual

8/3/2019 C320 Device Manual En
http://slidepdf.com/reader/full/c320-device-manual-en 2/54
R01(EU)
Trademarks
All brand and product names are trademarks or registered trademarks of their
respective companies.
Disclaimer Specifications and manuals are subject to change without notice. Mio Technology
assumes no liability for damage incurred directly or indirectly from errors,
omissions, or discrepancies between the device and the manuals.

8/3/2019 C320 Device Manual En
http://slidepdf.com/reader/full/c320-device-manual-en 3/54
i
Table of Contents
Precautions and Notices ........................................................................v 1 Getting Started..................................................................................1
1.1 Understanding Hardware Components................................................ 1 Front Components ............................................................................... 1 Back Components................................................................................ 2 Left-Side Components ......................................................................... 2 Top Components.................................................................................. 3 Bottom Components ............................................................................ 3
1.2 Performing the Initial Start Up.............................................................. 4 1.3 Charging the Battery via the USB Cable.............................................. 6 1.4 Using Your Device in a Vehicle............................................................ 7
Using the Device Cradle or TMC Cradle (Purchased Separately)....... 7 Connecting the Car Charger ................................................................ 8
1.5 Operating Basics.................................................................................. 9 Turning On and Off .............................................................................. 9 Navigating on the Screen..................................................................... 9 Home Screen ..................................................................................... 10 Using the Soft Keyboard .................................................................... 11
1.6 Inserting a SD/MMC Card.................................................................. 12
2 Audio................................................................................................13 2.1 Starting and Exiting Audio.................................................................. 13 2.2 Preparing the Audio Files for Your Device......................................... 14 2.3 Playing Audio Files............................................................................. 14 2.4 Playback Controls .............................................................................. 15

8/3/2019 C320 Device Manual En
http://slidepdf.com/reader/full/c320-device-manual-en 4/54
ii
2.5 Displaying Lyrics ................................................................................ 17 Preparing the Lyrics Files for your Device ......................................... 17 Playing Songs with Lyrics .................................................................. 17
2.6 Using the Play Lists............................................................................ 18 Creating a Play List ............................................................................ 18 Opening a Play List ............................................................................ 19
2.7 Equalizer ............................................................................................ 20 2.8 Settings .............................................................................................. 21
3 Settings............................................................................................23 3.1 Starting and Exiting Settings .............................................................. 23 3.2 Backlight............................................................................................. 24 3.3 Volume ............................................................................................... 25 3.4 Screen................................................................................................ 26 3.5 Power ................................................................................................. 27 3.6 Date/Time........................................................................................... 28 3.7 Language ........................................................................................... 30 3.8 Restore............................................................................................... 31
4 MioTransfer .....................................................................................33 4.1 Installing MioTransfer......................................................................... 33 4.2 Starting and Exiting MioTransfer........................................................ 34 4.3 Copying Multimedia Files to Your Device .......................................... 35
Managing Files................................................................................... 37 5 Troubleshooting and Maintenance ...............................................39
5.1 Restart, Reset, and Shut Down.......................................................... 39 Restarting Your Device ...................................................................... 39 Shutting Down Your Device ............................................................... 39
5.2 Troubleshooting ................................................................................. 40 Power Problems................................................................................. 40 Screen Problems................................................................................ 40 Connection Problems......................................................................... 41 GPS Problems.................................................................................... 41
5.3 Maintaining Your Device .................................................................... 42 6 Regulatory Information ..................................................................43
6.1 Regulations Statements..................................................................... 43 European Notice ................................................................................ 43

8/3/2019 C320 Device Manual En
http://slidepdf.com/reader/full/c320-device-manual-en 5/54
iii
6.2 Safety Precautions............................................................................. 44 About Charging .................................................................................. 44 About the Charger.............................................................................. 44 About the Battery ............................................................................... 44

8/3/2019 C320 Device Manual En
http://slidepdf.com/reader/full/c320-device-manual-en 6/54

8/3/2019 C320 Device Manual En
http://slidepdf.com/reader/full/c320-device-manual-en 7/54

8/3/2019 C320 Device Manual En
http://slidepdf.com/reader/full/c320-device-manual-en 8/54
A car holder is needed when using the device in a car. Be sure that you place
the device in an appropriate place, so as not to obstruct the driver’s view, or
deployment of airbags.
Do not mount where the driver’sfield of vision is blocked. Do not place unsecuredon the dashboard.
Do not mount in front of airbag panels.
Do not mount in front of anairbag field of deployment.
vi
8/3/2019 C320 Device Manual En
http://slidepdf.com/reader/full/c320-device-manual-en 9/54
1 Getting Started
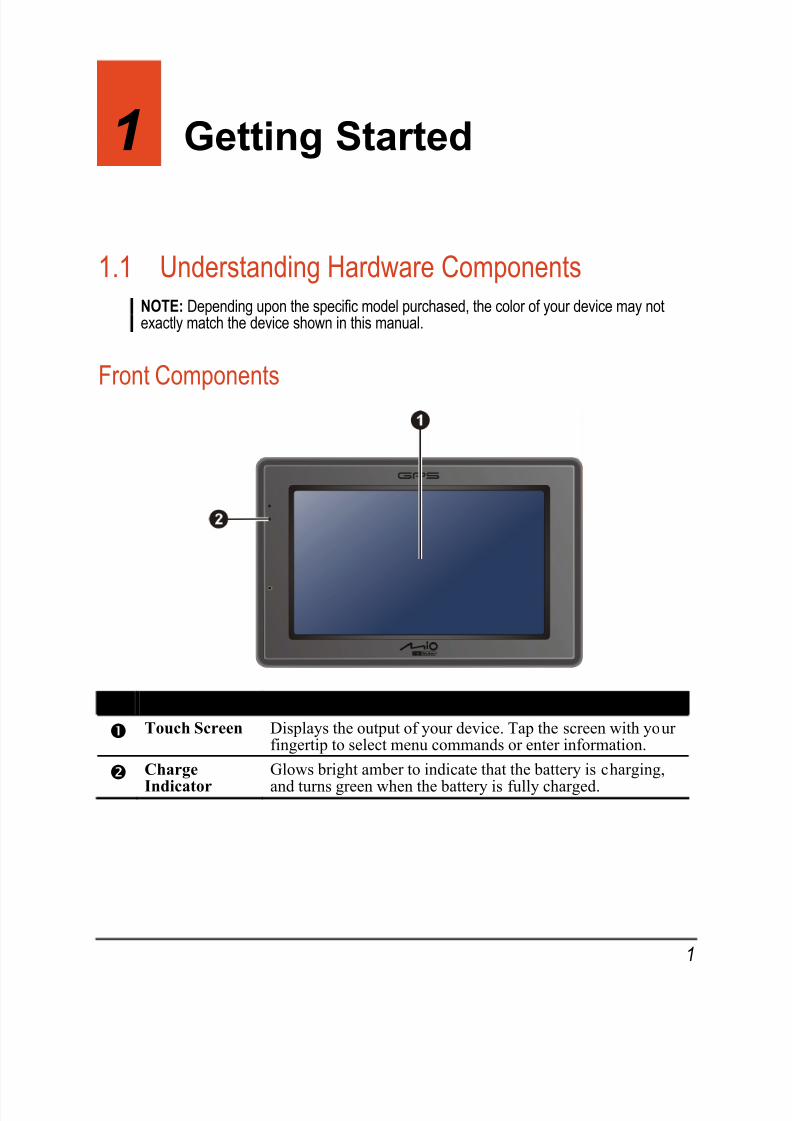
1.1 Understanding Hardware ComponentsNOTE: Depending upon the specific model purchased, the color of your device may notexactly match the device shown in this manual.
Front Components
Ref Component Description
Displays the output of your device. Tap the screen with yo Touch Screen ur fingertip to select menu commands or enter information.
Indicator
harging,and turns green when the battery is fully charged.
Charge Glows bright amber to indicate that the battery is c
1

8/3/2019 C320 Device Manual En
http://slidepdf.com/reader/full/c320-device-manual-en 10/54
Back Components
Ref Component Description
External GPSAntennaConnector
This connector (under rubber dust cover) allows use of anoptional external GPS antenna with magnetic mount, which may
be positioned on top of the car for better signal reception in areaswith poor reception.
Speaker Sends out music, sounds and voice.
Left-Side Components
2

8/3/2019 C320 Device Manual En
http://slidepdf.com/reader/full/c320-device-manual-en 11/54
Ref Component Description
SD/MMC Slot Accepts a SD (Secure Digital) or MMC (MultiMediaCard)card for accessing data such as MP3 music.
HeadphoneConnector
Connects to stereo headphones.
Top Components
Ref Component Description
Power Button Turns on and off the device. (Pressing briefly or for a longduration makes a difference. See Sections 1.6 and 5.1 for information.)
Bottom Components
Ref Component Description
Mini-USB Connector Connects to the charger or USB cable.
Cradle Connector Connects to the cradle. (The cradle supplied with your device depends on the model you purchased.)
3

8/3/2019 C320 Device Manual En
http://slidepdf.com/reader/full/c320-device-manual-en 12/54
1.2 Performing the Initial Start Up
1. For the initial start up, press the power button for 5 seconds to turn on your
device.
NOTE: For normal operation, briefly press the power button to turn on and off your device.
2. Your device turns on. Immediately charge your device as described in the
next section.
3. The “Switch Language” screen appears. Tap the arrow button to select the
desired language. Then, tap the button.
4. The “Date/Time” screen appears. Tap the appropriate arrow button to select
the time zone, date, and time. Then, tap the button.
4

8/3/2019 C320 Device Manual En
http://slidepdf.com/reader/full/c320-device-manual-en 13/54
5. The Home screen appears. You can now use your device.
5

8/3/2019 C320 Device Manual En
http://slidepdf.com/reader/full/c320-device-manual-en 14/54
1.3 Charging the Battery via the USB Cable
1. Turn on the computer.
2. Connect the mini-USB end of the USB cable to the bottom of your device and
the other end to a USB port on your computer.
3. If your device is on, the screen as shown below appears. Whenever your
device is connected to a computer, you will not be able to use it.
4. The charge indicator glows amber when charging is in progress. Do not
disconnect your device from AC power until the battery is fully charged, the
charge indicator will turn green. This will take a couple of hours.
6

8/3/2019 C320 Device Manual En
http://slidepdf.com/reader/full/c320-device-manual-en 15/54
NOTE: When the device is connected to a computer, it is recognized as an external mass storage
device. Do not delete any files pre-installed in the device. Deleting files of which thefunction is unknown can cause programs or features to malfunction.
If you intend to charge your device in this way, turn off your device so that it takes less timeto charge the battery.
CAUTION: For optimal performance of the lithium battery: Do not charge the battery where the temperature is high (e.g. in direct sunlight). There is no need to fully discharge the battery before charging. You can charge the battery
before it is discharged. When storing the product for a long period of time, be sure to fully charge the battery at
least once every two weeks. Over discharge of the battery can affect the chargingperformance.
1.4 Using Your Device in a VehicleCAUTION: Select an appropriate location for mounting the device in a vehicle. Never place the device
where the driver’s field of vision is blocked. Make sure that the GPS antenna has a clear view of the sky.
If the car’s windshield is tinted with a reflective coating, an external antenna (optional) maybe needed to route the antenna to the top of the vehicle through a window. When closingthe window, be careful not to pinch the antenna cable.
Using the Device Cradle or TMC Cradle (PurchasedSeparately)
Use the cradle and the stand to fix your device in a vehicle. (See a separate
document for the installation instruction.)
7

8/3/2019 C320 Device Manual En
http://slidepdf.com/reader/full/c320-device-manual-en 16/54
With the TMC cradle (purchased separately), you can connect the TMC antenna
to receive radio transmissions that are used to inform drivers of traffic conditions.
TMC information is monitored by the navigation software. Once the information
is received, you can view it on your device and traffic icons will appear in the map
view. Certain roads with reported traffic will be highlighted and you can choose to
avoid those roads and an alternate route will be automatically calculated. (See thenavigation software manual for detailed information.)
Connecting the Car Charger
The car charger supplies power to your device when you are using the device in a
car.
CAUTION: To protect your device against sudden surges in current, connect the car charger
only after the car engine has been started.
1. Connect one end of the car charger to the power connector of the cradle.
2. Connect the other end to the cigarette lighter in the car to power and charge
your device. The indicator on the car charger lights in green to indicate that
power is being supplied to your device.
8

8/3/2019 C320 Device Manual En
http://slidepdf.com/reader/full/c320-device-manual-en 17/54
1.5 Operating Basics
Turning On and Off
For normal operation, turn off the device by briefly pressing the power button.The device enters a suspended state.
When you next briefly press the power button, the system resumes. You will
either be back to where you left off or see the Home screen.
NOTE: The screen you see after resuming depends on the program you were using when you
suspended the device. Some programs will be closed when you suspend the device,meaning you can only see the Home screen after resuming.
Pressing the power button for a longer duration has a different effect. See Section 5.1 for more information.
Navigating on the Screen
To operate your device, touch the screen with your fingertip. You can perform the
following actions:
9

8/3/2019 C320 Device Manual En
http://slidepdf.com/reader/full/c320-device-manual-en 18/54
Tap
Touch the screen once with your fingertip to open items or select onscreen
buttons or options.
Drag
Hold your fingertip on the screen and drag up/down/left/right or across thescreen.
Tap and hold
Tap and hold your fingertip until an action is complete, or a result or menu is
shown.
Home Screen
The first time you initialize your device, the Home screen appears. The Homescreen is your starting place for various tasks. Tap a button to start a program or
open another menu. When you exit a program, you are back to the Home screen.
Button Name DescriptionFor DetailedInformation
MioMap Starts the navigation software. See the MioMap manual
Audio Plays audio files. Chapter 2
Settings Customizes the system settings. Chapter 3
10

8/3/2019 C320 Device Manual En
http://slidepdf.com/reader/full/c320-device-manual-en 19/54
Using the Soft Keyboard
There are occasions when you input text or numbers to your device. On such
occasions, the soft keyboard as shown below will appear on the screen.
Depending on the current operation, either the alphabet keypad or the
number/symbol keypad appears.
Alphabet Keypad
Backspace
Enable umlaut.
Switch to thenumber/symbol keypad.
Spacebar
Switch to lower case or upper case.
Number/symbol Keypad
Switch to the alphabet keypad.
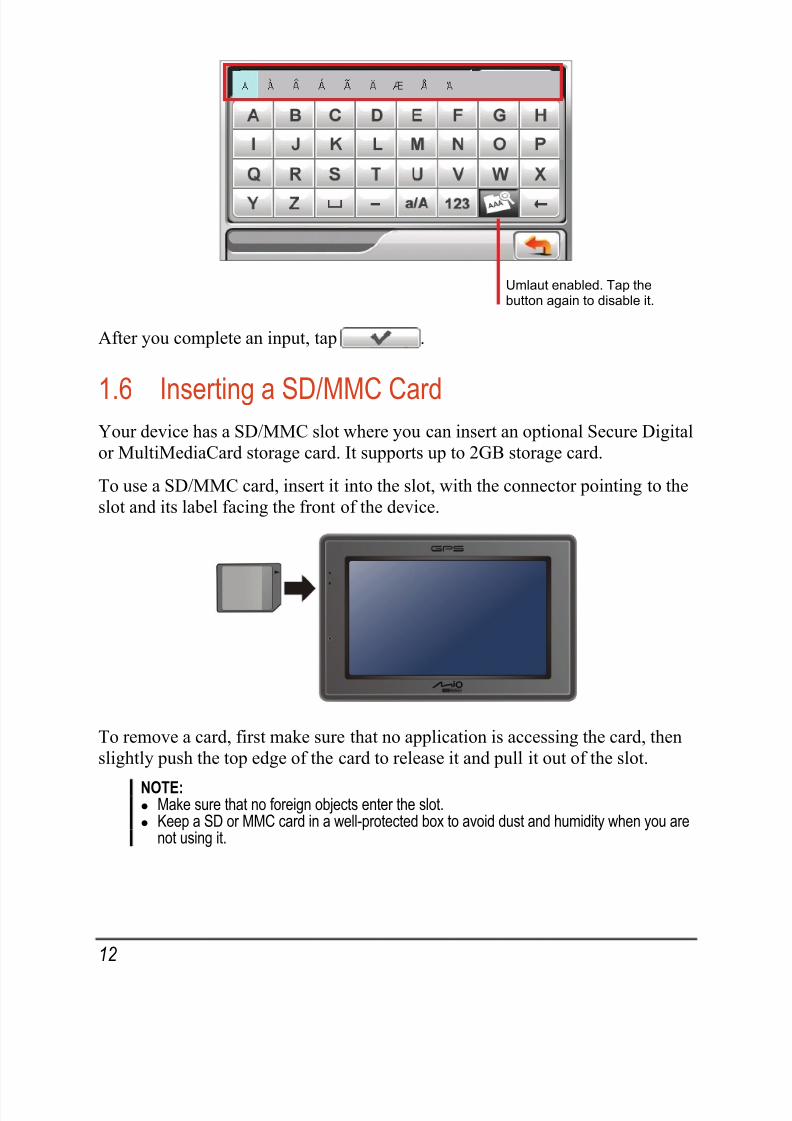
When you tap to enable umlaut, you can tap a vowel letter repeatedly to
input a different form of the letter. Alternatively, you can tap the letter in the pop-up window as shown below.
11
8/3/2019 C320 Device Manual En
http://slidepdf.com/reader/full/c320-device-manual-en 20/54
Umlaut enabled. Tap thebutton again to disable it.
After you complete an input, tap .
1.6 Inserting a SD/MMC Card
Your device has a SD/MMC slot where you can insert an optional Secure Digital
or MultiMediaCard storage card. It supports up to 2GB storage card.
To use a SD/MMC card, insert it into the slot, with the connector pointing to the
slot and its label facing the front of the device.
To remove a card, first make sure that no application is accessing the card, then
slightly push the top edge of the card to release it and pull it out of the slot.
NOTE: Make sure that no foreign objects enter the slot. Keep a SD or MMC card in a well-protected box to avoid dust and humidity when you are
not using it.
12

8/3/2019 C320 Device Manual En
http://slidepdf.com/reader/full/c320-device-manual-en 21/54
2 Audio
2.1 Starting and Exiting Audio
Audio features:
11 preset equalizer audio profiles
Audio
Playback of MP3/WAV/WMA filesBasic playback controls such as play, pause, stop, next and previous
Playback includes single selection playback, repeat, single repeat, sampling
playback, normal sequence and random sequence.
Play list support
Background playback
Tap on the Home screen to start the program.
Lyrics display
13
8/3/2019 C320 Device Manual En
http://slidepdf.com/reader/full/c320-device-manual-en 22/54
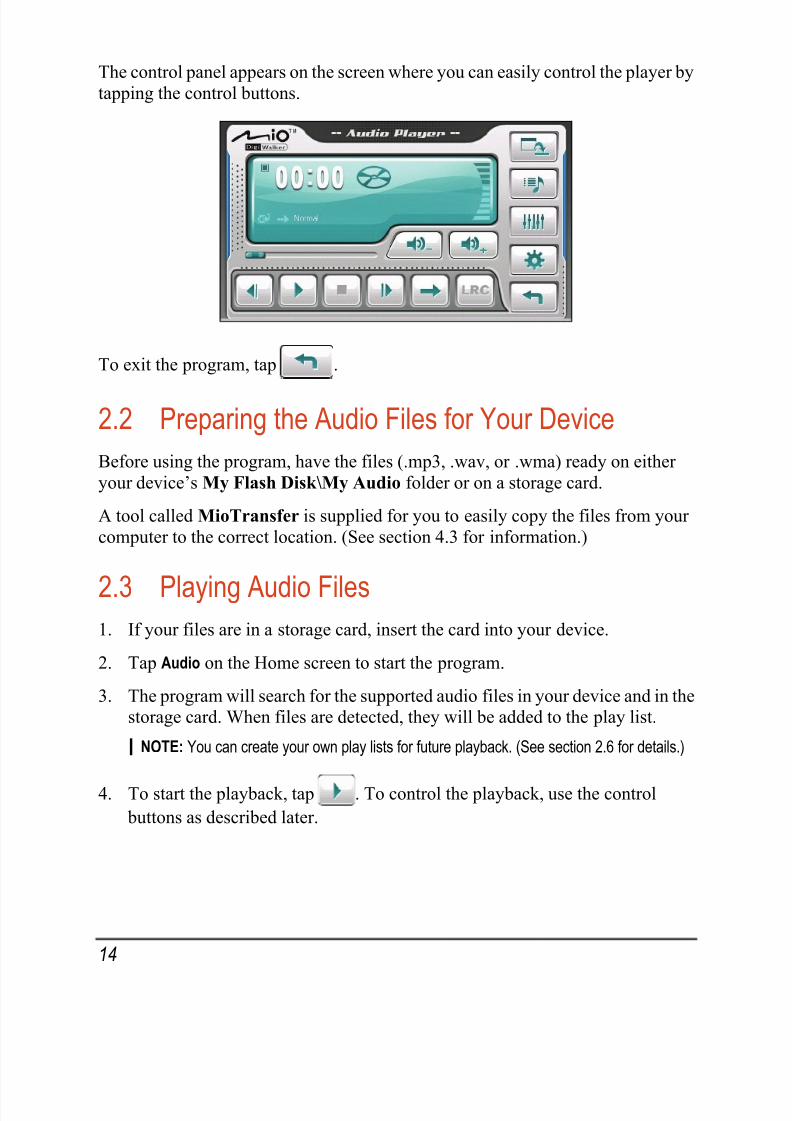
The control panel appears on the screen where you can easily control the player by
tapping the control buttons.
To exit the program, tap .
2.2 Preparing the Audio Files for Your Device
Before using the program, have the files (.mp3, .wav, or .wma) ready on either
your device’s My Flash Disk\My Audio folder or on a storage card.
A tool called MioTransfer is supplied for you to easily copy the files from your computer to the correct location. (See section 4.3 for information.)
2.3 Playing Audio Files
1. If your files are in a storage card, insert the card into your device.
2. Tap Audio on the Home screen to start the program.
3. The program will search for the supported audio files in your device and in thestorage card. When files are detected, they will be added to the play list.
NOTE: You can create your own play lists for future playback. (See section 2.6 for details.)
4. To start the playback, tap . To control the playback, use the control
buttons as described later.
14

8/3/2019 C320 Device Manual En
http://slidepdf.com/reader/full/c320-device-manual-en 23/54
The information area displays the current status including the play/pause/stop
status, the elapsed time, the power status, the playback mode, the volume
level, and the properties of the current song such as the artist (if available with
the file), filename, total length, and stereo/mono information.
NOTE: During the playback, the screen backlight will automatically shut off if you haven’t tapped
the screen within the preset time (30 seconds by default).The backlight will restore whenyou press the power button or when the playback of the current play list has ended.
If the total length of a song exceeds 99 minutes and 59 seconds, the information areacannot correctly display the length because the maximum number allowed is 99:59.However, the playback of the song is not affected.
2.4 Playback Controls
Control Button Name Description
/
Play/Pause Plays or pauses the playback.
Stop Stops the playback.
/Previous/
NextPlays the previous or next file.
/
Volume Increase or decrease the volume.The indicator on the panel shows the currentvolume level.
Track Bar You can tap on a point along the track bar to movedirectly to a different location for the playback.
15

8/3/2019 C320 Device Manual En
http://slidepdf.com/reader/full/c320-device-manual-en 24/54
Control Button Name Description
Playback Mode
Switches to the next mode:
Repeated playback of the current file.
Repeated playback of all files in the current playlist in sequence.
Playback of all files in the current play list inrandom order.
Sampling (10 seconds) playback of all files in thecurrent play list in random order.
Playback of all files in the current play list insequence.
Lyrics Opens the lyrics display. Available only if thecurrent song is with lyrics. (See Section 2.5 for more information.)
Minimize Minimizes the control panel and play the music inthe background.
Play List Opens the play list. (See Section 2.6 for moreinformation.)
Equalizer Opens the equalizer panel.(See Section 2.7 for more information.)
Settings Opens the Settings screen for setting up power saving mode and accessing help. (See Section 2.8for more information.)
Exit Closes the program and returns to the Homescreen.
16

8/3/2019 C320 Device Manual En
http://slidepdf.com/reader/full/c320-device-manual-en 25/54
2.5 Displaying Lyrics
The program allows you to display the real-time lyrics on the screen while playing
songs. This feature is especially handy for you to sing along with the songs.
Preparing the Lyrics Files for your Device
To display the lyrics, you need to have the lyrics files (.lrc) ready on your device’s
\My Flash Disk\My Audio\Lyric\ folder or the \Lyric\ folder on your storage
card.
NOTE: You can search and download these .lrc files from the Internet.
Use MioTransfer to copy the lyrics to the correct location of your device. (Seesection 4.3 for information.) When copying a lyric file to your device, be sure to
use the same filename as the audio file. For example, if a MP3 file is named My
Love.mp3, the lyrics filename must be My Love.lrc.
NOTE: When playing songs with lyrics, the 30s backlight shut off feature will be disabled.
Playing Songs with Lyrics
The button is available when you’re playing a song with lyrics. Tap this
button to view the lyrics.
As the song plays, the lyrics scroll line by line on the screen, with the current line
highlighted by a different color. The background image changes in turn at a
specific time interval.
17

8/3/2019 C320 Device Manual En
http://slidepdf.com/reader/full/c320-device-manual-en 26/54
To close the lyrics screen and go back to the control panel, tap anywhere on the
screen.
2.6 Using the Play Lists
You can create your own play lists for future use.
Creating a Play List
1. Tap on the control panel to open the play list screen. The screen shows
the current play list.
Back
Add song
Remove the selectedsong from the list or from
the storage media.
Save the play list.
Open the list of play lists.
Clear all songs from the currentplay list. (No files are deleted.)
Play the
selected file.
2. To add a song to the play list, tap .
3. A screen appears displaying all the audio files. Tap the song(s) you wish to
add and then tap .
18

8/3/2019 C320 Device Manual En
http://slidepdf.com/reader/full/c320-device-manual-en 27/54
Back
Add all songs to theplay list.
Add the selected song(s)to the play list.
4. To save the play list, tap .
5. The keyboard screen appears where you can change the default name of the
play list. Rename the play list if you want. Tap when finished.
6. To return to the control panel, tap .
Opening a Play List
To open one of the play lists that you have created:
1. Tap on the control panel.
2. Tap to display all the play lists you have created.
19

8/3/2019 C320 Device Manual En
http://slidepdf.com/reader/full/c320-device-manual-en 28/54
3. Tap the play list you want to open and tap .
Back
Rename the
selected play list.Delete the
selected play list.
Open the selected play list.
Delete all play lists.
4. To return to the control panel, tap .
2.7 Equalizer
The program provides 11 preset audio profiles. Tap to open the equalizer
panel.
Tap or to cycle through the available options: Default , Rock, Pop,
Jazz, Classical , Dance, Heavy, Disco, Soft , 3D and Hall .
20

8/3/2019 C320 Device Manual En
http://slidepdf.com/reader/full/c320-device-manual-en 29/54
Tap to save your selection and return to the control panel.
To select the Default profile, tap .
2.8 Settings
Tap on the control panel. The Settings screen appears.
Help
NOTE: To know the function of each button, you can tap . Then tap the button on thelist to display a description line on the right side of the screen.
Tap the check box (√) to turn on the power saving mode. Tap the up/down button
to set the timer to 10 seconds, 30 seconds, 1 minute, or 5 minutes. During the
playback, the screen backlight will automatically shut off if you haven’t tapped
the screen within the preset time (30 seconds by default).The backlight will
restore when you press the power button or when the playback of the current play
list has ended.
Tap to save any changes you have made.
21

8/3/2019 C320 Device Manual En
http://slidepdf.com/reader/full/c320-device-manual-en 30/54

8/3/2019 C320 Device Manual En
http://slidepdf.com/reader/full/c320-device-manual-en 31/54
3 Settings
3.1 Starting and Exiting Settings
You can customize the system settings such as backlight brightness, volume, an
language. Once you change the settings, the new settings will remain until you
change them again.
d
SettingsTap the button on the Home screen. The Settings menu appears as shown
below.
↓
23

8/3/2019 C320 Device Manual En
http://slidepdf.com/reader/full/c320-device-manual-en 32/54
To exit Settings, tap .
The fo owing sectionsll describe the various buttons and their functions.
1. Tap the Settings button on the Home screen.
2. Tap the Backli
3.2 Backlight
ght button.
Move the knob along the trac3. k bar to adjust the brightness of the backlight. To
darken the backlight, m light,
m
ove the knob to the left. To lighten the back
ove the knob to the right.
Tap4. to save the changes.
24

8/3/2019 C320 Device Manual En
http://slidepdf.com/reader/full/c320-device-manual-en 33/54
3.3 Volume
1. Tap the Settings button on the Home screen.
2. Tap the Volume button.
3. Move the knob along the track bar to adjust the volume. To decrease the
volume, move the knob to the left. To increase the volume, move the knob to
the right.
4. Tap save the changes.
25
8/3/2019 C320 Device Manual En
http://slidepdf.com/reader/full/c320-device-manual-en 34/54
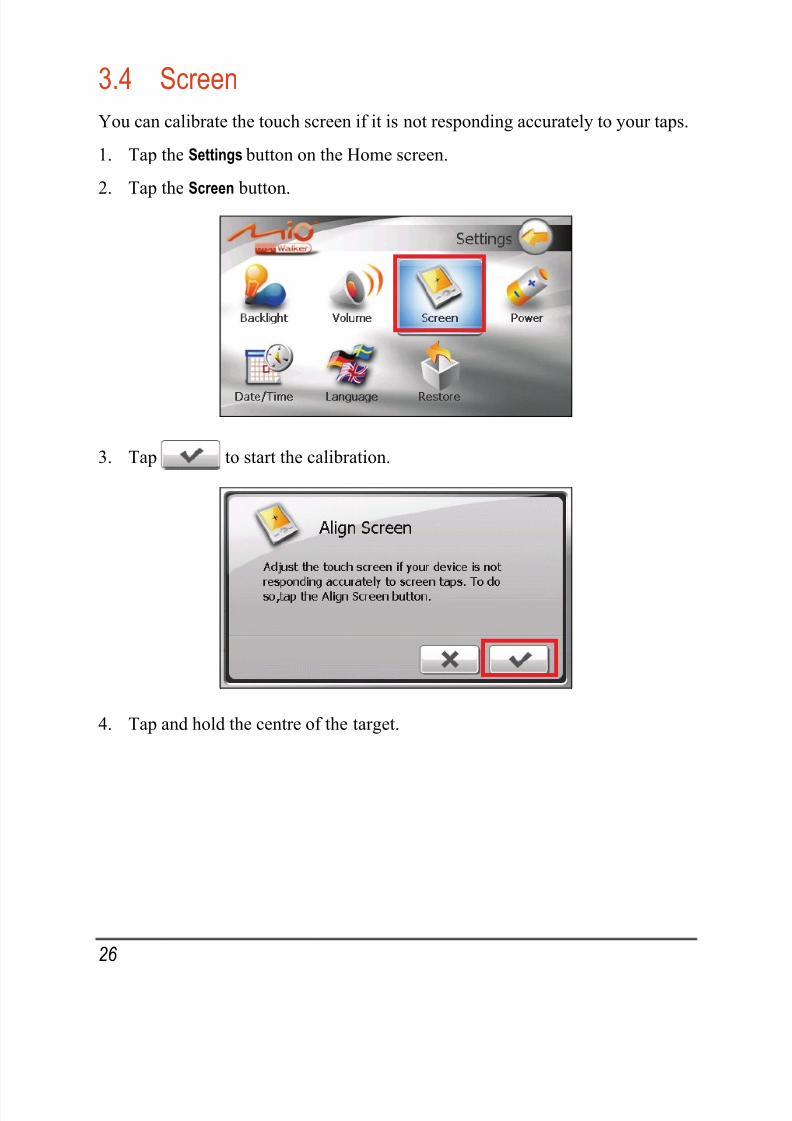
3.4 Screen
You can calibrate the touch screen if it is not responding accurately to your taps.
1. Tap the Settings button on the Home screen.
2. Tap the Screen button.
3. Tap to start the calibration.
4. Tap and hold the centre of the target.
26

8/3/2019 C320 Device Manual En
http://slidepdf.com/reader/full/c320-device-manual-en 35/54
5. When the target moves to another position, tap and hold the centre of the new
target. Repeat each time to complete the calibration process.
6. When completed, tap .
3.5 Power
To check the remaining power level of your battery and/or set up the power saving
feature:
1. Tap the Settings button on the Home screen.
2. Tap the Power button.
3. The screen shows the remaining power of your battery.
You can set a timer to automatically turn off your device when it is idle for a
set period of time. The options include Never, 30 minutes, 20 minutes, and
10 minutes.
27

8/3/2019 C320 Device Manual En
http://slidepdf.com/reader/full/c320-device-manual-en 36/54
4. Tap to save the changes.
3.6 Date/Time1. Tap the Settings button on the Home screen.
2. Tap the Date/Time button.
3. To change the time zone, tap the arrow in the “Time Zone” item.
28

8/3/2019 C320 Device Manual En
http://slidepdf.com/reader/full/c320-device-manual-en 37/54
4. To change the date, tap the down arrow in the “Date” item. A calendar pops
up. Tap the left arrow on the calendar to go to the earlier month and year or the
right arrow to the later month and year. Alternatively, you can tap the month
or year on top of the calendar to directly change the month or year.
When the calendar shows the current month, tap the date on the calendar.
5. To set the time, first tap the hour, minute, or second in the “Time” item and
then tap the up arrow to increase or down arrow to decrease the value.
6. Tap to save the changes.
29

8/3/2019 C320 Device Manual En
http://slidepdf.com/reader/full/c320-device-manual-en 38/54
3.7 Language
1. Tap the Settings button on the Home screen.
2. Tap the Language button.
3. Tap the up/down arrow button to select the desired language.
4. Tap to save the changes.
30
8/3/2019 C320 Device Manual En
http://slidepdf.com/reader/full/c320-device-manual-en 39/54
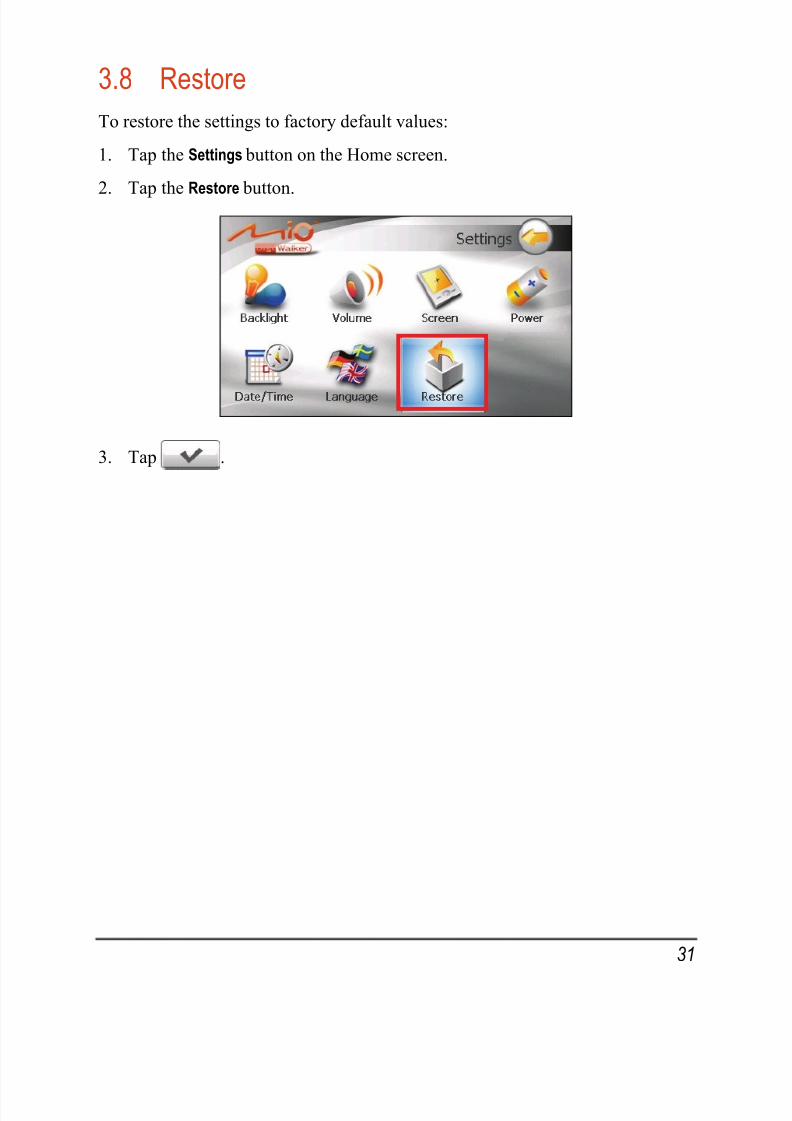
3.8 Restore
To restore the settings to factory default values:
1. Tap the Settings button on the Home screen.
2. Tap the Restore button.
3. Tap .
31

8/3/2019 C320 Device Manual En
http://slidepdf.com/reader/full/c320-device-manual-en 40/54

8/3/2019 C320 Device Manual En
http://slidepdf.com/reader/full/c320-device-manual-en 41/54
33
4 MioTransfer
4.1 Installing MioTransfer
MioTransfer allows you to easily transfer data such as MP3 files between your
device and a computer. To install MioTransfer to your computer:
1. Turn on your computer and insert the supplied CD/DVD into the
CD/DVD-ROM drive of your computer.
2. When the language selecting screen appears, click the language that you wish
to install from.
3. Click Install MioTransfer .

8/3/2019 C320 Device Manual En
http://slidepdf.com/reader/full/c320-device-manual-en 42/54
4. Click Next. Follow the onscreen instructions to complete the installation.
NOTE: If MioTransfer has already been installed on your computer, clicking InstallMioTransfer will remove the application from your system.
4.2 Starting and Exiting MioTransfer Click MioTransfer icon on the Windows Desktop to start the program. The
MioTransfer screen appears.
It provides the following tools:
Audio
Allows you to transfer the audio files between your device and your
computer. (See section 4.3 for details.)
Mio Online
Provides link to the Mio website.
To exit MioTransfer, click Exit at the bottom right corner of the screen.
34

8/3/2019 C320 Device Manual En
http://slidepdf.com/reader/full/c320-device-manual-en 43/54
4.3 Copying Multimedia Files to Your Device
Before playing multimedia files such as MP3 files, you need to have the files
ready on your device. Use MioTransfer to copy the files from your computer to
the correct location on your device.
1. If you want to copy files to a storage card, insert the card to your device.
2. Turn on your computer and your device.
3. Connect the mini-USB end of the USB cable to the bottom of your device and
the other end to a USB port on your computer.
4. Start MioTransfer by clicking MioTransfer icon on the Windows Desktop. The
MioTransfer screen appears.
5. To copy audio files, click Audio on the top menu bar.
The left column shows the drives of your computer and the right columnshows the files in the appropriate folder of the target device (either or
).
35

8/3/2019 C320 Device Manual En
http://slidepdf.com/reader/full/c320-device-manual-en 44/54
Target
Device
6. Select your target device by clicking one of the icons:
- the flash memory of your device
- a storage card inserted into your device.
7. Select the folder where your files are from the left column. Select the file you
want to copy and tap . The status bar will indicate the progress of file
transfer and the selected file will be copied to the target device.
NOTE: You can also copy files from your device to your computer. First select the file you
want to copy from the right column and select a folder on the left column to place these files.Then click to start the file transfer.
36

8/3/2019 C320 Device Manual En
http://slidepdf.com/reader/full/c320-device-manual-en 45/54
Managing Files
Various buttons are available for you to manage the files:
Rename
Changes the name of the selected file.
Delete
Removes the selected file.
Cancel
Aborts the ongoing action of file transfer.
New Folder
Creates a new folder in the selected drive or folder.
37

8/3/2019 C320 Device Manual En
http://slidepdf.com/reader/full/c320-device-manual-en 46/54

8/3/2019 C320 Device Manual En
http://slidepdf.com/reader/full/c320-device-manual-en 47/54
39
5 Troubleshooting and Maintenance
5.1 Restart and Shut Down
Occasionally, you may need to reset your device. For example, you should reset
your system when it stops responding; or appears to be “frozen” or “locked up.”
Restarting Your Device
To restart your device, press the power button for 5 seconds until the “Power Off
Selection” screen appears and then tap Restart.
Shutting Down Your Device
To shut down your device, press the power button for 5 seconds until the “Power
Off Selection” screen appears and then tap Shutdown.
Alternatively, you can press the power button for 10 seconds to directly shut down
the device. This is useful when a software failure prevents the “Power Off
Selection” screen from displaying.
Troubleshooting andMaintenance
8/3/2019 C320 Device Manual En
http://slidepdf.com/reader/full/c320-device-manual-en 48/54
40
Shutting down puts the device in a deep sleep state. The device will close all
running programs before shutting down. To use the device again, press the power
button for 5 seconds. The Home screen appears.
5.2
TroubleshootingNOTE: If you encounter a problem you cannot solve, contact an authorized service center for assistance.
Power Problems
Power does not turn on when using battery power
The remaining battery power may be too low to run your device. Charge the battery.
Screen Problems
Screen responds slowly
Make sure that your device is not running out of battery power. If the problem
still exists, reset your system.
Screen freezes
Reset your system.
Screen is hard to read
Make sure that the backlight of the display is on.
Move to a location with more light.
Inaccurate response to taps
Recalibrate the touch screen.

8/3/2019 C320 Device Manual En
http://slidepdf.com/reader/full/c320-device-manual-en 49/54
41
Connection Problems
Cable Connection Problems
Make sure that your device and your computer are both turned on before
trying to establish a connection.
Make sure that the cable is securely plugged into the USB port on your
computer and on the device. Connect the USB cable directly to your
computer—do not run the cable through a USB hub.
Reset your device before connecting the cable. Always disconnect your
device before you restart your computer.
GPS ProblemsWhen there are no valid signals available, consider the following:
Make sure that the device is facing a clear view of the sky.
Note that the GPS reception can be affected by:
Bad weather
Dense overhead obstacles (e.g. trees and tall buildings)
Other wireless device in the car Reflective car window tint and heated screens.
8/3/2019 C320 Device Manual En
http://slidepdf.com/reader/full/c320-device-manual-en 50/54
42
5.3 Maintaining Your Device
Taking good care of your device will ensure trouble-free operation and reduce the
risk of damage to your device.
Keep your device away from excessive moisture and extreme temperatures.
Avoid exposing your device to direct sunlight or strong ultraviolet light for
extended periods of time.
Do not place anything on top of your device or drop objects on your device.
Do not drop your device or subject it to severe shock.
Do not subject your device to sudden and severe temperature changes. This
could cause moisture condensation inside the unit, which could damage your device. In the event of moisture condensation, allow the device to dry out
completely before use.
Take care not to sit on the device. We advise not to carry the device in one’s
back pocket for that reason.
The screen surface can easily be scratched. Avoid touching it with sharp
objects. Non-adhesive generic screen protectors designed specifically for use
on portable devices with LCD panels may be used to help protect the screenfrom minor scratches.
Never clean your device with it powered on. Use a soft, lint-free cloth
moistened with water to wipe the screen and the exterior of your device.
Do not use paper towels to clean the screen.
Never attempt to disassemble, repair or make any modifications to your
device. Disassembly, modification or any attempt at repair could cause
damage to your device and even bodily injury or property damage and willvoid any warranty.
Do not store or carry flammable liquids, gases or explosive materials in the
same compartment as your device, its parts or accessories.

8/3/2019 C320 Device Manual En
http://slidepdf.com/reader/full/c320-device-manual-en 51/54
43
6 Regulatory Information
NOTE: Marking labels located on the exterior of your device indicate the regulations thatyour model complies with. Please check the marking labels on your device and refer to thecorresponding statements in this chapter. Some notices apply to specific models only.
6.1
Regulations StatementsEuropean Notice
Products with the CE marking comply with Radio & Telecommunication
Terminal Equipment Directive (R&TTE) (1999/5/EEC), the Electromagnetic
Compatibility Directive (89/336/EEC) and the Low Voltage Directive
(73/23/EEC) – as amended by Directive 93/68/ECC - issued by the Commission
of the European Community.
Compliance with these directives implies conformity to the following European
Standards:
EN301489-1: Electronic compatibility and Radio spectrum Matters (ERM),
ElectroMagnetic Compatibility (EMC) standard for radio equipment and services;
Part 1: Common technical requirements
EN301489-3: Electronic compatibility and Radio spectrum Matters (ERM),
ElectroMagnetic Compatibility (EMC) standard for radio equipment and services;
Part 3: Specific conditions for Short-Range Devices (SRD) operating onfrequencies between 9 kHz and 40 GHz
EN55022: Radio disturbance characteristics
EN55024: Immunity characteristics
EN6100-3-2: Limits for harmonic current emissions
EN6100-3-3: Limitation of voltage fluctuation and flicker in low-voltage supply
system
EN60950 / IEC 60950: Product Safety

8/3/2019 C320 Device Manual En
http://slidepdf.com/reader/full/c320-device-manual-en 52/54
44
The manufacturer cannot be held responsible for modifications made by the User
and the consequences thereof, which may alter the conformity of the product with
the CE Marking.
6.2
Safety Precautions Prolonged listening of music in maximum volume can damage the ears.
The use of headphones other than those recommended/supplied can cause
hearing impairment due to excessive sound pressure.
About Charging
Use only the charger supplied with your device. Use of another type of
charger will result in malfunction and/or danger.
This product is intended to be supplied by a LISTED Power Unit marked with
“LPS”, “Limited Power Source” and output rated + 5 V dc / 1.0 A”.
Use a specified battery in the equipment.
About the Charger
Do not use the charger in a high moisture environment. Never touch the
charger when your hands or feet are wet.
Allow adequate ventilation around the charger when using it to operate the
device or charge the battery. Do not cover the charger with paper or other
objects that will reduce cooling. Do not use the charger while it is inside a
carrying case.
Connect the charger to a proper power source. The voltage requirements are
found on the product case and/or packaging.
Do not use the charger if the cord becomes damaged.
Do not attempt to service the unit. There are no serviceable parts inside.
Replace the unit if it is damaged or exposed to excess moisture.
About the Battery
Use a specified battery in the equipment.

8/3/2019 C320 Device Manual En
http://slidepdf.com/reader/full/c320-device-manual-en 53/54
45
CAUTION: This unit contains a non-replaceable internal Lithium Ion battery. The battery canburst or explode, releasing hazardous chemicals. To reduce the risk of fire or burns, do notdisassemble, crush, puncture, or dispose of in fire or water.
Important instructions (for service personnel only)
Caution: Risk of explosion if battery is replaced by an incorrect type.
Dispose of used batteries according to the instructions.
Replace only with the same or equivalent type recommended by the
manufacturer.
The battery must be recycled or disposed of properly.
Use the battery only in the specified equipment.

8/3/2019 C320 Device Manual En
http://slidepdf.com/reader/full/c320-device-manual-en 54/54
6.3 Maintaining Your Device
ing good care of your device will ensure trouble-free operation and reduce t
of damage to your device.
Tak he
risk
e or subject it to severe shock.
is
our , allow the device to dry out
ne’s
an easily be scratched. Avoid touching it with sharp
rotect the screenfrom minor scratches.
Never clean your device with it powered on. Use a soft, lint-free cloth
moistened with water to wipe the screen and the exterior of your device.
Do not use paper towels to clean the screen.
Never attempt to disassemble, repair or make any modifications to your
device. Disassembly, modification or any attempt at repair could cause
damage to your device and even bodily injury or property damage and willvoid any warranty.
Do not store or carry flammable liquids, gases or explosive materials in the
same compartment as your device, its parts or accessories.
Keep your device away from excessive moisture and extreme temperatures.
Avoid exposing your device to direct sunlight or strong ultraviolet light for
extended periods of time.
Do not place anything on top of your device or drop objects on your device.
Do not drop your devic
Do not subject your device to sudden and severe temperature changes. Th
could cause moisture condensation inside the unit, which could damage ydevice. In the event of moisture condensation
completely before use.
Take care not to sit on the device. We advise not to carry the device in o
back pocket for that reason.
The screen surface c
objects. Non-adhesive generic screen protectors designed specifically for use
on portable devices with LCD panels may be used to help p