ca-cis for vse getting started
TRANSCRIPT

CA-CIS® for VSE
Getting Started r1.4 SP12

This documentation (the “Documentation”) and related computer software program (the “Software”) (hereinafter collectively referred to as the “Product”) is for the end user’s informational purposes only and is subject to change or withdrawal by CA at any time.
This Product may not be copied, transferred, reproduced, disclosed, modified or duplicated, in whole or in part, without the prior written consent of CA. This Product is confidential and proprietary information of CA and protected by the copyright laws of the United States and international treaties.
Notwithstanding the foregoing, licensed users may print a reasonable number of copies of the Documentation for their own internal use, and may make one copy of the Software as reasonably required for back-up and disaster recovery purposes, provided that all CA copyright notices and legends are affixed to each reproduced copy. Only authorized employees, consultants, or agents of the user who are bound by the provisions of the license for the Software are permitted to have access to such copies.
The right to print copies of the Documentation and to make a copy of the Software is limited to the period during which the license for the Product remains in full force and effect. Should the license terminate for any reason, it shall be the user’s responsibility to certify in writing to CA that all copies and partial copies of the Product have been returned to CA or destroyed.
EXCEPT AS OTHERWISE STATED IN THE APPLICABLE LICENSE AGREEMENT, TO THE EXTENT PERMITTED BY APPLICABLE LAW, CA PROVIDES THIS PRODUCT “AS IS” WITHOUT WARRANTY OF ANY KIND, INCLUDING WITHOUT LIMITATION, ANY IMPLIED WARRANTIES OF MERCHANTABILITY, FITNESS FOR A PARTICULAR PURPOSE OR NONINFRINGEMENT. IN NO EVENT WILL CA BE LIABLE TO THE END USER OR ANY THIRD PARTY FOR ANY LOSS OR DAMAGE, DIRECT OR INDIRECT, FROM THE USE OF THIS PRODUCT, INCLUDING WITHOUT LIMITATION, LOST PROFITS, BUSINESS INTERRUPTION, GOODWILL, OR LOST DATA, EVEN IF CA IS EXPRESSLY ADVISED OF SUCH LOSS OR DAMAGE.
The use of this Product and any product referenced in the Documentation is governed by the end user’s applicable license agreement.
The manufacturer of this Product is CA.
This Product is provided with “Restricted Rights.” Use, duplication or disclosure by the United States Government is subject to the restrictions set forth in FAR Sections 12.212, 52.227-14, and 52.227-19(c)(1) - (2) and DFARS Section 252.227-7013(c)(1)(ii), as applicable, or their successors.
All trademarks, trade names, service marks, and logos referenced herein belong to their respective companies.
Copyright © 2008 CA. All rights reserved.

Contents
Chapter 1: Introduction Service Descriptions .......................................................................... 1–2
CA-C Runtime............................................................................ 1–2 CA-EARL Service ......................................................................... 1–2 CA-SRAM Service......................................................................... 1–2 cBASE MAPPER .......................................................................... 1–2 CAIAUDIT ............................................................................... 1–3 CAICCI .................................................................................. 1–3 CAIHELP ................................................................................ 1–3 CAIVPE.................................................................................. 1–3 Catalog Management...................................................................... 1–4 MFLINK ................................................................................. 1–4 CAICUI .................................................................................. 1–4
Common User Access (CUA) ........................................................... 1–5 Common Programming Interface (CPI).................................................. 1–5 Session Manager (SM) ................................................................. 1–5
System Adapter........................................................................... 1–6 VSE Common Code ....................................................................... 1–6 Standard Security Facility (CAISSF)......................................................... 1–6
Installation Process ........................................................................... 1–6 Product Distribution .......................................................................... 1–6 Related Publications .......................................................................... 1–7 Command Notation........................................................................... 1–7
Chapter 2: System Requirements and Installation Materials Operating System Requirements ............................................................... 2–1 External Security Requirements ................................................................ 2–1 Installation Materials.......................................................................... 2–2
Contents iii

Chapter 3: CA LMP Operation General Operation of CA LMP..................................................................3–1
Emergencies Only!.........................................................................3–2 Using CA LMP................................................................................3–2
PROD Keyword ...........................................................................3–3 EKG Keyword ............................................................................3–3
Executing CA LMP ............................................................................3–4 Activating EKG via the CALMPKEY.A Member ..............................................3–5 Activating EKG via the PARM= Keyword ...................................................3–5 Re-initializing Product LMP Keys ...........................................................3–6
CA LMP Error Handling .......................................................................3–7 Loading CA LMP Keys ........................................................................3–8
Chapter 4: Installing CA-CIS How to Install CA-CIS .........................................................................4–1 Standard Installation JCL ......................................................................4–3 Simplified Installation JCL .....................................................................4–4 Upgrade with PTFSEL .........................................................................4–4 Installation Overview Checklist.................................................................4–5 Step 1. Review System Requirements............................................................4–7
Task 1A. Verify VSE Requirements ..........................................................4–7 Task 1B. Review Installation Materials.......................................................4–7 Task 1C. Verify CICS Requirements .........................................................4–7 Task 1D. Verify CA-CIS Requirements.......................................................4–7
Step 2. Review Conversion Considerations.......................................................4–8 Step 3. Complete the Installation Worksheet .....................................................4–8
Initial Information for Libraries and History File..............................................4–9 Standard Product Installation Worksheet .................................................. 4–10
Step 4. Restore the CA-CIS Library - Initial Installations Only.................................... 4–11 Task 4A. Extract Initial Install JCL......................................................... 4–11 Task 4B. Install Distribution Tape Using MSHP............................................. 4–11
Step 5. Restore the CA-CIS Library - Subsequent Installations Only .............................. 4–12 Step 6. Modify the CA LMP Execution Software Parameters .................................... 4–13
Task 6A. Customize the CAIRIM Procedure for CA LMP .................................... 4–14 Task 6B. Installing the CA LMP Services in a VM Environment .............................. 4–14 Task 6C. Installing the CA LMP VM Service Machine ....................................... 4–14
iv Getting Started
Step 7. Define, Initialize, and Upgrade the CA-CIS Data Sets ..................................... 4–16 Task 7A. Define and Initialize CAICUI Product Control Data Set ............................. 4–16 Task 7B. Upgrade CAICUI Product Control Data Set ........................................ 4–17 Task 7C. Define and Initialize CAUDPC1................................................... 4–17 Task 7D. Define and Initialize CAUDPC2................................................... 4–18 Task 7E. Define and Initialize CAUDSTG................................................... 4–18 Task 7F. Define and Initialize CAIHLPV ................................................... 4–18 Task 7G. Install CAIHLPV ................................................................ 4–19 Task 7H. Define and Initialize CAMAP..................................................... 4–20
Step 8. Update ASI Procedure................................................................. 4–20 Task 8A. Update Standard Labels.......................................................... 4–20 Task 8B. Update LIBDEF Information ...................................................... 4–21 Task 8C. Update SDL Load List ........................................................... 4–22 Task 8D. Update SVA Statement and Estimate SVA Storage Requirements .................... 4–22
Step 9. Update CICS.......................................................................... 4–24 Task 9A. Update File Control Table (FCT) .................................................. 4–24 Task 9B. Update Program List Table Post Initialization (PLTPI)............................... 4–24 Task 9C. Update Program List Table Shut Down (PLTSD).................................... 4–25 Task 9D. Update Program Control Table (PCT) ............................................. 4–26 Task 9E. Update Processing Program Table (PPT) ........................................... 4–29 Task 9F. Migrate PCT and PPT to CICS DFHCSD ........................................... 4–31 Task 9G. Define CUI as an Interactive User Interface (IUI) Application (Optional) .............. 4–32 Task 9H. Update SIT and CICS Startup JCL................................................. 4–32
Step 10. IPL ................................................................................. 4–32 Step 11. Migration of CA Products into Production.............................................. 4–33 Step 12. Install the CAICUI Logical Device Facility (CUILDEV)................................... 4–33
Task 12A. Load CUILDEV ................................................................ 4–33 Task 12B. Run the Installation EXEC ....................................................... 4–34 Task 12C. Tailor CUILDEV................................................................ 4–34
Step 13. Install the SRAM Options ............................................................. 4–34 CASRAM Macro (Respecifying Generation Options) ........................................ 4–35 Sample Option Generation Using the CASRAM Macro ...................................... 4–38
Step 14. Update CAIVPE Batch File Table Entries ............................................... 4–39 ROSFD Macro ........................................................................... 4–39
Step 15. Installing CA-JARS MWRT CMS Members for VM Users ................................ 4–42 Task 15A. Restoring CA-JARS MWRT CMS Members ....................................... 4–42 Task 15B. Installing the CA-JARS MWRT VM Component ................................... 4–42
Step 16. Save all Materials and Output ......................................................... 4–42 Contacting Technical Support................................................................. 4–43
Contents v

Chapter 5: Applying Maintenance
Chapter 6: Troubleshooting Collecting Diagnostic Data .....................................................................6–2
Interpreting Diagnostic Data................................................................6–3 Contacting Technical Support ..................................................................6–4 Generating a Problem Report...................................................................6–5
CAISERV Utility ..........................................................................6–5 Product Releases and Maintenance..............................................................6–8
Appendix A: Standard Product Installation Details Initial CA-CIS for VSE Product Installation from a Physical Tape ................................. A–2
Installation JCL—CAIN90B1............................................................... A–2 CAIN90B1 Execution ..................................................................... A–2
Variable Symbols for Job CAIN90B1 .................................................... A–3 Subsequent CA-CIS for VSE Product Installation from a Physical Tape ............................ A–4
Installation JCL—CAIN90B2............................................................... A–4 CAIN90B2 Execution ..................................................................... A–4
Variable Symbols for Job CAIN90B2 .................................................... A–4 Migration of CA-CIS for VSE Products into Production .......................................... A–5
Installation JCL—CAIN90B3............................................................... A–5 CAIN90B3 Execution ..................................................................... A–6
Variable Symbols for Job CAIN90B3 .................................................... A–6 Initial CA-CIS for VSE Product Installation from Electronic Delivery Files ......................... A–7
Installation JCL—CAIN90C1 .............................................................. A–7 CAIN90C1 Execution ..................................................................... A–8
Variable Symbols for Job CAIN90C1.................................................... A–8 Subsequent CA-CIS for VSE Product Installation from Electronic Delivery Files ................... A–10
Installation JCL—CAIN90C2 (with Pre-Production Testing) ................................. A–10 CAIN90C2 Execution .................................................................... A–10
Variable Symbols for Job CAIN90C2................................................... A–10 Installation JCL—CAIN90C4 (Without Pre-Production Testing) .............................. A–11 CAIN90C4 Execution .................................................................... A–12
Variable Symbols for Job CAIN90C4................................................... A–12
vi Getting Started

Simplified Installation of CA-CIS for VSE ..................................................... A–13 CAIN90Q1 Execution.................................................................... A–13
Variable Symbols for Job CAIN90Q1 .................................................. A–13 CAIN90Q2 Execution.................................................................... A–14
Variable Symbols for Job CAIN90Q2 .................................................. A–14 CAIN90Q3 Execution.................................................................... A–15
Variable Symbols for Job CAIN90Q3 .................................................. A–15 CAIN90Q4 Execution.................................................................... A–16
Variable Symbols for Job CAIN90Q4 .................................................. A–16
Index
Contents vii


Chapter
1 Introduction
This guide explains how to install the following:
CA-CIS Service Release
CA-C Runtime 3.1
cBASE MAPPER 2.3
EARL Service 6.1
SRAM Service 9.0
CAIAUDIT 1.4
CAICUI 1.4
CAIHELP 1.0
CAIVPE 4.2
Catalog Management 6.0
MFLINK 4.2
System Adapter 6.1
VSE Common Code 1.4
CAICCI 1.1
CA-CIS can be tailored by the client to fit the needs of any VSE installation, from large, multi-CPU installations to small, entry-level installations, and can be further tailored to meet the specific needs of individual users.
A brief introduction to each service and an overview of the installation process are provided in this chapter.
Note: For information on tailoring CAICCI, refer to the Administration Guide.
Introduction 1–1
Service Descriptions
Service Descriptions The following services are all part of CA-CIS a brief description of each follows.
CA-C Runtime
CA-C Runtime is a runtime facility with reentrancy capabilities. Its modular architecture insulates C Runtime programs from system and release dependencies. There is little, if any, system-dependent code linked with the user program. This allows for smaller user programs and easier maintenance. CA-C Runtime uses a memory manager to handle dynamic allocation requests for small pieces of storage. This enables fewer calls to be made on the operating system resulting in faster allocation and deallocation. The following are features of CA-C Runtime:
Calls functions written in other languages, such as Assembler or COBOL
Runtime kernels for each host environment
Device drivers for each environment
Single data structure for entry points
CA-EARL Service
The CA-EARL Service provides report writing facilities for CA VSE products. It is a subset of the CA product CA-Earl. It is intended for use with CA products only.
CA-SRAM Service
The CA-SRAM Service provides sort/merge facilities for CA VSE products. A subset of the CA-SRAM Service is used as a CA-CIS service. It is intended for use with CA products only.
cBASE MAPPER
The cBASE MAPPER service provides the subsystem code to access 3270 formatted screens.
1–2 Getting Started

Service Descriptions
CAIAUDIT
The CAIAUDIT service provides a comprehensive auditing and reporting system for all CA VSE products and localizes the viewing and depositing of audited events. The CAIAUDIT runtime system performs the actual logging of data to the CAIAUDIT data set(s).
CAICCI
CAICCI (CAI Common Communication Interface) is a communications facility that offers a simple yet flexible approach enabling CA products to communicate with one another. This facility provides a layer that isolates application software from the specifics of the communications environment.
CAIHELP
CAIHELP is an online application developed for all CA VSE products to provide immediate online assistance. It also presents detailed information about product facilities and explains all diagnostic messages.
HELP panels are designed in a hierarchy and are arranged by topic. Panel HELP, field HELP, HELP with HELP, message HELP and an online panel INDEX are all topics available within CAIHELP.
CAIVPE
CAIVPE, the Virtual Processing Environment, is an interproduct facility used by various CA solutions running under CICS. It contains monitor-specific code, and allows CA solutions to run independent of the environment. CAIVPE:
Makes environment inquiries
Makes terminal inquiries
Reads/Writes directly from/to sequential files
Performs upper/lower case translation
Issues messages to both the terminal and console
Checks runaway tasks
Dumps application-specific storage before giving control to the operating system
Introduction 1–3
Service Descriptions
Catalog Management
Catalog Management is a high-performance access method developed by CA for all CA products. It supports many different record formats and can be accessed at high rates due to its sophisticated catalog index structure.
MFLINK
MFLINK is the mainframe side of the interface that permits CA PC and mainframe products to communicate with one another.
CAICUI
CAICUI (Common User Interface) provides a set of standards for the CA VSE product line. All CA VSE products and services running under the Common User Interface comply with a set of panel design and functionality standards, creating a common look as well as a common method of use for all CA VSE products.
Using CAICUI eliminates the time required to learn multiple online procedures because it standardizes online navigation. The user need only learn one set of rules to operate any CAICUI-compliant product or service because with CAICUI, every application operates in basically the same way. CAICUI's standards provide consistency in all CA VSE products and allow the user to interface between products, services and operating systems. CAICUI is also flexible and user friendly and can be individually customized for each user.
CAICUI is a major step in the CA plan to provide system-wide product integration within its VSE product line. Most VSE products will support CAICUI in the future as it is the preferred execution environment for all VSE products. Existing transactions, however, will be supported for several releases, allowing for a smooth migration to the new CAICUI standards.
Conceptually similar to IBM's Systems Applications Architecture (SAA), CAICUI implements a subset of its Common User Access (CUA) standard. The main service of CAICUI is the CUI transaction. It controls other CA product transactions and maintains product resource definitions. CAICUI consists of three main areas:
CUA Common User Access
CPI Common Programming Interface
SM Session Manager
1–4 Getting Started

Service Descriptions
Common User Access (CUA)
CUA, when implemented, provides a standard way to access information from 3270-type devices by combining a subset of SAA standards with a standard already in use by many CA VSE products.
Common Programming Interface (CPI)
CPI defines the set of standard programming tools, languages and interfaces available to CA software developers. Using a common set of tools provides a great benefit to CA clients because they improve reliability, availability and serviceability for all CA products.
Session Manager (SM)
SM is an online CICS transaction environment providing a common execution platform for CAICUI applications. This platform allows any CAICUI application to be invoked from any other application, thereby providing system-wide product integration within the VSE product line. Several of the CPI services are built with extensions into the SM, enforcing CAICUI standards as well as helping to create a common programming environment.
The CAICUI Session Manager offers two modes of operation, prompt mode and command mode. In prompt mode, the user typically selects a menu option and enters any additional information to perform a specific function. In command mode, the user executes a function by directly entering a command on the command line. Either mode or a combination of both can be used during a session; mode switching is automatic and is based upon the user's entry.
Internally the SM is a command-based navigation system. The full panel prompt programs generate the appropriate commands from terminal input and pass them to a command manager. The generated commands execute at either the panel processor or the immediate command processor level. Screen processor programs handle applications that require panel I/O while immediate command processors execute commands that require no additional input.
Another powerful feature provided by the Session Manager is the ability to create user-defined long and short commands. User-defined long commands are entered on the command line and are usually abbreviated forms of internal, CAICUI-supplied long commands. One example might be a command named DAO, created to execute the CAIAUDIT 'DISPLAY AUDIT PRODUCT=CAOP' command. User-defined short commands, on the other hand, are entered in the short command area provided on directory panels and perform specific functions.
Introduction 1–5

Installation Process
System Adapter
The CA System Adapter provides operating system-dependent services, such as program retrieval and recovery, for a variety of CA products. Made through generic requests, these services facilitate the development of operating system-independent products.
VSE Common Code
VSE Common Code is used by all CA VSE products that require CA-CIS.
Standard Security Facility (CAISSF)
The Standard Security Facility (CAISSF) is a standardized security interface to CA-ACF2 and CA-TOP SECRET.
Installation Process This section outlines the steps required to complete the installation of CA-CIS, which are briefly described in general terms:
1. The installation process is divided into operational units called steps. Each step completes an identifiable unit of the installation process, such as 'Initialization of Product Data Sets'.
2. Each step is then divided into tasks. Each task is applicable either to all possible installation configurations or to a subset of the configurations.
The remainder of this guide contains the detailed information necessary to accomplish a successful installation.
Product Distribution The machine-readable program materials required for installation are distributed as a single, unlabeled, multi-file installation tape in IBM Maintain System History Program (MSHP) BACKUP format. This can be either a physical tape or a file distributed through electronic delivery. In either case, the layout is the same. One tape unit is required to install the product.
1–6 Getting Started

Related Publications
Related Publications The following publications relate to CA-CIS and are available from CA:
Title Operating System
CA-Earl Reference Guide MVS/VM/VSE
CA-Earl User Guide MVS/VM/VSE
CA-Earl Systems Programmer Guide
VSE
CA-Earl Examples Guide MVS/VM/VSE
The following IBM publications are referenced in this guide or are recommended reading:
CICS Customization Guide
Principles of Operation
VSE Central Functions Supervisor Diagnostic Reference
VSE/POWER Administration and Operation
VSE/VSAM Commands
VTAM Resource Definition Reference
z/VSE Messages and Codes
z/VSE Operation
z/VSE System and Control Statements
Command Notation This guide uses the following command notation.
Enter the following exactly as they appear in command descriptions:
UPPERCASE Identifies commands, keywords, and keyword values which must be coded exactly as shown.
MIXed Cases Identify command abbreviations. The uppercase letters are the minimum abbreviation; lowercase letters are optional.
symbols All symbols, such as commas, equal signs and slashes, must be coded exactly as shown.
Introduction 1–7

Command Notation
The following clarify command syntax; do not type these as they appear:
lowercase Indicates a value that you must supply.
[ ] Identify optional keywords or parameters.
{ } Require choosing one of the keywords or parameters listed.
underlining Shows default values which need not be specified.
| Separates alternative keywords and/or parameters. Choose one.
. . . Means the preceding items or group of items can be repeated more than once.
1–8 Getting Started

Chapter
2 System Requirements and Installation Materials
This chapter discusses the following:
The supported operating system environments
The External Security requirements that are needed for security
The installation materials necessary for using CA-CIS
Operating System Requirements CA-CIS operates under the following IBM environments:
1. CAICUI 1.4, CAIAUDIT 1.4, CAIHELP 1.0, System Adapter 6.1 and Catalog Management 6.0, operate under the following releases:
− Any VSE system currently supported by IBM
− CICS/VSE 2.3 and CICS TS 1.1 and above
− Any VM system currently supported by IBM
− System Adapter 6.1 fully supports the VSE Turbo Dispatcher.
2. CAICCI 1.1 operates under the following releases:
− CAICCI was written to exploit any VSE system currently supported by IBM. Additionally, the CCITCP component can utilize the available VSE TCP/IP stacks.
Note: For specific system requirements for CAICCI, see the Administration Guide.
External Security Requirements CAICUI signon will optionally use the signed-on user ID returned from CA-Top Secret (release 2.2 and above).
System Requirements and Installation Materials 2–1

Installation Materials
Installation Materials CA-CIS is distributed on a single, unlabeled tape reel which must be installed through the use of MSHP. The installation tape contains the following files:
File # File Description
001 - 189 Reserved
190 Tape Mark
191 CA-GSS for VSE history file – MSHP BACKUP format
192 CA-GSS for VSE product library – MSHP BACKUP format
193 - 198 Reserved
199 Tape Mark
200 CA-CIS for VSE history file – MSHP BACKUP format
201 CA-CIS for VSE library – MSHP BACKUP format
202 – 205 Reserved
206 MSHP Installation JCL
207 – 227 Reserved
228 CUI online panel HELP file data
229 VM component files
230 Reserved
231 cBASE Mapper CAMAP file data
232 – 239 Reserved
2–2 Getting Started

Chapter
3 CA LMP Operation
The CA License Management Program (LMP) is a subset of the services provided by CA-CIS. CA LMP is designed to operate smoothly and efficiently, regardless of whether you are using one CA solution on one physical CPU, or multiple CA solutions on several CPUs.
General Operation of CA LMP For CA LMP operation, each physical CPU that is running one or more CA solutions maintained by the License Management Program utilizes common CA LMP enforcement software and a common key library member. The common CALMPKEY.A member contains all of the CA LMP execution keys that are required in order to run the associated CA solutions on each of the specified CPUs. These execution keys must be transferred from CA LMP Product Key Certificates to the CALMPKEY.A member.
Periodically, during operation of each CA solution, the common enforcement software is automatically invoked. This software compares the Execution Keys with the actual, realtime execution environment. If there is a discrepancy between the Execution Keys and the environment, the enforcement software (CA90s Services maintenance level 9304 or lower) generates messages that are designed to enable you to resolve the situation and avoid any interruption in solution execution. If no action is taken, then the solution will be prevented from running. To avoid this, upgrade to CA-CIS or CA90s Services maintenance level 9307.
With CA-CIS or CA90s Services maintenance level 9307 and above, the enforcement software has been augmented to ensure that solution software under the control of CA LMP is not interrupted because of expiration dates, improper execution keys, or changes in the CPU on which it is running. When the enforcement software detects a discrepancy between the LMP Execution Key and the actual use of the solution, an automated message facility will now be invoked to notify you of this condition. Enforcement software messages will be written to the system console and/or batch joblog and will reflect any warnings. Once the appropriate messages have been issued, the CA solution continues normal operation.
CA LMP Operation 3–1

Using CA LMP
If there is no discrepancy, the CA solution continues normal operation.
Emergencies Only!
In emergency situations, such as disaster recovery, the Emergency Key Generator (EKG) can be used to quickly and efficiently activate all CA software from the mainframe site. With CA-CIS or CA90s Services maintenance level 9307 and above, it is no longer necessary to implement EKG to activate solution software in a disaster recovery situation. This level of enforcement software allows your CA solutions to run uninterrupted regardless of the CPU on which they are running. Please be advised when bypassing EKG, enforcement software messages will be issued. Once the appropriate messages have been issued, your CA solution now continues normal operation.
EKG processing can be implemented via the following techniques:
1. Update the CALMPKEY.A member with the eight byte EKG code, and run the CAIRIM utility.
2. Specify PARM='EKGP' keyword on the EXEC card of the CAIRIM utility JCL, and you will be prompted for the eight byte EKG code.
EKG ensures that you can use all CA software for 10 days from the date of activation of the EKG device.
Using CA LMP CA LMP provides a standardized and automated approach to the tracking of licensed software. Once CA-CIS has been installed or CA90s Services is maintained at genlevel 9301 or higher, CA LMP support is available for all CA LMP-supported CA solutions.
When a CA software solution has been enabled to take advantage of CA LMP, you receive a "Key Certificate" with your CA solution installation or maintenance tape.
CA LMP can be executed from two control cards:
PROD
EKG
The PROD control card is used to verify that the solution is licensed to run on a particular CPU.
The EKG control card is used ONLY in EMERGENCIES, such as disaster recovery.
3–2 Getting Started

Using CA LMP
PROD Keyword
The CA LMP execution key provided on the "Key Certificate" must be added to the CALMPKEY.A member to ensure proper initialization of the CA solution.
The parameter structure for member CALMPKEY.A is presented below: PROD(pp) DATE(ddmmmyy) CPU(tttt-mmmm/ssssss) LMPCODE(kkkkkkkkkkkkkkkk)
Where:
pp Required. The two-character product code. For any given CA LMP software solution, this code agrees with the product code listed on the LMP Key certificate.
ddmmmyy Required. The CA LMP execution key expiration date.
tttt-mmmm Required. The CPU type and model (for example: 3090-600) on which the CA LMP software solution is to run. If the CPU type and/or model require less than four characters, blank spaces are inserted for the unused characters.
ssssss Required. The serial number of the CPU on which the CA LMP software solution is to run.
kkkkkkkkkkkkkkkk Required. The execution key needed to run the CA LMP software solution. This CA LMP execution key is provided on the Key Certificate shipped with each CA LMP software solution.
Below is an example of a CA LMP product control card. Although this example uses CA-DYNAM/T to represent the CA solution, the CA LMP execution key value is invalid and provided as an example only! PROD(TD) DATE(01JAN94) CPU(3090-600 /370623) LMPCODE(XXXXXXXXXXXXXXXX)
EKG Keyword
The Emergency Key Generator (EKG) can be activated by one of two methods:
1. Insertion of the EKG control card as the first control card in the CALMPKEY.A member.
2. Adding PARM='EKGP' on the exec card of the CAIRIM utility. This will prompt the operator to manually enter the eight byte EKG code when CAIRIM is executed.
The format of the EKG control card is as follows: EKG(nnnnnnnn)
Where nnnnnnnn is the eight byte code from the EKG device.
CA LMP Operation 3–3

Executing CA LMP
The EKG control card must be the first uncommented control card in the CALMPKEY.A member to be successful.
Executing CA LMP CA LMP is executed as part of the the CASAUTIL utility. The CALMPKEY.A member referenced by the CASAUTIL utility is located using the LIBDEF SOURCE SEARCH chain for the partition it runs in. The CA LMP control card(s) is derived from the information contained on the CA solution's CA LMP Key Certificate. An illustration of this process is given below.
Each CA solution that is CA LMP supported has a control card in the CALMPKEY.A member found in the CA-CIS sublibrary. CAIRIM is called by CASAUTIL initialization. Each card is read and verified by CA LMP in sequential order as found in the CALMPKEY.A member.
Each card is displayed as it is read, shown in the sample panel below.
CAS9115I - INPUT: * ASM/ARCHIVE A. CAS9115I - INPUT: PROD(AO) DATE(01OCT93) CPU(3090-****/071584) LMPCODE( B. CAS9190I - PRODUCT (AO) KEY ACCEPTED FOR THIS CPU C. CAS9115I - INPUT: PROD(YG) DATE(08AUG93) CPU(3090-****/071584) LMPCODE( D. CAS9125E - INVALID DATA: KEY ALREADY EXPIRED CAS9115I - INPUT: * DYNAM/T E. CAS9115I - INPUT: PROD(TD) DATE(01OCT93) CPU(3090-****/370399) LMPCODE( CAS9115I - INPUT: PROD(YJ) DATE(01OCT93) CPU(3090-****/370399) LMPCODE(
The result of any card being read falls into one of the following three situations.
1. The first execution key A – as in the example panel above – is valid. It is followed by the accompanying message B which indicates the key has been accepted.
2. The second execution key in the example above C is expired. An error message D immediately follows. A similar situation would exist if the execution key is invalid or has been tampered with.
3. The third execution key E is defined for a CPU other than the one for which CAIRIM is attempting to initialize solutions. The key is displayed, but no message follows and no action is taken.
Situation #3 can occur if you are sharing a common member to define the execution keys for multiple CPUs.
3–4 Getting Started

Executing CA LMP
Activating EKG via the CALMPKEY.A Member
In the first example, EKG is activated using an EKG device code generated on November 4, 1992.
Example 1
EXEC CAIRIM A. EKG(3B1DE8CD) B. CAS9116I - EKG DEVICE CODE ACCEPTED. EKG ACTIVATED ON: NOV 04, 1992 G.M.T. CAS9115I - INPUT: * ASM/ARCHIVE CAS9115I - INPUT: PROD(AO) DATE(01OCT93) CPU(3090-****/071584) LMPCODE( C. CAS9190I - PRODUCT (AO) KEY ACCEPTED FOR THIS CPU
A This message shows EKG as the first uncommented control card, where EKG(3B1DE8CD) is the EKG device code.
B This message indicates EKG(3B1DE8CD) has been accepted and activated on November 4, 1992 based on G.M.T time. This eight byte EKG code allows all CA solutions to be run on any CPU for up to 10 days from the activation date.
C This message indicates product AO KEY has been accepted for this CPU. The KEY for product AO was valid for the machine that CAIRIM was executed on.
Activating EKG via the PARM= Keyword
In the second example, EKG is activated from the PARM='EKGP' keyword on the EXEC card of the CAIRIM utility. CAIRIM requires a miminum of 125k of partition getvis to run. The following is an example of coding the PARM='EKGP' keyword on the EXEC control card.
Example 2 // EXEC PGM=CAIRIM,PARM='EKGP'
Messages output to the console:
0 exec cairim,parm='ekgp' BG 000 EXEC CAIRIM,PARM='EKGP' BG 000 CAS9117D - ENTER EKG DEVICE CODE OR CANCEL TO ABORT BG-000 0 ekg(3b1de8cd) A. 0 EKG(3B1DE8CD) B. BG 000 CAS9116I - EKG DEVICE CODE ACCEPTED. EKG ACTIVATED ON: NOV 04, 1992 G.M.T. BG 000 CAS9115I - INPUT: * ASM/ARCHIVE BG 000 CAS9115I - INPUT: PROD(AO) DATE(01OCT93) CPU(3090-****/071584) LMPCODE( C. BG 000 CAS9190I - PRODUCT (AO) KEY ACCEPTED FOR THIS CPU
CA LMP Operation 3–5

Executing CA LMP
A This message shows the operator response to message CAS9117D, where EKG(3B1DE8CD) is the EKG device code.
B This message indicates EKG(3B1DE8CD) has been accepted and activated on November 4, 1992 based on G.M.T time. This eight byte EKG code allows all CA solutions to be run on any CPU for up to 10 days from the activation date.
C This message indicates product AO KEY has been accepted for this CPU. The KEY for product AO was valid for the machine that CAIRIM was executed on.
Note The EKG device code is only good for 10 days, based on G.M.T time.
If you have any problems with your EKG device code, go to http://supportconnect.ca.com/sc/licenses/siteLicenses.jsp to view your current LMP keys, to contact CA Licensing support, or to open or update any licensing issues.
Re-initializing Product LMP Keys
To add or alter any product's LMP status after LMP/VSE has been initialized, update the CALMPKEY.A library data set and execute CAIRIM without any JCL PARM= value. The following status changes can occur at this time:
1. For any product that does not have a change in its LMP KEY, the current status of the product will remain unchanged.
2. For any active product whose LMP KEY is changed for a future expiration date, no change in the status will occur and the future date will be placed into effect.
3. For any product that had previously expired, and a new valid LMP KEY for the product is encountered, the product will be notified of this fact and will then become an active participant in the total CA solutions.
4. For any new product LMP KEY encountered, the product and its LMP KEY will be placed into effect immediately and will be available as an active participant in the total CA solutions.
If EKG is currently in effect for any expired products, the EKG must be in the CALMPKEY.A data set at this time to remain in effect. Once all product LMP KEYs are valid, the EKG can be removed from the CALMPKEY.A data set.
3–6 Getting Started

CA LMP Error Handling
CA LMP Error Handling This section applies to CA solutions supported by CA License Management Program (CA LMP). If you take advantage of CA LMP, you may encounter one of the following messages during CAIRIM startup. If this happens, go to http://supportconnect.ca.com/sc/licenses/siteLicenses.jsp to view your current LMP keys, to contact CA Licensing support, or to open or update any licensing issues. CAS9125E Invalid data: %%%%%%%%..
This message means that invalid data has been encountered in the input parameter file. Processing continues with the next input record. When this message is invoked by CA LMP, one the following variable substitutes can be displayed:
Missing keyword or parameter card.
Duplicate keyword.
Product code NOT 2-character.
CPU ID is too long
Transcription error or tampering detected.
Review the CALMPKEY.A member for invalid data. Verify keyword, product code, or CPU ID as indicated and re-enter. CAS9180S CPU @@@@@@ requires a LMP Key to run product(%%) %%%%%%%%..
Where @@@@@@ is the CPU ID, %% is the product code, and %%%%%%%%... is the product name of the software solution CAIRIM has attempted to initalize. The CA LMP execution software does not possess the key to the given product on this CPU. You should contact CA TLC support. CAS9181A Enforcement postponed due to %%%%%%%%%%%%%%%%%%%
Your LMP Execution Key for this CA software solution has expired. A possible value for %%%%%%%%... can be "WEEKEND." CA LMP does not enforce initial expiration of licensing agreements during these days. Contact CA LMP support as soon as possible to avoid potential expiration of the CA solution Execution Key. With CA-CIS or CA90s Services maintenance level 9307 and above, the CA LMP enforcement software will allow the solution to continue running, but subsequent calls will result in the generation of messages to the system console and/or batch joblog if the situation is not corrected. Contact CA TLC support for further assistance. CAS9182W WARNING: Product %% will expire in XXX days
CA LMP Operation 3–7

Loading CA LMP Keys
Where %% is the CA solution licensed to run on this CPU, and XXX is the number of days remaining in the current Execution Key. The CA LMP Execution Key for this product is about to expire. Contact CA LMP support as soon as possible to avoid potential expiration of the CA Execution Key. With CA-CIS or CA90s Services maintenance level 9307 and above, the CA LMP enforcement software will allow the solution to continue running, but subsequent calls will result in the generation of messages to the system console and/or batch joblog if the situation is not corrected. Contact CA TLC support for further assistance.
Loading CA LMP Keys The following example shows how to load CA LMP Keys through the console: BG 000 // JOB PAUSE FOR ANYTHING DATE 11/03/92,CLOCK 07/45/50 BG 000 * ID ACFVLD137I ACFMAINT LAST SYSTEM ACCESS AT 07.45 ON 11/03/92 FROM GR BG 000 // PAUSE BG-000 0 // exec libr 0 // EXEC LIBR BG 000 L001A ENTER COMMAND OR END BG-000 0 access s=cis14.sublib 0 ACCESS S=CIS14.SUBLIB BG 000 L113I RETURN CODE OF ACCESS IS 0 BG 000 L001A ENTER COMMAND OR END BG-000 0 catals a.calmpkey 0 CATALS A.CALMPKEY BG 000 L003A ENTER MEMBER DATA OR /+ BG-000 0 prod(A0) date(01OCT93) cpu(3090-0060/12345) lmpcode(1234567890123456) 0 PROD(A0) DATE(01OCT93) CPU(3090-0060/12345) LMPCODE(1234567890123456) BG 000 L003A ENTER MEMBER DATA OR /+ BG-000 0 /+ 0 /+ BG 000 L113I RETURN CODE OF CATALS IS 0 BG 000 L001A ENTER COMMAND OR END BG-000
The following is an example of the CALMPKEY.Z member which loads CA LMP Keys, using the IBM LIBR utility. // JOB CALMPKEY CATALOG // EXEC LIBR ACCESS SUBLIB=CIS14.SUBLIB CATALOG CALMPKEY.A REPLACE=YES * ASM/ARCHIVE PROD(AO) DATE(01OCT93) CPU(3090-****/071584) LMPCODE(ZMVM4JORMLQR9JXW) PROD(YG) DATE(01OCT93) CPU(3090-****/071584) LMPCODE(GH2HC9N5H7T5P98W) * DYNAM/T PROD(TD) DATE(01OCT93) CPU(3090-****/071584) LMPCODE(D3C3L0253Z45P0BA) PROD(YJ) DATE(01OCT93) CPU(3090-****/071584) LMPCODE(IJEJ2SNVJWRV6SDC) /+ /* /&
3–8 Getting Started

Chapter
4 Installing CA-CIS
CA has created standardized procedures for installing products using the VSE MSHP utility. These standards allow a common method for installing all CA VSE products.
How to Install CA-CIS The installation process uses two types of libraries and history files: production and installation.
Production Libraries and History File
The production libraries and history file are created when the first CA product tape is installed using this standard. This library or library set and history file are designed to contain all CA VSE production products. Sufficient space should be allocated to contain all CA VSE products expected to be installed, even if only one product is being initially installed. When a product is subsequently installed, or reinstalled, it will not be merged into the production library set and history file until testing is complete.
Installation Libraries and History File
The installation libraries and history file are used for subsequent product installation to avoid installation of a new product, or new release of an existing product, into the user's production environment. These libraries and history file are used for installing, verifying, and testing the product Each product tape that is installed creates a separate sublibrary and history file that is unique for that product tape. After all testing has been completed, the product is merged into the production libraries and history file.
Installing CA-CIS 4–1

How to Install CA-CIS
Creating these two library sets therefore requires two different installation procedures and sets of JCL, depending upon whether the installation is an initial or subsequent installation:
When the first standardized CA VSE product tape is installed, one job creates the production library or library set and history file, and installs the product into these.
When a subsequent product tape is installed, the installation library or library set and history file are created and used until the product is ready to be migrated into the production environment, and then the installation library set is deleted.
The standard sequence of product installation is as follows:
1. Retrieve the initial install JCL
Retrieve the install JCL samples using the supplied JCL example for either CAIN90B0 or CAIN90C0. For more information about JCL examples, see the appendix "Standard Product Installation Details."
2. Modify the initial install JCL
Modify the variables in this JCL using an editor. A worksheet is provided defining the variables that must be specified (such as VOLSER and beginning block or track). There are 21 possible variables.
3. Install the products
Submit the modified MSHP job from Step 2 to install the product from tape.
4. Tailor and verify the products
Proceed with tailoring and verifying the product.
4–2 Getting Started

Standard Installation JCL
Standard Installation JCL For more information about the JCL, see the appendix "Standard Product Installation Details."
The following table lists the JCL members and information associated with each member:
Job Name Where Resides Source Member Description
CAIN90B0 Appendix "Standard Product Installation Details" only
Not supplied as a source member
Used to retrieve CA-CIS for VSE install JCL supplied as source members in file #206 of the physical install tape. The .Z members are placed into the specified VSE libname.subname.
CAIN90B1 Source library CAIN90B1.Z Used to perform the initial CA-CIS for VSE installation distributed as a physical tape directly into a production library and history file.
CAIN90B2 Source library CAIN90B2.Z Used to install CA-CIS for VSE (from a physical tape) into a test library to allow installation, verification, and testing prior to migration into the production libraries.
CAIN90B3 Source library CAIN90B3.Z Used to merge products into the production library and history file when installed with either CAIN90B2 or CAIN90C2.
CAIN90C0 Appendix "Standard Product Installation Details" only
Not supplied as a source member
Used to retrieve CA-CIS for VSE install JCL supplied as source members in file #206 of the electronic delivery file. The .Z members are placed into the specified VSE libname.subname.
CAIN90C1 Source library CAIN90C1.Z Used to install CA-CIS for VSE distributed as an electronic delivery file using IBM VSE Virtual Tape directly into a production library and history file.
CAIN90C2 Source library CAIN90C2.Z Used to install CA-CIS for VSE into a test library from an electronic delivery file through IBM VSE Virtual Tape to allow installation, verification, and testing prior to migration into the production libraries.
CAIN90C4 Source library CAIN90C4.Z Used to install CA-CIS for VSE distributed as an electronic delivery file using IBM VSE Virtual Tape directly into an existing library and history file.
Installing CA-CIS 4–3

Simplified Installation JCL
Simplified Installation JCL You can also use simplified installation JCL to install all CA VSE products. It eliminates the use of the standard installation worksheet. For more information about this JCL, see the appendix "Standard Product Installation Details."
The following table lists the JCL members and information associated with each member:
Job Name Where Resides Source Member Description
CAIN90Q1 Source library CAIN90Q1.Z Used to install CA-CIS for VSE distributed as a physical tape directly into the production library and history file.
CAIN90Q2 Source library CAIN90Q2.Z Used to perform all subsequent CA-CIS product installations from physical tape.
CAIN90Q3 Source library CAIN90Q3.Z Used to merge CA-CIS for VSE into the production library and history file when installed with either CAIN90C2 or CAIN90Q2.
CAIN90Q4 Source library CAIN90Q4.Z Used to install CA-CIS for VSE distributed as a physical tape directly into an existing library and history file.
Upgrade with PTFSEL If you have a product that uses PTFSEL, see that product’s documentation for details on using the PTFSEL utility.
4–4 Getting Started

Installation Overview Checklist
Installation Overview Checklist You can use the following checklist to track your progress through the installation process. These steps are described in detail in the following pages. Refer to the specific step if you need to call CA Technical Support for assistance during the installation process.
Step 1. Review system requirements.
Task 1A. Verify VSE requirements.
Task 1B. Review installation materials.
Task 1C. Verify CICS requirements.
Task 1D. Verify CA-CIS requirements.
Step 2. Review conversion considerations.
Step 3. Complete the installation worksheet.
Step 4. Restore the CA-CIS library - Initial installations only.
Task 4A. Extract initial install JCL.
Task 4B. Install distribution tape using MSHP.
Step 5. Restore the CA-CIS library - Subsequent installations only.
Step 6. Modify the CA LMP Execution Software Parameters.
Task 6A. Customize the CAIRIM procedure for CA LMP.
Task 6B. Installing the CA LMP services in a VM environment.
Task 6C. Installing the CA LMP VM service machine.
Step 7. Define, initialize, and upgrade the CA-CIS data sets.
Task 7A. Define and initialize CAICUI Product Control data set.
Task 7B. Upgrade CAICUI Product Control data set.
Task 7C. Define and initialize CAUDPC1.
Task 7D. Define and initialize CAUDPC2.
Task 7E. Define and initialize CAUDSTG.
Task 7F. Define and initialize CAIHLPV.
Task 7G. Install CAIHLPV.
Task 7H. Define and Initialize CAMAP.
Installing CA-CIS 4–5

Installation Overview Checklist
Step 8. Update ASI procedure.
Task 8A. Update standard labels.
Task 8B. Update LIBDEF information.
Task 8C. Update SDL load list.
Task 8D. Update SVA statement and estimate SVA storage requirements.
Step 9. Update CICS.
Task 9A. Update File Control Table (FCT).
Task 9B. Update Program List Table Post Initialization (PLTPI).
Task 9C. Update Program List Table Shut Down (PLTSD).
Task 9D. Update Program Control Table (PCT).
Task 9E. Update Processing Program Table (PPT).
Task 9F. Migrate PCT and PPT to CICS DFHCSD.
Task 9G. Define CUI as an Interactive User Interface (IUI) Application (Optional).
Task 9H. Update SIT and CICS startup JCL.
Step 10. IPL.
Step 11. Migration of CA products into production.
Step 12. Install the CAICUI Logical Device Facility (CUILDEV).
Task 12A. Load CUILDEV.
Task 12B. Run the installation EXEC.
Task 12C. Tailor CUILDEV.
Step 13. Install the SRAM Options.
Step 14. Update CAIVPE Batch File Table Entries.
Step 15. Install CA-JARS MWRT CMS Members.
Step 16. Save all materials and output.
4–6 Getting Started

Step 1. Review System Requirements
Step 1. Review System Requirements Before attempting to complete any of the following installation steps, the VSE environment must be examined to ensure the successful operation of CA-CIS after completion of the installation procedures. Perform the following tasks in sequence:
Task 1A. Verify VSE Requirements
Review the "System Requirements and Installation Materials" chapter in this guide to be sure that the level of VSE installed can support CAICUI 1.4, CAIAUDIT 1.4, CAIHELP 1.0, Catalog Management 6.0, System Adapter 6.1, CA-EARL Service 6.1, and CA-SRAM Service 9.0.
Task 1B. Review Installation Materials
Review the "System Requirements and Installation Materials" chapter in this guide to be sure you have received all of the required documentation and installation tape(s). If there are any discrepancies, contact your CA representative to request the missing items before proceeding with this installation.
Task 1C. Verify CICS Requirements
Review the "System Requirements and Installation Materials" chapter in this guide to be sure that the level of CICS installed can support CAICUI 1.4, CAIAUDIT 1.4, CAIHELP 1.0, Catalog Management 6.0, and System Adapter 6.1.
Note: The CUI transaction writes CICS Temporary Storage (TS) records to the Auxiliary File with a QUEUEID=CUI. This could cause a problem for users that are using CICS journaling with the DFHJCT defined with a 'BUFSIZE=4096 or less' and the DFHTST defined with a 'DATAID=(CU)'. This could cause the CUI transaction to abend with an ATSL. To resolve this condition, increase the size of the BUFSIZE to '4096' plus the CICS journal record prefix.
Task 1D. Verify CA-CIS Requirements
Review the supplied product specific documentation and determine which of the services are required by all of the product(s) you intend to install. The chart on the following page gives the co-dependencies for the CA-CIS services.
Installing CA-CIS 4–7

Step 2. Review Conversion Considerations
CA-CIS Co-Dependencies
If you are installing: You must also install:
CAIAUDIT System Adapter and CAICUI
CAICCI System Adapter
CAICUI No required service
CAIHELP No required service
CAIVPE No required service
Catalog Management System Adapter and CAICUI
cBASE MAPPER CA-C Runtime
CA-C Runtime No required service
EARL No required service
SRAM No required service
System Adapter CAICUI
Note: For information on tailoring CAICCI, see the Administration Guide.
Step 2. Review Conversion Considerations Users of previous releases of CAICUI who have already established a CAICUI Product Control data set must convert it to the new release. See Task7B. Upgrade CAICUI Product Control Data Set for instructions on converting the CAICUI Product Control data set.
Step 3. Complete the Installation Worksheet Before proceeding with the installation process, you must answer the following questions about the environment in which CA-CIS will be installed:
Which DASD packs will be used to hold libraries and installation files?
Which file IDs will be used for libraries and installation files?
What EXTENT information will be used for libraries and installation files?
4–8 Getting Started
Step 3. Complete the Installation Worksheet
The worksheet is provided to help you define these items, and should be completed before continuing any further with the installation procedure. The keywords on the worksheet are the same as the symbolic parameters used in the supplied installation JCL. These keywords will then be used to update the sample installation JCL for proper execution in your environment.
For more information about the list of variables that must be modified, see the appendix "Standard Product Installation Details."
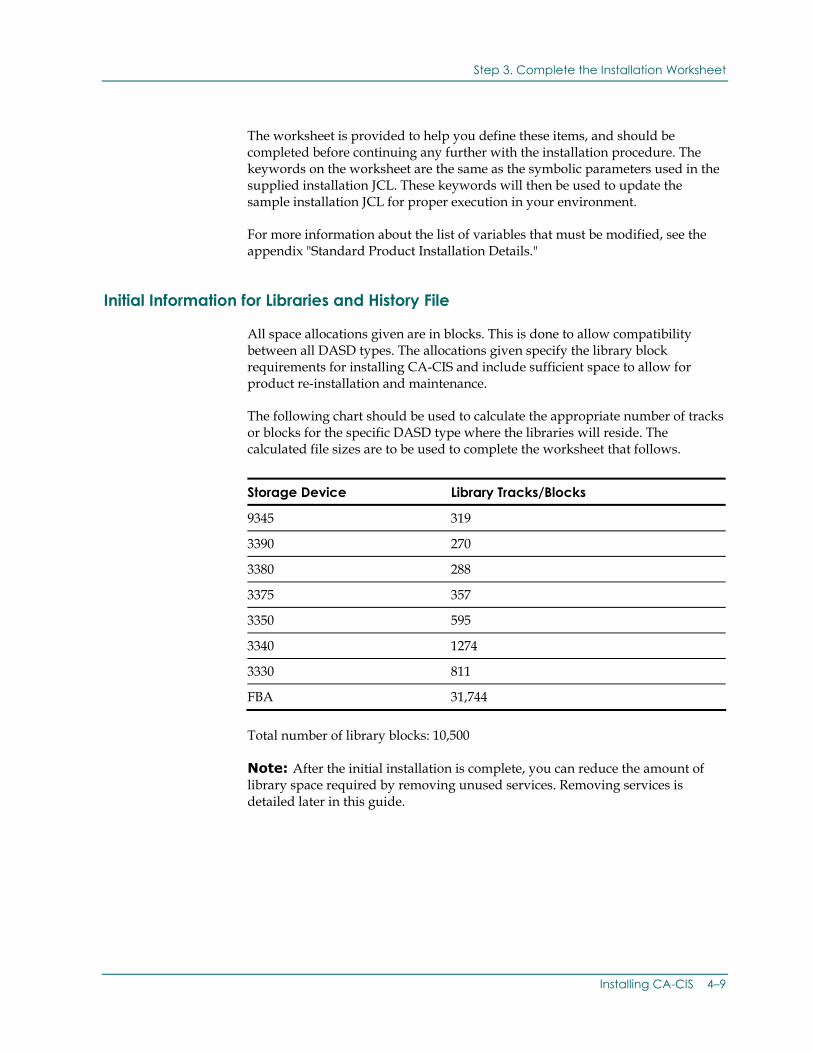
Initial Information for Libraries and History File
All space allocations given are in blocks. This is done to allow compatibility between all DASD types. The allocations given specify the library block requirements for installing CA-CIS and include sufficient space to allow for product re-installation and maintenance.
The following chart should be used to calculate the appropriate number of tracks or blocks for the specific DASD type where the libraries will reside. The calculated file sizes are to be used to complete the worksheet that follows.
Storage Device Library Tracks/Blocks
9345 319
3390 270
3380 288
3375 357
3350 595
3340 1274
3330 811
FBA 31,744
Total number of library blocks: 10,500
Note: After the initial installation is complete, you can reduce the amount of library space required by removing unused services. Removing services is detailed later in this guide.
Installing CA-CIS 4–9

Step 3. Complete the Installation Worksheet
Standard Product Installation Worksheet
+----------------------------------------------------------------------+ | Description Keywords | +----------------------------------------------------------------------+ 1. Supply the following information used to personalize the Computer Associates production history file: Customer Name 1. @CUSTNME=_______________ Customer Address @CUSTADD=_______________ Customer Phone Number @CUSTPHN=_______________ Programmer Name @PROGNME=_______________ 2. Supply the following information used for the production history file EXTENT: Volume ID of DASD pack 2. @HISTVOL=_______________ Beginning relative track or block @HISTREL=_______________ Number of tracks or blocks @HISTEXT=_______________ 3. Supply the following information used for the install history file EXTENT: Volume ID of DASD pack 3. @INSTVOL=_______________ Beginning relative track or block @INSTREL=_______________ Number of tracks or blocks @INSTEXT=_______________ 4. Supply the tape drive address where the installation tape will be mounted: Tape drive address of CUU 4. @TAPECUU=_______________ 5. Supply the following information used for the Production Library EXTENT: Volume ID of DASD pack 5. @DLIBVOL=_______________ Beginning relative track or block @DLIBREL=_______________ Number of tracks or blocks @DLIBEXT=_______________ 6. Supply the following information used for the install library EXTENT: Volume ID of DASD pack 6. @ILIBVOL=_______________ Beginning relative track or block @ILIBREL=_______________ Number of tracks or blocks @ILIBEXT=_______________ 7. Supply the product name and product code you are installing: PRODUCT NAME: CA-CIS 7. @PRODUCT=_______________ PRODUCT CODE: CGN14 @PRODCDE=_______________ 8. Supply the following only if you are installing from the electronic delivery file using IBM VSE Virtual Tape: IP address of the machine that currently holds the .AWS file 8. @IPADDR =_______________ The fully qualified location and name of the CA-CIS for VSE .AWS file @AWSFILE=_______________
4–10 Getting Started

Step 4. Restore the CA-CIS Library - Initial Installations Only
Step 4. Restore the CA-CIS Library - Initial Installations Only Note: If you already have a release of CA-CIS installed, skip this step.
This step creates and loads the CA-CIS library from tape using MSHP.
Task 4A. Extract Initial Install JCL
Extract the appropriate installation JCL member from the product library specified during the execution of either CAIN90B0 or CAIN90C0. Edit the JCL according to the worksheet items and the information located in the appendix "Standard Product Installation Details."
Task 4B. Install Distribution Tape Using MSHP
Standard Installation
Extract the installation copybook CAIN90B1.Z or CAIN90C1.Z from the sublibrary of the target library specified in Task 4A. Edit and modify the JCL using the worksheet items, located in the appendix "Standard Product Installation Details," for the appropriate JCL member. When editing the execution JCL, adhere to the following guidelines:
Be sure to limit the scope of editor changes to columns 1 through 71 of the skeleton JCL.
Remove the CATALS or CATALOG and BKEND statements from the beginning and end of each JCL sample.
In each JCL sample, change the following:
– '@*' to '/*'
– '@&' to '/&'
– './' to '//'
– '.*' to '/*'
– '.&' to '/&'
After all modifications are complete, mount the installation tape on the specified tape drive and submit the JCL for execution.
Simplified JCL
You can alternatively use simplified install JCL that does not require updating the standard installation worksheets.
Installing CA-CIS 4–11

Step 5. Restore the CA-CIS Library - Subsequent Installations Only
Extract the installation copybook CAIN90Q1.Z from the sublibrary of the target library specified in Task 4A. This JCL will create and install into a new production sublibrary and history file.
Step 5. Restore the CA-CIS Library - Subsequent Installations Only
This step is used when a release of CA-CIS has already been installed.
Standard Installation
In this step, extract the installation copybook CAIN90B2.Z or CAIN90C2.Z from the sublibrary of the CA Product Library that contains the previously installed CA-CIS. Edit and modify the JCL using the worksheet items, located in the appendix "Standard Product Installation Details," for the appropriate JCL member. When editing the execution JCL, adhere to the following guidelines:
Be sure to limit the scope of editor changes to columns 1 to 71 of the skeleton JCL.
Remove the CATALS or CATALOG and BKEND statements from the beginning and end of each JCL sample.
In each JCL sample, change the following:
– '@*' to '/*'
– '@&' to '/&'
– './' to '//'
– '.*' to '/*'
– '.&' to '/&'
After all modifications are complete, mount the installation tape on the specified tape drive and submit the JCL for execution.
Simplified JCL
You can use simplified install JCL that does not require updating the standard installation worksheets.
Extract the installation copybook CAIN90Q2.Z from the sublibrary of the CA Product Library that contains the previously installed CA-CIS. This JCL will create and install into a new temporary sublibrary and history file.
4–12 Getting Started

Step 6. Modify the CA LMP Execution Software Parameters
This JCL is intended to be used as the first part of a two-part install process; CAIN90Q3 is the second part of this process. Together, this process allows testing to be done before the newly installed product is merged into production.
Step 6. Modify the CA LMP Execution Software Parameters Important! This step is required for all solutions supported by CA LMP. Each solution supported by CA LMP and initialized by CA-CIS is defined via an entry in the CA-CIS sublibrary member CALMPKEY.A.
The parameter structure for CA LMP execution software presented below is only used with CA LMP supported software solutions.
PROD(pp) DATE(ddmmmyy) CPU(tttt-mmmm/ssssss) LMPCODE(kkkkkkkkkkkkkkkk)
Where:
pp Required. The two-character product code. For any given CA LMP software solution, this code agrees with the product code already in use by the CASAUTIL initialization parameters for the solution's non-CA LMP version.
ddmmmyy Required. The CA LMP Execution Key expiration date. dd is the numerical day of the month. mmm is the alpha abbreviation for the month (first three letters). yy is the numerical value for the year (last two digits).
tttt-mmmm Required. The CPU type and model (for example: 3090-600) on which the CA LMP software solution is to run. If the CPU type and/or model require less than four characters, blank spaces are inserted for the unused characters.
ssssss Required. The serial number of the CPU on which the CA LMP software solution is to run.
kkkkkkkkkkkkkkkk Required. The Execution Key needed to run the CA LMP software solution. This CA LMP Execution Key is provided on the Key Certificate shipped with each CA LMP software solution.
Example 1, below, shows a control card for the CA LMP execution software parameter.
Example 1 PROD(TD) DATE(01JAN97) CPU(3090-600 /370623) LMPCODE(XXXXXXXXXXXXXXXX)
Note: Refer to the chapter titled "CA LMP Operation", in the Administration Guide, for information on coding LMP statements.
Example 2, below, shows control card images that can be continued on the next line when a dash, "-", is placed in card column 72 of the first line.
Installing CA-CIS 4–13

Step 6. Modify the CA LMP Execution Software Parameters
Example 2 Col 1 Col 72 PRODUCT(TD) DATE(01JAN94) CPU(3090-600 /370623) - LMPCODE(XXXXXXXXXXXXXXXX)
Task 6A. Customize the CAIRIM Procedure for CA LMP
Customize the LMP Key install procedure, which is found in the CA-CIS sublibrary as member CALMPKEY.Z. Access the member and add the LMP keys for your installation. This example will catalog CALMPKEY.A with your LMP keys.
Task 6B. Installing the CA LMP Services in a VM Environment
If you are not running in a VM environment or are running VM/ESA 2.1 or higher, skip to Step 7. Define, Initialize, and Upgrade the CA-CIS Data Sets.
The CPUID used by CA LMP services is the real hardware CPUID. Therefore, when running as a guest under VM, CA LMP services tries to obtain the real CPUID from VM. In order to successfully implement CA LMP services in the VSE environment, the VSE guest machine must have any ONE of the following privileges:
The ability to issue a DIAG4
CLASS E
If the VSE guest machine has any of the above privileges, skip to Step 7. Define, Initialize, and Upgrade the CA-CIS Data Sets.
If the VSE guest machine does not have any of the above privileges, a VM Service Machine must be installed with a standard CMS userid of CASERVER.
Task 6C. Installing the CA LMP VM Service Machine
The following checklist should be used as you proceed through the installation process. These steps are discussed in further detail on the following pages.
1. Review System Requirements
2. Punch and Receive the Service Machine files
3. Run the Installation EXEC
4. File All Materials and Output
4–14 Getting Started

Step 6. Modify the CA LMP Execution Software Parameters
1. Review System Requirements
The CA LMP VM Service Machine requires the following:
− A CMS userid of CASERVER, with a minimum of 2M of storage for the LMP Virtual Service Machine.
− The following list of CP privileges in the CMS userid directory:
− DIAG4
− LOCK
− UNLOCK
− STCP
− Auto logon at IPL of CP/VM
OR
− CLASS A and C
− Auto logon at IPL of CP/VM
− One cylinder of CKD or ECKD DASD, or 1500 Blocks of FBA DASD, for storage space of programs, files, EXEC's and libraries.
2. Punch and Receive the Service Machine files
On the VSE Guest machine, run a LIBR job to punch the following two members from the CA-CIS sub-library to the CASERVER Service Machine:
− CASERVER.OBJ
− CASERVER.EXEC
Make sure to include the LIBR options FORMAT=NOHEADER and EOF=NO.
Receive the CASERVER.OBJ output as CASERVER TEXT onto the A disk of the CASERVER Service Machine.
Receive the CASERVER.EXEC output as CASERVER EXEC onto the A disk of the CASERVER Service Machine.
3. Run the Installation EXEC
From the CASERVER CMS userid, issue the following command: CASERVER
This command will drive the procedures which will generate the VM components required by the CASERVER VM Service Machine and activate the Service Machine.
This CASERVER EXEC can be placed into the PROFILE EXEC of the CMS userid, so that when a CP IPL is done the CASERVER Service Machine will automatically activate itself when the CASERVER CMS userid is auto logged on.
Installing CA-CIS 4–15

Step 7. Define, Initialize, and Upgrade the CA-CIS Data Sets
4. File all Materials and Output
Save all installation materials and any output from the installation process.
DO NOT erase any files which are created by the installation process. Many files may be created that have a filetype of LOADMAP, TAPEMAP TXTMAP; these files should not be erased, as they may be required for timely and accurate CA maintenance and support of the product.
Step 7. Define, Initialize, and Upgrade the CA-CIS Data Sets This section describes the tasks required for defining, initializing, and upgrading the CA-CIS data sets.
Task 7A. Define and Initialize CAICUI Product Control Data Set
Note: The System Adapter and Catalog Management system options are no longer supported through the DYNAM and CPUID macros; they must be maintained through the CAICUI online or batch maintenance facilities.
Important! If the products you are installing require the System Adapter or Catalog Management, you must complete this step. If your CA product does not require CAICUI, skip to Task7C. Define and Initialize CAUDPC1.
The CAICUI Product Control data set is a required VSAM data set that contains all of the user profile records, system options, CAIAUDIT component options and command tables.
This job must not be run with the previous release of CAICUI initialized. If CAICUI has been initialized, you must IPL before running this job.
Prior CAICUI users who have already established their CAICUI Product Control data set do not need to re-initialize this data set, and should skip this task and go to Task 7B. Upgrade CAICUI Product Control Data Set.
The following copybook defines the CAICUI Product Control data set and sets default CAICUI system options. The default System Administrator user ID and password are CSA and INITIAL, respectively. You must use them the first time you sign on to the CUI transaction.
Data Set Name
Copybook Name Description
CAICUI CAICUI.Z Define and initialize CAICUI data set.
4–16 Getting Started

Step 7. Define, Initialize, and Upgrade the CA-CIS Data Sets
Task 7B. Upgrade CAICUI Product Control Data Set
Users of CAICUI release 1.3 can skip to Task 7C. Define and Initialize CAUDPC1. Users of CAICUI releases 1.1 or 1.2 who have already established their CAICUI Product Control data set must run a batch conversion utility to upgrade the existing file and add any new system option records.
The CAICUI Product Control data set should be backed up before running the conversion.
This job must not be run with the previous release of CAICUI initialized. If CAICUI has been initialized, you must IPL before running this job.
The following copybooks backup and upgrade the CAICUI Product Control data set:
Data Set Name
Copybook Name Description
CAICUI BKUPCUI.Z Backup the existing file to tape.
CAICUI CONVERT.Z Convert the existing file and add any new system option records.
Task 7C. Define and Initialize CAUDPC1
If your CA product does not require CAIAUDIT, or you have an existing CAIAUDIT data set, skip to Task 7F. Define and Initialize CAIHLPV.
The CAIAUDIT Repository data set CAUDPC1 is a required VSAM data set and is the primary repository of CAIAUDIT records logged. A copybook containing the required JCL was cataloged to the CA-CIS library during installation under the name CAUDPC1.Z.
Data Set Name
Copybook Name Description
CAUDPC1 CAUDPC1.Z Define the CAIAUDIT Repository data set.
Installing CA-CIS 4–17

Step 7. Define, Initialize, and Upgrade the CA-CIS Data Sets
Task 7D. Define and Initialize CAUDPC2
The CAIAUDIT Repository data set CAUDPC2 is an optional VSAM data set that can be used as an alternate repository of CAIAUDIT records logged.
It is required, however, if the CAIAUDIT system option FULLACT has been specified as SWITCH. A copybook containing the required JCL was cataloged to the CA-CIS library during installation under the name CAUDPC2.Z.
Data Set Name
Copybook Name Description
CAUDPC2 CAUDPC2.Z Defines the optional CAIAUDIT Repository data set.
Task 7E. Define and Initialize CAUDSTG
The CAIAUDIT Staging data set CAUDSTG is an optional VSAM data set that serves as a high speed, temporary repository for CAIAUDIT records.
CAUDSTG is required, however, if the CAIAUDIT system option STAGE has been specified as YES. Using CAUDSTG permits swift draining of the in-core message queues by the CAIAUDIT logger tasks. The CAIAUDIT merger task then migrates records from CAUDSTG to a CAIAUDIT data set, either CAUDPC1 or CAUDPC2. See the Administration Guide to determine whether you may benefit from this option.
A copybook containing the required JCL was cataloged to the CA-CIS library during installation under the name CAUDSTG.Z. This data set cannot be shared among multiple CPUs.
Data Set Name
Copybook Name Description
CAUDSTG CAUDSTG.Z Define the optional CAIAUDIT Staging data set.
Task 7F. Define and Initialize CAIHLPV
The CAIHELP data set CAIHLPV is an optional VSAM data set and should be defined and initialized only if:
1. CAIHELP will be used. Consult the specific CA product documentation to determine whether the product(s) you plan to install use CAIHELP.
2. No CA VSAM help files have been defined to your system
4–18 Getting Started

Step 7. Define, Initialize, and Upgrade the CA-CIS Data Sets
If a CA VSAM help file has already been defined and CAIHELP will be used, skip this task and go on to the next. Consult the specific CA product documentation to determine whether the product(s) you have installed use CAIHELP.
Copybooks containing the required JCL were cataloged to the CA-CIS library during installation under the names CA90HLP1.Z and CA90HLP3.Z.
Data Set Name
Copybook Name Description
CAIHLPV CA90HLP1.Z Defines the optional CAIHELP data set and loads it from a physical product tape.
CAIHLPV CA90HLP3.Z Defines the optional CAIHELP data set and loads it from an electronic software delivery file.
Task 7G. Install CAIHLPV
Install the CAIHELP data set CAIHLPV only if:
The CAIHELP service will be used
A CA VSAM help file has already been defined to your system
If CAIHELP will not be used, skip this task and go on to the next. Consult the specific CA product documentation to determine whether the product(s) you have installed use CAIHELP.
Copybooks containing the required JCL were cataloged to the CA-CIS library during installation under the names CA90HLP2.Z and CA90HLP4.Z.
Data Set Name
Copybook Name Description
CAIHLPV CA90HLP2.Z Initializes the optional CAIHELP data set and loads it from a physical product tape.
CAIHLPV CA90HLP4.Z Initializes the optional CAIHELP data set and loads it from an electronic software delivery file.
Installing CA-CIS 4–19

Step 8. Update ASI Procedure
Task 7H. Define and Initialize CAMAP
The cBASE Mapper data set CAMAP is required if the cBASE Mapper is going to be installed on your system. If the cBASE Mapper is not going to be installed, skip to Step 8. Update ASI Procedure.
Data Set Name
Copybook Name Description
CAMAP DEFMAP.Z Defines the cBASE Mapper data set.
LOADMAP.Z Initializes the cBASE Mapper data set.
Step 8. Update ASI Procedure This section describes the tasks required for updating the ASI procedure.
Task 8A. Update Standard Labels
In this task, the CA-CIS data set label information must be placed into Standard Labels. The label information must exactly match the data set information defined to VSAM in Step 7. If multiple CICS Regions running in the VSE machine use separate copies of any of the CA-CIS data sets, the label information for those data sets must appear in the CICS Region(s) startup JCL and should be omitted from Standard Labels.
For reasons inherent to the update mechanisms used, the CAICUI Product Control data set must have two separate labels defined for it, using the DTF names CAICUI and CAICUIU. These labels are required and must be placed in the appropriate category, either Standard Labels or CICS startup JCL.
Only update Standard Labels with the label information of the data sets that you have already created.
If the data sets were initialized with the sample data set names shown in 'Step 7. Define, Initialize, and Upgrade the CA-CIS Data Sets', the required labels would be as follows:
// DLBL CAICUI,'CAI.CUI.PRODUCT.CONTROL.DATASET',,VSAM,CAT=CATNAME // DLBL CAICUIU,'CAI.CUI.PRODUCT.CONTROL.DATASET',,VSAM,CAT=CATNAME // DLBL CAUDPC1,'CAI.AUDIT1.DATASET',,VSAM,CAT=CATNAME
4–20 Getting Started

Step 8. Update ASI Procedure
The optional data set labels are also shown with the sample data set names from Step 7. It is recommended that they also be added to Standard Labels or the CICS startup JCL.
// DLBL CAUDPC2,'CAI.AUDIT2.DATASET',,VSAM,CAT=CATNAME // DLBL CAUDSTG,'CAI.STAGE.DATASET',,VSAM,CAT=CATNAME // DLBL CAIHLPV,'CAI.HELP.VSAM.DATASET',,VSAM,CAT=CATNAME // DLBL CAMAP,'CAIV.MAPPER.CAMAP',,VSAM,CAT=IJSYSUC
This is an example of the JCL to be added to your ASI procedure to start up the System Adapter and CAIAUDIT services.
* START UP SYSTEM ADAPTER PRODUCTS // EXEC CASAUTIL * START UP CAIAUDIT // EXEC CACCDBU0,PARM='START AUDIT SUBSYS(subsystem)' ** See Note 1 /* or
// JOB CASAUTIL START AUDIT RUNTIME // USPI 01 // EXEC CASAUTIL START SYSADAPTER START INIT START AUDIT SUB(POWER) /* /&
Place the JCL after the System Directory List (SDL) load and all LIBDEF statements.
Note 1: The subsystem can be POWER or VTAM. See the Administration Guide for details on SUBSYS.
Note 2: Add or update your size statements in the ASI to ensure that all partitions have at least 256K of partition GETVIS.
Note 3: The START parameters for the other services can be found in the Administration Guide. For other CA products, refer to the corresponding product documentation to obtain the START parameters.
Task 8B. Update LIBDEF Information
The library.sublibrary into which CA-CIS was installed must be added to the permanent default LIBDEF SEARCH group for all partitions. This requires a LIBDEF of SOURCE as well as PHASE, or use * (asterisk) for all types of libraries. For example: // LIBDEF SOURCE,SEARCH=(CAI2.CA90SV14,...),PERM // LIBDEF PHASE,SEARCH=(CAI2.CA90SV14,...),PERM or
// LIBDEF *,SEARCH=(CAI2.CA90SV14,...),PERM
Installing CA-CIS 4–21

Step 8. Update ASI Procedure
Task 8C. Update SDL Load List
Placing these entries in the SDL load list causes the named phases to become SVA resident. If they are not in the SDL load list, they will be dynamically loaded by CAIAUDIT.
Entry Service Required
CAAUACVT,SVA CAIAUDIT NO
CAAUNXPR,SVA CAIAUDIT NO
CAAUATC0,SVA CAIAUDIT NO
CAAUATC1,SVA CAIAUDIT NO
CAAUATC2,SVA CAIAUDIT NO
CAAURWT0,SVA CAIAUDIT NO
CAAURLGD,SVA CAIAUDIT NO
$$BCASI3,MOVE System Adapter YES
The following copybooks contain phases that can be added to the SDL if desired.
Entry Service Use
CAIY3CAT.Z Catalog Management optional
CAIY5SAD.Z System Adapter optional
SRAMSDL.Z SRAM optional
CAI3CCCI.Z CAICCI optional
Task 8D. Update SVA Statement and Estimate SVA Storage Requirements
The process of estimating required SVA storage depends upon a number of factors including, but not limited to, the following:
The number of services installed
The number of CA solutions utilizing those services
The specific CA options selected
The actual use of CA options
The address space layout and system configuration
The amount of partition storage available
4–22 Getting Started
Step 8. Update ASI Procedure
The following table provides approximate initial allocations by CA-CIS:
Service Approximate Allocations
CAIAUDIT 30K
CAICUI 52K
Catalog Management 25K
SRAM 35K
System Adapter 90K
CAICCI See storage requirements
The actual amount of storage you require may be less than or greater than the above amounts. After the initial installation and subsequent tailoring steps are completed, review the actual amount of storage used and adjust the allocated amount accordingly. It is highly recommended that a cushion of 80K is provided to make allowances for transient storage allocation.
CAICCI Storage Requirements
Storage of 4K and one SDL entry (via the SVA IPL command) must be available in the SVA(24) area for phase CAS9EVT. CAICCI internal processing phases must have approximately 110K of storage available in either the SVA area or the system GETVIS area.
The phases will be loaded into the system GETVIS area–GETVIS(31) area, if available–by the System Adapter. They are SVA eligible and can be placed there via the JCL SET SDL command. The phases are eligible for the SVA(31) area.
CAICCI must have approximately 4K of system GETVIS available for internal processing control blocks. CAICCI will use System GETVIS(31) storage if available.
Note: For information on tailoring CAICCI, see the Administration Guide.
Installing CA-CIS 4–23

Step 9. Update CICS
Step 9. Update CICS Important! New information may have been added to all of the CICS copybooks between releases. The names of the copybooks, however, may have remained the same from one release to the next. Please reassemble all of your tables that include copybooks to ensure that you have the most current copybooks available.
Task 9A. Update File Control Table (FCT)
Add the following entries to the CICS FCT. Copybooks containing the required FCT entries were cataloged to the CA-CIS library during installation.
Copybook Name Description
CAAUFCT6.A Contains the required entries for CICS 1.6. (For CAIAUDIT users only.)
CAAUFCT7.A Contains the required entries for CICS 1.7 and above. (For CAIAUDIT users only.)
CACCFCT6.A Contains the required entries for CICS 1.6. (For CAICUI users only.)
CACCFCT7.A Contains the required entries for CICS 1.7 and above. (For CAICUI users only.)
CAHLFCTV.A Contains the required entries for CICS 1.6. (For HELP users only.)
CAHLFCT7.A Contains the required entries for CICS 1.7 and above. (For HELP users only.)
CASCMFCT.A Contains the required entries for the cBASE Mapper.
Note: CAICUIU is a redefinition of the CAICUI Product Control data set. It is used by the CUI transaction during product control maintenance and is dynamically opened and closed by the CUI transaction. It is important that the FILSTAT be specified as UNENABLED,CLOSED.
Task 9B. Update Program List Table Post Initialization (PLTPI)
This task applies to CAICUI users only and is optional but highly recommended. It is required, however, if CA-CIS is to be initialized during CICS startup. If this task is not performed, CAICUI system initialization is triggered by the first attempt to use the online CUI transaction (default transaction ID CUI).
Note: The preferred initialization method is via the PLTPI to eliminate any possibilities of contention once CICS is already active.
4–24 Getting Started

Step 9. Update CICS
A copybook containing the PLTPI entry was cataloged to the CA-CIS library during installation under the name CAAUPLTI.A:
Copybook Name Description
CAAUPLTI.A Program List Table (Post Initialization).
If your installation does not currently have a PLTPI, copybook CAAUPLTI.Z has been provided to assist you.
Copybook Name Description
CAAUPLTI.Z Program List Table (Post Initialization).
If a new suffix is assigned to this PLTPI, make certain that the CICS System Initialization Table (SIT) or the CICS startup JCL is updated to reflect the new PLTPI phase name, which must also be added to the PPT. If the above example were used, then the following statement would have to be added to the PPT: DFHPLTPI DFHPPT TYPE=ENTRY,PROGRAM=DFHPLTPI
Task 9C. Update Program List Table Shut Down (PLTSD)
This task applies to CAICUI users only and is required even if Task 9B has not been performed. If this task is not performed, the CAICUI system will not terminate cleanly during CICS shutdown.
The following entry must be added to the PLTSD before the entry for DFHDELIM.
A copybook containing the PLTSD entry was cataloged to the CA-CIS library during installation under the name CAAUPLTS.A:
Copybook Name Description
CAAUPLTS.A Program List Table (Shut Down).
If your installation does not currently have a PLTSD, copybook CAAUPLTS.Z has been provided to assist you.
Copybook Name Description
CAAUPLTS.Z Program List Table (Shut Down).
Installing CA-CIS 4–25

Step 9. Update CICS
If a new suffix is assigned to this PLTSD, make certain that the CICS System Initialization Table (SIT) or the CICS startup JCL is updated to reflect the new PLTSD phase name, which must also be added to the PPT. If the above example were used, then the following statement would have to be added to the PPT: DFHPLTSD DFHPPT TYPE=ENTRY,PROGRAM=DFHPLTSD
Task 9D. Update Program Control Table (PCT)
Note: Steps 9D, 9E and 9F are accurate as written for CICS 2.3 and earlier releases of CICS. Support for CAIAUDIT and CAICUI under CICS Transaction Server releases 1.1.0 and above is provided by the members CUICSD.Z and CUICSDI.Z.
Member CUICSD.Z should be used to add CUI support to the appropriate CSD dataset.
If you intend to use CUI under ICCF on CICS Transaction Server, you will need to use the CUICSDI.Z member instead of the standard CUICSD.Z member.
Add the following entries to the CICS PCT:
Copybook Name Description
CAALPCT.A Contains the required PCT COPY ALKPCT statement to include all MFLINK PCT entries.
CACCPCT.A Contains the required PCT entries for CAICUI cataloged to the CA-CIS library during installation.
An optional RDO copybook is provided for CAICUI and CAIAUDIT users who wish to define those entries in this way (see Task 9F. Migrate PCT and PPT to CICS DFHCSD).
CAF2PCT.A Contains the required CICS 2.3 PCT entries for CA-C Runtime cataloged to the CA-CIS Library during installation.
If running on the CICS Transaction Server, you must load the supplied member CAF2CSD.Z. This member contains the required CICS program transaction definitions for CA-C Runtime.
CASCMPCT.A Contains the required PCT entries for the cBASE Mapper cataloged to the CA-CIS Library during installation.
4–26 Getting Started

Step 9. Update CICS
Copybook Name Description
CAVUPCT6.A Contains the required MRO TOR PCT entries for CAIVPE, running under CICS 1.6, cataloged to the CA-CIS Library during installation. If you are running in a non-MRO environment, this copybook is not required.
CAVUPCT7.A Contains the required MRO TOR PCT entries for CAIVPE, running under CICS 1.7, cataloged to the CA-CIS Library during installation. If you are running in a non-MRO environment, this copybook is not required.
CAVUPCT1.A Contains the required MRO TOR PCT entries for CAIVPE, running under CICS 2.1, cataloged to the CA-CIS Library during installation. If you are running in a non-MRO environment, this copybook is not required.
CAVUPCT2.A Contains the required MRO TOR PCT entries for CAIVPE, running under CICS 2.2, cataloged to the CA-CIS Library during installation. If you are running in a non-MRO environment, this copybook is not required.
CAVUPCT3.A Contains the required MRO TOR PCT entries for CAIVPE, running under CICS 2.3, cataloged to the CA-CIS Library during installation. If you are running in a non-MRO environment, this copybook is not required.
CAVUAPC6.A Contains the required MRO AOR PCT entries for CAIVPE, running under CICS 1.6, cataloged to the CA-CIS Library during installation. If you are running a non-MRO environment, this copybook is not required.
CAVUAPC7.A Contains the required MRO AOR PCT entries for CAIVPE, running under CICS 1.7, cataloged to the CA-CIS Library during installation. If you are running a non-MRO environment, this copybook is not required.
CAVUAPC1.A Contains the required MRO AOR PCT entries for CAIVPE, running under CICS 2.1, cataloged to the CA-CIS Library during installation. If you are running a non-MRO environment, this copybook is not required.
Installing CA-CIS 4–27
Step 9. Update CICS
Copybook Name Description
CAVUAPC2.A Contains the required MRO AOR PCT entries for CAIVPE, running under CICS 2.2, cataloged to the CA-CIS Library during installation. If you are running a non-MRO environment, this copybook is not required.
CAVUAPC3.A Contains the required MRO AOR PCT entries for CAIVPE, running under CICS 2.3, cataloged to the CA-CIS Library during installation. If you are running a non-MRO environment, this copybook is not required.
All parameters must be specified as shown, except for the CUI transaction ID, which can be changed if desired.
The following table is an example of the proper CAIVPE copy statements to use in your CICS PCT table assemblies.
Based on a CICS 2.1 MRO system:
AOR PCT COPY CAVUAPC1
TOR PCT COPY CAVUPCT1
Based on a CICS 2.1 non-MRO system:
PCT No requirements
Note: Existing sites that have CAIVPE 4.2 already installed should be aware that duplicate entries may occur during PCT assemblies. You may ignore the errors or delete the duplicate entries from the existing source copybooks.
4–28 Getting Started

Step 9. Update CICS
Task 9E. Update Processing Program Table (PPT)
The following copybooks contain the required PPT entries and were cataloged to the CA-CIS library during installation.
Copybook CA-CIS
CAALPPT.A Contains the required PPT COPY ALKPPT statement to include all MFLINK PPT entries.
CAAUPPT.A Contains the required PPT entries for CAICUI and CAIAUDIT cataloged to the CA-CIS Library during installation.
An optional RDO copybook is provided for CAICUI and CAIAUDIT users who wish to define those entries in this way (see Task 9F. Migrate PCT and PPT to CICS DFHCSD).
CASAPPT.A Contains the required PPT entries for System Adapter cataloged to the CA-CIS Library during installation.
CACNPPT.A Contains the required PPT entries for Catalog Management cataloged to the CA-CIS Library during installation.
CAF2PPT.A Contains the required CICS 2.3 PPT entries for CA-C Runtime cataloged to the CA-CIS Library during installation.
If running on the CICS Transaction Server, you must load the supplied member CAF2CSD.Z. This member contains the required CICS program transaction definitions for CA-C Runtime.
CASCMPPT.A Contains the required PPT entries for the cBASE Mapper cataloged to the CA-CIS Library during installation.
CAVUPPT.A Contains the required (CAIVPE common modules) non-MRO and MRO AOR PPT entries for CAIVPE, running all CICS levels, cataloged to the CA-CIS Library during installation. If you are running a non-MRO environment, this copybook is required. In addition, you need the proper CAVUPPTn copybook pertaining to your CICS release.
CAVUPPT6.A Contains the required non-MRO and MRO AOR PPT entries for CAIVPE, running under CICS 1.6, cataloged to the CA-CIS Library during installation. If you are running a non-MRO environment, this copybook is required.
Installing CA-CIS 4–29

Step 9. Update CICS
Copybook CA-CIS
CAVUPPT7.A Contains the required non-MRO and MRO AOR PPT entries for CAIVPE, running under CICS 1.7, cataloged to the CA-CIS Library during installation. If you are running a non-MRO environment, this copybook is required.
CAVUPPT1.A Contains the required non-MRO and MRO AOR PPT entries for CAIVPE, running under CICS 2.1, cataloged to the CA-CIS Library during installation. If you are running a non-MRO environment, this copybook is required.
CAVUPPT2.A Contains the required non-MRO and MRO AOR PPT entries for CAIVPE, running under CICS 2.2, cataloged to the CA-CIS Library during installation. If you are running a non-MRO environment, this copybook is required.
CAVUPPT3.A Contains the required non-MRO and MRO AOR PPT entries for CAIVPE, running under CICS 2.3, cataloged to the CA-CIS Library during installation. If you are running a non-MRO environment, this copybook is required.
CAVUTPT6.A Contains the required MRO TOR PPT entries for CAIVPE, running under CICS 1.6, cataloged to the CA-CIS Library during installation. If you are running a non-MRO environment, this copybook is not required.
CAVUTPT7.A Contains the required MRO TOR PPT entries for CAIVPE, running under CICS 1.7, cataloged to the CA-CIS Library during installation. If you are running a non-MRO environment, this copybook is not required.
CAVUTPT1.A Contains the required MRO TOR PPT entries for CAIVPE, running under CICS 2.1, cataloged to the CA-CIS Library during installation. If you are running a non-MRO environment, this copybook is not required.
CAVUTPT2.A Contains the required MRO TOR PPT entries for CAIVPE, running under CICS 2.2, cataloged to the CA-CIS Library during installation. If you are running a non-MRO environment, this copybook is not required.
4–30 Getting Started

Step 9. Update CICS
Copybook CA-CIS
CAVUTPT3.A Contains the required MRO TOR PPT entries for CAIVPE, running under CICS 2.3, cataloged to the CA-CIS Library during installation. If you are running a non-MRO environment, this copybook is not required.
If a new PLTPI or PLTSD phase has been generated, DFHPPT statements must be inserted into the PPT at this time.
The following table is an example of the proper CAIVPE copy statements to use in your CICS PPT table assemblies.
Based on a CICS 2.1 MRO system:
AOR PPT COPY CAVUPPT
COPY CAVUPPT1
TOR PPT COPY CAVUTPT1
Based on a CICS 2.1 non-MRO system:
PPT COPY CAVUPPT
COPY CAVUPPT1
Note: Existing sites that have CAIVPE 4.2 already installed should be aware that duplicate entries may occur during PPT assemblies. You may ignore the errors or delete the duplicate entries from the existing source copybooks.
Task 9F. Migrate PCT and PPT to CICS DFHCSD
This task is for CAIAUDIT and CAICUI users under CICS 2.3 only. It defines the required CA-CIS PCT and PPT entries in the CICS Resource Definition data set, DFHCSD. This step can be omitted if PCT and PPT entries were defined in Tasks 9D and 9E. Be sure to add the CAICUI group name to the CICS startup LIST(s).
Copybook Name Description
CAAUCSD7.Z Creates a single group named CAICUI that contains all required PPT and PCT entries.
Installing CA-CIS 4–31

Step 10. IPL
Task 9G. Define CUI as an Interactive User Interface (IUI) Application (Optional)
In this task, IBM's Interactive User Interface can be tailored to start transaction CUII and invoke the CA Common User Interface. Ensure that all of the following are satisfied:
All required steps previously listed in Task 9 have been completed.
An Interactive Interface Application Profile has been defined or updated to start a transaction ID (code 1) with an Activate Name of CUII.
If you will be using CUII from IUI, you may wish to apply special PTF LS86346. This PTF will suppress the CA message "CUI TRANSACTION TERMINATED" which is normally issued when CUI is ended. This message is potentially confusing to users running under the Interactive User Interface.
Task 9H. Update SIT and CICS Startup JCL
In this task, the CICS startup JCL must be examined to be certain that:
All required label information has been provided (see Task 8A. Update Standard Labels).
The LIBDEF statement has been updated to include the CA-CIS library.sublibrary.
The SIT or startup overrides have been updated to reflect any new tables that have been assembled and cataloged.
CA-C Runtime users note that a minimum of 8 bytes of Common Work Area (CWA) is required. Define WRKAREA=8 or add 8 to the WRKAREA parameter in the SIT.
Step 10. IPL An IPL is required for the installation and verification of CA-CIS. IPL the VSE operating system with the required options in place to support CA-CIS. Check your CA manuals for the appropriate CA-CIS services that should be started at this time in order for the individual products to run.
For example, if your product needs System Adapter to run, during or after the IPL, System Adapter should be started by running CASAUTIL. For more information on running CASAUTIL, see the Administration Guide.
4–32 Getting Started

Step 11. Migration of CA Products into Production
Step 11. Migration of CA Products into Production This step applies to subsequent installs only.
CAIN90B3 is used to migrate a product into the production library(s) and history file when a product was installed to an installation library(s) and history file using CAIN90B2 or CAIN90C2. This step is executed only after product installation, customization, verification and testing is complete.
The JCL is located on the restored product sublibrary and is named CAIN90B3.Z. Edit and modify the JCL using the worksheet items discussed in the Appendix of this guide.
Ensure that all modifications have been made according to the Installation Worksheet and submit the JCL for execution.
After this process is complete, the installation library(s) and history file can be deleted.
Step 12. Install the CAICUI Logical Device Facility (CUILDEV) The CAICUI Logical Device Facility (CUILDEV) allows access to VSE/CICS from a VM/CMS environment. CUILDEV establishes a logical session via CP's Logical Device Support Facility (LDEV). This facility can be used (by default) to establish a CAICUI session from CMS, or can be used to issue any valid CICS transaction from CMS. The CUILDEV driver is designed to be flexible and easy to use. The system can be tailored through the use of user defined profiles.
The purpose of this facility is to offer, in effect, a CMS interface to CAICUI or even to user defined transactions.
The programs and files that comprise CUILDEV are shipped on the standard CA-CIS installation tape.
Task 12A. Load CUILDEV
This task must be followed step by step to install CUILDEV:
1. Log on to a CMS userid with a read/write A-disk.
2. Have the CP OPERATOR attach a tape drive to the userid logged on to in step 1 (above), as device address 181.
3. Have the CP OPERATOR mount the CA-CIS product distribution tape on the tape drive that was attached to the userid as part of step 2 (above).
Installing CA-CIS 4–33

Step 13. Install the SRAM Options
4. Issue the command ===> TAPE REW
(This will position the tape at load point.)
5. Issue the command ===> TAPE FSF 228
(This will position the tape at the correct file in preparation for loading.)
6. Issue the command ===> TAPE LOAD * * A
(This will load all required programs and files.)
Task 12B. Run the Installation EXEC
From the CMS in 'Task 12A. Load CUILDEV', issue the following command: GENCUI
The above command will drive the procedures which will generate CUILDEV.
Task 12C. Tailor CUILDEV
The 'SITE CUIPROF' and 'USER CUIPROF' CMS files that were loaded in 'Task 12A. Load CUILDEV', must now be tailored. See the Administration Guide for more information.
Step 13. Install the SRAM Options To set generation defaults applicable to your installation, the SRAM Option macro may be coded and assembled following standard Assembler Language coding conventions. This macro will catalog a phase with the name SRAMCNFG, containing the generation options chosen. This phase may be recataloged at any time by reassembling the SRAM macro. User application programs will not be affected by the options chosen and will not need to be relinked if generation options are changed.
The following JCL is necessary to assemble the macro and recatalog the option phase: // JOB CASRAM MACRO ASSEMBLY // OPTION CATAL // PAUSE ENTER LIB ASSGN/LIBDEFS IF NECESSARY // EXEC ASSEMBLY CASRAM keyword parameters ... END /* // EXEC LNKEDT /&
4–34 Getting Started

Step 13. Install the SRAM Options
Note: A sample of the SRAM macro and keywords can be found in the installation library as CASRAM.A.
CASRAM Macro (Respecifying Generation Options)
The following keywords may be coded as operands in the SRAM macro:
SYSTEM= Indicates the instruction set to be used for move and compare operations.
The allowable values are 360, 370 and 4300. Users operating 30xx CPUs should specify 370. The values 370 and 4300 are equivalent.
Default = 370
SRAM uses the SYSTEM value to generate more efficient move and compare instructions on CPUs which operate with the 370 instruction set. The value 360 may be specified for a 370/43xx/30xx CPU without problems; however, a slight decrease in performance may result if records longer than 256 bytes are routinely sorted using SRAM. The value 370 or 4300 may not be specified if the CPU being used does not support this instruction set, either by hardware or the use of software instruction simulation.
USERID= A 1- to 16-character identifier may be associated with the SRAM configuration table for documentation purposes. It must be enclosed within quotes.
The USERID parameter can be used as the user desires to identify a specific SRAMCNFG table. Most users will use the field to indicate the assembly date (for example, 'REGENED 06/30/93'), or to indicate a new option in effect (for example, 'DYNAMD/PFIX').
OPSYS= The operating system may be selected as one of the following:
DOS A non-VS operating system (Release 26 or lower) is installed. This includes DOS/MVT, EDOS, DOS/RS and similar operating systems.
DOSVS A DOS/VS or compatible system is installed.
DOSVSE Any release of VSE or compatible system is installed. This includes MVT/VSE systems.
Default = DOSVS
The DOSVS and DOSVSE parameters are equivalent, as SRAM is able to determine dynamically at execution time if any release of VSE is operational. When running under VSE/SP, specify DOSVSE. Do not attempt to run SRAM on VSE with DOS as the specified operating system.
Installing CA-CIS 4–35

Step 13. Install the SRAM Options
STORAGE= Optional operand used to set a maximum limit on the use of main storage. The format is nnnnK.
SRAM uses this value to limit the amount of main storage to be used by all currently active SRAM sorts.
Default = 0K (no limit on storage)
The value specified in this parameter is an absolute limit to be applied against the storage requests of all active SRAM sorts. The STORAGE value will be compared against the length specified in a SRTCORE call, or the amount of storage remaining in the partition immediately following the application program. The smaller amount will be chosen.
Do not install SRAM with a storage value that is unnecessarily small, thus potentially preventing some SRAM sorts from acquiring enough storage to run, even though the storage is available in the partition.
The storage value should be allowed to default to 0K (no limit), meaning the SRTCORE or table values should control storage use, unless your environment has known paging problems caused by lack of available storage.
PFIX= Indicates whether virtual pages are to be fixed in storage for better performance as follows:
YES SRAM should attempt to page fix control blocks and buffers up to the limit specified in the supervisor ALLOCR operand for each partition. A minimum of 2K will be page fixed.
NO No page fixing or private CCW translation is to be done.
Default = YES
The reply YES is recommended. This allows control blocks and I/O buffers to be fixed and private CCW translation to occur (see also the EXCPVR parameter). This will reduce supervisor overhead and paging. PFIX=YES is not allowed for non-VS systems.
See Notes on the PFIX and EXCPVR Parameters for more information.
4–36 Getting Started

Step 13. Install the SRAM Options
DYNAMD= Indicates whether SRAM is to interface to CA-DYNAM/D as follows:
YES CA-DYNAM/D should be called to automatically truncate (space-release) work files. CA-DYNAM/D must be installed and active on the system.
NO CA-DYNAM/D is not installed and/or activated.
Default = NO
If the CA-DYNAM/D interface has been enabled using this parameter, CA-DYNAM/D must be active on the system. Failure to have CA-DYNAM/D active will cause every sort to cancel with the IBM message '4n80I INVALID FILE TYPE' when the work file is opened.
EXCPVR= Indicates whether SRAM is to attempt private CCW translation (EXCP V=R).
YES SRAM should attempt to aid performance by allowing EXCP V=R operations.
NO EXCP V=R is not allowed.
Default = YES
The reply YES is recommended on VSE along with PFIX=YES to allow private CCW translation to occur and to reduce supervisor overhead for work-file operations.
EOJERR Indicates whether SRAM is to force an EOJ condition when an error is detected.
YES Force EOJ condition.
NO Force end-of-step condition.
Default = NO
Notes on the PFIX and EXCPVR Parameters:
The following rules apply to the specification of the PFIX and EXCPVR generation parameters:
If PFIX=NO, SRAM will not attempt to page fix any main storage, even if PFIX=YES is generated in the DOS/VS(E) supervisor and real storage has been allocated to the partition.
If PFIX=YES and EXCPVR=NO, SRAM will attempt to page fix one page frame from each active sort task that contains the major control blocks for the sort process. I/O will not be optimized by using Private CCW Translation.
Installing CA-CIS 4–37

Step 13. Install the SRAM Options
If PFIX=YES and EXCPVR=YES, the control blocks and I/O buffers will be page fixed if possible and private CCW translation will occur for work file I/O operations. This is dependent on the VSE supervisor being generated with PFIX=YES and EXCPREAL=YES, as well as having adequate real storage allocated to the partition using the ALLOCR macro or JCL statement at IPL. Specifying YES for both parameters will yield maximum performance.
Sample Option Generation Using the CASRAM Macro
The following example shows how typical generation options would be specified in the CASRAM macro to generate a SRAMCNFG phase for an installation running under VSE Release 2 or higher, on a 4341 with CA-DYNAM/D installed and active. For best performance, SRAM will be allowed to attempt page fixing and to do private CCW translation (EXCP V=R). All active SRAM sorts from a program will execute in 512K or less. For documentation purposes, a user ID will be assembled into the option phase to indicate the assembly date. // JOB CASRAM OPTION MACRO ASSEMBLY // OPTION CATAL // EXEC ASSEMBLY PRINT OFF COPY CASRAM PRINT ON CASRAM SYSTEM=4300, .USE THE 4300 INSTRUCTION SET * OPSYS=DOSVSE, .DOS/VSE OPERATING SYSTEM * STORAGE=512K, .MAXIMUM STORAGE LIMIT * PFIX=YES, .PAGE FIXING IS ALLOWED * EXCPVR=YES, .ATTEMPT EXCP V=R * DYNAMD=YES, .CA-DYNAM/D IS INSTALLED * EOJERR=YES, .FORCE EOJ IF ERROR * USERID='SRAM GEN 01/JULY' END /* // EXEC LNKEDT /&
4–38 Getting Started
Step 14. Update CAIVPE Batch File Table Entries
Step 14. Update CAIVPE Batch File Table Entries The CAIVPE file table is used to describe data sets to CAIVPE in a batch environment. You can build or modify a file table by coding the CAIVPE ROSFD macro for each data set in the table. After you assemble and link this file table, it can be used to run programs.
CAIVPE-dependent products may have additional macros that need to be included in the CAIVPE batch file table. For more details, refer to the specific CA product documentation.
ROSFD Macro
A description of the ROSFD macro follows: name ROSFD ACCMETH={BDAM³VSAM³SEQ}, ADDRESS={RELTRK³ABS}, BLKSIZE=nnnnn, CTLCHAR={YES³ASA}, DEVADDR=SYSxxx, DEVICE=nnnn, DTFNAME={,³VSEdtfname}, DTFTYPE={DTFCD³DTFPR³DTFCDP³DTFSD³DTFMT}, FILABL={STD³NO}, LRECL=nnnn, RECFM={,³F³FB³V³VB³U}, STRNO={5³xx}
name This label is a required field. At execution time, it is used as the name provided on CAIVPE I/O service calls for the data set. If you do not specify a name for the DTFNAME= keyword or the DDNAME= keyword, this label will be the DTFNAME for the dataset in VSE, or the DDNAME for the dataset in MVS.
ACCMETH= This keyword specifies the access method used for the data set. Valid values are:
BDAM Specifies the Basic Direct Access Method, which is the default.
VSAM Specifies the Virtual Storage Access Method (VSE only).
SEQ Specifies the Sequential Access Method.
Installing CA-CIS 4–39

Step 14. Update CAIVPE Batch File Table Entries
ADDRESS= This keyword specifies the type of addressing to be used for data sets specified as ACCMETH=BDAM. Valid values are:
RELTRK Relative Track Addressing, which uses the TTR addressing scheme. This is the default.
RELBLK Relative Block Addressing.
ABS Absolute Addressing, which uses the MBBCCHHR addressing scheme.
BLKSIZE= This keyword specifies a dataset's block size. Valid values for MVS are 0 though 32767. If you specify BLKSIZE=0, you must place the BLK SIZE value in the JCL or the DCB of the dataset. For VSE, you must specify a value greater than 0.
CTLCHAR= This keyword specifies the type of printer control character. Valid values are:
YES 360-machine type
ASA ANSI
DEVADDR= The keyword specifies the logical unit assignment for the dataset. Use this keyword for card input, printer, punch, and tape entries. Sequential tape and BDAM entries can accept the default of SYS000, or use JCL to specify a logical unit assignment.
DEVICE= This keyword specifies the device type, for example 3380.
DTFNAME= This keyword specifies the DTFNAME used to identify a physical data set. A valid VSE DTFNAME may be used, or the value can be omitted. If you omit a value, the "name" label will be used as the DTFNAME.
DTFTYPE= This keyword specifies the DTF type. Valid values are:
DTFCD Card input
DTFPR Printer
DTFCDP Punch
DTFSD Sequential disk
DTFMT Magnetic tape
4–40 Getting Started

Step 14. Update CAIVPE Batch File Table Entries
FILABL= This keyword specifies the label type for a tape dataset. Valid values are:
STD Specifies that the tape data set has standard labels. This is the default.
NO Specifies that the tape dataset has no labels.
LRECL= This keyword specifies the logical record length of the data set. You must specify a value greater than 0 for VSE. In MVS, if you specify LRECL=0, you must place the LRECL value in the JCL or the DCB of the dataset.
RECFM= This keyword specifies the record format of the dataset. Valid values are:
F Fixed unblocked. If you omit this keyword, RECFM=F is assumed.
FB Fixed blocked.
V Variable unblocked.
VB Variable blocked.
U Undefined.
STRNO= This keyword specifies the STRNO value for VSAM entries. The default value is 5.
Installing CA-CIS 4–41

Step 15. Installing CA-JARS MWRT CMS Members for VM Users
Step 15. Installing CA-JARS MWRT CMS Members for VM Users
If you are a VM user running the CA-JARS Measured Workload Reporting Tool product, you can restore the CMS members of CA-JARS MWRT to a CMS minidisk after you have installed the VSE portion of CA-JARS MWRT. If you are not a VM user, skip this procedure.
Task 15A. Restoring CA-JARS MWRT CMS Members
The CMS members are contained in the CA-CIS for VSE library member MWRTVM.Z. This member is in DISK DUMP format. Tailor the following sample job (where 'lib.sublib' is the CA-CIS for VSE sublibrary) and run it to punch the CMS files to a CMS userid (preferably AUTOLOG1). You can use RECEIVE on CMS to copy the files to a minidisk (preferably AUTOLOG1's 191 disk).
// JOB CAMWPCMS PUNCH JARS MWRT CMS FILES // UPSI 1 // EXEC DITTO $$DITTO SET EOD=+++ $$DITTO CC * $$ SLI MEM=MWRTVM.Z,S=lib.sublib +++ $$DITTO EOJ /* /&
Task 15B. Installing the CA-JARS MWRT VM Component
Once the files have been received, you need to add the following statement to AUTOLOG1's Profile Exec: 'EXEC LDCAIHCP'
If you have chosen a different userid other than AUTOLOG1 to receive the files, you must add the appropriate LINK and ACCESS statements to AUTOLOG1's profile exec. The LDCAIHCP EXEC must be run each time VM is IPLed, or CA-JARS MWP data will not be collected for any VSE running under VM.
Step 16. Save all Materials and Output Be sure to save all installation materials and output from the installation process. This material is essential for timely and accurate CA product maintenance and support.
4–42 Getting Started

Contacting Technical Support
Contacting Technical Support For online technical assistance and a complete list of locations, primary service hours, and telephone numbers, contact Technical Support at http://ca.com/support.
Installing CA-CIS 4–43


Chapter
5 Applying Maintenance
The CA PTFSEL utility is no longer used by CA-CIS for VSE. You are urged to install the most current service pack tape. Additionally, you can obtain ongoing maintenance for CA-CIS for VSE through CA’s Technical Support (at http://ca.com/support). If you have a product that uses PTFSEL, see that product’s documentation for details on using the PTFSEL utility.
Applying Maintenance 5–1


Chapter
6 Troubleshooting
This chapter contains information about:
Identifying and resolving problems
Contacting CA Technical Support
Receiving ongoing product releases and maintenance
Requesting product enhancements
Troubleshooting 6–1

Collecting Diagnostic Data
Collecting Diagnostic Data In the table below, use the left column to categorize the problem your site has encountered. Then, follow the instructions in the corresponding right column to generate useful diagnostic data.
Problem Things to Check
A. CUI transaction not valid or any CICS APCT abend
1. CICS PCT and PPT
2. The suffix used for the CICS PPT and PCT
3. If using Resource Definition online, make certain the group containing the CAICUI entries is installed
4. The library search chain in your CICS startup or partition
5. CICS override parameters
6. CICS message log
7. CICS dump data set
B. CAICUI invalid command
1. Select the CUI Session Status Selection Panel:
(CUI-S000) from the Primary Selection Panel.
(CUI-MENU) and determine the user's profile.
2. Is the user ID defined in the CUI User Profile?
3. Is the user authorized to request this command?
C. CUI transaction is rejected by VTAM
1. CICS message log
2. CICS dump data set
3. Check that MAXBFRU will hold approximately 4000 bytes (P.I.U.)
D. Records are not being logged
1. Have the Event Control Options been properly set?
2. Has the AUDIT runtime system been started? (Check the VSE operator console log for startup messages.)
E. Records are not being logged to the VSE operator console
1. Have the Event Control Options been properly set?
2. Has the AUDIT runtime system been started? (Check the VSE operator console log for startup messages.)
6–2 Getting Started

Collecting Diagnostic Data
Problem Things to Check
F. Records are not being passed to the Notification Exits
1. Have the Event Control Options been properly set?
2. Has the AUDIT runtime system been started? (Check the VSE operator console log for startup messages.)
3. Have the Notification Exits been placed in the SVA before CAIAUDIT was started?
G. AUDIT runtime system startup failure
1. Have the data sets been defined and initialized?
2. Is label information for the data sets available in the partition where the runtime system is executing?
3. Are the AUDIT phases available? (Are LIBDEFs correct?)
4. Have you checked the VSE console for startup error messages?
H. AUDIT runtime system SWITCH failure
1. Has the alternate logging data set (CAUDPC2) been defined and initialized?
2. Are the AUDIT phases available? (Are LIBDEFs correct?)
Interpreting Diagnostic Data
When you have collected the specified diagnostic data, write down your answers to the following questions:
1. What was the sequence of events prior to the error condition?
2. What circumstances existed when the problem occurred and what action did you take?
3. Has this situation occurred before? What was different then?
4. Did the problem occur after a particular PTF was applied or after a new release of the software was installed?
5. Have you recently installed a new release of the operating system?
6. Has the hardware configuration (tape drives, disk drives, and so forth) changed?
From your response to these questions and the diagnostic data, try to identify the cause and resolve the problem.
Troubleshooting 6–3

Contacting Technical Support
Contacting Technical Support For online technical assistance and a complete list of locations, primary service hours, and telephone numbers, contact Technical Support at http://ca.com/support.
Have the following information ready before contacting Technical Support:
All the diagnostic information described in "Collecting Diagnostic Data."
Product name, release number, operating system and genlevel.
Product name and release number of any other software you suspect is involved.
Release level and PUTLEVEL of the operating system.
Your name, telephone number and extension (if any).
Your company name.
Your site ID.
A severity code. This is a number (from 1 to 4) that you assign to the problem. Use the following to determine the severity of the problem:
1 a "system down" or inoperative condition
2 a suspected high-impact condition associated with the product
3 a question concerning product performance or an intermittent low-impact condition associated with the product
4 a question concerning general product utilization or implementation
6–4 Getting Started

Generating a Problem Report
Generating a Problem Report Once a CA Technical Support representative has determined that your problem requires further investigation, you can use the CAISERV utility to generate a problem report.
CAISERV Utility
The CAISERV diagnostic facility produces a problem report for you to fill out and send in with all problem documentation.
CAISERV also produces a short report on the CA products that you have installed. You should also send this information to help Technical Support solve your problem. The output from the CAISERV run is sent to the printer and console.
Invoke CAISERV by executing the following job stream: // JOB CAISERV // EXEC CAISERV /&
Edit the JCL to your installation's standards, and submit the job.
Note: To generate the output to only the printer or console, code the UPSI statement and place it before the "// EXEC CAISERV" statement.
// UPSI 10 to generate PRINTER output only
// UPSI 01 to generate CONSOLE output only
The messages you may encounter when running CAISERV are:
CAPP999E INSUFFICIENT STORAGE TO PROCESS CAISERV
Reason: Sufficient storage was not allocated to execute CAISERV.
Action: Use at least 100K of storage for executing CAISERV.
** PRODUCT CAISERV MODULE 'modulename' NOT ACCESSIBLE ***
Reason: The proper libraries are not available.
Action: Review and modify the LIBDEFs. Execute CAISERV.
This job will produce the following problem report:
Troubleshooting 6–5

Generating a Problem Report
// EXEC CAISERV CAISERV 1 0 * COMPUTER ASSOCIATES PRODUCT STATUS REPORT * 07/18/01 (MM/DD/YY) 13.53.34 (HH.MM.SS) PAGE 1 ************************************************************************************************************** * COMPUTER ASSOCIATES PROBLEM REPORT SHEET * (ALWAYS COMPLETE THIS AND SUBMIT IT AND THE FOLLOWING PAGES WITH ANY PROBLEM) * ************************************************************************************************************** * * COMPANY NAME COMPANY ADDRESS * -------------------------------------- --------------- * * ------------------------------- * * ------------------------------- * CONTACT NAME TELEPHONE NUMBER * ----------------------- ------------------------- * *************************************************************************************************************** *************************************************************************************************************** * * OPERATING SYSTEM PUT LEVEL I/O DEVICES ATTACHED * UNDER VSE/ESA 6.4.0 ----------------- ON CPU FFnnnnnnnnnnnnnn -------------------- * * -------------------- * OTHER SYSTEM SOFTWARE * (VENDOR AND/OR IBM) -------------------------------------------------------------------------------------- * ********************************************************************************************************* * * PROBLEM SEVERITY PROBLEM TYPE * (CRITICAL, COSMETIC, ETC) -------------------- (INTERMITTENT, REPRODUCIBLE, ETC) -------------------------- * ********************************************************************************************************* * * DESCRIPTION OF PROBLEM * * * * * **********************************************************************************************************
Fill in the form completely. This information will be logged into the CA Technical Support system and will be tracked from the time it is reported to the time it is closed.
The next pages of the problem report provides a status of the CA products that you have installed. In most instances, this report includes the product release number, genlevel, and installation options. This is a sample CAICUI report.
6–6 Getting Started

Generating a Problem Report
CAISERV 1 0 * COMPUTER ASSOCIATES PRODUCT STATUS REPORT * 07/18/01 CADS000I CIS services 1.4 Srvlevel 03 0102 CGN CADS000I CA-SYSTEM ADAPTER COMPONENT IS ACTIVE CADS000I VM=6.1 Srvlevel=03 0102 AY5 CADS000I OPSYS='VSE/ESA' CPU=A SYSID=1 CPUID=FF10000220640000 CADS000I VSE/AF 5686-066 6.4.0 USERID=VSE.ESA.SUPX CADS000I ADAPTER 1ST LVL=035AE800 CADS000I ADAPTER 2ND LVL=035B0000 CADS000I ADAPTER CVT =003BF008 CADS000I ADAPTER SVC INT=035D6098 CADS000I ADAPTER AR INT=0358F8E0 CADS000I ADAPTER SVC=255 NSVRB=25 CADS000I TURBO DISPATCHER ACTIVE CAISERV 1 0 * COMPUTER ASSOCIATES PRODUCT STATUS REPORT * 07/18/01 CADS000I FN=NUCLEUS EP=003C4400 CADS000I FN=LOADLIST EP=003C3018 CADS000I FN=ACSERV PN=CATAAC2A ** LOAD DEFERRED ** IN=0200 VR=0 LV=8 CADS000I LIB=CAI2 SUBLIB=DYNAM60 VOL=CAISP2 CADS000I FN=ADDLABEL PN=CADCJESB LA=003BEA38 EP=003BEA38 IN=4000 VR=0 CADS000I LV=28 CADS000I IEFIBALL=CADCJESB 6 0 06/07/951 CADS000I FN=ARTRACE PN=CASATRCA LA=0040C008 EP=0040C008 IN=4000 VR=0 CADS000I LV=11 . . . . . CADS000I PRODUCT RELEASE SRVLEVEL LIBRARY SUBLIBRARY VOLSER CADS000I CA-SYSADAPTER 6.1 03 0102 AY5 CAI2 CA90S14 CAISP2 CADS000I CA-CATLG/MGMT 6.0 03 0102 AY3 CAI2 CA90S14 CAISP2 CADS000I CA-CAISPACE 1.1 03 0102 AYE CAI2 CA90S14 CAISP2 CADS000I CA-DYNAM/D 6.0 03 0102 ADD CAI2 DYNAM60 CAISP2 CADS000I CA-DYNAM/T 6.0 03 0102 ATD CAI2 DYNAM60 CAISP2 CADS000I CA-DYNAM/FI 6.0 03 0102 AFD CAI2 DYNAM60 CAISP2 CADS000I CA-CCI/VSE 1.1 03 0102 A3C CAI2 CA90S14 CAISP2 CADS000I CA-INDEX-VTOC 6.0 03 0102 AY9 CAI2 DYNAM60 CAISP2 CADS000I CA-ENF/VSE 1.0 03 0102 B6O CAI2 CA90S14 CAISP2 CADS000I CA-CAILABEL 1.1 03 0102 AYX CAI2 DYNAM60 CAISP2 CADS000I CA-SORT 8.2 03 0102 ASD CAI2 SRTSRM82 CAISP2 CADS000I CA-SUBSYSTEM 4.2 03 0102 TKB CAI6 GSS42E13 CAISP6 CAISERV 1 0 * COMPUTER ASSOCIATES PRODUCT STATUS REPORT * 07/18/01 CADS000I CA-DYNAM CATALOG MANGEMENT COMPONENT IS ACTIVE . . . .
CASD700I CA-SORT DOS VERSION 8.2 GENERATION OPTIONS IN EFFECT CASD701I GENLVL= 0102SD820 CASD702I PACKAGE PREFIX= CA82 CASD703I SYSTEM INSTR SET= 370/4300 CASD704I MODEL CLASS= 4341 CASD705I OPSYS= DOS/VS(E) CASD706I MSG= BOTH CASD707I PFIX= YES CASD708I OPT= E CASD709I DYNAM/D= YES CURRENT LEVEL RUNNING= 6.0 CASD710I STORAGE= 0300K CASD723I RESERVED= 0128K CASD711I DEFDTF= DISK CASD715I PREOPEN= YES CASD716I DISK= 3330-11, 3350, FBA CASD718I EQUALS= NO CASD719I DYNAMFI= YES CURRENT LEVEL RUNNING= 6.0 CASD720I CHECK= YES CASD721I WKASN= OFF CASD731I WKXTNTS=025 CASD722I DYNALOC= NO
Troubleshooting 6–7

Product Releases and Maintenance
CASD724I RC AT EOJ= NO CASD725I JCLPRNT= ALL CASD726I INVPRNT= ALL CASD727I INVCNCL= YES CASD729I CHALT= NO CASD730I ALTSEQ= NONE CASD732I CENTURY WINDOW= 1921-2020 CASD728I SPECIAL= (13) CAISERV 1 0 * COMPUTER ASSOCIATES PRODUCT STATUS REPORT * CASS000I CA-SRAM DOS VERSION 8.2 GENERATION OPTIONS IN EFFECT CASS001I GENLVL= 0102SD820 CASS002I USERID= DOSVS/370/PFIX CASS003I SYSTEM INSTR SET= 370/4300 CASS004I EXCPRV= YES CASS005I OPSYS= DOS/VS(E) CASS006I PFIX= YES . . . . EOJ
Product Releases and Maintenance a distribution tape containing the
ided. Updates to this documentation
ith current maintenance agreements also receive ongoing
New users of CA-CIS are provided withcurrent version of the system. Clients are requested to operate only under currently supported releases of CA-CIS.
Standard user documentation is also provare provided automatically to all customers having current maintenance agreements.
Customers wproduct/service maintenance. When a new release of the system is available, a notice is sent to all current customers.
6–8 Getting Started

Appendix
A Standard Product Installation Details
This appendix contains information about the JCL for installing CA-CIS for VSE. It describes JCL for the following types of installation:
Initial product installation from a physical tape
Subsequent product installation from a physical tape
Migration into production
Initial product installation from electronic delivery files
Subsequent product installation from electronic delivery files
Standard Product Installation Details A–1

Initial CA-CIS for VSE Product Installation from a Physical Tape
Initial CA-CIS for VSE Product Installation from a Physical Tape
This section provides information about installing CA-CIS for VSE for the first time, from a physical tape, using CAIN90B1.
Installation JCL—CAIN90B1
The initial CA-CIS for VSE installation JCL creates the production libraries and history file, and installs the product into the newly created libraries and history file. Use this JCL only to install the first product (CA-CIS for VSE) tape using this standard. After the product tape has been successfully installed, proceed with the steps in this Getting Started.
Use the following JCL to extract CAIN90B1 (and all of the installation JCL listed in this appendix) from the physical installation tape: // JOB CAIN90B0 CATAL INSTALL JCL TO LIBRARY // SETPARM LIBNAME=@LIBNAME replace @LIBNAME w/ library name // SETPARM SUBNAME=@SUBNAME replace @SUBNAME w/ sublibrary name // SETPARM TAPECUU=@TAPECUU replace @TAPECUU w/ tape addr // MTC FSF,&TAPECUU,99 // MTC FSF,&TAPECUU,99 // MTC FSF,&TAPECUU,7 // ASSGN SYSIPT,&TAPECUU // EXEC LIBR,SIZE=256K,PARM='ACCESS SUBLIB=&LIBNAME..&SUBNAME' // RESET SYSIPT /&
CAIN90B1 Execution
Execute CAIN90B1 to perform the following functions:
1. Open SYSPCH using the extents of the history files. This is a precautionary measure to avoid errors when the history file extent resides on a newly defined VM minidisk.
2. Create the CA production MSHP history file and the CA production libraries.
3. Install the CA-CIS for VSE product tape to the production history file and libraries.
A–2 Getting Started

Initial CA-CIS for VSE Product Installation from a Physical Tape
Variable Symbols for Job CAIN90B1
Variable Description
@HISTVOL The volume serial number where the production CA history file will reside.
@HISTREL The starting track (or block) number for the production CA history file.
@HISTEXT The number of tracks (or blocks) to be allocated to the production CA history file.
@INSTVOL The volume serial number where the installation CA history file will reside.
@INSTREL The starting track (or block) number for the installation CA history file.
@INSTEXT The number of tracks (or blocks) to be allocated to the installation CA history file.
@TAPECUU The device address where the physical product tape will be mounted.
@DLIBVOL The volume serial number where the production CA library will reside.
@DLIBREL The starting track (or block) number for the production CA library.
@DLIBEXT The number of tracks (or blocks) to be allocated to the production CA library.
@CUSTNME Customer name used to personalize the MSHP history file.
@CUSTADD Customer address used to personalize the MSHP history file.
@CUSTPHN Customer phone number used to personalize the MSHP history file.
@PROGNME Customer programmer name used to personalize the MSHP history file.
Also change the following:
Change each './' to a '//'
Change each '.*' to a '/*
Change each '.&' to a '/&'
Standard Product Installation Details A–3

Subsequent CA-CIS for VSE Product Installation from a Physical Tape
Subsequent CA-CIS for VSE Product Installation from a Physical Tape
This section provides information about subsequent installation of CA-CIS for VSE, from a physical tape, using CAIN90B2.
Installation JCL—CAIN90B2
CAIN90B2 is used to install CA-CIS for VSE into test libraries to allow installation verification and testing prior to migration into the production libraries. After the product tape has been successfully installed, proceed with the steps in this Getting Started.
CAIN90B2 Execution
Execute CAIN90B2 to perform the following functions:
1. Open SYSPCH using the extents of the history file. This is a precautionary measure to avoid errors when the history file extent resides on a newly defined VM minidisk.
2. Create the CA installation libraries and history file for the product tape being installed.
3. Install the product tape to the installation history file and libraries.
Variable Symbols for Job CAIN90B2
Variable Description
@PRODCDE The CA product code of CA-CIS for VSE (CGN14).
@INSTVOL The volume serial number where the installation CA history file will reside.
@INSTREL The starting track (or block) number for the installation CA history file.
@INSTEXT The number of tracks (or blocks) to be allocated to the installation CA history file.
@TAPECUU The device address where the physical product tape will be mounted.
@ILIBVOL The volume serial number where the installation CA library will reside.
A–4 Getting Started

Migration of CA-CIS for VSE Products into Production
Variable Description
@ILIBREL The starting track (or block) number for the installation CA library.
@ILIBEXT The number of tracks (or blocks) to be allocated to the installation CA library.
@CUSTNME Customer name used to personalize the MSHP history file.
@CUSTADD Customer address used to personalize the MSHP history file.
@CUSTPHN Customer phone number used to personalize the MSHP history file.
@PROGNME Customer programmer name used to personalize the MSHP history file.
@PRODUCT Product name: CA-CIS
Also change the following:
Change each './' to a '//'
Change each '.*' to a '/*'
Change each '.&' to a '/&'
Migration of CA-CIS for VSE Products into Production This section provides information about migrating CA-CIS for VSE into the production environment, using CAIN90B3.
Installation JCL—CAIN90B3
CAIN90B3 is used to migrate CA-CIS for VSE into the production libraries and history file when it was installed to an installation library and history file using CAIN90B2 or CAIN90C2. This step is executed only after product installation, customization, verification, and testing are complete.
After this process is complete, the installation libraries and history file can be deleted.
Standard Product Installation Details A–5

Migration of CA-CIS for VSE Products into Production
CAIN90B3 Execution
CAINSTB3 merges the tested product or products into the production libraries and history file.
Variable Symbols for Job CAIN90B3
Variable Description
@DLIBVOL The volume serial number where the production CA library resides.
@ILIBVOL The volume serial number where the installation CA library resides.
@PRODCDE The CA product code of CA-CIS for VSE(CGN14)
@HISTVOL The volume serial number where the production CA history file resides.
@HISTREL The starting track (or block) number for the production CA history file.
@HISTEXT The number of tracks (or blocks) to be allocated to the production CA history file.
@INSTVOL The volume serial number where the installation CA history file resides.
@INSTREL The starting track (or block) number for the installation CA history file.
@INSTEXT The number of tracks (or blocks) to be allocated to the installation CA history file.
Also change the following:
Change each './' to a '//'
Change each '.*' to a '/*'
Change each '.&' to a '/&'
A–6 Getting Started

Initial CA-CIS for VSE Product Installation from Electronic Delivery Files
Initial CA-CIS for VSE Product Installation from Electronic Delivery Files
This section provides information about installing CA-CIS for VSE for the first time, from electronic delivery files, using CAIN90C1.
Installation JCL—CAIN90C1
The initial CA-CIS for VSE installation JCL creates the production library and history file, and installs the product into the newly created library and history file. Use this JCL only to install the first product (CA-CIS) electronic delivery file through IBM VSE Virtual Tape using this standard. After the product has been successfully installed, proceed with the steps in this Getting Started.
Use the following JCL to extract CAIN90C1 (and all of the installation JCL listed in this appendix) from the electronic delivery file: * ************************************************************ * *** *** * *** Update the following SETPARM statements: *** * *** *** * *** @LIBNAME to the name of the library you are using *** * *** *** * *** @SUBNAME to the name of the sublibrary you are *** * *** using. *** * *** *** * *** @TAPECUU to the tape drive address of the IBM VSE *** * *** Virtual Tape used to read the .AWS file. *** * *** *** * *** @IPADDR to the IP address of the machine that *** * *** currently holds the .AWS file, and that *** * *** has the IBM Virtual Tape Server running *** * *** in JAVA. This value must be enclosed in *** * *** single quote marks ('). For example: *** * *** '123.231.132.321' *** * *** *** * *** @AWSFILE to the fully qualified location and name *** * *** of the CA-CIS for VSE .AWS file. *** * *** This value must be enclosed in single *** * *** Quote marks ('). For example: *** * *** 'E:\filename.AWS' *** * *** *** * ************************************************************ // JOB CAIN90C0 // SETPARM LIBNAME=@LIBNAME // SETPARM SUBNAME=@SUBNAME // SETPARM TAPECUU=@TAPECUU // SETPARM IPADDR=@IPADDR // SETPARM AWSFILE=@AWSFILE // ON $CANCEL GOTO RELTAP DVCDN &TAPECUU VTAPE START,UNIT=&TAPECUU,LOC=&IPADDR, x FILE='&AWSFILE',READ DVCUP &TAPECUU // MTC REW,&TAPECUU // MTC FSF,&TAPECUU,99 // MTC FSF,&TAPECUU,99 // MTC FSF,&TAPECUU,7
Standard Product Installation Details A–7

Initial CA-CIS for VSE Product Installation from Electronic Delivery Files
// ASSGN SYSIPT,&TAPECUU // EXEC LIBR,SIZE=256K,PARM='ACCESS SUBLIB=&LIBNAME..&SUBNAME' // RESET SYSIPT /. RELTAP DVCDN &TAPECUU VTAPE STOP,UNIT=&TAPECUU DVCUP &TAPECUU /&
CAIN90C1 Execution
Execute CAIN90C1 to perform the following functions:
1. Open SYSPCH using the extents of the history files. This is a precautionary measure to avoid errors when the history file extent resides on a newly defined VM minidisk.
2. Create the CA production MSHP history file and the CA production libraries.
3. Install the CA-CIS for VSE product tape to the production history file and libraries.
Variable Symbols for Job CAIN90C1
Variable Description
@HISTVOL The volume serial number where the production CA library will reside.
@HISTREL The starting track (or block) number for the production CA history file.
@HISTEXT The number of tracks (or blocks) to be allocated to the production CA history file.
@INSTVOL The volume serial number where the installation CA history file will reside.
@INSTREL The starting track (or block) number for the installation CA history file.
@INSTEXT The number of tracks (or blocks) to be allocated to the installation CA history file.
@TAPECUU The device address of the IBM VSE Virtual Tape used to read the .AWS file.
@DLIBVOL The volume serial number where the production CA library will reside.
@DLIBREL The starting track (or block) number for the production CA library.
A–8 Getting Started
Initial CA-CIS for VSE Product Installation from Electronic Delivery Files
Variable Description
@DLIBEXT The number of tracks (or blocks) to be allocated to the production CA library.
@IPADDR The IP address of the machine that currently holds the .AWS file, and that has the IBM VSE Virtual Tape Server running in JAVA. This value must be enclosed in single quote marks (').
For example: '123.231.132.321'
@AWSFILE The fully qualified location and name of the CA-CIS for VSE .AWS file. This value must be enclosed in single quote marks (').
For example: 'E:\filename.AWS'
@CUSTNME Customer name used to personalize the MSHP history file.
@CUSTADD Customer address used to personalize the MSHP history file.
@CUSTPHN Customer phone number used to personalize the MSHP history file.
@PROGNME Customer programmer name used to personalize the MSHP history file.
Also change the following:
Change each './' to a '//'
Change each '.*' to a '/*'
Change each '.&' to a '/&'
Standard Product Installation Details A–9

Subsequent CA-CIS for VSE Product Installation from Electronic Delivery Files
Subsequent CA-CIS for VSE Product Installation from Electronic Delivery Files
This section provides information about subsequent installation of CA-CIS for VSE, from electronic delivery files, using the following JCL:
CAIN90C2— Use this JCL member if you require pre-production testing.
CAIN90C4—Use this JCL member if you do not require pre-production testing.
Installation JCL—CAIN90C2 (with Pre-Production Testing)
CAIN90C2 is used to install CA-CIS for VSE into a test library to allow installation verification and testing prior to migration into the production libraries. After the product has been successfully installed from the electronic delivery file through IBM VSE Virtual Tape, proceed with the steps in this Getting Started.
CAIN90C2 Execution
Execute CAIN90C2 to perform the following functions:
1. Open SYSPCH using the extents of the history files. This is a precautionary measure to avoid errors when the history file extent resides on a newly defined VM minidisk.
2. Create the CA installation libraries and history file for the product being installed from the electronic delivery files.
3. Install the product to the installation history file and libraries from the electronic delivery file.
Variable Symbols for Job CAIN90C2
Variable Description
@PRODCDE The CA product code of CA-CIS for VSE (CGN14).
@INSTVOL The volume serial number where the installation CA history file resides.
@INSTREL The starting track number for the installation CA history file.
@INSTEXT The number of tracks to be allocated to the installation CA history file.
A–10 Getting Started
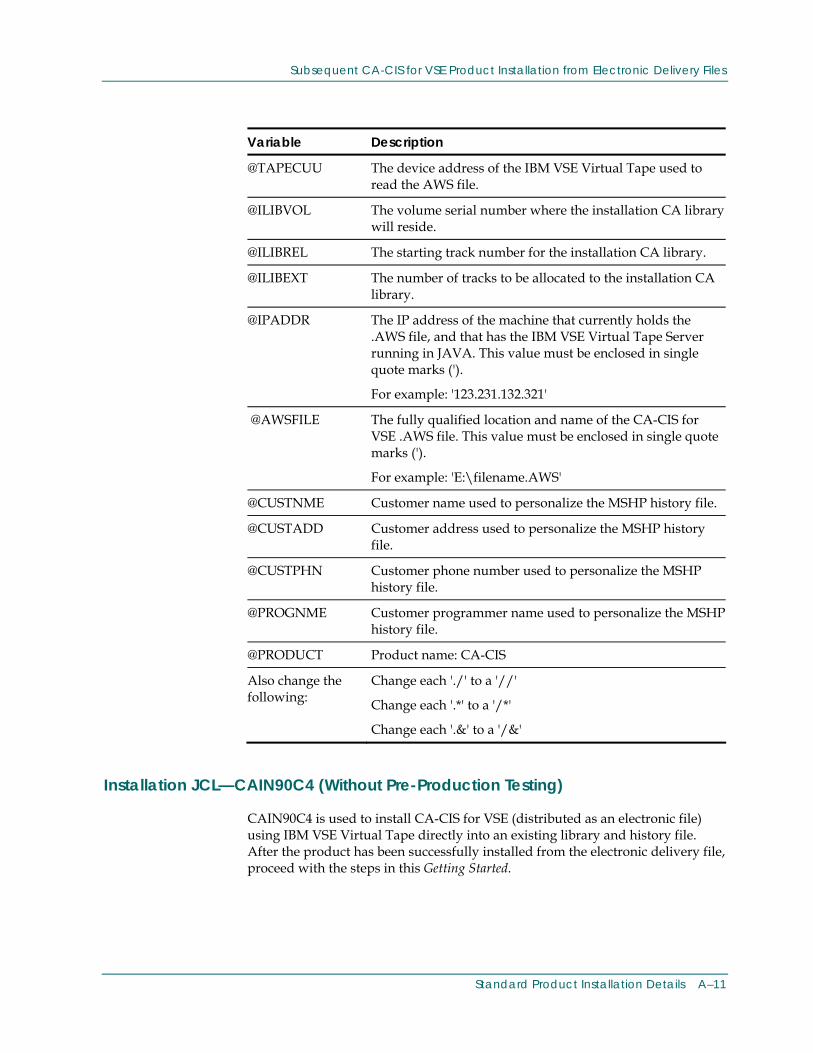
Subsequent CA-CIS for VSE Product Installation from Electronic Delivery Files
Variable Description
@TAPECUU The device address of the IBM VSE Virtual Tape used to read the AWS file.
@ILIBVOL The volume serial number where the installation CA library will reside.
@ILIBREL The starting track number for the installation CA library.
@ILIBEXT The number of tracks to be allocated to the installation CA library.
@IPADDR The IP address of the machine that currently holds the .AWS file, and that has the IBM VSE Virtual Tape Server running in JAVA. This value must be enclosed in single quote marks (').
For example: '123.231.132.321'
@AWSFILE The fully qualified location and name of the CA-CIS for VSE .AWS file. This value must be enclosed in single quote marks (').
For example: 'E:\filename.AWS'
@CUSTNME Customer name used to personalize the MSHP history file.
@CUSTADD Customer address used to personalize the MSHP history file.
@CUSTPHN Customer phone number used to personalize the MSHP history file.
@PROGNME Customer programmer name used to personalize the MSHP history file.
@PRODUCT Product name: CA-CIS
Also change the following:
Change each './' to a '//'
Change each '.*' to a '/*'
Change each '.&' to a '/&'
Installation JCL—CAIN90C4 (Without Pre-Production Testing)
CAIN90C4 is used to install CA-CIS for VSE (distributed as an electronic file) using IBM VSE Virtual Tape directly into an existing library and history file. After the product has been successfully installed from the electronic delivery file, proceed with the steps in this Getting Started.
Standard Product Installation Details A–11

Subsequent CA-CIS for VSE Product Installation from Electronic Delivery Files
CAIN90C4 Execution
Execute CAIN90C4 to install CA-CIS for VSE to an existing library and history file from the electronic delivery file.
Variable Symbols for Job CAIN90C4
Variable Description
@DLIBVOL The volume serial number of the location of the library you are using
@DLIBNAM The file name of the library you are using.
@DLIBID The file-id of the library being used. This must be enclosed in single quote marks (').
For example: 'CAI.PRODUCT.LIBRARY'
@HISTVOL The volume serial number of the location of the history files being used.
@HISTREL The starting track (or block) number for the history file being used.
@HISTEXT The number of tracks (or blocks) allocated for the history file being used.
@HISTID The file-id of the history file being used. This must be enclosed in single quote marks (').
For example: 'CAI.PRODUCT.HISTORY.FILE'
@TAPECUU The device address of the IBM VSE Virtual Tape used to read the .AWS file.
@IPADDR The IP address of the machine that currently holds the .AWS file, and that has the IBM VSE Virtual Tape Server running in JAVA. This value must be enclosed in single quote marks (').
For example: '123.231.132.321'
@AWSFILE The fully qualified location and name of the CA-CIS for VSE .AWS file. This value must be enclosed in single quote marks (').
For example: 'E:\filename.AWS'
Also change the following:
Change each './' to a '//'
Change each '.*' to a '/*'
Change each '.&' to a '/&'
A–12 Getting Started

Simplified Installation of CA-CIS for VSE
Simplified Installation of CA-CIS for VSE This section provides information about installing CA-CIS for VSE using simplified install JCL, as follows:
CAIN90Q1—Use this JCL member if you do not have any CA products already installed.
CAIN90Q2 with CAIN90Q3—Use these JCL members if both of the following apply:
– You have other CA products already installed.
– You require pre-installation testing.
CAIN90Q4—Use this JCL member if both of the following apply:
– You have other CA products already installed.
– You do not require pre-installation testing.
For more information about each of these options, see the following sections.
CAIN90Q1 Execution
CAIN90Q1 creates and installs CA-CIS for VSE into a new sublibrary and history file. It is a simplified installation JCL member that does not require the use of the standard installation worksheet. CAIN90Q1 can be used only if you do not have any CA products already installed.
Variable Symbols for Job CAIN90Q1
Variable Description
&HISTVOL The volume serial number where the production CA history file will reside.
&HISTREL The starting track (or block) number for the production CA history file.
&HISTEXT The number of tracks (or blocks) to be allocated to the production CA history file.
TAPECUU The device address where the physical product tape will be mounted.
&DLIBVOL The volume serial number where the production CA library will reside.
&DLIBREL The starting track (or block) number for the production CA library.
Standard Product Installation Details A–13
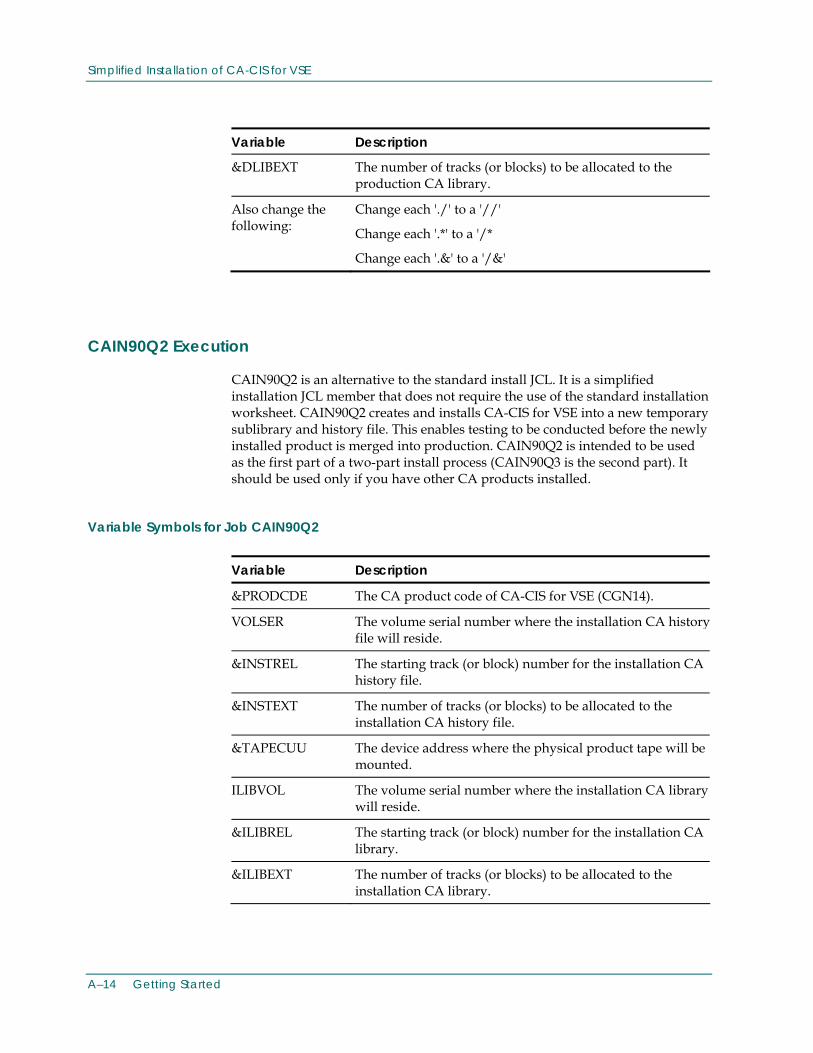
Simplified Installation of CA-CIS for VSE
Variable Description
&DLIBEXT The number of tracks (or blocks) to be allocated to the production CA library.
Also change the following:
Change each './' to a '//'
Change each '.*' to a '/*
Change each '.&' to a '/&'
CAIN90Q2 Execution
CAIN90Q2 is an alternative to the standard install JCL. It is a simplified installation JCL member that does not require the use of the standard installation worksheet. CAIN90Q2 creates and installs CA-CIS for VSE into a new temporary sublibrary and history file. This enables testing to be conducted before the newly installed product is merged into production. CAIN90Q2 is intended to be used as the first part of a two-part install process (CAIN90Q3 is the second part). It should be used only if you have other CA products installed.
Variable Symbols for Job CAIN90Q2
Variable Description
&PRODCDE The CA product code of CA-CIS for VSE (CGN14).
VOLSER The volume serial number where the installation CA history file will reside.
&INSTREL The starting track (or block) number for the installation CA history file.
&INSTEXT The number of tracks (or blocks) to be allocated to the installation CA history file.
&TAPECUU The device address where the physical product tape will be mounted.
ILIBVOL The volume serial number where the installation CA library will reside.
&ILIBREL The starting track (or block) number for the installation CA library.
&ILIBEXT The number of tracks (or blocks) to be allocated to the installation CA library.
A–14 Getting Started

Simplified Installation of CA-CIS for VSE
Variable Description
Also change the following:
Change each './' to a '//'
Change each '.*' to a '/*'
Change each '.&' to a '/&'
CAIN90Q3 Execution
If your site performs installation verification and testing prior to migration into production, CAIN90Q3 is an alternative to the standard install JCL. It is a simplified installation JCL member that does not require the use of the standard installation worksheet.
CAIN90Q3 merges the temporary sublibrary and history file, created in CAIN90Q2, into the permanent CA product sublibrary and history file. You can use this JCL only if all of the following apply:
You have already installed CA products.
You have successfully executed either CAIN90Q2 or CAIN90C2.
CA-CIS for VSE is ready for production.
Variable Symbols for Job CAIN90Q3
Variable Description
&DLIBVOL The volume serial number where the production CA library resides.
&ILIBVOL The volume serial number where the installation CA library resides.
&PRODCDE The CA product code of CA-CIS for VSE(CGN14)
HISTVOL The volume serial number where the production CA history file resides.
&HISTREL The starting track (or block) number for the production CA history file.
&HISTEXT The number of tracks (or blocks) to be allocated to the production CA history file.
Standard Product Installation Details A–15

Simplified Installation of CA-CIS for VSE
Variable Description
INSTVOL The volume serial number where the installation CA history file resides.
&INSTREL The starting track (or block) number for the installation CA history file.
&INSTEXT The number of tracks (or blocks) to be allocated to the installation CA history file.
Also change the following:
Change each './' to a '//'
Change each '.*' to a '/*'
Change each '.&' to a '/&'
CAIN90Q4 Execution
If your site does not require pre-production testing, you can use CAIN90Q4 as an alternative to the simplified install JCL members, CAIN90Q2 and CAIN90Q3. It is a simplified installation JCL member that does not require the use of the standard installation worksheet. CAIN90Q4 will install directly into an existing sublibrary and history file. It should be used only by clients who have CA products installed.
Variable Symbols for Job CAIN90Q4
Variable Description
&DLIBVOL The volume serial number of the location of the library you are using
&DLIBREL The starting track (or block) of the library you are using.
&DLIBEXT The number of tracks (or blocks) of the library you are using.
&HISTVOL The volume serial number of the location of the history files being used.
&HISTREL The starting track (or block) number for the history file being used.
&HISTEXT The number of tracks (or blocks) allocated for the history file being used.
TAPECUU The device address where the physical product tape will be mounted.
A–16 Getting Started

Simplified Installation of CA-CIS for VSE
Variable Description
Also change the following:
Change each './' to a '//'
Change each '.*' to a '/*'
Change each '.&' to a '/&'
Standard Product Installation Details A–17

Index
CAAUPLTI.Z, 4-25
CAAUPLTS.Z, 4-25 A CACCFCT6.A, 4-24
CACCFCT7.A, 4-24 applying maintenance, 5-1
CAHLFCT7.A, 4-24 ASI Procedure updating LIBDEF information, 4-21 CAHLFCTV.A, 4-24 SDL load list, 4-22
CAIAUDIT standard labels, 4-20 introduction, 1-3 SVA statement, 4-22 system GETVIS allocation adjusting, 4-22
CAICCI B service description, 1-3
storage requirements, 4-23
CAICUI BKUPCUI.Z, 4-17 CAIAUDIT data sets, 4-17, 4-18 installation overview, 1-6 multi-file distribution tape, 1-6 C service description, 1-4 using CUI transaction, 1-4
CA LMP, 4-13 CAICUI.Z, 4-16 Emergency Key Generator (EKG), 3-3
CAIHELP data set CAIHLPV Error Handling, 3-7 allocation, 4-18 execution, 3-4 description, 4-18 KEYS, 3-2, 4-14 initialization, 4-18 using, 3-2 sample JCL, 4-18
CA products, 4-33 upgrading, 4-19
CA3TFCT.A, 4-24 CAIHLPV allocation, 4-18 CA90HLP1.Z, 4-19 description, 4-18
CA90HLP2.Z, 4-19 initialization, 4-18 sample JCL, 4-18 CAAUFCT6.A, 4-24 upgrading, 4-19
CAAUFCT7.A, 4-24 CAIN90B1 JCL, A-2 CAAUPLTI.A, 4-25 CAIN90B2 JCL, A-4
Index–1

CAIN90B3 JCL, A-5 CAAUPLTI.A, 4-25 CAAUPLTI.Z, 4-25 CAIN90C1 JCL, A-7 CAAUPLTS.Z, 4-25 CACCFCT6.A, 4-24 CAIN90C2 JCL, A-10 CACCFCT7.A, 4-24
CAIN90C4 JCL, A-11 CAHLFCT7.A, 4-24 CAHLFCTV.A, 4-24 CAIN90Q1 JCL, A-13 CAI3CCCI.Z, 4-22
CAIN90Q2 JCL, A-14 CAICUI.Z, 4-16 CAIY3CAT.Z, 4-22 CAIN90Q3 JCL, A-15 CAIY5SAD.Z, 4-22
CAIN90Q4 JCL, A-16 CASCMFCT.A, 4-24 CAUDPC1.Z, 4-17 CAISERV CAUDPC2.Z, 4-18 invoking, 6-5 CAUDSTG.Z, 4-18 possible error messages, 6-5 CAVUAPC1.A, 4-27 reporting a problem, 6-5 CAVUAPC2.A, 4-27 sample reports, 6-5, 6-6 CAVUAPC3.A, 4-28
CAIVPE CAVUAPC7.A, 4-27 batch file table, updating, 4-39 CONVERT.Z, 4-17
DEFMAP.Z, 4-20 CAKEYS, 3-2 LOADMAP.Z, 4-20
CALMPKEY.A, 4-13 SRAMSDL.Z, 4-22
CASCMFCT.A, 4-24 CPI (Common Programming Interface), 1-5
CASRAM macro Creating sample, 4-38 history files, 4-11
target libraries, 4-11 CAUDPC1.Z, 4-17 CUA (Common User Access), 1-5 CAUDPC2.Z, 4-18 CUI transaction CAUDSTG.Z, 4-18
initial password, 1-4 CAVUAPC1.A, 4-27 initial user ID, 1-4
CAVUAPC2.A, 4-27
CAVUAPC3.A, 4-28 D CAVUAPC7.A, 4-27
cBASE MAPPER Data Sets introduction, 1-2 standard labels, 4-20
CICS DEFMAP.Z, 4-20 updating, 4-24
Command mode introduction, 1-5 E CONVERT.Z, 4-17
Copybooks EOJERR, 4-37 BKUPCUI.Z, 4-17
CA3TFCT.A, 4-24 Error Handling CA90HLP1.Z, 4-19 LMP, 3-7 CA90HLP2.Z, 4-19
EXCP, 4-38 CAAUFCT6.A, 4-24 CAAUFCT7.A, 4-24
Index–2 Getting Started

F J
Files on installation tape, 2-2 JCL CAIN90B1, 4-11 First installation, 4-11 CAIN90B2, 4-12 CAIN90B3, 4-33 installation, 4-3
G JCL for CAIN90B1, A-2
JCL for CAIN90B2, A-4 Generating a CAISERV problem report, 6-5
JCL for CAIN90B3, A-5 GETVIS
JCL for CAIN90C1, A-7 CAICCI storage, 4-23 partition storage requirements, 4-22 JCL for CAIN90C2, A-10 system adjusting, 4-22
JCL for CAIN90C4, A-11
JCL for CAIN90Q1, A-13 H JCL for CAIN90Q2, A-14
JCL for CAIN90Q3, A-15 Help data set CAIHLPV
JCL for CAIN90Q4, A-16 allocation, 4-18 description, 4-18 initialization, 4-18
K sample JCL, 4-18 upgrading, 4-19
History files, 4-1 KEYS, 3-2, 4-14
I L
Initial installation, 4-11 Labels, standard updating, 4-20 Installation LIBDEF information, updating, 4-21 checklist, 4-5
first CA product, 4-11 Libraries initial, 4-11 installation, 4-1 JCL, 4-3 production, 4-1 libraries, 4-1
LMP Macro example, 4-38 Error Handling, 3-7 materials, 2-2 KEYS, 3-2 multifile distribution tape, 1-6 using, 3-2 overview, 1-6
product, 4-2 LMP KEYS, 4-14 required material distribution, 1-6
LOADMAP.Z, 4-20 required steps, 4-5 steps defined, 1-6 Long commands, 1-5 subsequent, 4-12 tasks defined, 1-6 worksheet, 4-8, 4-10
Index–3

M CA-SRAM Service, 1-2 Catalog Management, 1-4 cBASE MAPPER, 1-2 MFLINK, 1-4 maintenance, applying, 5-1 Standard Security Facility (CAISSF), 1-6
MFLINK System Adapter, 1-6 service description, 1-4 VSE Common Code, 1-6
Migration of products into production, 4-33 Short commands, 1-5 MSHP, 2-2 SM (Session Manager), 1-5
and CPI services, 1-5 MSHP utility compatability requirements, 1-6
SRAM macro, 4-34
P options, 4-34
SRAMCNFG, 4-34, 4-38 Partition GETVIS storage requirements reduction, 4-22
Standard Labels, updating, 4-20
Standard Product Installation Worksheet, 4-10 Product
Startup CICS JCL, updating, 4-32 installation, 4-2 libraries restoring, 4-11 Steps
defined, 1-6 Production installation, required checklist, 4-5 CA products, 4-33
libraries, 4-1 Storage requirements for CAICCI, 4-23 Prompt mode, 1-5 Subsequent installations, 4-12 PTFSEL, 5-1 SVA
load list VSAM modification entries, 4-22 resident VSAM phases, 4-22
R statement updating, 4-22
System GETVIS, adjusting, 4-22 Respecifying Generation Options, 4-35
SYSTEM (installation parameter), 4-35 Restore product libraries, 4-11
ROSFD macro, 4-39
T
S Tasks defined, 1-6
SDL load list, updating, 4-22
U Service descriptions CA-C Runtime, 1-2 CA-EARL Service, 1-2
Updating CAIAUDIT, 1-3 ASI procedure, 4-20 CAICCI, 1-3 CAIVPE batch file table entries, 4-39 CAICUI, 1-4 CICS, 4-24 CAIHELP, 1-3 standard labels, 4-20 CAIVPE, 1-3 SVA statement, 4-22
Index–4 Getting Started

User-defined commands long, 1-5 short, 1-5
USERID (installation parameter), 4-35
V
VM/SP compatability requirements, 2-1
VSAM SVA resident phases, 4-22
W
Worksheet CA-CIS, 4-9 installation, 4-8 standard product installation, 4-10
Index–5
