ca configuration automation® configuration automation 12 8... · configuration settings ... enact...
TRANSCRIPT
Administrator Guide r12.8 SP02
CA Configuration Automation®
This Documentation, which includes embedded help systems and electronically distributed materials, (hereinafter referred to as the “Documentation”) is for your informational purposes only and is subject to change or withdrawal by CA at any time.
This Documentation may not be copied, transferred, reproduced, disclosed, modified or duplicated, in whole or in part, without the prior written consent of CA. This Documentation is confidential and proprietary information of CA and may not be disclosed by you or used for any purpose other than as may be permitted in (i) a separate agreement between you and CA governing your use of the CA software to which the Documentation relates; or (ii) a separate confidentiality agreement between you and CA.
Notwithstanding the foregoing, if you are a licensed user of the software product(s) addressed in the Documentation, you may print or otherwise make available a reasonable number of copies of the Documentation for internal use by you and your employees in connection with that software, provided that all CA copyright notices and legends are affixed to each reproduced copy.
The right to print or otherwise make available copies of the Documentation is limited to the period during which the applicable license for such software remains in full force and effect. Should the license terminate for any reason, it is your responsibility to certify in writing to CA that all copies and partial copies of the Documentation have been returned to CA or destroyed.
TO THE EXTENT PERMITTED BY APPLICABLE LAW, CA PROVIDES THIS DOCUMENTATION “AS IS” WITHOUT WARRANTY OF ANY KIND, INCLUDING WITHOUT LIMITATION, ANY IMPLIED WARRANTIES OF MERCHANTABILITY, FITNESS FOR A PARTICULAR PURPOSE, OR NONINFRINGEMENT. IN NO EVENT WILL CA BE LIABLE TO YOU OR ANY THIRD PARTY FOR ANY LOSS OR DAMAGE, DIRECT OR INDIRECT, FROM THE USE OF THIS DOCUMENTATION, INCLUDING WITHOUT LIMITATION, LOST PROFITS, LOST INVESTMENT, BUSINESS INTERRUPTION, GOODWILL, OR LOST DATA, EVEN IF CA IS EXPRESSLY ADVISED IN ADVANCE OF THE POSSIBILITY OF SUCH LOSS OR DAMAGE.
The use of any software product referenced in the Documentation is governed by the applicable license agreement and such license agreement is not modified in any way by the terms of this notice.
The manufacturer of this Documentation is CA.
Provided with “Restricted Rights.” Use, duplication or disclosure by the United States Government is subject to the restrictions set forth in FAR Sections 12.212, 52.227-14, and 52.227-19(c)(1) - (2) and DFARS Section 252.227-7014(b)(3), as applicable, or their successors.
Copyright © 2015 CA. All rights reserved. All trademarks, trade names, service marks, and logos referenced herein belong to their respective companies.
CA Technologies Product References
This document references the following CA Technologies products:
■ CA® Embedded Entitlements Manager (CA EEM)
■ CA Spectrum®® Automation Manager
■ CA® SiteMinder® Web Access Manager (CA SiteMinder)
Contact CA Technologies
Contact CA Support
For your convenience, CA Technologies provides one site where you can access the information that you need for your Home Office, Small Business, and Enterprise CA Technologies products. At http://ca.com/support, you can access the following resources:
■ Online and telephone contact information for technical assistance and customer services
■ Information about user communities and forums
■ Product and documentation downloads
■ CA Support policies and guidelines
■ Other helpful resources appropriate for your product
Providing Feedback About Product Documentation
If you have comments or questions about CA Technologies product documentation, you can send a message to [email protected].
To provide feedback about CA Technologies product documentation, complete our short customer survey which is available on the CA Support website at http://ca.com/docs.

Contents 5
Contents
Chapter 1: Introducing CA Configuration Automation 9
CA Configuration Automation Concepts .................................................................................................................... 10
Discovery ............................................................................................................................................................. 10
Chapter 2: Blueprint Overview 11
Services ............................................................................................................................................................... 11
Profiles ................................................................................................................................................................ 12
Snapshots ............................................................................................................................................................ 12
Rule Compliance ................................................................................................................................................. 12
CA Configuration Automation Components............................................................................................................... 13
CA Configuration Automation Server .................................................................................................................. 13
CA Configuration Automation Database ............................................................................................................. 13
CCA Agents .......................................................................................................................................................... 14
CCA Grid Nodes ................................................................................................................................................... 14
CA Network Discovery Gateway ......................................................................................................................... 14
CA EEM ................................................................................................................................................................ 15
Business Objects ................................................................................................................................................. 15
Chapter 3: Using the CA Configuration Automation User Interface 17
Log In to CA Configuration Automation ..................................................................................................................... 18
CA Configuration Automation UI Overview ............................................................................................................... 19
Management Panel ............................................................................................................................................. 19
Dashboard Panel ................................................................................................................................................. 20
Administration Panel ........................................................................................................................................... 22
Tasks Panel .......................................................................................................................................................... 25
Filter Table Views ....................................................................................................................................................... 25
Common Table Actions .............................................................................................................................................. 28
Export Table Data to Excel .................................................................................................................................. 28
Print Table Data .................................................................................................................................................. 29
Create Table View ............................................................................................................................................... 29
Chapter 4: Administering CA Configuration Automation 33
Configuration Settings ................................................................................................................................................ 33
View and Edit CA Configuration Automation Properties .................................................................................... 34
Import Properties ................................................................................................................................................ 54
6 Administrator Guide
Creating and Managing Security Certificates ...................................................................................................... 54
Working with Communication Mappings ........................................................................................................... 71
Working with Application Mappings ................................................................................................................... 73
Configuring Users and Role-Based Security ............................................................................................................... 76
Install the CA EEM Security Certificate and Configure the EEM Host Property .................................................. 76
Create CA Configuration Automation Users in CA EEM ...................................................................................... 77
Search for Users .................................................................................................................................................. 80
Create Access Policies ......................................................................................................................................... 80
Configure Global User and Global Group Storage .............................................................................................. 85
CA EEM Single Sign-On Scenarios ........................................................................................................................ 90
Managing Network Discovery Gateways ................................................................................................................... 90
View and Edit Network Discovery Gateways ...................................................................................................... 91
Create Network Discovery Gateways .................................................................................................................. 91
Test Network Discovery Gateways...................................................................................................................... 92
Secure Network Discovery Gateways ................................................................................................................. 93
Delete Network Discovery Gateways .................................................................................................................. 94
Managing Catalyst Attribute Profiles and Jobs .......................................................................................................... 94
Create Catalyst Attribute Profiles ....................................................................................................................... 94
View and Edit Catalyst Attribute Profiles ............................................................................................................ 96
Delete Catalyst Attribute Profiles ....................................................................................................................... 96
Import Catalyst Attribute Profiles ....................................................................................................................... 97
Export Catalyst Attribute Profiles ........................................................................................................................ 97
Set a Catalyst Attribute Profile as the Default .................................................................................................... 98
Create Catalyst Jobs ............................................................................................................................................ 98
CA Configuration Automation Diagnostics ............................................................................................................... 103
Migrating Data from CA Cohesion ACM ................................................................................................................... 103
Migration Prerequisites and Limitations ........................................................................................................... 104
Migration Options ............................................................................................................................................. 105
Implementing Multi-tenancy ................................................................................................................................... 111
Define the Master Instance ............................................................................................................................... 112
Create Tenants .................................................................................................................................................. 112
Create and Manage Users ................................................................................................................................. 113
Define User Access to Tenants .......................................................................................................................... 115
Import Objects Into Tenants ............................................................................................................................. 115
View and Edit Tenant Details ............................................................................................................................ 116
Manage Scripts ......................................................................................................................................................... 117
Script Editor ....................................................................................................................................................... 120
Manage Global Variables .................................................................................................................................. 122
Contents 7
Chapter 5: Understanding and Creating Rules 125
Chapter 6: Understanding and Creating Directives 127
Verification Directives .............................................................................................................................................. 127
Parameter Directives ................................................................................................................................................ 128
Configuration Executable Directives ........................................................................................................................ 128
Macro Step Directives .............................................................................................................................................. 128
Appendix A: Configuring sudo for UNIX and Linux Softagent Discovery 131
Appendix B: Mapping CA Configuration Automation Tasks to CA EEM Permissions 133
Service Options ........................................................................................................................................................ 134
Service Snapshot Options ......................................................................................................................................... 134
Service Component Options..................................................................................................................................... 135
Server Options .......................................................................................................................................................... 135
Server Snapshot Options .......................................................................................................................................... 136
Server Component Options ...................................................................................................................................... 136
Server Group Options ............................................................................................................................................... 137
Management Profile Options ................................................................................................................................... 137
Network Profile Options ........................................................................................................................................... 137
Network Scan Policy Options ................................................................................................................................... 138
Access Profile Options .............................................................................................................................................. 138
Credential Vault Profile Options............................................................................................................................... 139
Notification Profile Options...................................................................................................................................... 139
Blueprints Options.................................................................................................................................................... 139
Structure Class Options ............................................................................................................................................ 140
Global Variable Options ........................................................................................................................................... 140
Compliance Management Options........................................................................................................................... 141
Dashboard Options .................................................................................................................................................. 141
Remediation Options ............................................................................................................................................... 141
Report Options ......................................................................................................................................................... 141
Administration Options ............................................................................................................................................ 142
Index 143

Chapter 1: Introducing CA Configuration Automation 9
Chapter 1: Introducing CA Configuration Automation
CA Configuration Automation is a standards-based software product that lets you manage your enterprise's distributed hardware and software components from a centralized browser-based window. You can use CA Configuration Automation, to do the following:
■ Discover the servers in your enterprise
■ Find out what operating systems, databases, and software application components are installed on those servers
■ Access complex data, information, and configuration settings from within those components
■ Determine the relationships and dependencies between the servers in your enterprise
■ Detect server and service configuration changes and differences
■ Take and retain snapshots (point-in-time copies) of your services
■ Ensure software component and configuration policy compliance to corporate standards and best practices
■ Enact change on a collection of software component attributes within a service
■ Troubleshoot and improve the mean time to repair your servers and services
The following sections describe the CA Configuration Automation software components and provide a high-level overview of key concepts.
CA Configuration Automation Concepts
10 Administrator Guide
CA Configuration Automation Concepts
This section describes CA Configuration Automation terminology and concepts that you may not be familiar with. This document also contains a glossary that briefly defines these, and other, terms.
CA Configuration Automation supports two different approaches for managing your enterprise's distributed software components:
■ Server-centric management fulfills the need to manage the infrastructure of your enterprise
■ Service-centric management fulfills the need to manage complex tiered or multi-component applications across your enterprise
CA Configuration Automation provides discovery, snapshot, refresh, change detection, comparison, and rule compliance operations for either approach.
Discovery
You can identify network segments on which you want to perform discovery operations to locate servers and software. You assign each network segment a unique name that can then be scanned for servers. In addition, you can define a Management Profile that specifies the type of scan you want to perform and how frequently you want to perform it. This Management Profile can then be assigned to one or more network segments, letting you automate the discovery operations across your enterprise.
CA Configuration Automation begins managing your enterprise applications by establishing a comprehensive, up-to-date inventory of servers and software components across your organization's networks. You can discover components to get a complete, cross-platform inventory of applications at a granular level, including directories, files, registries, database tables, and configuration parameters. The basis for application-based discovery are Blueprints, which outline the basic structure of an application to enable the CA Configuration Automation Agent to find that application on a server. Blueprints are described in detail later in this section
Chapter 2: Blueprint Overview 11
Chapter 2: Blueprint Overview
Blueprints are the abstract definitions or metadata for a software component. This metadata defines the directives and mechanisms to:
■ Detect a software component on a given computer
■ Capture file system and database elements of the component
■ Express and show inter- and intra-component relationships and dependencies
■ Locate, analyze, and manage the configuration information
■ Define, execute, and interpret diagnostic macros
■ Define recommended, best-practice values for all these elements
CA Configuration Automation presents each Blueprint in a standardized format that simplifies configuration and administration tasks. CA provides a library of predefined Blueprints for commonly used software components. You can also edit existing Blueprints and can create custom Blueprints.
Services
Within CA Configuration Automation, a service is defined as a collection of software components running on one or more managed servers. You can define a service by specifying servers, server groups and related Component Blueprints that need to be discovered. A service generally fulfills a unique business function in the enterprise, however multiple instances of a service can run within an enterprise.
CA Configuration Automation presents a standardized and annotated view of all services, including configuration details, dependencies and constraint rules, file system elements, runtime logs, diagnostics, utilities, and a component inventory.

CA Configuration Automation Concepts
12 Administrator Guide
Profiles
Profiles let you automate CA Configuration Automation discovery and management operations using the following profiles:
■ Access Profiles are associated with servers and provide the rules for server access and Agent installation.
■ Network Profiles provide the operational rules for discovering servers.
■ Management Profiles can be created and assigned at the network and server level to manage discovery, blueprint, and software management tasks.
■ Notification Profiles store notification details for creating email messages that are sent when certain operations are performed.
Snapshots
CA Configuration Automation can detect change in a component or server by monitoring your enterprise using snapshots. A snapshot is a point-in-time copy of a server’s or service's software configuration. You can automatically recapture application inventories to archive configuration data into fully detailed snapshots that can be used for troubleshooting, record keeping, or release management and migration planning.
You can also designate a snapshot as the Gold Standard to use an application’s states in the snapshot as a baseline for auditing and Change Detection.
Rule Compliance
You can ensure that complex applications meet internal and regulatory compliance by using the detailed information that CA Configuration Automation collects and running a Rule Compliance operation. CA Configuration Automation helps control applications and establishes best practices with flexible, in-depth policy definition and automated enforcement of the rules you define. Auditing your enterprise’s performance configurations, security settings, and dependent variables hardens the application infrastructure, freeing organizations from manual, error prone reviews.
CA Configuration Automation Components
Chapter 2: Blueprint Overview 13
CA Configuration Automation Components
The CA Configuration Automation software includes the following components:
■ CA Configuration Automation Server
■ CA Configuration Automation Database
■ CA Configuration Automation Agents
■ CCA Grid Node
■ CA Network Discovery Gateway
■ CA EEM
■ BusinessObjects reports server
These components are described in the sections that follow.
CA Configuration Automation Server
CA Configuration Automation Server provides a browser-based user interface that acts as a central registry through which you manage persistent storage, control data access, and manage communication with the CA Configuration Automation Agents. CA Configuration Automation Server controls all aspects of the product’s operation, including discovery, configuration, reconciliation, and analysis functions. CA Configuration Automation Server is accessible from any Windows server with a supported browser.
CA Configuration Automation Database
The CA Configuration Automation Database stores all of the collected CA Configuration Automation data and configuration information, including the following:
■ Server configurations (hardware, software, system information)
■ Service configurations and components
■ Server and Service snapshots
■ Job Scheduler information
■ Custom Reports definitions
■ Custom Blueprints
Each instance of a CA Configuration Automation Server needs a corresponding database instance. Multiple CA Configuration Automation Servers can share the same database on the same database server, but each server must have its own set of tablespaces and tables within the database instance to store data.
CA Configuration Automation Components
14 Administrator Guide
CCA Agents
A CA Configuration Automation Agent is a light-weight executable that inspects and implements server-directed operations on Service Blueprint-based components running on CCA-managed servers in your enterprise. It can perform deep configuration management of both server and software configurations.
CA Configuration Automation Agents are installed as daemons on UNIX-based servers or as services on Windows-based servers.
You need to install a CA Configuration Automation Agent on every server in your enterprise on which you want CA Configuration Automation to manage servers and services in depth. In addition, we recommend that you install CA Configuration Automation Agent on each CA Configuration Automation Server machine to discover and manage the CA Configuration Automation Server components.
Note: CA Configuration Automation can also provide secure agentless interrogation and monitoring of subject systems using SSH. This option may be a viable alternative when installing an agent is not feasible or when a CA Configuration Automation Agent is not supported on a platform.
CCA Grid Nodes
Grid processing is used to increase performance by distributing operational workloads to multiple Grid Nodes. A server is capable of supporting multiple CCA Grid Nodes each with multiple threads. CA Configuration Automation operations are Grid-enabled so they can be divided into independent executable entities. These executable entities are distributed to available Grid servers, Grid nodes, and threads for execution.
CCA Grid Nodes are supported on Linux, UNIX, and Windows platforms and have their own installation programs. After installing a CCA Grid Node and registering it with the CA Configuration Automation Server, Grid processing is invisible to CA Configuration Automation users.
CA Network Discovery Gateway
The NDG Server is responsible for the CA Configuration Automation Discovery operations that locate and monitor servers and services in your enterprise. You must install the NDG Server on a supported Windows platform before installing the CA Configuration Automation Server. The CA Configuration Automation installation program prompts you for the name of the NDG Server and the port it uses for discovery operations.
CA Configuration Automation Components
Chapter 2: Blueprint Overview 15
CA EEM
CA Embedded Entitlements Manager (CA EEM) provides user and group management and role-based authentication services for the CA Configuration Automation user interfaces.
Business Objects
Business Objects is a third-party business intelligence platform shipped with CA Configuration Automation that provides interactive reporting. Predefined CA Configuration Automation reports are hosted on the Business Objects server.

Chapter 3: Using the CA Configuration Automation User Interface 17
Chapter 3: Using the CA Configuration Automation User Interface
This chapter introduces the CA Configuration Automation browser-based user interface. For information about the command-line interface (CLI), see Using the Command-line Interface.
This section contains the following topics:
Log In to CA Configuration Automation (see page 18) CA Configuration Automation UI Overview (see page 19) Filter Table Views (see page 25) Common Table Actions (see page 28)
Log In to CA Configuration Automation
18 Administrator Guide
Log In to CA Configuration Automation
Log in to CA Configuration Automation to access the user interface. When you log in for the first time, enter the correct URL and log in as the default or user-defined CCA Administrator user. You can change your password after you access the UI.
Follow these steps:
1. Open a supported web browser and enter the appropriate following URL in the Address field.
http://<server>:port/CCAUI.html
http://<server>:port/CCAUI.jsp
<server>
Defines the CA Configuration Automation server name that you entered during the installation process.
port
Defines the port number that you entered during the installation process.
Default: 8080
The CA Configuration Automation Log In page opens.
2. (Optional) Click Favorites on the browser toolbar and select Add to Favorites from the menu to add the Log In page to your list of favorite Web pages.
3. On the Log In page, complete one of the following actions and click Log In:
■ If you accepted the default CCA Administrator during the CA Configuration Automation Server installation process, enter ccaadmin in the User Name and Password fields.
■ If you did not accept the default CCA Administrator during the CA Configuration Automation Server installation process, enter the name and password you specified for the CCA Administrator.
The Tasks panel appears and displays the administrator user that you are logged in as. The panel also contains a link where you can change the associated password.
CA Configuration Automation UI Overview
Chapter 3: Using the CA Configuration Automation User Interface 19
CA Configuration Automation UI Overview
When you log in to CA Configuration Automation, the Tasks panel opens by default.
You can access the following main UI panels from links in the top right corner:
■ Management
■ Dashboard
■ Administration
■ Tasks
The link to the online help system accompanies each panel link. The sections that follow introduce each panel.
Management Panel
To complete most day-to-day configuration management operations, use the Management panel.
To create, view, and manage objects of the relevant type, use the following tabs on the Management panel:
■ Services
■ Servers
■ Software
■ Network
■ Storage
■ Blueprints
■ Compliance
■ Remediation
■ Jobs
■ Log
■ Reports
Each management tab page contains a table that lists the objects that are defined for that page. You can add objects to the tables manually or as the result of a discovery operation. You can import the objects from another application or the CA Configuration Automation installation program can install them as predefined data.
CA Configuration Automation UI Overview
20 Administrator Guide
Except for the Reports tab, all management tabs contain a Filter pane with which to filter so the table displays only the selected objects. For information about creating filters, see Filter Table Views (see page 25).
Most of the management tabs also contain the following drop-down lists from which you can select management actions:
Select Actions
Contains the options for running, managing, exporting, and deleting objects and operations.
Table View
Contains the options for displaying the default table view or the custom views you create.
Table Actions
Contains the options for creating or importing objects (servers, services, and so on), and the following common tasks:
■ Export to Excel
■ Configure Table View
The Table Action drop-down list on every tab page lists the common tasks. For information about the common tasks, see Common Table Actions.
For more information about the Management panel, see the section that corresponds to the relevant tab.
Dashboard Panel
The Dashboard panel contains two tabs: Charts and Visualization.
Charts Tab
The Charts tab contains a Dashboard pane that includes two folders: Dashboards and Charts. The Dashboard folder contains the following predefined Dashboards that display graphical summaries of the objects you are managing with CA Configuration Automation:
■ VM Hosting Servers
■ VM Guest Software Components
■ VM Guest Servers
■ Virtualization
■ Software Components
CA Configuration Automation UI Overview
Chapter 3: Using the CA Configuration Automation User Interface 21
■ Services
■ Servers (Unmanaged)
■ Servers (Managed)
■ Servers
■ Compliance
■ Communication Relationships
■ Change History
The Charts folder contains the following subfolders which contain related charts:
■ All Charts
■ Servers
■ Relationships
■ Virtual Environment
■ Applications
■ Software Components
■ Services
■ Rule Compliance
■ Change Detection
■ Grid Information
Dashboards, and their corresponding charts, contain options for displaying them, configuring them, removing them, refreshing them, and changing how they display information. Additionally, you can create new and custom Dashboards, and import and export Dashboards from and to other CA Configuration Automation implementations.
For detailed information about the Dashboard panel, see Dashboards.
Visualization Tab
The Visualization tab contains a Visualization pane that includes two folders: Graphs and Templates. The Graphs and Templates folders both contain the following subfolders:
■ Applications
■ Servers
■ Clusters and Service profiler
■ Services
■ Software Components
CA Configuration Automation UI Overview
22 Administrator Guide
You can view any of the predefined views in the Graphs subfolders, or display, modify, and save any view in the Templates subfolder to create a custom graph.
For detailed information about the Visualization panel, see Visualization.
Administration Panel
Define and manage CA Configuration Automation users, view and configure the CA Configuration Automation server settings, and manage port-based communication mappings on the following Administration panel tabs:
Configuration
Contains the following pages:
Properties
Contains the settings for viewing and editing how CA Configuration Automation looks and operates.
Security Certificates
Contains the settings for creating and managing CA Configuration Automation Server and CA Configuration Automation agents.
Communication Mappings
Lists the port numbers and communication types that the product commonly uses through the port. You can edit the communication type setting on this page.
Application Mappings
Lists the applications and regular expressions that identify the typical installation directory of the associated application. You can add, edit, and manage the mappings on this page.
For more information, see Configuration Settings (see page 33).
CA Configuration Automation UI Overview
Chapter 3: Using the CA Configuration Automation User Interface 23
Access Management
Links to the following access management pages that provide CA EEM integration functionalities:
Users
Provides the functionality for creating and managing users.
Policies
Provides the functionality for managing user access to specific CA Configuration Automation features.
Configure
Specifies where the product stores user and user group information and from where the product accesses it.
For more information, see Configuring Access Management (see page 76).
Network
Contains the Network Discovery Gateways table, which displays the servers where Network Discovery Gateways are installed. You can create, manage, and delete NDG Servers from this page.
Catalyst Integration
Contains the Catalyst Attributes Profiles table which displays predefined and custom Catalyst Attributes Profiles. You can create, import, export, edit, delete, and copy Catalyst Attributes Profiles from this page.
Profiles
Defines the predefined and custom Catalyst Attributes Profiles.You can determine what CIs to export to the CA Catalyst server.
Jobs
Specifies the selected information (servers, or services, or storage systems, or blueprints) that is published from CA Configuration Automation to the catalyst server.
Log
Logs the operations that are related to profile and jobs.
CA Configuration Automation UI Overview
24 Administrator Guide
Diagnostics
Links to the following diagnostics pages:
CCA Information
Displays the configuration details about the UI, and CA Configuration Automation integrations.
Database Information
Displays the configuration details about the CA Configuration Automation Database and the database schemas.
Grid Information
Displays the details for all Grid Nodes. This tab also displays the CA Configuration Automation Server grid jobs in a table view or a tree view.
Distributed Lock Information
Specifies the lock that is shared among the grids to orchestrate the allocation of services among the grids. The lock provides the server details where a scheduled job is executed. The services are assigned and reassigned in the event of failure.
Collect Diagnostics
Collects the information that CA Technologies Support requests to troubleshoot the CA Configuration Automation Server or CA Configuration Automation Server Grid Node issues.
Log Archives
Specifies the logs that are archived when the logs exceed the maximum storage size limit.
Data Migration
Provides the following options for migrating data from CA Cohesion CCA:
■ From the Cohesion Database to the CA Configuration Automation r12.8 SP02
■ From the Cohesion Database to a JAR file
■ From a JAR file to the CA Configuration Automation Database
■ Import Security Certificates from CA Cohesion ACM to CA Configuration Automation r12.8 SP02
For more information about how to migrate data from CA Cohesion ACM to CA Configuration Automation, see Migrating Data from CA Cohesion ACM.
Filter Table Views
Chapter 3: Using the CA Configuration Automation User Interface 25
Scripts
Links to the following script pages:
Scripts
Lists all the available scripts for the user and provides options to manage the scripts. See Scripts (see page 117) for more information.
Global Variables
Lists all the available global variables for the user and provides options to manage the global variables. See Manage Global Variables (see page 117) for more information.
Tasks Panel
Use the Tasks panel to complete the following common tasks:
■ Discover Network
■ Access Profile and Agent Deployment
■ Discover Service
■ Run Compliance Job
■ Locate and Upgrade Agents
Click a task to open a wizard that contains a detailed description of the task and navigation buttons that link to the subtasks that are required to complete the task.
Filter Table Views
Each of the CA Configuration Automation Management tab pages (Services, Servers, Network, Blueprints, Compliance, Remediation, Jobs, Log, and Reports) contains a table that displays details about the corresponding objects. Some of these tables can be very large. To make it easier to work with large amounts of table data, you can create a filter that only displays the objects that are important to you.
Filter Table Views
26 Administrator Guide
To filter table data
1. Open any of the nine tab pages.
The page displays a corresponding table. For example, if you select the Servers tab, the page displays the Servers table.
2. Create the filter by selecting options from the drop-down lists or typing in the following fields:
Column
Specifies the column in the table on which you want to filter. The drop-down list contains an option for each column in the table on which you can filter.
Value
Specifies the value in the selected column on which you want to filter. Some drop-down lists contain options for the values in the column selected in the Column field. If there are no options available, you must enter a text string in the field.
Note:
■ The Value field is not case-sensitive.
■ The string must match exactly—partial matches are not returned. For example if you want to the Blueprints table to display all Apache Blueprints, entering Apache will not return any Blueprints.
■ Wildcards are supported. You can use an asterisk (*) or a percent sign (%) as a wildcard, for example Apache* returns all Blueprints that begin with Apache (Apache Tomcat Servlet Engine, Apache HTTP Server, and so on).
Filter Table Views
Chapter 3: Using the CA Configuration Automation User Interface 27
3. (Optional) Add additional filter criteria to create a more complex filter:
a. Select one of the following options:
■ And—Specifies that table displays objects that match the entries in both pairs of Column and Value fields.
■ Or—Specifies that table displays objects that match entries in either pair of Column and Value fields.
b. Select an option from the second Column drop-down menu.
c. Enter or select a value in the second Value column.
For example, if you create a filter on the Blueprints page with the first Column field set to Blueprint Name and the first Value field set to Apache*, and the second pair of fields set to Blueprint Version and 1.0.0, selecting the And option would display all Apache Blueprints with a version of 1.0.0. If you select the Or option, the table would display all Blueprints that begin with Apache (regardless of what version they are), and all Blueprints that are version 1.0.0 (regardless of what their name is).
4. Click Refresh.
The table displays the rows of objects that match your filter criteria.
To clear a filter and display all table data
1. Open any of the eight tab pages.
The page displays a corresponding table.
2. Do one of the following:
■ Click Reset to clear the filter fields.
■ Select the blank entry from both of the Column drop-down lists (the blank option is the first entry on the menu, it appears above the first text option).
3. Click Refresh.
The filter is cleared and the table displays the first 50 rows of table data (rows 51 and above are displayed on different pages, 50 rows to a page).
Common Table Actions
28 Administrator Guide
Common Table Actions
Each of the CA Configuration Automation Management tab pages (Services, Servers, Networks, Profiles, Jobs, Blueprints, Reports, and Remediation) contains a table that displays details about the corresponding objects. Each table contains a Table Actions drop-down menu that contains page-specific table actions and the following three options that are common to all tables:
■ Export to Excel
■ Configure Table View
These options are described in the sections that follow.
Export Table Data to Excel
You can export table data and column headings to a Microsoft Excel spreadsheet to share CA Configuration Automation data with people who are not configured as CA Configuration Automation users.
To export table data to Excel
1. Open the tab page the contains the table that you want to export.
2. Select Export to Excel from the Table Actions drop-down list.
The File Download window appears and prompts to open or save the file.
3. Do one of the following:
■ Click Save, enter a name and location for the file, and then click Save.
The file is saved in the specified location.
■ Click Open.
The table data displays in Excel. Select Save As if you want to save the exported data as a file.
Common Table Actions
Chapter 3: Using the CA Configuration Automation User Interface 29
Print Table Data
You can print table data if you want to have a paper copy.
Follow these steps:
1. Open the tab page that contains the table that you want to print.
2. Select Print from the Table Actions drop-down list.
The table data is sent to your printer.
Create Table View
Tab pages that contain a table (for example, the Servers table) also contain a Create Table View option on the Table Actions drop-down list. You can use this option to define custom table views that display the table contents according to your personal preferences.
To create table views
1. Click the Management link then any tab that displays a tab page that contains an element table (for example, the Servers tab).
The tab page appears and, in this example, contains the Servers table.
2. Select Create Table View from the Table Actions drop-down list.
The Details page of the Create Table View wizard appears.
3. Enter the following information in the corresponding field, then click Next:
Name
Specifies a name for the table view.
Refresh Interval
Specifies the rate (in seconds) at which the table is automatically refreshed.
Page Size
Specifies the maximum number of rows per page in the table.
Sort Column
Specifies which column is used to determine the sort order. For example, if you select the Server Name column, the server names are sorted alphabetically. If you select the Creation Date/Time column, the server names are sorted chronologically.
Common Table Actions
30 Administrator Guide
Sort Order
Specifies Ascending or Descending. For example if a column was sorted alphabetically, and the Sort Order was set to Ascending, the order would be A through Z.
Shared View
Specifies whether this view is available to all users, or only to the table view creator.
The Columns page appears with all available columns displayed in the Selected Columns field (that is, by default, tables display all available columns).
4. Double-click one or more columns in the Selected Columns field that you want to remove from this custom view.
The selected columns are moved to the Available Columns field.
5. Click Next.
The Filter page appears.
6. Create a filter by selecting options from the drop-down menus or typing in the following fields:
Column
Specifies the column in the table on which you want to filter. The drop-down list contains an option for each column in the table on which you can filter.
Value
Specifies the value in the selected column on which you want to filter. Some drop-down lists contain options for the values in the column selected in the Column field. If there are no options available, you must enter a text string in the field.
Note:
■ The Value field is not case-sensitive.
■ The string must match exactly—partial matches are not returned. For example if you want the Blueprints table to display all Apache Blueprints, entering Apache will not return any Blueprints.
■ Wildcards are supported. You can use an asterisk (*) as a wildcard, for example Apache* returns all Blueprints that begin with Apache (Apache Tomcat Servlet Engine, Apache HTTP Server, and so on).
Common Table Actions
Chapter 3: Using the CA Configuration Automation User Interface 31
7. (Optional) Add additional filter criteria to create a more complex filter:
a. Select one of the following options:
■ And—Specifies that table displays objects that match the entries in both pairs of Column and Value fields.
■ Or—Specifies that table displays objects that match entries in either pair of Column and Value fields.
b. Select an option from the second Column drop-down list.
c. Enter or select a value in the second Value column.
For example, if you create a filter on the Blueprints page with the first Column field set to Blueprint Name and the first Value field set to Apache*, and the second pair of fields set to Blueprint Version and 1.0.0, selecting the And option would display all Apache Blueprints with a version of 1.0.0. If you select the Or option, the table would display all Blueprints that begin with Apache (regardless of what version they are), and all Blueprints that are version 1.0.0 (regardless of what their name is).
8. Click Finish.
The custom Table View is created and appears in the Table Views table.

Chapter 4: Administering CA Configuration Automation 33
Chapter 4: Administering CA Configuration Automation
This section contains the following topics:
Configuration Settings (see page 33) Configuring Users and Role-Based Security (see page 76) Managing Network Discovery Gateways (see page 90) Managing Catalyst Attribute Profiles and Jobs (see page 94) CA Configuration Automation Diagnostics (see page 103) Migrating Data from CA Cohesion ACM (see page 103) Implementing Multi-tenancy (see page 111) Manage Scripts (see page 117)
Configuration Settings
While there are a number of configuration files installed and referenced by CA Configuration Automation, you can view and edit many CA Configuration Automation configuration settings from a single, convenient UI location on the Properties page which can be accessed by clicking the Administration link, then the Configuration tab.
In addition to the configuration settings on the Properties page, you can access, view, and manage settings on the following pages from the Configuration tab page:
■ Security Certificates
■ Communication Mappings
Configuration Settings
34 Administrator Guide
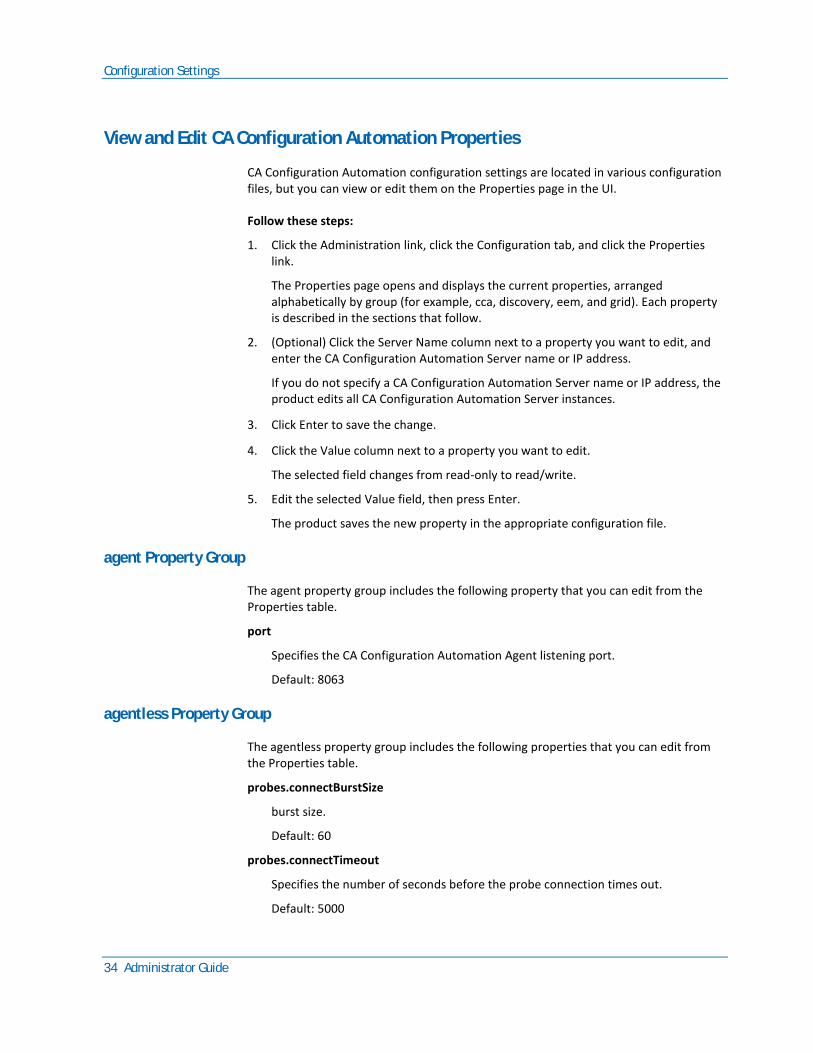
View and Edit CA Configuration Automation Properties
CA Configuration Automation configuration settings are located in various configuration files, but you can view or edit them on the Properties page in the UI.
Follow these steps:
1. Click the Administration link, click the Configuration tab, and click the Properties link.
The Properties page opens and displays the current properties, arranged alphabetically by group (for example, cca, discovery, eem, and grid). Each property is described in the sections that follow.
2. (Optional) Click the Server Name column next to a property you want to edit, and enter the CA Configuration Automation Server name or IP address.
If you do not specify a CA Configuration Automation Server name or IP address, the product edits all CA Configuration Automation Server instances.
3. Click Enter to save the change.
4. Click the Value column next to a property you want to edit.
The selected field changes from read-only to read/write.
5. Edit the selected Value field, then press Enter.
The product saves the new property in the appropriate configuration file.
agent Property Group
The agent property group includes the following property that you can edit from the Properties table.
port
Specifies the CA Configuration Automation Agent listening port.
Default: 8063
agentless Property Group
The agentless property group includes the following properties that you can edit from the Properties table.
probes.connectBurstSize
burst size.
Default: 60
probes.connectTimeout
Specifies the number of seconds before the probe connection times out.
Default: 5000
Configuration Settings
Chapter 4: Administering CA Configuration Automation 35
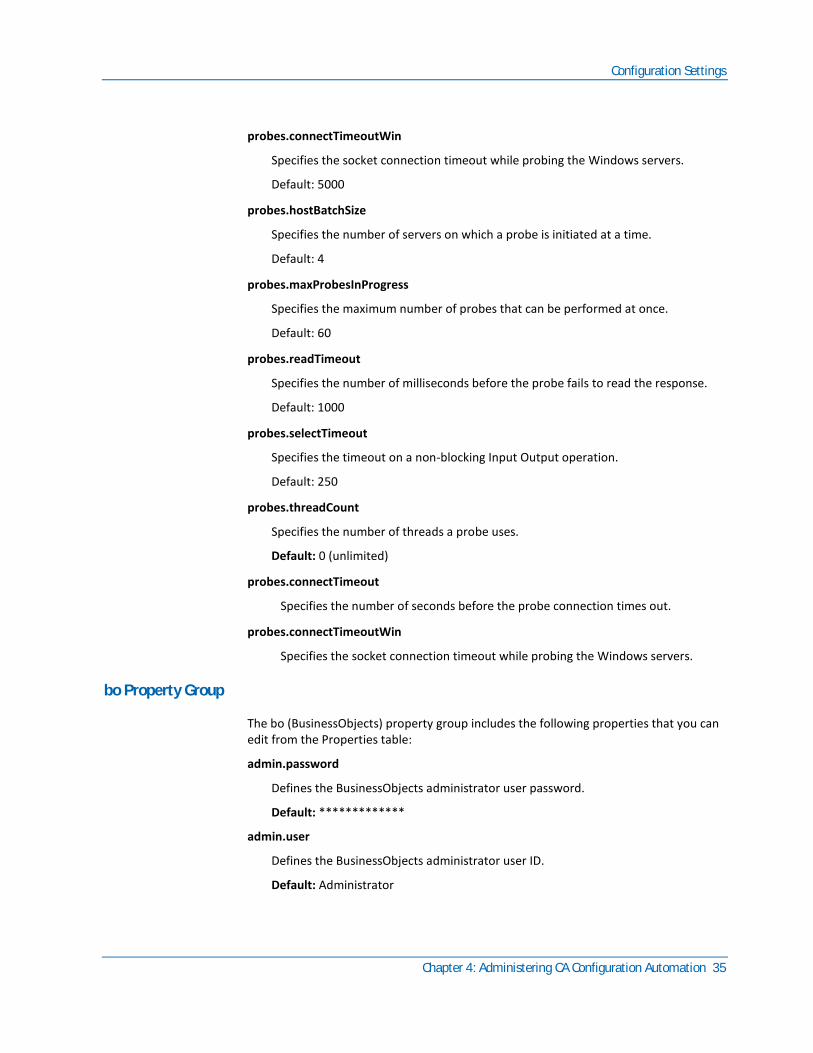
probes.connectTimeoutWin
Specifies the socket connection timeout while probing the Windows servers.
Default: 5000
probes.hostBatchSize
Specifies the number of servers on which a probe is initiated at a time.
Default: 4
probes.maxProbesInProgress
Specifies the maximum number of probes that can be performed at once.
Default: 60
probes.readTimeout
Specifies the number of milliseconds before the probe fails to read the response.
Default: 1000
probes.selectTimeout
Specifies the timeout on a non-blocking Input Output operation.
Default: 250
probes.threadCount
Specifies the number of threads a probe uses.
Default: 0 (unlimited)
probes.connectTimeout
Specifies the number of seconds before the probe connection times out.
probes.connectTimeoutWin
Specifies the socket connection timeout while probing the Windows servers.
bo Property Group
The bo (BusinessObjects) property group includes the following properties that you can edit from the Properties table:
admin.password
Defines the BusinessObjects administrator user password.
Default: *************
admin.user
Defines the BusinessObjects administrator user ID.
Default: Administrator

Configuration Settings
36 Administrator Guide
mail.server.attachment.size
Defines the maximum email attachment size.
Default: 25 MB
max.reports.retention.instances.size
Defines the number of report instances a custom report can have after the cleanup job.
Default: -1( report instances are never deleted automatically)
Limit: 0 to 999 instances
rptInstance.maxViewCount
Defines the maximum number of report instances to display on the Report Instances tab.
Default: 999
schedule.rpt.wait.time
Defines the interval (in seconds) that CCA waits for BusinessObjects to complete the report.
Default: 7200
server
Defines the BusinessObjects XI server name.
server.auth
Defines the authentication type to use to access the BusinessObjects report server.
Default: secEnterprise
server.port
Defines the BusinessObjects XI server port.
Default: 6400
user.group
Defines the BusinessObjects report group for CCA.
Default: CCA Users
user.prefix
Defines the BusinessObjects user name prefix to add to the ^$+userID identifier.
Default: cca
webserver.name
Defines the BusinessObjects server name or IP address.
Configuration Settings
Chapter 4: Administering CA Configuration Automation 37
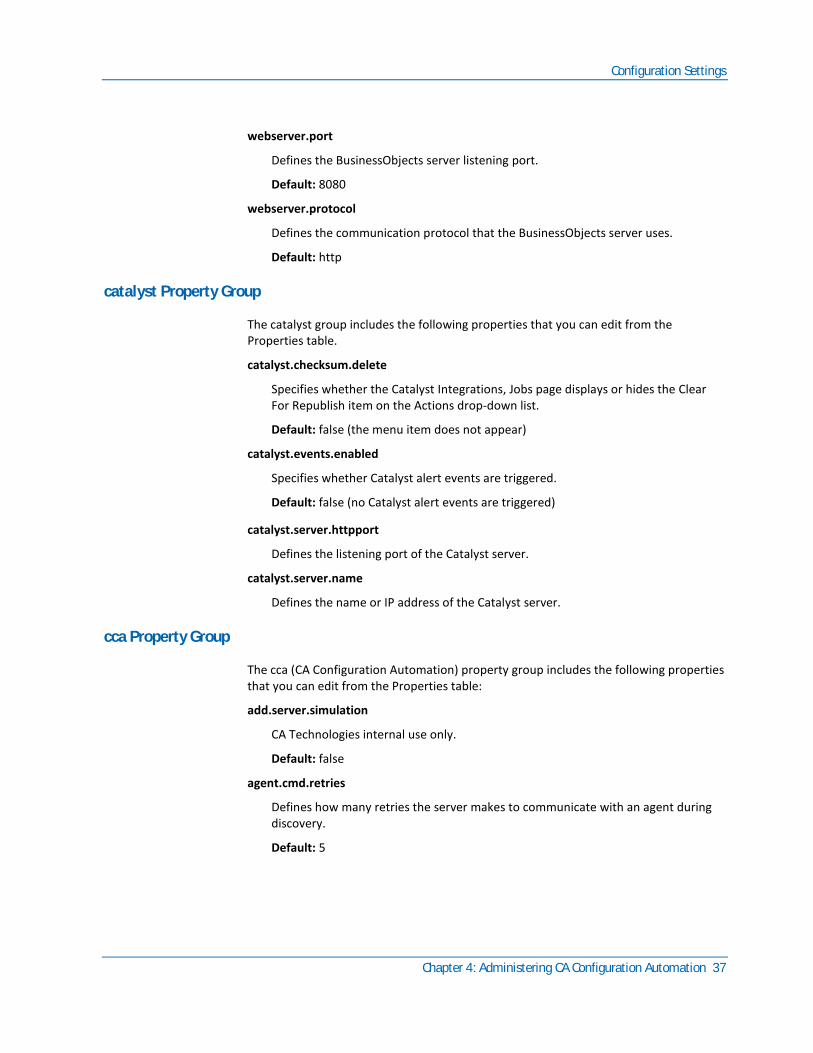
webserver.port
Defines the BusinessObjects server listening port.
Default: 8080
webserver.protocol
Defines the communication protocol that the BusinessObjects server uses.
Default: http
catalyst Property Group
The catalyst group includes the following properties that you can edit from the Properties table.
catalyst.checksum.delete
Specifies whether the Catalyst Integrations, Jobs page displays or hides the Clear For Republish item on the Actions drop-down list.
Default: false (the menu item does not appear)
catalyst.events.enabled
Specifies whether Catalyst alert events are triggered.
Default: false (no Catalyst alert events are triggered)
catalyst.server.httpport
Defines the listening port of the Catalyst server.
catalyst.server.name
Defines the name or IP address of the Catalyst server.
cca Property Group
The cca (CA Configuration Automation) property group includes the following properties that you can edit from the Properties table:
add.server.simulation
CA Technologies internal use only.
Default: false
agent.cmd.retries
Defines how many retries the server makes to communicate with an agent during discovery.
Default: 5
Configuration Settings
38 Administrator Guide
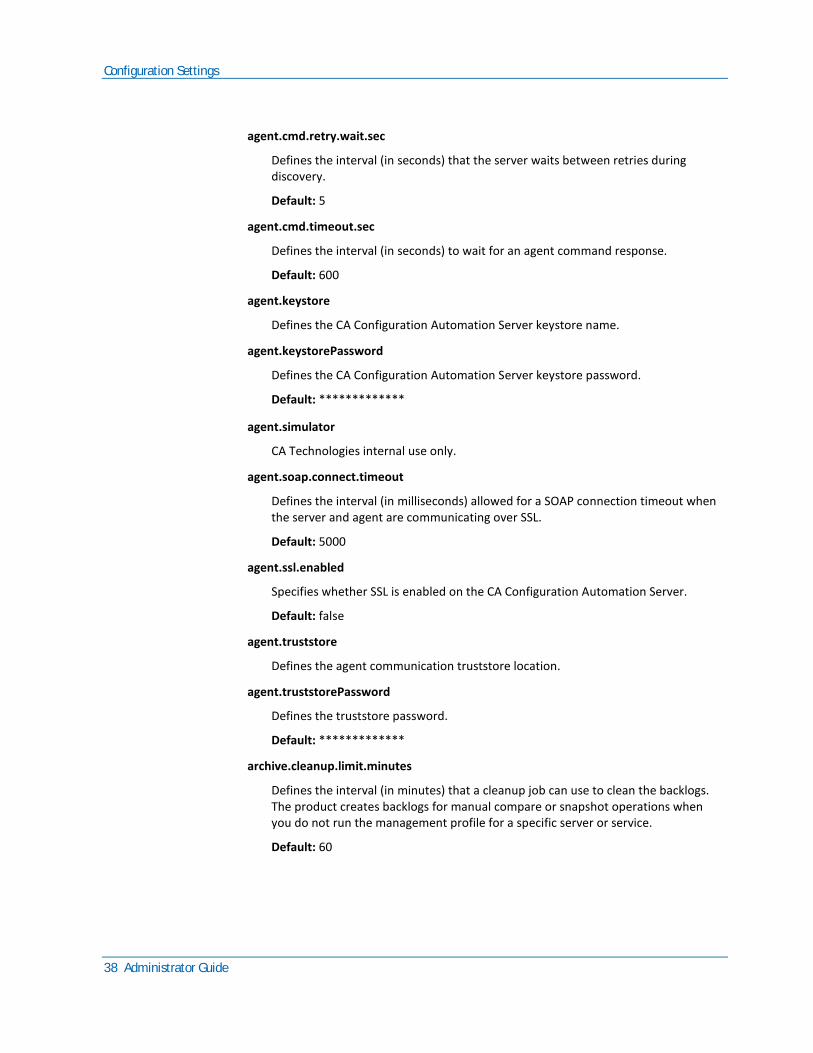
agent.cmd.retry.wait.sec
Defines the interval (in seconds) that the server waits between retries during discovery.
Default: 5
agent.cmd.timeout.sec
Defines the interval (in seconds) to wait for an agent command response.
Default: 600
agent.keystore
Defines the CA Configuration Automation Server keystore name.
agent.keystorePassword
Defines the CA Configuration Automation Server keystore password.
Default: *************
agent.simulator
CA Technologies internal use only.
agent.soap.connect.timeout
Defines the interval (in milliseconds) allowed for a SOAP connection timeout when the server and agent are communicating over SSL.
Default: 5000
agent.ssl.enabled
Specifies whether SSL is enabled on the CA Configuration Automation Server.
Default: false
agent.truststore
Defines the agent communication truststore location.
agent.truststorePassword
Defines the truststore password.
Default: *************
archive.cleanup.limit.minutes
Defines the interval (in minutes) that a cleanup job can use to clean the backlogs. The product creates backlogs for manual compare or snapshot operations when you do not run the management profile for a specific server or service.
Default: 60
Configuration Settings
Chapter 4: Administering CA Configuration Automation 39
archive.management.profile.limit.minutes
Defines the interval (in minutes) that the Management Profile archive can use when you upgrade to CCA for the first time. During the upgrade, some unarchived snapshots can take longer to archive.
Default: 1
archive.purge.eligibility.minutes
Defines the interval (in minutes) during which the snapshots that were recently added, recovered from the archive, or viewed are not eligible to be archived.
Important! Edit the archive.cleanup.limit.minutes, archive.management.profile.limit.minutes, and archive.purge.eligibility.minutes property groups only as instructed by CA Technical Support.
auto.refresh.limit
Defines the maximum number of automatic filter table UI refreshes to allow.
Default: 50
cleanup.execution.interval
Defines the number of hours between automatic database cleanup of obsolete objects.
Default: 24
db.batch.chunk.size
Defines the amount of data the CA Configuration Automation Server sends to CA Configuration Automation Database for storage or processing.
Default: 500
db.garbage.collection.interval
Defines the number of minutes between Java-related garbage collections.
Default: 30
delete.old.ccalogs.interval
Defines the interval (in days) that a cleanup job can use to clean the cca.log files from CCA Server and Grid Node.
Default: -1 (log files are never deleted automatically)
Limit: -1 to 365 days
discover.lock.timeout
Defines the Automatic Database Lock timeout.
Default: 30000
Configuration Settings
40 Administrator Guide
discovery.debug.enabled
Specifies whether to enable debugging on Discovery.
Default: false
discovery.extensive.log
Specifies the enhanced server and test discovery logs. The logs provide the information about the indicator searches, effective components roots, and reasons for blueprints getting excluded from the discovery. The enhanced logs provide a course of action to resolve the errors.
Default: False
installation.port
Defines the CA Configuration Automation Server listening port.
Default: 8080
installation.protocol
Defines the UI access protocol that the CA Configuration Automation Server uses.
Default: http
installation.server
Defines the name of the CA Configuration Automation Server host computer.
job.archive.minimum.records
Defines the minimum number of records the product requires to complete a job history archive.
Default: 200
job.archive.skip.records
Defines the number of records the product skips before archiving the remainder.
Default: 200
job.archive.threshold
Defines the maximum number of records a job history archive can contain.
Default: 500
locale
Defines the locale.
Default: en
log.archive.directory
Defines the location of the log file archives.

Configuration Settings
Chapter 4: Administering CA Configuration Automation 41
log.archive.minimum.records
Defines the minimum number of records the product requires to create a log archive.
Default: 1000
log.archive.skip.records
Defines the number of records the product skips before archiving the remainder.
Default: 1000
log.archive.threshold
Specifies the maximum number of records a log archive can contain.
Default: 5000
log.viewer.threshold
Defines the maximum number of log table records the product retrieves in each database operation.
Default: 10000
mail.from
Defines the address from which the product sends administrative emails.
Default: [email protected]_Server_name
mail.server
Defines the email server from which the product sends administrative emails.
max.treeview.items
Defines the maximum number of tree view items that the product can display in the grid job and cluster UI.
Default: 500
maximum.jobThreads
Defines the maximum number of job threads for each CA Configuration Automation Server or Grid Server.
Default: 32
server.ssl.enabled
Specifies whether CA Configuration Automation Server uses HTTPS to access the UI.
Default: false
Configuration Settings
42 Administrator Guide
service.profiler.debug.enabled
Specifies whether the Service Profile pane in the Service Profiler UI includes the View Queries button. The associated debugging functionality displays the query that was used to display the graphical representation of the service.
Important! Edit this property only as instructed by CA Technical Support.
set.session.timeout.interval.minutes
Defines the interval (in minutes) before the product automatically logs users out of CA Configuration Automation.
Default: -1. The product never logs users out automatically.
single.thread.metalink
CA Technologies internal use only.
Default: true
ssh.discovery.jTDS.driver.available
Specifies whether to use the jTDS JDBC driver for the Microsoft SQL Server connection.
Default: false (do not use the jTDS JDBC driver)
ssh.file.based
Specifies whether to use SSH file-based discovery. When you set this option to false, the product stores the SSH Discovery results in the cache. When the product discovers a server with a huge file system, memory cannot accommodate the large amount of data. An Out of Memory Exception results. If you set this flag to true, the product redirects the discovery results to a temporary file. The product deletes the file after it parses the results.
Default: false (do not use SSH file-based discovery)
ssh.file.chunk.size
Defines the maximum bytes the product reads from the cache results before writing to a temporary file when you set the ssh.file.based property to true.
Default: 8192 (8 MB)
ssh.rexec.timeout.sec
Defines the interval (in seconds) before an SSH Server command fails.
Default: 90
ssh.socket.timeout.sec
Defines the interval (in seconds) before the product terminates the SSH Server connection.
Default: 300
Configuration Settings
Chapter 4: Administering CA Configuration Automation 43
telnet.connection.retries
Defines the number of times the product tries to reconnect when the Telnet connection fails for any reason during discovery.
Default: 3. Increase this value to 6 if Telnet drops connections during discovery.
telnet.read.add_cr_byos
Specifies whether to add a carriage return to the Telnet commands for a specified operating system. By default, no operating system specification is required because Telnet commands do not require a carriage return.
telnet.read.byte_to_byte_delay_secs
Defines the maximum interval (in seconds) to wait for the next byte while reading the results. The product uses this value only when you do not select the Look for Prompts option in the Access Profile.
Default: 2. Increase this value to 4 if Telnet drops connections during discovery.
telnet.read.timeout_secs
Defines the maximum interval (in seconds) to wait to gather the results after issuing a command.
Default: 900. Increase this value to 1500 if Telnet drops connections during discovery.
timezone
Defines the timezone that the CA Configuration Automation Server uses.
wmi.file.based.discovery
Specifies whether the product uses file-based operations for the WMI-based discovery. When you set this property to true, the WMI discovery uses file-based operations to improve the performance.
wmi.process.output.charset
Corrects the Japanese systems in environments that are not configured with the proper character set. To avoid "junk text" messages in the CA Configuration Automation Server UI, set this value to SJIS in such environments.
wmi.script.exec.timeout.sec
Defines the interval during which the WMI-based discovery or the refresh operation must respond.
Default: 900
ignore.invalid.variables.datamigration
Specifies the special character & is skipped from the Validation during data migration of global variables from Cohesion Database to CCA Database.

Configuration Settings
44 Administrator Guide
discovery Property Group
The discovery property group includes the following properties that you can edit from the Properties table.
default.maximum.files
Specifies the maximum number of files to be searched for indicators during discovery process. This property can be used to speed up discovery of computers with large file systems.
Default: 50,000
default.maximum.registry
Specifies the maximum number of registry entries to be searched for indicators during discovery process. This property can be used to speed up discovery of computers with large amounts of registry data.
Default: 50,000
directive.netprobe.timeout.msec
Specifies the maximum time that is allowed for the agentless discovery using network probes.
Default: 2000
directive.rexec.timeout.sec
Specifies the maximum time that is allowed for the remote execution of scripts in Blueprints to avoid an indefinite wait for the script output.
Default: 300
fileget.encodeing.detector.retries
Improves the encoding detection accuracy of the file content when a configuration file contains localized content.
Improved the encoding detection accuracy of the file content, when a configuration file contains localized content.
Default: 3
manage.files.by.disc.option
Specifies the discovery of the manged files of a component from the Follow Symbolic, and the Include Network Drives management profiles.
Default: true.
Note: If the property value to false, the managed files from the symbolic links, and the Include Network Drives are discovered.
parsing_error_log_size
Specifies the length of the parser error message text.
Default: 10000
Configuration Settings
Chapter 4: Administering CA Configuration Automation 45
platform.exclude.files.unix
Specifies the comma-separated list of files to ignore during the discovery of UNIX and Linux servers.
platform.exclude.files.win32
Specifies the comma-separated list of files to ignore during the discovery of Windows servers.
platform.exclude.unix
Specifies the comma-separated list of directories to ignore during the discovery of UNIX and Linux servers.
Default: /cdrom,/boot,/dev,/proc,/tmp,/lost+found,/mnt,/devices./sys
platform.exclude.win32
Specifies the comma-separated list of directories to ignore during the discovery of Windows servers.
Default: A:,?:/RECYCLER,?:/$Recycle.Bin,C:/Documents and Settings, C:/Users,C:/ProgramData
server.reconcile
Specifies whether to reconcile the IP addresses of discovered servers.
Default: false
use.registry.cache
Specifies whether the agentless discovery (that is, WMI, SSH, and Telnet) stores the registry data in the cache. If the target grid node or CCA Server is installed on a computer with 2 GB of RAM (or less), set this property to false.
Configuration Settings
46 Administrator Guide
db Property Group
The db property group includes the following properties that you can edit from the Properties table:
batch.update.timeout.retries
Defines the number of retries to attempt when batch mode timeouts occur.
Default: 5 (minimum is 0).
batch.update.timeout.seconds
Defines the interval to wait (in seconds) before continuing to insert, update, or delete data in batch mode.
Default: 300 (minimum: 30, maximum10800).
deadlock.retry.delay.ms
Defines the interval to wait (in milliseconds) before retrying the transaction.
Default: 10000 (minimum: 1000, maximum: 300000).
jdbc.trace.level
Defines JDBC logging related to database operations. The following values are valid:
Severe
Indicates a serious failure and is the highest logging level. The JDBC driver uses this level to report errors and exceptions.
Warning
Indicates a potential issue.
Info
Provides informational messages.
Config
Provides configuration messages. The JDBC driver uses this level for global configuration settings.
Fine
Provides basic tracing information. The JDBC driver uses this level for most log messages.
Finer
Provides more detailed tracing information.
Finest
Provides highly detailed tracing information. Finest is the lowest logging level.
Configuration Settings
Chapter 4: Administering CA Configuration Automation 47
Off
Turns off logging.
All
Enables logging of all messages.
max.batch.size
Defines the number of rows that the product processes in each batch during database operations.
Default: 1000 (minimum: 100, maximum:10000).
query.timeout.seconds
Defines the interval (in seconds) to continue the query select attempts.
Default: 300 (minimum: 30, maximum: 3600).
update.timeout.seconds
Defines the interval (in seconds) to continue the insert, update, or delete attempts.
Default: 3600 (minimum: 30, maximum: 10800).
distributed lock Property Group
The distributed lock property group includes the following properties that you can edit from the Properties table.
distributedlock.heartbeatExpirationInterval
Change only if instructed to by CA Support
Default: 600
distributedlock.heartbeatRefreshInterval
Change only if instructed to by CA Support
Default: 300000
distributedlock.retryInterval
Change only if instructed to by CA Support
Default: 5000
Configuration Settings
48 Administrator Guide
distributedlock.garbageCollectionInterval
Specifies the maximum cleanup time for any distributed locks that a process acquires during the following operations:
■ discovery
■ change detection
■ compare
■ rule compliance operations.
Default: 300000
eem Property Group
The eem property group includes the following properties that you can edit from the Properties table.
applicationInstance.name
Identifies CA Configuration Automation within CA EEM.
Default: CCA
auth.enabled
Species whether CA EEM is configured to authenticate users. If this property is set to false, any entry in the Username and Password fields is valid.
Default: true
cca.admin.user
Identifies the CA Configuration Automation administrator user.
Default: ccaadminuser
client.auth.enabled
Specifies whether X.509 client certificate authentication is enabled.
Default: false
eventdeliveryhost
Specifies the host from which events are sent.
host
EEM Server host name.
Configuration Settings
Chapter 4: Administering CA Configuration Automation 49
grid Property Group
The grid property group includes the following properties that you can edit from the Properties table:
ftp.account
Defines the user name with which the product connects to the FTP server. The product uses the FTP properties for Telnet discovery operations. Configure the FTP account for each grid server so the account identifies it by host name only. Do not use a host name with a domain (for example, darkstar.ca.com) or an IP address.
ftp.password
Defines the password that is associated with the ftp.account user.
ftp.port
Defines the FTP server listening port.
Default: 21
ftp.root
Defines the root directory (that is, the FTP home directory) of the FTP server.
heartbeat.expiration.interval
Defines the interval (in seconds) during which the product considers a grid node heartbeat valid. When a grid node updates the heartbeat in the database, it also updates the heartbeat expiration to the current time plus the heartbeat.expiration.interval value. If the grid node does not update the heartbeat by the expiration time, the product considers the grid node unavailable or stopped.
Default: 300
heartbeat.refresh.interval
Defines the interval (in minutes) before the product retrieves data from other grid servers. Each grid node updates a heartbeat row in the database regularly. The constant heartbeat update indicates to other grid nodes that this node is running. For example, if you power the computer down the heartbeat eventually expires. When the heartbeat expires, other grid nodes assume the expired grid node is no longer running.
Default: 60
history.retention.days
Defines the interval (in days) to keep the event and job information about grid servers in the database for reporting.
Default: 14
Configuration Settings
50 Administrator Guide
job.resubmit.delay.ms
Defines the interval (in milliseconds) that the product delays an unprocessed grid job before it resubmits the job.
Default: 5000
max.jobs.master
Defines the maximum number of jobs the master grid server can run simultaneously. To conserve resources for other UI activities, this value is lower by default than it is for grid nodes.
Default: 10
max.jobs.slaves
Defines the maximum number of jobs the slave grid server can run simultaneously. Setting this value too low reduces scaling efficiency; setting this value too high can deplete resources and can cause out-of-memory exceptions.
Default: 20
rpc.connect.timeout.seconds
CA Technologies internal use only.
Default: 15
rpc.reply.timeout.seconds
CA Technologies internal use only.
Default: 0
stess.multiplier
CA Technologies internal use only.
Default: 3
system.wide.max.jobs
Defines the total jobs that all of the grid servers can run simultaneously. Setting this value too high can exhaust database resources, such as the maximum number of connections the product can support.
Default: 100
Configuration Settings
Chapter 4: Administering CA Configuration Automation 51
tcp.base.port
Defines the initial port for grid-to-grid communications. You can install a single UI server and any number of grid nodes on a single computer. When each of these servers starts, it creates a socket for grid-to-grid communications.
Default: 8065
tcp.port.range
Defines the range of contiguous ports from tcp.base.port that are available for grid-to-grid communications. All ports from tcp.base.port through tcp.base.port plus tcp.port.range must be open to your firewall.
Default: 15
ndg Property Group
The ndg property group includes the following properties that you can edit from the Properties table.
chunk.enabled
Specifies whether NDG imports data chunks periodically or waits until the scan completes to import data.
Default: true
chunk.interval
Specifies the number of seconds to wait before importing a data chunk.
Default: 30
comm.attributes.prune.interval
Specifies the number of days to wait before deleting old communication relationship attributes gathered by Packet Analysis scans.
Default: 30
comm.relationships.prune.interval
Specifies the number of days to wait before pruning old communication relationships gathered by the following operations:
■ Softagent Network Connections processing
■ Packet Analysis scans
■ Netflow scans
■ Traffic Summary data for Packet Analysis and Netflow scans
Default: 92
Configuration Settings
52 Administrator Guide
default.port
Specifies the port for NDG web service call.
Default: 8081
ignore_server_with_duplicate_ip
Specifies that network discovery does not create a new server entry for discovered servers that have an IP that conflicts with a server that already exists in the CCA Database when this value is set to true.
Default: false
Note: Network discovery processing logs a warning message when duplicate IPs are encountered.
reconcile_ip.use_tcp_connect_scan
Specifies whether to use TCP Connect Scan to perform a Reconcile IP operation. If this property is set to false, PingSweep is used.
Default: false
scheduler Property Group
The scheduler property group includes the following properties that you can edit from the Properties table.
instanceId
Specifies the job instance ID number.
Default: AUTO
instanceName
Specifies the job instance name.
Default: ACMScheduler
scheduler.rmi Property Group
The scheduler.rmi property group includes the following property that you can edit from the Properties table.
registryPort
Specifies the Remote Method Invocation (RMI) port.
Default: 1099
Configuration Settings
Chapter 4: Administering CA Configuration Automation 53
scheduler.threadPool Property Group
The scheduler.threadPool property group includes the following properties that you can edit from the Properties table.
threadcount
Specifies the number of threads per scheduled job.
Default: 100
threadPriority
Specifies the priority of the threads.
Default: 4
sdk Property Group
The sdk property group includes the following properties that you can edit from the Properties table.
sdk.enabled
Specifies whether SDK clients can access the CA Configuration Automation Server.
Default: true
sdk.session.cache.idle.time
Specifies the interval (in minutes) before the SDK credential cache entry is removed after the SDK request is completed.
Default: 10
sdk.session.cache.size
Specifies the maximum number of entries in the SDK credential cache.
Default: 100
snmp Property Group
The snmp property group includes the following properties that you can edit from the Properties table.
default.communitystring
Specifies the SNMP community string.
Default: public
default.retries
Specifies the SNMP retry count.
Default: 3

Configuration Settings
54 Administrator Guide
default.timeout
Specifies the SNMP send timeout.
Default: 5000
ping.timeout
Specifies the SNMP ping timeout.
100
Import Properties
You can import configuration properties as a Java Archive (JAR) file from another CA Configuration Automation instance.
Follow these steps:
1. Click the Administration link, then click the Configuration tab.
2. On the Configuration tab, click the Properties link.
3. On the Properties page, click Table Actions and select Import Properties.
4. On the Import Properties dialog, complete the following fields:
JAR File to Import
Defines the name of the JAR file that contains the properties to import. Click Browse to navigate to the file.
Overwrite Existing Properties
Specifies whether to overwrite a file with the same name. To retain the profile on another CA Configuration Automation instance, select this option.
5. Click one of the following buttons:
Import All
Imports all of the properties in the JAR file.
Import On Selected
Displays a dialog on which to select the properties to import from the JAR file.
The application imports the file and the Properties table displays the properties.
Creating and Managing Security Certificates
Use security certificates to implement SSL-based security for communications between the CA Configuration Automation Server and the CA Configuration Automation Agents, and to secure CA Configuration Automation user interface access.
Configuration Settings
Chapter 4: Administering CA Configuration Automation 55
Securing CA Configuration Automation Server to CCA Agent Communications
There are two communications channels between the CA Configuration Automation Server and the CA Configuration Automation Agent:
■ Communications initiated from the CA Configuration Automation Agent
■ Communications initiated from the CA Configuration Automation Server
The only communications initiated from the agent are those that allow for the automatic registration of an agent with the CA Configuration Automation Server and those that periodically send the server basic agent configuration and server information. This feature is optional and is not required for the successful operation of CA Configuration Automation. No secure mode is provided for agent to server communications. In a secure environment, you can disable the Server Ping option.
All other communications between the server and an agent (including discovery and refresh operations) are initiated from the server. Securing these communications protects the data exchanged between the managed servers and the CA Configuration Automation Server through encryption, and prevents unauthorized access to agents through authentication. The security cipher suite uses RSA key exchange, the RC4 stream cipher with 128-bit keys, and MD5 digests over TLS v1.
Securing CA Configuration Automation UI Access
The CA Configuration Automation web-based UI is served through HTTP. You can secure UI access using HTTPS, which provides Secure Socket Layer (SSL) encryption and authentication between an HTTP client and HTTP server.
After you secure access to the CA Configuration Automation Server UI, users need to log into the CA Configuration Automation Server using HTTPS rather than HTTP, for example, https://<CCA_Server_Name>:<port_number>/cca/CCAUI.html.
How to Configure CA Configuration Automation for SSL Security
This section describes how to configure CA Configuration Automation to use SSL security. The following process lists all steps you must complete:
1. Create a Certificate Authority (see page 56).
2. Create a Server Certificate (see page 56).
3. Enable HTTPS (see page 59).
4. Secure CA Configuration Automation Agents.
Configuration Settings
56 Administrator Guide
Create a Certificate Authority, Server Certificate, and HTTPS Certificate
The CA Configuration Automation certificate authority is used to create certificates for CA Configuration Automation Servers and CA Configuration Automation Agents. A password protects the certificate authority, and is required when you configure the certificate authority and when a new certificate is signed.
Follow these steps:
1. Click the Administration link, the Configuration tab, and click the Security Certificates link.
The Security Summary page opens and displays the status of the following security components:
Certificate Authority
Specifies whether the certificate authority has been created.
HTTPS Support
Specifies whether HTTPS is enabled for the CA Configuration Automation Server UI.
Agent Security
Specifies whether SSL security is enabled for the CA Configuration Automation Agent.
Client Authentication
Specifies whether client authentication is enabled for the CCA Server.
2. Select Create Certificate Authority from the Table Actions drop-down list.
The Create Certificate Authority dialog appears.
3. On the Create Certificate Authority dialog, complete the following fields, then click OK:
Certificate Authority Password
Defines the password for the certificate. This password is key to your system security. Choose the password according to security best practices, and do not use the same password for other certificates such as the HTTPS certificate.
Confirm Password
Ensures the certificate authority password was entered correctly by requiring that it matches this value.
Server Certificate Password
Specifies the server certificate password.
Confirm Password
Ensures the server certificate password was entered correctly by requiring that it match this value.
Configuration Settings
Chapter 4: Administering CA Configuration Automation 57
Set up HTTPS
Specifies whether HTTPS is enabled for accessing the CA Configuration Automation UI. The X.509 certificate authentication requires that HTTPS is enabled.
HTTPS Certificate Password
Specifies the HTTPS certificate password.
Confirm Password
Ensures the HTTPS certificate password was entered correctly by requiring that it match this value.
The application completes the following actions:
■ Creates the self-signed private and public certificate authority certificates
■ Creates and signs the CA Configuration Automation Server certificate
■ Sets up all the security-related directories and files
■ Creates the key and trust stores for the CA Configuration Automation Server
■ If the Set up HTTPS check box is selected, the application creates the HTTPS certificate that the application requires to complete the following actions:
– Secure access to the CA Configuration Automation UI
– Enable X.509 certificate authentication
■ Changes connector entries in the server.xml file as required
The following directories contain the CA Configuration Automation certificate authority certificates, the database of issued certificates, and copies of all of the issued keys and certificates:
■ UNIX and Linux: /opt/CA/CCAServer/security
■ Windows: \Program Files\CA\CCA Server\security
4. Stop and restart the CA Configuration Automation Server.
5. (Optional) Create and enable CA Configuration Automation Agent security certificates (if the application requires it according to Secure Agents).
Each CA Configuration Automation Agent requires that a separate certificate is issued for each server. Create CA Configuration Automation Agent security certificates using the Secure Agent option for each individual server that is selected on the Servers page.
Configuration Settings
58 Administrator Guide
Create Security Certificates
You can use CA Configuration Automation to create x509 security certificates that can be used to secure communications between the following:
■ CA Configuration Automation Server and CA Configuration Automation Agents
■ Client (browser) and CCA Server
To create security certificates
1. Click the Administration link, the Configuration tab, and then the Security Certificates link.
The Security Certificates page appears and displays the existing certificates in the Certificates table.
Note: You cannot create a server certificate if the Certificates table has no entries.
2. Select Create Certificate from the Table Actions drop-down list.
The Create Certificate dialog appears.
3. Enter the following information in the corresponding field, then click OK:
Server
Specifies the CA Configuration Automation Server being secured.
Certificate Purpose
Specifies that the certificate is being used to secure one of the following communication types:
■ CA Configuration Automation Agent—Secures communications beginning at the CA Configuration Automation Agent.
■ CA Configuration Automation Server—Secures communications beginning at the CA Configuration Automation Server.
■ Client Authentication—Secures communications between clients (user's browsers) and CA Configuration Automation Server. Use this option with X.509 certificate authentication.
■ HTTPS—Secures communications beginning at an HTTPS-enabled CA Configuration Automation Server.
■ Network Discovery Gateway—Secures communications between Grid Nodes and NDG.
Expiration (days)
Specifies the time period in days for which this certificate is valid.
Certificate Password
Specifies the password associated with this security certificate.
Configuration Settings
Chapter 4: Administering CA Configuration Automation 59
Confirm Password
Ensures the password was entered correctly by requiring it to match this entry.
Certificate Authority Password
Specifies the password entered when you created the certificate authority.
The certificate is created and appears in the Certificates table.
Enable HTTPS
If you created a certificate authority, but did not enable HTTPS, you can manually enable HTTPS to create the HTTPS Certificate and secure access to the CA Configuration Automation user interface.
To enable HTTPS
1. Click the Administration link, the Configuration tab, and then the Security Certificates link.
The Security Certificates page appears and displays the existing certificates in the Certificates table.
2. Review the Security Summary panel to ensure the Certificate Authority field reads Created and the HTTPS Support field reads Disabled.
3. Select Enable HTTPS from the Table Actions drop-down list.
You are prompted to create an HTTPS Certificate.
4. Click OK.
The Create HTTPS Certificate dialog appears with the following fields completed:
Server
Specifies the CA Configuration Automation Server host.
Certificate Purpose
Specifies HTTPS.
5. Enter the following information in the corresponding field, then click OK:
Expiration (days)
Specifies when the HTTPS Certificate expires. Default: 3650
Certificate Password
Specifies the password for the HTTPS Certificate.
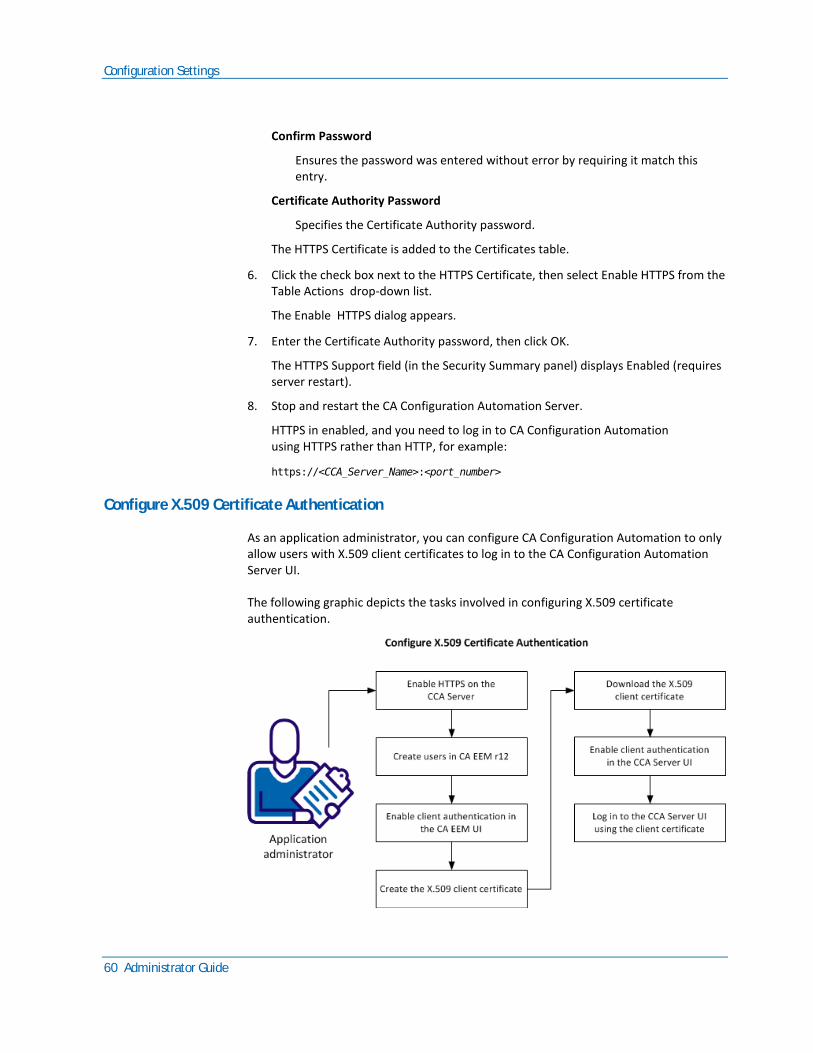
Configuration Settings
60 Administrator Guide
Confirm Password
Ensures the password was entered without error by requiring it match this entry.
Certificate Authority Password
Specifies the Certificate Authority password.
The HTTPS Certificate is added to the Certificates table.
6. Click the check box next to the HTTPS Certificate, then select Enable HTTPS from the Table Actions drop-down list.
The Enable HTTPS dialog appears.
7. Enter the Certificate Authority password, then click OK.
The HTTPS Support field (in the Security Summary panel) displays Enabled (requires server restart).
8. Stop and restart the CA Configuration Automation Server.
HTTPS in enabled, and you need to log in to CA Configuration Automation using HTTPS rather than HTTP, for example:
https://<CCA_Server_Name>:<port_number>
Configure X.509 Certificate Authentication
As an application administrator, you can configure CA Configuration Automation to only allow users with X.509 client certificates to log in to the CA Configuration Automation Server UI.
The following graphic depicts the tasks involved in configuring X.509 certificate authentication.
Configuration Settings
Chapter 4: Administering CA Configuration Automation 61
An application administrator can perform the following tasks to configure X.509 certificate authentication:
1. Enable HTTPS on the CA Configuration Automation Server (see page 56).
2. Create users in CA EEM r12 (see page 61).
3. Enable client authentication in the CA EEM UI (see page 63).
4. Create the X.509 client certificate (see page 58).
5. Download the X.509 client certificate (see page 65).
6. Enable client authentication in the CA Configuration Automation Server UI (see page 64).
7. Log in to CA Configuration Automation using the client certificate (see page 65).
Create CA Configuration Automation Users in CA EEM
After you install and integrate CA EEM, you can populate CA Configuration Automation with current CA EEM users or you can create new users.
The only user that is defined in CA Configuration Automation before you add users is the super user that was created during the CA Configuration Automation installation process. This super user has rights to all CA Configuration Automation functionality. The super user is designed for the initial login to configure the user access and to access the product if the connectivity to CA EEM is lost. Ensure at least one user has access to all functionality. If you intend to restrict privileges for this user, create and use a different administrative user for managing the product.
You can also create users and store them in an internal database, or you can import users from an external directory, such as Active Directory.
Note: The CA Configuration Automation and CA EEM integration lets you start the CA EEM UI from the CA Configuration Automation Administration panel. However, you need a user account and password to access CA EEM.
Follow these steps:
1. Open CA Configuration Automation, click the Administration link, and click the Access Management tab.
2. On the Users page, click the New User icon to the left of the cca_users folder icon in the Users area (lower left).
The CA EEM New User page opens in context of CA Configuration Automation.
Configuration Settings
62 Administrator Guide
3. Enter a name in the Name field.
Limit: 100 alphanumeric characters
4. Click Add Application User Details, then enter the following information:
app_instance_name
Defines the CA Configuration Automation instance this user account can access.
Application Group Membership
Defines one or more application-specific groups of which this user is a member.
5. Enter the appropriate details about the user in the General area.
6. Add the user to one or more existing global user groups by double-clicking a group in the Available Global User Groups column.
The Selected Global User Groups column displays the selected group appears.
Note: To locate a specific user group, complete the Attribute, Operator, and Value fields as appropriate, then click Search.
7. Complete the following fields in the Authentication area:
Incorrect Login Count
Indicates the number of concurrent unsuccessful login attempts by a user. This value is reset to zero after a successful login.
Enable Date
Defines the date on which to enable the user account. To select a date and time, click the calendar icon. The user cannot log in before the Enable Date or after the Disable Date.
Disable Date
Defines the date after which the user account is disabled. To select a date and time, click the calendar icon. Leave this field blank to specify no expiration. The user cannot log in before the Enable Date or after the Disable Date.
Override Password Policy
Specifies whether to permit the user to have passwords that do not meet the password policy.
Change Password at Next Login
Specifies whether the user must change the password after logging in for the first time with the administrator-assigned password.
Suspended
Specifies whether the user account is manually deactivated.
Configuration Settings
Chapter 4: Administering CA Configuration Automation 63
New Password
Defines the administer-assigned password for the user. If you select the Change Password at Next Login option, the application prompts the user to change this password after the first login to CA Configuration Automation.
Confirm Password
Ensures the password contains no mistakes by requiring that the entries match.
8. Click Save.
The following message appears:
Confirmation: Global User created successfully.
If you specified application-specific details in Step 4, the message also contains the following line:
Application User Details created successfully.
9. Repeat this procedure for each user.
Enable Client Authentication in CA EEM
The client authentication in CA Configuration Automation requires that you enable the client authentication (known as the certificate validation) in CA EEM.
Follow these steps:
1. Copy %CCA _installation%\lib\“tomcat.keystore” from your CCA Server to the following EEM Server location:
%EmbeddedEntitlementsManager%\ca
2. Log in to CA EEM, click the Configure tab, click the EEM Server link, and click the Certificate Validation link in the left pane.
The Certificate Validation page opens in the right pane.
3. Select the Enable Certificate Validation option, then complete the following fields:
Keystore File Location
Defines the location of the keystore file on the EEM Server.
Keystore Password
Defines the password to use when creating the certificate authority.
4. Select Subject from the User Mapping Field drop-down list.
5. To retrieve the user name from the certificate, provide the following pattern in the Username Extraction Pattern field:
CN=([^,]*)

Configuration Settings
64 Administrator Guide
6. Create a user that corresponds with each client certificate. The user name must be the same as the user name used when you created the client certificate.
7. Stop and restart the EEM Server.
The client authentication is enabled on the EEM Server.
Enable Client Authentication in CA Configuration Automation
You can enable the client authentication to secure the communication between the client (browser) and the CA Configuration Automation Server.
Note: After you enable the client authentication, users can only log in using client certificates. They cannot log in using a user name and password.
Follow these steps:
1. Click the Administration link, click the Configuration tab, and click the Security Certificates link.
2. On the Security Certificates page, review the Security Summary panel.
The Certificate Authority value must be Created and the HTTPS Support value must be Enabled.
3. From the Table Actions drop-down list, Select Enable Client Authentication.
4. Click OK to close the notification that only client certificates can be used to log in.
5. On the Enable Client Authentication dialog, complete the following fields, then click OK.
EEM Admin User Name
Defines the user name of the CA EEM administrator.
EEM Admin Password
Defines the password that is associated with the specified CA EEM administrator.
Certificate Authority Password
Defines the password that is used to create the certificate authority.
The Client Authentication Support field in the Security Summary panel displays Enabled (requires a server restart).
6. Download the client certificate, then stop and restart the CCA Server.
The client authentication is enabled.
Configuration Settings
Chapter 4: Administering CA Configuration Automation 65
Download a Client Certificate
You can download the client certificate file that is used to communicate between the client (user's browser) and the CA Configuration Automation Server.
Follow these steps:
1. Click the Administration link, the Configuration tab, and then the Security Certificates link.
The Security Certificates page appears and displays the existing certificates in the Certificates table.
2. Click the check box next to a certificate whose Purpose column is set to Client Authentication, then select Download Client Certificate from the Select Actions drop-down list.
A File Download dialog appears. The certificate file is assigned a name using the following format: <certificateName>.cer. You can edit this name in the next step.
3. Click Save, navigate to the location where you want to save the certificate file, and then click Save.
The client certificate file is copied to the specified location.
Log In to CA Configuration Automation Using a Client Certificate
After you configure client certificate, users can only log in to CA Configuration Automation using client certificates.
Follow these steps:
1. Import the client certificate to Internet Explorer:
a. Click Tools, Internet Options.
b. On the Internet Options dialog, click the Content tab, then click Certificates.
The Certificates dialog opens.
c. Click Import.
d. Follow the instructions in the Certificate Import Wizard.
When the import is complete, the list on the Certificates dialog Personal tab includes the certificate.
2. To log in to CA Configuration Automation, enter the following URL:
https://<CCA_Server_Name>:<port_number>/CCAUI.jsp?
If the browser contains multiple certificates, the Choose a Digital Certificate dialog opens.
3. Select the client certificate with CCA listed in the Issuer column for your user, then click OK.
The CA Configuration Automation Server UI opens.
Configuration Settings
66 Administrator Guide
CA EEM Configuration Options for CA Configuration Automation Certificate Authentication
This section describes CA EEM configuration options that can be used with CA Configuration Automation certificate authentication.
Revoke a Certificate
You can revoke a certificate in CA EEM so users cannot log in to the CA Configuration Automation Server using the revoked certificate. See the CA EEM documentation for information about configuring the revocation mechanism.
Enable the Debug Log in CA EEM SDK Client
By default the eiam.javasdk.log file is installed in the %CCAServer_INSTALLED_DIR%\logs directory. The default log file level is set to Error. You can set the log level to Debug.
Follow these steps:
1. Open the eiam.log4j.config log configuration file in the \%CCAServer_ INSTALLED _DIR%\tomcat\conf directory in a text editor.
2. Set the log level to debug.
<root>
<priority value="debug" />
<appender-ref ref="SDK" />
<!-- <appender-ref ref="Console" /> -->
</root>
3. Stop and restart the CCA Server.
Enable Certificate Validation Debug Log in CA EEM
By default the certvalidation.log file is installed in the %SC%\EmbeddedEntitlementsManager\logs directory. The default log file level is set to Info. You can set the log level to Debug.
Follow these steps:
1. Open the Server.java log configuration file in the %SC% \EmbeddedEntitlementsManager\config\logger directory in a text editor.
2. Set the log level to debug.
<logger name="com.ca.eiam.server.certvalidation" additivity="false">
<level value="debug"/>
<appender-ref ref="certvalidation"/>
</logger>
3. Stop and restart the EEM Server.
Configuration Settings
Chapter 4: Administering CA Configuration Automation 67
View CA Configuration Automation Security Settings and Certificates
The Security Summary and Certificates tables enable you to view your existing security configuration and edit existing security certificates if required.
To view security settings and certificates
Click the Administration link, the Configuration tab, and then the Security Certificates link.
The Security Certificates page appears and displays the following security settings in the Security Summary table:
Certificate Authority
Specifies whether the certificate authority has been created or not.
HTTPS Support
Specifies whether HTTPS support is enabled for the CA Configuration Automation Server. This entry also shows whether the CA Configuration Automation Server needs to be restarted.
Agent Security
Specifies whether agent security is enabled or not. This entry also shows whether the CA Configuration Automation Server and each grid node needs to be restarted.
The existing certificates appear in the Certificates table.
Delete Certificates
You can delete certificates from the CA Configuration Automation Database that you no longer need.
To delete security certificates
1. Click the Administration link, the Configuration tab, and then the Security Certificates link.
The Security Certificates page appears and displays the existing certificates in the Certificates table.
2. Click the check box next to one or more certificates, then select Delete Certificate from the Select Actions drop-down list.
The Delete Certificate dialog prompts you for the certificate password.
3. Enter the password, then click OK.
The certificate is deleted.

Configuration Settings
68 Administrator Guide
Destroy Certificate Authority
You can destroy the certificate authority that is securing your CA Configuration Automation Serverif no longer want to use the server in HTTPS mode.
To delete the certificate authority
1. Click the Administration link, the Configuration tab, and then the Security Certificates link.
The Security Certificates page appears and displays Certificate Authority: Created in the Security Summary above the Certificates table.
2. Click the check box next to the certificate authority for the server whose mode you want to change, then select Destroy Certificate Authority from the Table Actions drop-down list.
The certificate authority is destroyed.
3. Stop and restart the CA Configuration Automation Server.
The server no longer runs in HTTPS mode.
Download an Agent Key
You can download the certificate file that secures the CA Configuration Automation Agent.
To download an agent key
1. Click the Administration link, the Configuration tab, and then the Security Certificates link.
The Security Certificates page appears and displays the existing certificates in the Certificates table.
2. Click the check box next to a certificate whose Purpose column is set to CA Configuration Automation Agent, then select Download Agent Key from the Select Actions drop-down list.
A File Download dialog appears.
3. Navigate to the location where you want to save the certificate file, then click Save.
The file is copied to the specified location. By default, the file uses the following naming format:
<server_name.domain_name>_agent.cer
Configuration Settings
Chapter 4: Administering CA Configuration Automation 69
Download a Server Certificate
You can download the certificate file that secures the CA Configuration Automation Server.
To download a server certificate
1. Click the Administration link, the Configuration tab, and then the Security Certificates link.
The Security Certificates page appears and displays the existing certificates in the Certificates table.
2. Click the check box next to a certificate whose Purpose column is set to CA Configuration Automation Agent, then select Download Server Certificate from the Select Actions drop-down list.
A File Download dialog appears.
3. Navigate to the location where you want to save the certificate file, then click Save.
The ccaca.cer file is copied to the specified location.
Download a Server Keystore
You can download the server keystore certificate file.
To download a server keystore
1. Click the Administration link, the Configuration tab, and then the Security Certificates link.
The Security Certificates page appears and displays the existing certificates in the Certificates table.
2. Click the check box next to a certificate whose Purpose column is set to CA Configuration Automation Server, then select Download Server Keystore from the Select Actions drop-down list.
A File Download dialog appears.
3. Navigate to the location where you want to save the certificate file, then click Save.
The server keystore file is copied to the specified location.
Configuration Settings
70 Administrator Guide
Download a Server Truststore
You can download the server truststore certificate file.
To download a server truststore
1. Click the Administration link, the Configuration tab, and then the Security Certificates link.
The Security Certificates page appears and displays the existing certificates in the Certificates table.
2. Click the check box next to a certificate whose Purpose column is set to CA Configuration Automation Server, then select Download Server Truststore from the Select Actions drop-down list.
A File Download dialog appears.
3. Navigate to the location where you want to save the certificate file, then click Save.
The server truststore file is copied to the specified location.
Download the HTTPS Keystore
You can download the HTTPS keystore file.
To download an HTTPS keystore
1. Click the Administration link, the Configuration tab, and then the Security Certificates link.
The Security Certificates page appears and displays the existing certificates in the Certificates table.
2. Click the check box next to a certificate whose Purpose column is set to HTTPS, then select Download HTTPS Keystore from the Select Actions drop-down list.
A File Download dialog appears.
3. Navigate to the location where you want to save the certificate file, then click Save.
The HTTPS keystore file is copied to the specified location.
Configuration Settings
Chapter 4: Administering CA Configuration Automation 71
Working with Communication Mappings
The Communication Mappings page contains a table that shows which ports map to which applications in your environment. These mappings are used in the Server Details, Relationships page as described in View Relationship Details.
The following sequence describes how CA Configuration Automation uses the mapping between the two ports (one on Server 1, and one on Server 2) to determine which port is used.
■ If the destination port (Server 2) has a corresponding entry in the Communication Mappings table, it is used to identify the communication.
■ Otherwise, if the source port (Server 1) has a corresponding entry in the Communication Mappings table, it is used to identify the communication.
■ If neither of the ports has a corresponding entry in the Communication Mappings table, the communication is labeled Unknown on the View Relationships page.
View and Edit Communication Mappings
You can use the Communication Mappings page to view or edit current port assignments.
To view and edit CA Configuration Automation mappings
1. Click the Administration link, the Configuration tab, and then the Communication Mappings link.
The Communication Mappings page appears and displays the current mappings in a table arranged numerically by port number.
2. Click a value in the Communication Type column that you want to edit.
An editable text field appears.
3. Edit the value, then press Enter.
The new property value is saved in the appropriate configuration file.
Configuration Settings
72 Administrator Guide
Create Communication Mappings
You can create new mappings and manage them from the Communication Mappings page.
To create new mappings
1. Click the Administration link, the Configuration tab, and then the Communication Mappings link.
The Communication Mappings page appears and displays the current mappings in a table arranged numerically by port number.
2. Select Create Communication Mapping from the Table Actions drop-down list.
The Create Communication Mapping page appears.
3. Enter the appropriate information in the following fields, then click Save.
Port
Specifies the port number over which CA Configuration Automation is communicating.
Protocol
Specifies the protocol type, either TCP or UDP.
Communication Name
Describes the program or component using the port for communication.
A message confirms the mapping was created successfully, and the mapping appears in the Communications Mapping table.
Delete Communication Mappings
You can delete mappings when you no longer need them.
To delete communication mappings
1. Click the Administration link, the Configuration tab, and then the Communication Mappings link.
The Communication Mappings page appears and displays the current mappings in a table arranged numerically by port number.
2. Click the check box next to the mapping you want to delete, then select Delete Communication Mapping from the Select Actions drop-down list.
You are prompted to confirm you want to delete the selected mapping.
3. Click OK.
A confirmation message confirms the selected mapping has been deleted.
Configuration Settings
Chapter 4: Administering CA Configuration Automation 73
Working with Application Mappings
The Application Mappings page contains a table that lists predefined and user-defined application mappings.
Application Mappings consist of an application name and a regular expression path that indicates the installation location of the application. These mappings are then queried and used to resolve the application name in communication relationships and visualization graphs when an installation path for an executable is available (for example, in netstat relationships). For more information about relationships, see View Relationship Details.
View and Edit Application Mappings
You can use the Application Mappings page to view and edit the regular expression values that define the location of the associated application.
To view and edit Application Mappings
1. Click the Administration link, the Configuration tab, and then the Application Mappings link.
The Application Mappings page appears and displays the current mappings in a table arranged alphabetically by application vendor or publisher.
2. Click a value in the Application Path column that you want to edit.
An editable text field appears.
3. Edit the new value, then press Enter.
The table is updated with the new value.
Configuration Settings
74 Administrator Guide
Create Application Mappings
You can create new mappings for applications that are not predefined in CA Configuration Automation.
Follow these steps:
1. Click the Administration link, the Configuration tab, then the Application Mappings link.
The Communication Mappings page opens and displays the current mappings, arranged alphabetically by application vendor or publisher.
2. From the Table Actions drop-down list, select Create Application Mapping.
3. Complete the fields on the Create Application Mapping dialog, then click Save.
Application Name
Defines the name of the application.
By default, the predefined mappings use the format <applicationVendor> <applicationName> (for example, Microsoft Internet Explorer).
Application Path
Defines the regular expression that describes the directory where the application and supporting files are installed.
Test Value
Enables you to enter a value and test whether the regular expression can locate the application file.
For example, enter C:\Program Files\Internet Explorer\ExtExport.exe and click Test for the value .:\\.*Progra.*\\Internet Explorer\\.*. The application uses the regular expression value to search for the file. If the application locates the file, it displays a confirmation message.
A message confirms that the mapping was created successfully, and the Application Mapping table displays the mapping.
Import Application Mappings
You can import application mappings as a Java Archive (JAR) file from another CA Configuration Automation instance.
Follow these steps:
1. Click the Administration link, then click the Configuration tab.
2. On the Configuration tab, click the Application Mappings link.
3. On the Application Mappings page, click Table Actions, then select Import Application Mappings.
Configuration Settings
Chapter 4: Administering CA Configuration Automation 75
4. Complete the following fields on the Import Application Mappings dialog:
JAR File to Import
Defines the name of the JAR file that contains the Application Mappings to import. Click Browse to navigate to the file.
Overwrite Existing Application Mappings
Specifies whether to overwrite a file with the same name. To retain the profile on another CA Configuration Automation instance, select this option.
5. Click one of the following buttons:
Import All
Imports all of the Application Mappings in the JAR file.
Import On Selected
Displays a dialog on which to select specific Application Mappings to import from the JAR file.
The application imports the file and the Application Mappings table displays the mappings.
Delete Application Mappings
You can delete Application Mappings when you no longer need them.
To delete Application Mappings
1. Click the Administration link, the Configuration tab, and then the Application Mappings link.
The Application Mappings page appears and displays the current mappings in a table arranged alphabetically by application vendor or publisher.
2. Click the check box next to the mapping you want to delete, then select Delete Application Mapping from the Select Actions drop-down list.
You are prompted to confirm that you want to delete the selected mapping.
3. Click OK.
A confirmation message confirms the selected mapping has been deleted.
Configuring Users and Role-Based Security
76 Administrator Guide
Configuring Users and Role-Based Security
This section describes how to configure and manage users, user groups, policies, and security privileges. Perform these tasks from the Administration panel Access Management tab and in Embedded Entitlements Manager (CA EEM). You can integrate and start CA EEM in the context of CA Configuration Automation.
CA EEM provides the user management and resource access control. CA Configuration Automation adds users that are defined in CA EEM to product-specific user groups with configurable privileges and access levels.
The access privileges determine the data users can access, how the data is presented, and what actions users can perform.
Note: For more information about installing CA EEM to integrate with CA Configuration Automation, see the Implementation Guide. For more information about the CA EEM functionality, see the CA EEM documentation, including the Online Help.
Install the CA EEM Security Certificate and Configure the EEM Host Property
A security certificate is required to display CA EEM in the context of CA Configuration Automation. The CA EEM installation program creates the required security certificate using an unqualified host name.
The CA Configuration Automation Server installation program prompts you for the EEM Server name in the CA Embedded Entitlements Manager Configuration screen. By default, the installation program populates the EEM Server Name field with the unqualified name of the local host on which you are installing CA Configuration Automation Server. The CA Configuration Automation Server stores this default name (or whatever you enter) in the Configuration page Properties table. The product displays the following error if the entry does not match the security certificate when you try to view the Access Management tab:
Content was blocked because it was not signed by a valid security
certificate.
To avoid this error, install the security certificate and configure the EEM Host property to match the certificate.

Configuring Users and Role-Based Security
Chapter 4: Administering CA Configuration Automation 77
Follow these steps:
1. Click the Administration link, then click the Access Management tab.
The error message appears in the CA Configuration Automation UI. Internet Explorer displays a yellow bar with a similar Blocked Content message at the top of your browser.
2. Click the yellow bar, then select Display Blocked Content.
3. On the CA Configuration Automation login page, enter your user name and password, then click Log In.
The Access Management tab page opens with the CA EEM UI displayed in context.
4. Right-click anywhere in the CA EEM frame and select Properties.
5. On the Properties dialog, click Certificates.
The Certificates dialog appears.
Important! Note the server name in the General tab Issued To field. Enter this value exactly as it appears here in the Properties table in Step 9.
6. Click Install Certificate.
7. On the Select Certificate Store dialog, select the Trusted Root Certification Authorities certificate store, then click OK.
8. Click the Configuration tab, then click the Properties link.
9. In the Properties table, change the existing Value field value to the value of the General tab Issued To field from Step 5.
10. Press Enter.
The new value is saved and you can use CA EEM in CA Configuration Automation to manage users and user groups.
Create CA Configuration Automation Users in CA EEM
After you install and integrate CA EEM, you can populate CA Configuration Automation with current CA EEM users or you can create new users.
The only user that is defined in CA Configuration Automation before you add users is the super user that was created during the CA Configuration Automation installation process. This super user has rights to all CA Configuration Automation functionality. The super user is designed for the initial login to configure the user access and to access the product if the connectivity to CA EEM is lost. Ensure at least one user has access to all functionality. If you intend to restrict privileges for this user, create and use a different administrative user for managing the product.
Configuring Users and Role-Based Security
78 Administrator Guide
You can also create users and store them in an internal database, or you can import users from an external directory, such as Active Directory.
Note: The CA Configuration Automation and CA EEM integration lets you start the CA EEM UI from the CA Configuration Automation Administration panel. However, you need a user account and password to access CA EEM.
Follow these steps:
1. Open CA Configuration Automation, click the Administration link, and click the Access Management tab.
2. On the Users page, click the New User icon to the left of the cca_users folder icon in the Users area (lower left).
The CA EEM New User page opens in context of CA Configuration Automation.
3. Enter a name in the Name field.
Limit: 100 alphanumeric characters
4. Click Add Application User Details, then enter the following information:
app_instance_name
Defines the CA Configuration Automation instance this user account can access.
Application Group Membership
Defines one or more application-specific groups of which this user is a member.
5. Enter the appropriate details about the user in the General area.
6. Add the user to one or more existing global user groups by double-clicking a group in the Available Global User Groups column.
The Selected Global User Groups column displays the selected group appears.
Note: To locate a specific user group, complete the Attribute, Operator, and Value fields as appropriate, then click Search.
7. Complete the following fields in the Authentication area:
Incorrect Login Count
Indicates the number of concurrent unsuccessful login attempts by a user. This value is reset to zero after a successful login.
Enable Date
Defines the date on which to enable the user account. To select a date and time, click the calendar icon. The user cannot log in before the Enable Date or after the Disable Date.
Disable Date
Defines the date after which the user account is disabled. To select a date and time, click the calendar icon. Leave this field blank to specify no expiration. The user cannot log in before the Enable Date or after the Disable Date.
Configuring Users and Role-Based Security
Chapter 4: Administering CA Configuration Automation 79
Override Password Policy
Specifies whether to permit the user to have passwords that do not meet the password policy.
Change Password at Next Login
Specifies whether the user must change the password after logging in for the first time with the administrator-assigned password.
Suspended
Specifies whether the user account is manually deactivated.
New Password
Defines the administer-assigned password for the user. If you select the Change Password at Next Login option, the application prompts the user to change this password after the first login to CA Configuration Automation.
Confirm Password
Ensures the password contains no mistakes by requiring that the entries match.
8. Click Save.
The following message appears:
Confirmation: Global User created successfully.
If you specified application-specific details in Step 4, the message also contains the following line:
Application User Details created successfully.
9. Repeat this procedure for each user.
Configuring Users and Role-Based Security
80 Administrator Guide
Search for Users
The following fields appear on the Search Users panel:
Global Users
Includes all the users assigned to all applications.
Application User Details
Includes all the users assigned to a particular application.
Attribute
Specifies the attribute to search for. The Global User attributes are predefined. The Application User Detail attributes are defined for each application.
Operator
Specifies the operator to use for the search.
Value
Specifies the value to search for. You can use an asterisk (*) as a wild card when positioned as the first or last character only.
Leaving the Value field empty is the equivalent of setting it to *, which matches all values.
Show Empty Folders
Searches for folders that are empty or without any user.
Go
Searches for users based on the criteria specified. The users appear under the Users panel.
Create Access Policies
Access policies are rules that are created in CA EEM and attached to CA Configuration Automation users and user groups to define access rights for CA Configuration Automation features. CA EEM matches identities and resource classes to determine whether policies apply to users.
The Access Management tab page contains a link to the Policies page. On the Policies page, you can search, view, create, and edit access policies.
Configuring Users and Role-Based Security
Chapter 4: Administering CA Configuration Automation 81
The application sorts policies in the tree by the policy type and displays them under the following tabs:
Explicit Grants
Permits the identities with the specified access rights to the specified resources when the policy evaluates to "true."
Explicit Denies
Prevents the identities with the specified access rights to the specified resources when the policy evaluates to "true."
The application includes the following policy types in addition to application-specific access policies:
Delegation Policies
Enables the users to delegate their authority to other users.
Dynamic User Group Policies
Specifies the policies that use rules to define application-specific groups and their membership.
Event Policies
Determines which events are delivered, and which events are only coalesced into summaries. By using event policies, you can configure which events the application reports about in detail.
Obligation Policies
Returns required actions to the application after verifying authorization. The obligation policies are application-specific. They contain one or more obligation names and attributes. Your application can use obligation policies to control what actions to perform when access is granted or denied. For example, the application can send an event, start a workflow process, or send an email.
Scoping Policies
Limits the administrator access to the CA EEM objects, such as policies or a calendar.
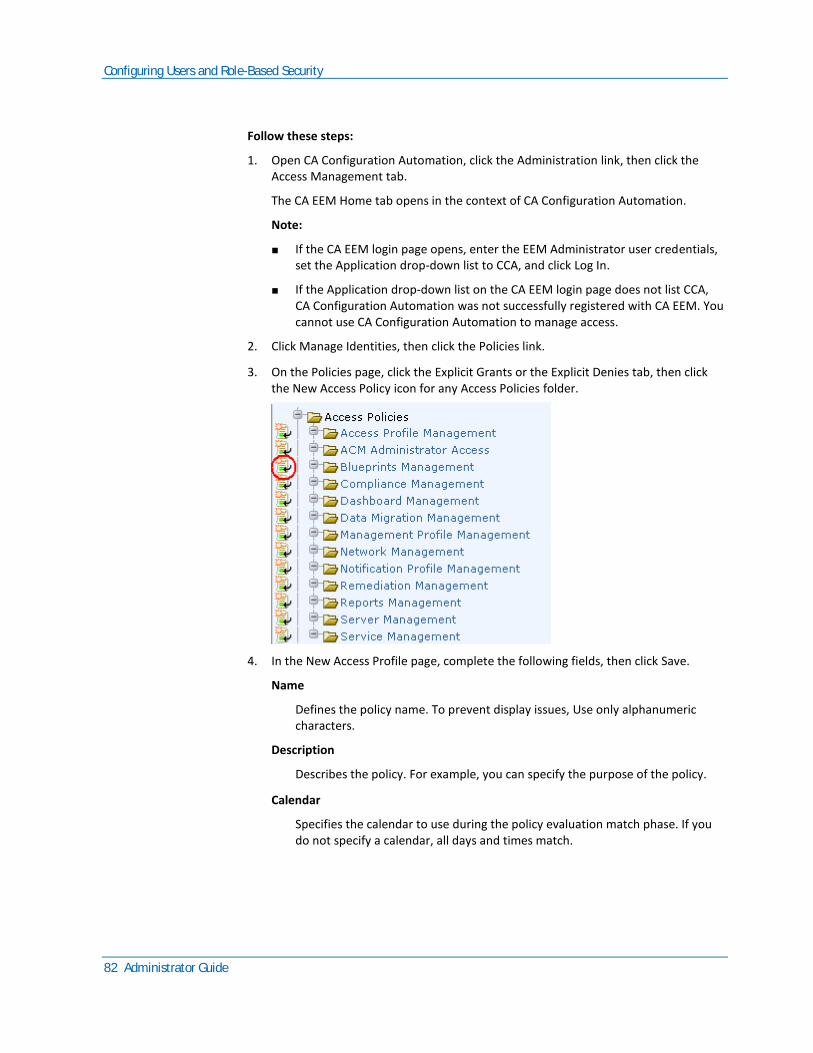
Configuring Users and Role-Based Security
82 Administrator Guide
Follow these steps:
1. Open CA Configuration Automation, click the Administration link, then click the Access Management tab.
The CA EEM Home tab opens in the context of CA Configuration Automation.
Note:
■ If the CA EEM login page opens, enter the EEM Administrator user credentials, set the Application drop-down list to CCA, and click Log In.
■ If the Application drop-down list on the CA EEM login page does not list CCA, CA Configuration Automation was not successfully registered with CA EEM. You cannot use CA Configuration Automation to manage access.
2. Click Manage Identities, then click the Policies link.
3. On the Policies page, click the Explicit Grants or the Explicit Denies tab, then click the New Access Policy icon for any Access Policies folder.
4. In the New Access Profile page, complete the following fields, then click Save.
Name
Defines the policy name. To prevent display issues, Use only alphanumeric characters.
Description
Describes the policy. For example, you can specify the purpose of the policy.
Calendar
Specifies the calendar to use during the policy evaluation match phase. If you do not specify a calendar, all days and times match.
Configuring Users and Role-Based Security
Chapter 4: Administering CA Configuration Automation 83
Resource Class Name
Specifies the name of the resource class for which the policy is defined. For example, you can set the resource class name for all delegation policies to safeDelegation and the resource class for all obligation policies to safeObligation. Define new resource classes on the Application Instances page.
Explicit Deny
Specifies whether the policy explicitly denies the access that the policy specifies and that the Explicit Denies tab displays.
Disabled
Specifies whether the policy is disabled and is not considered for the match phase.
Pre-Deployment
Specifies whether the policy is considered inactive. If you select the Pre-Deployment check box, the application does not use the policy to verify permissions.
Type
The following fields control the Access Policy Configuration:
Access Policy
Applies the actions and filters to all listed resources.
Access Control List
Specifies that each listed resource has specific actions and zero or one filter.
Identity Access Control List
Specifies that the application applies the actions to specific identities. The application creates a default rule that applies to all identities that are not in the list. The application also marks identity types (user, application groups, global groups, and dynamic groups) with icons.
Note: The application maintains a simple list for the resources, and has no filters for this type of policy.
Identities Panel
Defines a list of identities (users, user groups, and global user groups) to use during the policy evaluation match phase. If this list is empty, all identities match.
Type
Specifies the type of identity (User, Application Group, Global Group, or Dynamic Group).
After you select a type, you can specify search criteria such as the attribute, operator, and value and click Search to display matching identities.
Configuring Users and Role-Based Security
84 Administrator Guide
Identity
Displays the identities that match the specified Type.
Selected Identities
Displays the identities to which the policy applies. To move an identity to the Selected Identity field, click the right arrow.
Access Policy Configuration Panel
The Access Policy Configuration panel displays the following fields when the selected Type is Access Policy:
Add Resources
Defines which resources to use during the policy evaluation match phase. To designate wildcard characters, use the asterisk (*) at the beginning or the end of the resource name. The product processes asterisks in the middle of the resource class name as literals.
Actions
Specifies the actions (one or more of create, update, delete, export, or import) to use during the match phase of policy evaluation. If you do not select an action, all actions match.
Filters
Defines the filters to use in the policy evaluation evaluate phase. To define a filter, click Add Filter.
Access Control List Configuration Panel
The Access Policy Configuration panel displays the following fields when the selected Type is Access Control List:
Add resource
Defines a resource to use during the policy evaluation evaluate phase. Enter the resource name, then click the Add icon (+).
Actions
Specifies the actions (one or more of create, update, delete, export, or import) to use with the associated resource.
Treat Resource Names as Regular Expressions
Specifies whether to consider resource names as regular expressions. For example, an identity with access to the resource J*, saved as a regular expression, can access any resource that starts with J.
Filters
Defines the filter to which the associated resource name applies. To define a filter, click the pencil icon.
Configuring Users and Role-Based Security
Chapter 4: Administering CA Configuration Automation 85
Identity Access Control List Configuration Panel
The Access Policy Configuration panel displays the following fields when the selected Type is Identity Access Control List:
Type
Specifies the type of identity (User, Application Group, Global Group, or Dynamic Group).
After you select a type, you can specify search criteria such as the attribute, operator, and value and click Search to display matching identities.
Identity
Displays the identities that match the specified Type.
Selected Identities
Displays the identities to which the policy applies.
Resources
Defines a resource to use during the policy evaluation evaluate phase. This resource has specific associated actions and a filter.
Add Resources
Defines which resources to use during the policy evaluation match phase. To designate wildcard characters, use the asterisk (*) at the beginning or the end of the resource name. The product processes asterisks in the middle of the resource class name as literals.
Treat Resource Names as Regular Expressions
Specifies whether to consider resource names as regular expressions. For example, an identity with access to the resource J*, saved as a regular expression, can access any resource that starts with J.
The application creates the Access Profile.
Configure Global User and Global Group Storage
You can specify where global users and user groups are stored. The storage options are:
■ Store in internal datastore
■ Reference from an external directory
■ Reference from CA SiteMinder
Configuring Users and Role-Based Security
86 Administrator Guide
To configure storage of global users and groups
1. Open CA Configuration Automation, click the Administration link, the Access Management tab, and then the Configure link.
The EEM Server Configuration page appears.
2. Select one of the following options, provide entries in the fields that appear, then click Save:
Store in internal datastore
Stores the global users and global groups internally.
Reference from an external directory
Stores global users and groups in an external directory. If selected, global users and global groups are considered read only. The following fields appear when you select this option:
Type
Specifies the type of external directory. Currently supported types include CA Identity Manager, Microsoft Active Directory, Novell eDirectory, Novell eDirectory-CN, and Sun One Directory, and Custom Mapped Directory.
Host
Specifies the host of the external directory. Hostname is the IP name or address of the computer on which the external directory is installed and running. The IP name or address can be in Internet Packet version 4 (IPv4) or version 6 (IPv6) format.
Port
Specifies the port to connect to on the external directory host. This is an LDAP port.
Base DN
Specifies the LDAP DN that is used as the base. Only global users and groups discovered underneath this DN are mapped into eTrust IAM Toolkit.
Note: No spaces are allowed in the base DN.
User DN
Specifies the DN to use to attach to the external directory host.
Note: No comma is allowed in the cn of the User DN. For example, if your User DN is: cn=firstname,middlename,dc=foo,dc=com use the backslash '\' before the comma. For example, User DN: cn=firstname\,middlename,dc=foo,dc=com
Password and Confirm Password
Specifies the password for the User DN that is used to attach to the external directory host.
Configuring Users and Role-Based Security
Chapter 4: Administering CA Configuration Automation 87
Transport Layer Security
Specifies whether to use TLS when making the LDAP connection to the external directory.
Include Unmapped Attribute
Indicates the external attributes that are not mapped.
Note: Unmapped attributes can be used for search and as filters.
Cache Global Users
If selected, eTrust IAM Toolkit Server caches in memory the global users. This allows for faster lookups at the cost of scalability.
Note: Global user groups are always cached.
Cache Update Time
Specifies the time (in minutes) to update the cached groups (and optionally users).
Retrieve Exchange Groups as Global User Groups
Specifies that Exchange groups are also used as valid Global User Groups. This lets you write policies against members of distribution lists. Available only for type Microsoft Active Directory.
Configuring Users and Role-Based Security
88 Administrator Guide
Status
Specifies the status of the External directory bind and if the External directory data is loaded or not.
Means success, and is displayed if the External directory bind is successful and/or data is loaded.
Means warning, and is displayed if the External directory data is still loading.
Means error, and is displayed if the External directory bind failed.
Note: To refresh the status, without saving the changes, click Refresh status.
Reference from CA SiteMinder
Stores global users and groups in the CA SiteMinder data store. If selected, users and groups are considered read only. The following fields appear when you select this option:
Host
Defines the name of host system where CA SiteMinder® is running. Hostname is the IP name or address of the computer on which the CA SiteMinder® is installed and running. The IP name or address can be in Internet Packet version 4 (IPv4) or version 6 (IPv6) format.
Admin Name
Defines the CA SiteMinder® super user who has privileges to maintain system and domain objects.
Admin Password and Confirm Password
Defines the password for CA SiteMinder® administrator.
Agent Name
Defines the agent's name. This name must match the agent name provided to the Policy Server.
Note: Agent name is not case-sensitive.
Agent Secret and Confirm Secret
Defines the shared secret as defined in the CA SiteMinder® user interface.
Note: Agent Secret is case-sensitive.
Cache Global Users
Indicates that eTrust IAM Toolkit Server caches the global users in memory. This allows for faster lookups at the cost of scalability.
Note: Global user groups are always cached.
Configuring Users and Role-Based Security
Chapter 4: Administering CA Configuration Automation 89
Cache Update Time
Specifies the time (in minutes) to update the cached groups (and optionally, users).
Include Unmapped Attribute
Indicates the external attributes that are not mapped.
Note: These can also be used for search or as filters.
Authorization Store Type
Specifies the type of store used by CA SiteMinder® for authorization. Currently supported types include CA Identity Manager, Custom Mapped Directory, Microsoft Active Directory, Novell eDirectory, Novell eDirectory-CN, and Sun One Directory.
Authorization Store Name
Specifies the authorization store against which user information is authorized.
Authentication Store Name
Specifies the authentication store against which user information is authenticated.
Retrieve Exchange Groups as Global User Groups
Specifies that Microsoft Exchange groups are valid Global User Groups.
Search Time Out
Specifies the maximum time for which CA SiteMinder® will wait for a response from an external directory when searching users. CA SiteMinder® will timeout the connection with an external directory after the specified time.
Default: 60 seconds.
Managing Network Discovery Gateways
90 Administrator Guide
Refresh Store
Retrieves store information (Authorization Store Name and Authentication Store Name) based on the connection parameters.
Status
Specifies the status of the External directory bind and if the External directory data is loaded or not.
Means success, and is displayed if the External directory bind is successful and/or data is loaded.
Means warning, and is displayed if the External directory data is still loading.
Means error, and is displayed if the External directory bind failed.
The selected storage method is implemented for global users and groups.
CA EEM Single Sign-On Scenarios
CA Configuration Automation uses the existing CA EEM browser cookie and supports single sign-on when:
■ The CA EEM user of the launching product used the CA EEM interface of the launching product to log in to CA EEM. CA Configuration Automation and the launching product share the CA EEM server.
■ The launching product uses CA EEM APIs to authenticate to the CA EEM server silently and the launching product passes a token from CA EEM to the CA Configuration Automation Launch-in-Context URL parameter (EEM=[token]).
If CA EEM was not previously authenticated, the CA Configuration Automation Logon screen opens. CA EEM creates and uses the CA EEM browser cookie, and CA Configuration Automation does not support single sign-on.
Managing Network Discovery Gateways
The Network tab on the Administration panel contains functionality to create, view, edit, test, and secure Network Discovery Gateway (NDG) servers. NDG servers are responsible for the CA Configuration Automation Discovery operations that locate and monitor servers and services in your enterprise.
Managing Network Discovery Gateways
Chapter 4: Administering CA Configuration Automation 91
View and Edit Network Discovery Gateways
You can view all of the NDG servers that are installed on your network. You can also display and edit details about specific NDG servers.
Follow these steps:
1. Click the Administration link, then click the Network tab.
The Network Discovery Gateways page opens and displays the NDG server that you installed as a prerequisite to installing CA Configuration Automation. If you installed other NDG servers, they are also displayed.
2. Click a link in the Server Name column.
The details page for the selected NDG server opens.
3. (Optional) Edit the port number that the server uses for discovery operations, then click Save.
The Network Discovery Gateways page displays the updated information.
Create Network Discovery Gateways
When you install CA Configuration Automation, the application prompts you to enter the name and port number for the NDG Server that the CA Configuration Automation Server uses. If you install other NDG Servers, you can add and manage them in CA Configuration Automation.
Follow these steps:
1. Click the Administration link, then click the Network tab.
2. On the Network Discovery Gateways page, select Create Network Discovery Gateway from the Table Actions drop-down list.
3. On the Create Network Discovery Gateway page, enter the server name and the port number the Network Discovery Gateway uses for the discovery operations.
4. Click Save.
The application tests the server connection. If the connection is verified, the application adds the NDG Server to the table on the Network Discovery Gateways page.
Managing Network Discovery Gateways
92 Administrator Guide
Test Network Discovery Gateways
You can test the connection to any NDG Server managed by CA Configuration Automation.
To test an NDG server
1. Click the Administration link, then click the Network tab.
The Network Discovery Gateways page appears, and displays the existing NDG Servers.
2. Click the check box next to one or more NDG Servers, then select Test Network Discovery Gateways from the Select Actions drop-down list.
The Server Test Results window appears and displays either Responding or Failed for each selected server.
Managing Network Discovery Gateways
Chapter 4: Administering CA Configuration Automation 93
Secure Network Discovery Gateways
You can use security certificates to secure communication between the NDG server and your CA Configuration Automation Server. For information about creating certificates, see Creating and Managing Security Certificates (see page 54).
To secure an NDG server
1. Click the Administration link, then click the Network tab.
The Network Discovery Gateways page appears, and displays the existing NDG servers.
2. Click the check box next to one or more servers you want to secure, then select Secure Network Discovery Gateways from the Select Actions drop-down list.
The Secure Network Discovery Gateway dialog appears.
3. Enter the following information in the appropriate field, then click OK:
Agent Certificate Password
Specifies the password associated with the agent certificate when it was created.
Confirm Password
Ensures the certificate password was entered correctly by requiring that the passwords match.
Certificate Authority
Specifies the password associated with the certificate authority when it was created.
The connection is secured and a check mark appears in the Is Secure column of the Network Discovery Gateways table.
Managing Catalyst Attribute Profiles and Jobs
94 Administrator Guide
Delete Network Discovery Gateways
You can delete an NDG server from CA Configuration Automation when you no longer want to manage it.
To delete an NDG server
1. Click the Administration link, then click the Network tab.
The Network Discovery Gateways page appears, and displays the existing NDG servers.
2. Click the check box next to one or more servers you want to delete, then select Delete Network Discovery Gateways from the Select Actions drop-down list.
You are prompted to confirm the deletion.
3. Click OK.
The selected NDG servers are removed from the Network Discovery Gateways table.
Managing Catalyst Attribute Profiles and Jobs
Create Catalyst Attribute Profiles
Create a Catalyst Attribute Profile to specify the type of data that is sent from CA Configuration Automation to CA Catalyst and then to other consuming products (for example, CA CMDB).
To create a Catalyst Attribute Profiles Profile
1. Click the Administration link, the Catalyst tab, and then click the Profiles link.
The Catalyst Attributes Profiles tab page appears.
2. Click Table Actions, then select Create Catalyst Attributes Profiles.
The Profile page of the Create Catalyst Attributes Profiles wizard appears.
3. Enter the following information in the corresponding field, then click Next:
Name
Specifies the name of the profile.
Description
Describes the profile.

Managing Catalyst Attribute Profiles and Jobs
Chapter 4: Administering CA Configuration Automation 95
Dynamic
Specifies whether CA Catalyst, the CCA connector, and consuming products are dynamically notified of the following events in CA Configuration Automation:
■ A server, service, or component is added or deleted.
■ A server is added to, or deleted from a service.
Default
Specifies that this profile is the default profile for the scheduled Catalyst Attribute Profile jobs.
The Attributes page appears.
4. Click the plus sign next to one or more of the following attribute types in the Attribute pane:
■ Server
■ Component
■ Relationship
■ Storage
The selected node expands to display the attributes available for that attribute type.
5. Click the check box next to one or more attributes you want to include in the profile. The selected attributes are made available to consuming products by CA Catalyst and the CCA connector.
The selected attribute details appear in the right pane.
6. Click Finish:
The new profile is created and appears in the Catalyst Attributes Profiles table.
Managing Catalyst Attribute Profiles and Jobs
96 Administrator Guide
View and Edit Catalyst Attribute Profiles
You can view and edit existing Catalyst Attribute Profiles.
To view and edit Catalyst Attribute Profiles
1. Click the Administration link, the Catalyst tab, and then click the Profiles link.
The Catalyst Attributes Profiles tab page appears and displays the Catalyst Attributes Profiles table.
2. Click a link in the Profile Name column. The details page for the selected profile appears.
3. (Optional) Edit any of the entires on the Profile or Attributes pages, then click Save.
Descriptions of the fields are available in Create Catalyst Attribute Profiles (see page 94).
The profile is updated.
Delete Catalyst Attribute Profiles
You can delete profiles that you no longer want to run or schedule.
To delete Catalyst Attribute Profiles
1. Click the Administration link, the Catalyst tab, and then click the Profiles link.
The Catalyst Attribute Profiles tab page appears.
2. Click the check box next to one or more profiles that you want to delete, then select Delete Profiles from the Select Actions drop-down list.
You are prompted to confirm the deletion.
3. Click OK to confirm the profile deletion.
The selected profiles are deleted and removed from the Create Catalyst Attribute table.
Managing Catalyst Attribute Profiles and Jobs
Chapter 4: Administering CA Configuration Automation 97
Import Catalyst Attribute Profiles
You can import a Catalyst Attribute Profile as a Java Archive (JAR) file from another instance of CA Configuration Automation.
To import a Catalyst Attribute Profile
1. Click the Administration link, the Catalyst tab, and then click the Profiles link.
The Catalyst Attributes Profiles tab page appears.
2. Click Table Actions, then select Import Catalyst Attributes Profile.
The Import Catalyst Attributes Profile dialog appears.
3. Enter or select the following information in the corresponding field:
JAR File to Import
Specifies the name of the JAR file that contains the profile you want to import. You can click Browse to navigate to the file.
Overwrite Existing Catalyst Attributes Profile
Specifies whether the file being imported overwrites a file with the same name. Select this option if you want the changes made to the profile on another instance of CA Configuration Automation to be retained.
4. Click one of the following buttons:
Import All
Imports all of the profiles in the JAR file.
Import On Selection
Displays a dialog where you can select the profiles in the JAR file to import.
The file is imported and the profiles appear in the Catalyst Attributes Profiles table.
Export Catalyst Attribute Profiles
You can export a Catalyst Attribute Profile as a JAR file to use in another instance of CA Configuration Automation.
To export a Catalyst Attribute Profile
1. Click the Administration link, the Catalyst tab, and then click the Profiles link.
The Catalyst tab page appears.
2. Click the check box next to one or more profiles you want to export, then click Select Actions and select Export Catalyst Attributes Profile.
The File Download dialog appears.
Managing Catalyst Attribute Profiles and Jobs
98 Administrator Guide
3. Click Save.
The Save As dialog appears and the export JAR file is assigned a default name using the following format:
CatalystAttributesProfile_Export_<timestamp>.jar
For example: CatalystAttributesProfile_Export_2011_08_01_10_03_13.jar
4. Edit the file name if desired, select the location to save the file, and then click Save.
The profile is exported to the selected location.
Set a Catalyst Attribute Profile as the Default
You can designate one Catalyst Attribute Profile to be the default. The default profile is used by scheduled Catalyst Attribute Profile jobs to determine which attributes are made available to consuming products using CA Catalyst and the CCA connector.
To set a Catalyst Attribute Profile as the default profile
1. Click the Administration link, the Catalyst tab, and then click the Profiles link.
The Catalyst Attributes Profiles tab page appears.
2. Click the check box next to the Catalyst Attribute Profile that you want to be the default profile, then click Select Actions and select Set As Default.
The Is Default column displays a check mark next to the profile you selected.
Create Catalyst Jobs
Create and schedule Catalyst Attribute Profile jobs to export attributes in the profile to consuming products.
Follow these steps:
1. Click the Administration link, click the Catalyst tab, and click the Jobs link.
2. Click the Table Actions drop-down list, then select Create Catalyst Job.
Managing Catalyst Attribute Profiles and Jobs
Chapter 4: Administering CA Configuration Automation 99
3. Complete the fields on the Create Catalyst Job page, then click Next.
Name
Identifies the job.
Description
Describes the job purpose.
Attributes Profile
Defines which profile to use for the job.
Values:
■ Use Default
■ All Catalyst Attributes
■ A custom profile that you created
4. On the Services page, double-click one or more services in the Available Services column to include them in the Catalyst job.
The selected services move to the Selected Services column.
5. Click Next.
6. On the Server Groups page, double-click one or more server groups in the Available Server Groups column to include them in the Catalyst job.
The selected groups move to the Selected Server Groups column.
7. Click Next.
8. On the Servers page, double-click one or more servers in the Available Servers column to include them in the Catalyst job.
The selected servers move to the Selected Servers column.
9. Click Next.
10. On the Storage Systems page, double-click one or more storage systems in the Available Storage Systems column to include them in the Catalyst job.
11. Click Next.
12. On the Blueprint Groups page, double-click one or more groups in the Available Blueprint Groups column to include them in the Catalyst job.
The selected groups move to the Selected Blueprint Groups column.
13. Click Next to open the Blueprints page.
14. On the Blueprints page, double-click one or more Blueprints in the Available Blueprints column to include them in the Catalyst job.
The selected Blueprints move to the Selected Blueprints column.
15. Click Next.
Managing Catalyst Attribute Profiles and Jobs
100 Administrator Guide
16. On the Schedule page, select a one of the following values from the Frequency drop-down list to use this profile to run the export jobs:
Not Scheduled
Specifies that the profile associated with the job does not run automatically. Run a job manually or scheduled in the future.
Once
Specifies that the profile associated with the job runs one time. If you select this option, set the Time field.
Minutes
Specifies that the profile associated with the job runs at a specific interval in minutes. Define the following values if you select this option:
Start Time
Defines the time at which the profile starts to run. Start Time always occurs on the hour (for example, 10:00:00PM, 8:00:00AM).
Begin Date
Defines the date on which the profile runs for the first time.
End Date
Defines the date on which the profile runs for the last time.
Recur every # minutes
Defines the interval (in minutes) at which the profile runs.
For example, to run a profile every 10 minutes starting at 11:00 p.m., set Start Time to 11:00:00PM and specify Recur every 10 minutes. The profile runs at 11:00 p.m., 11:10 p.m., 11:20 p.m., and so on until the end of the hour (midnight in this example). If the current profile does not finish by the time the next interval occurs, the next run starts when the previous run completes.
Managing Catalyst Attribute Profiles and Jobs
Chapter 4: Administering CA Configuration Automation 101
Hourly
Specifies whether the profile associated with the job runs at a specific interval in hours. Define the following values If you select this option:
Start Time
Defines the time at which the profile starts to run. Start Time always occurs on the hour (for example, 10:00:00PM, 8:00:00AM).
Begin Date
Defines the date on which the profile runs for the first time.
End Date
Defines the date on which the profile runs for the last time.
Recur every # hours
Defines the interval (in hours) at which the profile runs.
For example, to run a profile every four hours starting at 11:00 p.m., set Start Time to 11:00:00PM and specify Recur every 4 hours. The profile runs at 11:00 p.m., 3:00 a.m., 7:00 a.m., 11:00 a.m., 3:00 p.m., and 7:00 p.m.. If the current profile does not finish by the time the next interval occurs, the next run starts when the previous run completes.
Note: If the Start Time for the current day has already passed, the profile runs immediately, then resumes the specified recurring schedule.
Daily
Specifies whether the profile associated with the job runs at a specific interval in days. Define the following values if you select this option:
Start Time
Defines the time at which the profile starts to run. Start time always occurs on the hour (for example, 10:00:00PM, 8:00:00AM).
Begin Date
Defines the date on which the profile runs for the first time.
End Date
Defines the date on which the profile runs for the last time.
Recur every # days
Defines the interval (in days) at which the profile runs.
Managing Catalyst Attribute Profiles and Jobs
102 Administrator Guide
Weekly
Specifies whether the profile associated with the job runs at a specific interval in weeks. Define the following values if you select this option:
Start Time
Defines the time at which the profile starts to run. Start time always occurs on the hour (for example, 10:00:00PM, 8:00:00AM).
Begin Date
Defines the date on which the profile runs for the first time.
End Date
Defines the date on which the profile runs for the last time.
Recur every # weeks
Defines the interval (in weeks) at which the profile runs.
Monthly
Specifies whether the profile associated with the job runs at a specific interval in months. Define the following values if you select this option:
Start Time
Defines the time at which the profile starts to run. Start time always occurs on the hour (for example, 10:00:00PM, 8:00:00AM).
Begin Date
Defines the date on which the profile runs for the first time.
End Date
Defines the date on which the profile runs for the last time.
Recur every # months
Defines the interval (in months) at which the profile runs.
17. Define the notification for the application to send when the profile associated with the job runs:
Notification Profile
Defines which notification profile to use when discovery operations using this profile run as scheduled. For more information, see Create Notification Profiles.
Subject
Defines the subject line of the email message that the selected notification profile sends.
18. Click Finish.
The Catalyst Jobs table lists the new job.
CA Configuration Automation Diagnostics
Chapter 4: Administering CA Configuration Automation 103
CA Configuration Automation Diagnostics
The Diagnostics tab page contains links to the following read-only information pages:
■ CCA Information
■ Database Information
■ Grid Information
■ Distributed Lock Information
■ Collect Diagnostics
■ Log Archives
Additionally, the Diagnostics tab page contains a link to the Collect Diagnostics page. There you can generate a heap dump of either your CA Configuration Automation Server or your CA Configuration Automation Server and Grid Nodes. A heap dump is a point-in-time record of all the objects in the Java Virtual Machine (JVM) heap. This information should only be generated when requested by CA Support.
When the logs exceed the maximum storage size limit they are archived, and are available in the Log Archives tab. The Log Archives tab lets you view the archived logs, and use the log information for diagnostics, or troubleshooting.
Migrating Data from CA Cohesion ACM
CA Configuration Automation includes functionality to migrate data from the following CA Cohesion releases into the CCA Database and manage it using the CA Configuration Automation Server UI:
■ CA Cohesion ACM r5.0
■ CA Cohesion ACM r5.0 SP1
Note: This remainder of this chapter refers to these releases collectively as CA Cohesion ACM.
The following CA Cohesion ACM objects can be migrated to CA Configuration Automation:
■ Servers
■ Server Management Profiles
■ Server Discovery Profiles
■ Server Access Profiles
■ Server Groups
■ Server Snapshots
Migrating Data from CA Cohesion ACM
104 Administrator Guide
■ Services
■ Service Management Profiles
■ Service Discovery Profiles
■ Service Snapshots
■ Blueprints
■ File Structure Classes and Parsers
■ Global Variables
■ Security Certificates
Migration Prerequisites and Limitations
Before migrating data from CA Cohesion ACM, ensure the following prerequisites have been satisfied:
■ Install and license the CA Configuration Automation r12.8 SP02 server
■ Ensure you have database access to both the Cohesion Database and the CA Configuration Automation Database
■ If your CA Cohesion ACM implementation used a Sybase database, you must do the following:
■ Copy the Sybase driver: sybase-jdbc4.2.jar (where 4.2 is the driver version, but may vary) from: <Cohesion_home>\Server\server\webapps\cohesion\WEB-INF\lib\ to: <CCA_r12.8 SP02_home>\tomcat\webapps\cca\WEB-INF\lib\
■ Restart the CA Configuration Automation Server r12.8 SP02
■ For importing security certificates, consider the following:
■ Ensure the certificate authority was created in CA Configuration Automation r12.8 SP02
■ You must know the server certificate password
■ You need the CA Cohesion ACM keystore and truststore files
Consider the following limitations before migrating data:
■ Similar data that already exists in the CA Configuration Automation Database is not overwritten
■ Change Detection and compare options in CA Cohesion ACM Management Profiles with specific Snapshot information are not migrated
■ Only recurring scheduling options are migrated with Management Profiles
Migrating Data from CA Cohesion ACM
Chapter 4: Administering CA Configuration Automation 105
■ The start time for scheduled operations in Management Profiles is set to the starting time of the scheduling window
■ Proxy options in CA Cohesion ACM Access Profiles are not migrated
■ When migrating Snapshots, if a parameter directive and a configuration file do not exist in the Blueprint, the respective values are ignored and migration of the Snapshot continues with the remaining values
Migration Options
CA Configuration Automation includes the following options for migrating data from CA Cohesion CCA:
■ From the Cohesion Database to the CA Configuration Automation Database (see page 105)
■ From the Cohesion Database to an archive file (see page 107)
■ From an archive file to the CA Configuration Automation Database (see page 109)
■ Import Security Certificates (see page 110)
The procedures associated with these options are described in the sections that follow.
Migrate Data from the Cohesion Database to the CCA Database
After ensuring the migration prerequisites have been satisfied, you can migrate data from Cohesion CA Configuration Automation Database into the CA Configuration Automation Database.
To migrate data from the Cohesion Database to the CA Configuration Automation Database
1. Click the Administration link, and then the Data Migration link.
The Data Migration page appears and displays the following panels:
■ From Cohesion Database
■ From Archive File
■ Security Certificates
2. Click the To CA Configuration Automation Database link in the From Cohesion Database panel.
The Cohesion Database Details page appears.

Migrating Data from CA Cohesion ACM
106 Administrator Guide
3. Enter the following information in the corresponding field, then click Test Connection.
Database Type
Specifies one of the following databases: SQL Server or Oracle.
Server Name
Specifies the server that hosts the Cohesion Database.
Port Number
Specifies the port number the Cohesion Database uses to communicate.
Database Name
(SQL Server database only) Specifies the SQL Server database instance.
Oracle SID
(Oracle database only) Specifies the system ID (SID) that uniquely identifies an Oracle database instance.
Database User
Specifies the user name of an administrator user who can access the Cohesion Database
Database Password
Specifies the password for the database user.
CA Configuration Automation uses the supplied information to ensure it can connect to the Cohesion Database and then confirms the connection.
4. Click Next.
The Shared Objects page appears.
5. Click one of the following object types to migrate:
■ Servers
■ Services
■ Blueprints
6. (Blueprints only) Clear one of the check boxes if you do not want to migrate that object type:
■ Migrate Blueprints
■ Global Variables
By default, both object types are migrated.
Migrating Data from CA Cohesion ACM
Chapter 4: Administering CA Configuration Automation 107
7. (Optional) Create a filter if you only want to migrate certain objects to CA Configuration Automation r12.8 SP02.
a. Click the Filters tab.
b. Select an object in the Available column (you can use Ctrl+click or Shift+click to select multiple objects).
c. Click the single right-facing arrow to move the selected objects to the Selected column.
d. Click OK.
8. (Optional) Repeat steps 5 through 7 to include other object types.
9. Click Finish.
The migration begins and confirms the successful migration when complete.
Migrate Data from the Cohesion Database to an Archive File
After ensuring the migration prerequisites have been satisfied, you can migrate data from the Cohesion Database into a JAR file.
To migrate data from the Cohesion CA Configuration Automation Database to the CA Configuration Automation Database
1. Click the Administration link, and then the Data Migration link.
The Data Migration page appears and displays the following panels:
■ From Cohesion Database
■ From Archive File
■ Security Certificates
2. Click the To Archive File link in the From Cohesion Database panel.
The Cohesion Database Details page appears.
3. Enter the following information in the corresponding field in the Cohesion Database Details panel, then click Test Connection:
Database Type
Specifies one of the following databases: SQL Server or Oracle.
Server Name
Specifies the server that hosts the Cohesion Database.
Port Number
Specifies the port number the Cohesion Database uses to communicate.
Database Name
(SQL Server database only) Specifies the SQL Server database instance.
Migrating Data from CA Cohesion ACM
108 Administrator Guide
Oracle SID
(Oracle database only) Specifies the system ID (SID) that uniquely identifies an Oracle database instance.
Database User
Specifies the user name of an administrator user who can access the Cohesion Database
Database Password
Specifies the password for the database user.
CA Configuration Automation uses the supplied information to ensure it can connect to the Cohesion Database and then confirms the connection.
4. Enter the following information in the corresponding field in the Archive Details panel:
File Path
Specifies the location where you want to save the JAR file.
File Name
Specifies the name of the JAR file (.jar is automatically appended to this entry).
5. Click Next.
The Shared Objects page appears.
6. Click one of the following object types to migrate:
■ Servers
■ Services
■ Blueprints
7. (Blueprints only) Clear one of the check boxes if you do not want to migrate that object type:
■ Migrate Blueprints
■ Global Variables
By default, both object types are migrated.
8. (Optional) Create a filter if you only want to migrate certain objects to the archive file.
a. Click the Filters tab.
b. Select an object in the Available column (you can use Ctrl+click or Shift+click to select multiple objects).
c. Click the single right-facing arrow to move the selected objects to the Selected column.
d. Click OK.
Migrating Data from CA Cohesion ACM
Chapter 4: Administering CA Configuration Automation 109
9. (Optional) Repeat steps 5 through 8 to include other object types.
10. Click Finish.
The migration begins and confirms that the archive file was successfully created.
Migrate Data from an Archive File to the CCA Database
You can migrate data into the CA Configuration Automation r12.8 SP02 database from a JAR file you created using the procedure described in Migrate Data from the Cohesion Database to an Archive File (see page 107).
Note: Only the JAR file created by the migration tool can be imported into CA Configuration Automation.
To migrate data from an archive file to the CA Configuration Automation Database
1. Click the Administration link, and then the Data Migration link.
The Data Migration page appears and displays the following panels:
■ From Cohesion Database
■ From Archive File
■ Security Certificates
2. Click the To CA Configuration Automation Database link in the From Archive File panel.
The Data Migration From Archive File dialog appears.
3. Click Browse and navigate to a Cohesion CCA archive file.
The selected file appears in the Archive File Details field.
4. Click OK.
The migration begins and displays the Data Migration Results dialog when complete.
5. Click one of the following buttons:
View Log File
Displays the migration log file.
Save Log File
Displays a download dialog where you can specify a location to save the migration log file.
Close
Closes the Data Migration Results dialog.
The contents of the archive file are imported into CA Configuration Automation.
Migrating Data from CA Cohesion ACM
110 Administrator Guide
Migrate Security Certificates
After ensuring the migration prerequisites have been satisfied, you can migrate security certificates created in Cohesion ACM into CA Configuration Automation r12.8 SP02.
To migrate security certificates from the Cohesion Database to the CA Configuration Automation Database
1. Click the Administration link, and then the Data Migration link.
The Data Migration page appears and displays the following panels:
■ From Cohesion Database
■ From Archive File
■ Security Certificates
2. Click the Import Certificates link in the Security Certificates panel.
The Import Certificates dialog appears.
3. Enter the following information in the corresponding field, then click Test Connection.
Cohesion Server Name
Specifies the Cohesion Server where the certificates were created.
Cohesion Server Certificate Password
Specifies the password associated with the server certificate when it was created.
CA Configuration Automation Server Certificate Password
Specifies the password associated with the certificate authority created on the CA Configuration Automation Server.
Cohesion Keystore File
Specifies the name of the keystore file located on the Cohesion Server in the <cohesion_home>\server\lib folder.
Cohesion Truststore File
Specifies the name of the truststore file located on the Cohesion Server in the <cohesion_home>\server\lib folder.
4. Click OK.
The certificate migration begins and confirms the successful migration when complete.
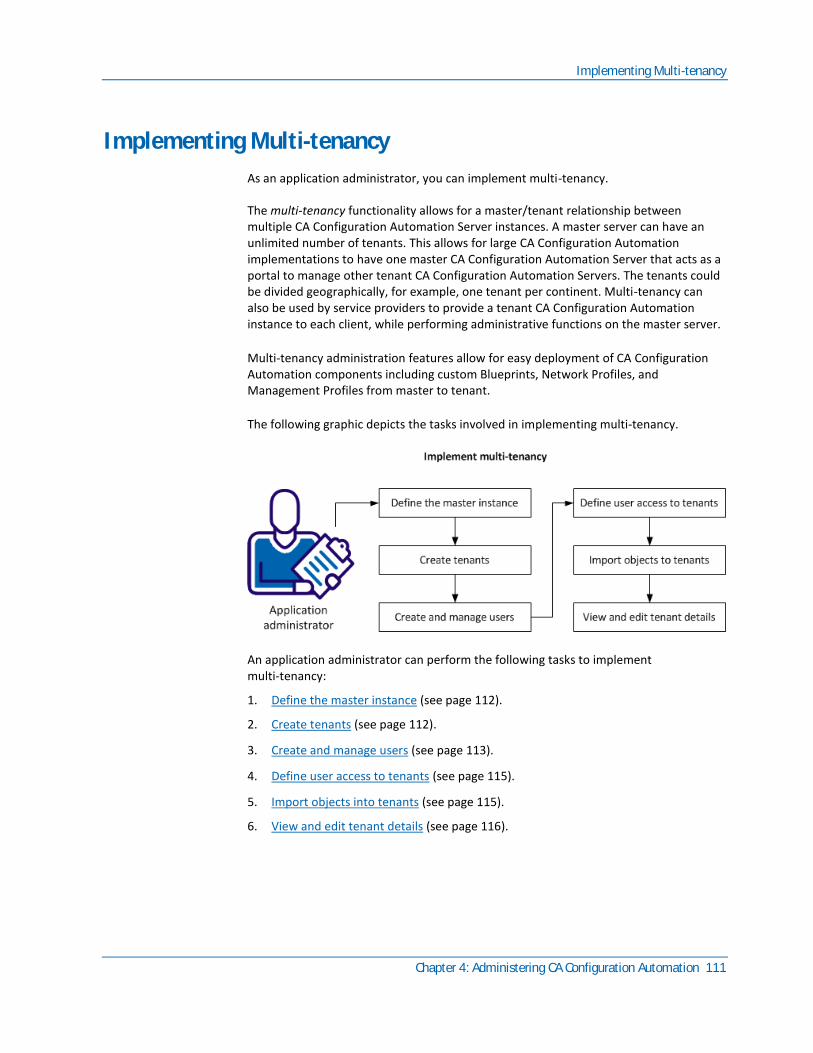
Implementing Multi-tenancy
Chapter 4: Administering CA Configuration Automation 111
Implementing Multi-tenancy
As an application administrator, you can implement multi-tenancy.
The multi-tenancy functionality allows for a master/tenant relationship between multiple CA Configuration Automation Server instances. A master server can have an unlimited number of tenants. This allows for large CA Configuration Automation implementations to have one master CA Configuration Automation Server that acts as a portal to manage other tenant CA Configuration Automation Servers. The tenants could be divided geographically, for example, one tenant per continent. Multi-tenancy can also be used by service providers to provide a tenant CA Configuration Automation instance to each client, while performing administrative functions on the master server.
Multi-tenancy administration features allow for easy deployment of CA Configuration Automation components including custom Blueprints, Network Profiles, and Management Profiles from master to tenant.
The following graphic depicts the tasks involved in implementing multi-tenancy.
An application administrator can perform the following tasks to implement multi-tenancy:
1. Define the master instance (see page 112).
2. Create tenants (see page 112).
3. Create and manage users (see page 113).
4. Define user access to tenants (see page 115).
5. Import objects into tenants (see page 115).
6. View and edit tenant details (see page 116).
Implementing Multi-tenancy
112 Administrator Guide
Define the Master Instance
The master instance is defined during the CA Configuration Automation Server installation.
Select the Tenant Master option on the Server Type screen. This option specifies to install the master instance of the CA Configuration Automation Server. The master instance can host multiple tenant instances that cannot access or manage data on the master tenant or the other tenants.
Create Tenants
You can define the master/tenant relationship two ways:
■ During the CA Configuration Automation Server installation, in the Server Type screen, select the Tenant option and specify the Master server credentials. This information is passed to the Tenant Administration UI and displayed in the table on the Tenant tab page.
■ In the Tenant Administration UI, select the Create Tenant option on the Tenant tab page. The Create Tenant functionality can be used to define previously installed CA Configuration Automation Server instances as tenants.
Note: You cannot create a tenant using a CA Configuration Automation Server instance from a previous release.
Follow these steps:
1. Log into the Tenant Administration UI on the master CA Configuration Automation Server, then click the Tenants tab.
The Tenants table appears and displays the tenants created with the Create Tenant functionality for this master server.
2. Select Create Tenant from the Table Action drop-down list.
The Create Tenant page appears.
3. Enter the following information in the appropriate field, then click Finish.
Name
Specifies the tenant name.
Description
Specifies details about the tenant.
Server Name
Specifies the CA Configuration Automation Server tenant instance. This can be the server name or IP address (IPv4 or IPv6).
Implementing Multi-tenancy
Chapter 4: Administering CA Configuration Automation 113
Port
Specifies the listening port of the tenant CA Configuration Automation Server.
SSL Enabled
Specifies whether SSL is used to secure communication between the tenant and master servers.
Viewers
Specifies the users that can view and manage the tenant from the Tenant Administration UI on the master instance. Double-click a user in the Available Viewers column to move it to the Selected Viewers column.
The tenant is created and appears in the Tenant table and in the Tenants pane for users authorized to view it.
Create and Manage Users
Use either the CA Configuration Automation Server UI or the CA EEM UI to define CA Configuration Automation users. In either case, click the Administration panel, click the Access Management tab, then click the Users link.. The functionality is identical in the two locations.
You can add users of the tenant UI to one or both of the following predefined user groups:
Tenant Administrators
Members can access the administration functions in the Tenant Administration UI on tenant instances on which they have access permissions. The Tenant pane contains an Administration link that opens the administrator UI. The pane also contains links that open the CA Configuration Automation Server UI on a selected tenant.
Tenant Viewers
Members can access the CCA Server UI on tenant instances that the Tenants pane displays.
Note: The Tenant Viewer permissions are required to view tenants in the Tenants pane.
Follow these steps:
1. Log in to the Tenant Administration UI on the master CA Configuration Automation Server, then click the Tenants tab.
The Tenants pane and the tenants table are displayed. They display the tenants that are configured for this master server.
2. In the Tenants pane, click the name of the tenant for which to add or modify users.
The CA Configuration Automation Server UI opens for the selected tenant.
Implementing Multi-tenancy
114 Administrator Guide
3. Click the Administration link, click the Access Management tab, then click the Users link.
The Search Users and Users panes open.
4. Complete one of the following tasks:
■ Add a user as described in the CA Configuration Automation Product Guide. Ensure that you:
– Click Add Application User Details, then enter CCA in the AppInstanceName field.
– Add the user to the CCA Tenant Administrators or CCA Tenant Viewers group.
– Click Save.
■ Modify a user:
– Enter the user name in the Search Users pane Value field, then click Go.
– Click the user name in the tree in the Users pane. The right User pane displays details of the selected user.
– Add the user to the CCA Tenant Administrators or CCA Tenant Viewers group.
– Click Save.
5. In the Tenant pane, click the Administration link.
6. In the Tenant Administration UI, click the Users tab.
The Selected Administrators or Selected Viewers column displays the user that you created in Step 4.

Implementing Multi-tenancy
Chapter 4: Administering CA Configuration Automation 115
Define User Access to Tenants
After you define users as members of the CCA Tenant Viewers group, you can specify which users can access each tenant.
1. Log in to the Tenant Administration UI on the master CA Configuration Automation Server, then click the Tenants tab.
2. In the Name column of the right pane, click a tenant name.
The Tenant Properties page for the selected tenant opens.
3. In the Available Tenants column, double-click each viewer that you want to access this tenant.
The application moves the selected viewer to the Selected Viewers column and grants permission to access the tenant. When the users in the Selected Viewers column log in to the Tenant Portal, the Tenant pane displays the selected tenant.
Note: If the selected tenant is a member of a tenant group, this user can access all members of the tenant group.
Import Objects Into Tenants
You can import the following objects to one or more tenants:
■ Management Profile
■ Blueprint
■ File Structure Class
■ Network Scan Policy
■ Notification Profile
■ Rule Group
■ Remediation Profile
■ Dashboard
■ Graph
■ Blueprint Group
■ Table View
■ Application Mapping
Implementing Multi-tenancy
116 Administrator Guide
■ Catalyst Profile
■ Property
Note: Before you import objects to tenant instances, export the objects as a Java Archive (JAR) from any CA Configuration Automation Server instance. For more information about exporting objects, see the Product Guide or CA Configuration Automation Server online help.
Follow these steps:
1. Log in to the Tenant Administration UI on the master CA Configuration Automation Server, then click the Import tab.
2. From the Type drop-down list, select the object type to import.
3. Click Browse and navigate to the exported JAR file to import, then click Open.
The JAR File to Import field displays the selected file.
4. (Optional) Select the Overwrite Existing Objects check box to specify that the file your are importing overwrites a file with the same name.
5. In the Available Tenants column, double-click one or more tenants to which to import the objects.
6. Click Import.
The application imports the objects to the selected tenants.
View and Edit Tenant Details
You can view and edit tenant details that you specified when you created the tenant.
Follow these steps:
1. Log in to the Tenant Administration UI on the master CA Configuration Automation Server, then click the Tenants tab.
2. In the Name column of the right pane, click a tenant name.
The Tenant Properties page for the selected tenant opens.
3. Edit the fields as appropriate, then click Save.
For more information about the fields, see Create Tenants (see page 112).
Manage Scripts
Chapter 4: Administering CA Configuration Automation 117
Manage Scripts
Use the Script table to define scripts to perform Rule Compliance, Remediation and Undo Remediation. Scripts can contain Global variables, Context variables (DiscoveredPath, OSSERVICENAME), and Parameters which can be evaluated and replaced with actual value at execution time.
You can use Global variables, Context variables and Parameters as follows:
■ Global Variables: Use the Global Variables table to define a global variable. Applicable for Script content and Rule Value only.
Syntax: $(@<varName>)
■ Context Variable: Are default variables defined in CA Configuration Automation. Applicable for Script content only.
Syntax: $(%DiscoveredPath) or $(%OSSERVICENAME)
Note: Context variables are not applicable to scripts used in blueprints.
■ Parameters: Use the Live Browse tab to define parameters. Applicable for Script Content, Rule Value, and Global variables.
Syntax: $(%<parameterName>)
Examples for Context variables:
■ DiscoveredPath refers to the absolute path of an object. For example, file or directory or registry key for Windows.
■ Discovered path for File: C:\Program Files\CA\CCA Agent\agent_prop.properties
■ Discovered path for Directory: C:\Program Files\CA\CCA Agent
■ Discovered path for Registry Key: HKEY_LOCAL_MACHINE\Software\ComputerAssociates
■ OSSERVICENAME variable refers to the installed service name in Windows. For example:
■ Service Name for “SQL Server (MSSQLSERVER)”: MSSQLSERVER
■ Service Name for "CA Network Discovery Server": CANDServer
You can create, edit, and delete Scripts using the Scripts table.
Manage Scripts
118 Administrator Guide
Follow these steps:
1. Click the Administration link, then the Scripts tab.
The Scripts page displays list of existing scripts.
Create a new Script
2. Click Create Script under the Table Actions menu.
The Script Editor dialog opens.
Note: Before you use the script for compliance and remediation, ensure that the script is validated in the script editor.
3. Complete the form fields and click OK.
Delete Scripts
4. Select one or more scripts from the list and click Delete Scripts under the Select Actions menu.
Export Scripts
5. Select one or more scripts from the list and click Export Scripts under the Select Actions menu.
Manage Scripts
Chapter 4: Administering CA Configuration Automation 119
Copy Script
6. To create a copy of an existing script, select a script and select Copy Script under the Select Actions menu.
Export Scripts to Excel
7. Click Export to Excel under the Table Actions menu.
Import Scripts
8. Click Import Scripts under the Table Actions menu.
The Import Scripts dialog appears.
a. Click Browse and navigate to the .jar file you want to import.
If the file was exported from a CA Configuration Automation Server, the file was assigned a default name using the following timestamp convention:
Script_Export_YYYY_MM_DD_HH_MM_SS.jar
Where YYYY is the year, the first MM is the month, DD is the day, HH is the hour (using a 24-hour clock), the second MM is the minutes, and SS is the seconds. For example:
Script_Export_2010_08_01_16_20_00.jar
b. (Optional) Select the following option.
Overwrite Existing Scripts
Specifies that the existing script on the CA Configuration Automation Server is replaced by the new .jar file.
c. Click one of the following buttons:
Import All
Imports all Scripts in the .jar file.
Import On Selection
Displays the Available Imports table which lists the Scripts in the .jar file, and enables you to specify which of them you want to import.
The import begins and may take a few moments depending on the size of the file. When the import is complete, a status message appears, the imported Scripts appears in the Scripts table, and the Modification Date/Time column is updated.
Print the list of scripts
9. Click Print under the Table Actions menu.
Configure Table View
10. Click Configure Table View under the Table Actions menu.
The Configure Table View dialog appears. For more details on configuring Table View, see Common Table Actions (see page 28) section.
Manage Scripts
120 Administrator Guide
Script Editor
You can use the script editor to edit an existing script or write a new script. Also, you can execute the script to verify the output.
Script Editor dialog gives the following options:
Server
Specifies the target server to test the developed script.
Script Type
Specifies the type of script, VB Script, Shell Script, or Command.
Script
You can write a new script or edit an existing script using this editor. Also, you can execute the script using the Execute button.
Executing a Script
Select an appropriate target server and click the Execute Script to validate result for the script.
Reformat Selection
Reformats the selected lines of code.
Reformat whole document
Reformats the whole document.
Result
Displays the the result of the executed script.
Click OK to save and close the dialog, or click Cancel to close the dialog without saving changes.
Manage Scripts
Chapter 4: Administering CA Configuration Automation 121
Examples for Scripts
You can refer to the following examples for writing a script in the script editor:
■ To set the start mode for the Windows service "Remote Registry" as 'Disabled', use the following command:
sc config RemoteRegistry start= disabled
■ Use the following command to start or stop the Windows service:
sc start $(%OSSERVICENAME) or sc stop $(%OSSERVICENAME)
■ To set the start mode of the Windows service to Manual:
sc config $(%OSSERVICENAME) start= demand
■ To set the security setting of the password policy “Max Password Age”
net accounts /maxpwage:42
■ To get the port value in CCA Agent Configuration file using the context variable “DiscoveredPath” in VB script
On Error Resume Next
Dim WSH, TempDir, strFile
Set WSH = WSCript.CreateObject("WScript.Shell")
Set objFSO=CreateObject("Scripting.FileSystemObject")
Set re = New RegExp
re.Pattern = "[p][o][r][t][=]"
TempDir = WSH.ExpandEnvironmentStrings("%TEMP%")
' How to write file
strFile = "$(%DiscoveredPath)"
Set objFile = objFSO.OpenTextFile(strFile)
Do Until objFile.AtEndOfStream
strLine= objFile.ReadLine
strMyString = strLine
If re.Test(strMyString) Then
s = Split(strMyString,"=")
WScript.Echo s(1)
End If
Loop
objFile.Close
■ Update port value in CCA Agent Configuration file in a file path using VB script
On Error Resume Next
Dim WSH, TempDir, strFile, fileContent,replacePort
Set WSH = WSCript.CreateObject("WScript.Shell")
Set objFSO=CreateObject("Scripting.FileSystemObject")
Set re = New RegExp
re.Pattern = "[p][o][r][t][=]"
replacePort="port=8063"
TempDir = WSH.ExpandEnvironmentStrings("%TEMP%")
' How to write file
strFile = "C:\Program Files\CA\CCA Agent\agent.conf"

Manage Scripts
122 Administrator Guide
Set objFile = objFSO.OpenTextFile(strFile)
Do Until objFile.AtEndOfStream
strLine= objFile.ReadLine
strMyString = strLine
If re.Test(strMyString) Then
s = Split(strMyString,"=")
fileContent = fileContent & replacePort & vbNewLine
Else
fileContent = fileContent & strLine & vbNewLine
End If
Loop
objFile.Close
'WScript.Echo fileContent
Set ObjFile = ObjFso.OpenTextFile (strFile, 2, True)
ObjFile.WriteLine(fileContent)
ObjFile.Close
■ Update file permissions in UNIX to rwxrwxrwx using the context variable “DiscoveredPath”
chmod 777 $(%DiscoveredPath)
Manage Global Variables
Global Variables enable you to define a set of name-value pairs that can be used in variable substitution expressions within directives, parameters, and macros. Global variables are independent of the typical server- or service-specific CA Configuration Automation data model, and can be defined manually within the CA Configuration Automation user interface, imported from an existing XML or CSV file, or exported to a CSV file.
CA Configuration Automation displays the global variable repository in a table on the Global Variables page. Global variables require unique variable names and can include only alphanumeric characters, periods (.), parentheses (( )), and underscores ( _ ).
The named values defined in the global variable repository are:
■ Stored and evaluated only as strings (they have no specific data type)
■ Optional and do not contain default values (not all names require a value and can simply be used to group together other named values)

Manage Scripts
Chapter 4: Administering CA Configuration Automation 123
The Global Variables page lets you create, export, import, and delete the global variables.
To manage the global variables, follow the steps:
1. Click the Administration link, then the Scripts tab.
The Scripts page appears.
2. Click the Global Variables link (below the main tabs).
The Global Variables page appears.
To create a global variable:
1. Select Create Global Variable from the Table Actions drop-down list.
The Create Global Variable dialog appears.
2. Enter the following information in the corresponding field:
Name
Identifies the global variable.
Description
Describes the purpose of the global variable.
Value
Specifies the syntax for addressing global variables for variable substitution using the $(@global_variable_name) format. This expression represents the value of the global variable c at the path /a/b in the Global Variables tree.
Note: You cannot use variable substitution expressions with name qualifiers that contain colons (:), for example: $(/var1/var2/var3/var3(:2:)/value) is not a valid expression.
3. Click OK to display the new global variable in the Global Variables table.
To Import the global Variables that have been exported from another instance of CA Configuration Automation:
1. Select Import Global Variables from the Table Actions drop-down list.
The Import Global Variables dialog appears.
2. Click Choose file and navigate to the exported global variable data file.
The selected file appears in the Import XML or CSV File field.
3. Click the Ignore Duplicate or Invalid Variables check box to ignore any duplicate or invalid variables in the global variable data file you are importing.
By default, all entries are imported.
Manage Scripts
124 Administrator Guide
4. Click OK.
The global variables are imported and appear in the Global Variables table.
To export global variables to an Excel file in a comma separated value (CSV) format:
1. Select Export to Excel from the Table Actions drop-down list.
The ExportToCsvServlet runs in a web browser, then displays a File Download window.
2. Click Save.
3. The Save As dialog appears with the default file name of GlobalVariables.csv.
4. Edit the default file name, select a location to save the file, and then click Save.
The CSV file is saved in the specified location.
To delete the global variables:
1. Select one or more global variables that you want to delete.
2. Select Delete Global Variables from the Table Actions drop-down list.
3. Click OK when prompted to confirm the deletion.
The selected global variables are removed from the table.
Chapter 5: Understanding and Creating Rules 125
Chapter 5: Understanding and Creating Rules
Constraint rules are used to place value constraints on particular types of CA Configuration Automation elements, including the following:
■ Rules in the Indicators, Verification Rules folder (Component Blueprints only)
■ Parameters in the Parameters folder (Services only)
■ Files and directories in the Managed, File System Overlay
■ Registry keys and values in the Managed, Registry Overlay folder
■ Parameters in the Parameter, Rules folder
■ Parameters in the Configuration, Structure Classes folder
■ Files in the Configuration folder
Constraint rules are always associated one-to-one with an element and can be either created in and inherited from the underlying Component Blueprint or created in and applied directly to a service instance. In addition to the explicit constraint rules that you create, there are also built-in CA Configuration Automation implicit constraint rules. For example, if you specify a particular value or data type for an element, CA Configuration Automation automatically creates an implicit Check Default or Verify Data Type rule.
Note: When possible, consider creating constraint rules within the Component Blueprint. You create the rule once, and it is automatically inherited by any service that uses the underlying Component Blueprint.
Constraint rules are initiated, viewed, and edited from the Rules field of the selected Component Blueprint.
The number of defined constraint rules or None is displayed in the brackets to the right of Rules. From the drop-down list, you can view a specific constraint rule, view all constraint rules, or add constraint rules.
■ If you select Show All Rules, a new page is displayed showing a list of all constraint rules in table format. You can change the sort order of the table by clicking any of the table headings.
■ If you select New Rule, the Rule attribute sheet is displayed.
■ If you select a specific constraint rule, the name is displayed in the Rules field and the attribute sheet for that constraint rule is displayed. You can edit or delete most rules from the attribute sheet. The exception is that you cannot edit or delete CA Configuration Automation built-in or implicit rules, such as Check Default or Verify Data Type. You can only view these implicit rules.
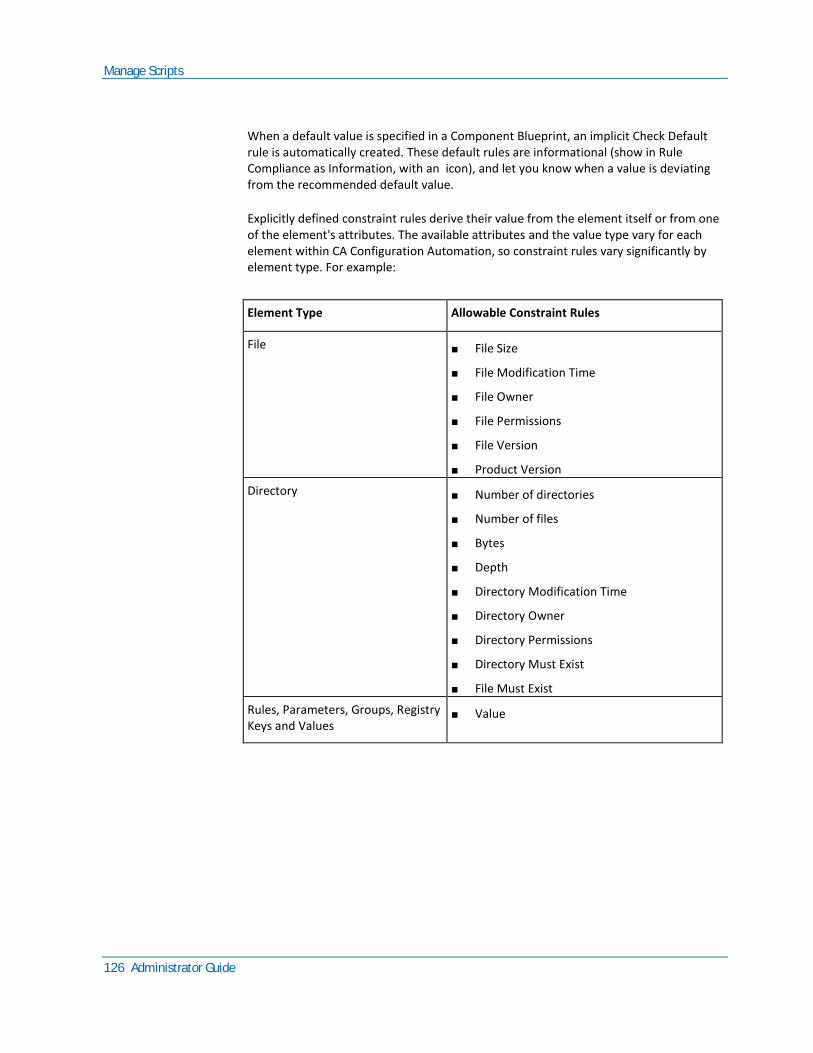
Manage Scripts
126 Administrator Guide
When a default value is specified in a Component Blueprint, an implicit Check Default rule is automatically created. These default rules are informational (show in Rule Compliance as Information, with an icon), and let you know when a value is deviating from the recommended default value.
Explicitly defined constraint rules derive their value from the element itself or from one of the element's attributes. The available attributes and the value type vary for each element within CA Configuration Automation, so constraint rules vary significantly by element type. For example:
Element Type Allowable Constraint Rules
File ■ File Size
■ File Modification Time
■ File Owner
■ File Permissions
■ File Version
■ Product Version
Directory ■ Number of directories
■ Number of files
■ Bytes
■ Depth
■ Directory Modification Time
■ Directory Owner
■ Directory Permissions
■ Directory Must Exist
■ File Must Exist
Rules, Parameters, Groups, Registry Keys and Values
■ Value
Chapter 6: Understanding and Creating Directives 127
Chapter 6: Understanding and Creating Directives
Directives are used to either extract values from elements managed within a service, or to retrieve values from managed servers using the CA Configuration Automation Agent. The following list introduces the four directive types:
■ Verification directives—Eliminate initially discovered components that are partially installed, of the wrong version, or not of interest to a particular service.
■ Parameter directives—Define parameters that are critical for locating and identifying the component, such as the file system or registry root, component version, vendor, and database connection information.
■ Executable directives—Define directives to extract and interpret configuration information from a server.
■ Macro step directives—Help diagnose problems specific to the servers containing the data being managed by its Component Blueprint and provide additional information about a server or service, such as viewing system information, memory statistics, or disk volume statistics.
The sections that follow describe the directives in detail.
Verification Directives
To initiate verification-related value directives in the Component Blueprint, select the Indicators, Verification Directives element and click Add Directive. View and edit existing verification directives from the Verification Directive tree that appears when you select a verification directive element.
The fields that are displayed vary by the Directive Type that you select.
Examples:
■ The Oracle 8i Database (UNIX) v8.* Component Blueprint defines a Remote Execution verification directive that uses SQL Plus to retrieve the version and verifies that the discovered component is version 8.
■ The Apache HTTP Server (UNIX) v1.3.* Component Blueprint defines a Constant verification directive that retrieves the version information and verifies that the discovered component is version 1.3.*.
Note: The example uses a wildcard (*) when specifying the regular expression on which to match. Discovery finds all versions that start with 1.3.
Parameter Directives
128 Administrator Guide
Parameter Directives
Parameter-related value directives are initiated in the Component Blueprint by selecting the Parameters, Directives element and clicking Add Directive. Existing parameter directives are viewed and edited from the Parameter tree that appears when you select a parameter directive element.
The fields displayed vary by the Directive Type selected.
Examples:
■ The WIN32 v*.* Component Blueprint defines a Constant parameter directive that exposes the product name and associated Service Pack version in the parameters of a discovered Windows operating system component in a service.
■ The same WIN32 v*.* Component Blueprint defines a Constant parameter directive that exposes the Vendor in the parameters of a discovered Windows operating system component in a service.
Configuration Executable Directives
Configuration executable-related value directives are initiated in the Component Blueprint by selecting the Configuration, Executables element and clicking Add Directive. Existing executable directives are viewed and edited from the Executable Directive tree that appears when you select a configuration executable directive element.
The fields displayed vary by the Directive Type selected.
Examples:
■ The Active Directory Service v*.* Component Blueprint defines a Get LDAP configuration executables directive that retrieves the FSMO Roles.
■ The BIG-IP Load Balancer v*.* Component Blueprint defines a Get SNMP configuration executables directive that retrieves values at the specified MIB address.
Macro Step Directives
Macro step-related value directives are initiated in the Component Blueprint by selecting a macro element under Diagnostics, Macros or Utilities, or Macros, and then clicking Add Step. Existing macro steps are viewed and edited from Macro Step tree that appears when you select a macro step element.
The fields displayed vary by the Directive Type selected.
Macro Step Directives
Chapter 6: Understanding and Creating Directives 129
Examples
■ The IBM WebSphere 6 Server Instance (UNIX) v6.* Component Blueprint defines a Remote Execution macro step directive that starts WebSphere Server with the help option.
■ The BIG-IP Load Balancer v*.* Component Blueprint defines a Get SNMP macro step directive that retrieves the total uptime values at the specified MIB address.

Appendix A: Configuring sudo for UNIX and Linux Softagent Discovery 131
Appendix A: Configuring sudo for UNIX and Linux Softagent Discovery
When using the NDG Softagent to discover UNIX and Linux servers, NDG attempts to establish an SSH connection to the UNIX and Linux hosts using the set of credentials provided in the credential vault. Depending how your UNIX/Linux security is configured, it is possible that some commands issued by the NDG Softagent cannot be authorized for the non-root user, resulting in less data being discovered for the server.
You have the following options to avoid having a non-root user issue discovery-related commands:
■ Provide root user credentials in the credential vault so all discovery-related commands are issued as root. This ensures the commands are authorized.
■ Use the sudo command to enable a non-root user to issue discovery-related commands under the authority of root, without having to supply root’s credentials.
You also have to define a path for the userid that is associated with the sudo user that includes all the locations for the following commands and utilities that NDG discovery uses:
■ /bin
■ /sbin
■ /usr/sbin
■ /opt/xensource/bin

Macro Step Directives
132 Administrator Guide
To configure the /etc/sudoers file to use sudo to authorize non-root users
1. Edit the /etc/sudoers file using the visudoers command.
2. Create the following entry for the user ndguser to issue all NDG Softagent commands using sudo without prompting for root credentials:
# simple entry for ndg discovery if client does not need granularity
# ndguser ALL=NOPASSWD: ALL
# detailed entry for ndg discovery permitting only those commands used by discovery
ndguser ALL = NOPASSWD: /bin/uname, /bin/echo, /bin/cat, \
/bin/domainname, /bin/hostname, \
/bin/netstat, /bin/df, /bin/ps, /bin/rpm, \
/bin/ls, /sbin/ifconfig, /sbin/ip, \
/sbin/mii-tool, /sbin/chkconfig, \
/sbin/sfdisk, /usr/sbin/dmidecode, \
/usr/bin/cdrecord, \
/opt/xensource/bin/xe, /bin/lshmc
Note: You can modify this entry to authorize an existing user instead of creating ndguser. If your system already has a user configured in the /etc/sudoers file to issue all commands without password prompting, or a granular list that contains all of the commands shown, that user can be used without any modifications by adding this user to your credential vault.
3. Save and close the sudoers file.
4. Click the Enable use of sudo check box on the Network Scan Policy page as described in Create a Network Scan Policy.
Define the path for the sudo user
1. Edit the shell configuration file for your UNIX or Linux system's shell (typically, .bashrc in the user's $HOME directory), and add the following lines to the user's PATH definition:
PATH=$PATH:/bin:/sbin:/usr/sbin:/opt/xensource/bin
export PATH
2. Save and close the file.

Appendix B: Mapping CA Configuration Automation Tasks to CA EEM Permissions 133
Appendix B: Mapping CA Configuration Automation Tasks to CA EEM Permissions
This appendix maps the CA Configuration Automation UI tasks to the CA EEM permissions required to perform that task. It describes CA Configuration Automation tasks by the UI location and which task to select from the Table Actions drop-down Select Actions drop-down list.
The CA EEM permissions are described in terms of the Policy and the corresponding Action.
Notes:
■ All users have view access to the entire CA Configuration Automation UI
■ An error message appears when the authorization fails for an operation
■ CA EEM performs the policy evaluation
■ You can assign policies to users directly, or to user groups
This section contains the following topics:
Service Options (see page 134) Service Snapshot Options (see page 134) Service Component Options (see page 135) Server Options (see page 135) Server Snapshot Options (see page 136) Server Component Options (see page 136) Server Group Options (see page 137) Management Profile Options (see page 137) Network Profile Options (see page 137) Network Scan Policy Options (see page 138) Access Profile Options (see page 138) Credential Vault Profile Options (see page 139) Notification Profile Options (see page 139) Blueprints Options (see page 139) Structure Class Options (see page 140) Global Variable Options (see page 140) Compliance Management Options (see page 141) Dashboard Options (see page 141) Remediation Options (see page 141) Report Options (see page 141) Administration Options (see page 142)
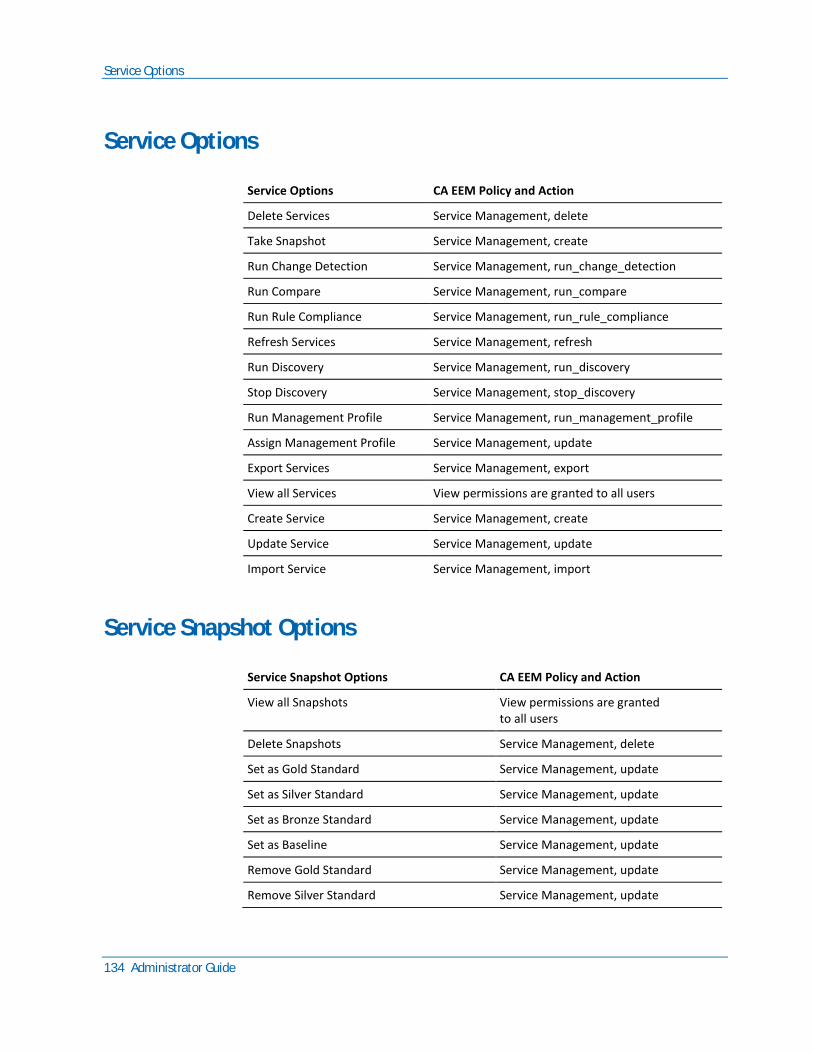
Service Options
134 Administrator Guide
Service Options
Service Options CA EEM Policy and Action
Delete Services Service Management, delete
Take Snapshot Service Management, create
Run Change Detection Service Management, run_change_detection
Run Compare Service Management, run_compare
Run Rule Compliance Service Management, run_rule_compliance
Refresh Services Service Management, refresh
Run Discovery Service Management, run_discovery
Stop Discovery Service Management, stop_discovery
Run Management Profile Service Management, run_management_profile
Assign Management Profile Service Management, update
Export Services Service Management, export
View all Services View permissions are granted to all users
Create Service Service Management, create
Update Service Service Management, update
Import Service Service Management, import
Service Snapshot Options
Service Snapshot Options CA EEM Policy and Action
View all Snapshots View permissions are granted to all users
Delete Snapshots Service Management, delete
Set as Gold Standard Service Management, update
Set as Silver Standard Service Management, update
Set as Bronze Standard Service Management, update
Set as Baseline Service Management, update
Remove Gold Standard Service Management, update
Remove Silver Standard Service Management, update
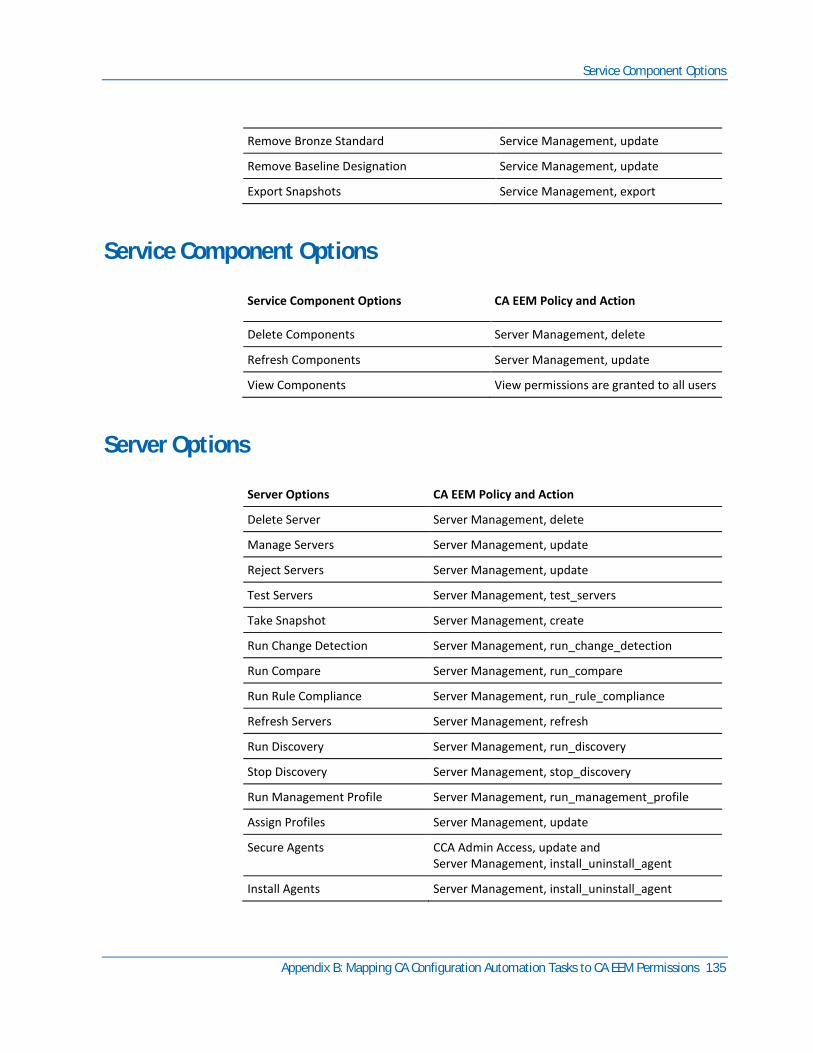
Service Component Options
Appendix B: Mapping CA Configuration Automation Tasks to CA EEM Permissions 135
Remove Bronze Standard Service Management, update
Remove Baseline Designation Service Management, update
Export Snapshots Service Management, export
Service Component Options
Service Component Options CA EEM Policy and Action
Delete Components Server Management, delete
Refresh Components Server Management, update
View Components View permissions are granted to all users
Server Options
Server Options CA EEM Policy and Action
Delete Server Server Management, delete
Manage Servers Server Management, update
Reject Servers Server Management, update
Test Servers Server Management, test_servers
Take Snapshot Server Management, create
Run Change Detection Server Management, run_change_detection
Run Compare Server Management, run_compare
Run Rule Compliance Server Management, run_rule_compliance
Refresh Servers Server Management, refresh
Run Discovery Server Management, run_discovery
Stop Discovery Server Management, stop_discovery
Run Management Profile Server Management, run_management_profile
Assign Profiles Server Management, update
Secure Agents CCA Admin Access, update and Server Management, install_uninstall_agent
Install Agents Server Management, install_uninstall_agent
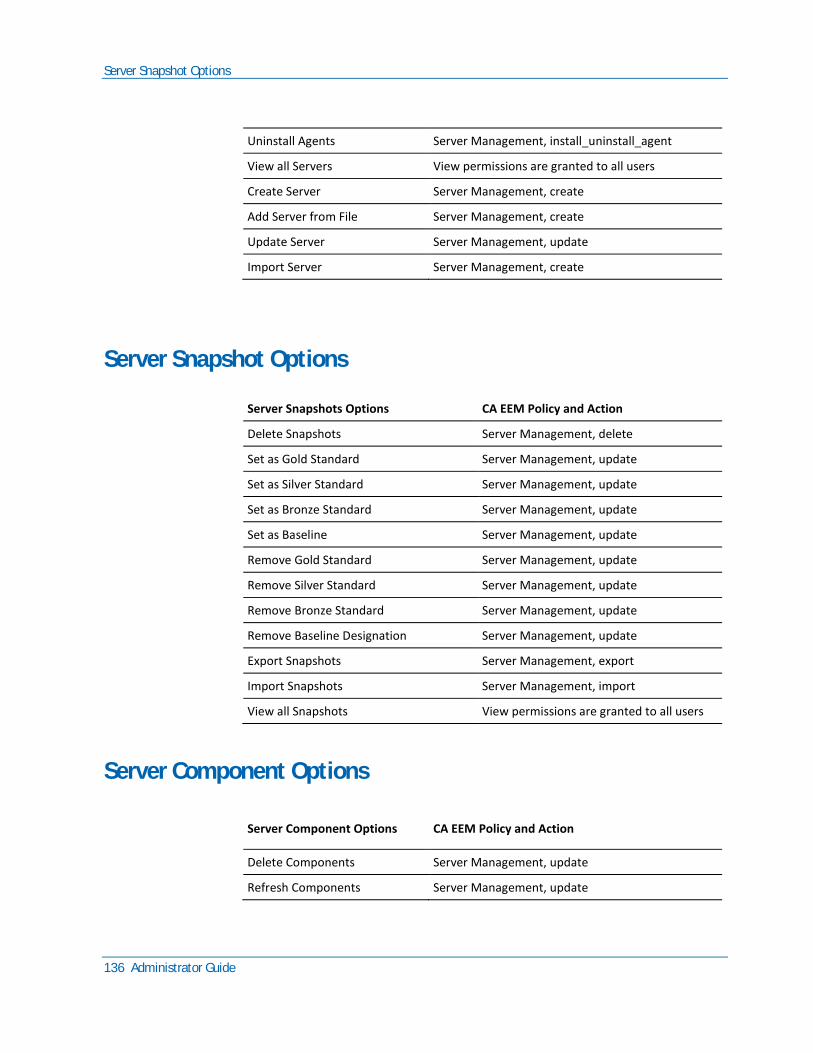
Server Snapshot Options
136 Administrator Guide
Uninstall Agents Server Management, install_uninstall_agent
View all Servers View permissions are granted to all users
Create Server Server Management, create
Add Server from File Server Management, create
Update Server Server Management, update
Import Server Server Management, create
Server Snapshot Options
Server Snapshots Options CA EEM Policy and Action
Delete Snapshots Server Management, delete
Set as Gold Standard Server Management, update
Set as Silver Standard Server Management, update
Set as Bronze Standard Server Management, update
Set as Baseline Server Management, update
Remove Gold Standard Server Management, update
Remove Silver Standard Server Management, update
Remove Bronze Standard Server Management, update
Remove Baseline Designation Server Management, update
Export Snapshots Server Management, export
Import Snapshots Server Management, import
View all Snapshots View permissions are granted to all users
Server Component Options
Server Component Options CA EEM Policy and Action
Delete Components Server Management, update
Refresh Components Server Management, update
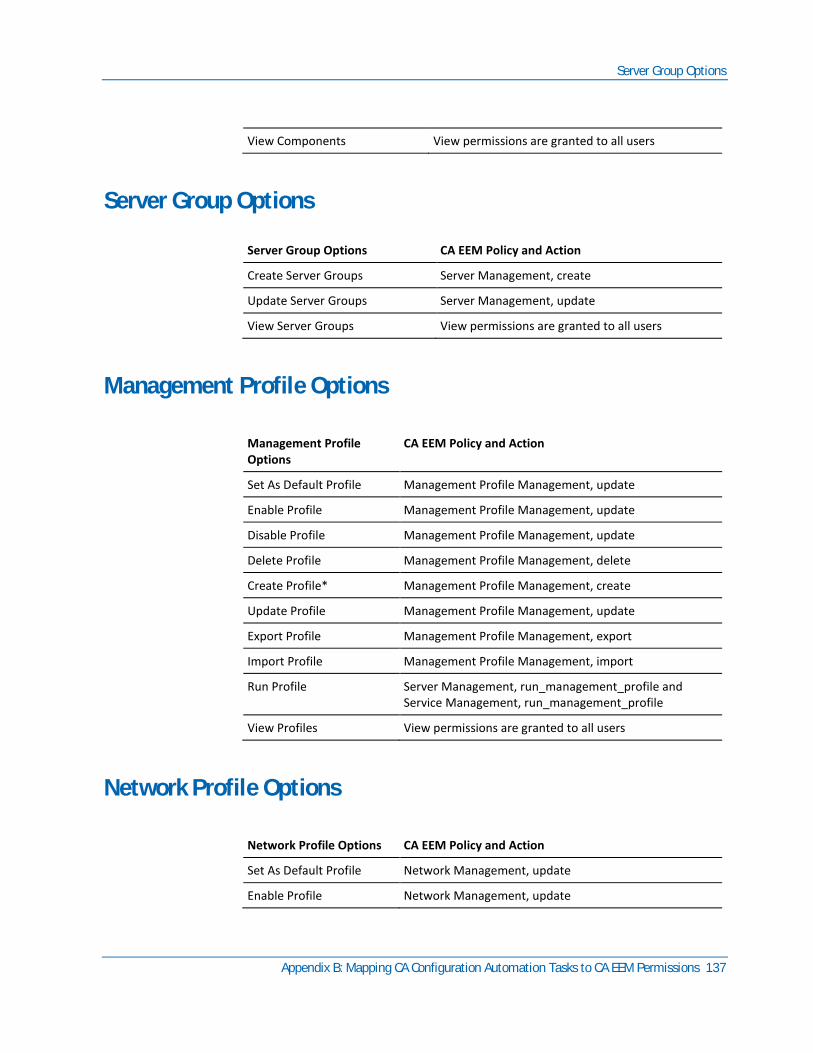
Server Group Options
Appendix B: Mapping CA Configuration Automation Tasks to CA EEM Permissions 137
View Components View permissions are granted to all users
Server Group Options
Server Group Options CA EEM Policy and Action
Create Server Groups Server Management, create
Update Server Groups Server Management, update
View Server Groups View permissions are granted to all users
Management Profile Options
Management Profile Options
CA EEM Policy and Action
Set As Default Profile Management Profile Management, update
Enable Profile Management Profile Management, update
Disable Profile Management Profile Management, update
Delete Profile Management Profile Management, delete
Create Profile* Management Profile Management, create
Update Profile Management Profile Management, update
Export Profile Management Profile Management, export
Import Profile Management Profile Management, import
Run Profile Server Management, run_management_profile and Service Management, run_management_profile
View Profiles View permissions are granted to all users
Network Profile Options
Network Profile Options CA EEM Policy and Action
Set As Default Profile Network Management, update
Enable Profile Network Management, update
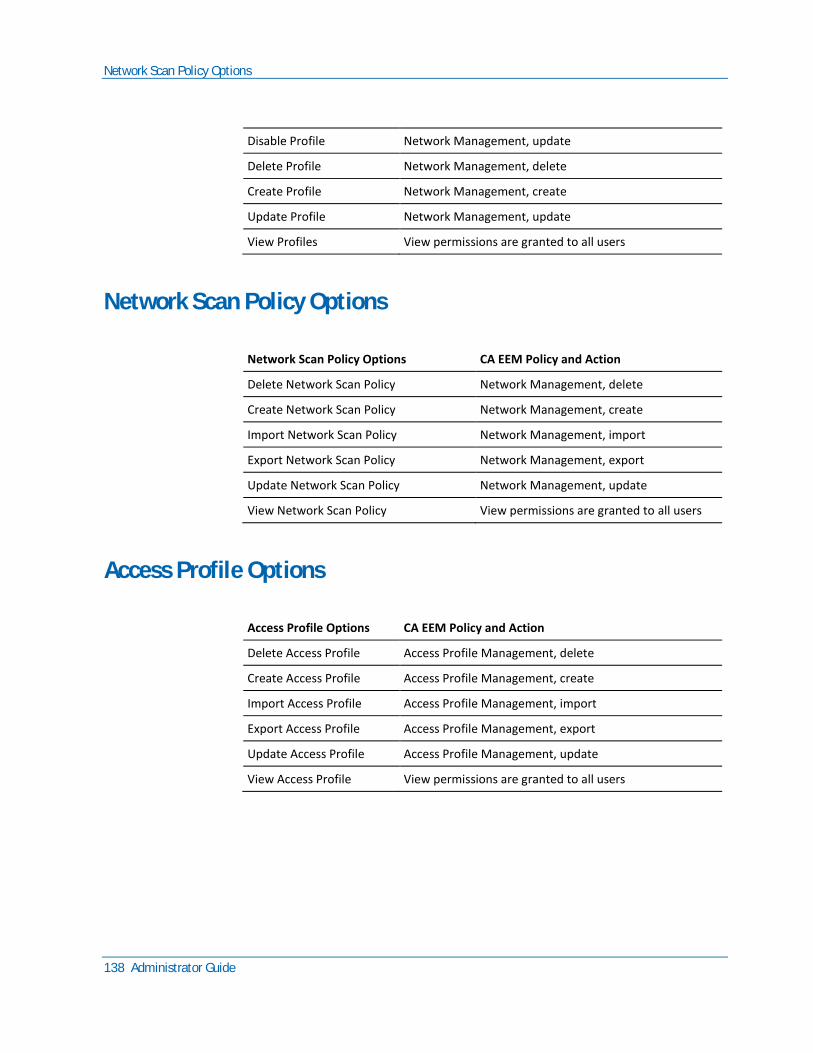
Network Scan Policy Options
138 Administrator Guide
Disable Profile Network Management, update
Delete Profile Network Management, delete
Create Profile Network Management, create
Update Profile Network Management, update
View Profiles View permissions are granted to all users
Network Scan Policy Options
Network Scan Policy Options CA EEM Policy and Action
Delete Network Scan Policy Network Management, delete
Create Network Scan Policy Network Management, create
Import Network Scan Policy Network Management, import
Export Network Scan Policy Network Management, export
Update Network Scan Policy Network Management, update
View Network Scan Policy View permissions are granted to all users
Access Profile Options
Access Profile Options CA EEM Policy and Action
Delete Access Profile Access Profile Management, delete
Create Access Profile Access Profile Management, create
Import Access Profile Access Profile Management, import
Export Access Profile Access Profile Management, export
Update Access Profile Access Profile Management, update
View Access Profile View permissions are granted to all users
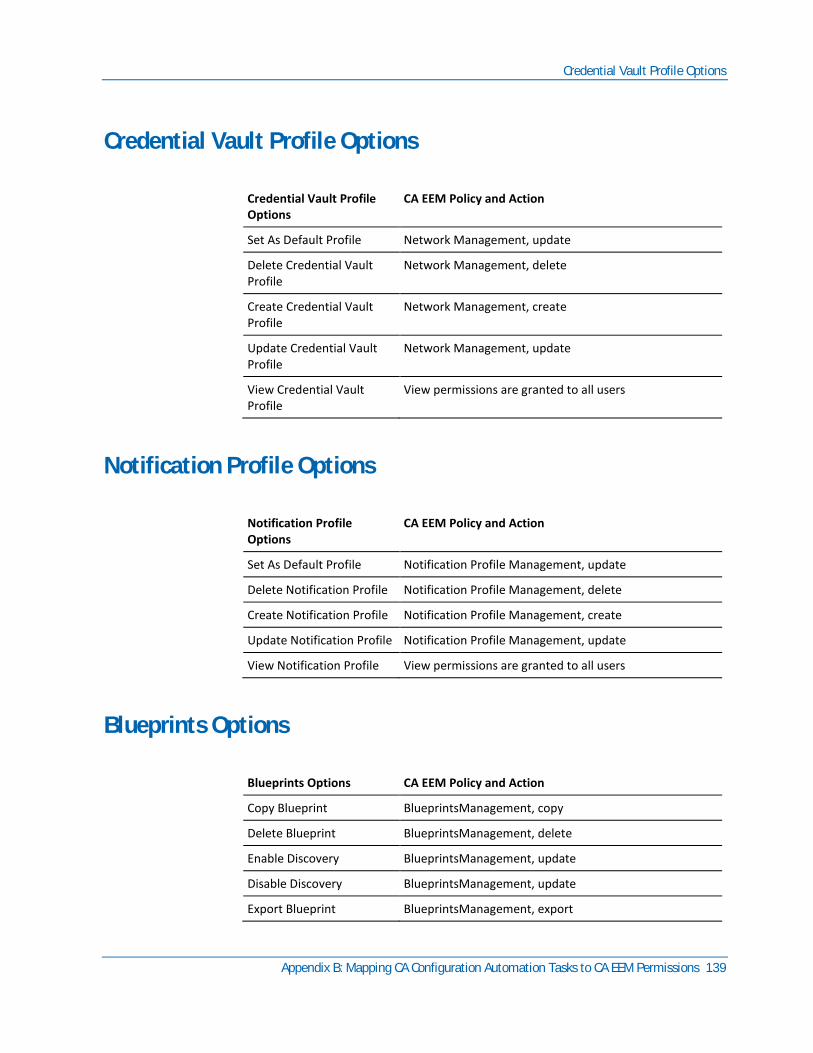
Credential Vault Profile Options
Appendix B: Mapping CA Configuration Automation Tasks to CA EEM Permissions 139
Credential Vault Profile Options
Credential Vault Profile Options
CA EEM Policy and Action
Set As Default Profile Network Management, update
Delete Credential Vault Profile
Network Management, delete
Create Credential Vault Profile
Network Management, create
Update Credential Vault Profile
Network Management, update
View Credential Vault Profile
View permissions are granted to all users
Notification Profile Options
Notification Profile Options
CA EEM Policy and Action
Set As Default Profile Notification Profile Management, update
Delete Notification Profile Notification Profile Management, delete
Create Notification Profile Notification Profile Management, create
Update Notification Profile Notification Profile Management, update
View Notification Profile View permissions are granted to all users
Blueprints Options
Blueprints Options CA EEM Policy and Action
Copy Blueprint BlueprintsManagement, copy
Delete Blueprint BlueprintsManagement, delete
Enable Discovery BlueprintsManagement, update
Disable Discovery BlueprintsManagement, update
Export Blueprint BlueprintsManagement, export
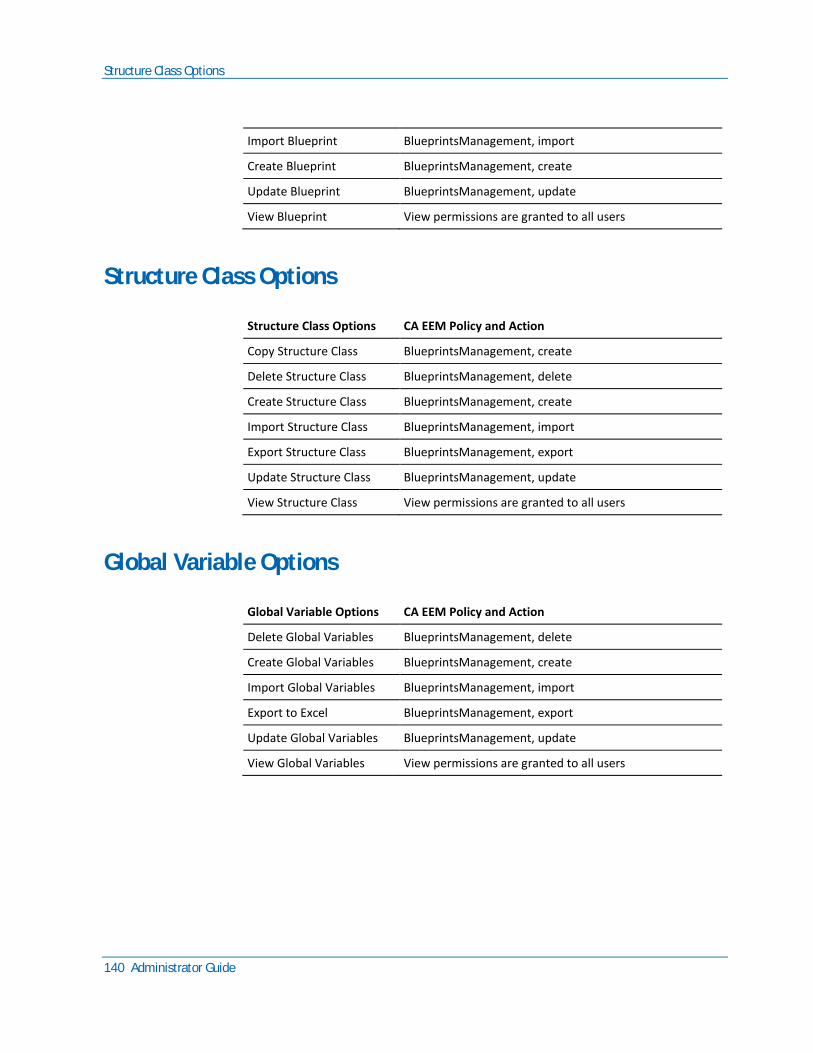
Structure Class Options
140 Administrator Guide
Import Blueprint BlueprintsManagement, import
Create Blueprint BlueprintsManagement, create
Update Blueprint BlueprintsManagement, update
View Blueprint View permissions are granted to all users
Structure Class Options
Structure Class Options CA EEM Policy and Action
Copy Structure Class BlueprintsManagement, create
Delete Structure Class BlueprintsManagement, delete
Create Structure Class BlueprintsManagement, create
Import Structure Class BlueprintsManagement, import
Export Structure Class BlueprintsManagement, export
Update Structure Class BlueprintsManagement, update
View Structure Class View permissions are granted to all users
Global Variable Options
Global Variable Options CA EEM Policy and Action
Delete Global Variables BlueprintsManagement, delete
Create Global Variables BlueprintsManagement, create
Import Global Variables BlueprintsManagement, import
Export to Excel BlueprintsManagement, export
Update Global Variables BlueprintsManagement, update
View Global Variables View permissions are granted to all users
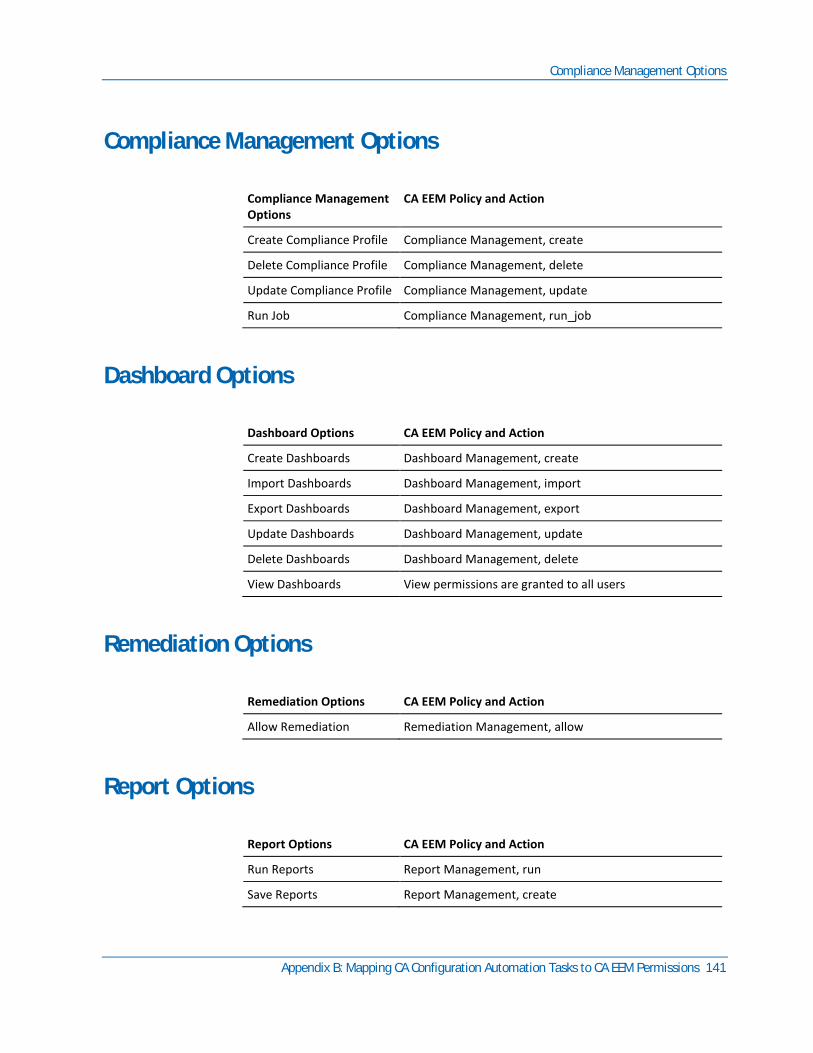
Compliance Management Options
Appendix B: Mapping CA Configuration Automation Tasks to CA EEM Permissions 141
Compliance Management Options
Compliance Management Options
CA EEM Policy and Action
Create Compliance Profile Compliance Management, create
Delete Compliance Profile Compliance Management, delete
Update Compliance Profile Compliance Management, update
Run Job Compliance Management, run_job
Dashboard Options
Dashboard Options CA EEM Policy and Action
Create Dashboards Dashboard Management, create
Import Dashboards Dashboard Management, import
Export Dashboards Dashboard Management, export
Update Dashboards Dashboard Management, update
Delete Dashboards Dashboard Management, delete
View Dashboards View permissions are granted to all users
Remediation Options
Remediation Options CA EEM Policy and Action
Allow Remediation Remediation Management, allow
Report Options
Report Options CA EEM Policy and Action
Run Reports Report Management, run
Save Reports Report Management, create
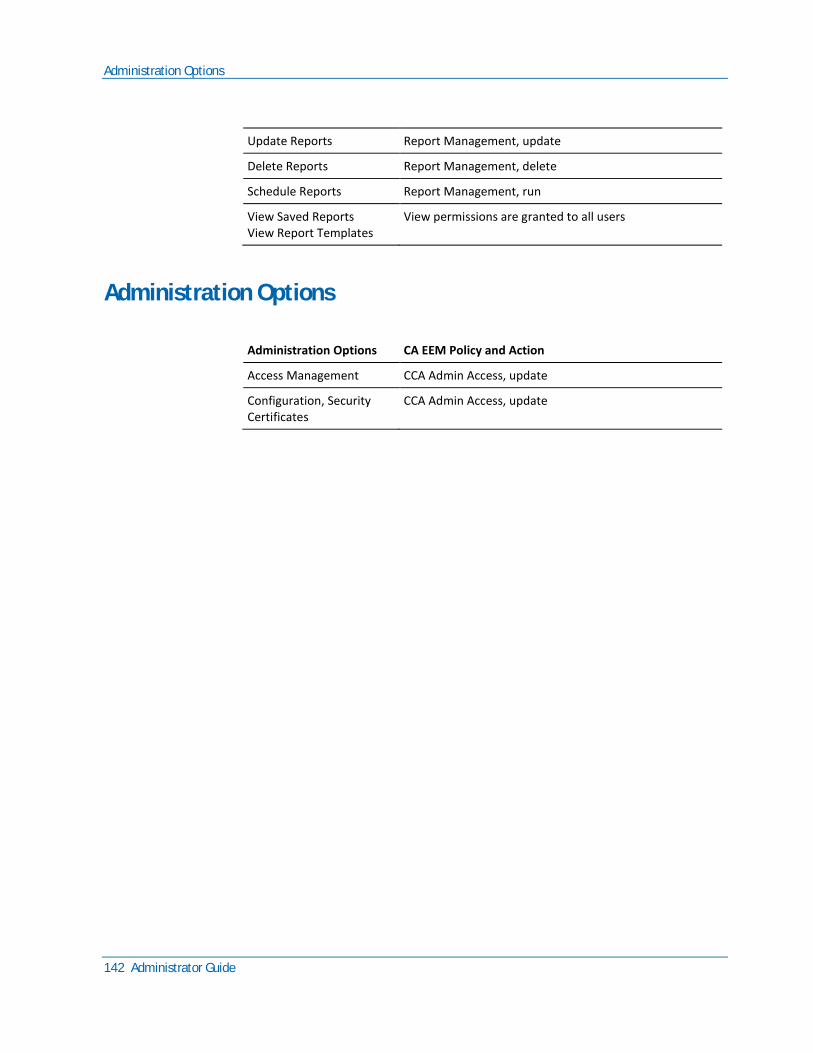
Administration Options
142 Administrator Guide
Update Reports Report Management, update
Delete Reports Report Management, delete
Schedule Reports Report Management, run
View Saved Reports View Report Templates
View permissions are granted to all users
Administration Options
Administration Options CA EEM Policy and Action
Access Management CCA Admin Access, update
Configuration, Security Certificates
CCA Admin Access, update
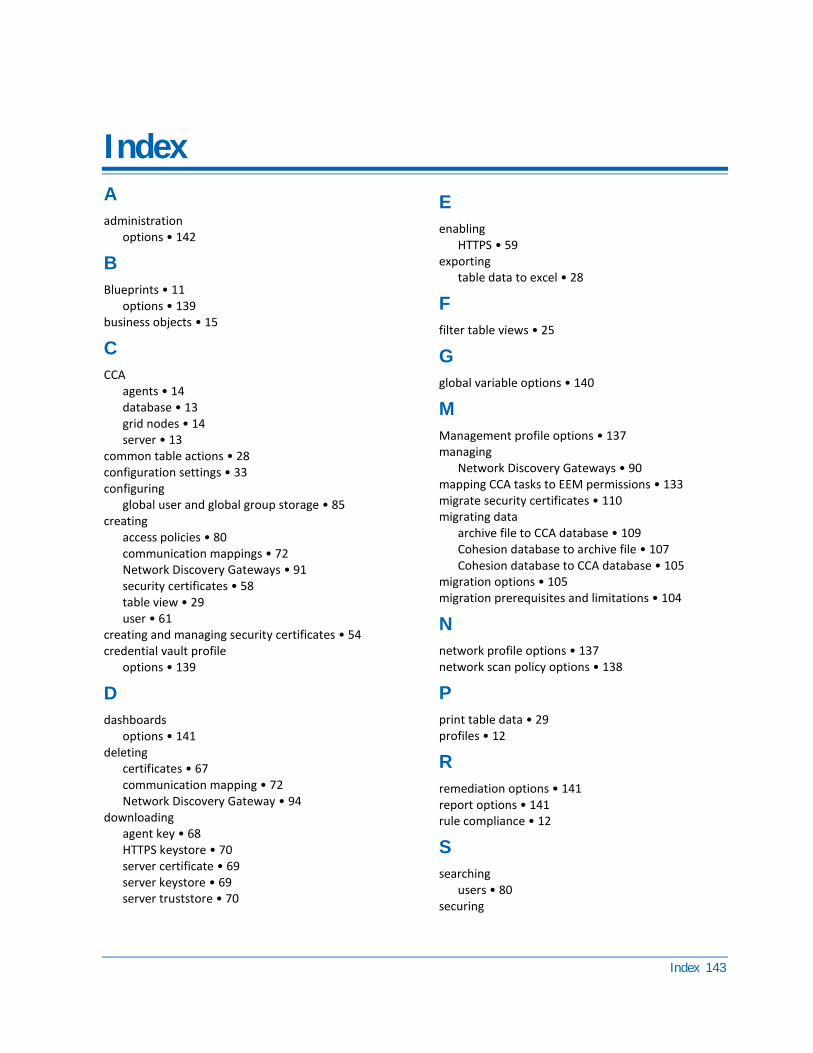
Index 143
Index
A
administration options • 142
B
Blueprints • 11 options • 139
business objects • 15
C
CCA agents • 14 database • 13 grid nodes • 14 server • 13
common table actions • 28 configuration settings • 33 configuring
global user and global group storage • 85 creating
access policies • 80 communication mappings • 72 Network Discovery Gateways • 91 security certificates • 58 table view • 29 user • 61
creating and managing security certificates • 54 credential vault profile
options • 139
D
dashboards options • 141
deleting certificates • 67 communication mapping • 72 Network Discovery Gateway • 94
downloading agent key • 68 HTTPS keystore • 70 server certificate • 69 server keystore • 69 server truststore • 70
E
enabling HTTPS • 59
exporting table data to excel • 28
F
filter table views • 25
G
global variable options • 140
M
Management profile options • 137 managing
Network Discovery Gateways • 90 mapping CCA tasks to EEM permissions • 133 migrate security certificates • 110 migrating data
archive file to CCA database • 109 Cohesion database to archive file • 107 Cohesion database to CCA database • 105
migration options • 105 migration prerequisites and limitations • 104
N
network profile options • 137 network scan policy options • 138
P
print table data • 29 profiles • 12
R
remediation options • 141 report options • 141 rule compliance • 12
S
searching users • 80
securing
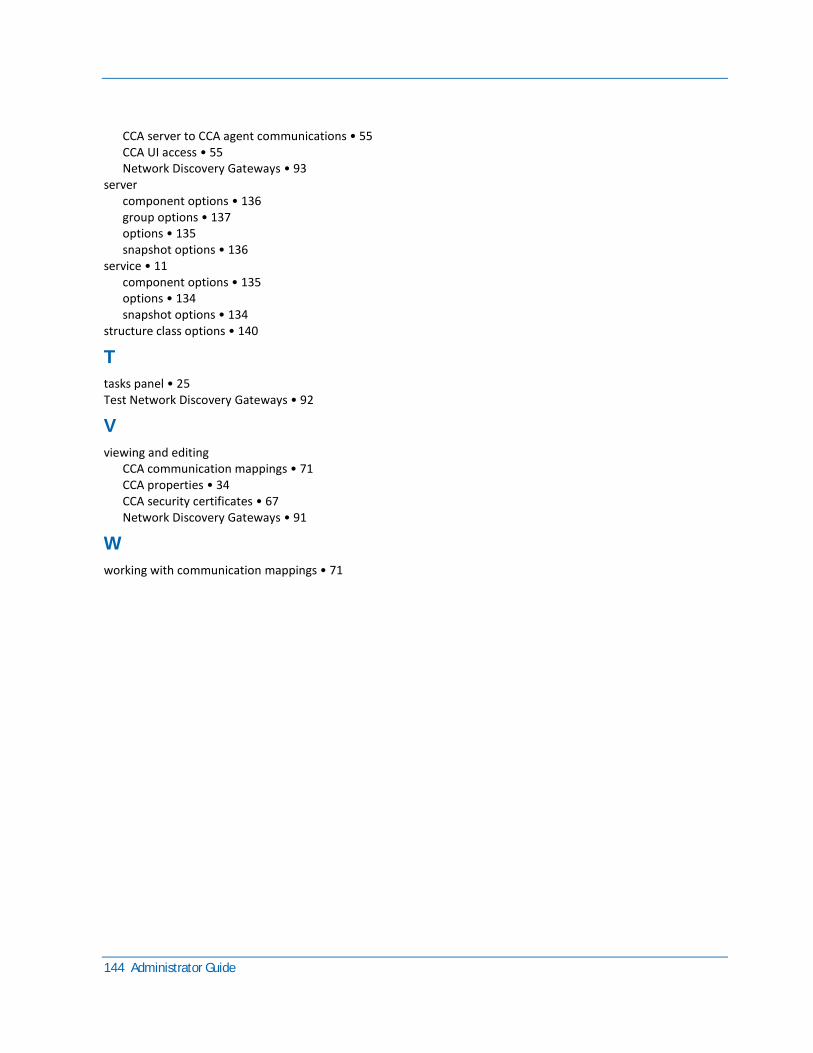
144 Administrator Guide
CCA server to CCA agent communications • 55 CCA UI access • 55 Network Discovery Gateways • 93
server component options • 136 group options • 137 options • 135 snapshot options • 136
service • 11 component options • 135 options • 134 snapshot options • 134
structure class options • 140
T
tasks panel • 25 Test Network Discovery Gateways • 92
V
viewing and editing CCA communication mappings • 71 CCA properties • 34 CCA security certificates • 67 Network Discovery Gateways • 91
W
working with communication mappings • 71