call centre group administrator user guide r14 v4 · pdf filecustomer group administrator user...
TRANSCRIPT
Telstra IP Telephony
Call Centre
Customer Group Administrator
User Guide
© Telstra Corporation Limited, 2009

2
Table of Contents
1. Introduction .................................................................................................................................... 3
2. Logging on as a Customer Group Administrator ............................................................................ 3
3. Add a Call Centre ............................................................................................................................. 4
4. Access the Profile Menu for a Call Centre ....................................................................................... 6
5. Configuring the Call Centre ............................................................................................................. 6
a. Assign users as agents for the Call Centre................................................................................... 9
b. Assigning a number to a Call Centre ........................................................................................... 9
c. Configure Statistics Reporting and View Statistics ................................................................... 10
d. Announcements ........................................................................................................................ 12
e. Configure Weighted Call Distribution ....................................................................................... 14
f. Voice Portal ................................................................................................................................ 15
g. Password .................................................................................................................................... 15
h. Reporting and Viewing Statistics .............................................................................................. 16
i. Configure Incoming Calling Plan ............................................................................................... 18
j. Modify or Delete a Call Centre Profile ....................................................................................... 18
6. Auto Attendants with a Call Centre .............................................................................................. 19
7. Further Information ...................................................................................................................... 19
3
1. Introduction
This guide provides step-by-step procedures for the Customer Group Administrator specifically for features related to a Telstra IP Telephony (TIPT) Call Centre.
The Call Centre feature pack and the Call Centre Agent and Supervisor clients are additional services that are required to be purchased from Telstra prior to configuration.
CommPilot is a web based application that provides a Customer Administrator with the ability to configure and manage Group and User services within TIPT. Once the Call Centre Client licence has been assigned, a Customer Group Administrator is required to configure the Call Centre. Features such as assigning agents and supervisor/s and customising announcements are a few of the main options that are required to make the Call Centre fully operational.
Additional TIPT features, such as adding an Auto Attendant which provides callers with a menu of options that allows them to self-select where their call is directed can also be configured in front of the Call Centre.
Agents have the ability, via the Call Centre client application on their desktop, to have call control capabilities such as answering calls, hold, transfer, and conference. They also have the ability to escalate calls to their Supervisor, change their queue status and display their real time statistics.
Supervisors have the ability via the TIPT Call Centre application on their desktop to better manage agents and queue/s. They have call control capabilities such as answering calls, hold, transfer, and conference. Supervisors also the ability to provide real time and historical reporting on the agent’s performance and queue/s they are monitoring. These reports can be viewed in both graphical and tabular format.
Instructions for Downloading the Telstra Call Centre are listed in the Installing, Upgrading, Starting and Uninstalling Quick Reference Guide on the Call Centre, Quick Reference Guide tab of the Online Resource Centre.
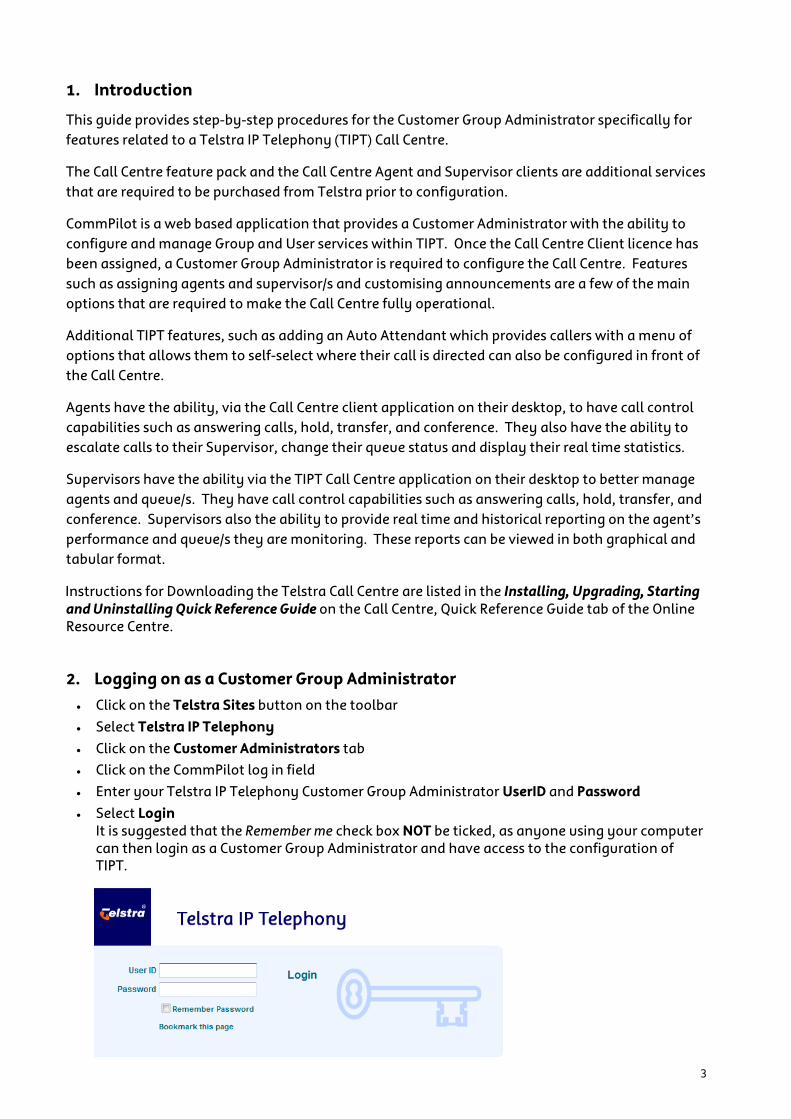
2. Logging on as a Customer Group Administrator • Click on the Telstra Sites button on the toolbar
• Select Telstra IP Telephony • Click on the Customer Administrators tab • Click on the CommPilot log in field • Enter your Telstra IP Telephony Customer Group Administrator UserID and Password
• Select Login It is suggested that the Remember me check box NOT be ticked, as anyone using your computer can then login as a Customer Group Administrator and have access to the configuration of TIPT.
4
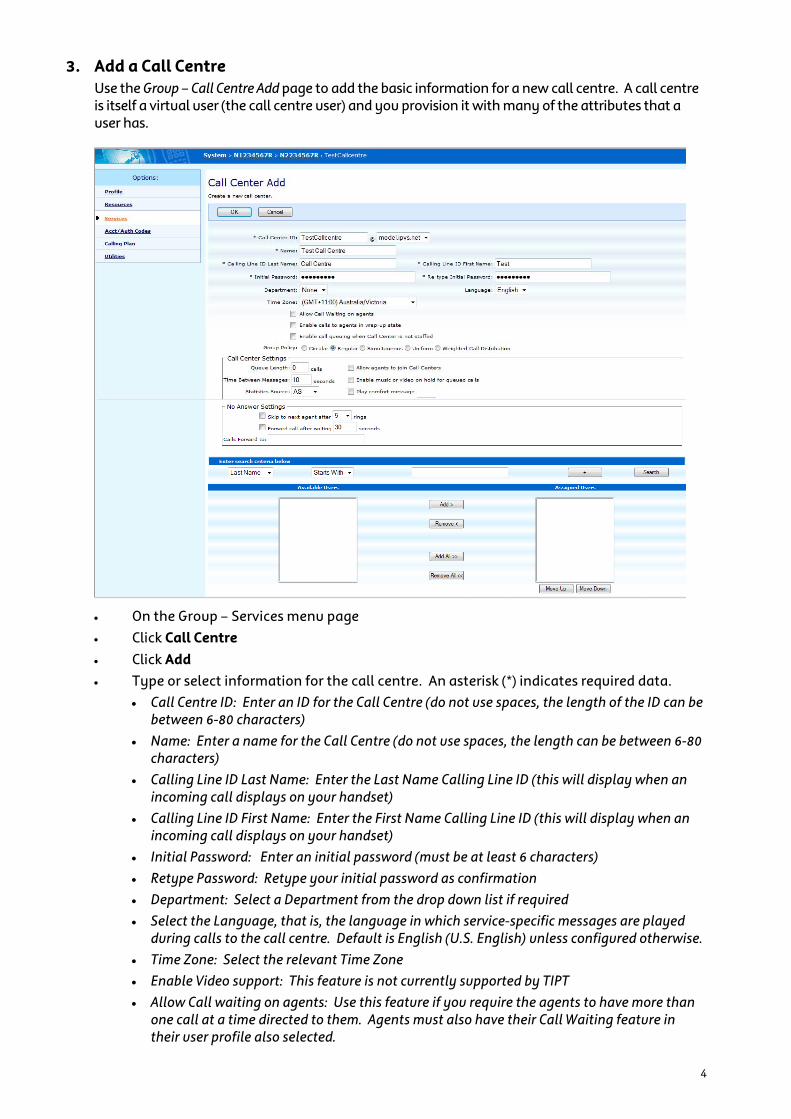
3. Add a Call Centre Use the Group – Call Centre Add page to add the basic information for a new call centre. A call centre is itself a virtual user (the call centre user) and you provision it with many of the attributes that a user has.
• On the Group – Services menu page • Click Call Centre • Click Add • Type or select information for the call centre. An asterisk (*) indicates required data.
• Call Centre ID: Enter an ID for the Call Centre (do not use spaces, the length of the ID can be between 6-80 characters)
• Name: Enter a name for the Call Centre (do not use spaces, the length can be between 6-80 characters)
• Calling Line ID Last Name: Enter the Last Name Calling Line ID (this will display when an incoming call displays on your handset)
• Calling Line ID First Name: Enter the First Name Calling Line ID (this will display when an incoming call displays on your handset)
• Initial Password: Enter an initial password (must be at least 6 characters) • Retype Password: Retype your initial password as confirmation • Department: Select a Department from the drop down list if required • Select the Language, that is, the language in which service-specific messages are played
during calls to the call centre. Default is English (U.S. English) unless configured otherwise. • Time Zone: Select the relevant Time Zone • Enable Video support: This feature is not currently supported by TIPT • Allow Call waiting on agents: Use this feature if you require the agents to have more than
one call at a time directed to them. Agents must also have their Call Waiting feature in their user profile also selected.
5
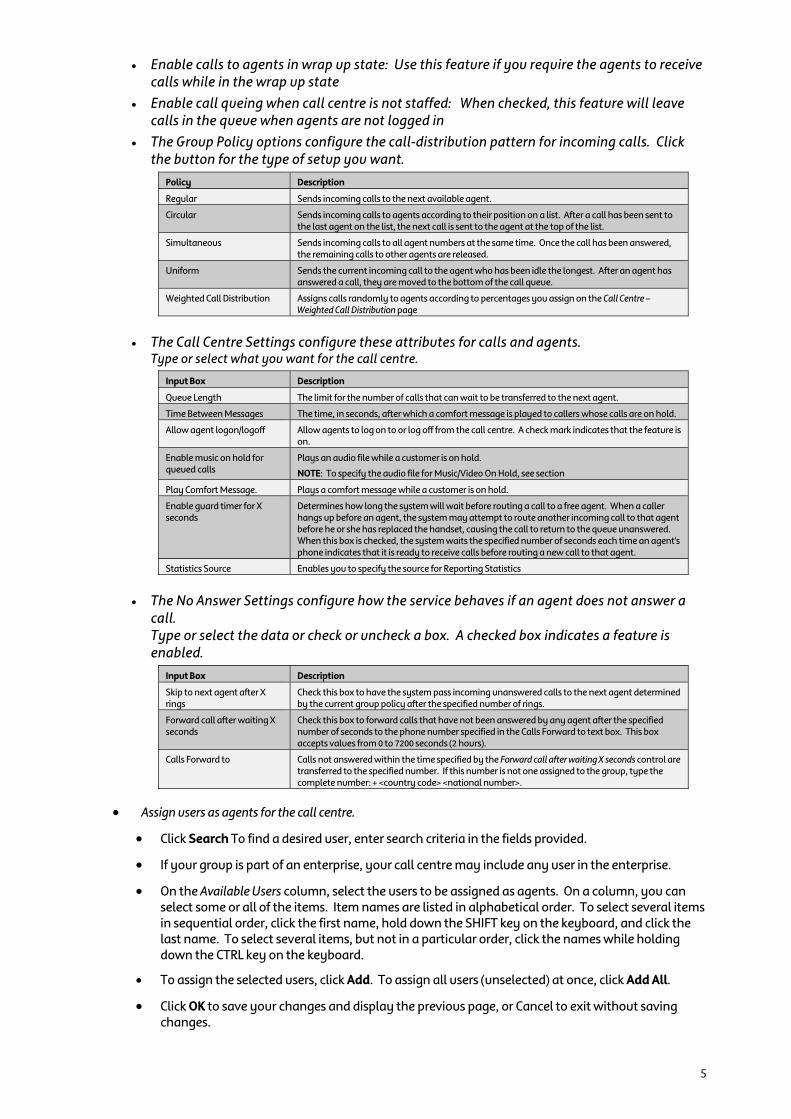
• Enable calls to agents in wrap up state: Use this feature if you require the agents to receive calls while in the wrap up state
• Enable call queing when call centre is not staffed: When checked, this feature will leave calls in the queue when agents are not logged in
• The Group Policy options configure the call-distribution pattern for incoming calls. Click the button for the type of setup you want.
Policy Description
Regular Sends incoming calls to the next available agent.
Circular Sends incoming calls to agents according to their position on a list. After a call has been sent to the last agent on the list, the next call is sent to the agent at the top of the list.
Simultaneous Sends incoming calls to all agent numbers at the same time. Once the call has been answered, the remaining calls to other agents are released.
Uniform Sends the current incoming call to the agent who has been idle the longest. After an agent has answered a call, they are moved to the bottom of the call queue.
Weighted Call Distribution Assigns calls randomly to agents according to percentages you assign on the Call Centre – Weighted Call Distribution page
• The Call Centre Settings configure these attributes for calls and agents. Type or select what you want for the call centre.
Input Box Description
Queue Length The limit for the number of calls that can wait to be transferred to the next agent.
Time Between Messages The time, in seconds, after which a comfort message is played to callers whose calls are on hold.
Allow agent logon/logoff Allow agents to log on to or log off from the call centre. A check mark indicates that the feature is on.
Enable music on hold for queued calls
Plays an audio file while a customer is on hold.
NOTE: To specify the audio file for Music/Video On Hold, see section
Play Comfort Message. Plays a comfort message while a customer is on hold.
Enable guard timer for X seconds
Determines how long the system will wait before routing a call to a free agent. When a caller hangs up before an agent, the system may attempt to route another incoming call to that agent before he or she has replaced the handset, causing the call to return to the queue unanswered. When this box is checked, the system waits the specified number of seconds each time an agent's phone indicates that it is ready to receive calls before routing a new call to that agent.
Statistics Source Enables you to specify the source for Reporting Statistics
• The No Answer Settings configure how the service behaves if an agent does not answer a call. Type or select the data or check or uncheck a box. A checked box indicates a feature is enabled.
Input Box Description
Skip to next agent after X rings
Check this box to have the system pass incoming unanswered calls to the next agent determined by the current group policy after the specified number of rings.
Forward call after waiting X seconds
Check this box to forward calls that have not been answered by any agent after the specified number of seconds to the phone number specified in the Calls Forward to text box. This box accepts values from 0 to 7200 seconds (2 hours).
Calls Forward to Calls not answered within the time specified by the Forward call after waiting X seconds control are transferred to the specified number. If this number is not one assigned to the group, type the complete number: + <country code> <national number>.
• Assign users as agents for the call centre.
• Click Search To find a desired user, enter search criteria in the fields provided.
• If your group is part of an enterprise, your call centre may include any user in the enterprise.
• On the Available Users column, select the users to be assigned as agents. On a column, you can select some or all of the items. Item names are listed in alphabetical order. To select several items in sequential order, click the first name, hold down the SHIFT key on the keyboard, and click the last name. To select several items, but not in a particular order, click the names while holding down the CTRL key on the keyboard.
• To assign the selected users, click Add. To assign all users (unselected) at once, click Add All.
• Click OK to save your changes and display the previous page, or Cancel to exit without saving changes.

6
4. Access the Profile Menu for a Call Centre Use the Call Centre – Profile menu page to display the pages to add attributes for a new call centre or to modify attributes for a call centre.
• On the Group – Services menu page • Click Call Centre • Click Edit or any item on the row for a call centre • To display the options for your Home page, click Group or Home.
5. Configuring the Call Centre To configure a Call Centre a number of screens must be filled in. Use the Group\Services\Call Centre Profile page to add basic information for a Call Centre. A Call Centre is a virtual user (a Call Centre user) and you provision it with many of the attributes a user has.
• Once you have logged in as a Customer Group Administrator • Select Services from the Options menu • Click Call Centre • Select the required call centre to Edit • Enter the required information for the Call Centre (an asterisk (*) indicates a mandatory
field and requires data).

7
• The following mandatory fields must be completed: Call Centre ID, Name, Calling Line ID Last name, Calling Name ID First Name.
• The default language is English (US English), unless configured otherwise. Clicking on the drop down arrow will list other available languages that are the language in which service-specific messages are played during calls to the call centre.
• Select the Allow Call Waiting on Agents box if you require the agents to have more than one call at a time directed to them. Agents must also have their Call Waiting feature in their user profile also selected.
• Select Enable calls to Agents in wrap-up state if you require agents to take calls while in wrap-up.
• Select Enable Call Queuing when Call Centre is not staffed, if required • Select the required Group Policy option to configure the call distribution pattern for
incoming calls
Policy Description
Regular Sends incoming calls to the next agent.
Circular Sends incoming calls to agents according to their position in a list. After a call has been sent to the last agent on the list, the next call is sent to the agent at the top of the list.
Simultaneous Sends incoming calls to all agent numbers at the same time.
Uniform Sends the current incoming call to the agent who has been idle the longest. After an agent has answered a call, they are moved to the bottom of the call list.
Weighted Call Distribution
Assigns calls randomly to agents according to percentages you assign on the Call Centre Weighted Distribution page.

8
• Enter the required Call Centre Settings • Queue length • Time Between Messages • Allow agents to join Call Centres • Enable music on hold for queued calls • Play Comfort Message • Statistics Source • Enable Guard Timer for “x” seconds
Input box Description
Queue length The maximum number of calls that can wait to be transferred to the next agent.
Time Between Messages The time in seconds, after which a comfort message is played to callers whose calls are on hold.
Allow agents to join Call Centres
Allow agents to log on or off from the Call Centre. A tick in the checkbox indicates that the feature is on.
Enable music on hold for queued calls
Plays an audio file while a customer is on hold.
Play Comfort Message Plays a comfort message while the customer is on hold.
Enable guard timer for “x” seconds
Determines how long the system will wait before routing a call to a free agent. When a caller hangs up before an agent, the system may attempt to route another incoming call to that agent before he or she has replaced the handset, causing the call to return to the queue unanswered. When this box is checked, the system waits the specified number of seconds each time an agent's phone indicates that it is ready to receive calls before routing a new call to that agent.
Statistics Source For the Statistics Source drop-down list, select either "none" or "AS" or "CCRS". The CCRS option is only displayed when the call centre is assigned to a Call Centre Reporting server on the Call Centre Supervisor Reporting page.
• The No Answer Settings allow you to configure how the service behaves if an agent does
not answer a call. • Type or select the required data, or tick or untick a checkbox. A ticked checkbox indicates
a feature is enabled.
Input Box Description
Skip to next agent after X rings
Check this box to have the system pass incoming unanswered calls to the next agent determined by the current group policy after the specified number of rings.
Forward call after waiting X seconds
Check this box to forward calls that have not been answered by any agent after the specified number of seconds to the phone number specified in the Calls Forward to text box. This box accepts values from 0 to 7200 seconds (2 hours).
Calls Forward to Calls not answered within the time specified by the Forward call after waiting X seconds control are transferred to the specified number. If this number is not one assigned to the group, type the complete number: + <country code> <national number>.
9
a. Assign users as agents for the Call Centre
• To view all users, click the Search button, OR • To find the desired user, enter the search criteria in the fields provided and click the
Search button • From the Available Users column, select the users to be assigned as agents click Add>. To
assign all users at once, click Add All>> To select several users in sequential order, click on the first user required, hold down the SHIFT key on the keyboard and click on the last user required. To select several items, not in a particular order, click on users while holding down the CTRL key on the keyboard.
• Click OK (to save changes) To exit without saving changes click Cancel, or select another menu option
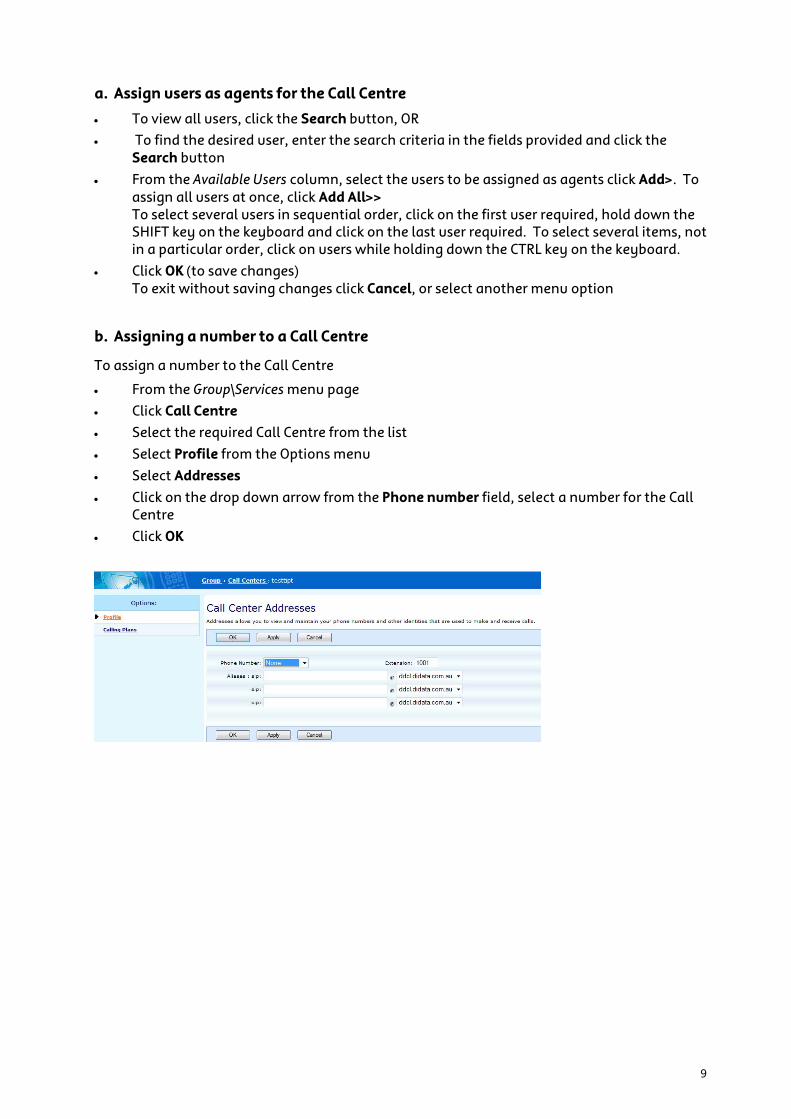
b. Assigning a number to a Call Centre
To assign a number to the Call Centre
• From the Group\Services menu page • Click Call Centre • Select the required Call Centre from the list • Select Profile from the Options menu • Select Addresses
• Click on the drop down arrow from the Phone number field, select a number for the Call Centre
• Click OK

10
c. Configure Statistics Reporting and View Statistics
Call Centre Statistics allows the Customer Group Administrator to view the statistics of the Call Centre’s activity, produce a Daily Report, select a reporting Period and configure E-mail addresses for reports to be sent. Three tabs are available for configuring or viewing: Statistics Report Settings; Queue Status; queue & Agent Statistics • From the Group\Services menu page • Click Call Centre • Select the required Call Centre • Select Profile from the Options menu • Select Status & Statistics
Call Centre Status & Statistics Report Settings
Configure statistics reporting: • To enable or disable statistics reporting, check or uncheck the Daily Report box. • Select the Reporting Period for the collection of statistics by entering the Start date and
time and End date and time. • Type one or two E-mail Addresses to receive the daily statistics report. • Click Queue Status to view the number of calls in the queue and Agents currently logged
in
Call Centre Status & Statistics Queue Status
• Click Queue & Agent Statistics to view the Status and Statistics of the call centre’s
activity. • Select the check box to Display current-time statistics, if you require the statistics for the
current time to display, then enter the Start date, OR • Specify a Start Date and Time and an End Date and Time

11
Queue & Agent Statistics
View group statistics
Statistic Description
Number of busy overflows Number of calls that came in after the queue limit was exceeded. It is likely that Auto Attendant answers such calls and the callers are directed to leave a message. (The queue length is set from the Call Centre Add or Call Centre Modify page.)
Number of calls answered Number of calls that agents in this Call Centre have answered.
Number of calls abandoned This is the total number of calls that an incoming party abandoned (hung up) or selected to leave a message an agent became available.
Number of calls transferred This is the total number of calls transferred out of the Call centre queue. Typically, a call is transferred from a given call Centre queue to another Call Centre queue.
Number of calls timed out This is the total number of calls that remain unanswered and that are forwarded out of the Call Centre queue upon timeout .
Average number of agents talking
This is the average number of agents who were in the talking state in the Call Centre during the specified period.
Average number of agents staffed
This is the average number of agents staffed in the Call Centre during the specified period
Average wait time This is the average amount of time that callers spend waiting for the next available agent to answer the call.
Average abandonment time This is the average time that callers spend waiting for an agent before hanging up or selecting the option to leave a message.
12
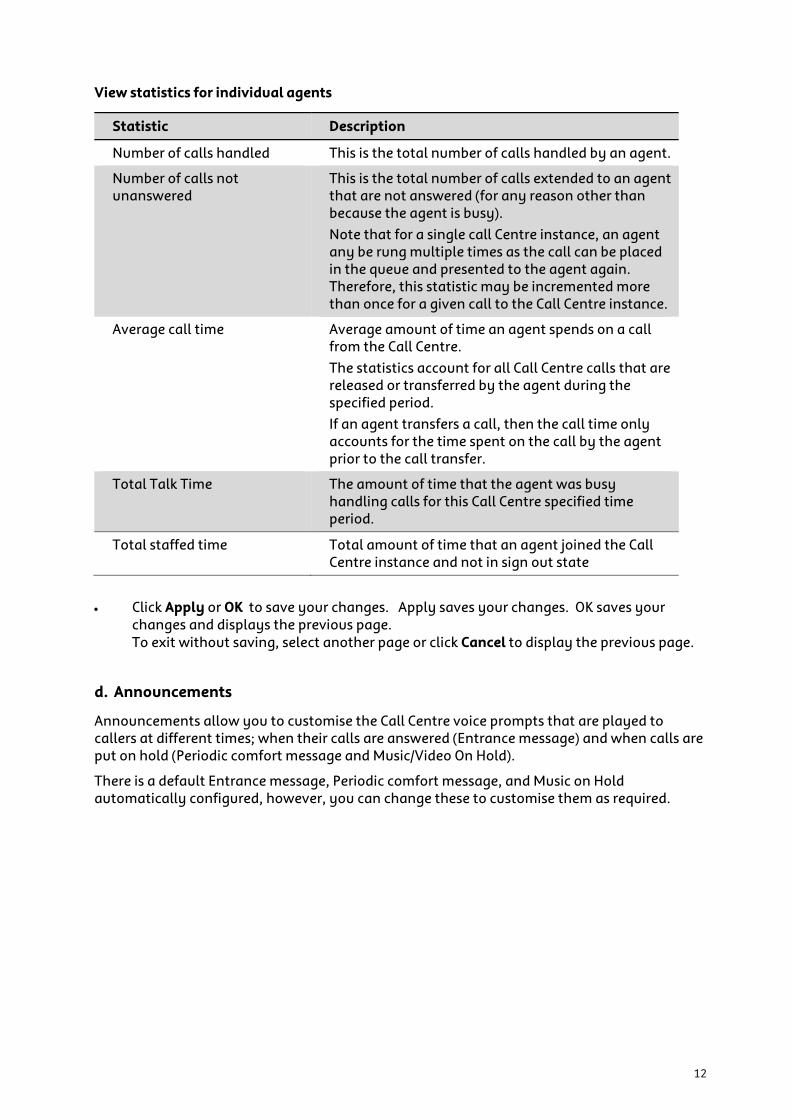
View statistics for individual agents
Statistic Description
Number of calls handled This is the total number of calls handled by an agent.
Number of calls not unanswered
This is the total number of calls extended to an agent that are not answered (for any reason other than because the agent is busy). Note that for a single call Centre instance, an agent any be rung multiple times as the call can be placed in the queue and presented to the agent again. Therefore, this statistic may be incremented more than once for a given call to the Call Centre instance.
Average call time Average amount of time an agent spends on a call from the Call Centre. The statistics account for all Call Centre calls that are released or transferred by the agent during the specified period. If an agent transfers a call, then the call time only accounts for the time spent on the call by the agent prior to the call transfer.
Total Talk Time The amount of time that the agent was busy handling calls for this Call Centre specified time period.
Total staffed time Total amount of time that an agent joined the Call Centre instance and not in sign out state
• Click Apply or OK to save your changes. Apply saves your changes. OK saves your
changes and displays the previous page. To exit without saving, select another page or click Cancel to display the previous page.
d. Announcements
Announcements allow you to customise the Call Centre voice prompts that are played to callers at different times; when their calls are answered (Entrance message) and when calls are put on hold (Periodic comfort message and Music/Video On Hold).
There is a default Entrance message, Periodic comfort message, and Music on Hold automatically configured, however, you can change these to customise them as required.
13
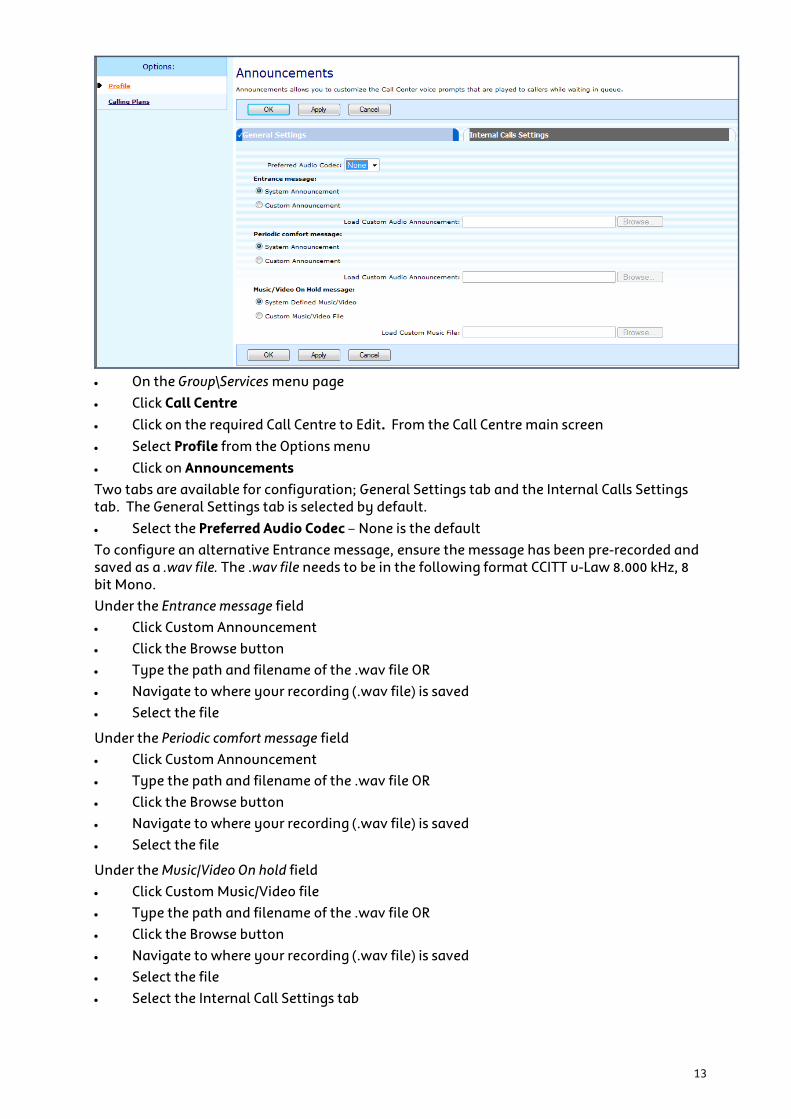
• On the Group\Services menu page • Click Call Centre
• Click on the required Call Centre to Edit. From the Call Centre main screen • Select Profile from the Options menu
• Click on Announcements Two tabs are available for configuration; General Settings tab and the Internal Calls Settings tab. The General Settings tab is selected by default. • Select the Preferred Audio Codec – None is the default To configure an alternative Entrance message, ensure the message has been pre-recorded and saved as a .wav file. The .wav file needs to be in the following format CCITT u-Law 8.000 kHz, 8 bit Mono. Under the Entrance message field • Click Custom Announcement • Click the Browse button • Type the path and filename of the .wav file OR • Navigate to where your recording (.wav file) is saved • Select the file
Under the Periodic comfort message field • Click Custom Announcement • Type the path and filename of the .wav file OR • Click the Browse button • Navigate to where your recording (.wav file) is saved • Select the file
Under the Music/Video On hold field • Click Custom Music/Video file • Type the path and filename of the .wav file OR • Click the Browse button • Navigate to where your recording (.wav file) is saved • Select the file • Select the Internal Call Settings tab
14
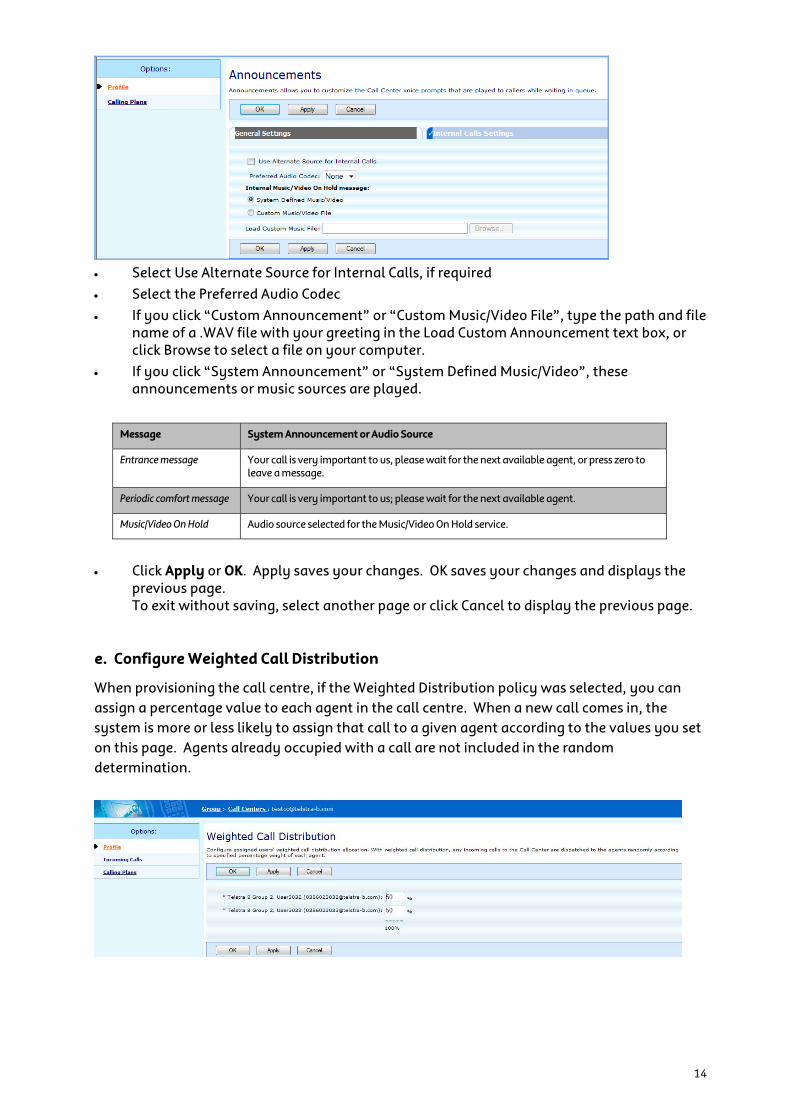
• Select Use Alternate Source for Internal Calls, if required • Select the Preferred Audio Codec • If you click “Custom Announcement” or “Custom Music/Video File”, type the path and file
name of a .WAV file with your greeting in the Load Custom Announcement text box, or click Browse to select a file on your computer.
• If you click “System Announcement” or “System Defined Music/Video”, these announcements or music sources are played.
Message System Announcement or Audio Source
Entrance message Your call is very important to us, please wait for the next available agent, or press zero to leave a message.
Periodic comfort message Your call is very important to us; please wait for the next available agent.
Music/Video On Hold Audio source selected for the Music/Video On Hold service.
• Click Apply or OK. Apply saves your changes. OK saves your changes and displays the previous page. To exit without saving, select another page or click Cancel to display the previous page.
e. Configure Weighted Call Distribution
When provisioning the call centre, if the Weighted Distribution policy was selected, you can assign a percentage value to each agent in the call centre. When a new call comes in, the system is more or less likely to assign that call to a given agent according to the values you set on this page. Agents already occupied with a call are not included in the random determination.

15
Use the Call Centre\Weighted Call Distribution page to configure the call distribution policy within your call centre.
• On the Group\Services menu page • Click Call Centre • Click on the required Call Centre to Edit • From the Call Centre main screen • Select Profile from the options menu
• Click on Weighted Call Distribution This link will only appear if you have enabled the Weighted Call Distribution policy on the profile page for this Call Centre.
• Assign a percentage value for each agent in your call centre using the input boxes provided. The values must add up to exactly 100.
• Click Apply or OK to save your changes. Apply saves your changes. OK saves your changes and displays the previous page. To exit without saving, select another page or click Cancel to display the previous page.
f. Voice Portal
Use the Call Centre\Voice portal page to set a Personalised Name (upload a .wav file for the Auto Attendant and Voice Messaging). The .wav file needs to be in the following format CCITT u-Law 8.000 kHz, 8 bit Mono.
• On the Group\Services menu page, click Call Centre • Click on the required Call Centre to Edit. From the Call Centre main screen • Select Profile from the Options menu
• Click on Voice Portal
• Click the Browse button • Type the path and filename of the .wav file
OR • Navigate to where your recording (.wav file) is saved • Select the file • Click OK
g. Password
The Customer Group Administrator using the Call Centre\Password page can configure or change the CommPilot web access or voice portal password for the Call Centre.
• On the Group\ Services menu page • Click Call Centre • Select the required Call Centre to Edit • Click Password To reset the Web access password • Ensure the Set web access password is selected • Type and retype the Reset Password text boxes
16
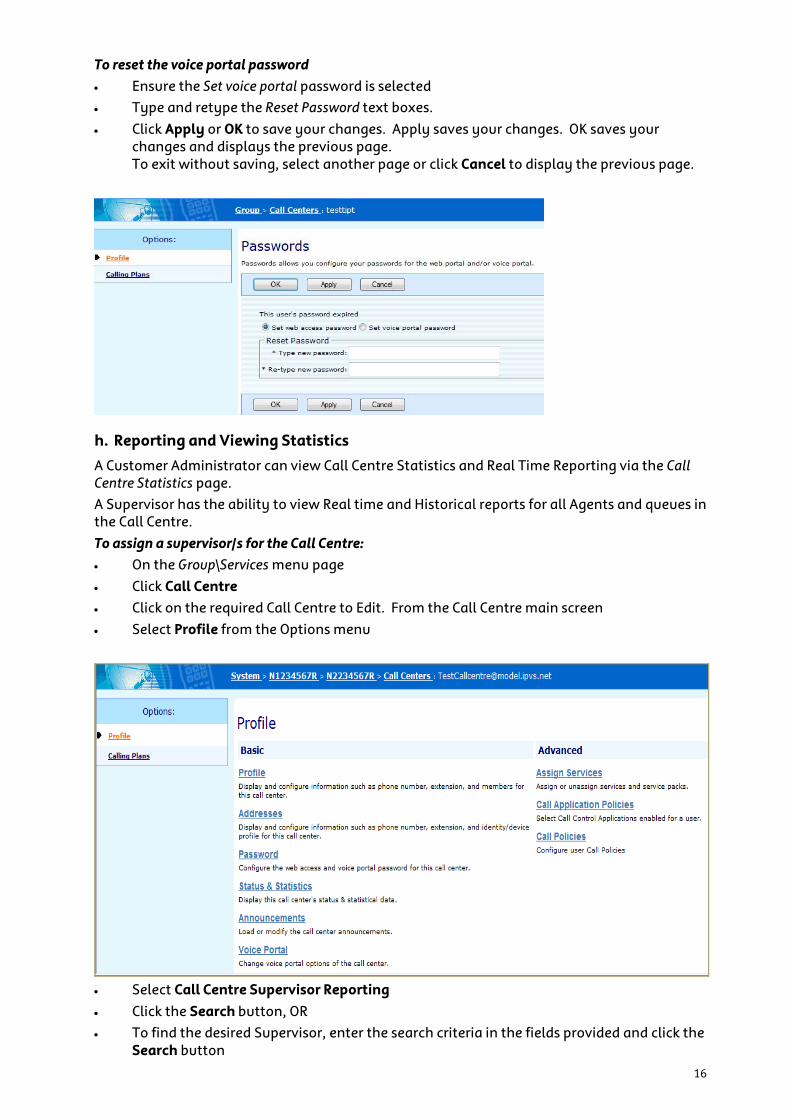
To reset the voice portal password • Ensure the Set voice portal password is selected • Type and retype the Reset Password text boxes. • Click Apply or OK to save your changes. Apply saves your changes. OK saves your
changes and displays the previous page. To exit without saving, select another page or click Cancel to display the previous page.
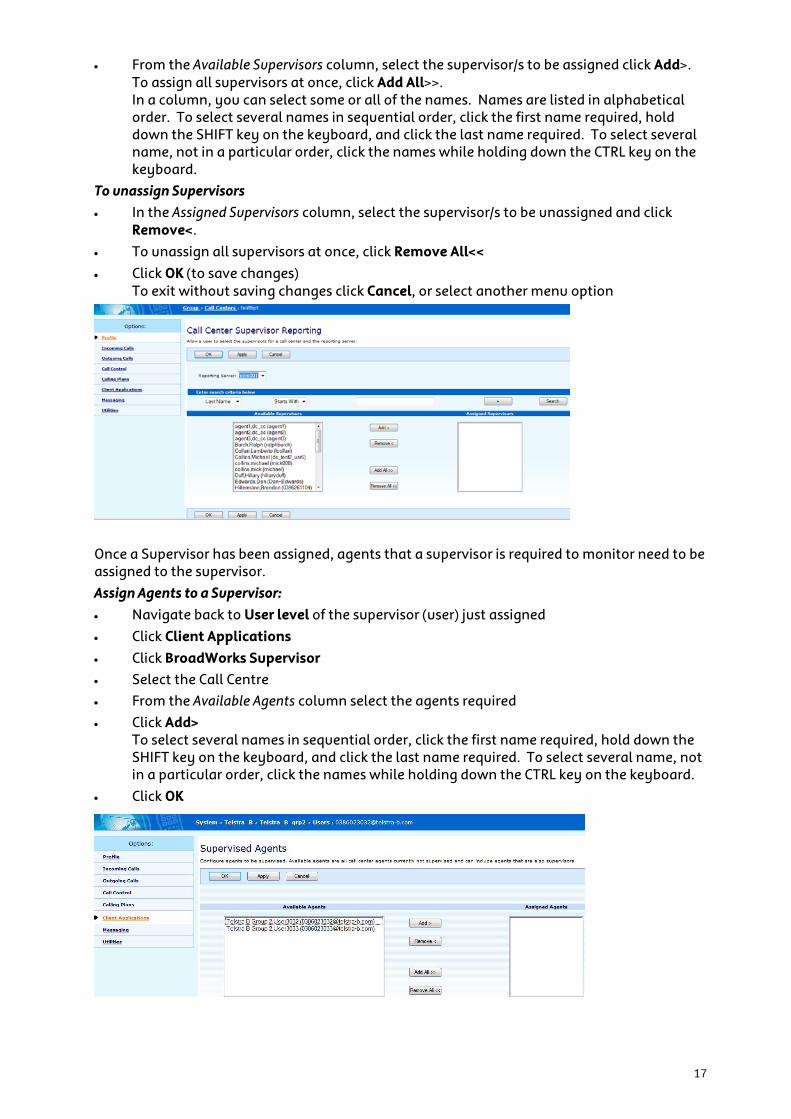
h. Reporting and Viewing Statistics
A Customer Administrator can view Call Centre Statistics and Real Time Reporting via the Call Centre Statistics page. A Supervisor has the ability to view Real time and Historical reports for all Agents and queues in the Call Centre. To assign a supervisor/s for the Call Centre: • On the Group\Services menu page • Click Call Centre • Click on the required Call Centre to Edit. From the Call Centre main screen • Select Profile from the Options menu
• Select Call Centre Supervisor Reporting
• Click the Search button, OR • To find the desired Supervisor, enter the search criteria in the fields provided and click the
Search button
17
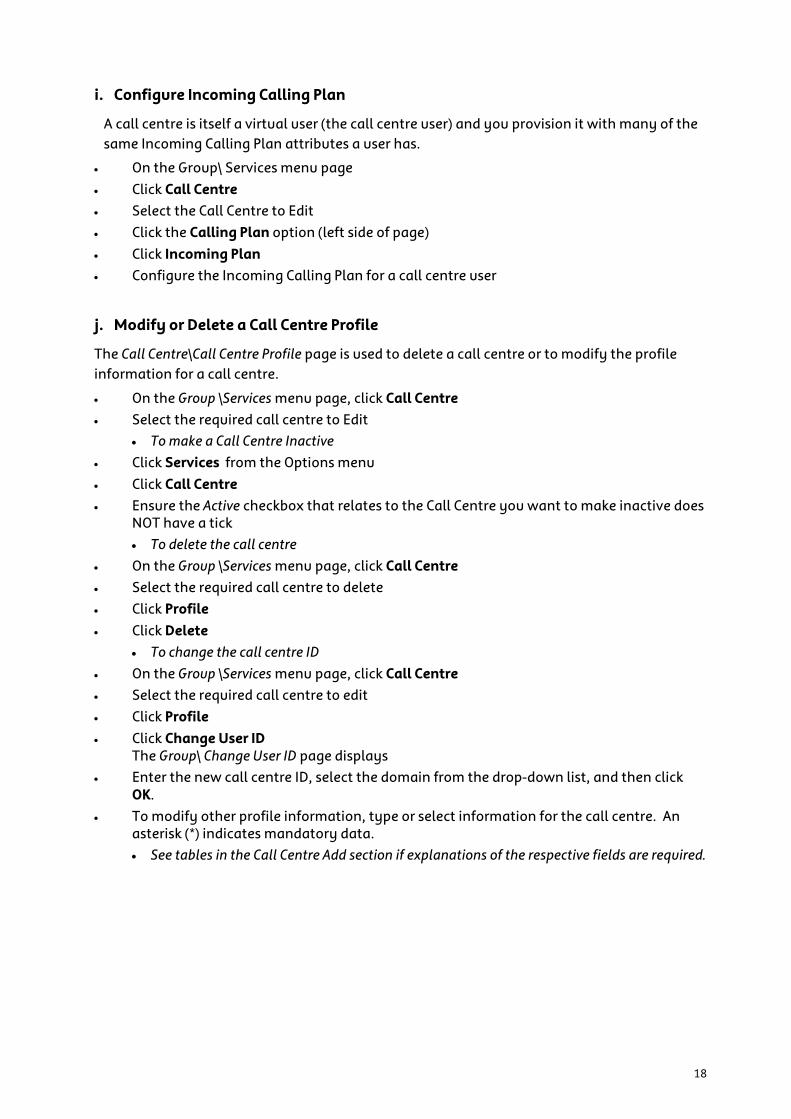
• From the Available Supervisors column, select the supervisor/s to be assigned click Add>. To assign all supervisors at once, click Add All>>. In a column, you can select some or all of the names. Names are listed in alphabetical order. To select several names in sequential order, click the first name required, hold down the SHIFT key on the keyboard, and click the last name required. To select several name, not in a particular order, click the names while holding down the CTRL key on the keyboard.
To unassign Supervisors • In the Assigned Supervisors column, select the supervisor/s to be unassigned and click
Remove<. • To unassign all supervisors at once, click Remove All<< • Click OK (to save changes)
To exit without saving changes click Cancel, or select another menu option
Once a Supervisor has been assigned, agents that a supervisor is required to monitor need to be assigned to the supervisor. Assign Agents to a Supervisor: • Navigate back to User level of the supervisor (user) just assigned
• Click Client Applications • Click BroadWorks Supervisor • Select the Call Centre • From the Available Agents column select the agents required • Click Add>
To select several names in sequential order, click the first name required, hold down the SHIFT key on the keyboard, and click the last name required. To select several name, not in a particular order, click the names while holding down the CTRL key on the keyboard.
• Click OK
18
i. Configure Incoming Calling Plan
A call centre is itself a virtual user (the call centre user) and you provision it with many of the same Incoming Calling Plan attributes a user has.
• On the Group\ Services menu page • Click Call Centre • Select the Call Centre to Edit • Click the Calling Plan option (left side of page)
• Click Incoming Plan • Configure the Incoming Calling Plan for a call centre user
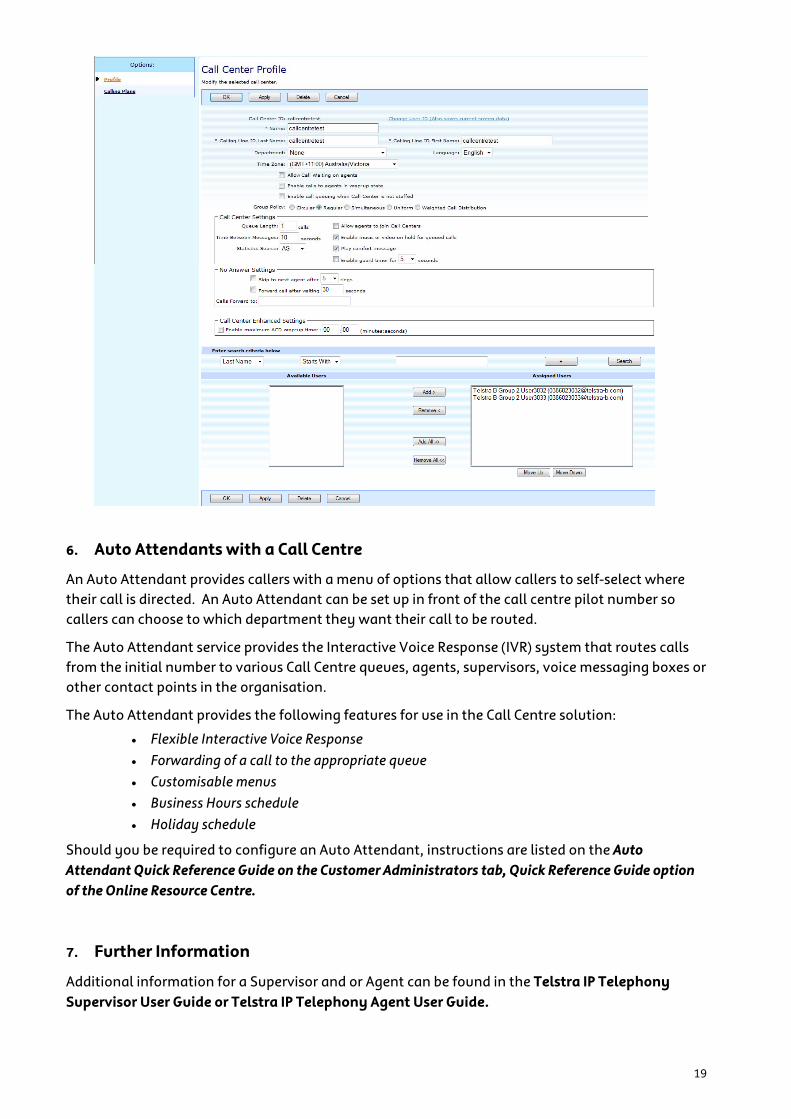
j. Modify or Delete a Call Centre Profile
The Call Centre\Call Centre Profile page is used to delete a call centre or to modify the profile information for a call centre.
• On the Group \Services menu page, click Call Centre • Select the required call centre to Edit
• To make a Call Centre Inactive • Click Services from the Options menu
• Click Call Centre • Ensure the Active checkbox that relates to the Call Centre you want to make inactive does
NOT have a tick • To delete the call centre
• On the Group \Services menu page, click Call Centre • Select the required call centre to delete • Click Profile
• Click Delete • To change the call centre ID
• On the Group \Services menu page, click Call Centre • Select the required call centre to edit • Click Profile • Click Change User ID
The Group\ Change User ID page displays • Enter the new call centre ID, select the domain from the drop-down list, and then click
OK. • To modify other profile information, type or select information for the call centre. An
asterisk (*) indicates mandatory data. • See tables in the Call Centre Add section if explanations of the respective fields are required.
19
6. Auto Attendants with a Call Centre
An Auto Attendant provides callers with a menu of options that allow callers to self-select where their call is directed. An Auto Attendant can be set up in front of the call centre pilot number so callers can choose to which department they want their call to be routed.
The Auto Attendant service provides the Interactive Voice Response (IVR) system that routes calls from the initial number to various Call Centre queues, agents, supervisors, voice messaging boxes or other contact points in the organisation.
The Auto Attendant provides the following features for use in the Call Centre solution:
• Flexible Interactive Voice Response • Forwarding of a call to the appropriate queue • Customisable menus • Business Hours schedule • Holiday schedule
Should you be required to configure an Auto Attendant, instructions are listed on the Auto Attendant Quick Reference Guide on the Customer Administrators tab, Quick Reference Guide option of the Online Resource Centre. 7. Further Information
Additional information for a Supervisor and or Agent can be found in the Telstra IP Telephony Supervisor User Guide or Telstra IP Telephony Agent User Guide.