cam chain mechanical tensioners installation guide for bmw ... · cam chain mechanical tensioners...
TRANSCRIPT

CAM CHAIN MECHANICAL TENSIONERS
INSTALLATION GUIDE FOR BMW F-SERIES
Models
F650GS, F700GS F800S, F800ST F800R, F800GS
Threaded Adjuster
Lock Nut
Plunger
Body
F-Series

WARNING: INCORRECT INSTALLATION OF A MANUAL CAM CHAIN TENSIONER MAY RESULT IN SEVERE ENGINE DAMAGE. IF YOU ARE NOT CERTAIN HOW TO INSTALL THE CAM CHAIN TENSIONER THEN IT IS ADVISED THAT IT BE INSTALLED BY A SHOP WHO IS FAMILIAR WITH THIS PROCESS.
1 | P a g e Copyright 2016 by Southern California MotoWerks LLC southerncaliforniamotowerks.com
(Fig. 2)
Step 1. Raise the bike onto a center stand so that
the rear tire is off the ground.
Step 2. Remove the factory installed tensioner
using a 22mm wrench. (Fig 1) (Fig 2) and (Fig. 3)
(Fig. 1)
(Fig. 3)
Step 3. Remove all factory chain tensioner parts
from the cylinder head. (Fig 4) and (Fig 5)
(Fig. 4)
WARNING: INCORRECT INSTALLATION OF A MANUAL CAM CHAIN TENSIONER MAY RESULT IN SEVERE ENGINE DAMAGE. IF YOU ARE NOT CERTAIN HOW TO INSTALL THE CAM CHAIN TENSIONER THEN IT IS ADVISED THAT IT BE INSTALLED BY A SHOP WHO IS FAMILIAR WITH THIS PROCESS.
2 | P a g e Copyright 2016 by Southern California MotoWerks LLC southerncaliforniamotowerks.com
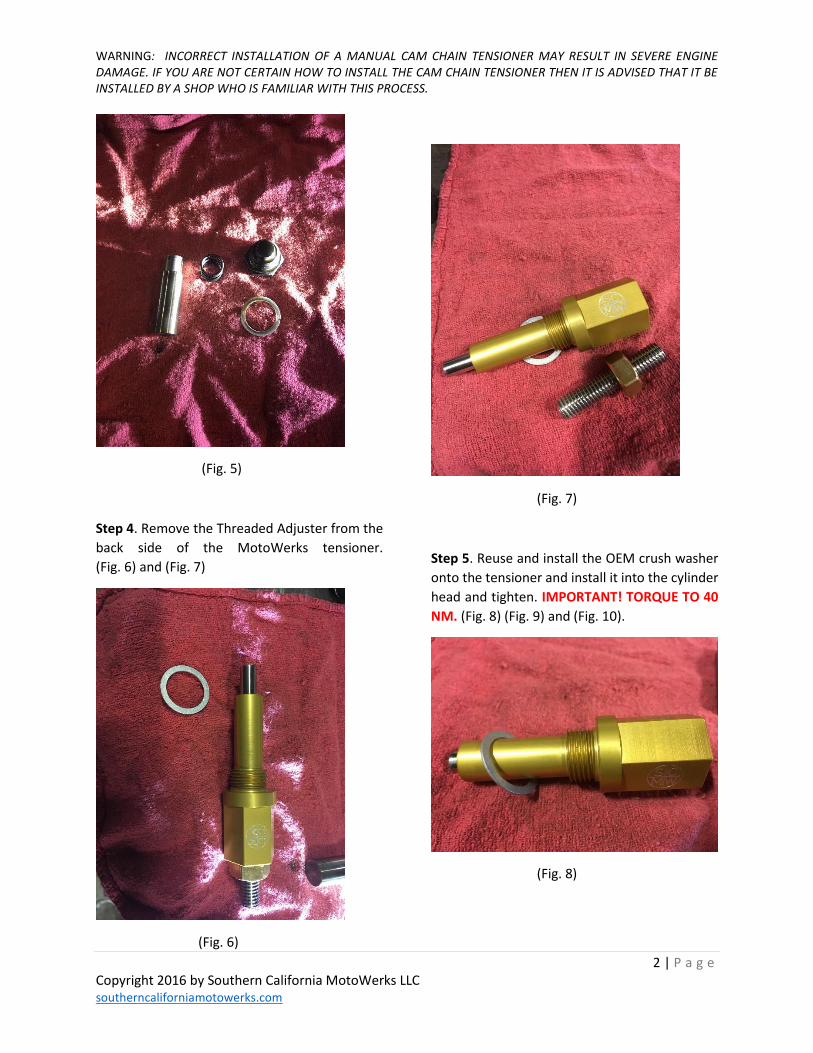
(Fig. 5)
Step 4. Remove the Threaded Adjuster from the
back side of the MotoWerks tensioner.
(Fig. 6) and (Fig. 7)
(Fig. 6)
(Fig. 7)
Step 5. Reuse and install the OEM crush washer
onto the tensioner and install it into the cylinder
head and tighten. IMPORTANT! TORQUE TO 40
NM. (Fig. 8) (Fig. 9) and (Fig. 10).
(Fig. 8)

WARNING: INCORRECT INSTALLATION OF A MANUAL CAM CHAIN TENSIONER MAY RESULT IN SEVERE ENGINE DAMAGE. IF YOU ARE NOT CERTAIN HOW TO INSTALL THE CAM CHAIN TENSIONER THEN IT IS ADVISED THAT IT BE INSTALLED BY A SHOP WHO IS FAMILIAR WITH THIS PROCESS.
3 | P a g e Copyright 2016 by Southern California MotoWerks LLC southerncaliforniamotowerks.com
(Fig. 9)
(Fig. 10)
Step 6. Install the Threaded Adjuster into the
tensioner and thread it in by hand (using a 5mm
allen wrench) until it begins to get tight. (Fig.11)
(Fig. 12) and (Fig. 13)
(Fig. 11)
(Fig. 12)
WARNING: INCORRECT INSTALLATION OF A MANUAL CAM CHAIN TENSIONER MAY RESULT IN SEVERE ENGINE DAMAGE. IF YOU ARE NOT CERTAIN HOW TO INSTALL THE CAM CHAIN TENSIONER THEN IT IS ADVISED THAT IT BE INSTALLED BY A SHOP WHO IS FAMILIAR WITH THIS PROCESS.
4 | P a g e Copyright 2016 by Southern California MotoWerks LLC southerncaliforniamotowerks.com
(Fig. 14)
(Fig. 13)
Step 7. After the tensioner gets snug, put the
motorcycle in 6th gear (Do not start the engine)
and using your hand, rotate the rear wheel in the
direction of the motorcycle’s forward rotation
(counter clockwise facing the bike from the left
side) at least a quarter turn. (Fig. 14) and (Fig. 15)
(Fig. 15)
Step 8. Turn the threaded adjuster in until it is
snug. Install the lock nut and tighten. (Fig. 16)
and (Fig. 17)
(Fig. 16)

WARNING: INCORRECT INSTALLATION OF A MANUAL CAM CHAIN TENSIONER MAY RESULT IN SEVERE ENGINE DAMAGE. IF YOU ARE NOT CERTAIN HOW TO INSTALL THE CAM CHAIN TENSIONER THEN IT IS ADVISED THAT IT BE INSTALLED BY A SHOP WHO IS FAMILIAR WITH THIS PROCESS.
5 | P a g e Copyright 2016 by Southern California MotoWerks LLC southerncaliforniamotowerks.com
Adjustment is done by sound. Listen
to the engine and adjust the tensioner
based on the engine’s chain noise. If
adjustment isn’t making a change in
the noise of the chain, then further
problems may need attention.
WARNING: OVER TIGHTENING THE
TENSIONER WILL CAUSE ENGINE
DAMAGE!
(Fig. 18)
Step 9. Start the engine and let it idle. Loosen the
lock nut and slowly loosen the Threaded
Adjuster out until you hear the cam chain begin
to rattle. Once it begins to rattle, turn it back just
enough until the noise goes away. (Fig. 17)
(Fig. 17)
Step 10. Thread the lock nut down and tighten.
ADJUSTMENT