(cameralink pocl, gev, coaxpress, and hd-sdi models) · bobcat hardware user’s manual imperx,...
TRANSCRIPT

BOBCAT Hardware User’s Manual
Imperx, Inc. Rev. 2.0.1 6421 Congress Ave. 4/10/2012 Boca Raton, FL 33487 +1 (561) 989-0006 1 of 253
BOBCAT Hardware User’s Manual (CameraLink PoCL, GEV, CoaXPress, and HD-SDI Models)
INTELLIGENT, HIGH-RESOLUTION, FIELD
UPGRADEABLE, PROGRAMMABLE, 8/10/12/14 BIT
DIGITAL CAMERAS
CONFIDENTIAL NOTICE:
These products are not intended for use in life support appliances, devices, or systems where malfunction of these
products can reasonably be expected to result in personal injury. Imperx customers using or selling these products for
use in such applications do so at their own risk and agree to fully indemnify Imperx for any damages resulting from
such improper use or sale.
Copyright © 2011, Imperx Inc. All rights reserved. All information provided in this manual is believed to be accurate
and reliable. Imperx assumes no responsibility for its use. Imperx reserves the right to make changes to this information
without notice. Redistribution of this manual in whole or in part, by any means, is prohibited without obtaining prior
permission from Imperx.

BOBCAT Hardware User’s Manual
Imperx, Inc. Rev. 2.0.1 6421 Congress Ave. 4/10/2012 Boca Raton, FL 33487 +1 (561) 989-0006 2 of 253
Revision History
Rev 0.2 03/23/09 P. Dinev Initial Pre-Release – Old UART protocol
Rev 0.3 07/31/09 P. Dinev Old UART removed, added new UART protocol and new
register addresses.
Rev 0.4 08/25/09 P. Dinev Image Enhancement section, AOI8 modes added.
Rev 0.5 08/27/09 P. Dinev Figure 2.27a and related text changed.
Rev 0.6 01/15/10 P. Dinev B0620, B2520 cameras added, all related tables and figures
updated. Minor errors fixed.
Rev 0.7 03/02/10 P. Dinev B1620, B1920 cameras added, all related tables and figures
updated. Minor errors fixed.
Rev 0.8 03/12/10 P. Dinev B2020, B4020 and B4820 cameras added, all related tables
and figures updated. Minor errors fixed.
Rev 0.9 04/12/10 P. Dinev GEV option added to all cameras, all related tables and
figures updated. Minor errors fixed.
Rev 1.0 04/25/10 P. Dinev Official Release
Rev 1.1 10/10/10 P. Dinev Minor errors fixed.
Rev 1.2 12/30/10 P. Dinev Minor errors fixed. 3x8 RGB out and WB feature added
Rev 2.0 01/10/12 B. Gisonni Minor errors fixed. Added cameras in Bobcat series –
B1310, B1411, B1020, B1320, B1621, B1921, B2320,
B3320, B4821 and B6620. Major feature TRUESENSE.
Rev 2.0.1 04/02/12 B.Gisonni Minor errors fixed.

BOBCAT Hardware User’s Manual
Imperx, Inc. Rev. 2.0.1 6421 Congress Ave. 4/10/2012 Boca Raton, FL 33487 +1 (561) 989-0006 3 of 253
TABLE OF CONTENTS
BOBCAT HARDWARE USER’S MANUAL 1
CHAPTER 1 – INTRODUCTION 18
1.1 BOBCAT FAMILY ............................................................................................................. 19
1.2 GENERAL DESCRIPTION .............................................................................................. 21
1.3 BOBCAT SPECIFICATIONS ........................................................................................... 23 1.3.1 General Information .......................................................................................................... 23
1.3.2 Spectral Response .............................................................................................................. 26
1.3.3 Bayer and TRUESENSE Pattern Information ................................................................... 29
1.3.4 Technical Specifications .................................................................................................... 30
1.4 CAMERA CONNECTIVITY ............................................................................................ 40 1.4.1 Camera Link Output ...................................................................................................... 40 1.4.2 GigE Output .................................................................................................................. 45
1.4.3 Power Supply ................................................................................................................ 46
1.5 MECHANICAL, OPTICAL and ENVIRONMENTAL .................................................. 47 1.5.1 Mechanical .................................................................................................................... 47 1.5.2 Optical ............................................................................................................................... 59
1.5.3 Environmental ................................................................................................................... 59
CHAPTER 2 – CAMERA FEATURES 65
2.1 IMAGE RESOLUTION ..................................................................................................... 66 2.1.1 Normal Mode – Single Output ...................................................................................... 66
2.1.2 Normal Mode – Dual Output ......................................................................................... 67
2.1.3 Center Mode .................................................................................................................. 67
2.2 FRAME TIME CONTROL ............................................................................................... 71 2.2.1 Internal Line and Frame Time Control .............................................................................. 71
2.2.2 Camera Speed Control ....................................................................................................... 71
2.2.3 External Line and Frame Time Control ............................................................................ 72
2.3 AREA OF INTEREST ........................................................................................................ 73 2.3.1 Horizontal and Vertical Window ...................................................................................... 73
2.3.2 Calculating the Frame Rate using Vertical Window ......................................................... 76
2.4 BINNING ............................................................................................................................. 96

BOBCAT Hardware User’s Manual
Imperx, Inc. Rev. 2.0.1 6421 Congress Ave. 4/10/2012 Boca Raton, FL 33487 +1 (561) 989-0006 4 of 253
2.5 EXPOSURE CONTROL .................................................................................................. 101 2.5.1 Internal Exposure Control - Electronic Shutter ............................................................... 101
2.5.2 External exposure control ................................................................................................ 101
2.5.3 Variable Frame Time – Programmable Line and Frame Time ....................................... 101
2.5.4 Automatic Exposure Control (AEC) ............................................................................... 102
2.5.5 Automatic Iris Control (AIC) .......................................................................................... 103
2.6 EXTERNAL TRIGGER ................................................................................................... 104 2.6.1 Triggering Inputs ......................................................................................................... 104
2.6.2 Acquisition and Exposure Control .............................................................................. 104
2.6.3 Trigger Strobe Control ................................................................................................ 105
2.6.4 Triggering modes ........................................................................................................ 105
2.7 STROBE OUTPUT ........................................................................................................... 110
2.8 GAIN and OFFSET ........................................................................................................... 111 2.8.1 Analog Domain – manual control ................................................................................... 111
2.8.2 Digital Domain – manual control .................................................................................... 112 2.8.3 Automatic Gain Control (AGC) ...................................................................................... 112
2.9 DATA OUTPUT FORMAT ............................................................................................. 113 2.9.1 Bit Depth ..................................................................................................................... 113
2.9.2 Digital Data Shift ......................................................................................................... 114
2.9.3 Output Format ............................................................................................................. 114
2.10 PULSE GENERATOR ..................................................................................................... 117
2.11 I/O CONTROL .................................................................................................................. 118 2.11.1 I/O Mapping ................................................................................................................ 118
2.11.2 Electrical Connectivity ................................................................................................ 119
2.12 TEST IMAGE PATTERNS ............................................................................................. 121 2.12.1 Test Image patterns ..................................................................................................... 121
2.12.2 Image Superimposition ................................................................................................ 121
2.13 WHITE BALANCE AND COLOR CONVERSION ..................................................... 122 2.13.1 White Balance ............................................................................................................. 122
2.13.2 Color (Bayer to RGB) Conversion .............................................................................. 122
2.14 DYNAMIC BLACK LEVEL CORRECTION AND TAP BALANCING ................... 123 2.14.1 Black Level Correction ............................................................................................... 123
2.14.2 Tap Balancing .............................................................................................................. 123
2.15 TRANSFER FUNCTION CORRECTION – USER LUT ............................................. 124 2.15.1 Standard Gamma Correction ....................................................................................... 124 2.15.2 User Defined LUT ....................................................................................................... 125

BOBCAT Hardware User’s Manual
Imperx, Inc. Rev. 2.0.1 6421 Congress Ave. 4/10/2012 Boca Raton, FL 33487 +1 (561) 989-0006 5 of 253
2.16 DEFECTIVE PIXEL CORRECTION ............................................................................ 126 2.16.1 Static Pixel Correction ................................................................................................. 126
2.16.1 Dynamic Pixel Correction ........................................................................................... 127
2.17 FLAT FIELD CORRECTION......................................................................................... 128
2.18 NEGATIVE IMAGE ......................................................................................................... 130
2.19 CAMERA INTERFACE .................................................................................................. 131 2.19.1 Status LED .................................................................................................................. 131
2.19.2 Temperature Monitor .................................................................................................. 131
2.19.3 Exposure Time Monitor .............................................................................................. 131
2.19.4 Frame Time Monitor ................................................................................................... 132
2.19.5 Current image size ....................................................................................................... 132
CHAPTER 3 – DIGITAL IMAGE PROCESSING 133
3.1 OVERVIEW ...................................................................................................................... 134
3.2 IMAGE ENHANCEMENT .............................................................................................. 134 3.2.1 Threshold Operation ........................................................................................................ 134
3.2.2 Multi Point Correction ..................................................................................................... 136
CHAPTER 4 – CAMERA CONFIGURATION 140
4.1 OVERVIEW ...................................................................................................................... 141
4.2 CAMERA CONFIGURATION ....................................................................................... 141 4.2.1 Configuration Memory – parameter FLASH .................................................................. 141 4.2.3 Camera Serial Protocol .................................................................................................... 142
4.3 CAMERA CONFIGURATION REGISTER DESCRIPTION ..................................... 146 4.3.1 Startup Procedure ............................................................................................................ 146
4.3.2 Saving and Restoring Settings ......................................................................................... 146
4.3.3 Retrieving Manufacturing Data ....................................................................................... 148
4.3.4 Camera Information Registers ......................................................................................... 150
4.3.5 Image Size (AOI) Workspace Registers ......................................................................... 152
4.3.6 Exposure Control Workspace Registers .......................................................................... 159
4.3.7 AEC, AGC, AIC Workspace Registers ........................................................................... 160
4.3.8 Video Amp, Gain and Offset Workspace Registers ........................................................ 163
4.3.9 Triggering Workspace Registers ..................................................................................... 165
4.3.10 Pulse Generator Workspace Registers ........................................................................ 168
4.3.11 Test Pattern Workspace Registers ............................................................................... 169
4.3.12 Input/output Workspace Registers .............................................................................. 170 4.3.13 Output Data Format ..................................................................................................... 175

BOBCAT Hardware User’s Manual
Imperx, Inc. Rev. 2.0.1 6421 Congress Ave. 4/10/2012 Boca Raton, FL 33487 +1 (561) 989-0006 6 of 253
4.3.14 White Balance Workspace Registers .......................................................................... 177
4.3.15 Color Conversion Workspace Registers ...................................................................... 178
4.3.16 Data Correction Workspace Registers ........................................................................ 179
4.4 DATA PROCESSING REGISTER DESCRIPTION .................................................... 180 4.4.1 Image Enhancement Workspace Registers ..................................................................... 180
CHAPTER 5 - CONFIGURATOR FOR CAMERALINK 182
5.1 OVERVIEW ...................................................................................................................... 183
5.2 DISCOVERY PROCEDURE ........................................................................................... 183
5.3 GRAPHICAL USER INTERFACE ................................................................................ 184
5.4 MAIN GUI MENU ............................................................................................................ 185
5.5 VIEW GUI WINDOWS .................................................................................................... 189
5.6 GUI HELP .......................................................................................................................... 190
5.7 PARAMETER WINDOWS .............................................................................................. 191 5.7.1 Video Amp .................................................................................................................. 191
5.7.2 I/O Control .................................................................................................................. 192
5.7.3 Trigger ......................................................................................................................... 194
5.7.4 Pulse Generator ........................................................................................................... 196
5.7.5 Exposure ...................................................................................................................... 197
5.7.6 Test Image ................................................................................................................... 199
5.7.7 Area of Interest (AOI) ................................................................................................. 200 5.7.8 Strobe Control ................................................................................................................. 202
5.7.9 Color ................................................................................................................................ 203 5.7.10 Processing .................................................................................................................... 204
5.7.10 Data Output ................................................................................................................. 206
CHAPTER 6 – GEN<I>CAM REFERENCE MANUAL 209
6.1 INTRODUCTION ............................................................................................................. 210
6.2 NODE TREE ...................................................................................................................... 211 6.2.1 Device Information .......................................................................................................... 211
6.2.2 IP Engine ......................................................................................................................... 211
6.2.3 GigE Vision Transport Layer .......................................................................................... 211
6.2.5 Acquisition and Trigger Controls .................................................................................... 213 6.2.6 Counters and Timers Controls ......................................................................................... 213 6.2.7 Analog Controls .............................................................................................................. 214

BOBCAT Hardware User’s Manual
Imperx, Inc. Rev. 2.0.1 6421 Congress Ave. 4/10/2012 Boca Raton, FL 33487 +1 (561) 989-0006 7 of 253
6.2.8 Test Mode ........................................................................................................................ 214
6.2.9 User Sets .......................................................................................................................... 214
6.2.10 Custom Features .......................................................................................................... 215
CHAPTER 7 – BOBCAT WARRANTY AND SUPPORT 218
7.1 ORDERING INFORMATION ........................................................................................ 219
7.2 TECHNICAL SUPPORT ................................................................................................. 220
7.3 WARRANTY ..................................................................................................................... 221
APPENDIX A – CAMERA CONFIGURATION REFERENCE 222
A.0 ABBREVIATIONS ........................................................................................................... 223
A.1 SAVING AND RESTORING REGISTERS ................................................................... 223
A.2 CAMERA INFORMATION REGISTERS .................................................................... 223
A.3 IMAGE SIZE (AOI) REGISTERS .................................................................................. 224
A.4 EXPOSURE CONTROL REGISTERS .......................................................................... 225
A.5 VIDEO REGISTERS ........................................................................................................ 225
A.6 AEC, AGC, AIC REGISTERS ........................................................................................ 226
A.7 TRIGGER REGISTERS .................................................................................................. 226
A.8 PULSE GENERATOR REGISTERS ............................................................................. 227
A.9 TEST PATTERN REGISTERS ....................................................................................... 227
A.10 STROBE REGISTERS ..................................................................................................... 227
A.11 INPUT AND OUTPUT REGISTERS ............................................................................. 227
A.12 OUTPUT DATA FORMAT REGISTERS ..................................................................... 228
A.13 WB AND COLOR CORRECTION REGISTERS......................................................... 228
A.14 DATA CORRECTION REGISTERS ............................................................................. 229
A.15 PROCESSING REGISTERS ........................................................................................... 229

BOBCAT Hardware User’s Manual
Imperx, Inc. Rev. 2.0.1 6421 Congress Ave. 4/10/2012 Boca Raton, FL 33487 +1 (561) 989-0006 8 of 253
A.16 MANUFACTURING DATA REGISTERS .................................................................... 229
APPENDIX B – CREATING LOOK UP TABLES 230
B.1 OVERVIEW ...................................................................................................................... 231
B.2 USING AN ASCII TEXT EDITOR ................................................................................. 231
B.3 USING MICROSOFT EXCEL ........................................................................................ 232
APPENDIX C – CREATING DPC AND HPC TABLES 233
C.1 OVERVIEW ...................................................................................................................... 234
C.2 USING AN ASCII TEXT EDITOR ................................................................................. 234
APPENDIX D – SOFTWARE INSTALLATION - CL 235
APPENDIX E – FIRMWARE UPGRADE - CL 237
E.1 OVERVIEW ...................................................................................................................... 238
E.2 BOBCAT UPGRADE ....................................................................................................... 238
APPENDIX F – GIGE VISION FIRMWARE UPGRADE 242 F-1 Overview: .............................................................................................................................. 243
F-2 RGS Upgrade ........................................................................................................................ 246 F-3 IP Engine Install .................................................................................................................... 247
APPENDIX G – POWER SUPPLIES 249

BOBCAT Hardware User’s Manual
Imperx, Inc. Rev. 2.0.1 6421 Congress Ave. 4/10/2012 Boca Raton, FL 33487 +1 (561) 989-0006 9 of 253
FIGURES
FIGURE 1.0A – INTERLINE CCD PIXEL STRUCTURE. 24
FIGURE 1.0B – KODAK TRUESENSE COLOR FILTER INTERLINE CCD PIXEL STRUCTURE. 24
FIGURE 1.1A – KAI (KODAK) CCD TYPICAL MONO SPECTRAL RESPONSE. 26
FIGURE 1.1B – KAI (KODAK) CCD TYPICAL UV SPECTRAL RESPONSE. 26
FIGURE 1.1C – KAI (KODAK) CCD TYPICAL COLOR SPECTRAL RESPONSE. 27
FIGURE 1.1D – KODAK TRUESENSE CCD TYPICAL SPECTRAL RESPONSE WITH AR COATED COVER GLASS. 27
FIGURE 1.2A – ICX (SONY) CCD TYPICAL MONO SPECTRAL RESPONSE. 28
FIGURE 1.2B – ICX (SONY) CCD TYPICAL COLOR SPECTRAL RESPONSE. 28
FIGURE 1.3 – BAYER PATTERN ARRANGEMENT. 29
FIGURE 1.3A – KODAK TRUESENSE PATTERN ARRANGEMENT. 29
FIGURE 1.4 – CAMERA BACK PANEL – CAMERA LINK OUTPUT 40
FIGURE 1.5A – CAMERA OUTPUT CONNECTOR 41
FIGURE 1.4A – CAMERA POWER CONNECTOR 43
FIGURE 1.6 – CAMERA BACK PANEL –GIGE OUTPUT 45
FIGURE 1.7A – C-MOUNT CAMERA LINK CAMERAS. 47
FIGURE 1.7B – C-MOUNT GEV CAMERAS. 47
FIGURE 1.8A – C-MOUNT CAMERA LINK OUTPUT – DIMENSIONAL DRAWINGS FOR ICL-B0610, B0620, B1310, B1410, B1411, B1610 AND ICL-B2520. 48

BOBCAT Hardware User’s Manual
Imperx, Inc. Rev. 2.0.1 6421 Congress Ave. 4/10/2012 Boca Raton, FL 33487 +1 (561) 989-0006 10 of 253
FIGURE 1.8B – C-MOUNT CAMERA LINK OUTPUT – DIMENSIONAL DRAWINGS FOR ICL-B1620 AND ICL-B1920. 49
FIGURE 1.8BA – C-MOUNT CAMERA LINK OUTPUT – DIMENSIONAL DRAWINGS FOR ICL-B1020, B1320, B1621, B1921 AND ICL-B2320. 50
FIGURE 1.8C – F-MOUNT CAMERA LINK OUTPUT – DIMENSIONAL DRAWINGS FOR ICL-B2020, ICL-B4020 AND ICL-B4820. 51
FIGURE 1.8CA – F-MOUNT CAMERA LINK OUTPUT – DIMENSIONAL DRAWINGS FOR ICL-B3320, ICL-B4821 AND ICL-B6620. 52
FIGURE 1.8D – C-MOUNT GIGE VISION OUTPUT – DIMENSIONAL DRAWINGS FOR IGV-B0610, IGV-B0620, IGV-B1410, IGV-B1610 AND IGV-B2520. 53
FIGURE 1.8E – C-MOUNT GIGE VISION OUTPUT – DIMENSIONAL DRAWINGS FOR IGV-B1620 AND IGV-B1920. 54
FIGURE 1.8EA – C-MOUNT GIGE VISION OUTPUT – DIMENSIONAL DRAWINGS FOR IGV-B1020, B1320, B1621, B1921 AND IGV-B2320. 55
FIGURE 1.8F – F-MOUNT GIGE VISION OUTPUT – DIMENSIONAL DRAWINGS FOR IGV-B2020, IGV-B4020 AND IGV-B4820. 56
FIGURE 1.8FA – F-MOUNT GIGE VISION OUTPUT – DIMENSIONAL DRAWINGS FOR IGV-B3320, IGV-B4821 AND IGV-B6620. 57
FIGURE 1.8G – SMALL BOBCAT MOUNTING PLATE USING ¼ IN 20 THREAD. 58
FIGURE 1.8GA – BIG BOBCAT MOUNTING PLATE USING ¼ IN 20 THREAD. 58
FIGURE 1.9A – OPTICAL PLANE POSITION FOR B0610 (KAI-0340), B0620 (KAI-0340), B1410 (ICX-285), B1610 (ICX-274) AND B2520 (ICX-625) CAMERAS. 60
FIGURE 1.9B – OPTICAL PLANE POSITION FOR B1620 (KAI-2020) AND B1920 (KAI-2093) CAMERAS. 61
FIGURE 1.9C – OPTICAL PLANE POSITION FOR B2020 (KAI-04022), B4020 (KAI-11002), AND B4820 (KAI-16000) CAMERAS. 62

BOBCAT Hardware User’s Manual
Imperx, Inc. Rev. 2.0.1 6421 Congress Ave. 4/10/2012 Boca Raton, FL 33487 +1 (561) 989-0006 11 of 253
FIGURE 1.9D – OPTICAL PLANE POSITION FOR B1020 (KAI-01050, B1621 (02050), B1921 (02150) AND B2320 (04050) CAMERAS. 63
FIGURE 1.9E – OPTICAL PLANE POSITION (IN MM) FOR B3320 (KAI- 08050). 64
FIGURE 1.9F – OPTICAL PLANE POSITION (MM) FOR B4821(KAI-16050) AND B6620 (KAI-29050). 64
FIGURE 2.1 – SINGLE OUTPUT MODE OF OPERATION. 66
FIGURE 2.2 – DUAL OUTPUT MODE OF OPERATION. 67
FIGURE 2.3 – CENTER COLUMNS OUTPUT MODE OF OPERATION. 68
FIGURE 2.4 – CENTER COLUMNS OUTPUT IN DUAL MODE OF OPERATION. 69
FIGURE 2.5 – CENTER COLUMNS OUTPUT IN DUAL TAP MODE. 69
FIGURE 2.6 – SUB-SAMPLED CCD OUTPUT. 70
FIGURE 2.7 – HORIZONTAL AND VERTICAL WINDOW POSITIONING. 73
FIGURE 2.8 – SLAVE AOIS. 74
FIGURE 2.9 – PAOI ENABLED AS PROCESSING ROI. 75
FIGURE 2.10A – FRAME RATE VS. VERTICAL WINDOW SIZE FOR B0610 76
FIGURE 2.10B – FRAME RATE VS. VERTICAL WINDOW SIZE FOR B0620 77
FIGURE 2.10BA – FRAME RATE VS. VERTICAL WINDOW SIZE FOR B1020 78
FIGURE 2.10BB – FRAME RATE VS. VERTICAL WINDOW SIZE FOR B1310 79
FIGURE 2.10BC – FRAME RATE VS. VERTICAL WINDOW SIZE FOR B1320 80
FIGURE 2.10C – FRAME RATE VS. VERTICAL WINDOW SIZE FOR B1410 81
FIGURE 2.10CA – FRAME RATE VS. VERTICAL WINDOW SIZE FOR B1411 82

BOBCAT Hardware User’s Manual
Imperx, Inc. Rev. 2.0.1 6421 Congress Ave. 4/10/2012 Boca Raton, FL 33487 +1 (561) 989-0006 12 of 253
FIGURE 2.10D – FRAME RATE VS. VERTICAL WINDOW SIZE FOR B1610 83
FIGURE 2.10E – FRAME RATE VS. VERTICAL WINDOW SIZE FOR B1620 84
FIGURE 2.10EA – FRAME RATE VS. VERTICAL WINDOW SIZE FOR B1621 85
FIGURE 2.10F – FRAME RATE VS. VERTICAL WINDOW SIZE FOR B1920 86
FIGURE 2.10G – FRAME RATE VS. VERTICAL WINDOW SIZE FOR B1921 87
FIGURE 2.10GA – FRAME RATE VS. VERTICAL WINDOW SIZE FOR B2520 88
FIGURE 2.10H – FRAME RATE VS. VERTICAL WINDOW SIZE FOR B2020 89
FIGURE 2.10I – FRAME RATE VS. VERTICAL WINDOW SIZE FOR B2320 90
FIGURE 2.10J – FRAME RATE VS. VERTICAL WINDOW SIZE FOR B3320 91
FIGURE 2.10K – FRAME RATE VS. VERTICAL WINDOW SIZE FOR B4020. 92
FIGURE 2.10L – FRAME RATE VS. VERTICAL WINDOW SIZE FOR B4820. 93
FIGURE 2.10M – FRAME RATE VS. VERTICAL WINDOW SIZE FOR B4821. 94
FIGURE 2.10M – FRAME RATE VS. VERTICAL WINDOW SIZE FOR B6620. 95
FIGURE 2.11 – 2:2 HORIZONTAL AND VERTICAL BINNING 96
FIGURE 2.11A – AOI WITHIN HORIZONTAL AND VERTICAL BINNED IMAGE. 100
FIGURE 2.12 – ELECTRONIC SHUTTER POSITION 101
FIGURE 2.13 – PROGRAMMABLE FRAME TIME 102
FIGURE 2.14 – STANDARD TRIGGERING TIMING 106
FIGURE 2.15 – FAST SYNCHRONIZED TRIGGERING - RAPID CAPTURE 107
FIGURE 2.16 – DOUBLE EXPOSURE TRIGGERING 108

BOBCAT Hardware User’s Manual
Imperx, Inc. Rev. 2.0.1 6421 Congress Ave. 4/10/2012 Boca Raton, FL 33487 +1 (561) 989-0006 13 of 253
FIGURE 2.17 – FRAME ACCUMULATION TRIGGERING 109
FIGURE 2.18 – ASYNCHRONOUS TRIGGERING 109
FIGURE 2.19 – STROBE PULSE POSITIONING 110
FIGURE 2.20 – AFE GAIN AND OFFSET 111
FIGURE 2.21 – DATA OUTPUT FORMAT 113
FIGURE 2.22 – OUTPUT DATA USING 4 BITS DIGITAL RIGHT SHIFT 114
FIGURE 2.24A – 2 TAP SEQUENTIAL OUTPUT 115
FIGURE 2.24B – 2 TAP INTERLEAVED OUTPUT 116
FIGURE 2.25 – INTERNAL PULSE GENERATOR 117
FIGURE 2.26 – IN1, IN2 ELECTRICAL CONNECTION. 119
FIGURE 2.27 – OUT1, OUT2 ELECTRICAL CONNECTION. 119
FIGURE 2.30 – LOOK UP TABLE 124
FIGURE 2.31 – GAMMA CORRECTED VIDEO SIGNAL 125
FIGURE 2.32 – CUSTOM LUT 125
FIGURE 2.33A – ORIGINAL IMAGE SHOWING ‘SHADING’ EFFECT 129
FIGURE 2.33B – FLAT FIELD CORRECTED IMAGE 129
FIGURE 2.34 – NORMAL AND NEGATIVE IMAGE 130
FIGURE 3.1 – ORIGINAL AND PROCESSED IMAGE WITH SINGLE THRESHOLD. 135
FIGURE 3.2 – ORIGINAL AND PROCESSED IMAGE WITH DOUBLE THRESHOLD. 135

BOBCAT Hardware User’s Manual
Imperx, Inc. Rev. 2.0.1 6421 Congress Ave. 4/10/2012 Boca Raton, FL 33487 +1 (561) 989-0006 14 of 253
FIGURE 3.3 – ORIGINAL AND PROCESSED IMAGE WITH THRESHOLD AND GRAY SCALE STRETCH. 136
FIGURE 3.4 – SINGLE POINT TF CORRECTION. 137
FIGURE 3.5 – MULTI POINT TF CORRECTION. 138
FIGURE 3.6 – MULTI POINT IMAGE CORRECTION (A – ORIGINAL, B – PROCESSED). 139
FIGURE 4.1 – SERIAL PROTOCOL FORMAT 142
FIGURE 4.2 – NORMAL WRITE CYCLE 143
FIGURE 4.3A – INVALID COMMAND ERROR 143
FIGURE 4.3B – RX TIMEOUT ERROR 143
FIGURE 4.4 – NORMAL READ CYCLE 144
FIGURE 5.1 – DISCOVERY PROCEDURE – SELECT PORT 183
FIGURE 5.2 – CAMCONFIG GUI 184
FIGURE 5.3 – MAIN MENU 185
FIGURE 5.5 – COMMAND TERMINAL 187
FIGURE 5.6 – DOWNLOAD TERMINAL 188
FIGURE 5.7 – VIEW GUI WINDOWS 189
FIGURE 5.8 – HELP MENU 190
FIGURE 5.9 – ABOUT CAMCONFIG. 190
FIGURE 5.10 – VIDEO AMP PARAMETER WINDOW 191
FIGURE 5.11 – I/O CONTROL PARAMETER WINDOW 193

BOBCAT Hardware User’s Manual
Imperx, Inc. Rev. 2.0.1 6421 Congress Ave. 4/10/2012 Boca Raton, FL 33487 +1 (561) 989-0006 15 of 253
FIGURE 5.13 – PULSE GENERATOR WINDOW 196
FIGURE 5.16 – AOI WINDOW. 201
FIGURE 5.17 – STROBE CONTROL WINDOW 202
FIGURE 5.18 – COLOR WINDOW 204
FIGURE 5.20 – DATA OUTPUT WINDOW 207

BOBCAT Hardware User’s Manual
Imperx, Inc. Rev. 2.0.1 6421 Congress Ave. 4/10/2012 Boca Raton, FL 33487 +1 (561) 989-0006 16 of 253
TABLES AND CAPTIONS
TABLE 1.0 – PIXEL STRUCTURE FOR DIFFERENT BOBCAT CAMERAS 25
TABLE 1.1A – B0610, B0620 CAMERA SPECIFICATIONS. 32
TABLE 1.1B – B1020, B1310 AND B1320 CAMERA SPECIFICATIONS 33
TABLE 1.1C – B1410 AND B1411 CAMERA SPECIFICATIONS 34
TABLE 1.1D – B1610, B1620 AND B1621 CAMERA SPECIFICATIONS 35
TABLE 1.1E – B1920 AND B1921 CAMERA SPECIFICATIONS 36
TABLE 1.1F – B2020 AND B2320 CAMERA SPECIFICATIONS 37
TABLE 1.1G – B2520, B3320 AND B4020 CAMERA SPECIFICATIONS 38
TABLE 1.1H – B4820, B4821 AND B6620 CAMERA SPECIFICATIONS 39
TABLE 1.2 – CAMERA OUTPUT CONNECTOR – SIGNAL MAPPING 41
TABLE 1.3 – BASE CAMERA LINK BIT ASSIGNMENT 42
TABLE 1.4B – CAMERA POWER CONNECTOR PIN MAPPING 43
TABLE 1.5A – BNC CONNECTORS PIN MAPPING 44
TABLE 2.1 – IMAGE RESOLUTIONS FOR DIFFERENT MODES 70
TABLE 2.2 – FRAME RATES FOR DIFFERENT MODES 72
TABLE 2.3A – IMAGE SIZES AND FRAME RATES FOR DIFFERENT H BINNING MODES 97
TABLE 2.3B – IMAGE SIZES AND FRAME RATES FOR DIFFERENT V BINNING MODES 98

BOBCAT Hardware User’s Manual
Imperx, Inc. Rev. 2.0.1 6421 Congress Ave. 4/10/2012 Boca Raton, FL 33487 +1 (561) 989-0006 17 of 253
TABLE 2.3C – B0620 CENTER MODE IMAGE SIZES AND FRAME RATES DURING V BINNING 98
TABLE 2.4A – BOBCAT INPUT MAPPING 118
TABLE 2.4B – BOBCAT OUTPUT MAPPING 118
TABLE 3.1 – CURRENT CAMERA TEMPERATURE VALUES 152
TABLE 4.0 – AUTO IRIS 4 PIN MINI PLUG E4-191J 252

BOBCAT Hardware User’s Manual
Imperx, Inc. Rev. 2.0.1 6421 Congress Ave. 4/10/2012 Boca Raton, FL 33487 +1 (561) 989-0006 18 of 253
Chapter 1 – Introduction
Introduction
This chapter outlines the key features of the BOBCAT camera.

BOBCAT Hardware User’s Manual
Imperx, Inc. Rev. 2.0.1 6421 Congress Ave. 4/10/2012 Boca Raton, FL 33487 +1 (561) 989-0006 19 of 253
1.1 BOBCAT FAMILY
The BOBCAT series of cameras are built around a robust imaging platform utilizing the
latest digital technology and components. BOBCAT camera series is designed around 20
different CCD imaging sensors, featuring different resolutions and frame rates. Each base
model is available in monochrome and color. Each base model is also available with Base
CameraLink PoCL output and GEV. The first three letters in the camera model name shows
the output interface – ICL for Camera Link, and IGV – for GigE Vision.
The BOBCAT family list is shown below:
Model Resolution Speed Type Optics CCD CCD model
ICL-B0610M 648/640 x 488/480 110/138 fps Mono 1/3" Kodak KAI-0340SM
ICL-B0610C 648/640 x 488/480 110/138 fps Color 1/3" Kodak KAI-0340SC
ICL-B0620M 648/640 x 488/480 210/260 fps Mono 1/3" Kodak KAI-0340DM
ICL-B0620C 648/640 x 488/480 210/260 fps Color 1/3" Kodak KAI-0340DC
ICL-B1020M 1032/1024 x 1032/1024 60/74 fps Mono 1/2'” Kodak KAI-01050M
ICL-B1020C 1032/1024 x 1032/1024 60/74 fps Color 1/2'” Kodak KAI-01050C
ICL-B1310M 1296/1280 x 966/960 26/39 fps Mono 1/3” Sony ICX-445AL
ICL-B1310C 1296/1280 x 966/960 26/39 fps Color 1/3” Sony ICX-445AQ
ICL-B1320M 1320/1280 x 736/720 68/85 fps Mono 1/2'” Kodak KAI-01150M
ICL-B1320C 1320/1280 x 736/720 68/85 fps Color 1/2'” Kodak KAI-01150C
ICL-B1410M 1392/1360 x 1040/1024 23/30 fps Mono 2/3" Sony ICX-285AL
ICL-B1410C 1392/1360 x 1040/1024 23/30 fps Color 2/3" Sony ICX-285AQ
ICL-B1411M 1392/1360 x 1040/1024 24/31 fps Mono 1/2'” Sony ICX-267AL
ICL-B1411C 1392/1360 x 1040/1024 24/31 fps Color 1/2'” Sony ICX-267AK
ICL-B1610M 1628/1620 x 1236/1220 16/25 fps Mono 1/1.8" Sony ICX-274ALM
ICL-B1610C 1628/1620 x 1236/1220 16/25 fps Color 1/1.8" Sony ICX-274AQC
ICL-B1620M 1608/1600 x 1208/1200 35/44 fps Mono 1.0" Kodak KAI-2020M
ICL-B1620C 1608/1600 x 1208/1200 35/44 fps Color 1.0" Kodak KAI-2020C
ICL-B1621M 1632/1600 x 1232/1200 34/42 fps Mono 2/3” Kodak KAI-02050M
ICL-B1621C 1632/1600 x 1232/1200 34/42fps Color 2/3” Kodak KAI-02050C
ICL-B1920M 1920 x 1080 33/41 fps Mono 1.0" Kodak KAI-2093M
ICL-B1920C 1928/1920 x 1084/1080 33/41 fps Color 1.0" Kodak KAI-2093C
ICL-B1921M 1951/1920 x 1112/1080 32/40 fps Mono 2/3” Kodak KAI-02150M
ICL-B1921C 1951/1920 x 1112/1080 32/40 fps Color 2/3” Kodak KAI-02150C
ICL-B2020M 2056/2048 x 2060/2048 16/20 fps Mono 1.3" Kodak KAI-04022M
ICL-B2020C 2056/2048 x 2060/2048 16/20 fps Color 1.3" Kodak KAI-04022C
ICL-B2320M 2352/2336 x 1768/1752 16/21 fps Mono 1” Kodak KAI-04050M
ICL-B2320C 2352/2336 x 1768/1752 16/21 fps Color 1” Kodak KAI-04050C
ICL-B2520M 2456/2448 x 2058/2050 11/16 fps Mono 2/3" Sony ICX-625AL
ICL-B2520C 2456/2448 x 2058/2050 11/16 fps Color 2/3" Sony ICX-625AQ
ICL-B3320M 3340/3296 x 2496/2472 9/11 fps Mono 4/3” Kodak KAI-08050M
ICL-B3320C 3340/3296 x 2496/2472 9/11 fps Color 4/3” Kodak KAI-08050C
ICL-B4020M 4032/4008 x 2688/2672 5/7 fps Mono 43.3 mm Kodak KAI-11002M
ICL-B4020C 4032/4008 x 2688/2672 5/7 fps Color 43.3 mm Kodak KAI-11002C

BOBCAT Hardware User’s Manual
Imperx, Inc. Rev. 2.0.1 6421 Congress Ave. 4/10/2012 Boca Raton, FL 33487 +1 (561) 989-0006 20 of 253
Model Resolution Speed Type Optics CCD CCD model
ICL-B4820M 4904/4872 x 3280/3248 3.2/4.2fps Mono 43.3 mm Kodak KAI-16000M
ICL-B4820C 4904/4872 x 3280/3248 3.2/4.2 fps Color 43.3 mm Kodak KAI-16000C ICL-B4821M 4920/4896 x 3280/3264 3.1/4.2 fps Mono 32.36 mm Kodak KAI-16050M ICL-B4821C 4920/4896 x 3280/3264 3.1/4.2 fps Color 32.36 mm Kodak KAI-16050C ICL-B6620M 6600/6576 x 4400/4384 1.8/2.5 fps Mono 43.3 mm Kodak KAI-29050M
ICL-B6620C 6600/6576 x 4400/4384 1.8/2.5 fps Color 43.3 mm Kodak KAI-29050C
NOTE:
1. Since the camera features and performance are output invariant, when describing the
cameras we will use only the model number without the first three letters.
2. B1920 supports only 1920 x 1080 image size.

BOBCAT Hardware User’s Manual
Imperx, Inc. Rev. 2.0.1 6421 Congress Ave. 4/10/2012 Boca Raton, FL 33487 +1 (561) 989-0006 21 of 253
1.2 GENERAL DESCRIPTION
The BOBCAT cameras are advanced, intelligent, high-resolution, progressive scan, fully
programmable and field upgradeable CCD cameras. They are built around SONY’s and
KODAK’s line of interline transfer CCD imagers. BOBCAT cameras are feature rich with
built in image processing engine (based on a 2 million gates FPGA), have small size, very
low power consumption, low noise, and efficient and optimized internal thermal
distribution. The BOBCAT cameras feature programmable image resolution, frame rates,
gain, offset, asynchronous external triggering with programmable exposure, fast triggering,
double exposure and capture duration, electronic shutter, long time integration, strobe
output, transfer function correction, temperature monitoring and user programmable and up-
loadable LUT. A square pixel provides for a superior image in any orientation. The interline
transfer CCD permits full vertical and horizontal resolution of high-speed shutter images.
The combination of electronic shutter and long time integration enables the cameras
capturing speed to be from 1/500,000 second to more than 16 seconds. A built-in Gamma
correction and user LUT optimizes the CCD‘s dynamic range. The cameras have a standard
GEV or Camera Link™ interface that includes 8/10/12/14 bits data transmission with one or
two output taps as well as camera control and asynchronous RS232 serial communication
interface, all on a single cable. The cameras are fully programmable via the serial interface
using a GUI based configuration utility. The adaptability and flexibility of the camera
allows it to be used in a wide and diverse range of applications including machine vision,
metrology high-definition imaging and surveillance, medical and scientific imaging,
intelligent transportation systems, character recognition, document processing and many
more and with a MTBF of > 660,000 hrs. It the most feature packed versatile camera line
produced.

BOBCAT Hardware User’s Manual
Imperx, Inc. Rev. 2.0.1 6421 Congress Ave. 4/10/2012 Boca Raton, FL 33487 +1 (561) 989-0006 22 of 253
MAIN BOBCAT FEATURES
Mono and color - 8/10/12/14-bit data
Color - 3x8-bit (RGB) data, auto white balance
TRUESENSE color filter pattern from Kodak
Normal and over-clock operation
Base camera link, PoCL support or GigE Vision
Rs232 serial communication
Analog and digital gain and offset control
1x, 2x, 3x, 4x, 8x horizontal and vertical binning
Eight (7 + 1) independent horizontal and vertical AOIs
Programmable horizontal and vertical resolution
Programmable line time, frame time and speed.
Programmable external trigger:
3 triggering sources
5 triggering modes
Automatic gain, exposure and iris control
Internal/External exposure control
Internal/External H and V sync input/output
Left/right digital bit shift
Test image with image superimposition
Built in pulse generator
Programmable I/O mapping
4 programmable inputs
3 programmable outputs
Dynamic transfer function correction
Dynamic black level correction
Two dimensional Flat field correction
Defective and hot pixel correction
Temperature monitor
Field upgradeable firmware, LUT, DPC, HPC, FFT

BOBCAT Hardware User’s Manual
Imperx, Inc. Rev. 2.0.1 6421 Congress Ave. 4/10/2012 Boca Raton, FL 33487 +1 (561) 989-0006 23 of 253
1.3 BOBCAT SPECIFICATIONS
1.3.1 General Information
A CCD camera is an electronic device for converting light into an electrical signal.
The camera contains a light sensitive element CCD (Charge Coupled Device) where
an electronic representation of the image is formed. The CCD consists of a two
dimensional array of sensitive elements – silicon photodiodes, also known as pixels.
The photons falling on the CCD surface create photoelectrons within the pixels, where
the number of photoelectrons is linearly proportional to the light level. Although the
number of electrons collected in each pixel is linearly proportional to the light level
and exposure time, the amount of electrons varies with the wavelength of the incident
light. When the desired exposure is reached, the charges from each pixel are shifted
onto a vertical register, VCCD, and then one row downwards in a vertical direction
towards a horizontal register, HCCD. After that the electrons contained in the HCCD
are shifted in a horizontal direction, one pixel at a time, onto a floating diffusion
output node where the transformation from charge to voltage takes place. The resultant
voltage signal is buffered by a video amplifier and sent to the corresponding video
output. There are two floating diffusions and two video amplifiers at each end of the
HCCD, and the charges can be transferred towards any of the outputs (depending on
the mode of operation). The time interval required for all the pixels, from the entire
imager, to be clocked out of the HCCD is called a frame. To generate a color image a
set of color filters (Red, Green, and Blue) arranged in a “Bayer” pattern, are placed
over the pixels. The starting color is typically Green for Kodak CCDs and Red for
SONY CCDs, but it varies from CCD to CCD. Figure 1.0a shows the CCD pixel
structure. Table 1.1 shows the individual pixel structure for different BOBCAT
cameras. Effective pixels image consists of Active and Buffer pixels. Figures 1.1a, b, c
and 1.2a, b show the camera’s spectral response. Figure 1.3 shows the Bayer pattern
arrangement.
A new innovation to the Bayer pattern is the TRUESENSE color filter pattern from
Kodak. The KODAK TRUESENSE Color Filter pattern uses a technology which
provides a 2x improvement in light sensitivity as compared to a standard color Bayer
pattern. This technology utilizes panchromatic filters (filters that are sensitive to all
colors of light) in addition to the standard green, red, blue filters. Figure 1.1d shows
the typical spectral response of the TRUESENCE CCD. Figure 1.3a shows the
TRUESENSE pattern arrangement. Figure 1.0b shows CCD pixel structure.

BOBCAT Hardware User’s Manual
Imperx, Inc. Rev. 2.0.1 6421 Congress Ave. 4/10/2012 Boca Raton, FL 33487 +1 (561) 989-0006 24 of 253
Figure 1.0a – Interline CCD pixel structure.
Figure 1.0b – Kodak TRUESENSE color filter interline CCD pixel structure.

BOBCAT Hardware User’s Manual
Imperx, Inc. Rev. 2.0.1 6421 Congress Ave. 4/10/2012 Boca Raton, FL 33487 +1 (561) 989-0006 25 of 253
Camera
Type
Effective
Pixels
Active
Pixels
Effective
Lines
Active
Lines CCD Sensor Pixel Size
B0610 648 640 488 480 KAI-0340S 7.40 μm sq.
B0620 648 640 488 480 KAI-0340D 7.40 μm sq.
B1020 1032 1024 1032 1024 KAI-01050 5.50 μm sq.
B1310 1296 1280 966 960 ICX-445 3.75 μm sq.
B1320 1320 1280 736 720 KAI-01150 5.50 μm sq.
B1410 1392 1360 1040 1024 ICX-285 6.45 μm sq.
B1411 1392 1360 1040 1024 ICX-267 4.65 μm sq.
B1610 1628 1620 1236 1220 ICX-274 4.40 μm sq.
B1620 1608 1600 1208 1200 KAI-2020 7.40 μm sq.
B1621 1632 1600 1232 1200 KAI-2050 5.50 μm sq.
B1920 1928 1920 1084 1080 KAI-2093 7.40 μm sq.
B1921 N/A 1920 N/A 1080 KAI-2150 5.50 μm sq.
B2020 2056 2048 2060 2048 KAI-4022 7.40 μm sq.
B2320 2352 2336 1768 1752 KAI-04050 5.50 μm sq.
B2520 2456 2448 2058 2050 ICX-625 3.45 μm sq.
B3320 3340 3296 2496 2472 KAI-08050 5.50 μm sq.
B4020 4032 4008 2688 2672 KAI-11002 9.00 μm sq.
B4820 4904 4872 3280 3248 KAI-16000 7.40 μm sq.
B4821 4920 4896 3280 3264 KAI-16050 5.50 μm sq.
B6620 6600 6576 4408 4384 KAI-29050 5.50 μm sq.
Table 1.0 – Pixel structure for different BOBCAT cameras

BOBCAT Hardware User’s Manual
Imperx, Inc. Rev. 2.0.1 6421 Congress Ave. 4/10/2012 Boca Raton, FL 33487 +1 (561) 989-0006 26 of 253
1.3.2 Spectral Response
Figure 1.1a – KAI (Kodak) CCD typical mono spectral response.
(Monochrome with the cover glass)
Figure 1.1b – KAI (Kodak) CCD typical UV spectral response.
(UV quantum efficiency measured without cover glass and micro-lenses)

BOBCAT Hardware User’s Manual
Imperx, Inc. Rev. 2.0.1 6421 Congress Ave. 4/10/2012 Boca Raton, FL 33487 +1 (561) 989-0006 27 of 253
Figure 1.1c – KAI (Kodak) CCD typical color spectral response.
(Color with the cover glass)
Figure 1.1d – KODAK TRUESENSE CCD typical spectral response with AR coated cover
glass.

BOBCAT Hardware User’s Manual
Imperx, Inc. Rev. 2.0.1 6421 Congress Ave. 4/10/2012 Boca Raton, FL 33487 +1 (561) 989-0006 28 of 253
Figure 1.2a – ICX (SONY) CCD typical mono spectral response.
(Monochrome with the cover glass)
Figure 1.2b – ICX (Sony) CCD typical color spectral response.
(Color with the cover glass)

BOBCAT Hardware User’s Manual
Imperx, Inc. Rev. 2.0.1 6421 Congress Ave. 4/10/2012 Boca Raton, FL 33487 +1 (561) 989-0006 29 of 253
1.3.3 Bayer and TRUESENSE Pattern Information
Bobcat is available with Monochrome or Color CCD imager. To generate a color
image a set of color filters (Red, Green, and Blue) arranged in a “Bayer” pattern, are
placed over the pixels. The starting color is typically GREEN for Kodak CCDs and
RED for SONY CCDs – Figure 1.3.
TRUESENSE
Panchromatic (“clear”) pixels (Pixel 1,1) added to standard Red, Green, and Blue
array.
Pan pixels provide increased sensitivity by detecting all visible wavelengths.
This provides a 2x – 4x increase in light sensitivity - Figure 1.3a.
Figure 1.3 – Bayer Pattern arrangement.
Figure 1.3a – Kodak TRUESENSE Pattern arrangement.
Pixel 1,1

BOBCAT Hardware User’s Manual
Imperx, Inc. Rev. 2.0.1 6421 Congress Ave. 4/10/2012 Boca Raton, FL 33487 +1 (561) 989-0006 30 of 253
1.3.4 Technical Specifications
The tables below illustrate and describe features and specification of the individual
Bobcat models. The Table below describes features and specifications that relate to
all Bobcat cameras.
Features / Specifications Common to all CL and GEV cameras
RS 232 interface Yes
Frame Time (Long int.) up to 16 sec
Auto White balance Yes
Auto iris Yes
Binning 2x2, 3x3, 4x4, 8x8
Test image Yes, Image superimposition
Mirror image (H Mirror) Yes
Defective pixel correction Static, Dynamic, User DPM,
Hot pixel correction Static, Dynamic, User HPM
Negative Image Yes
I/O Control 4 inputs, 3 outputs
Strobe output Two strobes, Active HIGH
Pulse Generator Yes
In-camera Image Processing Yes, User
Camera housing Aluminum
Supply voltage range 10 V to 15 V DC
Upgradeable firmware Yes
Upgradeable LUT,DPM, FFC Yes
Operating - 30.0 to + 80.0 deg C
Environmental - Storage - 40.0 to + 90.0 deg C
Vibration, Shock 10G (20-200) Hz XYZ, 70G
Relative humidity 90% non-condensing
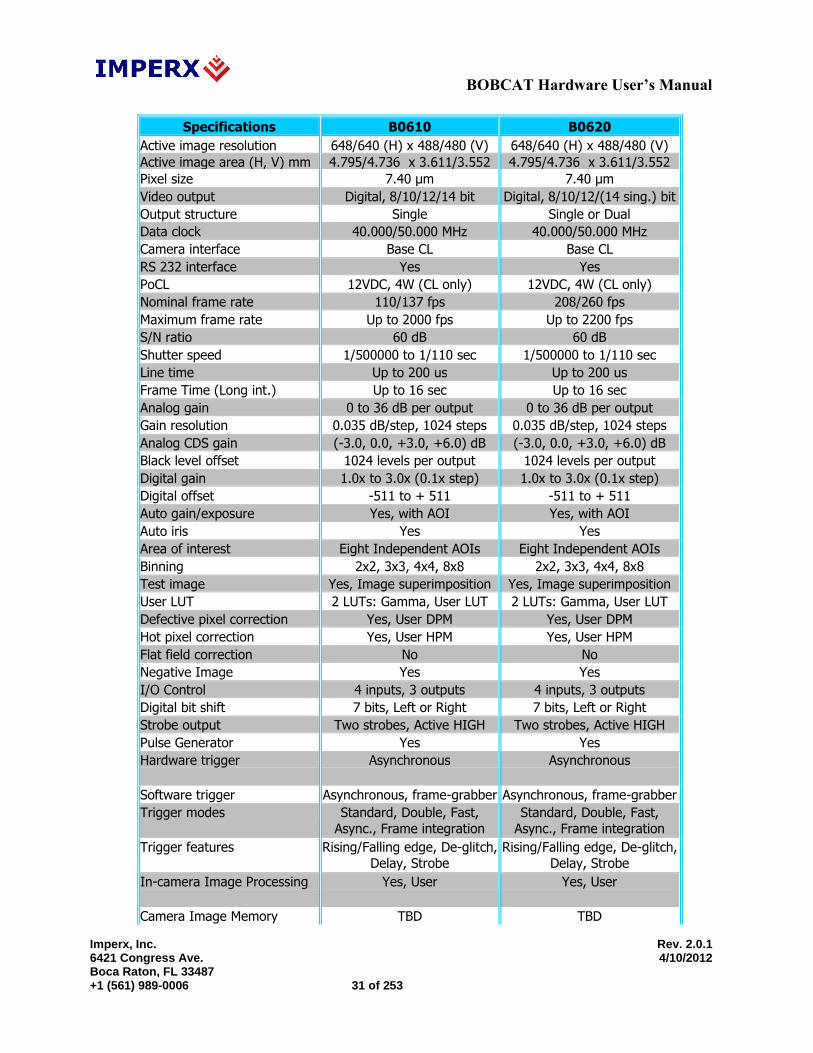
BOBCAT Hardware User’s Manual
Imperx, Inc. Rev. 2.0.1 6421 Congress Ave. 4/10/2012 Boca Raton, FL 33487 +1 (561) 989-0006 31 of 253
Specifications B0610 B0620
Active image resolution 648/640 (H) x 488/480 (V) 648/640 (H) x 488/480 (V)
Active image area (H, V) mm 4.795/4.736 x 3.611/3.552 4.795/4.736 x 3.611/3.552
Pixel size 7.40 μm 7.40 μm
Video output Digital, 8/10/12/14 bit Digital, 8/10/12/(14 sing.) bit
Output structure Single Single or Dual
Data clock 40.000/50.000 MHz 40.000/50.000 MHz
Camera interface Base CL Base CL
RS 232 interface Yes Yes
PoCL 12VDC, 4W (CL only) 12VDC, 4W (CL only)
Nominal frame rate 110/137 fps 208/260 fps
Maximum frame rate Up to 2000 fps Up to 2200 fps
S/N ratio 60 dB 60 dB
Shutter speed 1/500000 to 1/110 sec 1/500000 to 1/110 sec
Line time Up to 200 us Up to 200 us
Frame Time (Long int.) Up to 16 sec Up to 16 sec
Analog gain 0 to 36 dB per output 0 to 36 dB per output
Gain resolution 0.035 dB/step, 1024 steps 0.035 dB/step, 1024 steps
Analog CDS gain (-3.0, 0.0, +3.0, +6.0) dB (-3.0, 0.0, +3.0, +6.0) dB
Black level offset 1024 levels per output 1024 levels per output
Digital gain 1.0x to 3.0x (0.1x step) 1.0x to 3.0x (0.1x step)
Digital offset -511 to + 511 -511 to + 511
Auto gain/exposure Yes, with AOI Yes, with AOI
Auto iris Yes Yes
Area of interest Eight Independent AOIs Eight Independent AOIs
Binning 2x2, 3x3, 4x4, 8x8 2x2, 3x3, 4x4, 8x8
Test image Yes, Image superimposition Yes, Image superimposition
User LUT 2 LUTs: Gamma, User LUT 2 LUTs: Gamma, User LUT
Defective pixel correction Yes, User DPM Yes, User DPM
Hot pixel correction Yes, User HPM Yes, User HPM
Flat field correction No No
Negative Image Yes Yes
I/O Control 4 inputs, 3 outputs 4 inputs, 3 outputs
Digital bit shift 7 bits, Left or Right 7 bits, Left or Right
Strobe output Two strobes, Active HIGH Two strobes, Active HIGH
Pulse Generator Yes Yes
Hardware trigger Asynchronous Asynchronous
Software trigger Asynchronous, frame-grabber Asynchronous, frame-grabber
Trigger modes Standard, Double, Fast,
Async., Frame integration
Standard, Double, Fast,
Async., Frame integration
Trigger features Rising/Falling edge, De-glitch,
Delay, Strobe
Rising/Falling edge, De-glitch,
Delay, Strobe
In-camera Image Processing Yes, User Yes, User
Camera Image Memory TBD TBD
BOBCAT Hardware User’s Manual
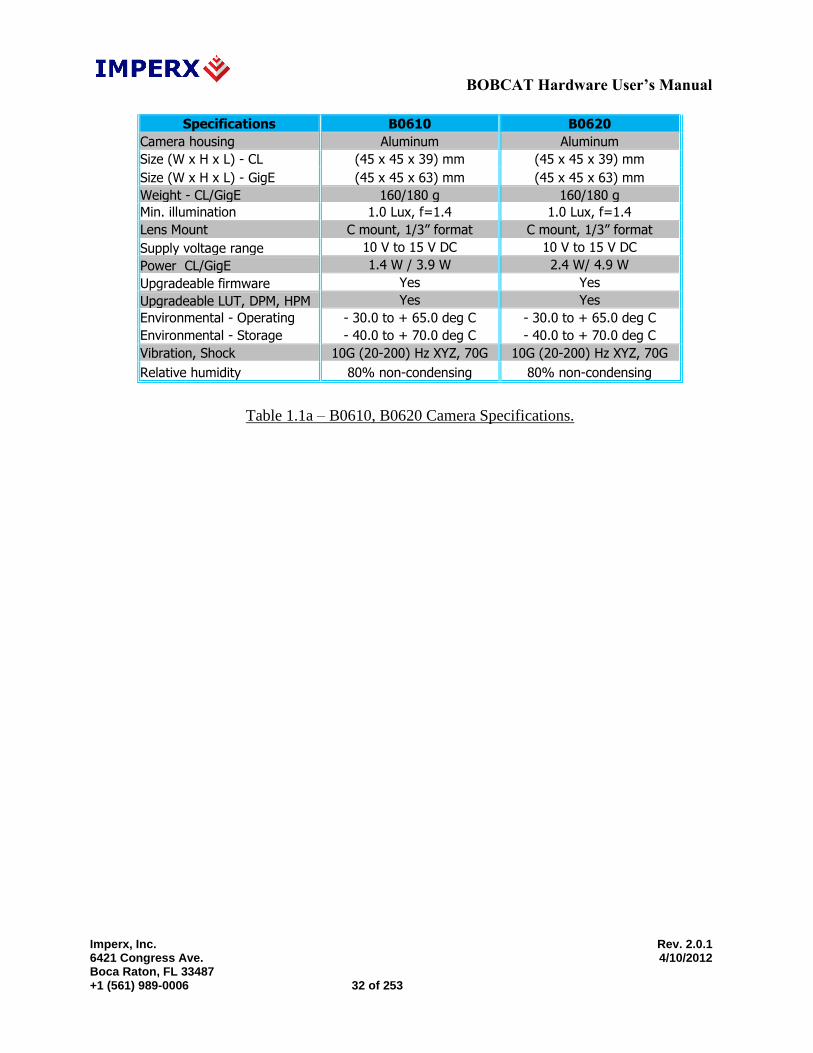
Imperx, Inc. Rev. 2.0.1 6421 Congress Ave. 4/10/2012 Boca Raton, FL 33487 +1 (561) 989-0006 32 of 253
Specifications B0610 B0620
Camera housing Aluminum Aluminum
Size (W x H x L) - CL (45 x 45 x 39) mm (45 x 45 x 39) mm
Size (W x H x L) - GigE (45 x 45 x 63) mm (45 x 45 x 63) mm
Weight - CL/GigE 160/180 g 160/180 g
Min. illumination 1.0 Lux, f=1.4 1.0 Lux, f=1.4
Lens Mount C mount, 1/3” format C mount, 1/3” format
Supply voltage range 10 V to 15 V DC 10 V to 15 V DC
Power CL/GigE 1.4 W / 3.9 W 2.4 W/ 4.9 W
Upgradeable firmware Yes Yes
Upgradeable LUT, DPM, HPM Yes Yes
Environmental - Operating - 30.0 to + 65.0 deg C - 30.0 to + 65.0 deg C
Environmental - Storage - 40.0 to + 70.0 deg C - 40.0 to + 70.0 deg C
Vibration, Shock 10G (20-200) Hz XYZ, 70G 10G (20-200) Hz XYZ, 70G
Relative humidity 80% non-condensing 80% non-condensing
Table 1.1a – B0610, B0620 Camera Specifications.

BOBCAT Hardware User’s Manual
Imperx, Inc. Rev. 2.0.1 6421 Congress Ave. 4/10/2012 Boca Raton, FL 33487 +1 (561) 989-0006 33 of 253
Specifications B1020 B1310 B1320
Active image resolution 1032/1024(H)x 1032/1024(V) 1296/1280(H) x 966/960(V) 1320/1280(H) x 728/720(V)
Active image area (H, V) mm
5.63/5.63(H)X5.63/5.63(V) 4.86/4.81(H)X 3.62/3.62(V) 7.26/7.04(H)X4.05/3.96(V)
Pixel size 5.50 μm 3.75 μm 5.50 μm
Video output Digital, 8/10/12/14 bit Digital, 8/10/12/14 bit 3x8RGB
Digital, 8/10/12/14 bit
Output structure Single or Dual Single RGB Single or Dual Data clock 40.000/50.000 MHz 40.000/64.000 MHz 40.000/50.000 MHz
Camera interface Base CL/GEV Base CL/GEV Base CL/GEV
PoCL 12V -3W (CL only) 12V -2W (CL only) 12V -2W (CL only)
Nominal frame rate 60/74 fps 26/39 fps 68/85 fps
Maximum frame rate 354 fps 170 fps 395 fps
S/N ratio 60dB 60dB 60dB
Shutter speed 1/500000 to1/60 1/200000 to 1/26 1/2500000 to/68
Line time Up to 200 us up to 200 us Up to 200 us
Analog gain 0 to 36 dB per output 0 to 36 dB per output 0 to 36 dB per output
Gain resolution 0.035 dB/step, 1024 steps 0.035 dB/step, 1024 steps 0.035 dB/step, 1024 steps
Analog CDS gain (-3.0, 0.0, +3.0, +6.0) dB (-3.0, 0.0, +3.0, +6.0) dB (-3.0, 0.0, +3.0, +6.0) dB
Black level offset 1024 levels per output 1024 levels per output 1024 levels per output
Digital gain 1.0x to 3.0x (0.1x step) 1.0x to 3.0x (0.1x step) 1.0x to 3.0x (0.1x step)
Digital offset -511 to + 511 -511 to + 511 -511 to + 511
Auto gain/exposure Yes, with AOI Yes, with AOI Yes, with AOI
Area of interest Eight Independent AOIs Eight Independent AOIs Eight Independent AOIs
User LUT 2 LUTs: Gamma, User LUT 2 LUTs: Gamma, User LUT 2 LUTs: Gamma, User LUT
Flat field correction No No No
Digital bit shift 7 bits, Left or Right 7 bits, Left or Right 7 bits, Left or Right
Hardware trigger Asynchronous Asynchronous Asynchronous
Software trigger Asynchronous, frame-grabber Asynchronous, frame-grabber Asynchronous, frame-grabber
Trigger modes Standard, Double, Fast, Async, Frame integration
Standard, Double, Fast, Async, Frame integration
Standard, Double, Fast, Async, Frame integration
Trigger features Rising/Falling edge, De-glitch, Delay, Strobe
Rising/Falling edge, De-glitch, Delay, Strobe
Rising/Falling edge, De-glitch, Delay, Strobe
Camera Image Memory TBD TBD TBD
Size (W x H x L) - CL (46X46X50.6) mm (46X46X39) mm (46X46X50.6) mm
Size (W x H x L) - GigE (46X46X74.5) mm (46X46X63) mm (46X46X74.5) mm
Weight - CL/GigE 186/229g 136/243g 186/229g
Min. illumination 1 lux, F1.4 0.2 Lux, f=1.4 1 lux, F1.4
Lens Mount C mount, 1/2” format CCD C mount, 1/3” format CCD C mount, 1/2” format CCD
Power CL/GigE 3.0 W / 4.4 W 1.8 W / 3.4 W 3.2 W / 54.5 W
Table 1.1b – B1020, B1310 and B1320 Camera Specifications

BOBCAT Hardware User’s Manual
Imperx, Inc. Rev. 2.0.1 6421 Congress Ave. 4/10/2012 Boca Raton, FL 33487 +1 (561) 989-0006 34 of 253
Specifications B1410 B1411
Active image resolution 1392/1360(H) x 1040/1024(V) 1392/1360(H) x 1040/1024(V)
Active image area (H, V) mm 8.978/8.772 x 6.708/6.605 6.47/6.31(H) X 4.83/4.72(V)
Pixel size 6.45 μm 4.65 μm
Video output Digital, 8/10/12/14 bit 3x8RGB Digital, 8/10/12/14 bit 3x8RGB
Output structure Single Single
Data clock 40.000/54.000 MHz 40.000/54.000 MHz
Camera interface Base CL/GEV Base CL/GEV
PoCL 12VDC, 4W (CL only) 12VDC, 4W (CL only)
Nominal frame rate 23/30 fps 24/31 fps
Maximum frame rate Up to 190 fps Up to 247 fps
S/N ratio 60 dB 60dB
Shutter speed 1/250000 to 1/23 sec 1/250000 to 1/24
Line time Up to 200 us Up to 200 us
Analog gain 0 to 36 dB per output 0 to 36 dB per output
Gain resolution 0.035 dB/step, 1024 steps 0.035 dB/step, 1024 steps
Analog CDS gain (-3.0, 0.0, +3.0, +6.0) dB (-3.0, 0.0, +3.0, +6.0) dB
Black level offset 1024 levels per output 1024 levels per output
Digital gain 1.0x to 3.0x (0.1x step) 1.0x to 3.0x (0.1x step)
Digital offset -511 to + 511 -511 to + 511
Auto gain/exposure Yes, with AOI Yes, with AOI
Area of interest Eight Independent AOIs Eight Independent AOIs
User LUT 2 LUTs: Gamma, User LUT 2 LUTs: Gamma, User LUT
Flat field correction No No
Digital bit shift 7 bits, Left or Right 7 bits, Left or Right
Hardware trigger Asynchronous Asynchronous
Software trigger Asynchronous, frame-grabber Asynchronous, frame-grabber
Trigger modes Standard, Double, Fast, Async, Frame integration
Standard, Double, Fast, Async, Frame integration
Trigger features Rising/Falling edge, De-glitch, Delay, Strobe
Rising/Falling edge, De-glitch, Delay, Strobe
Camera Image Memory TBD-DSP up to 2G TBD-DSP up to 2G
Size (W x H x L) - CL (46x46x39) mm (46x46x39) mm
Size (W x H x L) - GigE (46x46x63) mm (46x46x63) mm
Weight - CL/GigE 142/196 g 171/196 g
Min. illumination 0.2 Lux, f=1.4 0.2 Lux, f=1.4
Lens Mount C mount, 2/3” format CCD C mount, 1/2” format CCD
Power CL/GigE 2.7 W / 4.6 W 2.6 W / 4.2 W
Table 1.1c – B1410 and B1411 Camera Specifications

BOBCAT Hardware User’s Manual
Imperx, Inc. Rev. 2.0.1 6421 Congress Ave. 4/10/2012 Boca Raton, FL 33487 +1 (561) 989-0006 35 of 253
Specifications B1610 B1620 B1621
Active image resolution 1628/1620 (H) x 1236/1220 (V)
1608/1600 (H) x 1208/1200 (V)
1632/1600(H) x 1232/1200(V)
Active image area (H, V) mm
7.16/7.12 x 5.43/5.36 11.89/11.84 x 8.93/8.88 9.02/8.80(H) x6.82/6.60(V)
Pixel size 4.40 μm 7.40 μm 5.50 μm
Video output Digital, 8/10/12/14 bit,3x8RGB
Digital, 8/10/12/14 bit Digital, 8/10/12/14
Output structure Single Single or Dual Single or Dual
Data clock 40.000/64.000 MHz 40.000/50.000 MHz 40.000/50.000 MHZ
Camera interface Base CL/GEV Base CL/GEV Base CL/GEV
PoCL 12VDC, 4W (CL only) 12VDC, 4W (CL only) 12VDC, 3.0W (CL only)
Nominal frame rate 17/25 fps 35/44 fps 34/42 fps
Maximum frame rate 212 fps 299 fps 257 fps
S/N ratio 60 dB 60 dB 60dB
Shutter speed 1/200000 to 1/16 sec 1/100000 to 1/35 sec 1/500000 to 1/34
Line time Up to 200 us up to 200 us up to 200 us
Analog gain 0 to 36 dB per output 0 to 36 dB per output 0 to 36 dB per output
Gain resolution 0.035 dB/step, 1024 steps 0.035 dB/step, 1024 steps 0.035 dB/step, 1024 steps
Analog CDS gain (-3.0, 0.0, +3.0, +6.0) dB (-3.0, 0.0, +3.0, +6.0) dB (-3.0, 0.0, +3.0, +6.0) dB
Black level offset 1024 levels per output 1024 levels per output 1024 levels per output
Digital gain 1.0x to 3.0x (0.1x step) 1.0x to 3.0x (0.1x step) 1.0x to 3.0x (0.1x step)
Digital offset -511 to + 511 -511 to + 511 -511 to + 511
Auto gain/exposure Yes, with AOI Yes, with AOI Yes, with AOI
Area of interest Eight Independent AOIs Eight Independent AOIs Eight Independent AOIs
User LUT 2 LUTs: Gamma, User LUT 2 LUTs: Gamma, User LUT 2 LUTs: Gamma, User LUT
Flat field correction No Yes, User FFC Yes, User FFC
Digital bit shift 7 bits, Left or Right 7 bits, Left or Right 7 bits, Left or Right
Hardware trigger Asynchronous Asynchronous Asynchronous
Software trigger Asynchronous, frame-grabber
Asynchronous, frame-grabber
Asynchronous, frame-grabber
Trigger modes Standard, Double, Fast, Async, Frame integration
Standard, Double, Fast, Async, Frame integration
Standard, Double, Fast, Async, Frame integration
Trigger features Rising/Falling edge, De-glitch, Delay, Strobe
Rising/Falling edge, De-glitch, Delay, Strobe
Rising/Falling edge, De-glitch, Delay, Strobe
Camera Image Memory TBD-DSP up to 2G TBD-DSP up to 2G TBD-DSP up to 2G
Size (W x H x L) - CL (46x46x39) mm (46x46x43) mm (46x46x50.6) mm
Size (W x H x L) - GigE (46x46x63) mm (46x46x66) mm (46x46x74.5) mm
Weight - CL/GigE 167/192 g 156/210 g 171/245g
Min. illumination 0.5 Lux, f=1.4 1.0 Lux, f=1.4 1.0 Lux, f=1.4
Lens Mount C mount, 1/1.8” format CCD
C mount, 1.0” format CCD C Mount, 2/3 format CCD
Power CL/GigE 2.2 W / 4.6 W 3.2 W / 4.9 W 3.0 W / 4.5 W
Table 1.1d – B1610, B1620 and B1621 Camera Specifications

BOBCAT Hardware User’s Manual
Imperx, Inc. Rev. 2.0.1 6421 Congress Ave. 4/10/2012 Boca Raton, FL 33487 +1 (561) 989-0006 36 of 253
Specifications B1920 B1921
Active image resolution 1920 (H) x 1080 (V) 1952/1920(H) x 1112/1080 (V)
Active image area (H,V) mm 14.208 x 7.992 10.56(H) X 5.94(V)
Pixel size 7.40 μm 5.50 μm Video output Digital, 8/10/12/14 bit Digital, 8/10/12/14 bit
Output structure Single or Dual Single or Dual
Data clock 40.000/50.000 MHz 40.000/50.000 MHz
Camera interface Base CL/GEV Base CL/GEV
PoCL 12VDC, 3W (CL only) 12VDC, 3W (CL only)
Nominal frame rate 33/41 fps 32/40 fps
Maximum frame rate Up to 188 fps Up to 282 fps
S/N ratio 60 dB 60dB
Shutter speed 1/100000 to 1/33 sec 1/500000 to 1/32
Line time up to 200 us up to 200 us
Analog gain 0 to 36 dB per output 0 to 36 dB per output
Gain resolution 0.035 dB/step, 1024 steps 0.035 dB/step, 1024 steps
Analog CDS gain (-3.0, 0.0, +3.0, +6.0) dB (-3.0, 0.0, +3.0, +6.0) dB
Black level offset 1024 levels per output 1024 levels per output
Digital gain 1.0x to 3.0x (0.1x step) 1.0x to 3.0x (0.1x step)
Digital offset -511 to + 511 -511 to + 511
Auto gain/exposure Yes, with AOI Yes, with AOI
Area of interest Eight Independent AOIs Eight Independent AOIs
User LUT 2 LUTs: Gamma, User LUT 2 LUTs: Gamma, User LUT
Flat field correction Yes, User FFC Yes, User FFC
Digital bit shift 7 bits, Left or Right 7 bits, Left or Right
Hardware trigger Asynchronous Asynchronous
Software trigger Asynchronous, frame-grabber Asynchronous, frame-grabber
Trigger modes Standard, Double, Fast, Async, Frame integration
Standard, Double, Fast, Async, Frame integration
Trigger features Rising/Falling edge, De-glitch,
Delay, Strobe
Rising/Falling edge, De-glitch,
Delay, Strobe
Camera Image Memory TBD-DSP up to 2G TBD-DSP up to 2G
Size (W x H x L) - CL (46x46x43) mm (46x46x50.6) mm
Size (W x H x L) - GigE (46x46x66) mm (46x46x74.5) mm
Weight - CL/GigE 157/263 g 170/229 g
Min. illumination 1.0 Lux, f=1.4 1.0 Lux, f=1.4
Lens Mount C mount, 1.0” format CCD C mount, 2/3 format CCD
Power CL/GigE 3.2 W / 5.0 W 3.0 W / 4.4 W
Table 1.1e – B1920 and B1921 Camera Specifications

BOBCAT Hardware User’s Manual
Imperx, Inc. Rev. 2.0.1 6421 Congress Ave. 4/10/2012 Boca Raton, FL 33487 +1 (561) 989-0006 37 of 253
Specifications B2020 B2320
Active image resolution 2056/2048 (H) x 2060/2048 (V) 2352/2336(H) x 1768/1752(V)
Active image area (H,V) mm 15.214/15.155 x 15.244/15.155 12.98/12.85(H) X 9.76/9.64(V)
Pixel size 7.40 μm 5.50 μm Video output Digital, 8/10/12/14 bit Digital, 8/10/12/14 bit
Output structure Single or Dual Single or Dual
Data clock 40.000/50.000 MHz 40.000/50.000 MHz
Camera interface Base CL/GEV Base CL/GEV
PoCL 12VDC, 3.6W (CL only) 12VDC, 3.2W (CL only
Nominal frame rate 16/20 fps 16/21 fps
Maximum frame rate 123 fps 126 fps
S/N ratio 60 dB 60 dB
Shutter speed 1/100000 to 1/16 sec 1/500000 to 1/16
Line time up to 200 us up to 200 us
Analog gain 0 to 36 dB per output 0 to 36 dB per output
Gain resolution 0.035 dB/step, 1024 steps 0.035 dB/step, 1024 steps
Analog CDS gain (-3.0, 0.0, +3.0, +6.0) dB (-3.0, 0.0, +3.0, +6.0) dB
Black level offset 1024 levels per output 1024 levels per output
Digital gain 1.0x to 3.0x (0.1x step) 1.0x to 3.0x (0.1x step)
Digital offset -511 to + 511 -511 to + 511
Auto gain/exposure Yes, with AOI Yes, with AOI
Area of interest Eight Independent AOIs Eight Independent AOIs
User LUT 2 LUTs: Gamma, User LUT 2 LUTs: Gamma, User LUT
Flat field correction Yes, User FFC Yes, User FFC
Digital bit shift 7 bits, Left or Right 7 bits, Left or Right
Hardware trigger Asynchronous Asynchronous
Software trigger Asynchronous, frame-grabber Asynchronous, frame-grabber
Trigger modes Standard, Double, Fast, Async, Frame integration
Standard, Double, Fast, Async, Frame integration
Trigger features Rising/Falling edge, De-glitch,
Delay, Strobe
Rising/Falling edge, De-glitch,
Delay, Strobe
Camera Image Memory TBD-DSP up to 2G TBD-DSP up to 2G
Size (W x H x L) - CL (60x60x37) mm (46x46x50) mm
Size (W x H x L) - GigE (60x60x60) mm (46x46x74.5) mm
Weight - CL/GigE 294/379 g 172/227g
Min. illumination 1.0 Lux, f=1.4 1.0 Lux, f=1.4
Lens Mount F mount, 21 mm format CCD C Mount,1” format CCD
Power consumption 3.6 W / 5.0 W 3.2 W / 4.8 W
Table 1.1f – B2020 and B2320 Camera Specifications

BOBCAT Hardware User’s Manual
Imperx, Inc. Rev. 2.0.1 6421 Congress Ave. 4/10/2012 Boca Raton, FL 33487 +1 (561) 989-0006 38 of 253
Specifications B2520 B3320 B4020
Active image resolution 2456/2448 (H) x 2058/2050 (V)
3340/3296(H) x 2496/2472(V) 4032/4008 (H) x 2688/2672 (V)
Active image area (H,
V) mm
8.473/8.446 x
7.100/7.072
18.37/18.13(H)
X13.72/13.60(V)
36.288/36.072 x
24.192/24.048
Pixel size 3.45 μm 5.50 μm 9.00 μm
Video output Digital, 8/10/12/14 bit Digital, 8/10/12/14 bit Digital, 8/10/12 bit
Output structure Dual Single or Dual Single or Dual
Data clock 40.000/64.000 MHz 40.000/50.000 MHz 30.000/40.000 MHz
Camera interface Base CL/GEV Base CL/GEV Base CL/GEV
PoCL 12VDC, 4.8W (CL only) No No
Nominal frame rate 11/16 fps 8.5/10.6 fps 5/7 fps
Maximum frame rate 50 fps 73 fps 39 fps
S/N ratio 53 dB 60 dB 60 dB
Shutter speed 1/80000 to 1/11 sec 1/500000 to 1/8 1/100000 to 1/5 sec
Line time up to 200 us up to 200 us up to 200 us
Analog gain 0 to 36 dB per output 0 to 36 dB per output 0 to 36 dB per output
Gain resolution 0.035 dB/step, 1024
steps
0.035 dB/step, 1024 steps 0.035 dB/step, 1024 steps
Analog CDS gain (-3.0, 0.0, +3.0, +6.0) dB
(-3.0, 0.0, +3.0, +6.0) dB (-3.0, 0.0, +3.0, +6.0) dB
Black level offset 1024 levels per output 1024 levels per output 1024 levels per output
Digital gain 1.0x to 3.0x (0.1x step) 1.0x to 3.0x (0.1x step) 1.0x to 3.0x (0.1x step)
Digital offset -511 to + 511 -511 to + 511 -511 to + 511
Auto gain/exposure Yes, with AOI Yes, with AOI Yes, with AOI
Area of interest Eight Independent AOIs Eight Independent AOIs Eight Independent AOIs
User LUT 2 LUTs: Gamma, User
LUT
2 LUTs: Gamma, User LUT 2 LUTs: Gamma, User LUT
Flat field correction No Yes, User FFC Yes, User FFC
Digital bit shift 7 bits, Left or Right 7 bits, Left or Right 7 bits, Left or Right
Hardware trigger Asynchronous Asynchronous Asynchronous
Software trigger Asynchronous, frame-grabber
Asynchronous, frame-grabber Asynchronous, frame-grabber
Trigger modes Standard, Double, Fast,
Async, Frame integration
Standard, Double, Fast,
Async, Frame integration
Standard, Double, Fast, Async,
Frame integration
Trigger features Rising/Falling edge, De-glitch, Delay, Strobe
Rising/Falling edge, De-glitch, Delay, Strobe
Rising/Falling edge, De-glitch, Delay, Strobe
Camera Image Memory TBD-DSP up to 2G TBD-DSP up to 2G TBD-DSP up to 2G
Size (W x H x L) - CL (46 x 46 x 39) mm (60x60x45) mm (60x60x38) mm
Size (W x H x L) - GigE (46x46x63) mm (60x60x68) mm (60x60x60) mm
Weight - CL/GigE 137/243 g 186/309 g 288/372 g
Min. illumination .5 Lux, f=1.4 1.0 Lux, f=1.4 1.0 Lux, f=1.4
Lens Mount C mount,1.0” format CCD
F mount, 1.3” format CCD F mount, 43.3 mm format CCD
Power consumption 2.4 W / 4.8 W 3.6 W / 6.1 W 3.7 W / 6.5 W
Table 1.1g – B2520, B3320 and B4020 Camera Specifications

BOBCAT Hardware User’s Manual
Imperx, Inc. Rev. 2.0.1 6421 Congress Ave. 4/10/2012 Boca Raton, FL 33487 +1 (561) 989-0006 39 of 253
Specifications B4820 B4821 B6620
Active image resolution 4904/4872(H)x3280/3248(V) 4920/4896(H) x 3280/3264(V) 6600/6576(H) x 4408/4384(V)
Active image area (H,
V) mm
36.289/36.053(H) x
24.272/24.035(V)
27.060/26.928(H) x
18.040/17.952(V)
36.30/36.17(H) X
24.24/24.11(V)
Pixel size 7.40 μm 5.50 μm 5.50 μm Video output Digital, 8/10/12/14 bit Digital, 8/10/12/14 bit Digital, 8/10/12/14 bit
Output structure Single or Dual Single or Dual Single or Dual
Data clock 30.000/40.000 MHz 30.000/40.000 MHz 30.000/40.000 MHz
Camera interface Base CL/GEV Base CL/GEV Base CL/GEV
PoCL 12VDC, 4W (CL only)
Nominal frame rate 3/4 fps 3.1/4.2 fps 1.8/2.5 fps
Maximum frame rate 24 fps 21 fps 13 fps
S/N ratio 60 dB 60dB 60dB
Shutter speed 1/67000 to 1/3 sec 1/125000 to 1/3 1/125000 to1/2.5
Line time up to 200 us up to 200 us up to 200 us
Analog gain 0 to 36 dB per output 0 to 36 dB per output 0 to 36 dB per output
Gain resolution 0.035 dB/step, 1024 steps 0.035 dB/step, 1024 steps 0.035 dB/step, 1024 steps
Analog CDS gain (-3.0, 0.0, +3.0, +6.0) dB (-3.0, 0.0, +3.0, +6.0) dB (-3.0, 0.0, +3.0, +6.0) dB
Black level offset 1024 levels per output 1024 levels per output 1024 levels per output
Digital gain 1.0x to 3.0x (0.1x step) 1.0x to 3.0x (0.1x step) 1.0x to 3.0x (0.1x step)
Digital offset -511 to + 511 -511 to + 511 -511 to + 511
Auto gain/exposure Yes, with AOI Yes, with AOI Yes, with AOI
Area of interest Eight Independent AOIs Eight Independent AOIs Eight Independent AOIs
User LUT 2 LUTs: Gamma, User LUT 2 LUTs: Gamma, User LUT 2 LUTs: Gamma, User LUT
Flat field correction Yes, User FFC Yes, User FFC Yes, User FFC
Digital bit shift 7 bits, Left or Right 7 bits, Left or Right 7 bits, Left or Right
Hardware trigger Asynchronous Asynchronous Asynchronous
Software trigger Asynchronous, frame-
grabber
Asynchronous, frame-
grabber
Asynchronous, frame-
grabber
Trigger modes Standard, Double, Fast, Async, Frame integration
Standard, Double, Fast, Async, Frame integration
Standard, Double, Fast, Async, Frame integration
Trigger features Rising/Falling edge, De-
glitch, Delay, Strobe
Rising/Falling edge, De-
glitch, Delay, Strobe
Rising/Falling edge, De-
glitch, Delay, Strobe
Camera Image Memory TBD-DSP up to 2G TBD-DSP up to 2G TBD-DSP up to 2G
Size (W x H x L) - CL (60x60x38) mm (60x60x45) mm 60x60x45 mm
Size (W x H x L) - GigE (60x60x60) mm (60x60x68) mm 60x60x68 mm
Weight - CL/GigE 280/300 g 186/310 g 319 /400g
Min. illumination 1.0 Lux, f=1.4 1.0 Lux, f=1.4 1.0 Lux, f=1.4
Lens Mount F mount,43.3mm format
CCD
F mount,32.36mm format F mount,35mm format CCD
Power consumption 3.6 W / 6.1 W 4.0/5.6 W 3.6 W / 6.1 W
Table 1.1h – B4820, B4821 and B6620 Camera Specifications

BOBCAT Hardware User’s Manual
Imperx, Inc. Rev. 2.0.1 6421 Congress Ave. 4/10/2012 Boca Raton, FL 33487 +1 (561) 989-0006 40 of 253
1.4 CAMERA CONNECTIVITY
1.4.1 Camera Link Output
The interface between the BOBCAT-CL camera and outside equipment is done via 3
connectors and one LED, located on the back panel of the camera – Figure 1.4.
1. Camera output – standard base Camera Link Mini provides data, sync, control,
serial interface and PoCL power.
2. 12-pin Power Connector – provides power and I/O interface.
3. USB type B programming/SPI connector.
4. Status LED – indicates the status of the camera – refer to Status LED section.
5. Serial Number – shows camera model and serial number.
Figure 1.4 – Camera back panel – camera link output
Camera data output is compliant with base Camera Link standard and includes
12VDC Power over camera Link (PoCL), 4 W max, 24 data bits, 4 sync signals
(LVAL, FVAL, DVAL and User Out), 1 reference clock, 2 external inputs CC1,
CC2 and a bi-directional serial interface. The camera link output connector is shown
in Figure 1.5a, and the corresponding signal mapping in Table 1.2.

BOBCAT Hardware User’s Manual
Imperx, Inc. Rev. 2.0.1 6421 Congress Ave. 4/10/2012 Boca Raton, FL 33487 +1 (561) 989-0006 41 of 253
1
14
13
26
Figure 1.5a – Camera output connector
Cable Name Pin CL Signal Type Description
Base Wire 1 12 VDC Power Power PoCL Power
Base Wire 14 Power Return Ground PoCL Power
- PAIR 1 2 - X 0 LVDS - Out Camera Link Channel Tx
+ PAIR 1 15 + X 0 LVDS - Out Camera Link Channel Tx
- PAIR 2 3 - X 1 LVDS - Out Camera Link Channel Tx
+ PAIR 2 16 + X 1 LVDS - Out Camera Link Channel Tx
- PAIR 3 4 - X 2 LVDS - Out Camera Link Channel Tx
+ PAIR 3 17 + X 2 LVDS - Out Camera Link Channel Tx
- PAIR 4 5 - X CLK LVDS - Out Camera Link Clock Tx
+ PAIR 4 18 + X CLK LVDS - Out Camera Link Clock Tx
- PAIR 5 6 - X 3 LVDS - Out Camera Link Channel Tx
+ PAIR 5 19 + X 3 LVDS - Out Camera Link Channel Tx
+ PAIR 6 7 + SerTC LVDS - In Serial Data Receiver
- PAIR 6 20 - SerTC LVDS - In Serial Data Receiver
- PAIR 7 8 - SerTFG LVDS - Out Serial Data Transmitter
+ PAIR 7 21 + SerTFG LVDS - Out Serial Data Transmitter
- PAIR 8 9 - CC 1 LVDS - In User Selectable Input
+ PAIR 8 22 + CC 1 LVDS - In User Selectable Input
+ PAIR 9 10 + CC2 LVDS - In User Selectable Input
- PAIR 9 23 - CC2 LVDS - In User Selectable Input
- PAIR 10 11 N/C N/C N/C
+ PAIR 10 24 N/C N/C N/C
+ PAIR 11 12 N/C N/C N/C
- PAIR 11 25 N/C N/C N/C
Base Wire 13 Power Return Ground PoCL Power
Base Wire 26 12 VDC Power Power PoCL Power
Table 1.2 – Camera Output Connector – Signal Mapping

BOBCAT Hardware User’s Manual
Imperx, Inc. Rev. 2.0.1 6421 Congress Ave. 4/10/2012 Boca Raton, FL 33487 +1 (561) 989-0006 42 of 253
The bit assignment corresponding to the base configuration is shown in the
following table.
Port Port/bit 8-bits
Tap 1, 2 10-bits Tap 1, 2
12-bits Tap 1, 2
14-bits Tap 1
DATA 0 Port A0 A0 A0 A0 A0
DATA 1 Port A1 A1 A1 A1 A1
DATA 2 Port A2 A2 A2 A2 A2
DATA 3 Port A3 A3 A3 A3 A3
DATA 4 Port A4 A4 A4 A4 A4
DATA 5 Port A5 A5 A5 A5 A5
DATA 6 Port A6 A6 A6 A6 A6
DATA 7 Port A7 A7 A7 A7 A7
DATA 8 Port B0 B0 A8 A8 A8
DATA 9 Port B1 B1 A9 A9 A9
DATA 10 Port B2 B2 N/C A10 A10
DATA 11 Port B3 B3 N/C A11 A11
DATA 12 Port B4 B4 B8 B8 A12
DATA 13 Port B5 B5 B9 B9 A13
DATA 14 Port B6 B6 N/C B10 N/C
DATA 15 Port B7 B7 N/C B11 N/C
DATA 16 Port C0 N/C B0 B0 N/C
DATA 17 Port C1 N/C B1 B1 N/C
DATA 18 Port C2 N/C B2 B2 N/C
DATA 19 Port C3 N/C B3 B3 N/C
DATA 20 Port C4 N/C B4 B4 N/C
DATA 21 Port C5 N/C B5 B5 N/C
DATA 22 Port C6 N/C B6 B6 N/C
DATA 23 Port C7 N/C B7 B7 N/C
ENABLE 0 LVAL LVAL LVAL LVAL LVAL
ENABLE 1 FVAL FVAL FVAL FVAL FVAL
ENABLE 2 DVAL DVAL DVAL DVAL DVAL
ENABLE 3 User Out User Out User Out User Out User Out
CONTROL 0 CC 1 CC 1 CC 1 CC 1 CC 1
CONTROL 1 CC 2 CC 2 CC 2 CC 2 CC 2
CONTROL 2 N/C N/C N/C N/C N/C
CONTROL 3 N/C N/C N/C N/C N/C
Table 1.3 – Base Camera Link bit assignment

BOBCAT Hardware User’s Manual
Imperx, Inc. Rev. 2.0.1 6421 Congress Ave. 4/10/2012 Boca Raton, FL 33487 +1 (561) 989-0006 43 of 253
The power and all external input/output signals are supplied to the camera via the
camera power connector shown in Figure 1.4a. The corresponding pin mapping is
shown in Table 1.4b. The connector is a HIROSE type miniature locking receptacle
#HR10A-10R-12P.
Figure 1.4a – Camera power connector
(Viewed from rear)
Pin Signal Type Description
1 12 VDC Return Ground Return 12 VDC Main Power Return
2 + 12 VDC Power - Input + 12 VDC Main Power
3 IRIS VCC Power - Input 12 V Iris Power
4 IRIS Video Analog Output Iris Video Output
5 IRIS Return Ground Return 12 VDC Iris Power Return
6 GP OUT Return Ground Return General Purpose Outputs Return
7 GP OUT 1 TTL OUT 1 General Purpose Output 1
8 GP IN 1 TTL/LVTTL IN 1 General Purpose Input 1
9 GP IN 2 TTL/LVTTL IN 2 General Purpose Input 2
10 GP IN Return Ground Return General Purpose Inputs Return
11 GPIO LVTTL IN/OUT Reserved for custom GPIO
12 GP OUT 2 TTL OUT 2 General Purpose Output 2
Table 1.4b – Camera Power Connector Pin Mapping

BOBCAT Hardware User’s Manual
Imperx, Inc. Rev. 2.0.1 6421 Congress Ave. 4/10/2012 Boca Raton, FL 33487 +1 (561) 989-0006 44 of 253
The camera power cable (sold separately) terminates in a HIROSE plug #HR10A-
10P-12S, and has two small BNC pig-tail cables for the external trigger input (black)
and strobe output (white). The corresponding BNC connector pin mapping is shown
on Table 1.5a.
Pin Signal Cable color Description
Case In 1 Return BNC Black
User Selectable Input 1 Return
Signal In 1 Active User Selectable Input 1 Signal
Case Out 1 Return BNC White
User Selectable Out 1 Return
Signal Out 1 Active User Selectable Out 1 Signal
Table 1.5a – BNC Connectors Pin Mapping

BOBCAT Hardware User’s Manual
Imperx, Inc. Rev. 2.0.1 6421 Congress Ave. 4/10/2012 Boca Raton, FL 33487 +1 (561) 989-0006 45 of 253
1.4.2 GigE Output
The interface between the GEV camera and outside equipment is done via 2
connectors and one LED, located on the back panel of the camera – Figure 1.6.
1. Camera output – standard RJ-45 provides data, sync, control, and serial interface.
2. 12-pin Power Connector – provides power and I/O interface.
3. Status LED – indicates the status of the camera – refer to Status LED section.
4. Serial Number – shows camera model and serial number.
Figure 1.6 – Camera back panel –GigE output
The Camera data along with the serial communication and triggering signals are
serialized and continuously transmitted over the Gigabit Ethernet interface at GigE’s
full 1-Gb/s line rate, while delivering consistently low, predictable latencies. The
network interface is compatible with IP/Ethernet networks operating at 1000 Mb/s
using standard LAN CAT-5 (CAT-5e) cables.
The power and all external input/output signals are supplied to the camera via the
camera power connector shown in Figure 1.5b. The corresponding pin mapping is
shown in Table 1.4a. The connector is a HIROSE type miniature locking receptacle
#HR10A-10R-12P. The power supply is shipped with a power cable which

BOBCAT Hardware User’s Manual
Imperx, Inc. Rev. 2.0.1 6421 Congress Ave. 4/10/2012 Boca Raton, FL 33487 +1 (561) 989-0006 46 of 253
terminates in a HIROSE plug #HR10A-10P-12S, and has two small BNC pig-tail
cables for the external trigger input (black) and strobe output (white). The
corresponding BNC connector pin mapping is shown on Table 1.4b.
1.4.3 Power Supply
The camera Link version of the camera is compatible with power over camera Link
– PoCL, with a maximum power of 4 W.
If PoCL is not available, a universal desktop power supply adapter, providing +12
VDC, ± 10%, and up to 2.5A constant DC current, is available (for additional price)
from Imperx for the BOBCAT cameras. The operating input voltage ranges from 90
to 240 VAC.
CAUTION NOTE
1. It is strongly recommended that you do not use an adapter other than the one that
is available from Imperx for the camera!
2. The PoCL current is limited to 333 mA. The cameras are PoCL compatible in
normal camera operation – free running with full image. In some modes such as
vertical binning x4 and x8 and in AOI (with keep frame rate disabled), when the
vertical height is less than 100 lines, the camera current can exceed 333 mA.
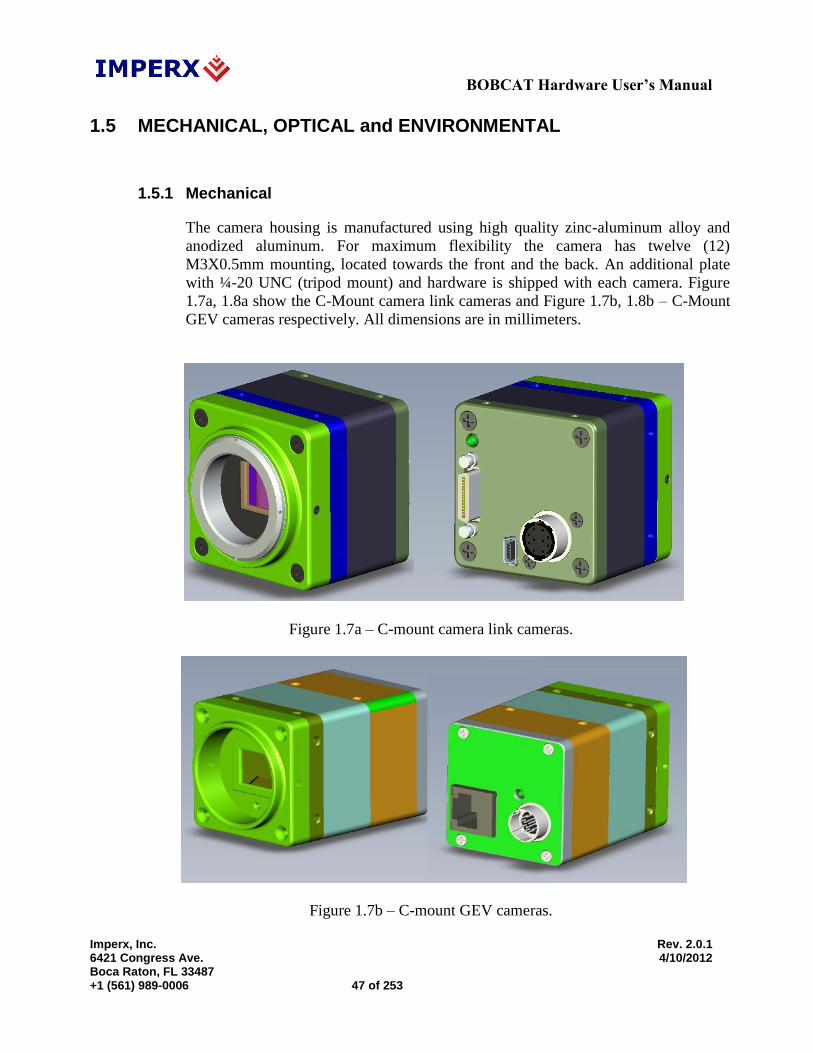
BOBCAT Hardware User’s Manual
Imperx, Inc. Rev. 2.0.1 6421 Congress Ave. 4/10/2012 Boca Raton, FL 33487 +1 (561) 989-0006 47 of 253
1.5 MECHANICAL, OPTICAL and ENVIRONMENTAL
1.5.1 Mechanical
The camera housing is manufactured using high quality zinc-aluminum alloy and
anodized aluminum. For maximum flexibility the camera has twelve (12)
M3X0.5mm mounting, located towards the front and the back. An additional plate
with ¼-20 UNC (tripod mount) and hardware is shipped with each camera. Figure
1.7a, 1.8a show the C-Mount camera link cameras and Figure 1.7b, 1.8b – C-Mount
GEV cameras respectively. All dimensions are in millimeters.
Figure 1.7a – C-mount camera link cameras.
Figure 1.7b – C-mount GEV cameras.

BOBCAT Hardware User’s Manual
Imperx, Inc. Rev. 2.0.1 6421 Congress Ave. 4/10/2012 Boca Raton, FL 33487 +1 (561) 989-0006 48 of 253
C – Mount Camera Link Output
Figure 1.8a – C-mount camera link output – dimensional drawings for ICL-B0610, B0620,
B1310, B1410, B1411, B1610 and ICL-B2520.

BOBCAT Hardware User’s Manual
Imperx, Inc. Rev. 2.0.1 6421 Congress Ave. 4/10/2012 Boca Raton, FL 33487 +1 (561) 989-0006 49 of 253
C – Mount Camera Link Output
Figure 1.8b – C-mount camera link output – dimensional drawings for ICL-B1620 and ICL-
B1920.

BOBCAT Hardware User’s Manual
Imperx, Inc. Rev. 2.0.1 6421 Congress Ave. 4/10/2012 Boca Raton, FL 33487 +1 (561) 989-0006 50 of 253
C – Mount Camera Link (CL) Output
Figure 1.8ba – C-mount camera link output – dimensional drawings for ICL-B1020, B1320,
B1621, B1921 and ICL-B2320.

BOBCAT Hardware User’s Manual
Imperx, Inc. Rev. 2.0.1 6421 Congress Ave. 4/10/2012 Boca Raton, FL 33487 +1 (561) 989-0006 51 of 253
F – Mount Camera Link Output
Figure 1.8c – F-mount camera link output – dimensional drawings for ICL-B2020, ICL-
B4020 and ICL-B4820.

BOBCAT Hardware User’s Manual
Imperx, Inc. Rev. 2.0.1 6421 Congress Ave. 4/10/2012 Boca Raton, FL 33487 +1 (561) 989-0006 52 of 253
F –Mount Camera Link (CL) Output
Figure 1.8ca – F-mount camera link output – dimensional drawings for ICL-B3320, ICL-
B4821 and ICL-B6620.

BOBCAT Hardware User’s Manual
Imperx, Inc. Rev. 2.0.1 6421 Congress Ave. 4/10/2012 Boca Raton, FL 33487 +1 (561) 989-0006 53 of 253
C – Mount GigE Vision (GEV) Output
Figure 1.8d – C-mount GigE vision output – dimensional drawings for IGV-B0610, IGV-
B0620, IGV-B1410, IGV-B1610 and IGV-B2520.

BOBCAT Hardware User’s Manual
Imperx, Inc. Rev. 2.0.1 6421 Congress Ave. 4/10/2012 Boca Raton, FL 33487 +1 (561) 989-0006 54 of 253
C – Mount GigE Vision (GEV) Output
Figure 1.8e – C-mount GigE vision output – dimensional drawings for IGV-B1620 and IGV-
B1920.

BOBCAT Hardware User’s Manual
Imperx, Inc. Rev. 2.0.1 6421 Congress Ave. 4/10/2012 Boca Raton, FL 33487 +1 (561) 989-0006 55 of 253
C – Mount GigE Vision (GEV) Output
Figure 1.8ea – C-mount GigE vision output – dimensional drawings for IGV-B1020, B1320,
B1621, B1921 and IGV-B2320.

BOBCAT Hardware User’s Manual
Imperx, Inc. Rev. 2.0.1 6421 Congress Ave. 4/10/2012 Boca Raton, FL 33487 +1 (561) 989-0006 56 of 253
F – Mount GigE Vision (GEV) Output
Figure 1.8f – F-mount GigE vision output – dimensional drawings for IGV-B2020, IGV-
B4020 and IGV-B4820.

BOBCAT Hardware User’s Manual
Imperx, Inc. Rev. 2.0.1 6421 Congress Ave. 4/10/2012 Boca Raton, FL 33487 +1 (561) 989-0006 57 of 253
F – Mount GigE Vision (GEV) Output
Figure 1.8fa – F-mount GigE vision output – dimensional drawings for IGV-B3320, IGV-
B4821 and IGV-B6620.

BOBCAT Hardware User’s Manual
Imperx, Inc. Rev. 2.0.1 6421 Congress Ave. 4/10/2012 Boca Raton, FL 33487 +1 (561) 989-0006 58 of 253
Figure 1.8g – Small Bobcat mounting plate using ¼ in 20 thread.
Figure 1.8ga – Big Bobcat mounting plate using ¼ in 20 thread.

BOBCAT Hardware User’s Manual
Imperx, Inc. Rev. 2.0.1 6421 Congress Ave. 4/10/2012 Boca Raton, FL 33487 +1 (561) 989-0006 59 of 253
1.5.2 Optical
The smaller body BOBCAT cameras (45 x 45) mm cross-section come with an
adapter for C-mount lenses, which have a 17.52 mm back focal distance – Figure
1.9a and Figure 1.9b. An F-mount lens can be used with a C-mount camera via an F-
mount to C-mount adapter, which can be purchased separately – refer to the Imperx
web site for more information. The bigger body BOBCAT cameras (60 x 60) mm
cross-section come with an adapter for F-mount lenses, which have a 46.50 mm back
focal distance – Figure 1.9c. The camera performance and signal to noise ratio
depends on the illumination (amount of light) reaching the sensor and the exposure
time. Always try to balance these two factors. Unnecessarily long exposure will
increase the amount of noise and thus decrease the signal to noise ratio.
The cameras are very sensitive in the IR spectral region. All color cameras have and
IR cut-off filter installed. The monochrome cameras are without IR filter. If
necessary, an IR filter (1 mm thickness or less) can be inserted under the front lens
bezel.
CAUTION NOTE
1. Avoid direct exposure to a high intensity light source (such as a laser beam).
This may damage the camera optical sensor!
2. Avoid foreign particles on the surface of the imager.
1.5.3 Environmental
The camera is designed to operate from -300 to 60
0 C in a dry environment. The
relative humidity should not exceed 80% non-condensing. Always keep the camera
as cool as possible. Always allow sufficient time for temperature equalization, if the
camera was kept below 00 C!
The camera should be stored in a dry environment with the temperature ranging
from -500 to + 70
0 C.
CAUTION NOTE
1. Avoid direct exposure to moisture and liquids. The camera housing is not
hermetically sealed and any exposure to liquids may damage the camera
electronics!
2. Avoid operating in an environment without any air circulation, in close
proximity to an intensive heat source, strong magnetic or electric fields.
3. Avoid touching or cleaning the front surface of the optical sensor. If the sensor
needs to be cleaned, use soft lint free cloth and an optical cleaning fluid. Do not
use methylated alcohol!

BOBCAT Hardware User’s Manual
Imperx, Inc. Rev. 2.0.1 6421 Congress Ave. 4/10/2012 Boca Raton, FL 33487 +1 (561) 989-0006 60 of 253
Figure 1.9a – Optical plane position for B0610 (KAI-0340), B0620 (KAI-0340), B1410
(ICX-285), B1610 (ICX-274) and B2520 (ICX-625) cameras.

BOBCAT Hardware User’s Manual
Imperx, Inc. Rev. 2.0.1 6421 Congress Ave. 4/10/2012 Boca Raton, FL 33487 +1 (561) 989-0006 61 of 253
Figure 1.9b – Optical plane position for B1620 (KAI-2020) and B1920 (KAI-2093) cameras.

BOBCAT Hardware User’s Manual
Imperx, Inc. Rev. 2.0.1 6421 Congress Ave. 4/10/2012 Boca Raton, FL 33487 +1 (561) 989-0006 62 of 253
Figure 1.9c – Optical plane position for B2020 (KAI-04022), B4020 (KAI-11002), and
B4820 (KAI-16000) cameras.
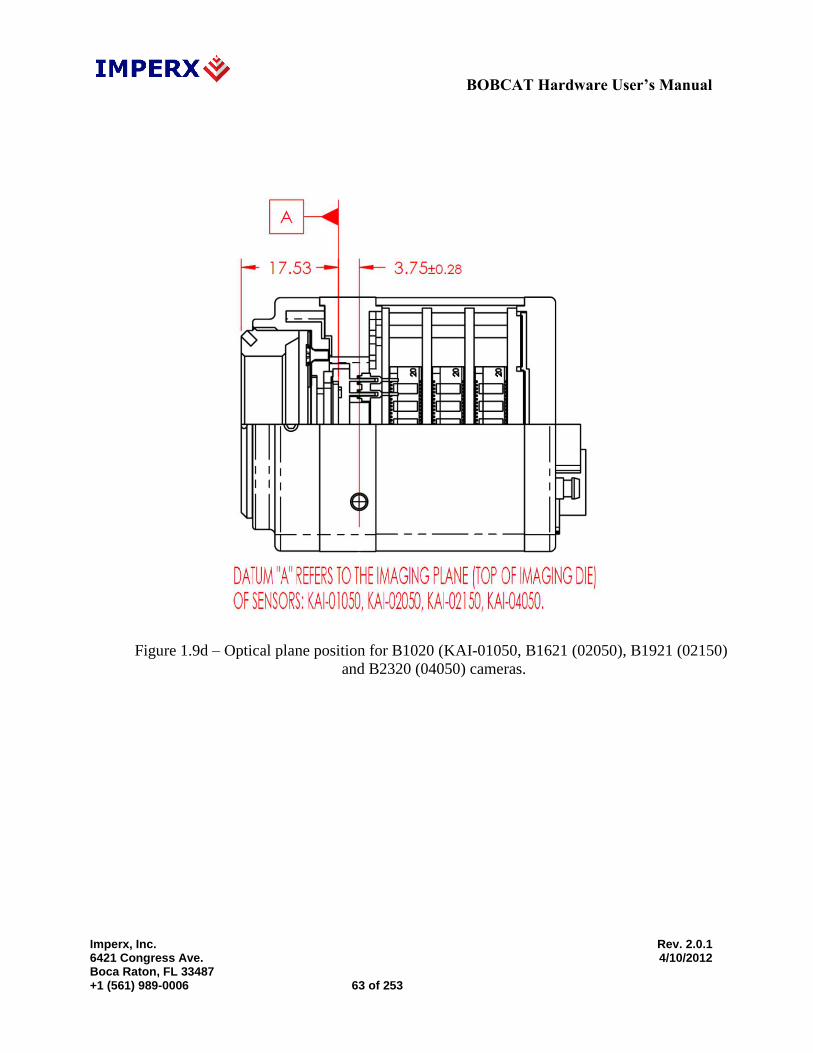
BOBCAT Hardware User’s Manual
Imperx, Inc. Rev. 2.0.1 6421 Congress Ave. 4/10/2012 Boca Raton, FL 33487 +1 (561) 989-0006 63 of 253
Figure 1.9d – Optical plane position for B1020 (KAI-01050, B1621 (02050), B1921 (02150)
and B2320 (04050) cameras.

BOBCAT Hardware User’s Manual
Imperx, Inc. Rev. 2.0.1 6421 Congress Ave. 4/10/2012 Boca Raton, FL 33487 +1 (561) 989-0006 64 of 253
Figure 1.9e – Optical plane position (in mm) for B3320 (KAI- 08050).
Figure 1.9f – Optical plane position (mm) for B4821(KAI-16050) and B6620 (KAI-29050).

BOBCAT Hardware User’s Manual
Imperx, Inc. Rev. 2.0.1 6421 Congress Ave. 4/10/2012 Boca Raton, FL 33487 +1 (561) 989-0006 65 of 253
Chapter 2 – Camera Features
Camera Features
This chapter discusses the camera’s features and their use.

BOBCAT Hardware User’s Manual
Imperx, Inc. Rev. 2.0.1 6421 Congress Ave. 4/10/2012 Boca Raton, FL 33487 +1 (561) 989-0006 66 of 253
2.1 IMAGE RESOLUTION
The image resolution is determined by the number of pixels per line and number of lines per
frame. The image is framed by two signals LVAL, enveloping the valid pixels in a line, and
FVAL – enveloping the valid lines in a frame. The camera offers two independently
selectable LVAL and FVAL sizes. The first LVAL value envelops all visible pixels in a line
(active pixels plus buffer pixels) and the second – only the active pixels. Respectively, the
first FVAL envelops all visible lines in a frame (active lines and buffer lines), and the
second – only the active lines. The camera speed (Frames per Second) is the same for both
image size selections. Typically, the pixels outside of LVAL and FVAL (primarily dark
pixels and lines) are masked with zeros, but in BOBCAT, the user has an option to mask or
not to mask these pixels or lines. Refer to section “BOBCAT Configuration” for more
information.
Camera models B0610, B1410and B1610 are available only with a single output. B2520 is
available only with dual output. The rest of the models are available in single or dual, In
some camera models a high readout mode is available as described below.
2.1.1 Normal Mode – Single Output
When operating in the single output mode, all pixels are shifted out of the HCCD
register towards the left video amplifier – Video L (Figure 2.1). The resulting image
has a normal orientation.
Figure 2.1 – Single output mode of operation.

BOBCAT Hardware User’s Manual
Imperx, Inc. Rev. 2.0.1 6421 Congress Ave. 4/10/2012 Boca Raton, FL 33487 +1 (561) 989-0006 67 of 253
2.1.2 Normal Mode – Dual Output
When operating in a dual output mode, the image is split in two equal parts, each
side consisting of half of the horizontal pixels and the full vertical lines. The first
(left) half of the pixels are shifted out of the HCCD register towards the left video
amplifier – Video L, while the second (right) half of the pixels are shifted towards
the right video amplifier – Video R (Figure 2.2). In the horizontal direction the first
half of the image appears normal and the second half is left/right mirrored. The
camera reconstructs the image by flipping the mirrored portion and rearranging the
pixels. Dual output is the default factory mode of operation – refer to the
Configuration Memory section. The image resolutions for different cameras are
shown in Table 2.1, and a frame rates – in Table 2.2.
Figure 2.2 – Dual output mode of operation.
2.1.3 Center Mode
A. B0610 and B0620 Models
The ‘center columns’ output mode is available in the B0610 and B0620 camera
models. In this mode the image field a reduced number of horizontal pixels located
in the center of the imager – Figure 2.3. When operating in a single output mode, all
pixels are shifted out of the HCCD register towards the left video amplifier – Video
L (Figure 2.4). The resulting image has a normal orientation. When operating in a
dual output mode, the image is split in two equal parts, and full vertical lines. The

BOBCAT Hardware User’s Manual
Imperx, Inc. Rev. 2.0.1 6421 Congress Ave. 4/10/2012 Boca Raton, FL 33487 +1 (561) 989-0006 68 of 253
first (left) half of the pixels are shifted out of the HCCD register towards the left
video amplifier – Video L, while the second (right) half of the pixels is shifted
towards the right video amplifier – Video R (Figure 2.5). In the horizontal direction
the first half of the image appears normal and the second half is left/right mirrored.
The camera reconstructs the image by flipping the mirrored portion and rearranging
the pixels. The image resolutions for different cameras are shown in Table 2.1, and a
frame rates – in Table 2.2.
CAUTION NOTE
1. Only 1x, 2x Vertical and 1x, 2x Horizontal binning can be performed when
Center mode is used for B0610 and B0620. No Fast Dump support if 2x Vertical
binning is enabled.
2. When Center mode is enabled, the maximum number of lines is 480.
3. Due to image artifacts B0620, in the Center mode the image is reduced to 224
pixels.
Figure 2.3 – Center columns output mode of operation.

BOBCAT Hardware User’s Manual
Imperx, Inc. Rev. 2.0.1 6421 Congress Ave. 4/10/2012 Boca Raton, FL 33487 +1 (561) 989-0006 69 of 253
B. B1320, B1410, B1411, B1610 and B2520 Models To achieve a higher frame rate B1320, B1410, B1411, B1610 and B2520 camera
models can provide a fast readout, where every the image is sub-sampled – 2 out of
8 lines/pixels are read out of the CCD – Figure 2.6. The image resolutions for
different cameras are shown in table 2.1a, and a frame rates – in Table 2.2.
Figure 2.4 – Center columns output in dual mode of operation.
Figure 2.5 – Center columns output in dual tap mode.
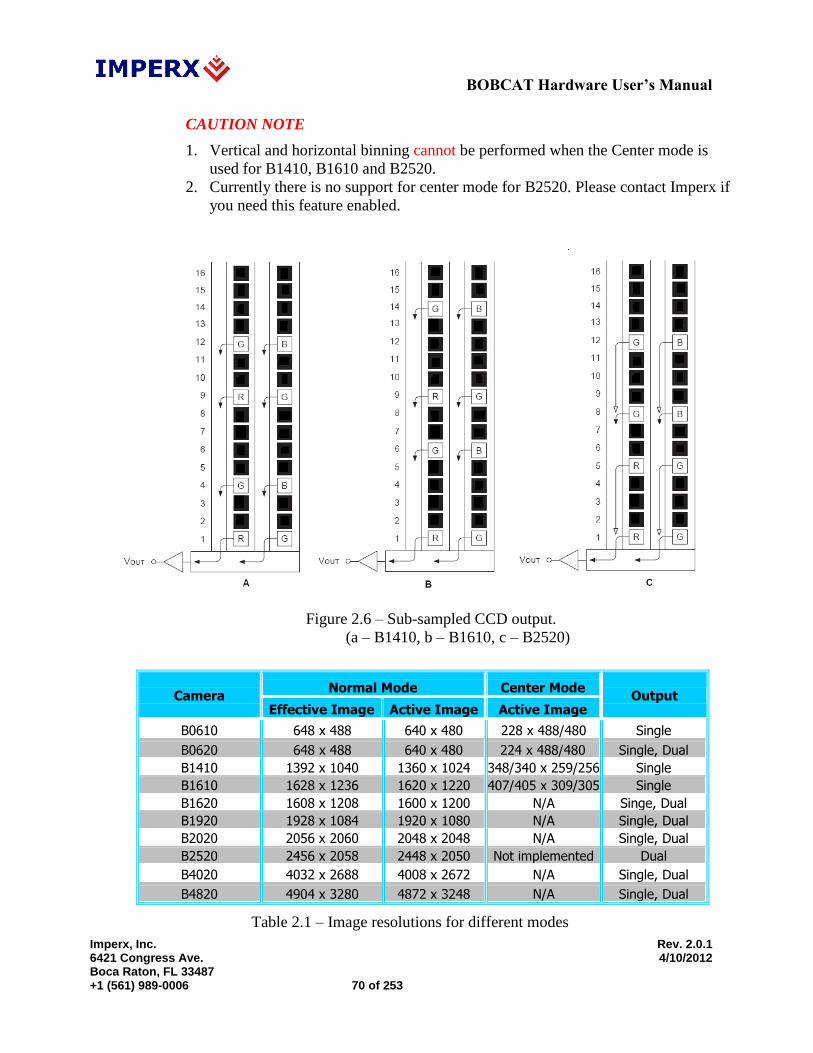
BOBCAT Hardware User’s Manual
Imperx, Inc. Rev. 2.0.1 6421 Congress Ave. 4/10/2012 Boca Raton, FL 33487 +1 (561) 989-0006 70 of 253
CAUTION NOTE
1. Vertical and horizontal binning cannot be performed when the Center mode is
used for B1410, B1610 and B2520.
2. Currently there is no support for center mode for B2520. Please contact Imperx if
you need this feature enabled.
Figure 2.6 – Sub-sampled CCD output.
(a – B1410, b – B1610, c – B2520)
Camera Normal Mode Center Mode
Output Effective Image Active Image Active Image
B0610 648 x 488 640 x 480 228 x 488/480 Single
B0620 648 x 488 640 x 480 224 x 488/480 Single, Dual
B1410 1392 x 1040 1360 x 1024 348/340 x 259/256 Single
B1610 1628 x 1236 1620 x 1220 407/405 x 309/305 Single
B1620 1608 x 1208 1600 x 1200 N/A Singe, Dual
B1920 1928 x 1084 1920 x 1080 N/A Single, Dual
B2020 2056 x 2060 2048 x 2048 N/A Single, Dual
B2520 2456 x 2058 2448 x 2050 Not implemented Dual
B4020 4032 x 2688 4008 x 2672 N/A Single, Dual
B4820 4904 x 3280 4872 x 3248 N/A Single, Dual
Table 2.1 – Image resolutions for different modes

BOBCAT Hardware User’s Manual
Imperx, Inc. Rev. 2.0.1 6421 Congress Ave. 4/10/2012 Boca Raton, FL 33487 +1 (561) 989-0006 71 of 253
2.2 FRAME TIME CONTROL
2.2.1 Internal Line and Frame Time Control
The camera speed (frame rate) depends on the CCD “read-out” time – the time
necessary to read all the pixels out of the CCD imager. The frame rate can be
calculated using the following Formula 1.1:
Frame rate [fps] = 1 / read-out time [sec] (1.1)
The user can program the camera to run slower than the nominal speed preserving
the camera full resolution. The user can independently extend the camera line time
(the time required to read one line out of the CCD imager) and camera frame time
(the time required to read the entire frame out of the CCD imager). The camera line
time can be extended to ~ 200 us, with a precision ~ 25 ns. The camera frame time
can be extended to ~ 16 sec, with a precision of ~ 1.0us. Please refer to
“EXPOSURE CONTROL” section for more information.
CAUTION NOTE
It is not recommended to use the Programmable Line Time feature when Vertical
Binning higher than 2x is used!
2.2.2 Camera Speed Control
BOBCAT camera series provides a unique way to control and increase the camera
nominal (free-running) speed. The user can select (Slow) or (Fast) camera speed.
The “Slow” speed is the camera nominal frame rate as determined by the CCD
manufacturer. Since BOBCAT internal design is optimized for higher clock rates, it
is possible to over-clock the camera (use an internal clock higher than the
recommended one), which will result in higher (~ 20%) frame rate. Special measures
have been taken in order to preserve the camera performance when over-clock mode
is used. The possible frame rates are shown in Table 2.2, where the camera speed is
the shown in [FPS)]. The first number represents the “Slow” speed, and the second –
“Fast” speed.

BOBCAT Hardware User’s Manual
Imperx, Inc. Rev. 2.0.1 6421 Congress Ave. 4/10/2012 Boca Raton, FL 33487 +1 (561) 989-0006 72 of 253
camera
Normal Mode Center Mode
Single Out Dual Out Single Out Dual Out
B0610 110/137 fps N/A 293 fps N/A
B0620 110/137 fps 208/260 fps 293/366 fps 539/674 fps
B1020 32/40 fps 60/74 N/A N/A
B1310 26/39 fps N/A N/A N/A
B1320 36/45 fps N/A 68/85 fps N/A
B1410 23/30 fps N/A 67/80 fps N/A
B1411 23/30 fps N/A 74/90 fps N/A
B1610 17/25 fps N/A 53/74 fps N/A
B1620 19/23 fps 35/44 fps N/A N/A
B1621 18/22 fps 34/42 fps N/A N/A
B1920 17/22 fps 33/41 fps N/A N/A
B1921 17/21 fps 31/39 fps N/A N/A
B2020 8.6/10.8 fps 16.3/20.4 fps N/A N/A
B2320 8.7/10.8 fps 16.4/20.6 fps N/A N/A
B2520 N/A 11/16 fps N/A N/A
B3320 4.4/5.6 fps 8.5/10.6 fps N/A N/A
B4020 2.6/3.4 fps 4.8/6.5 fps N/A N/A
B4820 1.7/2.3 fps 3.2/4.3 fps N/A N/A
B4821 1.6/1.9 fps 3.1/4.2 fps N/A N/A
B6620 1/1.2 1.8/2.4 N/A N/A
Table 2.2 – Frame rates for different modes
CAUTION NOTE
1. Changing the camera speed involves changing the output data clock frequency. Not all
frame-grabbers can automatically adapt to the new data clock. To prevent any loss of
data or synchronization, it is recommended to stop or pause the data acquisition prior to
changing the camera speed.
2.2.3 External Line and Frame Time Control
The camera speed (frame rate) can be controlled using external sync pulses. The
camera line time can be slaved to an external H-Sync pulse, and the camera frame
time can be slaved to an external V-Sync pulse. The camera can be slaved to one or
both pulses. The H-Sync and V-Sync has to be mapped to corresponding camera
input. For more information, please refer to the I/O Control section.

BOBCAT Hardware User’s Manual
Imperx, Inc. Rev. 2.0.1 6421 Congress Ave. 4/10/2012 Boca Raton, FL 33487 +1 (561) 989-0006 73 of 253
2.3 AREA OF INTEREST
2.3.1 Horizontal and Vertical Window
For some applications the user may not need the entire image, but only a portion of
it. To accommodate this requirement BOBCAT provides total of 8 (eight) Horizontal
and Vertical Areas of Interest (AOI) – one Master, 6 Slave and one Processing. The
starting and ending point for each AOI can be set independently in horizontal
direction (Horizontal Window) and vertical direction (Vertical Window), by setting
the window (H & V) offset and (H & V) size – Figure 2.7. The minimum window
size is one pixel/line for single mode and two pixels/lines for dual mode. The
maximum horizontal window size (H) and the vertical window size (V) are
determined by image full resolution as shown in Table 2.1, and the selected size of
LVAL and FVAL.
Figure 2.7 – Horizontal and vertical window positioning.
A. Master AOI (MAOI) The MAOI can be set to preserve or to change the camera frame rate. When the user
wants to preserve the camera frame rate the MAOI settings will control only the
image H & V dimensions. When the user wants to take advantage of the reduced
vertical image size and increase the camera frame rate, the image maximum camera
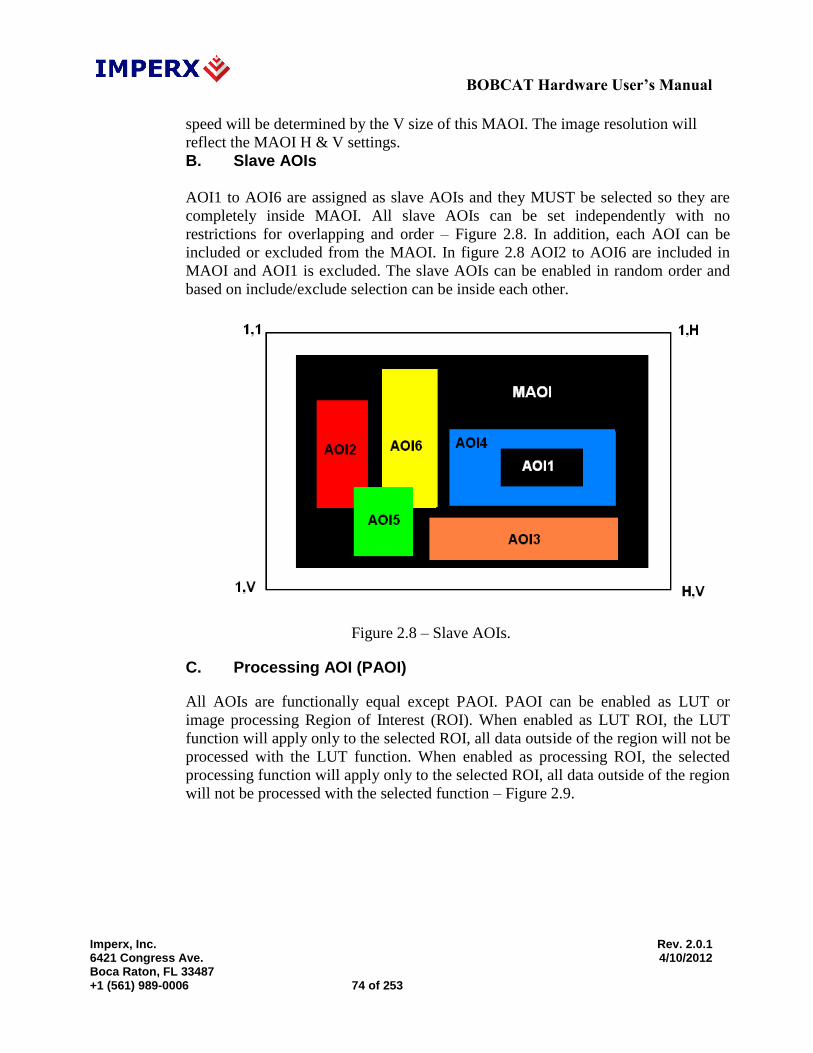
BOBCAT Hardware User’s Manual
Imperx, Inc. Rev. 2.0.1 6421 Congress Ave. 4/10/2012 Boca Raton, FL 33487 +1 (561) 989-0006 74 of 253
speed will be determined by the V size of this MAOI. The image resolution will
reflect the MAOI H & V settings.
B. Slave AOIs AOI1 to AOI6 are assigned as slave AOIs and they MUST be selected so they are
completely inside MAOI. All slave AOIs can be set independently with no
restrictions for overlapping and order – Figure 2.8. In addition, each AOI can be
included or excluded from the MAOI. In figure 2.8 AOI2 to AOI6 are included in
MAOI and AOI1 is excluded. The slave AOIs can be enabled in random order and
based on include/exclude selection can be inside each other.
Figure 2.8 – Slave AOIs.
C. Processing AOI (PAOI)
All AOIs are functionally equal except PAOI. PAOI can be enabled as LUT or
image processing Region of Interest (ROI). When enabled as LUT ROI, the LUT
function will apply only to the selected ROI, all data outside of the region will not be
processed with the LUT function. When enabled as processing ROI, the selected
processing function will apply only to the selected ROI, all data outside of the region
will not be processed with the selected function – Figure 2.9.

BOBCAT Hardware User’s Manual
Imperx, Inc. Rev. 2.0.1 6421 Congress Ave. 4/10/2012 Boca Raton, FL 33487 +1 (561) 989-0006 75 of 253
Figure 2.9 – PAOI enabled as processing ROI.
(All data within the selected ROI are processed with “One Point Correction”,
all data outside of the ROI are not processed)
CAUTION NOTE
1. If the user needs to enable AOI1 to AOI6 MAOI MUST be enabled.
2. To qualify the selected pixels/lines MAOI uses DVAL, where DVAL is high
within the selected MAOI. The frame-grabber horizontal and vertical resolutions
must be adjusted for each window size.
3. When MAOI is enabled the “Number of Lines” selection is disabled. To change
the “Number of Lines”, please disable MAOI first, change the “Number of
Lines” and them enable MAOI again.
4. Horizontal and vertical windows can be enabled in all camera modes, including
H & V binning. Refer to binning section for more information.
5. The size of the horizontal window does not affect the camera frame rate, the
vertical window does, but only if “Keep Frame Rate” is not enabled.
6. For dual tap mode of operation the horizontal Offset and Width must be even
number.
7. For B1920 the minimum “Horizontal Offset” is 10 pixels when “Constant Frame
Rate” is disabled, and 0 pixels when “Constant Frame Rate” is enabled.
8. Positioning the horizontal and vertical window size outside the maximum image
window will result in an error.
9. Color version users – when MAOI is enabled, for proper color reconstruction
and WB ‘Offset X’ and ‘Offset Y’ must be an even number.

BOBCAT Hardware User’s Manual
Imperx, Inc. Rev. 2.0.1 6421 Congress Ave. 4/10/2012 Boca Raton, FL 33487 +1 (561) 989-0006 76 of 253
2.3.2 Calculating the Frame Rate using Vertical Window
When camera frame rate changes with the size of the vertical window, the resulting
frame rate (FR) for each camera is shown on figure 2.10a – 2.10fg. The camera uses
an adaptive algorithm for the frame rate change, so it is difficult to put a simple
formula for the frame rate calculation. The camera will calculate and display the
actual frame rate at any vertical window selection.
0 200 400 600 800 100020
40
60
80
100
120
140
160
180
200
B1410 FRAME RATE
Active Lines
Fram
e R
ate
(fps
)
50 100 150 200 250 300 350 400 4500
200
400
600
800
1000
1200
1400
1600
1800
2000
B0610 FRAME RATE
Active Lines
Fram
e R
ate
(fps
)
. . . . . Normal window, normal clock
- . - . - Normal window, normal clock
-------- Center window, slow clock
- - - - - Center window, fast clock
Figure 2.10a – Frame rate vs. vertical window size for B0610

BOBCAT Hardware User’s Manual
Imperx, Inc. Rev. 2.0.1 6421 Congress Ave. 4/10/2012 Boca Raton, FL 33487 +1 (561) 989-0006 77 of 253
50 100 150 200 250 300 350 400 450200
400
600
800
1000
1200
1400
1600
1800
2000
2200B0620 FRAME RATE
Active Lines
Fra
me
Rat
e (f
ps)
Dual Output. . . . . Normal window, normal clock
- . - . - Normal window, fast clock
-------- Center window, normal clock
- - - - - Center window, fast clock
Figure 2.10b – Frame rate vs. Vertical window size for B0620
This figure shows the speed in dual output only. The speed in single output is identical to
B0610 – Figure 2.10a.

BOBCAT Hardware User’s Manual
Imperx, Inc. Rev. 2.0.1 6421 Congress Ave. 4/10/2012 Boca Raton, FL 33487 +1 (561) 989-0006 78 of 253
Figure 2.10ba – Frame rate vs. Vertical window size for B1020

BOBCAT Hardware User’s Manual
Imperx, Inc. Rev. 2.0.1 6421 Congress Ave. 4/10/2012 Boca Raton, FL 33487 +1 (561) 989-0006 79 of 253
Figure 2.10bb – Frame rate vs. Vertical window size for B1310
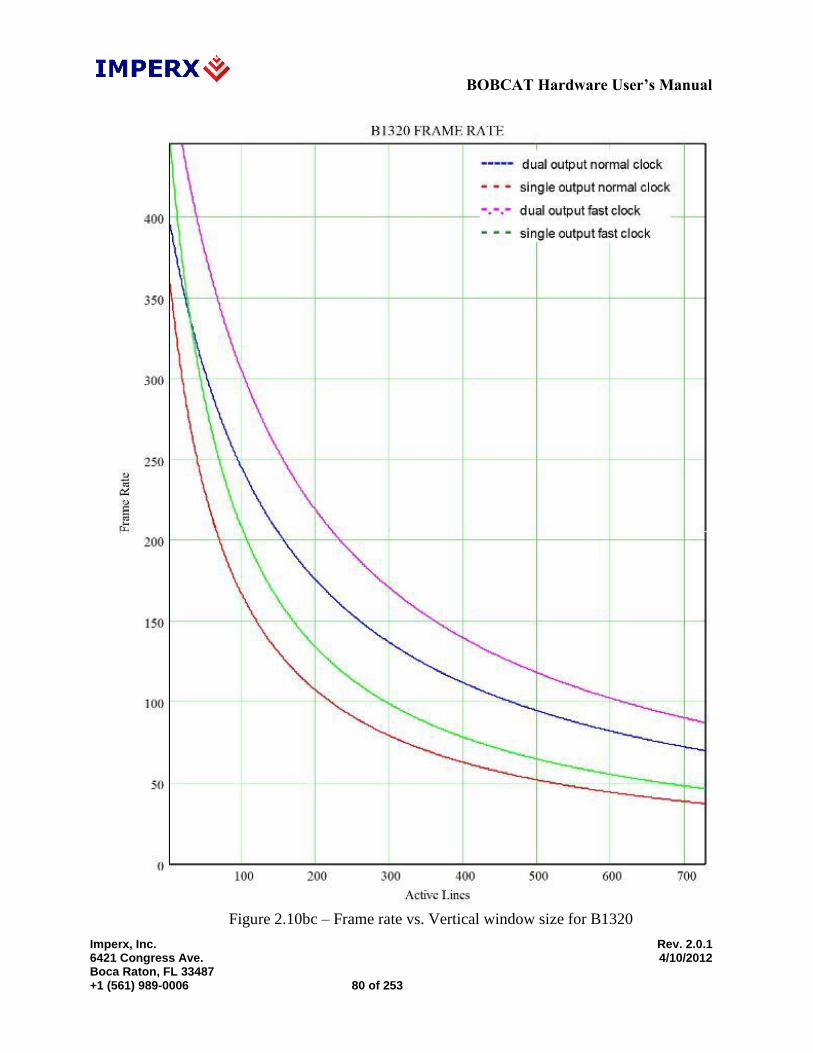
BOBCAT Hardware User’s Manual
Imperx, Inc. Rev. 2.0.1 6421 Congress Ave. 4/10/2012 Boca Raton, FL 33487 +1 (561) 989-0006 80 of 253
Figure 2.10bc – Frame rate vs. Vertical window size for B1320

BOBCAT Hardware User’s Manual
Imperx, Inc. Rev. 2.0.1 6421 Congress Ave. 4/10/2012 Boca Raton, FL 33487 +1 (561) 989-0006 81 of 253
0 200 400 600 800 100020
40
60
80
100
120
140
160
180
200
B1410 FRAME RATE
Active Lines
Fra
me
Rat
e (f
ps)
50 100 150 200 250 300 350 400 4500
200
400
600
800
1000
1200
1400
1600
1800
2000
B0610 FRAME RATE
Active Lines
Fra
me
Rat
e (f
ps)
----- Normal clock
- - - Fast clock
Figure 2.10c – Frame rate vs. Vertical window size for B1410

BOBCAT Hardware User’s Manual
Imperx, Inc. Rev. 2.0.1 6421 Congress Ave. 4/10/2012 Boca Raton, FL 33487 +1 (561) 989-0006 82 of 253
Figure 2.10ca – Frame rate vs. Vertical window size for B1411

BOBCAT Hardware User’s Manual
Imperx, Inc. Rev. 2.0.1 6421 Congress Ave. 4/10/2012 Boca Raton, FL 33487 +1 (561) 989-0006 83 of 253
0 200 400 600 800 1000 1200
20
40
60
80
100
120
140
160
180
200
220
B1610 FRAME RATE
Active Lines
Fra
me
Rat
e (f
ps)
----- Normal clock
- - - Fast clock
Figure 2.10d – Frame rate vs. Vertical window size for B1610

BOBCAT Hardware User’s Manual
Imperx, Inc. Rev. 2.0.1 6421 Congress Ave. 4/10/2012 Boca Raton, FL 33487 +1 (561) 989-0006 84 of 253
0 200 400 600 800 1000 1200 1400 1600 1800 200010
15
20
25
30
35
40
45
50
55
60B2520 FRAME RAT E
Active Lines
Fra
me
Rat
e (f
ps)
200 400 600 800 1000 12000
50
100
150
200
250
300
350B1620 FRAME RAT E
Active Lines
Fra
me
Rat
e
----- dual output normal clock
- - - single output normal clock
-.-.- dual output f ast clock
- - - single output f ast clock
Figure 2.10e – Frame rate vs. Vertical window size for B1620

BOBCAT Hardware User’s Manual
Imperx, Inc. Rev. 2.0.1 6421 Congress Ave. 4/10/2012 Boca Raton, FL 33487 +1 (561) 989-0006 85 of 253
Figure 2.10ea – Frame rate vs. Vertical window size for B1621
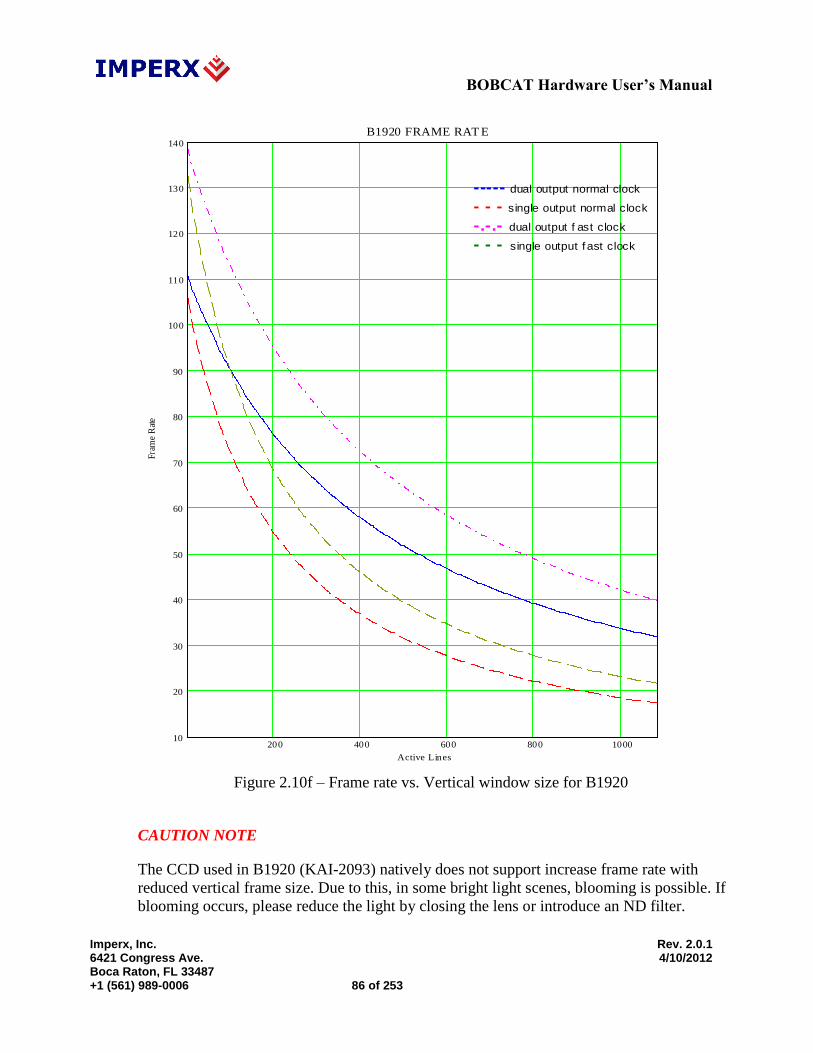
BOBCAT Hardware User’s Manual
Imperx, Inc. Rev. 2.0.1 6421 Congress Ave. 4/10/2012 Boca Raton, FL 33487 +1 (561) 989-0006 86 of 253
200 400 600 800 100010
20
30
40
50
60
70
80
90
100
110
120
130
140
B1920 FRAME RAT E
Active Lines
Fra
me
Rat
e
----- dual output normal clock
- - - single output normal clock
-.-.- dual output f ast clock
- - - single output f ast clock
Figure 2.10f – Frame rate vs. Vertical window size for B1920
CAUTION NOTE
The CCD used in B1920 (KAI-2093) natively does not support increase frame rate with
reduced vertical frame size. Due to this, in some bright light scenes, blooming is possible. If
blooming occurs, please reduce the light by closing the lens or introduce an ND filter.

BOBCAT Hardware User’s Manual
Imperx, Inc. Rev. 2.0.1 6421 Congress Ave. 4/10/2012 Boca Raton, FL 33487 +1 (561) 989-0006 87 of 253
Figure 2.10g – Frame rate vs. Vertical window size for B1921

BOBCAT Hardware User’s Manual
Imperx, Inc. Rev. 2.0.1 6421 Congress Ave. 4/10/2012 Boca Raton, FL 33487 +1 (561) 989-0006 88 of 253
0 200 400 600 800 1000 1200 1400 1600 1800 200010
15
20
25
30
35
40
45
50
55
60B2520 FRAME RAT E
Active Lines
Fra
me
Rat
e (f
ps)
200 400 600 800 1000 12000
50
100
150
200
250
300
350B1620 FRAME RAT E
Active Lines
Fra
me
Rat
e
----- Normal clock
- - - Fast clock
Figure 2.10ga – Frame rate vs. vertical window size for B2520

BOBCAT Hardware User’s Manual
Imperx, Inc. Rev. 2.0.1 6421 Congress Ave. 4/10/2012 Boca Raton, FL 33487 +1 (561) 989-0006 89 of 253
200 400 600 800 1000 1200 1400 1600 1800 20000
20
40
60
80
100
120
140
160
B2020 FRAME RAT E
Active Lines
Fra
me
Rat
e
----- dual output normal clock
- - - single output normal clock
-.-.- dual output f ast clock
- - - single output f ast clock
Figure 2.10h – Frame rate vs. vertical window size for B2020

BOBCAT Hardware User’s Manual
Imperx, Inc. Rev. 2.0.1 6421 Congress Ave. 4/10/2012 Boca Raton, FL 33487 +1 (561) 989-0006 90 of 253
Figure 2.10i – Frame rate vs. vertical window size for B2320

BOBCAT Hardware User’s Manual
Imperx, Inc. Rev. 2.0.1 6421 Congress Ave. 4/10/2012 Boca Raton, FL 33487 +1 (561) 989-0006 91 of 253
Figure 2.10j – Frame rate vs. vertical window size for B3320
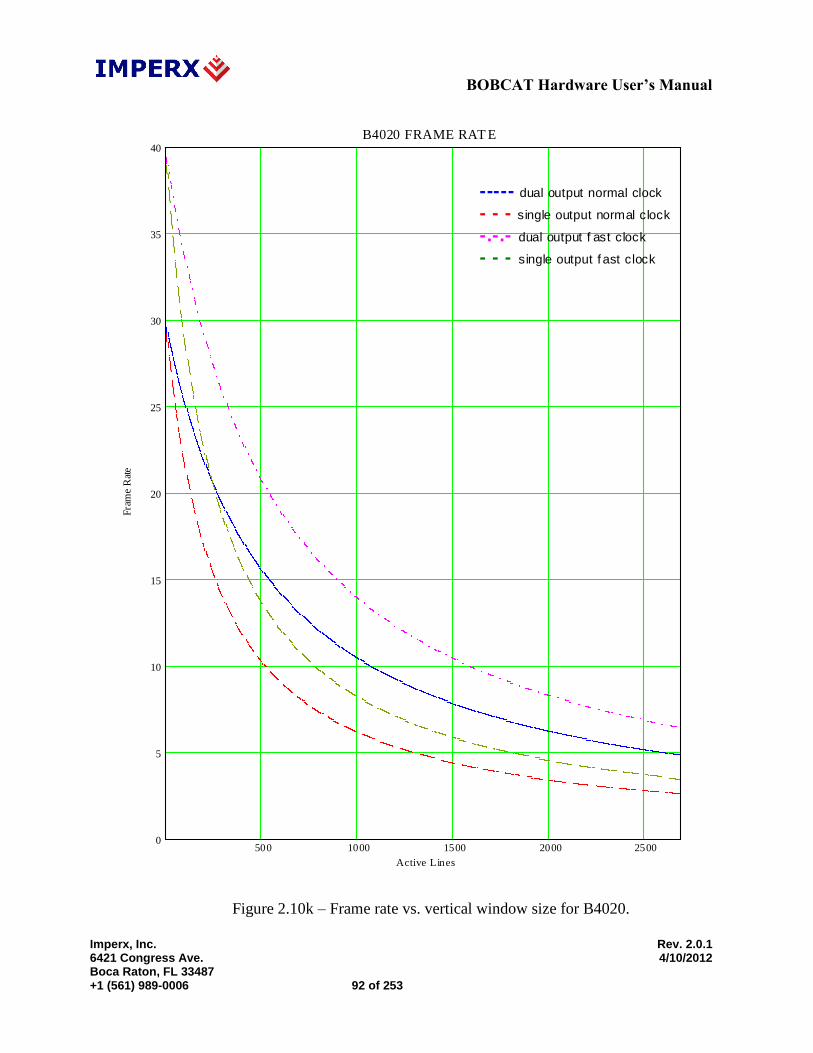
BOBCAT Hardware User’s Manual
Imperx, Inc. Rev. 2.0.1 6421 Congress Ave. 4/10/2012 Boca Raton, FL 33487 +1 (561) 989-0006 92 of 253
500 1000 1500 2000 25000
5
10
15
20
25
30
35
40
B4020 FRAME RAT E
Active Lines
Fra
me
Rat
e
----- dual output normal clock
- - - single output normal clock
-.-.- dual output f ast clock
- - - single output f ast clock
Figure 2.10k – Frame rate vs. vertical window size for B4020.

BOBCAT Hardware User’s Manual
Imperx, Inc. Rev. 2.0.1 6421 Congress Ave. 4/10/2012 Boca Raton, FL 33487 +1 (561) 989-0006 93 of 253
500 1000 1500 2000 2500 30000
2
4
6
8
10
12
14
16
18
20
22
24
26
B4820 FRAME RAT E
Active Lines
Fra
me
Rat
e
----- dual output normal clock
- - - single output normal clock
-.-.- dual output f ast clock
- - - single output f ast clock
Figure 2.10l – Frame rate vs. vertical window size for B4820.

BOBCAT Hardware User’s Manual
Imperx, Inc. Rev. 2.0.1 6421 Congress Ave. 4/10/2012 Boca Raton, FL 33487 +1 (561) 989-0006 94 of 253
Figure 2.10m – Frame rate vs. vertical window size for B4821.

BOBCAT Hardware User’s Manual
Imperx, Inc. Rev. 2.0.1 6421 Congress Ave. 4/10/2012 Boca Raton, FL 33487 +1 (561) 989-0006 95 of 253
Figure 2.10m – Frame rate vs. vertical window size for B6620.
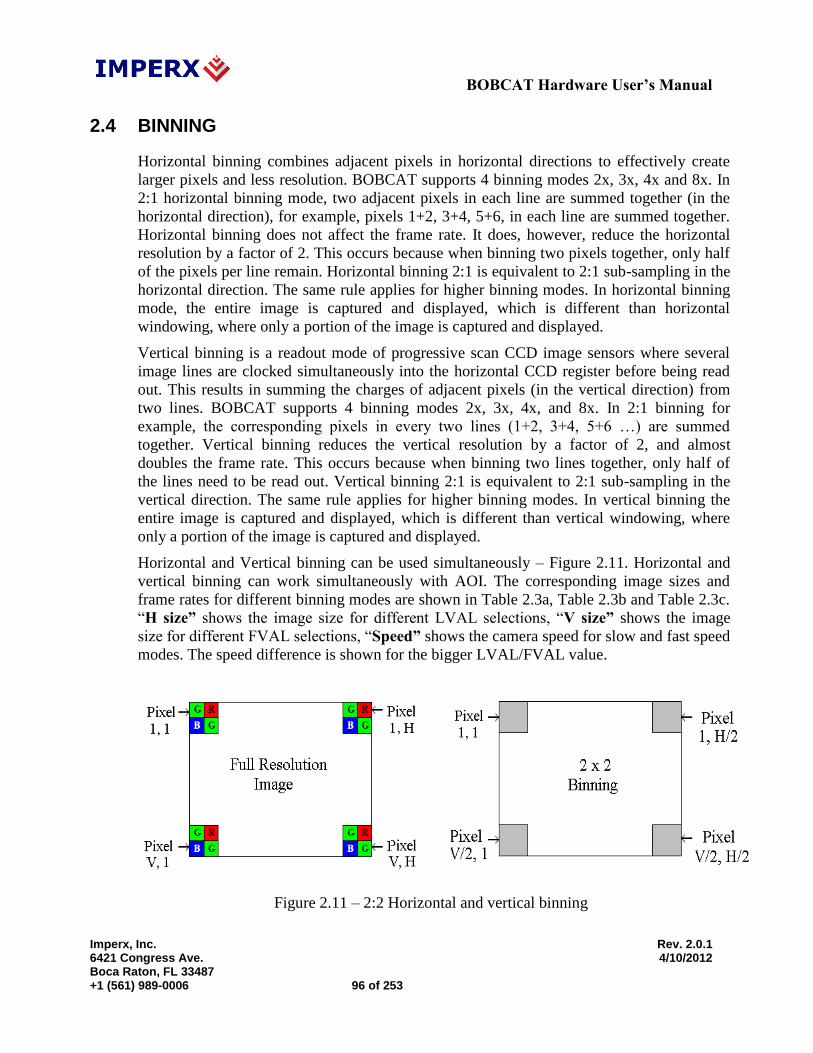
BOBCAT Hardware User’s Manual
Imperx, Inc. Rev. 2.0.1 6421 Congress Ave. 4/10/2012 Boca Raton, FL 33487 +1 (561) 989-0006 96 of 253
2.4 BINNING
Horizontal binning combines adjacent pixels in horizontal directions to effectively create
larger pixels and less resolution. BOBCAT supports 4 binning modes 2x, 3x, 4x and 8x. In
2:1 horizontal binning mode, two adjacent pixels in each line are summed together (in the
horizontal direction), for example, pixels 1+2, 3+4, 5+6, in each line are summed together.
Horizontal binning does not affect the frame rate. It does, however, reduce the horizontal
resolution by a factor of 2. This occurs because when binning two pixels together, only half
of the pixels per line remain. Horizontal binning 2:1 is equivalent to 2:1 sub-sampling in the
horizontal direction. The same rule applies for higher binning modes. In horizontal binning
mode, the entire image is captured and displayed, which is different than horizontal
windowing, where only a portion of the image is captured and displayed.
Vertical binning is a readout mode of progressive scan CCD image sensors where several
image lines are clocked simultaneously into the horizontal CCD register before being read
out. This results in summing the charges of adjacent pixels (in the vertical direction) from
two lines. BOBCAT supports 4 binning modes 2x, 3x, 4x, and 8x. In 2:1 binning for
example, the corresponding pixels in every two lines (1+2, 3+4, 5+6 …) are summed
together. Vertical binning reduces the vertical resolution by a factor of 2, and almost
doubles the frame rate. This occurs because when binning two lines together, only half of
the lines need to be read out. Vertical binning 2:1 is equivalent to 2:1 sub-sampling in the
vertical direction. The same rule applies for higher binning modes. In vertical binning the
entire image is captured and displayed, which is different than vertical windowing, where
only a portion of the image is captured and displayed.
Horizontal and Vertical binning can be used simultaneously – Figure 2.11. Horizontal and
vertical binning can work simultaneously with AOI. The corresponding image sizes and
frame rates for different binning modes are shown in Table 2.3a, Table 2.3b and Table 2.3c.
“H size” shows the image size for different LVAL selections, “V size” shows the image
size for different FVAL selections, “Speed” shows the camera speed for slow and fast speed
modes. The speed difference is shown for the bigger LVAL/FVAL value.
Figure 2.11 – 2:2 Horizontal and vertical binning

BOBCAT Hardware User’s Manual
Imperx, Inc. Rev. 2.0.1 6421 Congress Ave. 4/10/2012 Boca Raton, FL 33487 +1 (561) 989-0006 97 of 253
Camera
2:1 H Binning 3:1 H Binning 4:1 H Binning 8:1 H Binning
H Size Speed H Size Speed H Size Speed H Size Speed
B0610 324/320 110/137 216/213 110/137 162/160 110/137 81/80 110/137
B0620 324/320 207/259 216/212 207/259 162/160 207/259 80/80 207/259
B1020 516/512 60/74 344/341 60/74 258/256 60/74 129/128 60/74
B1310 648/640 26/39 432/426 36/39 324/320 26/39 162/160 26/39
B1320 656/640 68/85 437/426 68/85 328/320 68/85 164/160 68/85
B1410 696/680 24/31 464/453 24/31 348/340 24/31 174/170 24/31
B1411 696/680 24/31 464/453 24/31 348/340 24/31 174/170 24/31
B1610 810/814 17/25 542/540 17/25 405/407 17/25 202/203 17/25
B1620 804/800 35/44 536/532 35/44 402/400 35/44 200/200 35/44
B1621 816/800 34/42 544/532 34/42 408/400 34/42 204/200 34/42
B1920 960 33/41 640 33/41 480 33/41 240 33/41
B1921 976/960 32/40 650/640 32/40 488/480 32/40 244/240 32/40
B2020 1028/1024 16/20 686/682 16/20 514/512 16/20 256/256 16/20
B2320 1176/1168 16/20 784/778 16/20 588/584 16/20 292/294 16/20
B2520 1228/1224 11/16 818/816 11/16 614/612 11/16 306/306 11/16
B3320 1656/1648 9/11 1104/1098 9/11 828/824 9/11 414/412 9/11
B4020 2016/2004 4.8/6.5 1344/1336 4.8/6.5 1008/1002 4.8/6.5 504/500 4.8/6.5
B4820 2452/2436 3.2/4.3 1634/1624 3.2/4.3 1226/1218 3.2/4.3 612/608 3.2/4.3
B4821 2460/2448 3.1/4.2 1640/1632 3.1/4.2 1230/1224 3.1/4.2 614/612 3.1/4.2
B6620 3300/3288 1.8/2.4 2200/2192 1.8/2.4 1650/1644 1.8/2.4 822/824 1.8/2.4
Table 2.3a – Image sizes and frame rates for different H binning modes

BOBCAT Hardware User’s Manual
Imperx, Inc. Rev. 2.0.1 6421 Congress Ave. 4/10/2012 Boca Raton, FL 33487 +1 (561) 989-0006 98 of 253
Camera
1:2 V Binning 1:3 V Binning 1:4 V Binning 1:8 V Binning
V Size Speed V Size Speed V Size Speed V Size Speed
B0610 224/220 210/263 162/160 301/376 122/120 390/486 61/60 676/846
B0620 244/240 376/470 162/160 526/646 122/120 658/794 61/60 972/1215
B1020 516/512 100/125 344/341 129/161 258/256 151/188 129/128 202/253
B1310 483/480 46/68 322/320 63/90 241/240 77/107 120/120 115/152
B1320 364/360 116/145 242/240 153/191 182/180 180/225 91/90 248/310
B1410 520/512 41/52 346/341 55/68 260/256 67/82 130/128 99/115
B1411 520/512 42/54 346/341 58/72 260/256 71/87 130/128 112/131
B1610 618/610 30/45 412/410 42/61 309/305 53/74 154/152 82/110
B1620 604/600 62/77 402/400 84/105 302/300 102/128 151/150 150/188
B1621 616/600 57/72 94/97 75/94 308/300 89/111 154/150 122/153
B1920 540 59/74 360 81/101 270 99/124 135 150/187
B1921 556/540 55/68 370/360 72/90 278/270 86/107 139/135 120/150
B2020 1030/1024 29/37 686/682 41/51 515/512 50/62 257/256 77/96
B2320 884/876 28/36 589/584 38/47 442/438 45/56 219/221 63/79
B2520 1029/1025 19/25 686/683 24/31 516/515 28/35 257/256 38/43
B3320 1244/1236 15/19 829/824 20/25 618/622 24/31 311/309 35/44
B4020 1344/1336 8/11 896/890 10/14 672/668 12/16 336/334 16/22
B4820 1640/1624 5/7 1093/1082 7/9 820/812 8/11 410/406 11/15
B4821 1640/1632 5/7 1093/1088 7/10 820/816 9/11 410/408 12/16
B6620 2200/2192 3/4 1466/1461 5.2/3.9 1100/1096 4.6/6.1 550/548 6.4/8.5
Table 2.3b – Image sizes and frame rates for different V binning modes
B0620 1:2 V Binning 1:3 V Binning 1:4 V Binning 1:8 V Binning
V Size Speed V Size Speed V Size Speed V Size Speed
Center Single 240 525 N/A N/A N/A N/A N/A N/A
Center Dual 240 896 N/A N/A N/A N/A N/A N/A
Table 2.3c – B0620 Center mode image sizes and frame rates during V binning
Horizontal and vertical binning can work simultaneously with AOI. Although vertical and
horizontal binning are done in different domains, there are no differences in the way the
AOI with binning works.
Vertical Binning is done in the time domain, where the data from the binned lines is
added in the CCD. The vertical binning is performed first, and the vertical AOI is
second. The vertical AOI settings are referenced to the binned image. If the user wants to
set a vertical window of 200 lines, the user has to put 200 in the AOI height register
regardless of the selected vertical binning mode.

BOBCAT Hardware User’s Manual
Imperx, Inc. Rev. 2.0.1 6421 Congress Ave. 4/10/2012 Boca Raton, FL 33487 +1 (561) 989-0006 99 of 253
Horizontal Binning is done in the digital domain, where the data from the binned
pixels is added digitally. The horizontal binning is performed first, and the horizontal
AOI is second. The horizontal AOI settings are referenced to the binned image If the user
wants to set a horizontal window in the binned image with width 200 the user has to put 200
in the AOI width register regardless of off the selected horizontal binning mode.
Figure 2.11a illustrates the simultaneous usage of AOI and H & V binning. The original
image is 640 x 480. Then after 2 x 2 binning the resultant image is 320 x 240. Then a master
AOI is enabled with offset X = 80, offset Y = 120, width = 200 and height = 100. Then a
slave AOI is enabled with offset X = 50, offset Y = 30, width = 45 and height = 40. In the
left side the slave AOI is enabled in “Include” mode, and in the right side the same AOI is
enabled in “Exclude” mode. When enabled as “Include” only the selected slave AOI region
is displayed, the rest (of the master AOI) is black. When enabled as “Exclude” only the
selected slave AOI region is black, the rest is the selected master image
CAUTION NOTE
1. Vertical and horizontal binning cannot be performed when the Center mode is
used for B1410, B1610 and B2520.
2. Horizontal or vertical binning used alone changes the aspect ratio of the image in
the vertical or horizontal direction. To correct this, use identical horizontal and
vertical binning modes simultaneously.
3. The frame-grabber vertical and horizontal resolution should be changed to reflect
the actual number of active pixels and lines.
4. Vertical binning may cause blooming for saturated signal levels.
5. Color version users – horizontal or vertical binning used alone will create color
distortions. If used simultaneously, the resulting image will be monochrome.

BOBCAT Hardware User’s Manual
Imperx, Inc. Rev. 2.0.1 6421 Congress Ave. 4/10/2012 Boca Raton, FL 33487 +1 (561) 989-0006 100 of 253
Figure 2.11a – AOI within horizontal and vertical binned image.

BOBCAT Hardware User’s Manual
Imperx, Inc. Rev. 2.0.1 6421 Congress Ave. 4/10/2012 Boca Raton, FL 33487 +1 (561) 989-0006 101 of 253
2.5 EXPOSURE CONTROL
2.5.1 Internal Exposure Control - Electronic Shutter
During normal camera operation, the exposure time is fixed and determined by the
readout (frame) time. The electronic shutter can be used to precisely control the
image exposure time under bright light conditions. The electronic shutter does not
affect the frame rate; it only reduces the amount of electrons collected. Positioning a
short pulse “SHUTTER”, with respect to the vertical transfer pulse, VCCD – Figure
2.12, sets the exposure time. The electronic shutter pulse can be positioned within
the entire frame period with a precision of 1.0us. The maximum exposure is frame
time dependent and the minimum exposure is ~ 2 microseconds (camera dependent).
VCCD
SHUTTER
Frame Time
Exposure
Figure 2.12 – Electronic shutter position
2.5.2 External exposure control
The camera exposure can be controlled using an external pulse, supplied to the
camera. The pulse duration determines the exposure. For stable operation, this pulse
MUST be synchronized with the camera frame timing. Please refer to “I/O Control”
section for pulse mapping information.
2.5.3 Variable Frame Time – Programmable Line and Frame Time
Variable frame time mode provides the ability to run the camera in full resolution
and a frame rate slower than the nominal camera frame. This has two effects: 1) it
reduces the bandwidth requirements on the camera output and 2) it increases the
exposure time for the frame. During normal camera operation (no shutter), the
nominal frame rate determines the integration time. The desired frame rate, and thus
the new integration time, can be achieved by moving the vertical transfer pulse,
VCCD, beyond the normal integration period (the standard frame time) – Figure
2.13. The resultant frame rate can be calculated using formula 2.2. The user can

BOBCAT Hardware User’s Manual
Imperx, Inc. Rev. 2.0.1 6421 Congress Ave. 4/10/2012 Boca Raton, FL 33487 +1 (561) 989-0006 102 of 253
program the camera integration (frame time) from the nominal camera frame time to
16 sec (~ 0.0625 fps) with a precision of 1.0 us.
Frame rate [fps] = 1 / frame time [sec] (2.2)
VCCD
Programmable Integration Time
Standard Frame Time
Figure 2.13 – Programmable frame time
CAUTION NOTE
1. The maximum frame rate (and minimum frame time) is determined by the
camera mode of operation. If the user enters a higher frame rate than the allowed
one, the image will halt. Programmable Frame Time cannot be enabled in
Trigger mode.
2. When programmable line time and programmable frame time are to be enabled
simultaneously, enable line time first, set the appropriate line value, and then
enable the programmable frame time. If you change the line time value while the
frame time is enabled, please note that you might need to re-adjust the frame
time value.
3. If the frame time is greater than 500ms the camera has to be kept still otherwise a
motion smear will appear on the image.
2.5.4 Automatic Exposure Control (AEC)
The camera can be set to automatic exposure (and gain) control in order to keep the
same image brightness during changing light conditions. Both modes – automatic
exposure and automatic gain can be enabled simultaneously. In this mode the user
sets the image brightness (luminance) to be maintained, and the camera adjusts the
exposure accordingly. The user can select the average or peak brightness to be
maintained. The camera starts with changing the exposure within the preset by the
user min-max limits. If one of the exposure limits has been reached, the camera
indicates the limit has been reached and keeps the value until the light condition
change. The speed of convergence (how fast the camera stabilizes after change), can
be preset by the user (four possible options are available). The AEC algorithm
samples all pixels for the entire frame, but the user can select only a portion of the
image (AOI) to be used as a sample collecting region. The camera displays the

BOBCAT Hardware User’s Manual
Imperx, Inc. Rev. 2.0.1 6421 Congress Ave. 4/10/2012 Boca Raton, FL 33487 +1 (561) 989-0006 103 of 253
current luminance, current exposure and current gain. For auto gain control refer to
Automatic Gain Control (AGC) section.
CAUTION NOTE
1. In some bright light conditions a very small exposure values (~ microseconds)
must be used. In such cases the camera response is not linear, i.e. equal exposure
increments do not result in equal brightness increase. In some rare occasions during
such conditions, an image brightness oscillation (image flipping from bright to dark)
could occur. To prevent this, please change the AEC/AGC setting (exposure speed,
luminance level or AOI), or change the lens iris.
2.5.5 Automatic Iris Control (AIC)
The camera has a built in auto iris control feature, which is hardware compatible
with a "Video” auto iris lens. If enabled, the camera provides an analog video signal
(via 12 pin HIROSE connector), which is used by the lens to control the iris.

BOBCAT Hardware User’s Manual
Imperx, Inc. Rev. 2.0.1 6421 Congress Ave. 4/10/2012 Boca Raton, FL 33487 +1 (561) 989-0006 104 of 253
2.6 EXTERNAL TRIGGER
2.6.1 Triggering Inputs
In the normal mode of operation, the camera is free running. Using the trigger mode
allows the camera to be synchronized to an external timing pulse. There are three
input modes available for external triggering – software (CC), internal (pulse
generator), and external. Please note that the desired trigger input has to be mapped
to corresponding camera input. For more information, please refer to the I/O Control
section.
- “External” – the camera receives the trigger signal coming from the connector
located on the back of the camera.
- “Computer” – the camera receives the trigger signal command from the frame-
grabber.
- “Internal” – the camera has a built in programmable pulse generator – refer to
“Pulse Generator” section. In Internal triggering mode the camera receives the
trigger signal from the internal pulse generator.
- “Software” – the camera receives the trigger signal which is computer
generated. This input is available only for GigE Cameras. The camera expects a
one clock cycles pulse generated by the computer. The trigger exposure is
internal register controlled. Pulse duration exposure is not allowed.
2.6.2 Acquisition and Exposure Control
For each trigger input the user can set the trigger edge, the over-trigger conditions,
the de-bounce (de-glitch) time, the exposure time, the exposure delay, and the
number of frames captured.
1. “Triggering Edge” – the user can select the active triggering edge:
- “Rising” – the rising edge will be used for triggering
- “Falling” – the falling edge will be used for triggering
2. “De-bounce” – the trigger inputs are de-bounced to prevent multiple triggering
from ringing triggering pulses. The user has eight choices of de-bounce interval:
- “Off” – no de-bounce (default)
- “10” s, “50” s, “100” s, “500” s de-bounce interval
- “1.0” ms, “5.0” ms, “10.0” ms de-bounce interval
3. “Trigger Overlap” – if the next trigger pulse arrives while the previous
triggering cycle is in process, the user has three options:

BOBCAT Hardware User’s Manual
Imperx, Inc. Rev. 2.0.1 6421 Congress Ave. 4/10/2012 Boca Raton, FL 33487 +1 (561) 989-0006 105 of 253
- “Ignore” – the next rigger will be ignored, and the camera will continue its
present operation.
- “Accept” – the next trigger will be used. The camera will stop the present
operation, will reset and the new trigger cycle will start.
- “Accept after Exposure” – the next rigger will be ignored while the camera
is exposing the image. The next trigger will be used only after the image
exposure based on the previous trigger has been completed. The camera will
stop the present operation, will reset and the new trigger cycle will start.
4. “Exposure Time” – the exposure for all frames can be set in two ways:
- “Pulse Width” – the trigger pulse width (duration) determines the exposure.
- “Internal” – the camera internal exposure register determines the exposure.
A mid exposure pulse is generated in this mode.
5. “Frames captured” – the number of frames captured after the trigger pulse can
be programmed from 1 to 65530 frames, or to be free-running.
6. “Exposure Delay” – delays the beginning of the exposure with respect to the
trigger pulse. The delay can be programmed from 0 to ~16,777 seconds.
CAUTION NOTE
1. The de-bounce interval MUST be smaller than the trigger pulse duration. Adjust
the interval accordingly.
2. When Triggering is enabled “Programmable Integration” is not active
2.6.3 Trigger Strobe Control
Along with the shutter pulse, the camera can send one strobe pulse for
synchronization with an external light source. The user can set the strobe pulse
duration and the delay with respect to the trigger pulse active edge. The maximum
pulse duration and the maximum delay can be set up to 16777215 us with 1.0us
precision. The strobe pulse can be assigned to “Strobe 1” or “Strobe 2. If the number
of frames captured is more than 1, and the user wants to enable the strobe for the
next frames, he/she has to using the camera strobe – please refer to “Strobe” section
for more information.
2.6.4 Triggering modes
A. Standard Mode
When the standard triggering mode is enabled, the camera idles and waits for a
trigger signal. Upon receiving the external trigger signal, the camera clears the
horizontal and vertical registers, sends a shutter pulse to clear the pixels and starts
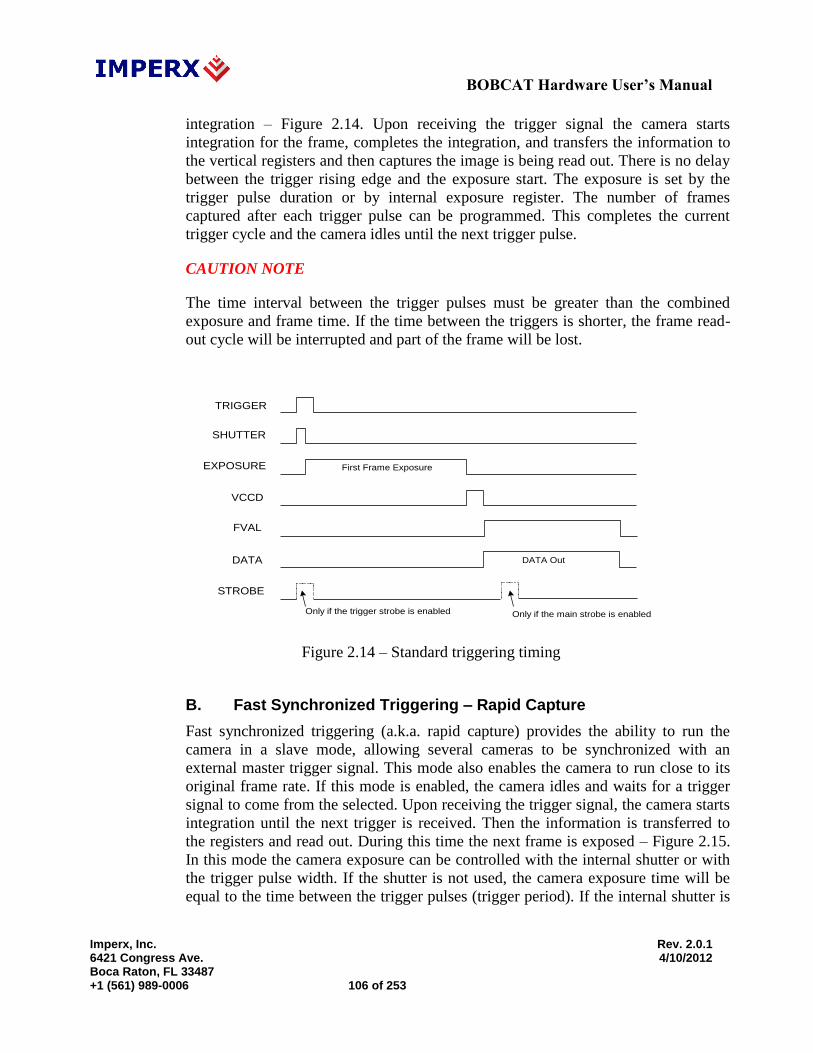
BOBCAT Hardware User’s Manual
Imperx, Inc. Rev. 2.0.1 6421 Congress Ave. 4/10/2012 Boca Raton, FL 33487 +1 (561) 989-0006 106 of 253
integration – Figure 2.14. Upon receiving the trigger signal the camera starts
integration for the frame, completes the integration, and transfers the information to
the vertical registers and then captures the image is being read out. There is no delay
between the trigger rising edge and the exposure start. The exposure is set by the
trigger pulse duration or by internal exposure register. The number of frames
captured after each trigger pulse can be programmed. This completes the current
trigger cycle and the camera idles until the next trigger pulse.
CAUTION NOTE
The time interval between the trigger pulses must be greater than the combined
exposure and frame time. If the time between the triggers is shorter, the frame read-
out cycle will be interrupted and part of the frame will be lost.
Only if the main strobe is enabled
VCCD
SHUTTER
TRIGGER
EXPOSURE
FVAL
DATA
STROBE
First Frame Exposure
DATA Out
Only if the trigger strobe is enabled
Figure 2.14 – Standard triggering timing
B. Fast Synchronized Triggering – Rapid Capture
Fast synchronized triggering (a.k.a. rapid capture) provides the ability to run the
camera in a slave mode, allowing several cameras to be synchronized with an
external master trigger signal. This mode also enables the camera to run close to its
original frame rate. If this mode is enabled, the camera idles and waits for a trigger
signal to come from the selected. Upon receiving the trigger signal, the camera starts
integration until the next trigger is received. Then the information is transferred to
the registers and read out. During this time the next frame is exposed – Figure 2.15.
In this mode the camera exposure can be controlled with the internal shutter or with
the trigger pulse width. If the shutter is not used, the camera exposure time will be
equal to the time between the trigger pulses (trigger period). If the internal shutter is

BOBCAT Hardware User’s Manual
Imperx, Inc. Rev. 2.0.1 6421 Congress Ave. 4/10/2012 Boca Raton, FL 33487 +1 (561) 989-0006 107 of 253
used the exposure control slider sets the exposure – Figure 2.15. The number of
frames captured is set to 1 and cannot be changed.
CAUTION NOTE
1. The time interval between the trigger pulses must be greater than the
corresponding camera frame time. If the time between the triggers is shorter, the
frame read-out cycle will be interrupted and part of the frame will be lost.
DATA
EXPOSURE
STROBE
N + 2
DATA N - 1 DATA N DATA N + 1
Exposure N Exposure N+1
SHUTTER
TRIGGER N + 1N
Only if the main strobe is enabled
Figure 2.15 – Fast synchronized triggering - rapid capture
C. Double Exposure Triggering
Double exposure allows two events (two images) to be captured in rapid succession
using a single trigger pulse. In this mode, the camera idles and waits for a trigger
signal to come from the selected source. Upon receiving the external trigger signal,
the camera clears the horizontal and vertical registers, and starts integration. There is
NO DELAY between the active trigger edge of the trigger pulse and the beginning
of the integration. Upon receiving the trigger signal the camera starts integration for
the first frame, completes the integration, transfers the information to the vertical
registers and then captures the second image. While capturing the second image the
first one is being read out. After exposing the second image, the information is
transferred to the vertical registers and read out – Figure 2.16. This completes the
current trigger cycle and the camera idles until the next trigger pulse. In this mode
the camera exposure can be controlled with the internal shutter or with the trigger
pulse width. The number of frames captured is set to 2 and cannot be changed. There
is NO DELAY between the frames captured.

BOBCAT Hardware User’s Manual
Imperx, Inc. Rev. 2.0.1 6421 Congress Ave. 4/10/2012 Boca Raton, FL 33487 +1 (561) 989-0006 108 of 253
TRIGGER
EXPOSURE
DATA
SHUTTER
DATA 1 DATA 2
Exp 1 Exposure 2
EVENTS
1 2
STROBE
Only if the main strobe is enabledOnly if the trigger strobe is enabled
Figure 2.16 – Double exposure triggering
CAUTION NOTE
The Vertical Frame Transfer period is the time required for all pixel charges to be
transferred under the vertical registers after the frame exposure ends. This finite time
imposes some restrictions for minimum exposure duration in standard and double
triggering modes. The minimum exposure period is camera dependent as shown
below:
A. B0610, B0620, B1020, B1320, B1621, B1921, B2320 and B3320 – minimum
exposure is 2 us,
B. B1410, B1610 and B4821 – minimum exposure is 4 us,
C. B2520 and B6620 – minimum exposure is 8 us.
D. B1620, B1920, B2020, B4020 and B4820 – minimum exposure is 10 us.
D. Frame Accumulation Triggering When the Frame Accumulation triggering mode is enabled, the camera idles and
waits for a trigger signal. Upon receiving the external trigger signal, the camera
clears the horizontal and vertical registers, sends a shutter pulse to clear the pixels
and starts integration – Figure 2.17. Upon receiving the trigger signal the camera
starts integration for the first frame, completes the integration, transfers the
information to the vertical registers and then waits for the next trigger. Upon
receiving the next trigger signal the camera starts integration for the next frame,
completes the integration, transfers the information to the vertical registers and then
waits for the next trigger. The number of triggers used is set by the “Pulses per
Capture” register. After the last trigger has been received the information is being
read out. This completes the current trigger cycle and the camera idles until the next
trigger pulse. In this mode the camera exposure can be controlled with the internal
shutter or with the trigger pulse width.

BOBCAT Hardware User’s Manual
Imperx, Inc. Rev. 2.0.1 6421 Congress Ave. 4/10/2012 Boca Raton, FL 33487 +1 (561) 989-0006 109 of 253
TRIGGER
DATA
TRANSFER
EXPOSURE
STROBE
DATA
Exp.1 Exp.2 Exp.3 Exp.4 Exp.5
Trg.1 Trg.2 Trg.3 Trg.4 Trg.5
DATA
OUTPUT
Figure 2.17 – Frame accumulation triggering
E. Asynchronous Triggering When the Asynchronous triggering mode is enabled, the camera is free running (no
horizontal and vertical flushing prior to trigger). Upon receiving the external trigger
signal, the current CCD timing stops, all camera lines are rapidly flushed, and a new
frame starts – Figure 2.18. This completes the current trigger cycle, the camera free
running and waits for the next trigger pulse. In this mode the camera exposure can be
controlled with the internal shutter or with the trigger pulse width. The time required
for rapid line flush (all charges stored in the vertical registers are cleared) is camera
dependent and if the camera is triggered via CC line, and the camera exposure is
determined by the duration of the CC pulse, the CC pulse duration must be longer
than the rapid flush time, as shown below.
TRIGGER
EXPOSURE
DATA DATA
VCCD
DUMP
DATA DATA DATA
SHUTTER
Figure 2.18 – Asynchronous triggering
F. Exposure Delay The user can delays the beginning of the triggering sequence (beginning of the
exposure) with respect to the trigger pulse. The delay can be programmed from 0 to
~16,777 seconds.

BOBCAT Hardware User’s Manual
Imperx, Inc. Rev. 2.0.1 6421 Congress Ave. 4/10/2012 Boca Raton, FL 33487 +1 (561) 989-0006 110 of 253
2.7 STROBE OUTPUT
The strobe output is used to synchronize an external light source with the camera timing,
and thus to maximize the camera efficiency in low light level conditions. The optimal strobe
signal position is achieved by the positioning of the STROBE pulse, with respect to the
vertical transfer pulse VCCD (end of the frame) - Figure 2.19. BOBCAT supports two
independent strobe signals. Each strobe pulse can be positioned within the entire frame
timing period with a precision 1.0 us. The strobe duration can be seen from 1.0 us to 65535
us with a precision of 1.0us. The internal camera timing has a flag for odd and even frames.
Each strobe can be assigned to every frame, only odd frames, only even frames, or the
strobe can be disabled. The actual strobe signal can be mapped to the corresponding camera
outputs – please refer to the “I/O Control” section.
CAUTION NOTE
During Standard triggering mode the odd/even frame flag resets with each new trigger. In
this case, if the number of frames is set to 1 the strobe will be present only in “Every Frame”
and “Odd Frames”.
VCCD
STROBE 1
Frame Time
Position Strobe 1
Position Strobe 2
STROBE 2Duration
Figure 2.19 – Strobe pulse positioning

BOBCAT Hardware User’s Manual
Imperx, Inc. Rev. 2.0.1 6421 Congress Ave. 4/10/2012 Boca Raton, FL 33487 +1 (561) 989-0006 111 of 253
2.8 GAIN and OFFSET
2.8.1 Analog Domain – manual control
The camera has dual analog signal processors (or Analog Front End – AFE), one per
channel. It features one dual processor, each containing a differential input sample-
and-hold amplifier (SHA), digitally controlled variable gain amplifier (VGA), black
level clamp and a 14-bit ADC. The programmable internal AFE registers include
independent gain and black level adjustment. There are 1024 possible gain levels
(gcode 0 to 1023) and 1024 offset (clamp) levels (ocode 0 to 1023). Figure 2.20
shows the relationship between the video signal output level and gain/offset.
Theoretically, the black level should reside at 0 volts and the gain changes should
only lead to increasing the amplitude of the video signal. Since the camera has two
separate video outputs coming out of the CCD, there is always some offset
misbalance between the video outputs. Thus, changing the AFE gain leads to a
change in the offset level and to a further misbalance between the two video signals.
To correct the balance between two signals for a particular gain, the user should
always adjust the offset for each output – refer to the Camera Configuration section.
The overall camera gain can be calculated using formula 2.3, where Fixed Gain (FG)
is user selectable (- 3dB, 0, 3 dB, or 6dB).
VGA Gain [dB] = FG [dB] + 0.0351 x gcode (2.3)
light intensity
vide
o ou
tput
black levelpixel output
0 V
AFE gain
AFE output
~ 20 mV offset
Figure 2.20 – AFE gain and offset
BOBCAT Hardware User’s Manual
Imperx, Inc. Rev. 2.0.1 6421 Congress Ave. 4/10/2012 Boca Raton, FL 33487 +1 (561) 989-0006 112 of 253
2.8.2 Digital Domain – manual control
The camera has a built in digital gain and offset control. There are 20 possible digital
gain levels from 1.0x to 3.0x with step of 0.1x, and 1024 offset levels from (–511, to
+ 511).
2.8.3 Automatic Gain Control (AGC)
The camera can be set to automatic gain (and exposure) control in order to keep the
same image brightness during changing light conditions. In this mode the user sets
the image brightness (luminance) to be maintained, and the camera adjusts the gain
accordingly. The user can select the average or peak brightness to be maintained.
The camera starts with changing the gain within the preset by the user min-max
limits. If one of the gain limits has been reached, the camera indicates the limit has
been reached and keeps the value until the light condition change. The speed of
convergence (how fast the camera stabilizes after change), can be preset by the user
(four possible options are available). If both modes, automatic exposure and
automatic gain are enabled simultaneously, the camera starts with changing the
exposure first within the preset by the user min-max limits. If one of the exposure
limits has been reached, the camera engages the analog gain, and changes it within
the preset by the user min-max limits. The AGC algorithm samples all pixels for the
entire frame, but the user can select only a portion of the image (AOI) to be used as a
sample collecting region. The camera displays the current luminance, current
exposure and current gain. For auto exposure control refer to Automatic Exposure
Control (AEC) section.

BOBCAT Hardware User’s Manual
Imperx, Inc. Rev. 2.0.1 6421 Congress Ave. 4/10/2012 Boca Raton, FL 33487 +1 (561) 989-0006 113 of 253
2.9 DATA OUTPUT FORMAT
2.9.1 Bit Depth
The internal camera processing of the CCD data is performed in 14 bits. The camera
can output the data in 14, 12, 10 or 8 bit format (3x8 RGB for B0610, B1410 and
B1610 ONLY). During this standard bit reduction process, the least significant bits
are truncated – Figure 2.21.
- “14-bit” – All original bits D0 (LSB) to D13 (MSB) are used. This mode is
available only for Single Output.
- “12-bit” – If the 14 bit original camera data is D0 (LSB) to D13 (MSB), and
camera is set to output 12 bit data, the 12 output bits are mapped to D2 (LSB) to
D13 (MSB).
- “10-bit” – If the 14 bit original camera data is D0 (LSB) to D13 (MSB), and
camera is set to output 10 bit data, the 10 output bits are mapped to D4 (LSB) to
D13 (MSB).
- “8-bit” – If the 14 bit original camera data is D0 (LSB) to D13 (MSB), and
camera is set to output 8 bit data, the 8 output bits are mapped to D6 (LSB) to
D13 (MSB).
10-bit output data
8-bit output data
12-bit output data
D0 D1 D2 D3 D4 D5 D6 D7 D8 D9 D10 D11
Internal Camera Processing - 14 bit Data
D12 D13
MSBLSB
14-bit output data
Figure 2.21 – DATA output format
- “3 Tap RGB” – In this mode each pixel is sent in 24 bit format (3 x 8 bit RGB),
starting with the first pixel of the first line and ending with the last pixel of the
line. Each pixel consists of three components R (red), G (green) and B (blue),
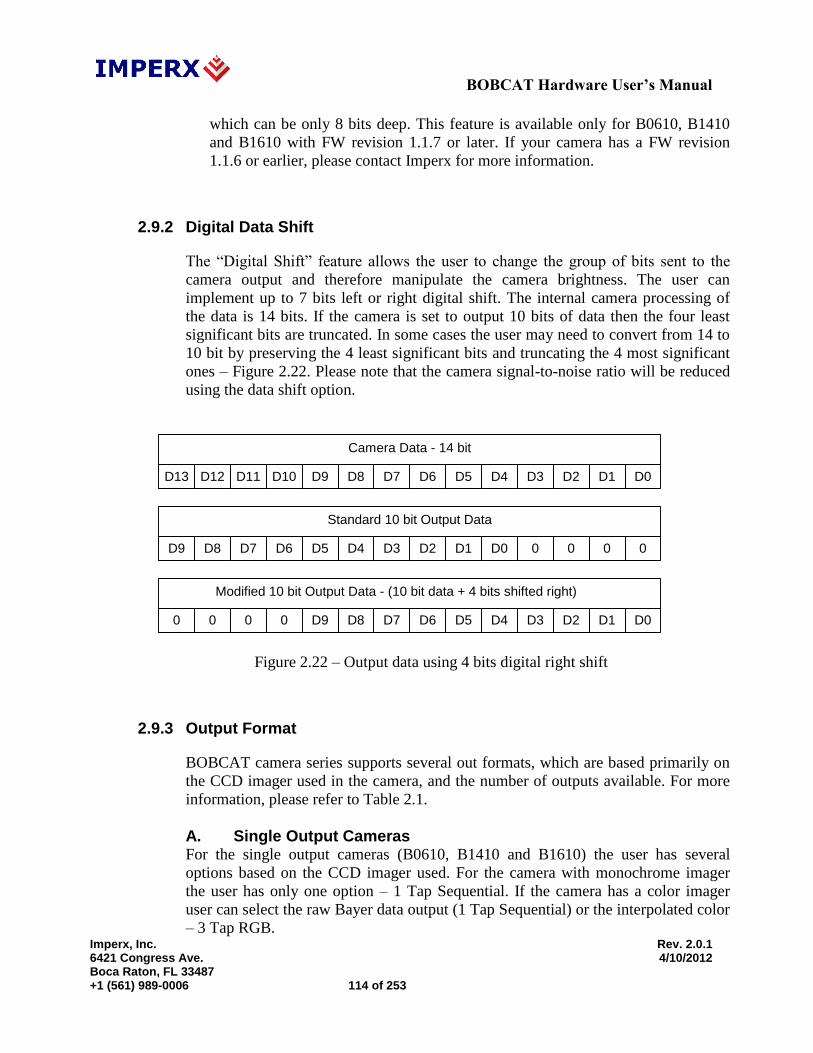
BOBCAT Hardware User’s Manual
Imperx, Inc. Rev. 2.0.1 6421 Congress Ave. 4/10/2012 Boca Raton, FL 33487 +1 (561) 989-0006 114 of 253
which can be only 8 bits deep. This feature is available only for B0610, B1410
and B1610 with FW revision 1.1.7 or later. If your camera has a FW revision
1.1.6 or earlier, please contact Imperx for more information.
2.9.2 Digital Data Shift
The “Digital Shift” feature allows the user to change the group of bits sent to the
camera output and therefore manipulate the camera brightness. The user can
implement up to 7 bits left or right digital shift. The internal camera processing of
the data is 14 bits. If the camera is set to output 10 bits of data then the four least
significant bits are truncated. In some cases the user may need to convert from 14 to
10 bit by preserving the 4 least significant bits and truncating the 4 most significant
ones – Figure 2.22. Please note that the camera signal-to-noise ratio will be reduced
using the data shift option.
Standard 10 bit Output Data
D0D1D2D3D4D5D6D7D8D9
D10D11
Camera Data - 14 bit
0 0
Modified 10 bit Output Data - (10 bit data + 4 bits shifted right)
D12D13
0000
0 0
D0D1D2D3D4D5D6D7D8D9
D0D1D2D3D4D5D6D7D8D9
Figure 2.22 – Output data using 4 bits digital right shift
2.9.3 Output Format
BOBCAT camera series supports several out formats, which are based primarily on
the CCD imager used in the camera, and the number of outputs available. For more
information, please refer to Table 2.1.
A. Single Output Cameras For the single output cameras (B0610, B1410 and B1610) the user has several
options based on the CCD imager used. For the camera with monochrome imager
the user has only one option – 1 Tap Sequential. If the camera has a color imager
user can select the raw Bayer data output (1 Tap Sequential) or the interpolated color
– 3 Tap RGB.

BOBCAT Hardware User’s Manual
Imperx, Inc. Rev. 2.0.1 6421 Congress Ave. 4/10/2012 Boca Raton, FL 33487 +1 (561) 989-0006 115 of 253
- “1 Tap Sequential” – In this mode all pixels (for every line) are sent to one
output (Tap 1) in a sequence, starting with the first and ending with the last (L)
pixel (1, 2, 3, … L-1, L) – Figure 2.23. Each pixel can be 8, 10, 12 or 14 bit
deep.
...Tap 1 P(L-1) P(L)P(1) P(2)
Figure 2.23 – 1 tap sequential output
B. Dual Output Cameras For the dual output cameras (B0620, B1620, B1920 and B2520) there are several
options available, since the camera can work in a single or in a dual output mode and
can have a color or monochrome imager. In a single mode (not available in B2520)
operation for the camera with monochrome imager the user has only one option – 1
Tap Sequential. If the camera has a color imager and is in a single mode, user can
select the raw Bayer data output (1 Tap Sequential) or the interpolated color – 3 Tap
RGB. For Dual mode of operation regardless of imager type (mono or color) the user
has two choices – 2 Tap Sequential or 2 Tap Interleaved. 3 Tap RGB is not available
because of bandwidth limitations for Base Camera Link
- “2 Tap Sequential” – In this mode all pixels are sent to two outputs (Tap 1 and
Tap2) in the following sequence – Figure 2.24a. Each pixel can be 8, 10 or 12
deep (14 bit output is not available in this mode). This feature is custom and it is
not implemented in the camera, please contact Imperx for more information.
-
Tap 1 – starting (for every line) with the pixel 1 and then all pixels in a sequence
(1, 2, 3 … M-1, M) until reaches the middle pixel (if the CCD has 1000
pixels in one line, the middle pixel M is #500.
Tap 2 – starting (for every line) with the pixel M+1 and then all pixels in a
sequence (M+1, M+2, M+3 …L-1, L) until reaches the last pixel for the
line.
... P(M-1)Tap 1
... P(L-1)
P(M)
P(L)
P(1)
P(M+1)
P(2)
P(M+2)Tap 2
Figure 2.24a – 2 tap sequential output

BOBCAT Hardware User’s Manual
Imperx, Inc. Rev. 2.0.1 6421 Congress Ave. 4/10/2012 Boca Raton, FL 33487 +1 (561) 989-0006 116 of 253
- “2 Tap Interleaved” – In this mode all pixels are sent to two outputs (Tap 1 and
Tap2) in the following sequence – Figure 2.24b. Each pixel can be 8, 10 or 12
deep (14 bit output is not available in this mode).
Tap 1 – starting (for every line) with the pixel 1 and then all odd pixels in a
sequence (1, 3 … L-3, L-1) until reaches the one before last pixel.
Tap 2 – starting (for every line) with the pixel 2 and then all even pixels in a
sequence (2, 4 …L-2, L) until reaches the last pixel for the line.
... P(L-3)Tap 1
... P(L-2)
P(L-1)
P(L)
P(1)
P(2)
P(3)
P(4)Tap 2
Figure 2.24b – 2 tap interleaved output

BOBCAT Hardware User’s Manual
Imperx, Inc. Rev. 2.0.1 6421 Congress Ave. 4/10/2012 Boca Raton, FL 33487 +1 (561) 989-0006 117 of 253
2.10 PULSE GENERATOR
The camera has a built in pulse generator. The user can program the camera to generate a
discrete sequence of pulse or a continuous trail – Figure 2.25. The pulse generator can be
used as a trigger signal, or can be mapped to one of the outputs – refer to “I/O Control”
section for more information. The discrete number of pulse can be set from 1 to 65530 with
a step of 1. The user has options to set:
- Granularity – Indicates the number of clock cycles that are used for each increment of
the width and the period. Four possible options are available (x1, x10, x100 and x 1000).
- Period – Indicates the amount of time (also determined by the granularity) between
consecutive pulses. Minimum value is 1, maximum is 1048576
- Width – Specifies the amount of time (determined by the granularity) that the pulse
remains at a high level before falling to a low level. Minimum value is 1, maximum is
524288
Period
Width
Figure 2.25 – Internal pulse generator

BOBCAT Hardware User’s Manual
Imperx, Inc. Rev. 2.0.1 6421 Congress Ave. 4/10/2012 Boca Raton, FL 33487 +1 (561) 989-0006 118 of 253
2.11 I/O CONTROL
2.11.1 I/O Mapping
The camera has 2 external inputs and 2 external outputs wired to the 12 pin HIROSE
connector, located on the back of the camera – please refer to Table 1.4a for more
information. In addition to these inputs and outputs, the cameras with camera link
output have two more inputs (CC1 and CC2) and one output (CL Spare) available.
The user can map camera inputs to: H or V Sync, External trigger, Computer trigger
and Exposure control. The user can map the camera outputs to: Exposure Start,
Exposure End, Mid-Exposure, Active Exposure Window, H or, V Sync, Odd/Even
Frame Flag, Trigger Pulse, Trigger Pulse Delayed, Camera Ready, Pulse Generator,
Strobe One, Strobe Two. For each mapped signal active “High”, active “Low”, can
be selected. All possible mapping options for the camera inputs and outputs are
shown in Table 2.4a and Table 2.4b respectively.
Note: CC1/CC2 is not available in GEV cameras.
Input Signals IN1 IN2 CC1 CC2
Exposure Control
External Trigger N/A N/A
Computer Trigger N/A N/A
H-Sync
V-Sync
Table 2.4a – BOBCAT Input Mapping
Output Signals OUT1 OUT2 CL SP
Exposure Start
Exposure End
Mid-Exposure
Active Exposure Window
H-Sync
V-Sync
Odd/Even Frame Flag
Trigger Pulse
Trigger Pulse Delayed
Camera Ready
Pulse Generator
Strobe One
Strobe Two
Table 2.4b – BOBCAT Output Mapping
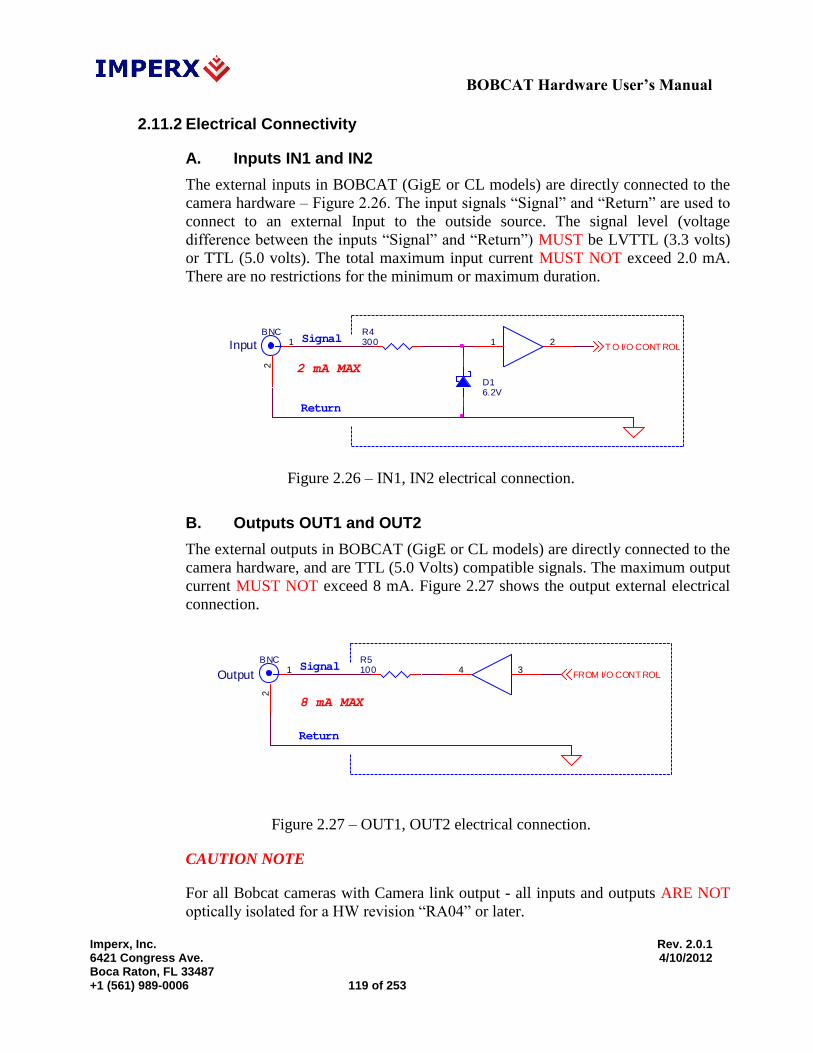
BOBCAT Hardware User’s Manual
Imperx, Inc. Rev. 2.0.1 6421 Congress Ave. 4/10/2012 Boca Raton, FL 33487 +1 (561) 989-0006 119 of 253
2.11.2 Electrical Connectivity
A. Inputs IN1 and IN2
The external inputs in BOBCAT (GigE or CL models) are directly connected to the
camera hardware – Figure 2.26. The input signals “Signal” and “Return” are used to
connect to an external Input to the outside source. The signal level (voltage
difference between the inputs “Signal” and “Return”) MUST be LVTTL (3.3 volts)
or TTL (5.0 volts). The total maximum input current MUST NOT exceed 2.0 mA.
There are no restrictions for the minimum or maximum duration.
T O I/O CONT ROL
2 mA MAX
R4300Input
BNC1
2
Return
Signal 1 2
D16.2V
Figure 2.26 – IN1, IN2 electrical connection.
B. Outputs OUT1 and OUT2
The external outputs in BOBCAT (GigE or CL models) are directly connected to the
camera hardware, and are TTL (5.0 Volts) compatible signals. The maximum output
current MUST NOT exceed 8 mA. Figure 2.27 shows the output external electrical
connection.
8 mA MAX
R5100
Output
BNC1
2
Signal
Return
34FROM I/O CONT ROL
Figure 2.27 – OUT1, OUT2 electrical connection.
CAUTION NOTE
For all Bobcat cameras with Camera link output - all inputs and outputs ARE NOT
optically isolated for a HW revision “RA04” or later.

BOBCAT Hardware User’s Manual
Imperx, Inc. Rev. 2.0.1 6421 Congress Ave. 4/10/2012 Boca Raton, FL 33487 +1 (561) 989-0006 120 of 253
C. Custom GPIO (IN/OUT)
BOBCAT (GigE or CL models) has a provision for a high-speed custom general
purpose I/O – LVTTL (3.3 Volts) compatible. The maximum output current MUST
NOT exceed 8 mA, and the maximum input current MUST NOT exceed 2.0 mA.
This GPIO is not currently enabled. If your application requires such configuration
please contact Imperx for more information.
D. Custom SPI Interface
BOBCAT (CL models ONLY) has a provision for a high-speed custom SPI interface
– LVTTL (3.3 Volts) compatible. The interface can be available via the mini USB
connector on the back of the camera. This SPI interface is not currently enabled. If
your application requires such interface please contact Imperx for more information.

BOBCAT Hardware User’s Manual
Imperx, Inc. Rev. 2.0.1 6421 Congress Ave. 4/10/2012 Boca Raton, FL 33487 +1 (561) 989-0006 121 of 253
2.12 TEST IMAGE PATTERNS
2.12.1 Test Image patterns
The camera can output several test images, which can be used to verify the camera’s
general performance and connectivity to the frame grabber. This ensures that all the
major modules in the hardware are working properly and that the connection
between the frame grabber and the camera is synchronized – i.e., the image
frameing, output mode, communication rate, etc. are properly configured. Please
note that the test image patterns do not exercise and verify the CCD’s functionality.
The following test images are available:
- Black – displays black image (value x0000)
- Gray – displays an uniform dark gray image (value x2000)
- White – displays an uniform white image (value 3FFF)
- H Ramp Still – displays a stationary horizontal ramp image
- V Ramp Still – displays a stationary vertical ramp image
- H Ramp Move – displays a moving horizontal ramp image
- V Ramp Move – displays a moving vertical ramp image
- Vertical Bars – displays a set of 8 vertical gray bars with different gray levels.
2.12.2 Image Superimposition
The user has the capabilities to superimpose over a live image the following test
patterns. The user can change the brightness of the superimposed image from black
(invisible) to white. Image superimposition is not available during H & V binning.
- “Crosshair” – Crosshair watermark (2 pixels and 2 lines thickness) indicating
the absolute image center of the image.
- “H & V Lines” – A pair of Horizontal and Vertical lines can be positioned in the
image. The user can enable the lines in horizontal, vertical or both directions, and
to position them at any pixel/line in the image. Since the H & V lines can be used
as a measuring tool, the pixel and line positions are referenced to the CCD pixels
and lines, not to the image pixels and lines. The spacing between the lines can be
displayed in:
1. Pixels - Natively, the spacing between the lines is shown in pixels
2. Metrical units - In addition, the user can use these lines as a measuring tool.
The user can apply a scale coefficient and thus, to calculate the spacing in
linear measuring units (micrometers, millimeters or meters).

BOBCAT Hardware User’s Manual
Imperx, Inc. Rev. 2.0.1 6421 Congress Ave. 4/10/2012 Boca Raton, FL 33487 +1 (561) 989-0006 122 of 253
2.13 WHITE BALANCE AND COLOR CONVERSION
2.13.1 White Balance
The color representation in the image depends on the color temperature of the light
source. Bobcat has built in algorithm to compensate for this. When white balance
correction is enabled, the camera collects the luminance data for each of the primary
colors R, G and B, analyzes it, and adjusts the color setting in order to preserve the
original colors and make white objects to appear white. The algorithm collects data
from the entire image, and can work in four different modes – “Off”, “Once”,
“Auto” and “Manual”. When set to “Off” no color correction is performed. When set
to “Once” the camera analyzes only one image frame, calculates only one set
correction coefficients, and all subsequent frames are corrected with this set of
coefficients. When set to “Manual” the camera uses the correction coefficients as
entered from the user. In “Auto” mode the camera analyzes every frame, a set of
correction coefficients are derived for each frame and applied to the next frame. All
Bobcat color cameras support white balance feature.
2.13.2 Color (Bayer to RGB) Conversion
All single tap only Bobcat cameras support Bayer to RGB interpolation algorithm.
The color interpolation is based on (5 x 5) algorithm with approximation in order to
achieve a good and pure color representation. The algorithm also allows for
individual control of the gain and offset of the primary R G B colors. The camera
also can output raw pixel data - user has an option to set the mode.
The cameras supporting the internal Bayer to RGB interpolations are B0610, B1310,
B1410, B1411 and B1610.

BOBCAT Hardware User’s Manual
Imperx, Inc. Rev. 2.0.1 6421 Congress Ave. 4/10/2012 Boca Raton, FL 33487 +1 (561) 989-0006 123 of 253
2.14 DYNAMIC BLACK LEVEL CORRECTION AND TAP BALANCING
2.14.1 Black Level Correction
As was described in the Gain and Offset section, the reference black level on each
CCD output fluctuates around 0V. The AFE offset correction works on the entire
image and if there are noise fluctuations on a line level, the AFE is not capable of
correcting them. The camera has a built in dynamic signal-to-noise correction feature
to compensate for this effect. In the beginning of each line the CCD has several back
(masked) columns. The dark level for each tap is sampled over several of these
masked pixels and the average per tap black level floor is calculated for each frame.
The average floor level for each tap is then subtracted from each incoming pixel
(from the corresponding tap) from the next frame.
2.14.2 Tap Balancing
Since the camera has two separate video outputs coming out of the CCD, there is
always some offset misbalance between the video outputs. Thus, changing the AFE
gain leads to a change in the offset level and to a further misbalance between the two
video signals. To correct the balance between two signals at any particular gain,
BOBCAT series of cameras have static and dynamic balancing algorithms
implemented in the firmware. The algorithms compares the black and bright levels
of the adjacent pixels around the tap line, and adjusts the gain and offset for each tap
accordingly, until the balance has been reached. The selection to use static or
dynamic balancing depends on the application. Please note, that if AGC is enabled, it
is strongly recommended to use static balancing, because the dynamic balancing can
interfere with the AGC algorithm.

BOBCAT Hardware User’s Manual
Imperx, Inc. Rev. 2.0.1 6421 Congress Ave. 4/10/2012 Boca Raton, FL 33487 +1 (561) 989-0006 124 of 253
2.15 TRANSFER FUNCTION CORRECTION – USER LUT
The user defined LUT (Lookup Table) feature allows the user to modify and transform the
original video data into any arbitrary value – Figure 2.30. Any 12-bit value can be
transformed into any other 12-bit value. The camera supports two separate lookup tables,
each consisting of 4096 entries, with each entry being 12 bits wide. The LUT is applied to
the entire image unless AOI8 is enabled as “LUT ROI”. In this case the LUT function will
apply only to the selected ROI. The first LUT is factory programmed with a standard
Gamma 0.45. The second LUT is not pre-programmed in the factory. Both LUT’s are
available for modifications, and the user can generate and upload his own custom LUT
using the BOBCAT Configuration software – refer to Appendix B.
LUT12 bit input
data
12 bit output
data
Figure 2.30 – Look up table
2.15.1 Standard Gamma Correction
The image generated by the camera is normally viewed on a CRT (or LCD) display,
which does not have a linear transfer function – i.e., the display brightness is not
linearly proportional to the scene brightness (as captured by the camera). As the
object brightness is lowered, the brightness of the display correspondingly lowers.
At a certain brightness level, the scene brightness decrease does not lead to a
corresponding display brightness decrease. The same is valid if the brightness is
increased. This is because the display has a nonlinear transfer function and a
brightness dynamic range much lower than the camera. The camera has a built-in
transfer function to compensate for this non-linearity, which is called gamma
correction. If enabled, the video signal is transformed by a non-linear function close
to the square root function (0.45 power) – formula 2.4. In the digital domain this is a
nonlinear conversion from 12-bit to 12-bit – Figure 2.31.
Output signal [V] = (input signal [V]) 0.45
(2.4)

BOBCAT Hardware User’s Manual
Imperx, Inc. Rev. 2.0.1 6421 Congress Ave. 4/10/2012 Boca Raton, FL 33487 +1 (561) 989-0006 125 of 253
Figure 2.31 – Gamma corrected video signal
2.15.2 User Defined LUT
The user can define any 12-bit to 12-bit transformation as a user LUT and can
upload it to the camera using the configuration utility software. The user can specify
a transfer function of their choice to match the camera’s dynamic range to the
scene’s dynamic range. There are no limitations to the profile of the function. The
LUT must include all possible input values (0 to 4095) – Figures 2.32.
Input signal
Outp
ut
sig
nal
Original TF
Modified TF
Figure 2.32 – Custom LUT

BOBCAT Hardware User’s Manual
Imperx, Inc. Rev. 2.0.1 6421 Congress Ave. 4/10/2012 Boca Raton, FL 33487 +1 (561) 989-0006 126 of 253
2.16 DEFECTIVE PIXEL CORRECTION
A CCD imager is composed of a two-dimensional array of light sensitive pixels. In
general, the majority of the pixels have similar sensitivity. Unfortunately, there are some
pixels which sensitivity deviates from the average pixel sensitivity. A defective pixel is
defined as a pixel whose response deviates by more than 15% from the average response.
In extreme cases these pixels can be stuck ‘black’ or stuck ‘white’ and are non-responsive
to light. There are two major types of pixel defects – “Defective” and “Hot”.
1. ”Defective” – these are pixels which sensitivity deviates more than 15% due to
fluctuations in the CCD manufacturing process. Two type of defective pixels are
possible:
a. “DARK” is defined as a pixel, whose sensitivity is lower than the sensitivity of
the adjacent pixels. In some cases this pixel will have no response (completely
dark).
b. “BRIGHT” is defined as a pixel, whose sensitivity is higher than the sensitivity
of the adjacent pixels. In some cases this pixel will have full response (completely
bright).
2. “Hot” – these are pixel, which in normal camera operation behaves as normal pixel
(the sensitivity is equal to the one of the adjacent pixels), but during long time
integration behaves as a high intensity bright pixel. In some cases this pixel will have
full response (completely bright).
2.16.1 Static Pixel Correction
Static Defective and Hot pixel correction works with predetermined and
preloaded Defective and Hot pixel maps. During factory final testing, our
manufacturing engineers run a program specially designed to identify these
‘defective’ and “hot” pixels. The program creates a map file which lists the
coordinates (i.e. row and column) of every defective pixel. This file, called the
Defect Pixel Map, is then downloaded into the camera’s non-volatile memory. Users may wish, however, to create and to upload their own DPM file because of the
uniqueness of their operating environment or camera use. When ‘Defective Pixel
Correction’ is enabled, the camera will compare each pixel’s coordinates with
entries in the ‘defect’ map. If a match is found, then the camera will ‘correct’ the
defective pixel. When ‘Hot Pixel Correction’ is enabled, the camera will compare
each pixel’s coordinates with entries in the ‘defect’ map. If a match is found, then
the camera will ‘correct’ the hot pixel. The "Defective/Hot Pixel Map" can be
displayed upon user request.

BOBCAT Hardware User’s Manual
Imperx, Inc. Rev. 2.0.1 6421 Congress Ave. 4/10/2012 Boca Raton, FL 33487 +1 (561) 989-0006 127 of 253
2.16.1 Dynamic Pixel Correction
Dynamic pixel correction works without preloaded pixel maps. When this option
is enabled, the camera determines which pixel needs correction and performs the
correction automatically. Static and Dynamic “Defective Pixel Correction” and
“Hot Pixel Correction” can be enabled independently or simultaneously.

BOBCAT Hardware User’s Manual
Imperx, Inc. Rev. 2.0.1 6421 Congress Ave. 4/10/2012 Boca Raton, FL 33487 +1 (561) 989-0006 128 of 253
2.17 FLAT FIELD CORRECTION
A CCD imager is composed of a two dimensional array of light sensitive pixels. Each
pixel within the array, however, has its own unique light sensitivity characteristics. Most
of the deviation is due to the difference in the angle of incidence and to charge transport
artifacts. This artifact is called ‘Shading’ and in normal camera operation should be
removed. The process by which a CCD camera is calibrated for shading is known as ‘Flat
Field Correction’. Refer to Figures 2.33a and 2.33b for images acquired before and after
Flat Field Correction. This feature is available as a standard feature only for cameras with
1.0” optical format or bigger.
The BOBCAT series of cameras incorporate a Flat Field Correction mechanism. The Flat
Field Correction mechanism measures the response of each pixel in the CCD array to
illumination and is used to correct for any variation in illumination over the field of the
array. The optical system most likely introduces some variation in the illumination
pattern over the field of the array. The flat field correction process compensates for
uneven illumination, if that illumination is a stable characteristic of each object exposure.
During factory final testing, our manufacturing engineers run a program specially
designed to identify the shading characteristics of the camera. The program creates a Flat
Field Correction file, which contains coefficients describing these shading characteristics.
This file is then downloaded into the camera’s non-volatile memory. When Flat Field
Correction is enabled, the camera will use the Flat Field Correction coefficients to
compensate for the shading effect.
Each Imperx camera is shipped with the Flat Field Correction file that was created for
that camera during factory final testing. Users may wish, however, to create their own
Flat Field Correction file because of the uniqueness of their operating environment (i.e.
lens, F-stop, lighting, etc.). Therefore, Imperx provides a Flat Field Correction utility that
allows users to generate a Flat Field Correction file. This file can then be downloaded
into the camera. While creating the Flat Field Correction file, it is necessary to illuminate
the CCD with a light pattern that is as representative of the background illumination as
possible. This illumination should be bright enough, or the exposure made long enough,
so that the CCD pixels signals are at least 25 percent of full scale (for 12 bit mode the
level should be at least 1000 ADUs).

BOBCAT Hardware User’s Manual
Imperx, Inc. Rev. 2.0.1 6421 Congress Ave. 4/10/2012 Boca Raton, FL 33487 +1 (561) 989-0006 129 of 253
Figure 2.33a – Original image showing ‘shading’ effect
Figure 2.33b – Flat field corrected image

BOBCAT Hardware User’s Manual
Imperx, Inc. Rev. 2.0.1 6421 Congress Ave. 4/10/2012 Boca Raton, FL 33487 +1 (561) 989-0006 130 of 253
2.18 NEGATIVE IMAGE
When operating in the negative image mode, the value of each pixel is inverted. The
resultant image appears negative – Figure 2.34. This feature could be useful if the camera
receives a negative image (i.e. image from microfilms, prints or slides). In this mode the
image has a normal vertical and horizontal orientation and full resolution. This feature is
available in both single and dual output modes.
Figure 2.34 – Normal and Negative Image

BOBCAT Hardware User’s Manual
Imperx, Inc. Rev. 2.0.1 6421 Congress Ave. 4/10/2012 Boca Raton, FL 33487 +1 (561) 989-0006 131 of 253
2.19 CAMERA INTERFACE
2.19.1 Status LED
The camera has a dual red-green LED, located on the back panel. The LED color
and light pattern indicate the camera status and mode of operation:
GREEN is steady ON – Normal operation. The user is expected to see a normal
image coming out of the camera.
GREEN blinks with frequency ~ 0.5 Hz – indicates triggering mode.
GREEN blinks with frequency ~ 2.0 Hz – indicates programmable integration
(line, frame or both) mode.
YELLOW is steady ON – Test mode. The user is expected to see one of the test
patterns.
YELLOW blinks with frequency ~ 0.5 Hz – the camera is in AGC/AEC mode.
In this mode changing the shutter slider will not affect the image luminance.
YELLOW blinks with frequency ~ 2.0 Hz – the camera is in external H or V
sync mode. The camera timing will be slaved to the external pulses. Changing
programmable integration sliders will not affect the image luminance
RED is steady ON – RS232 communication error or firmware load error. Re-
power the camera and load the factory settings. If the condition is still present,
please contact the factory for RMA.
LED is OFF – Power not present error. The camera has no power or indicates a
camera power supply failure. A faulty external AC adapter could also cause this.
To restore the camera operation, re-power the camera and load the factory
settings. If the LED is still “OFF”, please contact the factory for RMA.
2.19.2 Temperature Monitor
The camera has a built in temperature sensor which monitors the internal camera
temperature. The sensor is placed on the hottest spot in the camera. The internal
camera temperature is displayed on the Camera Configuration Utility screen and
can be queried by the user at any time – refer to Camera Configuration section.
2.19.3 Exposure Time Monitor
The camera has a built in exposure time monitor. In any mode of operation (i.e.
normal, AOI, binning, etc.) the user can query the camera for the current exposure

BOBCAT Hardware User’s Manual
Imperx, Inc. Rev. 2.0.1 6421 Congress Ave. 4/10/2012 Boca Raton, FL 33487 +1 (561) 989-0006 132 of 253
time by issuing a command – refer to the Exposure Control section. The current
camera integration time in units of microseconds will be returned.
2.19.4 Frame Time Monitor
The camera has a built in frame rate monitor. In any mode of operation (i.e.
normal, AOI, binning, etc.) the user can query the camera for the current frame
rate by issuing a command – refer to the Exposure Control section. The current
camera speed in units of frames per second will be returned.
2.19.5 Current image size
The camera image size can change based on a camera feature selected. In any
mode of operation (i.e. normal, AOI, binning, etc.) the user can query the camera
for the current image size by issuing a command – refer to the Image Size section.
The current camera image size in (pixels x lines) will be returned.

BOBCAT Hardware User’s Manual
Imperx, Inc. Rev. 2.0.1 6421 Congress Ave. 4/10/2012 Boca Raton, FL 33487 +1 (561) 989-0006 133 of 253
Chapter 3 – Digital Image Processing
Digital Image Processing
This chapter discusses built in Digital Image Processing algorithm in the
camera and their implementation and use.

BOBCAT Hardware User’s Manual
Imperx, Inc. Rev. 2.0.1 6421 Congress Ave. 4/10/2012 Boca Raton, FL 33487 +1 (561) 989-0006 134 of 253
3.1 OVERVIEW
The camera has built-in several basic image processing functions. More functions will be
added later. Please contact Imperx for more information.
3.2 IMAGE ENHANCEMENT
In many imaging applications the user will have a dark object on a bright background,
many dark and bright spots or shadows, or the light will not be sufficient, so the resulting
image will have a low contrast, and/or a vary low dynamic range. To improve the image
quality in such conditions, BOBCAT offers a set of image enhancing features –
thresholding and multi-point image correction. The processing function is applied to the
entire image unless AOI8 is enabled as “Processing ROI”. In this case the processing
function will apply only to the selected ROI.
3.2.1 Threshold Operation
In many applications the binary images are much simpler to analyze that the
original gray scale one. The process, which converts the regular gray scale image
to binary, is called “Thresholding”. Thresholding is a special case of intensity
quantization (binarisation) where the image can be segmented into foreground and
background regions, having only two gray scale levels “white” and “black”.
Selecting the threshold value is very critical for the binary image quality, and it is
to a great extend scene dependent. If a threshold level is chosen correctly, this will
produce a well-defined boundary of the object, which is essential. In some cases it
is desirable if part of the image is binary and some is grayscale image. The
camera has built in four thresholding modes:
3.2.1.1 Single Threshold Binary
If the image is a high contrast scene and has well defined bright and dark
regions a simple binarisation technique can be used for thresholding –
Formula 3.1. The binary image output is converted to “white” for all gray
level values higher or equal to the selected threshold point X1, and to
“black” for all gray levels lower than X1. The user can set the optimal
threshold value. Figure 3.1 shows the original and the processed image
with single threshold.
Output signal => “WHITE” if (input signal X1)
“BLACK” if (input signal < X1) (3.1)

BOBCAT Hardware User’s Manual
Imperx, Inc. Rev. 2.0.1 6421 Congress Ave. 4/10/2012 Boca Raton, FL 33487 +1 (561) 989-0006 135 of 253
3.2.1.2 Dual Threshold Binary
If the image has a low contrast and does not have well defined dark and
bright regions, the simple threshold operation does not yield good results.
In such cases a dual (known also as interval or window) thresholding
technique has to be implemented – Formula 3.2. The binary image output
is converted to “white” for all gray level values between the selected
threshold interval X1 and X2, and to “black” for all gray levels outside
(X1, X2) interval. The user can set the optimum X1 (Low) and X2 (High)
threshold values, please note that X2 > X1. Figure 3.2 shows the original a
processed image after a dual threshold operation.
Output signal => “BLACK” if (input signal X1)
“WHITE” if (X1 < input signal < X2)
“BLACK” if (input signal X2) (3.2)
Figure 3.1 – Original and processed image with single threshold.
Figure 3.2 – Original and processed image with double threshold.

BOBCAT Hardware User’s Manual
Imperx, Inc. Rev. 2.0.1 6421 Congress Ave. 4/10/2012 Boca Raton, FL 33487 +1 (561) 989-0006 136 of 253
3.2.1.3 Dual Threshold with Gray Scale
In some low contrast imaging applications, the simple threshold operation
along with a superimposed gray scale image might yield a good result. In
such cases a dual thresholding technique with a gray scale has to be
implemented – Formula 3.3. The image output is a gray scale image for all
gray level values between the selected threshold interval X1 and X2,
“black” for all gray levels lower than X1, and “white” for any gray levels
higher than X2. The user can set the optimum X1 (Low) and X2 (High)
threshold values, please note that X2 > X1. The image gray scale range is
only from values X1 to X2.
Output signal => “BLACK” if (input signal X1)
“Gray Scale” if (X1 < input signal < X2)
“WHITE” if (input signal X2) (3.3)
3.2.1.4 Dual Threshold with Gray Scale Stretch
In some low contrast applications, the threshold operation along with a
gray scale stretch might yield a good result – Figure 3.3. This is similar to
dual threshold with a gray scale, but the image gray scale is digitally
stretched to full 12 bit gray scale – Formula 3.4. The user can set the
optimum X1 (Low) and X2 (High) threshold values, note that X2 > X1.
Output signal => “BLACK” if (input signal X1)
“Full Gray Scale” if (X1 < input signal < X2)
“WHITE” if (input signal X2) (3.4)
Figure 3.3 – Original and processed image with threshold and gray scale stretch.
3.2.2 Multi Point Correction
Multi point correction is a modification of the slope of the camera transfer
function (TF), which results in the suppression or enhancement of certain image

BOBCAT Hardware User’s Manual
Imperx, Inc. Rev. 2.0.1 6421 Congress Ave. 4/10/2012 Boca Raton, FL 33487 +1 (561) 989-0006 137 of 253
regions. The original camera transfer function is linear and maps the data 1:1. The
new (corrected) transfer function has one or two sets of variable (X, Y) and based
on the relation between the variables a correction of certain image regions can be
achieved. The camera has two built in correction modes.
3.2.2.1 Single Point Correction
The simplest image enhancement can be achieved by a linear modification
of the original transfer function. If the image brightness is weighted
towards a particular region (dark or bright), this region needs to be
suppressed, and the less present (the flat) region needs to be enhanced.
The range of the correction is determined by the location of the break
point (X1, Y1) – Figure 3.4. This point (X1, Y1) divides the camera
transfer function into two regions (two lines). The slope of these lines (the
angle between the X axis and the line) determines the power of the
correction. If the angle is less than 45O
degrees, the grayscale range will be
suppressed. If the angle is more than 45O
degrees, the grayscale range will
be enhanced. The user can set the optimum (X1, Y1) values.
Input signal
Ou
tpu
t sig
na
l
Orig
inal T
F
New TF
X1
Y1
Figure 3.4 – Single point TF correction.
3.2.2.2 Multi Point Correction
If the image brightness is weighted towards two particular region – dark
and bright, and in the same time mid region has a low dynamic range a
multi point correction will produce much better results compare to the
single point correction. The range of the correction is determined by the
location of a pair of the break point (X1, Y1) and (X2, Y2) – Figure 3.5a.
The camera transfer function is divided into three regions (three lines),
which allows multiple grayscale regions to be corrected independent of
each other. If the angle is less than 45O
degrees, the grayscale range will be

BOBCAT Hardware User’s Manual
Imperx, Inc. Rev. 2.0.1 6421 Congress Ave. 4/10/2012 Boca Raton, FL 33487 +1 (561) 989-0006 138 of 253
suppressed, if the angle is 45O
degrees, the gray scale will not change. If
the angle is more than 45O
degrees, the grayscale range will be enhanced.
The user can set the optimum (X1, Y1) and (X2, Y2) values, note that X2
> X1. Figure 3.5b shows some of the most typical correction curves. If the
angle in the mid range (between X1 and X2) is negative, the grayscale
range will be reversed. Curve TF 1 enhances the dark image regions and
suppresses the bright ones. TF 2 – suppresses the dark and bright image
parts and enhances the mid range. TF 3 – enhances the bright image
regions and suppresses the dark ones. TF 4 – enhances the bright and dark
image parts and suppresses the mid range.
Ou
tpu
t sig
na
l
Input signalX1 X2
Ou
tpu
t sig
na
lO
rigin
al TF
TF 1
TF 2
TF 3
TF 4Y1
Y2
Orig
inal T
F
New TF
A B
Figure 3.5 – Multi point TF correction.
Figure 3.6 shows an original image (left) and processed one (right). The
original image has two dominant regions – predominantly dark subject
with a very bright bottom section and a relatively flat gray region. To
correct the image we will use “TF 1” type correction with points (650,
1950) and (2200,1760).

BOBCAT Hardware User’s Manual
Imperx, Inc. Rev. 2.0.1 6421 Congress Ave. 4/10/2012 Boca Raton, FL 33487 +1 (561) 989-0006 139 of 253
Figure 3.6 – Multi point image correction (a – original, b – processed).
CAUTION NOTE
Due to space limitations in the camera FPGA, the “Image processing” module is disabled
for the color Bobcat cameras. For more information please contact Imperx.

BOBCAT Hardware User’s Manual
Imperx, Inc. Rev. 2.0.1 6421 Congress Ave. 4/10/2012 Boca Raton, FL 33487 +1 (561) 989-0006 140 of 253
Chapter 4 – Camera Configuration
Camera Configuration
This chapter discusses how to communicate with the camera and configure
the camera’s operating parameters.

BOBCAT Hardware User’s Manual
Imperx, Inc. Rev. 2.0.1 6421 Congress Ave. 4/10/2012 Boca Raton, FL 33487 +1 (561) 989-0006 141 of 253
4.1 OVERVIEW
The Bobcat series of cameras are highly programmable and flexible. All of the
cameras resources (internal registers, video amplifiers and parameter FLASH) can
be controlled by the user. The user communicates with the camera using a simple,
register-based, command protocol via the Camera Link’s serial interface. The
interface is bi-directional with the user issuing ‘commands’ to the camera and the
camera issuing ‘responses’ (either status or info) to the user. The entire camera
registers and resources can be configured and monitored by the user. The
camera’s parameters can be programmed using the Bobcat Configurator graphical
user interface.
4.2 CAMERA CONFIGURATION
4.2.1 Configuration Memory – parameter FLASH
The camera has a built-in configuration memory divided into 4 segments: ‘work-
space’, ‘factory-space’, ‘user-space #1’ and ‘user-space #2’. The ‘work-space’
segment contains the current camera settings while the camera is powered-up and
operational. All camera registers are located in this space. These registers can be
programmed and retrieved via commands issued by the user. The workspace is
RAM based and upon power down all camera registers are cleared. The ‘factory-
space’ segment is ROM based, write protected and contains the default camera
settings. This space is available for read operations only. The ‘user-space #1’ and
‘user-space #2’ are non-volatile, FLASH based and used to store two user defined
configurations. Upon power up, the camera firmware loads the work-space
registers from the factory-space, user-space #1 or user-space #2 as determined by
a ‘boot control’ register located in the configuration memory. The ‘boot control’
register can be programmed by the user (refer to Camera Configuration Section).
The user can, at any time, instruct the camera to loads its workspace with the
contents of the ‘factory-space’, ‘user-space #1’ or ‘user-space #2’. Similarly, the
user can instruct the camera to save the current workspace settings into either the
‘user-space #1’ or ‘user-space #2’.
The non-volatile parameter FLASH memory also contains Defective Pixel Map,
Hot Pixel Map, Flat Field Correction Coefficients, LUT 1 and LUT 2, which can
be loaded to the camera internal memory upon enabling the corresponding camera
feature. The user can create its own DPM, HPM, FFCC, and LUT tables and
upload them to the parameter FLASH using the Bobcat Configurator graphical
user interface.

BOBCAT Hardware User’s Manual
Imperx, Inc. Rev. 2.0.1 6421 Congress Ave. 4/10/2012 Boca Raton, FL 33487 +1 (561) 989-0006 142 of 253
4.2.3 Camera Serial Protocol
In order to access the camera registers and resources a sequence of bytes needs to
be transmitted to the camera via the Camera Link serial interface. This is an
RS232, asynchronous, full-duplex, serial protocol, with 1 start bit, 8 data bits, 1
stop bit, no hand shake, and no parity – Figure 3.1. The default baud rate is
configurable (9600, 19200, 38400, 57600 and 115200 – default).
Figure 4.1 – Serial protocol format
Each camera control register can be updated independently. In terms of the serial
protocol, all registers are defined as 16-bit address (hex format), and 32-bit data
(hex format). Camera registers using less than 32-bits in width must be padded
with ‘0’s on writes, and unused bits are ignored on reads. Register data is always
“packed low” within 32-bit data words for registers defined less than 32-bits.
There is a latency delay for each command due to command execution and data
transmission over the serial port. This latency varies from command to command
because of resource location and command response length.
4.2.3.1 Write Operation
In order to write to any given camera register, a sequence of 7 bytes should be
sent to the camera. If there is no error the camera returns one byte
acknowledge for the write command <Ack> - Figure 3.2. If there is an error
the camera returns two bytes not-acknowledge for the write command – the
first byte is <Nac> <Err>, the second is the error code – Figure 3.3a,b:
Write to camera (7 Bytes): <Write_Cmd> <Address> <Data>
1st
byte: 0x57 (Write Command)
2nd
byte: <Register Address_High> MSB
3rd
byte: <Register Address_Low> LSB
4th
byte: <Register Data Byte 4> MSB
5th
byte: <Register Data Byte 3> …
6th
byte: <Register Data Byte 2> …
7th
byte: <Register Data Byte 1> LSB

BOBCAT Hardware User’s Manual
Imperx, Inc. Rev. 2.0.1 6421 Congress Ave. 4/10/2012 Boca Raton, FL 33487 +1 (561) 989-0006 143 of 253
Write Acknowledge (1 Byte): <Ack>
1st
byte: 0x06 (Acknowledge)
57 04 10 11 22 33 44
06
Rx
Tx
Wr_Cmd Addr Data
Ack
Figure 4.2 – Normal write cycle
Write Not-acknowledge (2 Bytes): <Nak> <Error Code>
1st
byte: 0x15 (Not-acknowledge)
2nd
byte: <XX> (Nck Error Code. See Error Code Description section)
47 04 10 11 22
15
Rx
Tx
Cmd
Nak
01
Invalid Cmd
These characters are dropped
33 44
* * * * All subsequent Rx characters are
dropped until the receipt of a valid
( 52 or 57 ) command
* * * *
Figure 4.3a – Invalid command error
Tx
57 04 10 11 22
15
Rx
Wr_Cmd Addr
Nak
02
Timeoutt=0 t=100 mS
33 44
These characters
are dropped
* * * *
* * * * All subsequent Rx characters are
dropped until the receipt of a valid
( 52 or 57 ) command
Figure 4.3b – Rx timeout error
Example: Write to register address 0x0410, data value = 0x11223344:

BOBCAT Hardware User’s Manual
Imperx, Inc. Rev. 2.0.1 6421 Congress Ave. 4/10/2012 Boca Raton, FL 33487 +1 (561) 989-0006 144 of 253
Camera Write Command : <0x57> <04> <10> <11> <22> <33> <44>
4.2.3.2 Read Operation
In order to read from any given camera register, a sequence of 3 bytes should
be sent to the camera. If there is no error the camera returns 5 bytes – one byte
acknowledge for the read command <Ack> and four bytes of data <DD>
<DD> <DD> <DD> - Figure 3.4. During read operation the camera does not
return an error or <Nac>. The only exception is the case of invalid command –
Figure 3.3a. If the user specifies a wrong address, the camera returns
acknowledge <06> and four bytes of data <00> <00> <00> <00>.
Read from camera (3 Bytes) : <Read_Cmd> <Address>
1st
byte: 0x52 (Read Command)
2nd
byte: <Register Address_Low>
3rd
byte: <Register Address_High>
The camera returns (5 bytes) : <ACK> <Data>
1st
byte: 0x06 (Acknowledge)
2nd
byte: <Register Data Byte 4> MSB
3rd
byte: <Register Data Byte 3> …
5th
byte: <Register Data Byte 2> …
6th
byte: <Register Data Byte 1> LSB
52 04 10
11 22 33 4406
Rd_Cmd Addr
DataAck
Rx
Tx
Figure 4.4 – Normal read cycle
Example: Read from camera register address 0x0410:
Camera Read Command : <0x52> <04> <10>
Camera returns register data payload value 0x11223344:
Register data <0x06> <11> <22> <33> <44>

BOBCAT Hardware User’s Manual
Imperx, Inc. Rev. 2.0.1 6421 Congress Ave. 4/10/2012 Boca Raton, FL 33487 +1 (561) 989-0006 145 of 253
4.2.3.3 Error Code Description
To manage camera reliability, not-acknowledge error codes are defined as
follows:
x00 – No error
x01 – Invalid command. An invalid command (not 52 or 57) has been sent to
the camera.
x02 – Time-out.
x03 – Checksum error
x04 – Value less then minimum
x05 – Value higher than maximum
x06 – AGC error
x07 – Supervisor mode error
x08 – Mode not supported error

BOBCAT Hardware User’s Manual
Imperx, Inc. Rev. 2.0.1 6421 Congress Ave. 4/10/2012 Boca Raton, FL 33487 +1 (561) 989-0006 146 of 253
4.3 CAMERA CONFIGURATION REGISTER DESCRIPTION
4.3.1 Startup Procedure
Upon power on or receipt of an ‘SW_Reset’ command, the camera performs the
following steps:
1. Boot loader checks Program FLASH memory for a valid Firmware image and
loads it into the FPGA.
2. The camera reads the ‘Boot From’ register from the parameter FLASH and
loads its workspace from one of the configuration spaces as determined by the
‘Boot From’ data. The available configuration spaces are: ‘Factory…’, ‘User #1…’, ‘User #2…’
3. The camera is initialized and ready to accept user commands.
4.3.2 Saving and Restoring Settings
Operational settings for the camera may be stored for later retrieval in its non-
volatile memory. Three separate configuration spaces exist for storing these
settings: ‘factory’ space, ‘user #1’ space and ‘user #2’ space. The factory space is
pre-programmed by factory personnel during the manufacturing process. This
space is write protected and cannot be altered by the user. Two user spaces are
also provided allowing the user to store his/her own preferences. The camera can
be commanded to load its internal workspace, from either of the three
configuration spaces, at any time. The user can also define from which space the
camera should automatically load itself following a power cycle or receipt of a
reset (‘SW_Reset’) command.
4.3.2.1 Boot From
This register determines which configuration space (factory, user#1 or user
#2) should be loaded into the camera following a power cycle or reset
(‘SW_Reset’) command. Upon a power cycle or reset, the camera reads the
‘boot from’ value from non-volatile memory and loads the appropriate
configuration space.
Address : 0x6000
Data (1- 0) : 00 – Boot from Factory
01 – Boot from User #1
: 10 – Boot from User #2
Data (31- 2) : N/A
BOBCAT Hardware User’s Manual
Imperx, Inc. Rev. 2.0.1 6421 Congress Ave. 4/10/2012 Boca Raton, FL 33487 +1 (561) 989-0006 147 of 253
4.3.2.2 Load From Factory
The ‘Load From Factory’ command instructs the camera to load its
workspace from the factory space. All current workspace settings will be
replaced with the contents of the factory space. This is a command, not a
register. The act of writing to this location initiates the load from the factory.
Address : 0x6060
4.3.2.3 Load From User #1
The ‘Load From User #1’ command instructs the camera to load its
workspace from the user #1 space. All current workspace settings will be
replaced with the contents of the user #1 space. This is a command, not a
register. The act of writing to this location initiates the load from the user #1.
Address : 0x6064
4.3.2.4 Load From User #2
The ‘Load From User #2’ command instructs the camera to load its
workspace from the user #2 space. All current workspace settings will be
replaced with the contents of the user #2 space. This is a command, not a
register. The act of writing to this location initiates the load from the user #2.
Address : 0x6068
4.3.2.5 Load MFG Default Gain
The ‘Load MFG Default Gain’ command instructs the camera to load its
default gain and offset settings from the manufacturing space. Different
settings will be loaded for “slow” and “fast” camera speed. This is a
command, not a register. The act of writing to this location initiates the load
the default gain and offset settings.
Address : 0x606C
4.3.2.6 Save to User #1
The ‘Save To User #1’ command instructs the camera to save its
workspace to the user #1 space. All current workspace settings will be saved
to the user #1 space. This is a command, not a register. The act of writing to
this location initiates the save to user #1 space.
Address : 0x6074

BOBCAT Hardware User’s Manual
Imperx, Inc. Rev. 2.0.1 6421 Congress Ave. 4/10/2012 Boca Raton, FL 33487 +1 (561) 989-0006 148 of 253
4.3.2.7 Save to User #2
The ‘Save To User #2’ command instructs the camera to save its
workspace to the user #2 space. All current workspace settings will be saved
to the user #2 space. This is a command, not a register. The act of writing to
this location initiates the save to user #2 space.
Address : 0x6078
4.3.2.8 SW_Reset
The ‘SW_Reset’ command instructs the camera to initiate software reset,
which resets the camera and loads its workspace from one of the configuration
spaces as determined by the ‘Boot From’ data. Although, this is a command,
the user MUST write a specific data 0xDEADBEEF in order to initiate the
reset sequence.
Address : 0x601C
Data : 0xDEADBEEF
4.3.2.9 BAUD Rate Selector
This register sets the communication baud rate between the camera and
computer.
Address : 0x0604
Data (2:0) : 000 – 9600
001 – 19200
010 – 38400
011 – 57600
100 – 115200 (default)
Data (31:3) : N/A
4.3.3 Retrieving Manufacturing Data
The camera contains non-volatile memory that stores manufacturing related
information. This information is programmed in the factory during the
manufacturing process.
4.3.3.1 Firmware Revision
This register returns the camera main firmware revision.
Address : 0x6004
Data (31:28) : <FW image>

BOBCAT Hardware User’s Manual
Imperx, Inc. Rev. 2.0.1 6421 Congress Ave. 4/10/2012 Boca Raton, FL 33487 +1 (561) 989-0006 149 of 253
Data (27:24) : <CCD Type>
Data (23:0) : <FW revision>
4.3.3.2 Firmware Build Number
This register returns the firmware build number, which tracks custom
firmware for specific applications.
Address : 0x6008
Data : <FBN revision>
4.3.3.3 Assembly Part Number
This register returns the camera assembly part number – the complete
assembly part number is 4 registers.
Address : 0x7004, 0x7008, 0x700C, 0x7010
Data : <Assembly Part Number>
4.3.3.4 Camera Serial Number
This register returns the camera serial number – the complete serial number is
2 registers.
Address : 0x7014, 0x7018
Data : <Camera Serial Number>
4.3.3.5 CCD Serial Number
This register returns the CCD imager number – the complete CCD number is
2 registers.
Address : 0x701C, 0x7020
Data : <CCD Serial Number>
4.3.3.6 Date of Manufacture
This register returns the camera date of manufacture – The complete date of
manufacture is 2 registers.
Address : 0x7024, 0x7028
Data : <Date of Manufacture>
4.3.3.7 Camera Type
This register returns the camera type – The complete assembly is 4 registers.
Address : 0x702C, 0x7030, 0x7034, 0x7038
Data : <Camera Type>

BOBCAT Hardware User’s Manual
Imperx, Inc. Rev. 2.0.1 6421 Congress Ave. 4/10/2012 Boca Raton, FL 33487 +1 (561) 989-0006 150 of 253
4.3.4 Camera Information Registers
The camera has a set of information registers, which provide information for the
camera current status, frame rate, exposure time, image size, etc.
4.3.4.1 Horizontal Frame Size (Max, Min)
This register returns the minimum/maximum horizontal image frame size in
pixels. The maximum horizontal image size is a dynamic parameter and
changes based on the LVAL selection.
Address : 0x6080
Data (15:0) : <Minimum Horizontal Size>
Data (31:16) : <Maximum Horizontal Size>
4.3.4.2 Vertical Frame Size (Max, Min)
This register returns the minimum/maximum vertical image frame size in
lines. The maximum vertical image size is a dynamic parameter and changes
based on the FVAL selection.
Address : 0x6084
Data (15:0) : <Minimum Vertical Size>
Data (31:16) : <Maximum Vertical Size>
4.3.4.3 Current Minimum Frame Time
This register returns the current minimum frame time in us.
Address : 0x6088
Data (23:0) : <Minimum Frame Time>
Data (31:24) : N/A
4.3.4.4 Current Minimum Line Time
This register returns the current minimum line time in pixels.
Address : 0x608C
Data (15:0) : N/A
Data (31- 16) : <Minimum Line Time>
4.3.4.5 Current Minimum Exposure
This register returns the current minimum possible camera exposure time in
us.
Address : 0x6094
Data (23:0) : <Minimum Camera Exposure>
Data (31:24) : N/A

BOBCAT Hardware User’s Manual
Imperx, Inc. Rev. 2.0.1 6421 Congress Ave. 4/10/2012 Boca Raton, FL 33487 +1 (561) 989-0006 151 of 253
4.3.4.6 Current Maximum Exposure
This register returns the current camera maximum exposure time in us. The
maximum camera exposure is a dynamic parameter and changes based on the
camera mode of operation.
Address : 0x6090
Data (23:0) : <Current Maximum Camera Exposure>
Data (31:24) : N/A
4.3.4.7 Current Camera Exposure
This register returns the current camera exposure time in us.
Address : 0x609C
Data (23:0) : <Current Exposure Time>
Data (31:24) : N/A
4.3.4.8 Current Frame Time
This register returns the current camera frame time in us.
Address : 0x60A0
Data (23:0) : <Current Frame Time>
Data (31:24) : N/A
4.3.4.9 Current Image Size
This register returns the current image frame size in pixels. The image size is
a dynamic parameter and changes based on the camera mode of operation.
Address : 0x60B0
Data (15:0) : <Current Horizontal Size>
Data (31:16) : <Current Vertical Size>
4.3.4.10 Current Gain & Luminance Status
This register returns the current analog gain and the current average image
luminance during normal, AGC and Tap Balance operation.
The Current Analog Gain (register bits D11:D0) displays:
- The current slider gain for tap 1 during normal operation.
- The calculated AGC gain for tap1 when AGC/AEC is enabled.
- The calculated analog gain for tap 2 when tab balancing is enabled.
Address : 0x60B4
Data (11:0) : <Current Analog Gain>
Data (23:12) : <Current Average Luminance>
Data (24) : <Analog Gain Minimum Limit Reached>

BOBCAT Hardware User’s Manual
Imperx, Inc. Rev. 2.0.1 6421 Congress Ave. 4/10/2012 Boca Raton, FL 33487 +1 (561) 989-0006 152 of 253
Data (25) : < Analog Gain Maximum Limit Reached>
Data (27, 26) : N/A
Data (28) : <Exposure Minimum Limit Reached>
Data (29) : <Exposure Maximum Limit Reached>
Data (31, 30) : N/A
4.3.4.11 Current Camera Temperature
This register returns the current camera temperature in degrees Celsius. The
temperature resolution is 0.25°C – Table 3.1.
Address : 0x6010
Data (9:0) : <Current Camera Temperature>
Data (31:10) : N/A
Temperature Register Value
+127.75 °C 01 1111 1111
... ...
+0.25 °C 00 0000 0001
0° C 00 0000 0000
-0.25 °C 11 1111 1111
... ...
-128 °C 10 0000 0000
Table 3.1 – Current camera temperature values
4.3.5 Image Size (AOI) Workspace Registers
4.3.5.1 Scan Mode Control
This register sets the current CCD readout (scan) mode. The default CCD
scanning mode for all Bobcat cameras is progressive, where all pixels within
the same exposure period are read out simultaneously. Some CCD imagers
allow a sub-sampled scan (center only), where only a sub-section of the pixels
are readout, thus providing a higher camera frame rate.
Address : 0x0504
Data (0) : 0 – normal – progressive scan
1 – center – sub-sampled (partial) scan
Data (31:1) : N/A
4.3.5.2 Vertical Binning Mode
This register sets the current binning format in vertical direction. Five possible
vertical binning options are possible.
Address : 0x0500

BOBCAT Hardware User’s Manual
Imperx, Inc. Rev. 2.0.1 6421 Congress Ave. 4/10/2012 Boca Raton, FL 33487 +1 (561) 989-0006 153 of 253
Data (2:0) : 000 – 1x vertical binning
001 – 2x vertical binning
010 – 3x vertical binning
011 – 4x vertical binning
100 – 8x vertical binning
Data (31:3) : N/A
4.3.5.3 Horizontal Binning Mode
This register sets the current binning format in horizontal direction. Five
possible horizontal binning options are possible.
Address : 0x0204
Data (2:0) : 000 – 1x horizontal binning
001 – 2x horizontal binning
010 – 3x horizontal binning
011 – 4x horizontal binning
100 – 8x horizontal binning
Data (31:3) : N/A
4.3.5.4 MAOI
This set of register enables MAOI and sets the appropriate window size and
offset in horizontal and vertical direction.
MAOI Enable
Address : 0x0208
Data (0) : 0 – MAOI disable
1 – MAOI enable
Data (31:1) : N/A
MAOI Horizontal Offset
Address : 0x0248
Data (11:0) : <value> MAOI offset in horizontal direction
Data (31:12) : N/A
MAOI Horizontal Width
Address : 0x0228
Data (11:0) : <value> MAOI width in horizontal direction
Data (31:12) : N/A
MAOI Vertical Offset
Address : 0x0288
Data (11:0) : <value> MAOI offset in vertical direction
Data (31:12) : N/A

BOBCAT Hardware User’s Manual
Imperx, Inc. Rev. 2.0.1 6421 Congress Ave. 4/10/2012 Boca Raton, FL 33487 +1 (561) 989-0006 154 of 253
MAOI Vertical Height
Address : 0x0268
Data (11:0) : <value> MAOI height in vertical direction
Data (31:12) : N/A
4.3.5.5 AOI 1
This set of register enables AOI #1 and sets the appropriate window size and
offset in horizontal and vertical direction.
AOI 1 Enable
Address : 0x020C
Data (1:0) : 00 – AOI 1 disable
01 – AOI 1 include
10 – AOI 1 exclude
11 – N/A
Data (31:2) : N/A
AOI 1 Horizontal Offset
Address : 0x024C
Data (11:0) : <value> AOI 1 offset in horizontal direction
Data (31:12) : N/A
AOI 1 Horizontal Width
Address : 0x022C
Data (11:0) : <value> AOI 1 width in horizontal direction
Data (31:12) : N/A
AOI 1 Vertical Offset
Address : 0x028C
Data (11:0) : <value> AOI 1 offset in vertical direction
Data (31:12) : N/A
AOI 1 Vertical Height
Address : 0x026C
Data (11:0) : <value> AOI 1 height in vertical direction
Data (31:12) : N/A
4.3.5.6 AOI 2
This set of register enables AOI #2 and sets the appropriate window size and
offset in horizontal and vertical direction.
AOI 2 Enable
Address : 0x0210
Data (1:0) : 00 – AOI 2 disable
01 – AOI 2 include

BOBCAT Hardware User’s Manual
Imperx, Inc. Rev. 2.0.1 6421 Congress Ave. 4/10/2012 Boca Raton, FL 33487 +1 (561) 989-0006 155 of 253
10 – AOI 2 exclude
11 – N/A
Data (31:1) : N/A
AOI 2 Horizontal Offset
Address : 0x0250
Data (11:0) : <value> AOI 2 offset in horizontal direction
Data (31:12) : N/A
AOI 2 Horizontal Width
Address : 0x0230
Data (11:0) : <value> AOI 2 width in horizontal direction
Data (31:12) : N/A
AOI 2 Vertical Offset
Address : 0x0290
Data (11:0) : <value> AOI 2 offset in vertical direction
Data (31:12) : N/A
AOI 2 Vertical Height
Address : 0x0270
Data (11:0) : <value> AOI 2 height in vertical direction
Data (31:12) : N/A
4.3.5.7 AOI 3
This set of register enables AOI #3 and sets the appropriate window size and
offset in horizontal and vertical direction.
AOI 3 Enable
Address : 0x0214
Data (1:0) : 00 – AOI 3 disable
01 – AOI 3 include
10 – AOI 3 exclude
11 – N/A
Data (31:2) : N/A
AOI 3 Horizontal Offset
Address : 0x0254
Data (11:0) : <value> AOI 3 offset in horizontal direction
Data (31:12) : N/A
AOI 3 Horizontal Width
Address : 0x0234
Data (11:0) : <value> AOI 3 width in horizontal direction
Data (31:12) : N/A

BOBCAT Hardware User’s Manual
Imperx, Inc. Rev. 2.0.1 6421 Congress Ave. 4/10/2012 Boca Raton, FL 33487 +1 (561) 989-0006 156 of 253
AOI 3 Vertical Offset
Address : 0x0294
Data (11:0) : <value> AOI 3 offset in vertical direction
Data (31:12) : N/A
AOI 3 Vertical Height
Address : 0x0274
Data (11:0) : <value> AOI 3 height in vertical direction
Data (31:12) : N/A
4.3.5.8 AOI 4
This set of register enables AOI #4 and sets the appropriate window size and
offset in horizontal and vertical direction.
AOI 4 Enable
Address : 0x0218
Data (1:0) : 00 – AOI 4 disable
01 – AOI 4 include
10 – AOI 4 exclude
11 – N/A
Data (31:2) : N/A
AOI 4 Horizontal Offset
Address : 0x0258
Data (11:0) : <value> AOI 4 offset in horizontal direction
Data (31:12) : N/A
AOI 4 Horizontal Width
Address : 0x0238
Data (11:0) : <value> AOI 4 width in horizontal direction
Data (31:12) : N/A
AOI 4 Vertical Offset
Address : 0x0298
Data (11:0) : <value> AOI 4 offset in vertical direction
Data (31:12) : N/A
AOI 4 Vertical Height
Address : 0x0278
Data (11:0) : <value> AOI 4 height in vertical direction
Data (31:12) : N/A

BOBCAT Hardware User’s Manual
Imperx, Inc. Rev. 2.0.1 6421 Congress Ave. 4/10/2012 Boca Raton, FL 33487 +1 (561) 989-0006 157 of 253
4.3.5.9 AOI 5
This set of register enables AOI #5 and sets the appropriate window size and
offset in horizontal and vertical direction.
AOI 5 Enable
Address : 0x021C
Data (1:0) : 00 – AOI 5 disable
01 – AOI 5 include
10 – AOI 5 exclude
11 – N/A
Data (31:2) : N/A
AOI 5 Horizontal Offset
Address : 0x025C
Data (11:0) : <value> AOI 5 offset in horizontal direction
Data (31:12) : N/A
AOI 5 Horizontal Width
Address : 0x023C
Data (11:0) : <value> AOI 5 width in horizontal direction
Data (31:12) : N/A
AOI 5 Vertical Offset
Address : 0x029C
Data (11:0) : <value> AOI 5 offset in vertical direction
Data (31:12) : N/A
AOI 5 Vertical Height
Address : 0x027C
Data (11:0) : <value> AOI 5 height in vertical direction
Data (31:12) : N/A
4.3.5.10 AOI 6
This set of register enables AOI #6 and sets the appropriate window size and
offset in horizontal and vertical direction.
AOI 6 Enable
Address : 0x0220
Data (1:0) : 00 – AOI 6 disable
01 – AOI 6 include
10 – AOI 6 exclude
11 – N/A
Data (31:2) : N/A

BOBCAT Hardware User’s Manual
Imperx, Inc. Rev. 2.0.1 6421 Congress Ave. 4/10/2012 Boca Raton, FL 33487 +1 (561) 989-0006 158 of 253
AOI 6 Horizontal Offset
Address : 0x0260
Data (11:0) : <value> AOI 6 offset in horizontal direction
Data (31:12) : N/A
AOI 6 Horizontal Width
Address : 0x0240
Data (11:0) : <value> AOI 6 width in horizontal direction
Data (31:12) : N/A
AOI 6 Vertical Offset
Address : 0x02A0
Data (11:0) : <value> AOI 6 offset in vertical direction
Data (31:12) : N/A
AOI 6 Vertical Height
Address : 0x0280
Data (11:0) : <value> AOI 6 height in vertical direction
Data (31:12) : N/A
4.3.5.11 Frame Rate Control
This register enables the camera frame rate to stay the same and to be
independent of the AOI vertical window size. If enabled the camera frame rate
will increase when the vertical window size decreases.
Address : 0x0200
Data (0) : 0 – constant frame rate disable
1 – constant frame rate enable
Data (31:1) : N/A
4.3.5.12 LVAL Size Control
This register sets the number of active image pixels per line (LVAL). Two
possible options are available – “all visible pixels” or “active pixels only”.
Address : 0x05A8
Data (0) : 0 – display active pixels only
1 – display all visible pixels
Data (31:1) : N/A
4.3.5.13 FVAL Size Control
This register sets the number of active image lines per frame (FVAL). Two
possible options are available – “all visible lines” or “active lines only”.

BOBCAT Hardware User’s Manual
Imperx, Inc. Rev. 2.0.1 6421 Congress Ave. 4/10/2012 Boca Raton, FL 33487 +1 (561) 989-0006 159 of 253
Address : 0x05AC
Data (0) : 0 – display active lines only
1 – display all visible lines
Data (31:1) : N/A
4.3.6 Exposure Control Workspace Registers
4.3.6.1 Exposure Control Mode
This register sets the exposure control mode and for the camera.
Address : 0x0544
Data (1:0) : 00 – off – no exposure control
01 – pulse width – the duration of the selected
trigger pulse determines the exposure during
triggering
10 – internal – exposure control register 0x0548 sets
the camera exposure
11 – external – an external signal via the camera I/O
determines the exposure.
Data (31:2) : N/A
4.3.6.2 Exposure Time Absolute
This register sets the actual camera exposure time when “Internal” exposure
mode is selected.
Address : 0x0548
Data (23:0) : <value> – actual exposure time in micro seconds.
Data (31:24) : N/A
4.3.6.3 Programmable Line Time Enable
This register enables a programmable line time mode. The user can extend the
camera line time beyond the camera free-running line time. This applies to all
lines in the frame.
Address : 0x054C
Data (0) : 0 – disable programmable line time.
1 – enable programmable line time
Data (31:1) : N/A
4.3.6.4 Programmable Line Time Absolute
This register sets the actual line time in pixels.
Address : 0x0554
Data (12:0) : <value> – actual line time in pixels.

BOBCAT Hardware User’s Manual
Imperx, Inc. Rev. 2.0.1 6421 Congress Ave. 4/10/2012 Boca Raton, FL 33487 +1 (561) 989-0006 160 of 253
Data (31:13) : N/A
4.3.6.5 Programmable Frame Time Enable
This register enables a programmable frame time mode. The user can extend
the camera frame time beyond the camera free-running frame time up to ~ 16
seconds. This is also known as long integration.
Address : 0x0550
Data (0) : 0 – disable programmable frame time.
1 – enable programmable frame time
Data (31:1) : N/A
4.3.6.6 Programmable Frame Time Absolute
This register sets the actual frame time in microseconds.
Address : 0x0558
Data (23:0) : <value> – actual frame time in micro seconds.
Data (31:24) : N/A
4.3.6.7 Camera Speed Selection
This register sets the camera speed. Two modes are available – normal and
fast (over-clocked). The free-running frame rate increases in fast mode.
Address : 0x0608
Data (0) : 0 – normal speed.
1 – fast speed.
Data (31:1) : N/A
4.3.7 AEC, AGC, AIC Workspace Registers
4.3.7.1 Auto Exposure Control (AEC)
This register enables the auto exposure control.
Address : 0x0150
Data (0) : 0 – disable auto exposure control
1 – enable auto exposure control
Data (31:1) : N/A
4.3.7.2 Maximum Exposure Time Limit
This register sets the maximum exposure time limit during AEC. The
automatic exposure control process will keep the camera exposure always
below the set level. This is to prevent motion smear. The Minimum Exposure
Time Limit is factory preset.
BOBCAT Hardware User’s Manual
Imperx, Inc. Rev. 2.0.1 6421 Congress Ave. 4/10/2012 Boca Raton, FL 33487 +1 (561) 989-0006 161 of 253
Address : 0x05B0
Data (23:0) : <value> – maximum exposure time limit
Data (31:24) : N/A
4.3.7.3 Exposure Correction Speed
This register sets the exposure correction speed during AEC. The automatic
exposure control process can set the algorithm convergence speed, i.e. how
long it takes to reach the desired exposure.
Address : 0x0174
Data (1:0) : 00 – 1x speed – slow
01 – 2x speed
10 – 3x speed
11 – 4x speed – fast
Data (31:2) : N/A
4.3.7.4 Auto Gain Control (AGC)
This register enables the auto gain control.
Address : 0x0154
Data (0) : 0 – disable auto gain control
1 – enable auto gain control
Data (31:1) : N/A
4.3.7.5 Maximum Gain Limit
This register sets the maximum analog gain limit during AGC. The automatic
gain control process will keep the camera analog gain always below the set
level. The Minimum Analog Gain Limit is factory preset.
Address : 0x0160
Data (9:0) : <value> – maximum analog gain limit
Data (31:10) : N/A
4.3.7.6 Gain Correction Speed
This register sets the gain correction speed during AGC. The automatic gain
control process can set the algorithm convergence speed, i.e. how long it takes
to reach the desired gain.
Address : 0x0178
Data (1:0) : 00 – 1x speed – slow
01 – 2x speed
10 – 3x speed
11 – 4x speed – fast
Data (31:2) : N/A

BOBCAT Hardware User’s Manual
Imperx, Inc. Rev. 2.0.1 6421 Congress Ave. 4/10/2012 Boca Raton, FL 33487 +1 (561) 989-0006 162 of 253
4.3.7.7 Luminance Level Threshold
This register sets the desired luminance level to be maintained during AEC or
AGC process.
Address : 0x0158
Data (11:0) : <value> – desired luminance level
Data (31:12) : N/A
4.3.7.8 Luminance Type Selection
This register sets the luminance mode to be used during AEC or AGC process.
The correction algorithm can use the average luminance for the entire frame
or the peak luminance in the frame.
Address : 0x017C
Data (1:0) : 00 – average luminance
01 – peak luminance
10 or 11 – reserved
Data (31:2) : N/A
4.3.7.9 Region of Interest Selection (AOI)
This set of register sets the region of interest to be used during AEC or AGC
process. The correction algorithm can use as a sampling (data collection)
region the entire frame or only a portion (AOI) of it.
AOI Horizontal Offset
Address : 0x0168
Data (11:0) : <value> AOI offset in horizontal direction
Data (31:12) : N/A
AOI Horizontal Width
Address : 0x0164
Data (11:0) : <value> AOI width in horizontal direction
Data (31:12) : N/A
AOI Vertical Offset
Address : 0x0170
Data (11:0) : <value> AOI offset in vertical direction
Data (31:12) : N/A
AOI Vertical Height
Address : 0x016C
Data (11:0) : <value> AOI height in vertical direction
Data (31:12) : N/A
BOBCAT Hardware User’s Manual
Imperx, Inc. Rev. 2.0.1 6421 Congress Ave. 4/10/2012 Boca Raton, FL 33487 +1 (561) 989-0006 163 of 253
4.3.7.10 Auto Iris Control (AIC)
This register enables the auto iris control.
Address : 0x014C
Data (0) : 0 – disable auto iris control
1 – enable auto iris control
Data (31:1) : N/A
Gain and Offset Workspace Registers
4.3.8 Video Amp, Gain and Offset Workspace Registers
4.3.8.1 Pre-amplifier Gain – Channel 1
This register sets the pre-amplifier analog gain for channel 1.
Address : 0x0000
Data (1:0) : 00 – -3.0 dB pre-amplifier gain channel 1
01 – 0.0 dB pre-amplifier gain channel 1
10 – +3.0 dB pre-amplifier gain channel 1
11 – +6.0 dB pre-amplifier gain channel 1
Data (31:2) : N/A
4.3.8.2 Analog Gain – Channel 1
This register sets the main analog gain for channel 1.
Address : 0x0004
Data (9:0) : <value> – analog gain channel 1
Data (31:10) : N/A
4.3.8.3 Analog Offset – Channel 1
This register sets the analog offset for channel 1.
Address : 0x0008
Data (9:0) : <value> – analog offset channel 1
Data (31:10) : N/A
4.3.8.4 Pre-amplifier Gain – Channel 2
This register sets the pre-amplifier analog gain for channel 2.
Address : 0x0010
Data (1:0) : 00 – -3.0 dB pre-amplifier gain channel 2
01 – 0.0 dB pre-amplifier gain channel 2
10 – +3.0 dB pre-amplifier gain channel 2
11 – +6.0 dB pre-amplifier gain channel 2
Data (31:2) : N/A

BOBCAT Hardware User’s Manual
Imperx, Inc. Rev. 2.0.1 6421 Congress Ave. 4/10/2012 Boca Raton, FL 33487 +1 (561) 989-0006 164 of 253
4.3.8.5 Analog Gain – Channel 2
This register sets the main analog gain for channel 2.
Address : 0x0014
Data (9:0) : <value> – analog gain channel 2
Data (31:10) : N/A
4.3.8.6 Analog Offset – Channel 2
This register sets the analog offset for channel 2.
Address : 0x0018
Data (9:0) : <value> – analog offset channel 2
Data (31:10) : N/A
4.3.8.7 Digital Gain
This register sets the main digital gain. The digital gain is applied to both
channels. The step is 0.1x
Address : 0x0180
Data (4:0) : <value> – digital gain
Data (31:5) : N/A
4.3.8.8 Digital Offset
This register sets the main digital offset. The digital offset is applied to both
cannels.
Address : 0x0184
Data (9:0) : <value> – digital offset
Data (31:10) : N/A
4.3.8.9 Black Level Correction
This register enables the black level correction.
Address : 0x0114
Data (0) : 0 – disable black level correction
1 – enable black level correction
Data (31:2) : N/A
4.3.8.10 Tap Balance
This register enables the tap balance. If the “Tap balance once” is to be used,
the register has to be set every time from “00” to “10”.
Address : 0x0110
Data (1:0) : 00 – no tap balance
01 – dynamic automatic tap balance

BOBCAT Hardware User’s Manual
Imperx, Inc. Rev. 2.0.1 6421 Congress Ave. 4/10/2012 Boca Raton, FL 33487 +1 (561) 989-0006 165 of 253
10 – dynamic balance taps once
11 – static automatic tap balance
Data (31:2) : N/A
4.3.9 Triggering Workspace Registers
4.3.9.1 Trigger Input Selector
This register selects the triggering source.
Address : 0x0508
Data (2:0) : 000 – off – no trigger, free running mode – CL only
(this is not available for GigE cameras)
001 – external – the camera expects the trigger to
come from the external source mapped to the
power and I/O connector.
010 – internal – the camera expects the trigger to
come from the programmable pulse generator.
011 – computer – the camera expects the trigger to
come from the camera link cable.
100 – software trigger – expects a one clock cycles
pulse generated by the computer. The trigger
exposure is internal register controlled. Pulse
duration exposure is not allowed.
101 to 111 – N/A
Data (31:3) : N/A
4.3.9.2 Trigger Input Mode – GigE cameras
This register enables or disables the triggering operation for GigE cameras.
Address : 0x05BC
Data (0) : 1 – trigger is disabled, free running mode
0 – trigger is enabled – camera is in trigger mode
Data (31:1) : N/A
4.3.9.3 Software Trigger Start
The ‘Start SW Trigger’ command instructs the camera to generate one
short trigger pulse. This is a command, not a register. The act of writing to this
location initiates the pulse generation.
Address : 0x6030
4.3.9.4 Triggering Edge Selector

BOBCAT Hardware User’s Manual
Imperx, Inc. Rev. 2.0.1 6421 Congress Ave. 4/10/2012 Boca Raton, FL 33487 +1 (561) 989-0006 166 of 253
This register selects the triggering edge – Rising or Falling.
Address : 0x050C
Data (0) : 0 – rising edge
1 – falling edge
Data (31:1) : N/A
4.3.9.5 Trigger De-bounce Time
This register selects the trigger signal de-bounce time. Any subsequent trigger
signals coming to the camera within the de-bounce time interval will be
ignored.
Address : 0x0510
Data (2:0) : 000 – no de-bounce
100 – 10 s de-bounce time
101 – 50 s de-bounce time
001 – 100 s de-bounce time
110 – 500 s de-bounce time
010 – 1.0 ms de-bounce time
111 – 5.0 ms de-bounce time
011 – 10.0 ms de-bounce time
Data (31:3) : N/A
4.3.9.6 Trigger Overlap
This register selects the trigger overlap mode. If the camera receives a trigger
pulse while the camera is still processing the previous trigger, the user has the
option to ignore the incoming trigger or to terminate the previous process and
to start a new one.
Address : 0x0514
Data (1:0) : 00 – ignore the next trigger
01 – accept only after the exposure is completed
10 – accept at any time
11 – N/A
Data (31:2) : N/A
4.3.9.7 Triggering Mode Selection
This register selects the triggering mode.
Address : 0x0518
Data (3:0) : 0x0 – standard triggering
0x1 – fast triggering
0x2 – double triggering
0x3 – frame accumulation
0x4 – asynchronous triggering
BOBCAT Hardware User’s Manual
Imperx, Inc. Rev. 2.0.1 6421 Congress Ave. 4/10/2012 Boca Raton, FL 33487 +1 (561) 989-0006 167 of 253
0x5 to 0xF – reserved
Data (31:4) : N/A
4.3.9.8 Number of Frames Captured
This register selects the number of frames captured after each trigger signal.
Address : 0x051C
Data (15:0) : <value> – # of frames captured
Data (31:16) : N/A
4.3.9.9 Number of Pulses Used
This register selects the number of trigger pulses used during a single trigger
sequence in frame accumulation mode.
Address : 0x0520
Data (15:0) : <value> – # of pulses used
Data (31:16) : N/A
4.3.9.10 Trigger Exposure Delay
This register selects the delay between the trigger signal and the beginning of
exposure. The actual exposure can set using “Exposure Time Absolute”
register 0x0548.
Address : 0x0528
Data (23:0) : <value> – exposure delay in microseconds
Data (31:24) : N/A
4.3.9.11 Trigger Strobe Enable
This register enables a strobe signal synchronous with the trigger pulse. The
strobe signal is mapped to one or both of the available strobe outputs.
Address : 0x0524
Data (1:0) : 00 – no strobe signal
01 – enable Strobe #1
10 – enable Strobe #2
11 – enable Strobe #1 and Strobe #2
Data (31:2) : N/A
4.3.9.12 Trigger Strobe Position Delay
This register sets the delay between the trigger pulse and the strobe pulse.
Address : 0x052C
Data (23:0) : <value> – trigger strobe delay
Data (31:24) : N/A

BOBCAT Hardware User’s Manual
Imperx, Inc. Rev. 2.0.1 6421 Congress Ave. 4/10/2012 Boca Raton, FL 33487 +1 (561) 989-0006 168 of 253
4.3.9.13 Trigger Strobe Pulse Duration
This register sets the strobe pulse duration.
Address : 0x05B8
Data (23:0) : <value> – trigger strobe duration
Data (31:24) : N/A
4.3.10 Pulse Generator Workspace Registers
4.3.10.1 Pulse Generator Timing Granularity
This register sets the pulse generator main timing resolution. The main
resolution is in microseconds, and 4 granularity steps are possible – x1, x10,
x100, x1000 (x1000 is equal to 1ms timing resolution).
Address : 0x0530
Data (1:0) : 00 – x1
01 – x10
10 – x100
11 – x1000
Data (31:2) : N/A
4.3.10.2 Pulse Generator Pulse Width
This register sets the value of the pulse width in microseconds.
Address : 0x0534
Data (18:0) : <value> – pulse width in microseconds
Data (31:19) : N/A
4.3.10.3 Pulse Generator Pulse Period
This register sets the value of the pulse period in microseconds.
Address : 0x0538
Data (19:0) : <value> – pulse width in microseconds
Data (31:20) : N/A
4.3.10.4 Pulse Generator Number of Pulses
This register sets the number of the pulses generated.
Address : 0x053C
Data (15:0) : <value> – number of discrete pulses
Data (16) : 1 – continuous pulse generation
Data (31:17) : N/A

BOBCAT Hardware User’s Manual
Imperx, Inc. Rev. 2.0.1 6421 Congress Ave. 4/10/2012 Boca Raton, FL 33487 +1 (561) 989-0006 169 of 253
4.3.10.5 Pulse Generator Enable
This register enables the pulse generator.
Address : 0x0540
Data (0) : 0 – disable pulse generator operation
1 – enable pulse generator operation
Data (31:1) : N/A
4.3.11 Test Pattern Workspace Registers
4.3.11.1 Test Mode Select
This register selects the test mode pattern.
Address : 0x012C
Data (3:0) : 0x0 – no test pattern
0x1 – black image – 0x000
0x2 – gray image – 0x1FF
0x3 – white image – 0xFFF
0x4 – steady horizontal image ramp
0x5 – steady vertical image ramp
0x6 – moving horizontal image ramp
0x7 – moving vertical image ramp
0x8 – 8 gray scale vertical bars
0x9 – H & V lines superimposed over live image
0xA to 0xF - reserved
Data (31:4) : N/A
4.3.11.2 H & V Lines Superimpose Enable
This register enables the H & V lines superimposed over live image.
Address : 0x0130
Data (0) : 0 – disable lines superimposed
1 – enable lines superimposed
Data (31:1) : N/A
4.3.11.3 H1 Superimposed Line Position
This register set the position of the horizontal line H1 (top) position.
Address : 0x0138
Data (11:0) : <value> – H1 line position
Data (31:12) : N/A
4.3.11.4 H2 Superimposed Line Position
This register set the position of the horizontal line H2 (bottom) position.

BOBCAT Hardware User’s Manual
Imperx, Inc. Rev. 2.0.1 6421 Congress Ave. 4/10/2012 Boca Raton, FL 33487 +1 (561) 989-0006 170 of 253
Address : 0x013C
Data (11:0) : <value> – H2 line position
Data (31:12) : N/A
4.3.11.5 V1 Superimposed Column Position
This register set the position of the vertical column V1 (left) position.
Address : 0x0140
Data (11:0) : <value> – V1 column position
Data (31:12) : N/A
4.3.11.6 V2 Superimposed Column Position
This register set the position of the vertical column V2 (right) position.
Address : 0x0144
Data (11:0) : <value> – V2 column position
Data (31:12) : N/A
4.3.11.7 Superimposed Lines Brightness
This register set the brightness of the superimposed cross and H & V lines.
Address : 0x0148
Data (11:0) : <value> – line brightness
Data (31:12) : N/A
4.3.11.8 Center Cross Superimpose Enable
This register enables center cross, superimposed over live image. This shows
the optical image center.
Address : 0x0134
Data (0) : 0 – disable cross superimposed
1 – enable cross superimposed
Data (31:1) : N/A
4.3.12 Input/output Workspace Registers
4.3.12.1 CC1 Input Polarity
This register sets the polarity (active Low or High) for the CC1 input.
Address : 0x0570
Data (0) : 0 – active LOW
1 – active HIGH
Data (31:1) : N/A

BOBCAT Hardware User’s Manual
Imperx, Inc. Rev. 2.0.1 6421 Congress Ave. 4/10/2012 Boca Raton, FL 33487 +1 (561) 989-0006 171 of 253
4.3.12.2 CC1 Input Mapping
This register maps the CC1 camera input to various internal signals.
Address : 0x0574
Data (2:0) : 000 – no mapping
001 – computer trigger
010 – reserved
011 – exposure control
100 – H sync
101 – V sync
110, 111 – Reserved
Data (31:3) : N/A
4.3.12.3 CC2 Input Polarity
This register sets the polarity (active Low or High) for the CC2 input.
Address : 0x0578
Data (0) : 0 – active LOW
1 – active HIGH
Data (31:1) : N/A
4.3.12.4 CC2 Input Mapping
This register maps CC2 camera input to various internal signals.
Address : 0x057C
Data (2:0) : 000 – no mapping
001 – computer trigger
010 – reserved
011 – exposure control
100 – H sync
101 – V sync
110, 111 – Reserved
Data (31:3) : N/A
4.3.12.5 IN1 Input Polarity
This register sets the polarity (active Low or High) for the IN1 input.
Address : 0x0580
Data (0) : 0 – active LOW
1 – active HIGH
Data (31:1) : N/A
4.3.12.6 IN1 Input Mapping
This register maps the IN1 camera input to various internal signals.
Address : 0x0584

BOBCAT Hardware User’s Manual
Imperx, Inc. Rev. 2.0.1 6421 Congress Ave. 4/10/2012 Boca Raton, FL 33487 +1 (561) 989-0006 172 of 253
Data (2:0) : 000 – no mapping
001 – reserved
010 – external trigger
011 – exposure control
100 – H sync
101 – V sync
110, 111 – Reserved
Data (31:3) : N/A
4.3.12.7 IN2 Input Polarity
This register sets the polarity (active Low or High) for the IN2 input.
Address : 0x0588
Data (0) : 0 – active LOW
1 – active HIGH
Data (31:1) : N/A
4.3.12.8 IN2 Input Mapping
This register maps the IN2 camera input to various internal signals.
Address : 0x058C
Data (2:0) : 000 – no mapping
001 – reserved
010 – external trigger
011 – exposure control
100 – H sync
101 – V sync
110, 111 – Reserved
Data (31:3) : N/A
4.3.12.9 OUT1 Output Polarity
This register sets the polarity (active Low or High) for the OUT1 output.
Address : 0x0590
Data (0) : 0 – active LOW
1 – active HIGH
Data (31:1) : N/A
4.3.12.10OUT1 Output Mapping
This register maps the various internal signals to OUT1 camera output.
Address : 0x0594
Data (3:0) : 0000 – no mapping
0001 – exposure start
0010 – exposure end

BOBCAT Hardware User’s Manual
Imperx, Inc. Rev. 2.0.1 6421 Congress Ave. 4/10/2012 Boca Raton, FL 33487 +1 (561) 989-0006 173 of 253
0011 – mid exposure
0100 – active exposure window
0101 – H sync
0110 – V sync
0111 – odd/even frame flag
1000 – trigger pulse actual
1001 – trigger pulse delayed
1010 – camera ready
1011 – pulse generator
1100 – strobe #1
1101 – strobe #2
Others – reserved
Data (31:4) : N/A
4.3.12.11OUT2 Output Polarity
This register sets the polarity (active Low or High) for the OUT2 output.
Address : 0x0598
Data (0) : 0 – active LOW
1 – active HIGH
Data (31:1) : N/A
4.3.12.12OUT2 Output Mapping
This register maps the various internal signals to OUT2 camera output.
Address : 0x059C
Data (3:0) : 0000 – no mapping
0001 – exposure start
0010 – exposure end
0011 – mid exposure
0100 – active exposure window
0101 – H sync
0110 – V sync
0111 – odd/even frame flag
1000 – trigger pulse actual
1001 – trigger pulse delayed
1010 – camera ready
1011 – pulse generator
1100 – strobe #1
1101 – strobe #2
Others – reserved
Data (31:4) : N/A

BOBCAT Hardware User’s Manual
Imperx, Inc. Rev. 2.0.1 6421 Congress Ave. 4/10/2012 Boca Raton, FL 33487 +1 (561) 989-0006 174 of 253
4.3.12.13 CLSP Output Polarity
This register sets the polarity (active Low or High) for the CLSP (Camera
Link cable Spare) output.
Address : 0x05A0
Data (0) : 0 – active LOW
1 – active HIGH
Data (31:1) : N/A
4.3.12.14 CLSP Output Mapping
This register maps the various internal signals to CLSP camera output.
Address : 0x05A4
Data (3:0) : 0000 – no mapping
0001 – exposure start
0010 – exposure end
0011 – mid exposure
0100 – active exposure window
0101 – H sync
0110 – V sync
0111 – odd/even frame flag
1000 – trigger pulse actual
1001 – trigger pulse delayed
1010 – camera ready
1011 – pulse generator
1100 – strobe #1
1101 – strobe #2
Others – reserved
Data (31:4) : N/A
4.3.12.15 Strobe #1 Select
This register sets the Strobe #1 mode of operation.
Address : 0x055C
Data (1:0) : 00 – disable Strobe #1
01 – enable Strobe #1 each frame
10 – enable Strobe #1 odd frames only
11 – enable Strobe #1 even frames only
Data (31:2) : N/A
4.3.12.16 Strobe #1 Position
This register sets the position of the strobe #1 pulse with respect of the end of
the frame.
Address : 0x0568

BOBCAT Hardware User’s Manual
Imperx, Inc. Rev. 2.0.1 6421 Congress Ave. 4/10/2012 Boca Raton, FL 33487 +1 (561) 989-0006 175 of 253
Data (23:0) : <value> – strobe #1 pulse positions in microseconds
Data (31:24) : N/A
4.3.12.17 Strobe #2 Select
This register sets the Strobe #2 mode of operation.
Address : 0x0560
Data (1:0) : 00 – disable Strobe #2
01 – enable Strobe #2 each frame
10 – enable Strobe #2 odd frames only
11 – enable Strobe #2 even frames only
Data (31:2) : N/A
4.3.12.18 Strobe #2 Position
This register sets the position of the strobe #2 pulse with respect of the end of
the frame.
Address : 0x056C
Data (23:0) : <value> – strobe #2 pulse positions in microseconds
Data (31:24) : N/A
4.3.12.19 Strobe #1 Duration
This register sets the duration of the strobe pulse (the same for both strobes).
Address : 0x0564
Data (23:0) : <value> – strobe pulse duration in microseconds
Data (31:24) : N/A
4.3.12.20 Strobe #2 Duration
This register sets the duration of the strobe pulse (the same for both strobes).
Address : 0x05B4
Data (23:0) : <value> – strobe pulse duration in microseconds
Data (31:24) : N/A
4.3.13 Output Data Format
4.3.13.1 Bit Dept/Format Selector
This register selects the bit debt output for the camera.
Address : 0x0100
Data (2:0) : 000 – 8-bit
001 – 10-bit
010 – 12-bit

BOBCAT Hardware User’s Manual
Imperx, Inc. Rev. 2.0.1 6421 Congress Ave. 4/10/2012 Boca Raton, FL 33487 +1 (561) 989-0006 176 of 253
011 – 14-bit – single tap cameras only
100 – 3x8-bit – RGB color (B0610, B1410, B1610
only)
Data (31:3) : N/A
4.3.13.2 Tap Mode Selector
This register selects the number of imager taps to be displayed.
Address : 0x0108
Data (1:0) : 00 – single
01 – dual
10, 11 – reserved
Data (31:2) : N/A
4.3.13.3 Data Format Selector
This register selects the tap format for the camera data output.
Address : 0x010C
Data (2:0) : 000 – 1 tap single output
001 – 2 tap interleaved
010 – 2 tap sequential
Others – reserved
Data (31:2) : N/A
4.3.13.4 Bit Shift Selector
This register selects the bit shift steps for the camera data output.
Address : 0x0104
Data (3:0) : 0x0 – no shift
0x1 – 1 bit left
0x2 – 2 bits left
0x3 – 3 bits left
0x4 – 4 bits left
0x5 – 5 bits left
0x6 – 6 bits left
0x7 – 7 bits left
0x8 – reserved
0x9 – 1 bit right
0xA – 2 bits right
0xB – 3 bits right
0xC – 4 bits right
0xD – 5 bits right
0xE – 6 bits right
0xF – 7 bits right
Data (31:4) : N/A

BOBCAT Hardware User’s Manual
Imperx, Inc. Rev. 2.0.1 6421 Congress Ave. 4/10/2012 Boca Raton, FL 33487 +1 (561) 989-0006 177 of 253
4.3.13.5 Negative Image Enable
This register inverts the image from positive to negative.
Address : 0x0188
Data (0) : 0 – positive image
1 – negative image
Data (31:1) : N/A
4.3.14 White Balance Workspace Registers
4.3.14.1 WB Select
This register selects which white balance mode will be used – Off, Once, Auto
or Manual.
Address : 0x0300
Data (0:1) : 00 – Off
01 – WB Once
10 – WB Auto
11 – WB Manual
Data (31:2) : N/A
4.3.14.2 WBC Red
This register contains the white balance correction coefficients for Red. In
manual mode the user enters the value, in Once or Auto, the camera returns
the actual (calculated) coefficient.
Address : 0x0304
Data (0:11) : <value> - WBC Red
Data (31:12) : N/A
4.3.14.3 WBC Green
This register contains the white balance correction coefficients for Green. In
manual mode the user enters the value, in Once or Auto, the camera returns
the actual (calculated) coefficient.
Address : 0x0308
Data (0:11) : <value> - WBC Green
Data (31:12) : N/A
4.3.14.4 WBC Blue
This register contains the white balance correction coefficients for Blue. In
manual mode the user enters the value, in Once or Auto, the camera returns
the actual (calculated) coefficient.

BOBCAT Hardware User’s Manual
Imperx, Inc. Rev. 2.0.1 6421 Congress Ave. 4/10/2012 Boca Raton, FL 33487 +1 (561) 989-0006 178 of 253
Address : 0x030C
Data (0:11) : <value> - WBC Blue
Data (31:12) : N/A
4.3.15 Color Conversion Workspace Registers
4.3.15.1 Gain Red
This register sets the digital gain for Red.
Address : 0x0310
Data (0:11) : <value> - Gain Red
Data (31:12) : N/A
4.3.15.2 Gain Green
This register sets the digital gain for Green.
Address : 0x0314
Data (0:11) : <value> - Gain Green
Data (31:12) : N/A
4.3.15.3 Gain Blue
This register sets the digital gain for Blue.
Address : 0x0318
Data (0:11) : <value> - Gain Blue
Data (31:12) : N/A
4.3.15.4 Offset Red
This register sets the digital offset for Red.
Address : 0x031C
Data (0:11) : <value> - Offset Red
Data (31:12) : N/A
4.3.15.5 Offset Green
This register sets the digital offset for Green.
Address : 0x0320
Data (0:11) : <value> - Offset Green
Data (31:12) : N/A
4.3.15.6 Offset Blue
This register sets the digital offset for Blue.
BOBCAT Hardware User’s Manual
Imperx, Inc. Rev. 2.0.1 6421 Congress Ave. 4/10/2012 Boca Raton, FL 33487 +1 (561) 989-0006 179 of 253
Address : 0x0324
Data (0:11) : <value> - Offset Blue
Data (31:12) : N/A
4.3.16 Data Correction Workspace Registers
4.3.16.1 LUT Select
This register selects which LUT will be used – LUT1 or LUT2.
Address : 0x0118
Data (0) : 0 – LUT #1 selected
1 – LUT #2 selected
Data (31:1) : N/A
4.3.16.2 LUT Enable
This register enables the selected LUT.
Address : 0x011C
Data (0) : 0 – LUT disable
1 – LUT enable
Data (31:1) : N/A
4.3.16.3 DPC Enable
This register enables the DPC (Defective Pixel Correction).
Address : 0x0120
Data (1:0) : 00 – DPC disable
01 – Static DPC enable
10 – Dynamic DPC enable
11 – Static and Dynamic DPC enable
Data (31:2) : N/A
4.3.16.4 HPC Enable
This register enables the HPC (Hot Pixel Correction).
Address : 0x0124
Data (1:0) : 00 – HPC disable
01 – Static HPC enable
10 – Dynamic HPC enable
11 – Static and Dynamic HPC enable
Data (31:2) : N/A
4.3.16.5 FFC Enable
This register enables the FFC (Flat Field Correction).

BOBCAT Hardware User’s Manual
Imperx, Inc. Rev. 2.0.1 6421 Congress Ave. 4/10/2012 Boca Raton, FL 33487 +1 (561) 989-0006 180 of 253
Address : 0x0128
Data (0) : 0 – FFC disable
1 – FFC enable
Data (31:1) : N/A
4.4 DATA PROCESSING REGISTER DESCRIPTION
4.4.1 Image Enhancement Workspace Registers
4.4.1.1 Enhancement Mode Selector
This register selects the image enhancement mode of operation.
Address : 0x0400
Data (3:0) : 0x0 – enhancement disable
0x1 – single threshold binary
0x2 – dual threshold binary
0x3 – dual threshold with gray scale
0x4 – dual threshold with contrast enhancement
0x5 – single point correction
0x6 – multi point correction
Data (31:4) : N/A
4.4.1.2 Point X1 Position
This register selects the position value for point X1.
Address : 0x0404
Data (11:0) : <value> – point X1 position value
Data (31:12) : N/A
4.4.1.3 Point X2 Position
This register selects the position value for point X2.
Address : 0x0408
Data (11:0) : <value> – point X2 position value
Data (31:12) : N/A
4.4.1.4 Point Y1 Position
This register selects the position value for point Y1.
Address : 0x040C
Data (11:0) : <value> – point Y1 position value
Data (31:12) : N/A

BOBCAT Hardware User’s Manual
Imperx, Inc. Rev. 2.0.1 6421 Congress Ave. 4/10/2012 Boca Raton, FL 33487 +1 (561) 989-0006 181 of 253
4.4.1.5 Point Y2 Position
This register selects the position value for point Y2.
Address : 0x0410
Data (11:0) : <value> – point Y2 position value
Data (31:12) : N/A
4.4.1.6 Processing and LUT AOI (PAOI)
This set of register enables the processing and/or LUT AOI and sets the
appropriate window size and offset in horizontal and vertical direction. The
processing algorithm or LUT will be implemented ONLY within the selected
AOI.
PAOI Enable
Address : 0x0224
Data (1:0) : 00 – PAOI disable
01 – Reserved
10 – PAOI enbled as processing AOI
11 – PAOI enabled as LUT AOI
Data (31:2) : N/A
PAOI Horizontal Offset
Address : 0x0264
Data (11:0) : <value> PAOI offset in horizontal direction
Data (31:12) : N/A
PAOI Horizontal Width
Address : 0x0244
Data (11:0) : <value> PAOI width in horizontal direction
Data (31:12) : N/A
PAOI Vertical Offset
Address : 0x02A4
Data (11:0) : <value> PAOI offset in vertical direction
Data (31:12) : N/A
PAOI Vertical Height
Address : 0x0284
Data (11:0) : <value> PAOI height in vertical direction
Data (31:12) : N/A

BOBCAT Hardware User’s Manual
Imperx, Inc. Rev. 2.0.1 6421 Congress Ave. 4/10/2012 Boca Raton, FL 33487 +1 (561) 989-0006 182 of 253
CHAPTER 5 - Configurator for CameraLink
BOBCAT Configurator for CameraLink This chapter provides a quick reference to using the BOBCAT
Configurator camera configuration utility for the Camera Link series of
BOBCAT cameras.

BOBCAT Hardware User’s Manual
Imperx, Inc. Rev. 2.0.1 6421 Congress Ave. 4/10/2012 Boca Raton, FL 33487 +1 (561) 989-0006 183 of 253
5.1 OVERVIEW
Camera configuration utility software and Bobcat Camera Configurator (CamConfig) are
provided with each camera. After installing the program, the user can program the
camera, change its settings and save the settings in a file or in the camera. The
configuration utility includes an interactive help file, which will guide you through the
camera setup.
5.2 DISCOVERY PROCEDURE
Often times, multiple frame grabbers and cameras may be installed into a computer at the
same time. The CamConfig utility provides an intelligent, automated method of
‘discovering’ and ‘searching’ all available UART components in your PC and allowing
the user to select the one that is connected to Bobcat camera. Bobcat search engine is not
only finding the CamLink DLL port but also looking for any available COM port
installed on the PC as well. It will then communicate with each port (.DLL and COM)
and attempt to query the attached camera. If it finds an attached Imperx Bobcat camera, it
will read the ‘camera type’ information from the camera. Bobcat camera name will be
displayed in the list box, which includes all DLLs, ports and cameras that it discovered.
The user can then select the DLL/port/camera, of interest, by highlighting the entry and
clicking on the ‘OK’ button. Clicking on the ‘Rescan Ports’ button causes the above
discovery procedure to be repeated. Please note the frame grabber has to be Camera Link
v1.0 (or later) compliant.
Figure 5.1 – Discovery procedure – select port
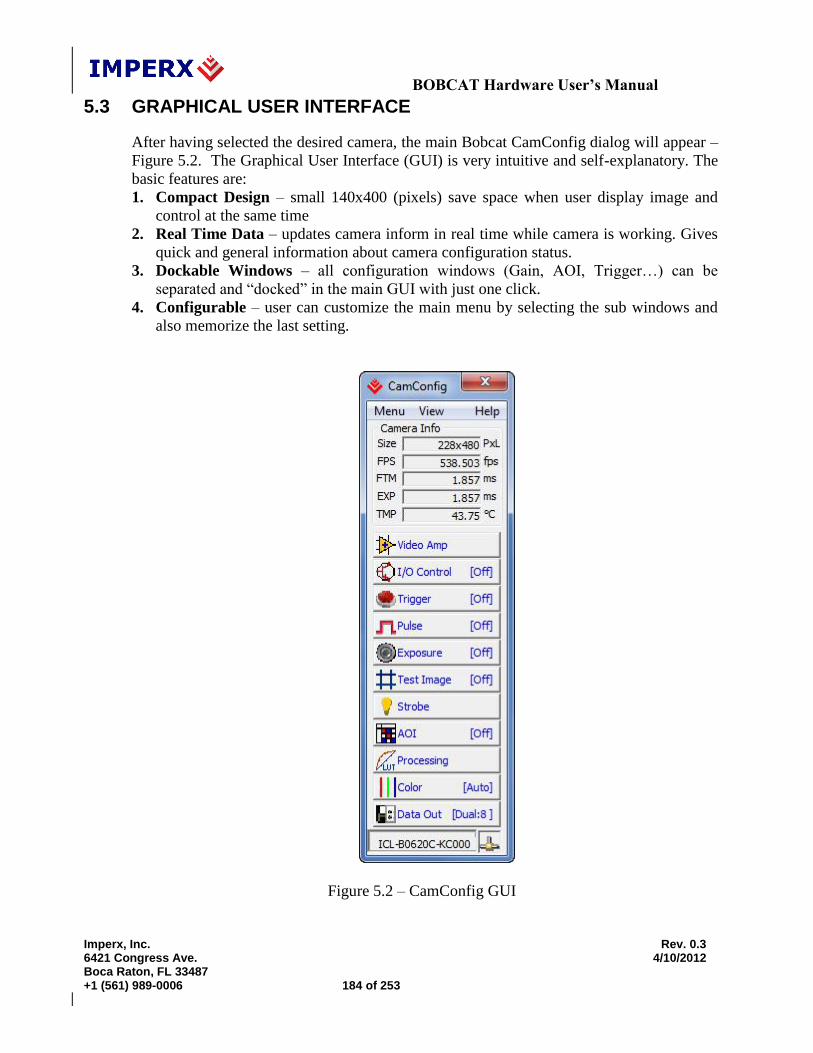
BOBCAT Hardware User’s Manual
Imperx, Inc. Rev. 0.3 6421 Congress Ave. 4/10/2012 Boca Raton, FL 33487 +1 (561) 989-0006 184 of 253
5.3 GRAPHICAL USER INTERFACE
After having selected the desired camera, the main Bobcat CamConfig dialog will appear –
Figure 5.2. The Graphical User Interface (GUI) is very intuitive and self-explanatory. The
basic features are:
1. Compact Design – small 140x400 (pixels) save space when user display image and
control at the same time
2. Real Time Data – updates camera inform in real time while camera is working. Gives
quick and general information about camera configuration status.
3. Dockable Windows – all configuration windows (Gain, AOI, Trigger…) can be
separated and “docked” in the main GUI with just one click.
4. Configurable – user can customize the main menu by selecting the sub windows and
also memorize the last setting.
Figure 5.2 – CamConfig GUI

BOBCAT Hardware User’s Manual
Imperx, Inc. Rev. 2.0.1 6421 Congress Ave. 4/10/2012 Boca Raton, FL 33487 +1 (561) 989-0006 185 of 253
The configuration utility includes an interactive help file, which will guide you through the
GUI controls and camera settings. On the main window the user can see useful camera
information – Current Image Size (Size), Number of Frame per second (FPS), the Frame
Time (FTM), Exposure Time (EXP) and Temperature of the CCD sensor (TMP).
Additional information can be obtained by clicking on the buttons shown in the CamConfig
window, such as Video Amp, I/O Control, Trigger, etc. The bottom of the main utility
window is camera name and status of Cam-link connection. If the connection between the
camera and the computer is lost a red cross will appear above the connection icon.
5.4 MAIN GUI MENU
All panels in the Bobcat CamConfig share the same general control options and menus for
“File”, “View” and “Help” – Figure 5.3.
Figure 5.3 – Main Menu
Run Application: Select and starts other executable file (Frame-Grabber application,
etc.…) that user normally uses. CamConfig will remember the path
of last executable file that you used, so the next time when you start
the application without having to type-in the location.
Load From: Loads the camera registers from a saved configuration space: File,
Workspace, Factory Space, User Space #1 or User Space #2.
1. File – loads the camera registers from a saved configuration file
2. Workspace – updates the GUI with the current camera
workspace settings
3. Factory – loads the camera registers with the original (factory)
settings.
4. User Space #1 – loads the camera registers with a saved camera
settings in the user space 1.

BOBCAT Hardware User’s Manual
Imperx, Inc. Rev. 2.0.1 6421 Congress Ave. 4/10/2012 Boca Raton, FL 33487 +1 (561) 989-0006 186 of 253
5. User Space #2 – loads the camera registers with a saved camera
settings in the user space 2.
Save To: Saves the camera registers to File, User Space #1 or User Space #2.
Factory Space is disabled for regular users and it is available only for
manufacturing technicians.
1. File – saves the current camera settings to a configuration file
2. Factory Space – saves the current camera settings to the camera
Factory space. This is restricted command and is disabled for
regular users.
3. User Space #1 – saves the current camera settings to the camera
User space 1.
4. User Space #2 – saves the current camera settings to the camera
User space 2.
Boot: This menu selects the ‘Boot From’ source. Upon power up, the
camera will load its registers from the selected ‘Boot From’ source:
Factory, User #1 or User #2. Bobcat camera will be release with
‘Factory” Setting and user can save and boot camera with their own
configurable features.
DPM: Defect Pixel Map – When selected, the DPM window will show
defected pixels location. The defective pixel map is stored in the
camera’s non-volatile memory and read out when running bad pixel
correction – Figure 5.4. Defected pixels are categorized as:
Figure 5.4 – Defective pixel map

BOBCAT Hardware User’s Manual
Imperx, Inc. Rev. 2.0.1 6421 Congress Ave. 4/10/2012 Boca Raton, FL 33487 +1 (561) 989-0006 187 of 253
1. Dead Pixels – pixels with sensitivity that deviates more than
15% due to fluctuations in the CCD manufacturing process.
2. Hot Pixels – pixels that during normal camera operation are
normal, but in long integration modes (programmable frame
time) behave as high-intensity bright pixels.
Terminal: The user can display two submenus: Command Terminal and
Download Terminal.
1. Command Terminal – shows information about all the
commands sent to or received from the camera. User can type in
Bobcat command directly in the text box provided – Figure 5.5.
All commands must start with 0x followed by ADDRESS and
DATA, without spaces – refer to chapter 4 for more information.
The “Disable Polling” check box will turn on/off the polling
commands (such as Frame Time, Exposure time, Frame Rate and
Sensor Temperature) in the dialog windows. The user can change
the polling time by entering the desired number in the window. If
for some reason the camera returns an error, when command was
sent to the camera, the GUI will respond with a pop-up window
displaying an error message. The user has option to disable the
error checking by enabling the “Disable Error Checking” box.
Figure 5.5 – Command terminal
2. Download Terminal – One of the great features in Bobcat
configuration utility is download terminal. User can upgrade the
camera firmware and up-load to the camera any custom LUT,
DPM or FFC – Figure 5.6.
A. File Type – from the pull-down menu the user can select the
appropriate type of file to up-load to the camera.

BOBCAT Hardware User’s Manual
Imperx, Inc. Rev. 2.0.1 6421 Congress Ave. 4/10/2012 Boca Raton, FL 33487 +1 (561) 989-0006 188 of 253
B. File Path – enter the file path manually into the edit box or
click the ‘…’ button to browse through folders.
C. Load File – after selecting the file, click on “Load File”
button to start the up-load process.
D. Cancel – stops the up-load process.
E. Progress Bar – displays the progress status of the up-load
process.
F. Terminal window – provides information about the
download process (completion, errors, etc.)
Figure 5.6 – Download terminal
Download Procedure:
1. Select correct ‘File Type” before downloading. Several options
are possible: DPM, HPM, LUT1, LUT2, Application FW,
Register space.
2. Type in or select the correct data file of this feature in ‘File Path’
3. Click on ‘Load File’ button to start downloading
4. Wait for the progress bar to finish (100%)
5. Reboot the camera and restart the GUI for the changes to take
into effect.
Connection: The user can select the connection type between the camera and the
computer:
1. Switch Port – If checked, “Select Port” window will popup. The
user can select new CamLink port, which connect to current
camera.

BOBCAT Hardware User’s Manual
Imperx, Inc. Rev. 2.0.1 6421 Congress Ave. 4/10/2012 Boca Raton, FL 33487 +1 (561) 989-0006 189 of 253
2. Set Baud Rate – the user can set the communication baud rate:
9600, 19200, 38400, 57600 or 115200 (default value).
Exit: Terminates the application.
5.5 VIEW GUI WINDOWS
The ‘View’ menu allows the user to select which camera parameter window to be
displayed on the main CamConfig GUI window – Figure 5.7.
Figure 5.7 – View GUI Windows
Video Amplifier: Controls the camera analog and digital gain and offset, tap
balancing, black level correction. Optional – controls RGB settings.
Input/output: Maps the internal input and output signals to the camera external
inputs and outputs.
Trigger: Controls the camera triggering features.
Pulse Generator: Enables and controls the internal pulse generator.
Exposure: Sets the exposure, line and frame time, and AEC, AGC, AIC modes.
Test: Enables the internal test pattern generator.
AOI: Sets up to 8 regions of interest, and H and V binning modes.

BOBCAT Hardware User’s Manual
Imperx, Inc. Rev. 2.0.1 6421 Congress Ave. 4/10/2012 Boca Raton, FL 33487 +1 (561) 989-0006 190 of 253
Strobe: Enables and controls the camera strobe signals.
Processing: Enables the built-in basic image processing functions.
Color: Sets the gain and offset for the primary R G B colors. Sets the white
balance mode. Displays WBC values.
Data Out (Settings): Sets for the data format – bit depth, bit shift, output format, camera
speed, LVAL, FVAL size, and DPC, HPC, FFC controls.
Select All: Enables all camera parameter windows.
Attach Window: Attaches all camera parameter windows to the main GUI window.
Disable Animation: Disables animated features of windows preview when moving the
mouse cursor over the buttons.
5.6 GUI HELP
The main “Help” menu is shown on Figure 5.8
Figure 5.8 – Help menu
Open Help: Opens an interactive help file.
Debug: Puts the GUI in a debug mode for test purposes and troubleshooting.
About: Provides information about application version and important
camera parameters such as Firmware revision, Assembly Part
Number, etc. – Figure 5.9.
Figure 5.9 – About CamConfig.

BOBCAT Hardware User’s Manual
Imperx, Inc. Rev. 2.0.1 6421 Congress Ave. 4/10/2012 Boca Raton, FL 33487 +1 (561) 989-0006 191 of 253
5.7 PARAMETER WINDOWS
Bobcat Cameras have many features that can easily be programmed using the Bobcat
graphical user interface (GUI) or via simple register commands using the Command
Terminal. The main parameter windows are described below.
5.7.1 Video Amp
Video Amp window allows the user to adjust the Analog or Digital gain and offset.
Manual entry and sliders are available for adjusting the individual parameters –
Figure 5.10.
Figure 5.10 – Video Amp parameter window
Analog: The user can set the desired analog gain (0 to 36 dB, 1024
discrete values) and offset (0 to 1023, 1 step increment) for each
channel via the sliders or by entering the desired values.
“Link Gain” and “Link Offset” links the corresponding channels
together (dual tap camera only), and the gain or offset difference
between them will be preserved.
Pre Amp Gain: The user can select the preamplifier gain for the camera (the
same for both channels). 4 options are possible -3 dB, 0, +3 dB,
and +6 dB. The default Pre Amp Gain value is camera dependent
and it is set for the best camera performance.

BOBCAT Hardware User’s Manual
Imperx, Inc. Rev. 2.0.1 6421 Congress Ave. 4/10/2012 Boca Raton, FL 33487 +1 (561) 989-0006 192 of 253
Digital: The user can set the desired digital gain (1.0x to 3.0x, 0.1x
increment) and digital offset (-511 to +511, 1 step increment) via
the slider or by entering the desired value. The selected value for
gain or offset is applied to both channels.
Load Defaults: Loads the Manufacturing default gain and offset settings. The
settings might be different for “Slow” and “Fast” modes.
Corrections: Tap balance – when selected enables automatic tap balancing.
Four options are available – Off, Auto, Once, Static.
White balance – when selected enables automatic white balance.
This feature is optional.
Black Comp – when selected enables “Black Compensation”
and automatically determines and compensates for black level.
5.7.2 I/O Control
The camera has 2 external inputs and 2 external outputs. In addition to these inputs
and outputs, the cameras with camera link output have two more inputs (CC1 and
CC2) and one output (CL Spare) available. The user can map all available internal
input and output signals to all external camera inputs and outputs – Figure 5.11.
Input: The user can map each of the camera inputs CC1, CC2, IN1 or
IN2 to all available internal input signals. 5 signals are available
for mapping. For each input the user can set the signal level to
active “High” or active “Low”.
1. Computer trigger – maps CC1 or CC2 to the internal (CC)
computer trigger input.
2. External Trigger – maps IN1 or IN2 to the external computer
trigger input.
3. Exposure control – provides an external exposure control
signal. For proper operation set the “Exposure Control
Register” to “External”.
4. H-Sync – synchronizes the camera line timing to the external
pulse. A continuous trail of pulses (one for every line) must
be provided. The camera uses only the pulse edge, but the
duration should be as short as possible. Min. duration - 50 ns.
5. V-Sync – synchronizes the camera frame timing to the
external pulse. A continuous trail of pulses (one for each
frame) must be provided. The camera uses only the pulse
edge, but the duration should be as short as possible. Min.
duration - 2 us.

BOBCAT Hardware User’s Manual
Imperx, Inc. Rev. 2.0.1 6421 Congress Ave. 4/10/2012 Boca Raton, FL 33487 +1 (561) 989-0006 193 of 253
6. Deselect – no signal is mapped.
Figure 5.11 – I/O control parameter window
Output: The user can map each of the camera outputs to OUT1, OUT2 or
CL Spare to all available internal output signals. 13 signals are
available for mapping. For each input the user can set the signal
level to active “High” or active “Low”.
1. Exposure Start – a short pulse (2 us) indicating the beginning
of the camera exposure in trigger mode.
2. Exposure End – a short pulse (2 us) indicating the end of the
camera exposure in trigger mode.
3. Mid Exposure – a short pulse (2 us) indicating indicates the
middle of the camera exposure in trigger mode.
4. Active Exposure Window – a signal indicating the duration
of the camera exposure in trigger mode.
5. H-Sync – a short pulse (2 us) synchronized with the camera
line timing.
6. V-Sync – a short pulse (2 us) synchronized with the camera
frame timing.
7. Odd/Even Frame Flag – a signal indicating if the frame is
ODD or EVEN. It alternates every frame. When “Active
High” ODD is LOW.
8. Trigger Pulse – maps the input trigger pulse to the output
with no delay (as is).
9. Trigger Pulse Delayed – maps the input trigger pulse to the
output with delay set by the Exposure Delay Register.
10. Camera Ready – a signal indicating when the camera is ready
to accept the next trigger pulse.
11. Pulse Generator – maps the internal pulse generator
waveform to the output.
12. Strobe 1 – maps “Strobe One” signal to the corresponding
external output.

BOBCAT Hardware User’s Manual
Imperx, Inc. Rev. 2.0.1 6421 Congress Ave. 4/10/2012 Boca Raton, FL 33487 +1 (561) 989-0006 194 of 253
13. Strobe 2 – maps “Strobe Two” signal to the corresponding
external output.
14. Deselect – no signal is mapped.
5.7.3 Trigger
Trigger window is used to set the camera trigger modes and trigger settings –
Figure 5.12. Four control panels are associated with this feature: “Settings”,
“Acquisition Control”, “Exposure control” and “Strobe Control”.
Figure 5.12 – Trigger parameter window
Settings: Trigger in – selects the active triggering input signal. The
selected trigger signal must be mapped to the corresponding
camera input.
1. Off – the camera is in free-running mode.
2. External – the camera expects a trigger signal coming from
IN1 or IN2 inputs.
3. Pulse Gen – the camera expects a trigger signal coming from
the internal pulse generator.
4. Computer – the camera expects a signal coming from CC1 or
CC2 inputs.
5. Software – the “Software Trigger” button when pressed starts
the triggering.
Mode – selects the desired triggering mode:
1. Standard – in this mode the camera exposes, reads-out the
selected number of frames and waits for the next trigger
signal. In this mode the maximum camera frame rate is LESS
than the free-running one.
2. Fast – in this mode the camera exposes then next frame while
reading the previous. This mode provides the ability to
trigger the camera with its original (free-running) frame rate.

BOBCAT Hardware User’s Manual
Imperx, Inc. Rev. 2.0.1 6421 Congress Ave. 4/10/2012 Boca Raton, FL 33487 +1 (561) 989-0006 195 of 253
3. Double – this mode is designed for capture fast processes
with short exposure times, and is commonly used in particle
velocity measurement. It is identical to the Standard mode
but, the camera will capture only 2 frames after each trigger
signal. There is no delay between the frames
4. Frame Accumulation – in this mode, after each trigger signal
the camera starts integration then transfers the information to
the vertical registers and then waits for the next trigger. After
the last trigger has been received the information is being
read out.
5. Asynchronous – in this mode the camera is free running prior
to the trigger. When the trigger is applied, it resets the CCD
timing, flushes the remaining lines and starts the integration.
Trigger Edge – the user can select the active triggering edge:
1. Rising – the rising edge is used for triggering.
2. Falling – the falling edge is used for triggering.
Trigger Overlap – the user can select how to handle the next
trigger pulse if arrives while the previous triggering cycle is in
process:
1. Ignore – the next rigger will be ignored, and the camera will
continue its present operation.
2. Accept – the next trigger will be used.
3. Accept after Exposure – the next rigger will be ignored while
the camera is exposing the image.
De-bounce – the trigger inputs are de-bounced to prevent
multiple triggering from ringing triggering pulses. The user has
eight choices of de-bounce interval:
1. Off – No de-bounce
2. 10.0 us – 10 microseconds de-bounce interval.
3. 50.0 us – 50 microseconds de-bounce interval.
4. 100.0 us – 100 microseconds de-bounce interval (default).
5. 500.0 us – 500 microseconds de-bounce interval.
6. 1.0 ms – 1 milliseconds de-bounce interval.
7. 5.0 ms – 5 milliseconds de-bounce interval.

BOBCAT Hardware User’s Manual
Imperx, Inc. Rev. 2.0.1 6421 Congress Ave. 4/10/2012 Boca Raton, FL 33487 +1 (561) 989-0006 196 of 253
8. 10.0 ms – 10 milliseconds de-bounce interval.
Acquisition: Frames per trigger – sets the number of frames captured after
each trigger in “Standard” mode. The user can select from 1 to
65500 discrete frames to be captured. If the value is 65501 or
bigger, the camera is free running after the trigger signal.
Pulses per capture – sets the number of trigger pulses used
during a single acquisition event in “Frame Accumulation”
mode. The user can select from 1 to 65535 discrete pulses.
Exposure Delay: Sets the delay between the trigger pulse active edge and
beginning of the exposure. The user can set the delay from 0 to
16777215 us.
5.7.4 Pulse Generator
In this window the user can configure the parameters of the Internal Pulse
Generator – Figure 5.13.
Figure 5.13 – Pulse generator window
Granularity: Sets the granularity for the internal counters. Granularity can be set
to 1x, 10x, 100x or 1000x.
Period: Sets the pulse period in microseconds.
Width: Sets the pulse width in microseconds.
# of Pulses: Sets the number of pulses generated. Two modes are available:

BOBCAT Hardware User’s Manual
Imperx, Inc. Rev. 2.0.1 6421 Congress Ave. 4/10/2012 Boca Raton, FL 33487 +1 (561) 989-0006 197 of 253
1. Continuous – provides a continuous operation. To stop the
process you have to press the “Stop” button.
2. Fixed # of pulses – the user can set only a discrete number of
pulses ranging (1 to 65500) to be generated. To stop the process
you have to press the “Stop” button. Otherwise, the process stops
automatically after the last pulse is sent.
Process: Start – starts and stops the process of Internal Pulse Generator.
When the process is in progress, the ‘Start” button becomes a ‘Stop”
button.
Status – provides the status of the process:
Red – the process is on hold,
Green – the process is working.
5.7.5 Exposure
This window controls the camera exposure, line and frame time, AEC, AGC and
AIC modes of operation – Figure 5.14.
Figure 5.14 – Exposure control window

BOBCAT Hardware User’s Manual
Imperx, Inc. Rev. 2.0.1 6421 Congress Ave. 4/10/2012 Boca Raton, FL 33487 +1 (561) 989-0006 198 of 253
Exposure Control: Sets the camera exposure:
4. Off – no exposure control.
5. Pulse Width – the pulse width (duration) determines the
exposure during triggering mode ONLY.
6. Internal – internal camera registers controls the exposure.
7. External – external pulse mapped to the camera input
controls the exposure.
8. Exposure time slider – sets the actual camera exposure in
microseconds. The minimum exposure time adjusts
accordingly, based on the camera mode of operation. The
slider can only be used when “Internal” mode is enabled.
Programmable Integration: Variable line and frame rate mode provides the
ability to run the camera in full resolution and at a
frame rate slower than the nominal camera frame
rate. The user can change “Line Time” in pixels
or change “Frame Time” in microseconds. The
maximum frame time is ~ 16 seconds.
AEC/AGC: The camera can be set to automatic exposure and gain control in
order to keep the same image brightness during changing light
conditions.
Enables – enables which feature to be used:
1. AEC – enables Automatic Exposure Control (AEC) mode. The
user can change “Area”, “Exposure” and “Luminance”. “Gain”
cannot be adjusted.
2. AGC – enables Automatic Gain Control (AGC) mode. The user
can change “Area”, “Gain” and “Luminance”. “Exposure”
cannot be adjusted.
3. AIC – enables Automatic Iris Control (AIC). The camera
provides an analog video signal (via 12 pin HIROSE connector),
compatible with “Video” iris lens control.
Area – sets an active region of significance. Only the image inside
the selected region will be used in the data collection AEC/AGC
algorithm. Any brightness changes outside of the region will be
ignored. The changes as determined by the algorithm will apply to
the entire image. The user can enter the region of significance by
setting the active window size (Width, Height) and offset (X, Y).
Image location (1.1) is top left corner. The user can set the desired

BOBCAT Hardware User’s Manual
Imperx, Inc. Rev. 2.0.1 6421 Congress Ave. 4/10/2012 Boca Raton, FL 33487 +1 (561) 989-0006 199 of 253
window size by typing the numbers directly, or by selecting the
desired size in the provided gray square window. To do this, simply
draw the window with the mouse in the gray square.
Luminance – sets the desired luminance level to be maintained in
the image. The comparison algorithm will adjust the image gain and
exposure accordingly, so the image luminance is always close to the
desired one. The user can select which luminance type to be used in
the algorithm:
1. Average – the average value of the image luminance will be used
in the comparison algorithm.
2. Peak – the peak luminance value (maximum luminance level)
will be used in the comparison algorithm.
Exposure – sets the maximum exposure time, which can be reached
in the AEC mode in order to avoid motion smear if a fast moving
object is monitored. The user can select the speed of convergence 1x
(slow), 2x, 3x and 4x (fast).
Gain – sets the maximum analog gain, which can be reached in the
AGC mode. The user can select the speed of convergence 1x (slow),
2x, 3x and 4x (fast).
Current – Provides live information about the current value of the
Exposure time, Gain and Luminance. The values will be refreshed
every time polling is done.
5.7.6 Test Image
This window sets the test image mode. Several test images are available for
selection, including pattern superimposing over live image – Figure 5.15.
Ping: Checks the serial connection status of the camera:
GREEN – followed by a brief “OK”, indicates a successful
connection.
RED – followed by and “ERR”, indicates no connection.
YELLOW – “Ping” command was sent to the camera. A few
seconds after pinging, the indicator becomes gray and the message
disappears.
Test Mode: Test Patterns – the camera can output eight test patterns:
1. Off – test mode is off.
2. Black – displays black image.
3. Gray Image – displays a uniform dark gray image.
4. White Image – displays a uniform white image.

BOBCAT Hardware User’s Manual
Imperx, Inc. Rev. 2.0.1 6421 Congress Ave. 4/10/2012 Boca Raton, FL 33487 +1 (561) 989-0006 200 of 253
5. H Ramp – displays a stationary horizontal ramp image.
6. V Ramp – displays a stationary vertical ramp image.
7. H Ramp move – displays a moving horizontal ramp image.
8. V Ramp move – displays a moving vertical ramp image.
9. Vertical Bars – displays a set of 8 vertical gray bars with
different gray levels.
Figure 5.15 – Test image window
Superimposed: This mode superimposes a test pattern over live image (not
available during H & V binning):
1. Crosshair – superimposes a cross, located in the center of the
CCD images. A small cross will appear in the gray square window.
2. H&V Lines – superimposes a pair of H and/or V lines. Dual
sliders are available to select the horizontal and vertical position of
the lines. Each line location will be visible in the gray square
window. The sliders range from 1 to the maximum number of
pixels/lines available on the sensor.
3. Brightness – sets the brightness of the crosshair and H&V lines,
ranges from 0 to 4095.
4. Scale – provides the ability to measure distance between the
lines in pixels or in linear units. The uses must enter a scale
calibration value.
5.7.7 Area of Interest (AOI)
AOI is used to select one or more regions of interest. A total of seven independent
AOIs can be generated, and the user can select the size of each horizontal and

BOBCAT Hardware User’s Manual
Imperx, Inc. Rev. 2.0.1 6421 Congress Ave. 4/10/2012 Boca Raton, FL 33487 +1 (561) 989-0006 201 of 253
vertical window. Horizontal and Vertical binning is also available to change the H
and V resolution of the image – Figure 5.16.
Window: This sets the portion of the image, which will be displayed and used:
1. Normal – the imager has full resolution as determined by LVAL
and FVAL settings.
2. Center – only a portion or center of the image will be used. This
mode is camera dependent and is not available for all cameras.
Binning: This sets the camera H & V binning modes:
1. Horizontal – enables the horizontal binning – the image
horizontal resolution is reduced by a factor of 1x, 2x, 3x, 4x or
8x (1x – no binning).
2. Vertical Horizontal – enables the vertical binning – the image
vertical resolution is reduced by a factor of 1x, 2x, 3x, 4x or 8x
(1x – no binning).
Figure 5.16 – AOI window.
Master AOI: Bobcat supports one Master AOI (MAOI). All other AOIs are slave
and they have to be positioned within the MAOI. This MAOI can be
enabled or disabled. When enabled, MAOI determined the current
image size. DVAL is HIGH within the selected area. The camera
frame rate is preserved or changed with “Keep Frame Rate”
selection. When enabled the camera frame rate is preserved
regardless of the AOI selection. When disabled, the frame rate is

BOBCAT Hardware User’s Manual
Imperx, Inc. Rev. 2.0.1 6421 Congress Ave. 4/10/2012 Boca Raton, FL 33487 +1 (561) 989-0006 202 of 253
determined by the selected vertical height settings. If other AOIs are
used, MAOI Must be enabled.
AOI #: Bobcat supports up to six slave independent horizontal and vertical
regions of interest could be enabled. If slave AOIs is to be used
MAOI MUST be enabled. All slave AOIs have to be positioned
within the MAOI. The slave AOIs can be set to be included or
excluded from the MAOI After enabling the selected AOI, the user
can enter the desired region of interest by setting the active window
size (Width, Height) and offset (X, Y). Image location (1.1) is top
left corner. The user can set the desired window size by typing the
numbers directly, or by selecting the desired size in the provided
gray square window. To do this enable the window first, press the
corresponding numerical number on the keyboard, and then draw the
window with the mouse in the gray square. Different AOIs will be
displayed with different colors.
5.7.8 Strobe Control
This window sets the camera strobe signals. Two independently controlled strobe
signals are supported – Figure 5.17.
Figure 5.17 – Strobe Control window
Strobe 1 Mode: Sets the Strobe 1 mode of operation. The strobe can be disabled
or enabled. When enabled the strobe can be set to appear “Each
Frame”, “Odd Frames” only or “Even Frames” only. In addition,
in trigger mode, the user can add a strobe pulse associated with
rising edge of the trigger pulse.

BOBCAT Hardware User’s Manual
Imperx, Inc. Rev. 2.0.1 6421 Congress Ave. 4/10/2012 Boca Raton, FL 33487 +1 (561) 989-0006 203 of 253
Strobe 2 Mode: Sets the Strobe 2 mode of operation. The strobe can be disabled
or enabled. When enabled the strobe can be set to appear “Each
Frame”, “Odd Frames” only or “Even Frames” only. In addition,
in trigger mode, the user can add a strobe pulse associated with
rising edge of the trigger pulse.
Standard Strobe: Controls the strobe position and pulse duration for Strobe 1 and
Strobe 2. The user can set the individual strobe position relative
to the beginning of the frame, via the slider or by entering the
desired value. The strobe pulse duration can be set for each
strobe individually. The user can set the strobe position and
duration within the camera frame period with 1 us resolution.
Trigger Strobe: Sets the duration and delay of a strobe sync pulse (with respect to
the trigger pulse) sent to the camera output. The user can set the
strobe duration and the delay from 0 to 16777215 us.
5.7.9 Color
This window sets the gain and offset for the primary R G B colors. Available only
for B0610C, B1410C, and B1610C cameras. In addition this window sets the White
balance mode and displays the calculated white balance coefficients – Figure 5.18.
This window will be disables for the Mono cameras.
White Balance: Sets the White balance mode of operation.
1. “Off” – No white balance is performed.
2. “Once” – the camera analyzes only one image frame,
calculates only one set correction coefficients, and all
subsequent frames are corrected with this set of coefficients.
3. “Auto” – the camera analyzes every frame, a set of correction
coefficients are derived for each frame and applied to the
next frame.
4. “Manual” – the camera uses the correction coefficients as
entered from the user.
Manual WBC: User enters manually the white balance coefficients for each
color. The range is from 0 to 4095 (255 is equal to 1.0x). The
user has option to set all coefficients to “Zero”.
Statistic: Displays the current (calculated) white balance coefficients per
color.

BOBCAT Hardware User’s Manual
Imperx, Inc. Rev. 2.0.1 6421 Congress Ave. 4/10/2012 Boca Raton, FL 33487 +1 (561) 989-0006 204 of 253
RGB Gain: The user can set individually the desired digital gain for each
primary color R G B (1.0x to 4.0x, 0.001x increment) via the
slider or by entering the desired value. The user has option to set
all gains to “Unity” (1.0x)
R G B Offset: The user can set individually the desired digital offset for each
primary color R G B (-511 to +511, 1 step increment) via the
slider or by entering the desired value. The user has option to set
all offsets to “Zero”.
Figure 5.18 – Color window
5.7.10 Processing
This window controls the image processing features implemented into the camera.
Currently only one Image Enhancement is implemented – Figure 5.19. More
features will be added later. Please contact Imperx for more information. This
window will be disabled for the color cameras.
Processing AOI: PAOI is multi functional. It can be enabled as:
Disabled – no PAOI functionality.
Processing ROI – the selected processing function will apply
only to the selected ROI, all data outside of the region will not be
processed with the selected function.
LUT ROI – the LUT function will apply only to the selected
ROI, all data outside of the region will not be processed with the
LUT function.

BOBCAT Hardware User’s Manual
Imperx, Inc. Rev. 2.0.1 6421 Congress Ave. 4/10/2012 Boca Raton, FL 33487 +1 (561) 989-0006 205 of 253
LUT: LUT Enable – enables the usage of the selected LookUp Table
(LUT).
LUT Select – selects which of the two supported LUTs will be used.
By default LUT #1 is factory programmed with standard Gamma of
0.45. LUT #1 and LUT #2 can be reprogrammed by the user.
Image Enables the image enhancement processing features. Seven options
Enhancement: are available:
Figure 5.19 – Processing window
1. Disable – no enhancement operation will be performed.
2. Single Threshold Binary – single point threshold operation
will be performed. Set the desired threshold level X1 using the
horizontal (bottom) slider (left portion).
3. Dual Threshold Binary – two-point threshold operation will
be performed. Set the desired upper threshold level X2 using
the horizontal (bottom) slider (right portion), and the lower one
X1 – horizontal (bottom) slider (left portion).
4. Dual Threshold Gray – two-point threshold operation with
gray scale mid. values will be performed. Set the desired upper
threshold level X2 using the horizontal (bottom) slider (left

BOBCAT Hardware User’s Manual
Imperx, Inc. Rev. 2.0.1 6421 Congress Ave. 4/10/2012 Boca Raton, FL 33487 +1 (561) 989-0006 206 of 253
portion), and the lower one X1 – horizontal (bottom) slider
(right portion).
5. Dual Threshold Contrast Enhancement – two-point
threshold operation with gray scale stretch will be performed.
Set the desired upper threshold level X2 using the horizontal
(bottom) slider (left portion), and the lower one X1 –
horizontal (bottom) slider (right portion).
6. One Point Correction – single point image enhancement
operation will be performed. Set the desired X1-point level
using the horizontal (bottom) slider (left portion). Set the
desired Y1-point level using the vertical (side) slider (bottom
portion).
7. Two Point Correction – two-point image enhancement
operation will be performed. Set the desired X1-point level
using the horizontal (bottom) slider (left portion), and X2-point
– the horizontal (bottom) slider (left portion). Set the desired
Y1-point level using the vertical (side) slider (bottom portion),
and Y2-point – the vertical (side) slider (top portion).
Side Slider: Multi purpose dual slider, controls the Y1 and Y2 positions for
single and two-point image enhancement.
Bottom Slider: Multi purpose dual slider, controls the X1 and X2 positions for
single and two-point image enhancement. Controls the lower and
upper threshold levels for single and dual threshold.
Gray Box: Multi purpose graphical interface. The user can set the desired X1,
(X1,X2), (X1,Y1) or (X2,Y2) points directly. Grab with the mouse
the yellow dots (dot) and move them in the gray square window
until the desired result is achieved.
5.7.10 Data Output
Data Output window provides full control of the camera digital data output – Figure
5.20.

BOBCAT Hardware User’s Manual
Imperx, Inc. Rev. 2.0.1 6421 Congress Ave. 4/10/2012 Boca Raton, FL 33487 +1 (561) 989-0006 207 of 253
Figure 5.20 – Data output window
Video Settings: Sets the data format and camera speed. Refer to Chapter 2 for
more information.
Taps – sets the number of image taps used in the current
configuration. These are CCD taps, not output taps. In some
camera the tap selection is not available:
1. Single – only one CCD tap is used, the CCD has only one
tap, or one tap operation is available for dual tap CCDs.
2. Dual – two taps CCD operation, the CCD must support dual
tap operation.
Format – sets the output data format, i.e. the number of output
taps used and mapped to the camera link output. A graphical
visualization of the selected output data format is shown in the
center of the window:
1. 1 Tap Single – the output data is mapped to one tap only.
2. 2 Taps Interleaved – the output data is mapped to two taps in
interleaved order.
3. 2 Taps Sequential – the output data is mapped to two taps in
sequential order. This feature is optional.
Speed – controls the camera speed and frame rate. All camera
features are available in both (Slow and Fast) modes.
1. Normal – normal camera operation.
2. Overclock – over-clocked camera operation. The camera
speed (frame rate) significantly increases while preserving
the image frame size noise and overall performance.
Lines – selects the size of the FVAL signal (valid lines in a
frame) and provides “Full size” or “Active size” options. Two
sizes (camera dependent) are available for selection.

BOBCAT Hardware User’s Manual
Imperx, Inc. Rev. 2.0.1 6421 Congress Ave. 4/10/2012 Boca Raton, FL 33487 +1 (561) 989-0006 208 of 253
Pixels – selects the size of the LVAL signal (valid pixels in a
line) and provides “Full size” or “Active size” options. Two sizes
(camera dependent) are available for selection.
Image – converts the image from positive to negative.
Bit Depth: Sets the camera bit depth, and which bits to be used in the data
output.
Depth – sets the bit depth of the camera output to 8, 10, 12, 14 0r
3x8 bits. All internal camera processing is done in 14 bits. 14-bit
output is available ONLY in 1 Tap Single data format.
Shift – selects which part of the entire 14 bit internal data will be
mapped. This provides up to 7 bits digital shift left or right to
manipulate camera brightness and contrast. A graphical
visualization of the selected bits is shown in the center of the
window
Corrections: DPC – enables Defective Pixel Correction (DPC). Each camera
comes with a built-in Defective Pixel Map (DPM) to correct for
defective pixels. The user can upload a custom DPM.
HPC – enables Hot Pixel Correction (HPC). Each camera comes
with a built-in Hot Pixel Map (HPM) to correct for hot pixels.
The user can upload a custom HPM
FFC – enables Flat Field Correction (FFC). Only big format
CCD cameras (optical format of 1”) have this feature. Each
camera (when available) comes with a built-in Flat Field Map
(FFM) to compensate for shading effect intrinsic to the imager.
The user can upload a custom FFM.

BOBCAT Hardware User’s Manual
Imperx, Inc. Rev. 2.0.1 6421 Congress Ave. 4/10/2012 Boca Raton, FL 33487 +1 (561) 989-0006 209 of 253
CHAPTER 6 – Gen<i>Cam Reference Manual
Gen<i>Cam Reference Manual This chapter provides a quick reference to Gen<I>Cam standard.

BOBCAT Hardware User’s Manual
Imperx, Inc. Rev. 2.0.1 6421 Congress Ave. 4/10/2012 Boca Raton, FL 33487 +1 (561) 989-0006 210 of 253
6.1 INTRODUCTION
The BobCat series of GigE Vision cameras are fully compliant with the Gen<i>Cam
standard. The cameras include an embedded camera description file ( XML ) that contains
all of the information required to automatically map a camera’s features to its internal
registers. The Gen<i>Cam standard defines the syntax and semantics of the camera
description file. It also defines a mechanism for the user to configure the camera by
reading/writing the camera registers associated with the features.
The camera description file ( XML ) contains a set of nodes where each node represents a
feature of the camera. Each node has a set of attributes that define the feature including a
description, type ( ie. integer, boolean, etc. ), register address, minimum value, maximum
value, increment, etc. All of this information is contained in the XML file. The XML file is
transferred from the camera to the host application when a connection is first established.
The host application then parses the XML file and presents the user with a “node tree’
representation.
The BobCat series of cameras include a full-featured host application, called PureGEV,
which allows the user to connect to a camera, view/save images from the camera and
control its features via a “node tree” user interface representation.. Please refer to the
PureGEV Quick Start Guide for details on how to install and use the PureGEV application.
A “node tree” is a tabular list of all of the camera features ( that were described in the XML
file ). The user can control a feature by simply clicking on it with the mouse and editing the
field. Some features provide drop down menu lists, while others support direct data entry.
Features that are read-only ( ie. status indicators ) are de-highlighted and un-editable. Some
features depend on the state of other features. For example, the GainAutoBalance is only
active if the SensorDigitizationTaps is equal to Two. Some features are locked while image
streaming is active. For example, the PixelFormat feature can only be changed while
images are not be streamed.
The following tables illustrate the node tree as it is displayed by the PureGEV application.
For a detailed description of the features, please refer to Chapter 2.

BOBCAT Hardware User’s Manual
Imperx, Inc. Rev. 2.0.1 6421 Congress Ave. 4/10/2012 Boca Raton, FL 33487 +1 (561) 989-0006 211 of 253
6.2 NODE TREE
6.2.1 Device Information
6.2.2 IP Engine
6.2.3 GigE Vision Transport Layer
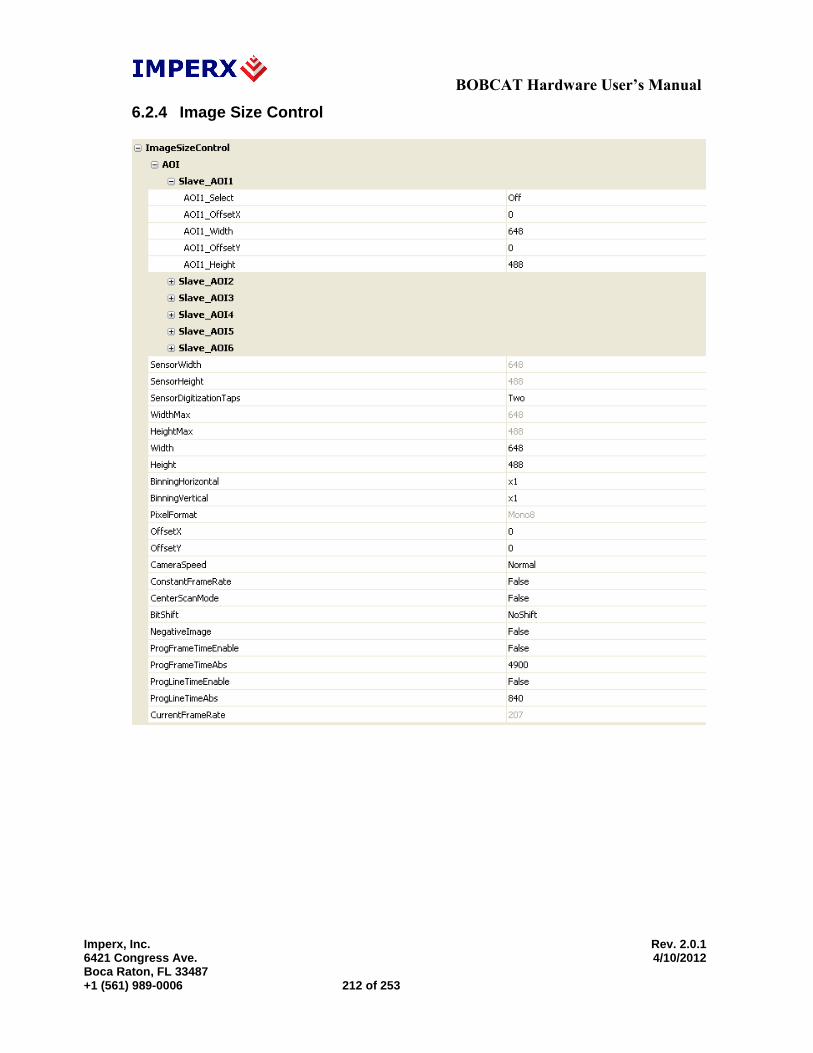
BOBCAT Hardware User’s Manual
Imperx, Inc. Rev. 2.0.1 6421 Congress Ave. 4/10/2012 Boca Raton, FL 33487 +1 (561) 989-0006 212 of 253
6.2.4 Image Size Control

BOBCAT Hardware User’s Manual
Imperx, Inc. Rev. 2.0.1 6421 Congress Ave. 4/10/2012 Boca Raton, FL 33487 +1 (561) 989-0006 213 of 253
6.2.5 Acquisition and Trigger Controls
6.2.6 Counters and Timers Controls

BOBCAT Hardware User’s Manual
Imperx, Inc. Rev. 2.0.1 6421 Congress Ave. 4/10/2012 Boca Raton, FL 33487 +1 (561) 989-0006 214 of 253
6.2.7 Analog Controls
6.2.8 Test Mode
6.2.9 User Sets
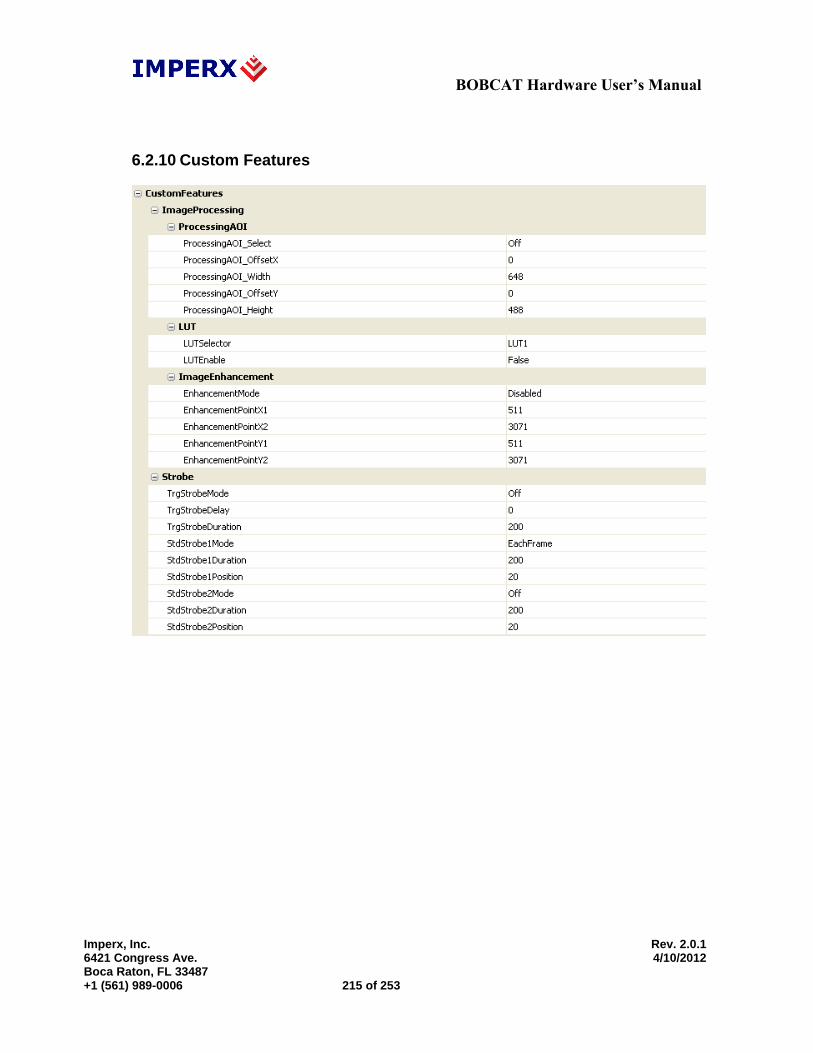
BOBCAT Hardware User’s Manual
Imperx, Inc. Rev. 2.0.1 6421 Congress Ave. 4/10/2012 Boca Raton, FL 33487 +1 (561) 989-0006 215 of 253
6.2.10 Custom Features
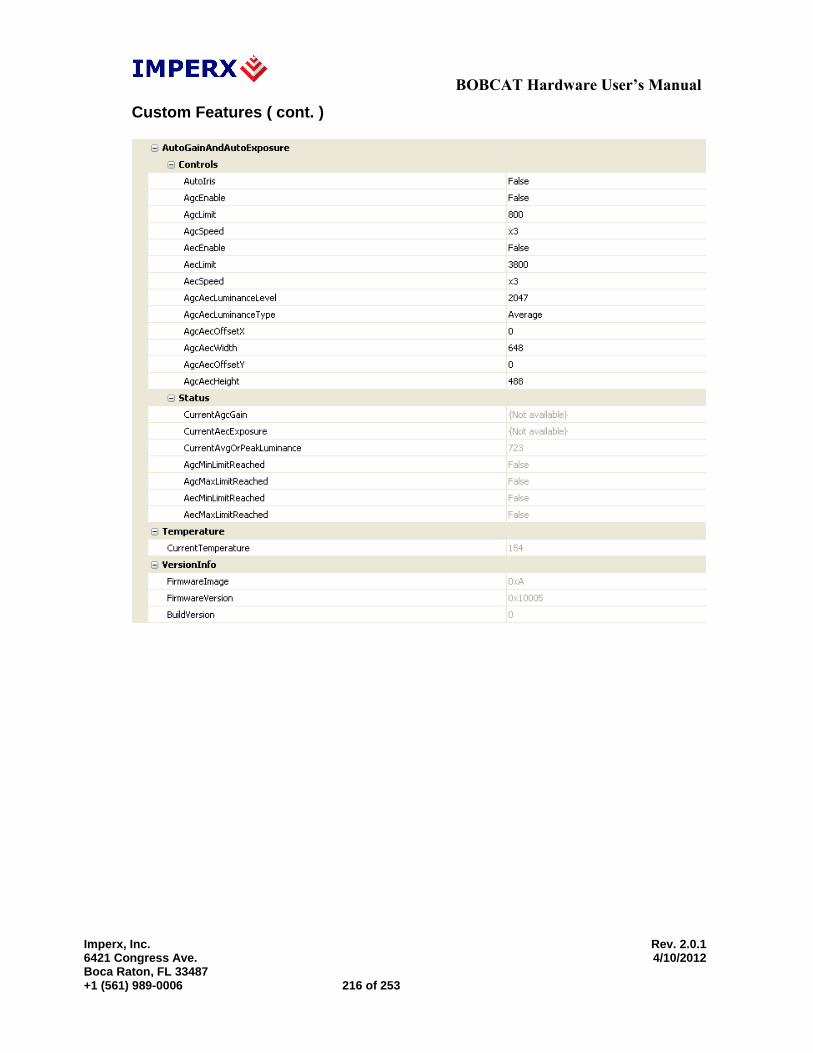
BOBCAT Hardware User’s Manual
Imperx, Inc. Rev. 2.0.1 6421 Congress Ave. 4/10/2012 Boca Raton, FL 33487 +1 (561) 989-0006 216 of 253
Custom Features ( cont. )

BOBCAT Hardware User’s Manual
Imperx, Inc. Rev. 2.0.1 6421 Congress Ave. 4/10/2012 Boca Raton, FL 33487 +1 (561) 989-0006 217 of 253
Custom Features ( cont. )

BOBCAT Hardware User’s Manual
Imperx, Inc. Rev. 2.0.1 6421 Congress Ave. 4/10/2012 Boca Raton, FL 33487 +1 (561) 989-0006 218 of 253
Chapter 7 – Bobcat Warranty and Support
BOBCAT Warranty and Support
This chapter discusses the camera’s warranty and support.

BOBCAT Hardware User’s Manual
Imperx, Inc. Rev. 2.0.1 6421 Congress Ave. 4/10/2012 Boca Raton, FL 33487 +1 (561) 989-0006 219 of 253
7.1 ORDERING INFORMATION
NOTE: For any other custom camera configurations, please contact Imperx, Inc.

BOBCAT Hardware User’s Manual
Imperx, Inc. Rev. 2.0.1 6421 Congress Ave. 4/10/2012 Boca Raton, FL 33487 +1 (561) 989-0006 220 of 253
7.2 TECHNICAL SUPPORT
Each camera is fully tested before shipping. If for some reason the camera is not
operational after power up please check the following:
1. Check the power supply and all I/O cables. Make sure that all the
connectors are firmly attached.
2. Check the status LED and verify that it is steady ON, if not – refer to the
LED section.
3. Enable the test mode and verify that the communication between the frame
grabber and the camera is established. If the test pattern is not present,
power off the camera, check all the cabling, frame grabber settings and
computer status.
4. If you still have problems with the camera operation, please contact
technical support at:
Email: [email protected]
Toll Free 1 (866) 849-1662 or (+1) 561-989-0006
Fax: (+1) 561-989-0045
Visit our Web Site: www.imperx.com

BOBCAT Hardware User’s Manual
Imperx, Inc. Rev. 2.0.1 6421 Congress Ave. 4/10/2012 Boca Raton, FL 33487 +1 (561) 989-0006 221 of 253
7.3 WARRANTY
Imperx warrants performance of its products and related software to the
specifications applicable at the time of sale in accordance with Imperx’s
standard warranty, which is 1 (one) year parts and labor. FOR GLASSLESS
CAMERAS THE CCD IS NOT COVERED BY THE WARRANTY.
Do not open the housing of the camera. Warranty voids if the housing has
been open or tampered.
IMPORTANT NOTICE
This camera has been tested and complies with the limits of Class A digital
device, pursuant to part 15 of the FCC rules.
Copyright © 2011 Imperx Inc. All rights reserved. All information provided
in this manual is believed to be accurate and reliable. No responsibility is
assumed by Imperx for its use. Imperx reserves the right to make changes to
this information without notice. Redistribution of this manual in whole or in
part, by any means, is prohibited without obtaining prior permission from
Imperx. Imperx reserves the right to make changes to its products or to
discontinue any product or service without notice, and advises its customers to
obtain the latest version of relevant information to verify, before placing
orders, that the information being relied on is current.
IMPERX PRODUCTS ARE NOT DESIGNED, INTENDED,
AUTHORIZED, OR WARRANTED TO BE SUITABLE FOR USE IN
LIFE-SUPPORT APPLICATIONS, DEVICES OR SYSTEMS OR
OTHER CRITICAL APPLICATIONS, WHERE MALFUNCTION OF
THESE PRODUCTS CAN REASONABLY BE EXPECTED TO
RESULT IN PERSONAL INJURY. IMPERX CUSTOMERS USING OR
SELLING THESE PRODUCTS FOR USE IN SUCH APPLICATIONS
DO SO AT THEIR OWN RISK AND AGREE TO FULLY INDEMNIFY
IMPERX FOR ANY DAMAGES RESULTING FROM SUCH
IMPROPER USE OR SALE.

BOBCAT Hardware User’s Manual
Imperx, Inc. Rev. 2.0.1 6421 Congress Ave. 4/10/2012 Boca Raton, FL 33487 +1 (561) 989-0006 222 of 253
Appendix A – Camera Configuration Reference
Camera Configuration Reference
This appendix provides a quick reference to the camera configuration
workspace registers.

BOBCAT Hardware User’s Manual
Imperx, Inc. Rev. 2.0.1 6421 Congress Ave. 4/10/2012 Boca Raton, FL 33487 +1 (561) 989-0006 223 of 253
A.0 ABBREVIATIONS
RW – read/write, RO – read only, WO – write only
MAX_HRZ_SZE, MIN_HRZ_SZE – Max. and Min. horizontal image size – camera dependent
MAX_VER_SZE, MIN_VER_SZE – Max. and Min. vertical image size – camera dependent
LIN_TIM_MIN – Minimum Line time – camera dependent
FRM_TIM_MIN – Minimum Frame time – camera dependent
FRM_TIM_ACT – Actual Current Frame time - variable
FRR_EXP_MIN – Minimum Exposure time – camera dependent
A.1 SAVING AND RESTORING REGISTERS
Address Register Name Type Usage MIN Value MAX Value
0x6000 Boot From RW 00 - Factory, 01 - User 1, 10 - User 2
0x00000000 0x00000002
0x6060 Load From Factory WO Command 0x00000000
0x6064 Load From User1 WO Command 0x00000000
0x6068 Load From User2 WO Command 0x00000000
0x606C Load MFG Default Gain WO Command 0x00000000
0x6074 Save to User1 WO Command 0x00000000
0x6078 Save to User2 WO Command 0x00000000
0x0604 RS-232 Baud Rate Selector
RW <BAUD Value> 0x00000000 0x00000004
A.2 CAMERA INFORMATION REGISTERS
Address Register Name Type Value
0x6004 Firmware Revision RO <Firmware Revision>
0x6008 Firmware Build Number RO <Firmware Build Number>
0x600C Test Register RW 0x76543210
0x601C Soft Reset WO 0xDEDBEEF
0x6080 Horizontal Frame Size RO <MAX_HRZ_SZE, MIN_HRZ_SZE>
0x6084 Vertical Frame Size RO <MAX_VER_SZE, MIN_VER_SZE>
0x6088 Current Minimum Frame Time RO <FRM_TIM_MIN>
0x608C Current Minimum Line Time RO <LIN_TIM_MIN> , <CLK_PER_PSC>
0x6090 Current Maximum Exposure RO <FRM_TIM_ACT>
0x6094 Current Minimum Exposure RO <FRR_EXP_MIN>
0x6098 Current Frame Number RO <Current Frame Number>
0x609C Current Camera Exposure RO <Current Exposure>
0x60A0 Current Frame Duration RO <FRM_TIM_ACT>
0x60B0 Current Image Size RO <CURT_VER_SZE>, <CRNT_HRZ_SZE>
0x60B4 Current AEC/AGC Status RO <Status Values>
0x6010 CCD Temperature RO <Current CCD Temperature>

BOBCAT Hardware User’s Manual
Imperx, Inc. Rev. 2.0.1 6421 Congress Ave. 4/10/2012 Boca Raton, FL 33487 +1 (561) 989-0006 224 of 253
A.3 IMAGE SIZE (AOI) REGISTERS
Address Register Name Type Usage MIN Value MAX Value
0x0500 Vertical Binning Mode RW 0x0 - 1x, 0x1 - 2x, 0x2 - 3x, 0x3 - 4x,
0x4 - 8x 0x00000000 0x00000004
0x0200 Constant Frame Rate RW 1 - Enable, 0 - Disable
0x00000000 0x00000001
0x0204 Horizontal Binning Mode RW 0x0 - 1x, 0x1 - 2x, 0x2 - 3x, 0x3 - 4x,
0x4 - 8x 0x00000000 0x00000004
0x0208 MAOI Enable RW 0 – Off, 1 - Enable 0x00000000 0x00000001
0x020C AOI 1 Enable RW 00 – Off, 01 – Include,
10 - Exclude 0x00000000 0x00000001
0x0210 AOI 2 Enable RW 00 – Off, 01 – Include,
10 - Exclude 0x00000000 0x00000001
0x0214 AOI 3 Enable RW 00 – Off, 01 – Include,
10 - Exclude 0x00000000 0x00000001
0x0218 AOI 4 Enable RW 00 – Off, 01 – Include,
10 - Exclude 0x00000000 0x00000001
0x021C AOI 5 Enable RW 00 – Off, 01 – Include,
10 - Exclude 0x00000000 0x00000001
0x0220 AOI 6 Enable RW 00 – Off, 01 – Include,
10 - Exclude 0x00000000 0x00000001
0x0224 PAOI Enable RW 00 - Off, 11 – LUT AOI
10 – Process. AOI, 0x00000000 0x00000003
0x0228 MAOI Horizontal Width RW <Width Value> 0x00000001 MAX_HRZ_SZE
0x022C AOI 1 Horizontal Width RW <Width Value> 0x00000001 MAX_HRZ_SZE
0x0230 AOI 2 Horizontal Width RW <Width Value> 0x00000001 MAX_HRZ_SZE
0x0234 AOI 3 Horizontal Width RW <Width Value> 0x00000001 MAX_HRZ_SZE
0x0238 AOI 4 Horizontal Width RW <Width Value> 0x00000001 MAX_HRZ_SZE
0x023C AOI 5 Horizontal Width RW <Width Value> 0x00000001 MAX_HRZ_SZE
0x0240 AOI 6 Horizontal Width RW <Width Value> 0x00000001 MAX_HRZ_SZE
0x0244 PAOI Horizontal Width RW <Width Value> 0x00000001 MAX_HRZ_SZE
0x0248 MAOI Horizontal Offset RW <Offset Value> 0x00000000*1 MAX_HRZ_SZE - 1
0x024C AOI 1 Horizontal Offset RW <Offset Value> 0x00000000 MAX_HRZ_SZE - 1
0x0250 AOI 2 Horizontal Offset RW <Offset Value> 0x00000000 MAX_HRZ_SZE - 1
0x0254 AOI 3 Horizontal Offset RW <Offset Value> 0x00000000 MAX_HRZ_SZE - 1
0x0258 AOI 4 Horizontal Offset RW <Offset Value> 0x00000000 MAX_HRZ_SZE - 1
0x025C AOI 5 Horizontal Offset RW <Offset Value> 0x00000000 MAX_HRZ_SZE - 1
0x0260 AOI 6 Horizontal Offset RW <Offset Value> 0x00000000 MAX_HRZ_SZE - 1
0x0264 PAOI Horizontal Offset RW <Offset Value> 0x00000000 MAX_HRZ_SZE - 1
0x0268 MAOI Vertical Height RW <Height Value> 0x00000001 MAX_VER_SZE
0x026C AOI 1 Vertical Height RW <Height Value> 0x00000001 MAX_VER_SZE
0x0270 AOI 2 Vertical Height RW <Height Value> 0x00000001 MAX_VER_SZE
0x0274 AOI 3 Vertical Height RW <Height Value> 0x00000001 MAX_VER_SZE
0x0278 AOI 4 Vertical Height RW <Height Value> 0x00000001 MAX_VER_SZE
0x027C AOI 5 Vertical Height RW <Height Value> 0x00000001 MAX_VER_SZE
0x0280 AOI 6 Vertical Height RW <Height Value> 0x00000001 MAX_VER_SZE

BOBCAT Hardware User’s Manual
Imperx, Inc. Rev. 2.0.1 6421 Congress Ave. 4/10/2012 Boca Raton, FL 33487 +1 (561) 989-0006 225 of 253
0x0284 PAOI Vertical Height RW <Height Value> 0x00000001 MAX_VER_SZE
0x0288 MAOI Vertical Offset RW <Offset Value> 0x00000000 MAX_VER_SZE - 1
0x028C AOI 1 Vertical Offset RW <Offset Value> 0x00000000 MAX_VER_SZE - 1
0x0290 AOI 2 Vertical Offset RW <Offset Value> 0x00000000 MAX_VER_SZE - 1
0x0294 AOI 3 Vertical Offset RW <Offset Value> 0x00000000 MAX_VER_SZE - 1
0x0298 AOI 4 Vertical Offset RW <Offset Value> 0x00000000 MAX_VER_SZE - 1
0x029C AOI 5 Vertical Offset RW <Offset Value> 0x00000000 MAX_VER_SZE - 1
0x02A0 AOI 6 Vertical Offset RW <Offset Value> 0x00000000 MAX_VER_SZE - 1
0x02A4 PAOI Vertical Offset RW <Offset Value> 0x00000000 MAX_VER_SZE - 1
*1
In B1920 the minimum “Horizontal Offset” is 10 pixels when “Constant Frame Rate” is
disabled.
A.4 EXPOSURE CONTROL REGISTERS
Address Register Name Type Usage MIN Value MAX Value
0x0544 Exposure Control Mode RW 00 - Off, 01 - PW, 10 - Int, 11 - Ext
0x00000000 0x00000003
0x0548 Exposure Time RW <Exposure Value> FRR_EXP_MIN, FRM_TIM_ACT
0x054C Prog. Line Time Enable RW 1 - Enable, 0 - Disable 0x00000000 0x00000001
0x0550 Prog. Frame Time Enable RW 1 - Enable, 0 - Disable 0x00000000 0x00000001
0x0554 Line Time RW <Line Time Value> LIN_TIM_MIN 0x00001FFF
0x0558 Frame Time RW <Frame Time Value> FRM_TIM_MIN 0x00FFFFFF
A.5 VIDEO REGISTERS
Address Register Name Type Usage MIN Value MAX Value
0x0000 PreAmp Gain Ch. 1 RW 00 - -3dB, 01 - 0dB, 10 - +3db, 11 - +6db
0x00000000 0x00000003
0x0004 Analog Gain Ch. 1 RW <Analog Gain Value> 0x00000000 0x000003FF
0x0008 Analog Offset Ch. 1 RW <Analog Offset Value> 0x00000000 0x000003FF
0x0010 PreAmp Gain Ch. 2 RW 00 - -3dB, 01 - 0dB, 10 - +3db, 11 - +6db
0x00000000 0x00000003
0x0014 Analog Gain Ch. 2 RW <Analog Gain Value> 0x00000000 0x000003FF
0x0018 Analog Offset Ch. 2 RW <Analog Offset Value> 0x00000000 0x000003FF
0x0180 Digital Gain RW <Digital Gain Value> 0x00000000 0x00000014
0x0184 Digital Offset RW <Digital Offset Value> 0x00000000 0x000003FF
0x0110 Tap Balance RW 00 - Off, 01 – Auto Dyn,
10 – Once Dyn, 11 - Static 0x00000000 0x00000002
0x0114 Black Level Correction RW 1 - Enable, 0 - Disable 0x00000000 0x00000001

BOBCAT Hardware User’s Manual
Imperx, Inc. Rev. 2.0.1 6421 Congress Ave. 4/10/2012 Boca Raton, FL 33487 +1 (561) 989-0006 226 of 253
A.6 AEC, AGC, AIC REGISTERS
Address Register Name Type Usage MIN Value MAX Value
0x014C Auto Iris Control RW 1 - Enable, 0 - Disable
0x00000000 0x00000001
0x0150 Auto Exposure Control RW 1 - Enable, 0 - Disable
0x00000000 0x00000001
0x0154 Auto Gain Control RW 1 - Enable, 0 - Disable
0x00000000 0x00000001
0x0158 Luminance Level Threshold RW <Luminance
Threshold Value> 0x00000001 0x00000FFF
0x05B0 Maximum Exposure Limit RW <Max. Exp. Value> FRR_EXP_MIN FRM_TIM_ACT
0x0160 Maximum Gain Limit RW <Max. Gain Value> 0x00000001 0x000003FF
0x0164 AOI Horizontal Width RW <Width Value> 0x00000001 MAX_HRZ_SZE
0x0168 AOI Horizontal Offset RW <Offset Value> 0x00000000 MAX_HRZ_SZE - 1
0x016C AOI Vertical Height RW <Height Value> 0x00000001 MAX_VER_SZE
0x0170 AOI Vertical Offset RW <Offset Value> 0x00000000 MAX_VER_SZE - 1
0x0174 Exposure Correction Speed RW 00 - 1x, 01 - 2x, 10 - 3x, 11 - 4x
0x00000000 0x00000003
0x0178 Gain Correction Speed RW 00 - 1x, 01 - 2x, 10 - 3x, 11 - 4x
0x00000000 0x00000003
0x017C Luminance Type Selection RW 00 - Average,
01 - Peak 0x00000000 0x00000003
A.7 TRIGGER REGISTERS
Address Register Name Type Usage MIN Value MAX Value
0x0508 Trigger Input Selector RW 000 - Off, 001 - External
010 - PG, 011 – Computer, 100 - Software
0x00000000 0x00000004
0x050C Trigger Edge Selector RW 1 - Falling, 0 - Rising 0x00000000 0x00000001
0x0510 De-bounce Time Selector RW
000 - Off, 100 - 10s,
101 - 50s, 001 - 100s,
110 - 500s, 010 - 1ms, 111 - 5ms, 011 - 10ms
0x00000000 0x00000007
0x0514 Trigger Overlap RW 00 – Ignore, 10 – Accept, 01 – Accept After Exp.,
0x00000000 0x00000000
0x0518 Triggering Mode Selector RW <Trigger Mode> 0x00000000 0x00000004
0x05BC Triggering Enable/Disable RW 0 – Enable, 1 – Disable 0x00000000 0x00000004
0x6030 Software Trigger Start WO Command 0x00000000
0x051C Number of Frames Captured RW <Number Frames> 0x00000001 0x0000FFFF
0x0520 Number of Pulses Used RW <Number Pulses> 0x00000001 0x0000FFFF
0x0524 Trigger Strobe Enable RW 00 - Off, 01 – Str1,
10 – Str2, 11 – Str1&2 0x00000000 0x00000003
0x0528 Trigger Exposure Delay RW <Exposure Delay Value> 0x00000000 0x00FFFFFF
0x052C Trigger Strobe Position Delay RW <Strobe Position Delay> 0x00000000 0x00FFFFFF
0x05B8 Trigger Strobe Duration RW <Strobe Duration> 0x00000000 0x00FFFFFF

BOBCAT Hardware User’s Manual
Imperx, Inc. Rev. 2.0.1 6421 Congress Ave. 4/10/2012 Boca Raton, FL 33487 +1 (561) 989-0006 227 of 253
A.8 PULSE GENERATOR REGISTERS
Address Register Name Type Usage MIN Value MAX Value
0x0530 Pulse Gen. Granularity RW 00 - 1x, 01 - 10x, 10 -
100x, 11 -1000x 0x00000000 0x00000003
0x0534 Pulse Gen. Pulse Width RW <Pulse Width> 0x00000001 0x0007FFFF
0x0538 Pulse Gen. Pulse Period RO <Pulse Period> 0x00000001 0x001FFFFF
0x053C Pulse Gen. # of Pulses RW <Number of Pulses> 0x00000001 0x0000FFFF
0x0540 Pulse Gen. Enable RW 1 - Enable, 0 - Disable 0x00000000 0x00000001
A.9 TEST PATTERN REGISTERS
Address Register Name Type Usage MIN Value MAX Value
0x012C Test Mode Selector RW 0x0 - Off,
0xX - Test Mode 0x00000000 0x00000009
0x0130 H&V Lines Superimpose RW 1 - ON, 0 - Off 0x00000000 0x00000001
0x0134 Cross Superimpose RW 1 - ON, 0 - Off 0x00000000 0x00000001
0x0138 H1 Superimpose Line Position RW <H1 Line Position> 0x00000001 MAX_VER_SZE
0x013C H2 Superimpose Line Position RW <H2 Line Position> 0x00000001 MAX_VER_SZE
0x0140 V1 Superimpose Column Position RW <V1 Column Position> 0x00000001 MAX_HRZ_SZE
0x0144 V2 Superimpose Column Position RW <V2 Column Position> 0x00000001 MAX_HRZ_SZE
0x0148 Superimposed Lines Brightness RW <Brightness Value> 0x00000000 0x00000FFF
A.10 STROBE REGISTERS
Address Register Name Type Usage MIN Value MAX Value
0x055C Strobe 1 mode selector RW 00 - Off, 01 - Each, 10 - Odd, 11 - Even
0x00000000 0x00000003
0x0560 Strobe 2 mode selector RW 00 - Off, 01 - Each, 10 - Odd, 11 - Even
0x00000000 0x00000003
0x0564 Strobe 1 duration RW < S1Duration Value> 0x00000001 FRM_TIM_ACT
0x05B4 Strobe 2 duration RW < S2Duration Value> 0x00000001 FRM_TIM_ACT
0x0568 Strobe 1 position RW <S1 Position Value> 0x00000001 FRM_TIM_ACT
0x056C Strobe 2 position RW <S2 Position Value> 0x00000001 FRM_TIM_ACT
A.11 INPUT AND OUTPUT REGISTERS
Address Register Name Type Usage MIN Value MAX Value
0x0570 CC1 Polarity Selector RW 1 - Active H, 0 -Active L 0x00000000 0x00000001
0x0574 CC1 Input Selector RW <Input Map> 0x00000000 0x00000005

BOBCAT Hardware User’s Manual
Imperx, Inc. Rev. 2.0.1 6421 Congress Ave. 4/10/2012 Boca Raton, FL 33487 +1 (561) 989-0006 228 of 253
0x0578 CC2 Polarity Selector RW 1 - Active H, 0 -Active L 0x00000000 0x00000001
0x057C CC2 Input Selector RW <Input Map> 0x00000000 0x00000005
0x0580 IN1 Polarity Selector RW 1 - Active H, 0 -Active L 0x00000000 0x00000001
0x0584 IN1 Input Selector RW <Input Map> 0x00000000 0x00000005
0x0588 IN2 Polarity Selector RW 1 - Active H, 0 -Active L 0x00000000 0x00000001
0x058C IN2 Input Selector RW <Input Map> 0x00000000 0x00000005
0x0590 OUT1 Polarity Selector RW 1 - Active H, 0 -Active L 0x00000000 0x00000001
0x0594 OUT1 Output Selector RW <Output Map> 0x00000000 0x0000000F
0x0598 OUT2 Polarity Selector RW 1 - Active H, 0 -Active L 0x00000000 0x00000001
0x059C OUT2 Output Selector RW <Output Map> 0x00000000 0x0000000F
0x05A0 CL Spare Polarity Selector RW 1 - Active H, 0 -Active L 0x00000000 0x00000001
0x05A4 CL spare Output Selector RW <Output Map> 0x00000000 0x0000000F
A.12 OUTPUT DATA FORMAT REGISTERS
Address Register Name Type Usage MIN Value MAX Value
0x0100 Bit Depth Selector RW 000 - 8, 001 -10,
010 - 12, 011 – 14, 100 – 3x8 RGB
0x00000000 0x00000003
0x0104 Bit Shift Selector RW <Bit Sift> 0x00000000 0x0000000F
0x0108 Tap Mode Selector RW 00 - Single, 01 - Dual 0x00000000 0x00000003
0x010C Data Format Selector RW <Format> 0x00000000 0x00000003
0x0188 Negative Image RW 1 - Enable, 0 - Disable 0x00000000 0x00000001
0x0504 Scan Mode Control RW 1 - Partial/Center, 0 - Full 0x00000000 0x00000001
0x05A8 Camera LVAL Size RW 1 - Full, 0 - Active 0x00000000 0x00000001
0x05AC Camera FVAL Size RW 1 - Full, 0 - Active 0x00000000 0x00000001
0x0608 Camera Speed RW 1 - Fast, 0 - Normal 0x00000000 0x00000001
A.13 WB AND COLOR CORRECTION REGISTERS
Address Register Name Type Usage MIN Value MAX Value
0x0300 White Balance Mode RW 00 - Off, 01 - Once, 10 - Auto, 11 – Manual
0x00000000 0x00000003
0x0304 WBC Red RW <Value> 0x00000000 0x00000FFF
0x0308 WBC Green RW <Value> 0x00000000 0x00000FFF 0x030C WBC Blue RW <Value> 0x00000000 0x00000FFF 0x0310 Gain Red RW <Value> 0x00000000 0x00000FFF 0x0314 Gain Green RW <Value> 0x00000000 0x00000FFF 0x0318 Gain Blue RW <Value> 0x00000000 0x00000FFF 0x031C Offset Red RW <Value> 0x00000000 0x000003FF 0x0320 Offset Green RW <Value> 0x00000000 0x000003FF 0x0324 Offset Blue RW <Value> 0x00000000 0x000003FF

BOBCAT Hardware User’s Manual
Imperx, Inc. Rev. 2.0.1 6421 Congress Ave. 4/10/2012 Boca Raton, FL 33487 +1 (561) 989-0006 229 of 253
A.14 DATA CORRECTION REGISTERS
Address Register Name Type Usage MIN Value MAX Value
0x0118 Look-Up-Table selector RW 1 – LUT 2, 0 – LUT 1 0x00000000 0x00000001
0x011C Look-Up-Table RW 1 - Enable, 0 - Disable 0x00000000 0x00000001
0x0120 Defective Pixel Correction RW 1 - Enable, 0 - Disable 0x00000000 0x00000001
0x0124 Hot Pixel Correction RW 00 – Disable, 01 – Static,
10 – Dynamic, 11 - All 0x00000000 0x00000003
0x0128 Flat Field Correction RW 00 – Disable, 01 – Static,
10 – Dynamic, 11 - All 0x00000000 0x00000003
A.15 PROCESSING REGISTERS
Address Register Name Type Usage MIN Value MAX Value
0x0400 Enhancement Mode RW 0000 - Off,
< Mode Select> 0x00000000 0x00000006
0x0404 Point X1 position RW <Point X1 Value> 0x00000000 0x00000FFF
0x0408 Point X2 position RW < Point X2 Value > 0x00000000 0x00000FFF
0x040C Point Y1 position RW < Point Y2 Value > 0x00000000 0x00000FFF
0x0410 Point Y2 position RW < Point Y2 Value > 0x00000000 0x00000FFF
A.16 MANUFACTURING DATA REGISTERS
Address Register Name Type Value
0x7004 Assembly Part Number RO <Assembly Part Number_1>
0x7008 Assembly Part Number RO <Assembly Part Number_2>
0x700C Assembly Part Number RO <Assembly Part Number_3>
0x7010 Assembly Part Number RO <Assembly Part Number_4>
0x7014 Assembly Serial Number RO <Assembly Serial Number_1>
0x7018 Assembly Serial Number RO Assembly Serial Number_2
0x701C CCD Serial Number RO <CCD Serial Number_1>
0x7020 CCD Serial Number RO <CCD Serial Number_2>
0x7024 Date of Manufacturer RO <Date of Manufacturer_1>
0x7028 Date of Manufacturer RO <Date of Manufacturer_2>
0x702C Camera Type RO <Type of Camera_1>
0x7030 Camera Type RO <Type of Camera_2>
0x7034 Camera Type RO <Type of Camera_3>
0x7038 Camera Type RO <Type of camera_4>

BOBCAT Hardware User’s Manual
Imperx, Inc. Rev. 2.0.1 6421 Congress Ave. 4/10/2012 Boca Raton, FL 33487 +1 (561) 989-0006 230 of 253
Appendix B – Creating Look Up Tables
Creating Look Up Tables
This appendix provides a reference on how to create a lookup table using
both an ASCII editor and an Excel spreadsheet.

BOBCAT Hardware User’s Manual
Imperx, Inc. Rev. 2.0.1 6421 Congress Ave. 4/10/2012 Boca Raton, FL 33487 +1 (561) 989-0006 231 of 253
B.1 OVERVIEW
The Lookup Table file can be created using any standard ASCII text editor or by
using Microsoft Excel. Additionally, any spreadsheet or mathematical program
capable of generating a comma delimited (.csv) file can be used.
B.2 USING AN ASCII TEXT EDITOR
A custom LUT (lookup table) can be prepared using any ASCII text editor, such as
“Notepad” or similar. Alternatively, any spreadsheet program (i.e. Microsoft Excel)
can be used by converting the spreadsheet into a comma delimited (.csv) file. In
either case, the file must be renamed to include the .lut extension. The .lut file has
two main sections: a header and a table. The ‘header’ section is a free text area of
up to 256 ASCII characters. Each line of the header section must be terminated in a
comma. The ‘table’ section of the file contains an array of 4096 lines with each line
containing an input value followed by a comma and an output value. The input
values represent incoming pixels and the output values represent what each
incoming pixel should be converted into as an output pixel.
The format of the .LUT file is as follows:
-- Look Up Table input file example,
-- lines beginning with two dashes are comments,
-- and are ignored by parser,
:Header,
-- this is the text that will get displayed with a 'glh' command,
Function is 'Negative Image',
Created by John Doe,
Date 1/14/09,
:Table,
-- input output,
0,4095
1,4094
2,4093
3,4092
4,4091
:
4095,0

BOBCAT Hardware User’s Manual
Imperx, Inc. Rev. 2.0.1 6421 Congress Ave. 4/10/2012 Boca Raton, FL 33487 +1 (561) 989-0006 232 of 253
B.3 USING MICROSOFT EXCEL
The .LUT file can be created in Excel as follows:
1 - create the spreadsheet as shown below (note that 4096 rows are required in the
table).
2 - add the necessary equations into the output cells to generate the transfer function
required.
3 - save the file as a .csv (comma delimited format).
4 - rename the .csv file to an extension of .lut.

BOBCAT Hardware User’s Manual
Imperx, Inc. Rev. 2.0.1 6421 Congress Ave. 4/10/2012 Boca Raton, FL 33487 +1 (561) 989-0006 233 of 253
Appendix C – Creating DPC and HPC Tables
Creating DPC and HPC Tables
This appendix provides a reference on how to create a DPC and HPC table
using an ASCII editor.

BOBCAT Hardware User’s Manual
Imperx, Inc. Rev. 2.0.1 6421 Congress Ave. 4/10/2012 Boca Raton, FL 33487 +1 (561) 989-0006 234 of 253
C.1 OVERVIEW
The Defective Pixel Map (DPM) and Hot Pixel Map (HPM) are provided with each
camera. If the user wants to create its own DPM or HPM file, he/she can use any standard
ASCII text editor or Microsoft Excel. Additionally, any spreadsheet or mathematical
program capable of generating a comma delimited (.csv) file can be used.
C.2 USING AN ASCII TEXT EDITOR
A custom Defective Pixel Map (DPM) and Hot Pixel Map (HPM) can be prepared using
any ASCII text editor, such as “Notepad” or similar. The file must have a .dpm extension
for DPM map and .hpm extension for HPM. The .dpm (or .hpm) file has two main sections:
a header and a table. The ‘header’ section is a free text area of up to 256 ASCII characters.
Each line of the header section must be terminated in a comma. The ‘table’ section of the
file contains an array of lines with each line containing an X (pixel number) value followed
by a comma and a Y (line number) value. All pixels are listed in the DPM (or HPM) in
order of increasing Y location. If the Y location is identical, the listing is in order of
increasing X location. After editing save each file with the appropriate file extension. The
maximum number of pixels in the DMP list is 128, and in HPM list is 1024.
Here is a simple example how to create a DPM. Create the DPM file with extension .dpm
using “Notepad” or any other editing software. Locate the defective pixels in the camera
and enter them in order starting with the smallest pixel number of the line number first. The
file looks like this:
-- Defective Pixel Map,
-- Date: 7/21/2009,
-- Model#: ICL-B0610M,
-- Serial#: 060380,
:Table,
-- Column(X),Row(Y)
4,1
588,1
78,5
82,27
405,300
Note.
In this example the first table entry is pixel 4 from line 1, the next entry is pixel 588 from
line 1, and the next entry is pixel 78 from line 5 and so on.

BOBCAT Hardware User’s Manual
Imperx, Inc. Rev. 2.0.1 6421 Congress Ave. 4/10/2012 Boca Raton, FL 33487 +1 (561) 989-0006 235 of 253
Appendix D – Software Installation - CL
Software Installation - CL
This appendix explains how to install the Bobcat CamConfig software.

BOBCAT Hardware User’s Manual
Imperx, Inc. Rev. 2.0.1 6421 Congress Ave. 4/10/2012 Boca Raton, FL 33487 +1 (561) 989-0006 236 of 253
Use the following steps to install the BobCat Configurator software supplied on a CD. Note that
‘click’ refers to the left mouse button.
1. If a version of BobCat Configurator was previously installed on this machine, then you
must first remove it:
To remove the application files:
1.1 Click on “Start”.
1.2 Click on “Settings”.
1.3 Click on “Control Panel”.
Double click on “Add or Remove Programs” for Windows XP or “Programs and
Features” for Windows Vista and Windows 7.
1.5 Click on “BobCat Configurator”.
1.6 Click on “Remove”.
1.7 If the ‘BobCat Configurator – InstallShield Wizard’ pops-up then do the following,
otherwise go to step 1.8:
Click on “Remove”.
Click “Next”.
Click “Yes”.
Click “Finish”.
1.8 Click on “Yes”.
1.9 Click on “Close”.
2. After having removed a previous version or if a version of BobCat Configurator was NOT
previously installed on this machine then:
The first step is to install the application files:
2.1 Insert the BobCat Configurator CD into the appropriate drive; the setup.exe file will
run automatically. Note: If it does not start automatically, click on “Start”, “Run”,
enter or browse to “(CD drive): setup.exe” and click “OK”.
2.2 Wait for the “BobCat Configurator - InstallShield Wizard” screen to appear.
2.3 Follow the on-screen instructions.
2.4 Click “Finish”. This completes the software installation.
2.5 Reboot your computer.
For additional information and the latest updates and downloads, please visit our
website at www.imperx.com

BOBCAT Hardware User’s Manual
Imperx, Inc. Rev. 2.0.1 6421 Congress Ave. 4/10/2012 Boca Raton, FL 33487 +1 (561) 989-0006 237 of 253
Appendix E – Firmware Upgrade - CL
Firmware Upgrade - CL
This appendix explains how to upgrade the Bobcat Firmware, DPH, HPM,
FFC, LUT and camera registers for Bobcat CL cameras.

BOBCAT Hardware User’s Manual
Imperx, Inc. Rev. 2.0.1 6421 Congress Ave. 4/10/2012 Boca Raton, FL 33487 +1 (561) 989-0006 238 of 253
E.1 OVERVIEW
Bobcat Camera series supports user FirmWare (FW) and Workspace registers upgrade,
along with a custom DPC, HPC, FFC and LUT tables upload. The upload utility software is
provided as a part of CamConfig GUI, shipped with each camera. After installing the
program, the user has access to a ‘download’ utility window, which allows the user to
download newly released firmware or other files into the camera’s non-volatile memory.
To receive the latest FW and RGS files, please contact Imperx. The user Application
Firmware file normally is called “ICL_XXXXX_RU_ABC.rpd” where “XXXXX”
represents the camera type and “ABC” represents the version number. The Factory Space
upgrade file is normally called “ICL_ YYYYY _RU_RA.rgs” where “YYYYY” represents
the camera type and “A” represents the version number.
E.2 BOBCAT UPGRADE
The user can select to upload either new Camera Firmware, Camera Factory Register Space,
a Lookup Table, a Defect Pixels Correction table, a Hot Pixels Correction table or a Flat
Field Correction file by selecting the appropriate path/filename of the file can be entered
manually into the edit box or browsed to by clicking on the ‘…’ button. Clicking on the
‘Load File…’ button begins the download process. The user must be familiar with the entire
procedure and must follow it precisely. To start a Bobcat upgrade, follow the described steps:
Start Application Bobcat CamConfig go to Main Menu and from submenu “Load From…”
select “Factory Space”. Wait until camera is initialized.
Go to Main Menu and from submenu “Terminal”, select Download Terminal.
When “Download Terminal” is opened, from File Type, you have to select what file you want
to upload to the Camera: Application Firmware Image (rpd), Factory Space (rgs) file), DPC,
HPC, FFC or LUT – Figure E.1.
DPC, HPC, FFC and LUT Upgrade: When you select the appropriate file for this particular
camera you have to press button “Load File” and wait to finish the process of uploading. This
could take few minutes. When everything is done you should get the message “Done!” Re-
power the camera.
FW Upgrade: When you select the appropriate Application Firmware Image file for this
particular camera you have to press button “Load File” and wait to finish the process of
uploading. This could take few minutes. When everything is done you should get the message
“Done! Reset FPGA and the current new version of your camera firmware” – Figure E.2.
RGS Upgrade: When you select the appropriate Factory Space file for this particular camera
you have to press button “Load File” and wait to finish the process of uploading. This could
take few minutes. When everything is done you should get the message “Uploading is
finished successfully”. Please re-power your camera after Factory Space upgrading –Figure
E.2.

BOBCAT Hardware User’s Manual
Imperx, Inc. Rev. 2.0.1 6421 Congress Ave. 4/10/2012 Boca Raton, FL 33487 +1 (561) 989-0006 239 of 253
Figure E.1
Figure E.2

BOBCAT Hardware User’s Manual
Imperx, Inc. Rev. 2.0.1 6421 Congress Ave. 4/10/2012 Boca Raton, FL 33487 +1 (561) 989-0006 240 of 253
Figure E.3
CAUTION NOTE
It is strongly recommended that you DO NOT USE any other communication software to
upgrade the camera FW, RGS, DPC, HPC, FFC and LUT files.
If the user selects to upgrade camera firmware (.RPD file) and camera factory register
space (.RGS file), the camera firmware (.RPD) must be upgraded first.
During camera RGS or FW upgrade the camera power must be on all the time, and the
process must not be interrupted. If the camera is disconnected or the process canceled, this
will result in a user application firmware corruption. If such event occurs start the upload
process again until completion. If the upgrade process cannot be completed, the camera
will power with the default Factory Firmware so you can start the upgrade process again. If
you need more information, please contact Imperx.

BOBCAT Hardware User’s Manual
Imperx, Inc. Rev. 2.0.1 6421 Congress Ave. 4/10/2012 Boca Raton, FL 33487 +1 (561) 989-0006 241 of 253
If the user selects to upgrade camera firmware and camera factory register space, the
camera firmware must be upgraded first.
During camera RGS or FW upgrade the camera power must be on all the time, and the
process must not be interrupted. If the camera is disconnected or the process canceled, this
will result in a user application firmware corruption. If such event occurs start the upload
process again until completion. If the upgrade process cannot be completed, the camera
will power with the default Factory Firmware so you can start the upgrade process again. If
you need more information, please contact Imperx.
During DPC, HPC, FFC or LUT upgrade the camera power must be on all the time, and the
process must not be interrupted. If the camera is disconnected or the process canceled, start
the upload process again until completion. If the upgrade process cannot be completed, the
corresponding camera function will not work. This will not affect the overall camera
performance, so you can start the upgrade process again. If you need more information,
please contact Imperx.

BOBCAT Hardware User’s Manual
Imperx, Inc. Rev. 2.0.1 6421 Congress Ave. 4/10/2012 Boca Raton, FL 33487 +1 (561) 989-0006 242 of 253
Appendix F – GigE Vision Firmware upgrade
GigE Vision Firmware upgrade This appendix explains how to upgrade and install GEV firmware
and table upgrades.

BOBCAT Hardware User’s Manual
Imperx, Inc. Rev. 2.0.1 6421 Congress Ave. 4/10/2012 Boca Raton, FL 33487 +1 (561) 989-0006 243 of 253
F-1 Overview:
The Bobcat camera GEV can be upgraded and custom DPM, HPM, FFC and LUT files
loaded. The example shown is to upgrade the camera firmware as this is more complicated,
than the loading of the custom DPM, HPM, FFC and LUT files. the same procedure is used
for all.
During firmware upgrade three files will need to be loaded the .RPD, .RGS and the IP
engine. They must be loaded in the order stated.
Before you begin upgrading the camera files the following criteria must be met:
1. Read and understand these Instructions
2. Be familiar with the general operation of the Bobcat camera to be upgraded.
3. Have the PC and camera on a working/charged UPS system.
4. Using the GEV player that you can access the camera connected to the NIC card
and that it displays images and generally functions.
5. Close all camera configuration software.
6. Download the correct file or files needed from web site and saved to a known,
assessable location (it is recommended that you save this file or files to your
desktop.
7. Verify the file or files are for the camera to be upgraded.
In Windows go to- Start -All programs –Imperx- Bobcat GEV- Bobcat GEV download
utility.

BOBCAT Hardware User’s Manual
Imperx, Inc. Rev. 2.0.1 6421 Congress Ave. 4/10/2012 Boca Raton, FL 33487 +1 (561) 989-0006 244 of 253
The GEV device selection window will open.
Select the appropriate camera you want to upgrade; the information on the right side of
the display should match the device you want to program/upgrade.
Click OK and the download window should appear.

BOBCAT Hardware User’s Manual
Imperx, Inc. Rev. 2.0.1 6421 Congress Ave. 4/10/2012 Boca Raton, FL 33487 +1 (561) 989-0006 245 of 253
Select the appropriate file (.RPD) and Click on the load file button.
The program will erase the existing file and load the information from the
file selected.
After the download has completed the camera needs to be reset.
Note: You must cycle power to the camera for a proper reset.

BOBCAT Hardware User’s Manual
Imperx, Inc. Rev. 2.0.1 6421 Congress Ave. 4/10/2012 Boca Raton, FL 33487 +1 (561) 989-0006 246 of 253
F-2 RGS Upgrade
Now up-grade the RGS file in a similar manner from the down load utility select”
factory space (. RGS). Then, browse to the location of the file and select it.
Click the “ load file “ button to start the upgrade of this file.
After completion of file uploading, close the down load utility and the camera will
need to be reset.
Note: You must cycle power to the camera for a proper reset.

BOBCAT Hardware User’s Manual
Imperx, Inc. Rev. 2.0.1 6421 Congress Ave. 4/10/2012 Boca Raton, FL 33487 +1 (561) 989-0006 247 of 253
F-3 IP Engine Install
Open the IP engine for the camera type model you are upgrading (IGV-
BXXXX.EXE) by double clicking on it.
Select the IP engine file and click OK.
After successful completion of the update close the window and power cycle the
camera.
CAUTION NOTE It is strongly recommended that you DO NOT USE any other communication software
to upgrade the camera FW, RGS, DPC, HPC, FFC and LUT files.
If the user selects to upgrade camera firmware and camera factory register space, the
camera firmware must be upgraded first.
During camera RGS or FW upgrade the camera power must be on all the time, and the
process must not be interrupted. If the camera is disconnected or the process canceled,
this will result in a user application firmware corruption. If such event occurs start the
upload process again until completion. If the upgrade process cannot be completed, the
camera will power with the default Factory Firmware so you can start the upgrade
process again. If you need more information, please contact Imperx.
During DPC, HPC, FFC or LUT upgrade the camera power must be on all the time, and
the process must not be interrupted. If the camera is disconnected or the process
canceled, start the upload process again until completion. If the upgrade process cannot

BOBCAT Hardware User’s Manual
Imperx, Inc. Rev. 2.0.1 6421 Congress Ave. 4/10/2012 Boca Raton, FL 33487 +1 (561) 989-0006 248 of 253
be completed, the corresponding camera function will not work. This will not affect the
overall camera performance, so you can start the upgrade process again. If you need
more information, please contact Imperx.

BOBCAT Hardware User’s Manual
Imperx, Inc. Rev. 2.0.1 6421 Congress Ave. 4/10/2012 Boca Raton, FL 33487 +1 (561) 989-0006 249 of 253
Appendix G – Power Supplies
Power Supplies
This appendix has power supply models and connectors for Bobcat series cameras.

BOBCAT Hardware User’s Manual
Imperx, Inc. Rev. 2.0.1 6421 Congress Ave. 4/10/2012 Boca Raton, FL 33487 +1 (561) 989-0006 250 of 253
Model: PS12V04 Bobcat standard power supply ordered separately.
Trigger & Strobe pigtail with Male BNC connectors

BOBCAT Hardware User’s Manual
Imperx, Inc. Rev. 2.0.1 6421 Congress Ave. 4/10/2012 Boca Raton, FL 33487 +1 (561) 989-0006 251 of 253
Model: PS12V05 Auto Iris 4 pin Video Type Option power supply ordered separately.
P4 CON4PF: 4 pin MINI plug E4-191J

BOBCAT Hardware User’s Manual
Imperx, Inc. Rev. 2.0.1 6421 Congress Ave. 4/10/2012 Boca Raton, FL 33487 +1 (561) 989-0006 252 of 253
Pin Signal Type Cable Description
1 IRIS + 12 VDC Power Brn + 12 VDC Main Power @ 1A Max
2 IRIS Return Ground Return Red 12 VDC Iris Power Return
3 IRIS Video Video Signal Yell Iris Video Output
4 IRIS Return Ground Return Orn 12 VDC Iris Power Return
Table 4.0 – Auto Iris 4 pin MINI plug E4-191J
Power Supply Specs:
Cable length:
Supplied AC power input cable (IEC): 1.8m (6’) 100 - 240 Vac, 50 - 60Hz 1A
Power supply Output (+12V): 3m (10’) ± 15cm (6”) connector HIROSE #HR10A-10P-12S
Strobe & Trigger: 10cm (4”) ± 1cm (0.5”) connector BNC male
Auto Iris Option: 18cm (7”) ± 1cm (0.5”) Video type 4 Pin MINI plug connector E4-191J
Electrical:
Over-Voltage Protective Installation
Short-circuit Protective Installation
Protection Type: Auto-Recovery
10 -15 VDC 12VDC nominal, 2 A.
Load regulation ± 5%
Ripple & Noise 1% Max.
Regulatory:
Class 1
Safety standards UL60950-1,EN60950-1,IEC60950-1
Safety (1) EMC UL/CUL,CE,TUV,DoIR+C-Tick,Semko,CCC,FCC
Safety (2) BSMI,FCC

BOBCAT Hardware User’s Manual
Imperx, Inc. Rev. 2.0.1 6421 Congress Ave. 4/10/2012 Boca Raton, FL 33487 +1 (561) 989-0006 253 of 253
Imperx Inc. also has a full line of Frame Grabbers to capture the high quality images coming from our cameras please check out the full line, link below.
http://www.imperx.com/framegrabbers