camtasia menumaker online help - techsmith template displays a floating menu self-conta ined within...
TRANSCRIPT
Camtasia MenuMaker Online Help
Version 6.0
MenuMaker Use Camtasia MenuMaker to create an attractive menu to launch your files. With MenuMaker, copies of all of the files are located in one central location making it easy to open and close files or applications. This means no more searching through drives, directories, and folders when giving a presentation or teaching a class. You can easily create a CD-ROM that will launch with the menu displayed making it a perfect way to distribute information to customers, students, workgroups, and more.
Make the menu from a number of different templates included with MenuMaker or make your own customized template. Additionally, include all types of files in the menu such as document files, graphic files, multimedia files, etc. The only stipulation for the inclusion of files is that the host application necessary to run the files resides on the PC that is used to launch the files.
See also:
MenuMaker
MenuMaker Welcome Options
Create a MenuMaker Project
Generate the Menu Using the Wizard
MenuMaker Overview Before you begin your work within MenuMaker, take a few minutes to get familiar with the MenuMaker interface.
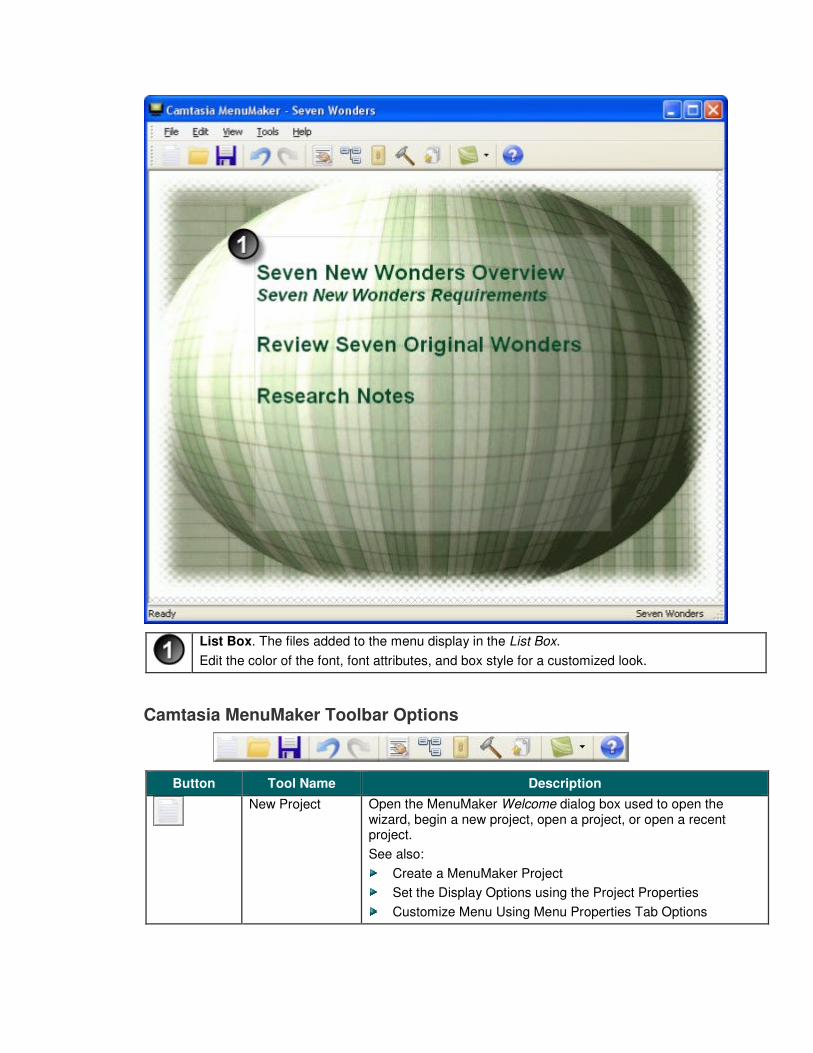
List Box. The files added to the menu display in the List Box.
Edit the color of the font, font attributes, and box style for a customized look.
Camtasia MenuMaker Toolbar Options
Button Tool Name Description
New Project Open the MenuMaker Welcome dialog box used to open the wizard, begin a new project, open a project, or open a recent project.
See also:
Create a MenuMaker Project
Set the Display Options using the Project Properties
Customize Menu Using Menu Properties Tab Options
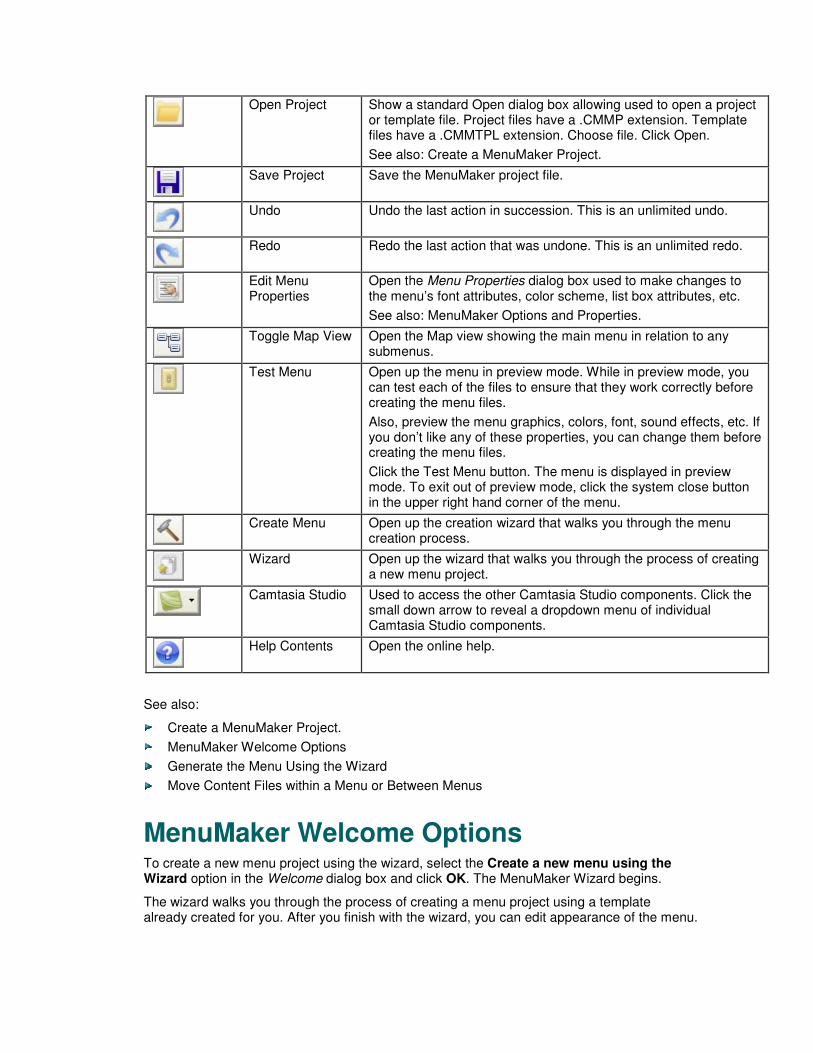
Open Project Show a standard Open dialog box allowing used to open a project or template file. Project files have a .CMMP extension. Template files have a .CMMTPL extension. Choose file. Click Open.
See also: Create a MenuMaker Project.
Save Project Save the MenuMaker project file.
Undo Undo the last action in succession. This is an unlimited undo.
Redo Redo the last action that was undone. This is an unlimited redo.
Edit Menu Properties
Open the Menu Properties dialog box used to make changes to the menu’s font attributes, color scheme, list box attributes, etc.
See also: MenuMaker Options and Properties.
Toggle Map View Open the Map view showing the main menu in relation to any submenus.
Test Menu Open up the menu in preview mode. While in preview mode, you can test each of the files to ensure that they work correctly before creating the menu files.
Also, preview the menu graphics, colors, font, sound effects, etc. If you don’t like any of these properties, you can change them before creating the menu files.
Click the Test Menu button. The menu is displayed in preview mode. To exit out of preview mode, click the system close button in the upper right hand corner of the menu.
Create Menu Open up the creation wizard that walks you through the menu creation process.
Wizard Open up the wizard that walks you through the process of creating a new menu project.
Camtasia Studio Used to access the other Camtasia Studio components. Click the small down arrow to reveal a dropdown menu of individual Camtasia Studio components.
Help Contents Open the online help.
See also:
Create a MenuMaker Project.
MenuMaker Welcome Options
Generate the Menu Using the Wizard
Move Content Files within a Menu or Between Menus
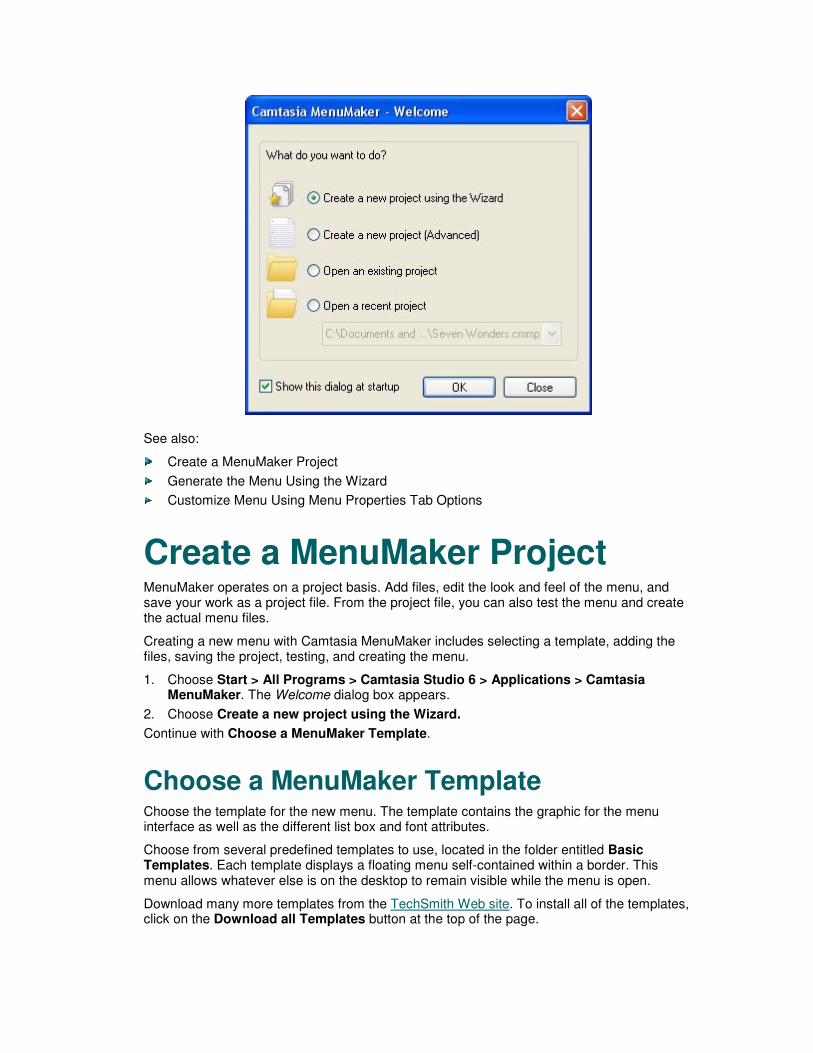
MenuMaker Welcome Options To create a new menu project using the wizard, select the Create a new menu using the Wizard option in the Welcome dialog box and click OK. The MenuMaker Wizard begins.
The wizard walks you through the process of creating a menu project using a template already created for you. After you finish with the wizard, you can edit appearance of the menu.
See also:
Create a MenuMaker Project
Generate the Menu Using the Wizard
Customize Menu Using Menu Properties Tab Options
Create a MenuMaker Project MenuMaker operates on a project basis. Add files, edit the look and feel of the menu, and save your work as a project file. From the project file, you can also test the menu and create the actual menu files.
Creating a new menu with Camtasia MenuMaker includes selecting a template, adding the files, saving the project, testing, and creating the menu.
1. Choose Start > All Programs > Camtasia Studio 6 > Applications > Camtasia MenuMaker. The Welcome dialog box appears.
2. Choose Create a new project using the Wizard.
Continue with Choose a MenuMaker Template.
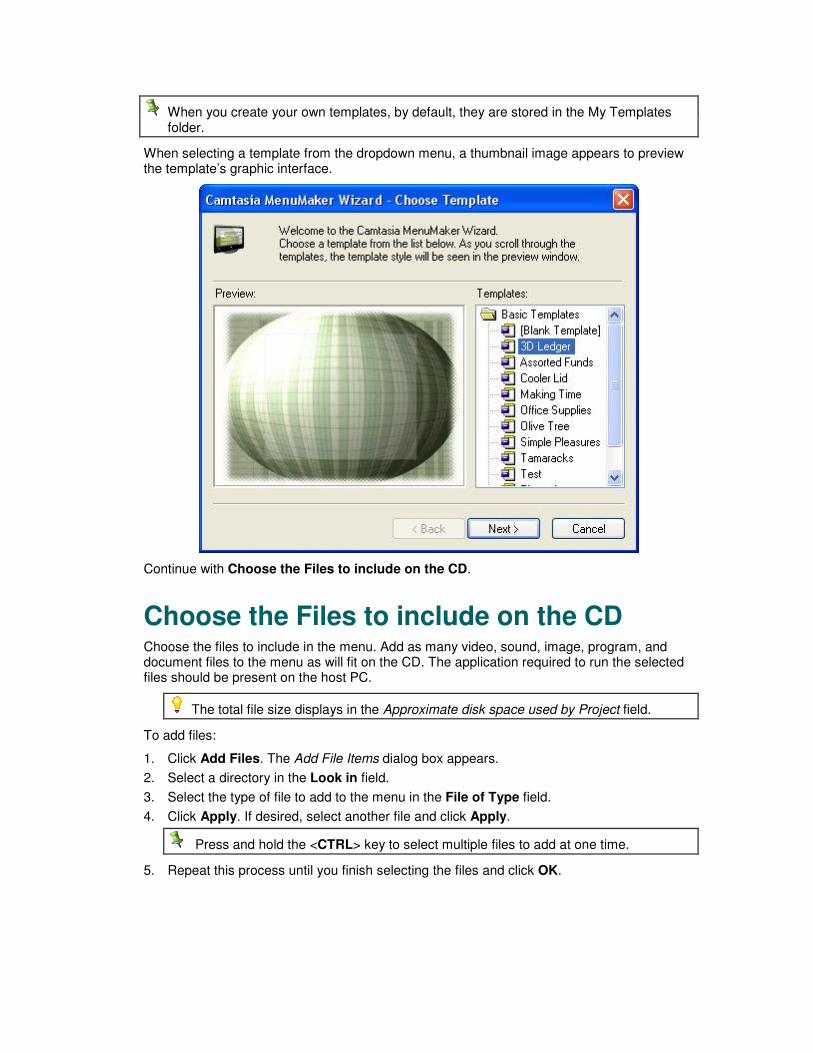
Choose a MenuMaker Template Choose the template for the new menu. The template contains the graphic for the menu interface as well as the different list box and font attributes.
Choose from several predefined templates to use, located in the folder entitled Basic Templates. Each template displays a floating menu self-contained within a border. This menu allows whatever else is on the desktop to remain visible while the menu is open.
Download many more templates from the TechSmith Web site. To install all of the templates, click on the Download all Templates button at the top of the page.
When you create your own templates, by default, they are stored in the My Templates folder.
When selecting a template from the dropdown menu, a thumbnail image appears to preview the template’s graphic interface.
Continue with Choose the Files to include on the CD.
Choose the Files to include on the CD Choose the files to include in the menu. Add as many video, sound, image, program, and document files to the menu as will fit on the CD. The application required to run the selected files should be present on the host PC.
The total file size displays in the Approximate disk space used by Project field.
To add files:
1. Click Add Files. The Add File Items dialog box appears.
2. Select a directory in the Look in field.
3. Select the type of file to add to the menu in the File of Type field.
4. Click Apply. If desired, select another file and click Apply.
Press and hold the <CTRL> key to select multiple files to add at one time.
5. Repeat this process until you finish selecting the files and click OK.
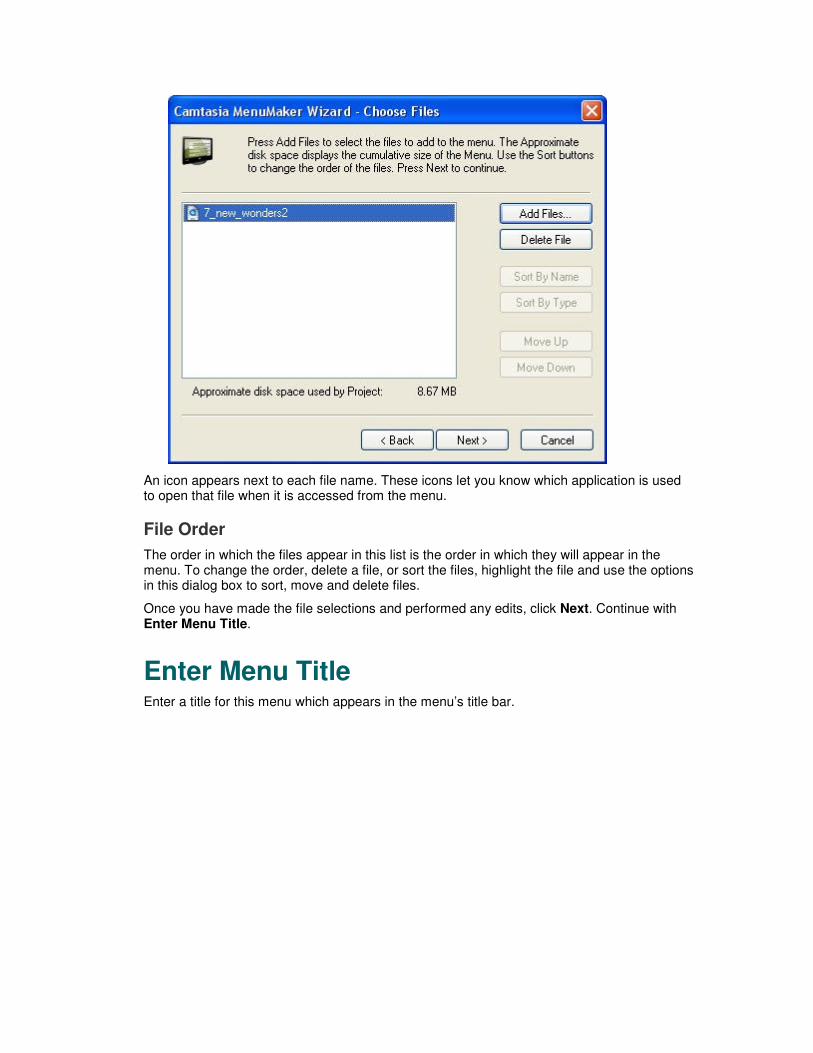
An icon appears next to each file name. These icons let you know which application is used to open that file when it is accessed from the menu.
File Order
The order in which the files appear in this list is the order in which they will appear in the menu. To change the order, delete a file, or sort the files, highlight the file and use the options in this dialog box to sort, move and delete files.
Once you have made the file selections and performed any edits, click Next. Continue with Enter Menu Title.
Enter Menu Title Enter a title for this menu which appears in the menu’s title bar.

Once you have entered the title, click Finish.
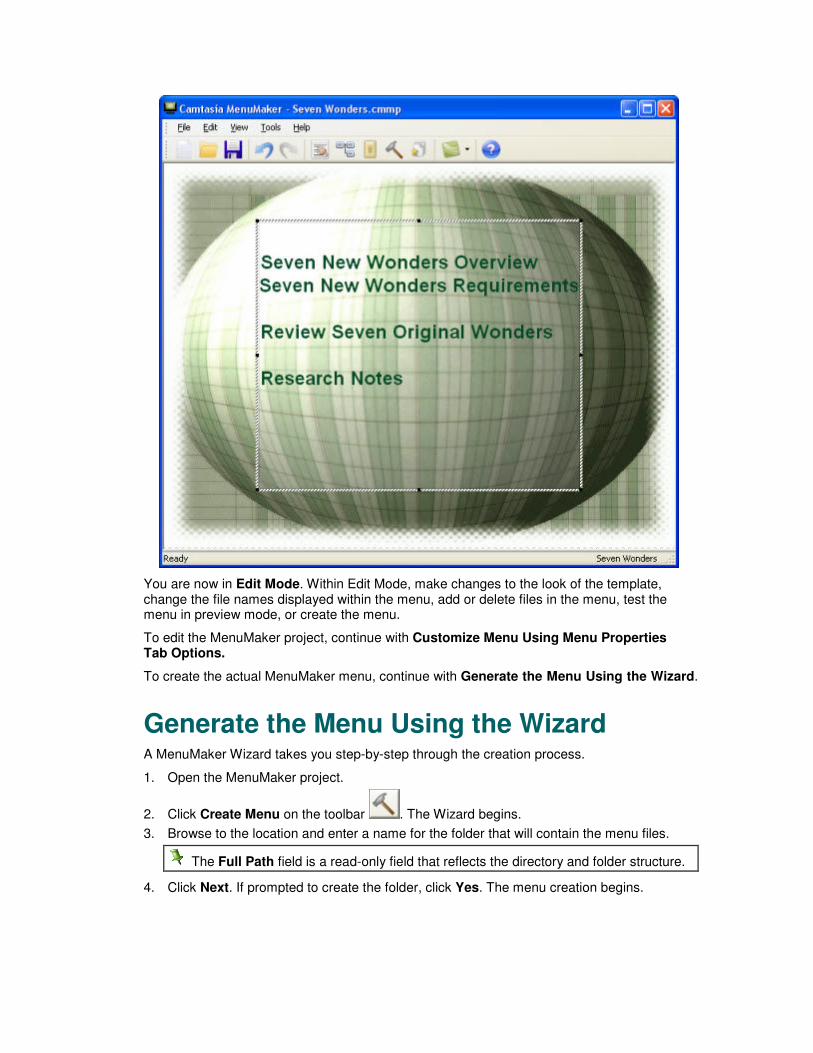
You are now in Edit Mode. Within Edit Mode, make changes to the look of the template, change the file names displayed within the menu, add or delete files in the menu, test the menu in preview mode, or create the menu.
To edit the MenuMaker project, continue with Customize Menu Using Menu Properties Tab Options.
To create the actual MenuMaker menu, continue with Generate the Menu Using the Wizard.
Generate the Menu Using the Wizard A MenuMaker Wizard takes you step-by-step through the creation process.
1. Open the MenuMaker project.
2. Click Create Menu on the toolbar . The Wizard begins.
3. Browse to the location and enter a name for the folder that will contain the menu files.
The Full Path field is a read-only field that reflects the directory and folder structure.
4. Click Next. If prompted to create the folder, click Yes. The menu creation begins.
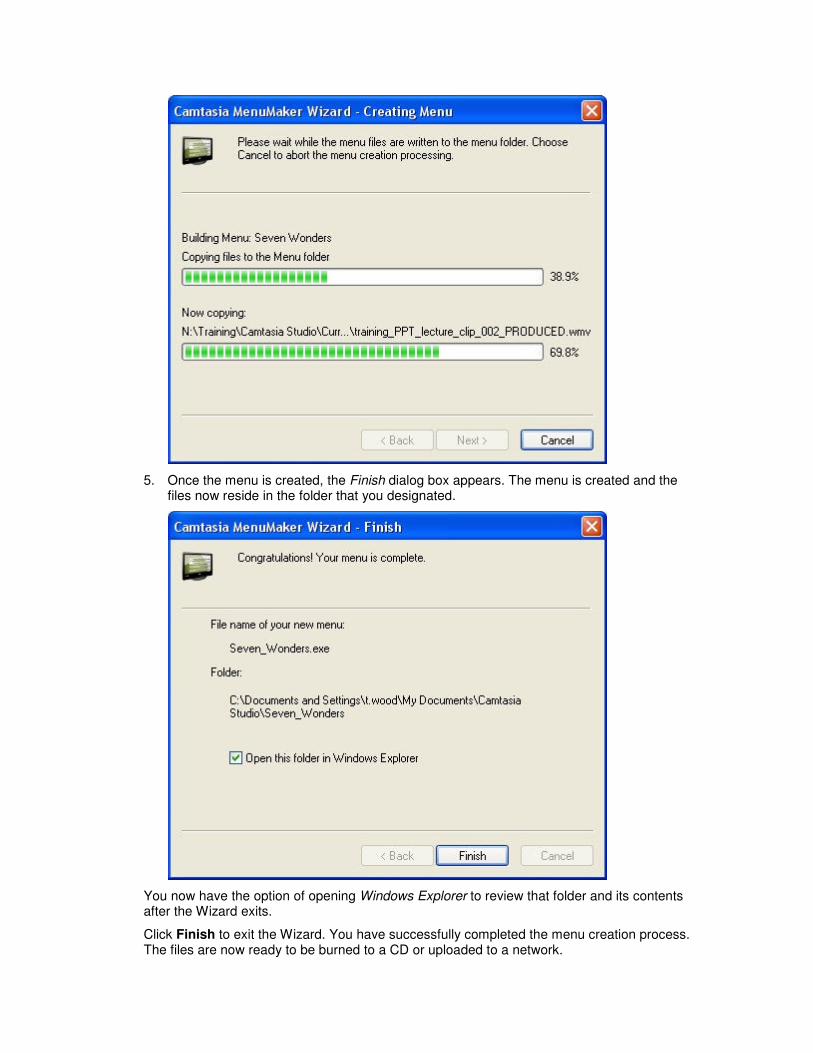
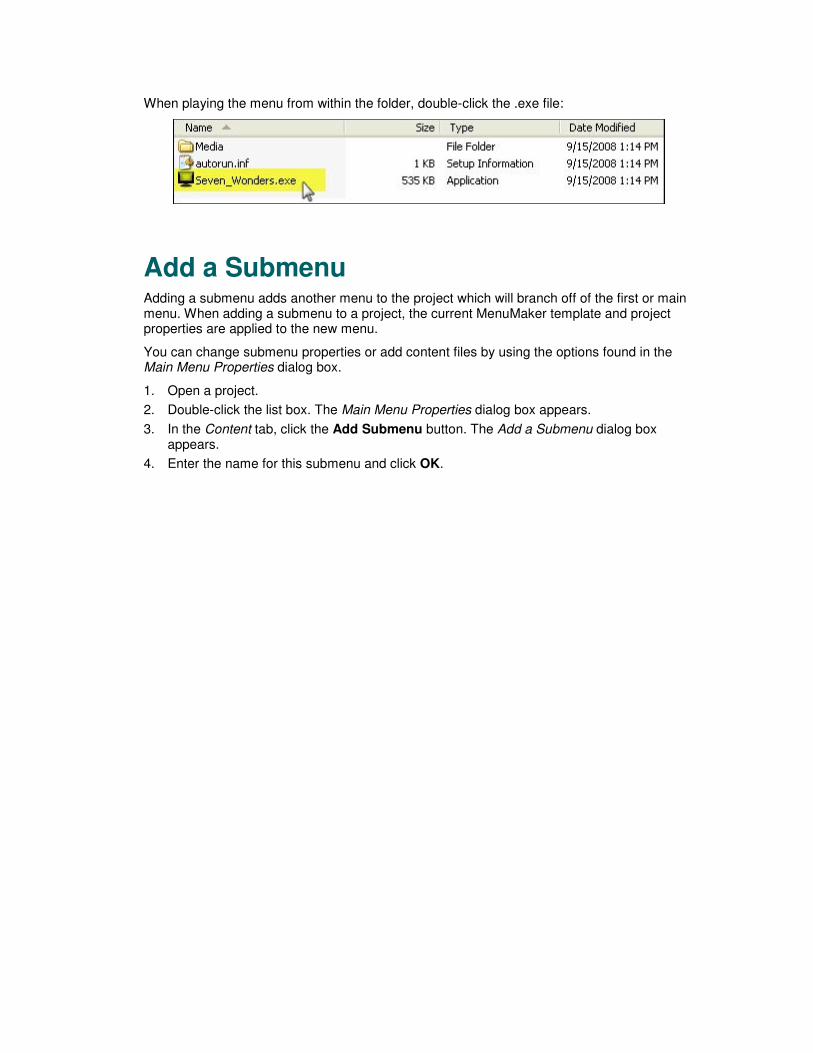
5. Once the menu is created, the Finish dialog box appears. The menu is created and the files now reside in the folder that you designated.
You now have the option of opening Windows Explorer to review that folder and its contents after the Wizard exits.
Click Finish to exit the Wizard. You have successfully completed the menu creation process. The files are now ready to be burned to a CD or uploaded to a network.
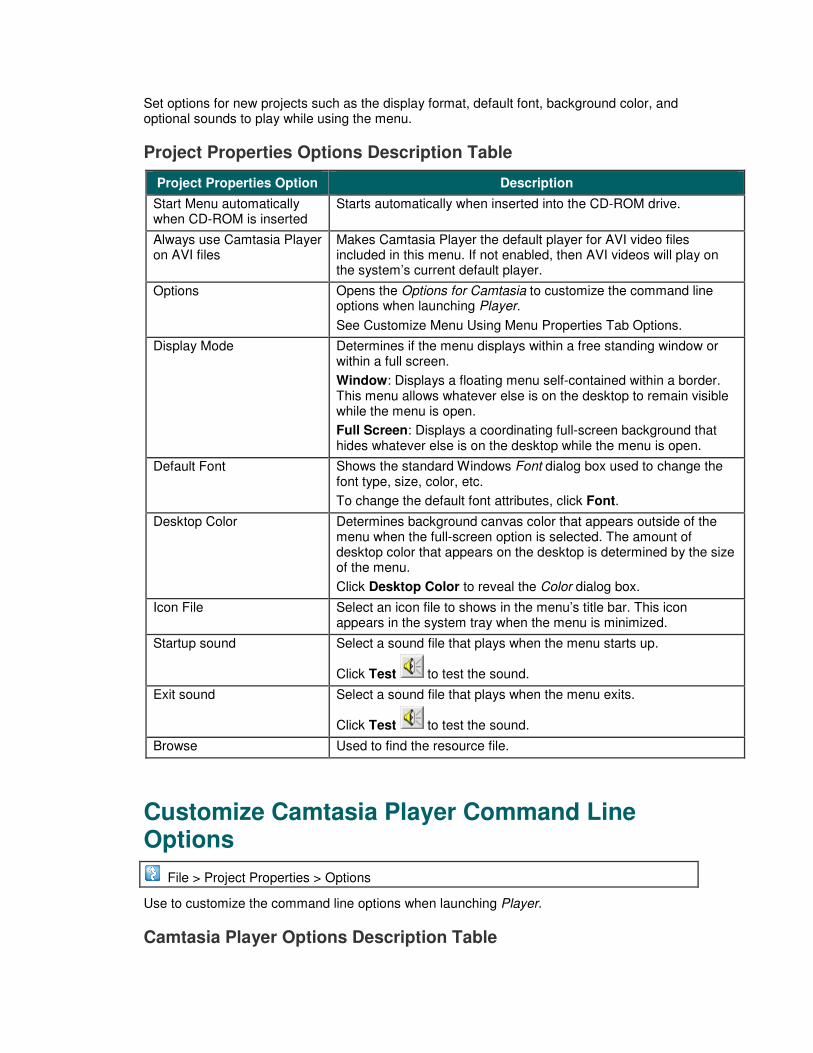
When playing the menu from within the folder, double-click the .exe file:
Add a Submenu Adding a submenu adds another menu to the project which will branch off of the first or main menu. When adding a submenu to a project, the current MenuMaker template and project properties are applied to the new menu.
You can change submenu properties or add content files by using the options found in the Main Menu Properties dialog box.
1. Open a project.
2. Double-click the list box. The Main Menu Properties dialog box appears.
3. In the Content tab, click the Add Submenu button. The Add a Submenu dialog box appears.
4. Enter the name for this submenu and click OK.

5. Highlight the submenu. Click the Move Down button to move the submenu.
6. Click Apply.
7. Click OK.
8. Click Toggle Map View . The new menu is added.

MenuMaker Options and Properties Option Description
Set the Display Options using the Project Properties
Set options for new projects such as the display format, default font, background color, and optional sounds to play while using the menu.
Customize Menu Using Menu Properties Tab Options
Set options for the menu such as title, changing the way the file names shows, overall size, font attributes, graphic used as the background, and optional sounds to play while using the menu.
Add a Submenu Adding a submenu adds another menu to the project which will branch off of the first or main menu. When adding a submenu to a project, the current MenuMaker template and project properties are applied to the new menu.
Move Content Files within a Menu or Between Menus
Move content files to a new location either within the same menu or to a different menu.
See also:
General Tab
Cursor Tab
List Tab
Content Tab
Content Tab Toolbar
Set the Display Options using the Project Properties
File > Project Properties
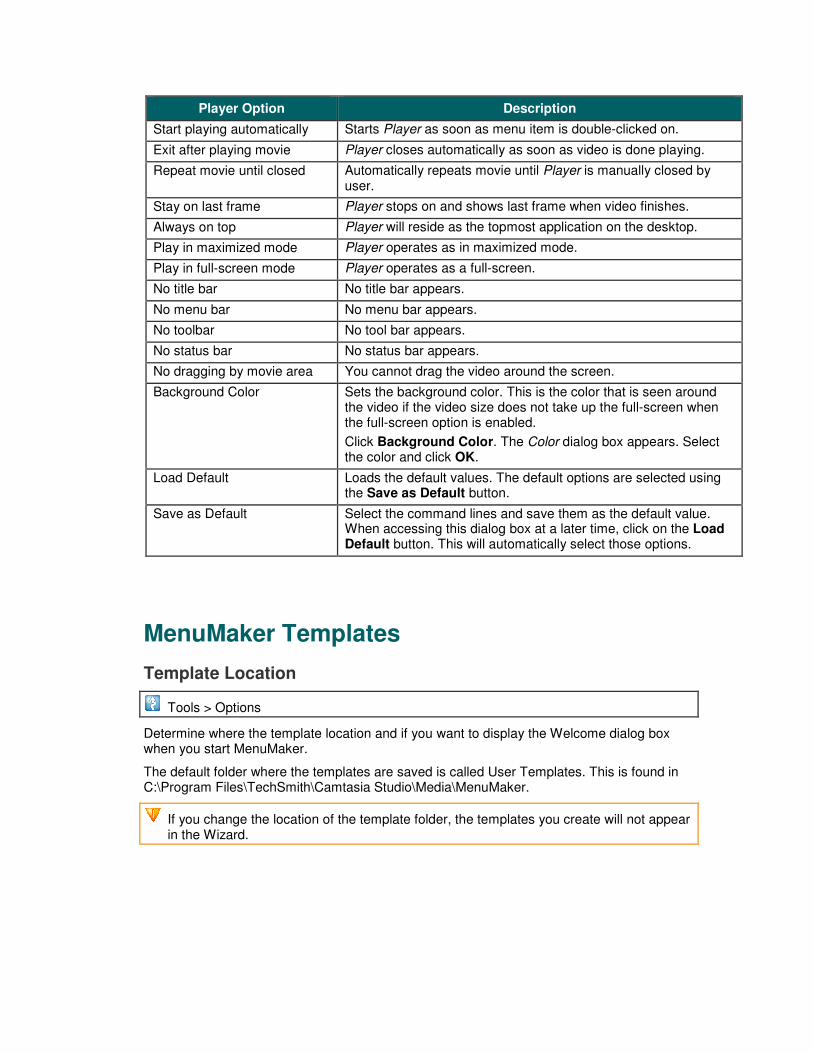
Set options for new projects such as the display format, default font, background color, and optional sounds to play while using the menu.
Project Properties Options Description Table
Project Properties Option Description
Start Menu automatically when CD-ROM is inserted
Starts automatically when inserted into the CD-ROM drive.
Always use Camtasia Player on AVI files
Makes Camtasia Player the default player for AVI video files included in this menu. If not enabled, then AVI videos will play on the system’s current default player.
Options Opens the Options for Camtasia to customize the command line options when launching Player.
See Customize Menu Using Menu Properties Tab Options.
Display Mode Determines if the menu displays within a free standing window or within a full screen.
Window: Displays a floating menu self-contained within a border. This menu allows whatever else is on the desktop to remain visible while the menu is open.
Full Screen: Displays a coordinating full-screen background that hides whatever else is on the desktop while the menu is open.
Default Font Shows the standard Windows Font dialog box used to change the font type, size, color, etc.
To change the default font attributes, click Font.
Desktop Color Determines background canvas color that appears outside of the menu when the full-screen option is selected. The amount of desktop color that appears on the desktop is determined by the size of the menu.
Click Desktop Color to reveal the Color dialog box.
Icon File Select an icon file to shows in the menu’s title bar. This icon appears in the system tray when the menu is minimized.
Startup sound Select a sound file that plays when the menu starts up.
Click Test to test the sound.
Exit sound Select a sound file that plays when the menu exits.
Click Test to test the sound.
Browse Used to find the resource file.
Customize Camtasia Player Command Line Options
File > Project Properties > Options
Use to customize the command line options when launching Player.
Camtasia Player Options Description Table
Player Option Description
Start playing automatically Starts Player as soon as menu item is double-clicked on.
Exit after playing movie Player closes automatically as soon as video is done playing.
Repeat movie until closed Automatically repeats movie until Player is manually closed by user.
Stay on last frame Player stops on and shows last frame when video finishes.
Always on top Player will reside as the topmost application on the desktop.
Play in maximized mode Player operates as in maximized mode.
Play in full-screen mode Player operates as a full-screen.
No title bar No title bar appears.
No menu bar No menu bar appears.
No toolbar No tool bar appears.
No status bar No status bar appears.
No dragging by movie area You cannot drag the video around the screen.
Background Color Sets the background color. This is the color that is seen around the video if the video size does not take up the full-screen when the full-screen option is enabled.
Click Background Color. The Color dialog box appears. Select the color and click OK.
Load Default Loads the default values. The default options are selected using the Save as Default button.
Save as Default Select the command lines and save them as the default value. When accessing this dialog box at a later time, click on the Load Default button. This will automatically select those options.
MenuMaker Templates
Template Location
Tools > Options
Determine where the template location and if you want to display the Welcome dialog box when you start MenuMaker.
The default folder where the templates are saved is called User Templates. This is found in C:\Program Files\TechSmith\Camtasia Studio\Media\MenuMaker.
If you change the location of the template folder, the templates you create will not appear in the Wizard.
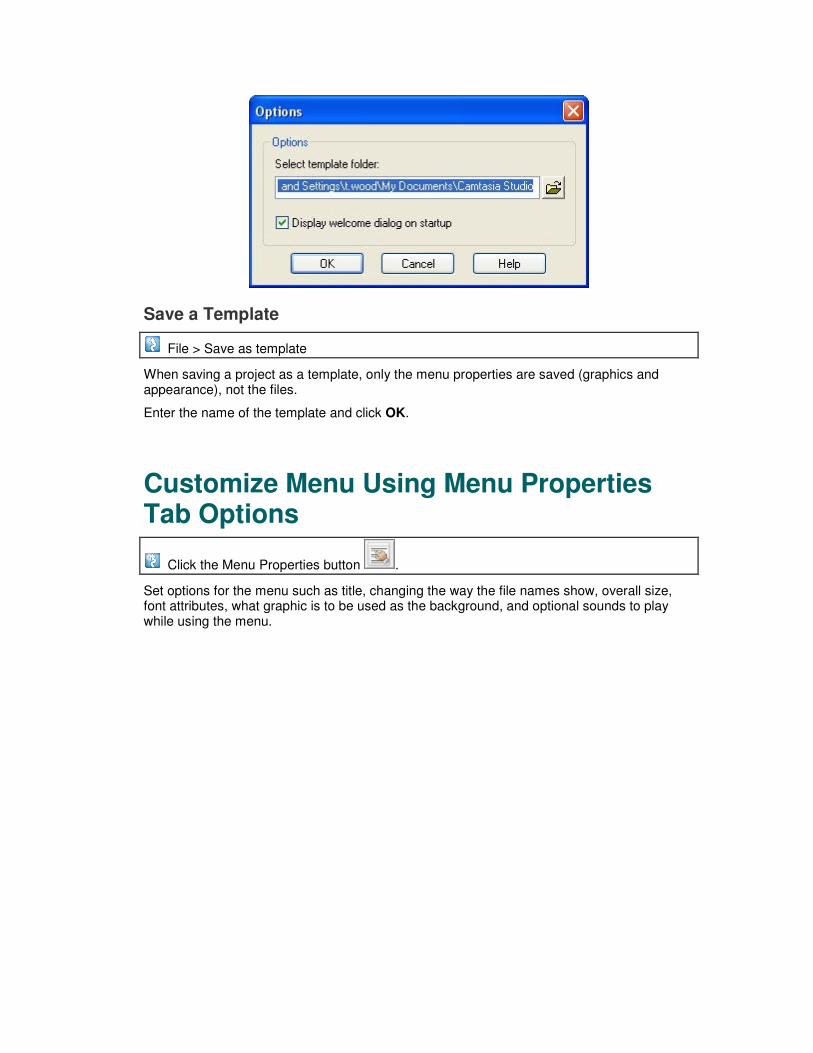
Save a Template
File > Save as template
When saving a project as a template, only the menu properties are saved (graphics and appearance), not the files.
Enter the name of the template and click OK.
Customize Menu Using Menu Properties Tab Options
Click the Menu Properties button .
Set options for the menu such as title, changing the way the file names show, overall size, font attributes, what graphic is to be used as the background, and optional sounds to play while using the menu.
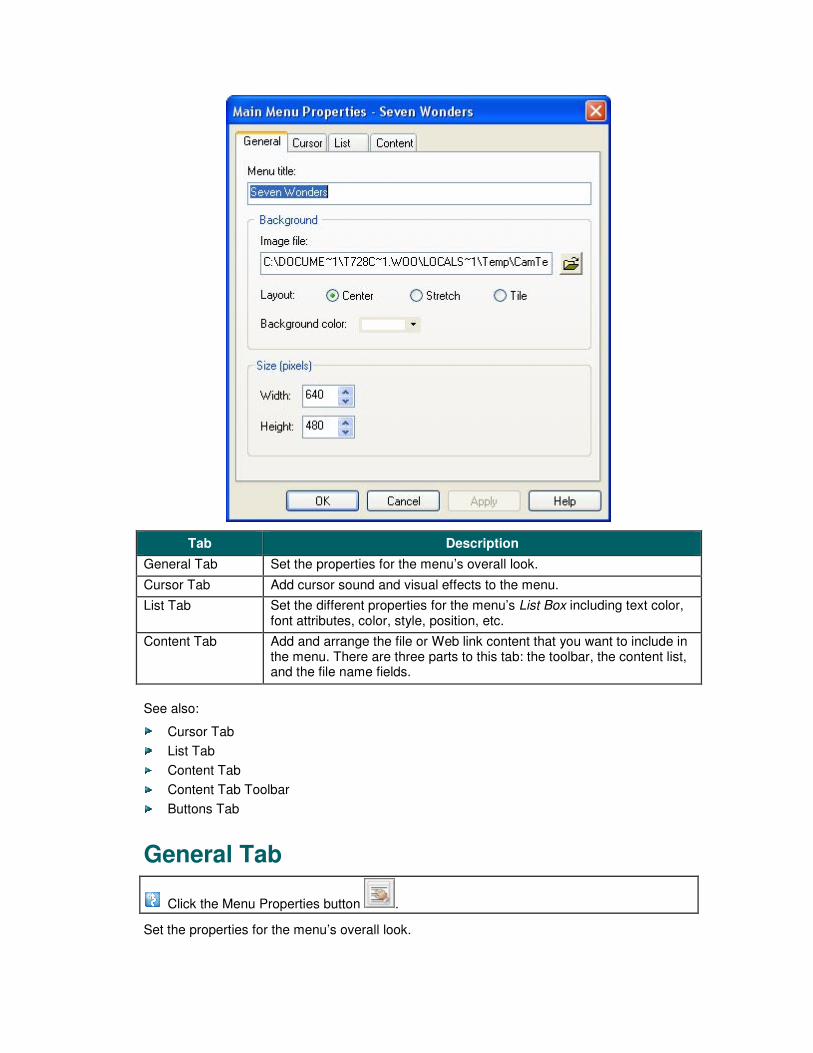
Tab Description
General Tab Set the properties for the menu’s overall look.
Cursor Tab Add cursor sound and visual effects to the menu.
List Tab Set the different properties for the menu’s List Box including text color, font attributes, color, style, position, etc.
Content Tab Add and arrange the file or Web link content that you want to include in the menu. There are three parts to this tab: the toolbar, the content list, and the file name fields.
See also:
Cursor Tab
List Tab
Content Tab
Content Tab Toolbar
Buttons Tab
General Tab
Click the Menu Properties button .
Set the properties for the menu’s overall look.
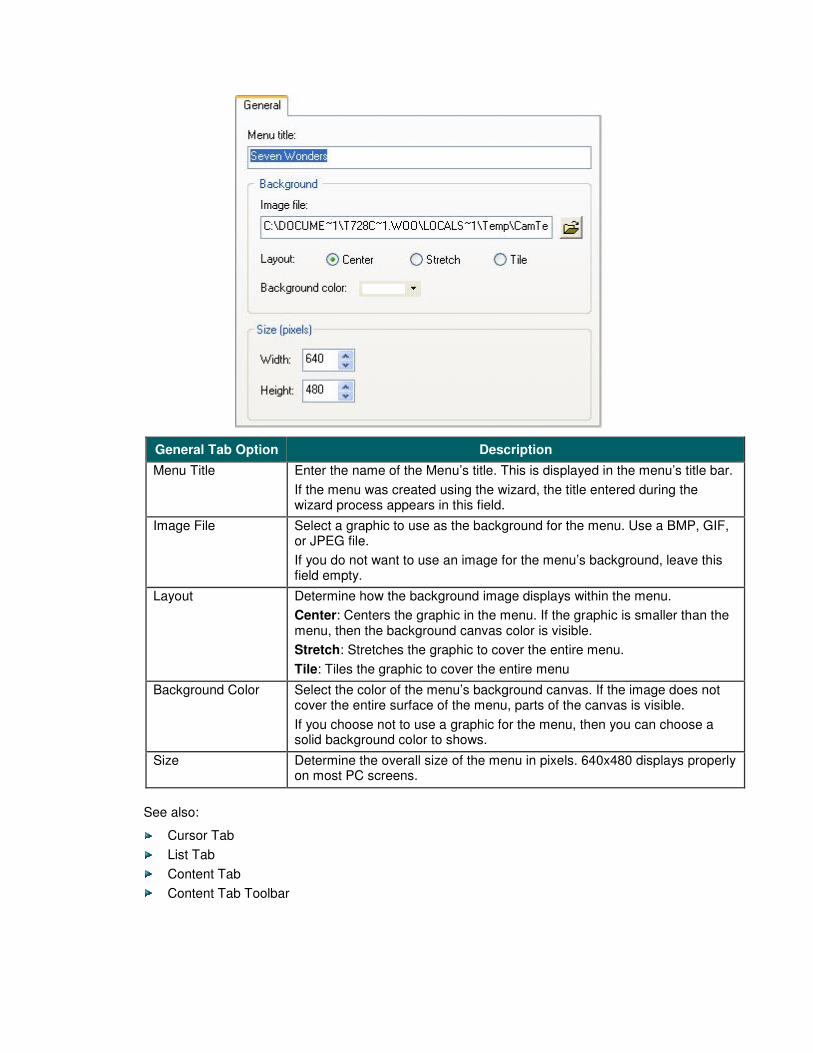
General Tab Option Description
Menu Title Enter the name of the Menu’s title. This is displayed in the menu’s title bar.
If the menu was created using the wizard, the title entered during the wizard process appears in this field.
Image File Select a graphic to use as the background for the menu. Use a BMP, GIF, or JPEG file.
If you do not want to use an image for the menu’s background, leave this field empty.
Layout Determine how the background image displays within the menu.
Center: Centers the graphic in the menu. If the graphic is smaller than the menu, then the background canvas color is visible.
Stretch: Stretches the graphic to cover the entire menu.
Tile: Tiles the graphic to cover the entire menu
Background Color Select the color of the menu’s background canvas. If the image does not cover the entire surface of the menu, parts of the canvas is visible.
If you choose not to use a graphic for the menu, then you can choose a solid background color to shows.
Size Determine the overall size of the menu in pixels. 640x480 displays properly on most PC screens.
See also:
Cursor Tab
List Tab
Content Tab
Content Tab Toolbar
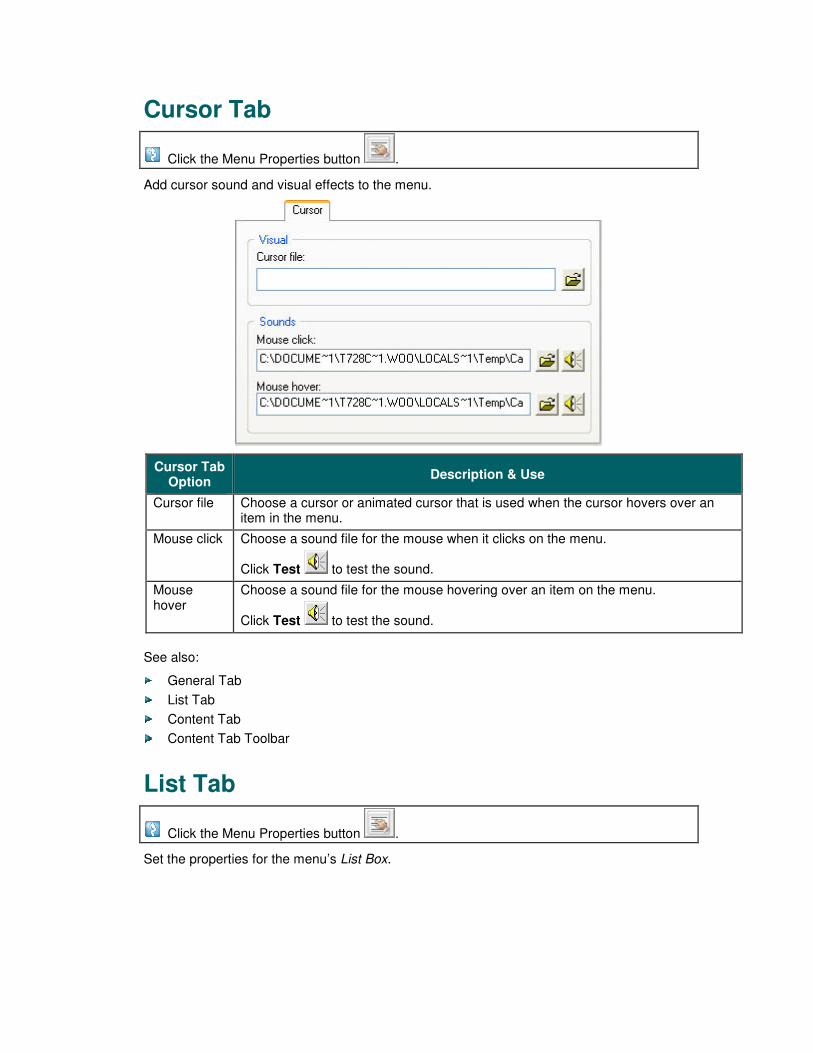
Cursor Tab
Click the Menu Properties button .
Add cursor sound and visual effects to the menu.
Cursor Tab Option
Description & Use
Cursor file Choose a cursor or animated cursor that is used when the cursor hovers over an item in the menu.
Mouse click Choose a sound file for the mouse when it clicks on the menu.
Click Test to test the sound.
Mouse hover
Choose a sound file for the mouse hovering over an item on the menu.
Click Test to test the sound.
See also:
General Tab
List Tab
Content Tab
Content Tab Toolbar
List Tab
Click the Menu Properties button .
Set the properties for the menu’s List Box.
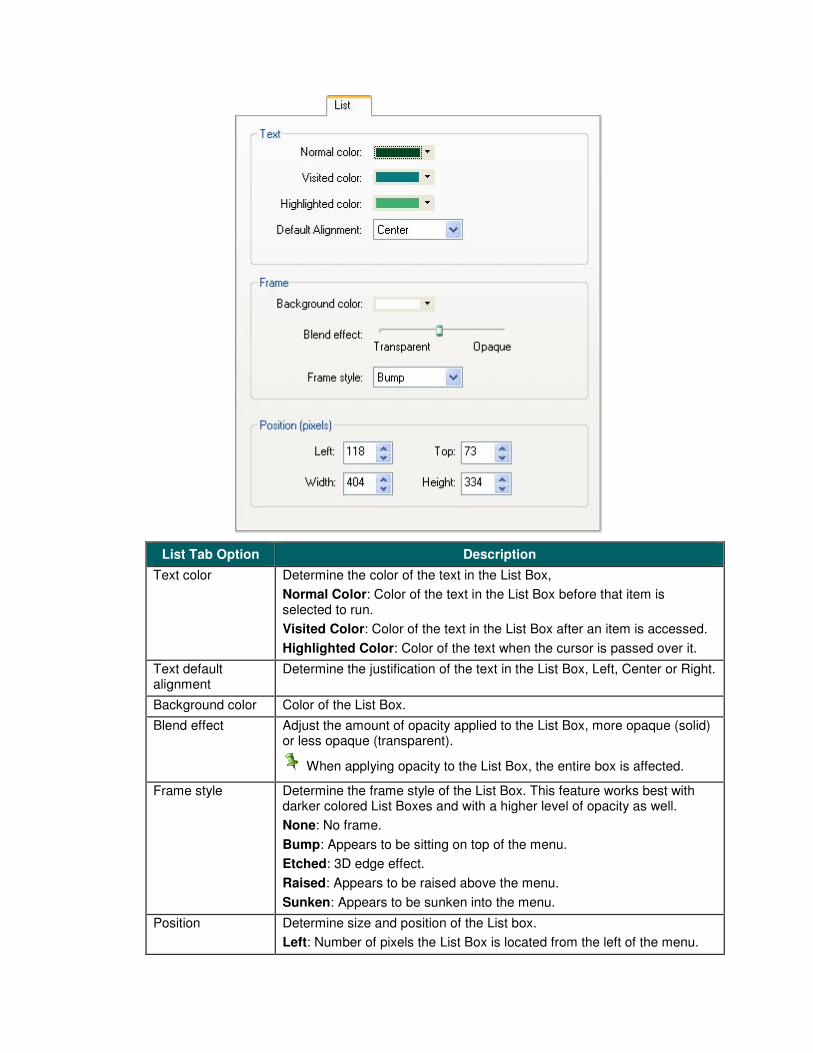
List Tab Option Description
Text color Determine the color of the text in the List Box,
Normal Color: Color of the text in the List Box before that item is selected to run.
Visited Color: Color of the text in the List Box after an item is accessed.
Highlighted Color: Color of the text when the cursor is passed over it.
Text default alignment
Determine the justification of the text in the List Box, Left, Center or Right.
Background color Color of the List Box.
Blend effect Adjust the amount of opacity applied to the List Box, more opaque (solid) or less opaque (transparent).
When applying opacity to the List Box, the entire box is affected.
Frame style Determine the frame style of the List Box. This feature works best with darker colored List Boxes and with a higher level of opacity as well.
None: No frame.
Bump: Appears to be sitting on top of the menu.
Etched: 3D edge effect.
Raised: Appears to be raised above the menu.
Sunken: Appears to be sunken into the menu.
Position Determine size and position of the List box.
Left: Number of pixels the List Box is located from the left of the menu.
Top: Number of pixels the List Box is located from the top of the menu.
Width, Height: Size of the List Box.
See also:
General Tab
Cursor Tab
Content Tab
Content Tab Toolbar
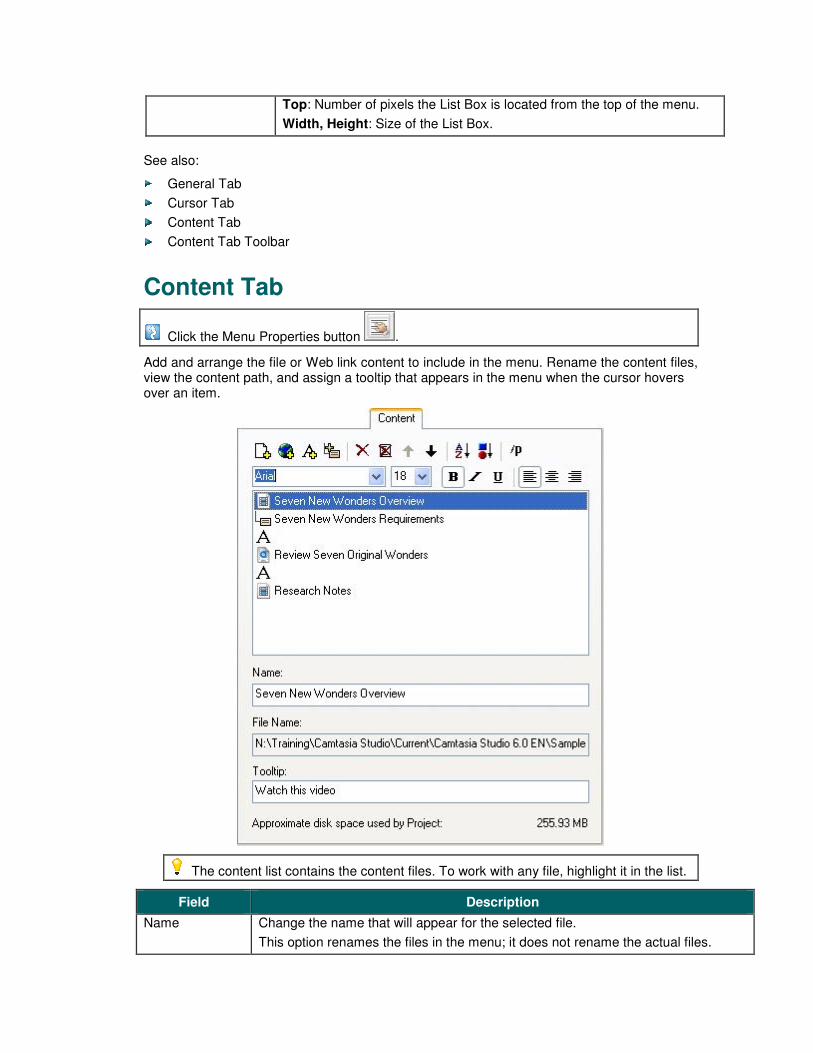
Content Tab
Click the Menu Properties button .
Add and arrange the file or Web link content to include in the menu. Rename the content files, view the content path, and assign a tooltip that appears in the menu when the cursor hovers over an item.
The content list contains the content files. To work with any file, highlight it in the list.
Field Description
Name Change the name that will appear for the selected file.
This option renames the files in the menu; it does not rename the actual files.
Choose the file from the content list. Type changes within the Name field. The changes are reflected in the content list.
Web address Displays the path of the selected file. This is populated automatically when a file is selected. To make changes to a Web address:
Highlight the item in the content list. Type changes within the File Name field. The changes are reflected in the content list.
This field disabled unless a Web address is selected in the content list.
Tooltip The information that appears while the cursor is hovered over an item in the menu. You can customize each file’s tooltip.
The Tooltip field can contain an unlimited number of characters.
Approximate disk space used by Project
Displays the size of the combined files added to the menu.
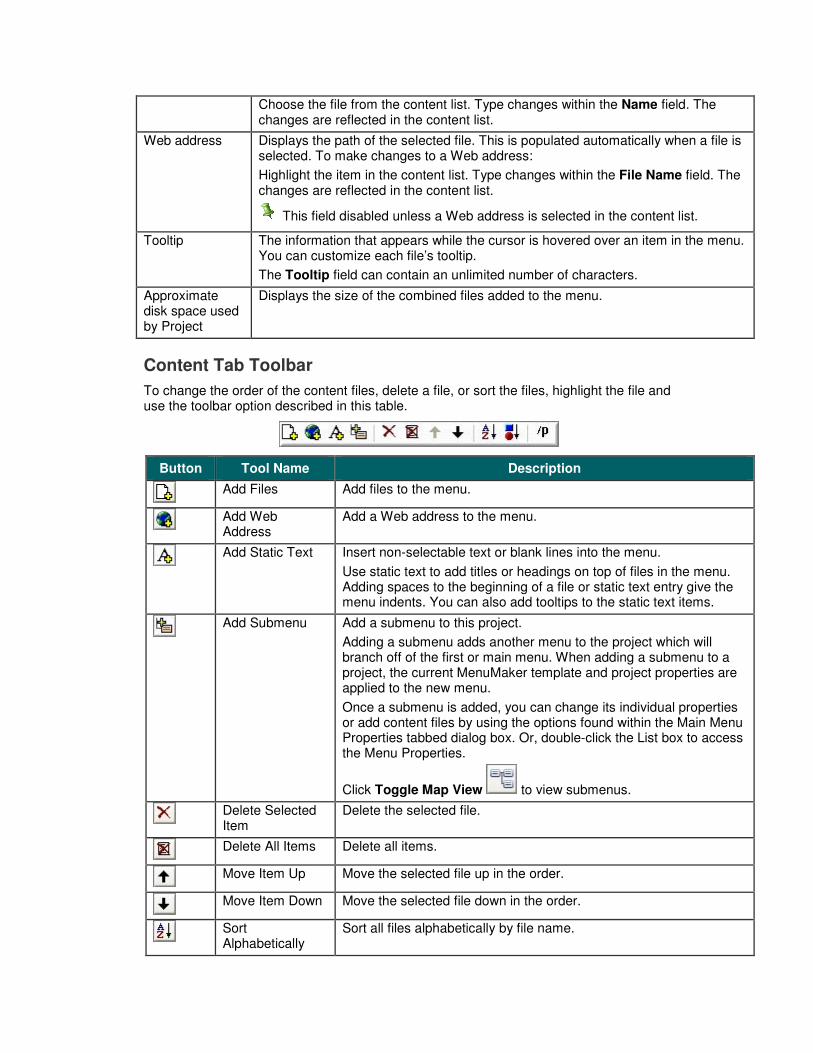
Content Tab Toolbar
To change the order of the content files, delete a file, or sort the files, highlight the file and use the toolbar option described in this table.
Button Tool Name Description
Add Files Add files to the menu.
Add Web Address
Add a Web address to the menu.
Add Static Text Insert non-selectable text or blank lines into the menu.
Use static text to add titles or headings on top of files in the menu. Adding spaces to the beginning of a file or static text entry give the menu indents. You can also add tooltips to the static text items.
Add Submenu Add a submenu to this project.
Adding a submenu adds another menu to the project which will branch off of the first or main menu. When adding a submenu to a project, the current MenuMaker template and project properties are applied to the new menu.
Once a submenu is added, you can change its individual properties or add content files by using the options found within the Main Menu Properties tabbed dialog box. Or, double-click the List box to access the Menu Properties.
Click Toggle Map View to view submenus.
Delete Selected Item
Delete the selected file.
Delete All Items Delete all items.
Move Item Up Move the selected file up in the order.
Move Item Down Move the selected file down in the order.
Sort Alphabetically
Sort all files alphabetically by file name.
Sort by Type Sort all files according to file type and alphabetically.
Show / Hide Parameters
Enter command line options for an AVI playback application.
Only use if you know the player used on the menu’s target system.
See also:
General Tab
Cursor Tab
List Tab
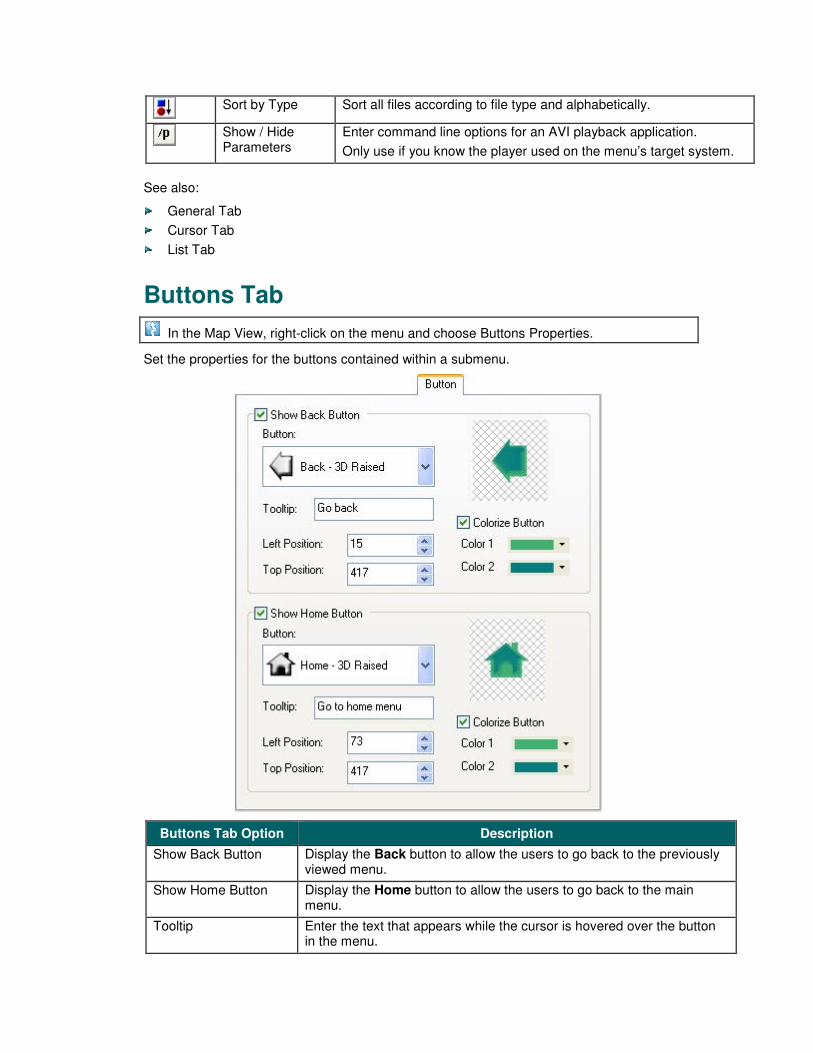
Buttons Tab
In the Map View, right-click on the menu and choose Buttons Properties.
Set the properties for the buttons contained within a submenu.
Buttons Tab Option Description
Show Back Button Display the Back button to allow the users to go back to the previously viewed menu.
Show Home Button Display the Home button to allow the users to go back to the main menu.
Tooltip Enter the text that appears while the cursor is hovered over the button in the menu.
Button Choose the button to use.
Left Position Enter the number of pixels that the button is located from the left of the menu.
Top Position Enter the number of pixels that the button is located from the top of the menu.
Colorize Button Change the foreground and background colors of the button.
Select the Colorize Button option.
Color 1 Change the foreground color of the button.
Color 2 Change the background color of the button.
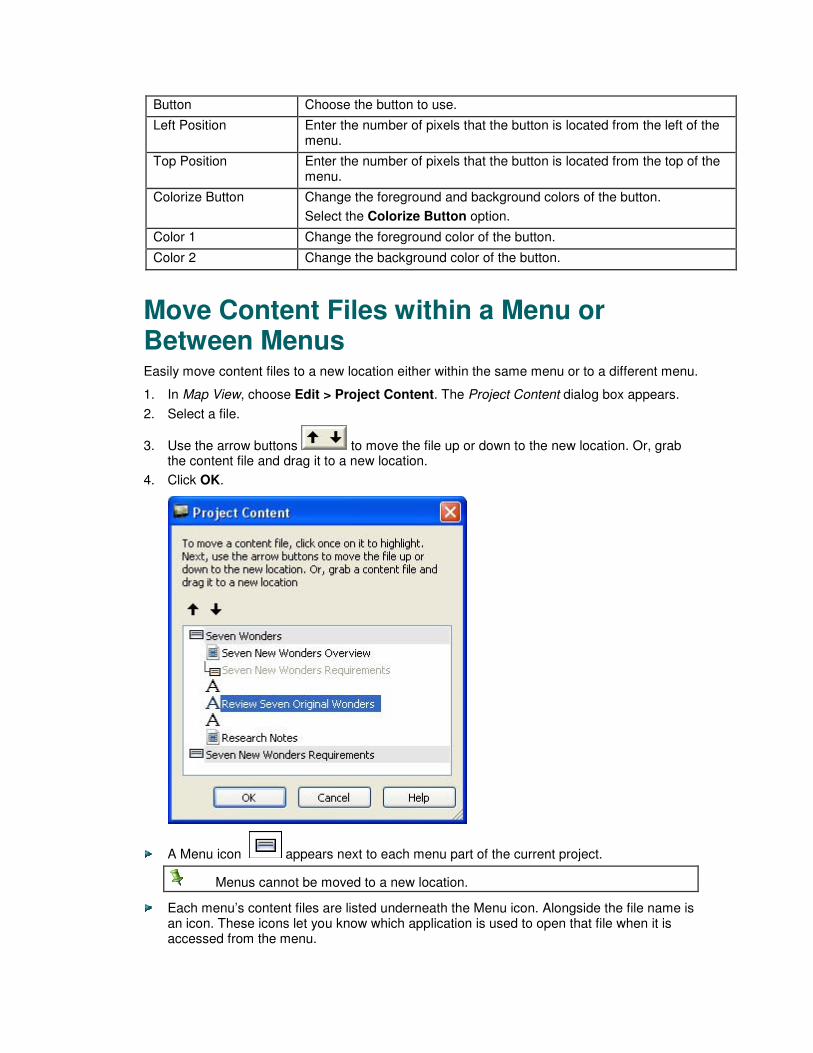
Move Content Files within a Menu or Between Menus Easily move content files to a new location either within the same menu or to a different menu.
1. In Map View, choose Edit > Project Content. The Project Content dialog box appears.
2. Select a file.
3. Use the arrow buttons to move the file up or down to the new location. Or, grab the content file and drag it to a new location.
4. Click OK.
A Menu icon appears next to each menu part of the current project.
Menus cannot be moved to a new location.
Each menu’s content files are listed underneath the Menu icon. Alongside the file name is an icon. These icons let you know which application is used to open that file when it is accessed from the menu.

A Branched Menu icon appears for each submenu linked to a parent menu.
Branched menus cannot be moved to a new location.