canon eos af microadjustment guidebook - gdlp01.c...
TRANSCRIPT

Canon EOSAF MicroadjustmentGuidebook
1
PreparationShoot &
confirmAdjust
Introduction

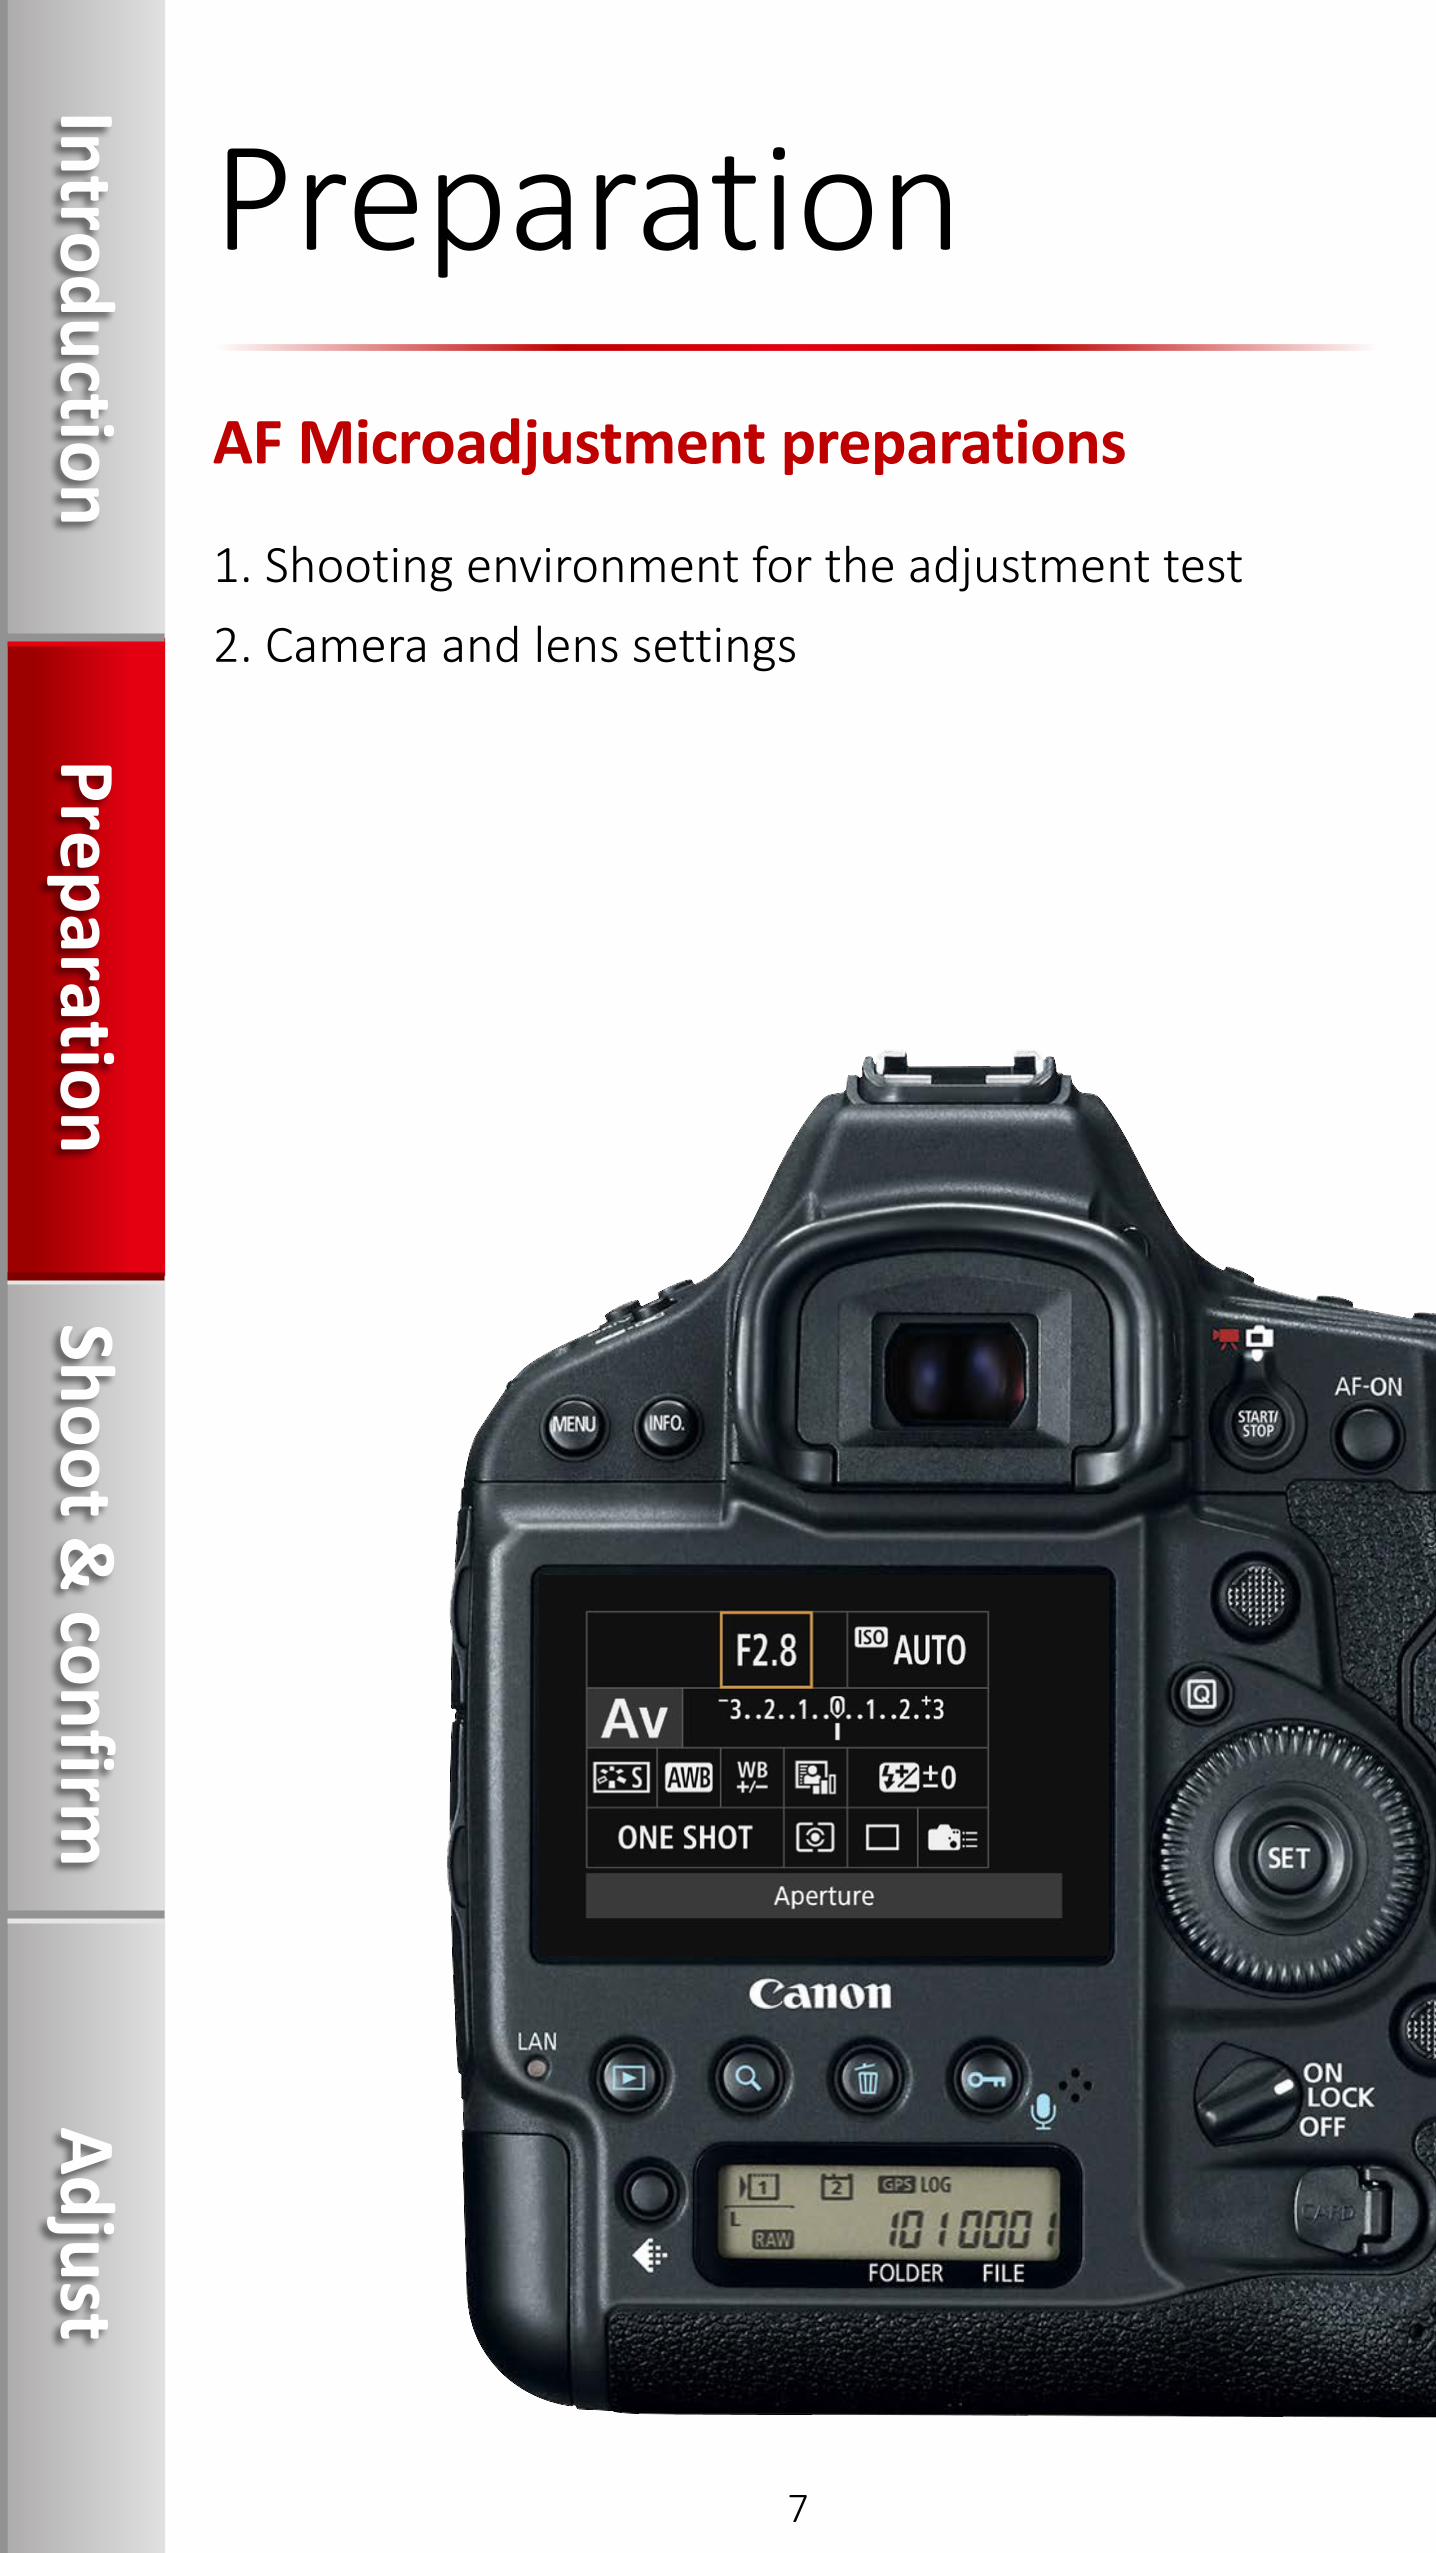
1. Shooting environment for the adjustment test
2. Camera and lens settings
[Preparation]AF Microadjustment preparations
[Shoot & confirm]Perform test shooting
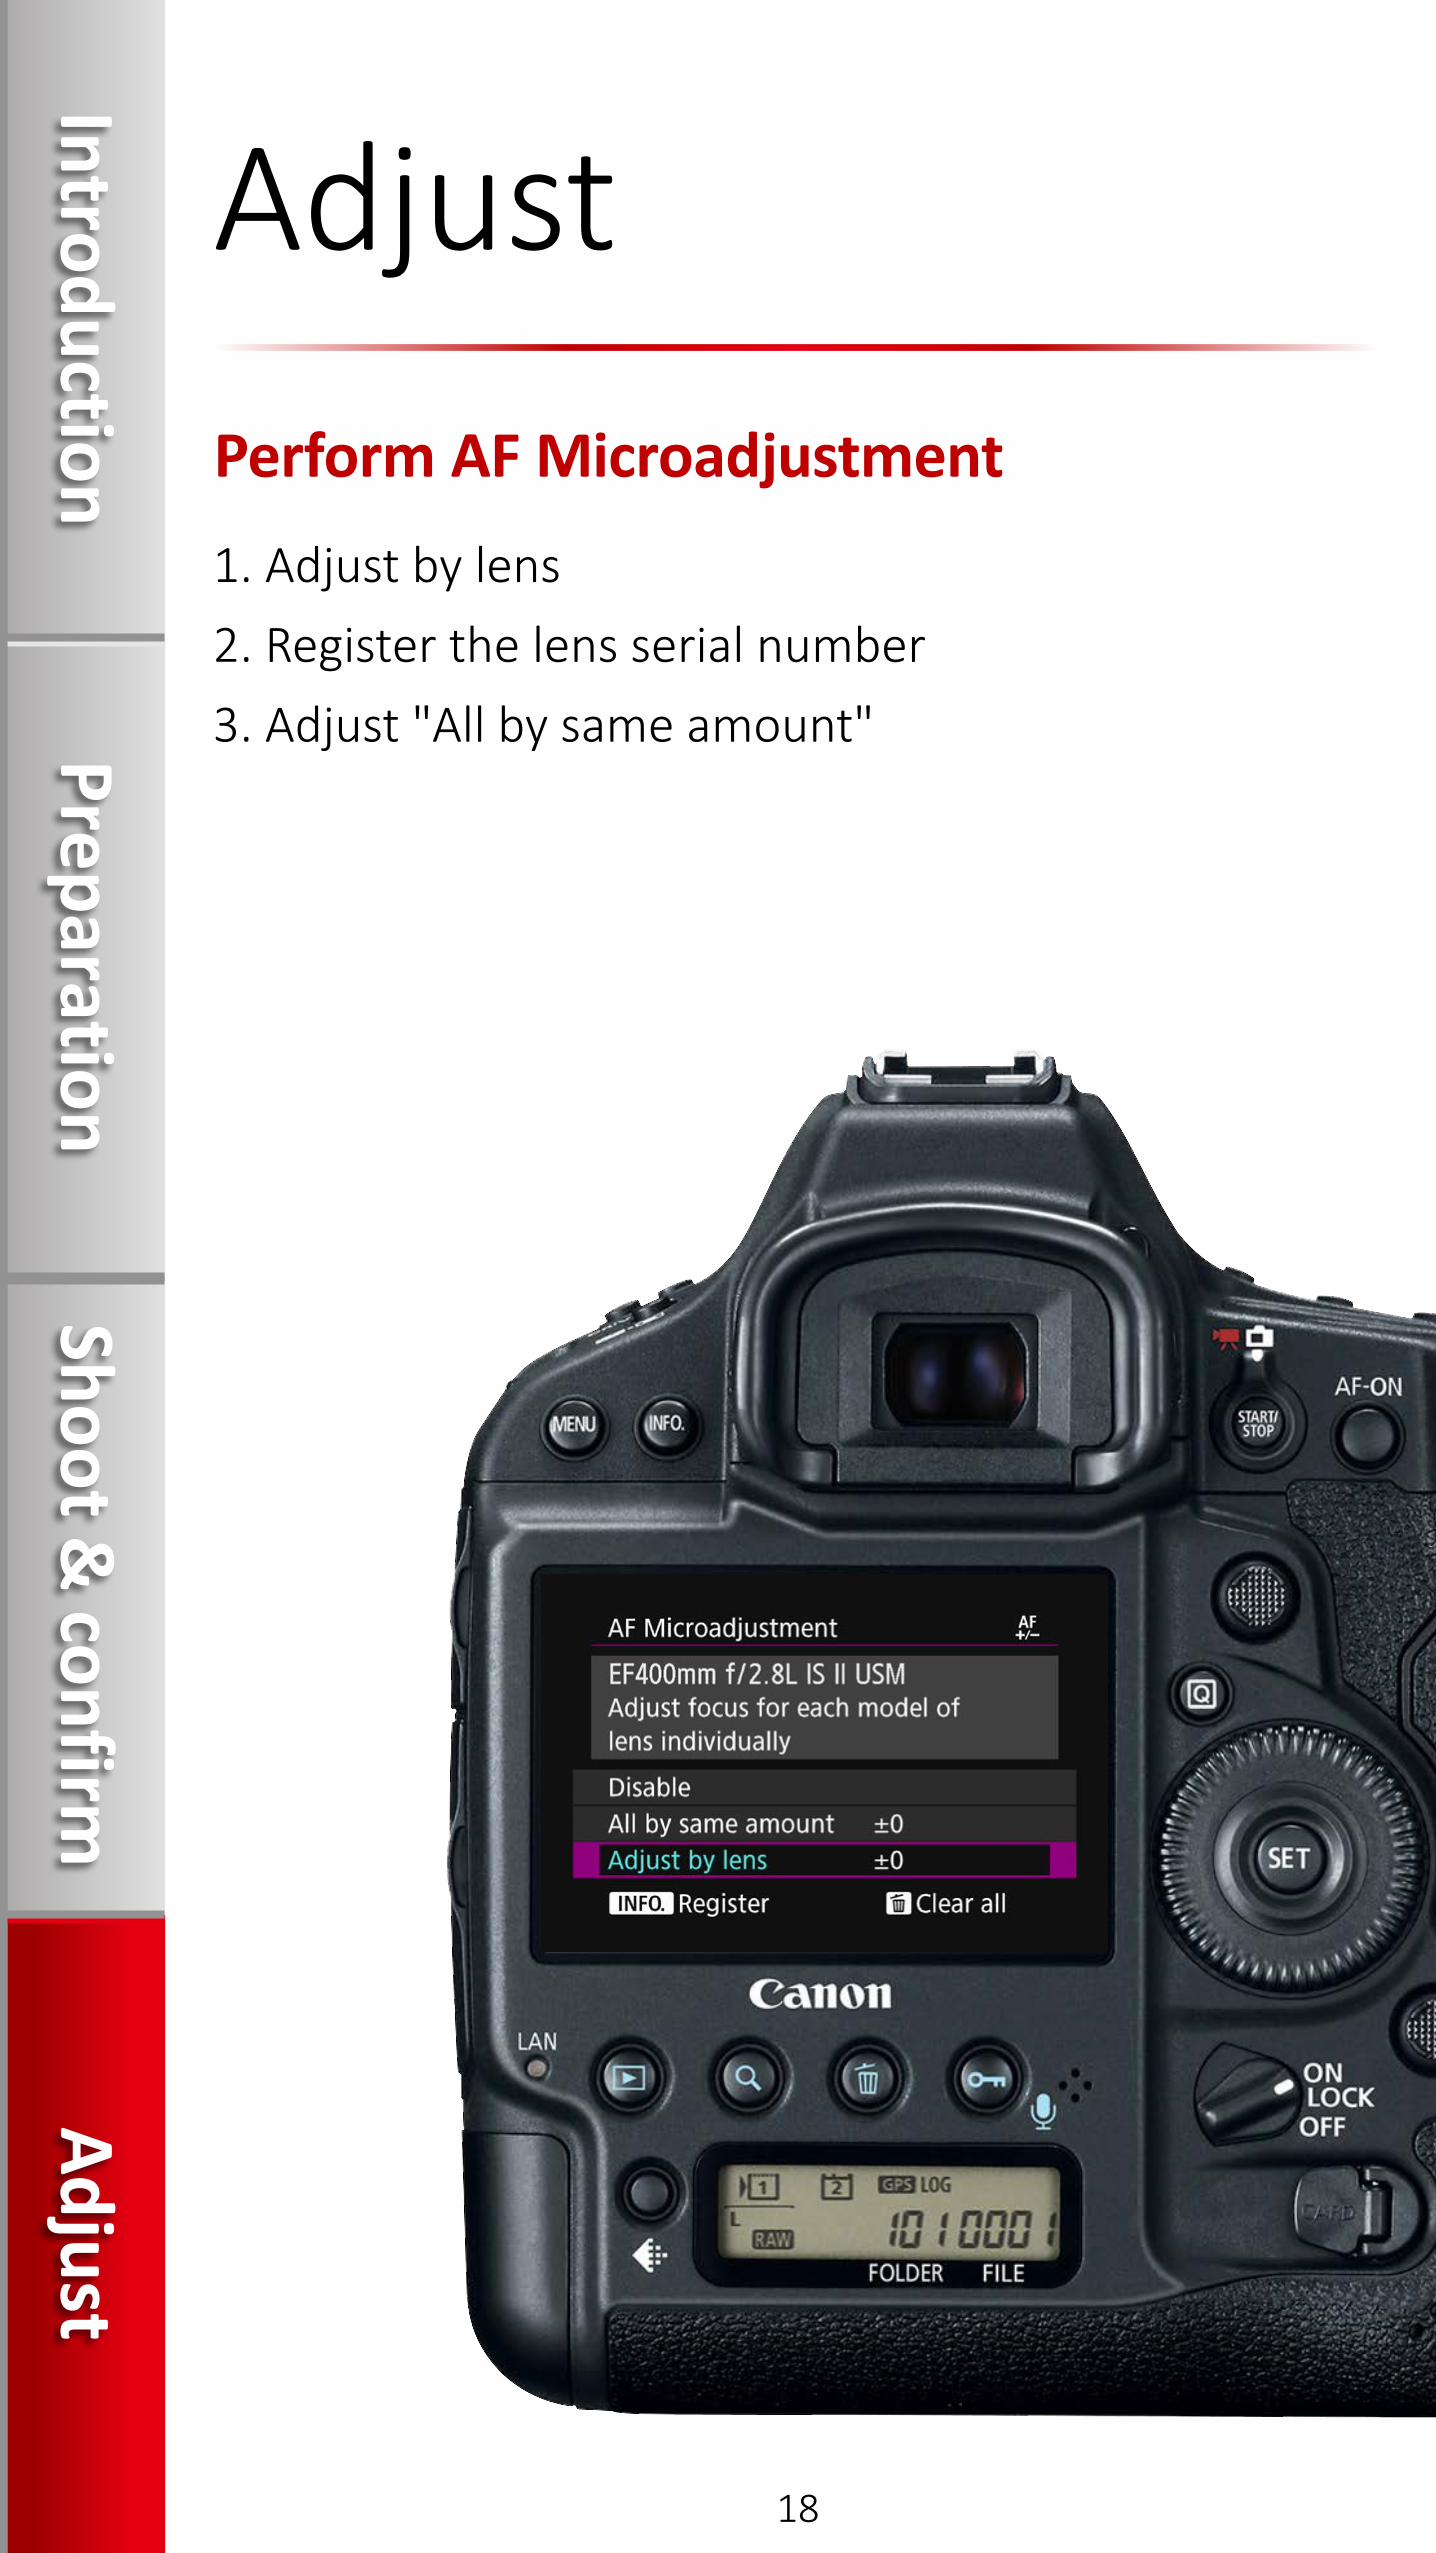
[Adjust]Perform AF Microadjustment
What is AF Microadjustment?
Situations that require AF Microadjustment
Types of AF Microadjustment
Introduction
1. Shoot images to check the AF
2. Points when comparing the images
3. Confirm the images
1. Adjust by lens
2. Register the lens serial number
3. Adjust "All by same amount"
3
13
19
4
15
25
8
5
17
27
10
2
IntroductionPreparation
Shoot & confirm
Adjust

What is AF Microadjustment?It is a function that makes it possible to make fine adjustments for the AF’s point of focus when using AF during viewfinder shooting. You can select from two types, "Adjust by lens" and "All by same amount."
Introduction
The AF point of focus may vary slightly due to shooting conditions such as subject conditions, its brightness, and the zoom position. Therefore, even if you perform AF Microadjustment, the point of focus may not always be at the suitable position. If you feel that focusing errors are not fixed after using this function several times, contact a Canon service center. We appreciate your understanding that if repairs are necessary, there may be a charge.• Adjusted content has no effect in the AF during Live View shooting or
movie shooting.• Even if the camera settings are reset, adjustment content will remain,
however, settings will be set to [Disable].
AF Microadjustment important information
3
IntroductionPreparation
Shoot & confirm
Adjust

An AF point on the face was selected, but the result is slightly out of focus.
An AF point on the face was selected, but the result is slightly out of focus.
The point of focus is on the ball, slightly in front of the face, which means the result is front focus.
The point of focus is on the rock, slightly in front of the face, which means the result is front focus.
Situations that require AF Microadjustment
When AF does not focus on the targeted position in situations like these, it is possible to change the point of focus by performing AF Microadjustment.
4
IntroductionPreparation
Shoot & confirm
Adjust

Types of AF Microadjustment
You can select from two types, "Adjust by lens" and "All by same amount."
Adjust by lens
It is possible to register adjustment results for up to 40 lenses on the camera when carrying out adjustments by lens individually. When performing AF using a registered lens, the point of focus will always be corrected by the adjustment value. If you use a zoom lens, it is possible to make adjustments to both the wide-angle(W) and telephoto(T) ends.
info
5
IntroductionPreparation
Shoot & confirm
Adjust

This is effective when focus is in front (or behind) the targeted position no matter which lens is used. After registering it once, regardless of the lens used later, the point of focus will always be corrected by the adjustment value.
info
All by same amount
6
IntroductionPreparation
Shoot & confirm
Adjust
AF Microadjustment preparations
1. Shooting environment for the adjustment test
2. Camera and lens settings
Preparation
7
IntroductionPreparation
Shoot & confirm
Adjust
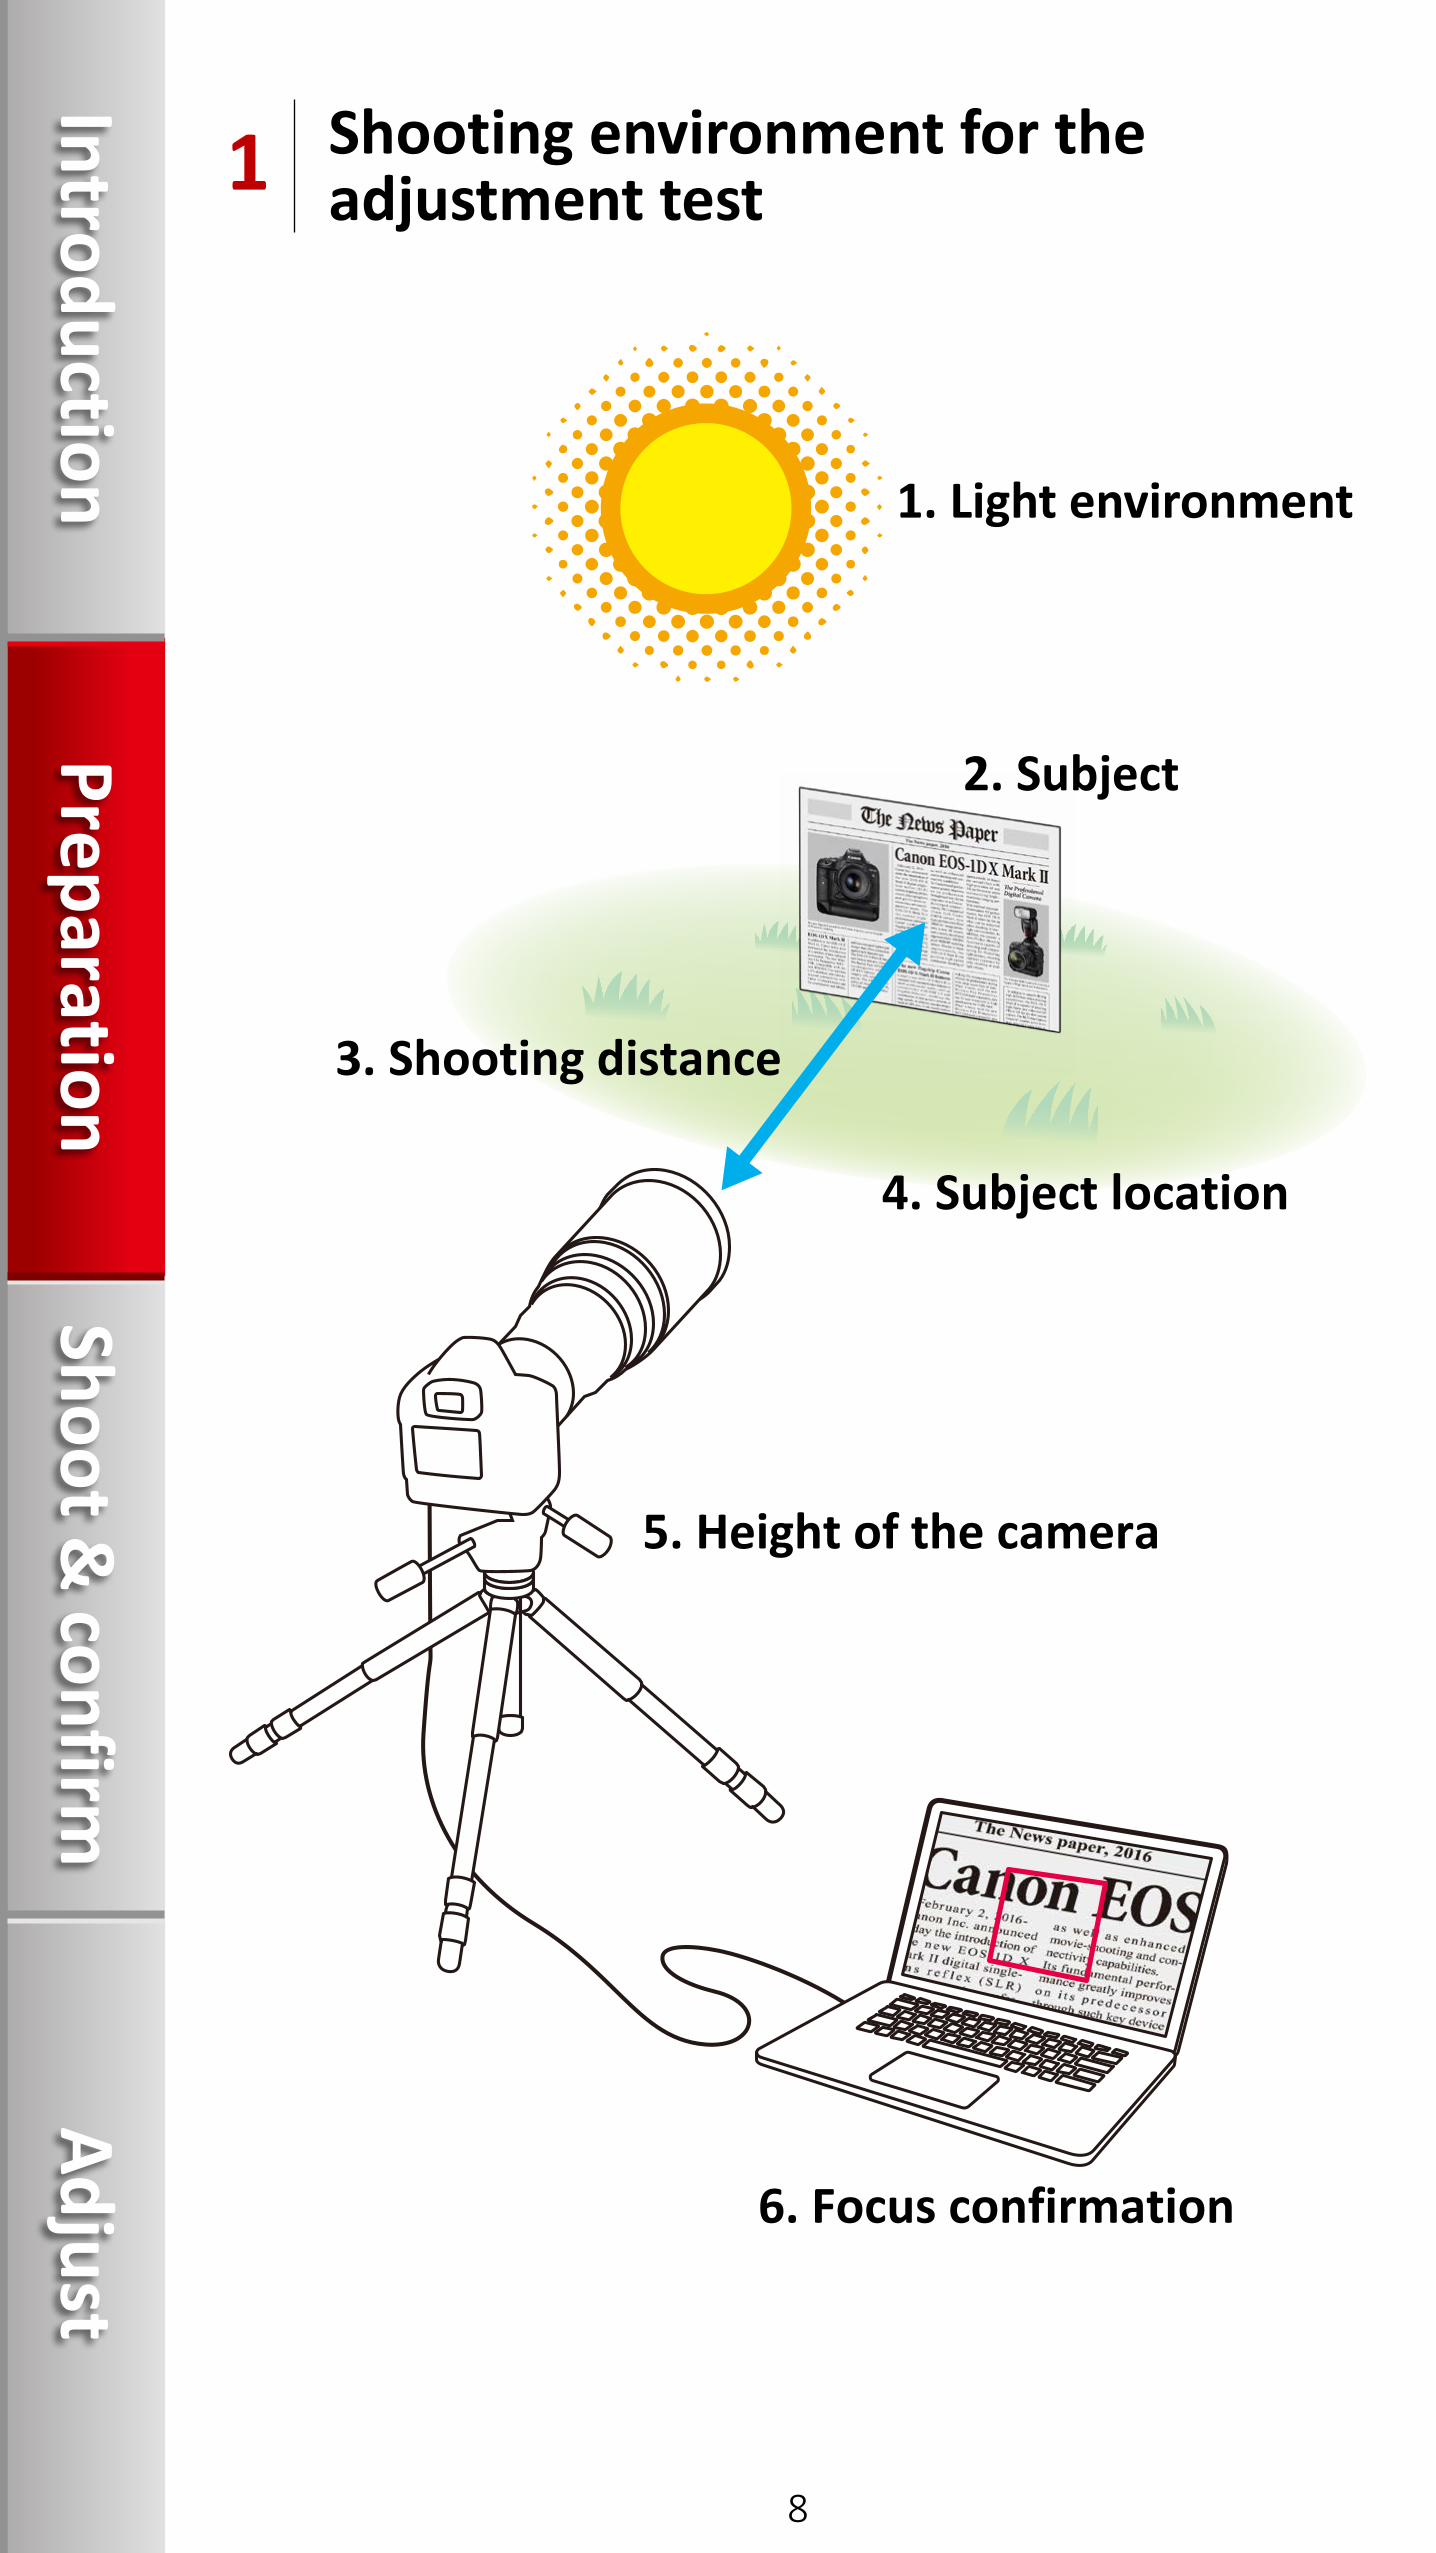
Shooting environment for the adjustment test 1
2. Subject
3. Shooting distance
4. Subject location
5. Height of the camera
6. Focus confirmation
1. Light environment
8
IntroductionPreparation
Shoot & confirm
Adjust
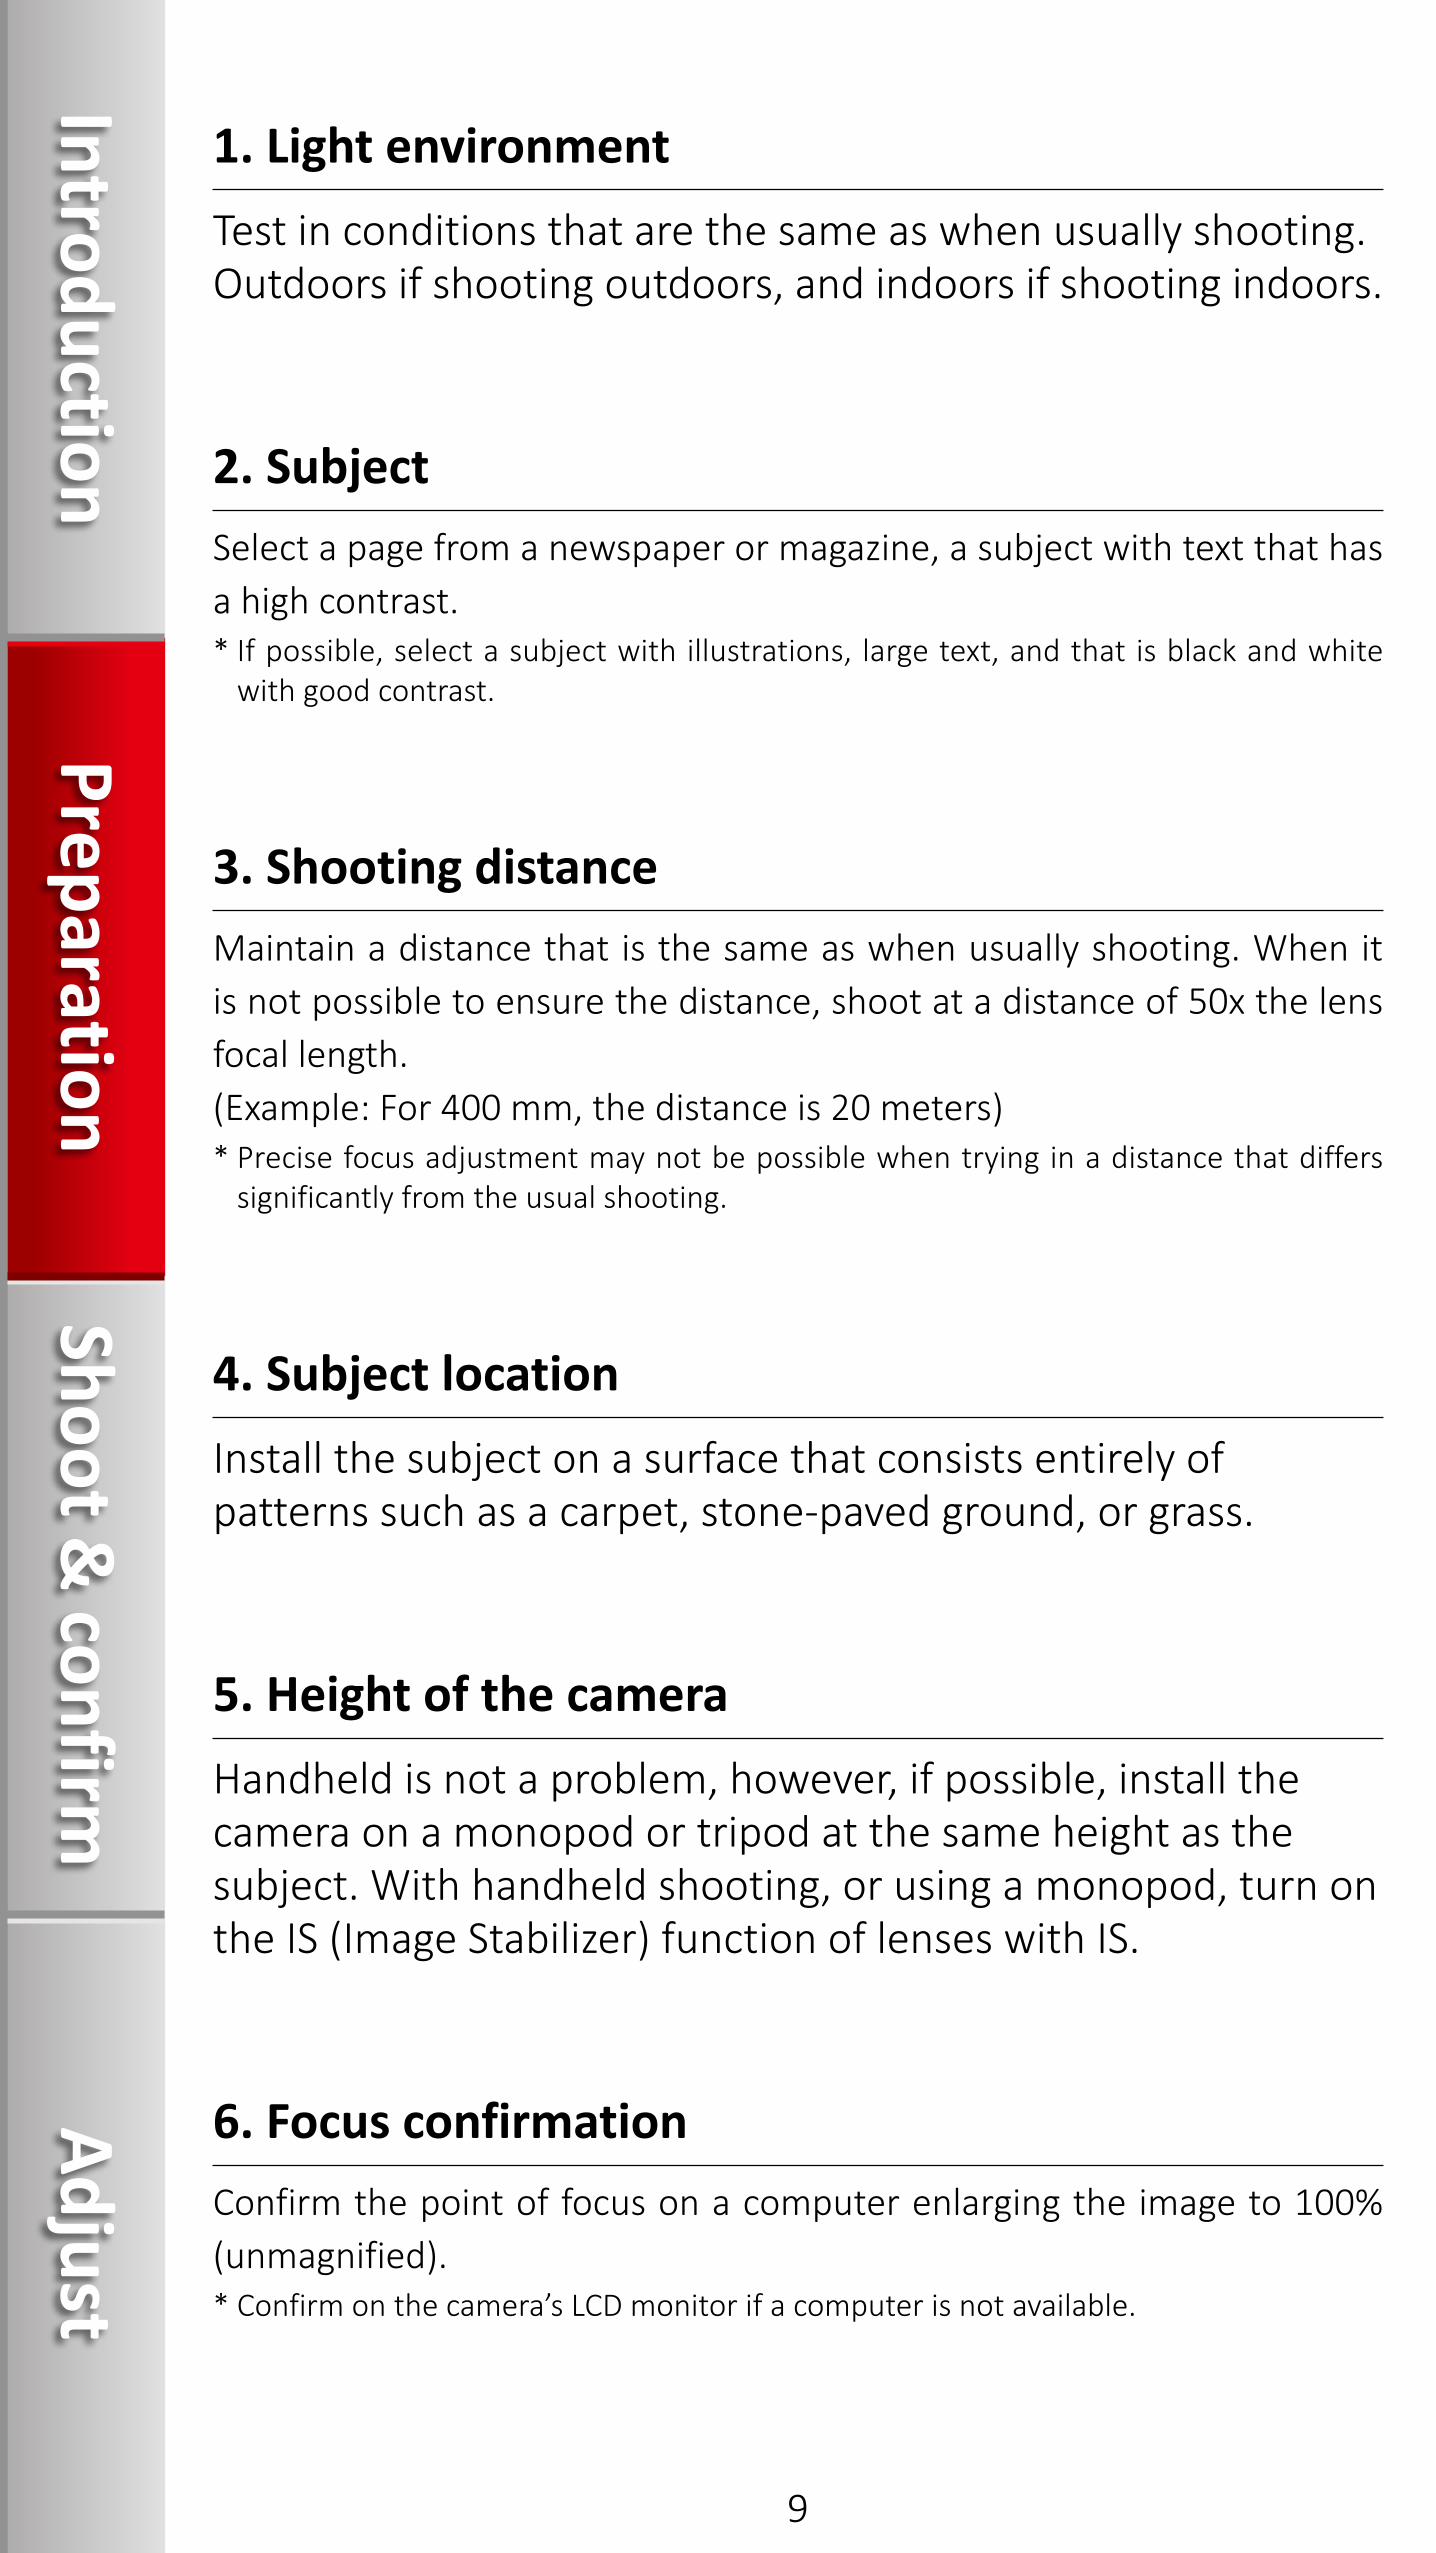
1. Light environmentTest in conditions that are the same as when usually shooting. Outdoors if shooting outdoors, and indoors if shooting indoors.
3. Shooting distanceMaintain a distance that is the same as when usually shooting. When it is not possible to ensure the distance, shoot at a distance of 50x the lens focal length. (Example: For 400 mm, the distance is 20 meters)* Precise focus adjustment may not be possible when trying in a distance that differs
significantly from the usual shooting.
2. SubjectSelect a page from a newspaper or magazine, a subject with text that has a high contrast.* If possible, select a subject with illustrations, large text, and that is black and white
with good contrast.
4. Subject locationInstall the subject on a surface that consists entirely of patterns such as a carpet, stone-paved ground, or grass.
5. Height of the cameraHandheld is not a problem, however, if possible, install the camera on a monopod or tripod at the same height as the subject. With handheld shooting, or using a monopod, turn on the IS (Image Stabilizer) function of lenses with IS.
6. Focus confirmationConfirm the point of focus on a computer enlarging the image to 100% (unmagnified).* Confirm on the camera’s LCD monitor if a computer is not available.
9
IntroductionPreparation
Shoot & confirm
Adjust

Camera and lens settings2
Settings can be made easily using the quick setting menu.
[Picture Style] Standard
[AF area]Select Single-point Spot AF (manual selection), and set to the center point.
[Image quality]Compression [8] to [10]
[Image size] JPEG L
10
IntroductionPreparation
Shoot & confirm
Adjust

1 Shooting method Viewfinder shooting
2 Shooting mode Av mode
3 Aperture valueMaximum aperture of the lens used* When shooting at the maximum aperture
of a wide-angle lens, aberration may occur.
4 Shutter speed Set to a shutter speed where camera shake does not occur.
5 ISO speed
Set to the value normally used.* When shooting with a monopod or
handheld, change the value of the shutter speed so the images will not be affected by camera shake.
6 White balance Set to the value/item normally used.
7 AF mode One-Shot
8 Metering modeSet to the mode normally used.* In order to confirm the point of focus, set
it so the ground is properly exposed.
9 Drive mode Single shooting
10 Picture StyleSet to Standard (The sharpness settings such as Strength, Fineness, and Threshold should be set to 3).
11 AF area selection mode AF point
Select "Manual select.: Spot AF" and set it to the center point.* Adjustment is not possible during
+Tracking and FlexiZone-Single.
12 Image size JPEG L
13 Image quality JPEG image quality: Set to 8 or higher
14 LensIf the IS function is equipped, turn it on.* It can be turned off if using a firmly fixed
tripod.
11
IntroductionPreparation
Shoot & confirm
Adjust

Perform test shooting
1. Shoot images to check the AF
2. Points when comparing the images
3. Confirm the images
Shoot & confirm
12
IntroductionPreparation
Shoot & confirm
Adjust
1. Shoot with One-Shot
2. Shoot about five images in [Single shooting] mode
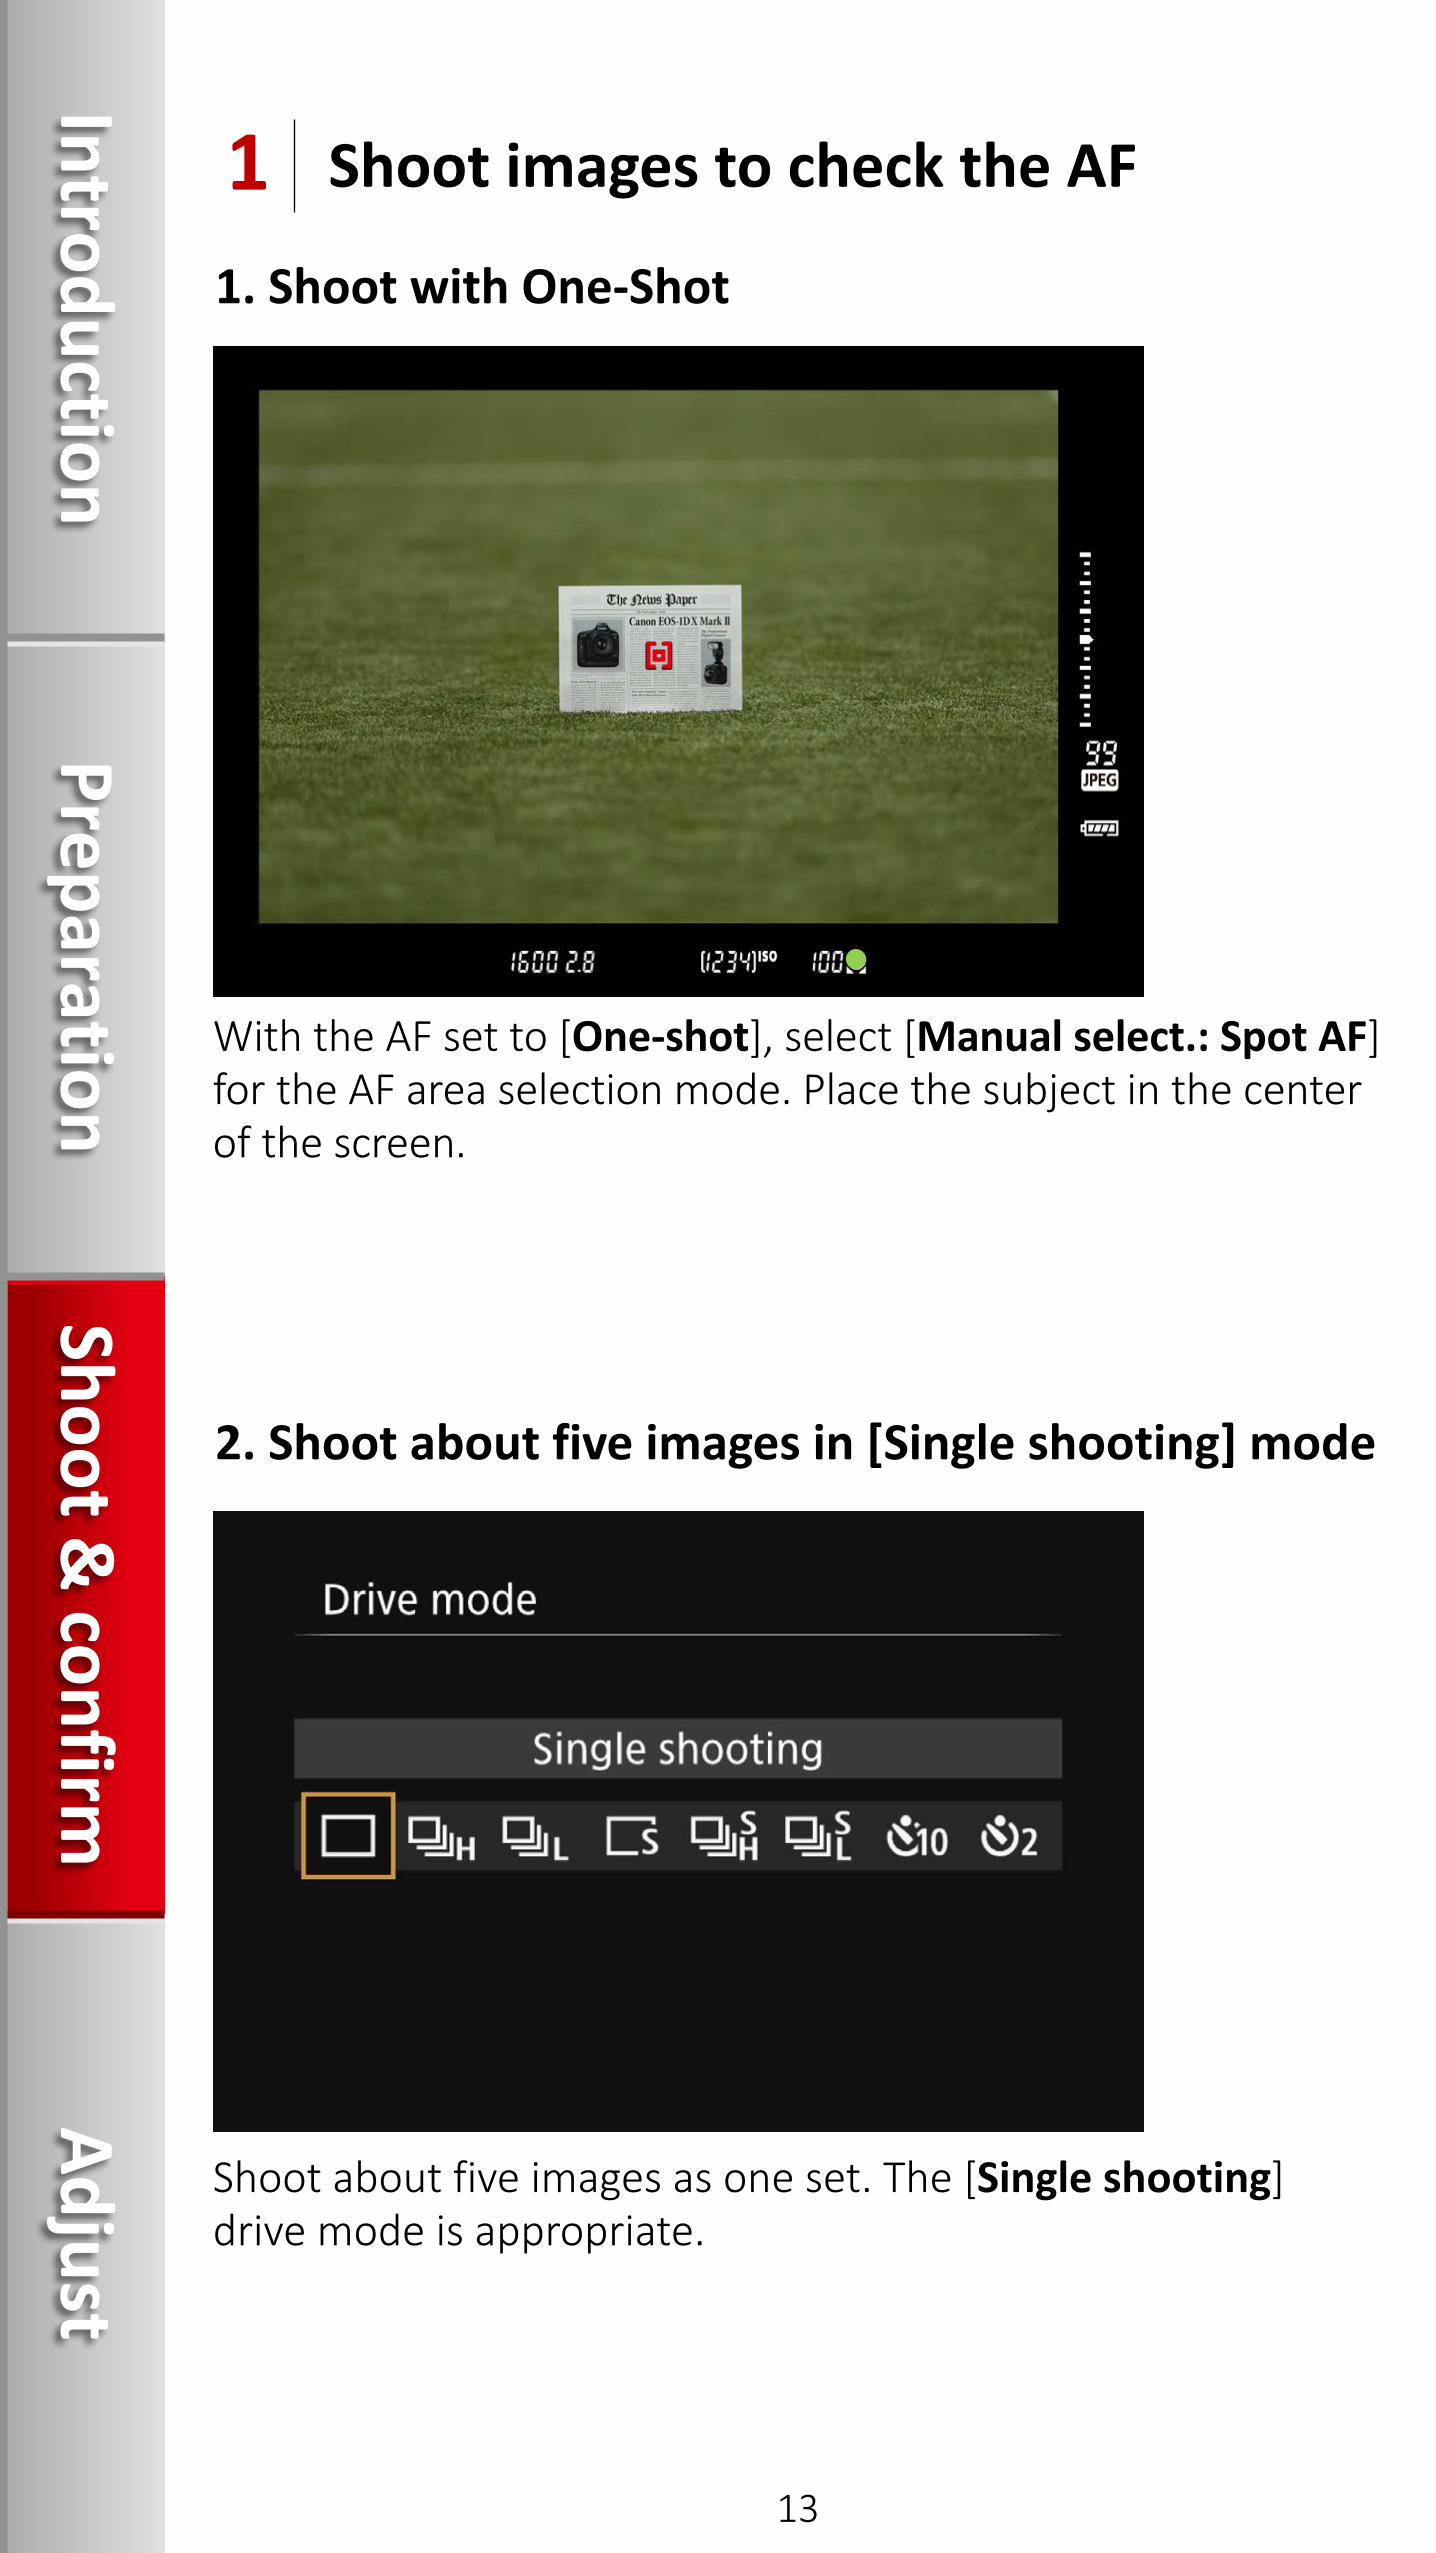
Shoot images to check the AF1
With the AF set to [One-shot], select [Manual select.: Spot AF] for the AF area selection mode. Place the subject in the center of the screen.
Shoot about five images as one set. The [Single shooting] drive mode is appropriate.
13
IntroductionPreparation
Shoot & confirm
Adjust
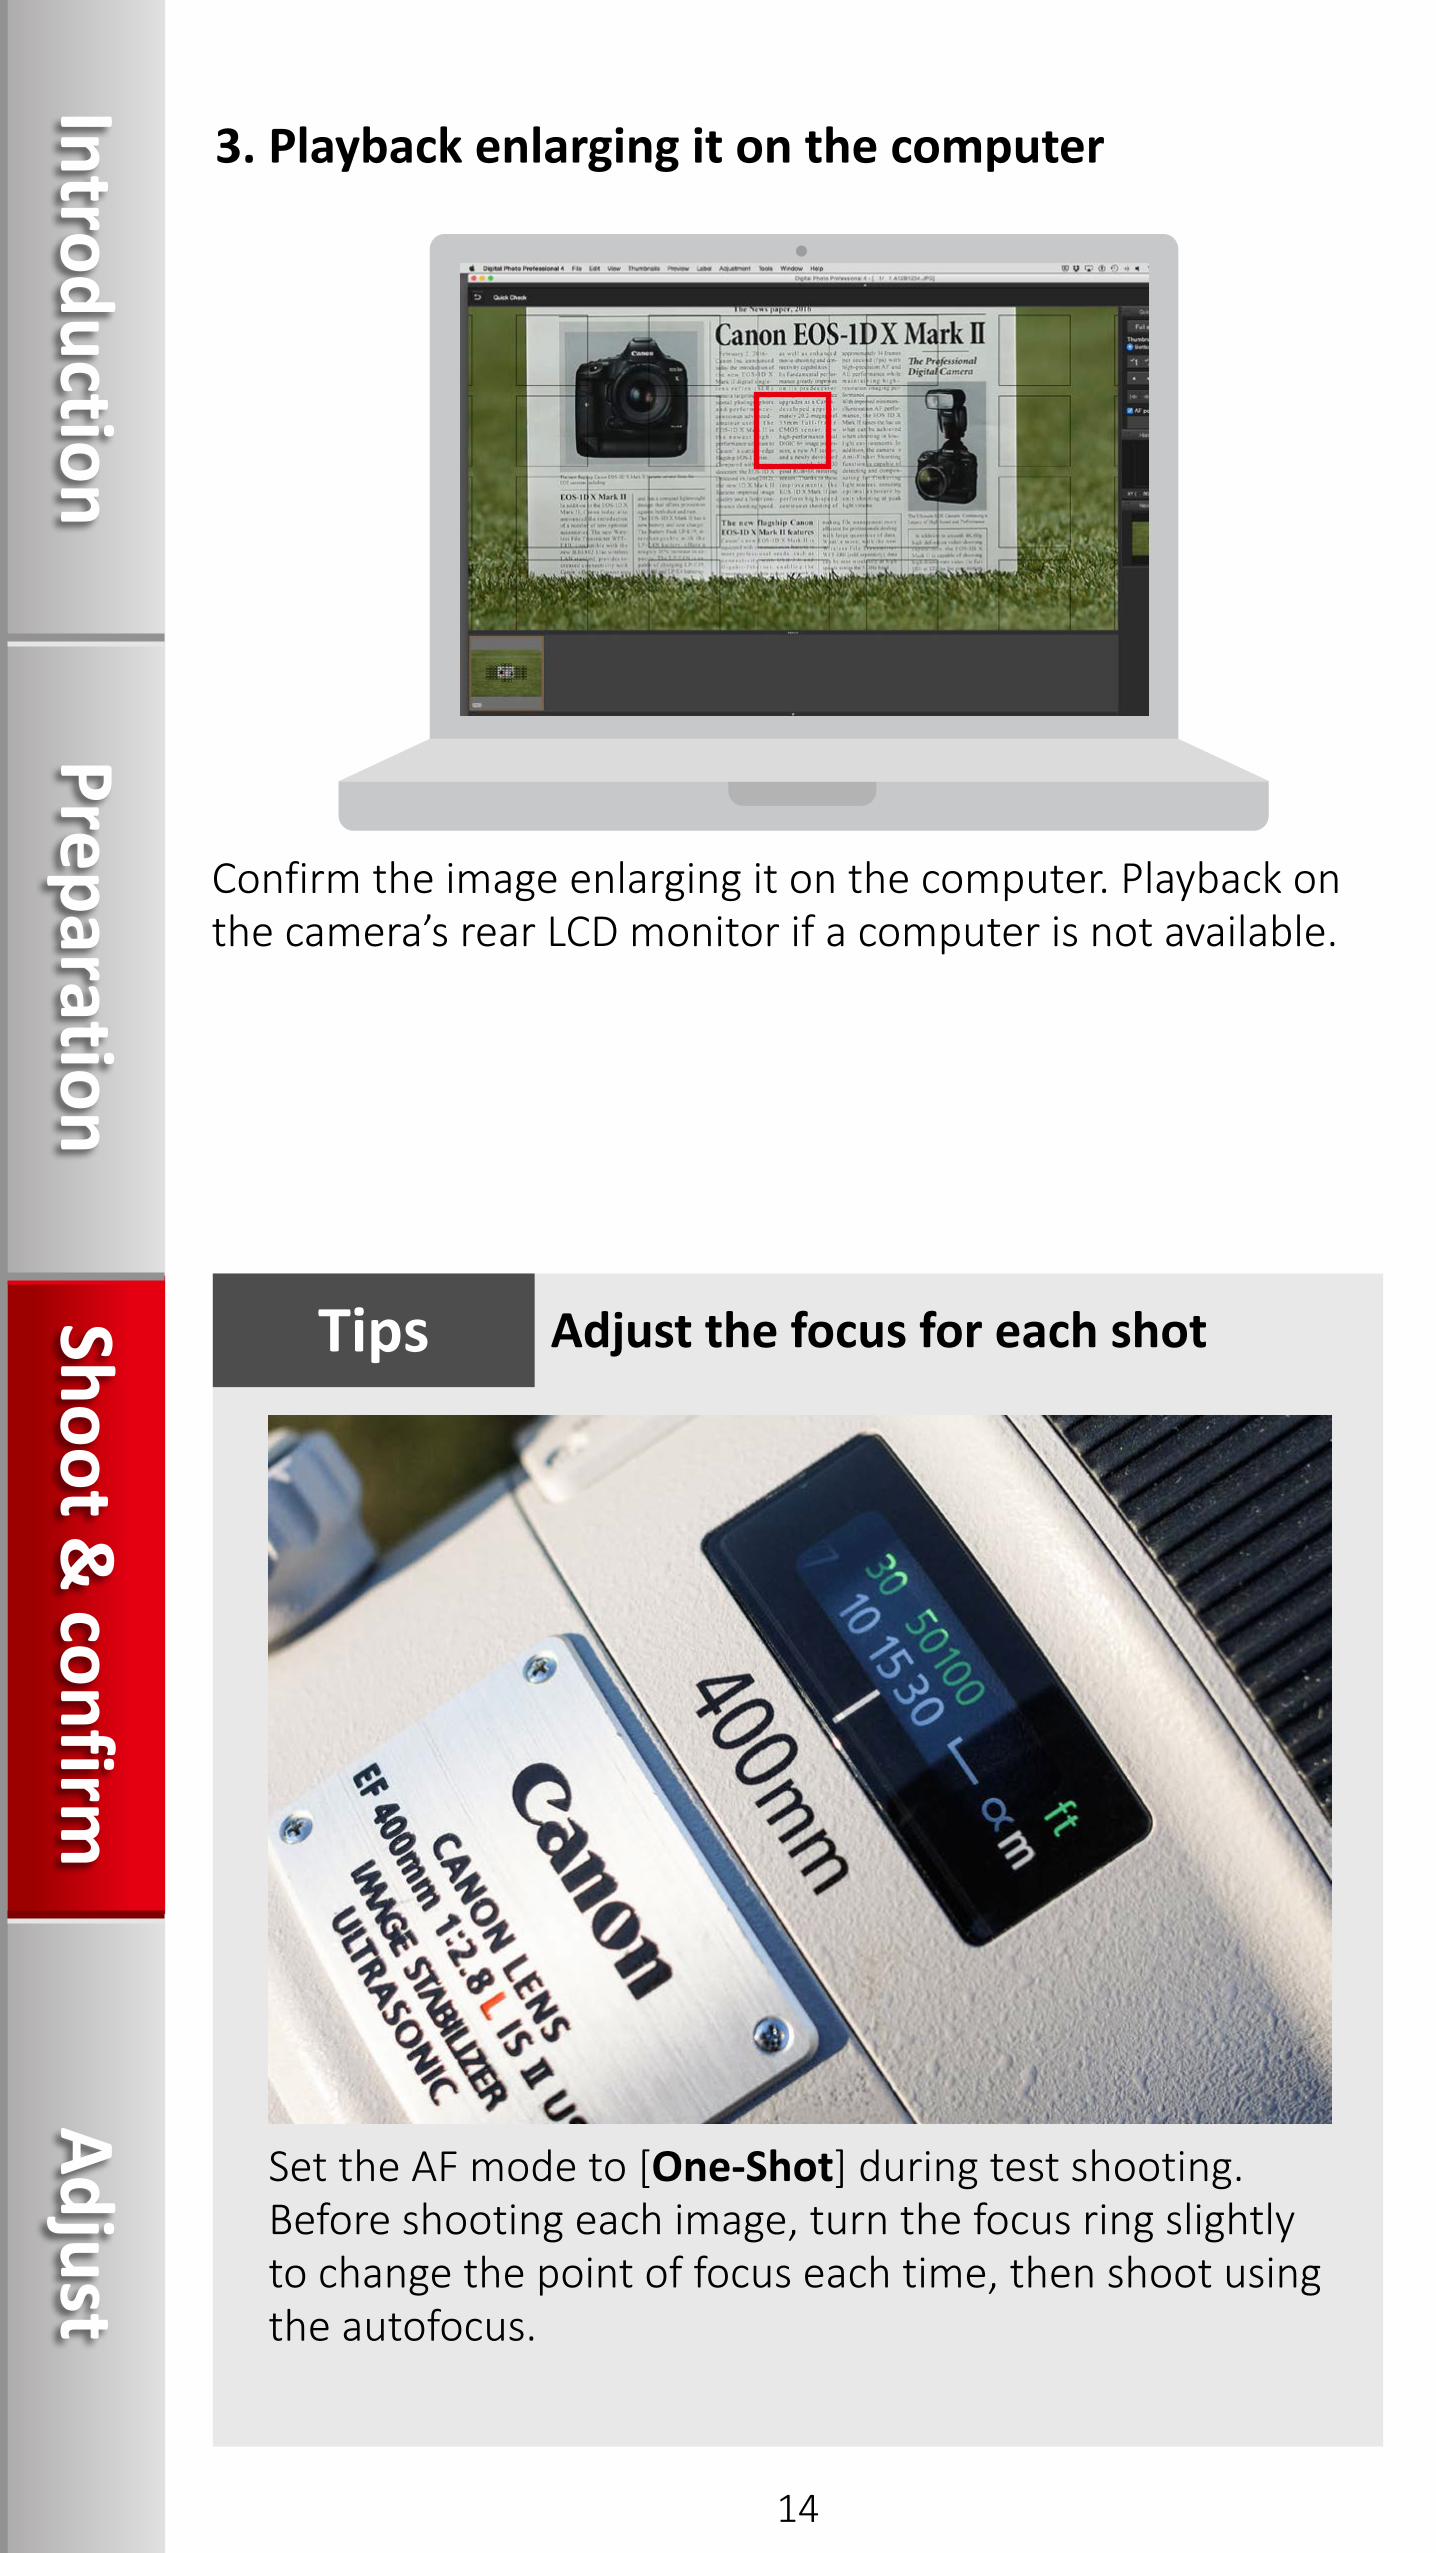
3. Playback enlarging it on the computer
Confirm the image enlarging it on the computer. Playback on the camera’s rear LCD monitor if a computer is not available.
Set the AF mode to [One-Shot] during test shooting. Before shooting each image, turn the focus ring slightly to change the point of focus each time, then shoot using the autofocus.
Adjust the focus for each shotTipsIntroduction
PreparationShoot &
confirmAdjust
14
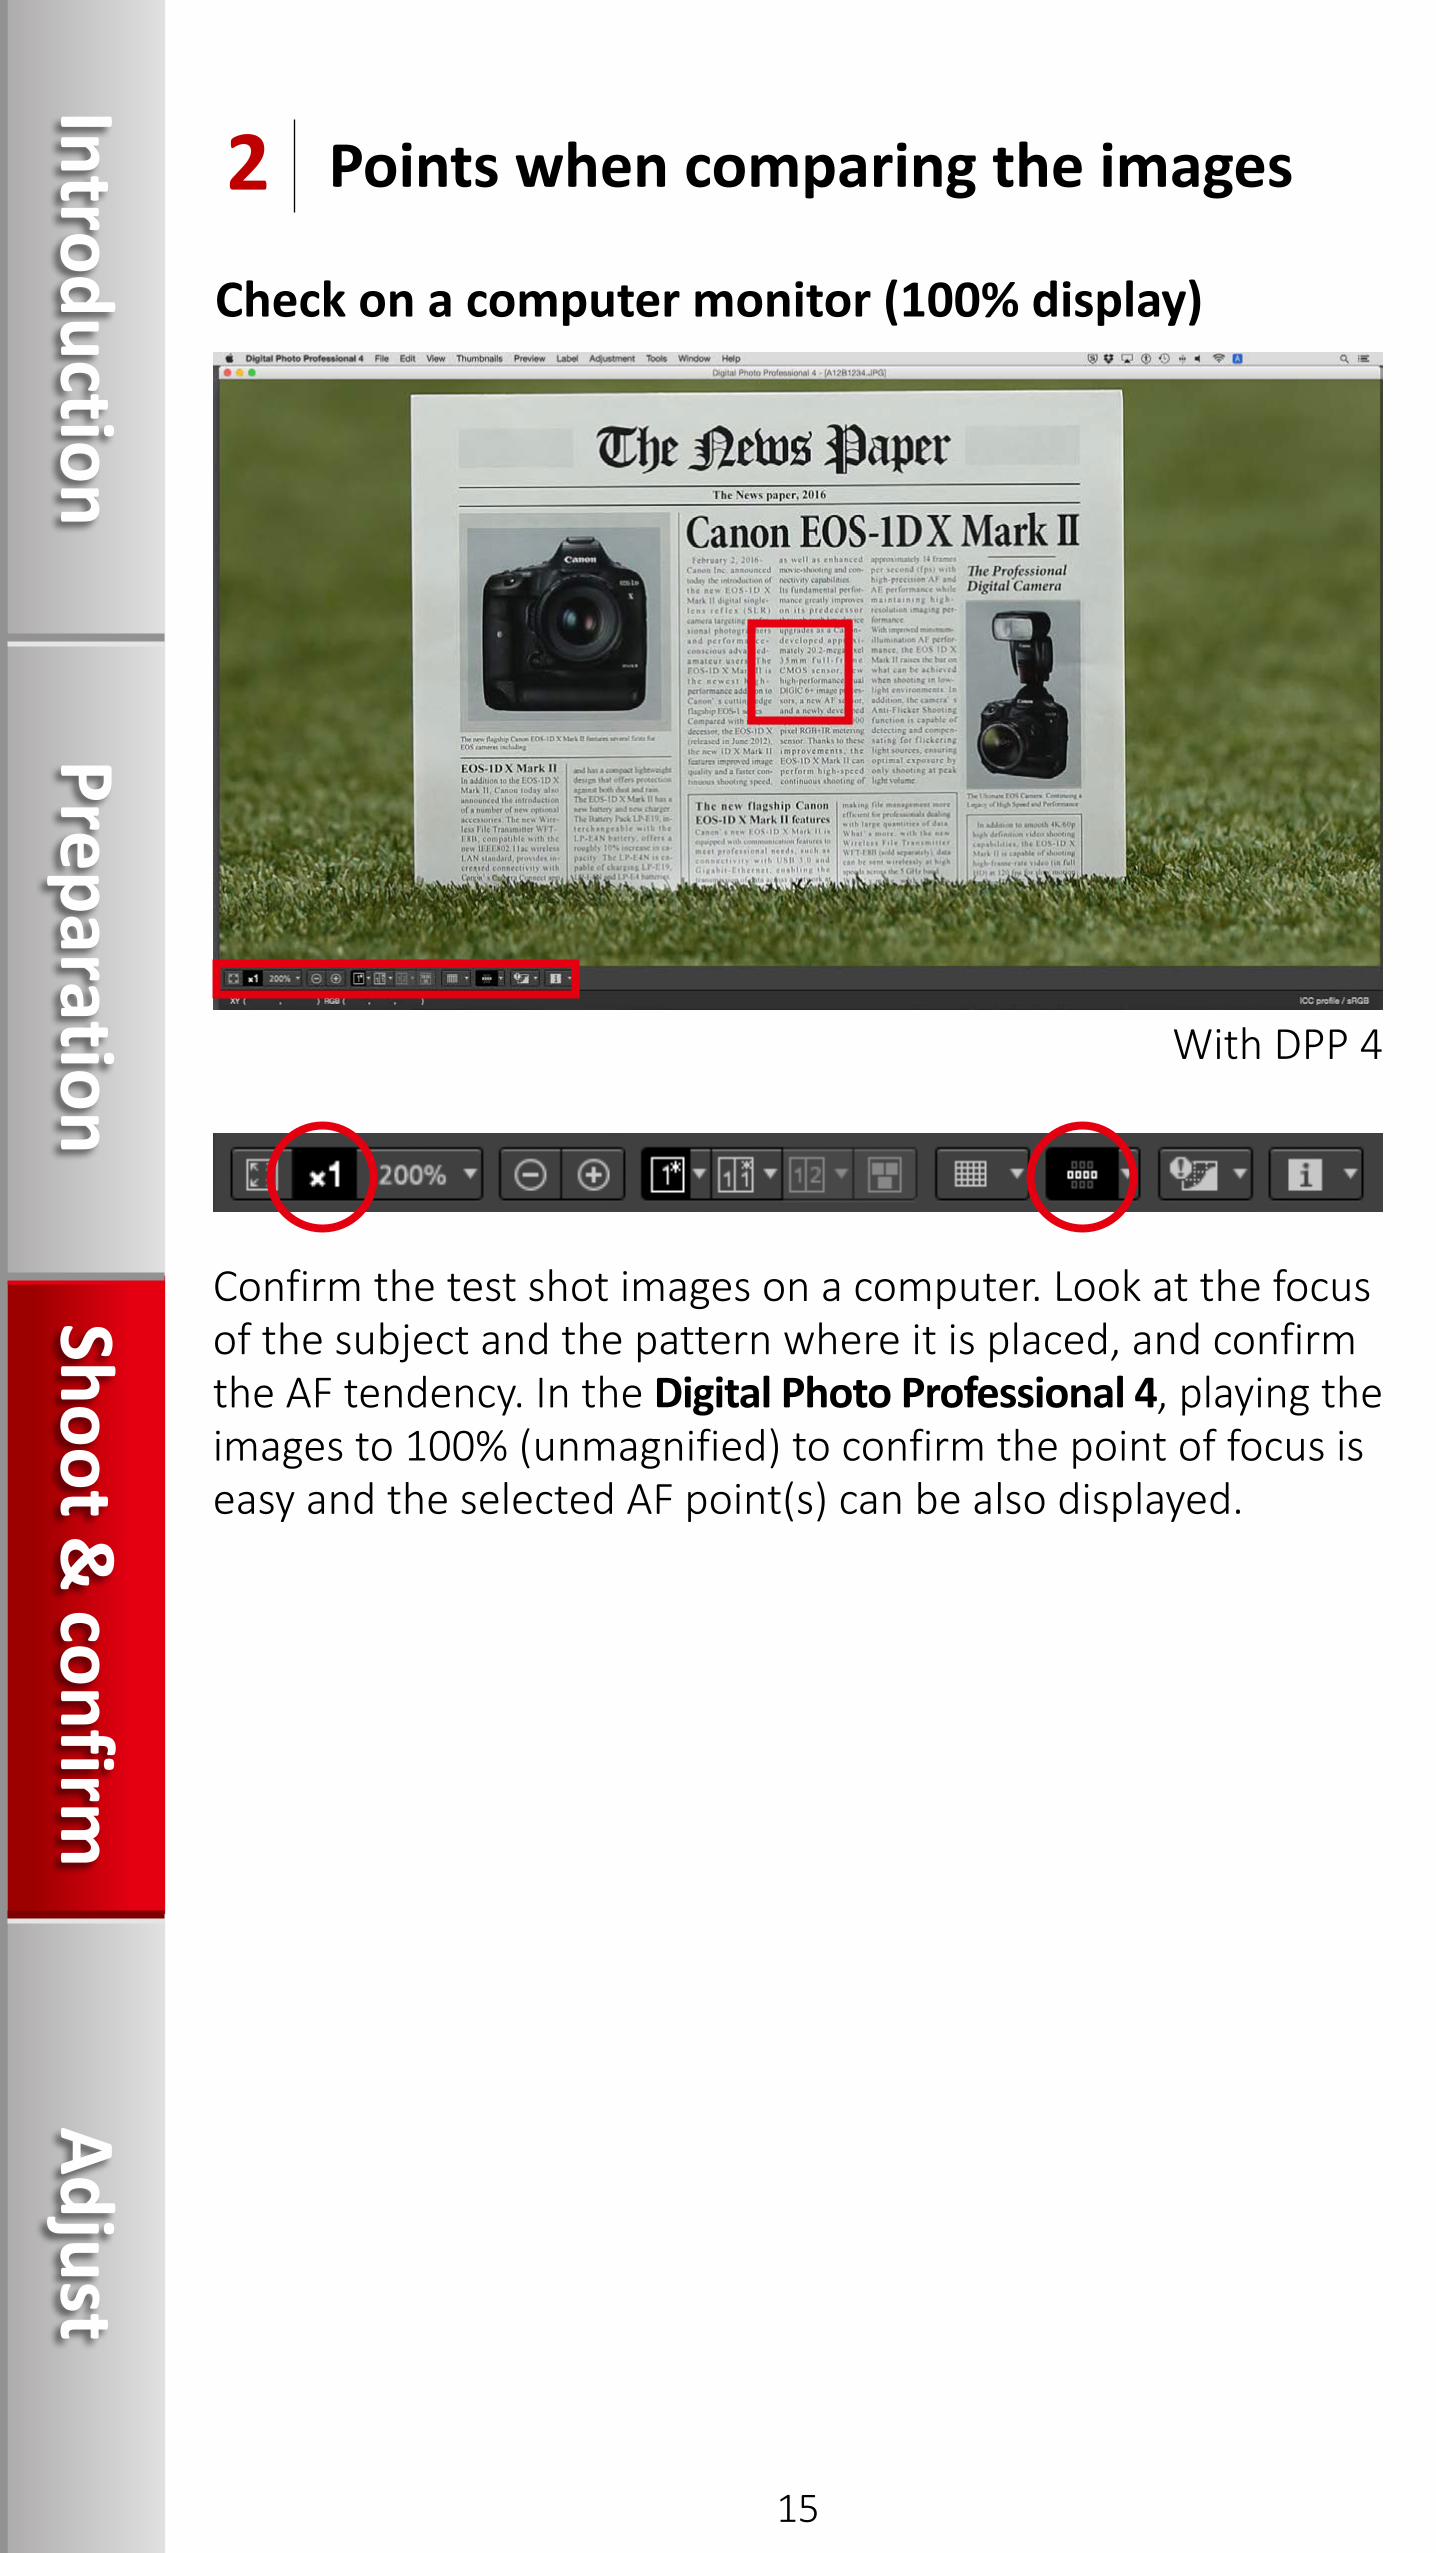
Check on a computer monitor (100% display)
Points when comparing the images2
Confirm the test shot images on a computer. Look at the focus of the subject and the pattern where it is placed, and confirm the AF tendency. In the Digital Photo Professional 4, playing the images to 100% (unmagnified) to confirm the point of focus is easy and the selected AF point(s) can be also displayed.
With DPP 4
15
IntroductionPreparation
Shoot & confirm
Adjust
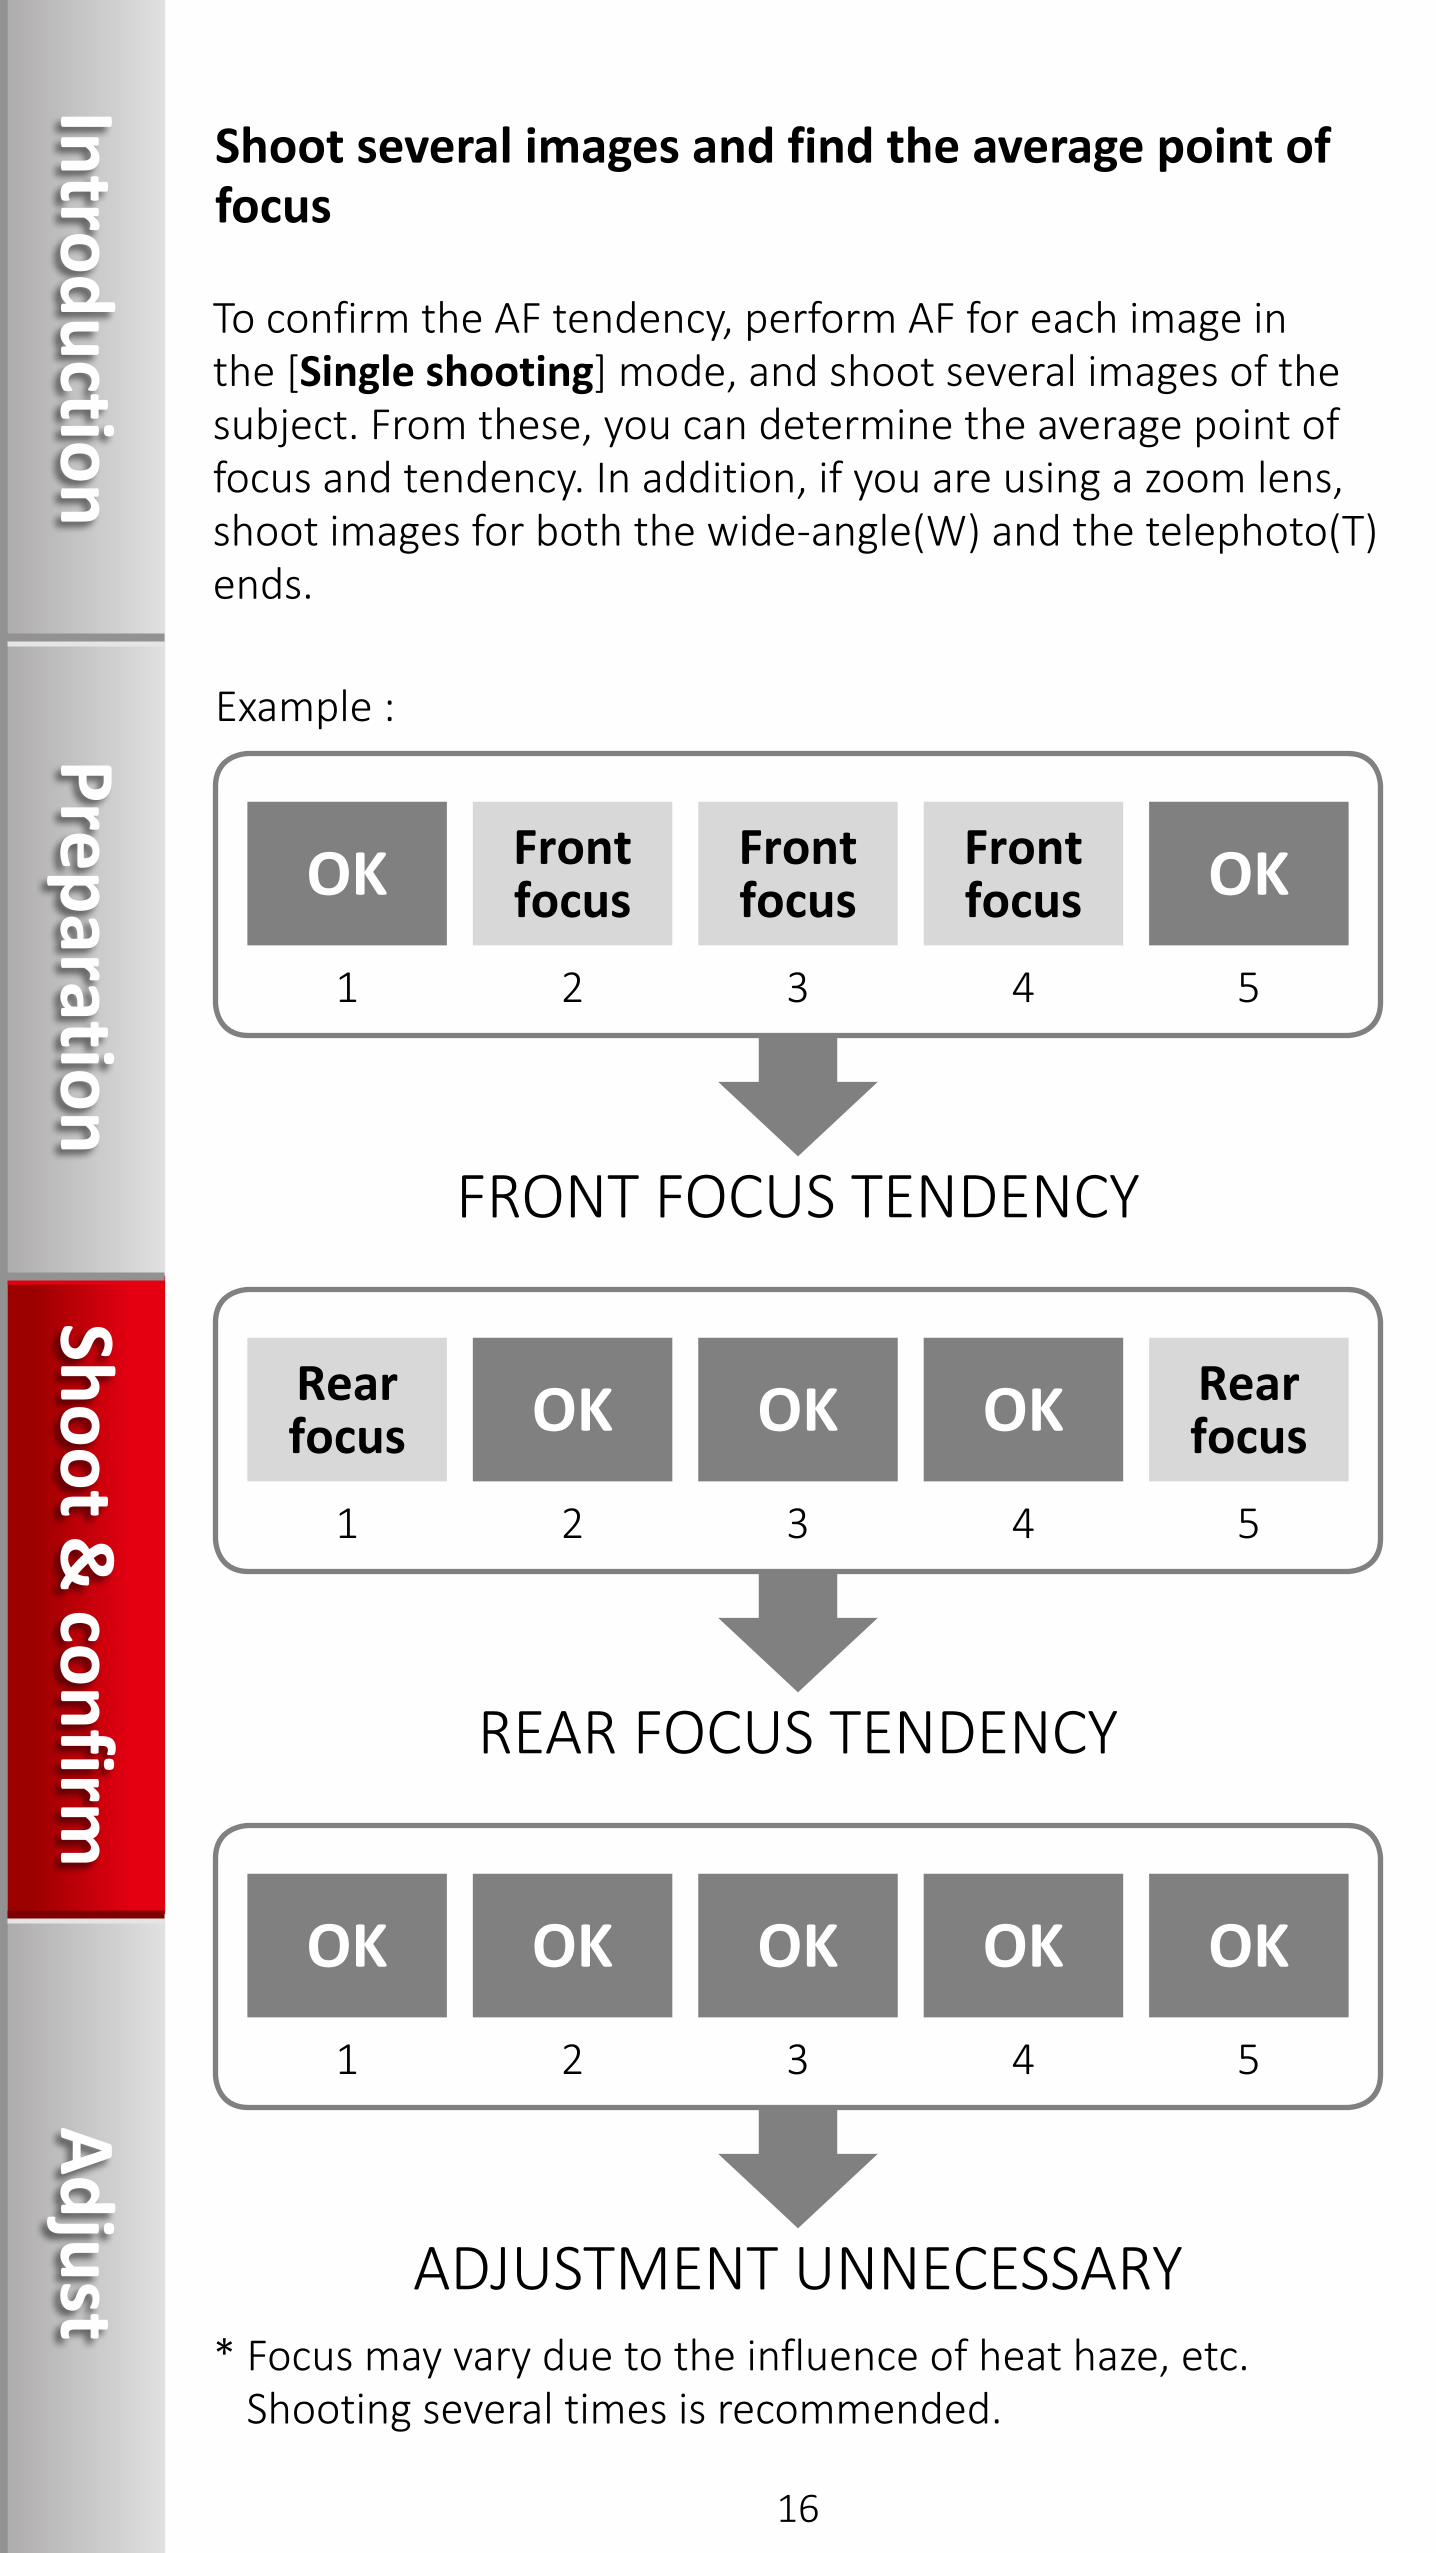
Shoot several images and find the average point of focus
Example :
To confirm the AF tendency, perform AF for each image in the [Single shooting] mode, and shoot several images of the subject. From these, you can determine the average point of focus and tendency. In addition, if you are using a zoom lens, shoot images for both the wide-angle(W) and the telephoto(T) ends.
FRONT FOCUS TENDENCY
OK Front focus
Front focus
Front focus OK
1 2 3 4 5
REAR FOCUS TENDENCY
Rear focus OK OK OK Rear
focus
1 2 3 4 5
ADJUSTMENT UNNECESSARY
OK OK OK OK OK
1 2 3 4 5
* Focus may vary due to the influence of heat haze, etc. Shooting several times is recommended.
16
IntroductionPreparation
Shoot & confirm
Adjust
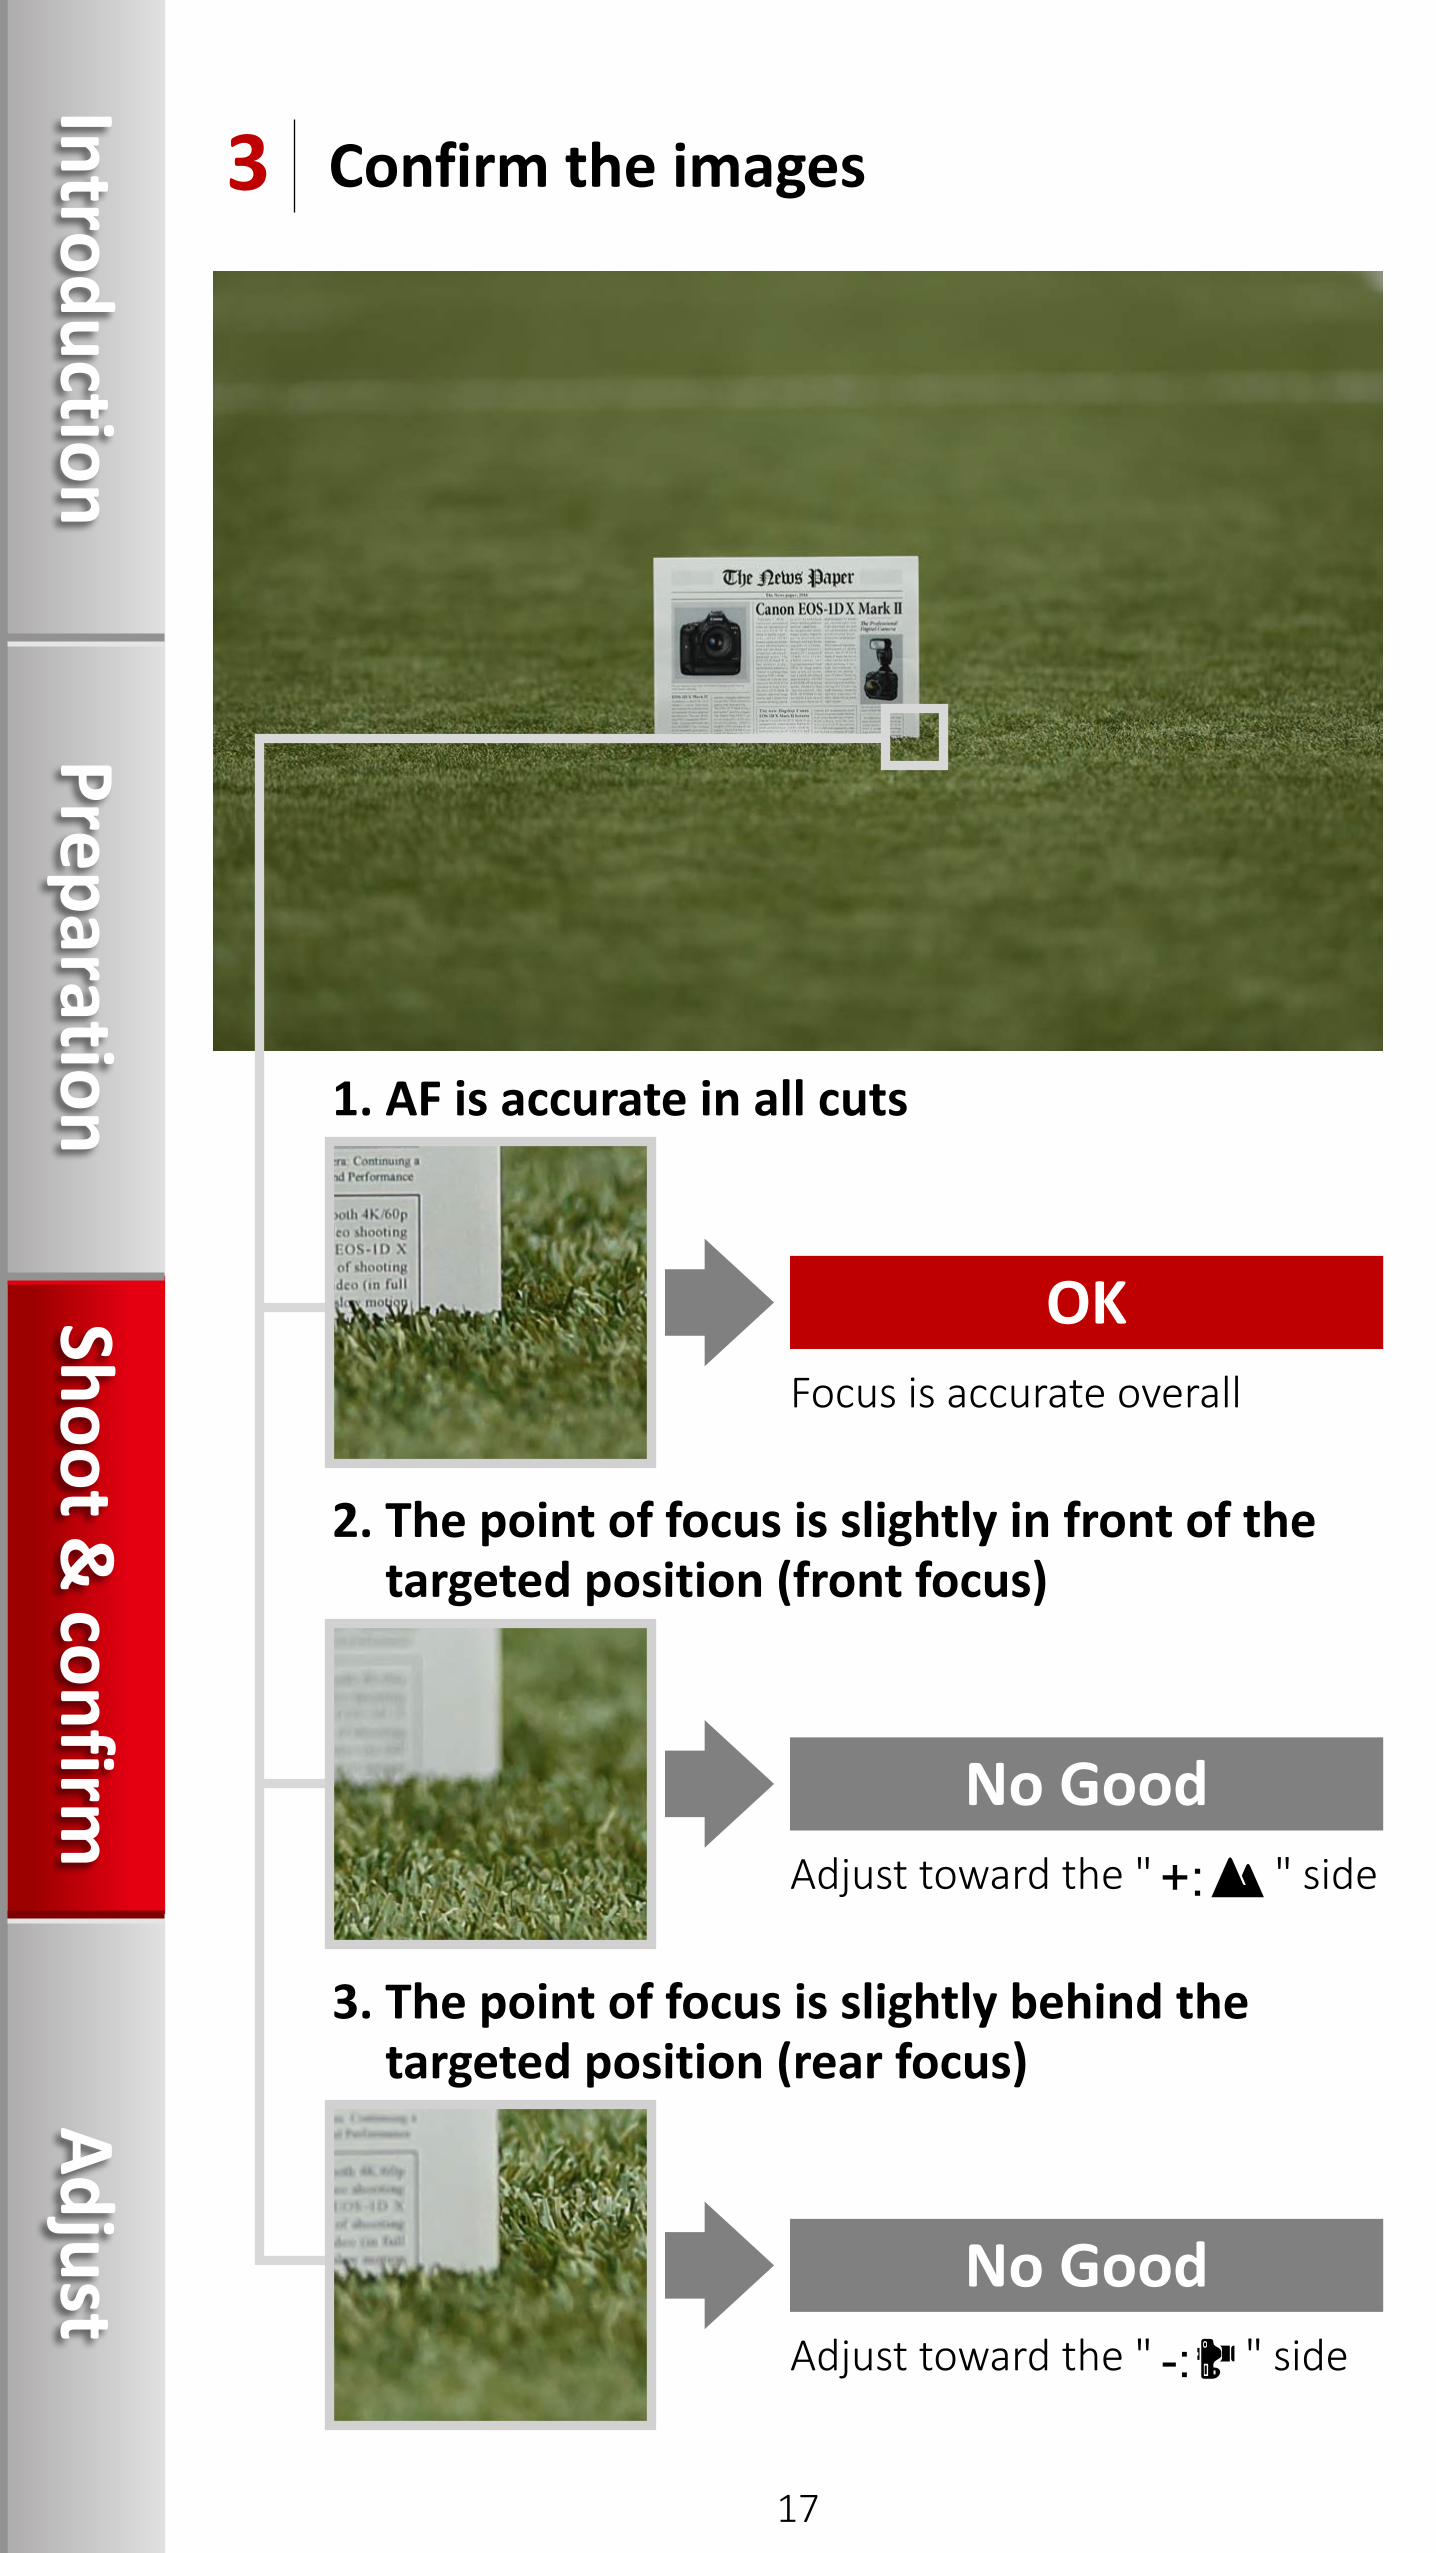
Confirm the images3
1. AF is accurate in all cuts
Focus is accurate overall
OK
2. The point of focus is slightly in front of the targeted position (front focus)
Adjust toward the " " side
No Good
3. The point of focus is slightly behind the targeted position (rear focus)
Adjust toward the " " side
No Good
17
IntroductionPreparation
Shoot & confirm
Adjust
Perform AF Microadjustment
1. Adjust by lens
2. Register the lens serial number
3. Adjust "All by same amount"
Adjust
18
IntroductionPreparation
Shoot & confirm
Adjust
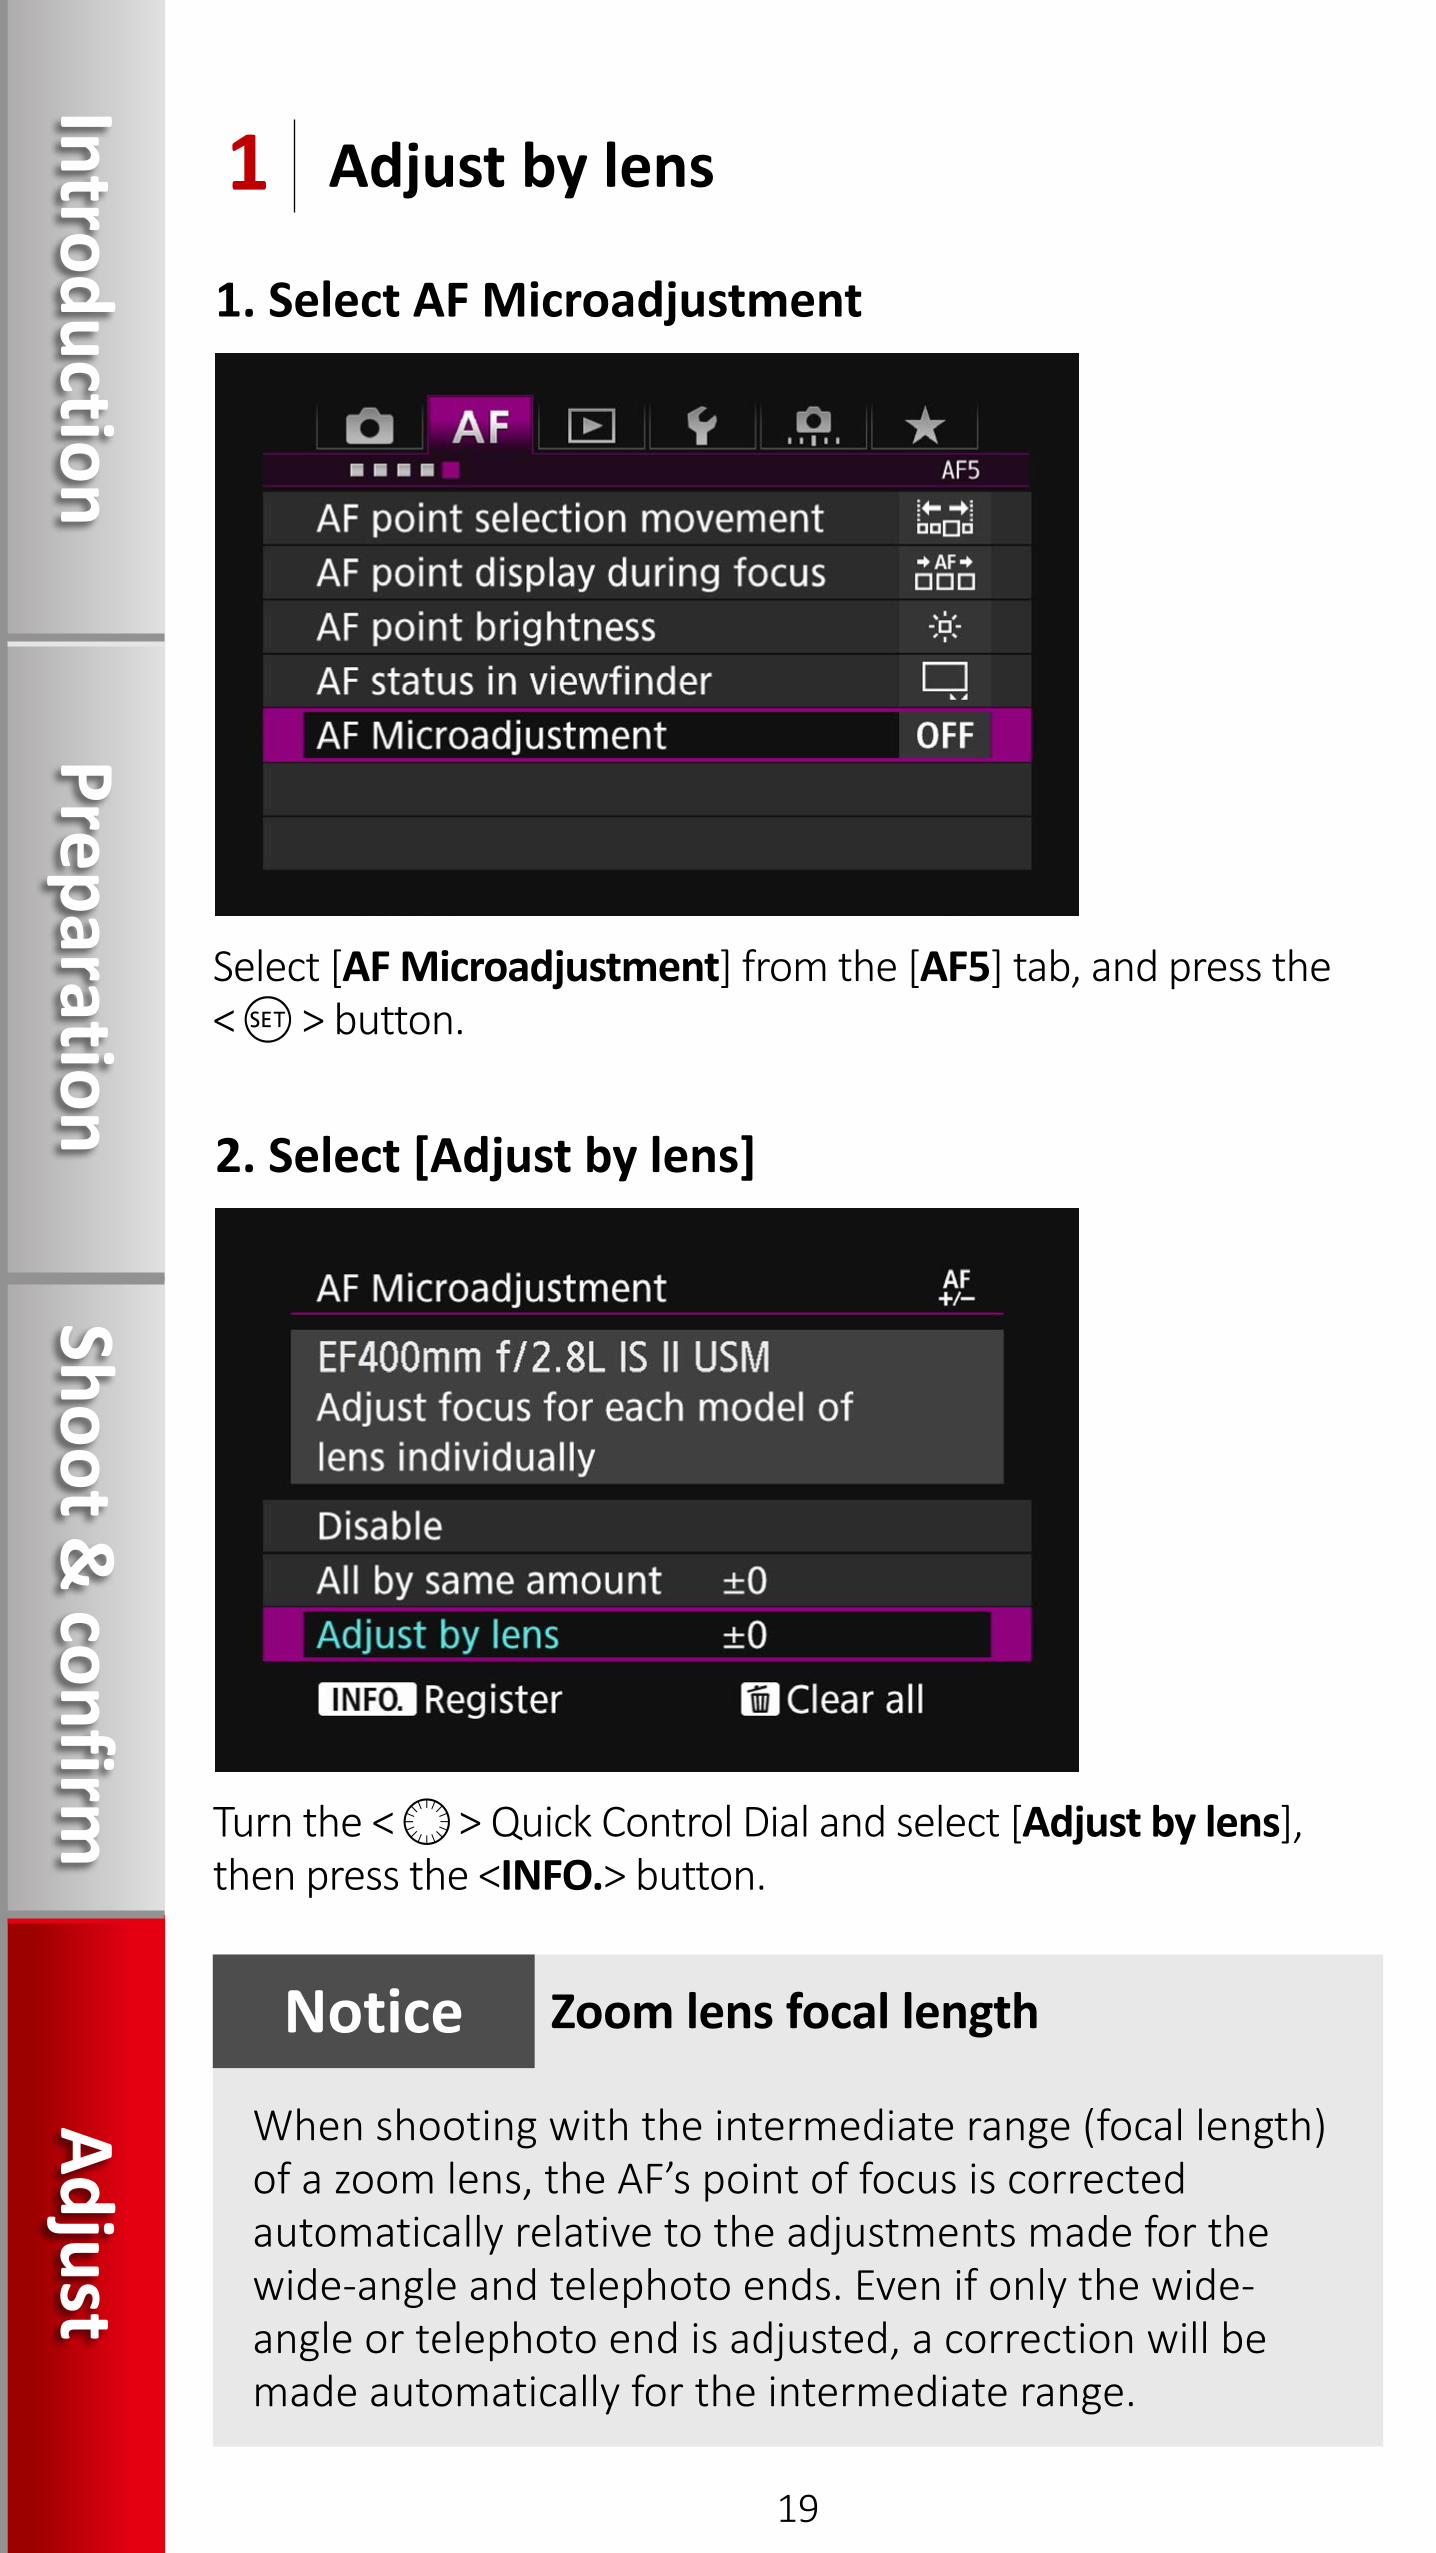
1. Select AF Microadjustment
2. Select [Adjust by lens]
Adjust by lens1
Select [AF Microadjustment] from the [AF5] tab, and press the < > button.
Turn the < > Quick Control Dial and select [Adjust by lens], then press the <INFO.> button.
When shooting with the intermediate range (focal length) of a zoom lens, the AF’s point of focus is corrected automatically relative to the adjustments made for the wide-angle and telephoto ends. Even if only the wide-angle or telephoto end is adjusted, a correction will be made automatically for the intermediate range.
Zoom lens focal lengthNotice
19
IntroductionPreparation
Shoot & confirm
Adjust

3. The adjustment screen is called up
4. Confirm/edit the lens information
Confirm that the [Adjust by lens] screen is displayed.
Press the < > button.• The screen will show the lens name and a 10-digit serial
number. When the serial number displays, select [OK], and proceed to procedure 1_5 (P. 21).
• If the lens serial number cannot be confirmed,"0000000000" will be displayed. In this case, enter the number by following the instructions on the next page. Refer to P. 25 regarding the "*" displayed in front of some lens serial numbers.
20
IntroductionPreparation
Shoot & confirm
Adjust
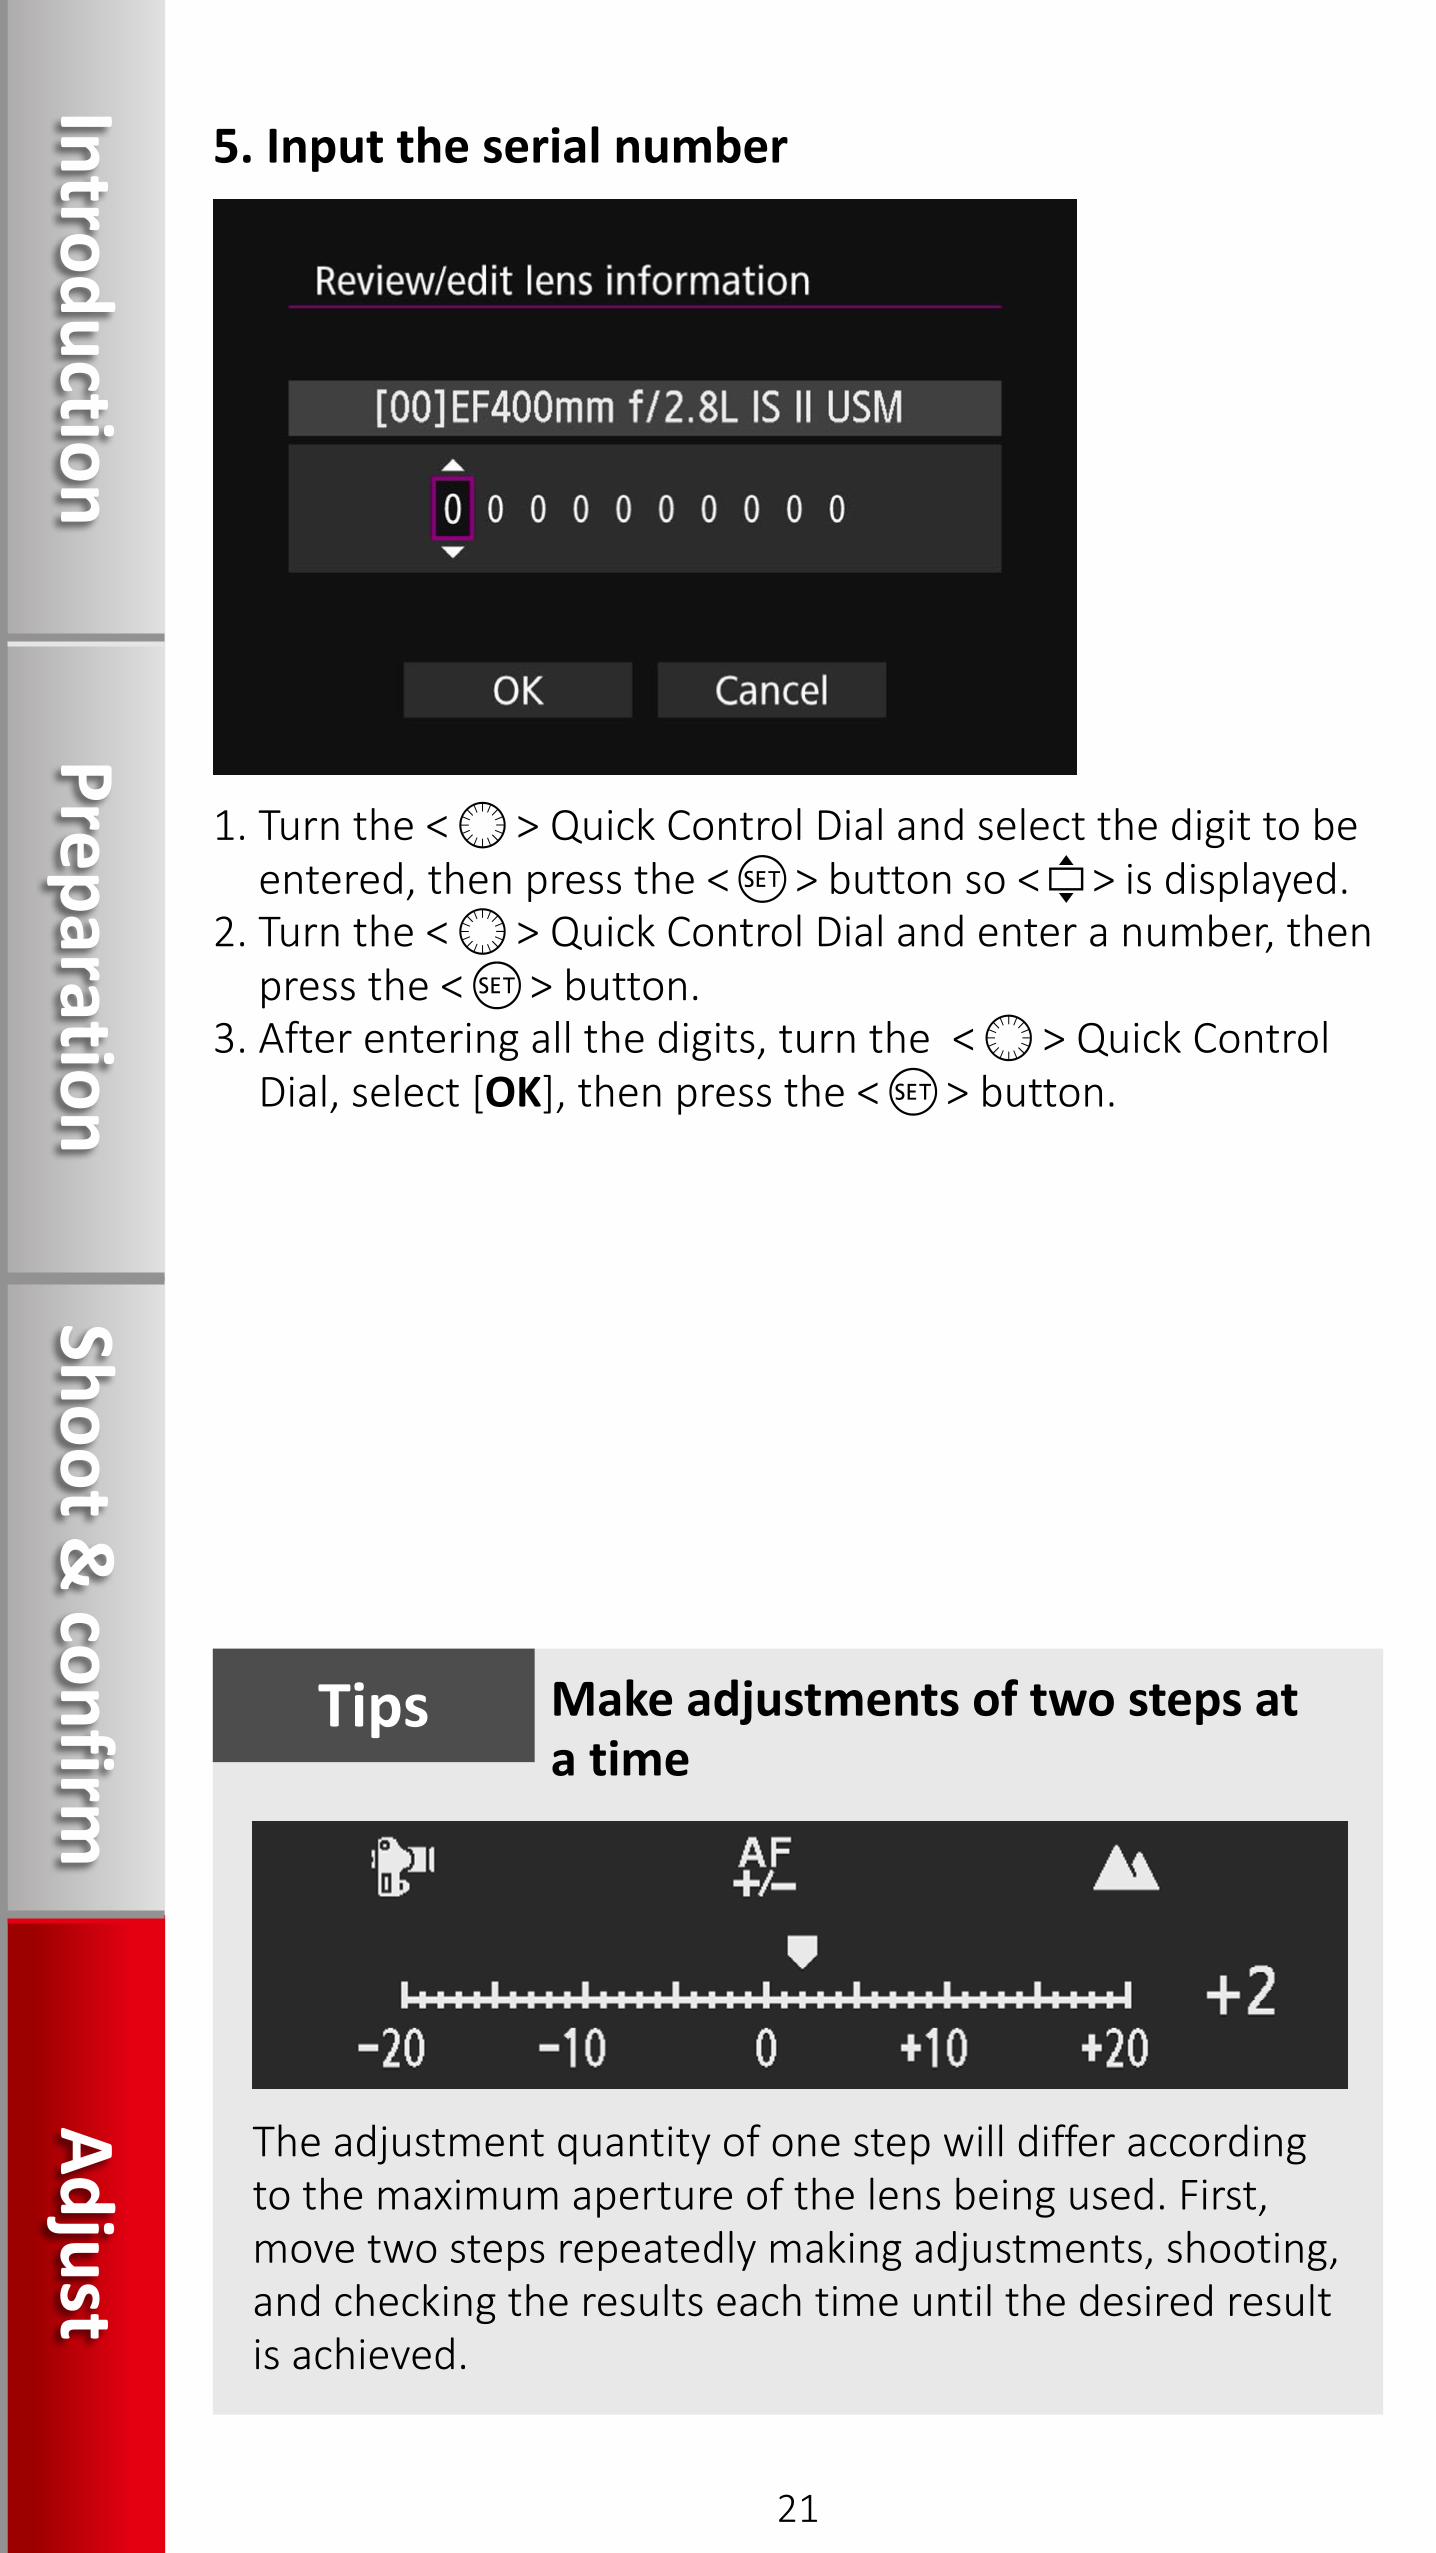
5. Input the serial number
1. Turn the < > Quick Control Dial and select the digit to be entered, then press the < > button so < > is displayed.
2. Turn the < > Quick Control Dial and enter a number, then press the < > button.
3. After entering all the digits, turn the < > Quick Control Dial, select [OK], then press the < > button.
The adjustment quantity of one step will differ according to the maximum aperture of the lens being used. First, move two steps repeatedly making adjustments, shooting, and checking the results each time until the desired result is achieved.
Make adjustments of two steps at a time
Tips
21
IntroductionPreparation
Shoot & confirm
Adjust

6. Make adjustments (With a single focal length lens)
(With a zoom lens)
Turn the < > Quick Control Dial and set the adjustment value. The adjustable range is ±20 steps. • Setting it toward " " will shift the point of focus in front
of the standard point of focus.• Setting it toward " " will shift the point of focus to the
rear of behind (rear focus) the standard point of focus.
1. For a zoom lens, turn the < > Quick Control Dial and select either the wide-angle (W), or the telephoto (T). Pressing the < > button will turn off the purple frame and make the adjustment possible.
2. Adjust it for the wide-angle (W) and telephoto (T) ends.
22
IntroductionPreparation
Shoot & confirm
Adjust

7. Determine the adjustment
8. Perform test shooting after the adjustment
1. After the adjustment is finished, press the <MENU> button and return to the procedure 1_2 (P. 19) screen.
2. Turn the < > Quick Control Dial and select [Adjust by lens], then press the < > button to return to the menu.
Perform test shooting again to verify the adjustment value.
23
IntroductionPreparation
Shoot & confirm
Adjust
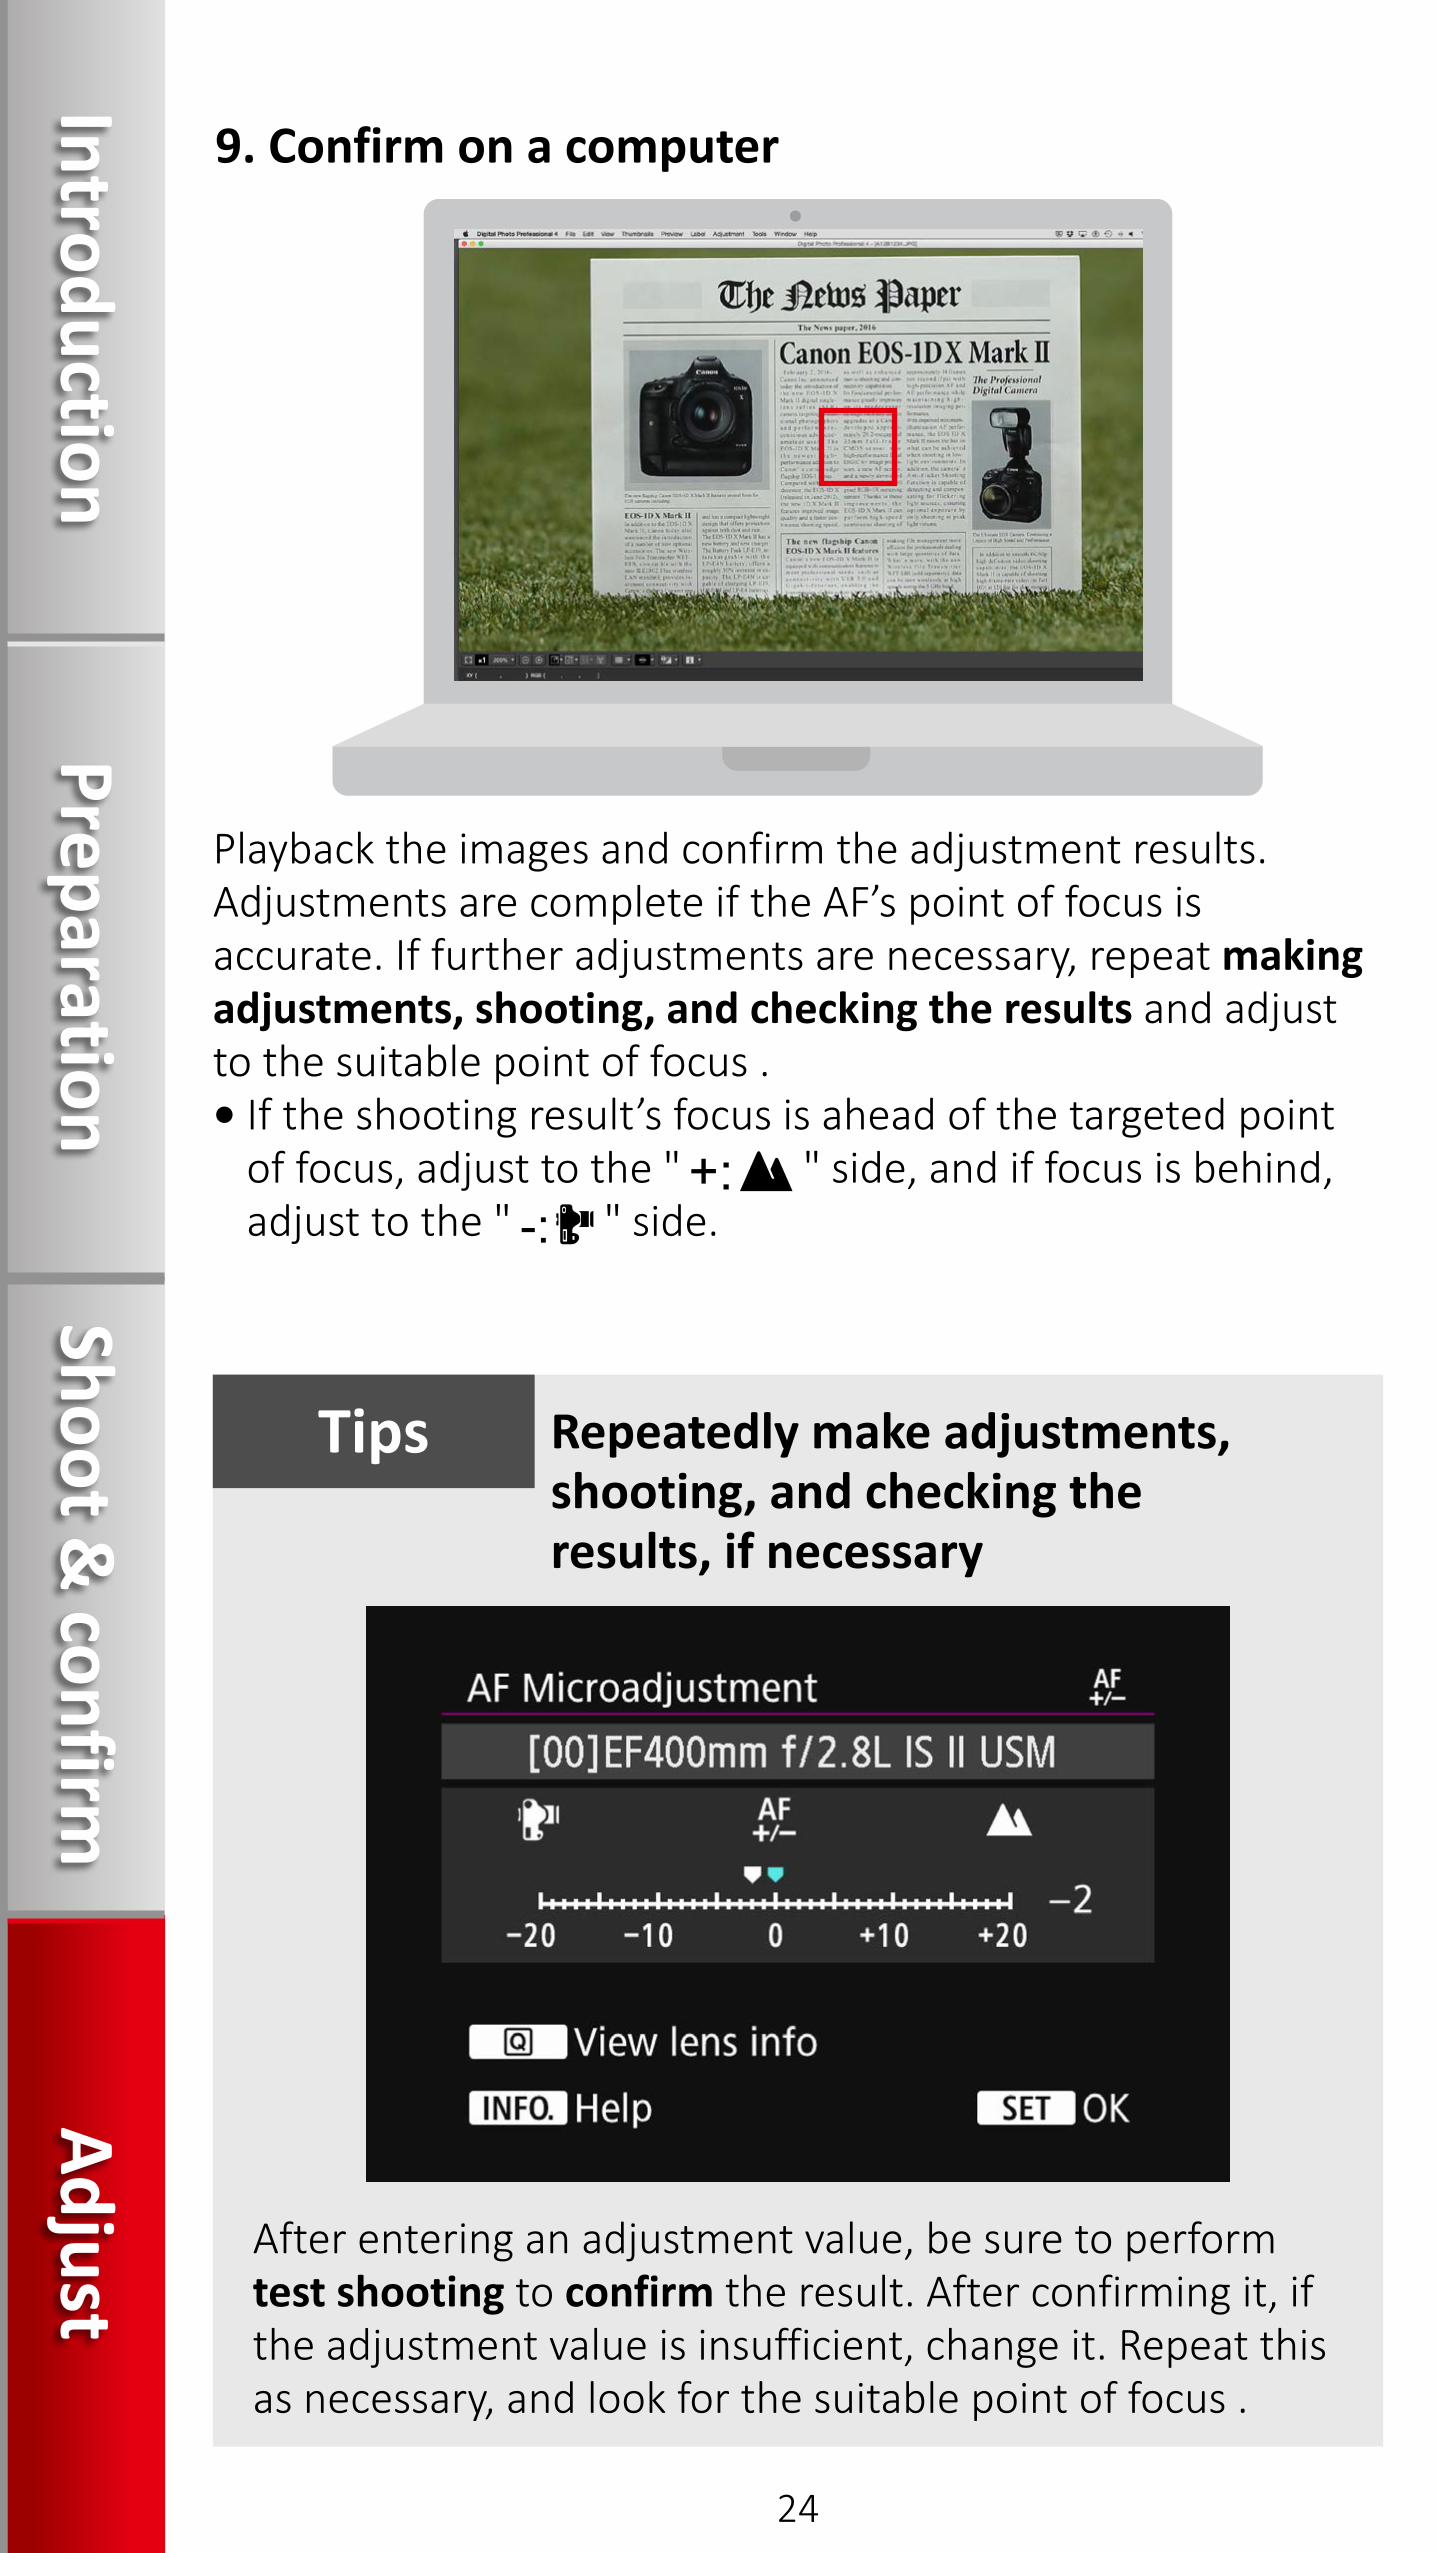
9. Confirm on a computer
Playback the images and confirm the adjustment results. Adjustments are complete if the AF’s point of focus is accurate. If further adjustments are necessary, repeat making adjustments, shooting, and checking the results and adjust to the suitable point of focus .• If the shooting result’s focus is ahead of the targeted point
of focus, adjust to the " " side, and if focus is behind, adjust to the " " side.
After entering an adjustment value, be sure to perform test shooting to confirm the result. After confirming it, if the adjustment value is insufficient, change it. Repeat this as necessary, and look for the suitable point of focus .
Repeatedly make adjustments, shooting, and checking the results, if necessary
Tips
24
IntroductionPreparation
Shoot & confirm
Adjust

Serial number and lens registration
Register the lens serial number2
Up to 40 lenses can be registered. A message will appear if 40 lenses have already been registered. After you select a lens whose registration is to be erased(overwritten), you can register another one.
• In procedure 1_4 (P. 20), if "*" appears in front of the 10-digit lens serial number, you can register only one unit of the same lens model. Even if you enter the serial number, "*" will remain displayed.
• The serial number listed for a lens may differ from the serial number displayed in procedure 1_4, however, this is not a malfunction.
• If the lens serial number includes letters, enter only the numbers by following the procedure 1_5 (P. 21).
• If the lens serial number is 11 digits or longer, enter the last 10 digits.
• The location of the serial number varies depending on the lens.
• Some lenses may not have a serial number inscribed. To register a lens that has no serial number inscribed, enter any serial number by following the procedure1_4.
25
IntroductionPreparation
Shoot & confirm
Adjust

If [Adjust by lens] is selected and an extender is used, the adjustment will be registered for the lens and extender combination.
Using an extenderTips
26
IntroductionPreparation
Shoot & confirm
Adjust
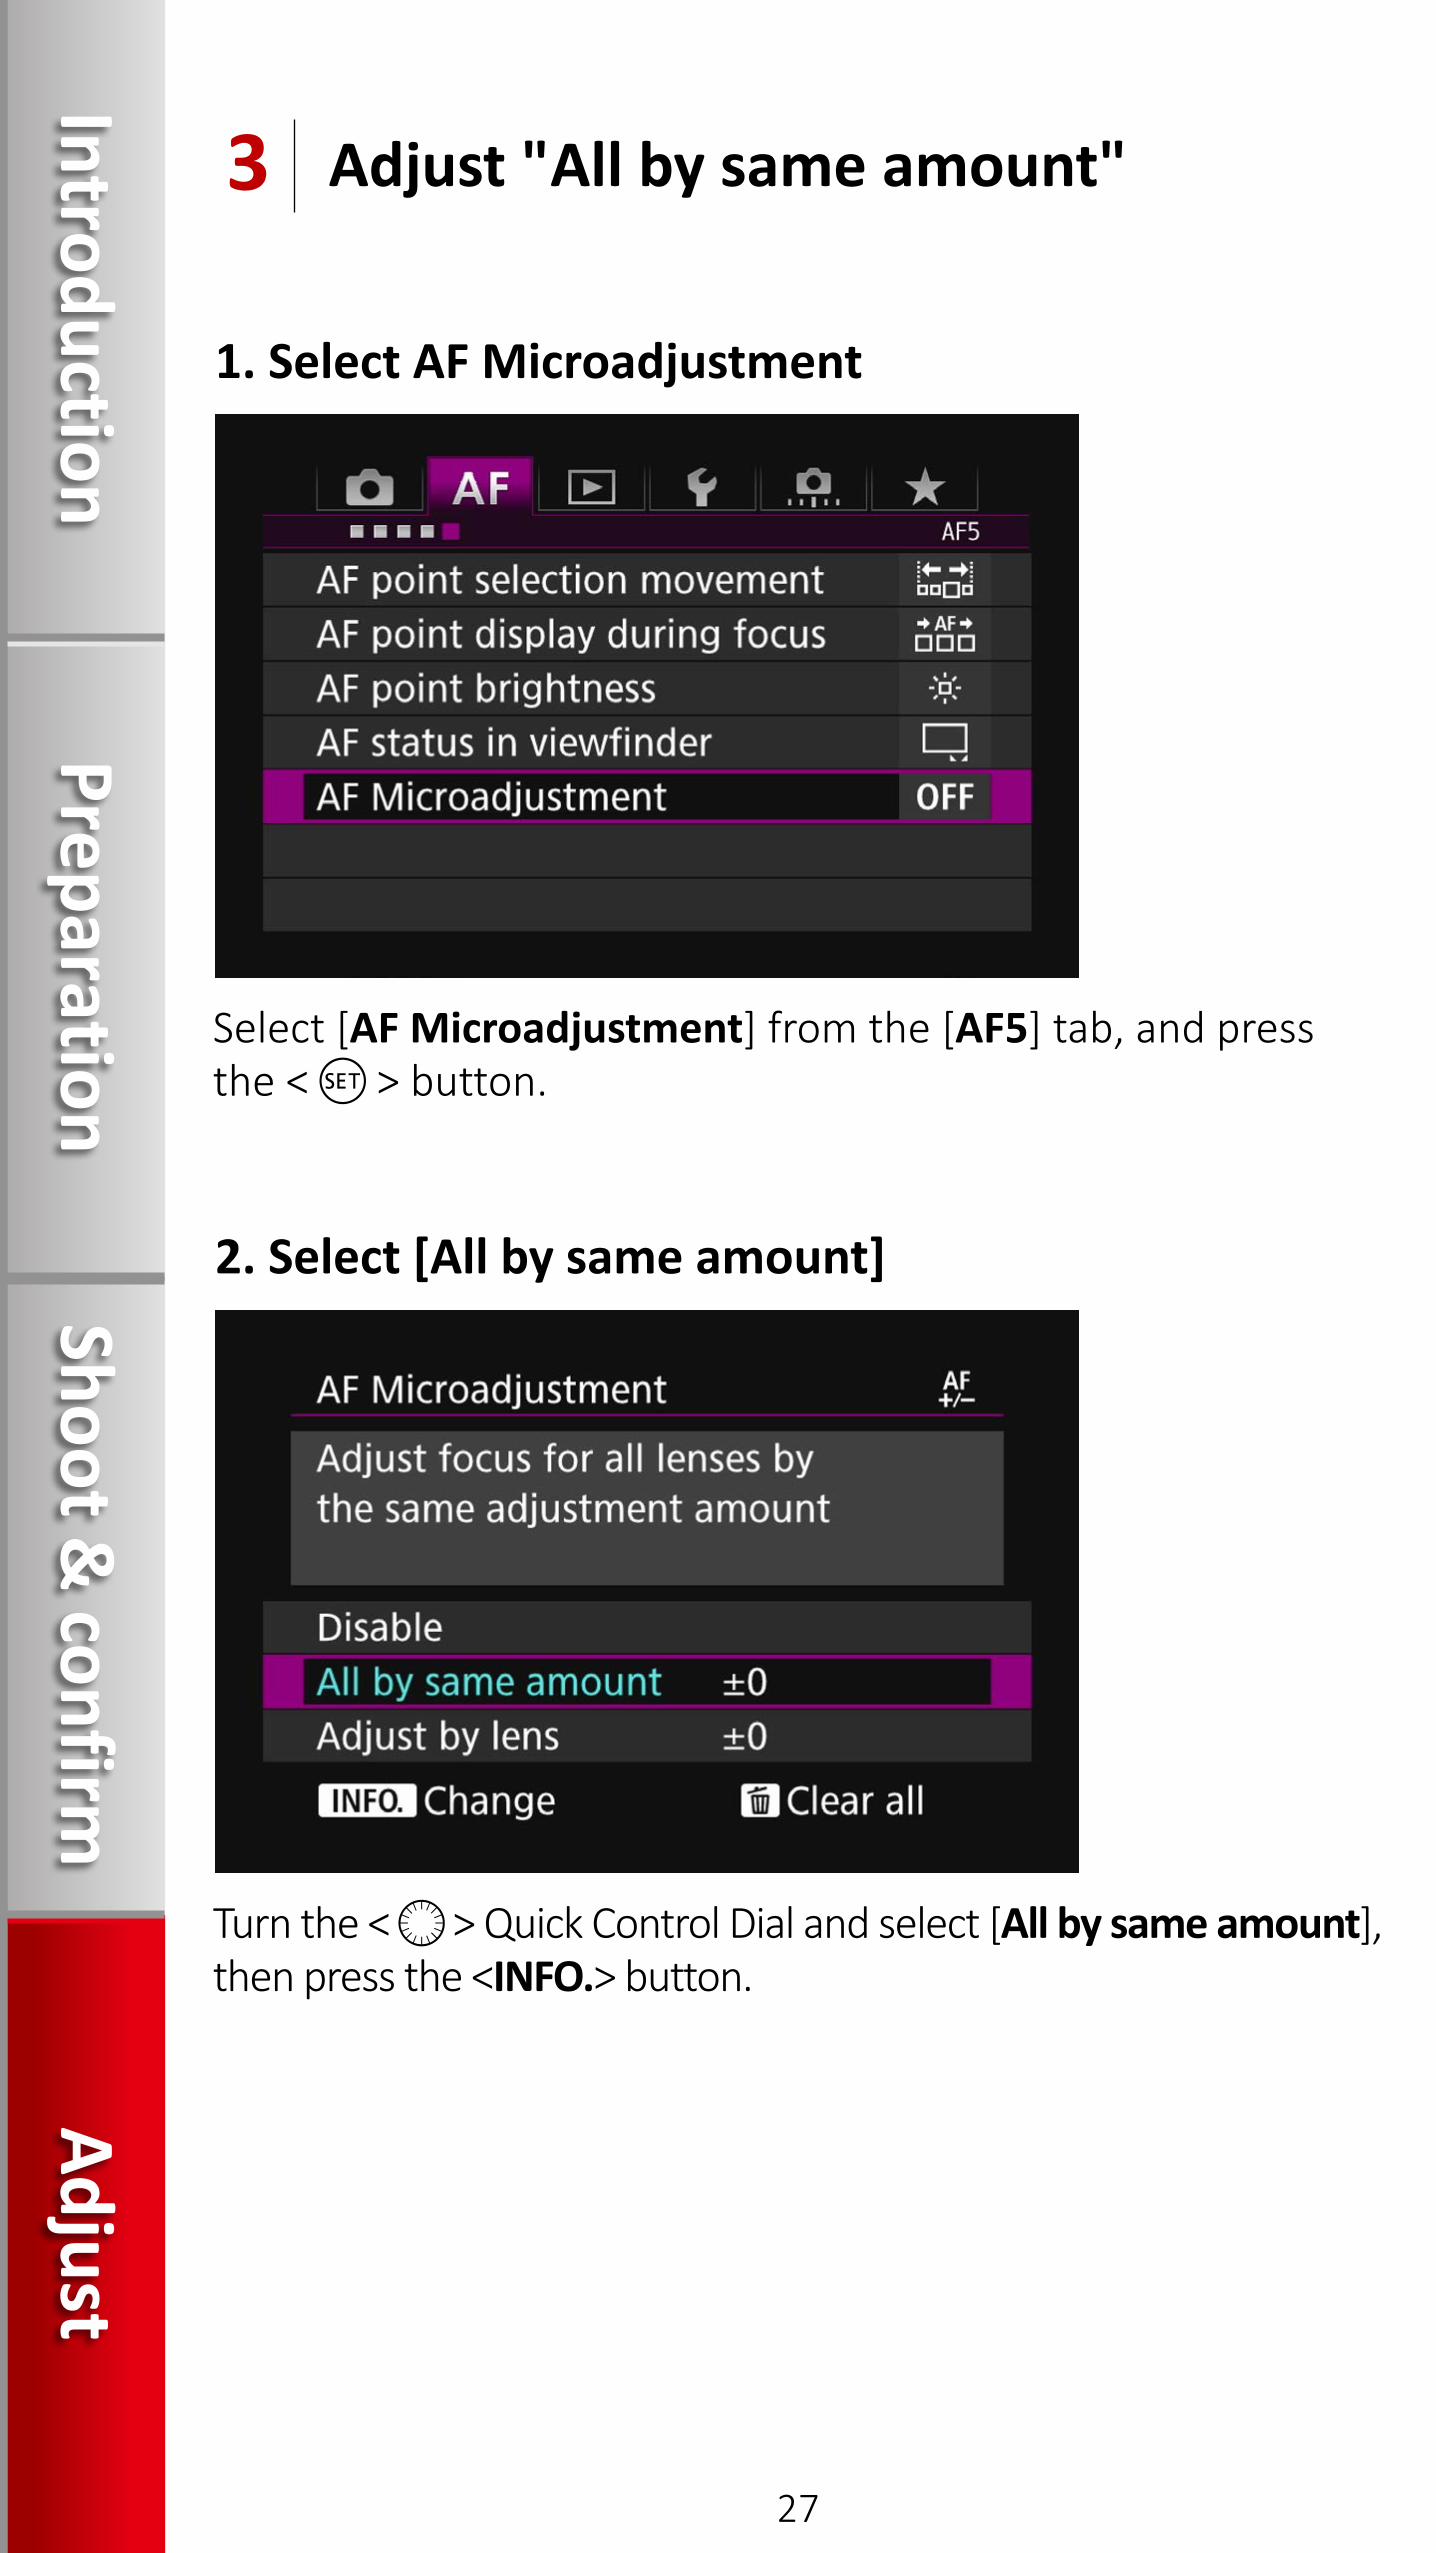
1. Select AF Microadjustment
2. Select [All by same amount]
Select [AF Microadjustment] from the [AF5] tab, and press the < > button.
Turn the < > Quick Control Dial and select [All by same amount], then press the <INFO.> button.
Adjust "All by same amount"3
27
IntroductionPreparation
Shoot & confirm
Adjust

The [All by same amount] screen is displayed.
3. The adjustment screen is called up
If [All by same amount] is selected, separate AF adjustment will not be possible for the wide-angle and telephoto ends of zoom lenses.
Zoom lens adjustmentNotice
28
IntroductionPreparation
Shoot & confirm
Adjust
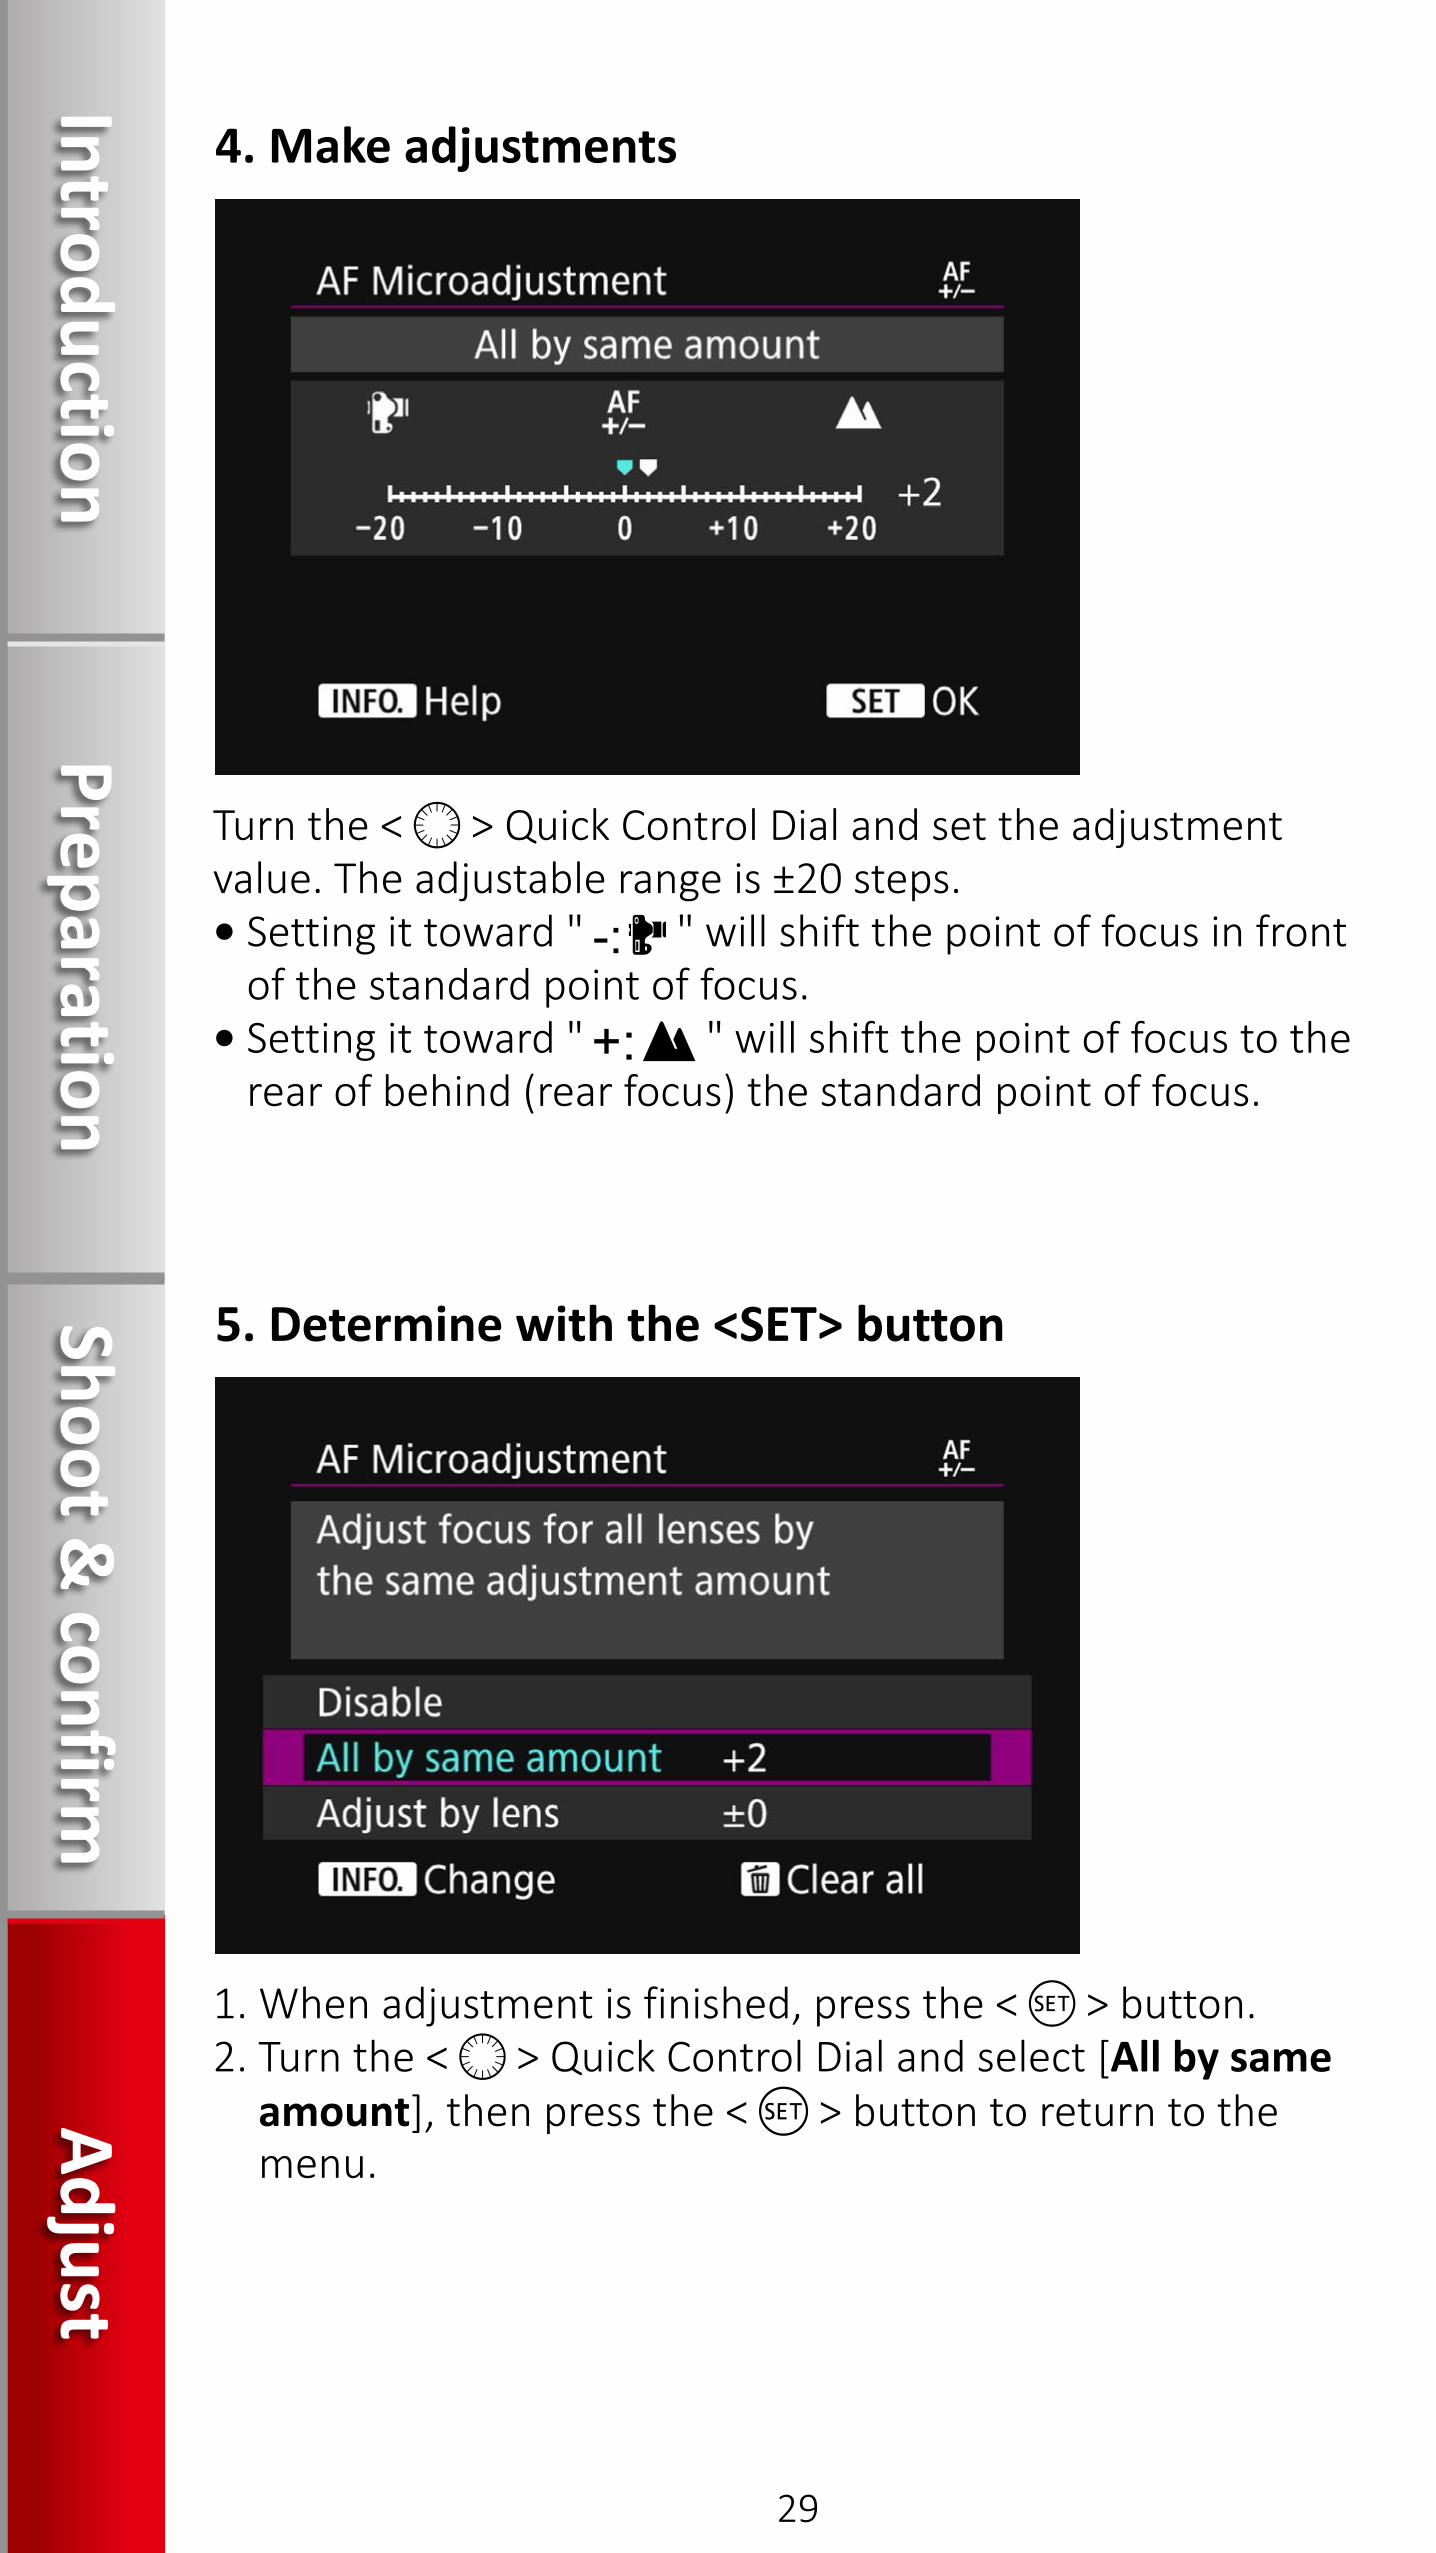
Turn the < > Quick Control Dial and set the adjustment value. The adjustable range is ±20 steps. • Setting it toward " " will shift the point of focus in front
of the standard point of focus.• Setting it toward " " will shift the point of focus to the
rear of behind (rear focus) the standard point of focus.
1. When adjustment is finished, press the < > button.2. Turn the < > Quick Control Dial and select [All by same
amount], then press the < > button to return to the menu.
4. Make adjustments
5. Determine with the <SET> button
29
IntroductionPreparation
Shoot & confirm
Adjust
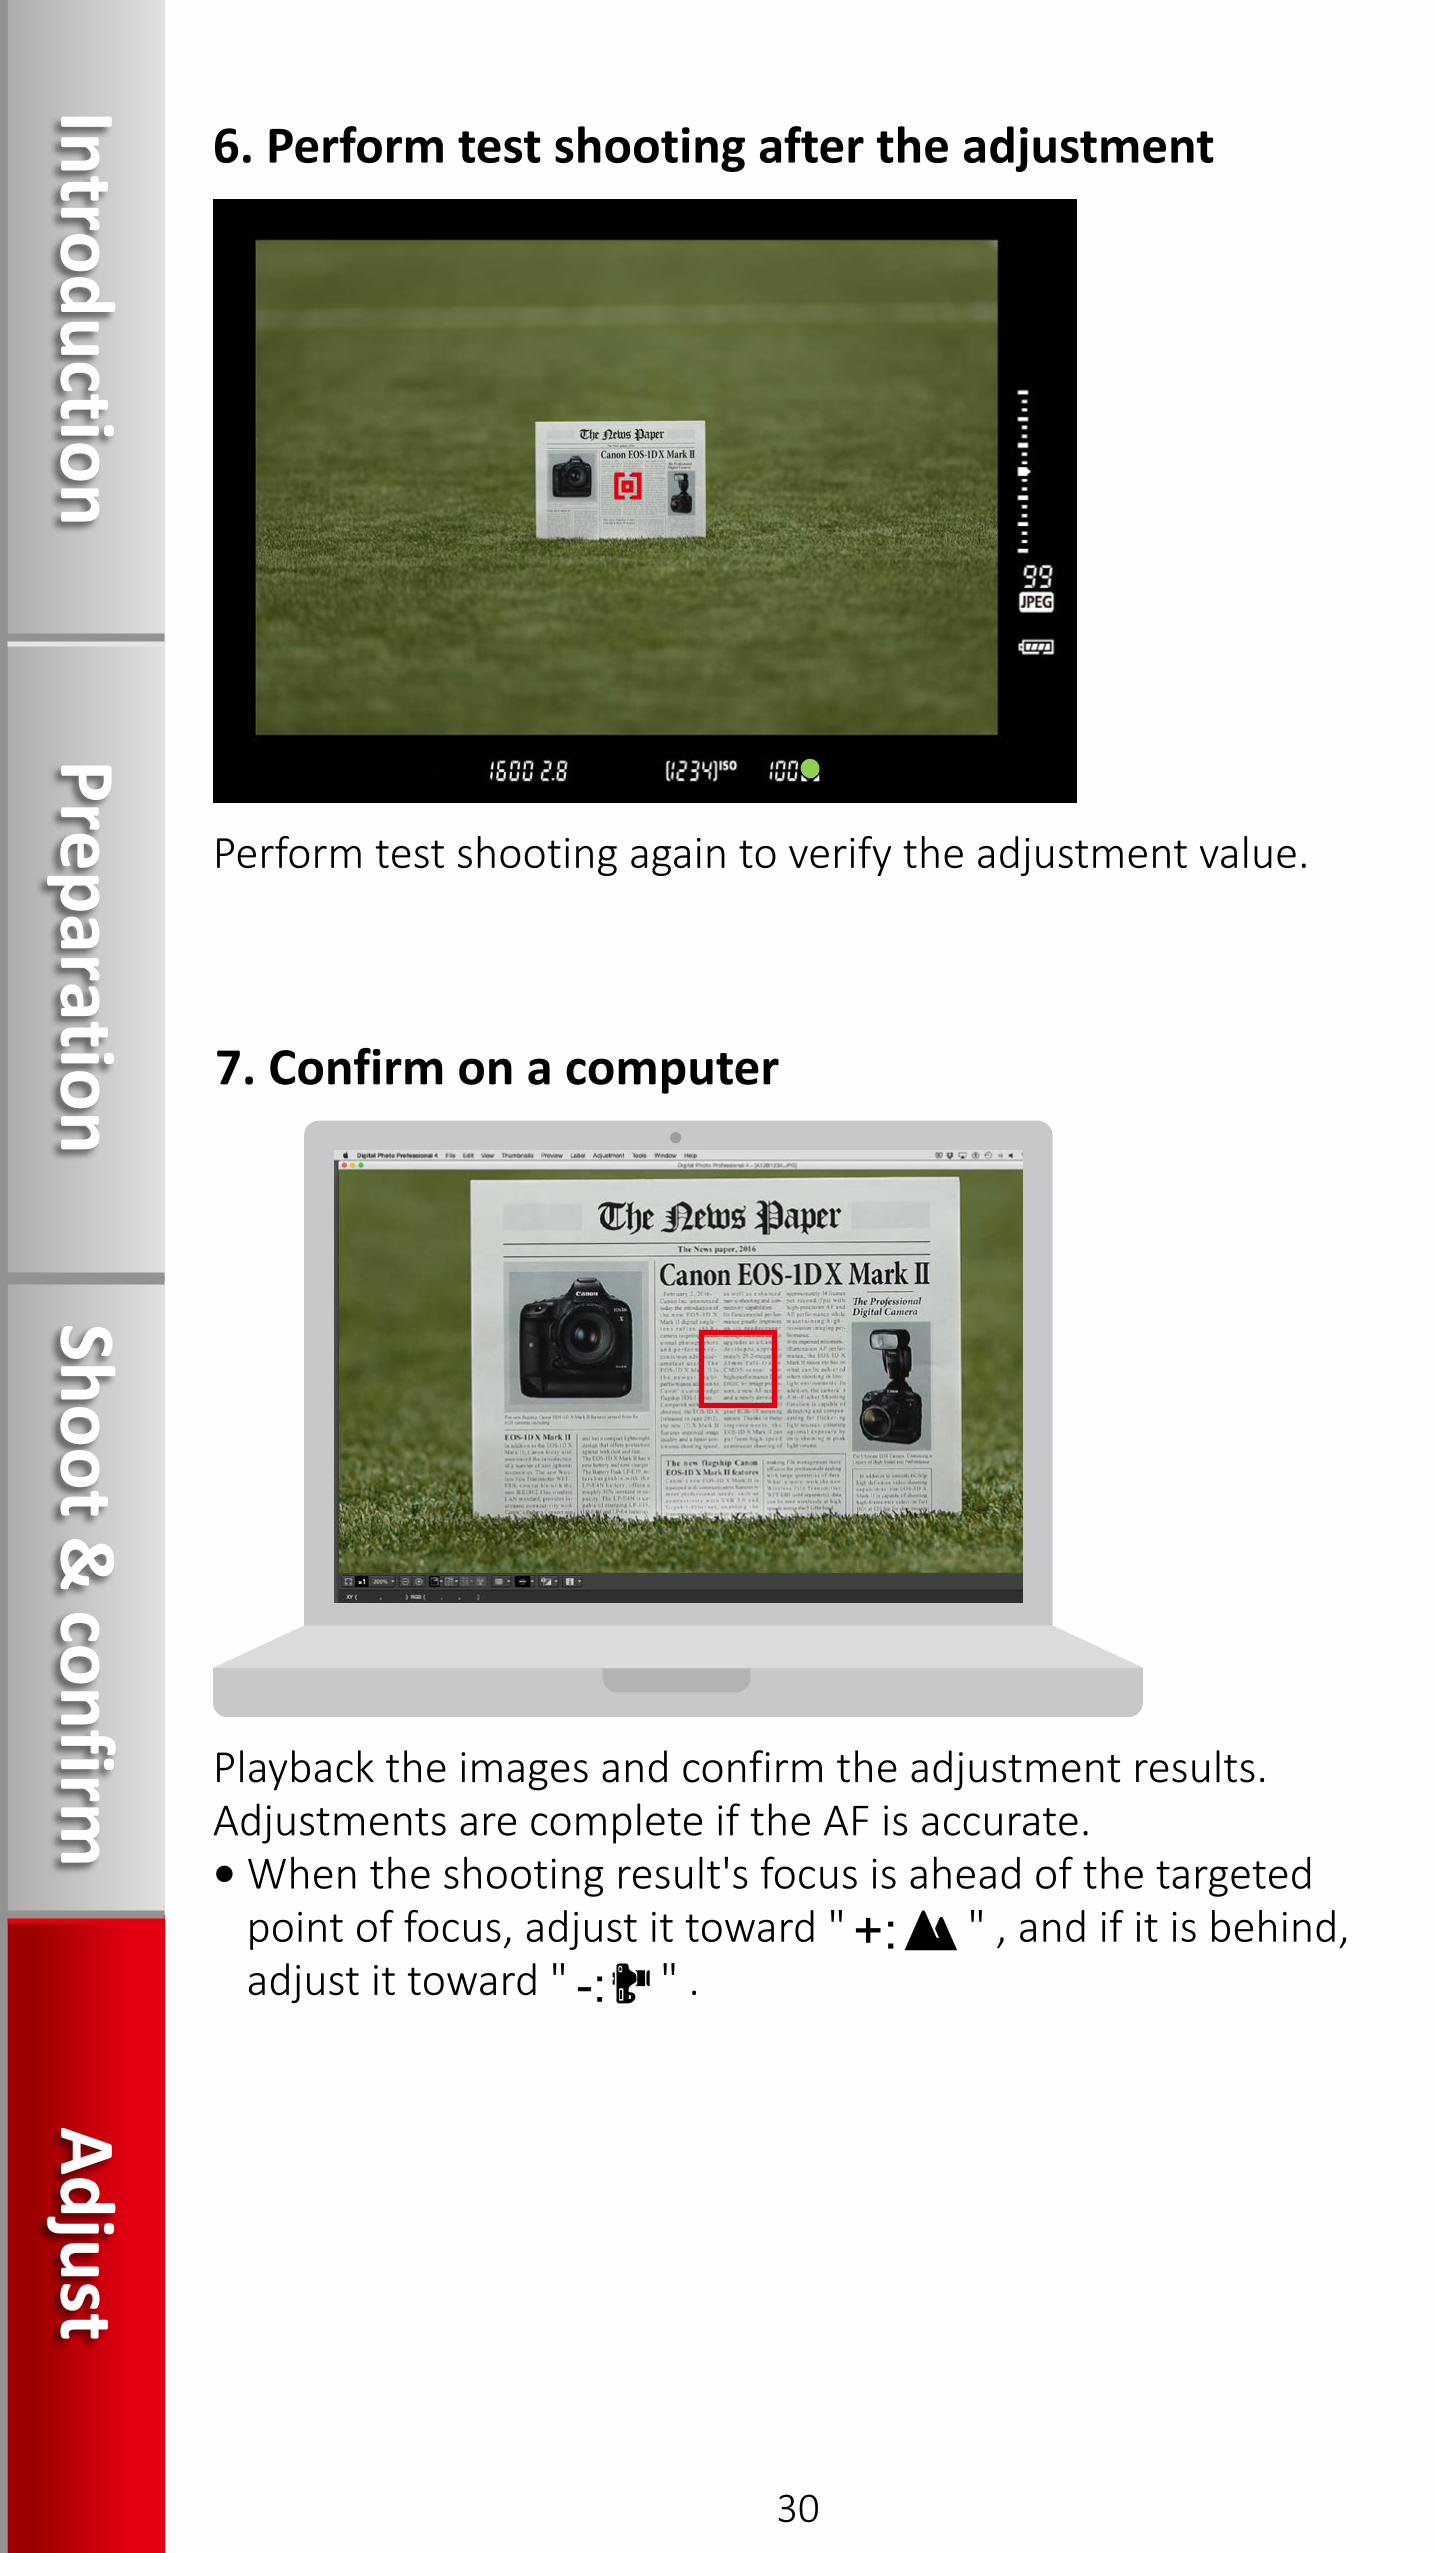
Perform test shooting again to verify the adjustment value.
Playback the images and confirm the adjustment results. Adjustments are complete if the AF is accurate.• When the shooting result's focus is ahead of the targeted
point of focus, adjust it toward " " , and if it is behind, adjust it toward " " .
6. Perform test shooting after the adjustment
7. Confirm on a computer
30
IntroductionPreparation
Shoot & confirm
Adjust
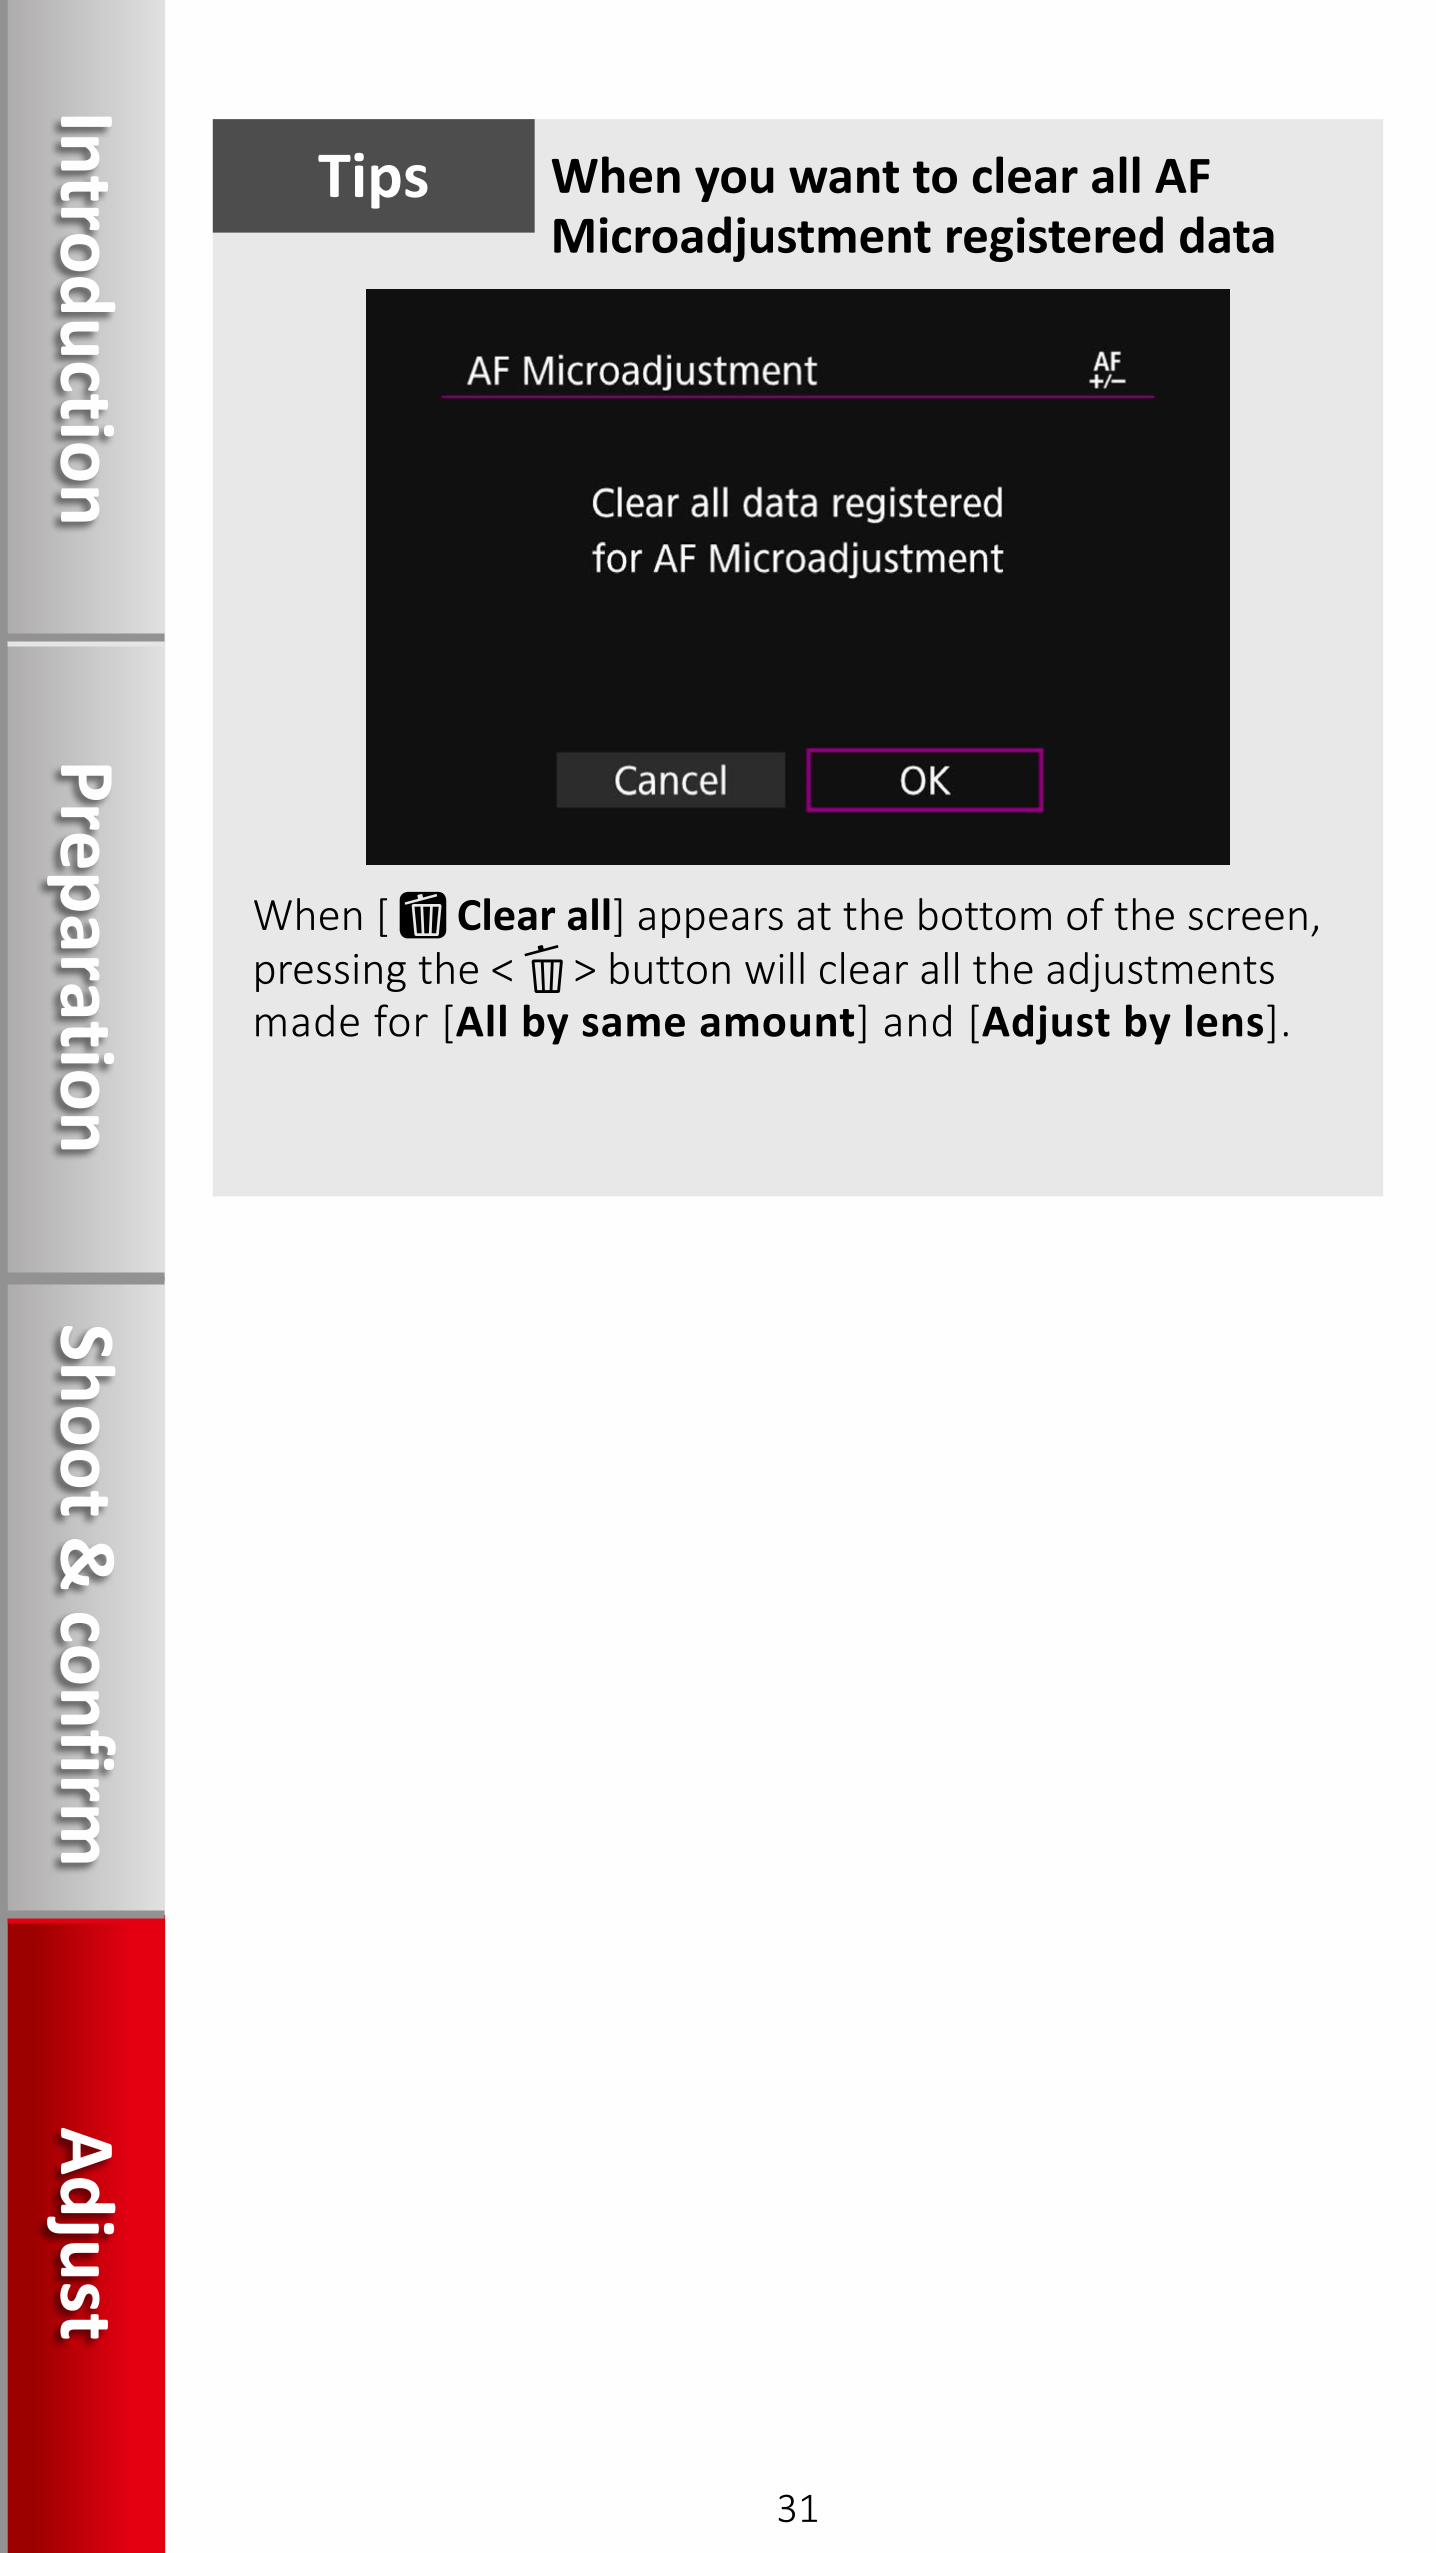
When [ Clear all] appears at the bottom of the screen, pressing the < > button will clear all the adjustments made for [All by same amount] and [Adjust by lens].
When you want to clear all AF Microadjustment registered data
Tips
31
IntroductionPreparation
Shoot & confirm
Adjust

Appendix
Autofocus can fail to achieve focus with certain subjects and environments. Even when the test environment is similar to the actual shooting environment, note that it may not be possible to perform an appropriate AF Microadjustment in these cases. A mistaken adjustment may cause the camera to be unable to achieve its optimal performance.
Subjects that AF does not handle well
1. Subjects with very low contrastExample: Skies, monochromatic flat surfaces, etc. (includes heat haze)
6. Subjects with repetitive patternsExample: Skyscraper windows, computer keyboards, etc.
7. Subjects with finer patterns than an AF pointExample: Faces or flowers as small as, or smaller than an AF point, etc.
5. Subjects such as dots of light framed close to an AF pointExample: Night scenes, etc.
4. Near and distant subjects framed close to an AF pointExample: Animals in cages, etc.
3. Strongly backlit or reflective subjectsExample: Cars with highly reflective bodies, etc.
2. Subjects in very low light
32
PreparationShoot &
confirmAdjust
Introduction